29586 ~ pt pneumatically operated abrasive metering valve
TRANSCRIPT

PT PNEUMATICALLY OPERATED ABRASIVE METERING VALVE
O. M. 29586
Do not use this equipment before READING this MANUAL and UNDERSTANDING its contents.
These WARNINGS are included for the health and safety of the operator and those in the immediate vicinity. Failure to read and understand these warnings can result in injury or death.
Electronic files include a preface containing the same important information as in the orange cover.
DATE OF ISSUE: 09/19 REVISION: B, 01/20
© 2020 CLEMCO INDUSTRIES CORP. One Cable Car Dr.
Washington, MO 63090 Phone (636) 239-4300
Fax (800) 726-7559 Email: [email protected]
www.clemcoindustries.com

PREFACE
[ I ]
• Employers are responsible for identifying all job site hazards, educating and training all persons who will operate and
maintain these products, and ensuring that all blast operators and their assistants understand the warnings and information contained in these instructions relating to safe and proper operation and maintenance of this equipment.
• Serious injury or death can result from failure to comply with all Occupational Safety and Health Administration (OSHA)regulations and all manufacturer’s instructions.
• This equipment is not intended for use in any area considered hazardous per National Electric Code NFPA 70 2011, Article 500.
• Read this document and follow all instructions before using this equipment.
OSHA regulations relating to abrasive blasting are contained in the Code of Federal Regulations, Title 29 (29 CFR 1910 General Industry; 1915 Maritime; 1926 Construction). The most pertinent include: 1910.94 Ventilation, 1910.95 Occupational Noise Exposure, 1910.132 Personal Protective Equipment, 1910.133 Eye and Face Protection, 1910.134 Respiratory Protection, 1910.135 Head Protection, 1910.244 (b) Remote Controls. Consult www.osha.gov for complete information.
NOTICE TO PURCHASERS AND USERS OF OUR PRODUCTS AND THIS INFORMATIONAL MATERIAL
Clemco proudly provides products for the abrasive blast industry and is confident that industry professionals will use their knowledge and expertise for the safe and efficient use of these products.
The products described in this material, and the information relating to these products, are intended for knowledgeable, experienced users.
No representation is intended or made as to: the suitability of the products described here for any purpose or application, or to the efficiency, production rate, or useful life of these products. All estimates regarding production rates or finishes are the responsibility of the user and must be derived solely from the user’s experience and expertise, not from information contained in this material.
It is possible that the products described in this material may be combined with other products by the user for purposes determined solely by the user. No representations are intended or made as to the suitability of or engineering balance of or compliance with regulations or standard practice of any such combination of products or components the user may employ.
Abrasive blast equipment is only one component of an abrasive blasting job. Other products, such as air compressors, air filters and receivers, abrasives, scaffolding, hydraulic work platforms or booms, equipment for lighting, painting, ventilating, dehumidifying, parts handling, or specialized respirators or other equipment, even if offered by Clemco, may have been manufactured or supplied by others. The information Clemco provides is intended to support the products Clemco manufactures. Users must contact each manufacturer and supplier of products used in the blast job for warnings, information, training, and instruction relating to the proper and safe use of their equipment.
GENERAL INSTRUCTIONS
This material describes some, but not all, of the major requirements for safe and productive use of blast machines, remote controls, respirator systems, and related accessories. All equipment and accessories must be installed, tested, operated and maintained only by trained, knowledgeable, experienced users.
The blast operator and all workers in the vicinity must be properly protected from all job site hazards including those hazards generated by blasting.
Work environments involving abrasive blasting present numerous hazards. Hazards relate to the blast process from many sources that include, but are not limited to, dust generated by blasting or from material present on the surface being blasted. The hazards from toxic materials may include, but are not limited to, silica, cyanide, arsenic, or other toxins in the abrasives or in the coatings, such as lead or heavy metals. Other hazards from toxins include, but are not limited to, fumes from coating application, carbon monoxide from engine exhaust, contaminated water, chemicals or asbestos. In addition, physical hazards that may be present include, but are not limited to, uneven work surfaces, poor visibility, excessive noise, and electricity. Employers must identify all job site hazards and protect workers in accordance with OSHA regulations.
Never modify Clemco equipment or components or substitute parts from other manufacturers for any Clemco components or parts. Any unauthorized modification or substitution of supplied-air respirator parts violates OSHA regulations and voids the NIOSH approval.
IMPORTANT
Contact Clemco for free booklets: Blast Off 2 – Guide to Safe, Productive, and Efficient Abrasive
Blasting, and Abrasive Blasting Safety Practices – Guide to Safe
Abrasive Blasting.
Clemco Industries Corp. One Cable Car Drive Washington MO 63090
Tel: 636 239-4300 — Fax: 800 726-7559
Email: [email protected]
Website: www.clemcoindustries.com

PREFACE
[ II ]
OPERATIONAL INSTRUCTIONS
OPERATOR SAFETY EQUIPMENT
OSHA regulation 1910.134 requires appropriate respiratory protection for blast operators and workers in the vicinity of blasting. These workers must wear properly-fitted, properly-maintained, NIOSH-approved, respiratory protection that is suitable for the job site hazards. Blast respirators are to be worn only in atmospheres not immediately dangerous to life or health from which wearers can escape without use of the respirator.
The employer must develop and implement a written respiratory protection program with required worksite- specific procedures and elements for required respirator use. The employer must provide effective training to employees who are required to use respirators. The training must be comprehensive, understandable, and recur annually, and more often if necessary.
NEVER use abrasives containing more than one percent crystalline silica. Fatal diseases, such as silicosis, asbestosis, lead or other poisoning, can result from inhalation of toxic dusts, which include, but are not limited to, crystalline silica, asbestos, and lead paint. Refer to NIOSH Alert 92-102; and OSHA CPL 03-00-007: “National Emphasis Program – Crystalline Silica”, in which OSHA describes policies and procedures for implementing a national emphasis program to identify and reduce or eliminate health hazards from exposure to crystalline silica. Numerous topics associated with the hazards of crystalline silica in silica blasting sand can be found on http:// osha.gov/. Clemco urges users of silica blasting sand to visit this website, and read and heed the information it contains.
Always make sure the breathing air supply (respirator hose) is not connected to plant lines that supply gases that include, but are not limited to, oxygen, nitrogen, acetylene, or other non-breathable gas. Never modify or change respirator air line connections without first testing the content of the line for safe breathing air. Failure to test the line may result in death to the respirator user.
• Breathing air quality must be at least Grade D, as defined by the Compressed Gas Association specification G-7.1, per OSHA Regulation 29 CFR 1910.134. When compressed air is the breathing air source, a Clemco CPF (suitable sorbent bed filter) should be used. Respirator hose connecting the respirator to the filter must be NIOSH approved. Non- approved hose can cause illness from chemicals employed to manufacture the hose.
• All workers must always wear NIOSH-approved respirators when any dust is present. Exposure to dust can occur when handling or loading abrasive, blasting, cleaning up abrasive, or working in the vicinity of blasting. Before removing the respirator, test the air with a monitoring device to ensure it is safe to breathe.
• Clemco respirators DO NOT remove or protect against carbon monoxide or any other toxic gas. Monitoring devices must be used in conjunction with the respirator to ensure safe breathing air. Always locate compressors and ambient air pumps where contaminated air will not enter the air intake.
• Always use Clemco lenses with Clemco respirators; installing non-approved lenses voids the NIOSH approval. Respirator lenses are designed to protect the wearer from rebounding abrasive; they do not protect against flying objects, heavy high-speed materials, glare, liquids, or radiation.
INDUSTRY ORGANIZATIONS
For additional information, consult: Occupational Safety and Health Administration (OSHA) - www.osha.gov Compressed Gas Association (CGA) - www.cganet.com The Society for Protective Coatings (SSPC) - www.sspc.org National Association of Corrosion Engineers (NACE) - www.nace.org American Society for Testing and Materials (ASTM) - www.astm.org National Institute of Occupational Safety and Health (NIOSH) - www.niosh.gov American National Standards Institute (ANSI) - www.ansi.org

PREFACE
[ III ]
BLAST MACHINES AND REMOTE CONTROLS
OSHA regulation 1910.169 describes the necessity of pressure relief valves on compressed air equipment. Do not operate blast machines with air compressors that are not equipped with properly functioning pressure relief valves. OSHA regulation 1910.244(b) requires the use of remote controls on blast machines. Serious injury or death can result from many sources, among them: Involuntary activation of the remote controls. Never modify or substitute remote control parts; parts are not
compatible among different manufacturers. Welding hose is not suitable for remote control hose. Its ID and material composition make it unsafe for remote control use.
Exceeding the maximum working pressure. Clemco blast machines are built to ASME-code and carry a ‘U’ or ‘UM’ stamp, and National Board/serial number. Every machine is marked with its maximum working pressure. Never exceed the maximum working pressure limits of the blast machine.
Uncontrolled blast stream. High-velocity abrasive particles will inflict serious injury. Always point the blast nozzle in the direction of the blast surface only. Keep unprotected workers out of the blast area.
Welding on the blast machine. Never weld on the blast machine; welding voids the National Board approval and may affect the dimensional integrity of the vessel.
Moving the blast machine. Never manually move a blast machine containing abrasive, any machine containing abrasive must be moved with appropriate mechanical lifting equipment.
HOSES, COUPLINGS, AND NOZZLE HOLDERS The inside diameter (ID) of air hoses, fittings, and connections should be at least four times larger than the nozzle orifice size. Blast hose ID should be three to four times the size of the nozzle orifice. Example: a #6 nozzle (3/8” diameter orifice) calls for 1-1/2” ID blast hose and 1-1/2” ID or larger compressor hose. All hose runs should be kept as short as possible and run in as straight a line as possible to reduce pressure loss.
To install, squarely cut the end of the hose so that it fits snugly against the coupling or hose end shoulder. Always use the screws recommended by the manufacturer ensuring that they do not penetrate the inner wall. Make sure the couplings tightly fit the hose. Install cotter pins at every connection or use couplings with built-in lock-springs to prevent disengagement. Install safety cables at all connections to prevent whipping if hoses disengage or blow out.
MAINTENANCE AND REPAIR
Completely read and follow all service instructions and recommended maintenance intervals. Always shut off compressor and depressurize blast machine before performing any maintenance. At every service interval, clean all filters, screens, and alarm systems. If spring-loaded abrasive valves are used, always cage spring before disassembly.
WARRANTY
The following is in lieu of all warranties, express, implied or statutory, and in no event shall seller or its agents, successors, nominees or assignees, or either, be liable for special or consequential damage arising out of a breach of warranty. This warranty does not apply to any damage or defect resulting from negligent or improper assembly or use of any item by the buyer or its agent or from alteration or attempted repair by any person other than an authorized agent of seller. All used, repaired, modified, or altered items are purchased “as is” and with all faults. In no event shall seller be liable for consequential or incidental damages. The sole and exclusive remedy of buyer for breach of warranty by seller shall be repair or replacement of defective parts or, at seller’s option, refund of purchase price, as set forth below
:
1. Seller makes no warranty with respect to products used other than in accordance hereunder.
2. On products seller manufactures, seller warrants that all products are to be free from defects in workmanship and materials for a
period of one year from date of shipment to buyer, but no warranty is made that the products are fit for a particular purpose.
3. On products which seller buys and resells pursuant to this order, seller warrants that the products shall carry the then standard warranties of the manufacturers thereof, a copy of which shall be made available to the customer upon request.
4. The use of any sample or model in connection with this order is for illustrative purposes only and is not to be construed as a warranty that the product will conform to the sample or model.
5. Seller makes no warranty that the products are delivered free of the rightful claim of any third party by way of patent infringement or the like.
6. This warranty is conditioned upon seller’s receipt within ten (10) days after buyer’s discovery of a defect, of a written notice stating in what specific material respects the product failed to meet this warranty. If such notice is timely given, seller will, at its option, either modify the product or part to correct the defect, replace the product or part with complying products or parts, or refund the amount paid for the defective product, any one of which will constitute the sole liability of the seller and a full settlement of all claims. No allowance will be made for alterations or repairs made by other than those authorized by seller without prior written consent of seller. Buyer shall afford seller prompt and reasonable opportunity to inspect the products for which any claim is made as above stated.
Except as expressly set forth above, all warranties, express, implied or statutory, including implied warranty of merchantability, are hereby disclaimed.

PREFACE
[ IV ]
DAILY SET ‐UP CHECK LIST
Make sure all blast operators are properly trained and suitably attired with a blast suit, safety boots, leather gloves, respiratory and hearing protection. Every day before start up, check all equipment components, including piping, fittings, and hoses, and valves, for leaks, tightness, and wear. Repair or replace as needed. Use the following checklist.
1. PROPERLY-MAINTAINED AIR COMPRESSOR sized to provide
sufficient volume (cfm) at given pressure for nozzle and other tools. ADD 50% volume (cfm) reserve to allow for nozzle wear. Use large compressor outlet and air hose (at least 4 times the nozzle orifice diameter). For oil-lubricated compressors, the employer shall use a high- temperature or carbon monoxide alarm, or both, to monitor carbon monoxide levels. If only high-temperature alarms are used, the air supply shall be monitored at intervals sufficient to prevent carbon monoxide in the breathing air from exceeding 10 ppm. Follow the manufacturer’s checklist and maintenance instructions.
2. BREATHING-AIR COMPRESSOR (or oil-less ambient air pump) capable of providing Grade D quality air, located in a dust free area. Read # 1 above.
3. CLEAN, PROPERLY-MAINTAINED NIOSH-APPROVED SUPPLIED-AIR RESPIRATOR worn by blast operators, and other workers exposed to blast dust. Make sure all respirator components are in place — all lenses, inner collar, and cape. Thoroughly inspect all components for wear. The NIOSH approval (approval number is listed in the owner’s manual) is for a complete assembly from point of attachment on the CPF (sorbent bed) filter to the complete respirator. Substitution of any part voids the NIOSH approval.
4. CARBON MONOXIDE MONITOR/ALARM installed at the CPF filter or inside the supplied-air respirator for monitoring for the presence of deadly CO gas and warning the operator(s) when the CO level reaches an unacceptable level. When an ambient air pump is used for breathing air, a CO monitor provides a measure of safety. Read # 1 above.
5. BREATHING-AIR FILTER (OSHA-REQUIRED sorbent bed filter) for removal of moisture and particulate matter in the compressed air breathing-air supply. Monitor the condition of the cartridge and replace when odor is detected or at 3 month intervals, whichever comes sooner. The breathing air filter does NOT detect or remove carbon monoxide (CO). Always install a CO monitor/alarm.
6. BLAST MACHINE (bearing U or UM stamp, National Board Number, and Maximum Working Pressure) sized to hold a 30-minute abrasive supply. Examine pop-up valve for alignment. Check piping, fittings, screens, valves for tightness, leaks, and wear. Always ground the machine to eliminate hazard of static shock. Install a blast machine screen to keep out foreign objects. Use a blast machine cover if left outdoors overnight. Never exceed the maximum working pressure of the vessel.
7. AIR LINE FILTER (moisture separator) installed as close as possible to the
blast machine inlet and sized to match the size of the inlet piping or larger air supply
line. Clean filter and drain often. Damp abrasive causes operational problems.
8. REMOTE CONTROLS are required by OSHA and must be in perfect
operating condition. Test and check all components to ensure all parts are present
and fully functional. Use genuine replacement parts. NEVER mix parts from different
manufacturers. Never use welding hose for remote control hose.
9. BLAST HOSE should have an inside diameter sized to suit the blast nozzle.
The ID should be three to four times the size of the nozzle orifice diameter. Blast hose
should be arranged in as straight a line as possible from the blast machine to the
work area, avoiding sharp bends.
10. COUPLINGS AND NOZZLE HOLDERS should fit snugly on the hose and
be installed with manufacturer recommended screws. Coupling lugs must snap firmly
into locking position. Gasket must always be used to form a positive seal, and cotter
pins must be installed. Replace gasket when wear, softness or distortion is detected.
Check nozzle holder for thread wear; replace at any sign of wear. Install safety cables
at all connections.
11. NOZZLE orifice size should be checked and nozzle replaced when worn
1/16” from original size. (No. 5 nozzle has 5/16” orifice diameter; replace when it
measures 3/8”). Threads should be inspected daily for wear and nozzle should be
replaced when wear is detected. Always use a nozzle washer.
12. ABRASIVE must be a material specifically manufactured for blasting. It
should be properly sized for the job. Check material safety data sheet for free-
silica, cyanide, arsenic, lead and other toxins and avoid use when these toxic,
harmful substances are present.
SURFACE TO BE BLASTED should be examined for hazardous substances.
Take appropriate protective measures as required by OSHA to ensure the blast
operator, other workers in the vicinity, and any bystanders are properly protected.
©Clemco Industries Corp., Stock No. 20954P, 0692 Rev. F, 06/12
1. Air Compressor
7. Air Line Moisture Separator
5. CPF Air Filter
6. ASME Code Blast Machine
8. Remote Controls
9. Blast Hose 10. Hose Couplings and Safety Cables
11. Appropriately Sized Nozzle
12. Abrasive
4. External or Helmet Mounted Carbon Monoxide Monitor /Alarm
2. Breathing Air Compressor for High Pressure Respirators
3. NIOSH Approved Supplied-Air Respirator
or Ambient Air Pump for Low Pressure Respirators

PT PNEUMATICALLY OPERATED ABRASIVE METERING VALVE Page 1
© 2020 CLEMCO INDUSTRIES CORP. www.clemcoindustries.com Manual No. 29586, Rev B 01/20
1.0 INTRODUCTION 1.1 Scope of manual
1.1.1 These instructions cover the setup, operation, maintenance, and replacement parts for Clemco’s PT pneumatically operated abrasive metering valve. 1.1.2 This manual contains important safety information. All operators and personnel involved with the abrasive blast process must read and understand the contents of these instructions, including the orange cover. It is equally important that the operator is trained and qualified to safely operate the blast machine, remote controls, and all other equipment used with the blast machine. 1.1.3 All personnel involved with the abrasive blasting process must be made aware of the hazards associated with abrasive blasting. The Clemco booklet Abrasive Blasting Safety Practices is included with every blast machine; it contains important safety information about abrasive blasting that may not be included in equipment operations manuals. To request additional copies, email [email protected]. 1.2 Safety Alerts
1.2.1 Clemco uses safety-alert signal words, based on ANSI Z535.4-2011, to alert the user of a potentially hazardous situation that may be encountered while operating this equipment. ANSI's definitions of the signal words are as follows:
This is the safety alert symbol. It is used to alert you to potential physical injury hazards. Obey all safety messages that follow this symbol to avoid possible injury or death.
Notice indicates information that is considered important, but not hazard-related, if not avoided, could result in property damage.
Caution indicates a hazardous situation that, if not avoided, could result in minor or moderate injury.
Warning indicates a hazardous situation that, if not avoided, could result in death or serious injury.
Danger indicates a hazardous situation that, if not avoided, will result in death or serious injury.
1.3 Table of Contents
SUBJECT LOCATION
INTRODUCTION ........................................................ 1.0 Scope of Manual ......................................................... 1.1 Safety Alerts ............................................................... 1.2 Table of Contents ....................................................... 1.3 Specifications ............................................................. 1.4 Components and Operating Principles ....................... 1.5
INSTALLATION ......................................................... 2.0 Remove Existing Metering Valve from Blast Machine ... 2.1 Install Adaptors onto PT Metering Valve .................... 2.2 Install Pipe Fittings onto PT Metering Valve ............... 2.3 Install PT Metering Valve onto Blast Machine ............ 2.4 Connect Pusher Line .................................................. 2.5 Connect Control Hose(s) ............................................ 2.6
ADJUST ABRASIVE FLOW ...................................... 3.0
SERVICE MAINTENANCE ........................................ 4.0 Upper Segment Disassembly ..................................... 4.1 Piston Removal and Disassembly .............................. 4.2 Lower Segment Disassembly ..................................... 4.3 Valve Reassembly ...................................................... 4.4
Troubleshooting ....................................................... 5.0 No Abrasive Flow ....................................................... 5.1 Abrasive Flow Does Not Stop
When Optional ACS Switch Is Turned OFF ............ 5.2 Turning Metering Knob Does Not Change Abrasive Flow .............................................................. 5.3 Air Leaks Through Relief Hole in Cylinder Cap .......... 5.4 Abrasive Flow Decreases Shortly After Blasting Starts ... 5.5 Abrasive Bridging ........................................................ 5.6
REPLACEMENT PARTS ........................................... 6.0 1.4 Specifications
Minimum pressure to begin opening .............. 40 psi Pressure to fully open and function correctly ... 80 psi Maximum working pressure ......................... 150 psi

PT PNEUMATICALLY OPERATED ABRASIVE METERING VALVE Page 2
© 2020 CLEMCO INDUSTRIES CORP. www.clemcoindustries.com Manual No. 29586, Rev B 01/20
1.5 Components and Operating Principles 1.5.1 Components
Components of the valve assembly include the metering valve, a 1-1/4 nipple to connect the valve to the blast machine, and an assortment of fittings and adaptors to connect the valve to the blast machine piping, as shown if Figures 1 and 2. 1.5.2 Operating Principles
The PT is a normally closed pneumatically operated abrasive metering valve. When the valve is idle (the control handle is up), spring pressure keeps the valve closed. When control air is applied (the control handle is pressed), Air pressure overcomes spring pressure and opens the valve to a specific point set by turning the metering knob. When the control handle is released, control pressure vents and spring pressure closes the valve, stopping abrasive flow. 1.5.3 Operating Pressure
The PT valve requires approximately 80 psi of control pressure to fully open and function properly.
2.0 INSTALLATION
2.1 Remove Existing Metering Valve from Blast Machine
2.1.1 Empty the blast machine of abrasive and depressurize the machine.
Failure to observe the following before performing any maintenance on the blast machine could cause serious injury or death from the sudden release of trapped compressed air: Depressurize the blast machine. Lockout (be certain the air supply is off and
that it cannot be started while work is in process) and tagout (make sure the air supply is clearly marked to prevent re-starting while work is in process) the compressed-air supply.
Bleed the compressed-air supply line to the blast machine.
2.1.2 Shut down the compressed-air source and lockout and tagout the air supply.
2.1.3 Remove control hose(s) from the existing metering valve. Make a note of the connections because connections shown in the illustrations can differ based on remote control options. NOTE: If the control connections are different from those supplied with the PT valve, save the connections from the existing valve for reuse on the PT. 2.1.4 Remove the metering valve from the blast machine. 2.2 Install Adaptors onto PT Metering Valve
Figure 1
NOTE: To ensure airtight seals and ease assembly, apply breakable sealant, such as loctite 243 or equal, to the male BSPP threads on the adaptors, as shown in Figure 1.
Apply breakable sealant only on male BSPP threads. Use conventional pipe sealant on male NPT pipe threads. Reversing sealant applications can cause leaks or damage threads when removing them. 2.2.1 Install BSPP adaptors onto the PT valve, as shown in Figure 1. Tighten all fittings to secure and prevent air leaks. 2.3 Install Pipe Fittings onto PT Valve ‒ Figure 2
2.3.1 If there is enough clearance to spin the PT valve onto the bottom of the machine with the pipe fittings attached, attach the fitting before installing the valve onto the machine. If there is not enough clearance to spin the assembled valve onto the blast machine, install the valve onto the machine and then install the pipe fittings. 2.4 Install PT Valve onto Blast Machine ‒ Figure 3
2.4.1 There are two options when installing the PT valve to the bottom of the blast machine, as noted below: Use option 1 when the blast hose connection is at a fixed position, as with bulk blast machines. Use option 2 when the blast machine connection can be at any height.
Option 1 Place the PT valve at the approximate height of the old valve and measure the distance from the top of the valve to the bottom of the blast machine. Add 1" and procure a 1-1/4-NPT nipple that equals the total length. Apply pipe thread sealant to the male NPT threads, screw the nipple into the top port on the PT valve, and attach the valve to the bottom of the blast machine, as shown in Figure 3. NOTE: A 1-1/2" x 1-1/4"

PT PNEUMATICALLY OPERATED ABRASIVE METERING VALVE Page 3
© 2020 CLEMCO INDUSTRIES CORP. www.clemcoindustries.com Manual No. 29586, Rev B 01/20
bushing may be required on the blast machine, depending on the vintage of the machine.
Option 2 Apply pipe thread sealant to the male threads of a 1-1/4-NPT x close nipple, screw the nipple into the 29861 adaptor previously installed on the PT valve, and attach the valve to the bottom of the blast machine, as
shown in Figure 3. NOTE: A 1-1/2" x 1-1/4" bushing may be required on the blast machine, depending on the vintage of the machine. 2.4.2 Attach the CF coupling and nipple to the PT valve.
Figure 1
Figure 2
29861 ‒ Adaptor 1-1/4 M-BSPP x 1-1/4-F-NPT
29863 ‒ Adaptor 1/8 M-BSPP x 1/4 F-NPT
29862 ‒ Adaptor 1-1/4 F-BSPP x 1-1/4-F-NPT
29860 ‒ Adaptor 1-1/2 F-BSPP x 1-1/2-F-NPT
1-1/4 Male-BSPP Threads 1-1/2 Male-BSPP Threads
1-1/4 Male-BSPP Threads
1-1/4 Female NPT Threads
1-1/4 Female NPT Threads
1-1/2 Female NPT Threads
BSPP threads on the female adaptors are identified by the raised rim.
01791 ‒ 1-1/2 NPT x Close Schedule 80 Nipple
PT Metering Valve with BSPP adaptors installed.
01854 ‒ Nipple, 1-1/4 x Close NPT HD or longer nipple, as noted in Section 2.4.1 ‒ Option 1.
00551 ‒ CF Coupling
* 01719 ‒ 1-1/4 NPT x 3” Nipple
11138 ‒ 1-1/2 x 1-1/4 NPT Bell Reducer
Apply pipe thread sealant on all male NPT threads.
* Longer nipples are used on Big Clem bulk blast machines.

PT PNEUMATICALLY OPERATED ABRASIVE METERING VALVE Page 4
© 2020 CLEMCO INDUSTRIES CORP. www.clemcoindustries.com Manual No. 29586, Rev B 01/20
Figure 3 2.5 Connect Pusher Line ‒ Figure 4
2.5.1 Attach the male end of the pusher line to the 1-1/4" adaptor on the metering valve. NOTE: The old pusher line may be too long or too short to connect to
the fittings without it streatching or kinking. Some adjustment can be done by lengthening or shorting the nipples between the side-piping tee and choke valve. If the pusher line does not fit correctly, a shorter or longer pusher line is required.
Figure 4
The blast machine and plumbing are shown for reference; they will vary depending on blast machine and plumbing options.
Assembled PT Metering Valve
Use longer or shorter nipple to adjust height location of the metering valve relative to the blast machine plumbing.
CF Coupling
Blast Machine Piping
Flexible Pusher Line
Male Adaptor
Use shorter or longer pipe nipples as needed to avoid stretching or kinking the flexible pusher line. If changing the nipples lengths do not allow use of the existing pusher line, replace it with one of appropriate size.

PT PNEUMATICALLY OPERATED ABRASIVE METERING VALVE Page 5
© 2020 CLEMCO INDUSTRIES CORP. www.clemcoindustries.com Manual No. 29586, Rev B 01/20
2.6 Connect Control Hose(s) ‒ Figure 5
2.6.1 Attach fittings and connect the control hose(s) to the PT valve, as shown in Figure 5. Note that the illustration in Figure 5 is typical and shown for reference; connect control fittings and hose(s) in the same manner as was used on the metering valve that the PT valve replaces. If necessary use the fittings from the valve the PT is replacing.
Figure 5
3.0 ADJUST ABRASIVE FLOW ‒ Figure 6
3.1 Adjust abrasive flow with the machine in the nonblast position (blast machine depressurized or ACS switch in OFF [no-blast] position). When the machine is in operation, friction makes the knob difficult to turn. If the abrasive flow is not correct, depressurize the blast machine and readjust the flow as needed.
Figure 6
3.2 The valve is closed when the knob is fully clockwise. Increase abrasive flow by turning the knob counterclockwise and decrease abrasive flow by turning the knob clockwise, as shown in Figure 6. Begin with the knob set 2 turns from fully closed. Increase flow by turning the knob no more than 1/4 turn counterclockwise. Check flow before readjusting. Continue making adjustments as described until the correct flow is attained. 3.3 Optimum abrasive flow depends on the type and size of abrasive and blasting pressure, and can best be determined by experience. Use as little abrasive as possible while maintaining the maximum cleaning rate. The air-abrasive mixture should be mainly air. As a rule, the stream of abrasive coming out of the nozzle should barely discolor the air when seen against a contrasting background.
4.0 SERVICE MAINTENANCE
Failure to observe the following before performing any maintenance could cause serious injury or death from the sudden release of compressed air: Depressurize the blast machine. Lockout (be certain the air supply is off and
that it cannot be started while work is in process) and tagout (make sure the air supply is clearly marked to prevent re-starting while work is in process) the compressed-air supply.
Bleed the compressed-air-supply line to the blast machine.
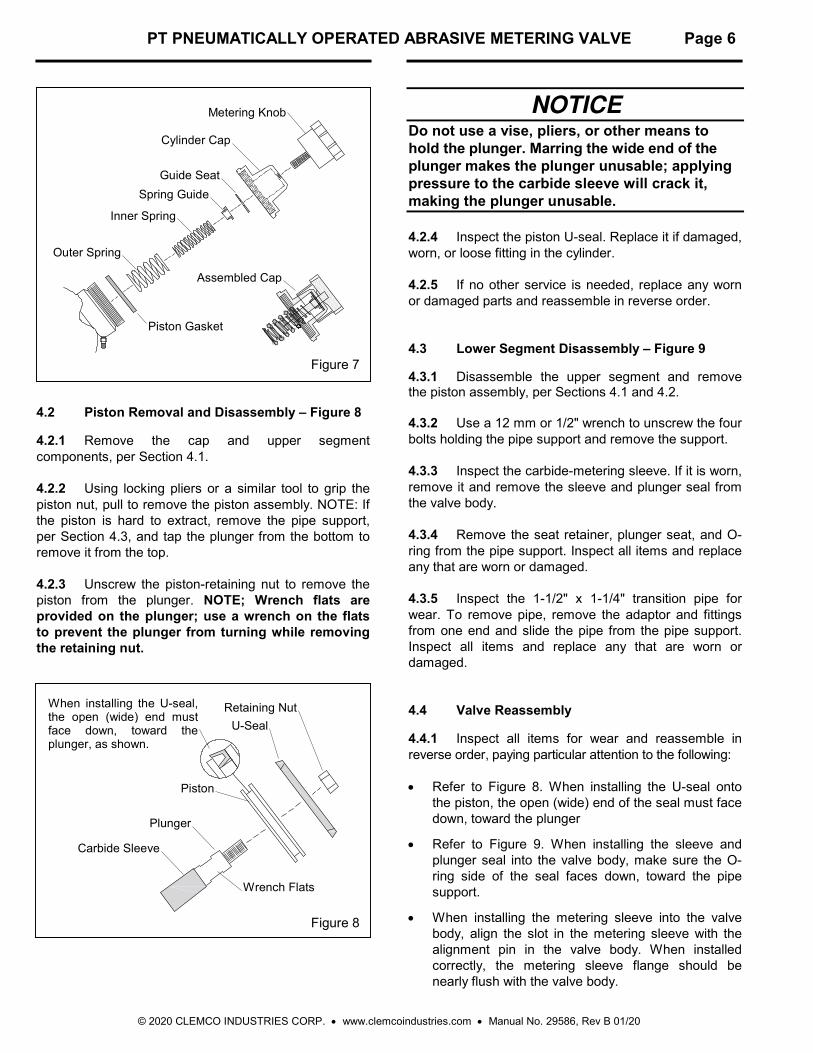
4.1 Upper Segment Disassembly ‒ Figure 7
4.1 Use a strap wrench or similar tool to unscrew the cylinder cap from the valve body. The springs, inner spring guide, guide seat, and piston gasket will be unattached. There is no need to remove the metering knob from the cap unless service to either is required.
Control Hose Fitting
Control Hose
The hose connection shown is for reference. Connect the control hose(s) to the PT valve in the same manner as the former valve.
Metering Knob
Turn counterclockwise to increase flow.
Turn clockwise to decrease flow.
PT PNEUMATICALLY OPERATED ABRASIVE METERING VALVE Page 6
© 2020 CLEMCO INDUSTRIES CORP. www.clemcoindustries.com Manual No. 29586, Rev B 01/20
Figure 7 4.2 Piston Removal and Disassembly ‒ Figure 8
4.2.1 Remove the cap and upper segment components, per Section 4.1. 4.2.2 Using locking pliers or a similar tool to grip the piston nut, pull to remove the piston assembly. NOTE: If the piston is hard to extract, remove the pipe support, per Section 4.3, and tap the plunger from the bottom to remove it from the top. 4.2.3 Unscrew the piston-retaining nut to remove the piston from the plunger. NOTE; Wrench flats are provided on the plunger; use a wrench on the flats to prevent the plunger from turning while removing the retaining nut.
Figure 8
Do not use a vise, pliers, or other means to hold the plunger. Marring the wide end of the plunger makes the plunger unusable; applying pressure to the carbide sleeve will crack it, making the plunger unusable. 4.2.4 Inspect the piston U-seal. Replace it if damaged, worn, or loose fitting in the cylinder. 4.2.5 If no other service is needed, replace any worn or damaged parts and reassemble in reverse order. 4.3 Lower Segment Disassembly ‒ Figure 9
4.3.1 Disassemble the upper segment and remove the piston assembly, per Sections 4.1 and 4.2. 4.3.2 Use a 12 mm or 1/2" wrench to unscrew the four bolts holding the pipe support and remove the support. 4.3.3 Inspect the carbide-metering sleeve. If it is worn, remove it and remove the sleeve and plunger seal from the valve body. 4.3.4 Remove the seat retainer, plunger seat, and O-ring from the pipe support. Inspect all items and replace any that are worn or damaged. 4.3.5 Inspect the 1-1/2" x 1-1/4" transition pipe for wear. To remove pipe, remove the adaptor and fittings from one end and slide the pipe from the pipe support. Inspect all items and replace any that are worn or damaged. 4.4 Valve Reassembly
4.4.1 Inspect all items for wear and reassemble in reverse order, paying particular attention to the following: Refer to Figure 8. When installing the U-seal onto
the piston, the open (wide) end of the seal must face down, toward the plunger
Refer to Figure 9. When installing the sleeve and plunger seal into the valve body, make sure the O-ring side of the seal faces down, toward the pipe support.
When installing the metering sleeve into the valve body, align the slot in the metering sleeve with the alignment pin in the valve body. When installed correctly, the metering sleeve flange should be nearly flush with the valve body.
Assembled Cap
Cylinder Cap
Guide Seat
Spring Guide
Inner Spring
Outer Spring
Piston Gasket
Retaining Nut
U-Seal
Piston
Plunger
Wrench Flats
Carbide Sleeve
When installing the U-seal, the open (wide) end must face down, toward the plunger, as shown.
Metering Knob

PT PNEUMATICALLY OPERATED ABRASIVE METERING VALVE Page 7
© 2020 CLEMCO INDUSTRIES CORP. www.clemcoindustries.com Manual No. 29586, Rev B 01/20
Figure 9 Before installing the seat retainer and plunger seat
into the pipe support, insert the transition pipe halfway into the pipe support. Assemble the seat retainer, O-ring, and plunger seat NOTE: The beveled side of the seat faces up when placed into the retainer.
When installing the retainer and seat assembly into the pipe support, the O-ring side of the assembly goes into the support. Slide the transition nipple in and out, and rotate it until the retainer slips inside the pipe. When correctly installed, the seat should protrude only slightly from the surface of the pipe support.
Before inserting the piston assembly into the valve body, apply a light smear of tool oil to the inside of the cylinder. When inserting the piston assembly, make sure the open side of the U-seal does not curl up. The chamfer in the valve body make the insertion easy.
5.0 TROUBLESHOOTING 5.1 No Abrasive Flow
5.1.1 Metering valve closed. Adjust abrasive flow per Section 3.0. 5.1.2 Optional ACS switch is closed. Switch is closed when the toggle is pointed toward the "EXH" port. 5.1.3 Leak or blockage in the control hose or fittings between the control unit (RLX Control Handle) and the PT valve. Make sure air pressure is reaching the control-line fitting on the PT valve. 5.1.4 Blast machine is empty. Check abrasive level 5.1.5 Obstruction in metering valve. Clear as follows: 5.1.5.1 Fully open the control valve. (It is fully open when the metering knob is turned fully counterclockwise.) While blasting, close the choke valve to force out small obstructions or wet abrasive. 5.1.6 Air leaks through the relief hole under the metering knob. Check for leak. A leak at the vent indicates a worn or damaged piston U-seal. Service the upper segment as need, per Sections 4.1 and 4.2. 5.1.7 Abrasive bridging in the blast machine. Refer to Section 5.6.
Transition pipe and adaptors are rotated for clarity.
Valve Body
Transition Pipe
BSPP to NPT Adaptor BSPP to NPT Adaptor
Sleeve and Plunger Seal
Plunger Seat
Seat Retainer
2.75" Screw
Retainer O-Ring
Metering Sleeve
Pipe Support
Washer
Metering Sleeve Alignment Pin
Alignment Slot
O-ring (wide) side of seal faces down, as shown.

PT PNEUMATICALLY OPERATED ABRASIVE METERING VALVE Page 8
© 2020 CLEMCO INDUSTRIES CORP. www.clemcoindustries.com Manual No. 29586, Rev B 01/20
5.2 Abrasive Flow Does Not Stop When Optional ACS Switch Is Turned to OFF
5.2.1 Control air is not exhausting from the switch. Check the exhaust muffler for blockage and check the control handle, per the control handle owner’s manual. 5.2.2 Worn plunger seat or plunger. Service the valve as needed, per Sections 4.1, 4.2 and 4.3. 5.2.3 Obstruction on the plunger seat. Service the valve as needed, per Section 4.0. 5.3 Turning Metering Knob Does Not Change Abrasive Flow
5.3.1 Inspect the seat and plunger for wear, per Sections 4.0. 5.4 Air Leaks Through Relief Hole in Cylinder Cap (under metering knob)
5.4.1 A leak at the vent indicates a worn or damaged piston U-seal. Service the upper segment as needed, per Section 4.1. 5.5 Abrasive Flow Decreases Shortly After Blasting Starts
5.5.1 Insufficient air supply causes control pressure to drop, in turn closing or partially closing the valve. Check for undersized air supply hose, and the cfm of compressor against the cfm consumption of the nozzle. The PT valve requires approximately 80 psi to operate. 5.5.2 Abrasive bridging in the blast machine. This is usually caused by using very fine abrasive, or by moist air. Refer to Section 5.6. 5.6 Abrasive Bridging
5.6.1 Frequent bridging or blockage in the blast machine and metering valve can be caused by damp abrasive. Blast media becomes damp by blasting parts that are slightly oily (when using recycled abrasive), from moisture in the compressed air line, or from absorption from ambient air. 5.6.2 To avoid contaminating recyclable abrasive by the workpiece, all parts should be clean and dry. If parts are oily or greasy, degrease and dry them prior to blasting.
5.6.3 Moist compressed air: Moisture in the air supply may be due to a faulty compressor that overheats, or pumps oil or moisture into the air line; an air line that is too long permitting moisture to condense on the inside; and from high humidity. Drain filters and receiver tank regularly. If the problem persists, a dryer or aftercooler may be required in the air supply line. 5.6.4 Absorption: Some abrasive tends to absorb moisture from the air, especially fine-mesh abrasive in high humidity areas. Empty abrasive from the blast machine at the end of the workday, and store it in an area protected from damp environment. 5.6.5 Condensation: When working in conditions of extreme temperature change or humidity, condensation may develop inside the machine. Condensation dampens abrasive and causes flow problems. Empty the machine of all abrasive, when shutting down for the day. This will eliminate trouble from moist abrasive the next time the machine is started.

PT PNEUMATICALLY OPERATED ABRASIVE METERING VALVE Page 9
© 2020 CLEMCO INDUSTRIES CORP. www.clemcoindustries.com Manual No. 29586, Rev B 01/20
6.0 REPLACEMENT PARTS ‒ Figure 10
Item Description Stock No.
(-) PT Metering Valve, complete .................... 29583 1. Knob, metering ......................................... 29587 2. Cap, cylinder ............................................. 29588 3. Gasket, piston ........................................... 29589 4. Spring, outer ............................................. 29590 5. Spring, inner .............................................. 29591 6. Nut, 1/2" NC hex ....................................... 03511 7. U-Seal, piston ........................................... 29592 8. Piston ........................................................ 29593 9. Plunger and sleeve kit .............................. 29864 10. Sleeve assembly rebuilt kit, includes items 9, 11, 12 & 13 ................ 29584 11. Seat, plunger ............................................. 29865 12. Retainer, plunger seat .............................. 29928
13. O-ring, seat retainer .................................. 29929 14. Body .......................................................... 29930 15. Gasket, cylinder cap ................................. 29931 16. Seal, sleeve and plunger .......................... 29932 17. Spring support guide ................................. 29933 18. Pipe, 1-1/2 x 1-1/4 reducing ...................... 29934 19. Support, pipe ............................................. 29936 20. Cap screw ................................................. 29935 21. Washer, 5/16" flat ..................................... 03216 22. Nipple, 1-1/4 NPT x close, heavy wall ..... 01854 23. Adaptor, 1/4" NPT x 1/4 JIC elbow ........... 02513 24. Adaptor, 1-1/2 F-BSPP x 1-1/2-F-NPT ..... 29860 25. Adaptor, 1-1/4 M-BSPP x 1-1/4-F-NPT .... 29861 26. Adaptor, 1-1/4 F-BSPP x 1-1/4 F-NPT ..... 29862 27. Adaptor, 1/8" M-BSPP x 1/4 F-NPT ........... 29863 28. Bell Reducer, 1-1/2 NPT x 1-1/4 NPT ....... 11138 29. Nipple, 1-1/2 NPT x close ......................... 01791
Figure 10
Some items rotated for clarity.
2
12
1
4
3
25
14
15
9
22
19
5
8
10
11
6
16
17
21
20
24
23
7
26 18
27
28 29
11 12
13
13
9
9