260 titration controller - denver · pdf filethe denver model 260 titration controlleris a...
TRANSCRIPT

260 Titration ControllerOperation Manual
352.6Titrating
9.7 minutes
2/13/982:24 P.M.
T1
902377.1 Rev. A

Specifications . . . . . . . . . . . . . . . . . . . . . . . . . . . . . . . . . . . . . . . . . . Inside front coverIntroduction
Menu Keys, Softkeys and Display . . . . . . . . . . . . . . . . . . . . . . . . . . . . . . . . . . . . 1Connectors and Inputs . . . . . . . . . . . . . . . . . . . . . . . . . . . . . . . . . . . . . . . . . . . . . 2LCD Display . . . . . . . . . . . . . . . . . . . . . . . . . . . . . . . . . . . . . . . . . . . . . . . . . . . . . . 3Function Keys . . . . . . . . . . . . . . . . . . . . . . . . . . . . . . . . . . . . . . . . . . . . . . . . . . . . . 4
Setup Menu. . . . . . . . . . . . . . . . . . . . . . . . . . . . . . . . . . . . . . . . . . . . . . . . . . . . . . . . . 6Quick Start Guide . . . . . . . . . . . . . . . . . . . . . . . . . . . . . . . . . . . . . . . . . . . . . . . . . . . . . 7Connecting to a Titration Module (Model 275KF). . . . . . . . . . . . . . . . . . . . . . . . . . . . . 8Coulometric Karl Fischer Titration
Running a Titration . . . . . . . . . . . . . . . . . . . . . . . . . . . . . . . . . . . . . . . . . . . . . . . . . 10Titrator Status and Operating Data . . . . . . . . . . . . . . . . . . . . . . . . . . . . . . . . . . 11Titration Setup Menu. . . . . . . . . . . . . . . . . . . . . . . . . . . . . . . . . . . . . . . . . . . . . . 12
Cleaning the Titration Cell . . . . . . . . . . . . . . . . . . . . . . . . . . . . . . . . . . . . . . . . . . . . . . 13Interfacing A Balance to Model 275KF . . . . . . . . . . . . . . . . . . . . . . . . . . . . . . . . . . . . 15Troubleshooting Guide . . . . . . . . . . . . . . . . . . . . . . . . . . . . . . . . . . . . . . . . . . . . . . . . 16Modifying Titration Protocols . . . . . . . . . . . . . . . . . . . . . . . . . . . . . . . . . . . . . . . . . . . 17Data logging . . . . . . . . . . . . . . . . . . . . . . . . . . . . . . . . . . . . . . . . . . . . . . . . . . . . . . . . 18Menu Tree Diagrams . . . . . . . . . . . . . . . . . . . . . . . . . . . . . . . . . . . . . . . . . . . . . . . . . . 19Maintenance . . . . . . . . . . . . . . . . . . . . . . . . . . . . . . . . . . . . . . . . . . . . . . . . . . . . . . . . 20Warranty Instructions . . . . . . . . . . . . . . . . . . . . . . . . . . . . . . . . . . . . Inside Back Cover
Table of Contents
Model 260 Titration Controller Specifications
Display 4.8”W x 3.6”H Backlit VGA resolution with full-screen display of titration progress.
Keypad Controls Sealed; audible entryData Memory Points 620Power-on Self-test YesError Messages YesData Output Print key; at end of titration; custom time intervalsAlarm High/low set points for all modesI/O RS-232C to computer or printer; serial network to titrator modules
Model 275KF Titration Specifications
Range 10µg to 20mg H2OAccuracy ±2µg or ±0.5%Resolution 0.1µgRate 3500µg H2O/min. (maximum)Endpoint Control 0 to 99 sec. persistence time and 0 to 9.9µg/sec. slope
(programmable)Capacity 1000mg H2O (for single charge reagents)
Specifications

The Denver Model 260 Titration Controller is a powerful, versatile andaccurate instrument offering many advanced options, programmablestandardization, quick update rates of twice per second for all channels,programmable data logging of 620 data points and a superb RS-232 serialinterface for obtaining data.
Direct Menu Keys, Softkeys and Display
The Model 260 uses six Direct Menu keys to access the menus and operations
(such as cal data, standardize protocols, select titration protocol, and selectchannels).
There are four Softkeys that provide additional operations; these Softkeys changetheir function as needed and each Softkey has an icon to indicate its currentfunction (start a titration).
The display is a backlit quarter-VGA screen capable of displaying up to four KarlFischer titrators (Model 275KF) simultaneously. The backlight will turn off after aperiod of non-use (the default is 45 minutes) and pressing any key willautomatically turn the display backlight on again.
T1 1.000 %H 2O
4/24/2008 08 :00 AM
1
Introduction
Softkeys
Direct Menu
KeysDirect Menu
Keys Numeric
Keypad

2
Connectors and Inputs
RS232C
titratornetwork
Serial port ("RS232") DB-9 connector:
Connect a serial printer or computerto send data and receive commands.
Power connector: Connect a 5.5mmOD x 2.1 ID coaxial connector with15VDC at 700mA (center pinnegative).
Titrator Network Connector: use toconnect up to four Coulometric KarlFischer titrators (Model 275KF).
RJ-11: non-functionalon Model 260
USB Port: non-functionalon Model 260
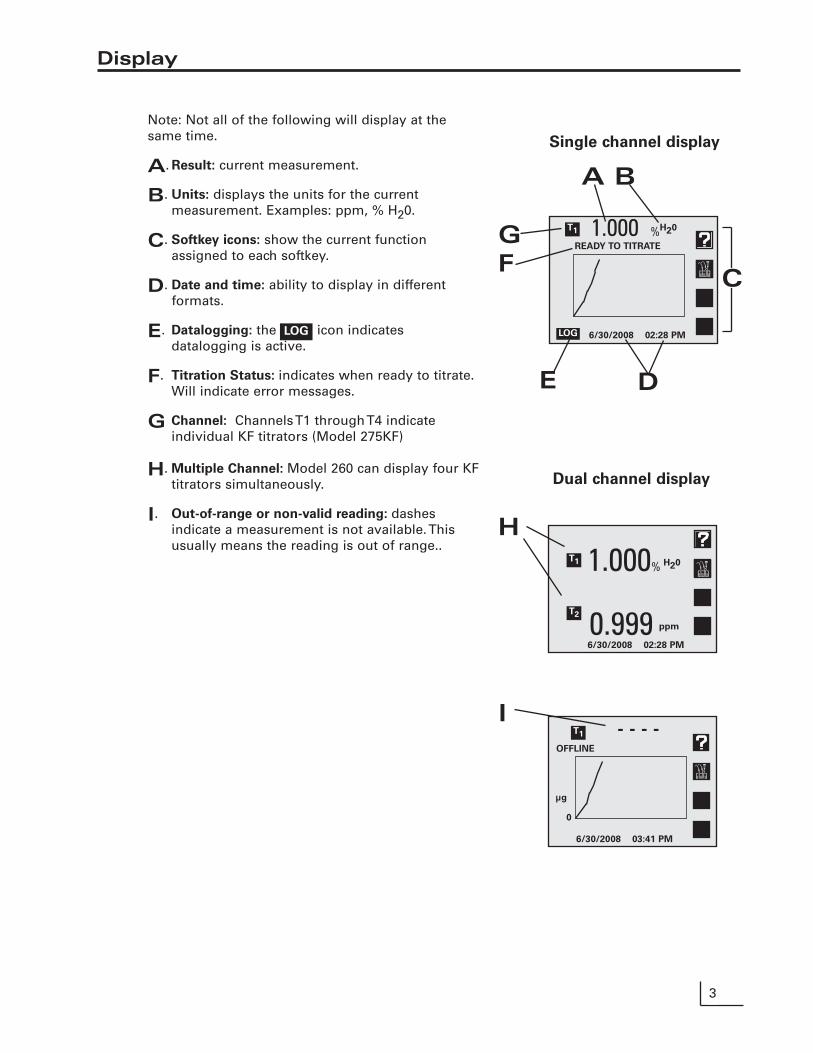
Note: Not all of the following will display at thesame time.
A. Result: current measurement.
B. Units: displays the units for the currentmeasurement. Examples: ppm, % H20.
C. Softkey icons: show the current functionassigned to each softkey.
D. Date and time: ability to display in different formats.
E. Datalogging: the icon indicatesdatalogging is active.
F. Titration Status: indicates when ready to titrate.Will indicate error messages.
G Channel: Channels T1 through T4 indicateindividual KF titrators (Model 275KF)
H. Multiple Channel: Model 260 can display four KFtitrators simultaneously.
I. Out-of-range or non-valid reading: dashesindicate a measurement is not available. Thisusually means the reading is out of range..
3
Display
1.000 %H20
READY TO TITRATE
6/30/2008 02:28 PM
A B
GF
D
C
Single channel display
E
1.000% H20
0.999 ppm
6/30/2008 02:28 PM
Dual channel display
HT1
LOGLOG
T2
T1
OFFLINE
6/30/2008 03:41 PM
0
µg
- - - -T1
I

A. Mode: Selects the mode. Select KFprotocol for selected titrator
B. Standardize: Use to modify a KF titrationprotocol. Also used to change othersettings which affect the measurement.
C. Cal Data: Shows KF titrator operatingdata such as drift rate, reagent condition,and statistics on the last titrations.
D. Channel: Channels T1 through T4 indicateindividual KF titrators (Model 275KF).
E. Setup:The Setup menu is used to setvarious general settings, such as date andtime, display contrast, keypress beep andserial port. Use Titration setup menu toaccess titration protocols and controltitrators (stirrers on/off).
F. Data Log: Displays the datalogging menuused to view and print the stored Data Log(see Datalogging).
G. Clear: Exits from the current menu andreturns to the previous menu, cancels thecurrent operation or clears a number entry.
H. Enter/Print: Accepts numeric values,menu selections or pending operations. Inthe main measure screen, acts as a Printkey, sending all current measurements to aprinter/ computer through the serial portand stores the measurements in the DataLog.
I. Softkeys: These four keys access differentoperations at different times. Most menusoffer a “Help” softkey and the “Measure”softkey, which allows a direct return to themain measuring screen, exiting all menusimmediately. The “Up Arrow” and “DownArrow” softkeys offer one way to select amenu item. The “Left Arrow” key is abackspace, active during number entry.
J. Numeric Keys: Pressing a number keyselects a numbered item in a menu. Thenumber keys also allow entering values forvarious settings.
4
Function Keys
Help
Measure
Scroll up
Scroll down
Backspace
Graph
Titrator Start/Stop
Statistics
Softkeys
X

5
Function Keys
Mode
Standardize
Cal Data
Channel Enter/Print
Clear
Setup
Data Log
?
A
B
C
D
E
F
G
H
I
J
Channels
The Channel key is used to turn on or off each availablechannel. In single-channel operation, additionalinformation for the selected channel is provided,including a display list of titration protocols. In multi-channel operation, the Mode, Standardize and Cal Datamenus ask for the channel before accessing the menu.
Configure Display
1) Turn channel T1 on/off: ON
2) Turn channel T2 on/off: ON
3) Turn channel T3 on/off: OFF
4) Turn channel T4 on/off: ON
5) Measurement screen
Model 260 Select Channel
screen
Channel

Setup Menu
Press Setup to access the Setup menu:
1. Time and date menu: use to set the time format (HH:MMAM/PM or HH:MM:SS), set the time, set the date format(MM/DD/YY, DD-MM-YY or YYYY.MM.DD), and set thedate.
2. Select contrast: use to select the display contrast, makingthe displayed characters lighter or darker. Select setting“5” for typical conditions.
3. Titration Setup Menu: use to modify, select and printtitration protocols, set titration intermediate resultsprintout, select balance type for the titrators, and controltitration stirrers.
4. Setup serial port: use to set the serial RS232 portsettings. To configure the serial port baud rate, data bits,stop bits and parity setting user must match the baud ratesetting of the printer or computer being used with thesystem.
5. Keypress beep on/off: use to turn on or off a "beep"upon each keypress as an audible signal that a key hasbeen pressed.
6. Select display background: use to set the display to blackcharacters on a white background or white characters ona black background.
7. Show meter information: use to show the meter model,software version and serial number.
8. Set screen saver timeout: use to set a time for thebacklight to turn off and the screensaver to activate.
9. Restore factory defaults: use to reset all settings tofactory defaults. On occasion it may be useful tocompletely reset the controller, for example, if otherusers have changed a setting.
Warning!
A reset erases all saved tiration protocols and restores the
original factory settings
6
Setup
!
Setup Menu
1) Time and date menu
2) Select contrast
3) Titration setup
4) Setup serial port
5) Keypress beep on/off
6) Select display background
7) Show meter information
8) Set screen saver timeout
9) Restore factory defaults
Setup
Select Time Format
1) hr : min : sec
2) hr : min AM/PM
Select Date Format
1) mm / dd / yyyy
2) dd – mm – yyyy
3) yyyy.mm.dd
Titration Setup Menu
1) Modify titration protocol2) Select/assign protocol3) Print a protocol4) Set printouts on/off :OFF5) Set printout interval: 6 sec6) Select balance type : A/M7) Turn stirrer 1 on/off :ON8) Turn stirrer 2 on/off :ON9) Turn stirrer 3 on/off :ON0) Turn stirrer 4 on/off :ON
NOTE: Any paused stirrers will automatically restartwhen you leave this screen.

Titrator 1
Start Titrator
Add sample: 00 : 14
Enter the empty container weight:
Status: Titrating 00:06
Result: – – –
Press Enter to accept.
Titrator 1
Start Titrator
Enter the full container weight:
Status: Ready to titrate
Result: – – –
Press Enter to accept.
7
Quick Start Guide
1. Turn Titrator 1 on for active display using the Channel key(see Function keys). If a Titrator is selected for singlechannel display, a real-time titration curve will be displayedduring each titration.
2. Select the KF titration protocol to be used for your analysisby pressing Mode, and selecting the protocol closest to yourneeds. Modify the selected protocol by pressingStandardize and selecting each parameter to modify.
3. A. Obtain the sample to be analyzed, typically in a syringe ifa liquid. Place the syringe on a balance and either notethe weight or tare the balance to show zero.
B. Press the Titration softkey [the key with an icon beside itthat looks like the KF titration cell].
C. Select which Titrator to use if there are multiple channelsturned on for display.
D. Enter the weight of the container (syringe) and sampleand press Enter. Usually this is entered as zero.
E. Immediately add the sample to the cell, usually byinjecting the sample through the septum into the sealedcell. Carefully allow a final drop to fall off the needle andpull back slightly on the syringe after the desired samplevolume has been introduced. Carefully remove thesyringe from the cell.
Note: You must begin adding sample before the sampleintroduction time elapses, or the Titrator may end thetitration before you add the sample. The sampleintroduction time can be programmed.
F. Place the container (syringe) back on the balance andobtain the weight. Enter the "empty container weight" (ifyou used zero for the "full container weight", then use anegative value for the second tare weight) and pressEnter. This second weight must be less than the firstweight.
G. Watch the titration progress. When the titration completesa beep will sound, the status changes from "Titrating" to"Done", and then to "Ready to titrate". A checkmarksymbol beside the "T1" channel indicator means thetitration is done. The result is automatically sent to theprinter/computer serial port and stored in the Data Log.
4. Repeat the titration. For best results, it is recommended tocalculate the average of two or three titrations. Once youhave more than one titration result on a sample, theController will calculate statistics on the results. Press CalData, Select Channel if necessary, and press the X-barStatistics softkey. The average, standard deviation and otherstatistical information is displayed for the selected Titrator,for the most recent "N" number of analyses with the currentunits. Press Clear or the Graph softkey to return to thereagent condition bar graph screen, or press the Measuresoftkey to return to the main measure screen.
Configure Display
1) Turn channel T1 On/Off : ON
2) Turn channel T2 On/Off : ON
3) Turn channel T3 On/Off : OFF
4) Turn channel T4 On/Off : OFF
5) Measurement Screen
0.00000 g
g
T1
Titrating 00:50
01/29/2008 12:01 AM
128
64
0
µg
0 120 240
112.3

8
Connecting To A Titration Module (Model 275KF)
The Model 260 Titration Controller operates one to fourattached Coulometric Karl Fischer Titrators (Model275KF). Each Titrator operates independently, so up tofour KF titrations can be run simultaneously. TheCoulometric KF method is a sensitive and specificmethod for the determination of water at low levels.Samples are introduced into a sealed titration cell wherethe water in the sample undergoes a chemical reaction(the Karl Fischer reaction) with the KF reagent in the cell.The Titrator senses that water is present and passes aquantity of electricity ("coulombs") through the cell toelectrochemically generate iodine, which reacts withwater. The Titrator determines when the titration iscomplete (all water has been consumed).
Preliminary Titrator Setup -
Setting up and Connecting the KF Titration Cell
1. Important! If unpacking the Titration Cell, remove theshipping spacer between the platinum outer electrodeand the glass frit.
2. Make sure the Titration Cell is clean and DRY. If thecell is dirty, especially the glass frit in the GeneratorAssembly separating the anode and cathode, it mustbe thoroughly cleaned and dried before filling beingput in service. See Cleaning the Cell.
3. Prepare the Desiccant Assembly used to prevent roomwater vapor from entering the cell. Remove theParafilm wrap over the ends used for protectionduring shipping. If needed, to replace the desiccant,unscrew the Desiccant Assembly from the cell top,place a plug of cotton or glass wool in the tubebottom, fill the tube with dry Indicating "Drierite" or 4Amolecular sieve desiccant (like "KF Dri-Alert") andclose the top cap.
4. Insert the KF Electrode into the compression fitting capwith the open hole in the top of the cell. Make surethe two platinum rods are straight and not touchingeach other, and are clean. Carefully insert theelectrode down until the rods nearly touch the cellbottom. Tighten the fitting firmly.
5. Carefully place a 5/16" X 1" magnetic stir bar in thecell.
6. Use a Teflon sleeve on the ground glass joint of theGenerator Electrode or apply a high-vacuum stopcockgrease to the joint. Remove sleeve when cleaninggenerator.
Warning!
Failure to use either stopcock grease or a Teflon sleeve
may result in the glass joint freezing together causing
breakage. Do not place teflon parts in oven when
cleaning.
!
Desiccant
Assembly
Generator
Assembly
Ceramic
Frit
Platinum
Mesh
Desiccant
Caps Kit
w/seals
300506.1
Desiccant
Chamber
300559.1
Generator
Assembly
300429.1
Injection
Septum
300386.1
Stir Bar
69TC0091
KF Electrode
300757.1
Cell Body
with Fittings
300463.1
Caps for
KF and
Septum
w/seal
300505.1

9
Connecting To A Titration Module (Model 275KF)
7. Add approximately 150 mL of the anolyte reagent into the outer cellcompartment. The reagent to use varies with sample type, buttypical reagents include Hydranal Coulomat AG, AG-H, A or AK; EMScience AquaStar Coulomat AN, A or AK; or GFS Watermark vesselsolution (#1612).
8 Quickly place the Generator Electrode into the cell to prevent furtherwater vapor absorption by the reagent.
9. Add catholyte reagent to the inner chamber of the GeneratorElectrode until the outer and inner reagent liquid levels are even,typically 5 to 10 mL. Immediately place the Desiccant Assembly ontop of the generator. The catholyte reagent to use generally matchesthe anolyte reagent used, such as Hydranal Coulomat CG, C or CK;EM Science Coulomat CN, C or CK; or GFS Watermark generatorsolution (#1613).
10.Place the Titration Cell in position on top of the Titration module.11. Plug the Generator Electrode (phone plug) into the "Generator"
connector on the back of the Titrator.12.Plug the Indicator Electrode (dual pin plugs) into the "Indicator" jacks
on the back of the module.
If reagent spills on the titration module, wipe up immediately, as reagent will destroy the plastic cover.
Preliminary Titrator Setup -
Connecting the Titrator(s) and Controller
1. Place the Titrator(s) beside the Controller. Connect the serial cable tothe Controller connector "titrator network" and to the first Titrator("Titrator 1") connector marked "network in". If more than one Titratoris connected, connect the second Titrator ("Titrator 2") by connectinga serial cable between Titrator 1 "network out" and Titrator 2 "networkin". Connect up to four Titrators by daisy-chaining in this fashion
2. Plug the 3-pin DIN power connector into each Titrator, and plug theline cord(s) from the transformer(s) into wall outlets. Plug the powerconnector for the Model 260 into the back of the Controller wheremarked "power", and plug the transformer into a wall outlet.
3. Verify the Titrators are communicating with the Controller by turningon the Titrator channel for each attached Titrator. Press Channel, thenpress the number for each titrator channel to toggle the channel ON,then press the number key for Measurement screen.
4. With the Titrator(s) and Controller set up, the Titrator(s) willautomatically begin drying the cell and reagents. When the cell andreagents are dry, the solution should be pale yellow. If the solution isdark yellow to brown, it is over dry; add a very small quantity ofwater to the reagent until it goes colorless.
powernetwork
outgeneratorprobe
indicatorprobe
balancenetwork
in
powernetwork
outgeneratorprobe
indicatorprobe
balancenetwork
inpower
networkoutgenerator
probe
indicatorprobe
balancenetwork
in
RS232C
titratornetwork
275KF Titration Modules
Titration
Controller
Note:

10
Coulometric Karl Fischer Titration
Running a Titration
1. Select one or more titrator channels for active display bypressing Channel and pressing the number key for eachtitrator channel to toggle ON or OFF. When all channelshave been set, press the number key for Measurementscreen or press the Measure softkey (the softkey withthe meter and needle symbol).
2. Press Mode and select one of the 10 stored KF titrationprotocols (protocols are methods) to use for the selectedTitrator. If multiple channels are active, Select the Titratorto change mode (protocol).
3. Modify the protocol if necessary by pressing Setup, 3)Titration setup menu, 1) Modify titration protocol,and select the protocol. Any changes made to thisprotocol are immediately stored for the protocol and areautomatically sent to all Titrators using that specificprotocol. The Titrators using any given protocol aredisplayed at the top of the screen.
4. Press the Titration softkey to start the titration. If multipletitrators are turned on, select the titrator to start.
5. If micrograms or milligrams water are the selected units,the Add Sample reminder and countdown will begin andthe titration will start immediately. After adding thesample press Enter.If % or ppm water are the selected units, enter the weightfor the sample and container (usually a syringe). Type inthe weight value, or use automatic transfer from abalance, then press Enter. Common practice is to tarethe balance with the sample/syringe on it, and enter thisweight as zero.
6. Immediately add the sample to the cell. The Controller willdisplay "Add sample: 00:20" and countdown theprogrammed sample introduction time. Be sure to beginadding the sample within this time period, or the Titratormay end the titration before the sample is added to thecell.
7. If % or ppm are the units, enter the empty containerweight. If the balance was tared with the syringe andsample, when the syringe is placed back on the balancethe weight is displayed as a negative value. Enter thisnegative value using the ± key. If weight transfer from abalance is set up, the weight appears in the displayautomatically, just press Enter.
8. The Controller returns to the main measure screen. Insingle channel display, a full screen real-time titrationcurve is displayed, showing the progress of the titration.In multiple channel mode there is no titration graph. Thestatus of the Titrator is displayed ("Titrating"), and whenthe titration is complete the status changes to "Done"briefly, then a "checkmark" appears by the titrator channelindicator to show the titration is done and the data isready. The status changes to "Ready to titrate", or theappropriate status.
Select Titrator to Change Protocol
1) Titrator 1: % Water
2) Titrator 2: % Water
3) Titrator 3: % Water
4) Titrator 4: % Water
Titrator 1
Select Mode
1) % Water
2) ppm Water
3) Hydrocarbons
4) Solids
5) KF Oven
6) User6
7) User7
8) User8
9) User9
0) User10
11
Coulometric Karl Fischer Titration
Titrator Status and Operating Data
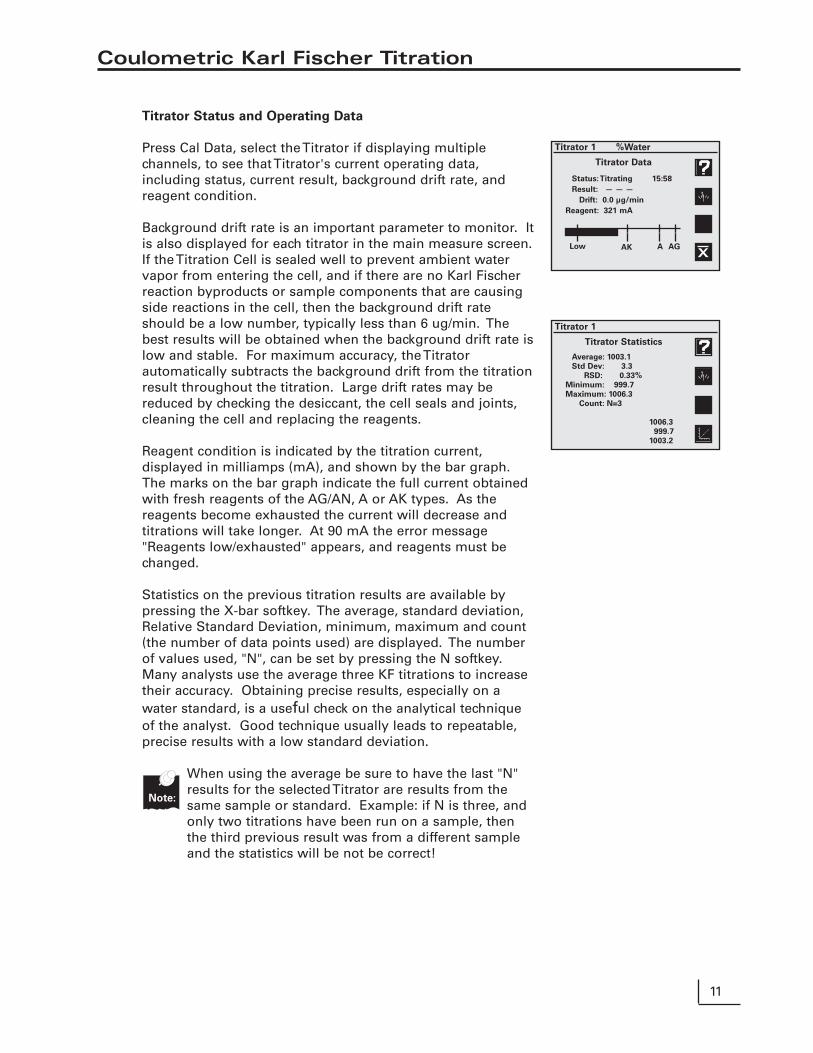
Press Cal Data, select the Titrator if displaying multiplechannels, to see that Titrator's current operating data,including status, current result, background drift rate, andreagent condition.
Background drift rate is an important parameter to monitor. Itis also displayed for each titrator in the main measure screen.If the Titration Cell is sealed well to prevent ambient watervapor from entering the cell, and if there are no Karl Fischerreaction byproducts or sample components that are causingside reactions in the cell, then the background drift rateshould be a low number, typically less than 6 ug/min. Thebest results will be obtained when the background drift rate islow and stable. For maximum accuracy, the Titratorautomatically subtracts the background drift from the titrationresult throughout the titration. Large drift rates may bereduced by checking the desiccant, the cell seals and joints,cleaning the cell and replacing the reagents.
Reagent condition is indicated by the titration current,displayed in milliamps (mA), and shown by the bar graph.The marks on the bar graph indicate the full current obtainedwith fresh reagents of the AG/AN, A or AK types. As thereagents become exhausted the current will decrease andtitrations will take longer. At 90 mA the error message"Reagents low/exhausted" appears, and reagents must bechanged.
Statistics on the previous titration results are available bypressing the X-bar softkey. The average, standard deviation,Relative Standard Deviation, minimum, maximum and count(the number of data points used) are displayed. The numberof values used, "N", can be set by pressing the N softkey.Many analysts use the average three KF titrations to increasetheir accuracy. Obtaining precise results, especially on awater standard, is a useful check on the analytical techniqueof the analyst. Good technique usually leads to repeatable,precise results with a low standard deviation.
When using the average be sure to have the last "N"results for the selected Titrator are results from thesame sample or standard. Example: if N is three, andonly two titrations have been run on a sample, thenthe third previous result was from a different sampleand the statistics will be not be correct!
Titrator 1 %Water
Titrator Data
Status:Titrating 15:58
Result: — — —
Drift: 0.0 µg/min
Reagent: 321 mA
Titrator 1
Titrator Statistics
Average: 1003.1
Std Dev: 3.3
RSD: 0.33%
Minimum: 999.7
Maximum: 1006.3
Count: N=3
1006.3
999.7
1003.2
Low AK A AG
Note:
X

12
Coulometric Karl Fischer Titration
Titration Setup Menu
Press Setup, 3) Titration setup menu to access KF titrationprotocols, intermediate result printout, select balance type,and control the Titrator stirrers.
1. Modify titration protocol: use to modify the 10 stored KFtitration protocols.
2. Select/assign protocol: use to select a protocol for a Titrator.3. Print a protocol: use to print hardcopy of a stored protocol.4. Set printouts on/off: use to turn on or off printing
intermediate titration results out the serial port to aprinter/computer. Useful for monitoring the rate of titratingwater in a sample when developing the optimal protocolfor a specific sample.
5. Set printout interval: use to set the time interval in secondsfor printing intermediate titration results.
6. Select balance type: use to set the balance attached toTitrator 1 for automatic weight transfers. The output stringof the balance must match the type selected in order forthe Titrator to use the balance data.
7. Turn stirrer 1 on/off: use to temporarily turn off a Titratorstirrer in order to replace the cell onto the Titrator and havethe stirbar magnetically couple. The Titrators are designedto maintain an equilibrium in the cell, and so continuousstirring is required. All paused stirrers are automaticallyturned back on when this Setup menu is exited.
Do not pick up cell body off the module withoutturning off the stirrer
Select Titrator to Assign Protocol
1) Titrator 1: % Water
2) Titrator 2: % Water
3) Titrator 3: % Water
4) Titrator 4: Solids
Set Balance Type
1) Denver TL,TR or TC
2) Denver A or M
3) Denver DI
4) Denver AB
5) Denver AE
6) Denver Pinnacle
Note:
Titration Setup Menu
1) Modify titration protocol2) Select/assign protocol3) Print a protocol4) Set printouts on/off :OFF5) Set printout interval: 6 sec6) Select balance type : A/M7) Turn stirrer 1 on/off :ON8) Turn stirrer 2 on/off :ON9) Turn stirrer 3 on/off :ON0) Turn stirrer 4 on/off :ON
NOTE: Any paused stirrers will automatically restartwhen you leave this screen.

13
Cleaning the Titration Cell
General Cleaning
Large cell body - wash with a detergent solution, rinse with de-ionizedwater and rinse with methanol or acetone. Do not add reagents untilthe cell is dry. If drying in an oven, remove all plastic componentsincluding the stopcock.
KF electrode and stir bar - wipe with Kimwipe being careful not to bendPt wires.
Cleaning the Generator Assembly
1. Block the hole in the upper glass portion of the Generator Assembly,this is where the platinum wire goes from the inside to the outside ofthe assembly. A recommended method is to wrap a piece ofParafilm around the Generator Assembly. When covering the hole besure that the wrap is not long enough to reach the solvent level asthe vacuum created can pull liquid between the Parafilm and thegenerator and in through the wire hole.
2. Have a vacuum source available. One method is to use a vacuumaspirator.
3. Attach the aspirator to a faucet and connect the Generator Assemblyto the aspirator. (See Diagram)
4. Place the Generator Assembly into a beaker of the appropriatesolvent that the samples analyzed are known to dissolve in. Typicalsolvents include hexane, methenol, acetone, chloroform and tolune.
5. Apply the vacuum and draw the solvent up through the frit.6. Repeat until the frit appears to be clean. This includes the removal of
any discoloration that may have accumulated from sample analysis.The solvent being drawn through should appear clear and clean, theabsence of an oil layer in the solvent drawn through or anyprecipitate on the frit, and are indications the frit is clean. The solventis drawn through the frit easier.
7. More than one reagent may be drawn through the frit for cleaningpurposes. (Typically concentrated nitric acid is used second).
8. The last solvent to be drawn through the generator assembly shouldbe either methanol or acetone.
9. Final cell drying should be done in an oven at 60°-75° C overnightand cooled in a dessicator.
Do not clean generator assembly with wateror solutions diluted with water.
Warning!
Do not heat the Generator Assembly above 80° C.
Damage will result.
Caution!
Let the cell cool before filling it with fresh Karl Fischer reagent, which
is mostly methanol and is flammable!
!
!
Note:

14
Cleaning the Titration Cell
10. Place fresh coulometric Karl Fischer reagents in the celland Generator Assembly, place the cell on the Titratorand begin the automatic cell and reagent dryingprocess. It may take a newly cleaned frit some time forreagent to diffuse into the frit and provide full titrationcurrent.
11. If the above procedure does not clean or unclog theglass frit, it may be necessary to use strong cleaningagents for your sample type. For severely clogged frits,a chromic acid or concentrated nitric acid cleaningprocess is recommended.
Caution!
These are strong acids and must be used with appropriate
care and safety protection!
Reagent Selection
Coulometric Karl Fischer reagents are available fromseveral manufacturers, including Riedel-de Haen Hydranal,EM Science AquaStar and GFS Watermark. The reagent ischosen so that its polarity will dissolve the samples. Themost common reagent type is the "AG" or "AN" methanolbased, next is the non-polar chloroform or long-chainalcohol based "A", "AG-H" types for oils and otherhydrocarbons, and samples with ketones or aldehydesmust be run in the special ketone reagents "AK". ContactDenver Instrument Electrochemistry Technical Support, orthe various reagent manufacturer's Technical Support foradditional assistance.
!
Cover the holeusing parafilm
Connect towater faucet
Cover the
hole using
parafilm
Aspirator
Connect to
water faucet

15
Interfacing a Balance to the Titration System
Balance interfaceWeight based measurements are the most accurate, and using a three-or preferably four-place balance is recommended. Automatic weighttransfer from the balance to the Titrator is a fast, error-free way to enterweights. The Titrator supports most Denver Instrument balances. Thebalance is attached to the balance port on Titrator 1, and serves for allTitrators. The balance type must be set in the Controller, and thebalance must be set to 4800 baud, parity off, continuous once persecond output. For exact settings for each Denver Instrument balance,contact Technical Support at 800-321-1135.
Interfacing a Denver Pinnacle Balance to Model 275KFRequired Items:
Denver Pinnacle Series analytical balance (P-114, 214, 314)Denver interface cable, part number 601493.1Adapter - DB25 Female to DB9 MaleAdapter - 9-pin null-modem
1. Attach the 9-pin null-modem adapter to the balance. 2. Attach the 25 to 9 pin adapter to the 9-pin null-modem adapter. 3. Attach the 601493.1 cable to the 25 to 9-pin adapter.4. Attach the phone plug end of the 601493.1 cable to the
Select the balance type on your Titration Controller
1. Press the Setup Menu Key 2. Select Titration Setup Menu, #33. Select Balance Setup, Menu # 6 to assign balance. 4. Select Denver Pinnacle Series. 5. Configure the Pinnacle balance settings on the balance to match the
Model 275KF Module.a) Select Print> Mode> Interval > Custom > set 0 sec b) Select Print> Format>Type 1 formatc) Select the following: System> RS-232>Baud rate> Set at 4800d) Select Bits/Parity> Select 8/None/1 parity
Please refer to your Pinnacle Series owners manual for step-by-stepinstructions in modifying interface settings.
Please call 1-800-321-1135 for additional assistance.

Troubleshooting Guide
Common Errors and Solutions
Indicator error
• Check the KF electrode (dual platinum) to see if it is plugged in.• Check that the KF electrode connectors are intact.• Check that the platinum tips are not touching each other or the cell.• Check for crack(s) in the electrode.• Verify that the reagents are not over dry (dark in color).• Clean the platinum tips thoroughly.
Generator error
• Check the Generator Assembly to see if it is plugged in at both ends.• Check the platinum grid at the bottom of the Generator Electrode.
Drying reagents
• If there are bubbles rising in the Generator Electrode, it is drying. Thereis water trapped in the cell and it must be titrated before continuing.
• Add a small amount of Composite 5 reagent to the cell to help dry thecell more quickly.
• If it is not bubbling and the reagents are getting darker, unplug themodule and controller and replug back in while adding a drop of water.
• If reagents smell like sulfur, dispose of them. The cell then needs to becleaned and dried in an oven (See Cleaning Instruction).
Over dry
• Add a drop of water.• Keep adding a drop at a time until the solution goes clear and Controller
displays “Ready to titrate” or “Drying reagents”.• Check continuity of generator electrode using an Ohm meter.
Titrators off-line
• Reconnect all serial cable connections.• Verify serial cables go to correct connections (“in” and “out”). Press the
Titration softkey, then select 6) reinitialize network’.• Unplug power to the Titrators and Controller and replug them back in.
Stir bar not spinning
• Check to see that the module is plugged in.• For further information contact Technical Assistance, a replacement
motor kit may be necessary.Low Results
• Verify after injecting the sample, no sample is left on the end of theneedle prior to pulling it out.
• Change the desiccant and cotton, also inspect the septum and replace asnecessary.
• Verify that the drift rate is normal (<10 µg/min).• Calibrate balance.• Clean the cell and frit.• Replace reagents.
High results
• Verify that when injecting, that all of the sample was injected into thereagents and not on the side of the reaction cell.
• Verify that the drift rate is normal• Check all seals on the reaction cell, and secure as needed.• Calibrate the balance.• Clean the cell and frit.• Replace reagents.
16

Modifying Titration Protocols
Each Titrator runs one of the 10 stored protocols. Theprotocol controls all parameters of the titration, includingthe units, sample introduction time, sample extractiontime, endpoint persistence time, endpoint slope, and asolvent blank.
Stored protocols include typical titration protocols formeasuring water content in easily analyzed liquid samplesin % and ppm units, for measuring water in hydrocarbons,water in slower to release solids, and water in plasticsbeing introduced by a KF oven/vaporizer. These protocolscan be modified and renamed, and five additionalprotocols are available for users.
A generic protocol often provides good results, butoccasionally must be modified for a specific sample.Examples of modifications include changing the time for atitration, either as additional "up-front" time withintroduction time, or as additional post-endpoint time withpersistence time, or using a low endpoint slope value like0.05 to force a titration to continue longer.
1. Each protocol has a user-entered name.2. Units of micrograms, milligrams, %, ppm, or mg/l can
be selected. % and ppm are weight:weightwater:sample. The mg/l unit is weight:volume.
3. Sample introduction time should provide ample time toget the sample into the cell. Sometimes a little extratime is helpful, and can be set.
4. Extraction time allows time for a slow dissolving, slowwater releasing, or slow mixing sample to release waterto the reagent system for titration.
5. Endpoint persistence time is additional time after firstreaching the endpoint that the titrator continues totitrate; use to ensure complete recovery of water fromdifficult samples.
6. Endpoint slope is the primary endpoint control. Thetitrator will titrate until the set slope (rate of waterrecovery from the sample in micrograms water/second)is reached; use to ensure complete recovery of waterfrom slowly releasing samples such as solids orcrystalline materials. This has little effect on miscibleliquid samples which usually release water quickly.
7. Use a solvent blank to subtract water present in asolvent used to dissolve otherwise insoluble solidsamples. The sample is dissolved in a fixed volume of asolvent, then that solvent is injected into the cell.Determine the water content of the fixed volume ofsolvent in micrograms, then set that value as a blank tobe subtracted.
Unit’s % and ppm are W:W (g of water to g ofsample). Unit mg/L W:V (g of water to L of sample).
Titrator 1, 2, 3, 4
Modify Titration Protocol
1) Change name% Water
2) Select units% H20
3) Set introduction time00:20 min:sec
4) Set extraction time00:00 min:sec
5) Set persistence time00:15 min:sec
6) Set endpoint slope0.05 µg/s
7) Set solvent blank0.0 µg H2O
Set Protocol Units
1) µg H2O
2) mg H2O
3) % H2O
4) ppm H2O
5) mg/l H2O
Note:
17
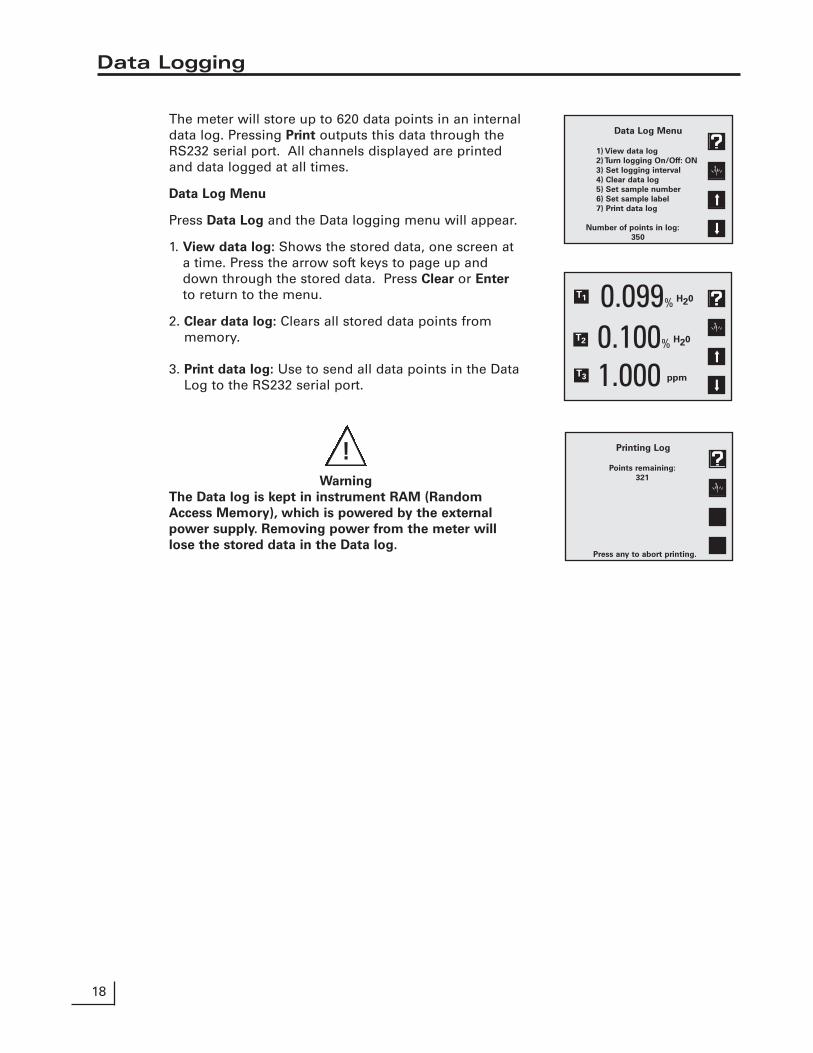
The meter will store up to 620 data points in an internaldata log. Pressing Print outputs this data through theRS232 serial port. All channels displayed are printedand data logged at all times.
Data Log Menu
Press Data Log and the Data logging menu will appear.
1. View data log: Shows the stored data, one screen ata time. Press the arrow soft keys to page up anddown through the stored data. Press Clear or Enter
to return to the menu.
2. Clear data log: Clears all stored data points frommemory.
3. Print data log: Use to send all data points in the DataLog to the RS232 serial port.
Warning
The Data log is kept in instrument RAM (Random
Access Memory), which is powered by the external
power supply. Removing power from the meter will
lose the stored data in the Data log.
Data Logging
!
Data Log Menu
1) View data log
2) Turn logging On/Off: ON
3) Set logging interval
4) Clear data log
5) Set sample number
6) Set sample label
7) Print data log
Number of points in log:
350
0.099% H20
0.100% H20
1.000 ppm
Printing Log
Points remaining:
321
Press any to abort printing.
T1
T2
T3
18

1) % Water2) ppm Water3) Hyrdocarbons4) Solids5) KF oven6) User 67) User 78) User 89) User 90) User 10
1) Change name2) Select units3) Set introduction time4) Set extraction time5) Set persistence time6) Set endpoint slope7) Set solvent blank
1) Turn channel T1 on/off2) Turn channel T2 on/off3) Turn channel T3 on/off4) Turn channel T4 on/off5) Measurement screen
1) Time and date menu2) Select contrast3) Titration setup menu4) Setup serial port5) Keypress beep on/off6) Select display background7) Show meter information8) Set screen saver timeout9) Restore factory defaults
1) Modify titration protocol2) Select/assign protocol3) Print a protocol4) Set printouts on/off5) Set printout interval6) Select balance type7) Turn stirrer 1 on/off8) Turn stirrer 2 on/off9) Turn stirrer 3 on/off0) Turn stirrer 4 on/off
1) View data log2) Clear data log3) Print data log
19
Menu Tree Diagram
Mode (T1, T2 & T3)
Titrator Standardize Menu:
Channel Menu:
Setup Menu:
Data Log Menu:
Titration Setup Menu

20
Maintenance
This product contains no user serviceable parts. All replacementparts should be obtained from the manufacturer or an authorizeddistributor.
Cleaning
The exterior surfaces of this product may be cleaned with a dampcloth or with mild detergent.
Caution
Changes or modifications not expressly approved by themanufacturer will void the user’s warranty for this equipment.
!

Manual and User Interface© Copyright Denver Instrument, 2008All rights reserved.
Warranty Instructions
1. Please return the prepaid, pre-addressed Purchase Registration Card to Denver InstrumentCompany promptly upon your purchase of the Denver Instrument product. The return of the card isnot a condition precedent to warranty coverage.
2. If you have any questions about a Denver Instrument product, please contact the nearest DenverInstrument office as listed below.
3. If it becomes necessary to return your Denver Instrument product for service, you must obtain a“Return Authorization Number”. Please pack the product securely in its original approved packingcarton or an other suitable container. Include your Return Authorization Number on the shippinglabel. Shipping charges must be fully prepaid.
Return to authorized distributor or :
North and South America: Denver Instrument Company
1401 17th St. Suite 750
Denver, Colorado 80202
1-800-321-1135
Tel: 303-431-7255
Fax: 303-423-4831
U.K. and Ireland: Denver Instrument Company
Denver House, Sovereign Way
Trafalgar Business Park
Downham Market
Norfolk PE38 9SW England
Tel: 44 136 63862 42
Fax: 44 136 63862 04
Europe, Asia and Australia: Denver Instrument GmbH
Robert-Bosch-Briete 10
37079 Gottingen Germany
Tel: 49 551 20977 31
Fax: 49 551 20977 39
The Denver Instrument Series 200 meters have a bi-directional RS-232 serialport, which can be used to send commands to the meter and output data fromthe meter. Special characters (W , µ, é) are coded using ASCII (not ANSI); usean ASCII font like “Terminal”. Also use a terminal emulation like TTY or ANSI,not VT100.Serial commands follow either "keystroke" mode or high level command modeconsisting of "SET", "GET" and "DO" instructions. (Note: “GET” and “DO” are optional).
Keystroke instructions
KEYS M ModeZ StandardizeC Cal DataH ChannelS SetupL Data LogR ClearN Enter/Print[0 to 9] Equivalent to pressing a numeric key- +/- key. Decimal keyE Used within a number to enter values in exponential form! Press softkey #1 (at top, usually Help)@ Press softkey #2 (usually return to measuring screen)# Press softkey #3 (usually up arrow)$ Press softkey #4 (at bottom, usually down arrow)
Notes: Key commands are acknowledged by the meter with a reply Keys = COMMAND_RECEIVED. Multiple keys can be concatenatedtogether into a single command, for example, Keys Z413@(Standardize, options, resolution, set to 3, main), or Keys Z4721.2-N@(Set manual temperature to -1.2).
High level instructions
Use commands SET, GET, DO.Follow command by a keyword like MODE, STDZPH, STDZCONDO, CALDATA, STDZCLEAR, CHANNEL, DATETIME, TIMESTAMP, DISPLAY, READ,INFOTypical Syntax: [command] [keyword] [channel] [variable(s)]
Error conditions are replied to with an Error response; for example:"Error: Need channel", "Error: Need mode", "Error: Unspecified"
Accepted commands have a response; indicated below for each command.
Mode operations
set mode "channel character" "mode id"
Examples: SET MODE A PH SET MODE B MVSET MODE B IONSET MODE C CONDUCTIVITY
Returns confirmation; for example "SET MODE A PH" returns "A mode = PH".Valid modes are (depending on the meter model) PH, MV, CONDUCTIVITY,RESISTIVITY, PRAC_SALINITY, NACL_SALINITY, DISSOLVED_SOLIDS.
RS-232 Serial Interface Meter Command Set

RS-232 Serial Interface Meter Command Set
[get] mode "channel character" "mode id"
Examples: [GET] MODE A
Returns mode information on selected channel; "A Mode = MV".
Channel operations
set channel "channel character" "on|off"
Examples: SET CHANNEL A ONSET CHANNEL C OFFReturns confirmation; for example "A Channel = ON".
[get] channel "channel character"Example: [GET] CHANNEL B
Returns channel information; "A Channel = OFF".
(DO) READ “channel character” (Take reading w/temperaturewithout sending to data log).
Standardization operations
[DO] STDZPH "channel character"
[DO] STDZCLEAR "channel character"
[DO] STDZCONDO "conductivity standard value"
[DO] CALDATA "channel character"
[DO] STDZPH A [Auto-enter a buffer]Returns "Stdz pH = COMMAND_RECEIVED", followed by the CalibrationData printout.
[DO] STDZCLEAR A [Clear all buffers/standards.]Returns "Stdz Clear = COMMAND_RECEIVED".
[DO] STDZCONDO 1000 [Enter a standard of 1000 uS/cm.]Returns "C Stdz Condo = COMMAND_RECEIVED", followed by theCalibration Data printout.
[DO] CALDATA AReturns "A Cal Data = COMMAND RECEIVED" followed by the CalibrationData printout.
General meter setup operations
SET DATETIME MM/DD/YYYY HH:MM:SS [Leading 0's required, 24hour time]
[GET] DATETIME Returns: "MM/DD/YYYYHH:MM:SS"
[GET] INFO Returns Model, Version,Serial#.
(DO) DISPLAY display_text_string (at 0, 0) [x = pixel from left, 0 - 319](DO) DISPXY x y display_text_string [y = pixel from top, 0 - 239]
Example: DO DISPXY 15 0 Device ready, press any key.
SET TIMESTAMP # (Set date/time using ‘unix’ (GET) TIMESTAMP seconds).

North and South America: Denver Instrument Company
1401 17th St. Suite 750
Denver, Colorado 80202
1-800-321-1135
Tel: 303-431-7255
Fax: 303-423-4831
U.K. and Ireland: Denver Instrument Company
Denver House, Sovereign Way
Trafalgar Business Park
Downham Market
Norfolk PE38 9SW England
Tel: 44 136 63862 42
Fax: 44 136 63862 04
Europe, Asia and Australia: Denver Instrument GmbH
Robert-Bosch-Briete 10
37079 Gottingen Germany
Tel: 49 551 20977 31
Fax: 49 551 20977 39
www.denverinstrumentUSA.com