#2067 paint-by-number instruction manual - bountiful...
TRANSCRIPT

Page 1
#2067Paint-By-Number
InstructionManual
www.bountifulbaby.com

Page 2
Genesis InstructionsHow to use Genesis PaintsIntroduction
Our Bountiful Baby BabySkin™ vinyl reborn kits are ready to go! There is no need to remove any factory paint, factory body, or factory hair. So let’s begin!
Although it may not be necessary to wash the vinyl before you begin, it is a good idea to wash the vinyl pieces before you begin to remove any manufacturing residue that may be on the surface of the vinyl. Wash the vinyl parts in warm water and hand dishwashing liquid, rinse thoroughly. Make sure the vinyl is com-pletely dry before you begin as the Genesis paints do not mix with water.
Our preferred paint for our BabySkin™ vinyl is our Bountiful Baby Heat-Set Genesis paints. We have our own private label Bountiful Baby Heat-Set Genesis paints in custom colors that match our vinyl perfectly. Bountiful Baby Heat-Set Genesis paints allow you to achieve permanent and amazingly realistic results.
Genesis “Paint-by-Number” set (our item #6724)
You can use the Genesis Thinning Medium (our item #1829), but we prefer to use Odorless Mineral Spirits (available at anycraft store) to achieve the flowing characteristics that we like.We have organized the painting into numbered steps. We tell you the pre-mixed paint color and brushes/applicators to use foreach step. This simplified process is what we call Reborn Paint by Number
Key points to success with Genesis paints:• Less is best. Use only a tiny amount of very thin paint. Too much paint can cause the doll to have a chalky over donelook.• Use an oven thermometer and a timer when baking the doll. Never leave unattended.• Do not overload your brush.• Use the right brush for each step.

Page 3
Supplies Needed: 1. Bountiful Baby Premixed Genesis Paints (our item #6723)
A vinyl doll kit of your chooseing.
3. Cosmetic Wedges (our item #3736)
2. #2667 - FIVE Brush Set for painting with Genesis
5. Optional: Cosmetic Rounds (Can purchase from any generalmerchandise store.)
4. Pointed Cotton Swabs (our item #263)
8. Odorless Thinner (our item #1916),
or
Genesis Thinning Medium (our item #1829)
9. Aleene’s Paper Glaze (our item #2277)
6. Toothpicks (our item #425)
7. Optional: Latex Disposable Gloves
7. Paint Tray/Palette/Plate (our item #1509)
Item #1916
or
Item #1829

Page 4
Color #1 - Vein Blue
1. First, thin this color to a water color consistency with odorless thinner or Mineral Spirits.
2. Using your mop brush put a small amount of paint on the brush. Lightly paint the inside of the head around the eye and nose area only (to add a little depth).

Page 5
These above pictures show the veining painted more heavily than recommended. It is for illustration purposes only, so that you can see the veining (otherwise the photography wasn’t showing the veining as well).
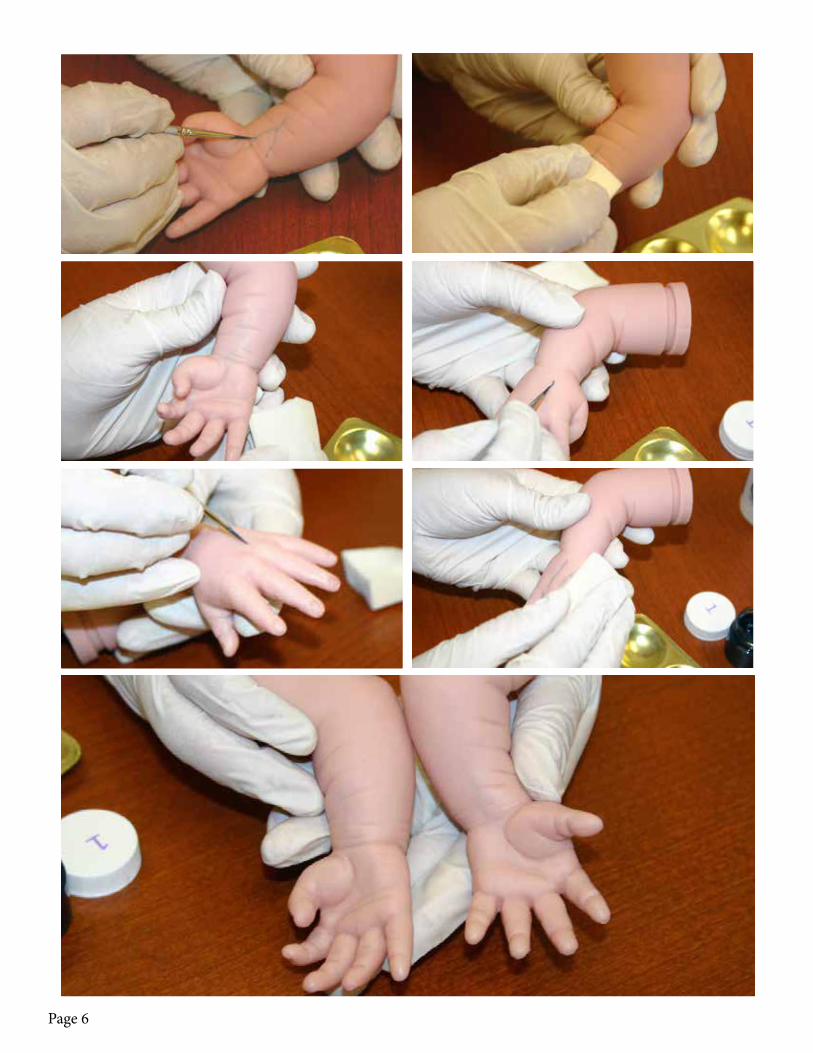
3. Next using your #1 liner brush paint veins on the outside of the head, wrists and ankles, by lightly loading the brush with paint and then painting onto a cosmetic round or paper towel to remove a little of the excess paint. This color has a tendency to stain the vinyl, so be careful not to overload your brush.
4. With a loose and free hand paint veins one at a time as illustrated below, or a similar pattern of your own design.
5. Use a cosmetic wedge or your fin-ger tip, as needed, to lightly pounce on the veins to soften the look. You can see subtle veining in this picture around the temple area.
6. Next, paint the veining on your baby’s wrists and ankles. (See images on pages 6-7.)
Page 6

Page 7

Page 8
Color #2 - Baby Skin1. This color is an all over color that brings depth to the skin tone. Thin this color to the consistency of wa-tercolor.
2. Use a mop brush to dab this color onto a Sea Sponge lightly.
3. Now take the sponge and lightly pounce the color all over the doll. Keep pouncing the paint until you achieve an even tiny pin-dot look to the skin.

Page 9
4. If your baby looks chalky you have added to much paint and will want to dab a sponge into straight Min-eral Spirits and pounce over the paint to remove the excess. You can also use Mineral Spirits to remove any areas of paint that you are not happy with to redo them.

Page 10
At this point, we recommend baking so that you do not ruin the tiny pin dot skin tone you have created. Bake at 260 - 265 F for 8-10 minutes. Use an oven thermometer to make sure it does not get too hot. Place the vinyl parts on a baking dish in a bed of poly-fil. We recommend having a couple inches of thickness between the parts and the bottom or sides of the pan to prevent melting. Never leave your doll unattended while baking.
Bake
Now do the same with adding Color #2 to your baby’s arms and legs.

Page 11
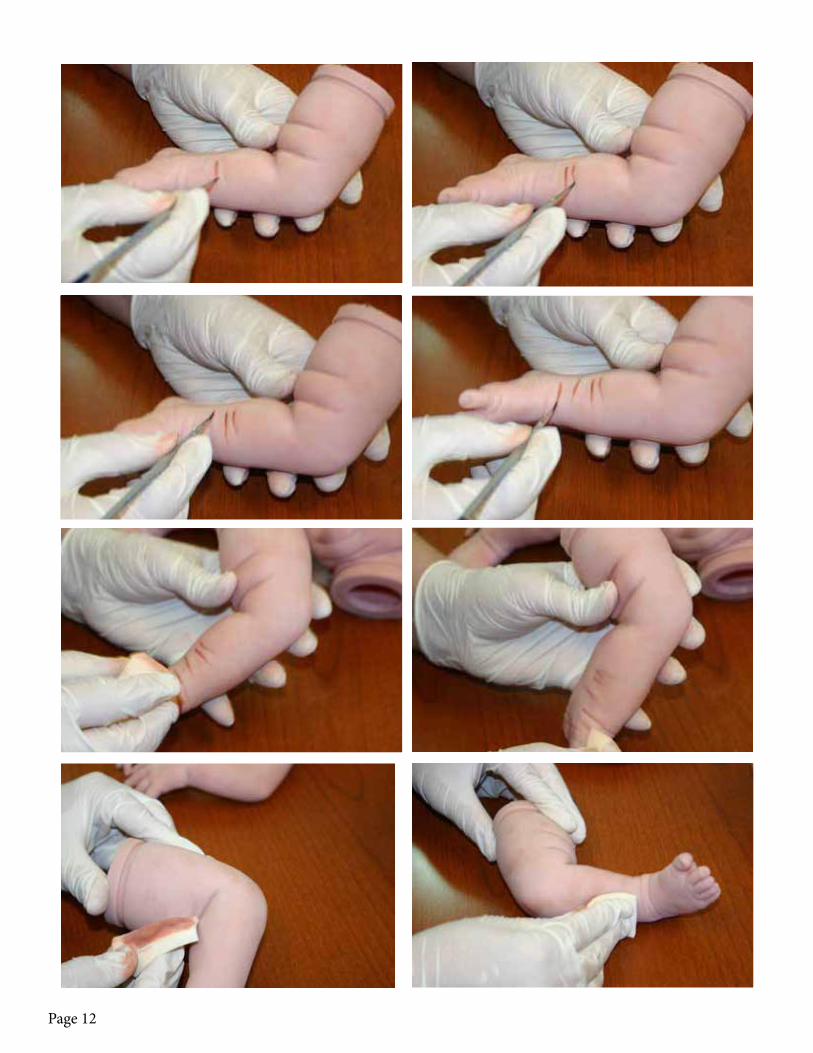
This color adds even more depth and warmth to the skin tone and can help achieve the blotchy look of a newborn. Thin the paint to a water color consistency with odorless thinner or Mineral Spirits. This color is added in the same manner as Color #1, but we like to dab this color here and there, leaving small spaces without paint, to help achieve a newborn complexion. If you are trying to make an older baby, you may want to add this color more evenly. The following illustrations show where this color is used.
Color #3 - Warm Blush
Page 12

Page 13
Color #4 - Nail/Lip/BlushUse this color for blushing areas such as the cheeks, nose, hands, feet, knees, elbows etc. This color is also great for stork bites. Thin to a watercolor consistency and add this color using your very lightly loaded Max-ine’s Mop brush. Remove excess paint onto a paper towel or cosmetic round before you begin.

Page 14
Color #5 - Eyelid Purple
Color #6 - Brow Brown
Thin this color and apply to the eyelids with a tiny 18/0 script liner brush. Using a free hand and a very lightly loaded brush, paint in tiny capillaries on the eye lids.
Thin this color and apply to the brow line using your 18/0 script liner brush. Start with a very, very thin paint and move to sightly thicker paint layers as you go, to give dimension. Note: Even the thicker paint will still be very thin.

Page 15
Color #7 - Nail Tip
BAke
Thin this color and add to the nail tips using a toothpick or your liner brush. After this step look your doll over carefully. If there are any areas that you have too much paint, dab them with a cosmetic wedge dipped in Odorless thinner. If there is any touch up work you would like to do, now is the best time.
Bake at 260 - 265 F for 8-10 minutes. Use an oven thermometer to make sure it does not get too hot. Place the vinyl parts on a baking dish in a bed of poly-fil. I would have a couple inches of thickness between the parts and the bottom or sides of the pan to prevent melting. Never leave your doll unattended while baking.
This time test the cure of the paint (to make sure it is dry) when the doll is cool by wiping the doll lightly with a damp cotton swab. If no color comes back off then the paint is cured, if color comes off bake again for 5 more minutes and test again when cool. If still not cured bake again, until cured, but never longer than 10 minutes at a time.

Page 16
You can open Avery’s nose with a drill bit if you wish, but the depth of her nose allows for a realistic look if left closed and only shaded. You can shade Avery’s nostrils slightly to add depth. I like to use the nail/lip/blush mixed with a bit of the brow brown and a touch of the vein blue. The color will be a muted reddish purple color that almost looks gray. You really can’t go wrong with the color here. Just thin the paint down to a water consistency and very lightly paint the inside of the nostrils near the back of the opening to add a shadowed look for the illusion of depth.
Color #8 - Matt Varnish
Color #9 - Aleene’s Paper Glaze
Congratulations!Your vinyl parts are now painted and you are ready to add hair to your baby!
Bake
Varnish #8 (Matte Varnish) This optional medium removes shine from the doll and gives a slight texture to the baby’s skin. Use this medium straight or slightly thinned if you prefer. Apply with a cosmetic wedge with a pouncing motion until it cover the piece lightly and evenly. Do not cover the nails and lips with this medium.
Paint the nails and lips using your size 2 shader brush. Allow this medium to air dry.
Bake again in the same manner as mentioned before

Page 17
Hair Rooting Instructionswith
(Bountiful Baby Item #5598)
Bountiful Baby®Micro-Root Rooting Tool
Our NeedlesWe stock four types of needles: (1) Regular, (2) Crown, (3) Forked, (4) Single Barb. In Regular, we stock 36, 38, 40, and 42 gauge. In Crown, we stock 36, 38, 40, 42, and 46 gauge (the bigger the number, the smaller the needle). In Forked, we stock 40, 42, 43 gauge. In Single Barb, we stock 43 gauge.
So, even though our Crown needles root more sparsely than any other needle, they still work well, and are our most popular needle (by about 3 to 1). However, some people do not like them, because they oot too sparsely for their tastes. For those people, they may be happier with 36 gauge regular needles.
Our NuBorn Mohair (tm) is 100% PURE Mohair, its ULTRA-SoftTexture makes it perfect to reborn NewBorn Baby!
NuBorn Mohair
All the needles are triangular, therefore they have three edges. The Crown needles have one single small barb per edge (three barbs total), with the barb approximately 1/8” from the tip of the needle. The Regular needles have two barbs per edge (six barbs total), and they are at staggered depths from the tip. For hair rooting, the “fine-ness” of the rooting depends on three factors: (1) the size of the rooting hole, (2) the number of hairs pulled into each rooting follicle, and (3) the elasticity of the medium being rooted into. The elasticity effects the degree that the root-ing medium closes back in on the rooting hole-- the greater the elasticity, then the greater the rooting medium will “squeeze”, or close back in, on the rooting follicle. For example, rooting into vinyl or silicone will appear finer than identical rooting into polymer clay (before the clay is baked), because both silicone and vinyl are more elastic than unbaked polymer clay. So, the best needle also depends upon the rooting medium. For rooting into vinyl (or a silicone/vinyl mix), a 38 gauge Crown needle roots about as finely as a 42 gauge regular needle (remember, the bigger the gauge number, the smaller the needle). This is because our Crown needles pull fewer hairs per follicle. That is what they are designed to do.

Page 18
Our Rooting Tool
The Original Micro-Root tool from the company that coined the term “Micro-Root”!
For hair rooting you will need mohair, a rooting tool (our item #5598), felting needles and Gem-Tac glue (our item #348). I also always use natural hair on my babies; such has mohair or human hair. I feel that natural hair adds to the realism of the baby. For mohair I prefer the premium mohair sold on our website. It is the closest thing to newborn baby hair that I have ever seen.
Human hair can also be used. Human hair is more difficult to root, so it is not recommended for your first experience with rooting. Human hair is a slicker texture than mohair and doesn’t grab on to the needle as well, but with practice can be successfully rooted using the same method that is described here for rooting mohair. I use hair from my own children for wonderful keepsake dolls made to look like them.
Notice that your rooting tool comes with 3 collets, make sure that the collet with the smallest opening has been inserted into the tool. Screw the vise part way back on the tool and then place a needle into the collet, pushing it in until almost all of the thicker part of the needle is inside the tool. Tighten the vise and you are ready to root. If you have difficulty getting the needle in at first a pair a needle nose pliers will help.
Heating the vinyl head with a blow dryer, working in direct sunlight, or placing the head under a sun lamp will heat and soften the vinyl making the head easier to root on most dolls.
With the rooting tool, place the collet with the smallest opening into the tool by completely unscrewing the metal vise and pushing the collet into the hole. Screw the vise part way back on the tool and then place a nee-dle into the collet, pushing it in until almost all of the thicker part of the needle is inside the tool. Tighten the vise and you are ready to root. If you have difficulty getting the needle in at first a pair a needle nose pliers will help.
Hold the rooting tool like a pencil, or else hold it by placing the wooden handle in the palm of your hand while pinching on the metal vise part of the tool. In either case, make sure your fingers are placed on and “pinching” the metal vise part of the tool, like you were holding a pencil, because supporting the tool down lower like this will help reduce needle breakage.
Hair Rooting Instructions, by Denise Pratt

Page 19
Before we begin rooting, let me explain something about mohair. As with human hair mohair has an up and a down side. It has a one way barb-like surface to it. If the hair is rooted from the center the hair will be messy, frizzy and hard to manage. It is important that you root from the cut ends of the hair and let the tip ends be the ends of the babies hair. If you root from the center of the hair you will be rooting some of the hair upside down and have a frizzy head of hair. Rooting from the center works for the cheaper roving type mohair be-cause it is already tossed around and is not sorted with the tip ends and cut ends together. If you are not sure which end is the cut end and which way is the tip. Run your hand down the lock. The hair will feel smoother going from the cut ends to the tip than it will going from the tip to the cut ends. As with your own hair, this is much easier to feel if the hair is wet.
Cut hair into approximately 3” lengths. I like to place a small rubber band loosely around the hair about 1 inch from the cut end to help hold the mohair.
The first step is to create the border or hairline. Follow the pattern of the molded hair on the head or use you own hairline as a guide.
Lay a small lock of hair on the vinyl and push the needle of the rooting tool through the vinyl about 1/8 to 1/3 inch from the cut ends of the mohair. You can either go straight into the vinyl or root at an angle towards the crown.
Work your way across the width of the lock of hair in one or more staggered rows. Pull away excess hair and move the remaining hair over and repeat.
If you get any short hairs that stick out or any excess hairs pull those back out with tweezers or pinch them out with your fingers.
When your lock of hair gets too small to work well, add more hair to your lock. Trim the cut ends of the hair where you are rooting often to keep them nice and even.
Continue working your way around the head until you have formed a complete hairline.
Next fill in the rest of the scalp working your way towards the crown.
Hair should be rooted on a downward angle and laying outwards from the crown in all di-rections. Root the crown of the head last.

Page 20
When hair is completely rooted, secure hair from inside by squeezing Gem-Tack glue around on the hair from the inside of the head. Next clip a piece of a cosmetic wedge onto hemostats and smooth the glue, covering all the hairs on the inside of the head. If you do not have cosmetic wedges or hemostats, you can use a paint brush.
When the glue has dried, you can brush and style the babies hair. Since Gem-Tac is waterproof when dry, you can even wash the babies hair without “rewetting” the glue inside the babies head.
Using a styling razor (such as our item #461), shape the baby’s hairline. For a newborn look, leave the babies hair longer in the front and shorter on the side front of the head. Cut away excess hair on the back and sides of the head. Layer the hair smoothly with the razor for a uncut newborn look.
Remember to take this step slowly and carefully, you can always cut away more hair, but it is not as easy to add hair if you remove too much.
After styling the baby’s hair, you may want to wet the hair using a wet baby soft brush and put a nylon sock over the baby’s head being careful not to cover the lashes, then allow hair to dry and remove the sock. The cut off foot of a pair of nylons works great for this. This will help train the hair to lay right on the head and push down any little short hairs that may have been left behind. With premium wavy or curly mohair, you can wet the hair and add a little styling mouse, then pick and shape the hair and let dry to bring out the curls.
Rooting eyelashes works very well on sleeping babies. I recommend that you go ahead and root the lashes from the center of the hair. Since there are so few hairs on the lashes, they are not likely to get tangled and mat-ted. Take a 5-6 inch piece of hair and loop it over the felting needle. Place the tip of the needle in the crease of the eyelid and push the needle into the vinyl catching the hair and pushing it inside the vinyl. I root the lashes with the needle pointing on an upward angle so that the hair will lay down against the face. Continue the pro-cess across the eye. Place glue on the inside to secure the lashes. Allow the glue to dry and then carefully trim the lashes. I like to cut some hairs slightly longer than others to give a softer natural look.
Brush baby’s hair as needed, with a baby soft brush. Your baby’s mohair may require occasional grooming, but the beauty and soft feel of this hair makes it worth a little effort.
Mohair is a natural fiber and it is natural for there to be some shedding. Brush baby’s hair as you would a real newborn’s hair to keep the hair looking it’s best.
Congratulations!Your Baby is Complete!
Rooting Eyelashes
Styling Baby’s Hair
Caring for Mohair