2013-2017 arctic cat proclimb - boondocker · 2013-2017 arctic cat proclimb ... inside fitting on...
TRANSCRIPT

2013-2017 Arctic Cat ProClimb
Sidekick Installation Instructions

BoonDocker \ Arctic Cat ProClimb
Revised 1/11/2017 Page 2 of 11 www.boondockers.com……………….....BoonDocker……….………………....877-522-7805
1.Remove side panels , front bumper, and hood
2. Remove pipe, muffler, heat shield and ECU
3. Remove cross brace. Unplug the servo motor and carefully move out of the way so air box can be removed
4. Loosen the clamps on the air box and slide forward to remove throttle bodies
5. Unclip oil pump linkage rod, loosen clamps and slide throttle bodies out of boots. Remove coolant lines from throttle bodies, clamp or plug lines (re-routed in Step 15).
6. Move throttle bodies out of the way and re-move the air box. NOTE; IF INSTALLING MTA OILLESS TURBO PROCEED TO STEP 14

BoonDocker \ Arctic Cat ProClimb
Revised 1/11/2017 Page 3 of 11 www.boondockers.com……………….....BoonDocker……….………………....877-522-7805
7. Plug exhaust and intake to prevent debris from getting into the engine.. Tip sled onto side, clutch side down.
8. Drill and remove the two access plate rivets from the bottom of the bulk head and remove access plate
9. Drill and remove the exhaust outlet plate and rubber from the belly pan
10. Locate the crank oil feed line on crank case, unbolt the fitting, remove the bolt and 2 washers (one on each side of fitting). Carefully remove the fitting from oil hose, DO NOT CUT!
11.Remove the stock oil lines from the throttle body boots and oil pump, keep clamps for in-stallation of new lines
12. Install the pre assembled Boondocker oil lines. Follow diagram for proper installation and routing. Before installation of last oil line to oil pump, use a syringe and fill lines with oil.

BoonDocker \ Arctic Cat ProClimb
Revised 1/11/2017 Page 4 of 11 www.boondockers.com……………….....BoonDocker……….………………....877-522-7805
13. Wrap the hose leading to the crank case us-ing the stock protective sleeve.
14. Remove the oil from pump, using a syringe fill system with oil.
15. Route both water lines from throttle body (from Step 5) thru the opening between bulk head and recoil housing. A little WD-40 will help slide hose thru clamp on bulk head.
16. Rotate Banjo fitting.
17. Install throttle body and tighten. Make sure to attach OIL LINKAGE ROD. Verify linkage operation and oil line routing, zip tie to prevent kinking and rubbing,
18. Install Boondocker Timing module.

BoonDocker \ Arctic Cat ProClimb
Revised 1/11/2017 Page 5 of 11 www.boondockers.com……………….....BoonDocker……….………………....877-522-7805
19. Drain oil into a clean container and remove the stock oil tank. Remove oil level sensor and rubber insert as well as the oil fill neck.
20. Install two layers of heat shielding tape onto sensor wiring that exits from bottom of chain case. After muffler installation, ensure wiring is routed away from muffler.
21. Install oil level sensor float facing down, install filler neck onto the new oil tank (apply thread sealant to threads of bolts). Re-connect oil-level sensor wiring after mounting.
22. Mount the oil tank using stock screws in the upper rear/lower front holes and use provided M6x1.0 hex head screw in upper front hole. Use provided 5/16 nuts as spacers between chaincase cover and bracket.
23. Fill the oil tank and lines, connect tank line to the stock oil pump feed line, make sure lines are full before assembly to eliminate air bubbles
24. Install the charge box, make sure the o-rings are lightly lubed for ease of installation
BoonDocker \ Arctic Cat ProClimb
Revised 1/11/2017 Page 6 of 11 www.boondockers.com……………….....BoonDocker……….………………....877-522-7805
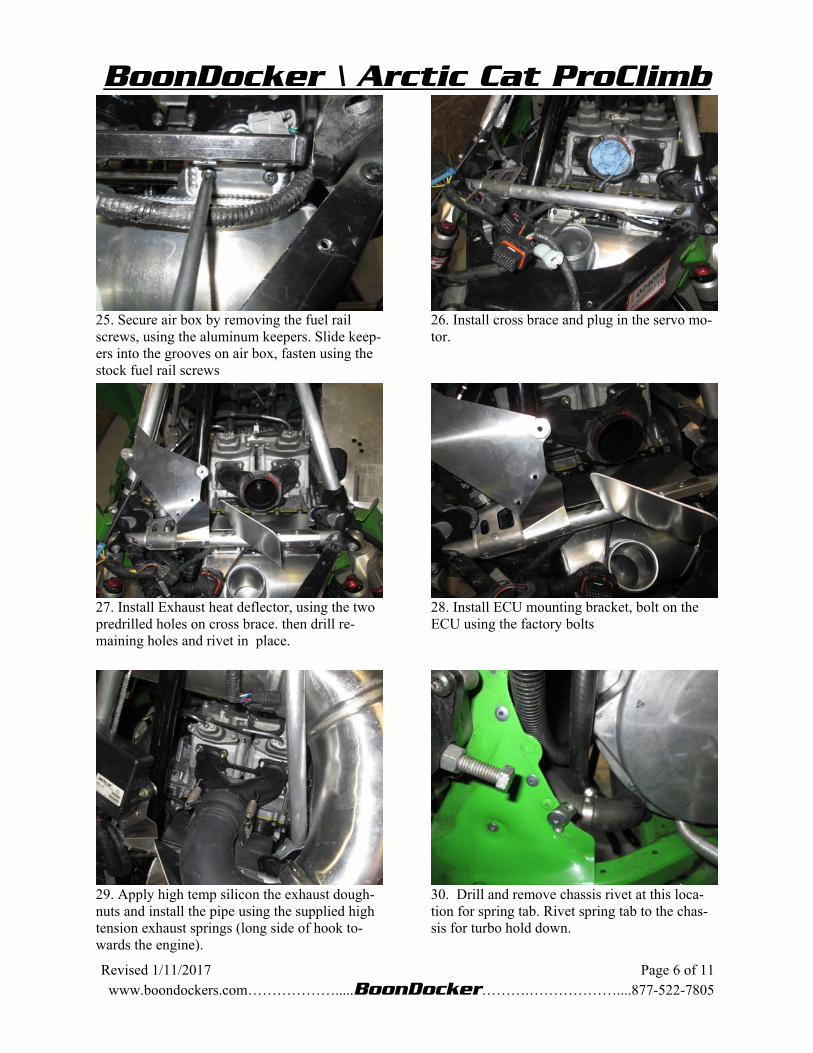
25. Secure air box by removing the fuel rail screws, using the aluminum keepers. Slide keep-ers into the grooves on air box, fasten using the stock fuel rail screws
26. Install cross brace and plug in the servo mo-tor.
27. Install Exhaust heat deflector, using the two predrilled holes on cross brace. then drill re-maining holes and rivet in place.
28. Install ECU mounting bracket, bolt on the ECU using the factory bolts
29. Apply high temp silicon the exhaust dough-nuts and install the pipe using the supplied high tension exhaust springs (long side of hook to-wards the engine).
30. Drill and remove chassis rivet at this loca-tion for spring tab. Rivet spring tab to the chas-sis for turbo hold down.

BoonDocker \ Arctic Cat ProClimb
Revised 1/11/2017 Page 7 of 11 www.boondockers.com……………….....BoonDocker……….………………....877-522-7805
31. Remove the stock rubber mounting hardware from the stock muffler and install onto the turbo bracket.
32. Hold turbo in place, route short water line to inside fitting on turbo, route long hose and cut to length (save extra tubing for the other water line). Secure hose to fitting.
33. Route long hose and cut to length, (save ex-tra tubing for the other water line).
34. Mount turbo on cross brace, spring into place using long exhaust spring
35. Install exhaust inlet onto turbo using hard-ware. Align and connect to turbo with exhaust pipe and install exhaust springs.
36. Fill the turbo oil feed line using a syringe, leave a 1” air pocket to ensure oil is pumping when machine is running, air pocket will disap-pear when pumping correctly.

BoonDocker \ Arctic Cat ProClimb
Revised 1/11/2017 Page 8 of 11 www.boondockers.com……………….....BoonDocker……….………………....877-522-7805
37. Connect the turbo oil feed line to the oil pump hose located on the bottom of the engine, Using a small zip tie, secure the oil pump hose to the union fitting on the end of the turbo feed line.
38. Routing is crucial, zip tie and secure to pre-vent rubbing kinking or melting
39. Install banjo fitting into crank case oil feed line, bolt to crank case (1 washer on each side of fitting)
40. Using the supplied template mark and drill a 2 1/4” hole in the tunnel, de-burr and verify fit, file to fit if needed
41. Using the supplied template cut and modify the foot rest kick plate
42. Using the spring tab that was removed ear-lier, bolt onto chain case cover using factory bolt, spring muffler into place.

BoonDocker \ Arctic Cat ProClimb
Revised 1/11/2017 Page 9 of 11 www.boondockers.com……………….....BoonDocker……….………………....877-522-7805
43. Install the muffler and spring into place. 44. Install the kick plate and muffler heat shield using factory bolts, Adjust heat shield to prevent vibration, rattling and rivet into place on the tun-nel
45. Zip tie oil line to the foot well upright post. Check and secure electrical/oil lines as neces-sary so all wires are routed away from exhaust components and have ample clearance.
46. Install the exhaust outlet block off plate.
47. Install the Boondocker control box.. NOTE: mount in lower left hand corner for hood clear-ance.
48. Plug in the Boost line, temp sensor and the boost control solenoid.
BoonDocker \ Arctic Cat ProClimb
Revised 1/11/2017 Page 10 of 11 www.boondockers.com……………….....BoonDocker……….………………....877-522-7805
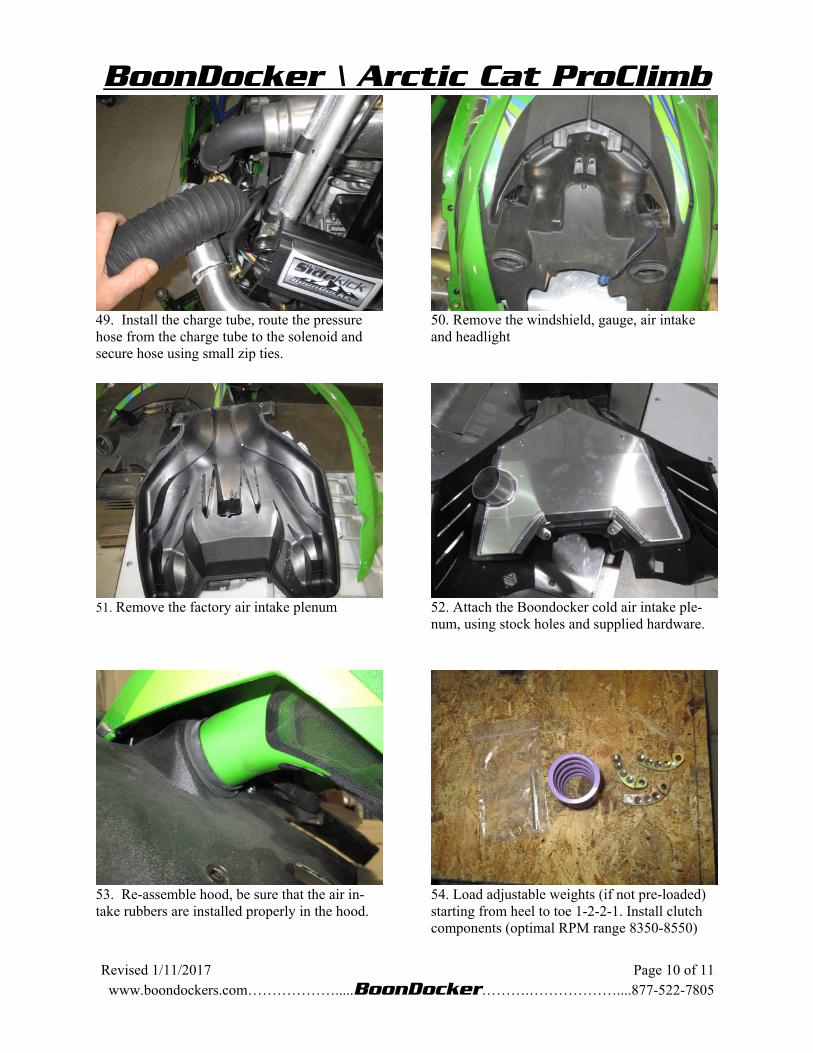
49. Install the charge tube, route the pressure hose from the charge tube to the solenoid and secure hose using small zip ties.
50. Remove the windshield, gauge, air intake and headlight
51. Remove the factory air intake plenum 52. Attach the Boondocker cold air intake ple-num, using stock holes and supplied hardware.
53. Re-assemble hood, be sure that the air in-take rubbers are installed properly in the hood.
54. Load adjustable weights (if not pre-loaded) starting from heel to toe 1-2-2-1. Install clutch components (optimal RPM range 8350-8550)
BoonDocker \ Arctic Cat ProClimb
Revised 1/11/2017 Page 11 of 11 www.boondockers.com……………….....BoonDocker……….………………....877-522-7805
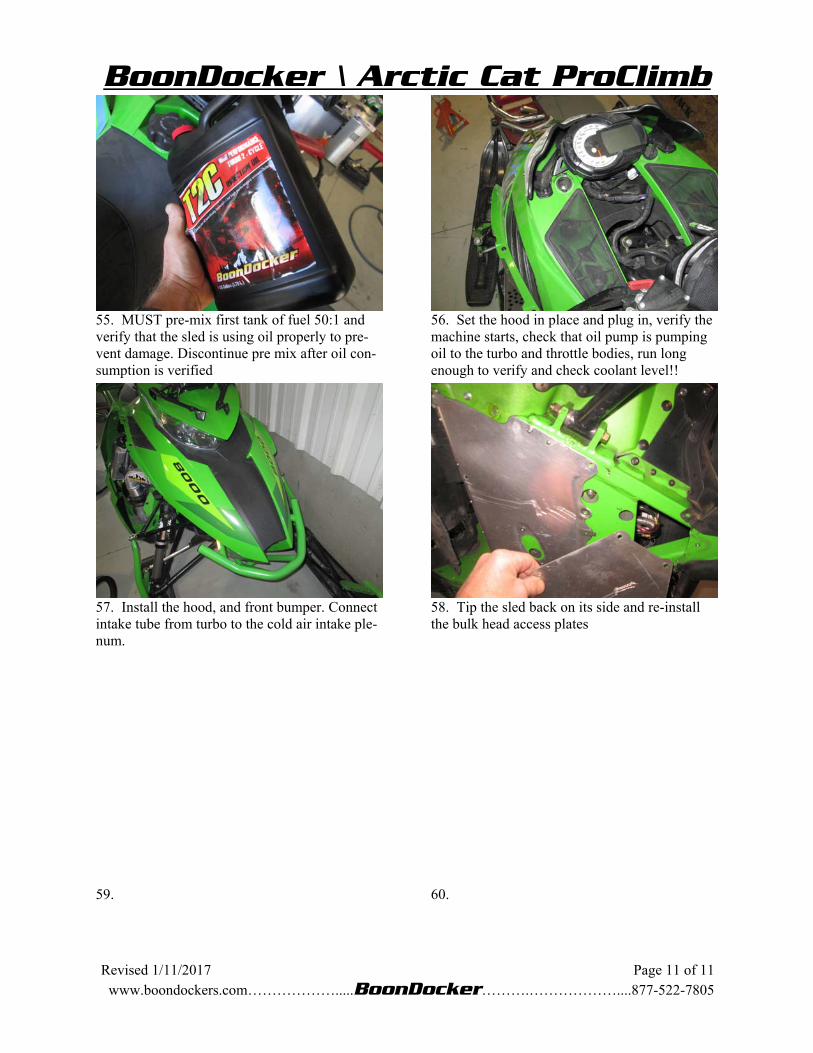
55. MUST pre-mix first tank of fuel 50:1 and verify that the sled is using oil properly to pre-vent damage. Discontinue pre mix after oil con-sumption is verified
56. Set the hood in place and plug in, verify the machine starts, check that oil pump is pumping oil to the turbo and throttle bodies, run long enough to verify and check coolant level!!
57. Install the hood, and front bumper. Connect intake tube from turbo to the cold air intake ple-num.
58. Tip the sled back on its side and re-install the bulk head access plates
59. 60.

THIS PAGELEFT BLANK
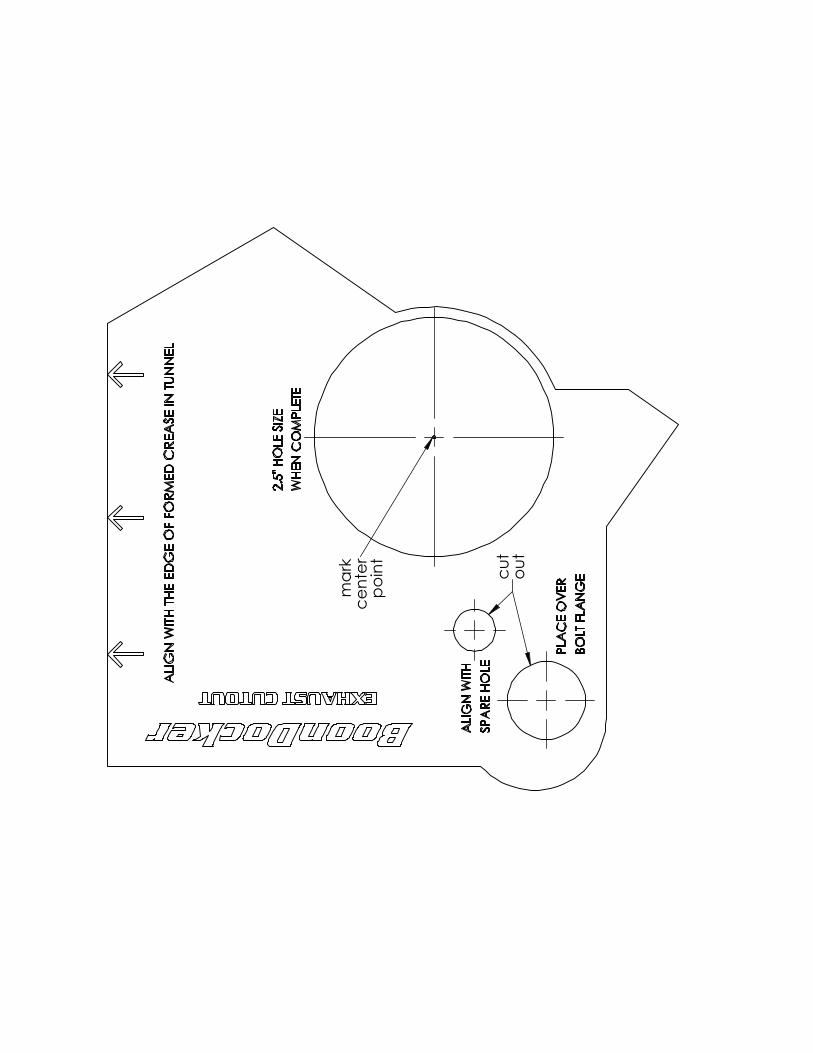
mark
center
point
cut
out

THIS PAGELEFT BLANK

place this fa
ce on running
board side of st
irrup plate
align holes and slo
ts for
best fit a
nd mark o
ut notch
notc
h

THIS PAGELEFT BLANK
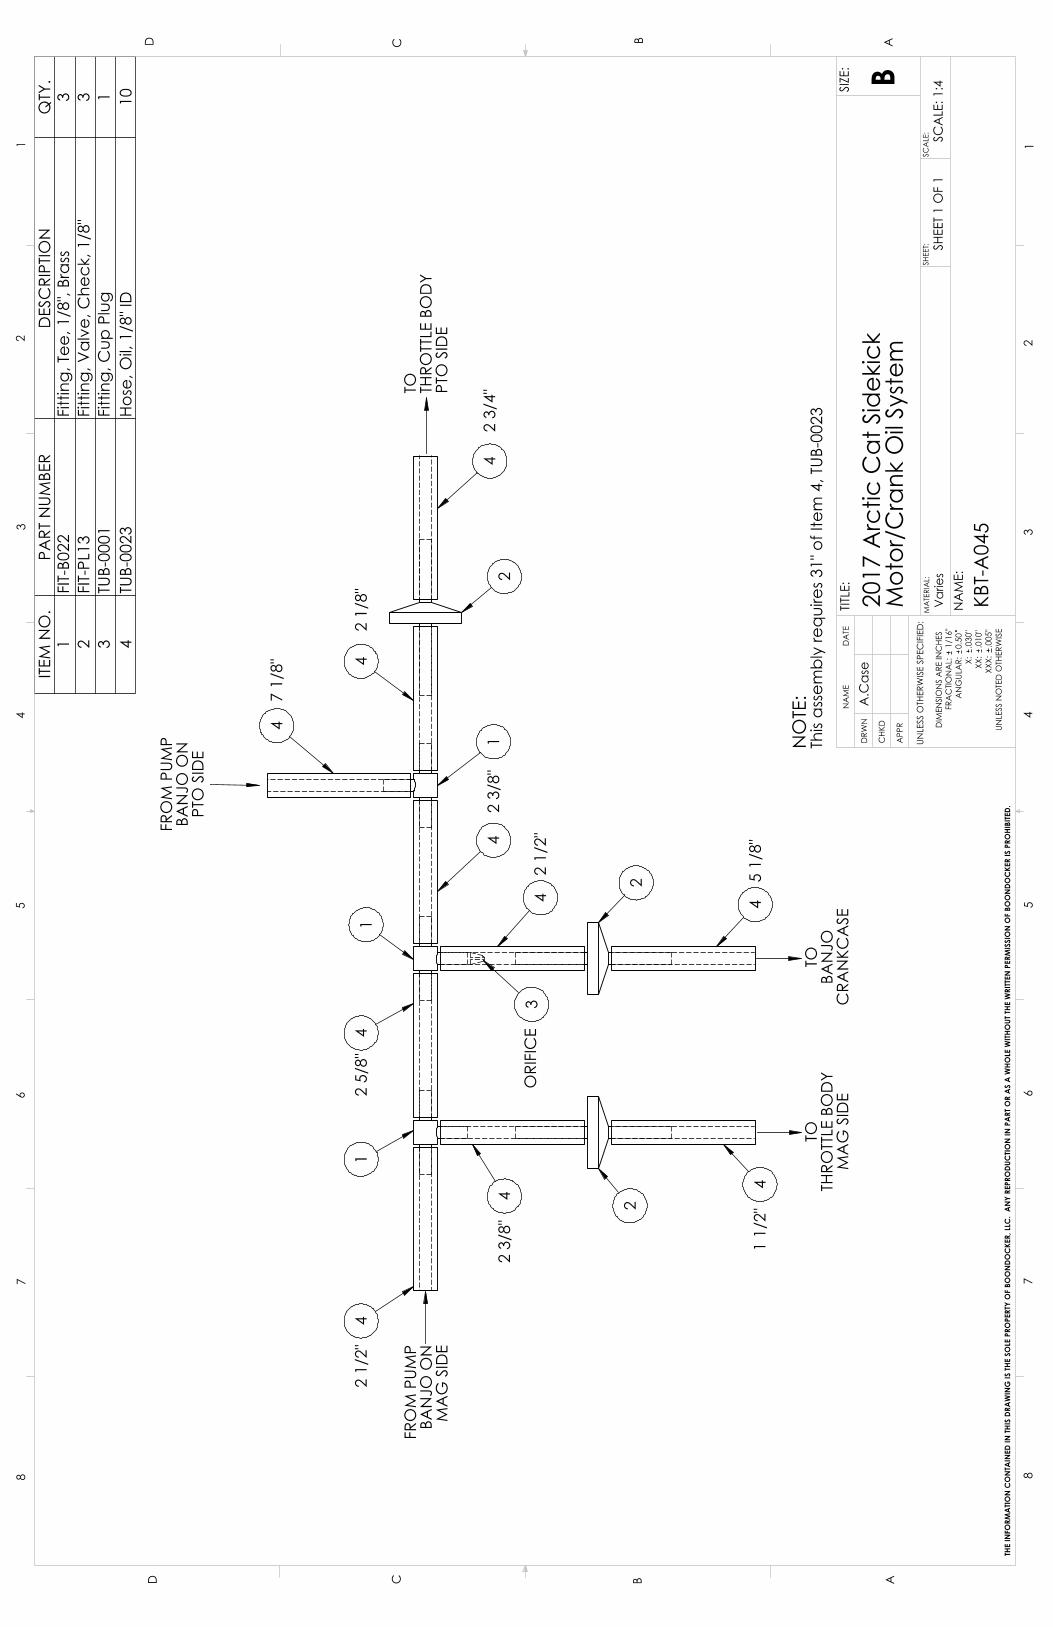
2
2
4
4
1
34
2 3/
8"
2 1/
8"2
1/2"
7 1/
8"
4
4
1
12
5/8"
2 3/
4"
TOBA
NJO
CRA
NKC
ASE
ORI
FIC
E
4
4
4
2
4
42
3/8"
1 1/
2"5
1/8"
2 1/
2"
TOTH
ROTT
LE B
OD
YM
AG
SID
E
FRO
M P
UMP
BAN
JO O
NPT
O S
IDE
FRO
M P
UMP
BAN
JO O
NM
AG
SID
E
TO THRO
TTLE
BO
DY
PTO
SID
E
NO
TE:
This
asse
mbl
y re
quire
s 31"
of I
tem
4, T
UB-0
023
ITEM
NO
.PA
RT N
UMBE
RD
ESC
RIPT
ION
QTY
.1
FIT-
B022
Fitti
ng, T
ee, 1
/8",
Bras
s3
2FI
T-PL
13Fi
tting
, Val
ve, C
heck
, 1/8
"3
3TU
B-00
01Fi
tting
, Cup
Plu
g1
4TU
B-00
23Ho
se, O
il, 1/
8" ID
10D C B A
ABCD
12
34
56
788
76
54
32
1
THE
INFO
RMA
TION
CO
NTA
INED
IN TH
IS D
RAW
ING
IS TH
E SO
LE P
ROPE
RTY
OF
BOO
NDO
CKE
R, LL
C.
AN
Y RE
PRO
DUC
TION
IN P
ART
OR
AS
A W
HOLE
WITH
OUT
THE
WRI
TTEN
PER
MIS
SIO
N O
F BO
ON
DOC
KER
IS P
ROHI
BITE
D.
MA
TERI
AL:
Var
ies
SHEE
T 1 O
F 1
KBT-
A04
5
SHEE
T:SC
ALE
: SCA
LE: 1
:4
TITLE
:
2017
Arc
tic C
at S
idek
ick
Mot
or/C
rank
Oil S
yste
m
NA
ME:
SIZE
: BUN
LESS
OTH
ERW
ISE
SPEC
IFIE
D:
FRA
CTIO
NA
L:
1/1
6"
AN
GUL
AR:
0.
50X:
.0
30"
XX:
.010
"XX
X:
.005
"
DIM
ENSI
ON
S A
RE IN
CHE
S
UNLE
SS N
OTE
D O
THER
WIS
E
CHK
D
DRW
N
NA
ME
APP
R
DA
TE
A.C
ase

4
TURB
O
REM
OV
E FR
OM
CRA
NKC
ASE
BA
NJO
STO
CK
OIL
LIN
E FR
OM
PUM
P(W
AS
CO
NN
ECTE
D T
O C
RAN
KCA
SE B
AN
JO)
53
2
1
18 1
/2" 16
"
6
#10
-32
TAP
ITEM
2G
REEN
LO
CTIT
E
78
2 13
/32"
NO
TE:
This
asse
mbl
y re
quire
s 18.
5" o
f Ite
m 4
, TUB
-002
3 an
d 1
6" o
f Ite
m 5
, SLE
-001
2
ITEM
NO
.PA
RT N
UMBE
RD
ESC
RIPT
ION
QTY
.1
FIT-
T004
Fitti
ng, U
nion
, 1/4
", 4A
N x
Brk
12
FIT-
H014
Fitti
ng, 4
5, 1
/4" N
PT x
Bar
b1
3FI
T-B0
02Fi
tting
, Uni
on, N
PT x
Bar
b1
4TU
B-00
23Ho
se, O
il, 1/
8" ID
15
SLE-
0012
Shie
ld, I
nsut
herm
, 3/8
16
FIT-
B050
Fitti
ng, U
nion
, 1/8
", Br
ass
17
TUB-
0016
Tubi
ng, H
eat S
hrin
k, 3
/8"
18
ZIP-
0002
Zip T
ie, 4
"1
D C B AABCD
12
34
56
788
76
54
32
1
THE
INFO
RMA
TION
CO
NTA
INED
IN TH
IS D
RAW
ING
IS TH
E SO
LE P
ROPE
RTY
OF
BOO
NDO
CKE
R, LL
C.
AN
Y RE
PRO
DUC
TION
IN P
ART
OR
AS
A W
HOLE
WITH
OUT
THE
WRI
TTEN
PER
MIS
SIO
N O
F BO
ON
DOC
KER
IS P
ROHI
BITE
D.
MA
TERI
AL:
Var
ies
SHEE
T 1 O
F 1
TCH-
IA33
SHEE
T:SC
ALE
: SCA
LE: 1
:4
TITLE
:
2017
Arc
tic C
at S
idek
ick
Turb
o Fe
ed O
il Sys
tem
NA
ME:
SIZE
: BUN
LESS
OTH
ERW
ISE
SPEC
IFIE
D:
FRA
CTIO
NA
L:
1/1
6"
AN
GUL
AR:
0.
50X:
.0
30"
XX:
.010
"XX
X:
.005
"
DIM
ENSI
ON
S A
RE IN
CHE
S
UNLE
SS N
OTE
D O
THER
WIS
E
CHK
D
DRW
N
NA
ME
APP
R
DA
TE
A.C
ase