2009 owner / operator manual - forumsforum.chaparralboats.com/ownersmanuals/2009/signature.pdfusing...
TRANSCRIPT

2 0 0 9 O W N E R / O P E R AT O R M A N U A L
S i g n a t u r e - 2 5 0 2 7 0 2 8 0 2 9 0 3 1 0 3 3 0 3 5 0


This manual has been compiled to help you operate your boat withsafety and pleasure. It contains details of the craft, typical equip-ment supplied or fitted, its systems and information on its operationand maintenance. Please read it carefully and familiarize yourselfwith your boat before using it.
If this is your first boat, or you are changing to a new type, for yourown comfort and safety please ensure that you obtain handling and
operating experience before “assuming command” of the boat. Yourdealer or national sailing federation or yacht club will be pleased toadvise you of local sea schools or competent instructors.
Please keep this manual in a secure place and hand it over tothe new owner when you sell the craft.
For a complete list of standard and optional features and equipment, consult your local Chaparral dealer. Due to a policy of continual product improvement,specifications are subject to change without notice. The weights and volumes shown are estimated and can vary from boat to boat because of equipment, etc.
Chaparral boats meet or exceed both NMMA and U.S. Coast Guard standards.
OWNER’S/OPERATOR’S MANUALP.O. Drawer 928
300 Industrial Park Blvd.Nashville, GA 31639
Phone: 229-686-7481 Fax: 229-686-3660


HAZARD COMMUNICATION LABELS ...........................i
INTRODUCTION .............................................................1Welcome Aboard!.................................................................1-1About This Manual ...............................................................1-1Construction and Standards.................................................1-2Responsibilities ....................................................................1-4Laws and Regulations..........................................................1-5Owner’s Logs and Records..................................................1-6Warranty Policy Transfer ......................................................1-6New Boat & Pre-Delivery Record.........................................1-7Boat Data Record.................................................................1-9Fuel Usage Chart ...............................................................1-10Travel Plan Log...................................................................1-11Ownership Transfer Record ...............................................1-13
BOATING SAFETY .........................................................2Hazard Communication........................................................2-1Owner Advisory Statements.................................................2-1Safety Recommendations ....................................................2-1Safety Equipment.................................................................2-4Running and Navigation Lights ............................................2-5Safety Afloat .........................................................................2-5Checklists ...........................................................................2-10Water Sports ......................................................................2-12Navigational Aids Chart......................................................2-15
SYSTEMS........................................................................3Electrical Systems................................................................3-1Fuel System .........................................................................3-8Fresh Water System.............................................................3-8Marine Sanitation Devices .................................................3-10Additional Inboard Systems ...............................................3-12Optional Systems ...............................................................3-13Troubleshooting Chart ........................................................3-14Boat Profiles and System Layout .......................................3-15
COMPONENTS ...............................................................4Dashboard and Instrument Panel ........................................4-1Hydraulic Steering System...................................................4-3Controls ................................................................................4-3Generator .............................................................................4-4Air Conditioner .....................................................................4-5Water Heater ........................................................................4-6Refrigerator ..........................................................................4-7Stove ....................................................................................4-7Microwave Oven ..................................................................4-7Platform Mounted Gas Grill ..................................................4-8Fire Extinguishers ................................................................4-8Bilge Pump...........................................................................4-9Bilge Blower .........................................................................4-9Underwater Lights ................................................................4-9Running and Navigation Lights ............................................4-9Radar Arch .........................................................................4-10Stereo Sound System ........................................................4-10Television with Dockside Cable Inlet and DVD Player .......4-10Component Quick Reference Sheets ................................4-11
UNDERWAY ....................................................................5Transporting Your Boat.........................................................5-1Launching and Loading........................................................5-2BoardingYour Boat ...............................................................5-5Fueling .................................................................................5-6Operating Your Boat.............................................................5-8Anchoring Your Boat ..........................................................5-13Mooring Your Boat .............................................................5-14Shutting Down the Engine..................................................5-14
Table of Contents continued on next page.
CHAPARRAL BOATS OWNER’S MANUAL

PREVENTIVE MAINTENANCE AND REPAIR ...............6Engine ..................................................................................6-1Tune-up ................................................................................6-2Fuel System .........................................................................6-2Monthly Inspection ...............................................................6-2Propeller ...............................................................................6-3Bilge .....................................................................................6-3
TROUBLESHOOTING ....................................................7
INTERIOR AND EXTERIOR CARE ................................8Fiberglass and Gelcoat ........................................................8-1Hull Bottom Maintenance .....................................................8-2Bottom Paint (Anti-Fouling) ..................................................8-2Hardware and Fittings ..........................................................8-2Windshield and Portholes.....................................................8-3Carpet ..................................................................................8-3Seat Coverings and Vinyl .....................................................8-3Canvas (Weather Coverings) ...............................................8-3Cabin Cushions, Side Curtains, and Fabrics .......................8-4Chaparral Logo ....................................................................8-4
WINTERIZING AND STORAGE......................................9Lifting The Boat ....................................................................9-1Dry Storage Preparation ......................................................9-1Systems and Components ...................................................9-2Engine ..................................................................................9-2Stern Drive ...........................................................................9-2Fuel System .........................................................................9-2Battery..................................................................................9-2Recommissioning.................................................................9-3
NAUTICAL GLOSSARY ...............................................10
WARRANTY ..................................................................11
WIRING SCHEMATICS.................................................12

Some or all of the hazard communication labels shown on the following pages can be found in various locations on your boat. If your boat is missing anyof these labels, notify your Chaparral dealer for replacement.
Note: Respective labels are determined by the standard and optional equipment actually installed on your boat upon delivery.
HAZARD COMMUNICATION LABELS
i
NOTICE
SEE YOUR DEALER FOROPTIONAL ANCHOR
NOTICEWHEN USING SHOWER TURN
SUMP PUMP BREAKER ON. FORWARDBILGE AREA MAY FLOOD IF BREAKER
IS NOT ON.
RAW WATER INLETGENERATOR
CLOSE SEACOCKWHEN NOT IN USE
RAW WATER INLETAIR CONDITIONER
CLOSE SEACOCKWHEN NOT IN USE
WARNING
SECURE ALL DOORS WHEN UNDERWAY
OPEN DOORS MAY CAUSEDAMAGE TO BOAT, AND/OR
PERSONAL INJURY

ii
RAW WATER INLETENGINE INTAKE
CLOSE SEACOCKWHEN NOT IN USE
NOTICEREMOVE AFT CURTAIN
BEFORE OPENING ENGINEHATCH. FAILURE TO DO SO WILL
CAUSE DAMAGE TO CANVAS.
DANGER
SECURE CAP OR RESEAL
RESEAL TO AVOIDASPHYXIATION OR DEATH
FINAL SHAFT ALIGNMENTIS THE RESPONSIBILITY OF
THE BOAT SELLING DEALER.BOAT SHOULD BE ALLOWED
TO SETTLE IN WATER FOR24 HOURS PRIOR TO ALIGNMENT.
SHAFT NOT ATTACHED TO ENGINE
AVOID SERIOUS INJURY OR DEATHFROM FIRE OR EXPLOSION
RESULTING FROM LEAKING FUEL.INSPECT SYSTEMS FOR LEAKS
PRIOR TO USAGE OF BOAT
WARNING
! !WARNINGSWIM PLATFORM PERSON CAPACITY NOT
TO EXCEED 700 LBS.DODO NOT USE FOR SUPPORT OF OTHER CRAFT.
DO NOT USE WHILE UNDERWAY.READ AND FOLLOW INSTRUCTIONS BEFORE INSTALLATION.
DANGER
WITHOUT BOLTS, ARCH COULD FALLFORWARD AND CAUSE PERSONAL INJURY OR DEATH
SECURE ARCH WITH BOLTSWHEN UNDERWAY.
! !WARNINGSWIM PLATFORM PERSON CAPACITY NOT
TO EXCEED 500 LBS.DO NOT USE FOR SUPPORT OF OTHER CRAFT.
DO NOT USE WHILE UNDERWAY.READ AND FOLLOW INSTRUCTIONS BEFORE INSTALLATION.
! WARNINGAVOID SERIOUS OR FATAL INJURY DUE TO
ROTATION OF SEAT.LOCK SWIVEL WHEN SPEED EXCEEDS 5 M.P.H.
WEIGHT LIMIT NOT TO EXCEED 40 LBS.
THIS TUB IS DESIGNED FOR STORAGE OFDOCK LINES, LIFE JACKETS & OTHER SOFT ITEMS.EXCEEDING WEIGHT LIMIT MAY CAUSE DAMAGETO BOAT AND/OR PERSONAL INJURY.
WARNING
DANGER
Shut off engine when persons are on swimplatform or on swim platform seat.
Rotating propellers can injure or kill you.
CHECK FOR WATERON SEAL BEFORE OPENING
CAULK BEFOREINSTALLING
SECURE OR STORE ITEMS BEFORE GETTING UNDERWAY
UNSECURED ITEMS MAYSHIFT OR FALL CAUSING
DAMAGE TO BOATAND OR PERSONAL INJURY
WARNING

iii
THE FEDERAL WATER POLLUTION CONTROL ACT PROHIBITS THEDISCHARGE OF OIL OR OILY WASTE INTO OR UPON THE NAVIGABLE WATERS AND CONTIGUOUS ZONE OF THE UNITED STATES IF SUCH DISCHARGE CAUSES A FILM OR SHEEN UPON, OR DISCOLORATION OF, THE SURFACE OF THE WATER, OR CAUSES A SLUDGE OR EMUL-
SION BENEATH THE SURFACE OF THE WATER.
VIOLATORS ARE SUBJECT TOA PENALTY OF $25,000
DISCHARGE OF OILPROHIBITED
WARNINGIN CASE OF FIRE DO NOT OPEN ENGINE
BOX OR COMPARTMENT. SHUT DOWN ENGINE,GENERATOR, AND BLOWERS, CONTINUOUSLY
DISCHARGE ENTIRE CONTENTS OF AGENT PORTABLE FIRE EXTINGUISHER THROUGH
PORT IMMEDIATELY.
DO NOT OPEN ENGINE BOX
WARNINGOPEN FLAME COOKING APPLIANCESCONSUME OXYGEN. THIS CAN CAUSE
ASPHYXIATION OR DEATH.
MAINTAIN OPEN VENTILATIONDO NOT USE THIS APPLIANCE
FOR COMFORT HEATING.THIS BOAT’S SYSTEM(S) INCLUDING ENGINE,FRESH WATER, WASTE, AIR CONDITIONER AND
GENERATOR HAVE BEEN WINTERIZED WITH 50%STARBRITE-200 (PART #31600) & 50% WATER ON
DATE
WITH DRAIN PLUGS INSTALLED ANDREQUIRES WINTERIZATION ON
DATE
IF THE BOAT HAS BEEN PLACED IN WATER(EVEN WITHOUT RUNNING THE ENGINE), IT SHOULD BEWINTERIZED BEFORE THE ONSET OF COLD WEATHER
TO REACTIVATE FRESH WATER SYSTEM FOR USE, SIMPLYFILL WATER TANK WITH WATER AND FLUSH ENTIRE
SYSTEM UNTIL THE FOOD GRADE BLUE COLOR DISAPPEARSFOR FURTHER INFORMATION SEE OWNERS MANUAL.

iv
CLOSE WINDOW
LEAVING WINDOW OPEN WHILE BOATIS UNDERWAY OR AT DOCK
COULD INDUCE EXHAUST FUMES INTOCABIN CAUSING INJURY OR DEATH.
WARNING
WARNINGCarbon monoxide (CO) can cause brain damage or death.
Carbon monoxide can be present in the cabin.
Signs of carbon monoxide poisoning include nausea, headache,dizziness, drowsiness, and lack of consciousness.
Get fresh air if anyone shows signs of carbon monoxide poisoning.
Get fresh air if carbon monoxide detector alarm sounds.
Carbon monoxide detector must be functioning at all times.NW-205-05
D
!
INTERNATIONAL SYMBOLS
Waste Water Sewage Fresh Water
Diesel Fuel
Electrical Hazard
Blower Warning
! WARNING
USE CAUTION WITH SKIER IN TOWAS TOW ROPE MAY BACKLASH INTO
COCKPIT WHEN RELEASED
CONTACT WITH UNPROTECTED ENGINEBELTS WILL RESULT IN SEVERE INJURY
TURN OFF ALL ENGINES BEFORE ENTERING MOTORWELL
DANGER
IN CASE OF FIRE DO NOT OPEN ENGINE BOX OR COMPARTMENT.
SHUT DOWN ENGINE, GENERATOR,AND BLOWERS, CONTINUOUSLY
DISCHARGE ENTIRE CONTENTS OFAGENT PORTABLE FIRE
EXTINGUISHER THROUGH PORTIMMEDIATELY
DO NOT OPEN ENGINE BOX
WARNING
SECURE ENGINE LID(S) WHENUNDERWAY OR WORKING IN
ENGINE COMPARTMENT. UNSECURELID MAY OPEN OR CLOSE SUDDENLY
CAUSING PERSONAL INJURY ORDAMAGE TO BOAT.
SECURE LID(S)

v
DO NOT OPERATE BOAT ABOVE 15 MPHWITH SUNPAD SECURED TO DECK.
REMOVE AND STORE SUNPAD WHENEXCEEDING 15 MPH OR GREATER
WARNING
NOTICEREMOVE STERN LIGHT BEFORE LIFTINGMOTOR BOX TO PREVENT DAMAGE TO
INTERIOR OR LIGHT.
NOTICEWHEN USING AIR CONDITIONER TURNSUMP PUMP BREAKER ON. FORWARDBILGE AREA MAY FLOOD IF BREAKER
IS NOT ON.
1. Turn off boat’s shore power switch.
2. Connect cable at boat first.
3. If polarity warning indicator is activated, immediately disconnect cable.
4. Disconnect at shore outlet first.
5. Close inlet cover tightly.
SHORE POWERWARNING
To minimize shock hazard, connect and disconnect cable as follows;
DO NOT ALTER SHORE POWER CABLE CONNECTORS
WARNING
BOATMAN’S CHECK LIST
DANGERUSING BOARDING LADDER WHILE ENGINE IS RUNNING CANRESULT IN SEVERE PERSONAL INJURY. TURN OFF ENGINE
BEFORE USING LADDER.
THE OPERATOR OF THIS VESSEL IS RESPONSIBLE FORTHE ACTIONS OF PERSONS IN AND AROUND THIS VESSEL.
SAFETY IS THE OPERATOR S RESPONSIBILTY.
USING SWIM PLATFORM, FORWARD DECK, OR SUN DECKWHILE BOAT IS UNDERWAY COULD RESULT IN SEVERE
PERSONAL INJURY. STOP BOAT AND TURNOFF ENGINES BEFORE USING.
AVOID SERIOUS OR FATAL INJURY DUE TO ROTATION OF SEAT.LOCK SWIVEL WHEN SPEED EXCEEDS 5 M.P.H.
INTERRUPT SWITCH MUST BE ATTACHED TO OPERATOR WHILEENGINE IS RUNNING. QUALIFIED OPERATOR MUST BE IN
CONTROL AT ALL TIMES. READ OWNER’S MANUAL BEFORE USE.
For maximum enjoyment and safety, check each of these itemsBEFORE you start your engine:DRAIN PLUG (Securely in place?)LIFE-SAVING DEVICES (One for every person on board?)STEERING SYSTEM (Working smoothly and properly?)FUEL SYSTEM (Adequate fuel? Leaks? Fumes?)BATTERY (Fully charged? Cable teriminals clean and tight?)ENGINE (In neutral?)CAPACITY PLATE (Are you overloaded or overpowered?)WEATHER CONDITIONS (Safe to go out?)ELECTRICAL EQUIPMENT (Lights, horn, pump, etc.?)EMERGENCY GEAR (Fire extinguisher, bailer, paddle, anchor & line, signaling device, tool kit, etc.?)
DANGERCarbon monoxide (CO) can cause brain damage or death.
Engine and generator exhaust contains odorless and colorless carbon monoxide gas.
Carbon monoxide will be around the back of the boat when engines or generators are running.
Move to fresh air, if you feel nausea, headache,dizziness, or drowsiness NW-206-06
vi
WARNINGCarbon monoxide (CO) can cause brain damage or death.
Engine and generator exhaust contains odorless and colorless carbon monoxide gas.
Signs of carbon monoxide poisoning include nausea, headache, dizziness, drowsiness, and lack of consciousness.
Get fresh air if anyone shows signs of carbon monoxide poisoning.
See Owner’s Manual for information regarding carbon monoxide poisoning.
NW-204-06
WARNING
AVOID DAMAGE TO YOUR FUEL SYSTEM
DO NOT USE FUEL OR ADDITIVES CONTAINING MORETHAN 10% ALCOHOL BY VOLUME (Methanol or Ethanol)
DAMAGE AND LOSS OF WARRANTY MAY RESULT
NOTICETHIS BOAT IS EQUIPPED
WITH A DIRECT OVERBOARD
DISCHARGE. DISCHARGING OF
SEWAGE DIRECTLY OVERBOARD IS
FOR USE WHERE APPROVED ONLY.
CHECK U.S. COAST GUARD AND
LOCAL REGULATIONS.
DO NOT OPERATE
MACERATOR DRY.

WELCOME ABOARD!
Congratulations!...
on your wise decision to purchase a Chaparral boat. We welcomeyou to the family of thousands of other Chaparral boat owners.Since your boat is a substantial investment, we are sure youselected your Chaparral because of its value, style, comfort, andperformance. This manual contains valuable information concerningyour boat’s operation, maintenance, and care plus tips on boatingsafety and seamanship.
ABOUT THIS MANUAL
More and more people are joining the ranks of boat owners. Thismanual is written for the first-time boat owner or operator. Even ifyou are an experienced boater, you will find much valuable informa-tion regarding the safe operation and maintenance of your newChaparral boat. Keep this manual on your boat for ready reference.
Due to our policy of continuous product improvement, the illustra-tions used in this manual may not be identical to the components,controls, gauges, etc. on your boat, as they are intended to be rep-resentative reference views. Some controls, indicators, orinformation may be optional and not included on your craft.
The precautions in this manual can’t and don’t cover every boatingsituation. If a specific method or procedure is not covered, you mustmake sure that what you do is safe for you and others. Always usecommon sense when boating! Remember, too, that every safe boat-ing excursion is a happy experience.
This manual is part of your boat’s equipment. Keep it on board theboat at all times. If you transfer ownership of this boat to someoneelse, be sure to give this manual to the new owner.
Your owner’s packet contains the manual for the boat you selected.Also in this packet are instruction manuals from the suppliers ofstandard and optional equipment for your boat. Examples of thesemanuals include the engine, electrical equipment, pumps, and cabinamenities. The suppliers of these products maintain their own man-ufacturer’s warranty and service facilities. Be sure to fill out eachwarranty card and mail it to the manufacturer to validate the war-ranty. Record all information regarding these products on the “BoatData Record.” A copy of this form is near the end of this chapterunder Logs & Records.
Important: Keep the completed Boat Data Record in a safeplace at home. Do not keep it aboard the boat.
Read this manual as well as the manuals for the systems and com-ponents on your Chaparral boat. They provide the informationneeded for safe operation and proper maintenance. The informationin the manuals provided by the manufacturers takes precedenceover any information in this manual if there is a conflict.
Following are summaries of each chapter in this manual:
1. Introduction
Included in this chapter is a summary of the manual plus generalinformation about construction and standards, dealer and ownerresponsibilities, laws and regulations, logs and records, and thewarranty for your boat.
2. Boating Safety
This chapter discusses potential hazards associated with boating,safety recommendations, safety information and practices, andwater sports safety. It also discusses safety equipment needed toprovide a safe operating environment.
INTRODUCTION 1
1-1

Note: For your safety, this manual has specific safety warn-ings and comments where appropriate. Be sure to read theentire manual.
3. Systems
Here you will find detailed information about the electrical and fuelsystems needed to operate your boat. This chapter discusses thefresh water system and marine sanitation devices which make yourboating experience more comfortable.
Note: Information in Chapters 3 and 4 is grouped by boat type:SSI Sportboats, SSX Sportdecks, Sunesta Deckboats andSignature Cruisers. Be certain that you read the portions ofChapters 3 and 4 pertaining to your boat type.
4. Components
Standard features and optional equipment for your Chaparral boatare discussed in this chapter. In general, these pertain to equipmentand amenities which make your boat a “home away from home.”
5. Underway
The intent of this chapter is to explain what you need to do before,during, and after your boating excursion to make it an enjoyable andsafe experience.
6. Preventive Maintenance & Repairs
Preventive maintenance is the key to troublefree operation andhelps protect your investment. This chapter explains what youshould do to maintain your boat and how to make adjustmentsand repairs.
7. Troubleshooting
Every boater encounters an operating problem at one time oranother. This chapter provides solutions to problems you can correct.
8. Interior & Exterior Care
This chapter tells you how to inspect, clean, and maintain yourboat’s interior and exterior.
9. Winterizing & Storage
What do you do when you need to winterize or store your boat for extendedperiods of time? This chapter provides the necessary information.
10. Nautical Glossary
The Nautical Glossary defines terms associated with your boat andterms you may encounter during your boating experience.
CONSTRUCTION & STANDARDS
All Chaparral boats meet or exceed the construction standards setby the U.S. Coast Guard, the National Marine ManufacturersAssociation (NMMA), and the American Boat and Yacht Council(ABYC) concerning:
• Navigation lights• Factory installed fuel systems• Engine and fuel tank compartment ventilation• Flotation• Steering systems• Backfire flame arresters
NMMA certification means that the boat complies with applicablefederal regulations set forth by the U.S. Coast Guard. These regula-tions are based on American Boat and Yacht Council (ABYC)standards and recommended practices.
All Chaparral models can be certified to carry the CE mark. The CEmark certifies that the boat meets relevant parts of the EuropeanDirective for Recreational Craft 94/25/EC of the EuropeanParliament, including the International Organization for Standards(ISO) and Recreational Marine Agreement Group (RMAG) guide-lines in effect at the time of manufacture.
1-2

We recommend that you see your dealer if you wish to modify fac-tory–installed equipment or add new equipment. Your dealer isqualified to make such modifications or additions without placing thesafety or design integrity of your boat at risk and without invalidatingthe warranty.
Chaparral builds exceptionally high quality boats. We offer numerousextras you won’t see at a boat show. We’ve created a list for your review.
Gelcoat
The advanced technology polyester we use offers superior weather-ing resistance to surface yellowing and chalking. It will also helpprotect and maintain the original glossy luster of your boat’s finish.Chaparral uses a premium quality gelcoat which offers improvedflexibility over other gelcoats, minimizing the potential for cracking.
Resin
It’s an age-old problem. Water penetrates the gelcoat and blistersthe bottom. The key is the resin. To cut costs, most use a generalpurpose resin. Chaparral uses a premium quality resin in the hullskin coat of every boat in our line because of its superior bondingcharacteristics and exceptional flex.
Plywood
To protect their wooden components from rot and deterioration,most boat builders dip their plywood parts in a vat of protectivesealant. Unfortunately, this only offers very minimal protection forthe outside plies. The plywood Chaparral uses throughout our boatsis pressure treated with a wood preservative and fungi inhibitingchemical before it is kiln dried.
Loom Wrap Wiring
Attention to rigging detail is a Chaparral hallmark. Instead of routingthe engine wiring harness haphazardly in the bilge in black tape, werely on automotive style flexguard loom that not only keeps thingsneat but also protects against abrasion.
Through Bolted Stainless Steel Cleats
It’s one of the most often used components on your boat, but mostpeople think a cleat is a cleat, right? Wrong. Chaparral’s cleats arestainless steel so they won’t corrode and so they won’t twist. Also,ours are big enough to accept a full-sized looped line.
Heavy Duty Rub Rail
A rub rail is supposed to protect your boat. Most don’t because they’rethe wrong material. Chaparral uses a heavy-duty PVC rub rail withstainless steel insert that absorbs far more impact without denting.
Acoustical Foam
The name says it all. Acoustical foam is the best way we’ve found toabsorb engine noise.
Acrylic Tops
Ours are acrylic because it’s a superior material that won’t crack,peel, or mildew. Further, our acrylic tops won’t shrink or expand,which means they look and fit better in all weather conditions.
Stain Resistant Fabrics
Accidents happen. Spilled drinks, wet bathing suits and soggy tow-els are a fact of life on a boat. All our cabin fabrics are stainresistant. Buyers can choose from a wide variety of colors. When itcomes to interior fabrics, we have the one that’s right for you.
Superior Plastics vs. Wood
Chaparral prides itself on building seats that are not only comfortable,but durable. We use plastic seats because they hold their shape anddon’t retain water, reducing the potential for foam deterioration.
1-3

Flotation Requirements
All Chaparral boats meet or exceed U.S. Coast Guard requirementsfor flotation. All Chaparral inboard/outboard and inboard poweredboats also meet or exceed U.S. Coast Guard requirements for thefollowing:
• Engine and Fuel Tank Compartment Ventilation(requirements for flame arresting devices)
• Factory-Installed Fuel Systems• Navigation Lights• Steering System
RESPONSIBILITIES
Chaparral’s quality service does not end when you buy one of ourboats. Through our dealer network we do everything possible toensure that you are satisfied with your purchase. Every Chaparraldealer has a responsibility to you, the boater.
Dealer
Dealer responsibilities include the following:
1. Discuss with you the terms of all warranties and stress the impor-tance of registering warranties with the appropriate manufacturers.
2. Explain how you can obtain warranty service.
3. Complete new boat and pre-delivery inspection procedures.Sign the form to certify that all items were completed.
Your Chaparral dealer can provide you with thorough instruction inthe operation of your boat. Please feel free to ask for assistance.
Boat Owner
Your responsibilities include the following:
1. Read this manual as well as all other manuals and informationincluded in your owner’s packet.
2. Schedule an appointment with your dealer to go over all war-ranties. After the appointment, complete the Chaparral Boatlimited warranty registration card in an envelope inside theOwner’s Manual packet. Keep a record of the hull number forfuture reference.
3. Inspect the boat at the time of delivery to make sure all systemsand components are operating properly. Chaparral recommendsthat you refer to your engine warranty for initial inspection andservice requirements.
The new boat and pre-delivery inspection form (found in yourowner’s manual) will help you as you inspect your new boat. Aftercompleting your inspection, sign the form to certify you haveinspected the boat with your dealer.
4. Schedule an appointment with your dealer to go over the pre-delivery engine service record. Sign this record to indicate yourdealer has explained this record to you.
5. Operate all equipment in accordance with the manufacturer’sinstructions.
6. Become familiar with all federal, state, and local laws affectingyour boat and its operation.
7. Perform or provide for the appropriate periodic maintenance out-lined in the manuals and service guides.
1-4

LAWS AND REGULATIONS
This section of the manual includes general information about gov-ernment regulations. You, the boater, are responsible forcomplying with the requirements of federal, state, and local laws.If you have any questions, contact the U.S. Coast Guard or otherappropriate authority.
Boat Registration
Federal and state laws require that every boat having propulsionmachinery of any type must be registered in the main state ofusage. Registration numbers and validation stickers must be dis-played on the boat according to regulations. The registrationcertificate must be carried on board when the boat is in use.
Safety Equipment
The following equipment is required on all boats:
• Fire extinguishers• Personal flotation devices (PFDs)• Navigation lights• Visual distress signals• Sound signaling device
See Chapter 2 for more information about safety equipment.
Discharge of Oil
The Federal Water Pollution Control Act prohibits the discharge ofoil or oily waste into or upon the navigable waters of the UnitedStates or the waters of the contiguous zone if such dischargecauses a film or sheen upon, or a discoloration of, the surface of thewater or causes a sludge or emulsion beneath the surface of thewater. Violators are subject to a penalty.
Disposal of Plastics & Other Garbage
Plastic refuse dumped in the water can kill fish and marine wildlifeand can foul vessel propellers and cooling water intakes. Otherforms of waterborne garbage can litter beaches and cause illness.U.S. Coast Guard regulations therefore strictly prohibit dumpingplastic refuse or other garbage mixed with plastic into the water any-where. Further, the regulations restrict the dumping of other forms ofgarbage within 12 miles from shore on the east coast, and 9 milesfrom shore on the west coast.
Within 3 miles of shore and in U.S. lakes, rivers, bays and sounds,it is illegal to dump plastic, dunnage, lining, and packing materialsthat float; and any garbage except dishwater, gray water, and freshfish parts.
Between 3 and 12 miles it is illegal to dump plastic, dunnage, lining,and packing materials that float; and any garbage not ground to lessthan one square inch.
Between 12 and 25 miles it is illegal to dump plastic, dunnage, andpacking materials that float.
Beyond 25 miles it is illegal to dump plastic.
The U.S. Coast Guard has issued these regulations to implementAnnex V of the International Convention for the Prevention ofPollution from Ships, 1973, commonly known as Annex V of theMARPOL (Marine Pollution) Treaty 73/78. They apply to all U.S.vessels wherever they operate (except waters under the exclusivejurisdiction of a state), and foreign vessels operating in U.S. watersout to and including the Exclusive Economic Zone (200 miles).
If your boat is 26 feet or more in length, the regulations require U.S.recreational boaters attach one or more Coast Guard TrashDumping Restrictions placards to your boat. The placard warnsagainst the discharge of plastic and other garbage within U.S. navi-gable waters and specifies discharge restrictions beyond theterritorial sea (generally within 3 or more nautical miles of shore).
1-5

The placard must also contain the warning that a person violatingthese requirements is liable for civil and criminal penalties. Theplacard must also state that local regulations may further restrict thedischarge of garbage. You may purchase these placards from localmarinas, boat dealers, or marine equipment suppliers.
The U.S. Coast Guard has also issued regulations requiring boatsto have a sanitation system on board to control pollution. Wastesare to be stored in a holding tank or other device, such as a Porta-Potti, until the device can be can be pumped out or otherwisedisposed of at a shore facility. Discharging this waste overboard isin most cases prohibited. Check with the Coast Guard regardingregulations in your area.
OWNER’S LOGS AND RECORDS
At the end of this chapter are three forms which you will find veryhelpful.
Use the Boat Data Record to record all important information aboutyour boat and the major components installed. After you haveentered all the data, remove this form from your Owner’s Manualand store in a safe place. Do not keep this form aboard your boat.
The Travel Plan Log provides a record of your destination, depar-ture and return times, boat description, passenger list, and otherinformation about the trip you have planned. At the bottom of theform is space for listing emergency telephone numbers in case yourreturn is delayed past the expected time. It also has space for indi-cating information about the person filing this report. Leave thecompleted form ashore with a responsible person. We recommendyou make several copies of this form each boating season to ensurean ample supply.
The Fuel Usage Chart is a handy way to record information cover-ing engine hours, fuel consumption, miles traveled, as well as RPM(revolutions per minute), Average MPH (miles per hour), and GPH(gallons per hour).
WARRANTY POLICY TRANSFER
Your Chaparral boat is backed by a Limited Express Warranty. It isimportant that you are aware of its terms. If a problem arises withyour Chaparral boat as a result of workmanship or materials, con-tact your dealer as soon as possible to determine whethercorrecting the problem may be covered by the warranty. Pleasehave your hull identification number and necessary model numberson hand for the items that may need service or repair. Your hullidentification number is below the rub rail on the starboard aft cornerof your boat.
The Chaparral Limited Warranty Policy may be transferred to sub-sequent owner(s) providing the Ownership Transfer Record (OTR)is completed and returned to the Chaparral Customer ServiceOffice. The OTR is located at the end of this chapter. Subsequentowner(s) will receive the balance of warranty available subject to a$100.00 deductible per occurrence for claims filed in accordancewith the Chaparral Limited Warranty Policy. The Ownership Transferfee varies by the length of the boat. The appropriate fee from theOwnership Transfer Record should be submitted with theOwnership Tranfer Record form to the Chaparral Customer Serviceoffice at the time of the transfer.
1-6

1-7


1-9
General
__________________ ___________________Model Name State of Registration
____________________________________________________Hull Identification Number
____________________________________________________Boat Name
____________________________________________________Hull Color(s)
___________ ___________ _______Length Beam Weight
__________________ _______________Draft (Drive Down) Draft (Drive Up)
Engine
_______________________ ___________________Manufacturer Model Name/Number
_____________ ____________ __________Oil Type/SAE Quarts Filter Type
_______________________ __________________________Serial Number Transom Plate Serial Number
Drive Unit
____________________________________________________Serial Number
Fuel System
__________________Tank Capacity
Fresh Water
__________________Tank Capacity
Propeller
__________________ _______________Manufacturer Pitch
____________________________________________________Model Number
Battery
__________________Manufacturer
____________________________________________________Model Number
Notes
Name ___________________________
Address__________________________
________________________________
Sales Manager ____________________
Phone ___________________________
Fax _____________________________
Purchase Dealership Service Dealership
Name ___________________________
Address__________________________
________________________________
Service Manager___________________
Phone ___________________________
Fax _____________________________
BOAT DATA RECORD

1-10
RunTime(In Hours)
Fuel Used(In Gallons)
DistanceTraveled(In Miles) RPM Average Miles
per HourGallons
per HourDate
FUEL USAGE CHARTRunTime(In Hours)
Fuel Used(In Gallons)
DistanceTraveled(In Miles) RPM Average Miles
per HourGallons
per HourDate

1-11
TRAVEL PLAN LOG
The boat listed below should return by:
__________________ ________________ at the latest.
If it has not, please call the emergency numbers
listed at the right.
Police _________________________________
Coast Guard _________________________________
Other Authority _________________________________
Personal _________________________________
Trip Information
_______________________ _______________________Departure Date/Time Departure Location
_______________________ _______________________Return Date/Time Return Location
Boat Description
_______________________ _______________________Boat Name Type
_______________________ _______________________Registration Number Manufacturer
_______________________Length
_______________________ _______________________Hull Color Deck (Color)
_______________________ _______________________Cabin (Color) Trim (Color)
____________________________________________________
____________________________________________________Other Physical Characteristics
Engine
_______________________ _______________________Type HP
_______________________ _______________________Fuel Type Fuel Capacity
Safety & Emergency Equipment(YES/NO & NUMBER)
_____________ _____________ ______________Life Jackets Cushions Distress Light
_____________ _____________ ______________Flares Smoke Signals Flash Light
_____________ _____________ ______________Mirror Paddles Anchor
_____________ _____________ ______________Food Water Life Raft
Radio
_______________________ _______________________Onboard (Yes/No) Type
____________________________________________________
____________________________________________________Frequencies usually used or monitored
Passenger List (Use Another Sheet If Necessary)
____________________________________________________Full Name
_______________________ ________________________Age/Sex Phone Number
____________________________________________________Complete Address
____________________________________________________
____________________________________________________Full Name
_______________________ ________________________Age/Sex Phone Number
____________________________________________________Complete Address
____________________________________________________
____________________________________________________Full Name
_______________________ ________________________Age/Sex Phone Number
____________________________________________________Complete Address
____________________________________________________
____________________________________________________Full Name
_______________________ ________________________Age/Sex Phone Number
____________________________________________________Complete Address
____________________________________________________
TimeDate
ALWAYS FILL THIS SHEET OUT COMPLETELY—IN AN EMERGENCY ALL INFORMATION MAY BE HELPFUL


OW
NE
RS
HIP
TR
AN
SF
ER
RE
CO
RD
Ple
ase
com
plet
e th
e fo
llow
ing
info
rmat
ion
and
retu
rn to
Cha
parr
al C
usto
mer
Ser
vice
with
the
corr
ect t
rans
fer
fee
amou
nt a
nd a
cop
y of
the
bill
of s
ale
or o
ther
evi
denc
e of
pur
chas
e w
ithin
30
days
aft
er p
urch
ase
from
the
orig
inal
ret
ail p
urch
aser
. C
ertif
ied
Che
cks
or m
oney
ord
ers
shou
ldbe
mad
e pa
yabl
e to
Cha
parr
al B
oats
, Inc
.
____
____
____
____
____
____
____
____
____
____
____
____
____
____
____
____
___
Cu
rren
t Ow
ner
Tra
nsf
er T
o
____
____
____
____
____
____
____
____
____
____
____
____
____
____
____
____
___
Add
ress
Add
ress
____
____
____
____
____
____
____
____
____
____
____
____
____
____
____
____
___
Cit
y, S
tate
, Zip
Cit
y, S
tate
, Zip
____
____
____
____
____
____
____
____
____
____
____
____
____
____
____
____
___
Hu
ll I
den
tifi
cati
on N
um
ber
Dat
e of
Sal
e
____
____
____
____
____
____
____
____
____
____
____
____
____
____
____
____
___
Sig
nat
ure
Sig
nat
ure
To r
egis
ter
the
tran
sfer
, the
sec
ond
purc
hase
r m
ust m
ail t
he f
ollo
win
g to
Cha
parr
al’s
Cus
tom
erS
ervi
ce D
epar
tmen
t, P.
O. D
raw
er 9
28, N
ashv
ille,
GA
316
39 n
o la
ter
than
thir
ty (
30)
days
aft
er th
epu
rcha
se f
rom
the
orig
inal
purc
hase
r:(1
) A
n O
wne
rshi
p T
rans
fer
Rec
ord
com
plet
ed b
y th
eor
igin
al p
urc
has
eran
d th
e su
bseq
uent
ow
ner;
(2)
A c
opy
of t
he b
ill o
f sa
le o
r ot
her
evid
ence
of p
urch
ase
of t
he b
oat
from
the
ori
gin
alpu
rcha
ser,
incl
udin
g th
e m
odel
and
hul
l ide
ntif
ica-
tion
num
ber;
and
, (3)
the
war
rant
y tr
ansf
er f
ee o
f $5
00.0
0 fo
r bo
ats
wit
h hu
ll le
ngth
s le
ssth
an 2
4 fe
et a
nd $
1,00
0 fo
r bo
ats
wit
h hu
ll le
ngth
s of
24
feet
or
mor
e.U
pon
rece
ipt o
f th
istr
ansf
er r
ecor
d th
e ne
w o
wne
r sh
all r
ecei
ve th
e ou
tsta
ndin
g ba
lanc
e of
the
ON
E-Y
EA
R T
RA
NS
FE
RA
BL
E L
IMIT
ED
WA
RR
AN
TY
and
the
TE
N-Y
EA
R T
RA
NS
FE
R-
AB
LE
LIM
ITE
D S
TR
UC
TU
RA
L H
UL
L W
AR
RA
NT
Y in
itiat
ed b
y th
e or
igin
al p
urch
aser
.Su
bseq
uent
ow
ner(
s) to
the
orig
inal
pur
chas
er s
hall
be
resp
onsi
ble
for
a $1
00.0
0 de
duct
ible
per
occu
rren
ce fo
r an
y cl
aim
fil
ed in
acc
orda
nce
wit
h th
e C
hapa
rral
Lim
ited
War
rant
y Po
licy
.
Ple
ase
refe
r to
the
Cha
parr
al O
wne
rs M
anua
l for
det
aile
d pr
ovis
ions
con
cern
ing
the
Cha
parr
alL
imite
d an
d S
truc
tura
l War
rant
y Po
licie
s. C
hapa
rral
Boa
ts, I
nc. r
eser
ves
the
righ
t to
deny
tr
ansf
er o
f w
arra
nty
to s
ubse
quen
t ow
ners
.
Que
stio
ns c
once
rnin
g th
e C
hapa
rral
War
rant
y Po
licy
shou
ld b
e su
bmitt
ed in
wri
ting
to th
eC
hapa
rral
Cus
tom
er S
ervi
ce O
ffic
e, P
.O. D
raw
er 9
28, N
ashv
ille,
GA
316
39.
1-13


YOU are responsible for your safety and your boat, as well as thesafety of passengers and other boaters.
HAZARD COMMUNICATION
As you read this manual, please note the hazard warnings whichalert you to safety precautions related to unsafe conditions or oper-ating procedures. We have included these warnings because weare concerned about your safety and the safety of your passengers.Hazard statements generally have five parts:
1. The hazard symbol
2. A signal word which indicates the severity of the hazard
3. A concise description of the hazard
4. The results of ignoring the hazard
5. Steps for avoiding the hazard
The three signal words indicating the severity of the hazardare danger, warning, and caution. The meanings they con-vey are as follows:
OWNER ADVISORY STATEMENTS
Advisory statements alert you to conditions affecting equipmentoperation, maintenance, and servicing practices.
Important: This is an advisory statement or procedure intendedto prevent damage to the equipment or associated components.
Note: This is a general advisory statement relating to equip-ment operation and maintenance procedures. Its intent is tocall attention to information more important than normal text.
SAFETY RECOMMENDATIONS
The popularity of boating and other water sports has grown tremen-dously in the past few years. Boating safety and the safety of yourpassengers are your responsibilities. You should fully understandand become familiar with the operating procedures and safety pre-cautions in this manual and the other manuals in the owner’s packetbefore you launch your Chaparral boat.
BOATING SAFETY 2
2-1
DANGER: calls attention to immediate hazards that WILLresult in severe personal injury or death.
WARNING: identifies hazards or unsafe practices thatCOULD result in severe personal injury or death.
CAUTION: indicates hazards or unsafe practices that COULDresult in minor personal injury or product or property damage.
Remember that along with the freedom and exhilaration of boatingcomes the responsibility that you have for the safety of your passen-gers and the other boaters who share the water with you.Throughout this manual specific precautions and symbols identifysafety-related information. Be sure to pay close attention to them.
Safe Operation
• Keep your boat and equipment in safe operating condition.Inspect the hull, engine(s), safety equipment, and all boatinggear regularly.
• Be very careful when fueling your boat. Be sure you know thecapacity of your boat’s fuel tank and the amount of fuel you usewhen operating at frequently used engine speeds (RPMs). Askyour Chaparral dealer about the capacity of your boat’sfuel tank.
• Make sure you have enough fuel on board for anticipated cruis-ing requirements. In general, use 1/3 of your supply to reachyour destination and use 1/3 to return. Keep 1/3 in reserve forchanges in your plans due to weather or other circumstances.
• Be sure lifesaving and fire extinguishing equipment is on board.This equipment must meet regulatory standards and it should benoticeable, accessible, and in safe operating condition. Yourpassengers should know where this equipment is and how touse it.
• Keep an eye on the weather. Be aware of possible changingconditions by checking local weather reports before your depar-ture. Monitor strong winds and electrical storms closely.
• Always keep accurate, updated charts of the area onboard your boat.
• Before you leave the port or harbor, file a Travel Plan with afamily member, relative, friend, or other responsible personashore.
• A lways opera te your boa t w i th ca re , cou r tesy andcommon sense.
• Instruct at least one other passenger aboard in the basic operat-ing procedures in handling your boat. This person can take overif you unexpectedly become unable to do so.
• Do not allow passengers to ride on parts of your boat other thandesignated seating areas.
• Ask all passengers to remain seated while the boat is in motion.
• Do not use the swim platform or boarding ladder while theengine or engines are running.
• Understand and obey the “Rules of the Road.” Always maintaincomplete control of your boat.
• Do not overload or improperly load your boat.
The information on your boat’s capacity plate does not override yourresponsibility for using common sense or sound judgment.Turbulent water and unfavorable weather conditions reduce thecapacity of your boat.
Swimming
1. Swim only in areas designated as safefor swimming. These are usuallymarked with a swim area buoy (seefigure). Do not swim alone or at night.
2. Do not allow anyone near the pro-peller(s), even when the engine is off.Propeller blades can be sharp andcan continue to turn even after theengine is off. Stay well away fromareas marked by a diver down float(see figure).
2-2

Safe Boating Courses
Your local U.S. Coast Guard Auxiliary and the U.S. PowerSquadrons offer comprehensive safe boating classes several timesa year. You may contact the Boat/U.S. Foundation at 1-800-336-BOAT (2628), or in Virginia 1-800-245-BOAT (2628). For a courseschedule in your area you may also contact your local U.S. CoastGuard Auxiliary or Power Squadron Flotilla for the time and place oftheir next scheduled class.
U.S. Coast Guard Website: www.uscg.milPower Squadron Website: www.usps.org
Voluntary Inspections
State boating officials in many states or the U.S. Coast GuardAuxiliaries offer courtesy inspections to check out your craft. Theywill check your boat for compliance with safety standards andrequired safety equipment. You may voluntarily consent to one ofthese inspections and you are allowed time to make correctionswithout prosecution. Check with the appropriate state agency or theCoast Guard Auxiliary for details.
Rules of the Road
All responsible boaters comply with the “Rules of the Road,” themarine traffic laws enforced by the U.S. Coast Guard. There are twosets of rules: the United States Inland Navigational Rules and theInternational Rules. The United States Inland Rules apply to all ves-sels inside the demarcation lines separating inland and internationalwaters. The Coast Guard publishes the “Rules of the Road” in its pub-lication “Navigational Rules, International-Inland.” You can get a copyfrom your local U.S. Coast Guard Unit or the United States CoastGuard Headquarters, 1300 E. Street NW, Washington, D.C. 20226.
Other helpful publications available from the U.S. Coast Guardinclude “Aids to Navigation” (U.S. Coast Guard pamphlet #123),which explains the significance of various lights and buoys; the“Boating Safety Training Manual”; and “Federal Requirements ForRecreational Boats.” Check with your local Coast Guard station,
your Chaparral dealer, or a local marina about navigational aidsunique to your area.
U.S. Coast Guard Website: www.uscg.milCalifornia Coast Guard Website: www.ccg-ggc.gc.ca
If you have a marine radio telephone, heed storm warnings andanswer any distress calls from other boats. The word “MAYDAY”spoken three times is the international signal of distress. Monitormarine radio channel 16 which is reserved for emergency andsafety messages. You can also use this channel to contact theCoast Guard or other boaters if you have trouble.
Important: Never send a “MAYDAY” message unless there is aserious emergency and you are in need of immediate assistance.
Warning Markers
Always check with local authorities concerning regional hazardousareas and how they are marked. Other considerations include:
• Boat operators must be able to recognize marine flag designsand respond accordingly.
• Caution should always be exercised relative to swimmers.Swimming areas may not always be marked.
• Navigation markers identify navigable routes and indicate waterhazards. Boat operators should familiarize themselves with theseimportant navigational tools and operate their boats accordingly.
• Be prepared to assist anyone flying a ‘distress’ flag as they arerequesting immediate assistance.
Drugs and Alcohol
Drugs and alcohol affect a person’s ability to make sound judg-ments and react quickly. A responsible boater refrains from usingdrugs or alcohol while operating their boat. Operation of motorizedvessels while under the influence carries a significant penalty. Drugs
2-3

and alcohol decrease your reaction time, impair your judgement,and inhibit your ability to safely operate your boat.
SAFETY EQUIPMENT
Important: Federal law requires you to provide and maintainsafety equipment on your Chaparral boat. As the boat owner,you are responsible for supplying all required safety equip-ment. Consult your Coast Guard, state, and local regulations toensure your boat has all required safety equipment on board.Additional equipment may be recommended for your safetyand that of your passengers. Make yourself aware of its avail-ability and use.
Personal Flotation Devices (PFDs)
There must be one United States Coast Guard approved wearablepersonal flotation device of Type I, II, or III for each person on boardor being towed on water skis, water sports tubes, kneeboards, etc.and one Type IV throwable device on board. The PFDs must be of asuitable size for each person aboard and must be in serviceablecondition and readily accessible.
PFD Type I, Wearable: This off-shore life jacket has the greatestbuoyancy. It is most effective for all waters where rescue may bedelayed. Its design allows for turning most unconscious persons inthe water from a face down position to a vertical or face-up position.
PFD Type II, Wearable: This near-shore buoyant vest provides lessbuoyancy than a Type I PFD. It is intended for calm inland water orwaters where there is a chance of quick rescue. It turns its wearer toa face-up position as does the Type I PFD, but the turning action isnot as pronounced as the Type I, and it will not turn as many per-sons under the same conditions as a Type I.
PFD Type III, Wearable: Classified as a flotation aid, this PFDallows wearers to place themselves in a vertical or face-up positionin the water. Type III has the same minimum buoyancy as a Type IIPFD. It has little or no turning ability. People participating in watersports often prefer this PFD because it intended for use in waters
where quick rescue is possible and it is generally the most comfort-able for continuous wear.
PFD Type IV, Throwable: You must also have aboard at least onethrowable PFD Type IV device. The Type IV device can be thrownto a person in the water and grasped and held by the user until res-cued. The design does not allow it to be worn. The most commonType IV PFDs are buoyant cushions or ring buoys. This PFD mustbe immediately available for use and in serviceable condition.
PFD Type V: Must be worn to be effective. When inflated, it pro-vides buoyancy equivalent to Type I, II, or III PFDs.
Fire Extinguishers
As the boat owner, you are responsible for making sure you havethe required number of fire extinguishers. Fire extinguishers mustbe approved by the U.S. Coast Guard.
Boats longer than 26 feet and shorter than 40 feet: Two Type B-1 orat least one Type B-2 portable hand extinguishers. If your boat hasa fixed fire extinguishing system approved by the U.S. Coast Guard,one Type B-1 extinguisher is required.
Boats longer than 16 feet and shorter than 26 feet: At least oneportable hand Type B-I fire extinguisher.
When outfitting your boat with portable fire extinguishers, make surethat you select a model that is large enough to fill the volume of yourboat’s engine compartment. Have your dealer help you choose theproper equipment for your boat.
All fire extinguishers should be mounted in a readily accessible loca-tion away from the engine compartment. Everyone on board shouldknow where the fire extinguishers are and how to operate them.
If your fire extinguisher has a charge indicator gauge, cold or hotweather may affect the gauge reading. Consult the instruction man-ual supplied with the fire extinguisher to determine the accuracy ofthe gauge.
2-4

Visual Distress Signals
The U.S. Coast Guard requires all boats operating on U.S. coastalwaters have visual distress signal equipment on board. In general,coastal waters include all waters except rivers, streams, and inlandlakes. The Great Lakes are considered coastal waters as is a rivermouth more than two miles wide. Boats owned in the United Statesand operating on the high seas must also carry visual distresssignal equipment.
Visual distress equipment must be in serviceable condition andstowed in a readily accessible location. Equipment having a dateshowing useful service life must be within the specified usage dateshown. Both pyrotechnic and non-pyrotechnic equipment must beU.S. Coast Guard approved.
Pyrotechnic U.S. Coast Guard approved visual distress signals andassociated equipment include:
• Red flares, hand held or aerial
• Orange smoke, hand held or floating
• Launchers for aerial red meteors or parachute flares
Non-pyrotechnic equipment includes an orange distress flag and anS-O-S electric distress light.
No single signaling device is ideal under all conditions for all pur-poses. Consider carrying various types of equipment. Carefulselection and proper stowage of visual distress equipment are veryimportant. If young children are frequently aboard, you should selectdevices with packages which children, but not adults, will find diffi-cult to open.
Sound Signaling Device
Your Chaparral boat must have a device that can produce a soundsignal when conditions require. For boats over 26 feet, the devicemust be able to produce a two-second blast which can be heard a
mile away. For boats less than 26 feet, it must be able to produce atwo-second blast which can be heard one-half mile away. It can bea hand, mouth or power operated horn or whistle. Refer to the U.S.Coast Guard’s publication “Navigational Rules, International-Inland”for details about the appropriate signals.
RUNNING AND NAVIGATION LIGHTS
Your boat must have running and navigation lights for safe opera-tion after dark. Observe all navigation rules for meeting andpassing. Do not run at high speeds during night operation. Alwaysuse common sense and good judgment.
SAFETY AFLOAT
Once your boat is launched and your excursion is underway, youneed to be aware of your surroundings and how they may affect yoursafety and that of your passengers. There is no substitute for goodjudgment and common sense.
Weather
Storms rarely appear without advance notice. Check the weatherforecast before you begin a day of boating. Be aware, however, thatweather conditions can change rapidly. If you have a marine radio,listen to the weather reports issued by the U.S. Coast Guard andothers. If you have a portable radio, keep it tuned to a station broad-casting frequent weather reports. Many boating clubs fly weathersignals. Learn to recognize these signals and listen to your localforecasts before leaving port.
Your surroundings can also be a good indicator of changing weatherconditions. Watch for changes in wind direction or cloud formations.There is no substitute for a good understanding of weather condi-tions and what to do when the weather takes a turn for the worse.
Fog
Fog is a result of either warm-surface or cold-surface conditions.You can judge the likelihood of fog formation by periodically mea-
2-5

suring the air temperature and dew point temperature. If the differ-ence between these two temperatures is small, fog is likely todevelop. Remember the following guidelines:
• Turn on running lights.
• Unless your boat is well equipped with charts, head for shore atthe first sign of fog and wait until conditions improve. If you havecharts on board, take bearings as fog sets in, mark your posi-tion, and continue to log your course and speed.
• Make sure all persons on board have put on their personal flota-tion devices.
• If your boat has sounding equipment, take soundings regularlyand match them with depths shown on your charts.
• Station a person forward in the boat as a lookout.
• Reduce your speed. From time to time, stop engine(s) and listenfor other fog signals.
• Sound the horn or fog bell intermittently to warn others.
• If there is any doubt in continuing your excursion, anchor. Listen forother fog signals while continuing to sound your fog horn or bell.
Storms
The present and forecasted weather conditions are a primary con-sideration, and the possibility of storms should always be a concern.If storms are a possibility, keep a watch on the horizon, especially tothe west, for approaching storms. Monitor the weather forecast on amarine channel or local weather station. The best possible situationis to return to a safe port if time allows.
Other steps to follow to weather the storm include:
• Close and secure port holes. Stow all loose gear below deckand tie down any gear on deck.
• Reduce speed as the seas build. Make sure all persons onboard have put on their personal flotation devices.
• Trail a sea anchor from the bow. If you do not have a sea anchoraboard, use a canvas bucket, tackle box, or other object that willwork like a sea anchor.
• Radar reflectors (if installed on your boat) should be 18 inchesdiagonally. They should be placed as far above waterline aspossible. Otherwise, a boat with radar may have trouble “see-ing” your boat.
Man Overboard
Should someone in the boat fall overboard:
• Act quickly—treat every situation as an emergency.
• Move throttle to idle position and yell “Man Overboard”.
• Immediately throw a Type IV PFD to the person in the water.
• Have someone in the boat assume responsibility for watchingthe person in the water and keep them in sight while the boatmaneuvers back to them.
• Approach the person into the wind and waves. When alongside,put the engine in neutral and throw them a Type IV PFD with aline attached or extend an oar or boat hook.
Fire
Important: A fire aboard your boat is a serious emergency. Youmust act immediately!
Every boater should develop a fire response plan to determine whatkind of fire (fuel, electrical, etc.) might break out, where it might breakout, and the best way to react. Having a plan and assigning respon-sibilities to others results in quicker decisions and quicker reactions.
2-6

Important: Everyone on board should know where fire extin-guishers are and how to operate them.
Any fire requires stopping the engine(s) immediately. Then:
• If the fire is in the engine compartment, shut off the bilgeblower immediately. If equipped the fire extinguisher systemwill discharge in the event of a fire. The heat sensitive auto-matic head will release the extinguishant as a vapor, totallyflooding the compartment in fire-killing concentrations. Thesystem indicator light is wired to the ignition and is turned onwhen the ignition is turned on. The indicator light, located atthe dash panel, indicates to the helmsman when the unit hasdischarged. Under normal operation, the indicator light is lit. Ifthe unit discharges, the charge light will go out.
• Do not open the hatch to the engine compartment! The firewill flare up if the fresh air supply increases suddenly.
• Keep the fire downwind if possible. If the fire is aft, head intothe wind.
• Have all persons on board put on their personal flotation devices.
• If you can get at the fire, aim the fire extinguisher at the base ofthe flames and use a sweeping action to put out the fire.
• If the fire gets out of control, make a distress signal, and call forhelp on the radio.
Deciding whether to stay with the boat or abandon ship will be difficult.If the decision is to abandon ship, all persons on board should jumpoverboard and swim a safe distance away from the burning boat.
Guidelines for Fire Prevention
• Check the bilge for fuel leaks• Check cleaning products for flammability• Ventilate when cleaning or painting• Disconnect electrical system from power source when perform-
ing any type of maintenance• Use extra caution when using exposed flame around urethane
foam• Extinguish smoking materials carefully• Ensure ventilation systems are not obstructed• Use only approved marine cooking and heating systems• Open flames demand constant attention• Keep flammable materials in approved containers• Replace circuit breaker fuse with one of the same amperage• Electrical appliances must be within rated amperage of boat
circuits• A qualified marine electrician should service the electrical
system
Flooding, Swamping or Capsized Boat
Flooding or swamping is usually caused by the actions of an inat-tentive boat operator, or by hazardous weather or water conditions.To prevent boat flooding:
• Install drain plug before launching.• Ensure proper bilge pump operation.• Do not overload boat.• Adjust boat speed and trim to match sea and weather
conditions.• Close all cabin hatches, doors, etc. while underway to prevent
flooding due to heavy seas or rain. Ensure proper ventilation toavoid carbon monoxide poisoning. See carbon monoxide hazardinformation later in this chapter.
• When only using one anchor, it should be attached to the bow ofthe boat.
• When slowing down or moving in reverse do not allow wake orfollowing seas to flood cockpit.
2-7
WARNING: Smoking, poor maintenance, or carelessness whenrefueling can cause hazardous conditions. Always follow properrefueling procedures for your boat.

If your boat becomes swamped or capsizes, put on a PFD immedi-ately and set off a distress signal. Chances are good that acapsized boat will stay afloat. For this reason, stay with the boat. Donot leave the boat or try to swim to shore except under extremeconditions. A capsized boat is easier to see than a swimmer, andthe shore may be farther away than it appears.
More often than not, boats sink while docked. Any number of factorsmay contribute to these sinkings. There may have been a mechani-cal failure such as a failed bilge pump or an electrical problem suchas a dead battery or tripped circuit breaker. Check your boat regu-larly if it is docked for an extended period of time to make sureeverything is in order.
Hypothermia
If a person falls overboard, hypothermia may be an immediate con-cern. Hypothermia means a person’s body loses heat to the waterfaster than the body can replace it. If not rescued, the person willbecome exhausted or likely drown. In general, the colder the water,the shorter the time for survival. PFDs will increase survival timebecause they provide insulation.
Water Exhaustion Expected TimeTemperature Unconsciousness of Survival
(°F)
32.5 Under 15 min. Under 15 to 45 min.32.5-40 15-30 min. 30-90 min.40-50 30-60 min. 1-3 hr50-60 1-2 hr 1-6 hr60-70 2-7 hr 2-40 hr70-80 3-12 hr 3 hr-Indefinite
Over 80 Indefinite Indefinite
Collision
If a serious collision occurs, first check the persons on board forinjuries. Then inspect the boat to determine the extent of damage.
• Prepare to help the other craft unless it places your passengersor boat in danger.
• If the bow of the other boat penetrated your boat’s hull, prepareto plug the fracture once the boats are separated.
• Shore up the hole inside your boat with a spare life jacket orcushion.
• While plugging the hole, shift weight to get the hole above thewater level.
• If your boat is in danger of sinking, have all persons put on theirpersonal flotation devices.
• If your boat has a radio, contact the U.S. Coast Guard or otherrescue authorities immediately (VHF channel 16 or 22 CB radio).
Running Aground
If you run aground check everyone for injury and inspect damage tothe boat and propeller(s). If possible, shift weight of passengers orgear to heel the boat while reversing engine(s). If towing becomesnecessary, do not attach tow line to deck cleats. These are notdesigned to take full load of the boat. Chaparral recommends usinga commercial towing service.
2-8
WARNING: When towing another boat or having your boattowed, make sure the tow line is fastened securely to the bow ortransom towing eyes. Never attach tow line to deck cleat oranchor windlass. Cleat or windlass may pull free from deck andcause serious personal injury or property damage.

Carbon Monoxide Hazard During Operation
Carbon monoxide (CO) in the engine exhaust is a poisonous gaswhich is odorless, colorless, and heavier than air. Direct prolongedexposure can result in carbon monoxide poisoning which can beharmful and may be fatal.
Indications of excessive exposure to carbon monoxide concentra-tions may include nausea, dizziness and drowsiness. Carbonmonoxide poisoning requires the operator’s special and immediateattention! To prevent excess exposure and reduce the possibility ofcarbon monoxide accumulation in the cabin of the boat, ensure ade-quate ventilation by opening cabin hatches, cabin doors, cabinwindows, and side windshield vents to increase air movement.
Some Chaparral models are equipped with a CO detector. Follow theoperating instructions supplied with the CO detector and test the unitto verify that it is functioning properly every time you use your boat.Refer to the information provided by the manufacturer in your owner’spacket to determine replacement interval for your CO detector.
The following illustrations show how carbon monoxide can possiblyaccumulate in your boat while at the dock or underway. Becomefamiliar with these examples and their precautions to prevent dan-gerous accidents from occurring on your boat.
2-9
DANGER: Blocked hull exhaust outlets near a pier, dock, seawall bulkhead or any other means can cause excessive accumu-lation of poisonous carbon monoxide gas within the cabin areas.Make sure hull exhaust outlets are not blocked. (Figure 2.1)
Figure 2.1 Running engine or generator in confined areas
CLOSE WINDOW
LEAVING WINDOW OPEN WHILE BOATIS UNDERWAY OR AT DOCK
COULD INDUCE EXHAUST FUMES INTOCABIN CAUSING INJURY OR DEATH.
WARNING
DANGERCarbon monoxide (CO) can cause brain damage or death.
Engine and generator exhaust contains odorless and colorless carbon monoxide gas.
Carbon monoxide will be around the back of the boat when engines or generators are running.
Move to fresh air, if you feel nausea, headache,dizziness, or drowsiness NW-206-06
WARNINGCarbon monoxide (CO) can cause brain damage or death.
Engine and generator exhaust contains odorless and colorless carbon monoxide gas.
Signs of carbon monoxide poisoning include nausea, headache, dizziness, drowsiness, and lack of consciousness.
Get fresh air if anyone shows signs of carbon monoxide poisoning.
See Owner’s Manual for information regarding carbon monoxide poisoning.
NW-204-06
WARNINGCarbon monoxide (CO) can cause brain damage or death.
Carbon monoxide can be present in the cabin.
Signs of carbon monoxide poisoning include nausea, headache,dizziness, drowsiness, and lack of consciousness.
Get fresh air if anyone shows signs of carbon monoxide poisoning.
Get fresh air if carbon monoxide detector alarm sounds.
Carbon monoxide detector must be functioning at all times.NW-205-05

Ensure proper ventilation aboard your boat and be aware of thepossibility of carbon monoxide poisoning (Figure 2.4). Keep yourboat in safe operating condition. Periodically inspect the hull, engineand engine compartment, and all other equipment.
CHECKLISTS
Each Trip
• Make sure all exhaust clamps are in place and secure.
• Look for exhaust leaking from the exhaust system componentsevidenced by rust and/or black streaking, water leaks, or cor-roded or cracked fittings.
• Inspect rubber exhaust hoses for burned or cracked sections. Allrubber hoses should be pliable and free of kinks.
• Confirm that water flows from the exhaust outlet when theengines and generator are started.
• Listen for any change in exhaust sound which could indicate afailure of an exhaust component.
• Test the operation of each carbon monoxide detector by press-ing the test button.
Note: Do not operate the vessel if any of these problems exist.
2-10
Figure 2.4 Desired Ventilation Through the Boat
DANGER: Hull exhaust from your boat while underway cancause excessive accumulation of carbon monoxide within thecabin and cockpit areas when using protective weather cover-ings. Provide adequate ventilation when the canvas top, sidecurtains, and/or back curtains are closed. (Figure 2.3)
Figure 2.3 Exhaust Accumulation While Canvas is in Place
DANGER: Generator or hull exhaust from other vesselsalongside your boat, while docked or anchored, can emit car-bon monoxide and cause excessive accumulation within thecabin and cockpit areas. Be alert for generator exhaust fromother vessels alongside. (Figure 2.2)
Figure 2.2 Exhaust Fumes from Vessel Alongside

At Least Annually(performed by a qualified marine technician)
• Replace exhaust hoses if any evidence of cracking, charring ordeterioration is found.
• Replace each water pump impeller and inspect the condition ofthe water pump housing. Replace if worn. (Refer to the engineand generator manuals for further information.)
• Inspect each of the metallic exhaust components for cracking,rusting, leaking or looseness. Pay particular attention to thecylinder head, exhaust manifold, water injections elbow, and thethreaded adapter nipple between the manifold and the elbow.
• Clean, inspect and confirm the proper operation of the generatorcooling water anti-siphon valve (if equipped).
Fuel System
Everyone who owns or operates a boat must practice fire safety.Each year, boat fires and explosions injure hundreds of individualsand cause millions of dollars in property damage. Many of theseaccidents can be prevented.
Be alert for damage to your boat’s fuel system. Over time, fuel fit-tings and fuel hoses wear out. Inspect these fittings and hosesregularly, especially near the engine where engine heat and vibra-tion can accelerate deterioration.
What to do1. Schedule regular engine and exhaust system maintenance
inspections by experienced and trained technicians.
2. Inspect fuel systems annually, particularly hoses, connectionsand tank surfaces. Use only USCG-approved fuel hoses.
3. Before fueling, shut down engines and auxiliary equipment and allelectrical equipment. Also close all hatches and doors on board.
4. Do not allow equipment or gear to contact fuel-system compo-nents. Monitor side storage areas where fill and vent hoses areoften located.
5. Do not store portable fuel tanks in enclosed areas, including theengine room compartment (even though it may be “ventilated”).
6. If your boat is equipped with a ventilation system, ensure that allblowers and hoses are operational and intact. Verify good air-flow at the vent located on the boat.
7. Take a boating safety course and learn the correct type and useof a fire extinguisher aboard a boat.
Each Trip• Before starting the engine “sniff” your bilges. Getting down on your
hand and knees and using your nose is the best fuel/vapor detector.
• Operate the bilge blower for AT LEAST FOUR MINUTES beforestarting an inboard or sterndrive engine. If you still smell fumes, tryto locate the source and make repairs before starting the engine.
• Make sure all passengers know where to find your fire extin-guishers and how to operate them.
• Before refueling, close all hatches, ports and other openings;shut off engines, motors, pumps and blowers; and DO NOTSMOKE. Fill all portable tanks on the dock.
2-11
WARNING
AVOID DAMAGE TO YOUR FUEL SYSTEM
DO NOT USE FUEL OR ADDITIVES CONTAINING MORETHAN 10% ALCOHOL BY VOLUME (Methanol or Ethanol)
DAMAGE AND LOSS OF WARRANTY MAY RESULT

• After refueling, wipe up or wash off any excess or spilled fuel;open all hatches and ports; and let the boat air out. “Sniff” yourbilges. Operate the bilge blower for AT LEAST FOUR MINUTESbefore starting the engine.
Important: Do not operate your boat until the source of a fuelleak is identified. Have a qualified service technician correctthe condition. NEVER USE A MATCH TO INSPECT FOR LEAKS.
At Least Annually:(Performed by a qualified marine technician)• Replace fuel system components if any evidence of cracking,
corrosion or deterioration is found.
• Inspect fuel tanks annually. Pay particular attention to bottomsurfaces that may have contacted bilge water. Also, check tosee if any part of the tank is corroded or damaged from rubbingand abrasion. Permanently installed fuel tanks must be ventedto the atmosphere outside the boat. Closed compartments thatcontain fuel tanks and engines or non-ignition protected electri-cal components must be ventilated.
• Be sure the fill pipe is securely mounted, grounded and locatedwhere spilled fuel is directed overboard. Dry and cracked or softand mushy fuel fill hoses should be replaced immediately.
• If your boat is equipped with bilge blowers, ensure they areworking properly.
• Ensure cooking appliances on board are secured and operateproperly. Refer to the appliance owner’s manual for guidance oninspecting for leaks in valves and connections. NEVER USE AMATCH to inspect for leaks.
• Ensure flammable items are stowed safely and cannot contactcooking appliance or hot engine parts.
• Ensure fire extinguishers are USCG-approved and in goodworking order (i.e., gauges register and nozzles are clear).
• Repair all bare wires and loose electrical connections that mightcause a short in your boat’s electrical system and start a fire.
• Do not store disposable propane cylinders or charcoal lightingfluid on board the boat.
• When replacing starters, generators or other electrical equipment use only ignition-protected parts. Do not use automotive parts.
Navigational Aids Chart
The Navigation Aids Chart (located at the end of this section) con-tains information about various signals, buoys, and warnings.Chaparral recommends you participate in a safe boating course tolearn more about navigating your boat safely.
WATER SPORTS
2-12
! WARNING
USE CAUTION WITH SKIER IN TOWAS TOW ROPE MAY BACKLASH INTO
COCKPIT WHEN RELEASED

Water skiing and other water sports, such as kneeboarding and rid-ing on inflatable towable devices, require an increased safetyawareness by all the people involved.
Important: Remember that three people — not two — are requiredfor safe water skiing: the boat operator, the skier, and anobserver on the boat facing the skier. The observer relays signalsfrom the skier to the operator. The operator can therefore give fullattention to the operation of the boat and the waters ahead.
Figure 2.6 shows a set of hand signals recommended by the AmericanWater Ski Association (AWSA). The skier, the observer, and the boatoperator should know and understand these 7 simple signals.
Following these guidelines helps make water skiing a safe andenjoyable experience:
1. Water ski only in safe areas away from other boats and swimmers,out of channels, and in water free of underwater obstructions.
2. Make sure anyone who water skis is a competent swimmer.
3. Be sure the skier is wearing a proper flotation device. A properlydesigned ski vest will keep a stunned or unconscious personafloat.
4. Approach a skier in the water from the lee side, and be certainto stop your motor before coming close to the skier.
5. Give immediate attention to a fallen skier. He or she is vulnera-ble in the water alone and is difficult to see by other boaters.
For more information about water skiing, Please contact theAmerican Water Ski Association, 799 Overlook Drive, WinterHaven, Florida 33884 (1-800-533-2972) or www.usawaterski.org.
2-13
WARNING: Death or serious poisoning can result from expo-sure to carbon monoxide from engine exhaust. Turn offgasoline-powered generators that exhaust at or near the waterlevel when the swim platform on the stern is in use. Swimmersshould not enter the cavity beneath the swim platform.
1. Thumb Up: Speed up the boat.2. Thumb Down: Slow down the boat.3. Cut Motor/Stop: Immediately stop boat.
Slashing motion over neck (also used by dri-ver or observer).
4. Turn: Turn the boat (also used by driver).Circle motion—arms overhead. Then point indesired direction.
5. Return to Dock: Pat on the head.6. OK: Speed and boat path OK. Or, signals
understood.7. I'm OK: Skier OK after falling.
1 2
3
4
5
6
7
Figure 2.6 AWSA Water Skiing Signals

Additional Equipment
You should consider having additional equipment on board to helpmake your boating experience safer and more enjoyable. Someexamples include the following:
• Anchor and line• Boat hook• Bucket & sponge• Commonly used spare parts• Compass, navigation charts• Distress signal kit• Docking and towing lines• Engine and accessory manuals• Extra keys• Fenders• First aid kit• Flashlight & extra batteries• Fuses• Manually operated bilge pump• Owner’s manual• Paddle• Replacement light bulbs• Ship-to-shore radio• Spare fuel and oil filters• Spare propeller with fastening hardware• Spare set of spark plugs and ignition parts• Tool kit
2-14
WARNING: Serious injury may result from para-sailing, kiting,or similar water sports. Chaparral Boats are not designed fortowing para-sails, kites, or any other device designed to becomeairborne when towed behind a boat.

2-15
ODD NUMBERED AIDSGREEN LIGHT ONLY
FLASHING
OCCULTING
QUICK FLASHING
ISOPHASE
2-15
NAVIGATIONAL AIDS CHARTREMEMBER THESE RULES
1. OVERTAKING - PASSING: Boat being passed has theright-of-way. KEEP CLEAR.
2. MEETING HEAD ON: Keep to the right.3. CROSSING: Boat on right has the right-of-way. Slow down
and permit boat to pass.
SAFE WATERMID-CHANNELS OR FAIRWAYS
NO NUMBERS-MAY BE LETTERED■■ WHITE LIGHT ONLY MORSE CODE
Mo(A)
PORT SIDE STARBOARD SIDE
STORM WARNINGS
RED FLAG 2 RED FLAGS SQUARE 2 SQUARESmall craft Gale RED FLAG RED FLAGS(winds to (winds up to BLACK BOX BLACK BOX33 knots) 47 knots) (Storm) (Hurricane)
WHISTLE SIGNALSONE LONG BLAST: Warning signal (Coming out of slip)
ONE SHORT BLAST: Pass on my port side
TWO SHORT BLASTS: Pass on my starboard side
THREE SHORT BLASTS: Engine(s) in reverse
FOUR OR MORE BLASTS: Danger signal
BRIDGE SIGNALS
DANGERZONE
(Dead aheadto 2 pointsabaft your
starboard beam)
Yieldright-of-way
to boatsin your
DANGERZONE!
SOUNDVESSEL: Open
BRIDGE: OK
No
VESSEL: Replies:
RADIO: VHF CH. 13
VISUALVESSEL: Open
orBRIDGE: OK Same Same
No
DAY NIGHT(Flag) (Lights)
STARBOARDPORT
COMPOSITE GROUP FLASHING ( 2 + 1)■ ■ ■ ■ ■ ■ ■ ■ ■
LIGHTED
PREFERRED CHANNELNO NUMBERS-MAY BE LETTERED
United States Coast Guard Website: www.uscg.mil
G "9"FI G 4sec
LIGHTED BUOY
GC "7"
CAN
GREEN LIGHT ONLY
GR "C"FI (2 + 1)
PREFERREDCHANNEL TOSTARBOARD
TOPMOST BANDGREEN
GRC "L"
CAN
JG
GR"A"
SG
DAYMARK G"1"
RW "N"Mo (A)
LIGHTEDAND OR SOUND
RWSP "G"
SPHERICAL
RW"A"
MR
EVEN NUMBERED AIDSRED LIGHT ONLY
FLASHING
OCCULTING
QUICK FLASHING
ISOPHASE
R "8"FI R 4sec
LIGHTED BUOY
RN "6"
NUN
TR
RDAYMARK "2"
RED LIGHT ONLY
RG "B"FI (2 + 1)
PREFERREDCHANNEL TO
PORTTOPMOST BAND
REDRG
N "W"
NUN
JR
RG"B"
LATERAL AIDS AS SEEN ENTERING FROM SEAWARD

2-16

This chapter discusses the various systems needed to make yourChaparral Cruiser a home away from home. These include the elec-trical, fuel, fresh water, and sanitation systems and relatedequipment. The drawings at the end of this chapter show the typicallocations of system equipment for boats with twin and singleengines, respectively.
Note: For location of items listed in this chapter, refer to therespective drawing. Depending on how your boat is equipped,the location of some items may be different than shown in theillustrations.
Note: The term “engine” in this chapter means one or twoengines, depending on how your boat is equipped.
ELECTRICAL SYSTEMS
Your Chaparral boat has two electrical systems: a 12 volt, direct cur-rent (DC) battery and a 120 or 220 volt alternating current (AC)system. An optional generator or the shore power connection pro-vides power to the AC system.
Safety Precautions
Follow these precautions when working with or on electrical sys-tems or electrically powered equipment:
1. Shut off power supply before starting work.
2. Use insulated mats to prevent accidental grounding.
3. Make sure clothing is dry. Keep skin dry.
4. Remove all metal jewelry.
12 Volt DC Power
Batteries are the source of power for the 12 volt DC (direct current)electrical system. The batteries are charged through the engine-dri-ven alternator or the optional AC (alternating current) batterycharger. The voltmeter on the instrument panel in the dash showsthe battery charging rate when the engine is running. Power fromthe battery is supplied through the selector switch in the stern areaof your boat. Exceptions to this power supply are the forward and aftbilge pumps, refrigerator, macerator, and the windlass. Breakers forthese items are near the battery selector switch in the engine com-partment for the Signatures 350, 330, 310, 290, 280, 270 and 250.All DC power is distributed through the battery selector switch.
The negative terminal of each battery is connected to the groundingstuds of the main engine(s) and generator. This type of negativeground system is the approved system for marine DC electrical sys-tems. If you add additional equipment to your boat it must beadaptable to the negative ground system. Chaparral supplies a fuseblock at the helm for additional electrical equipment.
Note: Consult your Chaparral dealer for additional DC powerneeds on your boat.
3-1
SYSTEMS 3
CAUTION: When adding electrical equipment, be careful not tooverload the fuse block.
WARNING: Considerable care has been taken to design asafe electrical system to protect you from hazardous shocks.Always have a qualified technician make any modifications tothe system.

Batteries
The batteries installed in your boat by your Chaparral dealer supplyyour boat with DC current for lights, engine starting or generator,and accessories. When the engine is running, the alternator sup-plies the power needed to keep the batteries charged. Lights andaccessories draw power from the batteries.
Battery Selector Switch
The battery selector switch is in the engine compartment or stern areaof your boat. Some models will have more than one switch. Leaveswitch on while motor is running or damage will occur to alternator.
Three Selector Switches with Two Batteries andSingle Engine
Models: Signature 270 and 250
Each of the three battery switches have two positions:
All Switches OffPower supplied to automatic bilge pump, CO detector (if soequipped), stereo memory, and corrosion protection system (ifso equipped).
#1 Battery Switch ONUse only Main Engine battery.
#2 Battery Switch ONUse only House battery.
Recommended settings are as follows:
1. All Switches OffWhen boat is not in use or power is not required, turn allswitches to OFF. The only power supplied at this setting isthe automatic bilge pumps, carbon monoxide detector (ifequipped), stereo memory and high water alarm.
2. #1 Battery Switch ONTo start the engine, place switch in ON position. With thissetting, power will now be supplied to your engine.
3. #2 Battery Switch ONFor cabin or accessory power, place the switch in the ONposition. Power will now be supplied to your boat from theHouse battery.
Note: Chaparral does not recommend leaving all threeswitches on when the engine is off. This will drain both batter-ies and you will not have a starting battery.
4. #1 Battery, #2 Battery and Parallel Switches ONIf both batteries are low, you still have the option of startingthe engine by combining the output from both batteries.
Note: When recharging a low battery, be sure to run the enginefor a sufficient amount of time to fully recharge the battery.
Note: Chaparral does not recommend any other settings thanmentioned because of possible damage to batteries or enginealternator.
Note: Chaparral recommends leaving the parallel switch inOFF position unless starting engine.
3-2
DANGER: Do Not disconnect or reconnect battery cables ifgasoline fumes are present!

Four Selector Switches with Three Batteries and TwinEngines
Models: Signature 350, 330, 310, 290, 280
Note: Signature 350, 330, 310 have two house batteries.
Each of the four battery switches have two positions:
All Switches OffPower supplied to automatic bilge pump, CO detector (if soequipped) and stereo memory.
STBD Switch ONUse only STDB (Main Engine) battery.
PORT Switch ONUse only PORT (Main Engine) battery.
HOUSE Switch ONUse only HOUSE battery.
STBD, PORT, and HOUSE Switches ONUse STDB (Main Engine) and PORT (Main Engine) batteries.Emergency parallel switch OFF.
Recommended settings are as follows:
1. All Switches OffWhen boat is not in use or power is not required, turn allswitches to OFF. The only power supplied at this setting isthe automatic bilge pumps, carbon monoxide detector (ifequipped), stereo memory and high water alarm.
2. STBD Switch ONTo start the engine, place switch in ON position. With thissetting, power will now be supplied to your boat from theSTBD (Main Engine) battery.
3. PORT Switch ONTo start the engine, place switch in ON position. With thissetting, power will now be supplied to your boat from thePORT (Main Engine) battery.
4. HOUSE Switch ONFor cabin or accessory power, place the switch in the ONposition. Power will now be supplied to your boat from theHOUSE battery.
Note: Chaparral does not recommend leaving all threeswitches on when the engine is off. This will drain both batter-ies and you will not have a starting battery.
5. STBD, PORT, and PARALLEL Switches ONIf the batteries are low, you still have the option of starting theengines by combining the output from both batteries.
Note: When recharging a low battery, be sure to run the enginefor a sufficient amount of time to fully recharge the battery.
Note: Chaparral does not recommend any other settings thanmentioned because of possible damage to batteries or enginealternator.
3-3
Figure 3.1 270, 250 Battery Panel

Note: Chaparral recommends leaving the parallel switch inOFF position unless starting engine.
AC/DC Converter and Battery Charger
Your Chaparral boat has a battery charging system which operates off120 or 220 volt AC power from shore or the generator charging sys-tem. Turn the charger on at the main cabin electrical panel wheneveryour boat is connected to shore power to keep batteries fully charged.The AC-to-DC converting and charging system is fully automatic andpermanently wired into the 12 volt DC system. If the monitored batterylevel drops under the full charge range, the charger automaticallyturns ON and restores the battery to FULL charge status. If the bat-tery is deeply discharged, the charger will deliver full output. Outputautomatically decreases as the battery is charged. If the battery isfully charged, the charger provides a trickle charge as needed.
120 or 220 Volt AC Power
The alternating current (AC) electrical system operates off a stan-dard 30 amp 120 or 220 volt, 60 or 50 cycle shore power system orthe optional onboard generator.
The main distribution panel in the cabin area has SHIP and SHOREtoggle switches which are covered by a sliding panel to preventturning both switches to ON at the same time.
If your boat has an air conditioning system, the main panel couldhave an additional set of SHIP and SHORE switches dedicated tothe air conditioner. If your boat has an onboard generator, you canuse the generator to power the air conditioner. More detailed infor-mation about the generator and the air conditioning is in Chapter 4and in the manufacturer’s literature in the owner’s packet. Checkwith your Chaparral dealer about proper generator usage.
Shore Power
Before you connect your boat to shore power, turn off the maincabin circuit breakers. Attach the shore power cord to the boat firstand turn clockwise to lock. Thread the locking ring on the inlet tosecure the cord. Connecting the cord to the boat first will preventdropping a “hot” cord into the water. (When you leave the dock,remove the cord from the dockside shore outlet first.) If you have
3-4
CAUTION: To prevent damage to electrical system, never oper-ate shore power system at low voltage.
Figure 3.2 280, 290, 310, 330, 350 Battery Panel
1. Turn off boat’s shore power switch.
2. Connect cable at boat first.
3. If polarity warning indicator is activated, immediately disconnect cable.
4. Disconnect at shore outlet first.
5. Close inlet cover tightly.
SHORE POWERWARNING
To minimize shock hazard, connect and disconnect cable as follows;
DO NOT ALTER SHORE POWER CABLE CONNECTORS

any questions, contact your Chaparral dealer. Always be sure whenusing a Y-adapter or connecting two power cords that any connec-tions are clear of water standing on the dock from rain or thepedestal water outlet.
Make sure the dockside shore power breaker is OFF, then plug inthe cord. Turn the dockside shore power breaker on. Immediatelycheck the polarity light(s) on the main panel. If the REVERSEDPOLARITY light on the main cabin panel illuminates, do not turnon the main cabin breaker.
Turn off the dockside shore power breaker and disconnect yourshore power cord. Inform the marina manager of the problem. If thereverse polarity light does not illuminate, push the test button next tothe light. If the light is functioning properly it will illuminate during thistest and you are now assured that the polarity of your shore powerconnection is correct. At this point, turn on the main cabin AC circuitbreaker(s). You may now use AC powered components on your boat.
Important: Some equipment will not work or may be damaged ifpolarity is reversed. Damage caused by reversed polarity is notcovered under your warranty. Be sure polarity is correct whenyou connect your boat to shore power.
Note: Generator or hull exhaust while docked or anchored, canemit carbon monoxide and cause excessive accumulationwithin the cabin and cockpit areas. Be alert for generatorexhaust from other vessels alongside also.
Shore Power Connection
To connect:Instructions for models that have shore power connectivity.
• Make sure all shore power cords and adapters are clean anddry before use. If they are dropped overboard, do not use untilcompletely dry and checked by a qualified marine electrician.Keep shore power inlet covers tightly closed when not in use.
• Get permission from the marina before connecting to a dockreceptacle and ask if the “polarity” and ground are correct andwhen they were last checked.
• Make certain there are no swimmers in the water around your slip.
• Shut off each individual breaker, the boat’s main AC circuit breaker,and dock breaker before connecting the shore power cord.
• Connect the shore power cord to the boat first, then connect thecord to the dock receptacle and turn on the dock breaker.Ensure dockside breaker is OFF.
• Thread the locking ring on the outlet to secure cable and pre-vent accidental unplugging and turn the dock breaker on thedock to the ON position.
• Check the boat’s “polarity” alarm or light (if equipped) on the ACpanel as soon as the dock breaker is turned on. If the polarity isincorrect, shut the dock breaker off and disconnect the dock endof the shore power cord immediately. Report the problem to themarina. The marina should contact a qualified electrician tomake corrections.
• Turn ON the AC main shore power breaker (if equipped).Individual AC breaker and switches can now be energized.
3-5
CAUTION: Electric shock is possible if you turn on main cabinbreaker when reversed polarity is present.

To Disconnect:
• Shut off each individual breaker first then shut off the boat’smain AC circuit breaker.
• Turn off the dock breaker.
• Disconnect the dock end of the shore power cord first.
• Clean and dry the shore power cord. Store it in a dry location onboard the boat.
You are now disconnected to shore power
Low Emissions Generator
The optional onboard generator can also provide AC power to yourboat’s electrical system. AC power output, in kilowatts, will vary,depending on the Cruiser’s needs. The control panel for the genera-tor is on the main panel in the cabin. Located on this panel is theblower switch for generator. Switch must be on before starting gen-erator and left on while generator is running. Before turning on theship circuit breaker to energize the AC system with the generator,test the polarity of your system as described in the Shore Powersection of this manual. Always be sure that the raw water seacock isopen before starting generator.
Note: See the generator instruction manual for detailed infor-mation about safe operation and proper maintenance.
Lighting
Lighting operates off the 12 volt DC system. Turn lights on or off atthe main electrical panel in the cabin or at the light fixture. See yourChaparral dealer for information regarding bulb replacement.
Ground Fault Interrupter Outlet
The ground fault interrupter outlet provides protection against cur-rents which can be dangerous even though they do not overloadcircuit breakers. These outlets which have a test and reset switch inthe middle of the faceplate provide ground fault protection to thehead and galley outlets on the boat. If there is a difference of morethan 5 milliamperes, a safety switch trips in the outlet and interruptsthe circuit. This protects the person who is operating the electricalequipment from serious electric shock or loss of life. The outlet maynot eliminate the feeling of an electric shock, but it does open thecircuit quickly enough to prevent injury to a person of normal health.
When the outlet’s circuit breaker is tripped, you must push theRESET button. Check this outlet periodically by pushing the TESTbutton. Pushing the TEST button cuts power to the 120 and 220volt outlets. Chaparral recommends replacing GFCI’s once peryear by a qualified electrician.
Electrolysis and Zinc Anodes
Many boaters are unaware of the problems associated with electroly-sis and how to properly address corrosion issues. Electrolysis is areaction between metal and electrical energy. Electrolysis occurs whenelectrical current is "leaking" into the water, and can come from a vari-ety of things such as ship to shore power, sharing electrical wires, oldelectrical devices in contact with the water, batteries in boats, etc.
Electrolysis can also be caused by “stray currents” due to a fault inan electrical item, even though correctly grounded. Chaparral boatswith shore power are equipped with a galvanic isolator which iso-lates the boat from the dockside electrical system.
Electrolysis/corrosion is a very real issue and expense for anyboater and boat owners must be aware of the proper protection andmaintenance. Corrosion will directly affect the performance of yourboat within a very short period of time.
3-6

It is the boat owner’s responsibility to check for and replace dam-aged parts due to galvanic deterioration. Refer to your Chaparraldealer to investigate the source of stray corrosive currents.
Zinc plates are installed on the transom and trim tabs to protectunderwater hardware on your boat. Zinc is less noble than copperbased alloys and aluminum used in underwater fittings; therefore, itwill deteriorate first and protect the more noble parts.
Zinc anodes generally require replacement about once a year. (Insalt water areas, replace every six months). The need to replaceanodes more frequently may indicate a stray current problem withinthe boat or at the slip or mooring. If zinc anodes are not replacedannually, they may not be providing the necessary protection.
Note: Do not paint between the zinc and any metal it touches.Do not paint over the zinc.
When an AC shore power system is connected to the boat, theunderwater metal fittings will be connected through the water togrounded metals ashore. The zincs will be consumed as a fasterrate unless the marina maintains a protective system to prevent this.
Placing a zinc in the water bonded to the metal outlet box on thedock will reduce zinc loss on the boat. Do not connect this zinc tothe boat’s ground system.
Important: All electrically operated DC equipment and acces-sories must be wired so that the ground polarity of each deviceis the same as that of the battery. Chaparral boats have a nega-tive ground system, which is recommended practice
throughout the marine industry. All metal items (fuel tanks,underwater hardware) in the boat are connected to the zincanode by the green bonding wire.
Once a year(Performed by a qualified marine technician)
Verify the integrity of the boat’s entire AC shore power groundingsystem, including the connection to the DC system negative.
Verify that any galvanic isolators (if installed on your boat) meetcurrent American Boat & Yacht Council (ABYC) standards and arefully functional.
Inspect shore power cords, adapters and boat receptacles for anysigns of deterioration, including cord wear, loose connections, signsof sparking or overheating and bent or pitted blades. If there are anysuch signs, examine, correct, and test the equipment or replace it.
Operate the boat’s electrical system at full load (everything on) andcheck for AC system leakage or voltage between the boat’s under-water fittings (bonded system, if equipped) and the shore side ACsystem ground.
General Electrical System Information
Electrical panel and shore power inlet wire connections may possi-bly loosen over time. Chaparral recommends having your dealercheck these connections at least annually, or if you are having anyelectrical system problem. Due to potential electrical shock hazard,do not attempt this service procedure yourself. Your dealer istrained to properly diagnose and correct electrical problems safely.
Galvanic Isolator
A galvanic isolator is installed in your boat and electrically con-nected between the boat’s AC panel ground and the dockside ACground wire. The galvanic isolator is designed to permit AC groundcurrents to pass safely between the boat and the dockside, but to
CAUTION: Replace zinc sacrificial anodes if they are corroded50% or more.
3-7

block the small DC currents that flow in seawater between boats ina marina because different metals on the boat are in the water.When the shore power cord is connected to boat and breaker, thegreen light on the panel should be on.
FUEL SYSTEM
The internal fuel system on your Chaparral boat meets all currentFederal requirements.
Fuel lines, filters, and all fuel system components should bechecked at the start of each season and periodically thereafter, par-ticularly after any work has been done aboard the boat which mighthave affected any part of the system. Be certain that all are inproper condition and that the entire system is fuel tight.
The fuel tank is located forward of the engine compartment underthe cockpit floor. The fuel tank fill pipe is located on the outsidedeck. Some models have a dual fuel system, providing convenienceand flexibility of refilling your fuel tank from either side of the boat.
The fuel tank vent allows air to escape as the tank is being filled andhelps equalize tank pressure as temperatures change. The tankhas an anti-siphon valve which keeps fuel from leaking into the boatin case of fuel line breaks.
Periodically, check the condition of the fuel tank components. Fueltank fittings are accessible through the inspection plate of the cock-pit floor.
Note: The fuel fill cap has a built in tank ventilation feature. Ifyou should need to replace the cap, see your Chaparral dealerfor the exact cap to ensure proper fuel system operation.
Fuel Recommendations:
The quality of the fuel is very important for satisfactory engine per-formance and long engine life. Fuel should be clean and free ofcontamination. Your fuel tanks should be kept full of fuel wheneverpossible. This will reduce the amount of water condensation andreduce the possibility of contamination
FRESH WATER SYSTEM
The fresh water system provides water from an onboard storagetank. Figure 3.3 shows a typical system and its components. A hotwater heater can provide hot water to the fresh water system. Beforeusing any fresh water system component, the water pump breakerswitch on the DC electrical panel must be switched on. When usingthe shower in the head compartment, be sure to switch on the sumppump switch (if so equipped) on the DC electrical panel, to activatethe automatic sump pump connected to the shower drain.
The fresh water tank is filled through the fill plate on the side of thedeck. The tank vent is next to the fill plate. The vent allows air toenter and escape as water levels change. Fill the tank only withpotable water. Using and refilling the tank frequently keeps drinkingwater fresh and clean.
Some models are equipped with an optional dockside water inlet.This allows city water to be connected to boat while at dock.
Note: Do not leave boat unattended for extended periods with-out disconnecting dockside water.
3-8
! WARNINGAVOID SERIOUS OR FATAL INJURY DUE TO
ROTATION OF SEAT.LOCK SWIVEL WHEN SPEED EXCEEDS 5 M.P.H.
WARNING
AVOID DAMAGE TO YOUR FUEL SYSTEM
DO NOT USE FUEL OR ADDITIVES CONTAINING MORETHAN 10% ALCOHOL BY VOLUME (Methanol or Ethanol)
DAMAGE AND LOSS OF WARRANTY MAY RESULT

Transom Shower
Nothing is more luxurious than being able to rinse yourself off withfresh water after swimming or water skiing in salt water. Some mod-els have an optional transom shower which is located at thetransom and has pressurized water. Most showers have a push but-ton shower head. Pressure water switch is located at helm.
Sanitizing the Fresh Water System
Sanitize the fresh water system before you use it the first time,when you recommission your boat after winter storage, or whensystem has not been used for an extended period of time.
Note: Fresh water tank must be empty before beginning sani-tizing process. Empty tank if necessary.
To sanitize the tank:
1. Pour 10 ounces of household bleach for every 10 gallons ofcapacity into the water tank.
2. Fill the water tank with fresh clean water.
3. Turn on water pump switch to pump water throughout the system.
4. When a steady stream of water is coming from the faucets, allair is out of the system. Turn switch OFF after closing faucets.
5. Allow treated water solution to remain in tank for 3 to 4 hours.
6. Turn on water pump switch and pump all treated water solutionfrom tank and lines through all faucets.
7. Refill tank with fresh water and turn on pump to thoroughly flushentire system with fresh water after each sanitizing.
Note: If fresh water tastes like chlorine after sanitizing, pour asolution of 1 quart of vinegar and 5 gallons of fresh water intothe tank and allow solution to stand in tank for several days.Then drain entire system and flush with fresh water. Fill tankwith fresh water.
3-9
Figure 3.3 Potable Water System
HEAD SINK/SHOWERFILLVENT
FRESH WATER
HEATER WITH
EXCHANGER
PUMP & FILTER
HOT WATER
TRANSOMDOCKSIDEWATERINLET(OPTIONAL)
SHOWER
COLD WATER
STERN BOW
GALLEYSINK
ENGINE
CAUTION: Bleach causes eye and skin irritation. Notify all per-sons onboard the fresh water system is being sanitized. Do notallow anyone to drink water from fresh water system while it isbeing sanitized. In case of body contact, follow directions onbleach container.

INITIAL STARTUP
After you have sanitized the fresh water system, follow these proce-dures to start the system:
1. Partially fill the fresh water tank.
2. Move WATER PUMP switch at main panel in cabin (or at helm)to ON.
3. Open cold water galley faucet to allow air to escape. Closefaucet when you see a steady flow of water.
4. Your boat is equipped with a hot water heater, so open hot watergalley faucet to fill water heater and allow air to escape fromline. Close faucet when you see a steady flow of water.
5. Bleed air from remaining faucets by opening each one until yousee a steady flow of water and then closing faucet.
6. Fill fresh water tank to capacity.
Water Pump and Filter
Once the water pump switch is switched on, the water pump sup-plies water under pressure to the fresh water system. The filterkeeps particles from entering the pump reservoir. Check the filterperiodically and clean if necessary. A clogged filter may be thecause of low water pressure to the system.
Before servicing the filter, turn the water system breaker OFF andrelease pressure on the system by opening all faucets. To clean thefilter, remove screen and rinse with clean water. Replace and makesure the O-ring is seated properly when installing the cover.
Note: Refer to the water pump manual for detailed operationand maintenance procedures.
MARINE SANITATION DEVICES
3-10
WARNING: Explosion Hazard! Waste in the holding tank canform methane, an explosive gas. Keep vent open and clear ofobstructions. Keep fire and flame away when maintaining sanitation system.
VACUUMTOILET
VACUUMGENERATOR
THRU-HULL FITTING
T SERIESDISCHARGE
PUMP
DECK DISCHARGE
VENTFILTER
TANKWATCH
HOLDING TANK
VENTFITTING
1) VENT FILTER STANDARD ON SIGNATURE MODELS 270 AND LARGER.2) VACUUM GENERATOR IS INTEGRATED WITH HOLIDNG TANK ON MOST CHAPARRAL MODELS.
SEE NOTE 2
SEE NOTE 1
12VDC
LEVEL MONITOR SYSTEM
R
EMPTY MID FULL
Figure 3.4 VacuFlush® System
VACUUMTOILET
THRU-HULL FITTINGT SERIES
DISCHARGEPUMP
DECK DISCHARGE
VENTFITTING
VACUUMHOLDING TANK
Vacuum Toilet
The EcoVac toilet operates in a way different from other marine toi-lets. EcoVac systems use a small amount of water (a little morethan a pint) per flush in addition to a simple vacuum. The toilet isconnected to a pressurized freshwater system. Fresh water is thekey to an odor-free bathroom compartment. EcoVac toilets areequipped with an integral vacuum breaker which prevents the possi-ble contamination of the potable water supply.
Vacuum Tank
The vacuum tank stores vacuum energy. System vacuum level ismonitored by a vacuum switch located on the vacuum tank. Whenthis switch senses a drop in vacuum in the system, it automaticallysignals the pump to energize and bring the vacuum to operatinglevel. This process is normally completed in less than one minute. Ina properly operating system, the stored vacuum will leak downbetween flushes, causing the vacuum pump to run for a short period.
Vacuum Pump
The vacuum pump is an electric, straight-through bellows type. It ismanufactured of long-lasting polypropylene and draws only 4 to 6amps of current at 12 VDC. This unique pump design is both an effi-cient air and liquid pump, and handles solids without a problem. Ithas two duckbill valves on each side of the pump chamber.
Vacuum Generator
The vacuum generator combines the vacuum tank and vacuumpump in one unit. It greatly reduces installation time and eliminatesthe hose run between the tank and pump. Its compact size makes itespecially well-suited to smaller crafts.
Vacuum Holding Tank
The vacuum holding tank combines the vacuum tank, vacuum pumpand holding tank. Refer to the Vacuum Holding Tank Owner’sManual for installation and troubleshooting information.
Note: See the owner’s manual supplied by the manufacturer forsafety precautions and for detailed operation, maintenance andwinterizing procedures. The manual is in your owner’s packet.
Flushing fresh water through the head is also a good idea if you willbe leaving the boat for two or more days. Doing so will clear allwaste from the lines into the holding tank. Waste in the lines tendsto dry out. These hardened wastes may affect future operationbecause they make the inside diameter of the hose smaller.
Overboard discharge
Important: Overboard discharge of untreated sewage within 12miles of shore on the east coast and within 9 miles of shore onthe west coast is prohibited by law. Check with the local author-ities for proper discharge procedures in your area. If your boatis going to be used on inland waters, have your dealer seal theoverboard discharge portion of your waste system.
If regulations permit, the macerator can be used to pump wastefrom the holding tank overboard. The MACERATOR circuit breakerat the battery selector switch panel protects the power supply to themacerator. The macerator pulls the waste from the holding tank,grinds the waste into small particles, and pumps the waste over-board through a hull discharge fitting above the water line.
Follow these procedures to operate the macerator:
1. Switch on the MACERATOR switch in the head compartment.
2. Allow the macerator to run until the holding tank is empty, butnot longer. Running the macerator when the tank is emptywill cause damage to the pump.
3. When you hear the pump speed up (indicates tank is empty),immediately turn the switch off.
3-11

Note: If the macerator won’t turn on, check the circuit breakerat the battery switch panel. If resetting the breaker doesn’tallow the macerator to turn on, see your dealer to determinethe cause of the problem.
Gray Water System
If your boat is equipped with a gray water system, all your drainedwater from sinks and showers will go to a gray water holding tank.Chaparral boats are equipped to have gray water pumped atmarina. (Figure 3.5)
ADDITIONAL INBOARD SYSTEMS
This section discusses your boat’s propulsion equipment.Depending on boat model, your boat is powered either by inboardengines through a transmission or by sterndrive(s). If your boat hasa sterndrive, the manufacturer’s manual provides detailed informa-tion about its operation.
Note: The information in this section applies primarily to V-drivepowered boats.
Propellers
The propellers supplied with your boat have been selected as thebest propellers for typical use. Consider keeping an extra set of pro-pellers on your boat. If the propellers become damaged, you can
replace them with the spares and continue your outing. Check withyour dealer if you want to purchase an extra set.
Note: You, as the boat owner, can change propeller sizes tosuit other conditions. Any damage caused by the change inpropeller size is the responsibility of the owner.
Propeller Shaft
The propeller shaft is made of stainless steel which has excellentcorrosion resistance and very high strength. The coupling at oneend of the shaft is bolted to the transmission. The other end of theshaft is tapered, threaded, and keyed for installation of the propeller.
Struts
Each propeller shaft is supported by struts fastened to the bottom ofthe hull. The struts have replaceable bearings to minimize wear and toprotect the shaft at the points where it passes through the strut hubs.
Shaft Log and Shaft Seal
The shaft log or stern tube is a bronze tube laid up or bolted into thehull for the propeller shaft to pass through.
The propeller shaft seal consists of a water-cooled lip seal con-tained in a housing. This housing is attached to the shaft log with ablue convoluted silicon hose and clamps. The lip seal is similar tothe seal in the aft end of the marine gearbox. The purpose of theshaft seal is to keep water from leaking around the shaft and intothe bilge.
The water injected into the shaft seal passes out of the boat via theshaft log. This cooling water is taken from the raw water system ofthe engine. It is recommended to check the water supply at leastonce a season. For further information, see the Strong SureSealbrochure that is in your owner’s pack.
3-12
Deck Plate
Level Indicator
Gray Water Tank
Galley Sink Head Sink
Level IndicatorPanel
Figure 3.5 Gray Water System

Alignment
Aligning the engine with the propeller shaft is critical for smoothoperation of your boat. The shafts are properly aligned at the fac-tory. Check the alignment after delivery or an extended lay–up. Aslight misalignment can result in a loss of power, vibration, or wearin the bearings.
To check the alignment:
1. Remove the coupling bolts and spread the couplings veryslightly.
2. Use a feeler gauge to measure the gap between drive shaft andpropeller shaft at the coupling. The difference in reading shouldnot exceed 0.003 inch around the coupling edges.
3. A second check is to leave the flange on the engine fixed androtate the propeller shaft coupling in 90° steps. Check the clear-ance between the fixed engine flange and the rotating propellerflange with the feeler gauge at the top. If the four measurementsdiffer by more than 0.003 inch, it may be an indication that thereis a slight bend in the propeller shaft. This is an important checkafter striking a submerged object.
4. The straightness of the shaft can be further checked with theboat out of the water by setting up a dial indicator on a solidfixed surface and rotating the propeller shaft by hand. This testwill clearly indicate whether the propeller shaft has been bent.
Shaft alignment may change slightly after your boat is in use. Yourdealer should check alignment occasionally, particularly if there isvibration, a drumming sound, or loss of RPMs.
Rudders
Your boat has dual rudders. The rudder shaft stuffing box provides anopening for the rudder shaft through the bottom of the boat. The stuff-ing box keeps water from leaking around the shaft into the boat. Therudder stuffing boxes are similar to those used for propeller shafts.
Important: Overtightening the packing retainer to stop stuffingbox leakage may score the rudder shaft.
Seacocks and Sea Strainers
Your boat may be equipped with seacocks to close through hullopenings below the water line. Close seacocks when your boat willbe unattended for extended periods of time.
Inspect and clean sea strainers regularly. The frequency of cleaningwill vary depending on the amount of use and local conditions. Toclean the strainer, close the seacock and unscrew the wing nuts ontop of the strainer housing. (Figure 3.6) Remove screen and wash.After replacing the screen, replace and tighten the wing nuts. Openthe seacock and check for leaks.
OPTIONAL SYSTEMS
QL Neutra-Salt Flush Kit
The corrosive effects of salt, inside and outside engines, are a chal-lenge to saltwater boaters – particularly if the boat is kept in thewater. With the QL Neutra-Salt Engine Flushing System, boaters
3-13
STRAINER
SCREEN
COVER
WINGNUT
Figure 3.6 Sea Strainer
have an effective and simple solution to combat internal corrosionand help extend the life of the engine.
There are a number of good reasons why saltwater boaters willwant to install the QL Neutra-Salt Engine Flushing System:
• It helps prevent corrosion by removing salt deposits, leaving a pro-tective corrosion inhibitor on all metal surfaces, including: powersteering and oil cooler, engine block, internal exhaust manifold andrisers, thermostat housing, circulating and raw-water pumps.
• It flushes your engine while the boat sits in the water – there isno need to trailer your boat or hook up to a fresh-water supply inorder to flush and protect your engine.
How Our Flushing System Works:
1. To operate, simply engage the “Flush” switch by pushing and
holding the dash-mounted switch for 45 seconds while runningthe engine at idle speed, making sure the engine has an ade-quate supply of raw water.
2. Once the Flush switch is engaged, the Neutra-Salt concentratesolution will be injected into the cooling system, leaving a corro-sion inhibiting coating on all metal surfaces, thereby neutralizingthe salinity of incoming seawater.
3. Before disengaging the Flush switch, you must turn off the engine.
For best results, use the QL Neutra-Salt Engine Flushing Systemafter every boat outing. Boat owners will typically get 10 to 15flushes before a refill is needed.
Neutra-Salt Engine flushing concentrate is available throughVolvo Penta dealers, selected independent marine dealers andretailers worldwide.
3-14
TROUBLESHOOTING CHART
PROBLEM CAUSE SOLUTIONExcessive vibration
Poor performance
Material obstructing propeller
Bent prop or shaft
Excessive play in shaft log
Bent rudder
Material wrapped around propeller
Damaged propeller; wrong propeller in use.
Remove material from propeller, shaft, orrudder by reversing engines. If necessary,stop engines and cut or pull away.
Replace propeller. If vibration continues, seeyour dealer for service.
Check shaft log for wear. Avoid suddentorque changes. See your dealer for repairs.
Replace. See your dealer for service.
Run engine in reverse. If necessary stopengines and cut or pull material away.
Replace propeller.

3-15
TYPICAL SIGNATURE 350 ENGINE COMPARTMENT
1. Batteries (4) 18. Air Conditioner Sea Pump2. Battery Selector Switches 19. Air Conditioner Sea Stainer3. Battery Charger 20. Air Conditioner Seacock5. Lower Unit Trim Pump Reservoir (Merc) 21. Fresh Water Tank6. Starboard Engine 22. Water Pump and Filter7. Port Engine 23. Forward Bilge Pump8. Generator 24. Sump Pump9. Bilge Blowers 25. Macerator (optional)10. Bulkhead 26. Fire Extinguishing System11. Fuel Tank 27. Galley Sink12. Water Heater with Heat Exchanger 28. Head Sink13. Generator Muffler 29. Steering Helm14. Generator Sea Strainer 30. Euro Manual Pump15. Generator Seacock 31. Cockpit Galley Sink16. Aft Bilge Pump 32. VacuFlush System17. Air Conditioner 33. High Water Bilge Alarm
SIGNATURE 350 DECK PLAN
SIGNATURE 350 PROFILE
A - Strong points for anchoring or dockingB - Sling locationsC - Trailering eye
Figure 3.7 Signature 350 Stern Drive

3-16
TYPICAL SIGNATURE 350 V-DRIVE ENGINE COMPARTMENT
1. Batteries (4) 20. Fresh Water Tank2. Battery Selector Switches 21. Water Pump and Filter3. Battery Charger 22. Forward Bilge Pump5. Starboard Engine 23. Sump Pump6. Port Engine 24. Holding Tank7. Generator 25. Macerator (optional)8. Blowers 26. Y-Valve (optional)9. Bulkhead 27. Fire Extinguishing System10. Fuel Tank 28. Galley Sink11. Water Heater with Heat Exchanger 29. Head Sink12. Generator Muffler 30. Steering Helm13. Generator Sea Strainer 31. Euro Manual Pump14. Generator Seacock 32. Cockpit Galley Sink15. Aft Bilge Pump 33. Vacuum Flush Tank16. Air Conditioner 34. High Water Bilge Alarm17. Air Conditioner Sea Pump 35. Engine Seacock & Strainer18. Air Conditioner Sea Strainer (V-Drive)19. Air Conditioner Seacock 36. Engine Muffler
37. Exhaust Tip
SIGNATURE 350 DECK PLAN
SIGNATURE 350 PROFILE
A - Strong points for anchoring or dockingB - Sling locationsC - Trailering eye
Figure 3.8 Signature 350 V-Drive

3-17
TYPICAL SIGNATURE 330 ENGINE COMPARTMENT
1. Batteries (4) 18. Air Conditioner Sea Pump2. Battery Selector Switches 19. Air Conditioner Sea Strainer3. Battery Charger 20. Air Conditioner Seacock5. Lower Unit Trim Pump Reservoir (Merc) 21. Fresh Water Tank6. Starboard Engine 22. Water Pump And Filter7. Port Engine 23. Forward Bilge Pump8. Generator 24. Sump Pump9. Blowers 25. Macerator (optional)10. Bulkhead 26. Fire Extinguishing System11. Fuel Tank 27. Galley Sink12. Water Heater With Heat Exchanger 28. Head Sink13. Generator Muffler 29. Steering Helm14. Generator Sea Strainer 30. Euro Manual Pump15. Generator Seacock 31. Cockpit Galley Sink16. Aft Bilge Pump 32. Vacuum Flush Tank17. Air Conditioner 33. High Water Bilge Alarm
SIGNATURE 330 DECK PLAN
SIGNATURE 330 PROFILE
A - Strong points for anchoring or dockingB - Sling locationsC - Trailering eye
A AA
B
C
B
A
Figure 3.9 Signature 330 Stern Drive

3-18
Figure 3.10 Signature 310
B
A
A
A
A
C
B
SIGNATURE 310 ENGINE COMPARTMENT
1. Batteries (4) 17. Air Conditioner (optional)2. Battery Selector Switches 18. Air Conditioner Sea Pump (optional)3. Battery Charger 19. Air Conditioner Sea Strainer (optional)5. Lower Unit Trim Pump Reservoir (Merc) 20. Air Conditioner Seacock (optional)6. Starboard Engine 21. Fresh Water Tank7. Port Engine 22. Water Pump And Filter8. Generator (optional) 23. Forward Bilge Pump9. Bilge Blowers 24. Sump Pump10. Bulkhead 25. VacuFlush System11. Fuel Tank 26. Macerator (optional)12. Water Heater With Heat Exchanger 27. Fire Extinguishing System13. Generator Muffler (optional) 28. Galley Sink14. Generator Sea Strainer 29. Head Sink
(optional) 30. Steering Helm15. Generator Seacock (optional) 31. Euro Manual Pump16. Aft Bilge Pump 32. Cockpit Galley Sink
33. High Water Bilge Alarm
SIGNATURE 310 DECK PLAN
SIGNATURE 310 PROFILE
A - Strong points for anchoring or dockingB - Sling locationsC - Trailering eye

3-19
Figure 3.11 Signature 290
SIGNATURE 290 DECK PLAN
SIGNATURE 290 PROFILE
A - Strong points for anchoring or dockingB - Sling locationsC - Trailering eye
SIGNATURE 290 ENGINE COMPARTMENT
1. Battery Charger 18. Air Conditioner Sea Strainer (optional)2. Water Pump and Filter 19. Air Conditioner Seacock (optional)3. Fresh Water Tank 20. Air Conditioner Sea Pump (optional)4. Macerator (optional) 21. Fire Extinguishing System5. Starboard Engine 22. Head Seacock6. Port Engine 23. Batteries (3)8. Water Heater with Heat Exchanger 24. Galley Sink
(Merc) 25. Head Sink9. Lower Unit Trim Pump Reservoir 26. Steering Helm10. Bulkhead 27. Euro Manual Pump11. Battery Selector Switches 28. Generator (optional)12. Bilge Blowers 29. Cockpit Sink13. Aft Bilge Pump 30. Generator Seacock (optional)14. Fuel Tank 31. Generator Sea Strainer (optional)15. Sump Pump 32. Generator Muffler (optional)16. Forward Bilge Pump 33. VacuFlush System17. Air Conditioner (optional) 34. High Water Bilge Alarm
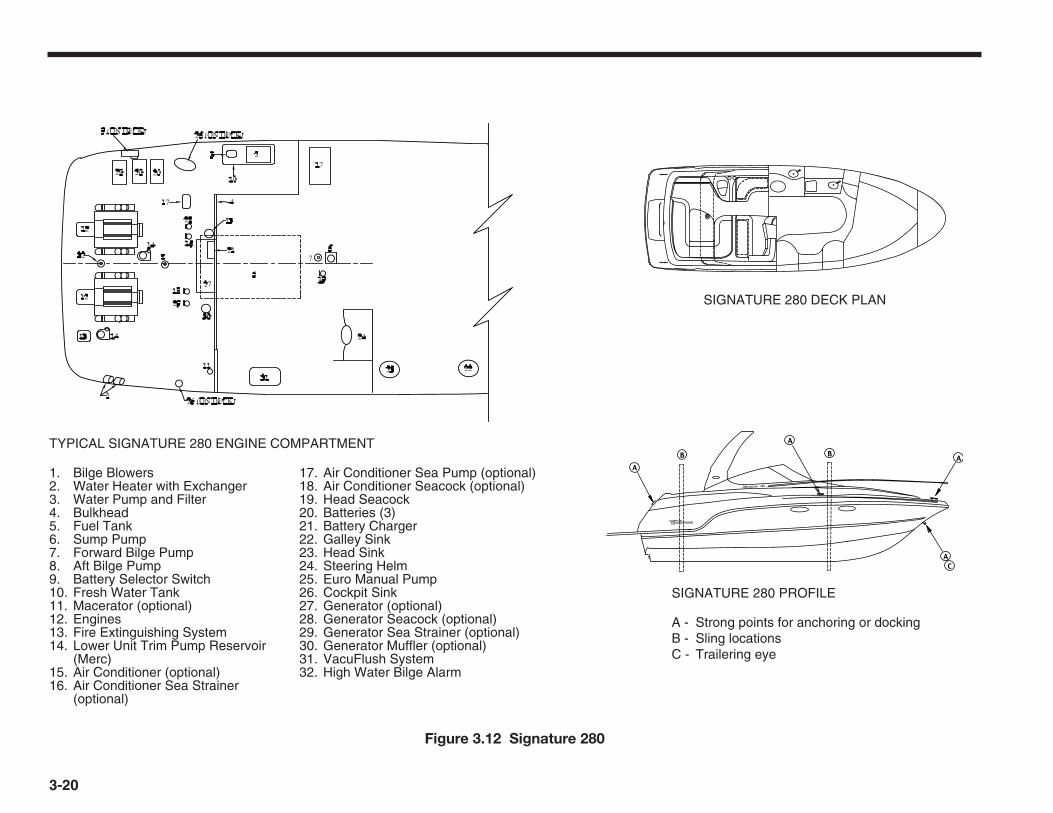
3-20
Figure 3.12 Signature 280
B
AA
A
AC
BTYPICAL SIGNATURE 280 ENGINE COMPARTMENT
1. Bilge Blowers 17. Air Conditioner Sea Pump (optional)2. Water Heater with Exchanger 18. Air Conditioner Seacock (optional)3. Water Pump and Filter 19. Head Seacock4. Bulkhead 20. Batteries (3)5. Fuel Tank 21. Battery Charger6. Sump Pump 22. Galley Sink7. Forward Bilge Pump 23. Head Sink8. Aft Bilge Pump 24. Steering Helm9. Battery Selector Switch 25. Euro Manual Pump10. Fresh Water Tank 26. Cockpit Sink11. Macerator (optional) 27. Generator (optional)12. Engines 28. Generator Seacock (optional)13. Fire Extinguishing System 29. Generator Sea Strainer (optional)14. Lower Unit Trim Pump Reservoir 30. Generator Muffler (optional)
(Merc) 31. VacuFlush System15. Air Conditioner (optional) 32. High Water Bilge Alarm16. Air Conditioner Sea Strainer
(optional)
SIGNATURE 280 DECK PLAN
SIGNATURE 280 PROFILE
A - Strong points for anchoring or dockingB - Sling locationsC - Trailering eye

3-21
Figure 3.13 Signature 270
TYPICAL SIGNATURE 270 ENGINE COMPARTMENT LAYOUT
1. Fresh Water Tank 17. Fire Extinguishing System (optional)2. Battery Selector Switch 18. Air Conditioner (optional)3. Water Heater with Heat Exchanger 19. Air Conditioner Sea Pump (optional)4. Engine 20. Air Conditioner Sea Strainer (optional)5. Batteries (2) 21. Air Conditioner Seacock (optional)6. Battery Charger 22. Generator (optional)7. VacuFlush System 23. Generator Sea Strainer (optional)8. Lower Unit Trim Pump Reservoir 24. Generator Seacock (optional)
(Merc) 25. Generator Muffler (optional)9 Bilge Blowers 26. Galley Sink10. Fuel Tank 27. Head Sink11. Bulkhead 28. Cockpit Galley Sink12. Aft Bilge Pump 29. Steering Helm13. Water Pump and Filter 30. Fire Port (below seat)14. Forward Bilge Pump 31. Euro Manual Pump15. Sump Pump 32. High Water Bilge Alarm16. Head Seacock
SIGNATURE 270 DECK PLAN
SIGNATURE 270 PROFILE
A - Strong points for anchoring or dockingB - Sling locationsC - Trailering eye

3-22
Figure 3.14 Signature 250
1. Fresh Water Tank2. Battery Selector Switch3. Water Heater with Heat Exchanger4. Engine5. Batteries (2)6. Battery Charger7. Lower Unit Trim Pump Reservoir
(Merc)8. Bilge Blowers9. Fuel Tank10. Bulkhead11. Aft Bilge Pump12. Macerator (optional)
13. Water Pump and Filter14. Head Seacock15. Fire Extinguishing System(optional)16. Galley Sink17. Head Sink18. Steering Helm19. Fire Port (below seat)20. Euro Manual Pump21. Sump Pump22. Air Conditioning Seacock (optional)23. High Water Bilge Alarm24. Generator (optional)
SIGNATURE 250 STANDARD DECK PLAN
SIGNATURE 250 OPTIONAL DECK PLAN
SIGNATURE 250 PROFILE
A - Strong points for anchoring or dockingB - Sling locationsC - Trailering eye
13
10
9
16
21
1
6
815
1217
18
19 20
5 5
11
4
7
23
8
3
6
22
2
24
A
A
A
B B
A CA C
A
A
A
B B
A CA C
SIGNATURE 250 ENGINE COMPARTMENT LAYOUT

This chapter describes standard and optional components factoryinstalled on Signature Series boats. Depending on how your boat isequipped, it may or may not have all of the equipment described inthis chapter.
Be sure to read all operation, maintenance, and safety informationcontained in each component’s manual before operation. The man-uals are in your owner’s packet.
Important: Adhere to all “safety” precautions in the manufac-turer’s literature when operating the components.
Note: “Engine” in this Chaparral manual means one or twoengines depending on how your boat is equipped.
DASHBOARD AND INSTRUMENT PANEL
Instruments on the dashboard are important for monitoring the per-formance of your boat and alerting you to possible problems orcauses of problems. Please refer to the quick reference informationat the end of this section.
Signature 280 – 300 Package Includes:5” Dual Tachometer Gauge5” 4-in-1 Multifunction Gauge2” Fuel Gauge2” Trim Gauge
Signature 250 – 270 Package Includes:3” Tachometer Gauge3” Speedometer Gauge3” Fuel Gauge2” Trim Gauge
Dual Tachometer Gauge and Single TachometerThe tachometer indicates the operating speed of the engine in revo-lutions per minutes (RPM). This gauge is also the master gauge inthe system, which means it provides data to all the other gauges.This gauge is equipped with a large LCD display to broadcast criticalengine information and convenience items such as depth, enginealarms and digital readouts of engine performance. Do note exceedthe maximum RPM range stated by the engine manufacturer.
Fuel GaugeThe fuel gauge indicates the approximate amount of fuel in your fueltank. The reading is most accurate when your boat is operating at idlespeed. Be aware that you should compare gauge readings with hoursof use versus known fuel consumption because the gauge is only anapproximate reading of the amount of fuel in your boat’s tank.
SpeedometerThe speedometer indicates the speed your boat is crossing thewater in miles per hour. Water pressure from a water pick up at theboat’s stern is measured and converted into a reading on thespeedometer.
4-1
COMPONENTS 4
WARNING: When using electrical components, observe safetyprecautions to reduce the risk of fire, electrical shock, personalinjury or damage to your boat and/or component.
WARNING: Your boat is equipped with digital instrumentation.Electrical system troubleshooting and/or adding of electricalequipment to your boat should only be performed by aChaparral Dealer to prevent damage to this electrical system.

4-in-1 Multifunction Gauge
The multifunction gauge contains four gauges into one. Thisincludes engine oil pressure, battery voltage, engine water tempera-ture and trim.
The oil pressure gauge is an accurate indicator about what isgoing on inside your boat’s engine. Any serious problem withyour engine will likely be indicated on this gauge. Check thereading when the engine is new, and use it as the reference pointduring the life of your engine. Also, check with your Chaparraldealer for the normal pressure reading for your boat’s engine.
The voltmeter indicates battery voltage. When the engine isrunning, the meter should read between 12 an 15 volts. A signif-icantly lower reading may indicate a battery or alternatorproblem or a heavy drain on the battery. If the voltmeter displayfluctuates, the alternator may not be charging properly.
The water temperature gauge indicates the temperature of thecooling water circulating inside your engine. A thermostat keepsthe temperature of the water at a preset temperature. If the tem-perature raises or continues to rise above normal, shut downyour engine and determine the cause of the high temperature.
The trim gauge indicates the angle of the engine outdrive. Thisgauge will assist in the planning and overall performance ofyour boat.
Depth FinderThe depth finder measurers the depth of the water from the bottom ofyour boat. See the manufacturer’s instruction manual for details aboutproper operation and maintenance.
CompassThe compass indicates the direction or heading in which your boat istraveling. Have the compass calibrated by an experienced technician.See the manufacturer’s instruction manual for details about properoperation and maintenance.
VHF RadioSome models are equipped with a VHF Radio. Refer to yourowner’s manual packet for instructions and warranty information.
GPSSome models include optional GPS. Our GPS units combine relia-bility and ease-of-use operation to help you get the most out of yourtime on the water. Refer to owner’s manual packet for instructionsand warranty information.
Multifunction Navigation Display SystemAn optional high performance multifunction display is available onselect models. Chaparral provides one of the most powerful multi-function navigation display systems available for recreational boating.Boat owners will have access to performance features such as 3Dchartplotting, HD digital technology, Sirius Satellite Radio and more.
Windlass SystemSome models come equipped with a windlass option. (See Figure 4.1)Your anchor can be raised and lowered with the windlass system by atoggle switch located at the helm or by two separate foot switcheslocated at the bow of the boat. It is important to remember to use theanchor safety lanyard on the anchor chain when anchor is in fullyretracted position. By attaching the lanyard clasp to one of the chainlinks, you are protecting your boat from any incidental damage from aswinging anchor.
Note: When anchor is in the up position and locked in slot, besure to secure the anchor to the deck before getting underway.
4-2
CAUTION: Compass reading may be erroneous if compensatoris not properly adjusted. Always make a deviation table and useit when navigating with compass.

Windlass Safety Tips• Always tie off rode while at anchor• Always secure rode/anchor when under way• Always look before deploying your anchor• Always motor up to anchor while retrieving• Never use your windlass to pull or tow boat• Never stick fingers in or around gypsy while operating• Always shut off breaker when working on windlass• Always shut off breaker when windlass is not in use• Keep all loose clothing and hair away from windlass when operating• Never use windlass to lift a person
Refer to owner’s manual packet for instructions and warrantyinformation.
HYDRAULIC STEERING SYSTEM
Your boat may have a hydraulic steering system. This system hasfour basic elements: helm pump, reservoir, relief valve, and cylin-der. The steering wheel is mounted to the shaft of the helm pump.
Turning the steering wheel pumps hydraulic fluid to the steeringcylinder. Extra hydraulic fluid and pressure head maintained bythe reservoir prevents air from entering the system. An air pres-sure gauge on the reservoir shows that the reservoir is charged tothe proper pressure. To keep dirt from entering the system,hydraulic fluid in the reservoir passes through a filter as it flowsout of the reservoir. A relief valve protects both the mechanicalportion of the rudder (in case the rudder strikes a hard object) andthe hydraulic system.
This is a manual system, not a power steering system. The effortrequired to turn the wheel will increase as the system is called on toexert more force on the rudder. At no time, should anyone expectthis system to turn as easily as a car’s power steering.
Check the level of hydraulic fluid in the reservoir regularly andreplenish if necessary. The fill cap behind the wheel has a gaugeindicating the fluid level. All other maintenance should be performedby your dealer.
CONTROLS
Steering
Other than the common sense and good judgment of the operator,the steering system is the most important safety system on yourboat. Factors requiring operator attention for safe steering includeengine torque, trim tab settings, waves and speed.
Power steering provides positive steering control while providing theoperator with the steering sensitivity and “feel” needed for goodsteering control. An enclosed cable system connects the steeringwheel to the stern drive. Check the cables regularly and tightenthem as needed.
Note: Your boat has a mechanical steering system. Refer tothe steering manufacturer’s owner’s manual found in yourOwner’s Packet, for detailed information regarding use, careand maintenance of the steering system.
4-3
Windlass Relay Box
Down
Battery
Battery Panel
Windlass Control@ Helm Station
Windlass Breaker
OrangeOrange
BlueNeg
NegPos
Pos
Up
Green
Green
Foot Switches
Figure 4.1 Windlass Schematic
WARNING: Moving parts may cut or crush. Read instructionsbefore use.

Note: Refer to the engine manufacturer’s information found inyour Owner’s Packet for use, care and maintenance instruc-tions for power steering units installed on their motors.
Throttle
The throttle controls the boat’s speed and the direction the boattravels. If the throttle is in its center neutral position, the boat will notmove forward or aft with the engine running. Moving the throttle for-ward from center moves the boat forward. Moving the throttle aftmoves the boat backward. The speed at which the boat moves isdirectly related to how far the operator pushes the throttle.
Note: The throttle must be in its center neutral position beforethe engine will start. See your engine manufacturer’s owner’smanual for specific starting instructions.
Power Trim
The power trim system allows the operator to raise and lower thestern drive to adjust the drive angle while underway. It also allowsthe operator to raise and lower the drive for trailering, beaching, andoperation in shallow water. Control your trim setting with the trimswitch on the control handle. Section 5 discusses the importance ofproper trim while operating your boat.
Note: Refer to your engine manufacturer’s owner’s manual forinformation concerning maintenance and operation.
GENERATOR
Starting The Generator
Note: Pre-start generator prior to getting underway as there isa possibility that it will not pick up water if started underway.Make sure the MAIN GENERATOR breaker is OFF and there isno load on the generator before starting it.
Remote control switches are located on the main distribution panelor local switches on the generator.
To start the generator and turn on generator power:
1. On the boat:
• Check fuel tank levels.
• 120 Volt or 220 Volt AC Main DistributionPanel: Ensure GENERATOR mainbreaker is OFF
• Cabin 12 Volt DC Panel: Turn ON bilge blowers. Run blow-ers for 4 minutes prior to starting. Leave blowers on whengenerator is on.
2. In the Engine Room:
• Open generatorseacock
• Smell for fuelfumes
4-4
WARNING: DO NOT run the engine or generator in an enclosedarea, such as a closed boat house, as there is the possibility ofbuildup and inhaling of carbon monoxide.
CAUTION: Acceleration at full throttle is not recommended untilafter the engine “break-in period.” This break-in period alsocoincides with the engine 20-hour checkup.
• Check generator oil and coolant levels. See generator oper-ator’s manual for proper readings.
3. Cabin 12 Volt DC distribution panel:
• Press and hold “START/RUN” switch. Release“START/RUN” switch when generator starts.
• (Not Shown) check generator exhaust port to verify thatwater is flowing. If not, shut generator down and refer to yourGenerator Operator’s Manual.
Read the generator owner’s manual in the owner’s manual packetfor your generator model.
Shifting from shore power to generator power
1. On the boat 120 volt or 220 volt AC Main Distribution Panel:
• Turn OFF AC equipment breakers
• TURN OFF SHORE & GENERATOR breakers.
2. On the dock:
• Turn OFF dock breaker.
• Unplug shore power cord.
On the boat:
• Turn OFF MAIN breaker located by shore power plug.
• Unplug shore power cord.
120 Volt or 220 volt AC Main Distribution Panel:
• Turn ON “GENERATOR” breaker.
• Verify proper voltage (120V System: 105V to 125V) (220V System: 205V to 225V)
• Turn ON AC equipment breakers.(Only turn on equipment you want to use. Always turn on“AC CONVERTER/CHARGER” breaker.)
Stopping the Generator
1. On the boat 120 volt or 220 volt AC Main Distribution Panel:
• Turn OFF AC equipment breakers.
• Turn OFF “GENERATOR” breakers. Allow the generator torun a few minutes to cool down. If desired, transfer to shorepower.
• Cabin 12 volt DC Distribution Panel: Press the bottom half ofthe generator “START/RUN” switch. The generator will stop.
Refer to owner’s packet for instructions and warranty information.
AIR CONDITIONER
Electrical control for the unit is at the main electrical panel in thecabin. Refer to Section 3 for additional information about this panel.The air conditioner runs on 120 or 220 volt AC power or 12 volt DCpower from either the onboard generator or shore power. You cancontrol heating and cooling from the air conditioner control panel.
4-5
DANGER: Gasoline vapors can explode. Always check engineroom by visual inspection and smell. Do not start the generatoror engines until the source of fumes is determined and cor-rected and the engine room is safely ventilated.

General instructions for operating the air conditioner are as follows:
1. Make sure the sea water inlet seacock is open and strainer isfree of debris.
2. Make sure the sump pump is on when you operate the air condi-tioner. Condensation from the air conditioner drains to the sumppump.
3. Make sure 120 or 220 volt AC or 12 volt DC power switch for airconditioner is on.
4. Set temperature on display. Select either heating or cooling.
5. Turn switch to ON. Fan, water pump, and compressor will start.
6. Look over side of boat and check for water flowing from dis-charge port. If water is not flowing, stop air conditioner. Checkfor the following: blocked water intake, air in line, clogged seastrainer, or closed seacock that should be open. Correct theproblem before restarting the air conditioner.
Follow these procedures to operate the air conditioner on shorepower:
1. Make sure the air conditioner breaker in the cabin is off.
2. Plug AC shore power cord into the receptacle on the boat, andturn clockwise to lock. Thread the locking ring on the inlet tosecure the cord. Connecting the cord to the boat first will pre-vent dropping a “hot” cord into the water.
3. Make sure dockside power is off. Then, plug in the cord. Turnthe dockside shore breaker on.
4. Immediately check the polarity light on the main cabin panel. Ifthe reversed polarity light on the main panel illuminates, do notturn on the cabin main breaker. Turn off the dockside shorepower breaker and disconnect the power cord. Inform marinamanager of the problem.
5. Make sure the sea water inlet seacock is open and strainer isfree of debris.
6. Make sure the sump pump is on when you operate the air con-ditioner. Condensate from the air conditioner drains to thesump pump.
7. Make sure 120 or 220 volt AC or 12 volt DC power switch for airconditioner is on.
8. Set temperature on display. Select either heating or cooling.
9. Turn selector switch to ON. Fan, water pump, and compressorwill start.
10. Look over side of boat and check for water flowing from dis-charge port. If water is not flowing, stop air conditioner. Checkfor the following: blocked water intake, air in line, clogged seastrainer, or closed seacock that should be open. Correct theproblem before restarting the air conditioner.
Note: On the 250 Signature Cruisers, there is an optional 12Vair conditioner. Power supplied to the optional 12V air condi-tioner comes from two additional batteries located in theengine compartment. These batteries are recharged whendocked and connected to shore power with the battery chargerbreaker on. Batteries are also recharged by the engine alterna-tor when the boat is underway.
Note: The manufacturer’s operation manual covers detailedinformation for operating the air conditioner including tempera-ture setting, display and calibration, and fan speed andcalibration. Also provided are technical data and troubleshoot-ing information to help you keep the unit in safe and properoperating condition.
WATER HEATER
The water heater, which runs on 120 or 220 volt AC power, has anON/OFF switch at the main panel in the cabin area. A check valve
4-6

in the water heater piping prevents hot water from washing backinto the cold water source. A pressure relief valve prevents damageif pressure or temperature gets higher than safe settings. The ther-mostat on the water heater is preset and is not adjustable.
Note: Refer to the water heater instruction manual for safety pre-cautions and for detailed operation, maintenance, and winterizinginstructions. In areas where frost is possible, the heater tank mustbe drained completely or filled with potable water antifreeze toprevent possible damage during winter storage.
Before turning on power to the water heater, be sure tank is full andwater is covering the heating element. The heater tank must be keptfull of water to avoid damage to the heating elements.
The water heater has a heat exchanger which captures heat fromthe engine cooling water by circulating the hot water through theexchanger to heat potable (fresh) water in the heater. Engine cool-ing water circulating through heater for more than two hours resultsin excessively HOT water.
REFRIGERATOR
The refrigerator/freezer is designed to operate on 120 or 220 voltAC and 12 volt DC power. When the 120 or 220 volt system is notoperating, the refrigerator operates on 12 volts. A built-in relayautomatically switches to the correct power. The AC control is anOFF/ON breaker switch at the main panel in the cabin. The unitalso has a 10 amp direct current (DC) breaker on the battery switchpanel in the engine compartment.
The power needed by the refrigerator exerts a continuous drain onthe battery when it is powered by the 12 volt DC system. It can drawa 12V 100 amp hour battery dead in a short period of time. To avoidexcessive battery drain, keep the temperature control at a mediumsetting when air temperatures are in the 70° to 90° F range. If youplan an overnight trip and shore power is not available, run the gen-erator or the engine occasionally to ensure your battery is charged.
Note: Refer to the refrigerator instruction manual for safetyprecautions and for detailed operation and maintenanceinstructions. The manual is in your owner’s packet.
STOVE
Your boat has an electrical stove in the galley. The electric stoveoperates off the shore power system, onboard generator, and has acircuit breaker labeled "range" on the main electrical control panel.
Important: The operator’s manual and safety instructionsexplain special safety precautions, maintenance, safety andproper operating procedures. Chaparral Boats cannot overem-phasize the proper use of safety when operating your stove.CAREFULLY READ and understand the instructions beforeoperating the stove.
MICROWAVE OVEN
The microwave oven is controlled by an electronic touch controlpanel. The breaker at the main panel must be on in order to use themicrowave. For a detailed description of the microwave oven fea-tures see the owner’s manual supplied by the manufacturer.
4-7
WARNING: Hydrogen gas may develop if you have not usedheater for two weeks or more. Hydrogen gas is extremely flam-mable. Open hot water faucet at galley sink before you use anyappliance connected to hot water system. Do not smoke or haveopen flame near open faucet.
CAUTION: To reduce the risk of burns, electric shock, fire, injuryto persons or exposure to excessive microwave energy, readALL instructions before using the microwave oven. Be sure tosecure turntable while underway to prevent damage to the unit.

PLATFORM MOUNTED GAS GRILL
Some models are equipped with an optional stainless steel gas grill.Grill operates on a standard 1-lb propane tank (not supplied withboat). This option allows for quick and easy meal preparation duringyour boat outing.
Note: Read entire instruction manual supplied in your Owner’sManual packet before using.
FIRE EXTINGUISHERS
As the boat owner, you are responsible for making sure you havethe required number of fire extinguishers. Fire extinguishers mustbe approved by the U.S. Coast Guard.
Boats longer than 26 feet and shorter than 40 feet: Two Type B-1 orat least one Type B-2 portable hand extinguishers. If your boat hasa fixed fire extinguishing system approved by the U.S. Coast Guard,one Type B-1 extinguisher is required.
Boats longer than 16 feet and shorter than 26 feet: At least oneportable hand Type B-1 fire extinguisher.
All fire extinguishers should be mounted in a readily accessible loca-tion away from the engine compartment. Everyone on board shouldknow where the fire extinguishers are and how to operate them.
If your fire extinguisher has a charge indicator gauge, cold or hotweather may affect the gauge reading. Consult the instruction man-ual supplied with the fire extinguisher to determine the accuracy ofthe gauge.
Automatic Fire Extinguisher
An automatic fire extinguisher is standard on some models andoptional on other models. The fire extinguishing system in theengine compartment uses a fire extinguishing agent. In case of fire,the heat-sensitive automatic nozzle releases agent as a vapor,totally filling the area with agent to extinguish the fire.
The system’s indicator light at the helm is illuminated when the igni-tion switch is on. When the system is discharged, the indicator lightwill go out.
4-8
WARNING: If system discharges, immediately turn OFF engineand electrical systems. Extinguish all smoking materials. Do notopen engine compartment. Fresh air supplies oxygen to fire andfire may flash back through opening.
CAUTION: OUTDOOR USE ONLY! Your SOLAIRE ANY-WHERE™ Grill is designed for outdoor use only.
WARNINGIN CASE OF FIRE DO NOT OPEN ENGINE
BOX OR COMPARTMENT. SHUT DOWN ENGINE,GENERATOR, AND BLOWERS, CONTINUOUSLY
DISCHARGE ENTIRE CONTENTS OF AGENT PORTABLE FIRE EXTINGUISHER THROUGH
PORT IMMEDIATELY.
DO NOT OPEN ENGINE BOX
WARNINGOPEN FLAME COOKING APPLIANCESCONSUME OXYGEN. THIS CAN CAUSE
ASPHYXIATION OR DEATH.
MAINTAIN OPEN VENTILATIONDO NOT USE THIS APPLIANCE
FOR COMFORT HEATING.

Allow agent to fill entire engine compartment for at least 15 minutes.Hot metals or fuel can also begin cooling during this time.Cautiously inspect compartment for cause of fire and damage toequipment. Have portable extinguishers readily available. Do notbreathe fire fumes or vapors.
Note: See the manufacturer’s owner’s manual for detailedinformation about safety precautions and procedures for oper-ating and maintaining the fire extinguishing system. Themanual is in your owner’s packet.
BILGE PUMP
The automatic electric bilge pump(s) removes water from the bilgearea. If the pump motor runs but does not remove any water, thepump may be clogged. If there is no visible debris clogging thepump and water is still not being removed, check the dischargehose for kinks or obstruction. The bilge pump can also be operatedin a manual mode by the switches on the main electrical panel.
Note: The Federal Water Pollution Act prohibits the dischargeof oil or oily waste into or upon the navigable waters and con-tiguous zones of the United States if such discharge causes afilm or sheen upon, or discoloration of, the surface of thewater, or causes a sludge or emulsion beneath the surface ofthe water. Violators are subject to a penalty.
High Water Alarm
Some models may be equipped with a high water bilge alarm. Abuzzer located inside the dash will sound if the accumulated enginecompartment bilge water level is higher than normal.
BILGE BLOWER
The bilge blower, controlled by a switch at the helm, evacuatesfumes from the engine compartment while bringing fresh air inthrough the deck vents. Make sure all fumes are evacuated from the
engine compartment prior to starting the engine. The bilge blowermust be running before and when you start the engine and whileoperating your boat below cruising speed.
UNDERWATER LIGHTS
Underwater lights provide boating enthusiasts with the latestenhancement for their boat, insuring a memorable experience andcreating a unique signature visible from shore or other boats. If yourboat is equipped with LED underwater lights, they are powered by atoggle switch at the helm.
It is the boat owner’s responsibility to manage battery voltage whileusing this feature, to ensure battery(s) are not drained to a pointwhere engine will not start.
Refer to owner's manual packet for instructions and warranty information
RUNNING AND NAVIGATION LIGHTS
If you operate your boat at night, the law requires you to turn yourboat’s running lights ON. Your Chaparral boat has one mast or tran-som light (white), one red (port), and one green (starboard) light.Check running lights periodically for proper operation. Check thembefore heading out after dusk.
4-9
WARNING: Never assume that operating the blower removesall explosive fumes from engine compartment. If you smell anyfuel, immediately stop engine and turn off all electrical compo-nents. Extinguish all smoking materials. Determine source ofsmell immediately.
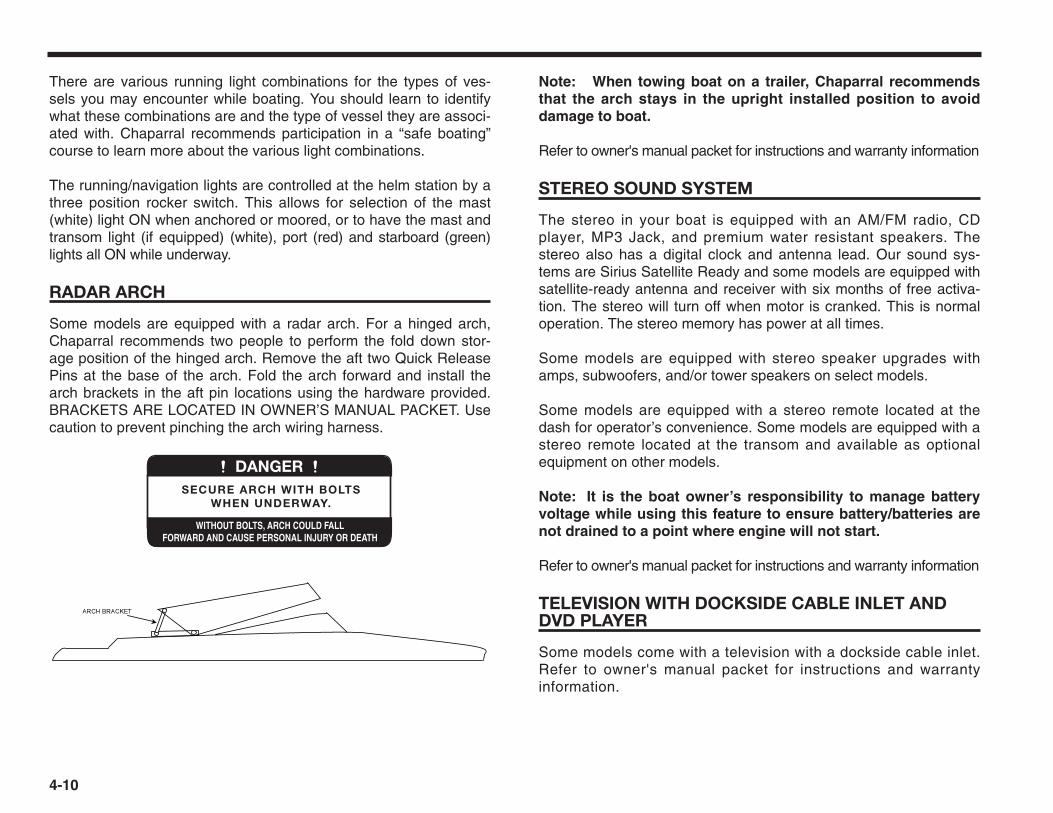
There are various running light combinations for the types of ves-sels you may encounter while boating. You should learn to identifywhat these combinations are and the type of vessel they are associ-ated with. Chaparral recommends participation in a “safe boating”course to learn more about the various light combinations.
The running/navigation lights are controlled at the helm station by athree position rocker switch. This allows for selection of the mast(white) light ON when anchored or moored, or to have the mast andtransom light (if equipped) (white), port (red) and starboard (green)lights all ON while underway.
RADAR ARCH
Some models are equipped with a radar arch. For a hinged arch,Chaparral recommends two people to perform the fold down stor-age position of the hinged arch. Remove the aft two Quick ReleasePins at the base of the arch. Fold the arch forward and install thearch brackets in the aft pin locations using the hardware provided.BRACKETS ARE LOCATED IN OWNER’S MANUAL PACKET. Usecaution to prevent pinching the arch wiring harness.
Note: When towing boat on a trailer, Chaparral recommendsthat the arch stays in the upright installed position to avoiddamage to boat.
Refer to owner's manual packet for instructions and warranty information
STEREO SOUND SYSTEM
The stereo in your boat is equipped with an AM/FM radio, CDplayer, MP3 Jack, and premium water resistant speakers. Thestereo also has a digital clock and antenna lead. Our sound sys-tems are Sirius Satellite Ready and some models are equipped withsatellite-ready antenna and receiver with six months of free activa-tion. The stereo will turn off when motor is cranked. This is normaloperation. The stereo memory has power at all times.
Some models are equipped with stereo speaker upgrades withamps, subwoofers, and/or tower speakers on select models.
Some models are equipped with a stereo remote located at thedash for operator’s convenience. Some models are equipped with astereo remote located at the transom and available as optionalequipment on other models.
Note: It is the boat owner’s responsibility to manage batteryvoltage while using this feature to ensure battery/batteries arenot drained to a point where engine will not start.
Refer to owner's manual packet for instructions and warranty information
TELEVISION WITH DOCKSIDE CABLE INLET ANDDVD PLAYER
Some models come with a television with a dockside cable inlet.Refer to owner's manual packet for instructions and warrantyinformation.
4-10
DANGER
WITHOUT BOLTS, ARCH COULD FALLFORWARD AND CAUSE PERSONAL INJURY OR DEATH
SECURE ARCH WITH BOLTSWHEN UNDERWAY.
ARCH BRACKET

4-11
Sin
ce t
he
CA
Nb
us
ga
ug
es
ha
ve
be
en
in u
se, t
hre
e a
rea
s o
f co
nce
rn/c
on
fuss
ion
ha
ve
su
rfa
ced
.Th
is d
ata
sh
ee
t w
ill a
tte
mp
t to
ad
-
dre
ss t
he
se
t u
p o
f th
se f
un
cti
on
s b
y w
alk
ing
th
e o
pe
rato
r th
rou
gh
th
e n
ece
ssa
ry s
tep
s.
1.
Tan
k L
ev
el 1
Se
tup
.
2. D
ep
th S
etu
p.
3.T
rim
Ga
ug
e C
ali
bra
tio
n.
Tan
k L
ev
el 1
Se
tup
De
pth
Av
ail
ab
le S
etu
p
TIP
: B
e c
ert
ain
all
th
ree
bu
tto
ns
“cli
ck”
wh
en
pre
sse
d fi
rm
ly.
Pa
ge
1 o
f 2

4-12
Calibrate Trim Gauge
Pa
ge
2 o
f 2

4-13

4-14

4-15

4-16

4-17

4-18

4-19
Y/N Depth
With Key Turned On,
Press and Hold Both
Arrow Keys fo 5
Seconds

4-20

This chapter discusses the operation of your boat from the begin-ning of a boating excursion to its end. We’d like to remind you to bekind to our environment while you’re boating. Don’t throw garbageand other refuse overboard. And do your best to keep harmful com-pounds like gasoline and antifreeze out of the water.
Note: The term “engine” in this chapter means one or twoengines depending on how your boat is equipped.
Note: If your boat is equipped with a carbon monoxide detec-tor, it should be tested to determine that it is functioningproperly every time you use your boat.
TRANSPORTING YOUR BOAT
A correctly selected trailer supports your boat properly, makes tow-ing safer, and makes unloading and loading in varying weatherconditions easier.
Important: Improper trailering is one of the major causes for dam-age to the hull. The warranty does not cover damage of this type.
The type and size of the side supports, or pads, are very important.Side supports run lengthwise to the boat and parallel to the keel. Sidesupports should only be tight enough to keep the boat from leaningside to side. Any unnecessary pressure will damage the hull. Newertrailers have self-adjusting side supports and a bow pad that can beeasily adjusted. These eliminate the need for manually adjusting sidesupports and keel rollers every time you load your boat. YourChaparral dealer can help you select the best trailer for your boat.
Inspect your trailer regularly to make sure the side supports are ingood working condition. Check bolts securing rollers and supportsfrom time to time to make sure they are tight.
The trailer should be designed and built to carry the full weight ofyour boat, engine, and gear while providing support for the hull. Besure not to overload your trailer by loading the boat with excessbaggage, camping equipment, etc. Check the certification label onthe frame of the trailer. It is required to show the gross vehicleweight rating. Be sure the total weight of your boat, engine, fuel,gear, and trailer does not exceed this rating. Make sure your towingvehicle has a hitch appropriate for the rating.
UNDERWAY 5
5-1
WARNING
SECURE ALL DOORS WHEN UNDERWAY
OPEN DOORS MAY CAUSEDAMAGE TO BOAT, AND/OR
PERSONAL INJURY
! WARNINGAVOID SERIOUS OR FATAL INJURY DUE TO
ROTATION OF SEAT.LOCK SWIVEL WHEN SPEED EXCEEDS 5 M.P.H.
SECURE OR STORE ITEMS BEFORE GETTING UNDERWAY
UNSECURED ITEMS MAYSHIFT OR FALL CAUSING
DAMAGE TO BOATAND OR PERSONAL INJURY
WARNING
CLOSE WINDOW
LEAVING WINDOW OPEN WHILE BOATIS UNDERWAY OR AT DOCK
COULD INDUCE EXHAUST FUMES INTOCABIN CAUSING INJURY OR DEATH.
WARNING
DO NOT OPERATE BOAT ABOVE 15 MPHWITH SUNPAD SECURED TO DECK.
REMOVE AND STORE SUNPAD WHENEXCEEDING 15 MPH OR GREATER
WARNING

Distributing the weight on the trailer is important. Place the heaviestitems at the bottom of the boat over a roller or chock, and securethem to keep them from shifting.
Balancing the load on the trailer is also important. If too muchweight rests on the hitch, the towing vehicle will oversteer, a condi-tion that causes the front end of the vehicle to sway. Conversely, toolittle weight on the hitch causes the trailer to fishtail. In both cases,the vehicle will be difficult to handle and at higher speeds the sway-ing or fishtailing can become uncontrollable and result in personalinjury and damage to the boat, trailer, or towing vehicle.
Weight on the hitch, or tongue weight, should be 5% to 10% of thetotal weight of the loaded trailer to avoid overloading the tow vehicleand to provide adequate pressure on the hitch ball. If the weight ofthe loaded trailer is 2000 pounds, the weight on the tongue shouldbe between 100 and 200 pounds. A weight distributing hitch trans-fers portions of tongue weight to a point between the front and rearwheels of the towing vehicle and to the trailer wheels.
Important: Bumper hitches are not safe and are illegal inmany states.
All trailers with a Gross Vehicle Weight Rating of 1500 pounds orgreater are required by law to have brakes. (State laws may vary; besure to check your state’s requirements.) The brake system is usuallycompletely self-contained on the trailer and no hook-up is required tothe towing vehicle. Brakes are either drum or disc type. They work thesame way as the brakes on a standard passenger vehicle, but themethod of applying the brakes is different. Your Chaparral or trailerdealer can explain how the brakes on your trailer work.
Make sure your boat is secure before towing it.
• Close all windows, hatches, and doors.
• Store equipment to keep it from shifting or falling.
• Remove and store convertible top if your boat is so equipped.
• Use a second safety chain to secure your boat’s bow to thetrailer tongue. Tie down the stern to the trailer.
Towing a boat requires extra caution by the vehicle’s driver. Allowextra distance between vehicles. Obey speed limits. Some stateshave lower speed limits for vehicles with trailers. If you are travelingslower than other traffic, pull over when it is safe to do so and allowtraffic to pass. As with all other aspects of owning and operatingyour boat, use common sense and good judgment.
If you do not have experience backing a trailer, practice before youget into a confined public or private launch site. Take your trailer toan open area and get accustomed to using it. If possible, takesomeone with you who knows how to back a trailer.
Steering a trailer while backing it up works the opposite of steering acar. If the trailer needs to go to the right, turn the steering wheel tothe left and vice versa. Inexperienced backers tend to turn thewheel too far. Do not oversteer. Turn the wheel gradually until youget the feel of safe backing.
LAUNCHING AND LOADING
The handling of your boat and trailer at the ramp requires practice,skill and patience. With care and attention to the following tips, youcan launch and relaunch your boat with relative ease.
Important: Typically a beam of 8 feet 6 inches allows you totow without a special permit in most places. These boats areconsidered "trailerable" for this reason. Other boats have wider
5-2
WARNING: Improper towing can result in an accident causingpersonal injury and equipment damage. Become familiar withtowing instructions in owner’s manuals and with warnings sup-plied with your trailer and towing vehicle.

beams and are still “trailerable”, but, in most cases you need apermit to do so. Check with your state on permit requirementsbefore towing.
Roller Trailers – Launching
Here are some tips to remember when you are putting yourChaparral boat in the water while using a roller trailer:
Important: Before launching your boat, make sure the transomdrain plug is installed. If it is not installed, the bilge could fillwith water quickly.
1. Always prepare the boat for launching before you get to theramp.
• Stop in a launching prep area near the ramp that doesn’tblock traffic and remove your tie-downs, tilt up your engineor drive unit, replace your transom drain plugs, etc.
• Do not disconnect the wiring harness, winch cable or boatbow safety chain until you are by the water, ready to launch.Winch and trailer unit should be locked.
• You do not need to disconnect the electric trailer brakesbefore launching the boat. If you disconnect the electrictrailer brakes, the trailer brakes will not work.
• Store all loose gear properly.
• Inventory your safety equipment.
• Tilt drive unit up to clear the ramp.
2. Have someone at the ramp to give you directions. Slowly backthe trailer down the ramp to the water. If there isn’t a ramp avail-able, use a solid area of ground to the shore, with a slope ifpossible. Avoid wet, soft sand. Always remember to launch yourboat at a right angle to the shore.
3. When the boat’s transom is in several inches of water:
• Do not put your trailer wheels and brakes in the water if pos-sible, especially in salt water. Tie a mooring line to the boatto help you control it in the water.
• Stop towing vehicle with manual transmission in gear orautomatic transmission in PARK. Remember to turn offengine and set the parking brake.
• On average grade ramp, the rollers on your trailer will allowyour boat to gently roll back into the water. Do not removethe boat bow safety chain or winch lock until the boat andtrailer are located in “launch” position.
• Once in “launch” position, remove bow safety chain from theboat. Hold the winch handle securely, reverse the winch lockand begin unwinding the line. Unwind it slowly and carefully.
• Move boat down the trailer and into the water.
• If your boat doesn’t immediately move, try unwinding aboutsix inches of line, lock your winch and give the boat apush. Then unlock the winch and try again. Your boat shouldroll safely into the water.
• Tie boat to pier or secure appropriately.
• Pull your vehicle away and park it.
Important: After each launching, monitor the bilge periodicallyto assure against abnormal water intake. Do not leave a new
5-3
WARNING: If the winch handle slips out of your hand, let itspin. DO NOT try to stop it

boat unattended for at least 8 hours after its initial launching. Aforgotten plug, a loose through-hull fitting, or faulty valve caneasily cause swamping. Neither the boat nor the engine war-ranties cover engine or engine components damaged byabnormal bilge water accumulations.
Roller Trailers – Loading
When loading, always prepare for the procedure prior to reachingthe ramp. If the ramp is busy, preparation will shorten the time ittakes for you to get your boat out of the water.
Make sure your engine or drive unit is in the full position. Just as inthe launching procedure, do not put your trailer wheels or brakes inthe water, if possible. For the self-adjusting and centering rollers towork properly, they must not be too far under water.
Unlock your winch and unwind enough cable/strap to attach thehook to the bow eye of your boat. For safety, always keep at leastthree turns of cable/strap around the winch drum. Never let yourcable/strap all the way out. Lock your winch before attempting towind the cable/strap in.
Fasten the boat to the winch line and start winding. Strong wind andcurrent can affect the automatic adjusting capability of your rollertrailer, so be aware of those conditions while loading. Optional loadguides can help you keep your boat centered in adverse conditions.Pull the bow eye tight to bow roller or vee block. Connect the boatbow safety chain and you are ready to drive to the loading/prepara-tion area near the ramp to connect all other tie-downs, lighting orelectric brake connections, etc.
Bunk or Custom Trailers—Launching
Here are some tips to remember when you are putting yourChaparral boat in the water:
Important: Before launching your boat, make sure the transomdrain plug is installed. If it is not installed, the bilge could fillwith water quickly.
1. Always prepare the boat for launching before you get to theramp. Stop in a launching prep area near the ramp that doesn’tblock traffic and remove your tie-downs, tilt up your engine ordrive unit, replace your transom drain plugs, etc.
2. Have someone at the ramp to give you directions. Slowly backthe trailer down the ramp to the water. If there isn’t a ramp avail-able, use a solid area of ground to the shore, with a slope ifpossible. Avoid wet, soft sand. Always remember to launch yourboat at a right angle to the shore.
3. Back the trailer down the ramp until there is enough water tomake the boat float. Because the bunks generate more frictionthan rollers, you need to back the trailer further into the water.
• Tie a mooring line to the boat so you will have control once itis floating.
• Unfasten the boat bow safety chain. Hold the winch handlesecurely, reverse the winch lock and begin unwinding theline. Unwind it slowly and carefully.
• On an average grade, the bunks on your trailer will allowyour boat to gently slip back and float into the water. If yourboat doesn’t immediately move, try unwinding about sixinches of line, lock your winch and give the boat a push.Then unlock the winch and try again. If this doesn’t work,you might try backing the trailer deeper, if possible.
• Care should be given when launching from trailers withbunks that are equipped with plastic-like materials. Thesematerials make the bunk surfaces very slippery, and the boatmay begin to unload as soon as tension is released on thewinch cable/strap.
5-4
WARNING: If the winch handle slips out of your hand, let itspin. DO NOT try to stop it

Bunk or Custom Trailers—Loading
When loading, always prepare for the procedure prior to reachingthe ramp. If the ramp is busy, preparation will shorten the time ittakes for you to get your boat out of the water.
You probably won’t have to back the trailer into the water as far toload the boat as you did to launch it. In fact, the easiest way is toback your trailer up until the rear of the bunks are in the water. By notputting your trailer too deep in the water, your boat will actually cen-ter itself on the bunks about 1/3 to 1/2 the distance onto the trailer.
Connect the winch cable/strap to the bow eye of the boat. Lock yourwinch before attempting to wind the cable/strap in. Once your boatis aligned and is pulled firmly against the winch stand roller or veeblock and your winch is in the locked position, connect the boat bowsafety chain and you are ready to drive to the loading/preparationarea near the ramp to connect all other tie-downs, lighting or electricbrake connections, etc.
Common Cause of Boat Misalignment
If your boat doesn’t sit level in the water or your bunks or rollers arenot adjusted properly, you may have misalignment problems withyour boat when loading. Basic correction procedures are as follows:
Correction Procedures:
Re-measure all roller assemblies that set in a line across from eachother. Make sure the distance to each roller from the centerline of thetrailer is equal. In other words, the left side of your trailer should beexactly the same as the right side. This is true of bunk or roller trailers.
If your boat keeps going to the port (left) side, remove the boat andloosen the U-bolts and/or the through bolts that clamp the rollerassemblies on the stern (back) section of the trailer. Force eachassembly to the right as if you were trying to turn the handlebars ofa bicycle. Hold each assembly in this turned position and retightenthe U-bolts and/or through bolts.
This repositioning of the roller assemblies should correct the mis-alignment of the boat on your trailer. If your boat goes toward thestarboard (right) side, reverse the procedure.
Another common reason for boats not centering themselves isputting the trailer too deep in the water, which does not allow thetrailer adequate time to center the boat. This is especially true onroller style trailers.
Note: Make sure your trailer is not too deep in the water or theboat will float over the rollers and be difficult to load and center.
BOARDING YOUR BOAT
Larger pleasure boats remain stable under most operating condi-tions because of their beam, draft, and weight displacement.However, the U.S. Coast Guard does require that a capacity platebe affixed to all boats up to 20 feet long. This plate states the maxi-mum load capacity. The plate shows persons and gear in poundsthe boat will handle safely under normal conditions. The U.S. CoastGuard establishes these load capacity ratings. Overloading andimproper distribution of weight are significant causes of accidents.Keep weight below maximum limits for safety in turbulent water.
Important: The presence of the capacity plate does not relieve theboat operator from the responsibility of using common sense orsound judgement. Turbulent waters and adverse weather condi-tions reduce the maximum load capacity rating of the boat.
When loading your gear on board your boat, remember to distributethe load evenly, keep the load low and do not overload. Always steponto the boat, never jump! Have someone on the dock pass your
5-5

gear aboard. Secure all gear firmly so that it will not move or inter-fere with operation of the boat.
The way your passengers are seated and gear stowed in the boat affectsyour boat’s performance. Passengers should board the boat one at atime and find a seat. Passengers should remain seated during loading ofgear to maintain an even trim. Distribute your passengers and gear sothat your boat is balanced side to side and front to rear (Figure 5.1).
Note: The swim platform is designed for weight loads up to700 poundson the 310, 330, and 350 Signatures and 500pounds on all other Signature models. Exceeding this weightlimit could cause damage to your boat or personal injury. Theswim platform is not designed to carry personal watercraft.
As the operator, you are responsible for the safety of your passengers.
• Do not allow passengers to ride on the bow with feet hangingover the side.
• Do not allow passengers to ride sitting on the stern or gun-wales. Falling from moving boats is a major cause of fatalrecreational boating accidents.
• Do not allow passengers to sit in the bow rider area (if so equipped)while underway; doing so will obscure the operator's vision.
A shift in passenger weight changes the planing angle of the hull orthe thrust of the propeller. This has the same effect on the boat as ifthe angle of the drive unit were changed. Minor deficiencies in yourboat’s ride can be quickly corrected by shifting passengers or gearforward or aft. By taking a little extra time to carefully place suchgear as coolers, water jugs, tackle box, anchor, and tools, you cre-ate a more desirable trim. On planing-type boats, utilize sternloading in order to slightly raise the bow.
FUELING
Improper fueling procedures are the most common cause ofboat fires.
5-6
DANGER: Fuel leaking from any part of the fuel system canlead to fire and explosion that can cause serious bodily injury ordeath. Inspect system before refueling.
WARNING: Do not smoke, extinguish all open flames, STOPengine and other devices that could cause sparks. Do not useelectrical switches or accessories.
CORRECTBalanced load: gives
maximum performance
INCORRECTOverload forward: causes
boat to "plow"
INCORRECTOverload aft: causes
boat to "porpoise"
Figure 5.1 Boat Loading

Before fueling your boat, check the entire fuel system for leaks.Check for weakening, hardening, swelling, or corrosion of fuel sys-tem components. These include the fuel tank, fuel lines and fittings,fuel filter, and carburetor. Any sign of leakage or deteriorationrequires immediate replacement before further engine operation.
Chaparral Boats recommends using alcohol-free gasoline whenpossible because alcohol tends to destroy marine fuel system hosesand other components. If only gasoline containing alcohol is avail-able or if you do not know whether the gasoline contains alcohol,inspect the fuel system for leaks and abnormalities more frequently.
Preliminary Procedures
1. Safely and securely moor your boat to the dock.
2. Turn off engine and all electrical equipment including lights,bilge pump, bilge blower, etc.
3. Extinguish all cigarettes, cigars, pipes, or other items that mayproduce a spark or flame.
4. Close all hatches, windows, doors, and compartments.
5. Make sure a fire extinguisher is readily available.
Fueling Procedures
1. Always fuel in an area which has sufficient lighting. Gasolinespills are hard to see when lighting is poor or it is dark.
Important: When fueling or having someone else fuel yourboat, be sure the waste or water fill caps are not mistaken forthe fuel fill cap. Also, make sure a fishing rod holder is not mis-taken for a fuel fill plate.
2. Your Chaparral boat has fittings for filling the fuel tank. Removefuel fill plate. Insert the fuel supply nozzle. Allow nozzle to stayin contact with fitting to prevent possible static-produced sparks.
Note: The fuel fill cap has a built in tank ventilation feature. Ifyou should need to replace the cap, see your dealer for theexact same cap to ensure proper fuel system operation.
3. After pumping approximately 5 gallons of fuel into tank, inspectengine and fuel tank area for any signs of fuel leakage. Continuefueling if you do not detect any leaks or other problems.
4. Allow space at the top of the tank for thermal expansion. Do notoverfill tank so that fuel comes out fuel tank vent.
Note: Do not over fill tank, causing fuel to spill onto water.
5. If fuel can not be pumped in at a reasonable rate, check for aplugged fuel vent plug or kink in the line.
Post-Fueling Procedures
1. When you have finished fueling, replace fuel fill cap and washoff any fuel spillage around fuel fill area. Discard, in a safe place,any rags you may have used to wipe off fuel spills.
5-7
DANGER: Fuel vapors are explosive and can become trappedwithin the lower portions of the boat. Close all hatches, win-dows, doors, and compartments while fueling your boat.
WARNING
AVOID DAMAGE TO YOUR FUEL SYSTEM
DO NOT USE FUEL OR ADDITIVES CONTAINING MORETHAN 10% ALCOHOL BY VOLUME (Methanol or Ethanol)
DAMAGE AND LOSS OF WARRANTY MAY RESULT

2. Open engine compartment and all hatches, windows, doors andcompartments closed during fueling. Inspect these areas for fuelfumes or fuel line leakage visually and by smelling. Check outany sign of fuel leakage or any indication of fumes and correctproblem before starting the engine.
3. Run bilge blower at least four minutes before restarting engineto ventilate engine compartment.
OPERATING YOUR BOAT
Starting the Engine
Important: Falls from moving boats are a major cause of fatalrecreational boating accidents. Do not allow passengers to rideon the bow with feet hanging over the side or ride while sittingon the stern, gunwales, or seat backs. The Coast Guard con-siders these acts to be negligent or grossly negligent operationand prohibits them by law.
The following information is only a general guide. Chapter 3 hasspecific starting instructions for boats with battery selector switches.Detailed instructions are also in the engine owner’s manual. Be sureto read and follow all of those instructions.
1. Secure boat to the dock or mooring slip before attempting tostart engine. Keep boat secure until engine is running andwarmed up.
2. Check lubricating fluid levels. Check fuel supply to make sureyou have enough fuel for your planned excursion.
3. To prevent an explosion or fire, look for leaks in fuel, oil, coolant,exhaust, and power steering systems. Be aware of any odors ofthese fluids.
4. Make sure the throttle is in the neutral position.
5. Start the engine. Refer to your engine owner’s manual for rec-ommended procedures for break-in, service, and other relatedoperation.
6. Turn ignition key to START. Release key and allow to return toRUN after engine starts. If engine fails to start, wait one minute.Move throttle only once to maximum position then back to theneutral position. Try to start engine again.
Note: Transmission must be in neutral position before enginewill turn over.
Important: Do not operate starter continuously for more than15 seconds without pausing. Allow starter to cool at least threeminutes between start attempts.
7. Warm up a cold engine by running it at fast idle speed (asrecommended in engine manual) approximately one totwo minutes.
5-8
DANGER: Gasoline vapors are highly explosive. Run bilgeblower for at least 4 minutes before starting engine. Check engineand fuel compartments for fumes or accumulation of fuel.
DANGER: Carbon Monoxide Hazard! A cold engine pro-duces more carbon monoxide than a warm engine. Provideadequate ventilation in the cabin and cockpit to prevent expo-sure and reduce the possibil i ty of carbon monoxideaccumulation. Open all hatches, doors, windows, and sidevents to increase air movement.

Leaving the Dock
After the engine has warmed up, you are ready to leave the dock.Before you cast off, check all gauges, particularly the oil pressuregauge, for proper readings. Check the operation of the steering byturning the steering wheel to full port and to full starboard whileobserving outdrive movement. Check that charging system is work-ing properly. Check again for fuel, oil, and exhaust leaks.
When you are sure your boat is ready, check wind, tide, current orother forces that will affect the way you maneuver your boat awayfrom the dock. Then cast off mooring lines and stow fenders.
Shift your boat’s engine into forward or reverse depending onwhether you want to move the bow or the stern away from the dockfirst. Move the throttle lever to neutral position. Then push forwardquickly and firmly to shift into forward gear or backward to shift toreverse. Your engine should be running at a slow speed as youmove away from the dock. If you move the bow out first, watch thatthe swim platform does not swing into the dock or a piling.
Getting Up To Cruising Speed
After slowly motoring from the dock area to open water, you cansafely accelerate to cruising speed. Advance throttle to settingwhich provides your desired engine speed (RPMs). As you movethe throttle forward, engine RPMs increase, and your boat movesfaster through the water.
Important: Acceleration at full throttle is not recommended dur-ing the engine “break-in period.” This “break-in period”coincides with the engine “20-hour check-up.” Do not attemptfull throttle acceleration during the first 20 hours of operation.
When you throttle up and accelerate, your boat increases the trimangle and causes the boat to ride bow-high. From a maximumangle, the boat levels out to its planing attitude as you continue toaccelerate. (Figure 5.2)
The maximum angle is commonly known as the “hump.” Youshould get over the hump as quickly as possible because visibility,handling, and performance are limited until you do. Only a fewseconds at full throttle should be needed; however, the way yourboat is loaded, the wind, and sea conditions affect the timerequired. When the boat gets over the hump, it reaches its planingattitude. Then, accelerate until your boat reaches a comfortableplane and then throttle down to cruising speed. This also providesfor better fuel efficiency.
When maneuvering at low speeds you can reverse (move throt-tle forward or aft) the shift mechanism. This will react in abraking action.
5-9
BOW RISES PLANING ATTITUDEACCELERATE
Figure 5.2 Boat Acceleration and Attitude
CAUTION: When shifting between forward and reverse, alwayspause in neutral for a few seconds before reversing the rotationof the propeller. This will prevent unnecessary damage to thedrive system.
CAUTION: High speed acceleration in reverse can create awake that could wash over the transom and flood the boat.

Steering Your Boat
Watch the stern when you turn! Steering a boat can be comparedto driving a car on slippery or icy pavement. Be cautious always.When you turn the wheel, the stern responds first by swinging out inthe opposite direction of the bow. When you are trying to avoid anobject in the water, this swing could turn out to be critical.
Always give yourself plenty of room to make a turn. You also shouldslow the speed of your boat while turning. Never make sharp, fastturns as this could cause loss of control. Remember that your pas-sengers should be seated whenever you’re underway.
Trimming Your Boat
Trim refers to the way a boat floats on the water. Your boat will work bestwhen it is trimmed to run at an angle between 3 to 5 degrees to thewater. You can trim your boat by shifting gear or passengers or, if yourboat is so equipped, by adjusting the drive unit angle or the trim tabs.
Power Trim
The operator can adjust his craft to the ideal boat angle for load andwater conditions by trimming the drive unit (Figure 5.3). The powertrim system allows the operator to adjust the drive angle while under-way by changing the angle of the outdrive in relation to the boat’stransom. It also allows the operator to raise and lower the drive fortrailering, beaching, launching, or operating in shallow water.
Note: Refer to your engine owner’s manual regarding theoperation of the power trim controls installed on your boat.
Drive Angle
The drive angle of the boat is the relationship between propellerthrust to the planing surface of the hull’s bottom. You can improvethe performance of the same boat under varying conditions byadjusting the drive angle.
Moving the drive unit angle towards its innermost adjustment bringsthe propeller in as close as possible to the transom. The angle ofthe propeller causes an upward thrust which pushes the boat’s bowdownward as shown on Figure 5.3.
By gradually shifting the drive unit from its innermost adjustmenttowards the outermost adjustment, the propeller thrust pushes in adownward motion. This motion as shown in Figure 5.3, tends to liftthe bow.
5-10
CORRECTGives maximum performance
INCORRECTCauses boat to "plow"
INCORRECTCauses boat to "porpoise"
Figure 5.3 Trimming the Drive Angle
CAUTION: Never trim drive unit up and out using TRAILERswitch while boat is underway. Use extreme caution when oper-ating with drive unit raised. Severe damage to drive unit mayresult if unit is raised beyond the gimbal ring support flanges atengine speeds above 1200 RPM.

After reaching plane, under certain load conditions, your boat couldhave a tendency to bury its forward V-ed section. The boat willbegin to plow and lose speed. If the water is choppy the boat willyaw. A boat will spin out if its bow is excessively buried. The onlyway to correct this situation is to increase the angle and swing thedrive unit outward.
If the drive unit is angled out too far, your loaded boat will be slug-gish in coming to plane. Once on plane, your boat will tend toporpoise. To correct this motion, move the propeller inward todecrease the angle between the drive shaft and the transom.
Very often, the optimum drive unit angle setting for the highestspeed while carrying a light load will be just short of the porpoisepoint. However, such a setting is unsuitable when you have a heavyload or are pulling skiers. By reducing the drive angle, you will find iteasier to maneuver the boat and to pull skiers to the surface.
Trim Tabs
Trim tabs also help the operator trim the boat. Trim tabs aremounted on the port and starboard transom below the water line.The operator can control the trim tabs at the helm with rockerswitches. (Figure 5.4) Pushing the switch activates the electric sys-tem which moves its tab up or down.
If the trim tabs are angled down, they cut into the water as it passesunder the hull to force the stern up and the bow down (Figure 5.5).Trim tabs also compensate for uneven loads in the boat by allowingthe operator to trim up one side of the boat or the other.
5-11
and bow down.
Stern Bow
Tabs
Tabs extended, water passesunder hull, hits tabs and forcesstern up and bow down.
Figure 5.5 Trim Tab Operation
Figure 5.4 Trim Tab and Switch
WARNING: Excessive trim decreases maneuverability,changes steering characteristics, and may cause “porpoising”(bow oscillates up and down) or “chine walking” (rocking side toside). Use power trim with care.

Chaparral utilizes a Lenco™ trim tab retractor. Tab switch integrates acompletely waterproof switch with a trim tab indicator. It is optional onall new trim tab kits and is able to retrofit the standard tactile switch.
Lenco retractor featureLenco marine’s trim tab retractor feature operates from either a 12v-24v signal or from an engine’s analog tach signal. The purpose ofthe accessory signal input is to turn the trim tab control box on andoff. When the control box is turned off, the trim tabs will retract.
Turn-on conditionWhen the Lenco accessory input is connected to either a 12v-24vsignal or an analog tach signal, the control box turns on and the trimtab becomes active. At this time the boat operator can run the trimtabs up or down.
Turn-off conditionIf the Lenco accessory input is connected to an analog tach signal,the control box will shut down when the tach signal is lost (i.e.engine stalls, stops). If the Lenco accessory input is connected to a12c-24c source, the control box will shut down when the voltagesource is removed.
Test modeLenco marine’s trim tab system includes a test mode feature thatallows the boat operator to by-pass the accessory input signal byholding down all four buttons on the key pad simultaneously forapproximately three to four seconds. This will turn on the controlbox and allow the trim tabs to run up or down.
Once the control box is turned on in the test mode, the boat opera-tor can turn the control box off by holding down all four buttons onthe key pad simultaneously.
Important: If the control box is turned on in the test mode andsubsequently receives a signal to turn it on via the accessoryinput, the boat operator can not turn off the control box byholding down all four buttons on the key pad. The box will onlyturn off by removing the signal from the accessory input.
Refer to your engine manufacturer’s owner’s manual for informationconcerning maintenance and operation.
Stopping Your Boat
A boat has no brakes. Stop the boat by allowing it to slow down toless than 5 miles per hour and then putting the engine in reverse.Slowly increasing reverse power will allow you to stop the boat in ashort distance. Remember that a boat does not respond to steeringin reverse as well as it does when going forward.
Additional Underway Information
• Be sure to run the bilge blower whenever the boat is operatedunder cruising speed.
• Keep all bilge blower and engine compartment vents free ofobstructions to allow proper ventilation.
• Always be aware of local laws on noise limits. Noise meansengine noise, radio noise or even yelling by people on yourboat. Good seamanship demands that you operate your boatquietly so as not to infringe on the rights of others. Don’t usethru-transom exhaust unless you are well offshore.
• You are responsible for any damage or injury caused by yourboat’s wake. Observe no wake speed zone warnings. Operateyour boat with regard for the safety of other boats and people inyour boating area.
• Keep your engine well tuned to decrease exhaust hydrocarbonemissions that pollute the air and water.
5-12
WARNING: Check behind you before coming OFF plane. Manyaccidents occur each year as a result of a driver coming offplane while being followed by a boat that is unable to slow downin time to avoid collision.

ANCHORING YOUR BOAT
Anchoring is necessary if you stop for recreation or an emergency.Practice anchoring techniques to make sure you know what to dowhen an emergency occurs. The size and weight of your boat gov-ern the weight of the anchor and the diameter of the anchor line.Your Chaparral dealer can help you select the proper anchoringequipment for your boat.
Use a burying anchor, such as a Danforth or plow anchor, whichgrips into the bottom and holds your boat secure. Holding powershould be more important than weight. For anchoring in relativelyquiet waters, you can use a mushroom anchor as an alternative.
The length of the anchor line should be six to eight times the depthof the water to ensure that the anchor bites into the bottom. The bot-tom end of the anchor line should be galvanized chain which holdsup well as the line moves back and forth on the bottom. The rest ofthe line should be nylon anchor line which stretches to soften theimpact of wind and waves on your boat.
Following are general guidelines for anchoring your boat:
• Secure the anchor line to the bow eye or deck cleat. Do not tieline to hardware not designed to support this stress.
• Use two or more anchors if anchoring overnight or extendedperiods of time. Otherwise, make sure your boat has enoughspace to swing full circle in case of shifting winds.
• Keep the anchor and line in an area where it will be readilyavailable in an emergency.
Dropping Anchor
1. Have a crew member carefully lower anchor, keeping a slighttension on the line as the anchor drops. Maintain tension afterthe anchor reaches the bottom. Simply throwing the anchoroverboard usually fouls the line and requires starting over.
2. Maneuver the boat backwards slowly until the proper length ofline is run out.
3. Fasten the anchor line around the bow eye or deck cleat.Anchor flukes should dig into bottom and hold boat in position.
4. Check shoreline landmarks at the time anchor is dropped andcheck again 30 minutes later. If position has changed, anchor isdragging and must be reset.
Weighing Anchor
Weighing, or pulling in the anchor, requires moving the boat in thedirection of the anchor and pulling in the anchor as the boatmoves. For this reason, the engines should be running. When theline is vertical, pull up firmly on the anchor line to free the flukesfrom the bottom. If the anchor remains stuck, feed out a few feetof line and attach it to the bow cleat. Maneuver the boat aroundthe anchor, keeping the line taut, until you find an angle that willpull the anchor free.
5-13
WARNING: Keep anchor secure while underway to preventdamage or injury if boat’s attitude changes suddenly. If yourboat has a power winch, do not use it as the primary source forsecuring anchor or anchor line. See the power winch instructionmanual for details about proper operation and maintenance.

Docking Your Boat
Important: When operating or docking in close quarters,maneuver your boat at idle speed. Proceed with caution in con-gested areas.
As you approach the dock or other mooring area, slow down yourboat in time to allow your wake to subside before it reaches otherboats or docks. As you get close to the dock, check for wind or cur-rents, and allow them to carry the boat toward the dock if you can.When approaching, check that lines are attached to the cleats onthe mooring side and that fenders are lowered on that side. Be surefenders are at the proper height. If you can, have one person at thestern and one person at the bow, each with a boat hook and amooring line attached to a cleat. Never approach a dock at a speedat which you would not want to bump the dock.
To dock a boat to the starboard side:
1. Approach at an angle approximately 45 degrees to the dock.
2. When the bow is within a few feet of the dock, bring the sternalongside the dock by turning hard to port.
3. Turn to starboard and, at idle speed, put the engine in reverse tobring the stern closer to the dock.
Reverse these steps to dock to the port side.
MOORING YOUR BOAT
When attaching mooring lines to deck cleats on your boat, make aloop in one end of the mooring line. Then, pass it through the hole inthe base of the deck cleat. Next, pass the loop back over the deckcleat. The mooring line can now safely be used to secure your boat.Mooring lines may remain attached to the cleats on your boat whileunderway. The lines must be coiled and placed where they cannotget tangled in deck gear or the propellers.
When you tie up, run the mooring line from your boat around thedock cleat and then back to your boat. This enables you to untie themooring line without leaving your boat. Just throw off one end of themooring line and then bring the entire length of mooring line backinto the boat. (Figure 5.6)
SHUTTING DOWN THE ENGINE
Following are general instructions for engine shutdown. Refer toyour engine owner’s manual for specific instructions.
1. Allow engine to idle so engine cools gradually.
2. Turn engine off.
5-14

5-15
Note: Manila rope, the standard for many years is not as strong as some ropesmade of synthetic materials. For mooring, its ability to stretch is an advantage, butit tends to shrink whenever it gets wet. Nylon rope is strong and elastic. Because ofits elasticity, it works well for mooring lines and anchor lines. Rope made of hightensile strength polyester fibers like Dacron™ is just about as strong as nylon rope,but it does not stretch. Kevlar rope is strong and does not stretch, but it is quiteexpensive. Polypropolene rope tends to deteriorate rapidly when it is exposed tosun light. Because it floats, it is well-suited for use as a tow rope for water skiing.Use for other nautical purposes is not recommended.
Figure 5.6 Mooring Lines

5-16

Do not attempt any repairs on your boat unless qualified to do so.Only use approved marine replacement parts available from yourChaparral dealer. Chaparral recommends having an authorizedChaparral dealer do your maintenance and repair work. Your dealeris qualified to make repairs or modifications to your boat in such amanner as to not compromise safety, design integrity, or warrantycoverage. This chapter includes information you can use to do gen-eral maintenance and repair. If you choose to do your boat’smaintenance and repairs, always refer to the product manuals fordetailed information.
ENGINE
Refer to the engine owner’s manual for detailed information aboutengine maintenance and repair. That manual has a maintenanceand service schedule for the engine on your boat.
Checking the Oil
Note: During the engine 20-hour break-in period, Chaparralrecommends that you check the oil level every two hours.
To check the oil:
1. Make sure boat is in the water and engine is stopped.
2. If engine is warm, let it cool for ten minutes to allow oil todrain back into the engine oil pan. This will make the checkmore accurate.
3. Pull engine oil dipstick out of its sleeve, wipe clean, and pushdipstick back into the sleeve. Make certain the dipstick ispushed all the way back in.
4. Pull dipstick out again and check oil level on dipstick. The oillevel must be between the ADD and FULL marks on the dipstick.
5. If oil level is at or below the ADD mark you must add oil.
6. Push dipstick back down into the sleeve. Be sure it is all the wayin and properly seated.
Adding Oil
To add oil:
1. Remove oil fill cap from valve cover.
2. Add oil as required to raise the oil level up between the ADDand FULL marks on the dipstick. Do not overfill. One quart(0.95 liter) of oil will be required if oil level was at the ADDmark on the dipstick. Add more oil if oil level was below ADDmark on dipstick.
3. Check oil level after adding oil.
Note: Chaparral Boats recommends that you use a funnelwhen you add oil to prevent spillage and to help keep yourengine free of surface grime and dirt.
Important: The Federal Water Pollution Control Act prohibitsthe discharge of oil or oily waste into or upon the navigablewaters of the United States or the waters of the contiguouszone if such discharge causes a film or sheen upon or a dis-coloration of the surface of the water or causes a sludge oremulsion beneath the surface of the water. Violators aresubject to a penalty.
PREVENTIVE MAINTENANCE AND REPAIR 6
6-1

Fuel Filter
Refer to your engine owner’s manual for detailed information aboutchecking and maintaining the fuel filter.
The engine exhaust system removes harmful gas created by theengine during combustion. Inspect the system for leaks before eachuse of the boat. Make sure all hose clamps and connections aretight and there are no cracks in any exhaust system component thatwould allow carbon monoxide gases to escape.
TUNE-UP
Tune-ups at recommended intervals keep your engine in top-notchoperating condition and help assure the highest possible perfor-mance from your engine. Engines should be tuned up every 200 to300 hours or if engine becomes hard to start or does not run well. Ifyour boat is used less than 200 to 300 hours per year, Chaparralrecommends that the boat be tuned up at least once a year.
Refer to your engine owner’s manual for detailed information.
FUEL SYSTEM
This information describes the fuel system excluding the engine.The fuel system provides a clean, continuous supply of fuel to theengine, in addition to helping prevent possible fire and explosion.All fuel systems installed at the Chaparral factory meet federalrequirements.
Note: Refer to your engine owner’s manual for detailed infor-mation about checking and maintaining the fuel system.
The fuel system must be inspected frequently and maintained regu-larly. Check for leaks and/or vapors and repair any problemsimmediately. Keep fuel tank filled during the boating season to pre-vent moisture from condensing in the tank.
MONTHLY INSPECTION
Note: A trained marine mechanic should replace parts or repairthe fuel system. See your Chaparral dealer for parts and repair.
1. Starting at the fuel tank, check the entire fuel system for leaksor vapors.
2. Check fuel lines and hoses for wear, kinks, cracks, or deterioration.
3. Inspect fuel line fittings, carburetor, and fuel pump to make suremounting brackets are tight.
4. Check fuel ventilation ducts and clamps for wear or damage.
Refer to the engine owner’s manual for recommended frequency forchecking stern drive unit and its oil.
Engine Alignment Check
Consult your Chaparral dealer for more information about checkingengine alignment.
6-2
CAUTION: Hot oil in operating stern drive can burn you. Do notremove oil vent plug immediately after using boat. Hot oilexpands and flows rapidly from vent plug opening if oil vent plugis removed.
WARNING: Gasoline vapor explodes easily. Explosion is likelyto cause fire and may burn you and damage your boat. AlwaysSTOP engine and do not smoke or allow open flames in areawhen changing filter.

PROPELLER
Note: Refer to the propeller manufacturer’s manual for instal-lation, removal, and further detailed information.
The propeller shipped with your boat is the size Chaparral recom-mends for the best overall performance. However, factors such asaltitude, temperature, load, bottom growth, and propeller conditioncan affect your boat’s performance. Consult your Chaparral dealerregarding your specific performance requirements.
Periodically check propeller for excessive wear and damage. Repairor replace, if required.
Steering System
Note: Some engine models do not have power steering as astandard feature. Refer to the engine owner’s manual or checkwith your dealer for details.
If your boat has a power steering system, it needs periodic mainte-nance to be troublefree and safe. Regular checks of the completesystem are essential.
Lubricate, inspect, and maintain system regularly.
Note: Operating boat in saltwater is classified as excessive use.
1. Lubricate control valve through grease fitting with multi-purposelubricant until grease is visible around rubber boot.
2. Coat power steering output shaft and exposed steering cableend with multi-purpose lubricant.
3. Lubricate cable end guide pivot point with SAE 30W engine oil.
4. Run engine for 20 to 30 minutes, then check power steeringfluid level. If low, add type “A” automatic transmission fluid tobring level up to FULL mark on the dipstick.
Note: If engine is cold, the correct fluid level should be at theADD mark to allow for oil expansion when engine is hot.
5. Check all hydraulic lines and hoses for leaks. Make sure nolines and hoses rub against other parts and or come into con-tact with any extremely hot parts. Tighten all fittings and clampsas required.
6. Check all bolts for tightness.
Consul t your Chaparra l dea ler regard ing a l l repa i rs orreplacement parts.
BILGE
Inspection
Check the bilge before you use your boat—every time! A smallamount of water in the bilge is normal and not a cause for concern.If the amount of water is excessive, check for water leaks. Repairleaks immediately.
If the bilge is ever filled with fuel or oil, check engine, hoses, fueltank(s), etc. for leaks. Repair immediately.
Important: Pumping fuel or oil overboard into the water vio-lates the Federal Clean Water Act. Pump into suitable containerand dispose of properly.
Cleaning
Run bilge until pump is dry. Remove all sand, silt, dirt, or foreignmaterial. Make sure all limber holes are open and strainers areclean. Use bilge cleaner to remove any obvious oil stains.
6-3

Important: Never use any flammable solvents for cleaning thebilge. Check with your Chaparral dealer for recommendedcleaners.
6-4
WARNING: Gasoline or vapors in bilge can explode. Removeall sources of ignition. Do not start engine, repair immediately.

The troubleshooting procedures listed in this chapter are designedto correct minor malfunctions for engine performance issues.Troubleshooting is a process of elimination. The troubleshootingchart displays areas that could be at fault and are presented in theorder of probable occurrence.
Use good common sense and always refer to the manufacturer’sEngine Owner/Service Manual. If the malfunction(s) appears too com-plicated or unsafe, contact your Chaparral dealer. If underway, andcontacting your Chaparral dealer is not practical, contact the localmarina for information regarding available marine mechanic service.
TROUBLESHOOTING 7
7-1
PROBLEM CAUSE SOLUTION
Engine will not crank (Ignition system)
Engine cranks but will not start (Fuel system)
1. Ignition breaker tripped or fuse blown atengine
2. Neutral safety switch not makingproper contact
3. Throttle lever in wrong position
4. Loose wire in starting circuit5. Ignition switch defective
6. Defective solenoid7. Dead battery8. Battery switch in wrong position
1. Lack of fuel
2. Improper starting procedure
3. Distributor cap brush cracked or broken4. Choke plate sticking
1. Reset by pushing ignition breaker orreplace fuse.
2. Have your Chaparral dealer inspectthrottle assembly.
3. Check position of throttle lever, ensureit’s in the “neutral” position.
4. Tighten all wiring connections.5. Test switch continuity. Replace switch
as required.6. Replace solenoid.7. Recharge or replace battery.8. Turn selector switch to battery on position.
1. Clean fuel filter, check fuel level; checkanti-syphon valve, if equipped.
2. See Engine Owner/Service Manual toreview starting procedure.
3. Replace brush.4. Check thermostatic spring housing
adjustment.
CAUTION: Disconnect battery cables before performing allinspections, checks, and repairs to avoid possible personalinjury and damage to equipment.

7-2
PROBLEM CAUSE SOLUTION
Engine cranks but will not start (Fuel system)cont.
Low cranking speed
Starter will not crank engine(s)
Poor acceleration
5. Clogged fuel filter6. No fuel reaching fuel intake system
(providing all fuel valves are open)
7. Engine flooded
8. Contaminated fuel
9. Spark plug(s) fouled or broken10. Distributor broken, wet, cracked, or dirty
1. Loose or dirty electrical connections ordamaged wiring
2. Bad battery
3. Engine oil too heavy for prevailingtemperatures
1. Discharged battery2. Corroded battery cables3. Loose connection in starting circuit4. Defective starter switch5. Starter motor brushes dirty6. Jammed “starter drive”
1. Fuel injector(s)2. Throttle not fully open
5. Check and replace fuel filter.6. Check fuel pump, fuel pump filter, and
fuel tank line for cracked flanges orrestricted fittings.
7. Do not attempt to start engine for atleast 5 minutes. For hot engine, fullyadvance throttle, (make sure throttlelever is in neutral) and crank engine.
8. Inspect for water or other contaminantsin fuel. If contaminated, drain tank andflush with fresh fuel.
9. Clean, adjust gap, or replace.10. If wet or dirty, wipe with cloth and clean-
ing solvent. Inspect cap for cracks,carbonized paths (inside and out),replace cap as required.
1. Check all related electrical connectionsand wires.
2. Test battery (See Engine Owner/ServiceManual).
3. Drain oil and refill with correct grade andviscosity oil (See Engine Owner/ServiceManual).
1. Charge battery.2. Clean battery terminals.3. Check and tighten all connections.4. Replace switch.5. Clean or replace brushes.6. Loosen starter motor, then free
stuck gear.
1. Clean or replace.2. Inspect cable and linkages for binding,
obstructions, or loose fasteners.

7-3
PROBLEM CAUSE SOLUTION
Poor acceleration cont.
Engine runs but misfiring
Excessive fuel consumption
Blue exhaust smoke
Black or Gray exhaust smoke
White exhaust smoke
3. Flame arrestor dirty or air intake obstructed
4. Engine overheating
1. Fouled spark plug(s)2. Wet spark plug wires
3. Carbon tracked distributor4. Loose ignition wires5. Defective fuel pump6. Partially clogged fuel filter7. Contaminated fuel
1. Restriction in flame arrestor2. Faulty fuel pump3. Dirty flame arrestor screen4. Spark plugs bad or set improperly5. Incorrect timing
1. Lube level too high2. Oil too thin
3. Oil overheated
1. Fuel mixture too rich (carb only)2. Choke stuck (carb only)3. Poor carburetor setting (carb only)
4. Carburetor fuel level too high (carb only)5. Clogged flame arrestor
1. Engine misfiring2. Spark plugs dirty or not gapped correctly
3. Clean f lame arrestor and checkair intake.
4. Check engine temperature (See EngineOwner/Service Manual).
1. Remove, clean, or replace.2. Wipe dry, inspect and replace
damaged wires.3. Clean or replace as required.4. Inspect all wire connections.5. Repair or replace as required.6. Clean or replace fuel filter.7. Drain fuel tank, flush clean and replace
fuel filter.
1. Remove flame arrestor and clean.2. Repair or replace as required.3. Clean or replace as required.4. Clean and set; or replace spark plugs.5. Time engine.
1. Drain off excessive oil.2. Drain and replace oil (See Engine
Owner/Service Manual).3. Check cooling system.
1. Adjust carburetor.2. Lubricate and adjust.3. Readjust carburetor (See Engine
Owner/Service Manual).4. Adjust float in carburetor.5. Clean or replace as required.
1. See Engine Owner/Service Manual.2. Clean, adjust gap, or replace.

7-4
PROBLEM CAUSE SOLUTION
Low oil pressure
No oil pressure
High oil pressure
Knocking or pinging
Rough running
1. Insufficient oil in crankcase
2. Excessive oil in crankcase
3. Diluted or improper grade and viscosity oil
4. Oil leak in pressure line
1. Defective gauge, gauge tube, or oil line
2. No oil in engine
1. Too heavy grade of oil
2. Dirt or obstruction in oil line
1. Incorrect type fuel2. Incorrect timing
3. Pre-ignition
4. Overheated engine5. Cooling system trouble
1. Choke not operating (carb only)
2. Faulty fuel pump
3. Idle speed too low4. Faulty ignition system components
1. Check and add correct grade andviscosity oil. Visually check enginefor leaks.
2. Check and remove required amount ofoil. Check for cause of excessive oil(improper filling, bad fuel pump, etc.).
3. Change oil and oil filter; be sure to usethe correct grade and viscosity oil.
4. Inspect all oil lines and tighten allconnections as necessary.
1. Replace gauge, or tube, and tighten orreplace line as necessary.
2. Fill with proper grade and viscosity oil(See Engine Owner/Service Manual).
1. Drain oil and replace with proper grade(See Engine Owner/Service Manual).
2. Drain and clear oil system. Check forbent or flattened oil lines and replaceas required.
1. Drain tank and replace with proper fuel.2. Time engine (See Engine Owner/
Service Manual).3. Clean or replace spark plugs; check
engine timing.4. Check engine cooling system.5. Check water intake connections for leaks.
1. Check choke linkages for bindingor obstruction.
2. Refer to Engine Owner/Service Manualfor fuel pump testing procedures.
3. Check idle speed and adjust.4. Service ignition system (See Engine
Owner/Service Manual).

7-5
PROBLEM CAUSE SOLUTION
Rough running cont.
Engine overheating
Sludge in oil
5. Clogged fuel filter6. Contaminated fuel
7. Kinked or clogged fuel lines, or fuel tankvent line
8. Flame arrestor plugged with foreignmaterial; or air intake hose obstructed
1. Bad sending or receiving unit2. Loose wiring connections at sending or
receiving unit3. Worn or broken impeller in sea
water pump4. Clogged oil cooler5. Exhaust lines plugged6. Ignition timing late7. Choke valve stuck closed (carb only)8. Collapsed water pump suction hose9. Loose or worn belts10. Restricted water intake
1. Infrequent oil changes
2. Dirty oil filter3. Water in oil
5. Replace fuel filter.6. Inspect fuel for water or other contami-
nants. If contaminated, drain tank andflush with fresh fuel.
7. Use compressed air, at not more than20 psi, to blow-out obstruction. Replaceline if kinked.
8. Clean flame arrestor and check hose.
1. Replace unit(s).2. Tighten all connections.
3. Replace impeller.
4. Remove obstruction.5. Remove obstruction.6. Time engine.7. Free choke valve movement.8. Install new hose.9. Adjust or replace belts as required.10. Clean water intake.
1. Drain and refill with proper grade andviscosity oil.
2. Replace oil filter.3. Drain and refill. If trouble persists, check
for cracked block, or defective head gas-ket and cracked head.
WARNING: Wear protective eye wearwhen performing compressed air cleaning.

7-6
PROBLEM CAUSE SOLUTION
Poor Performance
Vibration
1. Damaged or improper propeller2. Excessive water in bilge area
3. Boat overloaded or improper distributionof load
4. Fouled or damaged hull bottom
1. Loose engine mounting bolts2. Damaged propeller shaft3. Propeller bent or pitch out of true
4. Engine out of alignment
1. Inspect propeller and replace if required.2. Pump out bilge area. Inspect for causes
related to excess water.3. Reduce load or redistribute load.
4. Inspect, clean, or repair as required.
1. Inspect and tighten as required.2. Replace shaft.3. Inspect propeller and replace as
required.4. See Engine Owner/Service Manual.

The following information will help you keep the interior and exteriorof your boat in tip-top shape. If you need more specific information,contact your Chaparral dealer.
Note: Before you use a particular cleaning solution or method,test the material to be cleaned in a hidden or inconspicuousarea for possible adverse reactions. Use cleaning agents spar-ingly. Never discharge cleaning solutions into the waterways.Do not use products containing phosphates, chlorine, sol-vents, or nonbiodegradable or petroleum based products.
FIBERGLASS AND GELCOAT
The hull and deck are made of fiberglass. The outer layer of the hulland deck is a color pigmented polyester resin, called gelcoat.Gelcoat is highly resistant to scratches that occur during normalboat use. Nevertheless, during the life of your boat, some damageto the gelcoat is bound to occur.
Gelcoat Maintenance
To remove and prevent the buildup of most salt, soil, and grime,clean the hull and deck regularly with household detergent andwater.
Note: Make sure household detergent does not contain ammo-nia or chlorine. Because ammoniate or abrasive cleaners dulland discolor the gelcoat surface, they are not recommendedfor routine maintenance.
Gelcoat surfaces are very resistant to deep stains. To remove minorstains, wash the affected area with a soft cloth and household deter-gent. Then rinse thoroughly with clear water. If deep stains do occur,use a special fiberglass cleaner and stain remover.
Waxing the gelcoat surface regularly will help prevent soiling andpreserve its luster. Chaparral recommends a fiberglass wax that fillsthe gelcoat pores. Chemicals in fiberglass wax screen out harmfulultraviolet rays that cause fading of the gelcoat color.
Repairing Gelcoat Damage
Minor Scratches
Repair minor scratches with automotive rubbing compound or pol-ishing wax. Follow the manufacturer’s instructions. Although thescratches may not disappear completely, they should not be asnoticeable. Apply rubbing compound or polishing wax to a damp,soft cloth. Rub the gelcoat surface with the damp, soft cloth in a cir-cular motion.
Chips, Hairline Cracks, and Small Patches
Your Chaparral dealer has qualified personnel capable of makingthis type of repair.
Chaparral uses the finest gelcoats and resins available to preventgelcoat crazing and hairline cracks. Over time your boat maydevelop slight hairline cracks in the outermost gelcoat layer. Theseusually do not damage the structure of your boat or affect itsintegrity.
INTERIOR AND EXTERIOR CARE 8
8-1
CAUTION: Waxed gelcoat is slippery. Falls causing bodilyinjury or falls overboard are possible. Never wax deck surfacesthat require sure footing.

HULL BOTTOM MAINTENANCE
If your boat will be in water continuously for the majority of the boat-ing season, Chaparral recommends sealing the hull bottom with ahigh quality barrier coating. Repairing water blister damage is notcovered under the Chaparral Boat Warranty. Your Chaparral dealercan recommend the best barrier coating product for your boat.
Never use wire brushes, scouring pads, or other abrasive materialsor solutions on the bottom surface of your boat. They cause smallscratch marks that will collect dirt, silt, sand, marine growth andother foreign materials.
Keep the hull bottom of your boat clean. Checking it regularly forany signs of excessive wear or damage. Make needed repairs tothe hull bottom as soon as possible. Accumulation of natural coat-ings from water and marine growth can create drag and limit theefficiency of your boat.
BOTTOM PAINT (ANTI-FOULING)
Important: Consult your Chaparral dealer for recommendedbottom paints and local laws that govern your area. Manystates regulate the chemical content of bottom paints to meetenvironmental standards and regulations.
Anti-fouling bottom paint is designed to prevent marine growth bydissolving slowly. As a result, the bottom of your boat will usuallyneed painting after the boating season. Some variables to considerwhen selecting a protective bottom paint are the water temperature,water pollution, salinity, current, and organic matter in the water. Toprotect and repaint the boat bottom, perform the following:
• Remove boat from water once a year. Scrub bottom with a soapand water solution and a bristled brush.
Note: Repainting the bottom is not necessary each time thebottom is scrubbed, as long as no bare areas are visible in thebottom paint.
• Sand entire bottom surface of the boat.
• Fair (smooth out) all rough areas as required.
• Clean bottom surface to remove all dust and foreign materials.
• Make sure bottom surface is completely dry.
• Apply new coat of bottom paint.
Allow new bottom paint to dry 24 to 36 hours. Never attempt to haul,paint, and launch on the same day.
HARDWARE AND FITTINGS
Note: Always follow the manufacturer’s recommendationsfound in your owner’s packet for cleaning and maintainingdeck hardware and fittings. These recommendations includethe proper cleaning methods and cleaning agents.
Inspection
Inspect hardware and fittings to make sure they are tight. Allscrews, bolts, clamps, cleats, etc., should be secure.
Cleaning and Care
• Always clean stainless steel frequently with soap and water. Anycleaner safe for glass is usually safe for stainless steel.
• Always remove rust spots as soon as possible with a brass, sil-ver, or chrome cleaner. Irreversible pitting will develop underrust that remains on stainless steel for any period of time.
• Always use a cleaner, like a good car wax, for added beauty andprotection.
• Never use coarse abrasives like sandpaper or steel wool onstainless steel. These may actually cause rusting.
8-2

• Never clean with mineral acids or bleaches.
• Never leave stainless steel in contact with iron, steel, or othermetals which cause contamination leading to rust or corrosion.
WINDSHIELD AND PORTHOLES
Clean windshield safety glass with a glass cleaner or ammoniawater; then rinse with plenty of clear water.
Important: Solvents can penetrate glass or porthole surfacesand cause hazing. Hazing obstructs visibility. Never use ace-tone, benzine, carbon tetrachloride, lacquer thinner, or similarsolvents to clean glass or portholes.
The canvas or weather covering windows are made of a syntheticmaterial. Wash any Plexiglass, clear vinyl or other synthetic materi-als with a mild detergent or dishwashing liquid and water solution,then rinse with plenty of clear water.
When stowing plastic or vinyl windows, be sure they are dry. Makesure the vinyl is rolled and not folded or creased. Store them in abag that will breathe.
CARPET
After a boating excursion, allow carpet to dry completely in the sunto prevent mildew.
Vacuum carpeting frequently. Clean up spills as quickly as possible.Remove spots before they dry. Clean indoor/outdoor carpet with amild detergent or dishwashing liquid and warm water solution and ascrub brush. After cleaning, thoroughly rinse carpet with clear water.Your owner’s packet has more detailed information provided by themanufacturer. Follow the manufacturer’s recommendations forcleaning and stain removal.
SEAT COVERINGS AND VINYL
Because seat coverings and trim are made of expandable vinyl,extreme temperatures have little effect on them.
Note: Follow the manufacturer’s recommendations (found inyour owner’s packet) for cleaning and seat covering andremoving stains. These recommendations include the propercleaning methods and cleaning agents.
Care
Place removable exterior cushions inside the boat when they arenot in use.
Cleaning
Remove stains as soon as possible to eliminate any possible reac-tion between the staining agent and the vinyl. Wipe away dirt andsmudges with mild soap and warm water. If additional cleaning isrequired, scrub with a soft bristle brush to remove dirt from texturedpatterns. Dry with a soft, lint-free cloth or towel.
Follow manufacturer’s instructions closely. NEVER use steel wool,powdered abrasive cleaners, or bleaches. They will mar the surfaceand leave an unsightly appearance. Never use bleaches or solventsof any kind on monogram parts. Use mild soap and water. Bleachesand solvents will cause monograms to fade.
To store cushions onboard boat for winter or extended periods oftime, open zippers and elevate cover away from foam padding.Place a small rounded object (for example, a plastic bowl) inside toallow for air circulation.
CANVAS (WEATHER COVERINGS)
The canvas, or weather coverings, are 100% acrylic yarn. Besidesits resistance to mildew, rot and weather, canvas also resists indus-trial pollutants and the effects of ultraviolet light from the sun.
8-3
Care
• Keep the top up when boat is not in use or when it’s raining.Never trailer your boat with the canvas up. None of the canvas orcovers supplied with your boat were designed for the stress ofhighway speed trailering, and to do so may damage the canvas.
• Keep canvas clean. Acrylic fabric will not support mildewgrowth, but dirt and dust on the canvas will.
• Lubricate zippers with paraffin and snaps with petroleum jelly.
• If canvas or seams leak, apply a light coating of a fluorocarbonbased water repellent, or “303 High Tech Fabric Guard,” avail-able at most marine dealers.
• Allow all canvas to air dry before storing. Never store canvasdamp or wet. Provide proper ventilation to limit the possibility ofmildew.
• Avoid mooring under trees.
• Do not tow your boat with canvas attached to any hull or wind-shield mounted fasteners.
• Be careful not to scratch clear vinyl windows. Dry well beforestowing. When stowing clear vinyl, make sure the vinyl is rolledand not creased.
Cleaning
• Wet down all canvas material. Scrub with a soft bristle brushand a solution of mild soap and water. Never use a detergent orbleach on your canvas.
• Brush or sweep the underside of the top. Spray with Lysol orother disinfectant to prevent mildew.
CABIN CUSHIONS, SIDE CURTAINS, AND FABRICS
Clean interior cabin cushions with a foam type cleaner. Follow allinstructions as recommended by the product manufacturer. Dryclean all side curtains & fabrics, other than vinyl.
CHAPARRAL LOGO
The Chaparral logo mounted on your boat is chrome plated. Toproperly care for this logo:
• Use Tarni-Shield cleaner by 3M.
• A high quality chrome polish or cleaner can also be used.
• Mild soap and water can be used for normal cleaning.
• Always use a soft cloth while cleaning or polishing to preventabrasion.
Important: Do not use scrub brushes, buffing wheels, harshchemicals, rubbing or polishing compounds or steel wool onthe logo. All of these items can damage the finish of the logo.
8-4

This chapter tells you how to winterize and store your Chaparralboat in regions where temperatures fall below freezing. If you keepyour boat in an area not requiring winter storage, Chaparral recom-mends you perform an annual inspection, similar to the preparationfor storage as indicated in this chapter. With proper care, you willhave many years of enjoyable boating with your Chaparral boat.
LIFTING THE BOAT
Unless your boat is trailerable, have your dealer or qualified marinapersonnel lift your boat out of the water for you. Each boat has mainframe components designed to support the boat when it is beinglifted out of the water. Severe gelcoat crazing or more serious hulldamage can occur if the lifting slings exert pressure on the gun-wales. Flat, wide belting-type slings should be used. Don’t usecable-type slings. The spreader bar at each sling should be as longas the distance across the widest point the sling surrounds.
• Never hoist the boat with more than a minimal amount of waterin the bilge.
• Before lifting the boat, empty fuel and water tanks, especially ifthey have large capacities.
• Be sure to position slings as indicated by the diagrams inChapter 3.
• Do not use deck cleats or bow or stern eyes for lifting the boat.
• Be sure boat remains level while being lifted to avoid slingmovement or boat damage.
• If using any boat lifting device other than slings, position liftingdevice so as not to put pressure on any underwater hull compo-nent including trim tabs.
Cradle
A cradle is the ideal support for your boat whenever it is not in thewater. Properly designed and located, the cradle will support theboat under the main frames. Support at these points is essential forpreventing damage to the hull. Purchase a cradle from your dealerto ensure that your boat has the correct support.
DRY STORAGE PREPARATION
Note: Refer to Chapter 8, Interior and Exterior Care, for specificcleaning solutions and procedures.
Deck
• Wash the deck and walkway surfaces.
• Clean all deck hardware, and apply a coat of rust inhibitor.
• Clean the indoor/outdoor carpet.
Hull
• Scrape off any barnacles or crusted marine growth.
• Scrub hull thoroughly to remove marine growth, scum andloose bottom paint.
WINTERIZING AND STORAGE 9
9-1
WARNING: Lift slings may slip on the hull and result in seriousinjury or death from dropped load. Exercise extreme caution if inthe vicinity of such activity. If possible, slings should be tiedtogether before lifting.
• Inspect underwater gear and propeller for excessive wearor damage.
• Apply fresh coat of bottom paint.
• Remove hull drain plug; store it in a safe place. Allow bilgewater to drain, raise bow of boat during period of storage.
General Housekeeping
• Clean boat interior including all cabinets and drawers.
• Remove all cushions, mattresses, curtains, blankets and sheets,pillows, towels and linens, clothing, and any other items that canhold moisture and cause mildew.
Note: Leave mattresses onboard only if air can circulate aroundthem.
• Lay all plastic cushions flat.
• Make sure cabin is well ventilated.
• Check for adequate air circulation around life jackets and othersafety equipment left onboard.
• Clean and dry bilge. Remove any materials such as rags,sponges, or other cleaning material.
• Weather permitting, open all doors, hatches, portals, and win-dows to air out the interior for a day or two.
• If covering boat while in storage, use a cover constructed of fab-ric that allows for plenty of ventilation.
SYSTEMS AND COMPONENTS
In regions where temperatures fall below freezing, winterization ofthe systems and components is necessary. Failure to do so will
seriously damage them. They include, but are not limited to: gener-ator, mufflers, air conditioner, strainers, water heater, sump pump,Porta-Potti, head, holding tank, water tank, sewer system, andwater systems. As a result of not being able to completely drainwater systems with a water heater installed, it is recommended thatpotable water system antifreeze be run through the entire systemat the time of winterization. This needs to be COMPLETELYflushed before use the following spring.
Note: Chaparral strongly recommends having a qualified dealerperform winterization procedures for your boat.
ENGINE
Important: In regions where temperatures fall below freezing,winterizing your engine is necessary. Failure to do so will seri-ously damage the engine. Refer to your engine owner’s manualfor detailed winterization information.
Change engine oil before storing your boat. Refer to the instructionsin your engine owner’s manual.
STERN DRIVE
Remove stern drive unit. Have a qualified engine technician checkand adjust alignment as necessary.
FUEL SYSTEM
Add a gasoline stabilizer solution to the fuel tank. Follow the productmanufacturer’s recommended procedure.
BATTERY
Remove battery from boat and store battery in a cool dry placeaway from freezing temperatures.
9-2

• Cover battery terminals with rubber or plastic caps to preventaccidental contact between battery posts and metal objects.
• Clean outside battery case, terminals, and battery clamps with abaking soda and water solution. Do not allow solution to enterbattery cells.
• Clean battery posts and clamps with fine grit emery cloth. Use alight sanding motion when cleaning.
• Apply a l ight coat of petroleum jel ly to cover end ofbattery cables.
• Recharge battery monthly or trickle charge continuously whilebattery is stored.
RECOMMISSIONING
Note: For detailed information on recommissioning yourboat’s systems and equipment, refer to the owner’s manual foreach system or component.
1. Inspect, visually and by smelling, the fuel system and all associ-ated components for proper connections, wear, leaks, or otherdamage and needed repair.
Important: Inspection of the fuel system at recommissioning isvery important. We cannot overemphasize our concern for yoursafety.
2. Clean battery terminal posts with wire brush or steel woolbefore reinstallation.
3. Check charge on battery. Recharge or replace if necessary.
4. Inspect all battery wiring. Repair or replace if necessary.
5. Attach battery cables, and tighten cable clamps.
6. Apply petroleum jelly or marine grade grease on battery postsand clamps to eliminate air pockets and possible acid buildups.
7. Reinstall hull drain plug after coating threads with petroleumjelly.
8. Clean bilge area.
9. Reinstall exhaust drain plug.
10. Inspect all exhaust connections to avoid exhaust and carbonmonoxide (CO) leaks. Adjust as required.
11. Inspect all wiring for fraying, wear, loose connections, or otherdamage. Repair or replace if necessary.
12. Test operation of navigation lights and other lighting onboard.Inspect all switches, controls, and other related equipment forproper operation. Repair or replace as necessary.
13. Inspect all life jackets, anchor lines, and other safety equipmentfor proper operation and physical condition. Repair or replace ifnecessary.
9-3
WARNING: Battery electrolyte can cause severe eye damageand burn your skin. Wear goggles, rubber gloves and a protec-tive apron when working with battery. If electrolyte spills, washarea with a solution of baking soda and water.


Abaft Toward the stern.
Abeam Amidships, at a right angle to the keel.
Aboard On, in, or into a boat.
ABYC American Boat and Yacht Council, Inc., theorganization that sets voluntary safety andconstruction standards for small craft in theUSA.
Adrift Without motive power and without anchor ormooring.
Afloat On the water.
Aft Describing the after section of a vessel, orthings to the rear of amidships and near thestern.
Aground Touching bottom.
Amidships In the center, the center portion of a vessel.
Anchor A forging or casting shaped to grip the seabottom and, by means of a cable or rope,hold a boat in a desired position.
Anchorage A customary, suitable and (usually) desig-nated harbor area in which vessels mayanchor.
Astern Toward the stern. An object that is aft of aboat is said to be astern of the boat.
Athwart Across.
Aweigh Off the bottom, said of an anchor.
Aye Yes, while aboard a boat or ship. Means “Iunderstand.”
Bail To remove water from a boat by pump orbailer.
Ballast Heavy material such as iron, lead, or stoneplaced in the bottom of the vessel.
Beacon A post or buoy placed over a shoal or bank towarn vessels, also a signal mark on land.
Beam Imaginary line amidships at right angles tokeel of vessel. Also vessel’s maximum width.
Bearing The direction or point of the compass in whichan object is seen.
Belay To make fast to a cleat or belaying pin; tocancel an order.
Below Beneath, or under, the deck. One goes belowwhen going down into the cabin.
Bend To fasten by means of a bend or knot.
Berth A position, as a place to sleep or in which avessel maybe made fast; a margin of safety,as “a wide berth.”
Bilge The lower internal part of a boat’s hull.
Bollard A strong post for holding lines fast.
NAUTICAL GLOSSARY 10
10-1
Bow The forward part or front of the boat.
Breakers Waves cresting as they reach shallow water,as at or on a beach.
Breakwater A structure, usually stone or concrete, built tocreate a harbor or improve an existing one.
Bulkhead Vertical partition in a boat.
Burdened Vessel Former term for the vessel which must stayclear of vessels with the right-of-way.
Caulking Forcing filler material into the seams of theplanks in a boat’s deck or sides, to makethem watertight.
Camber The arch of a deck, sloping downward fromthe center toward the sides.
Capsize To turn over.
Carburetor Backfire Flame Arrestor Required equipment on all motorboats except
outboards and diesels. Reduces chance offire caused by backfires in internal combus-tion engines.
Cardinal Points The four main points of a compass; north,east, south, and west.
Ceiling The inside lining of the hull.
Certificate Government paper, such as a boat’s license.
Chart A map of a body of water that contains pilot-ing information.
Chine The intersection of sides and bottom of aboat.
Cleat A piece of wood or metal with projecting endsto which lines are made fast.
Clinker A method of planking in which the lower edgeof each strake overlaps the upper edge of thestrake next below. (Also called lapstrake.)
Coaming A raised edge, as around part or all of a cock-pit, that prevents seawater from entering theboat.
Coast Guard The federal marine law enforcement and res-cue agency in the US.
Cockpit A well or sunken space in the afterdeck of asmall boat for the use of the helmsman andcrew.
Companionway A hatch or entrance, from deck to cabin.
Compass The instrument which shows the heading of avessel.
Cowls Hooded openings used for ventilation.
Cradle A frame used to support a vessel on land.
Current The movement of the water in a horizontaldirection.
Deadrise The rise of the bottom of a midships framefrom the keel to the bilge.
Deck Any permanent covering over a compartment.
Deep-six To discard or throw overboard.
10-2

Depth Sounder An electronic depth-finding instrument, mea-suring the time a sound wave takes to gofrom the vessel to the bottom and return, thendisplaying the result in feet, fathoms, ormeters.
Dinghy A small, open boat.
Displacement Hull Type of hull that plows through the watereven when more power is added.
Dock An enclosed or nearly enclosed water area;all the port installations; a place where ves-sels can moor, as a pier, wharf, or floatingdock.
DocumentedVessel Vessel registered with the U.S. Coast Guard.
Dolphin A small group of piles, in the water, generallyused for mooring or as a channel marker.
Draft The depth of the vessel below the water line,measured vertically to the lowest part of thehull.
Dunnage Mats, boughs, pieces of wood, or other loosematerials placed under or among goods car-ried as cargo in the hold of a ship to keepthem dry and to prevent their motion andchafing; cushioning or padding used in a ship-ping container to protect fragile articlesagainst shock and breakage; baggage or per-sonal effects.
Ebb An outgoing tide.
Estuary An inlet or arm of the sea.
Fathom Six feet.
Fenders Objects placed along the side of the boat toprotect the hull from damage.
Flare The outward spread of the boat’s sides fromthe waterline to the rail at the bow. Also, apyrotechnic signalling device that can indicatedistress.
Fore Used to distinguish the forward part of a boator things forward of amidships. It is the oppo-site of aft or after.
Forward Toward the bow.
Frame Ribs of the hull, extending from the keel to thehighest continuous deck.
Freeboard The vertical distance measured on a boat’sside from the waterline to the gunwale.
Galley The kitchen area of a boat.
Gimbals Swivels used to keep equipment level.
Give-Way Vessel The one which must stay clear of vesselswhich have the right-of-way.
Grab Rail A convenient grip, on a cabin top or along acompanion ladder.
Gunwale The upper edge of a boat’s side. (pronouncedgunnel.)
Harbor A safe anchorage, protected from moststorms; may be natural or man-made, withbreakwaters and jetties; a place for dockingand loading.
10-3

Hatch An opening in a boat’s deck for persons orcargo to go below.
Head A marine toilet.
Headway Forward motion of a vessel through the water.
Helm The wheel or tiller by which a ship is steered.
Holding Tank Storage tank for sewage, so that it will not bepumped overboard into the water.
Hull The body of a boat.
Hypothermia A physical condition where the body losesheat faster than it can produce it.
Inboard More toward the center of a vessel; inside; amotor fitted inside the boat.
Inland Rules Rules of the road that apply to vessel opera-tion in harbors and certain rivers, lakes, andinland waterways.
IntracoastalWaterways ICW: bays, rivers and canals along the coasts
(such as Atlantic and Gulf of Mexico coasts),connected so that vessels may travel withoutgoing into the open sea.
Jetty A structure, usually masonry, projecting outfrom the shore; a jetty may protect a harborentrance.
Keel The permanently positioned, fore-and-aftbackbone member of a boat’s hull.
Knot To bend a line. Also, a unit of speed equal toone nautical mile (6,076.10 feet) an hour.
Launch (1) To put a vessel into the water; (2) a smallopen powerboat, mainly used for transporta-tion between a vessel and shore.
Lee The side opposite to that from which the windblows.
Leeward Situated on the side turned away from thewind. (Opposite of windward.)
Leeway The amount a boat is carried sideways by thewind’s force or current.
List (1) A continuous leaning to one side, oftencaused by an imbalance in stowage or a leakinto one compartment; (2) A light list is aprinted listing of aids to navigation, in geo-graphical order.or inclining of a vessel towardthe side.
LOA Length over all; the maximum length of a ves-sel’s hull, excluding projecting spars orrudder.
Locker A storage place, a closet.
Log A record or diary of a vessel’s journey.
Lubber’s Line A mark or permanent line on a compass thatshows the course of the boat.
Making Way Making progress through the water.
Marina A place, essentially a dock area, where smallrecreational craft are kept; usually floats orpiers, as well as service facilities, are avail-able.
10-4

MAYDAY A radio distress call, from the french m’aidez(help me); SOS in Morse Code.
Mooring Commonly, the anchor chain, buoy, pennant,etc., by which a boat is permanently anchoredin one location.
Motor A source of mechanical power.
Motorboat Any watercraft 65 feet or less in length pro-pelled by machinery, whether or not suchmachinery is the principal source of propul-sion.
Navigation The art of conducting a ship from port to port.
Nautical Mile 6076.12 feet, or 1852 meters, an internationalstandard; the geographical mile, the length ofone minute of latitude at the equator, is6087.20 feet.
Nun Buoy A conical, red buoy bearing an even numberand marking the starboard side of a channelfrom seaward.
Oar A long, wooden instrument with a flat blade atone end, used for propelling a boat.
Outboard (1) a propulsion unit for boats, attached at thetransom; includes motor, driveshaft, and pro-peller; fuel tank and battery may be integral orinstalled separately in the boat; (2) outside oraway from a vessel’s hull; opposite ofinboard.
Outdrive A propulsion system for boats, with aninboard motor operating an exterior drive,with driveshaft, gears, and propeller; alsocalled stern-drive and inboard/outboard.
Overall Length The extreme length of a vessel, excludingspars or rigging fittings. See LOA.
Painter A rope attached to the bow of a boat for mak-ing it fast.
PFD Personal Flotation Device.
Pier A structure, usually wood or masonry, extend-ing into the water, used as a landing place forboats and ships.
Pile A vertical wooden or concrete pole, driveninto the bottom; may be a support for a pier orfloats; also used for mooring.
Piling A structure of piles.
Pitch (1) The up and down movement as the bowand stern rise and fall due to wave action; (2)The theoretical distance advanced by a pro-peller in one revolution.
Planing Hull Type of hull that is shaped to lift out of thewater at high speed and ride on the surface.
Port The left side of a boat when you are facingthe bow, also a destination or harbor.
Privileged Vessel Former term for the vessel with the right-of-way.
Propeller Wheel or screw. Mechanism that pusheswater aft to propel the boat.
Rigging The general term for all lines (ropes) of a ves-sel.
10-5

Roll The sideward motion of a boat caused bywind or waves.
Rules of the Road The nautical traffic rules for preventing colli-sions on the water.
Scope The length of the anchor rope or chain. 6 to 1scope means that the length of the anchorrope from the boat to the anchor is 6 timesthe depth of the water.
Scupper A hole allowing water to run off the deck.
Sea Anchor A floating canvas cone, held open by wirerings, with an opening in the smaller end, anda rope bridle at the larger end attached to aline leading to the vessel; used in storm con-ditions to (a) keep the bow of the boat to thewind, and (b) slow downwind drift of the boat.
Seacock A through-hull valve, a shut-off on a plumbingor drain pipe between the vessel’s interiorand the sea.
Slip (1) a berth for a boat between two piers orfloats; (2) The percentage difference betweenthe theoretical and the actual distance that apropeller advances when turning in waterunder load.
Sole The cabin or cockpit floor.
Spar Buoy A channel marker that looks like a tall, slen-der pole.
Stand-On Vessel The vessel with the right-of-way.
Starboard The right side of a boat when you are facingthe bow.
Stern The after end or back of the boat.
Stow To store items neatly and securely.
Strake Planks running fore and aft on the outside ofa vessel.
Taffrail The rail around a boat’s stern.
Tide The alternate rise and fall of waters causedby the gravitational attraction of moon or sun.
Topsides (1) The sides of a vessel above the waterline;(2) On deck as opposed to below deck.
Transom The transverse planking which forms theafterend of a small, square-ended boat.(Outboard motors are usually attached to atransom.)
Trim To arrange weights in a vessel in such a man-ner as to obtain desired draft at bow andstern.
Trimaran Boat with three hulls, the center one is thelargest.
Unbend To cast-off or untie.
Underway Vessel in motion, i.e., when not moored, atanchor or aground.
USPS United States Power Squadron, a privatemembership organization that specializes inboating education and good boating prac-tices.
10-6

Vessel Every kind of watercraft, other than a sea-plane on the water, capable of being used asa means of transportation on water.
VHF Radio A Very High Frequency electronic communi-cations and direction finding system.
Wake Moving waves, created by vessel motion.Track or path that a boat leaves behind it,when moving across the water.
Wash The loose or broken water left behind a ves-sel as it moves along; the surging action ofwaves.
Waterline The intersection of a vessel’s hull and thewater’s surface; the line separating the bot-tom paint and the topsides.
Way Movement of a vessel through the water.Technically it is underway when not at anchor,aground, or made fast to the shore. The com-mon usage is interpreted as progress throughthe water. Headway when going forward andSternway when it is going backwards.
Well Area at the rear of a boat where the motormay be located.
Wharf A structure, parallel to the shore, for dockingvessels.
Wheel (1) The steering wheel; (2) the propeller.
Whistle Signal A standard communication signal betweenboats, to indicate change of course, danger,or other situations.
Windward Situated on the side closest to the wind.(Opposite of leeward.)
Yaw To swing or steer off course, as when runningwith a quartering sea.
10-7


CHAPARRAL BOATS, INC.WARRANTY CERTIFICATE
AND STATEMENT OF WARRANTYFOR ALL NEW BOATS
BEGINNING WITH THE 2005 MODEL YEAR
PLEASE READ THIS STATEMENT OF WARRANTY CAREFULLY. IF YOU HAVE ANY QUESTIONS REGARDING YOUR RIGHTS ANDOBLIGATIONS UNDER THIS WARRANTY, PLEASE CONTACT YOUR CHAPARRAL DEALER OR CHAPARRAL’S CUSTOMER SERVICE DEPARTMENT AT (229) 686-7481.
To initiate and validate this Chaparral Boats, Inc. Limited Warranty, the Warranty Registration Card must be returned to ChaparralBoats, Inc., P. O. Drawer 928, Nashville, Georgia 31639 (“Chaparral”) within fifteen (15) days of your purchase of a new Chaparral boatfrom an authorized Chaparral Boats dealer. For all purposes of this Statement of Warranty, the “date of purchase” shall mean the datethat you signed the contract with the authorized Chaparral dealer to purchase a new Chaparral boat.
THE WARRANTIESLIFETIME LIMITED STRUCTURAL HULL WARRANTY
Subject to the conditions and limitations to coverage and liability set forth below, Chaparral warrants to the original purchaser of anew Chaparral boat that either Chaparral or its authorized dealer will, at Chaparral’s option, repair or replace the fiberglass hull man-ufactured by Chaparral if it is found to be structurally defective in material or workmanship for as long as the original purchaser ownsthe boat. In the event Chaparral elects to replace a hull of a model for which the mold is no longer in use, Chaparral’s obligation islimited to provide only the nearest equivalent type of Chaparral hull available.
TEN-YEAR TRANSFERABLE LIMITED STRUCTURAL HULL WARRANTY
Subject to the conditions and limitations to coverage and liability set forth below, Chaparral offers to the first subsequent purchaserof a Chaparral boat, provided that the original retail purchaser has otherwise complied with the conditions of this Statement ofWarranty and the transfer is registered in the manner provided below, a limited structural warranty under which either Chaparral orits authorized dealer will, at Chaparral’s option repair or replace the fiberglass hull manufactured by Chaparral if it is found to bestructurally defective in materials or workmanship within ten (10) years after the date of purchase by the original retail purchaser. Toregister the transfer, the second purchaser must mail the following to Chaparral’s Customer Service Department, P. O. Drawer 928,Nashville, GA 31639 no later than thirty (30) days after the purchase from the original purchaser: (1) An Ownership TransferRecord (included in the Owner’s Manual) completed by the original purchaser and the subsequent owner; (2) A copy of thebill of sale or other evidence of purchase of the boat from the original purchaser, including the model and hull identifica-
11-1

tion number; and, (3) the warranty transfer fee of $500.00 for boats with hull lengths less than 24 feet and $1,000 for boatswith hull lengths of 24 feet or more. For purposes of this limited structural hull warranty, the term “structurally defective” meansthe presence of a defect that causes the hull to be unsafe or unfit for use under normal operating conditions; and the term “hull”means the single fiberglass molded shell and its integral fiberglass structural components below the hull flange.
FIVE-YEAR LIMITED STRUCTURAL HULL WARRANTY
Subject to the conditions and limitations to coverage and liability set forth below, Chaparral warrants to the original purchaser of a newChaparral boat for a period of five (5) years from the date of purchase, that either Chaparral or its authorized dealer will, at Chaparral’s option,repair or replace the fiberglass deck manufactured by Chaparral if it is found to be structurally defective in material or workmanship. In theevent Chaparral elects to replace a deck of a model for which the mold is no longer in use, Chaparral’s obligation is limited to provide only thenearest equivalent type of Chaparral deck available. This Five-Year Limited Structural Deck Warranty is not transferable.
For purposes of this limited structural deck warranty, the term “structurally defective” means the presence of a defect that causes the deck to beunsafe or unfit for use under normal operating conditions; and the term “deck” means the single fiberglass molded shell and its integral fiber-glass structural components above the hull flange.
FIVE-YEAR PRORATED LIMITED HULL BLISTER WARRANTY
Subject to the conditions and limitations to coverage and liability set forth below, and provided the original factory gelcoat surface has not beenaltered, Chaparral warrants to the original purchaser of a new Chaparral boat that for a period of five (5) years after the date of purchase,Chaparral will pay all or a portion of the cost to repair or correct any laminate blisters larger than 1/8” in diameter with a depth of at least 1/16”occurring on underwater gel coated surfaces of the hull as a result of defects in material or workmanship according to the following proratedschedule:
Less than two years from date of purchase-100%Two to three year from date of purchase-75%Three to Four years from date of purchase-50%Four to five years from date of purchase-25%
Reimbursement will be limited to one repair, not to exceed $110 per linear foot of waterline as measured from center of transom to center ofkeel prior to prorating. Prior authorization must be obtained from Chaparral before commencement of repairs. Authorization will only be givenfor repairs that include the addition of a barrier coat to that portion of the hull that rests in the water.
This Five-Year Limited Hull Blister Warranty is voided in the event the original factory gelcoat is altered by damage, accident repair, sanding,scraping, sandblasting or improper surface preparation for the application of a marine barrier coating or bottom paint. This warranty will also bevoided if the hull bottom is in water for more than 60 days during any 90 day period of time unless prior to the commencement of the 90 dayperiod of time, a marine barrier coating has been properly applied to the hull bottom. This warranty is subject to the conditions and limitations tocoverage and liability discussed below. This Five-Year Limited Hull Blister Warranty is not transferable.
11-2

TWO-YEAR LIMITED COCKPIT UPHOLSTERY WARRANTY
Subject to the conditions and limitations to coverage and liability discussed below, Chaparral warrants to the original purchaser of a new boatthat for a period of two (2) years from the date of purchase, Chaparral will repair or replace any cockpit upholstery found to be defective in mate-rial or workmanship. This Two-Year Limited Cockpit Upholstery Warranty is not transferable.
ONE-YEAR LIMITED CANVAS WARRANTY
Subject to the conditions and limitations to coverage and liability discussed below, Chaparral warrants to the original purchaser of a new boatthat for a period of two (1) year from the date of purchase, Chaparral will repair or replace any canvas found to be defective in material or work-manship. This One-Year Limited Canvas Warranty is not transferable.
ONE-YEAR PRORATED LIMITED EXTERIOR GELCOAT WARRANTY
Subject to the conditions and limitations to coverage and liability discussed below, Chaparral warrants to the original purchaser of a new boatthat, Chaparral will repair cracks, crazing or other cosmetic blemishes in the exterior gelcoat finish of the hull and the deck resulting from defec-tive materials or workmanship according to the following prorated schedule:
Less than six months from date of purchase-100%Six months to one year from date of purchase-50%
This One-Year Exterior Gelcoat Limited Warranty is not transferable.
ONE-YEAR TRANSFERABLE LIMITED WARRANTY
Subject to the conditions and limitations to coverage and liability discussed below, Chaparral warrants to the original and first subsequent pur-chaser who has registered the transfer with Chaparral in the manner provided above under “TEN-YEAR TRANSFERABLE LIMITEDSTRUCTURAL HULL WARRANTY”, for a period of one year from the date of purchase by the original purchaser, that each new fiberglass boatmanufactured by Chaparral is free from defects in material and workmanship.
Please note that engines, outdrives, controls, batteries, propellers, air conditioners, generators, refrigerators, certain electronics and certainother accessories or components on your boat are not warranted by Chaparral under this Limited Warranty, but may be warranted by manufac-tures other than Chaparral. Please refer to the Chaparral Owner’s Packet to locate Owner’s Manuals for these specific items and instructionalinformation about possible warranties from manufacturers other than Chaparral. Please note that coverage under any of these other indepen-dent warranties is contingent upon your compliance with the warranty registration requirements of the manufacturer of such item.
CONDITIONS AND LIMITATIONS TO COVERAGE UNDER THIS WARRANTYCONDITIONS TO COVERAGE
In addition to any other conditions to coverage contained herein, the availability of any benefits under each of the foregoing limited warranties isalso subject to the following conditions:
11-3

(1) The boat purchaser must first notify the dealer from whom the boat was purchased of any claim under this warranty within the applicablewarranty period and within thirty (30) days after the defect is or should have been discovered.
(2) All costs of any nature for delivering any boat to Chaparral, a Chaparral dealer or other point of repair authorized by Chaparral and thereturn thereof shall be paid by the boat owner and are not covered under this warranty.
(3) All repairs, corrections or replacements shall be performed by Chaparral or a dealer or repair facility authorized by Chaparral at its solediscretion.
LIMITATION OF COVERAGE FOR DEMONSTRATION MODELS
The Limited Warranties set forth above do not cover any boat that was previously used by the dealer for in-water demonstration pur-poses; provided, however, the Ten-Year Transferable Limited Structural Hull Warranty and the One-Year Transferable LimitedWarranty, only, are available for a demonstration boat purchased by the first retail purchaser who otherwise complies with thisWarranty Statement. The period of such limited warranties shall commence on the date the boat was first used for in- water demon-stration purposes.
LIMITATION OF REMEDIES
(1) Chaparral’s obligation under this warranty is limited to the cost of repair of the warranted item or replacement thereof, atChaparral’s option, when returned prepaid to Chaparral or other point of repair authorized by Chaparral;
(2) Chaparral is not liable for loss of use, loss of time, inconvenience, commercial loss or any consequential, incidental, generaland/or special damages. (Note: Some states do not allow the exclusion or limitation of incidental or consequential damages, so theforegoing limitation or exclusion may not apply to you).
EXCLUSIONS
THE LIMITED WARRANTIES SET FORTH ABOVE DO NOT COVER:(1) Engines, outdrives, controls, batteries, propellers, air conditioners, generators, refrigerators, electronics and other accessories, compo-
nents or other equipment which have been made by other manufactures, whether subject to a separate warranty or not, by such othermanufacturers;
(2) Any failure or defect resulting from normal wear and tear, climatic conditions, use under other than normal conditions or the lack ofproper maintenance;
(3) Any boat which has been powered or loaded in excess of the manufacturer’s maximum horsepower and/or capacity recommendations;(4) Any boat used for racing, rental or commercial purposes;(5) Any boat that has been subject to misuse, negligence, an accident, or structural modifications;(6) Plexiglas windscreen breakage, windshield breakage, windshield leakage, fuel gauges and fuel gauge systems, or fuel tanks;(7) Except as covered by One-Year Prorated Limited Exterior Gelcoat Warranty and the Five-Year Prorated Limited Hull Blister Warranty,
defects in paint or gelcoat finishes including blisters below the waterline, cracking, crazing, or minor discoloration;(8) Damage, rot, mildew or other damage to upholstery, canvas, vinyl, plywood, carpet and other materials and components within the inte-
rior as a result of water damage including, without limitation, condensation or precipitation;(9) Installation of engines, arches, swim platforms, or other parts or accessories installed by anyone other than Chaparral;(10) Any boat that has been used after the discovery of a defect is or should have been discovered and such continued use causes addi-
tional or other damage to the boat; and (11) Except as described in the Limitations to Coverage above, any boat that has been used by the dealer for demonstration purposes.
11-4

OTHER THAN THOSE LIMITED WARRANTIES CONTAINED HEREIN, CHAPARRAL MAKES NO OTHER WARRANTIES. ANY WAR-RANTY OF MERCHANTABILITY OR FITNESS FOR A PARTICULAR PURPOSE WITH RESPECT TO ANY COMPONENT OF THE BOAT ISLIMITED TO THE DURATION OF THE LIMITED WARRANTY APPLICABLE TO SUCH COMPONENT, AS SET FORTH ABOVE. (Note:Some states do not allow limitations on how long any implied warranty lasts, so the foregoing limitation may not apply to you.)
OTHER PROVISIONS APPLICABLE TO THIS WARRANTY
BY ACCEPTING DELIVERY OF THE BOAT COVERED BY THIS LIMITED WARRANTY, THE BOAT OWNER UNDERSTANDS ANDAGREES AS FOLLOWS:(1) No dealer or any other person is authorized to make on Chaparral’s behalf any other warranty other than those expressly set forth
herein.(2) Chaparral reserves the right, without notice, to make changes to or discontinue models and Chaparral shall be under no obligation to
equip or modify boats built prior to such changes.(3) Chaparral will discharge its obligations under this warranty as rapidly as possible, but cannot guarantee any specified completion date
due to the different nature of claims that may be made and services that may be required.(4) Chaparral boats is the registered trademark of Chaparral Boats, Inc.
CHAPARRAL BOATS, INC.P.O. DRAWER 928
300 INDUSTRIAL PARK BLVD.NASHVILLE, GEORGIA 31639
www.chaparralboats.com(229) 686-7481
11-5


WIRING SCHEMATICS 12
12-1
Signature 250

12-2
Signature 250

12-3
Signature 270

12-4
Signature 270
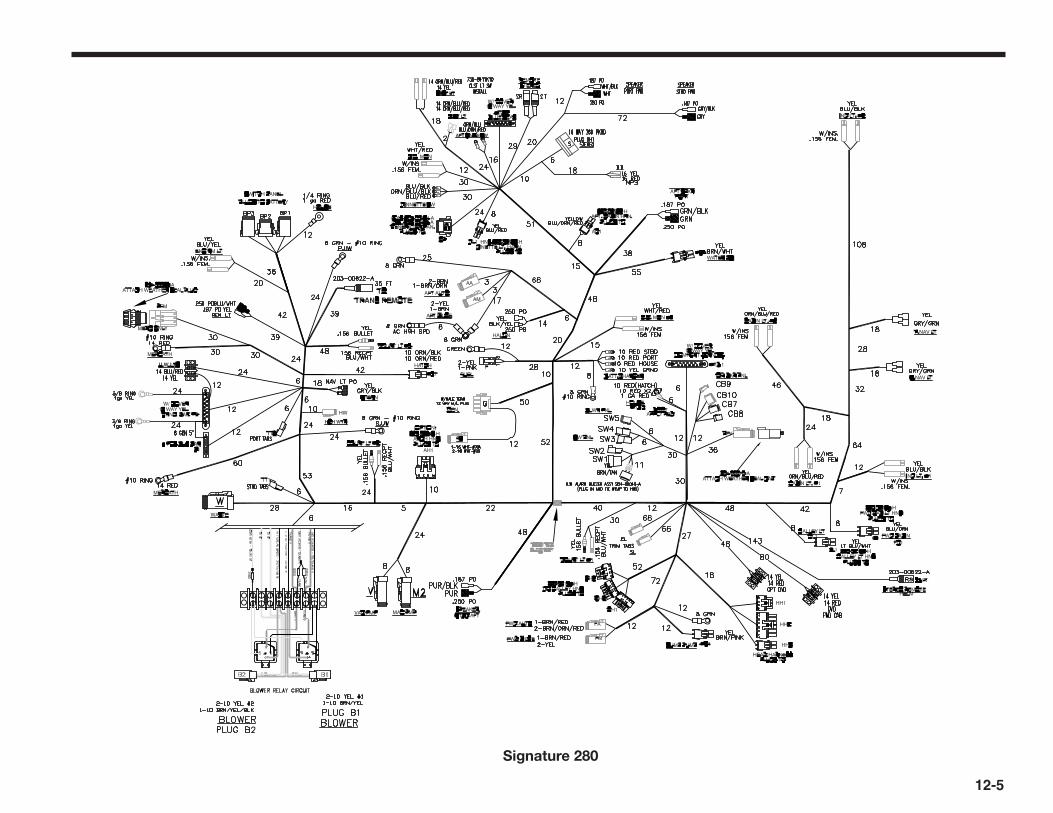
12-5
Signature 280

12-6
Signature 280

12-7
Signature 290
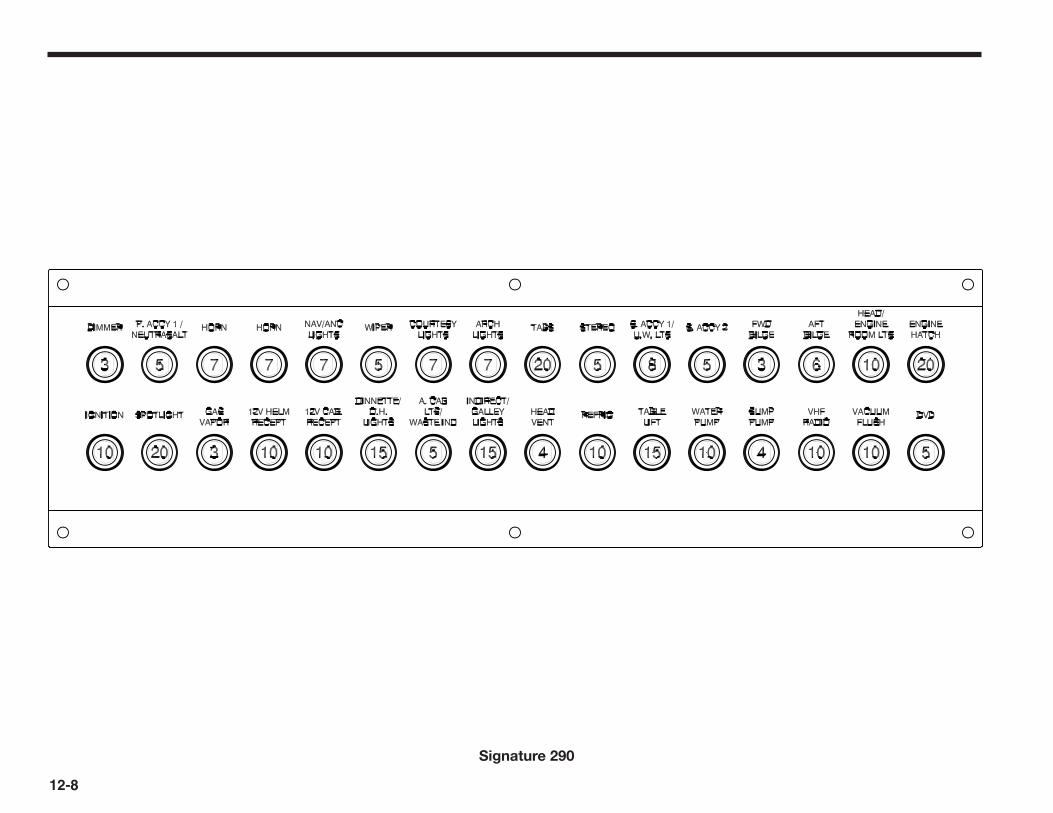
12-8
Signature 290

12-9
Signature 310

12-10
Signature 310

12-11
Signature 330

12-12
Signature 330

12-13
Signature 350

12-14
Signature 350


WORLD HEADQUARTERS
P.O. DRAWER 928 • 300 INDUSTRIAL PARK BOULEVARD • NASHVILLE, GEORGIA 31639PHONE #229.686.7481 • FAX #229.686.3660
www.chaparralboats. com