2008 mazda3 quick tips - mazda usa official sitemazda roadside assistance exhilaration, liberation...
TRANSCRIPT

Lower Octane Fuel Usage(MAZDASPEED3)If 91 octane fuel is not available,fuel as low as 87 octane can be used temporarily for emergency purposes, use of fuel lower than 91 octanecan decrease performance and deteriorate shift quality,refueling vehicle with correctoctane fuel a couple of times will restore vehicle performance and shift quality.
This Quick Tips® guide is provided byMazda North American Operationsto make your Mazda ownershipexperience more convenient. For complete details and operatinginstructions, see your Owner’s Manual.If you have any questions about yourvehicle, you are invited to contactyour local dealer. Or if you needadditional help, feel free to call ourCustomer Assistance Centerat 1-800-222-5500Monday through Friday, 8 a.m.-4:45 p.m., Pacific9 a.m.-5:45 p.m., Eastern/Central
Mazda Roadside AssistanceExhilaration, liberation and inspiration,are great reasons to drive a Mazda car, truck or SUV. In additionto all the other great standard features, you also get peace of mindwith our basic warranty periodEmergency Roadside AssistancePlan, it’s just a phone call away,24 hours a day, 365 days a year,call 1-800-866-1998.Mazda ‘’bumper-to-bumper”Limited Warranty andPowertrain WarrantyEngineers design and build everyMazda to give you driving pleasurenow and far down the road. We’reso confident in our quality that wecover the entire vehicle against defectsin materials and workmanship for36 months/36,000 miles, whichevercomes first, plus we provide apowertrain warranty for 60 months/60,000 miles, whichever comes first.
©2007 Calcar, Quick Tips® is a trademarkof Calcar, made in USA 11/07 51.846M DOTMazda North American Operations reserves the right to change product specifications at any time without incurring obligations.9999-95-038C-08QTR
R O A D S I D E A S S I S T A N C E / W A R R A N T Y
UnleadedGasoline
MAZDA387-octane
MAZDASPEED391-93-octane 14.5-gallon/55-liter tank
www.mazdausa.com
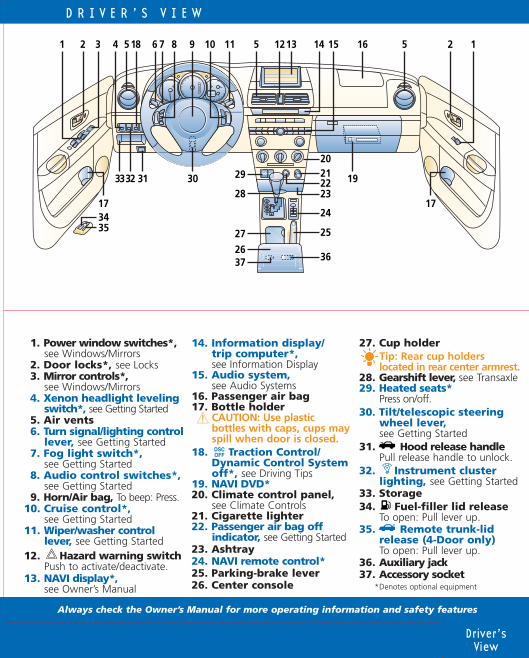
D R I V E R ’ S V I E W
Always check the Owner’s Manual for more operating information and safety features
1. Power window switches*,see Windows/Mirrors
2. Door locks*, see Locks3. Mirror controls*,
see Windows/Mirrors4. Xenon headlight leveling
switch*, see Getting Started5. Air vents6. Turn signal/lighting control
lever, see Getting Started7. Fog light switch*,
see Getting Started8. Audio control switches*,
see Getting Started9. Horn/Air bag, To beep: Press.
10. Cruise control*, see Getting Started
11. Wiper/washer control lever, see Getting Started
12. Hazard warning switchPush to activate/deactivate.
13. NAVI display*,see Owner’s Manual
14. Information display/trip computer*,see Information Display
15. Audio system,see Audio Systems
16. Passenger air bag17. Bottle holder
CAUTION: Use plastic bottles with caps, cups mayspill when door is closed.
18. Traction Control/Dynamic Control Systemoff*, see Driving Tips
19. NAVI DVD*20. Climate control panel,
see Climate Controls21. Cigarette lighter22. Passenger air bag off
indicator, see Getting Started23. Ashtray24. NAVI remote control*25. Parking-brake lever26. Center console
DSCOFF
Driver’sView
2 31
3417
35 27
23
20
54 516618 7 11 5 13129 108
30313332
2
17
14 15
25
192122
29
24
28
1
2637 36
*Denotes optional equipment
27. Cup holderTip: Rear cup holders located in rear center armrest.
28. Gearshift lever, see Transaxle29. Heated seats*
Press on/off.30. Tilt/telescopic steering
wheel lever, see Getting Started
31. Hood release handlePull release handle to unlock.
32. Instrument clusterlighting, see Getting Started
33. Storage34. Fuel-filler lid release
To open: Pull lever up.35. Remote trunk-lid
release (4-Door only)To open: Pull lever up.
36. Auxiliary jack37. Accessory socket

G E T T I N G S T A R T E D
Always check the Owner’s Manual for more operating information and safety features
Getting StartedMAZDA3/MAZDASPEED3 Quick Tips® are designed toquickly familiarize you withsome important features ofyour MAZDA3/MAZDASPEED3.
The Driver’s View tab is yourindex to the Quick Tips®, locatethe item you would like tolearn more about and thenturn to the listed tab.
This Getting Started sectioncontains important operatingtips about your MAZDA3/MAZDASPEED3.
Items identified in blue textcall out unique features.
MAZDASPEED3Turbocharger tipsTo get maximum performancefrom your turbocharged engine,take note of the following:Use 91 octane or above premiumunleaded gasoline only, extra fueladditives are NOT recommended.Change engine oil and filter every 7,500 miles, or sooner ifneeded, see Owner’s Manual.Use engine oil with API SL orILSAC GF-3 service grade or higher, extra oil additives are NOT recommended.After driving at freeway speeds or up a long hill, idle engine at least 30 seconds to cool turbo,avoid shutting engine off abruptlyafter a hard or long drive, turbocharger damage may result otherwise.
Do NOT race or over-rev ANYengine when starting, particularlya turbocharged engine.Do NOT add aftermarket devicesto alter the engine’s ignition, fueldelivery, or turbo boost pressure,this may lead to serious enginedamage and void your warranty.
Tire Pressure MonitoringSystem (TPMS)* Warning light illuminates for a few seconds with ignition onIf tire pressure is low, warninglight illuminates with audible beep sound, adjust tire pressure to correct specifications, performtire pressure adjustment beforedriving, a digital tire pressuregauge is recommended.Flashing warning light may indicate malfunction, dealer inspection required.
If the total seated weight is greater than approximately 93 lb., light does not illuminate,and the air bag/pretensioner will deploy/activate in an appropriate accident.See Owner’s Manual for additionalinformation on this feature andthe air bag system.Passenger sensing operationSee Driver’s ViewPassenger air bag deactivationindicator on dash will illuminatewhen passenger air bag is deactivated, child-restraint seatwith child that weighs a combinedtotal of 66 lbs. or less will deactivatefront passenger air bag/pretensioner.See Owner’s Manual
GettingStarted
GettingStarted
WARNINGS: Even with a deactivation system, never place rear-facing infant-safety seat in front of any air bag, an infant is in serious danger of being injured or killed.If you must install a forward-facing child-safety seat in thefront seating position, movevehicle seat as far back as possible.
Fuel filler doorLocated on passenger side.
Passenger air bag deactivation indicator lightFront air bag deactivation indicatorlight (1) provides current status of front passenger air bag and pretensioner system.If total seated weight on frontpassenger seat is less than approximately 66 lb., front passenger air bag deactivation indicator light illuminates, air bag/pretensioner will notdeploy/activate in an accident.
*Not available on MAZDA3i Sport produced prior to 9/1/07
1
PA
SS AIR BAG
OFF

G E T T I N G S T A R T E D
Always check the Owner’s Manual for more operating information and safety features
Steering-wheel audio controls*To increase/decrease volume:Press (5).
Radio: Press (6) less thanone second to select next/previous preset station, press (6)more than one second until beep sound is heard to seeknext/previous station.CD: Press (6) to select nexttrack, press (6) to repeat current track.Press (7) to select FM1, FM2, AM,SAT 1*, 2*, 3*, CD/MP3 and othermedia devices plugged into auxiliaryjack (auxiliary jack located in center console, see Driver’s View).Press (8) to mute audio/NAVI system.
/
/
Tilt/telescopic steering-wheel leverPull lever (9) downto unlock column;adjust tilt angle/column length; pullup to lock column.
Tip: Telescopic function allowssteering wheel to be adjustedcloser or farther according todriver’s reach.WARNING: Do not adjust steering-wheel while driving.
Panic alarm: Press (3); horn sounds,parking lights flash; press any button on transmitter to stop.After unlocking with the transmitter,all doors or the liftgate will automatically lock if a door or the liftgate is not opened withinabout 30 seconds.
HID headlights leveling switch*Adjusts headlight angle tocompensate for weightof passengers and cargo,see Owner’s Manual.
GettingStarted
GettingStarted
Instrument panel lightingWith headlights ON: To brighten/dim turn thumbwheelup/down.Headlights/parking lightsON, ignition key mustbe ON: Illuminationchanges brightness
when dimmer switch (4) is pressed(if equipped with black-out meter).With headlights OFF†, key ON:Press instrument cluster dimmerselect button (4) to select between 5 brightness settings for instrument cluster.
Cruise control*Operates above 19 mph Press MAIN (1) to turn systemon/off.
To set speed: Accelerate to desiredspeed and press SET/COAST (3).To accelerate: Press and holdRES/ACCEL (2); release button at desired speed.To decelerate: Press and holdSET/COAST (3); release button at desired speed.Incremental acceleration: Press andrelease (2); each tap = plus 1 mph.Incremental deceleration: Press andrelease (3); each tap = minus 1 mph.To cancel: Press CANCEL (4) orMAIN (1); tap brake pedal ordepress clutch pedal (M/T).
Remote entry system* Functions only with ignition key not inserted.To lock doors: Press LOCK (1);pressing again within 5 secondscauses doors/liftgate to re-lock,horn to beep once and hazardwarning lights to flash once ifdoors/liftgate properly closed.To unlock: Press UNLOCK (2) for driver’s door, hazard warninglights will flash twice, press againwithin 5 seconds for all other doors.
5 76
8
RESACCEL
SETCOAST
ONOFF
CANCEL
14
23
9
4
LOCK
UNLOCK
12
3123
*Denotes optional equipment†See Owner’s Manual

21
AUTO
G E T T I N G S T A R T E D
Always check the Owner’s Manual for more operating information and safety features
Turn signal/lighting control leverOFF = Lights off
= Tail, parking and dashboard lights on: Rotate knob (1) to first notch
= Tail, parking, dashboardand headlights on: Rotate knob (1) to second notchAUTO* = With ignition switch in ON position; headlights and exterior lights automatically turnON/OFF depending on surroundingdarkness/lightness; rotate knob (1) to third notch
High beams on/off: Push forward/pull back to detent.To flash high beams: Pull backslightly and release.
= Fog lights* on: Rotate (2);functions only with headlight low beams onTurn signals right/left: Move lever up/down.Tip: Headlights turn off andparking lights remain on ifheadlight switch is left on and ignition switch is in lockposition or key is removed.
REAR
1
REAR
13
INT
REAR
12
INT
Wiper/washer control leverSingle wipe: Push lever up.Washer: Pull back, also operates wipers. Intermittent wiper: One click down.To change interval speed:Rotate inner ring* (2).Normal wiper speed: Two clicks down.High-speed wiper: Three clicks down.Auto*: One click down.Rain sensor senses rain amount on windshield, then controls wiper automatically.Rain sensor sensitivity is adjustedfrom high sensitivity (+) to less sensitivity (-) by rotating ring (3).
GettingStarted
GettingStarted
Rear window wiper/washer (5-Door only)To activate rear interval wiper:Rotate knob (1) up to INT.To activate rear normal speedwiper: Rotate knob (1) up to ON.To activate rear washer: Rotateknob (1) to and release.
*Denotes optional equipment

I N S T R U M E N T C L U S T E R
Always check the Owner’s Manual for more operating information and safety features
WARNING LIGHTS• Cruise control on*,
Amber light: Cruise control system activated Green light: Cruising speed set;see Getting Started
• Tire Pressure MonitoringSystem (TPMS)†, see Getting Started
• Turn signals/hazard warning on
• High beams on• Engine oil-pressure
warning lightStop car when safe and turnoff engine; check oil level
• Brake systemParking brake on/low brake fluid
• Always fasten seat belts
GAUGES1. Fuel gauge
14.5-gallon/55-liter tank(2.0L and 2.3L engines)
2. Odometer/Trip meter3. Gear indicator (A/T only)*
Displays current gear position.
4. Tachometer
• Security indicator light(immobilizer system)/Theft-deterrent system*
• Lights on• Charging system
warning light Charging system malfunction;dealer inspection required
• Air bag/front seat beltpretensioner systemIf light flashes or stays on, the airbags/front seat belt pretensionersmay not operate in an accident;dealer inspection required
• Dynamic StabilityControl (DSC)*,see Driving Tips
• Traction Control/Dynamic Control System off*
DSCOFF
5. Instrument cluster dimmer select button*,see Getting Started
6. Speedometer7. Odometer/Trip meter
selectorPress to view odometer/tripmeterA or B; press and hold to resettrip odometer A/B settings.
InstrumentCluster
InstrumentCluster
nim/0001x
HP
TRIP A
80.0
RNDM
8
C
F
E
5 74 8
6
13 2
hpm
km/h
80
220200180160
140120
100
6040
20 0
020
40
60
80
100120
140
012
3
4
56 7 8
• Door ajar• Power steering
malfunctionDealer inspection required if lightremains on
• Check engineDealer inspection required
• O Low fuel• Automatic
transaxle warning light*Automatic transaxle malfunction;dealer inspection required
• Anti-lock BrakeSystem (ABS)*ABS malfunction, normal brakesonly; dealer inspection required
8. Engine coolant temperature gaugeStop car if near H and turn offengine, let vehicle cool; checkcoolant level when safe.
CRUISE
*Denotes optional equipment†Not available on MAZDA3i Sport
produced prior to 9/1/07

L O C K S
Always check the Owner’s Manual for more operating information and safety features
Locks
Locks
KeyOperates ignition and all locks.Tip: Use key number plate to purchase a new key; store in safe place separate from vehicle.
Retractable key To fold/unfold press release button (1).
Remote entry system*See Getting StartedImmobilizer systemPrevents engine from runningunless coded key is used, see Owner’s Manual.Illuminated entry systemActivates interior lights when domelight switch set to DOOR position;lights off after driver’s door islocked or ignition in ON position.
Manual doorlocksTo lock: Press front of button (3)toward door handle.To unlock: Pull frontof button awayfrom door handle.
Power door locks*To lock/unlock all doors frominside vehicle: Press bottom/top of switch (4). To lock doors without key: With door open, press bottom of door lock switch, exit car, close doors.To unlock/lock doors with key:Rotate key toward front to unlock driver’s front door, hold for one second or more to unlock all doors; rotate toward rear to lock.
LOCK
UNLOCK
Child-safety locksLocated at the edge of rear doors.To activate: Rotate childproof lock (1) to Lock position using key tip (doors open from outsideonly); rotate to Unlock position to deactivate.WARNINGS: Since children may access either rear door,child-safety locks for both rear doors should be activated.Never leave a child in car with key in the vehicle.
LiftgateTo open: Pull up on handle (2) and raise.To close: Push liftgate down withboth hands until it securely locks;do not slam liftgate.Locking/unlocking liftgate; turn key (3) counterclockwise/clockwise.
Luggage compartmentinternal safetyreleaseAllows you to escape should youbecome locked in trunk.
Slide illuminated release lever indirection of arrow; lever will glow if it has been exposed to lightLocated on interior trunk lid.
1 Lock
Unlock
2 3
LOCK
UNLOCK
4
3
1
*Denotes optional equipment
Ignition key release button (M/T)Press button (2) to remove key from ignition.
LO
CK
AC
C
ON
2

1. Map/reading light switch*Press on/off.
2. Interior light switchDOOR = light on when door openON = light always onOFF = light always off
3. Front interior light4. Rear interior light
OFF
DOOR
TILTSLIDE
1 2 1
33 56
ON
OFF DOOR
2
4 7
ON
O
FF
W I N D O W S / M I R R O R S
Always check the Owner’s Manual for more operating information and safety features
Windows/Mirrors
InteriorLights
Power windows*Ignition must be on.All windows controlled from thedriver’s armrest; passenger doorshave separate switches.1. Driver’s window: One-touch-
down; push down firmly andrelease, window goes down all the way; pull switch backbriefly to stop; press lightly andhold for normal operation.
2. Passenger window switches: Push down and hold to open, pull back and hold to close.
3. Power window lockout switch:Press down until it clicks, only driver’s window operates; press again and passenger window switches function again.
AUTO
1
3
2
Dual power mirrors*Ignition must be in ACC or ON.To adjust left/right mirror: Press control switch (1) left/right,press switch (2) in direction ofdesired mirror movement.Tip: To lock mirrors in place, move control switch to center position.
Manual mirrorsTo adjust: Move knob (3) on door.
1
2 3
5. Moonroof tilt switch*Press rear of switch to tilt rear of moonroof.Press front of switch to close.
6. Moonroof slide switch*Press rear of switch to open moonroof.Press front of switch to close.
7. Cargo light (5-Door)ON = Light always onOFF = Light always off
Cargo light (4-Door)Light on with trunk open. See Trunk/Cargo AreaDriver/passenger covered visor mirrorsTo access mirror: Lower visor.
*Denotes optional equipment
S E A T S
Always check the Owner’s Manual for more operating information and safety features
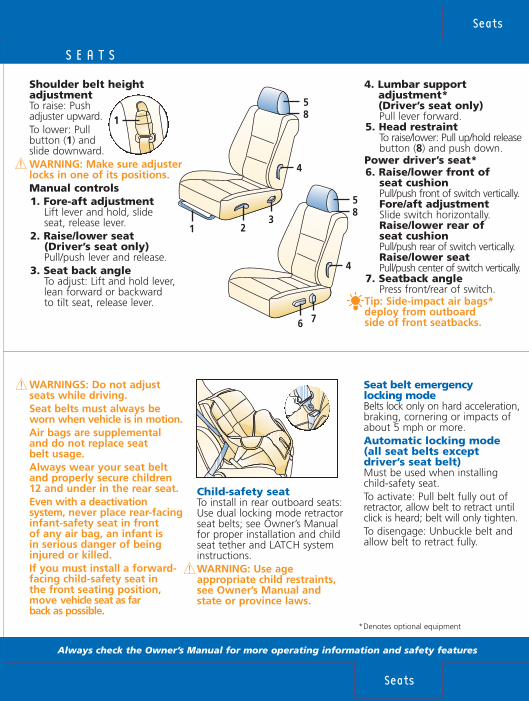
Shoulder belt height adjustmentTo raise: Push adjuster upward.To lower: Pull button (1) and slide downward.WARNING: Make sure adjusterlocks in one of its positions.Manual controls1. Fore-aft adjustment
Lift lever and hold, slide seat, release lever.
2. Raise/lower seat(Driver’s seat only)Pull/push lever and release.
3. Seat back angleTo adjust: Lift and hold lever,lean forward or backward to tilt seat, release lever.
4. Lumbar support adjustment* (Driver’s seat only)Pull lever forward.
5. Head restraintTo raise/lower: Pull up/hold releasebutton (8) and push down.
Power driver’s seat*6. Raise/lower front of
seat cushionPull/push front of switch vertically.Fore/aft adjustmentSlide switch horizontally. Raise/lower rear of seat cushionPull/push rear of switch vertically.Raise/lower seat Pull/push center of switch vertically.
7. Seatback anglePress front/rear of switch.
Tip: Side-impact air bags*deploy from outboard side of front seatbacks.
Seats
Seats
WARNINGS: Do not adjustseats while driving.Seat belts must always beworn when vehicle is in motion.Air bags are supplemental and do not replace seat belt usage.Always wear your seat beltand properly secure children 12 and under in the rear seat.Even with a deactivation system, never place rear-facing infant-safety seat in front of any air bag, an infant is in serious danger of being injured or killed.If you must install a forward-facing child-safety seat in the front seating position, move vehicle seat as far back as possible.
Seat belt emergencylocking modeBelts lock only on hard acceleration,braking, cornering or impacts ofabout 5 mph or more.Automatic locking mode (all seat belts except driver’s seat belt)Must be used when installingchild-safety seat.To activate: Pull belt fully out ofretractor, allow belt to retract untilclick is heard; belt will only tighten.To disengage: Unbuckle belt andallow belt to retract fully.
Child-safety seatTo install in rear outboard seats:Use dual locking mode retractorseat belts; see Owner’s Manual for proper installation and childseat tether and LATCH system instructions.WARNING: Use age appropriate child restraints,see Owner’s Manual and state or province laws.
*Denotes optional equipment
1
1
5
4
8
23
5
4
8
6 7

R E A R S E A T S
Always check the Owner’s Manual for more operating information and safety features
AutomaticTransaxle*Gearshift must be in Park or Neutral to start engine; it must be in Park to remove ignition key.
P = ParkTo move gearshift from Park: Press firmly on brake pedal thenmove the shift lever out of P.R = ReverseN = Neutral No gear engaged.D Drive (Overdrive) For normal driving: Shifts through all forward gears automatically.
Rear Seats
Transaxle
Rear center position seat belt†
Connecting seat belt: Pull seat belt (1) from recess behind headrestraint (A) (4-Door) or left side of cargo area (B) (5-Door) and connect tongue (2) to anchor (3). Wearing seat belt: Slowly pull out lap/shoulder belt (4) and insert tongue(5) into buckle (6) until click is heard.
Unfastening seat belt: Depressbuckle button (6) to release. Tip: Leave center-rear lap portionof seat belt fastened at all timesexcept when folding rear seat.Stowing seat belt: Insert key or smallobject in anchor buckle slot (7) torelease entire belt, let it fully retract,then put tongues (2) and (5) together,insert securely into recess (A or B).
M (Sport A/T manual shift mode)Move shifter from D to M to engage manual shift mode, M will be illuminated for manual mode on
shift position indicator located in the instrument panel.Manual shifting of transmission is achieved by moving shifter back to upshift and forward todownshift, move shifter from M to D to engage automatic shift mode.
Gear indicator (A/T only)*Illuminated numeral ofgear indicator locatedin the instrument panel displays currentgear in Automatic andManual shift modes.
Manual transaxleDepress clutch pedal to startengine and change gears.5-Speed: Put shifter in neutralbefore selecting reverse.6-Speed: Push shifter (1) downwardand over to select reverse gear.Tips: Do not shift into 1st above20 mph or clutch failure could occur.Resting your foot on clutchpedal while driving and usingthe clutch to hold your vehicleat a stand still while waitingon a hill may reduce clutch life.
P
RN
DM
73
26 5
1
4
A B
Split fold-down rear seatbacksTo fold: Push release knob (1), push seatback down.To return and lock: Push seatback firmly until latched,make sure seatbelts are returnedto original positions.Tip: 4-Door has seatback locksas part of trunk security.
WARNING: Lower seatbackslowly using both hands, seatback is heavy and couldcause personal injury.
Tip: Rear cup holders located in rear center armrest.
1
1
PRNDM
h
/h220
200
3
*Denotes optional equipment†See Owner’s Manual
5-speed
6-speed*
1

C L I M A T E C O N T R O L S
Always check the Owner’s Manual for more operating information and safety features
1. Air flow selections
= air to dash
= air to dash and floor
= air to floor
= air to floor and windshield
= defrost, air to windshield2. Fan control
Rotate knob right/left toincrease/decrease fan speed.
6. Air Conditioning*Press to activate/deactivate.Tip: With air flow switch infloor position and defrost positions or :A/C turns ON, air intakeswitches to fresh air.
7. OFFPress (7) to turn system off(Automatic System), rotateknob (2) to 0 (Manual System).
Automatic operationPress AUTO (9) for automaticoperation; rotate dial to set temperature, see Owner’s Manual.Tip: Automatic climate controldisplay viewed via informationdisplay, see below.
3. Temperature controlRotate knob to blue for cool,red for warm.
4. Rear window defoggerPress to activate/deactivate.
5. Air intake controlPress to select recirculated(indicator light on) or outside(indicator light off) air mode.WARNING: Do not use recirculated air mode in coldweather; windows will fogand hamper vision.
8. AMB*Press to display ambient temperature, press again toswitch display to temperatureset for climate control.Tip: With audio system ON, temperature display can be switched betweenCentigrade and Fahrenheitor vice versa by pressingaudio POWER button andMEDIA button and holdingboth for five seconds or more.
Control positions formaximum defrostFan to maximum, temperature to maximum hot, air flow selector knob to .Tips: To help prevent windshieldfogging in humid weather,select before starting engine.To prevent moisture buildup, do not deactivate A/C.Objects placed under the frontseats may interfere with airflow to the rear.
Information displayInformation display has the following functions: Trip computer*/clock (1), audio display, automatic climate control display and ambienttemperature display* (AMB). Trip computer* can display currentfuel economy, average fuel economy,approximate distance you can
travel on available fuel and averagevehicle speed.Ignition must be in ON position,press INFO button* (2) to changetrip computer display mode.Tip: Press CLOCK button (3) to display clock.See Owner’s Manual
ClimateControls
InformationDisplay
PUSH OFF
PUSH AUTO MODE
AMB A/C
2 7 9 1
MODE
0 41 32
A/C
56 4
1 2 3 3
6 5 4 8 Manual Automatic*
CLOCK INFO FM /AM SAT CD MEDIA
23
AMBCD IN MD IN STCONSUM CURmpg
RPT RDM AUTO-M FO
72.0103.522.4AUTOA/C ECO
1
*Denotes optional equipment

R A D I O / C O M P A C T D I S C / M P 3
Always check the Owner’s Manual for more operating information and safety features
CD/MP3: Press for MP3 fileinformation.Text (MP3): Rotate (5) to display long title.
6. SEEK/TRACK/CATRadio: Press to automaticallyseek higher/lower frequency.CD/MP3: Press to selectnext/beginning of current track;press and hold to fast forward/reverse through a track†.
7. SCANPress to briefly sample next listenable selections.
8. LOAD*To load multiple discs: Press and hold LOAD (8) until beepsound is heard; insert CD when “In” is displayed.To eject disc: Press Eject (17). To eject specific disc: Press andhold Eject (17) until beep sound isheard; within five seconds pressthe desired tray number 1-6 (18).
/
/
/
1. Power/Volume2. Repeat (RPT)
Press to replay current selection;press again within 3 seconds toplay tracks in current MP3 folderrepeatedly (with MP3).
3. Random (RDM)Press to enable/cancel random play.
4. Program††(not used)/Instantreplay†(Satellite radio only) Allows you to rewind and replayprogram you were previouslyor are currently listening to;use category buttons (6)to fast forward/rewind.
5. Tune/Auto-Memory/DisplayRadio: Press and hold until a beepsound is heard; system auto-matically scans and temporarilystores up to six strong stationsin each band; press again toswitch to another preset station.Tune: Rotate counterclockwise/clockwise to select station.
/
To set 12hr/24hr clock: Press(23) until 12hr/24hr clockappears on display, rotate (23) to desired setting, whileflashing, press to select.
10. :00** or INFO*Resets clock to nearest hour, seeClock (9) or selects trip computer,see Information Display.
11. CD slot12. FM/AM13. Display, see Information Display14. SAT*, Satellite ready capability.15. CD
Press to play CD/MP3.16. MEDIA
Press to play external musicdevice plugged into auxiliary jacklocated in center console (see Driver’s View).
17. CD eject button18. Memory preset buttons
To set: Tune to station, press andhold until beep sound is heard.
9. CLOCKTo set: With ignition in ACC or ON position, press (9) andhold until beep sounds; timeflashes on display (13); press H (6) to set hour, press M (6)to set minutes, press :00**(10) to reset time to nearesthour, press (9) to set.
22. Fast forward††
Press to fast forward through a track.
23. Text/Audio ControlAudio control: Press to selectALC/BASS/TREBLE/FADE/BAL/BEEP/ILLM EFT.Rotate right/left to adjustselected feature.
Tip: All audio systems equippedin vehicles produced after1/1/08 have MP3 capability. For vehicles produced beforethis date, there is an MP3accessory available. Audio systems with MP3 capability havean MP3 label next to CD slot.
19. Disc up *Press to skip forward to beginningof next CD/MP3 folder.
20. Disc down *Press to skip back to beginningof previous CD/MP3 folder.
21. Reverse††
Press to reverse through a track.
AudioSystems
AudioSystems
LOAD
CLOCK
SCAN RPTH
MVOL
TRACK SEEK CAT
PUSHPWRRDM
1 2
4 5
3
6
FM /AM SAT CD MEDIA
5 231234 21 22
98 1710 1211 14 15 16
76
18
AMBCD IN STCONSUM CURmpg
RPT RDM AUTO-M FO
72.0103.522.4AUTOA/C ECO
13
DISC
DISC 1920
*Denotes optional equipment**Not available with trip computer
†Vehicles produced after 1/1/08††Vehicles produced before 1/1/08
(See tag on driver’s door jamb for production date)

T R U N K / C A R G O A R E A
Always check the Owner’s Manual for more operating information and safety features
Trunk/Cargo Area
Driving Tips
When TCS detects drive wheel slippage it lowers enginetorque to prevent loss of traction.
Dynamic Stability Control (DSC)*DSC light may occasionally flashwhile driving, this indicates that the DSC was performing acorrection to help maintain yourbest vehicle control, if DSC lightremains on, see your Mazda Dealer.Gas capAfter filling vehicle with gasoline,fully reinstall gas cap by turningclockwise until a clicking sound is heard, if gas cap is not fullyinstalled, Check Engine light may come on.For more information on CheckEngine light, see Owner’s Manual.
MAZDA3 5-Door 1. Temporary spare tire
Stored under panel in trunk; to change flat tire: Followinstructions in Owner’s Manual.WARNING: Do not exceed 50 mph with temporary spare.Tip: For instructions and restrictions on use of temporary spare tire, see Owner’s Manual.
Tire economy and tipsCheck pressure at least monthlywhen tires are cold.Tires should be of the same make, kind and dimension.Maintain correct front-end alignment and tire balance; rotate tires at 5,000 or 7,500 mile intervals; see Owner’s Manual for rotation chart.Tire pressure Decal on driver’s door provides tire pressure information.Tire chains*†
Use only SAE Class “S” chains;install on front tires as tightly as possible and re-tighten periodically; do not use chains on dry roads, aluminum wheels,or with tire pressure monitor system**, damage may occur, use on steel wheels only.
Anti-lock Braking System (ABS)*ABS automatically reduceshydraulic pressure to any wheelon the verge of locking up.You may feel a slight pulsing ofthe brake pedal and hear a clicking noise; this tells you theABS is functioning properly;increase pressure on pedal formaximum braking. Tips: Maintain constant pressure on the brake pedal.Do not pump the brakes.ABS self testA self-diagnostic test is performedwhen starting; you may feel somebrake pedal pulsation and hearsome noise, this is normal.Traction Control System (TCS)*Enhances traction and safety by regulating engine torque.
2. Lug wrench3. Jack handle4. Cargo securing loops5. Jack6. Cargo light7. Front tiedown eyelet8. Cargo area cover
MAZDA3 4-Door 1. Temporary spare tire
Stored under panel in trunk; to change flat tire: Followinstructions in Owner’s Manual.WARNING: Do not exceed 50 mph with temporary spare.Tip: For instructions and restrictions on use of temporary spare tire, see Owner’s Manual.
2. Lug wrench3. Front tiedown eyelet4. Jack5. Jack handle6. Rear seatback lock
(4-Door only)Lock or unlock: Move lever.
7. Cargo light
1 644 3 25 8 7
2
7
4 1 5
66
3
*Denotes optional equipment**Not available on MAZDA3i Sport
produced prior to 9/1/07†See Owner’s Manual

U N D E R H O O D
Always check the Owner’s Manual for more operating information and safety features
Under Hood
1. Engine coolant reservoirLevel should be between MINand MAX indicator marks.WARNING: Never removecoolant reservoir cap whileengine is running or hot;remove only when system is cool.
2. Engine oil filler capSee Owner’s Manual for recommended engine oil viscosity.
Break-in periodFirst 600 miles: Avoid heavy braking and acceleration; drive atvarying road and engine speeds.Tip: Follow similar procedureswith newly overhauled engineor when brakes are replaced.Maintenance notes:Rotate tires every 7,500 miles or sooner if needed.Replace cabin air filter every25,000 miles or 24 months.Replace (FL22)* engine coolant at 120,000 miles.WARNING: Using coolant otherthan FL22 requires more frequentmaintenance intervals.Tip: For severe driving conditions, Owner’s Manualrecommends changing oil and filter at 5,000† miles.
Tip: For additional service intervals and complete details,see Owner’s Manual.
3. Engine oil dipstickFluid should be between F andL on dipstick; do not fill above F.
4. Brake/clutch fluid reservoirFill to MAX mark with DOT 3fluid; check with cap on.Tip: Clutch uses samefluid reservoir as brakes.
5. Battery
A. Replace: Engine oil/filterLubricate: All locks and hinges
B . Inspect: Cooling system, fuel lines and hoses, brake lines, hoses and connections, steeringoperation and linkages, front and rear suspension and ball joints, drive-shaft dust bootsTighten: Bolts and nuts on chassis
C . Inspect: Drive belts (tension)Replace: Air filter
D. Inspect: Hoses and tubes for emission systemReplace: Engine coolant (Other than FL22)
E . Inspect: Engine valve clearanceReplace: Spark plugs
F . Inspect: Disc brakesG . Inspect: Exhaust system and
heat shields
6. Fuse panel Push latch in, lift cover.
7. Air filter8. Automatic transaxle
fluid dipstick*Check with transaxle in park,engine on and at operatingtemperature.
9. Hood latchPress right to release hood.
10. Power steering fluidreservoirLevel should be between MIN and MAX lines.
11. Windshield washer reservoirFill with windshield washer fluid.
Tip: Check all fluids with vehicle parked on a level surface and engine off unless otherwise stated.
911 10 67
2 4 51
91110 78 6
1 542 3
32.0/2.3-liter Engine 2.3-liter I4 Turbo Engine
*Denotes optional equipment†See Owner’s Manual
N O R M A L S E R V I C E I N T E R V A L S
7,500 miles
15,000 miles
22,500 miles
30,000 miles
37,500 miles
45,000 miles
52,500 miles
60,000 miles
67,500 miles
75,000 miles
82,500 miles
90,000 miles A B F G
A
A C E F
A
A B D F
A
A F G
A C
A B F
A
A F
A

Lower Octane Fuel Usage(MAZDASPEED3)If 91 octane fuel is not available,fuel as low as 87 octane can be used temporarily for emergency purposes, use of fuel lower than 91 octanecan decrease performance and deteriorate shift quality,refueling vehicle with correctoctane fuel a couple of times will restore vehicle performance and shift quality.
This Quick Tips® guide is provided byMazda North American Operationsto make your Mazda ownershipexperience more convenient. For complete details and operatinginstructions, see your Owner’s Manual.If you have any questions about yourvehicle, you are invited to contactyour local dealer. Or if you needadditional help, feel free to call ourCustomer Assistance Centerat 1-800-222-5500Monday through Friday, 8 a.m.-4:45 p.m., Pacific9 a.m.-5:45 p.m., Eastern/Central
Mazda Roadside AssistanceExhilaration, liberation and inspiration,are great reasons to drive a Mazda car, truck or SUV. In additionto all the other great standard features, you also get peace of mindwith our basic warranty periodEmergency Roadside AssistancePlan, it’s just a phone call away,24 hours a day, 365 days a year,call 1-800-866-1998.Mazda ‘’bumper-to-bumper”Limited Warranty andPowertrain WarrantyEngineers design and build everyMazda to give you driving pleasurenow and far down the road. We’reso confident in our quality that wecover the entire vehicle against defectsin materials and workmanship for36 months/36,000 miles, whichevercomes first, plus we provide apowertrain warranty for 60 months/60,000 miles, whichever comes first.
©2007 Calcar, Quick Tips® is a trademarkof Calcar, made in USA 11/07 51.846M DOTMazda North American Operations reserves the right to change product specifications at any time without incurring obligations.9999-95-038C-08QTR
R O A D S I D E A S S I S T A N C E / W A R R A N T Y
UnleadedGasoline
MAZDA387-octane
MAZDASPEED391-93-octane 14.5-gallon/55-liter tank
www.mazdausa.com