2005 tx plus zbiorcza v2 - auraton · 2017-03-14 · 1.2 wiring auraton 2005 wiring terminals are...
TRANSCRIPT
I0
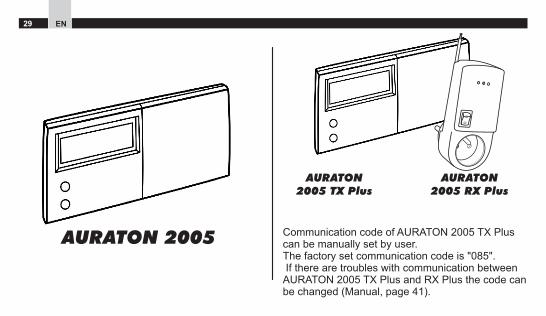
AURATON 2005
AURATON 2005 TX Plus
Communication code of AURATON 2005 TX Plus can be manually set by user. The factory set communication code is "085". If there are troubles with communication between AURATON 2005 TX Plus and RX Plus the code can be changed (Manual, page 41).
AURATON 2005 RX Plus
29 EN

1. Installation instructionsAURATON 2005
Caution: Switch off the electric source before installing the thermostat. We recommend that the installation should be performed by a trained personnel.
1.1 Select a suitable location for the AURATON
2005.
The location of the thermostat can greatly affect its performance. If it is located at where circulate air cannot reach, or exposed to direct sun light, it will not adjust the room temperature properly.
To ensure proper operation, the thermostat should be installed at an inside wall with freely circulating air. Find a place where your family usually occupied.
.
Avoid close to some heat generating appliance (e.g. TV, heater, refrigerator) or exposed to direct sun light. Do not install near a door where the thermostat will suffer from vibration.
15
0cm
właściwe usytuowanie sterownikaPROPERLY INSTALLED THERMOSTAT AURATON 2005
AURATON 2005 - Installation 30EN

1.2 Wiring AURATON 2005
Wiring terminals are at the back of the thermostat. Press down the terminal cover, you can find three terminals which labelled COM, NO and NC. It is a typical single-pole, double throw (SPDT) contact. In most COM and NO are used.
1.3 Mounting the thermostat AURATON 2005
Use the template provided, drill two Ø6mm holes on the wall. Insert the wall anchors and tighten the left screw with 3mm clearance.
NO
COMNC
NO
COM
NC
Fix the thermostat by putting it over the screwhead and slide it rightward (note the keyhole like opening at the back of the thermostat). Tighten the remain screw to lock it in place.
Note:If the wall is made of wood, there is no need to use the wall anchors. Drill two Ø2.7mm holes instead of Ø6mm.
AURATON 2005 - Installation31 EN

2. Familiar with your AURATON 2005 AURATON 2005 TX Plus
2.1 Appearance
There is a sliding front cover at the right of the thermostat. If you open the cover, you can see some buttons. This cover is removable for the replacement of batteries. To rise up the sliding cover, you can see the dip switch.
PROG0 6 12 18 24
0cd n m
Temp.
Prog.
Prog.#
OK Reset
-
-
+
+
ON
1 2 3
AURATON 2005, AURATON 2005 TX Plus - Familiar with your AURATON 32
2.2 Temperature mode
You can see "A" and "B" on both the buttons
and the LCD. "A" indicates comfort temperature
and "B" indicates economy temperature. These two temperatures are user changeable. Furthermore,
Othere is a fixed defrost temperature (7 C) indicated
by "d" on the LCD. Throughout the operation of the thermostat we will refer them as comfort, economy or defrost temperature instead of numeric values.
2.3 Dip switches
ON
1 2 3
DELAY 5 MIN.
COOLING
HEATING
NO DELAY
OSPAN TEMP = 1 C
SPAN TEMP O
= 0,5 C
EN

If you remove the front cover, you can find three small switches (dip switches). These three switches are used to control the span, output-on delay and
Oheat/cool system. Span is the temperature (1 C or O0,5 C) difference between the turn on temperature
and turn off temperature.
2.4 Program
AURATON 2005 or AURATON 2005 TX Plus is a programmable thermostat. It can automatically adjust the room temperature to a comfortable level when you are at home, and lower it to save energy when you go out or sleep. What you have to do is to program the thermostat so that it knows when to raise the temperature. There are altogether nine programs contained in the memory of the thermostat. Six of them are preset in the factory and the remaining three are user changeable.
2.5 LCD
1 - Day of the week Indicator2 - Time3 - Temperature4 - Program Number5 - Program Profile Indicator6 - Manual Override Indicator 7 - Output-On Indicator and temperature Mode
Indicator8 - Low Battery Indicator
0c
PROG0 6 12 18 24
1
2
8
5
4
67
3
AURATON 2005, AURATON 2005 TX Plus - Familiar with your AURATON33 EN

Note:
A. The output-on indicator will be displayed if the output is on. It will disappear if the output is off.
B. The low battery indicator will be displayed if the voltage of the batteries drop to a certain level. Please change the batteries as soon as possible.
2.6 Start
The thermostat is operated by two LR6 alkaline batteries. Please remove the front cover and install two new batteries. When the batteries are installed, the thermostat should be operating and you can see the LCD active. If the thermostat does not work properly, please check the batteries for wrong polarities and press the reset button by a ball-point pen.
The LCD after start or reset.
Note:OA. Temperature may not be 22.25 C as the
diagram shown and the Output-On indicator may active after a few seconds, depend on different situations.
B. Do not use a pencil to push the reset button. The graphite residue of a pencil can cause short circuit and damage the thermostat.
34AURATON 2005, AURATON 2005 TX Plus - Familiar with your AURATON
0c
PROG0 6 12 18 24
. .
EN

2.7 Set day/time
To set day, press "d" button. Similarly, press "h" button to set hour and "m" button to set minute.
Example: When start or after reset, the time is 00:00, Sunday. To set the clock to current time (e.g., 11:23, Tuesday), press "d" 2 times, "h" 11 times and "m" 23 times.
Note: When you press and hold the keys for 2 seconds the day/time will change rapidly. Release when the desired setting comes.
2.8 View/Change temperature
Press Temp, the thermostat enter View/Change temperature mode. The LCD will show the setting of
the current temperature mode ( A, B or d ) which
will be flashing. Press button "A" or "B" button to review or change the temperature. Press OK will directly return to normal operation mode.
Note:OA. The temperature setting range is 5 to 30 C.
B. To lower the setting, enter View/Change
temperature mode and press "A" or "B" until it Oreaches 30 C and then the setting will return to
O5 C. Continue to press until the desired setting comes.
C. Press and hold the keys, the setting will change rapidly.
D. Please note the temperature mode indicator. A
"A" means the comfort temperature is being viewed or changed.
A "B" indicates economy temperature. If "d" is shown, it is defrost temperature. Defrost
Otemperature is always at 7 C and is not changeable.
E. It is not always necessary to use OK key to return to normal operation mode. After 15 seconds of no key pressed it will automatically return to normal mode.
AURATON 2005, AURATON 2005 TX Plus - Familiar with your AURATON35 EN

2.9 View/Change programs
Press "Prog" button, the program of the current day is ready to be changed. Press "Prog" button again can advance to the next day and the program of that day will be shown.Press "Prog#" button to change the program. Programs 6, 7 and 8 are user-define programs. You
can use "A" or "B" to change the distribution of comfort or economy temperature and h to review the setting. Press OK can return to normal operation mode.
There are altogether nine programs available, as the diagram shown: Program 0 is a special program. It will set the whole
Oday to defrost temperature (7 C). (If cooling mode is selected, it will turn off the system). Programs 1,2, and 3 are some typical schedule of a day. You can select them if you found them suitable. Program 4 set the whole day to comfort temperature while program 5 set it to economy. Programs 6, 7 and 8 are user-define programs. They can be modified to suit your need.
36
0 6 12 18 24
0 6 12 18 24
0 6 12 18 24
PROG
PROG
PROG
AURATON 2005, AURATON 2005 TX Plus - Familiar with your AURATON
0 6 12 18 24
0 6 12 18 24
0 6 12 18 24
0 6 12 18 24
0 6 12 18 24
PROG
PROG
PROG
PROG
PROG
PROG0 6 12 18 24
EN

Example:
A. Assume you want to assign program 6 to Saturday and want to set the whole day to economy temperature except 13:00 to 18:00. Press "Prog". The thermostat enters program mode and the program of the current day (e.g., Tuesday) is ready to be programmed. The display shows the program for Tuesday is program 1, the temperature for 00:00 is
Oeconomy temperature and is 15 C. (The flashing cursor is the time to be edited)
B. Press "Prog" 4 times. The day indicator will point to Saturday:
C. Press "Prog#" 5 times to change the program from program 1 to program 6
D. Now you can set the time shown to economy
temperature by pressing "B" or press "A" to set it to comfort temperature. Or you can use "h" key to pass through the time without changing the setting.
Since we want to set 13:00 to 18:00 to comfort temperature and the remains to economy temperature, press 13 times. 00:00 to 12:00 will be programmed to economy temperature
Press "h" or "A" 6 times to move the flashing point to 19:00:
E. Finally, press "B" 5 times to set the remains of the day to economy temperature:
0c
0 6 12 18 24
. .
0 6 12 18 24
. .
AURATON 2005, AURATON 2005 TX Plus - Familiar with your AURATON37 EN

F. Press OK or leaving no key pressed for 15 seconds, the thermostat will return to normal operation mod.
Note: Programs 0, 1, 2, 3, 4, 5 are preset
programs. "A" and "B" cannot be used to edit them. But "h" key is still active.
2.10 Manual Override
Method no. 1:
Press "A" to select comfort temperature. Press "B" to select economy temperature. The current temperature mode will be overrode until the next set point of the program comes. Press OK to clear override.
Method no. 2:
Press "A" or "B" and hold for 2 seconds. "01" will apear on the LCD. It means that manual override will be forced for one hour. The number of hours (from 1 to 24) can be set by pressing/holding the button.
PROG0 6 12 18 24
0c
Ni Po Wt Ś r Cz Pt So
heating device
AURATON 2005 RX Plus
AURATON 2005 TX Plus
reciver radio signal temperature controllertransmitter
AURATON 2005 TX RX Plus - Installation 38
3. Installation instructionsAURATON 2005 TX RX Plus
Programmable Temperature Controller AURATON
2005 TX Plus is almost the same product as AURATON 2005. The only difference is way of transmitting on/off signal. AURATON 2005 TX Plus uses radio waves. That eliminates wires between AURATON 2005 TX Plus and controlled device. Receiver of radio waves is module called AURATON
2005 RX Plus. Range of AURATON 2005 TX Plus is very high but depends on materials that house is made of. AURATON 2005 TX Plus with AURATON
2005 RX Plus module is capable to hold range of over 100mtrs outdoor and up to 30mtrs indoor.
EN

4. Appearance of AURATON 2005 RX Plus
NC
NO
CO
M
front back
2
1
3
4
5
6
AURATON 2005 RX Plus - Appearance
3.1 Connecting AURATON 2005 RX Plus
to a heating device
Warning:
Unplug heating device from power supply before mounting receiver.
Find connectors on the back of AURATON 2005 RX
Plus under the plastic cover.
In most cases connect heating device to NO and COM connectors.
NO
COM
NC
NO
COM
NC
39 EN

5. Turning on AURATON 2005 TX RX Plus for the first time
1. Insert new ALKALINE batteries in AURATON 2005 TX Plus
2. Plug in AURATON 2005 RX Plus and wait 10 minutes to achive full range by transmitter
3. Yellow LED indicates that transmitter is within receivers range . LED blinks once a minute. The transmitter is out of range (or batteries of AURATON 2005 TX Plus are low) if LED blinks every second or does not blink. The factory set communication code is „085”. If there are troubles with communication code can be changed – see chapter no. 6.
4. Red LED indicates that receiver AURATON
2005 RX Plus is supplied with 230VAC.
5. Green LED indicates that heating device is on.
AURATON 2005 TX RX Plus - Turning on for the first time 40
1. Antenna for communication with AURATON
2005 TX Plus.
2. green LED – indicates operating status of heating device
red LED – indicates power supply status of AURATON 2005 RX Plus
yellow LED – indicates communication status with AURATON 2005 TX Plus
3. Additional electric socket switch
4. Additional electric socket – can be used to supply any 230VAC device (MAX.5A).
5. Plastic connectors cover
6. 230VAC plug
EN

AURATON 2005 TX RX Plus - Setting communication code
4. Choose any code between 001 and 255 and press „OK”
5. Receiver stores new code - yellow LED on AURATON 2005 RX Plus will blink a few times.
6. If receiver will not confirm new code (yellow LED will not blink) the procedure must be repeated.
7. Plastic holder forAuraton 2005 TX plus
There is a plastic holder for AURATON 2005 TX
Plus in the box.
Notes:
If AURATON 2005 RX Plus will not receive ON/OFF signal from AURATON 2005 TX Plus for 5 minutes (cycles) the heating device will be turned off. System will return to its normal operation after interfere disapear. AURATON 2005 TX Plus sends digital signals that is why many other devices can work within its range without interfere.
6. Setting communication code
There is a factory set communication codet - „085”. In case of interfere with other device (e.g. another AURATON 2005 TX Plus) preset code can be changed:
1. Unplug AURATON 2005 RX Plus from 230VAC for few seconds, then plug it in again.
2. Hold „PROG#” button for about 2 seconds. Factory set code „085” will apear on the LCD.
3. Press „PROG#” button again to change code.
41 EN

8. How to connect AURATON 2005
8.1 How to connect AURATON 2005 directly to a heating device.
AURATON 2005
AURATON 2005 - How to connect 42
NO
COMNC
HEATING DEVICE
EN

8.2 How to connect AURATON 2005 to single-phase heating device with working load exceeding 5A thought magnetoelectric relay.
AURATON 2005
NO
COMNC
POWER SUPPLY
max ~220V
HEATING DEVICE
MAGNETOELECTRICRELAY
AURATON 2005 - How to connect43 EN

8.3 How to connect AURATON 2005 to three-phase heating device through three-phase contactor.
44
AURATON 2005
NO
COMNC
THREE PHASE CONNECTOR
max ~220V
RST
HEATING DEVICE
AURATON 2005 - How to connect EN

8.4 How to connect AURATON 2005 directly to gas water heating device powered by ~220V and equipped with circulating pump.
NO
COMNC
AURATON-2005
GASWATER DEVICE
~220V
max ~220V 5A
CIRCULATING PUMP
AURATON 2005 - How to connect45 EN

NO
COM
NC
1
PROG0 6 12 18 24
0c
Ni Po Wt Śr Cz Pt So
2
HEATING DEVICE
1. AURATON 2005 RX Plus (receiver)2. AURATON 2005 TX Plus
AURATON 2005 TX RX Plus - How to connect 46
8.5 How to connect AURATON 2005 TX RX Plus with a heating device
EN
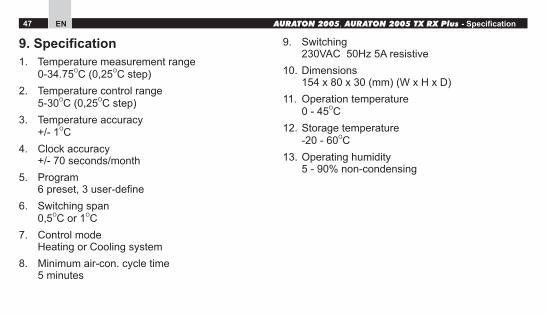
9. Specification
1. Temperature measurement rangeO O0-34.75 C (0,25 C step)
2. Temperature control rangeO O5-30 C (0,25 C step)
3. Temperature accuracyO+/- 1 C
4. Clock accuracy+/- 70 seconds/month
5. Program6 preset, 3 user-define
6. Switching spanO O0,5 C or 1 C
7. Control modeHeating or Cooling system
8. Minimum air-con. cycle time5 minutes
9. Switching230VAC 50Hz 5A resistive
10. Dimensions 154 x 80 x 30 (mm) (W x H x D)
11. Operation temperatureO0 - 45 C
12. Storage temperatureO-20 - 60 C
13. Operating humidity5 - 90% non-condensing
AURATON 2005, AURATON 2005 TX RX Plus - Specification47 EN