2004 billiards manual - cal spasthe limited warranty is void if the billiard table has been subject...
TRANSCRIPT

2004 Owner’s ManualUSA and Canada
BILLIARDS TABLE / BAR ASSEMBLY MANUAL
981TM
$5.00
Duplication without written consent is strictly prohibited.This Owner’s Manual is for billiards tables manufactured after January 1, 2004
Due to continuous improvement programs, all models, operation, and/or specifications are subject to change without prior notice.LTR17000237
www.calspas.com

Table of ContentsContact Information ................................................................................................................................2
Warranty Information..............................................................................................................................2
Safety Instructions ..................................................................................................................................2
Set-up and Delivery ................................................................................................................................3
Assembly Instructions ............................................................................................................................4
Cleaning and Maintenance......................................................................................................................8
Appendix ................................................................................................................................................9
Camelot Billiards Tables..................................................................................................................10
Accessories ......................................................................................................................................11
Warranty ..........................................................................................................................................12
Owner’s Manual Page 1
Table of Contents Owner’s Manual

Page 2 Owner’s Manual
CONTACT INFORMATION For customer service, please contact your authorized dealer immediately. If you need additional informationand/or assistance, please contact:
C.A.I. Customer Service Department1462 East Ninth StreetPomona, CA 91766Toll Free 1-800-CAL-SPASFax 1-909-629-3890
WARRANTY INFORMATIONSee your Cal Spa Camelot Billiards Table dealer for a copy of the applicable warranty, details and any questionsyou may have regarding the warranty coverage on your sauna.
Warranty LimitationsThe Limited Warranty is void if the billiard table has been subject to negligence, alteration, misuse, abuse, repairsby non- C.A.I. authorized representatives, incorrect installation, acts of God and any other cases beyond the control of C.A.I. Examples of common acts invalidating this warranty include but are not limited to:
Scratches caused by normal use.Damage caused by extreme weather conditions. (Hot, Cold, etc.)Damage caused by dirt, sand, and/or water damage.Damage caused by continued use of the billiard table with either known or unknown problems.Damage caused by direct sunlight (i.e. fading of the felt covering).Damage caused as a result of failure to follow the operating instructions as defined in this Owner’s Manual.
Warranty ExclusionsC.A.I. warranties the billiards table from defects in material and workmanship for a period of one year from theoriginal date of purchase.
SAFETY INFORMATIONWhile playing pool is not dangerous, assembly of the table, if done incorrectly, can be harmful to your physical health. The individual slate pieces are extremely heavy. With that said, it is strongly suggested that theowner have assistance when mounting the slate pieces. If the slate is damaged due to incorrect installation, thewarranty is void.
Owner’s Manual Benefits, Contact, Warranty and Safety

DELIVERY AND SET-UPPlease make a record of the following. It will be valuable if service is required.
Billiard Table/ Bar Model:Billiard Table/ Bar Serial Number:Date Purchased:Date Installed:Billiard Table/ Bar Dealer’s Phone Number:Billiard Table/ Bar Dealer’s Address:
Congratulations!!You have purchased a Camelot Billiards Table/ Bar. With a little preparation and care, your billiards table/ barwill give you many years of enjoyment. This section has been designed to provide you with all the informationyou’ll need to ensure a safe, speedy and trouble-free billiards table/ bar delivery and set-up.
PLANNING THE BEST LOCATION FOR YOUR BILLIARDS TABLE/ BARHere are some of the things that you will need to consider when determining where to place your new billiardstable/ bar.
Before the delivery of your new Camelot billiards table/ bar, it is strongly suggested that you have a room thatis large enough to accommodate the use of a billiards table (4’ to 5’ all the way around the billiards table shouldsuffice - see Appendix).
Make sure there is adequate floor support if the billiards table is to be located in an upstairs room.
BILLIARD TABLE / BAR ASSEMBLY TOOL KIT3/8” Drive Ratchet9/16” Socket1/2” SocketElectric Staple Gun1/2” Wide Crown Staples Edge BladesRubber MalletHammerRazor Knife or Straight-Edge BladesButane TorchBees Wax3” Putty KnifeSpray Adhesive6’ LevelElectric Drill or Battery-operated DrillPhillips Bit #2 & #1Screwdriver Flat TipPhillips Screwdriver #2 & #1Wood Putty Touch-upSpray Lacquer Touch-upFine Sandpaper Touch-up
Delivery and Set-Up Owner’s Manual
Owner’s Manual Page 3
Page 4 Owner’s Manual
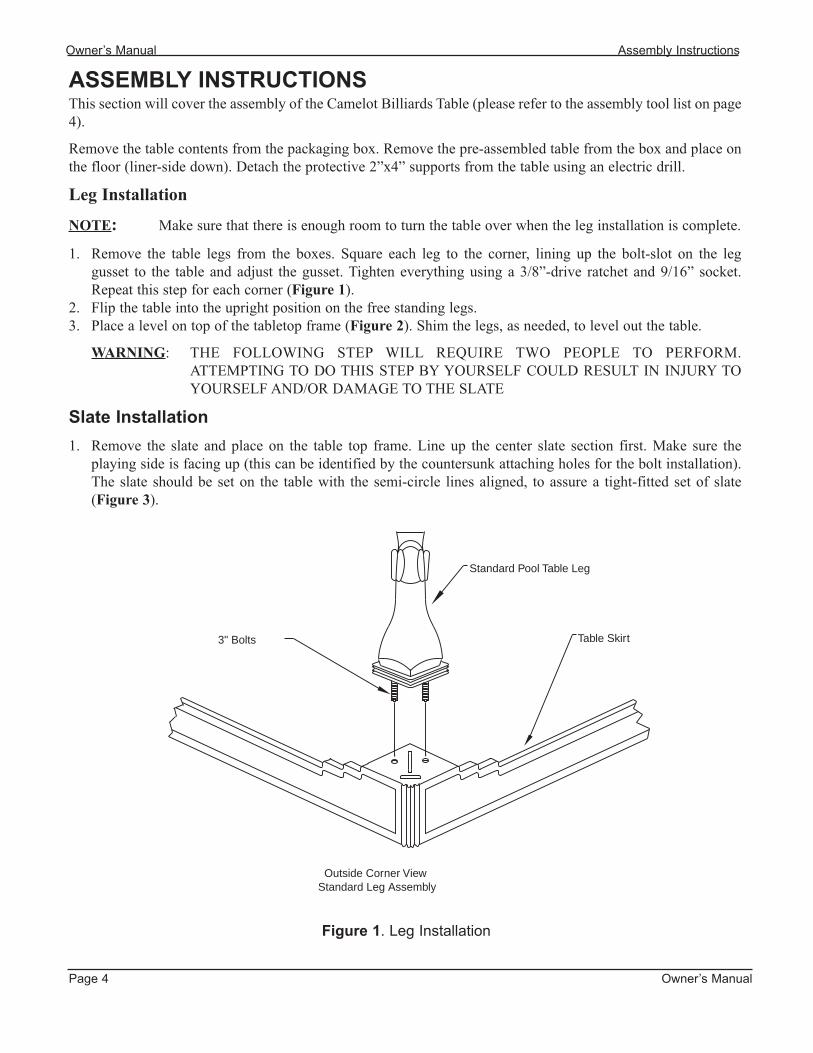
ASSEMBLY INSTRUCTIONSThis section will cover the assembly of the Camelot Billiards Table (please refer to the assembly tool list on page4).
Remove the table contents from the packaging box. Remove the pre-assembled table from the box and place onthe floor (liner-side down). Detach the protective 2”x4” supports from the table using an electric drill.
Leg Installation
NOTE: Make sure that there is enough room to turn the table over when the leg installation is complete.
1. Remove the table legs from the boxes. Square each leg to the corner, lining up the bolt-slot on the leg gusset to the table and adjust the gusset. Tighten everything using a 3/8”-drive ratchet and 9/16” socket. Repeat this step for each corner (Figure 1).
2. Flip the table into the upright position on the free standing legs.3. Place a level on top of the tabletop frame (Figure 2). Shim the legs, as needed, to level out the table.
WARNING: THE FOLLOWING STEP WILL REQUIRE TWO PEOPLE TO PERFORM. ATTEMPTING TO DO THIS STEP BY YOURSELF COULD RESULT IN INJURY TO YOURSELF AND/OR DAMAGE TO THE SLATE
Slate Installation
1. Remove the slate and place on the table top frame. Line up the center slate section first. Make sure the playing side is facing up (this can be identified by the countersunk attaching holes for the bolt installation).The slate should be set on the table with the semi-circle lines aligned, to assure a tight-fitted set of slate (Figure 3).
Owner’s Manual Assembly Instructions
Standard Pool Table Leg
Table Skirt3" Bolts
Outside Corner ViewStandard Leg Assembly
Figure 1. Leg Installation

Owner’s Manual Page 5
Pre-Assembled Frame
6' Level
Assembly Instructions Owner’s Manual
Figure 2. 6’ Level on Table Top Frame.
Slate
Pre-Assembled Frame
Figure 3. Slate Assembly

Page 6 Owner’s Manual
RAIL FELT INSTALLATION1. Remove the rails from the box. Place a protective pad on the slate table to avoid damage to the rail.2. Open the felt package and remove the rail felt pieces.3. Cut the feather strip molding to the length of rail.4. Lay the felt quality-face down onto the first rail.5. Fit the feather strip into the rail groove over the felt edge and tap the feather strip into place using a rubber
mallet.6. Fold the felt over the feather strip and seat the felt in place using the rubber mallet. Make sure the feather
strip is seated flush and that the felt is straight and free of wrinkles.7. Pull the felt tight at one corner by folding inward and secure using 1/2” x 5/16” long, wide crown staples.8. Pull felt tight and staple down the side.9. Slit the felt at the opposite end, from the rail corner tip to the end of the felt. Trim the excess felt from the
staple line.10. Pull the side end of the felt in and secure with staples.11. Pull the top end of the felt in and secure with staples.12. Inspect the completed rail to assure the felt is straight and free from wrinkles.13. Repeat Step 3 thru Step 12 to complete the remaining rails.
LEVELING THE SLATE1. Install 1/4” x 1 1/2” long pan head screws and seat into the countersunk holes on the slate (4) places on each
slate section using an electric drill.2. Check slate for flatness with a level (Figure 4) and identify all areas with a gap.3. Loosen screws as required and install slate from underneath the “backside” of the table. Tap the shims inward
using a hammer to raise the slate until the gaps are eliminated and the slate is level. Re-tighten screws asneeded.
4. Use a butane torch the heat the slate and melt bees wax into each slate seam area. Repair any small slate defects using the bees wax.
Owner’s Manual Rail Felt Installation
6' Slate Level
Figure 4. 6’ Level and Slate Sections

Owner’s Manual Page 7
ATTACHING THE FELT TO THE SLATE1. Pull the table felt and fold with the non-quality side facing outward. Brush the slate back and forth with the
felt to remove any debris.2. Shake the felt to remove any debris. Open the felt and place on the table with the quality face-side up. Lay
the felt in the center of the table and unravel.3. Secure the felt to one end and staple on the center into the liner. Pull the felt tight into each corner and
staple.4. Pull the felt tight on the opposite end and repeat Step 3.5. Pull the felt tight on one side and staple at one end. Fit the felt to the side pocket using a fist and secure it
with a staple. Fit the felt at the remaining end and secure in place using staples.6. Pull the felt tight on the opposite side. Fit the felt to the side pocket using a fist and secure using staples.7. Pull the felt tight at the corners and secure using staples.8. Apply spray adhesive at all pocket locations and allow adhesive to become tacky.9. Starting at one corner pocket, fit the felt using a fist and allow the felt to bond to the adhesive. Cut felt slits
in 3 places. Pull the felt tight and staple to the underside of the liner. Repeat at remaining pockets. Assure feltis secured and free from wrinkles.
10. Pull the felt tight on the sides and ends and staple to the liner from the underside.11. Trim excess felt from the table.12. Using a finger, locate the rail attaching holes. Use a screwdriver to trim out the hole in the felt by rotating the
screwdriver around the edge of the hole.
RAIL AND POCKET ASSEMBLYNOTE: This can be done by the second person while the felt is being installed.
1. Lay rails out on the floor, starting with an end rail.2. Insert the pocket-end stud into the rail and line up the screw hole to the rail hole.3. Secure the pockets to the rails using 1/4” x 1” long bolts and flat washers. Tighten with a 3/8” drive ratchet
and 1/2” socket (Figure 5).4. Assemble the remaining end and 2 side rails.
Attaching the Felt to the Slate Owner’s Manual
Figure 5. Pocket/Rail Installation

Page 8 Owner’s Manual
CLEANING AND MAINTENANCEA billiard table requires little care and virtually no maintenance at all.
CABINETRY CARESynthetic FinishesSynthetic surfaces , such a vinyl and FORMICA®, can be cleaned with a damp cloth and mild detergent.
Wood and Wood FinishesDust natural wood cabinetry frequently. To restore original luster, use a non-residue-producing dusting agent,such as mild lemon oil.
Never use glass cleaner on wood surfaces - the ammonia can chemically attack the finish.
High or low humidity extremes can cause the wood to warp and crack over time. Regulate humidity with ahumidifier or dehumidifier accordingly.
Although the finish is durable. spills should be cleaned immediately to prevent stains or damage.
Cloth CareUntil it is broken in, a new cloth can considerably affect ball roll. This is normal. Break in your cloth by brushing it as often as possible during the first three months of use.
Alternate breaking and racking ends of table when possible. Avoid excessively sliding the rack - try to rack inone motion.
Avoid excessive ball build-up in pockets. If not allowed to drop properly, balls can wear out the cloth around thepockets more quickly.
Chalk is a grinding agent, so avoid chalking your cue over the table.
The masse, jump shot, etc., can lead to scars or tears in the cloth.
Always brush the cloth in the same direction toward the end of the table. Never brush in a circular motion. Clothmay be vacuumed, in one direction only, using the upholstery attachment.
To protect your cloth against light, dust and moisture, cover your table when no in use.
The cloth can wrinkle and become loose if subjected to extreme temperatures or humidity. Regulate both.
With care, your cloth will last for years. Contact your Camelot dealer when your cloth needs to be replaced.
Pockets and Hardware CareProtect pockets from heat and light (sunlight, fireplaces, etc.) and humidity.
Do not sit or lean on pockets.
To avoid scuffing when shooting, never slide the cue over the pocket.
Examine pockets frequently to ensure no tacks or staples have loosened. Loose tacks can damage pool balls.
Dust pockets frequently. Clean with a damp cloth and mild soap when needed. Dry with a soft cloth.
Never set anything on pockets - pen, ink, nail polish remover, etc., can permanently stain pockets.
For leather pockets, treat with saddle soap or similar product. When finished, wipe pockets thoroughly to prevent ball and cloth blemishes.
Avoid storing balls in pockets for extended periods of time. If you do, distribute the balls evenly in all pockets.
Owner’s Manual Cleaning and Maintenance

Owner’s Manual Page 9
Cleaning and Maintenance Owner’s Manual
HardwareClean table hardware components with a damp cloth. This includes rail caps, cabinet corners, table feet and leglevelers.
Brushed aluminum components should only be cleaned with Never Dull®. This finish can be scratched anddulled if other cleaners are used.
BallsClean balls as needed with a mild household degreaser, such as 409®. Dry and polish with a clean soft cloth.
Stubborn stains can be removed with a non-abrasive cleanser, such as Soft Scrub®. Dry and polish with cleansoft cloth.
For a spectacular shine, after cleaning balls, apply paste wax and buff to a bright luster.
CuesAlways store cues upright in a wall rack located away from outside walls, doors and heat vents. Because wooden cues are susceptible to warping, never lean cues against a wall or table for any length of time.Clean cues as needed with a damp rag and mild soap. Dry and polish with a clean soft cloth.
A Few Billiard Table Care “NEVERS”Never sit on your Camelot Billiards Table, as it could break the seal between the rails and cushions, resultingin dead cushions that produce no ball response.
Never attempt to move your table. If you need to move your assembled table, call your Camelot dealer.
Never set drinks or food on your table.
Never place your table in direct sunlight.
Never use harsh chemicals or cleaners to clean your table.
Never smoke near your table.
Never stand on your table, as it could throw it out of level.
Never allow balls to build up in pockets.
Never store balls in pockets.

Page 10 Owner’s Manual
Owner’s Manual Bars
BARS
43"
46"
22"
Figure 6.B-100
24"
72"
43"
Figure 7. B-200

Owner’s Manual Page 11
Bars Owner’s Manual
Figure 8. B-300
Figure 9. B-400

Page 12 Owner’s Manual
Owner’s Manual Bars
43"
77"
26"
Figure 10. B-500
43"
58"
58"
Figure 11. B-600

Owner’s Manual Page 13
Bars Owner’s Manual
Figure 12. B-700
Figure 13. B-800

Page 14 Owner’s Manual
Owner’s Manual Bars
84"77"
26"
Figure 14. B-900
43"
84"
46"
Figure 15. B-1000

Owner’s Manual Page 15
Bar Owner’s Manual
Figure 16. B-1200
Figure 17. B-1300

Page 16 Owner’s Manual
Owner’s Manual Bars
FOOT REST ASSEMBLY1. Take foot rest hardware out of packaging.2 Assemble all long sections. Once all the long sections have been assembled, attach corner pieces. Tighten all
joints, using the locking nut (Figure 18 - Insert).3. Locate the pre-drilled mounting holes on the bar itself.5. After tightening the foot rest assembly, use the provided mounting screws and attach the foot rest assembly
to the bar (Figure 18 - Insert).
Traditional B-700L Bar Shown
Locking nut
Mounting Screws
Figure 18. Foot Rest Assembly

Cleaning and Maintenance Owner’s Manual
Owner’s Manual Page 17
CLEANING AND MAINTENANCEThe cleaning and maintenance for a bar is very easy to do. The following steps should simply the cleaning andmaintenance of your new bar.
1. Keep a dry environment. Moisture will damage your bar if not properly taken care of. There is a veneer coating on the bar, but unattended moisture (ie. spilled drink, cold drinks not utilizing a coaster) can scar thesurface permanently. Moisture, over a long period of time, can also dull the finish.
2. Dusting regularly, while keeping your bar clean, will also prevent scratches. Dust is tiny particles of dirt.Think of it this way: You have a new car. Take a hand full of dirt, or sand, and sprinkle it on the hood of thatbrand new car. Now rub it in. You can imagine the scratches that will be left. Its the same with your new bar. Everytime that dust is rubbed on the bar, it leaves tiny little scratches behind. You might think that they are tiny scratches, but just imagine this scenario happening over the course of the next 5 years. These little scratches will eventually turn in to bigger scratches that will allow moisture to seep into the scratches to the wood underneath.

Page 18 Owner’s Manual
Appendix Owner’s Manual
APPENDIXThe items that will be covered in this section will consist of the following:
Camelot Billiards Tables
Accessories
Warranty
In order for your retailer to expedite your order, for parts and accessories, it is recommended that you have theinformation that you attained in the Set-Up and Delivery section. Customer Service will want all this information for warranty purposes.
For Specific Room Sizes:
Key: Use [A] for 48” cue
Use [B] for 52” cue
Use [C] for 57” cue
For a 7’ table:
Use [A] for a 11’ 6” x 14’ 6” room
Use [B] for a 12’ x 15’ room
Use [C] for a 13’ x 16’ room
For a 8’ table:
Use [A] for a 12’ x 15’ 6” room
Use [B] for a 12’ 6” x 16” room
Use [C] for a 13’ 6” x 17’ room
For a 9’ table:
Use [A] for a 12’ 6” x 16’ 6” room
Use [B] for a 13’ x 17’ room
Use [C] for a 14’ x 18’ room

Owner’s Manual Page 19
AccessoriesDescription Part Numbers3-in-1 Game Table/ Ball and Claw Legs CML06500000
2-in-1 Game Table/ Ball and Claw Legs CML06500020
Spectator Chair CML06500140
With Foot Rest CML06500141
Foot Rest w/Pad CML06500142
Game Table Chair CML06500085
Pub Table/ Ball and Claw Legs CML06500040
Pub Table/ Standard Leg CML06500030
Octagon Pub Table/ Ball and Claw Legs CML06500045
Dual Spectator Chair CML06500090
4 Piece Accessory Kit CML06500350
2 Piece Accessory Kit CML06500345
8 Cue Wall Rack CML06500050
8 Cue and 2 Cup Wall Rack CML06500060
8 Cue and Ball Wall Rack CML06500070
9 Cue Corner Rack (New) CML06500071
9 Cue Round Rack CML06500073
9 Cue Pallet Rack CML06500072
Storage Love Seat CML06500145
CHAIR FABRIC
Game Time Multi POOL7474
Cue Balls Green POOL6262
Route 66 POOL6565
Cue Balls Navy POOL9595
Red OPTBR
Cinnamon OPTBC
Forrest OPTBF
Expresso OPTBEX
EXCLUSIVE
Poker Ball Set CM06500600
Appendix Owner’s Manual

Limited Warranty
WARRANTYC.A.I Warranties Hardwood Rails, Interior Bracing, Table Cabinet,Legs and bar tops from, splitting, cracking, or warping due to defects inmaterial or workmanship.
This Warranty specifically excludes wear items such as felt, pockets,lights and brass railing. These items are warranted to be delivered freeof defects in material and workmanship.
C.A.I Warranties Rails and Cushions from dry rot or hardening due todefects in material or workmanship.
C.A.I. Warranties the Slate Bed will not warp or crack due to defects inmaterial or workmanship. C.A.I Dura-Slate tables are guaranteed for 90(ninety days.)
EXTENT OF WARRANTY
This limited warranty extends to the original purchaser at the originalsite of installation. This warranty becomes valid at time of purchase and terminates either by owner transfer, relocation, or items listed in the warranty limitation section of this warranty.
WARRANTY PERFORMANCE
Warranty Performance: In the event of a malfunction or defect coveredunder the terms of this warranty, a factory authorized service agent ofC.A.I. will perform the necessary repairs. To obtain service, contact theauthorized selling dealer. In the event the consumer is unable to obtainservice or satisfactory customer service from the authorized selling dealer or service agent, written notification must be given to the C.A.I.Customer Relations Department within (10) ten days of the reported failure. There will be no charge for parts or labor on a covered item.However, the authorized service agent may assess a reasonable travel ormileage charge per service call. If C.A.I. determines that repair of a covered item is not feasible; it is C.A.I.’s sole option to replace the defective merchandise with merchandise of equal value to the originalpurchase price. In the event of any warranted replacement, all removal,replacement, installation and shipping costs are the responsibility of thebilliard table owner.
CAMELOT BILLIARD TABLESAfter the first year, labor and freight costs become the primaryresponsibility of the table owner.
WARRANTY LIMITATIONSWarranty Limitations: This warranty does not apply if the pool tablehas been subject to negligence, alteration, misuse, abuse, repairs bynon-C.A.I. authorized representatives, acts of God and any othercases beyond the control of C.A.I. Examples of common acts invalidating this guarantee includes but are not limited to: * Damage caused to billiard tables placed in non-approved locations.
(Outdoors, garages, patios, or any other non-climate controlledenvironment.)
* Use of billiards table other than the designed purpose. * Damaged caused by harsh cleaning agents.
This Limited Warranty applies only to billiard tables normally usedfor personal, family, or household purposes.
LEGAL REMEDIES
Legal Remedies: This warranty gives you specific legal rights andyou may have other rights, which vary from state to state.
CUSTOMER SERVICECustomer Service: For customer service, contact an authorizedservice agent immediately. To locate your local representative,contact the C.A.I. Customer Relations Department at 1462 EastNinth Street Pomona, CA 91766, or call 909-623-8781.
DISCLAIMERS
Disclaimers: C.A.I shall not be liable for loss of use of the billiardtable or other incidental or consequential cost expense or damageswhich may include but are not limited to removal of custom fixture or the necessity for crane removal. Any implied guarantee shall have duration of equal to the duration the applicableguarantee stated above. Under no circumstances shall CamelotBilliards or any of its representatives be held liable for injury to anyperson or damage to any property, however arising.
1462 East Ninth Street • Pomona CA, 91766 • 1 (800) CAL-SPASThis Limited / Lifetime Warranty is effective for Billiard Tables manufactured after January 01, 2004
Page 20 Owner’s Manual
WARRANTY