1955-57 ididit tilt steering column installation ididit tilt...by randy irwin 1955-57 ididit tilt...
TRANSCRIPT
by Randy Irwin
1955-57 IDIDIT TILT STEERING COLUMN INSTALLATIONWITH ALL STEERING TYPES
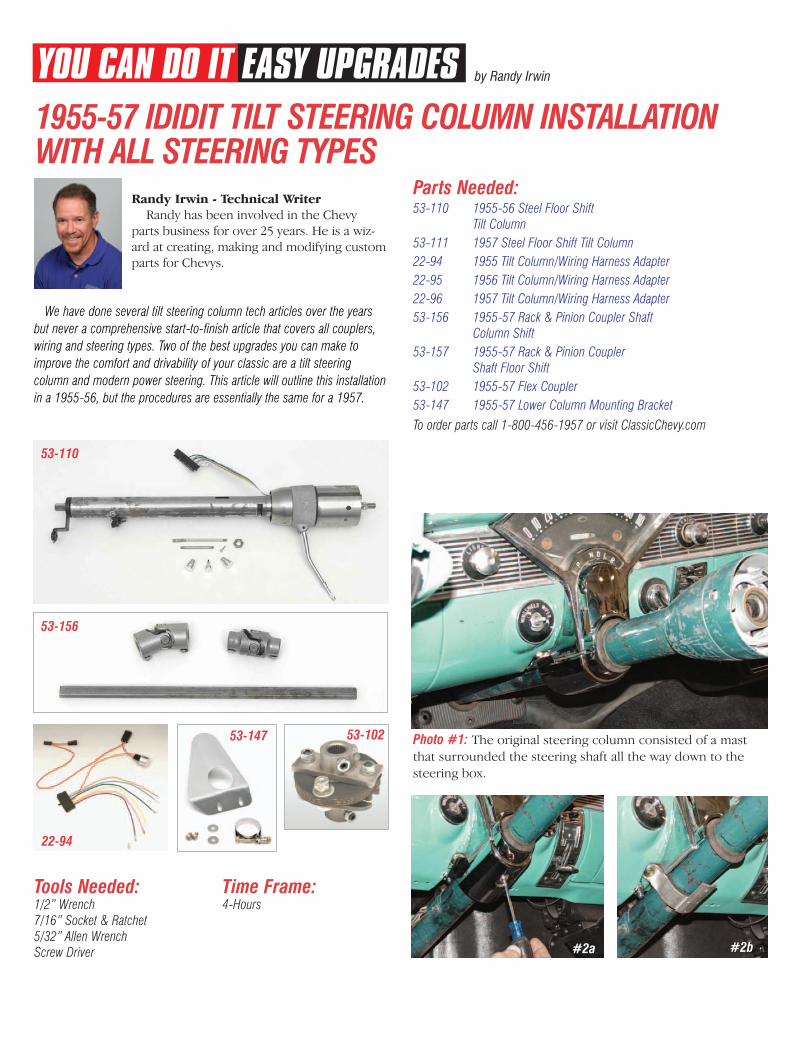
Parts Needed:53-110 1955-56 Steel Floor Shift
Tilt Column53-111 1957 Steel Floor Shift Tilt Column22-94 1955 Tilt Column/Wiring Harness Adapter22-95 1956 Tilt Column/Wiring Harness Adapter22-96 1957 Tilt Column/Wiring Harness Adapter53-156 1955-57 Rack & Pinion Coupler Shaft
Column Shift53-157 1955-57 Rack & Pinion Coupler
Shaft Floor Shift53-102 1955-57 Flex Coupler53-147 1955-57 Lower Column Mounting Bracket
To order parts call 1-800-456-1957 or visit ClassicChevy.com
Tools Needed: 1/2” Wrench7/16” Socket & Ratchet5/32” Allen WrenchScrew Driver
We have done several tilt steering column tech articles over the yearsbut never a comprehensive start-to-finish article that covers all couplers,wiring and steering types. Two of the best upgrades you can make toimprove the comfort and drivability of your classic are a tilt steeringcolumn and modern power steering. This article will outline this installationin a 1955-56, but the procedures are essentially the same for a 1957.
Time Frame: 4-Hours
Randy Irwin - Technical WriterRandy has been involved in the Chevy
parts business for over 25 years. He is a wiz-ard at creating, making and modifying customparts for Chevys.
Photo #1: The original steering column consisted of a mastthat surrounded the steering shaft all the way down to thesteering box.
#2a #2b
53-110
53-102
53-156
53-147
22-94

Photo #5a & 5b: The original steering column is held to thefirewall with a squeeze clamp. Remove the upper 5/16” X 3” boltand nut that squeezes the bracket around the steering column.Next remove the two 5/16” X 1” bolts that hold the bracket tothe firewall and slide the bracket down, off the end of thesteering column.
Photo #2a & 2b: The original steering column is anchored tothe dashboard and firewall. The clamp at the dashboard islocated under the lower steering column cover. The cover isheld in place with a 1/4”-20 clutch head screw.
Photo #3a & 3b: Remove theupper steering column cover fromthe front of the instrumentcluster. To remove the cover, pullthe steering column to instrumentcluster rubber seal up toward theshift collar and pull the cover upfrom the cluster.
#5a #5b
Photo #4: If the carhas an automatictransmission thereis a wire thatconnects from thesteering column tothe transmissionindicator on thedash. Unhook andremove this wire.
Photo #6: The 55-57 ididit tilt steering columns are 3-1/2”shorter than the stock steering column. When the tilt columnis installed in the car, the bottom of the column will be flushwith the firewall, leaving plenty of room in the enginecompartment for any type of steering conversion.
#3a
#3b Photo #7a & 7b: If a column shift ididit steering column isinstalled, a neutral safety switch is included and mounted tothe steering column down close to the firewall. The newcolumn shift tilt column also has a tab on the upper shift tubeto allow the shift indicator wire to be reconnected.
Photo #8: The shift lever for thetransmission linkage is offset toclear the firewall and is boltedon with four 3/32” Allen headscrews so that it can be removedduring installation.
Photo #9: There is a slot cut inthe bottom of the new column(‘55-‘56) for the tab on the lowercolumn clamp at the firewall.The tab on the clamp will keepthe column from rotating in theclamp.
#7a #7b
Photo #10: The neutral safetyswitch is held to the steeringcolumn with two #6 sheetmetal screws. The switchmust be removed to installthe column to instrumentcluster seal P/N 05-13.
#8
#9
Green wires forback up lights
Violet wiresfor starter
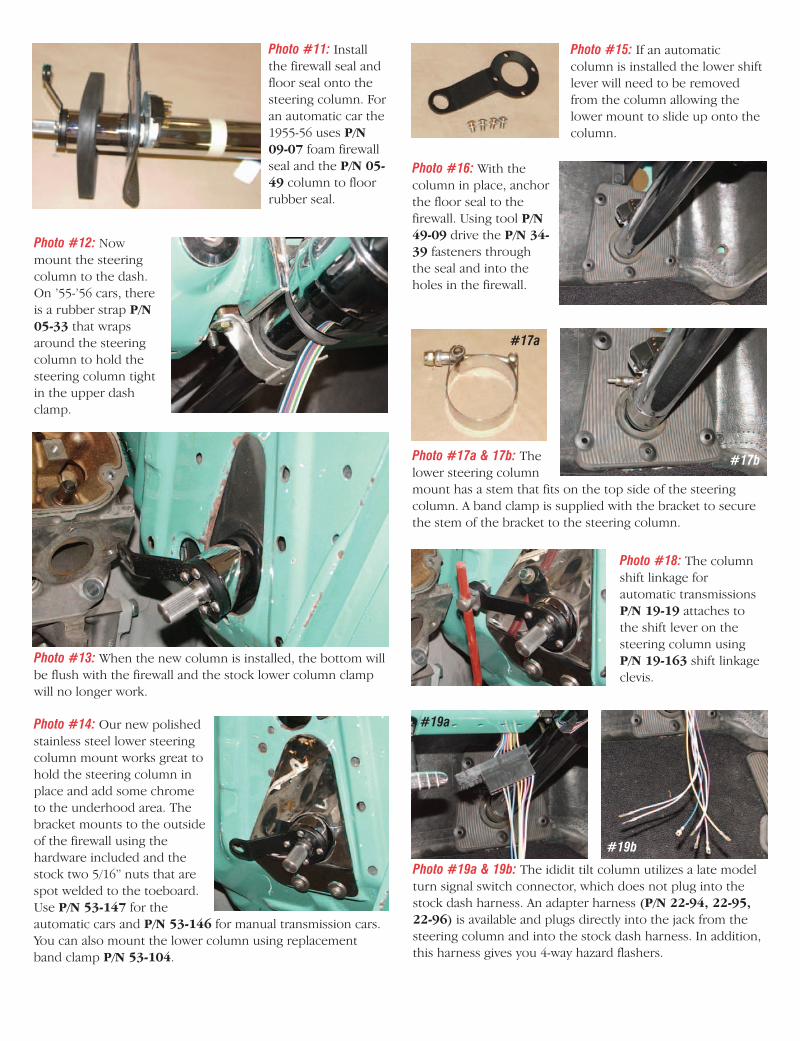
Photo #14: Our new polishedstainless steel lower steeringcolumn mount works great tohold the steering column inplace and add some chrometo the underhood area. Thebracket mounts to the outsideof the firewall using thehardware included and thestock two 5/16” nuts that arespot welded to the toeboard.Use P/N 53-147 for theautomatic cars and P/N 53-146 for manual transmission cars.You can also mount the lower column using replacementband clamp P/N 53-104.
Photo #11: Installthe firewall seal andfloor seal onto thesteering column. Foran automatic car the1955-56 uses P/N09-07 foam firewallseal and the P/N 05-49 column to floorrubber seal.
Photo #15: If an automaticcolumn is installed the lower shiftlever will need to be removedfrom the column allowing thelower mount to slide up onto thecolumn.
Photo #16: With thecolumn in place, anchorthe floor seal to thefirewall. Using tool P/N49-09 drive the P/N 34-39 fasteners throughthe seal and into theholes in the firewall.
Photo #17a & 17b: Thelower steering columnmount has a stem that fits on the top side of the steeringcolumn. A band clamp is supplied with the bracket to securethe stem of the bracket to the steering column.
Photo #12: Nowmount the steeringcolumn to the dash.On ’55-’56 cars, thereis a rubber strap P/N05-33 that wrapsaround the steeringcolumn to hold thesteering column tightin the upper dashclamp.
Photo #13: When the new column is installed, the bottom willbe flush with the firewall and the stock lower column clampwill no longer work.
Photo #18: The columnshift linkage forautomatic transmissionsP/N 19-19 attaches tothe shift lever on thesteering column usingP/N 19-163 shift linkageclevis.
Photo #19a & 19b: The ididit tilt column utilizes a late modelturn signal switch connector, which does not plug into thestock dash harness. An adapter harness (P/N 22-94, 22-95,22-96) is available and plugs directly into the jack from thesteering column and into the stock dash harness. In addition,this harness gives you 4-way hazard flashers.
#17a
#17b
#19a
#19b

Photo #20: There is ared wire in the adapterharness for the 4-wayflashers. Plug thefemale end of the redwire onto the ignitionswitch terminal markedBAT.
Photo #21: With thesteering column flushwith the firewall therewill be plenty of roomfor a “rag joint”coupler to connect toa 605 or 670 steeringbox. For ididit columnshift columns, use P/N53-102 coupler, whichis 3/4”-36 spline to3/4”-30 spline. Forididit floor shift columns, use coupler P/N 53-105, which is1” DD to 3/4”-30 spline. If you are installing the column usingan original steering box, use P/N 53-117 solid coupler 3/4”-36spline to 3/4” smooth bore or P/N 53-108 solid coupler 1/”DD to 3/4” smooth bore for floor shift columns.
Photo #22: The tilt column can be connected to the CCI rackand pinion steering, using the new Borgeson U-joints andshaft kit P/N 53-156 for column shift tilt columns and P/N53-157 for floor shift tilt columns. We also have completerack and pinion kits available including the shaft and joints toadapt directly to all types of columns.Once your column installation is complete, any type ofaftermarket steering wheel will bolt directly to the new tiltcolumn without any adapters needed. If you wish to install anoriginal pre-1969 GM steering wheel or one of the smallerdiameter reproduction wheels, simply use adapter P/N 53-202 an install! Good Luck!