17service menu settings - turuta · 17service menu settings ... to update eeprom content via uart...
TRANSCRIPT
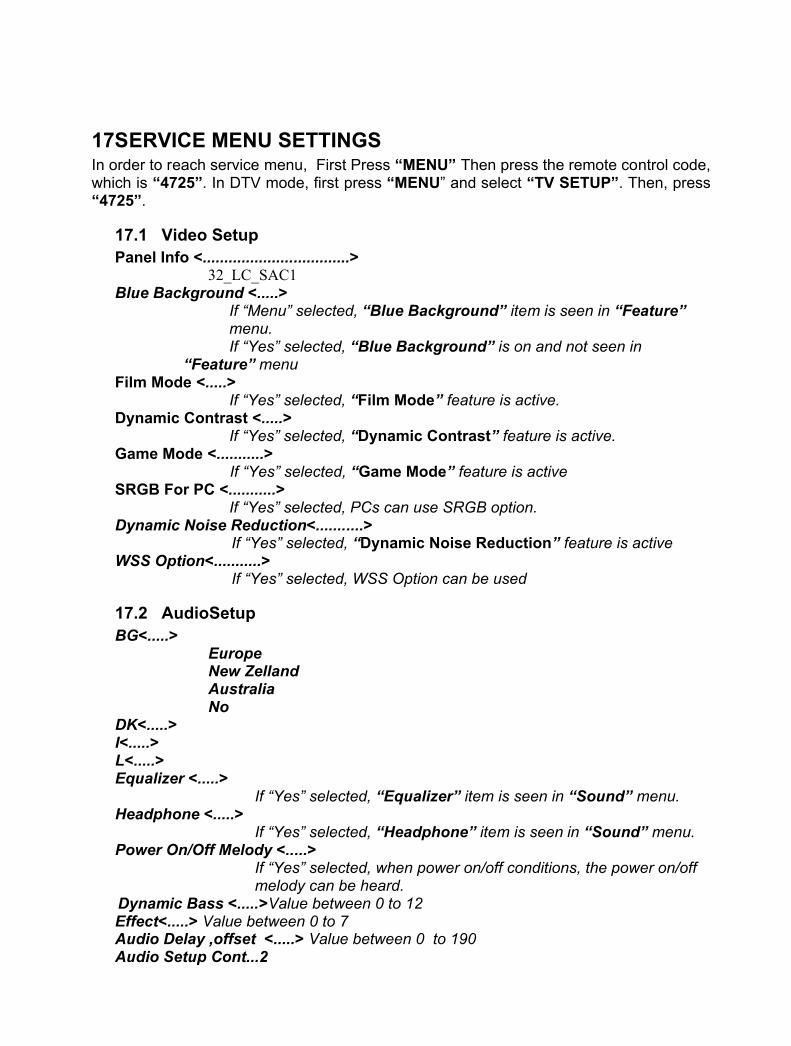
17SERVICE MENU SETTINGSIn order to reach service menu, First Press “MENU” Then press the remote control code, which is “4725”. In DTV mode, first press “MENU” and select “TV SETUP”. Then, press “4725”.
17.1 Video SetupPanel Info <..................................>
32_LC_SAC1Blue Background <.....>
If “Menu” selected, “Blue Background” item is seen in “Feature”menu.If “Yes” selected, “Blue Background” is on and not seen in
“Feature” menuFilm Mode <.....>
If “Yes” selected, “Film Mode” feature is active.Dynamic Contrast <.....>
If “Yes” selected, “Dynamic Contrast” feature is active.Game Mode <...........>
If “Yes” selected, “Game Mode” feature is activeSRGB For PC <...........>
If “Yes” selected, PCs can use SRGB option.Dynamic Noise Reduction<...........>
If “Yes” selected, “Dynamic Noise Reduction” feature is activeWSS Option<...........>
If “Yes” selected, WSS Option can be used
17.2 AudioSetupBG<.....>
EuropeNew ZellandAustraliaNo
DK<.....>I<.....>L<.....>Equalizer <.....>
If “Yes” selected, “Equalizer” item is seen in “Sound” menu.Headphone <.....>
If “Yes” selected, “Headphone” item is seen in “Sound” menu.Power On/Off Melody <.....>
If “Yes” selected, when power on/off conditions, the power on/off melody can be heard.
Dynamic Bass <.....>Value between 0 to 12Effect<.....> Value between 0 to 7Audio Delay ,offset <.....> Value between 0 to 190Audio Setup Cont...2

Carrier mute<.......> Value between 0 to 28Headphone Sound Select <.......>
Always Active SelectAlways Inactive SelectMenuAlways Main MenuAlways PIP/PAP Window
Sound Mode Detect Time <.......> Value between 0 to 255Noise Reduction Threshold <.......> Value between 0 to 255Noise Reduction Time <.......> Value between 0 to 15AVL Attack Time <.......> Value between 0 to 255AVL Release Time <.......> Value between 0 to 255
Prescales ( AVL On)FM Prescale<.......> Value between 0 to 255AM Prescale <.......> Value between 0 to 255NICAM Prescale <.......> Value between 0 to 255SCART Prescale <.......> Value between 0 to 255FAV Prescale <.......> Value between 0 to 255DTV Prescale <.......> Value between 0 to 255HDMI Prescale <.......> Value between 0 to 255YPbPr/PC Prescale <.......> Value between 0 to 255An. USB Prescale <.......> Value between 0 to 255Dig. USB Prescale <.......> Value between 0 to 255
Prescales ( AVL Off)FM Prescale<.......> Value between 0 to 255AM Prescale <.......> Value between 0 to 255NICAM Prescale <.......> Value between 0 to 255SCART Prescale <.......> Value between 0 to 255FAV Prescale <.......> Value between 0 to 255DTV Prescale <.......> Value between 0 to 255HDMI Prescale <.......> Value between 0 to 255YPbPr/PC Prescale <.......> Value between 0 to 255An. USB Prescale <.......> Value between 0 to 255Dig. USB Prescale <.......> Value between 0 to 255
Clipping Levels ( AVL On)FM Clipping <.......> Value between 0 to 255AM Clipping <.......> Value between 0 to 255NICAM Clipping <.......> Value between 0 to 255SCART Clipping <.......> Value between 0 to 255FAV Clipping <.......> Value between 0 to 255DTV Clipping <.......> Value between 0 to 255HDMI Clipping <.......> Value between 0 to 255YPbPr/PC Clipping <.......> Value between 0 to 255An. USB Clipping <.......> Value between 0 to 255Dig. USB Clipping <.......> Value between 0 to 255
Clipping Levels ( AVL Off)FM Clipping <.......> Value between 0 to 255AM Clipping <.......> Value between 0 to 255NICAM Clipping <.......> Value between 0 to 255
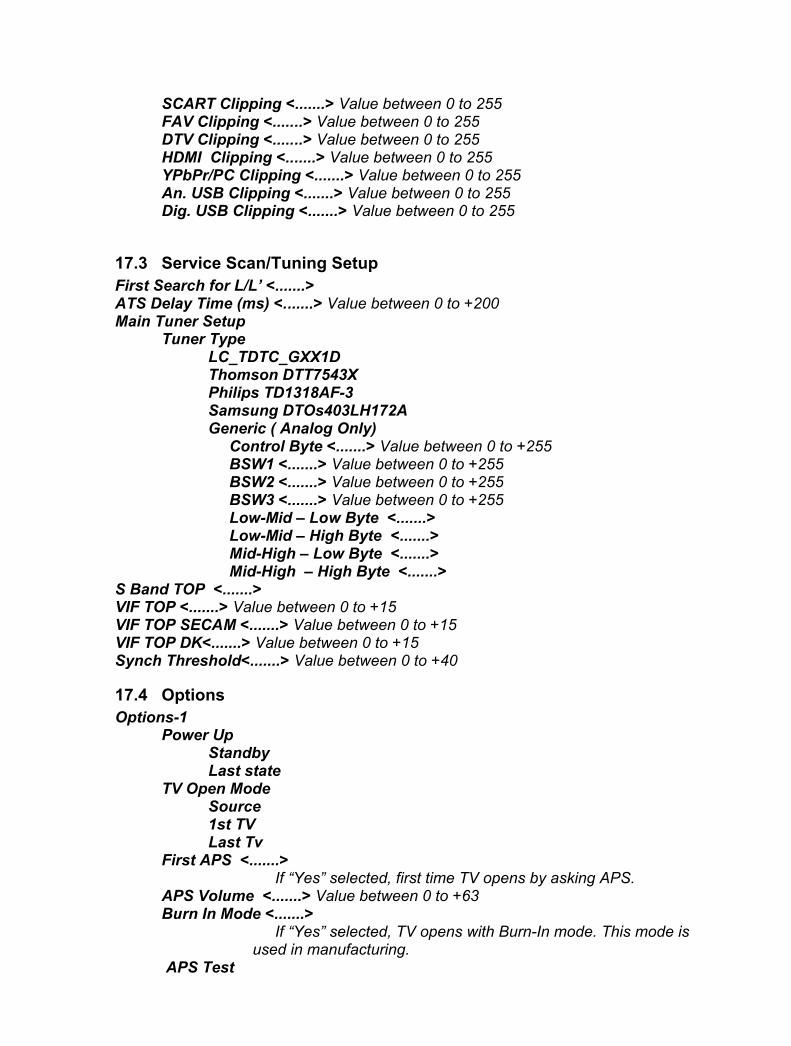
SCART Clipping <.......> Value between 0 to 255FAV Clipping <.......> Value between 0 to 255DTV Clipping <.......> Value between 0 to 255HDMI Clipping <.......> Value between 0 to 255YPbPr/PC Clipping <.......> Value between 0 to 255An. USB Clipping <.......> Value between 0 to 255Dig. USB Clipping <.......> Value between 0 to 255
17.3 Service Scan/Tuning SetupFirst Search for L/L’ <.......>ATS Delay Time (ms) <.......> Value between 0 to +200Main Tuner Setup
Tuner TypeLC_TDTC_GXX1DThomson DTT7543XPhilips TD1318AF-3Samsung DTOs403LH172AGeneric ( Analog Only)
Control Byte <.......> Value between 0 to +255BSW1 <.......> Value between 0 to +255BSW2 <.......> Value between 0 to +255BSW3 <.......> Value between 0 to +255Low-Mid – Low Byte <.......>Low-Mid – High Byte <.......>Mid-High – Low Byte <.......>Mid-High – High Byte <.......>
S Band TOP <.......>VIF TOP <.......> Value between 0 to +15VIF TOP SECAM <.......> Value between 0 to +15VIF TOP DK<.......> Value between 0 to +15Synch Threshold<.......> Value between 0 to +40
17.4 OptionsOptions-1
Power UpStandbyLast state
TV Open ModeSource1st TVLast Tv
First APS <.......> If “Yes” selected, first time TV opens by asking APS.
APS Volume <.......> Value between 0 to +63Burn In Mode <.......>
If “Yes” selected, TV opens with Burn-In mode. This mode is used in manufacturing.
APS Test

Autostore <.......>If “Yes” selected, Channel is automatically stored.
Unicode Enabled <.......>If “Yes” selected,Unicode characters can be read in the USB
Files.Options-2
Source List menu <.......>If “Yes” selected, Sorce List Menu appears on the screen when
press “source” button.RC Select <.......>
RC Group 1RC Group 2RC Group 3RC Group 4RC Group 5RC Group 6
Double Digit Key <.......>If “Yes” selected, Double Digit Button on RC activates.
Protection <.......> If “Yes” selected,short circuit protection activates.
Led Type <.......>1 Led 1 Color1 Led 2 Color2 Led 2 Color1 Led 3 Color2 Led 3 Color
200 Programme <.......> If “Yes” selected, totaly 200 programmes can be used.
TouchPad <.......> If “Yes” selected, TouchPad can be used.
Teletext OptionsTXT Darkness <.......> Value between 0 to +63TXT Type <.......>
Fasttext&ToptextNoDefaultFastextToptext
TXT Language <.......>MenuWest East CyrillicTurk/GreArabicPersianAuto
No Txt Warning <.......>
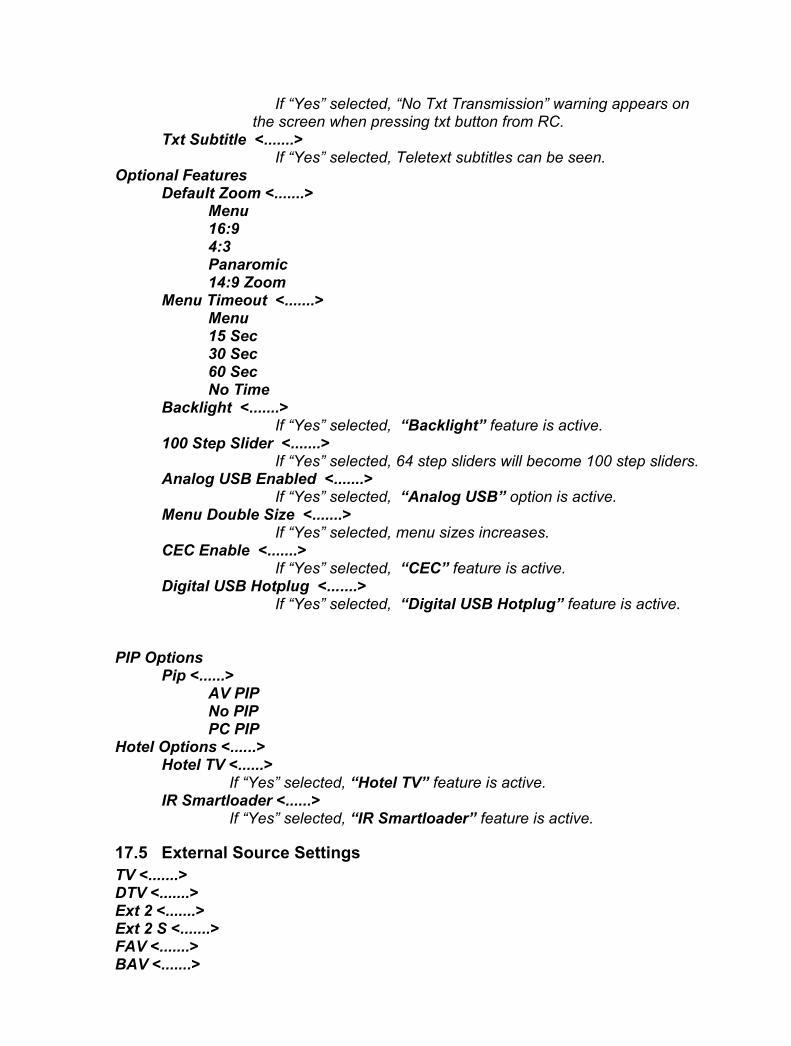
If “Yes” selected, “No Txt Transmission” warning appears on the screen when pressing txt button from RC.
Txt Subtitle <.......>If “Yes” selected, Teletext subtitles can be seen.
Optional FeaturesDefault Zoom <.......>
Menu16:94:3Panaromic14:9 Zoom
Menu Timeout <.......>Menu15 Sec30 Sec60 SecNo Time
Backlight <.......>If “Yes” selected, “Backlight” feature is active.
100 Step Slider <.......>If “Yes” selected, 64 step sliders will become 100 step sliders.
Analog USB Enabled <.......>If “Yes” selected, “Analog USB” option is active.
Menu Double Size <.......>If “Yes” selected, menu sizes increases.
CEC Enable <.......>If “Yes” selected, “CEC” feature is active.
Digital USB Hotplug <.......>If “Yes” selected, “Digital USB Hotplug” feature is active.
PIP OptionsPip <......>
AV PIPNo PIPPC PIP
Hotel Options <......>Hotel TV <......>
If “Yes” selected, “Hotel TV” feature is active.IR Smartloader <......>
If “Yes” selected, “IR Smartloader” feature is active.
17.5 External Source SettingsTV <.......>DTV <.......>Ext 2 <.......>Ext 2 S <.......>FAV <.......>BAV <.......>
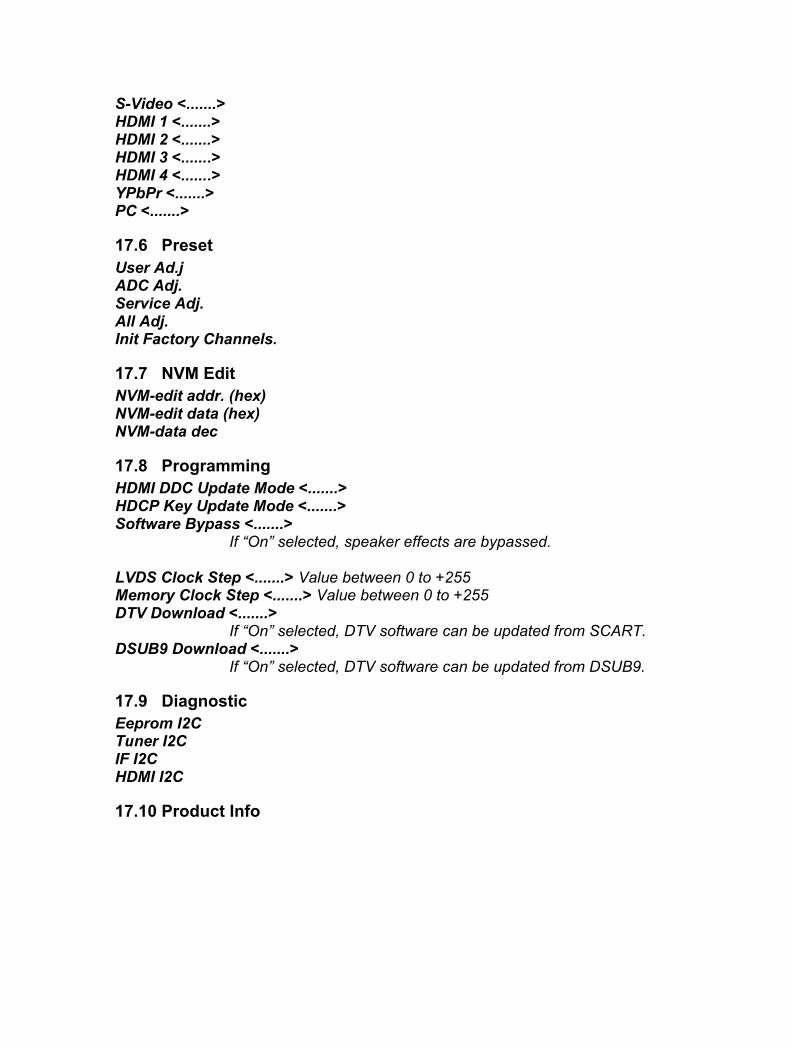
S-Video <.......>HDMI 1 <.......>HDMI 2 <.......>HDMI 3 <.......>HDMI 4 <.......>YPbPr <.......>PC <.......>
17.6 PresetUser Ad.jADC Adj.Service Adj.All Adj.Init Factory Channels.
17.7 NVM EditNVM-edit addr. (hex)NVM-edit data (hex)NVM-data dec
17.8 ProgrammingHDMI DDC Update Mode <.......>HDCP Key Update Mode <.......>Software Bypass <.......>
If “On” selected, speaker effects are bypassed.
LVDS Clock Step <.......> Value between 0 to +255Memory Clock Step <.......> Value between 0 to +255DTV Download <.......>
If “On” selected, DTV software can be updated from SCART.DSUB9 Download <.......>
If “On” selected, DTV software can be updated from DSUB9.
17.9 DiagnosticEeprom I2CTuner I2CIF I2CHDMI I2C
17.10 Product Info
18 SOFTWARE UPDATE DESCRIPTION
16.1 17MB37 Analog Part Software Update With Bootloader Procedure
1.1 The File Types Used By The Bootloader
All file types that used by the bootloader software are listed below:
1. The Binary File : It has “.bin” extension and it is the tv application. Its size is 1920 Kb.
2. The Config Binary File : It has “.cin extension and it is the config of the tv application. Its size may be 64 Kb or a few times 64 Kb.
3. The Test Script File : It has “.txt” extension and it is the test script that is parsed and executed by the bootloader. It don’t have to be any times of 64 Kb.
4. The Test Binary File : It has “.tin” extension and it is used and written by the test groups. It is run to understand the problem part of the hardware.
Alltough a file that is used by the bootloader can be had any one of these extensions, its name has to be “VESTEL_S” and it has to be located in the root directory of the usb device.
1.2 Usage of The Bootloader1. The starting to pass through : The chassis is only powered up.2. The starting to download something : When chassis is powered up the menu key has to be pushed.Before the chassis is powered up and if any usb device is plugged to the usb port, the programme is downloaded from usb firstly.Any usb device is plugged to usb port , user must open hyperterminal in the pc and connect pc to chassis via Mstar debug tool and any one of scart,dsub9 or I2c connectors. Serial connection settings are listed below:
- Bit per second: 115200 - Data bits: 8 - Parity: None- Stop bits: 1- Flow control: None
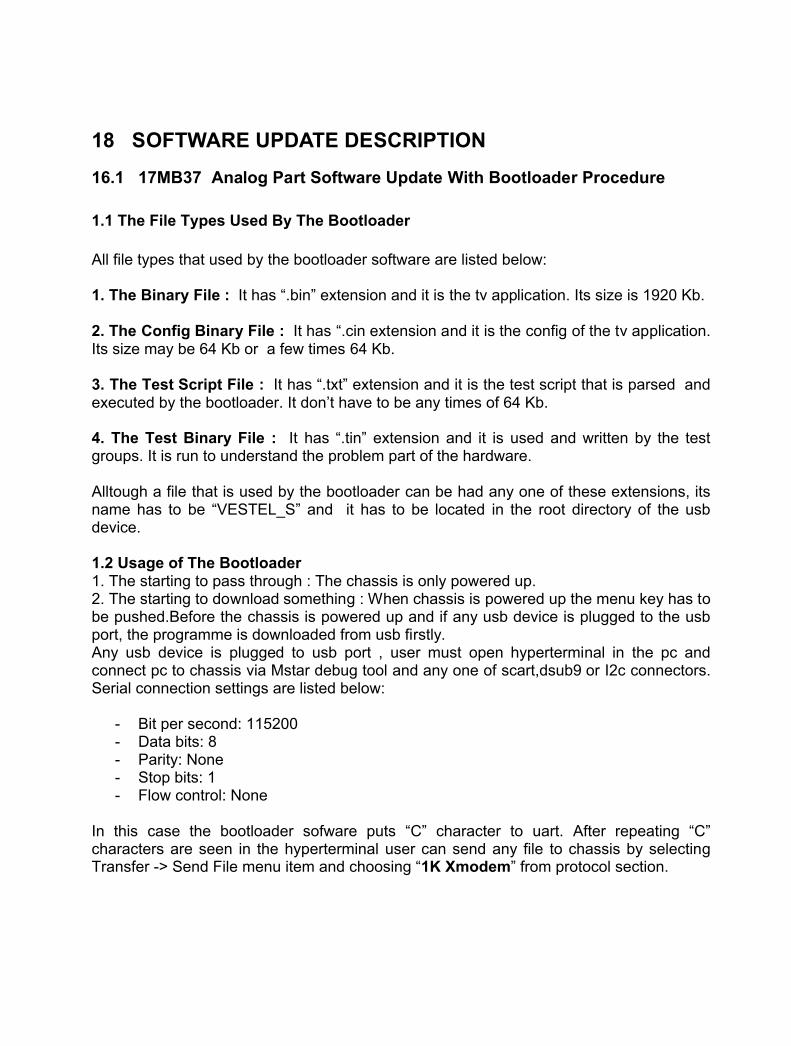
In this case the bootloader sofware puts “C” character to uart. After repeating “C” characters are seen in the hyperterminal user can send any file to chassis by selecting Transfer -> Send File menu item and choosing “1K Xmodem” from protocol section.
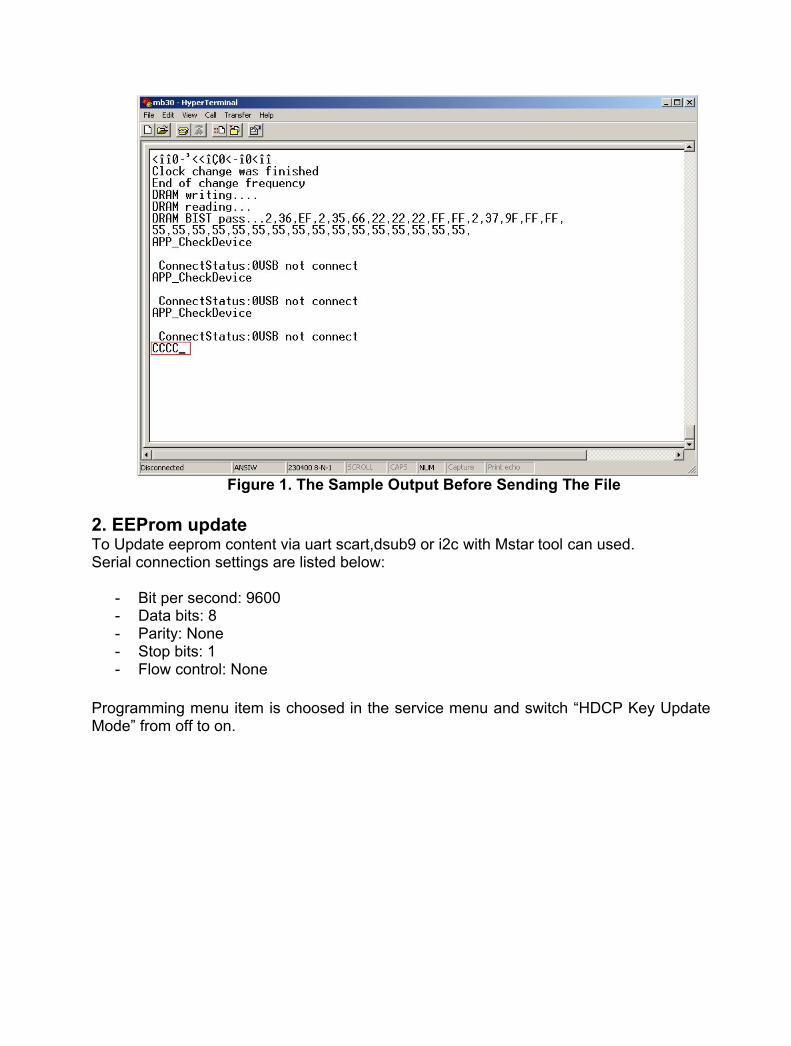
Figure 1. The Sample Output Before Sending The File
2. EEProm update To Update eeprom content via uart scart,dsub9 or i2c with Mstar tool can used.Serial connection settings are listed below:
- Bit per second: 9600 - Data bits: 8 - Parity: None- Stop bits: 1- Flow control: None
Programming menu item is choosed in the service menu and switch “HDCP Key Update Mode” from off to on.
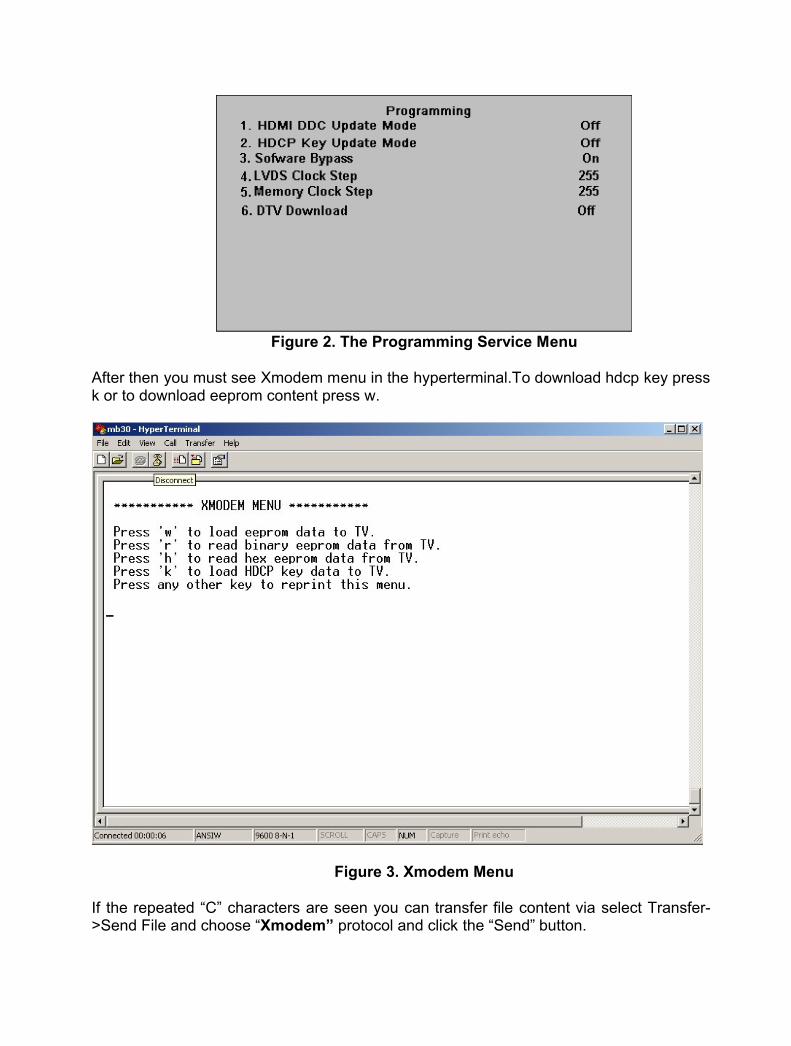
Figure 2. The Programming Service Menu
After then you must see Xmodem menu in the hyperterminal.To download hdcp key press k or to download eeprom content press w.
Figure 3. Xmodem Menu
If the repeated “C” characters are seen you can transfer file content via select Transfer->Send File and choose “Xmodem” protocol and click the “Send” button.
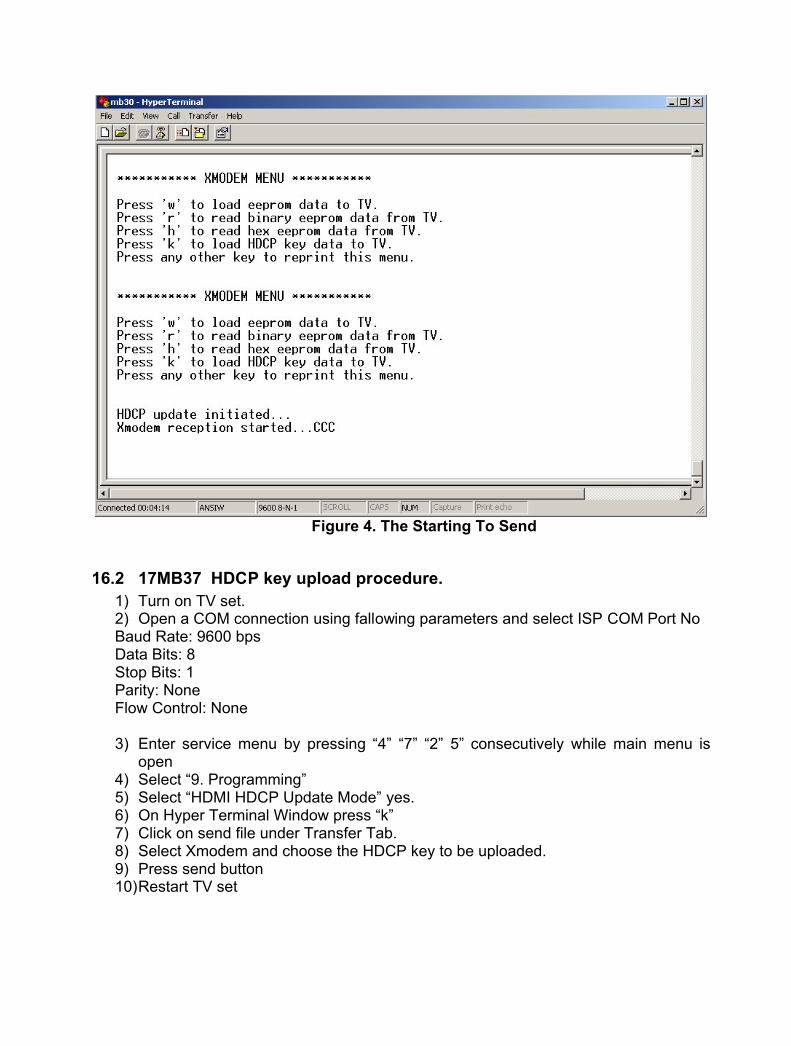
Figure 4. The Starting To Send
16.2 17MB37 HDCP key upload procedure.1) Turn on TV set.2) Open a COM connection using fallowing parameters and select ISP COM Port NoBaud Rate: 9600 bpsData Bits: 8Stop Bits: 1Parity: NoneFlow Control: None
3) Enter service menu by pressing “4” “7” “2” 5” consecutively while main menu is open
4) Select “9. Programming”5) Select “HDMI HDCP Update Mode” yes.6) On Hyper Terminal Window press “k”7) Click on send file under Transfer Tab.8) Select Xmodem and choose the HDCP key to be uploaded.9) Press send button10)Restart TV set
16.3 17MB37 Digital Software Update From SCARTAdjusting DTV Download Mode: 1. Power on the TV. 2. Exit the Stby Mode.3. Enter the “Tv Menu”. 4. Enter “4725” for jumping to “Service Settings”. 5. Select “8. Programming” step. 6. Change “6. DTV Download” to “On”. 7. Switch to the Stby mode.
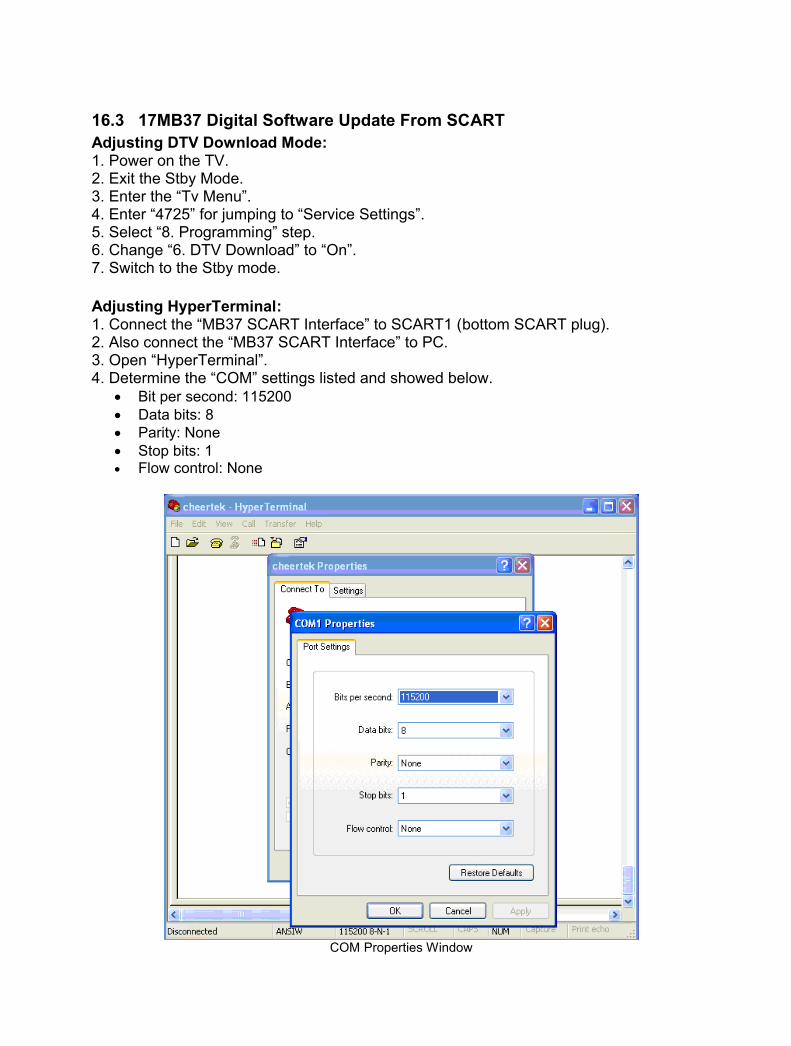
Adjusting HyperTerminal: 1. Connect the “MB37 SCART Interface” to SCART1 (bottom SCART plug). 2. Also connect the “MB37 SCART Interface” to PC.3. Open “HyperTerminal”.4. Determine the “COM” settings listed and showed below.
Bit per second: 115200 Data bits: 8 Parity: None Stop bits: 1 Flow control: None
COM Properties Window
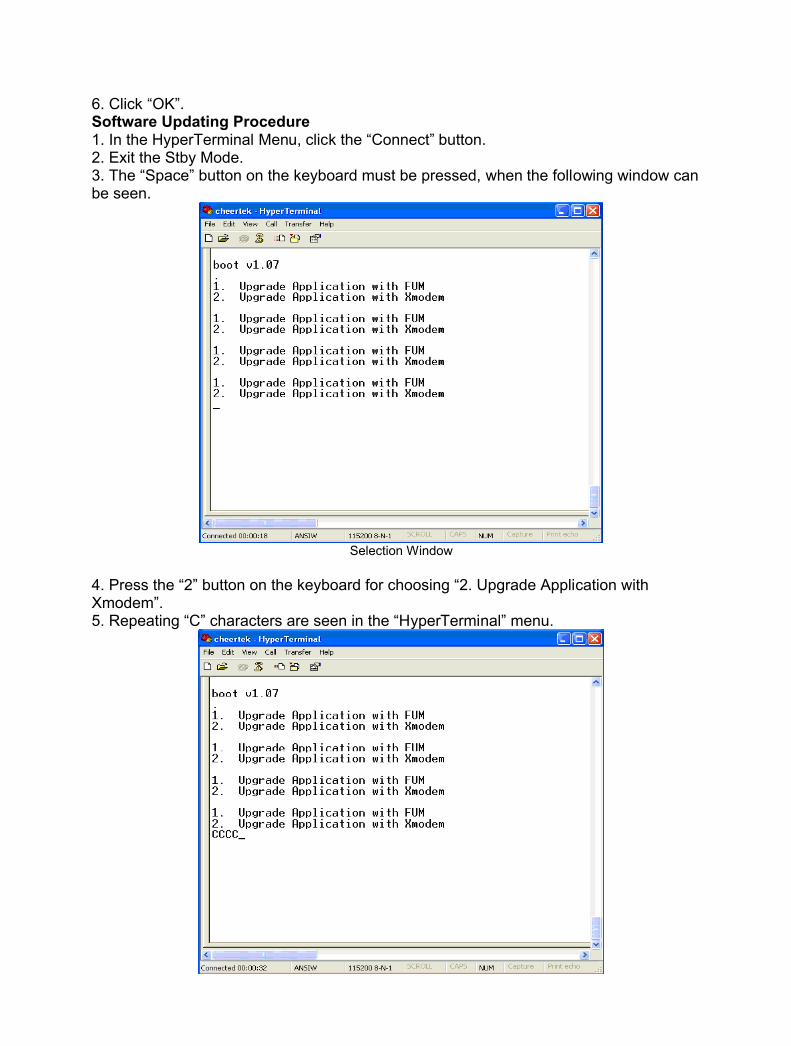
6. Click “OK”.Software Updating Procedure1. In the HyperTerminal Menu, click the “Connect” button. 2. Exit the Stby Mode.3. The “Space” button on the keyboard must be pressed, when the following window can be seen.
Selection Window
4. Press the “2” button on the keyboard for choosing “2. Upgrade Application with Xmodem”.5. Repeating “C” characters are seen in the “HyperTerminal” menu.
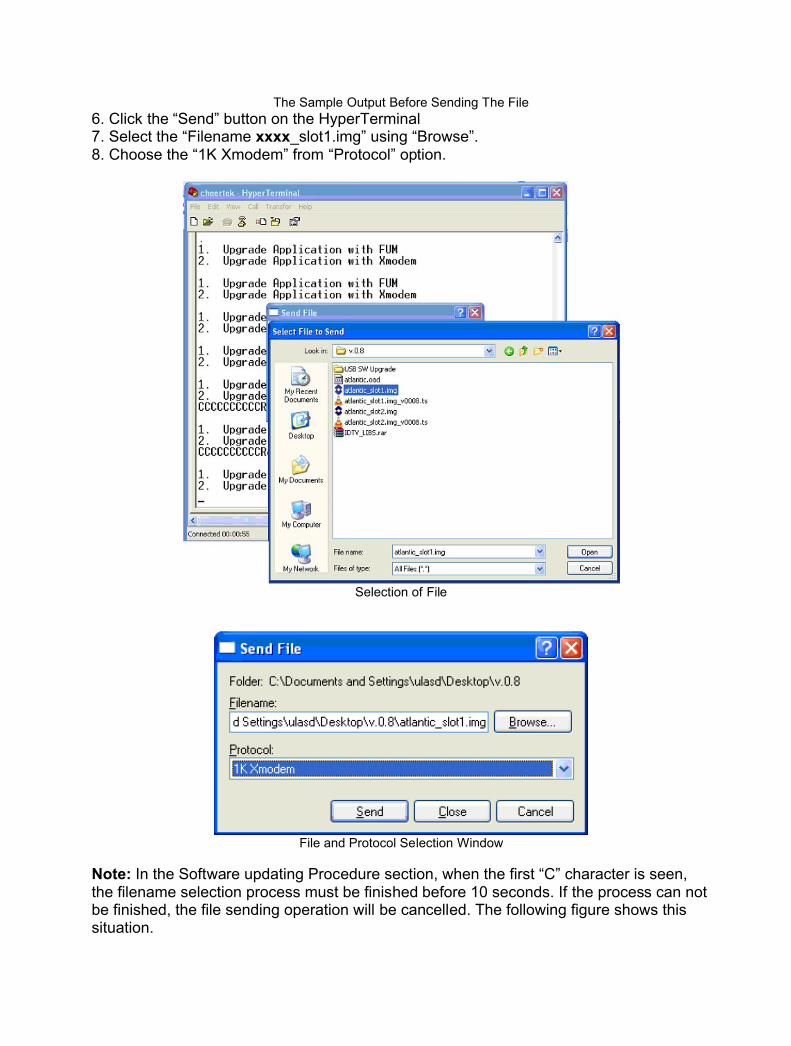
The Sample Output Before Sending The File6. Click the “Send” button on the HyperTerminal7. Select the “Filename xxxx_slot1.img” using “Browse”.8. Choose the “1K Xmodem” from “Protocol” option.
Selection of File
File and Protocol Selection Window
Note: In the Software updating Procedure section, when the first “C” character is seen, the filename selection process must be finished before 10 seconds. If the process can not be finished, the file sending operation will be cancelled. The following figure shows this situation.
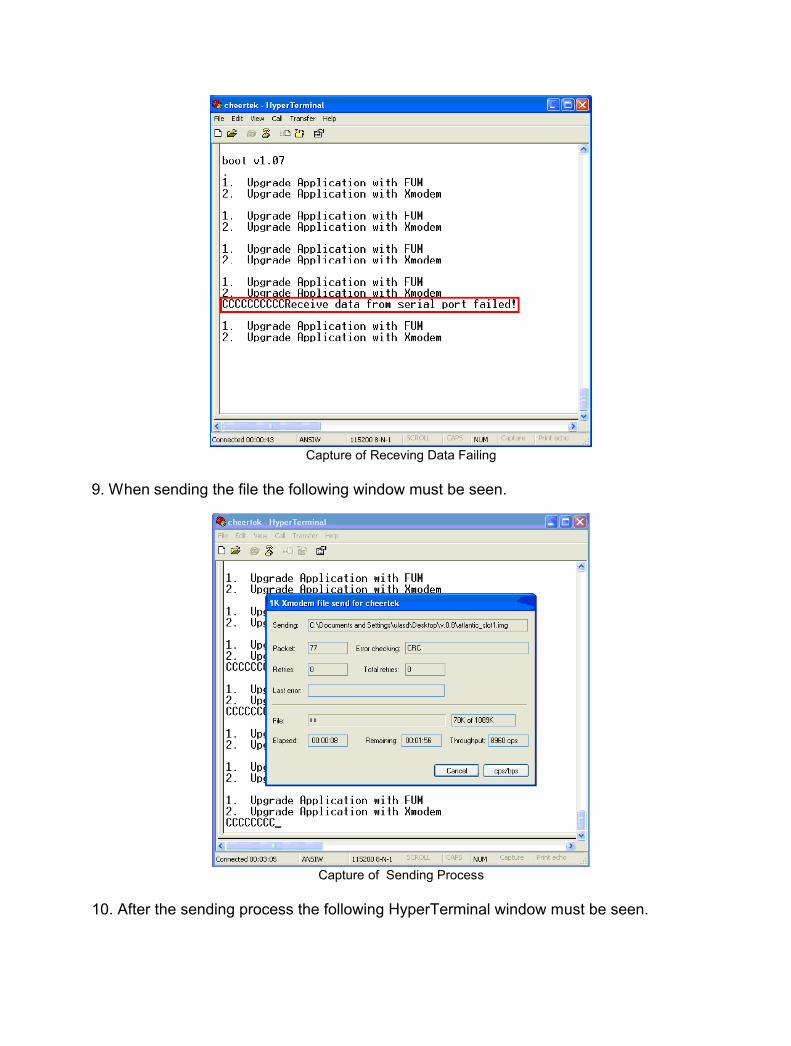
Capture of Receving Data Failing
9. When sending the file the following window must be seen.
Capture of Sending Process
10. After the sending process the following HyperTerminal window must be seen.
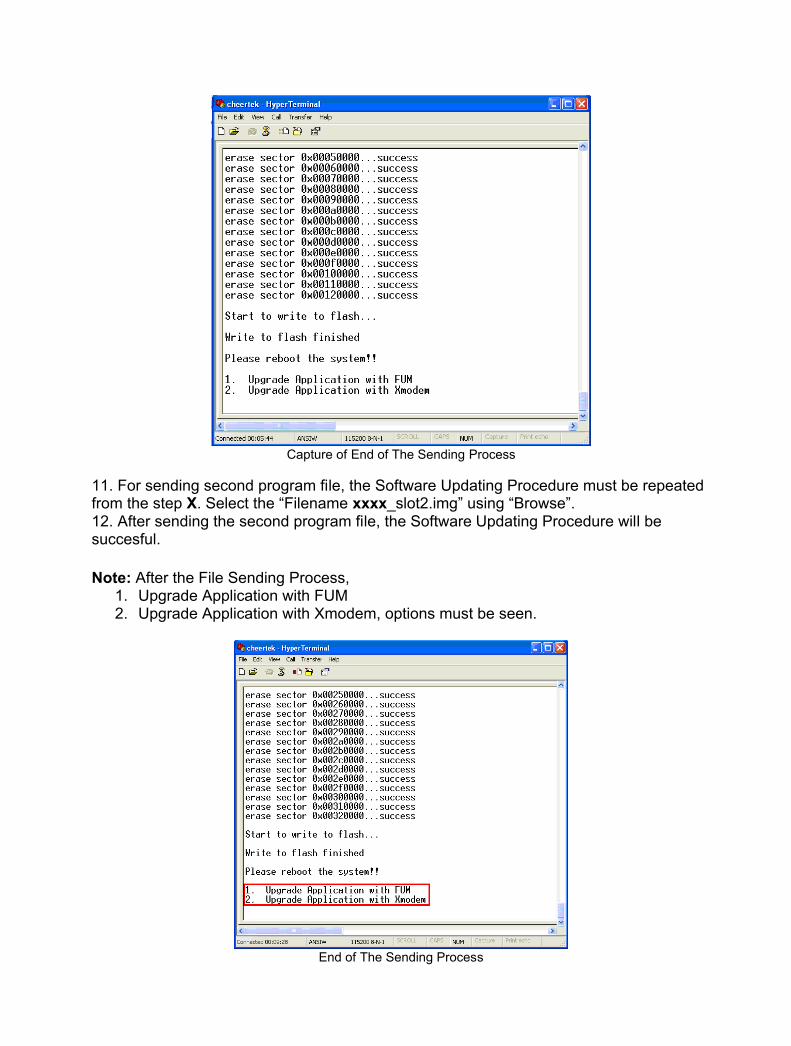
Capture of End of The Sending Process
11. For sending second program file, the Software Updating Procedure must be repeated from the step X. Select the “Filename xxxx_slot2.img” using “Browse”. 12. After sending the second program file, the Software Updating Procedure will be succesful.
Note: After the File Sending Process, 1. Upgrade Application with FUM2. Upgrade Application with Xmodem, options must be seen.
End of The Sending Process
Checking Of The New Software 1. Turn off and on the TV.2. Enter the “Setup” submenu in the “DTV Menu”.3. Choose the “Configuration” option.4. For controlling new software, check the “Receiver Upgrade” option.
16.4 17MB37 Digital Software Update From USBSoftware upgrade is possible via USB disk by folowing the steps below.
1. Copy the bin file, including higher version than the software loaded in flash, into the USB flash memory root directory. This file should be named up.bin.
2. Insert the USB disk.3. Digital module performs version and CRC check. If version and CRC check is
successful, then a message prompt appears to notify user about new version. If the user confirms loading of new version, upgrade.bin file is written into flash unused slot.
4. Digital module disables the previous software in the flash and then a system reset is performed.
5. After the reset, digital module starts with new software.
Revert operation:
With revert operation, it is possible to downgrade the software.Revert operation is very similar to upgrade process. In the revert operation, file name should be f_up.bin. Also user confirmation is not asked.
1. Copy the bin file into the USB flash memory root directory. This file should be named force_upgrade.bin.
2. Insert the USB disk.3. A lower version than the software in flash can be loaded with revert operation.
Digital module performs only CRC check. If CRC check is successful, then force_upgrade.bin file is written into flash unused slot.
4. Digital module disables the previous software in the flash.5. A message prompt is displayed to notify user about end of revert process. 6. Power off/on is required to start digital module with the new software.
For controlling new software, check the “Receiver Upgrade” option.