1625 manual fluke earth resistance
TRANSCRIPT

®
1625 Earth/Ground Tester
Users Manual
January 2006 © 2006 Fluke Corporation, All rights reserved. Printed in USA All product names are trademarks of their respective companies.

LIMITED WARRANTY AND LIMITATION OF LIABILITY Each Fluke product is warranted to be free from defects in material and workmanship under normal use and service. The warranty period is two years and begins on the date of shipment. Parts, product repairs, and services are warranted for 90 days. This warranty extends only to the original buyer or end-user customer of a Fluke authorized reseller, and does not apply to fuses, disposable batteries, or to any product which, in Fluke's opinion, has been misused, altered, neglected, contaminated, or damaged by accident or abnormal conditions of operation or handling. Fluke warrants that software will operate substantially in accordance with its functional specifications for 90 days and that it has been properly recorded on non-defective media. Fluke does not warrant that software will be error free or operate without interruption.
Fluke authorized resellers shall extend this warranty on new and unused products to end-user customers only but have no authority to extend a greater or different warranty on behalf of Fluke. Warranty support is available only if product is purchased through a Fluke authorized sales outlet or Buyer has paid the applicable international price. Fluke re-serves the right to invoice Buyer for importation costs of repair/replacement parts when product purchased in one country is submitted for repair in another country.
Fluke's warranty obligation is limited, at Fluke's option, to refund of the purchase price, free of charge repair, or replacement of a defective product which is returned to a Fluke authorized service center within the warranty period.
To obtain warranty service, contact your nearest Fluke authorized service center to obtain return authorization information, then send the product to that service center, with a de-scription of the difficulty, postage and insurance prepaid (FOB Destination). Fluke as-sumes no risk for damage in transit. Following warranty repair, the product will be re-turned to Buyer, transportation prepaid (FOB Destination). If Fluke determines that failure was caused by neglect, misuse, contamination, alteration, accident, or abnormal condition of operation or handling, including overvoltage failures caused by use outside the prod-uct’s specified rating, or normal wear and tear of mechanical components, Fluke will pro-vide an estimate of repair costs and obtain authorization before commencing the work. Following repair, the product will be returned to the Buyer transportation prepaid and the Buyer will be billed for the repair and return transportation charges (FOB Shipping Point).
THIS WARRANTY IS BUYER'S SOLE AND EXCLUSIVE REMEDY AND IS IN LIEU OF ALL OTHER WARRANTIES, EXPRESS OR IMPLIED, INCLUDING BUT NOT LIMITED TO ANY IMPLIED WARRANTY OF MERCHANTABILITY OR FITNESS FOR A PAR-TICULAR PURPOSE. FLUKE SHALL NOT BE LIABLE FOR ANY SPECIAL, INDIRECT, INCIDENTAL OR CONSEQUENTIAL DAMAGES OR LOSSES, INCLUDING LOSS OF DATA, ARISING FROM ANY CAUSE OR THEORY.
Since some countries or states do not allow limitation of the term of an implied warranty, or exclusion or limitation of incidental or consequential damages, the limitations and ex-clusions of this warranty may not apply to every buyer. If any provision of this Warranty is held invalid or unenforceable by a court or other decision-maker of competent jurisdiction, such holding will not affect the validity or enforceability of any other provision.
Fluke Corporation P.O. Box 9090 Everett, WA 98206-9090 U.S.A.
Fluke Europe B.V. P.O. Box 1186 5602 BD Eindhoven The Netherlands
11/99

i
Table of Contents
Title Page
Introduction .......................................................................................... 1 Models and Accessories........................................................................ 3 Safety Instructions ................................................................................ 4
Qualified Staff .................................................................................. 5 Setup ..................................................................................................... 5
Unpacking......................................................................................... 5 Checking the Scope of Delivery ....................................................... 5
General ................................................................................................. 6 Additional Accessories ......................................................................... 6 Assembly .............................................................................................. 7 Description of Functions....................................................................... 7
Measurement of Interference Voltage (UST) ..................................... 8 Measurement of Interference Frequency (FST).................................. 8 Measurement of Earthing Resistance (RE) ........................................ 9 Selective Measurement of Earthing Resistance (RE A) ................ 9 Resistance Measurement (R~) .......................................................... 9 Low Resistance Measurement (RF)................................................. 9 Checking for Correct Measuring Connection ................................... 9 Beeper............................................................................................... 9 LO-BAT............................................................................................ 10
Specifications........................................................................................ 10 Measurement of Interference Voltage DC + AC (UST) ..................... 13 Measurement of Interference Frequency (FST).................................. 13 Earthing Resistance (RE)................................................................... 13 Selective Measurement of the Earthing Resistance (REA)............ 17 Resistance Measurement (R~) .......................................................... 18 Resistance Measurement (RF) ......................................................... 19 Compensation of Lead Resistance (RK) ............................................ 20
Description of the Operating Elements ................................................. 21 Description of Display Elements ...................................................... 23
Procedure of Measurements.................................................................. 24 POWER ON Functions ................................................................. 25 Operation ...................................................................................... 26 Checking of Correct Measuring Connection (Socket Allocation). 30 Safety Control Measurements ....................................................... 31

1625 Users Manual
ii
Measurement of Interference - Voltages and Frequencies................ 31 Measurement of Earthing Resistances.............................................. 32
3-pole/4-pole Measurement of Earthing Resistance ..................... 33 Measurement of Single Earth Electrode Resistances in Mesh Operated Earthing Systems Using Selective Clamp Method ......................................................................................... 36 3-pole/4-pole Measurement of Single Earth Electrode Resistances ................................................................................... 37 Measurements on High Voltage Pylons........................................ 39 Correcting Clip-on Transformer Errors ........................................ 42 Compensation of Earth Electrode Connecting Lead..................... 44
Measurement of Soil Resistivity....................................................... 45 Measurement of Resistances ............................................................ 48
Resistance Measurement (R~)...................................................... 48 Resistance Measurement (RF)..................................................... 49 Compensation of Measuring Lead Resistance.............................. 50
Changing of All Data Settings with Personalized CODE................. 51 Storing a Code.............................................................................. 53 Deleting a Code ............................................................................ 54
Description of Displays ........................................................................ 55 Care and Maintenance .......................................................................... 60
Replacing Batteries........................................................................... 61 Recalibration .................................................................................... 62 Storage.............................................................................................. 62
Specifications ....................................................................................... 64 Principle of Operation .......................................................................... 65
Purpose............................................................................................. 65 Operation.......................................................................................... 68
Settings on the Tester ................................................................... 69 Applications ..................................................................................... 70
Description of Displays ................................................................ 72

iii
List of Tables
Table Title Page
1. Models and Accessories ................................................. 3 2. Electrical Measurement Specifications .......................... 14 3. Description of Displays.................................................. 56
1625 Users Manual
iv
v
List of Figures
Figure Title Page
1. Fluke 1625 Earth/Ground Tester.................................... 2 2. Description of Functions ................................................ 8 3. Display ........................................................................... 10 4. Operating Elements ........................................................ 21 5. Display Elements ........................................................... 23 6. Operational Modes ......................................................... 27 7. Measurement of Interference -
Voltages and Frequencies............................................... 32 8. Earthing Resistances Measurement - Method ................ 33 9. 3-pole/4-pole Measurement of Earthing Resistance -
Process............................................................................ 34 10. Earth Resistance - Maximum Permissible Value ........... 35 11. Measurement of Single Earth Electrode Resistances in
Mesh Operated Earthing Systems .................................. 36 12. 3-pole/4-pole Measurement of Single Earth
Electrode Resistances..................................................... 37 13. Measuring the Earthing Resistance without
Disengaging the Overhead Earth Wire........................... 40 14. Correcting Clip-on Transformer Errors.......................... 43 15. Compensation of Earth Electrode Connecting Lead ...... 44 16. Measurement of Soil Resistivity .................................... 45 17. Resistance Measurement (R~) ....................................... 48 18. Resistance Measurement (RF) ...................................... 49 19. Evaluation of Measured Value....................................... 50 20. Compensation of Measuring Lead Resistance ............... 51

1625 Users Manual
vi

1
Earth/Ground Tester
Introduction At locations involving the generation, distribution and consumption of electri-cal energy, certain safety measures must be met in order to protect human life. In many cases, these safety measures are national and international regulations which must be checked regularly. Grounding, the connection of exposed con-ductive parts to the earth in case of a fault, represents the most fundamental safety measure. There are requirements for grounding of transformers, high and medium voltage power pylons, railway tracks, tanks, vats, foundations and lightning protection systems.
The effectiveness of grounding systems should be checked using a ground test instruments such as the 1625 which checks the effectiveness of connections to the ground. The 1625 provides the perfect solution by combining the latest technology into a compact, field-rugged and extremely easy to use instrument. In addition to performing standard 3- and 4-pole ground resistance measure-ments, an innovative process accurately measures individual earth electrode resistances in single and meshed earthed systems without disconnecting any parallel electrodes. One specific application of this capability is quick and ac-curate measurement of power pylon grounds. The 1625 also incorporates automatic frequency control (AFC) to minimize interference. Before measur-ing, the instrument identifies existing interference and selects a measurement frequency to minimise its effect. The 1625 incorporates microprocessor con-trolled automatic measurements including checking probe hookup to ensure that measurements are taken correctly. It measures all probe ground resistances to ensure reliable, repeatable results. Probe resistance and auxiliary earth resis-tance are also measured and displayed.

1625 Users Manual
2
Notes
• The terms earth and earthing also refer to ground and grounding and is used interchangeably throughout this manual.
• For stakeless earth resistance measurements, the EI-1625 must be purchased. (The EI-1625 comes standard with the 1625 Kit). Refer to Appendix A for a complete set of operating information including specifications.
• Selective measurements are described in the main section of this manual.
Figure 1 displays the Fluke 1625 Earth/Ground Tester:
RRA REarth/Ground Resistance 300k
AC Resistance 300k DC Low Resistance 3k
CHANGEITEM
SELECT
STARTTEST
DISPLAYMENU
H/C2
S/P2
ES/P1
E/C1
4 POLE
3 POLE4 POLE
2 POLE
2 POLE
4 POLE
OFF
3 POLE
EARTH / GROUND TESTER1625
ST
edw001.eps
Figure 1. Fluke 1625 Earth/Ground Tester
Earth/Ground Tester Models and Accessories
3
Models and Accessories Table 1 lists the models and accessories.
Table 1. Models and Accessories
Description Item/Part Number
Earth Ground Tester - Basic (Includes manual, 2 leads and 2 clips)
Fluke-1625
Earth Ground Tester - Fully Loaded (Includes manual, 2 leads and 2 clips, ES162P4, EI-1623)
Fluke-1625 Kit
Service Replacement Kit (Includes 2 Leads, 2 Clips)
Fluke-162x-7001
Stake Set for 3 Pole Measurement (Includes three stakes, one 25 m cable reel, one 50 m cable reel)
ES-162P3
Stake set for 4 Pole Measurement (Includes four stakes, two 25 m cable reels, one 50 m cable reel)
ES-162P4
Selective/Stakeless Clamp Set for 1625. (Includes EI-162X and EI-162AC and 2-3 wire adapter cable)
EI-1625
Clip-on Current Transformer (sensing) with shielded cable set
EI-162X
Shielded Cable (Used w/EI-162X Clamp)
2539195
Clip-on Current Transformer (inducing) EI-162AC
12.7 Inch (320mm) Spilt Core Trans-former
EI-162BN
2-3 Wire Adapter Cable for 1625 for EI-162AC Current Transformer
2577171
Earth Stake 2539121
Cable Reel w/25m Wire 2539100
Cable Reel w/50m Wire 2539117
1625 Users Manual 2560348

1625 Users Manual
4
Safety Instructions
W Warning
This measuring equipment is only to be operated by quali-fied staff and in accord with its technical data in compli-ance with the safety precautions and instructions set forth below. In addition, use of this equipment requires compli-ance with the legal and safety instructions pertaining to the specific application in question. Similar precuations apply to the use of accessories.
Caution
Operation of electrical equipment inevitably causes certain parts of such equipment to carry dangerous voltage. Non-compliance with precautions may therefore cause major physical or material damage.
Fault-free and reliable operation of this instrument requires suitable transport and storage, setting-up and assembly, as well as care in operation and mainte-nance.
If there is reason to believe that risk-free operation is no longer possible, the instrument should be switched off immediately and protected against acciden-tal restarting. Risk-free operation shall be deemed to be no longer possible if and when the instrument
• shows visible damage,
• fails to work in spite of functioning batteries,
• has been exposed for some time to unfavorable conditions ( e.g. stor-age beyond the permissible climatic limits without adaptation to the ambient climate, dewing etc.),
• has been exposed to major strain during transport ( e.g. been dropped from some height without visible external damage etc.), or
• shows " E1 ... E5 " on the display.

Earth/Ground Tester Setup
5
Qualified Staff
Consists of persons familiar with the setting up, assembly, starting up and op-eration of the product and possess the qualifications required for such activi-ties, such as
• training, instruction and/or authorization to perform the following op-erations on circuits and equipment according to safety engineering standards: switching on and off, disconnecting, earthing/grounding, labeling;
• training or instructions according to safety engineering standards in the care and main tenance of adequate safety equipment.
• training in rendering first aid.
Setup
Unpacking
Check delivery for damage during transport. Keep the packing material for later transport and check scope of delivery.
Checking the Scope of Delivery
Upon unpacking immediately check the accessories for missing parts. The ac-cessories supplied are listed on page 2.
Caution
Although the instrument is easy to operate please read these operating instructions carefully for safety reasons and in order to make optimum use of the instrument.
The measuring functions are only all activated when the instrument is con-nected.
1625 Users Manual
6
General Microprocessor controlled universal earth resistance meter with fully auto-mated measuring frequency selection process as well as automatic testing of probe- and auxiliary earth electrode resistances and possible interference volt-ages as per DIN IEC61557-5/EN61557-5.
• Measurement of interference voltage (UST)
• Measurement of interference frequency (FST)
• Measurement of probe resistance (RS)
• Measurement of auxiliary earth electrode resistance (RH)
• Measurement of earthing resistance 3pole, 4pole, (RE) with or without using the external clip-on current transformer for selective measure-ment of single earthing branches in mesh operated earthing systems A
• Resistance measurement 2pole with AC voltage (R~)
• Resistance measurement with DC voltage 2pole, 4pole, (RF)
With its various possibilities of measurement and the fully automated measur-ing sequence control (incl. automatic frequency control AFC), this instrument offers the latest measuring technology in the field of earthing resistance meas-urements. By means of the selectable limit input with visual and accoustical confirmation/error message and with the code programmable and customer defined special functions, e.g. measuring voltage 20 V (for agricultural sys-tems), earthing impedance R* (measuring frequency 55 Hz) switched on or off etc., these instruments are individually programmable for use as a simple meter as well as a high end fully automated measuring device.
Additional Accessories An external current transformer with a transformation ratio between 80 and 1200:1 for the measurement of a single branch in mesh operated earthing sys-tems is available as an option and enables the user to measure on high voltage pylons without seperating the overhead earth wires or earth strips at the bottom of the pylons and also to measure lightning protection systems without seperat-ing the individual lightning protection wires.

Earth/Ground Tester Assembly
7
Assembly The instrument is made up of two parts:
1. The base part which contains the measuring electronics.
2. The protective housing.
The functions are selected with the central rotary switch. Four rubber buttons, which start measurements, read out supplementary measuring values and select special functions, are located on the left hand side of the front panel. This de-sign enables quick and clear one-hand operation.
The measured values are displayed on a liquid crystal display with correct decimal point and unit. Various additional special characters indicate measur-ing mode, operating condition and error messages.
The auxiliary power supply consists of 6 x 1.5 V batteries (IEC R6 or LR6 or type AA).
This device has been developed, designed and manufactured in compliance with quality system DIN ISO 9001.
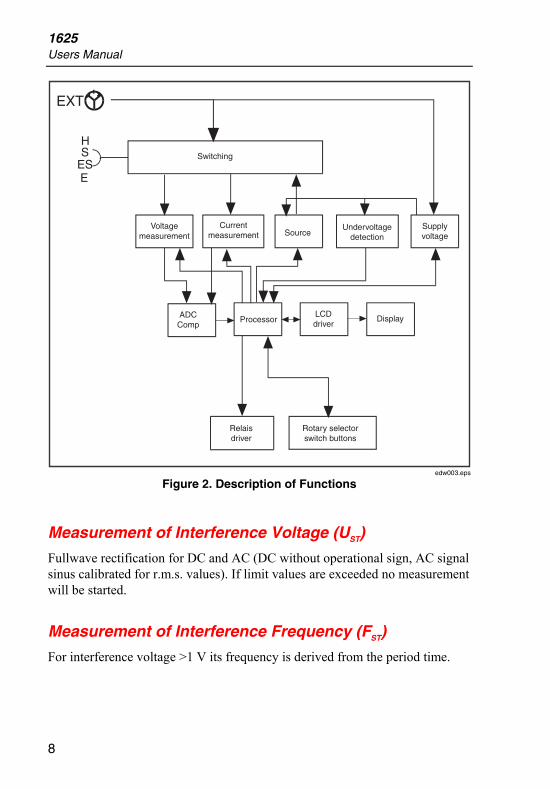
Description of Functions The following flowchart presents a description of the functions of the 1625 Earth/Ground Tester.
1625 Users Manual
8
EXT
HS
ESE
Switching
Voltagemeasurement
Currentmeasurement Source
Undervoltagedetection
Supplyvoltage
ADCComp
ProcessorLCDdriver
Display
Relaisdriver
Rotary selectorswitch buttons
edw003.eps
Figure 2. Description of Functions
Measurement of Interference Voltage (UST)
Fullwave rectification for DC and AC (DC without operational sign, AC signal sinus calibrated for r.m.s. values). If limit values are exceeded no measurement will be started.
Measurement of Interference Frequency (FST)
For interference voltage >1 V its frequency is derived from the period time.
Earth/Ground Tester Description of Functions
9
Measurement of Earthing Resistance (RE)
The earthing resistance is determined by a 3- or 4-pole current and voltage measurement. The measuring voltage is a square pulse AC voltage with 48 / 20 V and a frequency of 94, 105, 111 or 128 Hz. The frequency can be selected manually or automatically (AFC).
Selective Measurement of Earthing Resistance (RE A)
Measurement of a single earth electrode in a mesh operated (parallel) earthing system. The current flowing through the single earth electrode is measured with an external current transformer.
Resistance Measurement (R~)
The resistance is determined by a 2 pole current and voltage measurement. The measuring voltage is a square pulse AC voltage with 20 V and a frequency of 94, 105, 111 or 128 Hz. The frequency can be selected manually or automati-cally (AFC).
Low Resistance Measurement (RF)
The resistance is determined by DC current and voltage measurement. 2- as well as 4-pole measurement is possible. The short circuit current is > 200 mA. The resistance of both current directions is measured and stored.
Checking for Correct Measuring Connection
The processor checks if the measuring lead is properly connected according to the selected function via isolated, two piece contacts, inside of each 4 mm (ba-nana) input socket, in combination with detection circuitry. A wrong or miss-ing connection is indicated by an optical or acoustical signal.
Beeper
The built in beeper has two functions:
1. Giving messages if set limit values are exceeded.
2. Indicating dangerous conditions or maloperation.
Controlling is done by means of the microprocessor.
1625 Users Manual
10
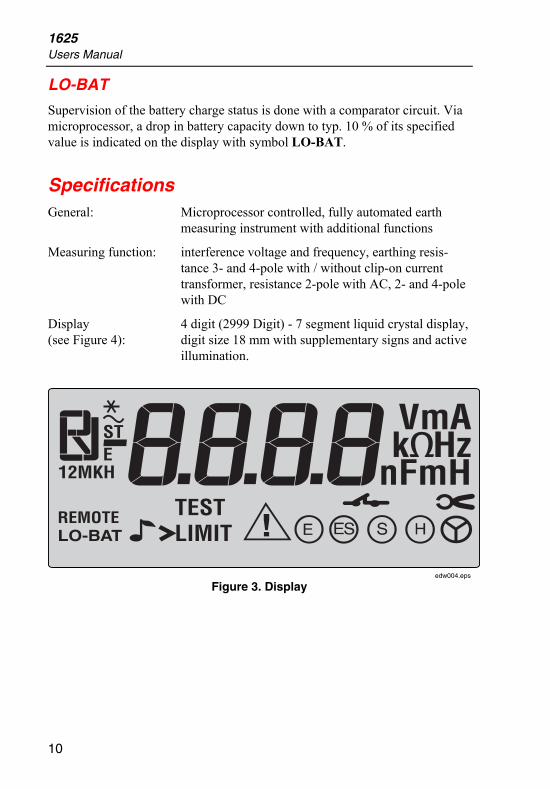
LO-BAT
Supervision of the battery charge status is done with a comparator circuit. Via microprocessor, a drop in battery capacity down to typ. 10 % of its specified value is indicated on the display with symbol LO-BAT.
Specifications General: Microprocessor controlled, fully automated earth
measuring instrument with additional functions
Measuring function: interference voltage and frequency, earthing resis-tance 3- and 4-pole with / without clip-on current transformer, resistance 2-pole with AC, 2- and 4-pole with DC
Display (see Figure 4):
4 digit (2999 Digit) - 7 segment liquid crystal display, digit size 18 mm with supplementary signs and active illumination.
ST
edw004.eps
Figure 3. Display

Earth/Ground Tester Specifications
11
Operation: Central rotary switch and function keys
Working temperature range: -10 °C … +50 °C
Operating temperature range: 0 °C … +35 °C
Nominal temperature range: 18 °C … +28 °C
Storage temperature range: -30 °C … +60 °C
Note
The chart of four temperature ranges for the instrument exist to sat-isfy European Standards requirements; the instrument can be used over the full Working temperature range by using the temperature co-efficient to calculate accuracy at the ambient temperature of use.
Temperature coefficient: ± 0.1 % of range / Kelvin
Operating errors: refer to operating temperature range and RH < 20 RE, RS < 100 RE
The maximum percentage operating error within the measurement range does not exceed ± 30 % with the measured value as fiducial value, as determined in accordance with TABLE 1.
The operating error applies under the rated operating conditions given in IEC1557-1 and the following:
• injection of series interference voltages with system frequencies of 400 Hz, 60 Hz, 50 Hz, 16 2/3 Hz or with d.c. voltage respectively across the terminals E (ES) and S. The r.m.s. value of the series inter-ference voltage shall be 3 V;
• resistance of the auxiliary earth electrode and of the probes: 0 to 100 x RA but ≤ 50 kΩ;
• system voltages between 85 % and 110 % of the nominal voltage and between 99 % and 101 % of the nominal system frequency for meas-uring equipment with a mains supply and/or measuring equipment de-riving its output voltage directly from the distribution system.
Limits of error: refer to nominal temperature range
Climate class: C1 (IEC 654-1), -5 °C...+45 °C, 5 %...95 % RH
Type of protection: IP 56 for case, IP 40 for battery door according to EN 60529

1625 Users Manual
12
Max voltage: Wsocket A to socket EFGH
Urms = 0 V
Sockets ” E ES S H " to each other in any com-bination, max. Urms= 250 V (pertains to misuse)
EMC (Emission Im-munity):
IEC 61326-1:1997 Class A
Quality standard: developed, designed and manufactured to comply with DIN ISO 9001
External field influ-ence:
complies with DIN 43780 (8/76)
Auxiliary power: 6 x 1,5 V alkali-manganese-batteries (IEC LR6 or type AA )
Battery life span: with IEC LR6/type AA: typ. 3000 measurements (RE+RH ≤ 1 kΩ)
with IEC LR6/type AA : typ. 6000 measurements (RE + RH >10 kΩ)
Dimensions: 240 mm (W) x 220 mm (D) x 90 mm ( H )
Weight: ≤ 1.1 kg without accessories
≤ 5.5 kg incl. accessories and batteries in carrying case
Case material: NORYL, shock -and scratch proof thermoplast
Earth/Ground Tester Specifications
13
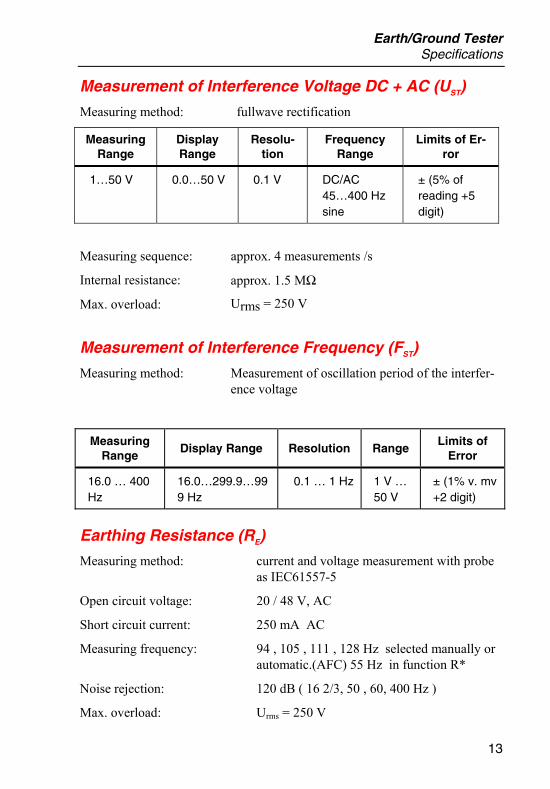
Measurement of Interference Voltage DC + AC (UST)
Measuring method: fullwave rectification
Measuring Range
Display Range
Resolu-tion
Frequency Range
Limits of Er-ror
1…50 V 0.0…50 V 0.1 V DC/AC 45…400 Hz sine
± (5% of reading +5 digit)
Measuring sequence: approx. 4 measurements /s
Internal resistance: approx. 1.5 MΩ
Max. overload: Urms = 250 V
Measurement of Interference Frequency (FST)
Measuring method: Measurement of oscillation period of the interfer-ence voltage
Measuring Range
Display Range Resolution Range Limits of
Error
16.0 … 400 Hz
16.0…299.9…999 Hz
0.1 … 1 Hz 1 V … 50 V
± (1% v. mv +2 digit)
Earthing Resistance (RE)
Measuring method: current and voltage measurement with probe as IEC61557-5
Open circuit voltage: 20 / 48 V, AC
Short circuit current: 250 mA AC
Measuring frequency: 94 , 105 , 111 , 128 Hz selected manually or automatic.(AFC) 55 Hz in function R*
Noise rejection: 120 dB ( 16 2/3, 50 , 60, 400 Hz )
Max. overload: Urms = 250 V
1625 Users Manual
14
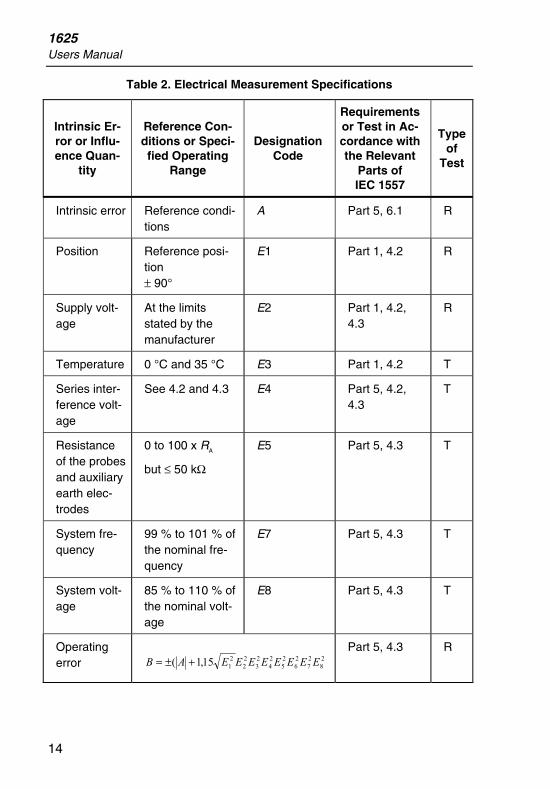
Table 2. Electrical Measurement Specifications
Intrinsic Er-ror or Influ-ence Quan-
tity
Reference Con-ditions or Speci-fied Operating
Range
Designation Code
Requirements or Test in Ac-cordance with the Relevant
Parts of IEC 1557
Type of
Test
Intrinsic error Reference condi-tions
A Part 5, 6.1 R
Position Reference posi-tion ± 90°
E1 Part 1, 4.2 R
Supply volt-age
At the limits stated by the manufacturer
E2 Part 1, 4.2, 4.3
R
Temperature 0 °C and 35 °C E3 Part 1, 4.2 T
Series inter-ference volt-age
See 4.2 and 4.3 E4 Part 5, 4.2, 4.3
T
Resistance of the probes and auxiliary earth elec-trodes
0 to 100 x RA
but ≤ 50 kΩ
E5 Part 5, 4.3 T
System fre-quency
99 % to 101 % of the nominal fre-quency
E7 Part 5, 4.3 T
System volt-age
85 % to 110 % of the nominal volt-age
E8 Part 5, 4.3 T
Operating error 2
827
26
25
24
23
22
2115,1( EEEEEEEEAB +±=
Part 5, 4.3 R
Earth/Ground Tester Specifications
15
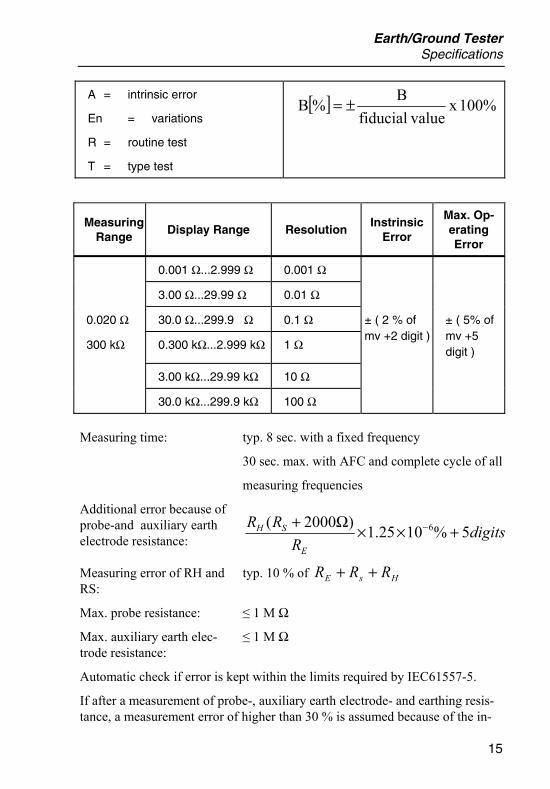
A = intrinsic error
En = variations
R = routine test
T = type test
[ ] 100% x valuefiducial
B%B ±=
Measuring Range
Display Range Resolution Instrinsic
Error
Max. Op-erating Error
0.001 Ω...2.999 Ω 0.001 Ω
3.00 Ω...29.99 Ω 0.01 Ω
0.020 Ω 30.0 Ω...299.9 Ω 0.1 Ω
300 kΩ 0.300 kΩ...2.999 kΩ 1 Ω
± ( 2 % of mv +2 digit )
± ( 5% of mv +5 digit )
3.00 kΩ...29.99 kΩ 10 Ω
30.0 kΩ...299.9 kΩ 100 Ω
Measuring time: typ. 8 sec. with a fixed frequency
30 sec. max. with AFC and complete cycle of all
measuring frequencies
Additional error because of probe-and auxiliary earth electrode resistance: digits
RRR
E
SH 5%1025.1)2000( 6 +××Ω+ −
Measuring error of RH and RS:
typ. 10 % of HsE RRR ++
Max. probe resistance: ≤ 1 M Ω
Max. auxiliary earth elec-trode resistance:
≤ 1 M Ω
Automatic check if error is kept within the limits required by IEC61557-5.
If after a measurement of probe-, auxiliary earth electrode- and earthing resis-tance, a measurement error of higher than 30 % is assumed because of the in-

1625 Users Manual
16
fluencing conditions (see diagramm), the display shows a warning symbol W and a notice that RS or RH are too high.
%0001F
%001
%01
%1
%1,0
M1 k001 k01 k1 001 01
3,0
1
3
01
03
001
=R/R EH 003
00010003
RS
edw005.eps
Automatic switchover of measuring resolution in dependence to auxiliary earth electrode resistance RH:
RH with Umeas = 48 V RH with Umeas = 20 V Resolution
< 300 Ω < 250 Ω 1 mΩ
< 6 kΩ < 2,5 kΩ 10 mΩ
< 60 kΩ < 25 kΩ 100 mΩ
< 600 kΩ < 250 kΩ 1 Ω

Earth/Ground Tester Specifications
17
Selective Measurement of the Earthing Resistance (REA)
Measuring method: Current and voltage measurement with probe as per EN61557-5 and current measurement in the individual branch with additional current transformer (patent ap-plied for).
Open circuit volt-age:
20 / 48 V AC
Short circuit current: 250 mA AC
Measuring fre-quency:
94, 105, 111, 128 Hz selected manually or automati-cally (AFC), 55 Hz (R*)
Noise rejection: 120 dB (16 2/3 , 50 , 60 , 400 Hz)
Max. overload: max. Urms = 250 V (measurement will not be started)
Measuring Range
Display Range Resolution Intrinsic Error *
Operating Error *
0.001...2.999 Ω 0.001 Ω
3.00...29.99 Ω 0.01 Ω
0.020 Ω... 30.0...299.9 Ω 0.1 Ω
30 kΩ 0.300...2.999 kΩ 1 Ω
± (7 % of m.v. +2 digit)
± (10% of m.v.
+5 digit)
3.00...29.99 kΩ 10 Ω
* With recommended current clamps / transformers.
Additonal error because of probe- and auxiliary earth typ.electrode resis-tance:
digitsR
RR
ETOTAL
SH 5%1025.1)2000( 6 +××
Ω+ −
Measuring error of RH and RS:
typ.of 10% of HSETOTAL RRR ++
Measuring time: typ. 8 sec. with a fixed frequency 30 sec.max. with AFC and complete cycle of all measuring frequencies

1625 Users Manual
18
Minimal current in single branch to be measured:
0.5 mA with transformer (1000:1)
0.1 mA with transformer (200:1)
Max. interference current through transformer:
3 A with a transformer (1000:1)
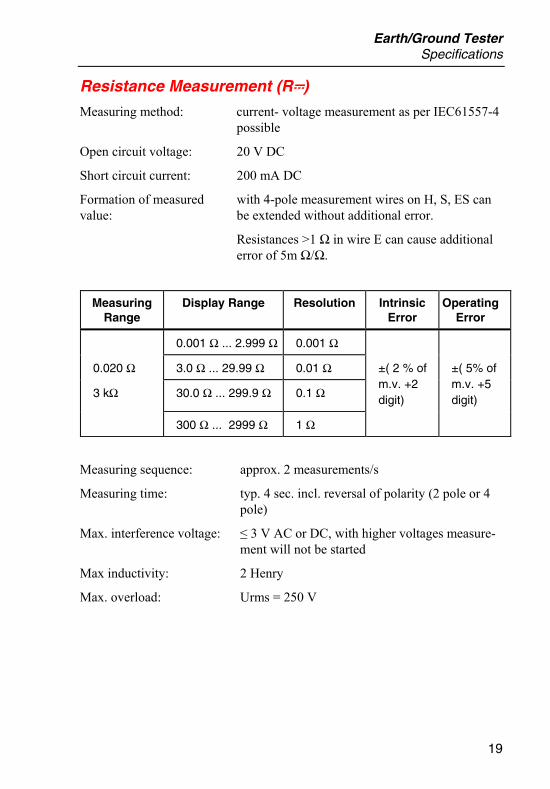
Resistance Measurement (R~)
Measuring method: current and voltage measurement
Measuring voltage: 20 V AC, square pulse
Short circuit current: > 250 mA AC
Measuring frequency: 94, 105, 111, 128 Hz selected manually or auto-matically (AFC)
Measuring Range
Display Range Resolution Intrinsic
Error Operating
Errors
0.001 Ω ... 2.999 Ω 0.001 Ω
3.0 Ω ... 29.99 Ω 0.01 Ω
0.020 Ω... 30 Ω ... 299.9 Ω 0.1 Ω
300 kΩ 300 Ω ... 2999 Ω 1 Ω
± ( 2 % of m.v. +2 digit )
± ( 5% of m.v. +5 digit )
3.0 kΩ ... 29.99 kΩ 10 Ω
30.0 kΩ ... 299.9 kΩ 100 Ω
Measuring time: typ. 6 sec.
Max. interference voltage: 24 V, with higher voltages measurement will not be started
Max overload: Urms max. = 250 V
Earth/Ground Tester Specifications
19
Resistance Measurement (RF)
Measuring method: current- voltage measurement as per IEC61557-4 possible
Open circuit voltage: 20 V DC
Short circuit current: 200 mA DC
Formation of measured value:
with 4-pole measurement wires on H, S, ES can be extended without additional error.
Resistances >1 Ω in wire E can cause additional error of 5m Ω/Ω.
Measuring Range
Display Range Resolution Intrinsic Error
Operating Error
0.001 Ω ... 2.999 Ω 0.001 Ω
0.020 Ω 3.0 Ω ... 29.99 Ω 0.01 Ω
3 kΩ 30.0 Ω ... 299.9 Ω 0.1 Ω
±( 2 % of m.v. +2 digit)
±( 5% of m.v. +5 digit)
300 Ω ... 2999 Ω 1 Ω
Measuring sequence: approx. 2 measurements/s
Measuring time: typ. 4 sec. incl. reversal of polarity (2 pole or 4 pole)
Max. interference voltage: ≤ 3 V AC or DC, with higher voltages measure-ment will not be started
Max inductivity: 2 Henry
Max. overload: Urms = 250 V

1625 Users Manual
20
Compensation of Lead Resistance (RK)
Compensation of lead resistance (RK) can be switched on in functions RE 3pole, RE 4pole A, R~ , and R F 2pole
Formation of measured value:
Rdisplay = Rmeasured - Rcompensated*
* Value of setpoint entry RK = 0.000Ω, vari-able from 0.000…29.99 Ω by means of measuring adjustment.
Earth/Ground Tester Description of the Operating Elements
21
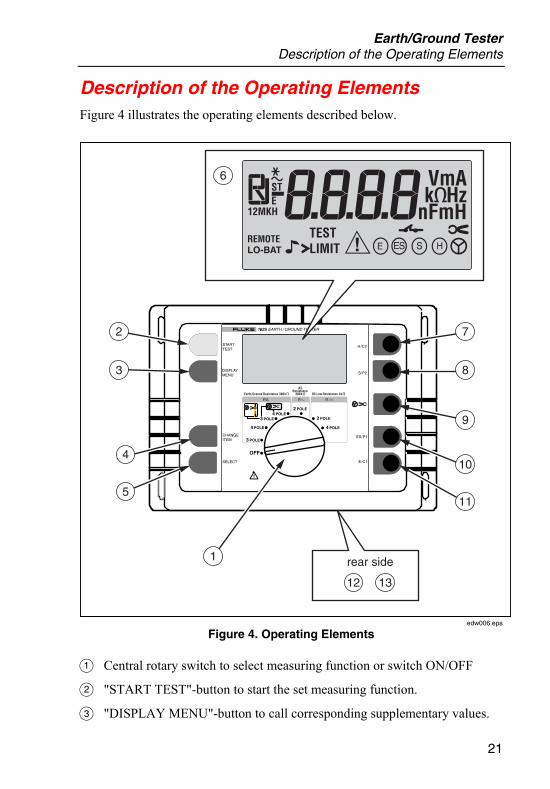
Description of the Operating Elements Figure 4 illustrates the operating elements described below.
RRA REarth/Ground Resistance 300k
AC Resistance 300k DC Low Resistance 3k
CHANGEITEM
SELECT
STARTTEST
DISPLAYMENU
H/C2
S/P2
ES/P1
E/C1
4 POLE
3 POLE4 POLE
2 POLE
2 POLE
4 POLE
OFF
3 POLE
EARTH / GROUND TESTER1625
6
12 13
rear side
2
3
4
5
1
7
8
10
9
11
edw006.eps
Figure 4. Operating Elements
A Central rotary switch to select measuring function or switch ON/OFF
B "START TEST"-button to start the set measuring function.
C "DISPLAY MENU"-button to call corresponding supplementary values.
1625 Users Manual
22
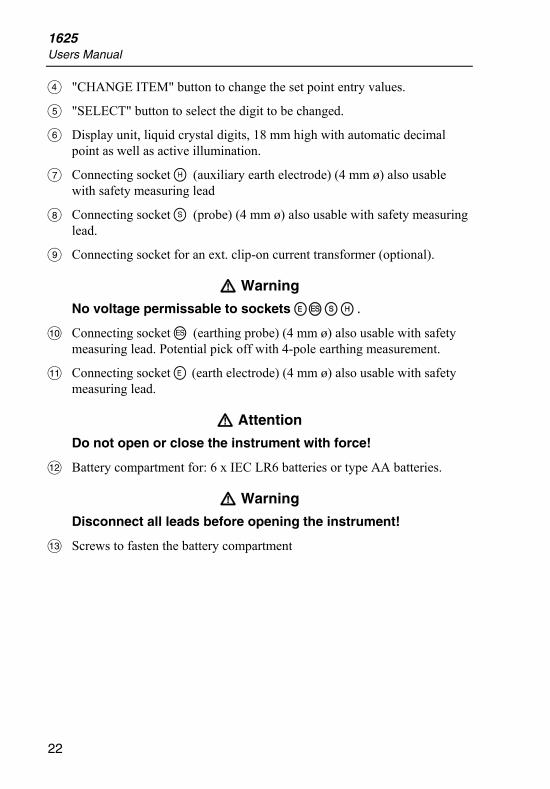
D "CHANGE ITEM" button to change the set point entry values.
E "SELECT" button to select the digit to be changed.
F Display unit, liquid crystal digits, 18 mm high with automatic decimal point as well as active illumination.
G Connecting socket H (auxiliary earth electrode) (4 mm ø) also usable with safety measuring lead
H Connecting socket G (probe) (4 mm ø) also usable with safety measuring lead.
I Connecting socket for an ext. clip-on current transformer (optional).
W Warning
No voltage permissable to sockets EFGH.
J Connecting socket F (earthing probe) (4 mm ø) also usable with safety measuring lead. Potential pick off with 4-pole earthing measurement.
K Connecting socket E (earth electrode) (4 mm ø) also usable with safety measuring lead.
W Attention
Do not open or close the instrument with force!
L Battery compartment for: 6 x IEC LR6 batteries or type AA batteries.
W Warning
Disconnect all leads before opening the instrument!
M Screws to fasten the battery compartment

Earth/Ground Tester Description of the Operating Elements
23
Description of Display Elements
The display (Figure 5) is divided into four display elements:
1. Digital display of measured value
2. Measuring function field to display measuring function
3. Unit field: V, Ω, kΩ, Hz
4. Special characters for operator guidance
1
4
2 3
edw008.eps
Figure 5. Display Elements
Description of display symbols:
UST Interference voltage (AC + DC)
FST Frequency of interference voltage
FM Frequency of measuring voltage
UM Measuring voltage limit 20/48 V
RE Earthing resistance
RH Auxiliary earth electrode resistance
RS Probe resistance
RK Compensation resistance
R1 , R2 Low voltage measurement with polarity indication

1625 Users Manual
24
R ~ AC- resistance
R* Earthing impedance (measuring frequency 55 Hz)
AFC Automatic-frequency-control
TEST Measuring sequence in process
LIMIT Limit value
> LIMIT Limit value exceeded
EFGH Socket recognition
B Recognition of current transformer socket
Message of an exceeded limit with beeper
LO-BAT Battery voltage too low, replace batteries.
REMOTE Interface ( optional ) active - button operation locked
C Measuring circuit ( E-S,E-H ) interrupted or measured value instable
W Warning
Refer to Operating Instructions.
Procedure of Measurements
W Warning
Use the instrument on voltage free systems only.
1. Set measuring function with the central rotary switch 1
2. Connect instrument without measuring lead connected START is omitted
3. Start measurement with "START TEST" button.
4. Read out measured value.
For optimum performance and utilization of the device observe the following points:

Earth/Ground Tester Procedure of Measurements
25
POWER ON Functions
During switching on of the instrument with the central rotary switch it is pos-sible to access certain operating conditions by pressing certain button combina-tions:
a) Standard mode
If the device is put into operation without further button control, it switches into a battery saving condition (Stand by-display "---") approx. 50 seconds after the termination of a measurement, or after a button push or turn of the rotary switch. Pressing the "DISPLAY MENU" reactivates the instrument; the "old" measured values can be read out again. After 50 min. of stand by the Display is turned off completely. Instrument is reactivated with ON / OFF on the rotary switch
b) Stand by disable
A simultaneous push of buttons "DISPLAY MENU" and "CHANGE ITEM" during switching on prevents the instrument from being switched off automati-cally (Stand by). The battery saving mode is reactivated with ON / OFF on the central rotary switch.
c) Prolonged displaytest
By keeping the "DISPLAY MENU" button pressed during switching on, the display test can be prolonged for any length of time. Return to the standard operation mode by pressing any button or turning of the central rotary switch.
d) Number of software version
By keeping the "SELECT" button pressed during the switch on sequence, the number of the software version is indicated on the display. By pressing the "DISPLAY MENU" button a switch over to the last calibration date is possi-ble. This display sequence is terminated by turning the central rotary switch or pressing the "START TEST" button.
Display format: SOFTWARE-version: X. X X
Date of calibration: M M . J J
Note
At delivery the date of calibration is set to 0.00. Only after the first recalibration a proper date is indicated.
1625 Users Manual
26
e) Activation of display illumination
By keeping the "CHANGE ITEM" button pressed during the switch on se-quence the display illumination is activated. Illumination fades away automati-cally if the instrument is switched to"Stand by" and, together with the instru-ment, is switched on again by pressing any button. The instrument is switched off with ON/OFF on the central rotary switch exclusively.
Operation
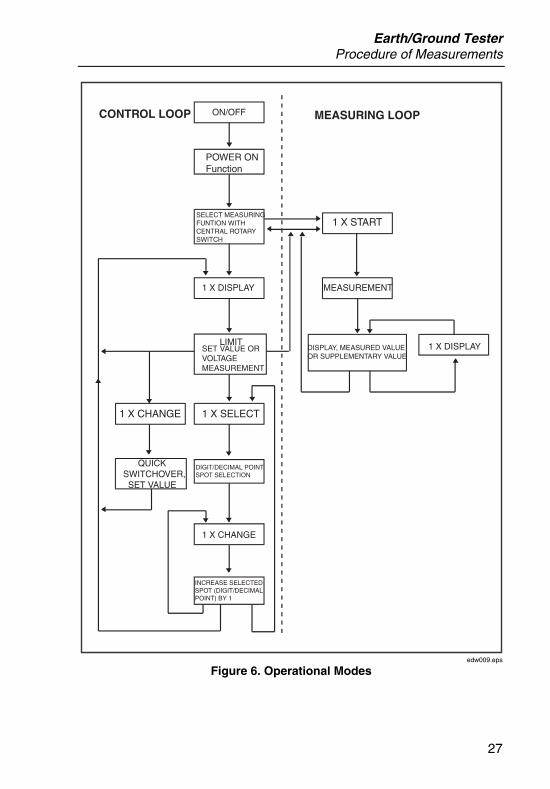
The measuring functions have two initial operational modes: the Control loop and the Measuring loop (see Figure 6).
Earth/Ground Tester Procedure of Measurements
27
CONTROL LOOP MEASURING LOOPON/OFF
POWER ONFunction
SELECT MEASURINGFUNTION WITHCENTRAL ROTARYSWITCH
1 X DISPLAY
LIMITSET VALUE ORVOLTAGEMEASUREMENT
1 X CHANGE 1 X SELECT
QUICKSWITCHOVER, SET VALUE
DIGIT/DECIMAL POINTSPOT SELECTION
1 X CHANGE
INCREASE SELECTEDSPOT (DIGIT/DECIMALPOINT) BY 1
1 X DISPLAYDISPLAY, MEASURED VALUEOR SUPPLEMENTARY VALUE
MEASUREMENT
1 X START
edw009.eps
Figure 6. Operational Modes
1625 Users Manual
28
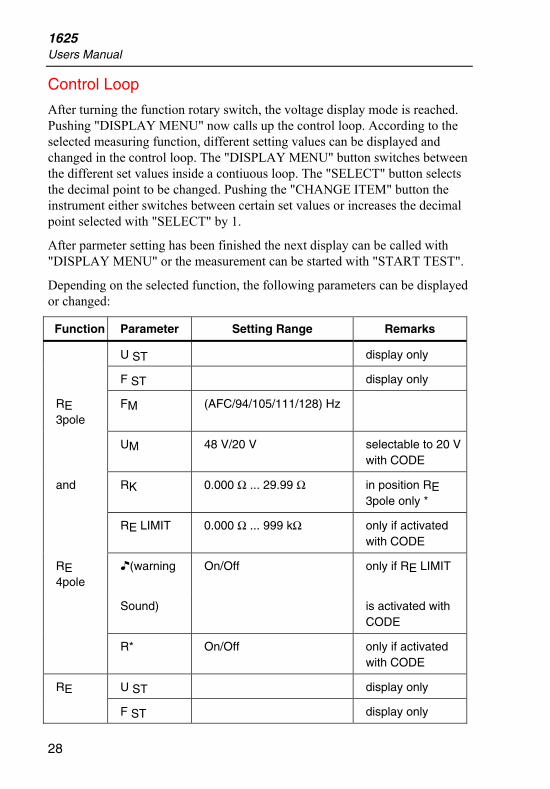
Control Loop
After turning the function rotary switch, the voltage display mode is reached. Pushing "DISPLAY MENU" now calls up the control loop. According to the selected measuring function, different setting values can be displayed and changed in the control loop. The "DISPLAY MENU" button switches between the different set values inside a contiuous loop. The "SELECT" button selects the decimal point to be changed. Pushing the "CHANGE ITEM" button the instrument either switches between certain set values or increases the decimal point selected with "SELECT" by 1.
After parmeter setting has been finished the next display can be called with "DISPLAY MENU" or the measurement can be started with "START TEST".
Depending on the selected function, the following parameters can be displayed or changed:
Function Parameter Setting Range Remarks
U ST display only
F ST display only
RE 3pole
FM (AFC/94/105/111/128) Hz
UM 48 V/20 V selectable to 20 V with CODE
and RK 0.000 Ω ... 29.99 Ω in position RE 3pole only *
RE LIMIT 0.000 Ω ... 999 kΩ only if activated with CODE
RE 4pole
(warning On/Off only if RE LIMIT
Sound) is activated with CODE
R* On/Off only if activated with CODE
U ST display only RE
F ST display only

Earth/Ground Tester Procedure of Measurements
29
A UM 48 V/20 V selectable to 20 V with CODE
and RK 0.000 Ω ... 29.99 Ω in position RE 3pole only *
I ( ratio ) 80 ... 1200 display only RE 4pole
A RE LIMIT 0.000 Ω ... 999 kΩ only if activated
with CODE
(warning- On / Off only if RE LIMIT
sound) is activated with CODE
R* On / Off only if activated with CODE
* (see Compensation of Earth Electrode Connecting Lead)
Function Parameter Setting Range Remarks
U ST display only
F ST display only
FM (AFC/94/105/111/128) Hz
R~ RK 0.000 Ω ... 29.99 Ω
R ~ LIMIT 0.000 Ω ... 999 kΩ only if activated with CODE
(warning- On / Off only if R ~ LIMIT
sound) is activated with CODE
RF U ST display only
2pole F ST display only
and RK 0.000 Ω ... 29.99 Ω
4pole R LIMIT 0.000 Ω ... 9,99 kΩ only if activated with CODE
(warning - sound)
On / Off only if R LIMIT is activated with CODE
1625 Users Manual
30
Measuring Loop
This loop is entered by pressing the "START TEST" button. After releasing "START TEST" the last measured value stays on the display. By repeated pressing of the "DISPLAY MENU" button all supplementary values can be called. If a measured value exceeds or falls below the pre-set limit, the limit can be displayed as well (with "DISPLAY MENU"). In that case the measured value is diplayed with a flashing "LIMIT" whereas the limit value is displayed with a steady "LIMIT"-symbol.
Inside the measuring loop parameters cannot be changed.
Further possibilities of button operation:
Warning sound () cancel with "DISPLAY MENU" (with display switchover) or with "CHANGE ITEM" or "SELECT" button (without display switchover).
Checking of Correct Measuring Connection (Socket Alloca-tion)
The instrument implements an automatic check, corresponding to the meas-urement selected, to see if the correct input sockets are used.
The display symbols EFGH and B are assigned to a specific socket as shown in Figure 4.
From the way the symbols are displayed, the validity of the connected wiring can be concluded by the following features:
• socket incorrectly wired (or, by mistake, not wired): corresponding symbol flashes.
• socket correctly wired: corresponding symbol is steady active
• socket with no connection: corresponding symbol is blank

Earth/Ground Tester Procedure of Measurements
31
Safety Control Measurements
Before each measurement the instrument automatically checks the measuring conditions and, while simultaneously displaying the kind of error, prevents measurements from being started under the following conditions:
• excessive voltage on the sockets (> 24 V in RE and R~; > 3 V in RF)
• wrong or incomplete connection
• Problems during the measuring sequence (display "E1 ... E5") see display description in the section ‘Procedure of Measurements’.
• Battery voltage too low ( display LO-BAT )
Measurement of Interference - Voltages and Frequen-cies
This measuring function detects possible interference voltages and their fre-quencies. This function is automatically active in every switch position before an earthing or resistance measurement. If the pre-set limit values are exceeded, the interference voltage is indicated as too high and a measurement automati-cally prevented .The frequency of an interference voltage is only measurable if the level of this intereference voltage is higher than 1 V. See Figure 7.
Bring central rotary switch in desired position, read out measured value of in-terference voltage, measured value of interference frequency is displayed with "DISPLAY".

1625 Users Manual
32
RRA REarth/Ground Resistance 300k
AC Resistance 300k DC Low Resistance 3k
CHANGEITEM
SELECT
STARTTEST
DISPLAYMENU
H/C2
S/P2
ES/P1
E/C1
4 POLE
3 POLE4 POLE
2 POLE
2 POLE
4 POLE
OFF
3 POLE
EARTH / GROUND TESTER1625
Auxiliary earthelectrodeProbeEarth
electrode
>20 m >20 m
edw010.eps
Figure 7. Measurement of Interference - Voltages and Frequencies
Measurement of Earthing Resistances
This instrument is equipped with a 3 pole as well as a 4 pole resistance meas-urement which renders measurements of resistances of earthing systems possi-ble, as well as measurements of the soil resistivity of geological strata. A spe-cific description of the different applications is given further on in this manual. As a special function, the instrument offers measurements with an external current transformer, with which a measurement of single resistance branches in interlinked networks (lightning protection and high voltage pylons with ca-bling) can be performed without seperating parts of the system.
To ensure most feasible interference suppression during measurements, the instrument is equipped with 4 measuring frequencies (94 Hz, 105 Hz, 111 Hz, 128 Hz), with automatic switch over if necessary (AFC - Automatic Frequency Control). The corresponding measuring frequency used for a spe-cific measurement can be called and displayed with "DISPLAY MENU" after the measurement. Additionally, one of the four measuring frequencies can be selected and permanently set in special cases. In that case, in order to stabilize the display, an average measurement can be carried out for up to 1 minute by keeping the ”START TEST" button pressed.
To determine the earthing impedance (R*) a measurement with a frequency close to the mains frequency (55 Hz) is carried out. At the activation of R* through user's code, this measuring frequency is activated automatically.
Earth/Ground Tester Procedure of Measurements
33
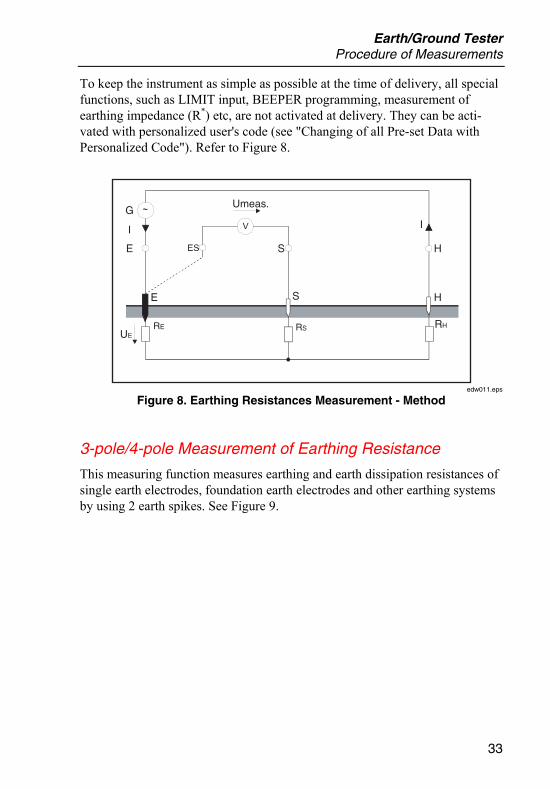
To keep the instrument as simple as possible at the time of delivery, all special functions, such as LIMIT input, BEEPER programming, measurement of earthing impedance (R*) etc, are not activated at delivery. They can be acti-vated with personalized user's code (see "Changing of all Pre-set Data with Personalized Code"). Refer to Figure 8.
G
I
E
Umeas.
E
UERE RS
S
S
I
H
H
RH
edw011.eps
Figure 8. Earthing Resistances Measurement - Method
3-pole/4-pole Measurement of Earthing Resistance
This measuring function measures earthing and earth dissipation resistances of single earth electrodes, foundation earth electrodes and other earthing systems by using 2 earth spikes. See Figure 9.
1625 Users Manual
34
RRA REarth/Ground Resistance 300k
AC Resistance 300k DC Low Resistance 3k
CHANGEITEM
SELECT
STARTTEST
DISPLAYMENU
H/C2
S/P2
ES/P1
E/C1
4 POLE
3 POLE4 POLE
2 POLE
2 POLE
4 POLE
OFF
3 POLE
EARTH / GROUND TESTER1625
Auxiliary earthelectrodeProbeEarth
electrode
4 pole
>20 m >20 m
edw012.eps
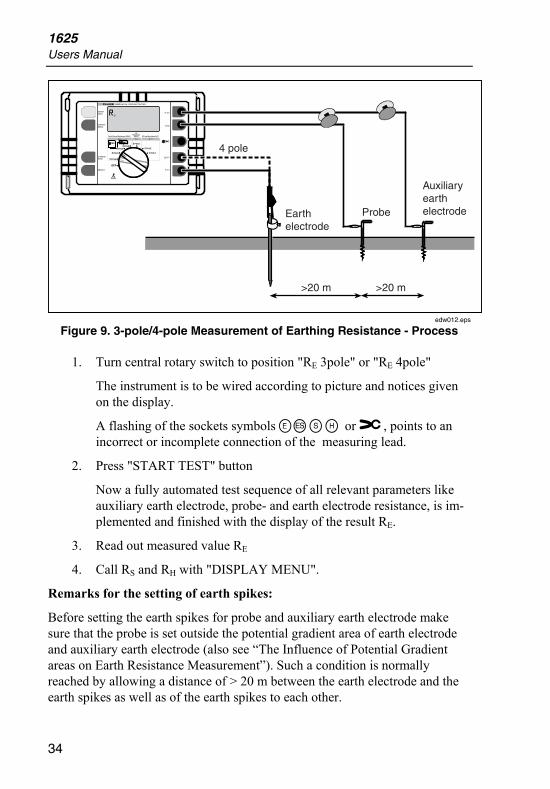
Figure 9. 3-pole/4-pole Measurement of Earthing Resistance - Process
1. Turn central rotary switch to position "RE 3pole" or "RE 4pole"
The instrument is to be wired according to picture and notices given on the display.
A flashing of the sockets symbols EFGH or A, points to an incorrect or incomplete connection of the measuring lead.
2. Press "START TEST" button
Now a fully automated test sequence of all relevant parameters like auxiliary earth electrode, probe- and earth electrode resistance, is im-plemented and finished with the display of the result RE.
3. Read out measured value RE
4. Call RS and RH with "DISPLAY MENU".
Remarks for the setting of earth spikes:
Before setting the earth spikes for probe and auxiliary earth electrode make sure that the probe is set outside the potential gradient area of earth electrode and auxiliary earth electrode (also see “The Influence of Potential Gradient areas on Earth Resistance Measurement”). Such a condition is normally reached by allowing a distance of > 20 m between the earth electrode and the earth spikes as well as of the earth spikes to each other.

Earth/Ground Tester Procedure of Measurements
35
An accuracy test of the results is made with another measurement following repositioning of the auxiliary earth electrode or probe. If the value stays the same, the distance is sufficient. If the measured value changes, probe or auxil-iary earth electrode must be repositioned until the measured value RE stays constant.
Spike wires should not run too close to each other.
3-pole measurement with longer earth electrode connecting leads
Use one of the accessory cable drums as earth electrode connecting lead. Spool off cable completely and compensate line resistance as described in “Compen-sation of Earth Electrode Connecting Lead”.
Time average measurement:
If there is a warning "measured value unstable" (see “Procedures of Measure-ment”, “Description of display”) after a test sequence, most likely it is caused by strong interference signals (e.g. unsteady noise voltage).Nevertheless, to get reliable values, the instrument offers the possibility of averanging over a longer period.
1. Select a fixed frequency (see “Control loop” in “Operation”)
2. Keep the "START TEST" button pressed until the warning "measured value unstable" disappears. Max. averaging time is approx. 1 min.
Evaluation of measured value:
Figure 10 shows the maximum permissible value of the Earth resistance which will not exceed a permissible limit value, taking into account the maximum usage error.
0
5
10
10
20
20
50
50
100
100
200
200
500
500
1000
1000 2000 2999
3000 3152
Desired Values
Measured Values edw013.eps
Figure 10. Earth Resistance - Maximum Permissible Value
1625 Users Manual
36
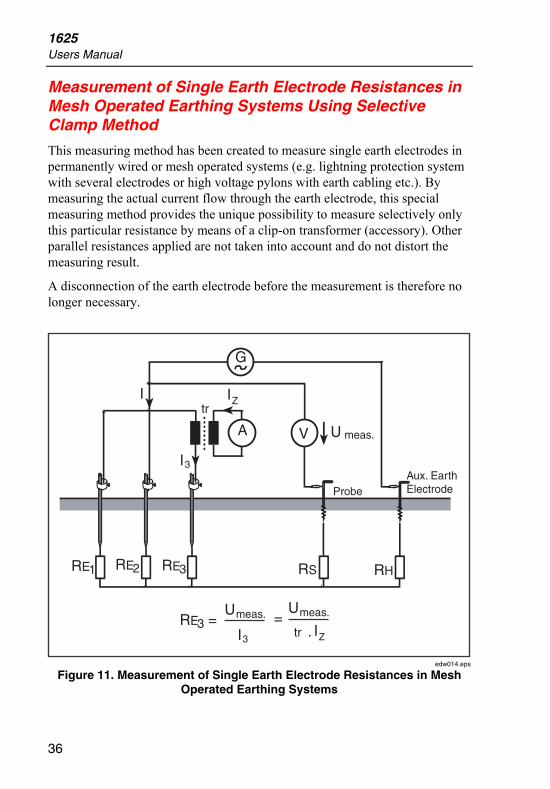
Measurement of Single Earth Electrode Resistances in Mesh Operated Earthing Systems Using Selective Clamp Method
This measuring method has been created to measure single earth electrodes in permanently wired or mesh operated systems (e.g. lightning protection system with several electrodes or high voltage pylons with earth cabling etc.). By measuring the actual current flow through the earth electrode, this special measuring method provides the unique possibility to measure selectively only this particular resistance by means of a clip-on transformer (accessory). Other parallel resistances applied are not taken into account and do not distort the measuring result.
A disconnection of the earth electrode before the measurement is therefore no longer necessary.
G
I IZtr
VA
Aux. EarthElectrodeProbe
I3
U meas.
RE1 RE2 RE3 RS RH
RE3 = Umeas.
I3
= Umeas.
tr . IZ
edw014.eps
Figure 11. Measurement of Single Earth Electrode Resistances in Mesh Operated Earthing Systems
Earth/Ground Tester Procedure of Measurements
37
Errors of the current transformer can be corrected as described in “Correcting Clip-on Transformer Error”.
3-pole/4-pole Measurement of Single Earth Electrode Re-sistances
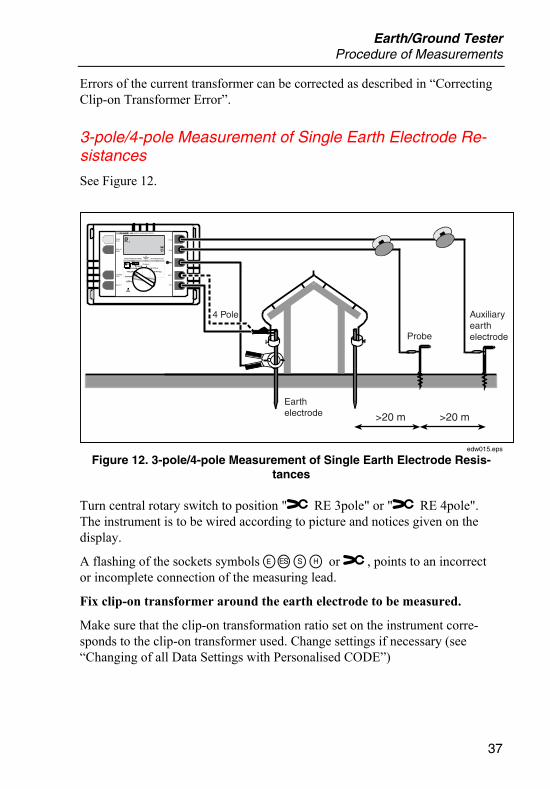
See Figure 12.
RRA REarth/Ground Resistance 300k
AC Resistance 300k DC Low Resistance 3k
CHANGEITEM
SELECT
STARTTEST
DISPLAYMENU
H/C2
S/P2
ES/P1
E/C1
4 POLE
3 POLE4 POLE
2 POLE
2 POLE
4 POLE
OFF
3 POLE
EARTH / GROUND TESTER1625
Auxiliary earthelectrodeProbe
Earthelectrode
4 Pole
>20 m >20 m
edw015.eps
Figure 12. 3-pole/4-pole Measurement of Single Earth Electrode Resis-tances
Turn central rotary switch to position "A RE 3pole" or "A RE 4pole". The instrument is to be wired according to picture and notices given on the display.
A flashing of the sockets symbols EFGH or A, points to an incorrect or incomplete connection of the measuring lead.
Fix clip-on transformer around the earth electrode to be measured.
Make sure that the clip-on transformation ratio set on the instrument corre-sponds to the clip-on transformer used. Change settings if necessary (see “Changing of all Data Settings with Personalised CODE”)
1625 Users Manual
38
Note
The ratio that is preset from factory is correct for the EI162X sensing clamp
Press "START TEST" button.
Now a fully automated test sequence of all relevant parameters like auxiliary earth electrode, probe- and earth electrode resistance, is implemented and fin-ished with the display of the result RE.
1. Read out measured value RE
2. Call RS and RH with "DISPLAY MENU".
Remarks for the Setting of Earth Spikes
Before setting the earth spikes for probe and auxiliary earth electrode make sure that the probe is set outside the potential gradient of earth electrode and auxiliary earth electrode (see also 12.5). Such a condition is normally reached by allowing a distance of >20 m between the earth electrode and the earth spikes as well as to the earth spikes to each other. An accuracy test of the re-sults is made by another measurement following repositioning of the auxiliary earth electrode or probe. If the value stays the same, the distance is sufficient. If the measured value changes, probe or auxiliary earth electrode must be repo-sitioned until the measured value RE stays constant.
Spikes wires should not run too close.
3-pole Measurement with Longer Earth Electrode Connect-ing Leads
1. Use one of the accessory cable drums as earth electrode connecting lead.
2. Spool off cable completely and compensate line resistance as de-scribed in “Compensation of Earth Electrode Connecting Lead”.
Time Average Measurement
If there is a warning "measured value unstable" (see “Description of Displays”, Procedure of Measurements) after a test sequence, most likely it is caused by strong interference signals (e.g. unsteady noise voltage). Nevertheless, to get
Earth/Ground Tester Procedure of Measurements
39
reliable values, the instrument offers the possibility of averaging over a longer period.
1. Select a fixed frequency (see "Control loop", Operation)
2. Keep the "START TEST" button pressed until the warning "measured value unstable" disappears. Max. averaging time is approx. 1 min.
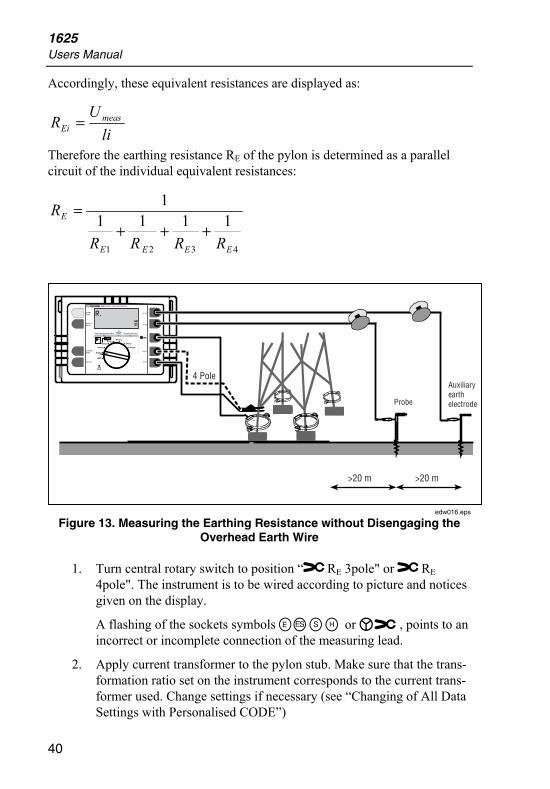
Measurements on High Voltage Pylons
Measuring the Earthing Resistance without Disengaging the Overhead Earth Wire Using the Selective Clamp Method
The measurement of the earth resistance of a single high voltage pylon usually requires the overhead earth wire to be disengaged (lifted off) or the seperation of the earthing system from the pylon construction. Otherwise false reading of the resistance of the pylon earth electrode are liable to occur because of the parallel circuit of the other pylons connected to each other by an overhead earth wire.
The new measuring method employed in this instrument - with its external current transformer to measure the true current flowing through the earth elec-trode - allows measurements of earth electrode resistances without disconnec-tion of the earthing system or disengaging the overhead earth wire.
As all four pylon stubs are connected to the foundation earth of the pylon, the measuring current Imeas is divided into five components according to the pre-sent resistances involved.
One part flows via pylon construction to the overhead earth wire and further to the parallelly circuited pylon earthing resistances.
The other four current components (I1... I4) flow via the individual pylon foots.
The addition of all currents result in a current IE going through the earthing resistance, i.e. the resistance of the "composite"earth electrode to the soil.
If the current transformer is fixed to each pylon stub, one after the other, four resistances have to be measured which show a behaviour inversely propor-tional to the corresponding current components I1 ... I4. The feeding point of the measuring current is to be left unchanged to avoid a change in the current distribution.
1625 Users Manual
40
Accordingly, these equivalent resistances are displayed as:
liU
R measEi =
Therefore the earthing resistance RE of the pylon is determined as a parallel circuit of the individual equivalent resistances:
4321
11111
EEEE
E
RRRR
R+++
=
RRA REarth/Ground Resistance 300k
AC Resistance 300k DC Low Resistance 3k
CHANGEITEM
SELECT
STARTTEST
DISPLAYMENU
H/C2
S/P2
ES/P1
E/C1
4 POLE
3 POLE4 POLE
2 POLE
2 POLE
4 POLE
OFF
3 POLE
EARTH / GROUND TESTER1625
Auxiliary earthelectrodeProbe
4 Pole
>20 m >20 m
edw016.eps
Figure 13. Measuring the Earthing Resistance without Disengaging the Overhead Earth Wire
1. Turn central rotary switch to position “ARE 3pole" or ARE 4pole". The instrument is to be wired according to picture and notices given on the display.
A flashing of the sockets symbols EFGH or B, points to an incorrect or incomplete connection of the measuring lead.
2. Apply current transformer to the pylon stub. Make sure that the trans-formation ratio set on the instrument corresponds to the current trans-former used. Change settings if necessary (see “Changing of All Data Settings with Personalised CODE”)

Earth/Ground Tester Procedure of Measurements
41
3. Press “START TEST” button
Now a fully automated test sequence of all relevant parameters like auxiliary earth electrode, probe- and earth electrode resistance, is im-plemented and finishes with the display of the result RE.
4. Read out measured value RE
5. Call RS and RH with “DISPLAY MENU”.
Notices for the setting of earth spikes:
Before setting the earth spikes for probe and auxiliary earth electrode make sure that the probe is set outside the potential gradient of earth electrode and auxiliary earth electrode (see also “The Influence of Potential Gradient Areas on Earth Resistance Measurement”). Such a condition is normally reached by allowing a distance of >20 m between the earth electrode and the earth spikes as well as to the earth spikes to each other. An accuracy test of the results is made with another measurement after repositioning of auxiliary earth electrode or probe. If the result is the same, the distance is sufficient. If the measured value changes, probe or auxiliary earth electrode must be repositioned until the measured value RE remains constant. Spike wires should not run too close.
1. Apply current transformer to next pylon stub.
2. Repeat measuring sequence.
Current feeding point of measuring current (alligator clip) and the polarity of the split core current transformer has to be left unchanged.
After values of REi of all pylon foots are determined, the actual earth resistance RE has to be calculated:
4321
11111
EEEE
E
RRRR
R+++
=
Note
If the displayed RE value is negative despite correct orientation of the current transformer, a part of the measuring current is flowing up-wards into the tower body. The earthing resistance, thus coming into effect, correctly calculates, if the individual equivalent resistances (under observation of their polarity) are inserted into the equation above.

1625 Users Manual
42
Time average measurement:
If there is a warning "measured value unstable" (see "Description of displays", Procedure of Measurement) after a test sequence, most likely it is caused by strong interference signals (e.g. unsteady noise voltage).
Nevertheless, to get reliable values, the instrument offers the possibility of averanging over a longer period.
1. Select a fixed frequency (see "Control loop", Operation)
2. Keep the "START TEST" button pressed until the warning "measured value unstable" disappears. Max. averaging time is approx. 1. min.
Measuring Earthing Impedance with 55 Hz (R*)
For the calculation of short circuit currents in power supply plants, the com-plex earthing impedance is important. Direct measurement is possible under the following conditions:
Phase angle at 50 Hz: 30 °... 60 ° inductive
auxiliary earth electrode (ohmic): >100 • ZE
Measuring process:
The measurement of the earthing impedance (R*) is only possible if it is acti-vated by putting in a personalized user's code (see "Change of Setup Data with Personalized Code"). If this measuring function is activated, in every meas-urement of the four RE positions, the earthing impedance R* is displayed be-fore all other measured values.
Correcting Clip-on Transformer Errors
If the measurement of an earthing resistance by means of a clip-on transformer results in a significantly different value as if measured without the clip-on, the deviation may be due to the tolerances of the clip-on current transformer. This error can be corrected by fine tuning the clip-on transformation ratio (basic settings 1000:1). This correction applies to the transformer current range it was performed with. For other ranges a different correction may be necessary.
1. Connect a low Ohm resistor (approx. 1 Ohm - in the range you want to correct) as described in the picture below.
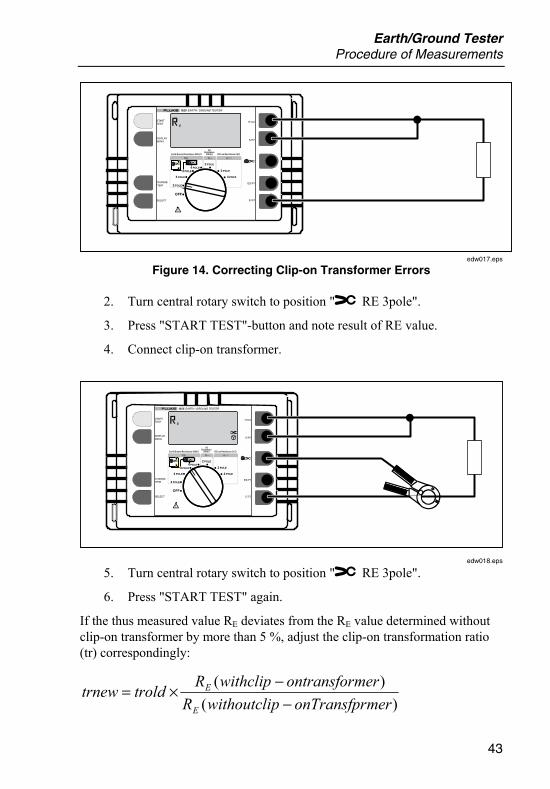
Earth/Ground Tester Procedure of Measurements
43
RRA REarth/Ground Resistance 300k
AC Resistance 300k DC Low Resistance 3k
CHANGEITEM
SELECT
STARTTEST
DISPLAYMENU
H/C2
S/P2
ES/P1
E/C1
4 POLE
3 POLE4 POLE
2 POLE
2 POLE
4 POLE
OFF
3 POLE
EARTH / GROUND TESTER1625
edw017.eps
Figure 14. Correcting Clip-on Transformer Errors
2. Turn central rotary switch to position "A RE 3pole".
3. Press "START TEST"-button and note result of RE value.
4. Connect clip-on transformer.
RRA REarth/Ground Resistance 300k
AC Resistance 300k DC Low Resistance 3k
CHANGEITEM
SELECT
STARTTEST
DISPLAYMENU
H/C2
S/P2
ES/P1
E/C1
4 POLE
3 POLE4 POLE
2 POLE
2 POLE
4 POLE
OFF
3 POLE
EARTH / GROUND TESTER1625
edw018.eps
5. Turn central rotary switch to position "A RE 3pole".
6. Press "START TEST" again.
If the thus measured value RE deviates from the RE value determined without clip-on transformer by more than 5 %, adjust the clip-on transformation ratio (tr) correspondingly:
)()(
meronTransfprpwithoutcliRmerontransforwithclipRtroldtrnew
E
E
−−
×=
1625 Users Manual
44
Example:
Your clip-on transformer has a transformation ratio of tr = 1000:1. The meas-urement without clip-on transformer results in a value RE = 0.983 Ω . With a clip-on transformer a value of RE = 1.175 Ω is measured.
The deviation thus reads (1.175 - 0.983) Ω= + 0.192 Ω and referring to RE = 0.983 Ω an error evolves as following:
%5.19983.0192.0%100 +=
ΩΩ×
The new transformation ratio to be set calculates:
1195983.0175.11000 =×=trnew
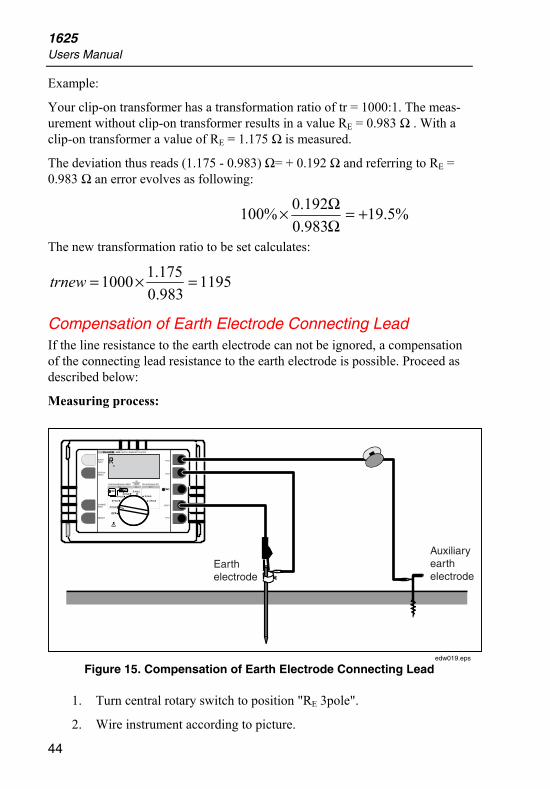
Compensation of Earth Electrode Connecting Lead If the line resistance to the earth electrode can not be ignored, a compensation of the connecting lead resistance to the earth electrode is possible. Proceed as described below:
Measuring process:
RRA REarth/Ground Resistance 300k
AC Resistance 300k DC Low Resistance 3k
CHANGEITEM
SELECT
STARTTEST
DISPLAYMENU
H/C2
S/P2
ES/P1
E/C1
4 POLE
3 POLE4 POLE
2 POLE
2 POLE
4 POLE
OFF
3 POLE
EARTH / GROUND TESTER1625
Auxiliary earthelectrode
Earthelectrode
edw019.eps
Figure 15. Compensation of Earth Electrode Connecting Lead
1. Turn central rotary switch to position "RE 3pole".
2. Wire instrument according to picture.

Earth/Ground Tester Procedure of Measurements
45
3. Call display RK with "DISPLAY MENU" button.
4. Implement compensation with "START TEST" button.
The compensation resistance is displayed only for as long as the "START TEST" button is kept pressed. After releasing the "START TEST" button the measured value is stored and the measuring instrument returns to the standard settings at the beginning of the measurement so that a succeeding measurement of the earthing resistance can be implemented by pressing "START TEST" again. Thereafter, RK is subtracted from the actual measured value.
If the compensation value has to be reset to the basic setting (0.000 Ω), the compensation sequence has to be implemented with an open (disconnected) measuring lead or turn the switch to the next position and back.
Measurement of Soil Resistivity
The soil resistivity is the geological and physical quantity for calculation and design of earthing systems. The measuring procedure applied below uses the method developed by Wenner (F.Wenner, A method of measuring earth resis-tivity; Bull. National Bureau of Standards, Bulletin 12 (4), Paper 258, S 478-496; 1915/16).
RRA REarth/Ground Resistance 300k
AC Resistance 300k DC Low Resistance 3k
CHANGEITEM
SELECT
STARTTEST
DISPLAYMENU
H/C2
S/P2
ES/P1
E/C1
4 POLE
3 POLE4 POLE
2 POLE
2 POLE
4 POLE
OFF
3 POLE
EARTH / GROUND TESTER1625
edw020.eps
Figure 16. Measurement of Soil Resistivity
1625 Users Manual
46
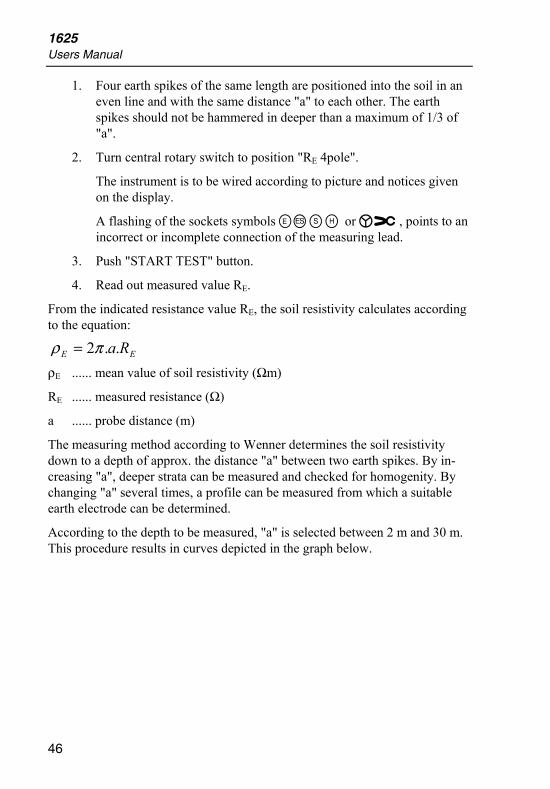
1. Four earth spikes of the same length are positioned into the soil in an even line and with the same distance "a" to each other. The earth spikes should not be hammered in deeper than a maximum of 1/3 of "a".
2. Turn central rotary switch to position "RE 4pole".
The instrument is to be wired according to picture and notices given on the display.
A flashing of the sockets symbols EFGH or B, points to an incorrect or incomplete connection of the measuring lead.
3. Push "START TEST" button.
4. Read out measured value RE.
From the indicated resistance value RE, the soil resistivity calculates according to the equation:
EE Ra..2πρ =
ρE ...... mean value of soil resistivity (Ωm)
RE ...... measured resistance (Ω)
a ...... probe distance (m)
The measuring method according to Wenner determines the soil resistivity down to a depth of approx. the distance "a" between two earth spikes. By in-creasing "a", deeper strata can be measured and checked for homogenity. By changing "a" several times, a profile can be measured from which a suitable earth electrode can be determined.
According to the depth to be measured, "a" is selected between 2 m and 30 m. This procedure results in curves depicted in the graph below.

Earth/Ground Tester Procedure of Measurements
47
Distances of Probe
Soi
l res
tivity
E
A
1
2 3
edw021.eps
Curve 1: As ρE decreases only deeper down, a deep earth electrode is advis-able
Curve 2: As ρE decreases only down to point A, an increase in the depth deeper than A does not improve the values.
Curve 3: With increasing depth ρE is not decreasing: a strip conductor elec-trode is advisable.
As measuring results are often distorted and corrupted by underground pieces of metal, underground aquifers etc, a second measurement, in which the spike axis is turned by an angle of 90 ° , is always advisable (see picture).

1625 Users Manual
48
HSE ES
90O
I
edw022.eps
Measurement of Resistances
Resistance Measurement (R~)
This measuring function determines the ohmic resistance between 0.001 Ω and 300 kΩ. The measurement is done with AC voltage. For measurements of very low resistances a compensation of the connecting leads is suggested (see “Compensation of Measuring Lead Resistance”).
RRA REarth/Ground Resistance 300k
AC Resistance 300k DC Low Resistance 3k
CHANGEITEM
SELECT
STARTTEST
DISPLAYMENU
H/C2
S/P2
ES/P1
E/C1
4 POLE
3 POLE4 POLE
2 POLE
2 POLE
4 POLE
OFF
3 POLE
EARTH / GROUND TESTER1625
edw023.eps
Figure 17. Resistance Measurement (R~)
1. Turn central rotary switch to position "R~".

Earth/Ground Tester Procedure of Measurements
49
2. Connect instrument according to picture.
3. In this mode, all settings and LIMIT values available can be called with "DISPLAY MENU" and the measuring frequency can be set.
4. Press "START TEST" button.
5. Read out measured value.
Resistance Measurement (RF)
In this measuring mode all resistances from 0.001 Ω to 3 kΩ can be measured with DC voltage and automatic polarity reversal as per EN61557-5.
To achieve highest accuracy 4 pole measurements are possible. To balance the extension lead, a compensation has to be done.
RRA REarth/Ground Resistance 300k
AC Resistance 300k DC Low Resistance 3k
CHANGEITEM
SELECT
STARTTEST
DISPLAYMENU
H/C2
S/P2
ES/P1
E/C1
4 POLE
3 POLE4 POLE
2 POLE
2 POLE
4 POLE
OFF
3 POLE
EARTH / GROUND TESTER1625
edw024.eps
Figure 18. Resistance Measurement (RF)
1. Connect instrument according to picture.
2. Turn central rotary switch to position "RF".
3. In this mode, all settings and LIMIT values available can be called with "DISPLAY MENU".
W Warning
Before starting a measurement bring plant or test object to off or de-energized circuit condition! With an external volt-age higher than 3 V measurement will not be started.
1625 Users Manual
50
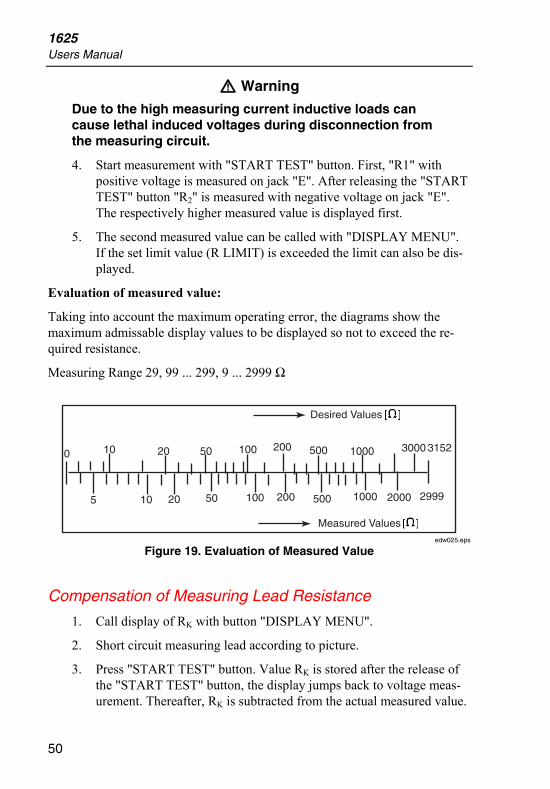
W Warning
Due to the high measuring current inductive loads can cause lethal induced voltages during disconnection from the measuring circuit.
4. Start measurement with "START TEST" button. First, "R1" with positive voltage is measured on jack "E". After releasing the "START TEST" button "R2" is measured with negative voltage on jack "E". The respectively higher measured value is displayed first.
5. The second measured value can be called with "DISPLAY MENU". If the set limit value (R LIMIT) is exceeded the limit can also be dis-played.
Evaluation of measured value:
Taking into account the maximum operating error, the diagrams show the maximum admissable display values to be displayed so not to exceed the re-quired resistance.
Measuring Range 29, 99 ... 299, 9 ... 2999 Ω
0
5
10
10
20
20
50
50
100
100
200
200
500
500
1000
1000 2000 2999
3000 3152
Desired Values
Measured Values edw025.eps
Figure 19. Evaluation of Measured Value
Compensation of Measuring Lead Resistance
1. Call display of RK with button "DISPLAY MENU".
2. Short circuit measuring lead according to picture.
3. Press "START TEST" button. Value RK is stored after the release of the "START TEST" button, the display jumps back to voltage meas-urement. Thereafter, RK is subtracted from the actual measured value.
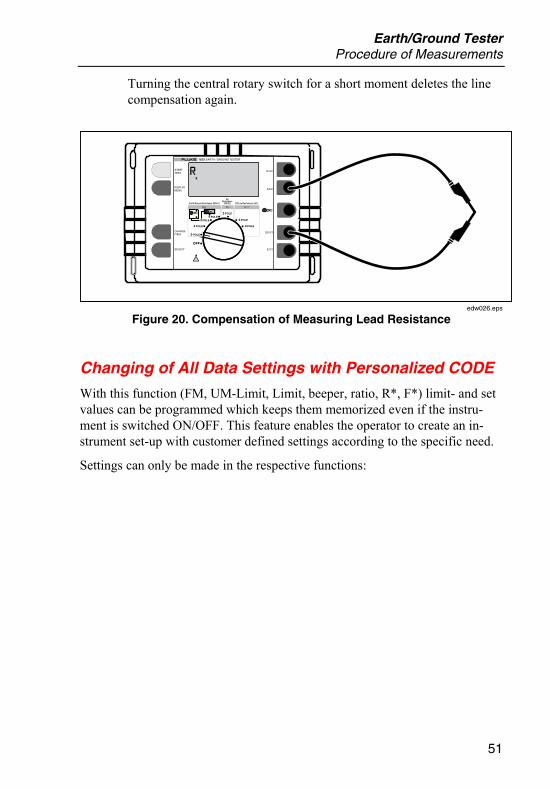
Earth/Ground Tester Procedure of Measurements
51
Turning the central rotary switch for a short moment deletes the line compensation again.
RRA REarth/Ground Resistance 300k
AC Resistance 300k DC Low Resistance 3k
CHANGEITEM
SELECT
STARTTEST
DISPLAYMENU
H/C2
S/P2
ES/P1
E/C1
4 POLE
3 POLE4 POLE
2 POLE
2 POLE
4 POLE
OFF
3 POLE
EARTH / GROUND TESTER1625
edw026.eps
Figure 20. Compensation of Measuring Lead Resistance
Changing of All Data Settings with Personalized CODE
With this function (FM, UM-Limit, Limit, beeper, ratio, R*, F*) limit- and set values can be programmed which keeps them memorized even if the instru-ment is switched ON/OFF. This feature enables the operator to create an in-strument set-up with customer defined settings according to the specific need.
Settings can only be made in the respective functions:

1625 Users Manual
52
Function Parameter Setting range Standard presetting
FM (AFC/94/105/111/128) Hz AFC
RE 3pole
UM 48 V/20 V 48V
RK 0.000 Ω ... 29.99 Ω 0.000 Ω
and LIMIT On / Off Off
RE LIMIT 0.000 Ω ... 999 kΩ 999 kΩ
RE 4pole
(Warning sound)
On/Off Off
R* On/Off Off
FM (AFC/94/105/111/128) Hz AFC
RE 3pole
UM 48 V/20 V 48V
A RK 0.000 Ω ... 29.99 Ω 0.000 Ω
and I ( ratio ) 80 ... 1200 1000
RE 4pole
LIMIT On/Off Off
A RE LIMIT 0.000 Ω ... 999 kΩ 999 kΩ
(Warning sound)
On/Off Off
R* On/Off Off
FM (AFC/94/105/111/128) Hz AFC
RK 0.000 Ω ... 29.99 Ω 0.000 Ω
R~ LIMIT On/Off Off
R ~ LIMIT 0.000 Ω ... 999 kΩ 999 kΩ
(Warning sound)
On/Off Off
Earth/Ground Tester Procedure of Measurements
53
R F
2pole RK 0.000 Ω ... 29.99 Ω 0.000 Ω
and LIMIT On/Off Off
4pole R LIMIT 0.000 Ω ... 9,99 kΩ 9.99 kΩ
(Warning sound)
On/Off Off
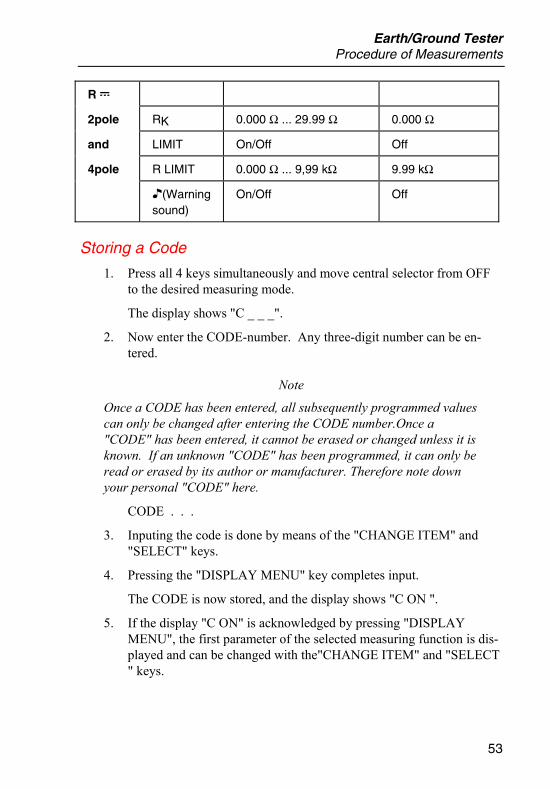
Storing a Code
1. Press all 4 keys simultaneously and move central selector from OFF to the desired measuring mode.
The display shows "C _ _ _".
2. Now enter the CODE-number. Any three-digit number can be en-tered.
Note
Once a CODE has been entered, all subsequently programmed values can only be changed after entering the CODE number.Once a "CODE" has been entered, it cannot be erased or changed unless it is known. If an unknown "CODE" has been programmed, it can only be read or erased by its author or manufacturer. Therefore note down your personal "CODE" here.
CODE . . .
3. Inputing the code is done by means of the "CHANGE ITEM" and "SELECT" keys.
4. Pressing the "DISPLAY MENU" key completes input.
The CODE is now stored, and the display shows "C ON ".
5. If the display "C ON" is acknowledged by pressing "DISPLAY MENU", the first parameter of the selected measuring function is dis-played and can be changed with the"CHANGE ITEM" and "SELECT " keys.

1625 Users Manual
54
6. The changed value is stored by pressing the "DISPLAY MENU" key.
7. Pressing the "START TEST" key exits the setting program.
Note
If the limit values required by regulations are changed incorrect, er-roneous test results may be displayed.
Deleting a Code
1. Press all 4 keys simultaneously and move central selector from OFF to any measuring mode.
The display shows " C _ _ _ ".
2. Now enter the existing CODE-number.
3. Inputing the code is done by means of the "CHANGE ITEM" and "SELECT" keys. Pressing the "DISPLAY MENU" key completes in-put.
4. Display shows "C ON". In the "C ON" state the CODE function can be disabled by pressing the "CHANGE ITEM" key. The display then shows "C OFF".
5. If this display is acknowledged by pressing the "DISPLAY MENU" key, the user code and all changes of the limit values are erased. The original default values are restored into memory.
6. Now a new CODE-number may be programmed and used for setting new parameters.
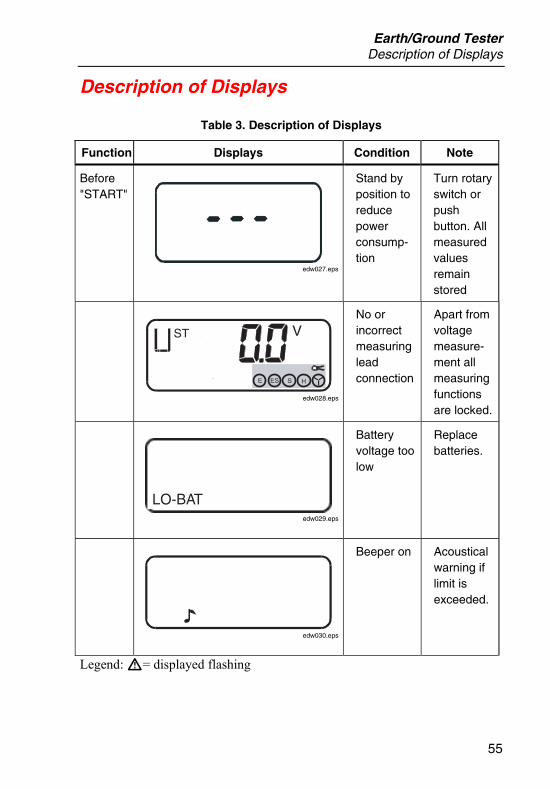
Earth/Ground Tester Description of Displays
55
Description of Displays
Table 3. Description of Displays
Function Displays Condition Note
Before "START"
edw027.eps
Stand by position to reduce power consump-tion
Turn rotary switch or push button. All measured values remain stored
ST V
edw028.eps
No or incorrect measuring lead connection
Apart from voltage measure-ment all measuring functions are locked.
LO-BAT edw029.eps
Battery voltage too low
Replace batteries.
edw030.eps
Beeper on Acoustical warning if limit is exceeded.
Legend: W= displayed flashing

1625 Users Manual
56
Function Displays Condition Note
ST
LIMIT
V
edw031.eps
Dangerous AC - vol-tage > 50 V
Apart from voltage measure-ment all measuring functions are locked.
Before "START"
edw033.eps
Rotary switch in inter-mediate position
Select cor-rect posi-tion.
After "START"
S
TEST
edw034.eps
Probe re-sistance is being tested
Wait for test result.
H
TEST
edw035.eps
Aux. cur-rent spike- resistance is being tested.
Wait for test result.
E
TEST
edw036.eps
Earth re-sistance is being tested.
Wait for test result.
Legend: W= displayed flashing
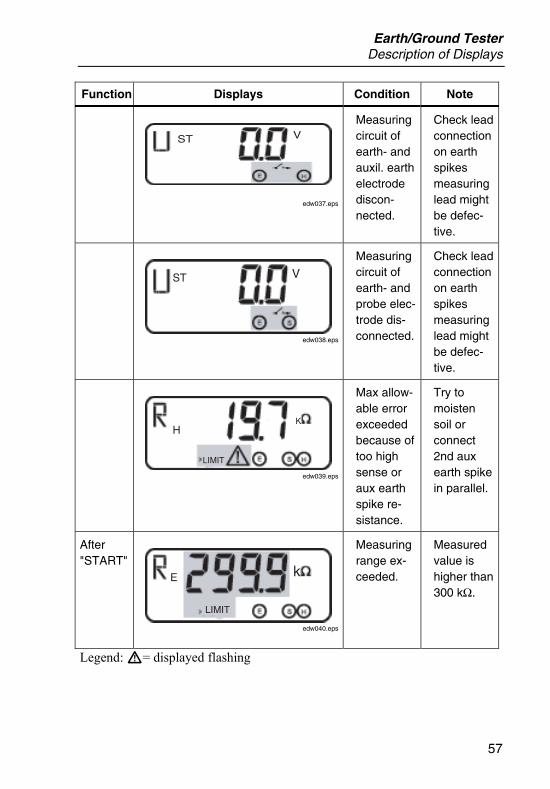
Earth/Ground Tester Description of Displays
57
Function Displays Condition Note
ST V
edw037.eps
Measuring circuit of earth- and auxil. earth electrode discon-nected.
Check lead connection on earth spikes measuring lead might be defec-tive.
ST V
edw038.eps
Measuring circuit of earth- and probe elec-trode dis-connected.
Check lead connection on earth spikes measuring lead might be defec-tive.
H
LIMIT
K
edw039.eps
Max allow-able error exceeded because of too high sense or aux earth spike re-sistance.
Try to moisten soil or connect 2nd aux earth spike in parallel.
After "START"
E
LIMIT
k
edw040.eps
Measuring range ex-ceeded.
Measured value is higher than 300 kΩ.
Legend: W= displayed flashing

1625 Users Manual
58
Function Displays Condition Note
E
LIMIT edw041.eps
Display of measured value ex-ceeds LIMIT.
Measured value is higher than set LIMIT.
K
LIMIT
edw042.eps
Compen-sation higher than measured value.
Delete compensa-tion or switch in-strument ON/OFF.
ST
edw043.eps
Wrong po-larity on jacks E and ES.
Reverse polarity.
E
edw044.eps
Measured value in-stable.
Unsteady noise volt-age. Try time aver-age meas-urement.
ST V
edw045.eps
Current in external trans-former to low.
Reduce auxiliary current spike re-sistance.
Legend: W= displayed flashing

Earth/Ground Tester Description of Displays
59
Function Displays Condition Note
No reactions to button control etc.
edw046.eps
Operation under faulty con-ditions.
Check bat-teries. Switch ON/OFF if still faulty, contact service.
After "START"
E
edw047.eps
Reverse orientation of current clamp or "upwards" current.
Reverse clamp or see note on page 28.
edw048.eps
Checksum of EE PROM in-correct.
edw049.eps
Hardware malfunc-tion (e.g. current overload).
Switch ON/OFF if still faulty;
The sym-bol may appear when us-ing the stakeless measure-ment on low resis-tance cir-cuits.
Legend: W= displayed flashing
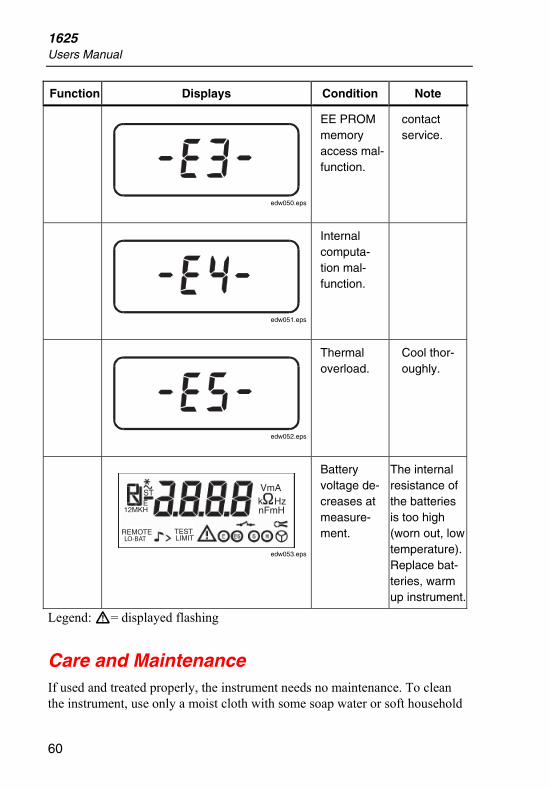
1625 Users Manual
60
Function Displays Condition Note
edw050.eps
EE PROM memory access mal-function.
contact service.
edw051.eps
Internal computa-tion mal-function.
edw052.eps
Thermal overload.
Cool thor-oughly.
STE
12MKH
REMOTELIMITTEST
VmAk HznFmH
LO-BAT edw053.eps
Battery voltage de-creases at measure-ment.
The internal resistance of the batteries is too high (worn out, low temperature). Replace bat-teries, warm up instrument.
Legend: W= displayed flashing
Care and Maintenance If used and treated properly, the instrument needs no maintenance. To clean the instrument, use only a moist cloth with some soap water or soft household

Earth/Ground Tester Care and Maintenance
61
detergent or spirit. Avoid aggressive cleaning agents and solvents (trilene, chlorothene etc.).
Service work must only be undertaken by trained qualified staff.
In all repair work care must be taken that the design parameters of the instru-ment are not modified to the detriment of safety, that assembled parts corre-spond to the original spares and that they are reassembled properly (factory state).
Caution
Before any maintenance, repair or parts replacement the instrument must be disconnected from all voltage sources.
Replacing Batteries
Note
NiMH or NiCADcells may be used but must be charged outside of the instrument. The number of measurements available with these cells will typically be different to those available using alkaline cells.
This instrument is equipped with six 1.5 V batteries IEC RL 6 or type AA. If after pressing the START-button all display-segments are lit (instrument re-sets, display-test) or if “LO-BAT” appears on display during a measurement the batteries must be replaced or the accumulators must be recharged.
Caution
For replacement of batteries the measuring cable must be disconnected, and the instrument switched off. Now the two screws at the rear of the instrument can be loosened with a suitable tool (screwdriver) and the battery recess cover removed. When replacing batteries, mind the correct polarity.
Always replace the complete set of batteries.
Note
For protection of the environment, please ensure proper disposal of the batteries.
1625 Users Manual
62
Recalibration
This instrument exceeds the prescribed accuracies by multiples as it leaves the factory. To maintain it in this state, we recommend a check at 1-year intervals. Please contact the nearest sales or service center for this purpose.
As an extra service feature we offer you periodic checking and calibration of your meters. You may order, for a fee, either company test certificates or test certificates of the public calibration service at your option. These orders will be carried out either generally or with additional test records (measuring points) as ordered by you.
Service If you suspect that the tester has failed, review this manual to make sure you are operating it correctly. If the meter still fails to operate properly, pack I se-curely (in its original container if available) and forward it, postage paid, to the nearest Fluke Service Center. Include a brief description of the problem. Fluke assumes NO responsibility for damage in transit.
To locate an authorized service center, call Fluke using any of the phone num-bers listed below:
USA: 1-888-99-FLUKE (1-888-993-5853) Canada: 1-800-36-FLUKE (1-800-363-5853) Europe: +31 402-678-2005 Japan: +81-3-3434-0181 Singapore: +65-738-5655 Anywhere in the world: +1-425-446-5500 Or, visit us on the World Wide Web: www.fluke.com. To register your prod-uct, visit register.fluke.com
Storage
If the instrument is stored or remains unused for some time, the batteries should be removed and stored separately to guard against damage by leaking electrolyte.

Stakeless Earth/Ground Resistance Testing Care and Maintenance
63
Appendix A Stakeless Earth/Ground Resistance
Testing
Introduction
Stakeless testing provides the ground tester with the unique capability to meas-ure individual ground resistances in multi-grounded systems using two clamp-on current transformers.
The use of ground stakes is not necessary.
Before this method was available, users were required to disconnect an indi-vidual ground path to be tested from other grounds to eliminate the influence of parallel ground paths.
This was time consuming at the minimum and in many cases dangerous.
Once disconnected, the standard 3-pole/terminal ground testing method was used which requires auxiliary earth stakes. In addition to consuming additional time, finding suitable locations for the ground stakes can be difficult and in some cases, impossible. The "stakeless" method of ground resistance testing eliminates these problems and ideally complements the ground testers' stan-dard testing methods.
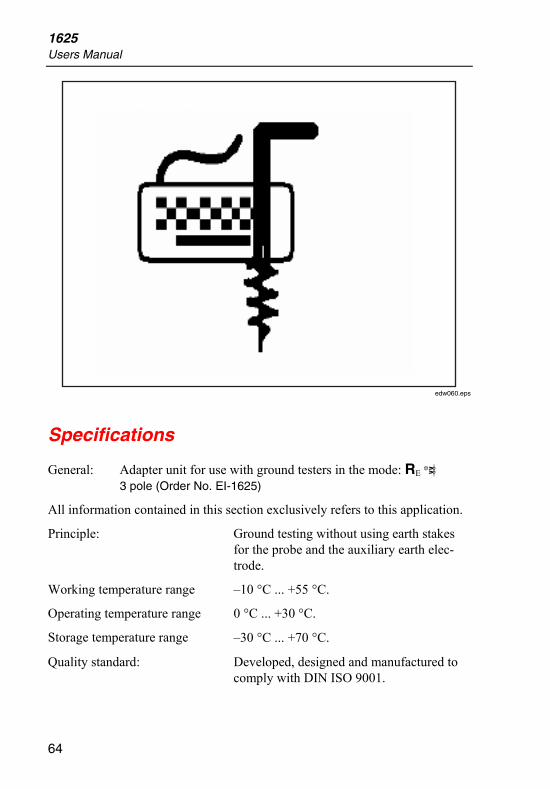
1625 Users Manual
64
edw060.eps
Specifications
General: Adapter unit for use with ground testers in the mode: RE D 3 pole (Order No. EI-1625)
All information contained in this section exclusively refers to this application.
Principle: Ground testing without using earth stakes for the probe and the auxiliary earth elec-trode.
Working temperature range –10 °C ... +55 °C.
Operating temperature range 0 °C ... +30 °C.
Storage temperature range –30 °C ... +70 °C.
Quality standard: Developed, designed and manufactured to comply with DIN ISO 9001.

Stakeless Earth/Ground Resistance Testing Principle of Operation
65
Dimensions Total length of adaptercable 1,8 m, Length of shielded cable to clamp-on CT 1,5 m.
Operating error*: ± (10% of m.v. + 5 digit).
Display range*: 0,010 Ω ... 130 Ω.
Measuring frequency: 128 Hz.
Measuring voltage: Um=48 VAC (primary).
Measuring range*: 0,020 Ω ... 100 Ω.
Resolution: .001... .1 ohm.
*when using: CT EI-162AC to induce voltage and
CT EI-162X to detect current.
Recommended distance between CT's: 10 cm.
Principle of Operation
Purpose
Testing the resistances of individual ground connections in systems with paral-lel ground connections (multi-grounded systems).
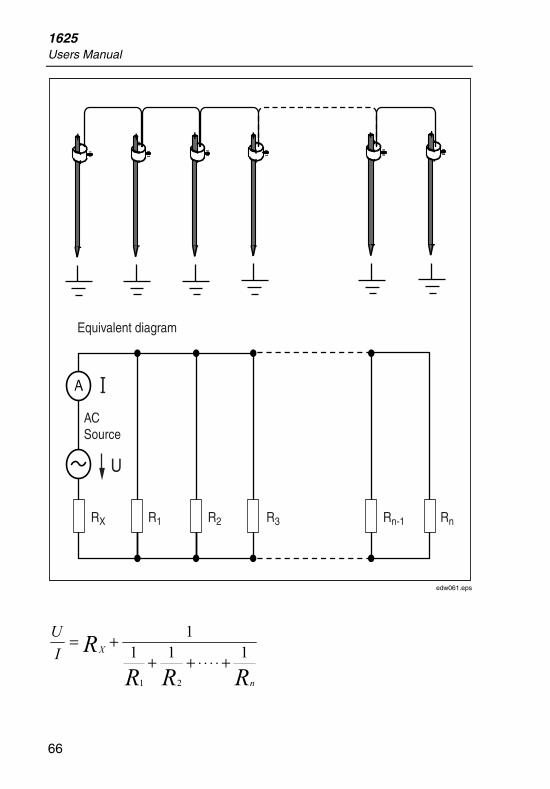
1625 Users Manual
66
U
RX R1 R2 R3 Rn-1 Rn
ACSource
Equivalent diagram
edw061.eps
RRRR
n
XIU
1111
21
+⋅⋅⋅⋅+++=

Stakeless Earth/Ground Resistance Testing Principle of Operation
67
If the parallel connection of resistors, R1...Rn is considerably lower than the ground connection under test RX:
RRRR
X
n
<<⋅⋅⋅⋅++ 111
1
21
then I
URX = is a reasonable approximation.
The test voltage (U) is applied without disconnecting ground rod and/or the direct electrical connection by means of a clamp-on current transformer and the current detected by a second current transformer.
RX R1 R2 Rn-1 Rn
CurrentI
VoltageU
edw062.eps
After synchronous rectification of current and voltage the tester displays RX.

1625 Users Manual
68
Operation
Connect the adapter according to the diagram and the designations E, S and H (C1, P1 and P2 for US-version) to the tester and to a current clamp.
RRA REarth/Ground Resistance 300k
AC Resistance 300k DC Low Resistance 3k
CHANGEITEM
SELECT
STARTTEST
DISPLAYMENU
H/C2
S/P2
ES/P1
E/C1
4 POLE
3 POLE4 POLE
2 POLE
2 POLE
4 POLE
OFF
3 POLE
EARTH / GROUND TESTER1625 H
EI-162X
Red
EI-162AC
BlackS
E
edw063.eps
Use the test cable contained in the set to connect the second current clamp to the socket. Ensure that connections are in the correct polarity. Turn the rotary switch of the tester to position RE D 3 pole.
Note
Use only current transformers referred to in this manual.
Clamp both transformers around the ground conductor to be tested.
Note
Try to have a distance > 10 cm between the clamps for optimal re-sults.
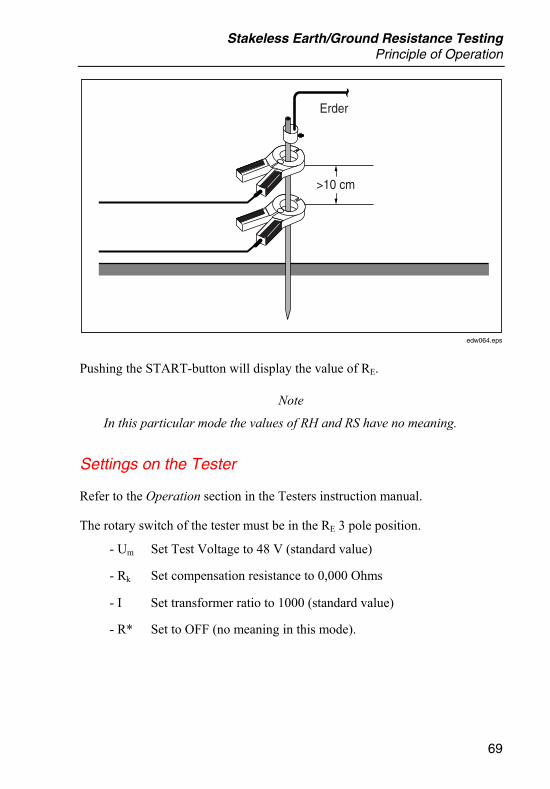
Stakeless Earth/Ground Resistance Testing Principle of Operation
69
>10 cm
Erder
edw064.eps
Pushing the START-button will display the value of RE.
Note
In this particular mode the values of RH and RS have no meaning.
Settings on the Tester
Refer to the Operation section in the Testers instruction manual.
The rotary switch of the tester must be in the RE 3 pole position.
- Um Set Test Voltage to 48 V (standard value)
- Rk Set compensation resistance to 0,000 Ohms
- I Set transformer ratio to 1000 (standard value)
- R* Set to OFF (no meaning in this mode).

1625 Users Manual
70
Applications
Example1: Ground rod on power poles.
edw065.eps
Example 2: Tests on multi-grounded (inter-connected) systems:
Ground conductors are for example bonded to grids or concrete-footing grounds and other conducting elements such as lightning protection systems or frameworks.
In this case the resistances of individual ground paths are not of significance.
It must be tested if the resistance of the bonding is sufficiently low and reli-able.

Stakeless Earth/Ground Resistance Testing Principle of Operation
71
M
LightningProtection
Footing ground Framework
edw066.eps

1625 Users Manual
72
Description of Displays
With stakeless ground testing some display combinations have certain signifi-cance.
E
edw067.eps
Polarity of CT’s is re-versed
Turn one CT
edw068.eps
Resistance under test is below meas-uring range or adapter cable is plugged into ground tester incorrectly
Switch on/off for next test
Legend: W= displayed flashing
Display Significance Note

Stakeless Earth/Ground Resistance Testing Principle of Operation
73
Display Significance Note
ST V
edw069.eps
Resistance under test is above measuring range
Legend: W= displayed flashing
74
Appendix B Earthing Resistance
Introduction
Per definition, the earthing resistance consists of several individual resistances.
1. The resistance of connecting lead to earth electrode
2. The resistance of the actual earth electrode; earthing rod, earthing plate, earthing strip, mesh earth electrode etc.
3. The dissipation resistance, the resistance between earth electrode and soil potential.
As the connecting cable and the resistance of the earth electrode are negligibly small after correct dimensioning, the earthing resistance dominantly de-pendends on the dissipation resistance. This shows that an accurate measure-ment of the dissipation resistance is necessary to determine the exact earthing conditions for protective measures. As the dissipation resistance is not only dependent on the specific soil resistivity, that is the resistance of the actual soil ( gravel, clay, granite ), but also significantly depents on the shape of the earth electrode, a metrological check has to be made even if the position of the earth electrode and the condition of the soil is well known.
For redimensioning of an earthing system, e.g. a lightning protection, an ap-proximate calculation, according to the table below, is possible. As a basis for this calculation the soil resistivity of the spot where the earth electrode is to be installed has to be known.
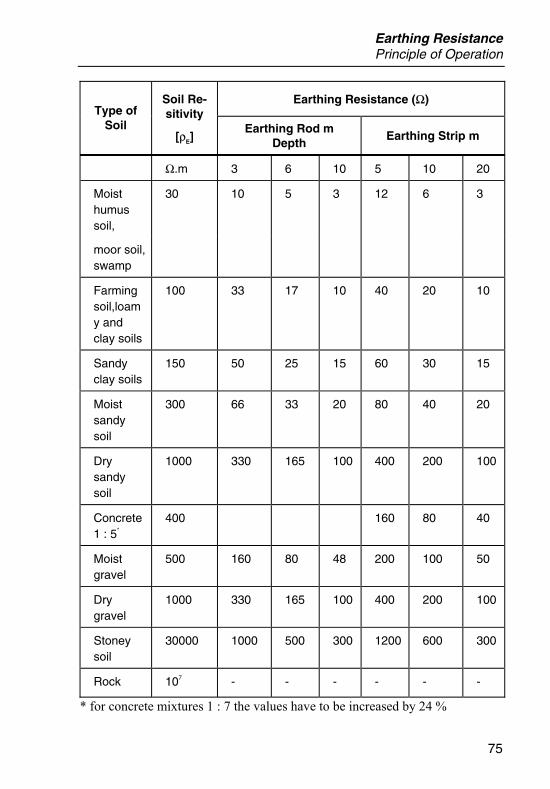
Earthing Resistance Principle of Operation
75
Earthing Resistance (Ω) Type of
Soil
Soil Re-sitivity
[ρE] Earthing Rod m
Depth Earthing Strip m
Ω.m 3 6 10 5 10 20
Moist humus soil,
30 10 5 3 12 6 3
moor soil, swamp
Farming soil,loamy and clay soils
100 33 17 10 40 20 10
Sandy clay soils
150 50 25 15 60 30 15
Moist sandy soil
300 66 33 20 80 40 20
Dry sandy soil
1000 330 165 100 400 200 100
Concrete 1 : 5*
400 160 80 40
Moist gravel
500 160 80 48 200 100 50
Dry gravel
1000 330 165 100 400 200 100
Stoney soil
30000 1000 500 300 1200 600 300
Rock 107 - - - - - -
* for concrete mixtures 1 : 7 the values have to be increased by 24 %

1625 Users Manual
76
Soil Resistivity ρE The soil resistivity is the resistance measured between two opposing surfaces of a cube of homogenous soil material with a lateral length of 1 meter. The unit is Ωm (see picture)
A = 1 m2
p = E
AL
. R( m)
L=1 m
edw054.eps
The soil resistivity significantly depends on the specific kind of material (farm-ing soil, dry sand, moist sand, concrete, gravel etc.), but also depends on sea-sonal changes. Dry soil has a higher resistivity than moist soil and frozen ground has a higher resistivity than dry, warm sand (see picture).
The two examples below show the change of resistivity during the course of one year.

Earthing Resistance Principle of Operation
77
monthDec.
0 1 2 3 4 5 6 87 9 10 11 120
4
8
12
16
20
24
28
Ear
th r
esis
tanc
e R
E
JulyJan.
edw055.eps
Temporal change of the earthing resistance of a conductor earth electrode (earth strip, earth cable).
14
month
0 1 2 3 4 5 6 7 8 9 10 11 120
2
4
6
8
10
12
Dec.JulyJan.
Ear
th r
esis
tanc
e R
E
edw056.eps
Temporal change of the earthing resistance of a buried earth electrode (earth pipe, earth plate)

1625 Users Manual
78
Measuring Method
The current voltage measuring method is based on the block diagram circuit shown in the figure below.
U meas.
V
G
I
E ES S
E S
RSRE
UE
I
H
H
RH
edw057.eps
An AC generator G feeds current I via earth electrode E (earth electrode resis-tance RE) and auxiliary earth electrode H (auxiliary earth electrode resistance RH).
Voltage UE drops on earthing resistance RE (UE proportional to RE.) This volt-age is picked up and measured by probe S. With the so called three wire cir-cuit, the instrument sockets E and ES are connected to each other. In a four wire circuit an separate cable is used to connect socket ES with the earth elec-trode.
With that, the voltage drop of the cable between socket E and earth electrode is not measured. As the voltage measuring circuit has such a high impedance, the influence by the probe resistance RS is neglectable within certain limits.
Thus the earthing resistance evolves
1Meas
EU
R =
and is independent from the resistance of the auxiliary earth electrode RH. The generator runs at a frequency between 70 and 140 Hz.
It has to hold a minimum distance of 5 Hz to one of the nominal frequencies between 16 2/3, 50 or 60 Hz and their harmonic waves. A frequency selective filter adjusted to the generator frequency is inserted.

Earthing Resistance Principle of Operation
79
The Potential Gradient Area
Around every earth electrode a so called potential gradient area develops dur-ing the flow of an electric current (see picture below).
U
US UE
E
40 60 m
edw058.eps
If the voltage between the earth electrode and a probe with a distance "a" from the earth electrode is measured, the value increases less with increasing dis-tance. Once the voltage does not increase, the probe is levelled to earth poten-tial FE that is, outside the potential gradient area.
It is the soil resistivity that mainly affects the diameter of the potential gradient area. This means the diameters in soils with a bad conductivity are correspond-ingly wide (30 ... 60 m), soils with a good conductivity correspondingly nar-row (10 ... 15 m).
Determining the probe- and auxiliary earth electrode resistance provides in-formation about the size of a possible potential gradient area. High resistances lead to correspondingly large gradient areas and vice versa. In this context it has to be taken into account that soils with a good conductivity and corre-spondingly small potential gradient areas result in a relatively steep voltage shape and therefore in a relatively high step voltage. If necessary, such systems have to undergo a potential check.
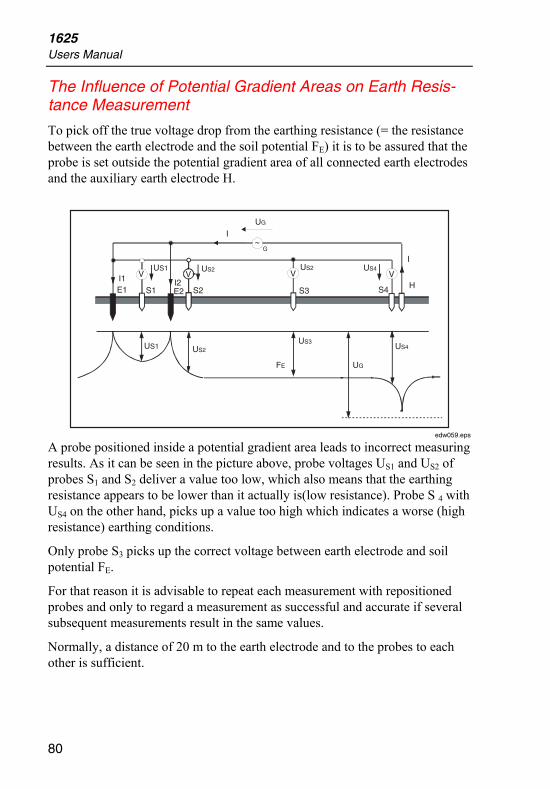
1625 Users Manual
80
The Influence of Potential Gradient Areas on Earth Resis-tance Measurement
To pick off the true voltage drop from the earthing resistance (= the resistance between the earth electrode and the soil potential FE) it is to be assured that the probe is set outside the potential gradient area of all connected earth electrodes and the auxiliary earth electrode H.
I1E1
US1
S1
US1
I2E2
US2
US2
S2
IUG
G
US2
S3
FE
US3
UG
US4
US4
S4
I
HVVV V
edw059.eps
A probe positioned inside a potential gradient area leads to incorrect measuring results. As it can be seen in the picture above, probe voltages US1 and US2 of probes S1 and S2 deliver a value too low, which also means that the earthing resistance appears to be lower than it actually is(low resistance). Probe S 4 with US4 on the other hand, picks up a value too high which indicates a worse (high resistance) earthing conditions.
Only probe S3 picks up the correct voltage between earth electrode and soil potential FE.
For that reason it is advisable to repeat each measurement with repositioned probes and only to regard a measurement as successful and accurate if several subsequent measurements result in the same values.
Normally, a distance of 20 m to the earth electrode and to the probes to each other is sufficient.

Earthing Resistance Principle of Operation
81
Earth Impedance (R*) on High Voltage Transmission Lines
The earthings of transmission line pylons are interconnected via the overhead earth wire.
This wire is not only ohmic. There is also inductivity and resistivity (L´, R´). For calculation of the short circuit current this impedance at line frequency has to be determined.
Inductivity and resistivity are known in most cases. Therefore the actual im-pedance can be calculated for each point of the line by a complex computation considering individual pylon resistance. This (computation) has to be done for each single pylon.
The earth impedance can be measured with this instrument.
The inductive portion of the impedance of the overhead wire is frequency de-pendent.
Accordingly, the measuring frequency applied by the tester has to be close to the mains frequency in order to get correct readings.
For that reason ordinary testers using frequencies between 70 Hz and 140 Hz show incorrect readings. This instrument measures with 55 Hz to be near enough to 50 / 60 Hz line frequency but to avoid interference with them

1625 Users Manual
82