15-inch string trimmer - sears
TRANSCRIPT
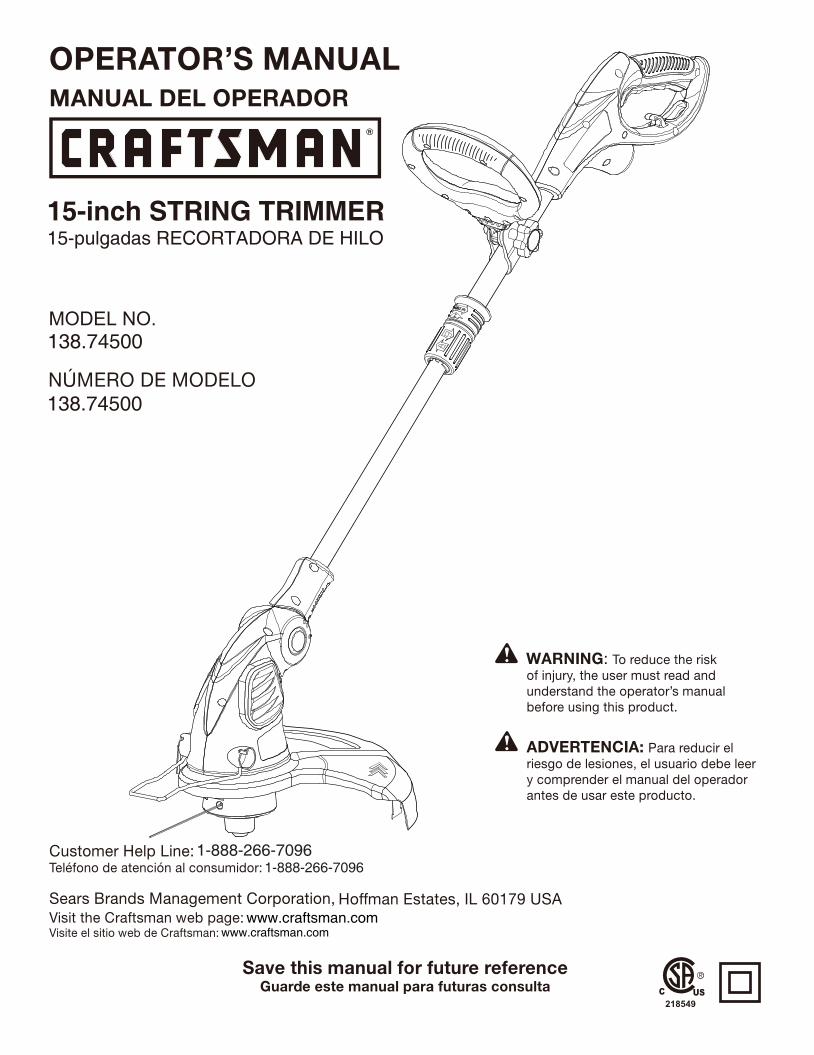
15-pulgadas RECORTADORA DE HILO15-inch STRING TRIMMER
MODEL NO. 138.74500
138.74500
1-888-266-70961-888-266-7096
www.craftsman.comwww.craftsman.com

.7-8
......9
.7-9
7
.9-10
this product is warranted against any defects in material or workmanship. A defective product will be replaced free of charge.�
� �� producto defectuoso se remplazara sin cargo.

For safe operation, read and understand all instructions before using this product. Follow all safety instructions. Failure to follow all safety instructions listed below, can result in serious personal injury. Do not allow children or untrained individuals to use this unit. Check the work area before each use. Remove all objects such as rocks, broken glass, nails, wire, or string which can be thrown or become entangled in the machine. Wear eye protection which is marked to comply with ANSI Z87.1 when operating this product. Use Safety Glasses – Always use face or dust mask if operation is dusty. Always wear safety glasses with side shields. Everyday glasses have only impact resistant lenses. They are NOT safety glasses. Following this rule will reduce the risk of eye injury. Use face mask if operation is dusty. Dress Properly – Use rubber gloves and substantial footwear is recommended when workingoutdoors. Wear heavy, long pants, boots, and gloves. Do not wear loose fitting clothing, short pants, or go barefoot. Do not wear jewelry of any kind. Secure long hair above shoulder level to prevent entanglement in moving parts. Keep children away - Keep all bystanders, children, and pets at least 50 ft. away. Stay alert - Do not operate this unit when you are tired, ill, or under the influence of alcohol, drugs, or medication. Do not operate in poor lighting. Keep all parts of your body away from any moving part. Do not operate power tools in explosive atmospheres, such as in the presence of flammable liquids, gases, or dust. Power tools create sparks which may ignite the dust or fumes.
To reduce the risk of electric shock, this tool has a polarized plug (one blade is wider than the other) and will require the use of a polarized extension cord. The plug will fit into a polarized extension cord only one way. If the plug does not fit fully into the extension cord, reverse the plug. If the plug still does not fit, obtain a correct polarized extension cord. A polarized extension cord will require the use of a polarized wall outlet. This plug will fit into the polarized wall outlet only one way. If the plug does not fit fully into the wall outlet, reverse the plug. If the plug still does not fit, contact a qualified electrician to install the proper wall outlet. Do not change the equipment plug, extension cord receptacle, or extension cord plug in any way.Avoid body contact with grounded surfaces such as pipes, radiators, ranges, and refrigerators. There is an increased risk of electric shock if your body is grounded.Avoid Dangerous Environments - Don’t expose power tools to rain or wet conditions. Waterentering a power tool will increase the risk of electric shock.Ground Fault Circuit Interrupter (GFCI) protection should be provided on the circuit (s) or outlet(s) to be used for the gardening appliance. Receptacles are available having built-in GFCI protection and may be used for this measure of safety. Use Right Appliance - Do not force tool. Use the correct tool for your application. The correct tool will do the job better and safer at the rate for which it is designed.Do not operate the equipment while barefoot or when wearing sandals or similar lightweightfootwear. Wear protective footwear that will protect your feet and improve your footing onslippery surfaces.Do not overreach. Keep firm footing and balance. Over-reaching can result in loss of balance.
Avoid Accidental Start – Do not carry plugged in appliance with finger on trigger. Be sure theswitch trigger is not en-gaged before pluggingin.Do not use tool if switch trigger does not turn it on or off. Any tool that cannot be controlled withthe switch trigger is dangerous and must be repaired.Disconnect appliance from power source before storing, servicing, changing accessoriessuch as cutting line. Such preventive safety measures reduce the risk of starting the toolaccidentally.Use only identical manufacturer’s replacement parts and accessories. Use of any other partsmay create a hazard or cause product damage.Maintain appliance with care - Replace string head if cracked, chipped, or damaged in any way.Be sure the string head is properly installed and securely fastened. Failure to do so can causeserious injury.Make sure all guards, straps, deflectors and handles are properly and securely attached.Use only the manufacturer’s replacement string in the cutting head. Do not use any othercutting attachment, for example, metal wire, rope, or the like. To install any other brand ofcutting head to this string trimmer can result in serious personal injury.Never operate unit without the grass deflector in place and in good condition.Check damaged parts. Before further use of the tool, a guard or other part that is damagedshould be carefully checked to determine that it will operate properly and perform its intendedfunction. Check for alignment of moving parts, binding of moving parts, breakage of parts,mounting and any other conditions that may affect its operation. A guard or other part that isdamaged must be properly repaired or replaced by an authorized service center to avoid riskof personal injury.Maintain a firm grip on both handles while trimming. Keep string head below waist level. Nevercut with the string head located over 30in, or more above the ground.
Store idle appliances - When not in use, string trimmer should be stored indoors in a dry, locked place out of the reach of children.Make sure your extension cord is in good condition. When using an extension cord, be sure to use one heavy enough to carry the current your product will draw. A wire gauge size (A.W.G.) of at least 16 is recommended for an extension cord 50 feet or less in length. A cord exceeding 100 feet is not recommended. If in doubt, use the next heavier gauge. The smaller the gaugenumber, the heavier the cord. An undersized cord will cause a drop in line voltage resulting in loss of power and overheating.Never use blades or flailing devices. Unit is designed for line trimmer use only. Use of any other accessories or attachments will increase the risk of injury. Inspect area to be cut. Remove objects (rocks, broken glass, nails, wire, string, etc.) which can be thrown or become entangled in cutting head.Keep the air vents clean and free of debris to avoid overheating the motor. Clean after eachuse.Stop the unit and disconnect the power source when not in use. Carry the unit with the motorstopped.Store unplugged and out of the reach of children.Do not hang unit so that the switch trigger is depressed.Do not use multiple cords.Do not abuse the cord. Never carry the unit bythe extension cord or yank extension cord todisconnect unit.Keep the extension cord clear of operator and obstacles at all times. Do not expose cords toheat, oil, water, or sharp edges.If the power supply cord is damaged, it must be replaced only by the manufacturer or by anauthorized service center to avoid risk.Save these instructions. Refer to them frequently and use them to instruct others who may use this power tool. If you loan someone this power tool, loan them these instructions also.
NOITANALPXE/NOITANGISED EMAN LOBMYS
egatloV stloV V
tnerruC serepmA A
)dnoces rep selcyc( ycneuqerF ztreH zH
rewoP ttaW W
emiT setuniM nim
Alternating Current Type of current
Direct Current Type or a characteristic of current
Class II Construction Double-insulated construction
Wet Conditions Alert Do not expose to rain or use in damp locations
To reduce the risk of injury user must read and siht gnisu erofeb launam s’rotarepo dnatsrednu
.tcudorp
Safety Alert Precautions that involve your safety.
Keep Bystanders Away Keep all bystanders at least 50 ft. away.
Always wear safety goggles or safety glasses ecaf lluf a ,yrassecen sa ,dna sdleihs edis htiw
.tcudorp siht gnitarepo nehw dleihs
Read The Operator’s Manual
Eye Protection

Input...........................................................120 V AC 60Hz.Cutting Path.................................................................15 in.Feed type..........................................0.065 in. bump & feed
Replacement Spool Part Number..........................71-85967Replacement Cutting line Part Number.................71-85822
Auxiliary handle
CORD RETAINERA convenient cord retainer helps keep the extension cord connection secure during string trimmer operation.
EDGER GUIDEThe easily mounted edger guide allows the string trimmer to perform as an edger.
FRONT HANDLEThe string trimmer is equipped with a front handle assembly for ease of operation and to prevent loss of control.
GRASS DEFLECTOR
ROTATING REAR HANDLE
The rotating rear handle on the string trimmer can be locked in two different positions for ease of use when edging.
TELESCOPING BOOM The string trimmer can be adjusted to different extension
points for ease of use.
The trimmer includes a grass deflecter that helps protect from flying debris.
When working outdoors with a product, use an extension designated with “WA” on the cord’s jacket.
Before using any extension cord, inspect it for loose or exposed wires and cut or worn insulation.
**Ampere rating (on product data plate)
0-2.0 2.1-3.4 3.5-5.0 5.1-7.0 7.1-12.0 12.1-16.0
Cord Length Wire Size (A.W.G.)
25 ́ 16 16 16 16 14 14
50 ́ 16 16 16 14 14 12
100 ́ 16 16 14 12 10 —
**Used on 12 gauge - 20 amp circuit.NOTE: AWG = American Wire Gauge
WARNING:
WARNING:
Keep the extension cord clear of the working area. Position the cord so that it will not get caught on lumber, tools, or other obstructions while you are working with a power tool. Failure to do so can result in serious per -sonal injury.
Check extension cords before each use. If damaged replace immediately. Never use product with a damaged cord since touching the damaged area could cause elec-trical shock resulting in serious injury.
ELECTRICAL
STARTING/STOPPING THE TRIMMER
OPERATING THE TRIMMER
If grass becomes wrapped around the string head:Attach the outlet end of an extension cord to the plug on the rear of the string trimmer.
Folow these tips when using the string trimer:
If any parts are damaged or missing, do not operate this product until the parts are replaced. Failure to heed this warning could result in serious personal injury.
Do not attempt to modify this product or create accessories not recommended for use with this product. Any such alteration or modification is misuse and could result in a hazardous conditionleading to possible serious personal injury.
Do not connect to power supply until assembly is complete. Failure to comply could resultin accidental starting and possible serious personal injury.
To start the string trimmer, press the switch trigger.To stop the string trimmer, release the switch trigger.If any parts are damaged or missing, please call 1-888-266-7096 for assistance.
Hold the trimmer with your right hand on the rear handle and your left hand on the front handle.Keep a firm grip with both hands while in operation.Trimmer should be held at a comfortable position with the rear handle about hip height.Cut tall grass from the top down. This will prevent grass from wrapping around the shaft housing and string head.
Stop the trimmer.Unplug the string trimmer.Remove the grass.
Remove supplied screw with a phillips screwdriver from the trimmer head.Fit the grass deflector into the slots on trimmer head.Turn counterclockwise to lock grass deflector into place.Line up the screw hole in the grass deflector with the center hole in the trimmer head.Install supplied screw and tighten by turning clockwise with a phillips screwdriver.
See Figure 4 - 5, page i.
See Figure 6, page i.
See Figure 3, page i.
1-888-266-7096
NOTE: Use only approved outdoor extension cords.Route the extension cord through the slot located on the rear of the string trimmer housing and place underneath the cord retainer.
Loosen and remove the knob from the handle.Install the handle on the rear handle pole in the area indicated by the illustration.Adjust handle up or down, if necessary, to desired operating position.Reinstall the knob. Tighten it to secure.
Do not attempt to modify this product or create accessories not recommended for use with this product. Any such alteration or modification is misuse and could result in a hazardous condition leading to possible serious personal injury.
If any parts are damaged or missing do not operate this product until the parts are replaced. Use of this product with damaged or missing parts could result in serious personal injury.

Keep the trimmer tilted toward the area being cut; this is the best cutting area.The string trimmer cuts when passing the unit from left to right. This will avoid throwing debris at the operator. Avoid cutting in the dangerous area shown in figure 8.
Use the tip of the string to do the cutting; do not force string head into uncut grass.Wire and picket fences cause extra string wear, even breakage. Stone and brick walls, curbs, and wood may wear strings rapidly.Avoid trees and shrubs. Tree bark, wood moldings, siding, and fence posts can easily be damaged by the strings.
Unplug the string trimmer.Pull up edging coupler and turn handle end counterclockwise.Release edging boom coupler when handle has been rotated 180°.
The rotating handle can be used in combination with the edger guide for edging sidewalks and walkways. To use the edger guide, flip down from it’s stored position.
CUTTING TIPS
THE CUTTING LINE
TELESCOPING BOOM AND FRONT HANDLE
ROTATING REAR HANDLE
EDGINGSee Figure 8, page ii.
See Figure 7, page i. See Figure 9, page ii.
See Figure 12-13, page ii.
See Figure 11, page ii.
THREE-POSITION PIVOTING HEAD
Unplug the string trimmer.Depress the pivot button and move the trimmer head up or down to one of the three positions indicated by the notches.
See Figure 10, page ii.
DO NOT grasp the exposed cutting line when picking up or holding the trimmer.
A single 0.065-inch round cutting line is pre-installed on the trimmer. When the cutting line needs replacing, install anew pre-wound spool, Craftsman 71-85967.
During operation, cutting lines shorten due to normal wear. For greater convenience and efficiency, your trimmer has been equipped with a bump feed head that allows you tosimply bump the trimmer head to extend the cutting lines while the trimmer is operating. Cutting line will wear faster and require more feeding if the cutting or edging is done along sidewalks or other abrasive surfaces or heavier weeds are being cut.
While the trimmer is on and spinning, gently bump the spool housing on a firm surface (hard ground or sidewalk). This should release additional cutting line from the spool. If no line is released, bump the trimmer head moresharply or try bumping it on a firmer surface.
If there is no change in the cutting line length, un-plugthe trimmer’s pigtail power cord from the extensioncord. After the trimmer head stops rotating, gently pull atthe cutting lines manually. Once the lines are pulled out(extended), plug the trimmer’s pigtail power cord into theextension cord and resume cutting.
If the cutting line still does not feed from the spool, thespool might be empty or the cutting line may be tangled or jammed on the spool. Un-plug the trimmer’s pigtail power cord from the extension cord. After the trimmer head stops rotating,remove the spool (see steps1 through 3 in “Removing the Spool” on page 9).If the line is tangled or jammed, untangle and replace the line. If the spool is empty, replace the spool.
EXTENDING THE CUTTING LINE
To avoid injury, ALWAYS turn off and disconnect the trimmer from the power outlet BEFORE installing parts or cleaning the trimmer or making any adjustments.
The angle of the front handle can be adjusted 180°. Unplug the string trimmer. Set the trimmer on a flat surface and turn the knob counterclockwise to loosen the handle. For trimming, adjust the handle upward. For edging, adjust the handle downward. Turn the knob clockwise until the handle is securely tightened.
The boom can be extended or shortened for ease of use. Unplug the string trimmer. Unscrew telescoping boom coupler and slide to desired position. Tighten boom coupler.
Please call 1-888-266-7096 for service andlocation of nearest authorized service center.
Please call 1-888-266-7096.
TO REPLACE CUTTING LINEREMOVE THE SPOOLFor easy spool replacement we recommend using Craftsman 71-85967, bump feed replacement spool with 0.065 cutting line. It is factory wound for maximum reliability.
Disconnect the trimmer from the power supply. Turntrimmer over to access spool head cover.
REPLACE THE SPOOL
FILLING SPOOL WITH CUTTING LINE
FILLING SPOOL WITH CUTTING LINE
Replace the spool with a new factory pre-wound spool,Craftsman 71-85967, available from your Sears store orother Craftsman outlet.Insert the end of one line through an eyelet in the spoolhousing. Insert the other line through the other eyelet.Insert the spool into housing and press it down gentlyuntil you feel it drop into place.Take care to keep the line from becoming trapped under the spool.
Snap the spool head cover back on and at the sametime pull lines and be sure that they are released fromspool rail notch.
Replacement packs of 0.065 inch (1.65mm) Craftsman Cutting Line 71-85822 are available from your Sears store.
Remove the empty spool from the tool as described in“REMOVE THE SPOOL”.Remove any remaining cutting line from the spool.First wind new line onto the uppermost part of thespool. Feed 3/4 inch of cutting line into one of the line spool rail notches. Wind the cutting line onto the spool in the direction of the arrow on the spool. Make sure to wind the line neatly and in layers Do not crisscross.
When the wound cutting line reaches the eyelets (recesses), cut the line. Temporarily park the line in the spool rail notch on one side of the spool. Repeat the above procedure for the second cutting line on the lower section of the spool. Fit the spool onto the tool as described in “REPLACE THE SPOOL”.
Press the release tabs on the spool head cover andremove cover, pulling it straight off of spool.Lift the spool out of the spool housing.
To avoid injury, ALWAYS turn off and disconnect the trimmer from the power outlet BEFORE installing parts or cleaning the trimmer or making any adjustments.
Before you begin trimming, only use the appropriate type of cutting line. Ensure that cuttingline is present in both sections of the spool.
See Figure 14, page ii.
See Figure 15, page ii.
See Figure 15, page ii.
Strings will not feed whenbumping during use as per instructions:
Grass wraps around drive shaft housing and string head.
Motor fails to start when switch trigger is depressed.
1. Strings have becomestuck together due to heator storage time.
2. Not enough string present in spool.
3. Strings are tangled on spool
1. Cutting tall grass at ground level.
1. Power cord is not pluggedin or connection is loose.2. Household circuit breaker is tripped.
3. Extension cord may be faulty.
1. Unplug trimmer. Open spool cover. Remove spool, unwind line and then rewind onto spool housing.
2. Unplug trimmer. Open spool cover. Remove spool and replace with new line or new spool assembly as per instructions in
manual.
3. Unplug trimmer. Open spool cover. Remove spool unwind and remove tangled line. Rewind line as per instructions in this manual.
1. Cut tall grass from the top down to prevent wrapping.
1. Plug in the power cord.
2. Check circuit breaker.
3. Try another extension cord or connect into another wall receptacle socket on a different circuit.
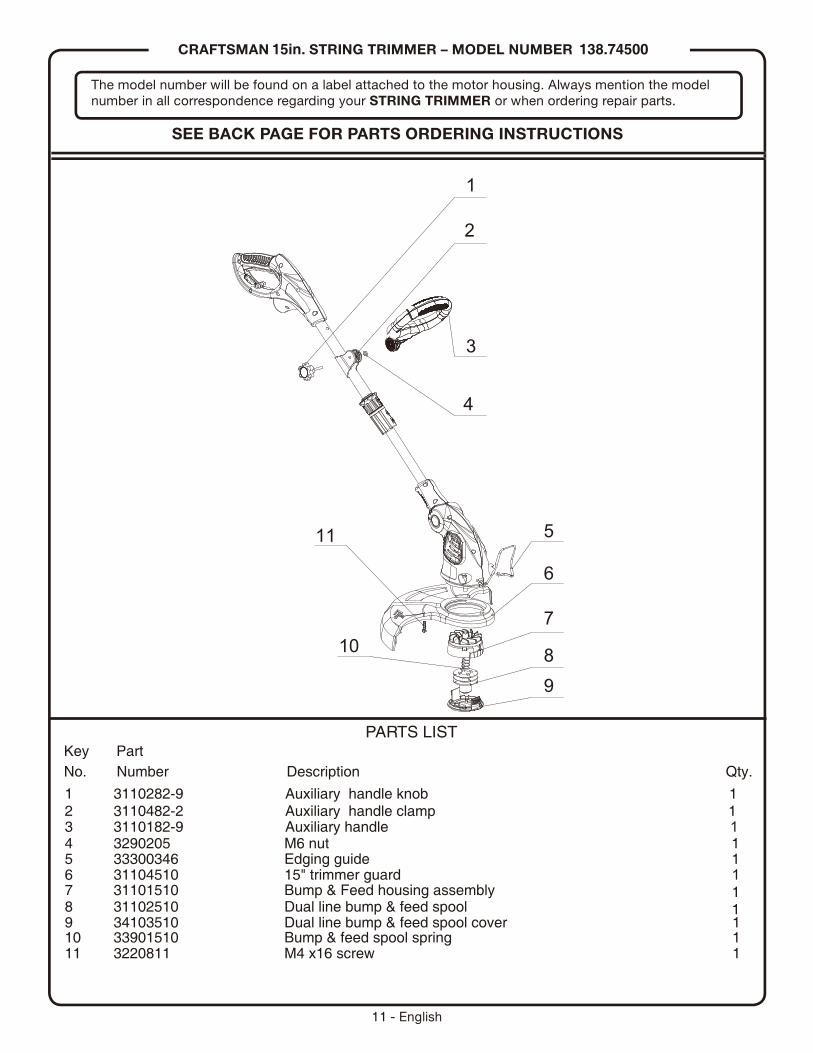
15in. 138.74500
PARTS LISTKey PartNo. Number Description Qty.
1
2
3
4
5
6
7
89
10
11
1 3110282-9 Auxiliary handle knob 12 3110482-2 Auxiliary handle clamp 13 3110182-9 Auxiliary handle 14 3290205 M6 nut 15 33300346 Edging guide 16 31104510 15" trimmer guard 17 31101510 Bump & Feed housing assembly 8 31102510 Dual line bump & feed spool 1
1
9 34103510 Dual line bump & feed spool cover 1 110 33901510 Bump & feed spool spring
11 3220811 M4 x16 screw 1

12 - English
NOTES

A
B
A
A
B
B
B
C
D
F
G
E
A
B
C
A - Cord retainer (reten para el cable) B - Switch trigger (gatillo del interruptor)C - Rotating rear handle (cómo rotar el mango trasero)D - Front handle (mango delantero)E - Telescoping boom (brazo telescópico)F - Grass deflector (deflector de hierba)G - Edger guide (guía para el recorte de bordes)
A - Grass deflector (deflector de hierba)
A - Screw(tornillo)B - Screw hole(orificio del tornillo)C - Button(botón)
B - Slide over head and turn counter clockwise deslizarlo sobre el cabezal y girarlo en sentido antihorario
PROPER OPERATING POSITION
POSICIÓN CORRECTAPARA EL MANEJO DE
LA HERRAMIENTA
A - Cord retainer (retén para el cable)B - Extension cord outlet end (extremo del enchufe de cordón de extensión)
A
A - Switch trigger (gatillo del interruptor)B - Attach outlet end of extension cord here
(acople aquí extremo del enchufe del cable de extensión)
Fig. 7
Bump on firm surfaceGolpeé en superficie firme
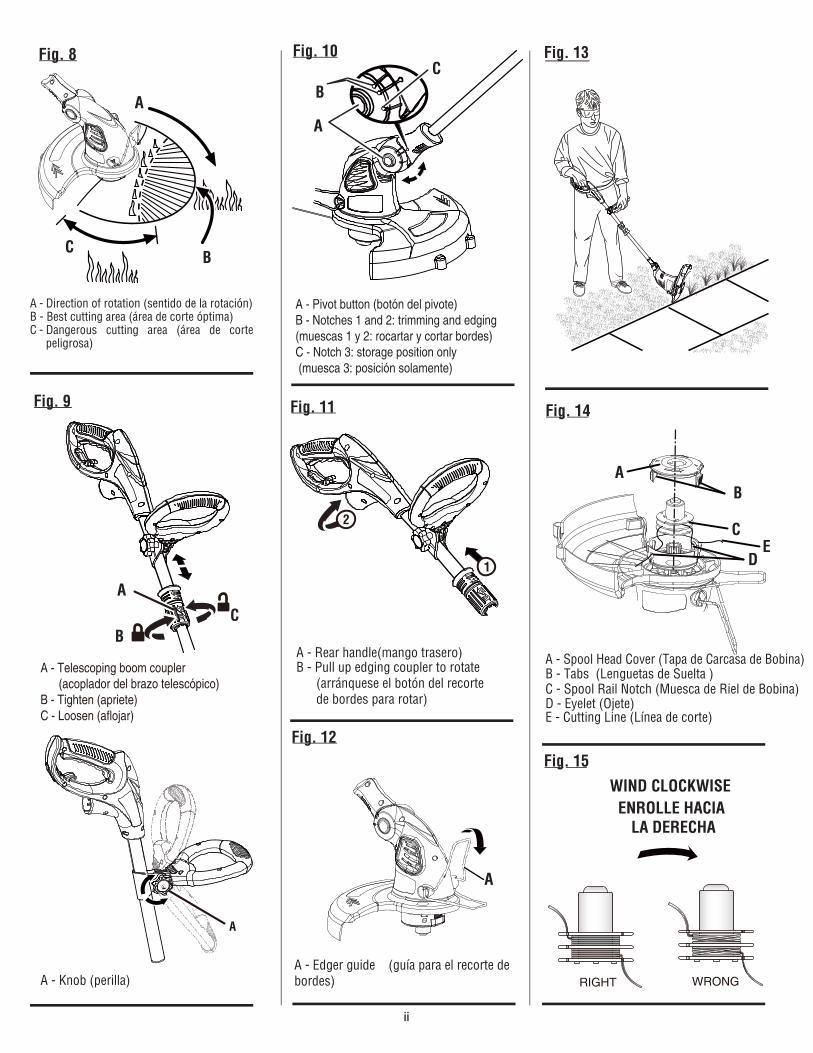
Fig. 8
Fig. 9 Fig. 11
Fig. 13
WIND CLOCKWISEENROLLE HACIA
LA DERECHA
AB
CE
D
A - Rear handle(mango trasero) A - Spool Head Cover (Tapa de Carcasa de Bobina)B - Tabs (Lenguetas de Suelta )C - Spool Rail Notch (Muesca de Riel de Bobina)D - Eyelet (Ojete)E - Cutting Line (Línea de corte)
B - Pull up edging coupler to rotate (arránquese el botón del recorte de bordes para rotar)
Fig. 10
Fig. 14
Fig. 15
A
CB
Fig. 12
A - Edger guide (guía para el recorte debordes)
A
A
BC
RIGHT WRONG
ii
A
BC
A - Pivot button (botón del pivote)B - Notches 1 and 2: trimming and edging (muescas 1 y 2: rocartar y cortar bordes)C - Notch 3: storage position only (muesca 3: posición solamente)
A - Knob (perilla)
A - Telescoping boom coupler (acoplador del brazo telescópico)B - Tighten (apriete)C - Loosen (aflojar)

Para la operación segura, lea y entienda todas las instrucciones antes de usar este producto. Siga todas las instrucciones de seguridad. La inobservancia de todas lasinstrucciones de seguridad señaladas abajo puede causar lesiones corporales graves.No permita que utilicen esta unidad niños ni personas carentes de la debida instrucción para su manejo.Limpie el área de trabajo cada vez antes de usar la unidad. Retire todos los objetos tales como piedras, vidrios rotos, clavos, alambre o cuerdas que pudiesen resultar lanzados o enredados en el hilo de corte o cuchilla, según sea el caso.Para utlizar este producto póngase anteojos de seguridad o gafas protectoras marcados con el sello de cumplimiento dela norma ANSI Z87.1.Utilice anteojos seguridad – siempre cara de uso o máscara de polvo si la operación está polvorienta.Siempre use gafas de seguridad con protección lateral. Los anteojos comunes sólo tienen lentes resistentes a los impactos. NO son anteojos de seguridad. Con el cumplimiento de esta regla se reduce el riesgo de posibles lesiones oculares. Si el proceso es polvoriento, utilice unacareta.Vista apropiadamente – guantes de goma de Uso y calzado substancial son recomendados al trabajar fuera.Póngase pantalones largos de tela gruesa, botas y guantes. No se ponga ropa holgada o pantalones cortos, ni ande descalzo. No se ponga joyas de ninguna clase.Recójase el cabello largo arriba del nivel de los hombros para evitar que se enrede en las piezas móviles.Mantenga alejados a los niños - Mantenga alejados a todos los circunstantes, niños y animales a una distancia mínima de 15 m (50 pies).Permanezca alerta - No use esta unidad cuando se encuentre fatigado, enfermo o bajo los efectos del alcohol, drogas o medicamentos.No utilice la unidad en condiciones deficientes de iluminación. Mantenga todas las partes del cuerpo alejadas de toda pieza en movimiento.No utilice herramientas motorizadas en atmósferas explosivas, como las existentes alrededor de líquidos, gases y polvos inflamables. Las herramientas eléctricas generan chispas que pueden encender el polvo y los vapores inflamables.Para reducir el riesgo de una descarga eléctrica, esta herramienta dispone de una clavija polarizada (una patilla es más ancha que la otra) y requiere un cable de extensión polarizado. Esta clavija encaja de una sola manera en un cable de extensión polarizado. Si la clavija no entra completamente en el enchufe del cable de
extensión, invierta la posición de la misma.Si aún así no entra la clavija, consiga un cable de extensión polarizado correcto. Un cable de extensión polarizado requerirá una toma de corriente polarizada. Esta clavija encaja de una sola manera en una toma de corriente polarizada. Si la clavija no entra completamenteen la toma de corriente, invierta la posición de la clavija. Si aún así no entra la clavija, llame a un electricista calificado para encargarle la instalación de una toma de corriente adecuada. No cambie de ninguna manera la clavija del equipo ni el enchufe o la clavija del cable deextensión.Evite el contacto del cuerpo con objetos conectados a tierra, como las tuberías, radiadores, estufas y refrigeradores. Existe un mayor riesgo de descargas eléctricas si el cuerpo está en contacto con tierra.Evite los entornos de trabajo peligrosos - No exponga las herramientas eléctricas a la lluvia ni a condiciones de humedad. La introducción de agua en una herramienta eléctrica aumenta el riesgo de descargas eléctricas.Use el aparato adecuado El (los) circuito(s) o la(s) toma(s) de corriente donde se conecta el aparato para labores de jardinería deben estar protegidos con un interruptor de circuito accionado por falla de conexión a tierra (GFCI). Hay receptáculos con la protección de un GFCI integrado, y pueden utilizarse para contar con esta característica de seguridad.Utilice aparato correcto - no fuerza instrumento. Utilice el instrumento correcto para su aplicación. El instrumento correcto hará el trabajo mejor y más seguro en la tasa para que es diseñado.No accione el equipo cuando esté descalzo o al llevar puestas sandalias o calzado liviano similar. Use calzado de seguridad que le proteja sus pies y mejore su postura en superficies resbaladizas.No estire el cuerpo para alcanzar mayor distancia. Mantenga los pies bien afirmados y el equilibrio. No trate de alcanzar demasiado lejos.Evite los arranques accidentales – Evite un arranque accidental de la unidad. Asegúrese de que el gatillo del interruptor no esté oprimido antes de conectar la herramienta.No utilice la herramienta si el interruptor no enciende o no apaga. Una herramienta que no pueda controlarse con el interruptor es peligrosa y debe repararse.Desconecte la clavija de la toma de corriente antes de guardar la herramienta. Tales medidas preventivas de seguridad reducen el riesgo de poner en marcha accidentalmente la herramienta.Sólo utilice piezas de repuesto idénticas y accesorios del fabricante original. El empleo de piezas diferentes puede causar un peligro o dañar el producto.
Proporcione mantenimiento con cuidado al aparato - Cambie el cabezal del hilo, si está agrietado, desportillado o dañado de cualquier forma. Asegúrese de que el cabezal del hilo, o cuchilla, según sea el caso, esté debidamente instalado y firmemente asegurado. La inobservancia de esta advertencia puede causar lesiones corporales serias.Asegúrese de que todas las protecciones, correas, mangos y deflectores estén acoplados debidamente y de manera segura.En el cabezal de corte use únicamente hilo de repuesto del fabricante original. No use ningún otro aditamento de corte, por ejemplo, cable metálico, cuerda o producto similar. Instalar cualquier otra marca de hilo de corte en esta recortadora de hilo puede producir lesiones corporales serias.Nunca utilice la unidad si el deflector de pasto no está montado en su lugar y en buenas condiciones de funcionamiento.Revise para ver si hay piezas dañadas. Antes de seguir utilizando la herramienta, es necesario inspeccionar cuidadosamente toda protección o pieza dañada para determinar si funcionará correctamente y desempeñará la función a la que está destinada. Verifique la alineación delas partes móviles, que no haya atoramiento de partes móviles, que no haya piezas rotas, el montaje de las piezas y cualquier otra condición que pudiera afectar su funcionamiento. Toda protección o pieza que esté dañada debe repararse apropiadamente o reemplazarse en uncentro de servicio autorizado para evitar todo riesgo delesiones.Al usar la recortadora, sujétela firmemente por ambos mangos. Mantenga el cabezal del hilo por debajo del nivel de la cintura. Nunca corte con el cabezal del hilo a más de 762 mm (30 pulg.) del suelo.Guarde los aparatos que no se están usando - Mientras no se esté utilizando, la sopladora debe almacenarse en el interior, en un sitio seco y bajo llave, lejos del alcance de los niños.Asegúrese de que esté en buen estado el cordón de extensión. Al utilizar un cordón de extensión, utilice uno del suficiente calibre para soportar la corriente que consume el producto. Se recomienda que los conductores sean de calibre 16 (A.W.G.) por lo menos para un cordónde extensión de 15 metros (50 pies) de largo o menos. Si tiene dudas, utilice un cordón del calibre más grueso siguiente. Cuanto menor es el número de calibre, mayor es el grueso del cordón. Un cordón de un grueso insuficiente causa una caída en el voltaje de línea, y produce recalentamiento y pérdida de potencia.Nunca use hojas ni dispositivos que flameen. Esta unidad se diseñó para usar con recortadora de hilo únicamente. El uso de cualquier otro accesorio o aditamento aumenta el riesgo de lesiones.
Inspeccione el área por cortar. Retire todos los objetos (piedras, vidrio roto, clavos, alambre, hilo, etc.) que puedan salir disparados o enredarse en el cabezal de corte.Mantenga las rejillas de ventilación limpias y sin desechos para evitar que se recaliente el motor. Límpielas cada vez, después de usar la herramienta.Apague la unidad y desconecte el suministro de corriente cuando no esté en uso. Traslade la unidad con el motor apagado.Guarde la unidad desenchufada y fuera del alcance de los niños.No cuelgue la unidad de modo que el gatillo del interruptor quede presionado.No use múltiples cordones.No maltrate el cordón. Nunca traslade la unidad sujetándola por el cordón de extensión ni tire del cordón de extensión para desconectarla.Mantenga el cordón de extensión alejado del operador y de los obstáculos en todo momento. No exponga los cordones al calor, aceite, agua ni bordes afilados.Si está dañado el cordón de corriente, debe ser reemplazado únicamente por el fabricante o en un centro de servicio autorizado para evitar riesgos.Guarde estas instrucciones. Consúltelas con frecuencia y empléelas para instruir a otras personas que puedan utilizar esta herramienta. Si presta a alguien esta herramienta, facilítele también las instrucciones.
SÍMBOLO NOMBRE NÓICACILPXE/NÓICANGISED
ejatloV stloV V
etneirroC soirepmA A
)odnuges rop solcic( aicneucerF ztreH zH
aicnetoP ttaW W
opmeiT sotuniM nim
Corriente alterna Tipo de corriente
Corriente continua Tipo o característica de corriente
Fabricación Clase II Fabricación con doble aislamiento
Alerta de condiciones húmedas No exponga la unidad a la lluvia ni la use en l .sodemúh seragu
Lea el manual del operador Para reducir el riesgo de lesiones, el usuario led launam le rednerpmoc y reel ebed
.otcudorp etse rasu ed setna rodarepo
Alerta de seguridad Precauciones para su seguridad.
Mantenga alejadas a Mantenga a los circunstantes a una distancia las personas presentes mínima de 15 m (50 pies).
Protección ocular Al utilizar este producto, póngase siempre gafas al ne y ,laretal nóiccetorp noc dadiruges ed
nu ecilitu ,oirasecen aes euq ne adidem .arac al adot arap rotcetorp

......................71-85967
..................71-85822
Entrada..............................................120V, AC only, 60HzCorte De Ruta........................................................381 MMTipo De Alimentación........1.65 MM golpe de alimentación
CARACTERISTIQUES ELECTRIQUES
línea de corte

No permita que su familiarización con los productos le haga perder la atención. Tenga presente que un descuido de un instante es suficiente para causar una lesión seria.
Cuando utilice productos, póngase siempre gafas de seguridad o anteojos protectores con protección lateral. La inobservancia de esta advertencia puede causar el lanzamiento de objetos a los ojos y, consecuentemente, posibles lesiones serias.
1-888-266-7096
MONTAJE DEL MANGO DELANTERO
Afloje y retire la tuerca de mariposa, la arandela y el mando.Instale el mango en el alojamiento del eje de impulsión, en el lugar que indica la etiqueta en el eje.Si es necesario, suba o baje el mango para ajustarlo a la posición de manejo deseada.Reinstale el mando y la tuerca de mariposa. Ajuste la mando por seguridad.
Auxiliar mango delantero
Vea la figura 3, página ii.

No utilice ningún aditamento o accesorio no recomendado por el fabricante de este producto. El empleo de aditamentos o accesorios no recomendados puede causar lesiones graves.
ENCENDIDO Y APAGADO DE LA RECORTADORA
NOTA: Use solamente cables de extensión aprobados para exteriores.
Pase el cable de extensión a través del ranura del asa situada en la parte trasera del alojamiento de la recortadora y póngalo debajo del retén del cable. Para encender la recortadora de hilo, presione el gatillo del interruptor de encendido. Para detener la recortadora de hilo, suelte el gatillo del
Si alguna pieza falta o está dañado, por favor llame al 1-888-266-7096 para obtener ayuda
interruptor.
MANEJO DE LA RECORTADORA
Siga las siguientes recomendaciones a manejar la recortadora de hilo:
Si la hierba se enrolla en el cabezal del hilo:
Apague la recortadora.Desenchufe la recortadora de hilo.Quite la hierba.
Sujete la recortadora con la mano derecha en el mango trasero y la izquierda en el delantero.Sujete firmemente la unidad con ambas manos durante la operación.Se recomienda sujetar la recortadora en una posición cómoda, con el mango trasero a la altura de la cadera aproximadamente.Corte la hierba alta desde arriba hacia abajo. Esto evitará que la hierba se enrolle alrededor del alojamiento del eje y del cabezal del hilo, lo que puede causar daños por calentamiento excesivo.
Durante el funcionamiento, las líneas de corte se acortan por el uso normal. Para una mayor conveniencia y eficiencia, su recortadora ha sido equipada con un cabezal de alimentación por golpes que le permite simplemente golpear el cabezal de la recortadora para extender las líneas de corte mientras usa la recortadora. La línea de corte gastará más rápido y necesitará más alimentación si la recortando o bordeando está hecho contra pavimento u otros superficies abrasivos, o si cortas hierbajos más pesados.
LA LÍNEA DE CORTE
NO haga contacto con la línea de corte expuesta cuando levanta o sostiene la recortadora.
Una línea redondo individual de 0.065 pulgadas se preinstala en la recortadora. Cuando la línea de corte necesita reemplace, instale nueva bobina devanada.Craftsman 71-85967. EXTENSIÓN DE LA LÍNEA DE CORTE
Mientras la recortadora está funcionamiento y girando, golpeé suavemente la carcasa de bobina contra una superficie firme (piso o pavimento). Esto debería soltar línea de corte adicional de la bobina.Si no se suelta ninguna línea, golpeé el cabezal de la recortadora con más fuerza o trate de golpearlo contrauna superficie aún más dura.Si no hay ningún cambio en la longitud de la línea de corte, desenchufe el cordón eléctrico en espiral del cordón de extensión. Cuando el cabezal de la recortadora haya dejado de girar, tire con suavidad delas líneas de corte manualmente. Una vez que laslíneas estén afuera (extendidas), enchufe el cordón eléctrico en espiral en el cordón de extensión y reanude el corte.
Si la línea de corte sigue sin alimentar la bobina, la bobina podría estar vacía o la línea de corte podría estar enredada o atascada en la bobina. Desenchufeel cordón eléctrico en espiral de la recortadora del cordón de extensión. Cuando el cabezal de la recortadora haya dejado de girar, retire la bobina (ver Pasos 1 a 3 en “SACAR LA BOBINA” en página 9).Si la línea está enredado o atascada, desenrede y reemplace la línea. Si la bobina está vacía, reemplace la bobina.
Mantenga la recortadora inclinada hacia el área de corte; ésa es el área óptima.La recortadora de hilo efectúa el corte al pasar la unidad de izquierda a derecha. De esta manera se evita el lanzamiento de desechos hacia el operador. Evite recortar en el área peligrosa mostrada en la figura 8.Haga que el recorte sea efectuado por la punta del hilo; no fuerce el cabezal del hilo en la hierba sin cortar.Las cercas de alambre y de estacas causan desgaste adicional del hilo, incluso su ruptura. Los muros de piedra y de ladrillo, así como las banquetas (aceras) yla madera pueden desgastar rápidamente los hilos.
RECOMENDACIONES DE CORTE
Evite el contacto con árboles y arbustos. La corteza de los árboles, las molduras de madera, los revestimientos de las paredes y los postes de las cercas pueden resultar dañados fácilmente por los hilos.
8
Vea la figuras 4-5, página i.
Vea la figura 6, página i.
Vea la figura 7, página i.
Vea la figuras 8, página ii.
Por favor llame al 1-888-266-7096 para el servicioy la ubicación en centro de servicio autorizado.
El brazo puede extenderse o acortarse para facilitar
El ángulo del mango delantero puede ajustarse a 180°. Desenchufe la recortadora de hilo. Coloque la recortadora en una superficie plana y gire la perilla hacia la izquierda para aflojar el mango. Para recortar, ajuste el mango hacia arriba. Para cortar bordes, ajuste el mango hacia abajo. Gire la perilla hacia la derecha hasta que el mango esté firmemente apretado antes de volver.
su manejo.Desenchufe la recortadora de hilo.Destornille el botón del brazo telescópico y
extiéndalo o retráigalo hasta la posición deseada.Apriételo el botón del brazo telescópico.
RECORTEECORTE DE BORDESVea la figuras 12-13, página ii.
Vea la figura 14, página ii.
Vea la figura 10, página ii.
Vea la figura 9, página ii.
Vea la figura 9, página ii.
Desenchufe el cordón eléctrico. Volteé la recortadora para acceder la tapa de carcasa de bobina.
BRAZO TELESCÓPICOEl brazo puede extenderse o acortarse para facilitar su manejo.
Desenchufe la recortadora de hilo.Destornille el botón del brazo telescópico y
extiéndalo o retráigalo hasta la posición deseada.Apriételo el botón del brazo telescópico.
BRAZO TELESCÓPICO
MANGO DELANTERO AJUSTABLE CÓMO ROTAR EL MANGO TRASERODesenchufe la recortadora de hilo.
le erig y sedrob ed etrocer led nótob le eseuqnárrA
Liberación el boton del recorte de bordes cuando mango ha sido girado 180°.
REEMPLAZAR DE LA LÍNEA DE CORTESACAR LA BOBINA
Para evitar cualquier lesión, SIEMPRE apague y desconecte la recortadora del
limpiar la
Presione las lenguetas de suelta en la tapa de carcasa de bobina y sacque la tapa, tirandola ponte derecho de la bobina.Quite la bobina de la carcasa de bobina.
Para otro tipo de reparaciones, lleve la recortadora a un establecimiento de servicio autorizado, Por favor llame al 1-888-266-7096.
Para reemplazo fácil de la bobina, recomendamos usando Craftsman 71-85967, bobina reemplaza de alimentación por golpes con 0.065 línea de corte. Está devanada por fábrica por confiabilidad máxima.
El mango giratorio puede usarse en combinación conla guía para el recorte de bordes en banquetas (aceras)y veredas de entrada. Para utilizar la guía para elrecorte de bordes, el golpe hacia abajo de lo haalmacenado la posición.
mango a la izquierda.
tomacorriente ANTES de instalar partes,recortadora o de realizar ajustes.

Las cadenas no se utilizarán cuandogolpes durante el uso comosegún las instrucciones:
La hierba se envuelve alrededor dela unidad eje de la vivienda y la cadena de la cabeza.
El motor no arranca cuandointerruptor disparador se presiona.
1. Las cadenas se han convertido enpegados debido al caloro tiempo de almacenamiento.2. No hay suficiente cuerdapresentes en el carrete.3. Las cadenas se enredanen el carrete
1. Corte de césped de alto en lanivel del suelo.
1. El cable de alimentación no está enchufado o en conexión está suelta.2. Hogares disyuntorse ha disparado.3. El cable de extensión puede serdefectuoso.
1. Cut tall grass from the topdown to prevent wrapping.
1. Desenchufe la máquina. Abrir el carretecubierta. Retire la corredera, relajarse líneay luego retroceder en la cubierta del carrete.2. Desenchufe la máquina. Abrir el carretecubierta. Retire el carrete y reemplacecon línea nueva o nuevo carretemontaje según las instrucciones enmanual.3. Desenchufe la máquina. Abrir el carretecubierta. Retire la corredera relajarse yeliminar la línea enredada. Rebobinar líneasegún las instrucciones en este manual.
1. Plug in the power cord.2. Check circuit breaker.3. Try another extension cord or connect into another wall receptacle socket on a different circuit.
REEMPLAZAR LA BOBINALLENAR LA BOBINA CON LÍNEA DE CORTE
Inserte la bobina en la carcasa y aprieta suavemente hasta que la sientas bajar al lugar. Ten cuidado que la línea no queda atrapada bajo la bobina. Se cierra con un clic la tapa de carcasa y al mismo tiempo, tire las líneas y asegure que son sueltos de las muescas de los rieles de bobina.
Puedes devanar la línea nueva en una bobina vacía. Paquetes de reemplazo de 0.065 pulgada (1.65mm) Línea de Corte Craftsman 71-85822 son disponibles de la tienda Sears.
Saque la bobina vacía de la recortadora, como describido en “SACAR LA BOBINA” arriba. Saque cualquier línea quedando en la bobina. Primero, devana la línea nueva en el parte de la bobina más alto. Introduzca 3/4 pulgada de la línea de corte en unas de las muescas de la riel de bobina. Devana la línea de corte en la bobina en la dirección de la flecha en la bobina. Enseguras que devana la línea uniformamente y en estratos.
POSIBLE CAUSA SOLUCIÓN
REEMPLAZAR LA BOBINAReemplaza la bobina con una bobina nuevadevanada por fábrica, Craftsman 71-85967,disponible a su tienda Sears u otro punto de venta
Inserte el extremo de una línea de corte por uno de los ojetes en la carcasa de bobina. Inserte la otra línea por otro ojete.
Limpie todos los desechos presentes en la aberturas de la recortadora.Con frecuencia, usted mismo puede efectuar los ajustes y reparaciones indicados aquí.
Craftsman.

11 - Español
NOTAS

® Registered Trademark / TM Trademark of KCD IP, LLC in the United States, or Sears Brands, LLC in other countries ® Marca Registrada / TM Marca de Fábrica de KCD IP, LLC en Estados Unidos, o Sears Brands, LLC in otros países MC Marque de commerce / MD Marque déposée de Sears Brands, LLC
Get it fixed, at your home or ours!Your Home
For troubleshooting, product manuals and expert advice:
www.managemylife.com
For repair – in your home – of all major brand appliances, lawn and garden equipment, or heating and cooling systems,
no matter who made it, no matter who sold it!For the replacement parts, accessories and
owner’s manuals that you need to do-it-yourself. For Sears professional installation of home appliancesand items like garage door openers and water heaters.
1-800-4-MY-HOME® (1-800-469-4663)Call anytime, day or night (U.S.A. and Canada)
www.sears.com www.sears.ca
Our Home For repair of carry-in items like vacuums, lawn equipment,
and electronics, call anytime for the location of your nearest Sears Parts & Repair Service Center
1-800-488-1222 (U.S.A.) 1-800-469-4663 (Canada)www.sears.com www.sears.ca
To purchase a protection agreement on a product serviced by Sears: 1-800-827-6655 (U.S.A.) 1-800-361-6665 (Canada)
Para pedir servicio de reparación a domicilio, y para ordenar piezas:
1-888-SU-HOGAR®
(1-888-784-6427)www.sears.com
Au Canada pour service en français:1-800-LE-FOYERMC
(1-800-533-6937)www.sears.ca