131116 vsi installer supplement - vinyl siding · vsi sponsors the vsi certified installer program...
TRANSCRIPT

December 2013

Copyright ©2013 Vinyl Siding Institute, Inc. (VSI). All rights reserved. No part of this document may be reproduced or used in any form or by any means—graphic, electronic, or mechanical, including photocopying, recording, taping, or information storage and retrieval systems—without the written permission of the copyright owner, VSI. Certified Trainers and Certified Installers may download this document to their own computers and make multiple machine‐readable copies and/or print hard copies for personal use, as long as they do not alter, modify, adapt, display, publish, sell, or prepare derivative works based upon such material.

VSI Certified Installer Program: Installer Supplement
1
Contents About This Supplement .......................................................................... 2
Section 1: Foreword .............................................................................. 3
Section 2: Safety Issues .......................................................................... 6
Ladder Safety: ........................................................................................................................... 6
Power Saw Safety: .................................................................................................................... 7
Electrical Safety: ........................................................................................................................ 7
Occupant Safety: ....................................................................................................................... 7
Section 3: Important Notes ...................................................................... 9
Section 4: Terminology ........................................................................ 10
Section 5: Materials, Tools, and Accessories .............................................. 11
Section 6: Getting Started ..................................................................... 12
Estimating Materials Practice .................................................................................................. 13
Section 7: Installing Accessories ............................................................. 14
Bending Trim Sheet ................................................................................................................. 15
Using Drawings ....................................................................................................................... 16
Measuring ................................................................................................................................ 17
Cutting and Bending ................................................................................................................ 18
Attaching Trim Sheet ............................................................................................................... 19
Installing J-channel (Trim) Around Windows ........................................................................... 19
Section 8: Installing Horizontal Siding ...................................................... 20
Section 9: Installing Vertical Siding .......................................................... 22
Section 10: Installing Soffit and Fascia ..................................................... 23
Open Eave Installation ............................................................................................................ 24
Installing Fascia Covers .......................................................................................................... 24
Soffit Transitions ...................................................................................................................... 25
Section 11: Other Techniques ................................................................ 27
VSI Certified Installer Program: Installer Supplement
2
ABOUT THIS SUPPLEMENT The Vinyl Siding Institute, Inc. (VSI) has created this course to teach proper vinyl siding installation techniques, based on ASTM D4756, and prepare experienced installers for the VSI Certified Installer examination. The VSI Vinyl Siding Installation Manual is intended to be used by anyone who is interested in the proper installation techniques for vinyl siding and is the basis for the VSI Certified Installer Program. There is, however, more information that is pertinent to professionals looking to become VSI Certified Installers. Therefore, this supplement was created to give Certified Installer candidates that information and help them to prepare to take the Certified Installer examination.
The course addresses a broad range of skills and techniques in the installation of vinyl siding, soffit, fascia, and trim. It covers the following:
Orientation
Safety issues
Important notes
Terminology
Materials, tools, and accessories
Getting started
Installing accessories
Installing horizontal siding
Installing vertical siding
Installing soffit and fascia
Other techniques

VSI Certified Installer Program: Installer Supplement
3
SECTION 1: FOREWORD
OBJECTIVES: After completing this section, you will:
1. Understand what VSI, the VSI Certified Installer Program, and the VSI Product Certification Program are.
2. Understand why it is important to achieve Certified Installer status.
3. Understand the benefits of vinyl siding and the resources Certified Installers can use to promote their status and vinyl siding.
4. Understand why proper installation is important.
5. Understand what they will learn in this course.
KEY VOCABULARY: Vinyl Siding Institute, Inc. (VSI)
ASTM International (formerly called American Society for Testing and Materials [ASTM])
VSI Product Certification Program
VSI Certified Installer Program
KEY POINTS: Vinyl siding was first developed in the late 1950s, and its use grew steadily because of its low maintenance, value, and easy installation. The vinyl siding industry has made numerous improvements in formulations. Today, vinyl siding is the #1 choice for exterior cladding in the United States and Canada because of its many benefits:
Beauty Cost effectiveness
Durability Variety of colors, profiles, and textures
Green building Low maintenance
VSI sponsors the VSI Certified Installer Program to help experienced installers demonstrate their knowledge of proper installation techniques. The Vinyl Siding Institute, Inc. (VSI) is the trade association for manufacturers of vinyl and other polymeric siding and suppliers to the industry. VSI is the place to go for general information about vinyl siding. Visit the VSI website at www.vinylsiding.org to download the VSI Vinyl Siding Installation Manual and other helpful materials to help you sell and install vinyl siding.
The Program Administrator registers installers for classes and maintains the Official Registry of Certified Installers and Trainers on the VSI website. If you have questions about the VSI Certified Installer logo or your certification status, call the Administrator at (877) 627-8997 and ask for the VSI Certified Installer Program manager or email [email protected]. VSI staff cannot assist with these types of questions.

VSI Certified Installer Program: Installer Supplement
4
The VSI Product Certification Program allows manufacturers to certify, with independent verification, that their vinyl siding (not the installation) meets or exceeds the requirements of ASTM D3679. ASTM International is one of the largest voluntary standards development organizations in the world. The Administrator verifies certification by:
Reviewing test reports to make sure that the siding meets or exceeds the standard.
Conducting unannounced plant inspections.
Reviewing quality control records.
Reviewing testing procedures.
Inspecting warehouses, product literature, and websites.
Performing random, independent laboratory testing.
You can tell which brands of siding are certified by looking for the VSI Product Certification Program label on the box, above right.
VSI CERTIFIED INSTALLER PROGRAM There are three types of certification: Certified Installer, Certified Trainer, and Certified Installer Company. So, why is installer certification important? VSI Certified Installers can say that they have demonstrated the knowledge of proper vinyl siding installation in accordance with ASTM D4756. At the end of this course, you will take an examination. If you score 80 percent or better on the examination, you will be certified. Benefits of certification include:
Independent validation of skills and knowledge.
Improved credibility as a qualified professional installer.
Increased exposure with name on the Official Registry of Certified Installers on the VSI website.
Leg up over competition during economic downturn with certification status.
Higher quality work requiring fewer call-backs.
Ability to install vinyl siding where Certified Installers are required.
Use of Certified Installer logo and marketing materials.
Certified Installer identification card with date of certification expiration.
Proper installation benefits everyone. If the siding is installed correctly, the homeowner, the installer, and the manufacturer are happy. However, if the siding is installed incorrectly, the homeowner will complain about the installation to the installer (and to their friends and family). The installer will need to leave a paying job and come back to repair the installation. According
VSI Certified Installer Program: Installer Supplement
5
to vinyl siding manufacturers, most of the field service calls that they respond to are the result of improper installation.
VSI Certified Installers are more likely to be hired or promoted and may even be required in some local jurisdictions. Homeowners will pay for knowledge, a quality installation, and a good reputation.
Recertification is required every three years and can be done online or through the mail. In order to recertify, you must verify that you are actively installing vinyl siding and take a simple open book examination using the VSI Vinyl Siding Installation Manual. The Administrator will contact you a few months before your certification expires. You must submit your recertification fee and pass your examination before your certification expires to remain on the Official Registry of Certified Installers. It is critical that you update your email and mailing addresses with the Administrator if they change.
For recertification information and forms, as well as other Certified Installer resources (including frequently asked questions, the VSI Vinyl Siding Installation Manual, marketing brochures, Certified Installer e-Newsletters, and the Official List of Certified Products and Colors), visit www.vinylsiding.org/ciresources.
REVIEW QUESTIONS: 1. What is the Vinyl Siding Institute, Inc.?
2. What is the VSI Product Certification Program?
3. What ASTM standard outlines the proper installation of vinyl siding?
4. How can Certified Installers promote themselves?
5. How/when must you become recertified?
VSI Certified Installer Program: Installer Supplement
6
SECTION 2: SAFETY ISSUES
OBJECTIVES: After completing this section, you will:
1. Understand safe vinyl siding installation practices.
2. Know how to use ladders safely.
3. Know how to safely use power tools associated with vinyl siding installation.
4. Know how to handle and lift vinyl siding materials and equipment properly.
5. Understand the concept of Occupational Safety and Health Administration (OSHA) health and safety rules and regulations regarding vinyl siding installation.
KEY VOCABULARY: Occupational Safety and Health Administration (OSHA)
KEY POINTS: When installing vinyl siding, you must be aware of the safety issues involved, such as potential damage to eyes, hands, or limbs from cutting siding; cuts from sharp edges; falling off ladders; and electrocution. Vinyl siding installers should take precautions, including (among others):
Wear safety glasses for all cutting and nailing operations.
Take care to avoid cuts from utility blades.
Pay attention so you do not inadvertently have hands or fingers in the way when the brake is in use.
Unplug tools before adjusting them.
Repair or replace defective tools before using them.
Always bend your legs when lifting heavy materials.
LADDER SAFETY: Falls from heights are one of the leading causes of death in the construction industry. Follow these tips on ladder safety:
Review OSHA safety requirements (www.osha.gov or www.osha.gov/stopfalls/edresources.html).
Ensure ladder safety by:
Inspecting ladders weekly. Checking wood ladders for knots and cracks. Never painting wood ladders, because the paint
could hide defects. Disposing of ladders with broken parts.

VSI Certified Installer Program: Installer Supplement
7
Always use care when using a metal ladder around electrical lines or equipment. Metal ladders can be conductors of electricity.
Only use stepladders on firm, level surfaces. This will help resist tipping of the ladder. Avoid working from or standing on the top of a stepladder.
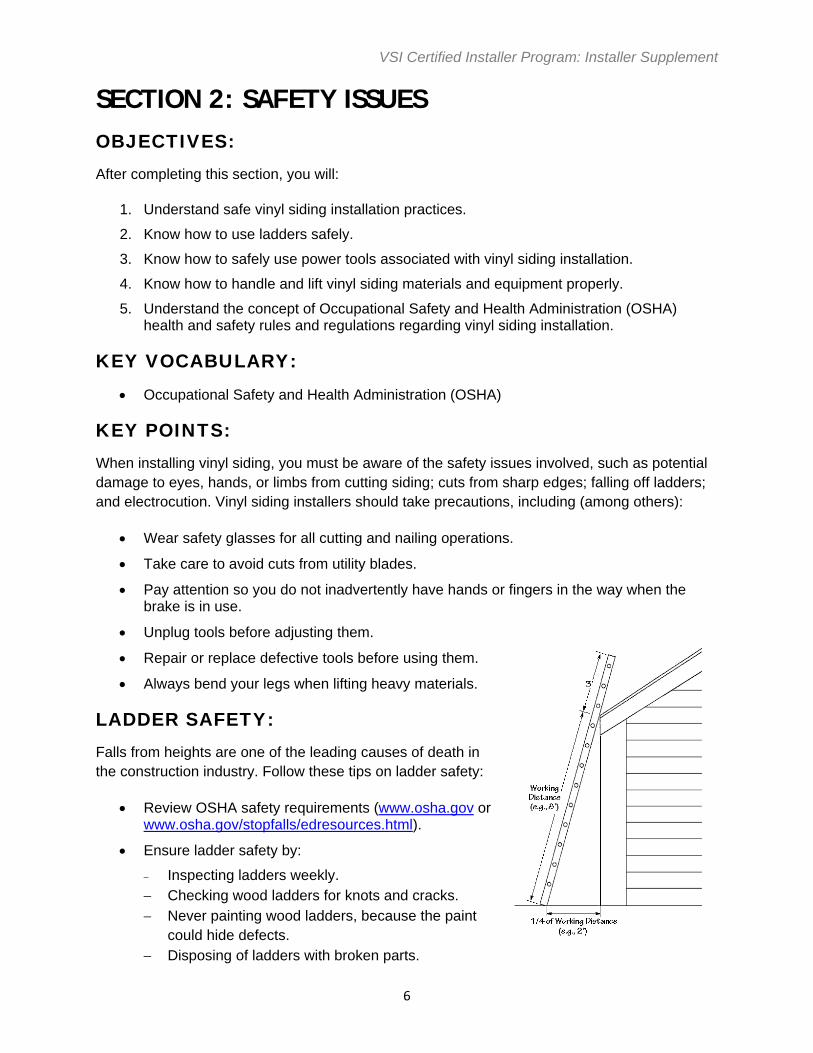
Always place extension ladders at such an angle that the distance from its base to the vertical wall is about 1/4 the supported length of the ladder. (See drawing on previous page.)
Use non-slip bases, such as shoes, spikes, or spurs, on extension ladders.
Securely tie off the top of an extension ladder to provide stability and to prevent the ladder from being moved by the wind.
When possible, have another worker hold the extension ladder while you work.
Do not use an extension ladder as a horizontal plank, platform, or scaffold.
When using an extension ladder to access a roof area, ensure that it reaches at least 3’above the roof.
POWER SAW SAFETY: When using power saws, remember the following:
Do not tie back guards.
Always use a fine-toothed (plywood) blade installed backwards when cutting vinyl siding. Do not use the saw in this configuration to cut any other products.
Cut slowly, especially in cooler weather, to avoid chipping or cracking the siding.
Do not wear loose clothing or hand jewelry, which could get caught in the equipment.
Wear safety glasses.
ELECTRICAL SAFETY: When dealing with electricity, remember the following:
Make sure there are no exposed parts on the electric cord.
Use grounded extension cords of adequate size.
Shut off power at the electric service panel.
Use lock-out/tag-out kits when shutting off power.
OCCUPANT SAFETY: When working on an occupied building, remember the following:
Block off your work area.
Clean up trash and construction debris.
Talk to homeowner about dogs and other pets that might be in the vicinity.
Inspect the building for insect nests.

VSI Certified Installer Program: Installer Supplement
8
REVIEW QUESTIONS: 1. What are some safe construction practices to remember when installing vinyl siding?
2. What do you need to do to maintain wood ladders?
3. How do you set up an extension ladder on a wall?
4. How many feet should an extension ladder extend past a roof?
5. What are some utility hazards to be aware of?
6. What are some safety procedures when using a power saw?
7. What is OSHA?
VSI Certified Installer Program: Installer Supplement
9
SECTION 3: IMPORTANT NOTES
OBJECTIVES: After completing this section, you will:
1. Understand what building codes are and why installers need to be familiar with them.
2. Understand what a water-resistive barrier is and why it should be installed with vinyl siding.
3. Understand the excellent fire performance of vinyl siding.
4. Understand how to transport and store vinyl siding.
5. Understand the concept of historic restoration.
6. Know how to clean vinyl siding.
7. Understand the basic installation rules for vinyl siding.
KEY VOCABULARY: Building codes
Historic restoration
Water-resistive barrier
KEY POINTS: Building codes (VSI Vinyl Siding Installation Manual, Page 2)
Water-resistive barrier (VSI Vinyl Siding Installation Manual, Pages 2–3)
Fire and heat concerns (VSI Vinyl Siding Installation Manual, Page 3)
Storage and transportation (VSI Vinyl Siding Installation Manual, Pages 3–4)
Historic restoration (VSI Vinyl Siding Installation Manual, Page 4)
Cleaning siding (VSI Vinyl Siding Installation Manual, Pages 4–5)
Basic installation rules (VSI Vinyl Siding Installation Manual, Page 6)
Other issues (VSI Vinyl Siding Installation Manual, Pages 3–5)
REVIEW QUESTIONS: 1. What are building codes?
2. Is vinyl siding a water-resistive barrier?
3. Why is a water-resistive barrier needed under vinyl siding?
4. Why is vinyl siding considered a fire-safe cladding?
5. How many cartons of siding can be stacked?
6. What can be used to remove mildew from vinyl siding?
7. Why should vinyl siding be hung loose?

VSI Certified Installer Program: Installer Supplement
10
SECTION 4: TERMINOLOGY
OBJECTIVES: After completing this section, you will be familiar with the terminology used in vinyl siding installations.
KEY VOCABULARY: Backerboard Nail hole slot punch
Buttlock Plumb
Channel Rake (roof)
Course Rake (wall)
Drip cap/head flashing Scoring
Double channel lineal Sealant
Face Shim
Face-nailing Snap lock punch
Fascia Soffit
Flashing Starter strip
Furring/furring strip Underlayment
Lap Utility trim
Lug/crimp Water-resistive barrier
Miter Weep holes
Nailing hem (or flange) Zip lock tool
Nailing strip
KEY POINTS: Typical sidewall terms
Common house terms (VSI Vinyl Siding Installation Manual, Figure 2)
Siding terms (VSI Vinyl Siding Installation Manual, Figure 3)
Terms to know (VSI Vinyl Siding Installation Manual, Pages 7–8)
REVIEW QUESTIONS: 1. What is backerboard?
2. What is face-nailing?
3. What is flashing?
4. What is a rake?
VSI Certified Installer Program: Installer Supplement
11
SECTION 5: MATERIALS, TOOLS, AND ACCESSORIES
OBJECTIVES: After completing this section, you will be familiar with:
1. Different types of vinyl siding.
2. Basic tools used for vinyl siding installation.
3. Specialty tools used for vinyl siding installation.
4. Different accessories used for vinyl siding installation.
KEY VOCABULARY: Dutchlap siding Vertical siding
Snap lock punch Nail hole slot punch
Zip lock tool Portable brake
KEY POINTS: Review the following:
Panel profiles (VSI Vinyl Siding Installation Manual, Page 9)
Basic installation tools and equipment (VSI Vinyl Siding Installation Manual, Pages 9–10)
Specialty tools (VSI Vinyl Siding Installation Manual, Page 10)
Accessories (VSI Vinyl Siding Installation Manual, Page 10)
REVIEW QUESTIONS: 1. Name three different types of vinyl siding.
2. How should the blade be installed in a circular saw to cut vinyl siding?
3. What is the purpose of a nail hole slot punch?
4. What is utility trim used for?
VSI Certified Installer Program: Installer Supplement
12
SECTION 6: GETTING STARTED
OBJECTIVES: After completing this section, you will:
1. Understand what type of underlayment needs to be behind vinyl siding.
2. Estimate the amount of materials needed to apply vinyl siding to a house.
3. Understand what fasteners to use with vinyl siding and how they are used.
4. Understand the different methods of cutting vinyl siding.
5. Understand how to prepare walls for vinyl siding installation.
KEY VOCABULARY: Sheathing/backerboard Gambrel roof
Square (of siding) Fasteners
Expansion/contraction Scoring
KEY POINTS: Review the following:
Materials (VSI Vinyl Siding Installation Manual, Page 11)
Estimating materials (VSI Vinyl Siding Installation Manual, Pages 11–13)
Fastener choices (VSI Vinyl Siding Installation Manual, Page 14)
Fastener application (VSI Vinyl Siding Installation Manual, Figure 15)
Fastening procedure (VSI Vinyl Siding Installation Manual, Page 15)
Fastening procedure with staples (VSI Vinyl Siding Installation Manual, Page 16)
Cutting siding (VSI Vinyl Siding Installation Manual, Page 16)
Preparing the walls (VSI Vinyl Siding Installation Manual, Page 17)

VSI Certified Installer Program: Installer Supplement
13
REVIEW QUESTIONS: 1. Can siding be attached to open studs?
2. What is the formula for determining the area of a rectangle?
3. What is the formula for determining the area of a triangle?
4. What types of fasteners are acceptable for vinyl siding jobs?
5. Why don’t you ever nail vinyl products tight?
6. What are some basic nailing techniques to remember?
7. Name the three ways to cut vinyl siding.
ESTIMATING MATERIALS PRACTICE Calculate the materials for the house below. Assume that the house looks the same from the opposite view. Vinyl siding comes in boxes that contain two squares (each square covers 100 sq. ft.), and accessories are in linear feet.

VSI Certified Installer Program: Installer Supplement
14
SECTION 7: INSTALLING ACCESSORIES
OBJECTIVES: After completing this section, you will:
1. Understand the proper method to install corner posts.
2. Know when and how to cap a corner post.
3. Understand the proper method to install starter strips.
4. Know when and how to properly flash around windows.
5. Understand the proper method to install J-channel around windows.
6. Understand how to bend and install trim sheet.
7. Understand the proper method to install J-channel over roof lines and under gables.
KEY VOCABULARY: Inside/outside corner posts Trim sheet
Pop rivet J-channel
Flashing F-channel
Starter strip
KEY POINTS: Review the following:
Installing corner posts (VSI Vinyl Siding Installation Manual, Page 18)
Capping corner posts (VSI Vinyl Siding Installation Manual, Page 38)
Installing starter strip (VSI Vinyl Siding Installation Manual, Page 19)
Flashing doors and windows (VSI Vinyl Siding Installation Manual, Page 20–21)

VSI Certified Installer Program: Installer Supplement
15
Bending Trim Sheet
Window and door trim is often covered with trim sheet.
Many of the accessories used for siding installation can be made on a brake.
Trim sheet can be either aluminum (0.019") or vinyl.

VSI Certified Installer Program: Installer Supplement
16
Using Drawings The drawings from the brake manufacturer:
Show the order of the bends.
Show if the finish side of the sheet should be facing up or down when making each bend.
Show where hems should be added for all exposed edges.

VSI Certified Installer Program: Installer Supplement
17
Measuring
Measure the object that is being covered and determine if receiving pockets will be needed.
If the face of the shape is especially wide, bends may need to be made to add stiffness.
Add material for each inside bend and any additional bends.
VSI Certified Installer Program: Installer Supplement
18
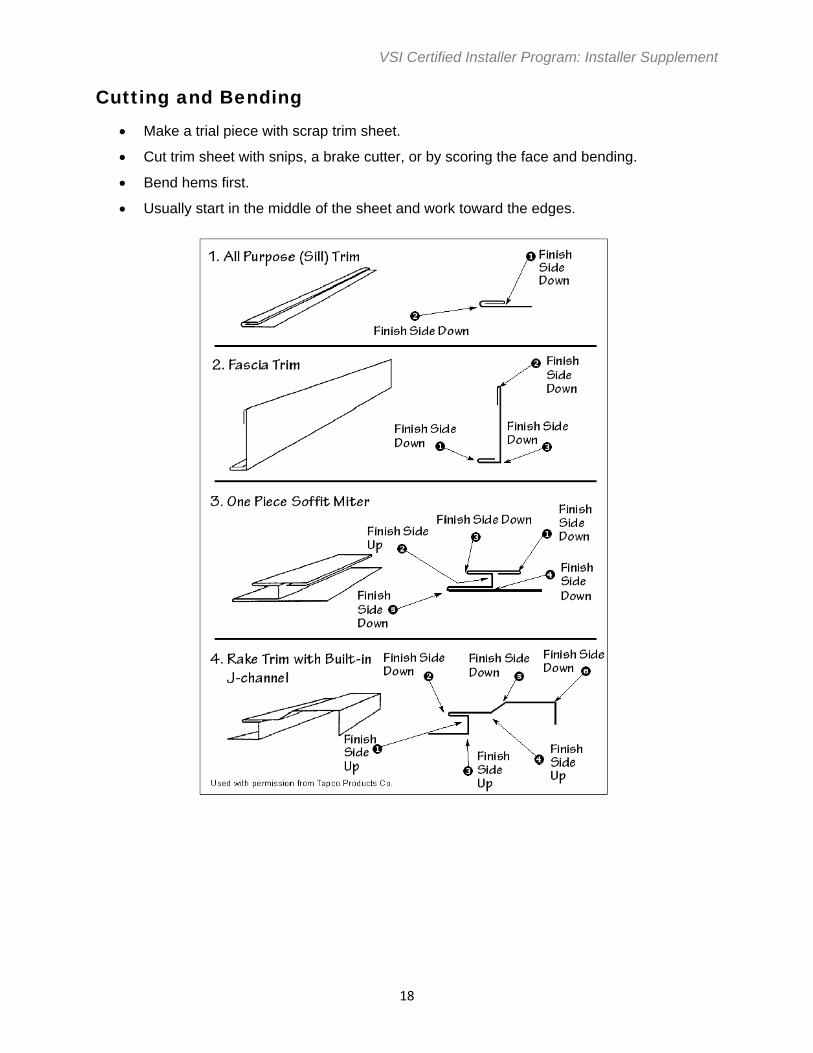
Cutting and Bending Make a trial piece with scrap trim sheet.
Cut trim sheet with snips, a brake cutter, or by scoring the face and bending.
Bend hems first.
Usually start in the middle of the sheet and work toward the edges.
VSI Certified Installer Program: Installer Supplement
19
Attaching Trim Sheet
Apply the lower pieces of trim sheet first (weatherboard fashion).
Make tabs so they go under upper pieces.
Attach pieces with aluminum or stainless steel color-matched trim nails.
Place nails in inconspicuous locations.
Pre-drill the nail holes through the trim sheet. The nail holes should be larger than the nail shank, but smaller than the nail head.
Don’t drive the nails tight.
Installing J-channel (Trim) Around Windows Apply the sill piece of J-channel first. Fasten every 8” to 12”.
Attach the jamb pieces next. The tabs of the jamb pieces go into the notches of the sill piece.
Attach the head J-channel last. The tabs of the head piece go into the notches of the jamb pieces.
REVIEW QUESTIONS: 1. How much of a gap should there be between the top of a corner post and the soffit
receivers?
2. How do you lap two corner posts?
3. How do you cap a corner post?
4. What is the proper fastener spacing for a starter strip?
5. What is the sequence for attaching flashing?
6. What should brick mold or exterior casing be covered with?
7. What types of nails can be used to attach trim sheet?
8. How much of a gap should there be between J-channel and a roof?

VSI Certified Installer Program: Installer Supplement
20
SECTION 8: INSTALLING HORIZONTAL SIDING
OBJECTIVES: After completing this section, you will:
1. Understand the proper method to install horizontal siding.
2. Know how to fit siding around fixtures.
3. Know how to fit siding around windows.
4. Understand how to install a diverter or kick-out flashing at the end of a roof line.
5. Understand how to finish siding in a gable end or under an eave.
6. Know how to transition from brick and from horizontal to vertical siding.
KEY VOCABULARY: Course Lap
Mounting block Fixture
Diverter Kick-out flashing
KEY POINTS: Review the following:
Installing horizontal siding (VSI Vinyl Siding Installation Manual, Page 23)
Fitting siding around fixtures (VSI Vinyl Siding Installation Manual, Page 24)
Fitting siding under windows (VSI Vinyl Siding Installation Manual, Page 24)
Siding installation at rooflines (VSI Vinyl Siding Installation Manual, Page 25)
Finishing gable ends (VSI Vinyl Siding Installation Manual, Page 26)
Finishing eaves (VSI Vinyl Siding Installation Manual, Page 26)
Low-pitch roofs (VSI Vinyl Siding Installation Manual, Page 27)
Transition from horizontal to vertical siding (VSI Vinyl Siding Installation Manual, Page 27)
Transition from brick to vinyl siding (VSI Vinyl Siding Installation Manual, Page 27)

VSI Certified Installer Program: Installer Supplement
21
REVIEW QUESTIONS: 1. What can be done to allow the siding to expand and contract with temperature?
2. How much of a gap must be allowed between siding and corner posts when the temperature is below 40° F?
3. How far should siding be lapped at the ends?
4. How do you fit siding around a fixture if a mounting block or trim ring is not available?
5. How much of a gap must there be around windows?
6. True or False: Utility trim should be used under a window.
7. What are the two types of diverters that can be used at the end of a roof line?
8. How do you make a template for cutting siding in a gable end?
9. How do you install the top piece of siding under an eave?
10. How do you transition from horizontal siding to vertical siding?
11. How do you transition from brick to vinyl siding?
VSI Certified Installer Program: Installer Supplement
22
SECTION 9: INSTALLING VERTICAL SIDING
OBJECTIVES: After completing this section, you will:
1. Understand how to prepare a wall for vertical siding installation.
2. Understand how to install accessories for vertical siding.
3. Know how to create a balanced appearance with vertical siding.
4. Understand how to install vertical siding in a gable end.
KEY VOCABULARY: Bottom receiver
Balanced wall
KEY POINTS: Review the following:
Wall preparation for vertical siding (VSI Vinyl Siding Installation Manual, Page 27)
Vertical siding accessories (VSI Vinyl Siding Installation Manual, Page 28 and 31)
Installing vertical siding on sidewalls (VSI Vinyl Siding Installation Manual, Pages 29–31)
REVIEW QUESTIONS: 1. What should be done to attach vertical siding if the wall does not have solid, nailable
sheathing?
2. How is the bottom receiver for vertical siding installed?
3. How is a balanced wall created?
4. Describe some of the options to start vertical siding on a sidewall.
5. How is the last panel attached on a sidewall?
6. How do you transition between two courses of vertical siding?
7. What is the gap at the bottom of a vertical panel?
VSI Certified Installer Program: Installer Supplement
23
SECTION 10: INSTALLING SOFFIT AND FASCIA
OBJECTIVES: After completing this section, you will:
1. Understand why attic ventilation is important.
2. Know how to attach receiving channels for soffit.
3. Know how to install soffit under open eaves.
4. Understand how to transition soffit around corners.
5. Know how to install fascia covers.
6. Know how to install soffit under enclosed eaves.
7. Know how to install soffit under porch roofs.
KEY VOCABULARY: Attic ventilation Nailing strip
Receiving channels Transitional channels
Open eaves Enclosed eaves
Fascia cover Fascia board
Bird box “V” groove
KEY POINTS: Review the following:
Soffit ventilation (VSI Vinyl Siding Installation Manual, Page 32)
Soffit receiving channels (VSI Vinyl Siding Installation Manual, Page 32)
Soffit installation (VSI Vinyl Siding Installation Manual, Pages 32–36)
Open eave installation (VSI Vinyl Siding Installation Manual, Pages 32–33)

VSI Certified Installer Program: Installer Supplement
24
OPEN EAVE INSTALLATION
INSTALLING FASCIA COVERS Fascia covers can be purchased ready-made (PVC
or aluminum) or field-formed from trim sheet.
Be sure to allow for the depth of the soffit panel when measuring.
The top of the fascia cover should slide under the drip edge or into utility trim.
All fastener holes must be pre-drilled slightly larger than the nail shank, and nails must not be driven tight.
If using aluminum fascia covers, fasten with color-matched trim nails through the bottom of the fascia cover through the “V” groove of the soffit, a maximum of every 24”.
Some manufacturers of vinyl fascia require:
Utility trim installed at the top of the fascia board.
F-channel installed at the bottom of the fascia board.
Fascia cover hooked onto F-channel and locked into utility trim.
When lapping vinyl fascia, cut 1-1/2” of the lip, and overlap by 3/4”.
Bending fascia around corners:
Install first piece by bending a 1” tab around the corner.
Bend a hem on the exposed edge of the second piece.
Install the second piece flush with the end.

VSI Certified Installer Program: Installer Supplement
25
SOFFIT TRANSITIONS
Mitered corners (see VSI Vinyl Siding Installation Manual, Page 34, Paragraph #4).
Square corners—If the eaves are unequal widths:
Install nailing strips to provide backing for the transitional channel, if necessary.
Install double channel lineal or back-to-back J-channel.
Eave to gable/rake:
Install framing for a bird box. Install soffit on the eave and the gable/rake. Create a bird box out of trim sheet or fascia
cover. Install bird box as a fascia cover for the eave. Install fascia covers on the eave and rake.
Enclosed eave installation (see VSI Vinyl Siding Installation Manual, Page 35).
Porch ceiling installation (see VSI Vinyl Siding Installation Manual, Page 36).

VSI Certified Installer Program: Installer Supplement
26
REVIEW QUESTIONS: 1. What dictates how much ventilation is needed for soffit?
2. Name three different methods for attaching a receiving channel against the wall.
3. What is the maximum eave span before soffit will need intermediate nailing strips?
4. How do you nail soffit?
5. What is an open eave? A closed eave?
6. When will a mitered transition at a corner not work?
7. How are aluminum fascia covers fastened?
8. How do you install fascia cover at a corner?
9. How often is soffit fastened under a porch roof?

VSI Certified Installer Program: Installer Supplement
27
SECTION 11: OTHER TECHNIQUES
OBJECTIVES: After completing this section, you will:
1. Know how to install shutters over vinyl siding.
2. Know how to replace a damaged panel of siding.
3. Know how to repair a damaged corner post.
KEY VOCABULARY: Shutter Zip lock tool
KEY POINTS: Review the following:
Attaching shutters (VSI Vinyl Siding Installation Manual, Page 37)
Replacing a damaged panel (VSI Vinyl Siding Installation Manual, Page 37)
Repairing a damaged corner post (VSI Vinyl Siding Installation Manual, Page 38)
REVIEW QUESTIONS: 1. How are shutters attached over vinyl siding?
2. How do you replace a damaged panel of vinyl siding?
3. How do you repair a corner post?