13-february-2019 interaction feedback - genesys … server installation client installation...
TRANSCRIPT

PureConnect®
2019 R1
Generated:
13-February-2019
Content last updated:
15-January-2019
See Change Log for summary ofchanges.
Interaction Feedback
Technical Reference
Abstract
This user guide documents the PureConnect Customer FeedbackManagement solution for customer Post-call surveys and On-demandsurveys. Learn how Interaction Feedback, an IC Business Managerapplication module, allows business users to create customer feedbacksurveys, analyze survey results, and view the results of surveys in real-time and in Interaction Reporter Interaction Feedback reports.
For the latest version of this document, see the PureConnectDocumentation Library at: http://help.genesys.com/cic.
For copyright and trademark information, seehttps://help.genesys.com/cic/desktop/copyright_and_trademark_information.htm.
1

245678889999
10101011121314141414141415151516171718181819212121222223242424252627272829293541414242424243444446
Table of ContentsTable of ContentsIntroductionAbout this informationReferenced informationOverviewInteraction Feedback components
Interaction Feedback ClientExploring the client interfaceNavigation Pane
Survey ResultsSurvey DefinitionLibrary
Interaction Feedback ToolbarInteraction Feedback ToolsShortcut menus
Interaction Feedback configuration containerInteraction Feedback Statistics ViewInteraction Feedback ReportsInstallation and Configuration
Planning for installationSoftware and hardware requirementsDatabase requirementsLicense requirements
Confirming Interaction Feedback licensesInstalling Interaction Feedback
IC server installationClient installation
Configuring Interaction FeedbackConfiguring settingsAssigning Access licenses
Interaction Feedback Access licenseAssigning Access Rights
Administrator Access rightsAccess Control rights
Starting the Interaction Feedback ClientInteraction Feedback moduleGetting Started Help
About Interaction Feedback customer surveysOverview of creating Interaction Feedback surveys
Creating a survey groupAdding a survey to a groupAdd questions to a survey
Add questions when creating a surveyAdd questions to an existing survey
Activate a surveyActivate a survey in Survey viewActivate a survey in Survey Activation viewDeactivate a survey
Create a new surveyCreate a post-call surveyCreate an on-demand survey
Add an on-demand survey to Interaction Attendant profileEdit a survey
Set the Minimum Acceptable PercentageAdd questions to a survey
Add questions to a surveyAdd questions when creating a surveyAdd questions to an existing survey
Question templatesLibraryQuestion Descriptions
2

4647474855555556565757575858595960606061616163646464
66666667676969707070707070717172737676777878797981
Create Question WizardCreate a question
Create a question from a templateCreate a new custom question
Ordering questions in a surveyEditing questions
Retries and TimeoutAdd branching logic to a survey
Create templatesCreate question templates
Delete Custom Questions from the LibraryCreate survey templates
View Survey ResultsCompleted survey results
The DashboardManage the DashboardDashboard viewUpdate the DashboardAccess the DashboardDefine surveys to display
SearchesCreate a SearchSearch AttributesSearch orderRun a search
Selecting Fields for the gridTools
Manage PromptsTypes of promptsFeedback Prompt Management
Create new promptsEdit promptsDelete a promptCreate a prompt from a WAV file
Manage Question CategoriesQuestion Categories
Adding categoriesDeleting categories
Manage RankingsDefine a Rank GroupDefine the ranking scaleAssign a Ranking to a survey
Monitor surveys in real-timeInteraction Feedback Reports
Interaction Feedback Survey reportsAppendix B. Add branching logic to a surveyAdd branching to a question
Add branching to a True/False questionAdd branching to a Multiple Choice questionAdd branching to a Numeric Range question
Change Log
3

IntroductionInteraction Feedback™ is the PureConnect Customer Feedback Management solution for automated post-call and on-demandcustomer surveys. It allows business users to create and manage customer feedback surveys, analyze survey results, and view theresults of surveys in real-time. Interaction Feedback has an intuitive interface with ready-to-use templates to help you build effectivesatisfaction surveys that ask your customers discerning questions about the quality of their experience with your company'sproducts and services.
This document includes:An Overview of Interaction Feedback features and componentsInstallation and Configuration informationSteps to build Interaction Feedback customer surveysHow to view survey results and real-time monitoringInformation on accessing Interaction Feedback reports in Interaction Reporter
4

About this informationThe information in this guide is for business users, contact center managers and supervisors, CIC system administrators, businessmanagers, and report administrators. Users might also include Genesys Business Partners and anyone who is interested in learninghow to create customer satisfaction surveys.
5

Referenced informationBecause Interaction Feedback is integrated with Customer Interaction Center, there are additional technical references and guidesthat are referenced in this document. Documents are available in the PureConnect Documentation Library on your CIC server.
The latest versions of these documents can also be accessed from the PureConnect Documentation Library athttps://help.genesys.com/cic.
The following technical references, Help, and links can provide additional information for Interaction Feedback.PureConnect Installation and Configuration GuidePureConnect Licensing Technical ReferenceInteraction Feedback HelpInteraction Feedback Tables in the PureConnect Data DictionaryIC Business Manager User Interface Help Getting StartedInteraction Administrator HelpInteraction Supervisor HelpInteraction Reporter Help
6

OverviewInteraction Feedback is an IC Business Manager program module that supports automated post-call customer satisfaction surveysand on-demand surveys. Interaction Feedback gives business users the ability to easily create surveys using the Create SurveyWizard. Surveys can be quickly created with pre-defined industry standard templates. Customized questions can be simply createdusing Interaction Feedback Tools, for creating prompts and managing questions.
Completed survey results are available for viewing immediately in the Interaction Feedback Client. Business users can get at-a-glance information for completed surveys using the Interaction Feedback Dashboard, giving organizations immediate insight intocustomers' experiences. For more detailed Survey Results, Interaction Feedback has extensive search and filtering capabilities,providing summary and detailed information for specific completed customer surveys.
The Interaction Feedback Statistics View in IC Business Manager provides business users the ability to view real-time statistics forsurveys in progress—surveys customers are in the process of taking—as well as completed surveys and surveys where participantshave opted out or abandoned. Interaction Feedback also takes advantage of the Interaction Supervisor Alerting mechanism in ICBusiness Manager, which is triggered by survey scores. This allows business users to receive immediate notifications whensurveys fail to meet a minimum acceptable score. Real-time monitoring provides valuable customer feedback and helps tounderstand what you are doing well and what immediate actions might need to be taken to meet customer expectations.
Interaction Reporter reports, available in IC Business Manager, include pre-defined reports for Interaction Feedback. These reportscontain summary and detailed information on completed customer satisfaction surveys.
After installation, Interaction Feedback is easily configured in Interaction Administrator. Interaction Feedback settings areconfigured in its container under System Configuration. Licensing for accessing Interaction Feedback features is also controlled inInteraction Administrator.
7
Interaction Feedback componentsThis section contains a detailed overview of the following Interaction Feedback components.
Interaction Feedback ClientInteraction Administrator configuration container for Interaction FeedbackInteraction Feedback Statistics View in IC Business ManagerInteraction Feedback reports in Interaction
Interaction Feedback ClientThe Interaction Feedback Client allows you to create effective customer satisfaction post-call surveys and on-demand surveys, andit provides you with the ability to view completed survey results.
Exploring the client interfaceThe Interaction Feedback module uses the features of IC Business Manager, making it easy to use.
The following quick explanation of the Interaction Feedback interface is meant to familiarize you with the most important featuresyou'll need to create a survey. You’ll find the detailed steps for creating a new survey in "Create a new survey".
For Help while using Interaction Feedback in the workspace, press the F1 key. For additional information on using IC BusinessManager menus, toolbars, and Navigation Pane, see IC Business Manager Help. To access this Help, from the Help menu clickGetting Started.
8

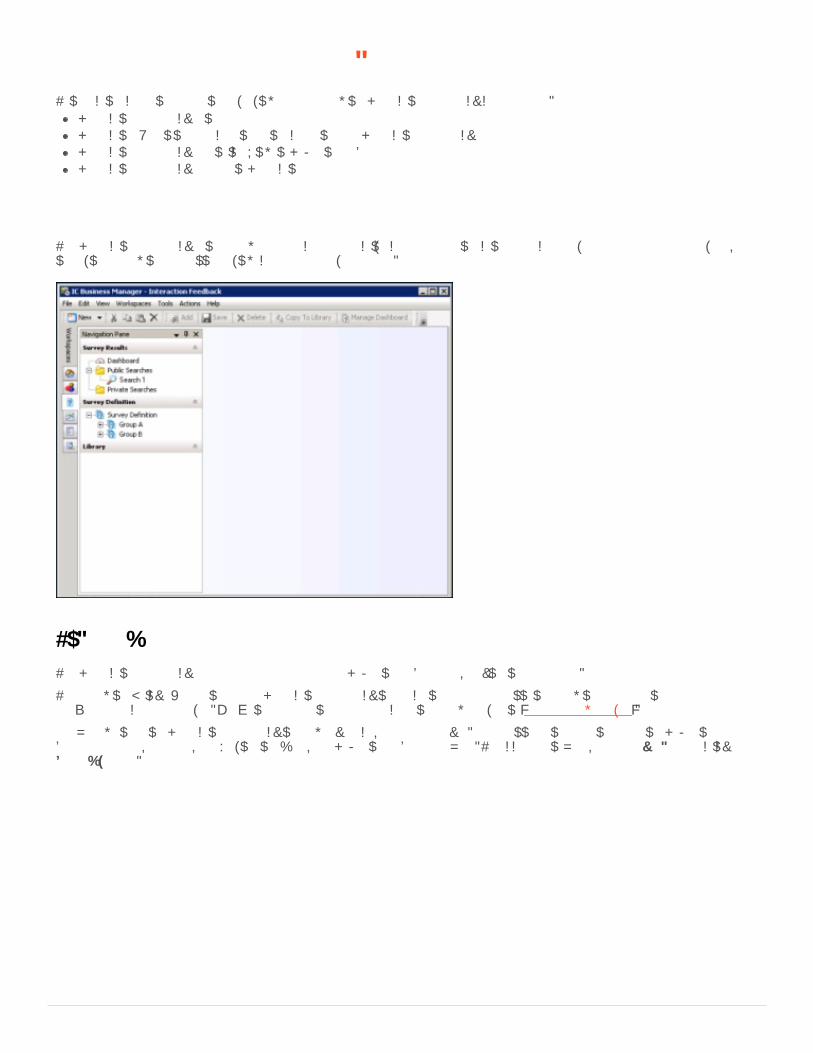
Navigation PaneThe Interaction Feedback navigation pane provides easy access to its survey features in the following navigation panes: SurveyResults, Survey Definition, and Library. It provides centralized navigation to survey components, which display their information inthe workspace next to the navigation panes.
If the Interaction Feedback navigation pane is not displayed in the IC Business Manager window, from the View menu, point toNavigation pane and click Normal.
The Survey Results navigation pane allows authorized users to display the results of completed surveys in the workspace, using theDashboard and Searches. Use the Dashboard for a quick graphical view of survey results by date. The Dashboard view includes theaverage score for a survey, the average ranking of a survey, and the number of surveys completed. For more detailed survey results,use the Public Searches folder and the Private Searches folder to build customized searches. Customized searches can be builtwith filtering attributes such as Ranking, Scored User, Survey Name, and Survey State.
Use the Survey Definition navigation pane to: create Survey Groups, which organize surveys; create customer surveys, new or from atemplate; create new survey questions, or add questions from an existing template; and to activate a survey. Surveys and questionsare edited and managed under Survey Definition. Surveys and questions can be saved as templates and used when creating newsurveys.
The Library navigation pane contains survey templates and question templates you create to use when creating surveys.
Survey Results
Survey Definition
Library
9

Interaction Feedback ToolbarInteraction Feedback provides Toolbar buttons for frequently used commands.
Toolbar buttons are available depending on the task being performed. For example, when Survey Definition is selected, the
button is available.
Interaction Feedback ToolsThe Interaction Feedback Tools menu provides tools to Manage Prompts, Manage Question Categories, and Manage Rankings foryour surveys and questions.
Shortcut menusThe Interaction Feedback interface supports shortcut menus that display the available commands specific to the current selectionand context. To display available commands, right-click to see the shortcut menu.
10
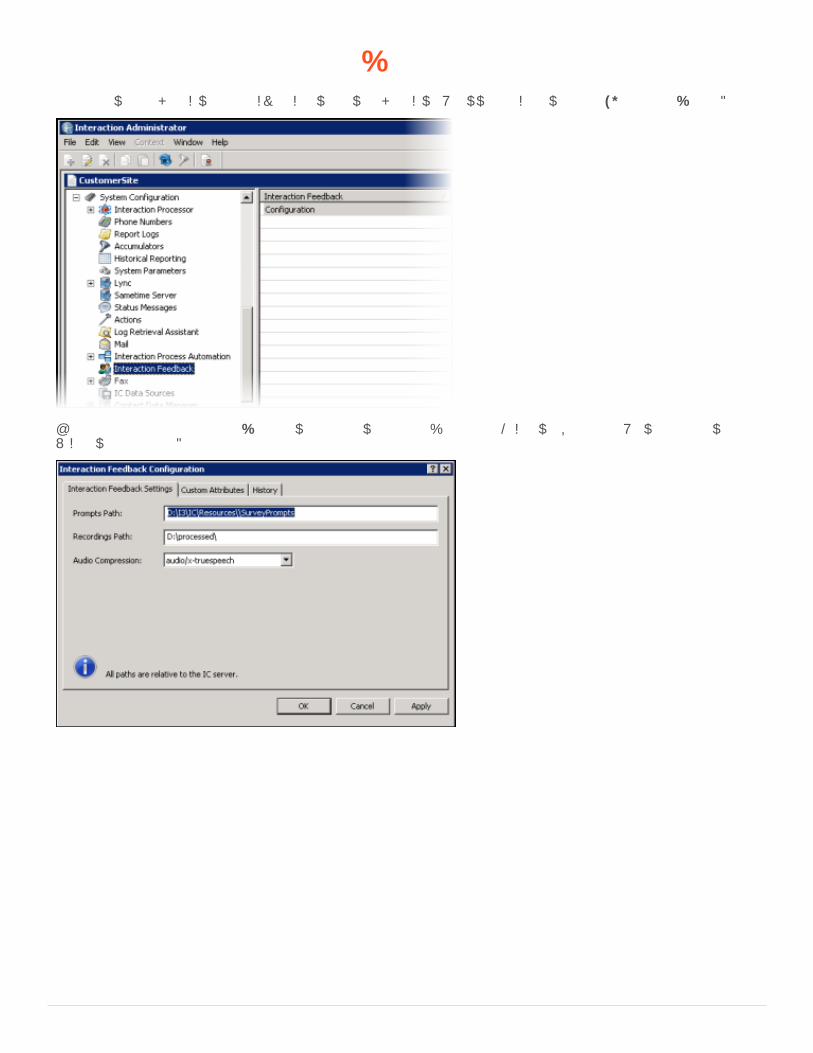
Interaction Feedback configuration containerGlobal settings for Interaction Feedback are configured in an Interaction Administrator container under System Configuration.
Use the Interaction Feedback Configuration dialog to set file paths for Prompts and Recordings, and to set Audio Compression andEncryption parameters.
11

Interaction Feedback Statistics ViewThe Interaction Feedback Statistics View is accessed in IC Business Manager. It provides business users the ability to view real-time statistics for surveys in progress—surveys customers are in the process of taking—as well as completed surveys and surveyswhere participants have opted out or abandoned.
Interaction Feedback real-time monitoring also allows business users to create Alerts for surveys that are in progress.
For complete information on Interaction Feedback Statistics View, see the Interaction Supervisor Help in IC Business Manager.
12

Interaction Feedback ReportsInteraction Feedback reports are available in Interaction Reporter in IC Business Manager. There are four reports that containsummary and detailed information on completed customer satisfaction surveys. The reports include survey details including: user,average score, percentile, and specific scores by questions. The reports provide information for comparison between differentusers' average survey scores over time. If Interaction Recorder data is available, a report shows comparisons between surveyscores and quality scores.
13

Installation and ConfigurationInteraction Feedback is an IC Business Manager program module that is installed with PureConnect Customer Interaction Center(CIC) components during CIC installation. If the CIC license includes the Interaction Feedback base license, during CIC serverinstallation Interaction Feedback will be installed and available in Interaction Administrator for configuration.
Consider the following requirements when planning for your Interaction Feedback Installation.Software and Hardware requirementsDatabase requirements
Planning for installationConsider the following requirements when planning for your Interaction Feedback installation.
Interaction Feedback has the same basic software and hardware requirements as the CIC servers, which are described in thePureConnect Installation and Configuration Guide, available in the PureConnect Documentation Library.
Please note that Interaction Feedback is not supported on the TAPI Platform.
The latest version of the PureConnect Installation and Configuration Guide document can be accessed from the PureConnectDocumentation Library.
The database space requirements for your CIC system will increase in order to store Interaction Feedback survey information andresults. Please refer to the CIC Database Space Planning Spreadsheet in the Technical Reference Documents section of thePureConnect Documentation Library to determine the space requirements needed for Interaction Feedback.
Interaction Feedback is licensed separately from CIC. Five Interaction Feedback component licenses are required. Be sure topurchase your Interaction Feedback licenses ahead of the time when you plan to install and test a new installation or upgrade froma previous release. The following licenses are required for Interaction Feedback.
License Description
I3_ACCESS_FEEDBACK Interaction Feedback Client workstation access license. This license is required for an ICBusiness Manager user to access the Interaction Feedback module for survey configuration orresults viewing and to view Interaction Feedback statistics within Interaction Supervisor.
The license is also required for users to have a survey applied to an interaction in which theywere a participant.
I3_FEATURE_BASE_FEEDBACK This license component enables all feature functionality of Interaction Feedback on the CICserver. Having this feature component in the CIC server license bundle enables the InteractionFeedback survey subsystem and the configuration containers in Interaction Administrator. ThisServer license also enables the Feedback reports.
Interaction Feedback base license for CIC server installation includes and automatically enablesthe I3_FEATURE_POST_CALL_FEEDBACK license, which enables post-call surveys, and theI3_FEATURE_INBOUND_FEEDBACK license, which enables on-demand surveys.
Confirming Interaction Feedback licenses
You can view the licenses on your system in Interaction Administrator by clicking the File menu, and then click LicenseManagement. Confirm that you have the necessary Interaction Feedback licenses on the Licenses page and the Features page.
Software and hardware requirements
Database requirements
License requirements
14

Installing Interaction Feedback
Interaction Feedback is currently installed in the IC server installation procedure. When IC Server Installation is installed, serverlicensed components of Interaction Feedback are available and configurable through Interaction Administrator.
Interaction Feedback Client is installed on client workstations using the IC Business Manager Applications workstation install fromthe PureConnect Customer Interaction Center (CIC) .iso file, located under Workstation. The install creates IC BusinessManager shortcuts in the PureConnect folder of the Start Menu and on the Windows desktop.
To run the Interaction Feedback Client install on a workstation, follow these steps.1. If you have not done so already:
a. Download the CIC 2015 R1 or later .iso file from the PureConnect Product Information site athttps://my.inin.com/products/Pages/Downloads.aspx.
b. Copy the .iso file to a file server (non-IC server) with a high bandwidth connection to the workstation(s) on which you willbe running the CIC 2015 R1 or later installs.
c. Mount the .iso file and share the contents to make them accessible to the workstation(s) on which you will be runningthe CIC 2015 R1 or later installs.
2. Navigate to the \Installs\ServerComponents directory on the file server.3. Copy the IC Business Manager Applications .msi file, for example, ICBusinessManagerApps_2018_R1.msi, to the
workstation on which you plan to run this install and double-click to launch it.The IC Business Manager Application Setup wizard starts.
4. On the Welcome screen, click Next.The Setup wizard guides you through the Interaction Feedback Client installation.
IC server installation
Client installation
15

Configuring Interaction FeedbackAfter installation, use Interaction Administrator to configure Interaction Feedback settings, allocate licenses, and assign accesscontrol.
The Interaction Feedback container is in Interaction Administrator under System Configuration.
16

The Interaction Feedback container is in Interaction Administrator under System Configuration.
To configure Interaction Feedback settings, select the Interaction Feedback container, and in the configuration pane on the right,double-click Configuration. The Interaction Feedback Configuration dialog is displayed.
On the Interaction Feedback Settings page, configure the following settings.
Prompts Path
Type the path from which the survey prompts are loaded. The default value for the prompts isC:\I3\IC\Resources\SurveyPrompts, when the IC Installation path is C:\I3\IC.
Recordings Path
Type the path where the recorded surveys are stored. This is where free-form survey answers are stored. The default valuefor the recordings is C:\I3\IC\Resources\SurveyRecordings or the recorder recordings directory if configured, whenthe IC Installation path is C:\I3\IC.
Audio Compression
Select the Audio Compression format to use when compressing survey recordings. The values are: audio/PCMU,audio/PCMA, audio/GSM, audio/x-truespeech, and audio/G726-32. The default value is audio/x-truespeech.
Access to Interaction Feedback is controlled through licensing in Interaction Administrator. The Interaction Feedback Accesslicense is required.
Next, read more about assigning Interaction Feedback licenses.
Configuring settings
Assigning Access licenses
17

Interaction Feedback Access license
Assign the Interaction Feedback Access license to give a user access to Interaction Feedback in IC Business Manager.
Assigning the Interaction Feedback Access license to a user (agent) allows the results of a survey to be visible to users with theSecurity Access Control to view Feedback survey results. If the agent is not assigned the Interaction Feedback Access license, thesurvey results are not included in survey reports and the survey is considered unlicensed.
To assign the Interaction Feedback access license, in Interaction Administrator, select the Users container, and double-click theuser name in the right pane. The User Configuration dialog is displayed. Assign the Interaction Feedback Access license on theLicensing tab.
To assign this license, on the Licensing page, select the Interaction Feedback Access check box. For more information onconfiguring the Licensing page, press F1 to display the Interaction Administrator Help.
Access rights for Interaction Feedback are assigned in Interaction Administrator under People. Administrator Access and AccessControl rights can be configured in the Users or Workgroups configuration dialogs.
Assigning Access Rights
18

Administrator Access rights
Administrator Access rights provide the ability to set access control for Interaction Feedback specific access rights in InteractionAdministrator. You can assign this access to a user or a workgroup. To grant this access, on the Security page of the Configurationdialog, click Administrator Access.
Under Interaction Feedback select the Interaction Feedback Administrator Access check box.
19

Access Control rights
Access Control rights provide the ability to View and Modify Interaction Feedback surveys and groups. There are two categories ofAccess Control, View or Modify Feedback Survey Groups and View or Modify Feedback Surveys.
Access Control rights for Interaction Feedback are assigned in Interaction Administrator under People. Access Control rights areconfigured in the Users or Workgroups configuration dialogs.
To grant this access, on the Security page of the Configuration dialog, click Access Control.
On the Access Control dialog, under Feedback Surveys, under Feedback Surveys, select the group or survey View or Modify checkbox.
20

Starting the Interaction Feedback ClientTo start the Interaction Feedback Client, from the Desktop, double-click the IC Business Manager icon.
The IC Business Manager logon dialog is displayed.
Use your CIC server credentials and the name of your CIC server Host to log on to IC Business Manager.
When you log on, the Interaction Feedback module is displayed in the IC Business Manager window. If the Navigation Pane is notdisplayed, on the menu bar, click View, point to Navigation Pane, and select Normal.
To view an online Getting Started Help for IC Business Manager modules, click the Help menu, and then click Getting Started.
The Interaction Feedback Help is also available from the IC Business Manager Help menu.
Interaction Feedback module
Getting Started Help
21

About Interaction Feedback customer surveysInteraction Feedback provides a simple solution to building surveys for measuring customer satisfaction. There are two types ofsurveys, Post-Call Survey and On-Demand Survey. An Interaction Feedback automated survey assists you in gathering and analyzingcustomer feedback faster and better than conventional survey methods.
An Interaction Feedback post-call survey contains:Rule Conditions that determine which customer calls will be offered the opportunity to take a survey.Prompts which invite the customer to take a survey, welcome the customer to the survey, and thank the customer for taking thesurvey.Questions that measure a customer's perception on satisfaction with the overall experience of the call, customer feedback onthe agent's skills and knowledge, and the likelihood that the customer might buy or recommend your company's products.
An on-demand survey contains Prompts and Questions.
Overview of creating Interaction Feedback surveysThe basic steps in creating a survey are:1. Create a survey group2. Create a survey3. Add questions to the survey4. Activate the survey
This section contains an overview of these basic steps to create a customer survey. Detailed instructions for creating post-callsurveys and on-demand surveys are later in this document. You'll find the detailed steps for creating a new survey in "Create a newsurvey".
22

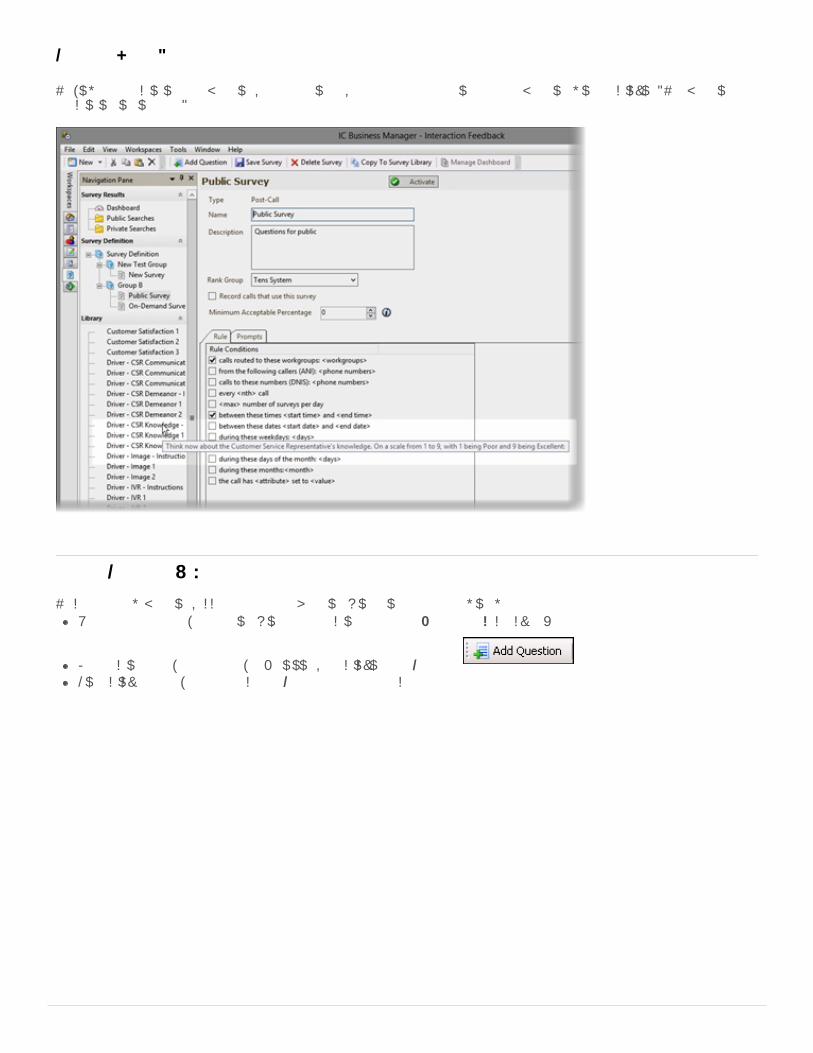
Create survey groups to organize surveys into logical groups and to control user access to those surveys. To create a group, fromthe Interaction Feedback Navigation Pane, under Survey Definition, select Survey Definition.
The Add Group button is now available on the Toolbar.
Next, click the Add Group button. In the Create New Group dialog, type a Name and Description for your new group, and click OK.
The new survey group is added to the bottom of the survey group list and is indicated by the group icon.
The next time Interaction Feedback is started, your survey group name is displayed in alphabetical order.
Creating a survey group
23
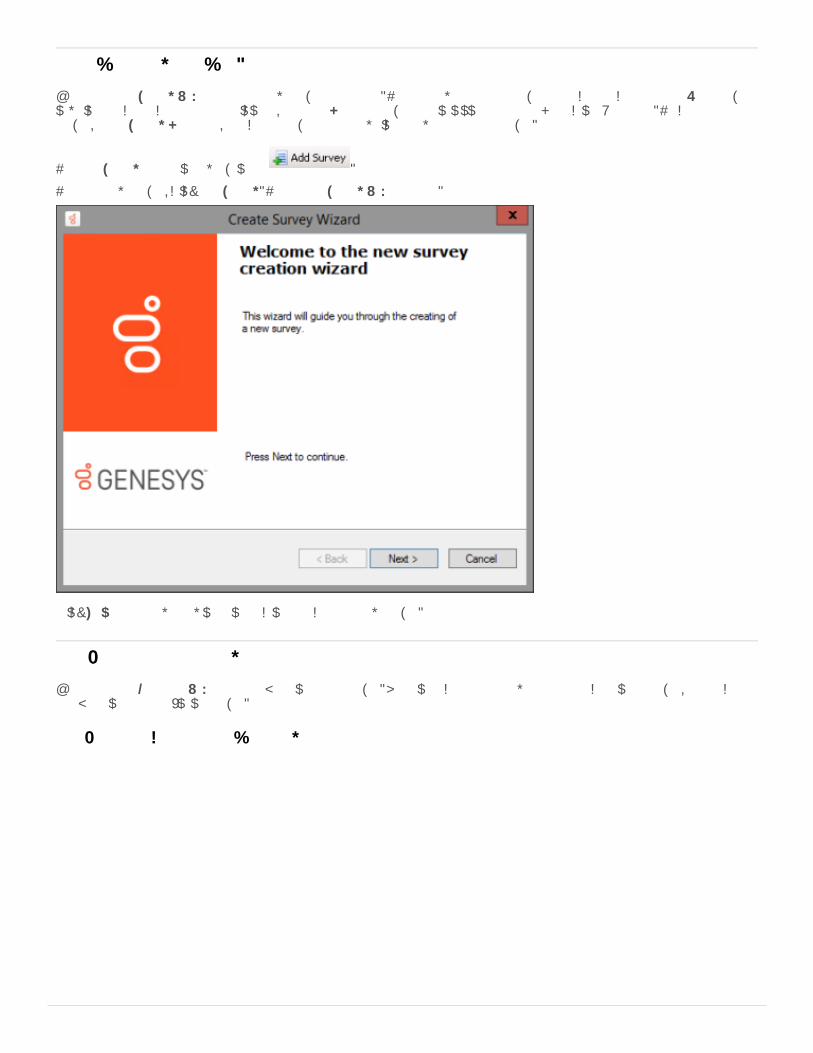
Use the Create Survey Wizard to add a new survey to a group. There are two types of surveys that can be created: Post-Call surveyin which the caller chooses to participate, or an On Demand survey that is initiated through Interaction Attendant. To create asurvey, under Survey Definition, select the survey group to which you want to add a survey.
The Add Survey button is now available .
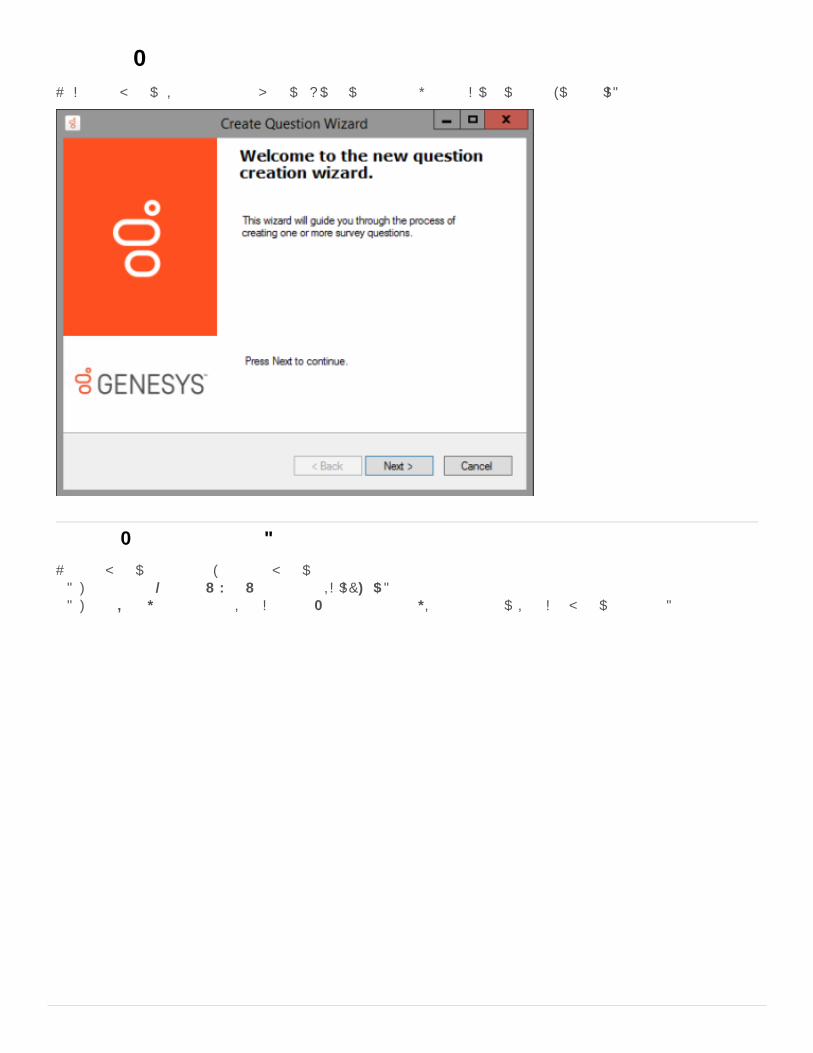
To add a new survey, click Add Survey. The Create Survey Wizard starts.
Click Next and follow the wizard instructions to create a new survey.
Use the Create Question Wizard to add questions to a survey. Questions can be added when you are creating a survey, or you canadd questions to an existing survey.
Add questions when creating a survey
Adding a survey to a group
Add questions to a survey
24

Questions can be added at the completion of the Create Survey Wizard by selecting the Create question now check box.
When you click Finish the Create Question Wizard is started.
Follow the wizard instructions to create one or more survey questions. For more information on using the wizard, see CreateQuestion Wizard.
Add questions to an existing survey
25

To add questions to an existing survey, under the survey group, select the survey and click Add Question on thetoolbar. The Create Question Wizard is started.
The wizard guides you through the process of creating questions for your survey. For more information on using the wizard, seeCreate Question Wizard. You’ll find the detailed steps for creating a new survey beginning.
Activating a survey makes it available to IC server for post-call and on-demand customer surveys. An active survey cannot bemodified.
There are two ways to activate a survey, in the Survey view and in the Survey Activation view.
Activate a survey
26
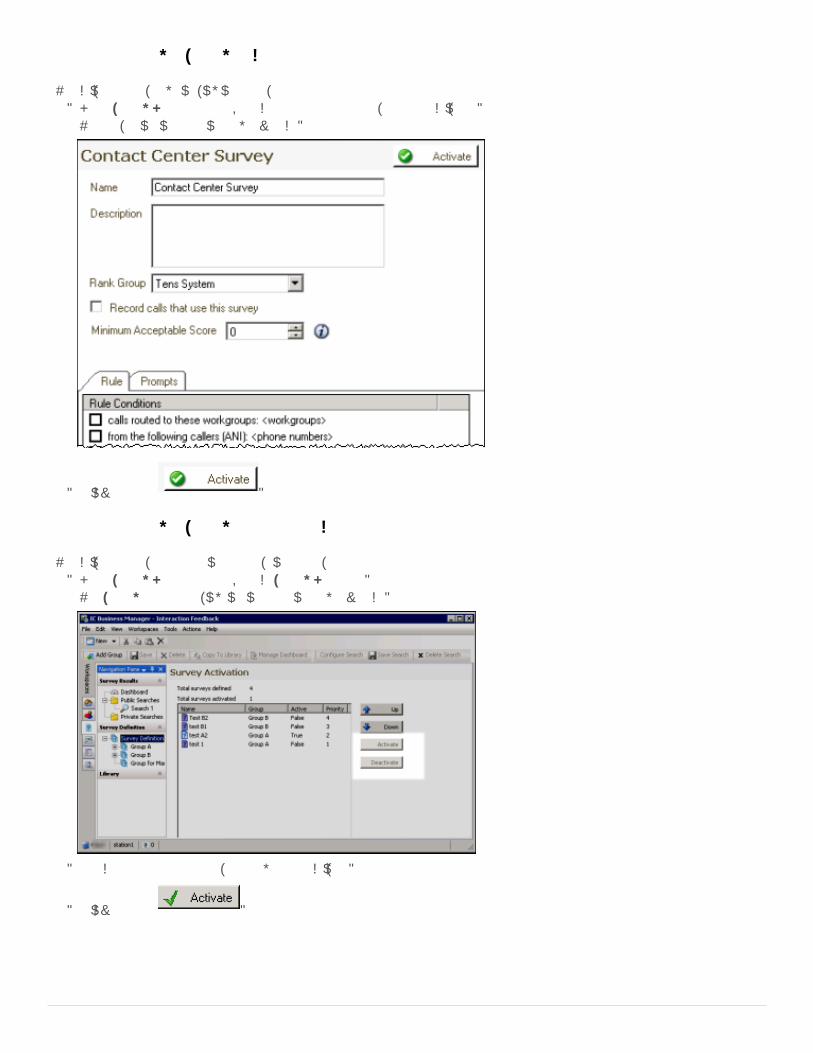
Activate a survey in Survey view
To activate a survey while viewing a survey:1. In the Survey Definition pane, select the name of the survey to be activated.
The survey is displayed in the workspace.
2. Click Activate .
Activate a survey in Survey Activation view
To activate a survey from a list of all available surveys:1. In the Survey Definition pane, select Survey Definition.
The Survey Activation view is displayed in the workspace.
2. Select the name of the survey you want to activate.
3. Click Activate .
27

Deactivate a survey
In order to modify an activated survey, it must be deactivated.
To deactivate a survey in the Survey view, from the survey displayed in the workspace, click .
To deactivate a survey in the Survey Activation view, from the list of surveys displayed in the workspace, select the survey Name
and click Deactivate .
When you click Deactivate, a confirmation dialog is displayed with three choices: Yes, No, or Cancel.
Yes When you choose Yes, all previous survey results will be purged, and the survey is deactivated.
No When you choose No, survey results are not purged and the survey is deactivated. Previous survey results will be mixedwith new survey results. Consider selecting No if you are changing something minor. However, this might causeconfusion in long-term reporting, for example if you add a new question.
Cancel When you choose Cancel, survey results are not purged and the survey is not deactivated.
Those are the basic steps for creating and activating a survey. Next you'll read about creating specific Interaction Feedback post-call surveys and on-demand surveys.
28

Create a new surveyYou can create a customized post-call survey or an on-demand survey using the Create Survey Wizard. Building a customized surveyallows you to create your own rule conditions, prompts, and questions to ask your customers the specific questions you want tomeasure.
Create a post-call surveyFollow these steps to create a post-call survey.1. Under Survey Definition, select the survey group for which you want to create a survey.
2. Click Add Survey .The Create Survey Wizard is started.
29

3. On the Create Survey Wizard Welcome page, click Next.The Library Selection page is displayed.
Note:As this is a new survey, you will not be selecting a template from the Library.
4. Select Create new survey, and click Next.The Survey Type Selection page is displayed.
30

5. On the Survey Type Selection page, select Post-Call and click Next.The Survey Settings page is displayed.
6. On the Survey Settings page, type a Name and Description for your new survey.7. Select a Rank Group for your survey.
For more information, see Define a Rank Group.8. If you want to record the audio for this survey, select the Record calls that use this survey check box.
Do not select this box if you use Interaction Recorder to record calls.9. Enter a Minimum Acceptable Percentage for this survey.
This is the value that is used to create Alerts in Interaction Supervisor.31

10. Click Next, the Survey Invitation Conditions page is displayed.
On the Survey Invitation Conditions page select the conditions to use when offering this survey.1. In the Rule Conditions box, select one or more rules to decide when this survey will be offered.
2. In the Rule description box, click a highlighted variable for each rule to specify a value.3. In the value dialog that is displayed, enter the requested value for the rule, and click OK. The specified values are displayed in
the Rule description box.
32
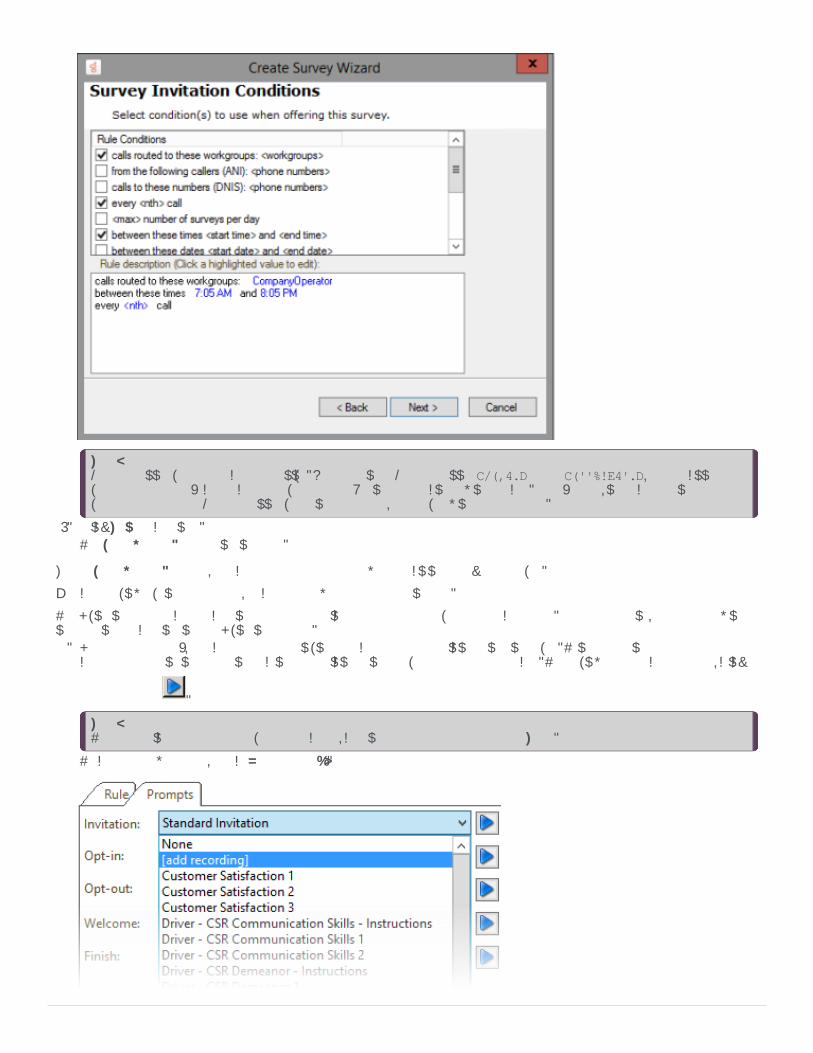
Note:Rule Condition values are case sensitive. When setting a Rule Condition <value> for an <attribute>, the specifiedvalue must be an exact match to the value of the Attribute associated with the call. For example, if the call attribute has avalue of true and the Rule Condition value is set to True, the survey will not be offered.
4. Click Next to continue.The Survey Prompts page is displayed.
On the Survey Prompts page, select the prompts for users when deciding to take the survey.
You can preview available prompts, or create a new prompt from this page.
The Invitation prompt can be configured to automatically present the survey to your customer. For more details, see the followinginformation on configuring the Invitation prompt.1. In the Invitation box, select a prompt that invites the customer to participate in this survey. This prompt is presented to the
caller at the beginning of the interaction to participate in a survey at the end of the call. To preview the selected prompt, click
the play button .
Note:To automatically present a survey to the caller, configure the Invitation prompt to None.
To create a new prompt, select [add recording].
33

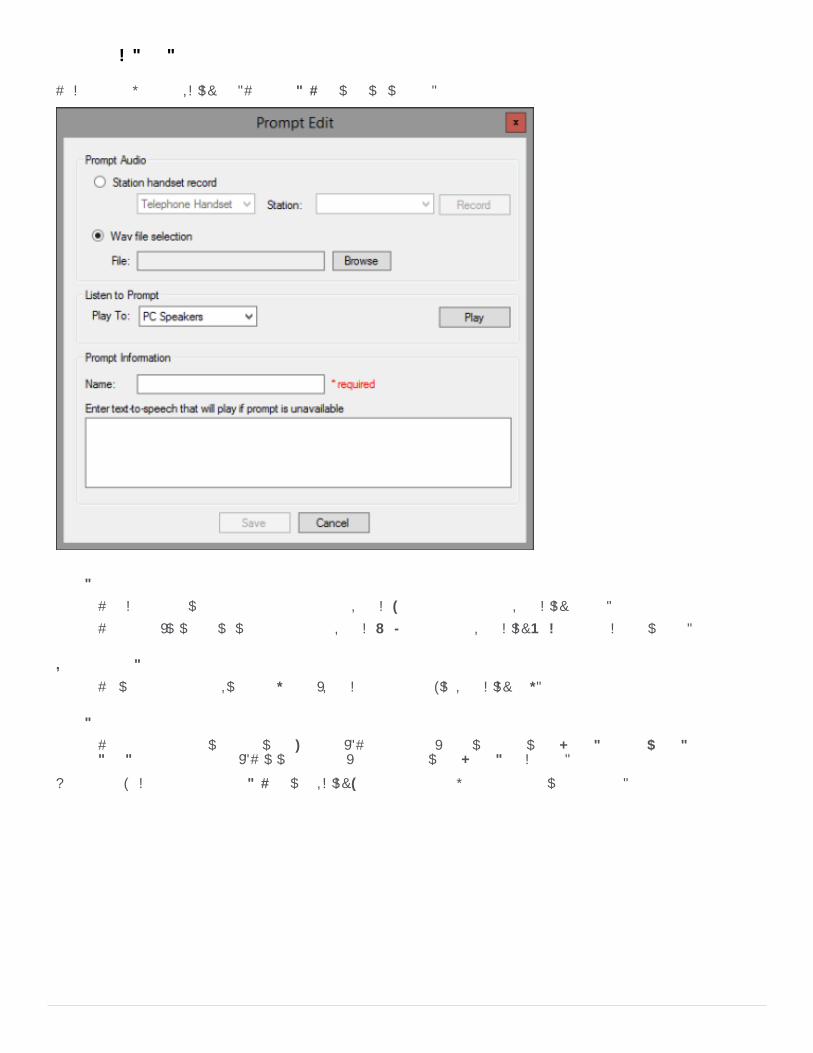
The Prompt Edit dialog is displayed.
Prompt AudioTo record an audio prompt from your telephone, select Station handset record, and click Record. To use an existingaudio file for your prompt, select WAV file selection, and click Browse to select the file path.
Listen to PromptTo listen to the prompt, in the Play To box, select the output device, and click Play.
Prompt InformationType the name for this prompt in the Name box. Type the full text of this prompt in the Enter text-to-speech that willplay if prompt is unavailable box.
When you have completed the Prompt Edit dialog, click Save.2. In the Opt-in box, select a prompt that recognizes that the customer has chosen to take the survey, and it requests that the
customer stay on the line after the interaction has concluded.
You can preview available prompts by clicking the play button .Or you can create your own Opt-in prompt by selecting [add recording].
3. In the Opt-out box, select a prompt that recognizes that the user has chosen not to take the survey.
You can preview available prompts by clicking the play button .Or you can create your own Opt-out prompt by selecting [add recording].
4. In the Welcome box select a prompt that welcomes the customer to the survey and provides instructions on how to take thesurvey, such as how to repeat a question or how to skip a question.
You can preview available prompts by clicking the play button .Or you can create your own Welcome prompt by selecting [add recording].
5. In the Finish box, select a prompt that is played at the completion of the survey.
34

You can preview available prompts by clicking the play button .Or you can create your own Finish prompt by selecting [add recording].
6. Click Create.You have successfully created your post-call survey, and you have the following options:
You can add questions to your survey by selecting the Create question now check box, and clicking Finish, which displaysthe Create Question WizardYou can click Finish and add questions later. When you click Finish, the survey is added to the end of the list of surveys inthe survey group.
A new custom survey is indicated by a survey icon .
Create an on-demand survey
Note:On-demand surveys are initiated in Interaction Attendant. For detailed instructions on adding an on-demand survey to anInteraction Attendant profile, see the Help topic, "Add inbound IVR surveys to Interaction Attendant profiles" in the InteractionAttendant Help.
Follow these steps to create an on-demand survey.1. Under Survey Definition, select the survey group for which you want to create a survey.
35

2. Click Add Survey .The Create Survey Wizard is started.
3. On the Create Survey Wizard Welcome page, click Next.The Library Selection page is displayed.
36

Note:As this is a new survey, you will not be selecting a template from the Library.
4. Select Create new survey, and click Next.The Survey Type Selection page is displayed.
5. On the Survey Type Selection page, select On Demand and click Next.The Survey Settings page is displayed.
37

6. On the Survey Settings page, type a Name and Description for your new survey.7. Select a Rank Group for your survey.8. Enter a Minimum Acceptable Percentage for this survey.
This is the value that is used to create Alerts in Interaction Supervisor.9. Click Next.
The Survey Prompts page is displayed.
On the Survey Prompts page, select the prompts to use for this survey. You can preview available prompts, or create a new promptfrom this page.
38
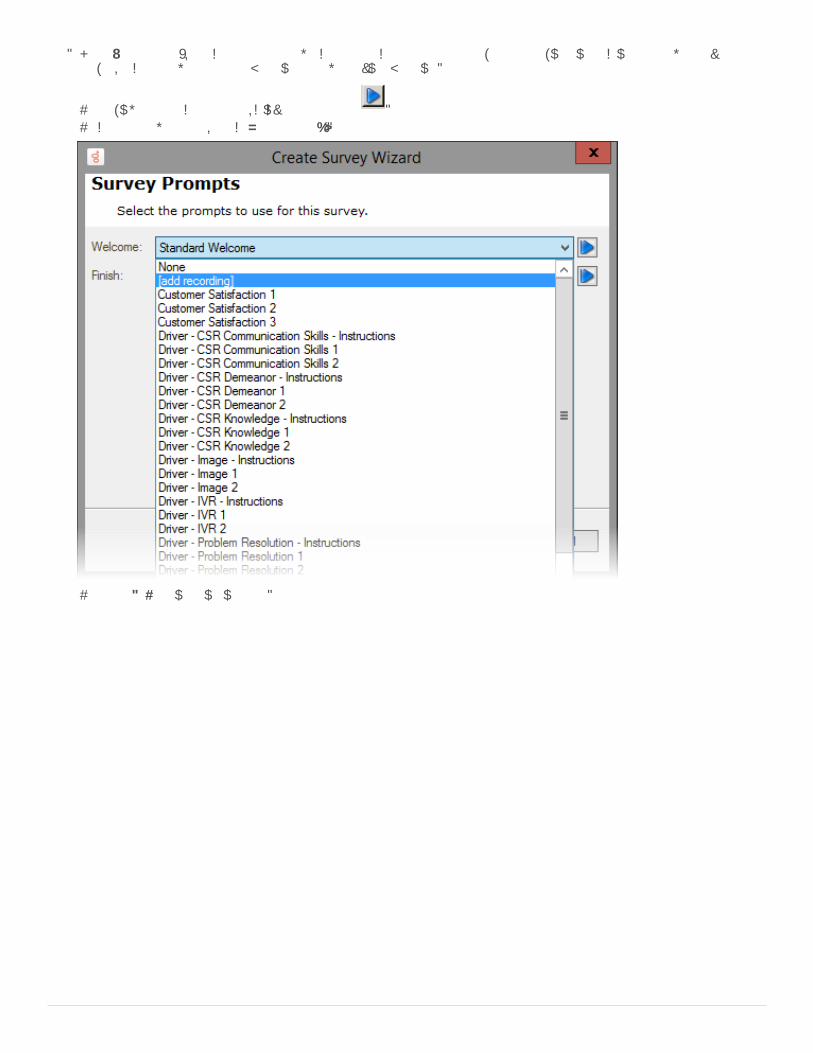
1. In the Welcome box, select a prompt that welcomes the customer to the survey and provides instructions on how to take thesurvey, such as how to repeat a question or how to skip a question.
To preview the selected prompt, click the play button .To create a new prompt, select [add recording].
The Prompt Edit dialog is displayed.
39

Prompt AudioTo record an audio prompt from your telephone, select Station handset record, and click Record. To use an existingaudio file for your prompt, select WAV file selection, and click Browse to select the file path.
Listen to Prompt
To listen to the prompt, in the Play To box, select the output device, and click Play.
Prompt Information
Type the name for this prompt in the Name box. Type the full text of this prompt in the Enter text-to-speech that willplay if prompt is unavailable box.
When you have completed the Prompt Edit dialog, click Save.2. In the Finish box, select a prompt that is played at the completion of the survey.
You can preview available prompts by clicking the play button .Or you can create your own Finish prompt by selecting [add recording].
3. Click Create. You have successfully created your on-demand survey, and you have the following options:You can add questions to your survey by selecting the Create question now check box, and clicking Finish, which displaysthe Create Question WizardYou can click Finish and add questions later. When you click Finish, the survey is added to the end of the list of surveys inthe survey group.
40

A new custom survey is indicated by a survey icon .
Note:On-demand IVR surveys are initiated in Interaction Attendant. An on-demand survey must be marked Active in order to beavailable for use in Interaction Attendant. For more information, see Activate a survey.
On-demand surveys are initiated in Interaction Attendant. For detailed instructions on adding an on-demand survey to an InteractionAttendant profile, see the Help topic, "Add inbound IVR surveys to Interaction Attendant profiles" in the Interaction Attendant Help.
Edit a surveyTo edit the settings for a survey, in the Survey Definition pane select the survey name under its group. The survey settings aredisplayed in the workspace.
Add an on-demand survey to Interaction Attendant profile
41

Use the Minimum Acceptable Percentage field to set a minimum score for a survey. Enter the Minimum Acceptable Percentage asa percentage of the maximum score for the survey. Click the information icon, next to the Minimum Acceptable Percentage box, todisplay a tooltip that assists you in selecting the percentage for the minimum acceptable score for the survey. The MinimumAcceptable Percentage is the value that is used for Alert notification in Interaction Supervisor.
The tooltip is displayed next to the Minimum Acceptable Percentage box.
When you have completed making your changes, click Save Survey .
Add questions to a surveyThe Create Question Wizard will guide you through the process of creating a new question for your survey, or choosing an existingquestion template. Here's how to add questions to a survey.
Use the Create Question Wizard to add questions to a survey. Questions can be added when you are creating a survey, or you canadd questions to an existing survey.
Add questions when creating a survey
Set the Minimum Acceptable Percentage
Add questions to a survey
42

Questions can be added at the completion of the Create Survey Wizard by selecting the Create question now check box.
When you click Finish the Create Question Wizard is started.
Follow the wizard instructions to create one or more survey questions. For more information on using the wizard, see CreateQuestion Wizard.
Add questions to an existing survey
43

To add questions to an existing survey, under the survey group, select the survey and click Add Question on thetoolbar. The Create Question Wizard is started.
The wizard guides you through the process of creating questions for your survey. For more information on using the wizard, seeCreate Question Wizard. You’ll find the detailed steps for creating a new survey beginning.
Question templates contain the question settings, including prompts and response values, and can save time when creating asurvey. You can choose question templates that you have created, from the Library.
Question templates
44

Library
The Library pane contains the question templates that are available for your surveys.
45
Question Descriptions
To view the description of a question, from the Library, pause the mouse pointer on the question without clicking. The questiondescription is displayed.
To create a new question, access the Create Question Wizard in one the following ways:At the end of the Survey Creation Wizard by selecting the Create question now check box
By selecting a survey under Survey Definition, and clicking Add Question on the toolbarRight-click on a survey and select Add Question on the shortcut menu
Create Question Wizard
46
Create a questionTo create a question, start the Create Question Wizard in one of the ways described in the previous topic.
To add a question to your survey from a question template:1. On the Create Question Wizard Welcome page, click Next.2. On the Library selection page, select Create question from library, and from the list, select a question template.
Create a question from a template
47
The question is displayed in the Question Text box.
3. Click Create. Your question is created and added to your survey.
4. To create another question from a template, select Create another question check box. If you are finished, click Finish.
Questions are added under Survey Definition below the survey, and they are indicated by a question icon .
Create a new custom question48

To create a new custom question for your survey:1. On the Create Question Wizard Welcome page, click Next.
2. On the Library selection page, select Create new question, and click Next.
3. On the Question Settings page, configure the Question type and Question settings.
49

Question TypeSelect the type of question: True/False, Multiple Choice, Numeric Range, or Free-form (recording).
Question Settings
NameType the name of the question.
DescriptionType a description for the question.
Question PromptFrom the drop-down list, select the question prompt for your new question, or create a new prompt by selecting [addrecording].
You can preview available prompts by clicking the play button .Use the Prompt Edit dialog to add prompts to surveys and questions. When you select [add recording].
50

The Prompt Edit dialog is displayed.
Prompt AudioTo record an audio prompt from your telephone, select Station handset record, and click Record. To use anexisting audio file for your prompt, select WAV file selection, and click Browse to select the file path.
51

Listen to PromptTo listen to the prompt, in the Play To box, select the output device, and click Play.
Prompt InformationType the name for this prompt in the Name box. Type the full text of this prompt in the Enter text-to-speechthat will play box.When you have completed the Prompt Edit dialog, click Save.
No Input PromptFrom the drop-down list, select the prompt that the customer will hear if there is no response to the question, or createa new prompt by selecting [add recording]. If you select <Default> a system prompt will play.
You can preview available prompts by clicking the play button .Or you can create your own No Input prompt by selecting [add recording].
No Match PromptFrom the drop-down list, select the prompt that the customer will hear if the response is invalid, or create a new promptby selecting [add recording]. If you select <Default> a system prompt will play.
You can preview available prompts by clicking the play button .Or you can create your own No Match prompt by selecting [add recording].
Question WeightSelect the number for which you want to weight the importance of this question. The Question weight is used as amultiplier to calculate the final score for a question. For example, if the question is scored as a 9 with a weight of 2,the final score for that question is 18.The Question Weight must be a non-zero value. It can be expressed as a decimal, for example 0.33, 1.5, or 5.55.To not have the score for a question considered in the final score, use the Ignore score for question check box.
Ignore score for questionSelect this box to not have the score for this question considered in the calculations for the final score of the survey.
52

4. Click Next.The Question Scoring page is displayed.
The values to set for scoring vary depending on the type of question you selected: True/False, Multiple Choice, Numeric Range,or Free-form (recording).
5. When you have completed entering the scoring values, click Next.The Select categories for the question page is displayed.
53

6. Under Question Categories, in the User Defined Categories box, select the categories in which you want this question to beincluded. Click the arrow to add the categories to the Selected Categories box.
7. When you have finished, click Create. Your question is created and added to your survey.
8. To create another question, select the Create another question check box.9. Click Finish.
Questions are added under Survey Definition below the survey, and the question type is indicated by an icon—for example:
Numeric Range question
54
True/False question
Multiple Choice question
Free Form recording
Note: When the customer is given the survey, the configured prompts are presented. You can localize the Free-form recordingconfirmation prompts by configuring the value of the CSSurvey: Clear Language For Survey server parameter. The serverparameter default value of Yes clears the language attribute of the call. If you do not want to clear the language attribute ofthe call when a survey begins, set the server parameter value to No. This allows the language attribute of the call to beused to localize the Free-form confirmation prompts.
Ordering questions in a surveyYou can change the order questions appear in a survey. Here's how:1. From the Interaction Feedback Navigation Pane, select a Question in a Survey.2. Right-click on a Question and on the shortcut menu click Up or Down.
The position of the question is reordered in the survey.
Editing questionsTo edit a question, in the Survey Definition pane, under the survey, select the question. The question properties are displayed in theQuestion View in the workspace. You can update all of the question properties you configured when creating the question andconfigure additional properties, such as Retries and Timeout. You can also add branching logic, to configure when and howquestions are presented based on customer responses to a question.
Retries and Timeout values are configured on the question properties displayed in the workspace.
The Retries value is the total number of times a question is repeated if there is an invalid response. If there is no response after thenumber of retries, Interaction Feedback goes on to the next question. However, if there is no answer or no match for the firstquestion, Interaction Feedback abandons the survey, allowing for hang ups. After the first question is answered, the remainingquestions will go on to the next question if there is no answer or no match.
The Timeout value is the time, in seconds, to wait for a response after the prompt is completed. When the timeout expires, the NoInput prompt is played.
To change the default values, display the question properties in the workspace, and update the values. When you have finished,right-click and in the shortcut menu, select Save question.
When your updates are complete, right-click and on the shortcut menu, select Save question.
Retries and Timeout
55

Adding branching logic to a survey allows the survey to change according to user responses to specific questions. In a survey withbranches, relevant questions are offered according to the user's specific situation. With branching, questions can be skipped oranother question can be asked based on the user response to a branching question.
After your survey has been created and you have added all your questions to the survey, you can add branching to specific surveyquestions. Branching is configured in the Interaction Feedback Question View. Branching options can be configured for thefollowing question types: True/False, Multiple Choice, and Numeric Range. Free Form (recording) questions cannot be configuredas a branching question.
Each question type has its own set of branching options. For example, here are the branching options offered for a True or FalseQuestion:
For step-by-step instructions on configuring each question type for branching logic in your survey, see Appendix B. Add branchinglogic to a survey.
Create templatesTemplates are created from existing surveys and questions. Templates save the settings for surveys and questions, saving youtime when creating new surveys. Templates are saved in the Library for reuse.
Add branching logic to a survey
56

To create a question template from a question:1. In the Survey Definition pane, select the question.
2. Click Copy to Question Library on the toolbar.
The new question template is added to the Library and is indicated with a question template icon .
Delete Custom Questions from the Library
You can remove custom questions that have been copied to the Question Library. To delete a question, the User must have theAccess Rights to Modify All surveys.
To remove a custom question from the Library:1. In the Library pane, select the question to be deleted.2. Right-click and on the shortcut menu, click Delete item.
You can only delete questions you have added to the Library.
To create a survey template from a survey:1. In the Survey Definition pane, select the survey.
2. Click Copy to Survey Library on the toolbar.
The survey template is added to the Library and is indicated with a survey template icon .
Create question templates
Create survey templates
57
View Survey ResultsUse Interaction Feedback to view completed survey results. You can use the Interaction Feedback Client Dashboard to view asummary of a completed survey, and you can create searches to display details for completed surveys.
Note:You can view surveys in real-time using Interaction Feedback Monitor in Interaction Supervisor. For more information on real-time viewing, see Monitor surveys in real-time.
Completed survey resultsThere are two ways to view completed surveys using the Interaction Feedback Client: the Dashboard and searches. Use theNavigation Pane to display these views in the workspace.
View completed Survey Results using the Interaction Feedback Navigation Pane.
58

Use Interaction Feedback's Dashboard to view a summary of individual survey results. To access the Dashboard, under SurveyResults select Dashboard. The Dashboard view is displayed in the workspace.
Manage the Dashboard
Use the Manage Dashboard toolbar button to add individual survey results to the Dashboard. Results are graphically displayed as aspeedometer.
The graphical interface shows the average score for surveys completed since the selected Starting Date. The speedometer alsodisplays the rank and the number of completed surveys.
The Dashboard
59

Dashboard view
Speedometer pointer
The average percentage for the surveys taken is indicated by the pointer, between 0% and 100%.
Ranking
The average ranking of a survey is displayed on the face of the speedometer. The text that is displayed depends on the Ranklabel assigned when creating the Rank Group.
Odometer
The number of completed surveys is displayed by the odometer.
Survey name
The survey name is displayed below the speedometer.
Starting Date
Select this check box to display data for a range of dates beginning with a specific date to the current day.
Date field
Enter a specific date for which to display completed survey results. If the Starting Date check box is selected, the averagecompleted survey results, beginning with this date to the current day, are displayed.
Update the Dashboard
The Dashboard data is updated every three minutes, or when refreshed. To refresh the data, right-click on the Dashboard, and on theshortcut menu click Refresh.
Access the Dashboard
To access the Dashboard, under Survey Results select Dashboard. The Dashboard view is displayed in the workspace.
60

Define surveys to display
1. To display survey results, click Manage Dashboard on the toolbar .The Manage Dashboard dialog is displayed.
2. Select the survey to be displayed from the Survey drop-down list.3. To display survey results for a range of dates beginning with a specific date to the current day, select the Starting Date check
box. Next, in the date field drop-down, select a starting date on the calendar that is displayed.Or, to display survey results for a specific date, clear the Starting Date check box, and in the drop-down calendar select the datefor which you want the data to be displayed.
4. Click Add.The survey is added to the Survey list, and the survey is displayed on the Dashboard.
5. Continue to define as many surveys as you want to display on the Dashboard. When you have completed defining surveys, clickClose.
You can create Public Searches and Private Searches to display completed survey results, in table form. After creating a search,use Run a Search to view the survey results in the workspace.
Create a Search
1. Select either the Public Searches folder or the Private Searches folder and right-click the selection.2. On the submenu, point to New, and then click Search.
Searches
61

3. The search properties are displayed in the workspace.
The default search name is displayed in the Title box. To rename the search, type a new name.4. To add an attribute to the search, click the New Attribute arrow.
5. Point to Survey, and click the attribute you want to add to your search.
The attribute is added to the workspace.
6. Select each attribute's search criteria and comparison operator.
Use this button to add additional search criteria to an attribute.
Use this button to delete a search criterion from an attribute.
62

7. To save a search, click Save Search on the toolbar.
Note:You can also create Public and Private Searches using the Menu Bar and the Toolbar. Using the Menu Bar, from the Filemenu, point to New and click Search. On the Select Search Location dialog, select Private Searches or Public Searches. Tocreate a new Interaction Feedback search using the Toolbar, click New, and on the Create New View dialog, click OK. Onthe Select Search Location dialog, select Private Searches or Public Searches.
Search Attributes
There are four search attributes specific to the Survey menu:
Ranking
The Survey Ranking attribute searches the selected Rank Group for surveys that match the selected rank using thecomparison operator.
Scored User
The Survey Scored User attribute searches surveys for the selected agent using the comparison operator.
Survey Name
The Survey Name attribute searches surveys for the selected survey name using the comparison operator.
Survey State
The Survey State attribute searches surveys for the selected survey state using the comparison operator.
63

Search order
Surveys are searched using the attributes in the way they are ordered from top to bottom.
Use the green arrows to change the order of the search attributes
Use the delete button to delete a selected attribute.
Run a search
To run a search, under Survey Results, select the search, and click Run Search on the toolbar. The search results aredisplayed in the workspace, in a grid.
Note:To paste Survey Results information into another application, use Ctrl+C in the Search Results grid to Copy an entire row, ormultiple rows, to the clipboard.
Selecting Fields for the grid
To change the fields that are displayed in the grid, click the Field Chooser on the upper left of the grid. In the Field Chooserdialog select the fields to display in the grid.
64
The available fields for the search results grid are described in the following table.
Field Chooser
Field Description
Agent Name of the agent whose call is associated with this survey
Caller Name of the caller who opted-in to take the survey
Completed Indicates a True or False value, True indicating all required survey questions were completed, and False indicatingall required survey questions were not completed
Date The Date and Time the survey occurred
Duration inseconds
The total time, in seconds, for the caller to take the survey
Interaction ID The Interaction ID of the call associated with the survey
Origin How the call came in to the system—possible values: Post-Call (used for opt-in surveys), External, Internal,Transfer, or Outbound
Rank The Rank, or grade, based on the score associated with the survey rank group
Recording ID The Recording ID of the call associated with the survey
The Recording ID is displayed as a dynamic link. To listen to the recording, click the link to launch the InteractionRecorder playback dialog.
Score Total survey score
State Current state of the survey, which include:Abandoned — The caller hung up during the survey and the survey was abandonedComplete — The survey was completedInsufficient Resources — Licensing or some other resource was not available to present the surveyOpt-Out — The caller opted out of the surveyError — There was an internal error when attempting to present the surveyNot Answered — The call was not answered by an agentCaller Disconnect — The caller disconnected before the survey began
Survey Name Name of the survey
Type The type of survey, either Post-Call or On Demand
65

ToolsInteraction Feedback has a suite of tools to manage Interaction Feedback's Prompts, Question Categories, and Rankings. Toaccess these tools, click the Tools menu.
Manage PromptsPrompts are pre-recorded audio files that:
Invite the customer to participate in a surveyWelcome the customer to the surveyAsk the customer specific customer satisfaction questionsThank the customer for taking the survey
You can select prompts from existing Interaction Feedback prompts or create your own prompts.
These are the types of prompts that you will be selecting on Interaction Feedback dialogs when creating surveys and questions.
Invitation
This prompt invites the customer, before interacting with an agent, to participate in a survey at the end of a call.
Opt-in
This prompt recognizes that the customer has chosen to take the survey, and requests that the customer stay on the lineafter the call has concluded.
Opt-out
This prompt is played when the user has chosen not to take the survey.
Welcome
This prompts welcomes the customer to the survey at the end of the agent interaction and provides instructions on how totake the survey, such as how to repeat a question or how to skip a question.
Questions
These prompts contain the specific questions that measure customers' perceptions on satisfaction with the overallexperience of the call, customer feedback on the agent's skills and knowledge, and the likelihood that the customer mightbuy or recommend your company's products.
No Input Prompt
This is the prompt that is played if there was no response to the question.
No Match Prompt
This is the prompt that is played if the customer's response is invalid.
Finish
This prompt is played at the completion of the survey and thanks the customer for taking the survey.
Types of prompts
66

Use the Feedback Prompt Management tool to:Create new promptsEdit existing promptsDelete promptsImport WAV files for new prompts
To access the Feedback Prompt Management dialog, from the Tools menu, click Manage Prompts.
Available prompts are listed by Name, File and Description. To sort the list of prompts, click a column heading.
Feedback Prompt Management
67
Create new prompts
To create a new prompt, click Add. The Prompt Edit dialog is displayed.
Prompt Audio
To record an audio prompt from your telephone, select Station handset record, and click Record.
To use an existing audio file for your prompt, select WAV file selection, and click Browse to select the file path.
Listen to Prompt
To listen to the prompt, in the Play To box, select the output device, and click Play.
Prompt Information
Type the name for this prompt in the Name box. Type the full text of this prompt in the Description or text to speech if noprompt has been added box. This is also the text that appears in the Description column.
When you have completed the Prompt Edit dialog, click Save to add your new prompt to the list of prompts.
68

Edit prompts
On the Feedback Prompt Management dialog, select the prompt, and click Edit. The Prompt Edit dialog is displayed with the currentprompt settings.
After updating the prompt properties, click Save.
Delete a prompt
Use the Feedback Prompt Management dialog to delete an existing prompt. From the Tools menu, click Manage Prompts.
To delete an existing prompt, select the prompt in the Feedback Prompt Management dialog, and click Delete.
69

Create a prompt from a WAV file
Use the Feedback Prompt Management dialog to create a prompt from an existing WAV file.
To create a prompt, click Import. The Select one or more prompt WAV files to import dialog is displayed. Locate and select the filename, and click Open.
A prompt is created using the WAV file name as the name of the prompt. To edit the prompt, select it and click Edit.
Manage Question CategoriesQuestion Categories are created to organize questions in to logical groups.
Use the Question Categories dialog to create and delete these categories. To access the Question Categories dialog, from theTools menu, click Manage Question Categories. The Question Categories dialog is displayed.
Adding categories
To create a new category, click Add. A New Category is created and selected. Type a Category Name and press Enter.
Deleting categories
To delete an existing category, select it and click Delete.
Manage RankingsRankings are scaled scores used to rate or grade customer surveys. When a survey is completed, the final score is compared to thevalue defined in the survey's ranking. When viewing survey results, the rank is displayed in searches and the Dashboard.
Question Categories
70
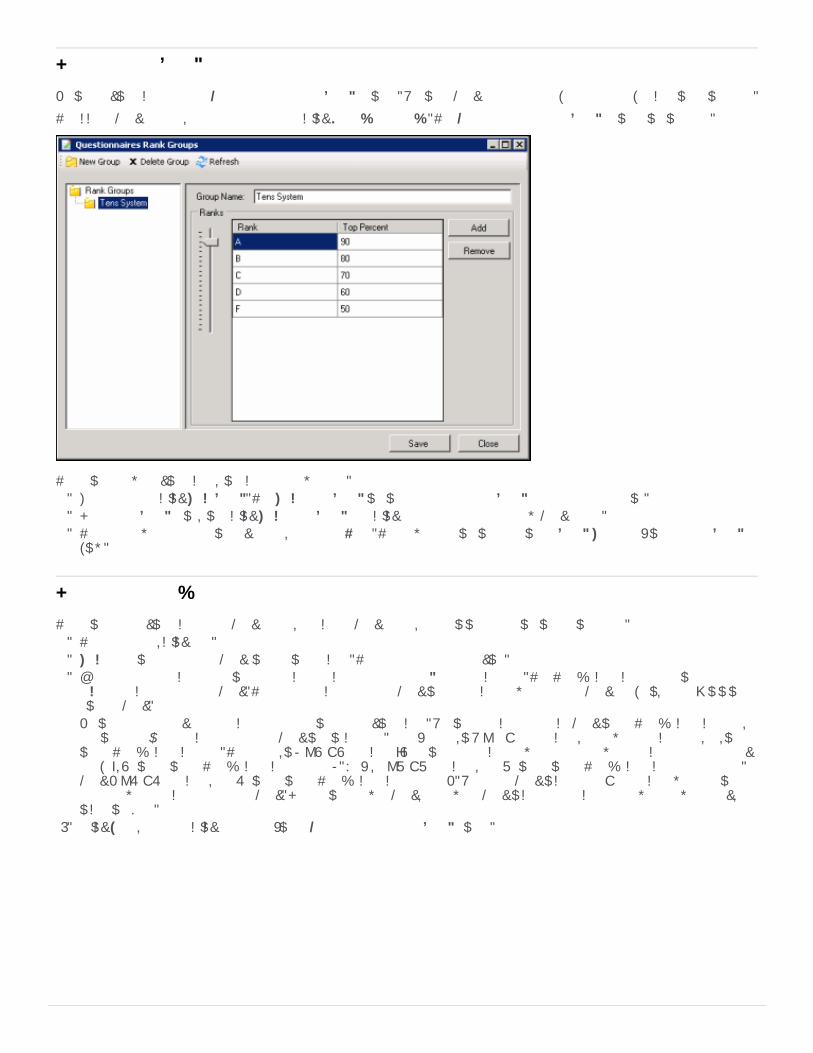
Define ranking scales on the Questionnaires Rank Groups dialog. Assign a Rank Group to a survey on the survey configuration page.
To access Rank Groups, from the Tools menu click Manage Rankings. The Questionnaires Rank Groups dialog is displayed.
To define a new ranking scale, first create a new group.1. On the toolbar click New Group. The New Rank Group is displayed under Rank Groups at the end of the list.2. In the RankGroups list, right-click New Rank Group and click Rename to name the new Rank Group.3. Type the new name for this rank group, and press Enter. The new name is displayed in the Group Name box in the Rank Groups
view.
To define the ranking scale for a Rank Group, select the Rank group, and edit its properties in the right pane.1. To add a Rank, click Add.2. New Rank is added to the Rank list and is selected. Type a name for the ranking.3. Use the Ranks percentage slider to select a percentage for the Top Percent column. The Top Percent column defines the
lowest percentage for the Rank. The upper percentage for a Rank is one percent lower than the Rank above it, or 100% if it is thehighest Rank.Define as many ranks as you choose to use in your ranking scale. Assign a percent for each Rank in the Top Percent column,setting the lowest percentage for the Rank in this column. For example, if A = 90—100 percent, the lowest percentage, 90, is setin the Top Percent column. Therefore, if B = 80—89 percent (89 being one percent lower than the lowest percentage of the rankabove), 80 is set in the Top Percent column for B. Next, C = 70—79 percent, and 70 is set in the Top Percent column for the C.Rank D = 60—69 percent, and 60 is set in the Top Percent column for D. And the F Rank includes 50—59 percent when 50 is setas the lowest percentage for the Rank. If there is no lower Rank, the lowest Rank includes all scores below the lowest rank,including zero.
4. Click Save, and then click Close to exit the Questionnaires Rank Group dialog.
Define a Rank Group
Define the ranking scale
71
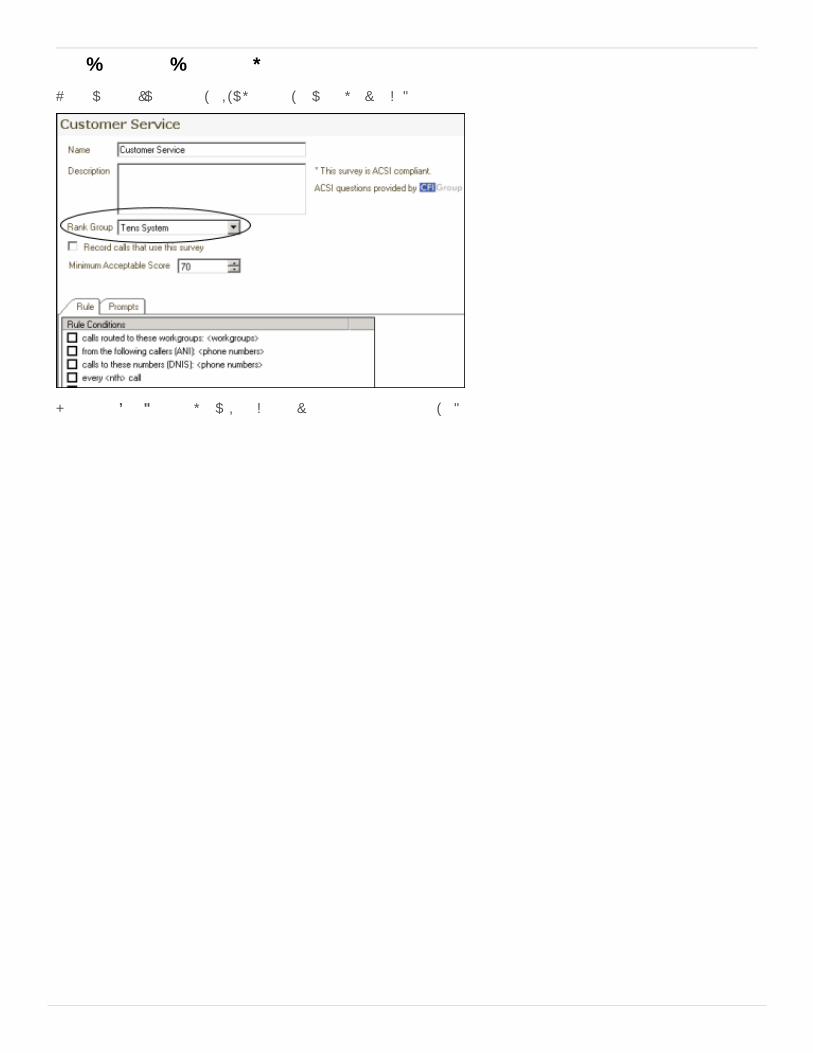
To assign a ranking to a survey, view the survey in the workspace.
In the Rank Group drop-down list, select a rank group to apply to the survey.
Assign a Ranking to a survey
72

Monitor surveys in real-timeUse Interaction Feedback Statistics View in IC Business Manager to monitor surveys in real-time. Interaction Feedback Statisticsprovides the ability to view real-time statistics for surveys in progress as well as completed surveys and surveys where participantshave opted out or abandoned.
Interaction Feedback real-time monitoring also allows business users to create Alerts for surveys that are in progress.
For complete information on Interaction Feedback Statistics View, see Interaction Supervisor Help in IC Business Manager.
To view surveys in real-time:1. In IC Business Manager, click the Default Workspace module tab.
2. On the IC Business Manager toolbar, click New.
3. On the Create New View dialog, in the Group by box select Categories, and in the left pane select Interaction Feedback Status.Interaction Feedback statistics is displayed in the right pane.
73

4. Click OK.The Interaction Feedback Wizard starts with the Survey Group page displayed.
5. Select a Group in the list box. You can use the Filter box to find a Group listed in the box. Click Next.6. On the Interaction Feedback Wizard Survey Name page, select a survey from the list and click Finish.7. The Interaction Feedback statistics page is displayed in the Workspace.
74

The available Feedback Survey Statistics include:Survey errors todaySurveys completed todayCaller disconnects todaySurveys offered last hourSurveys Opt-outs todaySurveys Offered todaySurveys bypassed (no license) todayAgent no answer todayActive surveysSurveys abandoned todayBelow minimum scoreSurvey average score todaySurvey average score last hour
For detailed information on using the Interaction Feedback statistics page, press F1 for Help. The Interaction Feedback Statisticsview Help is displayed.
75

Interaction Feedback ReportsThe results of the customer satisfaction survey data are collected, aggregated, and presented in Interaction Reporter in IC BusinessManager. Reports include data from completed surveys. You can view, export, and print customer satisfaction survey reports.Reports are based on completed customer surveys.
Note:If your survey contains a Free Form response as the last question, and the customer hangs up instead of pressing any key tocomplete the response, the survey state is marked Complete and the Complete Field for the report is marked as True.Comments that are ended by hanging up are displayed in the reports.
Interaction Feedback Survey reportsThe following Interaction Reporter reports are available for Interaction Feedback surveys:
Satisfaction Trends (Line Graph)
The Survey Satisfaction Trends report shows the satisfaction trend for an agent over time, by survey. The report is displayedin a line graph.
Survey Scoring Detail
The Survey Scoring Detail report shows the average survey score for agents during a date and time range. The report alsoshows survey detail by user, including survey scores, percentile, and score and weight by question.
Survey Scoring Summary
The Survey Scoring Summary report shows the average survey score for agents during a date and time range. It alsoincludes a list showing Average Score and Percentile per User for the selected survey.
Survey vs. Quality Scores
This report compares survey and quality scores from Interaction Recorder for a specified agent.
76

Appendix B. Add branching logic to a surveyAdding branching logic to a survey allows the survey to change according to user responses to specific questions. In a survey withbranches, relevant questions are offered according to the user’s specific situation. With branching, questions can be skipped oranother question can be asked based on the user response to a branching question.
When creating a survey, determine the logic you want to use for the branching. For example, you might want to offer a question onlyif someone chooses a specific answer to a question, or based on a specific answer to a question, branch to a set of questions.
First, sketch out the questions for your survey and their logic. After you have created the survey and your survey questions, orderyour survey questions and specify where and how the survey questions branch. The order of the questions in a survey is important,as when you are assigning branching you can only branch forward to a question, you cannot loop back to a previous question.
Branching options are based on the type of question you have created. Branching options can be configured for the followingquestion types: True/False, Multiple Choice, and Numeric Range. Free Form (recording) questions cannot be configured as abranching question.
77

Add branching to a questionAfter your survey has been created and you have added all your questions to the survey, you can add branching to specific surveyquestions. Branching is configured in the Interaction Feedback Question View. Branching options can be configured for thefollowing question types: True/False, Multiple Choice, and Numeric Range. Follow these steps to add branching to a question.
Add branching to a True/False questionBased on the customer's response to a True/False question, branching options for an answer are: Any, Skip, True, or False. Hereare the steps for configuring branching for a True/False question.1. In the Navigation Pane, under the Survey, select the question you want to add branching to.
The Question Settings are displayed in the workspace, including the Branching options.
2. Under Branching, for each possible Answer to the question that you want to specify a branching option for, select the questionthat you want to Branch To from the drop-down list. The default is <Next Question>, and included with the list of questions isthe option <End Survey>.
3. When you have completed adding branching to the question, click Save Question.The branching for this question is displayed in the Navigation Pane below the question.
78

Add branching to a Multiple Choice questionBased on the customer's response to a Multiple Choice question, branching options for an answer are: Any, Skip, and all DTMF Keyresponses are listed. Here are the steps for configuring branching for a Multiple Choice question.1. In the Navigation Pane, under the Survey, select the question you want to add branching to.
The Question Settings are displayed in the workspace, including the Branching options.
2. Under Branching, for each possible answer to the question that you want to specify a branching option for, select the questionthat you want to branch to from the drop-down list. The default is <Next Question>, and included with the list of questions isthe option <End Survey>.
3. When you have completed adding branching to the question, click Save Question.The branching for this question is displayed in the Navigation Pane below the question.
Add branching to a Numeric Range questionCreate a list of possible numeric ranges for customer responses and the questions to branch to when the responses falls within aspecified numeric range. Here are the steps for configuring branching for a Numeric Range question.1. In the Navigation Pane, under the Survey, select the question you want to add branching to. The Question Settings are displayed
in the workspace, including the Branching options.
79
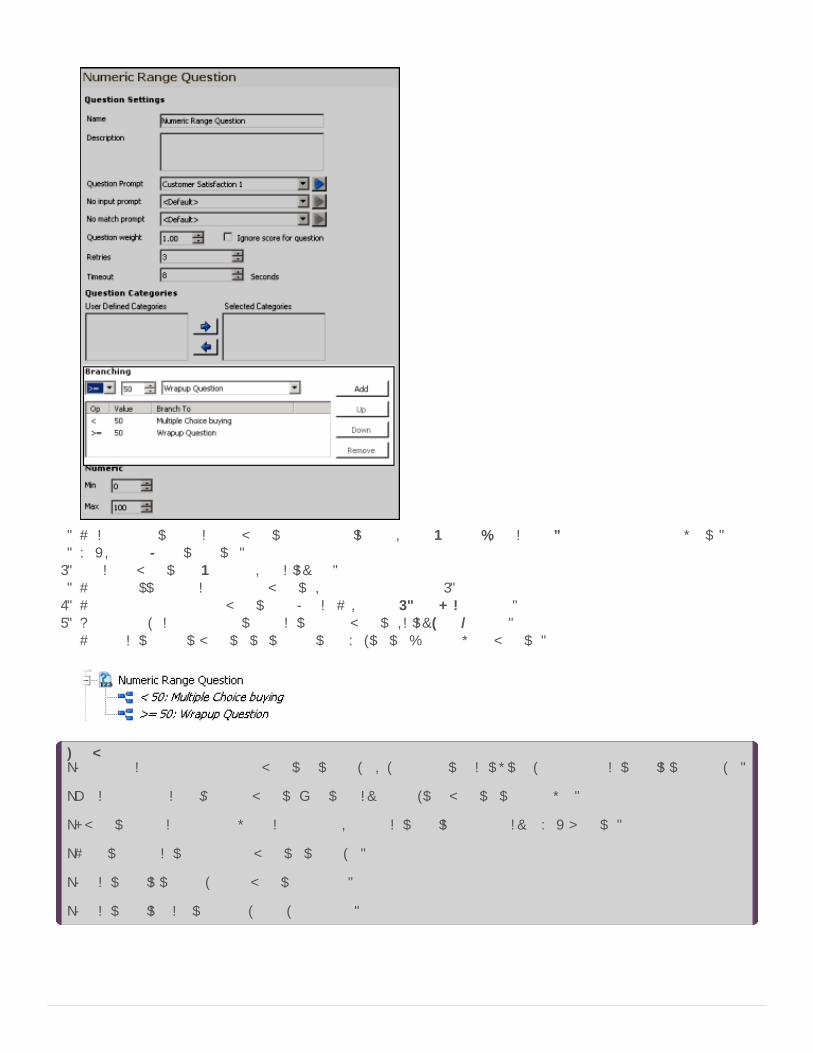
2. To create the first branch to a question for a numeric range, under Branching, select an Operator from the drop-down list.3. Next, enter a Value in the field.4. Select the question to Branch To, and click Add.5. To add additional branches to your question, repeat steps 2 through 4.6. To arrange the order of the questions to Branch To, use the Up and Down buttons.7. When you have completed adding branching to the question, click Save Question.
The branching for this question is displayed in the Navigation Pane below the question.
Note:• Before you change the order of the questions in a survey, evaluate the impact it will have on the branching logic in that survey.
• You can only branch forward to a question; looping back to a previous question is not allowed.
• If question order changes that would cause a loop, the branching logic defaults back to Next Question.
• There is no branching for the last question in a survey.
• Branching logic is not saved to a question template.
• Branching logic is copied to a saved survey template.
80
Change LogThe following table summarizes the updates made to the Interaction Feedback Technical Reference, since 4.0 product availability.
Date Changes
06-December-2011 Updated information on Minimum Acceptable Score value for a survey.
11-May-2012 Updated document for deleting custom questions from the Library
11-May-2012 Updated Copyright and Trademarks for 2012
04-June-2012 General edits to flow of document for new content
06-June-2012 Updated document for new On-demand surveys
14-June-2012 Added new information for adding branching logic to surveys
26-June-2012 Added additional information and references for initiating on-demand surveys in Interaction Attendant
17-August-2012 Updated information for fields in Search Results grid
22-August-2012 Added additional information for Deactivating a survey
10-September-2012 Updated Recording ID for dynamic link to recording
17-January-2013 Added information for additional ways to create Public and Private searches
28-January-2013 Updated Information for Rule Condition values being case sensitive
05-February-2013 Added information for Question Text box in Create Question Wizard
23-July-2013 Updated graphic for required Question Prompt
10-June-2014 Updated copyright and trademarks
23-June-2014 Removed references to deprecated I3_ACCESS_FEEDBACK_SUPERVISOR_PLUGIN license
23-June-2014 Updates for I3_FEATURE_INBOUND_FEEDBACK license and I3_FEATURE_POST_CALL_FEEDBACKlicenses
03-July-2014 Added new information for automatically presenting a survey to caller
25-August-2014 Updated documentation to reflect changes required in the transition from version 4.0 SU# to CIC 2015 R1,such as updates to product version numbers, system requirements, installation procedures, references toProduct Information site URLs, and copyright and trademark information.
26-August-2014 Updated Installation instructions for Interaction Feedback client
14-January-2015 Updated Copyright and Trademarks for 2015
14-January-2015 Updated information for Interaction Feedback reports in Interaction Reporter
14-January-2015 Added information for Completed survey state for Free Form response
19-January-2015 Added information on clearing the language attribute on a free-form survey
07-April-2015 Additional updates for Interaction Feedback reports in Interaction Reporter
08-April-2015 General usability documentation updates
06-July-2015 Added information for copying Search Results information from datagrid to clipboard
14-July-2015 Updated title page for new rebranding
02-October-2015 Updated screen captures for rebranding
81

20-December-2016 Updated information for the Retries logic
12-April-2017 Updated Copyright and Trademark information
25-August-2017 Updated terminology for Genesys rebranding
05-September-2017 Updated rebranded screen captures for New Surveys and for New Question WizardsUpdated Title page for rebranding
21-September-2017 Update for Survey View
31-October-2017 Updated licensing information for Access license
19-December-2017 Updated graphics for UI change for Minimum Acceptable Percentage
09-February-2018 Updates for HTML5 conversion
20-February-2018 Edits for Library
15-January-2019 Screen capture updates for UI and displayed text strings
82