#11034 kakute f7 aio - fpv sampa · solder the video wire from the video transmitter (vtx) to the...
TRANSCRIPT

#11034
KakuteF7AIO
UserManual&InstallationGuidev1.0

P a g e |1 KakuteF7AIO
Contents
Overview..........................................................................................1
FeaturesSpecificationsWarrantyandReturnPolicy
PinoutDiagram..............................................................................4
InstallationGuide.........................................................................5
UpdatingBetaflightFirmware.............................................11
InstallingDriversInstallingBetaflightConfiguratorFlashingNewFirmware
InitialConfiguration.................................................................15
ConnecttoTheBoard
PortsConfiguration
Blackbox
AdditionalReference................................................................25
AdjustPIDs/Rates/vTXfromTaranis..........................26

P a g e |1 KakuteF7AIO
OverviewTheHolybroKakuteF7All-In-Oneflightcontrollermakesiteasytobuildyourmultirotor.Itintegratesflightcontroller(FC),powerdistributionboard(PDB),andon-screendisplay(OSD)inone.TheKakuteF7AIO’slayoutmakesiteasytowireuptheothercomponentsofthemultirotorwhilekeepingthebuildneatandtidy.
Features• SupportsBetaflight,Butterflight,andCleanflight.• BetaflightOSD.ChangePIDs,adjustcommonconfigurationparameters,andchangevideo
transmitterchannelandpowerlevel,allusingyourtransmittersticksandgoggles.• Soft-mountingbuiltin.TheIMU(“gyro”)chiponthisboardismountedonvibration-isolating
foam.Thismeansthatthereisnoneedtosoft-mounttheboarditself.• High-performance/low-noise/highsensitivityIMU.ICM20689with6-axisgyroand
accelerometer.Canrunatupto32kHzsamplingrate.• Readyforautonomousflight:IntegratedBMP280barometerandSCL/SDApadsforusewith
externalGPS/magnetometerunits.• 2oz.copperPCBallowsupto120Amaximumcontinuouscurrent.• Dedicatedbootloaderbuttonforeasyfirmwareflashing.• Low-profiledesignfitsintoevenverycompactframes.• Inputvoltage7vto42v.Powertheboarddirectlyfromtheflightpack,upto6S(on“B+”pad
only).• Automaticvoltagemonitoring.NoneedtorunaseparatevBatwireforvoltagemonitoring;the
KakuteF7AIOmonitorsvoltagedirectlyfromthebatterypowerlead.• Filteredvoltageoutputforclean,noise-freevideo.On-boardregulatorsoutput5vatupto2
ampsand3.3vatupto200mAtopowerperipheralssuchasreceiver,videotransmitter,FPVcamera,orLEDstrip.
• SupportsBLHelipass-throughforeasyESCupgradeandconfiguration.

P a g e |2 KakuteF7AIO
Specifications• MCU:STM32F74532-bitprocessor• IMU:ICM20689(SPI)• Barometer:BMP280• CurrentSensor:Approximately130ampsmaximummeasurablevalue• USBVCPDriver(allUARTsusablesimultaneously;USBdoesnottakeupaUART)• 6hardwareUARTS(UART1,2,3,4,6,7)• AllUARTSsupporthardwareinversion.SBUS,SmartPort,andotherinvertedprotocolsworkon
anyUARTwithout“uninverthack”.• Supportsserialreceivers(SBUS,iBus,Spektrum,Crossfire)only.PPMandPWMreceiversarenot
supported.• TFcardforBlackboxlogging• Dimensions:35x48x7mm(includesfoam-mountedgyroboardinheight)• MountingHoles:Standard30.5mmsquaretocenterofholes• Weight:11g

P a g e |3 KakuteF7AIO
WarrantyandReturnPolicyIfyoubelievethatyourKakuteF7AIOisdefective,pleasecontactus.Ifwedeterminethattheboardisdefective,itwillberepairedorreplacedatnochargetoyou.WemayaskyoutosendyourKakutetoourservicecenterforexaminationorrepair.Shippingcostsareyourresponsibility.Returneditemsshouldincludetheoriginalpackagingandallaccessories.
Ifproductisdamagedordefective,wewillrepairorreplaceit.Refundsareonlygivenwhenproductislostbytheshippingcompany.Therefundamountislimitedtothepriceoftheproduct.Shippingcostsareneverrefundable.
Contactusat:
• Email:[email protected]• FacebookPage:Holybro• FacebookGroup:HolybroHobbyOfficialGroup

P a g e |4 KakuteF7AIO
PinoutDiagram
Topofboard
Pin FunctionB+ Batterypositivevoltage(2S-6S)5v 5voutput(2Amax)VO VideooutputtovideotransmitterVI VideoinputfromFPVcameraGorGND GroundSDA,SCL I2Cconnection(forperipherals)R1,T1 UART1RXandTXR2,T2 UART2RXandTXR3,T3 UART3RXandTXR4,T4 UART4RXandTXR6,T6 UART6RXandTXR7,T7 UART7RXandTX(RXislocatedatcornersfor
usewithESCtelemetry)LED WS2182addressableLEDsignalwireZ- Piezobuzzernegativeleg Connectbuzzerpositivelegto5vpadRSSI Analog(0-3.3v)RSSIinput3V3 3.3voutput(200mAmax)M1toM4 Motorsignaloutputs(locatedatcorners)M5,M6 Additionalmotorsignaloutputs(locatedat
sideofboard)RSSI Analog(0-3.3v)RSSIinputfromreceiverCAM AnalogFPVcamera-controloutputBoot Bootloaderbutton

P a g e |5 KakuteF7AIO
InstallationGuideSolderthemainbatteryconnectortothelarge+and-padsontheboard.Thebatteryconnectorshoulduseeither12gaugeor14gauge,fine-strand,silicone-insulationwire.Thistypeofwireiscommonlyreferredtoas“siliconewire”.Donotuseregularstrandedcopperwireforthebatterylead.Itwillbecomebrittleovertimeandbreak.ThebatteryconnectorwillmostcommonlybeanXT60.
InstalltheKakuteF7AIOinyourquadcopterframe.Donotcompletelyreassembletheframe.LeavetheKakuteF7AIOaccessiblesothatyoucansolderwirestoit.Forexample,leavethetopplateofyourframeoffsothatyouareworkingonlywiththebase-plate.HavingtheKakuteF7AIOmountedintheframewillallowyoutoensurethatwirelengthsarecorrectasyousolderaccessoriestotheboard.Whenindoubt,it’salwaysbettertoleavealittleextrawire.Be100%surethatthefront-facingarrowontheKakuteF7AIOfacesthefrontofthequadcopter!Ifforsomereasonthisisnotpossible,thenyoumustuseCleanflightorBetaflight’s“boardalign”featuretocompensate.
“BoardAlign”FeatureDocumentation
https://www.youtube.com/watch?v=QeuSq71pYF0
P a g e |6 KakuteF7AIO
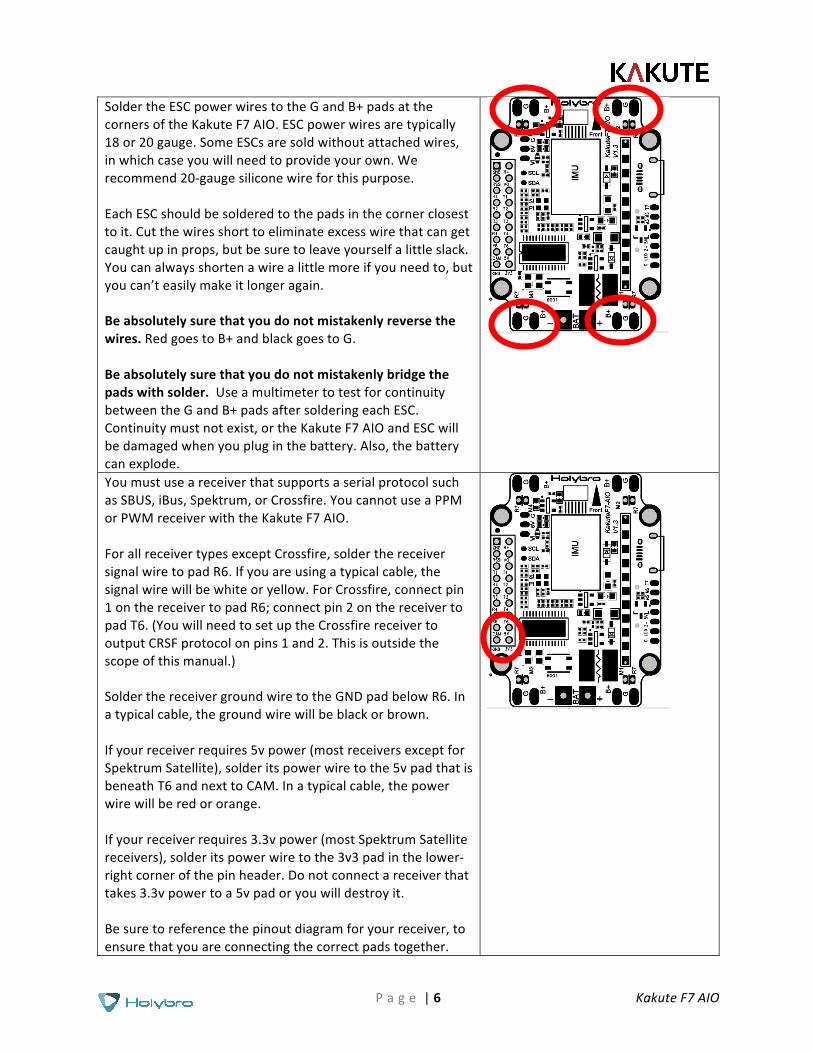
SoldertheESCpowerwirestotheGandB+padsatthecornersoftheKakuteF7AIO.ESCpowerwiresaretypically18or20gauge.SomeESCsaresoldwithoutattachedwires,inwhichcaseyouwillneedtoprovideyourown.Werecommend20-gaugesiliconewireforthispurpose.EachESCshouldbesolderedtothepadsinthecornerclosesttoit.Cutthewiresshorttoeliminateexcesswirethatcangetcaughtupinprops,butbesuretoleaveyourselfalittleslack.Youcanalwaysshortenawirealittlemoreifyouneedto,butyoucan’teasilymakeitlongeragain.Beabsolutelysurethatyoudonotmistakenlyreversethewires.RedgoestoB+andblackgoestoG.Beabsolutelysurethatyoudonotmistakenlybridgethepadswithsolder.UseamultimetertotestforcontinuitybetweentheGandB+padsaftersolderingeachESC.Continuitymustnotexist,ortheKakuteF7AIOandESCwillbedamagedwhenyoupluginthebattery.Also,thebatterycanexplode.
YoumustuseareceiverthatsupportsaserialprotocolsuchasSBUS,iBus,Spektrum,orCrossfire.YoucannotuseaPPMorPWMreceiverwiththeKakuteF7AIO.ForallreceivertypesexceptCrossfire,solderthereceiversignalwiretopadR6.Ifyouareusingatypicalcable,thesignalwirewillbewhiteoryellow.ForCrossfire,connectpin1onthereceivertopadR6;connectpin2onthereceivertopadT6.(YouwillneedtosetuptheCrossfirereceivertooutputCRSFprotocolonpins1and2.Thisisoutsidethescopeofthismanual.)SolderthereceivergroundwiretotheGNDpadbelowR6.Inatypicalcable,thegroundwirewillbeblackorbrown.Ifyourreceiverrequires5vpower(mostreceiversexceptforSpektrumSatellite),solderitspowerwiretothe5vpadthatisbeneathT6andnexttoCAM.Inatypicalcable,thepowerwirewillberedororange.Ifyourreceiverrequires3.3vpower(mostSpektrumSatellitereceivers),solderitspowerwiretothe3v3padinthelower-rightcornerofthepinheader.Donotconnectareceiverthattakes3.3vpowertoa5vpadoryouwilldestroyit.Besuretoreferencethepinoutdiagramforyourreceiver,toensurethatyouareconnectingthecorrectpadstogether.
P a g e |7 KakuteF7AIO
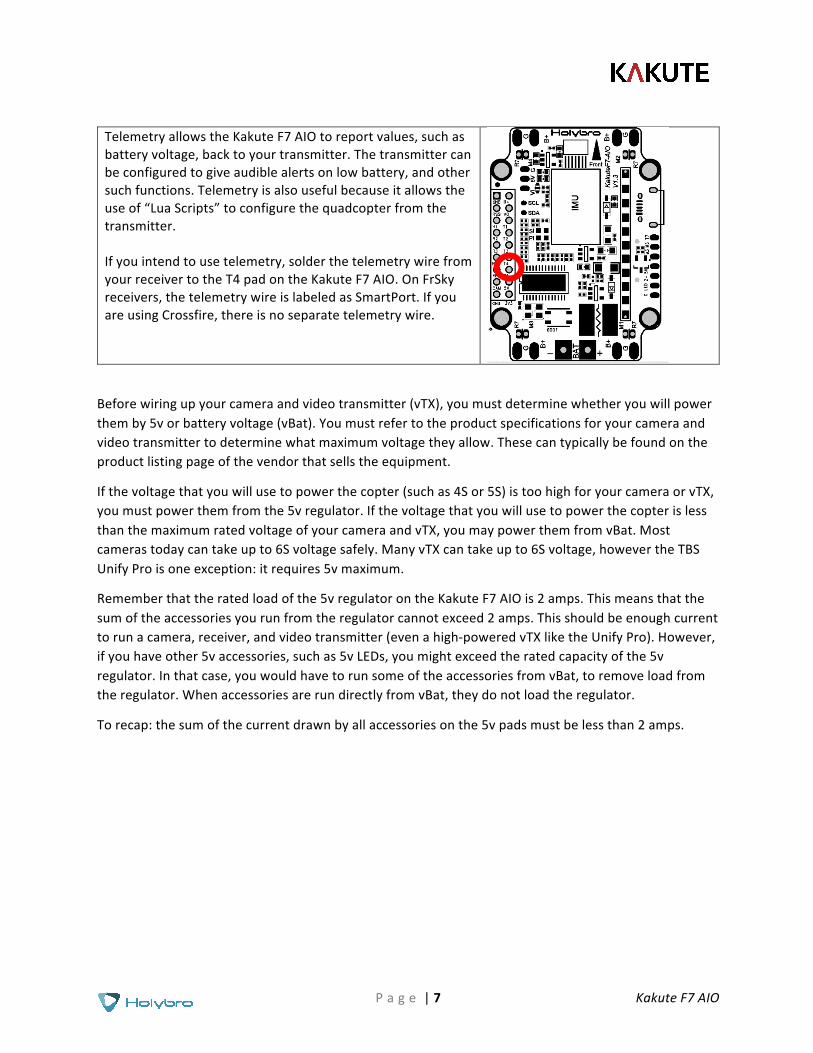
TelemetryallowstheKakuteF7AIOtoreportvalues,suchasbatteryvoltage,backtoyourtransmitter.Thetransmittercanbeconfiguredtogiveaudiblealertsonlowbattery,andothersuchfunctions.Telemetryisalsousefulbecauseitallowstheuseof“LuaScripts”toconfigurethequadcopterfromthetransmitter.Ifyouintendtousetelemetry,solderthetelemetrywirefromyourreceivertotheT4padontheKakuteF7AIO.OnFrSkyreceivers,thetelemetrywireislabeledasSmartPort.IfyouareusingCrossfire,thereisnoseparatetelemetrywire.
Beforewiringupyourcameraandvideotransmitter(vTX),youmustdeterminewhetheryouwillpowerthemby5vorbatteryvoltage(vBat).Youmustrefertotheproductspecificationsforyourcameraandvideotransmittertodeterminewhatmaximumvoltagetheyallow.Thesecantypicallybefoundontheproductlistingpageofthevendorthatsellstheequipment.
Ifthevoltagethatyouwillusetopowerthecopter(suchas4Sor5S)istoohighforyourcameraorvTX,youmustpowerthemfromthe5vregulator.IfthevoltagethatyouwillusetopowerthecopterislessthanthemaximumratedvoltageofyourcameraandvTX,youmaypowerthemfromvBat.Mostcamerastodaycantakeupto6Svoltagesafely.ManyvTXcantakeupto6Svoltage,howevertheTBSUnifyProisoneexception:itrequires5vmaximum.
Rememberthattheratedloadofthe5vregulatorontheKakuteF7AIOis2amps.Thismeansthatthesumoftheaccessoriesyourunfromtheregulatorcannotexceed2amps.Thisshouldbeenoughcurrenttorunacamera,receiver,andvideotransmitter(evenahigh-poweredvTXliketheUnifyPro).However,ifyouhaveother5vaccessories,suchas5vLEDs,youmightexceedtheratedcapacityofthe5vregulator.Inthatcase,youwouldhavetorunsomeoftheaccessoriesfromvBat,toremoveloadfromtheregulator.WhenaccessoriesarerundirectlyfromvBat,theydonotloadtheregulator.
Torecap:thesumofthecurrentdrawnbyallaccessoriesonthe5vpadsmustbelessthan2amps.

P a g e |8 KakuteF7AIO
Solderthevideowirefromthevideotransmitter(vTX)totheVOpadontheKakuteF7AIO.SolderthevideowirefromthecameratotheVIpadontheKakuteF7AIO.DependingonwhetheryouintendtorunoffvBator5v,solderthepowerwireforthecameraandvTXtoeitherthe5vortheB+padnearesttowhereyousolderedthevideowire.SolderthegroundwirefromthecameraandthevTXtotheGpadnearesttowhereyousolderedthevideowire.
Somevideotransmittersallowthechannel,transmitpower,andothersuchparameterstobeconfiguredremotely,throughtheBetaflightOSD.Thismeansyoucanchangechannelandtransmitpowerusingyourgogglesandtransmittersticks,insteadofpushingabuttonorflippingDIPswitchesonthevTXitself.Thisisahugeconvenience!
IfyouhaveavTXthatsupportsvTXRemoteControl,then:ForSmartAudiovTXincludingTBSUnify,HolybroAtlatlV2,andRaceDayQuadsMach2,soldertheaudiowirefromthevTXtotheT1padontheKakuteF7AIO.ForTrampTelemetryvTXincludingtheImmersionRCTrampandtheHolybroAtlatlV1,soldertheTwirefromthevTXtotheT1padontheKakuteF7AIO.OthervTXmaylabelthispindifferently.Refertotheirdocumentation.
RSSImonitoringallowsyoutoviewthesignalstrengthofthecontrollinkbetweenyourtransmitterandyourreceiverintheOSD.Thiscangiveawarningwhenyouaregettingclosetotheedgeofyourrange,aswellasshowingyouifyouhavedamagedequipment,suchasanantennathathasbeencutbyaprop.IfyouintendtousetheRSSIinput,soldertheanalogRSSIoutputofyourreceivertotheRSSIpadontheKakuteF7AIO.ManyreceiversdonotsupportanalogRSSIoutput,soyoumaynotbeabletousethisfeature.
P a g e |9 KakuteF7AIO
HowtowireupanalogRSSItoyourreceiver
https://www.youtube.com/watch?v=pX_PWoLhooU
AnalternatewaytogetRSSIinyourOSD
https://www.youtube.com/watch?v=t-evOAS9Mkg
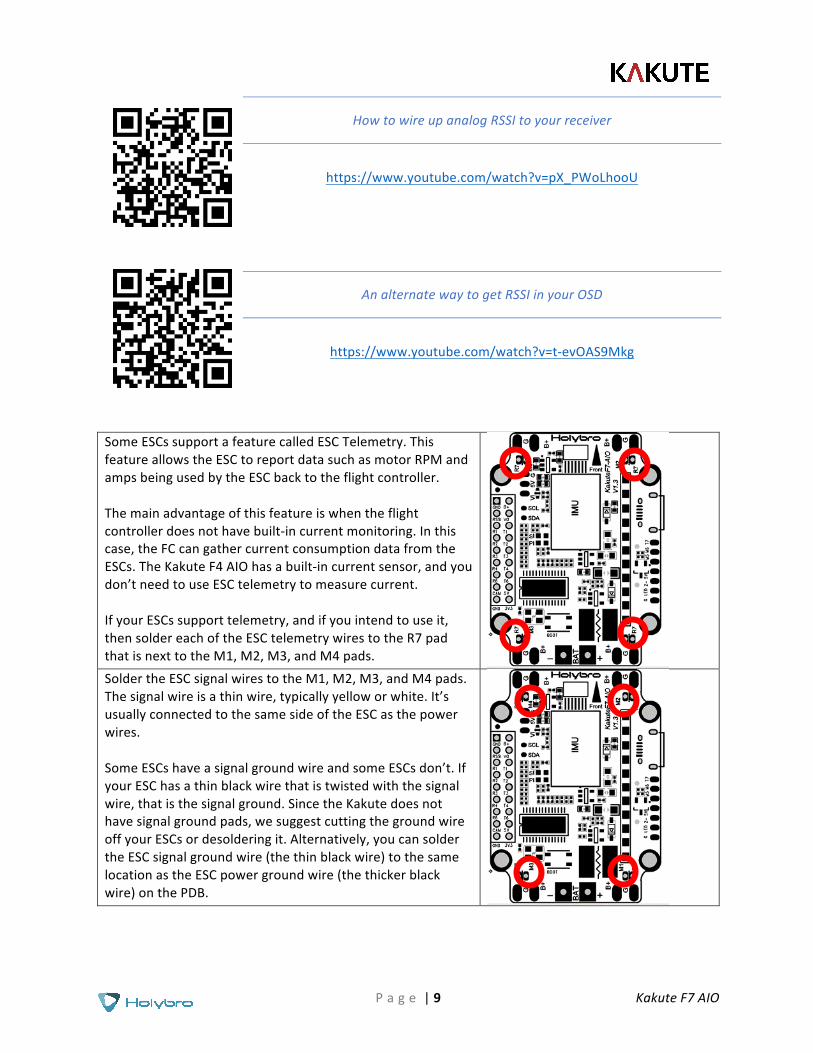
SomeESCssupportafeaturecalledESCTelemetry.ThisfeatureallowstheESCtoreportdatasuchasmotorRPMandampsbeingusedbytheESCbacktotheflightcontroller.Themainadvantageofthisfeatureiswhentheflightcontrollerdoesnothavebuilt-incurrentmonitoring.Inthiscase,theFCcangathercurrentconsumptiondatafromtheESCs.TheKakuteF4AIOhasabuilt-incurrentsensor,andyoudon’tneedtouseESCtelemetrytomeasurecurrent.IfyourESCssupporttelemetry,andifyouintendtouseit,thensoldereachoftheESCtelemetrywirestotheR7padthatisnexttotheM1,M2,M3,andM4pads. SoldertheESCsignalwirestotheM1,M2,M3,andM4pads.Thesignalwireisathinwire,typicallyyelloworwhite.It’susuallyconnectedtothesamesideoftheESCasthepowerwires.SomeESCshaveasignalgroundwireandsomeESCsdon’t.IfyourESChasathinblackwirethatistwistedwiththesignalwire,thatisthesignalground.SincetheKakutedoesnothavesignalgroundpads,wesuggestcuttingthegroundwireoffyourESCsordesolderingit.Alternatively,youcansoldertheESCsignalgroundwire(thethinblackwire)tothesamelocationastheESCpowergroundwire(thethickerblackwire)onthePDB.

P a g e |10 KakuteF7AIO
FPVCameraControlisafeatureofBetaflightthatallowsyoutoaccessyourFPVcamera’son-screenmenuusingyourtransmittersticks.Withthisfeature,youcaneasilyadjustbrightness,contrast,andothercamerasettingsinresponsetochanginglightingconditions.
TherearetwoformsofCameraControl:analoganddigital.Analogcameracontrolisforcamerasthatuseananalog-stylejoystickinput.DigitalcameracontroliscurrentlyreservedforsomeRuncamcameras.Lookattheplugonthebackofyourcamera.Ifyouseeapinlabeled“OSD”thenyourcamerausesanalogcontrol.IfyouhaveaRuncamcamerawithpinslabeled“RX”and“TX”,thenyourcamerausesdigitalcontrol.
Ifyourcamerausesanalogcontrol,solderthe“OSD”wireonthecameraplugtotheCAMpadontheKakuteF7AIO.Ifyourcamerausesdigitalcontrol,solderthecameraTXwiretopadR3ontheKakuteF7AIO.SolderthecameraRXwiretopadT3ontheKakuteF7AIO.
TheKakuteF7AIOhasaCameraControloutputthatfullyimplementstheanalogcameracontrolfeature,howeverthefeaturedoesnotwork100%reliablywitheverycameraonthemarket.Ifyouhookupthewireandthefeaturedoesn’twork,youmayneedtoadjustsomecommandlineparameters,orthefeaturesimplymaynotworkwithyourcamera.

P a g e |11 KakuteF7AIO
UpdatingBetaflightFirmwareLikeallsoftware,thesoftwarethatrunsyourflightcontrollerhasversions.JustlikeWindowsXPwasfollowedby2k,then7,8,and10.ThesoftwarethatrunsyourflightcontrolleriscalledBetaflight.PuttinganewversionofBetaflightonyourKakuteF7AIOiscalled“flashing”yourboard.
Evenifyoudecideyoudon'twanttoupdateyourfirmwarerightnow,youstillneedtoinstalltheVCPdrivertoconfiguretheboard.So,youmustatleastgothroughstep1belowtouseyourboard.
InstallingDriversBeforeyoucanflashyourboard,youmustgetthedriversinstalledonyourcomputer.IfyouareonMacOSorLinux,YourO/Scomeswiththedriversyouneedpre-installed.Youdonotneedtoperformthisstep.Youmayskipdirectlyto“InstallingBetaflightConfigurator”.
IfyouareonWindows,youmustinstallthedriversmanually.Thisisaplacewherebeginnersoftenstruggle.We’regoingtopresentthestepshere,andifyoucanfollowthem,thengreat,butmanypeoplewon’tbeabletofollowthem.Ifyouneedamorepersonalapproach,hereisalinktoavideothatwalksyouthroughtheprocessinmoredetail.
AllAboutBetaflightDrivers,IncludingHowtoInstallThem
https://www.youtube.com/watch?v=m4ygG6Y5zXI
Herearethestepsyouwillperform:
1. DownloadtheVirtualCOMPort(VCP)driverinstallerfromhere.Unfortunately,youmusteithercreatealoginorgivethemyouremailaddress,thenwaitforthemtoemailyoualink,todownloadtheactualinstaller.Werecommendthatyoucreateauserloginbecausethe“sendyoualinkinanemail”methodsometimestakesalongtimetogothrough.
a. TocreatealoginattheSTMsite,firstgotothisURL.b. Click“CreateanAccount”c. Enteryourinformationinthenextpageandclick“Register”d. Youwillreceiveaconfirmationemail.Completetheconfirmationprocess.e. LogintotheSTMsiteusingtheloginyoujustcreatedanddownloadtheVCPdriver
installerfromthelinkinstep3.2. RuntheVCPinstallerandletitfinish.3. DownloadtheImpulseRCDriverFixerfromhere.4. RuntheImpulseRCDriverFixer.Itwillinstructyoutopluginyourflightcontroller.5. PlugtheKakuteF7AIOintoyourPCviaUSB.TheImpulseRCDriverFixershouldcomplete
successfully.

P a g e |12 KakuteF7AIO
ThevideolinkedaboveshowsaprocessofusingZadigtoreplacetheVCPdriver.TheImpluseRCDriverFixerisaneasierwayofdoingthesamething.So,usetheImpulseRCDriverFixeranddon’tmessaroundwithZadiglikethevideoshows.
IsItOverYet?THATWASSUPERANNOYINGWASN’TIT.Yes…weknow.
Thegoodnewsis,youdonotneedtorepeatthisprocessagain.Sortof.Youneverneedtoinstallthedriversagainonthiscomputer,unlessyoureinstalltheoperatingsystemforsomereason.Ifyouuseanothercomputerforthefirsttime,youwillneedtoinstallthosedriversonit.Also,youmayneedtore-runtheImpulseRCDriverFixersometimeswhenyougotoflashtheboard.Ifyoutrytoflashtheboardanditfails,repeatsteps3through5above.InstallingBetaflightConfiguratorBetaflightismanagedusingtheBetaflightConfiguratorapplication,alsoknownforshortastheBetaflightGUI,orjust,“TheGUI”.(GUIispronounced“gooey”incaseyouwondered.Onlyweirdossay,“GeeYouEye”.)DownloadtheBetaflightConfiguratorapplicationhere:
https://github.com/betaflight/betaflight-configurator/releases
ThisisastandardapplicationpackageforWindows,MacOS,orLinux.Afteryoudownloadit,installandrunitthesameasanyotherapplication.
OnMacOSyoumustgivetheapplicationpermissiontorunandaccessthenetwork.Thesimplestwaytodothisistoright-clicktheinstallerandchooseOpen.Asecuritypromptwillappearasking,“Areyousureyouwanttoopenit?”ClickOpenonthispromptandtherelevantconfigurationchangeswillbemadeautomatically.

P a g e |13 KakuteF7AIO
FlashingNewFirmwareAtthispoint,ifyouwanttoupdateyourfirmware,hereishowtodoit.Butifyoujustwanttogofly,please,goforit!Youdon’thavetoberunningtheabsolutelatestfirmwaretohaveagoodtime.Justforgetaboutthisnonsense!
Toflashyourfirmware,youmustconnecttheboardin“bootloadermode”.Bootloadermodemeansthattheboardisreadytoacceptnewprogramming.Toputtheboardintobootloadermode,holddownthebootloaderbuttonwhilepluggingintheUSBcable.LeavethebuttonpressedforamomentafterpluggingintheUSBcabletobesureit“takes”.
IfyourKakuteF7AIOisinbootloadermode,thenyouwillsee“DFU”inthepulldownmenuintheupper-rightoftheconfigurator,asshownhere:
Ifyoudon’tseeDFUinthepulldownmenu,theneithertheboarddidn’tdetectthatyouhadthebootloaderbuttonpressedoryourdriversarenotinstalledcorrectly.Ifyoudon’tseeDFUinthepulldownmenu,youcannotflashnewfirmwaretotheboard.Itwon’twork.
Fortheadvancedusers,asimplerwayofgettingintobootloadermodeistogototheCLIandtype“bl”.Thiswillreboottheboardintobootloadermode.Thisisespeciallyusefuliftheboardisinstalledinacopterwhereitisn’tconvenienttopressthebootloaderbutton.Inrarecases,the“bl”commanddoesn’tworkandyoumustpressthebootloaderbuttonontheboard.

P a g e |14 KakuteF7AIO
Herearetheremainingsteps:
1. Gotothe“FirmwareFlasher”tab.2. Select“KAKUTEF7”inthe“Chooseaboard”pulldownmenu.Ifyouflashanyotherboardtype,
theKakuteF7AIOwillnotfunction.Itwon’tbedamaged,itjustwon’tworkuntilyouflashKAKUTEF7totheboard.
3. SelectthelatestversionofBetaflightinthe“Chooseafirmwareversion”pulldownmenu.4. Clickthe“LoadFirmware(Online)”button.Thebuttonwillchangetoread“Downloading”.The
FlashFirmwarebuttonwillchangefromgraytoorange.5. Clickthe“FlashFirmware”button.Thescreenshouldautomaticallyscrolldowntoshowthe
statusbar,whichwillfillwithorangeastheflashingprocesscompletes.6. Flashingwillbefollowedbyaprocesscalled“Verifying”.Verificationsometimesfails,butthis
isn’taproblem.Iftheflashcompletes,everythingisusuallyfine.7. Un-plugyourboardandthenplugitbackinagain,thistimewithoutholdingdownthe
bootloaderbutton.8. ForWindowsusers,thepulldownmenuintheupperrightoftheconfiguratorwillreadCOM3
(orsomeothernumber).ForMacOSandLinuxusers,thepulldownwillreadsomethingstartingwith/dev/tty.Thisisnormal.Ifthepulldownmenureads“ManualSelection”thenyourboardisnotbeingdetected.ThismayindicatethatyoudidnotusetheKAKUTEF7targetwhenyouflashedtheboard.OritmayindicatethatyourVirtualCOMPort(VCP)driverswerenotinstalledcorrectly.
Youarereadytoconfigureyourboard.

P a g e |15 KakuteF7AIO
InitialConfigurationThefullconfigurationofBetaflightcouldtakehourstodocument.Inthissection,we’lldescribeafewthingsthatarespecifictothisboard.Thiswon’tbeenoughtogetyouintotheair,sowe’llalsopointyoutosomevideosyoucanwatchifyou’renotperfectlysurewhatelseyouneedtodo.Evenpeoplehaveafewbuildsundertheirbeltmaybeskippingsomeimportantstepswithoutrealizingit!
ConnecttoTheBoardPlugtheboardintoUSB.StartBetaflightConfigurator.Youshouldsee“COM3”(orsomeothernumber)intheupper-rightmenu.Click“Connect”.
TheGUIwillload.
PortsClickonthe“Ports”tabontheleftsideofthewindow.
TheUARTsonyourKakuteF7areversatile;anyUARTcanbeusedforanyfunction.ThisisdifferentfromtheKakuteF4,inwhichcertainfunctionshadtobeassignedtocertainUARTs.Inthewiringinstructionsabove,certainUARTsweresuggested,suchassolderingtheSBUSreceivertoR6.Howeveryoudon’thavetofollowtheserecommendationsifforsomereasontheydon’tworkforyou.Ifyoufollowedtheinstructionsinthisguide,thescreenshotaboveshowshowtoconfigurethePortstab.
WhenyouconfigurethePorts,keepthefollowingguidelineinmind:eachUARTcanbeusedforonefunctiononly.Eachcolumn(SerialRX,TelemetryOutput,SensorInput,Peripherals)representsasinglefunction.SoeachUARTrowshouldonlyhaveonefunctionactiveatatime.Ifyoutrytoenablemultiplefunctions,theconfigurationmayberejected,ortheresultsmaybeunpredictable.

P a g e |16 KakuteF7AIO
Foreachfunction,identifywhichUARTnumberyouconnectedtheperipheralto.SoifyousolderedyourreceiversignalwiretopadR3,thatwouldbeUART3.IfyousolderedyourSmartPorttelemetrywiretopadT1,thatwouldbeUART1.ThenumberfollowingtheRorTindicatestheUARTnumber.
OneachrowinthePortstab,enabletheonefunctionthatyouconnectedottheTXand/orRXpadsforthatUART.Themostcommonoptionsarebelow.
• USBVCPistheportthatisusedtotalkbetweentheKakuteF7AIOandtheConfiguratorGUI.MSPistheprotocolthattheyusetotalktoeachother.IfyouturnoffMSPonUSBVCP,youwillnotbeabletocontacttheboardanymoreviatheConfigurator.Youwillhavetore-flashtheboardanderaseyourconfigurationtogetbackintoit.Sufficeittosay,thisisbad,andyoushouldn’tdoit.Don’tturnoffMSPontheUSBVCPlineinthePortstab.
• IfyouareusingFrSkySmartPorttelemetry,intheTelemetryOutputcolumn,chooseSmartPortfromthepulldownmenu.
• Enable“SerialRX”fortheUARTthatyousolderedthereceiversignalwireto.IfusinganSBUSorSpektrumreceiver,thiswillhavebeentheRXpadonly.ForaCrossfirereceiver,youwillhaveusedboththeTXandRXpadofthesameUART.
• IfyouareusingRunCamdigitalcameracontrol,inthePeripheralscolumn,chooseRunCamDevice.
• IfyouareusingESCTelemetry,ontheUART7line,intheSensorInputcolumn,chooseESC.AlthoughyoucantechnicallyuseanyRXpadforESCTelemetry,theR7padsarespecificallylocatedatthecornersoftheboardforthispurpose.
• IfyouareusingSmartAudioorImmersionRCTrampTelemetrytocontrolyourvideotransmitter:inthePeripheralscolumn,chooseeitherTBSSmartAudioorIRCTramp,dependingonwhichtypeoftransmitteryouareusing.

P a g e |17 KakuteF7AIO
ConfigurationClickonthe“Configuration”tabontherightsideofthewindow.Scrolldowntothe“OtherFeatures”section.
• Ifyouareusinganykindoftelemetry(SmartPort,Crossfire,etc.),enableTELEMETRY.
• IfyouareusingaprogrammableLEDstrip,enableLED_STRIP.
• AirModeincreasesauthoritywhenthethrottleisallthewaydown.Werecommendleavingthisoptiononallthetime.
• TheKakuteF7AIOhasbuilt-inBetaflightOSD.TheOSDoptionshouldalwaysbeenabled.
• IfyouareusingESCtelemetry,enabletheESC_SENSORoption.
• TheANTI_GRAVITYoptionincreasesthestabilityofthecopterwhenthethrottleisraisedorloweredquickly.Werecommendenablingthisoption,andsettingAntiGravityGainto3.0inthePIDTuningtab.Detailedinstructionsfortuningthisvalueareoutsidethescopeofthismanual,butthisdefaultsettingwillworkwellformostquads.
Next,gototheReceiversectionofthe“Configuration”tab.SincetheKakuteF7AIOonlysupportsserial-typereceivers,configurationofthissectionissimple.
• SettheReceiverModeto“Serial-basedreceiver”.
• SettheSerialReceiverProvidertothetypethatmatcheswhatkindofreceiveryouhave.FrSkyandotherSBUSreceivershoulduseSBUS.SpektrumSatellitereceiversshoulduseSPEKTRUM2048orSPEKTRUM1024dependingonwhethertheyareDSM2orDSMX.FlySkyreceiversuseiBus.CrossfirereceiversuseCRSF.
Thesearethemostcommonserialreceivertypesthatarelikelytobeencountered.

P a g e |18 KakuteF7AIO
BlackboxIfyouhaveenabledtheBlackboxfeature,gototheBlackboxtabontheleft-handsideoftheconfiguratorwindow.IntheBlackboxtab,atthetop,settheBlackboxloggingdeviceto“SDCard”(itshouldbesetlikethisbydefault).SettheBlackboxLoggingRateto2kHz.TouseBlackboxlogging,insertaFAT-formattedSDcardof32GBorsmallerintotheSDcardslotontheKakuteF7.YoucanusetheBetaflightBlackboxLogViewerapptoexamineblackboxlogs.

P a g e |19 KakuteF7AIO
OSDIntheOSDtab,youcanchoosewhichvaluesyouwanttoseeonscreenwhileyouareflying.EnableanddisableindividualelementsusingtheElementstogglesontheleft.
TheVideoFormatsectionletsyouchoosewhetheryourcameraisNTSCorPAL.BetaflightdefaultsthisvaluetoAuto,butAutosometimespickswrong.Ifthishappens,youmightnotseeanyOSDtext,orthebottomoftheOSDtextmightbeoffthebottomofthescreen.Insomecases,youwon’tseeanyvideoatall—justtheOSD.Becauseofthis,werecommendmanuallysettingtheVideoFormattoNTSCorPALdependingonwhichtypeofFPVcamerayouhave.
YoucanrearrangetheindividualOSDelementsonscreenbydraggingthemwithyourmouseinthe“Preview”sectionofthewindow.
SomeindividualOSDElementsofnoteare:
MainBattVoltage:Thisisprobablythesinglemostimportantelementtouse.Yourbatterymustnevergobelow3.3voltspercellunderanycircumstances,oritwillsufferdamage.Fora3Sbattery,thiswouldbe3times3.3=9.9volts.Fora4Sbattery,itwouldbe13.2volts.Anytimethebatterygoesbelowthislevel,itislikelybeingdamaged,atleastalittle.Moreimportantly,youwillhaveverylittlepowerandmaycrashifyouaredoingaggressivemaneuvers.
Although3.3voltsistherecommendedabsoluteminimum,youwillgetthebestlifeoutofyourbatteriesifyoukeepthevoltageaboveabout3.5voltspercell—10.5voltsfor3Sand14.0voltsfor4S.Ifyouareflyingandyounoticethebatterygoingbelowthislevel,itmightbetimetoland,oratleastgoeasieronthethrottle.Ifyourbatteriesconsistentlydroptothislevelwhenyoutrytofly,itmightbetimetogetnewbatteries.
Whenyouareusingthebattery,itsvoltagewilldrop.Thisisreferredtoas“sag”.Afteryouland,thebatterywillrecoverasmallamountanditsvoltagewillrise.Ourrecommendationisthat,thebatteryshouldbeatnolessthan3.75voltspercell—11.25voltsfora3Sand15.0voltsfora4S—afterithas
P a g e |20 KakuteF7AIO
beenallowedtorestattheendofaflight.Ifyourbatteriesareconsistentlyrestingatbelowthislevelattheendofadayofflying,thenyoumightbeshorteningtheirlifespanatleastalittle.
mAhDrawn:Althoughvoltageiswhatultimatelydetermineswhetherabatteryisbeingdamaged,mAhmaybeabetterwayofdecidingwhentoland.Becausevoltagesagswhenyouraisethethrottleandrecoverswhenyoulowerthethrottle,itcanbehardtotellexactlyhowused-upthebatteryis.mAhislikea“gasgauge”foryourbattery.Itshowshowmuchcapacityyouhaveconsumed,independentofotherfactors.
Agoodpracticeistodrawfromabatterynomorethanabout80%ofitsratedmAh.So,a1300mAhbatterywouldbeabletodeliverabout1000to1100mAh.Withahealthybatteryandanhonestbatteryrating,thiswillresultinthebatteryrestingatabout15.0voltsafterflying.Ifyoudraw80%ofabattery’sratedcapacityanditisrestingathigherthan15.0volts,themanufacturermighthaveunder-rateditscapacity.Ifthebatteryisrestingatlowerthan15.0volts,themanufacturermighthaveover-rateditscapacity.Also,rememberthatbatterieslosecapacityastheyage.Abatterythatconsistentlyfailstodeliver80%ofitsratedcapacitywithoutsaggingbelow14.0voltsmightneedretirement.
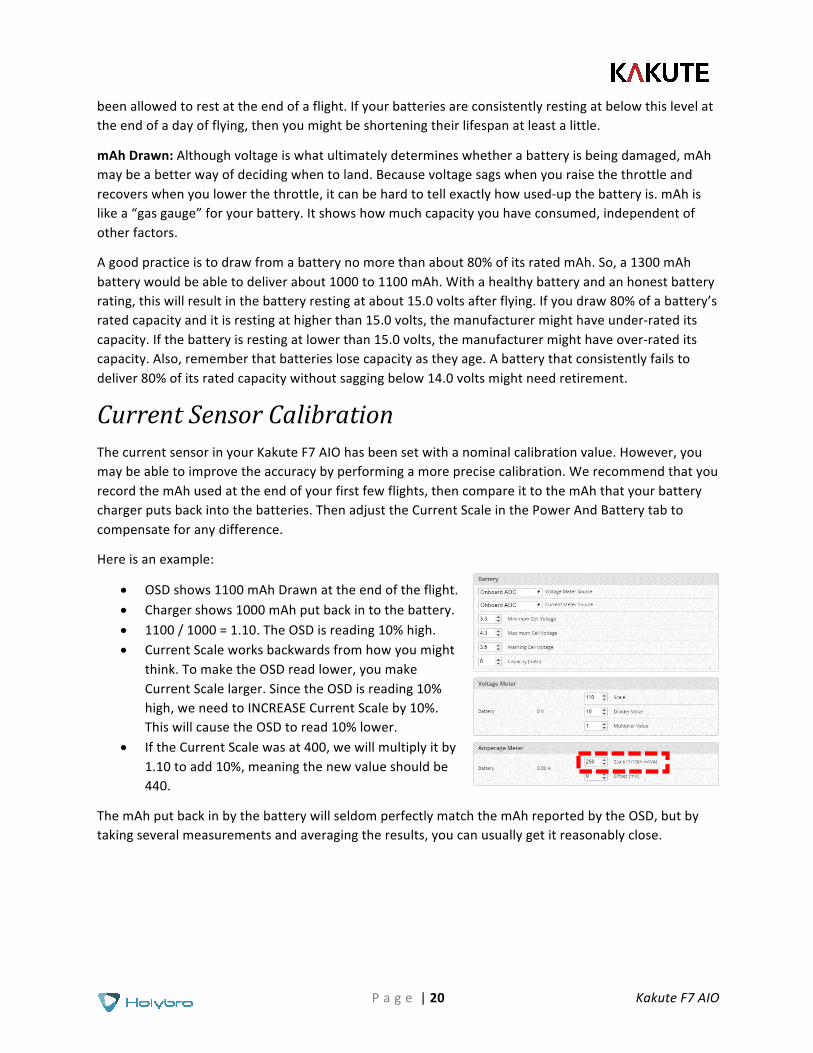
CurrentSensorCalibrationThecurrentsensorinyourKakuteF7AIOhasbeensetwithanominalcalibrationvalue.However,youmaybeabletoimprovetheaccuracybyperformingamoreprecisecalibration.WerecommendthatyourecordthemAhusedattheendofyourfirstfewflights,thencompareittothemAhthatyourbatterychargerputsbackintothebatteries.ThenadjusttheCurrentScaleinthePowerAndBatterytabtocompensateforanydifference.
Hereisanexample:
• OSDshows1100mAhDrawnattheendoftheflight.• Chargershows1000mAhputbackintothebattery.• 1100/1000=1.10.TheOSDisreading10%high.• CurrentScaleworksbackwardsfromhowyoumight
think.TomaketheOSDreadlower,youmakeCurrentScalelarger.SincetheOSDisreading10%high,weneedtoINCREASECurrentScaleby10%.ThiswillcausetheOSDtoread10%lower.
• IftheCurrentScalewasat400,wewillmultiplyitby1.10toadd10%,meaningthenewvalueshouldbe440.
ThemAhputbackinbythebatterywillseldomperfectlymatchthemAhreportedbytheOSD,butbytakingseveralmeasurementsandaveragingtheresults,youcanusuallygetitreasonablyclose.

P a g e |21 KakuteF7AIO
UsingTheOSDIfyouareusingaBetaflightFlightControllerwithBetaflightOSD,youcanmanagetheAtlatl’stransmitpowerandchannelfromwithintheOSD.
ThegraphicsaboveshowthestickcommandtobringuptheOSDmenu.Thestickcommandis:throttlecentered,yawleft,pitchforward.Theexactstickcommandthereforedependsonwhichmodeyourtransmittersticksarein.
IntheOSDmenu,usepitchup/downtomovethecursorbetweenmenuitems.Whenamenuoptionhasa>symboltotherightofit,thisindicatesthatitcontainsasub-menu.Roll-rightwillenterthesub-menu.Forexample,inthescreentotheright,movingthecursorto“Features”andthenmovingtherollsticktotherightwillenterthe“Features”sub-menu.
TomanagethevTX,enterthe“Features”menu.Fromthere,enter“VTXSA”ifyouareusingaSmartAudiodevice,or“VTXTR”ifyouareusinganImmersionRCTelemetrydevice.
Mode2 Mode1

P a g e |22 KakuteF7AIO
ThescreentotherightshowsthecurrentvTXsettings.Fromhere,youcanchangethefrequencyband,channel,andpowerlevelofthevideotransmitter.Aftermakingthechanges,movethecursorto“Set”andpressroll-righttoconfirmthesettings.

P a g e |23 KakuteF7AIO
UsingFPVCameraControlIfyouhaveconnectedtheCAMpadontheKakutetoyourFPVcamera,orifyouareusingaRuncamcamerawithTXandRXpads,thenyoucanusetheFPVCameraControlfeatureofBetaflight.ThisfeatureallowsyoutoaccessyourFPVcamera’ssetupmenuusingyourtransmittersticks.
HereishowtousetheCameraControlfeature.Withthequaddisarmed,putthethrottleat50%(centered).Pushyaw-rightonthetransmitterstick.YouarenowinCameraControlmode.
WheninCameraControlmode,thepitchandrollinputs(rightstickforMode2transmitters)input“up/down/left/right”pressesonthecamerajoystick.Pushingyaw-rightinputsone“click”onthecamerajoystick.Usetheseinputsexactlyasifyouhadpluggedajoystickintothebackofthecamera.
Whenyouaredoneadjustingthecamera,pushyaw-lefttoexitCameraControlmode.
IfyouareusingtheCAMpadontheKakute,thecameracontrolfunctionmaynotworkwitheveryFPVcamera.ThisisalimitationofhowBetaflightimplementsthisfunction,andnotadefectintheKakute.AftersettingupCameraControl,werecommendthatyoucenter-throttle&yaw-righttwoorthreetimesinarow.Ifyouareusingdigitalcontrol,themenushouldappear.Ifyouareusinganalogcontrolandthemenudoesnotappear,yourcameramaynotworkwiththisfeature,oryoumayneedtoadjustsomecommand-lineparameters.

P a g e |24 KakuteF7AIO
SavingYourConfigurationOnceyouhavefinishedbuilding,configuring,andtuningyourmultirotor,it’sagoodideatobackupyourconfigurationsothatyoucanrestoreitlater.Thisisusefulifyouloseyourquad,orifyoudamageyourflightcontroller,orifyouaccidentallylockyourselfoutofyourflightcontrollerandmustresetittogetbackin.
Beforeweshowyoutherightwaytosaveandrestoreyourconfiguration,letuswarnyouaboutthewrongway.BetaflightandCleanflighthavea“saveconfiguration”and“restoreconfiguration”button.Withoutgoingintotoomuchdetail,theyhavesomesignificantdrawbacksthatmeanwedon’trecommendthatyouusethem.
Thecorrectwaytosaveyourconfigurationisasfollows.
1. ConnectyourKakutetoyourPCbyplugginginUSB.2. StarttheBetaflightGUIapp.3. GototheCLItab.4. InthetextboxatthebottomoftheCLI,type“diffall”andhitenter.Thiswillcausetheflight
controllertodisplayallconfigurationoptionsthatyouhavechangedfromthedefaultvalues.5. Inthelower-rightcorneroftheconfigurator,clickthe“SavetoFile”button.6. Savethefilesomewhereyouwon’tloseit.
Torestoreyourconfiguration,dothis:
1. Openthetextfileinyourtexteditor.2. Highlighttheentirecontentsofthefile.3. Right-clickinthetexteditorwindowandchoose“Copy”.4. ConnectyourKakutetoyourPCbyplugginginUSB.5. StarttheBetaflightGUIapp.6. GototheCLItab.7. ClickthemouseonceinthetextboxatthebottomoftheCLItabtoplacethecursorthere.8. Insteadoftypinganycommands,right-clickinthetextboxandchoose“Paste”.9. PresstheEnterkeyonyourkeyboard.Thepasted-intextwillrapidlyscrollpast.10. Type“save”inthetextboxatthebottomofthescreen.11. PressEnter.Theflightcontrollerwillrebootandtheconfigurationwillberestored.

P a g e |25 KakuteF7AIO
AdditionalReferenceHerearesomelinkstoadditionalvideostohelpyoubuildyourquadcoptersuccessfully.
Betaflight3.3UltimateSetupGuide
https://www.youtube.com/watch?v=8vJCrHj9s6s
HowtoCalibrateYourESCs
https://www.youtube.com/watch?v=o3Mg-9M0l24
IfyouareusingananalogprotocollikeOneshotorMultishot,calibratingyourESCsismandatory.MostESCstodaysupportDshot.IfyourESCssupportDshot,youshoulduseit,andyoucanskipthisstep.
Failsafe
https://www.youtube.com/watch?v=dikr9oDzQqc
Failsafeiswhathappenswhenyouflytoofarawayoryourreceivergetsdisconnectedfromyourflightcontroller.Ifyoudon’tconfigurefailsafe,thequadcouldflyaway,oritcouldcrashintosomething…orsomeone.
DON’TFLYWITHOUTVERIFYINGTHATFAILSAFEWORKSCORRECTLY.
Toverifyfailsafe,removeyourprops,thenpluginyourbatteryandarmyourcopter.Thenturnoffyourtransmitter.Yourmotorsshouldstopwithin1to3secondsatmost.
Ifyourmotorsdon’tstopwhenyouturnoffyourtransmitter,DONOTFLYYOURMULTIROTORUNDERANYCIRCUMSTANCES.

P a g e |26 KakuteF7AIO
AdjustPIDs/Rates/vTXfromTaranisIfyouhaveaFrSkyTaranisradioandifyouareusingtelemetry(suchasSmartPort,FPort,orCrossfire),youcanuseyourTaranistochangeyourPIDsandrates.
ThisisdonebyinstallingapieceofprogrammingcodecalledaLuascriptonyourTaranis.IfyouarealsousingSmartAudio,youcanuseaLuascripttochangeyourvTXsettings.ThisisthesameasifyouwereusingtheBetaflightOSD,butitworkswithoutyouhavingtoputyourgoggleson.
Detailedinstructionsforhowtodothisarebelow:
HowtoUpgradeTaranistoOpenTX2.2andInstallLuaScripts
https://www.youtube.com/playlist?list=PLwoDb7WF6c8kLrGADjuxJUm5M2szXd_j8