10/6/16 weatherpro power awning control system control box
TRANSCRIPT

REVISION AForm No. 3309525.057 10/16©2016 Dometic CorporationLaGrange, IN 46761
USER’S GUIDE
Control SystemControl Box
+ –POWER 12 VDC
DOORMOTOR
PATIOMOTOR
DOORSWITCH
PATIOSWITCH
LIMITSWITCH
WINDSENSOR
2421181512
WIND
ON
U.S.A. PATENT NO 6,798,158.
EXTEND
RETRACT
Remote Rocker SwitchRemote Control (Key FOB)
PATIO
DOOR
EXTEND
EXTEND
RETRACT
RETRACT
USASERVICE OFFICEDometic Corporation1120 North Main StreetElkhart, IN 46514
CANADADometic Corporation46 Zatonski, Unit 3Brantford, ON N3T 5L8CANADA
SERVICE CENTER &DEALER LOCATIONSPlease Visit:www.eDometic.com
Electronic Control Kit3310287.XXX3311917.XXX

WeatherPro Awning User’s Guide
2
To activate the wind sensor, simultane-ously press and hold buttons 1 & 2 for 3 seconds.To de-activate the wind sensor simulta-neously press and hold buttons 3 & 4 for 3 seconds.
The wind sensor is specifically designed to allow air to pass across sensor probe.
Obstructions in the proximity of the wind sensor can di-minish the sensitivity. If wind sensor is de-activated and damage to awning occurs, the awning warranty will be void.
Important: The wind sensor will only function cor-rectly if the airway to the sensing probe is clear. Keep airway clear of dust, insects, ice, snow, or other debris. The sensing probe can be cleaned with a mild soap solution and a small soft bristle brush.
There are six (6) LED’s in the WeatherPro control and one (1) button for selecting the wind speed.
A. 12 VDC Power Indicator/Fault Indicator (ON)B. Wind Speed Setting
1. The LED that is yellow indicates the wind speed currently selected.
C. Wind Speed Selection Button1. Wind speed is preset from the factory at 18
MPH.2. The wind speed can be adjusted by pressing the
wind speed selection button. To increase or de-crease the sensor sensitivity, press and release the wind speed selection button until the desired wind speed LED is lit. The recommended setting is 18 MPH.
Note: Awning is not intended for cold weather operation. Awning will automatically close when the wind sensor de-tects temperatures below 32° F.
To Open Awning:A. Using The Remote Control (Key FOB)
1. Press and hold the “Extend” button for 3 seconds and the awning will automatically open. If not held for three seconds the awning will re-main in the position when button is released and will continue to extend when pressed again.
B. Using The Remote Rocker Switch
1. Press and hold the “Extend” button for 3 seconds and the awning will au-tomatically open. If not held for three seconds the awning will remain in the position when button is released and will continue to extend when pressed again.
Note: To stop awning during automatic opening operation (remote control) simply press and release any key FOB button or the Remote Rocker Switch button. Awning will stop in the position when button was pressed. To resume “OPEN” operation, press the “OPEN” button once again. When using the Remote Rocker Switch follow the same sequence.
Important: When installed correctly on a motorized RV, this system is wired to prevent accidental awning “extension” when vehicle ignition key is in the “ON” position. When the ignition key is turned “ON”, the “extension” mode is de-activated and awning will not extend. This however, will not prevent the awning from being retracted.
The WeatherPro awning is equipped with a wind sensing device that will automatically close the awning when wind conditions are present that may damage the awning. The factory preset setting is 18 MPH. To activate the wind sen-sor feature, locate the control box (usually mounted in a storage compartment), simultaneously depress and hold buttons 1 & 2 on the Remote Control (Key FOB) for 3 sec-onds. One of the wind speed LED’s will illuminate. Wind sensor is activated when shipped from the factory. The wind sensor should be enabled whenever possible.To de-activate the wind sensor feature, simultaneously depress and hold buttons 3 & 4 on the Remote Control (Key FOB) for 3 seconds. There are no wind speed LED’s illuminated when de-activated. Damage to the awning can occur in high winds if the awning is left in the open position with this feature de-activated.
Important: Do not attach or hang any objects from the awning or tie the awning down. If the sensor is activated or the retract button is depressed and the awning rolls up, damage to the awning and attached objects can occur.
WeatherPro Control Box
EXTEND
RETRACT
PATIO
DOOR
OPEN
OPEN
CLOSE
CLOSE
PATIO
DOOR
OPEN
OPEN
CLOSE
CLOSE
1
2
3
4
A
B
CWind SpeedSelection Button 12 VDC Power
Indicator AndFault Indicator
Wind Speed Setting
2421181512
WINDSENSOR
LIMITSWITCH
PATIOSWITCH
U.S.A. PAT

WeatherPro Awning User’s Guide
3
The WeatherPro awning is extremely durable and can be operated during light rain and light wind conditions. However, when periods of heavy rain, or wind is expected; or you leave the awning unattended the awning must be closed. Damage caused by wind and rain is not covered by warranty.
B. To Enable Auto-Water-Shed While Fully Extended:1. With awning fully extended at normal pitch, loosen
knob on rear hardware (left hand) while keeping front hardware knob tight. This will allow the rear hardware arm to automatically lower the height of the awning approximately 9 inches to allow water to run off. When there is no longer the need to shed water it will return to the normal pitch.
To Close Awning:
Pinch Hazard. When closing awning, bottom arm will fold down and against back channel. This area must be kept clear of people and objects. Failure to heed this warning could cause severe personal injury and/or property damage.
Pinch Point
Pinch Point
Adjust Pitch/Auto-Water-Shed Fea-ture:
A. To Adjust The Awning Pitch:
1. With awning fully extended, loosen knob on bot-tom arm.
Pinch Hazard. When adjusting awning pitch, bottom arm will telescope. Keep hands and objects clear of openings around bot-tom arm. Failure to heed this warning could cause personal injury.
2. Pull top arm down to lower roller tube to desired height.
3. While holding top arm in place, tighten knob to set pitch.
4. Repeat for hardware on other side.
Pull Top Arm Down
Then Tighten Knob
Important: To ensure rain water will run off awning, ensure that one end of the awning is lower than the other end. This will reduce the potential for water pool-ing in the center of the awning. See figure below.
5. Prior to closing awning, loosen knob to allow aw-ning to reset to original position. Lightly tighten knob to reduce potential for sounds of rattling during travel.
WeatherPro Awning User’s Guide
4
A. Ensure Knobs Have Been Loosened.B. Using The Remote Control (Key FOB).
1. Press and hold the “Retract” but-ton for 3 seconds and the awning will automatically close. If not held for three seconds the awning will remain in the position when button is released and continue to close when pressed again.
C Using The Remote Rocker Switch.1. Press and hold the “Retract” but-
ton for 3 seconds and the awning will automatically close. If not held for three seconds the awning will remain in the position when but-ton is released and continue to close when pressed again.
Note: To stop awning during automatic closing opera-tion, (remote control) simply press and release any key FOB button or the Remote Rocker Switch. Awning will stop in the position when button was pressed. To resume ”CLOSE” operation, press the “CLOSE” button once again. When using the Remote Rocker Switch follow the same sequence.Important: This will not work if awning is closing due to a fault.Important: As an extra safety precaution, visually verify that the awning is fully closed.
Replacing Internal Control Box Fuse:
Important: If the awning does not respond to the key FOB or the wall switch, locate the control box and verify that at least the “ON” LED (and possibly a wind speed setting indicator LED) is on. If all LEDs are off verify adequate voltage at control box. Check internal fuse and replace if necessary. See below for replace-ment instructions.
A. If the control box is not operational (all LEDs on the front of the control box are off) even after adequate voltage supply has been verified, the internal fuse may have blown during installation and may need to be replaced.
1. Disconnect 12V/Ignition harness from control box.
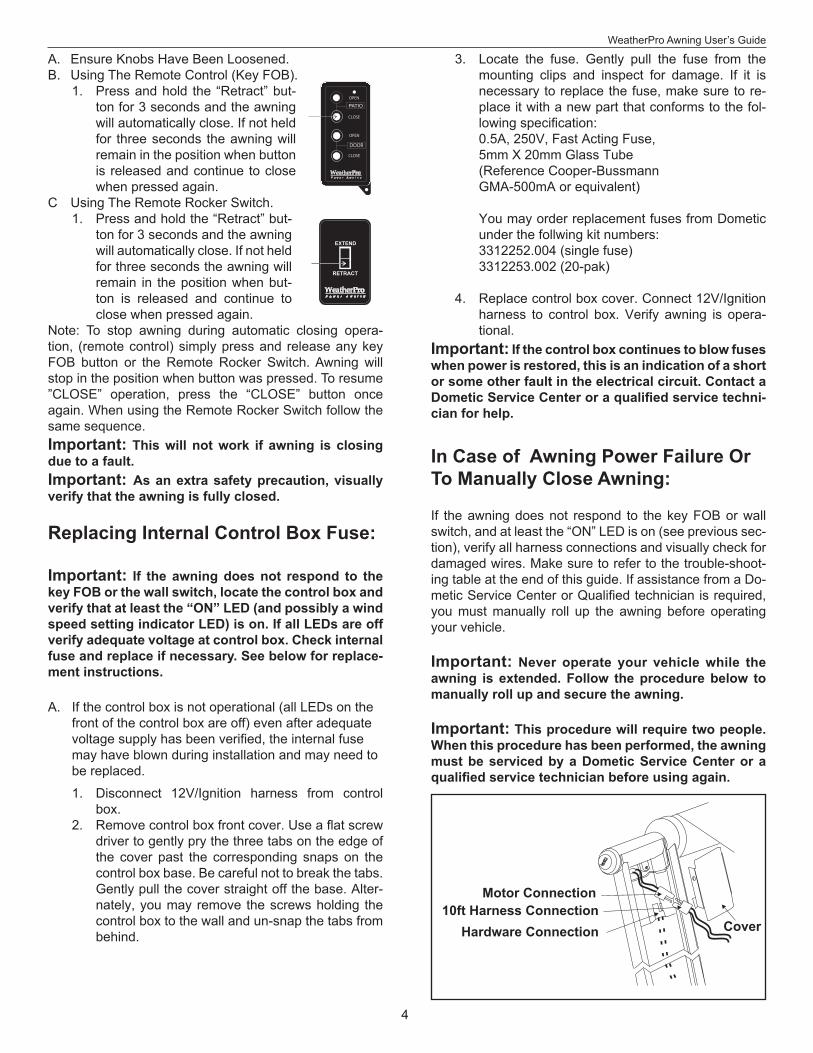
2. Remove control box front cover. Use a flat screw driver to gently pry the three tabs on the edge of the cover past the corresponding snaps on the control box base. Be careful not to break the tabs. Gently pull the cover straight off the base. Alter-nately, you may remove the screws holding the control box to the wall and un-snap the tabs from behind.
Motor Connection10ft Harness Connection
Hardware Connection Cover
3. Locate the fuse. Gently pull the fuse from the mounting clips and inspect for damage. If it is necessary to replace the fuse, make sure to re-place it with a new part that conforms to the fol-lowing specification:
0.5A, 250V, Fast Acting Fuse, 5mm X 20mm Glass Tube (Reference Cooper-Bussmann GMA-500mA or equivalent)
You may order replacement fuses from Dometic under the follwing kit numbers:
3312252.004 (single fuse) 3312253.002 (20-pak)
4. Replace control box cover. Connect 12V/Ignition harness to control box. Verify awning is opera-tional.
Important: If the control box continues to blow fuses when power is restored, this is an indication of a short or some other fault in the electrical circuit. Contact a Dometic Service Center or a qualified service techni-cian for help.
In Case of Awning Power Failure Or To Manually Close Awning:
If the awning does not respond to the key FOB or wall switch, and at least the “ON” LED is on (see previous sec-tion), verify all harness connections and visually check for damaged wires. Make sure to refer to the trouble-shoot-ing table at the end of this guide. If assistance from a Do-metic Service Center or Qualified technician is required, you must manually roll up the awning before operating your vehicle.
Important: Never operate your vehicle while the awning is extended. Follow the procedure below to manually roll up and secure the awning.
Important: This procedure will require two people. When this procedure has been performed, the awning must be serviced by a Dometic Service Center or a qualified service technician before using again.
PATIO
DOOR
OPEN
OPEN
CLOSE
CLOSE
EXTEND
RETRACT

WeatherPro Awning User’s Guide
5
There are two methods of rolling up the awning if it ap-pears there is no power to the awning motor. The follow-ing method should be performed first:A. When the WeatherPro hardware is in the open posi-
tion and the 12 VDC power has been lost the aw-ning can be closed by supplying auxiliary power to the hardware. Connect the awning motor to an ex-ternal 12 VDC power source via user-supplied wire (16 gauge minimum). A good external 12 VDC power source would be an automobile battery.1. Locate and unplug the motor and hardware cable
connection located in the upper part of the right hand arm.
2. Connect the user-supplied wire leads to the ter-minals in the connector from the motor. Electrical tape may be required to keep the wire leads in place. (Do not connect to the one in the hard-ware.)
3. Connect the other end to a 12 VDC battery source. The red wire goes to + and the black to –. If there is not a problem with the awning motor, this will retract the awning. To avoid motor dam-age disconnect battery source immediately after awning is fully retracted.
4. The awning can be extended by reversing the polarity. Place the red wire on the –and the black wire on the +. Again, remove wires immediately after awning is fully extended.
B. If the awning will not retract after performing the steps listed above, perform the following steps:
1. Slide the pull strap (provided) into the utility slot of the FRTA.
2. While one person is holding onto the pull strap, remove the screw in the top of the right side top casting. The FRTA will immediately roll in once the bolt is removed. Walk the awning to the closed position.
3. Align hole where screw was removed and replace screw into top casting to secure awning. Awning should be tied to prevent opening until it can be serviced by a Dometic Service Center.
Screw must be re-installed to prevent awning from opening during travel. Have awning serviced by a Dometic Service Center or a qualified service technician before attempt-ing to open awning after this procedure has been performed.
WeatherPro Helpful Hints:• Whenever the awning is wet while rolled up, soon as
conditions allow, roll it out and let it dry before rolling it up again. This will help prevent the formation of mil-dew and add greatly to the life of the awning.
• Mildew does not form on the fabric itself, but on the accumulated dust, dirt and grime. Periodically clean vinyl or woven acrylic fabric using a mixture of 1/4 cup of dish soap and 1/4 cup of bleach mixed with 5 gal-lons of warm water. Liberally slosh the mixture on the top of the fabric and roll the awning up for 5 minutes. This will apply the mixture to the bottom of the fabric as well. Roll it back out and hose off with fresh water. Repeat if necessary. Allow to dry before rolling up.
• Always make sure the awning is fully extended before opening the entry door.
When To Get More Help:This User’s Guide is intended to provide practical instruc-tion for the sequential operation of the WeatherPro Patio Awning. If malfunctions occur that cannot be corrected by reviewing this Guide, contact a Dometic Service Center or a qualified service technician for assistance.

WeatherPro Awning User’s Guide
6
Wea
ther
Pro
Aw
ning
Con
trol
- D
iagn
ostic
s G
uide
Win
d Sp
eed
LED
s “O
N”
LED
M
eani
ng
Rea
ctio
n by
Con
trol
R
eact
ion
by U
ser
1 SE
LECT
ED W
IND
SPEE
D ON
ON
•
Prop
er vo
ltage
is de
tected
at C
ontro
l and
W
ind S
enso
r is en
abled
•
Norm
al op
erati
on of
contr
ol.
•No
user
reac
tion r
equir
ed.
2 AL
L LED
s OFF
ON
•
Wind
Sen
sor h
as be
en di
sable
d with
the K
ey
FOB
•Co
ntrol
will r
etrac
t the a
wning
after
5 se
cond
s, if t
he aw
ning i
s ex
tende
d whe
n wind
sens
ing is
disa
bled..
•
Contr
ol dis
ables
the “
norm
al” ex
tensio
n rou
tines
for a
wning
•Us
er ca
n exte
nd aw
ning b
y pre
ssing
and h
olding
the e
xtend
butto
n. Aw
ning w
ill ex
tend f
or ap
prox
imate
ly 4 s
econ
ds an
d stop
. Use
r can
re
peat
as ne
cess
ary t
o obta
in ful
l exte
nsion
. •
User
shou
ld re
-ena
ble th
e Wind
Sen
sor w
hene
ver p
ossib
le
3 SE
LECT
ED W
IND
SPEE
D BL
INKI
NG
ON
•W
ind S
enso
r has
been
activ
ated b
y wind
•Co
ntrol
retra
cts aw
ning i
f awn
ing is
exten
ded.
•Co
ntrol
monit
ors f
or se
nsor
activ
ation
durin
g retr
actio
n and
at aw
ning
closu
re to
deter
mine
if ac
tivati
on co
ntinu
es af
ter aw
ning c
losur
e. •
Contr
ol wi
ll res
et aft
er aw
ning c
losur
e, if s
enso
r acti
vatio
n is n
o lon
ger
detec
ted.
•Us
er sh
ould
obse
rve w
ind co
nditio
ns be
fore a
ttemp
ting t
o exte
nd th
e aw
ning a
fter a
ny au
tomati
c clos
ure.
•Us
er ca
n exte
nd aw
ning a
s nor
mal (a
fter c
ontro
l rese
ts)
•Us
er sh
ould
use c
autio
n if th
ey ch
oose
to di
sable
the w
ind se
nsor
with
wi
nd pr
esen
t. Disa
bling
the s
enso
r is no
t rec
omme
nded
here
.
4 LE
Ds S
EQUE
NCE
ON,
THEN
OFF
FRO
M TO
P DO
WN
ON
•W
et Se
nsor
•Co
ntrol
retra
cts aw
ning i
f awn
ing is
exten
ded.
•Co
ntrol
monit
ors f
or se
nsor
activ
ation
durin
g retr
actio
n and
after
aw
ning c
losur
e to c
onfirm
Wet
Sens
or co
nditio
n exis
ts.•
Contr
ol dis
ables
the w
ind se
nsor.
•
Contr
ol dis
ables
the “
norm
al” ex
tensio
n rou
tines
for a
wning
•
Contr
ol wi
ll auto
matic
ally r
e-en
able
wind
sens
or w
hen i
t dete
rmine
s the
se
nsor
is no
long
er ac
tivate
d (no
long
er w
et)
•If s
enso
r acti
vatio
n con
dition
is ob
serve
d for
long
er th
an 12
hour
s, an
d aw
ning i
s exte
nded
, then
contr
ol wi
ll retr
act a
wning
.
•Us
er sh
ould
obse
rve w
ind co
nditio
ns be
fore a
ttemp
ting t
o exte
nd th
e aw
ning a
fter a
ny au
tomati
c clos
ure.
•Us
er ca
n exte
nd aw
ning b
y pre
ssing
and h
olding
the e
xtend
butto
n. Aw
ning w
ill ex
tend f
or ap
prox
imate
ly 4 s
econ
ds an
d stop
. Use
r can
re
peat
as ne
cess
ary t
o obta
in ful
l exte
nsion
. •
User
shou
ld re
-ena
ble th
e Wind
Sen
sor w
hene
ver p
ossib
le
5 SE
LECT
ED W
IND
SPEE
D BL
INKI
NG (a
ltern
ating
) B
LINKI
NG
(alte
rnati
ng)
•Se
nsor
fault
/ Com
munic
ation
issu
e betw
een
the W
ind S
enso
r and
the C
ontro
l Box
.
•Co
ntrol
retra
cts aw
ning a
fter 5
seco
nds i
f awn
ing is
exten
ded w
hen
comm
unica
tion i
ssue
is de
tected
. •
Contr
ol dis
ables
exten
sion o
f the a
wning
by th
e use
r whil
e the
wind
se
nsor
is en
abled
•
Contr
ol wi
ll res
et if c
ommu
nicati
on is
re-e
stabli
shed
.
•Us
er sh
ould
obse
rve w
ind co
nditio
ns be
fore a
ttemp
ting t
o exte
nd th
e aw
ning a
fter a
ny au
tomati
c clos
ure.
•Us
er ca
n disa
ble w
ind se
nsor
with
Key
FOB
to ex
tend a
wning
.
6 BO
TTOM
TW
O LE
Ds
BLIN
KING
ON
•
Wind
Sen
sor is
detec
ting t
empe
ratur
es
below
32° F
•Co
ntrol
retra
cts aw
ning i
f awn
ing is
exten
ded w
hen l
ow te
mper
ature
is
detec
ted.
•Co
ntrol
disall
ows a
ny ex
tensio
n of th
e awn
ing un
til tem
pera
ture g
oes
abov
e 32°
F.
•Us
er sh
ould
obse
rve te
mper
ature
befor
e atte
mptin
g to e
xtend
awnin
g ag
ain.
•Us
er ca
n disa
ble w
ind se
nsor
with
Key
FOB
to ex
tend a
wning
.
7 OF
F BL
INK
•Po
wer d
etecte
d by c
ontro
l is le
ss th
an 10
.5 VD
C (to
leran
ce is
+.5
VDC
and -
0.0 V
DC)
•Co
ntrol
retra
cts aw
ning i
f awn
ing is
exten
ded w
hen l
ow vo
ltage
sit
uatio
n is d
etecte
d. •
Contr
ol dis
allow
s any
exten
sion o
f the a
wning
until
prop
er vo
ltage
is
detec
ted.
•Us
er w
ill no
t be a
ble to
exten
d awn
ing.
•Ch
eck v
oltag
e at h
ouse
batte
ry ga
uge o
r othe
r gau
ge as
nece
ssar
y to
confi
rm lo
w vo
ltage
cond
ition.
•If v
oltag
e is l
ow, th
en st
art c
oach
engin
e to c
harg
e batt
eries
.•
User
shou
ld co
ntact
servi
ce ce
nter if
low
batte
ry co
nditio
n reo
ccur
s.
8 OF
F OF
F •
No P
ower
•
No re
actio
n by c
ontro
l •
Awnin
g(s)
cann
ot be
oper
ated
•Su
gges
t use
r to c
ontac
t ser
vice c
enter
. •
Chec
k volt
age s
ource
at co
ntrol,
corre
ct as
nece
ssar
y •
Chec
k inte
rnal
fuse a
t con
trol b
ox. R
eplac
e if n
eces
sary.