1 webehrs mobile training. 2 mobile concept how does this tablet work?
TRANSCRIPT

1
WebEHRS Mobile Training

2
Mobile Concept
How does this tablet work?

3
Mobile Concept
WebEHRS Server
Mobile Tablet/Laptop
When the mobile tablet/laptop is connected to the internet, all establishment information can be copied down from WebEHRS to the laptop.

4
When the Environmental Health Specialist performs a survey, they will take the mobile device/laptop along and fill the survey form out on the tablet. No internet connection is required.

5
Mobile Concept
WebEHRS Server
Mobile Tablet/Laptop
When finished with survey(s) the EHS should connect to the internet to send those forms to the WebEHRS database. After executing the Finish procedure, the survey(s) will be available on WebEHRS.

6
Using the Mobile Laptop
We will start by clicking on the Mobile Icon

7
Users will start on the Login page. The device may have one or more user.

8
Click on the user icon and then click OK or you can just double click on the user icon.

9
User will need to enter the password. The generic password will be ihs12345. Then
click OK.

10
After entering your password, if you receive this error message, it means you have no internet
connection. Click OK to continue.

11
We are now on the main WebEHRS page.

12
To change your icon, click Tools and then click Options.

13
Once on the options page, click Users

14
Click the Change Icon button.

15
Click on the icon you would like, then click OK.

16
Click the Ok button when you have finished.

17
WARNING! Do NOT make changes to options in other tabs without assistance from CDP Customer
Support.

18
Click the folder icon to open the forms.

19
On the open forms page, you have two options. You can Synch your data or perform a survey.

20
Your open forms page may appear as below. To toggle between the different views, click the icon
for the desired display.

21
The Synchronize With Server button retrieves the most recent version of the forms. This happens automatically
when you sign on with an internet connections.

22
Help is also available on this page. This is help for the mobile application only.

23
The Local Sessions tab will contain those surveys that have not been uploaded to WebEHRS.

24
The Remote Sessions tab will not be used.

25
Synching My Data
Synching my data is the process of pulling down the establishment information from the WebEHRS
system. This process requires the device to have an internet
connection.

26
To synch, double-click the Synch My Data form thumbnail, or select the Synch My Data form
thumbnail and click OK.

27
What is downloaded?
This process will only pull those establishments and temporary
establishments you have access to. It also updates support tables
and history.

28
This process will require your WebEHRS
User Name and Password.

29
Enter your User Name and Password. Click OK.

30
Forgot Password is not available on the mobile device.

31
After clicking OK, if no internet connection exists, mobile will not go beyond this screen.

32
You will see a status dialog box working through the synching process.

33
How often am I required to synch?
After 20 days without synching, the user will begin to receive
warning messages daily that they need to synch. After 90 days,
users will not be able to perform surveys until a synch is performed.

34
How often should I Synch My Data?
This process should be performed before going out to do surveys. If
you perform surveys daily then you should synch daily.
This will guarantee that you have the updated establishment
information.

35
Once the synch is completed, you will be on the below screen.

36
The screen will show two things: That your login to retrieve data was successful, and the date of the
last successful synch.

37
To close this page, click on File and then click Close.

38
Now lets discuss the Tool bar. Click on the green arrow.

39
This will cause the tool bar to appear. Let’s discuss each of the icons.

40
The folder icon will open a new or existing survey.

41
The disk icon will save the current survey into Local Sessions.

42
The checkmark icon will finish the current survey. This will send the survey up to
WebEHRS.

43
The X icon will close the current survey. The user will be prompted to save.

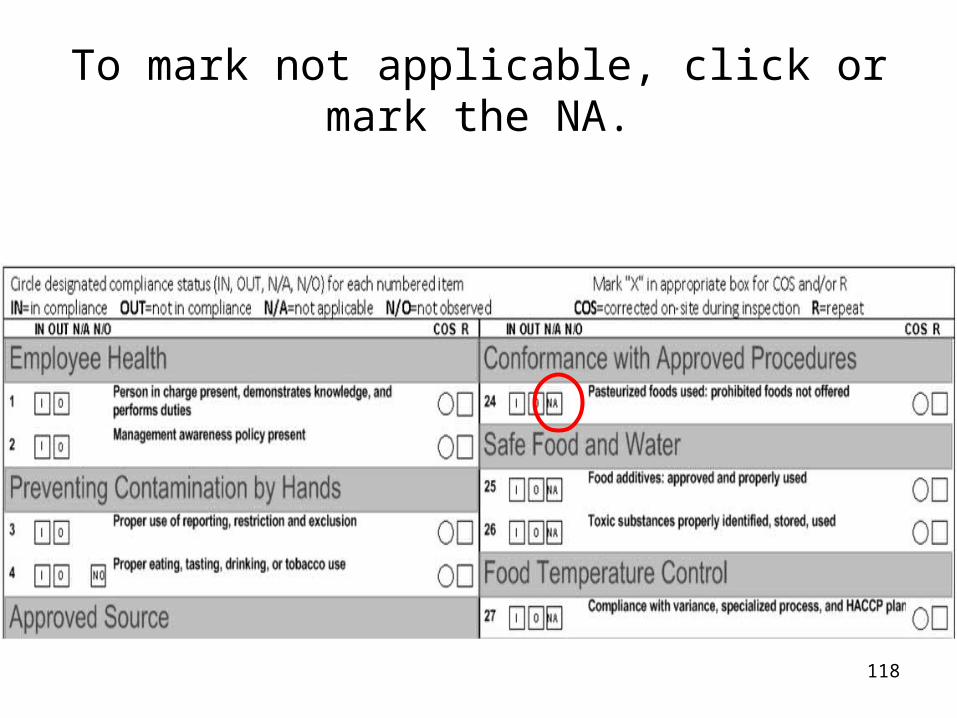
44
The keyboard key icon will allow you to use your keyboard or mouse to input information
to the survey form.

45
The pen icon will allow you to use your tablet stylus to input information to the
survey form.

46
The drop down by the pen icon will let you pick the color of your pen.

47
The eraser icon will allow you to erase pen marks on the form or clear fields to re-enter
data.

48
The drop down for the eraser allows you to pick the size of your eraser.

49
The paper clip icon will allow you to attach documents/images to survey form.
50
Let’s perform a survey.

51
Click on the folder icon from the mobile toolbar.

52
Double-Click on the Perform Survey icon or select the Perform Survey icon and click OK.

53
Top portion of the survey page 1.

54
At the top of the screen we see our survey session.

55
We also see tabs that are for each page of the survey form. We are currently on Page 1.

56
This survey form will pre-populate with the current date & time. This can be changed if
needed.

57
The logo populates based on the “Works For” value on your WebEHRS User Account.

58
The address populates from the physical office address on your WebEHRS User
Account.

59
First we want to select an establishment by clicking on the Establishment link.

60
An Establishment lookup screen will appear with those establishments that have been downloaded
to your tablet. There may be a pause before it appears, depending on the number of establishments you have access to.

61
Click on any of the Column Headings to sort the list of establishments.

62
Use the Search feature to query the list for a specific establishment. The user can search
by name, address, type, etc.

63
Type in information to search. I have entered “Preston” for my search.

64
After searching, click on the establishment you need and then click OK.

65
After selecting the establishment, the establishment information will be filled in on
the form.

66
Now we will click on Survey Type.

67
A window will appear with the survey types that are valid for the establishment type/user
filters.

68
Click on the survey type, and then click OK.

69
The survey type will appear on the form and the violation section of the form will populate.

70
An R/C/P can be selected if applicable.

71
The survey purpose needs to be set. Click on the Survey Purpose link.

72
A survey purpose window will appear. Select the purpose of your survey and click OK.

73
The survey purpose will now appear on the form.

74
If the survey purpose is Focused, then a Focus Survey type box will appear on the form.

75
Click on the Last 4 Surveys link if you would like to view the survey history for the establishment. This is not required.

76
A survey history window will appear. Select one of the previous surveys and click OK.

77
The survey form for that survey will pop up in a window for review or printing.

78
If values are set on the establishment, the manager’s name will populate from the establishment record. Manager’s Name can be
edited and the change will be reflected on the establishment in WebEHRS when the form is finished.

79
If values are set on the establishment, the latitude/longitude will populate from the establishment record. Latitude/Longitude can be edited and will be updated on the establishment in WebEHRS
when the form is finished.

80
Score does not calculate from the violation entries but can be manually entered.

81
When ready to enter Time Out, click on the Time Out link and the current time from your tablet/laptop will populate into the field. Or
you can manually enter the time out.

82
Bottom portion of survey page 1.

83
Using the tablet’s stylus, the establishment representative can sign the form on the tablet
screen.

84
The printed name of the establishment rep can be typed in the field below the signature. If a
signature is present, then the print name field is required. If a printed name is entered, then a
signature is required.

85
The EHS Signature field is optional.

86
The EHS printed name will already appear below the signature.

87
Click on the Next Survey Purpose link to open the Survey Purpose box. Select a Next Survey Purpose for the establishment and click OK.

88
If the Next Survey Purpose is set to Routine, then the Next Survey Date will be automatically
calculated. (The field will be editable).

89
If the Next Survey Purpose is set to a selection other than Routine, the Next
Survey Date must be entered manually.

90
Click on the Survey Reference link to open a copy of the Survey Reference Document in
a new window.

91
Entering the violations

92
The EHS can now go through and mark the violations for the inspection. All must be
answered. They can be marked with either the stylus or the tablet mouse.

93
The violations for the establishment are determined by the establishment type and survey
type.

94
To mark in compliance, click or mark the I.

95
To mark not in compliance, click or mark the O.

96
When a violation is marked as not in compliance, the user will be taken to the Violations page.

97
Click the drop down for the list of violations to select.

98
From the drop down select the appropriate violation. When the violation is selected, those
fields that are required will turn yellow.

99
Next you can click yes or no for Corrected on Site.

100
If this is a repeat violation, the system will automatically mark it. The EHS has the
ability to change if necessary.

101
The EHS can also enter the number of occurrences they witnessed.

102
If the violation can be marked as critical/non-critical, fields will appear on the form to allow this
to be marked.

103
Click the Comments link for a pop up to retrieve any Predefined Comments from the list. A Predefined
Comment can be modified after it is populated into the text box. Enter additional comments manually by writing in the box with the stylus, or click in the box with the mouse and
enter comments with the keyboard.

104
A spell check is available to check your comments after you have entered them.

105
After finishing the violation, click Save.

106
If the user enters information on the violation page and attempts to leave the page without saving, he/she will
receive this pop-up warning message.

107
After clicking Save, the user remains on the Violation page to enter additional violations (if necessary). Return to the survey from by clicking the appropriate form page.

108
Back on the survey form, the violation will now show as “not in compliance” and if corrected on
site or a repeat violation

109
If a violation is entered in error, click on the Violations tab at the top of the form.

110
You will be returned to the Violation page.

111
At the bottom of the Violation page, click on List of Violations Selected drop down.
Select the incorrect violation from the list.

112
The incorrect violation data will populate on the page for editing. Make your corrections and click the Save button.
Or…

113
Click on the Delete button to remove the violation entry.

114
You will be reminded that you are deleting a violation, are you sure?

115
Are you sure you want to delete the information? This has been
removed.

116
Are you sure you’re sure?

117
The violation will be cleared after violations are deleted.
118
To mark not applicable, click or mark the NA.

119
To mark not observed, click or mark the NO.

120
After completing Survey Pg.1, you can move on to pages 2, 3, and 4.

121
The survey type will determine if there are more violations to answer.

122
Page 3 is blank for this survey type.

123
Page 4 is blank as well.

124
A user can skip the survey pages, and enter violations on the violation page.

125
The list of violations will be lengthy.

126
A search is available to narrow down the list of violations.

127
Two pages are available for capturing samples

128
Sample information can be captured on the following survey types.
• Waste Water
• Drinking Water
• NavajoNationFood
• FDA2001
• FDA2005
• FDA2009

129
Sample Page 1.

130
Sample Page 2.

131
Sample pages tabs will show for all survey types but will be locked out for surveys that don’t capture
samples.

132
General Comments

133
Predefined Comments may be available. Click on the General Comments link to select from the list.

134
Spell check is available to check your comments spelling.

135
Additional Data

136
Additional Data Page
This page will allow the user to view only additional demographics for certain establishments types. The fields can’t be updated. They will show on the hard copy of the
survey only.

137
At the bottom of Additional Data, you will find the P/E/S/SS information and the 10 Essential
Services Information.

138
Print Preview

139
Print Preview Page
This page will allow the user to print out a hard copy of the
survey. This process can be performed at any stage of the
survey processing.

140
The survey form will pop up in a window
for review or printing.

141
On the survey pages that list the violations, text may appear truncated for some risk factors.

142
However on the print-out of the survey, the full text will show on the violations page for those not in
compliance.

143
Reference Source
For those violations marked not in compliance, if reference source
texts exist, it will be printed in the general comments section of the
survey.

144
The survey can also be printed by clicking on File and then Print. This will not show a preview page.

145
You will receive a screen to pick the printer for printing your survey. Click OK when ready to print.

146
Saving the Survey
At any point in filling out the survey, the form can be saved. It
is a good idea to save the form often. What if your tablet’s battery
goes dead?

147
To save the survey, click the disk icon located on the mobile toolbar.

148
The survey form will now show as saved in your local sessions.

149
Notice the survey form is outlined in red. This means the survey still has validation issues
(required fields need to be completed).

150
The survey will be outlined in green if no validation issues exist.

151
After saving the survey form, you can close the form.
152
Validating the form
Before the form can be finished, it must be validated. Validating makes sure all required fields
have been satisfied.

153
To start the validation, click on the stop light at the top of the page.

154
The Form Validation window will show all required fields that have not been satisfied.

155
As the required fields are entered, they will drop off the form validation screen.

156
Once all required fields are satisfied, the stop light will turn green. We can now finish the form.

157
Finishing the form

158
What happens when we finish?
• The survey gets copied up to the WebEHRS system.
• The survey is created as finalized.
• A corresponding Activity record is created automatically.
• The activity is created as finalized.

159
Finishing the form
We can finish a single form or finish multiple forms. Either way, we must
have an internet connection.
160
Finishing a single form

161
Click the checkmark icon in the mobile toolbar. Or click Finish from the file menu.

162
Each time you finish a survey
You will be required to enter your WebEHRS login.

163
During the finish process, you will receive a progress bar showing the status of your finish.

164
When the finish is complete, you will be returned to the screen below.

165
Finishing multiple forms.

166
Click on File, then click Finish Multiple.

167
On the local sessions tab, all surveys will be shown. Surveys that have been validated will be
outlined in green. Those that have not will be outlined in red.

168
You can click each survey individually or click Select All.

169
The survey forms will turn blue when selected. Then click OK.

170
After clicking OK, you will see a status bar that will show the progress of the finish.

171
Once a Survey is finished, it can be found in WebEHRS

172
A finished Survey can be found in WebEHRS in the Surveys Module.

173
Click on the Mobile hyperlink to view the Survey form exactly as it was completed in
the field.

174
A link to the associated activities for the survey is also available.

175
View Activity

176
Any Questions?