1 · vdo m6.1 und alle sender d3-speed, d3-cad, d3-hr bei bestimmungs- gemäßer verwendung den...
TRANSCRIPT

1www.vdocyclecomputing.com/service
vdo-qr.com
Kurz-BedienungsanleitungShort instruction manualNotice d‘utilisation abrégéeGuida rapida
Manual de instrucciones breveBeknopte gebruiksaanwijzing
32
ContentMontage / Installation / Installation / Montaggio / Montaje / Installatie
Deutsch ................................................................................................. 04
English .................................................................................................. 32
Francais ................................................................................................ 60
Italiano ................................................................................................. 88
Espanol .............................................................................................. 116
Nederlands ........................................................................................ 144
Reifengrößen-Tabelle / Wheelsize Chart / Tableau des pneus /
Tabella dimensioni ruote / Tabla de tamaños de neumáticos /
Tabel met wielmaten ........................................................................ 172
Montage der Halterung / Handlebar mount / Montage du support /
Montaggio del supporto / Montaje del soporte /
Montage van de houder ................................................................... 174
Montage des Magneten / Installation of the magnet / Montage de
l‘aimant / Montaggio del magnete / Montaje del imán /
Montage van de magneet ................................................................ 174
Montage des Geschw.-Senders / Installation wireless transmitter /
Montage de l‘émetteur de vitesse / Montaggio del sensore di
velocità / Montaje del transmisor de velocidad /
Montage van de snelheidszender .................................................. 175
Batteriewechsel Computer / Battery change bike computer /
Remplacement de la pile du compteur / Sostituzione batteria
computer / Cambio de batería del ordenador /
De batterij van de computer vervangen ........................................ 176
Batteriewechsel Geschw.-Senders / Battery change speed
transmitter / Remplacement de la pile de l‘émetteur de vitesse /
Sostituzione batteria sensore di velocità / Cambio de batería del
transmisor de velocidad / De batterij van de snelheidszender
vervangen ......................................................................................... 176
DEUTS
CH
54
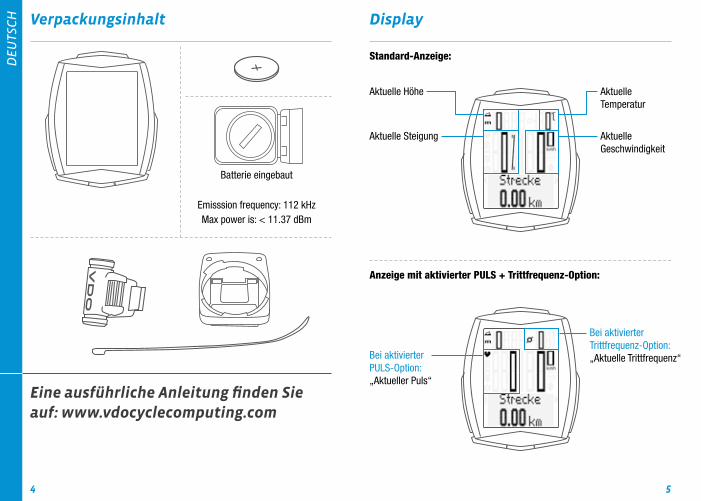
Verpackungsinhalt
Batterie eingebaut
Emisssion frequency: 112 kHzMax power is: < 11.37 dBm
Eine ausführliche Anleitung finden Sie auf: www.vdocyclecomputing.com
Display
Aktuelle Geschwindigkeit
Aktuelle Steigung
Aktuelle Temperatur
Aktuelle Höhe
Standard-Anzeige:
Bei aktivierter PULS-Option: „Aktueller Puls“
Bei aktivierter Trittfrequenz-Option: „Aktuelle Trittfrequenz“
Anzeige mit aktivierter PULS + Trittfrequenz-Option:
DEUTS
CH
76
BIKETPC
SET
ALTI
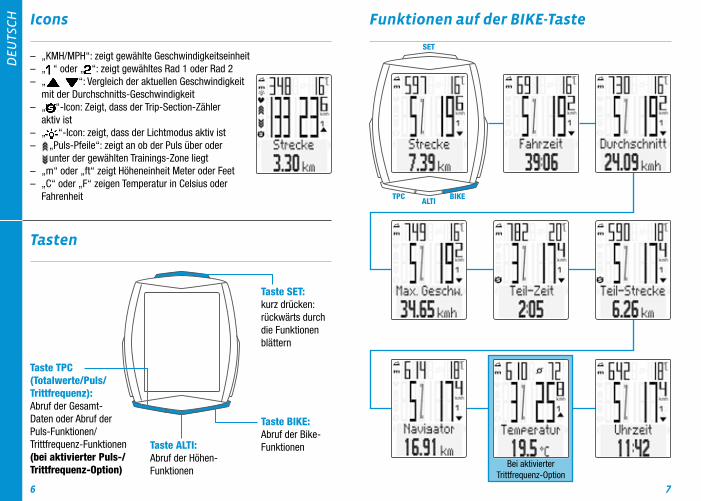
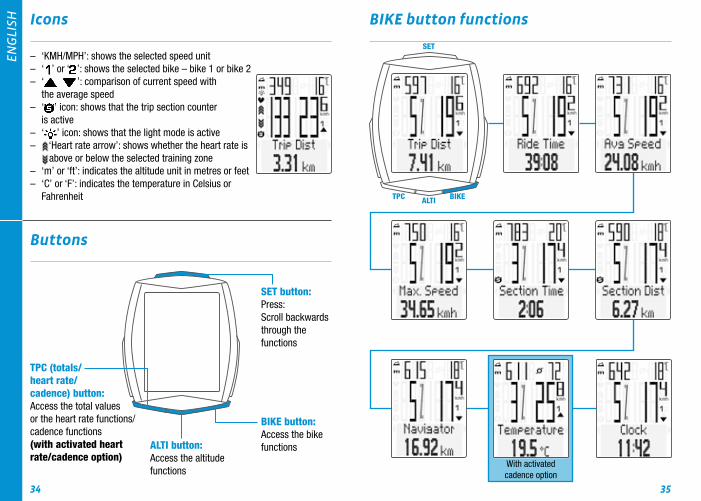
Icons
Tasten
– „KMH/MPH“: zeigt gewählte Geschwindigkeitseinheit– „ “ oder „ “: zeigt gewähltes Rad 1 oder Rad 2– „ “: Vergleich der aktuellen Geschwindigkeit mit der Durchschnitts-Geschwindigkeit– „ “-Icon: Zeigt, dass der Trip-Section-Zähler aktiv ist– „ “-Icon: zeigt, dass der Lichtmodus aktiv ist – „Puls-Pfeile“: zeigt an ob der Puls über oder unter der gewählten Trainings-Zone liegt– „m“ oder „ft“ zeigt Höheneinheit Meter oder Feet– „C“ oder „F“ zeigen Temperatur in Celsius oder Fahrenheit
Taste BIKE: Abruf der Bike- Funktionen
Taste TPC (Totalwerte/Puls/ Trittfrequenz): Abruf der Gesamt- Daten oder Abruf der Puls-Funktionen/ Trittfrequenz-Funktionen (bei aktivierter Puls-/Trittfrequenz-Option)
Taste SET: kurz drücken: rückwärts durch die Funktionen blättern
Taste ALTI: Abruf der Höhen-Funktionen
Funktionen auf der BIKE-Taste
Bei aktivierter Trittfrequenz-Option
DEUTS
CH
98
BIKETPC
SET
ALTI
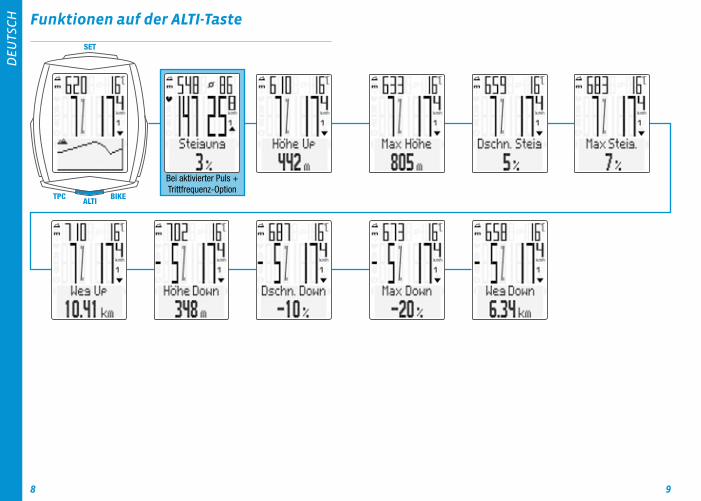
Funktionen auf der ALTI-Taste
Bei aktivierter Puls + Trittfrequenz-Option

DEUTS
CH
1110
BIKE BIKETPC TPC
SETSET
ALTIALTI
Funktionen auf der TPC-TasteGesamtdaten für Rad 1
HINWEIS:Wenn Sie auch mit Rad 2 gefahren sind, dann finden sie hier auch die Gesamtdaten für Rad 2 und die Totaldaten als Summe der Daten von Rad 1 + Rad 2.
Funktionen auf der TPC-Taste(bei aktivierter PULS-Option)

DEUTS
CH
1312
BIKETPC
SET
ALTI
Funktionen auf der TPC-Taste(bei aktivierter Puls+Trittfrequenz-Option)

DEUTS
CH
1514
BIKEBIKE TPCTPC
SETSET
ALTIALTI
Höhe auswählen/Re-Kalibrieren
2 Starthöhen wählbar, aktuelle Höhe einstellbar in Meter/Feet oder über Luftdruck über NN.
Rekalibrieren:Vor jeder Fahrt muss rekalibriert werden.Der aktuelle Luftdruck wird vom M6.1 gemessen und in eine Höhenanzeige umgerechnet. Wetterbedingt ändert sich der Luftdruck aber täglich. Das führt zu einer sich ständig ändernden aktuellen Höhenanzeige. Ihre Start-höhe ist aber unverändert geblieben.Beim Rekalibrieren wird nun der aktuell gemessene Luftdruck zurück-berechnet auf die eingestellte Starthöhe. Nach dem Rekalibrieren stimmt die aktuelle Höhe dann wieder mit der eingestellten Starthöhe überein.
Wenn Sie nicht von Starthöhe 1 oder 2 losfahren, können Sie hier auch die aktuelle Höhe korrigieren. Entweder durch Eingabe in Meter/Fuss oder durch Eingabe des Luftdrucks über NN.Angaben zu Luftdruck über NN finden Sie auf den Wetter-Webseiten.
– ALTI-Taste gedrückt halten– Blättern mit BIKE- oder TPC-Taste– Auswahl mit SET-Taste
Einstellungen mit der SET-Taste
– Einstell-Menü öffnen: SET-Taste gedrückt halten, bis sich das Menü öffnet– Blättern Von Logging zu Einstellung: Mit der BIKE-Taste oder der TPC-Taste– Einstell-Menü öffnen: mit der SET-Taste– Blättern im Einstell-Menü bis zur gewünschten Einstellung: mit der BIKE-Taste oder der TPC-Taste– Einstellung öffnen: mit der SET-Taste– Daten verändern: mit der BIKE-Taste oder der TPC-Taste– Einstellung bestätigen: Mit der SET-Taste– Einstell-Menü schließen/zurück zum Funktions-Menu: SET-Taste gedrückt halten– Oder Einstell-Menü schließen/eine Ebene zurück: ALTI-Taste gedrückt halten

DEUTS
CH
1716
BIKETPC
SET
ALTI
Einstell-Menüs
DEUTS
CH
1918
BIKE BIKETPC TPC
SET SET
ALTI ALTI
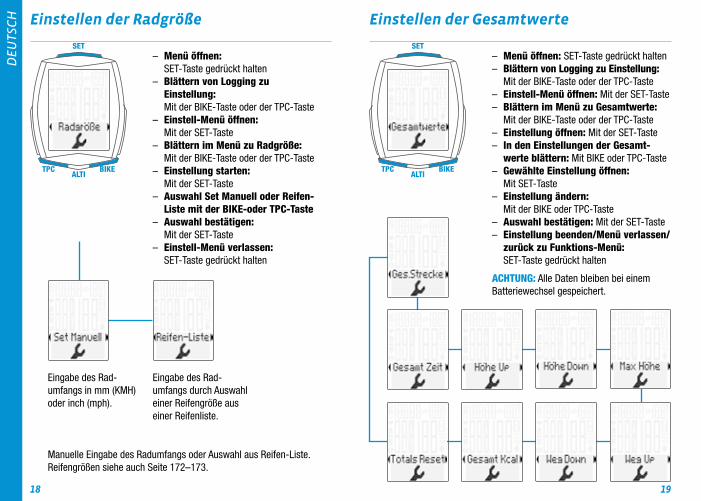
Einstellen der Radgröße Einstellen der Gesamtwerte
Eingabe des Rad-umfangs durch Auswahl einer Reifengröße aus einer Reifenliste.
Eingabe des Rad-umfangs in mm (KMH) oder inch (mph).
Manuelle Eingabe des Radumfangs oder Auswahl aus Reifen-Liste.Reifengrößen siehe auch Seite 172–173.
– Menü öffnen: SET-Taste gedrückt halten– Blättern von Logging zu Einstellung: Mit der BIKE-Taste oder der TPC-Taste– Einstell-Menü öffnen: Mit der SET-Taste– Blättern im Menü zu Radgröße: Mit der BIKE-Taste oder der TPC-Taste– Einstellung starten: Mit der SET-Taste– Auswahl Set Manuell oder Reifen- Liste mit der BIKE-oder TPC-Taste– Auswahl bestätigen: Mit der SET-Taste– Einstell-Menü verlassen: SET-Taste gedrückt halten
– Menü öffnen: SET-Taste gedrückt halten– Blättern von Logging zu Einstellung: Mit der BIKE-Taste oder der TPC-Taste– Einstell-Menü öffnen: Mit der SET-Taste– Blättern im Menü zu Gesamtwerte: Mit der BIKE-Taste oder der TPC-Taste– Einstellung öffnen: Mit der SET-Taste– In den Einstellungen der Gesamt- werte blättern: Mit BIKE oder TPC-Taste– Gewählte Einstellung öffnen: Mit SET-Taste– Einstellung ändern: Mit der BIKE oder TPC-Taste– Auswahl bestätigen: Mit der SET-Taste– Einstellung beenden/Menü verlassen/ zurück zu Funktions-Menü: SET-Taste gedrückt halten
ACHTUNG: Alle Daten bleiben bei einem Batteriewechsel gespeichert.

DEUTS
CH
2120
BIKE
BIKE
TPC
TPC
SETSET
ALTI
Abruf der Gesamtwerte bei aktivierter Puls/Trittfrequenz-Option
– Einstell-Menü öffnen: SET-Taste gedrückt halten, bis sich das Menü öffnet– Blättern von Logging zu Totalwerte: Mit der BIKE-Taste oder der TPC-Taste– Totalwerte öffnen: mit der SET-Taste– Blättern in den Totalwerten: Mit der BIKE-Taste oder der TPC-Taste– Totalwerte verlassen zurück zum Funktionsmenü: SET-Taste gedrückt halten
RESET aller Gesamt-Daten
z. B. zu Beginn der nächsten Saison.
– Einstell-Menü öffnen: SET-Taste gedrückt halten, bis sich das Menü öffnet– Blättern von Logging zu Einstellung: Mit der BIKE-Taste oder der TPC-Taste– Einstell-Menü öffnen: Mit der SET-Taste– Blättern bis Gesamtwerte: Mit der BIKE-Taste oder der TPC-Taste – Einstellung öffnen: Mit der SET-Taste– Blättern bis Totals Reset: Mit der BIKE-Taste oder der TPC-Taste– Totals Reset Öffnen: Mit der SET-Taste– Auswahl: Mit der BIKE-Taste oder der TPC-Taste– Auswahl bestätigen: Mit der SET-Taste– Einstell-Menü verlassen/zurück zu Funktions-Menü: SET-Taste gedrückt halten
ACHTUNG: Dieses RESET kann nicht Rückgängig gemacht werden.

DEUTS
CH
2322
BIKE
BIKETPC
SET
BIKETPC
SET
Tour Daten auf NULL zurückstellen
– BIKE-Taste gedrückt halten– Im Display erscheint der Hinweis: Tour Daten RESET– BIKE-Taste weiter gedrückt halten
Hinweis: Strecke, Fahrzeit, Höhendaten, Kalorien (bei aktivierter Puls-Option) werden zu den Gesamtdaten hinzu gerechnet. Alle Tour Daten werden bei RESET automatisch gespeichert sind dann im Menüpunkt „Logging” einsehbar.
Abruf der Tour Daten aus dem Speicher
– SET-Taste gedrückt halten– Logging mit SET-Taste öffnen– Blättern im Tourdaten-Speicher: Mit BIKE oder TPC-Taste– Öffnen der Logs: Mit SET-Taste– Blättern in den detaillierten Tour-Daten: Mit BIKE- oder TPC-Taste– Tour-Datenspeicher verlassen: SET-Taste gedrückt halten
Hinweis: Mit der optional erhältlichen VDO Dockingstation und der VDO Converter Software können Sie alle Logs auslesen (im .fit - Dateiformat, an Windows PCs und Android Geräten) und speichern.
TRIP SECTION Starten/Stoppen
– START: BIKE + SET-Taste gleichzeitig kurz drücken– STOP: BIKE + SET-Taste gleichzeitig kurz drücken– Re-START: Erneut BIKE + SET-Taste gleichzeitig kurz drücken– RESET: Wenn Funktion „Trip Section” in Display, BIKE-Taste gedrückt halten
ACHTUNG: Bei Geschwindigkeit NULL stoppt der Trip-Section-Zähler automatisch. Wird die Fahrt fortgesetzt, zählt der Trip-Section-Zähler automatisch weiter.
DEUTS
CH
2524
BIKE BIKE
BIKE
TPC TPC
TPC
SET SET
SET
ALTI ALTI
ALTI
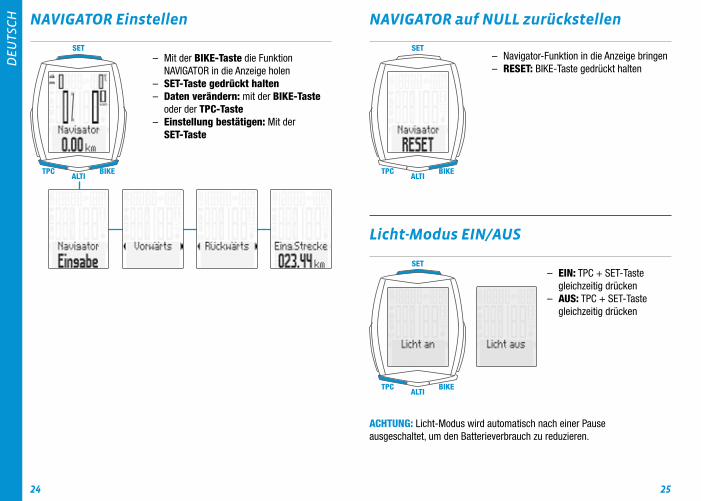
NAVIGATOR Einstellen
– Mit der BIKE-Taste die Funktion NAVIGATOR in die Anzeige holen– SET-Taste gedrückt halten– Daten verändern: mit der BIKE-Taste oder der TPC-Taste– Einstellung bestätigen: Mit der SET-Taste
Licht-Modus EIN/AUS
– EIN: TPC + SET-Taste gleichzeitig drücken– AUS: TPC + SET-Taste gleichzeitig drücken
ACHTUNG: Licht-Modus wird automatisch nach einer Pause ausgeschaltet, um den Batterieverbrauch zu reduzieren.
NAVIGATOR auf NULL zurückstellen
– Navigator-Funktion in die Anzeige bringen– RESET: BIKE-Taste gedrückt halten

DEUTS
CH
2726
BIKETPC
SET
ALTI
PULS-Option/Trittfrequenz-Option aktivieren
ACHTUNG: PULS-Sender Art. Nr. CP3013 und/oder Trittfrequenz-Sender Art. Nr. CP3012 werden zum aktivieren benötigt.
– SET-Taste gedrückt halten– Von Logging zu Einstellung blättern: Mit BIKE- oder PULS-Taste– Mit SET-Taste öffnen– Mit BIKE- oder PULS-Taste blättern zu SENSOR– Mit SET-Taste die Sensor-Auswahl öffnen– Mit BIKE- oder TPC-Taste Sensor auswählen– Mit SET-Taste bestätigen– Einstell-Menü verlassen/zurück zu Funktions-Menü: SET-Taste gedrückt halten
Pairing der Sender
– M6.1 Computer in die Lenkerhalterung setzen– Geschwindigkeits-Anzeige blinkt– Bei aktivierter Puls-Option: Puls-Anzeige blinkt– Bei aktivierter Trittfrequenz-Option: Trittfrequenz-Anzeige blinkt– Blinkende Anzeige: Die Sender werden gesucht– Vorderrad drehen: Geschwindigkeit wird gefunden und angezeigt– Tretkurbel drehen: Trittfrequenz wird gefunden und angezeigt– Puls-Sender anziehen: Puls wird gefunden und angezeigt
ACHTUNG: Wenn während des Pairings Funkstörungen durch andere Störquellen auftreten, dann meldet das Display „Zu viele Signale“.Diese Meldung bestätigen Sie mit einer beliebigen Taste. Danach verlassen Sie bitte den Ort mit den Störungen und gehen an einen anderen Ort.Drehen Sie den Computer aus der Lenkerhalterung. Setzen Sie den Computer nun erneut in die Lenkerhalterung. Der Computer macht nun ein neues Pairing.Mögliche Störquellen:– LED-Beleuchtung– Mobil-Telefon– GPS-Empfänger– WLAN– Diebstahl-Sicherungsanlagen im GeschäftDiese Störquellen können das Pairing stören.
ACHTUNG: Im Sender muss bei der ersten Inbetriebnahme der Schalter für die Raderkennung entweder auf RAD 1 oder RAD 2 eingestellt werden. Nur dann funktioniert auch die automatische Raderkennung.
Taste LANG gedrückt halten, bis LED Blinkt.1 mal blinken grün = Rad 1 ist ausgewählt2 mal blinken rot = Rad 2 ist ausgewählt
DEUTS
CH
2928
Garantiebedingungen
VDO Cycle Parts gewährt für Ihren VDO-Computer eine Garantie von 2 Jahren ab Kaufdatum. Die Garantie erstreckt sich auf Material- und Verarbeitungsfehler am Computer selbst, am Sensor/Sender und an der Lenkerhalterung. Kabel und Batterien sowie Montagematerialien sind von der Garantie ausgeschlossen.
Die Garantie ist nur dann gültig, wenn die betroffenen Teile nicht geöffnet wurden (Ausnahme: Batteriefach des Computers), keine Gewalt angewendet wurde und keine mutwillige Beschädigung vorliegt.
Bitte bewahren Sie den Kaufbeleg sorgfältig auf, da er im Reklamationsfall vorgelegt werden muss. Bei einer berechtigten Reklamation erhalten Sie von uns ein vergleichbares Austauschgerät. Ein Anspruch auf Ersatz des identischen Modells besteht nicht, wenn durch Modellwechsel die Produktion des reklamierten Modells eingestellt wurde.Bitte wenden Sie sich mit allen Reklamationen und Garantieansprüchen an Ihren Fachhändler, bei dem Sie das Gerät gekauft haben. Oder senden Sie Ihre Reklamation direkt an:
Cycle Parts GmbHLe Quartier Hornbach 1367433 Neustadt/Weinstrasse
Für technische Fragen stehen wir Ihnen unter folgender Hotline zur Verfügung:
+49 (0) 63 21- 95 82 7 - 10+49 (0) 63 21- 95 82 7 - 18
Unsere Telefon- Hotline ist für Sie da von9:00-12:00 Uhr, Montags bis [email protected]
Weitere technischen Informationen erhalten Sie unter: www.vdocyclecomputing.com
Im Zuge der Weiterentwicklung behalten wir uns technische Änderungen vor.
EU-Konformitätserklärung
Wir, CYCLE PARTS GmbH, Le Quartier Hornbach 13, D-67433 Neustadt/Weinstr. erklären, dass der VDO Fahrradcomputer mit Funkübertragung VDO M6.1 und alle Sender D3-SPEED, D3-CAD, D3-HR bei bestimmungs- gemäßer Verwendung den grundlegenden Anforderungen gemäß RED Directive 2014/53/EU und der RoHS Directive 2011/65/EU entsprechen.
Die Konformitäts-Erklärung finden Sie unter: ce.cycleparts.de/m6_1

DEUTS
CH
3130
Korrekte Entsorgung dieses Produkts (Elektromüll)
(Anzuwenden in den Ländern der Europäischen Union und anderen europäischen Ländern mit einem separaten Sammelsystem). Die Kennzeichnung auf dem Produkt bzw. auf der dazugehörigen Literatur gibt an, dass es nach seiner Lebensdauer nicht zusam-
men mit dem normalen Haushaltsmüll entsorgt werden darf. Entsorgen Sie dieses Gerät bitte getrennt von anderen Abfällen, um der Umwelt bzw. der menschlichen Gesundheit nicht durch unkontrollierte Müllbeseitigung zu schaden. Recyceln Sie das Gerät, um die nachhaltige Wiederverwertung von stofflichen Ressourcen zu fördern. Private Nutzer sollten den Händler, bei dem das Produkt gekauft wurde, oder die zuständigen Behörden kontaktie-ren, um in Erfahrung zu bringen, wie Sie das Gerät auf umweltfreundliche Weise recyceln können. Gewerbliche Nutzer sollten sich an Ihren Lieferanten wenden und die Bedingungen des Verkaufsvertrags konsultieren. Dieses Produkt darf nicht zusammen mit anderem Gewerbemüll entsorgt werden.
ENGLISH
3332
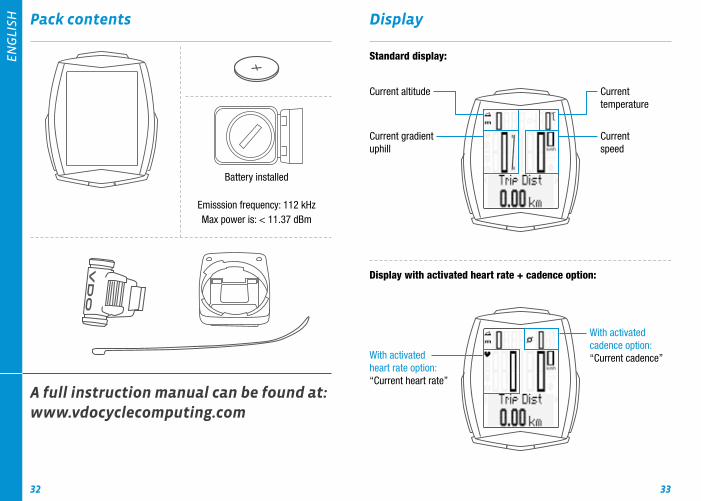
Pack contents
Battery installed
A full instruction manual can be found at: www.vdocyclecomputing.com
Display
Current speed
Current gradient uphill
Current temperature
Current altitude
Standard display:
With activated heart rate option: “Current heart rate”
With activated cadence option: “Current cadence”
Display with activated heart rate + cadence option:
Emisssion frequency: 112 kHzMax power is: < 11.37 dBm
ENGLISH
3534
BIKETPC
SET
ALTI
Icons
Buttons
– ‘KMH/MPH’: shows the selected speed unit– ‘ ’ or ‘ ’: shows the selected bike – bike 1 or bike 2– ‘ ’: comparison of current speed with the average speed– ‘ ’ icon: shows that the trip section counter is active– ‘ ’ icon: shows that the light mode is active – ‘Heart rate arrow’: shows whether the heart rate is above or below the selected training zone– ‘m’ or ‘ft’: indicates the altitude unit in metres or feet– ‘C’ or ‘F’: indicates the temperature in Celsius or Fahrenheit
BIKE button: Access the bike functions
TPC (totals/ heart rate/ cadence) button: Access the total values or the heart rate functions/cadence functions (with activated heart rate/cadence option)
SET button: Press: Scroll backwards through the functions
ALTI button: Access the altitudefunctions
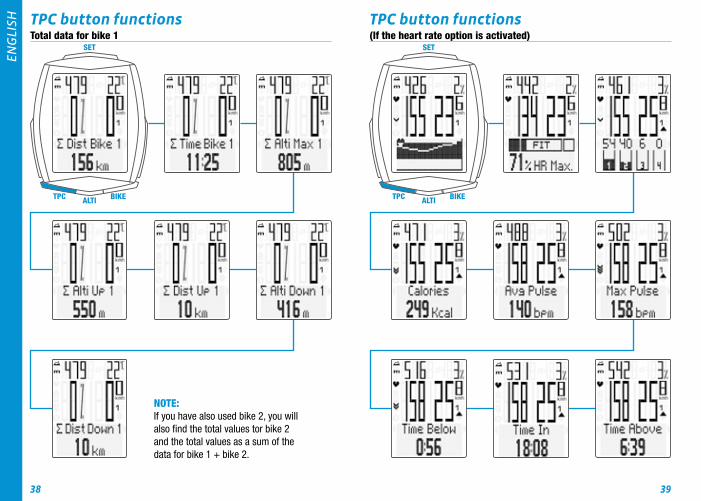
BIKE button functions
With activated cadence option

ENGLISH
3736
BIKETPC
SET
ALTI
ALTI button functions
With activated heart rate + cadence option
ENGLISH
3938
BIKEBIKE TPCTPC
SETSET
ALTIALTI
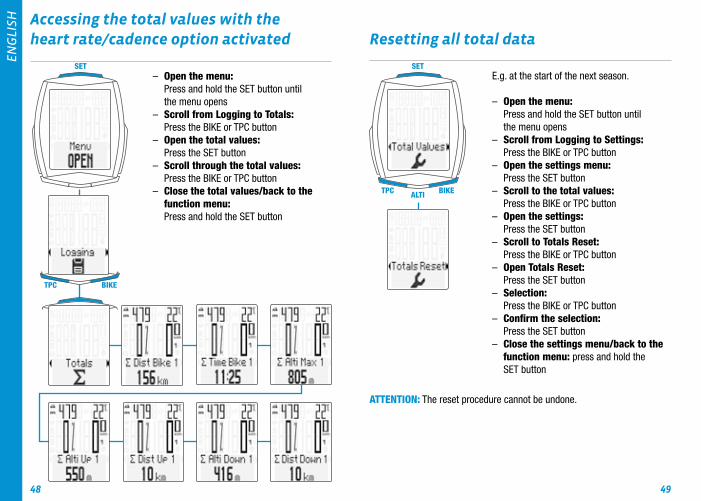
TPC button functionsTotal data for bike 1
NOTE:If you have also used bike 2, you will also find the total values tor bike 2 and the total values as a sum of the data for bike 1 + bike 2.
TPC button functions(If the heart rate option is activated)

ENGLISH
4140
BIKETPC
SET
ALTI
TPC button functions(If the heart rate + cadence option is activated)

ENGLISH
4342
BIKETPC
SET
ALTIBIKETPC
SET
ALTI
Select altitude/recalibrate
Two selectable start altitudes, current altitude can be set in metres/feet or by means of the sea level pressure.
Recalibration:Recalibration must occur before every trip.The M6.1 measures the current air pressure and converts it into an altitude measurement. However, the air pressure changes daily depending on the weather. This leads to a constantly changing current altitude measurement despite your start altitude not having changed.During recalibration, the currently measured air pressure is calculated back to the set start altitude. Following recalibration, the current altitude once again matches the set start altitude.
If you are not setting off from start altitude 1 or 2, you can correct the current altitude here. This can be done by entering either the altitude in metres/feet or the sea level pressure.Details of the sea level pressure can be found on weather websites.
– Press and hold the ALTI button– Scroll by pressing the BIKE or TPC button– Make a selection by pressing the SET button
Settings using the SET button
– Open the settings menu: Press and hold the SET button until the settings menu opens– Scroll from Logging to Settings: Press the BIKE or TPC button– Open the settings menu: press the SET button– Scroll to the desired setting in the settings menu: press the BIKE or TPC button– Open the settings: press the SET button– Change the data: press the BIKE or TPC button– Confirm the setting: press the SET button– Close the settings menu/back to the function menu: press and hold the SET button– Or close the settings menu/back one level: press and hold the ALTI button

ENGLISH
4544
BIKETPC
SET
ALTI
Setting menus

ENGLISH
4746
BIKETPC
SET
ALTIBIKETPC
SET
ALTI
Setting the wheel size Setting the total values
Enter the wheel circum-ference by selecting a tyre size from the tyre list.
Enter the wheel circum-ference in mm (kmh) or inches (mph).
Manually enter the wheel circumference or select from the tyre list.Information on tyre sizes can also be found on page 172–173.
– Open the settings menu: Press and hold the SET button until the settings menu opens– Scroll from Logging to Settings: Press the BIKE or TPC button– Open the settings: press the SET button– Scroll to wheel size in the menu: Press the BIKE or TPC button– Start the setting: Press the SET button– Press the BIKE or TPC button to select “Manual Set” or the tyre list– Confirm your selection: Press the SET button– Close the settings menu/back to the function menu: Press and hold the SET button
– Open the settings menu: Press and hold the SET button until the settings menu opens– Scroll from Logging to Settings: Press the BIKE or TPC button– Open the settings menu: press the SET button– Scroll to Total Values in the menu: Press the BIKE or TPC button– Open the settings: press the SET button– Scroll to the total values in the settings: Press the BIKE or TPC button– Open the selected setting: Press the SET button– Change the setting: Press the BIKE or TPC button– Confirm your selection: Press the SET button– Close the settings menu/back to the function menu: press and hold the SET button
ATTENTION: all data is retained when the battery is replaced.
ENGLISH
4948
BIKETPC
SET
BIKETPC
SET
ALTI
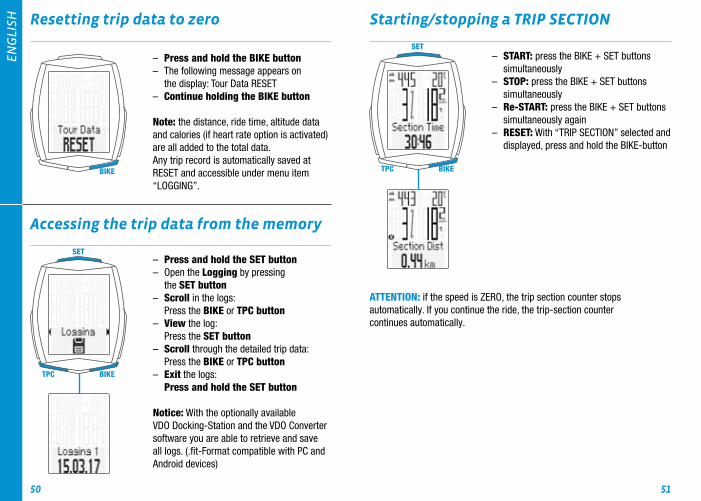
Accessing the total values with the heart rate/cadence option activated
– Open the menu: Press and hold the SET button until the menu opens– Scroll from Logging to Totals: Press the BIKE or TPC button– Open the total values: Press the SET button– Scroll through the total values: Press the BIKE or TPC button– Close the total values/back to the function menu: Press and hold the SET button
Resetting all total data
E.g. at the start of the next season.
– Open the menu: Press and hold the SET button until the menu opens– Scroll from Logging to Settings: Press the BIKE or TPC button– Open the settings menu: Press the SET button– Scroll to the total values: Press the BIKE or TPC button – Open the settings: Press the SET button– Scroll to Totals Reset: Press the BIKE or TPC button– Open Totals Reset: Press the SET button– Selection: Press the BIKE or TPC button– Confirm the selection: Press the SET button– Close the settings menu/back to the function menu: press and hold the SET button
ATTENTION: The reset procedure cannot be undone.
ENGLISH
5150
BIKE
BIKETPC
SET
BIKETPC
SET
Resetting trip data to zero
– Press and hold the BIKE button– The following message appears on the display: Tour Data RESET– Continue holding the BIKE button
Note: the distance, ride time, altitude data and calories (if heart rate option is activated) are all added to the total data. Any trip record is automatically saved at RESET and accessible under menu item “LOGGING”.
Accessing the trip data from the memory
– Press and hold the SET button– Open the Logging by pressing the SET button– Scroll in the logs: Press the BIKE or TPC button– View the log: Press the SET button– Scroll through the detailed trip data: Press the BIKE or TPC button– Exit the logs: Press and hold the SET button
Notice: With the optionally available VDO Docking-Station and the VDO Converter software you are able to retrieve and save all logs. (.fit-Format compatible with PC and Android devices)
Starting/stopping a TRIP SECTION
– START: press the BIKE + SET buttons simultaneously– STOP: press the BIKE + SET buttons simultaneously– Re-START: press the BIKE + SET buttons simultaneously again– RESET: With “TRIP SECTION” selected and displayed, press and hold the BIKE-button
ATTENTION: if the speed is ZERO, the trip section counter stops automatically. If you continue the ride, the trip-section counter continues automatically.
ENGLISH
5352
BIKETPC
SET
ALTIBIKETPC
SET
ALTI
BIKETPC
SET
ALTI
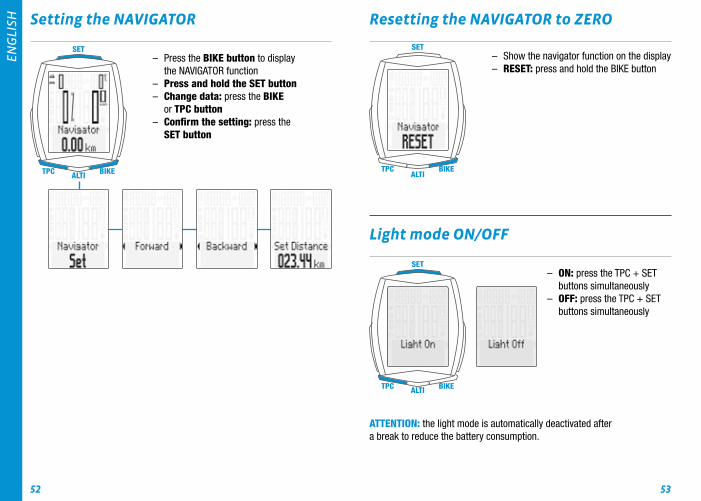
Setting the NAVIGATOR
– Press the BIKE button to display the NAVIGATOR function– Press and hold the SET button– Change data: press the BIKE or TPC button– Confirm the setting: press the SET button
Light mode ON/OFF
Resetting the NAVIGATOR to ZERO
– Show the navigator function on the display– RESET: press and hold the BIKE button
– ON: press the TPC + SET buttons simultaneously– OFF: press the TPC + SET buttons simultaneously
ATTENTION: the light mode is automatically deactivated after a break to reduce the battery consumption.

ENGLISH
5554
BIKETPC
SET
ALTI
Activating the heart rate/cadence option
ATTENTION: heart rate transmitter item no. CP3013 and/or cadence transmitter item no. CP3012 are required for activation.
– Press and hold the SET button– Scroll from Logging to Settings: By pressing the BIKE or TPC button– Open by pressing the SET button– Scroll to SENSOR by pressing the BIKE or TPC button– Open the sensor selection by pressing the SET button– Select the sensor by pressing the BIKE or TPC button– Confirm by pressing the SET button– Close the settings menu/back to the function menu: press and hold the SET button
Pairing the transmitter
– Insert the M6.1 computer into the handlebar bracket– Speed indicator flashes– If the heart rate option is activated: heart rate indicator flashes– If the cadence option is activated: cadence indicator flashes– Flashing display: searching for the transmitter– Spin the front wheel: speed is found and displayed– Spin the foot pedal: cadence is found and displayed– Put on the heart rate transmitter: heart rate is found and displayed
ATTENTION: When other radio signals interfere during the pairing function, the display shows the message “Too Many Signals”.Confirm this message by pressing any key. You will then need to leave this location and move to another location. Untwist the computer from the handlebar bracket. Then reinsert the computer into the handlebar bracket. The computer will now attempt another pairing.Potential source of interference:– LED lights– Mobile telephone– GPS receiver– WLAN– Anti-theft security systems inside the storeThese sources can interfere with the pairing.
ATTENTION: when using the transmitter for the first time, the bike recognition switch must be set to either BIKE 1 or BIKE 2. Only then will the automatic bike recognition work.
Press and HOLD the button until the LED flashes.Green flashes once = bike 1 is selectedRed flashes twice = bike 2 is selected
ENGLISH
5756
Terms of guarantee
VDO Cycle Parts offers a two-year guarantee on your VDO computer, starting from date of purchase. This guarantee covers material and processing defects on the computer itself, the sensor/transmitter and the handlebar bracket. Cables, batteries and mounting materials arenot covered by the guarantee.
The guarantee is only valid if the affected components have not been opened (exception: computer’s battery compartment), no force has been used and there is no sign of wilful damage.
Please store the purchase receipt in a safe place as it must be submitted in the event of a complaint. If your complaint is legitimate, you will receive a comparable replacement device. You are not entitled to a replacement of the identical model if the model in question is no longer in production due to a model change.Please contact the dealer from whom you purchased the device for all complaints and guarantee claims. Alternatively, send your complaint directly to:
Cycle Parts GmbHLe Quartier Hornbach 1367433 Neustadt/Weinstrasse
If you have any technical questions, please do not hesitate to call our hotline on:
+49 (0) 63 21- 95 82 7 - 10+49 (0) 63 21- 95 82 7 - 18
Our telephone hotline is available to assist you9:00-12:00, Monday to [email protected]
Additional technical information is available at: www.vdocyclecomputing.com
We reserve the right to make technical changes in the course of further development.
EU declaration of conformity
We, CYCLE PARTS GmbH, Le Quartier Hornbach 13, D-67433 Neustadt/Weinstr. declare under our responsibility that the product VDO M6.1 and all transmitters D3-SPEED, D3-CAD, D3-HR are compliant with the essential requirements and other relevant requirements of the RED Directive 2014/53/EU and the RoHS Directive 2011/65/EU.
The declaration of conformity can be found at: ce.cycleparts.de/m6_1

ENGLISH
5958
Correct disposal of this product (electrical waste)
(To be used in EU countries and other European countries with a separate collection system). The labelling on the product and the relevant literature indicates that it must not be disposed of with normal household waste at the end of its service life. Please
dispose of this device separately to other waste so as not to harm the environment or human health through uncontrolled waste disposal. Recycle the device to promote the sustainable reuse of material resources. Private users should contact the retailer from whom they purchased the product or the responsible authorities to find out how they can recycle the device in an environment-friendly manner. Commercial users should contact their suppli-ers and consult the conditions of the sales agreement. This product must not be disposed of with other commercial waste.

FRANÇAIS
6160
Contenu de l’emballage
Pile installée
Vous trouverez des instructions détaillées sur le site : www.vdocyclecomputing.com
Ecran
Vitesse actuelle
Montée actuelle
Température actuelle
Altitude actuelle
Affichage standard :
Lorsque l’option “Fréquence cardiaque” est active : “Fréquence cardiaque actuelle”
Lorsque l’option “Cadence” est active : “Cadence actuelle”
Affichage avec les options “Fréquence cardiaque” + “Cadence” activées :
Emisssion frequency: 112 kHzMax power is: < 11.37 dBm

FRANÇAIS
6362
BIKETPC
SET
ALTI
Icônes
Touches
– “KMH / MPH” : affichage de l’unité de vitesse choisie– “ ” ou “ ” : affichage du vélo sélectionné (1 ou 2)– “ ” : comparaison de la vitesse actuelle avec la vitesse moyenne– Icône “ ” : indique lorsque le compteur partiel est actif.– Icône “ ” : indique que le mode d’éclairage est actif. – “Flèches FC” : indiquent si la fréquence cardiaque est supérieure ou inférieure à la zone d’entraînement choisie.– “m” ou “ft” : indique l’unité d’affichage de l’altitude, en mètres ou pieds.– “C” ou “F” : indique l’unité de température, en Celsius ou Fahrenheit.
Touche BIKE : Consultation des fonctions “cycle”
Touche TPC (Valeurs totales / FC / Cadence) : Consultation des données totales ou consultation des fonctions “Fréquence cardiaque” / “Cadence” (lorsque la/les option(s) “Fréquence car-diaque” / “Cadence” est/sont active(s))
Touche SET : Pression courte : Retour en arrière dans les fonctions
Touche ALTI : Consultation des fonctions “Altitude”
Fonctions de la touche BIKE
Lorsque l’option “Cadence” est active

FRANÇAIS
6564
BIKETPC
SET
ALTI
Fonctions de la touche ALTI
Lorsque l’option “FC” + “Cadence” est active
FRANÇAIS
6766
BIKE BIKETPC TPC
SET SET
ALTI ALTI
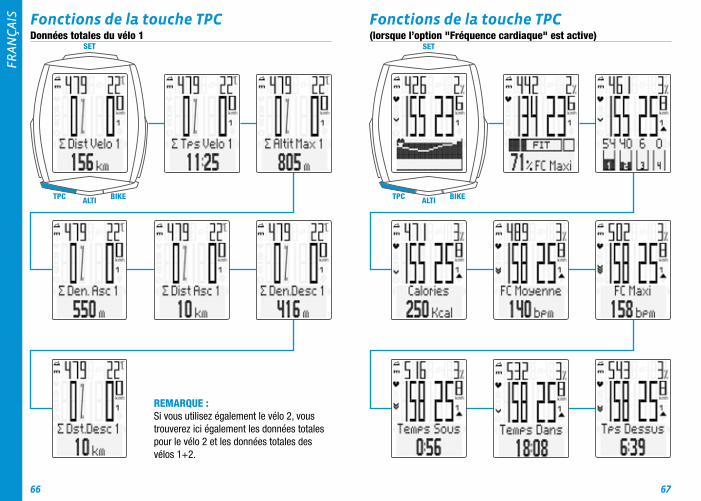
Fonctions de la touche TPCDonnées totales du vélo 1
REMARQUE :Si vous utilisez également le vélo 2, vous trouverez ici également les données totales pour le vélo 2 et les données totales des vélos 1+2.
Fonctions de la touche TPC(lorsque l’option "Fréquence cardiaque" est active)

FRANÇAIS
6968
BIKETPC
SET
ALTI
Fonctions de la touche TPC(lorsque les options “Fréquence cardiaque” + “Cadence” sont actives)

FRANÇAIS
7170
BIKE BIKETPC TPC
SET SET
ALTI ALTI
Sélection de l’altitude / Recalibrage
2 altitudes de départ au choix, altitude actuelle réglable en mètres/pieds ou via la pression atmosphérique au-dessus du niveau de la mer.
Recalibrage :Un recalibrage doit être effectué avant chaque trajet.La pression atmosphérique actuelle est mesurée par le M6.1 et convertie en une valeur d’altitude. En fonction de la météo, la pression atmosphérique change cependant chaque jour. L’affichage de l’altitude actuelle change donc en permanence. Votre altitude de départ reste cependant toujours la même.Le recalibrage permet de recalculer la pression atmosphérique actuelle mesurée en fonction de l’altitude de départ réglée. Après le recalibrage, l'altitude actuelle correspond à nouveau à l’altitude de départ réglée.
Si vous ne démarrez ni de l’altitude de départ 1, ni de l’altitude de départ 2, vous pouvez également corriger l’altitude actuelle ici. Ceci est possible en saisissant l’altitude en mètres/pieds ou la pression atmosphérique au-dessus du niveau de la mer. Vous trouverez des informations relatives à la pression atmosphérique au-dessus du niveau de la mer sur les sites météo.
– Maintenir la touche ALTI enfoncée– Faire défiler au moyen des touches BIKE ou TPC– Sélectionner avec la touche SET
Réglages avec la touche SET
– Ouverture du menu : maintenir la touche SET enfoncée jusqu'à ce que le menu s'ouvre.– Passage de “Logging” à “Réglages” : au moyen des touches BIKE ou TPC.– Ouverture du menu “Réglages” : au moyen de la touche SET– Défilement du menu “Réglages” jusqu'au réglage souhaité : au moyen des touches BIKE ou TPC.– Ouverture d’un réglage : avec la touche SET.– Modification des données : au moyen des touches BIKE ou TPC.– Confirmation d’un réglage : avec la touche SET.– Fermeture du menu “Réglages”: maintenir la touche SET enfoncée.– Ou Fermeture du menu “Réglages” / Retour d’un niveau en arrière : maintenir la touche ALTI enfoncée.
FRANÇAIS
7372
BIKETPC
SET
ALTI
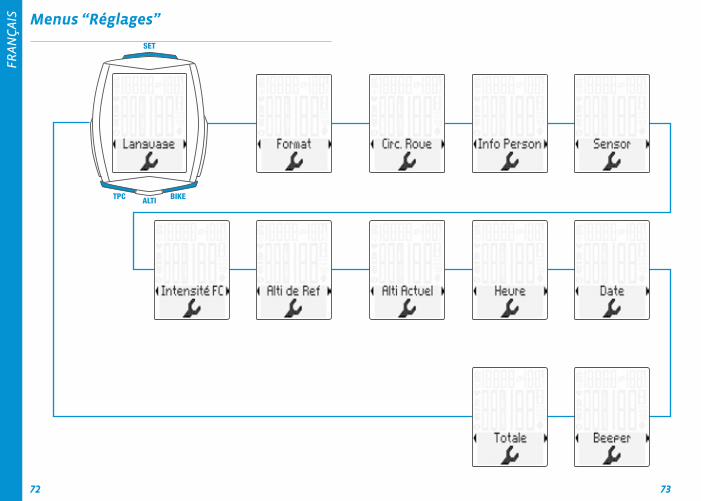
Menus “Réglages”
FRANÇAIS
7574
BIKETPC
SET
ALTI BIKETPC
SET
ALTI
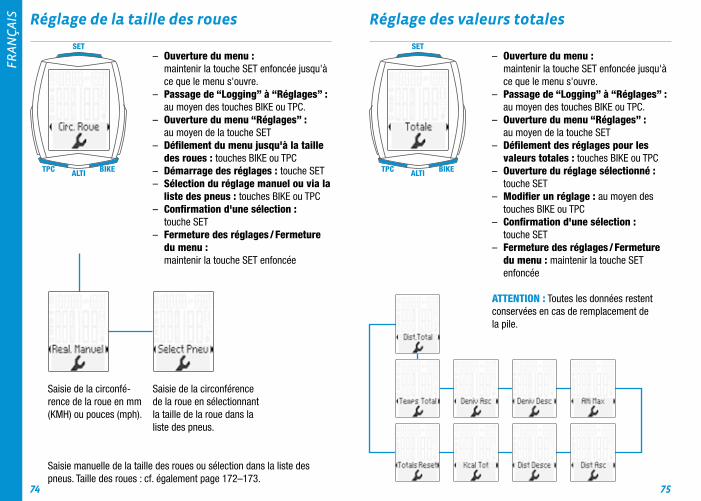
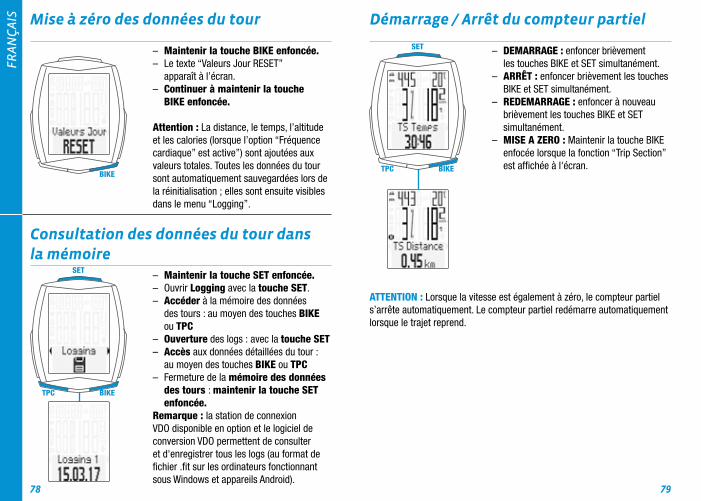
Réglage de la taille des roues Réglage des valeurs totales
Saisie de la circonférence de la roue en sélectionnant la taille de la roue dans la liste des pneus.
Saisie de la circonfé-rence de la roue en mm (KMH) ou pouces (mph).
Saisie manuelle de la taille des roues ou sélection dans la liste des pneus. Taille des roues : cf. également page 172–173.
– Ouverture du menu : maintenir la touche SET enfoncée jusqu'à ce que le menu s'ouvre.– Passage de “Logging” à “Réglages” : au moyen des touches BIKE ou TPC.– Ouverture du menu “Réglages” : au moyen de la touche SET– Défilement du menu jusqu'à la taille des roues : touches BIKE ou TPC– Démarrage des réglages : touche SET– Sélection du réglage manuel ou via la liste des pneus : touches BIKE ou TPC– Confirmation d'une sélection : touche SET– Fermeture des réglages / Fermeture du menu : maintenir la touche SET enfoncée
– Ouverture du menu : maintenir la touche SET enfoncée jusqu'à ce que le menu s'ouvre.– Passage de “Logging” à “Réglages” : au moyen des touches BIKE ou TPC.– Ouverture du menu “Réglages” : au moyen de la touche SET– Défilement des réglages pour les valeurs totales : touches BIKE ou TPC– Ouverture du réglage sélectionné : touche SET– Modifier un réglage : au moyen des touches BIKE ou TPC– Confirmation d'une sélection : touche SET– Fermeture des réglages / Fermeture du menu : maintenir la touche SET enfoncée
ATTENTION : Toutes les données restent conservées en cas de remplacement de la pile.

FRANÇAIS
7776
BIKETPC
SET
BIKETPC
SET
ALTI
Consultation des valeurs totales lorsque les options “Fréquence cardiaque” / “Cadence” sont actives
– Ouverture du menu : maintenir la touche SET enfoncée jusqu'à ce que le menu s'ouvre.– Passage de “Logging” à “Valeurs totales” : au moyen des touches BIKE ou TPC.– Ouverture des valeurs totales : avec la touche SET.– Consultation des valeurs totales : au moyen des touches BIKE ou TPC.– Fermeture des valeurs totales : maintenir la touche SET enfoncée.
MISE A ZERO de toutes les données totales
P.ex. au début de la saison suivante.
– Ouverture du menu : maintenir la touche SET enfoncée jusqu'à ce que le menu s'ouvre.– Passage de “Logging” à “Réglages” : au moyen des touches BIKE ou TPC.– Ouverture du menu “Réglages” : avec la touche SET.– Accès aux valeurs totale : au moyen des touches BIKE ou TPC. – Ouverture d’un réglage : avec la touche SET.– Accès à la mise à zéro des valeurs totales (Totals Reset) : au moyen des touches BIKE ou TPC.– Ouverture de la mise à zéro des valeurs totales : avec la touche SET.– Sélection : au moyen des touches BIKE ou TPC.– Confirmation d'une sélection : avec la touche SET.– Fermeture des réglages / Fermeture du menu : maintenir la touche SET enfoncée
ATTENTION : Il est IMPOSSIBLE d’annuler cette mise à zéro.
FRANÇAIS
7978
BIKE
BIKETPC
SET
BIKETPC
SET – DEMARRAGE : enfoncer brièvement les touches BIKE et SET simultanément.– ARRÊT : enfoncer brièvement les touches BIKE et SET simultanément.– REDEMARRAGE : enfoncer à nouveau brièvement les touches BIKE et SET simultanément.– MISE A ZERO : Maintenir la touche BIKE enfocée lorsque la fonction “Trip Section” est affichée à l'écran.
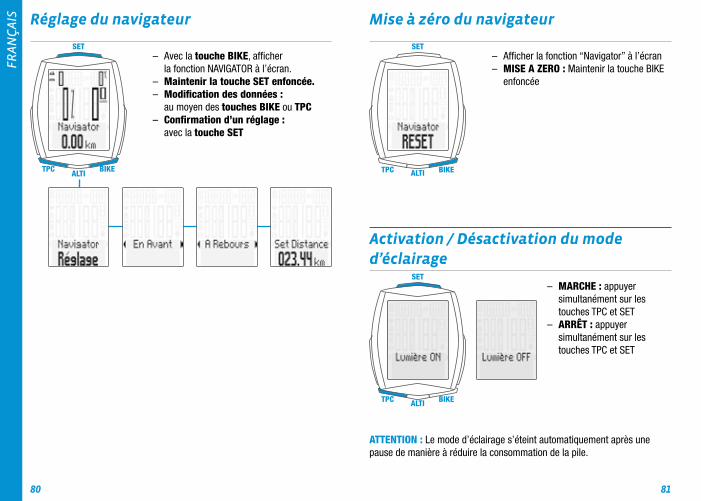
Mise à zéro des données du tour
– Maintenir la touche BIKE enfoncée.– Le texte “Valeurs Jour RESET” apparaît à l’écran.– Continuer à maintenir la touche BIKE enfoncée.
Attention : La distance, le temps, l’altitude et les calories (lorsque l’option “Fréquence cardiaque” est active”) sont ajoutées aux valeurs totales. Toutes les données du tour sont automatiquement sauvegardées lors de la réinitialisation ; elles sont ensuite visibles dans le menu “Logging”.
Consultation des données du tour dans la mémoire
– Maintenir la touche SET enfoncée.– Ouvrir Logging avec la touche SET.– Accéder à la mémoire des données des tours : au moyen des touches BIKE ou TPC– Ouverture des logs : avec la touche SET– Accès aux données détaillées du tour : au moyen des touches BIKE ou TPC– Fermeture de la mémoire des données des tours : maintenir la touche SET enfoncée.Remarque : la station de connexion VDO disponible en option et le logiciel de conversion VDO permettent de consulter et d'enregistrer tous les logs (au format de fichier .fit sur les ordinateurs fonctionnant sous Windows et appareils Android).
Démarrage / Arrêt du compteur partiel
ATTENTION : Lorsque la vitesse est également à zéro, le compteur partiel s’arrête automatiquement. Le compteur partiel redémarre automatiquement lorsque le trajet reprend.
FRANÇAIS
8180
BIKETPC
SET
ALTI BIKETPC
SET
ALTI
BIKETPC
SET
ALTI
Réglage du navigateur
– Avec la touche BIKE, afficher la fonction NAVIGATOR à l’écran.– Maintenir la touche SET enfoncée.– Modification des données : au moyen des touches BIKE ou TPC– Confirmation d’un réglage : avec la touche SET
Activation / Désactivation du mode d’éclairage
ATTENTION : Le mode d’éclairage s’éteint automatiquement après une pause de manière à réduire la consommation de la pile.
Mise à zéro du navigateur
– Afficher la fonction “Navigator” à l’écran– MISE A ZERO : Maintenir la touche BIKE enfoncée
– MARCHE : appuyer simultanément sur les touches TPC et SET– ARRÊT : appuyer simultanément sur les touches TPC et SET

FRANÇAIS
8382
BIKETPC
SET
ALTI
Activation des options “Fréquence cardiaque” / “Cadence”
ATTENTION : L’émetteur de fréquence cardiaque (n° art. CP3013) et/ou l’émetteur de cadence (n° art. CP3012) sont nécessaires pour l’activation.
– Maintenir la touche SET enfoncée.– Passage de “Logging” à “Réglages” : au moyen des touches BIKE ou TPC.– Ouverture avec la touche SET.– Accès Sensor avec les touches BIKE ou TPC.– Ouverture de la sélection de Sensor (l emetteur) avec la touche SET.– Sélection de l’émetteur au moyen des touches BIKE ou TPC.– Confirmation avec la touche SET.– Fermeture des réglages / Fermeture du menu : maintenir la touche SET enfoncée
Couplage des émetteurs
– Placer le compteur M6.1 dans le support du guidon.– L’affichage de la vitesse clignote.– Lorsque l’option “Fréquence cardiaque” est active : l’affichage de la fréquence cardiaque clignote.– Lorsque l’option “Cadence” est active : l’affichage de la cadence clignote.– Affichage clignotant : recherche de l’émetteur.– Faire tourner la roue avant : la vitesse est trouvée et s’affiche.– Faire tourner le pédalier : la cadence est trouvée et s’affiche.– Installer l’émetteur de fréquence cardiaque : la fréquence cardiaque est trouvée et s’affiche.ATTENTION : Si des interférences sont produites par d'autres sources de parasites lors du couplage, l'écran indique “Trop de signaux”. Ce message peut être confirmé avec n'importe quelle touche. Veuillez ensuite quitter le lieu des interférences et vous déplacer à un autre endroit. Retirez le compteur du support du guidon en le faisant tourner. Placez à nouveau le compteur dans le support du guidon. Le compteur procède à un nouveau couplage. Sources de parasites possibles :– Eclairage LED– Téléphone mobile– Récepteur GPS– WLAN– Systèmes antivol des magasinsCes sources de parasites peuvent gêner le couplage.ATTENTION : Dans l'émetteur, l'interrupteur de détection du vélo doit être réglé sur VELO 1 ou VELO 2 lors de la première mise en service. C'est la seule façon pour que le système de détection automatique du vélo fonctionne.
MAINTENIR la touche enfoncée jusqu'à ce que la LED clignote.1 clignotement vert = vélo 1 sélectionné2 clignotements rouges = vélo 2 sélectionné
FRANÇAIS
8584
Conditions de garantie
VDO Cycle Part offre une garantie de 2 ans à compter de la date d’achat pour votre compteur VDO. La garantie porte sur les défaillances du matériel ou les erreurs de traitement sur le compteur lui-même, sur le capteur/l’émetteur ou sur le support pour guidon. Les câbles et piles, ainsi que les matériaux de montage ne sont pas couverts par la garantie.
La droit à garantie n’est valable que lorsque les pièces concernées n’ont pas été ouvertes (exceptions : compartiment à pile du compteur), lorsqu’il n’a pas été fait usage de la force et lorsqu'aucun dégât intentionnel n’a été causé.
Veuillez conserver soigneusement la preuve d’achat ; celle-ci doit être pré-sentée en cas de réclamation. En cas de réclamation fondée, vous recevrez un appareil de rechange comparable. Le remplacement par un modèle identique ne peut être exigé lorsque la production du modèle faisant l’objet de la réclamation a été stoppée par un changement de modèle.Veuillez vous adresser à votre revendeur pour toute réclamation ou exercice du droit à la garantie. Ou envoyez votre réclamation directement à :
Cycle Parts GmbHLe Quartier Hornbach 1367433 Neustadt/Weinstrasse
Notre hotline est à votre disposition pour toute questions technique :
+49 (0) 63 21- 95 82 7 - 10+49 (0) 63 21- 95 82 7 - 18
Notre ligne d’assistance téléphonique est là pour vous de9 à 12 heures, du lundi au [email protected]
Vous trouverez de plus amples informations techniques à l’adresse : www.vdocyclecomputing.com
Sous réserve de modifications techniques occasionnées par l’amélioration du produit.
Déclaration de conformité UE
Nous, CYCLE PARTS GmbH, Le Quartier Hornbach 13, D-67433 Neustadt/Weinstr., déclarons que les compteurs cycle VDO avec transmission radio VDO M6.1 et tous les émetteurs D3-SPEED, D3-CAD, D3-HR satisfont aux exigences fondamentales de RED Directive 2014/53/EU et RoHS Directive 2011/65/EU en cas d'utilisation conforme aux dispositions.
Vous trouverez la déclaration de conformité à l’adresse : ce.cycleparts.de/m6_1

FRANÇAIS
8786
Elimination correcte de ce produit (déchets électriques)
(S’applique dans les pays de l’Union Européenne, ainsi que dans les autres pays européens présentant un système de collecte séparé). Le marquage du produit ou des documents correspon-dants indique que celui-ci ne peut pas être éliminé avec les
déchets ménagers normaux à la fin de sa durée de vie. Eliminez cet appareil séparément de manière à ne pas nuire à l’environnement ou à la santé en raison d’une élimination incontrôlée des déchets. Recyclez l’appareil de ma-nière à encourage une réutilisation durable des ressources. Les utilisateurs privés doivent contacter le revendeur auquel ils ont acheté le produit ou les autorités compétentes de manière à savoir comment ils peuvent recycler l’appareil dans le respect de l’environnement. Les utilisateurs professionnels doivent s’adresser à leur fournisseur et consulter les conditions reprises dans le contrat de vente. Ce produit ne peut pas être éliminé avec les autres déchets commerciaux.

ITALIANO
8988
Contenuto della confezione
Batteria integrata
Per istruzioni più dettagliate consultare il sito: www.vdocyclecomputing.com
Display
Velocità attuale
Salita attuale
Temperatura corrente
Altezza corrente
Visualizzazione standard:
Con l'opzione polso attivata: “Polso attuale”
Con l'opzione cadenza della pedalata attivata: “Cadenza della pedalata attuale”
Visualizzazione con opzione polso + cadenza della pedalata attivata:
Emisssion frequency: 112 kHzMax power is: < 11.37 dBm
ITALIANO
9190
BIKETPC
SET
ALTI
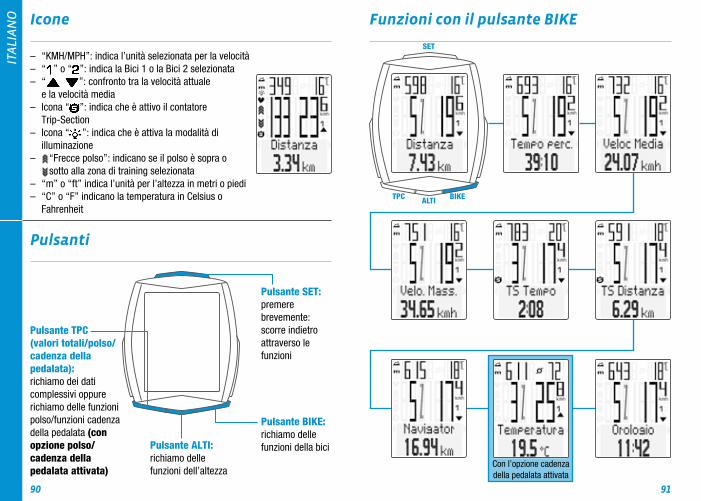
Icone
Pulsanti
– “KMH/MPH”: indica l’unità selezionata per la velocità– “ ” o “ ”: indica la Bici 1 o la Bici 2 selezionata– “ ”: confronto tra la velocità attuale e la velocità media– Icona “ ”: indica che è attivo il contatore Trip-Section– Icona “ ”: indica che è attiva la modalità di illuminazione – “Frecce polso”: indicano se il polso è sopra o sotto alla zona di training selezionata– “m” o “ft” indica l’unità per l’altezza in metri o piedi– “C” o “F” indicano la temperatura in Celsius o Fahrenheit
Pulsante BIKE: richiamo delle funzioni della bici
Pulsante TPC (valori totali/polso/ cadenza della pedalata): richiamo dei dati complessivi oppure richiamo delle funzioni polso/funzioni cadenza della pedalata (con opzione polso/cadenza della pedalata attivata)
Pulsante SET: premere brevemente: scorre indietro attraverso le funzioni
Pulsante ALTI: richiamo delle funzioni dell’altezza
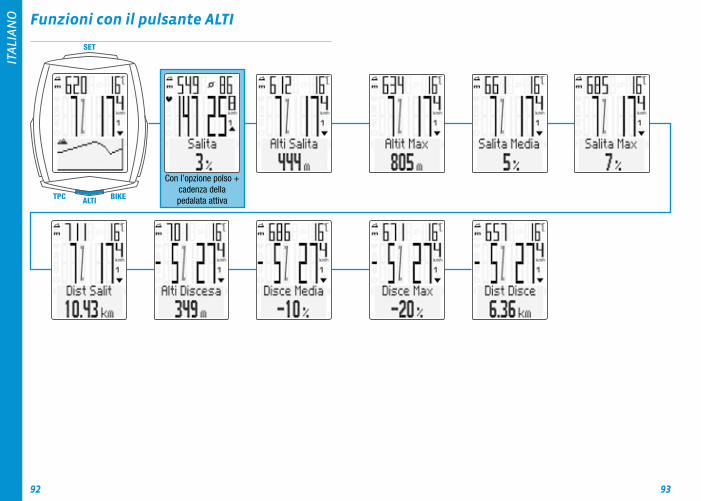
Funzioni con il pulsante BIKE
Con l’opzione cadenza della pedalata attivata
ITALIANO
9392
BIKETPC
SET
ALTI
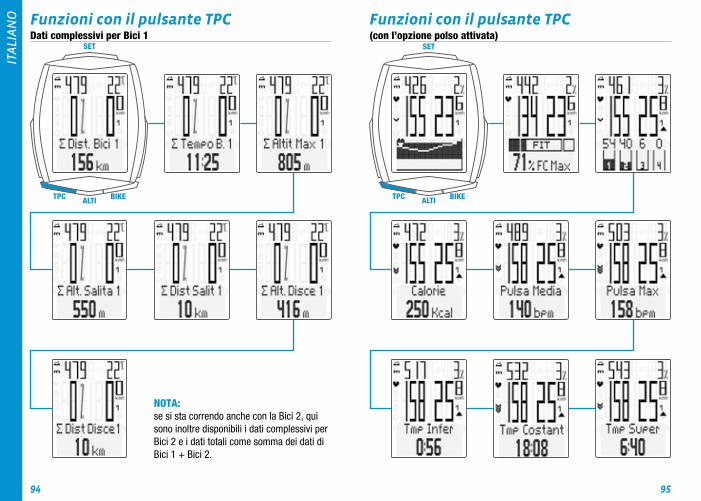
Funzioni con il pulsante ALTI
Con l’opzione polso + cadenza della pedalata attiva
ITALIANO
9594
BIKE BIKETPC TPC
SET SET
ALTI ALTI
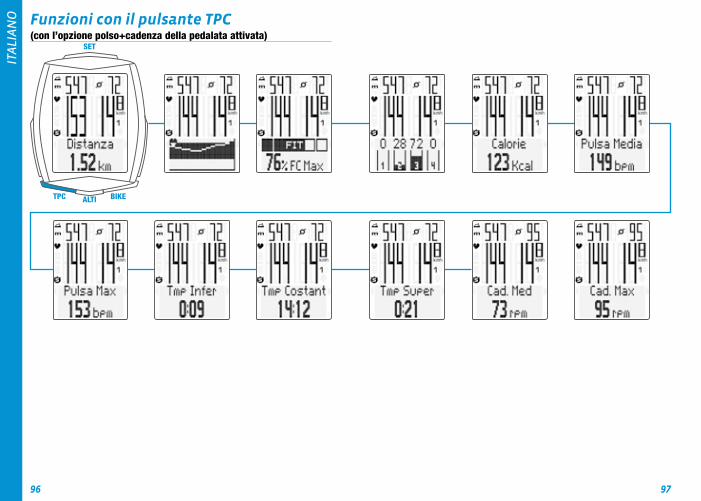
Funzioni con il pulsante TPCDati complessivi per Bici 1
NOTA:se si sta correndo anche con la Bici 2, qui sono inoltre disponibili i dati complessivi per Bici 2 e i dati totali come somma dei dati di Bici 1 + Bici 2.
Funzioni con il pulsante TPC(con l’opzione polso attivata)
ITALIANO
9796
BIKETPC
SET
ALTI
Funzioni con il pulsante TPC(con l’opzione polso+cadenza della pedalata attivata)

ITALIANO
9998
BIKEBIKE TPCTPC
SETSET
ALTIALTI
Selezione dell'altezza/ricalibratura
2 altezze di partenza selezionabili, altezza attuale impostabile in metri/piedi oppure mediante pressione dell’aria s.l.m.
Ricalibrare:prima di ogni partenza è necessario eseguire una ricalibratura.La pressione dell’aria attuale viene misurata dall’M6.1 e convertita in una rappresentazione dell’altezza. Le condizioni atmosferiche modificano però giornalmente tale pressione. Questo provoca una rappresentazione dell’altezza attuale che cambia costantemente. L’altezza di partenza resta però invariata.Al momento della ricalibratura, la pressione dell’aria misurata attualmente viene ricalcolata in base all’altezza di partenza impostata. Successivamente l’altezza attuale sarà nuovamente in linea con l’altezza di partenza impostata.
Se non si parte dall’altezza di partenza 1 o 2, è possibile correggere l’altezza attuale. L'immissione può essere fatta in metri/piedi oppure mediante inserimento della pressione dell’aria s.l.m. Le indicazioni relative alla pressione dell'aria s.l.m. sono disponibili sui diversi siti web del meteo.
– Tenere premuto il pulsante ALTI– Sfogliare con il pulsante BIKE o TPC– Selezionare con il pulsante SET
Impostazioni con il pulsante SET
– Aprire il menu: Tenere premuto il pulsante SET fino a quando si apre il menu– Scorrere da Logging a Impostazioni: usare il pulsante BIKE o TPC– Aprire il menu di impostazione: usare il pulsante SET– Scorrere nel menu di impostazione fino all'impostazione desiderata: usare il pulsante BIKE o TPC– Aprire le impostazioni: usare il pulsante SET– Modificare i dati: usare il pulsante BIKE o TPC– Confermare le impostazioni: usare il pulsante SET– Chiudere il menu di impostazione/tornare al menu di funzionamento: tenere premuto il pulsante SET– Oppure Chiudere il menu di impostazione/risalire di un livello: tenere premuto il pulsante ALTI
ITALIANO
101100
BIKETPC
SET
ALTI
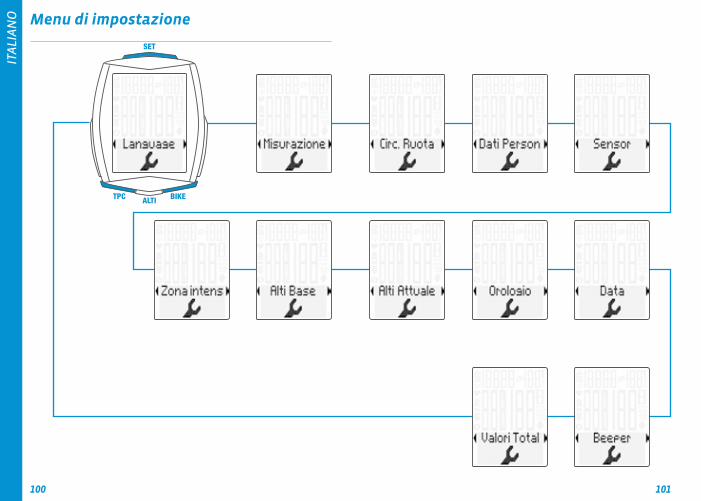
Menu di impostazione

ITALIANO
103102
BIKETPC
SET
ALTI BIKETPC
SET
ALTI
Impostazione della dimensione della ruota Impostazione dei valori complessivi
Immissione della circonferenza della ruota selezionando una dimensione da un apposito elenco.
Immissione della circonferenza della ruota in mm (KMH) o pollici (mph).
Immissione manuale della circonferenza della ruota oppure selezione da un elenco corrispondente. Per le dimensioni delle ruote vedere anche pagina 172–173.
– Aprire il menu: Tenere premuto il pulsante SET fino a quando si apre il menu– Scorrere da Logging a Impostazioni: usare il pulsante BIKE o TPC– Aprire il menu di impostazione: usare il pulsante SET– Scorrere nel menu fino alla dimensione della ruota: usare il pulsante BIKE o TPC– Avviare l'impostazione: usare il pulsante SET– Selezione Imp. Manual o elenco ruote con il pulsante BIKE o TPC– Confermare la selezione: usare il pulsante SET– Terminare l'impostazione/uscire dal menu/tornare al menu di funziona- mento: tenere premuto il pulsante SET
– Aprire il menu: Tenere premuto il pulsante SET fino a quando si apre il menu– Scorrere da Logging a Impostazioni: usare il pulsante BIKE o TPC– Aprire il menu di impostazione: usare il pulsante SET– Scorrere nel menu fino alla Valori Total: usare il pulsante BIKE o TPC– Avviare l'impostazione: usare il pulsante SET– Scorrere nelle impostazioni dei Valori Total: usare il pulsante BIKE o TPC– Aprire l'impostazione selezionata: usare il pulsante SET– Modificare l'impostazione: usare il pulsante BIKE o TPC– Confermare la selezione: usare il pulsante SET– Terminare l'impostazione/uscire dal menu/tornare al menu di funziona- mento: tenere premuto il pulsante SET
ATTENZIONE: tutti i dati restano memorizzati in caso di sostituzione della batteria.

ITALIANO
105104
BIKETPC
SET
BIKETPC
SET
ALTI
Richiamo dei valori complessivi in caso di opzione polso/cadenza della pedalata attivata
– Aprire il menu: tenere premuto il pulsante SET fino a quando si apre il menu– Scorrere da Logging a Dati Totale: usare il pulsante BIKE o TPC– Aprire i valori totali: usare il pulsante SET– Sfogliare i valori totali: usare il pulsante BIKE o TPC– Uscire dai valori totali e tornare al menu di funzionamento: tenere premuto il pulsante SET
RESET di tutti i dati complessivi
Ad es. all’inizio della stagione successiva.
– Aprire il menu: tenere premuto il pulsante SET fino a quando si apre il menu– Scorrere da Logging a Impostazioni: usare il pulsante BIKE o TPC– Aprire il menu di impostazione: usare il pulsante SET– Scorrere fino ai Valori Total: usare il pulsante BIKE o TPC – Aprire le impostazioni: usare il pulsante SET– Scorrere fino a Totals Reset: usare il pulsante BIKE o TPC– Aprire Totals Reset: usare il pulsante SET– Selezione: usare il pulsante BIKE o TPC– Confermare la selezione: usare il pulsante SET– Terminare l'impostazione/uscire dal menu/tornare al menu di funziona- mento: tenere premuto il pulsante SET
ATTENZIONE: questo RESET non può essere annullato.

ITALIANO
107106
BIKE
BIKETPC
SET
BIKETPC
SET
ATTENZIONE: in caso di velocità pari a ZERO, il contatore Trip-Section si arresta automaticamente. Quando si prosegue la corsa, il contatore Trip-Section Sriparte automaticamente.
Azzeramento dei dati del percorso
– Tenere premuto il pulsante BIKE– Sul display appare la nota: Dati Viaggio RESET– Tenere premuto il pulsante BIKE
Nota: percorso, tempo di corsa, dati sull’altezza, calorie (in caso di opzione polso attivata) rientrano nei dati totali. Con RESET tutti i dati del percorso vengono memorizzati automaticamente e sono visualizzabili alla voce di menu “Logging”.
Richiamo dei dati del percorso dalla memoria
– Tenere premuto il pulsante SET
– Aprire Logging con il pulsante SET– Sfogliare la memoria dati del percorso: usare il pulsante BIKE o TPC– Apertura dei log: usare il pulsante SET– Scorrere nei dati del percorso dettagliati: usare il pulsante BIKE o TPC– Uscire da memoria dati percorso: tenere premuto il pulsante SET
Indicazione: con la VDO docking station opzionale e il software VDO Converter è possibile selezionare tutti i log (in formato .fit, su PC Windows e dispositivi Android) e memorizzarli.
Avvio/arresto TRIP SECTION
– START: tenere premuti brevemente il pulsante BIKE + SET– STOP: tenere premuti brevemente il pulsante BIKE + SET– Re-START: tenere premuti di nuovo brevemente il pulsante BIKE + SET– RESET: Quando sul display appare la funzione “Trip Section”, tenere premuto il pulsante BIKE.
ITALIANO
109108
BIKETPC
SET
ALTI BIKETPC
SET
ALTI
BIKETPC
SET
ALTI
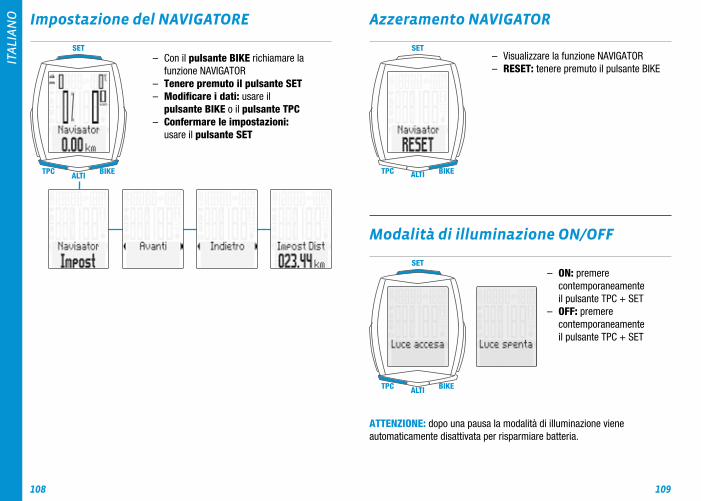
Impostazione del NAVIGATORE
– Con il pulsante BIKE richiamare la funzione NAVIGATOR– Tenere premuto il pulsante SET– Modificare i dati: usare il pulsante BIKE o il pulsante TPC– Confermare le impostazioni: usare il pulsante SET
Modalità di illuminazione ON/OFF
Azzeramento NAVIGATOR
– Visualizzare la funzione NAVIGATOR– RESET: tenere premuto il pulsante BIKE
– ON: premere contemporaneamente il pulsante TPC + SET– OFF: premere contemporaneamente il pulsante TPC + SET
ATTENZIONE: dopo una pausa la modalità di illuminazione viene automaticamente disattivata per risparmiare batteria.

ITALIANO
111110
BIKETPC
SET
ALTI
Attivazione dell'opzione POLSO/l'opzione cadenza della pedalata
ATTENZIONE: il sensore POLSO cod. art. CP3013 e/o il sensore cadenza della pedalata cod. art. CP3012 sono necessari per l’attivazione.
– Tenere premuto il pulsante SET– Scorrere da Logging a Impostazioni: usare il pulsante BIKE o TPC– Aprire con il pulsante SET– Con il pulsante BIKE o TPC scorrere fino a SENSORE– Con il pulsante SET aprire la selezione del sensore– Con il pulsante BIKE o TPC selezionare il sensore– Confermare con il pulsante SET– Terminare l'impostazione/uscire dal menu/tornare al menu di funziona- mento: tenere premuto il pulsante SET
Accoppiamento del sensore
– Posizionare il computer M6.1 nel supporto per manubrio– L’indicazione della velocità lampeggia– In caso di opzione polso attivata: l’indicazione del polso lampeggia– In caso di opzione cadenza della pedalata attivata: l’indicazione della cadenza della pedalata lampeggia– Visualizzazione lampeggiante: viene ricercato il sensore– Ruotare la ruota anteriore: viene rilevata e visualizzata la velocità– Ruotare la pedivella: viene rilevata e visualizzata la cadenza della pedalata– Indossare il sensore polso: viene rilevato e visualizzato il polsoATTENZIONE: se durante il pairing per la radiotrasmissione si attraversano zone di interferenza, il display mostra il messaggio “Troppi signale”.Confermare questo messaggio con un pulsante qualsiasi. Successivamente, allontanarsi dal luogo dove si verifica l‘interferenza. Inserire il computer nel supporto manubrio. Posizionare nuovamente il computer nel supporto manubrio. Il computer ora esegue un nuovo pairing.Possibili fonti di interferenza:– luci a LED– telefono cellulare– ricevitore GPS– WLAN– dispositivi antifurto in azioneQueste fonti possono interferire con il pairing.ATTENZIONE: alla prima messa in servizio è necessario impostare l'interruttore nel sensore su BICI 1 o BICI 2 per il riconoscimento della bici. Solo successivamente sarà in funzione il riconoscimento automatico della bici.
Tenere premuto A LUNGO il tasto, finché il LED lampeggia.Lampeggia verde 1 volta = Bici 1 selezionataLampeggia rosso 2 volte = Bici 2 selezionata
ITALIANO
113112
Condizioni di garanzia
Per il vostro computer VDO, VDO Cycle Parts offre una garanzia di 2 anni dalla data d'acquisto. La garanzia si estende ai difetti di materiali e di fabbricazione del computer, del sensore e del supporto per manubrio. I cavi e le batterie, nonché il materiale per il montaggio, sono esclusi dalla garanzia.
La garanzia è valida soltanto quando le parti interessate non sono state aperte (eccezione: vano batteria del computer), non è stata esercitata forza e non è presente alcun danno intenzionale.
Conservare con cura la ricevuta d’acquisto in quanto è necessario esibirla in caso di reclamo. Se il reclamo viene accettato, riceverete un dispositivo simile in sostituzione. Non è possibile rivendicare la sostituzione con un modello identico, se la produzione del modello oggetto del reclamo è stata interrotta per un cambio del modello.Per qualsiasi reclamo o richiesta di intervento in garanzia rivolgersi al rivenditore specializzato presso il quale è stato effettuato l’acquisto. In alternativa inviare il proprio reclamo direttamente a:
Cycle Parts GmbHLe Quartier Hornbach 1367433 Neustadt/Weinstrasse
Per questioni tecniche è a vostra disposizione la nostra hotline ai numeri:
+49 (0) 63 21- 95 82 7 - 10+49 (0) 63 21- 95 82 7 - 18
Questo servizio è disponibiledalle 9:00 alle 12:00, da lunedì a venerdì[email protected]
Ulteriori informazioni tecniche sono disponibili all’indirizzo: www.vdocyclecomputing.com
Con riserva di apportare modifiche tecniche in caso di ulteriore sviluppo.
Dichiarazione di conformità UE
La sottoscritta, CYCLE PARTS GmbH, Le Quartier Hornbach 13, D-67433 Neustadt/Weinstr. dichiara che il ciclocomputer VDO con trasmissione radio VDO M6.1 e tutti i sensori D3-SPEED, D3-CAD, D3-HR in caso di utilizzo conforme soddisfano i requisiti fondamentali secondo RED Directive 2014/53/EU e RoHS Directive 2011/65/EU.
La dichiarazione di conformità è disponibile all’indirizzo: ce.cycleparts.de/m6_1
ITALIANO
115114
Corretto smaltimento di questo prodotto (rifiuti da apparecchiature elettriche ed elettroniche)
(Da utilizzare nei Paesi dell’Unione europea e negli altri Paesi europei con un sistema di raccolta differenziata). La marcatura sul prodotto e sulla documentazione corrispondente indica che al termine della durata della vita il prodotto non deve essere smaltito
con i normali rifiuti domestici. Smaltire questo dispositivo separatamente dagli altri rifiuti in modo da non danneggiare l’ambiente e la salute degli esseri umani con uno smaltimento non controllato. Riciclare il dispositivo per favorire il riutilizzo sostenibile delle risorse materiali. Gli utenti privati devono contattare il rivenditore presso il quale è stato acquistato il prodotto oppure le autorità competenti per venire a conoscenza di come possono riciclare il dispositivo senza danneggiare l’ambiente. Gli utenti commerciali devono rivolgersi al proprio fornitore e consultare le condizioni del contratto di acquisto. Questo prodotto non deve essere smaltito con altri rifiuti industriali.
ESP
AÑOL
117116
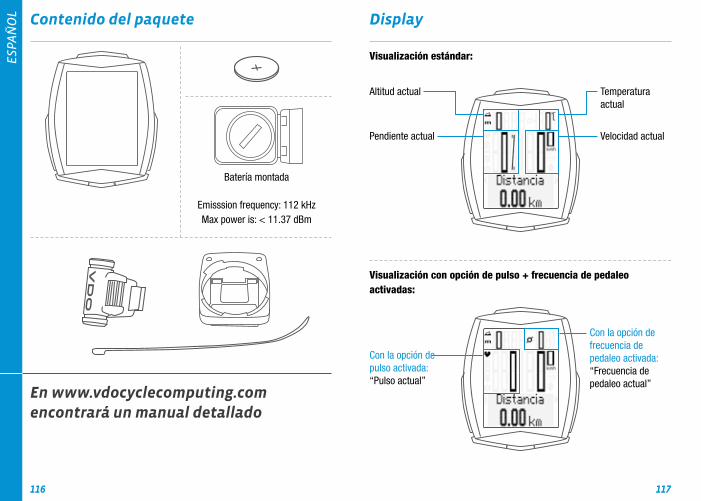
Contenido del paquete
Batería montada
En www.vdocyclecomputing.com encontrará un manual detallado
Display
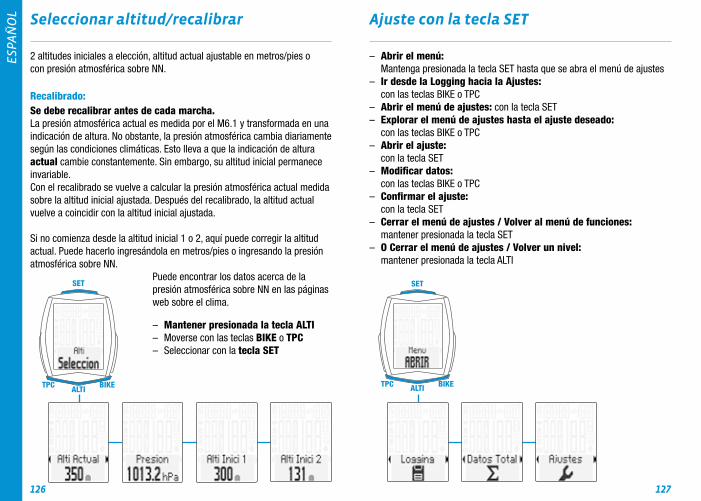
Velocidad actualPendiente actual
Temperatura actual
Altitud actual
Visualización estándar:
Con la opción de pulso activada: “Pulso actual”
Con la opción de frecuencia de pedaleo activada: “Frecuencia de pedaleo actual”
Visualización con opción de pulso + frecuencia de pedaleo activadas:
Emisssion frequency: 112 kHzMax power is: < 11.37 dBm

ESP
AÑOL
119118
BIKETPC
SET
ALTI
Íconos
Teclas
– “KMH/MPH”: muestra la unidad de velocidad seleccionada– “ ” o “ ”: muestra la bici 1 o bici 2 seleccionada– “ ”: Comparación de la velocidad actual con la velocidad promedio– Ícono “ ”: Indica que el contador de recorrido está activado– Ícono “ ”: indica que el modo de iluminación está activado – “Flechas de pulso”: indica si el pulso está por encima o por debajo de la zona de entrenamiento– “m” o “ft” indica la unidad de altitud en metros o pies– “C” o “F” indica la temperatura en Celsius o Fahrenheit
Tecla BIKE: Activación de las funciones de bicicleta
Tecla TPC (Valores totales/ Pulso/Frecuencia de pedaleo): Activación de los datos totales o de las funciones de pulso / de frecuencia de pedaleo (con la opción de pulso / frecuencia de pedaleo activada)
Tecla SET: presionándola brevemente: se exploran las funciones hacia atrás
Tecla ALTI: Activación de las funciones de altitud
Funciones de la tecla BIKE
Con la opción de frec. de pedaleo activada

ESP
AÑOL
121120
BIKETPC
SET
ALTI
Funciones de la tecla ALTI
Con la opción de pulso + frec. de pedaleo
activada

ESP
AÑOL
123122
BIKE BIKETPC TPC
SET SET
ALTI ALTI
Funciones de la tecla TCPDatos totales para la bici 1
ATENCIÓN:Si también ha andado en la bici 2, aquí encontrará los datos totales para la bici 2 y los datos totales como suma de los datos de la bici 1 + bici 2.
Funciones de la tecla TCP(con la opción de pulso activada)

ESP
AÑOL
125124
BIKETPC
SET
ALTI
Funciones de la tecla TCP(con la opción de pulso + frecuencia de pedaleo activadas)
ESP
AÑOL
127126
BIKETPC
SET
ALTIBIKETPC
SET
ALTI
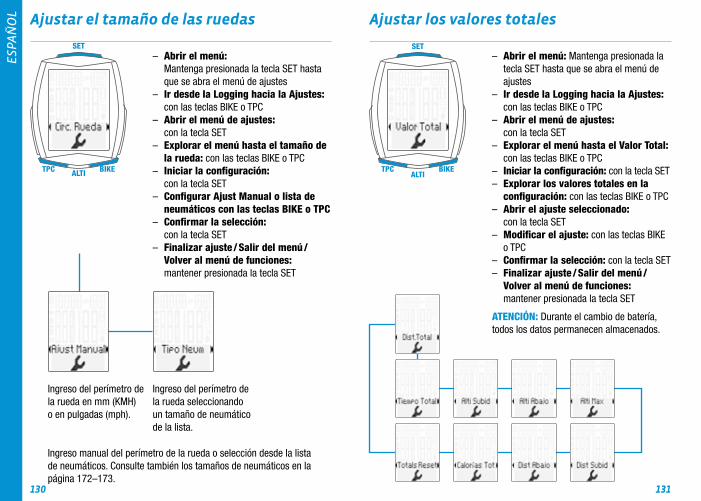
Seleccionar altitud/recalibrar
2 altitudes iniciales a elección, altitud actual ajustable en metros/pies o con presión atmosférica sobre NN.
Recalibrado:Se debe recalibrar antes de cada marcha.La presión atmosférica actual es medida por el M6.1 y transformada en una indicación de altura. No obstante, la presión atmosférica cambia diariamente según las condiciones climáticas. Esto lleva a que la indicación de altura actual cambie constantemente. Sin embargo, su altitud inicial permanece invariable.Con el recalibrado se vuelve a calcular la presión atmosférica actual medida sobre la altitud inicial ajustada. Después del recalibrado, la altitud actual vuelve a coincidir con la altitud inicial ajustada.
Si no comienza desde la altitud inicial 1 o 2, aquí puede corregir la altitud actual. Puede hacerlo ingresándola en metros/pies o ingresando la presión atmosférica sobre NN. Puede encontrar los datos acerca de la presión atmosférica sobre NN en las páginas web sobre el clima.
– Mantener presionada la tecla ALTI– Moverse con las teclas BIKE o TPC– Seleccionar con la tecla SET
Ajuste con la tecla SET
– Abrir el menú: Mantenga presionada la tecla SET hasta que se abra el menú de ajustes– Ir desde la Logging hacia la Ajustes: con las teclas BIKE o TPC– Abrir el menú de ajustes: con la tecla SET– Explorar el menú de ajustes hasta el ajuste deseado: con las teclas BIKE o TPC– Abrir el ajuste: con la tecla SET– Modificar datos: con las teclas BIKE o TPC– Confirmar el ajuste: con la tecla SET– Cerrar el menú de ajustes / Volver al menú de funciones: mantener presionada la tecla SET– O Cerrar el menú de ajustes / Volver un nivel: mantener presionada la tecla ALTI

ESP
AÑOL
129128
BIKETPC
SET
ALTI
Menús de ajustes
ESP
AÑOL
131130
BIKETPC
SET
ALTI BIKETPC
SET
ALTI
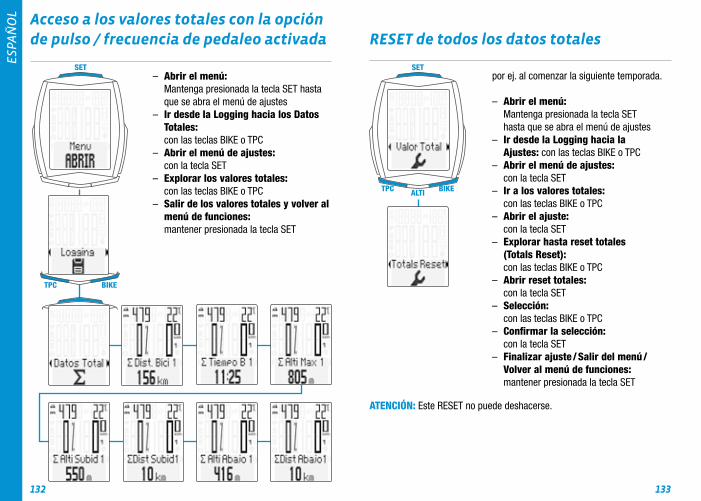
Ajustar el tamaño de las ruedas Ajustar los valores totales
Ingreso del perímetro de la rueda seleccionando un tamaño de neumático de la lista.
Ingreso del perímetro de la rueda en mm (KMH) o en pulgadas (mph).
Ingreso manual del perímetro de la rueda o selección desde la lista de neumáticos. Consulte también los tamaños de neumáticos en la página 172–173.
– Abrir el menú: Mantenga presionada la tecla SET hasta que se abra el menú de ajustes– Ir desde la Logging hacia la Ajustes: con las teclas BIKE o TPC– Abrir el menú de ajustes: con la tecla SET– Explorar el menú hasta el tamaño de la rueda: con las teclas BIKE o TPC– Iniciar la configuración: con la tecla SET– Configurar Ajust Manual o lista de neumáticos con las teclas BIKE o TPC– Confirmar la selección: con la tecla SET– Finalizar ajuste / Salir del menú / Volver al menú de funciones: mantener presionada la tecla SET
– Abrir el menú: Mantenga presionada la tecla SET hasta que se abra el menú de ajustes– Ir desde la Logging hacia la Ajustes: con las teclas BIKE o TPC– Abrir el menú de ajustes: con la tecla SET– Explorar el menú hasta el Valor Total: con las teclas BIKE o TPC– Iniciar la configuración: con la tecla SET– Explorar los valores totales en la configuración: con las teclas BIKE o TPC– Abrir el ajuste seleccionado: con la tecla SET– Modificar el ajuste: con las teclas BIKE o TPC– Confirmar la selección: con la tecla SET– Finalizar ajuste / Salir del menú / Volver al menú de funciones: mantener presionada la tecla SET
ATENCIÓN: Durante el cambio de batería, todos los datos permanecen almacenados.
ESP
AÑOL
133132
BIKETPC
SET
BIKETPC
SET
ALTI
Acceso a los valores totales con la opción de pulso / frecuencia de pedaleo activada
– Abrir el menú: Mantenga presionada la tecla SET hasta que se abra el menú de ajustes– Ir desde la Logging hacia los Datos Totales: con las teclas BIKE o TPC– Abrir el menú de ajustes: con la tecla SET– Explorar los valores totales: con las teclas BIKE o TPC– Salir de los valores totales y volver al menú de funciones: mantener presionada la tecla SET
RESET de todos los datos totales
por ej. al comenzar la siguiente temporada.
– Abrir el menú: Mantenga presionada la tecla SET hasta que se abra el menú de ajustes– Ir desde la Logging hacia la Ajustes: con las teclas BIKE o TPC– Abrir el menú de ajustes: con la tecla SET– Ir a los valores totales: con las teclas BIKE o TPC – Abrir el ajuste: con la tecla SET– Explorar hasta reset totales (Totals Reset): con las teclas BIKE o TPC– Abrir reset totales: con la tecla SET– Selección: con las teclas BIKE o TPC– Confirmar la selección: con la tecla SET– Finalizar ajuste / Salir del menú / Volver al menú de funciones: mantener presionada la tecla SET
ATENCIÓN: Este RESET no puede deshacerse.
ESP
AÑOL
135134
BIKE
BIKETPC
SET
BIKETPC
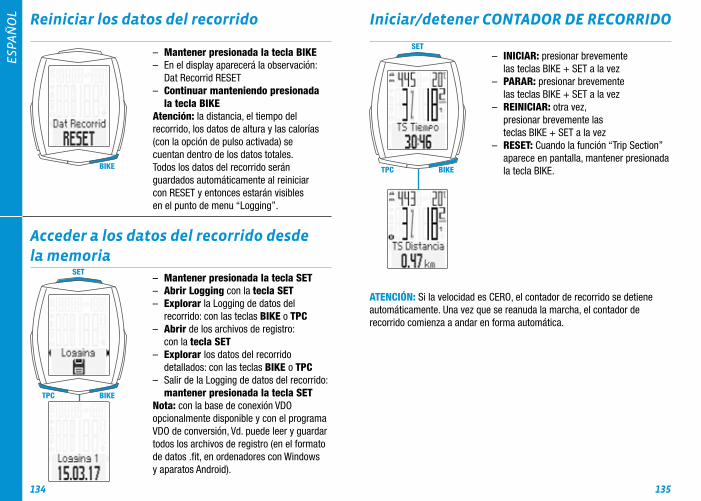
SET– INICIAR: presionar brevemente las teclas BIKE + SET a la vez– PARAR: presionar brevemente las teclas BIKE + SET a la vez– REINICIAR: otra vez, presionar brevemente las teclas BIKE + SET a la vez– RESET: Cuando la función “Trip Section” aparece en pantalla, mantener presionada la tecla BIKE.
ATENCIÓN: Si la velocidad es CERO, el contador de recorrido se detiene automáticamente. Una vez que se reanuda la marcha, el contador de recorrido comienza a andar en forma automática.
Reiniciar los datos del recorrido
– Mantener presionada la tecla BIKE– En el display aparecerá la observación: Dat Recorrid RESET– Continuar manteniendo presionada la tecla BIKEAtención: la distancia, el tiempo del recorrido, los datos de altura y las calorías (con la opción de pulso activada) se cuentan dentro de los datos totales. Todos los datos del recorrido serán guardados automáticamente al reiniciar con RESET y entonces estarán visibles en el punto de menu “Logging”.
Acceder a los datos del recorrido desde la memoria
– Mantener presionada la tecla SET– Abrir Logging con la tecla SET– Explorar la Logging de datos del recorrido: con las teclas BIKE o TPC– Abrir de los archivos de registro: con la tecla SET– Explorar los datos del recorrido detallados: con las teclas BIKE o TPC– Salir de la Logging de datos del recorrido: mantener presionada la tecla SETNota: con la base de conexión VDO opcionalmente disponible y con el programa VDO de conversión, Vd. puede leer y guardar todos los archivos de registro (en el formato de datos .fit, en ordenadores con Windows y aparatos Android).
Iniciar/detener CONTADOR DE RECORRIDO
ESP
AÑOL
137136
BIKETPC
SET
ALTI BIKETPC
SET
ALTI
BIKETPC
SET
ALTI
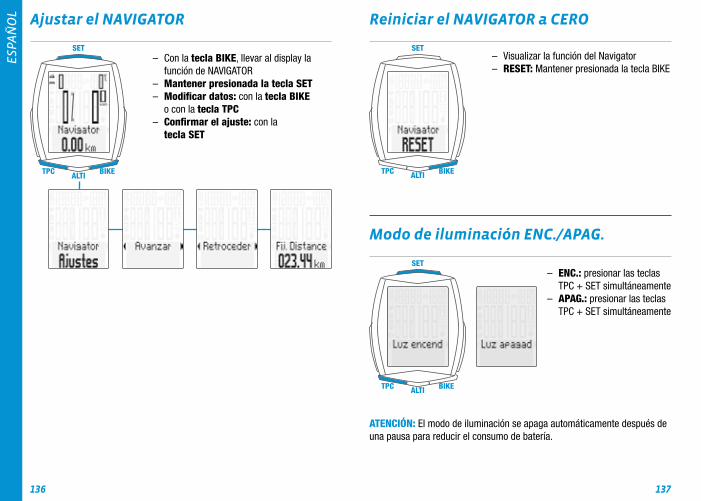
Ajustar el NAVIGATOR
– Con la tecla BIKE, llevar al display la función de NAVIGATOR– Mantener presionada la tecla SET– Modificar datos: con la tecla BIKE o con la tecla TPC– Confirmar el ajuste: con la tecla SET
Modo de iluminación ENC./APAG.
Reiniciar el NAVIGATOR a CERO
– Visualizar la función del Navigator– RESET: Mantener presionada la tecla BIKE
– ENC.: presionar las teclas TPC + SET simultáneamente– APAG.: presionar las teclas TPC + SET simultáneamente
ATENCIÓN: El modo de iluminación se apaga automáticamente después de una pausa para reducir el consumo de batería.

ESP
AÑOL
139138
BIKETPC
SET
ALTI
Activar opción de PULSO / opción de frecuencia de pedaleo
ATENCIÓN: Se requiere del transmisor de PULSO, artículo n.º CP3013, y/o del transmisor de frecuencia de pedaleo, artículo n.º CP3012, para la activación.
– Mantener presionada la tecla SET– Ir desde la Logging hacia la Ajustes: con las teclas BIKE o TPC– Abrir con la tecla SET– Con la tecla BIKE o con la tecla TPC, ir a SENSOR– Con la tecla SET, abrir la selección de sensor– Con las teclas BIKE o TPC, seleccionar sensor– Confirmar con la tecla SET– Finalizar ajuste / Salir del menú / Volver al menú de funciones: mantener presionada la tecla SET
Calibrado del transmisor
– Colocar el ordenador M6.1 en el soporte del manillar– La velocidad parpadea– Con la opción de pulso activada: la indicación de pulso parpadea– Con la opción de frecuencia de pedaleo activada: la indicación de frecuencia de pedaleo parpadea– Indicación parpadeando: se están buscando los transmisores– Girar la rueda delantera: se encuentra y muestra la velocidad– Girar la biela: se encuentra y muestra la frecuencia de pedaleo– Apretar el transmisor de pulso : se encuentra y muestra el pulsoATENCIÓN: Si durante la sincronización hay otras fuentes que generan interferencias, en el display aparecerá “Damsiadas señales”.Este mensaje se confirma presionando cualquier tecla. Luego, salga del lugar donde hay interferencias y diríjase hacia otro lado. Retire el ordenador del soporte del manillar girándolo. Vuelva a colocar el ordenador en el soporte del manillar. El ordenador volverá a sincronizarse.Posibles fuentes de interferencias:– iluminación LED,– teléfono móvil.– receptor GPS,– WLAN,– dispositivo de seguridad antirrobo en la tienda.Estas fuentes pueden interferir en la sincronización.
ATENCIÓN: En el transmisor se debe ajustar BICI 1 o BICI 2 en la primera puesta en marcha del conmutador para el reconocimiento de la bicicleta. Solo así funcionará el reconocimiento automático de la bicicleta.
MANTENER la tecla presionada hasta que parpadee el LED.Parpadea 1 vez verde = Bici 1 seleccionadaParpadea 2 veces rojo = Bici 2 seleccionada
ESP
AÑOL
141140
Condiciones de la garantía
VDO Cycle Parts le brinda una garantía de 2 años a partir de la fecha de compra por su ordenador VDO. La garantía se refiere a los fallos de material y de procesos en el ordenador mismo, en el sensor/transmisor y en el soporte del manillar. Los cables, las baterías y demás materiales de montaje están excluidos de la garantía.
La garantía solo rige siempre que las piezas afectadas no hayan sido abier-tas (excepción: compartimiento para la batería del ordenador), no se hayan forzado, ni exista daño intencional.
Le rogamos conservar el comprobante de compra, dado que deberá presentarse en caso de reclamos. Si el reclamo es fundado, le proveeremos un equipo similar para su recambio. No se podrá restituir un modelo idéntico si se ha discontinuado la producción del modelo reclamado debido a un cambio de modelo.En caso de dificultades o reclamos de garantía, le rogamos dirigirse al comercio especializado en el que ha adquirido el equipo. O envíe su reclamo directamente a:
Cycle Parts GmbHLe Quartier Hornbach 1367433 Neustadt/Weinstrasse (Alemania)
Para consultas técnicas, estamos a su disposición en la siguiente línea de atención:
+49 (0) 63 21- 95 82 7 - 10+49 (0) 63 21- 95 82 7 - 18
El horario de atención telefónica es de9:00 a 12:00 h de lunes a [email protected]
Puede acceder a mayor información técnica en: www.vdocyclecomputing.com
Nos reservamos el derecho de implementar modificaciones técnicas motivadas por perfeccionamientos posteriores.
Declaración de conformidad CE
Nosotros, CYCLE PARTS GmbH, con domicilio en Le Quartier Hornbach 13, D-67433 Neustadt/Weinstr. declaramos que el ordenador de bicicleta VDO con radiotransmisión VDO M6.1 y todos los transmisores D3-SPEED, D3-CAD, D3-HR se corresponden con los requisitos básicos conforme RED Directive 2014/53/EU y RoHS Directive 2011/65/EU.
Puede encontrar la declaración de conformidad en: ce.cycleparts.de/m6_1

ESP
AÑOL
143142
Eliminación correcta del producto (basura electrónica)
Para ser utilizado en los países de la Unión Europea y en otros paí-ses europeos con sistema de recolección discriminada. La marca sobre el producto o en la respectiva documentación indica que una vez terminada su vida útil, no se debe eliminar junto con la basura
doméstica. Deseche este aparato separado de otros residuos para no dañar al medio ambiente ni perjudicar la salud de las personas con la eliminación de basura sin control. Recicle el aparato para promover la reutilización sus-tentable de recursos materiales. Los usuarios particulares deben contactar a quien le vendió el producto o a las autoridades competentes para aprender a reciclar el aparato de manera ecológica. Las empresas deben contactar a sus proveedores y consultar las condiciones del contrato de venta. Este producto no debe eliminarse junto con otra basura industrial.

NEDERLA
NDS
145144
Verpakkingsinhoud
Batterij gemonteerd
Een uitgebreide handleiding vindt u op: www.vdocyclecomputing.com
Display
Huidige snelheidHuidige stijging
Huidige temperatuur
Huidige hoogte
Standaardweergave:
Bij ingeschakelde hartslagoptie: „Huidige hartslag”
Bij ingeschakelde trapfrequentie-optie: „Huidige trapfrequentie”
Weergave met ingeschakelde hartslag- en trapfrequentie-optie:
Emisssion frequency: 112 kHzMax power is: < 11.37 dBm

NEDERLA
NDS
147146
BIKETPC
SET
ALTI
Pictogrammen
Knoppen
De knop BIKE: Fietsfuncties oproepen
De knop TPC (Total/Puls/CAD): Oproepen van de to-taalgegevens of oproep van de hartslagfuncties/trapfrequentiefuncties (bij ingeschakelde hartslag-/trapfre-quentie-optie)
De knop SET: kort indrukken: achteruit door de functies bladeren
De knop ALTI: Oproepen van de hoogte-functies
Functies met de BIKE-knop
Bij ingeschakelde trapfrequentie-optie
– „KMU/MPH”: geeft de gekozen snelheidseenheid weer– „ ” of „ ”: geeft gekozen fiets 1 of fiets 2 weer– „ ”: Vergelijking van de huidige snelheid met de gemiddelde snelheid– Pictogram „ ”: Geeft aan dat de deelritteller is ingeschakeld– Pictogram „ ”: geeft aan dat de verlichtingsmodus is ingeschakeld – „hartslagpijl”: geeft aan of de hartslag boven of onder de gekozen trainingszone ligt– „m” of „ft” geeft de hoogte-eenheid weer (meter of feet)– „C” of „F” geeft de temperatuureenheid weer (Celsius of Fahrenheit)

NEDERLA
NDS
149148
BIKETPC
SET
ALTI
Functies met de ALTI-knop
Bij ingeschakelde hartslag + trap- frequentie optie
NEDERLA
NDS
151150
BIKE BIKETPC TPC
SET SET
ALTI ALTI
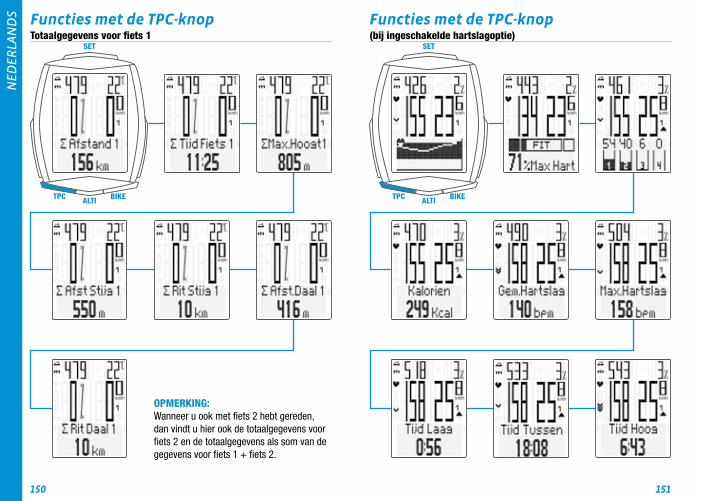
Functies met de TPC-knopTotaalgegevens voor fiets 1
OPMERKING:Wanneer u ook met fiets 2 hebt gereden, dan vindt u hier ook de totaalgegevens voor fiets 2 en de totaalgegevens als som van de gegevens voor fiets 1 + fiets 2.
Functies met de TPC-knop(bij ingeschakelde hartslagoptie)

NEDERLA
NDS
153152
BIKETPC
SET
ALTI
Functies met de TPC-knop(bij ingeschakelde hartslag- en trapfrequentie-optie)
NEDERLA
NDS
155154
BIKEBIKE TPCTPC
SETSET
ALTIALTI
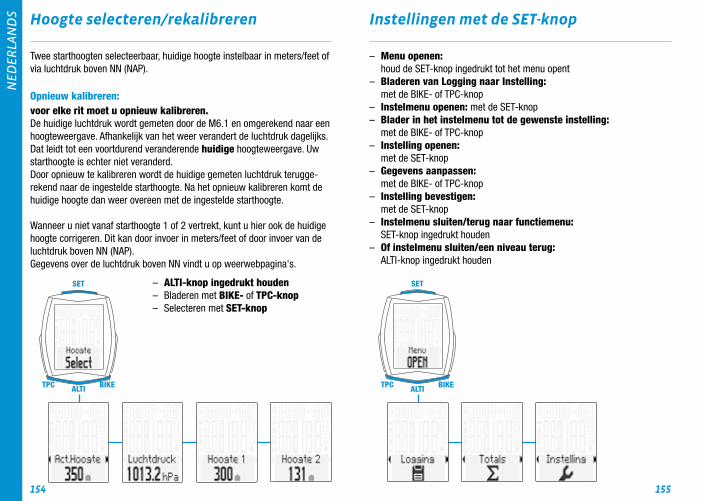
Hoogte selecteren/rekalibreren
Twee starthoogten selecteerbaar, huidige hoogte instelbaar in meters/feet of via luchtdruk boven NN (NAP).
Opnieuw kalibreren:voor elke rit moet u opnieuw kalibreren.De huidige luchtdruk wordt gemeten door de M6.1 en omgerekend naar een hoogteweergave. Afhankelijk van het weer verandert de luchtdruk dagelijks. Dat leidt tot een voortdurend veranderende huidige hoogteweergave. Uw starthoogte is echter niet veranderd.Door opnieuw te kalibreren wordt de huidige gemeten luchtdruk terugge-rekend naar de ingestelde starthoogte. Na het opnieuw kalibreren komt de huidige hoogte dan weer overeen met de ingestelde starthoogte.
Wanneer u niet vanaf starthoogte 1 of 2 vertrekt, kunt u hier ook de huidige hoogte corrigeren. Dit kan door invoer in meters/feet of door invoer van de luchtdruk boven NN (NAP).Gegevens over de luchtdruk boven NN vindt u op weerwebpagina's.
– ALTI-knop ingedrukt houden– Bladeren met BIKE- of TPC-knop– Selecteren met SET-knop
Instellingen met de SET-knop
– Menu openen: houd de SET-knop ingedrukt tot het menu opent– Bladeren van Logging naar Instelling: met de BIKE- of TPC-knop– Instelmenu openen: met de SET-knop– Blader in het instelmenu tot de gewenste instelling: met de BIKE- of TPC-knop– Instelling openen: met de SET-knop– Gegevens aanpassen: met de BIKE- of TPC-knop– Instelling bevestigen: met de SET-knop– Instelmenu sluiten/terug naar functiemenu: SET-knop ingedrukt houden– Of instelmenu sluiten/een niveau terug: ALTI-knop ingedrukt houden

NEDERLA
NDS
157156
BIKETPC
SET
ALTI
Instelmenu's

NEDERLA
NDS
159158
BIKETPC
SET
ALTI BIKETPC
SET
ALTI
Instellen van de wielmaat Instellen van de totaalwaarden
Invoer van de wielomtrek door selectie van wiel-maat in bandenlijst.
Invoer van de wiel-omtrek in mm (km/u) of inch (mph).
Handmatige invoer van de wielomtrek of selectie in bandenlijst.Wielmaten, zie ook pagina 172–173.
– Menu openen: houd de SET-knop ingedrukt tot het menu opent– Bladeren van Logging naar Instelling: met de BIKE- of TPC-knop– Instelmenu openen: met de SET-knop– Blader in het menu naar wielmaat: met de BIKE-knop of de TPC-knop– Instelling starten: met de SET-knop– Keuze Set handmatig of bandenlijst met de BIKE- of TPC-knop– Keuze bevestigen: met de SET-knop– Instelling afsluiten/menu verlaten/ terugkeren naar het functiemenu: SET-knop ingedrukt houden
– Menu openen: houd de SET-knop ingedrukt tot het menu opent– Bladeren van Logging naar Instelling: met de BIKE- of TPC-knop– Instelmenu openen: met de SET-knop– Blader in het menu naar Total Values: met de BIKE-knop of de TPC-knop– Open instelling: met de SET-knop– In de instellingen van de totale waarden bladeren: met BIKE of TPC-knop– Gekozen instelling openen: met SET-knop– Instelling wijzigen: met de BIKE of TPC-knop– Keuze bevestigen: met de SET-knop– Instelling afsluiten/menu verlaten/ terugkeren naar het functiemenu: SET-knop ingedrukt houden
LET OP: Alle gegevens blijven bij het vervangen van de batterij behouden.

NEDERLA
NDS
161160
BIKETPC
SET
BIKETPC
SET
ALTI
Oproepen van totaalwaarden bij inge-schakelde hartslag-/trapfrequentie-optie
– Menu openen: houd de SET-knop ingedrukt tot het menu opent– Bladeren van geheugen naar totaalwaarden: met de BIKE- of TPC-knop– Totaalwaarden openen: met de SET-knop– Bladeren door de totaalwaarden: met de BIKE- of TPC-knop– Totaalwaarden verlaten/terug naar functiemenu: SET-knop ingedrukt houden
Terugstellen van alle totaalgegevens
bijv. bij begin van nieuw seizoen.
– Menu openen: houd de SET-knop ingedrukt tot het menu opent– Bladeren van Logging naar Instelling: met de BIKE- of TPC-knop– Instelmenu openen: met de SET-knop– Bladeren naar Total Values: met de BIKE- of TPC-knop – Instelling openen: met de SET-knop– Bladeren naar Totals Reset: met de BIKE- of TPC-knop– Totals Reset openen: met de SET-knop– Selectie: met de BIKE- of TPC-knop– Selectie bevestigen: met de SET-knop– Instelling afsluiten/menu verlaten/ terugkeren naar het functiemenu: SET-knop ingedrukt houden
LET OP: Het terugstellen kan niet ongedaan worden gemaakt.

NEDERLA
NDS
163162
BIKE
BIKETPC
SET
BIKETPC
SET
De ritgegevens op nul terugstellen
– BIKE-knop ingedrukt houden– Op het scherm verschijnt de tekst: Tour Data RESET– BIKE-knop ingedrukt blijven houden
Opmerking: Afstand, rijtijd, hoogtegegevens, calorieën (bij ingeschakelde hartslagoptie) worden bij de totaalgegevens gerekend. Alle tourdata worden bij RESET automatisch opgeslagen en kunnen dan in menu “Logging” worden bekeken.
Ritgegevens oproepen uit het geheugen
– SET-knop ingedrukt houden– Logging met SET-knop openen– Bladeren in het Memory: met BIKE- of TPC-knop– Openen van de logs: met SET-knop– Bladeren door de gedetailleerde ritgegevens: met BIKE- of TPC-knop– Logging verlaten: SET-knop ingedrukt houden
Opmerking: met het optioneel verkrijgbare VDO docking station en de VDO Converter software kunt u alle logs uitlezen (in .fit -bestandsformaat, op Windows pc's en Android apparaten) en opslaan.
DEELRIT starten/stoppen
– START: BIKE- en SET-knop gelijktijdig kort indrukken– STOP: BIKE- en SET-knop gelijktijdig kort indrukken– Opnieuw starten: BIKE- en SET-knop nogmaals gelijktijdig kort indrukken– Terugstellen: Indien de functie “Trip Section” op het display verschijnt, dan BIKE-knop ingedrukt houden.
LET OP: Bij snelheid nul stopt de deelritteller automatisch. Rijdt u verder, dan telt de deelritteller automatisch verder.
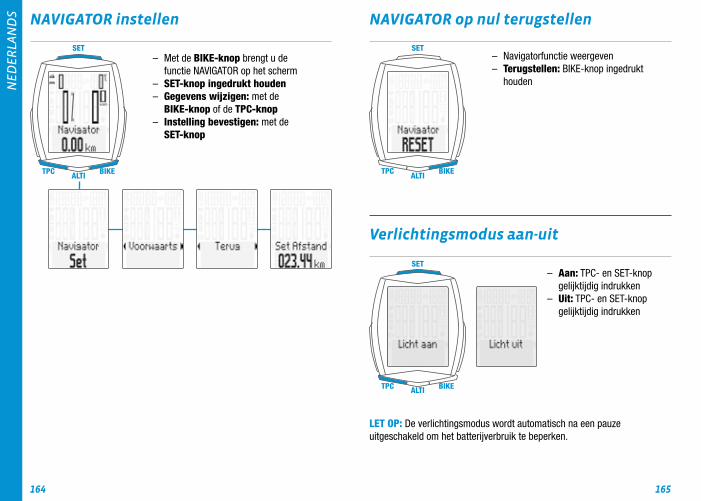
NEDERLA
NDS
165164
BIKETPC
SET
ALTI BIKETPC
SET
ALTI
BIKETPC
SET
ALTI
NAVIGATOR instellen
– Met de BIKE-knop brengt u de functie NAVIGATOR op het scherm– SET-knop ingedrukt houden– Gegevens wijzigen: met de BIKE-knop of de TPC-knop– Instelling bevestigen: met de SET-knop
Verlichtingsmodus aan-uit
NAVIGATOR op nul terugstellen
– Navigatorfunctie weergeven– Terugstellen: BIKE-knop ingedrukt houden
– Aan: TPC- en SET-knop gelijktijdig indrukken– Uit: TPC- en SET-knop gelijktijdig indrukken
LET OP: De verlichtingsmodus wordt automatisch na een pauze uitgeschakeld om het batterijverbruik te beperken.

NEDERLA
NDS
167166
BIKETPC
SET
ALTI
Hartslagoptie/trapfrequentie-optie activeren
LET OP: Voor inschakelen zijn hartslagzender (art.nr. CP3013) en/of trapfrequentiezender (art.nr. CP3012) nodig.
– SET-knop ingedrukt houden– Van Logging naar instelling bladeren: met BIKE- of TPC-knop– Met SET-knop openen– Met BIKE- of TPC-knop bladeren naar SENSOR– Met SET-knop sensorselectie openen– Met BIKE- of TPC-knop sensor kiezen– Met SET-knop bevestigen– Instelling afsluiten/menu verlaten/ terugkeren naar het functiemenu: SET-knop ingedrukt houden
Zenders koppelen
– M6.1-computer in stuurhouder plaatsen– Snelheidsweergave knippert– Bij ingeschakelde hartslagoptie: hartslagweergave knippert– Bij ingeschakelde trapfrequentie-optie: trapfrequentieweergave knippert– Knipperende weergave: zenders worden gezocht– Aan voorwiel draaien: snelheid wordt gevonden en weergegeven– Aan trappers draaien: trapfrequentie wordt gevonden en weergegeven– Hartslagzender plaatsen: hartslag wordt gevonden en weergegeven
LET OP: Wanneer tijdens het koppelen storing optreedt door andere stralingsbronnen, dan verschijnt op het scherm de melding „Te veel signalen”. De melding bevestigt u met een willekeurige knop. Daarna gaat u van de plek met storing weg en gaat u ergens anders heen. Draai de computer uit de stuurhouder. Plaats de computer opnieuw in de stuurhouder. De computer voert nu opnieuw een koppeling uit.Mogelijke storingsbronnen:– Led-verlichting– Mobiele telefoon– GPS-ontvanger– WLAN– Beveiligingsinstallaties in de winkelDeze storingsbronnen kunnen het koppelen storen.
LET OP: In de zender moet bij eerste ingebruikname de schakelaar voor de fietsherkenning ingeschakeld worden op fiets 1 of fiets 2. Alleen dan werkt de automatische fietsherkenning.
Toets LANG ingedrukt houden, tot de LED knippert.1 keer knipperen groen = fiets 1 is geselecteerd2 keer knipperen rood = fiets 2 is geselecteerd

NEDERLA
NDS
169168
Garantiebepalingen
VDO Cycle Parts geeft voor uw VDO-computer een garantie van 2 jaar vanaf de koopdatum. De garantie geldt voor materiaal- en fabricagefouten aan de computer zelf, aan de sensor/zender en aan de stuurhouder. Kabels, batterijen en montagematerialen zijn uitgesloten van garantie.
De garantie geldt alleen wanneer de betroffen onderdelen niet zijn geopend (uitzondering: batterijvak van de computer), geen geweld is gebruikt en geen moedwillige schade aanwezig is.
Bewaar de kassabon a.u.b. zorgvuldig, want in geval van een klacht moet deze getoond worden. Bij een terechte klacht krijgt u van ons een verge-lijkbaar omruilapparaat. Een aanspraak op vervanging door een identiek model bestaat niet, als door verandering van model de productie van het gereclameerde model stopgezet werd.Neem voor alle klachten en aanspraken op garantie contact op met uw de-tailhandel waar u het apparaat gekocht heeft. Of stuur uw klacht direct aan:
Cycle Parts GmbHLe Quartier Hornbach 1367433 Neustadt/Weinstrasse (Duitsland)
Voor technische vragen zijn wij beschikbaar via onze hotline:
+49 (0) 63 21- 95 82 7 - 10+49 (0) 63 21- 95 82 7 - 18
Onze telefonische helpdesk is er voor u van9:00 - 12:00 uur, maandag t/m [email protected]
Meer technische informatie vindt u op: www.vdocyclecomputing.com
In het kader van verdere ontwikkelingen behouden wij ons technische wijzigingen voor.
EU-conformiteitsverklaring
Wij, CYCLE PARTS GmbH, Le Quartier Hornbach 13 , D-67433 Neustadt/Weinstr., Duitsland verklaren, dat de VDO-fietscomputer met draadloze overdracht VDO M6.1 en alle zenders D3-SPEED, D3-CAD, D3-HR bij gebruik volgens de voorschriften voldoen aan de RED Directive 2014/53/EU en RoHS Directive 2011/65/EU.
U vindt de conformiteitsverklaring op: ce.cycleparts.de/m6_1
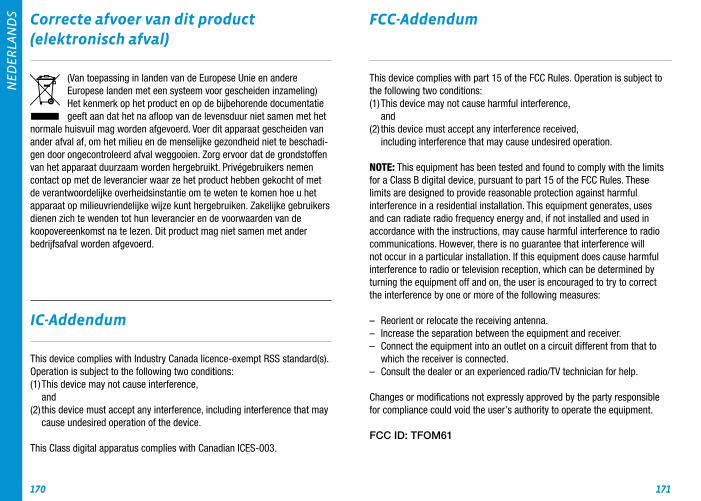
NEDERLA
NDS
171170
Correcte afvoer van dit product (elektronisch afval)
(Van toepassing in landen van de Europese Unie en andere Europese landen met een systeem voor gescheiden inzameling) Het kenmerk op het product en op de bijbehorende documentatie geeft aan dat het na afloop van de levensduur niet samen met het
normale huisvuil mag worden afgevoerd. Voer dit apparaat gescheiden van ander afval af, om het milieu en de menselijke gezondheid niet te beschadi-gen door ongecontroleerd afval weggooien. Zorg ervoor dat de grondstoffen van het apparaat duurzaam worden hergebruikt. Privégebruikers nemen contact op met de leverancier waar ze het product hebben gekocht of met de verantwoordelijke overheidsinstantie om te weten te komen hoe u het apparaat op milieuvriendelijke wijze kunt hergebruiken. Zakelijke gebruikers dienen zich te wenden tot hun leverancier en de voorwaarden van de koopovereenkomst na te lezen. Dit product mag niet samen met ander bedrijfsafval worden afgevoerd.
FCC-Addendum
This device complies with part 15 of the FCC Rules. Operation is subject to the following two conditions: (1) This device may not cause harmful interference, and(2) this device must accept any interference received, including interference that may cause undesired operation.
NOTE: This equipment has been tested and found to comply with the limits for a Class B digital device, pursuant to part 15 of the FCC Rules. These limits are designed to provide reasonable protection against harmful interference in a residential installation. This equipment generates, uses and can radiate radio frequency energy and, if not installed and used in accordance with the instructions, may cause harmful interference to radio communications. However, there is no guarantee that interference will not occur in a particular installation. If this equipment does cause harmful interference to radio or television reception, which can be determined by turning the equipment off and on, the user is encouraged to try to correct the interference by one or more of the following measures:
– Reorient or relocate the receiving antenna.– Increase the separation between the equipment and receiver.– Connect the equipment into an outlet on a circuit different from that to which the receiver is connected.– Consult the dealer or an experienced radio/TV technician for help.
Changes or modifications not expressly approved by the party responsible for compliance could void the user’s authority to operate the equipment.
FCC ID: TFOM61
IC-Addendum
This device complies with Industry Canada licence-exempt RSS standard(s). Operation is subject to the following two conditions: (1) This device may not cause interference, and (2) this device must accept any interference, including interference that may cause undesired operation of the device.
This Class digital apparatus complies with Canadian ICES-003.
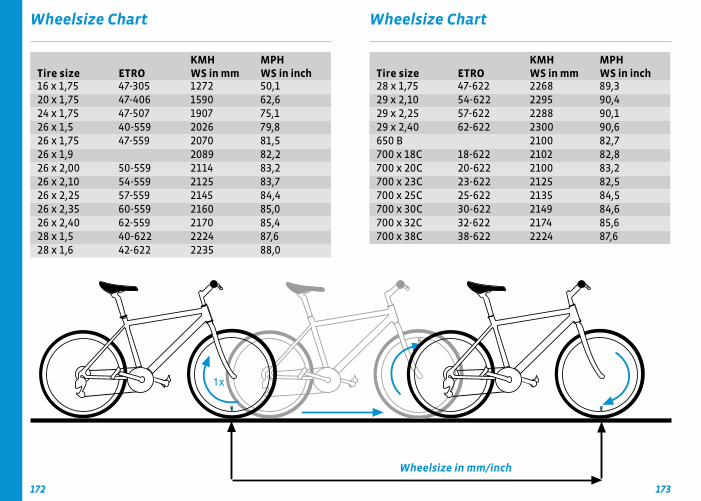
173172
Wheelsize Chart Wheelsize Chart
1x
Wheelsize in mm/inch
Tire size ETROKMH WS in mm
MPHWS in inch
16 x 1,75 47-305 1272 50,120 x 1,75 47-406 1590 62,624 x 1,75 47-507 1907 75,126 x 1,5 40-559 2026 79,826 x 1,75 47-559 2070 81,526 x 1,9 2089 82,226 x 2,00 50-559 2114 83,226 x 2,10 54-559 2125 83,726 x 2,25 57-559 2145 84,426 x 2,35 60-559 2160 85,026 x 2,40 62-559 2170 85,428 x 1,5 40-622 2224 87,628 x 1,6 42-622 2235 88,0
Tire size ETROKMH WS in mm
MPHWS in inch
28 x 1,75 47-622 2268 89,329 x 2,10 54-622 2295 90,429 x 2,25 57-622 2288 90,129 x 2,40 62-622 2300 90,6650 B 2100 82,7700 x 18C 18-622 2102 82,8700 x 20C 20-622 2100 83,2700 x 23C 23-622 2125 82,5700 x 25C 25-622 2135 84,5700 x 30C 30-622 2149 84,6700 x 32C 32-622 2174 85,6700 x 38C 38-622 2224 87,6

175174
Handlebar mount
Installation of the magnet
Installation wireless transmitter
LEFT RIGHT
CENTER
LEFT
90° – 45°
Funk
-Sen
der
/
wir
eles
s tr
ansm
itter
✔
✘
MAGNET
90°
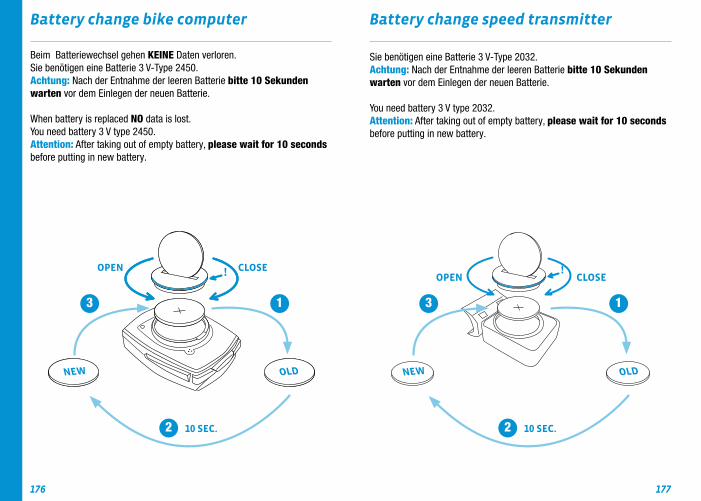
177176
!!
Beim Batteriewechsel gehen KEINE Daten verloren. Sie benötigen eine Batterie 3 V-Type 2450.Achtung: Nach der Entnahme der leeren Batterie bitte 10 Sekunden warten vor dem Einlegen der neuen Batterie.
When battery is replaced NO data is lost.You need battery 3 V type 2450.Attention: After taking out of empty battery, please wait for 10 seconds before putting in new battery.
Sie benötigen eine Batterie 3 V-Type 2032.Achtung: Nach der Entnahme der leeren Batterie bitte 10 Sekunden warten vor dem Einlegen der neuen Batterie.
You need battery 3 V type 2032.Attention: After taking out of empty battery, please wait for 10 seconds before putting in new battery.
OPEN CLOSEOPEN
NEW OLD OLDNEW
CLOSE
10 SEC. 10 SEC.
Battery change bike computer Battery change speed transmitter
1 1
2 2
3 3

179178
Computer: Approx. 49 H x 38 W x 12 D mmDisplay: H approx. 39 mm, W approx. 29 mm
Computer weight: Approx. 30 gHandlebar bracket weight: Approx. 10 gSpeed transmitter weight: Approx. 20 gCadence transmitter weight: Approx. 20 gHeart rate transmitter weight: Approx. 50 g
Computer battery: 3V, type 2450Computer battery service life: Approx. 2 years (approx. 400 ride hours, approx. 8,000 km (5,000 mi)
Speed transmitter battery: 3V, type 2032Speed transmitter battery life:Approx. 1.5 years (approx. 1,000 ride hours, approx. 20,000 km (12,000 mi)
Cadence transmitter battery: 3V, type 2032Cadence transmitter battery life:Approx. 1.5 years (approx. 1,000 ride hours, approx. 20,000 km (12,000 mi)
Heart rate transmitter battery: 3V, type 2032
Heart rate transmitter battery life:Approx. 1.5 years (approx. 1,000 ride hours, approx. 20,000 km (12,000 mi)
Wireless transmission ranges:Speed transmitter: 75 cmCadence transmitter: 90 cmHeart rate transmitter: 75 cm
Temperature indicator range on the display: -20°C to +70°C/ -4°F to +158°F
Speed range for wheel size 2,155 mm: Min 2.0 km/h, Max 199 kmh
Ride time measurement range: Up to 99:59:59 HH:MM:SS.Trip distance odometer measurement range: Up to value 9,999.99 km or miNAVIGATOR measurement range:From -99.99 to +999.99 km or miTotal km measurement range: Up to value 99,999 km or miTotal ride time measurement range: 9999:59 HHHH:MMHeart rate measurement range:40 to 240 bpmCadence measurement range:20 to 180 rpm
Wheel circumference setting range: From 100 mm to 3,999 mm (3.9 to 157.4 inches)
Altitude measurement range: -999 m to +4,999 m/-999 ft to 16,999 ft
Technical specifications

180
Cycle Parts GmbHLe Quartier Hornbach 1367433 Neustadt/Weinstrasse (Germany)
www.vdocyclecomputing.com CP8300
60/2
CE Information
EN You can find the CE declaration at: ce.cycleparts.de/m6_1
DE Sie finden die Konformitäts-Erklärung unter folgendem Link: ce.cycleparts.de/m6_1
FR Vous trouverez la déclaration CE à l’adresse : ce.cycleparts.de/m6_1
IT La dichiarazione CE è disponibile all‘indirizzo: ce.cycleparts.de/m6_1
ES Puede encontrar la declaración de conformidad CE en: ce.cycleparts.de/m6_1
PT Poderá encontrar a declaração CE em: ce.cycleparts.de/m6_1
NL U kunt de CE-certificering vinden op: ce.cycleparts.de/m6_1
PL Deklaracja CE znajduje się na stronie: ce.cycleparts.de/m6_1
CZ ES prohlášení najdete na adrese: ce.cycleparts.de/m6_1
DK Du kan finde EF-overensstemmelseserklæringen på: ce.cycleparts.de/m6_1
FI CE-vakuutus on luettavissa osoitteessa: ce.cycleparts.de/m6_1
NO Du finner CE-deklarasjonen under: ce.cycleparts.de/m6_1
SE Du kan hitta CE-deklarationen under: ce.cycleparts.de/m6_1
RU Декларацию о соответствии нормам ЕС Вы можете найти по адресу: ce.cycleparts.de/m6_1
HU A CE megfelelőségi tanúsítvány a ce.cycleparts.de/m6_1 oldalon található.
TR AT uygunluk beyanını ce.cycleparts.de/m6_1 adresinde bulabilirsiniz.
RO Declaraţia de conformitate CE poate fi găsită la: ce.cycleparts.de/m6_1
BG СЕ декларацията можете да намерите на: ce.cycleparts.de/m6_1
SI Izjavo CE najdete na ce.cycleparts.de/m6_1
SK ES vyhlásenie nájdete na adrese: ce.cycleparts.de/m6_1