1. safety instructions - redline stands
TRANSCRIPT

NTB-1200 Manual
Please read this Manual before using the Machine. You will need to know the safety instructions, System Settings, Wheel Parameters Input and Calibration process before youcan properly balance a wheel.
Contents
1. Safety Instructions2. Product Description3. Product Installation4. Control Panel5. System Settings6. Wheel Parameters Input7. Calibration8. Standard Dynamic Mode9. Static Mode10. ALU1-3 Mode11. ALUS Mode12. OPT Mode13. Errors and Trouble Shooting
1. Safety Instructions
1

All operators should be properly trained. Improper operations may result in incorrect measurement.
All operators should not wear loose clothing or jewelry. These things may become entangled with the wheel or spin shaft while using the balancer and could cause serious injury.
All operators should were protective eye wear. Safety guard should be used to avoid injury. The wheel balancer contains electronics and should be kept indoors and in a dry
environment. Exposure to water can cause damage and is not covered under any warranty.
Exposure to extreme heat can damage internal parts of the wheel balancer. The wheel balancer does not have an electrical surge protector. The user should
supply a surge protector to avoid damage to the wheel balancer in the event of an electrical surge or storm.
Do not use the wheel balancer beyond its measurement or weight range. Using the wheel balancer beyond its measurement or weight range could cause damage to the wheel balancer and does not ensure a precise balance of the wheel.
Other safety regulations may be in place according to OSHA or your local city and county. These should all be followed in addition to the instructions in this manual.
2. Product Specifications
Please see www.nationalautotools.com for the specifications on your wheel balancer.
3. Product Installation
Remove Wheel Balancer from shipping crate and pallet. Place Wheel Balancer on flat and stable floor. Install the Safety hood. Install threaded rod to spin rod extruding from side of the machine using the hex
bolt. If Wheel Balancer shakes or moves while spinning the wheel, it needs to be bolted
to the ground to ensure proper function. Electrical plug is preinstalled to fit North American 110 volt electrical socket.
Plug into proper electrical socket. Do not hard wire directly to your electrical source. There is no power surge protection on the machine. Please use a power surge protector to ensure your machine is not damaged.
Install the wheel balancer in a dry and safe environment. Exposure to moisture orextreme heat can damage the components inside the wheel balancer.
2

4. Control Panel
A. Inside Unbalance PointB. Inside Unbalance Display WindowC. Middle Static Unbalance Display WindowD. Sticking and Clamping Weight Position IndicatorE. Outside Unbalance Display WindowF. Outside Unbalance PointG. Standard Dynamic ModeH. Static ModeI. ALU ModeJ. ALUS ModeK. OPT ModeL. Mm/Inch IndicatorM. Car ModeN. Truck Mode
3

O. Up ArrowP. Down ArrowQ. Wheel Parameter Input KeyR. Enter KeyS. Dynamic/Static Mode KeyT. ALU Mode KeyU. Car/Truck Mode KeyV. Wheel Lift Up KeyW. Measurement Unit KeyX. OPT KeyY. Fine Measurement KeyZ. Wheel Lift Down KeyAA. Stop KeyBB. Start Key
4

Use the Car/Truck key to switch modes when balancing a passenger vehicle wheel versesa commercial truck wheel.
Use the up/down wheel keys to raise lower the wheel lift.
Use the Stop button to activate the air wheel lock. This locks the wheel in place so you can accurately place the wheel weight. Do not press the start button while wheel is locked. When locked the middle window will show LOC.
This is the beginning screen that will be displayed when you first turn on the machine:
If set to Grams.
If set to Ounces.
5

At anytime you may change from Ounces to Grams and back by simply pressing the C button.
5. System Settings
This section shows the user how to change the various system settings to meet their needs. You will need to check the settings and adjust them accordingly before balancing a wheel.
Step 1: Hold down the “ENTER” button until you see:
You are now in the system settings mode.
Use the UP and DOWN keys to navigate the different setting selections. You will see that the display in the MIDDLE STATIC UNBALANCE DISPLAY WINDOW:
will change as each time you press the UP or DOWN keys.
Here are the descriptions for each system setting that can be changed:
Guard control setting: If set to “On” the machine will not allow a wheel to spin while the safety hood is in the up position. If set to “Off” the machine will ignore the safety hood and will spin when the user presses START.
Standardization display setting: Set to 1g or 5g if using grams to measure. Setto .10 Oz or .25 Oz if you are using Ounces to measure. This sets the multiple in which the weight will be displayed on the display board.
Least unbalance value setting. Set between 1 g-40 g or .1 Oz-1.5 Oz. When the machine spins the wheel, any unbalance amount less than your setting will display as 0.
6

Buzzer switch setting. Change to “On” or “Off” to control the buzzer sound.
Width Input setting. Change width input to Grams or Ounces. Grams will display “0.” and Ounces will display “0.0”.
Diameter input setting. Change Diameter input to Grams or Ounces. Grams will display “0.” and Ounces will display “0.0”.
Unbalance unit of measurement. “Gr” means the unit will display in grams. “OS” means the unit will display in ounces.
Once you have found the system setting that you wish to change, press the ENTER key. This will then allow you to change the system setting to fit your needs. For example, the display will change to:
To Change this setting to off, push the UP or DOWN arrow. Once you have the setting correct to fit your needs, press the ENTER button to return to the system settings main menu. You can now use the UP or DOWN arrows to move to the next setting you wish to change.
Once you have made all the system setting changes you need, press the WHEEL
PARAMETERS INPUT AND SHIFT KEY which looks like: . This will save your changes and return you to the original balancing screen. To exit the system settings without saving your changes, press the STOP key.
If the above system settings instructions are not understandable, refer to following diagram:
7

6. Wheel Parameters Input
Install the wheel in either of the two ways shown here:
8

9

This must be performed before calibration and before balancing any wheel. If all four wheels for one vehicle are the same and being balanced, then parameters only need to be input one time. If you turn off the machine, the wheel parameters are forgotten and must be entered again.
To enter the wheel parameters input menu, press the WHEEL PARAMETERS INPUT
AND SHIFT KEY .
The display screen will show the following:
10

The number in the OUTSIDE UNBALANCE DISPLAY WINDOW may be different if you have used the machine before.
There are 3 parameters that must be entered when using Dynamic, Static, ALU1-3 and motorcycle mode.
You use the WHEEL PARAMETERS INPUT AND SHIFT KEY to navigate to each parameter screen. You will use the UP or DOWN key to change the measurement for each parameter. When you are finished entering each of the 3 parameters, simply push the STOP button to return to the balancing screen or if you already have your mode selected, you may close the hood and spin the wheel to begin balancing process.
The first parameter will look like this:
This parameter measures the distance of the wheel from the balancer. This is the A parameter. Use the built in ruler and extend it to the edge of the rim. You then multiply the measurement by 10 and enter than number for this parameter using the UP or DOWNkey. For example if the ruler shows 8, you multiply this by 10 to get 80. Enter 80 as
11

shown in the picture above. After you have this parameter entered, push the WHEEL PARAMETERS INPUT AND SHIFT KEY to navigate to the next parameter.
The second parameter will look like this:
This parameter measures the width of the rim. This is the B parameter. Use the plastic caliper provided with the machine to measure the width of the rim. Touch the caliper to the edge of the rim on both sides to measure the width. Use the UP or DOWN key to enter the parameter. Do not multiply this number like you did with parameter A. Simply enter the number as shown on the caliper. After you have this parameter entered, push the WHEEL PARAMETERS INPUT AND SHIFT KEY to navigate to the next parameter.
The third parameter will look like this:
This parameter measures the rim size. This is the D parameter. Use the plastic caliper provided with the machine to measure the width of the rim. Touch the caliper to the edgeof the rim on one side to measure the rim size. Use the UP or DOWN key to enter the parameter. Do not multiply this number like you did with parameter A. Simply enter the number as shown on the caliper.
When you are finished entering each of the 3 parameters, simply push the STOP button to return to the balancing screen.
At any time you may press the C button to change from Ounces to Grams. You can only do this when entering the B and D parameter.
When using ALUS mode, you must enter 4 parameters as shown in this diagram:
12

This must be performed before calibration and before balancing any wheel. If all four wheels for one vehicle are the same and being balanced, then parameters only need to be input one time. If you turn off the machine, the wheel parameters are forgotten and must be entered again.
7. Calibration
Calibration must be performed before machine will balance a wheel. If you move your balancer, calibration must be performed again. If you unplug or lose power to your balancer, calibration must be performed again. You do not have to leave the balancer power on, but do not unplug it from the electricity. Please remember to use a power surge protector to prevent damage to the electronics.
To begin, you must have a 15 or 14 inch steel rim with tire. If you don’t use a 15 or 14 inch steel rim, the machine will not balance correctly. Install this on the machine.
First, enter the wheel parameters then return to the initial balancing screen.
To enter the calibration process, do the following:
Press and Hold the FINE button for 5 seconds. The following screen will appear:
Now close the plastic hood and spin the wheel. If you have the guard control setting to “On” then the wheel will spin when the hood is closed. If you have the guard control setting is set to “Off” then you must push the START button to spin the wheel.
13
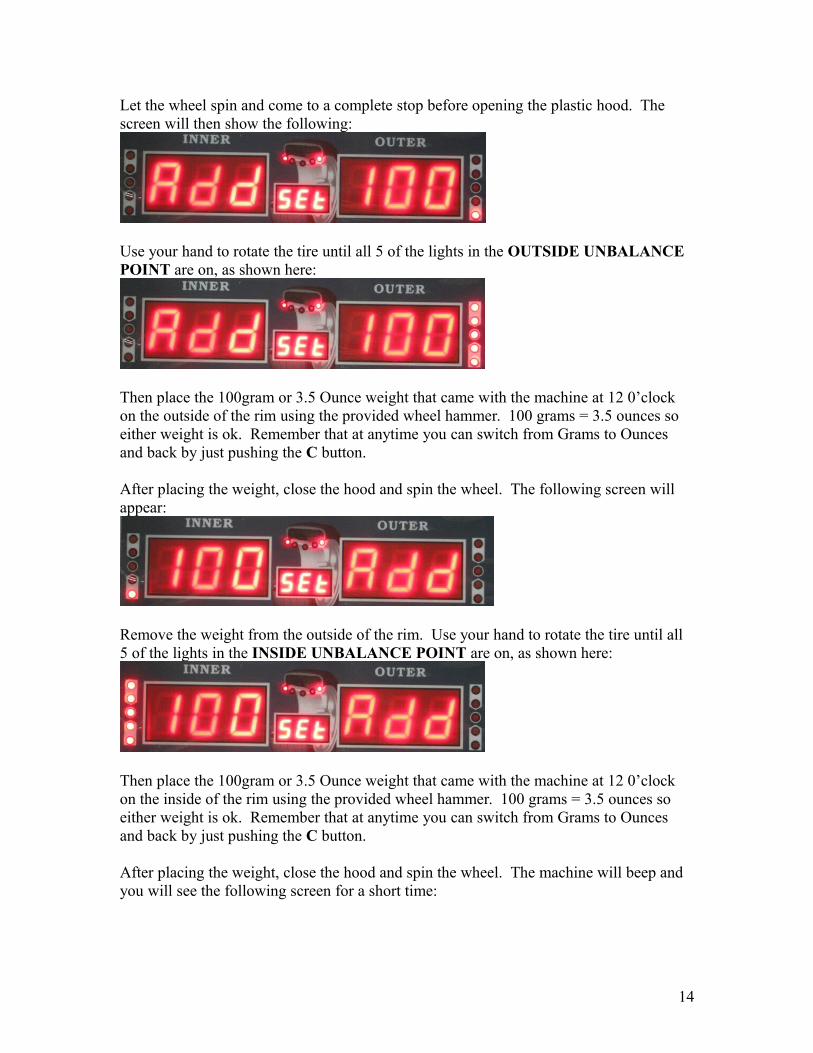
Let the wheel spin and come to a complete stop before opening the plastic hood. The screen will then show the following:
Use your hand to rotate the tire until all 5 of the lights in the OUTSIDE UNBALANCE POINT are on, as shown here:
Then place the 100gram or 3.5 Ounce weight that came with the machine at 12 0’clock on the outside of the rim using the provided wheel hammer. 100 grams = 3.5 ounces so either weight is ok. Remember that at anytime you can switch from Grams to Ounces and back by just pushing the C button.
After placing the weight, close the hood and spin the wheel. The following screen will appear:
Remove the weight from the outside of the rim. Use your hand to rotate the tire until all 5 of the lights in the INSIDE UNBALANCE POINT are on, as shown here:
Then place the 100gram or 3.5 Ounce weight that came with the machine at 12 0’clock on the inside of the rim using the provided wheel hammer. 100 grams = 3.5 ounces so either weight is ok. Remember that at anytime you can switch from Grams to Ounces and back by just pushing the C button.
After placing the weight, close the hood and spin the wheel. The machine will beep and you will see the following screen for a short time:
14

After showing this screen, the machine will automatically return to the initial balancing screen. You have successfully calibrated the machine and the data was saved automatically.
Please note that if you do not put a wheel weight on the rim, the machine will not calibrate. You will cause the machine to “chase itself to infinity” when trying to calculatethe calibration. The resulting screen will look like this:
If you see this screen, you did not calibrate it correctly. Turn off the machine and try again.
8. Standard Dynamic Mode
After completing the steps above, you are now ready to balance. Standard Dynamic mode is for balancing steel wheels by placing clip on weights on both the inside and outside of the rim. It is not for using aluminum wheels or stick on weights.
This is an example of balancing a steel wheel:
Start by placing the wheel on the machine and entering the parameters. Close the hood and spin the wheel. You will see:
Use your hand to rotate the tire until all 5 of the lights in the OUTSIDE UNBALANCE POINT are on, as shown here:
15

Then place the 2.25 Ounce weight that came with the machine at 12 0’clock on the outside of the rim using the provided wheel hammer. After placing the weight, close the hood and spin the wheel. The following screen will appear:
You have now zeroed out the balance for the outside of the rim.
Use your hand to rotate the tire until all 5 of the lights in the INSIDE UNBALANCE POINT are on, as shown here:
Now place the 3.00 Ounce weight that came with the machine at 12 0’clock on the outside of the rim using the provided wheel hammer. After placing the weight, close the hood and spin the wheel. The following screen will appear:
You zeroed out both sides and successfully balanced the wheel.
Please note that the machine is showing the wheel is balanced within the parameters you set in the system settings, specifically the “least unbalance value setting”. In the above balancing example, my “least unbalance value setting” was set to .70 ounces. After spinning the wheel and placing the weight, any unbalance value remaining that was less than .70 ounces was ignored and instead the machine showed it zeroed out.
This is where the FINE button comes into function. At anytime while balancing, you canpress the FINE button to show the exact unbalance value. The most accurate values are 1gram or .10 Ounce using the FINE button. Please see the following screen. This is the remaining unbalance value after the balancing example shown above was performed.
16

As you can see, the wheel is still technically out of balance by .20 Ounces on both sides. However, because I had the “least unbalance value setting” on .70 Ounces, the machine ignored the remaining .20 ounces because it was less than .70 ounces.
.20 Ounces may or may not make a significant difference depending on the size of the wheel and rim.
The FINE button function can be used in any of the balancing modes.
9. Static Mode
Press the DYNAMIC/STATIC MODE KEY to switch between Static and Dynamic mode. In static mode, everything functions the same as in Dynamic mode. However in Static mode you are only balancing the wheel by placing weight on the outside of the rim instead of on both sides.
10. ALU1-3 modes
This mode is used for Rims that do not accept clip on weights on one side or both sides. All parameters will be entered the same as in Dynamic mode. Please refer to the STICKING AND CLAMPING WEIGHT POSITION INDICATOR on the display screen as wheel as the following diagram to show where to place the weights on the rim.
17

11. ALUS mode
ALUS requires the user to enter 4 parameters as mentioned in the parameter entry instructions. As a result, ALUS will be the most accurate mode when using stick on weights. Please refer to the STICKING AND CLAMPING WEIGHT POSITION INDICATOR on the display screen and the following diagram when placing the weights on the rim.
18
The process is the same as the dynamic and static modes. The only difference is the parameter input and the position where weights will be put.
12. OPT mode
Please refer to the tire manufacture for instructions on how to match tires to the correct rim.
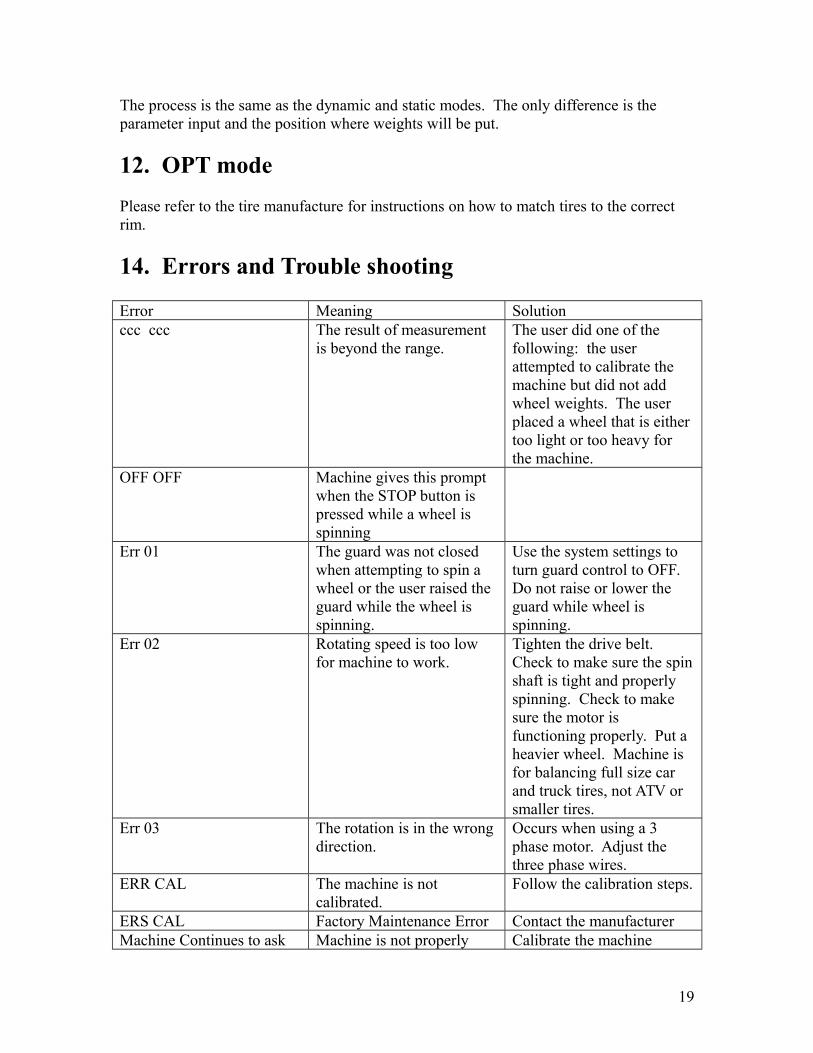
14. Errors and Trouble shooting
Error Meaning Solutionccc ccc The result of measurement
is beyond the range.The user did one of the following: the user attempted to calibrate the machine but did not add wheel weights. The user placed a wheel that is either too light or too heavy for the machine.
OFF OFF Machine gives this prompt when the STOP button is pressed while a wheel is spinning
Err 01 The guard was not closed when attempting to spin a wheel or the user raised the guard while the wheel is spinning.
Use the system settings to turn guard control to OFF. Do not raise or lower the guard while wheel is spinning.
Err 02 Rotating speed is too low for machine to work.
Tighten the drive belt. Check to make sure the spinshaft is tight and properly spinning. Check to make sure the motor is functioning properly. Put a heavier wheel. Machine is for balancing full size car and truck tires, not ATV or smaller tires.
Err 03 The rotation is in the wrong direction.
Occurs when using a 3 phase motor. Adjust the three phase wires.
ERR CAL The machine is not calibrated.
Follow the calibration steps.
ERS CAL Factory Maintenance Error Contact the manufacturerMachine Continues to ask Machine is not properly Calibrate the machine
19

for more weight calibrated, wheel parameters where not entered correctly, or weight sensor board is defective
properly. Enter wheel parameters correctly (remember that when the machine is turned off, the wheel parameters are not saved). Check weight sensor board for broken parts or loose wires.
Machine trips electrical breaker
Transformer or Power Board are defective
Replace the power board or transformer
Machine seems to overheat and shut down automatically
Transformer is overheating or power board is defective
Check temperature of transformer at the time the machine shuts down. If transformer is extremely hot, then it must be replaced. If transformer is not hot, then power board needs to be replaced.
Machine does not turn on Error in electrical wiring Check on off switch. Checkthe connection of all wires. Trace electrical current.
Copyright © 2010 National Auto Tools, Inc. www.nationalautotools.com
May not be copied or distributed without the permission of National Auto Tools, Inc.
20