1. injection molding · 1. injection molding 1.1 injection machine the injection machine is a...
TRANSCRIPT

- 1 -
1. Injection Molding
1.1 Injection machine
The injection machine is a machine that melt plasticize the molding material inside the heating
cylinder and inject this into the mold tool to create the molded product by solidifying inside it. The
injection machine is constructed of a mold clamping device that opens and closes the mold tool, and
device that plasticize and inject the molding material. There are several types in the injection
machine, and the difference is made by how these two devices are arranged.
(1) Horizontal injection machine : Both mold clamping device and injection device compounded
horizontally
(2) Vertical injection machine : Both mold clamping device and injection device compounded vertically
(3) Two-color injection machine
(4) Rotary injection machine
(5) Low foam injection machine
(6) Multi material injection machine
(7) Sandwich injection machine
1.2 Selection of injection machine
1.2.1 Select by injection volume
As a guide, generally the injection machine should be selected so that molded product volume will become 30%
to 80% of the machine's injection volume. When molding, the relation of the machine's injection volume Q(g) and
one shot weight (sprue and runner weight included) W(g) should be in the range indicated below.
Q = (1.3~1.5)×W
If the injection volume is too small, plasticization will not make it, and might lose its original physicality as a
molded product because the resin will be sent without enough plasticization. On the other hand, if the injection
volume is too big, residence time inside the cylinder will be longer and cause degradation by more chance.
1.2.2 Select by mold clamping pressure
Both toggle type and direct pressure type is suitable when molding NOVADURAN. The relation of molded
product projected area A(cm2) and required mold clamping pressure P(ton) should be in the range indicated
below.
P = (0.5~0.7)×A

- 2 -
1.2.3 Nozzle structure
Open nozzle is common when molding NOVADURAN. The nozzle of commercially-supplied injection machine
can be open nozzle or shut-off nozzle (Figure 1-1) but in any type, it is necessary to have a temperature control.
If drooling from the nozzle is concerned, use the shut-off nozzle. However, it might cause burn and sunspot
object by resin retention at the slide part, so be careful.
Figure 1-1 Types and structures of the nozzle
1.2.4 Injection mechanism
NOVADURAN can be molded by the basic injection machine which has the function of constant injection
speed and two-stage injection pressure control, but when molding the product which severe measurement,
appearance, and moldability (liquidity and demoldability) is required, it is effective to use the machine that has a
program control of injection speed and injection pressure.
1.2.5 Backflow prevention ring
Backflow prevention ring is necessary at the screw, because NOVADURAN has relatively low melt viscosity. If
this backflow prevention ring is damaged by wear or corrode, cushion volume cannot be kept because of the resin
backflow from the cylinder to the hopper when injecting (pressure keeping), and injection pressure (holding
pressure) might not be put properly to the cavity. In this case, good molded product cannot be made, so cushion
volume and its stability must be well controlled and maintained when molding. Corrosion and abrasion resistance
steel grade is preferable for the back flow prevention ring.
1.2.6 Drying machine
Preliminary drying is necessary before molding NOVADURAN, and the condition below is general.
120℃ 5~8 hours
130℃ 4~6 hours
Shelf-type hot air circulation dryer, hopper dryer, or dehumidification dryer is preferred when drying. To
prevent the dust and the dirt getting inside, a filter should be placed to air intake of the drying machine, and its
maintenance against clogging is also necessary.
(A) Open nozzle (B) Shut-off nozzle

- 3 -
1.3 Molding condition
1.3.1 Resin temperature
When molding NOVADURAN, resin temperature should be generally about 240℃~265℃. Liquidity will be
better as the temperature rises, but extremely high temperature will accelerate heat degradation which will end
up with physicality deterioration of the molded article.
1.3.2 Injection and pressure keeping
(1) Pressure
Injection pressure can be considered as the fill pressure (primary pressure) and the hold pressure (secondary
pressure). Generally the fill pressure will be set stronger than the hold pressure. When low-temperature
solidification, crystalline resin like NOVADURAN will cause a big shrink, therefore the hold pressure is
necessary for filling up and is closely related to the molding shrinkage. Increasing the hold pressure is effective to
resolve sink and void problem, but if it increase too much, it might cause burr, so the attention is required.
(2) Injection speed
In the case of thin molded product or multi-cavity molded product which severe size precision is required,
faster injection speed is better. In contrast, slower injection speed is better for thick molded product. Also, the
program control of injection speed is effective to resolve the jetting and the flow mark.
(3) Injection time
Setting will differ by the molding machine, but basically should be considered as below.
injection time (filling time + pressure keeping time) > gate sealing time
Gate sealing time is the time when resin stops flowing by solidification at the gate part. If pressure keeping is
put away before the gate is sealed, molten resin will backflow from the gate by the tool internal pressure, which
will cause measurement and physicality variability, and warpage, sink, and void problems, because of decrease in
molded product's filling density (packing property). To estimate the gate sealing time, measure the weight of
molded product by gradually increasing the injection time, and look for the injection time when the weight of
molded became a certain amount and stop changing.
1.3.3 Back pressure
The measurement might become instable by the gas and the air generated from molten resin when
plasticization. To stabilize the measurement and improve the kneading effect, put the screw back pressure (5
~10kg/cm2) on. However, if the back pressure is too strong, it might degrade the plasticization ability.
1.3.4 Mold temperature
Generally, 60℃ to 80℃ is suitable for mold temperature of NOVADURAN, and this is the most important

- 4 -
point in the molding condition. If high cycle molding is intended, molding in temperature of about 20℃ to 30℃
is possible by using chiller temperature controller, but require attention because it might cause deformation by
the residual strain inside the molded product, and dimension change by aftercontraction might be bigger
depending on the usage environment (high temperature atmosphere). It is effective to raise the mold temperature
to about 120℃, when dimension stability is required since assumed to use under a high temperature atmosphere,
or high level of surface gloss is necessary.
1.4 Preliminary drying
NOVADURAN is a resin with that has relatively low water absorption rate, but if it receives heat history when
it is absorbing water, even a small amount of moisture will cause hydrolysis reaction, and by that molecular
weight will decrease which will end up with degrade in physicality. Therefore, moisture must be removed well
enough before molding. Preliminary drying under conditions below is necessary before using.
Temperature of hot air 120℃ 5~8hours or
140℃ 4~6hours
About preliminary drying, if the temperature is under 100℃ it will have no drying effect, and if it is over 140℃,
pellet might change its color. Also, if the drying time is set longer than above, it might effect to liquidity and
pellet's color tone. Figure 1-2 indicates drying curve of pellet. If the pellet moisture rate exceed 0.03%, it will be
the cause of molded product surface appearance degradation, or physicality degradation.
Shelf-type hot air circulation dryer or hopper dryer is commonly used for preliminary drying. In the case of
shelf-type hot air circulation dryer, pellet height must be lower than 3cm to keep the drying efficiency.
Circulation type (partly air emission type) is good for the hopper dryer, furthermore, dehumidification type is
preferred.
When molding by the machine without hopper dryer, try to make the input of high temperature dried pellet
smaller as possible, and finish it within 30 minutes. If high temperature dried pellet is left inside the room, water
absorption speed will be extremely fast when cooling down. Figure 1-3 indicates water absorption curve of dried
pellet.
Figure 1-2 Drying curve of pellet Figure 1-3 Water absorption curve of dried pellet

- 5 -
1.5 Retention heat stability
If NOVADURAN is exposed to high temperatures when molding, molecular weight might decrease because of
the cut of molecular chain by heat deterioration. Figure 1-4 to 1-7 indicate relations between residence time and
physicality. From the figure, we know that deterioration will be faster as the cylinder temperature rises.
Furthermore, deterioration will accelerate as the moisture rate inside pellet rises, so need special attention.
Shortening residence time is especially necessary if adding reprocessed material. Effect to the residence time
is up to additive amount and heat history, and in the case of flame resisting grade, residence time should be set
even shorter.
Figure 1-4 Resin temperature, residence time and impact strength Figure 1-5 Resin temperature, residence time, and impact strength
Figure 1-6 Resin temperature, residence time, and melting viscosity Figure 1-7 Resin temperature, residence time, and melting viscosity
1.6 Liquidity
Liquidity of the molding material is important when deciding the molding condition at injection molding, and
choosing thickness and gate position of the molded product when mold designing. Viscosity index is shown by MI
value from melt index measurement, or melt viscosity from capillary rheometer measurement. These values are
used when drawing a comparison of liquidity between material to material, but these might not be enough to
evaluate the actual liquidity of the material when injection molding.
Therefore, showing liquidity by flow length of spiral or bar flow type mold is general for practical purposes.
When showing liquidity, flow length (L) is used and sometimes ratio (L/t) between cavity thickness (t) will be
- 6 -
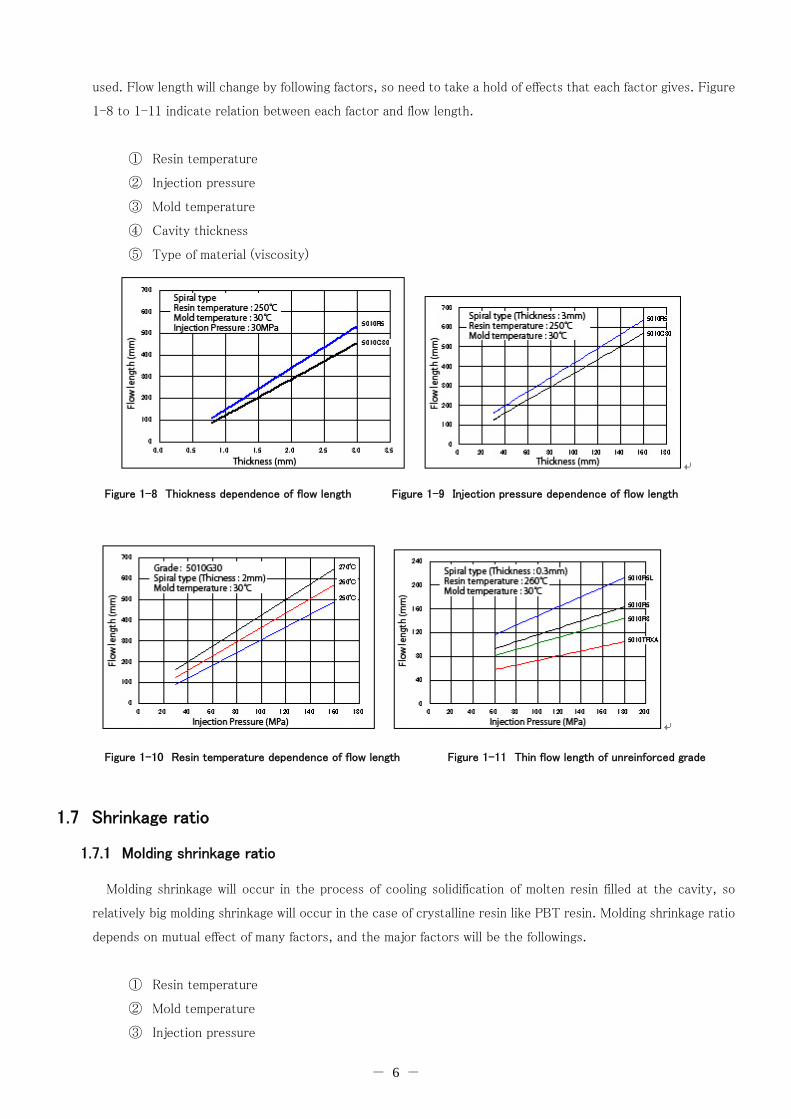
used. Flow length will change by following factors, so need to take a hold of effects that each factor gives. Figure
1-8 to 1-11 indicate relation between each factor and flow length.
① Resin temperature
② Injection pressure
③ Mold temperature
④ Cavity thickness
⑤ Type of material (viscosity)
Figure 1-8 Thickness dependence of flow length Figure 1-9 Injection pressure dependence of flow length
Figure 1-10 Resin temperature dependence of flow length Figure 1-11 Thin flow length of unreinforced grade
1.7 Shrinkage ratio
1.7.1 Molding shrinkage ratio
Molding shrinkage will occur in the process of cooling solidification of molten resin filled at the cavity, so
relatively big molding shrinkage will occur in the case of crystalline resin like PBT resin. Molding shrinkage ratio
depends on mutual effect of many factors, and the major factors will be the followings.
① Resin temperature
② Mold temperature
③ Injection pressure

- 7 -
④ Injection speed
⑤ Injection time
⑥ Molded product thickness
⑦ Filling material, shape of the reinforcing material, and content
Figure 1-12 indicates molding shrinkage ratio of NOVADURAN. In the case of glass fiber reinforcing PBT
resin, molding shrinkage ratio difference between machine direction and transverse direction is big compared to
unreinforced PBT resin, so anisotropic aspect is indicated. This shows us that effect that glass fiber orientation
gives is large.
1.7.2 Heating shrinkage ratio (aftercontraction ratio)
If the molded product is placed under high temperature after it is made, dimension will change by the progress
of crystallization and the relaxation of internal stress. Generally, dimension will be smaller, so this is called
"heating shrinkage" or "aftercontraction". In the case of NOVADURAN, the crystalline resin, aftercontraction
will occur by annealing process or exposing to high temperature at actual use environment. Aftercontraction
ratio will differ largely by the molding condition, heating temperature, and heating time of the molded product, so
require an attention. Figure 1-13 to 1-16 indicate relation between aftercontraction ratio and processing
temperature, mold temperature, and molded product thickness.
Figure 1-13 Aftercontraction ratio(Machine Direction)
Figure 1-12 Molding shrinkage ratio Figure 1-14 Aftercontraction ratio(Transverse Direction)

- 8 -
図 1-15 Aftercontraction ratio and mold temperature Figure 1-16 Aftercontraction ratio and molded product thickness
1.8 Countermeasure against molding defect
NOVADURAN is a resin with good injection moldability, but molding defect might occur by wrong molding
machine selection, irrelevant mold design, or irrelevant molding condition. The cause and its measure of these
molding defects will differ by the product and condition, but the typical molding defects and countermeasure of
those are indicated in the table 1-1 and 1-2.
Defect Cause Countermeasure
Strength poverty 1. Lack of drying
2. High resin temperature
3. Too much cushion volume
4. Shear heat generation at the runner
and the gate
5. Residence time too long
1. Preliminary dry the pellet well enough
2. Drop the cylinder temperature
3. Reduce the cushion volume
4. Make the runner and the gate bigger, and shorten
the gate land.
5a. Use the molding machine with appropriate
injection volume(about 1.5 to 3 times more than the
cavity volume)
5b. If resin remains inside the cylinder by some kind
of trouble, resume molding after purging it.
Warpage 1. Inappropriate gate location
2. Un even molded product thickness
3. Design of undercut, rib, and boss is
inappropriate
4. Lack of cooling
5. Large anisotropic of shrinkage ratio
1a. Change the gate location.
1b. Add the gates.
2. Try to make the molded product thickness even.
3. Change the design, thinking about warpage.
4. Drop the mold temperature, and make the
cooling time longer.
5. Use the low warpage grade.
Appearance defect
(Ex. GF standing
1. Slow injection speed
2. Weak injection pressure
1. Make the injection speed faster.
2. Make the injection pressure stronger.

- 9 -
Table 1-1 Molding defect of NOVADURAN and its countermeasures (Part 1)
Defect Cause Countermeasure
Drooling 1. High nozzle temperature
2. High resin temeperature
3. Strong back pressure
4. Big nozzle diameter
1. Drop the nozzle temperature.
2. Drop the cylinder temperature (especially the nozzle side).
3. Weaken the back pressure.
4a. Make nozzle diameter smaller.
4b. Use reverse taper nozzle.
4c. Put shut-off bulb on.
Sink marks 1. Lack of pressure keeping 1. Raise the pressure keeping.
out) 3. Not enough injection pressure on
the cavity
4. Big molded product thickness
5. Low resin temperature
6. Low mold temperature
7. Not enough preliminary drying
8. Poorly ventilated
9. Effect of mold lubricant
10. Lack of liquidity in resin material
3. Make the runner and the gate bigger.
4. Make it thinner.
5. Raise the cylinder temperature.
6. Raise the mold temperature.
7. Preliminary dry well enough under an appropriate
condition.
8a. Place a vent.
8b. Clear the clog.
9. Refrain to use mold lubricant.
10. Use good liquidity grade.
Burnt deposit 1. Fast injection speed
2. High resin temperature
3. Long residence time
4. Poorly ventilated
1. Make the injection speed slower.
2. Drop the cylinder temperature.
3a. Shorten the mold cycle.
3b. Use the molding machine of appropriate size.
4a. Place a vent.
4b. Clear the clog.
Nozzle clogged up 1. Low nozzle temperature
2. Low resin temperature
3. Low mold temperature
4. Small nozzle diameter
5. Heat is drawn by the mold
1. Raise the nozzle temperature
2. Raise the cylinder temperature (especially the
nozzle side)
3. Raise the mold temperature. When starting
molding, heat up the sprue bushing.
4. Make the nozzle diameter bigger.
5a. Raise the nozzle temperature.
5b. Pull back the nozzle after measurement.

- 10 -
2. Lack of pressure keeping time
3. Gate seal too fast
4. Molded product too thick
2. Make pressure keeping time longer.
3a. Make the measurement of the gate bigger.
3b. Make the gate land shorter.
3c. Make the measurement of the runner, sprue, and nozzle bigger.
4. Make the thickness thinner.
Burr 1. High injection pressure
2. High resin temperature
3. Too much plasticization
4. Lack of clamping capacity
5. Mold wear
1. Weaken the injection pressure.
2. Drop the cylinder temperature.
3. Decrease plasticization and adjust.
4. Make clamping force stronger. Change the molding machine to a
proper one with stronger clamping force.
5. Fix the mold and renew.
Wrong measurement
(too big)
1. Strong injection pressure and
overfilled
2. Excessive pressure keeping and
overfilled
3. High resin temperature
4. Low mold temperature
1. Weaken the injection pressure.
2. Weaken the pressure keeping, and make the pressure keeping time
shorter.
3. Drop the cylinder temperature.
4. Raise the mold temperature.
Wrong measurement
(too small)
1. Low injection pressure and lack of
filling
2. Low pressure keeping and lack of
filling
3. Low resin temperature
4. High mold temperature
5. Small gate temperature and lack of
filling
1. Raise the injection pressure.
2. Raise the pressure keeping, and make the pressure keeping time
longer.
3. Raise the cylinder temperature.
4. Drop the mold temperature.
5a. Make the measurement of the gate bigger.
5b. Make the gate land shorter.
5c. Make the measurement of the runner, sprue, and nozzle bigger.
Jetting 1. Fast injection speed
2. Strong injection pressure
3. Low resin temperature
4. Lack of gate measurement
5. Inappropriate gate location
1. Make the injection speed slower.
2. Weaken the injection pressure.
3. Drop the cylinder temperature.
4. Make the gate bigger (more than 2/3 of the thickness).
5. Rearrange the gate. Place the crucible.
Weld marks 1. Inappropriate gate location
2. Poorly ventilated
3. Low resin temperature
4. Slow injection speed
5. Low injection pressure
1. Rearrange the gate.
2a. Place a vent at weld part.
2b. Place a resin crucible.
3. Raise the cylinder temperature.
4. Make the injection speed faster.
5. Make the injection pressure, and pressure keeping stronger.
Screw rotation defect 1. Low cylinder temperature
2. Strong back pressure
1. Raise the cylinder temperature (especially the hopper side).
2. Weaken the back pressure.

- 11 -
3. Fast rotation speed
4. Lack of molding function
3. Drop the rotation speed.
4. Use molding machine with appropriate injection volume (more than
two times bigger compare to the cavity volume).
Mold releasing defect 1. Lack of draft angle and polishing
2. Ejector pin placed at improper
location, lack in number and thickness
3. High injection pressure and pressure
keeping
4. Lack of cooling time
1a. Make the draft angle bigger.
1b. Polish the mold towards mold releasing direction.
2. Increase the ejector pin and rearrange.
3. Weaken the injection pressure and pressure keeping.
4. Make the cooling time longer.
Table 1-2 Molding defect of NOVADURAN and its countermeasures (Part 2)
2. Mold Designing
2.1 Point of mold designing
Designing of molded product should be done to fulfill demanded characteristics of desired product, and need to
evaluate material's practical physicality, moldability, liquidity, and mold designing condition, comprehensively.
Basic points of mold designing are indicated below.
(1) Try not to make the thickness excessively thick, and try to keep it even, so that rapid change in thickness
will not occur.
If the molded product thickness is too thick, it will be the cause of defect like sink marks and void. Also, it will
take time to cool down and the molding cycle will be longer. When there is need to be thick for function, try to
keep it even by placing the recess. If there is unevenness or rapid change in thickness, flow marks might occur
because it blocks the resin flow, or warpage might occur by uneven mold shrinkage ratio, or deformation of
molded product might occur by uneven cooling speed.
Figure 2-1 Design of thickness distribution
Bad Bad
Bad
Bad Bad
Bad
Fair Fair
Fair Fair
Fair Fair

- 12 -
Figure 2-2 Design of thickness change
(2) Try not to make the undercut.
If there is undercut in molded product, problems likely to occur when releasing the mold, so as a general rule,
there should be no undercut. When undercut have to be placed by necessity, make the undercut volume small
enough towards the limit strain based on material physicality, or design the mold construction not be forced
extraction by placing the slide core.
Undercut volume (%)= ×100
Figure 2-3 Undercut volume Figure 2-4 Design of undercut
(3) Consider the draft angle.
If the draft angle is not enough, resist when releasing the mold will be big and the molded product might deform
by the ejector pin, so the draft angle should be taken as big as possible. Typical draft angle of NOVADURAN is
about 0.25 to 1°in unreinforced grade, and about 0.5 to 2°in GF reinforced grade. Following shows the points
of the draft angle design in typical form.
① Box, top form : Make the draft angle of the outside (cavity side) big to make it easy to take out. Make
the inside bit small to take balance of the cavity left and the core (outside 1 to 2°, inside 0.5 to 1°).
When placing the inverse warpage as a countermeasure against the warpage, taking the draft angle
bigger is good.
② Boss : Boss is relatively difficult to take out, so the draft angle need to be big (0.5 to 1°). The base
area will be big if the boss height is high, so making a hollow is one way to prevent the sink marks.
③ Grid : The pitch need to be big, because if it is small (smaller than 3mm), taking out will be difficult.
φD-φd
φD
Bad
Fair
Good
Machine direction
Machine direction
Machine direction
- 13 -
Also, it will be more difficult to take out as the grid number increases, so the draft angle need to be big
depending on the grid number (3 to 5°).
④ Rib : In the case of longitudinal rib, draft angle of more than 0.25°, in the case of bottom rib, draft
angle of more than 0.5°is preferred. Also, from workability point of view, more than 1mm thickness for
the tip of a rib is preferred.
⑤ Texture : The draft angle will differ by the texture type, depth, direction, processing method, or
whether it will be undercut or not, but generally, 4 to 5°(3 to 4°smallest) of draft angle is necessary.
Figure 2-5 Design of draft angle
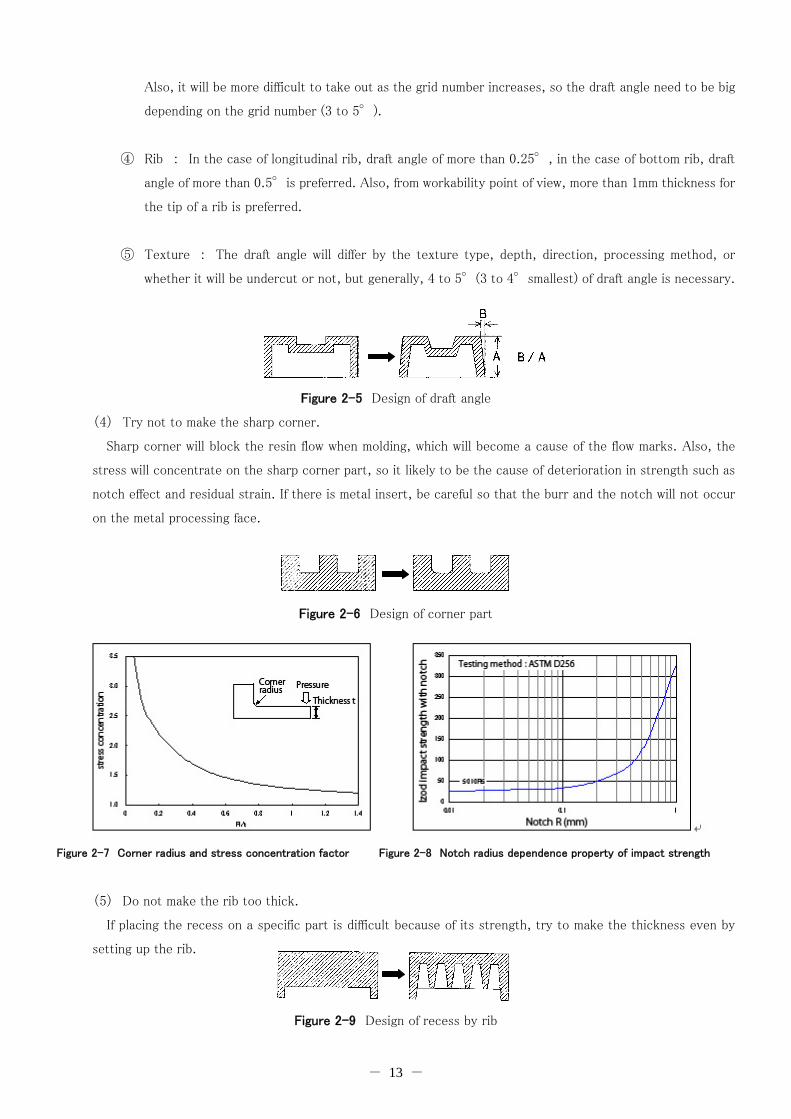
(4) Try not to make the sharp corner.
Sharp corner will block the resin flow when molding, which will become a cause of the flow marks. Also, the
stress will concentrate on the sharp corner part, so it likely to be the cause of deterioration in strength such as
notch effect and residual strain. If there is metal insert, be careful so that the burr and the notch will not occur
on the metal processing face.
Figure 2-6 Design of corner part
Figure 2-7 Corner radius and stress concentration factor Figure 2-8 Notch radius dependence property of impact strength
(5) Do not make the rib too thick.
If placing the recess on a specific part is difficult because of its strength, try to make the thickness even by
setting up the rib.
Figure 2-9 Design of recess by rib

- 14 -
(6) Do not make the ratio of diameter to length big in the case of cylindrical molded product.
Long and thin core pin might cause problem such as falling over and getting broken by the resin pressure when
molding. Also, the temperature of the central part of the core pin will become high compared to the end, so inner
diameter measurement is likely to vary, and if the mold cycle is short, skin layer of the inner diameter side might
be torn by the resin inner pressure.
Figure 2-10 Dimensional stabilize of cylindrical molded product by rib
(7) Consider the weld location and the resin orientation, and determine the gate location, direction, and
number.
(8) Try to make the molded product form tough.
(9) Consider the easiness of mold creation, and be careful the following points when forming so that mold
machining and finishing will be easier.
① Parting line should be simple straight line without a tilt.
② Round every edge, both inside and outside.
③ If mold machining is difficult because of the shape, use embedded structure.
④ Select a shape such as straight line and circle, so that deciding by machining will be simple.
⑤ Decide surface finishing by parts, to get rid of unnecessary face accuracy.
⑥ There are dimensions that directly settle by the mold and dimensions does not settle by the mold, so be
careful.(Table 2-1)
(10) Design considering building up and fabricating.
Type Example of application Accuracy
Dimension that settle
by the mold
1. General dimension
2. Curvature radius
3. Central clearance
1. Inside or outside horizontal and vertical
dimension of box type, inner and outer
diameter of the cup
2. Roundness of corner part
3. Space of hole, salient, and recess
3. Central clearance of implanted hardware
High
Low
Middle
Middle
Dimension that does
not settle by the mold
1. Dimension at mold opening
direction (dimension that get
across the parting line)
2. Dimension that settle by mold
assemblage
3. Parallelism, eccentricity
1. Outside height of box type and cup,
thickness of base
2. Dimension settle by relation of core and
cavity, relation of side core.
3. Swing of inner and outer axis of hollow
cylinder, shift of concentric circle
Middle
Low
Low

- 15 -
Other dimension 1. Skew, warpage, crook
2. Angle
1. Making the injection speed faster
2. Scale angle of indicator, tilt part angle
Low
Low
Table 2-1 Dimensions settle directly by mold and dimensions does not settle by mold
2.2 Gate Designing
Gate selection should be made considering molded product shape, number, performance, appearance,
economic efficiency, and moldability. There are many types of gates, and Figure 2-11 indicates structure of each
gate.
(1) Direct sprue gate
Used in the case of single- cavity, or when placing the gate directly to the base of the molded product.
Residual strain tend to occur because the injection pressure will directly apply to the molded product, but its
mold construction is most simple.
(2) Side gate
This type is most generally adopted, and used well in multi-cavity mold. Its shape is rectangle or semicircle,
and placed at side of the molded product.
(3) Fan gate
Its structure is similar to the side gate, but gate width is bigger and fan-shaped. Used in large size molded
product.
(4) Pinpoint gate
Diameter of the pinpoint gate is 0.5mm to 2mm, and as an advantage, it does not need any finishing. Gate seal
is fast and pressure that generates residual strain will not apply to the molded product. If the gate
cross-sectional area is small, flow distance will decrease and flow marks tend to occur around the gate.
(5) Disk gate
This gate is used to prevent eccentricity and weld when molding disk or cylinder shaped one. However, there
is a disadvantage that the finishing of the gate part is difficult.
(6) Ring gate
Used like the disk gate. Ring part must get filled first and then the cylinder part, otherwise the weld will occur.
(7) Film gate
This type will be applied to the plate shaped molded product. This type is effective to prevent deformation by
suppressing residual strain.
(8) Tab gate

- 16 -
This is a method that set up a tab on the side of the molded product, and place a gate there. Normally, the
gate and the tab should be placed at a right angle. Gate seal will happen on the gate part, so suppressing residual
strain and flow marks inside the tab is possible.
(9) Submarine gate
There is a runner part on the parting line surface, but the gate reach the side of the molded product through
fixed template or moving template from the runner part. When releasing the mold after mold opening, the gate
will automatically get cut.
2.3 Pressure loss
Pressure loss will occur on the sprue, runner, and gate part so be careful. Presuming the resin is Newtonian
fluid, the amount of pressure loss will be shown as the following, and from that, we know it depends largely on
cross-section thickness and diameter.
【 Rectangle cross-section 】
12・L・η・Q η : Viscosity, Q : Current speed
W・h3 L : Length, W : Width, h : thickness
【 Circle, semicircle, ellipse cross-section 】
8・L・η・Q η : Viscosity, Q : Current speed
π・R4 L : Length, R : Hydraulic radius
2・S S : Sectional area
ℓ ℓ : Cross-section perimeter
Practically, resin is a non Newtonian fluid with viscoelasticity, so viscosity will decrease if the shearing force
get bigger and cross-section thickness and diameter get smaller. So the actual effect of pressure loss might be bit
smaller than the formula above.
Direct sprue gate Side gate Fan gate
Pressure loss ΔP =
Pressure loss ΔP =
however R =
Land Gate width (w)
Gate thickness (t)
Gate

- 17 -
Pinpoint gate Disk gate Ring gate
Pinpoint gate Disk gate Ring gate
Figure 2-11 Gate type and structure
2.4 Multi-cavity layout
In the case of multi-cavity type, runner design will play an important role, because the dimension tend to vary
widely. Family-cavity type, which molds the product with different cavity shapes simultaneously, is basically not
recommended.
In the case of double-cavity layout, right and left layout is preferred rather than above and bottom, because it
will be affected by the gravity. Especially talking about thick molded product, the resin will be affected by the
gravity at the lower cavity, and jetting might occur because it droop down to the lower cavity after getting
through the gate.
In the case of multi-cavity type, the runner length to each cavity should be laid out equally (isometry runner),
and try to fill up simultaneously. If the runner length differs like a serial runner, keep balance by the gate
diameter. In the case of more than octuple-cavity type, inner cavity tend to get filled even if the isometry runner
is used, so keeping balance by the gate diameter might be necessary (Figure 2-13).
Secondary sprueProduct
Sprue
Gate
Main runner Sub runner
OverflowRing gate
DiskEjector pin
Gate diameter
Product
Parallel runner Division surface
Tab
Sprue
Product Ejector pinPrimary gate
Main runner
Runner
Gate

- 18 -
Figure 2-12 Layout example of multi-cavity
Figure 2-13 Filling pattern example of octuple-cavity isometry runner (one side half model)
2.5 Cooling pipework
Design of the mold cooling circuit is very important because it will work as a heat exchanger that cools the
resin when molding. Aboutφ8~12mm is preferred for the diameter of the mold cooling hole. Its location should
be near the cavity face as possible, and try to make the distance between cooling holes shorter as possible.
Shortest distance from the cavity surface to the cooling hole will be decided by the mold material, cooling hole
dimension, shape, and cavity inner pressure.
Figure 2-14 indicates relation between cooling hole distance from the cavity surface and cooling hole
dimension. This curve calculates the diameter of the cooling hole, presuming the cavity surface will elastically
change by 2m. As a rule of thumb, distance between cooling holes should be taken more than 0.7 times of the
cooling hole diameter.
However, this kind of layout is very difficult on the actual mold, so the actual mold is composed of combination
of various cooling circuit. If we are to classify the cooling circuits, there will be straight, circle, multistage, spiral,
flat turn around, jet (bubbler tube), separate plate (baffle plate), and etc. (Figure 2-15)
Also, partly replacing the mold material with the material which has better heat conductivity is one method for
the part where placing cooling flow passage is difficult.
(A) Serial runner (B) Isometry runner (C) Isometry runner
Inner cavity tend to get filled

- 19 -
Figure 2-14 Relation of distance from cavity surface to cooling hole and cooling hole dimension
Figure 2-15 Examples of cooling circuit structure

- 20 -
2.6 Gas vent
There are several ways to place a gas vent to the mold, but it can be classified broadly into the following three
ways.
・ Gas venting from the divided face of the mold
・ Gas venting from the cavity and core part
・ Gas venting by other special way
(2) Gas venting from the divided face of the mold (parting line)
Vent depth should be 0.005mm to 0.02mm, and generally placed on the following location.
① Preferably far from the gate.
② Place where weld lines tend to occur.
③ End part of the runner or sub runner.
(3) Gas venting from the cavity and core part
1) Method using ejector pin
Ejector pin and its hole clearance is used in this method. The clearance of pin and its hole should be
0.02mm to 0.03mm if the pin diameter is about 5mm to 10mm. If it is thinner than this, 0.01mm to 0.02mm
is general for the clearance.
2) Method using core pin
If there is tall boss or rib on the part of the product, vent by making clearance around the core pin.
3) Method by layered nesting block
As a method of gas venting of tall rib, use the clearance made by layered nesting composed of thin
blocks. Also, insert a flat part of the cavity as layered nesting, and vent from the clearance of that thin
plates.
(4) Gas venting by other special way
There is a method that ventilates a gas instantaneously by making high-vacuum state inside the
cavity, using the vacuum pump. This method is an ideal as a gas venting method, and also effective
for transfer accuracy upgrading against the mold cavity, but as disadvantage, the cost of equipment
will be expensive, and mold construction will be complicated.
2.7 Slide core
Slide core structure will be used if there is undercut on the molded product. This is a structure
that gates a slide core from side to side, by angular pin fixed on the ejector plate. If the sliding
distance is long, hydraulic cylinder unit will also be used.

- 21 -
Figure 2-16 Example of gas vent structure

- 22 -
3. Countermeasure Against Molded Product Wapage Deformation
3.1 Cause of deformation (warpage)
Deformation and dimension change by warpage are often being a problem of PBT resin molded product.
Following factors are the cause of the warpage deformation, but actually it will happen when several factors
overlap intricately.
【 Cause of warpage deformation 】
① Design ・ Lack of shape stiffness
・ Uneven thickness
・ Shape asymmetric property
② Material property ・ Crystalline
・ Anisotropy
・ Lack of material stiffness
③ Molding process ・ Resin and filling material orientation
・ Uneven inner pressure
・ Uneven cooling speed (mold temperature)
・ Shrinkage restriction by mold core
④ Fabricating ・ Thermal process (printing paint, adhesive setting process)
・ Aftercontraction
・ After processing, After insert
⑤ Usage environment ・ High and low temperature atmosphere
・ Creep
Following indicate examples of countermeasure against deformation for relatively simple shaped molded
products. Calculation made by CAE simulation is now getting discussed for complex shaped molded products.

- 23 -
3.2 Countermeasure against deformation in discoid molded product
(1) Generally, effect to the roundness by the gate type tend to be better in the following order.
Side gate < Pin gate(double points) < Pin gate (triple points) < Center sprue gate
(2) Weld might influence the roundness, especially in GF reinforced grade, so take care of the gate location,
try to mold under a good liquidity condition, and be careful of the mold gas vent.
(3) Deformation towards surface run out direction is often occurred by the shrinkage ratio difference between
diametrical direction and circumferential direction. Other than taking balance in shape, there is a method
that place a rib towards circumferential direction to strengthen the stiffness and remedy. The multipoint pin
gate is relatively effective against the surface run out.
(A) Side gate (B) Double-point gate (C) Triple-point gate (D) Center sprue gate
(A) Side gate (B) Pin gate (C) Spoke gate (D) Diaphragm gate
Figure 3-1 Gate type and roundness of discoid molded product
Figure 3-2 Example of countermeasure against surface run out

- 24 -
3.3 Countermeasure against deformation in cylinder molded product
(1) Triple or quadruple-point gate is preferred, since it can directly get in from longitudinal direction. In the
case of the side gate or submarine gate, make the runner go around and prevent the core from falling over
by making it two to three points.
(2) In the case of double cylinder, the rib thickness should be 1/3 of the base, because the joint rib thickness
will affect to the roundness.
(3) Cooling the core pin is very important element. Other than direct water cooling and heat pipe indirect
cooling, little ingenuity is required such as air cooling or using special material that have good heat
conductivity, when the pin is thin.
(4) Shape should be all similar in whole circumference. If there is a segmental part, placing a dummy bridge and
cut after cooling will be an effective method to prevent falling down.
(A) Side gate (B) Pin gate (C) Spoke gate (D) Diaphragm gate
Figure 3-3 Gate type and roundness of cylinder molded product
Figure 3-4 Making multipoint by runner in submarine gate case
Figure 3-5 Joint rib in double cylinder case Figure 3-6 Example of dummy bridge placement on segmental part
Dummy bridge

- 25 -
3.4 Countermeasure against deformation in long and thin molded product
(1) Long and thin will be greatly affected by the gate design, and it should be a design that resin flows towards
longitudinal direction. If the flow distance is short, the end gate from one end will be suitable to prevent
deformation.
(2) If the flow distance is long, there need to be a multipoint gate. In this case, attention against weld location
is required. If the width of the molded product is large, setting up the multipoint pin gate on the centerline
is good.
(A) Center gate
(B) End gate (C) Multipoint gat
Figure 3-7 Gate location and deformation of long and thin molded product
3.5 Countermeasure against deformation in flat plate molded product
(1) Generally, if there is a rib, it will stick up because the cooling is faster than the base, so convex deformation
to the rib side tend to happen. Therefore, H type cross-section structure which makes it possible to add
the rib on the other side, or create the rib on the other side by making the base thickness thinner.
(2) In the case of GF reinforced grade, twist deformation might occur from orientation unevenness, so attention
against the gate location and size is required.
(3) This shape will be affected a lot by the shape factor, so countermeasure by the molding condition is
generally difficult. There is method that make difference in mold temperature, but it will accompany a
hardship in facility aspect and management aspect.

- 26 -
Figure 3-8 Rib deformation effect on flat plate molded product
3.6 Countermeasure against deformation in L-shaped and U-shaped molded product
(1) At the corner part, outside cooling will be faster than the inside, so this shape tend to deform towards the
inside direction.
(2) Remedying by placing the gate on the corner part is sometimes possible if it is GF reinforced grade.
(3) Lightening the corner inside part is effective. Make the recess part round, and do not make the sharp
corner.
(4) If there is no limitation, place a triangle rib towards the corner. Take the triangle rib from the high location
as possible, and the thickness have to be thinner than the half of the base.
(5) If the triangle rib cannot be placed to the inside, putting a T-shaped rib on the outside of the corner is
another method.
Fall down deformation of L-shaped molded product (A) Gate placement to the corner part
(B) Recess of corner part (C) Triangle rib (D) Adding T-shaped rib
Figure 3-9 Fall deformation examples of L-shaped molded product
Gate→
Fall down
Cooling fall down
Fast cooling

- 27 -
3.7 Countermeasure against deformation in box molded product
(1) Generally, warpage towards inside tend to be bigger as the span get longer, and it tend to be bigger on the
long side, compared to the short side. Remedying by placing a rib on the inside, or placing a triangle rib on
the corner part, is possible.
(2) Strengthening shape stiffness of the edge part is also effective. Especially effective in GF reinforced grade.
(3) Core cooling is highly effective. Core cooling countermeasure should be considered well.
(4) Pin gate is a little better than the side gate in many situations.
Warpage towards inside (A) Reinforcing by placing rib
(B) Reinforcing sidewall (C) Reinforcing by band rib
(D) Reinforcement examples of edge part
Figure 3-10 Example of countermeasure against warpage deformation in box molded product

- 28 -
4. Recycling
4.1 Points of recycling
NOVADURAN can be recycled, but it might cause trouble if the direction is not good. As stated above, PBT
will degrade in physicality by causing hydrolysis if heat history is received without enough drying, so the drying of
fractured product need to be well considered when recycling. Also, in the case of GF reinforced grade, GF
fracture will occur when pulverizing, and degrade in strength when recycling tend to be bigger than the
unreinforced grade. Figure 4-1 to 4-8 indicate examples of physicality change when recycled NOVADURAN is
used.
Recycled material ratio of about 30% is possible in general NOVADURAN molding, if the direction is good
enough. If recycled material ratio goes over 30% or the water control of the recycled material is not good,
problem such as crack might occur. If the molded product is thin or have complex structure, often the mold
temperature will be high and large molding machine will be used, physicality degradation tend to occur when
molding, even if the drying is enough.
Figure 4-1 Tensile strength degradation of 5010R5 by recycling Figure 4-2 Tensile strain decrease in 5010R5 by recycling
Figure 4-3 Viscosity degradation of 5010R5 by recycling Figure 4-4 Impact strength degradation of 5010G30 by recyclin

- 29 -

- 30 -
Figure 4-5 Tensile strength degradation of 5010G30 by recycling Figure 4-6 Tensile strain decrease in 5010G30 by recycling
Figure 4-7 Flexural strength degradation of 5010G30 by recycling Figure 4-8 Flexural elasticity degradation of 5010G30 by recycling
4.2 Model calculation on repetitious recycling
As a reference, model calculation of recycled material ratio and physicality degradation on repetitious
recycling is indicated. If the recycled material mix rate is a constant value "r", recycled material ratio on
repetitious recycling will be as following.
Number of recycle Virgin material Once recycled material Twice recycled material Three times
recycled material Four times recycled material Five times recycled material ...
0 1
1 1-r r
2 1-r r(1-r) r2
3 1-r r(1-r) r2(1-r) r3
4 1-r r(1-r) r2(1-r) r3(1-r) r4
5 1-r r(1-r) r2(1-r) r3(1-r) r4(1-r) r5
Ex) If r=0.3(30% recycled), image will be like Figure 4-9
・・・

- 31 -
Number of recycle
0
1
2
3
4 -Four times
5 -Five times
Virgin material Once Twice Three times
Figure 4-9 Recycled material mixed image when 30% recycled
Furthermore, considering the physicality degradation by heat history from one molding, and replacing that
physicality retention rate with "α", physicality retention rate in each recycled time will be shown as below.
Number of recycle Physicality retention rate
0 α
1 α(1-r) + α(α・r)
2 α(1-r) + α(α・r)(1-r) + α(α・r)2
3 α(1-r) + α(α・r)(1-r) + α(α・r)2(1-r) + α(α・r)3
n α(1-r) + α(1-r) (α・r)k + α(α・r)n
∞ α(1-r) + α(1-r) + 0 =
Figure 4-10 indicates relation between number of recycle and physicality retention rate in the case that
recycled material ratio r=0.1,0.3,0.5, and physicality retention rate α=0.98,0.95. In each case,
physicality retention rate will be close to attainable retention rate if the recycling have been done about five
times, so recycling should be considered about five times in recycling discussion of the product. If the recycling
material ratio is too high, attainable retention rate will decrease, and recycling number tend to increase to get
close to the attainable retention rate and get stabilized (Figure 4-11). Generally, recycled material ratio should
be below 30%.
If recycling number cannot be increased, consideration can be made on recycled material ratio thinking about
attainable retention rate. For example, if the actual recycled material ratio is 30%, substitution method can be
made by testing once in recycled material ratio of 50%. However, recycling will be influenced greatly by
pulverization shape and water control, so sufficient confirmation is required.
Σ k=1
n-1
1-α・r
α・r
1-α・r
α(1-r)
・・・
・・・
・・・

- 32 -
Figure 4-10 Number of recycle and physicality retention rate (calculated value) Figure 4-11 Influence of recycled material ratio (calculated value)
4.3 Review method of recycling
Proper recycled material mix rate depends on the recycled material quality, using grade, and product's demand
characteristics, so cannot be completely defined. Therefore, decision of the limit of the recycled material ratio
should be made after sufficient check has been done. Do not mix oil or trash when recycling sprue and runner.
Also, molded products made for testing or requirement proposal are not suitable for recycling because the
physicality is unsteady. Figure 4-12 indicates the flow chart of the recycling method.

- 33 -
Figure 4-12 Flow chart of recycling method