1. get vmware software - bemsel · to evaluate cisco’s nexus 1000v in conjunction with netqos...
TRANSCRIPT

To evaluate Cisco’s Nexus 1000v in conjunction with NetQoS SuperAgent virtual collector, I had to install an
ESX Server into my lab. All necessary steps to do the first installation of ESX Server are documented in
this TechTip and a few others to follow on my web site
1. Get VMware Software
Download VMware vSphere Enterprise Plus and optionally VMware vCenter Server Standard
https://www.vmware.com/tryvmware/index.php?p=vspherecisco
As hardware I did use an HP Proliant DL140 G3 with 8 GB RAM, which I found on eBay a while back. A good
source would be LA Micro Group, Woodland Hills, CA
ESX will only install on a 64bit processor
After the registration process is completed, you will get a 60 days license YOUR TRIAL INCLUDES
• VMware vSphere Enterprise Plus
• VMware vCenter Server Standard
VMware vSphere Expiration Date: Oct 16, 2010 xxxxx-xxxxx-xxxxx-xxxxx-xxxxx
VMware vCenter Server 4 Expiration Date: Oct 16, 2010 xxxxx-xxxxx-xxxxx-xxxxx-xxxxx
Next, you will have to write the ISO Images on a DVD, which will ease the installation. You can also choose
to install from NFS, HTTP or FTP
Summary of Installation Steps of ESX 4.0
created by: Rainer Bemsel – Version 1.0 – Dated: Aug/21/2010

Summary of Installation Steps of ESX 4.0 page 2 of 6
Start the installation by inserting the Installation DVD in your DVD Drive and boot from DVD. Following
installation screen will appear.
Press Return or have the timer count down, the graphical mode will start
After the Welcome Screen you will be presented with the End User License Agreement you have to accept in
order to continue the installation.
Summary of Installation Steps of ESX 4.0 page 3 of 6
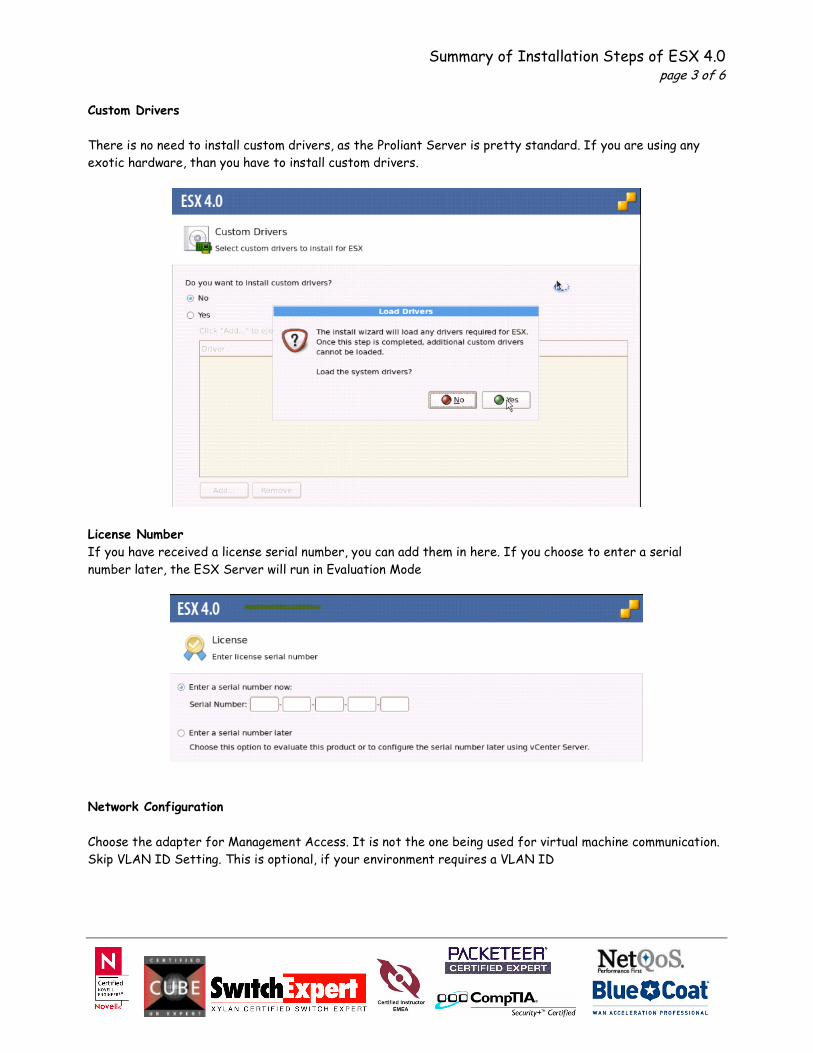
Custom Drivers
There is no need to install custom drivers, as the Proliant Server is pretty standard. If you are using any
exotic hardware, than you have to install custom drivers.
License Number
If you have received a license serial number, you can add them in here. If you choose to enter a serial
number later, the ESX Server will run in Evaluation Mode
Network Configuration
Choose the adapter for Management Access. It is not the one being used for virtual machine communication.
Skip VLAN ID Setting. This is optional, if your environment requires a VLAN ID

Summary of Installation Steps of ESX 4.0 page 4 of 6
Set static network address configuration and Test these settings – Do not continue until the Test
completes successfully
Install Media
Choose CD-ROM as the source for this ESX installation – other options only make sense if you host the
source on a remote location.

Summary of Installation Steps of ESX 4.0 page 5 of 6
Setup Type
If you have only a single hard drive, standard setup would be sufficient. Advanced Setup will give you the
option to choose and customize individual ESX partitions.
ESX Storage Device
There you can select the location to install ESX
Time Zone
Select the Time Zone and manually adjust calendar and time. If you have access to an NTP Server, I highly
suggest to chose NTP Server. Computer clocks are not as accurate as we believe
Set Administrator Password and let installation script do it’s job

Summary of Installation Steps of ESX 4.0 page 6 of 6
Finally, you can connect to your new ESX Server with your web browser and will get following Welcome
Screen
Once, you see that screen your ESX Server is ready to receive Virtual Machines and Virtual Appliances