06-uft_addinsguide
DESCRIPTION
testTRANSCRIPT

HP UFT Add-ins Guide Software Version: 11.50
Enter the operating system(s), e.g. Windows ®
For GUI Testing
Document Release Date: December 2012
Software Release Date: December 2012

2
Legal Notices
Warranty
The only warranties for HP products and services are set forth in the express warranty statements accompanying such products and services. Nothing herein should be construed as constituting an additional warranty. HP shall not be liable for technical or editorial errors or omissions contained herein.
The information contained herein is subject to change without notice.
Restricted Rights Legend
Confidential computer software. Valid license from HP required for possession, use or copying. Consistent with FAR 12.211 and 12.212, Commercial Computer Software, Computer Software Documentation, and Technical Data for Commercial Items are licensed to the U.S. Government under vendor's standard commercial license.
Copyright Notices
© 1992 - 2012 Hewlett-Packard Development Company, L.P.
Trademark Notices
Adobe® and Acrobat® are trademarks of Adobe Systems Incorporated.
Intel®, Pentium®, and Intel® Xeon™ are trademarks of Intel Corporation in the U.S. and other countries.
Java™ is a US trademark of Sun Microsystems, Inc.
Microsoft®, Windows®, Windows NT®, and Windows® XP are U.S registered trademarks of Microsoft Corporation.
Oracle® is a registered US trademark of Oracle Corporation, Redwood City, California.
Unix® is a registered trademark of The Open Group.
SlickEdit® is a registered trademark of SlickEdit Inc.

3
Documentation Updates
The title page of this document contains the following identifying information:
• Software Version number, which indicates the software version.
• Document Release Date, which changes each time the document is updated.
• Software Release Date, which indicates the release date of this version of the software.
To check for recent updates, or to verify that you are using the most recent edition of a document, go to:
http://h20230.www2.hp.com/selfsolve/manuals
This site requires that you register for an HP Passport and sign-in. To register for an HP Passport ID, go to:
http://h20229.www2.hp.com/passport-registration.html
Or click the New users - please register link on the HP Passport login page.
You will also receive updated or new editions if you subscribe to the appropriate product support service. Contact your HP sales representative for details.

4
Support
Visit the HP Software Support web site at:
http://www.hp.com/go/hpsoftwaresupport
This web site provides contact information and details about the products, services, and support that HP Software offers.
HP Software online support provides customer self-solve capabilities. It provides a fast and efficient way to access interactive technical support tools needed to manage your business. As a valued support customer, you can benefit by using the support web site to:
• Search for knowledge documents of interest
• Submit and track support cases and enhancement requests
• Download software patches
• Manage support contracts
• Look up HP support contacts
• Review information about available services
• Enter into discussions with other software customers
• Research and register for software training
Most of the support areas require that you register as an HP Passport user and sign in. Many also require a support contract. To register for an HP Passport ID, go to:
http://h20229.www2.hp.com/passport-registration.html
To find more information about access levels, go to:
http://h20230.www2.hp.com/new_access_levels.jsp

5
Table of Contents
Welcome to the HP Unified Functional TestingAdd-ins Guide ................................................................................17
HP Unified Functional Testing Add-ins Guide Overview ...................17Prerequisite Background......................................................................18How Do I Find the Information That I Need? ....................................19Unified Functional Testing Help Contents.........................................21Additional Online Resources...............................................................25
PART I: WORKING WITH UFT ADD-INS
Chapter 1: UFT Add-ins Overview.......................................................29
Concepts
UFT Add-in Support - Overview..........................................................30Record and Run Settings for Add-ins - Overview................................35UFT Add-in Extensibility .....................................................................38
Tasks
How to Manage UFT Add-ins ..............................................................40How to Define Record and Run Settings for UFT Add-ins..................41
Reference
Add-in Manager Dialog Box ................................................................44

Table of Contents
6
Chapter 2: Web-Based Application Support.......................................49
Concepts
Web-Based Application Support - Overview.......................................51Considerations - Web-Based Application Support..............................51Registering Browser Controls ..............................................................54Accessing Password-Protected Resources in the Active Screen ...........55Checkpoints for Web Pages.................................................................57Event Recording Configuration for Web-Based Applications.............58Advanced Operations on Web-Based Applications.............................59Web Object Identifiers ........................................................................62
Tasks
How to Define Record and Run Variables for a Web-Based Environment...................................................................................67
How to Modify Event Recording Configuration for Web-Based Applications ....................................................................................69
How to Configure UFT to Record Mouse Clicks .................................71How to Use Web Object Identifiers - Exercise ....................................73
Reference
Web Tab (Record and Run Settings Dialog Box).................................77Web > General Pane (Options Dialog Box).........................................82Web Pane (Test/Business Component Settings Dialog Box /
Application Area - Additional Settings Pane) ...............................101Web Event Recording Configuration XML File Structure ................106Register Browser Control Utility .......................................................108Active Screen Dialog Box...................................................................109
Chapter 3: Windows-Based Application Support .............................117
Concepts
Windows-Based Application Support - Overview.............................118
Tasks
How to Configure Options for Windows-Based Applications ..........120How to Define Record and Run Settings for Windows-Based
Applications ..................................................................................121

Table of Contents
7
Reference
Windows Applications Tab (Record and Run Settings Dialog Box) .124Windows Applications > General Pane (Options Dialog Box >
GUI Testing Tab) ...........................................................................136Windows Applications > Advanced Pane (Options Dialog Box >
GUI Testing Tab) ...........................................................................139
PART II: .NET ADD-IN
Chapter 4: .NET Add-in - Overview...................................................151
Chapter 5: .NET Web Forms Add-in - Quick Reference ....................153
Concepts
Considerations for Testing .NET Web Forms....................................156 .NET Web Forms Objects and Outputting Values............................157
Reference
Troubleshooting and Limitations - .NET Web Forms.......................158
Chapter 6: .NET Windows Forms Support - Quick Reference ..........163
Concepts
Considerations for Testing .NET Windows Forms Applications ......166.NET Add-in Extensibility..................................................................166Troubleshooting and Limitations - .NET Windows Forms...............167
Chapter 7: .NET Windows Forms Support - Testing and Configuration171
Concepts
.NET Windows Forms Objects - Checkpoints and Output Values ...172
.NET Windows Forms Spy .................................................................174
Tasks
How to Use the .NET Windows Forms Spy.......................................176
Reference
.NET Windows Forms Spy Dialog Box ..............................................182
Chapter 8: .NET Silverlight Add-in - Quick Reference ......................187
Concepts
Silverlight Add-in Extensibility ........................................................191

Table of Contents
8
References
Troubleshooting and Limitations - Silverlight Add-in .....................193
Chapter 9: .NET Windows Presentation Foundation Add-in - Quick Reference197
Concepts
Considerations for Working with the WPF Add-in ..........................200WPF Add-in Extensibility ..................................................................200
Reference
Troubleshooting and Limitations - Windows Presentation Foundation .....................................................................................202
Chapter 10: .NET Windows Presentation Foundation Add-in - Testing and Configuration205
Concepts
About WPF User Interface Automation ............................................206 WPF Objects, Methods, and Properties to Enhance Your Test or
Component...................................................................................208
PART III: ACTIVEX ADD-IN
Chapter 11: ActiveX Add-in - Quick Reference.................................213
Concepts
Considerations for Working with the ActiveX Add-in .....................216
Reference
Troubleshooting and Limitations - ActiveX Add-in .........................218
PART IV: DELPHI ADD-IN
Chapter 12: Delphi Add-in - Quick Reference...................................225
Concepts
Delphi Add-in Extensibility ..............................................................228
Tasks
How to Enable Communications Between UFT and Your Delphi Application....................................................................................230

Table of Contents
9
PART V: FLEX ADD-IN
Chapter 13: Flex Add-in - Quick Reference.......................................235
Concepts
Considerations - Flex Add-in.............................................................237
Tasks
How to Prepare Flex Applications for Testing..................................239
Reference
Troubleshooting and Limitations - Flex Add-in ...............................241
PART VI: JAVA ADD-IN
Chapter 14: Java Add-in - Quick Reference.......................................245
Concepts
Considerations - Java Add-in.............................................................248Java Add-in Extensibility ...................................................................250
Reference
Troubleshooting and Limitations - Java Add-in ...............................252
Chapter 15: Java Add-in - Testing and Configuration ......................267
Concepts
Java Add-in - Overview......................................................................268Recording Steps on Java Objects .......................................................269Advanced Java Test Object Methods.................................................272Java Add-in Environments ................................................................275
Tasks
How to Record Steps on Java Table Objects......................................277How to Define Record and Run Environment Variables for Java
Objects ..........................................................................................281How to Optimize Settings for Other Record and Run Settings
Dialog Box Tabs ............................................................................282How to Disable Dynamic Transformation Support (Advanced).......283

Table of Contents
10
Reference
Java Pane (Options Dialog Box > GUI Testing Tab)..........................286Java Pane (Test/Business Component Settings Dialog Box /
Application Area - Additional Settings Pane) ...............................294Java Tab (Record and Run Settings Dialog Box) ...............................298
PART VII: ORACLE ADD-IN
Chapter 16: Oracle Add-in - Quick Reference...................................305
Concepts
Considerations for Working with the Oracle Add-in ......................308
Reference
Troubleshooting and Limitations - Oracle Add-in............................310
Chapter 17: Oracle Add-in - Testing and Configuration ..................315
Concepts
Recording Tests on Oracle Applications ...........................................316 Dynamic Transformation Support ..................................................318
Tasks
How to Verify or Enable the Oracle Server Unique Name Attributes.......................................................................................320
How to Enable the Oracle Name Attribute .......................................321How to Set Oracle Environment Variables .......................................323How to Locate the Java Console .......................................................324How to Disable Dynamic Transformation Support ..........................325
Reference
Oracle Tab (Record and Run Settings Dialog Box)............................327Oracle Record and Run Environment Variables ...............................330
PART VIII : PEOPLESOFT ADD-IN
Chapter 18: PeopleSoft Add-in - Quick Reference............................335
Concepts
Considerations for Working with the PeopleSoft Add-in.................338
Reference
Troubleshooting and Limitations - PeopleSoft Add-in .....................339
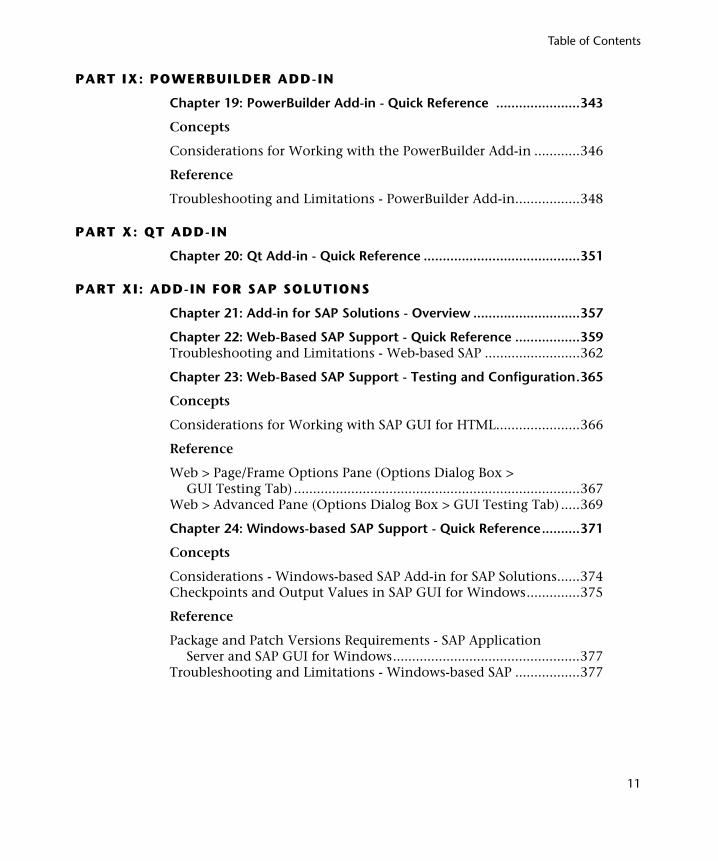
Table of Contents
11
PART IX: POWERBUILDER ADD-IN
Chapter 19: PowerBuilder Add-in - Quick Reference ......................343
Concepts
Considerations for Working with the PowerBuilder Add-in ............346
Reference
Troubleshooting and Limitations - PowerBuilder Add-in.................348
PART X: QT ADD-IN
Chapter 20: Qt Add-in - Quick Reference .........................................351
PART XI: ADD-IN FOR SAP SOLUTIONS
Chapter 21: Add-in for SAP Solutions - Overview ............................357
Chapter 22: Web-Based SAP Support - Quick Reference .................359Troubleshooting and Limitations - Web-based SAP .........................362
Chapter 23: Web-Based SAP Support - Testing and Configuration.365
Concepts
Considerations for Working with SAP GUI for HTML......................366
Reference
Web > Page/Frame Options Pane (Options Dialog Box > GUI Testing Tab) ...........................................................................367
Web > Advanced Pane (Options Dialog Box > GUI Testing Tab) .....369
Chapter 24: Windows-based SAP Support - Quick Reference..........371
Concepts
Considerations - Windows-based SAP Add-in for SAP Solutions......374Checkpoints and Output Values in SAP GUI for Windows..............375
Reference
Package and Patch Versions Requirements - SAP Application Server and SAP GUI for Windows.................................................377
Troubleshooting and Limitations - Windows-based SAP .................377

Table of Contents
12
Chapter 25: Windows-based SAP Support - Testing andConfiguration................................................................................385
Concepts
SAP GUI Scripting API and UFT .......................................................386Using the Auto-Parameterize Option to Parameterize Table and
Grid Cell Values ............................................................................389Low-Level or Analog Mode Recording on SAP GUI for Windows....397Spooling Data from a Table...............................................................398
Tasks
How to Enable Support for SAP GUI for Windows...........................399How to Record on Standard Windows Controls During an
SAP GUI for Windows Recording Session.....................................406
Reference
SAP Tab (Record and Run Settings Dialog Box) ................................407Environment Variables for Windows-based SAP Applications.........411SAP > General Pane (Options Dialog Box > GUI Testing Tab) .........412
Chapter 26: UFT-SAP Solution Manager Integration .......................417
Concepts
UFT-SAP Solution Manager Integration - Overview .........................419Test Management in SAP Solution Manager.....................................420Resource Files in Solution Manager ..................................................422Standalone Mode...............................................................................422Integrated Mode ................................................................................424
Tasks
How to Configure Solution Manager to Work with UFT .................425How to Open and Save Tests in Solution Manager in
Standalone Mode ..........................................................................428How to Upload Files to Solution Manager in Standalone Mode ......431How to Run a Test Stored in Solution Manager in
Standalone Mode ..........................................................................435How to Run a Test Stored in Solution Manager in Integrated Mode437How to Display or Edit a GUI Test from Solution Manager in
Integrated Mode............................................................................439How to Transfer Data To and From GUI Tests in Integrated Mode
Using Test Parameters ...................................................................441

Table of Contents
13
Reference
Solution Manager Testing Modes: Standalone or Integrated............442Solution Manager Connection Dialog Box .......................................444Save GUI Test to Solution Manager Dialog Box................................446Open GUI Test from Solution Manager Dialog Box .........................448Upload File to Solution Manager Dialog Box ...................................449Save External File to Solution Manager Dialog Box..........................451Download File from Solution Manager.............................................452SAP > SAP Solution Manager Pane (Options Dialog Box >
GUI Testing Tab) ...........................................................................454Solution Manager Trace Options Dialog Box....................................456
PART XII: SIEBEL ADD-IN
Chapter 27: Siebel Add-in - Quick Reference....................................461Considerations - Siebel Add-in..........................................................464Troubleshooting and Limitations - Siebel Add-in.............................465
Chapter 28: Siebel Add-in - Testing and Configuration...................471
Concepts
Siebel Add-in - Overview ...................................................................472Siebel Test Object Model - Overview.................................................473Siebel Add-in - Checkpoints and Output Values ..............................476Siebel 7.7.x or Late - Test Automation Module Configuration.........479
Tasks
How to Define Environment Variables for Siebel Applications........482How to Upgrade Tests Created with Version 6.5 of the Siebel
Add-in ...........................................................................................483
Reference
Siebel Tab (Record and Run Settings Dialog Box).............................485
Chapter 29: Siebel Test Express ........................................................491
Concepts
Using Siebel Test Express to Generate or Update Shared Object Repositories ...................................................................................492
Tasks
How to Use Siebel Test Express to Generate or Update a Shared Object Repository..........................................................................493

Table of Contents
14
Reference
Create Object Repository Wizard ......................................................496
PART XIII: STANDARD WINDOWS TESTING SUPPORT
Chapter 30: Standard Windows Support -Quick Reference.............507
PART XIV: STINGRAY ADD-IN
Chapter 31: Stingray Add-in - Quick Reference................................513Considerations for Working with the Stingray Add-in ...................515Troubleshooting and Limitations - Stingray Add-in.........................516
Chapter 32: Stingray Add-in - Testing and Configuration ...............519
Concepts
Setting Up Stingray Object Support ..................................................520Stingray Run-time Agent (Agent DLL) ..............................................521Stingray Precompiled Agent Mode....................................................522
Tasks
How to Set Up Your Stingray Project Using the Precompiled Agent Mode...................................................................................523
Reference
Stingray Support Configuration Wizard ...........................................527Stingray Pane (Options Dialog Box) .................................................548
PART XV: TERMINAL EMULATOR ADD-IN
Chapter 33: Terminal Emulator Add-in - Quick Reference ...............557Troubleshooting and Limitations - Terminal Emulator ...................559
Chapter 34: Terminal Emulator Add-in - Testing and Configuration................................................................................567
Concepts
Terminal Emulator Add-in - Overview..............................................568Recording Tests and Components on Terminal Emulator
Applications ..................................................................................570Checkpoints and Output Values - Terminal Emulators....................572Run Session Synchronization ...........................................................573Terminal Emulator Recovery Scenarios ............................................574

Table of Contents
15
Tasks
How to Check the Validity of a Terminal Emulator Configuration.576How to Copy Existing Terminal Emulator Configurations ..............576How to Set Your HLLAPI Terminal Emulator to Work with UFT .....579How to Manage Terminal Emulator Configuration Settings............585How to Synchronize Steps on Terminal Emulators ..........................586
Reference
Test Object Classes and Icons - Terminal Emulators ........................590Validating a Terminal Emulator - Possible Error Responses .............591Terminal Emulator Pane (Options Dialog Box) ................................595Terminal Emulator Configuration Wizard Overview .......................609
PART XVI: VISUALAGE SMALLTALK ADD-IN
Chapter 35: VisualAge Smalltalk Add-in - Quick Reference..............637
Tasks
How to Configure the VisualAge Smalltalk Add-in ..........................640
PART XVII: VISUAL BASIC ADD-IN
Chapter 36: Visual Basic Add-in - Quick Reference...........................645
Reference
Troubleshooting and Limitations - Visual Basic Add-in ...................648
PART XVIII: WEB ADD-IN
Chapter 37: Web Add-in - Quick Reference......................................651Web Add-in Extensibility ..................................................................654Extensibility Accelerator for HP Functional Testing .........................655Considerations - Mozilla Firefox .......................................................656Considerations - Google Chrome .....................................................659Considerations - Working With Multiple Browsers..........................659Troubleshooting and Limitations - Web Add-in...............................660
Chapter 38: Web Add-in - Testing and Configuration .....................669
Concepts
Event Recording Configuration for Web Objects - Overview...........670Web 2.0 Toolkit Support ...................................................................675

Table of Contents
16
Tasks
How to Manage Custom Web Event Recording Configurations ......681How to Manage Listening and Recording Events for Web Objects..683
Reference
Web Event Recording Configuration Dialog box .............................686Custom Web Event Recording Configuration Dialog Box ...............688
PART XIX: APPENDIX
Appendix A: GUI Checkpoints and Output Values Per Add-in.........695Supported Checkpoints .....................................................................696Supported Output Values ..................................................................698

17
Welcome to the HP Unified Functional TestingAdd-ins Guide
This chapter includes:
➤ HP Unified Functional Testing Add-ins Guide Overview on page 17
➤ Prerequisite Background on page 18
➤ How Do I Find the Information That I Need? on page 19
➤ Unified Functional Testing Help Contents on page 21
➤ Additional Online Resources on page 25
HP Unified Functional Testing Add-ins Guide Overview
This HP Unified Functional Testing Add-ins Guide explains how to set up support for, and work with, the UFT add-ins and standard Windows testing support, enabling you to test any supported environment using GUI tests and business components. The guide begins with an introductory section that describes working with GUI testing add-ins, and specific aspects of working with Windows-based and Web-based add-ins. After this overview section, and the section on standard Windows testing support, the add-ins are presented alphabetically.

Welcome to the HP Unified Functional Testing Add-ins Guide
18
Prerequisite Background
This guide assumes that you are familiar with UFT features and options. It describes the functionality that is added or changed in UFT when you work with specific GUI testing add-ins, as well as other add-in-specific considerations and best practices.
This guide should be used in conjunction with the HP Unified Functional Testing User Guide and the HP Unified Functional Testing Object Model Reference.
The information, examples, and screen captures in this guide often focus specifically on working with GUI tests. However, much of the information applies equally to keyword components and scripted components. Information that is unique to using a specific add-in with Business Process Testing is indicated as such.
Note: Keyword components and scripted components are part of HP Business Process Testing, which utilizes a keyword-driven methodology for testing applications. For more information, see the section on working with Business Process Testing in the HP Unified Functional Testing User Guide.
For users that work with UFT add-in extensibility, UFT also provides developer guides that describe how to extend UFT support for third-party and custom controls for supported environments, such as Delphi, Java, .NET, or Web. For more information, see the relevant Add-in Extensibility Help, available from the UFT Extensibility Documentation program group (Start > All Programs > HP Software > HP Unified Functional Testing > Extensibility > Documentation). Printer-friendly (PDF) versions of the developer guides are available in the <Unified Functional Testing installation folder>\help\Extensibility folder.

Welcome to the HP Unified Functional Testing Add-ins Guide
19
This guide is intended for UFT users at all levels. You should already have some understanding of functional testing concepts and processes, and know which aspects of their application you want to test.
In addition, because each UFT add-in takes advantage of commonly used UFT features such as the object repository, Keyword View, and checkpoints and output value steps, you should also have at least a basic understanding of these concepts before you begin working with a UFT add-in.
How Do I Find the Information That I Need?
Within this guide, each subject area is organized into topics. A topic contains a distinct module of information for that subject. The topics are generally classified according to the type of information they contain.
This structure is designed to create easier access to specific information by dividing the documentation into the different types of information you may need at different times.
Three main topic types are in use: Concepts, Tasks, and Reference. The topic types are differentiated visually using icons.
Topic Types
Topic Type Description Usage
Concepts General Concepts. Background, descriptive, or conceptual information.
Learn general information about what a feature does.
Use-case Scenario Concepts. Real-life examples of when or why to use a specific product area.
Learn why or when you may want to use the feature.
Welcome to the HP Unified Functional Testing Add-ins Guide
20
Tasks Instructional Tasks. Step-by-step guidance to help you work with the application and accomplish your goals. Some task steps include examples, using sample data.
Task steps can be with or without numbering:
➤ Numbered steps. Tasks that are performed by following each step in consecutive order.
➤ Non-numbered steps. A list of self-contained operations that you can perform in any order.
➤ Learn about the overall workflow of a task.
➤ Follow the steps listed in a numbered task to complete a task.
➤ Perform independent operations by completing steps in a non-numbered task.
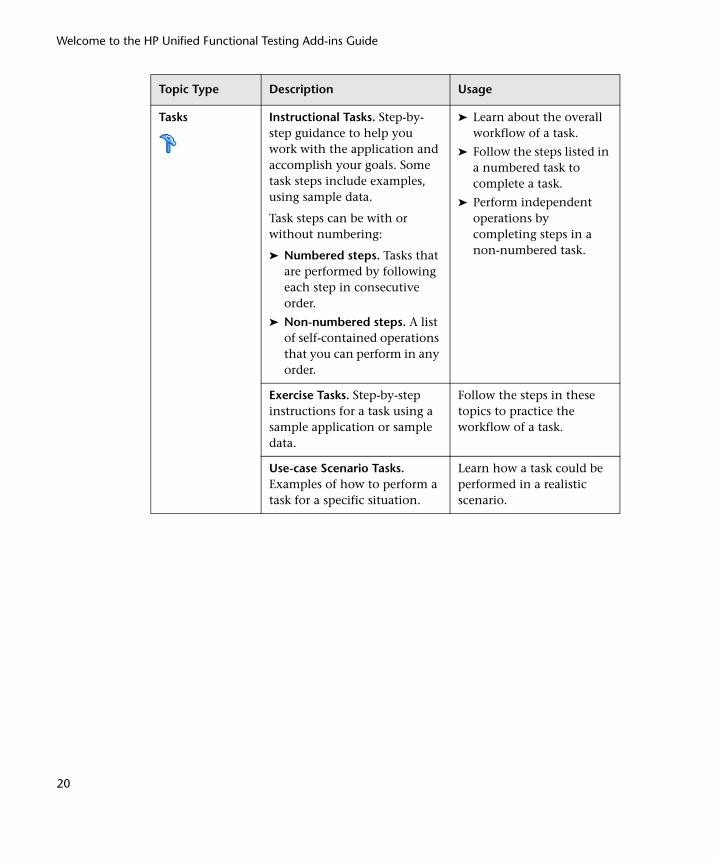
Exercise Tasks. Step-by-step instructions for a task using a sample application or sample data.
Follow the steps in these topics to practice the workflow of a task.
Use-case Scenario Tasks. Examples of how to perform a task for a specific situation.
Learn how a task could be performed in a realistic scenario.
Topic Type Description Usage

Welcome to the HP Unified Functional Testing Add-ins Guide
21
Unified Functional Testing Help Contents
This guide is part of the Unified Functional Testing Help. The Unified Functional Testing Help provides a single-point of access for all UFT documentation.
You can access the Unified Functional Testing Help by using the following:
➤ Select Help > HP Unified Functional Testing Help.
➤ In the Start menu, select All Programs > HP Software > HP Unified Functional Testing > Documentation > HP Unified Functional Testing Help.
➤ Click in selected UFT windows and dialog boxes or press F1.
➤ View a description, syntax, and examples for a UFT test object, method, or property by placing the cursor on it and pressing F1.
Reference General Reference. Detailed lists and explanations of reference-oriented material.
Look up a specific piece of reference information relevant to a particular context.
User Interface Reference. Specialized reference topics that describe a particular user interface in detail. Pressing F1 in the product area generally open the user interface topics.
Look up specific information about what to enter or how to use one or more specific user interface elements, such as a window, dialog box, or wizard.
Troubleshooting and Limitations
Troubleshooting and Limitations. Specialized reference topics that describe commonly encountered problems and their solutions, and list limitations of a feature or product area.
Increase your awareness of important issues before working with a feature, or if you encounter usability problems in the software.
Topic Type Description Usage

Welcome to the HP Unified Functional Testing Add-ins Guide
22
The Unified Functional Testing Help includes the following:
Type Included Documentation
Getting Started Documentation
➤ Readme provides the latest news and information about UFT. Select Start > All Programs > HP Software > HP Unified Functional Testing > Readme.
➤ HP Unified Functional Testing Installation Guide explains how to install and set up UFT. Select Help > Unified Functional Testing Help and click the link to the Installation Guide.
➤ HP Unified Functional Testing Tutorial teaches you basic UFT skills and shows you how to design tests for your applications. Select Help > Unified Functional Testing Help > Tutorial.
➤ Product Feature Movies provide an overview and step-by-step instructions describing how to use selected UFT features. Select Help > Product Feature Movies.
➤ Using this Help. Information on the structure, navigation, and content of the Unified Functional Testing Help. Select Help > Unified Functional Testing Help.
➤ What’s New provides an overview of the features, enhancements and supported environments that are new in the current version of UFT. Choose Help > What’s New.

Welcome to the HP Unified Functional Testing Add-ins Guide
23
Feature Documentation
Unified Functional Testing Help includes:
➤ Home provides links commonly used topics, feature movies, and links to support sites and forums.
➤ What’s New in Unified Functional Testing describes the newest features, enhancements, and supported environments in the latest version of UFT.
➤ HP Unified Functional Testing User Guide describes how to use UFT to test your application.
➤ HP Unified Functional Testing for Business Process Testing User Guide provides step-by-step instructions for using UFT to create and manage assets for use with Business Process Testing.
➤ HP Unified Functional Testing Add-ins Guide describes how to work with supported environments using UFT add-ins, and provides environment-specific information for each add-in.
➤ HP Unified Functional Testing Object Model Reference describes UFT test objects, lists the methods and properties associated with each object, and provides syntax information and examples for each method and property.
Type Included Documentation

Welcome to the HP Unified Functional Testing Add-ins Guide
24
Reference Documentation
➤ HP Unified Functional Testing Advanced References contains documentation for the following UFT COM and XML references:
➤ HP Unified Functional Testing Automation Object Model provides syntax, descriptive information, and examples for the automation objects, methods, and properties. It also contains a detailed overview to help you get started writing UFT automation scripts. The automation object model assists you in automating test management, by providing objects, methods and properties that enable you to control virtually every UFT feature and capability.
➤ HP Unified Functional Testing Run Results Schema documents the run results XML schema, which provides the information you need to customize your run results.
➤ HP Unified Functional Testing Object Schema documents the test object XML schema, which provides the information you need to extend test object support in different environments.
➤ HP Unified Functional Testing Object Repository Schema documents the object repository XML schema, which provides the information you need to edit an object repository file that was exported to XML.
➤ HP Unified Functional Testing Object Repository Automation documents the Object Repository automation object model, which provides the information you need to manipulate UFT object repositories and their contents from outside of UFT.
➤ VBScript Reference contains Microsoft VBScript documentation, including VBScript, Script Runtime, and Windows Script Host.
Type Included Documentation

Welcome to the HP Unified Functional Testing Add-ins Guide
25
Additional Online Resources
Sample applications. The following sample applications are the basis for many examples in this guide:
➤ Mercury Tours sample Web site. The URL for this Web site is newtours.demoaut.com.
➤ Mercury Flight application. To access from the Start menu, select Start > All Programs > HP Software > HP Unified Functional Testing > Sample Applications > Flight.
Troubleshooting & Knowledge Base accesses the Troubleshooting page on the HP Software Support Web site where you can search the Self-solve knowledge base. Choose Help > Troubleshooting & Knowledge Base. The URL for this Web site is http://h20230.www2.hp.com/troubleshooting.jsp.
HP Software Support accesses the HP Software Support Web site. This site enables you to browse the Self-solve knowledge base. You can also post to and search user discussion forums, submit support requests, download patches and updated documentation, and more. Choose Help > HP Software Support. The URL for this Web site is www.hp.com/go/hpsoftwaresupport.
Most of the support areas require that you register as an HP Passport user and sign in. Many also require a support contract.
To find more information about access levels, go to:
http://h20230.www2.hp.com/new_access_levels.jsp
To register for an HP Passport user ID, go to:
http://h20229.www2.hp.com/passport-registration.html
HP Software Web site accesses the HP Software Web site. This site provides you with the most up-to-date information on HP Software products. This includes new software releases, seminars and trade shows, customer support, and more. Choose Help > HP Software Web site. The URL for this Web site is www.hp.com/go/software.

Welcome to the HP Unified Functional Testing Add-ins Guide
26

Part I
Working with UFT Add-ins

28

29
1UFT Add-ins Overview
This chapter includes:
Concepts
➤ UFT Add-in Support - Overview on page 30
➤ Record and Run Settings for Add-ins - Overview on page 35
➤ UFT Add-in Extensibility on page 38
Tasks
➤ How to Manage UFT Add-ins on page 40
➤ How to Define Record and Run Settings for UFT Add-ins on page 41
Reference
➤ Add-in Manager Dialog Box on page 44
Chapter 1 • UFT Add-ins Overview
30
Concepts
UFT Add-in Support - Overview
UFT add-ins help you to create and run tests and business components on applications in a variety of development environments. After you load an add-in, you can record and run tests or business components on applications in the corresponding development environment, similar to the way you do with any other application. When you work with UFT add-ins, you can use special methods, properties, and various special options to create the best possible test or business component for your application.
You can install UFT add-ins when you install UFT, or you can install the add-ins at a later time by running the installation again in Modify mode. For details about installing and loading add-ins, see "How to Manage UFT Add-ins" on page 40.
When UFT opens, you can choose which of the installed add-ins you want to load using the Unified Functional Testing Add-In Manager dialog box, but to maximize performance, you should load only the add-ins you need for that testing session.
UFT includes built-in support for testing standard Windows applications. Standard Windows testing support is automatically loaded when UFT opens.
Your UFT license enables all UFT features, including the use of all UFT add-ins. You can use the latest released version of all add-ins with UFT. If you upgrade from a version earlier than 9.5, only licensed add-ins are available. Additional non-licensed add-ins that you install are disabled in the Add-in Manager dialog box. For details on installing add-ins and licenses, see the HP Unified Functional Testing Installation Guide. For details, see "Add-in Licenses" on page 33.
Chapter 1 • UFT Add-ins Overview
31
Using Add-ins in Your Test or Component
➤ You can use the Keyword View, the Step Generator, and the Editor to activate environment-specific test object and native (run-time object) operations, retrieve and set the values of properties, and check that objects exist.
➤ You can enhance your tests and business components using environment-specific checkpoints and output values. See the sections describing checkpoints and output values in the HP Unified Functional Testing User Guide.
➤ You can customize the Active Screen capture settings for some of the UFT add-ins. When you apply custom Active Screen settings, you override your previous capture-level settings with all of the settings in the Custom Active Screen Capture Settings dialog box. If you want to customize only specific settings, use the Reset to option to ensure that all other settings are using the capture-level setting you prefer and then modify the specific settings you need. For details, see the section describing Active Screen capture setting options in the HP Unified Functional Testing User Guide.
Available Add-ins Environments
➤ Several UFT Add-ins are designed to support special objects that are generally available in Web applications, such as standard Web (HTML), Siebel, .NET Web Forms, and Web-based SAP objects. These add-ins are known as Web-based Add-ins. The interface options, capabilities, and other functionality that is available for the Web-based add-ins are often identical or similar. These Web-specific features are described in Chapter 2, "Web-Based Application Support."
➤ UFT provides a set of add-ins designed to support special objects that are generally part of Windows applications, such as .NET Windows Forms, Windows Presentation Foundation, PowerBuilder, SAP GUI for Windows, VisualAge Smalltalk, Stingray, and others. These add-ins are known as Windows-based Add-ins. The interface options, capabilities, and other functionality that is available for the Windows-based add-ins are often identical or similar. These Windows-specific features are described in Chapter 3, "Windows-Based Application Support."

Chapter 1 • UFT Add-ins Overview
32
This section also includes:
➤ "Loading UFT Add-ins" on page 32
➤ "Considerations for Working with UFT Add-ins" on page 34
Loading UFT Add-insTo test applications developed in various environments, you must ensure that the relevant UFT add-in is installed and loaded on the computer on which you create and run your tests and business components. Loading the relevant add-in enables UFT to work with the corresponding environment.
When you start UFT, the Add-in Manager dialog box opens. It displays a list of all installed add-ins and the license used for each add-in. If you are using a seat add-in license, it also displays the time remaining for time-limited licenses. For details on the Add-in Manager dialog box user interface, see "Add-in Manager Dialog Box" on page 44.
If you have UFT add-ins installed, you can specify which add-ins to load at the beginning of each UFT session. You can also load UFT without add-in support if you want to test only standard Windows-based objects.
While UFT is open, you can check whether a specific add-in is installed by choosing Help > About Unified Functional Testing. Loaded add-ins are indicated by a check mark in the add-ins list.
Tip: The Web Services Add-in is supported for backwards compatibility only and is not enabled by default. New tests and components can use UFT’s API testing solution for web service testing purposes. To enable the Web Services Add-in for previously created tests, contact HP Software support.

Chapter 1 • UFT Add-ins Overview
33
When you load an add-in, UFT recognizes the objects you work with on the corresponding environment. In many cases, loading the add-in also adds new user interface options and capabilities to UFT, as well as adding support for the add-in’s object model—the set of test objects, methods, and properties specially designed for working with the objects in your development environment. Details of these objects, methods, and properties can be found in the relevant section of the HP Unified Functional Testing Object Model Reference (Select Help > HP Unified Functional Testing Help).
Add-in LicensesWhen you open UFT, if an add-in license has not yet been installed for a specific add-in, the add-in is displayed as Not Licensed in the License column of the Add-in Manager dialog box. An add-in may also be displayed as Not Licensed if no concurrent license server within your subnet has a registered license for the specific add-in, or if all concurrent licenses are in use (and are, therefore, unavailable). In this case, you can use the LSFORCEHOST or LSHOST variable to connect to a concurrent license server outside of the subnet that has the relevant add-in license installed on it, if one is available. For details on connecting to concurrent license servers, see the HP Unified Functional Testing Installation Guide.
You can also view license details for all currently loaded licensed add-ins by clicking License in the About Unified Functional Testing dialog box (Help > About Unified Functional Testing).
➤ For seat licenses, the category for each license is displayed. The license category may be Demo, Permanent, Commuter, or Time-Limited. For Demo, Commuter (used with concurrent licenses), and Time-Limited UFT seat licenses, the number of days and hours remaining until the license expires is also displayed.
➤ For concurrent licenses, the URL or host name of the concurrent license server used for each license is displayed.
➤ To switch between a seat and a concurrent license, click Modify License. Note that you can use only one license type per session for UFT and all loaded add-ins—either seat or concurrent. For more information on license types, installing licenses, and modifying licenses, see the HP Unified Functional Testing Installation Guide.

Chapter 1 • UFT Add-ins Overview
34
Considerations for Working with UFT Add-insConsider the following when loading and using UFT add-ins:
Installing and Loading Add-ins
➤ You must install and load an add-in to enable UFT to recognize objects from the corresponding environment. To load an add-in, select the add-in from the Add-in Manager dialog box that opens when you start UFT. For details, see "Add-in Manager Dialog Box" on page 44.
➤ For optimal performance when testing your applications, it is strongly recommended that you load only the required add-in or add-ins. For example, if you want to test a process that spans a Web application and a .NET application, load only the Web and .NET Add-ins. Do not load all add-ins unless you need to work with all of them. As a reminder, the tip at the bottom of the Add-in Manager changes to red text if more than three add-ins are selected.
➤ Some UFT add-ins require additional configuration after the installation is complete. Similarly, some environments may require configuration to enable UFT to interact with them. Configuration requirements, if any, are described in the introductory section of each relevant environment.
➤ Some applications must be opened prior to opening UFT, while some must be opened after UFT is opened. These requirements are described in the introductory section for each relevant environment.
➤ When testing applications that do not contain .NET objects, it is strongly recommended that you do not load the .NET Add-in.
➤ When you open a test or business component, UFT compares the add-ins that are currently loaded with the add-ins associated with your test or with your business component’s application area. If they do not match, UFT issues a warning message. For details on matching loaded add-ins with installed add-ins, see "Match loaded add-ins with associated add-ins" on page 40.
Running UFT from ALM with Add-ins
➤ When you run a UFT test from ALM, ALM instructs UFT to load the add-ins that are associated with the test.

Chapter 1 • UFT Add-ins Overview
35
If you created the test in ALM (and not in UFT), the test contains the settings specified in the template test you chose when creating the test. If you need to modify the associated add-ins, you can do so by opening the test in UFT. For details, see the section on template tests in the HP Unified Functional Testing User Guide.
➤ Before you run a UFT test from ALM, make sure that the required UFT add-ins are installed on the computer on which you want to run the UFT test.
Record and Run Settings for Add-ins - Overview
Before you record or run a test on an application, you can use the Record and Run Settings dialog box to instruct UFT which applications to open when you begin to record or run your test.
For some Windows-based applications, you also use the dialog box to specify the specific applications you want UFT to recognize during record, run, and Object Spy sessions. For example, you can choose to have UFT open a specific application when you start a record or run session.
You can set your record and run options in the Record and Run Settings dialog box, or you can set the options using environment variables.
The Record and Run Settings dialog box opens automatically each time you begin recording a new test and saves your settings with that test. Subsequently, when you perform additional record or run sessions on existing tests, the Record and Run Settings dialog box does not open. This is because UFT automatically applies the saved record and run settings.
You can modify the record or run settings prior to any session using the Record and Run Settings dialog box (Record > Record and Run Settings).
The Record and Run Settings dialog box always contains the Windows Applications tab. It may contain other tabs corresponding to add-ins that are loaded. For details on which tab of the Record and Run Settings dialog box you should use with an add-in, see the relevant add-in chapter.
Chapter 1 • UFT Add-ins Overview
36
For details on defining record and run settings, see the relevant add-in environment section, for example, "Windows Applications Tab (Record and Run Settings Dialog Box)" on page 124 if you are testing a standard Windows-based application.
This section also includes:
➤ "Considerations for Defining Record and Run Settings" on page 36
➤ "Environment Variables in Record and Run Settings" on page 37
Considerations for Defining Record and Run Settings
➤ The setting of the Active Screen capture level (Tools > Options > GUI Testing tab > Active Screen pane) can significantly affect the recording time for your test and the functionality of the Active Screen while editing your test. Confirm that the level selected answers your testing needs. For details, see the section on setting active screen options in the HP Unified Functional Testing User Guide.
➤ You can set the record and run settings for some add-in environments using the corresponding tab in the Record and Run Settings dialog box (displayed only when the add-in is installed and loaded). For details on record and run settings for:
➤ Windows-based applications, see "Define record and run settings for Windows-based applications" on page 122.
➤ Web-based environments, see "Web Tab (Record and Run Settings Dialog Box)" on page 77.
➤ other environments, see the relevant add-in chapter.
➤ You can set record and run options such that no applications open at the beginning of record and run sessions. In this case, you may need to open the application after you open UFT to ensure that UFT recognizes the application. For details, see the relevant add-in chapter.
➤ After you set the record and run settings for a test, the Record and Run settings dialog box will not open the next time you record operations in that test. If needed, you open the Record and Run Settings dialog box by choosing Record > Record and Run Settings.
Chapter 1 • UFT Add-ins Overview
37
If you change the record and run settings for additional recording sessions, confirm that you return the settings to match the needs of the first step in your test before you run it.
You should set or modify your record and run preferences in the following scenarios:
➤ You have already recorded one or more steps in the test and you want to modify the settings before you continue recording.
➤ You want to run the test on a different application than the one you previously set in the Record and Run Settings dialog box.
➤ If you define environment variables to specify the record and run details, those values override the values in the Record and Run Settings dialog box. For details, see "Environment Variables in Record and Run Settings" on page 37.
Environment Variables in Record and Run SettingsYou can use special, predefined environment variables to specify the applications or browsers you want to use for your test. This can be useful if you want to test how your application works in different environments. For example, you may want to test that your Web application works properly on identical or similar Web sites with different Web addresses.
When you define an environment variable for one (or more) of the application details, the environment variable values override any values that were added using these areas of the Record and Run Settings dialog box.
Note: If you select the option to Record and Run on any application (the upper radio button in each tab of the Record and Run Settings dialog box), UFT ignores any defined Record and Run environment variables.
You can define the environment variables as internal user-defined variables, or you can add them to an external environment variable file and set your test to load environment variables from that file.

Chapter 1 • UFT Add-ins Overview
38
You can set your Record and Run settings manually while recording your test and then define the environment variables or load the environment variable file only when you are ready to run the test (as described in the procedure below).
Alternatively, you can define environment variables before you record your test. In this case, UFT uses these values to determine which applications or browsers to open when you begin recording—assuming that the option to open an application when starting record and run sessions for the particular environment is selected. (This option corresponds to the lower radio button in each tab of the Record and Run Settings dialog box, and the third check box in the Windows Applications tab.)
For details on setting and modifying environment variables, see "How to Define Record and Run Settings for UFT Add-ins" on page 41.
UFT Add-in Extensibility
UFT add-in extensibility, available for some environments, enables you to extend the relevant UFT add-in to support third-party and custom controls that are not supported out-of-the-box.
When UFT learns an object in an application, it recognizes the object as belonging to a specific test object class. This type of test object might not have certain characteristics that are specific to the control you are testing. Therefore, when you try to create test steps with this test object, the available identification properties and test object operations might not be sufficient.
By developing support for a control using Add-in Extensibility, you can direct UFT to recognize the control as belonging to a specific test object class, and you can specify the behavior of the test object.
You can also teach UFT to treat a control that contains a set of lower-level controls as a single functional control, instead of relating to each lower-level control separately. For example, a calendar control may consist of buttons and text boxes. If you teach UFT to recognize the control as a calendar, ignoring the individual buttons and text boxes, you can create more meaningful tests on the calendar control.

Chapter 1 • UFT Add-ins Overview
39
In most environments, you can also extend the list of available test object classes that UFT is able to recognize. This enables you to create tests that fully support the specific behavior of your controls.
UFT add-in extensibility is currently supported for the Delphi, Java, .NET, Silverlight, Web, and WPF add-ins.
If you cannot develop support for your controls using the extensibility options provided for these environments, you might be able to take advantage of the Testing Extensibility for Unified Functional Testing program. Testing Extensibility is intended for customers who want to extend UFT testing capabilities for technologies or applications not supported by existing UFT add-ins. Participation in the program requires a separate license agreement with HP.
For details on Testing Extensibility, contact HP Software support.
For details on UFT Add-in Extensibility, see:
➤ "Delphi Add-in Extensibility" on page 228
➤ "Java Add-in Extensibility" on page 250
➤ ".NET Add-in Extensibility" on page 166
➤ "Silverlight Add-in Extensibility" on page 191
➤ "Web Add-in Extensibility" on page 654
➤ "WPF Add-in Extensibility" on page 200

Chapter 1 • UFT Add-ins Overview
40
Tasks
How to Manage UFT Add-ins
This task contains the following steps:
➤ "Load or remove add-ins from UFT" on page 40
➤ "Match loaded add-ins with associated add-ins" on page 40
Load or remove add-ins from UFT
1 Select Start > All Programs > HP Software > HP Unified Functional Testing > HP Unified Functional Testing. The Unified Functional Testing Add-in Manager dialog box opens.
If the Add-in Manager dialog box does not open, see the To access section in "Add-in Manager Dialog Box" on page 44.
2 In the add-in list, select or clear the check box for the relevant add-in and click OK. For details about the Add-in Manager, see "Add-in Manager Dialog Box" on page 44.
Match loaded add-ins with associated add-ins
If there are add-ins associated with your test or with your business component’s application area that are not currently loaded, you can:
➤ Close and reopen UFT, and select the required add-ins in the Add-in Manager dialog box.
➤ Remove the add-ins from the list of associated add-ins for your test or business component. To change the list of add-ins associated with your test or business component, select File > Settings and click Modify in the Properties pane.

Chapter 1 • UFT Add-ins Overview
41
If add-ins are loaded but are not associated with your test or with your business component’s application area, you can:
➤ Close and reopen UFT, and clear the check boxes for the add-ins in the Add-in Manager dialog box, if they are not required.
➤ Add the add-ins to the list of associated add-ins for your test or for your business component’s application area.
➤ To change the list of add-ins associated with your test, select File > Settings and click Modify in the Properties pane.
➤ To change the list of add-ins associated with your business component, open the application area associated with your business component, and modify the list in the Properties pane.
For details on associating add-ins with your test or business component, see the HP Unified Functional Testing User Guide.
How to Define Record and Run Settings for UFT Add-ins
This task contains the following steps:
➤ "Define record and run settings for specific add-ins" on page 41
➤ "Set record and run environment variables for add-ins" on page 42
Define record and run settings for specific add-ins
1 Review "Considerations for Defining Record and Run Settings" on page 36.
2 Use one of the following to open the Record and Run Settings dialog box:
➤ Select Record > Record and Run Settings.
➤ Click the Record button or select Record > Record. If you are recording for the first time in a test and have not yet set your recording preferences (by opening the dialog box manually), the Record and Run Settings dialog box opens.
The Record and Run Settings dialog box is divided by environment into several tabbed pages.

Chapter 1 • UFT Add-ins Overview
42
3 Select the relevant environment by clicking a tab.
4 Set the required options, as described in the relevant add-in chapter.
5 To apply your changes and keep the Record and Run Settings dialog box open, click Apply.
6 Close the Record and Run Settings dialog box to begin your record or run session, click OK.
Set record and run environment variables for add-ins
1 Review "Environment Variables in Record and Run Settings" on page 37.
2 Use one of the following to open the Record and Run Settings dialog box:
➤ Select Record > Record and Run Settings.
➤ Click the Record button or select Record > Record. If you are recording for the first time in a test and have not yet set your recording preferences (by opening the dialog box manually), the Record and Run Settings dialog box opens.
The Record and Run Settings dialog box is divided by environment into several tabbed pages.
3 Set your record and run preferences normally before recording your test.
Note: If you already have environment variables set for one or more application details, and you select the option to open an application when the record session begins (the lower radio button in each tab of the Record and Run Settings dialog box), UFT ignores the record settings you enter in the dialog box.
4 Record and edit your test normally.
5 If you did not define environment variables prior to recording your test, define an environment variable for each application detail you want to set using the appropriate variable name. For details on the variable names required, see:

Chapter 1 • UFT Add-ins Overview
43
➤ For Web browsers and URLs to open, see "How to Define Record and Run Variables for a Web-Based Environment" on page 67.
➤ For Windows applications on which you want to record and run tests, see "How to Define Record and Run Settings for Windows-Based Applications" on page 121.
➤ For other tabs in the Record and Run Settings dialog box, see the relevant add-in chapter in this guide.
For details on how to define a user-defined environment variable and how to create environment variable files, see the section on using environment variable parameters in the HP Unified Functional Testing User Guide.
6 Run the test. UFT uses the environment values to determine which applications to open at the beginning of the run session, and on which processes to record.

Chapter 1 • UFT Add-ins Overview
44
Reference
Add-in Manager Dialog Box
This dialog box enables you to select the add-ins that you want UFT to load by selecting the check boxes adjacent to required add-ins.
Chapter 1 • UFT Add-ins Overview
45
User interface elements are described below:
To access By default, this dialog box opens when you start UFT.
To display the Add-in Manager if it does not open when you start UFT, select Tools > Options > General tab > Startup Options node and select Display Add-in Manager on startup.
Important information
➤ If you select the check box of an add-in that contains a child add-in, the parent add-in is selected automatically.
➤ If you clear the check box for a parent add-in, the check boxes for its children are also cleared.
➤ UFT remembers which add-ins you selected so that the next time you open UFT, the same add-ins are selected in the Add-in Manager dialog box.
➤ If you load or unload an add-in that is displayed as a child of the Java add-in in the Add-in Manager, only applications that are opened after loading or unloading the add-in are affected.
Relevant tasks ➤ "How to Start UFT" in the HP Unified Functional Testing User Guide
➤ "How to Manage UFT Add-ins" on page 40
See also ➤ "Product Information Window" in the HP Unified Functional Testing User Guide
➤ "UFT Add-in Support - Overview" on page 30
➤ "Considerations for Working with UFT Add-ins" on page 34

Chapter 1 • UFT Add-ins Overview
46
UI Element Description
Add-in The names of the installed add-ins.
The list of Add-ins might also include child nodes representing add-ins that you or a third party developed to support additional environments or controls using add-in extensibility. For details, see the relevant Add-in Extensibility Developer Guide, available from the UFT Extensibility Documentation program group (Start > All Programs > HP Software > HP Unified Functional Testing > Extensibility > Documentation).
Note:
➤ If you plan to test your application in a Web browser, select Web as well as your required add-in.
➤ If you want to test .NET Windows Forms, select .NET and click OK. A message is displayed stating that for full operation of the .NET Add-in you must also load the Web Add-in. If you want to test only .NET Windows Forms (and not .NET Web Forms), you can click Yes.
License The license used by the add-in, if any, and the time remaining until a time-limited license expires:
➤ Licensed. Applies to the add-ins that are provided with UFT. Add-ins use the same license as UFT. Therefore, if UFT uses a Permanent license, the add-ins use the same Permanent license; if UFT uses a Time-Limited license, the add-ins use the same Time-Limited license.
➤ Not Licensed. Applies to an add-in that does not have an installed seat license or access to a concurrent license (for example, if all concurrent licenses are currently in use, or if the required add-in license is not installed on the concurrent license server on your subnet). To load the add-in, you first need to install or access a license.
➤ Time Remaining. Specifies the number of days and hours remaining until a time-limited add-in license expires. (Displayed only when using a UFT seat license—not a concurrent license.)
For more details, see the HP Unified Functional Testing Installation Guide.

Chapter 1 • UFT Add-ins Overview
47
License used The license used by UFT:
➤ Unified Functional Testing. Enables you to use all UFT features, including the use of GUI testing and API testing features.
➤ QuickTest Professional. Enables you to open only GUI tests and components. When using this license, API testing-related options are not available.
➤ Service Test. Enables you to open only API tests and components. When using this license, GUI testing-related options are not available.
➤ QuickTest and Service Test. Enables you to use UFT with a QuickTest 11.00 or earlier or a Service Test 11.20 or earlier license. When using this type of license, business process testing features and GUI/API integration features (like calls to a GUI test from an API test and vice versa are not available).
Click Change to modify the type of license used with a session of UFT.
Show on startup Instructs UFT to display the Add-in Manager dialog box each time you open UFT.
When this check box is cleared, UFT opens and loads the same add-ins it loaded in the previous session, without displaying the Add-in Manager.
Note for concurrent license users: If this check box was cleared in the previous session, and the license type selected from the concurrent license server in that session is not currently available, UFT tries to load an available license that matches the selected add-ins.
To display the Add-in Manager again: Select Tools > Options > General tab > Startup Options node and select Display Add-in Manager on startup.
UI Element Description

Chapter 1 • UFT Add-ins Overview
48

49
2Web-Based Application Support
This chapter includes:
Concepts
➤ Web-Based Application Support - Overview on page 51
➤ Considerations - Web-Based Application Support on page 51
➤ Registering Browser Controls on page 54
➤ Accessing Password-Protected Resources in the Active Screen on page 55
➤ Checkpoints for Web Pages on page 57
➤ Event Recording Configuration for Web-Based Applications on page 58
➤ Advanced Operations on Web-Based Applications on page 59
➤ Web Object Identifiers on page 62
Tasks
➤ How to Define Record and Run Variables for a Web-Based Environment on page 67
➤ How to Modify Event Recording Configuration for Web-Based Applications on page 69
➤ How to Configure UFT to Record Mouse Clicks on page 71
➤ How to Use Web Object Identifiers - Exercise on page 73
Reference
➤ Web Tab (Record and Run Settings Dialog Box) on page 77
➤ Web > General Pane (Options Dialog Box) on page 82
➤ Web Pane (Test/Business Component Settings Dialog Box / Application Area - Additional Settings Pane) on page 101

Chapter 2 • Web-Based Application Support
50
➤ Web Event Recording Configuration XML File Structure on page 106
➤ Register Browser Control Utility on page 108
➤ Active Screen Dialog Box on page 109
Troubleshooting and Limitations - Web-Based Application Support on page 110

Chapter 2 • Web-Based Application Support
51
Concepts
Web-Based Application Support - Overview
UFT provides a number of add-ins for testing Web-based applications. The way you configure many of your UFT settings is the same or similar for most UFT Web-based add-ins. These common configuration options are described in the remainder of this chapter.
For additional details on how to work with Web-based add-ins, see the following sections:
➤ ".NET Web Forms Add-in - Quick Reference" on page 153
➤ "PeopleSoft Add-in - Quick Reference" on page 335
➤ "Siebel Add-in - Quick Reference" on page 461
➤ ".NET Silverlight Add-in - Quick Reference" on page 187
➤ "Web Add-in - Quick Reference" on page 651
➤ "Web 2.0 Toolkit Support" on page 675
➤ "Web-Based SAP Support - Quick Reference" on page 359
In addition to using the add-ins described above, you can also use the Extensibility Accelerator to develop your own Web-based add-in support for third-party and custom Web controls that are not supported by any of the above UFT Web-based add-ins. For details, see "Extensibility Accelerator for HP Functional Testing" on page 655.
Considerations - Web-Based Application Support
This section contains the following items to consider when testing Web-based applications:
➤ "Recording and Running Steps on Web Controls" on page 52
➤ "Working with Web Browsers" on page 52
Chapter 2 • Web-Based Application Support
52
➤ "Testing Applications with Embedded Web Browser Controls" on page 53
Recording and Running Steps on Web Controls
➤ If UFT does not record Web events in a way that matches your needs, you can also configure the events you want to record for each type of Web object. For example, if you want to record events, such as moving the pointer over an object to open a sub-menu, you may need to modify the Web event configuration to recognize such events. For details, see "Event Recording Configuration for Web-Based Applications" on page 58.
➤ If you are recording on a list in an application, you must highlight the list, scroll to an entry that was not originally showing, and select it. If you want to select the item in the list that is already displayed, you must first select another item in the list (click it), then return to the originally displayed item and select it (click it). This is because UFT records a step only if the value in the list changes.
➤ If a Web element in an HTML page is set to be disabled or invisible, for example if a <DIV> element above it controls its appearance, but the elements on the page are available in the DOM, then UFT can perform operations on those objects even though a human user of the application could not.
Working with Web Browsers
➤ You select your browser in the Web tab of the Record and Run Settings dialog box. For details, see "Web Tab (Record and Run Settings Dialog Box)" on page 77.
➤ UFT does not support the option to zoom in and out of a Web page. If you use this option, some UFT functionality may not work as expected. For example, the Object Spy may be unable to correctly highlight objects or display object details. (These problems do not occur if the Zoom Text Only Firefox menu item is selected.)
Additionally, bitmap checkpoints will fail if a different zoom level is used when capturing the expected bitmap than the zoom level used when running the checkpoint step.

Chapter 2 • Web-Based Application Support
53
➤ By default, the name assigned to the Browser test object in the object repository is always the name assigned to the first Page object that is learned or recorded for the Browser object. The same Browser test object is used each time you learn an object or record in a browser with the same ordinal ID. Therefore, the name used for the Browser test object in the steps you record may not reflect the actual browser name.
➤ UFT Web support behaves as a browser extension in Microsoft Internet Explorer. Therefore, you cannot use the Web Add-in on Microsoft Internet Explorer without selecting the Enable third-party browser extensions option. To set the option, in Microsoft Internet Explorer select Tools > Internet Options > Advanced and select the Enable third-party browser extensions option.
➤ For UFT to run JavaScript methods, the security settings in your browser must be set to allow active scripting. (In Internet Explorer 7, for example, you can find these security settings under: Tools > Internet Options > Security > Custom Level > Scripting > Active scripting.)
This is relevant if your test steps include RunScript or EmbedScript methods, or if you are working with test objects supported using Web Add-in Extensibility, such as Web 2.0 test objects.
➤ Creating and running steps that start an InPrivate Browsing session is supported only by using Tools > InPrivate Browsing. Using toolbars or extensions for this operation may cause Microsoft Internet Explorer to behave unexpectedly.
➤ Creating and running steps that are related to tabs, such as selecting a tab or creating a new tab is not supported when Microsoft Internet Explorer is in Full Screen mode.
Workaround: Add a <Browser>.FullScreen step before and after the desired step to toggle Full Screen mode.
Testing Applications with Embedded Web Browser Controls
Working with applications that contain embedded Web browser controls is similar to working with Web objects in a Web browser.

Chapter 2 • Web-Based Application Support
54
Note: Embedded browser controls are supported only for Microsoft Internet Explorer.
To test objects in embedded browser controls, ensure that:
➤ The Web Add-in is loaded.
➤ The application opens only after UFT is open.
➤ (For tests) In the Web tab of the Record and Run Settings dialog box, the Record and run test on any open browser option is selected. (This option is not relevant for business components.)
After these conditions are met, you can start adding steps or running your test or business component.
Registering Browser Controls
A browser control adds navigation, document viewing, data download, and other browser functionality to a non-Web application. This enables the user to browse the Internet as well as local and network folders from within the application.
UFT cannot automatically recognize the objects that provide browser functionality in your non-Web application as Web objects. For UFT to record or run on these objects, the application hosting the browser control must be registered.
Note: You can register applications developed in different environments, such as those written in Java, .NET, and so on.
For user interface details, see "Register Browser Control Utility" on page 108.

Chapter 2 • Web-Based Application Support
55
Accessing Password-Protected Resources in the Active Screen
When UFT creates an Active Screen page for a Web-based application, it stores the path to images and other resources on the page, rather than downloading and storing the images with your test.
Note: The Active Screen pane is not available when working with keyword components (although it is available for scripted components).
Storing the path to images and other resources ensures that the disk space used by the Active Screen pages captured with your test is not affected by the file size of the resources displayed on the page.
For this reason, a page in the Active Screen (or in your run results) may require a user name and password to access certain images or other resources within the page. If this is the case, a pop-up login window may open when you select a step corresponding to the page (see "Active Screen Dialog Box" on page 109), or you may note that images or other resources are missing from the page.
For example, the formatting of your page may look very different from the actual page on your Web site if the cascading style sheet (CSS) referenced in the page is password-protected, and therefore could not be downloaded to the Active Screen.

Chapter 2 • Web-Based Application Support
56
You may need to use one or both of the following methods to access your password-protected resources, depending on the password-protection mechanism used by your Web server:
➤ Standard Authentication. If your server uses a standard authentication mechanism, you can enter the login information in the Web pane of the Test Settings dialog box. UFT saves this information with your test and automatically enters the login information each time you select to display an Active Screen page that requires the information. For details, see "Web Pane (Test/Business Component Settings Dialog Box / Application Area - Additional Settings Pane)" on page 101.
If you do not enter this information in the Web pane of the Test Settings dialog box and attempt to access the password-protected resources, the Active Screen dialog box opens. For details, see "Active Screen Dialog Box" on page 109.
➤ Advanced Authentication. If your server uses a more complex authentication mechanism, you may need to log in to the Web site manually using the Advanced Authentication dialog box. This gives the Active Screen access to password-protected resources in your Active Screen pages for the duration of your UFT session. When using this method, you must log in to your Web site in the Advanced Authentication dialog box each time you open the test in a new UFT session. For details, see "Advanced Authentication Dialog Box" on page 104.
In most cases, the automatic login is sufficient. In some cases, you must use the manual login method. In rare cases, you may need to use both login mechanisms to enable access to all resources in your Active Screen pages.
Note: If your Web site is not password-protected, but you are still unable to view images or other resources on your Active Screen, you may not be connected to the Internet, the Web server may be down, or the source path that was captured with the Active Screen page may no longer be accurate.

Chapter 2 • Web-Based Application Support
57
Checkpoints for Web Pages
This section describes the checkpoint types that are supported only for Web-based add-ins. For a list of all supported checkpoints per add-in, see "Supported Checkpoints" on page 696.
Accessibility Checkpoints
Accessibility checkpoints are designed to help you easily locate the areas of your Web site that require special attention according to the W3C Web Content Accessibility Guidelines. They do not necessarily indicate whether or not your Web site conforms to the guidelines.
Accessibility checkpoints are not supported for keyword components.
For details, see the chapter on accessibility checkpoints in the HP Unified Functional Testing User Guide.
Page Checkpoints
When working with tests, you can check statistical information about your Web pages by adding page checkpoints to your test. These checkpoints check the links and the sources of the images on a Web page. You can also instruct page checkpoints to include a check for broken links.
Page checkpoints are not supported for keyword components.
For details, see the chapter on page checkpoints in the HP Unified Functional Testing User Guide.
Tip: You can instruct UFT to create automatic page checkpoints for every page in all tests by selecting the Create a checkpoint for each Web page while recording check box in the Web > Advanced pane of the Options dialog box (Tools > Options > GUI Testing tab > Web > Advanced node). For details, see "Web > Advanced Pane (Options Dialog Box)" on page 92.

Chapter 2 • Web-Based Application Support
58
Event Recording Configuration for Web-Based Applications
When you record on a Web application, UFT generates steps by recording the events you perform on the Web objects in your application. An event is a notification that occurs in response to an operation, such as a change in state, or as a result of the user clicking the mouse or pressing a key while viewing the document.
UFT includes event recording configurations that have been optimized for each Web-based add-in, so that in most cases UFT records steps for relevant events on each object and avoids recording steps for events that usually do not impact the application. For example, by default, UFT records a step when a click event occurs on a link object, but does not record a step when a mouseover event occurs on a link.
Each Web-based add-in has its own XML file that defines the Web-event recording configuration for objects in that environment.
When you perform an operation on a Web-based object during a recording session (and the appropriate add-in is installed and loaded), UFT uses the recording configuration defined for that environment.
If your application contains several types of Web-based controls, the appropriate Web event recording configuration is used for each object and the configuration for one environment does not override another.
Chapter 2 • Web-Based Application Support
59
Customizing Event Recording Configurations for Web-Based Applications
You can view and customize the configuration settings for the Web Add-in in the Web Event Recording Configuration dialog box. The settings in that dialog box affect the recording behavior only for objects that UFT recognizes as Web test objects.
Note: For the purposes of Web event recording, UFT treats Web test objects that are child objects of a PSFrame test object as PeopleSoft objects and thus applies the settings in the PeopleSoft event configuration XML file when recording those objects.
For details, see "Event Recording Configuration for Web Objects - Overview" on page 670.
In most cases, it is not necessary to customize the Web event recording configuration of other add-ins. If you do need to customize these settings, you can do so either by editing the XML for the relevant add-in manually, or you can import the XML into the Web Event Recording Configuration dialog box to make the necessary changes and then export the modified file.
Advanced Operations on Web-Based Applications
This section describes various advanced operations you can perform on Web-based objects, and includes the following:
➤ "Activating methods associated with a Web-based object using the Object property" on page 60
➤ "Using programmatic descriptions for the WebElement object" on page 61

Chapter 2 • Web-Based Application Support
60
Activating methods associated with a Web-based object using the Object propertyIn the Editor, you can use the Object property to activate the method for a Web object. Activating the method for a Web object has the following syntax:
WebObjectName.Object.Method_to_activate( )
For example, suppose you have the following statement in your script:document.MyForm.MyHiddenField.value = "My New Text"
The following example achieves the same thing by using the Object property, where MyDoc is the DOM’s document:
Dim MyDocSet MyDoc = Browser(browser_name).page(page_name).ObjectMyDoc.MyForm.MyHiddenField.value = "My New Text"
In the following example, LinksCollecton is assigned to the link collection of the page through the Object property. Then, a message box opens for each of the links, with its innerHTML text.
Dim LinksCollection, linkSet LinksCollection = Browser(browser_name).Page(page_name).Object.linksFor Each link in LinksCollection
MsgBox link.innerHTMLNext
For details on the Object property (.Object), see the section on retrieving and setting identification property values in the HP Unified Functional Testing User Guide.
For a list of a Web object's internal properties and methods, see:
http://msdn2.microsoft.com/en-us/library/ms531073.aspx

Chapter 2 • Web-Based Application Support
61
Using programmatic descriptions for the WebElement objectWhen UFT recognizes an object as a Web-based object that does not fit into any other HP UFT test object class, it learns the object as a WebElement object. You can also use a programmatic description with a WebElement test object to perform methods on any Web object in your Web site.
For example, when you run either of the examples below, UFT clicks the first Web object in the Mercury Tours page with the name UserName.
Browser("Mercury Tours").Page("Mercury Tours").WebElement("Name:=UserName", "Index:=0").Click
or
set WebObjDesc = Description.Create() WebObjDesc("Name").Value = "UserName" WebObjDesc("Index").Value = "0" Browser("Mercury Tours").Page("Mercury Tours").WebElement(WebObjDesc).
Click
For details on the WebElement object, see the HP Unified Functional Testing Object Model Reference. For details on programmatic descriptions, see the section on programmatic descriptions in the HP Unified Functional Testing User Guide.

Chapter 2 • Web-Based Application Support
62
Web Object Identifiers
During a run session, UFT attempts to identify each object in your application by matching the description properties stored for the corresponding test object with the properties of the DOM element in the application. For complex Web applications that contain many objects, using only the standard identification methods may have unreliable results. For details on the standard methods UFT uses to identify objects, see the section on how UFT identifies objects in the HP Unified Functional Testing User Guide.
You can instruct UFT to use Web object identifiers before the regular object identification process to help limit the number of candidate objects to identify. UFT accesses the application’s DOM and returns objects that match the object identifier property values. UFT then continues to identify this smaller set of returned objects using the normal object identification process. Therefore, using Web object identifiers can lead to a more reliable and accurate object identification, and a quicker object identification process.
To follow an exercise describing the identification process using Web object identifiers, see "How to Use Web Object Identifiers - Exercise" on page 73.
For details about the general workflow of the object identification process, see the section on object identification in the HP Unified Functional Testing User Guide.
This section includes:
➤ "Web Object Identifier Types" on page 63
➤ "Considerations - Web Object Identifiers" on page 65

Chapter 2 • Web-Based Application Support
63
Web Object Identifier TypesThe following Web object identifiers are available:
CSS
CSS (Cascading Style Sheet) is a language used to define formatting of elements in HTML pages. You can define a CSS identification property value for a test object to help identify a Web object in your application based on its CSS definition.
UFT uses CSS identifiers only when identifying objects and not when learning objects. Therefore, they are not available from the Object Spy or the Object Identification dialog box.
For usage examples, see "How to Use Web Object Identifiers - Exercise" on page 73.
User-defined XPath
XPath (XML Path) is a language used to define the structure of elements in XML documents. You can define an XPath identification property to help identify a Web object in your application based on its location in the hierarchy of elements in the Web page. Because of the flexible nature of the language, you can define the XPath according to the unique way your Web page is structured.
UFT uses XPath identifiers only when identifying objects and not when learning objects. Therefore, they are not available from the Object Spy or the Object Identification dialog box.
For usage examples, see "How to Use Web Object Identifiers - Exercise" on page 73.
Automatic XPath
You can instruct UFT to automatically generate and store an XPath value when learning Web test objects. During the run session, if the automatically learned XPath for a particular object results in multiple matches or no matches, the learned XPath is ignored. Additionally, if you have added a user-defined XPath or CSS identification property to a test object description, then the automatically learned XPath is ignored.
Chapter 2 • Web-Based Application Support
64
Automatic XPath is a UFT-generated property, and therefore it is not available from the Object Spy, the Add/Remove Properties dialog box, or the Object Identification dialog box.
You enable this option in the Web section of the Options dialog box. For details, see "Web > General Pane (Options Dialog Box)" on page 82.
Attribute/* Notation
You can use the attribute/* notation to access custom native properties of Web-based objects or events associated with Web-based objects. You can then use these properties or events to identify such objects by adding the notation to the object’s description properties using the Object Identification dialog box, or by using programmatic descriptions.
Example of using attribute/<property> to identify a Web object
Suppose a Web page has the same company logo image in two places on the page:
<IMG src="logo.gif" LogoID="122"><IMG src="logo.gif" LogoID="123">
You could identify the image that you want to click by adding the attribute/LogoID notation to the object’s description properties and using a programmatic description to identify the object:
Browser("Mercury Tours").Page("Find Flights").Image("src:=logo.gif","attribute/LogoID:=123").Click 68, 12
Example of using attribute/<event> to identify a Web object
Suppose a Web page has an object with an onclick event attached to it:
‘’alert('OnClick event for edit.');”
You can identify the object by adding the attribute/onclick notation to the object’s description properties and using a programmatic description to identify the object:

Chapter 2 • Web-Based Application Support
65
Browser("Simple controls").Page("Simple controls").WebEdit("attribute/onclick:= alert\('OnClick event for edit\.'\);").Set "EditText"
For details on the Object Identification dialog box and programmatic descriptions, see the HP Unified Functional Testing User Guide.
For considerations on working with Web object identifiers, see "Considerations - Web Object Identifiers" on page 65.
Considerations - Web Object IdentifiersConsider the following when using Web object identifiers:
General
➤ Defining xpath and css properties using Frame HTML tags is not supported. This may cause incorrect identification when identifying Frame objects or retrieving Frame objects using the ChildObjects method.
➤ xpath and css properties are not supported for .NET Web Forms test objects or for other Web-based test objects that have .NET Web Forms parent test objects.
➤ When running in Maintenance Mode, UFT may replace test objects with XPath or CSS identifier property values with new objects from your application.
Workaround: Use the Update from Application option in the Object Repository Manager to update specific test objects with XPath or CSS identifier property values.

Chapter 2 • Web-Based Application Support
66
Differences Between User-Defined XPath and Automatic XPath Behavior During Run Sessions
Behavior in case of...
User-defined XPath Automatic XPath
Multiple objects match the XPath value
UFT continues to identify the matching objects.
UFT ignores the learned XPath and continues with the regular object identification process.
No objects match the XPath value
Object identification fails, and UFT continues to identify the object using Smart Identification
UFT ignores the learned XPath and continues with the regular object identification process.

Chapter 2 • Web-Based Application Support
67
Tasks
How to Define Record and Run Variables for a Web-Based Environment
You can use predefined environment variables to specify the applications or browsers you want to use for your test. This can be useful if you want to test how your application works in different environments.
Note: For details on environment variables and how to use them in tests, see "Environment Variables in Record and Run Settings" on page 37.

Chapter 2 • Web-Based Application Support
68
To use environment variables to define the Web browser and URL to open, set the appropriate variable names as specified below:
Option Variable Name Description
Type BROWSER_ENV The browser program to open. For example, Microsoft Internet Explorer, Google Chrome, or Mozilla Firefox.
Possible values:
IE. Opens Internet Explorer.
IE64. Opens a 64-bit version of Internet Explorer.
CHROME. Opens Google Chrome.
FIREFOX. Opens the latest version of Mozilla Firefox that is both installed on the computer and supported by UFT.
FF<VersionNumber>. Opens the specified version of Mozilla Firefox. For example: FF36 (version 3.6), FF40 (version 4.0), FF140 (version 14.0).
Note:
➤ If the specified browser program is not installed, the default browser is used.
➤ Mozilla Firefox is supported only for the Web Add-in.
➤ When specifying a Firefox version number, make sure to specify a supported version. For a list of all supported browser versions, see the HP Unified Functional Testing Product Availability Matrix, available from the UFT Help or the root folder of the Unified Functional Testing DVD. The most up-to-date product availability matrix is available from the HP Software Product Manuals site, at http://h20230.www2.hp.com/selfsolve/manuals (requires an HP Passport).
Address URL_ENV The Web address to display in the browser.

Chapter 2 • Web-Based Application Support
69
How to Modify Event Recording Configuration for Web-Based Applications
This task includes the following steps:
➤ "Modify the event recording configuration XML file manually" on page 69
➤ "Modify the event recording configuration in the Web Event Recording Configuration dialog box" on page 69
Modify the event recording configuration XML file manually
1 In a text or XML editor, open the appropriate MyEnvEventConfiguration.xml file from the <UFT installation folder>\dat folder, according to the following table:
2 Edit the file as necessary.
3 Save the file.
Modify the event recording configuration in the Web Event Recording Configuration dialog box
1 Back up the event recording configuration for the Web environment:
a Select Record > Web Event Recording Configuration. The Web Event Recording Configuration dialog box opens.
b Click Custom Settings.
Object Type: XML File Name
.NET Web Forms WebFormsEventConfiguration.xml
Siebel 7.5 or earlier SiebelEventConfiguration.xml
Siebel 7.7 or later CASEventConfiguration.xml
PeopleSoft Frame objects and all Web objects that are children of a PeopleSoft frame object
PSEventConfiguration.xml

Chapter 2 • Web-Based Application Support
70
c Select File > Save Configuration As and specify an XML filename for the backup file.
2 Back up the event recording configuration for the environment you want to modify:
Create a copy of the relevant <MyEnv>EventConfiguration.xml file from the <UFT installation folder>\dat folder.
3 Modify the <MyEnv>EventConfiguration.xml file in the Web Event Recording Configuration dialog box:
a In the Web Event Recording Configuration dialog box, select File > Load Configuration and browse to the relevant <UFT installation folder>\dat\<MyEnv>EventConfiguration.xml file. The event configuration for the selected environment is displayed in the dialog box.
b Modify the configuration using the Web Event Recording Configuration dialog box options, as described in "Event Recording Configuration for Web Objects - Overview" on page 670.
c Select File > Save Configuration As and overwrite the previous <UFT installation folder>\dat\<MyEnv>EventConfiguration.xml file.
4 Restore the configuration file for the Web environment:
Select File > Load Configuration and browse to the backup copy of the Web configuration file that you saved in step 1.
Caution: UFT always applies the configuration that is loaded in the Web Event Recording Configuration dialog box to all Web objects. If you do not restore the Web configuration file as described in step 4, then UFT will apply the configuration for the file you loaded in step 3, and as a result, UFT may not record Web events properly.

Chapter 2 • Web-Based Application Support
71
How to Configure UFT to Record Mouse Clicks
This task describes how to instruct UFT to record right mouse clicks by modifying the configuration file manually.
1 (Web Add-in only) Prerequisite - Export the configuration file from the Custom Web Event Recording Configuration dialog box
a Select Record > Web Event Recording Configuration, and then click Custom Settings. For user interface details, see the section on the Custom Web Event Recording Configuration dialog box.
b Export your custom configuration to an XML file by selecting File > Save Configuration As. Then, navigate to the folder in which you want to save the Web event recording configuration file, and enter a configuration file name. The extension for configuration files is .xml.
2 Open the XML file in a text editor
a Open the configuration file for editing in any text editor. The configuration file uses a predefined XML structure. For details, see "Web Event Recording Configuration XML File Structure" on page 106.
The following example illustrates the beginning of an exported configuration file:
The Property Name element controls the recording of the mouse buttons. The values of the mouse buttons are defined as follows:
➤ 1. Left
➤ 2. Right
➤ 4. Middle

Chapter 2 • Web-Based Application Support
72
3 Modify the XML file to enable mouse click recording
a Edit the XML file as follows:
➤ To record a left mouse click for the onmouseup event, add the following line:
<Property Name="button" Value="1" Listen="2" Record="2"/>
➤ To record right and left mouse clicks for the onmousedown event, add the following lines:
<Event Name="onmousedown" Listen="2" Record="1">
<Property Name="button" Value="2" Listen="2" Record="2"/>
<Property Name="button" Value="1" Listen="2" Record="2"/>
</Event>
Note: Only one event, either onmouseup or onmousedown, should be used to handle mouse clicks. If both events are used, UFT records two clicks instead of one. By default, UFT listens for the onmouseup event.
b Save the XML file.
4 (Web Add-in only) Load the XML file into the Custom Web Even Recording Configuration dialog box
a In the Custom Web Event Recording Configuration Dialog Box (described on page 688), select File > Load Configuration. The Open dialog box opens.
b Navigate to the folder in which you saved the edited configuration file, select the file, and click Open. The Custom Web Recording Configuration dialog box reopens.
c Click OK. The new configuration is loaded, with all preferences corresponding to those you defined in the XML configuration file. Any Web objects you now record will be recorded according to these new settings.
Chapter 2 • Web-Based Application Support
73
How to Use Web Object Identifiers - Exercise
In this exercise, you use XPath and CSS identifiers in a test object description to help locate the correct button in an HTML table.
This exercise includes the following steps:
➤ "Prerequisites" on page 73
➤ "Create a sample Web application" on page 74
➤ "Learn the button objects in the Web application" on page 74
➤ "Remove the ordinal identifiers from the button objects" on page 75
➤ "Add a CSS identifier based on the object’s parent container" on page 75
➤ "Add an XPath identifier based on the object’s parent container" on page 75
➤ "Add an XPath identifier based on the object’s sibling element" on page 76
➤ "Results" on page 76
1 Prerequisites
a Open UFT and create a new test.
b Disable Smart Identification for the Button test object class by selecting Tools > Object Identification, selecting the Web environment in the Object Identification dialog box, and then selecting the Button test object class from the Test Object classes list.
c Disable automatic XPath by selecting Tools > Options > GUI Testing tab > Web > Advanced node , and then making sure that the Learn and run using automatic XPath identifiers check box is not selected.

Chapter 2 • Web-Based Application Support
74
2 Create a sample Web application
a Open the Help version of this exercise, copy the syntax content into a text document, and save the document with an .html extension. The document is saved as an HTML page.
b Review the appearance and content of your newly created HTML page in any browser. Make sure that it matches the following image.
3 Learn the button objects in the Web application
a In UFT, open the Object Repository Manager, and select Object > Navigate and Learn. UFT is hidden, and the cursor changes to a pointing hand.
b To verify that UFT learned the objects correctly, in the object repository, select each Button object and select View > Highlight in Application. UFT highlights each button object in the HTML page.
c Rename the Button objects to make them more clear:
➤ Rename Buy to Buy_BPT.
➤ Rename Buy_2 to Buy_ALM.
➤ Rename Buy_3 to Buy_UFT.

Chapter 2 • Web-Based Application Support
75
4 Remove the ordinal identifiers from the button objects
Because all of the Button objects have identical property values, when UFT learned the objects it assigned an ordinal identifier to each test object based on the location of each object in the application. This may cause UFT to identify the objects incorrectly if the sorting order of the buttons in the application changes.
a Select the first button object to display its object properties on the right side of the object repository window.
b In the Ordinal Identifier section, select the Browse button. The Ordinal Identifier dialog box opens.
c In the Identifier type drop-down list, select None and close the dialog box. The ordinal identifier is removed from the test object’s identification properties.
d Repeat steps a- c above for each of the buttons.
e Verify that the test object descriptions are no longer unique by selecting each test object and selecting View > Highlight in Application. UFT cannot identify the objects.
5 Add a CSS identifier based on the object’s parent container
a Select the Buy_BPT button. The test object details are displayed on the right side of the object repository window.
b In the Object Description section, click the Add button, and add the css property to the test object description.
c Copy and paste the following syntax into the Value edit box:
6 Add an XPath identifier based on the object’s parent container
a Select the Buy_UFT button. The test object details are displayed on the right side of the object repository window.
b In the Object Description section, click the Add button, and add the xpath property to the test object description.
tr.BPTRow input
Chapter 2 • Web-Based Application Support
76
c Copy and paste the following syntax into the Value edit box:
7 Add an XPath identifier based on the object’s sibling element
a Select the Buy_QC button. The test object details are displayed on the right side of the object repository window.
b In the Object Description section, click the Add button, and add the xpath property to the test object description.
c Copy and paste the following syntax into the Value edit box:
8 Results
Select each object and select View > Highlight in Application. UFT can now identify each button based on the Web object identifiers you added.
//TR[@id='UFT']/*/INPUT
//td[contains(text(),'Quality')]/../*/INPUT
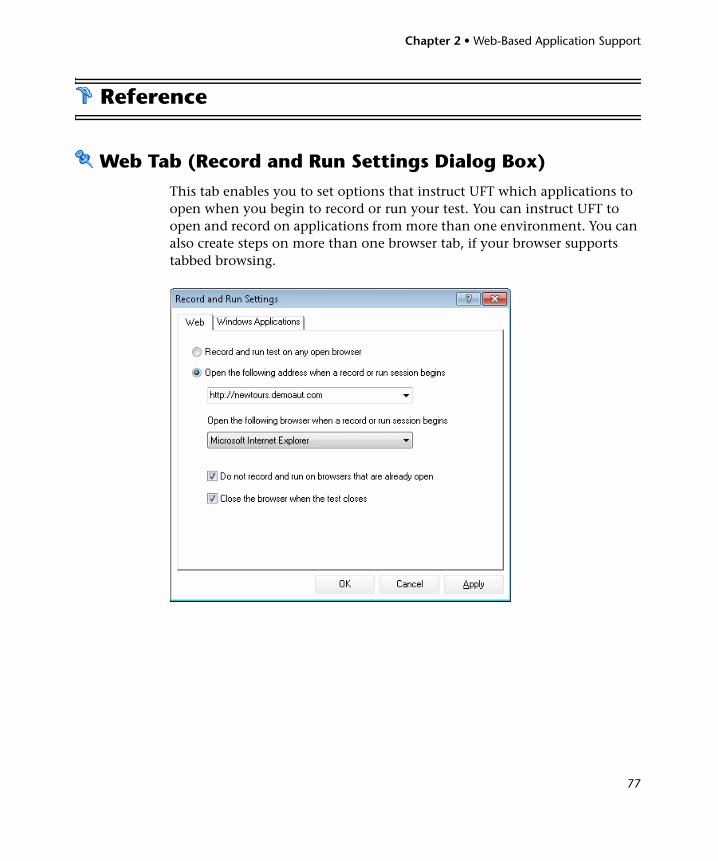
Chapter 2 • Web-Based Application Support
77
Reference
Web Tab (Record and Run Settings Dialog Box)
This tab enables you to set options that instruct UFT which applications to open when you begin to record or run your test. You can instruct UFT to open and record on applications from more than one environment. You can also create steps on more than one browser tab, if your browser supports tabbed browsing.

Chapter 2 • Web-Based Application Support
78
To access Select Record > Record and Run Settings and select the Web tab.
Important information
➤ The Web tab is available only when the Web add-in is installed and loaded. UFT uses the settings in this tab when recording and running tests or business components on Web, .NET Web Forms, PeopleSoft, and Web-based SAP objects.
➤ Siebel. For Siebel objects, UFT uses the settings in the Siebel tab, available when the Siebel Add-in is installed and loaded. For details, see "Siebel Tab (Record and Run Settings Dialog Box)" on page 485.
➤ Other environments. In addition to setting the appropriate settings in the Web tab, you should confirm that the other tabs in the dialog box have the appropriate settings.
The following settings are recommended:
➤ Windows Applications tab. Select Record and run only on: and confirm that all three check boxes are cleared, as shown below.
➤ Other tabs. (If displayed.) Select the option to record and run on any open application (upper radio button of each tab).
While these settings do not directly affect your record or run sessions when working with Web-based applications, they prevent you from inadvertently recording operations performed on Windows applications (such as e-mail) during your recording session. These settings also prevent UFT from opening unnecessary applications when you record or run tests on Web-based applications.
➤ Environment variables. You can also use special, predefined environment variables to specify the applications or browsers you want to use for your test. For details, see "Environment Variables in Record and Run Settings" on page 37.
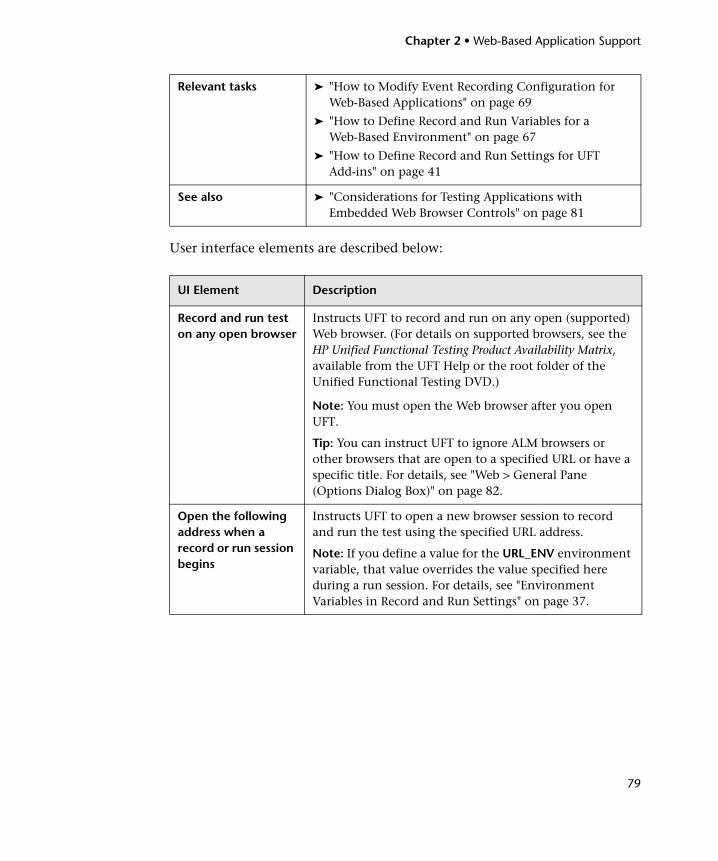
Chapter 2 • Web-Based Application Support
79
User interface elements are described below:
Relevant tasks ➤ "How to Modify Event Recording Configuration for Web-Based Applications" on page 69
➤ "How to Define Record and Run Variables for a Web-Based Environment" on page 67
➤ "How to Define Record and Run Settings for UFT Add-ins" on page 41
See also ➤ "Considerations for Testing Applications with Embedded Web Browser Controls" on page 81
UI Element Description
Record and run test on any open browser
Instructs UFT to record and run on any open (supported) Web browser. (For details on supported browsers, see the HP Unified Functional Testing Product Availability Matrix, available from the UFT Help or the root folder of the Unified Functional Testing DVD.)
Note: You must open the Web browser after you open UFT.
Tip: You can instruct UFT to ignore ALM browsers or other browsers that are open to a specified URL or have a specific title. For details, see "Web > General Pane (Options Dialog Box)" on page 82.
Open the following address when a record or run session begins
Instructs UFT to open a new browser session to record and run the test using the specified URL address.
Note: If you define a value for the URL_ENV environment variable, that value overrides the value specified here during a run session. For details, see "Environment Variables in Record and Run Settings" on page 37.

Chapter 2 • Web-Based Application Support
80
Open the following browser when a record or run session begins
Instructs UFT to open the specified browser type when recording or running a test:
Notes:
➤ Only those browsers currently installed on your computer are available in the list.
➤ If you define a value for the BROWSER_ENV environment variable, that value overrides the value specified here during a run session. For details, see "How to Define Record and Run Variables for a Web-Based Environment" on page 67 and "Environment Variables in Record and Run Settings" on page 37.
➤ If you select Mozilla Firefox, UFT opens the latest version of Mozilla Firefox that is both installed on your computer and supported by UFT.
➤ If you want to open a specific version of Firefox that is not available in this list, you can use the BROWSER_ENV environment variable as described in "How to Define Record and Run Variables for a Web-Based Environment" on page 67.
➤ For a list of all supported browser versions, see the HP Unified Functional Testing Product Availability Matrix, available from the UFT Help or the root folder of the Unified Functional Testing DVD.
Do not record and run on browsers that are already open
Instructs UFT not to record or run tests on any browsers that are already open prior to the start of the record or run session (and prior to opening UFT).
Selecting this option also prevents you from viewing the properties of these browsers using the Object Spy.
Close the browser when the test closes
Instructs UFT to close the browser window specified in the Address box when the test closes.
UI Element Description

Chapter 2 • Web-Based Application Support
81
Considerations for Testing Applications with Embedded Web Browser Controls
➤ To record and run tests on an application with embedded Web browser controls, select Record and run tests on any open Web browser in the Record and Run Settings dialog box.
➤ Register your browser control application (using the Register Browser Control Utility) so that UFT recognizes your Web object when recording or running tests. For details, see "Register Browser Control Utility" on page 108.
➤ Make sure that the application is opened after UFT, and start recording.

Chapter 2 • Web-Based Application Support
82
Web > General Pane (Options Dialog Box)
This pane enables you to determine how UFT behaves when recording and running tests or business components on Web sites.
To access 1 Make sure that a GUI test is open.
2 Select Tools > Options > GUI Testing tab > Web > General node.
Important information
You can also modify how UFT displays captured Web pages in the Active Screen. You do this in the Active Screen pane of the Options dialog box (Tools > Options > GUI Testing tab > Active Screen node). For details, see the section describing Active Screen options in the HP Unified Functional Testing User Guide.

Chapter 2 • Web-Based Application Support
83
Relevant tasks "How to Modify Event Recording Configuration for Web-Based Applications" on page 69
See also ➤ "Browser Details Dialog Box" on page 86
➤ "Web > Page/Frame Options Pane (Options Dialog Box)" on page 88
➤ "Web > Advanced Pane (Options Dialog Box)" on page 92

Chapter 2 • Web-Based Application Support
84
User interface elements are described below:
UI Element Description
Ignore the following browsers
Instructs UFT to ignore any specified browsers that may be open while UFT is recording or running a test or business component. This enables you to keep browsers that are not related to your testing environment open, without having them affect the record or run session.
For example, you may want to check your company’s share price or the news headlines during a record and run session. If you instruct UFT to ignore these specific browsers, they do not affect the session.
Note:
➤ UFT ignores browsers that match the defined criteria at the start of a record or run session. However, browsers that do not match the defined criteria at the start of a record or run session, but do match them during the session, are not ignored.
➤ Changes made to these settings apply to new tests or business components and new steps in existing tests or business components only, but not to any other existing steps.
➤ When working with tests, UFT ignores browsers only if you selected Record and run test on any open Web browser in the Web tab of the Record and Run Settings dialog box. For details, see "Web Tab (Record and Run Settings Dialog Box)" on page 77.
For details, see "Browser Details Dialog Box" on page 86.
Add Browser. Opens the Browser Details dialog box, which enables you to add browsers to the Ignore the following browsers list. For details, see "Browser Details Dialog Box" on page 86.
Modify Browser Details. If you selected a browser from the Ignore the following browsers list, this option opens the Browser Details dialog box, which enables you to edit the details of the selected browser. For details, see "Browser Details Dialog Box" on page 86.

Chapter 2 • Web-Based Application Support
85
Remove Browser. Removes the selected browser from the list if you no longer want UFT to ignore it during a record or run session.
Note: If a browser in the list is required for running a specific test, you can temporarily remove it from the list by clearing the check mark next to its name in the list of browsers.
Ignore ALM Instructs UFT to ignore all instances of ALM that are opened while recording or running a test or business component. By default, this option is selected.
Add __ seconds to page load time
Instructs UFT to add a specified number of seconds to the page load time property specified in each Page checkpoint. (Page checkpoints are not relevant for keyword components.)
Note: This option is a safeguard that prevents page checkpoints from failing in the event that the amount of time it takes for a page to load during the run is longer than the amount of time it took during the record session.
Broken links - check only links to current host
Instructs UFT to check only for broken links that are targeted to your current host.
UI Element Description

Chapter 2 • Web-Based Application Support
86
Browser Details Dialog BoxThis dialog box enables you to specify the browsers that you want UFT to ignore during a record or run session.
To access In the Web > General Pane (Options Dialog Box), click the Add Browser button or the Modify Browser Details button.
For details on the Web pane, see "Web > General Pane (Options Dialog Box)" on page 82.

Chapter 2 • Web-Based Application Support
87
User interface elements are described below:
Important information
➤ You can specify any one of the Title or URL properties, or both. However, the Title and URL properties have an AND relationship, meaning that a browser must match both property values (if defined) to be ignored by UFT.
➤ You can use regular expressions when specifying the values of these properties. For example, you can use .*finance.mybank.com to specify all finance.mybank.com domains and Web sites starting with www., http://, or https://. You do not need to use a regular expression to include child pages of a site, as UFT automatically ignores the entire domain or site. For details on supported regular expressions, see the HP Unified Functional Testing User Guide.
See also ➤ "Web > Page/Frame Options Pane (Options Dialog Box)" on page 88
➤ "Web > Advanced Pane (Options Dialog Box)" on page 92
UI Element Description
Name The name of the browser definition. The name you specify is used only to identify the browser in the list, and is not used by UFT.
Default format: Browser<number of browser in list>
Title The name of the Web page as it appears in the title bar of the browser.
Example: MyBank - Finance.*
URL The URL of the Web page. Any descendants of the specified Web page are automatically included in the list of browsers to ignore.
Example: http://www.finance.mybank.com

Chapter 2 • Web-Based Application Support
88
Web > Page/Frame Options Pane (Options Dialog Box)This pane enables you to modify how UFT records Page and Frame objects.
To access 1 Make sure that a GUI test is open.
2 Select Tools > Options > GUI Testing tab > Web > Page/Frame Options node.
See also ➤ "Web > General Pane (Options Dialog Box)" on page 82
➤ "Web > Advanced Pane (Options Dialog Box)" on page 92

Chapter 2 • Web-Based Application Support
89
User interface elements are described below:
UI Element Description
Create a new Page test object for
These options instruct UFT when to create a new Page object in the object repository while recording.
Create a new Frame test object for
These options instruct UFT when to create a new Frame object in the object repository while recording. The Frame options are similar to the Page options (except that the Every navigation option is not available).
Every navigation
Instructs UFT to create a new Page object every time a navigation is performed in a Web page.
(Relevant only for Create a new Page test object for.)
Different test object descriptions
Instructs UFT to create a new Page test object for pages with different test object descriptions, according to the properties defined for the Page test object.
Note: The default test object description for Page objects includes only the test object class. If you select this option, it is highly recommended that you define object identification properties that uniquely identify different Page objects. You should also ensure that the properties you define remain constant over time, otherwise future runs may fail.

Chapter 2 • Web-Based Application Support
90
Different URLs or a change in data transfer
Instructs UFT to create a new Page object only when the page URL changes, or if the URL stays the same and data that is transferred to the server changes, according to the data types and transfer methods you select:
➤ Ignore non user-input data - Get. Instructs UFT to ignore non user-input data if the Get method is used to transfer data to the server.
For example, suppose a user enters data on a Web page, and the data is then inserted as a hidden field using the Get method. The user clicks Submit (to send the data to the server). The new Web page is different, according to the hidden field data. However, UFT does not create a new Page test object.
➤ Ignore non user-input data - Post. Instructs UFT to ignore non-user-input data if the Post method is used to transfer data to the server.
For example, suppose a user enters data on a Web page, and the data is then inserted as a hidden field using the Post method. The user clicks Submit (to send the data to the server). The new Web page is different, according to the hidden field data. However, UFT does not create a new Page test object.
➤ Ignore user-input data - Get. Instructs UFT to ignore user-input data if the Get method is used to transfer data to the server.
For example, suppose a user enters data in a form on a Web page and clicks Submit (to send the data to the server) using the Get method. The new Web page is different according to the data filled in by the user. However, UFT does not create a new Page test object.
➤ Ignore user-input data - Post. Instructs UFT to ignore user-input data if the Post method is used to transfer data to the server.
For example, suppose a user enters data in a form on a Web page and clicks Submit (to send the data to the server) using the Post method. The new Web page is different according to the data filled in by the user. However, UFT does not create a new Page test object.
UI Element Description

Chapter 2 • Web-Based Application Support
91
Use additional Page information
Instructs UFT to use additional properties of the test object to identify an existing Page test object.
Tip: Select this option to instruct UFT to recognize existing pages when the Back and Forward navigation buttons are used.
Reset All Resets all options to their default core settings. Some Web-based add-ins modify the default settings to optimize page and frame recording. If you are using an add-in, it is recommended that you keep the default add-in settings and do not use the Reset button.
UI Element Description

Chapter 2 • Web-Based Application Support
92
Web > Advanced Pane (Options Dialog Box)This pane enables you to modify how UFT records and runs tests and business components on Web sites.
To access 1 Make sure that a GUI test is open.
2 Select Tools > Options > GUI Testing tab > Web > Advanced node.
Important information
The Accessibility checkpoint and Automatic Page checkpoint options are not relevant for keyword components.
See also "Web > General Pane (Options Dialog Box)" on page 82
"Web > Page/Frame Options Pane (Options Dialog Box)" on page 88
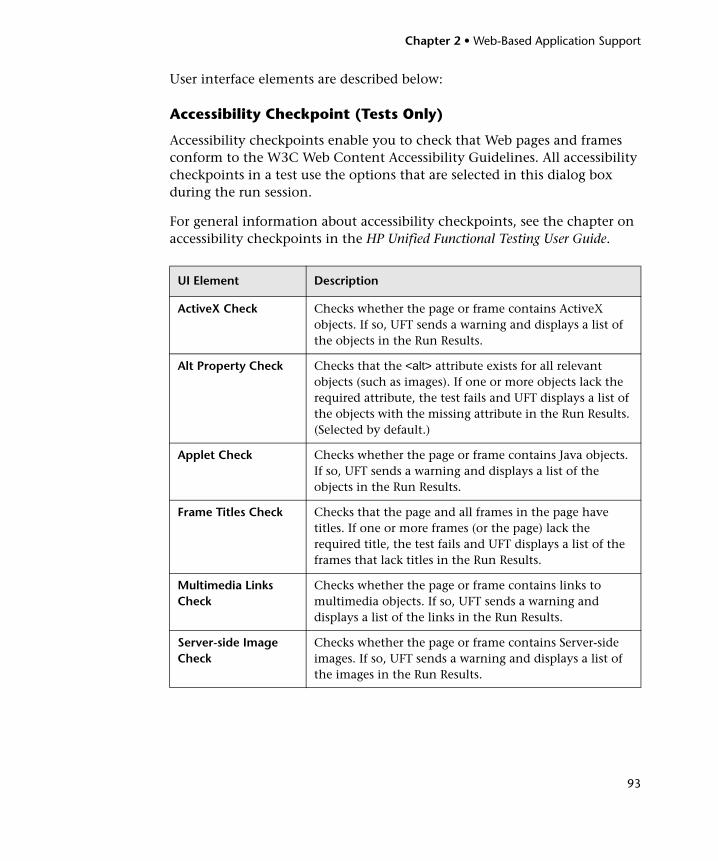
Chapter 2 • Web-Based Application Support
93
User interface elements are described below:
Accessibility Checkpoint (Tests Only)
Accessibility checkpoints enable you to check that Web pages and frames conform to the W3C Web Content Accessibility Guidelines. All accessibility checkpoints in a test use the options that are selected in this dialog box during the run session.
For general information about accessibility checkpoints, see the chapter on accessibility checkpoints in the HP Unified Functional Testing User Guide.
UI Element Description
ActiveX Check Checks whether the page or frame contains ActiveX objects. If so, UFT sends a warning and displays a list of the objects in the Run Results.
Alt Property Check Checks that the <alt> attribute exists for all relevant objects (such as images). If one or more objects lack the required attribute, the test fails and UFT displays a list of the objects with the missing attribute in the Run Results. (Selected by default.)
Applet Check Checks whether the page or frame contains Java objects. If so, UFT sends a warning and displays a list of the objects in the Run Results.
Frame Titles Check Checks that the page and all frames in the page have titles. If one or more frames (or the page) lack the required title, the test fails and UFT displays a list of the frames that lack titles in the Run Results.
Multimedia Links Check
Checks whether the page or frame contains links to multimedia objects. If so, UFT sends a warning and displays a list of the links in the Run Results.
Server-side Image Check
Checks whether the page or frame contains Server-side images. If so, UFT sends a warning and displays a list of the images in the Run Results.

Chapter 2 • Web-Based Application Support
94
Automatic Page Checkpoint (Tests Only)
These options enable you to check that expected and actual page properties are identical, by instructing UFT to automatically add a Page checkpoint for each Web page navigated during the recording process.
Note: If you are testing a Web page with dynamic content, using automatic Page checkpoints may cause the test to fail as these checkpoints assume that the page content is static between record and run sessions.
Tables Check Checks whether the page or frame contains tables. If so, UFT sends a warning and displays the table format and the tags used in each cell in the Run Results.
Add an automatic accessibility checkpoint to each Web page while recording
Instructs UFT to automatically add an accessibility checkpoint to each Web page while recording, using the checks selected in the option above.
UI Element Description
Broken links Displays the number of broken links contained in the page during the run session.
Note: If the Broken links - check only links to current host option is selected in the Web pane of the Options dialog box (see "Web > General Pane (Options Dialog Box)" on page 82), this number includes only those broken links that are targeted to the current host.
HTML source Checks that the expected source code is identical to the source code during the run session.
HTML tags Checks that the expected HTML tags in the source code are identical to those in the run session.
UI Element Description

Chapter 2 • Web-Based Application Support
95
Image source Checks that the expected source paths of the images are identical to the sources in the run session.
Links URL Checks that the expected URL addresses for the links are identical to the URL addresses in the source code during the run session.
Load time Checks that the expected time it takes for the page to load during the run session is less than or equal to the amount of time it took during the record session PLUS the amount of time specified in the Add seconds to page load time option (see "Web > General Pane (Options Dialog Box)" on page 82).
Number of images Checks that the expected number of images is identical to the number displayed in the run session.
Number of links Checks that the expected number of links is identical to the number displayed in the run session.
Create a checkpoint for each Web page while recording
Instructs UFT to automatically add a Page checkpoint for each Web page navigated during the recording process.
Ignore automatic checkpoints while running tests
Instructs UFT to ignore the automatically added Page checkpoints while running your test.
UI Element Description

Chapter 2 • Web-Based Application Support
96
Record Settings
These options enable you to set preferences for recording Web objects.
Note: If UFT does not record Web events in a way that matches your needs, you can also configure the events you want to record for each type of Web object. For example, if you want to record events, such as a mouseover that opens a sub-menu, you may need to modify your Web event configuration to recognize such events. For details, see "Event Recording Configuration for Web-Based Applications" on page 58.
UI Element Description
Enable Web support for Microsoft Windows Explorer.
When selected, UFT treats relevant objects in Microsoft Windows Explorer as Web objects. When cleared, UFT does not record events on Web pages displayed in Microsoft Windows Explorer.
Note: After modifying this setting, for the change to take effect, you must close all instances of Microsoft Windows Explorer (confirm that all explorer.exe processes are closed in the Windows Task Manager or restart the computer) and then restart UFT.
Record coordinates Records the actual coordinates relative to the object for each operation.
Record MouseDown and MouseUp as Click
Records a Click method for mouseup and mousedown events.
Note: For Web, UFT records RightClick and MiddleClick methods for most Web objects. Therefore, this option is relevant only for clicks made using the left mouse button.

Chapter 2 • Web-Based Application Support
97
Record Navigate for all navigation operations
Records a Navigate statement each time a Frame URL changes.
Use standard Windows mouse events
Instructs UFT to use standard Windows mouse events instead of browser events for the following events:
➤ OnClick
➤ OnMouseDown
➤ OnMouseUp
Note:
➤ Use this option only if the events are not properly recorded using browser events.
➤ For Web, UFT records RightClick and MiddleClick methods for most Web objects. Therefore, this option is relevant only for clicks made using the left mouse button.
➤ This option is available only for Internet Explorer.
UI Element Description

Chapter 2 • Web-Based Application Support
98
Run Settings
These options enable you to set preferences for working with Web objects during a run session.
UI Element Description
Browser cleanup Closes all open browsers after the current run or iteration ends.
When this option is selected, all currently open browsers are closed when the current run or iteration ends, regardless of whether the browsers were opened before or after UFT was opened.
Note:
This option is only applicable when a test iteration finishes naturally by running all test steps, and not by using the ExitTestIteration method.
If you need to use the ExitTestIteration method, add a wait statement at the end of the test script, just before the ExitTestIteration step.
Run only click Determines whether a Click operation is run on the application by sending MouseDown, MouseUp, and Click events, or by sending only a Click event. This option is relevant only for Click operations when Event is selected for the 'Replay type' option. It is relevant only for left-button mouse clicks.
Replay type Configures how to run mouse operations according to the selected option:
➤ Event. Runs mouse operations using browser events.
➤ Mouse. Runs mouse operations using the mouse, and keyboard operations using the keyboard.

Chapter 2 • Web-Based Application Support
99
Run using source index
Instructs UFT to learn and store the source index value when learning Web test objects, and to use that value during a run session to improve performance. During run sessions, UFT uses the learned source index value to return the relevant DOM element from the application and then verifies that this object matches the test object description. This operation is faster than searching the entire DOM for objects that match the test object description.
If the returned object does not match the description, the source index is ignored and UFT attempts to identify the object using the standard object identification process.
The source index is also ignored during a run session in the following scenarios:
➤ The description for a test object includes the XPath or CSS identifier. For details, see "Web Object Identifiers" on page 62.
➤ If you manually define an Index ordinal identifier for the test object. For details, see the section on Index Ordinal Identifiers in the HP Unified Functional Testing User Guide.
➤ The run session is performed using Mozilla Firefox.
UI Element Description

Chapter 2 • Web-Based Application Support
100
Resize browser on run if resized during a recording session
If you select this option and then resize the browser during a recording session, UFT resizes the browser to this size when the first time you run the recorded steps. At the end of a run session, the browser returns to its default size. It is recommended that you select this option if your test performs drag and drop operations.
Note:
➤ To use this option, select the Open the following browser option in the Record and Run Settings dialog box before recording.
➤ When this option is cleared, UFT does not change the browser size when a run session begins. If you run your steps with this option cleared, and the select this option again, UFT opens the browser to the same size as the previous run session, regardless of any resizing information you provided when recording the steps.
Learn and run using automatic XPath identifiers (Web Add-in only)
Generates and stores an XPath value when learning Web test objects, and uses that value during a run session to improve object identification reliability. During the run session, UFT uses the learned XPath value to return the DOM element from the application and verifies that this object matches the test object description. If it does not, the learned XPath is ignored.
Additionally, if the description for a test object includes the XPath or CSS identifier, or if the Run using source index option is selected, then this option is ignored for that object. For details, see "Web Object Identifiers" on page 62.
UI Element Description

Chapter 2 • Web-Based Application Support
101
Web Pane (Test/Business Component Settings Dialog Box / Application Area - Additional Settings Pane)
This pane provides options for recording and running tests on Web sites.
The following image displays the Web pane of the Test Settings dialog box. The content of this pane is identical to the content of the Web pane of the Business Component Settings dialog box and the Application Area’s Additional Settings pane.

Chapter 2 • Web-Based Application Support
102
User interface elements are described below:
To access Do one of the following:
➤ For a test or component:
Select File > Settings > Web node.
➤ For an application area:
Open the application area and select Additional Settings > Web in the sidebar.
Important information
➤ The Web pane is available only if the Web Add-in is installed and loaded.
➤ Recording events. In addition to the options in this pane, you can also configure the events you want to record for each type of Web object. For example, if you want to record events, such as moving the pointer over an object to open a sub-menu, you may need to modify your Web event configuration to recognize such events. For details, see "Event Recording Configuration for Web-Based Applications" on page 58.
➤ Business components. For business components, the settings displayed in this pane are read-only. To change the Web pane settings for a business component, open its associated application area and use the application area’s Additional Settings > Web pane.
UI Element Description
Browser navigation timeout
Sets the maximum time (in seconds) that UFT waits for a Web page to load before running a step in the test.
User name (tests only)
The user name for password-protected resources that use a standard authentication mechanism.
For details, see "Advanced Authentication Dialog Box" on page 104.

Chapter 2 • Web-Based Application Support
103
Password (tests only)
The password for password-protected resources that use a standard authentication mechanism.
For details, see "Advanced Authentication Dialog Box" on page 104.
Advanced (tests only)
Opens the Advanced Authentication dialog box, which enables you to manually log in to your Web site to enable access to password-protected resources that use an advanced authentication mechanism.
For details, see "Advanced Authentication Dialog Box" on page 104.
UI Element Description

Chapter 2 • Web-Based Application Support
104
Advanced Authentication Dialog BoxThis dialog box enables you to define login information, so that the Active Screen can access the resources on a site, where the automatic Active Screen login mechanism may not be sufficient.
Chapter 2 • Web-Based Application Support
105
To access In the Web Pane (Test/Business Component Settings Dialog Box / Application Area - Additional Settings Pane), click Advanced.
For details on the Web pane, see "Web Pane (Test/Business Component Settings Dialog Box / Application Area - Additional Settings Pane)" on page 101.
Important information
➤ After closing this dialog box, refresh the Active Screen by selecting a new step in the Keyword View or select View > Active Screen to re-display the Active Screen. Confirm that the pages are displayed correctly.
If you still cannot view images or other resources on your Active Screen, you may not be connected to the Internet, the Web server may be down, or the source path that was captured with the Active Screen page may no longer be accurate.
➤ When you log in using the Advanced Authentication mechanism, you remain logged in to the site for the duration of the UFT session. If you close and reopen UFT and then reopen your test, you must log in again.
➤ If the site to which you log in has an inactivity timeout after which you are automatically logged out of the Web site, you may need to log in using the Advanced Authentication dialog box more than once while editing your test to re-enable access to your Active Screen pages.
See also ➤ "Active Screen Dialog Box" on page 109
➤ "Accessing Password-Protected Resources in the Active Screen" on page 55

Chapter 2 • Web-Based Application Support
106
User interface elements are described below (unlabeled elements are shown in angle brackets):
Web Event Recording Configuration XML File Structure
The Web event recording configuration XML file is structured in a specific format when you export it from the Custom Web Event Configuration Dialog Box (described on page 688). If you are modifying the file, or creating your own file, you must ensure that you adhere to this format for your settings to take effect.
For task details, see "How to Modify Event Recording Configuration for Web-Based Applications" on page 69.
UI Element Description
<browser window> The default Web page for the test, displayed according to the following guidelines:
➤ The first time you open this dialog box for a given test, the browser window displays the URL address set for the test in the Web tab of the Record and Run Settings dialog box.
➤ If you navigate to a new URL address using this dialog box, that address becomes the default Advanced Authentication page for this test.
Use this window to enter your login information, and after logging into your application, click Close. The login session remains open for the remainder of your UFT session (or until the Web site’s inactivity timeout is exceeded).
Address The URL address of the Web page. If the displayed Web page is not the correct page for logging in to your site, enter the correct URL address in the Address box and click Go.

Chapter 2 • Web-Based Application Support
107
Sample XML File
The following attributes enable you to define the listening criteria and recording status options in the XML file:
<XML><Object Name="Any Web Object">
<Event Name="onclick" Listen="2" Record="2"/><Event Name="onmouseup" Listen="2" Record="1">
<Property Name="button" Value="2" Listen="2" Record="2"/></Event>
</Object>. . .. . .. . .
<Object Name="WebList"><Event Name="onblur" Listen="1" Record="2"/><Event Name="onchange" Listen="1" Record="2"/><Event Name="onfocus" Listen="1" Record="2"/>
</Object></XML>
Attribute Possible Values
Listen 1. Always
2. If Handler
4. If Behavior
6. If Handler or Behavior
0. Never
Record 1. Disabled
2. Enabled
6. Enabled on Next Event

Chapter 2 • Web-Based Application Support
108
Register Browser Control Utility
This utility enables you to define the path of your Web application hosting the browser control. After registration, UFT will recognize Web objects in your application when recording or running tests.
User interface elements are described below (unlabeled elements are shown in angle brackets):
To access Select Start > All Programs > HP Software > HP Unified Functional Testing > Tools > Register New Browser Control.
Important information
After you register an application hosting a browser control using this utility, you must restart UFT before you test your application.
See also "Registering Browser Controls" on page 54
UI Element Description
<host application path>
The absolute path to the .exe file of the application hosting the browser control.
Register / Unregister Registers or removes a registered application.

Chapter 2 • Web-Based Application Support
109
Active Screen Dialog Box
This dialog box enables you to enter login information for any images or other resources in the Active Screen that are password-protected using the standard authentication mechanism.
To access This dialog box opens when you select a step in your test or results in which one or more images or other resources in the Active Screen may be password-protected.
Important information
➤ After you enter a user name and password, refresh the Active Screen by selecting a new step in the Keyword View or select View > Active Screen to re-display the Active Screen. Confirm that the page is displayed correctly.
➤ If one or more resources are still missing or displayed incorrectly, you may need to use the Advanced Authentication mechanism. For details, see "Advanced Authentication Dialog Box" on page 104.
See also ➤ "Advanced Authentication Dialog Box" on page 104
➤ "Web Pane (Test/Business Component Settings Dialog Box / Application Area - Additional Settings Pane)" on page 101

Chapter 2 • Web-Based Application Support
110
User interface elements are described below:
Troubleshooting and Limitations - Web-Based Application Support
This section contains general troubleshooting and limitation information about the Web add-in, and includes the following sections:
➤ "User Account Control (Where Applicable)" on page 111
➤ "Test Objects, Methods, and Properties" on page 111
➤ "Creating and Running Testing Documents" on page 112
➤ "Running Tests or Components in Microsoft Internet Explorer" on page 112
➤ "Recognition of WebTable Test Objects" on page 113
➤ "Multilingual Support for Web Browsers" on page 116
UI Element Description
User name The user name used to log into your application.
Password The password used to log into your application.
Save the User Name and Password
Enables the automatic Active Screen login mechanism, by adding the login information to the Active Screen access area in the Web pane of the Test Settings dialog box. This prevents the Active Screen dialog box from opening, and ensures that all images and resources are displayed in the Active Screen and results each time you open the test, you can use the automatic Active Screen login mechanism.
Note: You can also add the login information manually in the Web pane of the Test Settings dialog box. For details, see "Web Pane (Test/Business Component Settings Dialog Box / Application Area - Additional Settings Pane)" on page 101.

Chapter 2 • Web-Based Application Support
111
User Account Control (Where Applicable)
➤ If you are working on a computer where the UAC (User Account Control) option is set to ON, UFT does not support testing on Mozilla Firefox browsers that were installed (or upgraded to a new version) after you installed UFT.
Workaround: After installing Mozilla Firefox on the environment described above, log in as an administrator and open UFT. This enables UFT to install files that are required for Mozilla Firefox support.
Test Objects, Methods, and Properties
➤ Web test objects do not support the Class Name identification property. If you try to run a ChildObjects(Descr) step on a Web object, and the Descr argument includes the Class Name property, a General Run Error message is displayed.
Workaround: Use the micclass property in the Descr argument.
➤ If you record drag and drop steps on a Web element within the same frame, the test steps may fail during the run session if the screen resolution is not identical to the screen resolution during the recording session. This is because the target location coordinates may be different for different screen resolutions.
Workaround: If this problem occurs, adjust the Drop coordinates according to the new location.
➤ UFT records changes in the edit field only on <input type="file"> tags. Browsing operations are not recorded.
➤ Clicks on form tags of type POST may not run correctly.
Workaround: If this problem occurs, change the replay type before the click to Run by mouse operations using: Setting.WebPackage("ReplayType") = 2. It is recommended to return the replay type to the default (Run by Events) setting after the click step: Setting.WebPackage("ReplayType") = 1.

Chapter 2 • Web-Based Application Support
112
Creating and Running Testing Documents
➤ If you use the Tab key when recording password fields in the AutoComplete dialog box, UFT may record incorrectly.
Workaround: Press ENTER after entering the user name or click the button for logging in.
➤ When UFT opens a browser, it may not correctly recognize multiple tabs that were opened and saved from a previous browser session.
Workaround: If multiple tabs are required, open them during the run session by adding the relevant steps to your test or business component.
Running Tests or Components in Microsoft Internet Explorer
➤ When using Microsoft Internet Explorer 7.0, UFT cannot switch to tabs that are not visible on the tab-band without scrolling.
Workaround: Perform either of the following:
➤ Maximize the browser to increase the number of tabs that are visible in the tab-band without scrolling.
➤ Increase the screen resolution to allow more tabs to be visible in the tab band.
➤ If you record a click on an area of an image map that is not mapped to a URL in Microsoft Internet Explorer, UFT will perform a click on the first mapped area of that map during the run session.
➤ UFT does not record on customized toolbar buttons in Microsoft Internet Explorer. (It records only on the toolbar buttons that are displayed by default in the browser.)
➤ UFT does not record on the Find window of the Microsoft Internet Explorer browser.
➤ UFT may respond slowly during a recording session if the drop-down boxes in a Web page contain a lot of data.
Workaround: Learn the objects on a Web page that contains a lot of data (instead of recording).

Chapter 2 • Web-Based Application Support
113
➤ If you install an update for Microsoft Internet Explorer 7 and later try to open UFT, UFT sometimes does not open correctly. This is due to a known Microsoft issue in which the urlmon.dll file becomes corrupted during the Microsoft Internet Explorer update. For details on this issue from the Microsoft support site see, http://support.microsoft.com/kb/946627.
Workaround: Reinstall Microsoft Internet Explorer 7 or install a later version.
➤ If Internet Explorer 9 displays the message: Speeding up browsing by disabling add-ons, choose Don't disable or select a bigger threshold value.
➤ When using Internet Explorer 9, the innertext, outertext, innerhtml and outerhtml property values may differ from earlier versions of Internet Explorer. Therefore, using these values in parameters or running checkpoints that use these property values may cause the steps to fail.
Recognition of WebTable Test Objects
By default, when using the UFT Web Add-in, UFT recognizes any HTML table as a WebTable test object.
However, in QuickTest 9.5 or 10.00, the default behavior was to ignore HTML tables with one row and one column during Object Spy, learn, and record sessions.
In specific situations, this changed default behavior may result in differences when learning new test objects or when running steps containing Web test objects that were learned in QuickTest 9.5 or 10.00. For example, the ChildObjects method may return a different value for parent objects that contain Web tables.
If necessary, you can revert to the previous behavior by enabling (and optionally modifying) abstract table support.
Abstract tables are defined in a built-in Web Add-in Extensibility toolkit support set called HPInternal. By default, this toolkit support set is not loaded.

Chapter 2 • Web-Based Application Support
114
To activate the abstract table support:
1 Open <UFT installation folder>\dat\Extensibility\Web\Toolkits\HPInternal\loadalways.ind
2 Change the single line in the file to: load=true
To modify which types of tables UFT treats as an abstract table:
Edit the IsHPAbstractTable JavaScript located in: <UFT installation folder>\dat\Extensibility\Web\Toolkits\HPInternal\HPAbstractTable.js.
The sample IsHPAbstractTable JavaScript function below causes UFT to treat Web table elements containing one row and one column as abstract tables:
function IsHPAbstractTable(){
// Treat all tables with only one cell as abstract tablesif ( _elem.rows.length == 1 && _elem.rows[0].cells.length == 1 ){
return true;}return false;
}
To instruct UFT to ignore additional types of Web table elements, modify the IsHPAbstractTable JavaScript function to return true for those types based on their HTML properties or other information. (Use the token _elem to represent the Web element UFT is currently handling.).
Caution: HPAbstractTable.js affects the way UFT identifies Web objects and can cause problems if modified incorrectly. Edit this file only if you are an experienced JavaScript programer and are familiar with the implementation of your Web controls. Make sure to create a backup copy of the file before making changes.
Chapter 2 • Web-Based Application Support
115
Checkpoints, Output Values, and the Active Screen
➤ Checkpoints on page source/HTML tags cannot be inserted from the Active Screen and must be inserted while recording. These checkpoints may fail during the first run session.
Workaround: Perform an update run (Run > Update Run Mode) of your test or business component before you run a test or business component that includes a page source/HTML tag checkpoint.
➤ If you insert checkpoints from the Active Screen when you are working with an application containing a browser control instead of a Web browser, your checkpoints may fail.
Workaround: Insert checkpoints while recording.
➤ If you take a snapshot of an ASPAjaxRichTextArea object on FireFox, it might not be displayed correctly in the Active screen.
Working with Multiple Web Browsers
Problem
When running steps that are intended to be performed on different browsers, and UFT tries to perform the step intended for the second browser before the second browser has finished loading, UFT will perform the step on the first browser, and the step may fail.
Solution
Insert a Wait() statement before the first step on the second browser to enable the second browser to finish loading.
Reason
By default, a Browser test object does not have any identification properties in its description. When only one browser is open, the open browser matches the (empty) description for any Browser test objects. When multiple browsers are open, UFT uses smart identification or the ordinal identifier property value stored with the relevant Browser test object to distinguish between the browsers and to select the correct browser.

Chapter 2 • Web-Based Application Support
116
However, if a second browser has not fully loaded when UFT tries to perform a step intended for that browser, UFT will assume that only one browser is open and it will try to perform the step on the first browser without reverting to smart identification or ordinal identifiers.
Multilingual Support for Web Browsers
➤ In Internet Explorer, the AutoComplete operation on edit fields is not recorded.
Workaround: You can disable the AutoComplete feature in Microsoft Internet Explorer by selecting Tools > Internet Options > Advanced and deselecting the Use inline AutoComplete under the Browsing options in Microsoft Internet Explorer.
➤ If a test or business component contains a step that closes a Mozilla Firefox browser, UFT may behave unexpectedly when that step is reached during a run session.
Workaround: Do not include a step that closes a Mozilla Firefox browser.

117
3Windows-Based Application Support
This chapter includes:
Concepts
➤ Windows-Based Application Support - Overview on page 118
Tasks
➤ How to Configure Options for Windows-Based Applications on page 120
➤ How to Define Record and Run Settings for Windows-Based Applications on page 121
Reference
➤ Windows Applications Tab (Record and Run Settings Dialog Box) on page 124
➤ Windows Applications > General Pane (Options Dialog Box > GUI Testing Tab) on page 136
➤ Windows Applications > Advanced Pane (Options Dialog Box > GUI Testing Tab) on page 139

Chapter 3 • Windows-Based Application Support
118
Concepts
Windows-Based Application Support - Overview
UFT provides a number of add-ins for testing Windows-based applications.
The way you configure many of your UFT options is the same or similar for most UFT Windows-based add-ins (as well as for the built-in standard Windows testing support). For details, see "How to Configure Options for Windows-Based Applications" on page 120.
Many UFT add-ins rely on the settings in the Windows Applications tab of the Record and Run Settings dialog box to determine on which applications UFT records and runs. For some add-ins, these settings may also affect the applications that UFT recognizes for certain operations while in edit mode, such as using the Object Spy or other pointing hand operations. For details, see "How to Define Record and Run Settings for Windows-Based Applications" on page 121.
You can also use predefined environment variables to specify the applications or browsers you want to use for your test. This can be useful if you want to test how your application works in different environments.
There may also be additional issues that you need to address to ensure that UFT recognizes your objects properly during record, run, and/or pointing hand operations. For details, see "Record and Run Setting Guidelines for Windows-Based Add-ins" on page 133.
For details about standard Windows testing support, see Chapter 30, "Standard Windows Support -Quick Reference."
For details on how to work with Windows-based add-ins, see the specific sections describing these add-ins in the guide:
➤ "ActiveX Add-in - Quick Reference" on page 213
➤ "Delphi Add-in - Quick Reference" on page 225
➤ ".NET Windows Forms Support - Quick Reference" on page 163

Chapter 3 • Windows-Based Application Support
119
➤ "PowerBuilder Add-in" on page 341
➤ "Qt Add-in" on page 349
➤ "Windows-based SAP Support - Quick Reference" on page 371
➤ "Stingray Add-in" on page 511
➤ "Terminal Emulator Add-in" on page 555
➤ "VisualAge Smalltalk Add-in" on page 635
➤ "Visual Basic Add-in" on page 643

Chapter 3 • Windows-Based Application Support
120
Tasks
How to Configure Options for Windows-Based Applications
This task describes the different ways you can configure UFT settings and options for working with Windows applications.
This task includes the following steps:
➤ "Configure general Windows-based application options" on page 120
➤ "Configure advanced Windows-based application options" on page 121
➤ "Define record and run settings for Windows-based applications" on page 122
Configure general Windows-based application options
Use the Windows Applications pane of the Options dialog box (Tools > Options > GUI Testing tab > Windows Applications node) to configure how UFT records and runs tests and business components for Windows-based applications, such as standard Windows, ActiveX, .NET Windows Forms, WPF, SAP GUI for Windows, and Visual Basic applications. For details, see "Windows Applications > General Pane (Options Dialog Box > GUI Testing Tab)" on page 136.

Chapter 3 • Windows-Based Application Support
121
Tip: When recording tests or scripted components on Windows-based applications, you can choose to save all Active Screen information in every step, save information only in certain steps, or disable Active Screen captures entirely. You set this preference in the Active Screen pane of the Options dialog box (Tools > Options > GUI Testing tab > Active Screen node). The less information saved, the faster your recording times will be.
This option is not relevant for keyword components.
For details, see the section describing the Active Screen pane in the HP Unified Functional Testing User Guide.
Configure advanced Windows-based application options
Use the Windows Applications > Advanced pane of the Options dialog box (Tools > Options > GUI Testing tab > Windows Applications > Advanced node) to modify how UFT records and runs tests or business components on Windows-based applications, such as ActiveX or Visual Basic. For details, see "Windows Applications > Advanced Pane (Options Dialog Box > GUI Testing Tab)" on page 139.
How to Define Record and Run Settings for Windows-Based Applications
This task includes the following steps:
➤ "Define record and run settings for Windows-based applications" on page 122
➤ "Define environment variables for Windows-based applications" on page 122

Chapter 3 • Windows-Based Application Support
122
Define record and run settings for Windows-based applications
➤ In the Windows Applications tab of the Record and Run Settings dialog box, you can set options that affect how you start creating and running tests for Windows-based applications. These options instruct UFT which applications to open when you begin to record or run your test. For details, see "Windows Applications Tab (Record and Run Settings Dialog Box)" on page 124.
➤ For Windows applications, you also specify the applications on which you want to record. For details, see "Application Details Dialog Box" on page 130.
Note: The Record and Run Settings dialog box applies only to tests. Record settings for business components are specified in the Applications pane or Applications dialog box of the relevant application area. However, specific record and run settings do not need to be defined for business components. For details on the Applications pane in the Additional Settings pane of an application area, see the HP Unified Functional Testing User Guide.
Define environment variables for Windows-based applications
Note:
➤ For details on environment variables and how to use them in tests, see "Environment Variables in Record and Run Settings" on page 37.
➤ The environment variables described in this section correspond with the settings you define in the Application Details Dialog Box (described on page 130).

Chapter 3 • Windows-Based Application Support
123
To use environment variables to define the details for the Windows-based applications on which you want to record and run tests, use the appropriate variable names as specified below:
Option Variable Names Description
Application EXE_ENV_1 … EXE_ENV_10
The executable files on which UFT records operations when record and run sessions begin. You can specify up to ten executable files.
Working folder DIR_ENV_1 … DIR_ENV_10
The folder to which the corresponding executable file refers (for each corresponding application).
Program arguments
ARGS_ENV_1 … ARGS_ENV_10
The command line arguments to be used for the specified application (for each corresponding application).
Launch application
LNCH_ENV_1 … LNCH_ENV_10
Whether to open the application when starting the record and run session (for each corresponding application).
Possible values: 0 (do not launch the application)1 (launch the application)
Include descendant processes
CHLD_ENV_1 … CHLD_ENV_10
Whether to record and run on processes created by the application during the record and run session (for each corresponding application).
Possible values: 0 (do not record on descendant processes)1 (record descendant processes)

Chapter 3 • Windows-Based Application Support
124
Reference
Windows Applications Tab (Record and Run Settings Dialog Box)
This tab enables you to define preferences for recording and running tests on Windows-based applications.

Chapter 3 • Windows-Based Application Support
125
To access Select Record > Record and Run Settings and then select the Windows Applications tab.
Note: The Record and Run Settings dialog box also opens automatically each time you begin recording a new test (unless you open the dialog box and set your preferences manually before you begin recording).
Important information
➤ You can instruct UFT to open and record on applications from more than one environment.
➤ For some Windows-based add-ins, the settings in this dialog box may also affect the applications that UFT recognizes for other UFT operations, such as learning objects or using the Object Spy. For details, see "Record and Run Setting Guidelines for Windows-Based Add-ins" on page 133.
➤ For performance reasons, the default setting in the Windows Applications tab is set to record and run only on the applications you specify (and not on any open application). If you do not specify an application or change this option, UFT will not record or run on any Windows-based application.
➤ If you loaded other add-ins when you opened UFT, there may be additional tabs in the Record and Run Settings dialog box. If this is the case, confirm that in each additional tab, the option to record and run on any open application (upper radio button of each tab) is selected.
While this setting does not directly affect your record or run sessions, it prevents UFT from opening unnecessary applications when you begin record or run sessions.
Relevant tasks "How to Define Record and Run Settings for Windows-Based Applications" on page 121
Chapter 3 • Windows-Based Application Support
126
See also ➤ "Record and Run Setting Guidelines for Windows-Based Add-ins" on page 133
➤ "Environment Variables in Record and Run Settings" on page 37
➤ "Application Details Dialog Box" on page 130
➤ "Record and Run Settings for Add-ins - Overview" on page 35
➤ "Windows-Based Application Support - Overview" on page 118

Chapter 3 • Windows-Based Application Support
127
User interface elements are described below:
UI Elements Description
Record and run test on any open Windows-based application
Instructs UFT to record all operations performed on any Windows-based application that is opened while recording your test (including e-mail applications, file management applications, and so on). UFT records and runs only on applications that have a user interface, and it does not matter how the applications are opened (as child processes of Windows Explorer, child processes of UFT, and so on).
When selecting this option, make sure that all the applications on which you want to record are currently closed. For some environments, UFT can recognize and/or record on the applications that you open manually only after you select this option and click OK. Instances of these applications that are already open when the Record and Run Settings dialog box opens may be ignored or may not be recognized or recorded correctly.

Chapter 3 • Windows-Based Application Support
128
Record and run only on
Restricts record and run (and in some cases pointing hand) operations to selected applications. Additionally, you can configure whether UFT should open these applications for you at the beginning of a record or run session. The following options are available:
➤ Applications opened by UFT. This option records, recognizes, and runs only on applications invoked by UFT (as child processes of UFT). For example, applications opened during a record or run session using a SystemUtil.Run statement, or using a statement such asSet shell = createobject("wscript.shell")shell.run "notepad".
➤ Applications opened via the Desktop (by the Windows shell). This option records, recognizes, and runs only on applications that are opened via the Windows Desktop. For example, applications opened from the Windows Start menu, by double-clicking executable files in the Windows Explorer, by double-clicking a shortcut on the Windows Desktop, or by clicking icons on the Quick Launch bar.
➤ Applications specified below. This option records, recognizes, and runs only on applications listed in the Application details area.
Tips:
➤ If you do not want to record on any Windows-based applications, select only the Applications specified below check box, and ensure that there are no applications listed in the Application details area.
➤ Make sure that all the applications listed in the Application details area are currently closed. For some environments, UFT can record only on the instances of the specified applications that are opened after you select this option and click OK. Instances of these applications that are already open when the Record and Run Settings dialog box opens may be ignored or may not be recognized or recorded correctly.
UI Elements Description

Chapter 3 • Windows-Based Application Support
129
Application details
The details of the applications on which to record and run the test. For details on the details displayed, see "Application Details Dialog Box" on page 130.
Note: If you define values for one or more environment variables, those values override the values in the Windows Applications tab during a test run. For details, see "Environment Variables in Record and Run Settings" on page 37.
Add. Opens the Application Details dialog box to enable you to add an application to the application list. You can add up to ten applications.
For details, see "Application Details Dialog Box" on page 130.
Edit. Opens the Application Details dialog box to enable you to edit the application details for the selected application. For details, see "Application Details Dialog Box" on page 130.
Delete. Removes the selected application from the application list.
UI Elements Description

Chapter 3 • Windows-Based Application Support
130
Application Details Dialog BoxThis dialog box enables you to add details for an application or to edit details for the application that you selected in the Windows Applications tab of the Record and Run Settings dialog box.
To access Select Record > Record and Run Settings, select the Windows Applications tab, and click the Add button or Edit button
.
Note: The Record and Run Settings dialog box also opens automatically each time you begin recording a new test (unless you open the dialog box and set your preferences manually before you begin recording).
Important information
➤ You can add up to ten applications to the application list displayed in the Windows Applications tab, and you can edit an existing application in the list. You can also select whether to launch the selected applications when the session starts, and whether to record and run on the application’s descendant processes.
➤ The details entered in the Application Details dialog box are displayed as a single list item for each application in the Application details area of the Windows Applications tab.

Chapter 3 • Windows-Based Application Support
131
User interface elements are described below:
Relevant tasks
"How to Define Record and Run Settings for Windows-Based Applications" on page 121
See also ➤ "Windows Applications Tab (Record and Run Settings Dialog Box)" on page 124
➤ "Windows Applications > General Pane (Options Dialog Box > GUI Testing Tab)" on page 136
➤ "Windows Applications > Advanced Pane (Options Dialog Box > GUI Testing Tab)" on page 139
➤ "Record and Run Settings for Add-ins - Overview" on page 35
➤ "Windows-Based Application Support - Overview" on page 118
UI Elements Description
Application The executable file on which to record.
You can enter the executable file as a relative path. During the run session, UFT searches for the file in the folder for the current test, and then in the folders listed in the Folders pane of the Options dialog box (Tools > Options > GUI Testing tab > Folders node). For details, see the sections on setting folder testing options, and on using relative paths in the HP Unified Functional Testing User Guide.
Note:
➤ The Application box should contain only the file name and path for the application. If you want to add command line arguments, use the Program arguments box.
➤ The full path name is used to launch an application only when Launch application is selected. UFT records and runs on any application with the specified executable file name. For example, if you specify C:\Windows\Notepad.exe, UFT records on a Notepad application invoked from any folder.
Tip: You can specify a document or other file associated in the file system with an application, for example, c:\tmp\a.txt. In this case, UFT automatically opens the specified file in the associated application (Notepad in this example). If you use this option, UFT ignores any defined program arguments.

Chapter 3 • Windows-Based Application Support
132
Working folder Optional. The current working folder for the application. The current working folder is used by the application to search for related files. If a working folder is not specified, the executable folder is used as the working folder.
Note: This parameter is used only when Launch application is selected. If Launch application is not selected, its value has no effect.
Program arguments
Optional. Instructs UFT to open the application using the specified command line arguments.
Note: This parameter is used only when Launch application is selected. If Launch application is not selected, its value has no effect.
Launch application
Instructs UFT whether to launch the selected application when the record and run session begins. By default, this option is selected.
Include descendant processes
Instructs UFT whether to record and run on processes created by the specified application during the record and run session. For example, a process that is used only as a launcher may create another process that actually provides the application functionality. This descendant process must therefore be included when recording or running tests on this application, otherwise the functionality will not be recorded, or the run session will fail.
By default, this option is selected.
UI Elements Description

Chapter 3 • Windows-Based Application Support
133
Record and Run Setting Guidelines for Windows-Based Add-insSpecial considerations are detailed below for each UFT add-in that is affected by the settings in the Windows Applications tab of the Record and Run Settings dialog box.
Add-in Environment Guidelines
ActiveX ➤ If you select the Record and Run only on radio button, the settings also define and limit which applications are recognized by the Object Spy and other pointing hand operations.
➤ UFT recognizes ActiveX objects only in applications that are opened after changing the settings in the Windows Applications tab of the Record and Run Settings dialog box.
Delphi ➤ UFT recognizes only Delphi applications that have been precompiled with the Delphi agent module (MicDelphiAgent.pas). For details, see "How to Enable Communications Between UFT and Your Delphi Application" on page 230.
➤ In some cases, if you select the Record and Run only on radio button, the settings may also define and limit which applications are recognized by the Object Spy and other pointing hand operations.
.NET Windows Forms If you select the Record and Run only on radio button, the settings also define and limit the applications that are recognized by the .NET Windows Forms Spy, the Object Spy, and other pointing hand operations.
.NET Windows Presentation Foundation Environment
If you select the Record and Run only on radio button, the settings also define and limit the applications that are recognized by the .NET Spy, the Object Spy, and other pointing hand operations.
PowerBuilder If you select the Record and Run only on radio button, the settings also define and limit the applications that are recognized by the Object Spy and other pointing hand operations.

Chapter 3 • Windows-Based Application Support
134
Standard Windows ➤ The Record and Run only on radio button applies only to record and run sessions. UFT recognizes all standard Windows objects for Object Spy and pointing hand operations, regardless of the settings in the Record and Run Settings dialog box.
➤ It is recommended that applications are opened after changing the settings in the Windows Applications tab of the Record and Run Settings dialog box.
Stingray ➤ In addition to the settings in the Record and Run Settings dialog box, you must also configure UFT to recognize your Stingray applications in the Stingray pane of the Options dialog box (Tools > Options > GUI Testing tab > Stingray node). For details, see "Stingray Pane (Options Dialog Box)" on page 548.
➤ If you select the Record and Run only on radio button, the settings also define and limit the applications that are recognized by the Object Spy and other pointing hand operations.
Terminal Emulators ➤ UFT recognizes only the terminal emulator set in the Terminal Emulator pane of the Options dialog box (Tools > Options > GUI Testing tab > Terminal Emulator node). For details, see "Terminal Emulator Pane (Options Dialog Box)" on page 595.
➤ The Record and Run only on radio button does not affect the applications on which UFT records, recognizes, and runs.
Add-in Environment Guidelines

Chapter 3 • Windows-Based Application Support
135
Visual Basic ➤ If you select the Record and Run only on radio button, the settings may also define and limit the applications that are recognized by the Object Spy and other pointing hand operations.
➤ UFT recognizes Visual Basic objects only in applications that are opened after changing the settings in the Windows Applications tab of the Record and Run Settings dialog box.
VisualAge ➤ UFT can recognize only VisualAge Smalltalk applications that have been precompiled with the VisualAge Smalltalk agent (qt-adapter). For details, see "How to Configure the VisualAge Smalltalk Add-in" on page 640.
➤ The Record and Run only on radio button applies only to record and run sessions. UFT recognizes all VisualAge Smalltalk objects for Object Spy and pointing hand operations, regardless of the settings in the Record and Run Settings dialog box.
Add-in Environment Guidelines

Chapter 3 • Windows-Based Application Support
136
Windows Applications > General Pane (Options Dialog Box > GUI Testing Tab)
This pane enables you to configure how UFT records and runs tests and business components for Windows-based applications.
To access Select Tools > Options > GUI Testing tab > Windows Applications > General node.
See also ➤ "Windows Applications > Advanced Pane (Options Dialog Box > GUI Testing Tab)" on page 139
➤ "Windows Applications Tab (Record and Run Settings Dialog Box)" on page 124
➤ "Windows-Based Application Support - Overview" on page 118
➤ "How to Configure Options for Windows-Based Applications" on page 120
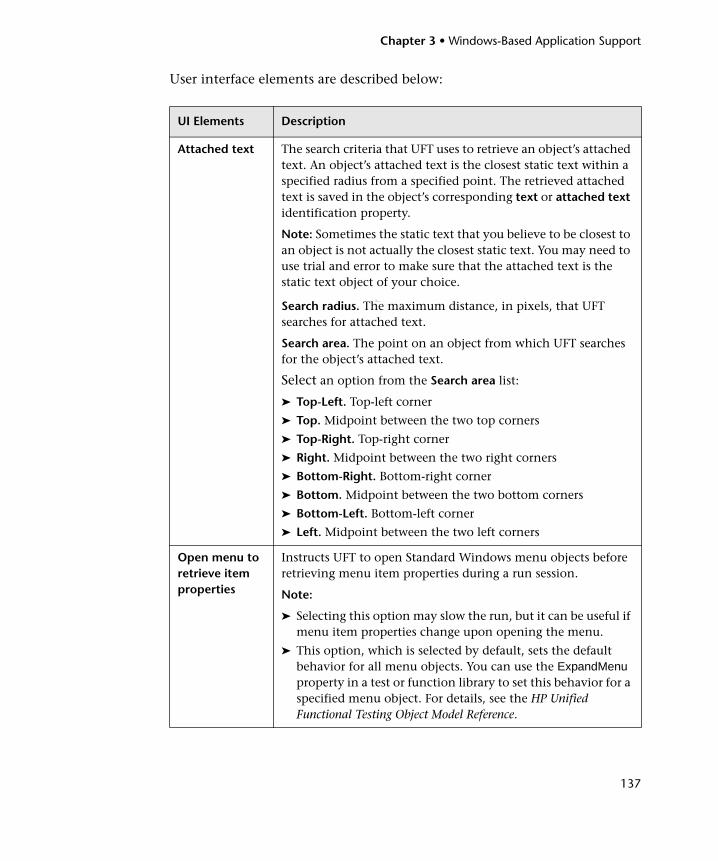
Chapter 3 • Windows-Based Application Support
137
User interface elements are described below:
UI Elements Description
Attached text The search criteria that UFT uses to retrieve an object’s attached text. An object’s attached text is the closest static text within a specified radius from a specified point. The retrieved attached text is saved in the object’s corresponding text or attached text identification property.
Note: Sometimes the static text that you believe to be closest to an object is not actually the closest static text. You may need to use trial and error to make sure that the attached text is the static text object of your choice.
I
Search radius. The maximum distance, in pixels, that UFT searches for attached text.
Search area. The point on an object from which UFT searches for the object’s attached text.
Select an option from the Search area list:
➤ Top-Left. Top-left corner
➤ Top. Midpoint between the two top corners
➤ Top-Right. Top-right corner
➤ Right. Midpoint between the two right corners
➤ Bottom-Right. Bottom-right corner
➤ Bottom. Midpoint between the two bottom corners
➤ Bottom-Left. Bottom-left corner
➤ Left. Midpoint between the two left corners
Open menu to retrieve item properties
Instructs UFT to open Standard Windows menu objects before retrieving menu item properties during a run session.
Note:
➤ Selecting this option may slow the run, but it can be useful if menu item properties change upon opening the menu.
➤ This option, which is selected by default, sets the default behavior for all menu objects. You can use the ExpandMenu property in a test or function library to set this behavior for a specified menu object. For details, see the HP Unified Functional Testing Object Model Reference.
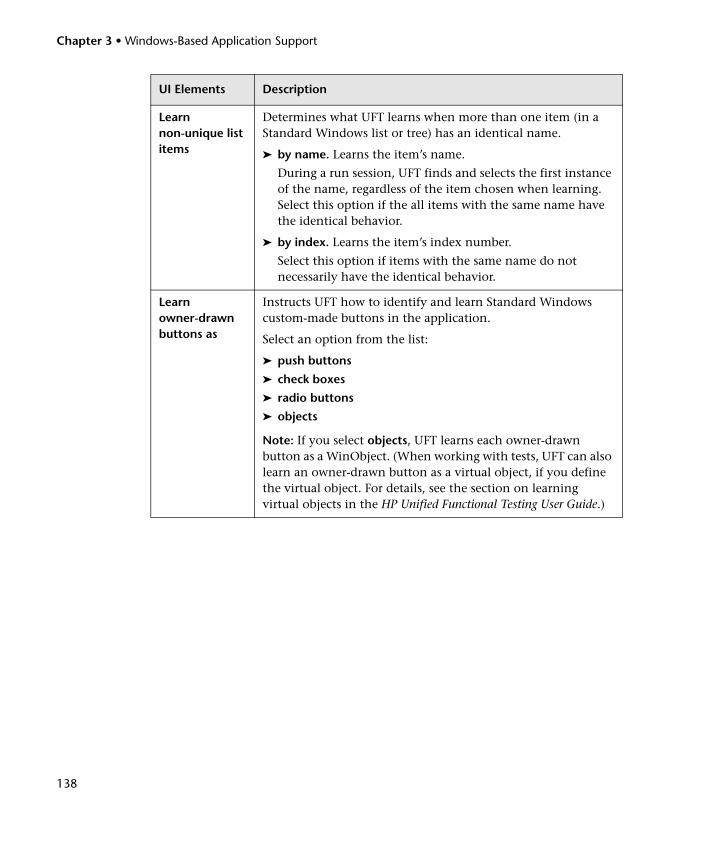
Chapter 3 • Windows-Based Application Support
138
Learn non-unique list items
Determines what UFT learns when more than one item (in a Standard Windows list or tree) has an identical name.
➤ by name. Learns the item’s name.
During a run session, UFT finds and selects the first instance of the name, regardless of the item chosen when learning. Select this option if the all items with the same name have the identical behavior.
➤ by index. Learns the item’s index number.
Select this option if items with the same name do not necessarily have the identical behavior.
Learn owner-drawn buttons as
Instructs UFT how to identify and learn Standard Windows custom-made buttons in the application.
Select an option from the list:
➤ push buttons
➤ check boxes
➤ radio buttons
➤ objects
Note: If you select objects, UFT learns each owner-drawn button as a WinObject. (When working with tests, UFT can also learn an owner-drawn button as a virtual object, if you define the virtual object. For details, see the section on learning virtual objects in the HP Unified Functional Testing User Guide.)
UI Elements Description

Chapter 3 • Windows-Based Application Support
139
Windows Applications > Advanced Pane (Options Dialog Box > GUI Testing Tab)
This pane enables you to modify how UFT records and runs tests or business components on Windows-based applications.
To access Select Tools > Options > GUI Testing tab > Windows Applications > Advanced node.
Important Information
For advanced Windows-based application testing information, intended for users with expertise in the Win32 API and the Windows messages model, see "Considerations for Advanced Windows-based Application Testing" on page 145.
See also "Windows-Based Application Support - Overview" on page 118

Chapter 3 • Windows-Based Application Support
140
User interface elements are described below:
UI Elements Description
Object Identification node
Always enumerate child windows (may affect performance)
Instructs UFT to enumerate all child windows when recording and running a test or business component. This option is cleared by default and should be used only when an object cannot otherwise be identified, because it may significantly affect performance. For details, see "Considerations for Advanced Windows-based Application Testing" on page 145.
Record Settings node
Button Defines record settings for button objects:
➤ Record only the object’s basic operation. Enables simplified recording on the button. Using this mode may improve recognition of user operations in non-standard cases. This option is cleared by default and should be used only when the default recording method does not meet your needs. For details, see "Considerations for Advanced Windows-based Application Testing" on page 145.
➤ Record Click. Specifies whether the Click operation should be recorded when the mouse button is pressed (On mouse button down) or when the mouse button is released (On mouse button up). This option is enabled only when Record only the object’s basic operation is selected. Default = On mouse button up.

Chapter 3 • Windows-Based Application Support
141
List Defines record settings for Windows-based list objects (for example, WinList, WinListView, and VbList):
➤ Record only the object’s basic operation. Enables simplified recording on the list. Using this mode may improve recognition of user operations in non-standard cases. This option is cleared by default and should be used only when the default recording method does not meet your needs. For details, see "Considerations for Advanced Windows-based Application Testing" on page 145.
➤ Record Select. Specifies whether the Select operation should be recorded when the mouse button is pressed (On mouse button down) or when the mouse button is released (On mouse button up). Default = On mouse button up.
Menu Defines record settings for menu objects:
➤ Enable recording. Specifies whether UFT records operations on menu controls. For example, you may want UFT to ignore the actual process of selecting a menu to open another window. This option is selected by default.
➤ Menu recording mode. Specifies whether UFT verifies or ignores menu initialization events before recording operations on menu controls. This option is enabled only when Enable recording is selected. Default = Verify menu initialization event.
For details, see "Considerations for Advanced Windows-based Application Testing" on page 145.
UI Elements Description

Chapter 3 • Windows-Based Application Support
142
Object Defines record settings for objects recognized as WinObject test objects:
➤ Record only the object’s basic operation. Enables simplified recording on the WinObject test object. Using this mode may improve recognition of user operations in non-standard cases. This option is cleared by default and should be used only when the default recording method does not meet your needs. For details, see "Considerations for Advanced Windows-based Application Testing" on page 145.
➤ Record Click. Specifies whether the Click operation should be recorded when the mouse button is pressed (On mouse button down) or when the mouse button is released (On mouse button up). This option is enabled only when Record only the object’s basic operation is selected. Default = On mouse button down.
Tab Defines record settings for tab objects:
➤ Record only the object’s basic operation. Enables simplified recording on the tab. Using this mode may improve recognition of user operations in non-standard cases. This option is cleared by default and should be used only when the default recording method does not meet your needs. For details, see "Considerations for Advanced Windows-based Application Testing" on page 145.
➤ Record Select. Specifies whether the Select operation should be recorded when the mouse button is pressed (On mouse button down) or when the mouse button is released (On mouse button up). This option is enabled only when Record only the object’s basic operation is selected. Default = On mouse button up.
UI Elements Description
Chapter 3 • Windows-Based Application Support
143
Toolbar Defines record settings for toolbar objects:
➤ Record only the object’s basic operation. Enables simplified recording on the toolbar. Using this mode may improve recognition of user operations in non-standard cases. This option is cleared by default and should be used only when the default recording method does not meet your needs. For details, see "Considerations for Advanced Windows-based Application Testing" on page 145.
➤ Record Press. Specifies whether the Press operation should be recorded when the mouse button is pressed (On mouse button down) or when the mouse button is released (On mouse button up). This option is enabled only when Record only the object’s basic operation is selected. Default = On mouse button up.
Tree view Defines record settings for tree view objects:
➤ Record only the object’s basic operation. Enables simplified recording on the tree view. Using this mode may improve recognition of user operations in non-standard cases. This option is cleared by default and should be used only when the default recording method does not meet your needs. For details, see "Considerations for Advanced Windows-based Application Testing" on page 145.
➤ Record Select. Specifies whether the Select operation should be recorded when the mouse button is pressed (On mouse button down) or when the mouse button is released (On mouse button up). This option is enabled only when Record only the object’s basic operation is selected. Default = On mouse button up.
➤ Record tree items. Specifies whether tree items are recorded By name or By virtual index. Default = By name.
UI Elements Description

Chapter 3 • Windows-Based Application Support
144
Window Defines record settings for window objects:
➤ Record only the object’s basic operation. Enables simplified recording on the window. Using this mode may improve recognition of user operations in non-standard cases. This option is cleared by default and should be used only when the default recording method does not meet your needs. For details, see "Considerations for Advanced Windows-based Application Testing" on page 145.
➤ Record Click. Specifies whether the Click operation should be recorded when the mouse button is pressed (On mouse button down) or when the mouse button is released (On mouse button up). This option is enabled only when Record only the object’s basic operation is selected. Default = On mouse button up.
Keyboard Defines record settings for operations performed on the keyboard:
➤ Keyboard state detection. Specifies which API UFT should use to detect the keyboard state. Default = Standard.
For details, see "Considerations for Advanced Windows-based Application Testing" on page 145.
Utility object Defines record settings for utility objects:
➤ Record SystemUtil.Run commands. Specifies whether UFT records SystemUtil.Run commands when you open an application during a recording session. This option is selected by default. For details on the SystemUtil.Run method, see the HP Unified Functional Testing Object Model Reference.
UI Elements Description

Chapter 3 • Windows-Based Application Support
145
Considerations for Advanced Windows-based Application TestingThe following information is intended for users with expertise in the Win32 API and the Windows messages model. It expands on the information provided for some of the options described in "Windows Applications > Advanced Pane (Options Dialog Box > GUI Testing Tab)" on page 139.
Always enumerate child windows
If UFT does not correctly record an object in your application, you can select this option to force UFT to enumerate all windows in the system. This means that even when UFT looks for a window without WS_CHILD style, it enumerates all windows in the system and not only the top-level windows.
You should select this option if there is a window in your application that does not have a WS_CHILD style but does have a parent (not an owner) window.
Run Settings node
Edit Box Defines run settings for Edit objects:
➤ Click Edit box before inserting text. Specifies whether UFT performs a Click operation to set the focus in an edit box before inserting text in it while running a test or business component. This option is cleared by default.
➤ Use keyboard events to perform Set operations. When selected, instructs UFT to simulate keyboard events when performing Set operations on edit boxes during a run session. When cleared, instructs UFT to use API or Window messages for edit box Set operations. This option is cleared by default.
Bottom area
Description Describes the selected option.
Reset button Resets all options in the pane to their default values.
UI Elements Description

Chapter 3 • Windows-Based Application Support
146
Record only the object’s basic operation
In general, UFT records operations on Windows objects based on Windows messages sent by the application. UFT recognizes the sequence of Windows messages sent to a specific application window by the system, and uses a smart algorithm to determine which operation to record.
In rare cases (where a non-standard message sequence is used), the smart algorithm may record unwanted operations. Select this option if you want to record only the object’s basic operation when the selected event occurs. When you select this option, you can also select when to record the operation. If you select On mouse button down, UFT records the operation performed when a WM_LBUTTONDOWN message is detected; if you select On mouse button up, UFT records the operation performed when a WM_LBUTTONUP message is detected.
Keyboard state detection
If UFT does not correctly record keyboard key combinations (for example, CTRL+Y, or ALT+CTRL+HOME), you can try changing the default setting for this option. Following is a brief explanation of each of the options:
➤ Standard. Uses the GetKeyboardState API to detect the keyboard state. For details, see http://msdn2.microsoft.com/en-us/library/ms646299.aspx.
➤ Alternate synchronous. Uses the GetKeyState API to detect the keyboard state. For details, see http://msdn2.microsoft.com/en-us/library/ms646301.aspx.
➤ Alternate asynchronous. Uses the GetAsyncKeyState API to detect the keyboard state. For details, see http://msdn2.microsoft.com/en-us/library/ms646293.aspx.

Chapter 3 • Windows-Based Application Support
147
Menu recording mode
In most applications, Windows sends a WM_CONTEXTMENU message, WM_ENTERMENULOOP message, WM_INITMENU message, WM_INITMENUPOPUP message, or other initialization message when a user opens a menu. Windows then sends a WM_MENUSELECT message when a user selects a menu item.
The Verify menu initialization event option instructs UFT to record menu operations only after detecting a menu initialization message. If UFT does not correctly record menu operations, or if your application does not send initialization messages before sending WM_MENUSELECT messages, try using the Ignore menu initialization event option. This instructs UFT to always record menu operations.

Chapter 3 • Windows-Based Application Support
148

Part II
.NET Add-in

150

151
4.NET Add-in - Overview
You can use the Unified Functional Testing .NET Add-in to test user interface objects (controls) in Silverlight, .NET Web Forms, .NET Windows Forms, and Windows Presentation Foundation applications. You can create and run tests and business components on these objects, and check their properties.
This section contains:
➤ .NET Silverlight Add-in
➤ .NET Web Forms Add-in
➤ .NET Windows Forms Support
➤ .NET Windows Presentation Foundation Add-in

Chapter 4 • .NET Add-in - Overview
152

153
5.NET Web Forms Add-in - Quick Reference
You can use the .NET Add-in to test .NET Web Forms user-interface objects (controls).
The following table summarizes basic information about the .NET Web Forms application support and how it relates to some commonly-used aspects of UFT.
General Information
Add-in Type The .NET Add-in functions like a Web-based add-in when testing .NET Web Forms controls. Much of its functionality is the same as other Web-based add-ins.
See "Web-Based Application Support" on page 49.
Supported Environments
For details on supported .NET Web Forms environments, see the .NET Add-in section of the HP Unified Functional Testing Product Availability Matrix, available from the UFT Help or the root folder of the Unified Functional Testing DVD.
Test Object Methods and Properties
The .NET Add-in provides test objects, methods, and properties that can be used when testing objects in .NET Web Forms applications. For details, see the .NET Web Forms section of the HP Unified Functional Testing Object Model Reference.
Checkpoints and Output Values
➤ See the sections describing checkpoints and output values in the HP Unified Functional Testing User Guide.
➤ See "GUI Checkpoints and Output Values Per Add-in" on page 695.
➤ See ".NET Web Forms Objects and Outputting Values" on page 157.

Chapter 5 • .NET Web Forms Add-in - Quick Reference
154
Troubleshooting and Limitations
See "Troubleshooting and Limitations - .NET Web Forms" on page 158.
Prerequisites
Opening Your Application
You must open UFT and set the Record and Run options before opening your .NET Web Forms application. Open your application only after you begin the recording session.
Add-in Dependencies
The Web Add-in must be loaded.
Configuration
Options Dialog Box Use the Web pane. (Make sure that a GUI test is open and select Tools > Options > GUI Testing tab > Web > General node.)
See "Web > General Pane (Options Dialog Box)" on page 82.
Record and Run Settings Dialog Box(tests only)
Use the Web tab.(Record > Record and Run Settings)
See "Web Tab (Record and Run Settings Dialog Box)" on page 77
Test Settings Dialog Box (tests only)
Use the Web pane. (File > Settings > Web node)
See "Web Pane (Test/Business Component Settings Dialog Box / Application Area - Additional Settings Pane)" on page 101.
Custom Active Screen Capture Settings Dialog Box(tests only)
Use the Web section.(Tools > Options > GUI Testing tab > Active Screen node > Custom Level)
See the section on the Custom Active Screen Capture Settings dialog box in the HP Unified Functional Testing User Guide.

Chapter 5 • .NET Web Forms Add-in - Quick Reference
155
This chapter includes:
Concepts
➤ Considerations for Testing .NET Web Forms on page 156
➤ .NET Web Forms Objects and Outputting Values on page 157
Reference
➤ Troubleshooting and Limitations - .NET Web Forms on page 158
Application Area Additional Settings pane(business components only)
Use the Web pane. In the application area, select Additional Settings > Web in the sidebar.
See "Web Pane (Test/Business Component Settings Dialog Box / Application Area - Additional Settings Pane)" on page 101.

Chapter 5 • .NET Web Forms Add-in - Quick Reference
156
Concepts
Considerations for Testing .NET Web Forms
When testing .NET Web Forms Applications applications, consider the following:
➤ When UFT learns .NET Web Forms objects, it does not learn the HTML elements that comprise the test objects. For example, when UFT learns the WbfGrid test object, the WbfGrid object is the bottommost object in the hierarchy, and the HTML elements used to create the grid’s cells are not learned.
➤ When you load the .NET Add-in, the Web event recording configurations designed for this add-in are loaded and are used whenever you record on a .NET Web Forms object. The.NET Web Forms Web event recording configurations do not affect the way UFT behaves when you record on other non-.NET Web Forms Web objects. For details, see "Event Recording Configuration for Web-Based Applications" on page 58.

Chapter 5 • .NET Web Forms Add-in - Quick Reference
157
.NET Web Forms Objects and Outputting Values
You can check or output values from supported .NET Web Forms controls and use the Object property to retrieve internal properties.
Accessing Internal Properties and Methods of Run-Time .NET Web Forms Objects
You can use the Object property to retrieve internal (native) properties and activate internal methods of any .NET Web Forms object in your application.
In the example below, the orientation property of the WbfTabStrip control is returned and displayed in a message box.
MsgBox Browser("WebControls:").Page("Page").WbfTabStrip("WbfTabStrip").Object.Orientation
The Object property is also useful for verifying the value of properties that are not available using a standard checkpoint.
For details on the Object property and for details on .NET Web Forms test objects, methods, and properties see the .NET Web Forms section of the HP Unified Functional Testing Object Model Reference.

Chapter 5 • .NET Web Forms Add-in - Quick Reference
158
Reference
Troubleshooting and Limitations - .NET Web Forms
This section describes troubleshooting and limitations for the .NET Web Forms Add-in.
General
➤ xpath and css properties are not supported for .NET Web Forms test objects or for other Web-based test objects that have .NET Web Forms parent test objects.
➤ Tests on WbfTreeView test objects that contain special characters may not run as expected.
Workaround: To run a test on a WbfTreeView item that contains special characters, use the #index format. See the .NET Web Forms Object Model Reference Help for details.
➤ WbfTreeView, WbfToolbar, and WbfTabStrip test objects are not supported for browser control applications.
➤ Active Screen operations are not supported for WbfTreeView, WbfToolbar, and WbfTabStrip objects.
➤ Performing a Select or Expand operation on a WbfTreeView object that causes page navigation may fail due to a synchronization problem.
Workaround: Try running the test on the WbfTreeView object step-by-step, meaning instead of using WbfTreeView.Select "item1;item2;item3;"Use WbfTreeView.Expand "item1"WbfTreeView.Expand "item1;item2"WbfTreeView.Select "item1;item2;item3;"
➤ Working on a .NET Web Forms application that has calendars with more than one unified style is not fully supported.

Chapter 5 • .NET Web Forms Add-in - Quick Reference
159
➤ The value of the Selected Date and Selected Range identification properties is always none for WbfCalendar objects in selection mode none.
➤ To retrieve correct values for WbfCalendar Selected Date and Selected Range identification properties, the selected date or range must be currently visible in your Web Forms application.
➤ All operations on grouping areas in WbfUltraGrid objects (Infragistics UltraWebGrid) are not recorded.
➤ Operations performed in a rapid sequence on WbfUltraGrid objects may not be recorded.
Workaround: Try to limit the recording to 1-2 operations per second.
WbfUltraGrid column names are comprised of the inner HTML of the column header, and therefore may include extraneous information.
➤ WbfUltraGrid may fail to sort columns in a descending order when the column is not already sorted.
Workaround: Split the Sort call into two calls—first sort in ascending order, then sort in descending order. For example:
Change:
WbfUltraGrid("UltraWebGrid1").Sort "Model","Descending"
To:
WbfUltraGrid("UltraWebGrid1").Sort "Model","Ascending"WbfUltraGrid("UltraWebGrid1").Sort "Model","Descending"
➤ Note that Visual Basic .NET applications are supported by the Unified Functional Testing .NET Add-in.

Chapter 5 • .NET Web Forms Add-in - Quick Reference
160
Creating, Editing, and Running Testing Documents
➤ UFT may recognize some Web Forms grids as WebTables instead of WbfGrid test objects.
Workaround: Do one of the following:
➤ Modify the Web forms control so that it meets one of the following conditions:
➤ The class attribute contains the string DataGrid.
➤ The id attribute contains at least one of the strings DataGrid or GridView.
➤ Modify the rules that UFT uses to determine when to identify a Web Forms table control as a DataGrid or GridView (and learn it as a WbfGrid test object).
These rules are defined in:<UFT installation folder>\dat\WebFormsConfiguration.xml.
The file contains comments that describe its format and explain how to use it.
➤ If you record a test containing .NET Web Forms objects, you can run it only on Microsoft Internet Explorer.
➤ When recording, you must open UFT and define record options before opening your .NET Web Forms application.
Checkpoint and Output Values
➤ WbfTreeView, WbfToolbar, and WbfTabStrip objects are not properly recognized in the Active Screen. Therefore:
➤ You cannot insert checkpoint or output value steps for these objects from the Active Screen.
➤ If you select to insert checkpoints for these objects from the Keyword View or Editor while in edit mode, the expected values of these objects may be incorrect.

Chapter 5 • .NET Web Forms Add-in - Quick Reference
161
Workaround: Insert checkpoint or output value steps on these objects during a recording session or remove the Active Screen for the relevant step and then insert a checkpoint from the Keyword View or Editor with your application open to the proper location, so that the values will be retrieved from the application.
➤ Text checkpoints are not supported for WbfTreeView, WbfToolbar, and WbfTabStrip objects.
➤ The Active Screen image for a WbfCalendar object is always saved before navigation. For example, if you click a NextMonth link, the Active Screen displays the current month. Therefore, if you create a checkpoint from the Active Screen and insert it after the Calendar.ShowNextMonth line, the checkpoint will fail.
Workaround: Do one of the following:
➤ Insert checkpoints on calendar objects while recording.
➤ While editing your test, edit the expected value for the checkpoint or insert the checkpoint before the current step.
➤ Table checkpoints are supported for WbfUltraGrid objects only while recording.
➤ When using the WbfUltraGrid.RowCount and WbfUltraGrid.ColumnCount methods or performing a table checkpoint on a grid that also contains additional grid controls inside it, UFT retrieves the rows or columns only for the outermost table. Note that the rows property and RowCount method count only the non-grouping rows.

Chapter 5 • .NET Web Forms Add-in - Quick Reference
162

163
6.NET Windows Forms Support - Quick Reference
You can use the Unified Functional Testing .NET Add-in to test .NET Windows Forms user-interface objects (controls).
The following table summarizes basic information about .NET Windows Forms application support and how it relates to some commonly-used aspects of UFT.
General Information
Add-in Type The .NET Windows Forms testing support functions like a Windows-based add-in. Much of its functionality is the same as other Windows-based add-ins.
See "Windows-Based Application Support" on page 117.
Supported Environments
For details on supported .NET Windows Forms environments, see the .NET Add-in section of the HP Unified Functional Testing Product Availability Matrix, available from the UFT Help or the root folder of the Unified Functional Testing DVD.
Important Information
➤ You can also test most custom .NET controls inherited from the System.Windows.Forms.Control regardless of which language was used to create the application (for example, Visual Basic .NET, C#, and so on)
➤ See Considerations for Testing .NET Windows Forms Applications.

Chapter 6 • .NET Windows Forms Support - Quick Reference
164
Test Object Methods and Properties
The .NET Add-in provides test objects, methods, and properties that can be used when testing objects in .NET Windows Forms applications. For details, see the .NET Windows Forms section of the HP Unified Functional Testing Object Model Reference.
Checkpoints and Output Values
➤ See the sections describing checkpoints and output values in the HP Unified Functional Testing User Guide.
➤ See "Considerations for Testing .NET Windows Forms Applications" on page 166.
➤ See "GUI Checkpoints and Output Values Per Add-in" on page 695.
Extending the .NET Add-in
.NET Add-in Extensibility (described on page 166) enables you to develop support for testing third-party and custom .NET Windows Forms controls that are not supported out-of-the-box by the Unified Functional Testing .NET Add-in.
Troubleshooting and Limitations
See "Troubleshooting and Limitations - .NET Windows Forms" on page 167.
Prerequisites
Opening Your Application
You must open UFT before opening your .NET Windows Forms application
Add-in Dependencies
The .NET Add-in must be installed.
Configuration
Options Dialog Box Use the Windows Applications pane. (Select Tools > Options > GUI Testing tab > Windows Applications node).
See "Windows Applications > General Pane (Options Dialog Box > GUI Testing Tab)" on page 136.

Chapter 6 • .NET Windows Forms Support - Quick Reference
165
This chapter includes:
Concepts
➤ Considerations for Testing .NET Windows Forms Applications on page 166
➤ .NET Add-in Extensibility on page 166
➤ Troubleshooting and Limitations - .NET Windows Forms on page 167
Record and Run Settings Dialog Box(tests only)
Use the Windows Applications tab. (Record > Record and Run Settings)
See "Windows Applications Tab (Record and Run Settings Dialog Box)" on page 124.
Note: If you select the Record and Run only on radio button in the Record and Run Settings dialog box, the settings also apply to (limit) the applications that are recognized for the .NET Windows Spy, the Object Spy, and other pointing hand operations.
Custom Active Screen Capture Settings Dialog Box(tests only)
Use the Windows applications section.(Tools > Options > GUI Testing tab > Active Screen node > Custom Level)
See the section on the Custom Active Screen Capture Settings dialog box in the HP Unified Functional Testing User Guide.
Application Area Additional Settings pane(business components only)
Use the Applications pane. In the application area, select Additional Settings > Applications in the sidebar.
See the section on the Applications pane in the HP Unified Functional Testing User Guide.

Chapter 6 • .NET Windows Forms Support - Quick Reference
166
Concepts
Considerations for Testing .NET Windows Forms Applications
➤ You can use the Keyword View and Editor to activate .NET Windows Forms test object operations and native (run-time object) operations, retrieve and set the values of properties, and check that objects in your application exist and function as expected.
➤ When you create a checkpoint on a .NET Windows Forms object, UFT stores the selected property values of the object. If your application changes, you can modify the captured values to match the new expected values.
.NET Add-in Extensibility
Unified Functional Testing .NET Add-in Extensibility enables you to develop support for testing third-party and custom .NET Windows Forms controls that are not supported out-of-the-box by the Unified Functional Testing .NET Add-in.
If the test object class that UFT uses to represent a control does not provide the operations and properties necessary to operate on your control, you can use .NET Add-in Extensibility to customize this behavior.
➤ You can instruct UFT to use a different test object class to represent the control.
➤ You can add operations or override existing ones, using .NET programming, to operate as necessary on the control.
➤ You can also teach UFT to treat a control that contains a set of lower-level controls as a single functional control, instead of relating to each lower-level control separately.
To implement .NET Add-in Extensibility, you need to be familiar with:

Chapter 6 • .NET Windows Forms Support - Quick Reference
167
➤ UFT and its Object Model Reference
➤ The behavior of the custom control (operations, properties, events)
➤ .NET programming in C# or Visual Basic
➤ XML (basic knowledge) Reference
You can install the .NET Add-in Extensibility SDK from the Add-in Extensibility and Web 2.0 Toolkits option in the UFT setup program.
The SDK also includes:
➤ Project templates and a wizard for Microsoft Visual Studio, that simplify setting up of your .NET Add-in Extensibility project.
➤ Samples of support developed using .NET Add-in Extensibility, which you can use to gain a better understanding of how to create your own support.
For installation and implementation details, see the .NET Add-in Windows Forms Extensibility Help, available from the UFT Extensibility Documentation program group (Start > All Programs > HP Software > HP Unified Functional Testing > Extensibility > Documentation).
A printer-friendly (PDF) version of the HP Unified Functional Testing .NET Add-in Extensibility Developer Guide is available in the <Unified Functional Testing installation folder>\help\Extensibility folder.
Troubleshooting and Limitations - .NET Windows Forms
This section describes troubleshooting and limitations for the .NET Windows Forms Add-in.
➤ Navigating in grid controls using keyboard keys (for example, to select cells, rows, and so on) may not be recorded correctly.
Workaround: Use the mouse to navigate in the grid control.
➤ If you call the Back method for a Microsoft DataGrid control on a table that does not have a parent row, no operation is performed when the
statement runs, and no error message is displayed.
➤ Grid controls in the Card View mode are not supported.

Chapter 6 • .NET Windows Forms Support - Quick Reference
168
➤ Changing the format of a DateTimePicker control during a test run or between record and run sessions (for example, from "Long Date" to "Time") will cause the test run to fail.
➤ Combo box objects of style Simple ComboBox are not supported.
➤ If a window in the tested application has an opacity property value not equal to 100% (that is, the form is completely or partially transparent), the Active Screen captures the image displayed below the form, and not the transparent window.
➤ .NET Windows Forms table checkpoints and output value steps can be created only for objects that UFT recognizes as SwfTable objects. UFT does not treat SwfPropertyGrid test objects as table objects.
➤ Operations on a grid cell that was selected before you started recording on the grid control may be recorded incorrectly. For example, a child cell element operation may be recorded instead of the parent grid operation (for example, SetCellData).
Workaround: Before performing operations on a cell that is already selected, begin recording, move the focus to another cell, select the required cell, and then perform the required operation.
➤ When recording steps using low-level recording, default description properties for WinObject and Window objects do not have constant values. This may lead to different description property values during a run session, which causes steps on these objects to fail.

Chapter 6 • .NET Windows Forms Support - Quick Reference
169
Workaround:
➤ Window test objects. Before recording, remove the regexpwndclass property from the list of mandatory, assistive, and Smart Identification properties using the Object identification dialog box.
➤ WinObject test objects. Do the following:
➤ Before recording, remove the window id property from the list of mandatory, assistive, and Smart Identification properties using the Object identification dialog box.
➤ After recording, change the regexpwndclass property value to a regular expression for each WinObject test object in the object repository, and edit the property value to remove everything except for the control type, for example:Change WindowsForms10.BUTTON.app3to .*BUTTON.*
➤ Note that Visual Basic .NET applications are supported by the Unified Functional Testing .NET Add-in.

Chapter 6 • .NET Windows Forms Support - Quick Reference
170
171
7.NET Windows Forms Support - Testing and Configuration
This chapter includes:
Concepts
➤ .NET Windows Forms Objects - Checkpoints and Output Values on page 172
➤ .NET Windows Forms Spy on page 174
Tasks
➤ How to Use the .NET Windows Forms Spy on page 176
Reference
➤ .NET Windows Forms Spy Dialog Box on page 182

Chapter 7 • .NET Windows Forms Support - Testing and Configuration
172
Concepts
.NET Windows Forms Objects - Checkpoints and Output Values
You can check or output values from supported .NET Windows Forms grid controls and use the Object property to retrieve internal properties.
For details, see:
➤ "Checking .NET Windows Forms Tables and Outputting Their Values" on page 172
➤ "Accessing Internal Properties and Methods of Run-Time .NET Windows Forms Objects" on page 173
Checking .NET Windows Forms Tables and Outputting Their Values
You check or output values from supported .NET Windows Forms grid controls using the Table Checkpoint Properties dialog box.
For tables with more than 100 rows, you can specify the rows you want to include in the checkpoint or output value in the Define Row Range dialog box. If you do not specify the rows to include, the table checkpoint or output value captures all data in the current level or view as follows:
When working with: The table checkpoint or output value captures:
ComponentOne C1FlexGrid and C1TrueDBGrid
The entire grid.
Microsoft Data Grid and DataGrid View
The currently displayed table (parent or child).

Chapter 7 • .NET Windows Forms Support - Testing and Configuration
173
Apart from the difference in captured information as listed above, you define a table checkpoint or output value for .NET Windows Forms in the same way as you do for any other table. For details, see the sections on checkpoints and output values in the HP Unified Functional Testing User Guide.
Accessing Internal Properties and Methods of Run-Time .NET Windows Forms Objects
You can use the Object property to retrieve internal (native) properties and activate internal methods of any .NET Windows Forms object in your application.
For example, you can set the focus to a particular button and change its caption using statements similar to the following:
Set theButton = SwfWindow("frmWin").SwfButton("OK").ObjecttheButton.SetFocustheButton.Caption = "Yes"
The Object property is also useful for verifying the value of properties that are not available using a standard checkpoint.
When you use the Object property to retrieve arrays of structures, the Object property returns the COM wrapper of the system.array object. In your VBScript test or business component steps, you can then use the system.array object to access the array members.
For example, suppose a button object in your application has a PointArray property, which is an array of Point structures. To access the first item in the PointArray property, you would use the following expression:
Infragistics UltraWinGrid The band in which a cell, column, or row is selected.
DevExpress XtraGrid The view that was most recently set.
Tip: Insert a SetView method before your table checkpoint to ensure that the view you want is displayed when the table checkpoint runs.
When working with: The table checkpoint or output value captures:

Chapter 7 • .NET Windows Forms Support - Testing and Configuration
174
SwfWindow("Form1").SwfButton("button1").Object.PointArray.GetValue1(0)
If the same object had an IntArray property, which was an array of integers, you would use the following expression to access the first item in the IntArray property:
SwfWindow("Form1").SwfButton("button1").Object.IntArray(0) For details on the Object property and for details on .NET Windows Forms test objects, methods, and properties see the .NET Windows Forms section of the HP Unified Functional Testing Object Model Reference.
.NET Windows Forms Spy
The .NET Windows Forms Spy (described in ".NET Windows Forms Spy Dialog Box" on page 182) enables you to select a specific control in your .NET application, view its run-time object properties and values, change property values in the application in run-time, listen to events on a specific control, view the event arguments, and fire events back at the application.
You can use the .NET Windows Forms Spy to help you develop extensibility for .NET Windows Forms controls.
To spy on a .NET Windows Forms application, make sure that the application is specified in the Windows Applications tab of the Record and Run Settings dialog box, and that the application is running with Full Trust. If the application is not defined to run with Full Trust, you cannot spy on the .NET application’s Windows Forms controls with the .NET Windows Forms Spy. For details on defining trust levels for .NET applications, see Microsoft documentation.
The .NET Windows Forms Spy is intended for advanced UFT users, especially those who are using .NET Add-in Extensibility to create support for custom .NET Windows Forms controls. The .NET Windows Forms Spy can assist you in examining .NET Windows Forms controls within your application and seeing which events cause it to change (to facilitate recording and running) and how the changes manifest themselves in the control’s state.

Chapter 7 • .NET Windows Forms Support - Testing and Configuration
175
Note: The .NET Windows Forms Spy runs in the context of your .NET application, not in the UFT context. The objects and run-time object properties on which you are spying are the raw .NET objects in your application, and not the .NET test objects used in UFT. Since the .NET Windows Forms Spy runs in the context of your .NET application, you can close UFT while you use the .NET Windows Forms Spy. However, UFT must be open if you want to use the pointing hand mechanism to spy on additional objects. If you close the .NET application on which you are spying, the UFT .NET Windows Forms Spy window is closed automatically.

Chapter 7 • .NET Windows Forms Support - Testing and Configuration
176
Tasks
How to Use the .NET Windows Forms Spy
This task describes elements of the .NET Windows Forms Spy including how to:
Spy on an object
1 Make sure that the application on which you want to spy is specified in the Windows Applications tab of the Record and Run Settings dialog box, and that the application is running with Full Trust.
2 Open the .NET Windows Forms application to the window containing the object on which you want to spy.
3 Select Tools > .NET Windows Forms Spy. The UFT .NET Windows Forms Spy window opens.
For details on the .NET Windows Forms Spy dialog box, see ".NET Windows Forms Spy Dialog Box" on page 182.
4 In the UFT .NET Windows Forms Spy window, click the pointing hand. Both UFT and the .NET Windows Forms Spy are minimized so that you can point to, and click on, any object in the open application.
For details on using the pointing hand, see the section describing the pointing hand in the HP Unified Functional Testing User Guide.
5 Click the object whose properties you want to view. If the location you clicked in your application is associated with more than one object, the Object Selection dialog box opens. The objects associated with the location you clicked are displayed in hierarchical order.
6 Select the .NET Windows Forms object on which you want to spy and click OK. The UFT .NET Windows Forms Spy window opens showing the properties and values for the selected object.
7 You can repeat steps 4 to 6 to spy on additional objects and add them to the Objects pane in the UFT .NET Windows Forms Spy window.

Chapter 7 • .NET Windows Forms Support - Testing and Configuration
177
Remove objects from the Objects pane
1 Select the object that you want to remove.
2 Perform one of the following:
➤ Right-click the object and select Remove Object.
➤ Press DELETE.
View values of run-time object properties
In the Objects pane, select the object whose run-time object properties you want to view. The properties for the selected object are displayed in the Properties tab, with the property names on the left, and the property values on the right. A description of the selected property is displayed below the properties grid.
Note: Any changes you make to the values of run-time object properties in the .NET application remain in effect only for the current instance of the .NET application. The next time you run the .NET application, the properties will return to their original run-time values.
View properties of embedded objects
1 In the Properties tab, select the property whose embedded object properties you want to view. For details on locating a property by value, see "Locate a property by its value" on page 178.
2 Click the Add selected property to the Objects tree button. The property is added to the Objects pane, and its run-time object properties and property values (if any) are shown in the Properties tab. Each time you add an embedded object to the Objects pane, it is added below its parent object, in a hierarchical format.

Chapter 7 • .NET Windows Forms Support - Testing and Configuration
178
Note: The Add selected property to the Objects tree button is disabled if the property’s value is null, or the property is an object with no properties of its own.
Locate a property by its value
1 Click the Search a property by value button. The Find Property by Value dialog box opens.
2 In the Find what box, specify the value for which you want to search.
3 To find only those occurrences in which the capitalization matches the text you entered, select Match case.
4 Specify the direction from the current cursor location in which you want to search: Up or Down.
5 Click Find Next. The .NET Windows Forms Spy locates the property whose value you specified.
Sort the properties grid
Click one of the following buttons to sort the properties grid in the Properties tab:
➤ Categorized. Lists all properties and property values for the selected object, by category. Categories are listed alphabetically. You can collapse a category to reduce the number of visible properties. When you expand or collapse a category, a plus (+) or minus (-) is displayed to the left of the category name.
➤ Alphabetical. Alphabetically sorts all run-time object properties for the selected object.
Note: The Property Pages button is not currently supported.

Chapter 7 • .NET Windows Forms Support - Testing and Configuration
179
Modify values of run-time object properties
1 In the Properties tab, click the property value you want to modify. Properties shown in gray are defined as read-only in the .NET application and cannot be modified.
2 Edit the property value as required. The property value displays different types of edit fields, depending on the needs of a particular property. These edit fields include edit boxes, drop-down lists, and links to custom editor dialog boxes.
After you modify a property value, the new value is applied to the run-time instance of the .NET application. For example, you can change the text of an edit box label, change the background color of a dialog box from gray to red, and so on.
View event arguments on an object
1 In the Objects pane, select the object whose event arguments you want to view.
2 Select the event in the Fired Events list whose arguments you want to view. The selected events arguments and argument values are shown directly below the event, in the Event Arguments list.
Listen to specified events of an object
1 In the Objects pane, select the object to whose events you want to listen.
2 In the Events list, select the check boxes for the event types to which you want to listen.
Note: The events that you select affect only the events that are listened to and logged by UFT. If you select or clear a check box for an event type after listening to events for an object, the events in the Fired Events list are not changed.

Chapter 7 • .NET Windows Forms Support - Testing and Configuration
180
Tip: You can click the Select All Events or Clear All Events buttons to select or clear all the event check boxes. You can also right-click the Events list and select Select All or Clear All.
3 Click the Listen to Selected Events button. UFT starts listening to the specified events on the selected object, and Listening is displayed in the status bar.
4 In your .NET application, perform the operations on the object to whose events you want to listen. The specified events are logged as they occur and are shown in the Fired Events list.
5 When you want to stop listening to events, click the Stop Listening to Events button. UFT stops listening to and logging the specified events.
Fire selected events on an object
1 In the Objects pane, select the object whose events you want to fire.
2 In the Fired Events list, select one or more events that you want to fire on your .NET application. You can select multiple events using standard Windows selection techniques (CTRL and SHIFT keys).
Tip: The selected events are fired in the order in which they appear in the Fired Events list. If the events do not appear in the Fired Events list in the order in which you want to fire them, listen to more events on the object until the events you want are added to the Fired Events list in the required order.
3 If the events you selected have editable arguments, you can change their argument values in the Event Arguments list if needed before firing the events. When the events are fired, they will be fired with the modified argument values.

Chapter 7 • .NET Windows Forms Support - Testing and Configuration
181
4 Click the Fire Selected Events button. The selected events are fired in the order in which they appear in the Fired Events list. You can view the effect that firing these events has on the relevant object in your .NET application. The status bar displays that the event firing is in progress, and when it ends.
Remove specific events from the Fired Events list
1 In the Objects pane, select the object whose events you want to remove from the Fired Events list.
2 Select the events in the Fired Events list that you want to remove. You can select multiple events using standard Windows selection techniques (CTRL and SHIFT keys).
3 Click the Clear Selected Events button. The selected events are removed from the Fired Events list.
Clear all events from the Fired Events list
1 In the Objects pane, select the object whose events you want to remove from the Fired Events list.
2 Click the Clear Event List button. All the logged events are removed from the Fired Events list.
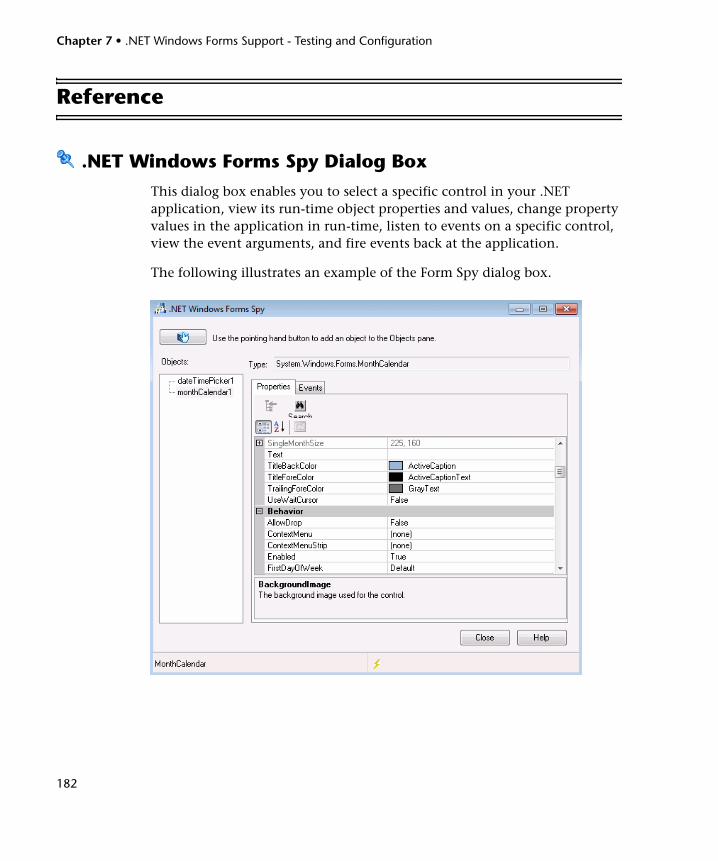
Chapter 7 • .NET Windows Forms Support - Testing and Configuration
182
Reference
.NET Windows Forms Spy Dialog Box
This dialog box enables you to select a specific control in your .NET application, view its run-time object properties and values, change property values in the application in run-time, listen to events on a specific control, view the event arguments, and fire events back at the application.
The following illustrates an example of the Form Spy dialog box.

Chapter 7 • .NET Windows Forms Support - Testing and Configuration
183
The following illustrates an example of the Form Spy Object Pane.
The following illustrates an example of the Form Spy Events tab.

Chapter 7 • .NET Windows Forms Support - Testing and Configuration
184
The following illustrates an example of the Form Spy Properties tab.
To access Select Tools > .NET Windows Forms Spy.
Relevant tasks ➤ "How to Use the .NET Windows Forms Spy" on page 176
See also ➤ ".NET Windows Forms Objects - Checkpoints and Output Values" on page 172.
➤ ".NET Add-in Extensibility" on page 166.
➤ ".NET Windows Forms Spy" on page 174.
➤ ".NET Windows Forms Spy Dialog Box" on page 182.

Chapter 7 • .NET Windows Forms Support - Testing and Configuration
185
User interface elements are described below:
UI Elements Description
Enables you to select a .NET Windows Forms object on which to spy. You can spy on as many objects within a single .NET application as you want. Each object that you select is added to the Objects pane.
Notes:
➤ If you select an object from a different .NET application, an additional UFT .NET Windows Forms Spy window opens, showing the information for the selected object.
➤ UFT must be open if you want to use the pointing hand mechanism to spy on additional objects.
Type Displays the full type name of the selected object.
Objects pane Displays a hierarchical tree of the objects you selected to spy.
The Objects pane contains a list of the objects in your .NET application on which you have spied. Each time you spy on another object in the same .NET application, it is added to the Objects pane. You can spy on as many objects from the same .NET application as you want, using the pointing hand button in the UFT .NET Windows Forms Spy window.
The Objects pane also contains any embedded objects that you added from the Properties tab. Each time you add an embedded object to the Objects pane, it is added below its parent object, in a hierarchical format. You can select an object in the Objects pane and view or modify its properties and property values, and listen to and fire its events. For details, see ".NET Windows Forms Spy" on page 174.
Chapter 7 • .NET Windows Forms Support - Testing and Configuration
186
Properties tab Enables you to view and modify values of run-time object properties in your .NET application. The Properties tab enables you to view run-time object properties and values for objects in your .NET application. You can select a property to display a description of the property below the property grid.
You can choose to display the properties alphabetically or by category. You can change property values in the .NET Windows Forms Spy and apply those changes to your .NET application in run-time. For details, see ".NET Windows Forms Spy" on page 174.
Events tab Enables you to listen to events in your .NET application and fire them at the application.
The Events tab enables you to listen to selected events on a specific control in your .NET application. You can then view the event arguments, and fire selected events back at the application.
This is especially useful if you are using .NET Add-in Extensibility to create support for custom .NET Windows Forms controls. You can see which events cause your .NET application to change, so you can implement extensibility for recording operations on specific controls, and also check which events need to be fired to make your .NET application behave the way you want.
For details, see ".NET Windows Forms Spy" on page 174.
Status bar Displays the class name of the object that is selected in the Objects pane, and the event handling status.
UI Elements Description

187
8.NET Silverlight Add-in - Quick Reference
You can use the Unified Functional Testing Silverlight Add-in to test user-interface objects (controls) in Silverlight applications.
The following table summarizes basic information about the Silverlight Add-in and how it relates to some commonly-used aspects of UFT.
General
Add-in Type This is a Web-based add-in. Much of its functionality is the same as other Web-based add-ins.
This add-in is installed as a sub add-in of the .NET Add-in.
See "Web-Based Application Support" on page 49.
Supported Environments
For details on supported Silverlight environments, see the .NET Add-in section of the HP Unified Functional Testing Product Availability Matrix, available from the UFT Help or the root folder of the Unified Functional Testing DVD.

Chapter 8 • .NET Silverlight Add-in - Quick Reference
188
Important Information
➤ To work with the Silverlight Add-in, your Silverlight application must be initialized with the EnableHtmlAccess property value set to ’True’. For details, see http://msdn.microsoft.com/en-us/library/cc838264.aspx
➤ Registering Microsoft sslauncher.exe. You can use the UFT Silverlight Add-in to test Silverlight out-of-browser applications. To do this you must register the Microsoft sslauncher.exe as a browser control. This executable is located in the Silverlight installation folder, for example, C:\Program Files\Microsoft Silverlight. You can do this using the UFT Register Browser Control Utility, which is available from Start > All Programs > HP Software > HP Unified Functional Testing > Tools > Register New Browser Control. For details, see "Registering Browser Controls" on page 54.
Test Object Methods and Properties
The Silverlight Add-in provides test objects, methods, and properties that can be used when testing objects in Silverlight applications. For details, see the Silverlight section of the HP Unified Functional Testing Object Model Reference.
Checkpoints and Output Values
➤ See the sections describing checkpoints and output values in the HP Unified Functional Testing User Guide.
➤ See "GUI Checkpoints and Output Values Per Add-in" on page 695.
Extending the Silverlight Add-in
Silverlight Add-in Extensibility (described on page 191) enables you to develop support for testing third-party and custom Silverlight controls that are not supported out-of-the-box by the Unified Functional Testing Silverlight Add-in.
Troubleshooting and Limitations
"Troubleshooting and Limitations - Silverlight Add-in" on page 193.
Prerequisites
Opening Your Application
You must open UFT before opening your Silverlight application.
Add-in Dependencies
The Web Add-in must be loaded.

Chapter 8 • .NET Silverlight Add-in - Quick Reference
189
Other To work with the Silverlight Add-in, .NET FrameWork 3.0 or later must be installed on your computer.
Configuration
Options Dialog Box Use the Web pane. (Make sure that a GUI test is open and select Tools > Options > GUI Testing tab > Web > General node.)
See "Web > General Pane (Options Dialog Box)" on page 82.
Record and Run Settings Dialog Box(tests only)
Use the Web tab. (Record > Record and Run Settings.)
See "Web Tab (Record and Run Settings Dialog Box)" on page 77.
Test Settings Dialog Box (tests only)
Use the Web pane. (File > Settings > Web node)
See "Web Pane (Test/Business Component Settings Dialog Box / Application Area - Additional Settings Pane)" on page 101.
Custom Active Screen Capture Settings Dialog Box(tests only)
Use the Web section.(Tools > Options > GUI Testing tab > Active Screen node > Custom Level)
See the section on the Custom Active Screen Capture Settings dialog box in the HP Unified Functional Testing User Guide.
Application Area Additional Settings pane(business components only)
Use the Web pane.In the application area, select Additional Settings > Web in the sidebar.
See "Web Pane (Test/Business Component Settings Dialog Box / Application Area - Additional Settings Pane)" on page 101.

Chapter 8 • .NET Silverlight Add-in - Quick Reference
190
This chapter includes:
Concepts
➤ Silverlight Add-in Extensibility on page 191
References
➤ Troubleshooting and Limitations - Silverlight Add-in on page 193

Chapter 8 • .NET Silverlight Add-in - Quick Reference
191
Concepts
Silverlight Add-in Extensibility
Unified Functional Testing Silverlight Add-in Extensibility enables you to develop support for testing third-party and custom Silverlight controls that are not supported out-of-the-box by the Unified Functional Testing Silverlight Add-in.
If the test object class that UFT uses to represent a control does not provide the operations and properties necessary to operate on your control, you can use Silverlight Add-in Extensibility to create a new test object class.
You can then map the control to the new test object class, and design the test object class behavior using .NET programming. You can program how operations are performed on the control, how properties are retrieved, and more.
You can also teach UFT to treat a control that contains a set of lower-level controls as a single functional control, instead of relating to each lower-level control separately.
To implement Silverlight Add-in Extensibility, you need to be familiar with:
➤ UFT and its Object Model Reference
➤ The behavior of the custom control (operations, properties, events)
➤ .NET programming in C#
➤ XML (basic knowledge)
You can install the WPF and Silverlight Add-in Extensibility SDK from the Add-in Extensibility and Web 2.0 Toolkits option in the UFT setup program.
The SDK also includes project templates and a wizard for Microsoft Visual Studio, that simplify setting up of your Silverlight Add-in Extensibility project.

Chapter 8 • .NET Silverlight Add-in - Quick Reference
192
For details on implementing Silverlight Add-in Extensibility, see the WPF and Silverlight Add-in Extensibility Help, available from the UFT Extensibility Documentation program group (Start > All Programs > HP Software > HP Unified Functional Testing > Extensibility > Documentation).
A printer-friendly (PDF) version of the HP Unified Functional Testing WPF and Silverlight Add-in Extensibility Developer Guide is available in the <Unified Functional Testing installation folder>\help\Extensibility folder.

Chapter 8 • .NET Silverlight Add-in - Quick Reference
193
References
Troubleshooting and Limitations - Silverlight Add-in
This section describes troubleshooting and limitations for the Silverlight Add-in, and contains the following sections:
➤ "General" on page 193
➤ "Checkpoints" on page 193
➤ "Creating and editing testing documents" on page 194
➤ "Running steps on Silverlight applications" on page 194
General
➤ UFT retrieves incorrect values for the all items and selection properties for ListBox and ComboBox controls that are bound to data via a template.
➤ If a recovery scenario uses the Object State trigger, the following may occur:
➤ The recovery scenario may detect redundant test objects when checking a SlvWindow state.
➤ The run results may not include all nodes related to the recovery scenario.
➤ You cannot create a virtual object for an area in a Silverlight application.
➤ Silverlight applications are not supported in Mozilla Firefox versions 4.0 and higher.
Checkpoints
➤ If you insert a text area checkpoint or a text area output value using the Windows API text recognition mechanism (as opposed to the OCR mechanism), all of the text on the Silverlight control is captured (instead of only the text from the selected area).
Chapter 8 • .NET Silverlight Add-in - Quick Reference
194
➤ For some test objects, if you try to insert a text checkpoint from the Active Screen, the text checkpoint cannot be inserted and an error message is displayed.
Creating and editing testing documents
➤ Recording on windowless Silverlight applications is not supported on Mozilla Firefox.
➤ If you open a Silverlight context menu when creating or editing a test, you must close the context menu control (for example, by pressing ESC) before you close the browser. Otherwise, during a run session, the browser window will remain open.
Workaround: Add the following line to the test before the line that closes the browser: Browser("SilverLightAUT").Page("SilverLightAUT").SlvWindow("Page").SlvButton("Login").Type micEsc
Example:
Browser("SilverLightAUT").Page("SilverLightAUT").SlvWindow("Page").SlvButton("Login").ShowContextMenu
Browser("SilverLightAUT").Page("SilverLightAUT").SlvWindow("Page").SlvButton("Login").Type micEsc
Browser("SilverLightAUT").Close
Running steps on Silverlight applications
➤ If a Web page contains a Silverlight application that is windowless and is scrolled out of view when the page opens the first time, UFT will not be able to make this application visible. (For example, in this scenario, UFT will not be able to perform an SlvWindow.MakeVisible step).

Chapter 8 • .NET Silverlight Add-in - Quick Reference
195
➤ In some versions of Internet Explorer, the Silverlight application becomes active only after a Click operation is performed. In these cases, UFT may fail to run test steps unless an initial Click operation is performed.
Workaround: Insert a step containing a Click operation on the Silverlight application before performing other operations on the application.
➤ To improve performance when running legacy tests in UFT, update your Silverlight test object descriptions to include the devnamepath property.

Chapter 8 • .NET Silverlight Add-in - Quick Reference
196

197
9.NET Windows Presentation Foundation Add-in - Quick Reference
You can use the UFT Windows Presentation Foundation Add-in to test WPF (Windows Presentation Foundation) user-interface objects (controls).
The following table summarizes basic information about Windows Presentation Foundation Add-in and how it relates to some commonly-used aspects of UFT.
General Information
Add-in Type This is a Windows-based add-in. Much of its functionality is the same as other Windows-based add-ins.
This add-in is installed as a sub add-in of the .NET Add-in.
See "Windows-Based Application Support" on page 117.
Supported Environments
For details on supported Windows Presentation Foundation environments, see the WPF Add-in section of the HP Unified Functional Testing Product Availability Matrix, available from the UFT Help or the root folder of the Unified Functional Testing DVD.
Test Object Methods and Properties
The WPF Add-in provides test objects, methods, and properties that can be used when testing objects in WPF applications. For details, see the .NET Windows Presentation Foundation section of the HP Unified Functional Testing Object Model Reference.

Chapter 9 • .NET Windows Presentation Foundation Add-in - Quick Reference
198
Checkpoints and Output Values
➤ See the sections describing checkpoints and output values in the HP Unified Functional Testing User Guide.
➤ To check properties that are not included in the Checkpoint Properties dialog box you can use the Object, AutomationElement, or AutomationPattern property. For details, see "Accessing Internal Properties and Methods of WPF Objects" on page 208.
➤ See "GUI Checkpoints and Output Values Per Add-in" on page 695.
Extending the WPF Add-in
WPF Add-in Extensibility (described on page 200) enables you to develop support for testing third-party and custom WPF controls that are not supported out-of-the-box by the UFT WPF Add-in. For details, see "WPF Add-in Extensibility" on page 200
Troubleshooting and Limitations
See "Troubleshooting and Limitations - Windows Presentation Foundation" on page 202.
Prerequisites
Opening Your Application
You can open your WPF application before or after opening UFT.
Add-in Dependencies
The Web and .NET Add-ins must be installed.
Configuration
Options Dialog Box Use the Windows Applications pane. (Tools > Options > GUI Testing tab > Windows Applications node)
See "Windows Applications > General Pane (Options Dialog Box > GUI Testing Tab)" on page 136.
Record and Run Settings Dialog Box(tests only)
Use the Windows Applications tab. (Record > Record and Run Settings)
See "Windows Applications Tab (Record and Run Settings Dialog Box)" on page 124.
For details, see "Define record and run settings for Windows-based applications" on page 122.

Chapter 9 • .NET Windows Presentation Foundation Add-in - Quick Reference
199
This chapter includes:
Concepts
➤ Considerations for Working with the WPF Add-in on page 200
➤ WPF Add-in Extensibility on page 200
Reference
➤ Troubleshooting and Limitations - Windows Presentation Foundation on page 202
Custom Active Screen Capture Settings Dialog Box(tests only)
Use the Windows applications section.(Tools > Options > GUI Testing tab > Active Screen node > Custom Level)
See the section on the Custom Active Screen Capture Settings dialog box in the HP Unified Functional Testing User Guide.
Application Area Additional Settings pane(business components only)
Use the Applications pane. In the application area, select Additional Settings > Applications in the sidebar.
See the section on the Applications pane in the HP Unified Functional Testing User Guide.

Chapter 9 • .NET Windows Presentation Foundation Add-in - Quick Reference
200
Concepts
Considerations for Working with the WPF Add-in
➤ You can test most custom WPF controls inherited directly or indirectly from the System.Windows.Controls.Control class regardless of which language was used to create the application (for example, Visual Basic, .NET, C#, and so on), as well as third-party WPF controls that are inherited from the System.Windows.Controls.Control class and implement automation interfaces.
➤ You can use the Keyword View and Editor to activate WPF test object, Automation object and run-time object methods, retrieve and set the values of properties, and check that objects exist.
WPF Add-in Extensibility
UFT WPF Add-in Extensibility enables you to develop support for testing third-party and custom WPF controls that are not supported out-of-the-box by the UFT WPF Add-in.
If the test object class that UFT uses to represent a control does not provide the operations and properties necessary to operate on your control, you can use WPF Add-in Extensibility to create a new test object class.
You can then map the control to the new test object class, and design the test object class behavior using .NET programming. You can program how operations are performed on the control, how properties are retrieved, and more.
You can also teach UFT to treat a control that contains a set of lower-level controls as a single functional control, instead of relating to each lower-level control separately.

Chapter 9 • .NET Windows Presentation Foundation Add-in - Quick Reference
201
To implement WPF Add-in Extensibility, you need to be familiar with:
➤ UFT and its Object Model Reference
➤ The behavior of the custom control (operations, properties, events)
➤ .NET programming in C#
➤ XML (basic knowledge)
You can install the WPF Add-in Extensibility SDK from the Add-in Extensibility and Web 2.0 Toolkits option in the UFT setup program.

Chapter 9 • .NET Windows Presentation Foundation Add-in - Quick Reference
202
Reference
Troubleshooting and Limitations - Windows Presentation Foundation
➤ When you spy on a WPF object using the Object Spy (or the .NET Windows Forms Spy when the .NET Add-in is loaded), and the Record and Run Settings dialog box is not configured to record on the WPF application on which you are spying, UFT recognizes the object as a standard Windows object.
Workaround: Close your WPF application. In UFT, open the Record and Run Settings dialog box (Record > Record and Run Settings) and in the Windows Application tab, select the Record and run test on any Windows application option. Reopen your WPF application and then spy on it again.
➤ When recording steps using low-level recording, default description properties for Windows Presentation Foundation test objects do not have constant values. This may lead to different description property values during a run session, which causes steps on these objects to fail.
➤ When you spy on a WpfComboBox control on a Microsoft Windows 7 operating system, to enable displaying the correct all items property value, you must first manually expand and collapse the combo box.
➤ The Unified Functional Testing .NET Add-in supports testing WPF controls inherited directly or indirectly from the System.Windows.Controls.Control class regardless of which language was used to create the application (for example, VisualBasic.NET, C#, and so forth), as well as third-party WPF controls that are inherited from the System.Windows.Controls.Control class and implement automation interfaces when the WPF Add-in is loaded.
➤ The Unified Functional Testing .NET Add-in supports:
➤ Testing standard .NET Windows Forms controls from the System.Windows.Forms library.

Chapter 9 • .NET Windows Presentation Foundation Add-in - Quick Reference
203
➤ Testing third-party .NET Windows Forms controls that are inherited from System.Windows.Forms.Control class.
➤ In addition to the controls listed in the HP Unified Functional Testing Product Availability Matrix, custom-built UFT support for a variety of Infragistics .NET Windows Forms controls is provided out-of-the-box by Infragistics TestAdvantage. For more information, refer to: http://www.infragistics.com/dotnet/testadvantageoverview.aspx#Overview
➤ To view the full type name of a .NET Windows Forms object in your application, view the SwfTypeName identification property in the Object Spy.
You can also view a list of the base types of a selected object by running a statement using the following syntax:
MsgBox SwfTestObj(descr).GetROProperty("SwfTypeNames")
where SwfTestObj(descr) is the test object you want to check.
Running this statement causes a message box to open displaying the actual class at the top of the list and the base classes below it.

Chapter 9 • .NET Windows Presentation Foundation Add-in - Quick Reference
204

205
10.NET Windows Presentation Foundation Add-in - Testing and Configuration
This chapter includes:
Concepts
➤ About WPF User Interface Automation on page 206
➤ WPF Objects, Methods, and Properties to Enhance Your Test or Component on page 208

Chapter 10 • .NET Windows Presentation Foundation Add-in - Testing and Configuration
206
Concepts
About WPF User Interface Automation
UI Automation provides a single, consistent, reference object for UI elements in multiple frameworks (For example, Win32, WPF, and Trident). With UI Automation, the functionality of objects in the UI is defined by a set of standard control patterns and properties that are common to all objects of that type.
WPF uses UI (User Interface) Automation to define UI objects. UI Automation provides standardization of controls and properties for the functionality of objects. The .NET Add-in supports UI Automation through the AutomationElement and Automation Pattern properties.
To learn more about UI Automation, see the UI Automation Fundamentals page of the Microsoft Developer Network library at http://msdn2.microsoft.com/en-us/library/ms753107.aspx.
Automation ElementsUI Automation exposes every element in the UI as an Automation Element. Automation Elements expose common properties of the UI elements they represent.
For example, a button control has the Automation Element property NameProperty, which references the name or text associated with a button control. That same property is called caption or alt in Win32 and HTML, respectively. With UI Automation, all button controls have a NameProperty, which is mapped to the corresponding property in each framework.
The Automation Element also exposes control patterns that provide properties and expose methods specific to their control types.
Chapter 10 • .NET Windows Presentation Foundation Add-in - Testing and Configuration
207
Control PatternsControl patterns represent discrete pieces of functionality that a control in the UI can perform. The total set of control patterns for a control type define the functionality of that control type.
Control patterns expose methods that provide the ability to programmatically manipulate the control.
Control patterns expose properties that provide information on the control’s functionality and current state.
The set of supported control patterns for a particular control can be dynamically defined. Therefore, a particular control type may not always support the same set of control patterns. For example, a multiline edit box supports scrolling (scrollpattern pattern) only if its text exceeds the viewable area.
Some controls types, such as Image controls do not support any control patterns.
UFT enables you to access the methods and properties of automation elements and control patterns using special properties in the UFT object model for WPF.
For details on how to work with UI Automation in your test or business component, see "Accessing Internal Properties and Methods of WPF Objects" on page 208.

Chapter 10 • .NET Windows Presentation Foundation Add-in - Testing and Configuration
208
WPF Objects, Methods, and Properties to Enhance Your Test or Component
A test or business component consists of statements coded in Microsoft VBScript. These statements are composed of objects, methods, and/or properties that instruct UFT to perform operations or retrieve information. You add these statements using objects from your object repositories, and methods and properties that are available for each object type. In addition, when you record, these statements are generated automatically in response to input to the application. You can also program statements manually, or mix recorded and programmed statements in the same test or business component. You create, view, and edit these statements in the Keyword View and/or Editor.
Accessing Internal Properties and Methods of WPF Objects
When accessing the internal properties and methods of WPF objects, it is important to know which property to use to access the object that contains the information you want to set or retrieve.
➤ AutomationElement property. Returns the object that gives access to the set of standard properties that expose information about the Automation Element.
➤ AutomationPattern property. Returns the object that gives access to the specific instance of a Control Pattern. For details on the methods and properties that are accessible through the AutomationPattern property, see the .NET Framework Developer Center of the Microsoft Developer Network library at http://msdn2.microsoft.com/en-us/library/system.windows.automation.aspx.
➤ Object property. Returns the object that gives access to properties specific to the actual run-time UI object, as defined by the developer.

Chapter 10 • .NET Windows Presentation Foundation Add-in - Testing and Configuration
209
Many of the properties and methods accessible through the AutomationElement and AutomationPattern properties contain the same information as the properties and methods accessible through the Object property. However, information available through UI Automation that is accessed through the Object property lacks the standardization provided by UI Automation.
Custom properties designed by the developer are accessible only through the Object property.

Chapter 10 • .NET Windows Presentation Foundation Add-in - Testing and Configuration
210

Part III
ActiveX Add-in

212
213
11ActiveX Add-in - Quick Reference
You can use the Unified Functional Testing ActiveX Add-in to test ActiveX user-interface objects (controls).
The following table summarizes basic information about the ActiveX Add-in and how it relates to some commonly-used aspects of UFT.
General Information
Add-in Type This is a Windows-based add-in. Much of its functionality is the same as other Windows-based add-ins.
See "Windows-Based Application Support" on page 117.
Supported Environments
For details on supported ActiveX environments, see the ActiveX Add-in section of the HP Unified Functional Testing Product Availability Matrix, available from the UFT Help or the root folder of the Unified Functional Testing DVD.
Important Information
See "Considerations for Working with the ActiveX Add-in" on page 216.
Test Object Methods and Properties
The ActiveX Add-in provides test objects, methods, and properties that can be used when testing ActiveX objects in applications. For details, see the ActiveX section of the HP Unified Functional Testing Object Model Reference.
Checkpoints and Output Values
➤ See the sections describing checkpoints and output values in the HP Unified Functional Testing User Guide.
➤ See "GUI Checkpoints and Output Values Per Add-in" on page 695.
Troubleshooting and Limitations
See "Troubleshooting and Limitations - ActiveX Add-in" on page 218.

Chapter 11 • ActiveX Add-in - Quick Reference
214
Prerequisites
Opening Your Application
The application containing the ActiveX controls on which you want to record must be closed before you begin a UFT recording session and set the Record and Run options. Open the application only after you begin the recording session.
Add-in Dependencies
Loading the ActiveX and Siebel add-ins together may cause problems when recording on some ActiveX methods.
Configuration
Options Dialog Box Use the Windows Applications pane.(Tools > Options > GUI Testing tab > Windows Applications node)
See "Windows Applications > General Pane (Options Dialog Box > GUI Testing Tab)" on page 136.
Record and Run Settings Dialog Box(tests only)
Use the Windows Applications tab.(Run > Run Settings or Record > Record Settings)
See "Windows Applications Tab (Record and Run Settings Dialog Box)" on page 124.
Note:
➤ If you select the Record and Run only on radio button in the Record and Run Settings dialog box, the settings also apply to (limit) the applications that are recognized for Object Spy and other pointing hand operations.
➤ UFT recognizes ActiveX objects only in applications that are opened after changing the record and replay settings in the Windows Applications tab of the Record and Run Settings dialog box.
Custom Active Screen Capture Settings Dialog Box(tests only)
Use the Windows applications section.(Tools > Options > GUI Testing tab > Active Screen node > Custom Level)
See the section on the Custom Active Screen Capture Settings dialog box in the HP Unified Functional Testing User Guide.

Chapter 11 • ActiveX Add-in - Quick Reference
215
This chapter includes:
Concepts
➤ Considerations for Working with the ActiveX Add-in on page 216
Reference
➤ Troubleshooting and Limitations - ActiveX Add-in on page 218
Application Area Additional Settings pane(business components only)
Use the Applications pane. In the application area, select Additional Settings > Applications in the sidebar.
See the section on the Applications pane in the HP Unified Functional Testing User Guide.

Chapter 11 • ActiveX Add-in - Quick Reference
216
Concepts
Considerations for Working with the ActiveX Add-in
➤ When you create a checkpoint on an ActiveX control, UFT captures all the properties for an ActiveX control, but it does not select any properties to check.
➤ When testing ActiveX objects in a browser, the top-level ActiveX object is inserted within the standard Web object hierarchy, for example, Browser.Page.ActiveX.
➤ UFT can record on standard controls within an ActiveX control and if an ActiveX control contains another ActiveX control, then UFT can record and run on this internal control as well. For example, suppose your ActiveX control is a calendar that contains a drop-down list from which you can choose the month. If you record a click in the list to select the month of May, UFT records this step in the Editor as:
➤ Loading the ActiveX and Siebel add-ins together may cause problems when recording on some ActiveX methods.
➤ When creating a programmatic description for an ActiveX test object and the relevant run-time object is windowless (has no window handle associated with it), you must add the windowless property to the description and set its value to True.
For example:
Dialog("ActiveX Calendars").ActiveX("SMonth Control").WinComboBox("ComboBox").Select "May"
Set ButDesc = Description.CreateButDesc("ProgId").Value = "Forms.CommandButton.1"ButDesc("Caption").Value = "OK"ButDesc("Windowless").Value = TrueWindow("Form1").AcxButton(ButDesc).Click

Chapter 11 • ActiveX Add-in - Quick Reference
217
For details, see the section on using programmatic descriptions in the HP Unified Functional Testing User Guide.
➤ If a "windowless" ActiveX radio button object is not first activated by clicking on it (AcxRadioButton.Click) or by using the Set method, a step containing the AcxRadioButton.GetVisibleText method will return an error stating that the object is not visible.
Workaround: Insert a step using the Click or Set methods prior to any step that uses the GetVisibleText method on a "windowless" ActiveX radio button object.

Chapter 11 • ActiveX Add-in - Quick Reference
218
Reference
Troubleshooting and Limitations - ActiveX Add-in
This section describes troubleshooting and limitations for the ActiveX Add-in.
Creating, Editing, and Running Testing Documents
➤ In the following ActiveX test object methods, if you specify the column by name, an error occurs when you run the test: ActivateCell, ActivateColumn, SelectCell, SetCellData, SelectColumn.
Workaround: When calling these methods, specify the column by number.
➤ When inserting steps in the Editor for a Web application that has a mixed hierarchy of Java objects inside an ActiveX control, then it may take a long time for UFT to retrieve the possible argument values (dynamic list of values) for ActiveX arguments.
Workaround: Insert these steps using the Keyword View (where the dynamic list of values functionality is not used).
➤ If UFT does not recognize an ActiveX control inside a Web page, reduce the security level within your Microsoft Internet Explorer browser.
➤ If an ActiveX control’s internal properties have the same name as the ActiveX properties created by UFT, retrieval and verification of such properties may be problematic.
Workaround: You can access the internal properties of an ActiveX control using the Object property.
➤ Methods performed on row and column positions for Apex, DataBound, and Sheridan grids return the values of the visible positions and not the absolute positions within the tables.
Workaround: Use the scroll bar while recording in order to display the required cells.

Chapter 11 • ActiveX Add-in - Quick Reference
219
Checkpoints and Output Values
➤ ActiveX table checkpoints capture only visible rows in data bound grids.
➤ When you insert a checkpoint on an ActiveX table from the Active Screen, the browser (or application) must be open to the same page (or screen). Otherwise, some data from the ActiveX table will be missing.
Workaround: Create ActiveX table checkpoints while recording.
➤ Checkpoints and output values for ActiveX properties of type VT_DISPATCH are not supported.
➤ Checkpoints and output values for write-only ActiveX properties are not supported.
➤ If you perform an update run (Run > Update Run Mode) on a test that contains checkpoints or output values for windowless ActiveX controls, and then you rerun the test, the run session may fail. This is because a hidden property called "windowless" is missing from the test object description.
Workaround: You can either relearn the problematic ActiveX controls, or you can add the "windowless" property with a value of 1 to all problematic, windowless ActiveX controls.

Chapter 11 • ActiveX Add-in - Quick Reference
220
Unsupported ControlsUFT does not support certain ActiveX controls or controls with certain prefixes. These controls are listed in the table below.
Unsupported Control Prefixes Unsupported Controls
Msawt AMOVIE.ActiveMovieControl.2
SpectrumHR.GrabBag MediaPlayer.MediaPlayer.1
SpectrumHR.EDataControl Trident.HTMLEditor.1
SpectrumHR.SSDBGridEventHandlerhtmlfile
ShockwaveFlash xmlfile
Spider90 htmlfile_FullWindowEmbed
XGO xmlfile_FullWindowEmbed
lnkfile
JScript
VBScript
MSJava
PDF.PdfCtrl.1
ScriptBridge.ScriptBridge.1
JavaSoft.JavaBeansBridge.1
Oracle.JavaBeansBridge.1
Spider.Loader.1
COMCTL.ImageListCtrl.1
ActiveTabs.SSTabPanel.4
ActiveTabs.SSTabPanel.2
ActiveTabs.SSTabPanel.3
{3050f67D-98b5-11cf-bb82-00aa00bdce0b}

Chapter 11 • ActiveX Add-in - Quick Reference
221
{3050F5C8-98B5-11CF-BB82-00AA00BDCE0B}
TriEditDocument.TriEditDocument.1
Miner3D.Miner3DObj.1
ActiveBar2Library.ActiveBar2.2
{275C23E2-3747-11D0-9FEA-00AA003F8646}
SpectrumHR.GrabBag.1
SpectrumHR.EDataControl.1
SpectrumHR.SSDBGridEventHandler.1
Unsupported Control Prefixes Unsupported Controls

Chapter 11 • ActiveX Add-in - Quick Reference
222

Part IV
Delphi Add-in

224

225
12Delphi Add-in - Quick Reference
You can use the Unified Functional Testing Delphi Add-in to test Delphi user-interface objects (controls).
The following table summarizes basic information about the Delphi Add-in and how it relates to some commonly-used aspects of UFT.
General Information
Add-in Type This is a Windows-based add-in. Much of its functionality is the same as other Windows-based add-ins.
See "Windows-Based Application Support" on page 117.
Supported Environments
The Delphi Add-in supports testing on Delphi controls created in the Delphi IDE and based on the Win32 VCL library. For details on supported Delphi environments, see the Delphi Add-in section of the HP Unified Functional Testing Product Availability Matrix, available from the UFT Help or the root folder of the Unified Functional Testing DVD.
Test Object Methods and Properties
The Delphi Add-in provides test objects, methods, and properties that can be used when testing objects in Delphi applications. For details, see the Delphi section of the HP Unified Functional Testing Object Model Reference.
Checkpoints and Output Values
➤ See the sections describing checkpoints and output values in the HP Unified Functional Testing User Guide.
➤ See "GUI Checkpoints and Output Values Per Add-in" on page 695.

Chapter 12 • Delphi Add-in - Quick Reference
226
Extending the Delphi Add-in
Delphi Add-in Extensibility (described on page 228) enables you to develop support for testing third-party and custom Delphi controls that are not supported out-of-the-box by the Unified Functional Testing Delphi Add-in.
Prerequisites
Opening Your Application
You can open your Delphi application before or after opening UFT.
Add-in Dependencies
None
Other Before running a test on a Delphi application, the application being tested must be compiled with the UFT agent MicDelphiAgent.
See "How to Enable Communications Between UFT and Your Delphi Application" on page 230.
Configuration
Options Dialog Box Use the Windows Applications pane. (Tools > Options > GUI Testing tab > Windows Applications node)
See "Windows Applications > General Pane (Options Dialog Box > GUI Testing Tab)" on page 136.
Record and Run Settings Dialog Box(tests only)
Use the Windows Applications tab. (Record > Record and Run Settings)
See "Windows Applications Tab (Record and Run Settings Dialog Box)" on page 124.
Notes:
➤ UFT recognizes only Delphi applications that have been precompiled with the MicDelphiAgent.pas module. For details, see "How to Enable Communications Between UFT and Your Delphi Application" on page 230.
➤ In some cases, if you select the Record and Run only on radio button, the settings may also apply to (limit) the applications that are recognized for Object Spy and other pointing hand operations.

Chapter 12 • Delphi Add-in - Quick Reference
227
This chapter includes:
Concepts
➤ Delphi Add-in Extensibility on page 228
Tasks
➤ How to Enable Communications Between UFT and Your Delphi Application on page 230
Custom Active Screen Capture Settings Dialog Box(tests only)
Use the Windows section.(Tools > Options > GUI Testing tab > Active Screen pane > Custom Level button)
See the section on the Custom Active Screen Capture Settings dialog box in the HP Unified Functional Testing User Guide.
Application Area Additional Settings pane(business components only)
Use the Applications pane. In the application area, select Additional Settings > Applications in the sidebar.
See the section on the Applications pane in the HP Unified Functional Testing User Guide.

Chapter 12 • Delphi Add-in - Quick Reference
228
Concepts
Delphi Add-in Extensibility
Unified Functional Testing Delphi Add-in Extensibility enables you to develop support for testing third-party and custom Delphi controls that are not supported out-of-the-box by the Unified Functional Testing Delphi Add-in.
If the test object class that UFT uses to represent your control does not provide the operations and properties necessary to operate on your control, you can use Delphi Add-in Extensibility to customize this behavior.
➤ You can map the control to an existing test object class.
➤ You can map the control to a new test object class that you create, and design the test object class behavior in Delphi code. You can program how operations are performed on the control, how properties are retrieved, and more.
➤ You can also teach UFT to treat a control that contains a set of lower-level controls as a single functional control, instead of relating to each lower-level control separately.
To implement Delphi Add-in Extensibility, you need to be familiar with:
➤ UFT and its Object Model Reference
➤ The behavior of the custom control (operations, properties, events)
➤ XML (basic knowledge)
➤ Delphi programming
Delphi Add-in Extensibility is available as part of the Delphi Add-in and does not require an additional installation.
UFT also provides samples of support developed using Delphi Add-in Extensibility, which you can use to gain a better understanding of how to create your own support.

Chapter 12 • Delphi Add-in - Quick Reference
229
For details on implementing Delphi Add-in Extensibility, see the Delphi Add-in Extensibility Help, available from the UFT Extensibility Documentation program group (Start > All Programs > HP Software > HP Unified Functional Testing > Extensibility > Documentation).
A printer-friendly (PDF) version of the HP Unified Functional Testing Delphi Add-in Extensibility Developer Guide is available in the <UFT installation folder>\help\Extensibility folder.

Chapter 12 • Delphi Add-in - Quick Reference
230
Tasks
How to Enable Communications Between UFT and Your Delphi Application
This task describes how to:
➤ Use the MicDelphiAgent.pas module to enable communications between UFT and each Delphi project you want to test.
➤ Configure support for the TwwDBGrid from InfoPower.
Link to the MicDelphiAgent.pas Module to Enable Communications
You must perform the following steps for each application that you want to test.
1 Add the <UFT Installation folder>\dat\Extensibility\Delphi folder to your Delphi project search path, or copy the contents of the <UFT Installation folder>\dat\Extensibility\Delphi folder to your project folder.
2 Add MicDelphiAgent to the Uses section of your application’s project file (project.dpr) as shown in the example below:
program flight;uses
MicDelphiAgent, Forms, Windows;
($R*.RES)begin
Application.InitializeApplication.Title :='Flight Reservation';Application.Run;
end.

Chapter 12 • Delphi Add-in - Quick Reference
231
3 Compile your Delphi project.
Note: If your application includes the TwwDBGrid from InfoPower, you must add support for this grid as described below..
Configure Support for TwwDBGrid
If your application includes the TwwDBGrid from InfoPower, do the following to enable support for this grid:
1 Add MicWWSupport to the Uses section of your application’s project file (project.dpr) after MicDelphiAgent, as shown in the example below:
2 Recompile your application.
You are now ready to create and run tests on Delphi applications.
program flight;uses
MicDelphiAgent, MicWWSupport,Forms, Windows;
($R*.RES)begin
Application.InitializeApplication.Title :='Flight Reservation';Application.Run;
end.

Chapter 12 • Delphi Add-in - Quick Reference
232

Part V
Flex Add-in

234

235
13Flex Add-in - Quick Reference
You can use the Unified Functional Testing Flex Add-in to test Flex user-interface objects (controls).
The following table summarizes basic information about the Flex Add-in and how it relates to some commonly-used aspects of UFT.
General Information
Supported Environments
For details on supported Flex Add-in environments, see the Flex section of the HP Unified Functional Testing Product Availability Matrix, available from the UFT Help or the root folder of the Unified Functional Testing DVD.
Important Information
➤ Tested applications must be built with Adobe Flex SDK version 4.5.x.
➤ You must prepare Flex applications before testing. For details, see "How to Prepare Flex Applications for Testing" on page 239.
➤ See "Considerations - Flex Add-in" on page 237.
Test Object Methods and Properties
The Flex Add-in provides Flex test objects, methods, and properties that can be used when testing Flex objects in Flex applications. For details, see the Flex section of the HP Unified Functional Testing Object Model Reference.
Checkpoints and Output Values
➤ See the sections describing checkpoints and output values in the HP Unified Functional Testing User Guide.
➤ See: "GUI Checkpoints and Output Values Per Add-in" on page 695
Troubleshooting and Limitations
"Troubleshooting and Limitations - Flex Add-in" on page 241

Chapter 13 • Flex Add-in - Quick Reference
236
This chapter includes:
Concepts
➤ Considerations - Flex Add-in on page 237
Tasks
➤ How to Prepare Flex Applications for Testing on page 239
Reference
➤ Troubleshooting and Limitations - Flex Add-in on page 241
Prerequisites
Opening Your Application
You can open your Flex application before or after opening UFT.
Add-in Dependencies
Different versions of the Flex SDK require different versions of Adobe Flash Player or Adobe Air.
The Flex Add-in requires the versions of Adobe Flash Player or Adobe Air that are required by the version of the Flex SDK used to build the application being tested.
For more information, see the Adobe Flex SDK documentation.
Configuration
Options Dialog Box Use the Windows Applications pane. (Tools > Options > GUI Testing tab > Windows Applications node)
See "Windows Applications > General Pane (Options Dialog Box > GUI Testing Tab)" on page 136.
Record and Run Settings Dialog Box(tests only)
Use the Windows Applications tab.(Run > Run Settings or Record > Record Settings)
See "Windows Applications Tab (Record and Run Settings Dialog Box)" on page 124.

Chapter 13 • Flex Add-in - Quick Reference
237
Concepts
Considerations - Flex Add-in
Considerations when working with the Flex Add-in include issues relating to the following:
➤ "UFT Interaction with the UFT Flex Agent" on page 237
➤ "UFT Recognition of Web-based Flex Applications" on page 238
UFT Interaction with the UFT Flex AgentYou must compile your application together with the precompiled agent provided with UFT. This agent enables UFT to communicate with the application.
For details about how to precompile the Flex Agent with UFT, see "How to Prepare Flex Applications for Testing" on page 239.
Note: UFT interacts with the UFT Flex Agent via a local TCP socket object. If the local TCP port is being used by another application, change the port being used by the other application in order to free this port for UFT.

Chapter 13 • Flex Add-in - Quick Reference
238
UFT Recognition of Web-based Flex ApplicationsUFT does not recognize local Web-based Flex applications as Flex test objects until you register them as trusted applications. Local Web-based Flex applications are Flex applications that are stored locally and run in a browser window.
Register your local Web-based Flex applications by adding the folder path containing the Web-based Flex application to one of the following:
➤ The Trusted Locations list in the Flash Player Global Settings.
➤ A text file located in the FlashPlayerTrust folder in the following location: %appdata%\Macromedia\Flash Player\#Security\FlashPlayerTrust
Each line in the text file must contain the name of a folder to be trusted. If a user specifies a folder, all files in that folder or any sub-folders are trusted. For example:
Note: The %appdata% folder is hidden in Windows by default. To show hidden folders, open the Windows Explorer Folder Options dialog box and select Show hidden files and folders.
If the #Security\FlashPlayerTrust directories do not exist, create them in the location relevant for your operating system, as listed above.
# Trust all files in the Employee online calendar application folder C:\Program Files\Personnel\Employees\OnlineCalendar
Chapter 13 • Flex Add-in - Quick Reference
239
Tasks
How to Prepare Flex Applications for Testing
This task describes the steps you must perform before testing Flex applications using UFT.
This section includes:
➤ "To prepare a Flex application for Web for testing" on page 239
➤ "To prepare an Flex application for Adobe AIR for testing" on page 239
➤ "To prepare a Flex application hosted by Adobe standalone Flash Player for testing, including the debug version, or Adobe Flash Player Projector" on page 240
➤ "To prepare a Flex application that uses the Flex charting or AdvancedDataGrid classes" on page 240
To prepare a Flex application for Web for testing
1 Link the Flex application to Adobe Flex automation libraries and a UFT Flex pre-compiled agent. To do this, add the following compiler arguments in the Flex project:
-include-libraries "<PATH_TO_UFT_ROOT>\dat\Flash\Flex\HpQTPAgent.swc"
-include-libraries "${flexlib}\libs\automation\automation_agent.swc"
-include-libraries "${flexlib}\libs\automation\automation.swc"
-include-libraries "${flexlib}\libs\automation\automation_spark.swc"
2 Embed the Flex application into a host .html document and open the host document using a Web browser.
To prepare an Flex application for Adobe AIR for testing
Link the Flex AIR application to Adobe Flex automation libraries and a UFT Flex pre-compiled agent. To do this, add the following compiler argument in the Flex AIR project:

Chapter 13 • Flex Add-in - Quick Reference
240
-include-libraries "<PATH_TO_UFT_ROOT>\dat\Flash\Flex\HpQTPAgent.swc"
-include-libraries "${flexlib}\libs\automation\automation_agent.swc"
-include-libraries "${flexlib}\libs\automation\automation.swc"
-include-libraries "${flexlib}\libs\automation\automation_spark.swc"
-include-libraries "${flexlib}\libs\automation\automation_air.swc"
-include-libraries "${flexlib}\libs\automation\automation_airspark.swc"
To prepare a Flex application hosted by Adobe standalone Flash Player for testing, including the debug version, or Adobe Flash Player Projector
1 Link the Flex application to Adobe Flex automation libraries and a UFT Flex pre-compiled agent. To do this, add the following compiler argument in the Flex project:
-include-libraries "<PATH_TO_UFT_ROOT>\dat\Flash\Flex\HpQTPAgent.swc"
-include-libraries "${flexlib}\libs\automation\automation_agent.swc"
-include-libraries "${flexlib}\libs\automation\automation.swc"
-include-libraries "${flexlib}\libs\automation\automation_spark.swc"
2 Open the application in one of the following:
➤ the Adobe standalone Flash Player
➤ the Debug version of the standalone Flash Player
➤ the Adobe Flash Player Projector
To prepare a Flex application that uses the Flex charting or AdvancedDataGrid classes
Link the Flex application to the automation_dmv.swc library. To do this, add the following compiler argument in the Flex project:
-include-libraries "${flexlib}\libs\automation\automation_dmv.swc"

Chapter 13 • Flex Add-in - Quick Reference
241
Reference
Troubleshooting and Limitations - Flex Add-in
General Functionality
➤ The Flex Add-in does not provide backward compatibility with the Adobe Flex Add-in for QuickTest, and uses a different set of test objects, methods, and properties. Legacy QuickTest tests recorded using the Adobe Flex Add-in cannot be used, and they cannot be upgraded to be used with the UFT Flex Add-in.
➤ The Flex Add-in does not support cross-domain or cross-host Flex applications. These types of applications are Flex applications where the HTML and SWF files are served from different domains, or from different hostnames within the same domain. For example, if an HTML page on www.mysite.com references an SWF file located on www.anothersite.com, or in content.mysite.com.
➤ The Flex Add-in relies on the port of the local TCP socket (#24654). If the communication port #24654 is occupied by another software program (for example, by a Web server), the add-in fails to load properly.
Workaround: If possible, configure the program occupying communication port #24654 to use another port.
➤ Testing Flex applications in UFT is only supported in Internet Explorer.
Active Screen
➤ The Active Screen pane is not fully supported for Flex test objects, and may not display the recorded steps correctly.
Object Identification
➤ UFT cannot recognize Flex test objects in windowless Flex applications. A windowless Flex application an wmode parameter defined as opaque or transparent, in the object element of a Flash Player object.

Chapter 13 • Flex Add-in - Quick Reference
242
Workaround: Use the window value for the wmode parameter value, or remove the wmode parameter altogether. This workaround requires that users can modify the Web page that contains the Flex application object.
➤ When identifying objects in a Flex application opened in a Web browser, the FlexWindow top-level test object is contained in a Page object.

Part VI
Java Add-in

244

245
14Java Add-in - Quick Reference
You can use the Unified Functional Testing Java Add-in to test Java user-interface objects (controls).
The following table summarizes basic information about the Java Add-in and how it relates to some commonly-used aspects of UFT.
General Information
Supported Environments
➤ You can run steps on Java objects in environments such as Internet Explorer, Mozilla Firefox, Java Web Start, Applet Viewer, and in standalone Java applications.
➤ For details on supported Java toolkits and versions, see the Java Add-in section of the HP Unified Functional Testing Product Availability Matrix, available from the UFT Help or the root folder of the Unified Functional Testing DVD.
Important Information
"Considerations - Java Add-in" on page 248
Test Object Methods and Properties
The Java Add-in provides customized Java test objects, methods, and properties that can be used when testing objects in Java applications. For details, see the Java section of the HP Unified Functional Testing Object Model Reference.
Checkpoints and Output Values
➤ See the sections describing checkpoints and output values in the HP Unified Functional Testing User Guide.
➤ See "Text Checkpoint and Text Output Value Steps for Java Objects" on page 271.
➤ See "GUI Checkpoints and Output Values Per Add-in" on page 695.
Chapter 14 • Java Add-in - Quick Reference
246
Extending the Java Add-in
"Java Add-in Extensibility" on page 250 (described on page 250) enables you to develop support for testing third-party and custom Java controls that are not supported out-of-the-box by the Unified Functional Testing Java Add-in.
Troubleshooting and Limitations
"Troubleshooting and Limitations - Java Add-in" on page 252
Prerequisites
Opening Your Application
You can open your Java application before or after opening UFT.
Note: If you cannot open your Java application after starting UFT, you may have a memory fragmentation issue. Check your memory settings, and see "Opening Java Applications After Opening UFT" on page 256.
Add-in Dependencies
The Unified Functional Testing Java Add-in can be installed and run together with any other UFT add-in. When testing Java applets in a Web browser, if your tests include operations on Web test objects, you must load the Web Add-in as well as the Java Add-in and use the Web tab of the Record and Run Settings dialog box to specify your record and run preferences.
Configuration
Options Dialog Box Use the Java pane. (Make sure that a GUI test is open and select Tools > Options > GUI Testing tab > Java node.)
See "Java Pane (Options Dialog Box > GUI Testing Tab)" on page 286.
Record and Run Settings Dialog Box(tests only)
Use the Java tab. (Record > Record and Run Settings
See "Java Tab (Record and Run Settings Dialog Box)" on page 298.

Chapter 14 • Java Add-in - Quick Reference
247
This chapter includes:
Concepts
➤ Considerations - Java Add-in on page 248
➤ Java Add-in Extensibility on page 250
Reference
➤ Troubleshooting and Limitations - Java Add-in on page 252
Test Settings Dialog Box (tests only)
Use the Java pane. (File > Settings > Java node)
See "Java Pane (Test/Business Component Settings Dialog Box / Application Area - Additional Settings Pane)" on page 294.
Custom Active Screen Capture Settings Dialog Box(tests only)
Use the Java section.(Tools > Options > GUI Testing tab > Active Screen node > Custom Level)
See the section on the Custom Active Screen Capture Settings dialog box in the HP Unified Functional Testing User Guide.
Application Area Additional Settings pane(business components only)
➤ Use the Java pane. In the application area, select Additional Settings > Java in the sidebar.
➤ See "Java Pane (Test/Business Component Settings Dialog Box / Application Area - Additional Settings Pane)" on page 294. (For business components, the settings displayed in this pane are read-only. To change the Java pane settings for a business component, open its associated application area and use the application area’s Additional Settings > Java pane.)
Chapter 14 • Java Add-in - Quick Reference
248
Concepts
Considerations - Java Add-in
When learning objects and running steps on Java applications, consider the following:
➤ After installing the Java Add-in, Java applets and applications will always open with Java support active. You can confirm that your Java environment has opened properly by checking the Java console for a message similar to the following confirmation message: "Loading Unified Functional Testing Java Support (version x.x.x.x) (<App> version x.x.x.x)." (where <App> is IE, IBM, or Oracle).
➤ The Object property can access only public methods and properties. A recommended alternative to using the Object property is to extend UFT support for the required Java object using UFT Java Add-in Extensibility. For details, see the HP Unified Functional Testing Java Add-in Extensibility Developer Guide.
➤ You cannot add SWT-based JavaMenu objects directly to an object repository using the Add Objects to Local button in the Object Repository window or the Add Objects button in the Object Repository Manager. If you want to add an SWT-based JavaMenu object to the object repository, you can use the Add Objects or Add Objects to Local button to add its parent object and then select to add the parent object together with its descendants. Alternatively, you can add a JavaMenu object using the Navigate and Learn option in the Object Repository Manager. For details, see the section on adding test objects using the Navigate and Learn option in the HP Unified Functional Testing User Guide.

Chapter 14 • Java Add-in - Quick Reference
249
➤ If you want to use a control’s native property for object identification, you can add the property to a Java test object as an identification property in the Add/Remove Properties dialog box. If you do this, consider the following:
➤ You can add only native properties for which the control has a public get or is method that returns the property value.
➤ If the native property name includes upper-case letters, then in the corresponding identification property name that you create, you must replace each of the upper-case letters except the first one with _<lower-case letter>. For example, to use the native property OneSmallProp, add an identification property named One_small_prop.
For more details on adding identification properties, see the section on the Object Identification dialog box in the HP Unified Functional Testing User Guide.
➤ In early releases of QuickTest, Java identification properties were not case-sensitive. If you learned a test object in a QuickTest version earlier than 11.00, you need to re-learn the object with properties that are case-sensitive by performing an Update Run (using the Update test object descriptions option). For details, see the section on Updating Test Object Descriptions in the HP Unified Functional Testing User Guide.
➤ In UFT, table data is always loaded from the application itself, even if the Active Screen contains an image of the table. For this reason, you must first open the table in the application before creating a table checkpoint in a test.
➤ In some cases you may have to scroll to the last row of the table to make sure that all the data is loaded.
➤ It is not necessary to open the table in your application to edit an existing table checkpoint.
➤ If you load or unload an add-in that is displayed as a child of the Java add-in in the Add-in Manager, only applications that are opened after loading or unloading the add-in are affected.
➤ When working with tests, if you create a checkpoint on an SWT-based Java tree with columns, a table checkpoint is created.

Chapter 14 • Java Add-in - Quick Reference
250
➤ For details on UFT functionality, see the HP Unified Functional Testing User Guide.
Java Add-in Extensibility
Unified Functional Testing Java Add-in Extensibility enables you to develop support for testing third-party and custom Java controls that are not supported out-of-the-box by the Unified Functional Testing Java Add-in.
If the test object class that UFT uses to represent a control does not provide the operations and properties necessary to operate on your control, you can use Java Add-in Extensibility to customize this behavior.
➤ You can map a custom control to an existing test object class, or to a new test object class that you define
➤ You can design and customize the behavior of the test object classes by developing custom Java support classes. You can program how operations are performed on the control, how properties are retrieved, and more.
➤ You can also teach UFT to treat a control that contains a set of lower-level controls as a single functional control, instead of relating to each lower-level control separately.
To implement Java Add-in Extensibility, you need to be familiar with:
➤ UFT and its Object Model Reference
➤ The behavior of the custom control (operations, properties, events)
➤ XML (basic knowledge)
➤ Java programming
You can install the Java Add-in Extensibility SDK from the Add-in Extensibility and Web 2.0 Toolkits option in the UFT setup program.
The SDK also includes:
➤ A plug-in for the Eclipse Java development environment, which provides wizards and commands that help you create and edit the support that you develop.
Chapter 14 • Java Add-in - Quick Reference
251
➤ Samples of support developed using Java Add-in Extensibility, which you can use to gain a better understanding of how to create your own support.
For details on installing and implementing Java Add-in Extensibility, see the Java Add-in Extensibility Help, available from the UFT Extensibility Documentation program group (Start > All Programs > HP Software > HP Unified Functional Testing > Extensibility > Documentation).
A printer-friendly (PDF) version of the HP Unified Functional Testing Java Add-in Extensibility Developer Guide is available in the <UFT installation folder>\help\Extensibility folder.

Chapter 14 • Java Add-in - Quick Reference
252
Reference
Troubleshooting and Limitations - Java Add-in
This section is intended to help pinpoint and resolve some common problems that may occur when testing Java applets and applications.
This section includes:
➤ "Identifying and Solving Common Problems" on page 253
➤ "General Notes and Limitations" on page 255
➤ "Java Environment Variables Settings" on page 262
➤ "Locating the Java Console" on page 264
➤ "Checking Whether the Problem is Application-Specific by Running an Application or Applet with the Same Settings" on page 265

Chapter 14 • Java Add-in - Quick Reference
253
Identifying and Solving Common ProblemsThe Unified Functional Testing Java Add-in provides a number of indicators that help you identify whether your add-in is properly installed and functioning. The following table describes the indicators you may see when your add-in is not functioning properly and suggests possible solutions:
Indicator Solution
You cannot record or run tests on Java applets or applications, or the Object Spy identifies Java objects as Standard Windows objects.
➤ Make sure that the Java Add-in is loaded with UFT. To check this, select Help > About Unified Functional Testing and verify that the Java Add-in check box is selected.
You load the Java Add-in using the Add-in Manager. For details, see "How to Manage UFT Add-ins" on page 40.
You cannot record or run tests on Java applets running on Microsoft Internet Explorer, and the Object Spy identifies Java objects in these applets as Standard Windows objects.
If you are working on the Microsoft Vista operating system, or a later version of Microsoft Windows, and you are using the Oracle Java 6 or 7 JRE on Microsoft Internet Explorer 7 or later, the JVM might not use the Java settings added to your system’s environment variables.
Use the Java Add-in JRE Support Tool to adjust your computer’s configuration to overcome this problem. The tool is available in the Start > All Programs > HP Software > HP Unified Functional Testing > Tools program group.
For details, see:
➤ "Java Environment Variables Settings" on page 262
➤ "Using the Java Add-in on Applets Running on Microsoft Windows Vista or Later and Internet Explorer 7 or Later" on page 263

Chapter 14 • Java Add-in - Quick Reference
254
The Java console does not display a line containing text similar to "Loading Java Support".
Check that the settings in your environment correspond to the environment settings defined in this chapter, or check for a batch file that may override the settings.
For details, see:
➤ "Java Environment Variables Settings" on page 262
➤ "Locating the Java Console" on page 264
A different applet or application works with the Unified Functional Testing Java Add-in, but the application you want to test does not work.
First check whether you can record and run tests if you invoke the other Java applet or application using exactly the same settings.
Check that the settings in your environment correspond to the environment settings defined in this chapter, or check for a batch file that may override the settings.
For details, see:
➤ "Checking Whether the Problem is Application-Specific by Running an Application or Applet with the Same Settings" on page 265
➤ "Java Environment Variables Settings" on page 262
After installing the Java Add-in, you cannot run Java applications using the IBM Java 6 JVM.
Check that the settings in your environment correspond to the environment settings defined in "Java Environment Variables Settings" on page 262, or check for a batch file that may override the settings.
In addition, you may need to do the following:
1 Remove -Xrunjvmhook from the _JAVA_OPTIONS and IBM_JAVA_OPTIONS environment variables.
2 Add -agentlib:jvmhook at the beginning of the _JAVA_OPTIONS and IBM_JAVA_OPTIONS environment variables.
3 Delete the JAVA_TOOL_OPTIONS environment variable.
Indicator Solution

Chapter 14 • Java Add-in - Quick Reference
255
General Notes and LimitationsThis section contains general information and limitations about the Java add-in, and includes the following sections:
➤ "Installing the Java Add-in" on page 256
➤ "Opening Java Applications After Opening UFT" on page 256
➤ "Loading a Child Add-in of the Java Add-in" on page 257
➤ "Creating and Running Testing Documents" on page 258
➤ "Record and Run Options" on page 258
➤ "Working with Java Controls" on page 259
➤ "Test Objects and Methods" on page 261
➤ "Checkpoints and Output Values" on page 261
The add-in does not function properly with applications that run with the -Xincgc option.
Either remove the -Xincgc option, or run without dynamic transformation support.
For details, see: "How to Disable Dynamic Transformation Support (Advanced)" on page 283.
Your Java console contains the line: Could not find -Xrun library: jvmhook.dll.
Check that the jvmhook.dll is located within your java.library.path.
None of the indicators above describe my problem.
See "General Notes and Limitations" on page 255
Indicator Solution

Chapter 14 • Java Add-in - Quick Reference
256
Installing the Java Add-in
In Windows XP and Windows 2003, after you install the Unified Functional Testing Java Add-in, the Windows Remote Shell Service (rshsvc.exe) may fail and display an error message every time you restart the computer. This occurs only if the Remote Shell Service is configured to run automatically.
Workaround: Either disable the automatic launching of the Remote Shell Service, or move the following variables from the System Variables section of the Environment Variables dialog box to the User Variables section: _classload_hook, _JAVA_OPTIONS, IBM_JAVA_OPTIONS, and MSJAVA _ENABLE _MONITORS.
Opening Java Applications After Opening UFT
If you are not able to open your Java application after you’ve opened UFT, you may have a memory space fragmentation issue, caused by loading a Windows .dll file. If Eclipse fails to start with higher memory settings, do one of the following:
➤ Use a 64-bit Windows operating system and 64-bit JVM, with 64-bit Eclipse. Have a 64-bit virtual memory space can prevent you from encountering memory fragmentation issues.
➤ Force Eclipse to start using the java.exe or javaw.exe file instead of the default jvm.dll startup file. To do this edit the eclipse.ini file by adding the following text, on two separate lines:
-vm
<full path to the java.exe or javaw.exe file>
➤ Modify the Eclipse memory setting in the eclipse.ini file. For example, if the application fails to start with a parameter setting of -Xmx512m, use a parameter setting of -Xmx256m or -Xmx384m instead.

Chapter 14 • Java Add-in - Quick Reference
257
Loading a Child Add-in of the Java Add-in
When you select a child add-in under Java in the Add-in Manager, you load Java Add-in extensibility support for the selected environment.
If you load support that was developed using a Java Add-in Extensibility SDK version earlier than version 10.00, then when you open one of the UFT dialog boxes that display test object classes for a selected environment (such as the Object Identification dialog box), the extensibility test object classes are displayed in the wrong list. If you select the child add-in in the Environment list, the list of test object classes is empty. Instead, the extensibility test object classes are displayed directly under the Java environment instead of being displayed under the child add-in in the Environment list.
Additionally, in some cases, the Generate Script button in the Object Identification dialog box does not function properly.
Workaround:
1 Locate the test object configuration file associated with the child add-in. This file is located in the following locations:
➤ <UFT Installation Folder>\dat\Extensibility\Java\<add-in name>TestObjects.xml.
➤ If working with ALM: <UFT Add-in for ALM Installation Folder>\dat\Extensibility\Java\<add-in name>TestObjects.xml.
2 In the XML file, locate the PackageName attribute in the TypeInformation element, and change its value from JavaPackage to the name of the child add-in.
3 Save the file and reopen UFT.
4 If this extensibility support (child add-in) was developed by a third party, you may want to contact them for assistance.

Chapter 14 • Java Add-in - Quick Reference
258
Creating and Running Testing Documents
➤ If, while recording keyboard operations in a JFC single-line edit box in an IME composition window, you press the ENTER key to select the composition string, the key press may be recorded as the Activate method, thereby generating an extra step. For example: JavaWindow("Application").JavaEdit("User Name").ActivateThis extra step generally does not affect the run session adversely.
Workaround: Before running your test or business component, remove the extra step that was recorded.
➤ The ALT+F4 keyboard shortcut (used for closing a Java applet or Java application) is not supported for recording or running.
Workaround: Use a Close menu command or button to close a Java applet or Java application during a recording session. Alternatively, manually add a JavaWindow(...).Close step.
Record and Run Options
➤ Adding a -Xincgc flag to the java.exe command line (in the Record and Run Settings dialog box or in a batch file) prevents the Java support from working properly.
Workaround: When testing with UFT Java support, do not use -Xincgc in your command line, or, alternatively, do not use the dynamic transformation support mechanism. For details, see the HP Unified Functional Testing Add-ins Guide.
➤ When selecting a JAR file from the command line in the Record and Run Settings dialog box, you should manually add -jar to the Command line box before you invoke the Java application.
➤ If you intend to launch your Java application using the Record and Run Settings dialog box without using a batch file (or another executable file), and without the -jar command line option (after selecting a JAR file), you should include the fully qualified name of the Java class in the Command line box.

Chapter 14 • Java Add-in - Quick Reference
259
Working with Java Controls
➤ By default, moving and resizing of Java windows are not recorded. This is because it may cause redundant recordings in some cases.
Workaround: To instruct the Java Add-in record these actions, use the Setting.Java method to set the record_win_ops variable to 1. For example: Setting.Java("RECORD_WIN_OPS") = 1
➤ AWT popup menus are recorded by the Standard Window control support WinMenu test object (while other Java menus are recorded using the JavaMenu test object). You cannot perform checkpoints or Active Screen operations on such menus.
Workaround: Use other verification methods (such as using GetTOProperty). For more details on verification methods, see the HP Unified Functional Testing User Guide.
➤ A call to .Object.startModal of a JavaInternalFrame or JavaDialog object may cause UFT to behave unexpectedly until the dialog box is closed.
➤ The use of multi-byte characters in a multiline edit field object is not supported.
➤ The Java Add-in does not record or run steps for hovering over identifiers in an Eclipse window.
➤ When you record a step that closes a Java dialog box, UFT records an additional Close statement.
Workaround: Manually delete the extraneous Close statement.

Chapter 14 • Java Add-in - Quick Reference
260
➤ For button objects (either JavaButton or a button in a JavaToolbar) whose label is determined by the name of the image file they display, the process of naming the test object when running in JDK 1.6 is different than the one used when running in JDK 1.5.
Therefore, if you have a test or business component containing button objects that were learned on JDK 1.5 and labeled according to their image file, when you run it on JDK 1.6, the test or business component may fail.
Workaround:
➤ For a JavaButton object—relearn the object on JDK 1.6. Then modify the test to use the new test object, or delete the old object from the object repository and rename the new test object to match the object name used in the step. Make sure the Automatically update test and business components steps when you rename test objects option is selected in the General pane of the GUI Testing tab in the Options dialog box (Tools > Options > GUI Testing tab > General node).
➤ For a button in a JavaToolbar object—modify the Item argument in the JavaToolbar statement to refer to the relevant button. You can specify the button’s index, or you can use the Object Spy to spy on the toolbar button, and then provide the label identification property as the Item argument.
➤ When the Active Screen displays a Java applet or ActiveX control within a Web page, the applet or control is for viewing purposes only and you cannot perform operations (for example, create checkpoints, add methods, and so forth) on the object.
Workaround: Record an operation on the Java applet/ActiveX control to create a step on the object with the ActiveX Add-in and/or Java Add-in loaded. Then you can create a checkpoint, parameterize a step, or add a method from the individual Java applet/ActiveX control in the Active Screen.

Chapter 14 • Java Add-in - Quick Reference
261
Test Objects and Methods
The PropertyValue argument (second argument) of the WaitProperty method for any Java test object can be only of type string.
Workaround: Use a string instead of the original type. For example, instead of 1, use "1". For example: y = JavaCheckBox("Active").WaitProperty ("enabled", "1", 1000)
Checkpoints and Output Values
➤ You can create text checkpoints and text output values only for Java objects that meet specific criteria. For details, see the HP Unified Functional Testing Add-ins Guide.
➤ To create a new table checkpoint on a Java table while editing a test or business component, you must first open the application containing the table you want to check and display the table in the application.
➤ If you add a checkpoints on a JavaList or JavaTree object while editing a test or business component, the list_content or tree_content property is not available in the checkpoint.
Workaround: Create checkpoints on Java lists and Java trees while recording.
➤ Performing a checkpoint on an object that is not always visible (such as a list opening from a combo box selection or a menu item) is not fully supported.
Workaround: If a checkpoint on a transient object is required, make sure the object is visible prior to executing the checkpoint. For example, in the case of combo box list, you should insert a statement that clicks the combo box button before executing the checkpoint.

Chapter 14 • Java Add-in - Quick Reference
262
Java Environment Variables SettingsThis section describes the environment variables that need to be set when you load your Java application with Unified Functional Testing Java Add-in support. You need to set one or more environment variables to the path name of the Java Add-in support classes folder.
Set the _JAVA_OPTIONS environment variable (Oracle) or the IBM_JAVA_OPTIONS environment variable (IBM) as follows:
-Xrunjvmhook -Xbootclasspath/a:"<UFT installation folder>\bin\java_shared\classes";"<UFT installation folder>\bin\java_shared\classes\jasmine.jar"
The above settings should appear on one line (no newline separators).
If you are working with Oracle Java 6 or 7 (versions 1.6 or 1.7), you must set an additional environment variable, JAVA_TOOL_OPTIONS, with the value -agentlib:jvmhook
Tip: If needed, you can temporarily remove Java support by renaming the _JAVA_OPTIONS or IBM_JAVA_OPTIONS environment variable. (If you are working with Java 6 or 7, you need to rename the JAVA_TOOL_OPTIONS environment variable as well.) For example, you must remove Java support if you want to test ActiveX controls that are embedded in SWT- or Eclipse-based applications.
Note:
You can also use short paths in these commands. For example:
-Xrunjvmhook -Xbootclasspath/a:C:\PROGRA~2\HP\UNIFIE~1\bin\JAVA_S~1\classes;C:\PROGRA~2\HP\UNIFIE~1\bin\JAVA_S~1\classes\jasmine.jar
In this example, UFT is installed in the default installation folder (C drive, Program Files) on a Windows 7 computer. PROGRA~2 denotes the Program Files (x86) folder, which is the Program Files folder on 64-bit operating systems.

Chapter 14 • Java Add-in - Quick Reference
263
Running Java applications on the IBM Java Runtime Environment (JRE) 1.6
In some cases, after installing the Java Add-in, Java applications running on the IBM Java 6 JVM cannot be started. The error message displayed may indicate that Mercury Interactive support could not be loaded and the Java Virtual Machine could not be created.
Workaround:
1 Remove -Xrunjvmhook from the _JAVA_OPTIONS and IBM_JAVA_OPTIONS environment variables.
2 Add -agentlib:jvmhook at the beginning of the _JAVA_OPTIONS and IBM_JAVA_OPTIONS environment variables.
3 Delete the JAVA_TOOL_OPTIONS environment variable.
Using the Java Add-in on Applets Running on Microsoft Windows Vista or Later and Internet Explorer 7 or Later
In some cases, when using the Microsoft Windows Vista operating system, or a later version of Microsoft Windows, and running Java applets using the Oracle Java 6 or 7 JRE on Microsoft Internet Explorer 7 or later, the Java Add-in does not recognize the applet as belonging to the Java environment. It does not recognize objects in the applet as Java objects, and cannot record or run steps on them.
This happens when the JVM does not use the Java Add-in’s settings from the environment variables. In this case, you need to set -agentlib:jvmhook -Xbootclasspath/ a:"<UFT installation folder>\bin\java_shared\classes";"<UFT installation folder>\bin\java_shared\classes\jasmine.jar" in the JVM Runtime Parameters.
Use the Java Add-in JRE Support Tool to set this string in the Runtime Parameters for the relevant JVM. The tool is available from: Start > All Programs > HP Software > HP Unified Functional Testing > Tools > Java Add-in JRE Support Tool
Chapter 14 • Java Add-in - Quick Reference
264
Locating the Java ConsoleThe Java console is the window in which your Java application or applet displays messages. The location of the Java console changes according to your application setup. Your Java application may be:
➤ A standalone application
➤ Run in an applet viewer
➤ An applet run in Microsoft Internet Explorer
If your Java application is a standalone application:
Open the batch file or shortcut that invokes the application and look for the command that launches Java (java.exe, javaw.exe, jre.exe, or jrew.exe).
➤ If the application was run with java.exe or jre.exe, it will load with a console (Command prompt window).
➤ If the application was run with javaw.exe or jrew.exe, it will not load with a console (the console is unavailable). You can check for Java Add-in support by invoking the application with java.exe or jre.exe. Do this by altering your batch file or the shortcut invoking your application.
Note: java.exe and javaw.exe are nearly identical, as are jre.exe and jrew.exe. The only difference between them is whether they launch a console window.
If your Java application runs in an applet viewer:
Look in the DOS command prompt window that invoked the applet viewer.
If there is no DOS command prompt window, your applet viewer may be run by a batch file similar to a standalone application. For details, see the information on javaw and jrew in the standalone application section above.

Chapter 14 • Java Add-in - Quick Reference
265
If your Java applet runs in Microsoft Internet Explorer:
If your applet runs in Microsoft Internet Explorer using the Oracle Java plug-in:
Right-click the Java (plug-in) icon in your taskbar tray and click the option that opens the console (for example, Open Console or Show Console, depending on the installed version).
If you do not see the Java (plug-in) icon in your taskbar tray, select Start > Control Panel and double-click the Java icon or option (select the Java version used by your application). Then, in the displayed dialog box, select the option to show the Java console (for example, Show console). Note that the actual name of the option, and its location in the dialog box, depend on the Java version used by your application.) Confirm the change (for example, by clicking Apply). Restart the browser.
Checking Whether the Problem is Application-Specific by Running an Application or Applet with the Same SettingsIn some cases, running another Java application or applet with the exact same settings helps determine whether you are encountering a general problem with the Java Add-in or an application-specific problem.
To run an application or applet with the same settings:
➤ Determine whether the application is a standalone application or an applet.
➤ If the application is an applet, check the browser type.
➤ If the applet is executed from a shortcut, execute the applet with the same command.
➤ If the applet is executed from a batch file, copy the batch file and change only the class file that invokes the applet.

Chapter 14 • Java Add-in - Quick Reference
266
Note: If the classpath must also be changed, add only the new items needed. Do not remove any of the items from the original application or applet classpath.
267
15Java Add-in - Testing and Configuration
This chapter includes:
Concepts
➤ Java Add-in - Overview on page 268
➤ Recording Steps on Java Objects on page 269
➤ Advanced Java Test Object Methods on page 272
➤ Java Add-in Environments on page 275
Tasks
➤ How to Record Steps on Java Table Objects on page 277
➤ How to Define Record and Run Environment Variables for Java Objects on page 281
➤ How to Optimize Settings for Other Record and Run Settings Dialog Box Tabs on page 282
➤ How to Disable Dynamic Transformation Support (Advanced) on page 283
Reference
➤ Java Pane (Options Dialog Box > GUI Testing Tab) on page 286
➤ Java Pane (Test/Business Component Settings Dialog Box / Application Area - Additional Settings Pane) on page 294
➤ Java Tab (Record and Run Settings Dialog Box) on page 298

Chapter 15 • Java Add-in - Testing and Configuration
268
Concepts
Java Add-in - Overview
This chapter explains how to use UFT to set testing preferences and to record and run steps on Java applets and applications. The chapter assumes basic knowledge of UFT features and capabilities. For details on working with UFT, see the HP Unified Functional Testing User Guide.
Note: Some of the features described in this chapter are relevant only for tests and scripted components. For details on the features that are available when working with keyword components, see the HP Unified Functional Testing User Guide.
Java Testing Options
You can use the Java pane of the Options dialog box (Tools > Options > GUI Testing tab > Java node) to set UFT record and run options on Java applets or applications. You can also open the Advanced Java Options dialog box that enables you to set table record mode preferences, enable text retrieval for checkpoints and output values, and specify lists of controls.
For details, see:
➤ "Java Pane (Options Dialog Box > GUI Testing Tab)" on page 286
➤ "Advanced Java Options Dialog Box" on page 290
Java Settings - Tests and Components
You define and view Java test or business component settings using one of the following:
➤ The Java pane of the Test Settings dialog box.
➤ The Java pane of the Business Component Settings dialog box (view only).

Chapter 15 • Java Add-in - Testing and Configuration
269
➤ The Java pane of the application area’s Additional Settings pane.
For details, see "Java Pane (Test/Business Component Settings Dialog Box / Application Area - Additional Settings Pane)" on page 294.
Recording Steps on Java Objects
When you record an operation on an applet, application, or Java object, UFT records the appropriate object icon next to the step in the Keyword View (for tests and business components) and adds the relevant statement in the Editor (for tests only).
If you try to record an operation on an unsupported or custom Java object, UFT records a generic JavaObject.Click statement that includes the coordinates of the click and the mouse button (that is, left or right) that was clicked. You can create support for your custom object using the UFT Java Add-in Extensibility. For details, see the HP Unified Functional Testing Java Add-in Extensibility Developer Guide.
Note: The way in which UFT records operations depends on the type of JTable cell editor in the table cell. For details, see "How to Record Steps on Java Table Objects" on page 277.
The UFT recorded hierarchy is composed of two or three levels of Java test objects. The top level is represented by the JavaApplet, JavaDialog, or JavaWindow object, as appropriate. The actual object on which you performed an operation may be recorded as a second or third level object. If the object is located directly in the top level object, it is recorded as a second level object (for example, JavaApplet.JavaButton). If a JavaDialog or JavaInternalFrame exists at the second level, then the object on which you performed the operation is recorded as a third level object (for example, JavaWindow.JavaDialog.JavaButton).
When testing applets in a browser, the two- or three-level hierarchy is recorded within the standard Web object hierarchy (for example, Browser.Page.JavaApplet.JavaTestObject.SubJavaTestObject).

Chapter 15 • Java Add-in - Testing and Configuration
270
Even though the object on which you record may be embedded in several levels of objects, the recorded hierarchy does not include these objects. For example, if the JavaList object on which you record is actually contained in several JPanel objects, which are all contained in a JavaWindow, the recorded hierarchy is only JavaWindow.JavaList.
Example
In a test, if you record a click on a Java check box, the Keyword View may be displayed as follows:
UFT records this step in the Editor as:
Window("Microsoft Internet Explorer").JavaApplet("Periodic").JavaCheckBox("Toggle").Set "ON"
In a keyword component, if you record a click on this same Java check box, the Keyword View would displayed as follows:
You can view the recorded hierarchy of a test object in the object repository. You can also access the full hierarchy of an object when using the pointing hand mechanism in the Step Generator (tests only), when inserting a checkpoint or output value step while recording, or when using the Object Spy.
For a related task, see "How to Record Steps on Java Table Objects" on page 277.
This section also includes:
➤ "Text Checkpoint and Text Output Value Steps for Java Objects" on page 271
➤ "Full Object Hierarchy Views" on page 272
Chapter 15 • Java Add-in - Testing and Configuration
271
Text Checkpoint and Text Output Value Steps for Java ObjectsWhen working with tests, you can use checkpoints or output values to check that text in your Java application or applet displays correctly. Similar to many other supported environments, it is recommended to retrieve and check text from your Java applet or application by inserting a standard checkpoint or output value for the object containing the desired text, and selecting to check or output its text (or similar) identification property (for example, text, attached text, or label).
If the object you want to work with does not have an appropriate identification property, or, if for any other reason, the above recommendation does not answer your needs (for example, the text before or after the selected text is important), you can consider inserting a UFT text checkpoint or text output value step for a Java object if it meets the following criteria:
➤ The object must draw the text itself (and not delegate the drawing task to the underlying operating system, as is the case with most AWT business components).
➤ The object must draw text by overriding the paint() method and calling the standard graphics.drawString() method to draw text. For example, the object cannot use special drawing methods for writing text, such as using a method that can draw oval circles to draw the letter O.
➤ The object cannot use the double (image) buffering drawing technique.
Note: Because many Java objects do not answer these criteria, the text checkpoint and text output mechanism for Java objects is disabled by default. You can enable it in the Advanced Java Options dialog box. For details, see "Advanced Java Options Dialog Box" on page 290.

Chapter 15 • Java Add-in - Testing and Configuration
272
Full Object Hierarchy ViewsThe Java Add-in enables you to view the full object hierarchy of each of the objects in your application in the Object Spy and Object Selection dialog boxes. In contrast to the recorded object hierarchy, the full object hierarchy shows you all of the parent objects associated with the clicked locations and, in some cases, the child objects of the clicked object.
The full object hierarchy enables you to view associated operations and properties of non-recorded objects in the Object Spy. You can also access non-recorded objects from the Object Selection dialog box that opens when using the Step Generator (tests only) or when inserting a checkpoint or output value step during a recording session.
The Object Spy and Object Selection dialog boxes enable you to view details, insert statements, or perform operations even for elements of an object (class business components) that are not recorded, such as java.awt.Component. For example, you can access the edit box, drop-down list, and button elements of a combo box.
For details on the Object Spy and Object Selection dialog boxes, see the HP Unified Functional Testing User Guide.
Advanced Java Test Object Methods
Java test object classes include test object methods that you can use in your tests to enhance the interaction between UFT and the application being tested.
This section includes:
➤ "CreateObject Method" on page 273
➤ "GetStatics Method" on page 273
➤ "FireEvent / FireEventEx Methods" on page 274

Chapter 15 • Java Add-in - Testing and Configuration
273
CreateObject MethodYou can use the CreateObject method to create an instance of any Java object within your applet or application. The CreateObject method returns an object reference to the newly created Java object. For details on the syntax of this method, see the Java section of the HP Unified Functional Testing Object Model Reference.
You can activate the methods of an object you create in the same way as you would activate the methods of any returned object from a prior call. Because the CreateObject method returns an object reference, there is no need to use the Object property when activating methods of the created object.
For example, you can use the CreateObject method to create a rectangle object. The return value is an object reference.
Set Rect = Browser("Periodic").Page("Periodic").JavaApplet("Periodic").JavaObject("Panel").CreateObject ("java.awt.Rectangle", 10, 20)
Note: The CreateObject method can be performed on any Java test object. The class loader of the Java test object on which the CreateObject method is performed is used to load the class of the newly created Java object.
It is recommended to use the CreateObject method on a Java test object from the same toolkit as the object you want to create. For example, to create a Swing/JFC object, use the CreateObject method on an existing Swing/JFC Java test object.
GetStatics MethodYou can invoke any static method, or you can set or retrieve the value of any static property of a Java class using the GetStatics method. For details on the syntax of this method, see the Java section of the HP Unified Functional Testing Object Model Reference.
GetStatics returns a reference to an object that can access static members of the specified class. The class loader of the Java test object on which the GetStatics method is performed is used to load the class specified as a parameter of the GetStatics method.

Chapter 15 • Java Add-in - Testing and Configuration
274
For example, to invoke the gc method of class.java.lang.System, which runs the garbage collector on the application, you can insert a statement similar to the following:
Browser("Browser").Page("Page").JavaApplet("mybuttonapplet.htm"). JavaObject("MyButton").GetStatics("java.lang.System").gc
To retrieve the value of the out property of the java.lang.System class, you can insert a statement similar to the following:
Set OutStream= Browser("Browser").Page("Page").JavaApplet("mybuttonapplet.htm"). JavaObject("MyButton").GetStatics("java.lang.System").out
To print a message to the Java console, you can insert a statement similar to the following:
Set OutStream= Browser("Browser").Page("Page").JavaApplet("mybuttonapplet.htm"). JavaObject("MyButton").GetStatics("java.lang.System").outOutStream.println "Hello, World!"
FireEvent / FireEventEx MethodsYou can simulate an event on a Java object during a run session with the FireEvent and FireEventEx methods. The FireEvent method simulates an event on a Java object using one of several pre-defined event constants. If the list of pre-defined constants does not cover the event you want to fire, you can use the FireEventEx method to fire any Java event. For details on the syntax of these methods and for the list of pre-defined event constants, see the Java section of the HP Unified Functional Testing Object Model Reference.
For example, you can use the FireEvent method to fire a MouseClick event on the JavaObject called MyButton_0.
Browser("Browser").Page("Page").Applet("mybuttonapplet.htm").JavaObject("MyButton_0").FireEvent micMouseClick, 0, "BUTTON1_MASK", 4, 4, 1, "OFF"

Chapter 15 • Java Add-in - Testing and Configuration
275
Alternatively, you can use the FireEventEx method to fire the same event as follows:
Browser("Browser").Page("Page").Applet("mybuttonapplet.htm").JavaObject("MyButton_0").FireEventEx "java.awt.event.MouseEvent", "MOUSE_CLICKED", 0, "BUTTON1_MASK", 4,4, 1, "False"
Note that you can pass any Java constant that is used as one of the event’s constructor parameters using its string, rather than its value. In the example above, the "java.awt.event.MouseEvent" Java constant MOUSE_CLICKED is supplied as a string argument instead of its value (500 in this example).
Java Add-in Environments
The Java Add-in uses a mechanism that supports multiple Java environments (such as IBM JRE, Oracle JRE, and Oracle JInitiator) and multiple Java versions (such as, JDK 1.5.x, 1.6.x and so on) without requiring any configuration changes. (For a list of supported environments and versions, see the HP Unified Functional Testing Product Availability Matrix, available from the UFT Help or the root folder of the UFT DVD.)
This mechanism, known as the dynamic transformation support mechanism, adjusts the Java Add-in support classes according to the Java environment and version used. The dynamic transformation support mechanism uses the Tool Interface of the Java Virtual Machine (JVMTI) (or the Profiler Interface (JVMPI) when working with JDK 1.5 and earlier).
The dynamic transformation support mechanism is invoked by the -Xrunjvmhook option, which is supplied to the JVM. If the -Xrunjvmhook option is specified, the JVM hook profiler (part of the Java Add-in support) is loaded with every Java application or applet that loads. The JVM hook profiler dynamically transforms the necessary classes to enable context-sensitive Java support.
When you run the Java Add-in on Java 6 or Java 7 environments, the dynamic transformation support mechanism is invoked by the -agentlib:jvmhook, which is defined in the JAVA_TOOL_OPTIONS environment variable.

Chapter 15 • Java Add-in - Testing and Configuration
276
Note: When working with Oracle Java 6 or Java 7 there is no conflict between -agentlib:jvmhook (defined in the JAVA_TOOL_OPTIONS environment variable) and -Xrunjvmhook (defined in the _JAVA_OPTIONS environment variable) because Java 6 and Java 7 ignore -Xrunjvmhook.
When working with IBM Java 6 or Java 7, these environment variables may conflict. For workaround details, see "Running Java applications on the IBM Java Runtime Environment (JRE) 1.6" on page 263.
The Java agent searches for the jvmhook.dll according to the java.library.path system property. You can identify any override of this system property using the Java command line: -djava.library.path = <path>However, although you can override the java.library.path system property, it is recommended to extend the java.library.path and not to overwrite it.
By default, the value of the java.library.path system property is the system path. If your application is loaded with a different library path, you must either add the jvmhook.dll to a location within the java.library.path, or change the java.library.path to contain <Windows installation folder>/system32.
The <JRE root folder>/bin folder is always located in the java.library.path. If needed, you can manually copy the jvmhook.dll to this folder. However, if you need to modify more than one computer, it is recommended to modify the batch file that alters the java.library.path.
For task details, see "How to Disable Dynamic Transformation Support (Advanced)" on page 283.

Chapter 15 • Java Add-in - Testing and Configuration
277
Tasks
How to Record Steps on Java Table Objects
When you record an operation that changes the data in a cell of a Java table object, UFT generally records the end result of the data in the cell in the form of a JavaTable.SetCellData statement. (JavaTable.SetCellData is not used when the JavaTable record mode is set to Analog. For details on JavaTable record mode, see "Advanced Java Options Dialog Box" on page 290.)
This task describes how to identify and record steps on different types of Java tables, and includes the following steps:
➤ "Record on standard cell editors in Swing JTable tables" on page 277
➤ "Record on custom cell editors in Swing JTable tables" on page 278
➤ "Modify the default JTable recording behavior (advanced)" on page 278
➤ "Find the toolkit class of a JTable cell editor using the Object Spy" on page 280
Record on standard cell editors in Swing JTable tables
Record operations using the Unified Functional Testing Java Add-in built-in support for several standard Swing JTable cell editor types. By default, UFT records operations on these standard cell editors in the same way as other table objects, using SetCellData statements.

Chapter 15 • Java Add-in - Testing and Configuration
278
Record on custom cell editors in Swing JTable tables
When a JTable contains a custom (non-standard) cell editor, the default SetCellData statement cannot be recorded. For example, if a cell contains both a check box and a button that opens a dialog box, then a SetCellData statement may not always provide an accurate description of the operations performed inside the cell.
If you record an operation on a custom cell editor, UFT records a statement that reflects the operation you performed on the object inside of the cell. For example, if the cell editor contains a custom check box, UFT might record the following statement:
Browser("Periodic").Page("Periodic").JavaWindow("CoolJava").JavaDialog("SetOptions").JavaCheckBox("MyCheckBox").Set "ON"
instead of:
Browser("Periodic").Page("Periodic").JavaWindow("CoolJava").JavaDialog("SetOptions").JavaTable("MyTable").SetCellData "ON"
Modify the default JTable recording behavior (advanced)
If the default recording behavior for JTables does not provide the desired value for the SetCellData statement of a particular editor, set that editor to be recorded, like a custom cell editor, in terms of the operation performed on the object inside the cell, by doing one of the following:
➤ Select Table cell controls > Controls to identify as separate test objects option in the Advanced Java Options dialog box, and then specify specific cell editor types that should always be treated as separate objects, and not as part of a JavaTable object.
➤ Create a Setting.Java ("table_internal_editors_list") statement. For details, see "Advanced Java Options Dialog Box" on page 290, and the HP Unified Functional Testing Object Model Reference.

Chapter 15 • Java Add-in - Testing and Configuration
279
Modify table cell control options
Use the Advanced Java Options dialog box to specify a list of table cell controls that you want UFT to identify as separate test objects. You can also specify a list of table cell controls for which you want UFT to record and run JavaTable operations. For user interface details, see "Advanced Java Options Dialog Box" on page 290.
Notes:
➤ Any changes you make are not applied to the currently open test or business component. To apply your changes, close your test or business component and reopen it.
➤ You can restore the default settings in the Advanced Java Options dialog box by clicking the Reset button.
1 Click the relevant option once to highlight it.
2 Click the option again or press F2 to open an edit box in which you can add or modify a list of controls.
3 Change the value as necessary.
Note: Specify editor class names separated by a space, tab, newline, or return character. Values are case sensitive.
4 When you finish editing the value, click another location in the dialog box to set the value.

Chapter 15 • Java Add-in - Testing and Configuration
280
Find the toolkit class of a JTable cell editor using the Object Spy
If you do not know the value of the toolkit class for an editor for use with the table_external_editors_list variable, you can find it by using the Object Spy, by running a short test in UFT to retrieve the value, or by creating a user-defined function and inserting it as a step.
To find the toolkit class of a JTable cell editor using the Object Spy:
1 Open the table and activate a cell in the cell editor column. For example, make sure the cursor is blinking inside an edit field or display the drop-down list of a combo box.
2 With the appropriate cell activated, use the Object Spy to point to the active cell. For details on using the Object Spy, see the HP Unified Functional Testing User Guide.
3 Make sure the Properties tab of the Object Spy is displayed and select the Identification radio button.
4 In the Properties column, scroll to toolkit class.
5 In the Values column, select the value of the toolkit class. The value is displayed in the box below the Properties tab.
6 Copy and paste the value from the Object Spy to the Table cell controls > Controls to identify as separate test objects option or your Setting.Java ("table_internal_editors_list") statement.
Chapter 15 • Java Add-in - Testing and Configuration
281
To find the toolkit class of a JTable editor by running a UFT script
For some cell editors, it is difficult or impossible to capture an activated cell with the Object Spy because the cell does not stay activated for a long enough period of time. For example, after a check box is selected or cleared, the cell is no longer active. If you need to find the toolkit class value to use for these types of cell editors, you can run a short test in UFT to retrieve the value. If you are working with business components, you can create a user-defined function and insert it as a step.
You can insert steps similar to the following example:
' Sample test to retrieve the toolkit class of a table cell editor' that cannot be made continuously active Set table = JavaWindow("TableDemo").JavaTable("Left table").ObjectSet JTableCS = table.mic_get_supp_class()Set comp = JTableCS.getComponentAt(table, 0, 6) ‘row 0, col 6MsgBox comp.getClass().getName()' Set the value of TABLE_EXTERNAL_EDITORS_LISTSetting.Java("TABLE_EXTERNAL_EDITORS_LIST") = comp.getClass().getName()
How to Define Record and Run Environment Variables for Java Objects
This task describes which application detail environment variables to specify for the applications you want to use for recording and running your test.
If you define any of these application details environment variables, they override the values in the Executable file, Command line, and Working directory boxes in the Java tab of the Record and Run Settings dialog box. For details, see "Java Tab (Record and Run Settings Dialog Box)" on page 298.

Chapter 15 • Java Add-in - Testing and Configuration
282
Use the variable names listed in the table below to define Java application details:
For details on defining and working with environment variables, see the HP Unified Functional Testing User Guide.
How to Optimize Settings for Other Record and Run Settings Dialog Box Tabs
In addition to setting the appropriate settings in the Java tab (or Web tab for applets in browsers), you should confirm that the other tabs in the dialog box have the appropriate settings for your test.
The following settings are recommended:
➤ Windows Applications tab. Select Record and run only on and confirm that all check boxes are cleared.
➤ Other tabs. (If displayed.) Select the option to record and run on any open application (upper radio button of each tab).
While these settings do not directly affect your record or run sessions when working with Java applets and applications, these settings prevent you from inadvertently recording operations performed on Windows applications (such as e-mail) during your recording session. These settings also prevent UFT from opening unnecessary applications when you record or run tests on Java applets and applications.
Option Variable Name Description
Executable file EXEPATH_ENV The executable file or a batch file to open.
Command line CMDLINE_ENV The command line to use to open the file.
Working directory WORKDIR_ENV The folder to which the specified command line or executable file refers.

Chapter 15 • Java Add-in - Testing and Configuration
283
For details on the Record and Run Settings dialog box, see "Record and Run Settings for Add-ins - Overview" on page 35.
How to Disable Dynamic Transformation Support (Advanced)
This task describes how to disable the dynamic transformation support mechanism if it does not work properly, and how to manually configure the Java environment to use the Java Add-in without dynamic transformation support. For general details about using the Java Add-in with multiple environments, see "Java Add-in Environments" on page 275.
Note: The dynamic transformation support mechanism is not supported when using the incremental garbage collector (-Xincgc option). Therefore, if you absolutely must use the -Xincgc option, you need to disable dynamic transformation support.
This task includes the following steps:
➤ "Save the dynamically transformed classes" on page 284
➤ "Disable dynamic transformation support" on page 285
➤ "Results" on page 285

Chapter 15 • Java Add-in - Testing and Configuration
284
1 Save the dynamically transformed classes
a Specify the folder in which to save the dynamically transformed classes that will be generated during the preliminary launching of your java applet or application.
To do this, open the registry editor (select Start > Run, type regedit in the Open box and click OK) and navigate to the JavaAgent main key, located in: HKEY_LOCAL_MACHINE\SOFTWARE\Mercury Interactive\JavaAgent. Define a new string value named ClassesDumpFolder, and set its value data to an existing folder (preferably empty) on your computer, for example, C:\JavaSupportClasses.
Note: If the ClassesDumpFolder string value already exists, you can modify its value data to an existing folder on your computer.
b If you are using the -Xincgc option, temporarily remove it from the command line to enable the JVM hook profiler to transform and save the necessary classes.
c Launch your applet or application and perform some basic operations on it. This ensures that all of the necessary classes are transformed and saved. Close your applet or application. All of the dynamically transformed classes are now saved in the folder you specified in the previous step (for example, C:\JavaSupportClasses).
d If you temporarily removed the -Xincgc option from the command line in step b, you can restore it now.
Now that you saved the transformed classes, you are ready to disable dynamic transformation support.

Chapter 15 • Java Add-in - Testing and Configuration
285
2 Disable dynamic transformation support
a Remove the -Xrunjvmhook option from the _JAVA_OPTIONS (or IBM_JAVA_OPTIONS for IBM VM-based applications, and JAVA_TOOL_OPTIONS if you are working with Java 6) environment variable.
b Add the following option instead:-Xbootclasspath/p:<ClassesDumpfolder>\Final where <ClassesDumpfolder> is the value of the folder in which the dynamically transformed classes were saved (step a on page 284). For example, after your modification the _JAVA_OPTIONS environment variable might look like this:
3 Results
The saved transformed classes are now used instead of dynamic transformation.
-Xbootclasspath/p:C:\JavaSupportClasses\Final -Xbootclasspath/a:C:\PROGRA~1\HP\UNIFIE~1\bin\JAVA_S~1\classes;C:\PROGRA~1\HP\UNIFIE~1\bin\JAVA_S~1\classes\jasmine.jar
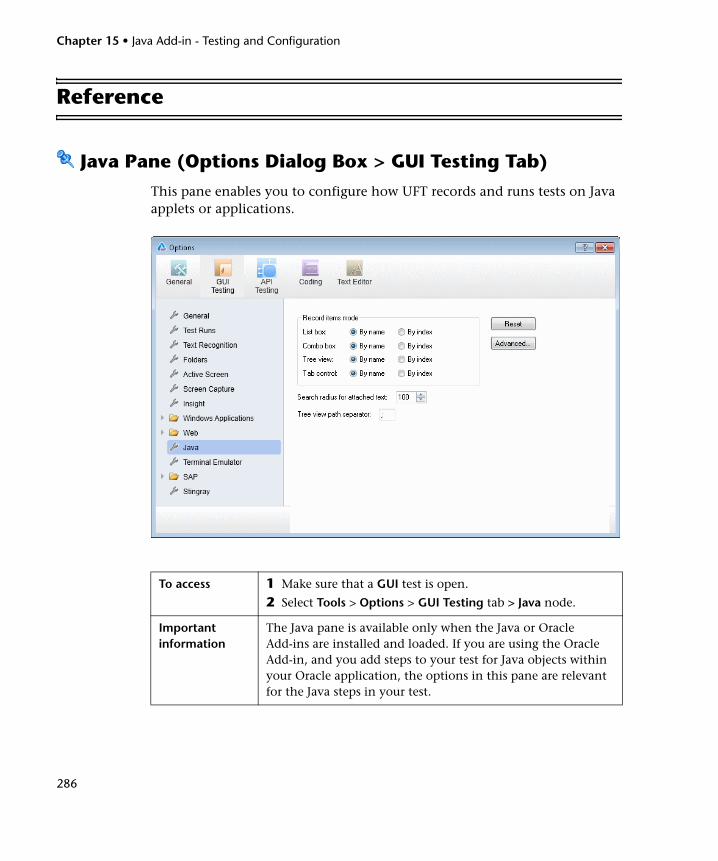
Chapter 15 • Java Add-in - Testing and Configuration
286
Reference
Java Pane (Options Dialog Box > GUI Testing Tab)
This pane enables you to configure how UFT records and runs tests on Java applets or applications.
To access 1 Make sure that a GUI test is open.
2 Select Tools > Options > GUI Testing tab > Java node.
Important information
The Java pane is available only when the Java or Oracle Add-ins are installed and loaded. If you are using the Oracle Add-in, and you add steps to your test for Java objects within your Oracle application, the options in this pane are relevant for the Java steps in your test.

Chapter 15 • Java Add-in - Testing and Configuration
287
Related tasks ➤ "How to Record Steps on Java Table Objects" on page 277
➤ "How to Optimize Settings for Other Record and Run Settings Dialog Box Tabs" on page 282
➤ "How to Define Record and Run Environment Variables for Java Objects" on page 281
See also ➤ "Advanced Java Options Dialog Box" on page 290.
➤ "Java Pane (Test/Business Component Settings Dialog Box / Application Area - Additional Settings Pane)" on page 294
➤ "Java Tab (Record and Run Settings Dialog Box)" on page 298
➤ "Recording Steps on Java Objects" on page 269

Chapter 15 • Java Add-in - Testing and Configuration
288
User interface elements are described below:
UI Element Description
Record items mode
Determines how UFT records operations on items in List box, Combo box, Tree view, and Tab control objects. The following options are available for each object:
➤ By name. (Default) Records operations on an item within the object (for example, selected list item or tab) according to the item’s name.
➤ By index. Records operations on an item within the object (for example, selected list item or tab) according to the item’s position within the Java object.
Note:
➤ If you select the By index option for Tree view, do not specify "#" as the default separator in the Tree view path separator option below.
➤ This option corresponds to the Setting.Java("record_by_num") variable.
Search radius for attached text
The maximum distance in pixels to search for attached text.
Default value: 100
Note:
➤ This option is relevant only when the label identification property is unavailable.
➤ This option corresponds to the Setting.Java("max_text_distance") variable.

Chapter 15 • Java Add-in - Testing and Configuration
289
Tree view path separator
The default separator used to separate entries in a path to a node of a Tree view control.
➤ Default value: ;
➤ Possible value: One or more single-character separators
Notes:
➤ If you enter more than one character, UFT treats each of the characters as a separator (but not both of them in sequence). If a path contains two consecutive separators, UFT interprets the path as if it contains a node with no name between the two separators. For example, if you specify %$ for this option and a particular path contains MyNode%$MySubNode, then UFT treats the % character as a separator for a node with no name, and the $ character as the separator for an additional node named MySubNode.
➤ If you select the By index option for Tree View in the Record Items mode area above, do not specify "#" as the default separator.
➤ This option corresponds to the Setting.Java("treeview_path_separator") variable.
Reset Resets the Java settings to their default values.
Advanced Opens the Advanced Java Options dialog box. For details, see "Advanced Java Options Dialog Box" on page 290.
UI Element Description

Chapter 15 • Java Add-in - Testing and Configuration
290
Advanced Java Options Dialog BoxThis dialog box enables you to specify additional Java options. You can configure table record mode preferences, enable retrieving text information from the run-time object for checkpoints and output values (tests only), and specify lists of controls.

Chapter 15 • Java Add-in - Testing and Configuration
291
To access
Make sure that a GUI test is open and select Tools > Options > GUI Testing tab > Java node > Advanced button. Then do the following:
1 Click the relevant option once to highlight it.
2 Click the option again or press F2 to open an edit box in which you can add or modify a list of controls.
3 Change the value as necessary.
Note: Specify editor class names separated by a space, tab, newline, or return character. Values are case sensitive.
4 When you finish editing the value, click another location in the dialog box to set the value.
Important information
➤ If you are using the Oracle Add-in, and you add steps to your test for Java objects within your Oracle application, the options in this dialog box are relevant for the Java steps in your test.
➤ Any changes you make are not applied to the currently open test or business component. To apply your changes, close your test or business component and reopen it.
➤ You can restore the defaultsettings in the Advanced Java Options dialog box by clicking the Reset button.
Related tasks "How to Record Steps on Java Table Objects" on page 277
See also ➤ "Java Pane (Options Dialog Box > GUI Testing Tab)" on page 286
➤ "Java Pane (Test/Business Component Settings Dialog Box / Application Area - Additional Settings Pane)" on page 294
➤ "Java Tab (Record and Run Settings Dialog Box)" on page 298
➤ "Recording Steps on Java Objects" on page 269
➤ "Text Checkpoint and Text Output Value Steps for Java Objects" on page 271

Chapter 15 • Java Add-in - Testing and Configuration
292
User interface elements are described below:
UI Element Description
JavaTable record mode
The record mode for table objects. The following modes are available:
➤ Context sensitive. (Default) Records operations on table objects in context-sensitive mode: SetCellData, SelectRow, and so on.
➤ Analog. Records only low-level (analog) table methods: ClickCell, DoubleClickCell, and Drag.
Note: This option corresponds to the Setting.Java("table_record_mode") variable.
Checkpoint and output value options
The preferences for checkpoint and output value steps on Java objects. The following option is available:
Enable retrieving text data from the Java run-time object: Enables UFT to retrieve text information from the Java objects in the application for checkpoints and output value steps. This option is not relevant if UFT is configured to use the OCR mechanism for text recognition (Tools > Options > GUI Testing tab > Text Recognition node).
Note:
➤ Retrieving text information from the run-time object is supported only for Java objects that meet very specific criteria. Therefore, this option is disabled by default.
➤ For a list of supported checkpoints and output values for the Java Add-in, see "Java Add-in - Quick Reference" on page 245.

Chapter 15 • Java Add-in - Testing and Configuration
293
Table cell controls The preferences for the way that UFT identifies controls inside table cells. The following options are available:
➤ Controls to identify as separate test objects: Specifies the list of controls that you want UFT to identify as separate test objects and not as part of a JavaTable object. Use this option to access methods that are specific to the object type or to otherwise improve the functionality of steps that UFT would normally record and run as operations on a JavaTable object.
Notes:
➤ This option is relevant for JTable Swing toolkit tables.
➤ Control class names must be separated by a space, tab, newline, or return character. Values are case sensitive.
➤ This option corresponds to the Setting.Java("table_internal_editors_list") variable.
➤ Controls to treat as part of the JavaTable test object: Specifies the list of controls for which you want UFT to record and run JavaTable operations. Use this option to record and run JavaTable operations (such as SetCellData and Select) on controls that UFT would normally treat as separate test objects.
Notes:
➤ This option is relevant for JTable Swing toolkit tables.
➤ Editor class names must be separated by a space, tab, newline, or return character. Values are case sensitive.
➤ This option corresponds to the Setting.Java("table_external_editors_list") variable.
See also:
➤ "Modify table cell control options" on page 279
➤ "Find the toolkit class of a JTable cell editor using the Object Spy" on page 280
UI Element Description

Chapter 15 • Java Add-in - Testing and Configuration
294
Java Pane (Test/Business Component Settings Dialog Box / Application Area - Additional Settings Pane)
This pane enables you to define Java test or business component settings. For business components, you use the application area’s Additional Settings pane to define the settings, and the Business Component Settings dialog box to view the settings in read-only mode.
The following image displays the Java pane of the Test Settings dialog box. The content of this pane is identical to the content of the Java pane of the Business Component Settings dialog box and the application area’s Additional Settings pane.

Chapter 15 • Java Add-in - Testing and Configuration
295
To access Do one of the following:
➤ For a test or component:
Select File > Settings > Java node.
➤ For an application area:
Open the application area and select Additional Settings > Java in the sidebar.
Important information
➤ The options shown in the Java pane are the same in the application area’s Additional Settings pane, the Business Component Settings dialog box, and the Test Settings dialog box.
The Business Component Settings dialog box displays the settings in read-only mode. To define the settings for a business component, use its application area’s Additional Settings pane.
➤ The Java pane is available only when the Java or Oracle Add-ins are installed and loaded. If you are using the Oracle Add-in, and you add steps to your test for Java objects within your Oracle application, the options in this pane are relevant for the Java steps in your test.
➤ For details on the Test Settings and Business Component Settings dialog boxes, and on application areas, see the HP Unified Functional Testing User Guide.
Related tasks ➤ "How to Define Record and Run Environment Variables for Java Objects" on page 281
➤ "How to Optimize Settings for Other Record and Run Settings Dialog Box Tabs" on page 282
See also ➤ "Java Pane (Options Dialog Box > GUI Testing Tab)" on page 286
➤ "Java Tab (Record and Run Settings Dialog Box)" on page 298
➤ "Recording Steps on Java Objects" on page 269
External resources
➤ For details on JFC or AWT-based Java key events and input methods, see Java documentation at http://www.oracle.com/technetwork/java/index.html.
➤ For details on SWT-based Java key events, see Java documentation at http://www.eclipse.org.

Chapter 15 • Java Add-in - Testing and Configuration
296
User interface elements are described below:
UI Element Description
When running JavaEdit.Set steps
Specifies how operations are performed on edit boxes during a test run. It is recommended not to modify these settings unless you fully understand Java key events and input methods, as well as the implications of sending or not sending these events. Note that JavaEdit.Set steps may fail during a run session if an incorrect value is used for these settings. You can set one or more of the following options:
➤ Send KEY_PRESSED event. Sends a KEY_PRESSED event to the object for every character from the input string. (Selected by default.) This setting corresponds to the P value of the Setting.Java("edit_replay_mode") variable.
➤ Send KEY_TYPED event. Sends a KEY_TYPED event to the object for every character from the input string. (Selected by default.) This setting corresponds to the T value of the Setting.Java("edit_replay_mode") variable.
➤ Send KEY_RELEASED event. Sends a KEY_RELEASED event to the object for every character from the input string. (Selected by default.) This setting corresponds to the R value of the Setting.Java("edit_replay_mode") variable.
➤ Use Java API. Calls the setValue() method to set a value of the edit object. This setting corresponds to the S value of the Setting.Java("edit_replay_mode") variable.
➤ Send InputMethod event. Sends an InputMethod event to the object for every character from the input string. This event is used with Unicode applications (for example, for some non-English applications). This setting corresponds to the I value of the Setting.Java("edit_replay_mode") variable.
➤ Send FOCUS_LOST event at end. Generates a FOCUS_LOST event after running the step. This setting corresponds to the F value of the Setting.Java("edit_replay_mode") variable.

Chapter 15 • Java Add-in - Testing and Configuration
297
Characters to exclude
Instructs UFT to ignore the specified characters during a run session. List characters consecutively, without a separator.
Default value: \t\n\r
Notes:
➤ This option is relevant only if the Use Java API check box is selected in the upper section of this dialog box, or if the value of the Setting.Java("edit_replay_mode") variable is set to S.
➤ This setting corresponds to the Setting.Java("exclude_control_chars") variable.
Perform mouse/keyboard operations at device level for these selected methods
By default, UFT performs mouse operations at the context-sensitive level. You can use this option to select specific operations to perform using device-level replay. Device-level replay simulates mouse or key operations exactly as if they occur on the mouse or keyboard drivers. When a mouse action is simulated on device replay, the mouse pointer moves on the screen to the point where the action is to be performed during the run session. You can select from the following mouse and keyboard methods:
➤ Click
➤ DoubleClick
➤ Type
➤ Drag / Drop
Default value: All check boxes are cleared.
This option corresponds to the Setting.Java("device_replay_mode") variable.
UI Element Description

Chapter 15 • Java Add-in - Testing and Configuration
298
Java Tab (Record and Run Settings Dialog Box)
This tab enables you to instruct UFT to open your Java applet or application each time you begin a recording session, or to instruct UFT to record on any open Java application.
To access Use one of the following:
Select Record > Record and Run Settings and select the Java tab.
Note: The Record and Run Settings dialog box opens automatically each time you begin recording a new test or business component (unless you open the dialog box and set your preferences manually before you begin recording).

Chapter 15 • Java Add-in - Testing and Configuration
299
Important information
➤ Testing Java applets in a Web browser. You must load both the Web Add-in and the Java Add-in. In this case, you use the Web tab of the Record and Run Settings dialog box to specify your record and run preferences.
➤ Verifying record and run settings. When you run a test, or if you begin a new recording session on an existing test, UFT automatically uses the existing record and run settings for the test and does not open the Record and Run Settings dialog box. However, it is important to confirm that the options in the Record and Run Settings Java tab are appropriate for the first step of your test before running it because you (or someone else) may have modified the Record and Run Settings dialog box manually in a prior recording session.
➤ Testing business components. Components do not require specific record and run settings to work with Java applets and applications. To record a business component, you need to first open the Java applet or application manually. Alternatively, you can include steps in your business component that connect to the Java applet or application, for example, you can include a step that contains the OpenApp operation.
When you begin recording a new business component, the Applications dialog box opens (unless you previously specified a Windows environment in the Business Component Settings dialog box or the application area’s Additional Settings pane). Click OK in the dialog box without making modifications to begin recording. For details on the Applications pane and Applications dialog box, see "Define record and run settings for Windows-based applications" on page 122.
Related tasks ➤ "How to Define Record and Run Environment Variables for Java Objects" on page 281
➤ "How to Optimize Settings for Other Record and Run Settings Dialog Box Tabs" on page 282
➤ "How to Define Record and Run Settings for UFT Add-ins" on page 41

Chapter 15 • Java Add-in - Testing and Configuration
300
User interface elements are described below:
See also ➤ "Java Pane (Options Dialog Box > GUI Testing Tab)" on page 286
➤ "Advanced Java Options Dialog Box" on page 290
➤ "Recording Steps on Java Objects" on page 269
➤ For details on the Web tab of the Record and Run Settings dialog box, see "Web-Based Application Support" on page 49.
➤ For general details on the Record and Run Settings dialog box, see the HP Unified Functional Testing User Guide.
UI Element Description
Record and run test on any open Java application
Instructs UFT to record and run the test on any open Java application or applet.
Open the following application when a record or run session begins
Instructs UFT to open a new Java application or applet using the specified application details.
Note:
➤ This setting controls only which Java application, if any, is opened at the beginning of a record or run session. It does not affect the applications that UFT recognizes. Even if this radio button is selected and no application is specified, UFT can still record, recognize, and run on any open Java application.
➤ When working with a Java applet inside a browser, use the Web tab of the Record and Run Settings dialog box to open the URL containing the applet.

Chapter 15 • Java Add-in - Testing and Configuration
301
Application details
The details of the Java application on which to run the test:
➤ Executable file. Instructs UFT to open the specified executable or batch file.
➤ Command line. Instructs UFT to open the application from the specified command line.
➤ Working directory. Instructs UFT to run the specified executable file or command line from the specified directory. Make sure you specify the full directory path, for example, C:\Program Files\Java\jre1.6.0\bin.
Note:
➤ If you define values for the EXEPATH_ENV, CMDLINE_ENV, and/or WORKDIR_ENV test environment variables, these values override the values in the Executable file, Command line, and Working Directory boxes of the Java tab during a run session. For details, see "How to Define Record and Run Environment Variables for Java Objects" on page 281.
➤ Always enter a value in the Working directory field, otherwise UFT cannot open your Java application.
UI Element Description

Chapter 15 • Java Add-in - Testing and Configuration
302

Part VII
Oracle Add-in

304

305
16Oracle Add-in - Quick Reference
You can use the Unified Functional Testing Oracle Add-in to test Oracle Applications and Oracle Forms objects (controls).
The following table summarizes basic information about the Oracle Add-in and how it relates to some commonly-used aspects of UFT.
General Information
Add-in Type This is a Web-based add-in. Much of its functionality is the same as other Web-based add-ins.
See "Web-Based Application Support" on page 49.
Supported Environments
For details on supported Oracle environments, see the Oracle Add-in section of the HP Unified Functional Testing Product Availability Matrix, available from the UFT Help or the root folder of the Unified Functional Testing DVD.
Important Information
When working with the Oracle Add-in, you must:
➤ Verify that the Oracle Name attribute is unique. See "How to Verify or Enable the Oracle Server Unique Name Attributes" on page 320.
➤ Enable the Oracle Name attribute. See "How to Enable the Oracle Name Attribute" on page 321.
Test Object Methods and Properties
The Oracle Add-in provides test objects, methods, and properties that can be used when testing objects in Oracle applications. For detail, see the Oracle section of the HP Unified Functional Testing Object Model Reference.

Chapter 16 • Oracle Add-in - Quick Reference
306
Checkpoints and Output Values
➤ See the sections describing checkpoints and output values in the HP Unified Functional Testing User Guide.
➤ See "GUI Checkpoints and Output Values Per Add-in" on page 695
Troubleshooting and Limitations
See "Troubleshooting and Limitations - Oracle Add-in" on page 310.
Prerequisites
Opening Your Application
You can open your Oracle application before or after opening UFT.
Add-in Dependencies
➤ The Web Add-in must be loaded. The Web Add-in supports Web-based forms.
➤ The Java Add-in must be loaded if your Oracle test or business component includes Java test objects.
Configuration
Options Dialog Box Use the Java pane if your Oracle test or business component includes Java test objects. (Make sure that a GUI test is open and select Tools > Options > GUI Testing tab > Java node).
See "Java Pane (Options Dialog Box > GUI Testing Tab)" on page 286.
Record and Run Settings Dialog Box(tests only)
Use the Oracle tab. (Record > Record and Run Settings)
See "Oracle Tab (Record and Run Settings Dialog Box)" on page 327.
Test Settings Dialog Box (tests only)
➤ Use the Web pane. (File > Settings > Web node)
See "Web Pane (Test/Business Component Settings Dialog Box / Application Area - Additional Settings Pane)" on page 101.
➤ Use the Java pane if your Oracle test or business component includes Java test objects. (File > Settings > Java node)
See "Java Pane (Test/Business Component Settings Dialog Box / Application Area - Additional Settings Pane)" on page 294.

Chapter 16 • Oracle Add-in - Quick Reference
307
This chapter includes:
Concepts
➤ Considerations for Working with the Oracle Add-in on page 308
Reference
➤ Troubleshooting and Limitations - Oracle Add-in on page 310
Custom Active Screen Capture Settings Dialog Box(tests only)
Use the Oracle applications section.(Tools > Options > GUI Testing tab > Active Screen node > Custom Level)
For details, see the section on the Custom Active Screen Capture Settings dialog box in the HP Unified Functional Testing User Guide.
Application Area Additional Settings pane(business components only)
➤ Use the Web pane if your test includes Web test objects.In the application area, select Additional Settings > Web in the sidebar.
For details, see "Web Pane (Test/Business Component Settings Dialog Box / Application Area - Additional Settings Pane)" on page 101.
➤ Use the Java pane if your Oracle test or business component includes Java test objects.In the application area, select Additional Settings > Java in the sidebar.
See "Java Pane (Test/Business Component Settings Dialog Box / Application Area - Additional Settings Pane)" on page 294.(The options shown in the Java pane of the Test Settings dialog box are the same as the options that are available in the Additional Settings in the application area.)

Chapter 16 • Oracle Add-in - Quick Reference
308
Concepts
Considerations for Working with the Oracle Add-in
➤ If you installed a version of JInitiator 1.1.x after installing the Oracle Add-in, a warning is displayed when you start recording your test or business component. Versions of JInitiator 1.1.x installed after you install the Oracle Add-in are not supported by UFT. In this case, you can repair the Oracle Add-in to enable full support of all currently installed versions of JInitiator 1.1.x. For details, see the section on repairing your UFT installation in the HP Unified Functional Testing Installation Guide.
If you try to record an action on an Oracle object with an unsupported version of JInitiator 1.1.x, UFT records a generic WinObject.Click statement that includes the coordinates of the click and the mouse button that was clicked.
➤ After installing the Oracle Add-in, your applications will always open with Java support active. You can confirm that your Oracle environment has opened properly by checking the Java console for the confirmation message similar to: Loading Oracle Support (version x.x build xxx) (Oracle Corporation x.x.x.xx).
For details, see "Dynamic Transformation Support" on page 318.
Note: The Unified Functional Testing Oracle Add-in supports only Oracle clients that are Java-based. Oracle Developer/2000 is not supported.
➤ Before using the Oracle Add-in to test Oracle Applications, you must first enable the Name attribute supplied by the Oracle Applications server. details, see "How to Enable the Oracle Name Attribute" on page 321.

Chapter 16 • Oracle Add-in - Quick Reference
309
➤ The Oracle Applications server supplies a unique Name attribute for many application objects. You can also find the Oracle Applications server Name attribute in the Oracle Add-in developer name identification property. The developer name identification property is used by UFT in most test object descriptions to identify Oracle objects. For details, see "How to Enable the Oracle Name Attribute" on page 321.
➤ In UFT, table data is always loaded from the application itself, even if the Active Screen contains an image of the table. For this reason, you must first open the table in the application before creating a table checkpoint in a test.
➤ In some cases you may need to scroll to the last row of the table to make sure that all the data is loaded.
➤ If the table object is not open in your application when you create the checkpoint, the Table Checkpoint Properties dialog box contains only the Properties tab, and the option to select which type of information to check (content or properties) is disabled.
➤ It is not necessary to open the table in your application to edit an existing table checkpoint.
➤ For details on UFT functionality, see the HP Unified Functional Testing User Guide.

Chapter 16 • Oracle Add-in - Quick Reference
310
Reference
Troubleshooting and Limitations - Oracle Add-in
This section contains general information and limitations about the Oracle add-in, and includes the following sections:
➤ "Installing the Oracle Add-in" on page 310
➤ "Creating and Running Testing Documents" on page 312
➤ "Record and Run Options" on page 313
➤ "Checkpoints" on page 313
For limitations relevant to specific test objects and methods, see the Oracle section of the HP Unified Functional Testing Object Model Reference.
Installing the Oracle Add-in
➤ If you install an Oracle JInitiator 1.1.x version after you install the UFT Oracle Add-in, you must repair UFT to test applications running in the newly installed JInitiator version. For details, see the HP Unified Functional Testing Add-ins Guide.
Note: It is not necessary to re-install or otherwise configure the UFT Oracle Add-in if you installed a new Oracle environment other than JInitiator 1.1.x.

Chapter 16 • Oracle Add-in - Quick Reference
311
➤ In Windows XP and Windows 2003, after you install the Oracle Add-in, the Windows Remote Shell Service (rshsvc.exe) may fail and display an error message every time you restart the computer. This occurs only if the Remote Shell Service is configured to run automatically.
Workaround: Either disable the automatic launching of the Remote Shell Service, or move the following variables from the System Variables section of the Environment Variables dialog box to the User Variables section: _classload_hook, _JAVA_OPTIONS, IBM_JAVA_OPTIONS, and MSJAVA _ENABLE _MONITORS.
➤ The Unified Functional Testing Oracle Add-in provides a number of indicators that help you identify whether your add-in is properly installed and functioning. The following table describes the indicators you may see when your add-in is not functioning properly, and suggests possible solutions:
Indicator Solution
You cannot record or run tests on Oracle Applications.
Ensure that the Oracle Add-in is loaded. For details, see "How to Manage UFT Add-ins" on page 40.
The Java console does not display a line containing the text similar to: Loading Oracle Support.
Check that the settings in your environment correspond to the environment settings defined in this chapter, or check for a batch file that may override the settings.
For details, see:
➤ "Recording Tests on Oracle Applications" on page 316.
➤ "Dynamic Transformation Support" on page 318.
Your Java console contains the line Could not find –Xrun library: jvmhook.dll.
Check that you have jvmhook.dll in your system folder (WINNT\system32, Windows\System32, or Windows\SysWOW64, depending on your operating system).

Chapter 16 • Oracle Add-in - Quick Reference
312
If, after reviewing the above indicators and solutions, you are still unable to record and run tests on your Oracle application, contact HP Software Support.
Creating and Running Testing Documents
➤ Test objects that require the index property for their description (for example, range flexfield objects) cannot be created from the Active Screen.
Workaround: Use the Add Objects button in the Object Repository window to add these test objects directly from your Oracle Applications instead.
➤ Active Screen captures are not supported for OracleListOfValues and OracleNotification test objects.
➤ The recovery scenario pop-up window trigger event is not supported when testing Oracle Applications.
➤ Simultaneous testing of multiple Oracle Applications sessions is not supported.
You cannot use UFT to record on Oracle Applications running on Oracle JInitiator versions 1.1.X.
The version of Oracle JInitiator 1.1.X on which your Oracle Application runs must be installed before you install the Unified Functional Testing Oracle Add-in.
If you installed Oracle JInitiator versions 1.1.X on your computer after you installed the Oracle Add-in, you should repair the Oracle Add-in installation. For details, see the section on repairing your UFT installation in the HP Unified Functional Testing Installation Guide.
Indicator Solution

Chapter 16 • Oracle Add-in - Quick Reference
313
Record and Run Options
The Log out of the application when the test closes option in the Record and Run Settings dialog box does not work if the Responsibilities List of Values window is displayed in the Oracle Applications session.
Checkpoints
➤ Performing a checkpoint on an object that is not always visible (such as a list opening from a combo box selection or a menu item) is not fully supported.
Workaround: If a checkpoint on a transient object is required, make sure the object is visible prior to executing the checkpoint. For example, in the case of combo box list, you should insert a statement that clicks the combo box button before executing the checkpoint.
➤ When testing Oracle applications, a table checkpoint may not capture the values of columns that are not visible.
Workaround: Before creating a table checkpoint, scroll in the table so that the last column is visible.

Chapter 16 • Oracle Add-in - Quick Reference
314

315
17Oracle Add-in - Testing and Configuration
This chapter includes:
Concepts
➤ Recording Tests on Oracle Applications on page 316
➤ Dynamic Transformation Support on page 318
Tasks
➤ How to Verify or Enable the Oracle Server Unique Name Attributes on page 320
➤ How to Enable the Oracle Name Attribute on page 321
➤ How to Set Oracle Environment Variables on page 323
➤ How to Locate the Java Console on page 324
➤ How to Disable Dynamic Transformation Support on page 325
Reference
➤ Oracle Tab (Record and Run Settings Dialog Box) on page 327
➤ Oracle Record and Run Environment Variables on page 330

Chapter 17 • Oracle Add-in - Testing and Configuration
316
Concepts
Recording Tests on Oracle Applications
As you record on an Oracle Applications session, UFT inserts statements into your test or business component that represent the operations you perform. The Unified Functional Testing Oracle Add-in recognizes specific Oracle objects such as button, form, navigator, list, and tree. It records these objects in relation to the data selected or entered and to the object within its parent object.
Note: UFT does not record the selection of Oracle tabs. Each object in an Oracle tab is included in the object repository within the tab hierarchy. UFT then uses this hierarchy when the test or business component is run, switching to the appropriate tab if needed.
The UFT learned object hierarchy is composed of one, two, or three levels of Oracle test objects. Depending on the actual object on which you performed an operation, that object may be recorded as a first level object (for example, OracleLogon), as a second level object (for example, OracleFormWindow.OracleList), or as a third level object (for example, OracleFormWindow.OracleTabbedRegion.OracleTable).
Even though the object on which you record may be embedded in several levels of objects, the recorded hierarchy does not include these objects. For example, even if the OracleListOfValues object in which you select an item is actually within an Oracle form, which is contained within an Oracle Applications session window, the recorded hierarchy is only OracleListOfValues.
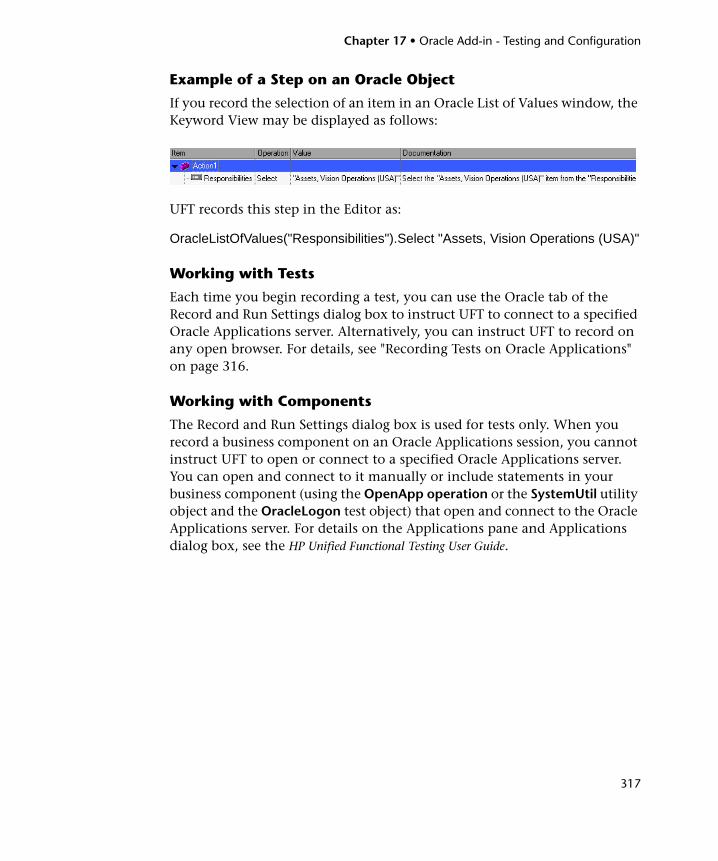
Chapter 17 • Oracle Add-in - Testing and Configuration
317
Example of a Step on an Oracle Object
If you record the selection of an item in an Oracle List of Values window, the Keyword View may be displayed as follows:
UFT records this step in the Editor as:
OracleListOfValues("Responsibilities").Select "Assets, Vision Operations (USA)"
Working with Tests
Each time you begin recording a test, you can use the Oracle tab of the Record and Run Settings dialog box to instruct UFT to connect to a specified Oracle Applications server. Alternatively, you can instruct UFT to record on any open browser. For details, see "Recording Tests on Oracle Applications" on page 316.
Working with Components
The Record and Run Settings dialog box is used for tests only. When you record a business component on an Oracle Applications session, you cannot instruct UFT to open or connect to a specified Oracle Applications server. You can open and connect to it manually or include statements in your business component (using the OpenApp operation or the SystemUtil utility object and the OracleLogon test object) that open and connect to the Oracle Applications server. For details on the Applications pane and Applications dialog box, see the HP Unified Functional Testing User Guide.
Chapter 17 • Oracle Add-in - Testing and Configuration
318
Working with Java Test Objects
You may have a combination of Oracle and Java test objects in your Oracle test or business component. This occurs when UFT encounters a Java applet within your Oracle Applications session and records it using the Java test object hierarchy.
You can edit steps that use Java test objects, methods, and properties in the same way as you edit other standard steps. You can add new steps to existing tests or business components using the new Oracle test object model. For details on Java objects, methods, and properties, see the Java section of the HP Unified Functional Testing Object Model Reference, installed together with the Oracle Add-in. For details on Oracle objects, methods, and properties, see the Oracle section of the HP Unified Functional Testing Object Model Reference.
There are specific options and settings you can use in your test or business component that apply only to steps that use Java test objects. These options and settings are located in the Java pane of the Test Settings dialog box (File > Settings > Java node) and the Java pane of the Options dialog box (Tools > Options > GUI Testing tab > Java node). For more information, click the Help button in the relevant Java pane. Note that the options in the Java panes do not have any effect on Oracle object steps in your test or business component.
Dynamic Transformation Support
The Oracle Add-in uses a mechanism for supporting multiple Java environments (Oracle Plug-in, JInitiator) and their versions (JInitiator 1.1.8, 1.3.1, and so on) without requiring any configuration changes. This mechanism is known as dynamic transformation support.
Dynamic transformation support uses the profiler interface of the Java Virtual Machine (JVM) to adjust the Oracle Add-in support classes according to the Java environment and version in use.
Chapter 17 • Oracle Add-in - Testing and Configuration
319
The dynamic transformation support mechanism is invoked by the -Xrunjvmhook option (for JInitiator 1.3.1.x and Sun Plug-in 1.4.1) or the _classload_hook=jvmhook option (for JInitiator 1.1.x) supplied to the JVM. If this option is specified, the JVM hook profiler, which is part of the Oracle Add-in support, is loaded with every application or applet and dynamically transforms the necessary classes to enable context-sensitive Oracle support.
➤ If the dynamic transformation support mechanism does not work properly, you can disable it and manually configure the Oracle environment to use the Oracle Add-in without dynamic transformation support. For details, see "How to Disable Dynamic Transformation Support" on page 325.
➤ The dynamic transformation support mechanism is not supported when using the incremental garbage collector (-Xincgc option). Therefore, if you absolutely must use the -Xincgc option, you need to disable dynamic transformation support. For details, see "How to Disable Dynamic Transformation Support" on page 325

Chapter 17 • Oracle Add-in - Testing and Configuration
320
Tasks
How to Verify or Enable the Oracle Server Unique Name Attributes
This task includes the following steps:
➤ "Prerequisite" on page 320
➤ "Enable the Oracle server to supply unique Name attributes" on page 320
1 Prerequisite
Use the Object Spy to point to a few edit boxes inside the Oracle application and view the developer name attribute. If the developer name is displayed in all capital letters in the format FORM:BLOCK:FIELD or FORM_BLOCK_FIELD, then the developer name attribute is supplied correctly.
If the developer name value is empty, then the server does not supply unique Name attributes. To use the Oracle Add-in to test Oracle Applications, your Oracle server must supply unique Name attributes.
Your Oracle server administrator can assist you in enabling unique Name attributes.
2 Enable the Oracle server to supply unique Name attributes
a Add the following line to the server configuration file (for example, $OA_HTML/bin/appsweb_UKTRN_hwu00001.cfg):
b Restart the Oracle server.
otherparams=record=names

Chapter 17 • Oracle Add-in - Testing and Configuration
321
How to Enable the Oracle Name Attribute
This task describes the different ways in which you can enable the Name attribute supplied by the Oracle Applications server before using the Oracle Add-in to test Oracle Applications.
This task includes:
➤ "Enable the Name attribute when accessing the application directly" on page 321
➤ "Enable the Oracle server to supply unique Name attributes" on page 320
➤ "Enable the Name attribute when using HTML to launch the Oracle application" on page 321
Enable the Name attribute when accessing the application directly
Add record=names to the URL parameters.
Example:
Enable the Name attribute when using HTML to launch the Oracle application
1 In the startup HTML file that is used to launch the application, locate the line: <PARAM name="serverArgs ............ fndnam= APPS">
2 Add the Oracle key: record=names
Example:
http://oracleapps.mydomain.com:8002/dev60cgi/f60cgi?record=names
<PARAM name="serverArgs" value="module=f:\FNDSCSGN userid=XYZ fndnam=apps record=names">

Chapter 17 • Oracle Add-in - Testing and Configuration
322
Enable the Name attribute when using the Personal Home Page to launch your Forms 6 application
Set up the following system profile option at (your) user level to enable the Name attribute:
1 Sign on to your Oracle application and select System Administrator responsibility.
2 Select Nav > Profile > System.
3 In the Find System Profile Values form:
➤ Confirm that Display: Site and Users contains your user logon.
➤ Enter %ICX%Launch% in the Profile box.
➤ Click the Find button.
4 Copy the value from the Site box of the ICX: Forms Launcher profile and paste it in the User box. Add &play=&record=names to the end of the URL in the User box.
5 Save your transaction.
6 Sign on again using your user name.
Note: If the ICX: Forms Launcher profile option is not updatable at the user level, access Application Developer and select the Updatable check box for the ICX_FORMS_LAUNCHER profile.

Chapter 17 • Oracle Add-in - Testing and Configuration
323
How to Set Oracle Environment Variables
This task describes how to set the environment variables you need for loading your Oracle application with UFT Oracle Add-in support. For all the environments, you need to set one or more environment variables with the path name of the Oracle Add-in support classes folder.
This task includes the following steps:
➤ "Sun Plug-in 1.4.1 and Oracle JInitiator 1.3.1.x" on page 323
➤ "Oracle JInitiator 1.1.x" on page 323
Sun Plug-in 1.4.1 and Oracle JInitiator 1.3.1.x
Set the _JAVA_OPTIONS environment variable as follows:
-Xrunjvmhook -Xbootclasspath/a:"<UFT installation folder>\bin\java_shared\classes";"<UFT installation folder>\bin\java_sharedclasses\jasmine.jar"
The above variables should appear on one line (no newline separators).
Note:
You can also use short paths in this command. For example:
-Xrunjvmhook -Xbootclasspath/a:C:\PROGRA~2\HP\UNIFIE~1\bin\JAVA_S~1\classes;C:\PROGRA~2\HP\UNIFIE~1\bin\JAVA_S~1\classes\jasmine.jar
In this example, UFT is installed in the default installation folder (C drive, Program Files) on a Windows 7 computer. PROGRA~2 denotes the Program Files (x86) folder, which is the Program Files folder on 64-bit operating systems.
Oracle JInitiator 1.1.x
Set the _classload_hook environment variable to jvmhook.
Chapter 17 • Oracle Add-in - Testing and Configuration
324
How to Locate the Java Console
This task describes how to locate the Java console for the following:
This task describes how to set environment variables for:
➤ "Oracle JInitiator 1.3 or higher" on page 324
➤ "IJInitiator 1.1.x" on page 324
➤ "JDK 1.4 Plug-in" on page 324
Oracle JInitiator 1.3 or higher
Do one of the following:
➤ Right-click the JInitiator icon in the taskbar tray and click Show Console.
➤ If you do not see the JInitiator icon in the taskbar tray, click Control Panel in the Start menu. Double-click the JInitiator icon (choose the icon for the Java version used by your application). In the Basic tab, select Show Java console and click Apply. Restart your JInitiator application.
IJInitiator 1.1.x
If you do not see the JInitiator icon in the taskbar tray, click All Programs > JInitiator Control Panel in the Start menu. In the Basic tab, select Show Java console and click Apply. Restart your JInitiator application.
JDK 1.4 Plug-in
Right-click the Java Plug-in icon in the taskbar tray and click Open Console.
Click Control Panel in the Start menu. Double-click the Java Plug-in icon. In the Basic tab, select Show Java in System Tray. Restart the browser.

Chapter 17 • Oracle Add-in - Testing and Configuration
325
How to Disable Dynamic Transformation Support
This task includes the following steps:
➤ "Save the dynamically transformed classes" on page 325
➤ "Disable dynamic transformation support" on page 326
This task describes how to disable dynamic transformation support if the dynamic transformation support mechanism does not work properly.
1 Save the dynamically transformed classes
a Specify the folder in which to save the dynamically transformed classes that will be generated during the preliminary launching of your Oracle application.
To do this:
Open the registry editor (select Start > Run, type regedit in the Open box and click OK)
Navigate to the JavaAgent main key, located in: HKEY_LOCAL_MACHINE\SOFTWARE\Mercury Interactive\JavaAgent.
Define a new string value named ClassesDumpFolder, and set its value data to an existing folder (preferably empty) on your computer, for example, C:\JavaSupportClasses.
If the ClassesDumpFolder string value already exists, you can modify its value data to an existing folder on your computer.
b If you are using the -Xincgc option, temporarily remove it from the command line to enable the JVM hook profiler to transform and save the necessary classes. You can add it back to the command line after performing the following step.
c Launch your applet or application and perform some basic operations on it. This ensures that all of the necessary classes are transformed and saved. Close your application. All of the dynamically transformed classes are now saved in the folder you specified in the previous step (for example, C:\JavaSupportClasses).

Chapter 17 • Oracle Add-in - Testing and Configuration
326
2 Disable dynamic transformation support
For Sun Plug-in 1.4.1 or JInitiator 1.3.1.x:
a Remove the -Xrunjvmhook option from the _JAVA_OPTIONS environment variable.
b Add the following option instead: -Xbootclasspath/p:<ClassesDumpFolder>\Final, where <ClassesDumpFolder> is the value of the folder in which the dynamically transformed classes were saved (step a on page 325), appended by the Final subfolder. For example, after your modification the _JAVA_OPTIONS environment variable might look like this:
For Initiator 1.1.x:
a Remove the _classload_hook option from the JDK settings by deleting the environment variable.
b Manually copy the classes from the <ClassesDumpFolder>, where <ClassesDumpFolder> is the value of the folder in which the dynamically transformed classes were saved (step a on page 325), appended by the Final subfolder, to the JInitiator 1.1.x classes folder. The JInitiator 1.1.x classes folder can be typically found under C:\Program Files\Oracle\JInitiator 1.1.x\classes.
-Xbootclasspath/p:C:\JavaSupportClasses\Final -Xbootclasspath/a:"C:\Program Files\HP Software\Unified Functional Testing\bin \java_shared\classes";

Chapter 17 • Oracle Add-in - Testing and Configuration
327
Reference
Oracle Tab (Record and Run Settings Dialog Box)
This tab enables you to specify whether or not to connect to an Oracle Applications server and open a specified Oracle Applications session when a record or run session begins. If you select to connect to a specific server, you can specify details that will enable UFT to automatically log on to the server each time a record or run session begins (instead of recording the log-in steps).

Chapter 17 • Oracle Add-in - Testing and Configuration
328
To access Select Record > Record and Run Settings
Note: If you do not modify the Record and Run settings before you begin recording, the Record and Run Settings dialog box opens automatically when you begin recording a new test (by clicking Record (or choosing Record > Record).
Important information
If you load only the UFT Oracle Add-in and the Web add-in, then only the Oracle, Web, and Windows Applications tabs are displayed in the Record and Run Settings dialog box. If other add-ins are loaded, the corresponding tabs (if any) are also displayed.
Relevant tasks ➤ "How to Verify or Enable the Oracle Server Unique Name Attributes" on page 320
➤ "How to Enable the Oracle Name Attribute" on page 321
➤ "How to Set Oracle Environment Variables" on page 323
➤ "How to Locate the Java Console" on page 324
➤ "How to Disable Dynamic Transformation Support" on page 325
See also ➤ "Recording Tests on Oracle Applications" on page 316
➤ "Dynamic Transformation Support" on page 318
➤ "Considerations for Working with the Oracle Add-in" on page 308

Chapter 17 • Oracle Add-in - Testing and Configuration
329
User interface elements are described below:
UI Elements Description
Record and run test on any open Oracle Application
Instructs UFT to record and run the test on any open Oracle application.
Open the following application when a record or run session begins
Instructs UFT to connect to the Oracle Applications server at the specified URL address.
Note: This setting controls only which application, if any, is opened at the beginning of a record or run session. It does not affect the applications that UFT recognizes. Even if this radio button is selected and no application is specified, UFT can still record, recognize, and run on any open Oracle application.
Address Indicates the URL of the Oracle Applications server to which you want to connect.
Auto-login Instructs UFT to log on to the specified Oracle Applications server using the specified user name and password.
Enabled only when Open the following application when a record or run session begins is selected.
The Auto-login feature works for the Java interface login only. If you log in to your Oracle applications through a Web interface, the Auto-login feature cannot be used.
User name The user name used to log on to the specified server.
Enabled only when Auto-login is selected.
Password The password for the specified user name.
Enabled only when Auto-login is selected.

Chapter 17 • Oracle Add-in - Testing and Configuration
330
Oracle Record and Run Environment Variables
You can use record and run environment variables to specify the applications you want to use for recording and running your test. These variables can also be used in external library files for automation scripts.
If you define any of these record and run environment variables, they override the values in the corresponding boxes in the Oracle tab of the Record and Run Settings dialog box. For details on the Oracle tab, see "Recording Tests on Oracle Applications" on page 316.
Use the variable names listed in the table below to define Oracle record and run variables:
Log out of the application when the test closes
Instructs UFT to log out of the Oracle Applications session specified in the Record and Run Settings dialog box when the test is closed.
Enabled only when Auto-login is selected.
Close the browser when the test closes
Instructs UFT to close the browser on which the test is recorded when the test is closed.
Enabled only when Open the following application when a record or run session begins is selected.
UI Elements Variable Name Description
Address ORACLE_URL_ENV The URL of the Oracle Applications server to which you want to connect.
Auto-login ORACLE_AUTO_LOGIN_ENV Instructs UFT to log on automatically to the Oracle Applications server.
Possible values:TrueFalse
UI Elements Description

Chapter 17 • Oracle Add-in - Testing and Configuration
331
For details on defining and working with environment variables, see the HP Unified Functional Testing User Guide.
User name ORACLE_USER_NAME_ENV The user name used to log on to the specified server.
Password ORACLE_PASSWORD_ENV The password for the specified user name.
Log out of the application when the test closes
ORACLE_LOGOUT_ENV Instructs UFT to log out of the Oracle Applications session specified in the Record and Run Settings dialog box when the test is closed.
Possible values:TrueFalse
Close the browser when the test closes
ORACLE_CLOSE_BROWSER_ENV Instructs UFT to close the browser on which the test is recorded when the test is closed.
Possible values:TrueFalse
UI Elements Variable Name Description

Chapter 17 • Oracle Add-in - Testing and Configuration
332

Part VIII
PeopleSoft Add-in

334

335
18PeopleSoft Add-in - Quick Reference
You can use the Unified Functional Testing PeopleSoft Add-in to test PeopleSoft user-interface objects (controls).
The following table summarizes basic information about the PeopleSoft Add-in and how it relates to some commonly-used aspects of UFT.
General Information
Add-in Type This is a Web-based add-in. Much of its functionality is the same as other Web-based add-ins.
See "Web-Based Application Support" on page 49.
Supported Environments
For details on supported PeopleSoft environments, see the PeopleSoft Add-in section of the HP Unified Functional Testing Product Availability Matrix, available from the UFT Help or the root folder of the Unified Functional Testing DVD.
Important Information
See "Considerations for Working with the PeopleSoft Add-in" on page 338.
Test Object Methods and Properties
The PeopleSoft Add-in provides test objects, methods, and properties that can be used when testing objects in PeopleSoft applications. For details, see the PeopleSoft section of the HP Unified Functional Testing Object Model Reference.
Checkpoints and Output Values
➤ See the sections describing checkpoints and output values in the HP Unified Functional Testing User Guide.
➤ See "GUI Checkpoints and Output Values Per Add-in" on page 695.
Troubleshooting and Limitations
See "Troubleshooting and Limitations - PeopleSoft Add-in" on page 339.

Chapter 18 • PeopleSoft Add-in - Quick Reference
336
Prerequisites
Opening Your Application
You must open UFT before opening your PeopleSoft application.
Add-in Dependencies
The Web Add-in must be loaded.
Configuration
Options Dialog Box Use the Web pane. (Make sure that a GUI test is open and select Tools > Options > GUI Testing tab > Web > General node.)
For details, see "Web > General Pane (Options Dialog Box)" on page 82.
Record and Run Settings Dialog Box(tests only)
Use the Web tab. (Record > Record and Run Settings)
See "Web Tab (Record and Run Settings Dialog Box)" on page 77.
Test Settings Dialog Box (tests only)
Use the Web pane. (File > Settings > Web node)
See "Web Pane (Test/Business Component Settings Dialog Box / Application Area - Additional Settings Pane)" on page 101.
Custom Active Screen Capture Settings Dialog Box(tests only)
Use the Web section.(Tools > Options > GUI Testing tab > Active Screen node > Custom Level)
See the section on the Custom Active Screen Capture Settings dialog box in the HP Unified Functional Testing User Guide.
Application Area Additional Settings pane(business components only)
Use the Web pane. In the application area, select Additional Settings > Web in the sidebar.
See "Web Pane (Test/Business Component Settings Dialog Box / Application Area - Additional Settings Pane)" on page 101.

Chapter 18 • PeopleSoft Add-in - Quick Reference
337
This chapter includes:
Concepts
➤ Considerations for Working with the PeopleSoft Add-in on page 338
Reference
➤ Troubleshooting and Limitations - PeopleSoft Add-in on page 339

Chapter 18 • PeopleSoft Add-in - Quick Reference
338
Concepts
Considerations for Working with the PeopleSoft Add-in
➤ When learning PSFrame objects, or Web pages containing PSFrame objects, the following child objects are automatically filtered out and are not added to the object repository:
➤ WebElement
➤ WebTable
➤ Images with type "Plain Image"
➤ Images with type "Image Link"
If you want to add an object that is automatically filtered out, you can manually add it by selecting it in the Object Selection dialog box.
➤ The PeopleSoft Add-in provides a customized PSFrame test object to identify PeopleSoft frames. The PSFrame object differs from the Web Frame object both in its test object description and its algorithm for generating object names. This customization helps make your PeopleSoft tests easy to read and maintain.
➤ The PeopleSoft Add-in identifies all other objects in your PeopleSoft application using Web test objects.
For details on PeopleSoft and Web test objects, methods, and properties, see the PeopleSoft and Web sections of the HP Unified Functional Testing Object Model Reference.
➤ For the purposes of Web event recording, UFT treats Web test objects that are child objects of a PSFrame test object as PeopleSoft objects and thus applies the settings in the PeopleSoft event configuration XML file when recording those objects.
For details on Web event recording configurations, see "Event Recording Configuration for Web-Based Applications" on page 58.

Chapter 18 • PeopleSoft Add-in - Quick Reference
339
Reference
Troubleshooting and Limitations - PeopleSoft Add-in
➤ The Active Screen may not function correctly when working with non-English UI servers.
➤ If you use the ENTER key to activate a search operation while recording a test, UFT may not perform the operation as expected during the test run.
Workaround: Activate the search by clicking the Search button with the mouse.
➤ The use of keyboard shortcut keys to perform operations while recording is not supported.

Chapter 18 • PeopleSoft Add-in - Quick Reference
340

Part IX
PowerBuilder Add-in

342

343
19PowerBuilder Add-in - Quick Reference
You can use the Unified Functional Testing PowerBuilder Add-in to test PowerBuilder user-interface objects (controls).
The following table summarizes basic information about PowerBuilder Add-in and how it relates to some commonly-used aspects of UFT.
General Information
Add-in Type This is a Windows-based add-in. Much of its functionality is the same as other Windows-based add-ins.
See "Windows-Based Application Support" on page 117.
Supported Environments
For details on supported PowerBuilder environments, see the PowerBuilder Add-in section of the HP Unified Functional Testing Product Availability Matrix, available from the UFT Help or the root folder of the hUnified Functional Testing DVD.
Important Information
See "Considerations for Working with the PowerBuilder Add-in" on page 346.
Test Object Methods and Properties
The PowerBuilder Add-in provides test objects, methods, and properties that can be used when testing objects in PowerBuilder applications. For details, see the PowerBuilder section of the HP Unified Functional Testing Object Model Reference.
Checkpoints and Output Values
➤ See the sections describing checkpoints and output values in the HP Unified Functional Testing User Guide.
➤ See "Considerations for Working with the PowerBuilder Add-in" on page 346.
➤ See "GUI Checkpoints and Output Values Per Add-in" on page 695.

Chapter 19 • PowerBuilder Add-in - Quick Reference
344
Troubleshooting and Limitations
See "Troubleshooting and Limitations - PowerBuilder Add-in" on page 348.
Prerequisites
Opening Your Application
You can open your PowerBuilder application before or after opening UFT.
Configuration
Options Dialog Box Use the Windows Applications pane.(Tools > Options > GUI Testing tab > Windows Applications node)
See "Windows Applications > General Pane (Options Dialog Box > GUI Testing Tab)" on page 136.
Record and Run Settings Dialog Box(tests only)
Use the Windows Applications tab. (Record > Record and Run Settings
See "Windows Applications Tab (Record and Run Settings Dialog Box)" on page 124.
Note: If you select the Record and Run only on radio button in the Record and Run Settings dialog box, the settings also apply to (limit) the applications that are recognized for Object Spy and other pointing hand operations.
Custom Active Screen Capture Settings Dialog Box(tests only)
Use the Windows applications section.(Tools > Options > GUI Testing tab > Active Screen node > Custom Level)
See the section on the Custom Active Screen Capture Settings dialog box in the HP Unified Functional Testing User Guide.
Application Area Additional Settings pane(business components only)
Use the Applications pane. In the application area, select Additional Settings > Applications in the sidebar.
See the section on the Applications pane in the HP Unified Functional Testing User Guide.

Chapter 19 • PowerBuilder Add-in - Quick Reference
345
This chapter includes:
Concepts
➤ Considerations for Working with the PowerBuilder Add-in on page 346
Reference
➤ Troubleshooting and Limitations - PowerBuilder Add-in on page 348

Chapter 19 • PowerBuilder Add-in - Quick Reference
346
Concepts
Considerations for Working with the PowerBuilder Add-in
The PowerBuilder Add-in provides the PbDataWindow test object with customized methods and properties to help you test PowerBuilder's DataWindow control.
➤ When you insert a checkpoint or output value step on a DataWindow control, UFT treats it as a table and opens the Table Checkpoint Properties or Table Output Value Properties dialog box (not supported for business components). It enables you to check or retrieve values for the table content and the object properties.
➤ When you insert a checkpoint or output value step on a DataWindow control during a recording session, the properties available to be checked or retrieved in the Properties tab include the DataWindow control’s inner attributes (such as DataWindow.color) in addition to the identification properties (such as enabled and focused).
The set of DataWindow inner attributes available in the dialog box is the same as the list of properties that would be returned if you run a DataWindow.Describe ("DataWindow.attributes") statement. Properties of the inner objects of the table (objects that can be retrieved using a DataWindow.Describe ("DataWindow.objects") statement) are not available in this list.

Chapter 19 • PowerBuilder Add-in - Quick Reference
347
➤ When you insert a checkpoint or output value step on a DataWindow control while editing (from the Active Screen, or on a step for which Active Screen data was captured), only the identification properties are available in the list.
For details on the DataWindow test object, see the PowerBuilder section of the HP Unified Functional Testing Object Model Reference.

Chapter 19 • PowerBuilder Add-in - Quick Reference
348
Reference
Troubleshooting and Limitations - PowerBuilder Add-in
When learning or recording on toolbars in PowerBuilder applications, UFT no longer records the PbToolbar test object. Instead, it records a PbObject.Click object. The PbToolbar test object is no longer available in UFT dialog boxes or in the documentation.
If a PbToolbar test object exists in an old object repository, it will be recognized and supported, but toolbar-specific methods such as CheckItem, GetContent, GetItem, GetItemProperty, GetItemCount, GetSelection, Press, ShowDropDown, and WaitItemProperty are not supported for this object. To fix this, update object repositories and tests to use the PbObject test object for toolbar steps.

Part X
Qt Add-in

350

351
20Qt Add-in - Quick Reference
You can use the Qt testing support provided by UFT to test user-interface objects (controls) developed using the Qt framework for mobile devices.
The following table summarizes basic information about Qt testing support and how it relates to some commonly-used aspects of UFT.
General Information
Add-in Type The Qt Add-in is a Windows-based add-in. Much of its functionality is the same as other Windows-based add-ins.
See "Windows-Based Application Support" on page 117
Important Information
"Considerations - Qt Add-in" on page 354
Test Object Methods and Properties
The Qt Add-in uses a sub-set of the standard Windows test objects, methods, and properties, which can be used when testing objects (controls) in Qt applications. For details, see the Standard Windows section of the HP Unified Functional Testing Object Model Reference.
For a list of supported Qt controls, see "Considerations - Qt Add-in" on page 354.
Checkpoints and Output Values
➤ See the sections describing checkpoints and output values in the HP Unified Functional Testing User Guide.
➤ See "GUI Checkpoints and Output Values Per Add-in" on page 695.
Prerequisites
Opening Your Application
You must open UFT before opening your Qt application.

Chapter 20 • Qt Add-in - Quick Reference
352
Add-in Dependencies
None
Low Level Recording
To enable low level recording on Qt controls, you must first modify the object identification properties list for the WinObject test object class, as follows:
➤ Add the regexpwndtitle property to the mandatory properties list.
➤ Move the object class property up the assistive properties list so that it is learned before the text property.
For details, see the section describing the Object Identification dialog box in the HP Unified Functional Testing User Guide.

Chapter 20 • Qt Add-in - Quick Reference
353
This chapter includes:
Considerations - Qt Add-in on page 354
Configuration
Options Dialog Box Use the Windows Applications pane.(Tools > Options > GUI Testing tab > Windows Applications node)
See "Windows Applications > General Pane (Options Dialog Box > GUI Testing Tab)" on page 136.
Record and Run Settings Dialog Box(tests only)
Use the Windows Applications tab.(Run > Run Settings or Record > Record Settings)
See "Windows Applications Tab (Record and Run Settings Dialog Box)" on page 124.
Note: UFT recognizes Qt objects only in applications that are opened after changing settings in the Windows Applications tab of the Record and Run Settings dialog box.
Custom Active Screen Capture Settings Dialog Box(tests only)
Use the Windows applications section.(Tools > Options > GUI Testing tab > Active Screen node > Custom Level)
See the section on the Custom Active Screen Capture Settings dialog box in the HP Unified Functional Testing User Guide.
Application Area Additional Settings tab(business components only)
Use the Applications pane. In the application area, click Additional Settings in the sidebar and select the Java node
See the section on the Applications Pane in the HP Unified Functional Testing User Guide.

Chapter 20 • Qt Add-in - Quick Reference
354
Considerations - Qt Add-in
Qt Add-in support is provided using standard Windows test objects. The following table lists each supported Qt control and its corresponding standard Windows test object.
Qt Control Standard Windows Test Object
QCheckBox WinCheckBox
QComboBox WinComboBox
QComboBoxPrivateContainer Window
QExpandingLineEdit WinEdit
QLabel Static
QLineEdit WinEdit
QListWidget WinList
QMenu Window
QMenuBar WinToolBar
QPlainTextEdit WinEditor
QPushButton WinButton
QRadioButton WinRadioButton
QSpinBox WinSpin
QTabWidget WinTab
QToolButton WinButton
QTreeWidget WinTreeView

Part XI
Add-in for SAP Solutions

356

Chapter 21 • Add-in for SAP Solutions - Overview
357
21Add-in for SAP Solutions - Overview
You can use the Unified Functional Testing Add-in for SAP Solutions to test user-interface objects (controls) in SAP GUI for Windows applications and in Web-based SAP applications. You can create and run tests and business components on these objects, and check their properties.
After you create your test or business component, you can enhance it by adding checkpoints, retrieving output values, and parameterizing values. Where relevant, you can also add SAP GUI for Windows or SAP Web objects, methods and properties to it.
This section contains:
➤ Web-Based SAP Support - Quick Reference
➤ Windows-based SAP Support - Quick Reference

Chapter 21 • Add-in for SAP Solutions - Overview
358

Chapter 22 • Web-Based SAP Support - Quick Reference
359
22Web-Based SAP Support - Quick Reference
You can use the SAP Web testing support provided with the Unified Functional Testing Add-in for SAP Solutions to test user-interface objects in Web-based SAP applications. These applications include SAP Enterprise Portal, Internet Transaction Server, SAP Customer Relationship Management (CRM), and the Interaction Centre Web Client.
The following table summarizes basic information about the Web-based SAP environment and how it relates to some commonly-used aspects of UFT.
General Information
Add-in Type Web-based SAP testing support is similar to other Web-based add-ins.
For details, see "Web-Based Application Support" on page 49.
Supported Environments
For details on supported Web-based SAP environments, see the Add-in for SAP Solutions section of the HP Unified Functional Testing Product Availability Matrix, available from the UFT Help or the root folder of the Unified Functional Testing DVD.
Note: Firefox is not supported for testing Web-based SAP environments.

Chapter 22 • Web-Based SAP Support - Quick Reference
360
Important Information
➤ Before you begin recording tests on Web-based SAP applications, you can define your required recording settings. This enables you to specify the browser on which you want UFT to record, specify any environment variables, and select the required Web options to optimize performance. For details, see "SAP Tab (Record and Run Settings Dialog Box)" on page 407.
➤ When the Unified Functional Testing Add-in for SAP Solutions is loaded, UFT can learn objects and run steps on both Web-based (requires the Web Add-in, too) and Windows-based SAP applications.
➤ For details on recording and running tests and business components on SAP GUI for Windows applications, see "Low-Level or Analog Mode Recording on SAP GUI for Windows" on page 397 and "How to Record on Standard Windows Controls During an SAP GUI for Windows Recording Session" on page 406.
➤ For details on working with SAP GUI from HTML, see "Considerations for Working with SAP GUI for HTML" on page 366.
Test Object Methods and Properties
The Add-in for SAP Solutions provides test objects, methods, and properties that can be used when testing objects in Web-based SAP applications. For details, see the SAP Web section of the HP Unified Functional Testing Object Model Reference.
Checkpoints and Output Values
➤ See the sections describing checkpoints and output values in the HP Unified Functional Testing User Guide.
➤ See "Considerations for Working with SAP GUI for HTML" on page 366.
➤ See "GUI Checkpoints and Output Values Per Add-in" on page 695.
Troubleshooting and Limitations
See "Troubleshooting and Limitations - Web-based SAP" on page 362.

Chapter 22 • Web-Based SAP Support - Quick Reference
361
Prerequisites
Opening Your Application
➤ Open UFT before you open your Web-based SAP application.
➤ If you are working in an SAP GUI application that contains HTML objects, you can log on to your application before opening UFT, but you must open UFT before navigating to the transaction containing any HTML objects.
➤ For SAP GUI for HTML, Interaction Centre Web Client (ICWC) applications, and Customer Relationship Management (CRM) applications, confirm that your SAP server and client are configured properly.
See "How to Enable Support for SAP GUI for Windows" on page 399.
Add-in Dependencies
The Web Add-in must be loaded.
Configuration
Options Dialog Box Use the Web pane.(Make sure that a GUI test is open and select Tools > Options > GUI Testing tab > Web > General node.)
See "Web-Based SAP Support - Testing and Configuration" on page 365.
Record and Run Settings Dialog Box(tests only)
➤ Use the SAP tab (Record > Record and Run Settings) to connect to the SAP GUI Client for SAP GUI for HTML or Interaction Centre Web Client (ICWC) applications. This is because ICWC opens from inside the SAP GUI Client.
See "How to Enable Support for SAP GUI for Windows" on page 399.
➤ Use the Web tab (Record > Record Settings) to instruct UFT to use a specific URL and browser to open a Web-based SAP application, or the SAP Enterprise Portal, at the beginning of each record and run session. Alternatively, you can instruct UFT to record and run on any open browser.
See "Web Tab (Record and Run Settings Dialog Box)" on page 77.

Chapter 22 • Web-Based SAP Support - Quick Reference
362
This chapter includes:
➤ Troubleshooting and Limitations - Web-based SAP on page 362
Troubleshooting and Limitations - Web-based SAP
This section contains general troubleshooting and limitation information about the Web-based SAP add-in, and includes the following sections:
➤ "General" on page 363
➤ "SAP Enterprise Portal" on page 363
➤ "SAP GUI for HTML—Internet Transaction Server (ITS)" on page 363
➤ "Using the Active Screen " on page 364
Test Settings Dialog Box (tests only)
Use the Web pane. (File > Settings > Web node)
See "Web Pane (Test/Business Component Settings Dialog Box / Application Area - Additional Settings Pane)" on page 101.
Custom Active Screen Capture Settings Dialog Box(tests only)
Use the Web section.(Tools > Options > GUI Testing tab > Active Screen node > Custom Level button)
See the section on the Custom Active Screen Capture Settings dialog box in the HP Unified Functional Testing User Guide.
Application Area Additional Settings pane(business components only)
Use the Web pane. In the application area, select Additional Settings > Web in the sidebar.
See "Web Pane (Test/Business Component Settings Dialog Box / Application Area - Additional Settings Pane)" on page 101.
Web Event Recording Configuration Dialog Box
When you load the Add-in for SAP Solutions, the settings in the Web Event Recording Configuration dialog box (Record > Web Event Recording Configuration) are automatically customized. You do not need to make any Web event configuration changes.
Chapter 22 • Web-Based SAP Support - Quick Reference
363
General
➤ It is not recommended to work with other Web-based add-ins when the Unified Functional Testing Add-in for SAP Solutions is loaded. The Add-in for SAP Solutions modifies certain Web configuration settings that may affect other add-ins or applications.
SAP Enterprise Portal
➤ Operations on the iView option menu and on objects within the page title bar of SAP Enterprise Portal are recorded as Web operations on the Frame object and not as SAP operations on the iView object.
➤ Minimized or collapsed iViews may not be recognized correctly.
➤ In some cases, when more than one browser is open during the test run, UFT is unable to correctly identify certain objects.
Workaround: Clear the Enable Smart Identification check box for the Browser test objects in the Object Repository window. You may also want to disable the Enable Smart Identification option for Browser test objects in the Object Identification dialog box for future test recording.
➤ In some cases, a frame in SAP Enterprise Portal may be recognized as a Web Frame object instead of an iView object. In some of these, the frame name is generated dynamically. Because the Web Frame object uses the name property to identify the object, you must modify the recorded name value to use an appropriate regular expression so that UFT will be able to recognize it during the test run.
SAP GUI for HTML—Internet Transaction Server (ITS)
➤ When using the Object Spy or creating a checkpoint on an object inside an SAP Web table cell, UFT may recognize the object as a WebElement (and not as the appropriate SAP Web object), if a click has not yet been performed on the object.
Workaround: Click on the object inside the SAP Web table cell before using the Object Spy or creating a checkpoint on it.

Chapter 22 • Web-Based SAP Support - Quick Reference
364
➤ Dragging the SAP GUI for HTML table scroll bar is not recorded.
Workaround: You can record scrolling in SAP GUI for HTML tables by clicking the scroll button. Alternatively, use the Step Generator or Editor to insert a SAPTable.Object.DoScroll("up") or SAPTable.Object.DoScroll("down") statement in your test.
➤ The appearance of toolbar buttons may differ, and toolbar buttons may or may not be displayed, depending on the size of your browser window.
Workaround: Try to maintain the same browser window size and the resulting menu appearance when recording and running your test.
➤ When running a test on an ITS frame in an SAP Enterprise Portal iView, the ITS menu sometimes fails to operate properly.
Workaround: Enlarge the iView size and/or increase the Object Synchronization Timeout and then run the test again.
➤ When recording a SAPList object, you need to click the input part of the list, not its button part in order to enable UFT to recognize the object.
Using the Active Screen
➤ The Active Screen may not display the entire HTML page captured while recording your test.
Workaround: Resize the Active Screen so that it best fits the HTML page size.
➤ When testing an SAP Enterprise Portal application, it is recommended to set advanced authentication for Active Screen access (File > Settings > Web).
➤ Avoid using an Active Screen that was captured when a pop-up dialog was open to add an object from the main window to the object repository. Doing this results in an incorrect object hierarchy in the object repository.
Web-based CRM Systems
➤ When using UFT to test Web-based CRM systems, make sure that the CRM system is in test mode. You can do this by adding "?sap-testmode=X" to the URL.

Chapter 23 • Web-Based SAP Support - Testing and Configuration
365
23Web-Based SAP Support - Testing and Configuration
This chapter includes:
Concepts
➤ Considerations for Working with SAP GUI for HTML on page 366
Reference
➤ Web > Page/Frame Options Pane (Options Dialog Box > GUI Testing Tab) on page 367
➤ Web > Advanced Pane (Options Dialog Box > GUI Testing Tab) on page 369

Chapter 23 • Web-Based SAP Support - Testing and Configuration
366
Concepts
Considerations for Working with SAP GUI for HTML
➤ You can add a table checkpoint while recording or editing your test.
➤ If a table has a column header row, it is counted as the first row in the table.
➤ If you have not recorded a step on the table object you want to check, but you have an Active Screen capture that displays the table object, you can add a table checkpoint if the Active Screen Capture level was set to Complete when the object was captured, and the Active Screen is currently selected (View > Active Screen).
(You set the Capture level in the Active Screen pane of the Options dialog box (Tools > Options > GUI Testing tab > Active Screen node). For details, see the section on Active Screen options in the HP Unified Functional Testing User Guide.)
➤ You can spool all of the available data from an SAP GUI for HTML application table into an external file using the GetCellData method, which loops through each cell in the table. You can then save the information to an external file.
The following example uses the GetCellData method to list the data of each cell in a table of 10 rows and 10 columns:
For details on the GetCellData method, see the SAP Web section of the HP Unified Functional Testing Object Model Reference.
For i=1 to 10For j=1 to 10
Dat=Browser("ITS System Informati").Page("Table control").SAPTable("MySAPTable").GetCellData (i, j)‘Enter lines of code that use the value of the returned Dat variable
NextNext

Chapter 23 • Web-Based SAP Support - Testing and Configuration
367
Reference
Web > Page/Frame Options Pane (Options Dialog Box > GUI Testing Tab)
This pane enables you to configure the settings that are best-suited for testing Page and Frame test objects in Web-based SAP applications. Applying these recommended settings helps to optimize UFT performance.

Chapter 23 • Web-Based SAP Support - Testing and Configuration
368
Recommended settings are described below:
To access 1 Make sure that a GUI test is open.
2 Select Tools > Options > GUI Testing tab > Web node > Page/Frame Options node.
See also ➤ "Web-Based SAP Support - Quick Reference" on page 359
➤ "Web > Advanced Pane (Options Dialog Box > GUI Testing Tab)" on page 369
➤ "Web > Page/Frame Options Pane (Options Dialog Box)" on page 88
UI Elements Description
Create a new Page test object for
Different URLs or a change in data transfer
Instructs UFT to create a new Page object only when the page URL changes, or if the URL stays the same and data that is transferred to the server changes, according to the data types and transfer methods you select.
Make sure that only the following check boxes are selected:
➤ Ignore user-input data - Get
➤ Ignore user-input data - Post
➤ Ignore additional Page information
Create a new Frame test object for
Different URLs or a change in data transfer
Note: This option is selected by default.
Instructs UFT to create a new Frame object only when the page URL changes, or if the URL stays the same and data that is transferred to the server changes, according to the data types and transfer methods you select.
Make sure that all of the check boxes in this section are selected.

Chapter 23 • Web-Based SAP Support - Testing and Configuration
369
Web > Advanced Pane (Options Dialog Box > GUI Testing Tab)
This pane enables you to configure the advanced settings that are best-suited for testing Web-based SAP applications. Applying these recommended settings helps to optimize UFT performance.
To access 1 Make sure that a GUI test is open.
2 Select Tools > Options > GUI Testing tab > Web node > Advanced node.
See also ➤ "Web-Based SAP Support - Quick Reference" on page 359
➤ "Web > Page/Frame Options Pane (Options Dialog Box > GUI Testing Tab)" on page 367
➤ "Web > Advanced Pane (Options Dialog Box)" on page 92
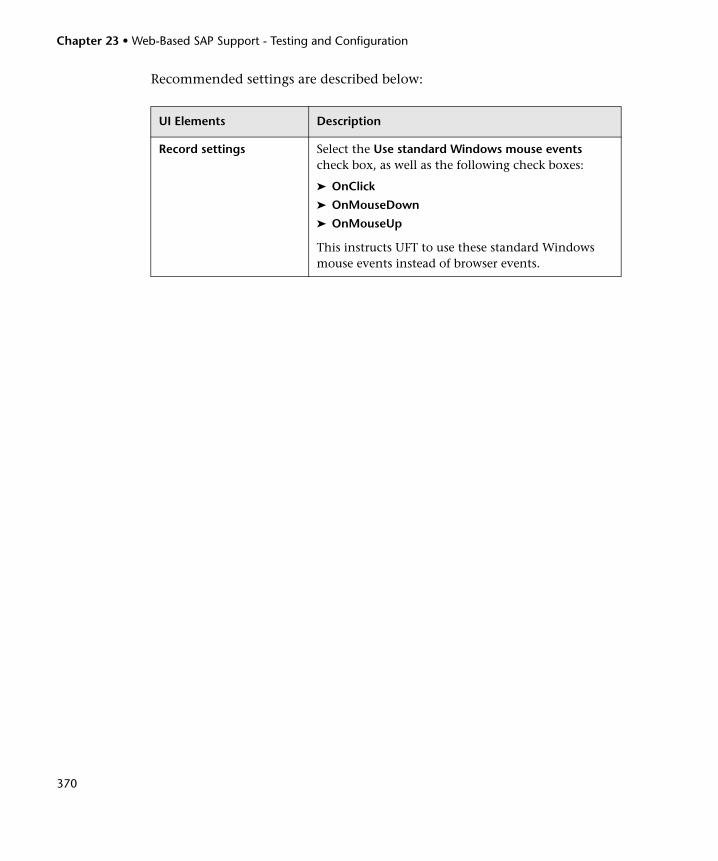
Chapter 23 • Web-Based SAP Support - Testing and Configuration
370
Recommended settings are described below:
UI Elements Description
Record settings Select the Use standard Windows mouse events check box, as well as the following check boxes:
➤ OnClick
➤ OnMouseDown
➤ OnMouseUp
This instructs UFT to use these standard Windows mouse events instead of browser events.

Chapter 24 • Windows-based SAP Support - Quick Reference
371
24Windows-based SAP Support - Quick Reference
You can use the Windows-based SAP testing support provided with the Unified Functional Testing Add-in for SAP Solutions to test user-interface objects in SAP GUI for Windows user-interface objects.
The following table summarizes basic information about the Windows-based SAP environment and how it relates to some commonly-used aspects of UFT.
General Information
Add-in Type When testing SAP GUI for Windows applications, much of the functionality is the same as other Windows-based add-ins.
See "Windows-Based Application Support" on page 117.
Supported Environments
For details on supported Windows-based SAP environments, see the Add-in for SAP Solutions section of the HP Unified Functional Testing Product Availability Matrix, available from the UFT Help or the root folder of the Unified Functional Testing DVD.
Important Information
When the Add-in for SAP Solutions is loaded, UFT can learn objects and run steps on both Web-based and Windows-based SAP applications. For details on recording and running tests and business components on Web-based SAP applications, see "Web-Based SAP Support - Testing and Configuration" on page 365.

Chapter 24 • Windows-based SAP Support - Quick Reference
372
Test Object Methods and Properties
The Add-in for SAP Solutions provides test objects, methods, and properties that can be used when testing objects in SAP GUI for Windows applications. For details, see the SAP GUI for Windows section of the HP Unified Functional Testing Object Model Reference.
Checkpoints and Output Values
➤ See the sections describing checkpoints and output values in the HP Unified Functional Testing User Guide.
➤ See "Checkpoints and Output Values in SAP GUI for Windows" on page 375.
➤ See "GUI Checkpoints and Output Values Per Add-in" on page 695.
Troubleshooting and Limitations
See "Troubleshooting and Limitations - Windows-based SAP" on page 377
Prerequisites
Before Using this Add-in
For details on the following prerequisites, see "How to Enable Support for SAP GUI for Windows" on page 399.
➤ The SAP GUI Scripting option must be installed.
➤ Your server and client must have the proper package and patch versions installed. For details, see "Package and Patch Versions Requirements - SAP Application Server and SAP GUI for Windows" on page 377.See also: SAP OSS note # 480149
➤ The Scripting API must be enabled on both the server and client. For details, see "Enable scripting on the SAP application (server-side)" on page 399.
➤ Your client must be configured to use the Dialog display mode for F4 Help screens.
➤ Make sure that the server is not set to use a Low speed connection.
➤ The F1 and F4 Help display setting must be configured correctly to support testing the use of the F1 and F4 Help screens in your SAP GUI for Windows application.
➤ If you plan to use the UFT-Solution Manager integration features, you must also install the appropriate support package and configure the Solution Manager server to work with UFT. For details, see "How to Configure Solution Manager to Work with UFT" on page 425.

Chapter 24 • Windows-based SAP Support - Quick Reference
373
This chapter includes:
Concepts
➤ Considerations - Windows-based SAP Add-in for SAP Solutions on page 374
➤ Checkpoints and Output Values in SAP GUI for Windows on page 375
Reference
➤ Package and Patch Versions Requirements - SAP Application Server and SAP GUI for Windows on page 377
➤ Troubleshooting and Limitations - Windows-based SAP on page 377
Add-in Dependencies
None
Configuration
Options Dialog Box Use the SAP > General pane. (Tools > Options > GUI Testing tab > SAP > General node)
See "SAP > General Pane (Options Dialog Box > GUI Testing Tab)" on page 412.
Record and Run Settings Dialog Box(tests only)
Use the SAP tab. (Record > Record and Run Settings)
See "SAP Tab (Record and Run Settings Dialog Box)" on page 407.
Custom Active Screen Capture Settings Dialog Box(tests only)
Use the SAP GUI for Windows section.(Tools > Options > GUI Testing tab > Active Screen node > Custom Level button)
See the section on the Custom Active Screen Capture Settings dialog box in the HP Unified Functional Testing User Guide.
Application Area Additional Settings pane(business components only)
Use the Applications pane. In the application area, select Additional Settings > Applications in the sidebar.
See the section on the Applications pane in the HP Unified Functional Testing User Guide.

Chapter 24 • Windows-based SAP Support - Quick Reference
374
Concepts
Considerations - Windows-based SAP Add-in for SAP Solutions
When recording and running tests or business components on SAP GUI for Windows applications, consider the following:
➤ When working in tests, the Record and Run Settings dialog box in UFT enables you to specify a server and client to open at the beginning of every test record and run session. The servers available in the dialog box are the same as those available in the SAP Logon Pad and SAP Logon dialog box.
➤ When you record a business component on an SAP GUI for Windows session, the Record and Run Settings dialog box is not available. Instead, you need to open the SAP session manually or include statements in your business component that connect to the SAP server (using the SAPGuiUtil test object).
➤ You can also record specific operations in your SAP GUI for Windows Application in Standard Windows Recording mode, if required. For details, see "How to Record on Standard Windows Controls During an SAP GUI for Windows Recording Session" on page 406.
➤ As you record a test or business component on your SAP GUI for Windows application, UFT records the operations you perform. UFT works directly with the SAP GUI Scripting API to record your operations. Therefore, although UFT records a step for each operation you perform, it adds the steps to your test only when API events are sent to UFT (when information is sent to the SAP server).
For details on the SAP GUI Scripting API events, see your SAP documentation.

Chapter 24 • Windows-based SAP Support - Quick Reference
375
➤ When you select a test step in UFT, the corresponding object is highlighted in the Active Screen (unless you chose not to capture Active Screen information when you recorded your test). However, the values of the object properties stored with the Active Screen are the values of the properties at the time that the steps were added to the test (when you performed the step that sent information to the SAP server). These values may potentially be different from the values of the properties at the time that the selected step was actually performed. For details on Active Screen capture levels, see the section on the Custom Active Screen Capture Settings dialog box in the HP Unified Functional Testing User Guide.
Checkpoints and Output Values in SAP GUI for Windows
➤ When inserting a table checkpoint (tests only), consider how other steps performed on the table may affect the checkpoint.
Example 1: If you have a step in your test that clicks the Total toolbar button on a grid control, that click refreshes all data in the table. The refresh could potentially cause a table checkpoint on a cell in the table to fail.
Example 2: If you click a toolbar button in a grid control that adds rows to your table before creating a table checkpoint, the extra rows are captured as part of the grid checkpoint (if you capture all rows). Therefore, confirm that the same rows are displayed during the run session.
➤ To insert a new table checkpoint while editing your test or business component, the actual table or grid must be open to the appropriate level or view. This is true even if your Active Screen (tests only) contains a capture of the table or grid.
➤ In general, it is not necessary to open the table or grid in the application to edit an existing checkpoint. However, if you want to modify the row range for the checkpoint, the actual table or grid must be open to the appropriate level or view.

Chapter 24 • Windows-based SAP Support - Quick Reference
376
➤ When creating a checkpoint on ActiveX grid controls (these generally have toolbars), UFT captures the data from all columns and all rows in the grid in the table checkpoint. If you do not need to check data from all rows in your grid, you can specify the rows you want to include in the checkpoint in the Define Row Range dialog box. You can also increase or decrease the number of rows included in the checkpoint at a later time.
➤ The Visible Rows option in the Define/Modify Row Range dialog box is not available for checkpoints created on grid controls.

Chapter 24 • Windows-based SAP Support - Quick Reference
377
Reference
Package and Patch Versions Requirements - SAP Application Server and SAP GUI for Windows
To test your application using UFT, you must confirm that you have the correct support package and kernel patch levels for your software component release. The following tables show the minimum required versions and levels. You must have these versions and levels or higher:
For details, see SAP OSS note # 480149.
Troubleshooting and Limitations - Windows-based SAP
This section contains general troubleshooting and limitation information about the Windows-based SAP add-in, and includes the following sections:
➤ "Creating and Running Testing Documents" on page 378
➤ "Working with Windows-based SAP Controls" on page 379
Software Component
Release Support Package Kernel Patch Level
SAP_APPL 31I SAPKH31I96 Kernel 3.1I level 650
SAP_APPL 40B SAPKH40B71 Kernel 4.0B level 903
SAP_APPL 45B SAPKH45B49 Kernel 4.5B level 753
SAP_BASIS 46B SAPKB46B37 Kernel 4.6D level 948
SAP_BASIS 46C SAPKB46C29 Kernel 4.6D level 948
SAP_BASIS 46D SAPKB46D17 Kernel 4.6D level 948
SAP_BASIS 610 SAPKB61012 Kernel 6.10 level 360

Chapter 24 • Windows-based SAP Support - Quick Reference
378
➤ "Checkpoints, Output Values, and the Object Spy" on page 380
➤ "Test Objects, Methods, and Properties" on page 381
➤ "Using the Active Screen" on page 382
➤ "SAP Scripting API" on page 382
Creating and Running Testing Documents
➤ Running a test on HTML elements embedded in an SAP GUI for Windows application may result in an "Object is disabled" error. This may happen if the HTML control is not ready for the test run.
Workaround: Add a Sync statement such as SAPGuiSession.Sync or a Wait statement to the script in order to run the test successfully.
➤ By default, the recording and running of steps on HTML elements embedded in an SAP GUI for Windows application is performed using the UFT Web Add-in. In some cases, steps recorded using the Web Add-in are inserted into the script before SAP Add-in steps that use the SAP Scripting API.
Workaround: Use the option of recording HTML elements embedded in SAP GUI application using the SAP Scripting Interface. To do so, stop recording, select the Record HTML elements using SAPGui Scripting interface check box in the SAP pane of the Options dialog box (Tools > Options > GUI Testing tab > SAP > General node). Then close and reopen the test and then begin recording again.
➤ If you insert a call to an external action or a copy of an action, and that action includes an SAPGuiTable.Input, SAPGuiGrid.Input, or SAPGuiAPOGrid.Input statement, the corresponding input data sheet is not copied to the Data pane with the action.
Workaround: Insert and run Datatable.AddSheet and Datatable.ImportSheet statements to import the sheet referenced by the action’s Input method. Ensure that the name of the data sheet exactly matches the name specified in the corresponding Input statement.

Chapter 24 • Windows-based SAP Support - Quick Reference
379
➤ In the SAP Enterprise Portal environment, occasional synchronization problems may occur during the test run when alternating between SAP Web and SAP Windows environments.
Workaround: Add a WaitProperty or Wait statement between the Web steps and the Windows steps.
➤ UFT can connect to your SAP Logon or SAP Logon Pad application for recording and running tests on SAP GUI for Windows sessions. If you use both SAP Logon and SAP Logon Pad processes on your computer, UFT connects to the latest process that was launched.
➤ Use the SAP tab of the Record and Run Settings dialog box to instruct UFT to open your SAP GUI for Windows application. Do not use the Windows Applications tab of the dialog box for this purpose.
Working with Windows-based SAP Controls
➤ Separate toolbar controls (ones that are not part of a grid or other object) are supported by the SapGuiToolbar test object (GuiComponentType is 202), and the Object Spy recognizes them because they are separate objects.
Note that tree controls do not have associated toolbars. Toolbars displayed on top of tree controls are recognized as separate toolbars, and are therefore supported as described above.
➤ Toolbars inside grid controls are supported by the SapGuiToolbar test object (GuiComponentType is 204). However, the Object Spy does not recognize these toolbars because they are part of the grid. You cannot add these toolbars to the object repository using the Add to repository option from the Active Screen or the Add Objects option in the Object Repository window. To add these toolbars to the object repository, record on them.
➤ Toolbars inside other controls (such as a toolbar within a text area control) are not supported.
➤ Microsoft Office controls within the SAP window are not supported.
➤ If you record the step of pressing an F4 key, and that key press results in setting new values for multiple fields, a step is recorded only for the field from which the F4 key was pressed, and therefore, only that field will be populated during the run.

Chapter 24 • Windows-based SAP Support - Quick Reference
380
➤ The SAP Editor control is not supported.
➤ UFT fails to run steps on SAP tree nodes that contain the ";" character.
➤ UFT does not automatically record standard Windows dialog boxes used by your SAP GUI for Windows application (such as the Open File and Save As dialog boxes). This is because the SAP scripting API does not support these dialog boxes. This may also occur when using SAP GUI for Windows with GuiXT.
Workaround: Do one of the following:
➤ Change to Standard Windows Recording mode (select Standard Windows Recording from the Recording Modes drop-down in the Record toolbar) to record on these objects. (Make sure that you switch to Standard Windows Recording mode before you perform the operation that opens the standard Windows control in your SAP application.)
➤ Use low-level recording to record on these objects.
➤ Use programmatic descriptions to run steps on these objects.
Checkpoints, Output Values, and the Object Spy
➤ To ensure that the correct object properties are captured with your checkpoint, always record a step that results in communication with the server (such as pressing ENTER) before inserting a checkpoint or output value.
➤ You cannot use the Object Spy or create checkpoints for the controls listed below. However, you can successfully record and run steps on them.
➤ Toolbar buttons in grid controls.
➤ Internal controls in tree or table objects.(For example, a radio button in a table cell or a check box in a tree.)
➤ Creating checkpoints or using the Object Spy on an object that is located in a currently inactive SAP screen (for example, if the screen is behind an invoked dialog box) is not supported. However, you can create checkpoints on status bar messages (displayed in an inactive window) using the Record status bar messages option (Tools > Options > GUI Testing tab > SAP node > Record status bar messages).
Chapter 24 • Windows-based SAP Support - Quick Reference
381
➤ When running old 6.20 tests on a 6.40 client, checkpoints on radio buttons, check boxes, edit boxes, or regular buttons may fail due to changes to tooltip property values for these objects in the 6.40 client.
➤ UFT can estimate the number of rows in a table control, but it cannot retrieve the exact number because only the table content that is visible on the client is actually available. Data from non-visible rows are stored only on the back-end server. Therefore, when inserting or modifying checkpoints for a table control object, the number of rows specified in the Define/Modify Row Range dialog box may not be accurate.
➤ Do not perform any operations on the SAP GUI window (such as changing the transaction state or navigating to another window) while UFT retrieves the data for a table checkpoint even if it seems to take a long time, as this may cause severe problems.
➤ When inserting a checkpoint on a table or grid from the Active Screen, the actual table must be open in your SAP Gui for Windows application to extract the correct information from the table or grid.
Test Objects, Methods, and Properties
➤ When using the SAPGuiTable Input method, check the scrolling mode of the current table. If you parameterize a table with a Data pane sheet that contains more rows in the sheet than are displayed in the table’s current view, UFT tries to scroll down the table while running the test, to insert more rows from the data sheet. UFT supports two ways of scrolling rows in tables—by pressing the ENTER key, or by pressing the PAGEDOWN key. By default, the Add-in for SAP Solutions tries PAGEDOWN if needed. You can configure the required mode using the second argument of the Input method.
For details, see the HP Unified Functional Testing Add-ins Guide.
➤ Right-click operations are not supported for the SAPGuiTextArea object.
➤ Drag-and-drop operations in the SAP Gui for Windows application are disabled when UFT is open.

Chapter 24 • Windows-based SAP Support - Quick Reference
382
Using the Active Screen
➤ Active Screen images are based on captured screen bitmaps. Therefore, objects that are not visible in the SAP GUI for Windows view are not part of the Active Screen image. You cannot add objects to the script from the Active Screen if they were not in the captured view.
➤ Drop-down menus are not captured in the Active Screen. Active Screen technology captures the data after the menu is closed and the menu item is selected.
➤ While recording, UFT captures one Active Screen image for several steps. UFT records steps only when the SAP GUI for Windows client sends information to the SAP back-end server. When this occurs, all steps that were performed between the previous communication and the current one are added to the script. The last screen that was sent to the server is captured by the Active Screen for all steps recorded during that communication.
➤ When recording on Web elements inside SAP GUI for Windows applications, HTML images are not captured.
➤ Adding objects to the object repository (using the View/Add Object option, or creating checkpoint or output value steps) from an Active Screen created from a step recorded on a Web element inside a SAP GUI for Windows application generates an incorrect object hierarchy in the object repository.
SAP Scripting API
➤ For security reasons, the SAP scripting API prevents the recording of passwords. When you record the operation of inserting a password in a password box, UFT records a Set statement using asterisks (****) as the method argument value.
Workaround: Do one of the following:
➤ Configure and enable the Auto-logon settings in the SAP tab of the Record and Run Settings dialog box.
➤ Insert a step using one of the SAPGuiUtil object’s AutoLogon methods.

Chapter 24 • Windows-based SAP Support - Quick Reference
383
➤ Record the password normally during the recording session. After the recording session, modify the password step to use the SetSecure method, and enter the encrypted password value or parameterize the value.
For details, see the SAP Windows section of the HP Unified Functional Testing Object Model Reference (Help > HP Unified Functional Testing Help > Object Model Reference for GUI Testing > SAP Windows).

Chapter 24 • Windows-based SAP Support - Quick Reference
384
Chapter 25 • Windows-based SAP Support - Testing and Configuration
385
25Windows-based SAP Support - Testing and Configuration
This chapter includes:
Concepts
➤ SAP GUI Scripting API and UFT on page 386
➤ Using the Auto-Parameterize Option to Parameterize Table and Grid Cell Values on page 389
➤ Low-Level or Analog Mode Recording on SAP GUI for Windows on page 397
➤ Spooling Data from a Table on page 398
Tasks
➤ How to Enable Support for SAP GUI for Windows on page 399
➤ How to Record on Standard Windows Controls During an SAP GUI for Windows Recording Session on page 406
Reference
➤ SAP Tab (Record and Run Settings Dialog Box) on page 407
➤ Environment Variables for Windows-based SAP Applications on page 411
➤ SAP > General Pane (Options Dialog Box > GUI Testing Tab) on page 412
Chapter 25 • Windows-based SAP Support - Testing and Configuration
386
Concepts
SAP GUI Scripting API and UFT
UFT works directly with the SAP GUI Scripting API to record your operations. Therefore, UFT adds steps to your test or business component only when API events are sent to the server. This means that while recording a test or business component, you may perform several operations on your application before the corresponding steps are added. When you perform a step that sends information to the server, UFT inserts steps with the relevant Windows-based SAP objects in the Keyword View (tests and business components) and adds corresponding statements in the Editor (tests only).
Note: The Unified Functional Testing Add-in for SAP Solutions provides an alternative recording mechanism for specific SAP GUI for Windows objects that do not have built-in test object support. For details, see "Low-Level or Analog Mode Recording on SAP GUI for Windows" on page 397.
For details on the test object model, the object repository, and the Object Spy, see the HP Unified Functional Testing User Guide.

Chapter 25 • Windows-based SAP Support - Testing and Configuration
387
Example 1: Check Boxes
Suppose you record the steps of filling in a Price Simulation for Material form. You select the three check boxes in the form (Incl. cash discount, Delivery costs, and Effective price) and click Continue. When you click the Continue button, information is sent to the SAP server, and the steps in which you select the check boxes and click the Continue button are added to your test at once. In the Keyword View, the process described above is displayed as follows.
UFT records these steps in the Editor as follows:
SAPGuiSession("Session").SAPGuiWindow("Price Simulation for Material").SAPGuiCheckBox("Incl. cash discount").Set "ON"
SAPGuiSession("Session").SAPGuiWindow("Price Simulation for Material").SAPGuiCheckBox("Delivery costs").Set "ON"
SAPGuiSession("Session").SAPGuiWindow("Price Simulation for Material").SAPGuiCheckBox("Effective price").Set "ON"
SAPGuiSession("Session").SAPGuiWindow("Price Simulation for Material").SAPGuiCheckBox("Effective price").SetFocus
SAPGuiSession("Session").SAPGuiWindow("Price Simulation for Material").SAPGuiButton("Continue (Enter)").Click

Chapter 25 • Windows-based SAP Support - Testing and Configuration
388
Example 2: Radio Buttons
Suppose you select a radio button in the My worklist tab of your SAP GUI for Windows application. This radio button is labeled In my role as....
UFT uses the SAP GUI business component type (41) to identify the object as an SAPGuiRadioButton object. It creates an SAPGuiRadioButton test object with the name In my role as... and records the following properties and values as the description for the radio button.
Note: The guicomponenttype and name property values are supplied by the SAP GUI Scripting API.
UFT also records that you performed a Set method to turn ON the radio button.
UFT displays your step in the Keyword View as follows:

Chapter 25 • Windows-based SAP Support - Testing and Configuration
389
UFT displays your step in the Editor like this:
When you run a test or business component, UFT identifies each object in your application by its test object class and its description—the set of identification properties and values used to uniquely identify the object. In the above example, during the run session, UFT looks up the description for the SAPGuiRadioButton object with the name In my role as... by searching the object repository. UFT finds the following description:
guicomponenttype = 41name = MEL_ROLtext = In my role as...
UFT then looks in the application for an SAPGuiRadioButton object that matches the above description. When it finds the object, it performs the Set method on it to change the value of the field to ON (selects the radio button).
Using the Auto-Parameterize Option to Parameterize Table and Grid Cell Values
When working with tests, UFT records a SetCellData statement, by default, each time you modify the value of a cell in a table or grid. If you want to modify the values of several cells in a single table or grid, and then parameterize your test so that different values are entered into the cells each time your test action runs, you can do this by parameterizing each statement individually, or by enabling the Auto-parameterize table and grid controls option.
SAPGuiSession("Session").SAPGuiWindow("Worklist: Notifications").SAPGuiRadioButton("In my role as...").Set

Chapter 25 • Windows-based SAP Support - Testing and Configuration
390
When this option is selected, UFT automatically captures all values you set for a particular table or grid during a recording session and stores them in a special data sheet in the Data pane. UFT inserts a single SAPGuiTable.Input, SAPGuiGrid.Input, or SAPGuiAPOGrid.Input statement into your test, which refers to this new data sheet. Before running the test, you can easily modify the values or add additional sets of data to the data sheet for each action iteration.
How UFT Records in Auto-Parameterize ModeIn tests, when you record with the Auto-parameterize table and grid controls option and you perform an operation that sends data to the SAP server after setting table or grid cell values, UFT:
➤ Creates a new data sheet to represent the table or grid. Each data sheet is a sub-sheet of the action in which the table or grid operations were recorded. The data sheet name is always the action name followed by a period (.) and the internal name of the table or grid. For example: Action1.FLIGHT_TABLE
➤ Adds a column to the data sheet for each table or grid column in which you record. (Columns in which you did not set any cell data are not added to the data sheet.)
The name of the column in the data sheet is generally the same as the name of the column in your application.
If a column in the application does not have a header, or more than one column header has the same name, UFT inserts a column with a name in the format: _ _<index>, where <index> represents the column number according to its location when you record the Input step.
➤ Inserts the values you set during the recording session into the appropriate cells in the data sheet. Each row in which you entered data is represented by a row in the data sheet. Place-holder (empty) rows are added for rows above the rows in which you recorded. For example, if you set data in rows 2, 4, and 7, seven rows are added to the data sheet. The cells in rows 1, 3, 5, and 6 do not contain any data.

Chapter 25 • Windows-based SAP Support - Testing and Configuration
391
➤ Inserts an additional end row where the value of the first cell in the row is .END.
➤ Inserts an Input DataSheetName statement (followed by a SelectCell statement) into your test.
UFT records these steps in the Editor as follows:
The Input statement instructs UFT to enter values from the data sheet into the table or grid corresponding to the data sheet name, similar to an automatically parameterized statement referring to a special sheet in the Data pane.
SAPGuiSession("Session").SAPGuiWindow("SAP").SAPGuiTable("Table control tc spfli").Input "Action1.Table control tc spfli_3"
SAPGuiSession("Session").SAPGuiWindow("SAP").SAPGuiTable("Table control tc spfli").SelectCell 1,"Airline"
SAPGuiSession("Session").SAPGuiWindow("SAP").SendKey ENTER

Chapter 25 • Windows-based SAP Support - Testing and Configuration
392
Suppose you update values in a table control containing airline flight information. You update some airline codes, add state and country names to some of the departure and destination cities, update one of the destination airport codes, and update some of the departure times. The edited table in your application may look something like this:
UFT inserts the following Input statement in your test to represent the data input:
Note: If you record on a table or grid that scrolls using the ENTER key rather than the PAGEDOWN key, you may need to manually add the ScrollMethod optional argument. For details, see "Data in Rows that Require Scrolling" on page 396.
SAPGuiSession("Session").SAPGuiWindow("SAP R/3").SAPGuiTable("SPFLI").Input "Action1.SPFLI"

Chapter 25 • Windows-based SAP Support - Testing and Configuration
393
The corresponding data sheet in your Data pane looks like this:
There are six rows in the data sheet, because data was modified in the first six rows of the table or grid in the application. Note that the data sheet does not contain columns for the Flight Number and Flight time columns, because no values were modified in those columns during the recording session.
Parameterized Cell Values in the Input Data SheetWhen working in tests, after you record an Input statement to create an input data sheet, you can modify the values to be used in the run session, and you can create multiple sets of table or grid cell data to be used in different iterations of an action.
As described above, when you record the Input statement, UFT records the values you set in the appropriate rows and columns in the input data sheet for that table or grid. Below the data it adds an end row (shaded in blue) with the text .END in the first cell of the row. This row indicates the end of the first set of data for the table or grid. This set of data and its corresponding end row represents a single data set.
To supply different data values for each action iteration, you add new data sets. You add a new data set for a table or grid by entering the values in the appropriate rows and columns below the previous end row. To indicate the end of the new data set, copy and paste the end row from the first set of data to the row below the new set of data. You can include a different number of rows in each data set.

Chapter 25 • Windows-based SAP Support - Testing and Configuration
394
Note: The Input statement can run successfully only if it can find the end row. Therefore, the first cell of the end row must contain only the text .END. You can enter text into other cells in that row, if needed. For example, you can enter a number in the second cell of the end row to indicate the iteration number corresponding to that set of data.
Because the input data sheets are added as a sub-sheet of the current action, the Input statement uses the data set corresponding to the current action iteration. For example, if you set the action to run on all iterations and your action sheet includes five rows of data, then your input data sheet should also include five data sets (and five .END rows).
The input data sheet below contains three sets of data. The first set contains data for the top three rows of the table or grid. The second set contains data for the top two rows of the table or grid. The third set contains data for rows 2-5. The blank first row (row 8 in the data sheet), indicates that no data should be entered or modified in the first row of the table or grid.
Note that a number was manually entered into the second cell of each END row to make it easier to identify the action iteration to which each data set corresponds.

Chapter 25 • Windows-based SAP Support - Testing and Configuration
395
Considerations for Auto-ParameterizationConsider the following when using the Auto-parameterize table and grid controls option:
➤ UFT inserts an Input statement and a new input data sheet each time information including modified table or grid cell data is sent to the server. If you set data in the cells of a particular table or grid both before and after sending information to the server, you will have more than one input data sheet (and more than one Input statement) representing the same table or grid. For best results:
➤ Enter data only in the visible rows of the table or grid while recording, especially if scrolling results in sending information to the server. You can add additional rows to the recorded data set while editing your test.
➤ Perform sorting, calculations, and other such operations either before beginning or after you finish entering data in a table or grid.
➤ The end of each data set in the input table or grid must be indicated by an end row with only the text .END in the first cell of the row.
➤ You can enter additional text, such as comments or an iteration number, in other cells of the .END row.
➤ You can include a different number of rows in each data set.
If you enter data for rows that require scrolling to display them in your application, you may need to modify your Input statement. For details, see "Data in Rows that Require Scrolling" on page 396.
➤ When recording, UFT adds a column to the input data sheet only for table or grid columns in which you set data. You can add additional columns from your table or grid to the data sheet while editing your test. Double-click the column header in the data sheet to rename it. Enter the name of your table or grid column. If the table or grid column name has spaces, replace the spaces with underscores.

Chapter 25 • Windows-based SAP Support - Testing and Configuration
396
➤ In general, the columns in your data sheet can be in any order, as long as the column names match the column names in your table or grid. However, if you record data in a column without a column header name or if more than one column in the table or grid has the same header name, UFT adds a column to the data sheet in the format: __<index>, where <index> indicates the number of the column in the table or grid when you record the Input statement, for example, __1 or __2. You can also use this format for columns in the data sheet if the column header names in your table or grid may change from iteration to iteration.
➤ To use multiple sets of data from an input data sheet, you must have at least one other Data pane parameter in your action that is set to use Current action sheet (local). Also, confirm that the action is set to run multiple iterations in the Run tab of the Action Properties dialog box.
➤ The number of data sets in your input data sheet should match the number of rows in the corresponding action data sheet.
If your input data sheet contains fewer data sets than the number of rows in the action sheet, no data will be inserted in the table or grid during those action iterations. For example, if the action runs five iterations, and your input data sheet contains only four data sets, during the fifth iteration no data will be entered into the table or grid when the Input statement runs.
If your data sheet contains more data sets than the number of rows in the action sheet, those data sets will not be used.
Data in Rows that Require ScrollingWhen working in tests, UFT inserts a new Input statement and creates a new input data sheet each time you send information to the server that includes table or grid cell data. Therefore, if scrolling results in sending data to the server, it is recommended to add data only to visible cells during the recording session. If you want to enter data into additional rows during the run session, you can add those rows to the data sheet manually while editing your test.

Chapter 25 • Windows-based SAP Support - Testing and Configuration
397
If you create an input data set for rows that are not visible on the table or grid in your application, then UFT must scroll the table or grid during the run session to insert the data for those rows. If you create an input data set for a row that needs to be added to the table or grid, UFT must send a command to add the row. By default, UFT sends a PAGEDOWN command if the rows in the data sheet exceed those currently displayed in the application. If UFT needs to use the ENTER key to add additional rows to the table or grid, then you need to manually add the optional ScrollMethod argument (with the value ENTER) to your Input statement before running your test.
For example:
Low-Level or Analog Mode Recording on SAP GUI for Windows
When working in tests, if you are unable to record steps on an object in the normal recording mode, or if you want to record mouse clicks and keyboard input with the exact x- and y-coordinates, you can record steps on those objects using low-level or analog recording (select Low-Level Recording or Analog Recording from the Recording Mode drop-down in the Record toolbar during a recording session).
When recording in one of these modes, your steps are added to your test (or to the analog file) as you record them rather than when information is sent to the server. If you begin recording in low-level or analog mode, do not switch back to the normal recording mode until you perform a step that results in communication with the SAP server. Switching between one of these modes and the normal recording mode before the server communication, may result in your steps being recorded twice (once in low-level/analog mode and once in normal mode).
For details on low-level and analog recording, see the HP Unified Functional Testing User Guide.
SAPGuiSession("Session").SAPGuiWindow("Create Standard").SAPGuiTable("SAPMV45ATCRTL_V_ERF_"). Input "Action1.All items", ENTER

Chapter 25 • Windows-based SAP Support - Testing and Configuration
398
Spooling Data from a Table
If you want to spool all the data from an SAP GUI for Windows table into an external file, use the GetCellData method to loop through each cell in the table. You can then save the information to an external file.
The following example uses the GetCellData method to list the data of each cell in a table of 10 rows and 10 columns:
For details on the GetCellData method, see the SAP GUI for Windows section of the HP Unified Functional Testing Object Model Reference.
For i=1 to 10for j=1 to 10
col="#" & jDat=SAPGuiSession("Session").SAPGuiWindow("Create Standard").
SAPGuiTable("SAPMV45ATCTRL_U_ERF_").GetCellData (i, col)‘Enter lines of code that use the value of the returned Dat variable
nextnext

Chapter 25 • Windows-based SAP Support - Testing and Configuration
399
Tasks
How to Enable Support for SAP GUI for Windows
This task describes how to enable SAP GUI for Windows to work with UFT.
1 Prerequisite: Make sure that SAP GUI Scripting is installed
When you install your SAP GUI for Windows application, you must select the SAP GUI Scripting installation option. If you did not select this option when you installed the SAP GUI for Windows application, it is essential that you reinstall it and select this option before setting the other configuration options described in this chapter.
Note: SAP provides a range of security mechanisms that enable the administrator to limit the use of SAP GUI Scripting by system, by group, by user, and by scripting functionality. To test SAP GUI for Windows applications, you must ensure that these security mechanisms are not activated. For details on the various security options, see the online SAP GUI Scripting Security Guide at the SAP Service Marketplace.
2 Enable scripting on the SAP application (server-side)
a Confirm that you have the proper support package and kernel patch levels installed. For details, see "Package and Patch Versions Requirements - SAP Application Server and SAP GUI for Windows" on page 377.

Chapter 25 • Windows-based SAP Support - Testing and Configuration
400
b Enable scripting on your SAP application. (By default, scripting is disabled.) You do this by entering the Maintain Profile Parameters window with administrative permissions and setting the sapgui/user_scripting profile parameter to TRUE on the application server.
➤ To enable scripting for all users, set this parameter on all application servers.
➤ To enable scripting for a specific group of users, set the parameter only on application servers with the appropriate access restriction settings.
For more details, see "How to Enable Scripting on the SAP Application (Server-Side)" on page 402.
Note: If you connect to a server on which scripting is disabled, an error message displays when you try to record on your SAP GUI for Windows application.
3 Enable scripting on the SAP application (client-side)
You can do this on your SAP client only if the SAP GUI Scripting option is installed. If this option is not installed, reinstall your SAP GUI for Windows application and be sure to select the SAP GUI Scripting check box. For details, see your SAP GUI for Windows documentation.
4 Eliminate warning messages
By default, you regularly receive two warning messages when using UFT with an SAP GUI for Windows application:
➤ When UFT connects to the Scripting API, the following warning message is displayed: A script is trying to attach to the GUI.
➤ When UFT opens a new connection using the Scripting API, the following warning message is displayed: A script is opening a connection to system <system_name>.

Chapter 25 • Windows-based SAP Support - Testing and Configuration
401
It is recommended to disable these warning messages in the SAP GUI for Windows application when working with UFT.
5 Check the connection speed on the SAP server
Confirm that the Low speed connection option is NOT selected for the server to which you are connecting before recording and running GUI tests.
This is because when you log on to SAP using the Low speed connection option to communicate with the server, the SAP server does not send sufficient information for UFT to properly record and run tests. (UFT displays an error message if the Low speed connection option is selected.)
For details, see SAP OSS note #587202.
6 Set F1 Help to use the modal dialog box mode
Confirm that the modal dialog box option is selected. This enables UFT to record the display of F1 Help in your tests. (The F1 Help in your SAP GUI for Windows application can be displayed using either the Performance Assistant or as a modal dialog box.)
7 Set F4 Help to use the dialog display mode
Confirm that your client is set to load F4 Help screens in Dialog mode. (The SAP GUI for Windows application cannot load F4 Help screens in Control mode when using the SAP GUI Scripting API (Enable Scripting option.)
Note: This is a per-user setting. You must set this option on each client that you want to test using the UFT Add-in for SAP Solutions. Alternatively, the SAP system administrator can change the system default for you.

Chapter 25 • Windows-based SAP Support - Testing and Configuration
402
How to Enable Scripting on the SAP Application (Server-Side)UFT records and runs steps based directly on the API events that are sent from the client to the SAP server because UFT communicates directly with the SAP GUI Scripting API. Therefore, to record and run tests and business components on your SAP GUI for Windows application, you must enable scripting on both the server-side.
After you confirm that you have the proper support package and kernel patch levels installed, you must enable scripting on your SAP application. By default, scripting is disabled.
You enable scripting by entering the Maintain Profile Parameters window with administrative permissions and setting the sapgui/user_scripting profile parameter to TRUE on the application server.
To enable scripting for all users, set this parameter on all application servers. To enable scripting for a specific group of users, set the parameter only on application servers with the appropriate access restriction settings.
Note: If you connect to a server on which scripting is disabled, an error message displays when you try to record on your SAP GUI for Windows application.
To change the profile parameter:
1 Enter /nrz11 in the OKCode edit box to open transaction rz11.

Chapter 25 • Windows-based SAP Support - Testing and Configuration
403
2 In the Param. Name box of the Maintain Profile Parameters window, enter sapgui/user_scripting and click the Display button.
Note: If the message Parameter name is unknown is displayed in the status bar, your client lacks the required support package (see "Package and Patch Versions Requirements - SAP Application Server and SAP GUI for Windows" on page 377). Download and install the support package that corresponds to the SAP release you are using and then repeat steps 1 and 2.

Chapter 25 • Windows-based SAP Support - Testing and Configuration
404
The Display Profile Parameter Attributes window opens.

Chapter 25 • Windows-based SAP Support - Testing and Configuration
405
3 If ProfileVal is FALSE, you must modify its value. To modify it, click the Change value button. The Change Parameter Value window opens.
4 Enter TRUE (in capital letters) in the New value box and click Save.
Note: The change takes effect only when you log on to the system. Therefore, before beginning to work with UFT, you must log off and log on again. You may also need to restart the SAP Service from the SAP Console.
If you find that even after restarting the SAP Service from the SAP Console and logging on again to the client, your change to the ProfileVal parameter was not saved, you may have an outdated kernel version. In this case, either restart the application server or download and import the required kernel patch, as specified below.
ReleaseKernel Version
Patch Level
6.10 6.10 391
6.20 all versions all levels

Chapter 25 • Windows-based SAP Support - Testing and Configuration
406
For details, see SAP OSS note # 480149.
How to Record on Standard Windows Controls During an SAP GUI for Windows Recording Session
To enable UFT to record steps on standard Windows controls during an SAP GUI for Windows recording session, you must switch to Standard Windows Recording mode prior to performing steps on these controls. (If you switch to Standard Windows Recording mode after performing an operation on a standard Windows control, both UFT and the SAP application may sometimes become unresponsive.)
This task describes how to toggle between the relevant recording options.
To switch to Standard Windows recording mode while recording a test in an SAP GUI for Windows application:
On the Record toolbar, select Standard Windows Recording from the Recording Modes drop-down, or press ALT+SHIFT+F3.
To record steps as SAP GUI for Windows objects again:
Do one of the following:
➤ On the Record toolbar, select Default from the Recording Modes drop-down.
➤ Stop the recording session.
This restores the normal recording mode for SAP GUI for Windows.
6.40 all versions all levels
7.10 all versions all levels
ReleaseKernel Version
Patch Level

Chapter 25 • Windows-based SAP Support - Testing and Configuration
407
Reference
SAP Tab (Record and Run Settings Dialog Box)
This dialog box enables you to specify how UFT connects to your SAP GUI for Windows application during a recording or run session.

Chapter 25 • Windows-based SAP Support - Testing and Configuration
408
User interface elements are described below:
To access Select Record > Record and Run Settings and choose the SAP tab.
Note: The Record and Run Settings dialog box also opens automatically each time you begin recording a new test (unless you open the dialog box and set your preferences manually before you begin recording).
See also ➤ You can also use application details environment variables to specify these parameters. For details, see "Environment Variables for Windows-based SAP Applications" on page 411.
➤ "SAP GUI Scripting API and UFT" on page 386.
➤ "Using the Auto-Parameterize Option to Parameterize Table and Grid Cell Values" on page 389.
➤ "Low-Level or Analog Mode Recording on SAP GUI for Windows" on page 397.
➤ "How to Record on Standard Windows Controls During an SAP GUI for Windows Recording Session" on page 406.
➤ "SAP > General Pane (Options Dialog Box > GUI Testing Tab)" on page 412.
UI Elements Description
Record and run tests on any open SAP GUI for Windows application
Instructs UFT to use any open SAP GUI for Windows application to record and run the test.
This option supports sessions opened using the SAP Logon dialog box or the SAP Logon Pad.
Open the following SAP Gui client when a record or run session begins
Instructs UFT to connect to the specified SAP server and open your SAP GUI for Windows application using specified user settings.
Note: If you select to connect to a specific server, you can specify details that will enable UFT to automatically log on to the server each time a record or run session begins (instead of recording the logon steps).

Chapter 25 • Windows-based SAP Support - Testing and Configuration
409
Server description Indicates the server to which you want to connect. The Server description box lists the servers available in the SAP Logon Pad or the SAP Logon dialog box.
To add a server to the list in the Record and Run Settings dialog box, close the Record and Run Settings dialog box, define an appropriate entry using your SAP Logon dialog box, and then reopen the Record and Run Settings dialog box.
Note: The values you enter for the User, Client, Password, and Language in the Auto-logon area of the dialog box are saved with the selected server (in addition to being saved with the test). Therefore, the saved values are automatically displayed in the auto-logon area when you specify a previously selected server.
System data container
Specifies the system data container that contains the available target systems for the current test.
Enabled only if you open a GUI test from Solution Manager in integrated mode.
Target system A drop-down list of available SAP environments that can be tested.
Enabled only if the System data container option is selected.
Enable auto-logon Instructs UFT to open the specified SAP GUI for Windows application using the specified logon details.
Enabled only when Open the following SAP Gui client when a record or run session begins is selected.
User The user name used to log on to the specified server.
Enabled only when Enable auto-logon is selected.
Password The password for the specified user name.
Enabled only when Enable auto-logon is selected.
Client The client number.
Enabled only when Enable auto-logon is selected.
UI Elements Description

Chapter 25 • Windows-based SAP Support - Testing and Configuration
410
Language The language that you want the specified SAP GUI for Windows application to display.
Enabled only when Enable auto-logon is selected.
Remember password Saves the password information in this dialog box so that you do not have to enter it each time you begin to record or run the test.
Enabled only when Enable auto-logon is selected.
Close the SAP GUI for Windows application when the test is closed
Instructs UFT to close the SAP GUI for Windows session specified in the Record and Run Settings dialog box when the test is closed.
Any other SAP GUI for Windows session that was opened before, during, or after the run session is not affected.
The Session cleanup option in the SAP pane of the Options dialog box (Tools > Options > GUI Testing tab > SAP node) overrides this option. For details, see "SAP > General Pane (Options Dialog Box > GUI Testing Tab)" on page 412.
Do not record and run on sessions that are already open
Instructs UFT not to record or run tests on any SAP GUI for Windows sessions that were already open prior to the start of the record or run session. This is to ensure that steps are not inadvertently recorded on other SAP GUI for Windows sessions that may also be running on the same computer.
Wait for Web pages to load before running steps
Instructs UFT to wait for Web-based SAP pages to synchronize completely before starting the test run.
Note: This option is selected by default. Clear this option only when working with IC WebClient.
UI Elements Description

Chapter 25 • Windows-based SAP Support - Testing and Configuration
411
Environment Variables for Windows-based SAP Applications
You can use environment variables to specify details for the applications you want to use during a recording or run session. These variables can also be used in external library files for automation scripts.
If you define any of these environment variables, they override the values in the Server description, User, Password, Client, and Language boxes in the SAP tab of the Record and Run Settings dialog box. For details, see "SAP Tab (Record and Run Settings Dialog Box)" on page 407.
Use the variable names listed in the table below to define SAP application details:
For details on defining and working with environment variables, see the HP Unified Functional Testing User Guide.
Option Variable Name Description
Server description SAP_SERVER_ENV The description of the server to which you want to connect.
User SAP_USERNAME_ENV The user name used to log on to the specified client number.
Password SAP_PASSWORD_ENV The encrypted password for the specified user name.
Client SAP_CLIENT_ENV The client number.
Language SAP_LANGUAGE_ENV The language that you want the specified SAP GUI for Windows application to display.

Chapter 25 • Windows-based SAP Support - Testing and Configuration
412
SAP > General Pane (Options Dialog Box > GUI Testing Tab)
This pane enables you to configure how UFT records and runs tests and business components on SAP applications.

Chapter 25 • Windows-based SAP Support - Testing and Configuration
413
User interface elements are described below:
To access 1 Make sure that a GUI test is open.
2 Select Tools > Options > GUI Testing tab > SAP > General node.
Important information
This pane is available only when the Unified Functional Testing Add-in for SAP Solutions is installed and loaded.
See also ➤ "SAP GUI Scripting API and UFT" on page 386.
➤ "Using the Auto-Parameterize Option to Parameterize Table and Grid Cell Values" on page 389.
➤ "How to Record on Standard Windows Controls During an SAP GUI for Windows Recording Session" on page 406.
➤ "Environment Variables for Windows-based SAP Applications" on page 411/
➤ "SAP Tab (Record and Run Settings Dialog Box)" on page 407.
UI Elements Description
Auto-parameterize table and grid controls
While recording tests, automatically captures the data you set in table and grid cells and stores it in a new data sheet in the Data pane. UFT inserts an Input statement into your test, which refers to the new data sheet. Using this option enables you to set values of multiple cells in a single test step and easily parameterize the cell values. For details, see "Using the Auto-Parameterize Option to Parameterize Table and Grid Cell Values" on page 389.
Record HTML elements using SAPGui Scripting interface
Specifies whether UFT should use the SAP GUI Scripting API when recording HTML elements within SAP applications, or use the built-in Web support to record these HTML elements. You can use this option to handle synchronization issues that may arise from recording on Web elements inside an SAP GUI for Windows session.
Changes to this option take effect only after you start recording a new test or business component.

Chapter 25 • Windows-based SAP Support - Testing and Configuration
414
Record Reset Method on SAP Gui Session
Records a Reset method as the first step when recording a test or business component. When the test or business component is run, the first step resets the application session so that it starts at the initial SAP screen. This ensures that the test or business component starts with the same application state each time it is run.
This option is applicable only if the Open the following SAP Gui client when a record or run session begins and the Auto-logon options are both selected in the SAP tab of the Record and Run Settings dialog box.
Record status bar messages
Records a SAPGuiStatusbar.Sync step each time a status bar message is displayed in the SAP application.
Note: This option is selected by default.
Show 'Disabled Scripting Interface' warnings
Instructs UFT to display warnings if the SAP GUI Scripting API is disabled on the SAP application. If this is the case, you cannot record or run steps until you enable the SAP GUI Scripting API. For information on enabling the SAP GUI Scripting API, see "Enable scripting on the SAP application (client-side)" on page 400.
Note: This option is selected by default.
UI Elements Description

Chapter 25 • Windows-based SAP Support - Testing and Configuration
415
Show 'Low Speed Connection' Warnings
Instructs UFT to display warnings if the connection speed to the server is set to Low speed connection.
Note: This option is selected by default.
If this option is selected, one of the following occurs if the connection speed is low:
➤ If the session was opened by UFT when recording started (as defined in the Record and Run Settings dialog box), the error message appears and the recording stops.
➤ If the session was opened by the user before recording started, the error message appears and recording continues in Standard Windows recording mode. For information on Standard Windows recording mode, see "How to Record on Standard Windows Controls During an SAP GUI for Windows Recording Session" on page 406.
If this option is not selected, one of the following occurs if the connection speed is low:
➤ If the session was opened by UFT when recording started (as defined in the Record and Run Settings dialog box), the error message does not appear and the recording stops.
➤ If the session was opened by the user before recording was begun, the error message does not appear and recording continues in Standard Windows recording mode. For information on Standard Windows recording mode, see "How to Record on Standard Windows Controls During an SAP GUI for Windows Recording Session" on page 406.
The connection speed can be checked using the SAP client. For details, see "Check the connection speed on the SAP server" on page 401.
UI Elements Description

Chapter 25 • Windows-based SAP Support - Testing and Configuration
416
Record only the selected value when using a Possible Entries (F4) list
Specifies that only the selected value is recorded when using a Possible Entries list. Any other actions performed on any windows opened after pressing F4 (or after clicking the icon in the specific field) are ignored, and only the actual change made to the field is recorded.
Note: An event is received only on the field in focus when F4 was pressed, and not on all the populated fields in the screen. For this reason it may be preferable not to select this option when recording.
Session cleanup Instructs UFT to close all SAP GUI for Windows sessions opened by UFT during the current run session when the test is closed. This includes all SAP GUI for Windows sessions that were invoked from the Record and Run Settings dialog box, as well as any sessions that may have been invoked during the run session using a SAPGuiUtil statement or the Open New Session button in the SAP GUI for Windows application that was being recorded.
SAP GUI for Windows sessions that were opened during a previous run session, or opened manually before or during the current run session are not affected.
This option overrides the Close the SAP GUI for Windows application when the test is closed option in the SAP tab of the Record and Run Settings dialog box. For details, see "SAP Tab (Record and Run Settings Dialog Box)" on page 407.
UI Elements Description

Chapter 26 • UFT-SAP Solution Manager Integration
417
26UFT-SAP Solution Manager Integration
This chapter includes:
Concepts
➤ UFT-SAP Solution Manager Integration - Overview on page 419
➤ Test Management in SAP Solution Manager on page 420
➤ Resource Files in Solution Manager on page 422
➤ Standalone Mode on page 422
➤ Integrated Mode on page 424
Tasks
➤ How to Configure Solution Manager to Work with UFT on page 425
➤ How to Open and Save Tests in Solution Manager in Standalone Mode on page 428
➤ How to Upload Files to Solution Manager in Standalone Mode on page 431
➤ How to Run a Test Stored in Solution Manager in Standalone Mode on page 435
➤ How to Run a Test Stored in Solution Manager in Integrated Mode on page 437
➤ How to Display or Edit a GUI Test from Solution Manager in Integrated Mode on page 439
➤ How to Transfer Data To and From GUI Tests in Integrated Mode Using Test Parameters on page 441
Reference
➤ Solution Manager Testing Modes: Standalone or Integrated on page 442

Chapter 26 • UFT-SAP Solution Manager Integration
418
➤ Solution Manager Connection Dialog Box on page 444
➤ Save GUI Test to Solution Manager Dialog Box on page 446
➤ Open GUI Test from Solution Manager Dialog Box on page 448
➤ Upload File to Solution Manager Dialog Box on page 449
➤ Save External File to Solution Manager Dialog Box on page 451
➤ Download File from Solution Manager on page 452
➤ SAP > SAP Solution Manager Pane (Options Dialog Box > GUI Testing Tab) on page 454
➤ Solution Manager Trace Options Dialog Box on page 456

Chapter 26 • UFT-SAP Solution Manager Integration
419
Concepts
UFT-SAP Solution Manager Integration - Overview
Note: Unless otherwise specified, references to Solution Manager in this Help file apply to all currently supported versions of SAP eCATT (SAP Extended Computer Aided Test Tool) and SAP Solution Manager. Note that some features and options may not be supported in the specific edition of Solution Manager or eCATT that you are using.
For a list of the supported versions of Solution Manager or eCATT, see the HP Unified Functional Testing Product Availability Matrix, available from the UFT Help or the root folder of the Unified Functional Testing DVD.
In addition to ALM, HP’s Web-based test management tool, you can also store and manage GUI tests in SAP Solution Manager.
Unified Functional Testing Add-in for SAP Solutions integrates with SAP Solution Manager. This means that you can use Solution Manager with UFT to run quality tests in environments that span beyond Windows and SAP environments including complex, multi-platform, highly-integrated composite, legacy, and proprietary enterprise applications.
Note: UFT cannot connect to both Solution Manager and ALM in the same session. Therefore, you cannot use Solution Manager to manage business components and application areas.

Chapter 26 • UFT-SAP Solution Manager Integration
420
You can work with GUI tests stored in Solution Manager in standalone or integrated mode. The current mode is indicated in the UFT title bar.
➤ Standalone Mode (described on page 422). The test is opened from UFT.
➤ Integrated Mode (described on page 424). The test is opened from Solution Manager.
Solution Manager support is available only when:
➤ SAP Frontend software is installed on your computer (including support for Unicode).
➤ SAP GUI for Windows software installed on your computer, including support for RFC libraries. You add support for RFC libraries by selecting the Unicode RFC Libraries check box (under Development Tools) during the SAP installation.
➤ The Unified Functional Testing Add-in for SAP Solutions is installed and loaded. For details, see "How to Manage UFT Add-ins" on page 40.
➤ Solution Manager integration components are installed.
Test Management in SAP Solution Manager
You can store and manage GUI tests for your SAP application in the file system or in a test management tool, such as HP ALM or SAP Solution Manager, depending on your testing needs.
To work with SAP Solution Manager, you must configure your Solution Manager server to work with UFT. After the server is configured, you can connect to Solution Manager from UFT in standalone mode, or you can connect to UFT from Solution Manager in integrated mode. For details, see "How to Configure Solution Manager to Work with UFT" on page 425.
You can create tests from UFT or from Solution Manager, store tests and associated resource files in the Solution Manager database, edit tests, run tests, and review run results. For details see, "How to Open and Save Tests in Solution Manager in Standalone Mode" on page 428.

Chapter 26 • UFT-SAP Solution Manager Integration
421
You can also call and pass values from a Solution Manager test script to a GUI test. For details, see "How to Transfer Data To and From GUI Tests in Integrated Mode Using Test Parameters" on page 441.
For details on performing basic Solution Manager test management operations, see:
➤ "How to Configure Solution Manager to Work with UFT" on page 425
➤ "How to Open and Save Tests in Solution Manager in Standalone Mode" on page 428
➤ "How to Upload Files to Solution Manager in Standalone Mode" on page 431
➤ "How to Run a Test Stored in Solution Manager in Standalone Mode" on page 435
➤ "How to Run a Test Stored in Solution Manager in Integrated Mode" on page 437
➤ "How to Display or Edit a GUI Test from Solution Manager in Integrated Mode" on page 439
➤ "How to Transfer Data To and From GUI Tests in Integrated Mode Using Test Parameters" on page 441

Chapter 26 • UFT-SAP Solution Manager Integration
422
Resource Files in Solution Manager
When you save a GUI test in Solution Manager, make sure you store all associated resource files in Solution Manager so that any user who opens the test from Solution Manager will have access to all of the test’s resource files.
Like test names, all test resource files stored in Solution Manager must begin with a valid prefix according to the server settings. For example, if your Solution Manager server requires all file names to begin with z, you would use the following naming convention: z<filename> (for example: zSOR_dwdm). You can set the default prefix for files in the Solution Manager pane of the Options dialog box. For details, see "SAP > SAP Solution Manager Pane (Options Dialog Box > GUI Testing Tab)" on page 454.
When you create a file in UFT, such as a new shared object repository or recovery file, you can create the file as you normally would in UFT and then save the file directly to Solution Manager.
You can also upload existing files that are stored in the file system (such as external data table files, function library files, shared object repository files, recovery files, and environment variable files).
For details on uploading resource files to Solution Manager, see "How to Upload Files to Solution Manager in Standalone Mode" on page 431.
Standalone Mode
You can connect to Solution Manager from UFT. This is known as standalone mode. After you connect to Solution Manager in standalone mode, you can:
➤ Store tests in the Solution Manager database.
➤ Open existing tests from the Solution Manager database.
➤ Upload files to or download files from Solution Manager.

Chapter 26 • UFT-SAP Solution Manager Integration
423
➤ Store a test’s external resource files in Solution Manager. For example, you can store shared object repository files, data table files, function library files, environment variable files, and recovery files in your Solution Manager database. UFT provides a special set of Solution Manager-specific options that enable you to control certain elements of the Solution Manager-UFT integration.
➤ Pass values from a Solution Manager test script to a GUI test, or vice versa, using GUI test parameters. For example, if you want to create tests or actions that you can use for different purposes or in different scenarios based on the data supplied to them, you can take advantage of the Automatically parameterize steps using Test Parameters option (in the General node of the GUI Testing tab in the Options dialog box (Tools > Options > GUI Testing tab > General node)). This option instructs UFT to automatically parameterize all the operation arguments in the steps of one or more actions in your test, at the end of a UFT recording session. You can then supply the values for these test parameters from Solution Manager. For more details on parameters, see the HP Unified Functional Testing User Guide.
Note:
➤ You can also perform many of these operations from Solution Manager in integrated mode. For details, see "Integrated Mode" on page 424. For a comparison of Solution Manager testing modes, see "Solution Manager Testing Modes: Standalone or Integrated" on page 442.
➤ You can also download resource files already stored in Solution Manager and save them in the file system.

Chapter 26 • UFT-SAP Solution Manager Integration
424
Integrated Mode
You can connect to UFT from Solution Manager. This is called integrated mode. When you work in integrated mode, only UFT features related to the Solution Manager test are available in UFT. When you run tests in integrated mode, your run session results are accessible in the Solution Manager log.
When you log on to a Solution Manager server that is configured to integrate with UFT, you can view, edit, and run GUI tests that are stored in Solution Manager. You can also use the standard Solution Manager commands to copy, rename, and delete GUI tests, just as you would with any other file stored in Solution Manager.
When you open a GUI test from Solution Manager, UFT opens in integrated mode. In this mode, you can use all UFT features that are associated with the open test. However, you cannot save the open test with another name.
You can run a test in integrated mode by using the Run option in UFT or using the Execute Test Script (F8) option for a selected GUI test in Solution Manager. You can also execute a Solution Manager test script (or blob—Binary Large Object) that calls a GUI test. Creating Solution Manager scripts that call GUI tests is useful if you want to pass or retrieve values to or from a GUI test.
For details on configuring Solution Manager to work with UFT, see "How to Configure Solution Manager to Work with UFT" on page 425.
Note: You can also work with tests stored in Solution Manager from the UFT interface in standalone mode. For details, see "Standalone Mode" on page 422. For a comparison of Solution Manager testing modes, see "Solution Manager Testing Modes: Standalone or Integrated" on page 442.

Chapter 26 • UFT-SAP Solution Manager Integration
425
Tasks
How to Configure Solution Manager to Work with UFT
This task describes how to configure Solution Manager to work with UFT so that you can use the Solution Manager-UFT integration features available with the Unified Functional Testing Add-in for SAP Solutions.
This task includes the following steps:
➤ "Prerequisites" on page 425
➤ "Set external tool parameters in the ECCUST_ET table" on page 426
➤ "Apply necessary roles or profiles to Solution Manager-UFT Users" on page 426
➤ "Register UFT to work with Solution Manager" on page 427
Prerequisites
You (or a Solution Manager system administrator) must install the appropriate support package and configure the Solution Manager server to work with UFT.

Chapter 26 • UFT-SAP Solution Manager Integration
426
Set external tool parameters in the ECCUST_ET table
This step enables Solution Manager to communicate with UFT. (You perform this procedure only once in the system.)
1 Navigate to transaction se17. The General Table Display window opens.
2 In the Table Name box, enter ECCUST_ET and press ENTER.
3 The Display Table ECCUST_ET window opens and displays an empty table with the required parameter names.
4 Enter the values exactly as shown below:
Note: You can also use the function module SET_EXTERNAL_TOOL to create entries in the customizing table. For details, see your Solution Manager documentation.
Apply necessary roles or profiles to Solution Manager-UFT Users
1 Make sure you have permission to:
➤ Run Solution Manager scripts
➤ Edit Solution Manager scripts
➤ Work with an external tool (UFT) in integrated mode
➤ Connect to Solution Manager from an external tool (UFT) in standalone mode

Chapter 26 • UFT-SAP Solution Manager Integration
427
2 Confirm with your system administrator that the user name you use is assigned the necessary roles or profiles to perform the above tasks before you begin working with the UFT-Solution Manager integration. For example, to work with UFT in standalone mode, you must be assigned the role S_ECET or the profile SAP_ECET in the Solution Manager system. This is because each of these tasks requires special roles or profiles.
For details, contact your system administrator or see your SAP and Solution Manager documentation.
Register UFT to work with Solution Manager
To enable UFT to communicate with Solution Manager, you must register UFT and then verify the registration. You perform this procedure only once in the system.
1 Navigate to transaction SPRO, click SAP Reference IMG, and browse to SAP Solution Manager > Capabilities (Optional) > Test Management > External Integration > External Test Tool with eCATT > Register Test Tool.
2 Click New Entries.
3 Enter the values exactly as shown below:

Chapter 26 • UFT-SAP Solution Manager Integration
428
4 Navigate to transaction SM30, and enter V_AGS_SMT_TCT, as shown in the example below.
5 Click Display and verify that a row exists with the following information:
UFT is now registered to work with your SAP application.
How to Open and Save Tests in Solution Manager in Standalone Mode
This task describes how to:
➤ "Save a test in standalone mode" on page 429
➤ "Open a test from Solution Manager in standalone mode" on page 430
Note: You can also open, edit, and save existing tests that are stored in Solution Manager, and you can save existing tests with a new name in the Solution Manager database or in the file system.

Chapter 26 • UFT-SAP Solution Manager Integration
429
Save a test in standalone mode
1 In UFT, create or open a test.
1 From UFT, connect to a Solution Manager server. UFT connects to Solution Manager in standalone mode. For user interface details, see "Solution Manager Connection Dialog Box" on page 444.
2 In UFT, select File > Save As. The Save GUI Test to Solution Manager dialog box opens.
Note: If you defined a New test prefix in the SAP Solution Manager pane of the Options dialog box, the dialog box displays the defined prefix. (For details, see "SAP > SAP Solution Manager Pane (Options Dialog Box > GUI Testing Tab)" on page 454.)
3 Do one of the following:
➤ To save a test directly to the file system, click File System. The Save Test dialog box opens. For user interface details, see the HP Unified Functional Testing User Guide.
➤ To save the test to Solution Manager, enter the required information and click OK. For details on the user interface, see "Save GUI Test to Solution Manager Dialog Box". When the save process finishes, the status bar displays the word Ready, and the test is saved to the local package ($TMP) in Solution Manager. When the save process is complete, the UFT title bar displays the test information in the following format:
[Solution Manager] TestName: VersionNumber (Mode)

Chapter 26 • UFT-SAP Solution Manager Integration
430
Open a test from Solution Manager in standalone mode
1 Connect to a Solution Manager server. For details, see "Solution Manager Connection Dialog Box" on page 444.
2 In UFT, select File > Open > Test to open the test. The Open GUI Test from Solution Manager dialog box opens.
Note: The Open GUI Test from Solution Manager dialog box opens when UFT is connected to a Solution Manager server. To open a test directly from the file system while you are connected to Solution Manager, click the File System button to open the Open Test dialog box.
3 Enter the required information and click OK. For details on the user interface, see "Open GUI Test from Solution Manager Dialog Box".
When the test opens, the UFT title bar displays the test information in the following format:
[Solution Manager] TestName: VersionNumber (Mode)

Chapter 26 • UFT-SAP Solution Manager Integration
431
How to Upload Files to Solution Manager in Standalone Mode
This task describes how to upload files to Solution Manager. When you upload a file to Solution Manager in standalone mode, it is automatically saved to the local package ($TMP) in Solution Manager.
This task describes how to:
➤ "Upload external resource files from the file system to Solution Manager" on page 431
➤ "Create a new shared object repository file and store it in Solution Manager" on page 432
➤ "Copy or export an object repository to Solution Manager" on page 433
➤ "Create a new recovery file in Solution Manager" on page 434
Upload external resource files from the file system to Solution Manager
1 Create and save the resource file in the file system.
2 Connect to Solution Manager. For details, see "Solution Manager Connection Dialog Box" on page 444.
3 Select File > Upload File to Solution Manager option. The Upload File to Solution Manager dialog box opens.
For information on the Upload File to Solution Manager dialog box, see "Upload File to Solution Manager Dialog Box".
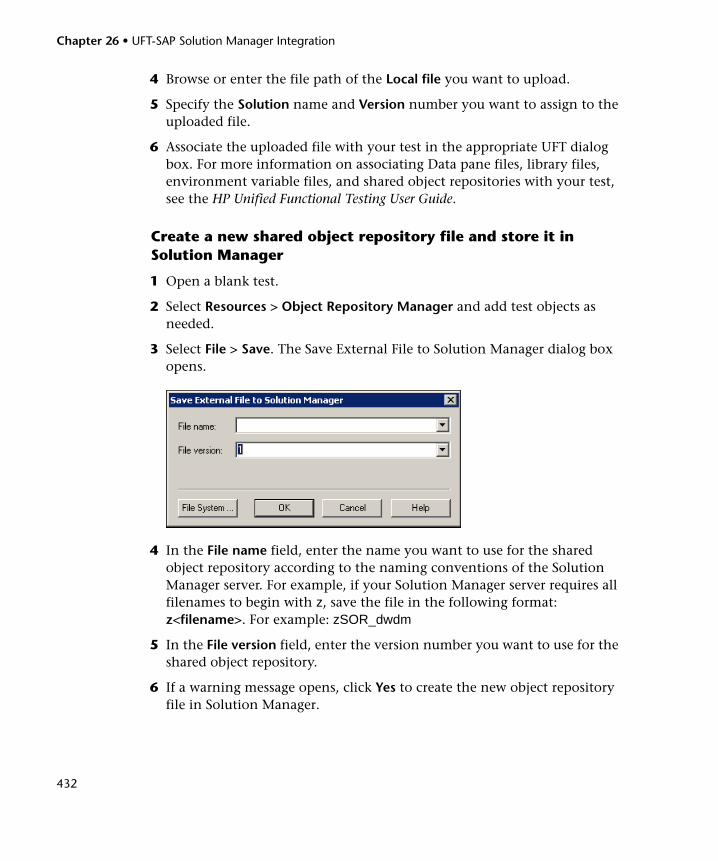
Chapter 26 • UFT-SAP Solution Manager Integration
432
4 Browse or enter the file path of the Local file you want to upload.
5 Specify the Solution name and Version number you want to assign to the uploaded file.
6 Associate the uploaded file with your test in the appropriate UFT dialog box. For more information on associating Data pane files, library files, environment variable files, and shared object repositories with your test, see the HP Unified Functional Testing User Guide.
Create a new shared object repository file and store it in Solution Manager
1 Open a blank test.
2 Select Resources > Object Repository Manager and add test objects as needed.
3 Select File > Save. The Save External File to Solution Manager dialog box opens.
4 In the File name field, enter the name you want to use for the shared object repository according to the naming conventions of the Solution Manager server. For example, if your Solution Manager server requires all filenames to begin with z, save the file in the following format: z<filename>. For example: zSOR_dwdm
5 In the File version field, enter the version number you want to use for the shared object repository.
6 If a warning message opens, click Yes to create the new object repository file in Solution Manager.

Chapter 26 • UFT-SAP Solution Manager Integration
433
For more information on creating object repository files, see the HP Unified Functional Testing User Guide.
Copy or export an object repository to Solution Manager
1 Open the test whose object repository you want to copy or export.
Note: If you are exporting objects from a local object repository:
➤ You must select the action whose object repository you want to export.
➤ The object repository name must contain at least 14 characters.
2 Select one of the following:
➤ Resources > Object Repository Manager to open the shared Object Repository Manager.
➤ Resources > Object Repository to open the local Object Repository for the selected action.
3 Do one of the following:
➤ In the shared Object Repository Manager, select File > Save As to save a copy of the object repository file with a new name in Solution Manager.
➤ In the Object Repository window, select File > Export Local Objects to export the object repository to a shared object repository file in Solution Manager.
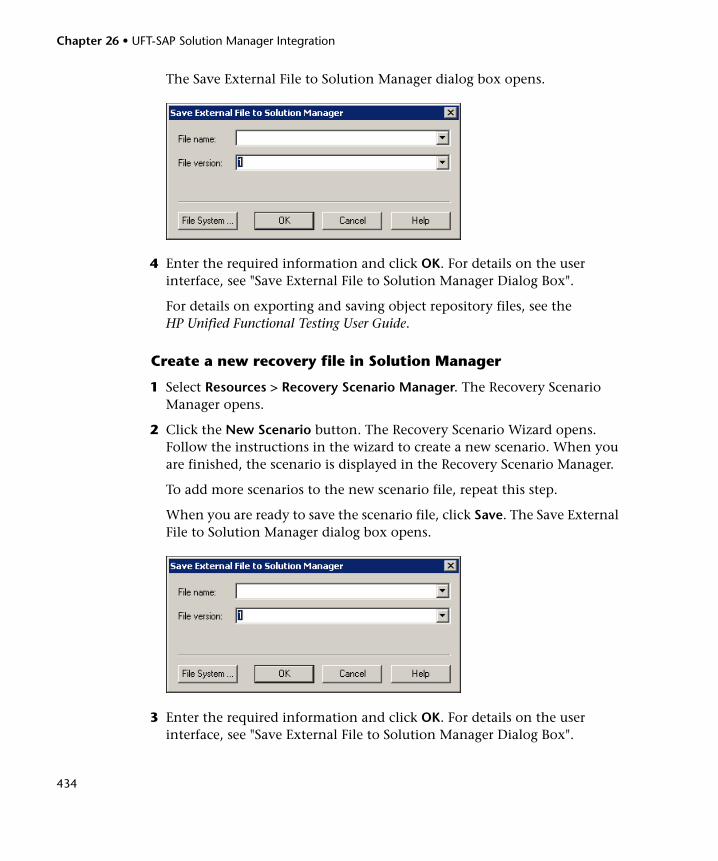
Chapter 26 • UFT-SAP Solution Manager Integration
434
The Save External File to Solution Manager dialog box opens.
4 Enter the required information and click OK. For details on the user interface, see "Save External File to Solution Manager Dialog Box".
For details on exporting and saving object repository files, see the HP Unified Functional Testing User Guide.
Create a new recovery file in Solution Manager
1 Select Resources > Recovery Scenario Manager. The Recovery Scenario Manager opens.
2 Click the New Scenario button. The Recovery Scenario Wizard opens. Follow the instructions in the wizard to create a new scenario. When you are finished, the scenario is displayed in the Recovery Scenario Manager.
To add more scenarios to the new scenario file, repeat this step.
When you are ready to save the scenario file, click Save. The Save External File to Solution Manager dialog box opens.
3 Enter the required information and click OK. For details on the user interface, see "Save External File to Solution Manager Dialog Box".
Chapter 26 • UFT-SAP Solution Manager Integration
435
For details on creating and saving recovery files, see the HP Unified Functional Testing User Guide.
How to Run a Test Stored in Solution Manager in Standalone Mode
This task describes how to run tests from UFT (standalone mode). The run results are stored in the location you specify in the file system. You cannot access these results from Solution Manager.
When working with UFT in standalone mode, you run a test stored in a Solution Manager database just like any other UFT test.
To run a test stored in Solution Manager in standalone mode:
1 Open UFT in standalone mode. For details, see "Solution Manager Connection Dialog Box" on page 444.
2 In UFT, open the test you want to run. For user interface details, see "Open GUI Test from Solution Manager Dialog Box" on page 448.
3 Click the Run button or select Run > Run. The Run dialog box opens.
4 Accept the default results folder or browse to select another one.

Chapter 26 • UFT-SAP Solution Manager Integration
436
Note:
➤ The default results folder is created under the folder where the cache (local) copy of your test is stored. You set the location of your Solution Manager test cache folder in the Solution Manager pane of the Options dialog box.
➤ When running tests in standalone mode, no Solution Manager log is created. For details on the Solution Manager log for UFT run sessions, see "View results of a GUI test run in integrated mode" on page 438.
➤ To run the test and overwrite the previous run session results, select the Temporary run results folder (overwriting older temporary results) option.
➤ UFT stores temporary run session results for all tests in <System Drive>:\%Temp%\TempResults. The path in the text box of the Temporary run results folder (overwriting older temporary results) option is read-only and cannot be changed.
5 Click OK. The Run dialog box closes and UFT begins running the test.
When the run session ends, the Run Results window opens (unless the View results when run session ends check box is cleared in the Run Sessions pane of the Options dialog box (Tools > Options > GUI Testing tab > General tab > Run Sessions node). For more details on running UFT tests and analyzing run results, see the HP Unified Functional Testing User Guide.

Chapter 26 • UFT-SAP Solution Manager Integration
437
How to Run a Test Stored in Solution Manager in Integrated Mode
This task describes how to run test from Solution Manager in integrated mode and view the run results stored in the network drive specified for Solution Manager run results (as defined in the SAP Solution Manager pane of the Options dialog box).
You can run GUI tests from Solution Manager test scripts (integrated mode) in any of the following ways:
➤ Use the Run option in UFT. Display the test in UFT and use the standard UFT Run option. For details on displaying the test, see "How to Display or Edit a GUI Test from Solution Manager in Integrated Mode" on page 439. For details on running a test using the UFT Run option, see the HP Unified Functional Testing User Guide.
➤ Run the test from Solution Manager. Create and run a Solution Manager test script that calls a GUI test. For information on creating test scripts that call GUI tests, see "How to Transfer Data To and From GUI Tests in Integrated Mode Using Test Parameters" on page 441. For information on running Solution Manager test scripts, see your Solution Manager documentation.
➤ Use the Execute Test Script (F8) option for a selected UFT test in Solution Manager. For details, see "Run a UFT test from Solution Manager using the Execute Test Script option" on page 437.
Note: For details on running tests in standalone mode, see "How to Run a Test Stored in Solution Manager in Standalone Mode" on page 435.
Run a UFT test from Solution Manager using the Execute Test Script option
For details, see your SAP documentation.
Chapter 26 • UFT-SAP Solution Manager Integration
438
View results of a GUI test run in integrated mode
You can view the results of a GUI test that was run from Solution Manager in the following ways:
➤ In the Solution Manager Log Display. You can view the results of the test or the results of a specific event, such as a checkpoint, in the Solution Manager log. You can view the folder in which the results are saved in the UNCPathToLocalLog line of the Solution Manager log.
➤ In the HP Run Results Viewer. You can view the run results in the Run Results Viewer, which you can either access from UFT or open directly.
If a test includes steps that log on to Solution Manager using the SAP tab of the Record and Run dialog box (as described in "SAP Tab (Record and Run Settings Dialog Box)" on page 407), the logon steps are displayed in the run results tree.
You can set the Run Results Viewer to open automatically after a test runs from Solution Manager. To do this, in Solution Manager, select the Log Display check box in the Shared tab in Start Options window.
For details on opening and analyzing run session results in UFT, see the HP Run Results Viewer User Guide.
➤ Via the generated XML Report. Each time you run a GUI test from Solution Manager, an .xml file is generated. This file contains all details of the run session. To view the file, click the line containing the text: XML-DATA in the Solution Manager log.

Chapter 26 • UFT-SAP Solution Manager Integration
439
How to Display or Edit a GUI Test from Solution Manager in Integrated Mode
This task describes how to display or edit any existing GUI test that is stored in Solution Manager. When you open the test, UFT opens in integrated and read-only mode. When you display or open a GUI test in integrated mode, you can work only with the open test. You cannot open another test or save the open test with another name.
Despite this, resource files that are saved with the test (for example, a local repository or the test’s local data table) are editable. To edit external resource files, open the test in standalone mode.
Note: If you select the UFT File > Save As menu command when working in integrated mode, UFT displays a warning message indicating that you can save a test with a new name in the file system, but doing so disconnects UFT from Solution Manager and switches UFT to standalone mode.
For more details on integrated and standalone modes, see "Standalone Mode" on page 422 and "Integrated Mode" on page 424.
This task describes how to:
➤ "Display or open a GUI test from Solution Manager" on page 439
➤ "Create a new GUI test from Solution Manager" on page 440
Display or open a GUI test from Solution Manager
1 Log on to Solution Manager and open a test script. Make sure to specify QuickTest Professional as the external tool. For details on how to open test scripts in Solution Manager, see your SAP documentation.
You can open the test in:
➤ Read-only (Display) mode. (If the test uses external resource files, the test and its resources open in read-only mode by default.)
➤ Edit mode. This enables you to use most UFT options. For details, see the HP Unified Functional Testing User Guide.

Chapter 26 • UFT-SAP Solution Manager Integration
440
2 To return to Solution Manager, close UFT.
Create a new GUI test from Solution Manager
1 Log on to Solution Manager. Then create and save a test script. Make sure to specify QuickTest Professional as the external tool. For details on how to open test scripts in Solution Manager, see your SAP documentation.
When you create the script, UFT opens with a blank test.
2 Create the test in UFT. For details on creating GUI tests in UFT, see the other chapters in this guide and the HP Unified Functional Testing User Guide.
3 In UFT, select File > Save As. A dialog box opens in Solution Manager.
4 In Solution Manager, specify the package in which you want to store the test. Confirm that the other edit boxes contain correct values.
If the test has external resource files, they are stored by default in the $TMP (local) package. If you select another package for the test, you must manually move any external resource files to the same package.
5 In Solution Manager, save the test. UFT is restored in integrated mode and displays the saved test for additional editing.
6 To return to Solution Manager, close UFT.

Chapter 26 • UFT-SAP Solution Manager Integration
441
How to Transfer Data To and From GUI Tests in Integrated Mode Using Test Parameters
You can pass values from a Solution Manager test script to a GUI test, or vice versa, using GUI test parameters.
To send values to your input arguments, you must run your test via a call from a Solution Manager test script. After you define input and output arguments for your GUI test, you can insert a call to that test from a Solution Manager test script and specify argument values for the input arguments.
Prerequisites
Define test parameters and use them in your GUI test. For details, see the section on the Parameters Pane (Test Settings Dialog Box) in the HP Unified Functional Testing User Guide.
Call a GUI Test and Specify Arguments from Solution Manager
To send values to your input arguments from Solution Manager, you must run your test via a call from a Solution Manager test script.
Tip: You can enter the name of a Solution Manager parameter from the Solution Manager script as the value of a GUI input parameter.
After you define input and output arguments for your GUI test, you can insert a call to that test from a Solution Manager script and specify argument values for the input arguments.

Chapter 26 • UFT-SAP Solution Manager Integration
442
Reference
Solution Manager Testing Modes: Standalone or Integrated
The table below describes the basic differences between the standalone and integrated testing modes.
Standalone Mode Integrated Mode
Open test from UFT Solution Manager
Solution Manager - UFT connection
Connect to Solution Manager from UFT using the Solution Manager Connection dialog box.
Solution Manager automatically establishes the Solution Manager - UFT connection.
Available UFT features
All UFT features are available. You can open and work with any test in Solution Manager or in the file system.
You can work only with the currently open test.
File > Open, File > New, and the Recent files list options are disabled.
If you select File > Save As, UFT warns you that it will disconnect from Solution Manager and switch UFT to standalone mode.
Resource files When you open the test, you can also edit and save all the test’s resource files, including those stored in Solution Manager.
When you open the test, test resources stored in Solution Manager are opened in read-only mode.
Save location Tests and uploaded files are automatically saved to the local package ($TMP) in Solution Manager.
You can save tests to any package (including non-local packages).
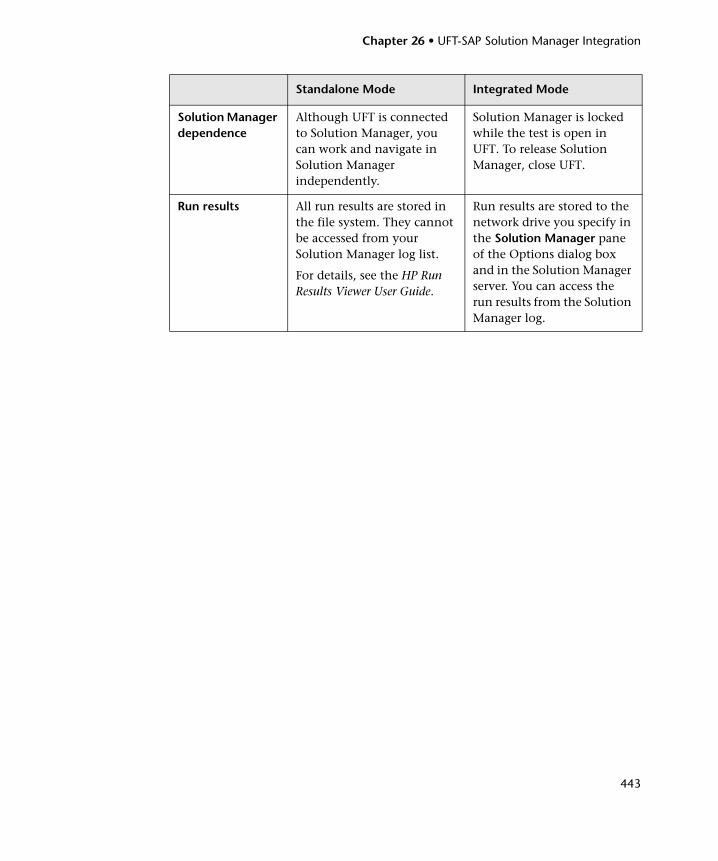
Chapter 26 • UFT-SAP Solution Manager Integration
443
Solution Manager dependence
Although UFT is connected to Solution Manager, you can work and navigate in Solution Manager independently.
Solution Manager is locked while the test is open in UFT. To release Solution Manager, close UFT.
Run results All run results are stored in the file system. They cannot be accessed from your Solution Manager log list.
For details, see the HP Run Results Viewer User Guide.
Run results are stored to the network drive you specify in the Solution Manager pane of the Options dialog box and in the Solution Manager server. You can access the run results from the Solution Manager log.
Standalone Mode Integrated Mode

Chapter 26 • UFT-SAP Solution Manager Integration
444
Solution Manager Connection Dialog Box
This dialog box enables you to connect to or disconnect from Solution Manager at any time during the testing process.
To access 1 Make sure that the computer is connected to Solution Manager.
2 Make sure that UFT is open with the Add-in for SAP Solutions loaded.
3 Select Tools > SAP Solution Manager Connection.
Important information
Do not disconnect UFT from Solution Manager while a GUI test that is stored in Solution Manager is open or while UFT is using a shared resource stored in Solution Manager (such as a shared object repository or data table file).
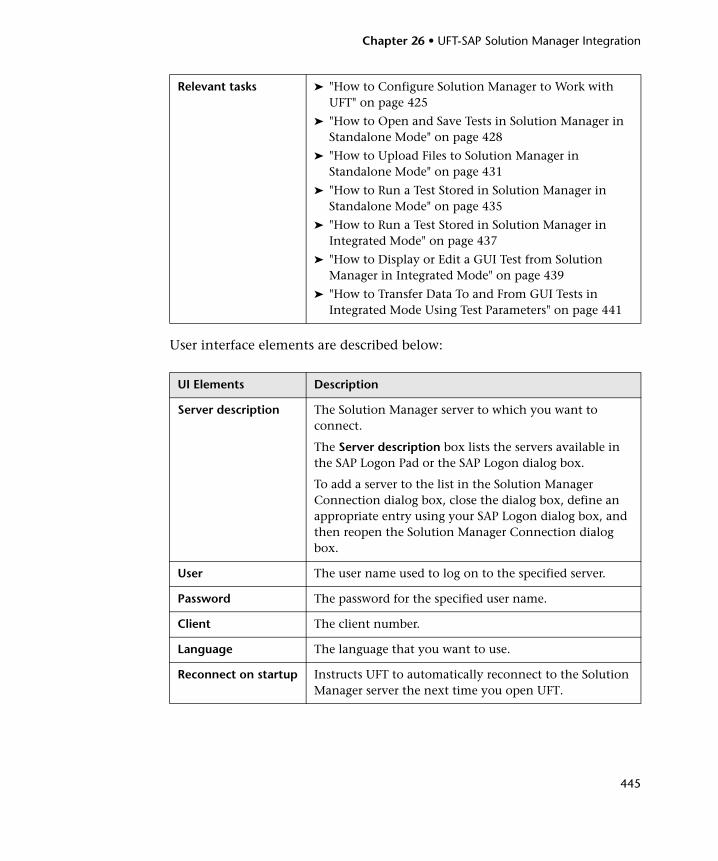
Chapter 26 • UFT-SAP Solution Manager Integration
445
User interface elements are described below:
Relevant tasks ➤ "How to Configure Solution Manager to Work with UFT" on page 425
➤ "How to Open and Save Tests in Solution Manager in Standalone Mode" on page 428
➤ "How to Upload Files to Solution Manager in Standalone Mode" on page 431
➤ "How to Run a Test Stored in Solution Manager in Standalone Mode" on page 435
➤ "How to Run a Test Stored in Solution Manager in Integrated Mode" on page 437
➤ "How to Display or Edit a GUI Test from Solution Manager in Integrated Mode" on page 439
➤ "How to Transfer Data To and From GUI Tests in Integrated Mode Using Test Parameters" on page 441
UI Elements Description
Server description The Solution Manager server to which you want to connect.
The Server description box lists the servers available in the SAP Logon Pad or the SAP Logon dialog box.
To add a server to the list in the Solution Manager Connection dialog box, close the dialog box, define an appropriate entry using your SAP Logon dialog box, and then reopen the Solution Manager Connection dialog box.
User The user name used to log on to the specified server.
Password The password for the specified user name.
Client The client number.
Language The language that you want to use.
Reconnect on startup Instructs UFT to automatically reconnect to the Solution Manager server the next time you open UFT.

Chapter 26 • UFT-SAP Solution Manager Integration
446
Save GUI Test to Solution Manager Dialog Box
This dialog box enables you to save a GUI test in the Solution Manager database.
Save password for reconnection on startup
Instructs UFT to save your password for reconnection on startup.
If you select Reconnect on startup, but do not select this option, you are prompted to enter it each time UFT opens.
Enabled only when Reconnect on startup is selected.
Connect Connects UFT to Solution Manager.
To access 1 Make sure that the computer is connected to Solution Manager.
2 Make sure that UFT is open with the Add-in for SAP Solutions loaded.
3 In UFT, display a GUI test and select File > Save As.
Important information
➤ This dialog box is similar to the Save External File to Solution Manager dialog box, and displays similar user interface elements.
➤ When saving a test to Solution Manager in standalone mode, the test is automatically saved to the local package ($TMP) in Solution Manager.
UI Elements Description

Chapter 26 • UFT-SAP Solution Manager Integration
447
User interface elements are described below:
UI Elements Description
Test name The name for the test. Use a descriptive name that will help you easily identify the test. Ensure that the test name begins with a prefix that matches your Solution Manager server naming conventions. For example, your Solution Manager server may require all file names to begin with the letter z.
When the Save Test in Solution Manager dialog box opens, it displays the default test prefix in the Test name box. You can define or modify this prefix in the Solution Manager pane of the Options dialog box. For details, see "SAP > SAP Solution Manager Pane (Options Dialog Box > GUI Testing Tab)" on page 454.
Test version The version number of the test. The version number can be any number that you choose. You can use the version number option as a kind of manual version control. For example, each time you open and modify a test, you can increment the version number by 1, instead of overwriting the existing version of the test if you want to keep a record of all versions of a test. The test name and version number together form a unique ID for the test.
File System Enables you to save the currently open test anywhere in the file system.

Chapter 26 • UFT-SAP Solution Manager Integration
448
Open GUI Test from Solution Manager Dialog Box
This dialog box enables you to open a GUI test from the Solution Manager database.
User interface elements are described below:
To access 1 Make sure that the computer is connected to Solution Manager.
2 Make sure that UFT is open with the Add-in for SAP Solutions loaded.
3 In UFT, select File > Open > Test.
Important information
This dialog box is similar to the Open External File from Solution Manager dialog box, except that this dialog box contains the Open in read-only mode option.
Relevant tasks "How to Open and Save Tests in Solution Manager in Standalone Mode" on page 428
UI Elements Description
Test name The name of the test you want to open.
When the Open Test from Solution Manager dialog box opens, it displays the most recently opened Solution Manager test in the Test name box.
You can enter a valid test name or select one from the list of recently opened Solution Manager tests. Do not specify a folder path or other location.
Test version The version number of the test you want to open.
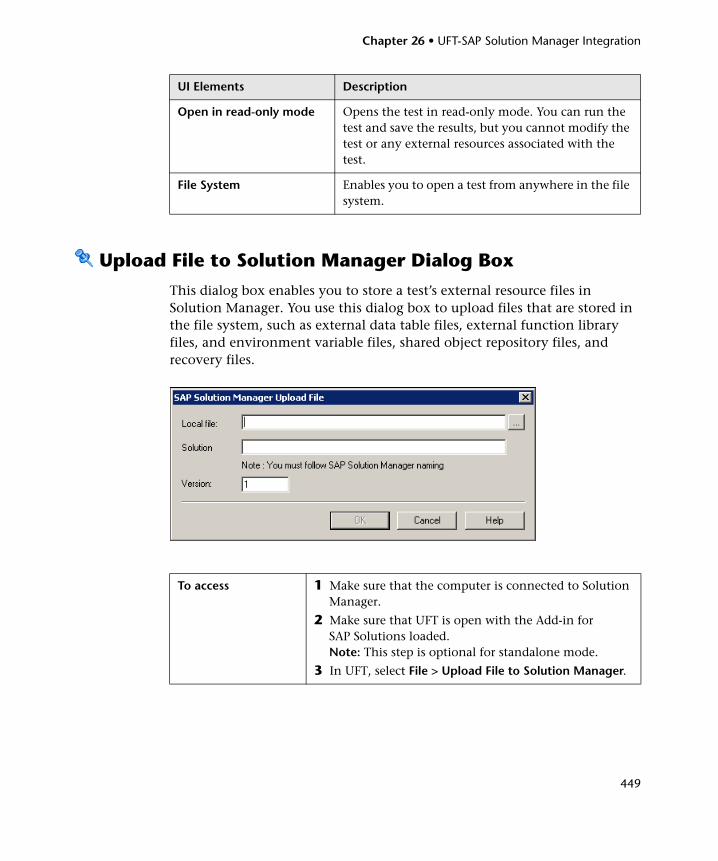
Chapter 26 • UFT-SAP Solution Manager Integration
449
Upload File to Solution Manager Dialog Box
This dialog box enables you to store a test’s external resource files in Solution Manager. You use this dialog box to upload files that are stored in the file system, such as external data table files, external function library files, and environment variable files, shared object repository files, and recovery files.
Open in read-only mode Opens the test in read-only mode. You can run the test and save the results, but you cannot modify the test or any external resources associated with the test.
File System Enables you to open a test from anywhere in the file system.
To access 1 Make sure that the computer is connected to Solution Manager.
2 Make sure that UFT is open with the Add-in for SAP Solutions loaded. Note: This step is optional for standalone mode.
3 In UFT, select File > Upload File to Solution Manager.
UI Elements Description

Chapter 26 • UFT-SAP Solution Manager Integration
450
User interface elements are described below:
Important information
When uploading a file to Solution Manager in standalone mode, it is automatically saved to the local package ($TMP) in Solution Manager.
Relevant tasks "How to Upload Files to Solution Manager in Standalone Mode" on page 431
UI Elements Description
Local file The complete path of the file you want to upload. You can enter a file path or browse to the file.
Solution The name under which to store the file in Solution Manager. Ensure that the file name begins with a prefix that matches your Solution Manager server naming conventions. For example, you may have to prefix all file names with the letter z.
When the Upload File to Solution Manager dialog box opens, it displays the default file prefix in the Solution Manager name box. You can define or modify this prefix in the Solution Manager pane of the Options dialog box. For details, see "SAP > SAP Solution Manager Pane (Options Dialog Box > GUI Testing Tab)" on page 454.
Version The version number of the file. The version number can be any number that you choose. For example, each time you open and modify a file, you can increment the version number by 1, instead of overwriting the existing version of the file if you want to keep a record of all versions of a file. The file name and version number together form a unique ID for the file.

Chapter 26 • UFT-SAP Solution Manager Integration
451
Save External File to Solution Manager Dialog Box
This dialog box enables you to save a GUI test’s resource files directly to Solution Manager.
To access 1 Make sure that the computer is connected to Solution Manager.
2 Make sure that UFT is open with the Add-in for SAP Solutions loaded. Note: This step is optional for standalone mode.
3 In UFT, display the file and select Tools > Save As.
Important information
This dialog box is similar to the Open External File from Solution Manager dialog box, except that this dialog box does not contain the Open in read-only mode option.
Relevant tasks "How to Upload Files to Solution Manager in Standalone Mode" on page 431

Chapter 26 • UFT-SAP Solution Manager Integration
452
User interface elements are described below:
Download File from Solution Manager
This dialog box enables you to download files stored in Solution Manager and save them in the file system.
UI Elements Description
File name The name under which to store the file in Solution Manager. Ensure that the file name begins with a prefix that matches your Solution Manager server naming conventions. For example, you may have to prefix all file names with the letter z.
When the Save External File to Solution Manager dialog box opens, it displays the default file prefix in the Solution Manager name box. You can define or modify this prefix in the SAP Solution Manager pane of the Options dialog box. For details, see "SAP > SAP Solution Manager Pane (Options Dialog Box > GUI Testing Tab)" on page 454.
File version The version number of the file. The version number can be any number that you choose. For example, each time you open and modify a file, you can increment the version number by 1, instead of overwriting the existing version of the file if you want to keep a record of all versions of a file. The file name and version number together form a unique ID for the file.

Chapter 26 • UFT-SAP Solution Manager Integration
453
User interface elements are described below:
To access 1 Make sure that the computer is connected to Solution Manager.
2 Make sure that UFT is open with the Add-in for SAP Solutions loaded.
3 In UFT, select File > Download File from Solution Manager.
Important information
If you upload a file to Solution Manager and then associate that file with a test as a resource file, the resource file is automatically downloaded each time you open the test, and you do not need to use this dialog box.
UI Elements Description
Solution The name of the file stored in Solution Manager.
When the Download File from Solution Manager dialog box opens, it displays the default file prefix in the Solution Manager name box. You can define or modify this prefix in the Solution Manager pane of the Options dialog box. For details, see "SAP > SAP Solution Manager Pane (Options Dialog Box > GUI Testing Tab)" on page 454.
Version The version number of the file to download.
Download to The complete path and file name of the location to which you want to download the file. You can enter or browse to the folder path.

Chapter 26 • UFT-SAP Solution Manager Integration
454
SAP > SAP Solution Manager Pane (Options Dialog Box > GUI Testing Tab)
This pane enables you to configure how UFT behaves when you are connected to SAP Solution Manager.
To access 1 Make sure that UFT is open with the Add-in for SAP Solutions loaded.
2 Make sure that a GUI test is open.
3 In UFT, select Tools > Options > GUI Testing tab > SAP > SAP Solution Manager node.

Chapter 26 • UFT-SAP Solution Manager Integration
455
User interface elements are described below:
UI Elements Description
Run results The location in which run results are stored when the test is run from Solution Manager.
This folder must be a mapped network drive or a path in Universal Naming Convention (UNC) format.
New test prefix The prefix that is displayed by default in the Save GUI Test in Solution Manager dialog box.
New file prefix The prefix that is displayed by default when specifying a file to store in Solution Manager.
Solution Manager test cache folder
The location in which a test from Solution Manager is temporarily stored when it is open for editing or running in UFT.
Default location = C:\Documents and Settings\<UserName>\Application Data\Solution Manager
Note: RunCache and EditCache folders are automatically created under the specified folder.
Clear Cache Deletes all files from the Solution Manager test cache folder.
Modify Trace Options Opens the Solution Manager Trace Options dialog box, which enables you to configure if and how UFT generates the UFT–Solution Manager communication trace log (used for troubleshooting communication errors). For details, see "Solution Manager Trace Options Dialog Box" on page 456.

Chapter 26 • UFT-SAP Solution Manager Integration
456
Solution Manager Trace Options Dialog Box
This dialog box enables you to configure whether and how UFT generates a trace file. For example, you can instruct UFT to generate a UFT–Solution Manager communication trace file each time Solution Manager runs a UFT test to troubleshoot communication errors.
To access 1 Connect the computer to Solution Manager in standalone mode.
2 In UFT, select Tools > Options > GUI Testing tab > SAP > SAP Solution Manager node.
3 In the SAP Solution Manager pane, click Modify Trace Options.
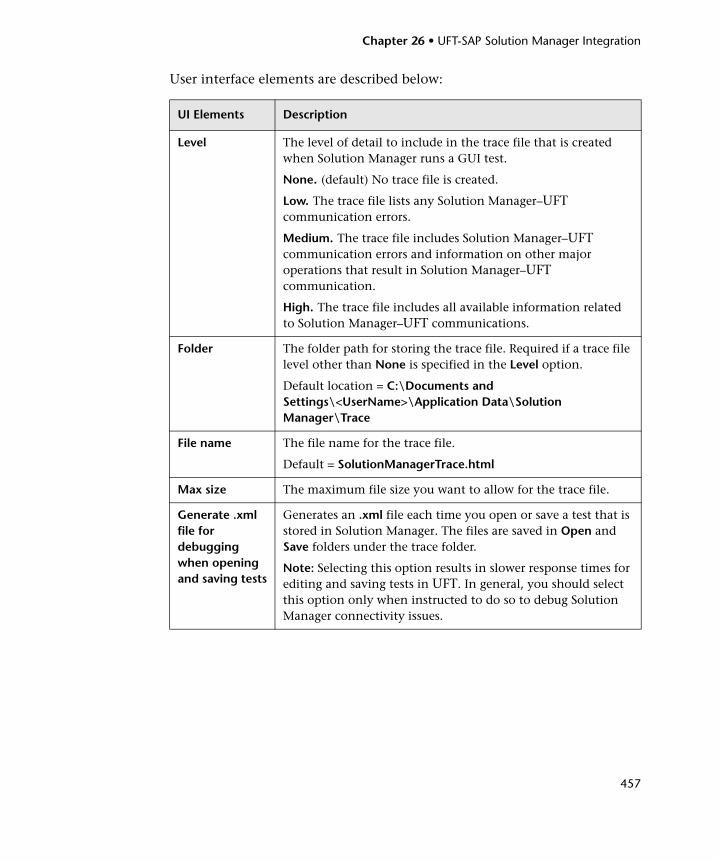
Chapter 26 • UFT-SAP Solution Manager Integration
457
User interface elements are described below:
UI Elements Description
Level The level of detail to include in the trace file that is created when Solution Manager runs a GUI test.
None. (default) No trace file is created.
Low. The trace file lists any Solution Manager–UFT communication errors.
Medium. The trace file includes Solution Manager–UFT communication errors and information on other major operations that result in Solution Manager–UFT communication.
High. The trace file includes all available information related to Solution Manager–UFT communications.
Folder The folder path for storing the trace file. Required if a trace file level other than None is specified in the Level option.
Default location = C:\Documents and Settings\<UserName>\Application Data\Solution Manager\Trace
File name The file name for the trace file.
Default = SolutionManagerTrace.html
Max size The maximum file size you want to allow for the trace file.
Generate .xml file for debugging when opening and saving tests
Generates an .xml file each time you open or save a test that is stored in Solution Manager. The files are saved in Open and Save folders under the trace folder.
Note: Selecting this option results in slower response times for editing and saving tests in UFT. In general, you should select this option only when instructed to do so to debug Solution Manager connectivity issues.

Chapter 26 • UFT-SAP Solution Manager Integration
458

Part XII
Siebel Add-in

460

461
27Siebel Add-in - Quick Reference
You can use the Unified Functional Testing Siebel Add-in to test Siebel user-interface objects (controls).
The following table summarizes basic information about the Siebel Add-in and how it relates to some commonly-used aspects of UFT.
General Information
Add-in Type This is a Web-based add-in. Much of its functionality is the same as other Web-based add-ins.
See "Web-Based Application Support" on page 49.
Supported Environments
For details on supported Siebel environments, see the Siebel Add-in section of the HP Unified Functional Testing Product Availability Matrix, available from the UFT Help or the root folder of the Unified Functional Testing DVD.
Important Information
➤ You can use Siebel Test Express to automatically generate a new object repository, or update an existing object repository. For details, see "Siebel Test Express" on page 491.
➤ For general considerations, see "Considerations - Siebel Add-in" on page 464.
Test Object Methods and Properties
The Siebel Add-in provides test objects, methods, and properties that can be used when testing objects in Siebel applications. For details, see the Siebel section of the HP Unified Functional Testing Object Model Reference.
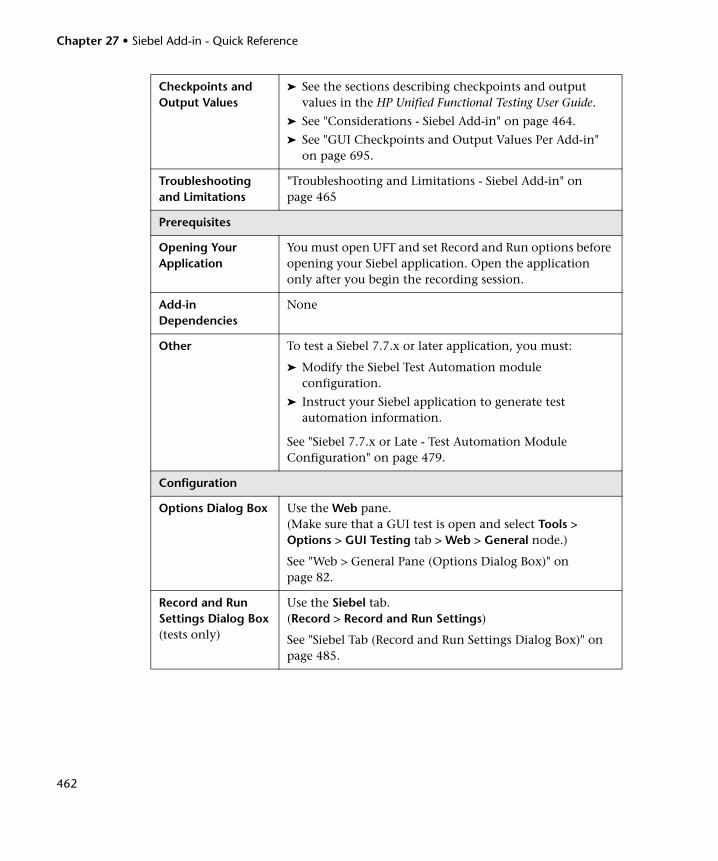
Chapter 27 • Siebel Add-in - Quick Reference
462
Checkpoints and Output Values
➤ See the sections describing checkpoints and output values in the HP Unified Functional Testing User Guide.
➤ See "Considerations - Siebel Add-in" on page 464.
➤ See "GUI Checkpoints and Output Values Per Add-in" on page 695.
Troubleshooting and Limitations
"Troubleshooting and Limitations - Siebel Add-in" on page 465
Prerequisites
Opening Your Application
You must open UFT and set Record and Run options before opening your Siebel application. Open the application only after you begin the recording session.
Add-in Dependencies
None
Other To test a Siebel 7.7.x or later application, you must:
➤ Modify the Siebel Test Automation module configuration.
➤ Instruct your Siebel application to generate test automation information.
See "Siebel 7.7.x or Late - Test Automation Module Configuration" on page 479.
Configuration
Options Dialog Box Use the Web pane.(Make sure that a GUI test is open and select Tools > Options > GUI Testing tab > Web > General node.)
See "Web > General Pane (Options Dialog Box)" on page 82.
Record and Run Settings Dialog Box(tests only)
Use the Siebel tab.(Record > Record and Run Settings)
See "Siebel Tab (Record and Run Settings Dialog Box)" on page 485.

Chapter 27 • Siebel Add-in - Quick Reference
463
This chapter includes:
➤ Considerations - Siebel Add-in on page 464
➤ Troubleshooting and Limitations - Siebel Add-in on page 465
Test Settings Dialog Box (tests only)
Use the Web pane.(File > Settings > Web node)
See "Web Pane (Test/Business Component Settings Dialog Box / Application Area - Additional Settings Pane)" on page 101.
Custom Active Screen Capture Settings Dialog Box(tests only)
Use the Web section.(Tools > Options > GUI Testing tab > Active Screen node > Custom Level)
See the section on the Custom Active Screen Capture Settings dialog box in the HP Unified Functional Testing User Guide.
Application Area Additional Settings pane(business components only)
➤ Use the Web pane. In the application area, click Additional Settings > Web in the sidebar.
See "Web Pane (Test/Business Component Settings Dialog Box / Application Area - Additional Settings Pane)" on page 101.
➤ Use the Applications pane.In the application area, select Additional Settings > Applications in the sidebar.
In the Siebel version box, specify the Siebel version for the applications on which you want to record your business component. The version that you choose remains selected for all subsequent business components.

Chapter 27 • Siebel Add-in - Quick Reference
464
Considerations - Siebel Add-in
General Considerations
➤ UFT learns objects in Siebel 7.7.x or later applications in a different way than in Siebel 7.0.x and 7.5.x applications. The Siebel Add-in has two different groups of test objects. The test object used to represent an object in your application depends on the Siebel version of your application and the implementation of the object. For details, see "Siebel Test Object Model - Overview" on page 473.
➤ When you load the Siebel Add-in, the Web event recording configurations designed for this add-in are loaded and are used whenever you record on a Siebel object. The Siebel Web event recording configurations do not affect the way UFT behaves when you record on other non-Siebel Web objects. For details, see "Event Recording Configuration for Web-Based Applications" on page 58.
➤ When you load the Siebel Add-in, the object identification settings are also automatically customized for Siebel. You do not need to make any changes to them. Therefore, the Siebel and Web options in the Object Identification dialog box are unavailable.
➤ Loading the ActiveX and Siebel add-ins together may cause problems when recording on some ActiveX methods.

Chapter 27 • Siebel Add-in - Quick Reference
465
Siebel 7.7.x or Later
➤ As you record a test or business component on your Siebel 7.7.x or later application, UFT records the operations you perform. UFT works directly with the Siebel Test Automation API (SiebelAx_Test_Automation_18306.exe) to record your operations. Therefore, although UFT records a step for each operation you perform, it adds the steps to your test or business component only when API events are sent to UFT (when information is sent to the Siebel server).
➤ When test automation is activated on a Siebel 7.7.x or later server and requested in the URL, the Siebel Web Engine (SWE) generates additional information about each object in the Siebel application when constructing the Web page. Each object has a specific set of properties, events, and methods that provide functionality for the Siebel application. The Siebel Test Automation API maps to these objects to enable you to manipulate your Siebel application from UFT when recording and running tests or business components on the Siebel application.
Siebel 7.0.x/7.5.x
The Siebel Add-in can also identify Siebel objects by the siebel attached text property (the static text displayed with a Siebel object), rather than by the HTML name of the object. This enables you to maintain the test or business component with dynamically created pages.
Troubleshooting and Limitations - Siebel Add-in
This section contains general troubleshooting and limitation information about the Siebel Add-in.
General
Recording on multiple Siebel application versions in the same computer may cause steps not to be recorded.

Chapter 27 • Siebel Add-in - Quick Reference
466
Checkpoints and the Object Spy
➤ To create a table content checkpoint or output value for the appropriate object type (for example, SiebList, SiebPicklist, or SiebPageTabs) when editing your test or business component, you must open the application to the exact screen in which the object appears. Otherwise, only the Properties tab is displayed in the Table Checkpoint dialog box or Table Output Value dialog box.
➤ Checkpoints created for SiebList objects that contain a Total row may fail during a run session if the action that led to the update of the Total row was not recorded.
➤ The Object Spy and checkpoints identify expanded calculator and calendar popup objects as Window("Siebel control popup").
This section also includes troubleshooting and limitation information about the following Siebel versions:
➤ "Siebel 7.7.x or Later" on page 466
➤ "Siebel 7.0.x and 7.5.x" on page 467
Siebel 7.7.x or Later
➤ Certain objects, methods, or properties may be available from within UFT even though they are not described in the documentation. This is because UFT retrieves the latest SiebelObject.xml file when loading the Siebel add-in and opening a Siebel application, and because the documentation is updated according to version of the XML file that is available at the time of the UFT product release.
➤ Certain objects, for example, in the SmartScript module, do not have a value for the repository name property and are therefore not recorded and are not recognized by the Object Spy.
Workaround: Use low-level recording.
➤ Gantt chart operations and RichText editor toolbar operations are not recorded.
Workaround: Use low-level recording.

Chapter 27 • Siebel Add-in - Quick Reference
467
➤ The appointment calendar object can be recorded only if the ActiveX Add-in is enabled.
➤ If you record the creation of a new appointment in an appointment calendar, the test or business component may fail when you run it.
Workaround: Manually add an onkeypress FireEvent to the WebElement before the Set step.
➤ The Active Screen is empty for steps recorded on pop-up tables.
➤ Inner objects that are placed in cells of a SiebList object cannot be accessed in the standard way, even if they are recorded. This may cause the following limitations:
➤ The entire SiebList object is highlighted if the test or business component script line contains an operation on a SiebList inner object.
➤ The ChildObjects method for SiebList objects returns 0.
➤ The Add Objects option in the Object Repository window cannot be used to add SiebList inner objects to the object repository.
➤ If a warning message opens while recording your test or business component, for example, if you insert invalid data, UFT may record these operations in the incorrect order.
Workaround: Manually change the order of the steps in your test after recording.
➤ Context-sensitive help (F1 Help) may not be available for Siebel 7.7.x or later objects and/or methods that were added by Siebel after the UFT 11.50 release. In addition, auto-documentation (in the Keyword View Documentation column) and step documentation (in the Step Generator) may not be available for these objects and/or methods.
Siebel 7.0.x and 7.5.x
Creating and Running Testing Documents
➤ UFT does not support recording on Siebel applications using keyboard shortcuts.
Workaround: Use the mouse to record on Siebel applications.

Chapter 27 • Siebel Add-in - Quick Reference
468
➤ UFT does not record the scrolling of a set of records in an SblTable.
Workaround: While recording, scroll the table row by row.
Tip: You can use the Editor to manually edit the statement to scroll multiple rows.
➤ By default, UFT does not record Editor control operations (used mainly in long Description fields).
Workaround: Use low-level recording, making sure you record the scrolling to the control if needed.
Working with Siebel Controls
➤ When you click the Search icon for the first time during a browser session, a frame opens that is different from all other search frames. When running test iterations, the correct frame may not be identified.
Workaround: Close the browser at the end of every iteration.
➤ Each Siebel version includes changes/modifications to the user interface. As a result, steps created on previous Siebel versions on elements that no longer exist in the interface will probably fail and should be replaced.
For example, the button arrow used to view the next set of records on the top line of the Siebel table that appears in earlier versions of Siebel was replaced in Siebel version 7.5.2 with a scroll bar at the side of the table. In this case, replace Image("Next Record").Click with an operation on the scroll bar.
➤ The name of the first column in an SblTable object cannot be retrieved.
Workaround: Use the column index to perform the operation on the cells in the first column.

Chapter 27 • Siebel Add-in - Quick Reference
469
Standard-Interactivity (SI) Applications
➤ In some SI application dialog boxes, in cases where selecting a check box causes a navigation to occur (for example, in a check box table column, such as the New column), UFT may not record the subsequent steps or may record them inaccurately.
Workaround: To continue recording accurately, click anywhere in the page before the next operation.
➤ When recording on a Currency Calculator pop-up control, clicking OK immediately after entering a currency value may result in a recording error.
Workaround: Before clicking OK in a Currency Calculator pop-up control within a SblAdvancedEdit object, select another control within the pop-up and click OK.
High-Interactivity (HI) Applications
➤ Depending on your browser's security settings and the Siebel patches that are installed, several dialog boxes may open when logging in to your Siebel application. It is recommended to run tests or business components when all required Siebel patches are downloaded and installed. If for some reason, you cannot do this, manually delete the Sync steps added between the steps recorded on the security alerts.
➤ UFT cannot record a SblTable.Sort operation if it is the first operation inside an MVG (Multi-Value Group) applet.
Workaround: Click anywhere in the MVG applet and then sort it.
➤ When recording on a SblAdvancedEdit object that opens a pop-up object, UFT records only the Set method and does not record the operations within the pop-up object. However, if you open a table from the pop-up object, UFT does record the operations performed within this secondary table. These statements are not required in the test or business component, since the operation of inserting the Pickup table selected item into the main table is also recorded. In some cases, these redundant statements interfere with the run session.
Workaround: If the test or business component does not run as expected, delete the statements recorded on secondary tables opened from a pop-up object.

Chapter 27 • Siebel Add-in - Quick Reference
470
➤ When adding an attachment to a Siebel table, UFT records additional statements that may interfere with the run session.
Workaround: After recording, delete the OpenCellElement and Add statements that were recorded when you added an attachment.
➤ When inserting a value into a Siebel table cell using the Currency Calculator control, UFT may record a new SelectCell step before the SetCellData if you move the cursor to another cell before clicking in the cell in which you entered a value.
Workaround: While recording, always close the Currency Calculator by pressing the ENTER key. If, for some reason, the Currency Calculator was not closed using the ENTER key, you can manually change the order between the SetCellData and SelectCell steps.

471
28Siebel Add-in - Testing and Configuration
This chapter includes:
Concepts
➤ Siebel Add-in - Overview on page 472
➤ Siebel Test Object Model - Overview on page 473
➤ Siebel Add-in - Checkpoints and Output Values on page 476
➤ Siebel 7.7.x or Late - Test Automation Module Configuration on page 479
Tasks
➤ How to Define Environment Variables for Siebel Applications on page 482
➤ How to Upgrade Tests Created with Version 6.5 of the Siebel Add-in on page 483
Reference
➤ Siebel Tab (Record and Run Settings Dialog Box) on page 485

Chapter 28 • Siebel Add-in - Testing and Configuration
472
Concepts
Siebel Add-in - Overview
The Siebel eBusiness platform is widely used in many organizations for their business process applications. UFT can create and run tests and business components on these applications using special test objects and operations (methods and properties) that are customized for Siebel.
The customized Siebel test objects, methods, and properties make scripts simpler to read, maintain, enhance, and parameterize, enabling both advanced and novice users to create sophisticated tests and business components on Siebel applications.
UFT supports testing on both standard-interactivity and high-interactivity Siebel applications:
➤ Standard-interactivity applications download data as it becomes necessary. This interface is designed for users accessing the application from outside the corporate network.
➤ High-interactivity applications download the majority of the required data at one time, requiring fewer navigations. This interface is designed for heavy use, for example, by call centers.
Note: Tests created in earlier versions of the Siebel Add-in can be opened in Unified Functional Testing Siebel Add-in. The Siebel Add-in provides an option to convert the test’s old record and run settings to the new version settings automatically. In addition, the naming convention for Siebel test objects has been modified for Unified Functional Testing Siebel Add-in. For details, see "How to Upgrade Tests Created with Version 6.5 of the Siebel Add-in" on page 483.

Chapter 28 • Siebel Add-in - Testing and Configuration
473
Siebel Test Object Model - Overview
The Siebel test object model is comprised of two different groups of test objects: test objects with the prefix Sbl and test objects with the prefix Sieb. If you are recording on a Siebel 7.0.x or 7.5.x application, UFT learns only Sbl test objects. If you are learning objects on a Siebel 7.7.x or later application, UFT may learn only Sieb test objects or a combination of Sbl and Sieb test objects, depending on the way in which your Siebel application was implemented.
For details on each of the Siebel test objects, see the Siebel section of the HP Unified Functional Testing Object Model Reference.
When you perform an operation on your Siebel application while recording a test or business component, UFT:
➤ identifies the object on which you performed the operation and creates the appropriate test object in the test or business component.
➤ reads the current value of the object’s properties in your application and stores them in the object repository as the test object’s property values.
➤ chooses a unique name for the test object, generally using the value of one of its prominent properties.
➤ records the operation (method) that you performed on the object and displays the operation as a step in the Keyword View and as a statement in the Editor.
For example, suppose you select a check box for a specific account on a page of your Siebel application. This check box has the label Competitor.
UFT identifies the check box as a SiebCheckbox object. It creates a SiebCheckbox test object with the name Competitor and records the following properties and values as the description for the Competitor SiebCheckbox.

Chapter 28 • Siebel Add-in - Testing and Configuration
474
It also records that you performed a SetOn method to select the SiebCheckbox object.
UFT displays your step in the Keyword View like this:
UFT displays your step in the Editor like this:
When you run a test or business component, UFT identifies each object in your application by its test object class and its description: the set of identification properties and values used to uniquely identify the object. In the above example, during the run session, UFT searches the object repository for the SiebCheckbox object named Competitor to look up its description. Based on the description it finds (repositoryname = Competitor and classname = SiebCheckbox), UFT searches the application for a SiebCheckbox object named Competitor. When it finds the object, UFT performs the SetOn method on the object to select the check box.
This section also includes:
➤ "Recording Steps on Siebel Objects" on page 474
➤ "Native Operations and Properties in Siebel 7.0.x and 7.5.x Applications" on page 475
Recording Steps on Siebel ObjectsWhen you record an operation on a Siebel object, UFT inserts a step with the relevant Siebel object in the Keyword View and adds the corresponding statement in the Editor.
SiebApplication("Siebel Call Center").SiebScreen("Accounts").SiebView("Account Details").SiebApplet("Account").SiebCheckbox("Competitor").SetOn

Chapter 28 • Siebel Add-in - Testing and Configuration
475
For example, if you select an item from a list, the Keyword View may be displayed as follows:
UFT records this step in the Editor as:
Tip: It is recommended to log out of your Siebel application at the end of the recording session before closing the browser.
If you have the Siebel Add-in installed, you can use UFT to generate an object repository for your application. For details, see Chapter 29, "Siebel Test Express."
Native Operations and Properties in Siebel 7.0.x and 7.5.x ApplicationsIn addition to the Siebel-specific test objects and operations, you can also use the Object property to access native (internal) operations and properties of the HTML or ActiveX elements that wrap Siebel objects. The Object property is available for all Siebel 7.0.x and 7.5.x objects.
Tip: You can use the Object Spy to view the native operations and properties of an object in your application.
SiebApplication("Siebel Call Center").SiebScreen("Accounts").SiebView("Account Details").SiebApplet("Account").SiebPicklist("Account Type").Select "Consultant"

Chapter 28 • Siebel Add-in - Testing and Configuration
476
The Object property is also useful for checking the value of properties that are not available using a standard Siebel checkpoint.
The following example uses the Object property to access the raw HTML element that represents the SblTabStrip object, retrieve its HTML tag name and size, and display this information in message boxes.
Note: Relying on native properties may be problematic if you are upgrading your Siebel application to a newer version, in which objects may have a different structure. For example, the conversion of HTML objects to ActiveX objects in the Internet Explorer Option Pack.
For details on using the Object property, see the HP Unified Functional Testing User Guide.
Siebel Add-in - Checkpoints and Output Values
After you create your test or business component, you can enhance it by adding checkpoints, retrieving output values, parameterizing values, and inserting Siebel objects, methods and properties.
You check most Siebel objects or output their property values in the same way as you do for other objects supported by UFT, with exceptions for SblTable objects and Sieb tabular test objects.
set obj = Browser("Siebel Call").Page("Siebel Call").Frame("Siebel Call").SblTabStrip("ScreenTabStrip").Objectmsgbox obj.tagNamemsgbox obj.heightmsgbox obj.width

Chapter 28 • Siebel Add-in - Testing and Configuration
477
Considerations - Siebel Add-in Checkpoints and Output Values
➤ You check SblTable objects and output their values in the same way as you do for other table objects supported by UFT—using the Table Checkpoint Properties dialog box or Table Output Value Properties dialog box—with the following differences:
➤ In Siebel 7.0.x or 7.5.x high-interactivity applications, you must have your Siebel application open to the page that contains the table while creating a table checkpoint or output value.
When creating table checkpoints or output values, do not include the header line of the SblTable object when selecting cells to check or output. To clear the selection in this first row of cells, double-click row heading 1 to the left of the table.
Tip: When working with SblTable objects, you can spool all of the visible data from a table into an external file. For details, see "Spooling Data from a Siebel Table" on page 478.
➤ Specific test objects in Siebel 7.7.x applications (with Sieb prefixes) have tabular characteristics. UFT treats Sieb tabular test objects as table-type objects and enables you to check both their content and/or their identification properties. You can also output content and/or identification property values for use in your test or business component. The following Sieb test objects have tabular characteristics: SiebCommunicationsToolbar, SiebList, SiebMenu, SiebPageTabs, SiebPDQ, SiebPicklist, SiebScreenViews, SiebThreadbar, SiebToolbar, and SiebViewApplets.
Tip: When working with Sieb tabular objects, you can spool all of the visible data from the object into an external file. For details, see "Spooling Data from a Siebel Table" on page 478.

Chapter 28 • Siebel Add-in - Testing and Configuration
478
➤ When testing high-interactivity applications:
➤ If the Sieb tabular object is not open in your Siebel application when you create a checkpoint, the Table Checkpoint Properties dialog box contains only the Properties tab and the option to select which type of information to check (content or properties) is disabled.
➤ If the Sieb tabular object is not open in your Siebel application when you create the output value, the Table Output Value Properties dialog box contains only the Properties tab, and the option to select which type of information to output (content or properties) is disabled.
➤ If you want to access an inner object contained in a SiebList object, hold the CTRL key while you click the SiebList object with the pointing hand mechanism.
Spooling Data from a Siebel Table
If you want to spool all the visible data from a SblTable or a Sieb tabular object (such as a SiebList object) into an external file, you can loop through each cell in the table and then save the information to an external file.
The following example uses the GetCellData method to list the data of each cell in a SblTable object with 10 rows and 10 columns:
For i=0 to 10For j=0 to 10
Dat=Browser("Siebel eChannel").Page("Siebel eChannel_8").Frame("Campaign Explorer").SblTable("Campaign").GetCellData (i, j)SaveToExternalFile (Dat)
NextNext

Chapter 28 • Siebel Add-in - Testing and Configuration
479
The following example uses the RowsCount and ColumnsCount methods to list the data of each cell in a SiebList object:
For details on the GetCellData, RowsCount, and ColumnsCount methods, see the Siebel section of the HP Unified Functional Testing Object Model Reference.
Siebel 7.7.x or Late - Test Automation Module Configuration
UFT support for Siebel 7.7.x or later applications is based on the Siebel Test Automation API (SiebelAx_Test_Automation_18306.exe). Before you can create or run tests or business components on your Siebel 7.7.x or later application, you must modify the Siebel Test Automation module configuration and instruct your Siebel application to generate test automation information.
You do not need to make any configuration changes in Siebel 7.0.x and 7.5.x applications to create and run tests or business components on these Siebel application versions.
RowsCount = SiebApplication("Siebel Call Center").SiebScreen("Accounts").SiebView("My Accounts").SiebApplet("Accounts").SiebList("List").RowsCount
ColsCount = SiebApplication("Siebel Call Center").SiebScreen("Accounts").SiebView("My Accounts").SiebApplet("Accounts").SiebList("List").ColumnsCount
For i=0 to RowsCount-1For j=0 to ColsCount-1
ColumnName = SiebApplication("Siebel Call Center").SiebScreen("Accounts").SiebView("My Accounts").SiebApplet("Accounts").SiebList("List").GetColumnRepositoryNameByIndex(j)
Dat=SiebApplication("Siebel Call Center").SiebScreen("Accounts").SiebView("My Accounts").SiebApplet("Accounts").SiebList("List").GetCellText(ColumnName,i)SaveToExternalFile (Dat)
NextNext

Chapter 28 • Siebel Add-in - Testing and Configuration
480
To test your Siebel 7.7.x or later application using the Siebel Add-in, you must confirm that your Siebel server has the Siebel Test Automation module installed and correctly configured to perform test automation. For detailed information, see the section that describes how to set up your functional testing environment in Testing Siebel eBusiness Applications Version 7.7, provided with your Siebel installation.
Generating Test Automation Information - Siebel Application
To create and run tests or business components on your Siebel 7.7.x or later application, you must instruct the Siebel Web Engine (SWE) to generate test automation information for the Siebel application, using a SWE command. To do so, append the SWECmd=AutoOn token to the URL of your Siebel server. For example: http://hostname/callcenter/start.swe?SWECmd=AutoOn. If you do not append this token, the SWE does not generate test automation information.
If you select the Open the following application when a record or run session begins option in the Siebel tab of the Record and Run Settings dialog box, UFT automatically appends the Siebel Test Automation information to the URL (you do not need to specify it manually in the URL). For details on the Record and Run Settings dialog box options, see "How to Define Environment Variables for Siebel Applications" on page 482.
Note: If a session timeout error occurs in your Siebel 7.7.x or later application, the Siebel Test Automation URL parameter values are not saved. After you log out and log in again, you must navigate to the correct URL that contains the required Siebel Test Automation parameter values (including password parameter values, if any—see below).

Chapter 28 • Siebel Add-in - Testing and Configuration
481
Generating Test Automation Information - Secured Siebel Application
If a password for generating test automation information is defined on your Siebel Server, you must also indicate that password in the URL (in addition to the SWECommand=AutoOn token described above). The URL token is in the format AutoToken=password. For example: http://hostname/callcenter/start.swe?SWECmd=AutoOn&AutoToken=mYPass. This enables UFT to run the Siebel Test Automation API SiebelAx_Test_Automation_18306.exe even in secure mode.
If a password is defined for the Siebel Server and you do not append this token to the URL, the SWE does not generate test automation information.
For details on whether your Siebel Server is secured for test automation, contact your Siebel system administrator.
If you select the Open the following application when a record or run session begins option in the Siebel tab of the Record and Run Settings dialog box, click the Advanced button, and specify the password in the Siebel automation access code box in the Advanced Siebel Record and Run Settings dialog box, UFT automatically appends the password information to the URL (you do not need to specify it manually in the URL). For details on the Record and Run Settings dialog box options, see "How to Define Environment Variables for Siebel Applications" on page 482.

Chapter 28 • Siebel Add-in - Testing and Configuration
482
Tasks
How to Define Environment Variables for Siebel Applications
Note:
➤ If you define any of these environment variables, it overrides the corresponding values in the Siebel tab of the Record and Run Settings dialog box (for tests), the Applications pane in the Business Component Settings dialog box (for components), or the Applications pane in the application area’s Additional Settings pane (for application areas).
➤ For details on defining and working with environment variables, see "Environment Variables in Record and Run Settings" on page 37.
Use the variable names listed in the following table to define Siebel application details:
Option Variable Name Description
Siebel version APPLICATION_ENV The Siebel version for the applications on which you want to record your test or business component.
Possible values:777075
This option is available for tests and business components.
Address URL_ENV The URL of the application you want to open. This option is available only for tests.
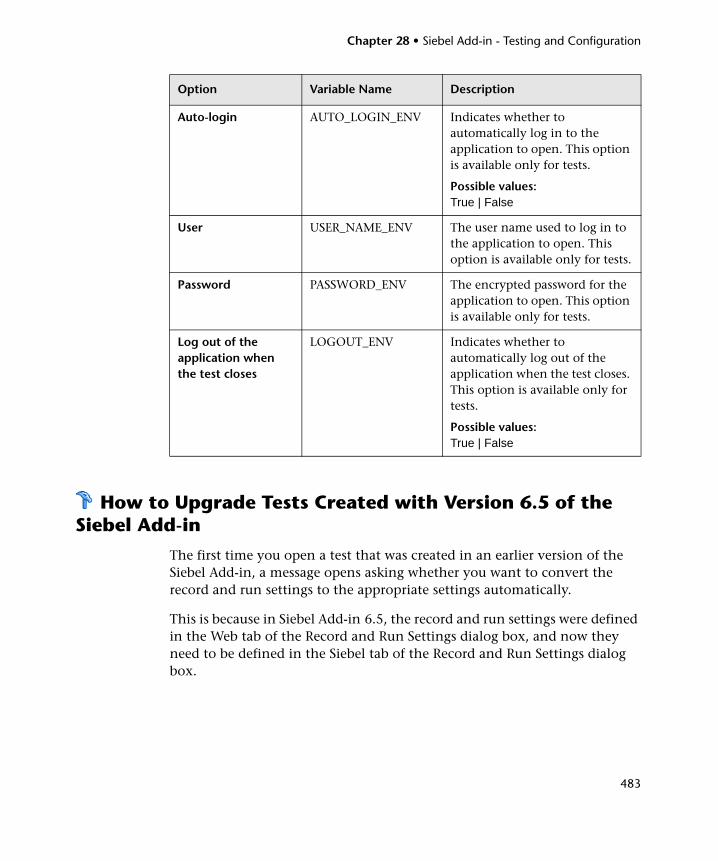
Chapter 28 • Siebel Add-in - Testing and Configuration
483
How to Upgrade Tests Created with Version 6.5 of the Siebel Add-in
The first time you open a test that was created in an earlier version of the Siebel Add-in, a message opens asking whether you want to convert the record and run settings to the appropriate settings automatically.
This is because in Siebel Add-in 6.5, the record and run settings were defined in the Web tab of the Record and Run Settings dialog box, and now they need to be defined in the Siebel tab of the Record and Run Settings dialog box.
Auto-login AUTO_LOGIN_ENV Indicates whether to automatically log in to the application to open. This option is available only for tests.
Possible values:True | False
User USER_NAME_ENV The user name used to log in to the application to open. This option is available only for tests.
Password PASSWORD_ENV The encrypted password for the application to open. This option is available only for tests.
Log out of the application when the test closes
LOGOUT_ENV Indicates whether to automatically log out of the application when the test closes. This option is available only for tests.
Possible values:True | False
Option Variable Name Description

Chapter 28 • Siebel Add-in - Testing and Configuration
484
Select one of the following:
➤ Yes. Converts the record and run settings for the test automatically.
➤ No. Leaves the settings as they are.
If you select Yes, the following settings are modified in the Siebel tab of the Record and Run Settings dialog box:
➤ The Siebel version is set as Siebel eBusiness 7.0/7.5.
➤ The browser settings and/or URL that were defined in the Web tab are transferred to the Siebel tab.
➤ The Web Add-in is removed from the list of add-ins associated with the test.
Note: If you choose not to convert the settings automatically, or if you choose to convert the settings but do not save the test before closing it, the message asking if you want to convert the settings is not displayed the next time you open the test. You can manually change the settings for a test at any time in the Siebel tab of the Record and Run Settings dialog box.
For user interface details of the Siebel tab of the Record and Run Settings dialog box, see "Siebel Tab (Record and Run Settings Dialog Box)" on page 485.

Chapter 28 • Siebel Add-in - Testing and Configuration
485
Reference
Siebel Tab (Record and Run Settings Dialog Box)
This tab enables you to define how UFT starts recording and running tests on Siebel objects.

Chapter 28 • Siebel Add-in - Testing and Configuration
486
To access Select Record > Record and Run Settings and select the Siebel tab.
Note: The Record and Run Settings dialog box opens automatically each time you begin recording a new test (unless you open the dialog box and set your preferences manually before you begin recording).
Important information
➤ If you have tests that were last modified using the Siebel Add-in, version 6.5, you need to convert your Record and Run Settings to use the Siebel tab instead of the Web tab. For details, see "How to Upgrade Tests Created with Version 6.5 of the Siebel Add-in" on page 483.
➤ If you are working with Siebel 7.7.x or later applications, consider the following:
➤ To test a Siebel 7.7.x or later application, you must open the Siebel application with Siebel Test Automation loaded, by specifying additional URL parameter values. For details, see "Siebel 7.7.x or Late - Test Automation Module Configuration" on page 479.
➤ If you select the Open the following application when a record or run session begins option, UFT automatically appends the Siebel Test Automation information to the URL (you do not need to specify it manually in the URL). If you select to record and run on any open browser, you must specify the required parameter values as part of the application URL when you open the application.
➤ If you select the Open the following application when a record or run session begins option, and specify the password in the Siebel automation access code box in the Advanced Siebel Record and Run Settings dialog box, UFT automatically appends the password information to the URL. You do not need to specify it manually in the URL. If you select to record and run on any open browser, or do not specify the password in the Advanced Siebel Record and Run Settings dialog box, you must specify the required password values as part of the application URL when you open the application.
➤ If a session timeout error occurs in your Siebel 7.7.x or later application, the Siebel Test Automation URL parameter values are not saved. After you log out and log in again, you must navigate to the correct URL that contains the required Siebel Test Automation parameter values.

Chapter 28 • Siebel Add-in - Testing and Configuration
487
User interface elements are described below:
Relevant tasks
➤ "How to Define Environment Variables for Siebel Applications" on page 482
➤ "How to Upgrade Tests Created with Version 6.5 of the Siebel Add-in" on page 483
See also ➤ "Considerations - Siebel Add-in" on page 464
➤ "How to Define Record and Run Settings for UFT Add-ins" on page 41
UI Elements Description
Siebel version Specifies the Siebel version for the applications on which you want to record your test. The version that you choose remains selected for all subsequent tests.
You can use an environment variable to specify the Siebel version. For details, see "How to Define Environment Variables for Siebel Applications" on page 482.
Record and run tests on any open browser
Instructs UFT to use any Internet Explorer browser to record and run the test.
UFT can record and run only browsers that are opened after UFT is opened. If you are using Siebel 7.7.x or later, make sure you specify the required test automation parameters, as described in "Siebel 7.7.x or Late - Test Automation Module Configuration" on page 479.
Open the following application when a record or run session begins
Instructs UFT to open the specified application when record or run sessions begin.
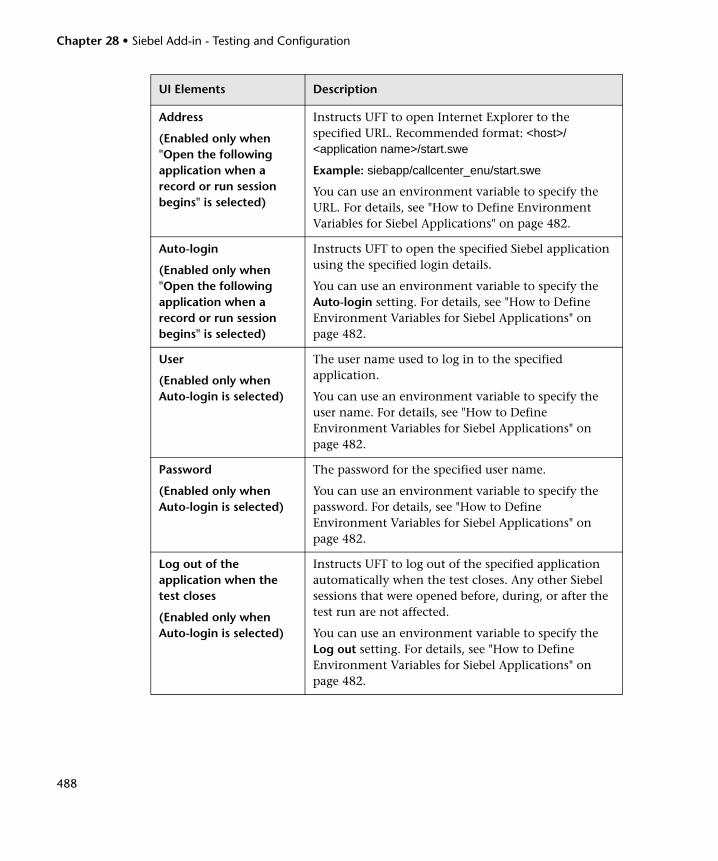
Chapter 28 • Siebel Add-in - Testing and Configuration
488
Address
(Enabled only when "Open the following application when a record or run session begins" is selected)
Instructs UFT to open Internet Explorer to the specified URL. Recommended format: <host>/<application name>/start.swe
Example: siebapp/callcenter_enu/start.swe
You can use an environment variable to specify the URL. For details, see "How to Define Environment Variables for Siebel Applications" on page 482.
Auto-login
(Enabled only when "Open the following application when a record or run session begins" is selected)
Instructs UFT to open the specified Siebel application using the specified login details.
You can use an environment variable to specify the Auto-login setting. For details, see "How to Define Environment Variables for Siebel Applications" on page 482.
User
(Enabled only when Auto-login is selected)
The user name used to log in to the specified application.
You can use an environment variable to specify the user name. For details, see "How to Define Environment Variables for Siebel Applications" on page 482.
Password
(Enabled only when Auto-login is selected)
The password for the specified user name.
You can use an environment variable to specify the password. For details, see "How to Define Environment Variables for Siebel Applications" on page 482.
Log out of the application when the test closes
(Enabled only when Auto-login is selected)
Instructs UFT to log out of the specified application automatically when the test closes. Any other Siebel sessions that were opened before, during, or after the test run are not affected.
You can use an environment variable to specify the Log out setting. For details, see "How to Define Environment Variables for Siebel Applications" on page 482.
UI Elements Description

Chapter 28 • Siebel Add-in - Testing and Configuration
489
Close the browser when the test closes
(Enabled only when "Open the following application when a record or run session begins" is selected)
Instructs UFT to close the opened browser when the test closes. Any other browsers that were opened before, during, or after the test run are not affected.
Advanced
(Enabled only when "Siebel version 7.7 and later" and "Open the following application when a record or run session begins" are selected)
Opens the Advanced Siebel Record and Run Settings dialog box, where you can specify the following options:
➤ Siebel automation request timeout. The timeout period (in seconds) for each attempt to connect to Siebel Test Automation when running the test. Default: 120 seconds.
➤ Siebel automation access code. The predefined security code required to enable access to Siebel Test Automation, if specified by your organization’s access security policy.
UI Elements Description

Chapter 28 • Siebel Add-in - Testing and Configuration
490

491
29Siebel Test Express
This chapter includes:
Concepts
➤ Using Siebel Test Express to Generate or Update Shared Object Repositories on page 492
Tasks
➤ How to Use Siebel Test Express to Generate or Update a Shared Object Repository on page 493
Reference
➤ Create Object Repository Wizard on page 496

Chapter 29 • Siebel Test Express
492
Concepts
Using Siebel Test Express to Generate or Update Shared Object Repositories
If the Siebel Add-in is installed on UFT, you can use Siebel Test Express to automatically generate a new shared object repository, or to update an existing object repository.
You can create new shared object repositories using the Create Object Repository Wizard. Using the wizard you can select the applications or top-level application objects for which to create an object repository. Siebel Test Express scans the Siebel application and creates test objects for every child object contained in the applications or top-level objects that you specify. After you have created the shared object repository, you can save it to the file system or to an ALM project using the Object Repository Manager.
You can also use Siebel Test Express to update an existing object repository. The Update Object Repository Wizard enables you to select the applications or top-level objects to include in the update, as well as the date from which to search for and include new or modified objects. The date refers to when the objects were last added or modified in the object repository.
After you update an object repository, the Object Repository Merge Tool merges the new and modified objects with objects from your existing object repository.
This chapter explains how to create or update an object repository using Siebel Test Express. For details on working with object repositories in general, see the HP Unified Functional Testing User Guide.
For details on creating and updating object repositories using Siebel Test Express, see "How to Use Siebel Test Express to Generate or Update a Shared Object Repository" on page 493.
For details on the Create / Update Object Repository wizard, see "Create Object Repository Wizard" on page 496.

Chapter 29 • Siebel Test Express
493
Tasks
How to Use Siebel Test Express to Generate or Update a Shared Object Repository
This task describes how to use Siebel Test Express to generate a new shared object repository for a Siebel application or to update an existing shared object repository.
This task includes the following steps:
➤ "Prerequisites" on page 493
➤ "Create or update a shared object repository" on page 493
➤ "(Optional) Use the Object Repository Merge Tool to merge the updated Siebel object repository" on page 494
➤ "Save the shared object repository" on page 495
1 Prerequisites
➤ To successfully run Siebel Test Express, the Siebel Add-in must be installed and loaded.
➤ Siebel Test Express supports Siebel 7.7 or later high-interactivity applications that are based on the Siebel Test Automation API.
➤ To work with Siebel Test Express in UFT, ensure that the Siebel Test Automation API version installed on your server is one that supports Siebel Test Express.
2 Create or update a shared object repository
a Select Resources > Object Repository Manager. The Object Repository Manager opens.
b (Optional) To update an existing object repository, open the object repository file you want to update in editable format.

Chapter 29 • Siebel Test Express
494
Note: By default, the object repository file opens in read-only mode. To open it in editable format, either clear the Open in read-only mode check box in the Open Shared Object Repository window, or enable editing by selecting File > Enable Editing after you open the repository.
c Open the Create Object Repository Wizard, as described in "Create Object Repository Wizard" on page 496.
d Follow the steps of the wizard to create the new shared object repository. The wizard contains the following pages:
➤ "Connection Information Page (Create Object Repository Wizard)" on page 497
➤ "Screen Selection Page (Create / Update Object Repository Wizard)" on page 499
➤ "Importing Test Objects Page (Create Object Repository Wizard)" on page 501
➤ "Object Repository Created / Updated Page (Create / Update Object Repository Wizard)" on page 503
After the import process ends, the Object Repository Merge Tool opens. This may take a few minutes.
3 (Optional) Use the Object Repository Merge Tool to merge the updated Siebel object repository
Conflicts between objects in the primary and secondary repository files are resolved automatically by the Merge Tool according to the default resolution settings. After the merge, the Merge Tool displays the Statistics dialog box, which lists the files that were merged, and the number and type of any conflicts that were resolved during the merge. You can accept or modify these resolutions to match your needs.
For details on working with the Object Repository Merge Tool, see the HP Unified Functional Testing User Guide.

Chapter 29 • Siebel Test Express
495
4 Save the shared object repository
Save the shared object repository to the file system or to an ALM project. For details on working with or saving shared object repositories, see the section on the Object Repository Manager in the HP Unified Functional Testing User Guide.
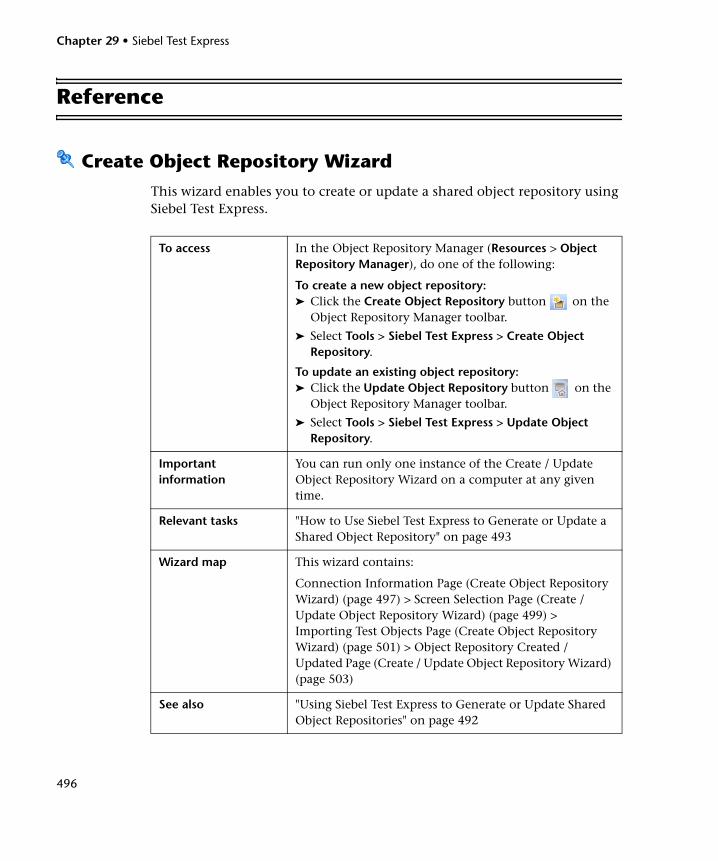
Chapter 29 • Siebel Test Express
496
Reference
Create Object Repository Wizard
This wizard enables you to create or update a shared object repository using Siebel Test Express.
To access In the Object Repository Manager (Resources > Object Repository Manager), do one of the following:
To create a new object repository:➤ Click the Create Object Repository button on the
Object Repository Manager toolbar.
➤ Select Tools > Siebel Test Express > Create Object Repository.
To update an existing object repository:➤ Click the Update Object Repository button on the
Object Repository Manager toolbar.
➤ Select Tools > Siebel Test Express > Update Object Repository.
Important information
You can run only one instance of the Create / Update Object Repository Wizard on a computer at any given time.
Relevant tasks "How to Use Siebel Test Express to Generate or Update a Shared Object Repository" on page 493
Wizard map This wizard contains:
Connection Information Page (Create Object Repository Wizard) (page 497) > Screen Selection Page (Create / Update Object Repository Wizard) (page 499) > Importing Test Objects Page (Create Object Repository Wizard) (page 501) > Object Repository Created / Updated Page (Create / Update Object Repository Wizard) (page 503)
See also "Using Siebel Test Express to Generate or Update Shared Object Repositories" on page 492

Chapter 29 • Siebel Test Express
497
Connection Information Page (Create Object Repository Wizard)This wizard page enables you to enter the connection information for logging in to the Siebel server.
Important information
➤ General information about the wizard is available here: "Create Object Repository Wizard" on page 496
➤ The information you enter on this page is saved as metadata in the generated object repository file.
➤ If you are creating a new repository, the information that was entered in this page the last time you used the wizard is automatically entered in this page.
➤ If you are updating the repository, the information that was saved as metadata with the repository file is automatically entered in this page.
➤ The data required in this page is not necessarily the same as the data you use to log into the Siebel application as a user. Contact your Siebel server administrator for details.
➤ While the Connection Information page is open, you cannot make the Object Repository Manager or UFT window active.
Wizard map The Create Object Repository Wizard contains:
Connection Information Page (Create Object Repository Wizard) > Screen Selection Page (Create / Update Object Repository Wizard) (page 499) > Importing Test Objects Page (Create Object Repository Wizard) (page 501) > Object Repository Created / Updated Page (Create / Update Object Repository Wizard) (page 503)
See also ➤ "How to Use Siebel Test Express to Generate or Update a Shared Object Repository" on page 493
➤ "Using Siebel Test Express to Generate or Update Shared Object Repositories" on page 492

Chapter 29 • Siebel Test Express
498
User interface elements are described below:
UI Element Description
Server URL The URL of the Siebel server (including http://).
User name Your user name.
Password Your password.
Database name The name of the Siebel database.
Table owner The table owner you want to use for the specified Siebel database.
Siebel repository (optional)
The name of the Siebel repository. If you do not enter a name, Siebel will use a default name.
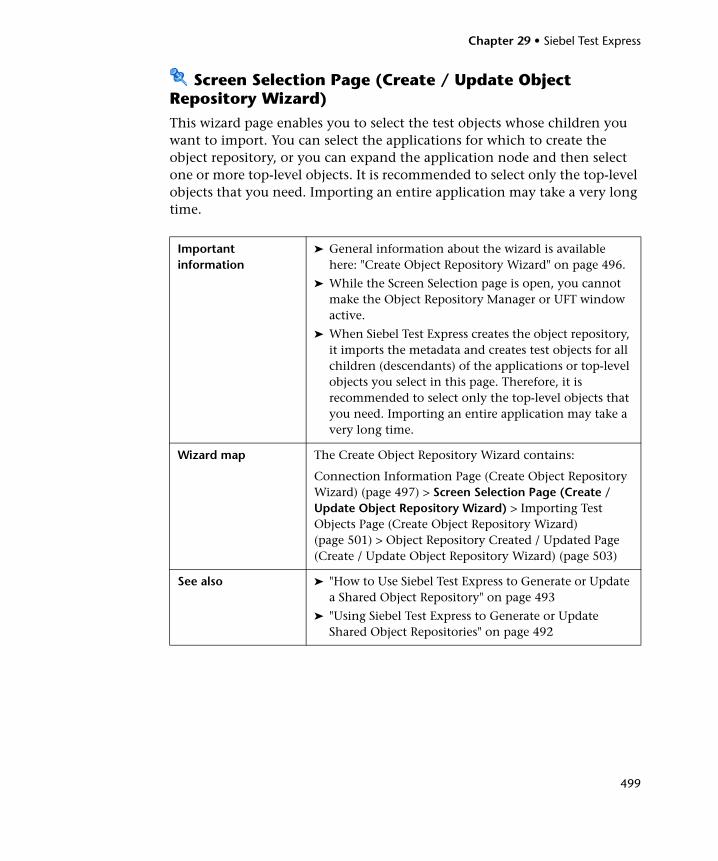
Chapter 29 • Siebel Test Express
499
Screen Selection Page (Create / Update Object Repository Wizard)This wizard page enables you to select the test objects whose children you want to import. You can select the applications for which to create the object repository, or you can expand the application node and then select one or more top-level objects. It is recommended to select only the top-level objects that you need. Importing an entire application may take a very long time.
Important information
➤ General information about the wizard is available here: "Create Object Repository Wizard" on page 496.
➤ While the Screen Selection page is open, you cannot make the Object Repository Manager or UFT window active.
➤ When Siebel Test Express creates the object repository, it imports the metadata and creates test objects for all children (descendants) of the applications or top-level objects you select in this page. Therefore, it is recommended to select only the top-level objects that you need. Importing an entire application may take a very long time.
Wizard map The Create Object Repository Wizard contains:
Connection Information Page (Create Object Repository Wizard) (page 497) > Screen Selection Page (Create / Update Object Repository Wizard) > Importing Test Objects Page (Create Object Repository Wizard) (page 501) > Object Repository Created / Updated Page (Create / Update Object Repository Wizard) (page 503)
See also ➤ "How to Use Siebel Test Express to Generate or Update a Shared Object Repository" on page 493
➤ "Using Siebel Test Express to Generate or Update Shared Object Repositories" on page 492

Chapter 29 • Siebel Test Express
500
User interface elements are described below (unlabeled elements are shown in angle brackets):
UI Elements Description
<test object tree> The list of all the available applications and their objects, according to the connection information entered in the Connection Information Page (Create Object Repository Wizard), displayed as nodes in a tree.
Note (updating an object repository):
➤ If the last used profile from a previous import operation was saved, the profile is loaded, and you can edit the selected options, as required. The new selections are saved in the profile to be used for future import operations on the same object repository.
➤ If you select objects other than the ones that were imported in the previous wizard session, then only objects modified since the selected date are imported.
Import only objects modified since (Update Object Repository Wizard only)
The date in which the last import was performed. You can keep the displayed date or select a new date by clicking the drop-down arrow, and select the date from the displayed calendar. All objects modified before the selected date are ignored during the import process. Using this option can speed up the importing process.

Chapter 29 • Siebel Test Express
501
Importing Test Objects Page (Create Object Repository Wizard)This wizard page shows the progress of the import process. The number imported indicates the number of applet objects that have already been imported, including all child objects of that applet.
Important information
➤ General information about the wizard is available here: "Create Object Repository Wizard" on page 496.
➤ Importing into the object repository can take up to several hours, depending on the size of the repository.
➤ At the same time that the wizard imports the objects, it is also retrieving information about the total number of applets it needs to import. While the wizard is retrieving this information, the total number changes and the words at least show that the wizard is still retrieving information. When the total number is known, the words at least are no longer displayed.
➤ You can work in either the Object Repository Manager or UFT while the wizard is generating the object repository. However, do not close either window. If you do try to close either window, a message is displayed, warning that the object repository generation process will be stopped and all data will be lost.
➤ If you are using the wizard to update an object repository, that object repository file is locked and you cannot modify it in the Object Repository Manager.
➤ During the import process, you can cancel the operation if required. If you cancel the operation, a message is displayed notifying you that stopping the import process will result in an incomplete object repository. You can then select whether to keep, discard, or continue importing test objects into the partial object repository.

Chapter 29 • Siebel Test Express
502
Wizard map The Create Object Repository Wizard contains:
Connection Information Page (Create Object Repository Wizard) (page 497) > Screen Selection Page (Create / Update Object Repository Wizard) (page 499) > Importing Test Objects Page (Create Object Repository Wizard > Object Repository Created / Updated Page (Create / Update Object Repository Wizard) (page 503)
See also ➤ "How to Use Siebel Test Express to Generate or Update a Shared Object Repository" on page 493
➤ "Using Siebel Test Express to Generate or Update Shared Object Repositories" on page 492

Chapter 29 • Siebel Test Express
503
Object Repository Created / Updated Page (Create / Update Object Repository Wizard)This wizard page opens after all the objects have been imported, displaying the total number of objects added or modified in the object repository.
Important information
➤ General information about the wizard is available here: "Create Object Repository Wizard" on page 496.
➤ Displaying the new or updated object repository in the Object Repository Manager may take a few minutes.
➤ If any errors occur during the import process, this page displays a warning and an Error Log button. The log contains error and exception data from the Siebel server, listing the failed calls and the object that caused the error. You can click the Error Log button to save the error log. By default, the error log is called TestExpressErrorLog.xml, and it is saved in the <Unified Functional Testing>\Tests folder.
Wizard map The Create Object Repository Wizard contains:
Connection Information Page (Create Object Repository Wizard) (page 497) > Screen Selection Page (Create / Update Object Repository Wizard) (page 499) > Importing Test Objects Page (Create Object Repository Wizard) (page 501) > Object Repository Created / Updated Page (Create / Update Object Repository Wizard)
See also ➤ "How to Use Siebel Test Express to Generate or Update a Shared Object Repository" on page 493
➤ "Using Siebel Test Express to Generate or Update Shared Object Repositories" on page 492

Chapter 29 • Siebel Test Express
504

Part XIII
Standard Windows Testing Support

506

507
30Standard Windows Support -Quick Reference
You can use the standard Windows testing support provided by UFT to test user-interface objects (controls) developed using the Win32 API or MFC platforms. UFT standard Windows testing support is built-in and does not require you to load any UFT add-in.
The following table summarizes basic information about standard Windows testing support and how it relates to some commonly-used aspects of UFT.
General Information
Add-in Type The standard Windows testing support functions like a Windows-based add-in. Much of its functionality is the same as other Windows-based add-ins.
See "Windows-Based Application Support" on page 117
Important Information
UFT uses built-in standard Windows testing support and standard Windows test objects to identify the following:
➤ Objects from other environments if the relevant add-in is not installed and loaded.
➤ Stingray, VisualAge Smalltalk, and Qt (widget toolkit) controls when the relevant add-in is installed and loaded. For details, see the relevant add-in documentation.
➤ Many windowless objects, if they were developed using the MSAA (Microsoft Active Accessibility) API. For example, the controls within the Microsoft Office ribbons are identified as independent objects.

Chapter 30 • Standard Windows Support -Quick Reference
508
Test Object Methods and Properties
Standard Windows testing support provides test objects, methods, and properties that can be used when testing objects in standard Windows applications. For more information, see the Standard Windows section of the HP Unified Functional Testing Object Model Reference.
Checkpoints and Output Values
➤ See the sections describing checkpoints and output values in the HP Unified Functional Testing User Guide.
➤ See "GUI Checkpoints and Output Values Per Add-in" on page 695.
Troubleshooting and Limitations
"Troubleshooting and Limitations - Standard Windows" on page 509
Prerequisites
Opening Your Application
You can open your standard Windows application before or after opening UFT.
Standard Windows testing support is always loaded in UFT. It is therefore not an available option in the Add-in Manager.
Add-in Dependencies
None
Configuration
Options Dialog Box Use the Windows Applications pane.(Tools > Options > GUI Testing tab > Windows Applications node)
See "Windows Applications > General Pane (Options Dialog Box > GUI Testing Tab)" on page 136.
Record and Run Settings Dialog Box(tests only)
Use the Windows Applications tab.(Record > Record and Run Settings)
See "Windows Applications Tab (Record and Run Settings Dialog Box)" on page 124.
Note: UFT recognizes standard Windows objects only in applications that are opened after changing the settings in the Windows Applications tab of the Record and Run Settings dialog box.

Chapter 30 • Standard Windows Support -Quick Reference
509
This chapter includes:
Troubleshooting and Limitations - Standard Windows on page 509
Troubleshooting and Limitations - Standard Windows
This section describes troubleshooting and limitations for working with Standard Windows test objects.
➤ When recording on WinMenu objects, the Active Screen is not captured.
➤ You cannot insert a checkpoint on a WinMenu object.
Workaround: Use the CheckProperty and CheckItemProperty methods to check specific property and item property values.
➤ If you record using Windows logo key shortcuts, the recording may be inaccurate.
Workaround: Use the Start menu instead of the Windows logo key when recording.
➤ Changing the style of a WinCalendar (from single selection to multi-selection, for example) will cause the run session to fail.
Custom Active Screen Capture Settings Dialog Box(tests only)
Use the Windows applications section.(Tools > Options > GUI Testing tab > Active Screen node > Custom Level)
See the section on the Custom Active Screen Capture Settings dialog box in the HP Unified Functional Testing User Guide.
Application Area Additional Settings pane(business components only)
Use the Applications pane. In the application area, select Additional Settings > Applications in the sidebar.
See the section on the Applications pane in the HP Unified Functional Testing User Guide.

Chapter 30 • Standard Windows Support -Quick Reference
510
➤ When using the pointing hand mechanism from the Object Spy to point to MFC static text or tab controls, UFT may fail to return the correct object.
Workaround: Add the object to the object repository. To do this, point to the object’s parent window, select the parent window object in the Object Selection dialog box, click OK, and perform one of the following in the Define Object Filter dialog box:
➤ Select the All object types option to add all of the objects in the parent window to the object repository.
➤ Select the Selected object types option, click the Select button, and then select the specific object type(s) you want to add to the object repository.
After you add the object to the object repository, you can use the GetROProperty method to retrieve the run-time values of its properties. For example:width = Dialog("Login").Static("Agent Name:").GetROProperty("width")MsgBox width
➤ Checkpoints are not supported for WinComboBox objects of style Simple ComboBox.
➤ Windowless objects developed using an API other than the MSAA API are not identified.
➤ The description properties of a windowless control must include the acc_name property. By default, this property is not available in the list properties when you add a new test object.
Workaround: Add the acc_name property to the list of properties. To do this from the Define New Test Object dialog box, in the Test object details area, click the Add description properties button . In the Add Properties dialog box, click the Define new property button and add the acc_name property.

Part XIV
Stingray Add-in

512

513
31Stingray Add-in - Quick Reference
The following table summarizes basic information about the Stingray Add-in and how it relates to some commonly-used aspects of UFT.
General Information
Add-in Type This is a Windows-based add-in. Much of its functionality is the same as other Windows-based add-ins.
See "Windows-Based Application Support" on page 117.
Supported Environments
The Unified Functional Testing Stingray Add-in recognizes and records on supported Stingray Objective Grid and Stingray Objective Toolkit controls. For details on supported Stingray environments, see the Stingray Add-in section of the HP Unified Functional Testing Product Availability Matrix, available from the UFT Help or the root folder of the Unified Functional Testing DVD.
Important Information
"Considerations for Working with the Stingray Add-in" on page 515
Test Object Methods and Properties
The Stingray Add-in uses a sub-set of the standard Windows test objects, methods, and properties, which can be used when testing objects (controls) in Stingray applications. For details, see the Stingray section of the HP Unified Functional Testing Object Model Reference.
Checkpoints and Output Values
➤ See the sections describing checkpoints and output values in the HP Unified Functional Testing User Guide.
➤ See "GUI Checkpoints and Output Values Per Add-in" on page 695.
Troubleshooting and Limitations
"Troubleshooting and Limitations - Stingray Add-in" on page 516

Chapter 31 • Stingray Add-in - Quick Reference
514
Prerequisites
Opening Your Application
You can open your Stingray application before or after opening UFT.
Add-in Dependencies
None
Other You must configure the Stingray Add-in to work with your application. See "Setting Up Stingray Object Support" on page 520.
Setting Preferences
Wizard "Stingray Support Configuration Wizard" on page 527
Options Dialog Box ➤ Use the Stingray pane. (Make sure that a GUI test is open and select Tools > Options > GUI Testing tab > Stingray node.)
See "Stingray Pane (Options Dialog Box)" on page 548.
➤ Use the Windows Applications pane.(Tools > Options > GUI Testing tab > Windows Applications node)
See "Windows Applications > General Pane (Options Dialog Box > GUI Testing Tab)" on page 136.
Record and Run Settings Dialog Box(tests only)
Use the Windows Applications tab.(Record > Record and Run Settings)
See "Windows Applications Tab (Record and Run Settings Dialog Box)" on page 124.
Notes:
➤ In addition to the settings in the Record and Run Settings dialog box, you must also configure UFT to recognize your Stingray applications in the Stingray pane of the Options dialog box (Tools > Options > GUI Testing tab > Stingray node). For details, see "Stingray Pane (Options Dialog Box)" on page 548.
➤ If you select the Record and Run only on radio button in the Record and Run Settings dialog box, the settings also apply to (limit) the applications that are recognized for Object Spy and other pointing hand operations.
Chapter 31 • Stingray Add-in - Quick Reference
515
This chapter includes:
➤ Considerations for Working with the Stingray Add-in on page 515
➤ Troubleshooting and Limitations - Stingray Add-in on page 516
Considerations for Working with the Stingray Add-in
UFT stores Stingray support configuration for each configured Stingray application separately. By default, UFT uses the latest configured Stingray agent version for all Stingray applications except those applications that are already configured.
For example, suppose you have two Stingray applications; application grid1.exe that uses Stingray Grid control version 9.03, and application tree1.exe that uses Stingray TreeView control version 11.00.
You can configure UFT to support both applications as follows:
1 Run the Stingray Support Configuration Wizard and configure support for the grid1.exe application. UFT saves the configuration for this application.
2 Run the Stingray Support Configuration Wizard again and configure support for the tree1.exe application. UFT saves the configuration for this application.
Custom Active Screen Capture Settings Dialog Box(tests only)
Use the Windows applications section.(Tools > Options > GUI Testing tab > Active Screen node > Custom Level)
See the section on the Custom Active Screen Capture Settings dialog box in the HP Unified Functional Testing User Guide.
Application Area Additional Settings pane(business components only)
Use the Applications pane. In the application area, click Additional Settings > Applications in the sidebar.
See the section on the Applications pane in the HP Unified Functional Testing User Guide.

Chapter 31 • Stingray Add-in - Quick Reference
516
After performing these steps, UFT will support the grid1.exe application and support all Stingray applications that have Stingray TreeView controls version 11.00, including the tree1.exe application.
Troubleshooting and Limitations - Stingray Add-in
This section describes troubleshooting and limitations for the Stingray Add-in.
General
➤ Applying Stingray Support Configuration settings to all users on the computer has no effect on users that have opened UFT at least once.
Workaround: Apply Stingray Support Configuration settings separately for each user that has opened UFT at least once.
➤ UFT does not support both Unicode and non-Unicode in the same application when the Stingray Add-in is loaded.
Creating and Running Tests and Components
➤ If your Stingray application was built using the precompiled agent mode and you have used the Stingray Support Configuration Wizard at least once to set a Stingray run-time agent, then recording, learning, or running steps on the application may fail.
➤ By default, only singlethreaded Stingray applications are supported.
To provide support for multithreaded applications, in UFT, select Tools > Options > GUI Testing tab > Stingray node. Select the Support multithreaded Stingray applications check box and click OK. Close and restart UFT.
For details, see "Stingray Pane (Options Dialog Box)" on page 548.
➤ The Stingray Add-in does not support Objective Edit or Objective Chart controls.
➤ The ExpandAll method is not supported for Stingray tree controls.

Chapter 31 • Stingray Add-in - Quick Reference
517
➤ Sometimes, the MFC internal map that correlates a window handle of a control with a Visual C ++ object may not contain an entry for all Stingray controls. In such cases, the Stingray Add-in may fail to recognize certain Stingray controls because it relies on this map when retrieving information from the application.
Workaround: The Stingray Add-in contains an auxiliary mechanism that serves as a fallback for the lack of MFC map entries in the situation described above. To activate this mechanism, in UFT, select Tools > Options > GUI Testing tab > Stingray node. Select the Cache MFC map check box and click OK. Close and restart UFT.
Note: This mechanism is not activated by default because it imposes some performance overhead.
➤ When working with nested tab controls, you may need to manually modify the corresponding entries in the object repository to enable unique identification. For example, you may need to add an ordinal identifier to the existing description.
➤ By default, edit boxes, check boxes, and drop-down (combo) lists are supported when recording on a Stingray grid. Other types of controls embedded in Stingray grids may be supported partially or may not be supported at all.
Note: The CGXTabbedComboBox control and the CGXCheckBoxEx control type are not supported during recording.
Workaround: To work with controls other than the supported ones, manually add SetCellData statements to your test or business component (instead of recording user actions inside cells).
➤ GetCellData and SetCellData methods are limited to 3000 characters.
Chapter 31 • Stingray Add-in - Quick Reference
518
➤ By default, only the following grid classes are supported:
➤ CGXBrowserView
➤ CGXBrowserWnd
➤ CGXGridWnd
➤ CGXGridView
➤ CGXGridHandleView
➤ When Stingray tree control items have tooltips, recording the selection of an item by clicking its label may fail.
Workaround: Select the requested item by performing a click on the item’s icon.

519
32Stingray Add-in - Testing and Configuration
This chapter includes:
Concepts
➤ Setting Up Stingray Object Support on page 520
➤ Stingray Run-time Agent (Agent DLL) on page 521
➤ Stingray Precompiled Agent Mode on page 522
Tasks
➤ How to Set Up Your Stingray Project Using the Precompiled Agent Mode on page 523
Reference
➤ Stingray Support Configuration Wizard on page 527
➤ Stingray Pane (Options Dialog Box) on page 548

Chapter 32 • Stingray Add-in - Testing and Configuration
520
Concepts
Setting Up Stingray Object Support
Before you begin working, you need to configure the Stingray Add-in to work with your application. UFT support for Stingray objects is based on an agent entity that exists in the Stingray application. This agent interacts with UFT to enable record and run operations. There are two different modes for establishing the agent entity:
➤ Run-time Agent Mode. UFT injects an agent DLL into the application’s process during run-time. This is the recommended mode. For details, see "Stingray Run-time Agent (Agent DLL)" on page 521.
➤ Precompiled Agent Mode. You make slight modifications to your Visual C++ project in addition to configuring the Stingray Add-in. Use this mode only if the run-time agent mode is unsuitable or cannot be used. For details, see "Stingray Precompiled Agent Mode" on page 522.
You choose your preferred mode and configure support for the Stingray Add-in using the Stingray Support Configuration Wizard. For details, see "Stingray Support Configuration Wizard" on page 527.
After you configure support for the Stingray Add-in, you can fine-tune the configuration options, if needed. For details, see "Stingray Pane (Options Dialog Box)" on page 548.

Chapter 32 • Stingray Add-in - Testing and Configuration
521
Stingray Run-time Agent (Agent DLL)
When you choose the run-time agent mode, UFT injects an agent DLL into the application’s process during run-time. This recommended mode is non-intrusive and does not require any modifications to the source code of the application being tested.
You can use the run-time agent mode only with Stingray applications that are created with dynamically-linked MFC libraries. You can verify if your MFC libraries are linked dynamically or statically by launching the Stingray Support Configuration Wizard. If the wizard identifies that your Stingray application uses statically-linked MFC libraries, it issues a warning.
The run-time agent mode supports the most commonly used major Stingray versions, as well as some—but not all—minor versions. For a list of supported version combinations, see the HP Unified Functional Testing Product Availability Matrix, available from the UFT Help or the root folder of the Unified Functional Testing DVD. You can also verify if your Stingray application version is supported by launching the Stingray Support Configuration Wizard. If the wizard identifies that your Stingray application version is not supported, it issues a warning.
Note: The Stingray Add-in is designed to support only applications that are compiled in Release mode.
If you cannot use the run-time agent mode for any reason, you can still work with your Stingray application using the precompiled agent mode, instead. For details, see "Stingray Precompiled Agent Mode" on page 522, or contact HP Software Support.

Chapter 32 • Stingray Add-in - Testing and Configuration
522
Stingray Precompiled Agent Mode
If your application is statically linked with the MFC libraries, you can use the precompiled agent mode to enable Stingray object support. The precompiled agent mode requires you to make slight modifications to your Visual C++ project to enable UFT to support your Stingray application. If you select the precompiled agent mode in the Stingray Support Configuration Wizard, you can compile your project using the Stingray Add-in agent files.
Note: If your Stingray application project was compiled with an earlier version of the Stingray Add-in agent, your project already contains the required support code. To take advantage of the latest functionality provided with this add-in, it is recommended to remove the existing Stingray Add-in agent files from your project and recompile using the latest agent files.
Setting up Stingray support using the precompiled agent mode requires adding one support header file to your application’s Visual C++ project and copying one library file to your Visual C++ project directory. After you complete these steps, you can compile your application, as usual.
Note: Use the precompiled agent mode only if the run-time agent mode is unsuitable or cannot be used.

Chapter 32 • Stingray Add-in - Testing and Configuration
523
Tasks
How to Set Up Your Stingray Project Using the Precompiled Agent Mode
Note:
➤ Use the precompiled agent mode only if the run-time agent mode is unsuitable or cannot be used.
➤ For a conceptual overview, see "Stingray Precompiled Agent Mode" on page 522.
This task includes the following steps:
➤ "Prerequisites" on page 524
➤ "Copy StgAgentLib.h and StgAgentLib.lib files" on page 524
➤ "Add #include "StgAgentLib.h" to a .cpp file" on page 525
➤ "Add the ReleaseWRVC(); function call" on page 526
➤ "Make sure that the Precompiled Agent option is selected in the Stingray Support Configuration Wizard" on page 526
➤ "Results" on page 526

Chapter 32 • Stingray Add-in - Testing and Configuration
524
1 Prerequisites
➤ Both Stingray Objective Grid and Stingray Objective Toolkit must be installed on your computer, even if your application contains only one type of Stingray control, such as a grid control or a tab control.
➤ The installed versions must match the version combinations supported for this add-in. For a list of supported version combinations, see the HP Unified Functional Testing Product Availability Matrix, available from the UFT Help or the root folder of the Unified Functional Testing DVD.
Note: If you do not have the required Stingray Objective Grid and Stingray Objective Toolkit version combination, contact HP Software Support for assistance.
➤ If your Stingray application was previously compiled with agent files from an earlier version of the Stingray Add-in, remove the existing agent files from your project.
Caution: If you choose not to replace your existing Stingray Add-in agent files with the latest agent files, do not continue with this procedure. Although you will be able to work with the Unified Functional Testing Stingray Add-in, you will not be able to take advantage of the latest functionality.
2 Copy StgAgentLib.h and StgAgentLib.lib files
a Copy the StgAgentLib.h header file from <UFT Installation Folder>\bin\StingrayAgent\AgentLib\src\StgAgentLib.h to your Visual C++ project directory. (You can optionally add the header file to the list of header files in your workspace.)
b Check the version of the Stingray Objective Grid or Stingray Objective Toolkit used by your application and search for the corresponding support library file, StgAgentLib.lib.

Chapter 32 • Stingray Add-in - Testing and Configuration
525
For example, if your application is not compiled in Unicode and uses Objective Grid version 9.03 and Objective Toolkit version 8.03 linked with MFC version 7.1, search for the library file in: <UFT Installation Folder>\bin\StingrayAgent\AgentLib\bin\MFC71\OG903_OT803
If the application is linked with MFC80, is compiled in Unicode and uses Objective Grid version 10.0 and Objective Toolkit version 9.0, search for the library file in: <UFT Installation Folder>\bin\StingrayAgent\AgentLib\bin\MFC80\OG1000U_OT900U
Note: Each support library file specifies a combination of Objective Grid and Objective Toolkit versions. You must choose a combination of Objective Grid or Objective Toolkit versions, even if your application uses only one of these Stingray tools. For a list of supported Stingray version combinations, see the HP Unified Functional Testing Product Availability Matrix, available from the UFT Help or the root folder of the Unified Functional Testing DVD.
c Copy the StgAgentLib.lib support library file to your Visual C++ project directory.
3 Add #include "StgAgentLib.h" to a .cpp file
Add the #include "StgAgentLib.h" statement to one of your cpp files, such as, MainFrm.cpp.
Chapter 32 • Stingray Add-in - Testing and Configuration
526
4 Add the ReleaseWRVC(); function call
Insert the ReleaseWRVC(); function call in one of the functions called when your application terminates, for example, CMainFrame::OnDestroy().
Note: Inserting this function call instructs the agent to perform required clean up operations related to the support library code.
5 Make sure that the Precompiled Agent option is selected in the Stingray Support Configuration Wizard
For details, see "Stingray Support Configuration Wizard" on page 527.
6 Results
When you build your application executable, the added header file automatically links the StgAgentLib.lib support library to your application statically, enabling the library code to be activated automatically during the run session.

Chapter 32 • Stingray Add-in - Testing and Configuration
527
Reference
Stingray Support Configuration Wizard
The wizard guides you through the steps that are necessary to configure UFT to work according to the agent mode that you select.
To access Use one of the following:
➤ Select Tools > Options > GUI Testing tab > Stingray node > Select Version button.
➤ From the Start menu, select All Programs > HP Software > HP Unified Functional Testing > Tools > Stingray Support Configuration Wizard.
Important information
You can open the Stingray Support Configuration Wizard from the Additional Installation Requirements dialog box. You can also open the wizard later by choosing it from the UFT program group or by activating it from the Stingray pane of the Options dialog box (Tools > Options > GUI Testing tab > Stingray node). For details, see "Stingray Pane (Options Dialog Box)" on page 548.
Relevant tasks
"How to Set Up Your Stingray Project Using the Precompiled Agent Mode" on page 523
Wizard map The Stingray Support Configuration Wizard contains:
Welcome Page > Support Mode Selection Page (page 528) > Add Support Code Page (page 530) > (Select Configuration Mode Page (page 532)) > (Manual Configuration Mode Page (page 535)) > (Automatic Configuration Mode Page (page 537)) > (Detected Stingray Components Page (page 541)) > (Finish Page (page 544)) > (Detection Failure Page (page 546))
Note: Pages that are in parentheses open according to the option selected in the previous page. Therefore, not all pages are displayed for every option.
See also ➤ "Setting Up Stingray Object Support" on page 520
➤ "Stingray Run-time Agent (Agent DLL)" on page 521
➤ "Stingray Precompiled Agent Mode" on page 522

Chapter 32 • Stingray Add-in - Testing and Configuration
528
Support Mode Selection Page (Stingray Support Configuration Wizard)This wizard page enables you to select a Stingray support mode.
Important information
General information about this wizard is available here: "Stingray Support Configuration Wizard" on page 527.
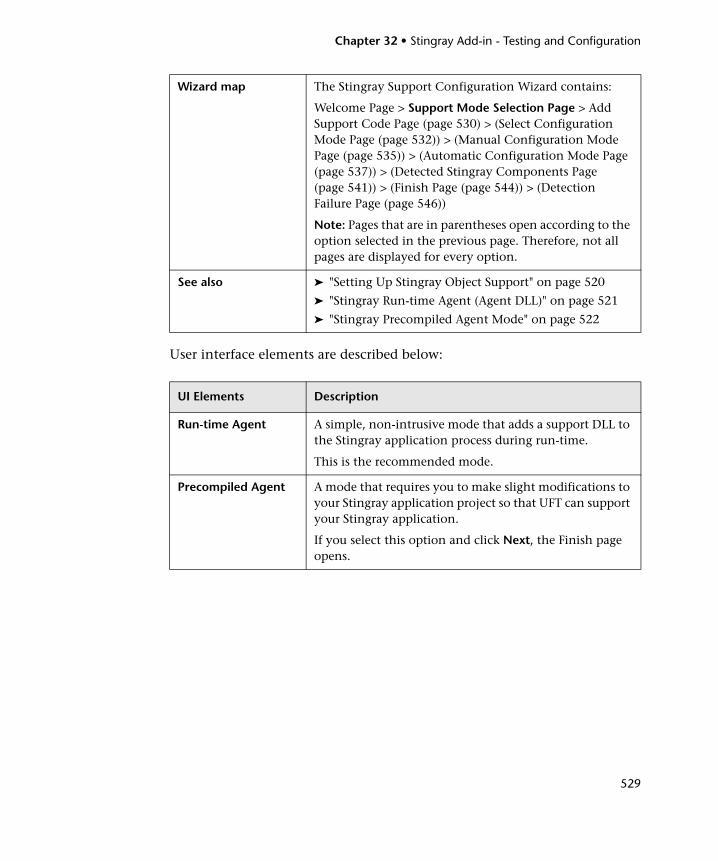
Chapter 32 • Stingray Add-in - Testing and Configuration
529
User interface elements are described below:
Wizard map The Stingray Support Configuration Wizard contains:
Welcome Page > Support Mode Selection Page > Add Support Code Page (page 530) > (Select Configuration Mode Page (page 532)) > (Manual Configuration Mode Page (page 535)) > (Automatic Configuration Mode Page (page 537)) > (Detected Stingray Components Page (page 541)) > (Finish Page (page 544)) > (Detection Failure Page (page 546))
Note: Pages that are in parentheses open according to the option selected in the previous page. Therefore, not all pages are displayed for every option.
See also ➤ "Setting Up Stingray Object Support" on page 520
➤ "Stingray Run-time Agent (Agent DLL)" on page 521
➤ "Stingray Precompiled Agent Mode" on page 522
UI Elements Description
Run-time Agent A simple, non-intrusive mode that adds a support DLL to the Stingray application process during run-time.
This is the recommended mode.
Precompiled Agent A mode that requires you to make slight modifications to your Stingray application project so that UFT can support your Stingray application.
If you select this option and click Next, the Finish page opens.

Chapter 32 • Stingray Add-in - Testing and Configuration
530
Add Support Code Page (Stingray Support Configuration Wizard) This wizard page enables you to access information describing how to add support code to your Stingray application project.
This wizard page opens if you selected the Precompiled Agent option in the Support Mode Selection (described on page 532).

Chapter 32 • Stingray Add-in - Testing and Configuration
531
User interface elements are described below:
Important information
➤ General information about this wizard is available here: "Stingray Support Configuration Wizard" on page 527.
➤ If your Stingray application project is already compiled with an earlier version of the Stingray Add-in agent, your project already contains the required support code. However, it is strongly recommended to remove the previous agent files and to recompile your project with the new Stingray Add-in agent included with this add-in.
Wizard map The Stingray Support Configuration Wizard contains:
Welcome Page > Support Mode Selection Page (page 528) > Add Support Code Page > (Select Configuration Mode Page (page 532)) > (Manual Configuration Mode Page (page 535)) > (Automatic Configuration Mode Page (page 537)) > (Detected Stingray Components Page (page 541)) > (Finish Page (page 544)) > (Detection Failure Page (page 546))
Note: Pages that are in parentheses open according to the option selected in the previous page. Therefore, not all pages are displayed for every option.
See also "Stingray Precompiled Agent Mode" on page 522
UI Elements Description
Help Displays information describing how to add support code to your Stingray application project.
Finish Closes the wizard. If you have not already compiled your application with the Stingray Add-in agent files, you must do so before you begin to work with the Unified Functional Testing Stingray Add-in.

Chapter 32 • Stingray Add-in - Testing and Configuration
532
Select Configuration Mode Page (Stingray Support Configuration Wizard)This wizard page enables you to select a configuration mode—either automatic or manual—and to create a diagnostic log file, when needed.
This wizard page opens if you selected the Run-time Agent option in the Support Mode Selection Page (described on page 532).
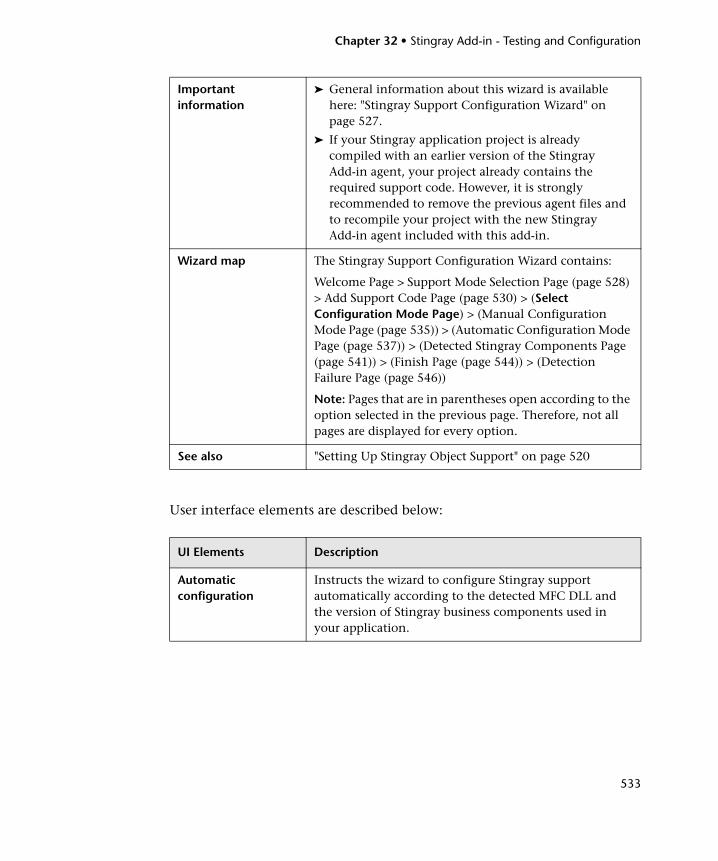
Chapter 32 • Stingray Add-in - Testing and Configuration
533
User interface elements are described below:
Important information
➤ General information about this wizard is available here: "Stingray Support Configuration Wizard" on page 527.
➤ If your Stingray application project is already compiled with an earlier version of the Stingray Add-in agent, your project already contains the required support code. However, it is strongly recommended to remove the previous agent files and to recompile your project with the new Stingray Add-in agent included with this add-in.
Wizard map The Stingray Support Configuration Wizard contains:
Welcome Page > Support Mode Selection Page (page 528) > Add Support Code Page (page 530) > (Select Configuration Mode Page) > (Manual Configuration Mode Page (page 535)) > (Automatic Configuration Mode Page (page 537)) > (Detected Stingray Components Page (page 541)) > (Finish Page (page 544)) > (Detection Failure Page (page 546))
Note: Pages that are in parentheses open according to the option selected in the previous page. Therefore, not all pages are displayed for every option.
See also "Setting Up Stingray Object Support" on page 520
UI Elements Description
Automatic configuration
Instructs the wizard to configure Stingray support automatically according to the detected MFC DLL and the version of Stingray business components used in your application.

Chapter 32 • Stingray Add-in - Testing and Configuration
534
Manual configuration
Enables you to configure Stingray support manually by specifying the MFC DLL and Stingray business component version used in your application. This is useful, for example, if your application is statically linked to the Stingray libraries.
Create wizard configuration log file
Creates a a diagnostic log file.
Select this check box if, at any time, you encounter problems with the Stingray Add-in.
Note: If you contact HP Software Support for assistance, you may be asked to provide this log file for diagnostic purposes.
UI Elements Description

Chapter 32 • Stingray Add-in - Testing and Configuration
535
Manual Configuration Mode Page (Stingray Support Configuration Wizard) This wizard page enables you to configure Stingray support manually by specifying the MFC DLL and Stingray business component version used in your application. This is useful, for example, if your application is statically linked to the Stingray libraries.
This wizard page opens if you selected the Manual configuration option in the Select Configuration Mode Page (described on page 535).

Chapter 32 • Stingray Add-in - Testing and Configuration
536
Important information
➤ General information about this wizard is available here: "Stingray Support Configuration Wizard" on page 527.
➤ If your Stingray application project is already compiled with an earlier version of the Stingray Add-in agent, your project already contains the required support code. However, it is strongly recommended to remove the previous agent files and to recompile your project with the new Stingray Add-in agent included with this add-in.
Wizard map The Stingray Support Configuration Wizard contains:
Welcome Page > Support Mode Selection Page (page 528) > Add Support Code Page (page 530) > (Select Configuration Mode Page (page 532)) > (Manual Configuration Mode Page) > (Automatic Configuration Mode Page (page 537)) > (Detected Stingray Components Page (page 541)) > (Finish Page (page 544)) > (Detection Failure Page (page 546))
Note: Pages that are in parentheses open according to the option selected in the previous page. Therefore, not all pages are displayed for every option.
See also "Setting Up Stingray Object Support" on page 520

Chapter 32 • Stingray Add-in - Testing and Configuration
537
Automatic Configuration Mode Page (Stingray Support Configuration Wizard)This wizard page enables you to instruct to identify the version of Stingray business components used by your application so that the wizard can set up Stingray support accordingly.
This wizard page opens if you selected the Automatic configuration option in the Select Configuration Mode Page (described on page 535).

Chapter 32 • Stingray Add-in - Testing and Configuration
538
Important information
General information about this wizard is available here: "Stingray Support Configuration Wizard" on page 527.
Wizard map The Stingray Support Configuration Wizard contains:
Welcome Page > Support Mode Selection Page (page 528) > Add Support Code Page (page 530) > (Select Configuration Mode Page (page 532)) > (Manual Configuration Mode Page (page 535)) > (Automatic Configuration Mode Page) > (Detected Stingray Components Page (page 541)) > (Finish Page (page 544)) > (Detection Failure Page (page 546))
Note: Pages that are in parentheses open according to the option selected in the previous page. Therefore, not all pages are displayed for every option.
See also "Setting Up Stingray Object Support" on page 520
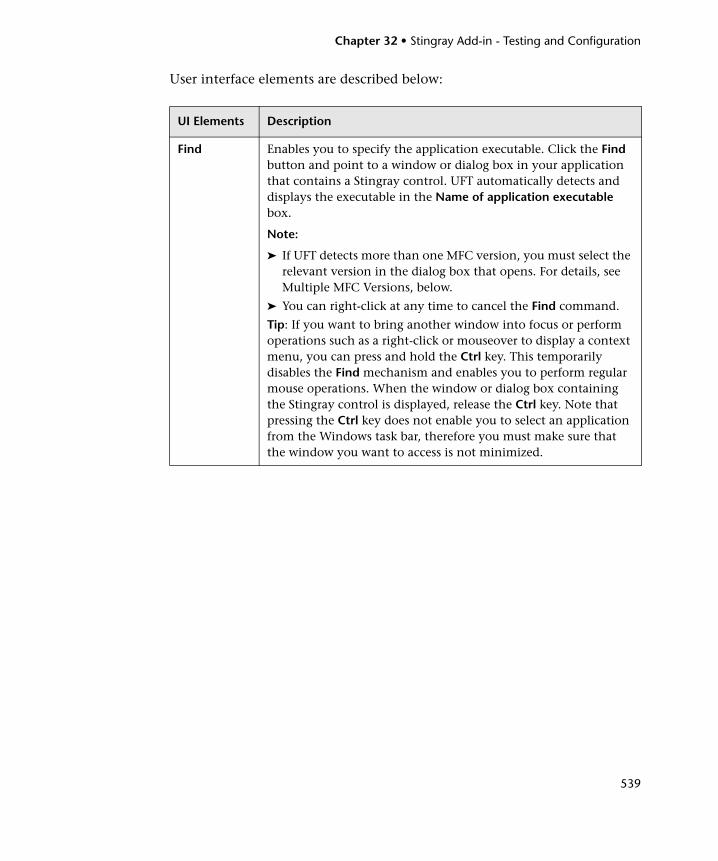
Chapter 32 • Stingray Add-in - Testing and Configuration
539
User interface elements are described below:
UI Elements Description
Find Enables you to specify the application executable. Click the Find button and point to a window or dialog box in your application that contains a Stingray control. UFT automatically detects and displays the executable in the Name of application executable box.
Note:
➤ If UFT detects more than one MFC version, you must select the relevant version in the dialog box that opens. For details, see Multiple MFC Versions, below.
➤ You can right-click at any time to cancel the Find command.
Tip: If you want to bring another window into focus or perform operations such as a right-click or mouseover to display a context menu, you can press and hold the Ctrl key. This temporarily disables the Find mechanism and enables you to perform regular mouse operations. When the window or dialog box containing the Stingray control is displayed, release the Ctrl key. Note that pressing the Ctrl key does not enable you to select an application from the Windows task bar, therefore you must make sure that the window you want to access is not minimized.

Chapter 32 • Stingray Add-in - Testing and Configuration
540
Multiple MFC Versions
If UFT detects more than one MFC version for the Stingray application, the following dialog box opens:
Select the relevant version and click Apply.

Chapter 32 • Stingray Add-in - Testing and Configuration
541
Detected Stingray Components Page (Stingray Support Configuration Wizard)This wizard page displays the Stingray business components it detected in your application process.
This wizard page opens if the wizard successfully identified the application executable in the Automatic Configuration Mode Page (described on page 537).
Important information
General information about this wizard is available here: "Stingray Support Configuration Wizard" on page 527.

Chapter 32 • Stingray Add-in - Testing and Configuration
542
Wizard map The Stingray Support Configuration Wizard contains:
Welcome Page > Support Mode Selection Page (page 528) > Add Support Code Page (page 530) > (Select Configuration Mode Page (page 532)) > (Manual Configuration Mode Page (page 535)) > (Automatic Configuration Mode Page (page 537)) > (Detected Stingray Components Page) > (Finish Page (page 544)) > (Detection Failure Page (page 546))
Note: Pages that are in parentheses open according to the option selected in the previous page. Therefore, not all pages are displayed for every option.
See also "Setting Up Stingray Object Support" on page 520

Chapter 32 • Stingray Add-in - Testing and Configuration
543
User interface elements are described below:
UI Elements Description
<Stingray business components>
The Objective Grid and Objective Toolkit that the wizard detected in your application.
Note: If, in the previous screen, you pointed to a non-Stingray application, or to a Stingray application whose business components UFT could not detect, a warning message displays stating that UFT failed to detect the Stingray business components in your application.
UFT may fail to detect business components of a Stingray application for several reasons, for example:
➤ The application may be statically linked to Stingray libraries, preventing the wizard from identifying the version of the Stingray libraries. In this case, click Back twice and select Manual configuration to configure Stingray support manually. For details, see "Manual Configuration Mode Page (Stingray Support Configuration Wizard)" on page 535.
➤ The application may be statically linked to the Microsoft Foundation Class (MFC) libraries. In this case, click Back three times and select Precompiled Agent. For details, see "Add Support Code Page (Stingray Support Configuration Wizard)" on page 530.
➤ The selected Stingray version may not be supported by the Stingray Add-in, or may be slightly different from the officially supported versions.
If you need to work with a Stingray version that is not supported, contact HP Software Support, who may be able to provide you with a support agent for your specific version.
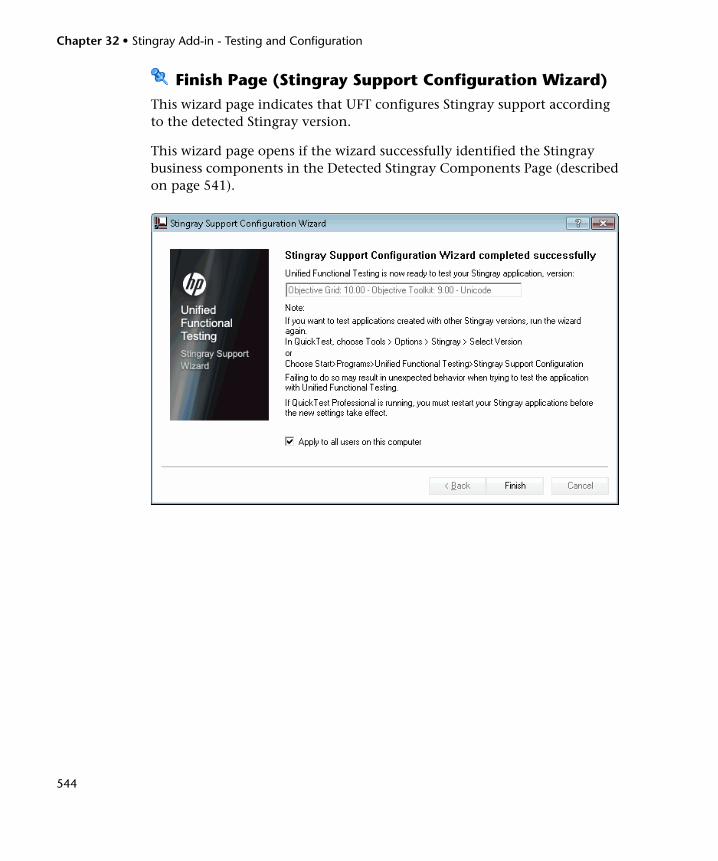
Chapter 32 • Stingray Add-in - Testing and Configuration
544
Finish Page (Stingray Support Configuration Wizard)This wizard page indicates that UFT configures Stingray support according to the detected Stingray version.
This wizard page opens if the wizard successfully identified the Stingray business components in the Detected Stingray Components Page (described on page 541).
Chapter 32 • Stingray Add-in - Testing and Configuration
545
User interface elements are described below:
Important information
General information about this wizard is available here: "Stingray Support Configuration Wizard" on page 527.
Wizard map The Stingray Support Configuration Wizard contains:
Welcome Page > Support Mode Selection Page (page 528) > Add Support Code Page (page 530) > (Select Configuration Mode Page (page 532)) > (Manual Configuration Mode Page (page 535)) > (Automatic Configuration Mode Page (page 537)) > (Detected Stingray Components Page (page 541)) > (Finish Page) > (Detection Failure Page (page 546))
Note: Pages that are in parentheses open according to the option selected in the previous page. Therefore, not all pages are displayed for every option.
See also "Setting Up Stingray Object Support" on page 520
UI Elements Description
<detected Stingray version>
Read-only display of the Stingray version detected using the Stingray Support Configuration Wizard.
Apply to all users on this computer
Applies the identical settings you configured in this wizard for all users on this computer.
Note: You must have administrator permissions on the computer to configure support for all users. If you do not have administrator permissions, this option is disabled.

Chapter 32 • Stingray Add-in - Testing and Configuration
546
Detection Failure Page (Stingray Support Configuration Wizard)This wizard page indicates that UFT configures Stingray support according to the detected Stingray version.
This wizard page opens if the wizard cannot identify the Stingray business components in the Detected Stingray Components Page (described on page 541).

Chapter 32 • Stingray Add-in - Testing and Configuration
547
User interface elements are described below:
Important information
General information about this wizard is available here: "Stingray Support Configuration Wizard" on page 527.
Wizard map The Stingray Support Configuration Wizard contains:
Welcome Page > Support Mode Selection Page (page 528) > Add Support Code Page (page 530) > (Select Configuration Mode Page (page 532)) > (Manual Configuration Mode Page (page 535)) > (Automatic Configuration Mode Page (page 537)) > (Detected Stingray Components Page (page 541)) > (Finish Page (page 544)) > (Detection Failure Page)
Note: Pages that are in parentheses open according to the option selected in the previous page. Therefore, not all pages are displayed for every option.
See also "Setting Up Stingray Object Support" on page 520
UI Elements Description
Configure the Stingray version manually
Opens the Manual Configuration Mode Page (Stingray Support Configuration Wizard) (described on (page 535) when you select this option and click Next.
Abandon manual configuration
Closes the Stingray Support Configuration Wizard when you select this option and click Finish.
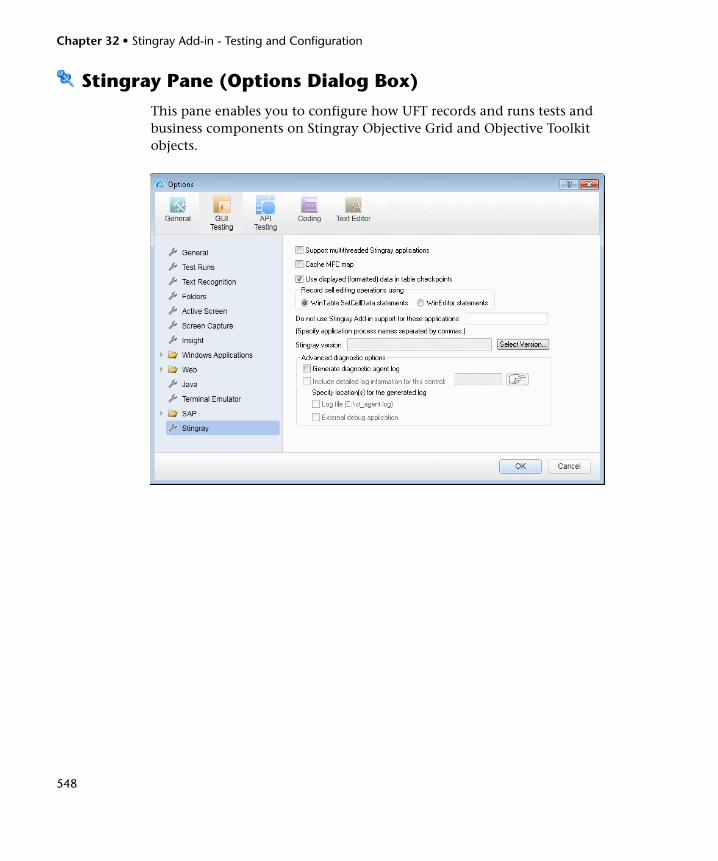
Chapter 32 • Stingray Add-in - Testing and Configuration
548
Stingray Pane (Options Dialog Box)
This pane enables you to configure how UFT records and runs tests and business components on Stingray Objective Grid and Objective Toolkit objects.

Chapter 32 • Stingray Add-in - Testing and Configuration
549
User interface elements are described below:
To access 1 Make sure that a GUI test is open.
2 Select Tools > Options > GUI Testing tab > Stingray node.
Important information
If the Stingray Add-in is configured correctly, you may not need to make any modifications using this pane. However, if you did not run the Stingray Support Configuration Wizard after installing the Stingray Add-in, or if you encounter difficulties when recording and running tests and business components on Stingray applications, you can use the options in this pane to fine-tune the configuration. For example, you can enable support for multithreaded applications by selecting the relevant option in this pane.
After modifying this pane, you must restart UFT before you continue working with this add-in.
Relevant tasks "How to Set Up Your Stingray Project Using the Precompiled Agent Mode" on page 523
See also "Stingray Support Configuration Wizard" on page 527
UI Elements Description
Support multithreaded Stingray applications
Instructs UFT to support multithreaded Stingray applications. If you are not sure whether you are working with a multithreaded Stingray application, first try to record and run on your Stingray application without selecting this check box. If you experience difficulties, you can select this check box and try again.
Select this check box only if you are working with a multithreaded application.
By default, this check box is cleared.

Chapter 32 • Stingray Add-in - Testing and Configuration
550
Cache MFC map Instructs UFT to use auxiliary caching as a backup for MFC’s internal mapping of window handles to Visual C++ objects. If UFT cannot identify one or more Stingray controls while recording or running a test or business component, you can select this check box to instruct UFT to use a cached map instead of using the Stingray application for identification.
By default, this check box is cleared.
Use displayed (formatted) data in table checkpoints
Instructs UFT to use the formatted data value in the Stingray grid control. You can use this option when working with table checkpoints (not supported for business components). For example, if the actual value of a cell in a Stingray application is formatted to display two digits to the right of the decimal point, UFT will use that rounded number instead of the actual number when checking the value during the run session.
By default, this check box is selected.
Record cell editing options using
Instructs UFT to record typing operations in a Stingray grid (edit) cell using one of the following options:
➤ WinTable.SetCellData statements. (Default) Uses the SetCellData method to record the final value that you enter in a grid cell. This option results in a single step in your test or business component. In most cases, this option makes the step more readable and easier to modify manually
➤ WinEditor statements. UFT records each operation that you perform in a Stingray grid edit cell as a separate WinEditor step. For example, operations such as placing the cursor in a specific place in the edit box, typing a single character, or deleting a character may be recorded as individual steps. This can make your test or business component less readable and more difficult to modify manually, but this may be useful if you want to test the behavior of specific editing operations.
For a use-case example, see "Record Cell Editing Options - Example" on page 553
UI Elements Description

Chapter 32 • Stingray Add-in - Testing and Configuration
551
Do not use Stingray Add-in support for these applications: (Specify application process names separated by commas)
Instructs UFT to treat the applications you specify as non-Stingray applications.
Some open, non-Stingray processes (such as explorer.exe) can cause unexpected behavior when recording and running tests and business components on Stingray applications. By adding the process names to this edit box, you can help prevent this unexpected behavior.
Note:
➤ In some cases, the executable file you use to open an application is only a launching process, which then opens the actual application process. In these cases, make sure that you specify the name of the actual application process and not the launching process.
➤ When working with tests, this option is relevant only if you selected the Record and run test on any open Windows-based application in the Record and Run Settings dialog box (Record > Record and Run Settings). For details on the options available in the Record and Run Settings dialog box, see "Windows Applications Tab (Record and Run Settings Dialog Box)" on page 124.
Stingray version Indicates the versions of the Stingray Objective Grid and Stingray Objective Toolkit libraries used for identifying Stingray objects in your application (read-only).
Select Version Opens the Stingray Support Configuration Wizard, which enables you to select the combination of Objective Grid and Objective Toolkit versions with which you want to work.
For details, see "Stingray Support Configuration Wizard" on page 527.
UI Elements Description

Chapter 32 • Stingray Add-in - Testing and Configuration
552
Generate diagnostic agent log
Instructs UFT to generate a diagnostic agent log file. You can use this option if you encounter problems with the Stingray Add-in, for example, if UFT does not recognize a Stingray grid control while recording. HP Software Support may ask you to generate this log and send it together with your service request.
When you select this check box, the following options are enabled:
➤ Include detailed log information for this control
➤ Log file (C:\st_agent.log)
➤ External debug application
Note: If you select this check box, you must specify the location for the generated log. For details, see "Specify location(s) for the generated log" on page 553.
Include detailed log information for this control
Instructs UFT to include detailed information in the generated log for a specific Stingray control, in addition to the general UFT/agent communication log information. For example, you may want to generate additional log details for a specific Stingray grid.
To select the object for which you want to generate detailed log information: Click the pointing hand and then click the relevant Stingray control. The selected object’s window handle is displayed in the edit box.
Note: This option is available only when the Generate diagnostic agent log check box is selected.
UI Elements Description

Chapter 32 • Stingray Add-in - Testing and Configuration
553
Record Cell Editing Options - Example
Suppose that during a recording session, you place the cursor in an edit-type cell that already contains the value abc. You place the cursor before the b, delete the b and c characters, and then you type bcde.
If you are using the WinTable.SetCellData statements option, UFT records the following in the Editor:
UFT inserts these steps as follows in the Keyword View:
Specify location(s) for the generated log
Instructs UFT to generate the log to the selected locations. You can select one or both of the following options:
➤ Log file (C:\st_agent.log). Saves the diagnostic log to the st_agent.log text file on your C: drive.
➤ External debug application. Exports the diagnostic log data to an external debug application, such as the freeware application, DebugView, or Microsoft VisualStudio.
Note: These options are available only when the Generate diagnostic agent log check box is selected.
Window("GRIDAPP").Window("GridAp1").WinTable("StingrayGrid").SelectCell "#2", "#3"Window("GRIDAPP").Window("GridAp1").WinTable("StingrayGrid").SelectCell "#2", "#3", "abcde"
UI Elements Description

Chapter 32 • Stingray Add-in - Testing and Configuration
554
If you are using the WinEditor statements option, UFT records the following in the Editor:
UFT inserts these steps as follows in the Keyword View:
Window("GRIDAPP").Window("GridAp1").WinTable("StingrayGrid").SelectCell "#2", "#3"Window("GRIDAPP").Window("GridAp1").WinEditor("Edit").SetCaretPos 0,1Window("GRIDAPP").Window("GridAp1").WinEditor("Edit").Type micDelWindow("GRIDAPP").Window("GridAp1").WinEditor("Edit").Type micDelWindow("GRIDAPP").Window("GridAp1").WinEditor("Edit_2").Type "bcde"
Part XV
Terminal Emulator Add-in

556
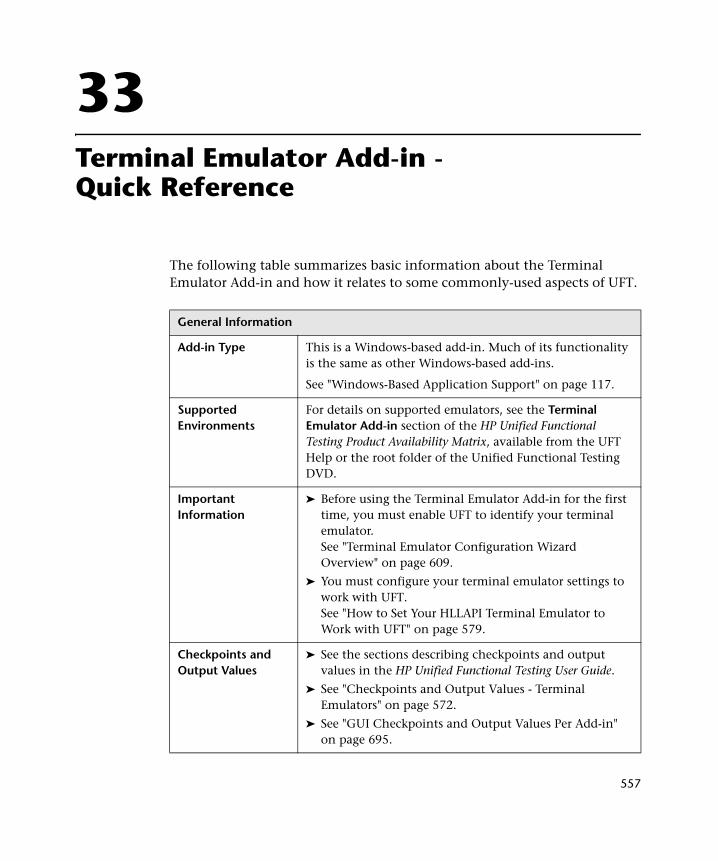
557
33Terminal Emulator Add-in - Quick Reference
The following table summarizes basic information about the Terminal Emulator Add-in and how it relates to some commonly-used aspects of UFT.
General Information
Add-in Type This is a Windows-based add-in. Much of its functionality is the same as other Windows-based add-ins.
See "Windows-Based Application Support" on page 117.
Supported Environments
For details on supported emulators, see the Terminal Emulator Add-in section of the HP Unified Functional Testing Product Availability Matrix, available from the UFT Help or the root folder of the Unified Functional Testing DVD.
Important Information
➤ Before using the Terminal Emulator Add-in for the first time, you must enable UFT to identify your terminal emulator.See "Terminal Emulator Configuration Wizard Overview" on page 609.
➤ You must configure your terminal emulator settings to work with UFT.See "How to Set Your HLLAPI Terminal Emulator to Work with UFT" on page 579.
Checkpoints and Output Values
➤ See the sections describing checkpoints and output values in the HP Unified Functional Testing User Guide.
➤ See "Checkpoints and Output Values - Terminal Emulators" on page 572.
➤ See "GUI Checkpoints and Output Values Per Add-in" on page 695.

Chapter 33 • Terminal Emulator Add-in - Quick Reference
558
Troubleshooting and Limitations
"Troubleshooting and Limitations - Terminal Emulator" on page 559
Prerequisites
Opening Your Application
You can open your Terminal Emulator application before or after opening UFT and creating a test.
Add-in Dependencies
None
Configuration
Wizard "Terminal Emulator Configuration Wizard Overview" on page 609
Options Dialog Box ➤ Use the Terminal Emulator pane.(Make sure that a GUI test is open and select Tools > Options > GUI Testing tab > Terminal Emulator node.)
See "Terminal Emulator Pane (Options Dialog Box)" on page 595.
➤ Use the Windows Applications pane.(Tools > Options > GUI Testing tab > Windows Applications node)
See "Windows Applications > General Pane (Options Dialog Box > GUI Testing Tab)" on page 136.
Custom Active Screen Capture Settings Dialog Box(tests only)
Use the Terminal Emulator section in the dialog box.(Tools > Options > GUI Testing tab > Active Screen node > Custom Level)
See the section on the Custom Active Screen Capture Settings dialog box in the HP Unified Functional Testing User Guide.
Application Area Additional Settings pane(business components only)
Use the Applications pane.In the application area, click Additional Settings > Applications in the sidebar.
See the section on the Applications pane in the HP Unified Functional Testing User Guide.

Chapter 33 • Terminal Emulator Add-in - Quick Reference
559
Troubleshooting and Limitations - Terminal Emulator
This section contains general troubleshooting and limitation information about the Web add-in, and includes the following sections:
➤ "Installing and Loading the Terminal Emulator Add-in" on page 559
➤ "Connecting and Disconnecting from the Terminal Emulator Add-in" on page 560
➤ "Configuration and Settings" on page 561
➤ "Creating and Running Tests and Components" on page 562
➤ "Working with Terminal Emulator Controls" on page 563
➤ "Test Objects, Methods, and Properties" on page 564
➤ "Checkpoints and Output Values" on page 565
➤ "Multilingual Support" on page 565
Installing and Loading the Terminal Emulator Add-in
➤ When installing a Hummingbird HostExplorer terminal emulator or patches, make sure that UFT is closed.
➤ If the Unified Functional Testing Terminal Emulator Add-in is installed and loaded, but there is no terminal emulator installed on your computer, the following error message is displayed: UFT Terminal Emulator support is not configured correctly. Either the terminal emulator is not installed on your computer or the HLLAPI DLL was not found.
Workaround: When you open UFT, clear the Terminal Emulators check box in the Add-in Manager.

Chapter 33 • Terminal Emulator Add-in - Quick Reference
560
Note: You can prevent this message from appearing by adjusting your emulator’s configuration settings. For more information, see the HP Unified Functional Testing Add-ins Guide.
➤ You may experience unexpected behavior after you install an EXTRA! emulator. You may not be able to run UFT or various features may stop working. This happens because the EXTRA! installation may have copied and registered an outdated version of the atl.dll file on your computer.
Workaround: Locate the atl.dll in your system folder (WINNT\system32). Its version should be 3.0 or higher. Register it with the regsvr32 utility.
Connecting and Disconnecting from the Terminal Emulator Add-in
➤ If you have more than one terminal emulator session open, UFT does not recognize either session.
Workaround: While recording or running your test or business component, make sure that only one terminal emulator session is connected at a time.
➤ If your test or business component contains steps that disconnect the current emulator session during the run session, followed immediately by a TeScreen.Sync command, the test or business component run might stop responding or take a long time to respond.
Workaround: Remove the Sync command from the test or business component, or replace it with a Wait statement. For more information, see the Utility Objects section of the HP Unified Functional Testing Object Model Reference.
➤ Inserting a checkpoint, creating a new test or business component, or opening an existing test or business component when the emulator session is busy may cause unexpected problems.
Workaround: Check the connection status of your emulator on the status line of the emulator screen before performing any of these operations.
Chapter 33 • Terminal Emulator Add-in - Quick Reference
561
➤ Unexpected behavior may occur after disconnecting from a Host On-Demand session while recording.
Workaround: Stop recording before disconnecting from the session. Then, manually add a step that disconnects from the session.
➤ You may experience unexpected behavior if the terminal emulator is closed while UFT is recording.
Configuration and Settings
➤ When working with an emulator that does not support HLLAPI, or with an emulator that has been configured as supporting text-only HLLAPI operations, do not change the size of the terminal emulator window after configuring the emulator settings.
➤ To enable support for a NetManage Web-To-Host Java Client session that is configured to open in a separate window, specify the title of your session window using the Tools > Options > GUI Testing tab > Terminal Emulator > Adjust Configuration > Object identification settings > Identify emulator window based on title bar prefix option.
Tip: You may need to clear this value when switching to another configuration.
➤ When using the Terminal Emulator Configuration Wizard to configure the screen sizes of NetManage RUMBA Web-to-Host, you cannot use the Mark Text Area option to draw on top of the emulator window.
Workaround: Configure the text area position of the screen manually.

Chapter 33 • Terminal Emulator Add-in - Quick Reference
562
Creating and Running Tests and Components
➤ When using the OCR mechanism in order to perform steps requiring text recognition on non-HLLAPI emulators, the steps run slowly due to the required processing power of the OCR mechanism. Therefore, when testing non-HLLAPI emulators, it is recommended to select the default text recognition option: First Windows API then OCR in the Text Recognition pane of the Options dialog box. (For details on this option, see the HP Unified Functional Testing User Guide.)
➤ The Unified Functional Testing Terminal Emulator Add-in can identify emulator window objects only when the emulator is connected. For example, you cannot use the following statement to connect to an emulator session:
TeWindow("TeWindow").WinMenu("Menu").Select "Communication;Connect"
Workaround: You can record any steps that need to be performed prior to connection with the emulator. These steps are recorded as if the Terminal Emulator Add-in is not loaded. After the emulator is connected, stop the recording session and begin a new recording session to record terminal emulator objects.
➤ When using an emulator that supports HLLAPI, if your emulator session disconnects from the host while recording, UFT no longer recognizes the emulator, even after reconnecting.
Workaround: Stop recording, reconnect the session, and continue recording.
➤ When recording on a Hummingbird HostExplorer emulator, menu and toolbar operations in the emulator window are disabled.
Workaround: Stop recording, select the required menu item or click the required toolbar button, and continue recording.
➤ When using an emulator that supports HLLAPI, closing the emulator window while recording may cause unexpected results.
Workaround: Stop recording before closing the emulator window.

Chapter 33 • Terminal Emulator Add-in - Quick Reference
563
➤ The Unified Functional Testing Terminal Emulator Add-in does not support recording operations on toolbar objects in terminal emulator applications.
Workaround: Record on the corresponding menu command for the toolbar button. Alternatively, you can use low-level recording to record operations on toolbars. For more information about low-level recording, see the HP Unified Functional Testing User Guide.
➤ If you record a test or business component using one terminal emulator, it may not run correctly on another terminal emulator. For example, tests recorded on RUMBA may not run on IBM PCOM.
➤ HostExplorer has a bug in the HLLAPI GetKey function. As a result, UFT will stop recording terminal emulator keyboard events after recording for a while, and the emulator might stop responding to keyboard events.
Workaround: Contact Hummingbird customer support to get the patch that fixes the problem with the HLLAPI GetKey function (where it stops responding after several calls).
➤ Clicking, typing, or moving objects in the terminal emulator window while UFT is running a test or business component may cause unexpected results.
Workaround: Wait until the end of the test or business component, or pause the test or business component execution before using the emulator.n
➤ To record and run tests or business components on Hummingbird 9.0 5250 sessions, you need to install a patch for Hummingbird.
Workaround: Contact Hummingbird customer support to get the patch that fixes the problem with HLLAPI where all 5250 fields appear protected.
➤ You can encounter unexpected results when you run the Reflection HLL API in multiple threads mode.
Working with Terminal Emulator Controls
➤ When working with Attachmate Terminal Viewer 3.1 5250 session, all of the fields that appear on the screen before the first unprotected field are recognized as a single field.

Chapter 33 • Terminal Emulator Add-in - Quick Reference
564
➤ UFT may not recognize a TeField object in a NetManage RUMBA session immediately after installing the emulator.
Workaround: Restart your computer after installing RUMBA, even if the installation does not request a restart.
Test Objects, Methods, and Properties
➤ When using the SendKey method to unlock a terminal emulator, for example, TeWindow("TeWindow").TeScreen("screen5296").SendKey TE_RESET, some emulators (such as Host On-Demand) may not be unlocked.
Workaround: Specify the keyboard event to send for the RESET command, using the Tools > Options > GUI Testing tab > Terminal Emulator > Adjust Configuration > Run Settings > Run steps containing special emulator keys using keyboard events > Keys for RESET function option.
➤ By default, UFT uses the attached text and protected properties in TeField test object descriptions. If the attached text for a field changes from session to session, UFT cannot find the field during the run session.
Workaround: Open the Object Repository window or the Object Properties dialog box for the object. Remove the attached text property from the field’s description and add another property (or properties) such as start row, start column, or index to uniquely identify the object.
Tip: You can also create a smart identification definition for TeField objects so that your recorded test or business component can run successfully even if the attached text property value for a particular TeField object changes. (Select Tools > Object Identification > Enable Smart Identification and click Configure.) For more information on Smart Identification, see the HP Unified Functional Testing User Guide.
➤ You cannot use the label property in a programmatic description of the TeScreen object. However, since only one screen can exist in the given TeWindow at any one time, you can use TeScreen("MicClass:=TeScreen").
For example:
Chapter 33 • Terminal Emulator Add-in - Quick Reference
565
TeWindow("short name:=A").TeScreen("MicClass:=TeScreen").TeField("attached text:=User", "Protected:=False").Set "33333"
➤ The TeTextScreen properties current column and current row are available only for emulators that support HLLAPI.
➤ The location property is not recorded for TeField objects.
Workaround: Use the index property instead.
Checkpoints and Output Values
In some cases, a bitmap checkpoint on a TeScreen may fail because the cursor shows in the expected bitmap, and not in the actual bitmap (or the other way around).
Workaround: Set the emulator cursor to a slow blink rate, or not to blink at all. This enhances the probability that the cursor is not captured in the bitmap.
Multilingual Support
When working with the IBM PCOM emulator, UFT may ignore special European language characters while recording or running a test or business component.
Workaround: Set the code page for your IBM PCOM emulator in UFT, using the Tools > Options > GUI Testing tab > Terminal Emulator > Adjust Configuration > Emulator settings > Code page number (IBM PCOM only) option.
Tip: Try setting the Code page number (IBM PCOM only) option to 1252.

Chapter 33 • Terminal Emulator Add-in - Quick Reference
566

567
34Terminal Emulator Add-in - Testing and Configuration
This chapter includes:
Concepts
➤ Terminal Emulator Add-in - Overview on page 568
➤ Recording Tests and Components on Terminal Emulator Applications on page 570
➤ Checkpoints and Output Values - Terminal Emulators on page 572
➤ Run Session Synchronization on page 573
➤ Terminal Emulator Recovery Scenarios on page 574
Tasks
➤ How to Check the Validity of a Terminal Emulator Configuration on page 576
➤ How to Copy Existing Terminal Emulator Configurations on page 576
➤ How to Set Your HLLAPI Terminal Emulator to Work with UFT on page 579
➤ How to Manage Terminal Emulator Configuration Settings on page 585
➤ How to Synchronize Steps on Terminal Emulators on page 586
Reference
➤ Test Object Classes and Icons - Terminal Emulators on page 590
➤ Validating a Terminal Emulator - Possible Error Responses on page 591
➤ Terminal Emulator Pane (Options Dialog Box) on page 595
➤ Terminal Emulator Configuration Wizard Overview on page 609

Chapter 34 • Terminal Emulator Add-in - Testing and Configuration
568
Concepts
Terminal Emulator Add-in - Overview
You can use UFT with the Terminal Emulator Add-in to test terminal emulator applications that support HLLAPI (High Level Language Application Programming Interface) as well as those that do not, for example, emulator sessions configured to work with the VT100 protocol (using the Text-only option). HLLAPI allows a PC application to communicate with a mainframe application with extended capabilities.
UFT distinguishes between the window of the terminal emulator and the screens in the host application. The terminal emulator window consists of the frame, menus, toolbar, and status bar of the terminal emulator itself. This window remains constant throughout each terminal emulator session.

Chapter 34 • Terminal Emulator Add-in - Testing and Configuration
569
The terminal emulator screen refers to the area of the window in which the application is displayed. Each time the host responds to user input to the application, the screen changes.
If your emulator supports HLLAPI, UFT recognizes the screen and field objects in your emulator screen. If your emulator does not support HLLAPI, or you have configured UFT in Text-only mode, UFT records operations in terms of the text as it appears in the rows and columns of your emulator screen.
The Unified Functional Testing Terminal Emulator Add-in includes preconfigured settings for several terminal emulators. The Terminal Emulator Add-in also enables you to configure the settings for most other terminal emulators using the "Terminal Emulator Configuration Wizard Overview" on page 609.
To configure your HLLAPI emulator to work with UFT, see "How to Set Your HLLAPI Terminal Emulator to Work with UFT" on page 579.

Chapter 34 • Terminal Emulator Add-in - Testing and Configuration
570
Recording Tests and Components on Terminal Emulator Applications
As you record, the test or business component reflects the objects in your application and the type of operation you perform (such as pressing function keys or typing in fields). Each object has a defined set of properties that determines its behavior and appearance. UFT learns these properties and uses them to identify and locate objects during a run session.
Tip: You can launch your terminal emulator using the SystemUtil.Run method as the first step of your test or business component. For more information, see the section on running and closing applications programmatically in the HP Unified Functional Testing User Guide, and the Standard Windows section of the HP Unified Functional Testing Object Model Reference.
By default, when you record a test or business component, UFT automatically inserts synchronization points so that during a run session, execution will be delayed until the application is ready to receive input. You can also add synchronization points manually. For more information, see "How to Synchronize Steps on Terminal Emulators" on page 586.
The following is a sample of a UFT test recorded on a terminal emulator application that fully supports HLLAPI.
While recording, the user pressed the ENTER key in the first screen of an application, waited for the screen to change, and then typed the name MERCTEST and a password in the appropriate fields.
TeWindow("TeWindow").TeScreen("Welcome").SendKey TE_ENTERTeWindow("TeWindow").TeScreen("Welcome").SyncTeWindow("TeWindow").TeScreen("Sign On").TeField("User").Set "MERCTEST"TeWindow("TeWindow").TeScreen("Sign On").TeField("Password").
SetSecure "3c4feb5bc6233d6e6898bc"

Chapter 34 • Terminal Emulator Add-in - Testing and Configuration
571
UFT displays this test in the Keyword View like this:
The following is a sample test on a terminal emulator that does not support HLLAPI or that has been configured to support text-only HLLAPI operations.
Note that UFT records the TeTextScreen object instead of the TeScreen object and that it does not record TeField objects. The operations are recorded in terms of keyboard and mouse operations on the text screen, rather than operations within fields.
TeWindow("TeWindow").TeTextScreen("TeTextScreen").ClickPosition 24,2TeWindow("TeWindow").TeTextScreen("TeTextScreen").Type "l"TeWindow("TeWindow").TeTextScreen("TeTextScreen").Type micReturnTeWindow("TeWindow").TeTextScreen("TeTextScreen").WaitString
"FRSMAIN",1,2,1,8,2000TeWindow("TeWindow").TeTextScreen("TeTextScreen").Type "qa1"TeWindow("TeWindow").TeTextScreen("TeTextScreen").Type micReturnTeWindow("TeWindow").TeTextScreen("TeTextScreen").Sync
UFT displays this test in the Keyword View like this:
This section also includes "Considerations for Recording and Running Tests and Components on Terminal Emulators" on page 572.

Chapter 34 • Terminal Emulator Add-in - Testing and Configuration
572
Considerations for Recording and Running Tests and Components on Terminal Emulators
➤ Connect your emulator to the host and ensure that the emulator is configured properly. For details, see "How to Set Your HLLAPI Terminal Emulator to Work with UFT" on page 579.
➤ Make sure that only one terminal emulator session is open. (Multiple open sessions may cause problems with recording and running tests or business components.)
➤ If your test or business component includes calls to WinRunner tests, make sure that these tests do not use the WinRunner Terminal Emulator Add-in. Similarly, when running WinRunner tests with the WinRunner Terminal Emulator Add-in, make sure that these tests do not use the Unified Functional Testing Terminal Emulator Add-in if they include calls to UFT tests.
➤ If you are using an emulator that is configured as fully supporting HLLAPI and you need to record specific steps in terms of keyboard and mouse operations on the text screen (instead of operations within fields), you can change the recording mode for your emulator by adjusting the configuration. For details, see "How to Manage Terminal Emulator Configuration Settings" on page 585.
➤ UFT does not record operations on the toolbar and status bar in the terminal emulator window. However, you can insert checkpoints or output values for the status bar of the terminal emulator window while recording. For more information, see "Checkpoints and Output Values - Terminal Emulators" on page 572.
Checkpoints and Output Values - Terminal Emulators
While recording your test, you can add text checkpoints for the following:
➤ TeScreen and TeTextScreen objects
➤ status bar of the terminal emulator window
➤ dialog boxes that open after menu options are selected
While editing your test or business component, you can:

Chapter 34 • Terminal Emulator Add-in - Testing and Configuration
573
➤ add text checkpoints for TeScreen objects.
➤ add text checkpoints for TeTextScreen objects if the test was recorded using an emulator with full HLLAPI support that was configured to record in Text screen mode. For details on changing the emulator mode, see "How to Manage Terminal Emulator Configuration Settings" on page 585.
➤ output property or text values from the objects in your terminal emulator application to use in your test or business component.
Guidelines for Using Checkpoints and Output Values
➤ You can create bitmap checkpoints for TeWindow, TeScreen and TeTextScreen objects, but not for TeField objects.
➤ You can create text output values (tests only) only for TeScreen and TeTextScreen objects.
➤ In the terminal emulator window you can add text checkpoints or output values (tests only) and standard checkpoints and output values for the status bar and the dialog boxes that open from the menu options. UFT recognizes these as standard Windows objects. For more information on the properties of standard Windows objects, see the HP Unified Functional Testing Object Model Reference.
For details on standard, text, and bitmap checkpoints, and on standard and text output values, see the HP Unified Functional Testing User Guide.
Run Session Synchronization
When testing a terminal emulator application, many factors can affect its speed of operation and therefore can potentially interfere with the run session. For example, host response time can vary depending on the system load.
Synchronizing your run session helps to ensure that UFT performs the next step in the test or business component only when your terminal emulator application is ready to continue. This prevents incidental differences in host response time and other factors from affecting successive run sessions.

Chapter 34 • Terminal Emulator Add-in - Testing and Configuration
574
The following table illustrates the synchronization options available for various terminal emulator applications:
For a list of tasks describing how to synchronize, see "How to Synchronize Steps on Terminal Emulators" on page 586.
Terminal Emulator Recovery Scenarios
UFT allows you to define recovery scenarios for your tests or business components, to cater for various unexpected events, such as crashes and error situations, which can disrupt your tests or business components and distort your results.
You can use the values of the Emulator status property and the other properties of the TeWindow object to define specific recovery scenarios for your terminal emulator application tests or business components.
Emulator type Synchronization options
All emulator types You can instruct UFT to delay the run session:
➤ For a specified period of time➤ Until a specific string appears in a defined area➤ Until a specified property achieves a defined value
Emulators that fully support HLLAPI
You can synchronize the run session with the response time of the host. By default, during a record session, UFT automatically generates a Sync statement for the TeScreen object each time the emulator waits for a response from the host.
Emulators that do not support HLLAPI
When you record using a terminal emulator that does not support HLLAPI, or that has been configured as supporting text-only HLLAPI operations, UFT automatically generates a Sync statement for the TeTextScreen object each time a specified key is pressed. The default is the ENTER key. UFT waits a specified period of time, to allow the host sufficient response time.

Chapter 34 • Terminal Emulator Add-in - Testing and Configuration
575
The possible values for the Emulator status property are:
➤ Busy. Emulator is communicating with the server.
➤ Disconnected. Emulator is not connected to the server.
➤ Locked. Emulator cannot currently accept input.
➤ Ready. Emulator is waiting for input.
➤ Unavailable. Emulator status cannot be identified.
For each emulator status, you can create a recovery scenario that performs an appropriate recovery operation. For example:
➤ Disconnected. Reconnect to the server, using a function call recovery operation that includes recorded steps for connecting, API commands in a VB Script, or a keyboard shortcut key, according to the capabilities of your terminal emulator.
➤ Ready. Perform specific operations according to the content of a displayed error message, including pressing the relevant key.
➤ Locked. Activate the emulator’s RESET key, or use a handler function to disconnect from the server and reconnect.
For detailed information on defining recovery scenarios, see the HP Unified Functional Testing User Guide.

Chapter 34 • Terminal Emulator Add-in - Testing and Configuration
576
Tasks
How to Check the Validity of a Terminal Emulator Configuration
1 Make sure that a GUI test is open.
2 Open the Terminal Emulator pane of the Options dialog box (Tools > Options > GUI Testing tab > Terminal Emulator node) (described on page 595).
3 Click Validate.
If a problem is detected, a brief description (error response) is displayed in the pane. For details on handling the error, click Troubleshoot to open a Help page that displays error-specific information.
How to Copy Existing Terminal Emulator Configurations
This task describes how to copy a terminal emulator configuration from another user who has already configured the UFT settings for a specific emulator using the Terminal Emulator Configuration Wizard.
For example, if the settings for your terminal emulator were configured and saved to a file on another computer (or on a network drive), you can copy this file to your computer, instead of running the wizard and configuring the settings yourself.
This task includes the following steps:
➤ "Prerequisites" on page 577
➤ "Copy the registry file to your computer" on page 577
➤ "Register the file" on page 577
➤ "Set the new emulator as the default emulator - Optional" on page 578

Chapter 34 • Terminal Emulator Add-in - Testing and Configuration
577
➤ "Modify the emulator settings - Optional" on page 578
➤ "Results" on page 578
1 Prerequisites
➤ The existing configuration file must be saved to a registry file, using the Save terminal emulator settings to file option in the wizard’s final page. For details, see "Completing the Terminal Emulator Configuration Wizard Page" on page 632.
➤ Before you copy the saved configuration, make sure you know the vendor name and the emulator name assigned to the configuration, and the exact name and location of the file. The file has a .reg extension.
2 Copy the registry file to your computer
a Locate the registry file containing the configuration settings for your emulator. The file has a .reg extension.
b Copy the file to the <UFT installation folder>\dat folder on your computer.
The path for the dat folder in a typical installation is: C:\Program Files\HP\Unified Functional Testing\dat
3 Register the file
a Double-click the registry file to open the Registry Editor message box.
b Click Yes to add the information into the registry. A message opens confirming that the information has been copied into the registry.
c Click OK. The emulator name assigned to this configuration is added to the list of available terminal emulators for your UFT installation.

Chapter 34 • Terminal Emulator Add-in - Testing and Configuration
578
4 Set the new emulator as the default emulator - Optional
a Open UFT with the Terminal Emulator Add-in loaded.
a Select the new emulator name from the list in the Tools > Options > GUI Testing tab > Terminal Emulator pane, and set it as your default emulator.
5 Modify the emulator settings - Optional
a Open UFT with the Terminal Emulator Add-in loaded.
b Open the Terminal Emulator Configuration Wizard. For details, see "Terminal Emulator Configuration Wizard Overview" on page 609.
6 Results
After you copy a configuration file from another location, the emulator name assigned to this configuration is added to the list of available terminal emulators for your UFT installation.
Note: If you copy a configuration file after starting UFT, you need to close and reopen UFT to see the updated list of available emulators.

Chapter 34 • Terminal Emulator Add-in - Testing and Configuration
579
How to Set Your HLLAPI Terminal Emulator to Work with UFT
The steps below provide a general overview of how to enable testing on your terminal emulator application when working with an emulator that supports HLLAPI. For details on how to configure a specific emulator, see "How to Configure an Emulator to Work with the Terminal Emulator Add-in" on page 579.
1 Connect your emulator to the host before running the Terminal Emulator Configuration Wizard and before recording each test or business component.
2 Assign the uppercase letter A as the short name for the current emulator session.
3 (Optional) Restart the emulator after changing these settings.
Note: For details on supported emulator versions and protocols, see the HP Unified Functional Testing Product Availability Matrix, available from the UFT Help or the root folder of the Unified Functional Testing DVD.
How to Configure an Emulator to Work with the Terminal Emulator Add-in
This section describes how to configure an emulator to work with the Terminal Emulator Add-in:
"Attachmate EXTRA!" on page 580
"Attachmate myEXTRA! Terminal Viewer" on page 580
"Attachmate INFOConnect" on page 581
"Hummingbird HostExplorer" on page 581
"IBM Personal Communications (PCOM)" on page 582
"IBM WebSphere Host On-Demand" on page 582

Chapter 34 • Terminal Emulator Add-in - Testing and Configuration
580
Attachmate EXTRA!
To connect your EXTRA! terminal emulator to UFT:
1 Open EXTRA!.
2 In EXTRA!, select Options > Global Preferences. The Global Preferences dialog box opens.
3 Click the Advanced tab.
4 In the HLLAPI shortname list, select the uppercase letter A as the Short Name.
5 Click the browse button, browse to and select your session profile, and click OK.
6 Save the profile before you start testing with UFT. This enables you to configure the terminal emulator once and then reuse the saved settings.
Attachmate myEXTRA! Terminal Viewer
To connect your myEXTRA! terminal viewer to UFT:
1 Open the myEXTRA! Management and Control Services window.
2 In the Management and Control Services window, select Products > Terminal Viewers. The Terminal Viewers tree is displayed in the left pane.
3 In the Terminal Viewers tree, select the required terminal.
4 In the right pane, select the required session and click Properties.
5 In the Properties pane, click Configure to configure the connection.
6 In the General tab of the Configure pane, select the Support HLLAPI check box and set the session name to A.
7 Save the session.
"NetManange RUMBA" on page 582
"NetManage RUMBA Web-to-Host" on page 583
"Seagull BlueZone" on page 584
"WRQ Reflection" on page 584
"Zephyr Passport" on page 584

Chapter 34 • Terminal Emulator Add-in - Testing and Configuration
581
8 If this is the first time that you are connecting to a myEXTRA! terminal viewer, install the HLLAPI DLL, as follows:
a Click Preferences.
b Click the Install HLLAPI Client Components link.
Attachmate INFOConnect
To connect your INFOConnect terminal emulator to UFT:
1 Open Attachmate INFOConnect.
2 Select Options > Global Preferences from the main menu.
1 Select the Advanced tab.
2 Select A as the session short name.
3 To associate the session short name (A), with your session, click Browse and locate your session profile in the file system.
4 Click OK.
Hummingbird HostExplorer
To connect your HostExplorer terminal emulator to UFT:
1 Open HostExplorer.
2 From the HostExplorer main menu, select File > Save Session Profile.
3 In the Save Profile dialog box, set the HLLAPI Short Name to the uppercase letter A.
4 From the main menu, select Options > API Settings.
5 In the API Global Settings dialog box, select the Update screen after PS update and Auto sync options.
6 Click OK.
Alternatively:
1 Open HostExplorer.
2 Open a saved session.
3 Select Options > Edit Session Profile.

Chapter 34 • Terminal Emulator Add-in - Testing and Configuration
582
4 Select Terminal > API in the categories tree.
5 Select A as the session short name and click OK.
6 Save the session profile.
IBM Personal Communications (PCOM)
The preconfigured settings enable UFT to work with IBM PCOM terminal emulators.
IBM WebSphere Host On-Demand
To connect your WebSphere Host On-Demand terminal emulator to UFT:
1 Open the WebSphere Host On-Demand EHLLAPI Enablement Tool. (If you do not have this tool, contact IBM for information on how to acquire and install it.)
2 To enable UFT to record on the IBM WebSphere Host On-Demand terminal emulator, define the session options as follows:
➤ Click Configure and select Properties from the list. Then select Preferences > Start Options and set Auto-Start HLLAPI Enabler to Yes.
➤ Set the Start In Separate Window option to Yes.
➤ Set the Alternate Terminal option to Disable.
Make sure that the server and client are not installed on a computer on which another terminal emulator is installed.
NetManange RUMBA
To connect your RUMBA terminal emulator to UFT:
1 Open RUMBA.
2 In RUMBA, select Options > API. The API Options dialog box opens.
3 Click the Identification tab.
4 In the Session Short Name field, type the uppercase letter A.
5 Click OK.
6 Save the profile.

Chapter 34 • Terminal Emulator Add-in - Testing and Configuration
583
Tip: It is recommended to save the profile before you start testing with UFT. This enables you to configure the terminal emulator once and then reuse the saved settings.
NetManage RUMBA Web-to-Host
To connect your RUMBA Web-to-Host terminal emulator to UFT:
1 Open the RUMBA Web-to-Host Session Configuration Manager and open a session.
2 In addition to your standard configuration steps in the Configuration Manager:
a Select Pro client from the Implementation drop-down list.
b Click HLLAPI Configuration and select A from the Session Short Name drop-down list.
3 Save the profile.
Note:
➤ For versions 5.x: Only Mainframe Display is supported for the Java client Only Replay is supported for both Java client and Pro client.
➤ For version 6.x: Java Client is not supported. Only Replay is supported for Pro client.
For more details on supported versions RUMBA Web-to-Host, see the HP Unified Functional Testing Product Availability Matrix, available from the UFT Help or the root folder of the Unified Functional Testing DVD.

Chapter 34 • Terminal Emulator Add-in - Testing and Configuration
584
Seagull BlueZone
To connect your BlueZone terminal emulator to UFT:
1 Open BlueZone.
2 In BlueZone, select Options > API. The API Properties dialog box opens.
3 Click the Options tab.
4 In the Short Name Session Identifier field, type the uppercase letter A.
5 Click OK.
6 Save the session.
WRQ Reflection
To connect your Reflection terminal emulator to UFT:
1 Open a new or existing session.
2 Select Setup > Terminal.
3 In the Short Name field, type the uppercase letter A.
4 Click OK.
Zephyr Passport
To connect your Zephyr Passport terminal emulator to UFT:
1 Open a new or existing session.
2 Check that the session shortname (A) Passport.zws appears in the window title bar.

Chapter 34 • Terminal Emulator Add-in - Testing and Configuration
585
How to Manage Terminal Emulator Configuration Settings
The following steps describe how to manage your terminal emulator configuration settings.
➤ "Change configuration settings" on page 585
➤ "Restore default settings for the selected preconfigured emulator" on page 585
➤ "Restore settings for a user-defined configuration" on page 586
Change configuration settings
The Terminal Emulator Configuration Adjustments dialog box contains check boxes, radio buttons, and options that require a numeric or text value.
1 Open the Terminal Emulator Configuration Adjustments Dialog Box, as described on page 595.
2 Enter a numeric or text value for an option:
a Click the option once to highlight it.
b Click the option again or press F2 to access the value to be changed.
c Change the value as necessary.
d Click another location in the dialog box to set the value.
3 Click OK to update the current terminal emulator configuration and close the dialog box.
Restore default settings for the selected preconfigured emulator
1 Open the Terminal Emulator Configuration Adjustments Dialog Box, as described on page 595.
2 Click the Reset button. (This button is enabled only if a preconfigured emulator is selected.)

Chapter 34 • Terminal Emulator Add-in - Testing and Configuration
586
Restore settings for a user-defined configuration
1 Locate the saved registry file that contains the configuration settings in the <UFT installation folder>\dat folder on your computer. The file has a .reg extension. (The path for the dat folder in a typical installation is: C:\Program Files\HP\Unified Functional Testing\dat)
2 Double-click the registry file to activate the registry file. A confirmation message opens.
3 Click Yes. A message opens confirming that the information was copied into the registry.
4 Click OK. The settings in the saved file are restored.
Tip: You can also restore the settings for a user-defined terminal emulator, if these settings were saved previously using the wizard. For details, see "Completing the Terminal Emulator Configuration Wizard Page" on page 632.
How to Synchronize Steps on Terminal Emulators
The following steps describe how to perform various types of synchronization operations. For conceptual details, see "Run Session Synchronization" on page 573.
➤ "Insert a synchronization step while recording" on page 587
➤ "Set synchronization timeout" on page 587
➤ "Insert a synchronization point for an object" on page 588
➤ "Wait for a specified text string" on page 588

Chapter 34 • Terminal Emulator Add-in - Testing and Configuration
587
Insert a synchronization step while recording
1 Select Design > Emulator Synchronization.
2 (Optional) Specify a timeout in milliseconds for the Sync statement, after which the run session continues regardless of the status of the emulator. If you do not specify a timeout value, UFT uses the default timeout interval, as described in "Set synchronization timeout" on page 587.
Note:
➤ You can adjust your emulator configuration to prevent UFT from automatically inserting Sync steps for TeScreen objects in your test or business component.
➤ You can specify the keys that generate Sync steps for TeTextScreen objects.
For details, see Chapter 34, "How to Manage Terminal Emulator Configuration Settings."
Set synchronization timeout
In the Run pane of the Test Settings dialog box (File > Settings > Run node), set the Object Synchronization Timeout. For details, see the HP Unified Functional Testing User Guide.
This enables you to specify the maximum interval (in milliseconds) that UFT waits before running each test step.

Chapter 34 • Terminal Emulator Add-in - Testing and Configuration
588
Note:
➤ This option is not available for business components.
➤ This setting is also used as the default timeout for the Sync and WaitString methods for both the TeScreen and the TeTextScreen objects if a timeout argument is not specified.
Insert a synchronization point for an object
Select Design > Synchronization Point. For details, see the HP Unified Functional Testing User Guide.
When you insert a synchronization point into your test or business component, UFT generates a WaitProperty statement in the Editor. This statement instructs UFT to pause the test or business component until a particular object property achieves the value you specify.
Example:
If you want the run session to wait until the Text property of the Result field has a value of Successful, insert the following statement:
TeScreen("LogOn").TeField("Result").WaitProperty "Text", "Successful"
Wait for a specified text string
UFT’s WaitString method delays the run session until a specific text string appears in a specified rectangle on the terminal emulator screen. The specified text string can be a constant string or a regular expression.
To insert a WaitString statement while recording:
1 Select Design > Emulator WaitString. Your cursor becomes a crosshairs pointer.
2 Drag the pointer to draw a rectangle on your emulator screen containing the text string for which you want the run session to wait. UFT inserts a step into your test or business component with the following syntax:

Chapter 34 • Terminal Emulator Add-in - Testing and Configuration
589
TeScreen object:TeScreen(description).WaitString String [, TopRow, LeftColumn, BottomRow, RightColumn, Timeout, RegExp]
TeTextScreen object:TeTextScreen(description).WaitString String [, TopRow, LeftColumn, BottomRow, RightColumn, Timeout, RegExp]
The position on the screen is defined by the values of the four corners of the rectangle, each corner with its own argument.
3 Optionally, you can:
➤ Specify that the value specified in the String argument is a regular expression by setting the value of the RegExp argument to True. Regular expressions enable UFT to identify objects and text strings with varying values. For more information on regular expressions, see the HP Unified Functional Testing User Guide.
➤ Add a timeout value in milliseconds after which the run session continues regardless of whether the text string appears on the screen. If you do not specify this value, UFT uses the default timeout interval. For details, see "Set synchronization timeout" on page 587.

Chapter 34 • Terminal Emulator Add-in - Testing and Configuration
590
Reference
Test Object Classes and Icons - Terminal Emulators
The following test object classes and icons apply to terminal emulators that are configured as fully supporting HLLAPI:
The following test object classes and icons apply to terminal emulators that do not support HLLAPI or that have been configured as supporting text-only HLLAPI operations:
The following test object classes and icons apply to the Windows objects for the terminal emulator window status bar and the dialog boxes that open from the menu options in the terminal emulator window:
Icon Test Object Class
TeField
TeScreen
TeWindow
Icon Test Object Class
TeTextScreen
TeWindow
Icon Test Object Class
Dialog
WinObject

Chapter 34 • Terminal Emulator Add-in - Testing and Configuration
591
Validating a Terminal Emulator - Possible Error Responses
The following possible error responses may be displayed in the Terminal Emulator pane of the Options dialog box (Tools > Options > GUI Testing tab > Terminal Emulator node) when you click the Validate button:
➤ "Invalid HLLAPI DLL" on page 591
➤ "Cannot detect an open session" on page 592
➤ "Cannot locate the main window class" on page 592
➤ "Cannot detect the emulator screen" on page 592
➤ "Cannot connect to the open session" on page 593
➤ "Cannot retrieve session text" on page 593
➤ "Cannot detect open session, or Cannot locate the main window class" on page 593
➤ "HLLAPI DLL not found" on page 594
➤ "More than one session open" on page 594
➤ "Unknown error" on page 594
Invalid HLLAPI DLLThe required HLLAPI or EHLLAPI function cannot be found, because the configured DLL is invalid.
Ensure that you have configured the correct DLL path and name in the Terminal Emulator Configuration Wizard (Tools > Options > GUI Testing tab > Terminal Emulator node > Open Wizard).
For more details, see the table listing the DLL names used by supported terminal emulators in "Configure HLLAPI Properties Page" on page 618, or the documentation provided by your emulator provider.

Chapter 34 • Terminal Emulator Add-in - Testing and Configuration
592
Cannot detect an open sessionUFT cannot detect an open terminal emulator session.
➤ Ensure that you have opened a current session in your terminal emulator.
➤ For HLLAPI emulators, ensure that the emulator short session name is set to the uppercase letter A. You may need to restart the emulator after changing this setting.
Cannot locate the main window class UFT cannot find the terminal emulator main window class name.
➤ Ensure that the terminal emulator main window class name is configured correctly in the Terminal Emulator Configuration Wizard (Tools > Options > GUI Testing tab > Terminal Emulator node > Open Wizard).
➤ If the main window class name has a postfix that changes each time you launch the emulator, enter only the non-changing portion of the name in the Terminal Emulator Configuration Wizard.
Cannot detect the emulator screenUFT cannot find the terminal emulator main window class name.
➤ Ensure that the terminal emulator main window class name is configured correctly in the Terminal Emulator Configuration Wizard (Tools > Options > GUI Testing tab > Terminal Emulator node > Open Wizard).
➤ If the main window class name has a postfix that changes each time you launch the emulator, enter only the non-changing portion of the name in the Terminal Emulator Configuration Wizard.

Chapter 34 • Terminal Emulator Add-in - Testing and Configuration
593
Cannot connect to the open sessionAlthough a current session is open, invoking an HLLAPI function resulted in an error.
Restart UFT and then restart the emulator. If this does not resolve the problem, contact your emulator provider.
Cannot retrieve session textUFT cannot display text captured in the current session.
➤ HLLAPI Emulators—Restart UFT and then restart the emulator. If this does not resolve the problem, contact your emulator provider.
➤ Non-HLLAPI Emulators—Click Validate again. If the error message is repeated, check that the emulator screen is brought to the front during the validate process (even when using remote access). If this is the case, contact HP Customer Support.
Cannot detect open session, or Cannot locate the main window classUFT cannot detect an open terminal emulator session, or find the terminal emulator main window class name.
➤ Ensure that you have opened a current session in your terminal emulator.
➤ Ensure that the terminal emulator main window class name is configured correctly in the Terminal Emulator Configuration Wizard (Tools > Options > GUI Testing tab > Terminal Emulator node > Open Wizard).
➤ If the main window class name has a postfix that changes each time you launch the emulator, enter only the non-changing portion of the name in the Terminal Emulator Configuration Wizard.
Chapter 34 • Terminal Emulator Add-in - Testing and Configuration
594
HLLAPI DLL not foundUFT cannot find the HLLAPI DLL specified for the selected emulator.
Ensure that you have configured the correct DLL path and name in the Terminal Emulator Configuration Wizard (Tools > Options > GUI Testing tab > Terminal Emulator node > Open Wizard).
For more details, see the table listing the DLL names used by supported terminal emulators in "Configure HLLAPI Properties Page" on page 618, or the documentation provided by your emulator provider.
More than one session openMore than one terminal emulator session is currently open.
Close additional sessions.
Unknown errorThe validation process failed due to an unknown error.
Restart UFT and then restart the emulator.

Chapter 34 • Terminal Emulator Add-in - Testing and Configuration
595
Terminal Emulator Pane (Options Dialog Box)
This pane enables you to change your terminal emulator settings and to validate your current terminal emulator configurations.

Chapter 34 • Terminal Emulator Add-in - Testing and Configuration
596
User interface elements are described below:
To access 1 Make sure that a GUI test is open.
2 Select Tools > Options > GUI Testing tab > Terminal Emulator node.
Important information
This pane is available only when the Unified Functional Testing Terminal Emulator Add-in is installed and loaded.
Any changes you make to the settings in this pane are immediately applied to the currently open test or business component when you click OK.
Terminal Emulator area: You can select an emulator to test using the Vendor and Emulator list boxes. The displayed lists include all of the vendor/emulator combination settings that are:
➤ Preconfigured (supplied with your Terminal Emulator Add-in)
➤ Copied to your computer
➤ Previously configured using the Terminal Emulator Configuration Wizard
You can also open the wizard to configure a new terminal emulator setting or modify an existing setting.
Relevant tasks "How to Check the Validity of a Terminal Emulator Configuration" on page 576
UI Elements Description
Vendor The list of available terminal emulator vendors. Select the vendor for your emulator.
Emulator The list of terminal emulators available for the selected vendor. Select the emulator application you want to test.
Protocol The protocol that your emulator uses.
Recommended: Auto-detect

Chapter 34 • Terminal Emulator Add-in - Testing and Configuration
597
Validate Validates the current configurations of the selected emulator, and, if an error is detected, displays a brief description that error.
Errors may result from:
➤ invalid terminal emulator configurations in the Terminal Emulator pane (Tools > Options > GUI Testing tab > Terminal Emulator node).
➤ invalid configurations made when configuring the terminal emulator using the Terminal Emulator Configuration Wizard (Tools > Options > GUI Testing tab > Terminal Emulator node > Open Wizard).
➤ errors in the terminal emulator itself.
For a list of possible error responses, see "Validating a Terminal Emulator - Possible Error Responses" on page 591.
Troubleshoot Opens a specific Help page that provides a troubleshooting solution where available.
Available only if an error response is displayed after you click Validate.
Example: If you click Validate and Invalid HLLAPI DLL is displayed, you can click Troubleshoot to open a Help topic displaying information on handling this error.
For details, see "Validating a Terminal Emulator - Possible Error Responses" on page 591.
UI Elements Description

Chapter 34 • Terminal Emulator Add-in - Testing and Configuration
598
Screen Label The area from which UFT reads the label property of the emulator screen while recording a test or business component. If the location and length of the label are correctly defined, UFT uses this value as the name of the TeScreen object. The Screen label area is enabled only for emulators that support HLLAPI.
To set the screen label:Enter the Start row and Start column coordinates that mark the beginning of the emulator label. Define the size of the label by entering the Length (in characters).
Note: You can change the way that UFT reads the label property of the emulator screen, by adjusting the configuration settings. For details, see "How to Manage Terminal Emulator Configuration Settings" on page 585.
Open Wizard Opens the Terminal Emulator Configuration Wizard. The wizard enables you to define new settings for a terminal emulator or to modify existing user-defined settings. For details, see "Terminal Emulator Configuration Wizard Overview" on page 609.
UI Elements Description

Chapter 34 • Terminal Emulator Add-in - Testing and Configuration
599
Terminal Emulator Configuration Adjustments Dialog Box
This dialog box enables you to make adjustments to existing terminal emulator configuration settings. This is required only in exceptional circumstances. In the majority of cases, UFT works successfully with terminal emulators using the supplied preconfigured settings and with the configuration settings defined using the Terminal Emulator Configuration Wizard.
Caution: Do not change the configuration settings using the options in this dialog box unless you have a good understanding of your terminal emulator and of the impact that such changes may have on your tests or business components.
Adjust Configuration Opens the Terminal Emulator Configuration Adjustments dialog box to allow changes to existing configuration settings in exceptional circumstances.
Note: In general, it is recommended to use the Terminal Emulator Configuration Wizard to configure your emulator screen settings. For details, see "Configure Emulator Screen Settings Page" on page 628. You should use the Adjust Configuration option only if you have a good understanding of your terminal emulator settings and of the impact that such changes may have on your tests or business components. For more information, see "How to Manage Terminal Emulator Configuration Settings" on page 585.
UI Elements Description
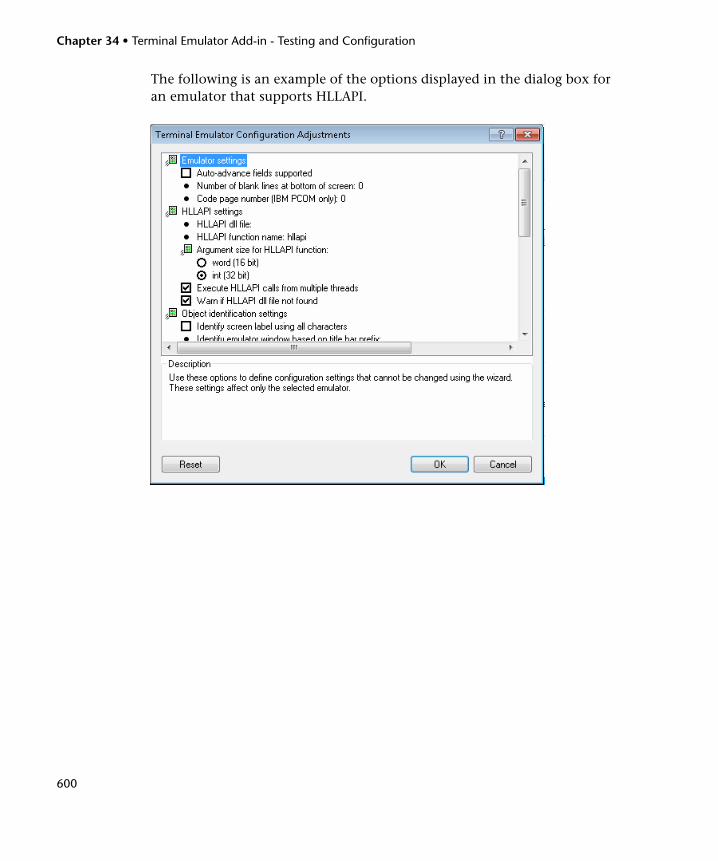
Chapter 34 • Terminal Emulator Add-in - Testing and Configuration
600
The following is an example of the options displayed in the dialog box for an emulator that supports HLLAPI.

Chapter 34 • Terminal Emulator Add-in - Testing and Configuration
601
To access 1 Select Tools > Options > GUI Testing tab > Terminal Emulator node.
2 Select an emulator and click Adjust Configuration,
Important information
The choice of options displayed in this dialog box depends on the type of terminal emulator selected in the Terminal Emulator pane.
The majority of the options in this dialog box are specific to the terminal emulator selected in the Terminal Emulator pane of the Options dialog. The values for these emulator-specific options are saved with the selected emulator. For example, if you specify an HLLAPI DLL file other than the default file, the specified file is used only for the selected emulator.
For a few options, the value is saved and applied regardless of the emulator selected in the Terminal Emulator pane of the Options dialog. For example, if you select not to record menus and dialog boxes, UFT keeps this setting even if you select a different emulator.
Relevant tasks You modify options that are displayed as bullets by clicking the text and modifying the value when the text becomes an editable box. For details, see "Change configuration settings" on page 585.
See also "How to Manage Terminal Emulator Configuration Settings" on page 585

Chapter 34 • Terminal Emulator Add-in - Testing and Configuration
602
User interface elements are described below:
UI Elements Description
Emulator Settings
The following options enable you to define configuration settings that cannot be changed using the wizard:
➤ Auto-advance fields supported. Auto-advance fields allow an application to proceed automatically to the next screen or field after input of a predefined number of characters without pressing ENTER or another key.
If your emulator supports auto-advance fields, select this check box to enable UFT to record Set statements on these fields.
Displayed for: Emulators that support HLLAPI.
➤ Number of blank lines at bottom of screen. Some emulators reserve blank lines at the bottom of the screen. If the screen size changes, these lines may distort UFT’s calculation of field locations. This option enables you to specify the number of blank lines at the bottom of the emulator screen. It is recommended to use the Terminal Emulator Configuration Wizard to configure this setting, but you can also modify the setting using this option.
Enter the number of lines that your emulator reserves at the bottom of the screen. UFT includes this value in its algorithm for identifying field locations.
➤ Code page number (IBM PCOM only). If you are using an IBM PCOM emulator with a language other than English, enter the code page number for this language. For example, for the German language keyboard, enter the value 1252. To use the default code page conversion, specify 0. To view a list of languages and their code page numbers, select Regional Options in the Windows Control Panel and select the Advanced button in the General tab.
UFT uses this code page to correctly identify the keys you record.

Chapter 34 • Terminal Emulator Add-in - Testing and Configuration
603
HLLAPI Settings
The following options enable you to define configuration settings for the selected emulator. They are displayed only for emulators that support HLLAPI.
➤ HLLAPI dll file. UFT uses the HLLAPI DLL file specified for this emulator to connect to the emulator and to retrieve data concerning its current status.
If you are using a customized version of a preconfigured emulator, you may need to specify a different DLL file name.
➤ HLLAPI function name. The HLLAPI DLL for this emulator uses this function as the entry point for all HLLAPI calls.
If you are using a customized version of a preconfigured emulator, you may need to specify a different function name.
➤ Argument size for HLLAPI function. For most emulators, the HLLAPI function receives 16-bit (word) arguments. For some emulators, such as IBM PCOM, the HLLAPI function receives 32-bit (integer) arguments.
Select the correct argument size for the selected emulator: word (16 bits) or integer (32 bits).
➤ Execute HLLAPI calls from multiple threads. Some emulators allow HLLAPI calls from multiple threads, while others require all HLLAPI calls to be executed from the same thread. (Selected by default for a preconfigured emulator configuration.)
Clear this check box to instruct UFT to open a separate process for HLLAPI calls and to execute all HLLAPI calls from this single thread.
➤ Warn if HLLAPI dll file not found. Instructs UFT to display a warning message when the HLLAPI DLL file for the current configuration cannot be found. For example, UFT warns you if you try to use the Terminal Emulator Add-in before you have installed the emulator itself.
If you clear this check box and UFT cannot find the required DLL file, it may be difficult to determine why UFT is not recording successfully. It is therefore recommended that you leave this option selected.
Applies to: All terminal emulator configurations, regardless of the currently selected emulator.
UI Elements Description

Chapter 34 • Terminal Emulator Add-in - Testing and Configuration
604
Object Identification Settings
The following options enable you to configure the way UFT identifies objects for the selected terminal emulator:
➤ Identify screen label using all characters. The label property value is used to identify the TeScreen test object. The location and length of the label are defined for the selected emulator in the Terminal Emulator pane. For more information, see "Terminal Emulator Pane (Options Dialog Box)" on page 595.
By default, only the protected characters in the defined label area are captured for the label property value.
Select this option if you want UFT to capture all the characters in the label area for the label property, including any unprotected or hidden characters that may form part of the label.
➤ Identify emulator window based on title bar prefix. UFT normally identifies the emulator window by its object class. With a user-defined configuration, the class name may not be unique. For example, an emulator may use a generic class name, such as Afx. In such cases, you can instruct UFT to identify the window based on a static prefix in the window title bar.
To instruct UFT to use a prefix to identify the correct window, specify the text string for the prefix.
When no value is specified, UFT uses the object class to identify the emulator window.
UI Elements Description

Chapter 34 • Terminal Emulator Add-in - Testing and Configuration
605
Record Settings
The following options enable you to configure the way UFT records operations:
➤ Communicate with server using these keys. When recording without HLLAPI support, UFT inserts Sync steps after specified keys are pressed, to synchronize the communication between the emulator and the server. The keys are identified by their virtual key codes.
Default: ENTER key—virtual key code value: 13 (0D Hex). You can specify different or additional keys. For example, you can add the CTRL key—virtual key code value: 17 (11 Hex).
Specify the decimal value of the virtual key code for each key, separated by a semicolon (;). UFT inserts a Sync step whenever one of these keys is pressed. For more information on synchronization, see "How to Synchronize Steps on Terminal Emulators" on page 586.
For a list of virtual key codes, see http://msdn.microsoft.com/en-us/library/dd375731(VS.85).aspx. The list on the MSDN page displays the Hex values for each key code. You must convert the value to decimal and specify the decimal value of the key codes when you add them to the list for this option.
Applies to: All terminal emulator configurations, regardless of the currently selected emulator.
➤ Record operations on menus and dialog boxes. By default, UFT records operations on the menus of the terminal emulator window and the dialog boxes that open as a result of these menu option selections.
Clear this check box if you do not want UFT to record these menu and dialog box operations. For example, you may not want emulator-specific menu and dialog box steps in your test or business component if cross-emulator compatibility is important, or if these steps are not relevant to your test or business component.
Applies to: All terminal emulator configurations, regardless of the currently selected emulator.
UI Elements Description

Chapter 34 • Terminal Emulator Add-in - Testing and Configuration
606
Record Settings (continued)
➤ Record mode. In Text screen mode, UFT records operations as TeTextScreen steps, based on the screen coordinates. In Context-sensitive mode, UFT records field operations as TeField steps.
By default, all preconfigured terminal emulators and user-defined emulators configured as fully supporting HLLAPI are set to context-sensitive mode. Select Text screen mode if you are using an emulator that supports HLLAPI and you want to test in terms of coordinates instead of TeField objects.
You can use the wizard to change the mode for a user-defined terminal emulator. For more information, see "Terminal Emulator Configuration Wizard Overview" on page 609.
Note: For emulators that do not support HLLAPI and those configured as supporting text-only HLLAPI operations, UFT always uses Text screen mode and this option is not available.
➤ Record steps without synchronizing. By default, when UFT recognizes a user operation in the terminal emulator application, such as keyboard input or a mouse click, UFT suspends the processing of the user input in the application. After the recorded statement is added to the test or business component script and the Active Screen information has been saved, UFT releases the emulator and allows it to process the user input.
Some emulators, such as IBM PCOM, do not support running HLLAPI while user input processing is suspended, and require UFT to release the emulator process before executing HLLAPI calls.
If you experience unexpected behavior while trying to record, you may need to select this option. For example, there may be no response from UFT or the emulator (or both). If you do select this option, make sure that you allow sufficient time for UFT to record each step before performing another operation.
UI Elements Description
Chapter 34 • Terminal Emulator Add-in - Testing and Configuration
607
Record Settings (continued)
➤ Record cursor position. When recording in a text screen or field, UFT uses TeTextScreen.ClickPosition or TeField.SetCursorPos to record the cursor position.
Clear this check box if you do not want to record the cursor position in your test or business component.
Applies to: All terminal emulator configurations.
➤ Trim trailing spaces in fields. When recording in Context-sensitive mode, fields may contain trailing spaces or other "white characters", such as tab symbols.
Select this check box to instruct UFT to trim these characters. If you select this option, specify the minimum length of fields to be trimmed. Fields containing fewer than the specified number of characters remain unchanged. The default is 5 characters.
Clear the check box to leave the field content unchanged.
Displayed for: Emulators that support HLLAPI.
➤ Use property patterns. Select this check box to use property patterns to record regular expressions in identification properties, such as for date and time values in a screen label.
For more information on property patterns, see Using Property Patterns to Identify Objects (Advanced) in PropPattern.htm. This file is located in the help subfolder of the UFT installation folder.
You can accept the default property pattern configuration file, change its contents, or specify a different property pattern configuration file. The default file is designed for applications where the current time forms part of the screen label. It defines regular expressions that replace the current time in the screen label, creating a reliable description and readable name for the screen.
Applies to: All terminal emulator configurations, regardless of the currently selected emulator.
UI Elements Description

Chapter 34 • Terminal Emulator Add-in - Testing and Configuration
608
Run Settings The following options enable you to configure the way UFT runs tests or business components for the selected terminal emulator, if the emulator supports HLLAPI:
➤ Beep when Sync operations are performed. Indicates whether UFT beeps after performing each Sync operation during a run session.
Applies to: All terminal emulator configurations, regardless of the currently selected emulator.
➤ Run steps containing special emulator keys using keyboard events. Instructs UFT to perform SendKey commands using keyboard events. If you do not use this option to specify key codes, UFT performs SendKey commands using the corresponding HLLAPI function.
Some emulators, for example, Attachmate Extra!, recognize the RESET command while the emulator is busy only when it is sent using keyboard events. In the Keys for RESET function option, specify the keyboard combination of the virtual key code by specifying the decimal value of each key in the code, separated by semicolons (;).
➤ Time between emulator status checks (in milliseconds). During a Sync step, UFT waits the specified period of time before checking the emulator status. UFT repeats these checks at the specified interval until the emulator status changes to Ready (or until the Sync timeout is reached), and then continues with the run session. For more information on synchronization, see "How to Synchronize Steps on Terminal Emulators" on page 586.
Specify the interval (in milliseconds) between emulator status checks.
Default: 200
Note: Specifying a very long interval could significantly increase the time your tests or business components take to run.
UI Elements Description

Chapter 34 • Terminal Emulator Add-in - Testing and Configuration
609
Terminal Emulator Configuration Wizard Overview
This wizard guides you through the process of configuring the settings UFT needs to identify your terminal emulator. If your emulator is not in the list of preconfigured settings to select, you can define the way UFT identifies your emulator.
To access 1 Open UFT with the Terminal Emulator Add-in loaded.
2 In UFT, select Tools > Options > GUI Testing tab > Terminal Emulator node.
3 In the Terminal Emulator pane, click Open Wizard.
Note: After you install UFT, the Terminal Emulator Configuration Wizard opens automatically if you selected Run the Terminal Emulator wizard in the Additional Installation Requirements dialog box.
Important information
➤ To configure a terminal emulator that supports HLLAPI, make sure that you close any application that is currently using the HLLAPI .dll file before you begin using the wizard. Otherwise, the wizard cannot connect to your terminal emulator.
➤ If terminal emulator settings for UFT are already configured on another computer, you can copy an existing configuration file onto your computer, instead of running the wizard. For details, see "How to Copy Existing Terminal Emulator Configurations" on page 576.
➤ After you run the wizard, the terminal emulator you selected is set as the default emulator when you open UFT with the Terminal Emulator Add-in loaded.

Chapter 34 • Terminal Emulator Add-in - Testing and Configuration
610
Wizard map The Terminal Emulator Configuration Wizard contains:
Terminal Emulator Configuration Wizard Welcome Page (page 611) > Specify Wizard Operation Page (page 613) > (Emulator Setup Page (page 616)) > Configure HLLAPI Properties Page (page 618) > (HLLAPI Configuration Test Page (page 621)) > (Configure Emulator Classes Page (page 624)) > (Configure Emulator Screen Settings Page (page 628))> Completing the Terminal Emulator Configuration Wizard Page (page 632)
Note: Pages that are in parentheses open according to the option selected in the previous page. Therefore, not all pages are displayed for every option.
See also ➤ You can check your configurations by clicking the Validate button in Terminal Emulator pane of the Options dialog box. A description of any detected problem is displayed in the pane, as well as a link to a specific troubleshooting Help page. For details, see "How to Check the Validity of a Terminal Emulator Configuration" on page 576.
➤ You can use the wizard to select a different emulator for use with your tests or business components. For more information, see "Terminal Emulator Configuration Wizard Overview" on page 609.

Chapter 34 • Terminal Emulator Add-in - Testing and Configuration
611
Terminal Emulator Configuration Wizard Welcome PageThis wizard page provides general information about the different options in the Terminal Emulator Configuration Wizard.

Chapter 34 • Terminal Emulator Add-in - Testing and Configuration
612
Wizard map The Terminal Emulator Configuration Wizard contains:
Terminal Emulator Configuration Wizard Welcome Page > Specify Wizard Operation Page (page 613) > (Emulator Setup Page (page 616)) > Configure HLLAPI Properties Page (page 618) > (HLLAPI Configuration Test Page (page 621)) > (Configure Emulator Classes Page (page 624)) > (Configure Emulator Screen Settings Page (page 628))> Completing the Terminal Emulator Configuration Wizard Page (page 632)
Note: Pages that are in parentheses open according to the option selected in the previous page. Therefore, not all pages are displayed for every option.
See also ➤ For details on how to open the wizard, see "Terminal Emulator Configuration Wizard Overview" on page 609.
➤ For details on copying an existing configuration, see "How to Copy Existing Terminal Emulator Configurations" on page 576.
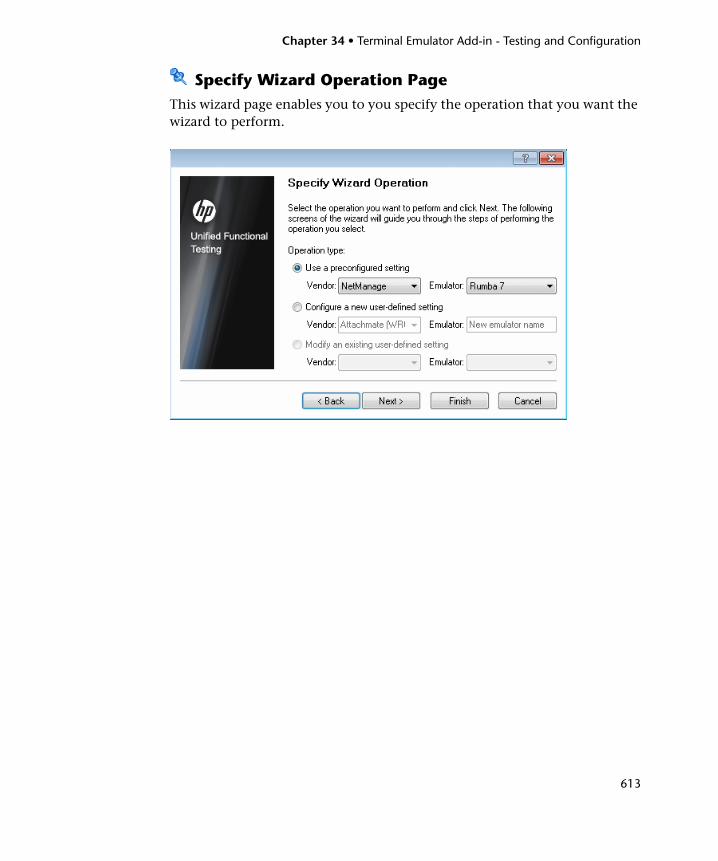
Chapter 34 • Terminal Emulator Add-in - Testing and Configuration
613
Specify Wizard Operation Page This wizard page enables you to you specify the operation that you want the wizard to perform.
Chapter 34 • Terminal Emulator Add-in - Testing and Configuration
614
Wizard map The Terminal Emulator Configuration Wizard contains:
Terminal Emulator Configuration Wizard Welcome Page (page 611) > Specify Wizard Operation Page > (Emulator Setup Page (page 616)) > Configure HLLAPI Properties Page (page 618) > (HLLAPI Configuration Test Page (page 621)) > (Configure Emulator Classes Page (page 624)) > (Configure Emulator Screen Settings Page (page 628))> Completing the Terminal Emulator Configuration Wizard Page (page 632)
Note: Pages that are in parentheses open according to the option selected in the previous page. Therefore, not all pages are displayed for every option.
See also ➤ For details on how to open the wizard, see "Terminal Emulator Configuration Wizard Overview" on page 609.
➤ For details on copying an existing configuration, see "How to Copy Existing Terminal Emulator Configurations" on page 576.
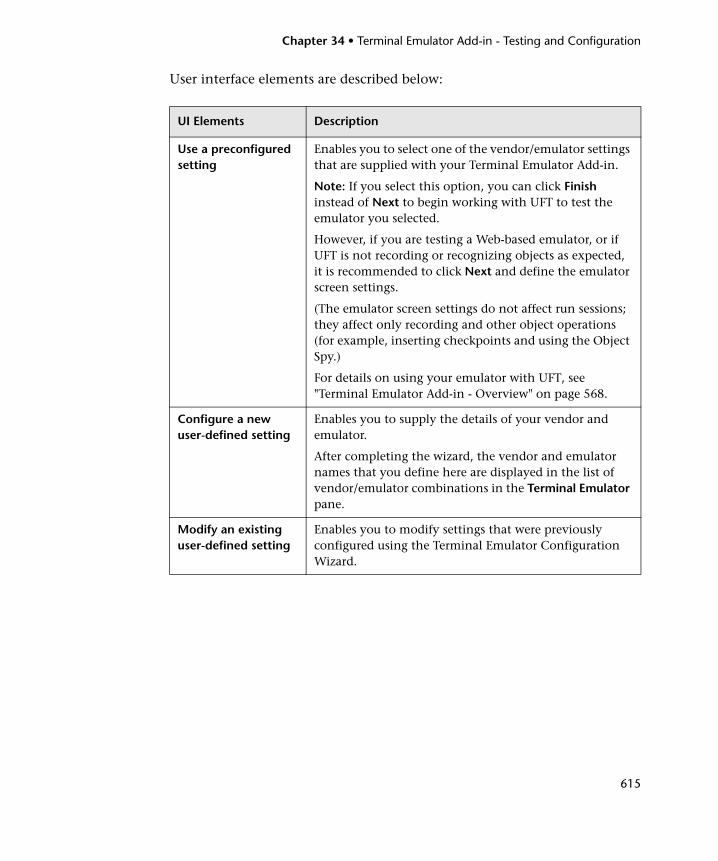
Chapter 34 • Terminal Emulator Add-in - Testing and Configuration
615
User interface elements are described below:
UI Elements Description
Use a preconfigured setting
Enables you to select one of the vendor/emulator settings that are supplied with your Terminal Emulator Add-in.
Note: If you select this option, you can click Finish instead of Next to begin working with UFT to test the emulator you selected.
However, if you are testing a Web-based emulator, or if UFT is not recording or recognizing objects as expected, it is recommended to click Next and define the emulator screen settings.
(The emulator screen settings do not affect run sessions; they affect only recording and other object operations (for example, inserting checkpoints and using the Object Spy.)
For details on using your emulator with UFT, see "Terminal Emulator Add-in - Overview" on page 568.
Configure a new user-defined setting
Enables you to supply the details of your vendor and emulator.
After completing the wizard, the vendor and emulator names that you define here are displayed in the list of vendor/emulator combinations in the Terminal Emulator pane.
Modify an existing user-defined setting
Enables you to modify settings that were previously configured using the Terminal Emulator Configuration Wizard.

Chapter 34 • Terminal Emulator Add-in - Testing and Configuration
616
Emulator Setup PageThis wizard page instructs you to open your terminal emulator and connect it to the server.
Important information
If your emulator supports HLLAPI, enable it and set the emulator short session name to the uppercase letter A. For details, see "How to Set Your HLLAPI Terminal Emulator to Work with UFT" on page 579.

Chapter 34 • Terminal Emulator Add-in - Testing and Configuration
617
Wizard map The Terminal Emulator Configuration Wizard contains:
Terminal Emulator Configuration Wizard Welcome Page (page 611) > Specify Wizard Operation Page (page 613) > (Emulator Setup Page) > Configure HLLAPI Properties Page (page 618) > (HLLAPI Configuration Test Page (page 621)) > (Configure Emulator Classes Page (page 624)) > (Configure Emulator Screen Settings Page (page 628))> Completing the Terminal Emulator Configuration Wizard Page (page 632)
Note: Pages that are in parentheses open according to the option selected in the previous page. Therefore, not all pages are displayed for every option.
See also ➤ For details on how to open the wizard, see "Terminal Emulator Configuration Wizard Overview" on page 609.
➤ For details on copying an existing configuration, see "How to Copy Existing Terminal Emulator Configurations" on page 576.

Chapter 34 • Terminal Emulator Add-in - Testing and Configuration
618
Configure HLLAPI Properties PageThis wizard page enables you to specify whether your terminal emulator supports HLLAPI.

Chapter 34 • Terminal Emulator Add-in - Testing and Configuration
619
User interface elements are described below:
Wizard map The Terminal Emulator Configuration Wizard contains:
Terminal Emulator Configuration Wizard Welcome Page (page 611) > Specify Wizard Operation Page (page 613) > (Emulator Setup Page (page 616)) > Configure HLLAPI Properties Page > (HLLAPI Configuration Test Page (page 621)) > (Configure Emulator Classes Page (page 624)) > (Configure Emulator Screen Settings Page (page 628))> Completing the Terminal Emulator Configuration Wizard Page (page 632)
Note: Pages that are in parentheses open according to the option selected in the previous page. Therefore, not all pages are displayed for every option.
See also ➤ For details on how to open the wizard, see "Terminal Emulator Configuration Wizard Overview" on page 609.
➤ For details on copying an existing configuration, see "How to Copy Existing Terminal Emulator Configurations" on page 576.
UI Elements Description
Emulator supports HLLAPI
If your emulator supports HLLAPI, select this option and supply the information described in the table below**. If you are not sure what values to enter, consult your terminal emulator documentation or contact the vendor for your terminal emulator.
HLLAPI dll path The HLLAPI dynamic-link library file specified for the selected emulator that UFT uses to connect to the emulator and to retrieve data concerning its current status. This file usually resides in the terminal emulator installation folder. You can click the browse button to search for the path.
HLLAPI function name
The HLLAPI DLL for the selected emulator uses this function as the entry point for all HLLAPI calls.

Chapter 34 • Terminal Emulator Add-in - Testing and Configuration
620
**The table below lists the DLL and function names used by the supported terminal emulators.
HLLAPI format The format by which UFT attempts to identify your emulator screen. If you are working with VT protocols, select the Text-only option. Otherwise, it is recommended to select Auto-detect.
If, in the next screen, UFT is unable to capture the text from your terminal emulator, you may need to return to this screen and change this selection to Classic, Extended, or Text-only. You should also confirm the accuracy of the properties you entered in the screen.
Emulator does not support HLLAPI
Select this option if your emulator does not support HLLAPI.
Emulator Name DLL Name HLLAPI Function Name
Attachmate EXTRA! and Attachmate myEXTRA! Terminal Viewer
ehlapi32.dll hllapi
Attachmate INFOConnect ihlapi32.dll WinHLLAPI
Hummingbird HostExplorer ehllap32.dll HLLAPI32
IBM Personal Communications (PCOM) and IBM WebSphere Host On-Demand
pcshll32.dll hllapi
NetManage RUMBA and NetManage RUMBA Web-To-Host
ehlapi32.dll hllapi
PuTTY Not applicable Not applicable
Seagull BlueZone WHLAPI32.dll hllapi
WRQ Reflection hllapi32.dll hllapi
Zephyr (PC/Web to Host) PassHll.dll hllapi
UI Elements Description
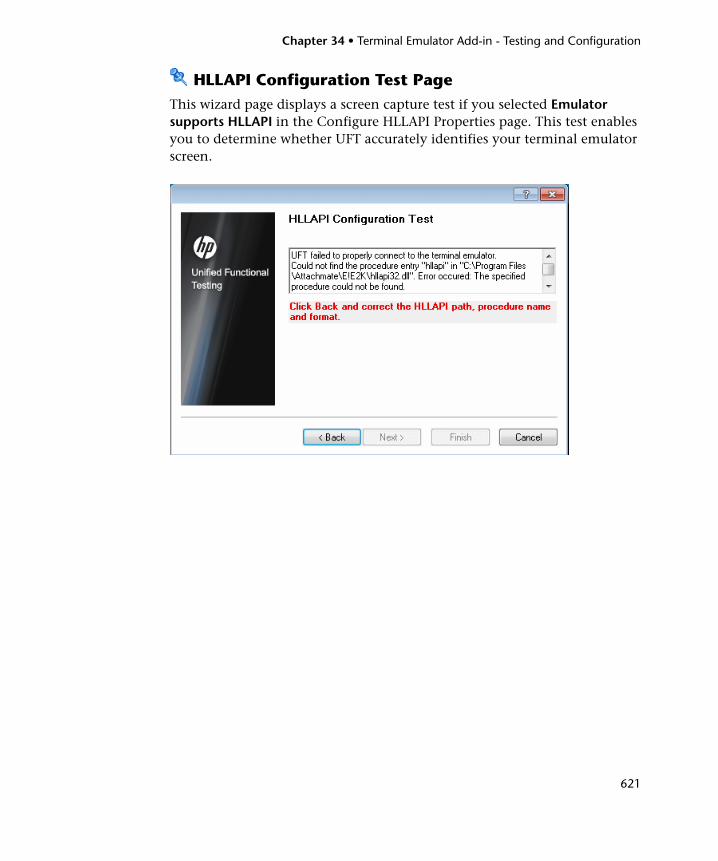
Chapter 34 • Terminal Emulator Add-in - Testing and Configuration
621
HLLAPI Configuration Test PageThis wizard page displays a screen capture test if you selected Emulator supports HLLAPI in the Configure HLLAPI Properties page. This test enables you to determine whether UFT accurately identifies your terminal emulator screen.

Chapter 34 • Terminal Emulator Add-in - Testing and Configuration
622
Important information
Check that the screen capture test is correct for your currently selected terminal emulator, and that all the text is correctly identified and displayed.
➤ If the wizard displays the emulator screen and the text correctly, click Next to continue.
➤ If the wizard does NOT display the emulator screen and the text correctly, see "Troubleshooting the HLLAPI Properties Configuration" on page 623.
Wizard map The Terminal Emulator Configuration Wizard contains:
Terminal Emulator Configuration Wizard Welcome Page (page 611) > Specify Wizard Operation Page (page 613) > (Emulator Setup Page (page 616)) > Configure HLLAPI Properties Page (page 618) > (HLLAPI Configuration Test Page) > (Configure Emulator Classes Page (page 624)) > (Configure Emulator Screen Settings Page (page 628))> Completing the Terminal Emulator Configuration Wizard Page (page 632)
Note: Pages that are in parentheses open according to the option selected in the previous page. Therefore, not all pages are displayed for every option.
See also ➤ For details on how to open the wizard, see "Terminal Emulator Configuration Wizard Overview" on page 609.
➤ For details on copying an existing configuration, see "How to Copy Existing Terminal Emulator Configurations" on page 576.

Chapter 34 • Terminal Emulator Add-in - Testing and Configuration
623
Troubleshooting the HLLAPI Properties Configuration
If the wizard does not display the text correctly, or if the HLLAPI configuration test fails, do the following:
1 Click Back. Before repeating the test:
➤ Make sure your emulator is connected to the host and the short name for the session is set to the uppercase letter A. For details, see "How to Set Your HLLAPI Terminal Emulator to Work with UFT" on page 579.
➤ Check that the settings you entered in the Configure HLLAPI Properties Page are accurate (DLL path, procedure, format). For details, see "Configure HLLAPI Properties Page" on page 618.
➤ Make sure that the HLLAPI .dll file you specified in the DLL path is not in use by UFT or another application.
If the .dll file is currently in use by another application, click Cancel to close the wizard, close the application using the DLL, and restart the wizard.
If the .dll file is currently in use by UFT, select a different emulator and create a new test. Then reopen the wizard and modify the original configuration as required.
2 If the display is still not correct, click Back and, in the Configure HLLAPI Properties page, change the HLLAPI format to Text-only. Use the Text-only option if you are working with a VT protocol, or if you have begun working in UFT and encountered problems with recording and running tests or business components. For details, see "Configure HLLAPI Properties Page" on page 618.
3 If the above tips do not solve the problem, click Back and, in the Configure HLLAPI Properties page, select Emulator does not support HLLAPI. For details, see "Configure HLLAPI Properties Page" on page 618.
Tip: If you have a good understanding of your emulator, you may be able to solve any problems you experience by adjusting the configuration settings. For details, see "How to Manage Terminal Emulator Configuration Settings" on page 585.

Chapter 34 • Terminal Emulator Add-in - Testing and Configuration
624
Configure Emulator Classes PageThis wizard page enables you to specify emulator class information. UFT uses this information to locate classes on the emulator screen. By identifying the business components of the terminal emulator window, UFT distinguishes between the window of the terminal emulator and the screens in the host application.

Chapter 34 • Terminal Emulator Add-in - Testing and Configuration
625
Important information
You identify the business components of the emulator by clicking the pointing hand and then clicking the corresponding object on your terminal emulator window.
Wizard map The Terminal Emulator Configuration Wizard contains:
Terminal Emulator Configuration Wizard Welcome Page (page 611) > Specify Wizard Operation Page (page 613) > (Emulator Setup Page (page 616)) > Configure HLLAPI Properties Page (page 618) > (HLLAPI Configuration Test Page (page 621)) > (Configure Emulator Classes Page) > (Configure Emulator Screen Settings Page (page 628))> Completing the Terminal Emulator Configuration Wizard Page (page 632)
Note: Pages that are in parentheses open according to the option selected in the previous page. Therefore, not all pages are displayed for every option.
See also ➤ For details on how to open the wizard, see "Terminal Emulator Configuration Wizard Overview" on page 609.
➤ For details on copying an existing configuration, see "How to Copy Existing Terminal Emulator Configurations" on page 576.
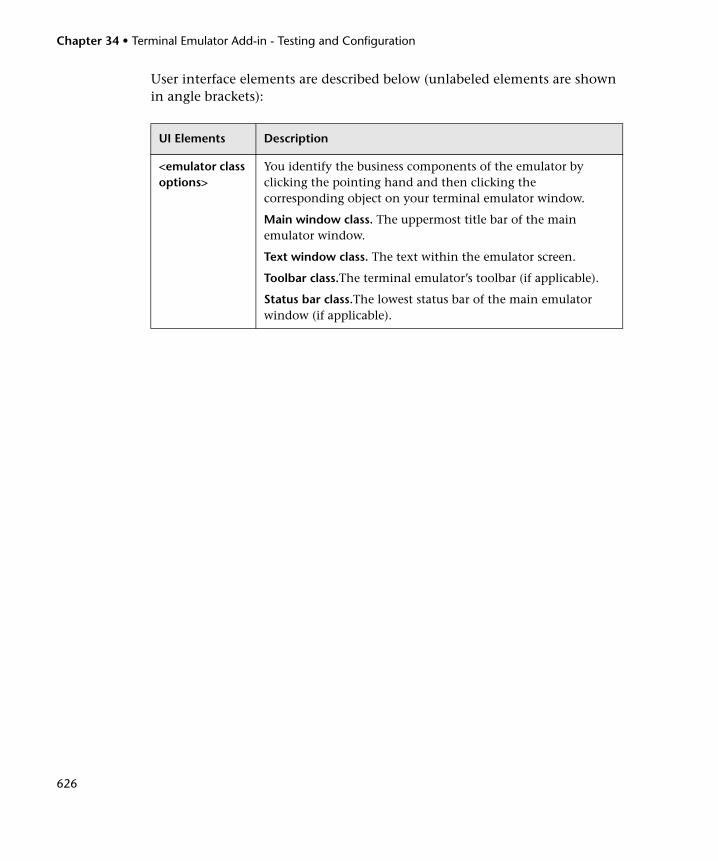
Chapter 34 • Terminal Emulator Add-in - Testing and Configuration
626
User interface elements are described below (unlabeled elements are shown in angle brackets):
UI Elements Description
<emulator class options>
You identify the business components of the emulator by clicking the pointing hand and then clicking the corresponding object on your terminal emulator window.
Main window class. The uppermost title bar of the main emulator window.
Text window class. The text within the emulator screen.
Toolbar class.The terminal emulator’s toolbar (if applicable).
Status bar class.The lowest status bar of the main emulator window (if applicable).

Chapter 34 • Terminal Emulator Add-in - Testing and Configuration
627
Emulator Process Image Name
The process name for the emulator. (The wizard detects the process name for the emulator and displays it in this box after identifying the emulator main window class.)
UFT uses this process name to identify the correct process for this terminal emulator when recording and running tests or business components.
Make sure that the displayed process name is correct for this emulator.
Tip: You can view the image names of the currently loaded processes in the Image Name column of the Windows Task Manager Processes tab.
Configure Emulator Screen
Select this check box to configure your emulator screen correctly for use with UFT if:
➤ Your emulator does not support HLLAPI.
➤ Your emulator supports HLLAPI, but you want to review or change the configuration settings for the emulator screen.
Note: If you do not select this check box, the Terminal Emulator Add-in automatically:
1 Retrieves the configuration settings for the emulator screen.
2 Adjusts the screen size and alignment using a proprietary algorithm with the settings retrieved for the emulator. These settings are normally correct, so you may not need to select this check box.
UI Elements Description
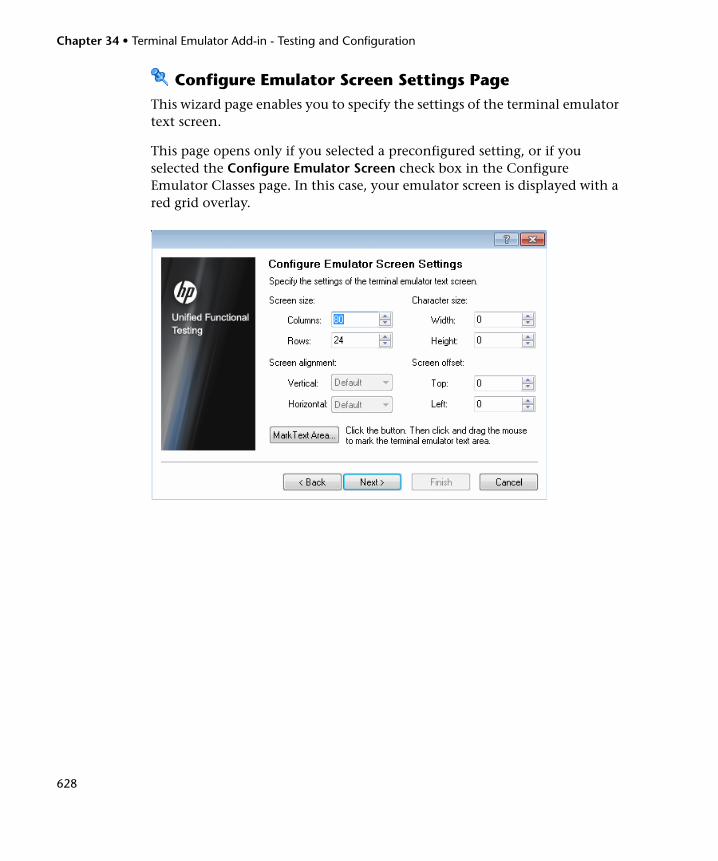
Chapter 34 • Terminal Emulator Add-in - Testing and Configuration
628
Configure Emulator Screen Settings PageThis wizard page enables you to specify the settings of the terminal emulator text screen.
This page opens only if you selected a preconfigured setting, or if you selected the Configure Emulator Screen check box in the Configure Emulator Classes page. In this case, your emulator screen is displayed with a red grid overlay.

Chapter 34 • Terminal Emulator Add-in - Testing and Configuration
629
Important information
You change the settings of the emulator screen to correspond to the required settings for your emulator. The character size, column, and row details for your terminal emulator are generally available from your emulator’s connection configuration menu.
As you change the settings for the emulator screen, the grid automatically adjusts to show the new settings.
It is recommended that you specify the text screen settings in the following order:
1 Use the Mark Text Area button to mark the text area on your emulator screen.
2 Fine-tune the text screen settings using the options above the Mark Text Area button.
Wizard map The Terminal Emulator Configuration Wizard contains:
Terminal Emulator Configuration Wizard Welcome Page (page 611) > Specify Wizard Operation Page (page 613) > (Emulator Setup Page (page 616)) > Configure HLLAPI Properties Page (page 618) > (HLLAPI Configuration Test Page (page 621)) > (Configure Emulator Classes Page (page 624)) > (Configure Emulator Screen Settings Page) > Completing the Terminal Emulator Configuration Wizard Page (page 632)
Note: Pages that are in parentheses open according to the option selected in the previous page. Therefore, not all pages are displayed for every option.
See also ➤ For details on how to open the wizard, see "Terminal Emulator Configuration Wizard Overview" on page 609.
➤ For details on copying an existing configuration, see "How to Copy Existing Terminal Emulator Configurations" on page 576.

Chapter 34 • Terminal Emulator Add-in - Testing and Configuration
630
User interface elements are described below (unlabeled elements are shown in angle brackets):
UI Elements Description
Mark Text Area Enables you to define the dimensions of the terminal emulator text area on your emulator screen. When you click this button, the wizard is minimized and the cursor becomes a crosshairs pointer. Drag the pointer on your emulator screen to define the text area.
After you mark the text area on your emulator screen you can fine-tune your settings by adjusting the text screen settings.

Chapter 34 • Terminal Emulator Add-in - Testing and Configuration
631
<text screen settings>
Screen and Character SizesYou can specify your emulator’s screen size in terms of:
➤ Number of columns and rows. Specify the number of columns and rows in your emulator screen.
➤ Character size. Select the width and height of your emulator’s characters to fit correctly in the defined emulator screen.
Alignment and OffsetYou can specify how the text on your emulator’s screen should be aligned in relation to the emulator window when the window size changes. The effect of these settings depends on the behavior of your emulator:
➤ Screen alignment. Select the vertical alignment (Top or Center) and the horizontal alignment (Left or Center) of the emulator screen inside the window. These options are already optimized for preconfigured emulator settings, and cannot be modified.
Tip: The screen alignment settings determine how UFT identifies the information on your emulator screen. If you are having trouble recording and running tests or business components (for example, the ClickPosition method is not accurately determining the coordinates), try changing the Screen alignment settings.
➤ Screen offset. Select the top and left offset for the text on your emulator screen in relation to the emulator window. For example, if you know that your emulator always reserves one blank row at the top of the screen, set the offset to 1.
UI Elements Description
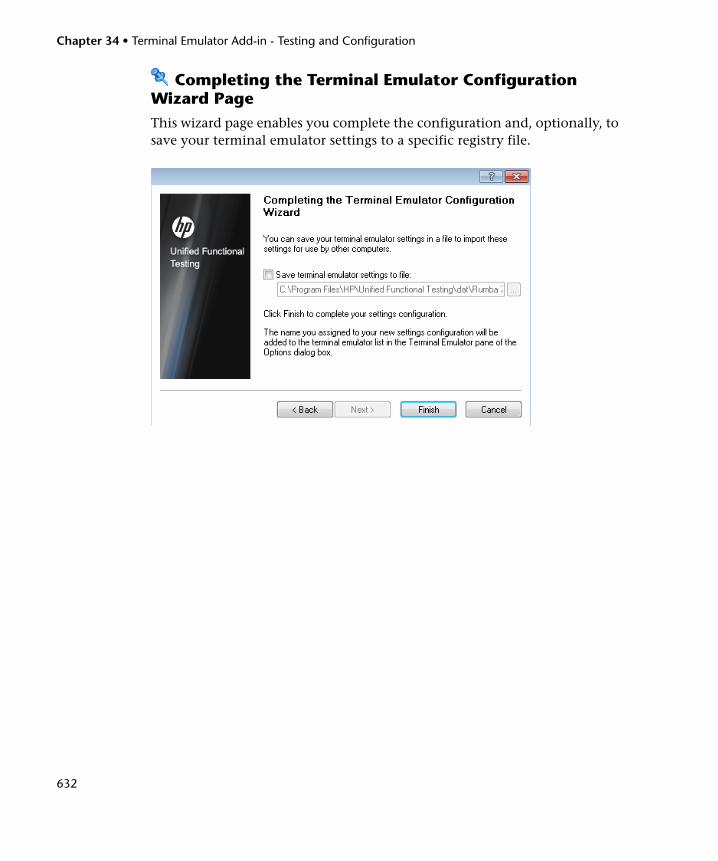
Chapter 34 • Terminal Emulator Add-in - Testing and Configuration
632
Completing the Terminal Emulator Configuration Wizard Page This wizard page enables you complete the configuration and, optionally, to save your terminal emulator settings to a specific registry file.
Chapter 34 • Terminal Emulator Add-in - Testing and Configuration
633
Important information
➤ It is recommended that you save the settings you have just configured to a separate registry file. This allows you to restore this exact configuration if you later change your configuration settings. For more information, see "Terminal Emulator Pane (Options Dialog Box)" on page 595.
➤ If you save your settings to a registry file, other users will be able to copy and use your terminal emulator configuration. For more information, see "How to Copy Existing Terminal Emulator Configurations" on page 576.
➤ If you are using the wizard from the Terminal Emulator pane of the Options dialog box (Tools > Options > GUI Testing tab > Terminal Emulator node), any changes you make are not applied to the currently open test or business component. To apply your changes, close your test or business component and reopen it.
Wizard map The Terminal Emulator Configuration Wizard contains:
Terminal Emulator Configuration Wizard Welcome Page (page 611) > Specify Wizard Operation Page (page 613) > (Emulator Setup Page (page 616)) > Configure HLLAPI Properties Page (page 618) > (HLLAPI Configuration Test Page (page 621)) > (Configure Emulator Classes Page (page 624)) > (Configure Emulator Screen Settings Page (page 628))> Completing the Terminal Emulator Configuration Wizard Page
Note: Pages that are in parentheses open according to the option selected in the previous page. Therefore, not all pages are displayed for every option.
See also ➤ For details on how to open the wizard, see "Terminal Emulator Configuration Wizard Overview" on page 609.
➤ For details on copying an existing configuration, see "How to Copy Existing Terminal Emulator Configurations" on page 576.
Chapter 34 • Terminal Emulator Add-in - Testing and Configuration
634
User interface elements are described below (unlabeled elements are shown in angle brackets):
UI Elements Description
Save terminal emulator settings to file
Saves your settings to a registry file when you specify a location. This enables others to import these settings as needed.
<file location> The location in which to save the terminal emulator settings registry file.
Finish Adds the name you assigned to your new configuration settings to the list of available terminal emulators in the Terminal Emulator pane of the Options dialog box as described in "Terminal Emulator Pane (Options Dialog Box)" on page 595.

Part XVI
VisualAge Smalltalk Add-in

636

637
35VisualAge Smalltalk Add-in - Quick Reference
You can use the Unified Functional Testing VisualAge Smalltalk Add-in to test VisualAge Smalltalk user-interface objects (controls).
The following table summarizes basic information about the VisualAge Smalltalk Add-in and how it relates to some commonly-used aspects of UFT.
General Information
Add-in Type This is a Windows-based add-in. Much of its functionality is the same as other Windows-based add-ins.
See "Windows-Based Application Support" on page 117.
Supported Environments
For details on supported VisualAge Smalltalk environments, see the VisualAge Smalltalk Add-in section of the HP Unified Functional Testing Product Availability Matrix, available from the UFT Help or the root folder of the Unified Functional Testing DVD.
Important Information
You must configure your VisualAge Smalltalk environment by importing the qt-adapter.dat file and then recompiling your application.
See "How to Configure the VisualAge Smalltalk Add-in" on page 640.
Test Object Methods and Properties
The VisualAge Smalltalk Add-in uses a sub-set of the standard Windows test objects, methods, and properties, which can be used when testing objects in VisualAge Smalltalk applications. For details, see the VisualAge Smalltalk section of the HP Unified Functional Testing Object Model Reference.

Chapter 35 • VisualAge Smalltalk Add-in - Quick Reference
638
Checkpoints and Output Values
➤ See the sections describing checkpoints and output values in the HP Unified Functional Testing User Guide.
➤ See "GUI Checkpoints and Output Values Per Add-in" on page 695.
Prerequisites
Opening Your Application
You can open your VisualAge Smalltalk application before or after opening UFT.
Add-in Dependencies
None
Configuration
Configuring Your Application
You configure your VisualAge Smalltalk environment by importing the qt-adapter.dat file and then recompiling your application.
See "How to Configure the VisualAge Smalltalk Add-in" on page 640.
Record and Run Settings Dialog Box(tests only)
Use the Windows Applications tab. (Record > Record and Run Settings)
See "Windows Applications Tab (Record and Run Settings Dialog Box)" on page 124.
Notes:
➤ UFT can recognize only VisualAge Smalltalk applications that have been precompiled with the qt-adapter agent. For details, see "How to Configure the VisualAge Smalltalk Add-in" on page 640.
➤ The Record and Run only on radio button applies only to record and run sessions. UFT recognizes all VisualAge Smalltalk objects for Object Spy and pointing hand operations, regardless of the settings in the Record and Run Settings dialog box.
Custom Active Screen Capture Settings Dialog Box(tests only)
Tools > Options > GUI Testing tab > Active Screen node > Custom Level
See the section on the Custom Active Screen Capture Settings dialog box in the HP Unified Functional Testing User Guide.

Chapter 35 • VisualAge Smalltalk Add-in - Quick Reference
639
This chapter includes:
Tasks
➤ How to Configure the VisualAge Smalltalk Add-in on page 640
Application Area Additional Settings pane(business components only)
Use the Applications pane. In the application area, select Additional Settings > Applications in the sidebar.
See the section the Applications pane in the HP Unified Functional Testing User Guide.

Chapter 35 • VisualAge Smalltalk Add-in - Quick Reference
640
Tasks
How to Configure the VisualAge Smalltalk Add-in
This task describes how to configure the VisualAge Smalltalk Add-in by importing the qt-adapter.dat file to your VisualAge Smalltalk development environment and then recompiling your application to include the qt-adapter agent.
1 Start VisualAge Smalltalk.
2 In the System Transcript window, select Tools > Browse Configuration Maps.
3 In the Configuration Maps Browser window, right-click the All Names pane and select Import > Selected Versions.
4 In the Information Required box, enter the IP address or host name of the server, or leave the text box blank to use the native (fileio) access. Click OK. The Selection Required dialog box opens.
5 In your file system, browse to the <UFT installation folder>/dat folder and select qt-adapter.dat.
6 In the Selection Required dialog box, do the following:
➤ In the Names pane, select Unified Functional Testing.
➤ In the Versions pane, select UFT Adapter 1.0.
➤ Click the >> button and click OK.
7 In the Configuration Maps Browser window, do the following:
➤ In the All Names pane, click Unified Functional Testing.
➤ In the Editions and Versions pane, click UFT Adapter 1.0. A list of available applications displays in the Applications pane.
➤ Right-click the Editions and Versions pane and select Load.
8 To save your changes, select File > Save Image, or click OK in the Warning dialog box when closing the VisualAge Smalltalk application.

Chapter 35 • VisualAge Smalltalk Add-in - Quick Reference
641
9 Recompile your VisualAge Smalltalk application with the qt-adapter agent.
You are now ready to create and run tests on VisualAge Smalltalk applications.

Chapter 35 • VisualAge Smalltalk Add-in - Quick Reference
642

Part XVII
Visual Basic Add-in

644

645
36Visual Basic Add-in - Quick Reference
You can use the Unified Functional Testing Visual Basic Add-in to test Visual Basic user-interface objects (controls).
The following table summarizes basic information about the Visual Basic Add-in and how it relates to some commonly-used aspects of UFT.
General Information
Add-in Type This is a Windows-based add-in. Much of its functionality is the same as other Windows-based add-ins.
See "Windows-Based Application Support" on page 117.
Supported Environments
For details on supported Visual Basic environments, see the Visual Basic Add-in section of the HP Unified Functional Testing Product Availability Matrix, available from the UFT Help or the root folder of the Unified Functional Testing DVD.
Test Object Methods and Properties
The Visual Basic Add-in provides test objects, methods, and properties that can be used when testing objects in Visual Basic applications. For details, see the Visual Basic section of the HP Unified Functional Testing Object Model Reference.
Checkpoints and Output Values
➤ See the sections describing checkpoints and output values in the HP Unified Functional Testing User Guide.
➤ See "GUI Checkpoints and Output Values Per Add-in" on page 695.
Troubleshooting and Limitations
See "Troubleshooting and Limitations - Visual Basic Add-in" on page 648.

Chapter 36 • Visual Basic Add-in - Quick Reference
646
Prerequisites
Opening Your Application
You can open your Visual Basic application before or after opening UFT.
Add-in Dependencies
None
Configuration
Options Dialog Box Use the Windows Applications pane. (Tools > Options > GUI Testing tab > Windows Applications node)
See "Windows Applications > General Pane (Options Dialog Box > GUI Testing Tab)" on page 136.
Record and Run Settings Dialog Box(tests only)
Use the Windows Applications tab. (Record > Record and Run Settings)
See "Windows Applications Tab (Record and Run Settings Dialog Box)" on page 124.
Notes:
➤ If you select the Record and Run only on radio button, the settings may also apply to (limit) the applications that are recognized for Object Spy and other pointing hand operations.
➤ UFT recognizes Visual Basic objects only in applications that are opened after changing the settings in the Windows Applications tab of the Record and Run Settings dialog box.
Custom Active Screen Capture Settings Dialog Box(tests only)
Use the Windows applications section.(Tools > Options > GUI Testing tab > Active Screen node > Custom Level)
See the section on the Custom Active Screen Capture Settings dialog box in the HP Unified Functional Testing User Guide.
Application Area Additional Settings pane(business components only)
Use the Applications pane.In the application area, select Additional Settings > Applications in the sidebar.
See the section on the Applications pane in the HP Unified Functional Testing User Guide.

Chapter 36 • Visual Basic Add-in - Quick Reference
647
This chapter includes:
Reference
➤ Troubleshooting and Limitations - Visual Basic Add-in on page 648

Chapter 36 • Visual Basic Add-in - Quick Reference
648
Reference
Troubleshooting and Limitations - Visual Basic Add-in
This section describes troubleshooting and limitations for the Visual Basic Add-in.
➤ When working with the Visual Basic Add-in, it is recommended to select the Record and run on these applications (opened on session start) option and then to specify the application name in the Windows Applications tab of the Record and Run settings dialog box.
If you select the Record and run test on any open Windows-based application option, you should open the Visual Basic application after the first time you start recording.
➤ Combo box objects of style Simple ComboBox are not supported.
➤ Note that Visual Basic .NET applications are supported by the Unified Functional Testing .NET Add-in.

Part XVIII
Web Add-in

650

651
37Web Add-in - Quick Reference
You can use the Web Add-in to test HTML user-interface objects (controls).
The following table summarizes basic information about the Web Add-in and how it relates to some commonly-used aspects of UFT. This information is also relevant for all child add-ins that extend the Web Add-in.
General Information
Add-in Type Much of the functionality of this add-in is the same as other Web-based add-ins.
➤ See "Web-Based Application Support" on page 49.
Supported Environments
➤ For details on supported Web browsers and versions, see the HP Unified Functional Testing Product Availability Matrix, available from the UFT Help or the root folder of the Unified Functional Testing DVD.
➤ UFT also provides a set of add-ins that support testing specialized controls from a number of Web 2.0 toolkits using test object classes that were developed by HP using Web Add-in Extensibility (described on page 654). These add-ins are displayed as child nodes of the Web Add-in in the Add-in Manager. For details, see "Web 2.0 Toolkit Support" on page 675.
Test Object Methods and Properties
The Web Add-in provides test objects, methods, and properties that can be used when testing objects in Web applications. For details, see the Web section of the HP Unified Functional Testing Object Model Reference.

Chapter 37 • Web Add-in - Quick Reference
652
Checkpoints and Output Values
➤ See the sections describing checkpoints and output values in the HP Unified Functional Testing User Guide.
➤ See "Checkpoints for Web Pages" on page 57.
➤ See "GUI Checkpoints and Output Values Per Add-in" on page 695.
Extending the Web Add-in
Web Add-in Extensibility (described on page 654) enables you to develop support for testing third-party and custom Web controls that are not supported out-of-the-box by the Unified Functional Testing Web Add-in.
Other ➤ When you load the Siebel Add-in in addition to the Web Add-in, the object identification settings are automatically customized. For this reason, the Web Add-in is not available in the Environment list in the Object Identification dialog box (Tools > Object Identification), even though the Web Add-in is loaded.
For details, see "Siebel Add-in - Overview" on page 472.
➤ You can create steps on more than one browser tab, if your browser supports tabbed browsing.
Prerequisites
Opening Your Application
You must open UFT before opening your Web application.
Add-in Dependencies
None
Configuration
Options Dialog Box Use the Web pane. (Make sure that a GUI test is open and select Tools > Options > GUI Testing tab > Web > General node.)
For details, see "Web > General Pane (Options Dialog Box)" on page 82.
Record and Run Settings Dialog Box(tests only)
Use the Web tab.(Record > Record and Run Settings)
See "Web Tab (Record and Run Settings Dialog Box)" on page 77.
Chapter 37 • Web Add-in - Quick Reference
653
This chapter includes:
➤ Web Add-in Extensibility on page 654
➤ Extensibility Accelerator for HP Functional Testing on page 655
➤ Considerations - Mozilla Firefox on page 656
➤ Considerations - Google Chrome on page 659
➤ Considerations - Working With Multiple Browsers on page 659
➤ Troubleshooting and Limitations - Web Add-in on page 660
Test Settings Dialog Box (tests only)
Use the Web pane. (File > Settings > Web pane)
See "Web Pane (Test/Business Component Settings Dialog Box / Application Area - Additional Settings Pane)" on page 101.
Custom Active Screen Capture Settings Dialog Box(tests only)
Use the Web section.(Tools > Options > GUI Testing tab > Active Screen node > Custom Level)
See the section on the Custom Active Screen Capture Settings dialog box in the HP Unified Functional Testing User Guide.
Application Area Additional Settings pane(business components only)
Use the Web pane. In the application area, select Additional Settings > Web in the sidebar.
➤ See "Web Pane (Test/Business Component Settings Dialog Box / Application Area - Additional Settings Pane)" on page 101.
➤ See the section on defining Application Settings for your application area in the HP Unified Functional Testing User Guide.

Chapter 37 • Web Add-in - Quick Reference
654
Web Add-in Extensibility
Unified Functional Testing Web Add-in Extensibility enables you to develop support for testing third-party and custom Web controls that are not supported out-of-the-box by the Unified Functional Testing Web Add-in.
If the test object class that UFT uses to represent a control does not provide the operations and properties necessary to operate on your control, you can use Web Add-in Extensibility to create a new test object class.
You can then map the control to the new test object class, and design the test object class behavior in JavaScript. You can program how operations are performed on the control, how properties are retrieved, and more.
You can also teach UFT to treat a control that contains a set of lower-level controls as a single functional control, instead of relating to each lower-level control separately.
To implement Web Add-in Extensibility, you need to be familiar with:
➤ UFT and its Object Model Reference
➤ The behavior of the custom control (operations, properties, events)
➤ Web programming (HTML and JavaScript)
➤ XML (basic knowledge)
Extensibility Accelerator for HP Functional Testing (described on page 655) is a Visual Studio-like IDE that facilitates the design, development, and deployment of Web Add-in Extensibility support. You can install it from:
➤ The Add-in Extensibility and Web 2.0 Toolkits option in the UFT setup program.
➤ www.hp.com/go/functionaltestingWeb2
Extensibility Accelerator also provides samples of support developed using Web Add-in Extensibility, which you can use to gain a better understanding of how to create your own support.

Chapter 37 • Web Add-in - Quick Reference
655
For details on implementing Web Add-in Extensibility, see the Web Add-in Extensibility Help, available from the UFT Extensibility Documentation program group (Start > All Programs > HP Software > Unified Functional Testing > Extensibility > Documentation).
A printer-friendly (PDF) version of the HP Unified Functional Testing Web Add-in Extensibility Developer Guide is available in the <UFT installation folder>\help\Extensibility folder.
Extensibility Accelerator for HP Functional Testing
An increasing number of Web applications are making use of Web 2.0-based toolkits, such as ASP.NET AJAX, Dojo, YahooUI, GWT, and JQueryUI to add dynamic and interactive content to their sites. The controls in these toolkits are complex and require sophisticated and flexible testing capabilities.
Unified Functional Testing Web Add-in Extensibility enables you to extend the Web Add-in to customize how UFT recognizes and interacts with different types of controls. Until now, using Web Add-in Extensibility consisted of manually developing and maintaining toolkit support sets.
Extensibility Accelerator for HP Functional Testing is a Visual Studio-like IDE that facilitates the design, development, and deployment of these support sets. It makes it faster and easier to create the required extensibility XML files so that you can invest your main efforts in the development of the JavaScript functions that will enable UFT to work with your custom Web controls.
The Extensibility Accelerator user interface helps you define new test object classes, operations, and properties. It also provides a point-and-click mechanism you can use to map the test object classes you defined to controls in your application. Extensibility Accelerator deployment capabilities enable you to automatically deploy your new toolkit support set to UFT or to package it so that you can share it with other UFT users.
Chapter 37 • Web Add-in - Quick Reference
656
The Extensibility Accelerator for HP Functional Testing installation is available from:
➤ The Add-in Extensibility and Web 2.0 Toolkits option in the Unified Functional Testing setup program.
Note: As part of this process, an html page opens in your browser. To complete the installation successfully, this page must be opened in Internet Explorer.
➤ www.hp.com/go/functionaltestingWeb2
Considerations - Mozilla Firefox
UFT tests and business components are generally cross-browser—you can record Web steps on Microsoft Internet Explorer or Mozilla Firefox, or you can create steps with the keyword-driven methodology using any supported browser. You can run Web steps in any supported browser.
For general considerations on working with Web browsers, see "Considerations - Web-Based Application Support" on page 51.
The following sections describe specific items to consider when working with Mozilla Firefox:
➤ "Running Steps on Mozilla Firefox Browser Controls" on page 657
➤ "Running Steps on Mozilla Firefox Dialog Boxes" on page 657
➤ "Checkpoints and Output Values" on page 658

Chapter 37 • Web Add-in - Quick Reference
657
Running Steps on Mozilla Firefox Browser Controls
Generally, steps that were recorded on Microsoft Internet Explorer will run on Mozilla Firefox without requiring any modification. However, there are several differences to consider:
➤ UFT does not support Mozilla Firefox menus or sidebars.
➤ UFT supports specific Browser menu operations that are represented by the following toolbar buttons:
➤ Back
➤ Forward
➤ Home
➤ Refresh
➤ Stop
All other toolbars and toolbar buttons are not supported. If you record steps on any unsupported menu or toolbar objects when working with Microsoft Internet Explorer, you may need to remove or replace the steps before running the test or business component on Mozilla Firefox.
Running Steps on Mozilla Firefox Dialog Boxes
➤ Due to the difference in standard dialog boxes, pop-up recovery scenarios that use the Click button with label recovery operation and were built for Microsoft Internet Explorer will not work for Mozilla Firefox, and vice versa.
➤ Mozilla Firefox uses different standard dialog boxes than the Windows standard dialog boxes used by Microsoft Internet Explorer. If you create steps on such dialog boxes, you should create additional steps to be used when running on Mozilla Firefox, and precede them with an If statement to check which browser is running.

Chapter 37 • Web Add-in - Quick Reference
658
For example, the following two dialog boxes are a security alert of the same Web site. The one on the left is from Microsoft Internet Explorer, and the one on the right is from Mozilla Firefox. Although they both look like a Windows dialog box, the Mozilla Firefox one is actually a browser window.
Checkpoints and Output Values
Cross-browser UFT operations may affect the results of some types of checkpoints and output values:
➤ Standard or page checkpoints for links and images that are created on Internet Explorer using Record, or using the Active Screen, may not pass when run using Mozilla-based browsers, even if the checkpoints pass when the test is run using Internet Explorer.
➤ Standard checkpoints for links and images created on Active Screen captures that were captured from a Mozilla-based browser may not pass when run using Internet Explorer, even if the checkpoints pass when the test is run using the Mozilla-based browser.
You can use regular expressions if you want to create checkpoints for links and images that run on both Internet Explorer and Mozilla-based browsers. For details on regular expressions, see the section on understanding and using regular expressions in the HP Unified Functional Testing User Guide.

Chapter 37 • Web Add-in - Quick Reference
659
➤ Standard checkpoints that use the inner_html property may not pass when run using Mozilla-based browsers because blanks, slashes, backslashes, or other special characters are handled differently in different browser types.
➤ Before running text/text area checkpoint or output value steps, you must set the text recognition options to use only OCR, by selecting the Use Only OCR option in the Text Recognition pane of the Options dialog box (Tools > Options > GUI Testing tab > Text Recognition node).
Considerations - Google Chrome
By default, the ability to run extensions on local HTML files is disabled in Google Chrome. Do the following to allow the UFT Google Chrome extension to run on local HTML files:
1 In Google Chrome, browse to the following URL: chrome://extensions
2 Locate the UFT extension, named Unified Functional Testing Agent.
3 Click the arrow located to the left of the icon to expand details about the extension.
Select Allow access to file URLs. Your selection is automatically saved.
Considerations - Working With Multiple Browsers
Web applications and Web controls may be implemented or displayed differently on different browsers. This may affect the behavior of your tests and components, especially if you design them on one browser, and then run them on another. The run results may also differ when running the same test or component on different browsers. For example, if properties are implemented or stored differently on different browsers, UFT may use different properties for object identification or checkpoints depending on the browser you use to open the application.
If you are aware of differences in your application’s behavior on different browsers, you may be able to design your tests and components to be browser-independent by anticipating these differences.

Chapter 37 • Web Add-in - Quick Reference
660
For example:
➤ Link controls are displayed differently on Firefox and Chrome, using different font and color properties. If you design a test or component that runs a checkpoint on a Link object, and the test may run on different browsers, be sure to deselect the font, color, and backgroundColor properties in the checkpoint. Alternatively, you can define regular expressions for these properties, to enable the checkpoint to pass for different values.
➤ The type attribute for a button object is button in Internet Explorer, but submit in Firefox and Chrome. Therefore, if you learn a button object on Internet Explorer, and the type attribute is added to the object’s description, UFT has to use smart identification to identify the button object if you test a Web page opened with Firefox or Chrome.
➤ You may design a test that enters text into an edit box, and then retrieves the edit box content and sends it to the run results. If you use this test to check a Web page opened in Chrome, the text is not displayed in the run results, because Chrome does not store this text in a property that UFT can retrieve.
Troubleshooting and Limitations - Web Add-in
This section contains troubleshooting and limitation information about working with the Web Add-in.
Active Screen
➤ When working with test objects that are supported using Web Add-in Extensibility, such as Web 2.0 test objects, if you create a checkpoint from the Active Screen, or try to view the object’s properties from the Active Screen, some property values may be empty.
➤ When working with the Web 2.0 ASPAjax Add-in, running scripts in the Active Screen is not enabled by default.

Chapter 37 • Web Add-in - Quick Reference
661
Workaround:
1 In the Options dialog box, enable running scripts in the Active Screen. In Tools > Options > GUI Testing tab > Active Screen node, set Run scripts to Enabled.
2 Close and reopen your test or component for the setting to take effect.
Object Identification
If UFT does not recognize your objects in the correct location, check to see that you are viewing the page at 100%, and are not zooming in or out of the page.
For example, if you view the page at 90% or 120%, you may be required to click or select an area to the left or the right of the actual object in order to recognize it.
Recording
Autocomplete is not supported during recording sessions. When recording on an autocomplete control, enter the full string instead of selecting the suggestion provided by the control. The step is recorded in the same way as other (non-autocomplete) controls.
Workaround: You can disable the AutoComplete feature in Microsoft Internet Explorer by selecting Tools > Internet Options > Advanced and deselecting the Use inline AutoComplete under the Browsing options.
Troubleshooting and Limitations - Browser Specific
➤ "Troubleshooting and Limitations - Internet Explorer" on page 662
➤ "Troubleshooting and Limitations - Mozilla Firefox" on page 663
➤ "Troubleshooting and Limitations - Google Chrome" on page 665

Chapter 37 • Web Add-in - Quick Reference
662
Troubleshooting and Limitations - Internet Explorer
Test Objects, Methods, and Properties
➤ Recognition of test objects when using AutoXPath is very slow for web pages in Quirks Mode and Almost Standards Mode.Workaround: Convert the web page into Standards Mode by adding or changing the DOCTYPE of the page into <!DOCTYPE.htlm> or <!DOCTYPE.HTML PUBLIC "-//W3C//DTD HTML 4.01//EN""http://www.w3.org/TR/html4/strict.dtd" or disable AutoXPath capabilities in UFT by clearing the Learn and run using automatic XPath identifiers in the Web > Advanced pane (Tools > Options > GUI Testing tab > Web > Advanced node).
➤ When using the RunScript method with protected mode ON, Alert, Confirm, or Prompt dialogs are not displayed.Workaround: When writing a RunScript method, use the following method syntax: Set wnd=Browser("<browser name>").Page("<page name>").RunScript("window") wnd.alert()’ or Browser("<browser name>").Page("<page name>").RunScript "setTimeout(function () {alert(); }, 0)".
Recording
When recording a test on Internet Explorer 8 or earlier with the Active Screen enabled, performance on the site may become very slow. This is due to a performance issue in the JavaScript engine used in these browsers.Workaround: Record the test using Internet Explorer 9, or disable the Active Screen. For details, see the HP Unified Functional Testing User Guide.
Web 2.0 Support
Due to synchronization issues, if you navigate to a new Web page in Internet Explorer while recording, then UFT may not record certain operations on certain ASP .NET Ajax or jQuery UI objects in the page. Similarly, when running steps that navigate to a new page, UFT may fail to perform certain steps on certain ASP .NET Ajax or jQuery UI objects.
Workaround: If the problem occurs while recording, refresh the Web page and record the step again. If the problem occurs while running, insert a Wait() statement before the problematic step.

Chapter 37 • Web Add-in - Quick Reference
663
Internet Explorer 9
➤ The WebXML object is not supported on Internet Explorer 9 in standard mode.
➤ XML checkpoints are not supported on Internet Explorer 9 in standard mode.
Google Chrome Frame
➤ Google Chrome Frame is used for only one page at a time, and does not have access to Internet Explorer’s browsing history. For this reason, the Browser Back (CMD_BROWSER_BACK) and Browser Forward (CMD_BROWSER_FORWARD) commands will not work when testing in Google Chrome Frame.
➤ You cannot run a test on multiple tabs using Google Chrome Frame.
➤ You cannot run a UFT test while running Google Chrome and Google Chrome Frame simultaneously.
➤ The OpenTitle and OpenURL Browser object identification properties may return incorrect values. This is because Google Chrome Frame creates a new Browser object for each navigation activity.
Troubleshooting and Limitations - Mozilla Firefox
Checkpoints
XML and text area checkpoints are not supported on Mozilla Firefox.
General Limitations
➤ If two minor versions of Mozilla Firefox are installed on the same computer, and the earlier version (for example, Firefox 1.5.0.3) was installed after the later version (for example, Firefox 1.5.0.8), UFT may not recognize which is the latest version.
➤ UFT does not support anonymous content elements in non-XUL frames. (For example, the buttons in the Mozilla Firefox SSL exception page.)
Chapter 37 • Web Add-in - Quick Reference
664
Recording
➤ Recording on Mozilla Firefox pages is only possible when the page is fully loaded.
➤ When recording steps in Mozilla Firefox, additional steps may be recorded.
Workaround: Manually remove the extraneous steps after the recording session ends.
➤ The If Handler option in the Web Event Recording Configuration dialog box works on Mozilla Firefox browsers only if the handler is assigned as an attribute (for example, <A onclick = "some code"/>) and not if it is assigned as a property (for example, aObj.onclick = function() {some code})
Test Objects, Methods and Properties
➤ The Object Spy and Checkpoint Properties dialog boxes do not retrieve the current value of edit boxes in Mozilla Firefox dialog boxes.
➤ The Object Spy and Navigate and Learn dialog boxes do not retrieve the current value of tabmodal dialogs in Mozilla Firefox.
➤ The Type property of the WebButton test object has a different default value in Microsoft Internet Explorer and Mozilla Firefox. In Microsoft Internet Explorer the default value is Button, but in Mozilla Firefox the default value is Submit.
Workaround: Do not use the Type property in the description of a WebButton test object.
➤ When using Mozilla Firefox, the innertext, outertext, innerhtml and outerhtml property values may differ from other browsers. Therefore, using these values in parameters or running checkpoints that use these property values may cause the steps to fail.
➤ The WebXML test object and the Browser.Object method are not supported on Mozilla Firefox.
➤ If you drag a tab to create a separate window in Firefox, UFT stops recognizing, recording, or running any web objects in the new window.

Chapter 37 • Web Add-in - Quick Reference
665
Web 2.0 Support
➤ Due to synchronization issues, if you navigate to a new Web page in Firefox while recording, then UFT may not record certain operations on certain ASP.NET Ajax or jQuery UI objects in the page. Similarly, when running steps that navigate to a new page, UFT may fail to perform certain steps on certain ASP.NET Ajax or jQuery UI objects.
Workaround: If the problem occurs while recording, refresh the Web page and record the step again. If the problem occurs while running, insert a Wait() statement before the problematic step.
Troubleshooting and Limitations - Google Chrome
Checkpoints
➤ Bitmap checkpoints may fail in Google Chrome because of differences between browsers.
➤ Page checkpoints may fail in Google Chrome because of differences between Google Chrome and Internet Explorer when handling casing in HTML source files.
➤ If you add a text checkpoint to an text string in Google Chome, it will not be recognized during a run session and the test will fail.
Chapter 37 • Web Add-in - Quick Reference
666
Google Chrome Functionality and Settings
➤ Web pages that modify Google Chrome's JavaScript functionality (for example, a Web page that replaces the JSON object) may cause UFT to behave unexpectedly.
➤ If you manually un-install the UFT Agent extension from Google Chrome using Tools > Extensions, you must manually reinstall it if you reinstall this hotfix.
➤ The font and color properties for link objects contain different values in Google Chrome. Therefore, if you create standard checkpoints in Microsoft Internet Explorer and select the font and color properties, running these checkpoints in Google Chrome may cause the checkpoints to fail.
➤ Internal Google Chrome pages, such as the about:blank page, Google Chrome sign-in page, Google Chrome Web Store, and Google Chrome’s default tabs homepage are not recognized as Web pages but WinObjects.
Recording and Learning
➤ Recording steps in Google Chrome is not supported.
➤ Learning all objects on the page in Google Chrome may result in unexpected behavior.
Workaround: Learn individual objects at a time instead of all objects simultaneously.
Test Objects, Methods and Properties
➤ When using Google Chrome, the innertext, outertext, innerhtml and outerhtml property values may differ from other browsers. Therefore, using these values in parameters or running checkpoints that use these property values may cause the steps to fail.
➤ The following test objects, methods, and other Web-specific functionalities are not supported in Google Chrome:
➤ Browser.Home method.
➤ Browser.FullScreen method.
➤ Browser.ClearCache method.

Chapter 37 • Web Add-in - Quick Reference
667
➤ Browser.Object method.
➤ chrome://* pages.
➤ Developer Tools pane. (Running steps on Google Chrome while the Developer Tools pane is open is supported.)
➤ Web pages that include frame sets.
➤ Web test objects located inside iFrame controls with a blank or about:blank SRC identification property value.
➤ WebXML test object.
➤ Web 2.0 test objects or Web Add-in Extensibility-based test objects.
➤ Web-based environments, such as Web-based SAP, Siebel, Java, .NET Web Forms, and so on.
➤ When psying on a Web file in Google Chome, you get a fakepath for a Webfile value property.

Chapter 37 • Web Add-in - Quick Reference
668

669
38Web Add-in - Testing and Configuration
This chapter includes:
Concepts
➤ Event Recording Configuration for Web Objects - Overview on page 670
➤ Web 2.0 Toolkit Support on page 675
Tasks
➤ How to Manage Custom Web Event Recording Configurations on page 681
➤ How to Manage Listening and Recording Events for Web Objects on page 683
Reference
➤ Web Event Recording Configuration Dialog box on page 686
➤ Custom Web Event Recording Configuration Dialog Box on page 688

Chapter 38 • Web Add-in - Testing and Configuration
670
Concepts
Event Recording Configuration for Web Objects - Overview
When you record on a Web application, UFT generates steps by recording the events you perform on the Web objects in your application. An event is a notification that occurs in response to an operation, such as a change in state, or as a result of the user clicking the mouse or pressing a key while working in a Web application.
You may need to record more or fewer events than UFT automatically records by default. If so, you can modify the default event recording settings for Web objects using the Web Event Recording Configuration dialog box to use one of three predefined configurations, or you can customize the individual event recording configuration settings to meet your specific needs.
For example, UFT does not generally record mouseover events on link objects. If, however, you have mouseover behavior connected to a link, it may be important for you to record the mouseover event. In this case, you could customize the configuration to record mouseover events on link objects whenever they are connected to a behavior.
Considerations for Configuring Web Event Recording for Web Objects
➤ Event configuration is a global setting and therefore affects all steps that are recorded after you change the settings.
➤ Changing the event configuration settings does not affect steps that have already been recorded. If you find that UFT recorded more or less than you need, change the event recording configuration and then re-record the steps that are affected by the change.

Chapter 38 • Web Add-in - Testing and Configuration
671
➤ Changes to the custom Web event recording configuration settings do not affect open browsers. To apply your changes, make the changes you need in the Web Event Recording Configuration dialog box, refresh any open browsers, and then start a new recording session.
➤ The settings in the Web Event Recording Configuration dialog box affect recording only for objects that UFT recognizes as Web test objects. The recording configuration for other Web-based objects (such as Siebel, PeopleSoft, .NET Web Forms, and SAP Web controls) is defined by environment-specific XML configuration files.
➤ You can restore predefined settings after you set custom settings by resetting the event recording configuration settings to the basic level from the Web Event Recording Configuration dialog box. You can also restore the default custom level settings from the Custom Web Event Recording Configuration dialog box.
Note: For the purposes of Web event recording, UFT treats Web test objects that are child objects of a PSFrame test object as PeopleSoft objects and thus applies the settings in the PeopleSoft event configuration XML file when recording those objects.
This section also includes:
➤ "Event Listening and Recording for Web Objects" on page 671
➤ "Considerations - Event Listening and Recording" on page 673
Event Listening and Recording for Web ObjectsFor each event, you can instruct UFT to:
➤ listen every time the event occurs on the object.
➤ listen only if an event handler is attached to the event.
➤ listen only if a DHTML behavior is attached to the event.

Chapter 38 • Web Add-in - Testing and Configuration
672
➤ listen if either an event handler or DHTML behavior are attached to the event.
➤ never listen to the event.
An event handler is code in a Web page, typically a function or routine written in a scripting language, that receives control when the corresponding event occurs.
Note: UFT supports event handlers that are attached using an on* attribute (such as onclick or onmouseover). It does not support other event handlers, such as those attached using an addEventListener or attachEvent command.
A DHTML behavior encapsulates specific functionality or behavior on a page. When applied to a standard HTML element on a page, a behavior enhances that element's default behavior.
For each event, you can enable recording, disable recording, or enable recording only if the next event is dependent on the selected event.
For example, suppose a mouseover behavior modifies an image link. You may not want to record the mouseover event each time you happen to move the pointer over this image. It is essential, though, that the mouseover event be recorded before a click event on the same object because only the image that is displayed after the mouseover event enables the link event. This option applies only to the Image and WebArea objects.
For task details, see "How to Manage Listening and Recording Events for Web Objects" on page 683.
Recording Right Mouse Button Clicks
UFT enables you to record click events made using left, center, and right mouse buttons. By default, only left clicks are recorded, but you can modify the configuration to record clicks from the right and center buttons, as well.

Chapter 38 • Web Add-in - Testing and Configuration
673
UFT records the Click statement when the OnClick event is triggered. UFT differentiates between the mouse buttons by listening for events configured for each of the mouse buttons. By default, it listens for the OnMouseUp event, but you can also configure it to listen for the OnMouseDown event using the Web Event Recording Configuration dialog box.
Note:
➤ UFT does not record the simultaneous clicking of more than one mouse button.
➤ UFT does not record the right-click that opens the browser context menu, or the selection of an item from the context menu. For details on modifying the script manually to enable these options, visit the HP Software Self-solve knowledge base and search for document ID KM185231.
For details, see "How to Configure UFT to Record Mouse Clicks" on page 71.
Considerations - Event Listening and RecordingIt can sometimes be difficult to find the ideal listen and recording settings. When defining these settings, keep in mind the following guidelines:
➤ If settings for different objects in the Objects pane conflict, UFT gives first priority to settings for specific HTML Tag Objects and second priority to Web Objects settings. UFT applies the settings for Any Web Object only to Web objects that do not belong to any other loaded Web-based environment and were not defined in the HTML Tag Object or Web Objects areas.
➤ To record an event on an object, you must instruct UFT to listen for the event, and to record the event when it occurs. You can listen for an event on a child object, even if a parent object contains the handler or behavior, or you can listen for an event on a parent object, even if the child object contains the handler or behavior.

Chapter 38 • Web Add-in - Testing and Configuration
674
However, you must enable recording for the event on the source object (the object on which the event actually occurs, regardless of which parent object contains the handler or behavior).
For example, suppose a table cell with an onmouseover event handler contains two images. When the mouse moves over either of the images, the event also bubbles up to the cell, and the bubbling includes information on the image that the mouse moved over. You can record this mouseover event by:
➤ Setting Listen on the <TD> tag mouseover event to If Handler (so that UFT "hears" the event when it occurs), while disabling recording on it, and then setting Listen on the <IMG> tag mouseover event to Never, while setting Record on the <IMG> tag to Enable (to record the mouseover event on the image after it is listened to at the <TD> level).
➤ Setting Listen on the <IMG> tag mouseover event to Always (to listen for the mouseover event even though the image tag does not contain a behavior or handler), and setting Record on the <IMG> tag to Enabled (to record the mouseover event on the image).
➤ Instructing UFT to listen for many events on many objects may lower performance, so it is recommended to limit Listen settings to the required objects.
➤ In Internet Explorer, listening to the object on which the event occurs (the source object) can, in rare situations, interfere with the event.
If you find that your application works properly until you begin recording on the application using UFT, your Listen settings may be interfering.
➤ If this problem occurs with a mouse event, try selecting the appropriate Use standard Windows mouse events options in the Web > Advanced pane of the Options dialog box (Tools > Options > GUI Testing tab > Web > Advanced node). For details, see "Web > Advanced Pane (Options Dialog Box)" on page 92.
➤ If this problem occurs with a keyboard or internal event, or the Use standard Windows mouse events option does not solve your problem, set the Listen settings for the event to Never on the source object (but keep the record setting enabled on the source object), and set the Listen settings to Always for a parent object.
Chapter 38 • Web Add-in - Testing and Configuration
675
Web 2.0 Toolkit Support
The Complexities of Testing Web 2.0 Controls
Web 2.0 sites often include a feature-rich, user-friendly interface based on client-side interactivity frameworks. The controls in these sites are generally created using a combination of HTML and client-side JavaScript code that create complex, interactive application objects.
Many groups and organizations have published Web 2.0 toolkits. These toolkits comprise open source JavaScript libraries that define Web 2.0 controls. Developers can use or customize these toolkits to build Web 2.0 applications instead of developing Web 2.0 controls from scratch.
The UFT Web Add-in does not recognize these complex controls and, instead, relates to the HTML elements that comprise them. This results in low-level steps on generic Web test objects. Such steps may be difficult to create, read, and maintain.
Testing Web 2.0 Controls with UFT Web 2.0 Add-in Support
UFT Web Add-in Extensibility makes it possible to develop Web-based add-ins that can identify the controls in a Web 2.0 application in a way that better matches the intended purpose and functionality of those controls.
UFT provides built-in Web Add-in Extensibility support for several public Web 2.0 toolkits. The support for each toolkit is packaged as a child add-in of the Web Add-in. If you install the Web 2.0 Toolkit Support, you can load this support by selecting the relevant toolkit name in the Add-in Manager. The Web 2.0 Toolkit Support Setup is available from the Add-in Extensibility and Web 2.0 Toolkits option in the UFT setup.
The operations supported for each Web 2.0 test object class are a combination of custom operations developed for that test object class and operations directly inherited from the corresponding (base) Web Add-in test object class.
You work with a Web 2.0 toolkit add-in much the same way as you work with the regular Web Add-in. When the toolkit support is loaded, you can learn, record, create checkpoints, run steps, and use all standard UFT functionality on controls from these toolkits.
Chapter 38 • Web Add-in - Testing and Configuration
676
UFT provides support for the following toolkits:
➤ ASP .NET Ajax - http://www.asp.net/ajax/
➤ Dojo - http://www.dojotoolkit.org
➤ Google Web Toolkit (GWT) - http://code.google.com/webtoolkit/
➤ jQuery UI - http://jqueryui.com/
➤ Yahoo User Interface (Yahoo UI) - http://developer.yahoo.com/yui/
For details on the test objects and operations supported for these toolkits, see the Web 2.0 Toolkits section of the HP Unified Functional Testing Object Model Reference.
Considerations for Working with Web 2.0 Add-ins
➤ jQuery UI Library Injection. The Web 2.0 Add-in support is based on the jQuery UI JavaScript library. Therefore, if you load any Web 2.0 add-in, UFT injects the jQuery UI JavaScript library into every Web page that opens in a browser while UFT is open (unless a jQuery UI library is already included in the page).
The specific jQuery UI file injected for each Web 2.0 add-in is specified in the add-in’s toolkit XML file, located in: <UFT installation>\dat\Extensibility\Web\Toolkits\<ToolkitName>\<ToolkitName>.xml
➤ F1 Help Support. When you press F1 on a test object operation that was inherited from the Web Add-in, the Help displays information about that operation for the Web Add-in test object class from which the operation was inherited, and not for the extensibility-based test object class used in your step.
Additionally, the details in the Help file reflect the behavior of the test objects and operations in the XML files provided with UFT. If these files were customized or modified in any way, the details in the Help files supplied with UFT may no longer be accurate.

Chapter 38 • Web Add-in - Testing and Configuration
677
In general, when the content of the extensibility files for a Web 2.0 toolkit is modified, the Help file should also be changed as described in "Customization Guidelines" on page 679. In these cases, you should contact the person or organization who customized the files as your first contact point for support.
➤ Checkpoints and Output Values. Inserting checkpoints and output values on Web 2.0 objects is supported only when recording steps.
➤ Container Objects. Some Web 2.0 objects that visually or behaviorally seem to contain other objects in a Web application are not learned as container objects in terms of the test object hierarchy. For example, this is the case for the YUIDialogBox and GWTDialogBox test objects.
➤ Identification property values. When working in Mozilla Firefox, the value of the selected item or selected identification property is not available in the Object Spy for some Web 2.0 test object classes. The same is true when updating property values from the application in the object repository. This is because the value is only retrievable when the browser is in focus.
Workaround: Retrieve the property value without removing focus from the browser. For example:
➤ Object Type Identification. In the toolkit XML file, the <HTMLTags> and <Conditions> elements in the <Identification> section for the relevant test object class define how UFT maps Web controls to that class.
Browser("Dijit Tree Test").Page("Dijit Tree Test").DojoTree("mytree").Select "Continents;Africa"
msgbox Browser("Dijit Tree Test").Page("Dijit Tree Test").DojoTree("mytree").GetROProperty("selected item")

Chapter 38 • Web Add-in - Testing and Configuration
678
In the example below, UFT identifies a control as a GWTToggleButton test object (when the GWT Add-in is loaded) if it has a <div> HTML tag and a className HTML property with a value that matches the regular expression: .*gwt-ToggleButton.*
In some cases (for example, when <Conditions type="CallIDFuncIfPropMatch">), a JavaScript function that contains identification criteria is also used to help map controls to a test object class.
Keep in mind that the support provided in the HP-furnished Web 2.0 add-ins is dependent on the HTML and DOM structure of the controls. If developers of a Web 2.0-based application change the values of a control’s properties, then the values defined for the <HTMLTags> and <Conditions> elements of the toolkit XML files (or JavaScript files) may not enable UFT to correctly identify those controls.
If UFT is not identifying an object in your application as you expect, you can view or adjust these values in the relevant toolkit support files.
The toolkit XML files are located in: <UFT installation>\dat\Extensibility\Web\Toolkits\<ToolkitName>\<ToolkitName>.xml
The JavaScript files are in a JavaScript folder under the above folder.
<Control TestObjectClass="GWTToggleButton"><Settings>
<Variable name="default_imp_file" value="JavaScript\GWTToggleButton.js"/></Settings><Identification>
<Browser name="*"><HTMLTags>
<Tag name="div"/></HTMLTags><Conditions type="IdentifyIfPropMatch">
<!-- The search string in this condition is treated as a regular expression and is therefore equivalent to .*gwt-ToggleButton.* -->
<Condition prop_name="className" expected_value="gwt-ToggleButton" is_reg_exp="true"/>
</Conditions></Browser>

Chapter 38 • Web Add-in - Testing and Configuration
679
If you modify this (or any) HP-furnished toolkit support set file, follow the guidelines described in "Customization Guidelines" on page 679.
For more details on the way UFT identifies supported controls and for details on the implementation of the supported operations, see the comments provided in the XML and JavaScript files for the relevant toolkit support set.
Customization Guidelines
If you are familiar with Web Add-in Extensibility, then you can customize or further extend the built-in Web 2.0 support to match the needs of the Web 2.0 toolkit application you are testing.
Additionally, if you have installed Extensibility Accelerator, you can use this Visual Studio-like IDE to make it faster and easier to design and develop the required extensibility XML files so that you can invest your main efforts in the development of the JavaScript functions that will enable UFT to work with your custom Web controls.
Extensibility Accelerator also comes with built-in projects for the UFT Web 2.0 add-ins. You can use these projects to help you learn the Extensibility Accelerator features or to more easily add to or modify the provided support files.
If you customize or further extend any of the HP-furnished Web Add-in Extensibility files, you should also do the following:
➤ Make a copy of, or otherwise back up, the original HP-provided files.
➤ Change the name and description that are displayed in the Add-in Manager for the toolkit. Include the text: "Provided by <YourOrganization>" in the Add-in Manager description (in the Controls\Description element of the toolkit XML file).
➤ Create your own Help file to be opened for the customized test object classes or operations. You must use a different file name than the HP-provided Help file. (Change the file name in the HelpInfo element of the Test Object XML file.)

Chapter 38 • Web Add-in - Testing and Configuration
680
Note: When installing the Web 2.0 add-ins, if a previous version of a selected add-in is installed on your computer, the setup stores the previous files in a backup folder before installing. You may need to merge any customizations you made to the previous version into the new version.
For details on how to make these changes and how to customize the support files, see the Unified Functional Testing Web Add-in Extensibility documentation, available in the <UFT installation folder>\help\Extensibility folder.
For details on working with Extensibility Accelerator, see the HP Extensibility Accelerator for HP Functional Testing User Guide.

Chapter 38 • Web Add-in - Testing and Configuration
681
Tasks
How to Manage Custom Web Event Recording Configurations
This task describes the different ways you can define, modify, export, and reset custom Web event recording configurations.
This task includes the following steps:
➤ "Add objects to the HTML Tag Objects list" on page 681
➤ "Delete objects from the HTML Tag Objects list" on page 682
➤ "Save a custom configuration in an XML file" on page 682
➤ "Load a custom configuration from an XML file" on page 682
➤ "Modify a custom configuration file manually - Optional" on page 682
➤ "Reset configuration settings to a pre-configured basic level" on page 683
Prerequisite - Open the Custom Web Event Recording Configuration dialog box
Select Record > Web Event Recording Configuration, and then click Custom Settings. For user interface details, see "Custom Web Event Recording Configuration Dialog Box" on page 688.
Add objects to the HTML Tag Objects list
1 Select Object > Add. A New Object object is displayed in the HTML Tag Objects list.
2 Click New Object to rename it. Enter the exact HTML Tag name.
By default the new object is set to listen and record onclick events with handlers attached.
Chapter 38 • Web Add-in - Testing and Configuration
682
Delete objects from the HTML Tag Objects list
1 Select the object in the HTML Tag Objects category that you want to delete.
2 Select Object > Delete. The object is deleted from the list.
Save a custom configuration in an XML file
1 Select File > Save Configuration As. The Save As dialog box opens.
2 Navigate to the folder in which you want to save your event configuration file and enter a configuration file name. The extension for configuration files is .xml.
3 Click Save to save the file and close the dialog box.
Load a custom configuration from an XML file
1 Select File > Load Configuration. The Open dialog box opens.
2 Locate the event configuration file (.xml) that you want to load and click Open. The dialog box closes and the selected configuration is loaded.
Modify a custom configuration file manually - Optional
Open the XML file that you saved in any text editor, and modify the file according to your needs. To enable UFT to recognize the modifications that you made, the XML file must keep its original structure. For details on the XML file structure, see "Web Event Recording Configuration XML File Structure" on page 106.
For example, you can modify the file to enable right mouse click recording, as described in "How to Configure UFT to Record Mouse Clicks" on page 71.

Chapter 38 • Web Add-in - Testing and Configuration
683
Reset configuration settings to a pre-configured basic level
➤ From the Custom Web Event Recording Configuration dialog box. In the Reset to box, select the predefined event recording level you want, and click Reset. All event settings are restored to the defaults for the level you selected.
➤ From the Web Event Recording Configuration dialog box. Reset basic level configuration settings by selecting Default Settings. The configuration slider is displayed again, and all event settings are restored to the Basic event recording configuration level.
Note: When you choose to reset predefined settings, your custom settings are cleared completely. If you do not want to lose your changes, make sure to save your settings in an event configuration file. For details, see "Custom Web Event Recording Configuration Dialog Box" on page 688.
How to Manage Listening and Recording Events for Web Objects
This task describes the different ways you can manage listening and recording events for Web objects.
Note: The listen and record settings are mutually independent. This means that you can choose to listen to an event for a particular object, but not record it, or you can choose not to listen to an event for an object, but still record the event. For details, see "Considerations - Event Listening and Recording" on page 673.

Chapter 38 • Web Add-in - Testing and Configuration
684
This task contains the following steps:
➤ "Prerequisite - Open the Custom Web Event Recording Configuration dialog box" on page 684
➤ "Add listening events for an object" on page 684
➤ "Delete listening events for an object" on page 684
➤ "Specify the listening criterion for an event" on page 685
➤ "Set the recording status for an event" on page 685
Prerequisite - Open the Custom Web Event Recording Configuration dialog box
Select Record > Web Event Recording Configuration, and then click Custom Settings. For user interface details, see "Custom Web Event Recording Configuration Dialog Box" on page 688.
Add listening events for an object
1 Select the object to which you want to add an event, or select Any Web Object.
2 Select Event > Add. A list of available events opens. For details, see "Custom Web Event Recording Configuration Dialog Box" on page 688.
3 Select the event you want to add. The event is displayed in the Event Name column in alphabetical order. By default, UFT listens to the event when a handler is attached and always records the event (as long as it is listened to at some level).
Delete listening events for an object
1 Select the object from which you want delete an event, or select Any Web Object.
2 Select the event you want to delete from the Event Name column.
3 Select Event > Delete. The event is deleted from the Event Name column.

Chapter 38 • Web Add-in - Testing and Configuration
685
Specify the listening criterion for an event
1 Select the object for which you want to modify the listening criterion or select Any Web Object.
2 In the row of the event you want to modify, select the listening criterion you want from the Listen column. You can select Always, If Handler, If Behavior, If Handler or Behavior, or Never. For details, see "Custom Web Event Recording Configuration Dialog Box" on page 688.
Set the recording status for an event
1 Select the object for which you want to modify the recording status or select Any Web Object.
2 In the row of the event you want to modify, select a recording status from the Record column. For details, see "Custom Web Event Recording Configuration Dialog Box" on page 688.
Configure UFT to record mouse click events
For details, see "How to Configure UFT to Record Mouse Clicks" on page 71.

Chapter 38 • Web Add-in - Testing and Configuration
686
Reference
Web Event Recording Configuration Dialog box
This dialog box enables you to select a predefined event configuration level to use when recording on Web objects. By default, UFT uses the Basic level. If UFT does not record all the events you need, you may require a higher level.
To access Select Record > Web Event Recording Configuration.
See also "Event Recording Configuration for Web Objects - Overview" on page 670

Chapter 38 • Web Add-in - Testing and Configuration
687
User interface elements are described below (unlabeled elements are shown in angle brackets):
UI Elements Description
<Event configuration level slider>
Enables you to select a predefined event recording configuration.
Note: If you define a custom event recording configuration, the slider scale is hidden and the configuration description displays Custom.
Basic (selected by default)
Instructs UFT to:
➤ Always record click events on Web objects that commonly support clicking, such as images, buttons, and radio buttons.
➤ Always record the submit event within forms.
➤ Record click events on other Web objects with an Internet Explorer handler or behavior connected.For details on handlers and behaviors, see "Event Listening and Recording for Web Objects" on page 671.
➤ Record the mouseover event on images and image maps only if the event following the mouseover is performed on the same object.
Medium Instructs UFT to record click events on the <DIV>, <SPAN>, and <TD> HTML tag objects, in addition to the events recorded in the basic level.
High Instructs UFT to record mouseover, mousedown, and double-click events on Web objects with handlers or behaviors attached, in addition to the events recorded in the basic level.

Chapter 38 • Web Add-in - Testing and Configuration
688
Custom Web Event Recording Configuration Dialog Box
This dialog box enables you to customize the event recording configuration in cases where the predefined Web event configuration levels do not exactly match your recording needs.
You can customize event recording in the following ways:
➤ Add or delete objects to which UFT should apply special listening or recording settings.
➤ Add or delete events for which UFT should listen.
➤ Modify the listening or recording settings for an event.
Custom Settings
Opens the Custom Web Event Recording dialog box, which enables you to customize the event recording configuration. For details, see "Custom Web Event Recording Configuration Dialog Box" on page 688.
Default Settings
Restores the settings to the Basic level.
Note: When you choose to reset predefined settings, your custom settings are cleared completely. If you customized the event recording configuration and do not want to lose these settings, make sure to save your settings in an event configuration file. For details, see "How to Manage Custom Web Event Recording Configurations" on page 681.
UI Elements Description

Chapter 38 • Web Add-in - Testing and Configuration
689
To access 1 Select Record > Web Event Recording Configuration. The Web Event Recording Configuration dialog box opens.
2 Click the Custom Settings button. The Custom Web Event Recording Configuration dialog box opens.
Important information
➤ If an object is listed in the Custom Web Event Recording Configuration dialog box, then the settings for that object override the settings for Any Web Object.
➤ You cannot delete or add to the list of objects in the Web Objects category, but you can modify the settings for any of these objects.
➤ You can add any HTML Tag object in your Web page to the HTML Tag Objects category.

Chapter 38 • Web Add-in - Testing and Configuration
690
User interface elements are described below (unlabeled elements are shown in angle brackets):
Relevant tasks ➤ "How to Manage Custom Web Event Recording Configurations" on page 681
➤ "How to Manage Listening and Recording Events for Web Objects" on page 683
➤ "How to Modify Event Recording Configuration for Web-Based Applications" on page 69
➤ "How to Configure UFT to Record Mouse Clicks" on page 71
See also ➤ "Event Recording Configuration for Web Objects - Overview" on page 670
➤ "Event Listening and Recording for Web Objects" on page 671
UI Elements Description
<menu options>
File Menu➤ Load Configuration. Enables you to load a custom
configuration XML file.
➤ Save Configuration As. Enables you to save your custom configuration in an XML file.
Object Menu➤ Add. Enables you to add an HTML tag object to the Objects
pane.
➤ Delete. Enables you to delete an HTML tag object from the Objects pane.
Event Menu➤ Add. Enables you to add the following events to the Events
pane: onchange, ondblclick, onblur, onfocus, onmousedown, onmouseup, onmouseover, onmouseout, onsubmit, onreset, onpropertychange.
Depending on the selected object, not every event type is available.
➤ Delete. Delete the selected events from the Events pane.

Chapter 38 • Web Add-in - Testing and Configuration
691
<Objects pane>
The list of Web test object classes and HTML tag objects. The top of the hierarchy is Any Web Object.
Note:
➤ The settings for Any Web Object apply to any object on the Web page, for which there is no specific event recording configuration set. Below this are the Web Objects and HTML Tag Objects categories, each of which contains a list of objects.
➤ Only HTML tag objects can be added or deleted to this list.
<Events pane> The list of events associated with the object.
Event Name The name of the event to which UFT listens and/or records, depending on the settings you specify.
Listen The criteria that instructs UFT when to listen to the event. The following criteria are available:
➤ Always. Always listens to the event.
➤ If Handler. Listens to the event if a handler is attached to it. A handler is code in a Web page, typically a function or routine written in a scripting language, that receives control when the corresponding event occurs.
➤ If Behavior. Listens to the event if a DHTML behavior is attached to it. A DHTML behavior encapsulates specific functionality or behavior on a page. When applied to a standard HTML element on a page, a behavior enhances that element's default behavior.
➤ If Handler or Behavior. Listens to the event if a handler or behavior is attached to it.
➤ Never. Never listens to the event.
UI Elements Description

Chapter 38 • Web Add-in - Testing and Configuration
692
Record The record status for the selected object. The following statuses may be displayed:
➤ Enabled. Records the event each time it occurs on an object as long as UFT listens to the event on the selected object, or on another object to which the event bubbles.
Bubbling is the process whereby, when an event occurs on a child object, the event can travel up the chain of hierarchy within the HTML code until it encounters an event handler to process the event.
➤ Disabled. Does not record the specified event and ignores event bubbling where applicable.
➤ Enabled on next event. Same as Enabled, except that it records the event only if a subsequent event occurs on the same object.
Reset Enables you to reset your settings to a pre-configured level. The following levels are available:
➤ Basic
➤ Medium
➤ High
Note: When you choose to reset predefined settings, your custom settings are cleared completely. If you do not want to lose your changes, make sure to save your settings in an event configuration file. For details, see "How to Manage Custom Web Event Recording Configurations" on page 681.
UI Elements Description

Part XIX
Appendix

694

695
AGUI Checkpoints and Output Values Per Add-in
Relevant for: GUI tests and components
The tables in this chapter show the categories of checkpoints and output values that are supported by UFT for each add-in.
For more information about using checkpoints and output values in a specific add-in, see the relevant add-in section.
This chapter includes:
➤ Supported Checkpoints on page 696
➤ Supported Output Values on page 698

Chapter A • GUI Checkpoints and Output Values Per Add-in
696
Supported Checkpoints
Relevant for: GUI tests and components
The following table shows the categories of checkpoints that are supported by UFT for each add-in.
Table Legend
➤ S: Supported
➤ NS: Not Supported
➤ NA: Not Applicable
Note:
➤ Only standard and bitmap checkpoints are supported for keyword components.
➤ XML checkpoints are not supported on Internet Explorer 9 running in standard mode or on Mozilla Firefox because the WebXML test object is not supported for these browsers.

Chapter A • GUI Checkpoints and Output Values Per Add-in
697
For additional information, see "Footnotes" on page 698.
Acc
essi
bili
ty
Bit
map
Dat
abas
e
File
Co
nte
nt
Imag
e
Pag
e
Stan
dar
d
Tab
le
Text
Text
Are
a
XM
L (A
pp
licat
ion
)
XM
L (R
eso
urce
)
.NET Web Forms3
S S NA NA NA NA S S S6 S6 S S
.NET Windows Forms
NA S NA NA NA NA S S S6 S6 NA NA
ActiveX NS S NA NA NS NA S S S S NA NA
Delphi NS S NA NA NS NA S S S S NA NA
Flex NA S NA NA NA NA S S S S NA NA
Java NA S NA NA NA NA S S S S4 NA NA
Oracle NA S NA NA NA NA S S NS NS NA NA
PeopleSoft S S NA NA S S S S S1 NS S S
PowerBuilder2 NS S NA NA NS NA S S S S NA NA
Qt NS S NA NA NS NA S S S S NA NA
SAP Web-based S S NA NA S S S S S NS S S
SAP Windows-based
S5 S NA NA S5 S5 S S S5 NS S5 NA
Siebel S S NA NA S S S S S NS S S
Silverlight NA S NA NA NA NA S S S S NA NA
Standard Windows
NS S NA NA NS NA S S S S NA NA
Stingray NA S NA NA NA NA S S S S NA NA
Terminal Emulator
NA S NA NA NA NA S NA NA NA NA NA
VisualAge for Smalltalk
NA S NA NA NA NA S S S S NA NA

Chapter A • GUI Checkpoints and Output Values Per Add-in
698
Footnotes1 Text checkpoints are supported only for Page, Frame, and ViewLink objects.
2 When you insert a checkpoint on a PowerBuilder DataWindow control, UFT treats it as a table and opens the Table Checkpoint Properties dialog box.
3 For NET Web Forms, text checkpoints for WbfTreeView, WbfToolbar, and WbfTabStrip objects are not supported.
4 The text area checkpoint mechanism for Java Applet objects is disabled by default. You can enable it in the Advanced Java Options dialog box.
5 This is supported only when UFT records HTML elements using the Web infrastructure, but not when it records using the SAPGui Scripting Interface (as selected in the SAP pane of the Options dialog box).
6 This is supported only when UFT is configured to use the OCR (optical character recognition) mechanism.
Supported Output Values
Relevant for: GUI tests and components
The following table shows the categories of output values that are supported by UFT for each add-in.
Visual Basic NS S NA NA NS NA S S S S NA NA
Web S S NA NA S S S S S1 S S NA
Web Services NA NA NA NA NA NA S NA NA NA S NA
WPF NA S NA NA NA NA S S S S NA NA
Acc
essi
bili
ty
Bit
map
Dat
abas
e
File
Co
nte
nt
Imag
e
Pag
e
Stan
dar
d
Tab
le
Text
Text
Are
a
XM
L (A
pp
licat
ion
)
XM
L (R
eso
urce
)

Chapter A • GUI Checkpoints and Output Values Per Add-in
699
Table Legend
➤ S: Supported
➤ NS: Not Supported
➤ NA: Not Applicable
Note: Only standard and bitmap checkpoints are supported for keyword components.
For additional information, see "Footnotes" on page 700.
Acc
essi
bili
ty
Bit
map
Dat
abas
e
File
Co
nte
nt
Imag
e
Pag
e
Stan
dar
d
Tab
le
Text
Text
Are
a
XM
L (A
pp
licat
ion
)
XM
L (R
eso
urce
)
.NET Web Forms NA NA NA NA NA S S S S5 S5 NA NA
.NET Windows Forms
NA NA NA NA NA NA S S S5 S5 NA NA
ActiveX NS NA NA NA NA NA S S S S NA NA
Delphi NS NA NA NA NA NA S S S S NA NA
Java NA NA NA NA NA NA S NA S S3 NA NA
Oracle NA NA NA NA NA NA S S NA NA NA NA
PeopleSoft NA NA NA NA NA S S S S1 NS S S
PowerBuilder2 NA NA NA NA NA NA S NA S S NA NA
Qt NA NA NA NA NA NA S S S S NA NA
SAP Web-based NA NA NA NA NA S S S S NS S S
SAP Windows-based
NA NA NA NA NA S4 S S S4 NS S4 S
Siebel NA NA NA NA NA S S S S NS S S

Chapter A • GUI Checkpoints and Output Values Per Add-in
700
Footnotes1 Text output values are supported only for Page, Frame, and ViewLink objects.
2 When you insert an output value step on a PowerBuilder DataWindow control, UFT treats it as a table and opens the Table Output Value Properties dialog box.
3 The text area output mechanism for Java Applet objects is disabled by default. You can enable it in the Advanced Java Options dialog box.
4 This is supported only when UFT records HTML elements using the Web infrastructure, but not when it records using the SAPGui Scripting Interface (as selected in the SAP pane of the Options dialog box).
5 This is supported only when UFT is configured to use the OCR (optical character recognition) mechanism.
Silverlight NA NA NA NA NA NA S S S S NA NA
Standard Windows
NA NA NA NA NA NA S S S S NA NA
Stingray NA NA NA NA NA NA S S S S NA NA
Terminal Emulator
NA NA NA NA NA NA NA NA NA NA NA NA
VisualAge for Smalltalk
NA NA NA NA NA NA NA S S S NA NA
Visual Basic NA NA NA NA NA NA S NA S S NA NA
Web NA NA NA NA NA S S S S1 NS S NA
Web Services NA NA NA NA NA NA NA NA NA NA NA S
WPF NA NA NA NA NA NA S S S S NA NA
Acc
essi
bili
ty
Bit
map
Dat
abas
e
File
Co
nte
nt
Imag
e
Pag
e
Stan
dar
d
Tab
le
Text
Text
Are
a
XM
L (A
pp
licat
ion
)
XM
L (R
eso
urce
)