01 layout gb - hp® official site | laptop …h10032. 22-11-2000 09:21 pagina 2 english cdrw...
TRANSCRIPT

ReWritableRecordableRecordableRecordableReWritable
PHONES VOLUMEWRITING DISC IN
ACTIVEPHONES VOLUME
WRITING DISC IN
ACTIVE
OPEN/CLOSEOPEN/CLOSE
01_LAYOUT_GB 22-11-2000 09:21 Pagina 1a

Front view ©
1. Headphone plug2. Headphone volume control3. Write indicator4. Disc Tray5. Disc in/Active/error
indicator6. Open/Close button7. Emergency eject
Rear view
8. Audio Line Out connector9. Jumperblock10. IDE connector 11. Host DC power connector12. Digital Audio out
ReWritableRecordableRecordableRecordableReWritable
PHONES VOLUME
OPEN/CLOSE
WRITING DISC IN
ACTIVEPHONES VOLUME
OPEN/CLOSE
WRITING DISC IN
ACTIVE
CDRW 8x4x32 - Compact Disc Recordable/Rewritable
FIG.1
12
MASTERSLAVE
CABLE SELECTAUDIO OUT
R GND LCS
SL
MA
IDE PIN 1
DC INPUT+5 GND +12
MASTERSLAVE
CABLE SELECTAUDIO OUT
R GND LCS
SL
MA
IDE PIN 1
DC INPUT+5 GND +12
MASTERSLAVE
CABLE SELECTAUDIO OUT
R GND LCS
SL
MA
IDE PIN 1
DC INPUT+5 GND +12
Front view
Rear view
Vorderansicht d
1. Anschlußbuchse Kopfhörer2. Lautstärke Kopfhörer3. Schreibanzeige4. Schublade5. Diskette ein/Aktiv/Fehler
anzeige6. Open/Close Taste7. Notauswurf
Rückansicht
8. Analog Audio-Ausgang9. Jumperblock10. IDE Anschluß11. Host Gleichspannungs-
anschluß12. Digital Audio-Ausgang
Panneau avant f
1. Prise pour casque2. Commande du volume du
casque3. Témoin lumineux
d’enregistrement4. Tiroir à disque5. Témoin disque/Activé/erreur6. Touche ouvrir/fermer7. Ejection d’urgence
Panneau arriëre
8. Connecteur de sortie de ligne audio
9. Cavaliers10. Connecteur IDE 11. Connecteurs au bloc
d’alimentation C.C. hôte12. Sortie audio numérique
Parte anteriore i
1. Presa cuffie2. Controllo volume cuffie3. Indicatore di scriture4. Cassetto del disco5. Indicatore disco
inserito/Attivo/Errore6. Tasto Apertura/Chiusura7. Espulsione di emergenza
Parte posteriore
8. Connettore Line Out Audio9. Blocco Jumpers10. Connettore IDE11. Connettore alimentazione DC12. Uscita audio digitale
Vista frontal e
1. Clavija de los auriculares2. Control del volumen de los
auriculares C.D.3. Indicador escritura4. Bandeja del Disco5. Indicador de Disco
introducido/Activo/Error6. Bóton de Apertura/Cierre7. Expulsión de emergencia
Vista posterior
8. Conector de salida de Línea de Audio
9. Bloque de conectores10. Conector IDE11. Conector de alimentacíon12. Salida de audio digital
Voorzijde ñ
1. Hoofdtelefoon aansluiting2. Hoofdtelefoon volumeregelaar3. Schrijfindicator4. Disc-lade5. Disc aanwezig/
Actief/foutindicator6. Openen/sluiten-toets7. Nood-eject
Achterzijde
8. Audio-connector lijnuitgang9. Jumper-block10. IDE connector 11. Voedingsconnector host
computer12. Digital audio-uitgang
01_LAYOUT_GB 22-11-2000 09:21 Pagina 1b

01_LAYOUT_GB 22-11-2000 09:21 Pagina 1c
WARNING
This device complies with Part 15 of the FCC (U.S.A.) Rules. Operationis subject to the following two conditions: (1) This device may not causeharmful interference, and (2) this device must accept any interferencereceived, including interference that may cause undesired operation.
NOTEThis equipment has been tested and found to comply with the limits fora Class B digital device, pursuant to Part 15 of the FCC Rules. Theselimits are designed to provide reasonable protection against harmfulinterference in a residential installation. This equipment generates, usesand can be used in accordance with the instructions, may cause harmfulinterference to radio communications. However, there is no guaranteethat interference will not occur in a particular installation. If thisequipment does cause harmful interference to radio or televisionreception, which can be determined by turning this equipment off andon, the user is encouraged to try to correct the interference by one ormore of the following measures:
•Reorient or relocate the receiving antenna.• Increase the separation between the equipment and receiver.•Connect the equipment into an outlet on a circuit differentfrom that to which the receiver is connected.
•Consult the dealer or an experienced radio/TV technician forhelp.
FOR CANADA (ICES-003)
This class B digital apparatus meets all requirements of the CanadianInterference-Causing Equipment Regulations.
Cet appareil numerique de la classe B respecte toutes les exigences duReglement sur le materiel brouilleur de Canada.
FOR EUROPE
“The CDRW 8x4x32 is in conformity with the EMCdirective and low-voltage directive
IMPORTANT
Any change or modifications to the equipment by the user not expresslyapproved by the grantee or manufacturer could void the user's authorityto operate such equipment.
01_LAYOUT_GB 22-11-2000 09:21 Pagina 1d
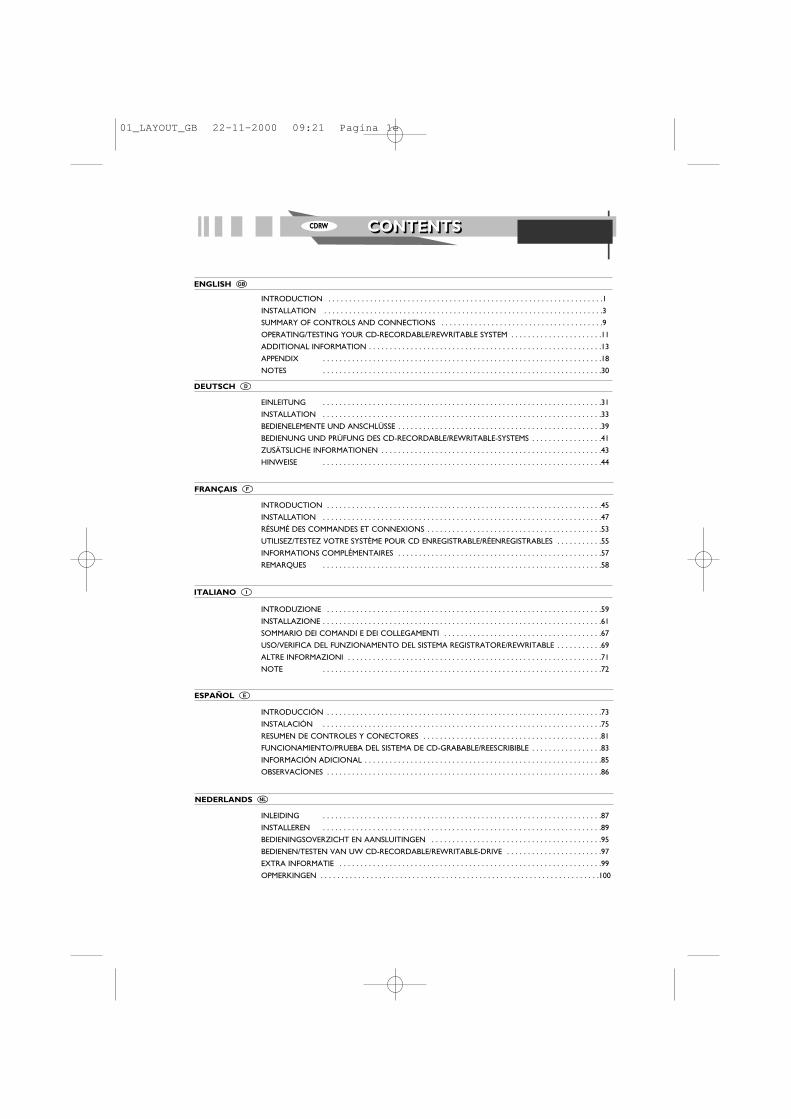
CONTENTSCONTENTSCDRW
ENGLISH ©
DEUTSCH d
FRANÇAIS f
ITALIANO i
ESPAÑOL e
NEDERLANDS ñ
EINLEITUNG . . . . . . . . . . . . . . . . . . . . . . . . . . . . . . . . . . . . . . . . . . . . . . . . . . . . . . . . . . . . . . . . . . .31
INSTALLATION . . . . . . . . . . . . . . . . . . . . . . . . . . . . . . . . . . . . . . . . . . . . . . . . . . . . . . . . . . . . . . . . . . .33
BEDIENELEMENTE UND ANSCHLÜSSE . . . . . . . . . . . . . . . . . . . . . . . . . . . . . . . . . . . . . . . . . . . . . . . . .39
BEDIENUNG UND PRÜFUNG DES CD-RECORDABLE/REWRITABLE-SYSTEMS . . . . . . . . . . . . . . . . .41
ZUSÄTSLICHE INFORMATIONEN . . . . . . . . . . . . . . . . . . . . . . . . . . . . . . . . . . . . . . . . . . . . . . . . . . . . .43
HINWEISE . . . . . . . . . . . . . . . . . . . . . . . . . . . . . . . . . . . . . . . . . . . . . . . . . . . . . . . . . . . . . . . . . . .44
INTRODUCTION . . . . . . . . . . . . . . . . . . . . . . . . . . . . . . . . . . . . . . . . . . . . . . . . . . . . . . . . . . . . . . . . . .45
INSTALLATION . . . . . . . . . . . . . . . . . . . . . . . . . . . . . . . . . . . . . . . . . . . . . . . . . . . . . . . . . . . . . . . . . . .47
RÉSUMÉ DES COMMANDES ET CONNEXIONS . . . . . . . . . . . . . . . . . . . . . . . . . . . . . . . . . . . . . . . . . .53
UTILISEZ/TESTEZ VOTRE SYSTÈME POUR CD ENREGISTRABLE/RÉENREGISTRABLES . . . . . . . . . . .55
INFORMATIONS COMPLÉMENTAIRES . . . . . . . . . . . . . . . . . . . . . . . . . . . . . . . . . . . . . . . . . . . . . . . . .57
REMARQUES . . . . . . . . . . . . . . . . . . . . . . . . . . . . . . . . . . . . . . . . . . . . . . . . . . . . . . . . . . . . . . . . . . .58
INTRODUZIONE . . . . . . . . . . . . . . . . . . . . . . . . . . . . . . . . . . . . . . . . . . . . . . . . . . . . . . . . . . . . . . . . . .59
INSTALLAZIONE . . . . . . . . . . . . . . . . . . . . . . . . . . . . . . . . . . . . . . . . . . . . . . . . . . . . . . . . . . . . . . . . . . .61
SOMMARIO DEI COMANDI E DEI COLLEGAMENTI . . . . . . . . . . . . . . . . . . . . . . . . . . . . . . . . . . . . . .67
USO/VERIFICA DEL FUNZIONAMENTO DEL SISTEMA REGISTRATORE/REWRITABLE . . . . . . . . . . .69
ALTRE INFORMAZIONI . . . . . . . . . . . . . . . . . . . . . . . . . . . . . . . . . . . . . . . . . . . . . . . . . . . . . . . . . . . . .71
NOTE . . . . . . . . . . . . . . . . . . . . . . . . . . . . . . . . . . . . . . . . . . . . . . . . . . . . . . . . . . . . . . . . . . .72
INTRODUCCIÓN . . . . . . . . . . . . . . . . . . . . . . . . . . . . . . . . . . . . . . . . . . . . . . . . . . . . . . . . . . . . . . . . . .73
INSTALACIÓN . . . . . . . . . . . . . . . . . . . . . . . . . . . . . . . . . . . . . . . . . . . . . . . . . . . . . . . . . . . . . . . . . . .75
RESUMEN DE CONTROLES Y CONECTORES . . . . . . . . . . . . . . . . . . . . . . . . . . . . . . . . . . . . . . . . . . .81
FUNCIONAMIENTO/PRUEBA DEL SISTEMA DE CD-GRABABLE/REESCRIBIBLE . . . . . . . . . . . . . . . . .83
INFORMACIÓN ADICIONAL . . . . . . . . . . . . . . . . . . . . . . . . . . . . . . . . . . . . . . . . . . . . . . . . . . . . . . . . .85
OBSERVACÍONES . . . . . . . . . . . . . . . . . . . . . . . . . . . . . . . . . . . . . . . . . . . . . . . . . . . . . . . . . . . . . . . . . .86
INLEIDING . . . . . . . . . . . . . . . . . . . . . . . . . . . . . . . . . . . . . . . . . . . . . . . . . . . . . . . . . . . . . . . . . . .87
INSTALLEREN . . . . . . . . . . . . . . . . . . . . . . . . . . . . . . . . . . . . . . . . . . . . . . . . . . . . . . . . . . . . . . . . . . .89
BEDIENINGSOVERZICHT EN AANSLUITINGEN . . . . . . . . . . . . . . . . . . . . . . . . . . . . . . . . . . . . . . . . .95
BEDIENEN/TESTEN VAN UW CD-RECORDABLE/REWRITABLE-DRIVE . . . . . . . . . . . . . . . . . . . . . . .97
EXTRA INFORMATIE . . . . . . . . . . . . . . . . . . . . . . . . . . . . . . . . . . . . . . . . . . . . . . . . . . . . . . . . . . . . . . .99
OPMERKINGEN . . . . . . . . . . . . . . . . . . . . . . . . . . . . . . . . . . . . . . . . . . . . . . . . . . . . . . . . . . . . . . . . . . .100
INTRODUCTION . . . . . . . . . . . . . . . . . . . . . . . . . . . . . . . . . . . . . . . . . . . . . . . . . . . . . . . . . . . . . . . . . .1
INSTALLATION . . . . . . . . . . . . . . . . . . . . . . . . . . . . . . . . . . . . . . . . . . . . . . . . . . . . . . . . . . . . . . . . . . .3
SUMMARY OF CONTROLS AND CONNECTIONS . . . . . . . . . . . . . . . . . . . . . . . . . . . . . . . . . . . . . . .9
OPERATING/TESTING YOUR CD-RECORDABLE/REWRITABLE SYSTEM . . . . . . . . . . . . . . . . . . . . . .11
ADDITIONAL INFORMATION . . . . . . . . . . . . . . . . . . . . . . . . . . . . . . . . . . . . . . . . . . . . . . . . . . . . . . . .13
APPENDIX . . . . . . . . . . . . . . . . . . . . . . . . . . . . . . . . . . . . . . . . . . . . . . . . . . . . . . . . . . . . . . . . . . .18
NOTES . . . . . . . . . . . . . . . . . . . . . . . . . . . . . . . . . . . . . . . . . . . . . . . . . . . . . . . . . . . . . . . . . . .30
01_LAYOUT_GB 22-11-2000 09:21 Pagina 1e
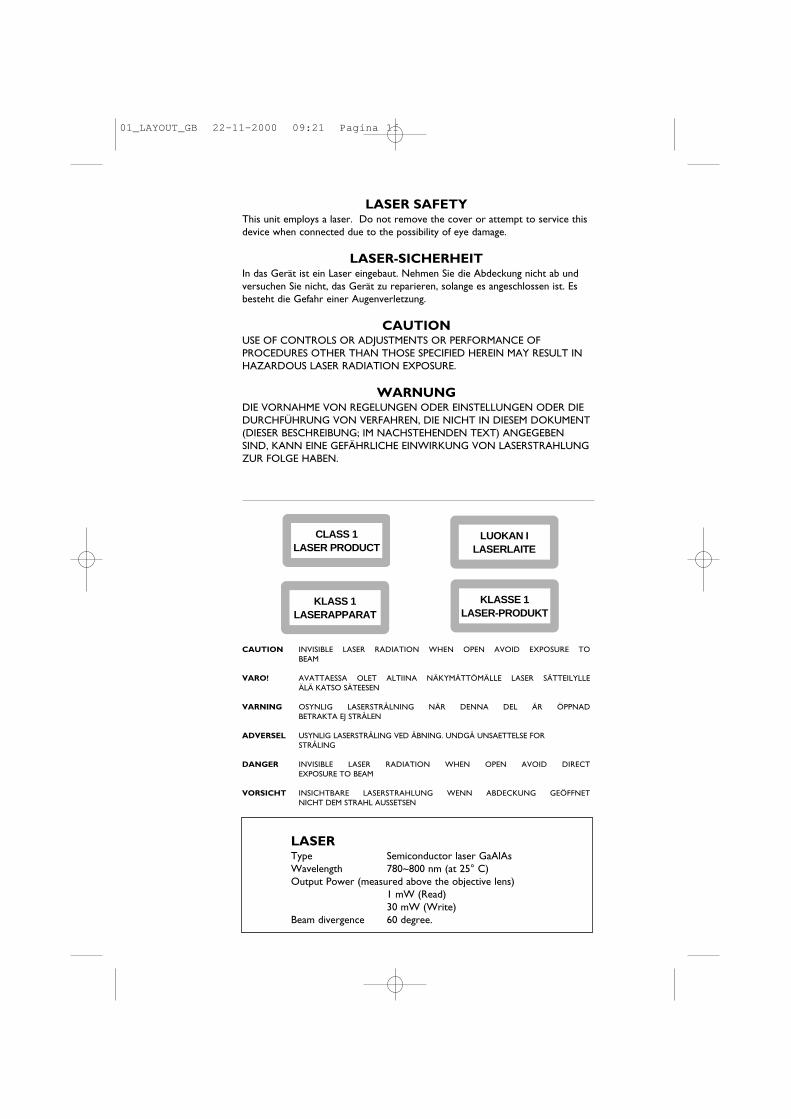
LASER SAFETYThis unit employs a laser. Do not remove the cover or attempt to service thisdevice when connected due to the possibility of eye damage.
LASER-SICHERHEITIn das Gerät ist ein Laser eingebaut. Nehmen Sie die Abdeckung nicht ab undversuchen Sie nicht, das Gerät zu reparieren, solange es angeschlossen ist. Esbesteht die Gefahr einer Augenverletzung.
CAUTIONUSE OF CONTROLS OR ADJUSTMENTS OR PERFORMANCE OFPROCEDURES OTHER THAN THOSE SPECIFIED HEREIN MAY RESULT INHAZARDOUS LASER RADIATION EXPOSURE.
WARNUNGDIE VORNAHME VON REGELUNGEN ODER EINSTELLUNGEN ODER DIEDURCHFÜHRUNG VON VERFAHREN, DIE NICHT IN DIESEM DOKUMENT(DIESER BESCHREIBUNG; IM NACHSTEHENDEN TEXT) ANGEGEBENSIND, KANN EINE GEFÄHRLICHE EINWIRKUNG VON LASERSTRAHLUNGZUR FOLGE HABEN.
CLASS 1LASER PRODUCT
LUOKAN ILASERLAITE
KLASS 1LASERAPPARAT
CAUTION INVISIBLE LASER RADIATION WHEN OPEN AVOID EXPOSURE TOBEAM
VARO! AVATTAESSA OLET ALTIINA NÄKYMÄTTÖMÄLLE LASER SÄTTEILYLLEÄLÄ KATSO SÄTEESEN
VARNING OSYNLIG LASERSTRÅLNING NÄR DENNA DEL ÄR ÖPPNADBETRAKTA EJ STRÅLEN
ADVERSEL USYNLIG LASERSTRÅLING VED ÅBNING. UNDGÅ UNSAETTELSE FORSTRÅLING
DANGER INVISIBLE LASER RADIATION WHEN OPEN AVOID DIRECTEXPOSURE TO BEAM
VORSICHT INSICHTBARE LASERSTRAHLUNG WENN ABDECKUNG GEÖFFNETNICHT DEM STRAHL AUSSETSEN
KLASSE 1LASER-PRODUKT
LASERType Semiconductor laser GaAlAsWavelength 780~800 nm (at 25° C)Output Power (measured above the objective lens)
1 mW (Read)30 mW (Write)
Beam divergence 60 degree.
01_LAYOUT_GB 22-11-2000 09:21 Pagina 1f
ENGLISH
CDRW INTRODUCTIONINTRODUCTION
INTRODUCTION
CDRW 8x4x32 is a new generation Half Height 5.25" Built-in CD-Recordable/ReWritable drive with the popular (Enhanced) IDEinterface.
The drive is in fact a multi-function device, since it can be used as:
• fast CD-ROM reader (max 32x)
• 8x speed CD-Recorder, e.g. to record your own CD-ROM's or Audio-CD's
• 4x speed CD-ReWritable device to use as your personal storage medium, by using Incremental Packet Writing
The CDRW 8x4x32 is the ideal tool for publishing large amounts ofdata in compact form on CD. The Incremental Packet Writingfunction will make this drive attractive to the general desktop PC-user for personal data storage.
CD-Recordable discs can be recorded at 8x speed, and in allstandard formats, e.g. CD-Audio, CD-ROM (XA), CD-i and Video-CD among others.Since these discs are recorded in accordance with the Orange Book(part II) specification, these discs can be played back on allcompatible CD-players.
CD-ReWritable is a feature which allows re-use of previouslywritten discs by rewriting portions or the complete disc inaccordance with the Orange Book (partIII) specification. Thesediscs can be recorded at quadruple speed in all standard formats.
1
01_LAYOUT_GB 22-11-2000 09:21 Pagina 1

ENGLISH
CDRW INTRODUCTIONINTRODUCTION(CONT.)
2
Features of the CDRW 8x4x32 CD-Recordable/ReWritable drive:
• Multi-function device (CD-ROM reader, CD-Recorderand CD-ReWritable drive)
• Supports Incremental Packet Writing for data storageapplications and "drag & drop" File System support through the CD-UDF standard (endorsed by Optical Storage Technology Association or OSTA)
• Supports standardised Multi Media Commandset (MMC-2) as standardised by the American National Standards Institute (ANSI)
• Plug & Play read compatibility under Windows 95/98/2000 and Windows NT
• Interfaces directly to low cost standardised (Enhanced) IDE connector on PC motherboard
• Supports Fast Format (Background Formatting)depending on the application software, whichreduces formatting time of a CD-RW disc to only afew minutes.
Unpacking
If the CDRW 8x4x32 package shows evidence of rough handling ordamage and the drive does not function properly on initial startup:return the drive and damaged package to your supplier and requesta replacement.
Lift out the CDRW 8x4x32 and remove the packing pieces.Check that the package contains following items :
• User manual• Mounting screws
An IDE flatcable and/or audio cable could be part of this packagedepending on the commerical package. It can also be obtainedfrom your local supplier.
01_LAYOUT_GB 22-11-2000 09:21 Pagina 2
ENGLISH
CDRW INSTALLATIONINSTALLATION
3
INSTALLATION
Precautions
This CD-Recordable/Rewritable drive, like all electronicequipment, is static sensitive.
• Please take the proper precautions when handling the drive, for example by touching the PC - chassis before touching thedrive.
• Avoid touching the IDE connector pins as well as the audio-connector pins and the jumper pins.
• Keep the drive in its conductive wrapping until you are ready
to install the drive in your computer.
Safety Precautions
• Europe: This drive shall be installed only with an EN60950 (IEC950) approved Power supply.
• USA/Canada: This drive is for use only with IBM compatible UL listed Personal Computers or Macintosh UL listed workstations weighing less than 18 kg.
Copyright Statement
It is a criminal offence, under applicable copyright laws, to makeunauthorised copies of copyright-protected material, includingcomputer programs, films, broadcasts and sound recordings. Thisequipment should not be used for such purposes.
01_LAYOUT_GB 22-11-2000 09:21 Pagina 3

ENGLISH
CDRW INSTALLATIONINSTALLATION(CONT.)
4
Installing the drive
11 Turn off your computer, monitor and other peripherals.
To disconnect your configuration completely from the mains,
the mains plug has to be disconnected.
OPEN THE COVER FLAP OF THIS BOOKLET FOR
LOCATING THE DRIVE-CONNECTORS AND THEIR ORIENTATION.
22 Remove the cover from your computer.
Please consult the manuals that came
with your computer for specific details.
NOTE:
01_LAYOUT_GB 22-11-2000 09:21 Pagina 4

ENGLISH
CDRW INSTALLATIONINSTALLATION(CONT.)
5
33 In order to mount the drive inside your PC (or other type
of computer), locate a free 5.25" bay and follow the instructions,
as provided with your computer systems, for installing the drive.
When you are planning to use 8 cm discs your drive should be
mounted horizontaly or you should use an adapter
(for information contact your local supplier).
44 You have several possibilities to install your IDE data cable
depending on your existing configuration:
(See page 18 for Jumper block)
A) Hard-Disc connected as Master to Primary IDE Port,
CD-ROM connected as Master to Secundary IDE Port:
Connect CDRW 8x4x32 as Slave to Secundary IDE Port.
Primary Port Hard-Disc -
Secundary Port CD-ROM -
MASTER SLAVE
Primary Port Hard-Disc -
Secundary Port CD-ROM CDRW 8x4x32
MASTER SLAVE
JumperBlock
ExistingPC Configuration
PC Configurationafter Installation
CS
S M
01_LAYOUT_GB 22-11-2000 09:21 Pagina 5

ENGLISH
CDRW INSTALLATIONINSTALLATION(CONT.)
6
B) Single Hard-disc connected as master to Primary IDE Port:
Connect CDRW 8x4x32 as Master to Secundary Port.
C) Hard-disc connected as Master to Primary IDE Port,
CD-ROM connected as Slave to Primary IDE Port:
Connect CDRW 8x4x32 as Master to Secundary IDE Port.
D) CS (Cable Select) (With use of CS Cable)
The MASTER/SLAVE settting will be set automatically
depending on the hardware configuration. Please refer to
your PC manual for details.
INSTALLATION A IS PREFERRED FOR SYSTEMS WITH
AN IDE HARD-DISC AND CD-ROM.
INSTALLATION B IS PREFERRED FOR SYSTEMS WITH
ONLY AN IDE HARD-DISC.NOTE:
NOTE:
Primary Port Hard-Disc CD-ROM
Secundary Port - -
MASTER SLAVE
Primary Port Hard-Disc CD-ROM
Secundary Port CDRW 8x4x32 -
MASTER SLAVE
JumperBlock
CS
S M
ExistingPC Configuration
PC Configurationafter Installation
Primary Port Hard-Disc -
Secundary Port - -
Primary Port Hard-Disc -
Secundary Port CDRW 8x4x32
JumperBlock
CS
S M
ExistingPC Configuration
PC Configurationafter Installation
01_LAYOUT_GB 22-11-2000 09:21 Pagina 6
ENGLISH
CDRW INSTALLATIONINSTALLATION(CONT.)
7
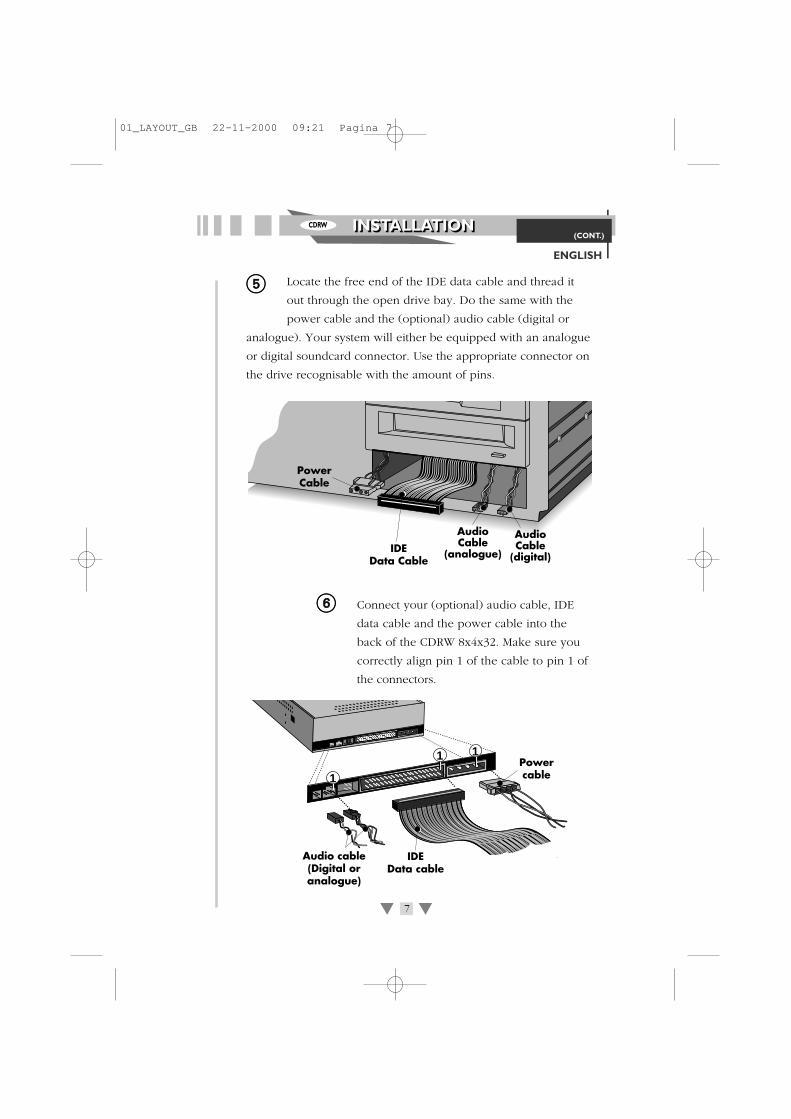
55 Locate the free end of the IDE data cable and thread it
out through the open drive bay. Do the same with the
power cable and the (optional) audio cable (digital or
analogue). Your system will either be equipped with an analogue
or digital soundcard connector. Use the appropriate connector on
the drive recognisable with the amount of pins.
66 Connect your (optional) audio cable, IDE
data cable and the power cable into the
back of the CDRW 8x4x32. Make sure you
correctly align pin 1 of the cable to pin 1 of
the connectors.
Audio cable(Digital oranalogue)
IDEData cable
Powercable
1 1
1
IDEData Cable
PowerCable
AudioCable
(digital)
AudioCable
(analogue)
01_LAYOUT_GB 22-11-2000 09:21 Pagina 7

ENGLISH
CDRW INSTALLATIONINSTALLATION(CONT.)
8
77 Insert the CDRW 8x4x32 into the drive bay. Using all the
screws included in the bag to secure the CDRW 8x4x32
into the bay.
88 Replace the cover. Connect the mains plug
of your configuration. When you have
successfully installed the drive and established all connections, it
is now time to switch on the PC. You are ready to install the
software.
ReWritable
RecordableRecordableRecordableReWritable
PHONES
VOLUME
OPEN/CLOSE
WRITINGDISC IN
ACTIVE
PHONES
VOLUME
OPEN/CLOSE
WRITINGDISC IN
ACTIVE
01_LAYOUT_GB 22-11-2000 09:21 Pagina 8

ENGLISH
CDRW CONTROLSCONTROLS
9
SUMMARY OF CONTROLS AND CONNECTIONS
Front view (See Cover Flap Fig.1)
1. HEADPHONE PLUGConnect your headphone to listen to audio or music discs (ortracks).
2. HEADPHONE VOLUME CONTROLTurn the wheel to the right to increase the audio volume ofyour headphone.
3. WRITE INDICATORLights “orange” when writing of a disc occurs.Flashes “orange” during write emulation.
4. DISC TRAY
5. DISC IN/ACTIVE/ERROR indicator (dual color LED)Lights “green” when a disc is present. Flashes “green”asymmetrically when data is being read from disc or written tothe disc. Flashes “green” symmetrically when starting up a disc.Lights “red” upon error (e.g. after failed selftest).
6. OPEN/CLOSE BUTTONPress the OPEN/CLOSE button to open the disc loading tray.To close the disc loading tray, gently push the front of thetray or press the Open/Close button.Using the open/closebutton to close the tray will calibrate the movement of thetray in case this devitates from the original setting due to forinstance eaging
7. EMERGENCY EJECTIn case you are not able to power up your PC, and want to takethe disc out of the drive, push with a rod (paperclip) of about5 cm through the hole in the front to disengage the gearsinside. Then pull the tray out. After taking the disc, gently pushit back to its original positionThis is only in case of emergency, not meant for normaloperations.
01_LAYOUT_GB 22-11-2000 09:21 Pagina 9
ENGLISH
CDRW(CONT.)
CONTROLSCONTROLS
10
Rear view (See Cover Flap Fig.1)
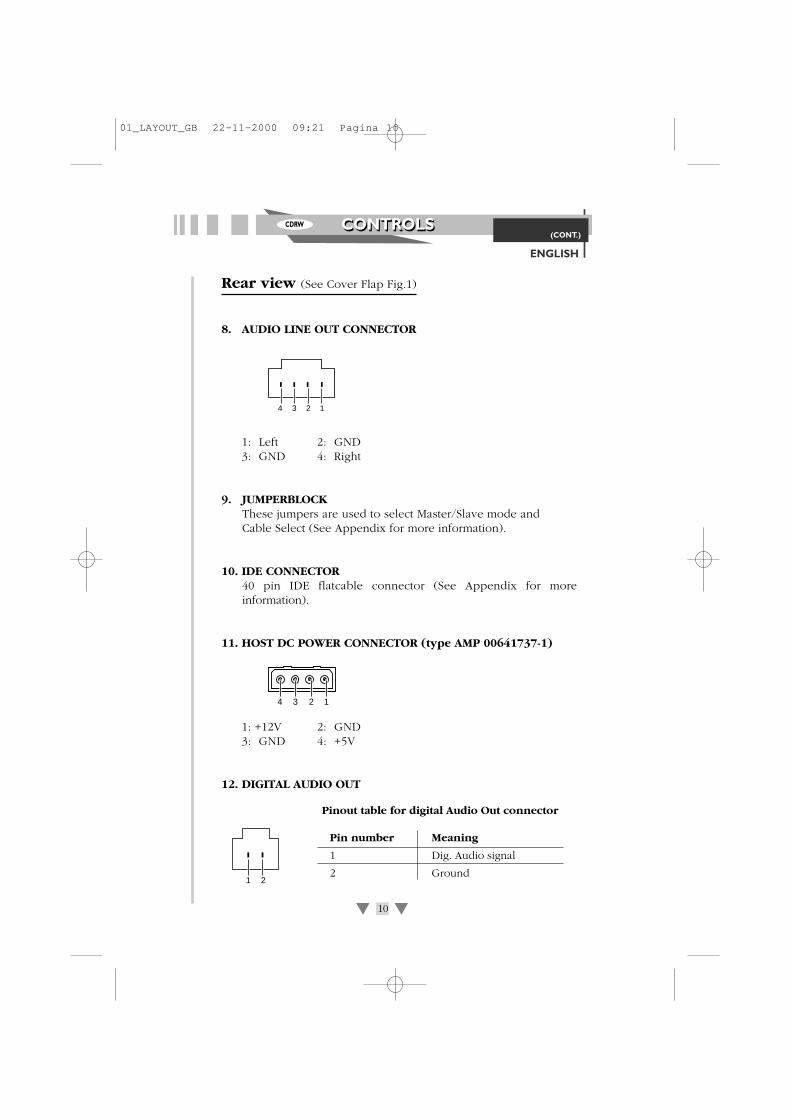
8. AUDIO LINE OUT CONNECTOR
1: Left 2: GND3: GND 4: Right
9. JUMPERBLOCKThese jumpers are used to select Master/Slave mode and Cable Select (See Appendix for more information).
10. IDE CONNECTOR40 pin IDE flatcable connector (See Appendix for moreinformation).
11. HOST DC POWER CONNECTOR (type AMP 00641737-1)
1: +12V 2: GND3: GND 4: +5V
12. DIGITAL AUDIO OUT
1 2
Pin number Meaning
1 Dig. Audio signal
2 Ground
Pinout table for digital Audio Out connector
4 3 2 1
4 3 2 1
01_LAYOUT_GB 22-11-2000 09:21 Pagina 10
ENGLISH
CDRW OPERATING/TESTINGOPERATING/TESTING
11
OPERATING/TESTING YOUR CD-RECORDABLE/REWRITABLE
SYSTEM
Loading and unloading a disc
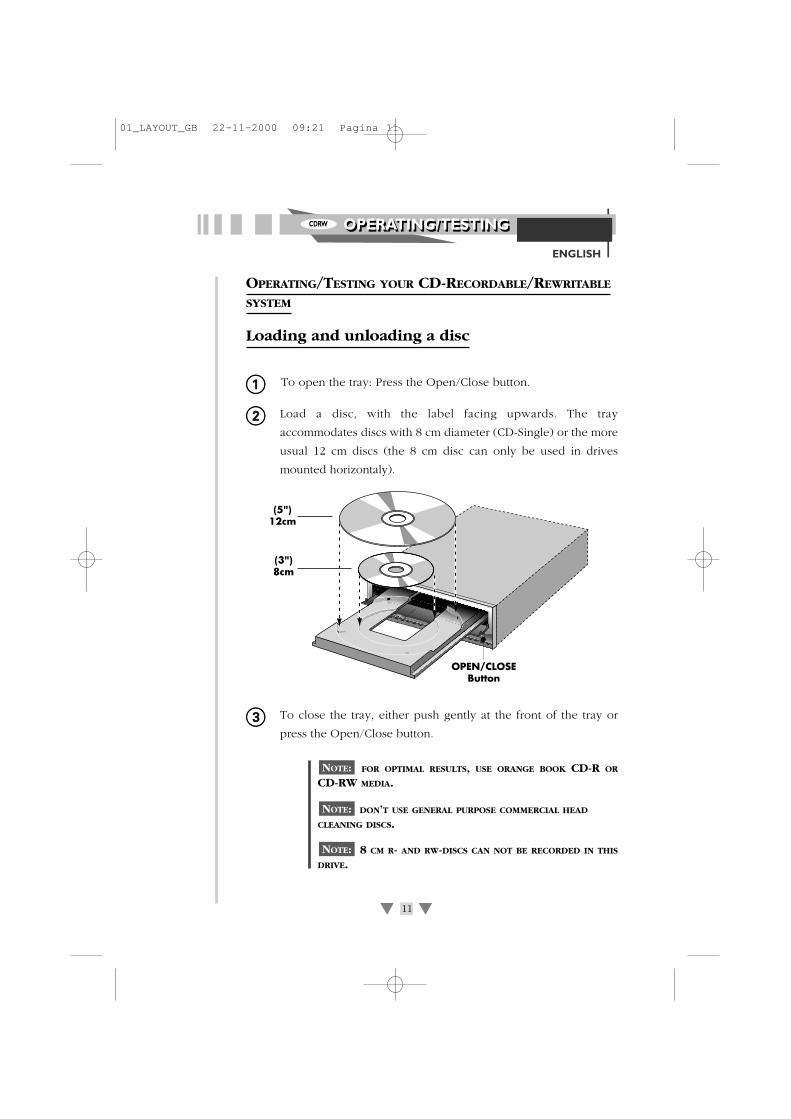
11 To open the tray: Press the Open/Close button.
22 Load a disc, with the label facing upwards. The tray
accommodates discs with 8 cm diameter (CD-Single) or the more
usual 12 cm discs (the 8 cm disc can only be used in drives
mounted horizontaly).
33 To close the tray, either push gently at the front of the tray or
press the Open/Close button.
FOR OPTIMAL RESULTS, USE ORANGE BOOK CD-R OR
CD-RW MEDIA.
DON’T USE GENERAL PURPOSE COMMERCIAL HEAD
CLEANING DISCS.
8 CM R- AND RW-DISCS CAN NOT BE RECORDED IN THIS
DRIVE.NOTE:
NOTE:
NOTE:
PHONES
VOLUME
OPEN/CLOSE
WRITINGDISC IN
ACTIVE
PHONES
VOLUME
OPEN/CLOSE
WRITINGDISC IN
ACTIVE
(5")12cm
(3")8cm(3")8cm
OPEN/CLOSE Button
01_LAYOUT_GB 22-11-2000 09:21 Pagina 11
ENGLISH
CDRW(CONT.)
OPERATING/TESTINGOPERATING/TESTING
12
DO NOT SWITCH OFF THE COMPUTER AND/OR THE DRIVE
DURING THE RECORDING PROCESS, SINCE THIS MIGHT RESULT IN
AN UNREADABLE DISC. PLEASE MAKE SURE THAT THE COMPUTER
HAS FINISHED IT’S RECORDING PROCESS AND THAT THE WRITE
INDICATOR ON THE FRONT OF THE DRIVE IS OFF.
Operating the CD-Recordable/Rewritable on thecomputer
Specific Application Software running on the computer platform inuse, designed to work with the CDRW 8x4x32, must be used in order to be able to operate the CDRW 8x4x32 correctly.
Software installation
The installation and operation of the necessary software is dependentof the computer configuration in which the CDRW 8x4x32 is to beused, e.g. PC’s, Windows 95/98/2000, Windows NT, UNIX or otherOperating Systems. Contact your supplier for the full list of supported host configurations and available software packages.
All trademarks acknowledged.
Command description
This drive supports commands based on the industry standard MMC(MultiMedia Command set). An extensive description of the totalcommand set is available on request.
NOTE:
01_LAYOUT_GB 22-11-2000 09:21 Pagina 12

ENGLISH
CDRW ADDITIONAL INFOADDITIONAL INFO
13
ADDITIONAL INFORMATION
Care of discs
• When loading a disc, allow time for the door to open and thengently insert the disc.
• Handle discs only by the outer and inner edges.
•Never write with a ballpoint on thesurface of the disc.
•Do not store a disc in places with hightemperature and humidity. Do not placethe disc under direct sunlight.
• Store discs in their cases to prevent dust contamination,scratches, bending and other damages.
• When a disc becomes dirty, clean it with a cleaning cloth. Wipethe disc from the centre out. Do not use solvents such asbenzine, thinner, commercially available cleaners, or anti-staticfluids. Using fluids of these types may damage the disc.
• Empty discs are separately available through your dealer.
• To get an optimal temperature controle, you should close your PCafter installing the drive in this way the central fan will help coolingyour drive and keep performance according specification.
• Unloading a disc after recording might take some time, becausethe drive has to update the TOC before the disc can be ejected.
01_LAYOUT_GB 22-11-2000 09:21 Pagina 13
ENGLISH
CDRW(CONT.)
ADDITIONAL INFOADDITIONAL INFO
14
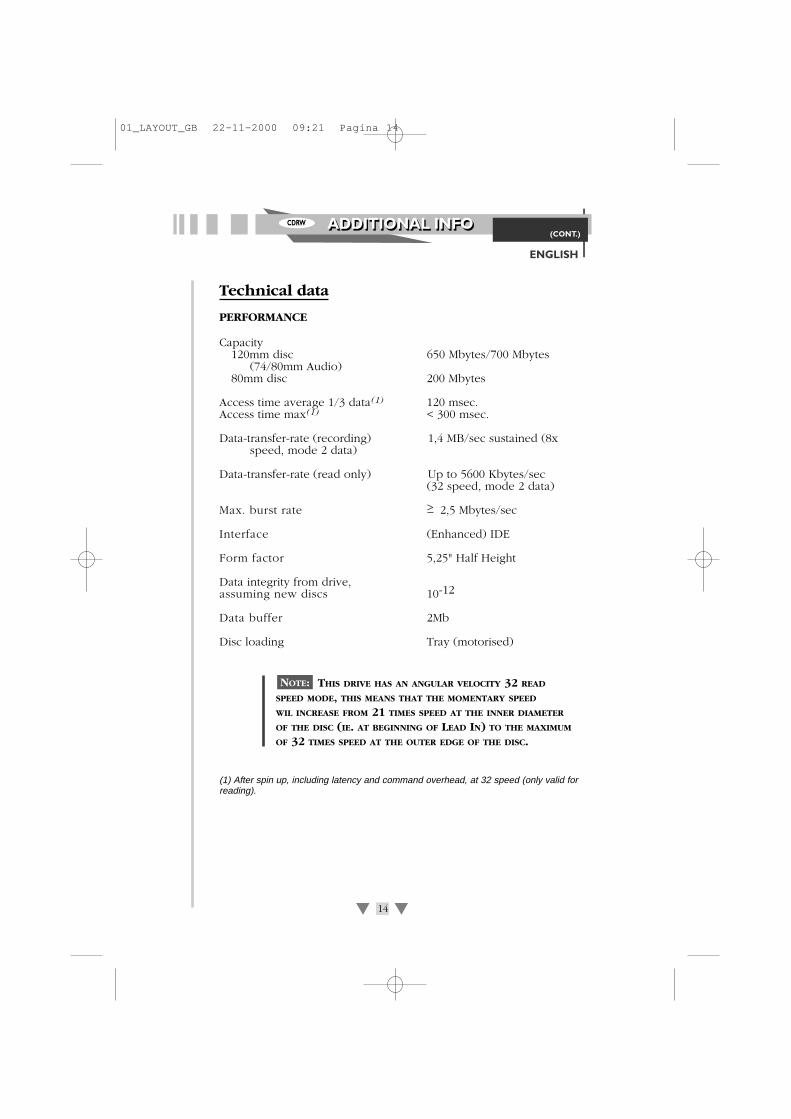
Technical data
PERFORMANCE
Capacity120mm disc 650 Mbytes/700 Mbytes
(74/80mm Audio)80mm disc 200 Mbytes
Access time average 1/3 data(1) 120 msec.Access time max(1) < 300 msec.
Data-transfer-rate (recording) 1,4 MB/sec sustained (8x speed, mode 2 data)
Data-transfer-rate (read only) Up to 5600 Kbytes/sec (32 speed, mode 2 data)
Max. burst rate >_ 2,5 Mbytes/sec
Interface (Enhanced) IDE
Form factor 5,25" Half Height
Data integrity from drive, assuming new discs 10-12
Data buffer 2Mb
Disc loading Tray (motorised)
THIS DRIVE HAS AN ANGULAR VELOCITY 32 READ
SPEED MODE, THIS MEANS THAT THE MOMENTARY SPEED
WIL INCREASE FROM 21 TIMES SPEED AT THE INNER DIAMETER
OF THE DISC (IE. AT BEGINNING OF LEAD IN) TO THE MAXIMUM
OF 32 TIMES SPEED AT THE OUTER EDGE OF THE DISC.
(1) After spin up, including latency and command overhead, at 32 speed (only valid forreading).
NOTE:
01_LAYOUT_GB 22-11-2000 09:21 Pagina 14
ENGLISH
CDRW(CONT.)
ADDITIONAL INFOADDITIONAL INFO
15
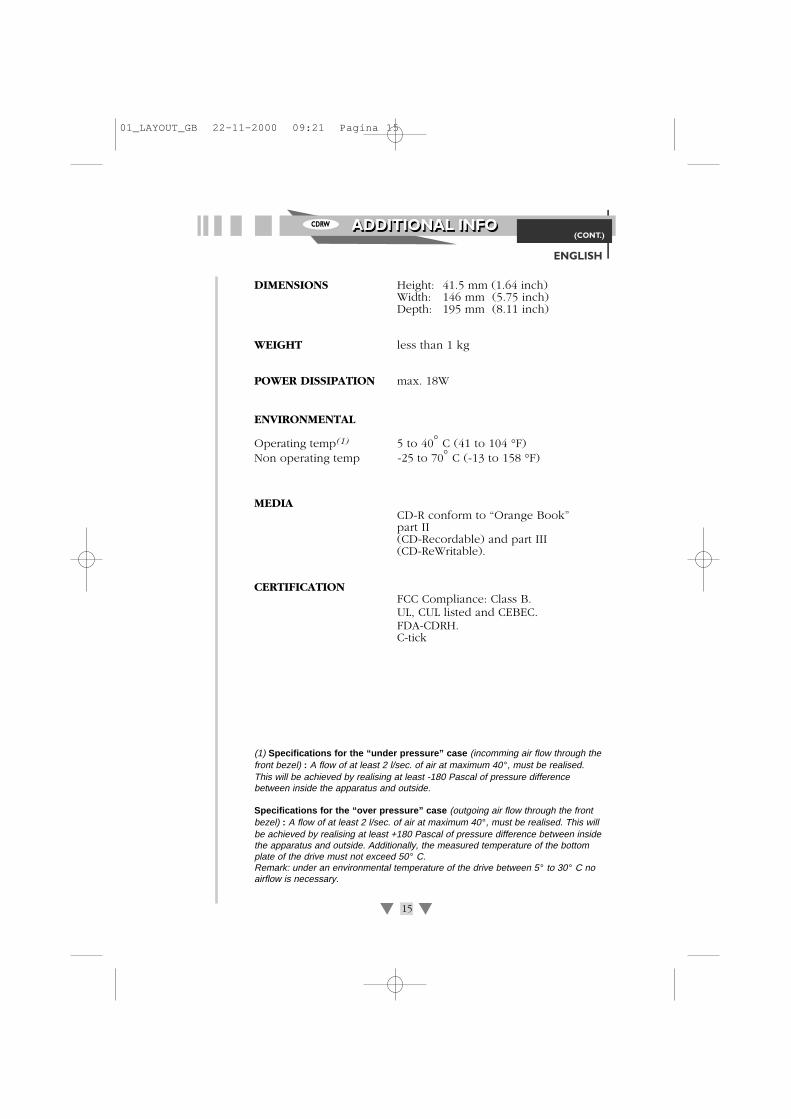
DIMENSIONS Height: 41.5 mm (1.64 inch)Width: 146 mm (5.75 inch)Depth: 195 mm (8.11 inch)
WEIGHT less than 1 kg
POWER DISSIPATION max. 18W
ENVIRONMENTAL
Operating temp(1) 5 to 40° C (41 to 104 °F)Non operating temp -25 to 70° C (-13 to 158 °F)
MEDIACD-R conform to “Orange Book” part II (CD-Recordable) and part III (CD-ReWritable).
CERTIFICATIONFCC Compliance: Class B.UL, CUL listed and CEBEC.FDA-CDRH.C-tick
(1) Specifications for the “under pressure” case (incomming air flow through thefront bezel) : A flow of at least 2 l/sec. of air at maximum 40°, must be realised.This will be achieved by realising at least -180 Pascal of pressure differencebetween inside the apparatus and outside.
Specifications for the “over pressure” case (outgoing air flow through the frontbezel) : A flow of at least 2 l/sec. of air at maximum 40°, must be realised. This willbe achieved by realising at least +180 Pascal of pressure difference between insidethe apparatus and outside. Additionally, the measured temperature of the bottomplate of the drive must not exceed 50° C.Remark: under an environmental temperature of the drive between 5° to 30° C noairflow is necessary.
01_LAYOUT_GB 22-11-2000 09:21 Pagina 15

ENGLISH
CDRW(CONT.)
ADDITIONAL INFOADDITIONAL INFO
16
Audio performance
• Audio specification for line out:
On pressed CD On recordable CD
Output Voltage 1 V rms 1 V rms
Unbalance max 0.25 dB max 0.25 dB
Output Impedance 470 Ohm 470 Ohm
Amplitude Linearity 1.5 dB (20 Hz - 20 kHz) 2.5 dB (20 Hz - 16 kHz)
S/N-ratio 81 dB (84 dB A-wtg) 80 dB (82 dB A-wtg)
Total Harmonic 65 dB 55 dB
Distortion + Noise (1kHz) (1kHz)
Outband attenuation min. 50 dB above 25 kHz min. 50 dB above 25 kHz
Channel separation min. 70 dB (20 kHz) min. 65 dB (16 kHz)
Muting level during min. 70 dB (BW = 20 kHz) min. 70 dB (BW = 20 kHz)
random access
• Audio specification for headphone:
On pressed CD On recordable CD
Output Voltage 3.1 V rms 3.1 V rms
(max volume)
Unbalance max 0.25 dB max 0.25 dB
Output Impedance 120 Ohm 120 Ohm
Amplitude Linearity 1.5 dB (20 Hz - 20 kHz) 2.5 dB (20 Hz - 16 kHz)
S/N-ratio 81 dB (84 dB A-wtg) 80 dB (82 dB A-wtg)
Total Harmonic 60 dB 45 dB
Distortion + Noise
Outband attenuation min. 50 dB above 25 kHz min. 50 dB above 25 kHz
Channel separation min. 67 dB (20 kHz) min. 65 dB (16 kHz)
Muting level during min. 60 dB (BW = 20 kHz) min. 60 dB (BW = 20 kHz)random access
THE SOMEWHAT REDUCED AUDIO QUALITY WHEN
PLAYING BACK AUDIO TRACKS ON CD-R DISCS HAS NO RELATION TO THE DIGITAL QUALITY OF THE AUDIO
TRACKS AS THEY HAVE BEEN RECORDED ONTO THE CD-R DISC.
NOTE:
01_LAYOUT_GB 22-11-2000 09:21 Pagina 16
ENGLISH
CDRW(CONT.)
ADDITIONAL INFOADDITIONAL INFO
17
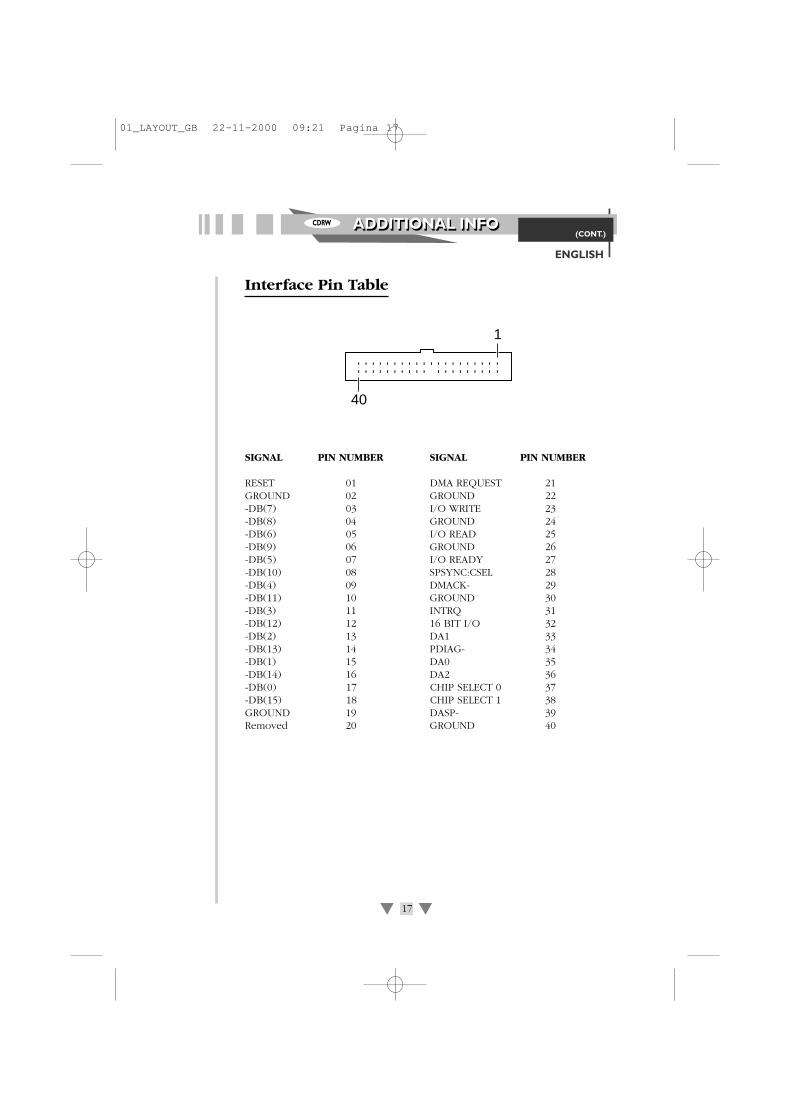
Interface Pin Table
SIGNAL PIN NUMBER SIGNAL PIN NUMBER
RESET 01 DMA REQUEST 21GROUND 02 GROUND 22-DB(7) 03 I/O WRITE 23-DB(8) 04 GROUND 24-DB(6) 05 I/O READ 25-DB(9) 06 GROUND 26-DB(5) 07 I/O READY 27-DB(10) 08 SPSYNC:CSEL 28-DB(4) 09 DMACK- 29-DB(11) 10 GROUND 30-DB(3) 11 INTRQ 31-DB(12) 12 16 BIT I/O 32-DB(2) 13 DA1 33-DB(13) 14 PDIAG- 34-DB(1) 15 DA0 35-DB(14) 16 DA2 36-DB(0) 17 CHIP SELECT 0 37-DB(15) 18 CHIP SELECT 1 38GROUND 19 DASP- 39Removed 20 GROUND 40
40
1
01_LAYOUT_GB 22-11-2000 09:21 Pagina 17

ENGLISH
CDRW APPENDIXAPPENDIX
18
APPENDIX
Jumper Block
• When a shorting jumper is in the "CS" (CSEL) position, the device will use the host interface signal CSEL to configure the device.
• When the shorting jumper is placed in the "M" (MASTER) or "S" (SLAVE), the drive will be configured accordingly.
JumperBlock
CS
S M
JumperBlock
CS
S M
JumperBlock
CS
S M
CS
S M
JumperBlock
MASTERSLAVE
CABLE SELECTAUDIO OUT
R GND LCS
SL
MA
MASTERSLAVE
CABLE SELECTAUDIO OUT
R GND LCS
SL
MA
MASTERSLAVE
CABLE SELECTAUDIO OUT
R GND LCS
SL
MA
IDE PIN 1
DC INPUT+5 GND +12
IDE PIN 1
DC INPUT+5 GND +12
IDE PIN 1
DC INPUT+5 GND +12
OR
01_LAYOUT_GB 22-11-2000 09:21 Pagina 18
ENGLISH
CDRW(CONT.)
APPENDIXAPPENDIX
19
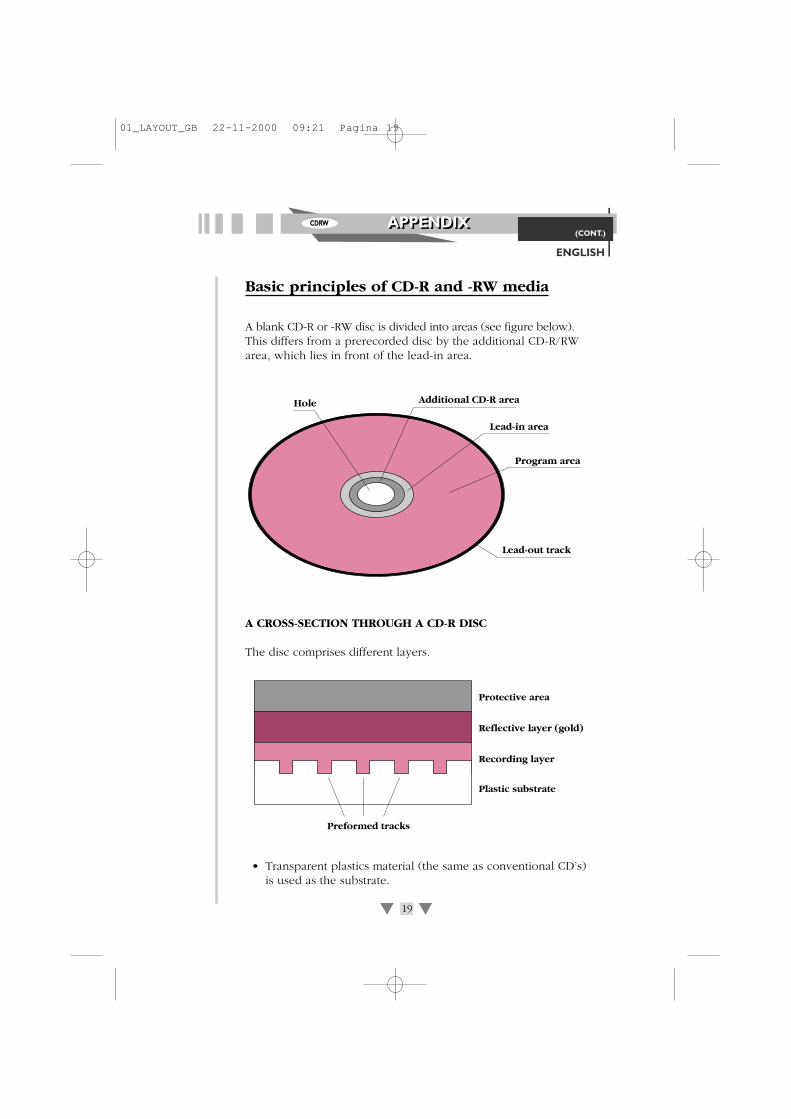
Basic principles of CD-R and -RW media
A blank CD-R or -RW disc is divided into areas (see figure below).This differs from a prerecorded disc by the additional CD-R/RWarea, which lies in front of the lead-in area.
A CROSS-SECTION THROUGH A CD-R DISC
The disc comprises different layers.
• Transparent plastics material (the same as conventional CD’s) is used as the substrate.
Preformed tracks
Protective area
Reflective layer (gold)
Recording layer
Plastic substrate
Hole Additional CD-R area
Lead-in area
Program area
Lead-out track
01_LAYOUT_GB 22-11-2000 09:21 Pagina 19
ENGLISH
CDRW(CONT.)
APPENDIXAPPENDIX
20
• Onto this a special greenish tinged translucent layer is applied. The substrate has already been provided with a preformed track spiral into which the data will be written during recording.
• On top of the green recording layer is a reflective gold layer and a protective layer of plastic material.
The additional CD-R/RW area of a CD-R and -RW disc
The additional CD-R/RW area is divided into two areas:
• The Program Memory Area (PMA) which mainly contains the track numbers of the tracks recorded with respective start andstop points.
• The Program Calibration Area (PCA). Disc space for the CD writer to calibrate the laser energy needed for recording on the disc via a trial recording.
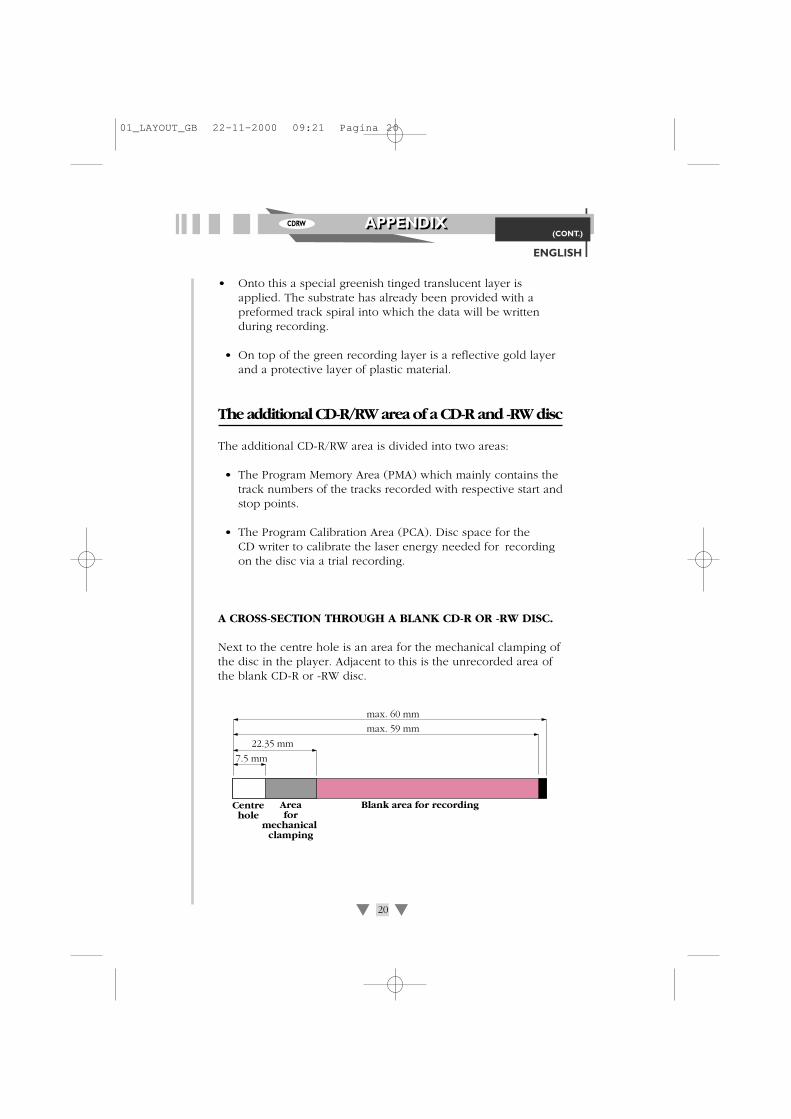
A CROSS-SECTION THROUGH A BLANK CD-R OR -RW DISC.
Next to the centre hole is an area for the mechanical clamping ofthe disc in the player. Adjacent to this is the unrecorded area ofthe blank CD-R or -RW disc.
7.5 mm
22.35 mm
max. 59 mm
max. 60 mm
Centrehole
Areafor
mechanical clamping
Blank area for recording
01_LAYOUT_GB 22-11-2000 09:21 Pagina 20
ENGLISH
CDRW(CONT.)
APPENDIXAPPENDIX
21
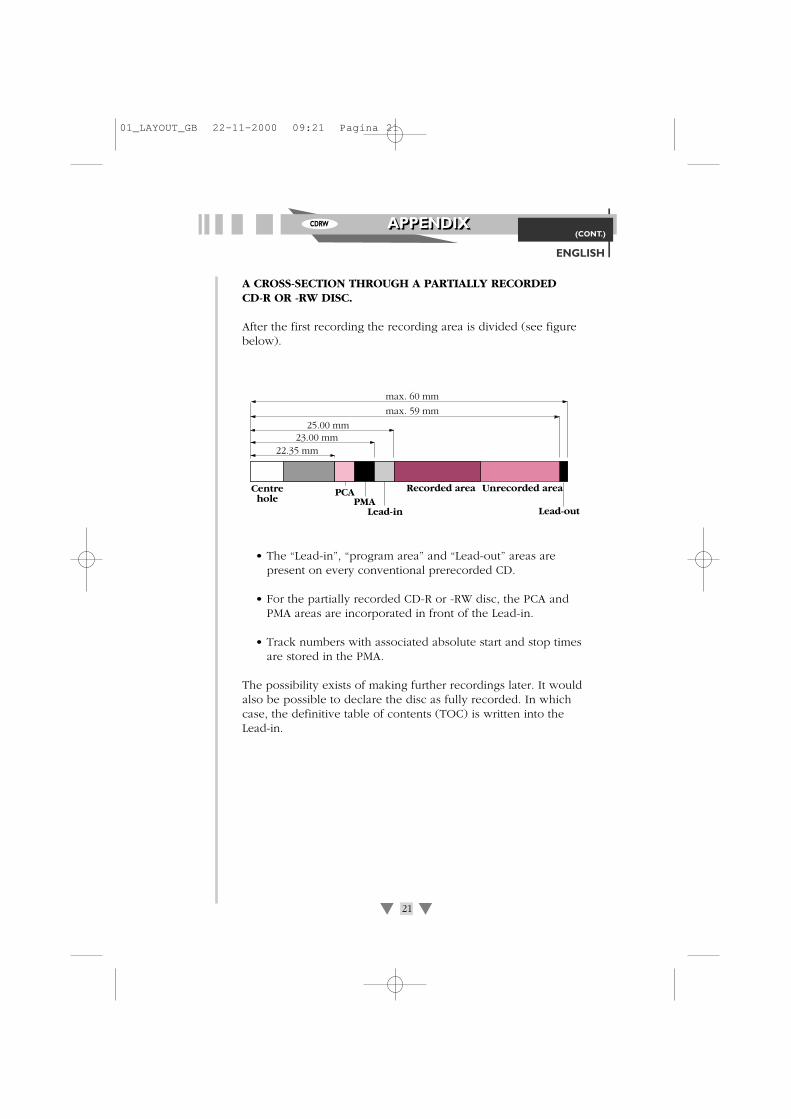
A CROSS-SECTION THROUGH A PARTIALLY RECORDED CD-R OR -RW DISC.
After the first recording the recording area is divided (see figurebelow).
• The “Lead-in”, “program area” and “Lead-out” areas arepresent on every conventional prerecorded CD.
• For the partially recorded CD-R or -RW disc, the PCA andPMA areas are incorporated in front of the Lead-in.
• Track numbers with associated absolute start and stop timesare stored in the PMA.
The possibility exists of making further recordings later. It would also be possible to declare the disc as fully recorded. In which case, the definitive table of contents (TOC) is written into the Lead-in.
22.35 mm
max. 59 mm
max. 60 mm
Centrehole
PCA Recorded area
23.00 mm25.00 mm
PMALead-in
Unrecorded area
Lead-out
01_LAYOUT_GB 22-11-2000 09:21 Pagina 21
ENGLISH
CDRW(CONT.)
APPENDIXAPPENDIX
22
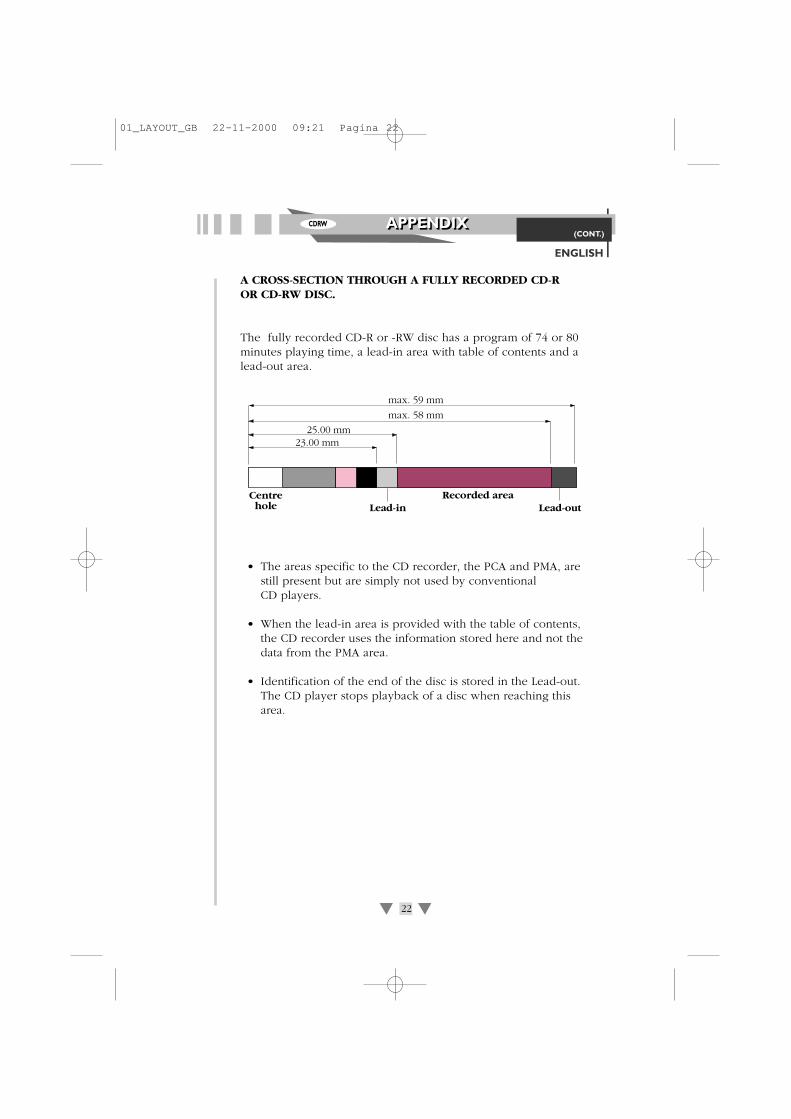
A CROSS-SECTION THROUGH A FULLY RECORDED CD-R OR CD-RW DISC.
The fully recorded CD-R or -RW disc has a program of 74 or 80minutes playing time, a lead-in area with table of contents and alead-out area.
• The areas specific to the CD recorder, the PCA and PMA, are still present but are simply not used by conventional CD players.
• When the lead-in area is provided with the table of contents, the CD recorder uses the information stored here and not the data from the PMA area.
• Identification of the end of the disc is stored in the Lead-out. The CD player stops playback of a disc when reaching this area.
max. 58 mm
max. 59 mm
Centrehole
Recorded area
23.00 mm25.00 mm
Lead-in Lead-out
01_LAYOUT_GB 22-11-2000 09:21 Pagina 22

ENGLISH
CDRW(CONT.)
APPENDIXAPPENDIX
23
Glossary of terms CD-RW
THE BEST WAY TO CREATE YOUR OWN CDs - WITH RE-USABLE CD-RW.
• CD-ReWritable (CD-RW) gives you the opportunity to create your own CDs, in the best and most cost-effective way. CD-RW is, in fact, the logical extension of CD-Recordable (CD-R). Together, they give you the opportunity to run the media that best suits the job in hand.
• CD-RW supports the recording of small packages of data, using incremental packet writing in the universal (UDF) file format. As with floppy discs, you have the option of writing a disc all at once, or building it up bit by bit - and re-using the disc later for other data.
• CD-RW media can be rewritten hundreds, or even thousands of times. This means that the overall running costs, for hardware and software together, can be very economical indeed.
• CD-RW will greatly extend your personal short-term storage capacity, providing space for large-volume files like Internet downloads, backups, and hard disc dumps. It is also excellent for low-quantity multimedia applications, from one-off disc testing to small-scale distribution
MULTIREAD: MAKING CD-RW MEDIA COMPATIBLE WITH CD-ROM AND DVD-ROM.
• CD-RW media reflects less laser light than the other CD media. To play all CD media, drives must be able to adapt to these different reflectivities.
• For compatibility, drives need to do this in a standard way. They also need to interface and interact with their host computer systems in a standard way.
01_LAYOUT_GB 22-11-2000 09:21 Pagina 23
ENGLISH
CDRW(CONT.)
APPENDIXAPPENDIX
24
• That standard way is MultiRead. And any CD drive can play all CD media - CD-Digital Audio, CD-ROM, CD-R, and CD-RW - provided that it supports MultiRead.
• What is more, MultiRead extends the same compatibility to DVD. All DVD equipment that supports MultiRead will also be able to retrieve CD-RW data. This means that you can go ahead now with storing valuable data on CD-RW media, safe in the knowledge that it will be future-proof.
Glossary of terms CD-R
Copyright acknowledgment: This part contain material from “OSTA - Optical StorageTechnology Association”. Published with permission.
“Optical Storage Technology Association”311 East Carrillo Street
Santa Barbara, CA 93101 - USA Tel.: (805) 963 3853Fax.: (805) 962 1541
World Wide Web homepage: http://www.osta.org
WHAT IS CD-RECORDABLE?
• CD-Recordable is compact disc technology that allows theuser to create their own CD’s. This is done by means of arecording system that uses “Write once” type optical discs and documented in the “Orange Book, Part II” and a CD recording device that is connected to a host system.Typically, the host system is a personal computer which also contains recording software.
01_LAYOUT_GB 22-11-2000 09:21 Pagina 24
ENGLISH
CDRW(CONT.)
APPENDIXAPPENDIX
25
WHAT IS THE ORANGE BOOK?
• The Orange Book is a document that describes the specification for CD-Write Once (CD-Recordable) technology.
• It defines both the physical structure and dimensions of a CD-R disc as well as the use of certain portions of the recording surface:
• to record information (the Program area), • to calibrate the recorder laser power
(Power Calibration area or PCA), • to record track information for all sessions
(the Program Memory area or PMA), • to record the Lead-in Lead-out areas that
preceed and follow, respectively, the Program area.
• There are several “parts” to the Orange Book. Part II refers to CD-Recordable.
WHAT DOES ORANGE BOOK CERTIFIED MEDIA MEAN ANDWHY?
• The Orange Book, Part II is the primary specification for CD-R media. Accordingly, all CD-R media should meet theOrange Book criteria for recordability and playback.
• Philips and Sony, the orginators of the Orange Book, provide Orange Book certification of CD-R media.
WHAT IS MULTISESSION CD?
The principal purpose of multiple sessions is to allow additionaldata to be appended to a previously recorded disc.
SOME OLDER CD READERS CAN READ ONLY THE
FIRST SESSION OF A MULTISESSION DISC. NOTE:
01_LAYOUT_GB 22-11-2000 09:21 Pagina 25
ENGLISH
CDRW(CONT.)
APPENDIXAPPENDIX
26
A session is defined as an area including lead-in, program dataand lead-out.
• A CD-R recorder that supports multisession recording can write a disc that will have multiple sessions linked together, each containing their own lead-in, program and lead out.
• Any multisession-supported CD reader can access the data, whether it was written in the first session or a subsequent session.
Contrast this to the recording structure of a pressed CD-ROM or aCD-R written in “Disc at Once” mode that contains just one lead-in area and one lead-out area.
WHAT IS THE RECORDING SPEED OF CD-R?
The “speed” rating of a CD-Recordable/Rewritable determineshow fast it can record data to blank CD-R media.
Speed designators, such as “1X”, “2X”, “4X” and “6X” define multiples of the original playback speed of first generation CD-ROM players:
• For a CD-ROM player or CD-Recordable/Rewritable, a 1X speed translates to 153,600 Bytes per second. This is usually rounded down to 150 Kb per second. Therefore, a“1X” recorder writes 150 Kb per second to the CD-R media.
• Likewise, a “4X” recorder records at 600 Kb per second.
THERE ARE SOME VARIATIONS IN MEASURING
SPEED, BECAUSE THERE ARE RECORDING MODES THAT
PROVIDE MORE THAN 2,048 DATA BYTES PER BLOCK
(AUDIO IS RECORDED AT 2,352 BYTES PER BLOCK).
SOME CD-RECORDABLE/REWRITABLES HAVE A
DIFFERENT READING SPEED THAN THEIR RATED RECORDING
SPEED. FOR INSTANCE, THIS “8X4X32” CD-RECORDABLE /REWRITABLE CAN WRITE AT 8X SPEED ON CD-R, 4X SPEED
ON CD-RW AND READ BACK AT 32X SPEED.
NOTE:
NOTE:
01_LAYOUT_GB 22-11-2000 09:21 Pagina 26

ENGLISH
CDRW(CONT.)
APPENDIXAPPENDIX
27
COMPACT DISC AVERAGE TRANSFER RATES
Note 1: The normal CD (at n=1) transfer rate from the disc is 75 blocks per second.Note 2: The average transfer rates shown are in BYTES PER SECOND.
WHAT IS THE DIFFERENCE BETWEEN CD-R “FIXATION” AND“FINALIZATION”?
• Fixation is the process of writing the lead-in and lead-outinformation to the disc. This process finishes a writing session and creates a table of contents.
• Fixation is required for a CD-ROM or CD-Audio player to play the disc. Discs which are “fixated for append” can have additional sessions recorded, with their own session lead-in and lead-out, creating a multisession disc.
• When a disc is “finalized” the absolute lead-in and lead-out for the entire disc is written, along with information which tells the reader not to look for subsequent sessions.
This final table of contents (TOC) conforms to the ISO 9660 filestandard.
Read/Write Audio CD-ROM Mode 1 CD-ROM Mode 2 Speed (2,352 Bytes/Block) (2,048 Bytes/Block) (2,336 Bytes/Block)
1X 176,000 153,600 175,2002X 352,800 307,200 350,4004X 705,800 614,400 700,8008X 1,411,200 1,228,800 1,401,60024X 4,233,600 3,686,400 4,204,80032X 5,644,800 4,915,200 5,606,400
01_LAYOUT_GB 22-11-2000 09:21 Pagina 27
ENGLISH
CDRW(CONT.)
APPENDIXAPPENDIX
28
WHAT IS “DISC AT ONCE”?
• Disc at Once is a writing mode that requires data to be written continuously, without any interruptions, until the entire data set is transferred to the CD-R.
• The lead-in, program and lead-out are written in a single event. All of the information to be recorded needs to be staged on the computer’s hard disc prior to recording in the Disc at Once mode.
• This mode is usually preferred for discs that are sent to a CD-ROM replication facility when CD-R is the source media.
• Recording in the Disc at Once mode eliminates the linking and run-in and run-out blocks associated with multisession and packet recording modes, which often areinterpreted as uncorrectable errors during the glass mastering process.
WHAT IS “TRACK AT ONCE”?
• Track at Once is a writing mode that allows a session to be written in a number of discrete write events, called tracks.
• The disc may be removed from the writer and read in another writer (given proper software) before the session is fixated.
The written sessions contain complete “tracks” of information.
WHAT IS “INCREMENTAL” OR “PACKET” WRITING?
• Track at Once writing is a form of incremental write which mandates a minimum track length of 300 blocks and a maximum of 99 tracks per disc.
01_LAYOUT_GB 22-11-2000 09:21 Pagina 28
ENGLISH
CDRW(CONT.)
APPENDIXAPPENDIX
29
• A track written “at once” has 150 blocks of overhead for run-in, run-out, pre-gap and linking. Packet write, on the other hand, is a method whereby several write events are allowed within a track, thus reducing the overhead.
These “packets” are bounded by 7 blocks for run-in (4), run-out(2) and link (1).
WHAT’S THE DIFFERENCE BETWEEN A “MULTISESSION”DISC AND A “MULTITRACK” DISC?
• A “session” is a unity on a CD which is bounded by lead-in and lead-out. A session contains one or several (up to 99 per disc) tracks.
• There are two types of tracks. A Red Book audio track is usually written in disc at once mode along with several other tracks in one session. These tracks have index numbers in the subchannel which differentiate one from the other and which allow selective playback.
• The other type of track is the incrementally written type described above.
01_LAYOUT_GB 22-11-2000 09:21 Pagina 29

ENGLISH
NOTESNOTESCDRW
30
01_LAYOUT_GB 22-11-2000 09:21 Pagina 30
© 2000All trademarks acknowledged.
The
pro
duct
s an
d se
rvic
es d
escr
ibed
her
ein
are
not n
eces
saril
y av
aila
ble
in a
ll co
ntrie
s. D
ue to
con
tinuo
us p
rodu
ct im
prov
emen
ts th
is d
ocum
ent i
s su
bjec
t to
chan
ge w
ithou
t not
ice.
Prin
ted
in B
elgi
um.
3104 125 2363.2
01_LAYOUT_GB 22-11-2000 09:21 Pagina 31