000.100.531 - asyril smartsight programming guide en · smartsight programming guide general...
TRANSCRIPT
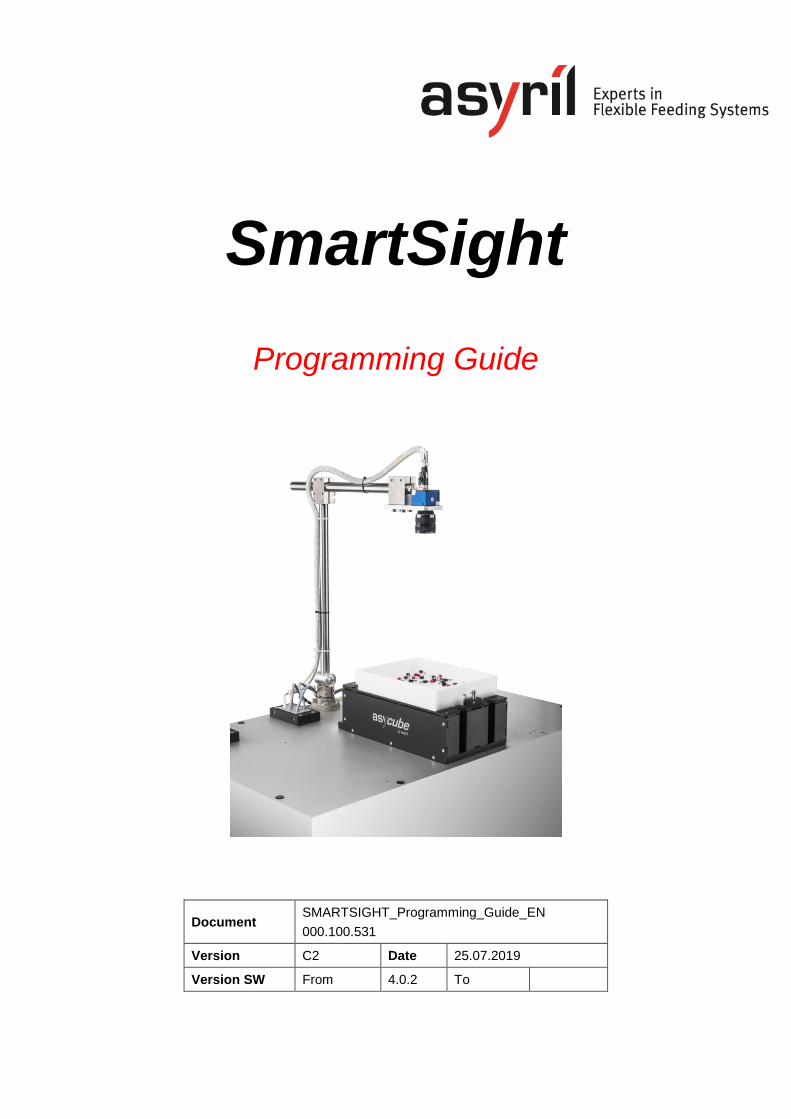
SmartSight
Programming Guide
Document SMARTSIGHT_Programming_Guide_EN
000.100.531
Version C2 Date 25.07.2019
Version SW From 4.0.2 To
SmartSight
Programming Guide
Table of Contents Version: C2
000.100.531 2/64
Table of Contents
TABLE OF CONTENTS ................................................................................................................................ 2
1. INTRODUCTION .................................................................................................................................... 4
1.1. GENERAL INFORMATION .......................................................................................................................... 4
2. GENERAL INTRODUCTION ................................................................................................................ 5
3. CONTROL UNIT .................................................................................................................................... 7
3.1. OPERATING SYSTEM ............................................................................................................................... 7
3.1.1. Locking the C partition ................................................................................................................. 8
3.1.2. Unlocking the C partition ............................................................................................................. 8
3.2. ASYRIL LICENCE ...................................................................................................................................... 8
3.2.1. General Information ..................................................................................................................... 8
3.2.2. Control of the number of cameras ............................................................................................. 8
3.2.3. Updating the licence ..................................................................................................................... 9
3.3. STARTING THE ASYVIEW ....................................................................................................................... 10
3.3.1. General Information ................................................................................................................... 10
3.3.2. Checking C partition lock status ................................................................................................ 11
3.3.3. Checking Asyril licence .............................................................................................................. 12
3.3.4. Checking Cognex licence .......................................................................................................... 13
3.4. ASYRIL DATA BACKUP FROM D PARTITION ............................................................................................ 14
4. ASYVIEW INTERFACE ....................................................................................................................... 15
4.1. USER ACCESS LEVEL ............................................................................................................................ 17
4.2. ARCHITECTURE ..................................................................................................................................... 17
4.3. LOGS (COM LOGGER AND LOGFILE) ................................................................................................... 17
4.4. TESTCLIENT .......................................................................................................................................... 19
4.5. SIMULATOR ........................................................................................................................................... 20
5. ASYVIEW COMMUNICATION PROTOCOL ..................................................................................... 21
5.1. TCP/IP PARAMETERS ........................................................................................................................... 21
5.2. PROTOCOL ............................................................................................................................................ 21
5.2.1. MessageType .............................................................................................................................. 21
5.2.2. Command .................................................................................................................................... 22
5.2.3. Standard Parameters ................................................................................................................. 26
5.2.4. Parameters .................................................................................................................................. 27
5.2.5. Termination .................................................................................................................................. 27
6. ASYVIEW METHODS .......................................................................................................................... 28
SmartSight
Programming Guide
Table of Contents Version: C2
000.100.531 3/64
6.1. MODES .................................................................................................................................................. 28
6.2. WORKING MODE ................................................................................................................................... 28
6.2.1. Active Working Mode ................................................................................................................. 29
6.2.2. Passive Working Mode .............................................................................................................. 34
6.3. RECIPE .................................................................................................................................................. 35
7. ASYVIEW INSTRUCTIONS ................................................................................................................ 36
7.1. TABLE OF INSTRUCTIONS ...................................................................................................................... 37
7.2. RECIPES ................................................................................................................................................ 39
7.3. CALIBRATION ......................................................................................................................................... 43
7.4. PRODUCTION ......................................................................................................................................... 50
7.5. UTILITIES ............................................................................................................................................... 58
8. TECHNICAL SUPPORT ...................................................................................................................... 62
8.1. TO HELP US PROVIDE THE BEST SERVICE … ........................................................................................ 62
8.2. CONTACT ............................................................................................................................................... 62
REVISION TABLE ....................................................................................................................................... 63
SmartSight
Programming Guide
Introduction Version: C2
000.100.531 4/64
1. Introduction
1.1. General information
This document is the property of Asyril SA; it may not be reproduced, modified or
communicated, in whole or in part, without our prior written authorization. Asyril SA reserves
the right to modify any information contained in this document for reasons related to product
improvements without prior notice. Before using the product, please read this entire
document to ensure that the product is used correctly. However, if you encounter difficulties
when using the product, do not hesitate to contact our customer service department.
In this manual, the safety information that must be respected is split into three types:
"Danger", "Important" and "Note". These messages are identified as follows:
DANGER!
Failure to respect this instruction may result in serious physical injury.
DANGER!
This instruction identifies an electrical hazard. Failure to respect this instruction may
result in electrocution or serious physical injury due to an electric shock.
IMPORTANT!
Failure to respect this instruction may result in severe damage to equipment.
NOTE:
The reader's attention is drawn to this point to ensure that the product is used correctly.
However, failure to respect this instruction does not pose a danger.
Reference …
For more information on a specific topic, the reader is invited to refer to another manual or
another page of the current manual.
IMPORTANT!
Asyril cannot be held responsible for damage to property or persons caused by the failure to
respect the instructions contained in the manual for your machine.
NOTE:
All dimensions and values in this manual are expressed in millimetres (mm)
SmartSight
Programming Guide
General introduction Version: C2
000.100.531 5/64
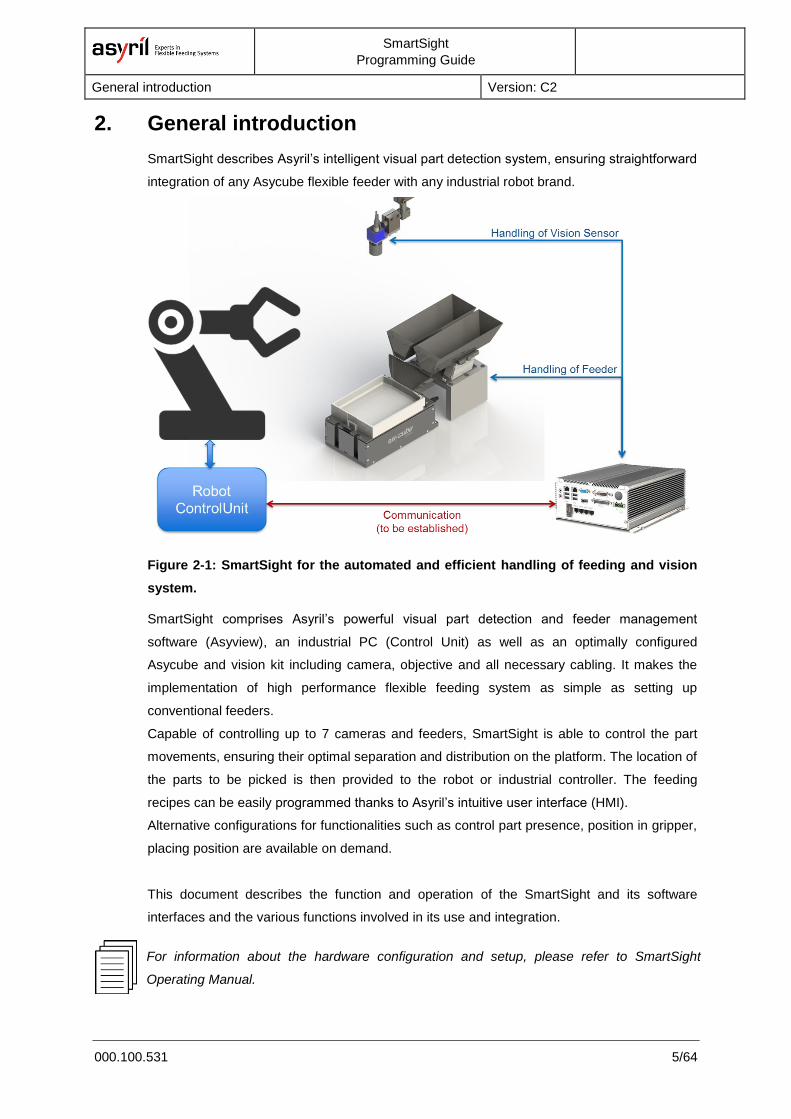
2. General introduction
SmartSight describes Asyril’s intelligent visual part detection system, ensuring straightforward
integration of any Asycube flexible feeder with any industrial robot brand.
Figure 2-1: SmartSight for the automated and efficient handling of feeding and vision
system.
SmartSight comprises Asyril’s powerful visual part detection and feeder management
software (Asyview), an industrial PC (Control Unit) as well as an optimally configured
Asycube and vision kit including camera, objective and all necessary cabling. It makes the
implementation of high performance flexible feeding system as simple as setting up
conventional feeders.
Capable of controlling up to 7 cameras and feeders, SmartSight is able to control the part
movements, ensuring their optimal separation and distribution on the platform. The location of
the parts to be picked is then provided to the robot or industrial controller. The feeding
recipes can be easily programmed thanks to Asyril’s intuitive user interface (HMI).
Alternative configurations for functionalities such as control part presence, position in gripper,
placing position are available on demand.
This document describes the function and operation of the SmartSight and its software
interfaces and the various functions involved in its use and integration.
For information about the hardware configuration and setup, please refer to SmartSight
Operating Manual.

SmartSight
Programming Guide
General introduction Version: C2
000.100.531 6/64
The SmartSight software is called Asyview. It has an interface dedicated to the integrator
tasks as well as some log functionalities available for the end-user. The configuration of any
recipes and calibration tasks is operated through the Asyril HMI. Asyview, Asyview Interface
and HMI are installed on the SmartSight control unit.
Figure 2-2: SmartSight Control Unit
Role More information in:
Asyview core Visual part detection and feeder
management
Ch. 5 Asyview Communication
protocol
Ch. 6 Asyview Methods
Ch. 7 Asyview Instructions
Asyview interface Monitoring and support to the
integration
Ch. 4 Asyview interface
HMI Interface for monitoring, configuring
and teaching new recipes and as
well as defining image configuration
and calibration
See SmartSight User Guide
Control Unit Starting procedure
License information
Backup and protection
Ch. 3 Control Unit
Table 2-1: role of Asyview and interfaces

SmartSight
Programming Guide
Control Unit Version: C2
000.100.531 7/64
3. Control Unit
The control unit is factory configured and ready to use out of the box.
IMPORTANT!
This control unit is configured exclusively for the use of Asyril’s Asyview and HMI software;
NOT anything else. Failure to comply with this directive will void your warranty.
NOTE:
The control unit uses industrial-grade PC that were validated, tested and certified by Asyril as
suitable for the use of our software. As no guaranties can be given as to the suitability of any
other hardware, it is not possible to get the software as a standalone and install them on the
customer’s own system.
3.1. Operating system
The SmartSight control unit runs on Windows 7 Embedded Edition with the Enhanced Write
Filter enabled (EWF).
The idea behind this feature is to create an image of the C partition and lock it. Then, at each
start up, this image is run instead, and every changes made to it will be temporarily written in
system RAM, leaving the original C partition unchanged This implies that any change made
while the filter is enabled will be lost when power is lost (PC restart, power outage…)
The pros are as follows:
- Faster operation (not bottlenecked by the SSD’s read and write speeds).
- Virus protection (since a restart of the PC lets you start from a healthy image), so no
need to use any anti-virus software (usually resource-intensive programs).
The only con is:
- Having to unlock the partition to be able to perform any kind of permanent modification
on it (in the case of the C partition, this includes any OS configuration changes, port
changes….) .
NOTE:
To keep the system running within the optimal operating conditions such as defined by Asyril,
the customer may freely change the configuration of the Process and Remote ports, but NOT
change the OS default language (doing so may prevent the Asyview from functioning properly
if the number separator of the new language happens not to be a dot but a coma instead).
SmartSight
Programming Guide
Control Unit Version: C2
000.100.531 8/64
3.1.1. Locking the C partition
To enable the EWF and lock the C partition and allow the use of the SmartSight system, a
batch file is included while the system is being configured at the factory. You can find this file
under:
C:\ Program Files \ Asyril\ EWF\ Lock.bat
Make sure all your other programs are closed and double click on this file to run it. After a few
seconds, the computer will restart and the C partition will be locked.
3.1.2. Unlocking the C partition
To disable the EWF and unlock the C partition and allow the configuration SmartSight system
(within the limits allowed by Asyril), a batch file is included while the system is being
configured at the factory. You can find this file under:
C:\ Program Files \ Asyril\ EWF\ Unlock.bat
Make sure all your other programs are closed and double click on this file to run it. After a few
seconds, the computer will restart and the C partition will be unlocked.
NOTE:
While the C partition is unlocked, the Asyview will not be able to be started and an error
message will appear on its starting window, stating that the EWF check has failed. When the
C partition is locked again, the Asyview will be able to be started.
3.2. Asyril licence
3.2.1. General Information
The Asyview software implements a licencing system that allows you to pay only for what the
customer really need i.e. the number of cameras you will be using with your control unit. In practice,
you will receive with your control unit a licence dongle that allows you to use the number of cameras
you have selected in your order. That licence can be upgraded if you need it, just get in touch with our
sales department.
3.2.2. Control of the number of cameras
Whenever you start the Asyview, a licence check will be performed to make sure the licence
you are using is authorizing at least as many cameras as you have configured for the
Asyview.
SmartSight
Programming Guide
Control Unit Version: C2
000.100.531 9/64
3.2.3. Updating the licence
It may happen that you want to add more cameras to your control unit in the future. In this
case, you may ask for an update to our sales department.
The control unit comes with a little program to help you in this regard. Once you have gotten
in touch with our customer support department so they can make you an offer for the
upgrade, you can find the program by typing “LicenceUpdaterTool” in the Windows search
bar or by following this link:
C:\Program Files\Asyril\AsyView\LicenceUpdaterTool.exe
Once it’s started, you may click on “Create Update Request File”. This will generate a file on
your desktop that you may then send to Asyril. We then will send back an updated file that
you will need to copy to your desktop and restart the “LicenceUpdaterTool”. Finally, click on
“Import Update to Protection Dongle”. A confirmation message will inform you that the
procedure has been successfully completed.
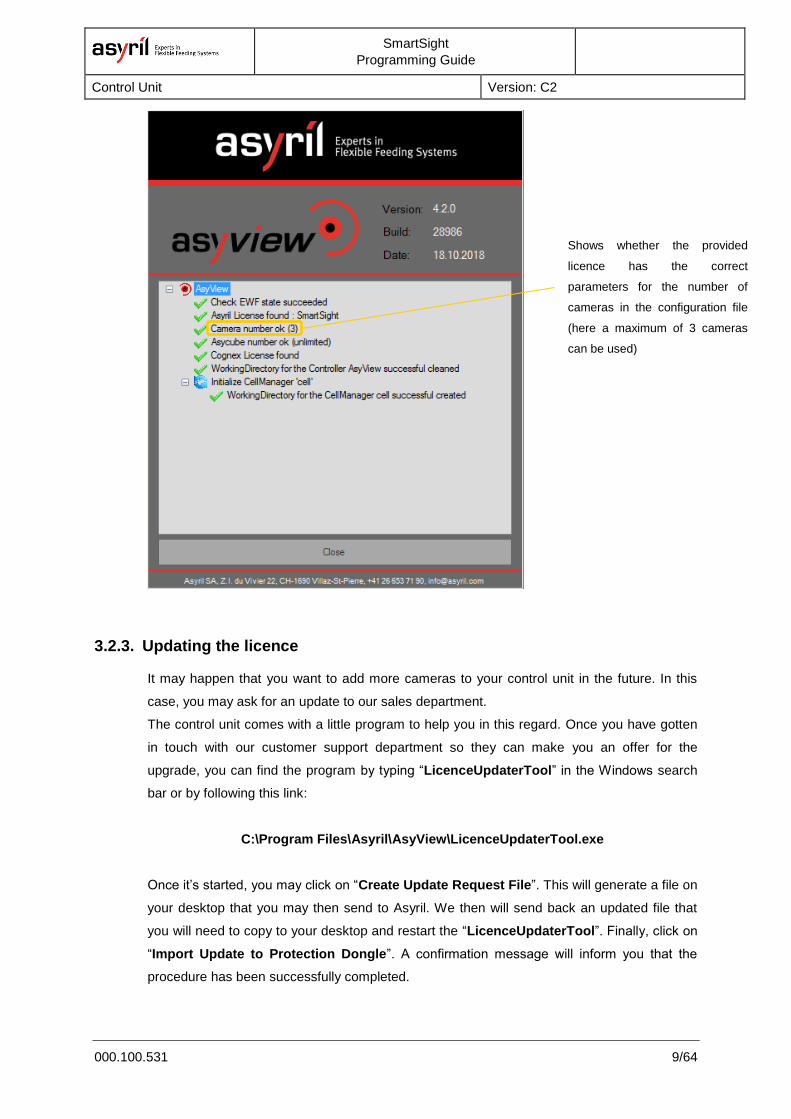
Shows whether the provided
licence has the correct
parameters for the number of
cameras in the configuration file
(here a maximum of 3 cameras
can be used)
SmartSight
Programming Guide
Control Unit Version: C2
000.100.531 10/64
3.3. Starting the Asyview
3.3.1. General Information
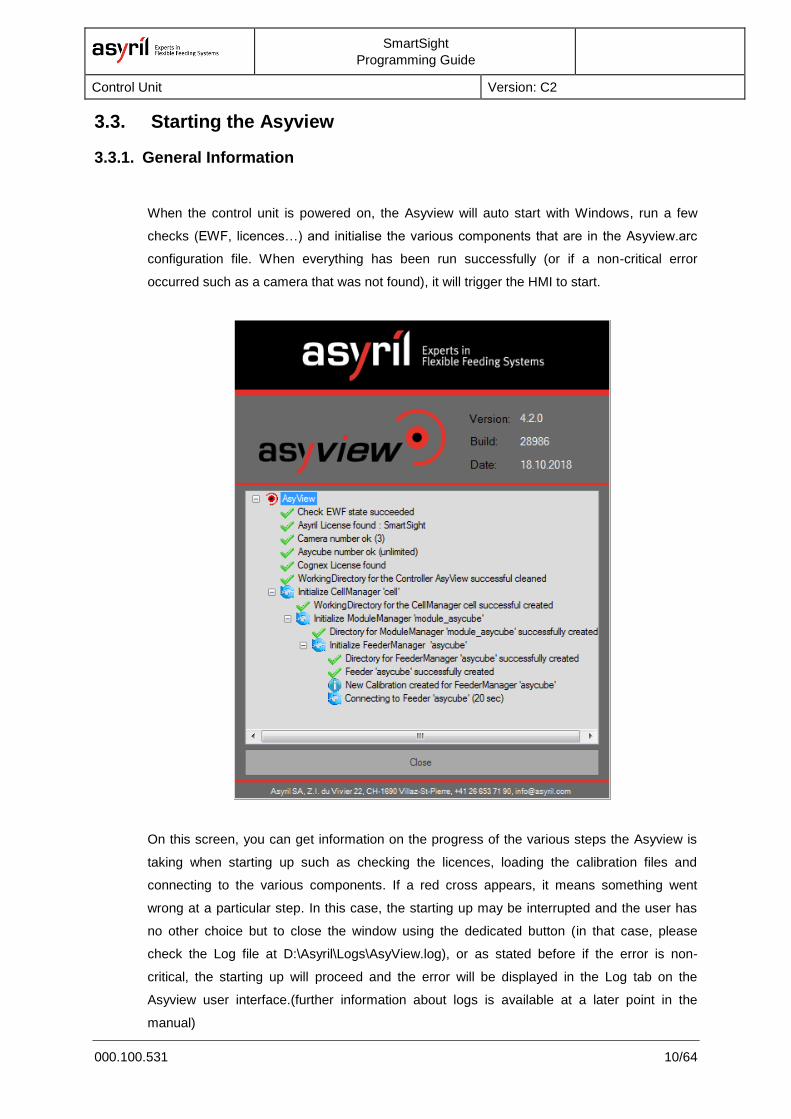
When the control unit is powered on, the Asyview will auto start with Windows, run a few
checks (EWF, licences…) and initialise the various components that are in the Asyview.arc
configuration file. When everything has been run successfully (or if a non-critical error
occurred such as a camera that was not found), it will trigger the HMI to start.
On this screen, you can get information on the progress of the various steps the Asyview is
taking when starting up such as checking the licences, loading the calibration files and
connecting to the various components. If a red cross appears, it means something went
wrong at a particular step. In this case, the starting up may be interrupted and the user has
no other choice but to close the window using the dedicated button (in that case, please
check the Log file at D:\Asyril\Logs\AsyView.log), or as stated before if the error is non-
critical, the starting up will proceed and the error will be displayed in the Log tab on the
Asyview user interface.(further information about logs is available at a later point in the
manual)

SmartSight
Programming Guide
Control Unit Version: C2
000.100.531 11/64
3.3.2. Checking C partition lock status
At start-up, the Asyview performs a check to see whether the C partition is indeed locked. If it
is, start-up can proceed, otherwise it will be aborted.
Shows that the EWF is enabled
and start-up can proceed
Shows that the EWF is disabled
and start-up will be aborted
SmartSight
Programming Guide
Control Unit Version: C2
000.100.531 12/64
3.3.3. Checking Asyril licence
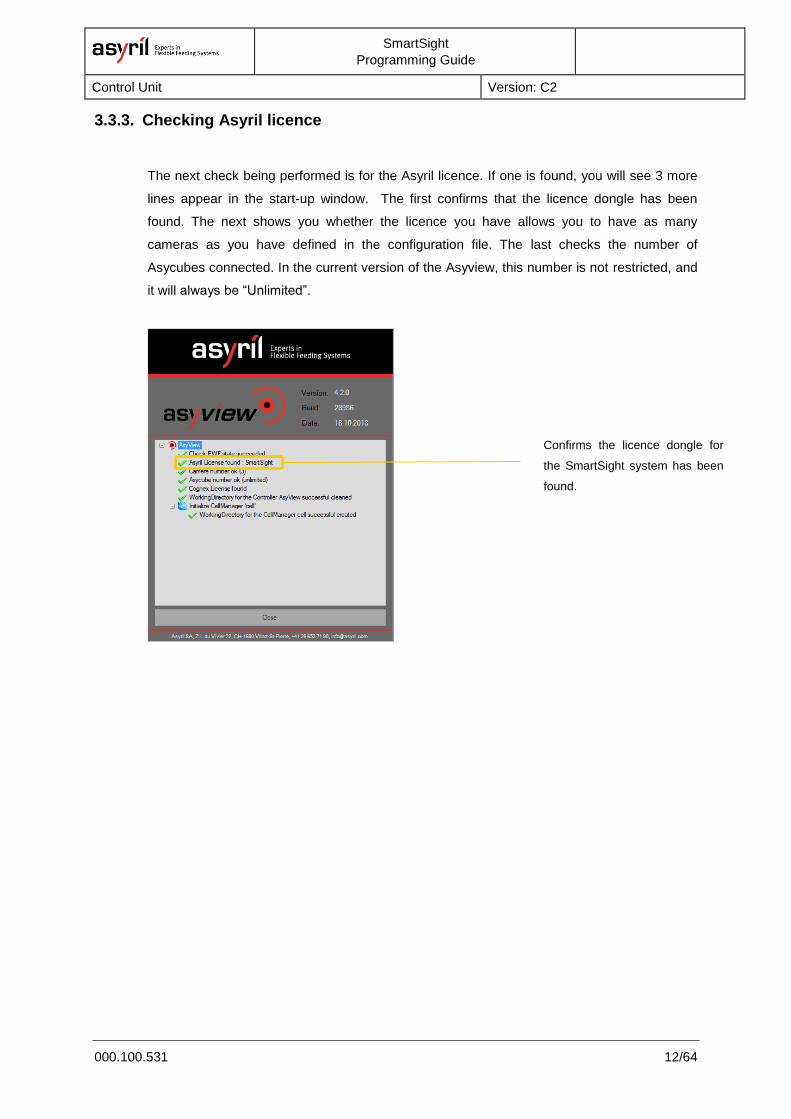
The next check being performed is for the Asyril licence. If one is found, you will see 3 more
lines appear in the start-up window. The first confirms that the licence dongle has been
found. The next shows you whether the licence you have allows you to have as many
cameras as you have defined in the configuration file. The last checks the number of
Asycubes connected. In the current version of the Asyview, this number is not restricted, and
it will always be “Unlimited”.
Confirms the licence dongle for
the SmartSight system has been
found.

SmartSight
Programming Guide
Control Unit Version: C2
000.100.531 13/64
3.3.4. Checking Cognex licence
The last check performed at start-up is the presence of the Cognex licence dongle. Again,
should it not be found, start-up will be aborted.
Shows that a Cognex licence
dongle has been found
Shows that no Cognex licence
dongle was found
SmartSight
Programming Guide
Control Unit Version: C2
000.100.531 14/64
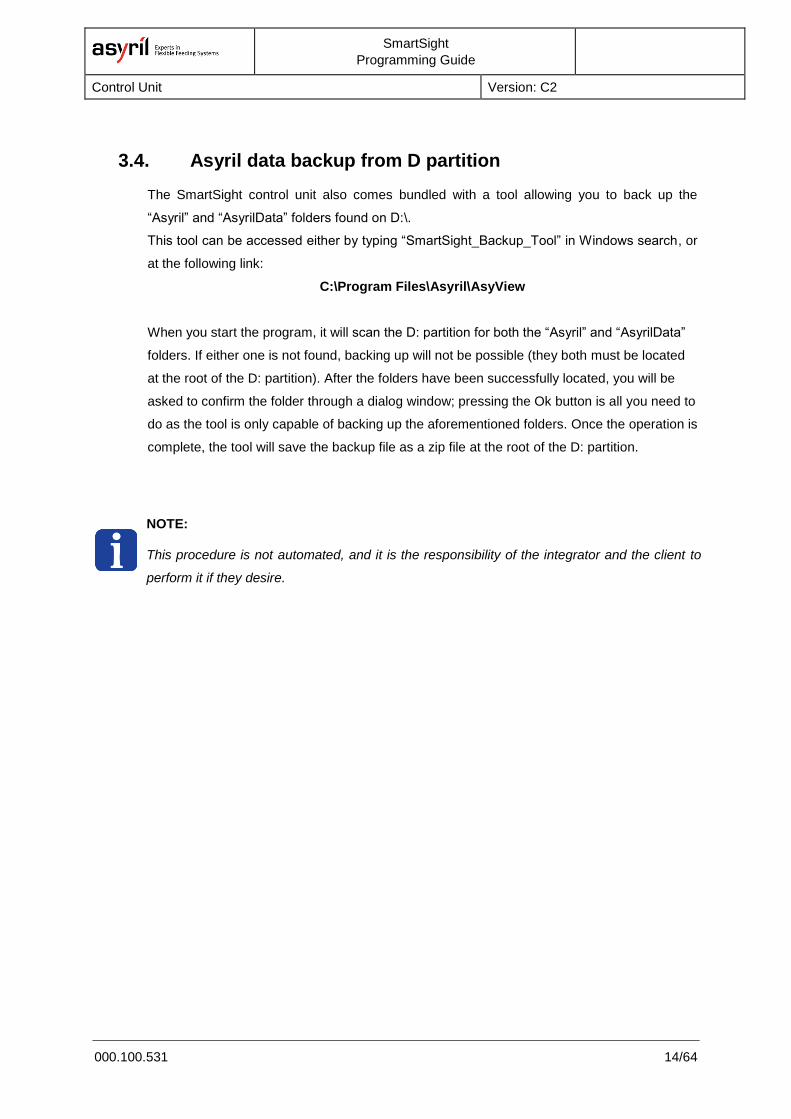
3.4. Asyril data backup from D partition
The SmartSight control unit also comes bundled with a tool allowing you to back up the
“Asyril” and “AsyrilData” folders found on D:\.
This tool can be accessed either by typing “SmartSight_Backup_Tool” in Windows search, or
at the following link:
C:\Program Files\Asyril\AsyView
When you start the program, it will scan the D: partition for both the “Asyril” and “AsyrilData”
folders. If either one is not found, backing up will not be possible (they both must be located
at the root of the D: partition). After the folders have been successfully located, you will be
asked to confirm the folder through a dialog window; pressing the Ok button is all you need to
do as the tool is only capable of backing up the aforementioned folders. Once the operation is
complete, the tool will save the backup file as a zip file at the root of the D: partition.
NOTE:
This procedure is not automated, and it is the responsibility of the integrator and the client to
perform it if they desire.
SmartSight
Programming Guide
Asyview interface Version: C2
000.100.531 15/64
4. Asyview interface
NOTE:
Asyview interface can be launched by right clicking on the logo on the icon bar
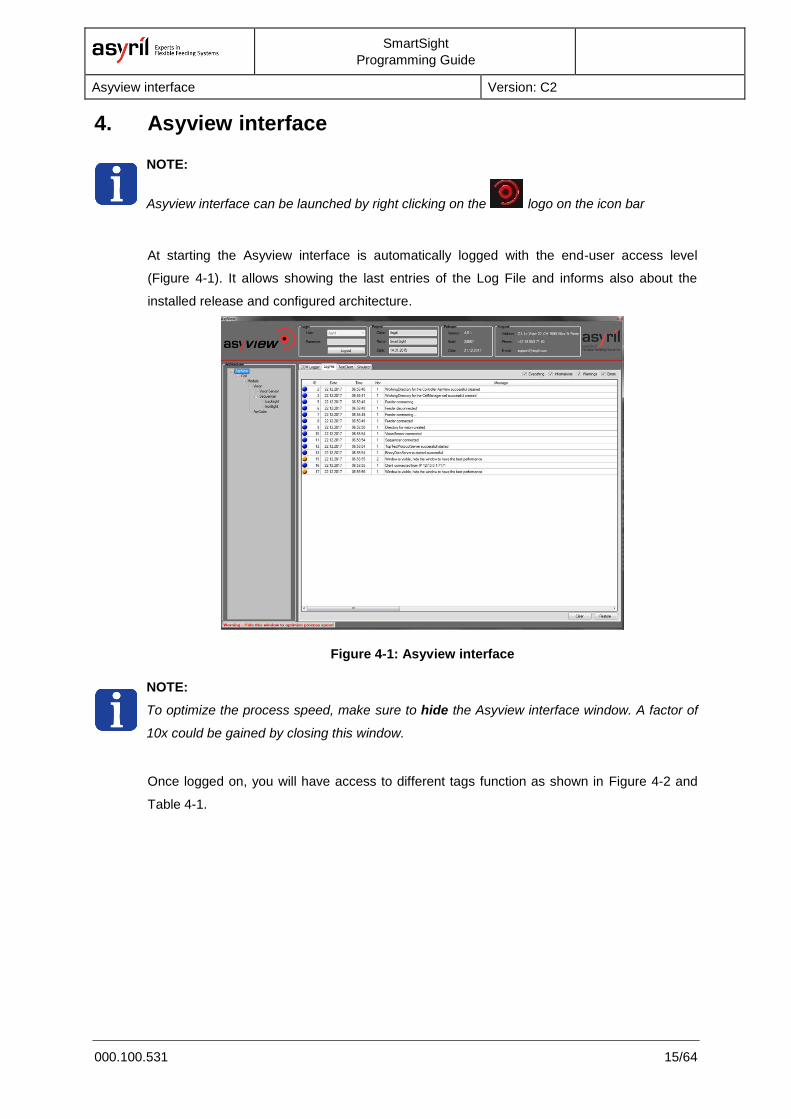
At starting the Asyview interface is automatically logged with the end-user access level
(Figure 4-1). It allows showing the last entries of the Log File and informs also about the
installed release and configured architecture.
Figure 4-1: Asyview interface
NOTE:
To optimize the process speed, make sure to hide the Asyview interface window. A factor of
10x could be gained by closing this window.
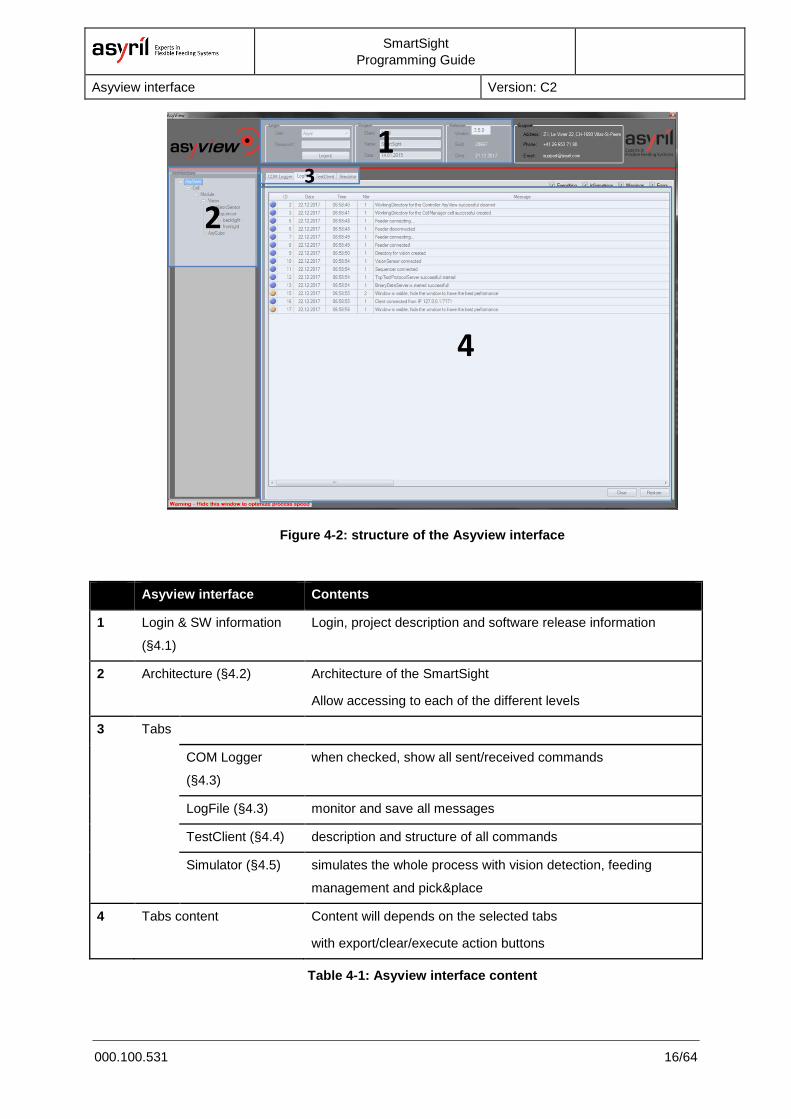
Once logged on, you will have access to different tags function as shown in Figure 4-2 and
Table 4-1.
SmartSight
Programming Guide
Asyview interface Version: C2
000.100.531 16/64
Figure 4-2: structure of the Asyview interface
Asyview interface Contents
1 Login & SW information
(§4.1)
Login, project description and software release information
2 Architecture (§4.2) Architecture of the SmartSight
Allow accessing to each of the different levels
3 Tabs
COM Logger
(§4.3)
when checked, show all sent/received commands
LogFile (§4.3) monitor and save all messages
TestClient (§4.4) description and structure of all commands
Simulator (§4.5) simulates the whole process with vision detection, feeding
management and pick&place
4 Tabs content Content will depends on the selected tabs
with export/clear/execute action buttons
Table 4-1: Asyview interface content
SmartSight
Programming Guide
Asyview interface Version: C2
000.100.531 17/64
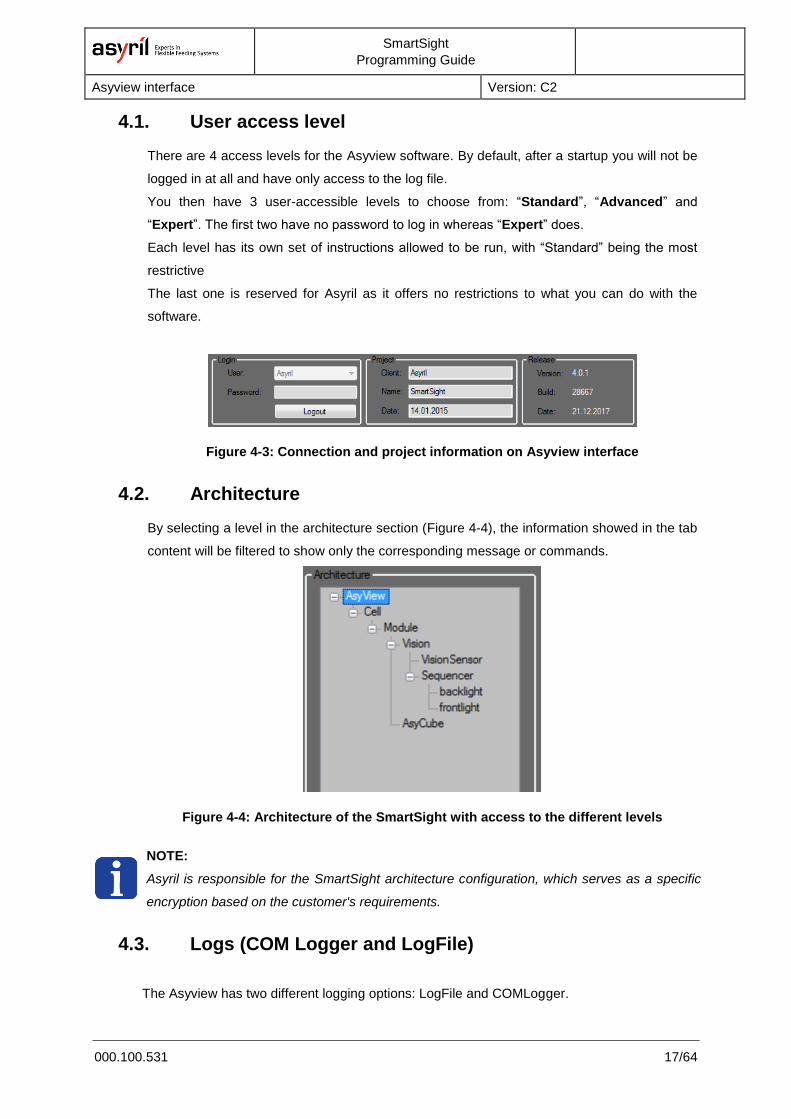
4.1. User access level
There are 4 access levels for the Asyview software. By default, after a startup you will not be
logged in at all and have only access to the log file.
You then have 3 user-accessible levels to choose from: “Standard”, “Advanced” and
“Expert”. The first two have no password to log in whereas “Expert” does.
Each level has its own set of instructions allowed to be run, with “Standard” being the most
restrictive
The last one is reserved for Asyril as it offers no restrictions to what you can do with the
software.
Figure 4-3: Connection and project information on Asyview interface
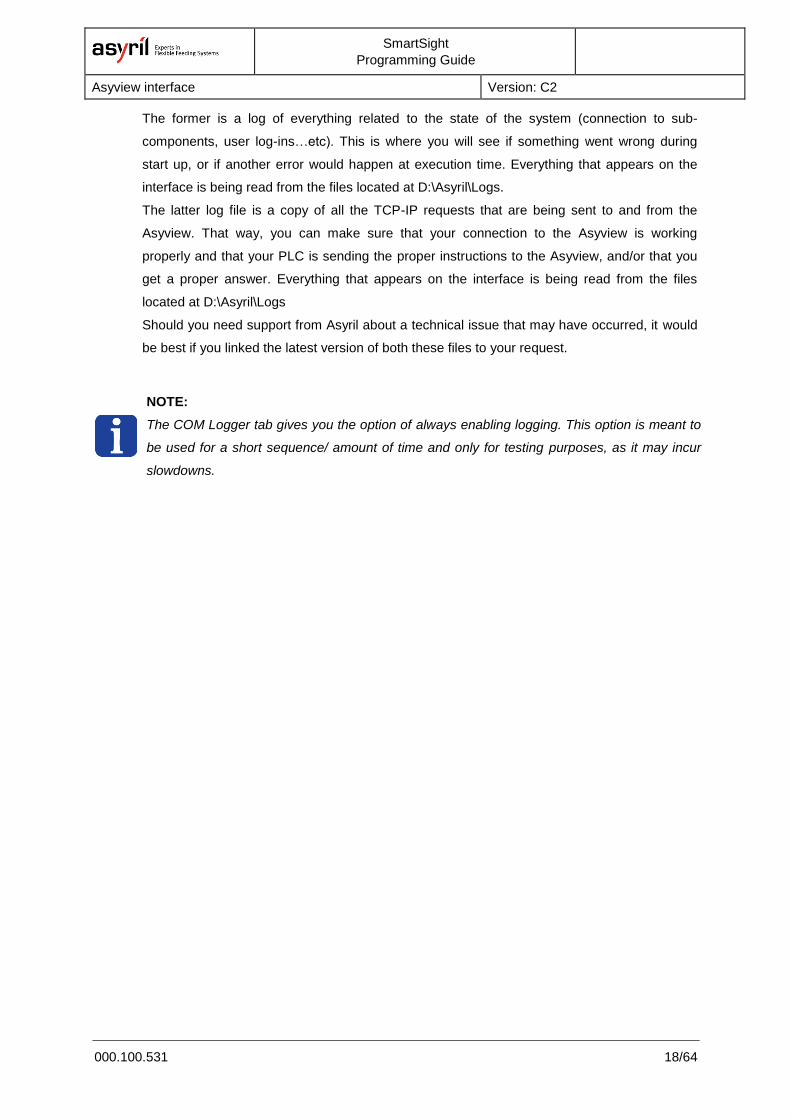
4.2. Architecture
By selecting a level in the architecture section (Figure 4-4), the information showed in the tab
content will be filtered to show only the corresponding message or commands.
Figure 4-4: Architecture of the SmartSight with access to the different levels
NOTE:
Asyril is responsible for the SmartSight architecture configuration, which serves as a specific
encryption based on the customer's requirements.
4.3. Logs (COM Logger and LogFile)
The Asyview has two different logging options: LogFile and COMLogger.
SmartSight
Programming Guide
Asyview interface Version: C2
000.100.531 18/64
The former is a log of everything related to the state of the system (connection to sub-
components, user log-ins…etc). This is where you will see if something went wrong during
start up, or if another error would happen at execution time. Everything that appears on the
interface is being read from the files located at D:\Asyril\Logs.
The latter log file is a copy of all the TCP-IP requests that are being sent to and from the
Asyview. That way, you can make sure that your connection to the Asyview is working
properly and that your PLC is sending the proper instructions to the Asyview, and/or that you
get a proper answer. Everything that appears on the interface is being read from the files
located at D:\Asyril\Logs
Should you need support from Asyril about a technical issue that may have occurred, it would
be best if you linked the latest version of both these files to your request.
NOTE:
The COM Logger tab gives you the option of always enabling logging. This option is meant to
be used for a short sequence/ amount of time and only for testing purposes, as it may incur
slowdowns.

SmartSight
Programming Guide
Asyview interface Version: C2
000.100.531 19/64
4.4. TestClient
Depending on the selected architecture level, the TestClient tab will list all corresponding
and available commands (Chapter 7 “Asyview Instructions”). It can help then to build a
command by selecting and informing the keywords and parameters. By clicking on
- the Insert button: the complete command will be written on the console
- the Execute button: the complete command is written on the console and sent to the
system
- a message line: the command is displayed in a more intuitive and readable format to
extract all parameters.
Figure 4-5: TestClient tab

SmartSight
Programming Guide
Asyview interface Version: C2
000.100.531 20/64
4.5. Simulator
In the Simulator tab one can launch a cycle with the simulated pick requested. It allows
testing and seeing how to implement the process and the synchronization between the
(robot) controller and the SmartSight controller. The different parameters allow to set some
timer and to follow the results. Please note that a vision configuration must be done before
starting the simulation.
Figure 4-6 : Simulator tab
SmartSight
Programming Guide
Version: C2
000.100.531 21/64
5. Asyview Communication protocol
5.1. TCP/IP parameters
The Asyview is implemented as a TCP/IP server operating as a slave to the machine. You
will therefore need to implement a TCP Client to connect to the Asyview.
The default configuration for the Asyview server port (PROCESS) is as follows:
IP address Subnet Mask Port
192.168.0.70 255.255.255.0 7171
Table 5-1: Asyview PROCESS TCP/IP parameters
5.2. Protocol
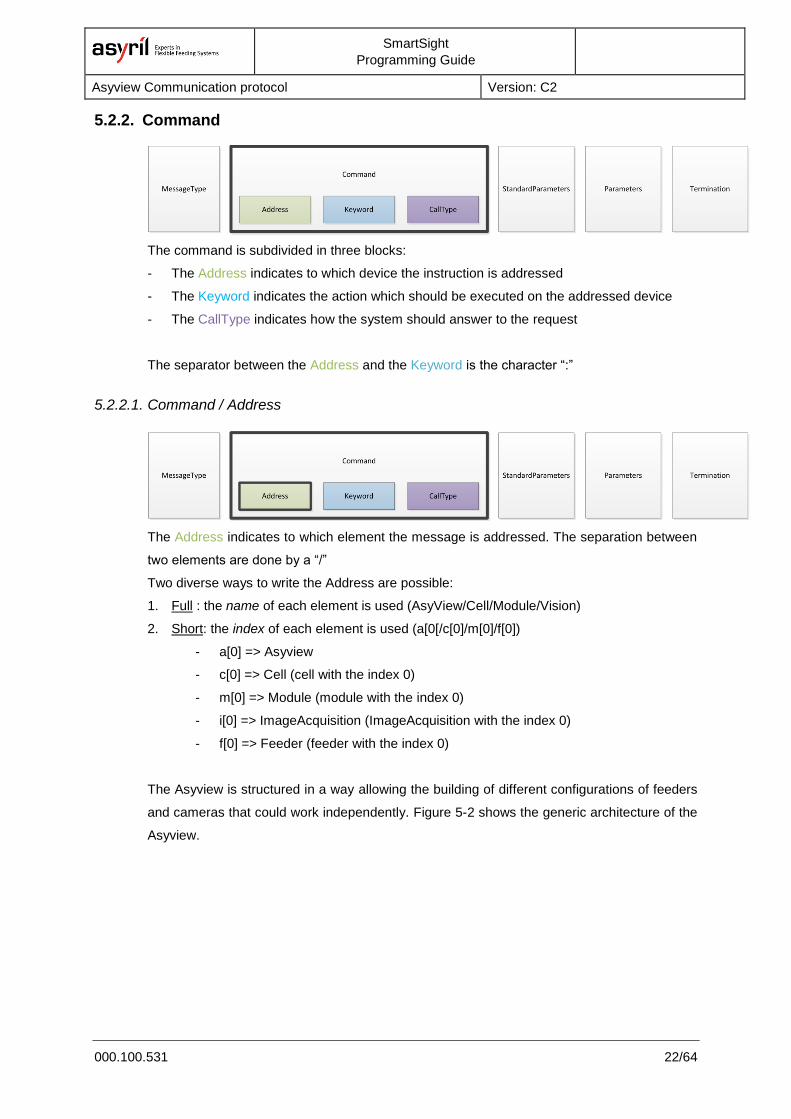
The protocol is based on textual command. Here below is the general description of its
syntax, followed by the different response modes available.
A message contains up to 5 blocks separated by a “white space” character.
Figure 5-1: Protocol description
The syntax of the 5 different blocks is described here below.
5.2.1. MessageType
The MessageType helps to filter and trace request / answer in case of troubles (for example
with the help of WireShark or with the COMLog file).
It indicated a new request / answer as following:
- Request begins with cmd/?
- Answer begins with ?/cmd
SmartSight
Programming Guide
Asyview Communication protocol Version: C2
000.100.531 22/64
5.2.2. Command
The command is subdivided in three blocks:
- The Address indicates to which device the instruction is addressed
- The Keyword indicates the action which should be executed on the addressed device
- The CallType indicates how the system should answer to the request
The separator between the Address and the Keyword is the character “:”
5.2.2.1. Command / Address
The Address indicates to which element the message is addressed. The separation between
two elements are done by a “/”
Two diverse ways to write the Address are possible:
1. Full : the name of each element is used (AsyView/Cell/Module/Vision)
2. Short: the index of each element is used (a[0[/c[0]/m[0]/f[0])
- a[0] => Asyview
- c[0] => Cell (cell with the index 0)
- m[0] => Module (module with the index 0)
- i[0] => ImageAcquisition (ImageAcquisition with the index 0)
- f[0] => Feeder (feeder with the index 0)
The Asyview is structured in a way allowing the building of different configurations of feeders
and cameras that could work independently. Figure 5-2 shows the generic architecture of the
Asyview.

SmartSight
Programming Guide
Asyview Communication protocol Version: C2
000.100.531 23/64
Figure 5-2: Architecture level of the Asyview
Also, you can find the indexes assigned to the elements in your system by looking at the tree
structure of the Asyview in its interface:
SmartSight
Programming Guide
Asyview Communication protocol Version: C2
000.100.531 24/64
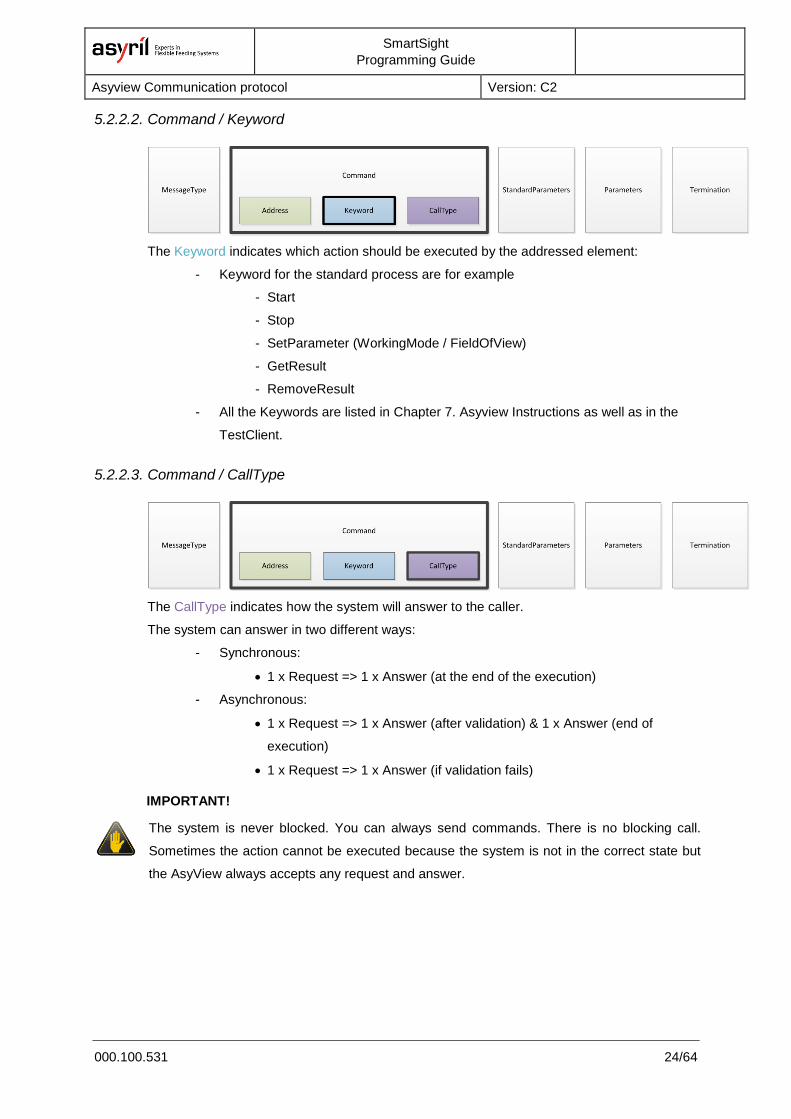
5.2.2.2. Command / Keyword
The Keyword indicates which action should be executed by the addressed element:
- Keyword for the standard process are for example
- Start
- Stop
- SetParameter (WorkingMode / FieldOfView)
- GetResult
- RemoveResult
- All the Keywords are listed in Chapter 7. Asyview Instructions as well as in the
TestClient.
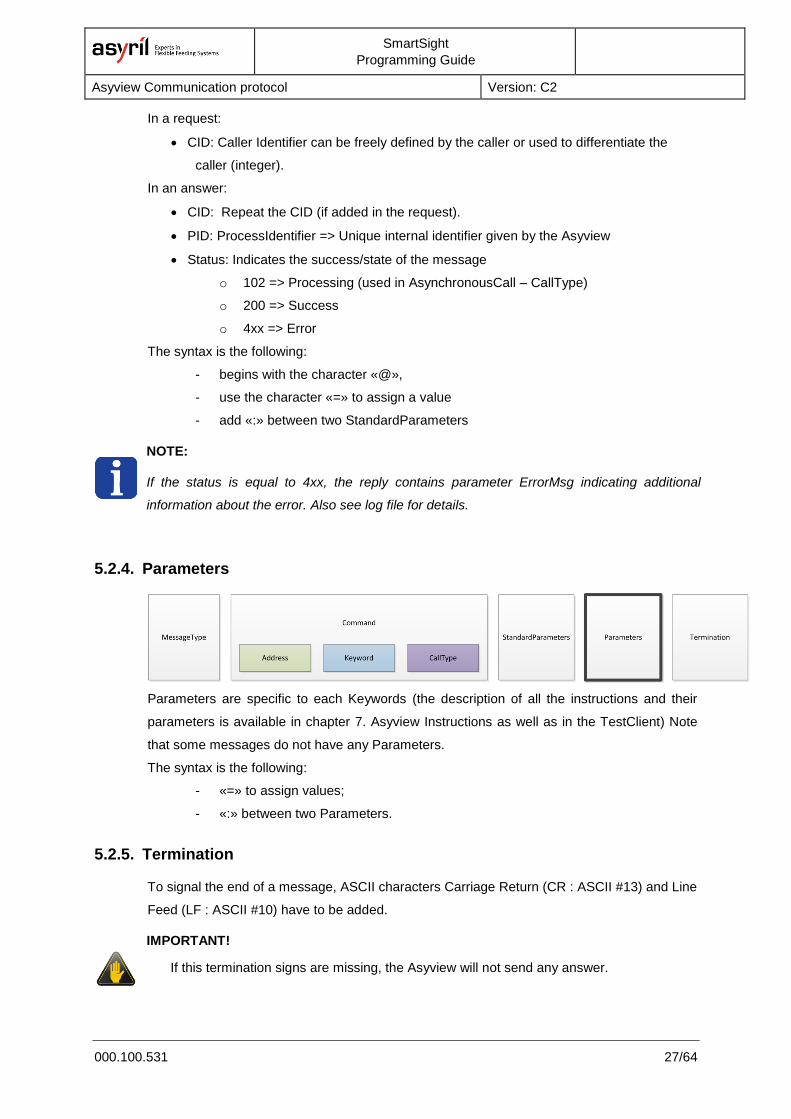
5.2.2.3. Command / CallType
The CallType indicates how the system will answer to the caller.
The system can answer in two different ways:
- Synchronous:
• 1 x Request => 1 x Answer (at the end of the execution)
- Asynchronous:
• 1 x Request => 1 x Answer (after validation) & 1 x Answer (end of
execution)
• 1 x Request => 1 x Answer (if validation fails)
IMPORTANT!
The system is never blocked. You can always send commands. There is no blocking call.
Sometimes the action cannot be executed because the system is not in the correct state but
the AsyView always accepts any request and answer.

SmartSight
Programming Guide
Asyview Communication protocol Version: C2
000.100.531 25/64
5.2.2.3.1. Command / CallType / Synchronous
With the Synchronous CallType the asyview will respond to each request with one single
answer once the action is finished or if an error occurred. The request does not block other
requests.
To use this CallType no sign or special character are between the Keyword and the
StandardParameters.

SmartSight
Programming Guide
Asyview Communication protocol Version: C2
000.100.531 26/64
5.2.2.3.2. Command / CallType / Asynchronous Call
With the Asynchronous CallType the asyview will respond to each request at least with one
answer. The first answer will be sent directly after the reception of the command to confirm
the validation of its parameters and the execution state.
• If the validation fails, only one answer will be sent (after the validation)
• If the validation succeeds, a first answer will be sent directly and a second one will be
sent once the action is done.
A request does not block other requests.
To use this CallType the following two characters have to be added after the Keyword: “/!”
The answer will have the CallType character
- “/!” for the validation
- “/#” for the end of action
5.2.3. Standard Parameters
Standard Parameters can be used in every message.
SmartSight
Programming Guide
Asyview Communication protocol Version: C2
000.100.531 27/64
In a request:
• CID: Caller Identifier can be freely defined by the caller or used to differentiate the
caller (integer).
In an answer:
• CID: Repeat the CID (if added in the request).
• PID: ProcessIdentifier => Unique internal identifier given by the Asyview
• Status: Indicates the success/state of the message
o 102 => Processing (used in AsynchronousCall – CallType)
o 200 => Success
o 4xx => Error
The syntax is the following:
- begins with the character «@»,
- use the character «=» to assign a value
- add «:» between two StandardParameters
NOTE:
If the status is equal to 4xx, the reply contains parameter ErrorMsg indicating additional
information about the error. Also see log file for details.
5.2.4. Parameters
Parameters are specific to each Keywords (the description of all the instructions and their
parameters is available in chapter 7. Asyview Instructions as well as in the TestClient) Note
that some messages do not have any Parameters.
The syntax is the following:
- «=» to assign values;
- «:» between two Parameters.
5.2.5. Termination
To signal the end of a message, ASCII characters Carriage Return (CR : ASCII #13) and Line
Feed (LF : ASCII #10) have to be added.
IMPORTANT!
If this termination signs are missing, the Asyview will not send any answer.
SmartSight
Programming Guide
Version: C2
000.100.531 28/64
6. Asyview Methods
6.1. Modes
The Asyview controller has two modes: Configuration and Process. Their functions are as
follows:
- Configuration:
o Default mode
o Allows recipes to be created and modified
Adjusting image and lighting acquisition sequences
Teaching vision models
Adjusting Asycube parameters
Selecting the operating mode
o Loading and saving recipes
o Calibration (calculation)
- Process:
o Active mode: once this state is reached, the system launches the cycle to obtain
the first available component (feeding by Asycube, then acquiring an image as
soon as the field of view is unlocked)
o Passive mode: the system is ready to receive image and then position requests.
The Start and Stop commands are used to switch from one mode to another.
Each module can be switched independently from one state to another. This means that one
camera can be in configuration mode while a process is under way on another module.
Below are descriptions of the different usage methods concerning the Active and Passive
Process, as well as the various calibration procedures for calibrating the fields of view.
All the instructions are listed in chapter 7.
6.2. Working Mode
There are two types of operation. The main difference between them is whether the feeder
has to be automatically managed or not.
A distinction can therefore be made between the uses of
- a camera placed above an Asycube to prepare a list of available parts in order to send
their position once the request is made,
- a control camera whose image acquisition is subject to a request (e.g. by moving the
manipulator into the control field of view).
SmartSight
Programming Guide
Asyview Methods Version: C2
000.100.531 29/64
Their main characteristics are as follows:
- Active mode:
o automatic management of the Asycube and image acquisition using information
concerning synchronization with the pick & place process
o automatic “feeding cycle – image acquisition – data processing” sequence until a
result is obtained
o during a position request: sending of the position of the first available part, even if
the image analysis is not complete
o camera/lighting synchronization
- Passive mode:
o image acquisition on request
o camera/lighting synchronization
o no Asycube management
6.2.1. Active Working Mode
Figure 6-1 shows the standard interaction between a SmartSight module and the machine to
synchronize the two cycles and transfer the position information.
Reminder: in the Active type, the Asyview manages the Asycube feeding system
automatically. This means that, when an image is being processed, an initial step is executed
to deliver the positions of the available parts as quickly as possible based on the configured
criteria. These positions can be read even if the image processing is not complete, to enable
the Pick&Place operations to be started as soon as possible. In the second step, once all the
possible positions have been detected, the system evaluates also the distribution of the
components on the surface of the Asycube to generate the appropriate vibration sequence. It
is then ready to launch the feeding sequence as soon as all the positions have been deleted.
The simulator (Asyview interface) details the same method and describes the instructions
used and the responses obtained.
There is a possibility to force the system to take a new picture before every pick. To do that,
send a command to clear all the results after placing the part (see Figure 6-1). This can be
useful when the position of the parts that are still on the platform may change between two
picks because of an external perturbation (for example: parts move while picking another
one, vibration of the overall system is inducing movement of parts on the platform).
In the following diagrams, the red boxes are action with communication with Asyview.

SmartSight
Programming Guide
Asyview Methods Version: C2
000.100.531 30/64
6.2.1.1. With only one model
Start Vision Device
Set Working Mode to Active
Robot is out of the field of view
Free field of view
Part pick and place loop
Position request
Block field of view
Robot picks part
Remove position from list
Robot leaves field of view
Free field of view
Robot places parts
No
Sto
p
End of cycle
Need new picture ?
Take a new picture
Yes
Working mode has to be defined once for each module
Asyview switches from Configuration to Process mode
From this point, Asyview can take a picture and feed parts if no part is available.
A result is given as soon as the first correct part has been found. Image processing will then continue to prepare the next results and the next feeding movements
Asyview can no longer take a picture (the robot will enter the field of view)
From this point, and if necessary because the position list is empty, the system can feed (vibrate)
From this point, the system can take a picture (and continue to feed if necessary)
Asyview switches from Process to Configuration mode
Asyview forces the system to capture a new picture
Figure 6-1: Schematic of the Active mode with one model
SmartSight
Programming Guide
Asyview Methods Version: C2
000.100.531 31/64
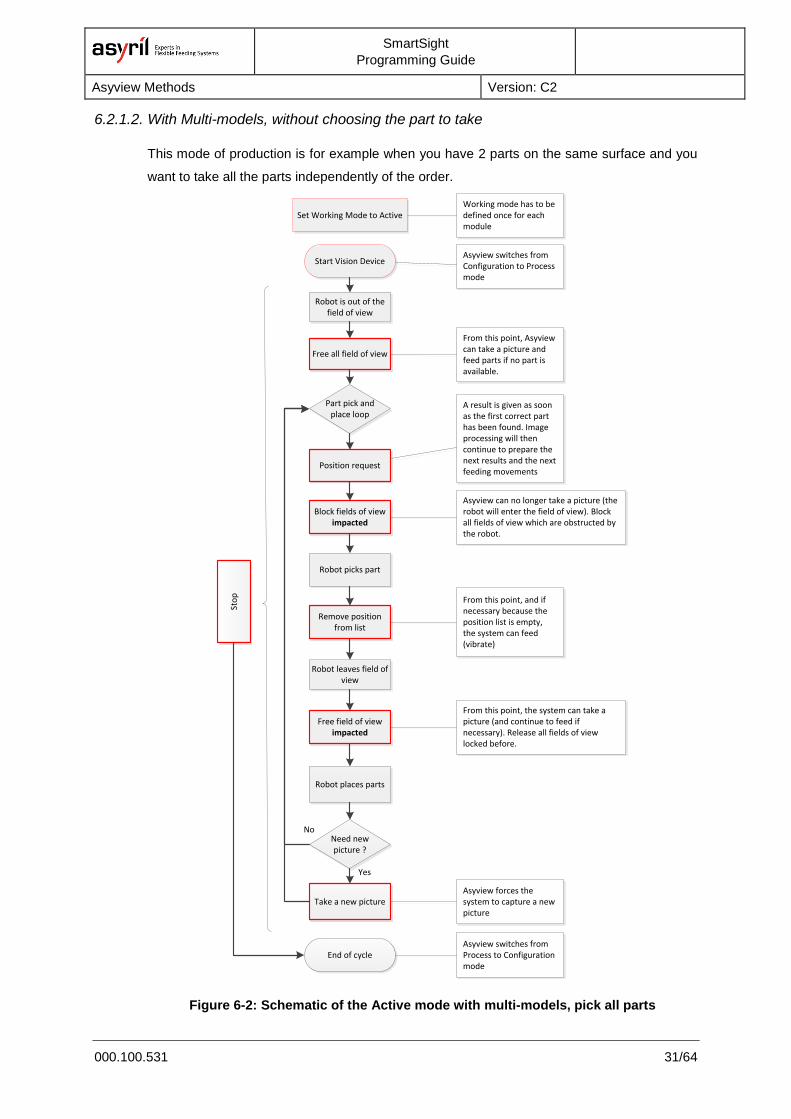
6.2.1.2. With Multi-models, without choosing the part to take
This mode of production is for example when you have 2 parts on the same surface and you
want to take all the parts independently of the order.
Start Vision Device
Set Working Mode to Active
Robot is out of the field of view
Free all field of view
Part pick and place loop
Position request
Block fields of view impacted
Robot picks part
Remove position from list
Robot leaves field of view
Free field of view impacted
Robot places parts
No
End of cycle
Sto
p
Need new picture ?
Take a new picture
Yes
Working mode has to be defined once for each module
Asyview switches from Configuration to Process mode
From this point, Asyview can take a picture and feed parts if no part is available.
A result is given as soon as the first correct part has been found. Image processing will then continue to prepare the next results and the next feeding movements
Asyview can no longer take a picture (the robot will enter the field of view). Block all fields of view which are obstructed by the robot.
From this point, and if necessary because the position list is empty, the system can feed (vibrate)
From this point, the system can take a picture (and continue to feed if necessary). Release all fields of view locked before.
Asyview switches from Process to Configuration mode
Asyview forces the system to capture a new picture
Figure 6-2: Schematic of the Active mode with multi-models, pick all parts

SmartSight
Programming Guide
Asyview Methods Version: C2
000.100.531 32/64
6.2.1.3. With Multi-models, with choosing the part to take
This mode of production is for example when you have 2 parts on the same surface and you
want to take the parts in a specified order.
Start Vision Device
Set Working Mode to Active
Robot is out of the field of view
Free all field of view
Part pick and place loop
Position request
Block fields of view impacted
Robot picks part
Remove position from list
Robot leaves field of view
Free field of view impacted
Robot places parts
No
Sto
p
End of cycle
Need new picture ?
Take a new picture
Yes
Working mode has to be defined once for each module
Asyview switches from Configuration to Process mode
From this point, Asyview can take a picture and feed parts if no part is available.
A result is given as soon as the first correct part has been found. Image processing will then continue to prepare the next results and the next feeding movements
Asyview can no longer take a picture (the robot will enter the fields of view). Block all fields of view which are obstructed by the robot.
From this point, and if necessary because the position list is empty, the system can feed (vibrate)
From this point, the system can take a picture (and continue to feed if necessary). Release all fields of view locked before.
Add indication for the requested part in the command (ModelName or ImageConfigurationName)
Add indication for the next requested part in the command (NextModelName or NextImageConfigurationName)
Asyview switches from Process to Configuration mode
Asyview forces the system to capture a new picture
Figure 6-3: Schematic of the Active mode with multi-models, pick specified part

SmartSight
Programming Guide
Asyview Methods Version: C2
000.100.531 33/64
IMPORTANT!
When the Asyview has multi-models using various image configurations, be careful to block
all the fields of views that are impacted by the arrival of the robot. Otherwise, the new
acquisition can take place when the robot is in the field of view and the parts will not be
detected.
When all the fields of view used are in the same geometric region (for example on the same
Asycube and using all the resolution), it is possible to block (or release) all the fields of view
in the same time. Just do not specify the name of the image configuration in the command.
SmartSight
Programming Guide
Asyview Methods Version: C2
000.100.531 34/64
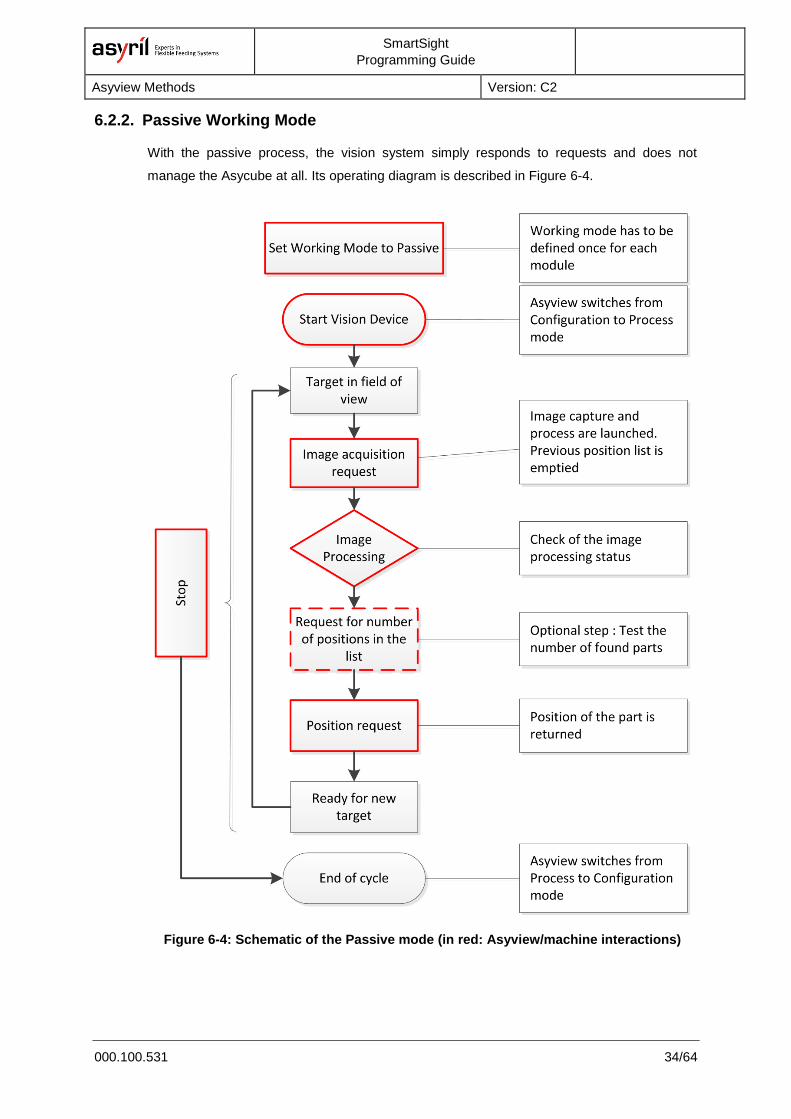
6.2.2. Passive Working Mode
With the passive process, the vision system simply responds to requests and does not
manage the Asycube at all. Its operating diagram is described in Figure 6-4.
Figure 6-4: Schematic of the Passive mode (in red: Asyview/machine interactions)
SmartSight
Programming Guide
Asyview Methods Version: C2
000.100.531 35/64
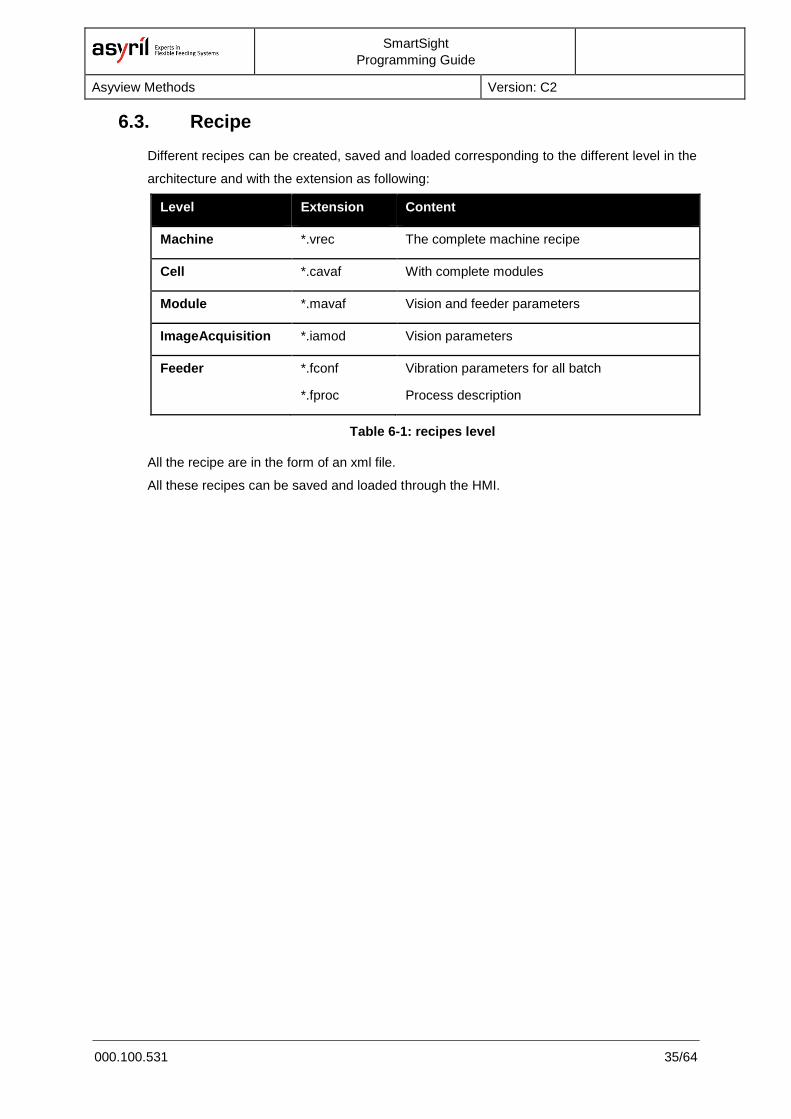
6.3. Recipe
Different recipes can be created, saved and loaded corresponding to the different level in the
architecture and with the extension as following:
Level Extension Content
Machine *.vrec The complete machine recipe
Cell *.cavaf With complete modules
Module *.mavaf Vision and feeder parameters
ImageAcquisition *.iamod Vision parameters
Feeder *.fconf
*.fproc
Vibration parameters for all batch
Process description
Table 6-1: recipes level
All the recipe are in the form of an xml file.
All these recipes can be saved and loaded through the HMI.
SmartSight
Programming Guide
Asyview Instructions Version: C2
000.100.531 36/64
7. Asyview Instructions
Here below are listed all instructions implemented in the Asyview. The TestClient tab in the
Asyview interface can be used to create the instructions and test them. The instructions are
categorized by domain.
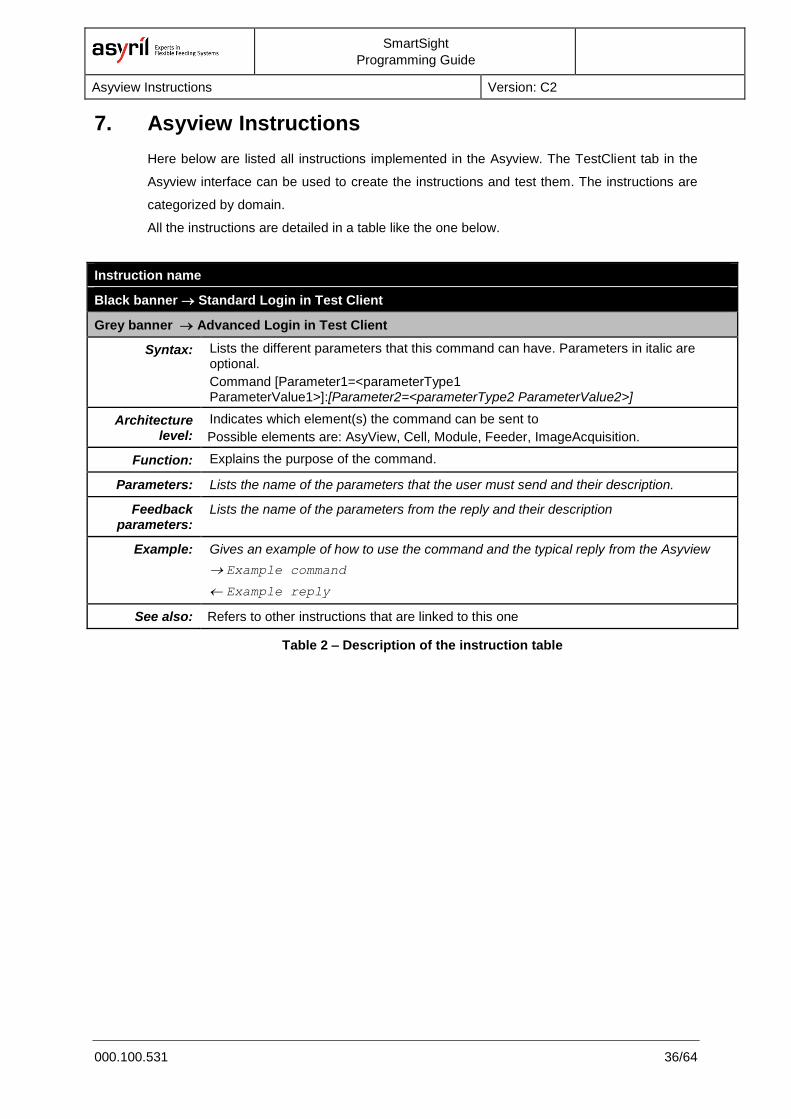
All the instructions are detailed in a table like the one below.
Instruction name
Black banner Standard Login in Test Client
Grey banner Advanced Login in Test Client
Syntax: Lists the different parameters that this command can have. Parameters in italic are optional.
Command [Parameter1=<parameterType1 ParameterValue1>]:[Parameter2=<parameterType2 ParameterValue2>]
Architecture level:
Indicates which element(s) the command can be sent to
Possible elements are: AsyView, Cell, Module, Feeder, ImageAcquisition.
Function: Explains the purpose of the command.
Parameters: Lists the name of the parameters that the user must send and their description.
Feedback parameters:
Lists the name of the parameters from the reply and their description
Example: Gives an example of how to use the command and the typical reply from the Asyview
Example command
Example reply
See also: Refers to other instructions that are linked to this one
Table 2 – Description of the instruction table
SmartSight
Programming Guide
Asyview Instructions Version: C2
000.100.531 37/64
7.1. Table of Instructions
7.2. RECIPES 39
CLEARTEACHING 39
LOADFILE (ASYVIEW / CELL / MODULE) 39
LOADFILE (FEEDER) 39
LOADMODELFILE 40
SAVEFILE (ASYVIEW / CELL / MODULE) 41
SAVEFILE (FEEDER) 41
SAVEMODELFILE 42
7.3. CALIBRATION 43
ADDPOINTPAIR 43
CALIBRATE 43
GETPARAMETER [CALIBRATION] (MODULE / FEEDER) 44
GETPARAMETER [CALIBRATION] (VISION) 44
GETPARAMETER [CALIBRATIONPOINTPAIR] 45
GETPARAMETER [CALIBRATIONPOINTPAIRNUMBER] 46
LOADCALIBRATION 47
SAVECALIBRATION 47
SETPARAMETER [CALIBRATION] (MODULE / FEEDER) 48
SETPARAMETER [CALIBRATION] (VISION) 49
UNCALIBRATE 50
7.4. PRODUCTION 50
ACQUIRE 50
CLEARRESULTS 50
GETPARAMETER [AVAILABLERESULTS] 51
GETPARAMETER [FIELDOFVIEW] 51
GETPARAMETER [MODE] 52
GETPARAMETER [MODELNAMES] 52
GETPARAMETER [PARTSONFEEDER] 53
GETPARAMETER [PROCESSMANAGERSTATE] 53
GETPARAMETER [STATES] 54
GETPARAMETER [WORKINGMODE] 54
GETRESULT 55
REMOVERESULT 55
SETPARAMETER [FIELDOFVIEW] 56
SETPARAMETER [WORKINGMODE] 57
SmartSight
Programming Guide
Asyview Instructions Version: C2
000.100.531 38/64
START 57
STOP 57
7.5. UTILITIES 58
EXECUTECMD 58
GETPARAMETER [SAVEIMAGESSTATE] 58
GETPARAMETER [VERSION] 58
RESET 59
SAVELATESTIMAGES 59
STARTSAVEIMAGES 60
STOPSAVEIMAGES 60
SmartSight
Programming Guide
Asyview Instructions Version: C2
000.100.531 39/64
7.2. Recipes
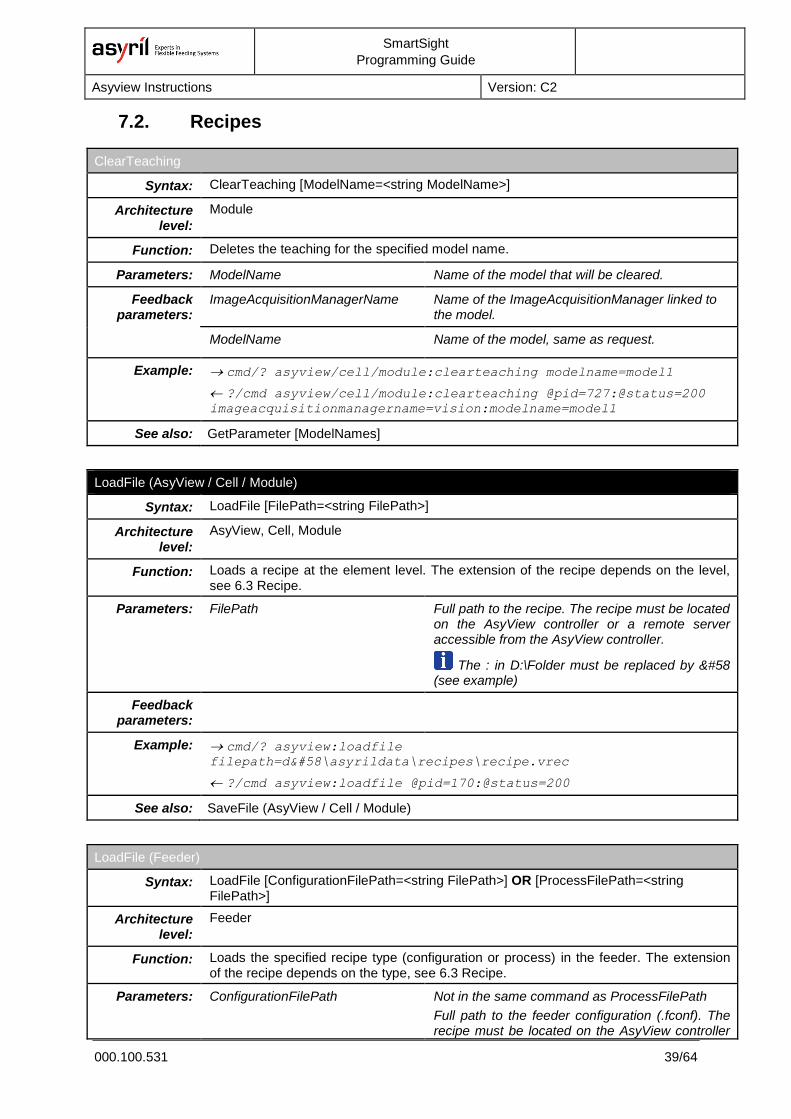
ClearTeaching
Syntax: ClearTeaching [ModelName=<string ModelName>]
Architecture level:
Module
Function: Deletes the teaching for the specified model name.
Parameters: ModelName Name of the model that will be cleared.
Feedback parameters:
ImageAcquisitionManagerName Name of the ImageAcquisitionManager linked to the model.
ModelName Name of the model, same as request.
Example: cmd/? asyview/cell/module:clearteaching modelname=model1
?/cmd asyview/cell/module:clearteaching @pid=727:@status=200 imageacquisitionmanagername=vision:modelname=model1
See also: GetParameter [ModelNames]
LoadFile (AsyView / Cell / Module)
Syntax: LoadFile [FilePath=<string FilePath>]
Architecture level:
AsyView, Cell, Module
Function: Loads a recipe at the element level. The extension of the recipe depends on the level, see 6.3 Recipe.
Parameters: FilePath Full path to the recipe. The recipe must be located on the AsyView controller or a remote server accessible from the AsyView controller.
The : in D:\Folder must be replaced by : (see example)
Feedback parameters:
Example: cmd/? asyview:loadfile filepath=d:\asyrildata\recipes\recipe.vrec
?/cmd asyview:loadfile @pid=170:@status=200
See also: SaveFile (AsyView / Cell / Module)
LoadFile (Feeder)
Syntax: LoadFile [ConfigurationFilePath=<string FilePath>] OR [ProcessFilePath=<string FilePath>]
Architecture level:
Feeder
Function: Loads the specified recipe type (configuration or process) in the feeder. The extension of the recipe depends on the type, see 6.3 Recipe.
Parameters: ConfigurationFilePath Not in the same command as ProcessFilePath
Full path to the feeder configuration (.fconf). The recipe must be located on the AsyView controller

SmartSight
Programming Guide
Asyview Instructions Version: C2
000.100.531 40/64
or a remote server accessible from the AsyView controller.
The : in D:\Folder must be replaced by : (see example)
ProcessFilePath Not in the same command as ConfigurationFilePath
Full path to the process configuration (.fproc). The recipe must be located on the AsyView controller or a remote server accessible from the AsyView controller.
The : in D:\Folder must be replaced by : (see example)
Feedback parameters:
ConfigurationFilePath Path to the file, same as sent.
ProcessFilePath Path to the file, same as sent.
Example: cmd/? asyview/cell/module/asycube:loadfile @pid=123:@status=200 configurationfilepath=d:\asyrildata\recipes\feeder1.fconf
?/cmd asyview/cell/module/asycube:loadfile @pid=123:@status=200 configurationfilepath=d:\asyrildata\recipes\feeder1.fconf
See also: SaveFile (Feeder)
LoadModelFile
Syntax: LoadModelFile [FilePath=<string FilePath>]:[NewModelName=<string NewModelName>]:[NewImageConfigurationName=<string NewImageConfigurationName>]
Architecture level:
Module
Function: Loads a model recipe (.iamod) into the selected module with the specified name.
As the maximum number of models is two, adding a third model will generate an error (function_not_possible). A model must be deleted before adding this model (see ClearTeaching)
Parameters: FilePath Full path to the recipe. The recipe must be located on the AsyView controller or a remote server accessible from the AsyView controller.
The : in D:\Folder must be replaced by : (see example)
NewModelName Optional parameter. If not specified, the name stored in the recipe file will be use.
Name of the model
If the name is already used in this module, an error will be returned.
NewImageConfigurationName Name of Image Configuration that will be linked to the loaded model
Feedback parameters:

SmartSight
Programming Guide
Asyview Instructions Version: C2
000.100.531 41/64
Example: cmd/? asyview/cell/module:loadmodelfile filepath=d:\asyril\recipes\model1.iamod:newmodelname=model1:ne
wimageconfigurationname=default
?/cmd asyview/cell/module:loadmodelfile @pid=697:@status=200
See also: ClearTeaching / GetParameter [ModelNames] / SaveModelFile
SaveFile (AsyView / Cell / Module)
Syntax: SaveFile [FilePath=<string FilePath>]
Architecture level:
AsyView, Cell, Module
Function: Saves a recipe at the element level (see 6.3 Recipe) in the specified folder.
Parameters: FilePath Full path to the recipe. The recipe will be located on the AsyView controller or a remote server accessible from the AsyView controller.
The : in D:\Folder must be replaced by : (see example).
Feedback parameters:
Example: cmd/? asyview:savefile filepath=d:\asyrildata\recipes\recipe.vrec
?/cmd asyview:savefile @pid=206:@status=200
See also: LoadFile (AsyView / Cell / Module)
SaveFile (Feeder)
Syntax: SaveFile [ConfigurationFilePath=<string FilePath>] OR [ProcessFilePath=<string FilePath>]
Architecture level:
Feeder
Function: Saves the specified recipe type (configuration or process) in the specified folder. The extension of the recipe depends on the type, see 6.3 Recipe.
Parameters: ConfigurationFilePath Not in the same command as ProcessFilePath
Full path to the feeder configuration (.fconf). The recipe will be located on the AsyView controller or a remote server accessible from the AsyView controller.
The : in D:\Folder must be replaced by : (see example)
ProcessFilePath Not in the same command as ConfigurationFilePath
Full path to the process configuration (.fproc). The recipe will be located on the AsyView controller or a remote server accessible from the AsyView controller.
The : in D:\Folder must be replaced by : (see example)

SmartSight
Programming Guide
Asyview Instructions Version: C2
000.100.531 42/64
Feedback parameters:
ConfigurationFilePath Path to the file, same as sent.
ProcessFilePath Path to the file, same as sent.
Example: cmd/? asyview/cell/module/asycube:savefile @pid=119:@status=200 configurationfilepath=d:\asyrildata\recipes\feeder1.fconf
?/cmd asyview/cell/module/asycube:savefile @pid=119:@status=200 configurationfilepath=d:\asyrildata\recipes\feeder1.fconf
See also: LoadFile (Feeder)
SaveModelFile
Syntax: SaveModelFile [FilePath=<string FilePath>]:[ModelName=<string ModelName>]
Architecture level:
Module
Function: Saves the vision recipe of the specified model at the specified location. The extension of the recipe is .iamod.
Parameters: FilePath Full path to the recipe. The recipe will be located on the AsyView controller or a remote server accessible from the AsyView controller.
The : in D:\Folder must be replaced by : (see example).
ModelName Name of the model that will be saved.
Feedback parameters:
Example: cmd/? asyview/cell/module:savemodelfile filepath=d:\asyril\recipes\model1.iamod:modelname=model1
?/cmd asyview/cell/module:savemodelfile @pid=565:@status=200
See also: GetParameter [ModelNames] / LoadModelFile

SmartSight
Programming Guide
Asyview Instructions Version: C2
000.100.531 43/64
7.3. Calibration
AddPointPair
Syntax: AddPointPair [PositionX=<float PositionX>]:[PositionY=<float PositionY>]:[VisionPositionX=<float VisionPositionX>]:[VisionPositionY=<float VisionPositionY>]:[ImageConfigurationName=<string ImageConfigurationName>]
Architecture level:
Module, Feeder
Function: Associates a pair of vision point to a pair of other points.
Parameters: PositionX X coordinate of the position
PositionY Y coordinate of the position
VisionPositionX X coordinate of the detected vision position
VisionPositionY Y coordinate of the detected vision position
ImageConfigurationName
Name of the ImageConfiguration
The system always has a “default” ImageConfiguration that can be used if multiple configurations are not needed.
Feedback parameters:
ImageConfigurationName
Name of the ImageConfiguration, same as sent parameter.
Example: cmd/? asyview/cell/module:addpointpair positionx=1:positiony=1:visionpositionx=1:visionpositiony=1:image
configurationname=default
?/cmd asyview/cell/module:addpointpair @pid=379:@status=200 imageconfigurationname=default
See also: GetParameter [CalibrationPointPair] / GetParameter [CalibrationPointPairNumber]
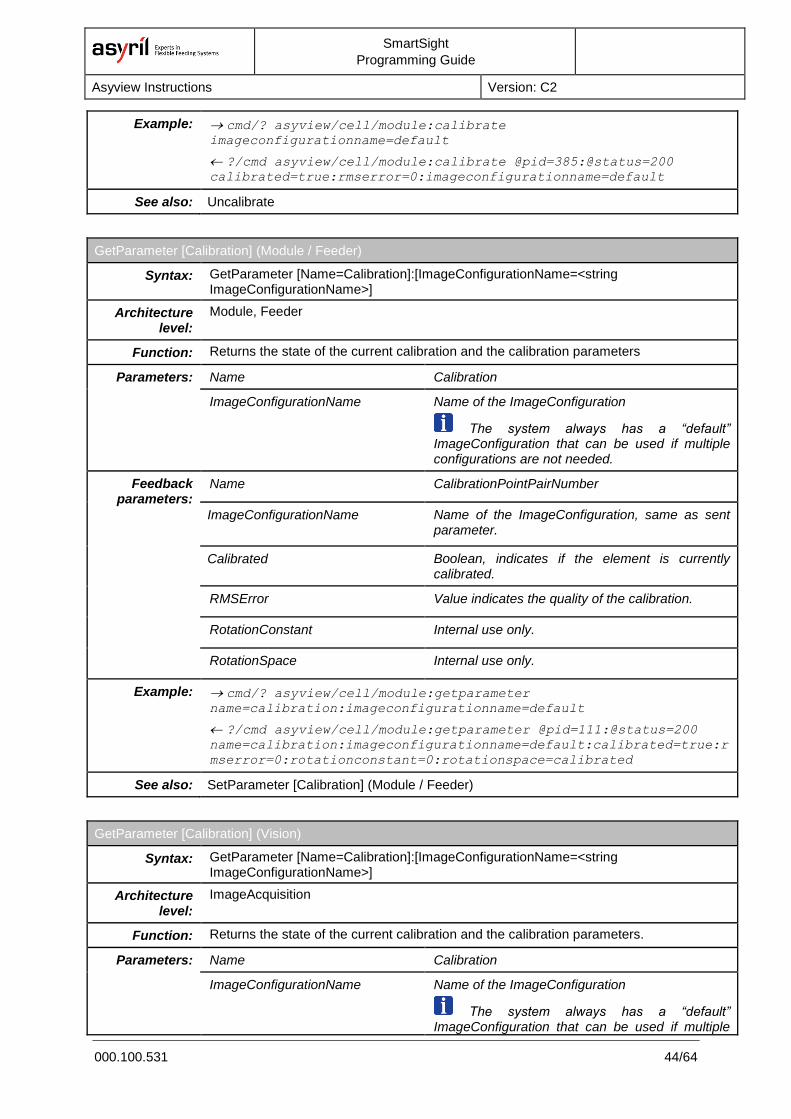
Calibrate
Syntax: Calibrate [ImageConfigurationName=<string ImageConfigurationName>]
Architecture level:
Module, Feeder, ImageAcquisition
Function: Executes the calibration and applies it to the targeted element.
Parameters: ImageConfigurationName Name of the ImageConfiguration
The system always has a “default” ImageConfiguration that can be used if multiple configurations are not needed.
Feedback parameters:
Calibrated Boolean, indicates if the calibration was successful.
If False, no other feedback parameters are sent.
RMSError Value indicates the quality of the calibration
ImageConfigurationName Name of the ImageConfiguration, same as sent parameter.
SmartSight
Programming Guide
Asyview Instructions Version: C2
000.100.531 44/64
Example: cmd/? asyview/cell/module:calibrate imageconfigurationname=default
?/cmd asyview/cell/module:calibrate @pid=385:@status=200 calibrated=true:rmserror=0:imageconfigurationname=default
See also: Uncalibrate
GetParameter [Calibration] (Module / Feeder)
Syntax: GetParameter [Name=Calibration]:[ImageConfigurationName=<string ImageConfigurationName>]
Architecture level:
Module, Feeder
Function: Returns the state of the current calibration and the calibration parameters
Parameters: Name Calibration
ImageConfigurationName
Name of the ImageConfiguration
The system always has a “default” ImageConfiguration that can be used if multiple configurations are not needed.
Feedback parameters:
Name CalibrationPointPairNumber
ImageConfigurationName
Name of the ImageConfiguration, same as sent parameter.
Calibrated Boolean, indicates if the element is currently calibrated.
RMSError Value indicates the quality of the calibration.
RotationConstant Internal use only.
RotationSpace Internal use only.
Example: cmd/? asyview/cell/module:getparameter name=calibration:imageconfigurationname=default
?/cmd asyview/cell/module:getparameter @pid=111:@status=200 name=calibration:imageconfigurationname=default:calibrated=true:r
mserror=0:rotationconstant=0:rotationspace=calibrated
See also: SetParameter [Calibration] (Module / Feeder)
GetParameter [Calibration] (Vision)
Syntax: GetParameter [Name=Calibration]:[ImageConfigurationName=<string ImageConfigurationName>]
Architecture level:
ImageAcquisition
Function: Returns the state of the current calibration and the calibration parameters.
Parameters: Name Calibration
ImageConfigurationName
Name of the ImageConfiguration
The system always has a “default” ImageConfiguration that can be used if multiple
SmartSight
Programming Guide
Asyview Instructions Version: C2
000.100.531 45/64
configurations are not needed.
Feedback parameters:
Name CalibrationPointPairNumber
ImageConfigurationName
Name of the ImageConfiguration, same as sent parameter.
Calibrated Boolean, indicates if the element is currently calibrated.
ComputationMode Mode to compute the calibration.
Usual value: Linear
ExposureTime Exposure time for the calibration picture
FeatureFinder Type of feature to detect
Usual value: CheckerboardExhaustive
FiducialMark Type of fiducial marks
Usual value: StandardRectangles
Output01
Boolean, indicates if the output is used or not to take the calibration picture.
Output02
Output03
Output04
TileSizeX Size of the tile in X direction.
TileSizeY Size of the tile in Y direction.
RMSError Value indicates the quality of the calibration.
Example: cmd/? asyview/cell/module/vision:getparameter name=calibration:imageconfigurationname=default
?/cmd asyview/cell/module/vision:getparameter @pid=110:@status=200
name=calibration:imageconfigurationname=default:calibrated=false:
computationmode=linear:exposuretime=5:featurefinder=checkerboarde
xhaustive:fiducialmark=standardrectangles:output01=true:output02=
false:output03=false:output04=false:tilesizex=2:tilesizey=2:rmser
ror=0
See also: SetParameter [Calibration] (Vision)
GetParameter [CalibrationPointPair]
Syntax: GetParameter [Name=CalibrationPointPair]:[ImageConfigurationName=<string ImageConfigurationName>]:[Index=<int Index>]
Architecture level:
Module, Feeder
Function: Returns the values of the chosen calibration point pair.
Parameters: Name CalibrationPointPair
ImageConfigurationName
Name of the ImageConfiguration
The system always has a “default”
SmartSight
Programming Guide
Asyview Instructions Version: C2
000.100.531 46/64
ImageConfiguration that can be used if multiple configurations are not needed.
Index Index of the calibration point. Starts at 0. Usually between 0 and 3.
Feedback parameters:
Name CalibrationPointPair
ImageConfigurationName
Name of the ImageConfiguration, same as sent parameter.
Index Index of the calibration point, same as the sent parameter.
If the index doesn’t exist, the highest index will be return.
PositionX X coordinate of the position
PositionY Y coordinate of the position
VisionPositionX X coordinate of the detected vision position
VisionPositionY Y coordinate of the detected vision position
Example: cmd/? asyview/cell/module:getparameter name=calibrationpointpair:imageconfigurationname=default:index=3
?/cmd asyview/cell/module:getparameter @pid=93:@status=200
name=calibrationpointpair:imageconfigurationname=default:index=3:
positionx=1:positiony=0:visionpositionx=1:visionpositiony=0
See also: GetParameter [CalibrationPointPairNumber]
GetParameter [CalibrationPointPairNumber]
Syntax: GetParameter [Name=CalibrationPointPairNumber]:[ImageConfigurationName=<string ImageConfigurationName>]
Architecture level:
Module, Feeder
Function: Indicates how many calibration points are already defined.
A calibration must have 4 points to be valid, otherwise it will not be possible to apply the calibration.
Parameters: Name CalibrationPointPairNumber
ImageConfigurationName
Name of the ImageConfiguration
The system always has a “default” ImageConfiguration that can be used if multiple configurations are not needed.
Feedback parameters:
Name CalibrationPointPairNumber
ImageConfigurationName
Name of the ImageConfiguration, same as sent parameter.
Number Integer, number of calibration points already defined. Usually between 0 and 4.
SmartSight
Programming Guide
Asyview Instructions Version: C2
000.100.531 47/64
Example: cmd/? asyview/cell/module:getparameter name=calibrationpointpairnumber:imageconfigurationname=default
?/cmd asyview/cell/module:getparameter @pid=351:@status=200 name=calibrationpointpairnumber:imageconfigurationname=default:nu
mber=0
See also: GetParameter [CalibrationPointPair]
LoadCalibration
Syntax: LoadCalibration [ImageConfigurationName=<string ImageConfigurationName>]:[FilePath=<string FilePath>]
Architecture level:
Module, Feeder, ImageAcquisition
Function: Loads manually a saved calibration for a specific element.
Parameters: ImageConfigurationName
(Module Level only)
Name of the ImageConfiguration
The system always has a “default” ImageConfiguration that can be used if multiple configurations are not needed.
FilePath Optional parameter, possibility to save a calibration somewhere else and load it manually later.
Full path to the file. The file will be located on the AsyView controller or a remote server accessible from the AsyView controller.
File Extensions:
Module: *.pcalib
Feeder: *.fcalib
ImageAcquisition: *.vcalib
The : in D:\Folder must be replaced by : (see example).
Feedback parameters:
ImageConfigurationName
(Module Level only)
Name of the ImageConfiguration, same as sent parameter.
FilePath File Path, same as sent parameter.
Example: cmd/? asyview/cell/module:loadcalibration imageconfigurationname=default:filepath=d:\asyril\calibration\
cell\module\vision_default.pcalib
?/cmd asyview/cell/module:loadcalibration @pid=54:@status=200 imageconfigurationname=default:filepath=d:\asyril\calibration\
cell\module\vision_default.pcalib
See also: SaveCalibration
SaveCalibration
Syntax: SaveCalibration [ImageConfigurationName=<string ImageConfigurationName>]
Architecture level:
Module, Feeder, ImageAcquisition
Function: Saves the calibration into the default folder (or a specific folder) so the calibration can be
SmartSight
Programming Guide
Asyview Instructions Version: C2
000.100.531 48/64
loaded automatically (or manually) on next system boot.
Parameters: ImageConfigurationName
(Module Level only)
Name of the ImageConfiguration
The system always has a “default” ImageConfiguration that can be used if multiple configurations are not needed.
FilePath Optional parameter, possibility to save a calibration somewhere else and load it manually later.
Full path to the file. The file will be located on the AsyView controller or a remote server accessible from the AsyView controller.
File Extensions:
Module: *.pcalib
Feeder: *.fcalib
Vision: *.vcalib
The : in D:\Folder must be replaced by : (see example).
Feedback parameters:
ImageConfigurationName
(Module Level only)
Name of the ImageConfiguration, same as sent parameter.
FilePath Only if in the command, same as sent parameter.
Example: cmd/? asyview/cell/module:savecalibration imageconfigurationname=default
?/cmd asyview/cell/module:savecalibration @pid=47:@status=200 imageconfigurationname=default
See also: LoadCalibration
SetParameter [Calibration] (Module / Feeder)
Syntax: SetParameter [Name=Calibration]:[ImageConfigurationName=<string ImageConfigurationName>]:[RotationSpace=<Calibrated/Constant/Uncalibrated>]:[RotationConstant=<int RotationConstant>]
Architecture level:
Module, Feeder
Function: Sets the calibration parameters for the specific ImageConfiguration
Parameters: Name Calibration
ImageConfigurationName
Name of the ImageConfiguration
The system always has a “default” ImageConfiguration that can be used if multiple configurations are not needed.
Feedback parameters:
Name CalibrationPointPairNumber
ImageConfigurationName
Name of the ImageConfiguration, same as sent parameter.
Example: cmd/? asyview/cell/module/asycube:setparameter name=calibration:imageconfigurationname=default:rotationspace=cal
ibrated:rotationconstant=0
?/cmd asyview/cell/module/asycube:setparameter
SmartSight
Programming Guide
Asyview Instructions Version: C2
000.100.531 49/64
@pid=354:@status=200
name=calibration:imageconfigurationname=default
See also: GetParameter [Calibration] (Module / Feeder)
SetParameter [Calibration] (Vision)
Syntax: SetParameter [Name=Calibration]:[ImageConfigurationName=<string ImageConfigurationName>]:[TileSizeX=<float TileSizeX>]:[TileSizeY=<float TileSizeY>]:[FiducialMark=<DotGridAxes/None/StandardRectangles>]:[FeatureFinder=<Checkerboard/CheckerboardExhaustive/DotGrid>]:[ComputationMode=<Linear/Linescan2DWarp/LinescanWarp/PerspectiveAndRadialWarp>]:[ExposureTime=<int ExposureTime>]:[Output01=<True/False>]:[Output02=<True/False>]:[Output03=<True/False>]:[Output04=<True/False>]
Architecture level:
ImageAcquisition
Function: Sets the calibration parameters for the specific ImageConfiguration
Parameters: Name Calibration
ImageConfigurationName
Name of the ImageConfiguration
The system always has a “default” ImageConfiguration that can be used if multiple configurations are not needed.
TileSizeX Size of the tile in X direction.
TileSizeY Size of the tile in Y direction.
FiducialMark Type of fiducial marks
Usual value: StandardRectangles
FeatureFinder Type of feature to detect
Usual value: CheckerboardExhaustive
ComputationMode Mode to compute the calibration.
Usual value: Linear
ExposureTime Exposure time for the calibration picture
Output01
Boolean, indicates if the output is used or not to take the calibration picture.
Output02
Output03
Output04
Feedback parameters:
Name CalibrationPointPairNumber
Example: cmd/? asyview/cell/module/vision:setparameter name=calibration:imageconfigurationname=default:tilesizex=2:tiles
izey=2:featurefinder=checkerboardexhaustive:fiducialmark=standard
rectangles:computationmode=linear:exposuretime=5:output01=true:ou
tput02=false:output03=false:output04=false
?/cmd asyview/cell/module/vision:setparameter @pid=358:@status=200 name=calibration
See also: GetParameter [Calibration] (Vision)
SmartSight
Programming Guide
Asyview Instructions Version: C2
000.100.531 50/64
Uncalibrate
Syntax: Uncalibrate [ImageConfigurationName=<string ImageConfigurationName>]
Architecture level:
Module, Feeder, ImageAcquisition
Function: Removes the calibration for the selected ImageConfiguration on the targeted element.
Parameters: ImageConfigurationName Name of the ImageConfiguration
The system always has a “default” ImageConfiguration that can be used if multiple configurations are not needed.
Feedback parameters:
ImageConfigurationName Name of the ImageConfiguration, same as sent parameter.
Example: cmd/? asyview/cell/module:uncalibrated imageconfigurationname=default
?/cmd asyview/cell/module:uncalibrate @pid=340:@status=200 imageconfigurationname=default
See also: Calibrate
7.4. Production
Acquire
Syntax: Acquire [ModelName=<string ModelName>]
Architecture level:
ImageAcquisition
Function: Asks the system to take a picture and start an image analysis.
This command is not available in active production mode.
Parameters: ModelName Optional parameter.
If sent, only the picture(s) for the specified model will be taken and analysed.
This parameter is useful only when working with multiple models.
Feedback parameters:
Example: cmd/? asyview/cell/module/vision:acquire
?/cmd asyview/cell/module/vision:acquire @pid=556:@status=200
See also:
ClearResults
Syntax: ClearResults [OnlyAcquire=<False/True>]
Architecture level:
Module
Function: Clears the list of all remaining good results.
Then, it will start with a vibration (OnlyAcquire=False) or an image acquisition and analysis (OnlyAcquire=True).

SmartSight
Programming Guide
Asyview Instructions Version: C2
000.100.531 51/64
Depending on when the command is sent, it is possible that the system will refuse it and send back a status=409. Then, the command must be sent again until the system accepts it.
Parameters: OnlyAcquire Boolean, indicates if the next action is a vibration or image acquisition and process
Feedback parameters:
Example: cmd/? asyview:clearresults onlyacquire=true
?/cmd asyview:clearresults @pid=480:@status=200
See also: GetResult
GetParameter [AvailableResults]
Syntax: GetParameter [Name=AvailableResults]:[ModelName=<string ModelName>]
Architecture level:
Module
Function: Returns the number of good parts that are considered as available (coordinates not sent by a GetResult yet)
Parameters: Name AvailableResults
ModelName Optional parameter.
Returns only the number of available parts of the specified model.
This parameter is useful only when working with multiple models.
Feedback parameters:
Name AvailableResults
AvailableResults Integer, indicates how many results are available.
Example: cmd/? asyview/cell/module:getparameter name=availableresults
?/cmd asyview/cell/module:getparameter @pid=411:@status=200 name=availableresults:availableresults=1
See also: GetResult
GetParameter [FieldOfView]
Syntax: GetParameter [Name=FieldOfView]:[ImageConfigurationName=<string ImageConfigurationName]
Architecture level:
ImageAcquisition
Function: Returns the state of the FieldOfView for the specified ImageConfiguration. If no ImageConfiguration specified, the state of the FieldOfView of all ImageConfigurations will be returned.
Parameters: Name FieldOfView
ImageConfigurationName
Optional parameter
Name of the ImageConfiguration
The system always has a “default”

SmartSight
Programming Guide
Asyview Instructions Version: C2
000.100.531 52/64
ImageConfiguration that can be used if multiple configurations are not needed.
Feedback parameters:
Name FieldOfView
<ImageConfigurationName01>
State of the field of view for each ImageConfiguration.
Locked or Unlocked
<ImageConfigurationName02>
<…>
Example: cmd/? asyview/cell/module/vision:getparameter name=fieldofview:imageconfigurationname=default
?/cmd asyview/cell/module/vision:getparameter @pid=500:@status=200 name=fieldofview:default=unlocked
cmd/? asyview/cell/module/vision:getparameter name=fieldofview
?/cmd asyview/cell/module/vision:getparameter @pid=502:@status=200
name=fieldofview:default=unlocked:smdpile=unlocked:smdface=unlock
ed
See also: SetParameter [FieldOfView]
GetParameter [Mode]
Syntax: GetParameter [Name=Mode]
Architecture level:
Module
Function: Returns the mode of the module.
See 6.1 Modes
Parameters: Name Mode
Feedback parameters:
Name Mode
Mode Mode of the module.
Configuration or Process.
Example: cmd/? asyview/cell/module:getparameter name=mode
?/cmd asyview/cell/module:getparameter @pid=419:@status=200 name=mode:mode=process
See also: Start / Stop
GetParameter [ModelNames]
Syntax: GetParameter [Name=ModelNames]
Architecture level:
Module
Function: Returns the names of all the models currently loaded on the module. The maximum number of models is currently limited to two.
Parameters: Name ModelNames
Feedback Name Mode
SmartSight
Programming Guide
Asyview Instructions Version: C2
000.100.531 53/64
parameters: Model01 Returned only if existing.
Name of the 1st model.
Model02 Returned only if existing.
Name of the 2nd model.
Example: cmd/? asyview/cell/module:getparameter name=modelnames
?/cmd asyview/cell/module:getparameter @pid=446:@status=200 name=modelnames:modelname01=model1:modelname02=model2
See also:
GetParameter [PartsOnFeeder]
Syntax: GetParameter [Name=PartsOnFeeder]:[ModelName=<string ModelName>]
Architecture level:
Module
Function: Returns the total number of parts detected by the vision (good and bad) located on the feeder.
Parameters: Name PartsOnFeeder
ModelName Optional parameter.
Returns only the number of parts of the specified model.
This parameter is useful only when working with multiple models.
Feedback parameters:
Name PartsOnFeeder
PartsOnFeeder Integer, indicates the number of parts on the feeder.
AnalyzeRunning Boolean, indicates if the analysis is still running or finished.
Example: cmd asyview/cell/module:getparameter name=partsonfeeder:modelname=model1
?/cmd asyview/cell/module:getparameter @pid=456:@status=200 name=partsonfeeder:modelname=model1:partsonfeeder=10:analyzerunni
ng=false
See also:
GetParameter [ProcessManagerState]
Syntax: GetParameter [Name= ProcessManagerState]:[ModelName=<string ModelName>]
Architecture level:
Module
Function: Returns the state of the process manager for a specified ModelName. Used mostly in passive mode to know if the image analysis is finished.
Parameters: Name ProcessManagerState
ModelName Name of the model
Feedback Name ProcessManagerState
SmartSight
Programming Guide
Asyview Instructions Version: C2
000.100.531 54/64
parameters: ProcessManagerState State of the ProcessManager. IDLE or Running.
ImageAcquisitionManagerName Name of the ImageAcquisitionManager linked to this ProcessManager.
ModelName Name of the model, same as request.
Example: cmd/? asyview/cell/module:getparameter name=processmanagerstate:modelname=model1
?/cmd asyview/cell/module:getparameter @pid=414:@status=200 name=processmanagerstate:state=idle:imageacquisitionmanagername=v
ision:modelname=model1
See also: GetResult / Acquire / SetParameter [WorkingMode]
GetParameter [States]
Syntax: GetParameter [Name=States]
Architecture level:
AsyView, Cell, Module, Feeder, ImageAcquisition
Function: Informs about the general state of the element.
Parameters: Name States
Feedback parameters:
Name States
ConnectionState Element connection state (connected / disconnected)
DataState Element data state (loaded / unloaded)
Mode Element mode (configuration / production)
State Element state (IDLE / Running)
Example: cmd/? asyview:getparameter name=states
?/cmd asyview:getparameter @pid=166:@status=200 name=states:connectionstate=connected:datastate=loaded:mode=confi
guration:state=idle
See also: Start / Stop
GetParameter [WorkingMode]
Syntax: GetParameter [Name=WorkingMode]
Architecture level:
Module
Function: Returns the working mode of the module.
See 6.2 Working Mode
Parameters: Name WorkingMode
Feedback parameters:
Name WorkingMode
Mode WorkingMode of the module.
Active or Passive.
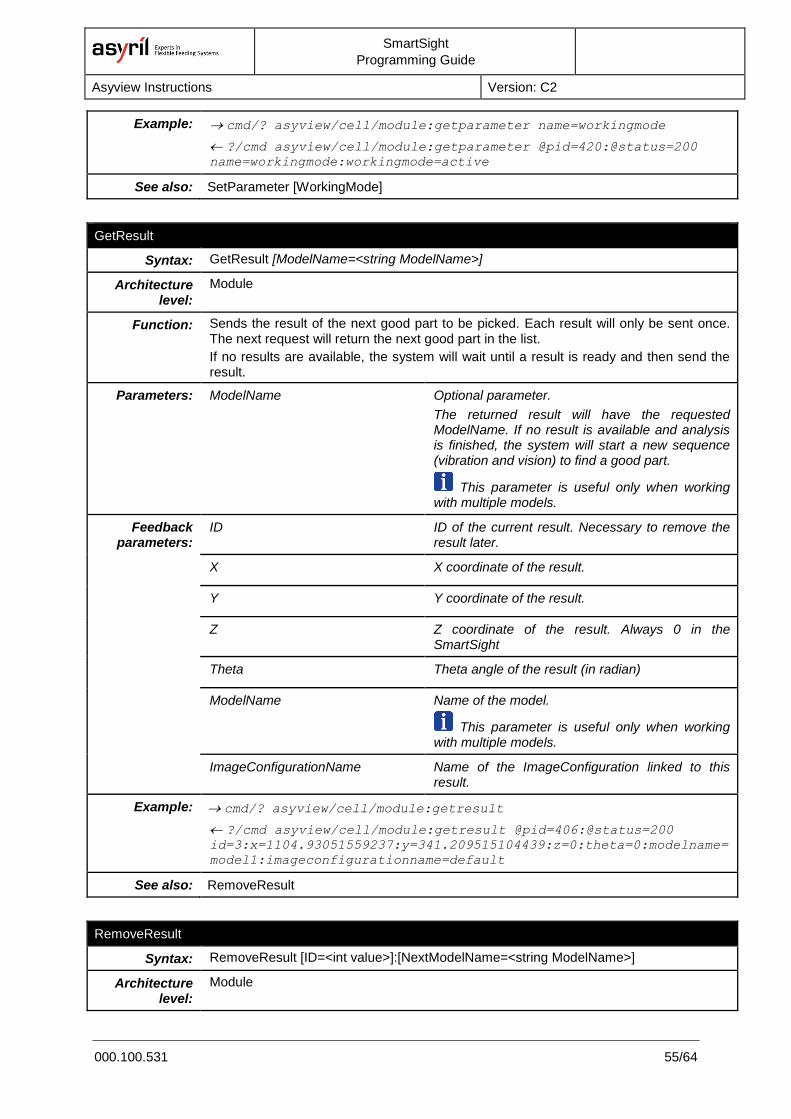
SmartSight
Programming Guide
Asyview Instructions Version: C2
000.100.531 55/64
Example: cmd/? asyview/cell/module:getparameter name=workingmode
?/cmd asyview/cell/module:getparameter @pid=420:@status=200 name=workingmode:workingmode=active
See also: SetParameter [WorkingMode]
GetResult
Syntax: GetResult [ModelName=<string ModelName>]
Architecture level:
Module
Function: Sends the result of the next good part to be picked. Each result will only be sent once. The next request will return the next good part in the list.
If no results are available, the system will wait until a result is ready and then send the result.
Parameters: ModelName Optional parameter.
The returned result will have the requested ModelName. If no result is available and analysis is finished, the system will start a new sequence (vibration and vision) to find a good part.
This parameter is useful only when working with multiple models.
Feedback parameters:
ID ID of the current result. Necessary to remove the result later.
X X coordinate of the result.
Y Y coordinate of the result.
Z Z coordinate of the result. Always 0 in the SmartSight
Theta Theta angle of the result (in radian)
ModelName Name of the model.
This parameter is useful only when working with multiple models.
ImageConfigurationName Name of the ImageConfiguration linked to this result.
Example: cmd/? asyview/cell/module:getresult
?/cmd asyview/cell/module:getresult @pid=406:@status=200 id=3:x=1104.93051559237:y=341.209515104439:z=0:theta=0:modelname=
model1:imageconfigurationname=default
See also: RemoveResult
RemoveResult
Syntax: RemoveResult [ID=<int value>]:[NextModelName=<string ModelName>]
Architecture level:
Module
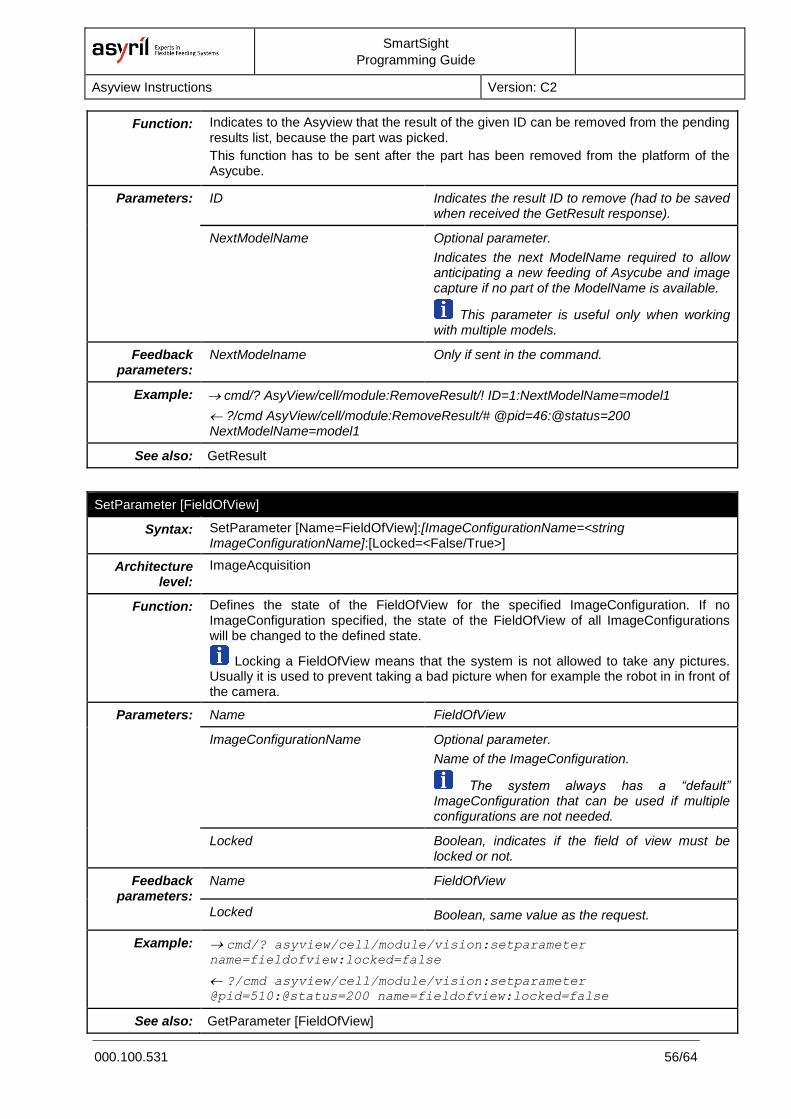
SmartSight
Programming Guide
Asyview Instructions Version: C2
000.100.531 56/64
Function: Indicates to the Asyview that the result of the given ID can be removed from the pending results list, because the part was picked.
This function has to be sent after the part has been removed from the platform of the Asycube.
Parameters: ID Indicates the result ID to remove (had to be saved when received the GetResult response).
NextModelName Optional parameter.
Indicates the next ModelName required to allow anticipating a new feeding of Asycube and image capture if no part of the ModelName is available.
This parameter is useful only when working with multiple models.
Feedback parameters:
NextModelname Only if sent in the command.
Example: cmd/? AsyView/cell/module:RemoveResult/! ID=1:NextModelName=model1
?/cmd AsyView/cell/module:RemoveResult/# @pid=46:@status=200 NextModelName=model1
See also: GetResult
SetParameter [FieldOfView]
Syntax: SetParameter [Name=FieldOfView]:[ImageConfigurationName=<string ImageConfigurationName]:[Locked=<False/True>]
Architecture level:
ImageAcquisition
Function: Defines the state of the FieldOfView for the specified ImageConfiguration. If no ImageConfiguration specified, the state of the FieldOfView of all ImageConfigurations will be changed to the defined state.
Locking a FieldOfView means that the system is not allowed to take any pictures. Usually it is used to prevent taking a bad picture when for example the robot in in front of the camera.
Parameters: Name FieldOfView
ImageConfigurationName
Optional parameter.
Name of the ImageConfiguration.
The system always has a “default” ImageConfiguration that can be used if multiple configurations are not needed.
Locked Boolean, indicates if the field of view must be locked or not.
Feedback parameters:
Name FieldOfView
Locked Boolean, same value as the request.
Example: cmd/? asyview/cell/module/vision:setparameter name=fieldofview:locked=false
?/cmd asyview/cell/module/vision:setparameter @pid=510:@status=200 name=fieldofview:locked=false
See also: GetParameter [FieldOfView]

SmartSight
Programming Guide
Asyview Instructions Version: C2
000.100.531 57/64
SetParameter [WorkingMode]
Syntax: SetParameter [Name=WorkingMode]:[WorkingMode=<Active/Passive>]
Architecture level:
Module
Function: Defines the working mode of the module.
See 6.2 Working Mode
Parameters: Name WorkingMode
WorkingMode WorkingMode of the module.
Active or Passive.
Feedback parameters:
Name WorkingMode
Example: cmd/? asyview/cell/module:setparameter name=workingmode:workingmode=active
?/cmd asyview/cell/module:setparameter @pid=463:@status=200 name=workingmode
See also: GetParameter [WorkingMode]
Start
Syntax: Start
Architecture level:
AsyView, Cell, Module
Function: Starts the targeted element (and all sub-elements).
This will switch the elements from configuration mode to production mode.
Parameters:
Feedback parameters:
Example: cmd/? asyview:start
?/cmd asyview:start @pid=170:@status=200
See also: Stop / GetParameter [Mode]
Stop
Syntax: Stop
Architecture level:
AsyView, Cell, Module
Function: Stops the targeted element (and all sub-elements).
This will switch the systems from production mode to configuration mode.
Parameters:
Feedback parameters:
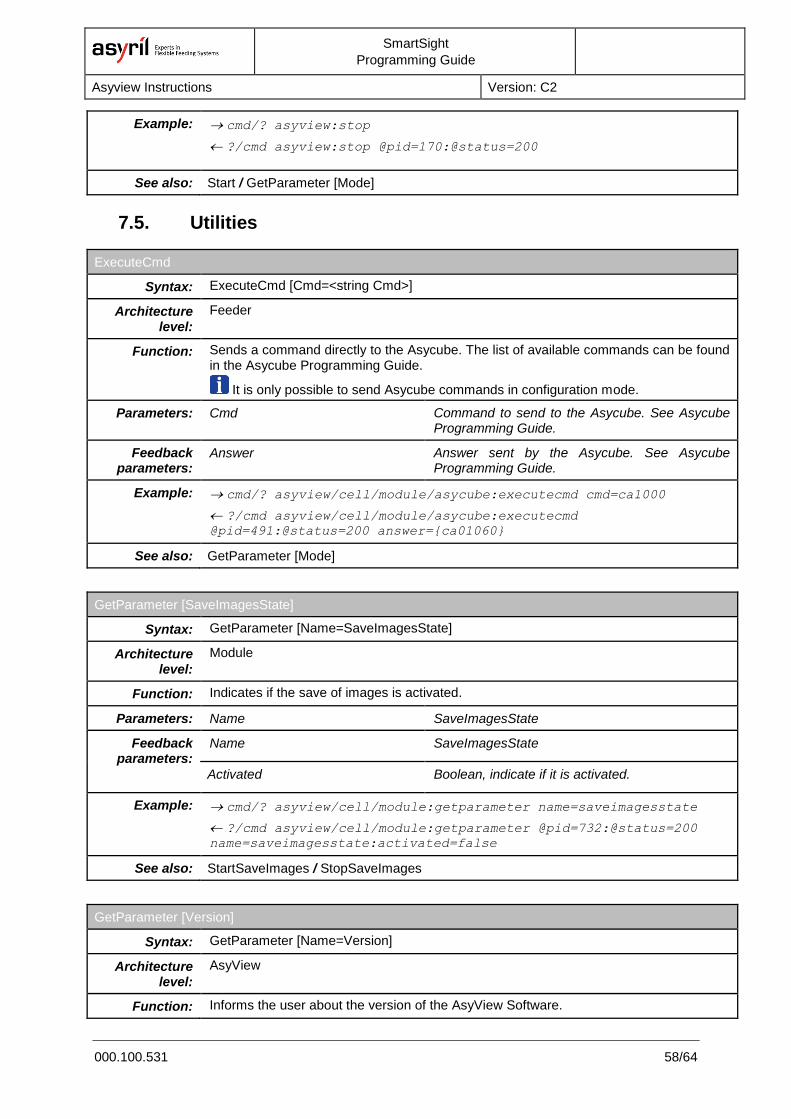
SmartSight
Programming Guide
Asyview Instructions Version: C2
000.100.531 58/64
Example: cmd/? asyview:stop
?/cmd asyview:stop @pid=170:@status=200
See also: Start / GetParameter [Mode]
7.5. Utilities
ExecuteCmd
Syntax: ExecuteCmd [Cmd=<string Cmd>]
Architecture level:
Feeder
Function: Sends a command directly to the Asycube. The list of available commands can be found in the Asycube Programming Guide.
It is only possible to send Asycube commands in configuration mode.
Parameters: Cmd Command to send to the Asycube. See Asycube Programming Guide.
Feedback parameters:
Answer Answer sent by the Asycube. See Asycube Programming Guide.
Example: cmd/? asyview/cell/module/asycube:executecmd cmd=ca1000
?/cmd asyview/cell/module/asycube:executecmd @pid=491:@status=200 answer={ca01060}
See also: GetParameter [Mode]
GetParameter [SaveImagesState]
Syntax: GetParameter [Name=SaveImagesState]
Architecture level:
Module
Function: Indicates if the save of images is activated.
Parameters: Name SaveImagesState
Feedback parameters:
Name SaveImagesState
Activated Boolean, indicate if it is activated.
Example: cmd/? asyview/cell/module:getparameter name=saveimagesstate
?/cmd asyview/cell/module:getparameter @pid=732:@status=200 name=saveimagesstate:activated=false
See also: StartSaveImages / StopSaveImages
GetParameter [Version]
Syntax: GetParameter [Name=Version]
Architecture level:
AsyView
Function: Informs the user about the version of the AsyView Software.
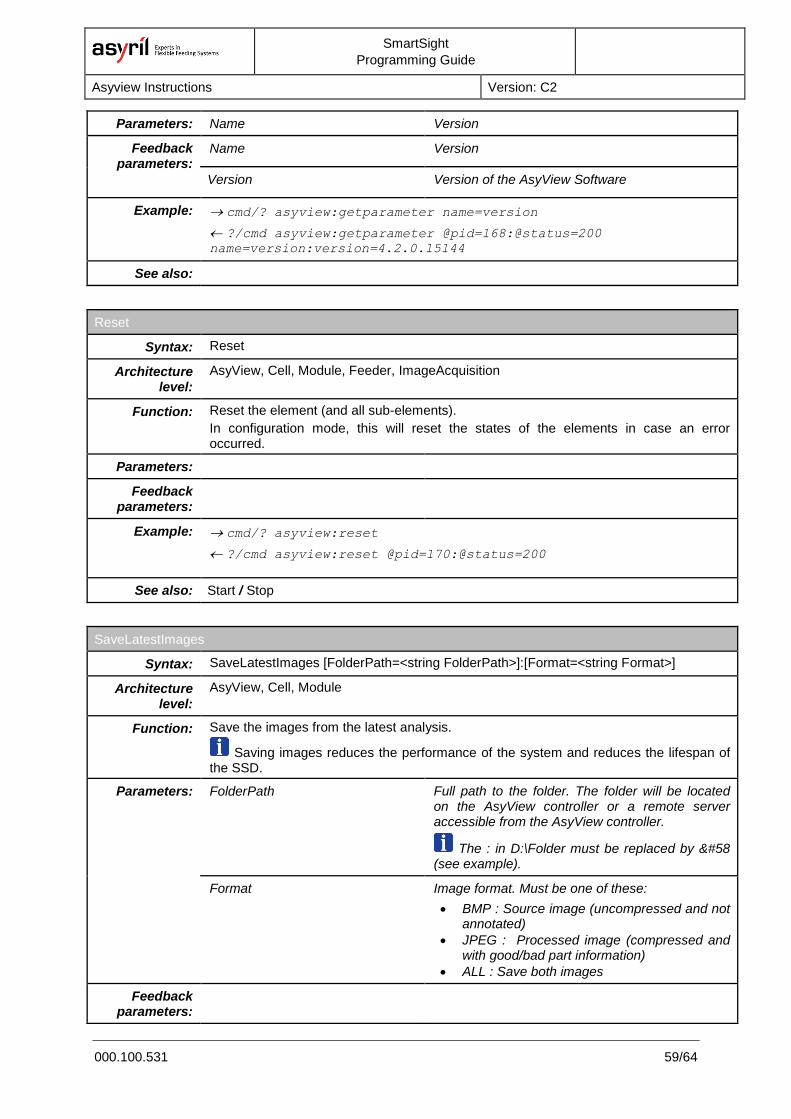
SmartSight
Programming Guide
Asyview Instructions Version: C2
000.100.531 59/64
Parameters: Name Version
Feedback parameters:
Name Version
Version Version of the AsyView Software
Example: cmd/? asyview:getparameter name=version
?/cmd asyview:getparameter @pid=168:@status=200 name=version:version=4.2.0.15144
See also:
Reset
Syntax: Reset
Architecture level:
AsyView, Cell, Module, Feeder, ImageAcquisition
Function: Reset the element (and all sub-elements).
In configuration mode, this will reset the states of the elements in case an error occurred.
Parameters:
Feedback parameters:
Example: cmd/? asyview:reset
?/cmd asyview:reset @pid=170:@status=200
See also: Start / Stop
SaveLatestImages
Syntax: SaveLatestImages [FolderPath=<string FolderPath>]:[Format=<string Format>]
Architecture level:
AsyView, Cell, Module
Function: Save the images from the latest analysis.
Saving images reduces the performance of the system and reduces the lifespan of the SSD.
Parameters: FolderPath Full path to the folder. The folder will be located on the AsyView controller or a remote server accessible from the AsyView controller.
The : in D:\Folder must be replaced by : (see example).
Format Image format. Must be one of these:
• BMP : Source image (uncompressed and not annotated)
• JPEG : Processed image (compressed and with good/bad part information)
• ALL : Save both images
Feedback parameters:

SmartSight
Programming Guide
Asyview Instructions Version: C2
000.100.531 60/64
Example: cmd/? asyview:savelatestimages folderpath=d:\asyril\imagedatabase:format=bmp
?/cmd asyview:getparameter @pid=211:@status=200
See also: StartSaveImages/ StopSaveImages
StartSaveImages
Syntax: StartSaveImages [FolderPath=<string FolderPath>]:[Format=<string Format>]:[Number=<int Number>]
Architecture level:
AsyView, Cell, Module
Function: Saves the images for the next <Number> analysis.
Saving images reduces the performance of the system and reduces the lifespan of the SSD.
Parameters: FolderPath Full path to the folder. The folder will be located on the AsyView controller or a remote server accessible from the AsyView controller.
The : in D:\Folder must be replaced by : (see example).
Format Image format. Must be one of these:
• BMP : Source image (uncompressed and not annotated)
• JPEG : Processed image (compressed and with good/bad part information)
• ALL : Save both images
Number Optional parameter
Defines the number of analysis saved until it stops automatically. If omitted, no automatic stop.
Feedback parameters:
Example: cmd/? asyview:startsaveimages folderpath=d:\asyril\imagedatabase:format=bmp:number=10
?/cmd asyview:startsaveimages @pid=214:@status=200
See also: GetParameter [SaveImagesState] / SaveLatestImages / StopSaveImages
StopSaveImages
Syntax: StopSaveImages
Architecture level:
AsyView, Cell, Module
Function: Stop the current save images process if any.
Parameters:
Feedback parameters:

SmartSight
Programming Guide
Asyview Instructions Version: C2
000.100.531 61/64
Example: cmd/? asyview:stopsaveimages
?/cmd asyview:stopsaveimages @pid=216:@status=200
See also: GetParameter [SaveImagesState] / StartSaveImages / SaveLatestImages

SmartSight
Programming Guide
Technical Support Version: C2
000.100.531 62/64
8. Technical Support
8.1. To help us provide the best service …
Have you read the FAQ and the check-list and still not found an answer your questions?
Before contacting us, please note down the following information concerning your product:
- Serial number and product key for your equipment
- Software version(s) used
- Error message, alarm, or visual signals displayed by the interface.
8.2. Contact
You can find extensive information on our website: www.asyril.com
You can also contact our Customer Service department:

SmartSight
Programming Guide
Revision table Version: C2
000.100.531 63/64
Revision table
Rev. Date Author Comments
B 27.03.2015 DaM Initial version for Asyview V3.0
B1 24.08.2016 DaM Minor corrections (architecture, product and documentation name)
B2 12.06.2017 WaJ Minor modification (Chapter 4.2)
C 16.01.2018 HsJ Modifications for new version AsyView 4
C1 29.03.2018 HsJ Modifications for new computer model
C2 29.07.2019 CoG/
GuB
Added instruction descriptions and changes linked to Asyview 4.2.0
(Asyril licencing system)
SmartSight
Programming Guide
Revision table Version: C2
000.100.531 64/64
This document is the property of Asyril SA.; it may not be reproduced, modified or communicated, in
whole or in part, without our prior written authorisation. Asyril SA. reserves the right to modify any
information contained in this document for reasons related to product improvements without prior
notice
Asyril SA
Z.I. le Vivier 22
Ch-1690 Villaz-St-Pierre
Switzerland
Tel. +41 26 653 71 90
www.asyril.com