1kotsp.info/.../en/en_kot_administrator_manual_2.3.56.docx · web viewwork attendance management...
TRANSCRIPT

Administrator Manual Ver. 2.3.56
1. Introduction.............................................................................................................................11.1 Administration Screen Log-in........................................................................................................1
2. Initial Settings................................................................................................................................22.1 Basic Settings............................................................................................................................22.2 Section Settings.........................................................................................................................22.3 Employee-Type Settings..............................................................................................................32.4 Employee Settings......................................................................................................................42.5 Time Recorder Setting.................................................................................................................52.6 Send Time Recorder URL............................................................................................................6
3. Manage Employee Information........................................................................................................83.1 Basic Operation Menu.................................................................................................................83.2 Daily Info...................................................................................................................................93.3 Pattern Settings.......................................................................................................................12
3.3.1 Create Schedule Patterns..................................................................................................123.4 Holiday Settings.......................................................................................................................13
3.4.1 Register Additional Holidays..................................................................................................133.4.2 Import Japanese National Holidays........................................................................................13
3.5 Weekly Assign Settings (Schedule Pattern Allocation)....................................................................143.6 Individual Schedule Settings......................................................................................................153.7 Request List............................................................................................................................163.8 Error List.................................................................................................................................163.9 Pending Alerts Display..............................................................................................................173.10 Monthly Info...........................................................................................................................17
3.10.1 Close Attendance Record...................................................................................................173.11 Data Export............................................................................................................................18
3.11.1 Create Layout Settings.......................................................................................................183.11.2 Data Export.......................................................................................................................19
3.12 Employee Search...................................................................................................................194. General Administrator Roles..........................................................................................................20
4.1 Administrator / Workflow & Approval Operation Menu....................................................................204.2 Role Settings...........................................................................................................................20
4.2.1 Combination of Section Management Accessibility and Employee-Type......................................224.2.2 Details of Access Settings.....................................................................................................22
4.3 Workflow & Approval Settings.....................................................................................................234.3.1 Create Workflow..................................................................................................................234.3.2 Workflow Example...............................................................................................................23

1. IntroductionWork attendance management system, KING OF TIME consists of three screens.
Administration screen: Administrators manage employees’ records and settingsTime Recorder screen: Employees record work attendanceTimecard screen: Employees view personal attendance record
This setup manual introduces settings on [Administration] screen.
The manual content includes settings which are exclusive for an administrator with complete security rights. Check administrator rights in case any operation is not available or a control is not displayed.
1.1 Administration Screen Log-in
1) Launch Internet Explorer and type the log-in URL in the address bar.2) Enter log-in ID and password, then click [LOG-IN] button3) After successful authentication, the following screen is displayed.4) Add the URL to [Favorites] or create a shortcut on Desktop for future convenience.
2

2. Initial SettingsThese section details initial settings in order to prepare employees to record work attendance.
2.1 Basic SettingsProceed with basic settings in the following order: [Section Settings] > [Employee-Type Settings] > [Employee Settings] > [Timerecorder Settings].(Sample data for each setting is available for your convenience.)
Operation Menu Description SectionSection Settings Enter the work location where the Time Recorder is used 2.2
Employee-Type Settings Enter employee types such as staff and part-time 2.3
Employee SettingsEnter employee information such as name, employment date and employee code
2.4
Timerecorder Settings Time recorder settings for recording work attendance 2.5
2.2 Section Settings1) Select Section Settings from the operation menu, and click [New Registration] button (or [Edit]
button). [Section Settings] screen is displayed.2) After changing settings, click [Save] button.
Control DescriptionSection Name Enter the section name. Maximum 50 characters.Section Code Enter the section code. 3-10 alphanumeric characters.
Day Starting TimeEnter time when new work day begins. Select a time when no employee will be clocked in.
Search schedule of another business day
No: Date change is determined by [Day Starting Time] setting.Yes: Recording date is determined based on the assigned schedule.
[Day Starting Time] settings are not in affect.Language Select from Japanese or English
Timerecorder Settings The link to [Timerecorder Settings] screen is displayed
3
2.2 2.3
2.42.5

2.3 Employee-Type Settings1) Click [New Registration] button (or [Edit] button) from Employee-Type Settings.
[Employee-Type Settings] screen is displayed.2) After changing settings, click [Save] button.
Control DescriptionEmployee-Type Name Enter employee type such as Staff and Part-Time. Maximum 20 characters.
Employee-Type CodeEnter employee-type code with 1-10 alphanumeric charactersThis information is required only when importing employee data from CSV file.
Language Select from Japanese or English
Closing DateSelect month closing date of the Time Recorder from 1st through the end of month.For example, if [15] is selected, a month starts on 16th and ends on 15th for this employee-type. Timecard is also displayed based on the closing date.
Round Work-IN/OUT time Set rounding time for work-in and work-out. Treated as rounding down.
Round Break-IN/OUT time Set rounding time for break-in and break-out. Treated as rounding down.
Round Base Time
Always 0 min (recommend): Round recording time by 0 min as a calculation guide.For example, 15 min rounding time setting will result in rounding recording time to the nearest 15 minute (e.g. 0 min, 15 min, 30 min or 45 min).
Work-IN/OUT Record will be changed to match Scheduled Work-IN/OUT time: For example, with 15 min rounding time and 8:40 scheduled work-in / 17:05 scheduled work-out, rounding for work-in is based on 40 min in 15 min increments (e.g. 40 min, 55 min, 10 min, 25 min), and work-out is based on 05 min (e.g. 05 min, 20 min, 35 min, 50 min).
All Work-IN Record will be changed to match Scheduled Work-IN time: For example, the case with 8:40 scheduled work-in and 17:05 scheduled work-out will be rounded based on 40 min for both work-in and work-out time (becomes 8:40-17:40).
Overtime Start Time
Setting for calculate the "overtime work", there are two methods;First method: Adding up exceeding hours "overtime work" to the set-up time. When working hours exceed the entered regular working hours, exceeded hours are calculated as "overtime hours".Second method: Registering a schedule and performing the "overtime work" calculation based on the registered schedule.For example: If a schedule is set to 6 hours, hours exceeding 6 hours are added as "overtime work". To use the "overtime work", select the first check box in the "Overtime Start Time", and enter the regular working hours. To use the second method using the registered schedule, select the second check box in the "Overtime Start Time". It is possible to select both check boxes at the same time.
Late-Night Start/End TimeAll working hours occurred between [Late-Night Start Time] and [Late-Night End Time] are calculated as “late-Night” or “Late-Night Overtime” depending on [Allocated Late-Night Working Hrs] setting.
Round Monthly SumRound setting for the total working hours of a month. For example, [30 min] setting will treat 170 hrs 25 min working hours as 170 hrs 0 min. When check box is marked, working hours will round up to 170 hrs 30 min.
Record BreakSetting for Break-In/Break-Out time recording.Yes (Default): allows an employee to record Break-IN/OUT.NO: does not allow an employee to record Break-IN/OUT
Break Time (1, 2, 3)Enter break time length which is automatically allocated to employee’s schedule according to the work duration.
Non-Assigned Working Time Allocation Type
Setting for non-assigned working time allocation. Select from [as Non-Assigned], [as Assigned] and [as Overtime].*Non-assigned working time: working hours exceed the scheduled work hours, but does not meet overtime hours.
Allocated Late-Night Working Hrs
Setting for allocated working hours accumulated during late night shift.Select from [as Late-Night] or [as Late-Night Overtime]
How to Handle Overtime [Before-Schedule]
Select if the time between actual work-in time and scheduled work-in time is handled as [Working Time] or [No Working Time].
How to Handle Overtime [After-Schedule]
Select if the time between scheduled work-out time and actual work-out time is handled as [Working Time] or [No Working Time].
Daily Contract Working HrsSetting for contract working hours per day. This setting could be used to calculate vacation days for a given year.
Edit Record by Employee Setting for recording time editing. [Yes] allows an employee to edit work attendance record without
4

restriction.
2.4 Employee Settings1) Click [Edit] button from Employee-Type Settings. [Employee Settings] screen is displayed.2) After changing settings, click [Save] button.
Control Description
Section Select section to which an employee belongs.
Employee-Type Select type of employee
Employee CodeEnter employee-type code with 1-10 alphanumeric charactersEmployee code has to be unique.
Family Name/First Name Enter employee’s surname and first name. Maximum 40 characters each.
Gender Select from Male, Female or Not Selected.
Date Enter birth date.
Hire DateEnter hire date. This setting is used to calculate vacation time earned. An employee is not able to record time before the hire date.
Resign DateEnter resign date. Employee information will not be displayed on the screen such as [Daily Info] and [Daily Assign]. An employee is not able to record time after the resign date.
PasswordEnter password. This password is used to log-in to employee timecard screen and to record time with password. (If the password it not set, employee code is used)
Daily Contract Working TimeSetting for contract working hours per day. If [Daily Contract Working Time] is also specified in [Employee-Type Setting], this one takes precedence.
E-mailEnter email address. Notification emails such as for the Time Recorder URL and Request Screen URL (ID and password) are sent to this email address. The email address entered here could be used to notify an employee for their requests approval and/or denial. *1
*1 [Send Approve/Reject email to requester] checkbox has to be marked.This setting is found at [Company Setting] > [Request-approve basic setting].
Mass import for employee settings is available from [Import/Export] > [Employee Data Import].
5

2.5 Time Recorder Setting1) Click [Edit] button from Timerecorder Settings. [Company Timerecorder Setting] screen is displayed.2) After changing settings, click [Save] button.
Control Description
Authentication DeviceSelect the authentication device (fingerprint, finger vein, finger hybrid, etc.) to be usedSelectable devices may vary according to your application. Select the one you implemented.
Authentication Level
Displayed only when [Fingerprint] or [Finger Vein] is selected for [Authentication Device]Select High, Middle or Low for fingerprint authentication, and select High or Middle for finger vein authentication.High strictly authenticates the data. While it avoids false authentication and grants access only for the designated employee, there is greater chance of failure to recognize the designated employee’s fingerprint.
Operation Mode
Regular Mode: Save the record to the local PC when server connection failsAlways Online Mode: Time Recorder does not record time when server connection failsDial-Up Mode: Save the record to the local PC, and send the recording time only when designated.
WarningDisplay warning message to avoid false operations. Example: Employee can’t select [Work-IN] when work-in has already been selected and work time is being recorded.
Timerecorder Button Setting
Select View or Hide for [Break-IN] and [Break-OUT] buttons and set button operations*[Work-IN] and [Work-OUT] buttons are always displayed.Operation by Selection: After recording time (e.g. Work-IN), the Time Recorder returns to [Waiting] mode. The next employee to record time has to select [Work-IN] before authentication.Operation Mode: Selected operation mode (e.g. Work-IN) is kept until it is manually changed.
Display TimeCard ButtonSelect [Yes] to display [Time Card] button on [Time Recorder] screen. [Time Card] button displays an employee’s individual time card after authentication.
Display Visitor ButtonSelect [Yes] to display [Visitor] button on [Time Recorder] screen. [Visitor] button is used when any employee from other store/office records work attendance.
Display Attendance ButtonSelect [Yes] to display [Attendance Status] button on [Time Recorder] screen. [Attendance Status] button is to display attendance status of selected section.
Display Size Select from Normal, SVGA or VGA.
Timerecorder TimeoutSet the timeout length. The time record is saved to the local PC if server cannot connect within the timeout length setting.
IP Access LimitationEnter IP address to be restricted from accessing the Time Recorder. This setting can be used to prevent access from outside the work place.
Timerecorder With Positioning Information
Setting to obtain position information*1 when recording time with a mobile device.When [Unable to Work-IN/OUT without Positioning Information] checkbox is marked, the system does not process recording time if position information is not obtained.
Enter Password at LOG-IN Setting to use password*2 when recording time from a mobile device.
*1 When [Obtaining position information when Work-IN/OUT] is selected, any device which does not support GPS may not function properly. Location accuracy may vary depending on device accuracy.
*2 Default setting of the password is an employee code.
6
2.6 Send Time Recorder URLCommon Settings for Authentication Device and Cloud RecorderThe Time Recorder URL for PC Authentication device and Cloud Recorder is assigned per section.
1) Click [Send Timerecorder URL] button from Timerecorder Settings.[Send Timerecorder URL] screen is displayed.
2) Enter email address for [Receiver], then click [Send Email] button.3) When accessing Time Recorder from the PC, the Time Recorder URL can be copied from the email
and pasted to the address bar.
3) Conduct Time Recorder settings with the PC which will be used as a time recorder. Please refer to the Time Recorder Manual download URL found in the email regarding installation and instructions.
The sender of the email is [email protected].
7

Record Time with Mobile BrowserThe individual Time Recorder URL for Mobile browser is assigned per employee.
1) Select the section and click [View] button from Employee Settings.2) Click [Send All Emails]*1 button.3) Select [For Mobile TimeCard] and click [Insert Template] button.4) Select employees*2 to send email and click [Send Email] button.
5) Launch the Time Recorder with the mobile device to be used.Please refer to “Employee Manual” for Time Recorder instruction.
*1 An email could be send to a single employee from [Send Timerecorder URL].
*2 An email address for each employee needs to be registered prior to this operation.
The email might not be received if a spam mail setting is turned on for the mobile device. Approve emails from the domain: kingtime.jp prior to sending emails.
8

3. Manage Employee InformationThe Administration screen is to view and edit employees’ records in real time as well as to export time record data.
3.1 Basic Operation Menu
Operation Menu Description Section
Daily Info View/edit daily information such as time record and schedule 3.2
Pattern Settings Create work/leave schedule patterns. 3.3
Holiday Settings Register national holidays and other types of holidays. 3.4
Weekly Assign Register weekly assignment settings by each day of the week 3.5
Daily Assign Create monthly schedule 3.6
Request List Approve/reject requests from employees. 3.7
Error List View pending records 3.8
Error List/Outstanding Request Alert Display an alert when errors and/or pending requests exist 3.9
Monthly Info Display monthly record 3.10
Data ImportExport
Export Layout Create layout for data export 3.11.1
Data Export Export data with various formats 3.11.2
Employee Search Search an employee by name and/or employee code. 3.12
3.2 Daily Info1) Set display criteria and click [view] button. (Record summary is displayed if checkbox is marked.)
9
3.2
3.12 3.73.6
3.8
3.9
3.113.10
3.5
3.3 3.4

2) Click [TimeCard] button to view timecard record. Click [Edit] button to modify timecard record.
a. Time Card
1) Click [Edit] button to modify time record. Please refer to the next page for details.
10

b. Edit
<Edit Record Screen: Items>
Item Name DescriptionType Select from [Work-IN], [Work-OUT], [Break-IN], and [Break-OUT]
MethodDisplay time record method. “F” fingerprint authentication; “V” finger vein authentication; “HB” hybrid authentication; “IC” IC authentication; “P” password authentication; “Map” mobile browser positioning information of time record enabled (disabled); “E” time record by editing; “A” approved time record.
Time Display time record. Enter time for editing.
Section Display section.
Delete Mark when delete time record.
Schedule Pattern Select preset schedule patterns for work or vacations.
Work-IN Schedule Enter planned work-in time. Work-in after the entered time is handled as arriving late.
Work-OUT Schedule Enter planned work-out time. Work-out before the entered time is handled as leaving early.
Before-Schedule StartEnter starting time for work attendance calculation. Any recorded time before the entered time is not handled as work attendance.
Overtime EndEnter ending time for work attendance calculation. Any recorded time after the entered time is not handled as work attendance.
Break Schedule Enter planned break time. The entered time is automatically applied as break.
Break-IN/OUT Schedule Automatically obtain break time by entering time in [Break-IN Schedule] and [Break-OUT Schedule].
Work Type Select from [Weekday], [Legal-Holiday] and [Non-Legal Holiday]. (if not specified, handled as [Weekday])
Half Day Type Select when obtain half-day leave
Work-IN SectionDisplay section where Work-IN. When Work-IN is recorded in multiple sections, the section where the last recording occurred is handed as the Work-IN section. When Work-IN section is different from the section to which an employee belongs, it is handled as “visitor” time record.
Invalid Auto-Break Invalidate schedule-break or auto-break (specified at [Employee-Type Settings])
<Edit Record Screen: Command Buttons>Save & Return to TimeCard Save edited information and go back to the previous screen.
Save & Review Save edited information and redisplay Edit Record screen.Back Discard edited information and go back to the previous screen.
11

Delete Record Delete time card record to reset the time record of the day. (edit history is logged)Edit History Display the history of time record editing.
Calculation Method Display calculation method for time recording system.
Close Attendance Record Lock the timecard. After closing, general administrator cannot edit record. Employees cannot submit any request.
12

3.3 Pattern SettingsPattern settings allow to automatically record time such as auto-break, arriving late and leaving early. Schedule patterns need to be registered first, then those patterns are assigned to employees.
3.3.1 Create Schedule Patterns
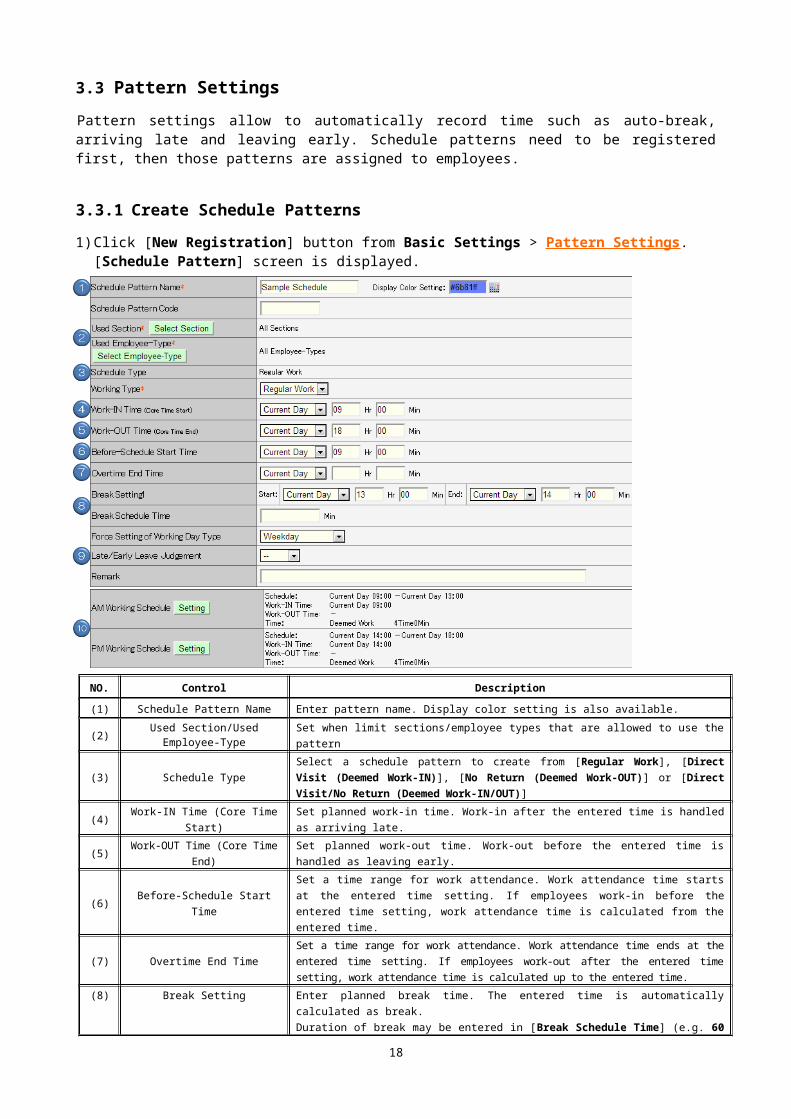
1) Click [New Registration] button from Basic Settings > Pattern Settings.[Schedule Pattern] screen is displayed.
NO. Control Description
(1) Schedule Pattern Name Enter pattern name. Display color setting is also available.
(2)Used Section/Used Employee-
Type Set when limit sections/employee types that are allowed to use the pattern
(3) Schedule TypeSelect a schedule pattern to create from [Regular Work], [Direct Visit (Deemed Work-IN)], [No Return (Deemed Work-OUT)] or [Direct Visit/No Return (Deemed Work-IN/OUT)]
(4) Work-IN Time (Core Time Start) Set planned work-in time. Work-in after the entered time is handled as arriving late.
(5) Work-OUT Time (Core Time End) Set planned work-out time. Work-out before the entered time is handled as leaving early.
(6) Before-Schedule Start TimeSet a time range for work attendance. Work attendance time starts at the entered time setting. If employees work-in before the entered time setting, work attendance time is calculated from the entered time.
(7) Overtime End TimeSet a time range for work attendance. Work attendance time ends at the entered time setting. If employees work-out after the entered time setting, work attendance time is calculated up to the entered time.
(8) Break SettingEnter planned break time. The entered time is automatically calculated as break.Duration of break may be entered in [Break Schedule Time] (e.g. 60 Min) instead of entering specific time period.
(9) Late/Early Leave Judgment Select [Invalid] when late/early leave needs to be disregarded.
(10)AM / PM Working Schedule
SettingsSettiings for half day off, setup only a half day of work.
13

3.4 Holiday Settings1) Click [New Registration] button or [Import National Holidays] button from Holiday Settings.
The setting screen is displayed.2) Registered holidays are reflected to other settings such as Weekly Assign List (3.5 Schedule
Assign Settings). Holidays are displayed in red in respective screens.
3.4.1 Register Additional Holidays
1) Click [New Registration] button and set [section] to apply the holiday, [date] and [Holiday Name].Then click [Save] button.
3.4.2 Import Japanese National Holidays
1) Click [National Holidays] button. [Import National Holidays] screen is displayed.2) Select sections to apply holidays and click [Save] button.
14

3.5 Weekly Assign Settings (Schedule Pattern Allocation)Allocating preset schedule patterns allows automatic calculation of times, such as break and late/early leave. This section details how to allocate schedule patterns.
1) Click [Edit] button in Weekly Assign List. Setting screen is displayed.
2) Select [Work Type] and [Schedule Pattern] per day of the week.
15
Control Description
Work Type
Classify work for each day of the week from
[Weekday], [Legal Holiday] or [Non-Legal Holiday].
The example to the left shows that recording
time on Sunday is classified as [Legal Holiday]
and Monday is classified as [Weekday].
Schedule
Pattern
Allocate schedule pattern for each day of the
week.
The example to the left shows that Monday
through Friday are allocated as [Regular] for
recording time, while Saturday and Sunday are
allocated as [--].

3) Selected [Work Type] and [Schedule Pattern] will be automatically applied when employees record time.
Please refer to “3.6 Individual Schedule Settings” to allocate schedules for individual employee.
3.6 Individual Schedule Settings1) Conduct mass schedule assignment for employees who belong to the same section. 2) Select the display criteria and click [View] button. Then click [Schedule Setting] button.
16

3) Select [Schedule] from [Original Schedule to Copy], and mark checkboxes for applicable days.
4) Click [Save & Return] button to complete the registration.
3.7 Request List1) View outstanding requests from [Request List] screen.2) Select [Approve] or [Reject] and click [Save] button. Approved requests are reflected to employee’s
timecard.
17
3) By marking [Copy to Timecard], the final approver is able to copy either the [Message] from an employee or [Comment] from an administrator
to the timecard [Remark] column.
!) A notification email is sent to an administrator when an employee submits a request. An administrator’s email address must be registered at Basic Settings > Role Settings to receive notifications.
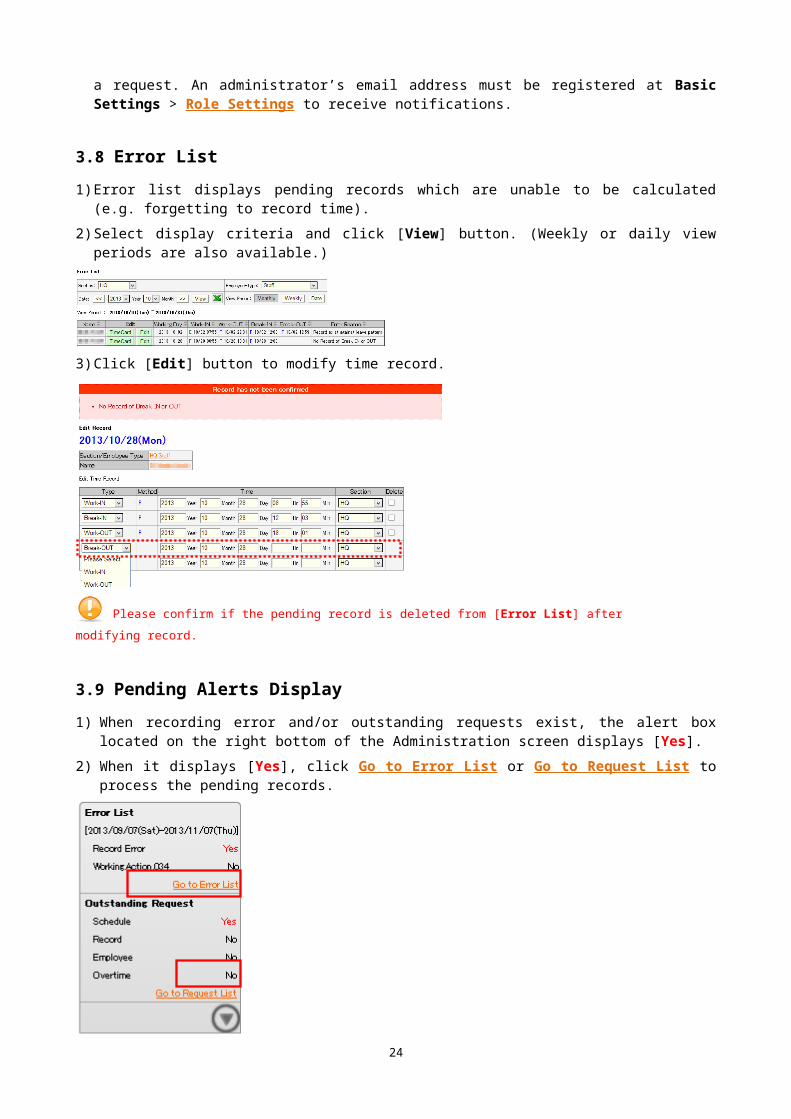
3.8 Error List1) Error list displays pending records which are unable to be calculated (e.g. forgetting to record time).2) Select display criteria and click [View] button. (Weekly or daily view periods are also available.)
3) Click [Edit] button to modify time record.
Please confirm if the pending record is deleted from [Error List] after modifying record.
3.9 Pending Alerts Display1) When recording error and/or outstanding requests exist, the alert box located on the right bottom of
the Administration screen displays [Yes].2) When it displays [Yes], click Go to Error List or Go to Request List to process the pending
records.
18

3.10 Monthly Info1) Select display criteria and click [View] button. (Weekly or daily view periods are also available)
3.10.1 Close Attendance Record
1) Close attendance record after confirming each employee’s time record from [Daily Info] or [Monthly Info].
2) After clicking [Close Attendance Record], the time record during the displayed period does not allow any edits or requests.
Control Description
Close Attendance RecordOnce the attendance record is closed, the record is locked and [Closed] is displayed. The general administrators are not able to edit the data, and employees are not able to submit requests after closing.
Cancel ClosingOnly administrators with complete rights are able to cancel the closed attendance record. After cancelling closing, general administrators are able to edit data and employees are able to submit requests.
Administrators with complete rights are able to edit the closed attendance record.
3.11 Data Export1) Select the data item to export from Import/Export.
19

Control Description
Payroll Data Export Export monthly sum data in CSV format for payroll software integration.Time Record Data Export Export detailed attendance record in CSV format.
TimeCard Export Export timecard record in PDF format.Layout Settings Select exporting items from [Layout Settings] to create a custom export layout.
3.11.1 Create Layout Settings
1) Click [Layout Settings] from [Select Data Export/Import] screen.[Layout Settings] screen is displayed.
2) Click an item from [Selectable Item] list, then click [>>] button. The item is moved to [Selected Item] list.
[Payroll Custom Item] allows combining the existing items to create the custom layout. (For time record data and timecard data, select [Time Record Custom Item] and [Timecard Custom Item] respectively.)
3.11.2 Data Export
1) Select exporting layout and criteria, then click [Export] button.
20

[Time Record Data Export] and [Time Card Export] is the same process.
<Export Example>
3.12 Employee SearchThis function is used to search an employee by name and/or employee code. The search result allows direct access to an employee’s time record as well as the ability to export data.
Mark [Include Resignee] checkbox to search employees including resignees.
21
TimeCard Export PDF(Landscape)
Time Record DataCSV Export

4. General Administrator RolesKING OF TIME allows for the creation of general administrators with limited rights to edit and register records as well as the creation of administrators with all rights assigned (system administrator).
4.1 Administrator / Workflow & Approval Operation Menu
4.2 Role Settings1) Click [New Registration] button from Role Settings to create a general administrator.2) Complete settings for the administrator account.
Control Description
Manager Name Enter a name of a general administrator. 20 characters maximum.
Manager CodeEnter the manager code with 3-10 alphanumeric characters.This code will become the part of the log-in ID.
PasswordEnter a log-in password with 6-20 characters. In case of forgetting the log-in password, it needs to be reset.
IP Access LimitationEnter IP address to be restricted from accessing the Time Recorder. This setting can be used to prevent access from outside the work place.
Email Address Enter email address to receive notifications when employees submit requests.
Language Select from Japanese or English.
3) Set the operation rights for the Administration screen.
22
4.2
4.3

Control Description
Basic Settings
Company Settings
Set permission for [Company Settings]. [Company Settings] are found in [Basic Settings] to assign the general settings for the entire company.○Access/Edit: Allowed to view/edit company settings△Access Only: Allowed to view only×No Accessibility: Items for [Company Settings] are not displayed
Section/Timerecorder Settings
Set permission for [Section Settings]. [Section Settings] allows registering and editing section/division information.○Access/Edit: Allowed to view/edit settings for existing sections and to
create new sections△Access Only: Allowed to view settings for existing sections×No Accessibility: Items for [Section Settings] are not displayed
Employee-Type Settings
Set permission for [Employee-Type Settings]. [Employee-Type Settings] are used to set work rules and type of employment.○Access/Edit: Allowed to view/edit settings for existing employees and to
register new employees△Access Only: Allowed to view settings for existing employees×No Accessibility: Items for [Employee-Type Settings] are not displayed
Schedule Pattern Settings
Set permission for [Schedule Pattern Settings]. [Schedule Pattern Settings] are to create schedule patterns which are used for assigning shifts.○Access/Edit: Allowed to view/edit settings for existing schedule patterns
and to register new schedule patterns△Access Only: Allowed to view settings for existing schedule patterns×No Accessibility: Items for [Schedule Pattern Settings] are not displayed
Edit Permissions for LOG-IN Password
Set permission to change a log-in password on the general administrator own.○Access/Edit: Allowed to edit password from the Administration screen×No Accessibility: Password change controls are not displayed
23
4) Next step is to set rights for sections and employee-types.
Control DescriptionSection
Management Accessibility
Assign permissions to whole section. When settings for [All Section] are selected, the same permissions are assigned to all sections at a time. When assigning different permissions to each section, select the section and set accessibility. The example above is for [Singapore HQ] to assign rights.
Employee Type Management Accessibility
Select employee-type to assign permissions. When settings for [All Employee-Types] are selected, the same permissions are assigned to all employee-types at a time. When giving different permissions to each employee-type, select the employee-type and set accessibility. The example above is for [Shibuya Office] to assign permissions.The example above is for [HQ Staff(Japan)], [Staff] and [Part-time] to assign permissions. The example setting shows cannot access to [HQ Staff(Japan)].
4.2.2 Combination of Section Management Accessibility and Employee-Type1) In the example above, the general administrator has accessibility to [Singapore HQ] for [Employee
Settings]. Thus, [Employee Settings] from other sections are not allowed to view or edit.2) Since no permissions are assigned for employee-type [HQ Staff(Japan)], the general administrator
is not able to view or edit [HQ Staff(Japan)]’s record.3) The general administrator is able to view data for [Staff], and view/edit data and create new
registrations for [Part-Time].
4.2.3 Details of Access SettingsControl Description
Employee Settings
Set permission for [Employee Settings].○Access/Edit: Allowed to view/edit existing employee settings and to register new employee settings■Access/Request: New registration is completed when approved by a supervisor△Access only: Allowed to view existing employee settings
Schedule Settings
Set permission for [Schedule Settings].○Access/Edit: Allowed to view/edit existing schedule settings and to register new schedule settings■ Access/Request: Allowed to view existing schedule settings and request new registration/edition by
following workflow and approval settings△Access only: Allowed to view existing schedule settings
Working Record
Set permission for time record.○Access/Edit: Allowed to view/edit existing time record and to create new time record■ Access/Request: Allowed to view existing time record and request record creation/edition by following workflow
& approval settings△Access only: Allowed to view existing time recordData Export Set permission to export data with various formats such as Excel, CSV, and PDF
Close Set permission to close attendance recordSum Data
RecalculationSum data recalculation is the process to apply new work rules to the past attendance record when work rules have changed.
24

4.3 Workflow & Approval Settings
Employees are allowed to request changes of attendance record to administrators. When a request is approved, the change is reflected to the employee’s timecard. This section details workflow settings to process requests.
[Approval Workflow Setting] is assigned per section.
4.3.1 Create Workflow
1) From Workflow & Approval Settings, click [Edit] button of a section to create workflow.
2) Select the administrator who will become an approver, and click [Save] Button.3) When creating multiple levels of workflow, select second and third approvers.4) When creating multiple approvers for the same level, click [Add Manager in Same Level] button.
4.3.2 Workflow Example
Section Setting Example
Singapore HQTwo approvers are registered as the No.1 approvers. When one of the two approvers approves a request, a request is reflected to employee’s timecard.
Changi FactoryThere is one No.1 approver and one No.2 approvers. When No.1 approver approves a request, one No.2 approves will receive a request. When No.2 approver approves a request, a request is reflected to employee’s timecard.
Rejection of a request cannot be returned or cancelled.
Administrators with all rights are not able to view, approve, and/or reject requests on behalf of approvers unless administrators are registered in [Approval Workflow Settings].
25

Attention:
1) Contents may not be used for any other purpose without written permission.
2) Changes may be made to the information in this manual; these changes will be
incorporated in new editions of the publication.
Copyright© HumanTechnologies, Inc. All Rights Reserved.