media1.razorplanet.commedia1.razorplanet.com/share/510741-9835/sitedocs/assist_5_manual.… ·...
TRANSCRIPT

Page 1
CHURCHSOFTCHURCHSOFT®®
A Professional Software AssistantA Professional Software Assistant
User’s Guide
New Edition Assist 5.0All rights reserved. This book may not be reproduced as a whole and for the purpose of resale. No part of the book may be reproduced in any way without written permission from the publisher unless otherwise specified in this book. Certain parts such as codes or worksheets may be copied by the licensed without written permission.
Neither Churchsoft, nor any of the publishing staff assume any liability with respect to the information contained herein. Churchsoft, the author, or anyone on the publishing staff assumes no responsibility for errors or omissions.
TrademarksChurchsoft is a registered trademark of Churchsoft, Inc.
Warning and DisclaimerChurchsoft, Inc. shall have no liability or responsibility to any person or entity with respect to any loss or damages arising form the information contained in this book.
Sales Of This BookAdditional copies of this book may be obtained by calling Churchsoft.
Copyright © 2005 by Churchsoft, Inc.All Rights Reserved
CHURCHSOFT700 Concord Road Anderson SC 29621
PublisherChurchsoft
AuthorDanny Keen
Copy EditorYvonne Chapman
ProofreadersJane KeenJames Sadler
Technical AdvisorsAmber AutryMark Miller

Page 2
Table of ContentsNew Edition.........................................................................................2Assist 5.0.............................................................................................2Table of Contents................................................................................3
END-USER LICENSE AGREEMENT FOR CHURCHSOFT SOFTWARE 11WELCOME TO ASSIST 5.0................................................................14
Introduction......................................................................................14About Churchsoft.............................................................................14Assist 5.0 Modules & Time Saving Features.....................................15Look What’s New In Assist 5.0!........................................................17
Backup Form................................................................................17Bulletin Maker...............................................................................17Calendar Form.............................................................................17Calendar Popup............................................................................17Chart of Accounts.........................................................................17Checks Form................................................................................18Contributions................................................................................18Data Entry Form...........................................................................19Employer Form.............................................................................20Export Form.................................................................................20Letters..........................................................................................21Miscellaneous Form.....................................................................21Officers / Ministries / Groups........................................................21Pledge Module.............................................................................21Setup Tables Form.......................................................................22Startup Menu................................................................................22Sunday School.............................................................................22Update Form................................................................................22Utility Form...................................................................................22VBS Module.................................................................................23Visitors.........................................................................................23
INSTALLING ASSIST 5.0...................................................................24Before Installing...............................................................................24
Make sure you have:....................................................................24Also do the following:....................................................................24How to do a Disk Clean Up. . .......................................................24System Requirements..................................................................25
Installing Assist 5.0..........................................................................25How To Install Assist 5.0..............................................................26Screen Resolution........................................................................27Position Properties Tool Bar.........................................................27Very Important Re-install Information............................................27

Page 3
Un-installing Assist 5.0.....................................................................28Registering Assist 5.0......................................................................28Updating Assist 5.0..........................................................................28Questions and Answers About Installing 5.0.....................................29Network Installations........................................................................30
How to Setup Assist 5.0 on a Peer to Peer Network......................30ON THE SERVER (Computer1)................................................30Step 1: Check Network and Share the Drive or Folder..............30Step 2: Change settings in the BDE.........................................31ON THE CLIENT (Computer2)..................................................32Step 3: Change settings in the BDE on the client computer......32Step 4: Change the path on the icon to point to the data...........32ON ALL COMPUTERS.............................................................32
Configuring Paradox Runtime...........................................................32LEARNING TO USE...........................................................................34ASSIST 5.0.........................................................................................34
Starting Assist 5.0............................................................................34Entering Unlock Number..................................................................34Navigation and Selection..................................................................34
Menu Command Keys..................................................................34Form Navigation Keys..................................................................35Form Window Shortcuts...............................................................36When In Edit Mode.......................................................................36Function Keys in Forms................................................................37Using the Tool Bars......................................................................37
Searching – How To Find or Locate.................................................38Locating.......................................................................................38Locating Next...............................................................................38Replacing Data.............................................................................39Filtering Data................................................................................39Using Wildcard Characters...........................................................40The Project Viewer.......................................................................41Other Information and Tips...........................................................42
CUSTOMIZING ASSIST 5.0...............................................................43Church / User Information................................................................43
Unlock Number.............................................................................43Setup and User Information..............................................................43
General Information......................................................................43Titles, Cities and Zip Codes..........................................................44Religious Faith..............................................................................44School and Day Care....................................................................44Group and Outreach Leaders.......................................................44Sunday School.............................................................................45Budget / Categories / Funds.........................................................45

Page 4
Bus Captains/Library....................................................................46Office/Miscellaneous....................................................................46Settings........................................................................................46Church Tab..................................................................................47Empty Tables...............................................................................47Customizing Letters......................................................................47
DATA ENTRY.....................................................................................48The Application................................................................................48
Forms Tool Bar............................................................................48Deleting A Record........................................................................50Adding a Record...........................................................................50Entering Birthdays and Updating Age............................................51Gender and Status.......................................................................51Salutation.....................................................................................52Calculated Names And Salutation.................................................52Employer and Occupation.............................................................53Phone Numbers...........................................................................53
Address Information.........................................................................53Street and Address.......................................................................54Same...........................................................................................54City, State and Zip........................................................................54Subdivision and Zone...................................................................55Email Field...................................................................................55Mailing List...................................................................................55Second Address...........................................................................55Maps Button.................................................................................55Duplicating Records......................................................................56Locate Record Button...................................................................56Personal Information Reports.......................................................57
Family Information...........................................................................57Why minimal family information?...................................................57Spouse, Anniversary and Family Group Number...........................57Head of Household - Children - Youth In Family............................58Family Members Birthdays...........................................................58
Mailing Labels..................................................................................58OUTREACH / PROSPECTS...............................................................60
Outreach..........................................................................................60Marking Prospects........................................................................60Prospect Information....................................................................60Directions.....................................................................................61Outreach Reports.........................................................................62
VISITOR INFORMATION....................................................................63Visitors............................................................................................63
Visitor Info / Multi-Record.............................................................63

Page 5
Adding and Removing Visitors......................................................63Services Attended........................................................................63Other Visitor Information...............................................................64Comments....................................................................................64Location and Mail.........................................................................64Repeat Visits................................................................................64Visitors Letters.............................................................................64Visitors Reports............................................................................65
TRACKING DECISIONS.....................................................................67Decisions.........................................................................................67
Customizable Decision Text..........................................................67Membership.................................................................................67Deceased Individuals....................................................................68Decision Letters and Reports........................................................68
CHURCH LISTS AND CODES............................................................70Lists and Codes...............................................................................70
Church Lists.................................................................................70Church Table Button.....................................................................71Pledges Button.............................................................................71Current Attenders and Church Directory.......................................71List Reports..................................................................................72
MINISTRY GROUPS AND..................................................................73OFFICERS..........................................................................................73
Introduction to Ministries / Groups....................................................73Ministries / Offices / Groups..........................................................73
YOUTH AND MUSIC..........................................................................75Introduction......................................................................................75
Youth-Music.................................................................................75Reports........................................................................................75Bus Ministry.................................................................................75Sunday School.............................................................................76Information...................................................................................76Group and Outreach Leaders.......................................................76Sunday School Reports................................................................76Meetings......................................................................................77Minute Module..............................................................................77Appointments / Events / Facility Scheduler...................................78
LETTERS AND LABELS....................................................................80Introduction......................................................................................80Letters.............................................................................................80
Mark Letters.................................................................................80Editing Default Letters..................................................................80Additional Custom Merge Letters..................................................80Hospital Letter..............................................................................81

Page 6
Clear Marked................................................................................81Printing Letters and Envelopes.....................................................82
SUNDAY SCHOOL.............................................................................83Attendance......................................................................................83
Posting Attendance-General Information.......................................83ACCOUNTING IN ASSIST 5.0............................................................86
Understanding Fund Accounting.......................................................86Explanation of Terms....................................................................86
How to Setup Accounting.................................................................88General Information......................................................................88Using Punctuation and Case.........................................................89
Step 1: Use the Work Sheets..........................................................89Bank Accounts: Work Sheet 1.........................................................90Funds: Work Sheet 2......................................................................91Account Groups: Work Sheet 3.......................................................92Income Accounts: Work Sheet 4.....................................................93Expense Accounts: Work Sheet 5...................................................94Liabilities Accounts: Work Sheet 6...................................................95Final Totals: Work Sheet 7..............................................................96Step 2: Set up Bank Accounts.........................................................97Step 3: Setup the Funds List...........................................................97Step 4: Set up Accounts/Categories................................................99
Working with the Chart of Accounts..............................................99Viewing and Using a Sample Chart...............................................99Customizing the Chart................................................................100Modifying an Existing Account....................................................101Entering a New Account.............................................................101
HOW TO….............................................................................101Deleting an Account....................................................................103Make Accounts Unique...............................................................105Sorting the Chart........................................................................105Printing the Chart........................................................................106Viewing the Budget Totals..........................................................106
Step 5: Enter Beginning Fund Balances........................................106How to Enter Beginning Balances…............................................106
CONTRIBUTIONS............................................................................108Before Entering Contributions.........................................................108
1. Mark the individual as a Tither/Giver......................................1082. Assign Envelope Numbers If Used.........................................1083. Setup Your Funds and Accounts............................................1095. Set the Default Settings.........................................................109
Using the Default Bank Field...................................................109Using the Default Date Field....................................................110Using the Default Service........................................................110

Page 7
Locating Givers..............................................................................111Locating By Name......................................................................111Locating By Envelope Number....................................................111Locating By ID Number...............................................................111Locating By Easy Locate Button.................................................111
Adding a New Giver.......................................................................112Entering Contributions – Single Method..........................................112
Using the Single Method.............................................................113How to Enter Contributions Using The Single Method..............113
Splitting a Contribution...................................................................114How to Split a Contribution..........................................................114
Posting Contributions.....................................................................115How to Post Contributions..........................................................115
Un-posting Contributions................................................................116How to Unpost Contributions.......................................................116
Entering Contributions - Quick Entry...............................................116How to Use Quick Entry Rapid Recorder.....................................116
Giving Tools...................................................................................117Contribution Reports......................................................................119
Running Reports.........................................................................119PLEDGES.........................................................................................121
Entering Pledges............................................................................121How To . . ..................................................................................121Opening the Pledge Form...........................................................121Inserting Pledges........................................................................121Assigning Funds & Categories....................................................122Year to Date Pledges..................................................................122Table View.................................................................................122Other Information.......................................................................123Pledge Reports...........................................................................123
Checking..........................................................................................125The Application..............................................................................125
The Workspace..........................................................................125Buttons on the Top of the Check Form....................................125Buttons at the Bottom of the Check Fo....................................125
The Check Register.......................................................................125General Ledger – Accounts Payable...........................................125How to Begin..............................................................................126
Step One: Setup Bank Account Names..................................126Step Two: Setup Funds and Accounts....................................127Step Three: Enter Opening Balance.......................................127Step Four: Set Options...........................................................127Auto Memorize........................................................................127Starting Check Number...........................................................127

Page 8
Enter a check number in the LastCkNum field. For example: Suppose your checks start at 1000. You would enter 999 in the LastCkNum Field. This allows the user to start check numbers with any number. This is useful if you reorder checks that start with a lower number than your old checks. 127Step Five: Begin entering transactions....................................127
Changing Dates..........................................................................128Changing the Sort Order of the Register.....................................128Entering Payee Information.........................................................128Payments and Deposits..............................................................129Splitting Transactions.................................................................129Account / Category Fields...........................................................130Auto Entry of Group and Fund....................................................131Account Number Fields...............................................................131Inv/Memo Button and Print Check Box........................................131Recalc Reg Button......................................................................132Inserting Transactions................................................................132Deleting Transactions.................................................................132Memorizing Transactions............................................................132Check Tab..................................................................................133Reconciling Bank Statement.......................................................133Reports......................................................................................133
EMPLOYEE / PAYROLL..................................................................135Employee / Payroll.........................................................................135
Opening The Employee Form.....................................................135Entering Employment Information...............................................135Other Information.......................................................................136Deleting an Employee.................................................................136Employee Table View.................................................................136W-4 Form...................................................................................136W-2 Form...................................................................................137WAGES.....................................................................................137Wage Information.......................................................................137SICK AND VACATION DAYS.....................................................138Sick Days...................................................................................138Vacation Days............................................................................139TAXES AND DEDUCTIONS.......................................................139Federal Taxes............................................................................139State / Local and Unemployment Taxes......................................140Other Deductions........................................................................141After Tax Deductions..................................................................142TIME/PAYROLL.........................................................................142Entering Time/Creating New Check............................................142Calculating Taxes and Deductions..............................................143Printing / Posting Checks To Register.........................................143
BUSINESS MODULE........................................................................145Business Addresses.......................................................................145

Page 9
Quick Start.................................................................................145SERMONS........................................................................................149
Sermons........................................................................................149Quick Start.................................................................................149
LIBRARY MODULE..........................................................................152Library...........................................................................................152General Information.......................................................................152
Other Information.......................................................................152PROFILE FORM...............................................................................154
Profile Form...................................................................................154SCHOOL MODULE..........................................................................155
Christian School.............................................................................155Quick Start.................................................................................155
TOOLS & UTILITIES........................................................................159Utilities and Tools...........................................................................159
SECURITY........................................................................................163The Application..............................................................................163Passwords.....................................................................................163
3. Enter Password Table password (PSWDUSR) click ok.......164BACKUP AND RESTORE................................................................167CALENDAR MODULE......................................................................170BULLETIN MAKER..........................................................................171APPENDIX........................................................................................172
The Application..............................................................................172APPENDIX........................................................................................173
The Help File.................................................................................173Forms and Reports.....................................................................173
APPENDIX........................................................................................174

Page 10
END-USER LICENSE AGREEMENT FOR CHURCHSOFT SOFTWARECopyright 1997 - 2005 by Churchsoft All rights reserved
IMPORTANT!! PLEASE READ CAREFULLY: This Churchsoft End-User License Agreement is a legal agreement between you and Churchsoft for the product listed above unless you have a different license agreement signed by Churchsoft. This product includes computer software, printed materials, documentation, electronic documentation and other associated media. By installing, copying, downloading, accessing, or using this software, you agree to be bound by the terms of this end-user license. If you do not agree to the terms of this license, do not install or use the software product and you may return it complete and unopened within 10 days to the person or place from which it was purchased for a full refund less S&H.
COPYRIGHT / LICENSE
1. SOFTWARE COPYRIGHT
ATTENTION: This is a license not a sale. This product is provided under the following license which defines what you may do with the product and contains limitations on warranties. This software package is granted by and is proprietary to Churchsoft and protected under US copyright laws.
.....................................................................................................................................2. GRANT OF LICENSE
! Application Software. A Single User License (as indicated above in ALicenses@ by the number A1") entitles you to use the software on the following terms: Churchsoft products are provided under a simple, no-nonsense, License Agreement. You may install, use, access, display, run, or otherwise interact with one copy of the software product on a single computer or workstation.
! Software Use. Only one person may use the software at any particular time. The primary user of the computer on which the software is installed may install the software on a second computer for his or her exclusive (non-simultaneous) use. This means, for example, that you may have a copy on both office and home machines for your own use, provided the software is not being used at the same time by someone else at the primary location.
! Storage/Backup. You are free to copy this software for archival or backup purposes. Paradox Runtime is owned by Corel Corporation and may not be copied except for backup purposes.
! Multi-User Licenses. If this is a single user license, the software may not be installed on a network for use by more than one person. For network use or other multiple user situations, you must purchase a Multiple User Site License. If the number of copies specified above as ALicenses@ is more than one, this agreement constitutes a multi-user license for the number indicated. If this is a multi-user site license, you are free to copy this software for archival or backup purposes.
! Portable/Notebook Usage. Churchsoft grants the primary user a free install on a notebook, laptop or portable computer.
3. OTHER RIGHTS AND LIMITATIONS
! Not For Resale. The purchaser of this software may make copies for demonstration and evaluation purposes but may not make copies to resell or otherwise for transfer of value.
! Restrictions on Disassembly and Development. You may not decompile or dissemble or use any part of this software package in the development of another product to be resold unless you have written permission from Churchsoft.
! Separation of Modules. This software product is licensed as a single product. You may not separate the modules or components for use on more than one computer.
4. UPGRADES
AN UPGRADE IS REPLACEMENT SOFTWARE. The upgrade is a new version that entitles the user to install the software on a computer with an earlier version. The upgrade does not entitle the user to have a second license or full copy version. An upgrade replaces and/or supplements the product that formed the bases of your eligibility for the upgrade.
5. SUPPORT
Churchsoft will provided technical support for a period of ninety (60) days from the purchase date provided you are a Registered User. No support services will be provided by Corel Corporation or Inprise/Borland International. A maintenance agreement is available for technical support beyond (60) days or otherwise the caller will be charged on a per call basis.
LIMITED WARRANTY

Page 11
1. SOFTWARE PRODUCTS
Churchsoft warrants that this software product upon installation will perform substantially in accordance with the accompanying written materials. Within a period of (60) days, technical support engineers will make commercially reasonable efforts to solve any installation or operational problems. Churchsoft will not be responsible or liable for problems that may arise as a result of computer hardware issues, software conflicts, or user errors or negligence.
2. RETURNS AND REPLACEMENTS
Within thirty (30) days of purchase Churchsoft will replace any defective CD-ROM if physical defects occur (including, for example, a damaged or incorrect CD-ROM.) Churchsoft offers a (30) money back guarantee. If a full version purchase was made and for some reason you decide not to keep the software, Churchsoft will refund within (30) days the purchase price less shipping, handling, and packaging charges and provides no other warranty. Working Modules are not returnable and are non-refundable.
3. GOVERNING LAWBy using the Churchsoft product(s) covered by this license, you agree to become bound by its terms. This agreement will be governed by the laws in force in the state of South Carolina.
DISCLAIMER OF WARRANTY
If you have any questions about this End-user License Agreement, please feel free to contact us in writing.
We have made every effort to verify that Assist 5.0 for Windows is an effective tool for helping the church and pastor. However, you must be aware that Assist 5.0 for Windows is sold to you "as is," without any warranty of any kind except the 30-day warranty extended for replacement of defective disks, or a refund as specified above in the Return statement.
IN NO EVENT SHALL CHURCHSOFT, ANY OF ITS SUPPLIERS OR REPRESENTATIVES, COREL OR INPRISE/BORLAND BE LIABLE OR RESPONSIBLE FOR ANY DAMAGES WHATSOEVER (INCLUDING DAMAGES FOR LOSS OF BUSINESS, BUSINESS INTERRUPTION OR LOSS OF DATA) THAT MAY ARISE BECAUSE OF THE USE, INABILITY TO USE THE PRODUCT OR DEFECTS WITH Assist 5.0 FOR WINDOWS. UNDER NO CIRCUMSTANCES WILL CHURCHSOFT=S LIABILITY TO YOU EXCEED THE RETAIL PRICE OF THE SOFTWARE. COREL OR INPRISE/BORLAND ASSUMES NO RESPONSIBILITY FOR DAMAGES INCURRED WHILE USING Assist 5.0 FOR WINDOWS.
Check the Help file for additional information.

WELCOME TO ASSIST 5.0
IntroductionWelcome to Assist 5.0! Thank you for purchasing this integrated set of church productivity applications. Assist 5.0 is a comprehensive church management software package for Windows 95, 98, NT, ME and XP. With Assist 5.0 you can track ministry needs and finances, create reports, calculate budgets, produce mailing lists and much more.
This User’s Guide will explain the features of Assist 5.0 and give step by step instructions for performing the most common tasks of entering data and running reports. You will now be able to do things quickly and with greater efficiency. It is versatile and covers nearly every area of church management.
If you are new to church management software, you can use this User’s Guide as a tool for learning. Whether you are a new or an experienced user, the User’s Guide can provide you with the foundation to get you up and running with Assist 5.0 quickly.
If you want to explore all of the possibilities and potential of Assist 5.0, click on Help and read the extensive instructions. The program is built using an award winning database engine produced by Corel Corporation. Other sources of information on using this database engine are available on their website.
About ChurchsoftMission Statement: To provide quality church management software that is easy to use, versatile and affordable.
The Company: Churchsoft has been in existence since 1997. It was founded by a pastor who continues to serve as chief developer and consultant. We are committed to providing quality church software at an affordable price. Over 5000 churches have purchased our software to assist their church and ministry.
Our Staff: We are glad to provide you with a Christian staff who works not just from experience, but from the heart. Our workers strive in every way to fulfill our company motto of “Helping The Church.”
Assist 5.0 Modules & Time Saving Features
Personal Information Visitation Visitors
Decisions Lists User Defined Tables
11

User Fields Contributions Membership
Letters & Labels Phone Dialer Automated Data Entry
Sunday School Statistics Attendance
Profile Module 300 Pre-built Reports No Programming
Address Module Sermon Module Christian School
Accounts Payable Photos Network Capable
Bus Ministry Mail Merge Library Module
Youth & Music Support & Service Assets Manager
Personal Information Visitation Visitors
Payroll Password Secure Counseling
Facility Scheduler Business Meetings Calendar
Events & Appointments Chart Of Accounts Decisions

HAVE QUESTIONS?
Call or write us -
CHURCHSOFT700 Concord RoadAnderson, SC 29621
(864) 225-8118
email: [email protected]
NEED TECHNICAL SUPPORT?
Monday – Thursday 9 am to 5 pm EST, Friday 9 am to 2 pm EST
Call Toll Free
(888) 301-8580
Check us out on the World Wide Webwww.churchsoft.com

Look What’s New In Assist 5.0!
Backup Form Does not give an error when overwriting a directory
Bulletin Maker Has the ability to enter data in a pre-designed bulletin format
Calendar Form Large monthly calendar and database
Calendar Popup
Added a check box that opens the calendar on today’s date If box is not checked, the calendar opens where last used Arrow keys change months, page up and down, 3 month change Double click month goes to January, right double click goes to December Home goes to January, End goes to December
Chart of Accounts
Redesigned and enlarged form Error checking on account numbers. Cannot have duplicate numbers Error checking on category field. Now locates by using the account number and category Traps for duplicate account names Error checking does not allow account numbers to be smaller than group numbers and vise versa Budget item accounts now include the ability to be tagged as non-budgeted items Added “Bank Name” to the Chart of Accounts drop down field Accounts can now be set up to automatically assign the bank name when entering giving data Icon to open Chart and Budget is now on Finances Form Chart can also be opened from a popup menu on the Data Entry Form Validation of linked data when changing the Funds list Validity check when deleting an account. Cannot delete an account that has data linked to it When deleting an account, the user has the option of changing linked data to another account When adding new funds to the Funds list, an item is not deleted from the chart if it is already there Default Bank field on chart has auto fill button
Checks Form
Check Register Reports may be sorted by date, check number, account, payee and entry order Fixed Budget Expense Report allows for a leap year so the amount budgeted for the period is correct and the transactions for the last day of the year are also calculated Fixed Deduction form so total check amount adds correctly Balance Sheet Report Profit and Loss Statement Report

Larger form Account number now refreshes Error checking when transaction type does not match the correct column When DEP is the type, the cursor automatically moves to Deposit column In the Split Form, the transaction type updates when the type field changes A message pops up asking you to choose a category if the category field is left blank Account Group drop down now lists income and expenses instead of just income The down arrow key can now be used to scroll down the register Go To button quickly finds a transaction by date Memorized transactions enters amount, type and all data from Chart of Accounts New field added that records transactions as reconcilable Employee Checks now show current and year to date deductions Start check numbers at field which allows numbers to match the checks being used
Contributions
Redesigned and enlarged Contribution form and enlarged Split form Enter a date in the Set Date field and date is automatically entered when inserting a contribution Bank Name can be set so that it is automatically entered Now handles non-cash contributions as well as regular contributions New field so non-budgeted contributions, such as reimbursements, may be specified Amounts being posted to various banks may now be verified before they are posted to check register Fixed Contribution Form so a record cannot be inserted by pressing the insert key Name locate does not drop the first character when typing a locate name Fixed locate when locating by envelope number on Contributions Form Took edit() out in open form on Contribution Form because edit() is on mouse enter and set focus method Removed action code from page in Contribution Form trying to eliminate GPV when form opens When posting Contributions, the bank account totals now appear instead of only the total amount Time saving Duplicate button to copy a record Quick Entry Rapid Recorder with default settings to enter contributions from a table Print Contribution Statements over a certain amount. Eliminates printing small dollar gifts Secondary Sort Indexes on Giving Table: Date, Category, Fund and Envelope number Permanently re-sorts the Giving Table with button in Tools section Improved performance when entering a record and entering splits; especially on large tables Split Amounts are now entered in the same column as the Amounts Update button in Giving Tools when transferring all data
New contribution reports:Contributors to any accountContributors to any account – SummaryContributors to any fundContributors to any fund – SummaryContributions by Fund and AccountContributions Statement - OverContributions Letter - Current Record

Contribution Report sorted by largest contributorsAdded a report to give a receipt for non-cash contributionsAdded a statement report for tracking non-budgeted items like Camp Fees, Women’s Conference Fees, etc…New report that shows giving by Bank AccountsNew report that shows giving by week, month, or quarterNew report that shows a list of people who gave to a certain fund or account
Data Entry Form
MapQuest link which connects to the Internet to find directions Microsoft Streets and Trips link which locates an address and gives directions The year in the birthday field now translates to a four digit year even when only two digits are entered Expanded pop-up menu includes additional forms and security Icon Bar opens other forms and applications A form that when checked removes a deceased person from all lists Secondary Sort Indexes by Street Name, City, Zip Code, Zone and Age Unlisted phone numbers do not show on some Data Entry reports Merge Letters now print sorted by Last Name to match labels Church Groups is now Church Lists, Officers is now Ministries-Groups Expanded First Name to 15 characters and Last Name to 20 characters Field for Work Extension Number Gender, Title, and Salutation fields drop down on arrival Any List and Any Code Roll now shows the group in the title along with the church name
New reports:Church members sorted by zoneChurch members sorted by zip codeNew Church Directory Report
Employer Form
Employee Form and W2 Form Locate will find the current employee which is showing Employer Tax Liability Report totals are accurate State and Local Tax percent can be entered with 3 decimals instead of two Updated Tax Tables Fixed Employer Tax Liability Report so totals are accurate Checks posted to the Check Register post taxes, Medicare and Social Security as splits Medicare and Social Security wages can be calculated apart from gross wages New 941 Entry form Supports new 941 form and allows margins to be adjusted W2 Form Gross Wages does not include housing Net Pay on Employee Summary totals accurately
Export Form

The PhoneTree link tables can be exported by group
Letters
Graphic signature can be used on all letters
Miscellaneous Form
Enlarged form for easy viewing Date ranges can be done month to month, month and day, month, day and year and from year to year on birthday and anniversary dates Age updates accurately Fixed Birthday Fields in Profile Reports to display the text birthday rather than the date birthday
New reports:All names sorted by CityAll names sorted by ZoneAll Names, All Phone Numbers and All AddressesJust Phone NumbersMiscellaneous Reports may be queried by groupsBirthday Letter ReportBirthday LabelsPostcard Reports
Officers / Ministries / Groups
Enlarged form Renamed tabs Set initial caps on fields Added drop down report field to form Added Committee report Enhanced other reports Moved User Defined Report button to drop down field

Pledge Module
Added Beginning and Ending Date field on form to specify length of pledge Added Total Days field to calculate pledge for the period The type of pledge can now be entered as O for a one time pledge YTD now calculates from the beginning date you specify Pledge for the period and over / under for the period added to most reports Pledge Comparison is now project specific When category is selected, the fund is now selected from the chart
Eight New Pledge / Comparison Reports:1. Pledge / Comparison All Categories2. Pledge / Comparison Any Categories3. Pledge / Comparison Any Name4. Pledge / Comparison by Funds5. Pledge / Comparison by Name 16. Pledge / Comparison by Name 27. Pledge / Comparison Itemized8. Capital Stewardship Project Report
Setup Tables Form
Enlarged form Added Class Gender Field to SS Lookup Table Automatically setup Promotion Table Backup and Restore Button for Sunday School Table Auto Promote students by age
Startup Menu Designed new Startup Menu Program can be registered from Startup form along with Internet access
Sunday School
New Reports: Grid Sunday School Roll for Quarter 1, 2, 3 and 4 Statistics by Date Statistics by Class Statistics by Name Attended Over 50 Percent of a Date Range

Update Form
Redesigned the Update form Changed the Update form to update data from any path, not just C:\
Utility Form
Added an update button so new files can be copied from CD without having to un-install and re-install.
VBS Module
Visitors
Click a field in the multi-record Visitor section and a record is entered without a key violation

INSTALLING ASSIST 5.0
Before Installing Make sure you have:
! A familiar knowledge of the Windows operating system
! Installation Instructions and Information
! 1 CD-ROM entitled Assist 5.0
! The Current User’s Guide
! The License Agreement
Also do the following:
! Close any open applications
! Disable any virus-detection application
! Make sure your computer meets the system requirements below
! Consider doing a disk clean up
How to do a Disk Clean Up. . .
Before installing software it is a good practice to do a Disk Clean Up which cleans out your temp directory and deletes used files. To do a Disk Clean Up, click Start, Programs, Accessories, System Tools and then Disk Clean Up. You may need to defrag your hard disk if you haven’t done this lately. After you tune up your system, do a fresh boot of the computer by turning it off and then back on. Make sure all other programs are closed.
To clean out your temp folder manually, right click on Start, then click on Explore. Choose Tools from the Menu Bar and click the View tab and put a dot by Show Hidden Files or Folders. This allows you to see the temp folder of the current user which is under the Local Settings folder. Click on the Temp folder. Click on the word Edit on the menu bar. Choose Select All to highlight all the temp files. Press the Delete button or the Delete key to remove the files. You may safely delete any files in the right window pane.
12

System Requirements
To effectively use this program, you should have:
Pentium II PC or higher
128 MB Ram system memory (512 recommended)
VGA or 100% compatible video graphic adapter and monitor
One CD ROM Drive
One hard disk drive with 200 MB free space
Windows 98 or higher
Mouse or other pointing device
HP compatible Laser or DeskJet Printer (Recommended)
Installing Assist 5.0There are two types of Assist installs: (1) Updates and (2) Upgrades. An update involves changes to the same version. An upgrade is a completely new version which will be installed by default in a different folder. If you are installing a new version, click the Install button. For example: If you have Assist 4.0 installed on your computer and you are installing Assist 5.0, then click the Install button. The program installs in two parts: Part I installs Assist 5.0. Part II installs the database runtime engine. If you are doing an update, then click the Update button on the Install Menu. For example: If you have Assist 5.0 installed on your computer and your want to copy the latest Assist 5.0 update, click the Update button. Do not install a new version to an old folder or you will overwrite the data in the old folder with empty tables. For example: Do not install Assist 5 to Assist 4.
The Install program will copy the database engine files to C:\Program Files\Corel\Paradox 10 Runtime. It is best to use this directory even though you have the option to change it. The Application and Data files (tables, forms, reports, and queries) will be installed in C:\Churchsoft\Assist5. Installing Assist 5 will NOT OVERWRITE the data you had in a previous version.
How To Install Assist 5.0
Insert the CD-ROM into your CD-ROM Drive. When the CD is inserted, THE CD-ROM WILL AUTO INSTALL if you have the Auto Run option checked. If the program does not auto run, continue with step 2.
1. Click on Start. Click on Run. In the Run Dialog box type D:\AutoRun.exe where D: is your CD-ROM Drive, then click OK. If Auto Run is not enabled, click Start, Control Panel, Add/Remove Programs. Click the Add New Programs button. Click the CD or Floppy button. Click Next.
2. The License Agreement will appear. If you accept The License Agreement, click I Agree, and then click OK. Enter a User Name and Password and click OK.

(This Password is located on a label on the back of the CD sleeve in which the CD came.)
3. The Install Menu will appear. Click the Install button. Click the Play Audio button to start hear a welcome greeting and instructions.
4. Installing Assist 5.0
The Setup screen appears showing the various modules. Click Next. When the Welcome screen appears, click Next. The License Agreement will appear again, click Next if you accept. The Read Me screen will appear. Click Next. When the Customer Information screen appears, type in the name of your church. Choose “Anyone Who Uses This Computer” and click Next. The Destination folder screen will appear. Click Next. Note: It is best to install the program on the C drive in the default folder, although it is possible to install
it to other drives and folders. The Setup Type screen appears. Click Next. The Ready to Install screen appears. Click Next. When the Install Completed Part I screen appears, click Continue.
5. Install The Database Engine
Welcome, click Next. License, click I Accept and then click Next. User Information, choose “Anyone Who Uses This Computer,” then Next. At the Destination screen, click Next. Ready To Install, click Next. Click the Finish button.
6. If you receive an application error during installation, reboot and try reinstalling the software. Make sure the CD is not scratched and is seated firmly in the tray. If you get a message that the Install cannot find certain files, or if the software does not install, try installing it on another computer. If it does not install on the other, call Technical Support.
7. When the program has finished installing, an icon will be installed on your START > ALL PROGRAMS menu and on your screen desktop.
Screen Resolution
It is best to run in a screen resolution of 800 x 600 unless you are using a small monitor (14 or 15 inch). A larger resolution number will cause items to appear smaller on your screen, thus allowing all of the form to show. 640 x 480 may not show the entire form when the program is opened because the items will appear larger and you will have to use the scroll bars to see all of the form. If you run in a resolution higher than 800 x 600, the forms will appear small and are harder to read. To change your resolution, right click on the screen desktop, select Properties, then click on the Settings tab and slide the pointer in the screen area to adjust the resolution. When a resolution of 800 x 600 is used, the form will not fill all of the application workspace. Maximizing will only maximize the window, not the form.
Position Properties Tool Bar
When the program opens, left click, hold and drag the Properties tool bar (with the arrows) on the same line as the standard tool bar (with the printer icon). If the entire form does not show, right click on any tool bar and choose Customize, then click the Toolbars button and change the slider to Small Border.

Very Important Re-install Information
If you have to re-install Assist 5.0, make sure all of your data files are backed up and DO NOT INSTALL IN THE SAME FOLDER,unless you have renamed the original folder. Assist 5.0 comes pre-built with empty tables. If you have data in your tables and you re-install it in the same directory, you may overwrite the data with empty tables. When re-installing, there are three options: (1) Rename the Assist Folder using Explorer, and then re-install the program. Go to the Utilities module after you re-install, and click the Upgrade button to transfer the data from the old tables to the new tables. (2) Back up your tables, re-install Assist 5.0, and then restore your backup data providing the backup data is from the same version. (3) Reinstall Assist 5.0 in a different directory and then use the Utilities module to append the data from the old tables to the new tables. (See Chapter 14 for more information on appending records.)
Un-installing Assist 5.0To un-install Assist 5.0 for Windows, click on the Control Panel. Click on Assist 5.0 in the list, and then click the Remove button. After un-installing Assist 5.0, click on the Paradox 10 Runtime, then click the Remove button. If you have data in your tables, DO A BACKUP BEFORE DOING THE UNINSTALL! An un-install deletes all files in the working folder!
Registering Assist 5.0
Registering Assist 5.0 assures you that you will have the latest product updates and technical support services!
To register Assist 5.0, call 1-888-301-8580, or click the Register button on the Install main menu. After completing registration, you will be given an Unlock Number which will allow unlimited entries in Assist 5.0.
Updating Assist 5.0 If you already have Assist 5.0 installed on your computer and you want to install the latest update, use the auto method as follows:
Insert the CD-ROM into your CD-ROM Drive. (You need to know the drive letter of the CD-Rom you are using in case you are asked to enter it later.) If you have two CD Rom drives, insert the CD into the top drive. When the CD is inserted, THE CD-ROM WILL AUTO START if you have the Auto Run option checked. If the program does not auto run, continue with step 2.
1. Click on Start. Click on Run. In the Run Dialog box, type D:\AutoRun.exe where D: is your CD-ROM Drive, and then click OK. If autorun is not enabled, click Start, Control Panel, and Add/Remove Programs. Click the Add New Programs button. Click the CD or Floppy Button. Click Next.
2. The License Agreement will appear. If you accept The License Agreement, click I Agree, and then click OK. Enter a User Name and Password and then click OK. (This Password is located on a label on the back of the CD sleeve in which the CD came.)
3. The Install Menu will appear. Click the Update button. If you would like to hear a welcome greeting and audio instructions , click the Play Audio button. When the Update button is clicked, a Welcome Update setup screen appears. Click Next.
4. When the information screen appears, click Next. The End screen appears. Click Exit.

5. Exit the Install menu and you will see an Update icon on your screen desktop. Double click the Update icon.
6. Follow the onscreen instructions. During the Update process, Your Assist 5 folder will be backed up to C:\Churchsoft\Backup and then your Assist 5 folder will be renamed to Assist5Old. Files will then be copied from your CD-ROM to the Churchsoft folder on your hard drive.
Questions and Answers About Installing 5.0
What should I do if the CD does not install? Open Explorer and make sure that files are on the CD. If there are not files on the CD, call Churchsoft for a new CD.
If the CD contains files but does not install, try installing the program on another computer.
Make sure you have sufficient access rights to install the program.
Make sure your system meets the minimum requirements.
I installed the program. Why doesn’t it run? Make sure you installed the Runtime Database Engine. The Runtime Database Engine is located on the root directory of the CD and can be installed separately. How can I create two working folders on my computer? Copy the Assist5 folder to another location and create another icon on your desktop that points to the other folder. The path on the icon that sets the working directory is –w C:\Churchsoft\Assist5
Network Installations
How to Setup Assist 5.0 on a Peer to Peer Network
ON THE SERVER (Computer1)
Step 1: Check Network and Share the Drive or Folder
1. Log on with the user name under which you will use the program. You must be logged on as an Administrator. Install Assist 5.0 on all computers. Open the program on each stand alone computer to make sure the program has installed and runs properly. Close the program on all machines.
2. You must know the names of all the computers involved. To locate this information, right click My Computer or the Network Neighborhood icon (depending on the operating system), and click the Identification tab. If you are using XP, right click My Computer and click Properties, then click the Computer Name tab. You will see the computer name beside the field, Full Computer Name . For this example, we will use the computer names Computer1 (which we will designate as the server–the one on which the data and network control file will reside) and Computer2 (which we will call the client). When setting up Assist 5.0, you will need to change the computer names to reflect the names of your computers. For example, Computer1 may be Churchoffice and Computer 2 may be Pastorsoffice. Note case and type the names exactly as they appear.
3. Determine which machine you want to designate as the server (in our example, this will be Computer1). Start with Computer1 and make sure the network is working

properly by clicking on My Network Places on the start menu. All computers should show up in the Local Network window. If all computers are not shown, then check your network cards and cords making sure they are properly installed or connected.
4. On Computer1, create a new folder on the root drive, called CSNET. To do this, open Windows Explorer by right clicking on the Start button and choosing Explore. Slide the left vertical button up until you see Local Disk (C:) and click on it. On the menu bar click File, New Folder and name the folder CSNET. Slide the left vertical button down until you see the CSNET folder in the left window and right click on it. When the menu pops up, choose Sharing and Security.
5. In the Networking Sharing and Security section check the square by Share This Folder on the Network. CSNET will appear in the Share Name field. Put a check by Allow Other Users to Change My Files. Click Apply. A hand should appear under the CSNET folder.
6. Also, share the Assist5 folder. Slide the left vertical button up until you see Local Disk (C:) and click on it. Slide the left vertical button down until you see the Churchsoft folder. Click on the + sign by Churchsoft. Under the Churchsoft folder right click on Assist5. When the menu pops up, choose Sharing and Security. Share as Assist and allow other users to change files.
Step 2: Change settings in the BDE
1. Click on Start and choose Settings, then Control Panel. Double click on the BDE Administrator. When the BDE Admin opens, click on the Configuration tab. Click on the + sign by drivers, click on the + sign by native, then click on Paradox.
2. Click NET DIR, and type the path name, \\Computer1\CSNET. This is the location of the Pdoxusrs.net (network control file). This path must be the same on all computers. Do not use C:\CSNET as the path. All computers must point to this file in the BDE.
3. Click Paradox again, and a series of green triangles will appear next to Configuration, Drivers, Native, and Paradox. Also, the two arrow buttons on the tool bar will turn blue and red. Click the blue Apply button, and click Yes when prompted to save changes to PARADOX. The triangles will disappear, and the arrows will become grayed out.
4. In the left hand window, click on the + sign by System, click on INIT. On the right window, click on the word False in the Local Share field and change it to TRUE. Depending on your computers memory you can set the other parameters: Low memory usage to 64; MaxBufsize to 4096; MaxFileHandles to 140; Memsize to 32; MinBufSize to 2048. SharedMemLocation to 5BDE and SharedMemSize to 2048. Click on the blue arrow that curves to the right and when asked, click OK and save all edits to Paradox and close the BDE Administrator. You are now done with the server computer.
ON THE CLIENT (Computer2)
Step 3: Change settings in the BDE on the client computer
1. Click on Start and choose Settings, then Control Panel. Double click on the BDE Administrator. When the BDE Admin opens, click on the Configuration tab. Click on the + sign by drivers, click on the + sign by native, then click on Paradox.
2. Repeat the BDE changes (all of Step 2 above) for each computer in the network. Note that the NET DIR setting should be the same on all computers; in this example, \\Computer1\CSNET.
Step 4: Change the path on the icon to point to the data
1. Right click on the Assist 5.0 icon that opens the program. Choose Properties. Click on the Shortcut tab. Click in the target field to remove the highlight.2. Use the left arrow and scroll to the left until you see the -w "C:\Churchsoft\Assist5" path. Highlight C:\Churchsoft and type \\Computer1. The -w path now should be
-w "\\Computer1\Assist5". Now when you click on the icon, Assist 5.0 will open to the data on the server machine. You do not need to type Churchsoft in the path

because the Assist5 folder was shared.
ON ALL COMPUTERS
IMPORTANT: Search for and delete any paradox.lck and pdoxusrs.lck files before starting Assist 5.0. To do the search in XP, click Start, Search, All Files and Folders. Type p*.lck in the Search field then click the Search button. Delete any paradox.lck and pdoxusrs.lck that are found. When starting Assist 5.0 at anytime, if you get the message Initialization failed, could not initialize BDE then close all programs and search for and delete the above .lck files.
Configuring Paradox RuntimeDouble click the BDE Administrator icon in Control panel. This will load the BDE Configuration Utility.
Click on the Configuration tab. Click on the + sign by Drivers, click on the + sign by Native, then click on Paradox. Or click on the + sign by System, then Init. Change any settings by clicking in the field definitions on the right. If you have at least 128 MB of memory, it is suggested that you type 4096 in the MINBUFSIZE and 8092 in the MAXBUFSIZE. You may want to increase the number of Maxfilehandles to 140
For networked computers, set Local Share to TRUE. Choose Object | Save As configuration... to save the configuration setup. For more information , see the section above on Network installations or download the document from the Churchsoft web site on How To Install Assist 5.0 On A Network.

Learning To Use Assist 5.0
Starting Assist 5.0Click on Start then click on All Programs. Click on Churchsoft then click the Assist 5.0 icon.
A startup screen will display and a password field will display with the Ok button beneath the password field. Click on OK to enter the program. There is no password set at this stage.
The Data Entry Form will be displayed.
Click on the New Record button to insert a new record.
25 individual records may be entered without an unlock number.
Help is available by clicking on Help from the menu. If you need technical assistance and you are covered under a maintenance plan, call (888) 301-8580. If you are not on a maintenance plan, call (864) 225-8118.
Entering Unlock NumberYou do not need an unlock number to open the program, but you do need it to allow the entry of unlimited records. To enter the unlock number, click on the Setup icon at the top of the Data Entry Form (icon with the key and windows tag). Click in the Unlock Number field and enter the number that was given you when you registered.
Navigation and SelectionThis section will tell you how to get around in Assist 5.0 and other helpful tips and short cuts.
Menu Command Keys
For programs which are open.ESC Close a Control menu, but leave the Control menu boxPress ESC a second time Deselect the Control menu box.ALT + ESC Display the next application on the Windows desktop. CTRL + ESC Access the Start button on the taskbar.ALT + HYPHEN Open the active window's Control menu.ALT + SPACEBAR Open the application Control menuALT + TAB Display the next application on the Windows desktop.
For Assist 5.0
Use... To...
3

ALT Select the Menu barALT + HYPHEN Open the child window Control menuALT + SPACEBAR Open the application Control menuARROW KEYS Select menu itemsENTER or Open the selected menuESC Exit from a menu without choosing a command
Form Navigation Keys
This table shows the keys with which you can navigate when you are looking at data in forms. Make sure NUMLOCK is off when you use ALT in combination with a keypad key. Field view and non-field-view keys are listed.
Key Non-field view
PAGE UP Up one set of recordsCTRL + PAGE UP Left one screenPAGE DOWN Down one set of recordsCTRL + PAGE DOWN Right one screenOME First field of recordSHIFT + HOME Select first field of recordCTRL + HOME First field of first recordALT + HOME First field of recordEND Last field of recordENTER Next field Next fieldCTRL + END Last field of last recordALT + END Last field of recordLEFT ARROW (LA) Left one fieldCTRL + SHIFT+LA Select first field of recordALT +LA Left one fieldRIGHT ARROW (RA) Right one fieldCTRL + SHIFT+(RA) Select to last field of recordALT +RA Right one fieldUP ARROW (UA) Up one fieldCTRL+ UA Move to same field of first recordALT + UA Up one fieldDOWN ARROW (DA) Down one fieldCTRL +DA Move to same field of last recordALT + DA Down one field Down one fieldTAB Next field Insert tabSHIFT + TAB Previous field N/A
Form Window Shortcuts
CTRL + A Locate next

CTRL + D Locks record for data entryCTRL + F Field ViewCTRL + INSERT Copy to the ClipboardCTRL + L Lock the current recordCTRL + SHIFT + L Post changes made to the current recordCTRL + R Rotate columns (on table frame)CTRL + T Memo ViewCTRL + Z Locate ValueCTRL + SHIFT + Z Locate and ReplaceDELETE Clear or deleteSHIFT + DELETE Cut to the ClipboardSHIFT + INSERT Paste from the Clipboard
When In Edit Mode
INSERT Insert record (if there is not an insert button)SHIFT + INSERT Paste (same as Edit, Paste)CTRL + INSERT Copy (same as Edit, Copy)DELETE Delete selected text (same as Edit, Delete)SHIFT + DELETE Cut (same as Edit, Cut)CTRL + DELETE Delete record (if there is not a delete button)BACKSPACE Delete character to the left or delete selected textCTRL + BACKSPACE Delete word to leftALT + BACKSPACE Undo record edit (same as Edit, Undo)ESC Undo field edit
TAB Post value and move to next fieldSHIFT + TAB Post value and move to previous fieldENTER Post value and move to next fieldCTRL + SPACEBAR Lookup Help (if defined)CTRL + SHIFT + SPACEMove Help (if applicable)**
Function Keys in Forms
F1 Displays HelpF2 Field ViewSHIFT + F2 Memo View if field is a memo fieldCTRL + F2 Persistent Field ViewF3 Super Back TABCTRL + F3 Refresh data*SHIFT + F3 Previous PageF4 Super TABSHIFT + F4 Next Page (Next note page for example)F5 Lock recordSHIFT + F5 Post record and SAVE CHANGES IMMEDIATELY

CTRL + F5 Post/Keep LockF6 View current object's right-click menuF9 Edit/End EditF10 MenuSHIFT + F10 View current object's right-click menuF11 Go To Previous recordCTRL + F11 First recordSHIFT + F11 Previous setF12 Go To Next recordCTRL + F12 Last recordSHIFT + F12 Next set
Using the Tool Bars
There are three main tool bars: Standard, Property and Status bar. The tool bars may be customized. To custom the tool bars, right click on the tool bar and choose Customize then click the Toolbars button. You may also choose Tools, Settings, Customize Tool bars from the menu bar and then
Open File Icon Opens a form or reportPrint Icon Invokes the printer dialogueCut Icon Cut a selection to the clipboardCopy Icon Copies a selection to the clipboardPaste Icon Paste from the clipboardProject Viewer Icon Opens the Project Viewer to manage filesView Data Takes the form out of edit modeEdit Data Icon Puts the form in edit modeLocate Icon Invokes the Locate Value Dialogue BoxLocate Next Icon Locates the next searched valueNavigation Arrows First Record, Previous Set (10), Previous Record, Next Record, Next Set and Last RecordFilter Icon Find a Group of Records
Searching – How To Find or LocateThis section will tell you how to locate the data you have in Assist. First you need to know that Assist 5.0 is a relational program. A relational program is a main table (Master) that is linked to other tables (detail or often called child tables). When in the Data Entry Form, the name and address, for example, are fields in the main table.
The family table is a detail table. The main table may be actively searched. To search a detail table you must be in the Table View Form. If you try search a detail table you will get the message, “Active object is not a field or has a value that cannot be searched.”
Locating
Using the Locate Icon (Binoculars Icon)
To locate a person when in the Data Entry Form, first click in the field you want to search. For example, click the Name field in the upper right corner. Then click on the binoculars icon on the tool bar or choose Record, Locate,Value from the menu. The drop down field named Field will display Name. If this is not the field you want to search
on, click the drop down arrow and choose another field.
Then click in the Value field and type the name of the person you want to locate. You may use wild card characters (symbols to represent part of the name) so you do not have to type then entire name. For example: to locate John Smith, type joh.. smi.. in the value field. Searchers are not case sensitive unless you specify them to be on the search dialogue. For a list of wild card characters, see the section below entitled “Using Wildcard characters.
Using the Locate Record Button
See the section in the Data Entry Form for information on using the Locate Record Button.
Locating Next
When Assist 5.0 locates a value, it always finds the first value match to the criteria you specified. Joh..Smi.. would locate the first John Smith in the database. To locate the next without having to re-enter the search criteria, click the locate next icon (binoculars with the blue arrow). Each time you click the locate next icon the next record matching the search criteria will be found.
Replacing Data
Sometimes you will want to locate one value and replace it with another value. For example: Suppose the bank name assigned to Data Records changes from SunTrust to Wachovia. Rather than retyping all the data you can search for SunTrust and have Assist 5.0 replace all the records with the new data.
Using the Table View Open the Table View Type the new data in the Replace field Click on the old data in the table Click the Replace button
Using the Form On the menu bar click Record, Locate, Replace Enter the value you want to search for in the value field Type the new or replace value in the Replace field When prompted, click Change All Occurrences
Using the Search and Replace From Click the Search / Replace button located on the different forms Choose the table you want to search Choose the field you want to search Type the value you want to use for the search Choose the field you want to replace Type the new replace data in the Replace With Value field
Filtering Data
You want to see certain records. Sometimes you don't want to see just one record and you don’t want to see all the records in a database. You can use filters to limit your view

to those records whose field values meet the conditions you set. You can also use a filter to change the order in which records are displayed.
Filters let you view a subset of records. For example, you might want to see only those church members who live on a certain street. Filters make it possible to view and edit records whose fields meet conditions specified by you even though they are in a different order. You can also specify a range based on the main id or secondary indexes such as last name.
HOW TO Click on the filter icon (funnel) on the tool bar or Choose Record, Filter from the Menu bar. Type the filter criteria in a field Click OK
The only records that will show in the form are those you specified in the filter. If you set a filter, don’t forget to remove the filter to see all the records again. If you filter a field and do not see any records, it is because there are no records that match that criteria, or you have incorrectly entered the filter. Click Help from the menu bar for more information on filtering. Example: To find all church members that live in Dallas, type Dallas in the city field. To find all church members that live in Dallas and Fort Worth, type Dallas OR Fort Worth in the city field.
Using Wildcard Characters
If you can't remember the exact spelling or syntax of the data you want to locate, you can use wildcards. Wildcards are operators that let you suggest patterns to use in your search. You can use two wildcards in any search string you specify, using Locate and Replace.
To search for @ or .. characters as literals, you must precede them with a backslash ( \ ). For example: If you search for [email protected], the @ must be preceded with a backslash.
Extended list of wildcards
You can use an extended set of wildcards in a search string when you enable advanced pattern match in the Locate and Replace dialog box.
Wildcard Character Represents
@ Any single character.. Any value^ Beginning of field$ End of field* Match none or more of the expressions before the *+ Match one or more of the expressions before the +? Match one or none of the expressions before the ?, Match either the characters before or after the vertical bar[abc] Match any of the characters contained within the brackets[^abc] Match any characters not contained within the brackets
(abc) A group (a series of literals)\ Use the following wildcard operator as a regular character\r Carriage return

\n Line feed\t Tab\f Form feed
The Project Viewer
The Project Viewer is a utility for organizing, managing, and using your files. The Project Viewer displays all files for the current working and private directories. Open the Project Viewer by choosing Tools, Project Viewer or by clicking on the Project View icon (yellow folder with the white paper on the corner)
When the Project Viewer opens, the field Working Directory or Database shows the path to the data folder you are working in, commonly called your working directory. In Assist 5.0 the working folder is Assist5.
Although most forms can be opened from the Project Viewer, we recommend opening them by clicking a button on a form. Some forms will not work unless they are opened from their calling form.
To open a form using the Project Viewer:
Open the Project ViewerClick on FormsDouble click the form
The Project Viewer is especially useful when you want to change directories to another folder such as a backup folder you have made.
To switch to a different data folder using the Project Viewer
Click the Project iconClick the button beside the drop down field with the yellow folder on itClick the folder you want in the Browse For folder dialogueClick OKWhen the message “Changing Your Working Directory or Database closes all desktop windows, click OK.
Other Information and Tips
To sort a detail table in table view, click the Filter icon. Click the field you want to sort by in the Order By section and then click OK.
Birthday fields are automatically converted to four digit years even if you only enter two digits.
Data may be copied and pasted from one field to another or from one record to another. Highlight the data and choose CTRL-C to copy data and CTRL-V to paste or click the Copy and Paste icons on the tool bar.
Phone number fields are formatted to accept phone numbers with area codes or without area codes. When using area codes, they must be enclosed in parenthesis. Press the

space bar and the first parenthesis will be added. Then just type the number. See the Chapter on the Data Entry form for more information on entering phone numbers.
If a field is a true date field, hitting the space bar three times will add today’s date.
If you get a key violation when entering data, it is because you have entered something incorrectly. Chose Edit Undo or press ALT+BACKSPACE and your changes will be discarded.
To preview a file before printing, click Close when the Print Dialogue appears. When you are ready to print, click the printer icon on the tool bar and the Printer Dialogue will re-appear.

CUSTOMIZING ASSIST 5.0
Church / User InformationTo open the Church / User Information form, click on the Setup icon (Yellow key with the windows tag) at the top of the Data Entry Form or the Church/User button on the Setup Tables Form. This information is used on certain reports and displays on certain forms. Enter the data for your church. If you enter a Federal Tax Id number, the number will appear on the Contribution Statement.
Unlock Number
The unlock number field is for typing a PIN to unlock the 25 record limitation. Assist 5.0 is fully functional and working up to 25 records but the PIN must be entered for additional records. The PIN will be given when the program is purchased and the transaction is complete and a payment is made. If you have the working demo and wish to purchase it, call Churchsoft at 1-888-301-8580 or send a check to Churchsoft at 700 Concord Road Anderson, SC 29621. When you have received your unlock number, type it in the Unlock Number field on the Church/User Setup Form. To do this click on the Key icon at the top of the Data Entry Form. When the mouse cursor is over the Key icon, it will display ASetup@. Type the number in the Unlock Number field near the bottom of the form.
To unlock the School Module, you must type a different number in the Unlock School field.
Setup and User InformationGeneral Information
The information in the Setup Tables Form is used to define drop down edit list sometimes referred to as combo edit boxes. The lists are used on forms to automate data entry. Assist 5.0 allows the user to customize many of these lists. ATTENTION: When changing or adding data in the Setup Tables Form, if the list does not refresh with the new information, close the Data Entry Form or other form which contains the drop down list. When you reopen the Data Entry Form, your changes will be reflected in the list. Click on the Setup icon (yellow key) at the top of the Data Entry Form or open the Setuptbl.fdl from the Project Viewer. The Setup Tables Form will be displayed.
Titles, Cities and Zip Codes
Click on the Titles, City and Zip tab. The titles are used as a drop down list on the Data Entry Form. To change titles, click in the table and change the title. To add a new title, click on the last record in the table and press insert or press the down arrow key and type the new title.
Enter the Cities, State and Zip Codes you will be entering in the Data Entry Form. This list is used to automate data entry when typing the City, State and Zip Code. When the City is entered, the matching state and zip code will be selected. When the zip code is selected, the matching state and city will be selected.
Religious Faith
This table is used as a look up table on the Visitation tab. When posting a person’s religious faith, press Ctrl + the space bar to bring up the lookup table. Data should not be added to the religious faith field unless it is in the lookup table. To change the data, click in the table and change the code and name or click on the last record and press the insert key to add a new code and denomination.
School and Day Care
4
The Class/Grade is a table used to define a drop down list on the Academic Tab in the School Module. You may delete or modify the Class Names.
The Subjects table is also used to define a list on the Academic Tab. You can insert new subjects by clicking in the table and pressing the insert key.The City, State and Zip Code table automates data entry in the Christian School Module. The Code List allows the user to define the different accounts. DC, for example, is a code for Day Care and SCH is a code for School accounts.
The code field is a drop down list in the Christian School Module. The default is DC for Day Care and SCH for School. This list is used on the accounts field. These may be changed, but the default is recommended.
Group and Outreach Leaders
Click on the Group Leaders tab to define a drop down list to be used when entering Group Leaders in the Data Entry Form on the Sunday School page. All Group leaders can be entered here. Then just select the group leader to assign them to an individual.
Click in the Outreach Leaders table to define a drop down list to be used when entering Outreach Leaders on the Sunday School page of the Data Entry Form. All Outreach Leaders can be entered here. Then just select the outreach leader to assign them to an individual.
Sunday School
The Sunday School tab is for setting up Sunday School Classes, Teachers, and Assist 5.0 Teachers. Default data is already entered in the table, but your classes will be different. To delete a record click on the record and press Ctrl Delete. To change a class, click on the class and type the new name. Tab to the next field and type the Department. Tab to the SS Teacher field and type the Sunday School Teacher’s name. Tab to the Ast. Teacher and type the Ast. Teacher's name. This information is used on the Sunday School tab of the Data Entry Form as a drop down list and as a lookup table.
If you change a class name, Assist 5.0 will automatically update the changes in the Sunday School table (SS.db) and the Sunday School Data table (SSClRec.db). The update time will depend on the number of records you are updating. When Department, Teacher, or Ast. Teacher changes are made, click the Update button to update the data in the Sunday School table. For example: If the Class is Adult Men and you change it to Men’s Bible Class, all records currently in the Sunday School table will be changed to Men’s Bible. If you change the teacher from Derrel Moore to Danny Smith and the Ast. Teacher from Jack Alexander to Paul Knight, click the Update button and all records will be updated with the new changes. You can make all changes in every class and then click the Update button only once.
Each year classes change teachers. The auto updating feature prevents you from having to manually search and change each record when teacher changes are made. If the student is promoted to another class, then you must search for the student and change the class unless you use auto promotion.
Budget / Categories / Funds
To set up budgets and categories, click on the Budget / Categories tab. To open the Chart of Accounts Form, click on the Chart Of Accounts button. Click on the Setup Budget/Funds/Categories button to open the Budget form.
Accounts are sometimes referred to as Categories. AAccount@ is more an accounting term whereas ACategory@ is a term used by popular programs such as Quicken, In Assist 5.0 the two terms are synonymous. The Chart of Accounts is for the purpose of setting up the categories.
SEE ACCOUNTING IN CHAPTER 14. For information on setting up the chart of accounts, click on the Chart of Accounts button in the Setup Form, in the Accounts Payable Module or on the Accounting Module Form. Create a new chart by deleting the sample data or by modifying the current Chart of Accounts. To modify the chart, click in a field and change it. In most cases it may be easier to modify than to delete and start from scratch.

The Budget form and the Chart of Accounts from previous versions have been combined. Spend some time getting the chart of accounts setup properly and using the program will be much easier and more efficient.
Bus Captains/Library
Enter the Bus Captains name. This list is used on the Bus tab of the Church/SS tab.
The Type table is used as a drop down list in the Library Module. The Publisher table is also used as a drop down edit list in the Library Module.
Office/Miscellaneous
The Service Time is a drop down list in the Sermon Module. This custom list is provided because churches have various service times.
The Office Lists allow the user to categorize church offices.
Settings
Some printers like the Canon Bubble Jet and Epson Printers feed envelopes in portrait mode. Landscape mode is when the paper is turned sideways and the text is printed down the page. If you are using HP type printer, the envelopes feed landscape and there will be no need to change the orientation because the default is set for landscape. If your printer feeds envelopes in portrait mode, click on Portrait and the envelopes should print correctly. You will get a message that page and printer orientation do not match but the envelopes will still print correctly.
The configure sound option allows the user to turn off the click sound that is heard when a tab is clicked. The default path for the sound file is C:\Program Files\Churchsoft\Sounds. Click on the Folder button to change the default path of the sound files. Click AOff@ to turn the sounds off.
The text table allows the user the option of changing the wording of fields on the decision tab. To change the name of a field, click in the Text table and type the new name. When you open the Data Entry Form, the fields on the decision tab will reflect the new name.
Church Tab
The Joined How list and Removed How list are customizable lists used on the decision tab.
Empty Tables
The Empty Tables Button allows the user to delete data out of tables. Although this is an option, it is not recommended to use this method. Where possible, it is better to delete data using a delete button or Ctrl Delete. This form may also be opened from the Utilities form. Be sure to have a backup of all tables because once data has been deleted it cannot be recovered. Before emptying tables, close all open forms, otherwise table indexes may not be updated correctly. To delete data out of all or any table, click on the Empty All Tables button. The Empty tables form will open. On the left side of the form is a table listing all the tables you want to empty. If you do not want to delete data out of a certain table, take it out of the list by clicking on the table name and pressing Ctrl Delete. Change or customize the list by typing another or a new table name. All Paradox tables have the extension of .db which must be typed along with the table name. Once the Delete Tables List is customized, click on the Delete Data Out Of All Tables button. You will be given two opportunities to cancel in the event you change your mind. To delete the data in only one table, press the Empty One Table Button. The file browser dialogue box will open. Select the table you want to empty and press the Open Button. ALL DATA IN THE TABLE WILL BE DELETED.
Customizing Letters
To customize the pre-written letters, click on the Letters button. The Customize Letters form will be displayed. To customize a letter, use the scroll bar on the right side of the form and scroll down to the letter you want to customize. Use both scroll bars if necessary. Click in the letter you want to change and type the changes. For example, if your church name is First Baptist you would want to replace "our church" with First Baptist. If your pastor's name is Rev. John James, replace "Your Pastor" at the end of the letter with Rev. John James. When you are finished, Assist 5.0 saves the changes and when the letter is printed, the changes will be reflected on screen display and in the printed letter.

DATA ENTRY
The ApplicationWorkspace
The application workspace consists of:
The Title bar Shows the Application name (Assist 5.0) The Menu bar The bar with File, Edit, View Commands The Tool bar The bar with the application icons The Form Place Data is entered, edited or viewed The Forms Tool bar On Data Entry - Opens other forms The Status Bar Two lines: Shows Information and Open
Forms
Notebook Tabs
Assist 5.0 makes extensive use of notebook tabs. By clicking a tab you can easily go to a different module or database. The tabs on the Data Entry Form are Personal, Outreach, Visitors, Decisions, Church/SS and Letters. On the Church/SS tab there are five tabs: Church Lists, Ministries-Groups, Youth-Music, Bus and Meetings.
ALL the fields, check boxes, etc. on the Data Entry form apply to the person whose name is showing in the upper right.
Forms Tool Bar
The Forms tool bar is located at the top of the Data Entry form. Most of the main forms in Assist 5.0 can be easily accessed by clicking one of the icons. The forms which can be opened from the Forms Tool bar at the top of the Data Entry form are:
Address and BusinessesSermon and Illustration ModuleLibrary ModuleContributionsProfileLabelsInternetMiscellaneous Reports FormsFinances FormChristian School Module
A Relational Database
Assist 5.0 is a relational database which means several tables are connected. This means data only has to be entered once for many tasks. Click on any of the icons at the top of the Data Entry Form to access other forms and databases. Hold your mouse over an icon for a second to display a tool tip which identifies the function of each icon.
5

These are the main tables which Assist 5.0 uses to store data:
The personal information and address is in the Main table (Main.db)
The family information is in the Family table (Family.db)
The visitation information is in the Church table (Church.db)
The visitor information is in the Visitors table (Visitor.db)
The letter information is in the Letters table (Letters.db)
The Sunday School information is in the Sunday School table (SS.db)
The business address information is in the Address table (Address.db)
The sermon information is in the Sermon table (Sermon.db)
The library information is in the Library table (Library.db) The contribution information is in the Giving table (Giving.db)
The profile information is in the Profile table (Profile.db)
The school/daycare information is in the School table (ICADay.db)
The school/daycare payments are in the Accounts table (Account.db)
The pledges data is in the Pledges table (Pledges.db)
The contacts data is in the Contacts table (Contacts.db)
The employee data is in the Employee table (Employee.db)
The payroll data is in the Payroll table (Payroll.db)

Entering Data
Do not enter data in all caps. This makes data hard to read when displayed in reports. Assist 5.0 formats data with initial caps. There is no need to press Shift to capitalize a word.
When data is entered in a field, press the TAB key or the ENTER key to go to the next field.
Personal Information
The Data Entry Form opens after the password is typed in the Startup Form and the user has clicked OK. When the form opens, the Personal tab text is in red. As you click on other tabs, the tab text is changed to red and the previous tab text changes to black. Once a name and address is entered in Assist 5.0, just point and click a check box or field to assign data.
Deleting A Record
To delete a record, press the Delete Record Button. Ctrl Delete only deletes the data out of the current table. Assist 5.0 is a relational database which means Ctrl Delete will not delete the record out of all tables. Most of the time, you will use the Delete button to delete a record . THE RECORD WILL THEN BE DELETED 0UT OF ALL TABLES TO WHICH IT IS LINKED.
Adding a Record
Begin by clicking the New Record Button. A new record is inserted with a unique ID number.
Type a name in the First Name field. You do not have to type capital letters--Assist 5.0 will auto capitalize for you. It is best if you DO NOT USE ALL CAPS. Tab to the Last Name field. When you tab to the last name field, the first name is added to the name field in the upper right corner.
Type the last name and press tab. The last name is added to the name field.
If the name is already in the database, the program will inform you that the name is a duplicate name and already exists in the database. This dialogue box has three options:
1. Delete The Record Deletes the name you just entered2. Continue Editing Allows you to continue entering information3. Locate The Record Locates the matching record to view or delete it
Click one of the above options and then click the Continue button.
Entering Birthdays and Updating Age
Type the person’s birthday in the Birthday field. There are three fields that make up the birthday field: Month, Day and Year. These are number fields which are concatenated into a text field for display in reports. Since these fields are number fields, there is no need to enter a “0” before a single digit. For example, just enter “1” not “01”. If you wish to see the text field, double click in the blank space to the left of the word birthday and the text field will appear in red. Birthdays after 1910 may be entered with two digits years. When you tab off the field, the year is converted to a four digit year and the age is calculated automatically. Birthdays are calculated based on the system clock. Make sure the computer's date is set right or the age will not calculate correctly. If you do not know the year or don’t want it to show on reports, leave the year field blank.

As people have birthdays, their age will need to be updated. To update the age, click on the Misc Reports icon at the top. The Misc Reports screen will be displayed. Click on the Other tab then click the Update Age button. The age for all records in the database will be updated with the current age. Updating the age should be done periodically so that information will be current.
Gender and Status
The Gender and Status fields are combo fields which will drop down when you arrive on them. In the Gender field, M=Male F=Female. If you try to type any other character than M or F, the message in the lower right hand corner will display invalid character. When the Gender or Status is changed, the mailing title and name will automatically be changed. Example: if the Gender is F and the Status is S and you change the Status to M, the title will be changed from AMiss@ to AMrs.@
The Status field has five options. C=Couples living together that are not married; D=Divorced; M=Married; S=Single; W=Widow. When you place your cursor over the Status field, a tool tip will appear showing what the alpha characters represent.
When you type the Gender and Status, the Title is entered automatically. If you wish to change the Title, click in the field and type a different title. If you code the heads of household as Gender= and Status= and there is, the mailing title and name will calc AMr. and Mrs.@
Special titles in the drop down list may be changed or set up by clicking on the Setup icon (yellow key with the windows tag) and then clicking on Set Up tables. Click in the Titles table to change or add other titles. Close the Data Entry form and reopen it and the new values you typed in the Titles table will show in the drop down list.
Salutation
The |Salutation will drop down when you arrive on it. Hold the mouse over it a second and a tool tip will appear showing what the characters represent. The Salutation field determines what salutation to use when sending out letters. Assist 5.0 has been programmed to save you time and work. The Salutation field is a code, although you have the option of typing a name if you do not like the programmed code.
If the person's name is Ralph Jones and the code is set to: CF the letter goes out "Dear Bro. Ralph" (CF=Christian First); CL=Christian Last and the salutation reads "Dear Bro. Jones"; FN=First Name and the salutation reads, "Dear Ralph"; LN=Last Name and the salutation reads "Dear Mr. Jones. The salutation is calculated automatically each time you tab off the field, if the salutation code has been changed.
Calculated Names And Salutation
To view or change the Salutation or one of the other calculated names, click on the Letters tab at the bottom right of the Data Entry Form. The calculated fields may be changed by clicking in the field and typing another name or title. If you type a name after you have set the salutation code, do not go back and change the salutation code or the programmed code will replace the title you entered.
The full name is calculated when you change a value on the first or last name. An example of a full name would be “John Smith” or “Mr. John Smith” The other names are calculated based upon the codes in the Gender, Status and Salutation field.
A Salutation with FN gets “John”. The mailing salutation will be the same unless John is married. If John is married to Mary, the salutation will be John and Mary If John is not married, the mailing title will be Mr. If John is married, the mailing title will be Mr. and Mrs. If John is not married, the mailing name will be Mr. John Smith. If John is married, the mailing title will be Mr. and Mrs. John Smith.

Examples:
Full Name John Smith or Mr. John SmithMail Name Mr. John Smith, Mr. and Mrs. John SmithSalutation Dear John, Dear Bro. John, Dear Mr. Smith or Dear Bro.
SmithMailing Salutation Dear John, Dear John and Mary, Dear Mr. Smith, or
Dear Mr. and Mrs. Smith
Employer and Occupation
Type the name of the person's employer and their occupation.
Phone Numbers
Phone Numbers may be entered in two formats: Optional area code or without the area code. If you enter the area code, it must be entered beginning with a parenthesis. Example: (864) 225-8118. If you tried to enter the number 864-225-8118 you will get a key violation because area code does not have a parenthesis. Simply backspace and take out the unwanted characters and enter the number using the correct format. To type a phone number with the area code, just hit the space bar and the first parenthesis will be entered for you—then just type all the numbers. When the first parenthesis and the area code are entered, the second parenthesis and a space is added automatically. If you choose not to type the area code, type the seven digits of the phone number--for example 225-8118. You do not have to type the hyphen. The hyphen will be added automatically.
When you type the phone number and press tab, the cursor goes to the Street Number field. If you wish to type a work number, press shift tab or click in the Work Number field. Most of the time you may not readily know the work number so Assist 5.0 is programmed to skip the work number to facilitate data entry. To type an extension for the work number, click the Ext. button next to the Work Phone field. A field will appear allowing you to enter up to 6 digits for the extension number.To enter a second number (such as a home phone, a cell or fax number), click on the More button. After you enter the other phone numbers, click on Close to close the other phone numbers. You can view them again by clicking the More button.
Address Information
Street and Address
Enter the street number in the Street Number field and the street name in the Street Name field. The number and name are entered separately so reports can be sorted by street names. The street number and name will be connected in all letters and reports. If the address is 1005-A Phillips Rd., enter the street number as 1005-A and the street name as Phillips Rd. If the address is Route 1 Box 345 enter Rt. 1 in the Street Number field and Box 345 in the Street Name field. Nine characters or digits may be entered in the Street Number field. You may enter routes as Rt. 1, Route 1, Route #1 or any other format, provided no more than 9 characters are entered.
When data is entered in the Street Number and Street Name field, the two fields join to form the Mailing Address unless the mailing address is a Post Office Box. The mailing address may be viewed or changed by clicking on the letters tab.
When entering address information, do not use punctuation in the address if the address is too be used for bulk mail . For example, if you abbreviate street with St. or road with Rd. or Route with Rt., your mailing will not conform to postal regulations. Either abbreviate without a period or write out street, road, etc. The mailing labels in Assist 5.0 are formatted to conform to Postal regulations, but you must decide if you will use punctuation when you enter the data.

Same
The Same field asks the question, "Is the mailing address the same as the street address?" If the answer is "Yes", enter a Y in the Same field. If the mailing address is different, enter an N in the Same field. If N is entered in the Same field and a Post Office Box is entered in the PO Box field, all you have to do is enter the PO Box number. The PO Box number then becomes the mailing address.
City, State and Zip
The City and Zip fields are drop down edit lists which drop down upon arriving on the field. If the city you are entering begins with a AB@, when you type AB@ then Belton is located in the list. Press the enter button and Belton is entered in the City field. When you choose a city, the zip is entered automatically. Choose a zip and the city is entered. To set up the edit list, choose the Setup icon (key) and click on Set Up Tables. Type the cities and corresponding zip codes in the City Zip table. Anytime you set up tables you must close the Data Entry or form which contains the list and reopen it for the list to show.
Subdivision and Zone
The Subdivision field allows people (mainly prospects) to be sorted and grouped according to certain areas. If the subdivision is Evergreen Hills or the area is South Anderson, type this information in the Subdivision field. Keep the data in this field uniform. (Do not type South Anderson in one record and S. Anderson in another.)
The Zone field allows the user to divide their city into zones by assigning a zone number to each prospect. Section a city map with zones. If the prospect lives in zone 5, type 5 in the zone field. When you print out prospect cards, you can give people cards according to zones. Time is saved and efficiency is maximized because all the prospects are located in the same area.
Email Field
Click in the Email field and enter an email address such as [email protected].
Mailing List
To add a person to the mailing list, hit the space bar or click on the check box with the mouse. Only heads of household are added to the mailing list. If you put the head of household on the mailing list, do not add the spouse or children. The mailing list is primarily for bulk mailings, printing labels, etc.
Second Address
Some people have residences in two states; therefore we have added the capability to have an automatic second address. To add a second address, click on the 2nd Address button and enter the information in the second address fields. Type a Beginning Date and an Ending Date for the address to be used. The second address will be used if your computers date falls within the Beginning or Ending Date. For example, a person lives in Florida (1 st address) November through April and in West Virginia (2nd address) May through October. The Florida church would enter a beginning date of 5/1/00 and an ending date of 10/31/00. Their mailing address for November thru April would be the Florida address and May thru October would be the 2nd address.
To periodically update the 2nd address dates, open the Miscellaneous Reports form. Click on the Update tab and click on the + Increment 2nd Address button. One year will then be added to both the beginning and ending dates only if today’s date is greater than the ending date.
Maps Button
When the maps button is clicked four buttons appear:

Streets and Trips FindStreets and Trips DirectionsMapQuest FindMapQuest Directions
The Streets and Trips Find will open Microsoft Streets and Trips provided (1) You have Streets and Trips installed on your computer (2) Streets and Trips was installed in the default directory of C:\Program Files\Microsoft Streets and Trips\.Assist 5.0 will open Streets and Trips and will find the address showing on the screen. Assist 5.0 accesses Streets and Trips using macros. If the locate failed, close Streets and Trips and click the Streets and Trips Find button again.
To find and get directions, click the Streets and Trips Dir button. Assist 5 will use the church address you typed in the User/Info form as the Start Address. The End address will be the address you have showing in your data entry form.
If you are connected to the Internet and wish to find and address using MapQuest, click the MapQuest Find button. To get directions using MapQuest, click the MapQuest Dir button. Assist 5 will use the church address you typed in the User/ Info form as the Start Address. The End address will be the address you have showing in your data entry form.
Duplicating Records
When adding records that have the same address, click on Duplicate Record. The record will be inserted with the address of the current record. The fields duplicated are: Last Name, Home Phone, Street Number, Street Name, PO Box, City, State, Zip, Same, Mailing Address, Zone, Subdivision, Comments, Directions and Family Group Number. If a field duplicates data when you didn't want to, highlight the data and press the delete key.
Locate Record Button
To locate a record by using a table as a pick list, click on the Locate button. This opens the locate form. Click on an alpha letter to find the names of people whose last name begins with that letter. Double click the name of the person you want to locate or click on the name and click the Find button. The record will be found and the Locate form will close. To dial the number, double click the Phone Number field or click on the Dial button.
Personal Information Reports
All reports pertaining to personal information can be run by clicking on the Misc Reports icon (Two Blue Pages). Then click on the button next to the report you want to print.
Personal information reports: Family Group Report Birthdays of Current Attenders grouped by month Birthdays of Everyone in database Birthdays of Church Members Birthdays of Current Attenders by Last Name Birthdays to Post on Bulletin Board Birthdays & Anniversaries of Any List based on Codes field (Ex: ..ML..) Birthdays for Any Date and Any List
Anniversary Report List of all names in database List of all names sorted by ID number Marital Status Reports Profile Reports: Single or Directory Format Report of families with youth A report listing all heads of household The update age button to update recalculate ages periodically.
Family Information
Why minimal family information?
The family information should not be detailed for two reasons: (1) The more detailed, the larger your database. (2) The more detailed, the more duplicate data you would have, because more than likely you will be adding a record for the spouse and records for the children. The family information is stored in a table named family.db which may be viewed by clicking on the More button and then the Family Table button.
Spouse, Anniversary and Family Group Number
Enter the spouse name and the spouse's last name if it is known. Sometimes spouses will have different last names. Enter the spouse's last name regardless of whether it is the same or different. Information in the spouse last name field sometimes determines how mail is sent.
Enter the Anniversary. If you do not know the year, enter 00 for the year. Later, when you know the year, search on the dates with 00 and add the year.
The family group number enables you to group all the members in a family. Start with any number such as 1 or 100, but give members of the same family the same number. Each household will have a unique number, but family members will have the same number. If you have four members of the Keen family, give all members the number 1. When you add records for the three members of the Smith family, give them family group number 2
Head of Household - Children - Youth In Family
If the name in the Personal Information is the head of the household click on Yes.If the family has children, click on Youth in Family.List the children's names. If a child has a different last name, enter the full name up to 15 characters. Click on the More button when the family has more than 4 children or if you wish to view the Family Table.
Family Members Birthdays
To enter the birthdays of other family members, click the BDays button. Birthdays may be entered for the spouse and children. The birthdays should be entered under the Head Of House record. You may enter them on the spouse record, but there are no reports that use the birthdays on the spouse record. Church Directory 1 is a report that pulls information from these birthday fields under the head of household.
Mailing LabelsTo run mailing labels, click on the Labels icon at the top of the Data Entry Form. The Labels form will be displayed. Assist 5.0 allows inkjet or laser labels to be printed three

ways: (1) Everyone on the Mailing List. (2) Individuals which have been tagged. (3) By Groups - A code must be entered in the code field.
First, choose what name to use on the mailing label. You may choose the person’s name - David Wilson. Or, you may choose the mailing name - Mr. and Mrs. David Wilson. Or, you may choose to use either the name or mailing name by choosing the IN/HW code. If you code the person IN the name on the label will be David Wilson. If you code the person HW the name on the label will be Mr. and Mrs. David Wilson. Keep in mind the postal regulation codes when printing labels. Some post offices do not allow punctuation in the name or address, so if you chose Mr. and Mrs. which contains periods your label would not conform to standard postal codes. Even though you did not type the name in all caps, the label will always print in all caps to conform to standard postal codes.
To print all names on the mailing list, click on the button next to the text which says Avery 5160 For Laser or Inkjet Printer (All). Make sure you have added the individual to the mailing list by clicking the Mailing List Check Box on the Data Entry Form. This will print all the names which are on the mailing list.
Click on the Clear button to clear those you marked when doing a previous printing session. To print only certain labels, click on the check box labeled Tagged. Then click on the button next to the text which says Avery 5160 For Laser or Inkjet Printer (Tagged). Any number of names can be printed by tagging the labels.
If you want to print labels for a group, the code must be entered in the Codes field. Then click on the button next to the text which says Avery 5160 For Laser or Inkjet Printer (Codes). A dialogue box will ask you to enter a code which you entered in the code field. For example, if you want to print labels for a mailing to the Choir Members, the code CM must be entered in the code field. When the input box appears asking for the code, enter CM in the box and press enter. Then labels will be printed for only the group you have specified. The .. before and after the code are used for a wild card search. For example, ..CM.. says find all the records which have CM in the code field.
Assist 5.0 supports dot matrix labels, but only for printing the mailing list. Tagged and codes are not supported for dot matrix printers but may in future versions. The first dot matrix labels button sets the printer settings automatically provided your printer communicates correctly with the computer. The second dot matrix button allows the user to set the printer settings manually.

OUTREACH / PROSPECTS
Outreach
Marking Prospects
To add a person to the prospect list, click on the Put on Prospect List check box. To remove a person from the prospect list, click on the checked box which contains the check mark.
To mark or tag a prospect for a visit, click on the Mark for a Visit check box. All those marked can be printed on a prospect card by clicking on Print Marked. Before you tag a series of prospects, click on Clear Marked to clear those you may have tagged last week unless you want to print them again.
To add a youth to the youth prospect list, click on Youth Prospect List. To mark or tag the youth for a visit, click on Mark Youth for Visit. As with prospects, click on Clear Marked to clear those you have previously tagged. Prospects are cleared also.
Tip: To print all cards at one time, click on the Tag button. When you choose the Cards Marked Report and click the Print Cards button, all the cards will be printed. Click the Tag All by Youth, to mark all youth prospect cards for printing. If you forgot to tag one after you have printed, Clear Marked, tag the prospect and click on Print Marked.
The Table button opens a table form that allows you to tag prospects from a table view without having to locate each one. To remove a person from the Prospect List, click the check box in the On column.
When a person is in the hospital, click on the In Hospital check box. Two fields will appear allowing you to enter the Hospital Room Number and the Hospital Name. Choose the In Hospital Report from the Select Which Report field to see a list of those in the hospital. To clear all tagged hospital records; double click the words, AIn Hospital@ next to the check box. The room # and check marks will be cleared. Prospect Information
1. Enter the person’s religious faith by clicking on the drop down arrow at the end of the Religious Faith field. Only the two or three letter code is entered in this field. A code is entered rather than the full name of the denomination because less data is stored in the database. If you do not know what religious faith the code stands for, press ctrl + space bar and a lookup table will appear giving you the codes and the respective denomination. Select the religious faith code and press enter or double click. The code will be entered in the Religious Faith field. You should not type a code in the field unless it is in the look up table. You cannot enter the denomination in the Religious Faith field, only the code. The Denomination field in the lookup table only serves to identify the code.
2. To edit or add to the look up table, click on the Set Up Table Button. Click on the Religious Faith tab and change the table. The changes will be reflected in the drop down edit list.
3. Enter the Sunday School class for the prospect. Type the class name or select from the drop down list. If you have not already set up the Sunday School classes, click on the Setup Table button, then on the Sunday School tab. Enter Sunday School Classes, departments, teachers, etc.
4. The Source field tells how you secured the prospect. There are nine options: Bus Ministry, Door Visit, Other, Pastor, Phone Call, Referral, SS, Visitor's Card, and Survey. If the prospect was secured through the bus ministry, then select Bus Ministry in the drop down list.
6

To keep a history of visitation and prospect contacts, click on the Contacts button. This will open the Contacts/Results form linked to the record that was displayed in the Data Entry form. If Sam Smith was showing in the Data Entry Form, Sam Smith will be located, and his contact history will be displayed when the form opens. Click on the Insert Record button and enter the Contacts data in the various fields.
To run Contacts reports, click on the drop down Reports field, choose a report and click the Print button.
Directions
Type the directions to the prospect’s address. Start the directions from the church or a main street. For example: "Take 28 By-pass N. to Camellia Dr. Turn right onto Camellia Dr. Go to Dogwood St. and turn right. Last house on right." This field is limited to 200 characters and the information is printed on the prospect card.
Outreach Reports
To run prospect reports, click in the Which Reports field on the Visitation tab. Select from the following reports: To print the report, click on the Print Report or Card button. Prospect list sorted by religious faithProspect list sorted by last nameProspect list sorted by rateProspect list sorted by sourceProspect list grouped by Sunday School ClassProspect list grouped by Sunday School Class & RateProspect list sorted by the street nameProspect list sorted by subdivisionProspect list sorted by zoneProspect visitation cards markedProspect visitation cards blankProspect visitation cards by classSunday School/ Worship Service Class LabelsLabels for a class and labels with phone numbersYouth Prospect listYouth Visitation cards markedThose in hospital

VISITOR INFORMATION
VisitorsVisitor Info / Multi-Record
To enter Visitor information, click on the Visitors tab.
To scroll from visitor to visitor, click in the field and click on the VCR type arrows at the top. To scroll from visit to visit, click in field in the . Note the message displayed in the lower left corner of the screen. If you click in the Name field the message will read for example: 1 of 568 (568 being the number of records in the database). If you click in the Visitor Info section, the message displayed will read: 1 of 3 (3 being the total number of visits this individual has made).
Adding and Removing Visitors
To mark an individual as a visitor, click on the check box next to Visitor. To remove the person from the Visitors List, click on the check in the check box. The individual and all related visitor information is then deleted. When Visitor is checked, the Send Letter field in the mail box is also checked and the To or Status field is highlighted in yellow as a reminder to choose the status. The previous Sunday’s date (which is the date they visited) is entered in the Date field. This date is significant because the Visitor’s Letters print based on the previous Sunday. Do not click one of the other Visitor fields until you have first marked this person as a Visitor.
Services Attended
If the individual visited Sunday School, click on the Class field and select the class.Click on the Service field to mark what service or services the Visitor attended. SS=Sunday School; SM=Sunday Morning Service; SN=Sunday Night Service; WN=Wednesday Night Service; REV=Revival. SS, SM means they attended Sunday School and the Sunday Morning Service. SS, SM, SN means they attended Sunday School, the Sunday Morning Service and the Sunday Night Service.
If they attended Sunday School, it is important that you click on the Service field which records them as attending Sunday School (SS). The visitors are then counted in the Sunday School Attendance Report. They will not be counted if you choose only SM for example. If you mark an individual as a visitor, do not add them as a new member to the Sunday School roll, until after you record the Present and Absent attendance of regular members; or they get counted twice in the final statistics.
Other Visitor Information
This information includes: Would like visit from the pastor; Would consider becoming a member; Would like more information about the church and if they are a Member of another church. If they are a member of another church, type the name of the church in the What Church field.
Comments
If you wish to add a comment about a person, click on the Comments button. Type a brief comment in this field.
Location and Mail
7
If the person lives in the area, click on In Area. If they live out of town, click on Out of Area.
The Send Letter field must be checked for a person to receive a visitors letter. The To field is a status field that decides to whom is this letter mailed - the individual or the husband and wife. If Individual is selected the letter goes out for example: Mr. John Jones. If HW is selected, the letter is sent to Mr. and Mrs. John Jones. Once the mail status is selected, the yellow highlight turns white.
Repeat Visits The visitor information goes into a table call visitor.db. The visitor form displayed is a multi-record data entry form. This means a person can be added as a visitor more than one time. An individual may visit several times before becoming a member. Mark them as a visitor each time they attend.
To record subsequent or repeated visits, click on the Next Visit button. If you do not want to send a letter, click the Send Letter check box to remove the check.
Visitors Letters
To print a visitor’s letter make sure Send Letter is checked and that the date is the previous Sunday. Assist 5.0 is designed to print all the Visitors letters for the previous Sunday. If the visitors date is two weeks prior, you must change the system clock to print the letter. Or, you may enter the previous Sunday date, print the letter and then change the visit date to the correct date after printing.
To print a letter to those who visited the church worship service, choose the Letter-Church Report from the Which Report field. To print a letter to someone who visited Sunday School, choose the Letter-SS Report. Click on Print Letter to print all the visitor’s letters. If you want to print only a certain one, use the next record arrow at the top to go to the letter you want to print. Determine the page number by looking in the status bar at the bottom. When you print, only print that page. For example, in the Print Dialogue form, choose Page Range and type 4 to 4 (4 being the letter or page you want to print).
All the visitors which were added to the Visitors List by clicking on visitors will be printed. (You may use letterhead stationary if the letterhead is not larger than 2.5 inches.)
You may enter some visitors on one day and some another day and still print all the visitors letters at one time, as long as they are printed the week following the Sunday they visited. If you wish to print some one day and some letters another day or if you print the visitors letters and realize one did not print, you may: Add the person as a visitor then (1) Click on Print Letter which will display all the letters for the previous Sunday. Then print only the page of the letter you missed. (2) Click on Clear Send. Then add the remaining visitors and click on Print Letter. Only those you last entered after clicking on Clear Send will be printed. Print envelopes before you click on Clear Send or you will have to search and tag visitors again.
Most printers print envelopes in landscape mode. The default for printing envelopes in Assist 5.0 is landscape. Some printers (like Canon Bubble Jet) print envelopes in portrait mode. To set envelopes to print in portrait mode, click on the Setup icon (Key) and click on the Setup Tables button. Click on the Miscellaneous tab and click on Portrait in the Envelope Orientation box. When the report prints, a note will say printer and page orientation do not match, but the envelope will still print.
Visitors Reports
To run Visitor reports click on the Which Report field. Select from the following reports:
Visitors list of all visits sorted by dates Visitors grouped by months Visitors list grouped by year Visitors last Sunday All visitors sorted by last name Visitors that would consider becoming a member

Visitors that would like more information Visitors that would like a visit from the pastor
When Visitors Date Report is selected, a date range box displays. Dates must be entered in the From and To fields. Click on the button with three dots next to the From field. This pops up a calendar for you to pick a date. Click the date you want to use for your FROM date. The cursor will automatically move to the TO field. Click the date you want to use for the ending date.
Entering the From date and the To date, sets the date range for the report. If you type in the dates, do not use dashes, use slashes. If the report is for the first 3 months, enter 1/1/2005 in the From field and 3/31/2005 in the To field. To print the report, click on the Print Report button.

TRACKING DECISIONS
DecisionsCustomizable Decision Text
The text wording next to the check boxes on the Decision tab may be changed. To change the text labels, Open the Setup Form, click on the Settings tab and type the new name in the corresponding fields.
When a person makes a decision, click on the check box which corresponds to the type of decision which was made. If the decision was a salvation decision, click on Salvation. If you are marking the individual as a member, click on the check box next to Membership. (The Christian Service decision is when someone answers the call to full time Christian Service.) Click on a Type of Decision check box and the individual is added to the Decision list. The previous Sunday date is added, the send letter is checked, the To Whom field is highlighted and the letter is entered in the Print What Letter Field. If the date is not correct, change it. If you do not want a letter sent, remove the check mark in the check box by clicking in the box next to the letter you do not wish to send. Click on Clear Send if you wish to unmark those which have been previously tagged for printing. This is useful if you send some decision letters out one day and some at a later date. If the tag is in the following week, it is not necessary to click on Clear Send.
Membership
Click on Active or Inactive to mark the status of a person’s membership.
The Joined How field records how they the individual came for membership. If the individual came by Letter, choose Letter from the drop down list or Baptism, Statement, or Other. This list may be customized by clicking on the Setup Form then clicking on the Church tab.
The Date Joined is entered when the Joined/Member check box is checked. The previous Sunday is added. If this is not the correct date, change it. When members are being added initially, the date they joined may be several years ago, so change to date if you know the date they joined.
When a member is removed from the roll, record how they were removed by selecting from the Removed How field. This list is also customizable.
The date they were removed from the roll may be entered in the Date Removed field.
Deceased Individuals
When a person passes away, click the Deceased check box. When you click this check box, a message box appears asking if you want to uncheck this person from all lists. If you check yes, the Uncheck All List form opens showing the person’s name and main id number. To uncheck them from all lists and groups, click the Uncheck All Check Boxes button. The person will be removed from all check boxes, except the Deceased check box. All the codes in the codes field will be replaced with the code DCL for Deceased List. If you click No, when the Remove Name message appears, the person is put on the Deceased List and is not removed from any other Lists.
Removing a person from all lists does not delete the person or data tied to that person. To delete the name and all data associated with the person, click the Delete Record button on the Personal tab.
8

Decision Letters and Reports
When printing letters, make sure Send Letter is checked and that the decision date is the previous Sunday. Assist 5.0 is designed to print all the Decision letters of those who made decisions last Sunday. If the decision date is earlier than the previous Sunday, you must change the system clock to print the letter. Another solution is to enter the previous Sunday date, print the letter and then change the date to the correct date after printing. Click on Print Letter to print all the decision letters.
Be sure to print envelopes before you click on Clear Send; otherwise you will have to mark the decisions again. The following reports may be printed:
Active / Inactive Rededications sorted by DateBaptisms sorted by date Rededications sorted by Last NameBaptisms sorted by name Rededications last SundayCalled to Service Salvation decisions sorted by dateReport showing how joined or removed Salvation decisions by last nameMembers joined sorted by date Those who were saved last SundayMembership sorted by last name All DecisionsMembers who joined last Sunday
When a Decision Report is selected, a Date Range box displays. Dates must be entered in the From and To fields. Click on the button with three dots next to the From field. This pops up a calendar for you to pick a date. Click the date you want to use for your FROM date. The cursor will automatically move to the TO field. Click the date you want to use for the ending date.
By entering the dates, you set the date range for the report. If you type in the dates, do not use dashes, use slashes. If the report is for the first 3 months, enter for example 1/1/2005 in the From field and 3/31/2005 in the To field. To print the report, click on the Print Report button.
The Date Range box will close when you click on the Print Report button or you may click on the Close button.
CHURCH LISTS AND CODES
Lists and CodesThe Church and Sunday School tab contains six areas of information: List, Officers and Ministry, Youth-Music, Bus Ministry, Sunday School, and Meetings Module.
Church Lists
The Church-Groups form is for classifying people into groups or adding them to lists. By marking a person on a certain list, a report can be printed for just that group. (For example, marking the Church Directory check box adds the person to the Church Directory. The Youth List check box is on the Youth-Music tab)
The individual may be added to the following lists:
Bus Route Mailing List Members ListChurch Training Other List Any Code ListCurrent Attenders Senior Saints Shut In ListMen’s List Tither/Giver List Phone ListChurch Directory Women's List Email ListEmployee List Other List 2
NOTE: To the right of the Tither/Giver List is a field to enter a person’s envelope number, if your church uses an envelope system.. The number can also be used to locate individuals when adding Contributions.
Most of the check boxes in Assist 5.0 enter a two letter code in the Codes field. When the check box is unchecked the code is removed from the Code field. The Code field is used when sending group letters. (For example, when the Bus Route box is checked, "BR" is entered in the Code field. A letter may then be sent to all those who are on the bus route.
Codes may be entered manually. For example, you may want to enter the code YA for all Young Adults or MAT for Ministry Action Team. Each Code should be separated by a semi-colon.
By entering the codes, you do not have to tag each one individually. If you are only sending to 3 in a group, then you would want to mark the person for mailing. The Mark for Mail field is on the Letters tab.The codes on the check boxes are:
ML Mailing List YL Youth ListYF Youth in Family WA Woman's AuxiliaryPL Prospect List OL Officers ListVL Visitors List GL Group Leader ListDL Decision List DB Deacon BoardBR Bus Route OC On CommitteeCD Church Directory EM Email List
9

TL Teachers List EL Employee ListCM Church Member SM Sing Special MusicCT Church Training CL Choir ListCA Current Attenders PI Play InstrumentMM Masters Men YL Youth ListOT Other List YC Youth ChoirSL Senior List SS Sunday School RollSI Shut-Ins MS Mailing List-Sunday SchoolTG Tither/Giver PH Phone ListO2 Other List 2
Church Table Button
Click on Church Table button to see a table view of the church database. This table is for editing and viewing, not for data entry.
Pledges Button
This button opens the Pledge Form. See the chapter on Pledges for more information.
AM PM MW Attendance Button
This button opens a form that allows the recording of attendance for all services. See the chapter on attendance for more information.
Current Attenders and Church Directory
A Current Attenders list is for all those who are currently attending, if they are a member or not. The Church Directory does not have to contain just church members. The Church Directory 1 can be used as a Phone and Address list. When using the Church Directory 1 as a Phone and Address List, only put heads of household on the list. The list will print the phone, address and name along with the spouse's name.
The Church Directory List may be grouped into three groups: Regular Attenders (RA), Not Regular Attending (NRA), and Youth (YTH).When printing the church directory, if you only want to print the Regular Attenders List, when the Print Dialogue box comes up, choose Page Range. Then type from page 2 to 2 or 2 to 3 depending on the number of regular current attenders. Only the regular current attenders will print.
List Reports
Reports may be printed of all the above lists. Click on the Print Which Report field and choose the report you want to print and then click on Print Report. Use the scroll bar on the drop down list to view all the reports in the list. The Any Code List or Any Code Roll ask for a value from the Codes field. For example: If the Codes field has a code of ;RA then to print a list of all RA=s you would type ARA@ (without the quotes) in the input box.. You may use periods as wildcard characters in the field to call up more than one group.

MINISTRY GROUPS ANDOFFICERS
Introduction to Ministries / GroupsMinistries / Offices / Groups
This module can track the different ministries of your church. It can also track offices and can be used to track spiritual gifts. If the person is an officer, click on the check box next to Is Person An Officer. Other offices are listed, mark them accordingly. If the office or ministry is not listed, you may enter the office or ministry in the Ministry field. This is a user defined field which allows for any code, word or number to be entered. If a person is involved in several ministries and you enter the ministries or codes in the Ministry field, you can get a report which tells you everyone that is involved in a particular ministry. See below for more details.
The Add Offices button is for entering all offices and those who hold the offices. When you click the Add Offices button, a form opens which allows you to input the data of all offices held by a particular person. Click the Add Office button in the List Offices form to insert a new office. Click the drop down arrow in the Type of Office Field. The list can be customized by clicking on the Setup Button. Enter the Type of Office and then tab to the Office field and enter the office. For example: The Type of Office might be General Church Office, but the office might be Treasurer. Another example would be Board Member and the office would Deacon. Enter the other information: Class, Expires, etc. When you click off the form, the form closes automatically.Officer ReportsA list of all officers and the office which they holdA list of DeaconsA list of TeachersA list of Group LeadersOther listOfficers By nameOfficers And Teachers ListAll OfficesAny Type of OfficeAny Office or CommitteeUser Selected Report
When printing a report based on the What Ministry field, a search value box will appear asking you to enter a value from the What Ministry field. You may use the .. wildcard search. For example: If the code in the ministry field is 1-3, 4-2, 7-5 and you want to find all those who are in the 4-2 ministry which is the Shut-In Ministry, you would enter ..4-2.. in the search dialogue box. Press OK and the report will run listing all those in the Shut-In Ministry. If the code in the field is BM, NH, OR and you want to find all those in the OR (Out Reach) then you would type ..OR.. In the search box. Print the report and all those in the Out Reach Ministry will be listed.
If you are having teacher's meeting and need to call all the teachers, run a Teachers List report. If you need to have an emergency meeting of the board, run a Deacon List Report and call them.
10

YOUTH AND MUSIC
IntroductionYouth-Music
This section is helpful to the youth and music minister. Click all check boxes which apply. The Youth List is a list of all youth. This is not the same as the Youth In Families List in the Miscellaneous Reports and is not the same as the Youth Prospect List.
Reports
Choir MembersPlay InstrumentsSing SpecialsA list of all youth choir membersA list of all youth
If the choir is having an outing or special practice, click on the Reports field then click on Choir Members. Then click on Print Report to have a ready list to call all choir members. Select and print other reports as needed.
Bus Ministry
The Bus Ministry information is mainly for recording Bus Route Information. Enter the name of the Bus Captain or Driver. The drop down list can be setup by clicking on the Setup icon (Key) and clicking on Set Up tables. Click on the Bus Captains tab and enter the names of the captains or drivers.
Each rider can be assigned a pick up route number. The list will then print out in ascending order beginning with 1. Tip: If you use numbers in multiples of three, this allows for other numbers to be inserted rather than changing the whole list. For example: Give the first rider 3, the next 6 and the next 9 and so forth. When a new rider is added give them a number between these numbers.
Click on Bus Route List or the individual will not be added to the Bus List.
There are two reports: One of all Bus Routes and the Bus Route List which is a separate page of each bus route. The bus route reports are sorted by Route number, then pickup number, and then last name.
Sunday School
Information
Before entering Sunday School information, setup Sunday School Classes. Click on the Setup icon (key) then click on Set Up Table. When the Set Up Tables form opens, click on the Sunday School tab. Enter the Class names and corresponding teacher’s names in the table. Close both the Set Up Table form and the Data Entry form. When you reopen the Data Entry Form, your classes will appear in the drop down list. The Class, Teacher and Assistant Teacher field is automated. When a class is selected, the teacher
11

and assistant teacher's name is entered automatically. If you select a teacher, the corresponding class and Assistant Teacher is selected. Since entering data is automated on these fields, it is To add an individual to the Sunday School Roll, click on the check box next to On Sunday School Roll. If you wish to have a separate mailing list for the Sunday School, click on SS Mail List. If the individual being added is a teacher, click on Teacher. If the person is not a teacher, click on Member. When the rolls print the Teacher will be sorted first in the list.
To remove a person from the Sunday School Roll, click on the check mark next to On SS Roll. The person will be removed from the roll.
Group and Outreach Leaders
Care Group Leaders are class members, church members, or current attenders which have been assigned 5 to 7 other individuals. Group and Outreach Leaders may be assigned to anyone, not just Sunday School members. Although the Group and Outreach Leader information is on the SS Tab, you do not have to add a person to the SS Roll to assign them to a group or to an outreach leader. Group Leaders can be a valuable method to keep track of people coming into the church or Sunday School. The purpose of the Outreach Leader is to build a list of prospects and then enlist the class or others in the church to help reach them.
Sunday School Reports
The following reports are on the Data Entry SS tab:
Sunday School Rolls An Individuals Group LeaderSunday School Mail list Group Leaders By ClassAn Individuals Outreach Leader A Group Leaders GroupAn Outreach Leaders Group Individuals Outreach & Group LeadersOutreach Leaders by Class
To print the Sunday School Rolls each week, click on the Church/SS tab. Then click on the SS tab. Click on the Sunday School Reports field. Select SS Roll and click Print.
Have the SS Superintendent to make copies of the roll each Sunday Morning and teachers have an instant absentee list.
Other reports are on the Sunday School Attendance Form. Click on the Attendance button to open the Attendance Module.
Meetings
Within meetings you have four components. They are the Minute Module, Appointments, Events, and Facility Scheduler. The Minute Module’s primary use is for the recording of any minutes from meetings of various topics such as financial meetings. The Appointments module is for tracking daily appointments throughout the day or week. The Events Module is used for recording events that the church will participate in, whether in house or outside of the church. The Facility Scheduler is for the scheduling of the facility and the time that it will be used for various events.
Minute Module
To begin using the Minute Module click on the Minute Module Button. The Module will open. In order to insert a new meeting, click on the New Meeting button. If this is your first record, you will see the record number as 1. When you enter a second record the record number will then change to 2 and the form will open with blank fields allowing you to enter information for the second meeting.
In the Text fields you enter information for the meetings, such as the date, prayer, or purpose of the meetings. To enter specific items within the module there will be a button called Insert Item. Click on Insert Item and a number will be entered in the Number field as a record of the item being the first item, second item, third item and so on. After entering the first item, if there is a second item, click on the Insert Item button a second time. The next step would be to enter the item, do this by clicking in the Item field next to the Record Number field for that item. A text cursor will enter the item field and you will then type that item in. To select a time for that items discussion use the drop down list box under Time to select the time for that item. The next field is the Notes field where you may enter any notes on the item.
In order to enter minutes for the meeting, click on the Minutes tab which is next to the Agenda tab. A Memo field will open once you click on the Minutes tab which will allow you to enter any minutes or further details concerning the meeting. In the bottom right of the memo field you will find a Comments button. Click on this button to enter any comments from the meeting.
To print reports from the meeting, select the Reports tab which will be next to the Minutes tab. Click on the Reports tab and the Reports module will open. To print a report click in the Date Range From field, then click on the Calendar button next to the Date field to select the From date. Do the same for the To date. From the Reports drop down list box you may select from two reports: Agenda or Minutes.
Appointments / Events / Facility Scheduler
To open this module, click on the Appointments button.
The Appointment, Events, and Facility Scheduler buttons under the Meetings tab within the Church/SS Tab take you to a module where all three items are linked by tabs. To switch between Appointments, Events and the Facility Scheduler simply click on the desired tab.
In Appointments, to enter a new schedule for a day click on New Date. You will then be allowed to enter information for a day just as you would on a daily planner. Click within the field of the time you wish to enter information and type the meeting or even a specific time within that day. You may also print the planner by using the reports offered which are:
Today Yesterday Last 7 Days Tomorrow2 Days Ahead 3 Days Ahead 4 Days Ahead 5 Days Ahead
You may locate a date by using the drop down list box designated as Locate.
Click on the Events button. If the module is already open, click on the Events tab at the bottom of the screen to open Events. Click on Insert Record to insert an event. The Date field will be filled automatically with the current date. To change this date, click in the Date field and enter the desired date. Click in the Event field and enter the event. Do the same with the Place, Contact, Phone and Date/Time to enter the appropriate information for those fields. You will need to use the horizontal scroll bar to slide the form to see all the fields offered.
In order to view events, you may select from the drop down list box designated by Show Events For. From this list box you may choose from:
Last 2 Days Next 7 Days This MonthLast 7 Days Next 14 Days TodayLast 30 Days Next 30 DaysLast Week Next WeekLast Month This Week

To print reports for the Events module, use the drop down list box designated as Reports. There are two reports you may choose from: Past Events by Date, and Upcoming Events by Date.
To open the Facility Scheduler, click on the Facility Scheduler button under the Meetings tab or if the Appointments, Events module is already open click on the tab labeled Facility. Within the Facility Scheduler you have fields to input information for the building. its use, and its time. Contact Information fields are available for entering information on the contact for the scheduled use of the building or event.
Begin by simply inserting information for the first scheduled event for the building. When you are ready to enter another schedule, simply use the VCR buttons to move to the next blank record for entry. Enter the information for the next scheduled use. You can use the VCR buttons to move back and forth between scheduled events. To delete a record, click inside any of the text box fields on the record you wish to delete in order to select that record. Push and hold the control key and then push the delete key to delete the record.

LETTERS AND LABELS
Introduction
LettersMark Letters
To mark a letter for mailing, click on the check box next to the letter you want to mail. If you want the letter to go to the individual, select IN from the drop down list. If you want the letter to be sent to the Husband and Wife select HW from the drop down list.
When you mark a letter, the name of the letter is entered in the Print What Letter field. Click on Print Letter to print the letter.
Editing Default Letters
If you want to change the default letters and add the name of your church or personalize it with the Pastor’s name, click on the Edit Letters button. The Customize Letters form will open. Click on the tabbed name of the letter or the left right arrow buttons above the horizontal scroll bar to select a letter. Click in the letter, and type your changes. Close the form. The changes will be saved automatically. When you run the letter, your changes will be reflected.
When the Print form displays, you can click on Cancel Print to view the letter or report.
Additional Custom Merge Letters
NOTE: To view or edit a custom letter which you have typed:
Click on the Custom Merge Button. The Custom Merge Letter form will open. Use the VCR type arrows at the top to scroll through the database of letters. You may also click on the Search icon and use a wildcard search to find a letter. For example: If the letter contains the word “attending”, click on the Locate (binoculars) icon and enter ..attending.. and Assist 5.0 will find the first letter with the word “attending” in it.
You may type unlimited custom letters by clicking on the Custom Merge button on the Letters tab of the Data Entry form. A form will display, allowing you to type a new letter. Click on the New Letter button. Type the letter and then close the form or click on the Done button. The merge letters database will contain several letters. Click on the Merge Tag check box. The word Merge is entered in the Print What Letter field. Choose IN or HW (IN if the letter is going to an individual or HW if the letter is going to both the husband and wife). Click on the Print Letter button, and then click OK.
To send a letter to a group, click on the Custom Merge button. The Merge Letter form will display, allowing you to type a new letter. Click on the New Letter button. Type the letter, then close the form or click on the Data Entry button if you are returning to the Data Entry Form or the To SS button if you are merging a letter to a class. The one that will print is the one that is visible when you close the form.
Click on the Merge Codes check box. The words Merge Codes will be entered in the Print What Letter Field and a box will display asking you which name you want to use in the merge letter. There are three options: (1) The persons name - Mr. Dan Smith (2) The Mailing Name - Mr. & Mrs. Dan Smith or (3) The IN or HW code. If you select the IN or HW code and there is no code in the IN/HW status field, the persons individual name will be used.
12

Click on the Print Letter button. A box will display asking you to enter a value from the codes list. Then Click OK. Example: If you are sending a letter to those on the Mailing List which would be coded ML then enter ..ml.. in the Search Display box. When you click OK, the letter will be sent to all those on the mailing list.
Hospital Letter
When you click on the Hospital check box, the word Hospital is entered in the Print What Letter field and a Hospital Name and Address form will appear. Enter the room number and name and address of the hospital you are mailing to. You only have to enter the hospital name and address when you first run a hospital letter. More than one hospital may be listed, but click on Send Letter beside the hospital you want to mail to. Click OK, then click on Print Letter.
Clear Marked
Clear Marked runs a query that clears all check marks in the letters table. It is letters.db. If several letters and envelopes are run and you later decide to send another letter, click on Clear Send. The only letter that will print will be the one you marked after clicking on Clear Send. Do not click on Clear Send until you have run the envelopes or you will have to tag each letter again to run the envelopes
Printing Letters and Envelopes
Letters must be printed separately. For example: Print all the Thank You letters and envelopes that you marked. Then mark and print all the Absentee letters and envelopes. You can tag the same letter to send to different individuals but you cannot mark two different letters to the same person and print them at the same time. Envelopes are designed to print in landscape mode, upper tray. If you feed envelopes manually, be careful not to feed them too fast. Also, later model printer drivers with certain printers are not compatible with Paradox Runtime 10. In this case you must set the paper size and orientation manually when printing landscape.
SUNDAY SCHOOL
AttendanceNOTE: Assist 5.0 allows posting of attendance for all services. The How To information pertaining to SS Attendance applies also to entering data for AM, PM and MW attendances. The AM, PM, MW and SS are separate modules and databases for entering attendances. Worship Attendance modules allow for keeping records of the various worship groups such as children’s church. Posting Attendance-General Information
Click on the SS tabs. Click on the Attendance button. The Attendance form will open. Do not open this form from the Project Viewer. Always open it by clicking on the Attendance button. The Sunday School Attendance form will open with the names sorted by Sunday School Class, First Name, Last Name.
Each week you will be updating rolls, adding and deleting members. Visitors are posted and counted in the Sunday School statistics when you add them on the Visitors tab. If you add visitors to the roll before you post attendance, they will be counted twice in the final statistics. If you do add visitors to the SS Roll before posting attendance, then do not add them as a visitor. The other tab allows you to delete such statistics in the event they do get counted twice.
If you have all rolls in hand when posting attendance, sort the rolls alphabetically and start posting attendance by clicking on Present or Absent. If you post attendance without sorting, or as they are turned in, then filter the Sunday School Class field for the class you want to post. To filter, right click on the Sunday School Class field. Click on Filter... In the Filter Input box type the name of the class you want to post. You may also use wildcards. For example: if you are posting the attendance for the Adult Men’s Class you would type Adult Men’s in the filter box. Or, if you use wildcard searches, type ..Ad..Me.. to will find all the classes which contain Ad and Me.
Click the Present or Absent Button to post attendance. When the attendance is posted, an A or P is entered in the correct week. When using the Present or Absent Button, you do not have to click in the correct week. Assist 5.0 is programmed to know the correct week or Sunday based on the computer clock.
If you get behind a week or two in posting attendance, you will need to change your computer clock to a date following the Sunday for which you want to post attendance and the A or P will be entered in the correct week.
You may also post or change attendance by an “OR” . Click in the correct week. For example: If you are posting attendance for the 1st Sunday of January 1998, click in the first field under January. Assist 5.0 is programmed to know the date for that Sunday and the date appears in the Date field. If the person is present press P, or A if the person is absent. When an A or P is entered, Assist 5.0 calculates statistics and automatically moves to the next record.
When attendance is posted the following statistics are calculated:
Consecutive Weeks AbsentNumber of Weeks AbsentNumber of Weeks PresentThe percentage of absencesThe percentage of times presentThe total Sundays the person has attended
13
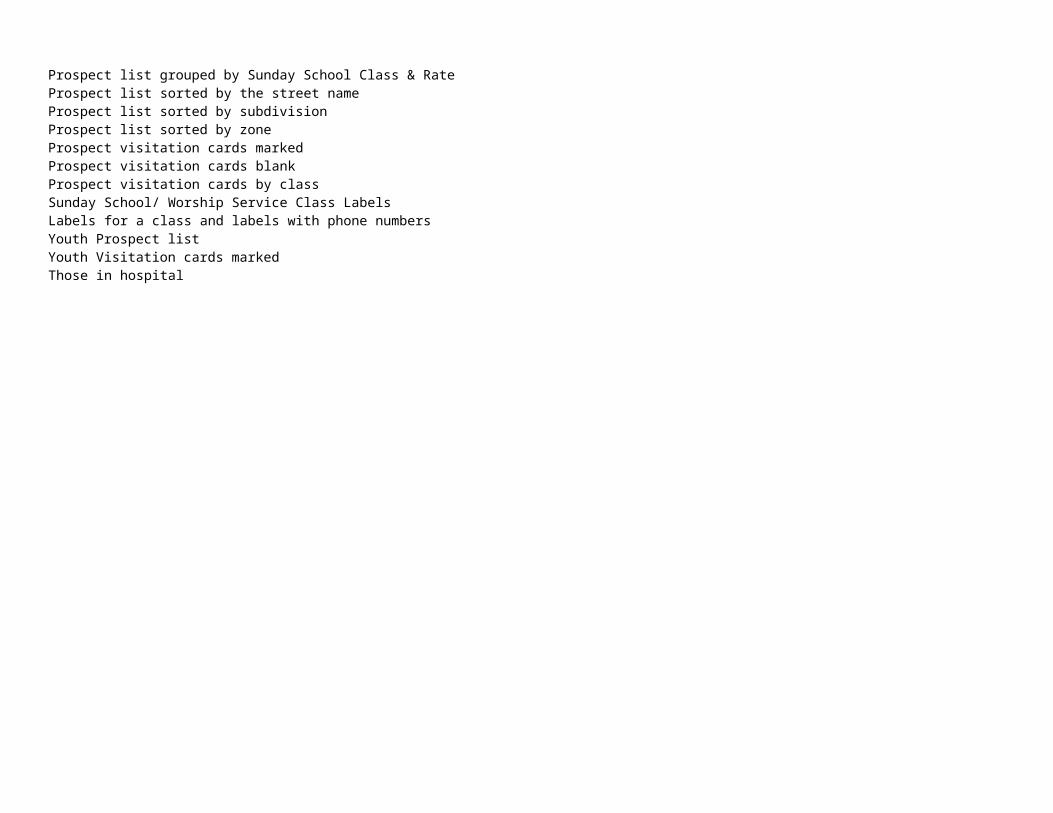
Attendance Reports
Absentee Record-One Person Attendance Record-One PersonAbsentees by Class Attendance by DateAbsentees by Name Attendance by NameAbsentees by Date Attendance last SundayAttendance by Class Individual Annual AttendancePerfect Attendance Statistical ReportMerge Letter to Absentees Merge Letter to ClassLabels for a Class Envelopes for a ClassBy Group Leader Date Last Attended by ClassE-mail to a Class Envelope Current RecordLabels to Absentees Labels with Phone NumberAnnual AttendanceAbsentees Last Sunday sorted by Consecutive AbsencesDeleting Sunday School Data
IMPORTANT!! At the archive or backup the Sunday School Table (SS.db) and the Class Records Table (SSClRec.db) to a floppy or backup device. Also, backup all other files with the SS or SSClRec. Then click on the button to empty the table of all A's and P's and statistics. This will delete the A=s and P=s but not the names, classes, teachers, etc.
Do not click on the Delete SS Data button until the end of the year! Clicking on this button will erase the data in the Sunday School table! When you click on this button, you will have two opportunities to cancel if you change your mind.
The table in the Other tab is used to calculate statistical reports. You should not have to change data in this table.
To record attendance statistics for other services, click on the Other Att. button. A form will be displayed which contains a table for recording the attendances for the Sunday Morning, Sunday Night and Wednesday Night Services and Visitation. To enter the attendance records, press the insert key to enter a new record. If you are on the last record, the down arrow key will allow you to append the next record. Enter the Date or Sunday for which you are recording the attendance. Enter the Sunday School or Bible Study Attendance in the SS Column. Tab to the SM column and enter the Sunday Morning Worship Attendance. Do the same for Sunday Night (SN), Mid-Week (MW), and Visitation or Outreach (VTN).
To track offerings, enter the amounts in the respective columns. If you do not separate the Sunday Offerings, enter the total in either the Sunday AM or PM. When the offerings are entered the total amount is calculated in the Total Column. Once the offerings are recorded, averages for any date are automatically figured when the reports are run. To run reports, enter the date range for the reports and then select the report you want to run.
The following reports may be run:
Attendance and Averages Offerings and Averages Total Offerings

ACCOUNTING IN ASSIST 5.0
Understanding Fund AccountingAssist 5.0 provides an integrated, powerful and flexible accounting system to help your church track income and expenses and/or fund balances. The contribution module is linked with the membership. The Check Register Ledger can receive data from the Contribution module. The Employee/Payroll module can send data to the Check register ledger.
With Assist 5.0 you may choose to use only the Contribution part of the accounting. Although it is not recommended, you can use funds without setting up categories. In Assist 5.0, the accounting structure can be broken down four ways:
ClassesFunds
Account Groups/HeadingsAccounts/Categories
Accounts/Categories are sub-categories of Groups. Groups are a sub-category of Funds and Funds are a sub-category of Classes.
Explanation of Terms
Fund Accounting: Fund Accounting is a financial method of tracking monies based on funds (explained below).
Classes: Classes in Assist 5.0 are the main groups used to structure the Chart of Accounts or help to make up the Balance sheet. The classes are ASSETS, LIABILITIES, EQUITY, FUNDS, INCOME AND EXPENSES. For the most part, the only time you will have to be concerned with classes is when you are setting up your Chart of Accounts. Make sure you have the right class associated with an account. When you are entering data and selecting a category, Assist 5. 0 enters the correct class for you.
Funds: A fund is an account that is setup to track and/or hold money for the various entities or organizations within your church. (General, Building, Youth, Women’s or Ushers Fund, etc…) A fund carries a balance. That is why they are designated as a Fund Balance type. Do not confuse funds with Accounts/Categories.
Account Groups: Account Groups are also called Headings because they are used as headings in the budget. They are sub-categories of Funds and / or Budget Headings. That is, an account can be assigned a group to which it belongs. For example: Beginning Fund Balances, Payroll Liabilities, Tithes and Offerings, Administration, Church Program etc. Administration would be the group and Pastor’s Salary would be the account or Church Program would be the group and Music Expense would be the account.
Accounts/Categories: Accounts, also referred to as categories, are actually sub-categories of Groups. Although they are used for many purposes, they are primarily used to track income and expenses.
14

What is the difference between a fund and an account?
In Assist 5.0, setup a FUND for any entity in your church that you want to hold and track a balance of how much of the money belongs to them. Setup an ACCOUNT to track the income and expenses of the Fund. For example: A church has a group called Youth. Setup a fund called Youth. Then setup the accounts associated with the Youth Fund. First, you will have an Income Account, such as Youth Income, to track the money they receive. Second, you will have one or more expense accounts such as Youth Fellowships or Youth Trips to track what they spend.
Bank Accounts: The name of the institution where money is deposited
Reconcilable: A transaction that will appear on your bank statement
Equity: The difference between your assets and liabilities
Assets: What you own. In Assist 5.0 there are four different types of assets. These assets fall into the 1000 class.
1. Bank Assets are current assets. Cash accounts such as Checking and Savings accounts are examples of current assets. Current assets are things you own that you can easily use or liquidate.
2. Other Current Assets are equipment, inventory or undeposited money3. Fixed Assets are long term assets that you own, such as property assets. Examples are land, buildings, vehicles, etc.4. Other Assets would be any asset not already named.
Liabilities: Liabilities are what you owe. In Assist 5.0 there are three types of liabilities. Liabilities fall into the 2000 class.
1. Payroll Liabilities such as accrued Federal, State and Local tax withholdings, Social Security, Medicare and fringe benefits. Until these are deposited in a financial institution or paid out to their respective entities, the money is held in the Payroll Liabilities accounts.
2. Other Current Liabilities: Sales tax and direct deposits3. Long Term Liabilities are loans payable such as mortgages on buildings and vehicles.
Fund Balance Accounts: Accounts that have a balance. Setup a Fund Balance Account when the account being setup carries a balance. Any entity within your church that you hold money for and want to keep up with how much it has, setup a Fund Balance Account. Fund Balance Examples of fund balance accounts are general fund, building fund, youth fund, women’s fund, missions fund, etc. Accounts fall into the 4000 class.
Income: Monies you receive. Any money that you take in you want to track. Set up an Income Account and tie it to a fund. Examples of Income Accounts are Tithes and Offerings, Building Offerings, Missions Offerings, Special Offerings, Youth Monies, etc. Income Accounts fall into the 5000 class.
Expense: Monies you spend such as salaries, cooperative giving, utilities, office supplies, etc. These fall into the 6000 class

How to Setup AccountingGeneral Information
The Finances/Accounting Form provides a check list for setting up the Accounting. To open the Finances/Accounting Form, click the yellow check icon. Click the Checklist Setup icon and the Financial Setup Checklist form will appear. Use this checklist to help you go to the right places when setting up your funds and accounts.
Much of the work of in setting up your accounting has been done in the default chart of accounts. We strongly suggest you modify this chart rather than doing a new one. The default chart already has the account numbers and a structure that parallels proper accounting procedures.
Using Punctuation and Case
When setting up accounts DO NOT USE PUNCTUATION and pay attention to case and plurality. For example, Assist 5.0 recognizes building offerings and Building Offerings as two different accounts because one is capitalized and the other is not. Also, Building Offering and Building Offerings are two different accounts because one is plural and the other is not. Pastor’s salary and Pastors Salary are recognized as two different accounts because one has an apostrophe and the other does not. Misc. Income and Misc Income are two different accounts because one has a period and the other doesn’t. Punctuation affects how a table is filtered and when you use punctuation, it is easy to forget a period or an apostrophe.
Step 1: Use the Work SheetsUse the work sheets provided below. You may copy these work sheets if you need more space than is provided. You can setup your accounting without using the work sheet but that is NOT recommended. Setting up the accounting in Assist 5.0 will be much easier if you will take the time to fill out the work sheets and do them in the proper order.

Bank Accounts: Work Sheet 1List your Bank Accounts here. Keep the bank names short one word names with no punctuation. Although Assist 5.0 will work with two or three words in the bank field and will work with punctuation, it is best to keep them short and simple! The larger the bank name, the more data is stored in your tables. You may use generic names such as Checking or Savings or you may use names such as SunTrust or Wachovia.
Once you decide on the name of the bank to use, it is best not to change it although Assist 5.0 will validate bank name data.
With Assist 5.0 you can have one account or you can have multiple bank accounts
Bank Name: _____________________________ Amount ________________
Bank Name: _____________________________ Amount ________________
Bank Name: _____________________________ Amount ________________
Bank Name: _____________________________ Amount ________________
Bank Name: _____________________________ Amount ________________
Bank Name: _____________________________ Amount ________________
Bank Name: _____________________________ Amount ________________
Total in All Bank Accounts ________________
The total in your bank accounts will be the total in all your funds + the total of your liabilities. Once you list your bank accounts, ask, “Who does this money belong too?” Or, what organizations within the church own this money?” Our first thought would be that it all belongs to the church, but some of it was designated for the building and some belongs to the Women’s Ministry and the Youth. So once you list your bank names, list the funds to which this money should be assigned.

Funds: Work Sheet 2List all your funds here and the beginning balances in those funds. Again, your funds are those entities that own the money you listed on Work Sheet 1. The total in your funds should equal the total in your bank accounts. Do not use the word fund when naming a Fund. For example, just say General, not General Fund. The word fund will be added by Assist 5.0 when you add them to your chart. Remember if the account doesn’t have a balance and you just want to track income and expenses, list the item as an account/category, not a fund.
Fund: _____________________ Beginning Balance___________________
Fund: _____________________ Beginning Balance ___________________
Fund: _____________________ Beginning Balance ___________________
Fund: _____________________ Beginning Balance ___________________
Fund: _____________________ Beginning Balance ___________________
Fund: _____________________ Beginning Balance ___________________
Fund: _____________________ Beginning Balance ___________________
Fund: _____________________ Beginning Balance ___________________
Fund: _____________________ Beginning Balance ___________________
Fund: _____________________ Beginning Balance ___________________
Fund: _____________________ Beginning Balance ___________________
Fund: _____________________ Beginning Balance ___________________
Total in All Funds ___________________
List the funds on the Setup Funds tab in the Chart of Accounts. The funds will be entered in the 4000 section of the Chart of Accounts.
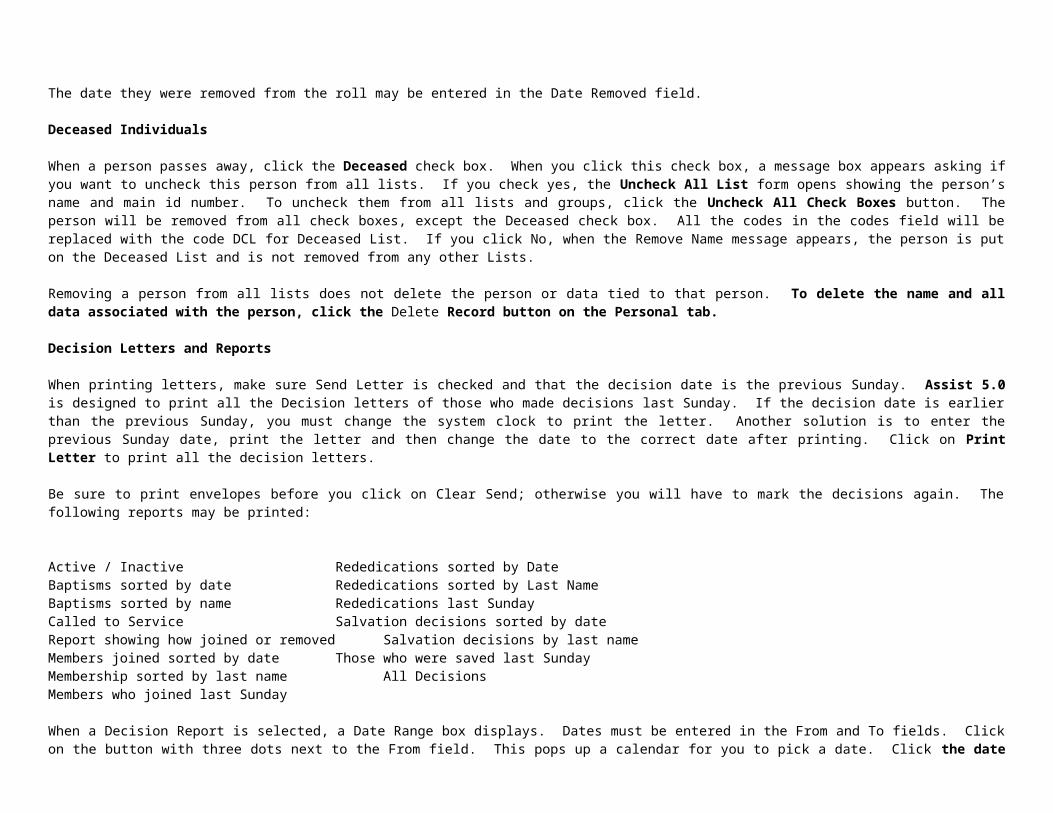
Account Groups: Work Sheet 3Account groups are also called Budget Headings because some of them correspond to the main headings in your budget. The account group/headings are used to put accounts into like groups. Example: All salary accounts should belong to a group called Administration. Other groups you may list are Cash Accounts, Property Assets, Liabilities, Funds, Tithes and Offerings, etc… If you have a budget, list the main headings of your budget here. This will comprise most of your Account Groups List.
Account Group: ______________________________
Account Group: ______________________________
Account Group: ______________________________
Account Group: ______________________________
Account Group: ______________________________
Account Group: ______________________________
Account Group: ______________________________
Account Group: ______________________________
Account Group: ______________________________
Account Group: ______________________________
Account Group: ______________________________
Account Group: ______________________________
Account Group: ______________________________
Account Group: ______________________________

Income Accounts: Work Sheet 4Make a list of all your income accounts such as Tithes, Offerings, Building Income, etc. Any money that the church receives that you want to track should be listed as an income account. Accounts are associated with Funds and Budget Heading Account Groups also list the Fund and Budget Heading with each account.
Fund Account Group Account Name
_____________ ____________________ ____________________________
_____________ ____________________ ____________________________
_____________ ____________________ ____________________________
_____________ ____________________ ____________________________
_____________ ____________________ ____________________________
_____________ ____________________ ____________________________
_____________ ____________________ ____________________________
_____________ ____________________ ____________________________
_____________ ____________________ ____________________________
_____________ ____________________ ____________________________
_____________ ____________________ ____________________________
_____________ ____________________ ____________________________
_____________ ____________________ ____________________________
_____________ ____________________ ____________________________
Enter the income accounts in the 5000 section of the Chart of Accounts. When you enter your income accounts, enter the Projected Amounts if you project how much you anticipate receiving.

Expense Accounts: Work Sheet 5Make a list of all your expense accounts such as Pastors Salary, Office Supplies, Building Repairs etc. Any money that the church spends that you want to track should be listed as an expense account. Accounts are associated with Funds and Budget Heading Account Groups, so list the Fund and Budget heading with each account.
Fund Account Group Account Name
_____________ ____________________ ____________________________
_____________ ____________________ ____________________________
_____________ ____________________ ____________________________
_____________ ____________________ ____________________________
_____________ ____________________ ____________________________
_____________ ____________________ ____________________________
_____________ ____________________ ____________________________
_____________ ____________________ ____________________________
_____________ ____________________ ____________________________
_____________ ____________________ ____________________________
_____________ ____________________ ____________________________
_____________ ____________________ ____________________________
_____________ ____________________ ____________________________
_____________ ____________________ ____________________________
Enter the expense accounts in the 6000 section of the Chart of Accounts. When you enter your expense accounts, enter the budget amounts for each item if your church has a budget.

Liabilities Accounts: Work Sheet 6We have completed most of this work sheet for you. Make a list of all your liabilities accounts such as Federal and State Withholdings. Liabilities are the amounts you withhold on an employee. If you withhold money on an employee, then you will have a beginning balance in your liabilities accounts. If you do not use the payroll portion of Assist 5.0, then you may skip this work sheet. Also, list the beginning balance of each account.
Fund Account Group Account Name Beg. Balance
General Payroll Liabilities Federal Withholding _____________
General Payroll Liabilities State Withholding _____________
General Payroll Liabilities Social Security Withholding______________
General Payroll Liabilities Medicare Withholding ______________
General Payroll Liabilities Local Withholding ______________
General Payroll Liabilities ______________________ ______________
General Payroll Liabilities ______________________ ______________
General Payroll Liabilities ______________________ ______________
General Payroll Liabilities ______________________ ______________
Total Liabilities ______________
Enter the liabilities accounts in the 2000 section of the Chart of Accounts.

Final Totals: Work Sheet 7Total Liabilities __________________________
Total of Funds __________________________
1. Total of Funds + Liabilities __________________________
2. Total in All Banks __________________________
The Totals in 1 and 2 must agree
Now you are ready to enter the information in Assist 5.0.

Step 2: Set up Bank Accounts
HOW TO. . .
1. Click on the Finances/Accounting icon at the top of the Data Entry Form. The Finances/Accounting form will open.
2. Click the Check List Setup button. The Financial Checklist Setup form will open.
3. Click the blue link, ASetup Bank Accounts List@ on the Financial Setup Checklist form or the Bank Accounts button in the Contribution form or the Accounts Payable form. When the Bank Account form opens,
4. Click the New Account button to insert a new bank name. Type the names of the bank you entered on Work Sheet 1 above, such as Checking, Savings, SunTrust, BankAmerica, Wachovia, etc. Do not use punctuation and pay attention to case because Assist 5.0 recognizes Checking and checking as two different accounts, because one is capitalized and the other is not.
5. Click on a name and type over it to change a name. If you change a bank name that has data tied to it , the message “Changing Bank Name” will appear, asking if you want to continue. If you click “yes”, the data in the Giving, Checking, Payroll and Bank Name tables will be updated to reflect the new change. If you click “ no”, the bank name will change back to the original name and no data will be validated.
6. Click the Delete button to delete Bank Account names. If you try to delete a bank name that has data tied to it, you will be presented with the option of assigning another name to the data. This way you do not have widowed data. When you close the form the Bank account names are automatically saved.
Step 3: Setup the Funds ListThis is the list of funds you listed on work sheet 3 above. A fund should be set up for any entity or organization within your church for which you hold money and want to keep a balance. If it is not an entity and you do not have a balance and you just want to track the income or expenses, set the account up as a category, (also, called account) not a fund.
Some churches have one Bank account but the money is divided into several funds. For example, a church may have $5000.00 in the bank. $2000.00 of this money may belong to the General Fund, $2000.00 may belong to the Building Fund and $1000.00 may belong to the Youth Fund. Some churches have multiple funds in several bank accounts. With Assist 5.0 all the monies in all bank accounts and in all funds can be tracked.
Again, keep your fund names as short as possible. Do not type the word “fund” at the end of the fund name. If the fund name is Building, just type Building. The word “fund” will be added when you put them in the chart of accounts.
HOW TO. . .
1. Click on the Finances/Accounting icon at the top of the Data Entry Form. The Finances/Accounting form will open.
2. Click the Check List Setup button. The Financial Checklist Setup form will open.
3. Click the blue link “Setup Funds List.” This will take you to the Funds List in the Chart of Accounts. (Form A sample funds list is provided. You may modify this

list or create a new one.)
4. Right click anywhere, except a field, on the Data Entry Form. When the pop-up menu appears
5. Choose Chart of Accounts, and then click the Setup Funds Tab.
6. Click the Insert button at the bottom of the Fund Table to insert a new fund. Type in the funds you listed in work sheet 3. If you choose, you change the ones in the table and then enter others as needed.
7. To delete a fund, click the Delete button.
8. Click the Add New Funds to Chart button. This will insert the new funds you listed in the Chart of Accounts in the 4000 section. If a fund is already listed in the 4000 section of the chart, clicking this button does not change the numbers assigned to the fund.
Note about changing funds: If you change a fund name, then Assist 5.0 will check your tables to see if you have transactions assigned to the fund. If so, you will be asked to confirm your change. The fund name will be changed in the Funds list, the Chart of Accounts and all records in the Giving, Checking, and Payroll tables that have data linked to the fund.
The Re-Add All to Chart will remove the 4000 section from the chart and re-add the list as you have it typed. Do not do this unless the new accounts you add are at the end of the list, because the fund accounts in the chart will be re-numbered. If you have data assigned certain numbers, then the numbers in your chart will not match your data. This button can be clicked only when you have added new funds at the bottom of the list. This prevents the existing funds from being re-numbered. This button is primarily to be used when first setting up your accounting, but can be used if the new funds were added to the end of the list.
Step 4: Set up Accounts/CategoriesWorking with the Chart of AccountsThe chart of accounts is the main hub of the accounting system. When this chart is setup properly you will be able to easily track your income and expenses. The Budget, Chart and Check Ledger are all in the same data file in Assist 5.0. A new chart and budget can be setup just by changing the dates to the new year.
There are several buttons and ways to open the chart:
1. From the Data Entry Form right click the form and choose Chart of Accounts from the pop-up menu2. From the Finances and Accounting form click the Chart of Accounts button3. From the Financial Setup Checklist form, click the blue link, ASetup Chart Of Account@4. From the Check Register Ledger, click the Chart/Budget button5. From the Contribution Form, click the Chart Accts. button6. From the Setup Tables Form, click the Chart of Accounts/Budget button
Viewing and Using a Sample Chart
Assist 5.0 comes with three, pre-built sample Chart of Accounts:
Sample for a small church Sample for a mid-size church Sample for a large church (default)

When you only want to track income and expenses, or when your church doesn’t use a budget and there’s no need to do fund accounting, then you may want to choose the chart for a small church. If you want to track certain funds, and when you use a budget, but don’t need to run balance sheets, you may want to use the sample chart for a mid-size church. If you want to take advantage of the full accounting potential of Assist 5.0 such as Profit and Loss, or if you have a lot of different incomes and expenses to track, then use the chart for a large church. The default chart is for a large church. You do not need to import a sample chart if you choose to use the chart for a large church.
HOW TO. . .
1. Open the Chart Of Accounts2. Click on the Setup Funds/Other tab3. Click the sample chart buttons and view the charts4. Click the Use Sample Chart button5. Click the radio button next to the chart you want to use6. Click the Import button and the old chart in your Chart of Accounts will be replaced by the sample chart. (Do not use a sample chart once you have setup your chart,
because the sample chart will replace the data in your chart of accounts.)
Customizing the Chart
The Chart of Accounts can be customized by changing the account groups and account names. The data can be completely deleted, however, this is not recommended. We strongly suggest modifying the chart rather than doing a completely new one. The sample charts cannot be customized until they are imported into the Chart of Accounts.
The Chart of Account data includes: (1) A Class Number and Name field (font color red) (2) The Fund field (font color green) (3) An Account Group Number and Account Group Heading field (font color blue) (4) An Account Number and an Account field (font color maroon) (5) The Budget Amount field (font color green) (6) Non-budget column (check boxes) (7) Bank Name column (drop down field) (8) An Account type (font color black) (9) A Balance column (10) A Beginning date field (11) Account Id field (always ACC) (12)
The default chart of account follows accounting practices by dividing the chart into classes such as ASSETS, LIABILITIES, EQUITY, FUNDS, and INCOME AND EXPENSES. The chart of accounts also serves as a budget form. The account groups are the budget headings and the accounts are the budget items.
There are two options to setting up accounts: (1) Setup a new one or (2) Modify an existing one.
Modifying an Existing Account
If you are modifying an existing one, just click on the account and change it. This is much better than having to enter an entire list of group and account numbers! Change the Fund, account group and account type if it needs to be changed.
For the most part, all you have to do to setup your Chart of Accounts is change the account groups and account names. It is best not to change the group numbers and account numbers.
Unless you have completely started from scratch in doing your chart, much of the data will be copied for you even when entering a new account.
Entering a New Account

HOW TO…
1. Click in the chart where you want the new account.
2. Click the New Account button. A new record will be entered after the selected one. The class, class number, fund, account group number, account group/heading, the account type, the bank name, a date and an account number incremented by two will be copied from the previous record. Again, if you choose to modify the existing accounts, just click in the field and type over the old account.
The red fields at the top of the Accounts tab are the Class Number and the Class Name. This field is automatically filled in when you select the Type of Account from the Account Type field.
ASSETS are given a class number of 1000. LIABILITIES are given a class number of 2000. EQUITY is given a class number of 3000. FUNDS are given a class number of 4000. INCOME is given a class number of 5000. EXPENSES are given a class number of 6000. OTHER is given a class number of 7000.
These numbers serve to sort the Chart of Accounts.
3. Next, click the drop down arrow in the Funds column (green font, column 1) and choose the Fund you want to assign this account to. Every account must be assigned a fund.
4. After you assign the Fund, click in the group number field (blue font, column 2) and enter a group number. Then tab to the Account Group/ Heading field (blue font, column 3) and enter a group name/heading.
5. Tab to the Acc # field (maroon font, column 4) and enter an account number. Tab to the Account field (maroon font, column 5) and enter an account name.
6. Tab to the Budget Amount field (green font, column 6) and enter an amount for this budget item. If you do not use a budget, skip this field.
7. Tab to the Non-Bud field (column 7) and check the field if this is a non-budget item. Non-budget items are items that you want to track but do not want them to show in the budget. Non-budget items will not be counted in income and expense reports. Some examples of non-budget items are non-cash donations, re-imbursements where you give back monies not spent for trips or conferences, etc.
8. Tab to the Bank field (drop down field, column 8) and select a Bank Name if you want this item to automatically be assigned to a Bank Account when entering contributions.
How To: If you want to quickly fill all the Bank Name fields with the same bank name, choose a bank name from the drop down default bank name field in the upper right corner of the chart. Click the Fill Bank Column button and all the bank fields of all chart items will be filled with the value in default bank name you selected. If you fill the field with the wrong name or change your mind and want to blank out the fields, just leave the default field blank and click the Fill button.
9. Tab to the Account Type column and choose an account type from the drop down list. Most of the time you will not have to choose this because it will be duplicated when you click New Account. Be sure to check the account type to make sure you have the correct type entered for each item. All 4000 numbers should say Fund Balance for the account type. All 5000 numbers should say Income and all 6000 numbers should say Expense. If you have a 5000 income item listed as Expense, then Assist 5.0 recognizes it as an expense even though you intended it to be an income account.
10. If the account has a beginning balance, tab to the Balance/Amt column and enter the beginning balance in this field. Accounts that will have beginning balances will be the 4000 FUND BALNACE accounts and the LIABILITY accounts. If the account is an ASSET, enter an amount for the asset in the Balance/Amt Column.
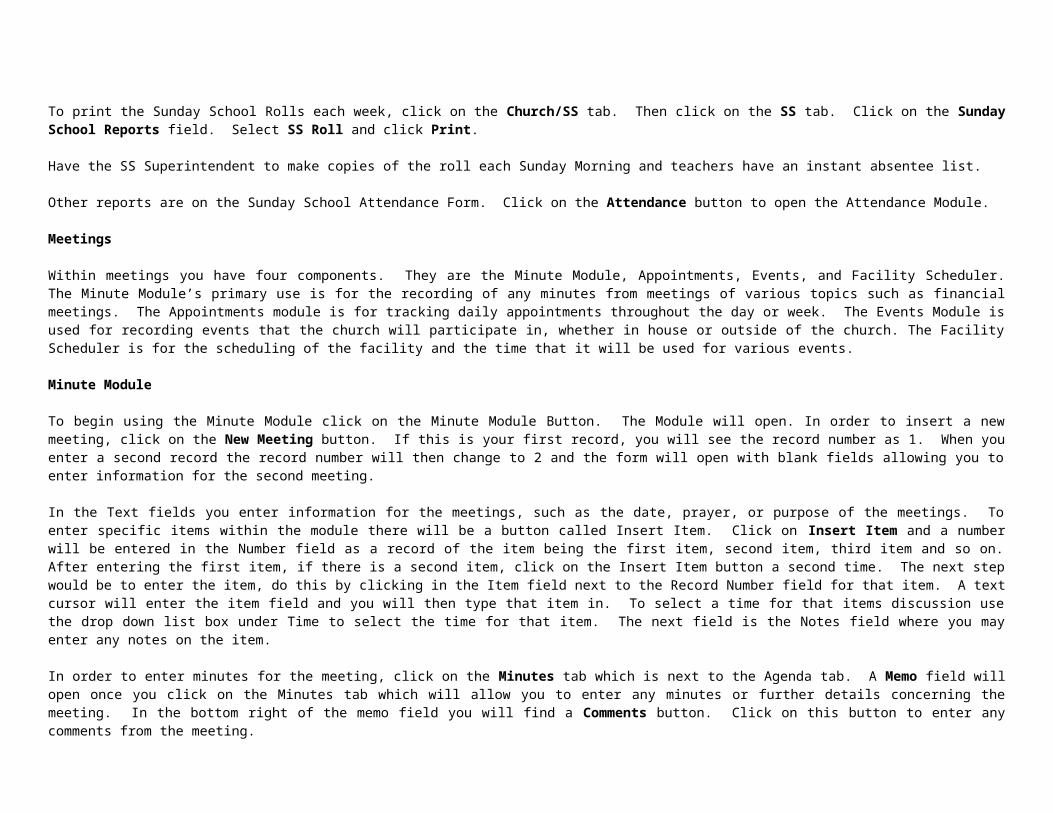
Example 1: Suppose you want to track your General Operating income (money that is not designated). Money received is considered INCOME (5000) unless it is listed as non-budget. For example, enter a number of 5000 in the Group Number field and Tithes and Offerings as the Account Group/Budget Heading. Enter a number of 5005 as the Account number and General Operating in the Account field. Now, when you enter a contribution of $100.00 in the Contribution Module, select General Operating from the drop down accounts field. The amount of $100.00 is assigned to the General Fund and belongs to the Tithes And Offerings Group as General Operating. Reports can be run showing how much has been received in the General Fund for General Operating income.
Example 2: If you want to track your tithes and offerings separately, the account group would be Tithes and Offerings and you would have an account for General Tithes and one for General Offerings. When you enter $100.00 in the Contribution module, you would split the contribution. $50.00 would be entered as General Tithes. The other $50.00 would be entered as General Offerings.
Deleting an Account
To delete an account, click on the Delete Account button and the account will be deleted. If you attempt to delete an account that has data tied to it, Assist 5.0 blocks this attempt and presents you a message and an opportunity to change the data to another account before deleting it. Choose another account name so the data in your tables will be linked to an account. If it is not linked to an account, when you run a report, such as the Budget Expense Comparison report, your report will not be correct. You cannot delete an account that is linked with data until you change the data to another account.
The Delete Chart button has been removed from the Accounts tab and is located only on the other tab as Empty Your Chart button. Now you won’t accidentally delete your chart thinking you are deleting an account.
There are two drop down Show Filter fields at the top of the Chart of Accounts. The first field filters the chart for the account type. The second drop down field filters the chart for the fund.
HOW TO…
If you only want to see the Income accounts, click the first drop down arrow in Show field and choose Income. The chart will show only the Income accounts. If you want to see only the accounts which have been assigned to the General fund, click the second drop down arrow and choose General. You may filter on the
type, or fund, or both. If you want to see only the Income accounts which have been assigned to the General Fund, click the first arrow and choose Income, then click the second arrow and
choose General. To show all, Choose All Types or All Funds, or just press the Delete key and all accounts will show.
A quicker way to change data is to use Record Locate and Replace.
HOW TO…

If the data in the Account Group/Heading says just “Income” and you want to change it to “Tithes and Offerings”…
Highlight “Income” and click the copy icon. Click on the word Record on the menu bar Choose Locate, and then choose Replace. The Record Locate and Replace form will open with the cursor blinking in the Value field. Click the Paste icon and “Income” will be pasted into the value field. You could type in the value to search for it, but it is much easier to copy and paste it. Click in the Replace field and type “Tithes And Offerings” Click OK. All the records in the current chart with “Income” in the Account Group/Heading column will be replaced with “Tithes and Offerings”
Also, you can click on the Search and Replace button on the Setup Funds/Other tab and change any data in any field in any table. With the Search and Replace Form you can search on one field and replace on another field.
Note: If you change an Account Name, make sure you also do a Search and Replace on the Giving table, the Checks table, and the Payroll table in the Category field.
The chart of accounts form opens with a chart already created. You can empty this chart or modify it. To create a new chart for the next year, you do not have to delete the previous year but you do need to archive it in case you need to use it later.
HOW TO…
1. Click the Backup Chart button. Three buttons will appear. To save it as last year’s Chart and Budget, click the S ave As Last Yr button. If the year is 2005, then the chart will be named Chart2004.db. If the year is 2006, then the chart will be copied to Chart2005.db
2. Choose a new beginning date from the drop down Beginning Date field. If the Beginning Date of your church year is not in the list, click the Budget tab and enter or change an existing date. Do not delete the Show All record from this table. When you choose a new beginning date, a new blank chart will appear.
3. Click the New Chart button in the lower right corner of the chart and a new chart will be added with the same items, but with new beginning dates. All you have to do is modify the budget amounts. This does not actually create a new chart as in Assist 4.0, it just changes the dates.
Make Accounts Unique
The accounts/categories can also be changed but each account name should be unique. You cannot have two categories with the same name or number. For example: Two Miscellaneous categories will cause your figures in comparison reports to be incorrect because these categories are stored as data in the Accounts Payable module. You MUST make the account/categories unique. When you enter an account with the same name, to make the name unique, end the account name with Ast for Asset, Lib for Liability or Inc for Income or Exp for Expense, etc. By doing this you are able to quickly identify in the drop down list what type of account this is and this helps make the account unique.

Sorting the Chart
The Chart of Accounts may be sorted several ways.
HOW TO…
Click on the filter icon (funnel) or Choose Record, Filter… from the menu bar Click the field in the Order by section you want sorted first Click OK
The filter will remain in effect until you change it, close the form, or change the filter criteria.
Printing the Chart
To print the Chart of Accounts, click the Print Chart button. The chart can be sorted by Class number, Group Number or Account number. The chart can also be sorted by Banks, Funds, Groups Accounts, and Account Type.
Viewing the Budget Totals
Click on the Budget tab to view a breakdown of the budget. The budget is broken down into Income and Expense showing the Annual, Monthly and Weekly totals.To print the budget, click the Print Budget button.
Step 5: Enter Beginning Fund BalancesThe final step in setting up your accounting system in Assist 5.0 is to enter beginning balances and opening balances. Beginning balances are balances such as beginning fund balances. They are entered in the Balance/Amt column in the Chart of Accounts. Opening balances are check book beginning balances and they should be entered as the first entry in the general ledger check register. The beginning balances can be setup when you setup your Chart of Accounts or you can setup the chart and then enter your beginning balances.
How to Enter Beginning Balances…
Get the worksheets you filled out earlier in this chapter Open the Chart of Accounts Click on the account for which you want to enter a beginning balance Tab to the Balance/Amt column and type the beginning balances from your work sheet Open the Check Register and enter the opening balance of each bank account. The type should be BNK, denoting that this is a bank account. Do not use BGB for
opening balances as was used in Assist4. In Assist 4 beginning balances were setup in the check register not in the Chart of Accounts. In Assist 5.0 the Chart of Accounts and check register are in the same table, making accounting much easier!
Example 1: If the account is 4010 Building Fund and the beginning balance is $5000.00. Click on Building Fund in the account column. Tab to the Balance / Amt column and type 5000. Click or tab off the field or press Shift-F5 to post your change. When a balance is entered, a credit for the amount entered is also posted.
Example 2: You have $20,000 in three bank accounts. $10,000 is in the general checking account. $5,000 is building fund money and is in a building fund account and $5,000 is in a savings account. When setting up beginning balances the total of your funds + liabilities = balance in bank.

Open the Chart of Accounts Click on General Fund, tab to Balance/Amt, enter 10,000 Click on Building Fund, tab to Balance/Amt, enter 5,000 Click on Savings Fund, tab to Balance/Amt and enter 5,000 Open the check register and enter 10,000 in the checking account. Make sure the opening balance is listed as BNK. Select the Building bank account and enter 5,000 Select the Savings bank account and enter 5,000 Congratulations! You have setup beginning and opening balances!

CONTRIBUTIONS
Before Entering Contributions1. Mark the individual as a Tither/Giver
The name will not show up in the Contribution form unless they have been checked as a Tither/Giver.
HOW TO… Click on the Church/SS tab on the Data Entry Form. On the Church List tab check Tither/Giver. If Tither/Giver is not checked, the name will not appear in the Contribution module.
It is best to mark the person as a Tither/Giver when you enter the name in the Data Entry Form. If you did not mark Tither/Giver when you entered the record, a quick way to mark them all is to:
Click in the Name field Click the Tither/Giver check box Click back in the Name to go to the next person
Also, you may click the Easy Locate button on the Contribution Form and check the square by their name. When you are finished, press Shift-F5 to save the changes to the last record.
If you want to check them all as a Tither/Giver:
Click on the Tool Bar icon (Last icon on right of the Data Entry Form) When the Tool Bar appears, click on the Tableview icon Slide scroll bar to the right until you see the Tither field and click in it Choose Record, Locate, Replace from the menu bar Leave the value field blank but put a “Y” in the Replace With field Click OK
2. Assign Envelope Numbers If Used
There are two places you can issue or assign envelope numbers: (1) Data Entry Form (2) Contribution Form. To issue envelope numbers on the Data Entry form, click on the Church/SS Tab. (The envelope number field is the dotted rectangle box to the right of the Tither/Giver check box.) With your mouse, enter this box, where a status bar message at the bottom of your screen says ”Enter Envelope Number”. Click Enter Envelope Number and type the person’s number. It is best to enter this number when entering a person’s name on the Data Entry form and tagging them at that time as a Tithe/Giver.
To enter the envelope number in the Contribution Form, locate the person by typing their name in the Locate Name field. Click in the Env # field in the upper right of the form and type their envelope number.
15

3. Setup Your Funds and Accounts
DO NOT enter contributions until you have setup your Bank Accounts, Funds and Chart of Accounts. (See Chapter 14 on Accounting)
Default fields are fields where you enter a value and the value is automatically entered each time you insert a contribution. Assist 5 has three default fields: (1) Bank Name (2) Service (3) Date. To set default settings, first open the Contribution form.
HOW TO… To open the Contribution Form, click on the Contribution icon (green dollar mark) at the top of the Data Entry Form or click on the Contribution icon on the Finances form. The Contribution form will be displayed with the names sorted by last name, then first name. If the names in your contribution module are not sorted by last name, first name, then you many have some bad table indexes. (See the chapter on Table Repair for help on repairing table indexes.)
The Contribution Form provides the user with access to every name that was marked as a Tither / Giver.
5. Set the Default Settings
Using the Default Bank Field
Assist 5.0 assigns each contribution to a bank name for the purpose of automatically posting money into the General Check Ledger. (See the section below on Posting Deposits for more information.) For help in setting up bank account names, see the section in Chapter 14 entitled Setting Up Bank Accounts. The default bank field is named Set Bank Account To. Click the drop down default Bank field and choose a bank account name.
The default Bank Account you choose will be entered automatically in the Bank field, in the giving table when you insert an amount. After you enter the contribution, if you want the contribution to be assigned to a different bank account than the default, click the drop down bank field in the table and choose another bank account. For example: if Checking is the default account and a deposit is to be made to the Building account, Click the Insert Amount button and then choose the drop down Bank field in the table and select Building instead of Checking. You can change the default field before you enter a contribution. Another way to facilitate entering contributions is to enter all the contributions that go into the Checking account and then change the default bank name to Building and enter all the Building contributions.
If you have a lot of contributions where part of the money is going into one bank and part into another, it will be easier to use the Chart of Accounts method of entering the bank name.
HOW TO…
When setting up your accounts, assign each account to a bank name. Leave the default bank field blank. When the default field is left blank, it will use the bank name you specified in the Chart of Accounts. For example: The General Operating account in the Chart of Accounts was assigned to the Checking account and Building Offerings was assigned to the Savings account. When you click the Insert Amount button and choose General Operating, then Checking is automatically entered into the Bank field. When you choose Building Offerings, then Savings are entered into the Bank field.
Using the Default Date Field
Click in the Set Date To field. Click the calendar button with the three dots. Click the date for which you are entering contributions. You may also type the date in this field. When you enter a contribution, the date is automatically entered for you based on the date you entered in the default field. For example: If the contributions were for Sunday October 16, 2005, then enter 10/16/2005 in the default date field. If the default date field is left blank, the date defaults to last Sunday.

Using the Default Service
The default Set Service To field shows when the contribution was collected. Contributions may be assigned automatically to a particular worship service. The services designated in the default Service field are AM (Morning Worship service), PM (Evening Worship Service), MW (Midweek Service), AM2 (Second Morning Worship Service), AM3 (Third Morning Worship Service), REV (Revival Services), VBS (Vacation Bible School) or SUN (All Sunday Services).
Example: If you do not want to track the contributions for certain services, just use SUN. When you enter a contribution, SUN will be entered automatically in the Service field in the table. If you want to track the contributions for the AM worship service, choose AM from the default Service field. When you click the Insert Amt button, AM will appear in the Service field in the table.
Locating GiversBefore you can enter a person’s contribution, you must first locate the persons name in the database. Assist 5.0 provides four ways to locate the name of the person making the contribution: Locate By (1) Name (2) Envelope Number (3) ID Number (4) Easy Locate Button.
Locating By Name
To locate by Name, click on Type Name Here in the Locate Name field. As you start typing the name of the person you are locating, Assist 5.0 begins to find that name. When the name is located, press the enter key and a new record is inserted. Example: If the name you are locating is Danny Keen and you start typing Da the first record it locates may be Dale or David but as you continue typing, the full name Danny will be located. When you locate the name you may insert a contribution record by pressing the enter key or by clicking on the Insert Amount Button.
Locating By Envelope Number
Locating by Envelope Number works a little differently. To locate by Envelope Number, click on By Env # in the Locate Env field and type the Envelope Number. When the complete Envelope Number is typed, Assist 5.0 will locate that person.
Locating By ID Number
The Id number is the primary key that links the Giving table to the Main table. It is the number that each person was given when you clicked on New Record in the Data Entry Form. To locate by the ID number, click on the Go to ID# button. A value box will be displayed. Enter the ID Number you are locating and click on OK.
Locating By Easy Locate Button
To locate using the Easy Locate button, click the Easy Locate button. A form will open. Click the alpha letter of the last name of the person you want to locate. Scroll through the list until you see the person’s name. Double click it and the person will be located.
The first column on the Easy Locate form is Giver. By checking the box by the person’s name you can mark a person as a Tither/Giver. To unmark a person as a Tither/Giver, click on the Tither/Giver Check Box and remove the check. When you unmark a person as a Tither/Giver, their name will not appear in the Contribution module the next time it is opened. A report list can be printed of all the Tithers or Givers. This report includes the individual's pledge if it was entered.

Adding a New GiverHOW TO…
Click the New Giver button. This takes you back to the Personal Information Tab on the Data Entry Form. If the name is not already in the main table, Click on the New Record button Enter the name of the new giver in the First and Last Name fields along with other Personal Information. Check the Tither/Giver check box on the Church-List Tab. If you return to the Contribution form, and do a locate on the name, you will see the name you entered.
The name field in the Contribution form is read only. If you want to change the name, change it from the Data Entry form. Since Assist 5.0 is relational or integrated, the changes you make in the Data Entry form are reflected in other forms.
If the name is already in the personal information database, then locate the name and tag them as a tither giver.
If you want to track Miscellaneous, Undesignated Offerings, or Loose Change, make a record in the Data Entry form called Misc Offerings. Tag Misc Offerings as a Tither/Giver so the entry will show up in the Contribution form. Locate Misc Offerings in the contribution form and add all loose change or monies that were in the offering plate.
Entering Contributions – Single MethodThere are two methods for entering contributions: (1) Single (2) Quick Entry or Batch. In the single method, you locate a giver and record that person’s contribution. The Quick Entry (also called Batch) is when you open the table of all givers, and go down the list entering the amounts.
The Contribution module is designed to be used on a weekly basis. Occasionally you may need to enter several weeks at one time. Enter a week, run its report, and if it is correct, begin the next week. Never attempt to enter a giver’s contributions for the whole year. If there is an error, it is very time consuming to find your mistake.
Assist 5.0 assigns a unique number to each giving record. Split numbers are associated with this number. Records cannot be entered on two stand alone computers and then merged. If two computers are on a network, and the data all points to one computer, then computer A can enter 25 blank records for each person and then computer B can enter 25 blank records for each person
If the computers are connected, another possibility is to use the batch processing method explained below as long as the batches are not being posted at the same time.
Using the Single Method
How to Enter Contributions Using The Single Method
Locate the giver by typing the name in the Name Locate field. Press the Enter key if you are in one of the Locate fields, or click the Insert Amount button. The default date or last Sunday’s date is entered. Then the default
service, the default bank and “RC” are entered in the Type C (Type of Contribution) field. The cursor moves to the Cash/ Check number field (Ca/Ck). If you need to change the date, click in the Date field, then click the Calendar button (three dots) and choose the correct date.
Enter the Check Number. If the contribution was made by check, enter the check number. Leave it blank if the contribution was cash. Tab to the Amount field and enter the amount. You do not need to enter the $ sign. For example: If the contribution was $100.00, just enter 100. If it was $100.50
enter 100.5. If the amount was the same as last week, double click in the field or press Ctrl D () and the amount which was in the field last week will automatically be entered.
Tab to the Account/Category field to categorize the contribution. The categories are the income accounts you setup in the Chart of Accounts. (This is a drop down edit field is alphabetized by name and drops down upon arriving on the field.) When you type a AB@ for example, the first category which begins with a AB@ in the

list is located. Press the enter key and the category is entered in the field.
Example: If Building Offerings is the first “B” in your income accounts, when you type “B” the cursor goes to Building Offerings in the list. Press the Enter key. Building Offerings is selected and placed in the Accounts/Category field. Building Fund is placed in the Fund field. When you want to know how much has been received for Building Offerings, a report can be run showing the total amount. If a giver wants to know how much they have given toward the Building Fund, a report may be printed and given to the individual.
The Accounts Group field and the Fund field are entered automatically when you select the Account. In Assist, you can leave the Accounts field blank and only choose the Fund. This is not recommended as you will not be able to use Assist’s powerful reporting features.
Tab to the Type of Contribution field and select NC, RC or RE. RC is the default. RC = Regular contribution such as cash or check. NC is a non - cash contribution such as a donation. RE is a Re-imbursement that you want to track, such as money that was returned by a giver. NC and RC monies are not recorded in the contribution statement totals. NC and RC totals are available in separate reports.
Note 1: Donation of services is not considered by the IRS as a viable donation and therefore, is not recorded on Assist’s contribution statements. The best way for a person to donate their services, is for the church to pay the person and then they can write a check back to the church.
Note 2: When an Account/Category is selected and you press the enter key, the cursor returns to the Locate Name field to locate the next person.
Note 3: The funds list is setup in the Chart of Accounts.
Splitting a ContributionHow to Split a Contribution
Click the Insert Amt button (green font) and enter an amount. The amount must be entered before you can split a contribution. Click the Split Amt button (blue font). The Split Contribution screen will appear showing the amount of the split at the bottom. If this is not correct, click the Finish
button, go back to the Contribution form and enter the correct amount. Click the Insert Split button. A new record will be added in the table with the date and check number. The date and check number will be the same as the main Split
in the Contribution form. Enter the amount of the first split, then select the Account/Category. Click the Insert Split button and insert the next split. Click the Finish button. The Split screen will close and the words “Split” will be entered in the Fund, Account Group and Account Name field.
Suppose for example, a contribution was given for $100.00. $50.00 was given to the General Operating account and $50.00 to Building Offerings. Click Split Amount to show the Split form. In the Split form, click the Insert Split button and enter $50.00 in the Amount field. Choose General Operating from the drop down Account/Category field. Click the Insert Split button again. Enter $50.00 in the Amount field and choose Building Offerings from the Account/Category List. As you enter splits, they are totaled and deducted from the contribution amount. If the splits do not total the contribution amount, a remainder will show in the lower left of the form.
Fund Accounting
Assist 5.0 does fund accounting. After the contribution receipts are entered in the contribution module and posted to the various bank accounts, a fund balance sheet report can be run to give actual balances in the various funds and accounts. The fund balance report is located in the Accounts Payable reports. (For more information, see the section entitled Fund Accounting in Chapter 14.)
Special Notes

Posting ContributionsAfter the contributions have been entered, the amount can quickly be deposited into the General Check Register.
How to Post Contributions
Run a report to make sure all contributions have been entered. Giving Last Sunday or Giving by Date will let you see the contributions entered. Do not post contributions until you are sure the total amount is correct.
Click the Post Deposits button Enter dates in the Date Range box. If the contributions were given on 10/16/2005, then a date range of 10/15/2005 to 10/17/2005 will query out all the contributions
for the 16th. If you entered contributions, but they do not show when you post deposits, check the dates and also check the bank account names. If the dates are right and the bank accounts are right, Assist 5.0 will sum and split entries if necessary and deposit the amounts in the correct bank account. The Accounts Payable form will be opened and updated. The deposits can be entered manually if you do not want them posted automatically. When the deposits have been posted to the bank accounts, a AP@ will be placed in the Posted field of the giving table. To view the posted field, click hold and drag the scroll bar at the bottom of the giving form to the right. If you post the deposits manually, no AP@ will be entered into the Posted field.
Un-posting ContributionsIf you made a mistake and need to add something after you have posted, it is best to unpost the contributions, make the corrections and then re-post.
How to Unpost Contributions
Click on the Report/Tools tab Click the Unpost Deposits button in the Tools section Enter the same dates in the date range box you used when you posted Click the Unpost Deposits button on the Date Range Box and the “P” will be removed from the contributions. When the General Check Register opens, delete the deposit entry. Deleting the main Split transaction will delete all associated splits. Make changes as necessary. Run reports as necessary. Then Re-post.
Entering Contributions - Quick EntryAssist 5.0 provides a easier way to enter contributions by using the Quick Entry Rapid Recorder. Quick Entry is a batch method that lists all givers. All fields are filled in except the Check Number and Amount Field. Just Go down the list and enter the check number, the amounts and change Accounts/Categories as needed.
How to Use Quick Entry Rapid Recorder
Click the Quick Entry button and the Quick Entry Default form appears. This form asks you to choose between two options: (1) Work on current batch (2) Start a new batch.
Click Start New Batch if this is a new one. If you have already started a batch, click Work on Current Batch. When you click on Start New Batch, if you have an existing batch, Assist 5.0 will ask you if you want to continue using it or overwrite it.
Click Continue. Default Settings field appears allowing you to pre-fill the Date field, Service field, Bank field and the Account/Category field. Type a date in the date field if it is not correct.

Click the drop down arrow in the What Service field and choose the default Service Click the drop down arrow in the Bank Name field and select the default Bank Name Click the drop down arrow in the Account/Category field and select the default Account Click Continue and the Quick Entry form appears Enter the check number and amounts Change Account/Categories as needed Click Finish Other button
The Next Name button moves to the next tither/giver. The Prev Name button moves to the previous tither/giver.
The Insert Copy button allow you to make an exact copy of a record. Click on the record you want to copy and then click the Insert Copy button. An exact copy will be inserted at the end of the table frame. If this is a Split, the splits will also be copied.
The Contribution form contains buttons to open other forms. Click the Giving Table button to open a Tableview of all giving transactions. The Tableview is primarily for the purpose of viewing, not entering data. (If you want a Tableview method of entering data, use the Quick Entry Rapid Recorder.)
Click on the Pledges button to open the Pledges Form. See the chapter on Pledges for information on pledges and pledge reports.
Click the Bank Account button to open the table that holds the bank names you setup in chapter 14.
Click the Chart Accts button to open the Chart of Accounts. When you click this button the Contribution form will close.
Click the Checking button to open the General Ledger check register.
Click the New Giver button to add a new tither or giver. This opens the Data Entry Form where you enter names. Be sure to mark them as a tither/giver.
Giving ToolsThe Contribution Form has a section of Utility buttons. Each performs a certain task. Below is a list of the Utility buttons and a brief explanation of each task.
Backup Any Table
This button opens a dialogue box which gives you access to backup tables to another location on your hard drive.
Backup Giving Table
The Backup Giving Table button makes a backup copy of the giving table to the Assist5 folder on your hard drive. The backup copy will be named GivingBak.db.
Items Not In Chart
This button is a utility that enables the user to determine if there are giving transactions that have funds or accounts that are not listed in the Chart of Accounts.
For example, the giving table account/category shows Building Offerings and the Chart of Accounts does not have an account listed for Building Offerings. The report Giving Accounts Not in Chart will show the entries in the giving with Building Offerings. If there are items that do not match, then add an item in the Chart of Accounts to match the data. If you have an account like the data, then you may want to change it in the giving table. Run the report “Giving Funds Not in Chart” to

flag all records that do not have a fund listed in the chart.
Resort Giving Table
This button resorts the giving table by date. When contributions are entered they are displayed according to the way they are entered. For example, a contribution may be entered for 10/16/2005 and then one may be entered for 10/2/2005. If you want the 10/2/2005 to show first, then resort the table.
How to… Click the Resort Giving Table button. Assist will backup your giving table to your Assist 5 folder. The backup copy will be named givingbak.db. Click OK when the backup is complete. The Resort Giving Table form will appear. Click the Resort Giving Table button on this form. When you are finished, click the Contribution button to return back to the Contribution form.
Update Amounts
You do not need to use this button unless you are upgrading from an earlier version of Assist and are transferring all data. This button is used to transfer the amount in the Split column to the Amount column. Assist 5 uses the Amount column for both the transaction amount and the splits.
Un-post Deposits
See the section above entitled Unposting Deposits.
The SL Code field contains two values: MN and N. N=Name and MN=Mailing Name. If you want the Contribution letter or statement to be sent to the individual person, use the N code. If you want the letter or statement to be sent to the Husband and Wife, use the MN code which uses data from the Mailing Name field. Remember--the mailing name for a male married would be Mr. and Mrs., but for a female who is married it would just be Mrs. (You would not send to Mrs. and Mr.) You can change the mailing name if Assist 5.0 does not program to your liking. Click on the Letters tab on the Data Entry Form. This code must be set for each giver.
Contribution ReportsRunning Reports
To run contribution reports, click on the Reports tab. Click on the Select Reports field. Click on the report you want to run and click the Print Report button. After you have entered some data, run some of these reports, print them out and keep them in a notebook. Assist 5.0 has over 600 reports! One of the most important reports you will be using is the Contribution Statement All. The statement may be printed for any date range, but most churches give it out at the end of the year as a receipt statement which shows their yearly giving.
Many churches print the Contribution Letter. This letter may be sent along with the Contribution statement as a stand alone receipt.
Giving Last Sunday is a report you should run after logging the weekly contributions to check the totals.
The following contribution reports may be run:
Contributions by Any Date Contribution by Fund-ItemizedContribution by Fund-Summary Tither/Giver ListContributions by Name Contribution Statement-All

Contributions by Envelope Number Contribution Statement-CurrentContributions Over $250 RecordContribution Letter Id # ListContributions by Account Group Contributions by Account ItemizedContributions by Account Summary Contributions by Any FundContributions by Name Summary Contributions by WeekFund and Account Summary Giving Last SundayDeposit Slip Non-giving Church Members
When the contribution reports run, a dialogue box will be displayed asking you to input dates for the report. Do not use dashes in dates. Enter dates in the following format: 1/1/2003, not 1-1-2003.
Dates may be entered using the popup calendar. Click in the From field. Click the button with the three dots to the right of the From field. The calendar will appear. Click on the date you want to use. The calendar will close and the cursor will move to the To field. Click the button with the three dots to the right of the To field. The calendar will appear again. Click on the date you want to use for the To date. Choose the drop down arrow to change months or click the double left and right arrows to scroll from month to month.
Assist 5.0 allows reports to be run for any date or date range. When the date range input box displays, enter dates in the From and To fields. To run a contribution report for the first quarter of the year enter 1/1/97 in the From field and 3/31/97 in the To field. This specifies a date range which says find all the records with dates greater than or equal to 1/1/97 but less than or equal to 3/31/97.

PLEDGES
Entering Pledges
Assist 5.0 supports multiple pledges. You can make as many pledges to as many funds and categories as you wish. Assist 5.0 will compare an individual’s giving with their pledge showing an over or under value. Assist 5.0 also summarizes all the pledges into Annual, Monthly, Weekly or One time amount. With the pre-built reports, you will be able to quickly track a capital stewardship campaign by making comparisons with a person’s actual giving.
How To . . .
Opening the Pledge Form
To open the pledge form:
Click on the Pledges button on the Contribution Form. Click on the Pledges button, located on the Church Tab of the Data Entry Form. Right click on the Data Entry Form and choose Pledges Form from the popup menu. Click on the Pledges icon which is located on the Accounting Modules form.
If the Pledge form was opened from the Data Entry Form, the Pledge Form will open showing the record of the person whose name was showing in that form. If David Wilson was showing in the Data Entry Form, when you click the Pledges Button, David Wilson’s pledge information will be located and displayed.
Inserting Pledges
When the form opens, click the Insert Pledge Button. A blank record will be inserted with the cursor and highlight in the Amount field. Enter the Amount of the Pledge. Tab to the Beginning Date field and enter the starting date of the pledge. To enter today’s date; press the space bar three times. Tab to the End Date field and enter the ending date of the pledge. For example, if the pledge start date was 1/1/2005 and the length of the pledge is for three years,
you would enter 12/31/2007 for the end date Tab to the Type field and enter a AW@ for Weekly, AM@ for Monthly and AA@ for Annual or “O” for One Time. For example: Jim Brown makes a weekly pledge
of $50.00 and a monthly pledge of $10.00 and an annual pledge of $250.00 and a One time pledge for $500.00. You would click on the Insert button and enter $50.00 in the Amount field, the date and a AW@ in the Type field. Click the Insert Pledge button and enter $10.00 in the Amount Field and a AM@ in the Type field. Click the Insert Pledge button and enter $250.00 in the Amount field and an AA@ in the Type field. Click the Insert Pledge button again and enter $500.00 in the Amount Field and choose “O” form the drop down Type field. When the value changes in the Amount, Beg Date, End Date or the Type field, the Total pledge is calculated along with the total number of days of the pledge.
Assigning Funds & Categories
Choose the drop down field in the Category column. When the category field is selected, the Fund is automatically entered based upon how it was setup in the chart of accounts. The pledge can be made to various funds and categories. If Mr. Brown’s weekly pledge of $50.00 was to the General Fund, you would choose General from the drop down list in the Fund column. If the $10.00 monthly pledge was a pledge to the Missions Fund, you would select Missions from the list and even specify in the category field
16
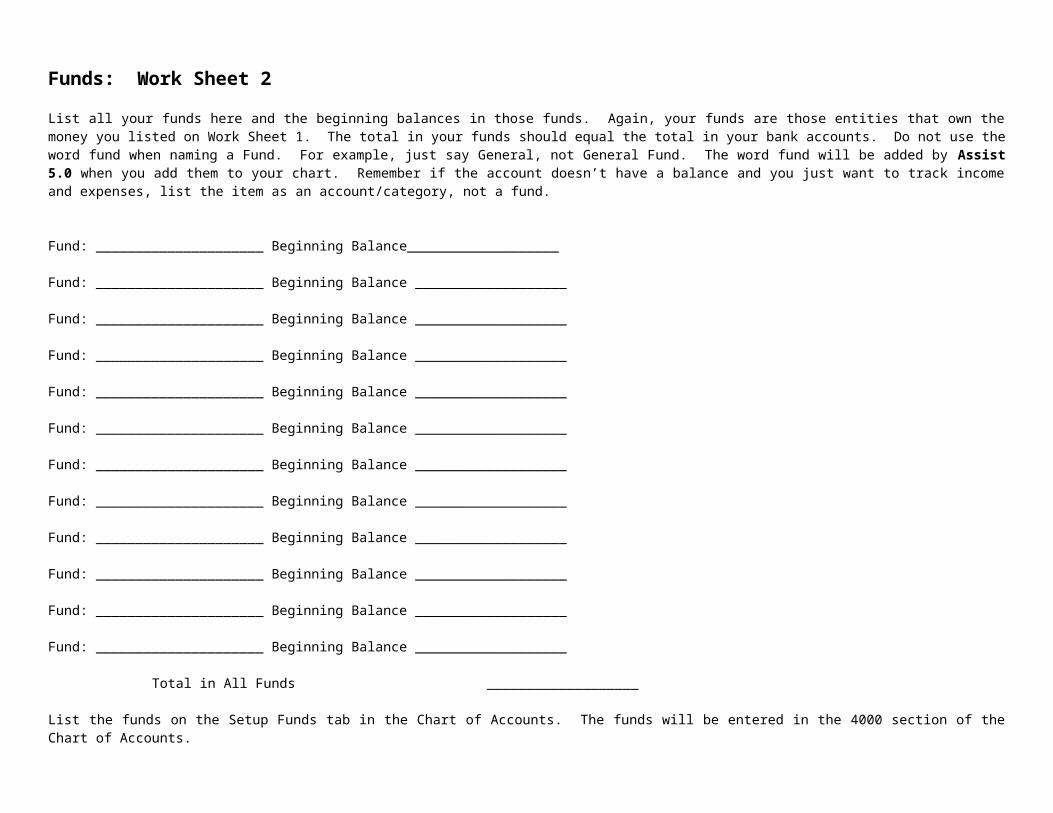
the missionary to whom the pledge was made. If the $250.00 was an annual pledge to the Building Fund, select Building from the drop down list and as an option specify a category. You do not have to specify a category, but the option is there if you choose.
Year to Date Pledges
In Assist 5 year to date is figured based upon the date you type in when you click the YTD update button to today’s date.
Click the Update YTD button. Enter the date your church year begins. Click OK Example: If your church year began 1/1/2005 and today is 10/31/2005, the number of days since the first of the year would be 304. If the pledge was an annual pledge
of $500.00, then the YTD pledge up to the end of October would be $416.00 Table View To view all of the pledges in the database, click on the Tableview button. This table is for viewing data, not entering data.
Other Information
To delete a pledge, click on the pledge you want to delete and click the Delete button. To go to the Contribution form, click on the Contribution button. To go to the Data Entry form, click on the Data Entry button.
Pledge Reports
Assist 5.0 is a great module for tracking Capital Stewardship Campaigns. The Pledge Comparison Report calculates a person’s giving, figures the total pledge and the pledge for the period.
Note: The Pledge for the period is figured based upon the Start date of the pledge. For example: A person makes a one time pledge of $4680.00 for a period of three years. The start date of the pledge was 4/1/2004 and the end date of the pledge is 3/31/2007. The days in the period are 1095. If you run the report from 1/1/2004 to 9/30/2005 the number of days in the period would be 548. 4/102004 – 9/30/2005 = 548. Even though you ran the report from January 1, the pledge did not actually start until April 1.
Some pledge reports can distinguish between those who signed a card and those who did not sign a card.
To run a pledge report, click on the Pledge Reports drop down field, and choose a report. Click the Print Report button. The following Pledge Reports may be run:
Giving / Pledge Comparison All Categories Pledges by CategoryGiving / Pledge Comparison Any Categories Pledges by DateGiving / Pledge Comparison Any Name Pledges by FundsGiving / Pledge Comparison by Funds Pledges by NameGiving / Pledge Comparison by Name 1 Pledges Any CategoryGiving / Pledge Comparison by Name 2 Pledges Any FundGiving / Pledge Comparison Itemized Pledges by TypeGiving / Pledge Comparison Statistics Pledges by AmountGiving / Pledge Comparison Summarized Pledges SummarizedGiving / Pledge Comparison by FundsOver / Under Pledge by Names

The above reports may be run to show a total of what has been given to the church compared to a total of what was pledged. When asked for a date, type for example: 1/1/2005 in the From field and 12/31/2005 in the To field.
If you want to know what a member has given over or under their pledge, run the AOver / Under Pledge by Names@ report.
To find out what pledges were made to All Funds, run the APledges By Fund@ Report. If you want to know what pledges were made to just the General Fund, run the report, APledges Any Fund@.
To know the total weekly pledges, run the report APledges By Type@. To know what a particular individual pledged, run the report APledges By Name.@
To find the amount of pledges made to a missionary, run the report APledges Any Category@.
If you want a summary of Pledges by Fund and a summary of Pledges by Category, run the report, APledges Summarized.@

Checking
The ApplicationThe Workspace
Look at the Checking form and become familiar with the layout, buttons and fields. Below is a list of buttons and a brief explanation.
Buttons on the Top of the Check Form
Banks Opens the Bank Account FormChart of Accounts Opens the Chart of Accounts and Budget formContributions Opens the Contribution formEmployee Opens the Employee and Payroll formMemorize Form Opens the Memorize TransactionView Deductions Views Deductions of Payroll ChecksReconcile Opens the Reconcile formRecalc Re-calculates the check register
Buttons at the Bottom of the Check Form
Go To Opens the Calendar and Locates a Check by DateTransfer Opens a Form to do Bank and Fund TransfersSplit Amount Opens the Split Transaction formNew Entry Enters a New TransactionDelete Deletes a TransactionMemorize Memorizes a TransactionInv/Memo Allows Notation of an Invoice NumberClear Marked Clears Checks Marked for PrintingSort Opens the Filter / Sort form
The Check RegisterGeneral Ledger – Accounts Payable
The Accounts Payable is a check register that is a type of general ledger. It is a financial module that can be used to record income and expenses for the church or school. Many churches have more than one bank account and need to track funds in all of them. Assist 5.0 supports multiple bank accounts. If the church has a checking account, a building fund account, a youth account and a savings account, then Assist 5.0 can track the inflow and outflow of each, and do summaries of all the accounts. (If you prefer, you still have the option of tracking everything from one account.) Assist 5.0 also supports split transactions and true balances on all funds and accounts.
17

Type of Transactions
In Assist 5.0 there are different types of transactions: (1) Reconcilable (2) Non-reconcilable . A reconcilable transaction is one that appears on the bank statement such as checks and deposits. A non-reconcilable does not appear on the bank statement. An example of a non-reconcilable transaction is a transfer between funds.
How to Begin
Step One: Setup Bank Account Names
The first step is to create the various bank accounts you want to track. You may skip this step if you have already set them up. Assist 5.0 installs default bank accounts which you may use, or you can create a new account. To create a new bank account, see chapter 14 or follow the instructions below.
Open the Finances Form by clicking on the Check icon at the top of the Data Entry Form. Click on the Checklist Setup button. Click on the blue link Setup Bank Accounts List. The Bank Accounts form will open. Click on the New Account button Type the name of the Bank Account you want to track. Keep the bank account names as short as possible. Do not use punctuation and pay attention to case and
plurality!!
Example: If the account is Wachovia Checking, then type WachoviaChk in the field. If the account is Wachovia Savings, type WachoviaSav in the field. Close the Bank Account form.
When you want to switch to another account, click in the drop down Bank Field and select the bank account you want to use. For example, choose WachoviaChk from the list and a new check register will appear, allowing entries for this account. To switch to the Wachovia savings account, choose WachoviaSav from the drop down list. The bank account that will be assigned will be the one displayed in the drop down list.
Step Two: Setup Funds and Accounts
The second step is to set up the funds and categories in the Chart of Accounts. (See the section on Accounting in chapter 14 for information on setting up funds and accounts.)
Step Three: Enter Opening Balance
The first entry in your Check Register should be your Opening Balance. Enter your Opening Balance by clicking the New Entry button. Your Opening Balance is the total of all your funds. Choose BNK as the Type of Transaction. Type “Opening Balance” in the Payee field. Tab to the Deposit column and enter the amount. Tab to the Category field and choose the name of the Bank Account From the drop down field.
The bank name in the Category field for the Opening Balance should be the same as the bank name in the Bank Field in the upper right of the form. Once you have entered the Opening Balance you are ready to enter checks and deposits.
Step Four: Set Options
Auto Memorize
Click the Other tab and check Auto Memorize Transactions if you want transactions to be entered automatically from the Memorize table. When the Payee field is selected the transaction is automatically filled in based upon a matching Payee in the Memorize table. The fields that are filled in are the Amount and the Category.
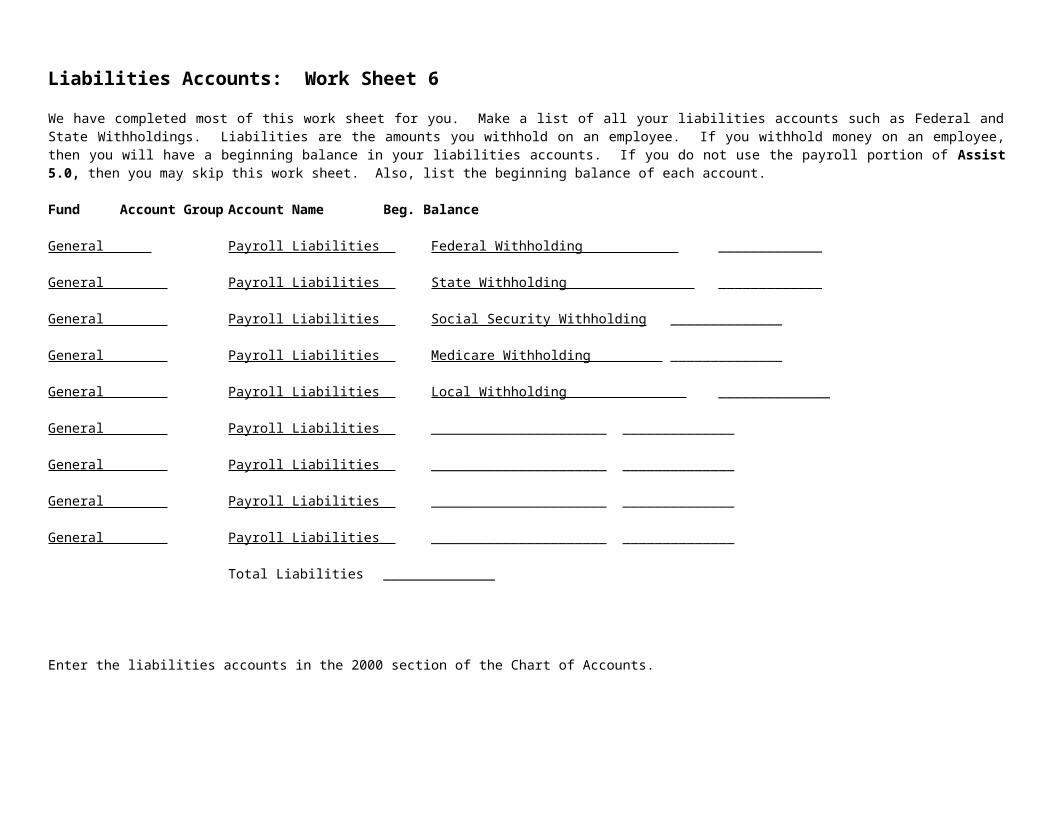
Starting Check Number
Enter a check number in the LastCkNum field. For example: Suppose your checks start at 1000. You would enter 999 in the LastCkNum Field. This allows the user to start check numbers with any number. This is useful if you reorder checks that start with a lower number than your old checks.
Step Five: Begin entering transactions
Check Register/Incrementing Dates and Check Numbers
To enter checks, click on the yellow check icon at the top of the Data Entry Form. The Accounting form will open. Click the Accounts Payable button. The Check Register will appear and the highlight will move to the last record. Click on the New Entry button. A new record will be inserted using the date of the last record, the next check number and CHK in the Type field. A bank account will be assigned to the transaction. The bank account that will be assigned will be the one displayed in the drop down list. Change the date, check number or type if necessary. Pressing the + key changes the date to the next date by incrementing the date by one day. Pressing the - key changes the date to the previous date by subtracting one day. For example, if the date is 4/15/2005 then pressing the + key would make the date 4/16/2005.
Enter the check number. The check number can be incremented by a + or by a -. You must use the + sign or the – sign on the numeric keypad not on the numbers row.
Enter or change the type of transaction. DEP=income CHK=expense.
Changing Dates
The check register sorts transactions by date and then by check number. If you change a transaction to an earlier date, the transaction will move to its sorted position when you move off the record. Therefore, complete the transaction by entering data in all fields and then change the date to an earlier date . When the record moves, the balances are recalculated. After the balances are recalculated, the cursor will move with the record if the record is posted by doing a Shift-F5. If you click off the record, the record is posted and the cursor moves to the record on which you clicked.
Changing the Sort Order of the Register
Click on the word Record from the menu bar then choose Filter or click the Sort button. Click a sort index in the Order By section and the click OK. Change the sort order to CkIdNum or some other index Don’t forget to change the sort order back to Date when you are finished. Click the Sort button again and choose Date.
When you change the sort order, the register does not automatically recalculate the balances. If you wish to change the balances, click on the first record in the check register and then click the Recalc Reg button to recalculate the balances from the beginning.
Entering Payee Information
Tab to the Payee field. The field automatically drops down. To quickly find the payee you need, start typing the first few characters and the cursor will go to the first record in the list that corresponds to the characters you typed. For example: If the Payee was Lifeway then type “Lif” and the cursor jumps down the list to Lifeway. When you see the item in the list, press the enter key and the highlighted item will be entered in the Payee field.
Lookup items default to the first values entered. If there are several items in the list with the same beginning characters, continue typing until you see the payee you need. For example: A memorized transaction for a person named Duke Burgess may have been previously entered. Also a memorized transaction for Duke Power may have been previously entered. If the check was to Duke Power, then typing Duke will find Duke Burgess. If you continue typing Duke P then Duke Power will be located in the drop

down list. When the name is entered in the Payee field, the name is memorized and stored in the memorized transactions table. The table is used as a pick list on the Payee Field. If the name is one that is not used regularly and you do not want it in the list, click on the Memorize Form button and click on the name and then on the Delete button.
Payments and Deposits
Payments and deposits in Assist 5.0 are similar to debits and credits in accounting. Tab to the Payment field and enter the amount. (If the amount was $121.76, then enter this amount). If the item was a deposit, enter the amount in the Deposit field. Payments and deposits cannot be entered on the same transaction record. If you try to make one record include two transactions, the summary information may not be correct. For example: If a payment transaction is categorized as Utilities and a deposit has also been entered, the deposit will have the wrong category when the summary report runs.
By double clicking the Payment field, the Dollars field on the check is filled with text and asterisks. If the Payment was $121.76 then One-hundred and twenty one and 76/100*********************** will be added to the Dollars field.
If you click on the Payment or Deposit fields of a split transaction and attempt to change it, a message will appear asking if you want to continue editing the split. If you click AYes@, the Split Form will open. If you click ANo@, the cursor will move to the Date field.
If you change the amount of a non split transaction, the register will recalculate the balances.
Important: If you are entering a deposit do not use the Bank Account Name as the category. Choose the appropriate income account.
Splitting Transactions
Assist 5.0 supports split transactions. A split transaction is one in which the payment or deposit is split into different funds or categories. For example: a check has been written for $500.00 to Office Depot. $100.00 was for paper and supplies, $100.00 was for printing and $300.00 was for a new printer. $500 would be entered in the Payment field. You would then want to divide or split these expenses into different categories and funds.
1. After you have clicked New Entry and entered the amount of the payment or deposit, click the Split button. The Split Transaction window will appear showing the amount of the split and the cursor will be located in the Type field. The table will be in edit and insert mode.
2. Click the Insert Split button and enter the type of transaction in the Type field by entering DEP or CHK. Enter General in the Fund, tab to the Category field and choose Office Supplies, tab to the Payment field and enter $100.00. As you enter a split transaction, a Split Total appears at the bottom of the form and a Remainder field showing the difference.
3. Click Insert Split again to enter the second record. Choose Printing and Copying as the category and enter $100.00 in the Payment field. In the third record, choose Equipment and Repair to categorize the printer, and enter $300.00 in the Payment field.
4. Click the Finished button to close the Split Transaction Window and return to the Check Register. If no amount has been entered in the Payment or Deposit fields, a message will ask you to enter an amount or delete the split. When the Split form closes, the amount of the split will be entered into the Payment or Deposit field of the check register, the words Split will be entered into the Fund and Category fields and the Balance column will calculate.
NOTE: Once you enter a transaction as a split, it cannot be changed from the check register. If you click on the word ASplit@ in the Fund or Category field, the split form will automatically open. If you click on the Payment or Deposit fields of a split transaction and attempt to change it, a message will appear asking if you want to continue editing the split. If you click AYes@, the Split Form will open. If you click ANo@, the cursor will move to the Date field.
Account / Category Fields

The terms Account and Category are the same. Some users like to call them categories and some like to call them accounts. In accounting terms they are accounts but Assist 5.0 uses both terms synonymously. The gray lines in the check register are for entering category information. The Fund field is entered in automatically when the category is selected. The categories may be set up by clicking on the Chart of Accounts button and entering information in the Chart of Accounts table.
Do not type in the category field. If you make a typo error when typing in the categories field, your report figures will not be correct because the category is not in the Chart of Accounts and it is the category field that links some tables together. You must choose the category from the drop down list. If a category is not in the list, click on the Chart of Accounts and insert it. For example: Utilities: Electric must be in the Chart of Accounts if you are going to use it in the category field.
If you type in the Account / Category field and the account is not in the chart of accounts, a message will appear asking if you want to add it and the field will be made blank. If you click Yes, the Chart of Accounts opens so you can add the new account. Once the account has been added, choose it from the drop down list. By categorizing the check, a report may be printed which gives a total amount spent in a certain category. The tab and enter key moves from field to field in the check register. When the category field of the last record is reached and the tab key is pressed, the cursor does not move off the record. If you are on the category field of the last record and press the enter key, a new record will be inserted.
Auto Entry of Group and Fund
When you select a value from the Account / Category field, the Group and Fund field is filled in automatically. The group and fund is tied to the account in the chart of accounts. Since funds and groups are tied to categories, do not select a different fund after you have selected a category.
Account Number Fields
The Account number is located next to the heading Payee / Account and appears in a dashed rectangle box with red fonts. You do not have to enter this number. If you have set up your chart correctly, the account number will be entered automatically. Early versions of Assist linked tables using the budget number. Assist 5.0 links tables using categories and account numbers.
Inv/Memo Button and Print Check Box
Click on the Inv/Memo button to add a memo note or invoice number to a printed check. If you want to print the check, click on the Mark Check for Printing box next to the Memo Field. Before marking checks for printing, click the Clear Marked button to clear those you printed last time. Assist 5.0 is designed so all data can be entered in either the check register and the check can be printed on the Check Tab. When a new record is inserted, a unique record number is assigned to the record and the cursor moves to the date field.
Recalc Reg Button
To recalculate the balances for the entire register, click on the first record in the register then click the Recalc button. All the balances from beginning to end will be recalculated. If you only want to calculate the balances from a certain record, click on the record, then click the Recalc Button and the balances will be calculated from the current record to the end of the register.
Inserting Transactions
When a new record is inserted, a unique record number is assigned to the record, and the cursor moves to the date field of the last record. A new record cannot be inserted by pressing the insert key or by clicking on Record Insert from the menu bar. To insert a record, you must click on the New Entry button.

Deleting Transactions
To delete a check, press the Delete button. Records may be deleted also by pressing Ctrl Delete or Record Delete from the Menu Bar. A message will display asking AAre you sure you want to delete this record.@ Do not delete a transaction unless you are positive that you no longer need the transaction. Once a transaction is deleted, it cannot be replaced in the same place in the register. If you delete a record that you didn’t intend to delete, click on the New Entry Button and add the transaction back in as a new record. The new transaction will be appended to the end of the table.
The balance field shows a running subtotal. This field is set to read only. The only way to change the balance is to change the payment or deposit.
Memorizing Transactions
Assist 5.0 does not automatically memorize transactions as in previous versions. To memorize a transaction, click on the transaction and click the Memorize button. If you want memorized transactions to be used when filling in a check or deposit, click on the Other tab and put a check in the field Auto Memorize transactions. When the Payee field is selected, values will be entered in all fields.
To delete a memorized transaction
Click the Memorize Form button to open the Memorized Transactions Click on the memorized transaction you want to delete Click the Delete button.
Check Tab
Checks can be entered on the Check tab but we recommend entering all checks in the check register and then go to the Check tab to print the checks. To use the check form, click on the Check tab. Enter the information. When you enter the amount of the check, the currency amount is added as text in the Dollars field when you tab off of the field. For example, If the check amount is $25.10, the dollars field would display Twenty-five and 10/100******. Also, the currency amount can be changed to text by double clicking the Dollars field.
To add a note to the Memo field, click in the field and type your text. Memos can also added when using the check register.
Press the Clear Send button to clear previously marked checks. Otherwise, the last ones you printed will print again.
To print the check, mark the check for printing. Click on the drop down list on the left of the check and select which checks you will be using.
The reports are designed to print using Current Checks and Quicken Checks. Current personal small checks and Current business large checks may be run landscape through a HP DeskJet Printer. The information will be printed on the check. The large 3 checks are designed to print 3 business checks at one time in portrait mode. Quicken Standard and Quicken Voucher Checks are printed in Portrait Mode.
Reconciling Bank Statement
Reconciling your bank statement and balancing your checkbook many now be done quickly and with ease. Do the following to reconcile your statement:
1. Any debits or credits shown on your statement that have not been entered in the check register must be entered as a transaction.2. Mark the checks that have cleared. Double click in the Clr field and a Ac@ will be entered.3. Click on the Reconcile button and enter the Beginning Balance from your bank statement in Step # 1.

4. The rest is figured automatically.
Reports
Click on the Reports tab to run financial statements. Then click the Mark Category button and Assist 5.0 marks empty category fields as AUncategorized@. This helps to insure the integrity of your data in reports. After you click the Mark Category button, run the report AShow Uncategorized Transactions@ to see a list of transactions where you did not enter a category. Type dates in the From and To Fields. Select a report from the Reports field. Click on Print Report to print the following reports:
All transactions Category Summary Current BankBudgets Fund and Balance SheetBudget/Expense Comparison Show Uncategorized TransactionsPayments/Deposits Bank Account BalancesCategory Summary All Banks Show Blank CategoriesSummary by Funds Splits by Check NumberTransactions Any Category Transactions Any FundTransactions Not Cleared Transactions by Account Group
NOTE: When you run a Budget Expense Comparison, the Over/Under Year column will reflect the complete year only if the complete year is specified in the From and To fields; otherwise, the figures reflected will be for the period specified.
If you get unwary results in reports, it could be you have typed a category in the Category field that is not in the Chart of Accounts or because you have blank category fields or because you have two categories which are the same.
Bank Account Balances report must also use dates that encompass the whole database.
If you get a net difference when you run the Fund Balance Sheet report, it is because you have entered data in the Contributions Module that has not been posted to the check register or vice versa.
TIP: Click on the Table View button to view or edit the Checks database. This form is for viewing and editing only.

EMPLOYEE / PAYROLLEmployee / Payroll
PERSONAL INFO
Adding Employees
To setup a new employee, go to the Data Entry form, click on the New Record button and enter the personal information. Click on the Church/SS tab at the bottom of the Data Entry form and click on the square by Employee List to mark this person as an employee. If the person is already in the Data Entry form, then go to the Church Tab and click the square by Employee List.
When the square is checked, a message will appear asking if you want to open the Employee Form and setup this person as an Employee. If you click "Yes", then the Employee Form will open. If you do not want to open the Employee Form when you mark the person as an employee, then just click "No" when the question appears.
Opening The Employee Form
All the employees may be entered in the Data Entry Form before opening the Employee Form. The Employee Form opens when the Employee List square is checked. The Employee Form may also be opened by clicking on the Finances/ Accounting icon (yellow Check) at the top of the Data Entry Form. The Finances Form will open. To open the Employee Form, click on the People icon beside Employee/Payroll. The Employee Form will open.
Entering Employment Information
Enter the employment information. Type the name that is to appear on the check in the Name on Check field. Tab to the Position field and enter the position the employee holds such as Pastor, Administrator, Secretary etc… Tab to the Employee Type field and choose from the drop down list the type of employee : Hourly, Salaried, SelfEmp (Self-employed) or IndCont (Independent Contractor). Enter the person’s social security number in the Social Security Field if it was not entered in the Data Entry form. Enter the person’s Driver License number in the Driver's License field.
If the employee has signed an employment contract, check the square by Contract. Enter any additional information such as the date hired, date last reviewed, date released or date of last raise.
Dates may be entered by clicking the button with the three dots which opens the calendar. To enter a date using the calendar, click in a Date field, then click the calendar button (three dots). When the calendar appears, choose the month by clicking the drop down Month field or use the double arrows to scroll back to the month you need. When the correct month appears, click the date you want to enter. The calendar will close and the date will be entered in the active date field. For example, if you want to enter a date hired as 1/1/2003, then click in the Date Hired field and then click the Calendar Button. Choose January from the drop down month field. Click on the January 1, and the date of 1/1/2003 will be entered in the Date Hired field.
Other Information
The two letter State field at the top is the State you typed in on the Church/User Info form. If this field is blank, click on Setup icon (Key) at the top of the Data Entry Form and enter the two letter State in the State field.
18

Deleting an Employee
To delete an Employee, click the Delete Employee button. A message will appear asking if you are sure you want to delete the employee. Click “Yes” to delete the Employee's setup information. This only deletes the setup information. The person is not deleted out of the Data Entry Form, nor is any Payroll data associated with this person deleted. Once an Employee is setup, it is not recommended to delete the employee’s setup information, but to keep it for future reference.
Employee Table View
Click the Emp. Table View button to open the Employee Table. This table is just for viewing, editing or trouble shooting and is not intended for data entry.
W-4 Form
Click the W-4 button to open the W-4 Form. The W-4 Form will open maximized to the same employee who was showing in the Employee Form. Part of the data is entered automatically. (For example, the persons name, address, Social Security number, etc… This information was entered in the Data Entry Form and the Setup Form.) To enter the rest of the Employee's W-4 information, click the New W-4 button at the top of the form. A new W-4 Form will be inserted with the employee’s personal information. Enter information A-H on the worksheet. If you do not need to use the worksheet, fill in the information on the W-4 Form.
To print the form, click on the Printer icon on the tool bar.
W-2 Form
To open the W-2 Form, click the W-2 button. The W-2 information will appear with information for the current year. Fill any additional information. To print the Form, click the Printer icon on the Tool Bar.
WAGES
Wage Information
After all Personal information is entered, click the Wages tab and setup the employee’s wages. If Hourly was selected as the Employee Type, the Wage Info will display Pay Rate. If Salaried or SelfEmp was selected, the Wage Info will display Salary. If IndCont was selected the field will display Amount.
If the employee is an hourly employee, enter the hourly wage in the Pay Rate field and the Overtime rate in the Overtime field. If the employee is Salaried, enter the salary in the Salary Field. If the person being paid is an Independent Contractor, enter the Amount in the Amount field.
Enter any Housing Allowance, Retirement or Other Wages in their respective fields. Enter amounts paid for Auto, Travel, Professional Expenses or Other Reimbursements in the fields. Any amounts entered in Housing, Retirement, Other Wages, Auto, Travel, Professional Expenses or Other Reimbursements are not taxed if the employee is under an accountable reimbursement plan. (Under an accountable reimbursement, the employee must turn in expenses to the church within a reasonable length of time.) If the employee is under an accountable plan, put a check in the square next to Reimbursements and the amounts will not be taxed. If this square is checked, the field will display "T" for "Taxed". If the field is not checked the field will display "NT" for "Not Taxed" and the Housing, Retirement, Other Wages, Auto, Travel, Professional Expenses, and Other Reimbursements will not be taxed.
If the square is checked, then these amounts will be taxed and figured in the total wages in item 1 on the W-2 form. If the square is not checked, the Housing and Retirement will be reported on the W-2 form in item 14 as Housing and Retirement. The Reimbursements will not be reported on the W-2 form.
As an example: If an employee is paid $600.00 a week in salary, 200 weekly in Housing, $50.00 weekly in Retirement, $50.00 in Auto, and $50.00 in Professional Expenses

and Reimbursements is not checked (Not Taxed), the Gross Taxable Pay would be $600.00, and the Non-taxable pay would be $350.00. If Reimbursements is checked (Taxed), then the Gross Taxable Pay would be $950.00 and the Non-taxable pay would be $0.00.
If you want the non-taxed Reimbursements to be included in the same check as the Salary, click the Pay: W Wages radio button. If you do not want the non-taxed Reimbursements included in the same check, click the Separt radio button. For example: If Pay: W Wages is selected, the check amount would be $850.00. If Pay: Separt is selected, the payroll check amount would be $500.00. A separate check would then be written from the Checking Module (Accounts Payable) for the $350.00 Reimbursements. If you write a separate check for the Reimbursements, do not enter a new check in the Payroll module, but rather enter the check in the Check Register; otherwise the reimbursement amounts will be entered twice. Taxed reimbursements cannot be paid separately and will be included in the same check.
SICK AND VACATION DAYS
Sick Days
Enter the number of sick days the employee is allowed in the Sick Days Allowed field. Enter the number of sick days used in the Sick Days Used field. When the data is entered in either of these two fields, the Sick Days Left is automatically calculated. If you change the value in the Sick Days Left field, the Sick Days Used is recalculated.
Sick Days may be accrued Annually, Monthly or Weekly. Accrual means the sick days left at the end of the period are carried over and the employee does not loose the sick days accumulated. If an employee was allowed 14 sick days of which 8 were used during the year, the employee has 6 left at the end of the year. These 6 days are then automatically added to the Accrued Days field
To automatically accrue sick days, check the Reset Sick check box and then select Annually, Monthly or Weekly from the drop down field Accrual Period field. If you do not want the sick days to accrue automatically, uncheck the Reset Sick check box. When you select the accrual period, the next date is entered automatically, but you may click in the field and change it to a different date.
When Annually is selected, the next accrual date (field beside Reset Sick) will be set 1 year from the Date hired, which is the first anniversary of the person’s employment. If no hire date was entered, the next accrual date will be set one year from today's date (date you selected the Accrual Period). If the hire date is more than one year from today when you select the accrual period, the next accrual date will be set to the next anniversary after today's date. For example: If the hire date was 1/15/2003, then the next accrual date will be 1/15/2004 and January 15 of every year thereafter. If the date hired was 10/15/2000 and today’s date is 4/28/2003, then the next accrual date will be 10/15/2003. If today’s date is 4/28/2003 and no hire date was entered, the next accrual date will be 4/28/2004. Again, if the accrual date does not calculate as you wish, you may click in the field and change it. Do not set the accrual.
If you select Monthly as the accrual period, the accrual date will be set one month from the first of the month. The date hired has no effect on the next monthly accrual date because it is set to one month from the first of the next month. If the Date hired was 1/15/2003 and today’s date is 4/15/2003, then the next accrual date will be 6/1/2003, which is one month from the first of the next month. Sick days will automatically accrue each month thereafter.
If you select Weekly, the sick days will accrue every 7 days.
Vacation Days
Vacation days accrue the same as sick days. Remember, Reset Vact. must be checked or the days will not automatically accrue.
TAXES AND DEDUCTIONS
Federal Taxes

To setup taxes, click on the Taxes/Ded. tab. Setting up taxes and deductions means simply checking the box next to the deduction.
Choose the filing status by clicking the Filing Status drop down field. Select Married or Single. The filing status must be set for the taxes to calculate. The filing status is used determine the amount of taxes deducted.
Choose the pay period for this employee. Select either, Weekly, Bi-weekly, Monthly, Semi-monthly or Daily. The data in this field is also used to determine the correct amount of taxes that will be deducted.
Enter the number of allowances in the Allowances field. The number of allowances is used along with the filing status and the pay period to determine the amount of taxes deducted.
If Federal taxes are to be deducted from the Employee's taxable income, click the check box next to Federal. If Federal taxes are not to be deducted from this employee, do not check this box. If the employee is married with two allowances and the taxable weekly income is $600.00, the amount of Federal taxes deducted is $42.26 and the net pay would be $557.74.
Check the Medicare box to deduct Medicare taxes from this employee. The Medicare taxes will be deducted at the current rate (1.45% for 2003). If Medicare is deducted along with the federal taxes from the above pay, the Medicare tax would be $8.70 which is 1.45% of $600.00 and the net pay would be $549.04 ($600.00-$42.26-$8.70=$549.04)
Check the Social Security box if Social Security is to be deducted. The Social Security will be deducted at the current rate (6.45 % for 2003). If only Medicare and Social Security is deducted, the net pay would be $554.10 ($600.00-$8.70-37.20=$554.10)
If the employee or employer wants a percentage deducted from the pay check, enter the percent as a number in the Federal % Withholding field. (For example: If the employee wants 3.5% deducted from his check, enter 3.50 in the percent field. The percent amount will be deducted from the taxable income. Taxable income is gross income minus nontaxable deductions, such as cafeteria and 403b deductions. See section below on Other Deductions) This amount will be deducted even if the Withhold Federal check box is checked. If you do not want a percent deducted, leave this field blank.
If the employee or employer wants a certain dollar amount withheld from the pay check, enter the amount in the Federal $ Withholding field. If an extra amount is to be withheld, enter this amount in the Federal Other Withholding field.
Most churches pay Federal Unemployment Tax (Futa); however, to deduct Futa click the check box next to Federal Unemployment Tax. The tax will be deducted at the current rate that is entered in the box to the right.
When Advanced Earned Income is checked a field appears to the right. Enter any AEIC that the employee is qualified to receive. (See IRS tax guidelines to determine if the employee is eligible to receive AEIC.) This amount will be added to the paycheck.
State / Local and Unemployment Taxes
To withhold state taxes, click the check box next to Withhold State. Uncheck if no state taxes are to be withheld.
The state taxes for South Carolina residents are figured from the SC tax tables. All other states must enter the amount initially in the State Tax $ field, State Tax % field, or the State Extra Withholding field. The tax may be entered in either field or all three. SC residents may also enter amounts in these fields. The Withhold State check box must be checked before these amounts will be deducted.

To deduct the same amount of taxes as last week’s paycheck, click the Same As Last Check checkbox.
Click the Withhold Local Tax check box to deduct local tax and after entering the Locality enter the amounts to be deducted in the Local tax % field and the Local Tax $ field. These amounts are entered as a total in the Local Tax field when checks are created.
If the church pays State Unemployment Tax (Suta), click the State Unemployment check box and enter the percent in the box to the right.
Other Deductions
Other deductions fall into three categories: Cafeteria deduction, 403b (retirement) and Miscellaneous.
Cafeteria Plan (125) A Cafeteria plan is a benefit plan maintained by the church or a third party administrator under which all participants are employees and each participant has the opportunity to select the particular benefits that he desires according to Sec. 125. These benefits are non-taxable and the amounts are deducted from the gross income taxes if Cafeteria Plan (125) is checked. If this field is not checked, the amounts entered in the benefits fields are deducted after taxes.
Example: The weekly gross income is $600.00, the employee pays federal taxes and has $65.00 in benefits and is not under a cafeteria plan. The federal tax figured on $600.00 is $42.26. The adjusted gross income is $557.74. The benefits of $65.00 are deducted after taxes or the adjusted gross income, making the net pay $492.74. If the weekly gross income is $600.00 and the employee has $65.00 weekly in benefit deductions and is under a Cafeteria Plan, the taxable income would be $535.00. The Federal tax is figured on the $535.00 would be $32.51, making the net pay $502.49. The difference between the two plans is that the employee does not pay taxes on the $65.00 in benefits.
403b Plan
A 403b Plan is a tax sheltered account that enables the employee to deduct the amount from the gross before taxes. The employee does not pay federal taxes on the 403b amount. The difference between 403b deduction and the non taxable retirement in the wages section is that the not taxable retirement in the wages section is paid by the church and is not considered income and is not reported on form W-2 as income.
To enter a 403b amount, click the 403b check box. A field will appear to the right. Enter the amount of the 403b in the field.
Miscellaneous Deductions
If you need to deduct an amount from the gross before taxes, enter the amount in the Gross $ Deduction field and/or in the gross % deduction.
After Tax Deductions
After Tax Deductions such as Savings, Retirement savings, Disability, etc, are deducted after all other taxes and deductions. These deductions affect only the net pay.
TIME/PAYROLL
Click the Time/Payroll tab. Click the drop down arrow in the Bank field and select the Bank from which these transactions will be deducted. Each transaction will be assigned this bank unless you change it. You may change the bank before or after you create the check. (To change the bank name after you create the check, scroll to the right in the Payroll table until you see the Bank column. Click in the field and type another bank to change it).

Entering Time/Creating New Check
To enter time and create a new check, click the New Check button.
If the employee is paid hourly, when the New Check button is clicked, a new record will be entered with today’s date and the cursor will move to the Hours field. Enter the number of hours the employee worked. If the hours were the same as last week, double click the Hours field and the same number of hours as in the previous record will be entered. The hours may be entered as a whole number or fraction thereof. If the employee worked 30 and 1/2 hours enter 30.5 in the Hours field. If the employee worked overtime, enter the number of overtime hours in the Overtime Hours field.
If the employee is salaried, when the New Check button is clicked, a new record is entered and the cursor moves to the Category field. Select the Category and Fund to which this transaction applies. The categories and funds are setup in the Chart of Accounts.
Calculating Taxes and Deductions
Click the Calculate Check button to figure the base pay, gross pay, taxable income (adjusted gross income), taxes and deductions and the net pay. Assist 5 calculates everything automatically.
The is derived by multiplying the number of hours by the pay rate. If a person is salaried, the base pay will be the same as the salary on the Wages tab. This is derived by adding supplemental wages to the base pay. If an employee’s reimbursements are taxed (non accountable), then the Housing, Retirement, Auto, Travel, Professional Expenses and Supplemental Wages are also added to the base pay. If the employee’s reimbursements are not taxed, then the reimbursements are added together to total the .
The is derived by deducting any Cafeteria deductions, 403b, and/or miscellaneous deductions from the gross pay before taxes; otherwise the deductions are deducted after taxes. Taxes, Social Security and Medicare is figured on the taxable income and deducted. After tax deductions are then subtracted deriving the .
Printing / Posting Checks To Register
The printing and posting of checks is similar to how the checks are printed within the Accounts Payable module.
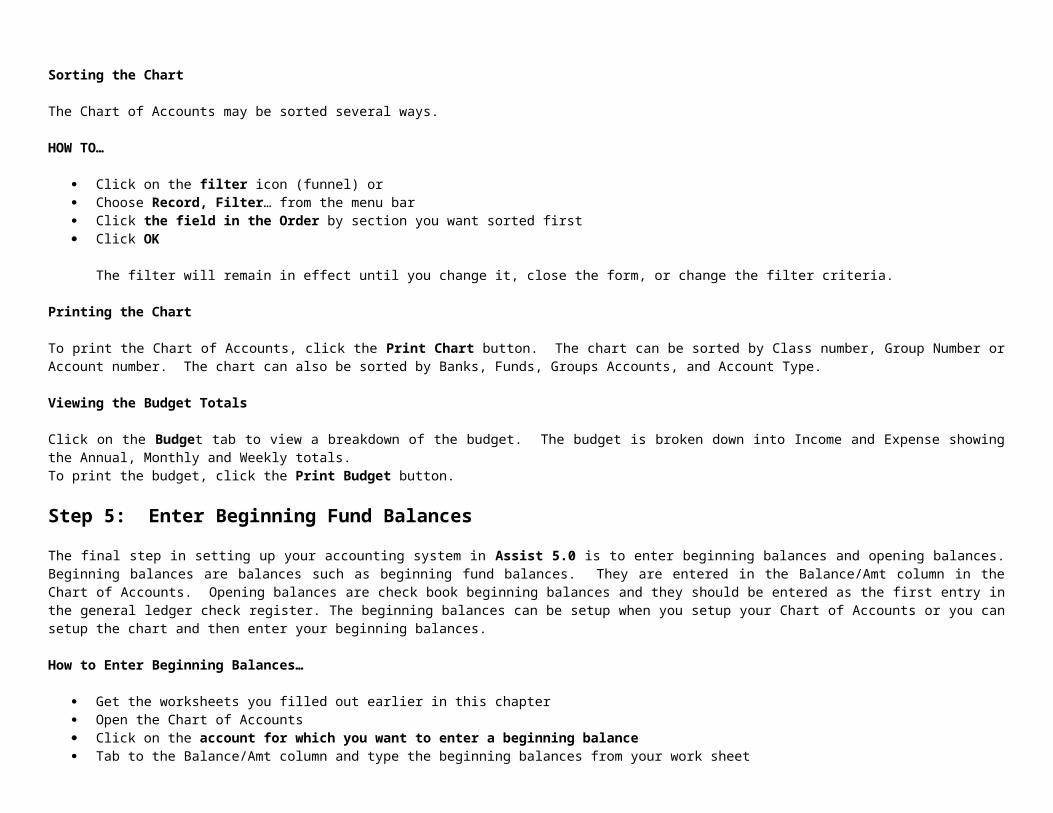
Once the checks for Time/Payroll are entered you click on Post Checks. It will ask for you to enter the date range for the Payroll checks with the To and From date fields. When you have selected the date range and click on Continue it will take you to the check register under the Accounts Payable. Click on the Check tab and press the Clear Send Button to clear previously marked checks. Otherwise the ones you have previously printed will print again. To print the check, mark the check for printing. Click on the drop down list on the left of the check and select which checks you will be using.

BUSINESS MODULE
Business AddressesQuick Start
1. Click on the Address icon at the top of the Data Entry form.
2. When the Address form displays, enter the Name and Address information.
3. Click on the Type Letter To tab and type the letter.
4. Click on the Mailing and Print tab and choose Company or Individual. Choose Marked from the Letters field.
5. Click on the Print Letter button, then click on the Print Envelope button.
Address Information
The Address Book is a module designed to correspond with businesses, companies and individuals that would not be included in your church database. The Data Entry form is for church members, prospects, etc… Any church related name should be included in the Data Entry Form. The Address module is a database for other churches, pastors, commercial companies or non-church related individuals. Correspondence can be sent to the company, individual, or to the attention of someone specifically. Information in the Address module is stored in a table called Address.db.
To use the Address Book, click on the Address Book icon (small card file) at the top of the Data Entry form. The Address module will be displayed. Click on the New Record button. An ID number will be assigned to this record. Enter the Company or Church Name and their address in the Company/Church section. Enter the title and Pastor or other Name in the Individual section on the right of the form, along with the individual's address.
If the individual address is the same as the company address, click on the Copy Adr. button and the company address information will be entered in the individual address fields. Be careful not to click on the Copy Adr. button after you type different addresses, or you will have to type the individual address again.
In the Type of Business or Group field, enter a word or code to classify or group the companies or individuals. If you want to be able to group all the churches, enter Church in the field. If you want to classify certain churches, you could enter BC for Baptist Churches. Or, you could enter BP for Baptist Pastors. More than one code may be entered in this field. For example, the field could be coded BC, BP. When you run the report to send letters, you would type a value from this field in the input box.
To enter phone numbers, click on one of the phone number fields and type the number. If you type the area code, all you have to type is the first parenthesis--then type the number. The second parenthesis and a space is added along with dashes. (Many companies or individuals now have more than one or two phone numbers.) Ample fields have been provided to store this information.
The Comments button is for typing a note about this company or individual. When you click on the Comments button, the text on the button changes to Phone # and a field displays which covers the phone number fields. To view the phone numbers again, click on the phone numbers button.
To delete a record, click on the Delete Record button. This will delete the address information and all related letters written to this address.
Click on the Data Entry button, to go to, or return to the Data Entry form.
19

Click on the Clear Marked button to unmark letters you have previously marked. (This in the event that you may do more than one mailing a day.) If you send three letters in the morning and want to send three in the afternoon, click on Clear Send so the letters you sent in the morning will not print. Another option is to run the report with all the letters, but only print the page number which corresponds with the new letter. To do this, cancel print and use the navigation arrows at the top to view the new letter. If the new letter is page four, then click on the Printer icon and click on Page Range and type 4 to 4 in the Page Range field. Only page four will print. The latter option works fine, unless you have a lot of letters, in which case use the Clear Send button.
Typing Letters
Click on Type Letter To tab to send a letter to this company or individual. Click on the New Letter button to type a new letter this address. When you click on the New Letter button, the current date is entered in the date field and the Mark for Mail field will be checked. Type the letter. The letter is saved automatically. You may now print the letter and envelope. To type another letter to this address, click on the New Letter button again. You do not have to delete the old letters. Each letter you type is stored in a table called AdrLet.db. If you do not want to save the old letters, delete the letter and type the new letter in the letter field. The date will be updated with the current date and the Mark for Mail field will be checked. Different letters may be typed to different individuals and will print out at the same time, provided they are marked.
To scroll from letter to letter, click in the Letter field and click on the navigation arrows at the top.
Printing Address Letters and Envelopes
To print a letter, click on the Mailing & Print tab. If the Mark For Mail field is not checked, check it. The letter will not display nor print unless this field is checked. Letters are printed only the Mark For Mail Field is checked. Click on the Church / Company or Individual radio button in the Send To: field. If you want the letter to go to the Church / Company Address, click on Church / Company. If you want the letter to go to the individual's address click on Individual.
If the letter is being sent to a company and it is to be sent to the attention of someone, type the name in the attention field and type a salutation in the salutation field. Do not type anything in the attention field, if you are sending to an individual. And, It is not necessary to type a salutation in the salutation field unless you want it to be different than the default which is Title and Last Name. Example: If the Title is Rev. and the last name is Keen, the salutation will read Dear Rev. Keen unless you have typed a different salutation.. When individual or Church / Company is chosen, the words "Different Letter To Marked" appears in the letters field. If these words are not in this field, click on the drop down arrow and click on "Different Letter To Marked". This tells Assist 5.0 that you want to print all those letters which you have marked for mailing.
To print the letter, click on the Print Letter button. The letter will print with the individual's address if you chose individual or the Church / Company address if you chose Church / Company.
Click on the Print Envelope Button to print the envelopes.
Sending A Letter To Group
Assist 5.0 allows the user to send the same letter to a group. There will be times when you will want to type one letter and send it to many recipients. To do this after entering the Name and Address information, click on the Type Letter tab and click on the Group Letter Button. The Group Letters Form will be displayed. Click on the New Letter button or delete the old letter and type in the new letter. The date will be updated with the current date. When you are finished typing the letter, click on the Back To Mailing button. The letter that will print is the one that is visible when you close the form. Assist 5.0 uses the Letter # which is unique to determine which letter you want to print. When you click on the Back To Mailing Button, the form will close and take you back to the Mailing & Print page.
Click the Letters field and select "Same Letter To Group". Then click the Print Letter Button. A search value box will appear and ask you to enter a value from the Type Of

Business Or Group field. You may use wild card searches. Example: ..Bap..Chur.. When you press enter or click OK Assist 5.0 will search for all the Baptist Churches and print the letter. Or if you wanted to send a letter to all the commercial companies coded CC then type ..CC.. in the input box and the letter will be sent to all the companies whose type of business is CC.
If you want to send the same letter to only those you have tagged, first click on the Group Letter button and type the letter. Click on the Back To Mailing button and select "Same Letter To Marked". Click the Print Letter button and the letter will print provided you have checked the Mark For Mailing field.
The group letters as with other letters queries on the Mark For Mail field unless you are sending the ASame Letter To Group@ in which case the search queries on the value you specify. You may need to click on the Clear Send button to clear those you tagged from a previous session. You can manipulate what is printed by the value entered in this field. Envelopes are printed using the same options for printing letters. When printing envelopes to a group, select Same Envelope To Group.
Printing Reports and Labels
To print reports click on the Reports field and select from the following reports:Company Address List - Individual Address List: Click the Print Report ButtonTo print labels, Click on the Report Field. Select the label you want to print and click on the Print Label button. The following labels may be printed:
Company Label (5160) Tape Mailing Label (8164)Individual Label (5160) Shipping Label (8164)Any Label-Type Of Business (5160) Any Label-Type Of Business (DM)Company Label (Dot Matrix) Individual label (Dot Matrix)
SERMONS
SermonsQuick Start
1. Click on the Sermon Icon (folder) at the top of the Data Entry.
2. Click on Add Record and type the Title and related information.
3. Click on the Sermon Outline button and type the outline or sermon text.
4. Click on the Illustration tab and enter the illustration titles in the table.
5. Click on the Illustration text button to type the text for the illustration.
6. Click on the Reports and Tape tab to print out sermons and illustrations
General Information
The Sermon module is a simple and easy to use filing system for sermons and illustrations with built in word processing capabilities. To open the Sermon module click on the Sermon icon at the top of the Data Entry Form. The Sermon Form will be displayed. Click the Add Record button. Click on Sermon or Bible Study to categorize the type of material being filed.
Type the title of the sermon in the title field. Tab to the File field and type the letter of the folder which contains the sermon. Tab to the Other Field if you have a second title or other information to record.
When tab is pressed upon leaving the Other field, the cursor goes to the Speaker field. Type the name of the speaker for this sermon. If the speaker is the same as the previous record, press Ctrl D (ditto) or double click in the field. The speaker of the previous record will be entered into the current record.
Tab to the Book field. In the Book field select or type the first three letters of the Book in the Bible where the sermon is located. If the text is a book that begins with a Roman Numeral type the numerals and then the first three letters of the book. Type the chapter and verses in the Passage field. For example: If the book is I Samuel 17:48-58 then you would type I Sam in the Book field and 17:48-58 in the Passage field. The book and passage will be automatically concatenated to form the text. When the text field concatenates, the full name of the book is used.
Entering Data In The Places Preached Table
If you wish to enter the date and place the sermon was preached, simply click in the table and type in the data. This table allows auto inserting and appending. Click on the headings of the fields and the default data will be entered. For example, click on Date and the previous Sunday will be entered, click on Placed preached and the name of the church you typed in the User Info form will be entered. The service field indicates in what service the sermon was preached. SM=Sunday Morning; SN=Sunday Night; WN=Wednesday Night; RV=Revival.
The side field is used to enter what side of the audio tape the sermon is on if the sermon was recorded. When SM is selected a 1 is entered in the Side Field. When SN is selected, a 2 is entered in the Side Field. If you wish to change the default side data, click in the field and change it but do not go back and click in the service field or the side
20

data may be overwritten.
To enter more than one placed preached, press the down arrow key or click on the next line and type in the data.Typing Outlines and Illustrations
This is a relational module. The Sermon Outline or Text is connected to the Sermon Title and the Illustration Text is connected to the Illustration Title. To type an outline for a sermon after you have entered the title, click on the Sermon Outline Button. The outline form will be displayed. Type the outline or text in the Outline field. When you are finished, close the form by clicking on the X in the upper right corner of the form.
To type illustrations, first click on the illustrations tab. Enter the name of the illustration in the Illustration Title field. The ID numbers which connect the illustration with the sermon will be entered automatically. After the title is entered, click on the Illustration Text button. The illustration form will be displayed. Type the illustration in the illustration text field then close the form.Printing Sermons and Illustrations
To print sermons and illustration, click on the Reports and Tape tab. Select the report you want to print. The Sermon Module contains the following reports:
Bible StudiesIllustrations ListIllustrations Text AllIllustrations Text AnySermon ListSermon Outline AnySermon Outline AllIllustrations Grouped By Sermons
Printing Tape Labels
How to print a fixed number of labels with the same title
First enter the Sermon Title. Second enter the place preached. Then tag the placed preached. Click on the Reports tab. Click on the Tag To Print field. Under Tapes & Mailing click on the drop down arrow and choose Label 1-12 and click the Print Label Button. A full sheet (12 labels) will print. If you only want to print 4 labels choose Label 1-4. Save the remaining labels and the next time you print use the Label 5-8, etc. Be sure to clear tagged or the labels your printed last time will also print.
Tip: To print 24 labels with the same title, enter the date and placed preached twice in the table and tag both records. Then choose the Label 1-12 report and click the Print Label Button
To print various number of labels with the same title
Example: Enter the Sermon Title. Add the place preached 5 times in the places preached table. Tag all five records. Click on the Reports tab and click on the Tag To Print field. Choose one of the 5198 reports. Click the Print Label Button. The label will be printed 5 times.
To print various number of labels with different titles
Example: Enter Sermon Title 1. Add the place preached in the places preached table. Tag the place preached record. Click on the Reports tab and click on the Tag To Print field. Go to your sermon 2 and do the same as you did for sermon 1. Choose one of the 5198 reports and click the Print Label Button. Again, to print more than one label

enter the place preached x number of times and tag them. Example: If you want 4 labels of Sermon 1 then enter the place preached 4 times, tag each record. If you want 3 labels of Sermon 2, enter the place preached 3 times and tag each record.

LIBRARY MODULELibrary Quick Start
1. Click on the Library Icon at the top of the Data Entry Form.
2. Click on the Add Button and enter Title and other information.
3. Click on Checked Out and enter the #Days the book or material is checked out and to whom.
4. Click on the Reports tab, select the report to run and click Print Report.
General InformationThe Library Module is designed to be used to catalogue the Pastors books, the Church Library Books or books in a Book Store. The Library module can be used to catalogue various types of material, not just books. To open the Library Form, click on the Library Icon at the top of the Data Entry Form. Click on the Add button to enter Church Library data. Type the title of the book in the title field and the author in the Author field.
Enter data in the Category field. The category field can be used to give the books a certain category. For example: If the book is on Prayer or Witnessing, enter Prayer or Witnessing in the Category field. The category field can also be used to define where the book is located. For example, is the book in the Pastor's Library, the Church Library or the Book Store? If the book belongs to the Pastor you could enter Pastor in the Category field. A combination can also be used. For example: Prayer-Pastor or Witnessing-Church Library.
The Publisher and Type fields are drop down edit list which can be defined by the user. To set up the default information for these fields click on the Set Up Tables button. Click on the Library tab and customize the list to your liking by adding or changing the default information. The type field allows the user to classify the type of material. For example: Is the material a hard back book, a notebook, an audio tape, video, etc.
Other Information
If the Library Module is used to catalogue a church library, then enter the catalogue number. Enter the condition of the book or material. For example, is the book new, used, poor , good, etc.? Enter the number of copies in the number of copies field and the price in the price field if you are operating a book store or book ministry.
If the book is checked out, click on the Checked Out field. When the Checked Out Field is checked, the current date is entered in the date checked out field. Enter the number of days the book is checked or loaned out. Enter the name of the person who checked out the book. The due date is a calculated field that is derived by adding the days checked out to the current date. If the date is 4/1/97 and the book is checked out for 7 days then the due date would be 4/8/97. When the 7 days are past the Overdue field turn yellow and reports Yes indicating that the book is overdue.
Review
The review tab is for making notes or doing a brief review of the book or other material. Click in the field and type the review notes.
Library Reports
The following library reports may be run:
21
A report based on any categoryA List sorted by titleA list sorted by authorA list grouped by typeOverdue list

PROFILE FORMProfile FormIf you wish to enter more information about the individual in the personal information, click on the Profile button. Here you may enter a picture of the individual, hobbies, interest, miscellaneous information or make notes from interviews.
The graphic field can contain pictures. You can create graphics in a painting or drawing application, or scan in images. You can select .BMP, .PCX, .TIF, .GIF, .JPG and .EPS file formats. When you paste a graphic into a graphic field, Paradox converts the graphic into the .BMP format.
To add a picture, scan the picture or input from a digital camera or import from a file. Copy the picture to the windows clipboard or save the picture as a file. Right click on the picture field and choose paste or paste from.
Recommended saving of pictures: 8 bit; 256 colors; *.bmp format; 2" X 2.5". If you save the picture as a bitmap in the 2" X 2.5" size, the picture will fit the frame exactly; otherwise you will have some white space showing or if the graphic is larger, it will not all fit into the frame. Experiment with a graphic to determine how to save the picture for the best quality.
When you click on the picture field and the picture is not clear, right click or click in another field and the picture will appear clear.
To run Profile reports, click on the Misc Reports Icon (Book) at the top of the Data entry form and click on the Reports 2 tab. Select a profile report from the drop down list and click the button beside the field.
22

SCHOOL MODULE
Christian SchoolQuick Start
1. Click on the Christian School icon at the top of the Data Entry Form.
2. Click on the New Record Button and enter Personal, Address And Account Information.
3. Click on the Payments tab then click the Insert Amount button to post Amount Due and Amount Paid.
4. Or, Click on the Post Due-All button to post an amount due for all records.
5. Click on the Reports tab and select the report to run, then click the Print Report Button.
General Information
The Christian School module is designed to handle accounts receivable for a Christian School and Day Care Center. To run, click on the Christian School icon (red building) at the top of the Data Entry Form. The Christian School Form will be displayed.
Adding New Records
Click on the new record button. A unique ID number will be entered in the number field. Enter the parents last name in the Lname field. Type the parents first name in the Parents field. Tab to the First Name field and enter the child or students first name. Tab to the last name field and enter the child or students last name. Enter the Birthday and Gender information.
The Account field is a code field that can be used to identify the child or student as belonging to Day Care or the School. DC=DC and SCH=School. The codes in this field can be user defined by clicking on the Setup Icon at the top of the Data Entry Form. Click on Setup Tables then click on the Christian School tab and enter whatever values you want. It is best to use the default. Values can be entered in the Account field even if they are not in the user defined table.
Address Information
Enter the address information and the city, state and zip. The City, State and Zip fields can be user defined by clicking on the Setup Form and then clicking the Setup Tables button. When the city is entered, the zip code and state will then be entered automatically. When the zip code is entered, the city will be entered if the correct values have been entered in the setup table. The city, state, zip setup table is different than the city, state and zip table on the data entry form. Multiple zip codes may be entered for the same city but when you select the city, it will choose the first zip code in the table. The blank fields are for future expansion and are not significant to the operation of the program.
Annual Fee and Payment Amount
If the annual total of a students bill is known, enter this amount in the Annual Fee. If the payment is to be made monthly, enter the number of months for this amount to be paid in the # Payments Field. Choose M for the Payment Method. When the number of months is entered, the payment is figured automatically. For example, if the annual bill is $1000.00 and the number of months to pay is 10 then the Payment amount would be $100.00. If the payment is to be made weekly, enter the annual amount. Then enter the
23

number of weeks and choose W for the payment method.
If the annual total is not known, enter a payment amount in the Payment Amount field. When a value is entered in the Method field, the payment Amount may be posted as an Amount Due to all records by clicking the Post-M or Post-W Buttons on the Payments tab. For example: If you had 200 in your daycare and 400 in your school, you could post what is due each week or each month on all records by just clicking the buttons. If there is no value in the Method field, no amount due will be posted.
Phone Numbers
Enter the phone numbers. The phone numbers may be entered with or without the area code. If the area code is entered, type a parenthesis around the area code. All you have to type is the first parenthesis and the number. The second parenthesis and a space will automatically be entered. When typing the phone numbers, hyphens will also be entered automatically. Enter the mothers work phone in the Her Work Phone field and the fathers work phone in the His Work Phone field. Click on the Emer.. button to type in a name or number to call in case of an emergency. Enter any comments about the child or student in the comments field.
Dates
Enter the Entry Dates, Withdrawal dates, etc.
Records On File
To keep a list of all student records on file, click on the Records On File Button. A form will open which will allow you to enter a list of the student records. Click on the Insert Record button to enter a new record.
Duplicating Information
If data is being entered for additional children of the same family, click on the Duplicate button. You may use one record for more than one child. To do this type all the first names of the children in the first name field. No more than 30 characters may be entered in the first name field.
Deleting records
If you only want to delete a child's personal information, click on Record then delete from the menu bar. If you want to delete the personal information and the payments on the account, click on the delete button.
Posting Fees And Payments
To post an amount due or an amount paid, click on the payments tab. Then click on the Insert Amount button. The current date is entered. If the current date entered is not the date that you want entered, click in the date field and change it. Enter the check number if a payment is being recorded. Tab to the Amount Paid field. Enter the Amount that is paid on the account. Click the down arrow in the Category field and select Payment. If an amount due is being posted to the account, enter the amount of the charge in the Amount Due field. Click in the Category field and select Tuition, Book Fee, etc.
The Christian School module is designed so you can post charges due weekly or monthly. To post an amount due for all records, click the Post-W or Post-M Buttons. An amount equal to the Payment Amount will be entered in the Amount Due field. You could post the total annual fee in the Amount Due field at the beginning of the year--then just post the payments as you receive them. This method is not recommended because setting the overdue limit on a total amount would not work because you would have to adjust the overdue limit each month.

If the Amount Due is the same as the last Amount entered press Ctrl D or double click to ditto the amount. Enter the Amount Paid or press Ctrl D or double click to ditto the last amount. When an amount is entered in the Amount Paid, the current date is entered in the Date Paid field.
Limit , Overdue and Balance
The limit field is the amount that is allowed before an account is flagged overdue. For example: If the limit is $50.00 and the balance is $50.00 the Overdue would display No. If the balance was $100.00 the account would show Yes because the balance is $50.00 over the limit. The Total field shows a sum total of the amount that has been paid on the students account. The Balance shows the outstanding balance on the account.
Entering Academic Records
Click on the Academic Tab. Click on the Insert Grades Button. Enter the appropriate data on subject and scores. Ignore the ID numbers, they are just record identifiers.
To run the reports, click on the reports tab. Select the report you want to print from the Accounts Receivable Reports. Click the Print Account Reports Button. To run Academic Reports, Click Print Academic Reports Button
Address List Outstanding BalancesBalance All Accounts Overdue AccountsBilling Envelope Total Income-All AccountsIndividual Account-All Total Income-Any AccountIndividual Account-Current Record Summary Balance-All AccountsAcademic Reports
TOOLS & UTILITIES
Utilities and ToolsThe Utilities and Tools form allows the user to work with Paradox (*.db) and Dbase (*.dbf) tables. File functions available on the Utilities form are import, export, copy, rename, add, empty and view structure. Because of Assist 5.0s structure and design, most end users will not have to perform table operations but we have made these available just in case. To open the Utilities form, click on the Utilities icon at the top of the Data Entry Form (Gears, wrench and screwdriver). The Utilities and Tools form will open.
Import / Export
Export allows the user to export the data to a delimited or fixed length ASCII text. The file then can be used for example as a data file for mail merge with a word processor. To export click the Export button. The Import / Export form will open. The default for exporting is a tab delimited file. If you want the fields to be separated by commas, choose the commas radio button. If you want the fields delimited by quotes, click on the quotes radio button. When you have selected all options, click the export button which is below the import button. The Export From file browser will open and allow you to specify which file to export. Click on the file and then click open. The Export To file browser will open. Give the new file a name then click Open. The file will be saved in the directory you specify in the Look In field.
If you want the first row of the file to be the field names, check Use Field Names.A fixed length export sets the field length of the export file the same as the source table.
To import a file, the table structures must be identical. The field names must be the same name, the same length and in the same order in the table. This can be a little tricky unless you are an experienced database end user. It is difficult to salvage data in old tables because the field types, names, length and order may be different. Unless you have a really large database, it would probably be best to key in the data. And that would probably be best any way because Assist 5.0 is automated and calculates titles and salutations when data is entered.
Click on the Fixed / *.dbf tab. Click the Create Adr *.dbf Button. Three dbase address tables will be created in you working folder. The ExNamAdr.dbf is a table that uses the individuals name. The ExMaiAdr.dbf uses the mailing name. The Exboth.dbf includes both the individual and mailing name and the salutations. Use Windows Explorer to copy these files to other folders if needed.
Many word processors will open or import these dbase files directly. If not, export the *.dbf file as a comma, double quote delimited ASCII, with ANSI character set.Depending on your word processor, you may need to choose File, Open or File Import. When you open the file, many word processors will give you the option to select or unselect what fields you want to use.
These database tables include all the names in the main.db table. Programs like Phone Tree will allow you to categorize the All Names database. The fields in these tables are Name, Address, City, State, Zip Code, Phone, and Last Name. The ExBothNM.dbf also includes the salutation and mail salutation fields and both the name and mailing name fields.
The Add button allows the user to append records from one table to another. For example: If you install Assist 5.0 in a different directory with empty tables and want to add the data from your old tables to the new tables, click the Add button. To add records from one table to another, or the data will not be inserted in the correct fields. Assist 5.0 inserts data beginning with the first field in the table and continuing to the right until all data has been inserted.
24

To add, click the Add button. An options box will appear allowing you to choose Append, Update, or Append Update. Append takes records from the source table and inserts them to the target table without affecting any existing records. Update takes data from source table and updates any changes which have been made to the corresponding records in the source table. Any records in the source table that don=t match an existing record aren=t added Append & Update both adds new records and updates existing records.
Note: The table you add records to must be keyed to use Append & Update. Update and Append are not allowed on dBase tables.
After you choose the Append or Update options, click the Add button. The Add Records From file browser will open. Click on the file you want to add records from (source table) then click open. The Add Records To file browser will open. Select the table you want to add the record to (target table) then click open. The records will be added or updated from the source table to the target table.
Copy
The copy function allows the user to make a copy of a table. The table can be stored as a backup or used for other purposes. When copying Paradox tables, use the copy function within the program not the dos copy command. When you use the copy function within the program, the *.db file is copied along with other files such as indexes which are necessary for the table to open. Using explorer will not copy all related files that make up the table. When you use Assist 5.0 to copy a table, both its structure and the data contained in it are copied.
Rename
The rename utility not only renames the *.db table but also renames all related index files with the same name but with appropriate extensions.
Empty Tables
Emptying a table is not the same as deleting a table. When a table is deleted the structure and data are deleted. Emptying only deletes the data out of the table but does not delete the table. To empty a table, click on the Empty Table Button. Do not empty a table unless you have a specific reason for doing so. We recommend that you keep at least three years data in tables before you think about emptying. The only exception is the Sunday School table that has to be empted at the end of each church year. Do not empty the SS table with the empty button, clear last years data by clicking on the Delete SS Data Button in the Attendance Form.
The Upgrade Button allows the user to transfer data from an older version to a new version. Steps:
1. Assist 5.0 will install in C:\Program Files\Churchsoft\Working. We recommend that you use this default directory. Assistant For Windows default path was C:\Churchsoft\working. DO NOT install Assist 5.0 in the same folder as Assistant For Windows. If for some reason you need to reinstall Assist 5.0 then , use Windows Explorer and rename the old working directory to Workold and then install the program in the default directory which is C:\Program Files\Churchsoft\Working
2. Click on the upgrade button and enter a path to your old files
If the path to your new directory is C:\Program Files\Churchsoft\Working and the path to your old directory is C:\Churchsoft\Working then type the old path in the path field (this path is entered by default). If you renamed your old working to Workold then you would type C:\Churchsoft\Workold in the path field.
3. Click on the continue button.

When you click Continue, the path box will close and you will be given two chances to cancel the upgrade. All sample data in the new working directory will be emptied. A message box will display saying, ADeleting Sample Data...@. Then all data will be transferred from the old tables to the new tables. A message will display saying, ATransferring Data...@ When all tables are upgraded with the new data, a message will display saying, ATransfer Complete...@.
Note: Before performing an upgrade operation, make sure you have backed up your data in case something doesn=t transfer correctly. Some of the earlier versions of Assistant For Windows may not upgrade automatically because of a difference in table structures. In this case, backup your data and send it to Churchsoft and we will upgrade your tables. You will only be charged for the price of the upgrade.
Databases use index files to speed up searches and to perform other functions. Sometimes the table header or indexes corrupt. This can be caused by a power interruption or a computer glitch, etc. When a table corrupts you may not be able to edit your data or may not be able to see all your data in reports. When things don=t appear to work right, you may need to repair the table.
1. To repair the table, open the Utilities and Tools Form. Click on the Repair Table icon and the Table Repair Utility will open.
2. Click The Browse Button to open the Browse Dialogue Box and click on a table name and then click open. For example: Click on the Main.db table and Click the Open Button. Click on Verify to check the validity of the table. If the table reports errors, Click on the Rebuild Button.
3. You will need to check all the tables connected on the form. The Data Entry for example consists of Main.db, Family.db, Church.db, Visitors.db, SS.db, SSClRec.db and Letters.db and other unlinked tables.
4. When a table is repaired, a copy of the damaged table named copy of main.db is placed in your working directory. You can later delete this copy of table.

SECURITY
The ApplicationWorkspace
PasswordsGeneral Info
Master Passwords and Auxiliary Passwords may be set on any table but do not set any more passwords than is necessary to give you the security you need. If for some reason you have to reinstall Assist 5.0 and are upgrading data, You must unprotect a table before doing an upgrade.
Creating a master password controls access to a table. You must input the correct password before Paradox opens the table. Typically, one person, such as a database administrator, has access to a master password. A group of users who need to perform different tasks in the table have different auxiliary passwords that provide different levels of access. For more information about auxiliary passwords, see "Creating, modifying, and deleting auxiliary passwords."
You can also change a master password. In addition, if a password-protected table contains information that no longer needs to be restricted, Paradox lets you delete the master password.
To create a master password, click the Utilities / Tools icon. Click OK to close all other forms. When the Tools form opens, click the Password Button. A password dialog box will open asking you to enter the password for the PSWDUSR.DB. In the text box password field type PSWDUSR (must be in all caps this is a case sensitive field). After typing in the password click ok. When the Password is entered, the Password form will appear with the highlight in the Choose Table drop down field. Click the drop down arrow and choose a table.
The table for the drop down list is in the Setup Tables form. Most of the main tables are already added to this list. If the table you want to protect is not in the list, then click the Setup Button and open the Setup Form. Click on the Settings tab. Type the table name in the ATables To Protect@ section. The table will then appear in the Password drop down list the next time you open the form.
After choosing a table for then click the Define Button to define a Master password. The Master Password form will appear. Type the password in the Enter Password Field. Tab to the Verify field and type the password again. Master passwords are case sensitive. Write down the password and keep it in a safe place. If you forget your password there will be no way to access the table. You will need to send your Assist4 working folder to Churchsoft for password analysis and a fee will be charged.
When the password is verified, the OK button will be enabled. Click the OK button. If you chose to protect Address.db for example with the password ADDRESS, a message will appear stating AYou are about to password protect Address.db with the password ADDRESS. Do you want to continue?@ If the password is correct, click the Yes Button and a message will appear stating that the table is now encrypted. Click the OK Button. The Modify and Delete buttons are now enabled.
Quick Steps:
25

1 Click the Utilities Icon then click OK2 Click the Passwords Button.3. Enter Password Table password (PSWDUSR) click ok.3 Choose the table then click Define.4 Type a password in the Password box.5 Retype the password again in the Verify password box.
To change a password, choose the table that contains the password you want to change. Click the Modify button. A form will appear asking you to enter the old password for the table. Type the old password in the place of the text AType Old password here.@ Click OK.
The Master Password form will appear for you to type a new password. Type the new password in the password field. Tab to the Verify field and retype the new password. Click OK. A message will appear stating that the password has been changed. If for example the original password of the Address.db table was ADDRESS and you want to change it to12345 then click the Modify Button, type ADDRESS in the Enter Old Password form. Click OK. Type 12345 in the Master Password form field and retype 12345 in the verify field. Click OK and the message will appear saying, AThe password for Address.db has been changed to 12345.
Quick Steps:
1 Choose the table then click the Modify button.2 Type the master password in the Enter Old Password box.3 Click OK.4 Type the new password in the Password box.5 Retype the new password in the Verify password box.6 Click OK.
To delete a password, choose the table which contains the password you want to delete. Click the Delete Button. The Master Password form will appear asking you to enter the master password for the table. Type the Master Password in the password field. You are not required to verify the password when deleting passwords. If you enter the wrong password a message will appear stating you have entered an incorrect password. Click OK. A message will appear stating that the table is now unprotected.
1 Choose the table that contains the master password.2 Click Delete button.3 Type the master password in the Password box.4 Click OK.
Creating Auxiliary Passwords lets you set different passwords for different users. Each user can have their own password. When a button is clicked to open a form that has a password protected table, an Auxiliary form appears allowing the user to enter the password which has been assigned to them When you define a master password, the auxiliary section is then enabled. If you choose a table from the list that is not protected, the Auxiliary Password section is not enabled. If an auxiliary password has not been assigned and you try to open a form by doing file, open, form or through the Project viewer, a form will appear asking you to enter the master password. If you enter the master password for the protected table, the form will open.
To create an auxiliary password, choose a protected table from the drop down list. Click the Add button in the Auxiliary Password section. The master password form will
appear. Type the Master password in the Enter Password field. You are not required to verify the master password when adding auxiliary passwords. Click the OK Button or press the Enter Key. The Auxiliary password table will appear with the highlight in the Auxiliary Password field. Type the auxiliary password in the Auxiliary Password field. Click the Save button or click the Add button to add another Auxiliary password.
1 Choose the table that contains a master password.2 Click the Add button.3 Type the master password in the Password box.4 Click OK.5 Type the auxiliary password in the Auxiliary passwords list.6 Click the Save button.
:
1 Choose a table that contains an auxiliary password.2 Type the master password in the Password box.3 Click OK4 Click the Remove Button.5 Choose an auxiliary password from the Auxiliary passwords list.6 Type the new password over the old one.7 Click the Save Button
1 Choose a table that contains an auxiliary password.2 Type the master password in the Password box.3 Click OK4 Click the Remove Button.5 Choose an auxiliary password from the Auxiliary passwords list.6 Click Remove again or press Ctrl Del7 Click the Save button.
Table rights cannot be set in Assist 5.0 even though there are check boxes on the form.

BACKUP AND RESTOREBACKUP AND RESTORE
How To Backup Data Files
Note: If you have a CD writer, Zip Drive or USB type device do not use the Microsoft Backup Program. Burn a CD, copy to the Zip Disk or to the USB backup device. See instructions below on backing up to a CD-Writer. Click on the Floppy disk icon at the top of the Data Entry Form. This will close Assist 5.0 and execute Microsoft Backup, provided that Microsoft Backup is installed on your computer in the default directory. When Windows 95 is installed, Microsoft Backup is installed in C:\Program Files\Accessories. If you are running Windows 98 Microsoft Backup is installed in C:\Program Files\Accessories\. Microsoft Backup must be in these directories or the program will not execute from Assist 5.0. If Microsoft Backup does not load by clicking on the disk icon in Assist 5.0, then click on the Start button, select Programs, select Accessories, select System Tools, then click on Backup. If Backup is not listed, then you must install it from your windows disk or cd-rom.
To install Microsoft Backup, click on the Start button, select settings, select control panel, click on the Add/Remove Programs icon, then click on the Windows Setup tab, click on Disk Tools, then click the Details button and check Backup and then click OK, apply and then OK.
When backing up files, backup all files in the working directory. The best device for backing up files is a zip drive, CD writer or USB disk device. With a these devices you can drag and drop files to the media using Windows Explorer. If you do not have a backup device, backup to floppy disks. If you choose the compress option in backup, it will take two or three disks to backup the entire working directory. But by all means backup!
Steps To Backing Up To Floppy Disks 1. Open Microsoft Backup by clicking on Start, Programs, Accessories, System Tools and Backup. A message may appear saying that no backup device is installed. Click No and Microsoft Backup will open with a screen that says Welcome to Microsoft Backup.
2. Choose Create A New Backup Job and then click OK. The Backup Wizard will appear asking What To back up. Choose Back Up selected files, folder, and drives and click the Next button.
3. When the What To Backup browser form opens click on the + sign by the C: to expand the directory tree. Click on the + sign by Churchsoft and then put a check mark in the white square by the Assist4 Folder. Click next and choose All Selected Files then click Next.
4. The Where To Backup form will appear. In the field next to the folder button, type for example A:\Mybackup1.qic as the backup file name and click Next or click on the folder button and choose 3 2 floppy A from the Look in field and then type Mybackup1.qic in the name field and click the Open Button.
5. The How To Backup form will appear. Uncheck compare (unless you want to verify the backups which will take longer) and leave compressed checked and click Next.
6. When the Name Backup form appears, type a name for the backup job. For example type Churchsoft Working 1 as the backup job name and then click Start.
For more help or instructions on how to use Microsoft Backup, see your Windows manual or click on help in Windows. Note that if you use Microsoft Backup for Windows 98
26

and at a later time upgrade your operating system the Microsoft Backup for Windows 98 IS NOT compatible with Windows 2000, ME, or XP.
1. Place the zip disk into the zip drive. Right click on the Start Button then choose Explore.
2. Slide the left vertical scroll bar up until you see the C: Drive. Click on the + sign. Click on the + sign by Churchsoft then click on the Assist4 folder. You will see the Working folder on the right.
3. Slide the vertical scroll bar down until you see the Zip or Removable Drive icon. If you have sub directories on the zip disk you will need to click the + sign by the Zip Drive to see the sub folders. Left click hold and drag the Working folder to the Removable drive icon.
If your operating system is Windows XP, backing up is very simple.
1. Place the CD-R or a CD-RW into the CD Rom Drive. Right click on the Start button then choose Explore.
2. Slide the left vertical scroll bar up until you see the C: Drive. Click on the + sign. Click on the + sign by Churchsoft, then right click on the Assist4 folder. A menuwill popup. Choose SendTo and then choose your CD rom drive. Windows XP will copy the files. A message balloon will popup in your windows status bar at the bottom saying, AYour have files waiting to be written to the CD. Click the balloon, then click on the text in the upper right that says Write these Files to the CD. The entire Assist4 working folder will be copied to the CD. 3. Another method is to use copy and paste. Right click on the Assist4 folder and when the menu pops up choose copy. Slide your scroll button down until you see your CD Rom drive and right click on it. When the menu pops up, choose paste.
1. Rename the Assist4 folder (optional) Although it is not required, it is a good idea to rename the original folder before doing the restore. Right click on the Start button then choose Explore. Slide the vertical scroll bar up until you see the C: Drive. Click on the + sign. Click on the + sign by Churchsoft, then right click on the Assist4 folder. A menu will popup. Choose Rename. Rename the original Assist 4 folder AssistOrg.
2. Do the restore. Slide the left vertical scroll bar down until you see your CD rom drive and click on it. You will see the Assist4 folder in the right window pane. Right click on the Assist4 folder and then left click on copy. Slide back up until you see the Churchsoft folder. Right click on the Churchsoft folder and then left click on paste. The backed up Assist4 folder will be copied to Churchsoft.

CALENDAR MODULE 27

BULLETIN MAKER 28

APPENDIX
The ApplicationWorkspace
A

APPENDIX
The Help FileHelp Most of the information in this manual pertains specifically to using the various modules in Assist 5.0. The that installs with Assist 5.0 is information pertinent to the Paradox engine. To learn more about Assist 5.0, click on the Help icon in the Assist 5.0 Group or click on Help from the menu bar.
The Help file contains the following information:
Application Basics
1. Using the Project Viewer2. Directories and Directory Browser3. Navigating within objects4. Printing
Forms and Reports
1. Viewing and using forms and reports2. Entering and editing data in forms3. Inserting and deleting records4. Cutting, copying and pasting data5. Finding or searching for specific records6. Filtering data in forms7. Viewing & Printing Reports
Exchanging Data
General References
1. Glossary2. Keyboard Shortcuts3. Tool Bars
NOTE: You may print any portion of the Help file by choosing File, then select Print Topic...
B

APPENDIX
ReportsReports in Assist 5.0 may be customized if you have Corel Paradox 10. Others are code sensitive. All reports should be run from the form, not the Project Viewer. Contact Corel or see you local software dealer to purchase Paradox 10.
21st Century Date Questions
Paradox version 10 is ready for the 21st century. The BDE in Paradox 10 automatically enters dates in the 21 st Century with 2 digits. Also, dates in the 20 th Century after 1949 may be entered with two digits. The preceding statements are true only if your computer is fully compliant with 21 st century standards. In Assist 5.0 all dates will be automatically changed to 2 digit dates if you enter them with four digits--1/1/1998 will be changed to 1/1/98. Dates before 1950 must be entered with a four digit year. For example: 3/15/1945. If you enter 3/15/45 Assist will recognize the date as being the year 2045 not 1945. With this version of Assist 5.0, enter dates after 1949 with two digit dates as you did in the 20th Century. If you enter dates with dashes A-Athey will automatically be changed to slashes A/@.
When you run date range reports, you will enter the date with a two digit year. Example: From: 1/1/00 To: 12/31/00. If you run a report using a two digit dates and no data shows in the report, use a four digit year.
Experiment in a form to know how your computer and Assist 5.0 will handle dates. For example, Go back to Assist 5.0 and enter a few contribution dates. Run a date range report to see how it works. If something doesn’t appear to work as you think it should, call Technical Support. When you are through experimenting, don’t forget to delete the experimental data you entered.
On The Web
Click on the Internet button (Web Icon) at the top of the Data Entry Form to access the World Wide Web. Also, you may right click on the Data Entry form and choose World Wide Web from the pop up menu.
When you choose World Wide Web, a form will open that will allow you to connect to the Churchsoft web site. Just click on the Churchsoft link and in seconds you will be connected. If you click on the Internet button, your default browser will open. Type churchsoft.com in the URL to go to our web site.For other helpful information, click on the Corel link or go to Corel=s web site and explore their information about Paradox.
C