· web viewselect the program type, including "ordinary program" and "interactive...
TRANSCRIPT

User Manual for MIPS Digital Signage Information System
Background User Manual
for MIPS Digital Signage
Information System(Official Release V3.0.0)

User Manual for MIPS Digital Signage Information System
Contents

User Manual for MIPS Digital Signage Information System
1 System Overview...........................................................................................................................1
1.1 Overview.............................................................................................................................1
2 Description of System Functions...............................................................................................1
2.1 System Login.............................................................................................................1
2.1.1 System Login/Logout.....................................................................................................1
2.1.2 Selection of System Version in Chinese or in English.....................................................2
2.2 Program Management..............................................................................................3
2.2.1 Program list....................................................................................................................3
2.2.2 New Program.................................................................................................................5
2.2.3 Release list...................................................................................................................33
2.2.4 Program Release..........................................................................................................41
2.3 Device Management...............................................................................................46
2.3.1 Device Information......................................................................................................46
2.3.2 Version Information.....................................................................................................62
2.4 Material Management............................................................................................63
2.4.1 Template Management................................................................................................63
2.4.2 Material List.................................................................................................................65
2.5 Authority Management..........................................................................................66
2.5.1 Overview......................................................................................................................66
2.5.2 Organization...............................................................................................................67
2.5.3 Role Management.......................................................................................................69
2.5.4 Business Management...............................................................................................70
2.5.5 Illustration..................................................................................................................71
2.6 Authorization Management....................................................................................78
2.6.1 Charge Description......................................................................................................79
2.6.2 Terminal Activation Management...............................................................................79
2.6.3 Server Authorization Management.............................................................................82
2.7 System Management..............................................................................................84
Digital Signage Information System

User Manual for MIPS Digital Signage Information System
2.7.1 User Operation Log......................................................................................................84
2.7.2 System Settings............................................................................................................85
2.8 Statistical report......................................................................................................86
2.8.1 Program statistics.........................................................................................................86
2.8.2 Material statistics.........................................................................................................87
Digital Signage Information System

User Manual for MIPS Digital Signage Information System
1 System Overview
1.1 Overview
The MIPS digital signage information system is a high-definition multimedia display technology, which provides a set of general media information release management platform and Device software, and makes use of display screen to make all-round display of such information as enterprise propaganda, product show and real-time notification. The System can integrate audio and video, television images, pictures, animation, texts, documents, web pages, information data and other information into a wonderful program, and push the produced program to media display Devices distributed in various places in real time over the network so as to comprehensively and perfectly show wonderful images and real-time information for the target audience in the specified place. It can achieve unified production, distribution, review, Device management of programs.
2 Description of System Functions
2.1 System Login
The system login module has system user login/logout function and selection of system version in
English or in Chinese.
2.1.1 System Login/Logout
System login
Login steps are as follows:
1) Open the browser to input the address of the server, for example,
http://192.168.1.105:9000/MIPS;
Digital Signage Information System Page1

User Manual for MIPS Digital Signage Information System
2) Input user name&password and a verification code in the input box.The initial login
account is admin, and the password is 123456;
3) Click on it for login to enter the home page of multimedia information release system;
System exit
After the user logs in the system, he or she can click on the “Sign out” button in the upper right of
the system to exit the system and return to the login page;
Digital Signage Information System Page2

User Manual for MIPS Digital Signage Information System
2.1.2 Selection of System Version in Chinese or in English
Select Chinese or English version on the [Login] page, click on the button of language selection
on the top right of the interface.
2.2 Program Management
There are two parts in Program Management. One is Program List, the other is Publish List. Here you can do all the operations for releasing the programs.
2.2.1 Program list
In the Program List, you can view program information and complete basic tasks such as program editing and program content management. Program ListThis page contains all the created program information. You can create, delete, modify, preview, import, export, review and group manage the programs.
Digital Signage Information System Page3

User Manual for MIPS Digital Signage Information System
2.2.1.1 The details of program list
Program list
Noun The description of the noun
NumberThe number is automatically generated by the system and is
incremented from 1.
Name
Customize and click the program name to preview program when
creating the program which name is grouped by "Program + Current
Date & Time" by default.
Length (secs) It refers to the total duration of the current program.
Resolution The resolution defined when creating the program
Creator Program creator
Program typeProgram type: one is Ordinary program and the other is Interactive
program.
Date created Program creation time
Status The program status contains both "unaudited" and "audited" states
Operation
Modify: Click to enter the program editor page of the program to make
changes.
Preview: Preview the program by clicking.
Export: Export the program by clicking.
Review: Click to enter the [review] page to audit the imported program.
Digital Signage Information System Page4

User Manual for MIPS Digital Signage Information System
2.2.1.2 Operation
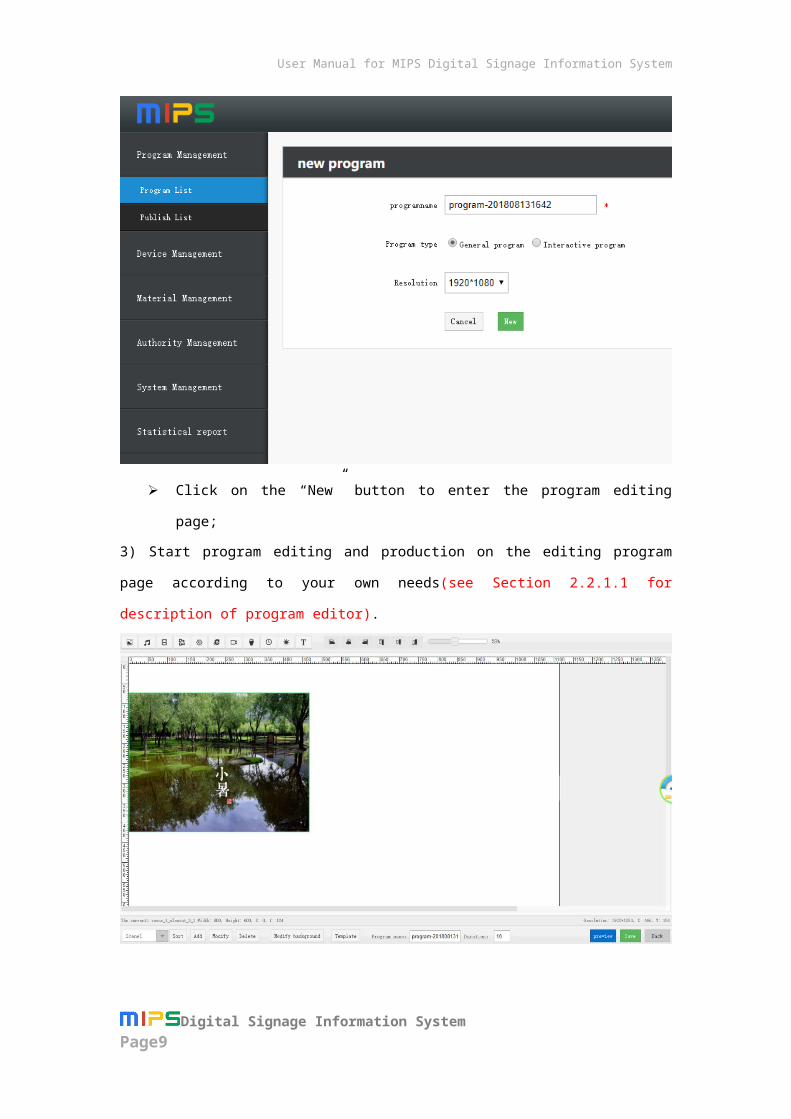
New Program
Click the New program, and choose the suitable program type and Resolution. Then click the
New to enter into the Program Edit.
Delete
Select the program you want to delete in the Program List, and click the to delete
this selected programs.
Import
Click the in the Program List to enter the Program Upload page. After the program
upload operation is completed, programs outside the system can be imported into this system.
Digital Signage Information System Page5

User Manual for MIPS Digital Signage Information System
Export
Check programs in the program list, click on the “Export” button to export the selected
programs to the designated location in the zip file format;
Edit
Edit the program operation by clicking “edit” to enter the editor page after selected
the program in the program list,
Move(omit)
2.2.2 New Program
[New Program] has a series of functions, such as program name editing, device resolution
selection and content editing. These functions are used to rapidly edit and produce new programs,
Digital Signage Information System Page6

User Manual for MIPS Digital Signage Information System
including audio and video, pictures, web site, date & time, weather, word/pdf document, and text.
Steps for program creation are as follows:
Click the Program Management - Program list - New program.
2) Enter the 【New Program】 page:
Edit program name;
Select the program type, including "ordinary program" and "interactive program".
Interactive program has four more elements--link element, dynamic scene element,
button element and apk element--than ordinary program; Edit program resolution (which must be the same as Device resolution corresponding to
the program).If there is no resolution you need in the list, you can manually set up it in
the custom resolution;
Digital Signage Information System Page7

User Manual for MIPS Digital Signage Information System
Click on the “New” button to enter the program editing page;
3) Start program editing and production on the editing program page according to your own
needs(see Section 2.2.1.1 for description of program editor).
4) After program editing is completed, click on to save the program in the Program List
to complete this program editing;
Digital Signage Information System Page8
User Manual for MIPS Digital Signage Information System
2.2.2.1 Description of Program Edit
Program Edit is composed of three functional areas, Functional Area for Program Element
Editing, Functional Area for Program Scene Operating, Functional Area for Program Content and
Layout.
1) Functional Area for Program Element Editing
It includes 15 kinds of program elements including adding pictures, audio, video, documents,
mixed broadcasting, web pages, live streaming, buttons, HDMI IN, date and time, weather
forecast, text, link, dynamic scene and apk, as well as the function of program element
alignment;2) Functional Area for Program Scene Operating
Include the functions of adding, deleting and sorting operation of program scene, scene
background settings, scene template selection, scene name editing, and scene play time
setting;
3) Area for Program Content Layout
When program elements are added to the layout area, layout operations can be carried out,
for example, element size can be changed by dragging and parameter setting, and elements
can be distributed in the full screen;
View for Program Editor Page Annotation
Digital Signage Information System Page9

User Manual for MIPS Digital Signage Information System
2.2.2.1.1 Description of Adding Program Elements
There are 15 kinds of program elements that can be added: pictures, audio, video, documents,
multicast, web pages, live stream, buttons, HDMI IN, date time, weather forecast, text, link,
dynamic scene and apk,description and operating instructions of these elements are as follows;
1) Image element
Definition:
It is used to add image materials to be played;
Format support:
jpg、gif、png、jpeg、bmp; Image size support:
Support 1024MB image upload by a single one or in a batch;
Operation:
Adding images
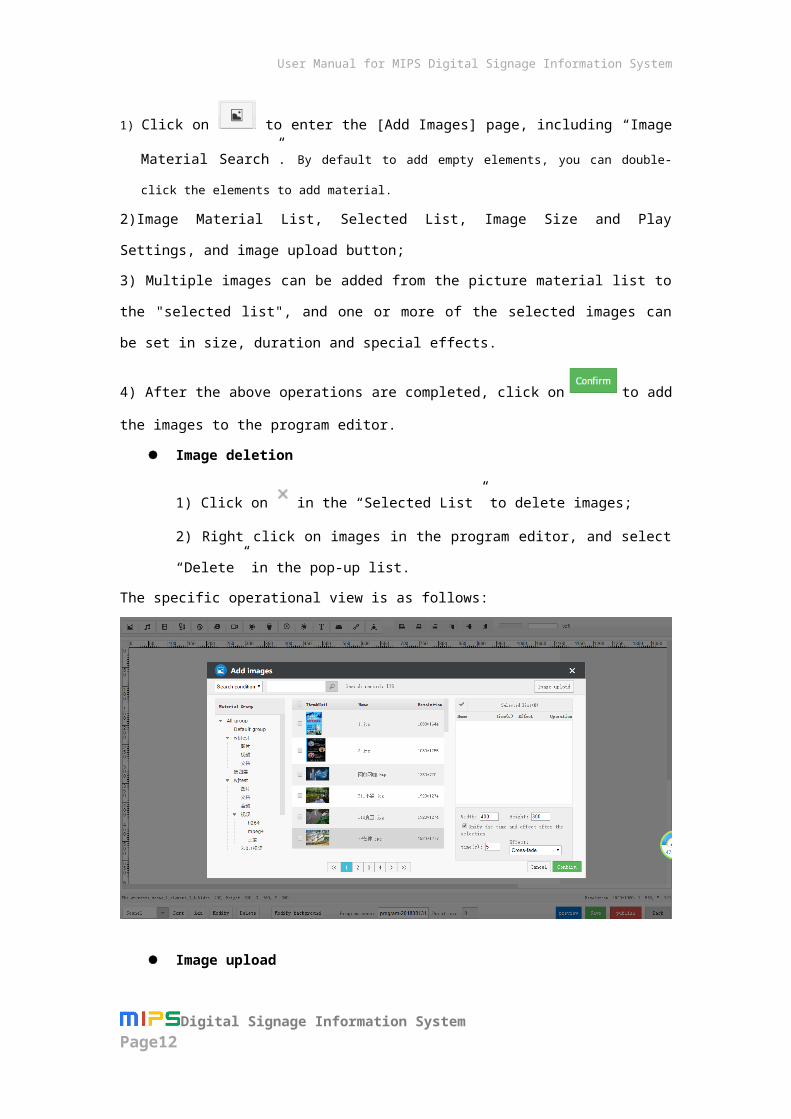
1) Click on to enter the [Add Images] page, including “Image Material Search”. By
default to add empty elements, you can double-click the elements to add material.
2)Image Material List, Selected List, Image Size and Play Settings, and image upload button;
3) Multiple images can be added from the picture material list to the "selected list", and one or
more of the selected images can be set in size, duration and special effects.
4) After the above operations are completed, click on to add the images to the program
editor.
Image deletion
1) Click on in the “Selected List” to delete images;
2) Right click on images in the program editor, and select “Delete” in the pop-up list.
The specific operational view is as follows:
Digital Signage Information System Page10

User Manual for MIPS Digital Signage Information System
Image upload
1) Click the button on the top right of the [Add Images] page to enter the
[Image Upload] page;
2) Click the button on the [Image Upload] page to open local folders to add
images (optional). When the added images appear in the list, start to upload images;
3) Click the button to start upload.The upload status of 100% means that
upload is completed;
Digital Signage Information System Page11
User Manual for MIPS Digital Signage Information System
4) Close the [Image Upload] page, and return to the [Add Images] page to continue to
add images;
After clicking the confirm, right click the picture.
Set to full screen: Image elements are set up displayed in the full screen;
undo full screen: Click to cancel the full screen when the picture is in a state of full
screen.
Edit: Back to the [Add Images] page to edit images.
Attribute: Open the information of image layout, including x-axis and y-axis position
Digital Signage Information System Page12

User Manual for MIPS Digital Signage Information System
of images in the editing area as well as image width & height, which can be modified;
Layer moving: Include four operations, Move top, Move up one layer, Mover
down one layer and Move bottom. These operations can modify the layer order of
the selected images.
Delete: Delete the added image elements;
2) Audio element
Definition
It is used to add audio material to be played;
Format support
mp3, aac, wma
Digital Signage Information System Page13

User Manual for MIPS Digital Signage Information System
Audio size support
Support 1024MB audio file upload by a single one or in a batch;
Operations
Add audio
1) Click on and then double click the to enter into the [Add Audio]
page.
2) The Add Audio page is including Material Search Box,
Current Audio Material List”, “Selected List”, “Element Moving and Operating
Area”, and audio upload button;
2) Multiple audio materials can be added from the audio material list to the "selected
list" through radio or full selection.
2) After the above operations are completed, click on to add the audio to the
program editor.
Audio delete
1) Click on in the “Selected List” to delete audios;
2) Right click on audios in the program editor, and select “Delete” in the pop-up list.
The specific operational view is as follows:
Digital Signage Information System Page14

User Manual for MIPS Digital Signage Information System
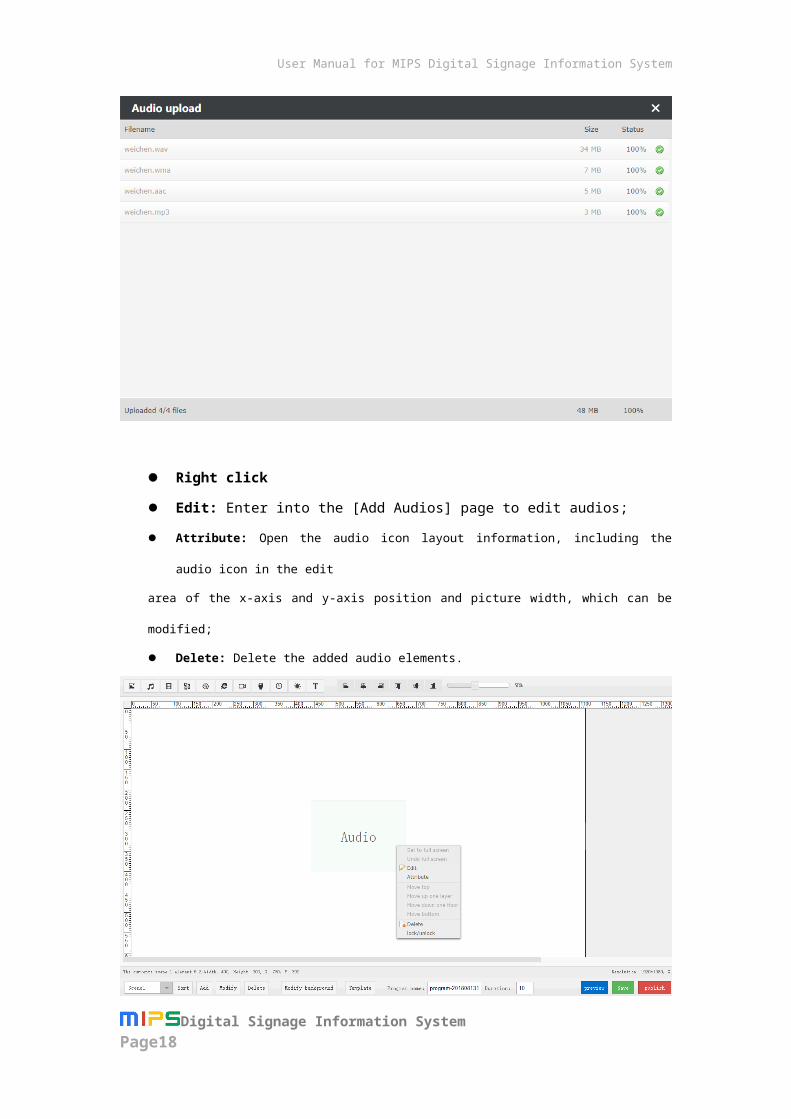
Audio upload
1) Click on the button on the top right of the [Add Audios] page;
2) Click on the button on the [Audio Upload] page to open local folders to
add audios (optional). When the added images appear in the list, start to upload audios;
3) Click on the button to start upload. The upload status of 100% means that
upload is completed;
Digital Signage Information System Page15

User Manual for MIPS Digital Signage Information System
4) Close the [Audio Upload] page, and return to the [Add Audios] page to continue to
add audios.
Right click
Edit: Enter into the [Add Audios] page to edit audios;
Attribute: Open the audio icon layout information, including the audio icon in the
edit
area of the x-axis and y-axis position and picture width, which can be modified;
Digital Signage Information System Page16

User Manual for MIPS Digital Signage Information System
Delete: Delete the added audio elements.
3) Video element
Definition
The is used to add video materials that need to be played, and supports both
proportional display and tile display.
Format support
wmv, avi, rm, rmvb, mpeg, ts, mp4, m4v, mkv, 3gp, mov; Video size support
Support up to 1024MB audio file upload as a single file or as multiple files;
Operation
Add video (omitted)
Click on to enter the [Add Videos] page, By default to add empty elements, you
can double-click the elements to add material. See image and audio operations for the
others;
Video deletion (omitted)
See image and audio operations;
Digital Signage Information System Page17
User Manual for MIPS Digital Signage Information System
Right click (omitted)
See image operations;
Video upload (omitted)
See image and audio operations;
Equal proportion and tiling display settings
Equal proportion: The added video is displayed according to the proportion of video
itself, and video images are not stretched;
Tiling display: It is the default display mode, namely, video is displayed in the full
screen according to the height and width of video elements. It is used as required;
4) Document element
Definition
It is used to add files to be played;
Format support
doc, docx, ppt, pptx, xls, xlsx, pdf;
Video size support
Support 1024MB audio file upload by a single one or in a batch;
Operation
Digital Signage Information System Page18
User Manual for MIPS Digital Signage Information System
Doc Upload
1) Click on to enter the [Doc Upload] page. By default to add empty elements
, you can double-click the elements to add material.
2) Only one document can be selected on this page every time, if it is required to add
several documents, the above operation should be repeated for many times;
Document deletion
After adding the element, right click on the document element in the program editor to
select delete option for deletion;
Right click
See the image operation;
Document upload
See the image and audio operations;
5) Web Page Element
Definition
It is used to add web pages;
Input format
Digital Signage Information System Page19
User Manual for MIPS Digital Signage Information System
Input the web link to be displayed while adding, e.g. www.baidu.com;
Operation
Add web page:
1) Click on to enter the [Add Web Page] page
2) Input Website URL, Refresh Time and Width & Height and click the Confirm to
complete web page element adding;
3) After adding, drag the element to adjust the display area;
Web Page Delete
After adding the element, right click web page element in the program editor to select
delete;
Right click
1) Click on “Set to Full Screen” to set up the element to be displayed on the full screen;
2) Select edit option to enter into the [Add Web page]
3) Move the layer;
4) Click on the “Delete” button;
Digital Signage Information System Page20

User Manual for MIPS Digital Signage Information System
6) Date & Time Element
Definition
It is used to add date & time materials in the fixed format;
Display format
1) Style 1: xxx: xx,Week, xxxx-xx-xx, for example, 10:25Monday, 2015-07-13;
2) Style 2: xxx: xx, xxxx-xx-xx, for example, 10:25, 2015-07-13;
3) Style 3: xx: xx, for example, 10:25;
Operation
Adding date & time:
1) Click on the date & time button to enter the [Add Date Time] page;
2) Set up display size, color, style and time zone of date & time;
3) Click on the “Confirm” button to complete date time element adding;
Date & time deletion:
After adding the element, right click the element in the program editor to select delete.
Right click
1) Select edit option to enter the [Add Date & Time] page;
2) Move the layer;
3) Click on the “Delete” button;
Digital Signage Information System Page21

User Manual for MIPS Digital Signage Information System
7) Weather Forecast Element
Definition
It is used to add weather forecast information in the fixed format;
Display format
Operation
Adding
1) Click on the “Add Weather” icon to enter the [Add Weather] page, select the country,
province, city, refresh time, display size and other information, and then click on the
“Confirm” button to complete adding;
2) Since the data of the weather forecast needs to be obtained online, when there is no
network connected, no data will be displayed.
Digital Signage Information System Page22

User Manual for MIPS Digital Signage Information System
Delete
Right click on the weather forecast element in the program editor, and select delete.
Right click
Same as other element operation;
8) Text Element
Definition
It is used to add static or scrolling text messages;
Display format
Text element supports change in font, size and color;
Operation
Text adding
1) Click on the button to open the [Add Text] page;
2) Settings in Add Text:
Display mode: static text and scroll text;
Scroll speed: Very fast, fast, medium, slow, very slow
Scroll direction: Left-ward and upward;
Text size, font type, font color, and width and height of text display area;
Digital Signage Information System Page23

User Manual for MIPS Digital Signage Information System
Text delete
Right click on text elements in the program editor, and select delete.
Right click
Same as other element operation;
9) Link Element
Definition
Use the transparent layer as link element between scenes and dynamic scene elements in the
scene, but do not display the element when playing on the Device;
Display format
Transparent layer with link attribute;
Operation
Scene selection:Select the scene required by link element;
Link in the scene:When selecting the current scene, if there are dynamic scene elements in
the scene, set up a link element to link with one of dynamic scene elements;
Digital Signage Information System Page24

User Manual for MIPS Digital Signage Information System
Third party website link: select "third party website" from the link location option, enter the url to be linked, and set the position and size of the page pop-up window to display on the terminal device. Click “Confirm” to complete the link element link to the third party website;
The size of the pop-up box is set according to the proportion of the screen resolution of the device, ranging from 30% to 90%, and the default is 60%;
10) Button element
Definition
A jump button for dynamic scene elements between scenes and within scenes as well as links
to third-party web addresses;
Display format
With text jump button, support button text content, font color size, button radian, button
width and height and button background color modification;
Digital Signage Information System Page25

User Manual for MIPS Digital Signage Information System
Operation
Button add: Click to enter the "add button" page. By default, empty elements
are added first.
Scene selection, in-scene links, third-party url links (refer to link element
operations);
Press the button to remove the element
After adding this element, right click the button element in the program editor to select
the delete item for deletion.
Right-click on the operation:Same operation as the rest of the elements;
11) Apk elements
Definition
Used to add elements that jump to other software installed in the terminal;
Input formats:
Just enter the name of the apk package of other applications installed in the terminal that you
want to jump to when adding;
Digital Signage Information System Page26
User Manual for MIPS Digital Signage Information System
Operation
Add Apk elements
Click to enter the "apk add" page. By default, empty elements are added first. Double-click
elements to set apk, including setting the text content, font, color size, radian, width and height of the apk element display and the apk file name of the software to be linked.
Apk element deletion
After adding this element, right click the apk element in the program editor to select
delete items;
Right-click on the operation:
Same operation as other elements;
12) Multiple elements
Definition
Used to add elements that need to be mixed with pictures and video;
Format support:
Video format: wmv, avi, rm, rmvb, mpeg, ts, mp4, m4v, mkv, 3gp, mov, flv;Image format: jpg, gif, png, jpeg, bmp;
Operation Add Multiple Elements
Digital Signage Information System Page27

User Manual for MIPS Digital Signage Information System
Click to enter the [Add Multiple Elements] page. By default, empty elements are
added first. Double-click the elements to add the material. Other operations refer to the
picture and video elements;
Delete
Refer to the operation of picture elements;
Right-click (omit)
Refer to the operation of picture elements;
13) HDMI IN elements
Definition
Operation
Add HDMI elements
Click to enter the "HDMI IN element add" page. By default, empty elements are
added first. Double-click elements to set element properties, including the width and height
of the HDMI screen displayed and the X and Y coordinates.
Digital Signage Information System Page28

User Manual for MIPS Digital Signage Information System
HDMI IN element delete
Reference picture element operation
Right click (omit)
Reference picture element operation
14) Dynamic Scene Elements
Definition
The elements used to add local interactions within a scene where images, videos, audio, and
documents can be added. These elements can be called by the link elements in the current scene.
Operation
You can add four elements: image, video, audio, and document. After adding, each added
element can pass the link in the current scene.
The element is linked and selected for play. By default, an empty element is added first, and
the element can be double-clicked to add the material.
Dynamic element material addition can refer to image element addition operation;
Digital Signage Information System Page29

User Manual for MIPS Digital Signage Information System
15) Streaming Media Element
DefinitionIt is used to add live streaming media resources; DisplaySupport live streaming in the encapsulation format such as http and rtsp; Operation
Add Live Streaming (omit)
Click on to enter into the [ Add Live Streaming] page to add the available live
streaming url address. By default to add empty elements, you can double-click the
elements to add material ;
Live streaming deletion (omit)
Select an element, and right click on the “Delete” button.
Digital Signage Information System Page30

User Manual for MIPS Digital Signage Information System
2.2.2.2 Program Element Alignment
Drag and place freely, zoom freely or in an equal proportion the added program elements with a
mouse within the “Program Layout Area”;
1) Drag the mouse on the edge of the added elements to adjust display width and height freely;
2) Drag the mouse with a combination key of “Shift + left mouse button”to zoom elements in an
equal proportion;
3)Adjust the position of the element after select a program element: left-justified, horizontal
center, right-aligned, aligned, vertically centered, under the alignment.
2.2.2.3 Program Scene
A program includes multiple scenes, and each scene separately includes its own program content
at the same time.
1) When a program is created, the program editor has a default initialized program scene named
“Scene 1”, and each scene consists of several parts below:
Scene Name:
Each scene has an independent scene name. You can modify the scene name as needed. The
steps are as follows:
In the scene switching drop-down menu at the lower left corner of the editor , select the scene
to change the scene name -- > click the "modify" button -- > changes the scene name in the
pop-up box, click Confirm.
Scene play time:
Each scene has its own independent play time, which can be set up according to the play
requirement of the scene;
Scene background
It refers to the scene’s background image. Click on the button to set up the
background image;
Digital Signage Information System Page31
User Manual for MIPS Digital Signage Information System
Scene program content:
It refers to the program content of the scene, and is only displayed and played in the scene.
2) Program scene can be sorted, added, deleted, modified, etc.;
Sorting program scene
1) Click on the button in the functional area for program scene operation to enter the
[Scene Sorting] interface;
2) In the [Scene Sorting] interface, you can Up, Down and Delete the existing scene or you
can drag the mouse to select and sort scenes in the scene list.
Digital Signage Information System Page32

User Manual for MIPS Digital Signage Information System
Add Program Scene
Click on the button to add a new scene to the program. The scene has an independent
content and play time;
Delete Program Scene
There are two options in the program editor for scene deletion:
1) Select a scene in the scene list on the Scene Sorting page, click on the button,and
then press the button to complete scene deletion;
2) Click on to delete the current scene in the scene functional operating area, and
the system will prompt whether to delete the current scene;
Background modification
Click on the button to enter the [Modify Background] page. Program
background can use two modes i.e.“Background Images” and “Color Background”, as well as
“Background Position”:
Background Images:
Select an image in the image background list on the [Modify Background] page as scene
background;
Background color:
Digital Signage Information System Page33
User Manual for MIPS Digital Signage Information System
Select a color in the color background selection area on the [Modify Background] page
as pure color background of the scene;
Background position:
There are two background positions “Tile” and “Stretch” for selection, and scene
position is only effective for image background:
Tile: Display background in the equal proportion of image, and use images with the
same proportion to cover the blank area, until the layout area is fully covered;
Stretch: Stretch the image as scene background according to the size of layout area;
2.2.2.4 Program Preview and Save
Preview
Click on to preview the effect of playing current produced programs in the browser;
Preview effect is as follows:
Digital Signage Information System Page34

User Manual for MIPS Digital Signage Information System
Save:
Click on the button to complete saving the current program, and then check it in the
[Program List];
Save as:
When modifying the program, there is the “Save as” button on the bottom of the program editor,
and the program can be save as a new program;
2.2.3 Release list
[Release list] consists of [Program Release] and [Spot Announcement] modules. Users can
view the programs that have been released by the terminal in the program list. Also, users
Digital Signage Information System Page35

User Manual for MIPS Digital Signage Information System
can send programs to the terminal, make spot announcements and management the
programs in the Release List.
2.2.3.1 Program Release
The module can release single-screen and dual-screen programs and manage the release list. The details of releasing and upload can be seen in this module. Also, users can Audit, Retract, and Delete the programs.
2.2.3.1.1 Description of Program Release
Description of Program Release
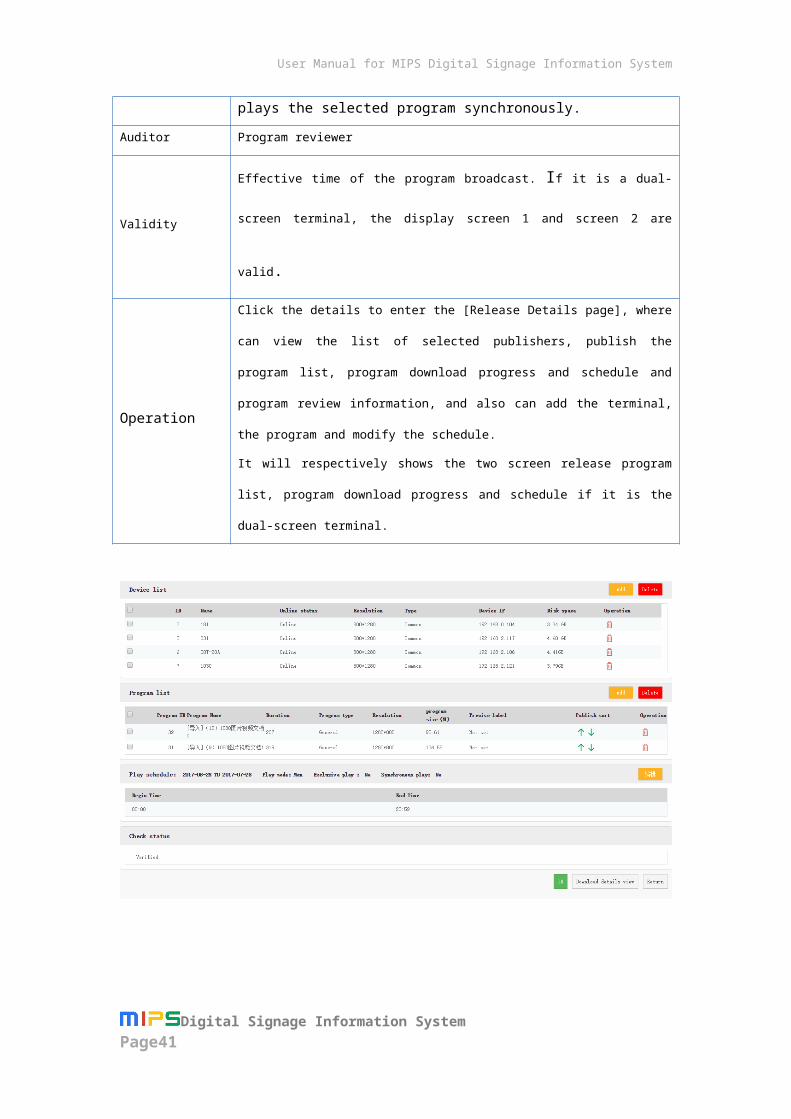
Release List
Item Description
NumberThe number of released program is automatically generated by the system,
starting at 1.
Name Name of the released program
Release Mode
Daily Rotation: multiple programs are played in turn in the selected cycle.
Custom: set the play period to play according to specific playback
requirements.
Digital Signage Information System Page36

User Manual for MIPS Digital Signage Information System
Creator People who release the programs
Auditor Status Include audited, unverified, and rejected review states.
SyncAppears when two or more terminals in the same group are selected. When
selected, the terminal plays the selected program synchronously.
Auditor Program reviewer
ValidityEffective time of the program broadcast. If it is a dual-screen terminal,
the display screen 1 and screen 2 are valid.
Operation
Click the details to enter the [Release Details page], where can view the
list of selected publishers, publish the program list, program download
progress and schedule and program review information, and also can
add the terminal, the program and modify the schedule.
It will respectively shows the two screen release program list, program
download progress and schedule if it is the dual-screen terminal.
2.2.3.1.2 Operation of Release List
Program Retract
Digital Signage Information System Page37

User Manual for MIPS Digital Signage Information System
Check the released programs on the [Release List] page, click on to complete
program retract. The programs on the device will be retract after the last round of playback;
Program Audit
Click the "Audit" button to enter the audit operation page after selected the release program
in the “Release list” page, than users that can select programs to audit them.
Delete
Click the “Delete” button to complete delete operation, select multiple programs, batch audit
operation after selected the released program in the “Release list” page.
SearchIn the [Publish List] page, you can select the search criteria by the date range, and check the status to query the collection program.1) Select the search criteria: the number, the creator, the mode, and the auditor;2) Audit status: All, reviewed, unreviewed, rejected, and offline.
2.2.3.2 Spot Announcement
The [Spot Announcement] page contains the spot announcement list and other related
operations, and can view information about a single terminal or a group of spot
announcement.
2.2.3.2.1 Description of Spot Announcement
Massage list
Noun The description of noun
Title The title of spot announcement
Speed The speed of spot announcement
Digital Signage Information System Page38

User Manual for MIPS Digital Signage Information System
Status Including playing, not playing, has been offline three play status
Creator The publisher of the message
Date Created The release time of spot announcement
Belongs Displays the screen position where the interstitial message is displayed.
Type Time slot, number of time.
Operation
View the details and the contents of the spot announcement, terminal
information and other contents after clicked the details button to enter
the "Interstitial Message Details" page.
Modify the interstitial message to re-release by clicking on the editor.
2.2.3.2.2 Spot Announcement List Operation
RetractCancel the just-published spot announcement by clicking the “spot announcement” button
after selected the specified message in the pop-up list.
Delete Click the "Delete" button to delete the spot announcement in the list after selected the
message when spot announcement goes retract. It will prompt the box when prompted to
delete the time if the message is not retract.
Digital Signage Information System Page39

User Manual for MIPS Digital Signage Information System
2.2.3.2.3 Spot Announcement
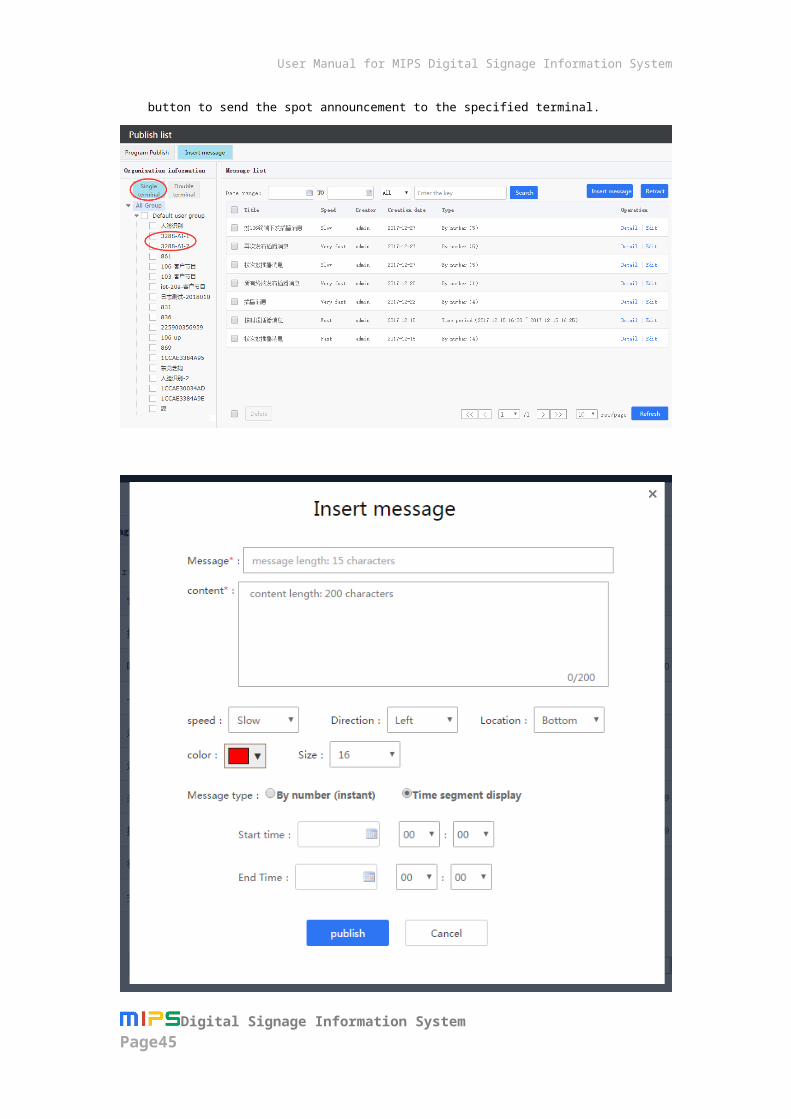
1) The single-screen terminal releases spot announcement .
The default choice is a single-screen terminal spot announcement page when click on
the spot announcement.
Click on "Spot Announcement" to complete the terminal to add operations after chose
the terminal in the terminal list, which also means choose more than one terminal at
one time.
Enter “Spot Announcement”page which including the title, content, speed, direction,
font size, background color, background transparency, message type, etc. After filled
out the above information, choose the Release button to send the spot announcement
to the specified terminal.
Digital Signage Information System Page40
User Manual for MIPS Digital Signage Information System
Digital Signage Information System Page41

User Manual for MIPS Digital Signage Information System
2) Double-screen terminal release spot announcement.
Switch to the dual-screen terminal spot announcement page when you click on it.
Click on "spot announcement" to complete the terminal to add operations after
chose the terminal in the terminal list, which also means choose more than one
terminal at one time.
Enter“spot announcement”page which including the title, content, speed,
direction, font size, background color, background transparency, message type
etc. After filled out the above information, choose the Release button to send the
spot announcement to the specified terminal.
Digital Signage Information System Page42

User Manual for MIPS Digital Signage Information System
2.2.4 Program Release
There are five steps in the[Program Release] process, namely,select a programselect a Device
set the scheduleconfirm the release.
2.2.4.1 Single-screen terminal release program
1) Program Selection
1)Click the "release program" button in Release List.2)After entering the [Release Program] page, the first step is to select the type of program to be
released, including two types, i.e. ordinary program and interactive program;
3)The default is to select the release of common program, you only need to click on the “Add ”
button in the top right of the list, and select the program to be released in the pop-up box;
4)If an interactive program is selected, click on the “Add” button in the top right of the list of
interactive programs to add the only interactive one, at this point, add at most three common
programs to the screen saver programs; thus, these three programs will serve as the screen saver
programs when nobody operates an interactive program.Set up waiting time of the screen saver
programs below the screen saver programs, ranging from 5 seconds to 999 seconds and
defaulting 30 seconds.
5) Select a program,and click on the “Next” button to enter the [Device Selection] interface to
complete program selection;
Digital Signage Information System Page43

User Manual for MIPS Digital Signage Information System
2) Device Selection
The first step of program release is to select a Device for program release, and operation and
instructions are as follows:
1) Check a Device in the Device list, and click on to complete Device adding (several
Devices can be selected synchronously);
2) When a Device offline is selected for program release, the program will be released after the
Device comes back online;
Digital Signage Information System Page44
User Manual for MIPS Digital Signage Information System
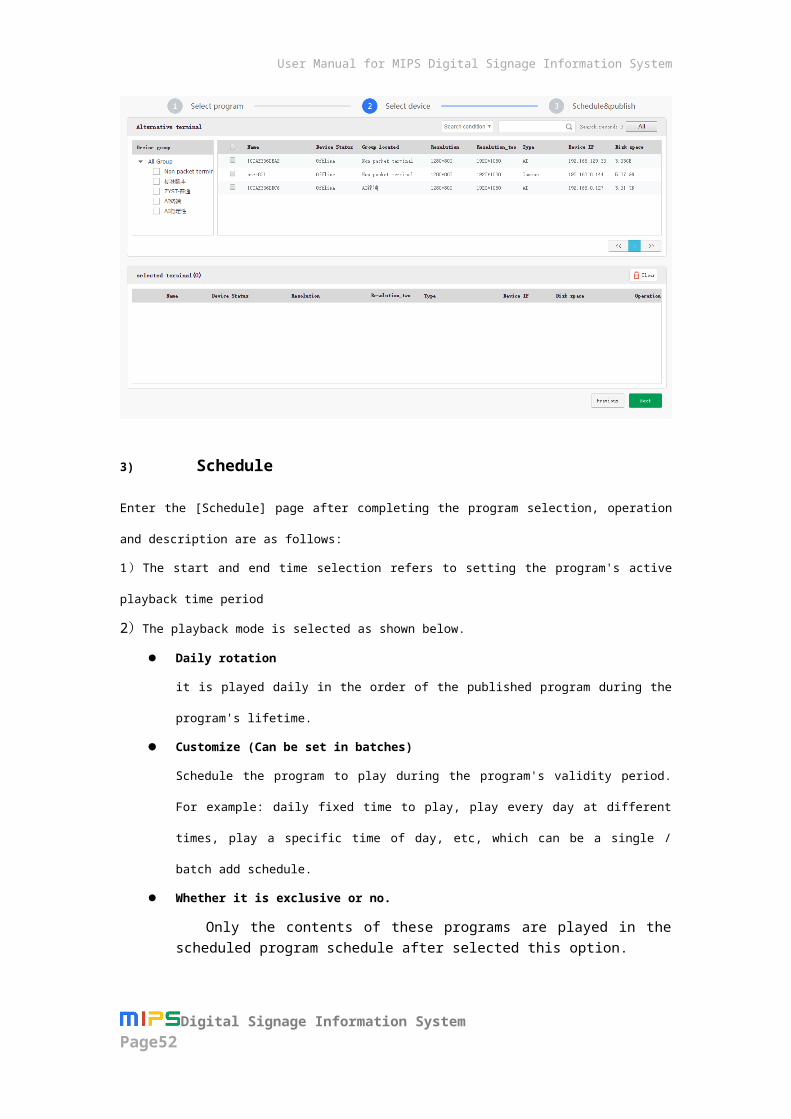
3) Schedule
After program selection, enter the release [Schedule] page, operation and instructions and are as
follows:
1) Select start time and end time, namely, set the effective play time of the program;
2) Select play mode: add release, insert release, replace release;Programs that are broadcast in an
exclusive format are broadcast.
After the replacement of the release, the existing release schedule (including the program
schedule) will be deleted to form a new schedule and sent to the terminal as follows:
Loop playback every day
Play the programs in the sequence of release every day within the period of validity;
Customized (batch setting is feasible)
Arrange the program play time within the period of validity, for example, play at a fixed
time every day, play at different times every day,play during a specified period every
day, etc., add it to the schedule one time/in bulk;
Digital Signage Information System Page45

User Manual for MIPS Digital Signage Information System
Sync
When selecting two or more Devices in the same group, the option appears, play the
selected programs synchronously on all the selected Devices;
Whether to be exclusive
When selecting the option, only play the programs released for this time in the set
schedule;
2.2.4.2 Double screen terminal release program
1) Program Selection
Click the "release program" button by clicking on the main navigation of the [release
program] or in the "program list".
1)Choose the desired program in the pop-up box by clicking the "Add Program" button in
the top right of the list to add the program to screen 1 and screen 2 of the dual-screen
terminal respectively after entered the [Select Program] page.
2)Enter 【Select Terminal】 interface to complete the program selection after selected
program.
Digital Signage Information System Page46

User Manual for MIPS Digital Signage Information System
2) Device Selection
1 ) Click “Next” to complete terminal add operation after checked the terminal in the
terminal list.
2)The program will be released when these terminals are back online when selecting an
offline terminal for publication.
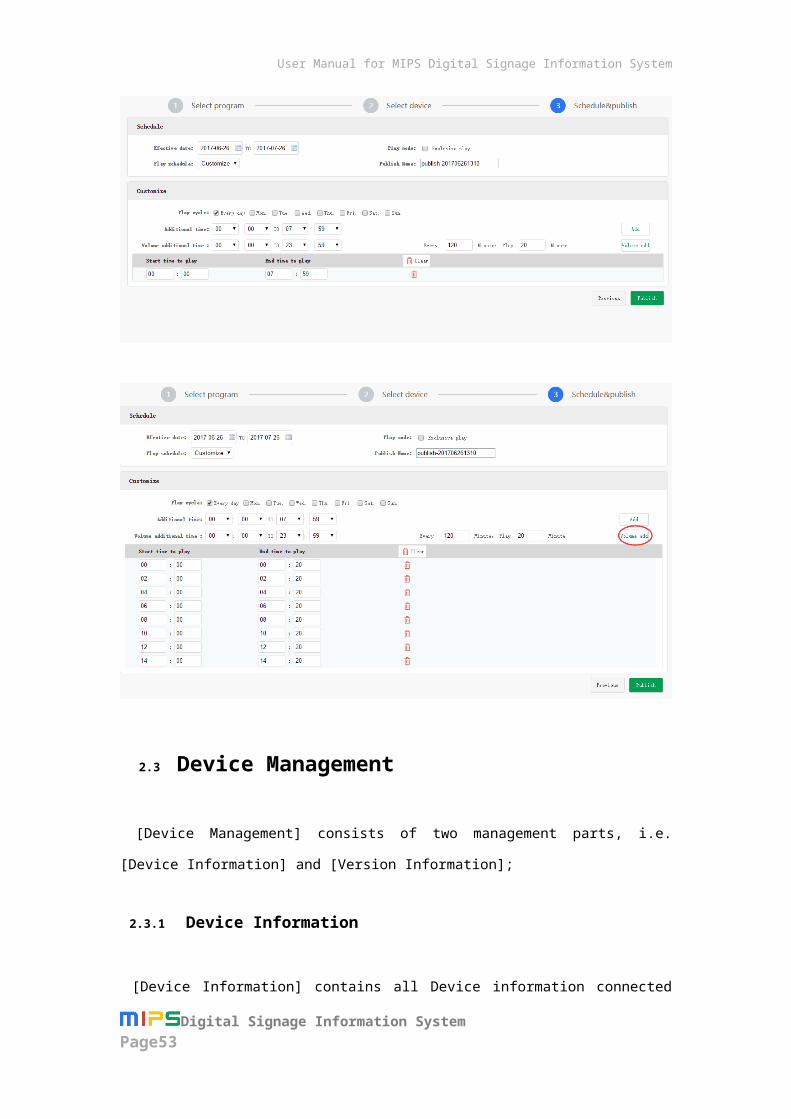
3) Schedule
Enter the [Schedule] page after completing the program selection, operation and
description are as follows:
1)The start and end time selection refers to setting the program's active playback time
period
Digital Signage Information System Page47

User Manual for MIPS Digital Signage Information System
2)The playback mode is selected as shown below.
Daily rotation
it is played daily in the order of the published program during the program's
lifetime.
Customize (Can be set in batches)
Schedule the program to play during the program's validity period. For example:
daily fixed time to play, play every day at different times, play a specific time of
day, etc, which can be a single / batch add schedule.
Whether it is exclusive or no.
Only the contents of these programs are played in the scheduled program schedule after selected this option.
Digital Signage Information System Page48

User Manual for MIPS Digital Signage Information System
2.3 Device Management
[Device Management] consists of two management parts, i.e.[Device Information] and [Version
Information];
2.3.1 Device Information
[Device Information] contains all Device information connected to the system, including inactive
Device and activated Device. On the page,the operations of Device management below can be
performed. Respectively, single-and double-screen terminal for a single, multiple or group
management operations.
Digital Signage Information System Page49

User Manual for MIPS Digital Signage Information System
2.3.1.1 Description of Device Information
The information displayed in the list can be checked in More.List of Device Information
Noun The description of noun
Name Click the terminal name to enter the terminal details page
Group The group where the terminal is belonging to.
Terminal MAC
Address
Terminal physical address (each terminal MAC address is fixed and
unique)
Software
Version
The version of the terminal software used.
Online Status Terminal status: Online, Offline
Activation State Three states: activation, deactivation and trial.
Capacity The size of the space available to the terminal.
2.3.1.2 Activation
In the case where there is a remaining number of terminal activation in the system, an activation
operation can be performed on the "inactive" terminal. Activation is divided into formal activation
Digital Signage Information System Page50

User Manual for MIPS Digital Signage Information System
and trial activation, the operation steps are the same, and the imported activation files are the
same.
Import the official activation file, you can use the terminal normally; import the trial activation
file, which is the server to apply for activation of the terminal, three the trial period of the month.
Within three months, there is no difference in the use of the terminal without activation of the
terminal, and the terminal authorization status becomes "trial" status; three months have passed.
After the formal activation file is not applied, the inactive icon will be displayed in the center of
the terminal screen, and the server will be in the background and the operation of the terminal will
be invalid.
Instructions:
1) Select the "Inactive" terminal that needs to be activated;
2) Click the "Activate" button to complete the activation;
The details are shown in the figure below:
2.3.1.3 Add Program, Reduce Program and Insert Program
2.3.1.3.1 Add Program
1) single-screen terminal program
The instructions are as follows:1) Select a single-screen terminal, after selecting one or multiple Devices in the Device list,
Digital Signage Information System Page51
User Manual for MIPS Digital Signage Information System
click on the “Add Program” button to enter the operating interface;
2) Select materials to be released from the material list;
3) Set up the date, for example, [2016-07-29 to 2016-08-20];
4) Click the "Add Program" button to complete the program add to broadcast operation, you can
choose to add the program or material;
The details are shown in the figure below:
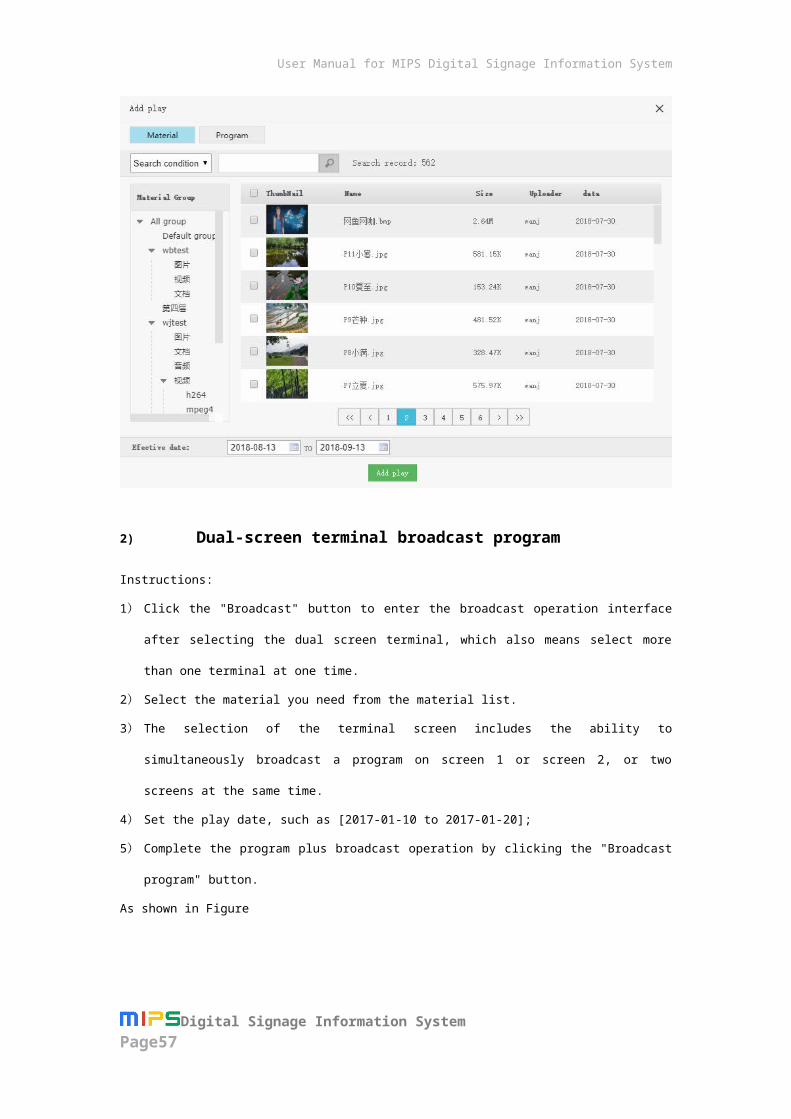
2) Dual-screen terminal broadcast program
Instructions:
1) Click the "Broadcast" button to enter the broadcast operation interface after selecting
the dual screen terminal, which also means select more than one terminal at one time.
2) Select the material you need from the material list.
3) The selection of the terminal screen includes the ability to simultaneously broadcast a
program on screen 1 or screen 2, or two screens at the same time.
4) Set the play date, such as [2017-01-10 to 2017-01-20];
5) Complete the program plus broadcast operation by clicking the "Broadcast program"
button.
As shown in Figure
Digital Signage Information System Page52
User Manual for MIPS Digital Signage Information System
2.3.1.3.2 Reducing Program
Reduce playing the programs released to the Device. The Device will not play the cut programs
after reducing;
1) single-screen terminal release program
Operating instructions are as follows:
1) Choose a single-screen terminal,After selecting one or multiple Devices in the Device list, click
on the “Reduce Play” button to enter the operating interface;
2) Select the programs to be cut, and click on the“Program Reduction” button to complete the
operation;
The details are shown in the figure below:
Digital Signage Information System Page53

User Manual for MIPS Digital Signage Information System
2) Double-screen terminal release program
Instructions:
1) Click the "Broadcast" button to enter the broadcast operation interface after selecting
the dual screen terminal, which also means select more than one terminal at one time.
2) Select the screen One or screen Two, and then choose the program you need to
release, click the "Multicast program" button to complete the program to reduce the
operation.
As shown below
Digital Signage Information System Page54

User Manual for MIPS Digital Signage Information System
2.3.1.3.3 Insert Program
1) Single-screen terminal programming
The operating mode is same as that of “Add Program”, but insert program has the highest priority
in terms of play, and can be played exclusively on the Device;
2) Dual screen terminal intro
This mode of operation is the same with the double screen "broadcast program". But it
Digital Signage Information System Page55

User Manual for MIPS Digital Signage Information System
broadcasts the way to play the program to play the highest priority, which will be exclusive play in the terminal.
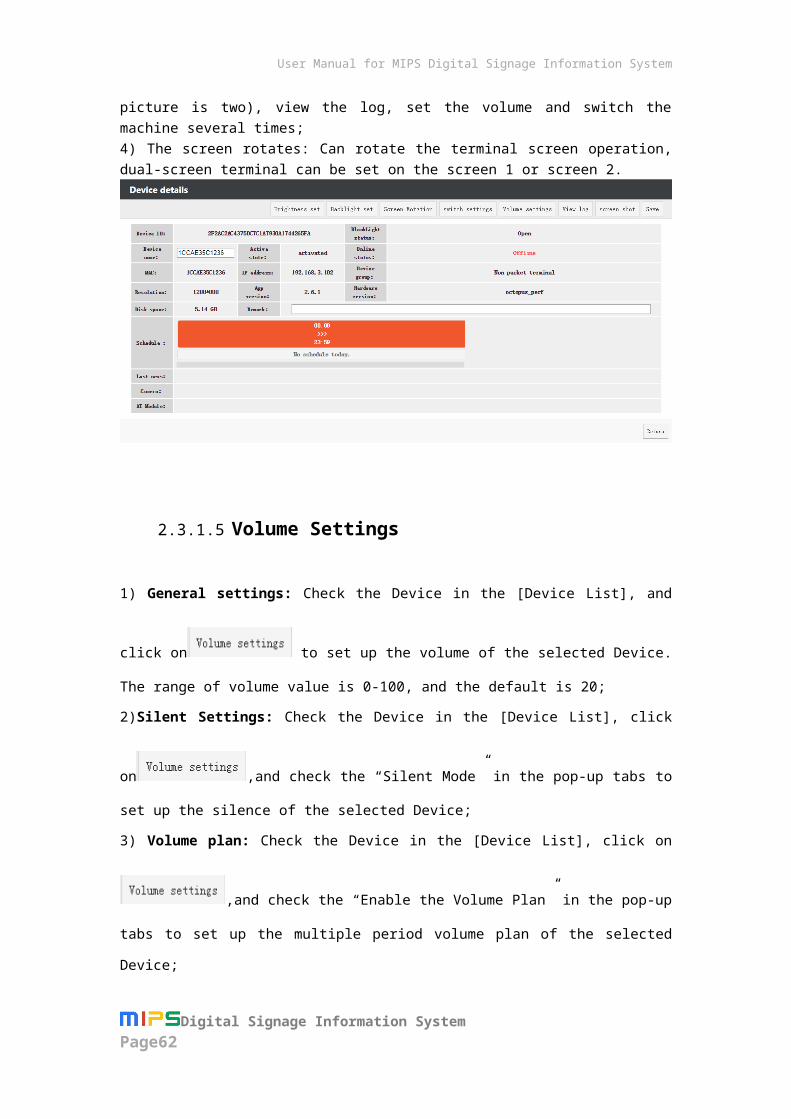
2.3.1.4 Checking the Device Details
Click on the “Device Name” option of the designated Device in the Device list to enter the [Device Detailed Information] page, which contains the following information:1) Device basic information includes Device name, active state, online status, mac address, IP address, Terminal grouping,resolution information, It shows the resolution of the two screens if it is a dual screen terminal. software version, Hardware version. system version, disk space and
remarks, of which Device name and remark can be manually modified.Click on to complete
modification after modified;2) Schedule: Refers to the current program schedule information for the terminal. The schedule is displayed as empty if the terminal does not have the program to play.3) [Terminal details] Operation: Supports screen capture of the terminal (used to view the current playback screen of the terminal, if it is a dual-screen terminal, the screen capture picture is two), view the log, set the volume and switch the machine several times;4) The screen rotates: Can rotate the terminal screen operation, dual-screen terminal can be set on the screen 1 or screen 2.
Digital Signage Information System Page56
User Manual for MIPS Digital Signage Information System
2.3.1.5 Volume Settings
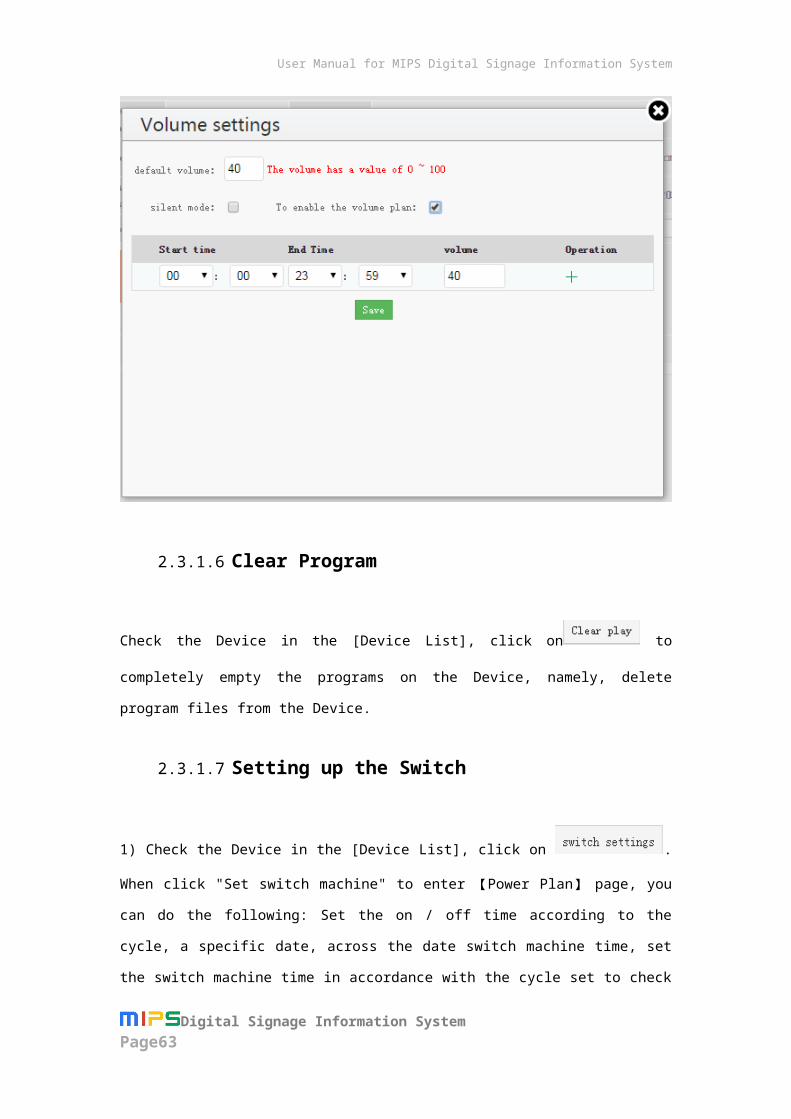
1) General settings: Check the Device in the [Device List], and click on to set
up the volume of the selected Device. The range of volume value is 0-100, and the default is 20;
2)Silent Settings: Check the Device in the [Device List], click on ,and check
the “Silent Mode” in the pop-up tabs to set up the silence of the selected Device;
3) Volume plan: Check the Device in the [Device List], click on ,and check the
“Enable the Volume Plan” in the pop-up tabs to set up the multiple period volume plan of the
selected Device;
Digital Signage Information System Page57

User Manual for MIPS Digital Signage Information System
2.3.1.6 Clear Program
Check the Device in the [Device List], click on to completely empty the programs
on the Device, namely, delete program files from the Device.
2.3.1.7 Setting up the Switch
1) Check the Device in the [Device List], click on . When click "Set switch
machine" to enter 【Power Plan】 page, you can do the following: Set the on / off time according
to the cycle, a specific date, across the date switch machine time, set the switch machine time in
accordance with the cycle set to check from Mon. To Sun. The priority of the setup mode is: Cross
Date Settings> Special Date Segment Settings> Weekly Settings. At this point, set up the periodic
Digital Signage Information System Page58

User Manual for MIPS Digital Signage Information System
startup & shutdown time or startup & shutdown time on a specific date, after that, click on
to send startup & shutdown information to the designated Devices.If the programs are required to
be cleared before startup & shutdown, just click on to clear the previous
settings;
2) Can set multiple switch machine time in every time, which means you can set a
maximum of more than one time switch machine settings, support up to 20 switch
machines set according to week settings, can add five switch machine settings in
accordance with the specific date and set the date.
2.3.1.8 Software Upgrade
Check the Device in the [Device List], click on to enter the Device software upgrade
page, where the information list of uploaded Device software can be seen.Check the version of
Device software to be upgraded, and click on the upgrade button to complete Device software
upgrade.Supports online and offline operations
Digital Signage Information System Page59

User Manual for MIPS Digital Signage Information System
2.3.1.9 Delete
Click the "delete" button to complete the delete operation ( support for a single or multiple
terminal operations) after selected the terminal that needs to be deleted in the terminal
list, which only support offline terminal removal.
2.3.1.10 Terminal Group
Click on the "terminal group" button, and then select the group "OK" to complete the
grouping operation after selected the terminal that needs to be grouped in the terminal list,
which supports single or multiple terminal operations.
2.3.1.11 Backlight Settings
Choose the terminal you want to set the backlight after clicking the "backlight setting"
button to turned on or off the backlight in the terminal list . The terminal is in hibernation
with the program mutes after turning off the backlight. It will restore the sound after
turning the backlight back on.
Digital Signage Information System Page60

User Manual for MIPS Digital Signage Information System
Remark: The backlight setting function only works on the LVDS screen, but not on the HDMI
screen.
2.3.1.12 Auto starts
Auto starts: The application will be switched on/off when it works, or it is closed.Click "Boot Start" button to turn on or off this function after setting up the startup of the terminal in the terminal list.
2.3.1.13 Application Protection
Application Protection: The application will automatically jump back to the playback interface after the application has been dropped when it is turned on.It will not automatically jump back when it is closed.Click the "Application Protection" button to open or close this function after setting up the terminal of the application guard in the terminal list.
Digital Signage Information System Page61
User Manual for MIPS Digital Signage Information System
2.3.1.14 Select the Display Item
View the terminal in the terminal list of relevant information after clicked on the "Display Item" and chose the terminal list shows the content.
2.3.1.15 Screen Rotation
Background supports setting the device vertical screen, click "Screen Rotation", and you can choose 4 types of horizontal, vertical, reverse horizontal and reverse vertical screens. Please note the following:1. Device initialization defaults to the set property of the client, which is subject to the client set2.It supports the selection of single/multiple device Settings. When selecting multiple
Digital Signage Information System Page62
User Manual for MIPS Digital Signage Information System
device Settings, the original Settings will be overwritten after the batch setting is prompted.3.The terminal will be restarted after the operation; Only support online synchronous system operation.
2.3.1.16 Remote shutdown
Check the terminal that needs to be shut down remotely in the terminal list. Click the "Remote Shutdown" button to realize the remote shutdown.
2.3.1.17 Restart
Check the terminal that needs to be restarted in the terminal list, and click the "restart" button to realize remote restart. Note that check whether the terminal that needs to be restarted is online in the terminal list in advance.
2.3.1.18 Brightness Setting
Select the specified terminal in the terminal list. Click to set the brightness of the selected terminal.
Digital Signage Information System Page63

User Manual for MIPS Digital Signage Information System
2.3.1.19 Status bar Setting
Select the specified terminal in the terminal list, click to set the status bar of the
selected terminal, and choose to hide or display the status bar.
2.3.1.20 Group batch operation
In the terminal group by selecting the terminal grouping for batch operation, support to activate the terminal grouping, seeding, call waiting, empty program, the volume set, remote shutdown, restart, set the switch machine, software upgrades, backlight settings, brightness settings, boot since the opening and application of guardian, somehow the screen settings, status bar settings, such as operation, as shown in the figure below:
Digital Signage Information System Page64

User Manual for MIPS Digital Signage Information System
If there is no device under the selected group, the pop-up prompt: please select again if there is no device under the selected group. The original settings will be overwritten after the batch setting is prompted, if there is a device under the selected group.
2.3.2 Version Information
The [Version Information]page contains the information list of client-side software,as well as
upload and deletion of software version.
2.3.2.1 Delete
Check the software version to be deleted in the software/firmware list, and click on the
button to complete version deletion.
Digital Signage Information System Page65

User Manual for MIPS Digital Signage Information System
2.3.2.2 Version Upload
Click on the “New” button to open the [New software]page, after uploading software file on the
page, click on the button to complete uploading new software version;
2.4 Material Management
[Material Management] consists of two modules, [Template Management] and [Material List];
2.4.1 Template Management
The template management page contains the default template, template information list and create a new template, delete a template, and query a template and other operational functions. The default template has 2 generic templates, which is composed of empty elements.There are four industry templates, including hotels, banks, business super, catering.
Digital Signage Information System Page66

User Manual for MIPS Digital Signage Information System
2.4.1.1 Template Creation
Click on the button to enter the [Template Creation] page, of which the operation is similar
to that of program creation.The completed template can be saved in the template list, and the
Template previously produced can be used in the process of program creation;
2.4.1.2 Delete
Check the template to be deleted in the template list, and click on the button to complete
deletion;
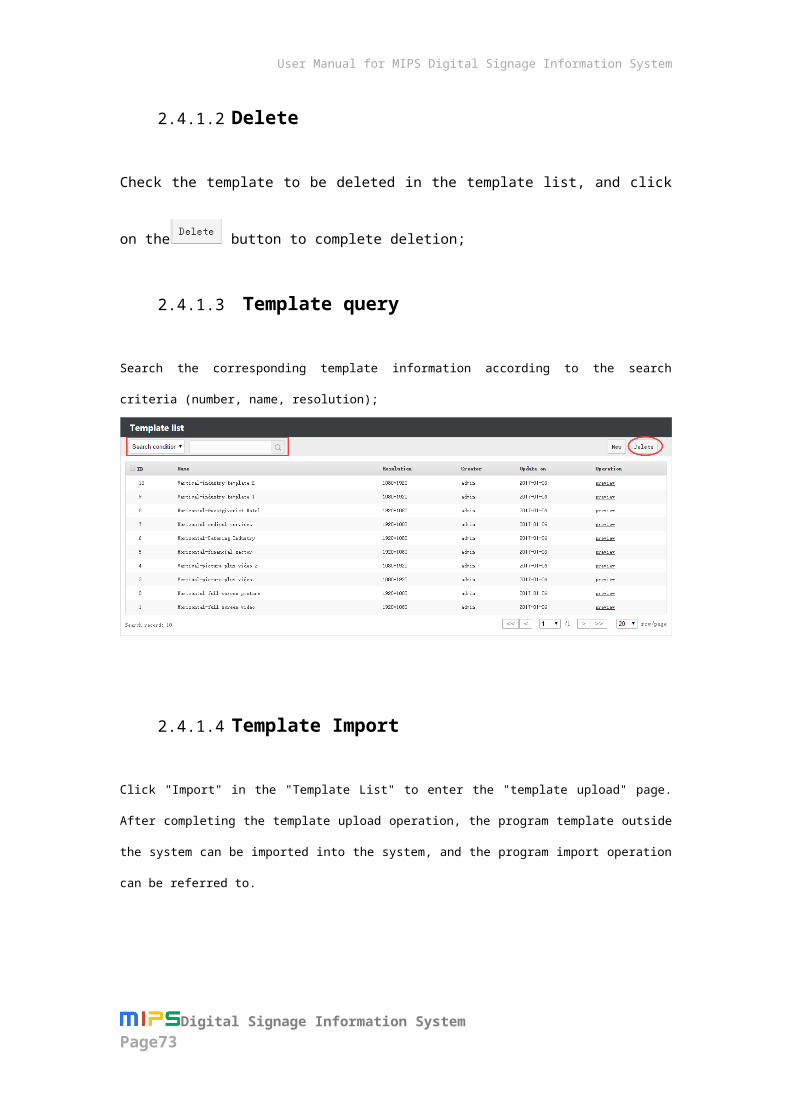
2.4.1.3 Template query
Search the corresponding template information according to the search criteria (number,
name, resolution);
Digital Signage Information System Page67

User Manual for MIPS Digital Signage Information System
2.4.1.4 Template Import
Click "Import" in the "Template List" to enter the "template upload" page. After completing
the template upload operation, the program template outside the system can be imported
into the system, and the program import operation can be referred to.
2.4.1.5 Template Export
Select the template to be exported in the template list and click "export" to export the program template to the default download path of the browser.
2.4.2 Material list
【Material list】The material can be uploaded, grouped, deleted, classified query and fuzzy
query and other operations on the page shows the various sub-group of material
information.
2.4.2.1 Material upload
After selecting grouping in the "material list" page, click the upload button to enter the
Digital Signage Information System Page68

User Manual for MIPS Digital Signage Information System
material upload page. The uploaded material is automatically divided into the
corresponding material type by the system. When you do not select a group, the material is
left in the default group by default.
Instructions:1) Upload images, video, audio file suffix case;2) Support 7 document type files (.doc |.docx |. XLS |. XLSX |. PPT |. PPTX |.pdf) upload, and transfer to PDF.3) Material format support description:Image format support (5 types) : JPG, GIF, PNG,jpeg, BMP;Video format support (12) :avi, WMV, FLV, rm, RMVB, mpeg, ts, mp4, m4v, MKV, 3 gp, mov.Audio formats support (7) : mp3, aac, wma, mid, cda, wav, wma,Document format support (7) : doc, docx, XLS, XLSX, PPT, PDF;
2.4.2.2 Delete
Click the delete button to delete the material after selecting the item you want to
delete in the material list.
Digital Signage Information System Page69

User Manual for MIPS Digital Signage Information System
2.4.2.3 Material Query
Search for matching material information according to the search criteria which can
also be grouped search.
Label switch, classification display all the material, pictures, video, audio, documents.
2.4.2.4 Move Group
In the material list, check the items that need to be moved to other groups, click "mobile
grouping", and click "Confirm" after selecting grouping, to complete the mobile grouping
operation (support single or multiple material operations).
2.5 Authority Management
2.5.1 Overview
【 Authority Management 】 is composed of organizational structure, role management,
business management of three parts;
Enterprises are the main users of the system. All the data generated in the system uses the
enterprises as the carriers and boundaries. The data between different enterprises are
independent and can not be interoperable.Enterprise administrators manage their own
internal organizational structure, hierarchical relationship. In addition, users can define
their own roles, and each enterprise can define many different roles according to the scope
of functions.
Digital Signage Information System Page70

User Manual for MIPS Digital Signage Information System
2.5.2 Organization Information
【 Organization Information 】 The module is used to manage the internal organizational
structure and enterprise user information management. It’s hierarchical relationship is
created and managed by admin or enterprise administrator.
2.5.2.1 Ownership of Business Data
All kinds of business data generated by enterprise users will only be saved in the
organizational structure of the enterprise belongs to the group, and all business
modules within the enterprise are using the same organizational grouping;
In the same enterprise organizational structure, users at a higher level can access
business data in a lower-level architecture, whereas lower-level users can not access
higher-level business data and other enterprises can not access the data;
Business data access permissions between groups can be configured in the same
enterprise organization;
An enterprise administrator can manage all business data in the organization's
organization, but can not access data from other businesses.
2.5.2.2 Group Management
Create a group
Select group, click "New" to enter 【New Group】 page, just fill in the page name of
the group, set the group permissions and save:
Digital Signage Information System Page71

User Manual for MIPS Digital Signage Information System
Modify, delete operation Group permissions description
1) Group permissions are grouped into groups, at the same level, the other three
modes;
2) Within the group: business data between users under the grouping is visible, and
there is a corresponding operating authority after checking;
3) Peer: Other users at the same level can see the business data under the group
and have the corresponding operation right after checking;
4) Others: After checking, the other subordinate groups at the same level and users
at subordinate and subordinate groups can see the business data of the subgroup
and have the corresponding operation authority.
Remark: The users under the grouping can only see the business data created by the
users themselves if the group permissions are not checked. The business data of all
the users under the grouping can be seen if the users are administrators.
2.5.2.3 User Management
Create user
Digital Signage Information System Page72
User Manual for MIPS Digital Signage Information System
Select group, click "New" to enter 【 New User 】 page, just fill in the user name,
password, confirm password, phone number, and select the role and click "Save",
which as shown below.
Remark: The system defaults to ordinary users. You need to select a role after
selecting an ordinary user. You can have all the rights under the group without
selecting a role if you select an administrator.
Modify, query, delete operation User password change: Please note that only the administrator (admin or company
administrator) can reset the password of users in the group, and the password reset is 123456.
2.5.3 Role Management
【Role Management 】 used to create and manage roles. The role, composed of different
functional operation authorities,is used to control various business function modules and
functions of users in the system.
Role Description Each enterprise can create more one roles with different scopes of authority for
performing different functions for different users in the enterprise organizational
structure;
Digital Signage Information System Page73

User Manual for MIPS Digital Signage Information System
The role information between the enterprise and the enterprise is independent from
each other and can not be accessed by each other.
Remark: The role of admin is system super administrator, which can manage all the
function modules and service data in the system. Among them, 【 Authorization
Management】, 【System Settings】, 【Version Information】 can be managed by admin
users only. Other users including enterprise administrator users can not see function
modules and service data;
Creating a RoleClick the "New" button to enter the 【 New Role 】 page after entering 【 Authority
Management】 - 【Role Management】, ;
2.5.4 Business Management
The 【Enterprise Management】module, only be operated by the super administrator, to
Digital Signage Information System Page74
User Manual for MIPS Digital Signage Information System
create and manage enterprise accounts in the system. Each enterprise account has
enterprise administrator rights and can use this account to log in to the system.Can
manage the organization, users and roles in the enterprise, and can view and manage all
the business data created by the enterprise user except the operating authority of the
function 【Authorization Management】, 【System Settings】, 【Version Information]】and
get the data of other business users after the account is logged into the system.
The super administrator can create, modify, and query an enterprise, as shown in the figure below:
Support enterprise deletion operation. After deleting an enterprise, all data associated with the enterprise will be deleted, and the devices under the enterprise will belong to the admin default grouping.
2.5.5 Illustration
2.5.5.1 Scenario 1: Individual users operate and manage the
terminal
Scene description: There is an independent operation of the company with advertising
and operations department. Departments only given some of the authority of the company
to get the corresponding business data. The company administrator manages and operates
all the terminals under the company and can view and control the department's terminal
and business data;Advertising and operations department have their own department
manager and an ordinary user. The manager of the operations department manages all of
its business data, the ordinary user is responsible for managing his own terminal,
Digital Signage Information System Page75

User Manual for MIPS Digital Signage Information System
publishing advertisements, and viewing programs made by the advertising department;
The manager of the advertising department manages all of its business data, and the
ordinary users of the advertising department are only responsible for managing their own
advertising programs and materials;
2.5.5.1.1 Steps to Create User Hierarchical Rights Management
Step1: First use the admin to log in to the system and enter the 【Organization】 module
to create the departmental organization structure directly, that is, create the department
and organization department, create the advertisement department and operation
department, set the grouping permission for the advertisement department and operation
department, and then set the corresponding terminal transferred to these organizational
structures, as shown;
Step 2:Enter【Role Management】, create a role according to the function needs, set up
an advertisement department user role which only make the program, manage the
permission of the material template, set up a user role of operation department which
Digital Signage Information System Page76

User Manual for MIPS Digital Signage Information System
make programs, publish programs, manage terminals, manage material templates
Permission.
Step 3:Create an administrator for both the advertising department and the operations
department; Create an ordinary user for the advertising department and the operation
department, set the corresponding permissions;
2.5.5.1.2 Permission Description
admin user is the highest management with the highest management authority, who
can view the two departments of the terminal and business data, and have the
operating authority; own management of the terminal and create business data, other
departments are not visible to the user, only visible to their own operation;
The administrator of the operation department can view all the terminal and business
Digital Signage Information System Page77
User Manual for MIPS Digital Signage Information System
data of the department and can access the terminal and the business data of the
advertisement department of the same level and have the operation right and can not
access the company administrator's terminal and the business data;
Ordinary users under the operating department have the authority to make programs,
distribute programs, manage terminals, and manage material templates, but can only
operate the terminals that are assigned to individuals by themselves and the service
data established by themselves, and can access terminals at the same level of
advertisement department Business data. Can not see the business data of the super
administrator and company administrator, can not see the terminal and business data
of other ordinary users in this department;
The manager of the advertising department can view all the terminal and business
data of the department, can not access the terminal and business data of the
company administrator, can not access the terminal and business data of the
operating department at the same level;
Ordinary users under the advertisement department can only see their own business
data and can not see the other business data going to the user in the department and
can not see the business data of the superior administrator and other departmental
users only by authorizing programs and managing the material templates.
2.5.5.2Scenario 2: Enterprise users operate and manage the
terminal
Scene description: There is an independent operation of the company with two branches.
Each branches has its own two departments.The company's administrators manage and
operate all the terminals under the company and can view and control the department's
terminal and business data; Branch of the business data are independent, the manager of
branch office manage its business data, the ordinary users of branch manage their own
business data, the administrators of each branch of the branch manage their business
data, the ordinary user under the department manages their own business data, and the
business data between the departments can be checked with each other.
Digital Signage Information System Page78

User Manual for MIPS Digital Signage Information System
2.5.5.2.1 Steps to Create User Hierarchical Rights Management
Step 1: First, use the admin to log in to the system and enter the 【Organization】 module
to directly create the departmental organization structure, that is, create the departmental
organization structure to create the branch office 1 and 2, and set up the department
under each branch office. To set the data between the branch is not visible, the branch
within the department's internal data can be seen, as shown in the figure;
Step 2:Create a new character according to the function needs after entering into 【role
management】
Digital Signage Information System Page79

User Manual for MIPS Digital Signage Information System
Step 3:Create an administrator and general user for each branch and department, and set
the corresponding permissions of ordinary users;
2.5.5.2.2 Permission Description
admin user is the highest administrator with the highest management authority who
can view all the the terminal and business data of the branches and departments and
has the operational authority; Manage their terminals and create the business data
which are not visible to other branches and departments only visible and operational
by the admin user;
The branch manager can view all of the company's terminal and business data, and
has the right to operate, and can not access the terminal and business data of the
same level of branch and head office;
Ordinary users of branch offices can view the branch manager's business data and all
terminal and business data in the company department and has the operation right,
can not access the business data of other branches and head offices.
Digital Signage Information System Page80

User Manual for MIPS Digital Signage Information System
The department manager in the branch office can manage all the terminal and
business data in the department, can access the business data of other departments
in the branch office, can not access the business data of the branch ordinary users and
branch office administrator users and other branch offices and head office business
data.
The ordinary users in the department of the branch can view their business and other
departments in the business data, also can access other departments in the business
data, can not view the branch manager and branch ordinary user data, do not visit
other branches and head office business data.
2.5.5.3Scenario 3: Platform users operate and manage the
terminal
Scene description : A media operator provides advertisement service for enterprise
customers all over the country. Enterprise customers all over the world can operate their
own terminals independently and advertise information. At the same time, the terminal and
business data among all enterprise customers can only be viewed and managed by the
users in each enterprise.
2.5.5.3.1 Steps to Create User Hierarchical Rights Management
Step 1: Enter 【Enterprise management】 through admin to create the enterprise
(including the enterprise account information), and then assign the account information to
the enterprise client as the administrator account of the enterprise back office;
Digital Signage Information System Page81

User Manual for MIPS Digital Signage Information System
Step 2: Admin transfers all of the enterprise's terminals to the it's organizational structure;
Step 3: Enterprise customers get the account to login system, which can manage their
own business all the terminal and business data. If you need to create a lower-level
organizational structure under the enterprise, you can refer to Scenarios 1 and 2.
Step 4: Platform managers can create their own data and view the data created by other
companies, which can be operated in the way of scenario 1 and 2.
Digital Signage Information System Page82

User Manual for MIPS Digital Signage Information System
2.5.5.3.2 Permission Description
admin user is the highest administrator with highest management authority. Platform managers can manage their own platform terminal and business data, but also see the various enterprises of the terminal and business data;
Administrators of all enterprises can only see all the terminal and business data of the enterprise itself, can not see the terminal and business data of other enterprises, can not see the terminal and service data of the platform media operator.
Upgrade considerations:As 2.6.1 version of the rights management part of the new features to upgrade, if you want
to upgrade to 2.6.1 version, it will clear all the user information created in the previous
version, and then need to be based on the new rights management capabilities to re-
create, please upgrade before Record the original user information, so as to avoid loss of
user information data.
2.6 Authorization Management
Authorization management is composed of two parts, i.e. [Server Authorization Management] and
[Terminal Activation Management];
2.6.1 Charge Description
Type of Request Charge Description
Request for Server Free of charge
Digital Signage Information System Page83

User Manual for MIPS Digital Signage Information System
authorization
Request for terminal
activation number
Charge in proportion of the request number of activated terminals
Table 1 Charge Description
2.6.2 Terminal Activation Management
Notes: Before terminal activation request, server authorization should be carried out first.Once the server is
authorized one time, such an operation is not required;
The [Terminal Activation Management] page is used for request and management of the number
of activated terminals. There are two types of terminal activation request, i.e. “Local Activation”
and “Associated Activation”, and the details are as follows:
2.6.2.1 Terminal Activation Request (Local Request)
“Local Activation” request is that the server request the number of activated terminal, and the
operating steps are as follows:
1) Click on “Activation Request”, default option is “Local Activation”, then fill in the information
of terminal activation request, and export the request file;
2) Send the file to the MIPS software provider, and then receive relevant activation document;
3) Click on “Activation Import”, and select and import the received activation document to
complete the activation import;
After importing terminal activation document, the interface will be shown in the figure below:
Digital Signage Information System Page84

User Manual for MIPS Digital Signage Information System
Fig.3 Number of imported terminal activation document
2.6.2.2 Terminal Activation Request (Associated Activation)
The type of “Associated Activation” request is to use one server to request the activation number
of another server;(for example,if the customer requests the number of activated terminals of the
server in a factory by means ofthe company administrator’s server, this method can be used), and
the steps are as follows:
1) Click on “Activation Request”, select “Associated Activation”, fill in the request information
such as associated server code, and export the request file;
2) Send the file to the MIPS software provider, and then receive relevant activation document;
3) Click on “Activation Import” on the associated server, and import the received activation
document to complete the activation import;
2.6.2.3 How to Activate the Terminal
1) After importing the terminal activation document, enter the [Terminal Information] page;
2) Choose the terminal to be activated, and click the “Activation” button to activate the selected
terminal;
Digital Signage Information System Page85

User Manual for MIPS Digital Signage Information System
Fig. 4 Activated terminals
[Exemplification]
At present, 100 terminals are required to be activated.Enter the [Terminal Activation Management]
page, click on “Activation Request”, fill in 100 as the number of terminals to be activated and
other information, export activation request file, send the document to the MIPS software
provider, and receive the activation document. Click on the “Activation Import” button to import
the document on the [Terminal Activation Management] page to obtain 100 activated terminals,
enter the [Terminal Information] Page, and select the terminal to be activated for activation.
Notes: After importing authorization and terminal activation file into the server, do not reinstall the system or
format the disk; otherwise,the license file and terminal activation file will be missing;
2.6.2.4 Terminal Activation Settings
There are two types of terminal activation switching settings, i.e. “Manual Activation” and
“Automatic Activation”. Set the switching option on the [Terminal Activation Management] page
and the details are as follows:
Setting “Manual Activation” is to select inactive terminals for activation on the interface of
terminal management when the terminal is connected to the server;
Setting “Automatic Activation” is to directly activate inactive terminal safter the terminal is
connected to the server;
Digital Signage Information System Page86

User Manual for MIPS Digital Signage Information System
Fig. 5 Terminal activation settings
2.6.3 Server Authorization Management
Server authorization function instructions1) Under normal circumstances, only one file of "terminal activation application" needs to be exported to the MIPS business personnel. After that, the client can import the received "terminal activation number" file and complete the two operations of "activation number import" and "server authorization" at one time.2) This function is used to control the number of terminals that the server can connect to.If the client's terminal exceeds the "number of terminals activated that have been imported", it needs to re-apply for server authorization. Otherwise, the terminal beyond the maximum number of connections will be unoperable;3) Note: the maximum number of connected terminals of the server is equal to the current
number of "imported terminal activation" of the server plus the default number of 20. If
100 exciting terminal activation Numbers have been imported in the current system, the
maximum number of connected terminals of the server is 120.
2.6.3.1 Server Authorization (free of charge)
There are two states of server authorization, as follows:
Unauthorized: Default state, at this point, the user is a “Beta User”, only connected to 20
terminals at most;
Digital Signage Information System Page87

User Manual for MIPS Digital Signage Information System
Authorized: Authorized state, at this point, the user is an “Authorized User”, connected to
numerous terminals with no limit;
2.6.3.2 Server License Request
1) Click on the “License Request”, fill in the information of license request, and export the request
file;
2) Send the “License Request”file to the MIPS software provider for authorization, and then
receive the license file;
3) Click on the “License Import” to select and import the received license file to complete the
authorization;
“Unauthorized” state is shown in the figure below:
Fig.1 “Unauthorized” state of the server
“Authorized” state is shown in the figure below:
Digital Signage Information System Page88

User Manual for MIPS Digital Signage Information System
Fig. 2 “Authorized” state of the server
2.7 System Management
The [System Management] page consists of two parts, namely,[User Operation Log] and [System
Settings].
2.7.1 User Operation Log
The system log list on the [User Operation Log] page contains information record ofuser
behaviors in the process of using the system, such as operation type, content, results and date, as
well as operators.
Digital Signage Information System Page89

User Manual for MIPS Digital Signage Information System
2.7.2 System Settings
System settings have four functions, namely,“Program Review Settings”, “Release Review
Settings” and “Synchronous Device Download Settings” and "web service port configuration."
1) Program review settings: The settings are opened by default, at this point, the programs created
by non-super administrators should be reviewed.If the settings are closed, review is not required;
2) Release review settings: The settings are closed by default, at this point, the programs created
by all users are not required to be reviewed.If the settings are opened, the programs created by
non-super administrators should be reviewed
3) Synchronous Device download settings: The function is used to set up the number of Devices
for synchronous program download, ranging from 1 to 100, to avoid excessive pressure on the
server caused by too much synchronous program download on the Devices;
4) Support configuration of web service port: background service port can be configured (between
9000-9999), and the default value is 9000;The message service port can be configured (between
7000 and 7999), and the default value is 7788. After setting, the background needs to be restarted
before it can take effect.
Digital Signage Information System Page90

User Manual for MIPS Digital Signage Information System
2.8 Statistical report
Summary: statistical statements are used to count the number of times a program or material is played at each terminal.The statistical types are classified into statistics by material broadcast and statistics by program broadcast, which are related to devices.Individual users, enterprise users and admin users will see different statistics after entering, which will be determined by the terminal authority that each user can view. For details, please refer to the [terminal list] in [terminal management].
2.8.1 Program statistics
2.8.1.1 Program Statistics List Details
Program play statistics list
Noun Noun description
Terminal name Terminal name
Terminal mac Terminal physical address (each terminal mac address is fixed and
Digital Signage Information System Page91
User Manual for MIPS Digital Signage Information System
address unique)
Program
number
Program Numbers are generated automatically by the system and
incremented from 1
Programme
name
The name of the published show
Views Number of shows
Statistics Time Count the number of times the show is played
2.8.1.2 Program Statistics List Operation
Search
In the "program statistics" page, it is supported to query the program playing records by the combination of terminal grouping, terminal name, terminal MAC address, program name and date range or single query conditions.Note that selecting a group means querying the data of the current group, and subsequent clicking on the search data is the data under the current group.
excel Export excelClick to export the corresponding data according to the query results, so as to facilitate the
user to operate the statistics.The excel table data is exported to the default download path of the browser.
2.8.2 Material statistics
2.8.2.1 Material statistics list details
Playlist statistics
Noun Noun description
Terminal name Terminal name
Terminal mac
address
Terminal physical address (each terminal mac address is fixed and
unique)
Material number The material number is automatically generated by the system and
Digital Signage Information System Page92

User Manual for MIPS Digital Signage Information System
increments from 1
Material name The name of the published material
Views Material play count
Statistics Time Count the number of times the show is played
2.8.2.2 Operation of material statistics list
SearchIn the "material statistics" page, it is supported to query the material playing record by grouping by terminal, terminal name, terminal MAC address, material name and date range or single query condition.In addition, notice that selecting the grouping means querying the data of the current grouping, and the data of subsequent clicking search is the data under the current grouping.
excel Export excelClick "export excel" to export the corresponding data according to the query results, so
as to facilitate users to operate the statistics.The excel table data is exported to the
default download path of the browser.
Digital Signage Information System Page93