user guide...1 salesforce 1
TRANSCRIPT

Informatica PowerExchange for Salesforce(Version 9.0.1 HotFix 1)
User Guide

Informatica PowerExchange for Salesforce User Guide
Version 9.0.1 HotFix 1August 2010
Copyright (c) 2006-2010 Informatica. All rights reserved.
This software and documentation contain proprietary information of Informatica Corporation and are provided under a license agreement containing restrictions on use anddisclosure and are also protected by copyright law. Reverse engineering of the software is prohibited. No part of this document may be reproduced or transmitted in any form,by any means (electronic, photocopying, recording or otherwise) without prior consent of Informatica Corporation. This Software may be protected by U.S. and/or internationalPatents and other Patents Pending.
Use, duplication, or disclosure of the Software by the U.S. Government is subject to the restrictions set forth in the applicable software license agreement and as provided inDFARS 227.7202-1(a) and 227.7702-3(a) (1995), DFARS 252.227-7013©(1)(ii) (OCT 1988), FAR 12.212(a) (1995), FAR 52.227-19, or FAR 52.227-14 (ALT III), as applicable.
The information in this product or documentation is subject to change without notice. If you find any problems in this product or documentation, please report them to us inwriting.
Informatica, Informatica Platform, Informatica Data Services, PowerCenter, PowerCenterRT, PowerCenter Connect, PowerCenter Data Analyzer, PowerExchange,PowerMart, Metadata Manager, Informatica Data Quality, Informatica Data Explorer, Informatica B2B Data Transformation, Informatica B2B Data Exchange and InformaticaOn Demand are trademarks or registered trademarks of Informatica Corporation in the United States and in jurisdictions throughout the world. All other company and productnames may be trade names or trademarks of their respective owners.
Portions of this software and/or documentation are subject to copyright held by third parties, including without limitation: Copyright DataDirect Technologies. All rightsreserved. Copyright © Sun Microsystems. All rights reserved. Copyright © RSA Security Inc. All Rights Reserved. Copyright © Ordinal Technology Corp. All rightsreserved.Copyright © Aandacht c.v. All rights reserved. Copyright Genivia, Inc. All rights reserved. Copyright 2007 Isomorphic Software. All rights reserved. Copyright © MetaIntegration Technology, Inc. All rights reserved. All rights reserved. Copyright © Oracle. All rights reserved. Copyright © Adobe Systems Incorporated. All rights reserved.Copyright © DataArt, Inc. All rights reserved. Copyright © ComponentSource. All rights reserved. Copyright © Microsoft Corporation. All rights reserved. Copyright © RougeWave Software, Inc. All rights reserved. Copyright © Teradata Corporation. All rights reserved. Copyright © Yahoo! Inc. All rights reserved. Copyright © Glyph & Cog, LLC. Allrights reserved.
This product includes software developed by the Apache Software Foundation (http://www.apache.org/), and other software which is licensed under the Apache License,Version 2.0 (the "License"). You may obtain a copy of the License at http://www.apache.org/licenses/LICENSE-2.0. Unless required by applicable law or agreed to in writing,software distributed under the License is distributed on an "AS IS" BASIS, WITHOUT WARRANTIES OR CONDITIONS OF ANY KIND, either express or implied. See theLicense for the specific language governing permissions and limitations under the License.
This product includes software which was developed by Mozilla (http://www.mozilla.org/), software copyright The JBoss Group, LLC, all rights reserved; software copyright ©1999-2006 by Bruno Lowagie and Paulo Soares and other software which is licensed under the GNU Lesser General Public License Agreement, which may be found at http://www.gnu.org/licenses/lgpl.html. The materials are provided free of charge by Informatica, "as-is", without warranty of any kind, either express or implied, including but notlimited to the implied warranties of merchantability and fitness for a particular purpose.
The product includes ACE(TM) and TAO(TM) software copyrighted by Douglas C. Schmidt and his research group at Washington University, University of California, Irvine,and Vanderbilt University, Copyright (©) 1993-2006, all rights reserved.
This product includes software developed by the OpenSSL Project for use in the OpenSSL Toolkit (copyright The OpenSSL Project. All Rights Reserved) and redistribution ofthis software is subject to terms available at http://www.openssl.org.
This product includes Curl software which is Copyright 1996-2007, Daniel Stenberg, <[email protected]>. All Rights Reserved. Permissions and limitations regarding thissoftware are subject to terms available at http://curl.haxx.se/docs/copyright.html. Permission to use, copy, modify, and distribute this software for any purpose with or withoutfee is hereby granted, provided that the above copyright notice and this permission notice appear in all copies.
The product includes software copyright 2001-2005 (©) MetaStuff, Ltd. All Rights Reserved. Permissions and limitations regarding this software are subject to terms availableat http://www.dom4j.org/ license.html.
The product includes software copyright © 2004-2007, The Dojo Foundation. All Rights Reserved. Permissions and limitations regarding this software are subject to termsavailable at http:// svn.dojotoolkit.org/dojo/trunk/LICENSE.
This product includes ICU software which is copyright International Business Machines Corporation and others. All rights reserved. Permissions and limitations regarding thissoftware are subject to terms available at http://source.icu-project.org/repos/icu/icu/trunk/license.html.
This product includes software copyright © 1996-2006 Per Bothner. All rights reserved. Your right to use such materials is set forth in the license which may be found at http://www.gnu.org/software/ kawa/Software-License.html.
This product includes OSSP UUID software which is Copyright © 2002 Ralf S. Engelschall, Copyright © 2002 The OSSP Project Copyright © 2002 Cable & WirelessDeutschland. Permissions and limitations regarding this software are subject to terms available at http://www.opensource.org/licenses/mit-license.php.
This product includes software developed by Boost (http://www.boost.org/) or under the Boost software license. Permissions and limitations regarding this software are subjectto terms available at http:/ /www.boost.org/LICENSE_1_0.txt.
This product includes software copyright © 1997-2007 University of Cambridge. Permissions and limitations regarding this software are subject to terms available at http://www.pcre.org/license.txt.
This product includes software copyright © 2007 The Eclipse Foundation. All Rights Reserved. Permissions and limitations regarding this software are subject to termsavailable at http:// www.eclipse.org/org/documents/epl-v10.php.
This product includes software licensed under the terms at http://www.tcl.tk/software/tcltk/license.html, http://www.bosrup.com/web/overlib/?License, http://www.stlport.org/doc/license.html, http://www.asm.ow2.org/license.html, http://www.cryptix.org/LICENSE.TXT, http://hsqldb.org/web/hsqlLicense.html, http://httpunit.sourceforge.net/doc/license.html, http://jung.sourceforge.net/license.txt , http://www.gzip.org/zlib/zlib_license.html, http://www.openldap.org/software/release/license.html, http://www.libssh2.org,http://slf4j.org/license.html, http://www.sente.ch/software/OpenSourceLicense.html, and http://fusesource.com/downloads/license-agreements/fuse-message-broker-v-5-3-license-agreement.
This product includes software licensed under the Academic Free License (http://www.opensource.org/licenses/afl-3.0.php), the Common Development and DistributionLicense (http://www.opensource.org/licenses/cddl1.php) the Common Public License (http://www.opensource.org/licenses/cpl1.0.php) and the BSD License (http://www.opensource.org/licenses/bsd-license.php).
This product includes software copyright © 2003-2006 Joe WaInes, 2006-2007 XStream Committers. All rights reserved. Permissions and limitations regarding this softwareare subject to terms available at http://xstream.codehaus.org/license.html. This product includes software developed by the Indiana University Extreme! Lab. For furtherinformation please visit http://www.extreme.indiana.edu/.
This Software is protected by U.S. Patent Numbers 5,794,246; 6,014,670; 6,016,501; 6,029,178; 6,032,158; 6,035,307; 6,044,374; 6,092,086; 6,208,990; 6,339,775;6,640,226; 6,789,096; 6,820,077; 6,823,373; 6,850,947; 6,895,471; 7,117,215; 7,162,643; 7,254,590; 7,281,001; 7,421,458; and 7,584,422, international Patents and otherPatents Pending.

DISCLAIMER: Informatica Corporation provides this documentation "as is" without warranty of any kind, either express or implied, including, but not limited to, the impliedwarranties of non-infringement, merchantability, or use for a particular purpose. Informatica Corporation does not warrant that this software or documentation is error free. Theinformation provided in this software or documentation may include technical inaccuracies or typographical errors. The information in this software and documentation issubject to change at any time without notice.
NOTICES
This Informatica product (the “Software”) includes certain drivers (the “DataDirect Drivers”) from DataDirect Technologies, an operating company of Progress SoftwareCorporation (“DataDirect”) which are subject to the following terms and conditions:
1.THE DATADIRECT DRIVERS ARE PROVIDED “AS IS” WITHOUT WARRANTY OF ANY KIND, EITHER EXPRESSED OR IMPLIED, INCLUDING BUT NOTLIMITED TO, THE IMPLIED WARRANTIES OF MERCHANTABILITY, FITNESS FOR A PARTICULAR PURPOSE AND NON-INFRINGEMENT.
2. IN NO EVENT WILL DATADIRECT OR ITS THIRD PARTY SUPPLIERS BE LIABLE TO THE END-USER CUSTOMER FOR ANY DIRECT, INDIRECT,INCIDENTAL, SPECIAL, CONSEQUENTIAL OR OTHER DAMAGES ARISING OUT OF THE USE OF THE ODBC DRIVERS, WHETHER OR NOT INFORMED OFTHE POSSIBILITIES OF DAMAGES IN ADVANCE. THESE LIMITATIONS APPLY TO ALL CAUSES OF ACTION, INCLUDING, WITHOUT LIMITATION, BREACHOF CONTRACT, BREACH OF WARRANTY, NEGLIGENCE, STRICT LIABILITY, MISREPRESENTATION AND OTHER TORTS.
Part Number: PWX-SFU-90100-HF1-0001

Table of Contents
Preface . . . . . . . . . . . . . . . . . . . . . . . . . . . . . . . . . . . . . . . . . . . . . . . . . . . . . . . . . . . . . . . . . . . . . . . . . . ivInformatica Resources. . . . . . . . . . . . . . . . . . . . . . . . . . . . . . . . . . . . . . . . . . . . . . . . . . . . . . iv
Informatica Customer Portal. . . . . . . . . . . . . . . . . . . . . . . . . . . . . . . . . . . . . . . . . . . . . . . . iv
Informatica Documentation. . . . . . . . . . . . . . . . . . . . . . . . . . . . . . . . . . . . . . . . . . . . . . . . iv
Informatica Web Site. . . . . . . . . . . . . . . . . . . . . . . . . . . . . . . . . . . . . . . . . . . . . . . . . . . . iv
Informatica How-To Library. . . . . . . . . . . . . . . . . . . . . . . . . . . . . . . . . . . . . . . . . . . . . . . . v
Informatica Knowledge Base. . . . . . . . . . . . . . . . . . . . . . . . . . . . . . . . . . . . . . . . . . . . . . . v
Informatica Multimedia Knowledge Base. . . . . . . . . . . . . . . . . . . . . . . . . . . . . . . . . . . . . . . . v
Informatica Global Customer Support. . . . . . . . . . . . . . . . . . . . . . . . . . . . . . . . . . . . . . . . . . v
Chapter 1: Understanding PowerExchange for Salesforce. . . . . . . . . . . . . . . . . . . . . . . . . . 1Understanding PowerExchange for Salesforce Overview. . . . . . . . . . . . . . . . . . . . . . . . . . . . . . . . 1
PowerCenter and Salesforce Integration. . . . . . . . . . . . . . . . . . . . . . . . . . . . . . . . . . . . . . . . . . . 2
Designer and Salesforce Integration. . . . . . . . . . . . . . . . . . . . . . . . . . . . . . . . . . . . . . . . . . . 2
PowerCenter Integration Service and Salesforce Integration. . . . . . . . . . . . . . . . . . . . . . . . . . . 2
Chapter 2: Installation and Configuration. . . . . . . . . . . . . . . . . . . . . . . . . . . . . . . . . . . . . . . . . . 4Installation and Configuration Overview. . . . . . . . . . . . . . . . . . . . . . . . . . . . . . . . . . . . . . . . . . . 4
Prerequisites. . . . . . . . . . . . . . . . . . . . . . . . . . . . . . . . . . . . . . . . . . . . . . . . . . . . . . . . . . 4
Installing and Configuring PowerExchange for Salesforce. . . . . . . . . . . . . . . . . . . . . . . . . . . . . 4
Upgrading PowerExchange for Salesforce. . . . . . . . . . . . . . . . . . . . . . . . . . . . . . . . . . . . . . . 4
Plug-in Registration. . . . . . . . . . . . . . . . . . . . . . . . . . . . . . . . . . . . . . . . . . . . . . . . . . . . . . . . 5
HTTP Proxy Options. . . . . . . . . . . . . . . . . . . . . . . . . . . . . . . . . . . . . . . . . . . . . . . . . . . . . . . . 5
Configuring HTTP Proxy Options for the PowerCenter Client. . . . . . . . . . . . . . . . . . . . . . . . . . . 5
Configuring HTTP Proxy Options for the PowerCenter Integration Service. . . . . . . . . . . . . . . . . . 6
Uninstalling PowerExchange for Salesforce. . . . . . . . . . . . . . . . . . . . . . . . . . . . . . . . . . . . . . . . . 6
Release Information. . . . . . . . . . . . . . . . . . . . . . . . . . . . . . . . . . . . . . . . . . . . . . . . . . . . . . . . 6
New Features. . . . . . . . . . . . . . . . . . . . . . . . . . . . . . . . . . . . . . . . . . . . . . . . . . . . . . . . . 6
Changed Behavior. . . . . . . . . . . . . . . . . . . . . . . . . . . . . . . . . . . . . . . . . . . . . . . . . . . . . . 7
Chapter 3: Salesforce Sources and Targets. . . . . . . . . . . . . . . . . . . . . . . . . . . . . . . . . . . . . . . 10Salesforce Sources and Targets Overview. . . . . . . . . . . . . . . . . . . . . . . . . . . . . . . . . . . . . . . . . 10
Importing Fields from Related Salesforce Objects. . . . . . . . . . . . . . . . . . . . . . . . . . . . . . . . . . . . 10
Rules and Guidelines for Importing Fields from Related Salesforce Objects. . . . . . . . . . . . . . . . . 11
Salesforce Sources. . . . . . . . . . . . . . . . . . . . . . . . . . . . . . . . . . . . . . . . . . . . . . . . . . . . . . . . 12
Time Zones for Salesforce Sources. . . . . . . . . . . . . . . . . . . . . . . . . . . . . . . . . . . . . . . . . . 12
Time Conversion from Salesforce Sources. . . . . . . . . . . . . . . . . . . . . . . . . . . . . . . . . . . . . . 12
Salesforce Targets. . . . . . . . . . . . . . . . . . . . . . . . . . . . . . . . . . . . . . . . . . . . . . . . . . . . . . . . 12
Table of Contents i

Time Zones for Salesforce Targets. . . . . . . . . . . . . . . . . . . . . . . . . . . . . . . . . . . . . . . . . . . 12
Determining Possible Update Strategies for a Salesforce Target. . . . . . . . . . . . . . . . . . . . . . . . 12
Rules and Guidelines for the Salesforce Target Update Strategy. . . . . . . . . . . . . . . . . . . . . . . . 13
Importing a Salesforce Source or Target Definition. . . . . . . . . . . . . . . . . . . . . . . . . . . . . . . . . . . 14
Chapter 4: Salesforce Lookup Transformation. . . . . . . . . . . . . . . . . . . . . . . . . . . . . . . . . . . . . 15Salesforce Lookup Transformation Overview. . . . . . . . . . . . . . . . . . . . . . . . . . . . . . . . . . . . . . . 15
Salesforce Lookup Components. . . . . . . . . . . . . . . . . . . . . . . . . . . . . . . . . . . . . . . . . . . . . . . 16
Salesforce Lookup Ports. . . . . . . . . . . . . . . . . . . . . . . . . . . . . . . . . . . . . . . . . . . . . . . . . . . . 17
Lookup Ports. . . . . . . . . . . . . . . . . . . . . . . . . . . . . . . . . . . . . . . . . . . . . . . . . . . . . . . . . 17
Pass-Through Ports. . . . . . . . . . . . . . . . . . . . . . . . . . . . . . . . . . . . . . . . . . . . . . . . . . . . 18
LKP_FILTER Port. . . . . . . . . . . . . . . . . . . . . . . . . . . . . . . . . . . . . . . . . . . . . . . . . . . . . . 18
LKP_MATCHIDX Port. . . . . . . . . . . . . . . . . . . . . . . . . . . . . . . . . . . . . . . . . . . . . . . . . . . 18
Salesforce Lookup Query. . . . . . . . . . . . . . . . . . . . . . . . . . . . . . . . . . . . . . . . . . . . . . . . . . . . 19
Creating a Salesforce Lookup Transformation. . . . . . . . . . . . . . . . . . . . . . . . . . . . . . . . . . . . . . . 19
Chapter 5: Salesforce Merge Transformation. . . . . . . . . . . . . . . . . . . . . . . . . . . . . . . . . . . . . . 21Salesforce Merge Transformation Overview. . . . . . . . . . . . . . . . . . . . . . . . . . . . . . . . . . . . . . . . 21
Sample Salesforce Merge Transformation. . . . . . . . . . . . . . . . . . . . . . . . . . . . . . . . . . . . . . 22
Salesforce Merge Components. . . . . . . . . . . . . . . . . . . . . . . . . . . . . . . . . . . . . . . . . . . . . . . . 22
Salesforce Merge Ports. . . . . . . . . . . . . . . . . . . . . . . . . . . . . . . . . . . . . . . . . . . . . . . . . . . . . 23
Salesforce Object Attribute Ports. . . . . . . . . . . . . . . . . . . . . . . . . . . . . . . . . . . . . . . . . . . . 23
ID and SlaveID Input Ports. . . . . . . . . . . . . . . . . . . . . . . . . . . . . . . . . . . . . . . . . . . . . . . . 23
MergedID, MergedSlaveID1, and MergedSlaveID2 Output Ports. . . . . . . . . . . . . . . . . . . . . . . . 23
Rules and Guidelines for the Salesforce Merge Transformation. . . . . . . . . . . . . . . . . . . . . . . . . . . 23
Creating a Salesforce Merge Transformation. . . . . . . . . . . . . . . . . . . . . . . . . . . . . . . . . . . . . . . 24
Chapter 6: Salesforce PickList Transformation. . . . . . . . . . . . . . . . . . . . . . . . . . . . . . . . . . . . 25Salesforce PickList Transformation Overview. . . . . . . . . . . . . . . . . . . . . . . . . . . . . . . . . . . . . . . 25
Salesforce PickList Components. . . . . . . . . . . . . . . . . . . . . . . . . . . . . . . . . . . . . . . . . . . . . . . 25
Salesforce PickList Ports. . . . . . . . . . . . . . . . . . . . . . . . . . . . . . . . . . . . . . . . . . . . . . . . . . . . 26
Rules and Guidelines for the Salesforce PickList Transformation. . . . . . . . . . . . . . . . . . . . . . . . . . 26
Creating a Salesforce PickList Transformation. . . . . . . . . . . . . . . . . . . . . . . . . . . . . . . . . . . . . . 26
Chapter 7: Salesforce Sessions and Workflows. . . . . . . . . . . . . . . . . . . . . . . . . . . . . . . . . . . 28Salesforce Sessions and Workflows Overview. . . . . . . . . . . . . . . . . . . . . . . . . . . . . . . . . . . . . . 28
Salesforce Connections. . . . . . . . . . . . . . . . . . . . . . . . . . . . . . . . . . . . . . . . . . . . . . . . . . . . . 28
Configuring a Salesforce Connection. . . . . . . . . . . . . . . . . . . . . . . . . . . . . . . . . . . . . . . . . 29
Configuring a Session with a Salesforce Source. . . . . . . . . . . . . . . . . . . . . . . . . . . . . . . . . . . . . 29
Filtering Source Data. . . . . . . . . . . . . . . . . . . . . . . . . . . . . . . . . . . . . . . . . . . . . . . . . . . 30
Capturing Deleted and Archived Salesforce Records. . . . . . . . . . . . . . . . . . . . . . . . . . . . . . . 30
Capturing Changed Data. . . . . . . . . . . . . . . . . . . . . . . . . . . . . . . . . . . . . . . . . . . . . . . . . 31
Using the SystemModstamp or LastModifiedDate Timestamp for Change Data Capture. . . . . . . . . 32
ii Table of Contents

Configuring a Session with a Salesforce Target. . . . . . . . . . . . . . . . . . . . . . . . . . . . . . . . . . . . . . 33
Configuring the Upsert Target Operation. . . . . . . . . . . . . . . . . . . . . . . . . . . . . . . . . . . . . . . 34
Configuring the Maximum Batch Size. . . . . . . . . . . . . . . . . . . . . . . . . . . . . . . . . . . . . . . . . 34
Handling Null Values in Update and Upsert Operations. . . . . . . . . . . . . . . . . . . . . . . . . . . . . . 35
Logging PowerExchange for Salesforce Session Details. . . . . . . . . . . . . . . . . . . . . . . . . . . . . 35
Override an External ID with an idLookup for Upserts. . . . . . . . . . . . . . . . . . . . . . . . . . . . . . . 36
Configuring a Bulk API Session. . . . . . . . . . . . . . . . . . . . . . . . . . . . . . . . . . . . . . . . . . . . . 36
Monitoring a Bulk API Session. . . . . . . . . . . . . . . . . . . . . . . . . . . . . . . . . . . . . . . . . . . . . 36
Configuring a Bulk API Session Load Type. . . . . . . . . . . . . . . . . . . . . . . . . . . . . . . . . . . . . 37
Bulk API Success and Error Files. . . . . . . . . . . . . . . . . . . . . . . . . . . . . . . . . . . . . . . . . . . . 37
Configuring a Session for Optimal Performance. . . . . . . . . . . . . . . . . . . . . . . . . . . . . . . . . . . . . 38
Tuning the DTM Buffer Size. . . . . . . . . . . . . . . . . . . . . . . . . . . . . . . . . . . . . . . . . . . . . . . 38
Modifying the Precision of String Fields. . . . . . . . . . . . . . . . . . . . . . . . . . . . . . . . . . . . . . . . 38
Appendix A: Datatype Reference. . . . . . . . . . . . . . . . . . . . . . . . . . . . . . . . . . . . . . . . . . . . . . . . . . 39Datatype Reference Overview. . . . . . . . . . . . . . . . . . . . . . . . . . . . . . . . . . . . . . . . . . . . . . . . . 39
Salesforce and Transformation Datatypes. . . . . . . . . . . . . . . . . . . . . . . . . . . . . . . . . . . . . . . . . 39
Appendix B: Glossary. . . . . . . . . . . . . . . . . . . . . . . . . . . . . . . . . . . . . . . . . . . . . . . . . . . . . . . . . . . . 42
Index. . . . . . . . . . . . . . . . . . . . . . . . . . . . . . . . . . . . . . . . . . . . . . . . . . . . . . . . . . . . . . . 44
Table of Contents iii

PrefaceThe PowerExchange for Salesforce User Guide provides information to build Salesforce mappings, extract datafrom Salesforce objects, and load data into Salesforce objects. It is written for the developers who are responsiblefor extracting data from Salesforce objects and loading data into Salesforce objects.
This book assumes you have knowledge of web services concepts, relational database concepts, PowerCenter,and Salesforce. You must also be familiar with the interface requirements for other supporting applications. Foradditional information about related Salesforce issues, refer to the Salesforce documentation.
Informatica Resources
Informatica Customer PortalAs an Informatica customer, you can access the Informatica Customer Portal site at http://mysupport.informatica.com. The site contains product information, user group information, newsletters,access to the Informatica customer support case management system (ATLAS), the Informatica How-To Library,the Informatica Knowledge Base, the Informatica Multimedia Knowledge Base, Informatica ProductDocumentation, and access to the Informatica user community.
Informatica DocumentationThe Informatica Documentation team takes every effort to create accurate, usable documentation. If you havequestions, comments, or ideas about this documentation, contact the Informatica Documentation team throughemail at [email protected]. We will use your feedback to improve our documentation. Let usknow if we can contact you regarding your comments.
The Documentation team updates documentation as needed. To get the latest documentation for your product,navigate to Product Documentation from http://mysupport.informatica.com.
Informatica Web SiteYou can access the Informatica corporate web site at http://www.informatica.com. The site contains informationabout Informatica, its background, upcoming events, and sales offices. You will also find product and partnerinformation. The services area of the site includes important information about technical support, training andeducation, and implementation services.
iv

Informatica How-To LibraryAs an Informatica customer, you can access the Informatica How-To Library at http://mysupport.informatica.com.The How-To Library is a collection of resources to help you learn more about Informatica products and features. Itincludes articles and interactive demonstrations that provide solutions to common problems, compare features andbehaviors, and guide you through performing specific real-world tasks.
Informatica Knowledge BaseAs an Informatica customer, you can access the Informatica Knowledge Base at http://mysupport.informatica.com.Use the Knowledge Base to search for documented solutions to known technical issues about Informaticaproducts. You can also find answers to frequently asked questions, technical white papers, and technical tips. Ifyou have questions, comments, or ideas about the Knowledge Base, contact the Informatica Knowledge Baseteam through email at [email protected].
Informatica Multimedia Knowledge BaseAs an Informatica customer, you can access the Informatica Multimedia Knowledge Base at http://mysupport.informatica.com. The Multimedia Knowledge Base is a collection of instructional multimedia filesthat help you learn about common concepts and guide you through performing specific tasks. If you havequestions, comments, or ideas about the Multimedia Knowledge Base, contact the Informatica Knowledge Baseteam through email at [email protected].
Informatica Global Customer SupportYou can contact a Customer Support Center by telephone or through the Online Support. Online Support requiresa user name and password. You can request a user name and password at http://mysupport.informatica.com.
Use the following telephone numbers to contact Informatica Global Customer Support:
North America / South America Europe / Middle East / Africa Asia / Australia
Toll FreeBrazil: 0800 891 0202Mexico: 001 888 209 8853North America: +1 877 463 2435 Standard RateNorth America: +1 650 653 6332
Toll FreeFrance: 00800 4632 4357Germany: 00800 4632 4357Israel: 00800 4632 4357Italy: 800 915 985Netherlands: 00800 4632 4357Portugal: 800 208 360Spain: 900 813 166Switzerland: 00800 4632 4357 or 0800 463200United Kingdom: 00800 4632 4357 or 0800023 4632 Standard RateBelgium: +31 30 6022 797France: 0805 804632Germany: 01805 702702Netherlands: 030 6022 797
Toll FreeAustralia: 1 800 151 830New Zealand: 1 800 151 830Singapore: 001 800 4632 4357 Standard RateIndia: +91 80 4112 5738
Preface v

vi

C H A P T E R 1
Understanding PowerExchange forSalesforce
This chapter includes the following topics:
¨ Understanding PowerExchange for Salesforce Overview, 1
¨ PowerCenter and Salesforce Integration, 2
Understanding PowerExchange for Salesforce OverviewPowerExchange for Salesforce integrates PowerCenter with Salesforce to extract data from Salesforce sourcesand write data to Salesforce targets. Salesforce sources and targets represent objects in the Salesforce objectmodel. Salesforce objects are tables that correspond to tabs and other user interface elements on the Salesforceweb site. For example, the Account object contains the information that appears in fields on the SalesforceAccount tab. You can view, create, update, and delete data in Salesforce objects.
PowerExchange for Salesforce uses the Salesforce security model to enforce data access controls. Your ability toaccess data depends on the Salesforce organization, or org, that is associated with the user login you use whenyou connect to Salesforce. It also depends on the user privileges and the field and row level permissionsassociated with the login.
You specify the Salesforce login user and password in an application connection object that you create in theWorkflow Manager or when you import a Salesforce object in the Designer. PowerExchange for Salesforce usesthe Salesforce API to apply existing access policies, and it does not impose additional data access restrictions.
PowerExchange for Salesforce provides the following benefits:
¨ Data integration and migration. Integrate data from diverse data sources, including other applications, withSalesforce data. Also, use PowerCenter to migrate data from various data sources to Salesforce.
¨ Data analysis. Use the built-in data quality capability of PowerCenter to analyze and evaluate Salesforce data.
¨ Access to Salesforce functionality through PowerCenter. Gain full access to Salesforce objects as sourcesand targets in PowerCenter.
1
PowerCenter and Salesforce IntegrationPowerExchange for Salesforce integrates Salesforce with the Designer so you can import Salesforce objects intoPowerCenter and use them in mappings. It integrates Salesforce with the PowerCenter Integration Service so youcan run workflows that extract, transform, and load Salesforce data.
PowerExchange for Salesforce uses Secure Sockets Layer (SSL) to encrypt all data that crosses the Internet. Ituses 128-bit SSL encryption. PowerExchange for Salesforce also uses 128-bit encryption before it stores user IDs,passwords, and session IDs in the repository or in temporary storage locations.
Designer and Salesforce IntegrationYou use the Designer to import Salesforce objects as Salesforce source or target definitions or as SalesforceLookup, Merge, or Picklist transformations. You can then use those objects in mappings for seamless integrationbetween PowerCenter and Salesforce.
You can import both standard and custom Salesforce objects. Standard object types are objects packaged withinSalesforce, such as Account, AccountPartner, Event, Opportunity, and Product.
Custom object types extend the Salesforce data for an organization by defining data entities that are unique to theorganization. Salesforce administrators can define custom fields for both standard and custom objects.
The Designer uses a Salesforce login connect to the Salesforce service. It then generates a list of objects that areavailable for download.
PowerCenter Integration Service and Salesforce IntegrationThe PowerCenter Integration Service connects to Salesforce to extract, transform, and load Salesforce data. ThePowerCenter Integration Service uses a Salesforce login call to authenticate with the Salesforce service. You canspecify the login server to use either a production environment or a special testing and development environmentcalled the Salesforce Sandbox.
A connection object stores the Salesforce user ID, password, and end point URL information for the run-timeconnection. Each Salesforce source or target in a mapping references a Salesforce application connection object.You can use multiple Salesforce application connections in a mapping to access different sets of Salesforce datafor the sources and targets.
The PowerCenter Integration Service uses the Salesforce security mechanism to authenticate users and managesessions. The Salesforce API performs user ID and password authentication at the initiation of a run-time session.
At session run time, the PowerCenter Integration Service generates an SOQL query based on the Salesforcesource definitions and field projections in the mapping. The SOQL language is a derivative of SQL. The SalesforceAPI performs SOQL syntax validation at run time.
The PowerCenter Integration Service uses the Salesforce API to read from and write to Salesforce objects. Whenreading a significant amount of Salesforce data, the PowerCenter Integration Service breaks up the data intosmaller segments. PowerExchange for Salesforce submits sequential requests for subsets of a query result setuntil the entire set has been retrieved.
The PowerCenter Integration Service uses the SOAP protocol to transmit data between the PowerCenterIntegration Service and the Salesforce service. To increase performance, the PowerCenter Integration Serviceuses HTTP compression to reduce the size of the SOAP packets that are sent over the Internet.
When the PowerCenter Integration Service writes data to Salesforce, it converts the PowerCenter datatypes toSalesforce datatypes.
2 Chapter 1: Understanding PowerExchange for Salesforce

Code PagesSalesforce processes UTF-8 characters. The PowerCenter Integration Service handles Salesforce data based onthe following data movement modes:
¨ ASCII. When the PowerCenter Integration Service runs in ASCII mode, it does not perform any code pagevalidation or any data conversion. You might get inconsistent or truncated data if the PowerCenter IntegrationService runs in ASCII mode but processes non-ASCII character data when writing to a Salesforce target.
¨ Unicode. When the PowerCenter Integration Service runs in Unicode mode, it converts data from the sourcecharacter set to UCS-2, processes the data, and then converts the UCS-2 data to the target code pagecharacter set before loading the data. If a session writes to a Salesforce target, the PowerCenter IntegrationService converts the UCS-2 data to the UTF-8 character set.
PowerCenter and Salesforce Integration 3
C H A P T E R 2
Installation and ConfigurationThis chapter includes the following topics:
¨ Installation and Configuration Overview, 4
¨ Plug-in Registration, 5
¨ HTTP Proxy Options, 5
¨ Uninstalling PowerExchange for Salesforce, 6
¨ Release Information, 6
Installation and Configuration OverviewThis chapter provides information about upgrading, installing, and configuring PowerExchange for Salesforce.
PrerequisitesBefore you upgrade or install PowerExchange for Salesforce, install or upgrade PowerCenter on the machine thatruns the Integration Service.
Installing and Configuring PowerExchange for SalesforceTo install and configure PowerExchange for Salesforce, complete the following steps:
1. Register the plug-in.
2. Configure the HTTP proxy options. Configure the HTTP proxy options for the PowerCenter Client and thePowerCenter Integration Service.
After you install and configure PowerExchange for Salesforce, you can create connections to access Salesforce.Create connection objects in the Workflow Manager so the PowerCenter Integration Service can connect toSalesforce.
Upgrading PowerExchange for SalesforceWhen you upgrade PowerExchange for Salesforce, complete the following tasks:
1. Upgrade the plug-in registration.
2. Complete post-upgrade tasks.
4

Plug-in RegistrationAfter you install PowerExchange for Salesforce, register the plug-in with the repository. If you are upgrading froma previous version, update the plug-in registration when you register the plug-in.
A plug-in is an XML file that defines the functionality of PowerExchange for Salesforce. To register the plug-in, therepository must be running in exclusive mode. Use the Informatica Administrator or the pmrep RegisterPlugincommand to register the plug-in.
The plug-in file for PowerExchange for Salesforce is pmsfdc.xml. When you install the Repository component, theinstaller copies pmsfdc.xml to the following directory:
<PowerCenter Installation Directory>/server/bin/native
Note: If you do not have the correct privileges to register the plug-in, contact the user who manages thePowerCenter Repository Service.
HTTP Proxy OptionsIf you are installing PowerExchange for Salesforce and your organization uses a proxy server to access theinternet, you must create the initialization file and configure HTTP proxy server authentication settings in the file.
You must configure the HTTP proxy server authentication settings for the following PowerCenter components:
¨ PowerCenter Client
¨ PowerCenter Integration Service
If you are upgrading PowerExchange for Salesforce, verify that the settings for the HTTP Proxy options for eachcomponent are correct.
Configuring HTTP Proxy Options for the PowerCenter ClientTo configure the HTTP proxy options for the PowerCenter Client:
1. Create an empty text file.
2. Create the following parameters in the text file:
¨ ProxyHost
¨ ProxyPort
¨ ProxyUser
¨ ProxyPassword
3. Specify the values for each parameter.
For example:ProxyHost=d123456.informatica.comProxyPort=8082ProxyUser=adminProxyPassword=password123
4. Save the text file as an .ini file and use the following file name:pmsfdc.ini
5. Place the file in the following directory:<PowerCenter Installation Directory>\client\bin
Plug-in Registration 5
Configuring HTTP Proxy Options for the PowerCenter IntegrationService
To configure the HTTP proxy options for the PowerCenter Integration Service:
1. Open the Administrator tool.
2. Click the Administration tab, and then select the PowerCenter Integration Service.
3. Click the Properties tab.
4. Click Edit for the HTTP Proxy Properties section.
5. Configure the following properties:
¨ HttpProxyServer
¨ HttpProxyPort
¨ HttpProxyUser
¨ HttpProxyPassword
¨ HttpProxyDomain
Uninstalling PowerExchange for SalesforceYou can uninstall PowerExchange for Salesforce when you uninstall PowerCenter. For more information aboutuninstalling PowerCenter, see the PowerCenter Installation Guide.
Release InformationPowerExchange for Salesforce includes new features and changed behavior.
New FeaturesPowerExchange for Salesforce includes new features.
Salesforce Bulk API SessionsEffective in version 9.0.1, you can use the Salesforce Bulk API to load bulk data into a Salesforce target.Salesforce Bulk API can insert, update, upsert, and delete records. In a Bulk API session, you can perform parallelor serial loads, log information about batch processing in the session log, and create success and failure logs. Bydefault, PowerExchange for Salesforce uses the standard Salesforce API.
Viewing Record-Level Session LogsEffective in version 8.6.0.1, the PowerCenter Integration Service generates record-level logs for each session thatwrites to a Salesforce target. The PowerCenter Integration Service generates the following types of logs:
¨ Success log. The success log contains an entry for each record that is successfully inserted, updated,deleted, or upserted. Each entry contains the values loaded for all fields of the record. Use this file understandwhat data is loaded into the Salesforce target.
6 Chapter 2: Installation and Configuration

¨ Failure log. The failure log contains an entry for each data error. Each log entry contains the values for allfields of the record and the error message. Use this file to understand why records did not load into theSalesforce target.
Note: The PowerExchange for Salesforce session logs are different from the PowerCenter session logs. ThePowerExchange for Salesforce session logs contain record-level details that are specific to sessions withSalesforce targets. You can also use the PowerCenter session logs to view information about the tasks performedby the PowerCenter Integration Service, general session errors, and load summary and transformation statisticsfor the session.
You can configure whether the PowerCenter Integration Service generates the success and failure logs and thedirectories where the logs are stored.
Capturing Deleted and Archived Salesforce RecordsEffective in version 8.6.0.1, the PowerCenter Integration Service can capture deleted and archived records from aSalesforce source object. By default, mappings do not capture deleted or archived records.
Supporting Salesforce Professional Edition AccountsEffective in version 8.6.0.1, the PowerCenter Integration Service can extract data from and load data intoSalesforce Professional edition accounts.
Merging Duplicate Salesforce RecordsEffective in version 8.6.0.1, PowerExchange for Salesforce contains the Salesforce Merge transformation. Use theSalesforce Merge transformation to merge duplicate records into a single record.
Validating Salesforce PickList ValuesEffective in version 8.6.0.1, PowerExchange for Salesforce contains the Salesforce PickList transformation. Usethe Salesforce PickList transformation to retrieve picklist values from Salesforce and store them in thePowerCenter repository. Use the picklist values to validate values that are loaded into a Salesforce target.
Changed BehaviorPowerExchange for Salesforce includes changed behavior.
Using Salesforce APIsEffective in version 9.0.1 HotFix1, PowerExchange for Salesforce uses version 19.0 of the Salesforce API.
Previously, the application connections pointed to earlier versions of the Salesforce service.
To connect to the the new version of a Salesforce object, change the service URL in existing applicationconnections from the previous version to the new version. The following table shows the service URLs forapplication connections created in previous versions of PowerExchange for Salesforce:
PowerExchange for Salesforce Version Salesforce Service URL
9.0.1 https://www.salesforce.com/services/Soap/u/18.0
9.0 https://www.salesforce.com/services/Soap/u/17.0
Release Information 7

PowerExchange for Salesforce Version Salesforce Service URL
8.6.1 and 8.6.1.0.3 https://www.salesforce.com/services/Soap/u/14.0
8.6.0.1 https://www.salesforce.com/services/Soap/u/12.0
8.1.1.0.2, 8.5, 8.5.1, and 8.6 https://www.salesforce.com/services/Soap/u/8.0
The 19.0 version of the Salesforce service URL is:
https://www.salesforce.com/services/Soap/u/19.0
If the new version of a Salesforce object has a different structure than the previous version of the object, reimportthe Salesforce object. After you reimport the object, analyze the associated mapping to determine if you need toupdate transformations in the mapping. For example, if you reimport a source definition that is based on aSalesforce object that contains a new field, you can modify your mapping to extract the new field and write thedata to the target.
Converting Time DataEffective in version 9.0.1, PowerExchange for Salesforce trims the date when it converts the PowerCenter Date/Time transformation datatype to the Salesforce time datatype.
Previously, when you configured a mapping to write to the Salesforce time datatype, you had to trim the date fromthe Date/Time transformation datatype. Existing mappings are unaffected by this change.
Specifying the ID field for an Upsert OperationEffective in version 8.6.1 HotFix5, you can specify the ID field to use for an upsert operation on a Salesforce target.
Previously, when you configured a session to upsert records into a Salesforce target and the Salesforce target hadmultiple external ID or Idlookup fields, the PowerCenter Integration Service used the first external ID or Idlookupfield to identify existing target records.
Updating the Repository Plug-inEffective in version 8.6.1, you must update the repository plug-in.
RELATED TOPICS:¨ “Updating the Repository Plug-in” on page 8
Configuring Dates for Change Data CaptureEffective in version 8.6.1, you can use the SystemModstamp or LastModifiedDate field for a time-period basedchange data capture session. Default is LastModifiedDate. When you upgrade to version 8.6.1, existing sessionscontinue to use the LastModifiedDate field. To increase session performance, configure sessions to use theSystemModstamp field. Salesforce indexes the SystemModstamp field, not the LastModifiedDate field.
Previously, all sessions used the LastModifiedDate field.
Upserting Records Based on a Salesforce idLookup FieldEffective in version 8.6.1, you can use the Salesforce idLookup or external ID fields to upsert records into aSalesforce object.
Previously, you had to use the external ID to upsert records.
8 Chapter 2: Installation and Configuration

Converting DatatypesEffective in version 8.6.1, PowerExchange for Salesforce supports the following datatype conversions:
SalesforceDatatype
Range and Description PowerCenterDatatype
Range and Description
encrypted String Encrypted text fields contain anycombination of letters, numbers, orsymbols that are stored in encryptedform.
String 1 to 104,857,600 characters
time Time values. Date/Time Precision 1 to 28 digits, scale 0 to 28.PowerCenter Integration Service addsthe current date to the time whenconverting from the time Salesforcedatatype to the Date/Timetransformation datatype.
Previously, PowerExchange for Salesforce did not support the Salesforce encryptedString or Time datatypes.
Handling Null Values in Update and Upsert OperationsEffective in version 8.6.0.1, you can configure the PowerCenter Integration Service to replace existing values in aSalesforce record with null values from a source during an update or upsert operation. By default, thePowerCenter Integration Service does not replace existing values with null values.
Previously, the PowerCenter Integration Service replaced existing values with null values by default. When youupgrade, all sessions are not configured to replace existing values with null values. To update existing value withnull values, configure the Set Fields to NULL session property.
Upserting Related Object RecordsEffective in version 8.6.0.1, the PowerCenter Integration Service can upsert records from more than two relatedobjects into a Salesforce target object.
Previously, you could upsert records from one or two related objects.
Release Information 9

C H A P T E R 3
Salesforce Sources and TargetsThis chapter includes the following topics:
¨ Salesforce Sources and Targets Overview, 10
¨ Importing Fields from Related Salesforce Objects, 10
¨ Salesforce Sources, 12
¨ Salesforce Targets, 12
¨ Importing a Salesforce Source or Target Definition, 14
Salesforce Sources and Targets OverviewUse the Designer to import Salesforce source and target definitions into the PowerCenter repository. You canimport metadata from any standard or custom Salesforce object available to your Salesforce user account.
When you import a Salesforce definition, the Designer creates one port for each field of the Salesforce object.When you import the Salesforce definition, you can also import fields of related objects. The Designer determinesrelated objects based on the relationships defined in Salesforce.
If you create a Salesforce definition manually, the Designer creates the definition with no fields and does not allowyou to add any fields.
Importing Fields from Related Salesforce ObjectsWhen you import a Salesforce object, you can import fields of related Salesforce objects into the same source ortarget definition or transformation. You can import fields from child and descendant related objects.
The Designer identifies related Salesforce objects based on relationships defined in Salesforce. Related objectscan include standard and custom Salesforce objects.
For example, if you import Opportunity as a source, you can also import fields of the following child related objects:
¨ Account. By default, the Opportunity object stores the account ID of the opportunity. If you import the relatedobject Account, you can view details about each account, such as account name, account type, and the parentaccount.
¨ Campaign. By default, the Opportunity object stores the campaign ID of the opportunity. If you import therelated object Campaign, you can view details about the corresponding campaign, such as campaign name,type, description, and start and end dates.
10

In this example, the Opportunity object is the primary Salesforce object in the definition and the Account andCampaign objects are child related objects. A primary Salesforce object is the primary object used to create thedefinition.
You can also import descendant related objects, which are indirectly related to the primary object. For example,when you import the Opportunity object, you can also import the User descendant related object based on itsAccounts relationship with the Account child related object. You might import the fields of the User object to getthe details about the account owner such as the account owner name, phone number, and email address.
When you import the primary Salesforce object in the Designer, you can also specify the related objects to import.The Designer displays related objects using the following naming convention:
<Relationship name> (<Salesforce object name>)
The Designer shows the relationship name and the object name as they are defined in Salesforce.
Note: When you import a Salesforce object and its related objects, some related objects may not appear. TheSalesforce API does not expose all related objects and their relationships.
Rules and Guidelines for Importing Fields from Related SalesforceObjects
Use the following rules and guidelines when you import fields from related Saleforce objects:
¨ Import fields of related objects to create a Salesforce source definition under the following circumstances:
- You want to extract data from Salesforce only.
- You want to load data for the Salesforce object and one or more related objects.
- You do not need to transform source data before you load it into the target.
- To improve session performance when you join data from multiple Salesforce objects. Instead of using aJoiner transformation to join data from multiple Salesforce objects, import the fields of the related objects inthe Salesforce source definition to improve performance.
¨ You cannot import fields from related objects if the related objects are parent objects, and if the Salesforcedefinition is based one of the following Salesforce objects:
- Attachment
- Note
- NoteAndAttachment
- ProcessInstance
- ProcessInstanceHistory
¨ Import fields of related objects to create a Salesforce target definition when you want to upsert records into aSalesforce target and its related objects. You can use the external ID or Salesforce idLookup fields to upsertrecords into a Salesforce target or related object.
¨ Import fields of related objects for a Salesforce Lookup transformation when you want to look up data in theprimary Salesforce object and related objects and do not want to perform a join. For example, you can lookupopportunity information in the Opportunity object and also get the related account information in the Accountrelated object.
¨ Import fields of related objects for a Salesforce Merge transformation when you want to merge data in theprimary Salesforce object with data in related objects.
¨ Import fields of related objects for a Salesforce Picklist transformation when you want to retrieve picklist valuesfrom related objects.
Importing Fields from Related Salesforce Objects 11

Salesforce SourcesThe PowerCenter Integration Service can extract data from Salesforce source definitions. You can import one ormore source definitions for each Salesforce object. If you import multiple source definitions for the sameSalesforce object, you must provide unique names for the source definitions. If you do not provide unique names,the Designer requires you to resolve the conflict.
When the PowerCenter Integration Service extracts data from a Salesforce source, it converts the data based onthe datatypes in the Application Source Qualifier associated with the source.
Time Zones for Salesforce SourcesSalesforce can store datetime data in multiple time zones. The PowerCenter Integration Service converts the timezones of all times extracted from Salesforce to the Coordinated Universal Time (UTC) time zone.
Time Conversion from Salesforce SourcesWhen the PowerCenter Integration Service extracts data from a Time field of a Salesforce object, it adds thecurrent date to the time. For example, the PowerCenter Integration Service extracts 10:46:51.9884 from a Timefield in a Salesforce source on 01/01/2007. The resulting Date/Time value is 01/01/2007 10:46:51.988400.
Salesforce TargetsYou can perform insert, update, delete, and upsert operations on a Salesforce target.
The PowerCenter Integration Service determines whether records are new, existing, or deleted based on therecord ID. You can use the following types of IDs to identify records in Salesforce objects:
¨ Salesforce ID. By default, Salesforce generates IDs for each new record.
¨ External ID. External IDs are IDs that are generated outside of Salesforce. You cannot use external IDs toidentify records for deletion from a Salesforce target.
You can also configure the PowerCenter Integration Service to replace existing values in a record in a Salesforcetarget with null values during an update or upsert operation. By default, the PowerCenter Integration Service doesnot replace existing values with null values.
RELATED TOPICS:¨ “Handling Null Values in Update and Upsert Operations” on page 35
Time Zones for Salesforce TargetsSalesforce targets store time data as Coordinated Universal Time (UTC) data. Ensure that each mapping convertstime data to the UTC time zone before it loads the data into the target.
Determining Possible Update Strategies for a Salesforce TargetYou can view properties for a Salesforce target definition to determine whether you can create, update, or upsertrecords into the Salesforce target. To view details about object fields, double-click the title bar of the targetdefinition and select the Attributes tab.
12 Chapter 3: Salesforce Sources and Targets

The Attributes tab lists attribute values for each field in the imported Salesforce object.
The following table describes the attributes that display for each field:
Attribute Description
SforceName Field name in Salesforce.
Field Name Name of the field as it is defined in the Salesforce target definition.
Createable Indicates whether the field allows inserts:- 0. False, the PowerCenter Integration Service cannot insert data in this field.- 1. True, the PowerCenter Integration Service can insert data in this field.A PowerCenter insert is equivalent to a Salesforce create operation.
Updateable Indicates whether the field allows updates:- 0. False, the PowerCenter Integration Service cannot update data in this field.- 1. True, the PowerCenter Integration Service can update data in this field.
External ID Salesforce custom fields only. Indicates whether the field is designated as an external ID field:- 0. False, the field is not designated as an external ID field.- 1. True, the field is designated as an external ID field.Each Salesforce object can contain a single custom field designated as the external ID field.Salesforce appends custom field names with “__c”.For more information about external ID and custom fields, see the Salesforce documentation.
Rules and Guidelines for the Salesforce Target Update StrategyUse the following rules and guidelines when configuring the update strategy for a Salesforce target:
¨ The PowerCenter Integration Service cannot create or update system fields in a record of a Salesforce target.Each Salesforce object includes read-only system fields that Salesforce creates or updates. For example, eachSalesforce object includes an Id system field. The Id field contains a unique identifier for the record. When yourun a session containing a Salesforce target definition, the PowerCenter Integration Service inserts the recordinto the Salesforce target, but Salesforce generates the ID.
¨ To configure a session to update or delete records in the Salesforce target, you must pass the ID for eachrecord through the mapping and link it to the Id input port in the Salesforce target definition. Salesforce usesthe Id field to identify the record being updated or deleted.
¨ To upsert a record, you must provide the external ID or Salesforce idLookup field.
¨ To delete a record, you must provide the Salesforce ID.
¨ You do not need to link the Id input port for a session that inserts records. Salesforce generates the ID for newrecords. You can also insert, update, and upsert records in a Salesforce target based on the external ID if youuse the external ID field to identify records in a Salesforce object. You might choose to use an external ID toupdate or upsert records when it is difficult to get the ID from the Id field in the Salesforce target.
¨ If the PowerCenter Integration Service encounters a transient error while performing an update, upsert, ordelete operation, it retries the operation. The PowerCenter Integration Service retries the operation three timeswith a five-second interval between retry attempts. Transient errors include errors such as network failures andtimeouts from Salesforce.
¨ Salesforce targets cannot contain XML characters. If the PowerCenter Integration Service encounters XMLcharacters in a source field, it removes the XML characters before loading the Salesforce target field.
Salesforce Targets 13

Importing a Salesforce Source or Target DefinitionTo import a source or target definition from Salesforce:
1. Import a definition.
¨ To import a Salesforce source definition, in the Source Analyzer, click Sources > Import from Salesforce.
¨ To import a Salesforce target definition, in the Target Designer, click Targets > Import from Salesforce.
2. In the Import Tables from Salesforce dialog box, enter the following information:
Import Attribute Description
User Name Salesforce user name.
Password Password for the Salesforce user name. Password is case sensitive.
Service URL URL of the Salesforce service you want to access.In a test or development environment, you might want to access the Salesforce Sandbox testingenvironment. For more information about the Salesforce Sandbox, see the Salesforcedocumentation.
3. Click Connect.
The Designer displays a list of objects available to the Salesforce user.
4. Select the objects you want to import, and click OK.
¨ Hold down the Shift key to select blocks of tables.
¨ Hold down the Ctrl key to make non-contiguous selections.
¨ Use the Select All button to select all tables.
¨ Use the Select None button to clear all highlighted selections.
5. In the Include Salesforce Object Relationship dialog box, select the related objects to include in the sourcedefinition.
6. Click OK.
14 Chapter 3: Salesforce Sources and Targets

C H A P T E R 4
Salesforce Lookup TransformationThis chapter includes the following topics:
¨ Salesforce Lookup Transformation Overview, 15
¨ Salesforce Lookup Components, 16
¨ Salesforce Lookup Ports, 17
¨ Salesforce Lookup Query, 19
¨ Creating a Salesforce Lookup Transformation, 19
Salesforce Lookup Transformation OverviewThe Salesforce Lookup transformation is an active transformation. Use a Salesforce Lookup transformation to lookup data in a Salesforce object. For example, the source table includes the employee ID, but you want to includethe employee name in the target table to make summary data easy to read. You can use the Salesforce Lookuptransformation to look up the employee name in a Salesforce object.
You can create a Salesforce Lookup transformation from any standard or custom Salesforce object available toyour Salesforce user account. You can also include fields from related Salesforce objects in the SalesforceLookup transformation.
The PowerCenter Integration Service queries the lookup source based on ports in the transformation. It generatesqueries in sforce Object Query Language (SOQL), which is a derivative of SQL. It generates a query for each rowthat enters the Salesforce Lookup transformation. The PowerCenter Integration Service compares thetransformation port values to lookup source field values based on the SOQL queries.
A Salesforce Lookup transformation differs from a Lookup transformation. For example, the Salesforce Lookuptransformation returns all rows that match the lookup query condition. The Lookup transformation returns one row.When the Salesforce Lookup transformation returns multiple rows, it assigns a sequence ID to each row thatmatches the condition.
The following table describes the differences between the Salesforce Lookup transformation and the Lookuptransformation:
Item Salesforce Lookup Transformation Lookup Transformation
Lookup object Salesforce object Flat file or relational table
Transformation type Active Passive
Transformation in mapping Connected Connected or unconnected
15

Item Salesforce Lookup Transformation Lookup Transformation
Cache type Uncached Cached or uncached
Return rows All matched rows Single matched row
Query language SOQL query SQL query
Query conditionconfiguration
Based on connected ports Defined on the Condition tab of the transformation
Note: The Salesforce Lookup transformation can retrieve data in real time. To cache Salesforce data, use aSalesforce source definition instead of a Salesforce Lookup transformation. You can use a Joiner transformationto join two data sources and cache source data during processing.
Salesforce Lookup ComponentsWhen you configure a Salesforce Lookup transformation, you define the following components:
¨ Transformation tab. You can rename the transformation and add a description on the Transformation tab.
¨ Ports tab. The Salesforce Lookup transformation can include lookup ports, pass-through ports, and defaultports.
¨ Properties tab. You can configure the tracing level for the transformation. The default tracing level is Normal.In addition, you can specify whether or not the output is deterministic. By default, the output is deterministic.
¨ Initialization Properties tab. The Salesforce Lookup transformation does not use initialization properties. ThePowerCenter Integration Service retrieves initialization information from a vendor-defined metadata extension.
¨ Metadata Extensions tab. Create a non-reusable metadata extension to extend the metadata of thetransformation transformation. Configure the extension name, datatype, precision, and value. You can alsopromote a metadata extension to a reusable extension if you want to make the extension available to alltransformation transformations.
¨ Port Attribute Definitions tab. The Port Attribute Definitions tab displays the port attributes defined for aSalesforce Lookup transformation. SforceDataType and SforceName are the only port attributes.
The transformation includes some configurable Custom transformation properties that the PowerCenter IntegrationService does not use for lookups. The PowerCenter Integration Service ignores those configurable properties atrun time.
16 Chapter 4: Salesforce Lookup Transformation

The following table lists configurable properties that the Salesforce Lookup transformation does not use:
Property Location Description
Runtime Location Properties tab The PowerCenter Integration Service ignores the run-timelocation.
Initialization Property Initialization Properties tab The PowerCenter Integration Service ignores the initializationproperties. It retrieves initialization information from a vendor-defined metadata extension.
Port Attribute Definition Port Attribute Definitions tab The Salesforce Lookup transformation uses a port attributedefinition named SforceDataType. If you configure additionalport attribute definitions, the PowerCenter Integration Serviceignores them.
Salesforce Lookup PortsYou can include the following types of ports in a Salesforce Lookup transformation:
¨ Lookup ports. You import the lookup ports from a Salesforce object definition when you create a SalesforceLookup transformation. The PowerCenter Integration Service uses lookup ports to generate the lookup query.
¨ Pass-through ports. You can add pass-through ports to the transformation. The PowerCenter IntegrationService passes these port values unchanged through the transformation.
¨ Default ports. When you import a Salesforce object definition, the Designer creates default ports namedLKP_FILTER and LKP_MATCHIDX. You can use the LKP_FILTER port to add a filter condition to the lookupquery. The PowerCenter Integration Service uses the LKP_MATCHIDX port to assign sequence IDs tomatched rows.
Lookup PortsWhen you import a Salesforce object to create a Salesforce Lookup transformation, the Designer creates ports touse in the lookup query. The PowerCenter Integration Service generates the lookup query based on connectedinput and output ports. If you rename a port that you imported from a Salesforce object, the PowerCenterIntegration Service does not include the port in the lookup query.
When you import a Salesforce object, the Designer converts the Salesforce field datatypes to transformationdatatypes and stores the Salesforce datatypes as port attributes. The Ports tab of a Salesforce Lookuptransformation displays the transformation datatypes. To view the Salesforce datatypes, view the port-levelattributes.
To view the port-level attributes in a Salesforce Lookup transformation, click the Ports tab of the transformation.Then click Edit > Port Attributes. The Salesforce datatypes for ports appear in the port-level attributes.
For ports that are imported from Salesforce, the datatypes must conform to the Salesforce and transformationdatatype mapping.
RELATED TOPICS:¨ “Salesforce Lookup Query” on page 19
¨ “Salesforce and Transformation Datatypes” on page 39
Salesforce Lookup Ports 17

Pass-Through PortsYou can add ports to a Salesforce Lookup transformation as pass-through ports. The PowerCenter IntegrationService passes the value of these ports through the transformation without performing lookup on the data.
To add a pass-through port, create a new port or copy and paste a port into the transformation. Then, connect theport to upstream and downstream ports.
LKP_FILTER PortWhen you import a Salesforce object to create a Salesforce Lookup transformation, the Designer creates a defaultport named LKP_FILTER. Use the LKP_FILTER port to add filter conditions in the lookup query that you cannotgenerate by connecting the lookup input ports of the Lookup transformation.
Note: You can use the LKP_FILTER port in conjunction with the connected lookup input ports.
In a mapping, you can create a transformation such as an Expression transformation that outputs a constant, arange, or a mapping parameter or variable value. Then, you can connect the appropriate output port of thetransformation to the LKP_FILTER input port. The lookup query includes the output in the WHERE clause of thelookup query.
For example, you create an Expression transformation that outputs the value of the Name port as a constant,‘Edge Communications.’ The transformation uses the following expression:
'Name =' || CHR(39) || 'Edge Communications' || CHR(39)
Then, you project the Expression transformation output for the Name port to the LKP_FILTER port in theSalesforce Lookup transformation. In this example, the Salesforce Lookup transformation is based on theSalesforce object named Account. The connected lookup input ports are Id, Sale_Amount, and Sale_Date. Theconnected lookup output ports are Sale_Amount, Sale_Date, and Name.
Note: If you use a default port and modify or rename it, you might get unexpected results.
The SOQL SELECT statement for each row that passes through the transformation has the following format:
SELECT Id, Name, Phone FROM Account WHERE Id = '<value of Id>' AND AccountNumber = '<value of AccountNumber>' AND Name = 'Edge Communications'
RELATED TOPICS:¨ “Salesforce Lookup Query” on page 19
LKP_MATCHIDX PortWhen you import a Salesforce object to create a Salesforce Lookup transformation, the Designer creates a defaultport named LKP_MATCHIDX.
Use the LKP_MATCHIDX output port to identify the matched rows when a lookup query returns multiple matches.For each matched row, the PowerCenter Integration Service assigns a unique sequence ID. A value of 0 meansthat no match exists for the input row.
The following rules apply to matched and unmatched rows:
¨ Matched. The SOQL query returns a row for each match found. It can return multiple rows for one input row. Ifyou use the LKP_MATCHIDX port and the query returns multiple matches, the PowerCenter Integration Servicegenerates a sequence ID for each returned row. The values of the sequence IDs are 1–n.
18 Chapter 4: Salesforce Lookup Transformation

¨ Unmatched. If the SOQL query returns no rows, the PowerCenter Integration Service generates one outputrow with a sequence ID of 0. The PowerCenter Integration Service retains the value of pass-through ports, andit sets the value of the lookup output ports to NULL. To pass null values to the target, you must configure it toaccept null values. If you do not want to pass null values to the target, use a transformation to convert nullvalues to a default value.
Note: If you use a default port and modify or rename it, you might get unexpected results.
Salesforce Lookup QueryThe input and output ports in a Salesforce Lookup transformation determine the sforce Object Query Language(SOQL) query used in the lookup. The SOQL language is a derivative of SQL. The PowerCenter IntegrationService generates a separate SOQL query for each row that passes into the transformation. The port values foreach row determine the values used in the query.
The PowerCenter Integration Service generates SOQL queries according to the following rules:
¨ A lookup port is a port that you import from a Salesforce object and connect in a mapping.
¨ All lookup ports must match the Salesforce field name and have an associated Salesforce datatype.
¨ The PowerCenter Integration Service generates the SELECT statement based on the connected lookup outputports.
¨ The PowerCenter Integration Service generates the WHERE clause based on the connected lookup input portsand the LKP_FILTER port.
¨ The PowerCenter Integration Service matches rows based on equality with the connected input port valuesand, if applicable, based on an additional filter condition.
For example, a Salesforce Lookup transformation is based on the Salesforce object named Account. Theconnected lookup input ports are Id and AccountNumber. The connected lookup output ports are Id, Name, andPhone. The SOQL SELECT statement has the following format:
SELECT Id, Name, Phone FROM Account WHERE Id = '<value of Id>' AND AccountNumber = '<value of AccountNumber>'
Creating a Salesforce Lookup TransformationTo create a Salesforce Lookup transformation:
1. In the Transformation Developer or Mapping Designer, click Transformation > Create.
The Create Transformation dialog box appears.
2. Select Salesforce Lookup as the transformation type, and enter a name.
3. Click Create.
Salesforce Lookup Query 19

4. In the Import Tables from Salesforce dialog box, enter the following information:
Import Attribute Description
User Name Salesforce user name.
Password Password for Salesforce user name. The password is case sensitive.
Service URL URL of the Salesforce service that you want to access.In a test or development environment, you might want to access the Salesforce Sandboxtesting environment. For more information about the Salesforce Sandbox, see the Salesforcedocumentation.
5. Click Connect.
The Designer displays a list of objects available to the Salesforce user.
6. Select the object you want to import, and click OK.
7. In the Include Salesforce Object Relationships dialog box, select the relationships to include, and click OK.
If there are no conflicts, the Designer creates a Salesforce Lookup transformation based on the selectedobject and related objects. If there are conflicts, resolve the conflicts.
8. In the Create Transformation dialog box, click Done.
20 Chapter 4: Salesforce Lookup Transformation
C H A P T E R 5
Salesforce Merge TransformationThis chapter includes the following topics:
¨ Salesforce Merge Transformation Overview, 21
¨ Salesforce Merge Components, 22
¨ Salesforce Merge Ports, 23
¨ Rules and Guidelines for the Salesforce Merge Transformation, 23
¨ Creating a Salesforce Merge Transformation, 24
Salesforce Merge Transformation OverviewThe Salesforce Merge transformation is a passive transformation. Use a Salesforce Merge transformation tomerge duplicate records.
You can create a Salesforce Merge transformation from Account, Contact or Lead Salesforce objects. You canalso include fields from related Salesforce objects in the Salesforce Merge transformation.
You can merge up to three Salesforce records into a single record. When you create a Salesforce Mergetransformation, you identify the master record and up to two slave records. When you merge the records, theSalesforce Merge transformation retains the master record and deletes the slave records from the Salesforceobject.
To ensure that no child records become orphaned, the Salesforce Merge transformation reassigns child records ofslave records to the master record. For example, you merge two records from the Account Salesforce object. Eachaccount record is the parent of a record in the Contact Salesforce object. When the Salesforce Mergetransformation merges the account records, it also assigns the contact record associated with the slave accountrecord to the master account record.
You can override the values of Salesforce object attributes in a master record. To override an attribute value,configure the source to provide the value for the Salesforce object attribute, and map the field from the sourcethrough the Salesforce Merge transformation to the target in the mapping.
21
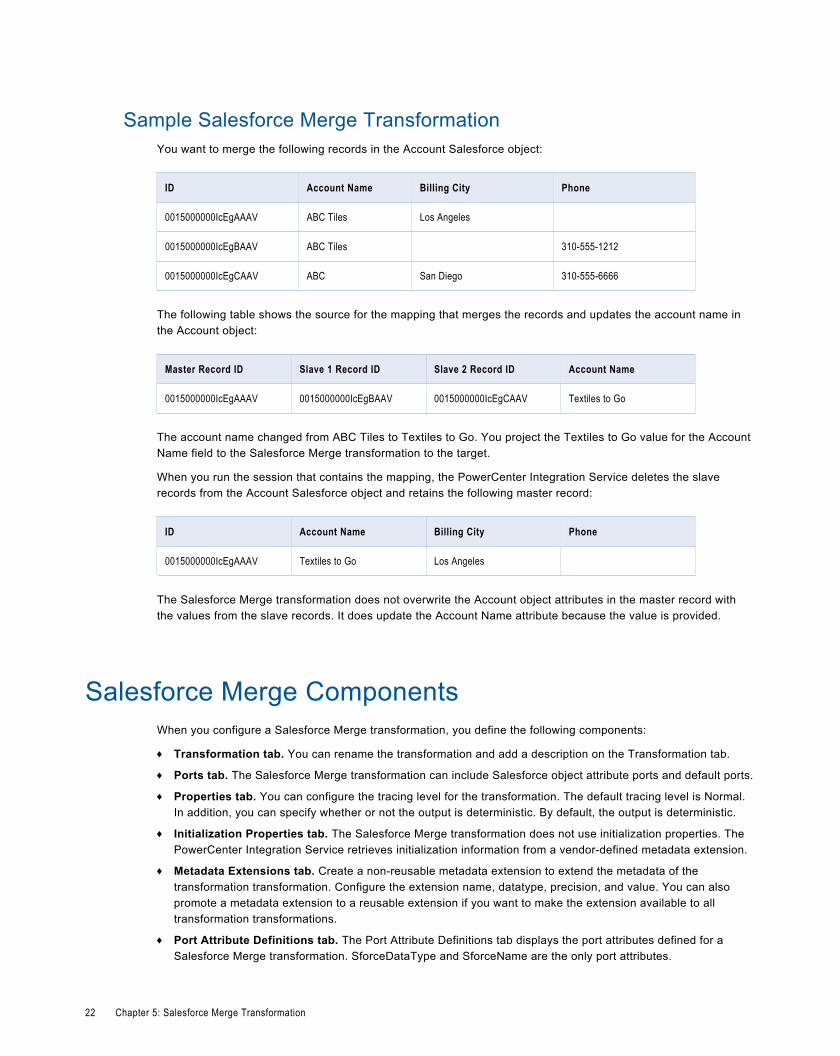
Sample Salesforce Merge TransformationYou want to merge the following records in the Account Salesforce object:
ID Account Name Billing City Phone
0015000000IcEgAAAV ABC Tiles Los Angeles
0015000000IcEgBAAV ABC Tiles 310-555-1212
0015000000IcEgCAAV ABC San Diego 310-555-6666
The following table shows the source for the mapping that merges the records and updates the account name inthe Account object:
Master Record ID Slave 1 Record ID Slave 2 Record ID Account Name
0015000000IcEgAAAV 0015000000IcEgBAAV 0015000000IcEgCAAV Textiles to Go
The account name changed from ABC Tiles to Textiles to Go. You project the Textiles to Go value for the AccountName field to the Salesforce Merge transformation to the target.
When you run the session that contains the mapping, the PowerCenter Integration Service deletes the slaverecords from the Account Salesforce object and retains the following master record:
ID Account Name Billing City Phone
0015000000IcEgAAAV Textiles to Go Los Angeles
The Salesforce Merge transformation does not overwrite the Account object attributes in the master record withthe values from the slave records. It does update the Account Name attribute because the value is provided.
Salesforce Merge ComponentsWhen you configure a Salesforce Merge transformation, you define the following components:
¨ Transformation tab. You can rename the transformation and add a description on the Transformation tab.
¨ Ports tab. The Salesforce Merge transformation can include Salesforce object attribute ports and default ports.
¨ Properties tab. You can configure the tracing level for the transformation. The default tracing level is Normal.In addition, you can specify whether or not the output is deterministic. By default, the output is deterministic.
¨ Initialization Properties tab. The Salesforce Merge transformation does not use initialization properties. ThePowerCenter Integration Service retrieves initialization information from a vendor-defined metadata extension.
¨ Metadata Extensions tab. Create a non-reusable metadata extension to extend the metadata of thetransformation transformation. Configure the extension name, datatype, precision, and value. You can alsopromote a metadata extension to a reusable extension if you want to make the extension available to alltransformation transformations.
¨ Port Attribute Definitions tab. The Port Attribute Definitions tab displays the port attributes defined for aSalesforce Merge transformation. SforceDataType and SforceName are the only port attributes.
22 Chapter 5: Salesforce Merge Transformation

Salesforce Merge PortsYou can include the following types of ports in a Salesforce Merge transformation:
¨ Salesforce object attribute ports. Use these ports to update values for the Salesforce object attributes in themaster record. The values in these ports override the values in the master and slave records.
¨ Default ports. When you import a Salesforce object definition, the Designer creates the default input ports andthe default MergedID, MergedSlaveID1, and MergedSlaveID2 output ports.
Salesforce Object Attribute PortsThe Salesforce Merge transformation contains input ports for all attributes of the Salesforce object. Provide valuesfor each port to override the values in the master record. The PowerCenter Integration Service updates the masterrecord with the values provided for each Salesforce object port.
When you map source values to a port, verify that the datatypes the source data and ports are compatible. If youmap incompatible datatypes, the session may fail or the master record may contain unexpected values.
RELATED TOPICS:¨ “Salesforce and Transformation Datatypes” on page 39
ID and SlaveID Input PortsMap the master record ID to the ID input field. Map the slave record ID to the input SlaveID1 field. If applicable,map the second slave record ID to the input SlaveID2 field. The PowerCenter Integration Service identifies themaster and slave records in the Salesforce object using the IDs provided by the source.
MergedID, MergedSlaveID1, and MergedSlaveID2 Output PortsThe Salesforce Merge transformation populates the master record ID in the MergedID field. The PowerCenterIntegration Service also deletes slave records that are identified in the SlaveID1 and SlaveID2 fields.
Rules and Guidelines for the Salesforce MergeTransformation
Use the following rules and guidelines to configure the Salesforce Merge transformation:
¨ The session fails if you do not specify the master record ID and at least one slave ID.
¨ The IDs for the master record and slave records must be valid Salesforce IDs.
¨ Values of fields that are linked to the Salesforce Merge transformation overwrite existing values in the masterrecord.
¨ If you project columns of the master record, but the values are null, the merge will take the value from the slaverecord and update the master record with this value.
¨ The Salesforce Merge transformation reassigns child records of each slave record to the master record duringthe merge.
¨ You can merge at most two slave records with a master record. To merge more than two slave records, createand run the Salesforce Merge transformation multiple times using the same master record ID.
Salesforce Merge Ports 23

¨ The PowerCenter Integration Service does not merge a slave record if the slave ID is blank, does not exist inthe Salesforce object, or the slave ID does not contain 18 characters.
¨ If the master ID or at least one slave ID does not exist in the Salesforce object, the merge fails.
Creating a Salesforce Merge TransformationTo create a Salesforce Merge transformation:
1. In the Transformation Developer or Mapping Designer, click Transformation > Create.
The Create Transformation dialog box appears.
2. Select Salesforce Merge as the transformation type, and enter a name.
3. Click Create.
4. In the Import Tables from Salesforce dialog box, enter the following information:
Import Attribute Description
User Name Salesforce user name.
Password Password for Salesforce user name. The password is case sensitive.
Service URL URL of the Salesforce service that you want to access.In a test or development environment, you might want to access the Salesforce Sandboxtesting environment. For more information about the Salesforce Sandbox, see the Salesforcedocumentation.
5. Click Connect.
The Designer displays a list of objects available to the Salesforce user.
6. Select the object you want to import, and click OK.
7. In the Include Salesforce Object Relationships dialog box, select the relationships you want to include, andclick OK.
If there are no conflicts, the Designer creates a Salesforce Merge transformation based on the selected objectand related objects. If there are conflicts, resolve the conflicts.
8. In the Create Transformation dialog box, click Done.
24 Chapter 5: Salesforce Merge Transformation

C H A P T E R 6
Salesforce PickList TransformationThis chapter includes the following topics:
¨ Salesforce PickList Transformation Overview, 25
¨ Salesforce PickList Components, 25
¨ Salesforce PickList Ports, 26
¨ Rules and Guidelines for the Salesforce PickList Transformation, 26
¨ Creating a Salesforce PickList Transformation, 26
Salesforce PickList Transformation OverviewThe Salesforce PickList transformation is a passive transformation. Use the Salesforce PickList transformation toretrieve a list of picklist values for a field in a Salesforce object. A Salesforce picklist is a list of valid values for aSalesforce field. You might retrieve picklist values to validate source data.
You can create a Salesforce PickList transformation from any standard or custom Salesforce object available toyour Salesforce user account. You can also include fields from related Salesforce objects in the SalesforcePickList transformation.
The PowerCenter Integration Service can retrieve the picklist for each field with a defined picklist in the SalesforcePickList transformation. In the mapping, you can use any source type with the Salesforce PickList transformation.To retrieve the list of picklist values, connect the Source Qualifier transformation to the PickList_Input port of theSalesforce PickList transformation. The transformation outputs a colon-separated list of valid values for the picklistfields linked to the target.
Salesforce PickList ComponentsWhen you configure a Salesforce PickList transformation, you define the following components:
¨ Transformation tab. You can rename the transformation and add a description on the Transformation tab.
¨ Ports tab. The Salesforce PickList transformation can include picklist ports and pass-through ports.
¨ Properties tab. You can configure the tracing level for the transformation. The default tracing level is Normal.In addition, you can specify whether or not the output is deterministic. By default, the output is deterministic.
¨ Initialization Properties tab. The Salesforce PickList transformation does not use initialization properties. ThePowerCenter Integration Service retrieves initialization information from a vendor-defined metadata extension.
25
¨ Metadata Extensions tab. Create a non-reusable metadata extension to extend the metadata of thetransformation transformation. Configure the extension name, datatype, precision, and value. You can alsopromote a metadata extension to a reusable extension if you want to make the extension available to alltransformation transformations.
¨ Port Attribute Definitions tab. The Port Attribute Definitions tab displays the port attributes defined for aSalesforce PickList transformation. The SforceDataType and SforceName are the only port attributes.
Salesforce PickList PortsYou can include the following types of ports in a Salesforce PickList transformation:
¨ PickList_Input port. To enable the PowerCenter Integration Service to retrieve the Salesforce picklist, mapany field in the Source Qualifier transformation to the PickList_Input port in the Salesforce PickListtransformation. If you do not map a field to the PickList_Input port, the session fails.
¨ Output ports. By default, the Designer creates output ports for Salesforce object attributes that have picklistvalues. To output multiple picklists for different Salesforce object attributes, configure one Source Qualifiertransformation for each attribute. When you run the session, the PowerCenter Integration Service outputspicklist values for each Salesforce object attribute included in the mapping.
¨ Pass-through ports. You can add ports to a Salesforce PickList transformation as pass-through ports. ThePowerCenter Integration Service passes the value of a pass-through port through the transformation and intothe target if the port is connected to the target.
Rules and Guidelines for the Salesforce PickListTransformation
Use the following guidelines to configure the Salesforce PickList transformation:
¨ The default length for picklist ports is 512 characters. The PowerCenter Integration Service truncates valuesthat are longer than 512 characters. To prevent truncation, increase the port length.
¨ You must connect at least one port from the source to the Salesforce PickList transformation.
¨ The Salesforce PickList transformation does not retrieve restricted picklist values from Salesforce because theSalesforce API does not expose them.
¨ The Salesforce PickList transformation does not retrieve values from multi-select picklists.
Creating a Salesforce PickList TransformationTo create a Salesforce PickList transformation:
1. In the Transformation Developer or Mapping Designer, click Transformation > Create.
The Create Transformation dialog box appears.
2. Select Salesforce PickList as the transformation type, and enter a name.
26 Chapter 6: Salesforce PickList Transformation

3. Click Create.
4. In the Import Tables from Salesforce dialog box, enter the following information:
Import Attribute Description
User Name Salesforce user name.
Password Password for Salesforce user name. The password is case sensitive.
Service URL URL of the Salesforce service that you want to access.In a test or development environment, you might want to access the Salesforce Sandboxtesting environment. For more information about the Salesforce Sandbox, see the Salesforcedocumentation.
5. Click Connect.
The Designer displays a list of objects available to the Salesforce user.
6. Select the object you want to import, and click OK.
7. In the Include Salesforce Object Relationships dialog box, select the relationships to include, and click OK.
If there are no conflicts, the Designer creates a Salesforce PickList transformation based on the selectedobject and related objects. If there are conflicts, resolve the conflicts.
8. In the Create Transformation dialog box, click Done.
Creating a Salesforce PickList Transformation 27
C H A P T E R 7
Salesforce Sessions and WorkflowsThis chapter includes the following topics:
¨ Salesforce Sessions and Workflows Overview, 28
¨ Salesforce Connections, 28
¨ Configuring a Session with a Salesforce Source, 29
¨ Configuring a Session with a Salesforce Target, 33
¨ Configuring a Session for Optimal Performance, 38
Salesforce Sessions and Workflows OverviewAfter you create mappings, you can create a session and use the session in a workflow to extract, transform, andload data. Create sessions and workflows in the Workflow Manager.
When you configure a Salesforce session, you create connections to read data from and write data to Salesforce.You can also define properties in a session to determine how the PowerCenter Integration Service reads data froma Salesforce source or writes data to a Salesforce target.
To configure the session, complete the following tasks:
¨ Configure an application connection for Salesforce sources and targets in the Workflow Manager. Youconfigure application connections to read from or write to Salesforce.
¨ Configure the session properties for the Salesforce source.
¨ Configure the session properties for the Salesforce target.
¨ Optionally, configure the session for optimal performance.
Salesforce ConnectionsBefore the PowerCenter Integration Service can connect to Salesforce, you must configure a Salesforceapplication connection in the Workflow Manager. When you configure a Salesforce application connection, youspecify connection attributes the PowerCenter Integration Service uses to connect to Salesforce. A connectionobject stores the Salesforce user ID, password, and end point URL information for the run-time connection.
28

The PowerCenter Integration Service uses the Salesforce security mechanism to authenticate the login. If youprovide an invalid login, the following error appears:
Invalid login. When accessing Salesforce from outside of your company's trusted networks, you must append a security token to your password to log in to the API or a desktop client. To receive or reset your security token, log in to Salesforce with your browser and click Setup | My Personal Information | Reset Security Token.
For more information about obtaining a valid Salesforce login, see the Salesforce administrator for yourorganization.
Note: You cannot use a connection variable for an application connection.
Configuring a Salesforce ConnectionTo configure a Salesforce application connection:
1. In the Workflow Manager, connect to a PowerCenter repository.
2. Click Connections > Application.
The Application Connection Browser dialog box appears.
3. From Select Type, select Salesforce Connection.
4. Click New.
5. In the Connection Object Definition dialog box, enter a name for the application connection.
6. Enter the Salesforce user name for the application connection.
The PowerCenter Integration Service uses this user name to log in to Salesforce.
7. Enter the password for the Salesforce user name.
8. Enter the Salesforce service URL.
In a test or development environment, you might want to access the Salesforce Sandbox testing environment.For more information about the Salesforce Sandbox, see the Salesforce documentation.
9. Click OK.
The new application connection appears in the Application Object Browser.
Configuring a Session with a Salesforce SourceYou can configure the session properties for a Salesforce source on the Mapping tab. Define the properties foreach source instance in the session.
The following table describes the session properties you can configure for a Salesforce source:
Property Name Description
SOQL Filter Condition Enter a filter condition to filter Salesforce source records.
CDC Time Limit Time period (in seconds) that the PowerCenter Integration Service reads changed Salesforcedata. When you set the CDC Time Limit to a non-zero value, the PowerCenter IntegrationService performs a full initial read of the source data and then captures changes to theSalesforce data for the time period you specify. Set the value to -1 to capture changed datafor an infinite period of time. Default is 0.
Configuring a Session with a Salesforce Source 29

Property Name Description
Flush Interval Interval (in seconds) at which the PowerCenter Integration Service captures changedSalesforce data. Default is 300. If you set the CDC Time Limit to a non-zero value, thePowerCenter Integration Service captures changed data from the source every 300 seconds.Otherwise, the PowerCenter Integration Service ignores this value.
CDC Start Timestamp Start date and time for the time period. The PowerCenter Integration Service extracts datathat was added or modified after this time. Must be in the format YYYY-MM-DDTHH:MI:SS.SSSZ. You can also use the $Paramstart mapping variable in a parameter fileto specify the CDC start time.
CDC End Timestamp End date and time for the time period. The PowerCenter Integration Service extracts data thatwas added or modified before this time. Must be in the format YYYY-MM-DDTHH:MI:SS.SSSZ. You can also use the $Paramend mapping variable in a parameter fileto specify the CDC end time.
Row Limit Select to specify the maximum number of rows the PowerCenter Integration Serviceprocesses. Default is 0. 0 indicates that there is no row limit, and the PowerCenter IntegrationService processes all records.
Use queryAll Select to run a query that returns all rows, which includes active, archived, and deleted rows.Otherwise, the PowerCenter Integration Service returns only active rows.
Use SystemModstamp forCDC
Select to use the SystemModstamp as the timestamp for changed records in Salesforce.Otherwise, the PowerCenter Integration Service uses the LastModifiedDate timestamp toidentify changed records in Salesforce. Default is to use the LastModifiedDate timestamp.
Filtering Source DataAt session run time, the PowerCenter Integration Service generates an SOQL query based on the objects andfields included in the Salesforce source definition. When you configure a session that reads data from a Salesforcesource, you can enter a filter condition to filter records read from the source. When you enter a filter condition, thePowerCenter Integration Service modifies and overrides the WHERE clause in the SOQL query.
To filter records from a Salesforce source, enter a filter condition for the SOQL Filter Condition session property.For example, enter the following filter condition to read records from the Salesforce Account object that werecreated before October 30, 2007:
CreatedDate < '2007-10-30'
Enter a filter condition based on the SOQL syntax in the Salesforce documentation. The Salesforce API performsSOQL syntax validation at run time. If you enter an invalid filter condition, the session fails.
The session also fails if you enable CDC and one of the following conditions are true:
¨ You enter a LIMIT clause in the filter condition.
¨ You enter an AND or OR operator in the filter condition, but you do not enclose the AND or OR statement inparentheses. Enclose the AND or OR statement in parentheses as shown in the following example:
(Name="Jason" OR Name="Thompson")
Capturing Deleted and Archived Salesforce RecordsThe PowerCenter Integration Service can capture active, deleted, and archived records from a Salesforce sourceobject. By default, mappings do not capture deleted and archived records. To capture deleted and archivedrecords, configure the Use queryAll session property.
30 Chapter 7: Salesforce Sessions and Workflows

Capturing Changed DataThe PowerCenter Integration Service can capture changed data from a Salesforce object that is replicateable andcontains CreatedDate and LastModifiedDate fields. If you configure a session to capture changed data from aSalesforce object that is not replicateable or does not contain CreatedDate and LastModifiedDate fields, thesession fails. For more information about replicateable objects, see the Salesforce documentation.
Use one of the following methods to capture changed data:
¨ Capture changed data continuously. Configure a session to capture changed data to process data in real-time.
¨ Capture changed data for a specific time period. Configure a session to capture changed data during aparticular time period when the data changes.
By default, change data capture is disabled. To enable a particular method, specify the required attributes in thesession properties. Configure the attributes for one CDC method. If you configure properties for both methods, youmay encounter unexpected results.
Also, you can configure the LastModifiedDate or SystemModstamp field as the timestamp that determines when aSalesforce record was last modified.
RELATED TOPICS:¨ “Using the SystemModstamp or LastModifiedDate Timestamp for Change Data Capture” on page 32
Processing a Continuous CDC SessionWhen the PowerCenter Integration Service runs a continuous CDC session, it reads all records in the sourceobject and passes them to the next transformation as rows flagged for insert. After the PowerCenter IntegrationService reads all source data, the CDC time limit and flush interval begin.
After the flush interval ends, the PowerCenter Integration Service completes the following tasks to capturechanged data for a continuous CDC session:
1. Reads all records created since the initial read and passes them to the next transformation as rows flaggedfor insert.
2. Reads all records updated since the initial read and passes them to the next transformation as rows flaggedfor update.
3. Reads all records deleted since the initial read and passes them to the next transformation as rows flaggedfor delete.
After the PowerCenter Integration Service finishes reading all changed data, the flush interval starts again. ThePowerCenter Integration Service stops reading from Salesforce when the CDC time limit ends.
When you configure the session to capture changed data and use source-based commits, the PowerCenterIntegration Service commits data to the target based on the source-based commit interval and the flush interval.
For example, you set the CDC time limit to 4,000 seconds, the flush interval to 300 seconds, and the source-basedcommit interval to 1,000 rows. After the PowerCenter Integration Service reads all the source data, the flushinterval begins. The PowerCenter Integration Service captures changed data and commits rows to the target afterreading 1,000 rows from the source and after each 300 second flush interval. The PowerCenter IntegrationService stops reading from Salesforce after 4,000 seconds.
If you configure the session to use target-based commits, the PowerCenter Integration Service runs the sessionbased on source-based commits. Also, it only commits rows to the target based on the flush interval. It does notcommit rows to the target based on the commit interval.
Configuring a Session with a Salesforce Source 31

Configuring a Continuous CDC SessionComplete the following tasks to capture changed data continuously for sessions that read from replicateableSalesforce objects:
¨ For each CDC session, complete the configuration steps for real-time sessions.
¨ Set the time limit and flush interval for change data capture.
Processing a Time-Period Based CDC SessionWhen the PowerCenter Integration Service runs a CDC session for a specific time period, it reads all records inthe source object and extracts records that meet the CDC time period criteria.
The PowerCenter Integration Service completes the following steps to capture changed data for a time-periodbased CDC session:
1. Reads all records created between the CDC start time and end time, and passes them to the nexttransformation as rows flagged for insert.
2. Reads all records updated between the CDC start time and end time, and passes them to the nexttransformation as rows flagged for update.
3. Reads all records deleted between the CDC start time and end time, and passes them to the nexttransformation as rows flagged for delete.
Configuring a Time-Period Based CDC SessionTo enable change data capture for a specific time period, define the start and end time for the time period in thesession properties.
Rules and Guidelines for Processing a Time-Period Based CDC SessionUse the following rules and guidelines when you run a CDC session for a particular time period:
¨ The PowerCenter Integration Service validates the formats of the start and end times when you run thesession. If either timestamp format is wrong, the session fails.
¨ The values for the start and end times must be in the past.
¨ The start time must predate the end time.
¨ You cannot run the session continuously.
¨ When you configure the session to capture changed data and to use source-based commits, the PowerCenterIntegration Service commits data to the target based on the source-based commit interval. If you configure thesession to use target-based commits, the PowerCenter Integration Service runs the session based on source-based commits.
Using the SystemModstamp or LastModifiedDate Timestamp forChange Data Capture
When you run a session that extracts data from a Salesforce source, the PowerCenter Integration Servicedetermines new and updated records based on the Use SystemModstamp for CDC session property. Youconfigure this session property to indicate whether to use the SystemModstamp or LastModifiedDate attribute todetermine when a Salesforce record was last modified.
Salesforce updates the LastModifiedDate attribute of a Salesforce record when you update the record. Salesforceupdates the SystemModstamp attribute of a Salesforce record when you update the record or a record of a relatedobject.
32 Chapter 7: Salesforce Sessions and Workflows

Salesforce indexes the SystemModstamp attribute, not the LastModifiedDate attribute. To improve sessionperformance, use the SystemModstamp attribute.
Configuring a Session with a Salesforce TargetYou can configure the session properties for a Salesforce target on the Mapping tab. Define the properties foreach target instance in the session.
The following table describes the session properties you can configure for a Salesforce target:
Property Name Description
Treat Insert as Upsert Select to enable the PowerCenter Integration Service to upsert any records flagged as insert.By default, the PowerCenter Integration Service treats all records as insert.
Treat Update as Upsert Select to enable the PowerCenter Integration Service to upsert any records flagged as update.Select this option only if you use the Update Strategy transformation in the mapping or theTreat Source Rows As session property to flag records as update.
Max Batch Size Enter the maximum number of records the PowerCenter Integration Service can write to aSalesforce target in one batch. Default is 200 records.
Set Fields to NULL Select to replace existing values in the target with null values from the source. By default, thePowerCenter Integration Service does not replace existing values in a record with null valuesduring an update or upsert operation. It retains the existing values.
Use SFDC Error File Select to enable the PowerCenter Integration Service to generate failure logs. By default, thePowerCenter Integration Service does not generate failure logs.
Use SFDC Success File Select to enable the PowerCenter Integration Service to generate success logs. By default,the PowerCenter Integration Service does not generate success logs.
SFDC Success File Directory Specify the directory where the PowerCenter Integration Service stores the success logs. Bydefault, the PowerCenter Integration Service stores the success logs in the $PMTargetFileDirdirectory. The PowerCenter Integration Service stores the failure logs in the $PMBadFileDirdirectory.
Use Idlookup Field for Upserts Select to use the Salesforce idLookup field to identify target records that need to be upserted.If you do not select this option, you must use the external ID for the upsert operation. If you donot select this option and do not provide the external ID, the session fails.
Use this ExternalId/IdLookupfield for Updates
Enter the exact name of the external ID or idLookup field to use for updates.By default, the PowerCenter Integration Service uses the first external ID or idLookup field inthe target. Use this option when you want to use a different field for updates.
Use SFDC Bulk API Select to use the Salesforce Bulk API to load batch files containing large amounts of data toSalesforce targets. By default, the Integration Services uses the standard Salesforce API.
Monitor Bulk Job Until AllBatches Processed
Bulk API sessions only. Select to monitor a Bulk API session. When you select this option, theIntegration Service logs the status of each batch in the session log. If you do not select thisoption, the Integration Service does not generate accurate session statistics for the sessionlog.
Configuring a Session with a Salesforce Target 33

Property Name Description
Override ParallelConcurrency with Serial
Bulk API sessions only. Select to have the Salesforce service write batches to targets serially.By default, the Salesforce service writes batches in parallel.
Disable Bulk Success andError File Creation
Bulk API sessions only. Select to disable the creation of Bulk API success and failure logs. Bydefault, the Integration Service generates Bulk API success and failure logs when you monitora Bulk API session.
Configuring the Upsert Target OperationThe Salesforce upsert operation creates a new record or updates an existing record in a Salesforce object. Youmust provide one of the following types of fields to upsert records to a Salesforce object:
¨ External ID field. You can use a custom Salesforce field to uniquely identify each record in a Salesforceobject. You can create a custom external ID field for each object in Salesforce. You can view the properties ofa Salesforce target definition in the PowerCenter Designer to see if the object includes an external ID field.
¨ idLookup field. You can use a Salesforce idLookup field to identify each record in a Salesforce object.Salesforce creates idLookup fields for each standard Salesforce object. For example, the Email field is anidLookup field for the Contact object. Custom Salesforce objects do not contain an idLookup field. For moreinformation about idLookup fields, see the Salesforce documentation.
A Salesforce target object may have multiple external ID or Idlookup fields. By default, the PowerCenterIntegration Service uses the first external ID or Idlookup field it encounters. However, you can specify the externalID or Idlookup field to use for the upsert operation in the session properties.
To configure the upsert operation for a session that writes to a Salesforce target:
1. Map the external ID or idLookup field from the source to the target in the mapping. If you are using anexternal ID, map the external ID to the external ID field in the Salesforce target object. If you are using anidLookup field, map the field to the appropriate target field. For example, map the email source field to theEmail field in the Salesforce Contact object target.
2. Configure the Treat Insert as Upsert or Treat Update as Upsert session properties to configure a Salesforcesession to upsert records.
3. To use the idLookup field instead of an external ID field, enable the Use IdLookup Field for Upserts sessionproperty. By default, the PowerCenter Integration Service uses the external ID for upserts. You can configurethe session to override the external ID, and use the idLookup instead.
4. To specify which external ID or Idlookup field to use, enter the external ID or Idlookup field name in the Usethis ExternalId/Idlookup Field for Upserts session property.
Note: If you do not enter the name of the external ID or Idlookup field, the PowerCenter Integration Serviceselects the first external ID or Idlookup field it encounters. If you specify a field that is not an external ID orIdlookup field, or you misspell the field name, the session fails.
Configuring the Maximum Batch SizeThe PowerCenter Integration Service writes data to a Salesforce target as a batch. The Max Batch Size attributein the session properties determines the maximum number of records the PowerCenter Integration Service canwrite to a Salesforce target in a batch. The Salesforce service can receive a maximum of 200 records in a singleinsert, update, or delete call.
To minimize the number of calls made to the Salesforce service, each batch should contain the maximum numberof records as configured in the Max Batch Size property. To optimize session performance, use the default MaxBatch Size of 200 and tune the DTM Buffer Size session property so that buffer blocks contain multiples of 200records.
34 Chapter 7: Salesforce Sessions and Workflows

RELATED TOPICS:¨ “Tuning the DTM Buffer Size” on page 38
Handling Null Values in Update and Upsert OperationsBy default, the PowerCenter Integration Service does not replace existing values in a Salesforce record with nullvalues from the source during an update or upsert operation. To replace existing values with null values, configurethe Set Fields to NULL session property for the Salesforce target.
Note: You cannot set the value of an external ID field in a Salesforce target to null. The session fails if you enablethe Set Fields to NULL session property and the session tries to replace an existing value for an external ID fieldwith a null value.
Logging PowerExchange for Salesforce Session DetailsThe PowerCenter Integration Service generates record-level logs for each session that writes to a Salesforcetarget. The PowerCenter Integration Service generates the following types of logs:
¨ Success log. The success log contains an entry for each record that successfully loads into the Salesforcetarget. Each entry contains the values loaded for all fields of the record, including the Salesforce ID. Use thisfile understand what data is loaded into the Salesforce target. You can use the success log as an audit trail forall operations performed.
¨ Failure log. The failure log contains an entry for each data error. Each log entry contains the values for allfields of the record, including the Salesforce ID, and the error message. The failure log displays errormessages from Salesforce and Informatica On Demand. Use this file to understand why records did not loadinto the Salesforce target.
The PowerCenter Integration Service inserts quotes around commas and quotes included in the data.
Note: The PowerExchange for Salesforce session logs are different from the PowerCenter session logs. ThePowerExchange for Salesforce session logs contain record-level details that are specific to sessions withSalesforce targets. You can also use the PowerCenter session logs to view information about the tasks performedby the PowerCenter Integration Service, general session errors, and load summary and transformation statisticsfor the session.
The PowerCenter Integration Service uses the following naming conventions for the log files:
Type of Log File Naming Convention
Success log file <session name><timestamp>success.csv
Failure log file <session name><timestamp>failure.csv
To configure the PowerCenter Integration Service to generate success and failure logs for a session that writes toSalesforce target, configure the Use SFDC Error File, Use SFDC Success File, and SFDC Success File Directorysession properties.
Configuring a Session with a Salesforce Target 35

Sample Success LogThe following table shows an excerpt of a success log:
ID NAME ACCOUNTNUMBER
EXTERNAL_ACCOUNT_NUMBER__C
STATUS
0017000000NYre4AAD JumpCo 76543 666 Item Created
The Status field indicates whether PowerCenter Integration Service created, updated, or deleted the record.
Sample Failure LogThe following table shows an excerpt of a failure log:
NAME ACCOUNTNUMBER
ANNUALREVENUE
EXTERNAL_ACCOUNT_NUMBER__C
ERROR
Company1 76544 about 8 Million 555 Error converting value to correct datatype: For input string: "about 8 Million"
Company2 76545 444 Duplicate external id specified: 444
Company3 76546 3.70E+10 444 Duplicate external id specified: 444
Override an External ID with an idLookup for UpsertsThe PowerCenter Integration Service can use the external ID or idLookup fields when performing an upsertoperation on a Salesforce target. The PowerCenter Integration Service uses one of these IDs to identify records inthe Salesforce target to upsert. By default, the PowerCenter Integration Service uses the external ID for upserts.You can configure the session to override the external ID, and use the idLookup instead.
Configuring a Bulk API SessionThe Integration Service can write data to Salesforce targets using the Salesforce Bulk API. Use the Bulk API towrite large amounts of data to Salesforce while generating a minimal number of API calls.
With the Bulk API, each batch of data can contain up to 10,000 rows or one million characters of data in CSVformat. When the Integration Service creates a batch, it adds any required characters to properly format the data,such as adding quotation marks around text.
You can configure a Bulk API session to load batches at the same time or serially. You can also monitor theprogress of batches in the session log, and create success and failure logs for row-level information.
To configure a session to use the Salesforce Bulk API, select the Use SFDC Bulk API session property. When youselect this property, the Integration Service ignores the Set Fields to Null, Use SFDC Success File, Use SFDCError File, SFDC Success File Directory session properties.
Monitoring a Bulk API SessionYou can configure the Integration Service to monitor a Salesforce Bulk API session. When the Integration Servicemonitors a Bulk API session, it requests the status of each batch from the Salesforce service. The Integration
36 Chapter 7: Salesforce Sessions and Workflows

Service repeats the request every ten seconds until all batches complete, and writes the response from theSalesforce service in the session log.
By default, the Integration Service does not monitor Bulk API sessions. Without monitoring, the session logcontains information about batch creation, but does not contain details about batch processing or accurate sessionstatistics.
Note: The Integration Service performs additional API calls when monitoring a Bulk API session. To reduce thenumber of API calls the Integration Service makes, do not monitor the session. For more information about batchprocessing, use the batch IDs in the session log to access Salesforce statistics.
To configure the Integration Service to monitor a Bulk API session, select the Monitor Bulk Job Until All Jobs AreProcessed session property.
To see how many records were successfully loaded for each batch, set the Override Tracing session property to avalue other than “None.”
Configuring a Bulk API Session Load TypeThe Salesforce service can perform a parallel or serial load for a Bulk API session. By default, it performs aparallel load.
In a parallel load, the Salesforce service writes batches to session targets at the same time. It processes eachbatch as soon as possible. In a serial load, the Salesforce service writes batches to targets in the order it receivesthem. It processes the entire contents of each batch before proceeding to the next batch.
Use a parallel load to increase performance when you are not concerned about the target load order. Use a serialload when you want to preserve the target load order, such as during an upsert load.
Configure the Bulk API load type in the session properties. To configure the session for a serial load, select theOverride Parallel Concurrency with Serial session property.
Bulk API Success and Error FilesWhen the Integration Service monitors a Salesforce Bulk API session, it generates Bulk API success and failurelogs. Success and failure logs are CSV files that contain row-level details provided by the Salesforce service.
When the Salesforce service completes all batch processing for a Bulk API session, the Integration Servicerequests success and failure information. The Integration Service uses this information to generate success andfailure logs.
The following table describes the location and naming convention for the Bulk API success and failure log files:
Log Type Location Naming Convention
Bulk API success log $PMTargetFileDir Batch_<BatchId>_success.csv
Bulk API failure log $PMBadFileDir Batch_<BatchId>_failure.csv
If you do not want to generate success and error statistics and log files, select the Disable Bulk Success and ErrorFile Creation session property.
Configuring a Session with a Salesforce Target 37

Configuring a Session for Optimal PerformanceYou can increase the performance of PowerExchange for Salesforce by editing the mapping or session. Configurethe following options to increase the session performance:
¨ DTM buffer size. You can increase or decrease the value of DTM Buffer Size to specify the amount of memorythe PowerCenter PowerCenter Integration Service uses as DTM buffer memory.
¨ Precision of string fields. Modify the precision of fields that map to the string transformation datatype.
For more information about these parameters see the PowerCenter Performance Tuning Guide.
Tuning the DTM Buffer SizeThe DTM Buffer Size determines the size of the buffer blocks that the PowerCenter Integration Service uses tomove data from sources to targets. When a target definition receives a buffer block, the PowerCenter IntegrationService creates one or more batches to send the records to the Salesforce service.
For example, if Max Batch Size is set to 200 and a buffer block contains 200 records, the PowerCenter IntegrationService sends one batch to the Salesforce target containing 200 records. If a buffer block contains 500 records,the PowerCenter Integration Service sends three batches containing 200, 200, and 100 records each.
The performance of a session that writes to a Salesforce target may be slower than a similar session that writes toa relational database because the Salesforce service runs on top of a relational database.
To optimize the performance of a session for a Salesforce target, tune the DTM Buffer Size session property sothat buffer blocks contain multiples of 200 records.
Modifying the Precision of String FieldsTo improve performance, you can reduce the precision to the anticipated size of the source or target data. Forexample, the precision of a field of the String datatype in a Salesforce source definition is 64 KB. However, thisfield contains data with a maximum size of 1 KB. You can reduce the precision for the field in the source definitionto 1 KB so that the PowerCenter Integration Service processes less data for the field.
Edit the Salesforce source or target definition to change the precision of fields that map to the Stringtransformation datatype in PowerCenter. Do not change the precision of fields that do not map to the Stringtransformation datatype in PowerCenter.
38 Chapter 7: Salesforce Sessions and Workflows

A P P E N D I X A
Datatype ReferenceThis appendix includes the following topics:
¨ Datatype Reference Overview, 39
¨ Salesforce and Transformation Datatypes, 39
Datatype Reference OverviewWhen the PowerCenter Integration Service reads data from a Salesforce object, it converts each Salesforcedatatype to a compatible PowerCenter transformation datatype. When the PowerCenter Integration Service loadsdata into a Salesforce object, it converts each PowerCenter transformation datatype to a compatible Salesforcedatatype.
PowerExchange for Salesforce uses the following datatypes:
¨ Salesforce datatypes. Salesforce datatypes appear in Salesforce definitions in a mapping.
¨ Transformation datatypes. Transformation datatypes are generic datatypes that PowerCenter uses during thetransformation process. The transformation datatypes appear in PowerCenter transformations.
Salesforce and Transformation DatatypesWhen the PowerCenter Integration Service reads data from a Salesforce source, it converts the data in the datafields to transformation datatypes used in the Application Source Qualifier. When writing data to a Salesforcetarget, the PowerCenter Integration Service converts the data based on the native datatypes in the target objects.
The following table shows the conversion between Salesforce datatypes and transformation datatypes:
SalesforceDatatype
Range and Description TransformationDatatype
Range and Description
base64 Base64-encoded arbitrary binarydata.
String 1 to 104,857,600 characters
boolean Boolean (true/false) values. Integer Precision 10, scale 0
currency Currency values. Decimal Precision 1 to 28 digits, scale 0 to 28
39

SalesforceDatatype
Range and Description TransformationDatatype
Range and Description
DataCategoryGroupReference
Types of category groups andcategory unique names.
String 1 to 104,857,600 characters
date Date values. Date/Time Jan 1, 0001 A.D. to Dec 31, 9999 A.D.(precision to nanosecond)
dateTime Date and time values. Date/Time Jan 1, 0001 A.D. to Dec 31, 9999 A.D.(precision to nanosecond)
double Double values. Decimal Precision 1 to 28 digits, scale 0 to 28
email Email addresses. String 1 to 104,857,600 characters
encrypted String Encrypted text fields contain anycombination of letters, numbers, orsymbols that are stored inencrypted form.
String 1 to 104,857,600 characters
ID Primary key for a Salesforce object. String 1 to 104,857,600 characters
Int Integer values. Integer Precision 10, scale 0
multipicklist Multiple-selection picklists, whichprovide a set of enumerated valuesthat you can select multiple valuesfrom.
String 1 to 104,857,600 characters
percent Percentage values. Decimal Precision 1 to 28 digits, scale 0 to 28
picklist Single-selection picklists, whichprovide a set of enumerated valuesthat you can select one value from.
String 1 to 104,857,600 characters
reference Cross-reference to anotherSalesforce object.
String 1 to 104,857,600 characters
string String values. String 1 to 104,857,600 characters
textarea String that appears as a multiple-line text field.
String 1 to 104,857,600 characters
time Time values. Date/Time Precision 1 to 28 digits, scale 0 to 28.PowerCenter Integration Service addsthe current date when it converts theSalesforce time datatype to the Date/Time transformation datatype. ThePowerCenter Integration Service trimsthe date when it converts the Date/Timetransformation datatype to theSalesforce time datatype.
url URL values. String 1 to 104,857,600 characters
Note: After you import a Salesforce definition, you can change the precision of fields that map to the Stringtransformation datatype in PowerCenter. In some cases, you might want to decrease the precision to improve
40 Appendix A: Datatype Reference

performance. Do not change the precision of fields that do not map to the String transformation datatype inPowerCenter.
Salesforce and Transformation Datatypes 41

A P P E N D I X B
GlossaryC
Change Data Capture (CDC)An option that enables PowerExchange for Salesforce to process changed data. You can capture changed datafor replicateable objects that have the CreatedDate and LastModifiedDate fields.
E
external IDA record ID generated by a system outside of Salesforce. The PowerCenter Integration Service uses the externalID field to identify records in a Salesforce object if the object is configured with an external ID field. You indicatewhether a custom field is an external ID field in Salesforce.
P
primary Salesforce objectThe primary object in Salesforce that you import to create a source or target definition, or transformation inPowerCenter.
R
related Salesforce objectA Salesforce object that is related to a primary Salesforce object. When you import a Salesforce definition basedon a primary Salesforce object, you can also import fields of related objects. The Designer determines relatedobjects based on the relationships defined in Salesforce.
replicateable objectA Salesforce object that can be duplicated in another environment. Every Salesforce object has a replicateableflag that determines if an object can be duplicated in another environment. PowerExchange for Salesforce usesthe flag to determine if it can replicate the Salesforce object.
S
Salesforce objectsSubject areas in Salesforce, such as Account, Asset, Case Solution, and Lead. Salesforce objects usuallycorrespond to tabs in the Salesforce user interface. For example, you can add accounts in the Salesforce
Accounts tab. You import standard and custom Salesforce objects into PowerCenter as transformations, andsource and target definitions.
Salesforce SandboxA special testing or development Salesforce environment.
Sforce Object Query Language (SOQL)Proprietary Salesforce language used to construct a query in a Salesforce query call. At run time, thePowerCenter Integration Service generates an SOQL query based on the objects and fields included in themapping.
U
upsertA Salesforce operation that uses a custom field designated as the external ID field to determine whether it shouldcreate a new record or update an existing one when loading data into a Salesforce target. You can configure thesession to upsert records only if the Salesforce target object includes a custom field designated as the external IDfield.
Appendix B: Glossary 43

I N D E X
Aapplication connections
configuring for Salesforce 29description for Salesforce 2endpoint URL for Salesforce 28Salesforce 28updating for Salesforce 7
authenticationuser authentication for Salesforce 2, 28
Bbatch size
description for Salesforce 34bulk API session
configuring for Salesforce 33Bulk API session
configuring for Salesforce 36configuring the load type for Salesforce 37monitoring for Salesforce 36
Bulk API sessionsavailable for Salesforce 6
Bulk API success and failure logsdisabling for Salesforce 37
CCDC End Timestamp
configuring for Salesforce 29CDC Start Timestamp
configuring for Salesforce 29CDC Time Limit
configuring for Salesforce 29description for Salesforce 31
change data captureconfiguring for Salesforce 31continuous capture for Salesforce 31, 32rules for continuous capture for Salesforce 31rules for time-period capture for Salesforce 32time-period capture for Salesforce 32timestamp configuration for Salesforce 32
code pagessupported code pages for Salesforce 3validation for Salesforce 3
configurationPowerExchange for Salesforce 4
configuring for SalesforceBulk API sessions 36
connection objectsdescription for Salesforce 2
continuous workflowsand change data capture for Salesforce 31
Createable attributedescription for Salesforce 12
custom fieldsexternal ID attribute for Salesforce 10
custom objectsdescription for Salesforce 2
Ddata access controls
description for Salesforce 1data movement mode
ASCII for Salesforce 3Unicode for Salesforce 3
datatypesconversion for Salesforce 12, 39Salesforce 39
descendant objectdescription for Salesforce 10
Designerintegration with Salesforce 2
Disable Bulk Success and Error File Creationconfiguring for Salesforce 33
disablingSalesforce Bulk API success and failure log 37
DTM Buffer Sizeconfiguring for Salesforce 34tuning for Salesforce sessions 38
Eexternal ID
description 34description for Salesforce 12overriding with idLookup 36
external ID attributedescription for Salesforce 12
Ffield attributes
description for Salesforce 12filter conditions
on Salesforce lookup 18Salesforce data 30
filters, for Salesforce source 30Flush Interval
configuring for Salesforce 29description for Salesforce 31
44

HHTTP proxy options
configuring for PowerCenter Client (Salesforce) 5configuring for PowerCenter Integration Service (Salesforce) 6configuring for Salesforce 5
IidLookup
description for Salesforce 34overriding the external ID 36
IDsexternal and Salesforce 12
installationPowerExchange for Salesforce 4
LLastModifiedDate
description for Salesforce 32LKP_FILTER port
description for Salesforce 18LKP_MATCHIDX port
description for Salesforce 18lookup ports
in Salesforce Lookup transformation 17lookup query
description for Salesforce 19Salesforce matches 18
Lookup transformationsimporting fields from related Salesforce objects 10, 11
Mmapping variables
for CDC in Salesforce sessions 29Max Batch Size
configuring for Salesforce 33Merge transformations
importing fields from related Salesforce objects 10, 11Monitor Bulk Job Until All Batches Processed
configuring for Salesforce 33monitoring
Salesforce Bulk API sessions 36
Nnaming conventions
for related Salesforce objects 10nulls
handling in upserts and updates 35
Oobject types
custom for Salesforce 2standard for Salesforce 2
output portsin Salesforce PickList transformation 26
Override Parallel Concurrency with Serialconfiguring for Salesforce 33
P$Paramend
mapping variable 29$Paramstart
mapping variable 29pass-through ports
in Salesforce Lookup transformation 18in Salesforce PickList transformation 26
performanceconfiguring buffer block size for Salesforce 34configuring DTM Buffer Size for Salesforce 38
permissionson Salesforce data 1
Picklist transformationsimporting fields from related Salesforce objects 10, 11
PickList_Input portin Salesforce PickList transformation 26
plug-insregistration for PowerExchange for Salesforce 5
pmsfdc.iniPowerExchange for Salesforce configuration file 5
pmsfdc.xmlSalesforce plug-in 5
portstypes in Salesforce Lookup transformation 17types in Salesforce Merge transformation 23types in Salesforce PickList transformation 26
PowerCenterintegration with Salesforce 1
PowerCenter Integration Serviceintegration with Salesforce 2
PowerExchange for Salesforceapplication connections, updating 7changed behavior 7overview 1post-upgrade tasks 7reimporting definitions 7
precisionmodifying for Salesforce fields 38
prerequisitesPowerExchange for Salesforce 4
primary Salesforce objectdescription 10
Rrelated objects
importing from Salesforce 10related objects:
importing fields from Salesforce 11relationships
importing related object fields from Salesforce 10replicateable object
description 31repository plug-in
updating for Salesforce 8Row Limit
configuring for Salesforce 29rules
configuring update strategy for Salesforce targets 13for continuous change data capture for Salesforce 31for importing fields from related Salesforce objects 11for time-period based change data capture for Salesforce 32
Index 45

SSalesforce
datatypes 39Salesforce Bulk API
sessions 6Salesforce definitions
overview 10reimporting 7
Salesforce Lookup transformationcompared to Lookup transformation 15components 16creating 19default ports 17lookup filter 18lookup ports 17matches, identifying 18overview 15pass-through ports 18port types 17
Salesforce Merge transformationcomponents 22creating 24default ports 23guidelines 23overview 21port types 23
Salesforce objectsattributes 12description 1permissions 1
Salesforce PickList transformationcomponents 25creating 26guidelines 26output ports 26overview 25pass-through ports 26PickList_Input port 26port types 26
Salesforce Sandboxaccessing 14
Salesforce sessionlogging session details 35
Salesforce sessionscontinuous change data capture 31time-period change data capture 32
Salesforce source definitionscreating 12
Salesforce sourcestime zone handling 12
Salesforce targetstime zone requirement 12
session conditionsDisable Bulk Success and Error File Creation 33DTM Buffer Size for Salesforce 34Max Batch Size for Salesforce 33Monitor Bulk Job Until All Batches Processed 33Override Parallel Concurrency with Serial 33Row Limit for Salesforce 29SFDC Success File Directory for Salesforce 33Treat Insert as Upsert for Salesforce 33Treat Update as Upsert for Salesforce 33Use Idlookup Field for Upserts for Salesforce 33Use SFDC Bulk API 33
session detailsfor Salesforce sessions 35
session propertyCDC End Timestamp for Salesforce 29CDC Start Timestamp for Salesforce 29CDC Time Limit for Salesforce 29Flush Interval for Salesforce 29Set Fields to NULL for Salesforce 33SOQL Filter Condition for Salesforce 29Use queryAll for Salesforce 29Use SFDC Error File for Salesforce 33Use SFDC Success File for Salesforce 33Use SystemModstamp for CDC for Salesforce 29
sessionsoverview 28tuning DTM Buffer Size for Salesforce 38tuning joins for Salesforce 11
Set Fields to NULLconfiguring for Salesforce 33
SFDC Success File Directoryconfiguring for Salesforce 33
Sforce Object Query Language (SOQL)description 2
SOQL Filter Conditionconfiguring for Salesforce 30
SOQL overrideconfiguring 30description 30
source definitionimporting from Salesforce 14
source definitionsoverview for Salesforce 10
sourcesimporting fields from related Salesforce objects 10, 11Salesforce data, filtering 30
SSLtransport-layer security for Salesforce 2
SystemModstampdescription 32
Ttarget definition
importing from Salesforce 14target definitions
overview for Salesforce 10target loading
Salesforce Bulk API sessions 37target operations
PowerExchange for Salesforce 12targets
importing fields from related Salesforce objects 10, 11time zone handling
for Salesforce sources 12time zone requirement
for Salesforce targets 12timestamp
configuring for change data capture for Salesforce 32transformations
Salesforce Lookup 15Salesforce Merge 21Salesforce PickList 25
Treat Insert as Upsertconfiguring for Salesforce 33
Treat Update as Upsertconfiguring for Salesforce 33
46 Index

Uuninstalling
PowerExchange for Salesforce 6Updateable attribute
description for Salesforce 12upgrading
PowerExchange for Salesforce upgrade tasks 4upsert
configuring for Salesforce 34description for Salesforce 34external ID 34overriding external ID with idLookup 36Salesforce idLookup field 34Salesforce session configuration 34
Use Idlookup Field for Upsertsconfiguring for Salesforce 33
Use queryAllconfiguring for Salesforce 29
Use SFDC Bulk APIconfiguring for Salesforce 33
Use SFDC Error Fileconfiguring for Salesforce 33
Use SFDC Success Fileconfiguring for Salesforce 33
Use SystemModstamp for CDCconfiguring for Salesforce 29
Use this ExternalId/IdLookup field for Updatesconfiguring for Salesforce 33
Vvalidation
SOQL syntax 2
Index 47