© ensystex, inc. nim 2.01 05.12 page 1 of 53 manual 2.03 06.18.pdf · novithor termite protection...
TRANSCRIPT

© Ensystex, Inc. NIM 2.01 05.12 Page
1 of 53
© Ensystex, Inc. NIM 3.01 08.18 Page 2 of 53 pages
KEY BENEFITS ....................................................................................................................................................... 3
PESTICIDE FREE - TERMITE PROTECTION SYSTEM ......................................................................................................................... 3
WHAT IS NOVITHOR? ............................................................................................................................................ 3
COMPLIANCE ........................................................................................................................................................ 4
STATEMENT OF QUALITY ......................................................................................................................................................... 4
ABOUT TERMITES ................................................................................................................................................. 5
INSTALLATION - GENERAL ..................................................................................................................................... 6
AUTHORISED INSTALLERS ........................................................................................................................................................ 6 GENERAL PROCEDURES .......................................................................................................................................................... 6 BUILDER’S RESPONSIBILITY ...................................................................................................................................................... 6
TERMITE INSPECTIONS .......................................................................................................................................... 6
INSPECTION ZONES ................................................................................................................................................................ 6 ANNUAL INSPECTIONS ............................................................................................................................................................ 6
NOVITHOR TERMITE PROOF CEMENTITIOUS PARGE ....................................................................................... 7
BENEFITS ............................................................................................................................................................................. 7 APPLICATION DIRECTIONS ....................................................................................................................................................... 9
NOVITHOR TERMITE PROOFING RESIN .................................................................................................................27
BENEFITS ........................................................................................................................................................................... 27 CSIRO APPROVED FOR DAMP-PROOFING ................................................................................................................................ 27 APPLICATION DIRECTIONS ..................................................................................................................................................... 27 INSTALLATION VIDEO LINK .................................................................................................................................................... 27
NOVITHOR TERMITE PROOF FLEX-GEL ..................................................................................................................30
BENEFITS ........................................................................................................................................................................... 30 APPLICATION DIRECTIONS ..................................................................................................................................................... 30
SPECIAL REGIONAL INSTALLATION DETAILS ..........................................................................................................44
MORTAR EXPANSION JOINT................................................................................................................................................... 45 GARAGE DOORS – QLD ....................................................................................................................................................... 46
NOVITHOR TERMITE PROOF COLLARS...................................................................................................................50
INSTALLATION ..................................................................................................................................................................... 50
ESSENTIAL EQUIPMENT........................................................................................................................................53
ESSENTIAL INSTALLATION EQUIPMENT ..................................................................................................................................... 53 ESSENTIAL SAFETY EQUIPMENT .............................................................................................................................................. 53
™ Trademarks of Ensystex, Inc. used by licence to Ensystex Australasia Pty. Ltd.
© Ensystex, Inc. NIM 3.01 08.18 Page 3 of 53 pages
Key Benefits
Pesticide Free - Termite Protection System
Tough. NOVITHOR Termite Protection System is
exceptionally tough and will not be damaged by normal
building work practices.
No Registration Requirements with the Australian
Pesticides and Veterinary Medicines Authority (APVMA).
Durable for 50 years.
BCA Compliant. NOVITHOR Termite Protection System
complies with the relevant requirements of the Building
Code of Australia.
Environmentally friendly. Pesticide free.
User-friendly and flexible to install, and doesn’t impinge
on any other trades.
Suits all building designs.
Manufacturer’s Warranty.
What is NOVITHOR? NOVITHOR Termite Protection System consists of;
1. NOVITHOR Termite Proof Cementitious Parge.
2. NOVITHOR Termite Proofing Resin.
3. NOVITHOR Termite Proof Flexi-Gel.
4. NOVITHOR Termite Proof Collars.
NOVITHOR Termite Protection System is a flexible
termite protection system which can be used as part of a
complete termite protection system in association with
other approved systems.
It is particularly used with a concrete slab, poured and
cured in accord with the requirements of AS 2870:
Residential slabs and footings - Construction and AS
3600: Concrete structures.
The slab in this case forms part of the termite protection
system with NOVITHOR Termite Protection System
protecting the high risk termite penetration areas. It is
applied in a range of widths to suit the particular building
design.
It is also used for bearer and joist constructions and
piers.

© Ensystex, Inc. NIM 3.01 08.18 Page 4 of 53 pages
Compliance NOVITHOR Termite Protection System is approved as an
alternative solution in accord with the Building Code of
Australia (BCA). The approved Assessment Method is
that independent scientific evidence has been produced
to prove that the NOVITHOR Termite Protection System
meets the Performance Requirements and/or the
Deemed-to-Satisfy Provisions of the Australian Standards
AS 3600 Series - Termite management.
Evidence of this is contained within reports provided in
CSIRO Entomology, CSIRO Engineering, Agrisearch and
Newcastle University Reports and through the
Australian Building Codes Board CodeMark
Accreditation.
These evaluations included documentary evidence
produced by CSIRO Entomology, CSIRO Engineering
Newcastle University and Agrisearch Laboratories. These
reports prove conclusively that NOVITHOR Termite
Protection System may be used in accord with, and meet,
the requirements of:
AS 3660.1.2000 Termite Management - Part 1: New
building work;
AS 3660.3.2000 Termite Management – Part 3:
Assessment criteria for termite management systems;
AS 2904.1995 – Damp Proof Course
AS 3700.2001 Masonry Structures
AS 2870 Residential slabs and footings - Construction
AS 3600 Concrete structures
Independent trials, conducted in accordance with the
requirements of the Australian Standard AS 3660.3
Termite management Part 3 Assessment criteria for
termite management systems; and other tests show that
NOVITHOR Termite Protection System should remain as
an effective termite measure for 50 years.
NOVITHOR Termite Protection System meets the
performance criteria of section 1 Clause 1.3, of AS 3660
Termite management Part 1, New building work in
accordance to AS 3660 Termite management Part 3
Assessment criteria for termite management systems.
NOVITHOR Termite Protection System also meets the
performance requirements BP1.1, BP1.2 P2.1.1 and QLD
2.1.3 as an alternate solution under BCA, Part 3.1.3:
Termite Risk Management (Queensland Variation) and
National Construction Code (NCC).
Statement of Quality
The NOVITHOR Termite Protection System, has been
designed to achieve a service life of 50 years during
which period the NOVITHOR Termite Protection System,
including its constituent components, is expected to
maintain efficacy and function as a physical termite
protection system in accordance with AS 3660.1.
The NOVITHOR Termite Protection System has been
designed in accordance with a quality management
system that incorporates a set of rules for the design,
manufacture, installation and maintenance of all
elements of the system;
The components used in the manufacture of the
NOVITHOR Termite Protection System have been
selected for their intended purpose and are expected to
operate in accordance with their specification for the
duration of the design life of the NOVITHOR Termite
Protection System.

© Ensystex, Inc. NIM 3.01 08.18 Page 5 of 53 pages
About Termites No property in mainland Australia is safe from termites.
Termites are the cause of the greatest economic losses of
timber in service in Australia. Independent data compiled
by State Forests indicates that 1 in every 5 Australian
homes is attacked by termites at some stage in its life.
Australia’s subterranean termite species (white ants) are
the most destructive timber pests in the world. In fact it
can take “as little as 3 months for a termite colony to
severely damage the timber in a home”.
How Termites Attack Homes. The most destructive
species live in large underground nests containing more
than a million timber destroying insects. The problem
arises when a nest matures near a home. Homes tend to
provide natural shelter and food for the termites. The
gallery system of a single colony may exploit food
sources over as much as one hectare, with individual
galleries extending up to 75 metres to enter homes,
where there is a smorgasbord of timber to feast upon.
Even concrete slabs do not act as a barrier; termites can
penetrate through cracks in the slab to gain access. They
also build mud tubes around the slab to gain access to
above ground timbers.
Termite Damage. Once in contact with timber, termites
excavate it, often leaving only a thin veneer on the
outside. If left undiscovered, the economically important
species can cause many thousands of dollars damage and
cost two to five thousand dollars (or more) to treat.
Subterranean Termite Ecology. Termites are social
insects usually living in large underground nests. Nests
may be in trees or in rare instances they may be in above
ground areas within the property. They tunnel
underground to enter the building and then remain
hidden within the timber making it difficult to locate
their presence. Where timbers are concealed, as in most
modern homes, it makes it more difficult to locate their
presence. Especially if gardens have been built up around
the home and termite protection systems are either not
in place or poorly maintained.
There are about 3,000 species of termites found in the
world with about 300 species native to Australia. All
termites eat some form of plant cellulose. Most termites
simply eat humus in the soil, or grass and leaves. Very
few eat wood, and only a small number of these eat
sound wood (i.e. wood that has not been decayed by
fungus). Some 20 or more species cause serious
economic loss to Australian homes.
Termite Biology. Termites or “white ants” are social
insects that work and live together in groups called
colonies. Each colony contains several castes which differ
in body shape, behaviour and tasks performed.
The king and queen mate and control the entire colony.
In most species that causes economic loss to Australian
homes, the queen becomes physogastric. This means she
has a grossly enlarged abdomen for the purpose of laying
millions of eggs. She is essentially an egg laying machine.
These eggs hatch into the nymphal stage and through a
series of moults develop into one of the adult castes.
The worker caste has the largest number of individuals
within the colony and is responsible for building the nest,
tending eggs and young termites, gathering food and
feeding those castes that are unable to feed themselves.
Worker termites are wingless, blind and do not
reproduce. Workers perform almost all the tasks in the
colony except for defence and reproduction.
The soldier caste can be distinguished from other castes
by the head. The head of the soldier caste is large, dark
and has either mandibles or a ‘nasute’ (pointed)
protuberance. Soldier termites defend the colony against
predators such as ants and are also unable to reproduce.
The winged reproductive caste are the potential future
kings and queens of new colonies. This caste has eyes
and wings, and usually leaves the parent colony in large
swarms. They do not fly very far before shedding their
wings.

© Ensystex, Inc. NIM 3.01 08.18 Page 6 of 53 pages
Installation - General
Authorised Installers
For CodeMark installations, NOVITHOR Termite
Protection System may only be installed by NOVITHOR
Authorised Installers who have been trained by Ensystex
to help ensure installations are done correctly and that
systems comply with the requirements of the Australian
Standard Series AS 3660 Termite management and the
Australian Environmental Pest Managers Association
AEPMA Industry Code of Best Practice for Termite
Management during Constructions.
NOVITHOR Authorised Installers must demonstrate their
understanding of, and compliance with, the procedures
and requirements of this Installation Manual. Any breach
of, or deviation from, the required procedures may result
in the termination of their Authorisation. Only
appropriately trained and licensed pest management
professionals can qualify as NOVITHOR Termite Security
Authorised Installers. The NOVITHOR Termite Protection
System Authorised Installer must nominate trained
installers who will be operating under their Licence.
Licenses may be cancelled and supply stopped to any
company that acts fraudulently or demonstrates
consistently poor quality workmanship.
General Procedures
It is the responsibility of the NOVITHOR Termite
Protection System Authorised Installer to liaise with the
Builder and ensure that the installation procedures are
correctly performed so that the completed NOVITHOR
Termite Protection System can be certified by the
NOVITHOR Termite Protection System Authorised
Installer to comply with the Ensystex Warranty Program.
Builder’s Responsibility
Builders must ensure that:
1. The under-slab soil substrate is levelled.
2. All service pipe penetrations are installed in their
final position.
3. they are aware of the placement requirements for
NOVITHOR Termite Protection System.
4. once installed, NOVITHOR Termite Protection
System must not be moved without consulting with
the NOVITHOR Termite Protection System
Authorised Installer.
5. They inform the NOVITHOR Termite Protection
System Authorised Installer of any damage to,
disturbance of, or misalignment of the NOVITHOR
Termite Protection System prior to the pouring of
the concrete slab.
Termite Inspections
Inspection Zones
The Australian Standard AS 3660.1 Termite management
– New building work, refers to a 75 mm inspection zone
between the exposed edge of a termite protection
system in the outer wall of a building and the grade level
beneath.
The purpose of this inspection zone is to ensure that
sufficient un-occluded surface exists to allow easy
identification of termite mud-tubes up the outer wall of
the structure during the inspection process. It was
decided at the time by the Standards Committee that a
distance of 75 mm (the depth of one standard building
brick) would allow for changing grade levels due to
gardening activities in adjacent soil, the depth of growing
grass and so on, while still leaving sufficient un-occluded
surface to allow for efficient inspection.
Where the grade is fixed and unchanging against the wall
surface, such as in the case of concrete or paved
pathways, patios, and driveways, this inspection zone
may be reduced. This is particularly important where
step-downs in doorways and windows occur.
With installations of NOVITHOR Termite Protection
System, where hard surfaces such as concrete or paving
exist, a minimum distance of 25 mm should exist
between the outer exposed edge of the termite
protection system and the top surface of the concrete or
paving. This distance is adequate to allow for
identification of termite mud-tubes by those trained to
do so, or by observant property owners.
Annual Inspections
All termite management systems require at least an
annual inspection by a professional timber pest inspector
in accord with the requirements of the Australian
Standard Series AS 3660 Termite management. These
inspections are integral to good termite management.
For details of appropriate inspection standards see
Section 12.1 of the AEPMA Industry Code of Best Practice
for Termite Management.

© Ensystex, Inc. NIM 3.01 08.18 Page 7 of 53 pages
NOVITHOR Termite Proof Cementitious Parge
Benefits
1. Has the unique ability to become part of the
matrix of masonry surfaces.
2. Does not leach through products when over
coating is required e.g. water proofing
membranes, painting systems, cement renders,
etc.
3. Has high bond strength to a wide range of
building products.
4. Has an M4 mortar rating (high strength grout
classification).
5. Does not contain any termiticides or poisons.
6. Mixed on site and applied in a two coat
application by soft broom, brush or trowel.
7. Cost effective termite protection for large
surface areas.
CSIRO Approved for Damp-proofing
NOVITHOR Termite Proof Cementitious Parge has been
tested in compliance with AS/NZS 4347.1:1995
Australian/New Zealand Standard: Damp-proof courses
and flashings. See Test Report 4591A from CSIRO
Materials Science & Engineering, 37 Graham Road,
Highett, Victoria 3190.
TERMITE PROTECTION SYSTEM FOR EXTERIOR RETAINING WALL AND FACE BRICKWORK

© Ensystex, Inc. NIM 3.01 08.18 Page 8 of 53 pages
Description
NOVITHOR Termite Proof Cementitious Parge is a ready-
to-use pumpable, natural aggregate, general purpose
grout which undergoes controlled expansion in the
plastic state. It is a Class ‘A’ grout as defined by SAA
MP20 – Part 3, 1977.
There are two components to NOVITHOR Termite Proof
Cementitious Parge, NOVITHOR TPC Powder and
NOVITHOR TPC Liquid. They are generally mixed at a rate
of 4 parts NOVITHOR TPC Powder to one part NOVITHOR
TPC Liquid.
NOVITHOR Termite Proof Cementitious Parge is applied
to a minimum thickness of 4 mm. Where the product is
applied as a coating this will require a two coat
application. When applied into a recess such as a
penetration or construction joint the 4 mm depth can
usually be achieved with a single application.
Uses
• As a physical termite protection system and damp
proof course;
• As a perimeter termite protection system in knock
out block work.
• As a perimeter termite protection system in cavity
brick construction.
• When applied to brick or core filled block work used
in retaining walls.
• As a continuous termite protection system in bearer
and joist construction.
• Applied to Hebel or other panelling systems.
• As a repair mortar for concrete repairs.
• As a high strength grout in tilt panel construction.
• On the top of reinforced concrete slabs around pipe
penetrations.
• Over concrete rebates as a damp proof barrier.
• As a mortar or render.
Recommended For
All general purpose grouting operations with clearance of
12-15 mm or more including:
• Column bases, in-fill grout for cavity block walls.
• In caulking of joints and pipes.
• Between pre-cast panels and other joints where
total load-bearing is not required.
• Underpinning where a grout similar in appearance to
concrete is required.
Features
• Low liquid/cement ratio reduces drying shrinkage and
increases durability.
• May be damp packed without slumping.
• Complete void filling resulting from controlled fluid-
phase expansion.
• Non staining cement, similar in appearance to plain
concrete.
• No added chlorides.
Performance Data
The strength of the cement is often the determining
factor in deciding when loads can be put on structural
members or machinery that has been grouted. The
strength of the cement is dependent on the amount of
NOVITHOR TPC Liquid added, temperature (ambient and
grout), curing and age of the hardened cement.
Typical compressive strength of NOVITHOR Termite
Proof Cementitious Parge in place at 20oC is:
Compressive Strength (MPa):
Age Consistency
Damp Packed Plastic Flowable
1 day 30 22 18
3 days 50 39 36
7 days 55 44 41
28
days
66 55 50
(Tested in accordance with AS 2073-Part 10, 1977 using 5
0 mm cubes, moist cured and restrained during setting)
Flexural Strength (MPa):
Age Consistency
Damp Packed Plastic Flowable
7 days 10 7-5 7
28
days
11 9.5 9
Tested as 160 mm x 40 mm x 40 mm prisms.
Setting Times and Bleed:
Temp. Consistency
@ 23oC Damp
Packed
Plastic Flowable
Initial Set
(hr:min)
3:30 5:15 6:05
Final Set
(hr:min)
4:10 6:45 7:45
Bleed (%) 0 0 0.6
Note: The data shown is based on controlled laboratory
tests. Reasonable variations from the results can be
expected in practice.

© Ensystex, Inc. NIM 3.01 08.18 Page 9 of 53 pages
Application Directions
Preparation
The foundations should be clean, well roughened and
pre-saturated with water. Eliminate external sources of
vibration until the grout hardens.
NOVITHOR TPC Liquid
20kg of NOVITHOR TPC Powder mixed with 5 litres of
NOVITHOR TPC Liquid yields 11.0 litres (0.011m3).
The actual amount of NOVITHOR TPC Liquid used
depends on the desired consistency for the job and
temperature (both ambient and grout). For any given
consistency more liquid will be required at high
temperatures and less at low temperatures. As a guide,
20kg of NOVITHOR TPC Powder mixed at 20oC requires
the following amount of liquid to achieve the consistency
indicated:
Consistency Litres per 20 kg bag
Damp Packed 2.4
Plastic 3.75
Flowable 5.0
Damp packed is used for tilt slab panel applications.
Plastic is used for repairing holes in mortar joints, and
concrete repairs.
Flowable is used for retaining walls and pipe
penetrations.
A little bit of water may be added if the mixture needs to
be made a little more flowable, e.g. to reactivate the
product if it is starting to dry out.
Note: DO NOT USE NOVITHOR TPC LIQUID IN AN
AMOUNT OR AT A TEMPERATURE THAT WILL CAUSE THE
MIXED CEMENTITIOUS PARGE TO BLEED EXCESSIVELY OR
SEPARATE.
Mixing
For large quantities use a paddle type mortar mixer.
For smaller quantities, mix in a 20-25 litre bucket using a
heavy-duty electric drill fitted with a helical paddle bit
(Jiffy).
When using a mortar mixer, add about 70% of the
required mixing liquid before adding any NOVITHOR TPC
Powder. Add only as much NOVITHOR TPC Liquid as
necessary to provide required consistency. Too much
NOVITHOR TPC Liquid may adversely affect expansion
characteristics and strength development. Mix until
parge appears homogeneous, about 2 minutes.
When using a helical mixer, add all the required
NOVITHOR TPC Liquid before adding any NOVITHOR TPC
Powder. Mix for 1 - 2 minutes. Do not use NOVITHOR TPC
Powder from damaged containers.
Placement
Place NOVITHOR Termite Proof Cementitious Parge
within 30 minutes of mixing. Place by hand and ram
(damp pack) or rod into place (plastic).
NOVITHOR Termite Proof Cementitious Parge may be
placed at a flowable consistency by pouring from one
side only into a formed header box. Avoid entrapping air.
To facilitate NOVITHOR Termite Proof Cementitious
Parge movement, gently strap or rod the NOVITHOR
Termite Proof Cementitious Parge. A minimum thickness
of 4mm is required.
Shelf Life
NOVITHOR TPC Powder has a shelf life of approximately
24 months when stored in a cool dry environment. The
expiry date is printed on the container.
Precautions
The Cementitious material in NOVITHOR TPC Powder
may cause irritation, avoid contact with eyes and
prolonged contact with skin. In case of contact with eyes,
immediately flush with water for at least 15 minutes. Call
a physician. Wash skin thoroughly after handling
product. Keep product out of reach of children.
Read the MSDS before use.
Mixing on site
Figure 2 Mixing on site

© Ensystex, Inc. NIM 3.01 08.18 Page 10 of 53 pages
A strike line is not essential for a modern plastic render, but is required for a cement mortar. Often building inspectors
will look for a strike line, so it may be provided if preferred.
© Ensystex, Inc. NIM 3.01 08.18 Page 11 of 53 pages
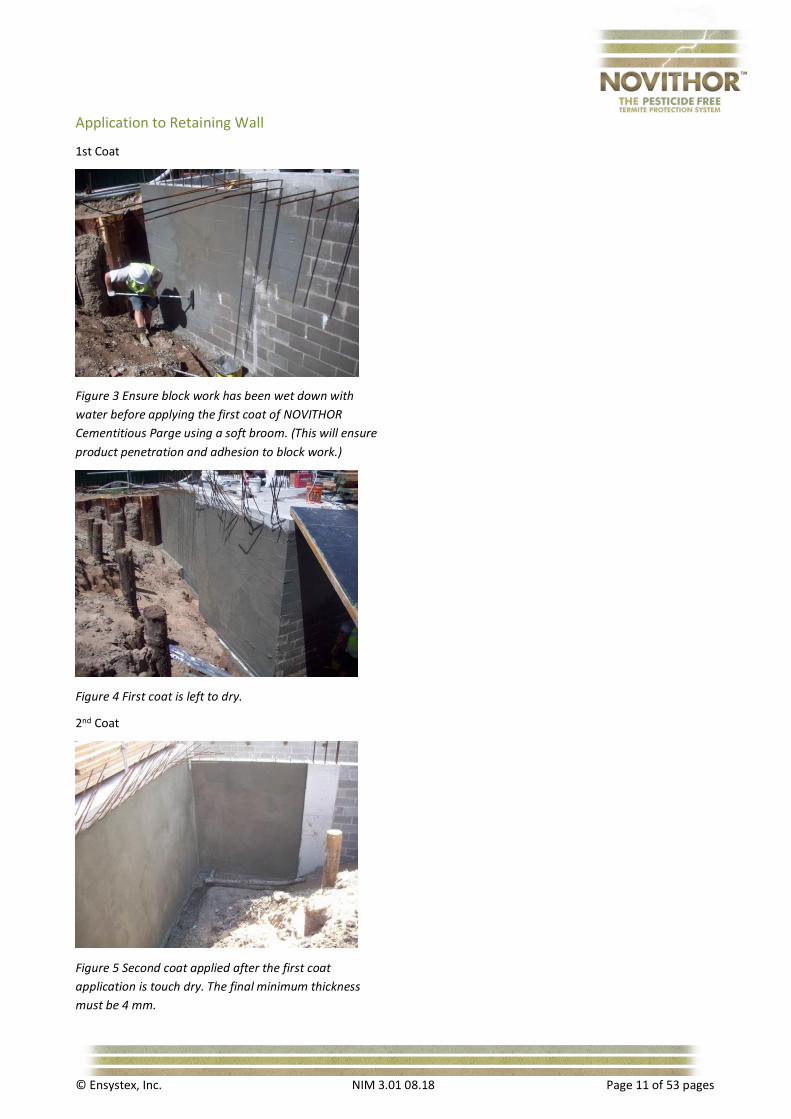
Application to Retaining Wall
1st Coat
Figure 3 Ensure block work has been wet down with
water before applying the first coat of NOVITHOR
Cementitious Parge using a soft broom. (This will ensure
product penetration and adhesion to block work.)
Figure 4 First coat is left to dry.
2nd Coat
Figure 5 Second coat applied after the first coat
application is touch dry. The final minimum thickness
must be 4 mm.

© Ensystex, Inc. NIM 3.01 08.18 Page 12 of 53 pages
Figure 6

© Ensystex, Inc. NIM 3.01 08.18 Page 13 of 53 pages
Figure 7

© Ensystex, Inc. NIM 3.01 08.18 Page 14 of 53 pages
Figure 8

© Ensystex, Inc. NIM 3.01 08.18 Page 15 of 53 pages
Construction Joints & Pipe Penetrations
Figure 9 NOVITHOR Cementitious Parge over cold joint in
RC retaining wall.
Figure 10 NOVITHOR Cementitious Parge over cold joint
between concrete slab and footing plinth.
Figure 11 NOVITHOR Cementitious Parge over cold joint
between concrete slab and concrete block. Refer page26.
Figure 12 NOVITHOR Cementitious Parge over cold joint
between old and new concrete and around pipe
penetrations.
Figure 13

© Ensystex, Inc. NIM 3.01 08.18 Page 16 of 53 pages
Figure 14

© Ensystex, Inc. NIM 3.01 08.18 Page 17 of 53 pages
Figure 15 Using a rotary hammer drill with a flat chisel
bit, chip out a recess in the slab approx. 5 mm deep.
Figure 16 Clean any excess concrete from the edge of the
pipe using course sand paper.
Figure 17 Brush dirt and loose concrete from the base of
the pipe and surrounding slab area.
Figure 18 Wipe pipe and surrounding slab clean using a
wet rag.
Figure 19 mix TPC Powder and TPC Liquid to a wet
consistency to flow into the recess around the pipe.
Figure 20 Apply Parge to base of pipe with a soft brush &
ensure recess is full with no gaps and extends50 mm.
Figure 20A Completed pipe

© Ensystex, Inc. NIM 3.01 08.18 Page 18 of 53 pages
Alternatively, where it is expected that the pipes will be
cut by later trades, the following method may be
employed. In this case the NOVITHOR Installer cuts the
pipes prior to applying the NOVITHOR Termite
Protection. This ensures the NOVITHOR Termite
Protection is not later damaged. This method is
illustrated in Figures 20B – 20K below.
Figures 20A – 20C Use a 4¼ inch battery powered angle
grinder with a diamond blade wheel to cut the pipe flush
with the concrete.
Figures 20D – 20F Then grind down around the pipe into
the concrete to create a 4 mm deep trench around the
pipe that is feathered to the outer edge of the trench.
© Ensystex, Inc. NIM 3.01 08.18 Page 19 of 53 pages
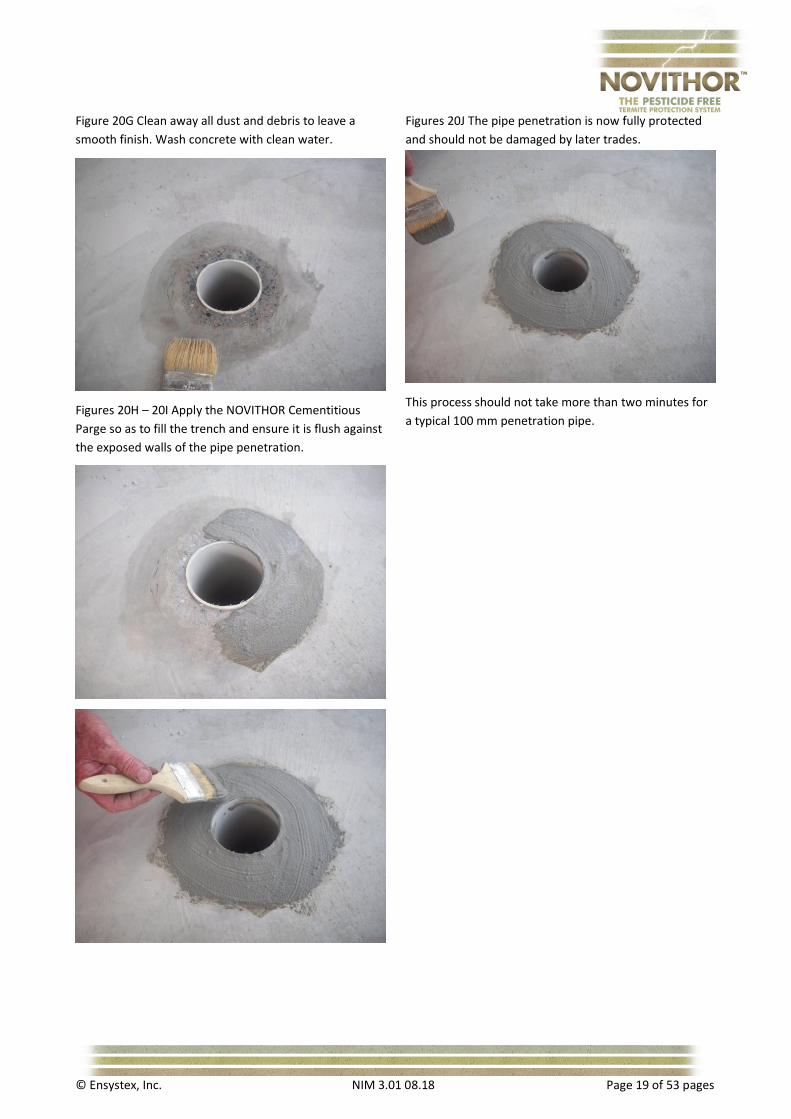
Figure 20G Clean away all dust and debris to leave a
smooth finish. Wash concrete with clean water.
Figures 20H – 20I Apply the NOVITHOR Cementitious
Parge so as to fill the trench and ensure it is flush against
the exposed walls of the pipe penetration.
Figures 20J The pipe penetration is now fully protected
and should not be damaged by later trades.
This process should not take more than two minutes for
a typical 100 mm penetration pipe.

© Ensystex, Inc. NIM 3.01 08.18 Page 20 of 53 pages
Figure 21
© Ensystex, Inc. NIM 3.01 08.18 Page 21 of 53 pages
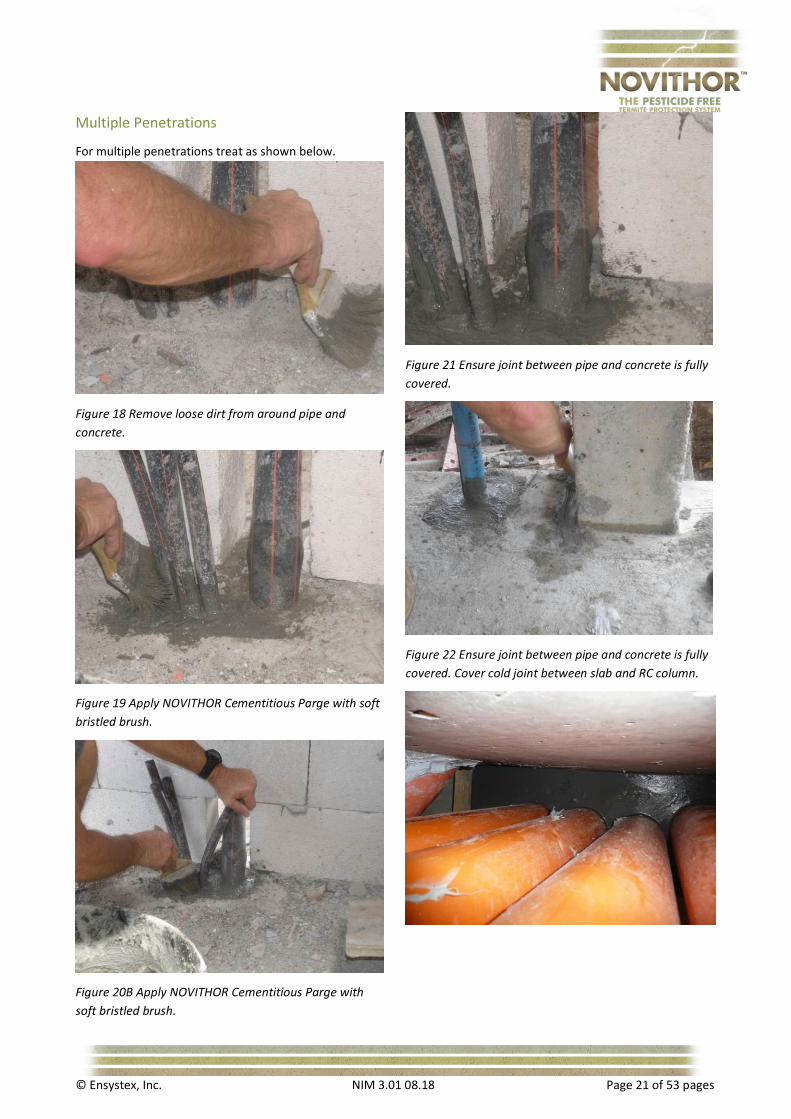
Multiple Penetrations
For multiple penetrations treat as shown below.
Figure 18 Remove loose dirt from around pipe and
concrete.
Figure 19 Apply NOVITHOR Cementitious Parge with soft
bristled brush.
Figure 20B Apply NOVITHOR Cementitious Parge with
soft bristled brush.
Figure 21 Ensure joint between pipe and concrete is fully
covered.
Figure 22 Ensure joint between pipe and concrete is fully
covered. Cover cold joint between slab and RC column.
Figure 23 NOVITHOR Cementitious Parge for multi-cluster
piping.

© Ensystex, Inc. NIM 3.01 08.18 Page 22 of 53 pages
Tilt Panels
Figure 24 Tilt panel slab placed by builder.
Figure 25 Tilt slab panel to be grouted with NOVITHOR
Cementitious Parge.
Figure 26 NOVITHOR Cementitious Parge positioned
below tilt panel and on concrete slab.
Hebel Power Panels
Figure 27 NOVITHOR Cementitious Parge applied over
CSL Hebel and concrete slab edge.
Figure 28 NOVITHOR Cementitious Parge applied over
CSR Hebel and concrete slab edge.

© Ensystex, Inc. NIM 3.01 08.18 Page 23 of 53 pages
Figure 29 NOVITHOR Cementitious Parge applied over
CSR Hebel and concrete slab edge.
Figure 30 NOVITHOR Cementitious Parge applied over
CSR Hebel and concrete slab edge.
Figure 31 Example of NOVITHOR Cementitious Parge
applied as grouting between tilt slab panel and concrete
slab.

© Ensystex, Inc. NIM 3.01 08.18 Page 24 of 53 pages
Capping Retaining Wall
Figure 32 NOVITHOR Cementitious Parge capping RC block wall
Figure 33 NOVITHOR Cementitious Parge extending 75 mm down RC block wall to create a
minimum 75 mm inspection zone.
© Ensystex, Inc. NIM 3.01 08.18 Page 25 of 53 pages
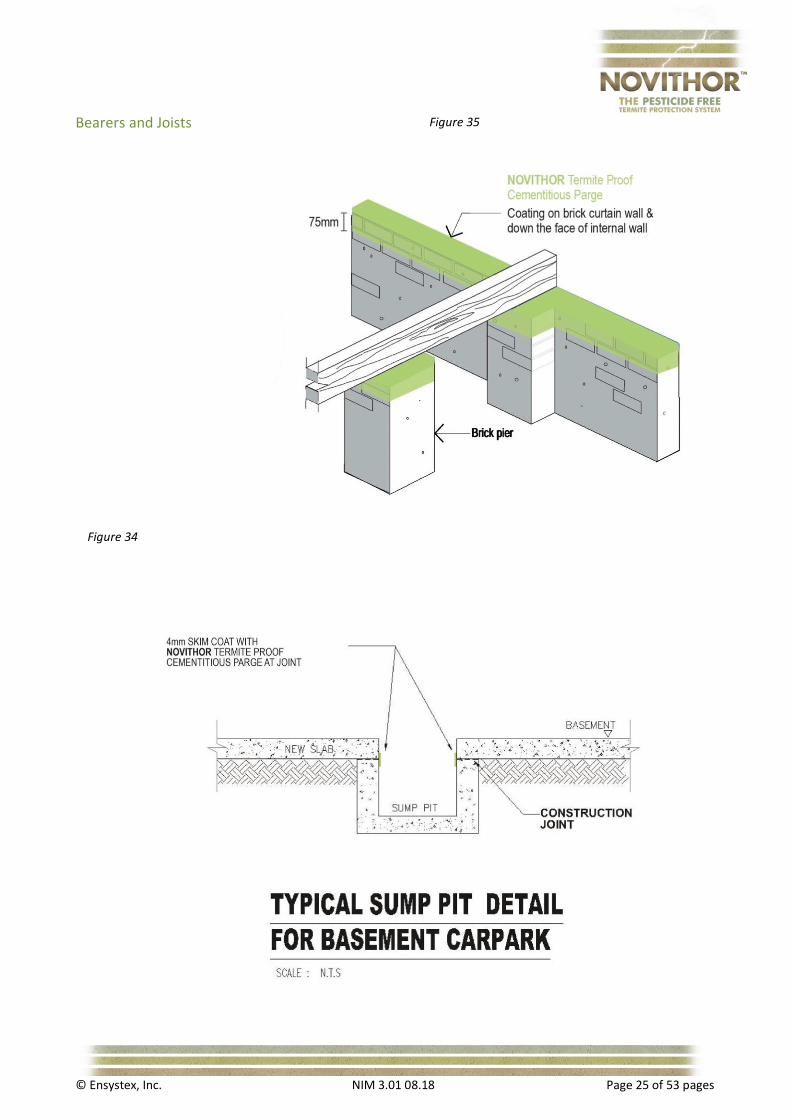
Bearers and Joists
Figure 34
Figure 35
© Ensystex, Inc. NIM 3.01 08.18 Page 26 of 53 pages
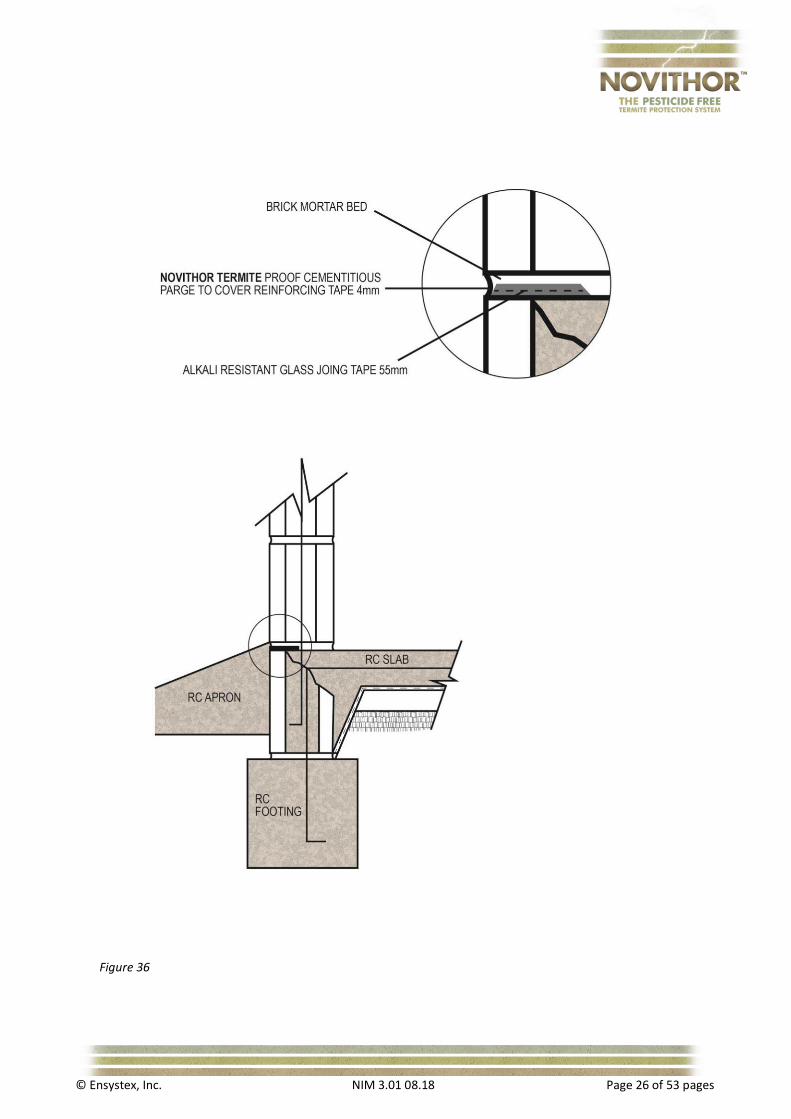
Figure 36

© Ensystex, Inc. NIM 3.01 08.18 Page 27 of 53 pages
NOVITHOR Termite Proofing Resin NOVITHOR Termite Proofing Resin is a termite proofing
liquid designed to create a physical termite protection
system against the ingress of subterranean termites by
being applied to mortar or render. It soaks into the
mortar joints, goes hardens the mortar and stops attack
by termites either pulling at the grains of sand and/ or by
stopping the reaction of the formic acid with the cement
in the mortar that termites produce thus weakening the
cement so the grains of sand can be extracted. On its
own, NOVITHOR Termite Proofing Resin is not termite
proof, it works with the mortar.
NOVITHOR Termite Proofing Resin is used externally or
internally and meets the requirements of Australian
Standards AS 3660.1 2000 and AS 3660.3.
Benefits
• Easily applied by brush or low pressure spray.
• Dries clear and enhances the natural colour of
masonry surfaces.
• Prevents termite’s formic acid reacting with mortar.
• It is identified by traceable elements.
• Easy two coat application.
• Minimum 50 year life expectancy.
• Suitable for post and pre-construction applications.
• Reduces/stops efflorescence in treated brickwork.
• Reduces water absorption in treated brickwork.
• Hardens brickwork, mortar and render by its unique
ability to penetrate and interface as part of the
matrix of the masonry.
• Water proofing membranes may be applied directly
over NOVITHOR Termite Proofing Resin treated
retaining walls.
• May be applied to internal masonry surfaces.
• Ideal for zero allotment buildings.
CSIRO Approved for Damp-proofing
NOVITHOR Termite Proofing Resin has been tested in
compliance with AS/NZS 4347.1:1995 Australian/New
Zealand Standard: Damp-proof courses and flashings. See
Test Report 6505 from CSIRO Materials Science &
Engineering, 37 Graham Road, Highett, Victoria 3190.
Application Directions
Surfaces Concrete and Masonry Walls
Substrates Concrete, cement renders brickwork
NOVITHOR Termite Proofing Resin is applied to the lower
courses of brickwork from the footing or slab edge until
75 mm above finished ground level.
NOVITHOR Termite Proofing Resin is applied to cement
render extending from the footing or slab edge until 75
mm above finished ground level.
Before applying NOVITHOR Termite Proofing Resin
ensure ALL surfaces have been thoroughly cleaned and
mortar stains have been removed with acid wash.
Rendered building
The Resin is usually applied after the render has been
applied. Where a building is rendered it is common
practices to provide a strike line. With modern renders it
is not essential that this occurs with NOVITHOR Termite
Proofing Resin. It is still a good idea to apply a strike line
though since it serves to show where the Resin has been
applied and serves as a guide for future visual inspections
to show that the inspection zone has not been
concealed.
Installation Video Link
Please see:
http://novithor.com/images/Novithor-SD-540.mp4

© Ensystex, Inc. NIM 3.01 08.18 Page 28 of 53 pages
VERY IMPORTANT:
All holes in mortar joints where NOVITHOR Termite
Proofing Resin is must be filled with matching mortar.
It is recommended that mortar joints on new buildings
be ironed or struck in areas to be treated with
NOVITHOR Termite Proofing Resin.
Apply NOVITHOR Termite Proofing Resin on a day where
weather is to be fine, do not apply in wet conditions.
When surfaces are thoroughly dry, apply NOVITHOR
Termite Proofing Resin with brush or low pressure spray.
Apply NOVITHOR Termite Proofing Resin to brickwork
ensuring mortar joints are flood coated from footing to
75 mm above finished ground level.
Apply NOVITHOR Termite Proofing Resin to render
ensuring surface of render is flood coated from footing to
75 mm above finished ground level.
Coverage
Quantities below will allow for a two coat application.
Brickwork 1 Litre per 2 sq. metres
Concrete & cement render 1 Litre per 2 sq. meters
Concrete block 1 Litre per 2 sq. meters
Note: NOVITHOR Termite Proofing Resin is only to be
applied as supplied, do not dilute.
Shake or stir drum well before applying NOVITHOR
Termite Proofing Resin to masonry surfaces.
Cleaning Equipment
To clean brushes and spray equipment use lacquer
thinners of DUCO type e.g. (Xylene) and then flush with
clean tap water.
Figure 37 NOVITHOR Resin being applied to mortar joints
in retaining wall.
Figure 38 NOVITHOR Resin applied to rendered wall.
Figure 39 Applied to face bricks work. 1st coat focus on
mortar joints; 2nd coat cover brick face to blend any runs.
Figure 40 Resin being applied to rendered wall.
Figure 41 NOVITHOR Resin being applied to mortar joints
in retaining wall.

© Ensystex, Inc. NIM 3.01 08.18 Page 29 of 53 pages
Figure 42
Figure 43

© Ensystex, Inc. NIM 3.01 08.18 Page 30 of 53 pages
NOVITHOR Termite Proof Flex-Gel is a Neutral cure, 100% gel rubber sealant and glue based
on silicone. It cures at room temperature to provide
excellent resistance to termites, weathering, ultra violet
radiation, vibration, moisture, ozone, temperature
extremes, airborne pollutants, and many cleaning
detergents and solvents. It is grey in colour and non-
slumping.
Benefits
• Resists the growth of mould and mildew
• Superior adhesion to a wide range of building
materials including concrete and brickwork
• Long life reliability and low maintenance at
temperatures from -500C (-580F) to +1500C (+3020F)
• Can be packed and applied in any season
• Can be applied in vertical and overhead joints
Uses
NOVITHOR Termite Proof Flex-Gel is a high performance
neutral cure gel sealant and adhesive specifically
formulated for indoor/outdoor or confined space
applications. It is used for sealing applications on
zincalume, galvanized iron, anodized aluminium, coated
steel products, concrete, brick veneer, aerated concrete
(AAC) & rigid PVC. It is suitable for sanitary applications
due to the presence of a mould inhibitor.
Typical Properties
NB These values are not intended for use in preparing
specifications. Please contact the Ensystex office prior to
writing specifications on this product.
Parameter Unit Value
As supplied - tested at 250C, 50% relative humidity
Flow, sag or slump mm Nil
Working time minutes 10
Surface cure time minutes 35
Specific gravity g/mL 1.03
As cured - tested at 250C, 50% relative humidity
Hardness, shore A Points 20
Ultimate tensile strength MPA >1.1
Ultimate elongation % >300
Modulus at 100% MPA 0.5
Movement capability % 25
Application Directions
1. Correct joint design reduces stress on the sealant,
enables optimum movement capability, assists
sealant application, and reduces the potential for
sealant splitting and voiding.
2. Guidelines are:
a. Minimum joint width - 2 mm.
b. Minimum joint depth - 6 mm.
For larger joints, the width of the joint should be greater
than the sealant depth. Avoid 3-sided adhesion; Apply
backer rod or bond breaker tape in the base of the joint
to ensure the sealant is only bonded to the sides of the
joint.
3. Clean all joint surfaces. Surfaces must be clean, dry,
and sound. Remove loose debris and/or old sealant.
General Recommendations
For non-porous surfaces: Solvent wipe the joint surfaces
using a non-oily solvent such as methyl ethyl ketone,
white spirits or mineral turpentine on a clean white lint-
free cloth to remove any oils or contaminants.
Immediately wipe with a second dry cloth to remove any
traces of solvent and contamination.
For porous surfaces: Wire brush or abrade the surfaces
to remove loose debris, old paint and other
contaminants. Remove dust with an oil-free compressed
air blast and/or high-pressure water blast. Allow to dry
before sealing. If necessary solvent wash and dry.
Priming. A primer may be needed for optimum adhesion
to some substrates based on in-situ testing.
Install backing material. A backer rod (e.g. closed-cell
polyethylene or open-cell polyurethane foam) or similar
material (e.g. low tack polyethylene tape for shallow
joints) can be used in the base of the joint to control
sealant depth and avoid 3-sided adhesion by preventing
adhesion to the base of the joint.
Mask adjacent surfaces with masking tape. This will
ensure a clean, neat appearance and reduce clean up by
protecting surrounding areas from excess sealant.
Apply sealant. Dispensing equipment is required. Please
contact Ensystex for purchase. Apply sealant into the
base of the joint so that it completely fills the joint,
wetting both sides.
© Ensystex, Inc. NIM 3.01 08.18 Page 31 of 53 pages
Tool joint/remove masking tape. Tool the surface of the
joint before the sealant forms a skin to provide a smooth
even finish and to ensure the sealant adheres to the
sides of the joint. Do not use soap or water as tooling
aids. Remove masking tape immediately after tooling and
before the sealant skins. After a skin has formed, do not
disturb the joint for 24 hours. Avoid contact with
cleaning agents and solvents (e.g. bleach) whilst sealant
is curing. Uncured sealant can best be cleaned from tools
using commercial solvents such as xylene, toluene,
methyl ethyl ketone, or mineral turpentine.
Observe proper precautions when using flammable
solvents. On porous surfaces, allow sealant to cure
before removing by abrasion. Cured sealant is not
soluble and must be trimmed with a blade. Avoid
undercutting the seal.
Safe-handling
Before use, read product Material Safety Data Sheet and
container label.
Useable Life And Storage
When stored at or below 300C in the original unopened
containers, this product has a useable life of 36 months
from the date of manufacture.
Packaging
NOVITHOR Termite Proof Flex-Gel is supplied in a 300 g
cartridge tube.
Limitations
• Do not use for structural glazing.
• Not recommended for continuous water immersion.
• Not recommended for polycarbonate plastic sheeting
• Paint will not adhere well to the sealant. Paint before
applying sealant and ensure paint is thoroughly dry
(particularly enamel or solvent based paints).
• Do not apply in contact with materials that bleed
plasticisers, solvents or release by-products that may
inhibit cure, affect adhesion or discolour the
sealant(e.g. bituminous adhesives and coatings).
• Do not clean or treat the sealant with materials,
solvents, or cleaning agents that may affect or
discolour the sealant, particularly during sealant cure.
• Do not use when substrate surface temperature
exceeds 500C.
• Do not use as a penetration fire stop sealing system.
• Do not apply to surfaces in direct contact with food or
drinking water.
• Do not use on the reflective coatings on mirrors.
Warranty Information - Please Read Carefully
The information contained herein is offered in good faith
and is believed to be accurate. However, because
conditions and methods of use of our products are
beyond our control, this information should not be used
in substitution for customer's own tests to ensure that
the product is effective and satisfactory for the intended
end use.
© Ensystex, Inc. NIM 3.01 08.18 Page 32 of 53 pages
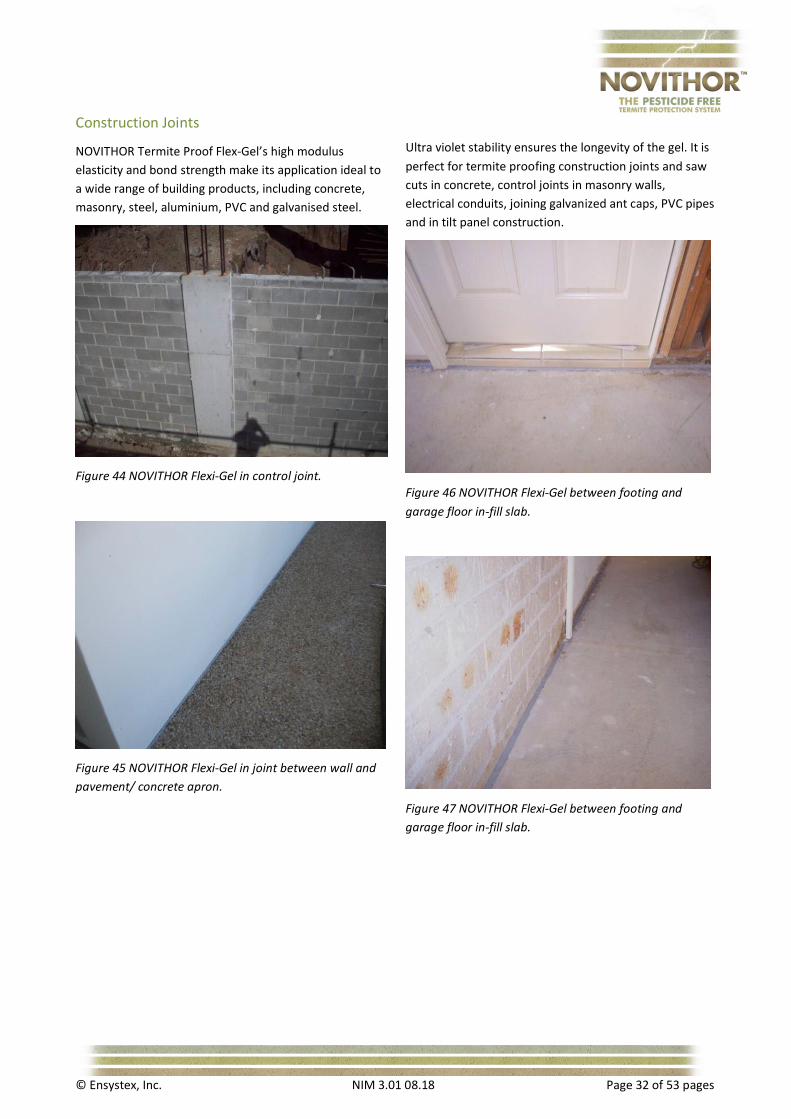
Construction Joints
NOVITHOR Termite Proof Flex-Gel’s high modulus
elasticity and bond strength make its application ideal to
a wide range of building products, including concrete,
masonry, steel, aluminium, PVC and galvanised steel.
Figure 44 NOVITHOR Flexi-Gel in control joint.
Figure 45 NOVITHOR Flexi-Gel in joint between wall and
pavement/ concrete apron.
Ultra violet stability ensures the longevity of the gel. It is
perfect for termite proofing construction joints and saw
cuts in concrete, control joints in masonry walls,
electrical conduits, joining galvanized ant caps, PVC pipes
and in tilt panel construction.
Figure 46 NOVITHOR Flexi-Gel between footing and
garage floor in-fill slab.
Figure 47 NOVITHOR Flexi-Gel between footing and
garage floor in-fill slab.

© Ensystex, Inc. NIM 3.01 08.18 Page 33 of 53 pages
Figure 48 NOVITHOR Flexi-Gel protecting construction
joint.
Figure 49 NOVITHOR Flexi-Gel around core drilled pipe.
Figure 50 NOVITHOR Flexi-Gel around column.
© Ensystex, Inc. NIM 3.01 08.18 Page 34 of 53 pages
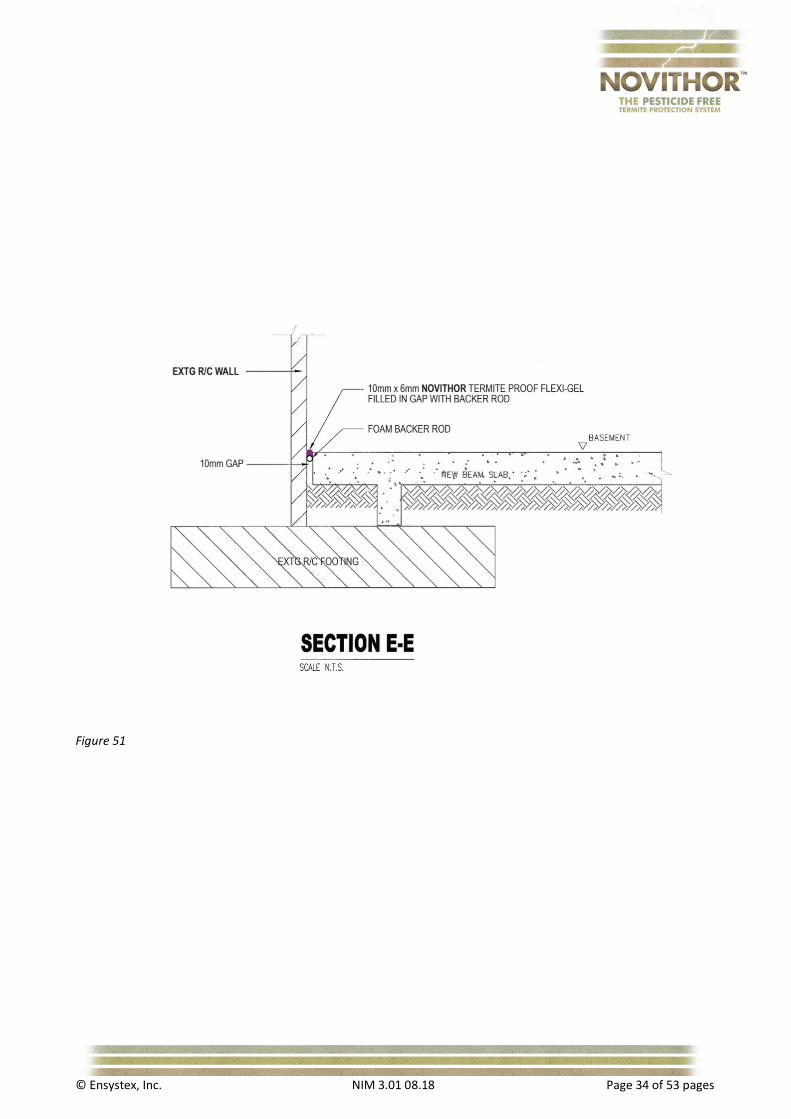
Figure 51
© Ensystex, Inc. NIM 3.01 08.18 Page 35 of 53 pages
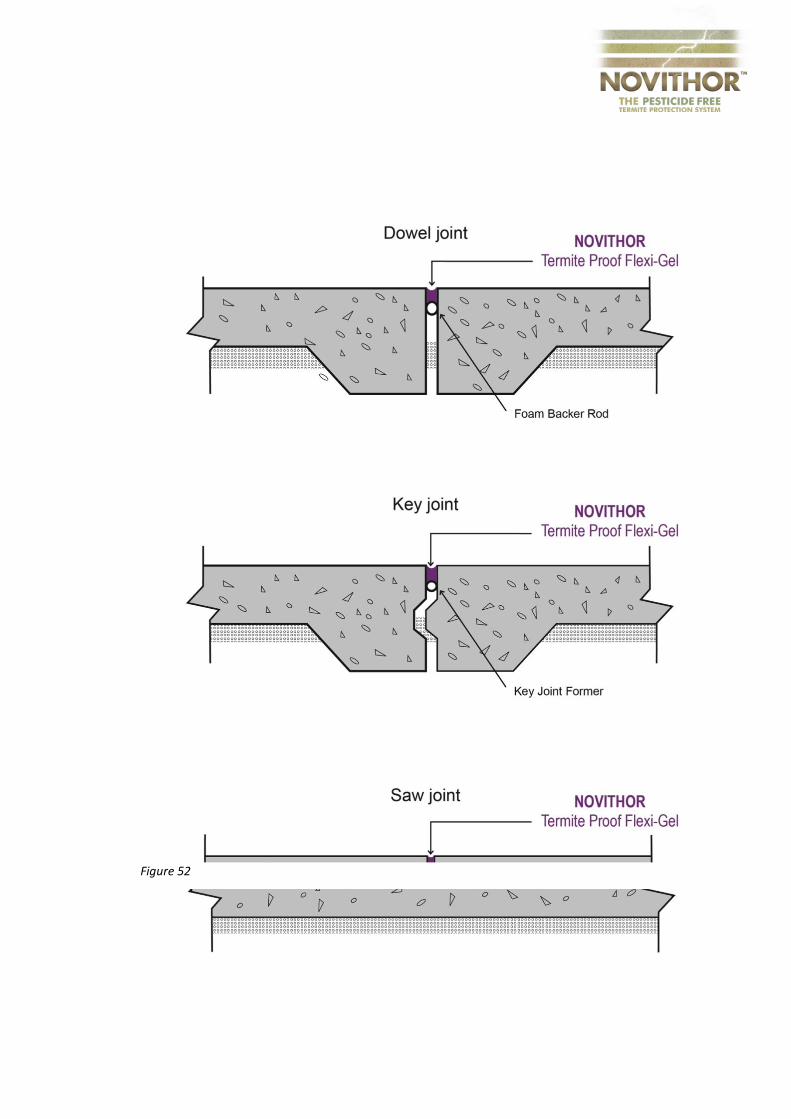
Figure 52

© Ensystex, Inc. NIM 3.01 08.18 Page 36 of 53 pages
Figure 53
Electrical conduit
© Ensystex, Inc. NIM 3.01 08.18 Page 37 of 53 pages
The successful performance of a building exterior is
frequently defined by its ability to keep termites and the
elements outside, away from the building’s occupants.
One of the critical links to ensuring a termite proof
building is the joint sealant. Building joints can be sealed
effectively by following a few simple guidelines for design
in workable joints, selecting the correct termite proof
sealant, performing appropriate surface preparation, and
performing quality checks to ensure proper performance.
Joint Movement
Regardless of the size and height of structures, joint
movement inevitably occurs from various factors such as
changes in temperature, seismic movement, elastic
frame shortening, creep, live loads, concrete shrinkage,
moisture induced movements and design errors.
Therefore, each joint should be designed to absorb these
movements, using the correct sealant.
When movement is caused by temperature change, the
degree of joint movement for each material should be
considered since all materials have their own coefficient
of linear thermal expansion (CTE). Joint movement
caused by thermal expansion can be calculated by the
following equation:
Movement (Mt) = CTE x Temp. Change x Length
of Material
Average Coefficients of Linear Thermal Expansion for
Building Materials - Reference ASTM C-1193
Note: The coefficient of expansion for natural materials
(brick, stone, wood, etc.) or fabrications of natural
materials can be highly variable. If a specific material is
contemplated then the coefficient for that material
should be established and used rather than an average
value. Moisture induced movement of brick masonry will
cause the brick to swell and reduce joint sizes over the
life of the project.
Joint Types
From a functional point of view, joints for construction
can be put into two classes depending on the degree of
movement.
Working Joints
Working joint are joints in which the shape and size of
the sealant joint changes dramatically when movement
occurs. Usually, a working joint occurs on the building
envelope when different materials abut each other or
joints are designed to allow thermal expansion of
materials. Typical examples or working joints include,
Control Joints, Expansion Joints, Lap Joints, Butt Joints
and Stack Joints.
Fixed Joints
Fixed Joints are joints which are mechanically fixed to
prohibit movement. Movement is generally less than
10% of joint width. These joints are typically designed as
air and/or water seals in curtain walls.
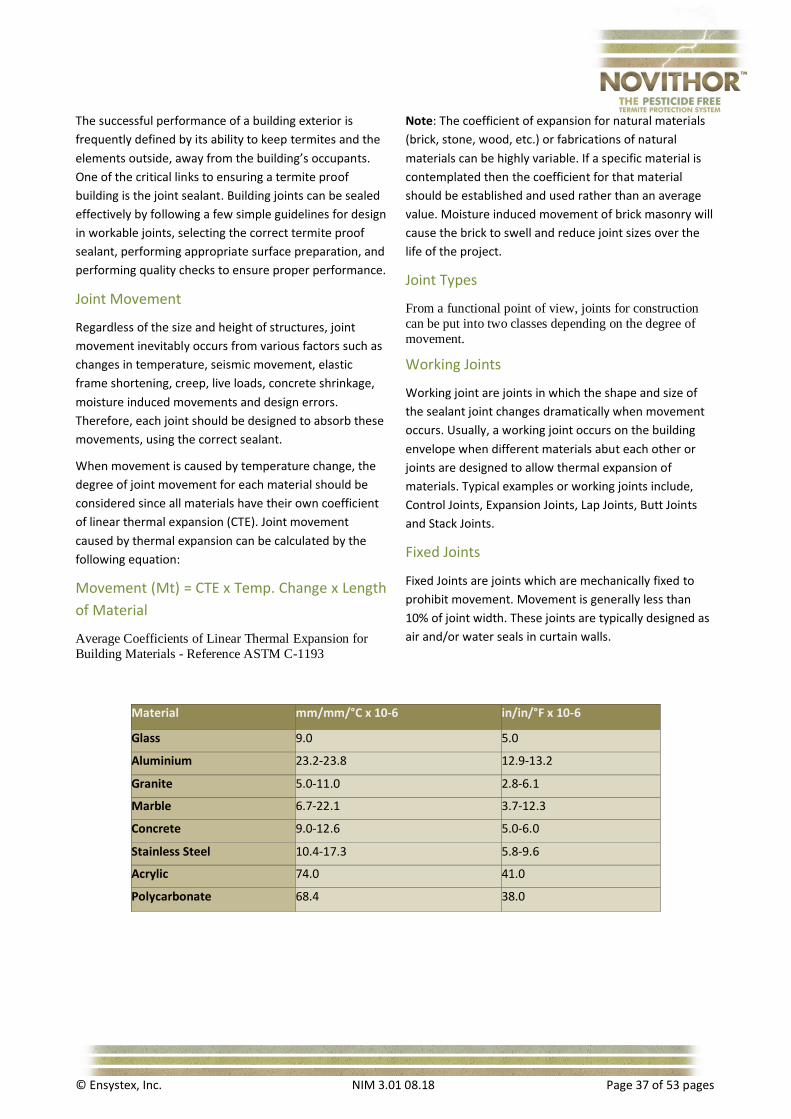
Material mm/mm/°C x 10-6 in/in/°F x 10-6
Glass 9.0 5.0
Aluminium 23.2-23.8 12.9-13.2
Granite 5.0-11.0 2.8-6.1
Marble 6.7-22.1 3.7-12.3
Concrete 9.0-12.6 5.0-6.0
Stainless Steel 10.4-17.3 5.8-9.6
Acrylic 74.0 41.0
Polycarbonate 68.4 38.0

© Ensystex, Inc. NIM 3.01 08.18 Page 38 of 53 pages
Joint Design
Figure 54 – Working Joints Applications
NOVITHOR Termite Proof Flex-Gel has been designed to
perform when installed in compliance with accepted
termite sealing procedures.
A few underlying principles are critical to consider in all
joint designs using termite proof silicone sealants.
In all cases, a minimum depth of 6 mm sealant/ substrate
bond is necessary to ensure adequate adhesion.
A minimum width of 6 mm is necessary to ensure that
sealant applied from a caulking gun will flow into the
joints. Note: In some cases where the sealant is used
simply as a non-moving bedding compound and is
applied to one substrate before both substrates are
pressed together, thinner joint dimensions are
acceptable.
NOVITHOR Termite Proof Flex-Gel requires atmospheric
moisture to fully cure. Therefore, the sealant joint must
be designed to ensure that the sealant is not isolated
from air.
Moving Joint Considerations
When designing moving joints, the following points need
consideration:
A minimum 6 mm joint width is recommended. Wider
joints accommodate more movement than narrow joints.
Three-sided adhesion limits the amount of movement
that a joint can accept without inducing a tear. Three-
sided adhesion can be eliminated by the addition of a
bond breaker tape or backer rod. With three-sided
adhesion, no more than +/-15 per cent movement can be
accommodated.
A thin sealant joint (6 mm +/- 3 mm) will accommodate
more movement than a thick joint. Optimum
performance is observed when the joints are shaped like
an hourglass.
As a practical matter, as the sealant joint width becomes
larger than 25 mm, the depth should be held at
approximately 9 - 12 mm. There is no need for greater
sealant depth with NOVITHOR Termite Proof Flex-Gel.
Minimum Joint Width = 100 ÷ X (Mt + Ml) + T
X = Sealant Movement Capacity (%)
Mt = Movement due to thermal expansion
Ml = Movement due to Live loading
T = Construction Tolerance
E.g. A horizontal joint between an aluminium curtain wall
and a concrete panel with a thermal movement of 8 mm,
a live load movement of 6 mm, a construction tolerance
of 6 mm and 25 % movement capacity sealant would be:
Width = 100 ÷ 25 x (8 + 6) + 6
Width = 62 mm
Joint movement in Shear
When joints move in shear, greater joint movement can
be accommodated since actual movement on the sealant
is less. The joint width required (A) for joint movement
(B), is as calculated below, or the allowable movement
(B) for a particular joint width dimension (A), can be
calculated using Pythagoras’ Theorem. The new joint
width after movement (C) is limited by the movement
capability of the sealant in shear in a termite proof joint
configuration. The calculation is as follows:
A2 + B2 = C2 where
A = original joint width
B = joint movement
C = new joint width after joint movement

© Ensystex, Inc. NIM 3.01 08.18 Page 39 of 53 pages
Movement During Cure
NOVITHOR Termite Proof Flex-Gel cures by reacting with
atmospheric moisture. Joint movement during cure can
cause unsightly aesthetics due to joint deformation e.g.
wrinkling. Premature adhesion loss can also occur
because the adhesive characteristics of the sealant are
obtained after the sealant has cured. Adhesion loss due
to movement during cure can be minimized by the use of
a primer. Primers can decrease the adhesion cure time
lag. ‘Wrinkling’ can be minimized by following these
guidelines:
Use open cell polyurethane backer rod
Seal when the joint surface is cool and will experience
minimum temperature changes, typically in the late
afternoon or early evening.
Place no more than 6 mm of sealant over the backer rod
at the centre.
These suggestions should help minimize wrinkling, but
may not eliminate it, as all sealants are prone to this
aesthetic issue.
Backer Materials
A backer rod is the typical backer material for most
termite proof joints. The role of a backer rod is to allow
NOVITHOR Termite Proof Flex-Gel to be installed and
tooled to a proper joint profile. Once it cures, the backer
material must not restrict the movement of the sealant
or cause 3-sided adhesion. To provide sufficient
backpressure during sealant installation, the backer rod
should be sized 25 % larger than the joint opening. Sizing
differs among backer rod types; refer to manufacturer’s
recommendations.
Generally, three common backer rod types can be used
with NOVITHOR Termite Proof Flex-Gel:
• Open cell polyurethane
• Closed cell polyethylene
• Non-gassing polyolefin
Each backer rod type has demonstrated successful
performance with NOVITHOR Termite Proof Flex-Gel.
When selecting a backer rod, consider the following:
1. Open cell polyurethane backer rods allow the
NOVITHOR Termite Proof Flex-Gel to cure through
the backer rod, which is beneficial when fast sealant
cure is desired. It can absorb water, which may have
a detrimental effect in certain joint types.
2. Closed cell polyethylene backer rods may outgas if
punctured during installation, requiring them to be
left for 20 minutes before application.
3. Other back-up materials such as expanding foam
tapes or glazing gaskets should be reviewed or
tested for compatibility prior to use.
When a backer rod cannot be positioned in a joint
opening, Teflon or polyethylene tape should be used to
prevent 3-sided adhesion.
EIFS Consideration
Exterior Insulation and Finish Systems (EIFS) are a new
and growing segment of the exterior cladding market.
EIFS offer unique challenges due to their composition.
NOVITHOR Termite Proof Flex-Gel has a demonstrated
history of success when used with Exterior Insulation and
Finish Systems. NOVITHOR Termite Proof Flex-Gel offers
unique benefits over organic sealants when used with
EIFS.

© Ensystex, Inc. NIM 3.01 08.18 Page 40 of 53 pages
Termite proof Design
Examples of a variety of termite proof joints follow with a
review of joint type for key points and concerns.
Conventional Moving Termite Seal
•
•
•
Good Joint Design
Dimension A must be at least 6 mm
Dimension B must be at least 3 mm
Dimension C must be at least 6 mm
Joint surface should be tooled.
Dimension B suggested maximum = 12 mm
Joints wider than 50 mm may slump slightly; therefore
double application techniques of the NOVITHOR Termite
Proof Flex-Gel may be required.
Poor Joint Design
A deep sealant joint will not have the same movement
capability as a properly designed joint.
Slow cure due to excessive sealant depth.
Figure 55

© Ensystex, Inc. NIM 3.01 08.18 Page 41 of 53 pages
Moving Corner Joints (Fillets)
Figure 56
Good Joint Design
Dimension A and B must be at least 6 mm.
A bond breaker tape or backer rod must be present if
joint movement is anticipated.
Joint must be tooled flat or slightly concave.
Dimension C must be at least 6 mm.
Figure 57
Poor Joint Design
Dimension A or B less than 6 mm.
Joint not properly tooled.
No bond breaker material; therefore the joint will not
accept movement.
Bond breaker tape
NOVITHOR Flexi-Gel
© Ensystex, Inc. NIM 3.01 08.18 Page 42 of 53 pages
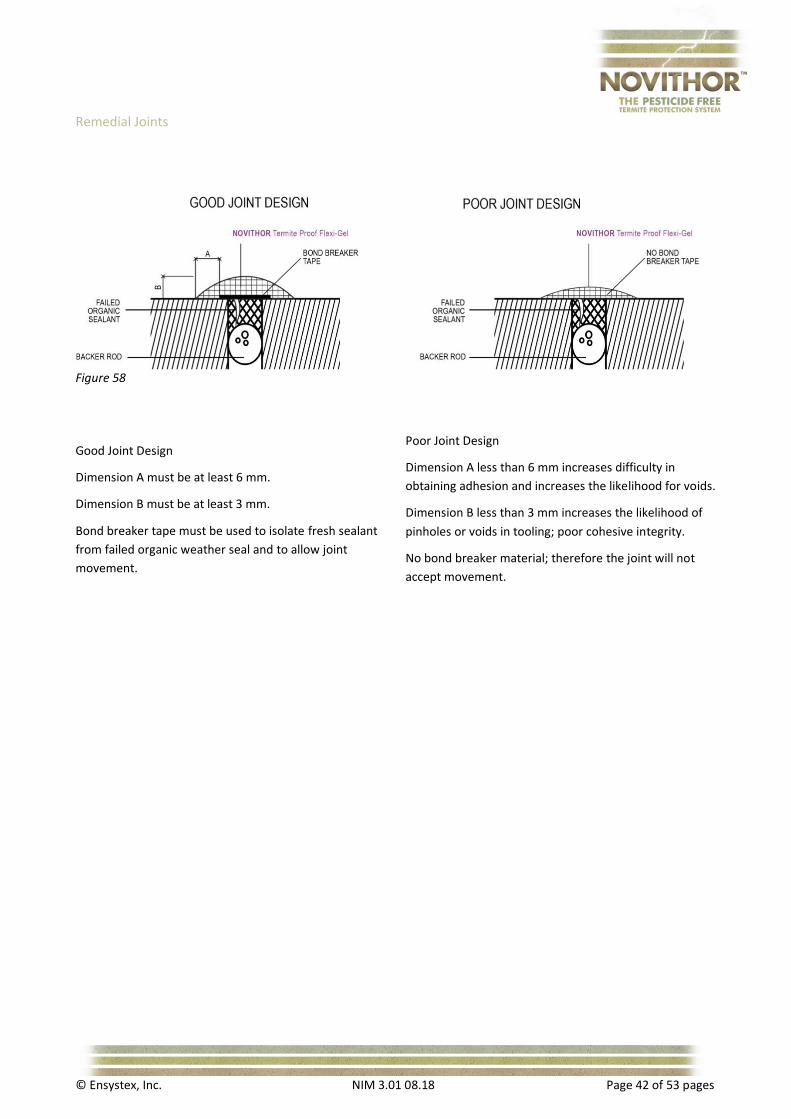
Remedial Joints
Good Joint Design
Dimension A must be at least 6 mm.
Dimension B must be at least 3 mm.
Bond breaker tape must be used to isolate fresh sealant
from failed organic weather seal and to allow joint
movement.
Poor Joint Design
Dimension A less than 6 mm increases difficulty in
obtaining adhesion and increases the likelihood for voids.
Dimension B less than 3 mm increases the likelihood of
pinholes or voids in tooling; poor cohesive integrity.
No bond breaker material; therefore the joint will not
accept movement.
Figure 58

© Ensystex, Inc. NIM 3.01 08.18 Page 43 of 53 pages
Movement Control Joints
Expansion joints (closing control and articulation joints)
shall be clean and free from any hard or incompressible
material for the full width and depth of the joint (before
a backing rod and NOVITHOR Termite Proof Flex-Gel is
inserted to prevent access of subterranean termites.
Garage Driveways / External Patio’s
These areas are able to be treated by means of
NOVITHOR Termite Proof Flex-Gel as a control joint.
Wall & Floor / Pipe Penetrations for
Services
a) Wall penetrations are to be treated with either,
NOVITHOR Termite Proof Flex-Gel or NOVITHOR
Termite Proof Cementitious Parge
b) Floor penetrations are to be treated with either,
NOVITHOR Termite Proof Flexi-Gel or NOVITHOR
Termite Proof Cementitious Parge (as shown in this
installation manual).
Figure 59
Estimating Sheet
A guide to NOVITHOR Termite Proof Flex-Gel quantities
(for fillet work multiply metre runs per cartridge or ‘foil’
by two).
Joint size
in mm
Litre NTPG Metre run Metre run
per metre
run
per
cartridge
(300 g)
per foil
(500 g)
5 x 5 0.025 12.4 20
5 x 10 0. 50 6.2 10
5 x 15 0.075 4.2 6.7
10 x 10 0.100 3.1 5.0
10 x 15 0.150 2 3.3
10 x 20 0.200 1.55 2.5
10 x 25 0.250 1.24 2.0
15 x 10 0.150 2.06 3.3
15 x 15 0.225 1.35 2.3
15 x 20 0.300 1.04 1.7
15 x 25 0.375 0.82 1.3
15 x30 0.450 0.69 1.1
15 x 40 0.600 0.51 0.8
20 x 10 0.200 1.55 2.5
20 x 15 0.050 1.04 1.7
20 x 20 0.400 0.78 1.3
25 x 12 0.300 1.00 1.7
25 x 15 0.380 0.81 1.3
25 x 20 0.500 0.62 1.0
25 x 25 0.630 0.5 0.8
30 x 15 0.450 0.69 1.1
30 x 20 0.600 0.51 0.8
30 x 25 0.750 0.42 0.7
40 x 20 0.800 0.39 0.7
40 x 25 1.000 0.31 0.5
40 x 30 1.200 0.26 0.4
© Ensystex, Inc. NIM 3.01 08.18 Page 44 of 53 pages
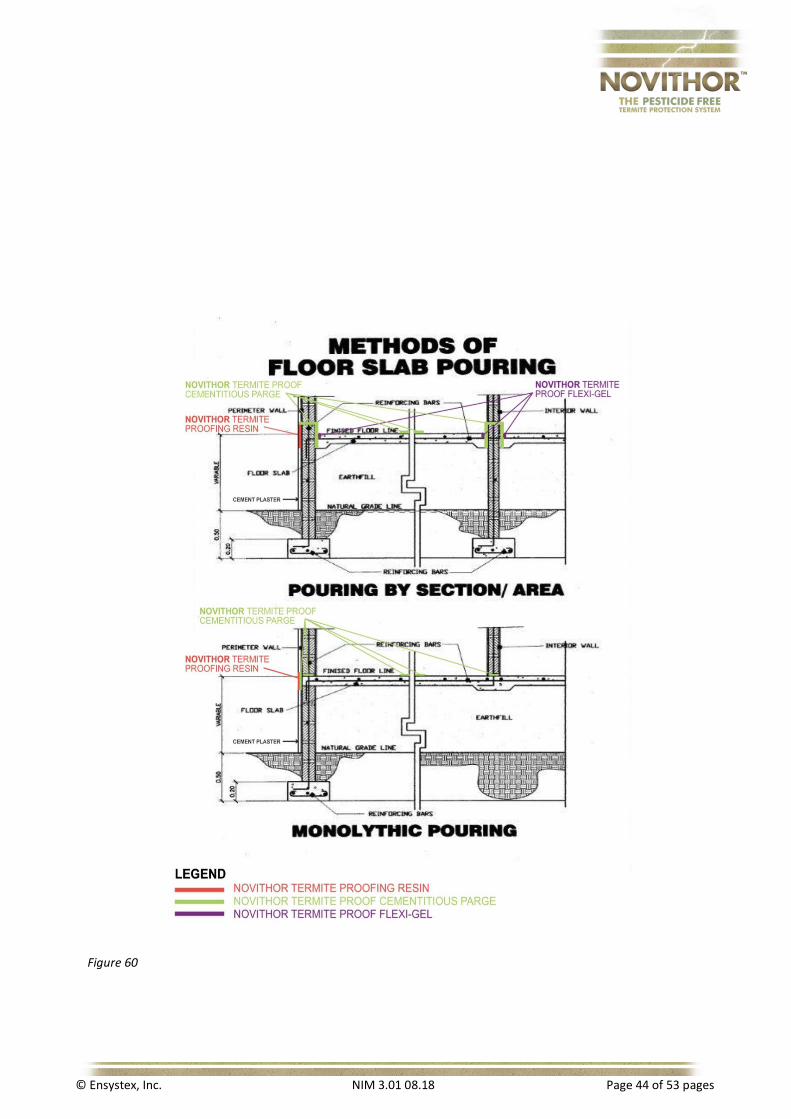
Figure 60
© Ensystex, Inc. NIM 3.01 08.18 Page 45 of 53 pages
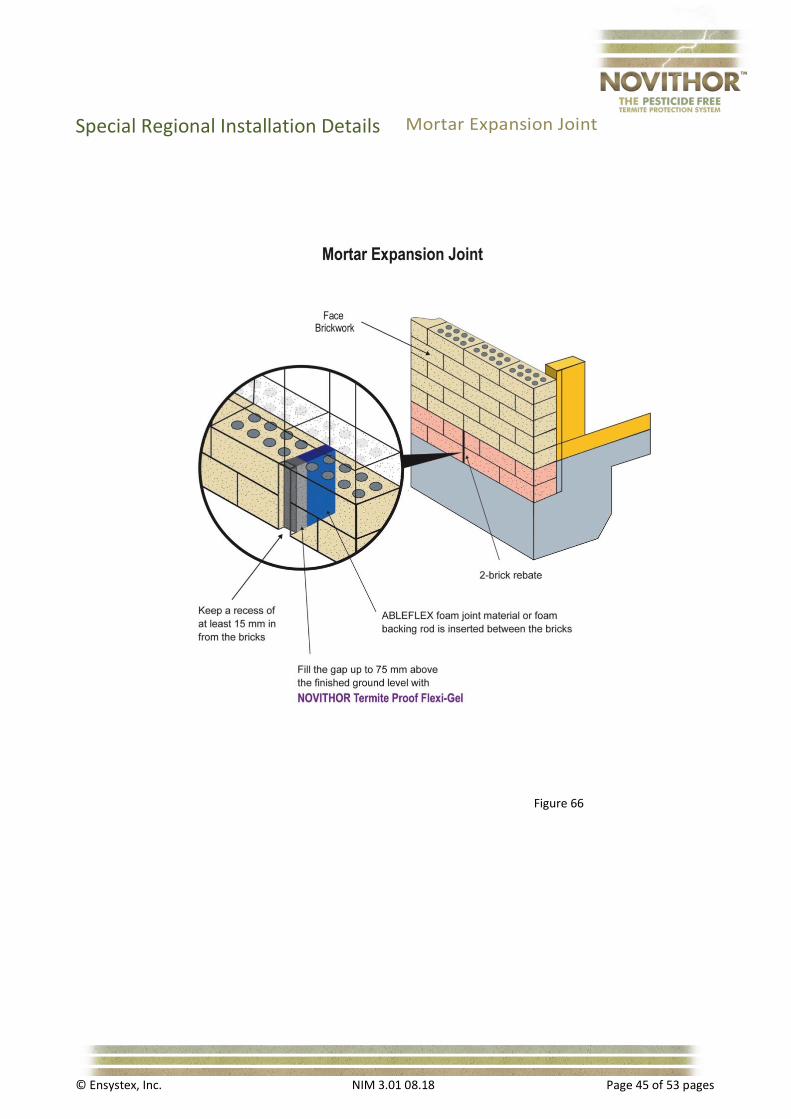
Special Regional Installation Details
Mortar Expansion Joint
Figure 66

© Ensystex, Inc. NIM 3.01 08.18 Page 46 of 53 pages
Garage Doors – QLD
Figure 67

© Ensystex, Inc. NIM 3.01 08.18 Page 47 of 53 pages
Figure 68
© Ensystex, Inc. NIM 3.01 08.18 Page 48 of 53 pages
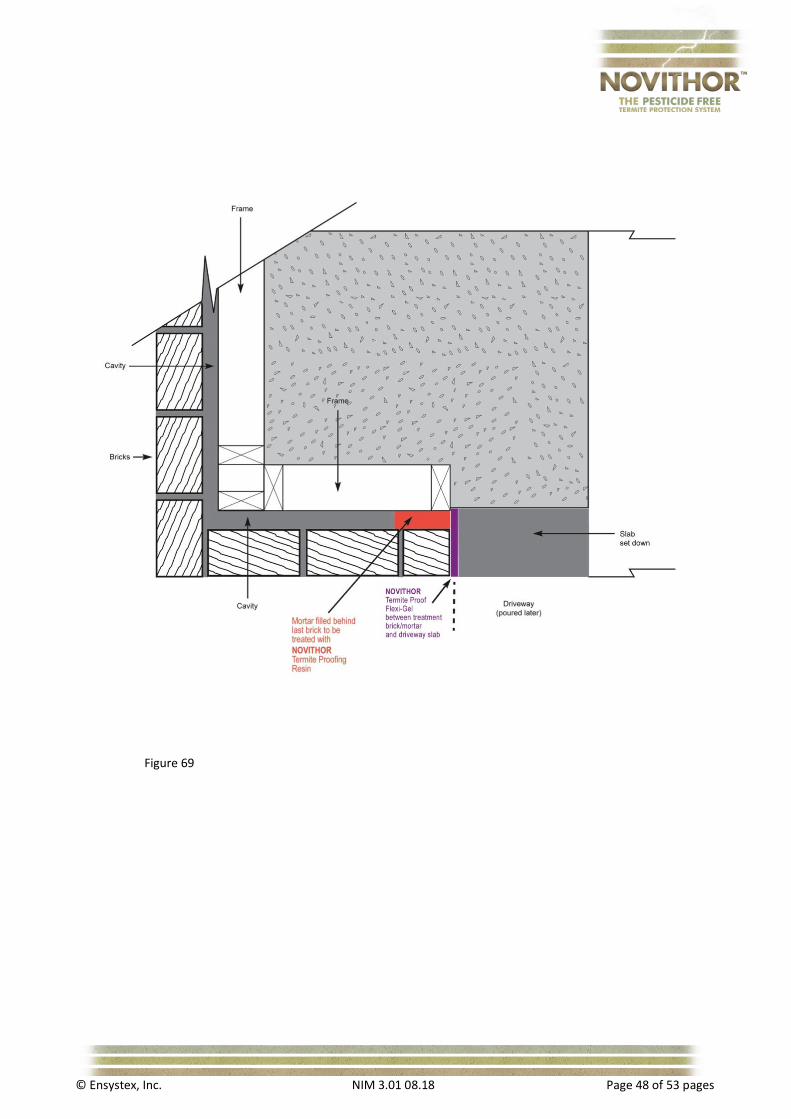
Figure 69

© Ensystex, Inc. NIM 3.01 08.18 Page 49 of 53 pages
Garage with timber door jam overhanging the driveway entry
Figure 70

© Ensystex, Inc. NIM 3.01 08.18 Page 50 of 53 pages
NOVITHOR Termite Proof Collars NOVITHOR Termite Proof Collars provide the premium
solution for pesticide free protection of pipe
penetrations in new buildings. NOVITHOR Termite Proof
Collars are made out of Ultra Marine Grade Aluminium,
which is robust and able to withstand the harshest
treatment and environments.
NOVITHOR Termite Proof Collars are used as a physical
termite barrier around plumbing pipes and electrical
conduits that penetrate through reinforced concrete
slabs. They come in the following sizes, and can be
adapted to suit an even wider range of pipe sizes.
100 mm 43 mm
82 mm 19 mm
56 mm 12 mm
Since the Collars for pipe penetrations are made from
Flex-temper aluminium they can be moulded into various
shapes and can fit the tightest of situations e.g. two
pipes side by side.
The internal flange on Collars is able to be cut and
expanded to enable it to be fitted over flanged ends of
pipes, once fitted over the flange, the collar is pressed
back into its original shape and fastened onto the pipe
with Termite Proof Flex-Gel.
Installation
In-Slab Fixing
1. Select the correct sized NOVITHOR Termite Proof
Collar, ensuring a neat fit is achieved, with the
internal flange extension facing down.
2. The Collar is positioned at the height of the chaired
steel reinforcement.
3. Seal between pipe and the Collar with NOVITHOR
Termite Proof Flex-Gel. Ensure all surfaces are clean
and allow adequate time for the Flex-Gel to cure
before proceeding with the concrete pour.
Figure 71
Figure 72
Figure 73
Figure 74
Figure 75

© Ensystex, Inc. NIM 3.01 08.18 Page 51 of 53 pages
On-Slab Fixing
1. Select the correct sized Collar. Ensure a neat fit is
achieved with the internal flange extension facing
upwards.
2. Ensure the concrete is sound, free of dust and any
curing compounds.
3. Wipe clean all surfaces with methylated spirits.
4. Apply NOVITHOR Termite Proof Flex-Gel to the base
of the pipe, the internal edge and underneath of the
Collar.
Electrical Conduits
Use NOVITHOR Termite Proof Collars around all electrical
conduits penetrating the slab.
Horizontal Penetrations
A horizontal penetration is a right-angle insertion into
the slab. It usually occurs where a service penetration
goes through an edge beam or structural beam. This may
allow concealed termite entry through any hollow
building materials holding the service penetrations in
place (e.g. copper or PVC pipe). All such hollow
structures must be replaced or removed before installing
NOVITHOR Termite Proof Collars.
Multiple Penetrations
This is where there are several service penetrations that
are close to each other. Often these consist of different
pipe sizes. NOVITHOR Termite Proof Cementitious Parge
may also be used in these cases. Treat each penetration
separately. (See next page for details.)
Figure 76
Figure 77
Figure 78
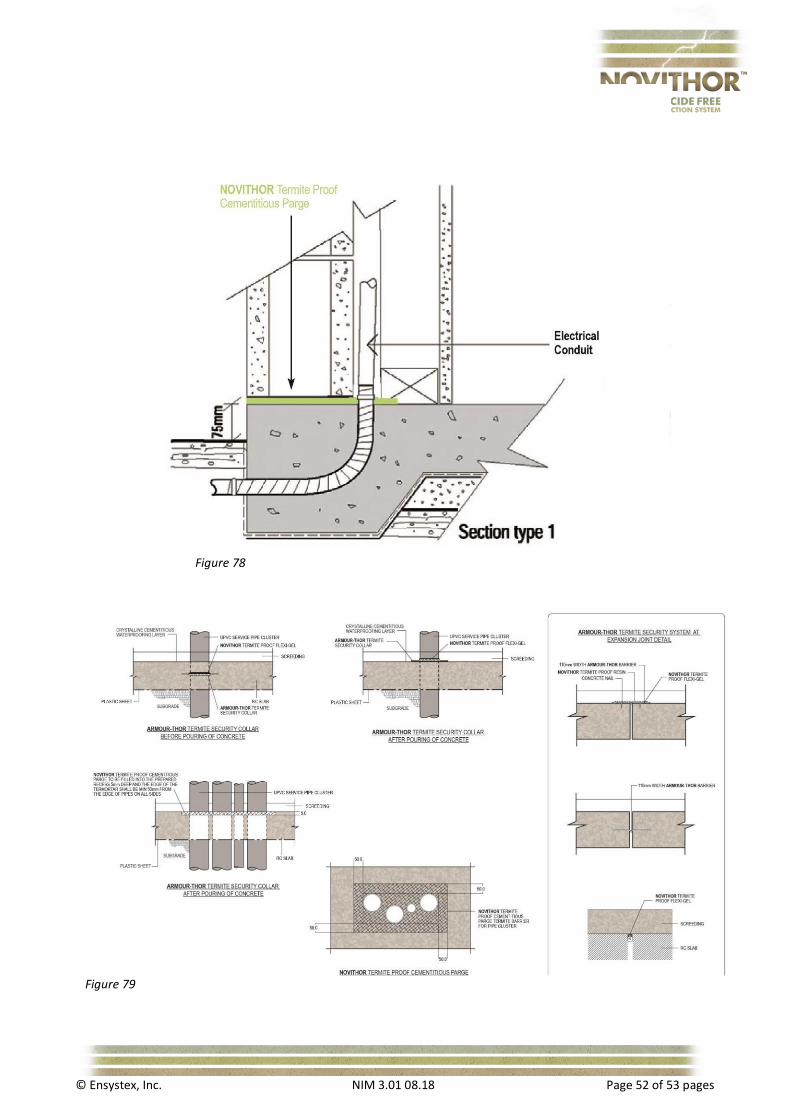
© Ensystex, Inc. NIM 3.01 08.18 Page 52 of 53 pages
Figure 78
Figure 79

© Ensystex, Inc. NIM 3.01 08.18 Page 53 of 53 pages
Essential Equipment
Essential Installation Equipment
ACCUTHOR™ 5 L Stainless Steel Sprayer with Multi-nozzle and 50 cm wand. NB Filters should be removed
Xylene for clean up of NOVITHOR Resin
Solvent-safe Funnel
13 mm Backing Rod for vertical brick joints with no foam in them Trim knife to cut back foam when present in vertical brick joints
Small square mouth shovel to clean up dropped materials covering the bottom mortar bed if needed
Small shifters to dismantle sprayer assembly for cleaning
Coarse bristle brush and banister brush to clean any laitance off the concrete substrate
Heavy duty applicator/gel gun or sausage gun with trigger to squeeze/push Termite Proof Flex-Gel out of the tube
Two putty knives with blades approx. 30-40 mm wide
Brick layers trowel
30 m tape measure
Hammer and bolster
Battery power drill with paddle mixer for mixing NOVITHOR Cementitious Parge
Hand towelling or waste rags
Plastic buckets
Soft bristled broom.
Tin snips, straight, left and right cutting types to cut aluminium.
Water should be available on site – if not, provide your own
NOVITHOR Meter box stickers
Essential Safety Equipment
Hardhat
Safety glasses
Chemical resistant gloves
Hearing protection
Overalls
Safety boots
Portable Eye Wash