· 8.8. bonding large tile areas ... 10. bonding homogeneous floor coverings without electric...
TRANSCRIPT

������������
��� ���� ���������� �

������������

������������

��� ���� �����������
� ������������
1. INTRODUCTION............................................................................................................................................4 2. PRODUCT SELECTION ................................................................................................................................4 3. BASES ...........................................................................................................................................................4 3.1. Cement bases ............................................................................................................................................................5 3.2. Anhydrite bases..........................................................................................................................................................5 3.3. Magnesite screeds .....................................................................................................................................................5 3.4. Chipboard and cement-chipboard bases....................................................................................................................6 3.5. Bases of ceramic and cement tiles and cast terrazzo.................................................................................................6 3.6. Using original floor coverings as a base .....................................................................................................................6 4. TOOLS, EQUIPMENT & ACCESSORIES .....................................................................................................6 4.1. Base preparation ........................................................................................................................................................6 4.2. Measurement..............................................................................................................................................................6 4.3. Dimensional adjustments ...........................................................................................................................................7 4.4. Installation ..................................................................................................................................................................7 4.5. Accessories ................................................................................................................................................................7 4.6. Cleaning agents..........................................................................................................................................................7 5. BONDING.......................................................................................................................................................7 5.1. Preparing the base before bonding ............................................................................................................................7 5.2. Applying the adhesive ................................................................................................................................................10 5.3. Rolling the floor...........................................................................................................................................................10 5.4. Adhesives...................................................................................................................................................................10 6. DELIVERY INSPECTION ..............................................................................................................................10 7. INSTALLING STRIPS OF HETEROGENEOUS FLOOR COVERING ..........................................................10 7.1. Product details............................................................................................................................................................10 7.2. Preparing the base .....................................................................................................................................................10 7.3. Preparing the floor covering........................................................................................................................................10 7.4. Using dispersion adhesives........................................................................................................................................11 7.5. Using solvent adhesives .............................................................................................................................................11 7.6. Using welding rods .....................................................................................................................................................11 7.7. Cold-welding...............................................................................................................................................................12 8. INSTALLING HOMOGENEOUS FLOOR COVERING TILES .......................................................................12 8.1. Product details............................................................................................................................................................12 8.2. Preparing the base .....................................................................................................................................................12 8.3. Preparing the floor covering........................................................................................................................................12 8.4. Bonding the tiles .........................................................................................................................................................12 8.5. Bonding the main field ................................................................................................................................................13 8.6. Cutting peripheral tiles................................................................................................................................................13 8.7. Bonding peripheral tiles ..............................................................................................................................................13 8.8. Bonding large tile areas..............................................................................................................................................14 9. CONDUCTIVE FLOOR COVERINGS ...........................................................................................................14 9.1. Bonding electrostatically conductive floor coverings...................................................................................................14
9.1.1. Fatra – Henkel system.....................................................................................................................................15 9.1.1.1. Installing the conductive mesh ...........................................................................................................15
9.1.2. Fatra – Mapei system.......................................................................................................................................15 9.1.2.1. Installing the conductive mesh ...........................................................................................................15
9.1.3. Fatra – Uzin system .........................................................................................................................................16 9.1.3.1. Installing the conductive mesh ...........................................................................................................16
9.1.4. Fatra – Schönox system...................................................................................................................................17 9.1.4.1. Installing the conductive mesh ...........................................................................................................17
9.1.5. Fatra – Kiesel system.......................................................................................................................................17 9.1.5.1. Installing the conductive mesh ...........................................................................................................17
9.1.6. Fatra – Bralep system ......................................................................................................................................18 9.1.6.1. Installing the conductive mesh ...........................................................................................................18
��� ���� �����������
�� ������������
9.2. Bonding antistatic floor coverings ...............................................................................................................................18 9.2.1. Fatra – Henkel system.....................................................................................................................................18
9.2.1.1. Installing the conductive mesh ...........................................................................................................18 9.2.2. Fatra – Mapei system.......................................................................................................................................19
9.2.2.1. Installing the conductive mesh ...........................................................................................................19 9.2.3. Fatra – Uzin system .........................................................................................................................................20
9.2.3.1. Installing the conductive mesh ...........................................................................................................20 9.2.4. Fatra – Schönox system...................................................................................................................................20
9.2.4.1. Installing the conductive mesh ...........................................................................................................20 9.2.5. Fatra – Kiesel system.......................................................................................................................................21
9.2.5.1. Installing the conductive mesh ...........................................................................................................21 9.2.6. Fatra – Bralep system ......................................................................................................................................21
9.2.6.1. Installing the conductive mesh ...........................................................................................................22 9.3. Installing a conductive mesh made of Cu strip ...........................................................................................................22
9.3.1. Bonding electrostatically conductive floor coverings to a conductive mesh made of Cu strip ..........................23
10. BONDING HOMOGENEOUS FLOOR COVERINGS WITHOUT ELECTRIC PROPERTIES.....................23 11. FINISHING .....................................................................................................................................................23 11.1. Joining tiles with a welding rod ...................................................................................................................................23 11.2. Using floor strips.........................................................................................................................................................23 11.3. Finishing the floor with a scotia...................................................................................................................................24 11.4. Creating scotias using scotia and end profiles............................................................................................................24
11.4.1 Creating scotias without using an end profile ...................................................................................................25 11.4.1.1 Creating inside and outside corners...................................................................................................25
11.5. Bonding PVC stair nosings .........................................................................................................................................25 12. CHECKING AND REVIEWING FLOOR QUALITY ........................................................................................26 12.1. Checking the quality and inspecting floors with electric properties.............................................................................26 13. GENERAL SAFETY, WORK HYGIENE AND FIRE SAFETY........................................................................26 14. CARE AND MAINTENANCE .........................................................................................................................27 14.1. Cleaning and maintaining floor coverings with a PUR protective layer.......................................................................27
14.1.1. Cleaning after completion of construction works..............................................................................................27 14.1.2. Usual cleaning and maintenance.....................................................................................................................27 14.1.3. Removing stains and lines made by rubber heels ...........................................................................................27 14.1.4. Comprehensive cleaning .................................................................................................................................28 14.1.5. Proactive long-term protection/renovation .......................................................................................................28 14.1.6. Maintaining the product value on special premises .........................................................................................28
14.2. Cleaning and maintaining floor coverings without a PUR protective layer ..................................................................28 14.2.1. Cleaning after completion of construction works..............................................................................................28 14.2.2. Product care ....................................................................................................................................................28 14.2.3. Usual cleaning and maintenance.....................................................................................................................29 14.2.4. Inter-stage cleaning .........................................................................................................................................29 14.2.5. Comprehensive cleaning .................................................................................................................................29 14.2.6. Removing stains and lines made by rubber heels ...........................................................................................29
14.3. Recommended products for cleaning and maintaining LINO FATRA floor coverings.................................................30 14.4. Cleaning and maintaining floor coverings with defined electric properties..................................................................31 15. RESISTANCE TO CHEMICALS ....................................................................................................................31 15.1. Organic substances....................................................................................................................................................32 15.2. Water solutions...........................................................................................................................................................32 16. HETEROGENEOUS PVC WALL COVERINGS ............................................................................................32 16.1. Product details............................................................................................................................................................32 16.2. Preparing the base .....................................................................................................................................................32 16.3. Preparing the covering ...............................................................................................................................................32 16.4. Installation ..................................................................................................................................................................33 16.5. Maintenance and care ................................................................................................................................................33 17. PUR PROTECTIVE LAYER...........................................................................................................................33
��� ���� �����������
�� ������������
1. INTRODUCTION This manual is a reference guide for anyone involved in the design, project preparation, installation and maintenance of LINO FATRA floor coverings. The floor quality depends on a variety of factors including the floor covering. As not even a perfect knowledge and adherence to the instructions and advice given in this installation manual can replace the skills of a floor covering fitter, FATRA, a.s. recommends contracting an experienced flooring company that will guarantee the quality of installation. OUR GOAL IS TO:
• Support the customer, whether a designer, builder, flooring company or an end user, • Provide all relevant information necessary for our products to guarantee the maximum utility value, • Provide instructions to specialist flooring companies to ensure that each installation is performed professionally, with an
emphasis on the overall aesthetics thanks to the wide range of attractive patterns, • Prevent problems by addressing risks and their potential consequences prior to product installation. Should you have any questions regarding LINO FATRA floor coverings, please do not hesitate to contact our Insulation Studio. The staff will be happy to give you advice on the suitability, parameters and installation of any LINO FATRA product. A new branch of Fatra, a.s. Napajedla, the Insulation Studio focuses on providing technical support to contractors, building companies, designers and builders.
2. PRODUCT SELECTION Choosing a suitable floor covering type is of paramount importance. The floor covering must meet the designer’s specifications while maintaining the required quality throughout its intended service life. It is essential to analyse the location and the load the floor covering is to be exposed to. Special attention must be paid to the type and frequency of human and equipment traffic, specific requirements for acoustic and electro-insulating properties, resistance to fire, chemicals and dirt, resistance to static and dynamic load and, last but not least, to anti-slip properties. Also bear in mind that floor coverings manufactured by FATRA, a.s. are designed solely for indoor use and as such they are not stabilised against UV radiation. If installed in medical facilities where the air and surface of objects are sterilised using direct ultraviolet C radiation (e.g. germicidal lamps), the floor covering surface will degrade over time and the colours will change permanently. If the floor covering is exposed to UV-C radiation, the stability of its colours cannot be guaranteed and is not covered by warranty. The floor coverings must not be installed in rooms that are not sufficiently waterproofed (Czech standard CSN P 73 0606), e.g. rooms without basements, and in floor-heated rooms if the surface temperature exceeds +28°C. The contact points of all mobile furniture and furniture legs must be fitted with suitable protection (e.g. textile pads under the legs of chairs and tables or PET boards under caster chairs). We also recommend checking them regularly for functionality. If mobile furniture whose contact points are not properly protected scratches the PUR protective layer, such damage is not covered by warranty. 3. BASES A perfect base made in accordance with specifications of current national or European standards is a prerequisite for quality installation. In general, the base must meet requirements regarding its levelness, residual moisture content, surface integrity, repair of cracks, joints and unevenness. In addition, the base must demonstrate resistance to pressure in accordance with the CSN 74 4505 standard. Base layers must be fully cured, level, smooth and free of dust, wax, grease, paint, varnish, polishing agents, oil, curing agents, sealants and any other material that might adversely affect the adhesive properties of the levelling compound and adhesive to be used. The base levelness must be in accordance with the CSN 74 4505 standard (maximum deviation 2 mm per 2 m). The construction project must specify the floor structure quality, in particular the base layer type, the bonding agent to be used, arrangement and thickness of individual layers, insulation and sealing properties and the location of expansion gaps. These specifications must be detailed in the list of flooring works and approved by the designer (or building company representatives) and the flooring company representative. This data is of great importance since different bases require different preparation works. Inspections of whether adherence was maintained to building project specifications in making the base floor structure usually focus on the quality of the base surfaces and their moisture rather than on the quality of the entire floor or ceiling structure and effective waterproofing measures. Before installing the floor covering, make sure to check again the quality of the base top layer (usually the levelling compound). Base quality requirements are contained in the CSN 74 4505 standard. Where the base levelness does not meet the applicable quality standards, a suitable levelling compound must be used. Before installing the floor covering, the levelling compound must be reground and cleaned thoroughly of any grinding residues. If applying a levelling compound, follow the manufacturer’s instructions. In addition to the base, make sure to check whether the walls are perpendicular to the floor and to inspect the wall surface quality where skirting or scotias are to be installed. Any plaster repairs must be made before installing the floor covering. It is also advisable to specify the way in which heating pipe protrusions are to be finished.

��� ���� �����������
�� ������������
Levelling products containing gypsum are not suitable for use in preparing the base. An inspection of the base surface quality is made using standard flooring tools and equipment. • 2-metre rule (spirit level) to check levelness • Slide gauge • Measuring tools to determine the residual moisture in the base • Thermometers and moisture meters to measure climate in the rooms Before starting the floor covering installation, make sure to check again the residual moisture in the base and note the result in the construction log or a separate report, indicating the method used. Calibrated measuring tools must be used. 3.1. Cement bases Cement bases are the most common base structure. They must meet the requirements set out in section 3 of this manual (levelness, strength etc). Determined using the gravimetric method under the CSN EN ISO 12570 standard, the maximum permissible moisture of a cement screed in weight percent at the time of installing a PVC, linoleum, rubber or cork floor covering is 3.5%. If the floor incorporates a floor heating system, the maximum permissible moisture of a cement screed is reduced by 0.5%. To determine the maximum permissible moisture of a cement screed, a suitable alternative method, e.g. the carbide method, may be employed. The maximum then must not exceed approx. 2.1% CM (carbide method) for normal use and approx. 1.7% CM for heated floors (CSN CEN/TS 14472-1). Cement bases with epoxy paint must be given a suitable sealing coat to avoid the ingress of undesired substances from the base. 3.2. Anhydrite bases Anhydrite screeds (AFE) are made from anhydrite binder, aggregate (sand and gravel) and water. In addition, admixtures are frequently used to change the screed chemical or physical properties, e.g. processability, hardening or setting. Anhydrite screeds are used primarily because of their easy and fast application and are applied as a liquid self-levelling mixture. Given the processing method, uniform strength and levelness tolerance values can be guaranteed that are impossible to achieve with mixtures containing less mixing water. AFE screeds are not susceptible to later deformations that occur in the curing of conventional cement screeds, making them suitable for creating large areas without gaps. However, bear in mind that there are two disadvantages when installing floor coverings on AFE: • Screed moisture • Surface strength
When installing a floor covering on AFE, the following empirical rule applies for determining curing time regarding the permissible residual moisture of AFE screed up to 40 mm in thickness: approximately 1 week of curing per 10 mm. If AFE screed is over 40 mm in thickness, the curing time lengthens more than proportionately, i.e. approximately two weeks per each additional 10 mm of thickness. These empirical values always apply to standard climatic conditions. The empirical rule cannot be used under exceptional climatic conditions such as high air humidity. Determined employing a gravimetric method under the CSN 74 4501 standard – Basic Provisions – or a carbide method, the maximum permissible moisture of an anhydrite screed in weight percent must not exceed 0.5% CM when installing impermeable floor coverings. The residual weight moisture must not exceed 0.3% CM in case of heated floors (CSN CEN/TS 14472-1). Dielectric moisture meters are suitable for approximate measurements only – to identify humid spots. In order to determine the residual base moisture, a gravimetric or carbide CM method must be used. As an anhydrite screed is curing, a thin layer appears on the surface that must be removed by regrinding. For this, use a suitable grinding machine with grade 16 sandpaper and then remove the grinding residue. After, check the surface to determine its hardness by using a base hardness tester (scratch test). This is a simple method where you mechanically scratch the base surface and then assess its hardness. Materials of an anhydrite base having strength of CA-C20-F4 (AE 20) usually fail the test. If so, the base needs to be repaired with a levelling compound and bonding primer recommended for anhydrite bases. 3.3. Magnesite screeds Magnesite screeds are made from caustic magnesite, admixtures (quartz, wood or cork powder) and an aqueous solution of salt, usually magnesium chloride. Caustic magnesite is a finely ground stone powder that is baked from natural magnesite. A magnesite screed with a raw material density of up to 1,600 kg/m3 is called a xylolite screed. Wood or cork powder is used, among others, as an admixture or filler, hence the term xylolite screed. Single-layer xylolite screeds are often used as a base for floor coverings. The coverings may then be installed after approx. three weeks if the moisture content is lower that the value specified in the standard. Extensive experience is required to determine whether a magnesite screed is cured enough to allow the installation of floor coverings. A soft base can often remain underneath a relatively cured surface layer. Even greater difficulties arise with old two-layer xylolite screeds where the top layer is usually impregnated with wax or a similar product. In both cases, we

��� ���� �����������
�� ������������
recommend grinding off the top layers with grade 16 sandpaper and using suitable bonding primer to prepare the base for the application of a levelling compound. 3.4. Chipboard and cement-chipboard bases The minimum thickness and density of large boards should be 18 mm and 700 kg/m3 respectively. We recommend using large boards manufactured in 1,200 x 2,400 mm or 600 x 2,400 mm dimensions. Large boards with a closing mechanism – groove and tongue or a U-shaped groove and tongue – are preferable. It is advisable to bond the joints on at least two edges. If the gaps between two adjacent boards are larger than 1 mm or if oriented strand boards (OSB) are used, we recommend that they be overlaid with a suitable prefabricated base or levelling compound layer. The boards must be fixed at a spacing of 350 mm, using lost head nails or countersunk head wood screws with a length of at least 2.5 times the board thickness, or using fastening clips. Boards of a minimum thickness of 18 mm may be used for supports spaced no more than 450 mm apart. Boards of a minimum thickness of 22 mm must be used for supports spaced 610 mm apart. Chipboards and cement chipboards must not contain any binders that affect the adhesion of the adhesive. Materials that might be attacked by fungi or wood-destroying insects must be treated in advance with suitable fungicides and insecticides. Before installing the floor covering, make sure to check whether there is uniform density in the panels and the wooden supporting structures to eliminate any dimensional changes. The products should be left for at least 7 days in their intended environment to acclimatise. 3.5. Bases of ceramic and cement tiles and cast terrazzo All tiles must be damage-free, joined firmly to the base and any loose grout must be removed from the gaps. The surface must be degreased using water-soluble degreaser, washed using a solution of washing soda and hot water and allowed to dry. For better adhesion, roughen the surface before applying the bonding primer and the levelling compound. 3.6. Using original floor coverings as a base We do not recommend installing LINO FATRA floor coverings on old floor coverings. All original floor coverings must be removed including the adhesive if possible. The base must be coated with a levelling compound layer of a minimum thickness of approx. 3 mm. The original floor coverings must be disposed of ecologically, e.g. by controlled burning, placing in a landfill, or recycled. Never burn them at the construction site along with other construction waste. In both cases, we recommend grinding off the top layers before applying the bonding primer and the levelling compound.
4. TOOLS, EQUIPMENT & ACCESSORIES A qualified fitter must have an essential tool kit that should be kept clean and in good technical condition. The actual choice of tools depends on the fitter’s decision, extent of application and the type of preparatory works. An essential tool kit includes: 4.1. Base preparation Large broom Low-speed electric drill and mixing extension piece Hand brush Container to mix levelling compound Inspection 2-m board with measuring wedge Moisture meters and thermometers Slide gauge Floor scrapers Moisture indicator Aeration (porcupine) roller Base hardness meter Grinding stone Rotary grinding machine Smoothing tool Foam plastic roller Vacuum cleaner
4.2. Measurement Meter, ruler Linear steel strip Marking string and chalk Angle squares, T-strip Pencil Cross laser

��� ���� �����������
�� ������������
4.3. Dimensional adjustments Flooring knives Circular knife for holes Drawing instrument Meter Ruler Tile cutter Compasses Circular cutter Flooring scissors Mitre box, sliding mitre saw Universal skirting cutter PVC nosing cutter
4.4. Installation Toothed scraper Hot-air gun Hand roller Trimming knife with guide piece, for welded joints Sectional roller, weight: at least 50 kg Brush Joint cutter – Linocut Cold-welding kit Electric groove cutter Electrical resistance meter Hand groove knife Rubber hammer Quick-welding nozzles (ULTRA nozzle for PUR) Melting gun
4.5. Accessories Welding rod Scotia profiles Skirting, inside and outside corners, end pieces, roses Transition, levelling and end profiles Stair nosings Conductive Cu strip Fixings Pads under caster chairs Sealants Door stoppers etc
4.6. Cleaning agents Clean cloth Dry and wet vacuum cleaner Water and detergent for tool cleaning Cleaning machine Bucket Cleaning mop with applicator
5. BONDING The following information is only for guidance. Always follow all recommendations and instructions of adhesive manufacturers. Adhesives must always be handled properly. We recommend using adhesives tested and approved by the floor covering manufacturer.
5.1. Preparing the base before bonding The base layers must be fully cured and have flexural strength in accordance with the CSN EN 13813 standard. Industrial floors require that the base or traffic layer meets at least the strength class C20/25 under the CSN EN 206-1 standard or the strength class determined by a structural calculation. The minimum value of tensile strength for surface layers under the wear layer is 1.25 MPa for non-traffic floors. The base structure must be free of cracks, holes and protrusions. In addition, the base structure must be dry, clean and free of dust, wax, grease, paint, varnish, polishing agents, oil, curing agents, sealants and any other material that might adversely affect the adhesive properties. The base layer must be smooth, level and horizontal. The levelness and horizontality of the base must conform to the CSN 74 4505 standard, Article 4.3 and Table 1 – Maximum deviations from the wear layer levelness. All protrusions must be levelled and cracks, hairline cracks and damaged points must be properly repaired. Expansion gaps compensating building movement during use must be respected in all floor layers. They are to be filled with flexible fill and fitted with expansion profiles. The floor covering is then fitted into these profiles. Construction gaps and gaps created by the contraction of base structures that do not compensate building movement during use may be overlaid with the floor covering. These gaps are then treated identically to cracks. Floor heating should be switched off 48 hours before bonding. The heating must be tested, including a test where the floor heating system is brought gradually into service. The gradual activation usually involves increasing the temperature of the heating water by 5°C per 24 hours from the initial (current) temperature. After the desired temperature is reached, the system remains on with that temperature for 3 days before the temperature is gradually brought back to the initial (current temperature), decreasing by 10°C per 24 hours. Allow a minimum of 24 hours after the floor covering installation before bringing the floor heating system back into service. The activation must be gradual, in accordance with the activation curve. Earlier activation may cause the residual moisture in the adhesive to evaporate, creating bubbles in the floor covering. While the floor heating system is out of service, an alternative solution must be provided at all times to maintain the temperature required for the floor covering installation.
Never use products with gypsum to create base layers for floor coverings.

��� ���� �����������
�� ������������
Moisture indicator CM machine Base hardness tester
Measuring wedge Porcupine aeration roller Toothed scraper
Straight knife Hooked knife Steel strip
Tile cutter Knife for accurate orthogonal cutting of floor covering edges next to walls Circular cutter

��� ���� �����������
�� ������������
Circular knife Chamfer plane Drawing instrument
Sectional roller Vertical scriber Groove knife
Groove cutter Hot-air welding machine Trimming knife with guide piece
Cold-welding kit Polish applicator Floor covering remover

��� ���� �����������
��� ������������
5.2. Applying the adhesive We strongly recommend keeping all adhesives at a temperature of over 18°C for at least 24 hours before installation. Use a toothed scraper to apply the adhesive. The scraper type suitable for your job is specified by the adhesive manufacturers (usually A1 – A4). Bonding with solvent adhesives is an exception as a smooth scraper is used instead. Before installing the floor covering, allow the adhesive to partly dry on the surface. The partial drying time is specified by the manufacturer and allows excessive water to evaporate from the adhesive, ensuring optimum adhesion. Once optimum moisture is achieved, the ‘bonding’ time begins. Also specified by the manufacturer, this time is the bonding interval. Its duration may be influenced by the base porosity, ambient temperature, relative humidity and other aspects that may shorten or significantly lengthen the bonding time. The area covered by the adhesive at any one time should be in line with the fitter’s performance and reflect the application conditions and bonding time. Excessive adhesive must be continuously removed. Water-based adhesives that have not yet dried are easy to remove with a clean wet cloth. To remove dried water-soluble adhesives, use a small amount of a solvent cleaning agent recommended by the adhesive manufacturer. Using an excessive amount of the cleaning agent may change the colours and soften the surface of the floor covering.
5.3. Rolling the floor Immediately after installation, the floor covering must be rolled using a 50 kg sectional roller. Using a lighter roller does not guarantee a sufficient contact between the floor covering and the adhesive, the removal of residual air and the smoothing of adhesive traces. Make sure to repeat the operation after 1 to 4 hours.
5.4. Adhesives A great variety of adhesives is available in the market and their selection depends on many different factors. The choice should be made during the planning of the construction project, giving consideration to the adhesive properties during installation, use as well as removal. Strictly follow recommendations by floor covering and adhesive manufacturers. It is of particular importance to heed the recommended consumption, type of the toothed scraper used to spread the adhesive and other recommendations. Also pay attention to the adhesive composition, floor covering type, construction conditions, conditions of the floor covering use and other aspects that impact the selection.
6. DELIVERY INSPECTION After delivery and before storage, check if the type, pattern and colour match your order, whether the quantities match and that the floor covering is not damaged. Check especially if the floor covering comes from an identical batch. If the floor coverings were manufactured on different dates, minor colour differences may occur in accordance with the technical sheet and these are not covered by warranty. We recommend that you retain the ID tag from each packaging in case a warranty claim is later made. When checking any other deliveries for the contract, you should proceed as described above. Before installation, the floor covering, accessories and auxiliary materials must be kept at a temperature of 18°C or over for at least 24 hours, preferably for 48 hours.
7. INSTALLING STRIPS OF HETEROGENEOUS FLOOR COVERING
7.1. Product details Heterogeneous floor coverings consist of a wear layer and additional one or more base layers of various compositions. They are manufactured in 1,500 mm wide strips. Please see the relevant technical sheet and catalogue lists for specific technical parameters.
7.2. Preparing the base See article 3.
7.3. Preparing the floor covering After a delivery inspection as per section 6, first unwind the floor covering and visually check the quality of its appearance and pattern. Do not install (bond) any floor covering with visible defects. Instead, file a warranty claim with your supplier. During installation, the rolls should be used successively according to their serial number shown on the tag so as to avoid any colour differences. Cut the floor covering strips to the required dimension, keeping a 5 – 10 cm overlap. Allow the floor covering strips to lie for 48 hours before installation. The room temperature must not drop below +18°C. The product dimensions will stabilise and minor ripples will smooth out automatically during this time.

��� ���� �����������
��� ������������
7.4. Using dispersion adhesives This method is also known as one-sided (adhesive) bonding and is used especially in bonding a floor covering to absorbent bases. If using specific adhesives, you may also apply this method on non-absorbent bases. Adjust the entire length of the floor covering strip so that it fits the wall profile (alcoves, projections). Then move the strip approx. 0.5 cm from the wall (expansion gap) and bend it in half, lengthwise. Make sure the base is free of dust and impurities. Then use a toothed scraper (the type recommended by the adhesive manufacturer) to apply the dispersion adhesive on an area covering half the width of the floor covering strip. Allow the adhesive to dry partly. The partial drying time depends on absorbing properties of the base, relative humidity and the room temperature. If the base is highly absorbent or has an open structure, we recommend that you apply a suitable bonding primer, using a foam plastic roller, before applying the adhesive. Then attach the strip carefully, making sure it does not move from its position, and roll the entire area with a sectional roller (minimum width: 50 kg). Repeat the entire process on the other strip half. For the opposite walls, cut the edge of the floor covering so that the strip may expand (leaving a gap of approx. 5 mm). Place a second (third, fourth etc) strip, making sure it overlaps slightly the bonded floor covering strip, and bond it as described above. After the strips are bonded, cut the overlaps using a knife for accurate orthogonal cutting of floor covering edges next to walls (see figure on page 8). After the entire area is covered, roll it again with the sectional roller. Any adhesive stains on the floor covering must be removed immediately with a wet cloth. If the adhesive dries, it becomes water resistant and may only be removed using solvents recommended by the adhesive manufacturer and approved by the floor covering manufacturer, or by benzine. Avoid exposing the area to load within at least 24 hours after installation. Then weld the floor covering and install floor skirting.
7.5. Using solvent adhesives When using solvent adhesives, make extra sure that the base is of the best possible quality, paying special attention to strength, cohesion and levelness of the contact surface. If the base has a rough surface, the adhesive layer occasionally becomes thicker, resulting in the insufficient evaporation of the solvent from the adhesive. This may cause ripples and bubbles after the floor covering is installed. The installation method is similar to that for dispersion adhesives. In this bonding method, the adhesive is applied on both the floor covering underside and the base; this is a two-sided technique, known as contact bonding. When preparing the first strip, i.e. adjusting the strip edge to the wall, use a pencil or a felt-tip pen to mark on the base the entire length of the strip edge where a second strip will join. The line will help you to exactly position the strip during the installation. During the installation, no repositioning of the strips is possible. Repeat the marking and installation process for the other strips in the entire area. Before the installation, both the covering underside and the base must be coated with the adhesive, using a smooth scraper. Use a brush to apply the adhesive on the floor covering edges. If the base is highly absorbent, recoat it after it dries. The adhesive drying time depends on the room temperature and ventilation. When dried optimally, the adhesive is sticky to touch but no longer creates a ‘hair’. If the adhesive is too dry or insufficiently dry, it has a negative impact on the floor covering adhesion to the base. The installation must be done with extreme care since errors are very difficult to fix. Any repositioning of bonded floor covering strips results in damaging the base structure or the floor covering underside. The remaining process is identical to the use of dispersion adhesive. Any adhesive stains on the floor covering must be removed immediately with benzine, under strict safety measures. Since there is risk of an explosive mixture of solvent vapours and air being created, it is highly important and necessary to ventilate the room while the adhesive is being applied and the floor covering installed and cleaned. Make sure to strictly adhere to the safety instructions and post danger signs on the access route to the site of application.
7.6. Using welding rods Before welding, a U- or V-shaped gap must be cut in the joint of two adjacent strips, either by machine or hand. The cut must have a depth of 2/3 of the floor covering thickness. Cutting the gap is necessary to:
a) Remove stuck adhesive or impurities from the joint, b) Properly position the welding rod, c) Ensure a uniform gap width.
Unwind the welding rod, which must be approx. 50 cm shorter than the length of the floor covering strips, place it along the gap and weld both strips. In the opposite direction, continue where the complete joint ends. A quality weld requires properly preparing the gap and using a suitable welding machine, with a temperature range from 20 to 700°C, continuous controls and an adapter for an appropriately shaped quick-welding nozzle. To weld floor coverings with a polyurethane protective layer, we recommend using the ULTRA quick-welding nozzle with a controlled and projecting air hole. This will prevent the possible thermal degradation of the PUR lacquer surface layer at the point of welding. We recommend using a motorised semi-automatic welding machine for larger areas. When using this machine, make sure to synchronise the hot air temperature and the speed of movement. In addition, check that the guide wheel does not run out of the gap and that the welding rod is placed uniformly in the gap. The welding speed depends on ambient conditions, the set welding temperature and the fitter’s skills.
��� ���� �����������
�� ������������
The weld area must be slightly shiny and the rod edges must be slightly melted without colour changes. Using an excessively high welding temperature causes the rod area to turn brown or even black. If the weld is not made properly, the welding rod will not adhere and will come out of the gap while being cut to size. Both of these circumstances are unacceptable. After the welding, allow the rod to cool to room temperature and cut it two times to the floor covering level, using either a quarter moon shaped knife with a guide piece or a plane suitable for welded joints. To repair a defective weld, cut the rod out of the defective place and then make a new weld, with an overlap of approx. 5 cm on both sides.
7.7. Cold-welding This bonding method is suitable for rooms exposed to reduced use and where a floor covering without gaps is required. To make perfectly tight joints (where both overlapping strips are cut once atop each other, known as a double cut), use a cold-welding SEAL ‘A’ solution in a tube or a bottle fitted with the type ‘A’ nozzle. Attach a paper tape over the joint of the floor coverings and cut it at the joint point. Then apply the cold-welding solution into the gap. After the THF evaporates, a watertight and almost invisible joint will be created. The welded joint may be exposed to use after approx. 10 minutes. The joint will develop its optimum strength after approx. 1 hour at a temperature of 18 – 20°C. We recommend that you weld the joints immediately after laying the floor covering. To join strips of floor coverings with joints that do not fit closely together (maximum width of 3 mm) or that were previously installed and exposed to use, to make corrections or to weld PVC floor strips onto floor coverings, use a cold-welding SEAL ‘C’ solution – matt paste with the type ‘C’ nozzle. We recommend that welding works are done at a temperature of 18 – 20°C.
8. INSTALLING HOMOGENEOUS FLOOR COVERING TILES
8.1 Product details Our homogeneous floor coverings are manufactured in the shape of 608 x 608 mm tiles. Please see the relevant technical sheet and catalogue lists for specific technical parameters. 8.2 Preparing the base See article 3.
8.3 Preparing the floor covering Keep the floor covering at a temperature of 18 – 26°C for at least 48 hours before installation. Remove the cartons from pallets and place them open in the room where they will be installed. If the outside temperature exceeds 12°C during the shipping and transport, a maximum of 5 boxes may be stacked on each other. The temperature during installation and for 24 hours afterwards must range from 18 to 26°C to prevent any temperature-induced changes and expansion of individual tiles. 8.4 Bonding the tiles The area covered with the adhesive at any one time depends on the on-site conditions such as relative humidity, air temperature and air circulation that affect the adhesive gelling properties, as well as the pattern and the fitter’s skills. Always follow the adhesive bonding time specified by the adhesive manufacturer. The installation area should preferably be divided into partial sections where the peripheral tiles are bonded only after the main area is installed. The use of dispersion and solvent adhesives is described in sections 7.4 and 7.5 of this manual.

��� ���� �����������
��� ������������
8.5 Bonding the main field As the tile pattern is irregular, we recommend spreading or arranging the tiles. As soon as the applied adhesive is ready for bonding, place the first tile in the initial position, i.e. at the intersection point of both centre lines. Press firmly on the tile centre and then slide your hand or a roller towards the tile edges to force out air and make a perfect joint between the tile and the adhesive. Place the next tile, changing the colours and marbling if desirable, and proceed along the centre line, installing two tile rows, one on each side of it. The first tile row must be placed exactly along the line. Make sure to keep identical gaps between the tiles. The gaps must not be wider than 1.5 mm! They form guiding grooves for future cutting. Repeat the process along the second centre line perpendicular to the first line. Then complete the entire section, working from the centre lines and making sure that the tiles are properly bonded. Remove any excessive adhesive immediately as you work. After the section is installed (except the edges), it must be rolled in both directions, using a 50 kg sectional roller. Repeat the process for each section until the main field is laid. 8.6 Cutting peripheral tiles Two methods are usually available to cut peripheral tiles. Choosing the suitable one depends on the room layout and parallelism of the main field edges and the adjacent walls. Image: Overlapping method Image: Drawing instrument method A. Overlapping method This method is used if the wall is parallel to the main field edge.
• Place the tile to be cut exactly on the last installed tile. • Place another tile on the tile to be cut so that the external edge rests against the wall. • Draw a line on the tile to be cut along the lower edge of the top tile. • Cut the tile 5 mm shorter than the required dimension (due to dimensional expansion), put it loosely in place and check
whether it fits in position. • Repeat the process along the entire wall.
B. Drawing instrument method This method is used if the wall is not parallel to the main field edge.
• Place the tile to be cut exactly on the last installed tile. • Set the dimension of the tile being installed on the drawing instrument. • Plot the wall profile on the tile to be cut, holding the drawing instrument vertically and perpendicularly to the tile edge. • Cut the tile 5 mm shorter than the required dimension (due to dimensional expansion), put it loosely in place and check
whether it fits in position. • Repeat the process along the entire wall.
Note: when plotting irregular shapes such as door frames, both methods may be used. We recommend making a template for complicated shapes. 8.7 Bonding peripheral tiles After measuring and loosely laying the peripheral tile row, move all tiles to the main area, maintaining their original arrangement. Apply the adhesive as far as the edge of the peripheral strip and after the adhesive dries partly, place the peripheral tiles in their final position. Remove any excess adhesive as you work. Make sure to carefully roll the tiles in both directions, using a 50 kg sectional roller. Use a hand roller for locations that are difficult to access. Repeat the process for all four walls. Roll the entire area again after 1 to 4 hours.

��� ���� �����������
��� ������������
8.8 Bonding large tile areas In order to maintain a straight line on large areas, proceed as follows. Identify the initial centre point to avoid excessive waste from peripheral tiles (see section 8.4). Place the first pyramid adjacent to the centre line, as shown in the figure below. Repeat the process on the other side of the centre line. Make the pyramids progressively larger until there are only the peripheral tiles to install. Then install the peripheral tiles. Image: Pyramid method on large areas
9. CONDUCTIVE FLOOR COVERINGS Conductive floor coverings are used on premises where the electrostatic charge must be removed (hospitals, IT facilities, explosion hazard areas, electricity distribution stations, paint shops where paint is applied in the electric field etc). The floor coverings are classified by their electrostatic properties (internal Rv resistance) into electrostatically conductive and antistatic groups.
ELECTROSTATICALLY CONDUCTIVE floors are used where the required leakage resistance of the floor is 5 . 104 � � Rv � 106 � (i.e. 50,000 � – 1,000,000 �) ANTISTATIC floors are used where the required leakage resistance of the floor is 5 . 104 � � Rv � 108 � (i.e. 50,000 � – 100,000,000 �)
9.1 Bonding electrostatically conductive floor coverings Electrostatically conductive floor coverings are used where the required leakage resistance of the floor ranges from 5 . 104 � to 1 . 106 �. For application with conductive adhesives, Fatra recommends the following systems: Fatra – Uzin, Fatra – Henkel, Fatra – Mapei, Fatra – Schönox, Fatra – Kiesel and Fatra – Bralep. All have been tested by the State Laboratory 210 (Reports of the State Laboratory 210: 10/0007, 01/0028-1, 02/0001-1, 03/0035, 07/0070-1 and 06/0024-1).
9.1.1. Fatra – Henkel system This floor system includes the following components:
• Elektrostatik floor covering • Cu strip • Thomsit K 112 conductive adhesive • Thomsit R 762 conductive base coat • Thomsit DD self-levelling compound • Bonding primer depending on the base type (absorbent – non-absorbent)

��� ���� �����������
��� ������������
9.1.1.1. Installing the conductive mesh Use a foam plastic roller to apply a uniform layer of the conductive coat (replaces a Cu strip mesh) onto the base with the self-levelling compound. Allow the coat a minimum of 12 hours to dry. Arrange the conductive mesh onto the dry base so that no point of the floor covering is more than 1 m from the Cu strip. Use a brush to apply a thin, approximately 3 cm wide layer of the conductive dispersion adhesive into which the Cu strip will be pressed.
2 m 2 m 2 m Approx. 300 mm When dry, solder all intersections on the strip with tin tape (CSN 42 3655). The solder layer must be flat so that the tin does not deform the floor covering once installed. Do not use soldering acid to eliminate the occurrence of rust in the joint. Loose ends of the copper strip fitted with a disconnectable terminal to check electrical resistance must be connected to the main protective terminal in accordance with the CSN 33 2000-5-54 standard (Grounding and protective conductors). Once the Cu conductive mesh is installed, measure its resistance R. The remaining steps are identical to those described in sections 8.4 to 8.9.
9.1.2. Fatra – Mapei system This floor system includes the following components:
• Elektrostatik floor covering • Cu strip • Ultra / Bond Eco V4 conductive adhesive • Primer G conductive base coat • Plano 3 self-levelling compound • Primer G adhesive (connecting) bridge
9.1.2.1. Installing the conductive mesh Use a foam plastic roller or a brush to apply a uniform layer of the conductive coat onto the base with the self-levelling compound. Allow the coat a minimum of 12 hours to dry.
15 m 15 m Approx. 300 mm
Approx. 300 mm Cu strip
Grounding
Approx. 300 mm Cu strip
Grounding

��� ���� �����������
��� ������������
Arrange the conductive mesh onto the dry base so that no point of the floor covering is more than 7.5 m from the Cu strip. In smaller rooms, install only one grounding end of the Cu strip. The minimum length of the Cu strip that must be installed into the Fatra – Mapei floor system is 1 m. Use a brush to apply a thin, approximately 3 cm wide layer of the conductive dispersion adhesive into which the Cu strip will be pressed. All intersections must be soldered in accordance with section 9.1.1.1. Loose ends of the copper strip fitted with a disconnectable terminal to check electrical resistance must be connected to the main protective terminal in accordance with the CSN 33 2000-5-54 standard (Grounding and protective conductors). Once the Cu conductive mesh is installed, measure its resistance R. The remaining steps are identical to those described in sections 8.4 to 8.9.
9.1.3. Fatra – Uzin system This floor system includes the following components:
• Elektrostatik floor covering • Cu strip • Uzin KE2000 SL conductive adhesive • Uzin-PE260L conductive base coat • Uzin-NC150 levelling compound • Bonding primer depending on the base type
9.1.3.1. Installing the conductive mesh Use a foam plastic roller or a brush to apply a uniform layer of the conductive coat onto the base with the self-levelling compound. Allow the coat a minimum of 12 hours to dry. Arrange the conductive mesh onto the dry base so that no point of the floor covering is more than 15 m from the Cu strip. In smaller rooms, install only one grounding end of the Cu strip. The minimum length of the Cu strip that must be installed into the Fatra – Uzin floor system is 1 m. Use a brush to apply a thin, approximately 3 cm wide layer of the conductive dispersion adhesive into which the Cu strip will be pressed. All intersections must be soldered in accordance with section 9.1.1.1.
30 m 30 m Approx. 300 mm
Loose ends of the copper strip fitted with a disconnectable terminal to check electrical resistance must be connected to the main protective terminal in accordance with the CSN 33 2000-5-54 standard (Grounding and protective conductors). Once the Cu conductive mesh is installed, measure its resistance R. The remaining steps are identical to those described in sections 8.4 to 8.9.
9.1.4. Fatra – Schönox system This floor system includes the following components:
• Elektrostatik floor covering • Cu strip • Schönox Combileit conductive adhesive • Schönox SuperPlan self-levelling compound
9.1.4.1. Installing the conductive mesh Use a foam plastic roller or a brush to apply a uniform layer of the conductive coat onto the base with the self-levelling compound. Allow the coat a minimum of 12 hours to dry. Arrange the conductive mesh onto the dry base so that no point of the
Approx. 300 mm Cu strip
Grounding
��� ���� �����������
��� ������������
floor covering is more than 15 m from the Cu strip. In smaller rooms, install only one grounding end of the Cu strip. The minimum length of the Cu strip that must be installed into the Fatra – Schönox floor system is 1 m. Use a brush to apply a thin, approximately 3 cm wide layer of the conductive dispersion adhesive into which the Cu strip will be pressed. All intersections must be soldered. Loose ends of the copper strip fitted with a disconnectable terminal to check electrical resistance must be connected to the main protective terminal in accordance with the CSN 33 2000-5-54 standard (Grounding and protective conductors).
30 m 30 m Approx. 300 mm Once the Cu conductive mesh is installed, measure its resistance R. The remaining steps are identical to those described in sections 8.4 to 8.9.
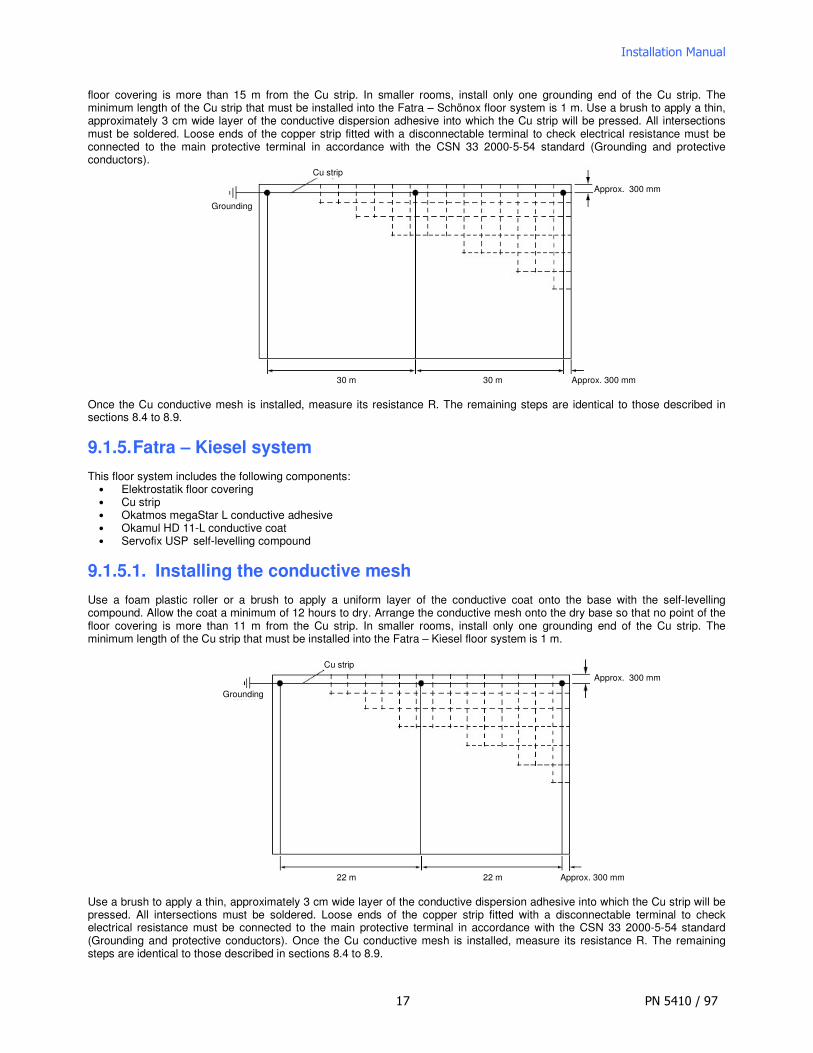
9.1.5. Fatra – Kiesel system This floor system includes the following components:
• Elektrostatik floor covering • Cu strip • Okatmos megaStar L conductive adhesive • Okamul HD 11-L conductive coat • Servofix USP self-levelling compound
9.1.5.1. Installing the conductive mesh Use a foam plastic roller or a brush to apply a uniform layer of the conductive coat onto the base with the self-levelling compound. Allow the coat a minimum of 12 hours to dry. Arrange the conductive mesh onto the dry base so that no point of the floor covering is more than 11 m from the Cu strip. In smaller rooms, install only one grounding end of the Cu strip. The minimum length of the Cu strip that must be installed into the Fatra – Kiesel floor system is 1 m.
22 m 22 m Approx. 300 mm Use a brush to apply a thin, approximately 3 cm wide layer of the conductive dispersion adhesive into which the Cu strip will be pressed. All intersections must be soldered. Loose ends of the copper strip fitted with a disconnectable terminal to check electrical resistance must be connected to the main protective terminal in accordance with the CSN 33 2000-5-54 standard (Grounding and protective conductors). Once the Cu conductive mesh is installed, measure its resistance R. The remaining steps are identical to those described in sections 8.4 to 8.9.
Approx. 300 mm Cu strip
Grounding
Approx. 300 mm Cu strip
Grounding

��� ���� �����������
��� ������������
9.1.6. Fatra – Bralep system This floor system includes the following components:
• Elektrostatik floor covering • Cu strip • Bralep Floor 500L conductive adhesive • Bralep 280 L conductive coat • Bralep RTN 2020 self-levelling compound • Bonding primer depending on the base type
9.1.6.1. Installing the conductive mesh Use a foam plastic roller or a brush to apply a uniform layer of the conductive coat onto the base with the self-levelling compound. Allow the coat a minimum of 12 hours to dry. Arrange the conductive mesh onto the dry base so that no point of the floor covering is more than 10 m from the Cu strip. In smaller rooms, install only one grounding end of the Cu strip. The minimum length of the Cu strip that must be installed into the Fatra – Bralep floor system is 1 m.
20 m 20 m Approx. 300 mm Use a brush to apply a thin, approximately 3 cm wide layer of the conductive dispersion adhesive into which the Cu strip will be pressed. All intersections must be soldered. Loose ends of the copper strip fitted with a disconnectable terminal to check electrical resistance must be connected to the main protective terminal in accordance with the CSN 33 2000-5-54 standard (Grounding and protective conductors). Once the Cu conductive mesh is installed, measure its resistance R. The remaining steps are identical to those described in sections 8.4 to 8.9.
9.2. Bonding antistatic floor coverings Antistatic floor coverings are used where the required leakage resistance of the floor ranges from 5 . 104 � to 1 . 108 �. For application with conductive adhesives, Fatra recommends the following systems: Fatra – Henkel, Fatra – Mapei, Fatra – Uzin, Fatra – Schönox, Fatra – Kiesel or Fatra – Bralep. All have been tested by the State Laboratory 210 (Reports of the State Laboratory 210: 10/0007, 01/0028-1, 02/0001-1, 03/0035, 07/0070-1 and 06/0024-1).
9.2.1. Fatra – Henkel system This floor system includes the following components:
• Dynamik floor covering • Cu strip • Thomsit K 112 conductive adhesive • Thomsit R 762 conductive base coat • Thomsit DD self-levelling compound • Bonding primer depending on the base type
9.2.1.1. Installing the conductive mesh Use a foam plastic roller or a brush to apply a uniform layer of the conductive coat onto the base with the self-levelling compound. Allow the coat a minimum of 12 hours to dry. Arrange the conductive mesh onto the dry base so that no point of the floor covering is more than 10 m from the Cu strip. In smaller rooms, install only one grounding end of the Cu strip. The minimum length of the Cu strip that must be installed into the Fatra – Henkel floor system is 1 m.
Approx. 300 mm Cu strip
Grounding

��� ���� �����������
��� ������������
20 m 20 m Approx. 300 mm Use a brush to apply a thin, approximately 3 cm wide layer of the conductive dispersion adhesive into which the Cu strip will be pressed. All intersections must be soldered in accordance with section 9.1.1.1. Loose ends of the copper strip fitted with a disconnectable terminal to check electrical resistance must be connected to the main protective terminal in accordance with the CSN 33 2000-5-54 standard (Grounding and protective conductors). Once the Cu conductive mesh is installed, measure its resistance R. The remaining steps are identical to those described in sections 8.4 to 8.9.
9.2.2. Fatra – Mapei system This floor system includes the following components:
• Dynamik floor covering • Cu strip • Ultra / Bond Eco V4 conductive adhesive – dispersion adhesive (Adesilex G 19 conductive – polyurethane adhesive) • Primer G conductive base coat • Plano 3 self-levelling compound • Primer G adhesive bridge
9.2.2.1. Installing the conductive mesh Use a foam plastic roller or a brush to apply a uniform layer of the conductive coat onto the base with the self-levelling compound. Allow the coat a minimum of 12 hours to dry. Arrange the conductive mesh onto the dry base so that no point of the floor covering is more than 15 m from the Cu strip. In smaller rooms, install only one grounding end of the Cu strip. The minimum length of the Cu strip that must be installed into the Fatra – Mapei floor system is 1 m.
30 m 30 m Approx. 300 mm
Use a brush to apply a thin, approximately 3 cm wide layer of the conductive dispersion adhesive into which the Cu strip will be pressed. All intersections must be soldered in accordance with section 9.1.1.1. Loose ends of the copper strip fitted with a disconnectable terminal to check electrical resistance must be connected to the main protective terminal in accordance with the CSN 33 2000-5-54 standard (Grounding and protective conductors). Once the Cu conductive mesh is installed, measure its resistance R. The remaining steps are identical to those described in sections 8.4 to 8.9.
Approx. 300 mm Cu strip
Grounding
Approx. 300 mm Cu strip
Grounding

��� ���� �����������
�� ������������
9.2.3. Fatra – Uzin system This floor system includes the following components:
• Dynamik floor covering • Cu strip • Uzin KE2000 SL conductive adhesive • Uzin-PE260L conductive base coat • Uzin-NC150 levelling compound • Bonding primer depending on the base type
9.2.3.1. Installing the conductive mesh Use a foam plastic roller or a brush to apply a uniform layer of the conductive coat onto the base with the self-levelling compound. Allow the coat a minimum of 12 hours to dry. Arrange the conductive mesh onto the dry base so that no point of the floor covering is more than 15 m from the Cu strip. In smaller rooms, install only one grounding end of the Cu strip. The minimum length of the Cu strip that must be installed into the Fatra – Uzin floor system is 1 m.
30 m 30 m Approx. 300 mm
Use a brush to apply a thin, approximately 3 cm wide layer of the conductive dispersion adhesive into which the Cu strip will be pressed. All intersections must be soldered in accordance with section 9.1.1.1. Loose ends of the copper strip fitted with a disconnectable terminal to check electrical resistance must be connected to the main protective terminal in accordance with the CSN 33 2000-5-54 standard (Grounding and protective conductors). Once the Cu conductive mesh is installed, measure its resistance R. The remaining steps are identical to those described in sections 8.4 to 8.9.
9.2.4. Fatra – Schönox system This floor system includes the following components:
• Dynamik floor covering • Cu strip • Schönox Combileit conductive adhesive • Schönox SuperPlan self-levelling compound
9.2.4.1. Installing the conductive mesh Use a foam plastic roller or a brush to apply a uniform layer of the conductive coat onto the base with the self-levelling compound. Allow the coat a minimum of 12 hours to dry. Arrange the conductive mesh onto the dry base so that no point of the floor covering is more than 15 m from the Cu strip. In smaller rooms, install only one grounding end of the Cu strip. The minimum length of the Cu strip that must be installed into the Fatra – Schönox floor system is 1 m. Use a brush to apply a thin, approximately 3 cm wide layer of the conductive dispersion adhesive into which the Cu strip will be pressed. All intersections must be soldered. Loose ends of the copper strip fitted with a disconnectable terminal to check electrical resistance must be connected to the main protective terminal in accordance with the CSN 33 2000-5-54 standard (Grounding and protective conductors). Once the Cu conductive mesh is installed, measure its resistance R. The remaining steps are identical to those described in sections 8.4 to 8.9.
Approx. 300 mm Cu strip
Grounding

��� ���� �����������
�� ������������
30 m 30 m Approx. 300 mm
9.2.5. Fatra – Kiesel system This floor system includes the following components:
• Dynamik floor covering • Cu strip • Okatmos megaStar L conductive adhesive • Okamul HD 11-L conductive coat • Servofix USP self-levelling compound
9.2.5.1. Installing the conductive mesh Use a foam plastic roller or a brush to apply a uniform layer of the conductive coat onto the base with the self-levelling compound. Allow the coat a minimum of 12 hours to dry. Arrange the conductive mesh onto the dry base so that no point of the floor covering is more than 11 m from the Cu strip. In smaller rooms, install only one grounding end of the Cu strip. The minimum length of the Cu strip that must be installed into the Fatra – Kiesel floor system is 1 m.
22 m 22 m Approx. 300 mm Use a brush to apply a thin, approximately 3 cm wide layer of the conductive dispersion adhesive into which the Cu strip will be pressed. All intersections must be soldered. Loose ends of the copper strip fitted with a disconnectable terminal to check electrical resistance must be connected to the main protective terminal in accordance with the CSN 33 2000-5-54 standard (Grounding and protective conductors). Once the Cu conductive mesh is installed, measure its resistance R. The remaining steps are identical to those described in sections 8.4 to 8.9.
9.2.6. Fatra – Bralep system This floor system includes the following components:
• Dynamik floor covering • Cu strip • Bralep Floor 500L conductive adhesive
Approx. 300 mm Cu strip
Grounding
Approx. 300 mm Cu strip
Grounding

��� ���� �����������
� ������������
• Bralep 280 L conductive coat • Bralep RTN 2020 self-levelling compound • Bonding primer depending on the base type
9.2.6.1. Installing the conductive mesh Use a foam plastic roller or a brush to apply a uniform layer of the conductive coat onto the base with the self-levelling compound. Allow the coat a minimum of 12 hours to dry. Arrange the conductive mesh onto the dry base so that no point of the floor covering is more than 10 m from the Cu strip. In smaller rooms, install only one grounding end of the Cu strip. The minimum length of the Cu strip that must be installed into the Fatra – Bralep floor system is 1 m.
20 m 20 m Approx. 300 mm Use a brush to apply a thin, approximately 3 cm wide layer of the conductive dispersion adhesive into which the Cu strip will be pressed. All intersections must be soldered. Loose ends of the copper strip fitted with a disconnectable terminal to check electrical resistance must be connected to the main protective terminal in accordance with the CSN 33 2000-5-54 standard (Grounding and protective conductors). Once the Cu conductive mesh is installed, measure its resistance R. The remaining steps are identical to those described in sections 8.4 to 8.9.
9.3. Installing a conductive mesh made of Cu strip The conductive mesh must be installed in a way that the electrostatic charge is removed from each tile! Measure the room accordingly before the installation. Choose the most direct wall of the room and mark the position of the first strip approximately 30 cm from the wall (half the tile width). Starting from that line, mark the position of the remaining Cu strips at approx. 60 cm intervals across the entire room width. The last Cu strip next to the opposite wall must also be positioned at half the width of the last tile. Transverse discharge strips are usually installed in such a way that they join directly to the measuring terminal of the conductive mesh. The number of ends depends on the room area. If the area is 100 m2 or smaller, there must be two ends (usually in opposite room corners). Another end must be provided for each additional 100 m2.
Approx. 300 mm Cu strip
Grounding
Grounding
Cu strip
Cu strip
Tin-soldered
Test terminal

��� ���� �����������
�� ������������
Apply the adhesive (width: approx. 3 cm) on the marked positions of the Cu strip and then affix the copper strip. Transverse strips must extend approx. 50 cm above the floor level and be temporarily attached to the wall, using paper tape. When dry, solder all intersections on the strip with tin tape (CSN 42 3655), according to section 9.1.1.1. The solder layer must be flat so that the tin does not deform the floor covering once installed. Do not use soldering acid to eliminate the occurrence of rust in the joint. The ends of the copper strip must be professionally connected to a disconnectable measuring terminal for checking electric resistance. The ends must be connected to the main protective terminal in accordance with the CSN 33 2000-5-54 standard (Grounding and protective conductors). Once the Cu conductive mesh is installed, measure its resistance R.
9.3.1. Bonding electrostatically conductive floor coverings to a conductive mesh made of Cu strip
This bonding method is identical to that for homogeneous coverings, see sections 1 – 8. It is necessary to use conductive adhesive (any). Note: it is essential to roll electrostatically conductive and antistatic floor coverings – for the reasons set out in section 5.3 of this manual and in particular to achieve the specified leakage resistance of the floor.
10. BONDING HOMOGENEOUS FLOOR COVERINGS WITHOUT ELECTRIC PROPERTIES All types of homogeneous floor coverings (Elektrostatik, Dynamik, Praktik) may be used if you wish to install homogeneous coverings without defined electrical properties that do not discharge the electrostatic charge. Proceed according to section 8, without installing a conductive mesh of Cu strips and using the conductive base coat or conductive adhesive.
11. FINISHING
11.1. Joining tiles with a welding rod Do not expose the bonded tiles to any load for at least 24 hours. After that, you may weld the covering. Before welding, a U- or V-shaped gap must be cut, either by machine or hand. The cut must have a depth of 2/3 of the tile thickness. Cutting the gap is necessary to:
a) Remove stuck adhesive or impurities from the joint, b) Properly position the welding rod, c) Ensure a uniform gap width.
Unwind the welding rod, which must be approx. 50 cm shorter than the length of the floor covering strips, place it along the gap and weld both strips. In the opposite direction, continue where the complete joint ends. A quality weld requires properly preparing the gap and using a suitable welding machine, with a temperature range from 20 to 700°C, continuous controls and an adapter for a quick-welding nozzle. We recommend using a motorised semi-automatic welding machine for larger areas. When using this machine, make sure to synchronise the hot air temperature and the speed of movement. In addition, check that the guide wheel does not run out of the gap and that the welding rod is placed uniformly in the gap. The welding speed depends on ambient conditions, the set welding temperature and the fitter’s skills. The weld area must be slightly shiny and the rod edges must be slightly melted without colour changes. Using an excessively high welding temperature causes the rod area to turn brown or even black. If the weld is not made properly, the welding rod will not adhere and will come out of the gap while being cut to size. Both of these circumstances are unacceptable. After welding, allow the rod to cool to room temperature and cut it two times to the floor covering level, using either a quarter moon shaped knife with a guide piece or a plane suitable for welded joints. To repair a defective weld, cut the rod out of the defective place and then make a new weld, with an overlap of approx. 5 cm on both sides.
11.2. Using floor strips To join floor coverings to the walls, Novoplast floor strips may be used. Place the strips along the walls and cut them to the required size plus approx. 5 cm. Use a brush to apply solvent adhesive onto the wall that must be smooth up to the strip height. The adhesive layer must end 0.5 cm below the strip height. For aesthetic purposes, the wall above the strip must not be stained with the adhesive. Maintain the same distance when applying the adhesive on the floor. We recommend using a suitable round long-haired brush for applying the adhesive to the wall. Then apply the adhesive onto the strip underside, preferably using a brush that is 1 cm narrower than the strip width. We recommend using an adhesive-applying machine for larger projects. The adhesive on the strip and the wall must not become over-dry; the adhesive must be optimally dry. Ventilation must be provided since the adhesive is a class I flammable and there is risk of an explosive mixture being created.

��� ���� �����������
�� ������������
Start the installation in a corner and bond the entire strip while holding it pressed. In inside and outside corners, place the strip edges so that they overlap, cut them, remove the overlaps and bond the strips edge-to-edge. The strip must form a compact and aesthetic whole with the floor covering. Any adhesive stains on the floor covering and the strip must be removed using benzine.
Inside corner Outside corner
11.3. Finishing the floor with a scotia All types of floor coverings may be finished with a scotia. Using scotias is becoming increasingly popular on aesthetic, practical and especially sanitary grounds.
Unfolded shape of inside corner Unfolded shape of ½ of outside corner
11.4. Creating scotias using scotia and end profiles The main field is installed first as described in sections 7, 8 and 9 of this manual and finished in all directions approx. 100 mm from the wall. When taking the room dimensions, always make sure that the tile width adjacent to the scotia is not too small. If the main axes are oriented diagonally (diagonal installation), we recommend keeping a minimum height of 100 mm in any additionally cut triangle of the main field. When ending the installation of the main field, bear in mind the overlap of individual tiles on the planned scotia edge so that the edge can be additionally aligned (cut) to guide the scotia. After completing the main field, bond the profiles 1953 + 2198 (scotia + end profile) or the combined profile 2345. Use contact (solvent) adhesive for the bonding. The bonding process is identical to that used for floor strips. Trouble-free arrangement and
Drawing: ½ of outside corner
Drawing: unfolded shapes of inside and outside corners
Drawing: inside corner

��� ���� �����������
�� ������������
installation of scotias requires maintaining the level line of the end profile. The method of bonding scotias is identical to that used for the main field and we recommend using contact (solvent) adhesive for shorter bonding times and better adhesion in comparison to dispersion adhesives. When choosing the scotia, attention must be paid to the architect’s design, user’s wishes and, last but not least, to minimising floor covering waste. In general, scotias may be joined using two methods:
• Cold-welding scotias edge-to-edge • Leaving a gap between scotias and joining them with a welding rod (as specified in sections 7.6 and 8.8).
11.4.1. Creating scotias without using an end profile This installation method is identical to that described in section 10.2.1. Bond a prepared scotia onto the wall, using contact (solvent) adhesive, up to the level line that you drew before. Any height differences may be removed by cutting the scotia top edge along an attached steel strip. We recommend using silicone or acrylic sealant to finish the scotia top edge on the wall. This method is more difficult in terms of the accuracy of scotia preparation and installation.
11.4.1.1. Creating inside and outside corners To create inside and outside corners, it is necessary to draw in advance the unfolded shape of the inside corner/of half of the outside corner on the scotia. After cutting out the shape, make sure to check its accuracy by putting it in place and adjusting it if necessary. Only after that may the scotia finally be bonded. Cold-welding is usually used to connect inside and outside corners with the main field of the floor covering.
11.5. Bonding PVC stair nosings The LINO FATRA floor coverings are commonly installed on stairs, landings and intermediate landings. Bonding stair nosings in the LINO FATRA system is a finishing operation that greatly impacts the overall appearance of the floor covering as well as its technical properties and utility value. The LINO FATRA range includes a single stair nosing type available in three dimensions and designs. This universal nosing type allows you to make a perfect connection to the floor covering. Concrete stairs are the most suitable for the application. The stairs must be level, clean, firm, rigid and free of dust. All cracks, protrusions, grease stains and other impurities must be removed.
Cold welding
Installation instructions: • The base quality must be in conformity with the CSN 74 4505 standard. • Pay special attention to the geometry of stair edges; edge rounding is completely unacceptable! • Before bonding, dimensions of the stair nosings must be stabilised in a manner identical to that for floor coverings, i.e. make
sure the temperature is � 18°C for at least 24 hours before installation. • The solvent adhesive layer must be spread as evenly as possible. Failing to do so may increase the adhesive layer, which
may cause bubbles or ripples on the stair nosing if the solvent does not evaporate sufficiently. • Before bonding the stair nosing, check on both bonded surfaces if the solvent is sufficiently evaporated from the applied
adhesive layer. When dried optimally, the adhesive is sticky to touch but it no longer creates a ‘hair’. Use a brush to apply the adhesive onto the base and the stair nosing, and a smooth scraper to apply the adhesive onto the treads, risers and floor covering strips.

��� ���� �����������
�� ������������
• A white rubber hammer must be used for perfect shaping of bonded nosings. Gently tap the bonded nosing to join it perfectly to the base and eliminate the occurrence of any gaps.
• Always bond the entire area of stair nosings, i.e. both the tread and the riser. • When bonding the floor covering on a flight of stairs, always start from the first stair, working upwards to the last, top stair. • A finished floor covering may not be used for at least 24 hours after completion of installation. Since vertical paths in new
and renovated buildings are exposed to heavy use, we recommend protecting, in particular, the stair nosings with suitable material.
• Use solvent adhesive to bond the floor covering on the stair horizontal surface as far as the edge of the stair nosing. In order to eliminate the ingress of impurities into the gap and the subsequent separation of the floor covering, we recommend welding the joint with a welding rod coloured identically to the floor covering or cold-welding the joint with the type ‘C’ paste.
• After installing the floor covering, make sure to remove any impurities and excessive adhesive. Scrape off any dried adhesive, taking care that the floor covering is not damaged. Remove adhesive residue with benzine.
• Adhere to the occupational health and safety rules set out in the Labour Code and relevant safety regulations, in particular those relating to the safety of work with flammables. While applying any solvent adhesives, the premises must be adequately ventilated to prevent the occurrence of explosive concentrations of vapours and the air. Danger signs must be posted on access routes to the premises to advise other persons that flammable and explosive substances are used in the building.
12. CHECKING AND REVIEWING FLOOR QUALITY The provisions of the CSN 74 4505 standard apply to the floor approval process. The appearance is to be assessed under indirect sunlight from a height of 160 cm. The light conditions must be identical to those under which the floor is mostly used. The installed floor covering must be free of any ripples or other deformations.
12.1 Checking the quality and inspecting floors with electric properties The general provisions of the CSN 74 4505 and CSN 33 2030 standards apply to the process of approving floors with electrostatically conductive coverings. The coverings are manufactured with different conductivity levels (internal resistance), which is measured by the manufacturer before shipment. In addition to the floor covering, an electrostatically conductive system also includes accessories and auxiliary materials (strip, welding rod, conductive adhesive, levelling compound, bonding primer etc). The system must be installed in accordance with instructions of the floor covering manufacturer and instructions given by manufacturers of the other materials in use. Before putting a floor with electric properties into use, the leakage resistance of the floor must always be checked. The measurement must be in line with the CSN EN 1081 standard and is usually performed by the floor fitter. The lower leakage resistance limit of 5 . 104 for protected buildings does not apply if protection against hazardous contact voltage is provided. Floor acceptance must occur within 28 days of installation completion and the first measurement must take place during this time, to be arranged by the floor user (compulsory measurement – to be made no earlier than 2 weeks after floor installation and to be repeated on an annual basis). The acceptance under the CSN EN 1081 standard shall be made by an electricity inspector. If requested and if the covering is to be used in an explosive hazard environment, the approval shall be performed by the Physical – Technical Testing Institute, State Laboratory 210, Ostrava – Radvanice. A test report is issued after acceptance and inspection and should indicate as follows:
• Building name • Floor covering manufacturer, brand and type • Installation method (system) • Date of floor installation and name of the contractor • Date and values of the floor leakage resistance measurement – 1st measurement • Layout plans of measured floor points including temperature and relative humidity during measurement • Reference to the CSN EN 1081 standard, measuring voltage • Assessment of measurement results and the decision as to whether the floor is suitable for use • Signature, stamp and date.
13. GENERAL SAFETY, WORK HYGIENE AND FIRE SAFETY The provisions of the Labour Code, Act 262/2006 Coll., Government Decree 591/2006 Coll. on the essential occupational health safety standards at construction sites and Act 309/2006 Coll. setting forth additional occupational health and safety requirements apply to ensure occupational health and safety during the use of solvent adhesives. Legislative requirements regarding fire safety are set forth, in particular, in Act 133/1985 Coll. on fire safety as amended, Decree 246/2001 Coll. on fire safety conditions and the state fire prevention authority (the latter is an implementing decree for the Act on fire safety) and other technical standards.

��� ���� �����������
�� ������������
14. CARE AND MAINTENANCE Regular cleaning and maintenance greatly influence the appearance, hygiene and service life of all floor coverings. Cleaning costs and maintenance intervals depend on the frequency of use and related soiling of the floor. Preventive measures must be taken to reduce the amount of dirt on the floor to the minimum. Entrances of heavy use buildings must be equipped with effective facilities to contain dirt (known as cleaning zones). The dimensions, location and design of a cleaning zone must be determined as early as the designing phase and the zone length should not be less than 3 metres. In addition, these cleaning zones must be subject to regular cleaning. If doormats or carpets are used, they must be immediately replaced if they no longer meet their intended function. Important preventive measures include choosing the right floor covering since it has an effect on future cleaning and maintenance costs. The floor covering type, quality, texture and colour play an important role. It generally holds that multi-coloured floor coverings are less sensitive than single-coloured ones and that muted colours are more suitable than light colours. The following recommendations on cleaning and maintaining LINO FATRA floor coverings are based on many years of hands-on experience and reflect the current trends in building chemistry and cleaning technology. However, as local conditions will vary, our recommendations are not binding. No warranty can be provided regarding the specified cleaning and maintenance products. If you are in doubt, the instructions given by the manufacturer of the care product shall be authoritative. When using any floor cleaning and maintenance products, always adhere to the instructions given by the manufacturer and consult the manufacturer’s technical staff if necessary. Do not use any aggressive products for standard cleaning (e.g. conventional detergents, cleaning products with abrasives, alkalis or a high content of organic solvents and degreasers). 14.1. Cleaning and maintaining floor coverings with a PUR protective layer Most of the dirt on the floor covering may be eliminated using cleaning mats in front of the entrance and cleaning zones in the entrance. Both must be cleaned on a regular basis. If using a floor covering with a PUR protective layer, suitable means of protection must be installed on all surfaces coming into contact with the floor (e.g. textile pads under chair and table legs or PET boards under caster chairs). These must be regularly checked for functionality and cleaned. 14.1.1. Cleaning after completion of construction works Before being put into service, a newly laid floor covering must be cleaned thoroughly to remove all impurities from production and installation. For this purpose, use the CC-PU cleaner diluted with water in the ratio of 1:5 to 1:10. The concentration may be increased depending on the amount of dirt. Apply the cleaner evenly onto the floor and after approx. 10 minutes scrub with a brush or the CC-SRP single-disc rotary machine with a brush or a red pad. Use a water vacuum cleaner to remove any dissolved dirt and thoroughly neutralise the entire area with clean water until all residues of the cleaning solution are removed. 14.1.2. Standard cleaning and maintenance Dust removal: Use a wet mop to remove loose dust and dirt. Manual or machine wet cleaning: To remove adhering dirt, use a CC-PU cleaner diluted with water in the ratio of 1:200 and mop the floor or use an automatic cleaning machine (e.g. CC-Premium F2). On premises that require a regular surface disinfection cleaning, use the CC disinfectant – concentrate (tested in accordance with DGHM and DVG regulations). Inter-stage cleaning: If standard cleaning is insufficient to remove adhering dirt, it is advisable to perform inter-stage cleaning using a solution of the CC-PU cleaner and water in a concentration suitable for the amount of dirt (e.g. 1:50 up to 1:100). Use a brush or an automatic cleaning machine (e.g. CC-Premium F2 for hard floors) or the spray method. In order to maintain the floor value, we recommend polishing it regularly with the CC-SRP 2+S single-disc rotary machine (400 rpm) with a white pad or a polishing brush.
14.1.3. Removing stains and lines made by rubber heels To remove stubborn stains and lines made by rubber heels, use the undiluted CC-PU cleaner and a cloth or a smooth white pad. To finish, wash with clean water. If possible, remove all stains immediately since some of them may migrate into the surface as they age, making their complete removal very difficult or impossible.

��� ���� �����������
�� ������������
14.1.4. Comprehensive cleaning Comprehensive cleaning is performed when extremely stubborn dirt and stains that spoil the floor appearance cannot be removed during usual daily cleaning or when worn floor surface must be prepared with the CC-PU matt sealer for renovation. For comprehensive cleaning, use the CC-R basic cleaner diluted with water in the ratio of 1:5. Apply the solution onto the floor and after approx. 10 to 15 minutes scrub thoroughly, using a single-disc rotary machine with a green pad, brush or the CC-Padmeister. If no surface treatment is to follow, use a red pad or a brush. Use a water vacuum cleaner to remove any dissolved dirt and thoroughly neutralise the entire area with clean, and preferably warm, water until all dirt and residues of the cleaning solution are removed (until the water stops foaming).
14.1.5. Proactive long-term protection/renovation Floor coverings with the PU factory finish do not usually require an additional protective film immediately after installation. Applying the film is, however, recommended in heavy duty rooms (e.g. corridor, kitchen). As necessary, the first surface treatment is to be performed only after some period of use (e.g. 4 to 6 months) in order to rejuvenate a worn looking or slightly scratched surface. This operation may be regularly performed as necessary. In order to consistently maintain the properties of the PU factory finish, i.e. protection, reduced adhesion of dirt, simpler daily cleaning, we recommend proactive long-term protection of the PU factory finish and making timely renovation of any damaged spots. Proactive long-term protection: After an extensive period of use or once the first worn spots appear, it is advisable to rejuvenate the PU factory finish using the CC-PU matt sealer. First activate the sealer with a suitable hardening agent and then apply it undiluted onto the surface (see Comprehensive cleaning). The surface must be perfectly clean and dry. Use the CC ‘Aquatop’ 10 mm lacquer roller to apply the CC-PU matt sealer, strictly following the instructions. The floor may be used again approximately 12 hours after the last layer is applied. Allow the protective system approx. 7 days to achieve its final resistance. Renovation: if the PU factory finish is extensively worn out, the CC-PU matt sealer must be applied twice. Before applying the second layer, always allow the first one to dry sufficiently (at least 2 hours). Both coatings must be applied on the same day. Please note that before applying the CC-PU matt sealer, the surface must be matted using the CC-SRP 2+S single-disc rotary machine (400 rpm) and the grey CC-PU renovation pad. This will make the surface visually uniform, including at transition points, and ensure perfect adhesion of the protective coat.
14.1.6. Maintaining the product value on special premises Using the CC-PU matt sealer creates the best possible protection on the surface that is comparable to the factory finish. Please contact our technical consultants if a floor installed on special premises (such as medical facilities, hair salons, car showrooms) requires protection against colouring effects (e.g. to minimise surface discolouring by substances such as wound disinfectants, hair dyes, softeners) or if a chemically removable protective coat must be used due to building specific requirements.
14.2. Cleaning and maintaining floor coverings without a PUR protective layer
14.2.1. Cleaning after completion of construction works Before being put into service, a newly laid floor covering must be cleaned thoroughly to remove all impurities from production and installation. For this purpose, use the CC-R basic cleaner diluted with water in the ratio of 1:5 to 1:10. The concentration may be increased depending on the amount of dirt. Apply the cleaner evenly onto the floor and after approx. 10 minutes scrub with the CC-SRP single-disc rotary machine with a green pad. Use a water vacuum cleaner (e.g. CC-Premium F2) to remove any dissolved dirt and thoroughly neutralise the entire area with clean water until all residues of the cleaning solution are removed. If the floor is not to be treated with the CC hard sealer, use a brush extension instead of the green pad to clean the floor after completion of construction works.
14.2.2. Protective layer Applying a protective layer will create a resistant film on the surface that protects the floor covering, reduces the adhesion of dirt and facilitates everyday standard cleaning. We do not recommend applying the protective layer in damp environments. To create the protective layer, you may use the CC interior hard sealer, CC-SG shine hard sealer or the CC-Secura hard sealer (silky matt surface). Apply the product undiluted in two layers as a regular thin film. Apply three layers in heavy duty environments (shopping centres, department stores etc). Use the CC applicator with a special coat or a flat mop to apply the

��� ���� �����������
�� ������������
sealer. Apply the sealer crosswise. Always allow the coat to dry sufficiently before applying the next layer. The floor may be used after the last layer dries thoroughly (approx. 12 hours, preferably overnight). In special environments where, for example, solvent-containing products are handled (certain hospital wards, general practitioner surgeries etc), use, as specified above, the CC Medica hard sealer or the CC-R 1000 cleaner.
14.2.3. Standard cleaning and maintenance Dust removal: Wipe loose dust and dirt off with a wet cloth. Manual or machine wet cleaning: To remove adhering dirt, use a CC-R 1000 cleaner diluted with water in the ratio of 1:200 and wipe the floor by hand or with an automatic cleaning machine. On premises that require a regular surface disinfection cleaning, use the CC disinfectant (approved by the Czech Republic’s Chief Sanitary Officer, tested by the Prague-based State Testing Institute and in accordance with DGHM and DVG regulations, document VII). To restore the shine, the surface may be coated with the CC-Shine 3000PU diluted with water in the ratio of 1:200. Protective layer renovation and hardening: The regular renovation of the protective layer is intended to renew damaged or highly worn out protective layers and to extend the interval between comprehensive cleaning operations. We recommend that you regularly (e.g. once a week) polish the current protective layer, using a single-disc rotary machine with a polishing pad or a polishing brush. If the surface is treated by one of the CC hard sealers as detailed in section 14.2.2., the areas where the protective layer is damaged or worn out (e.g. in the directions exposed to the heaviest use) may be renewed using the protective layer dry renovation method. Aimed to maintain the product value, this measure is of particular importance in highly trafficked buildings. Dry renovation requires that the floor covering is professionally installed, without any bubbles or unevenness.
14.2.4. Inter-stage cleaning If standard cleaning is insufficient to remove adhering dirt and the protective film is still intact, it is advisable to perform inter-stage cleaning using a solution of the CC-active cleaner R 280 and water in a concentration suitable for the amount of dirt (e.g. 1:50 up to 1:100). Use a brush or an automatic cleaning machine. This cleaning method leaves the protective layer intact.
14.2.5. Comprehensive cleaning Comprehensive cleaning is necessary if the protective layer is worn out or damaged extensively. Depending on the floor use and standard cleaning method, this operation needs to be performed once per 6 to 12 months if the protective film is not renovated on a regular basis. Comprehensive cleaning thoroughly removes old protective layers, stubborn dirt and other stains that spoil the appearance of the floor covering. If the floor covering is treated with the CC hard sealer in accordance with section 3.1, undiluted CC-R basic cleaner or the CC-Profi cleaner diluted with water in the ratio of 1 up to 5 may be used for the comprehensive cleaning. Apply the solution onto the floor and after approx. 15 to 20 minutes scrub thoroughly, using a single-disc rotary machine with a green pad. Use a water vacuum cleaner (e.g. CC-Premium F2) to remove any dissolved dirt and thoroughly neutralise the entire area with clean, and preferably warm, water until all dirt and residues of the cleaning solution are removed (until the water stops foaming). If the surface is to be treated with the CC-R 1000 cleaner, use the CC-R basic cleaner for comprehensive cleaning (allow the cleaner to work for 10 to 15 minutes).
14.2.6. Removing stains and lines made by rubber heels To remove stubborn stains and lines made by rubber heels, use the CC-Elatex cleaner and a cloth or a smooth pad. To finish, wash the area with clean water. Since the product also dissolves protective layers, the cleaned spot must be renovated using the care product that was applied to create the protective layer. If possible, remove all stains immediately since some of them may migrate into the surface as they age, making their complete removal very difficult or impossible.

��� ���� �����������
��� ������������
14.3. Recommended products for cleaning and maintaining LINO FATRA floor coverings
Manufacturer
Dr. Schutz
Cleaning after installation
Protective layer, first treatment
Standard daily wet cleaning
Standard daily wet cleaning + surface disinfection
Inter-stage intensive cleaning without damage to protective coatings
Comprehensive cleaning
Floor coverings with PUR protective layer
CC-PU cleaner
CC-PU matt sealer 5) (proactive long-term protection/renovation of PUR factory finish)
CC-PU cleaner
CC-disinfectant 1)
CC-PU cleaner
CC-R basic cleaner
Floor coverings without protective layer
CC-R basic cleaner
CC-SG shine hard sealer 4)
CC-Secura hard sealer 4)
CC interior mat hard sealer 4)
CC-R 1000 cleaner
CC-Shine 3000PU
CC-disinfectant 1)
CC-active cleaner R 280
CC-Profi basic cleaner
Electrostatically conductive and antistatic floor coverings
CC-basic cleaner
CC-R 1000 cleaner
CC-SG shine hard sealer 2) 4)
CC-Secura hard sealer 2) 4)
CC-R 1000 cleaner
CC-disinfectant 1)
CC-active cleaner R 280
CC-Profi basic cleaner3)
CC-R basic cleaner
Key: 1) Tested in accordance with DGHM and DVG regulations. 2) Only in exceptional cases. The CC polymer dispersion is to be applied in no more than two thin layers. First treat a test surface and measure if conductivity is sufficient. 3) If the surface is treated with the CC hard sealer, use the CC-Profi basic cleaner for comprehensive cleaning. 4) In environments where enhanced resistance to disinfectants is required, use the CC-Medica hard sealer or the CC-PU matt sealer for treatment. Pay attention to instructions and recommendations in our leaflet. If in doubt, contact our technical consultants. 5) For long-term active protection and renovation of the PU factory finish after a certain period of use. Complete thorough comprehensive cleaning with the machine and a green pad first.

��� ���� �����������
��� ������������
Other recommended products for maintaining and cleaning LINO FATRA floor coverings without a PUR protective layer in buildings and households
Manufacturer Cleaning after installation
First treatment (application of protective layer)
Standard daily wet cleaning
Inter-stage intensive cleaning without damage to protective polymer dispersions
Comprehensive cleaning (removal of old worn protective layers)
Loba LOBA Grundreiniger LOBA V6 Finish LOBA
Neutralreiniger LOBA Industriereiniger R
LOBA Wachsentferner
Henkel Thomsit PRO 40
Thomsit PRO 10
Thomsit PRO 11+12 (matt)
Thomsit PRO 15
Thomsit PRO 20
Thomsit PRO 15 (diluted)
Thomsit PRO 40
These recommendations are not necessarily exhaustive. The information about the above products is current at the time of print. In case of any doubt, the respective manufacturer’s recommendations are authoritative. Adherence to these maintenance instructions gives the floor covering a long service life. 14.4. Cleaning and maintaining floor coverings with defined electric
properties CAUTION! It is forbidden to use maintenance and polishing emulsions that prevent the removal of electric charges on floors with defined electric properties. Using unsuitable disinfectants may have a negative effect on mechanical and physical properties (colouring, softening or surface etching) of the floor covering. 15. RESISTANCE TO CHEMICALS Vinyl floor coverings demonstrate above-average resistance to mild and diluted acids, alkalis, soaps and solvents. Petroleum and strong acids do not damage the floor covering if the stains are immediately removed. Ketones, chlorinated solvents, acetone and similar solvents must not come into contact with the floor covering. If it happens, the damage may be minimised by immediately washing the place of contact and giving the residues of these reagents time to evaporate before the floor covering surface is put back into service. Vinyl floor coverings are suitable for use in most environments where chemicals are handled and where there is a risk of accidental spillage. However, some chemicals contain very strong colouring agents that will leave stains on the floor, even after short contact. Where such types of chemicals are used, we recommend choosing dark vinyl colours in order to minimise the risk of staining. When coming into contact with floor coverings, rubber products (mostly dark and coloured rubber – rubber casters, device protectors, shoe soles etc) cause an irreversible change of the wear layer colour as a result of which the floor covering surface will turn yellow, brown or even black in the place of contact. Burning and smoking items leave indelible marks on the surface. The tables below indicate the general chemical resistance of vinyl floor coverings (see the note for a description of the testing method).

��� ���� �����������
�� ������������
15.1 Organic substances
TYPE OF CHEMICAL EFFECT REMEDY
Aldehydes Esters Halogen hydrocarbons Ketones
The floor covering is attacked after several minutes
Wipe the floor immediately
Alcohols Ethers Glycols Hydrocarbons (aromatic and aliphatic) Paraffin Edible oil
Release of plasticizers occurs after a few days, accompanied by material shrinkage and embrittelment
Wipe the floor immediately
15.2 Water solutions
TYPE OF CHEMICAL EFFECT REMEDY
Mild acids and alkalis No effect
Strong alkalis Shine damaged, may cause some colours to fade
Dilute and remove
Strong acids Protracted contact may cause colours to fade
Dilute and remove immediately
Colouring agents (indicative) Contact may cause colours to fade Dilute and remove immediately
Note: resistance to chemicals is tested for 24 hours while the product is in contact with the chemical at a room temperature of 21°C. The product is then washed with cold water. Some stains may be ground off with a nylon cube.
16. HETEROGENEOUS PVC WALL COVERINGS
16.1 Product details Heterogeneous PVC wall coverings consist of a wear layer and a base layer and are manufactured in 1,500 mm wide and 1.15 mm thick strips. The coverings contain a PUR protective layer that makes cleaning easier, reduces maintenance costs and ensures resistance to microorganisms. Please see the relevant technical sheet and catalogue lists for specific technical parameters.
16.2 Preparing the base In general, the bases where PVC wall coverings are to be applied must meet requirements similar to those for the installation of floor coverings (see section 3). The base must be level, smooth, free of cracks and dust and sufficiently firm, clean and dry. Grease stains and other impurities must be removed. Walls coated with oil paints must be scraped. Unevenness, cracks, joints and different levels must be repaired or levelled. The residual moisture of the base prepared for installation must not exceed 2.1% CM and 0.5% CM for cement and gypsum bases respectively (CM = carbide method). Wall coverings must not be installed in rooms that are not sufficiently insulated against moisture.
16.3 Preparing the covering After a delivery inspection (see section 6), first unwind the covering and visually check the quality of its appearance and pattern. Do not install (bond) any wall covering with visible defects. Instead file a warranty claim with your supplier. Before installation, the unwound wall covering must be kept for at least 24 hours, or preferably 48 hours, in the room where it is to be installed. The product dimensions will stabilise and minor ripples will smooth out automatically during this time. The room temperature must not drop below +18°C during installation.

��� ���� �����������
��� ������������
16.4 Installation Cut the wall strips to the required dimension, keeping a 5 – 10 cm overlap. If the base is highly absorbent, we recommend that you apply a suitable bonding primer before applying the adhesive. Similarly to floor coverings, wall coverings are bonded over their entire area with dispersion adhesives. You must follow the basic principles of this bonding method (see section 7.4). However, installing wall coverings has its specifics and it is always necessary to adhere to instructions given by the manufacturer of the recommended adhesive with respect to amount used and ventilation time. The adhesive should preferably be applied with a roller (no foam roller allowed). Applying the adhesive with a toothed scraper involves the risk that the scraper movement will remain visible on the wall. When bonding the strips, make sure to force the air out with a rounded edge board or a hand roller. It is best to work from the top downwards and from the centre to the sides of the strips. The maximum gap between adjacent strips must not exceed 1 mm. When applying the wall covering in outside or inside corners, you may use a hot-air gun to gently heat the covering for easier shaping and better installation. Once the installation is complete, roll the entire area again with a hand roller and do not expose it to any load for at least 24 hours. Then weld the wall covering. Individual strips of the wall covering may be joined with a welding rod or cold-welded (see 7.6 and 7.7).
16.5 Maintenance and care When using any floor cleaning and maintenance products, always adhere to the instructions given by the manufacturer and consult the manufacturer’s technical consultants if necessary. Use lukewarm water with an admixture of a recommended detergent for standard cleaning of the wall covering. Apply the cleaning solution to the wall covering, allow it to work for the time determined by the detergent manufacturer and then clean the surface. Then wash the cleaned surface thoroughly with clean water and allow it to dry unless otherwise specified. Failure to adhere to detergent dosing instructions (increased dosage) may cause excessive staining of the surface during use. Do not use any aggressive products for standard cleaning (e.g. conventional detergents, cleaning products with abrasives, alkalis or a high content of organic solvents and degreasers). In addition, use only those products that manufacturers recommend for the maintenance and care of coverings with a PUR protective layer (e.g. CC-PU cleaner). The wall covering must be protected against staining from asphalt, ink, aniline paint, coloured oils, iodine tincture, Castellani’s paint methylene blue, potassium permanganate and all agents containing paint and organic solvents. We recommend using Chloramin B, Chlorseptol and Orthosan BF 12 for disinfection. Use of any other products requires prior testing. When coming into contact with floor coverings, rubber products (mostly dark and coloured rubber – rubber casters, device protectors etc) cause an irreversible change of the wear layer colour as a result of which the wall covering surface will turn yellow, brown or even black in the place of contact.
17. PUR PROTECTIVE LAYER Using a PUR (polyurethane) protective layer is a current trend among all leading manufacturers of (PVC, linoleum) floor coverings. Reasons behind the use of a PUR protective layer:
• It replaces the first protective layer after the floor covering application. • It greatly reduces maintenance costs.
A thin polyurethane film is applied by the manufacturer on the floor covering surface, filling microscopic defects that keep dirt on the surface. Dirt then cannot penetrate the product. If the floor covering is cleaned properly, which means using only those detergents that are suitable for coverings with a PUR protective layer (e.g. Dr. Schutz), it will remain in great condition. Fatra, a.s., Napajedla, is in the forefront of development in its field. The protective layer is currently used for these products: Novoflor Standard, Novoflor Extra and Dual. If using the above floor coverings, suitable means of protection must be installed on all mobile furniture surfaces coming into contact with the floor (e.g. textile pads under chair and table legs or PET boards under caster chairs). We recommend checking them regularly for functionality. The resistance of floor coverings with a PUR protective layer to staining reduces maintenance costs especially in heavy duty environments (shops, corridors etc). This is where the resistance of the protective layer to abrasion plays an important role. The PUR protective layer does not replace cleaning zones at entrances to rooms.

��� ���� �����������
��� ������������
However, abrasion does not mean wear. Floor coverings exposed to the greatest wear are those installed in classrooms, canteens, meeting rooms, offices etc. Failure to install means of protection on mobile furniture contact points with the floor will inevitably result in scratching the top layers of all floor coverings, including those with a PUR protective layer. Although surface scratches do not affect the functionality of floor coverings, they tarnish their aesthetic appearance. If mobile furniture whose contact points are not properly protected scratches the PUR protective layer, such damage is not covered by warranty. The product range manufactured by Fatra, a.s., Napajedla, also includes floor coverings without a PUR protective layer, namely Elektrostatik, Dynamik and Praktik N. Their thermal finish and homogeneous structure give them enhanced resistance to wear.
FATRA, A.S., NAPAJEDLA WISHES YOU GOOD WORK WITH ITS PRODUCTS.