zims tips and tricks february 2015 managing your staff and my institution 1
TRANSCRIPT

1
ZIMS Tips and TricksFebruary 2015
Managing Your Staffand
My Institution

2
The Staff Grid
The Staff grid displays the full name of the Staff member, the Job Title at your facility,the ISIS data standard Job Type and any Roles assigned to the Staff member. A green checkin the ZIMS User column indicates that Staff member has been assigned a Role and is a ZIMS User, a red check means they have not. A green check in the Public Contact column means they will display Globally for others looking at your institution and they can be found using the Contact Directory. Any Staff actively using ZIMS will display as Active in the Online/Offline column.

3
Adding Staff Members
To add a new Staff member select Add New Staffunder the Actions button in the Staff grid.
It can be tempting to only enter the mandatory fields (First and Last Name), but there is a lot of other information that can be recorded that can help you to better manage your staff. Both the Department and Team fields are multiple select, allowing a staff member to be assigned to more than one. Both Teams and Departments can also be assigned from their respective grids in My Institution.

4
Adding Staff MembersIf you check the Make User VisibleOutside My Institution box then otherswill be able to find them in the ContactDirectory. It is up to your institutionto determine who they want visible,but it makes it easy for your colleaguesto find contacts at your institution. Also,if this box is checked the Staff memberwill display on the Global level at yourfacility in the Staff grid. The Job Title is a free text field to enter the various titles at your facility. The Job Type is a multipleselect data standard. The Staff Code maybe used but it is not a searchable field.The Start and End Date may be useful ashuman resources functionality. Addingan End Date does not automaticallylock the Staff member out of ZIMS andtheir name continues to appear in listsfor Recorded By and Responsible Party.

5
Communication Details
From within the Staff grid there are manyactions you can perform. You can addCommunications details for your Staff tomake it easier for others to contact them.

6
ZIMS User Details - Assigning RolesView/edit ZIMS User Details iswhere you assign the ZIMS Role(s)to the Staff member. The ZIMS User box must be checked to activate this screen. The email and the User Name must be unique within ZIMS. The email can be edited but the User Name cannot. Any Role with (ISIS) at the end is an ISIS template Role and cannot be edited. A Role without (ISIS) at the end is a custom Role that has been created at your facility. These can be edited.To assign a Role simply double click on the Role in the left box, or highlight it and use the arrow to move to the right box. The Role(s) that remain in the right box will be assigned to the Staff member.

7
ZIMS User Details – Staff Security In the bottom half of that screen you can select to Force Single Session.
This restricts the User from logginginto ZIMS from more than onecomputer at a time. This can also beset at the institution level for all Staff using Institution Preferences.
You can also limit access by IP Numberusing Single IP or a Range. You willusually get this information from your IT person. If it is Active remember tocheck the box. IP addresses can alsobe restricted for all staff at the institutionlevel using Institution Preferences.However, THIS IS NOT RECOMMENDEDas there is too high a possibility thatyou may actually be locked out of ZIMSshould it change.

8
Making Staff Members Obsolete
For those circumstances when you do NOT want the Staff member to continue to have access to ZIMS or have their name appearin drop down lists you will need to mark them as Obsolete using the Actions button selections. You can also stop access to ZIMS by removing their Role.
To find Staff marked Obsolete you can use the Search Form and check the Include Marked Obsolete box.

9
Obsolete Staff
When you Include Obsoletein your search results a new column “Obsolete” will appear.You can see that three Staff members are marked Obsolete.You can make them Active againby selecting the Restore asActive option.

10
Active SessionsIn the Staff grid you canview who is currentlyusing ZIMS. Both Adrienne and Christine are using ZIMS. Selecting the Active Sessions hyperlink you can seethe IP address where theyare signed in. By selectingSign Out From Selected you can actually end theirsession. If you do NOT sign out and just close ZIMS, your session will remain as Active.
11
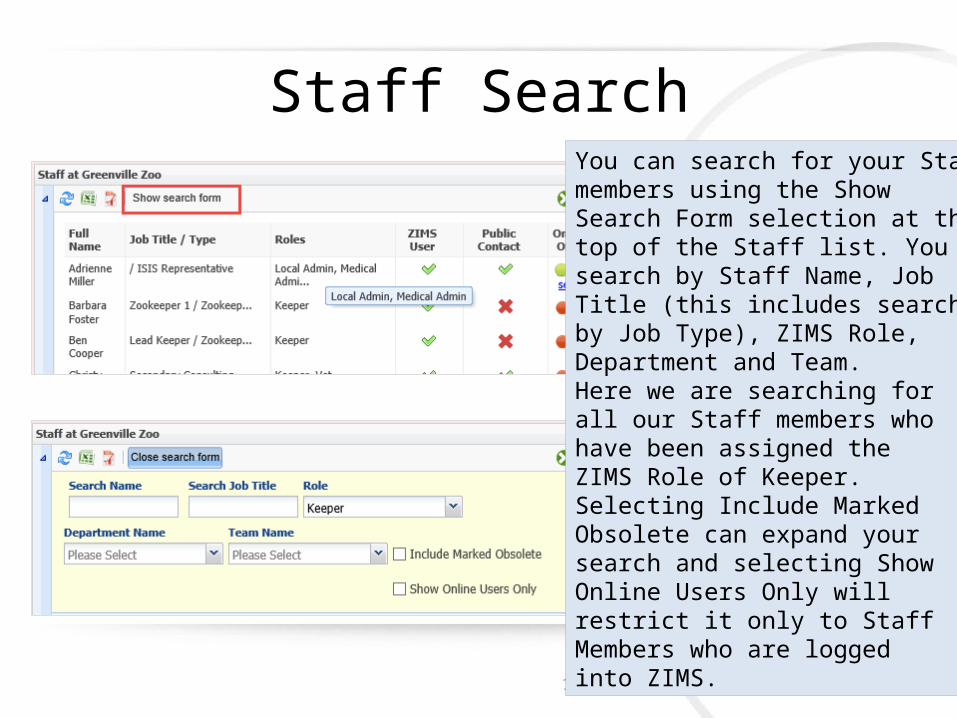
Staff SearchYou can search for your Staff members using the ShowSearch Form selection at thetop of the Staff list. You cansearch by Staff Name, JobTitle (this includes searchingby Job Type), ZIMS Role,Department and Team.Here we are searching forall our Staff members whohave been assigned theZIMS Role of Keeper.Selecting Include MarkedObsolete can expand your search and selecting ShowOnline Users Only willrestrict it only to Staff Members who are logged into ZIMS.

12
Global Staff Grid
If you have marked a Staff member as visible outside your institution they will appear in the Staff grid inthe Global view of that facility.
Selecting View Communications Details will open ascreen with the information you have entered, makingit easy for colleagues to find and contact each other.

13
Contact DirectoryAnother way to find Staff that are marked as visible outside their institutions is by using the Contact Directory in My Institution. Selecting All Contacts willfind all appropriate contacts in your directory. ISIS Contacts are visible to all ISIS community and maintained by the Institutions that created the record. My Contacts are visible only to your institution.
You would add a Local contact by using the Add New Contact option under the Actions button. This is also where you can Edit any Local Contacts or View Communication Details for a selected Contact.

14
Searching Contacts
Above we have searched for all ISIS Contacts who are Directors in the United Kingdom.
To find further details we can select to View Communications Details where we can find email addresses. The Contact Directory helps colleagues connect quickly.
15
Institution Preferences –Impact on Your Staff
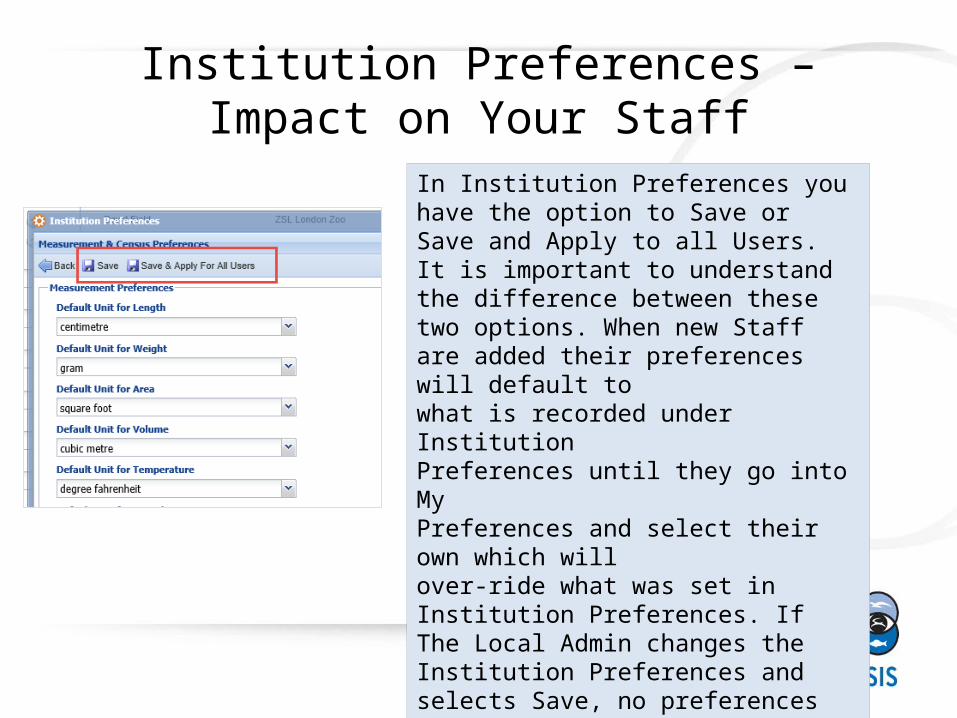
In Institution Preferences you have the option to Save or Save and Apply to all Users. It is important to understand the difference between these two options. When new Staff are added their preferences will default towhat is recorded under InstitutionPreferences until they go into MyPreferences and select their own which willover-ride what was set in Institution Preferences. If The Local Admin changes the Institution Preferences and selects Save, no preferences set by your Staff in My Preferences will be changed. HOWEVER!! If they select Save & Apply For All Users the Institution Preferences will over-ride any MyPreferences set by your Staff. Be careful howyou use this Save option!

16
My Preferences for Staff
Some of the options in My Preferences will actually help your Staff to manage themselves. They can change their own Passwords. Unlike when Local Admin changes their Passwords for them, the Staff will need to know what their current Password is. This is where you can change your own email address. This cannot be done from the Staff details screens. For institutions with Parent and Child relationships and your Staff member has access to several Institutions, they can change the default institution here.

17
Template versus custom RolesYour Institution Roles gridwill display all Roles availableat your facility. Any Role with (ISIS) at the end is an ISIS Template Role and cannot be edited. A Role without (ISIS) at the end is a Custom Role that has been created at your facility. These can be edited.You can also see which aretemplate roles in the ISISTemplate Role column whereISIS templates have a greencheck. When new functionalitybecomes available ISIS willupdate the appropriate ISISTemplate Roles. Your CustomRoles will have to be updatedby you with any new functionality.
18
Creating Custom Roles
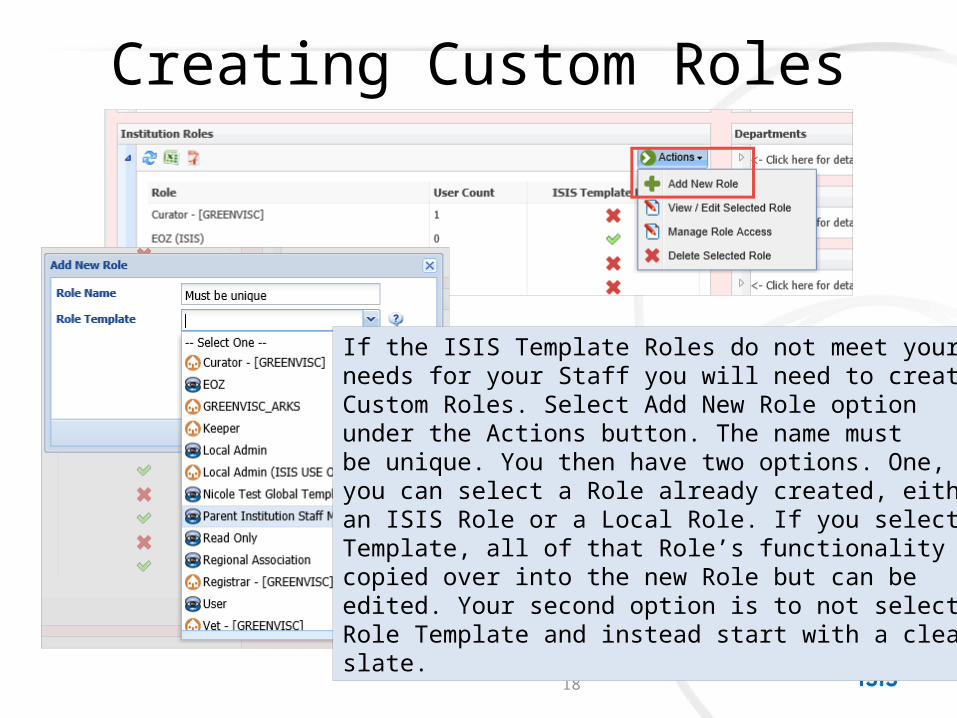
If the ISIS Template Roles do not meet yourneeds for your Staff you will need to createCustom Roles. Select Add New Role optionunder the Actions button. The name mustbe unique. You then have two options. One,you can select a Role already created, eitheran ISIS Role or a Local Role. If you select a RoleTemplate, all of that Role’s functionality will becopied over into the new Role but can beedited. Your second option is to not select a Role Template and instead start with a clean slate.

19
Creating Custom Roles
To create your Custom Role you will select Manage Role Access from theActions button. View/Edit will allow you to change the Role Name only.You cannot Delete a Role that has any Users assigned to it. You will needto first delete that Role from the User before being able to Delete the Role.

20
Creating Custom Roles
To create the role you will need to go intoeach of the eight modules and select whataccess (Search/View, Edit, Add or Remove)that you want that Role to have.

21
Creating Custom Roles
For the Custom Role in the upper left you have selected a Template to build your newRole off of. You will check or uncheck as desired. In the Custom Role on the lower rightyou have not selected a Template to build your Role off of. You will need to check theTurn On Module Functionality for this Role to activate the checkboxes. You will thencheck access as desired. After you assign this Role to a Staff member it is a good ideato sign in as them and check that they have access or do not have access correctly.

22
TeamsCreating Teams and Departmentsare another way to manage your Staff by dividing them into units.The Team Name must be unique.The Team Type is a data standarddropdown list. Selecting Team Members is identical to assigning Roles. Simply select the name from the left Box and move to the right box.
The Teams will display in the TeamGrid. To see the Team members select the View Member hyperlink.Staff can also be added to a Teamusing the Staff Details screen fromthe Staff grid.

23
Departments - MembersFor Departments you simply name them and record the members, there is no Type for Departments.
Adding Members is similar to creating lists, just type the name and select it, then type the next name and select.
You can indicate the Head of a Department by simply clicking on the star to the left. If you are using Advanced Access Management (AAM), Departments are where youwould manage Staff access for this additional feature as eachDepartment is assigned specificAAM access.

24
Responsible PartyIndividuals, Teams and Departments can all be selected as Responsible Parties. A single person icon is an Individual. A trio is a Team or a Department. Because I added the appropriate term to the end of my Teams and Departments I can tell them apart in this list. How you use Responsible Parties is up to your facility.
Checking , or unchecking the Active box allows you to track how theResponsible Party has changed over time.

25
Searching for Responsible Party
You can search for Responsible Party in any module they can be assigned.On the left we are using EnclosureSearch to find all enclosures thatAdrienne Miller is responsible for.To search in the Animal module youwill need to use the Advanced AnimalSearch where it is found at thebottom as shown on the right. Both Active and Inactive results will be found.
26
Studbook News Feed
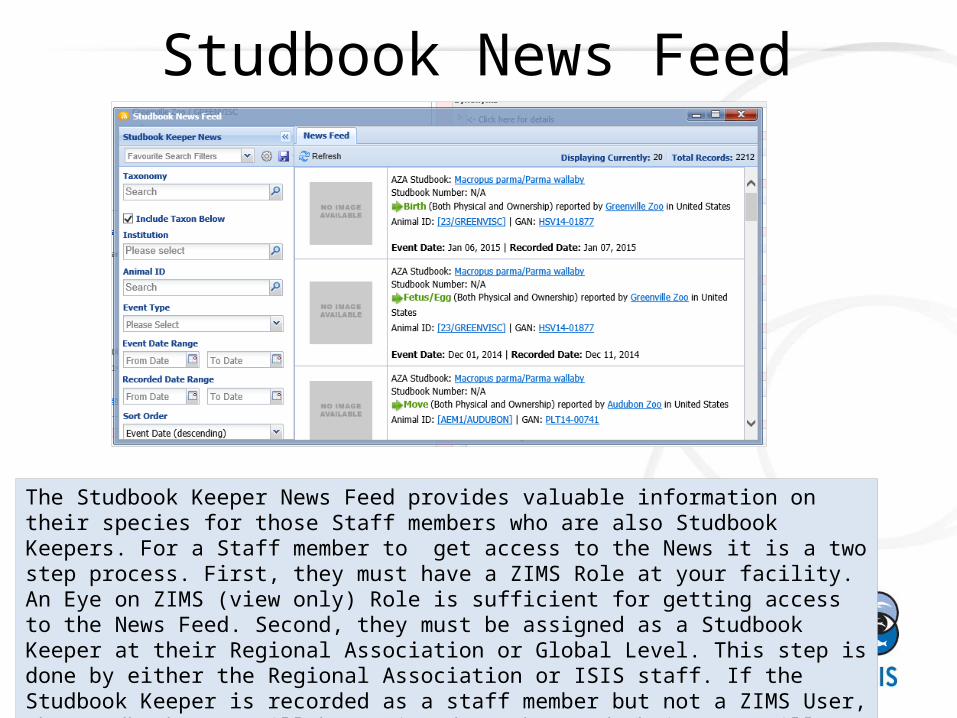
The Studbook Keeper News Feed provides valuable information on their species for those Staff members who are also Studbook Keepers. For a Staff member to get access to the News it is a two step process. First, they must have a ZIMS Role at your facility. An Eye on ZIMS (view only) Role is sufficient for getting access to the News Feed. Second, they must be assigned as a Studbook Keeper at their Regional Association or Global Level. This step is done by either the Regional Association or ISIS staff. If the Studbook Keeper is recorded as a staff member but not a ZIMS User, the studbook can still be assigned to them and their name will display in the Studbook Keeper grid in the Taxonomy module, but they will NOT have access to the News without a Role.

27
Scheduling Tasks - Calendar
You can also help manage your Staff’s time and activity by using Alerts from within the Animal or Enclosure modules or from within the My Calendar itself. Above we are looking at Alerts for Adrienne Miller who is part of the Animal Care Department and the Africa Team. The Enclosure Alert was assigned directly to her. The Fasting Alert was assigned to the Africa Team and the Weigh Alert was assigned to the Animal Care Department. When viewing her Alerts she will view all associated with her.

28
Calendar Access
Access to what is viewed in the Calendar can be controlled via the Calendarmodule in Roles. This Role can only view Animal and Enclosure Alerts, Sample Collection and Treatment/Prescription. Other medical related Alerts are notvisible to anyone assigned this Role.

29
Transaction MonitoringYou can monitor your Staff’s ZIMS activityusing Transaction Monitoring found underthe Start menu.
The Session History will display the User,the Start and End Date and Time, how longthey were in ZIMS, if they performed anyTransactions (additions, edits or deletions)and from what IP address they had signed in.

30
Transaction Count Hyperlinks
The Transaction Counts are hyperlinks that will open the screen to let you seewhat was recorded. During this session I edited a Role, changed some UserPreferences and added some Responsible Parties for both Animals andEnclosures.
Double left clicking on the left side notebook icon will display the details. Forthe Animal I added the Africa Team as a Responsible Party.

31
Transaction Monitor Search
Using the left hand Search box you can filter your search to find specific actions(record types) or find what certainStaff members have been recording.Here we are seeing if any weights were added by Ben Cooper during a week’s range. This is handy to find if specifictasks, such as recording monthly weights, have been accomplished.

32
Roll Back (Undo Selected)
Should something have been entered incorrectly you can select to UndoSelected. This will remove the transaction from ZIMS and record whenand who Rolled it back in the grid. Be VERY CAREFUL! You do not get aWarning and Rolled Back actions cannot be undone.

33
Any questions?
On Managing Your Staff in ZIMS