zimbra for mac mail user guide microsoft word - global relay - mac mail - zimbra setup guide cr...
TRANSCRIPT

Zimbra for Mac Mail User Guide Page 1 of 17
Copyright © 1999-2013 Global Relay. Confidential & Proprietary. All Rights Reserved. Not to be reproduced or distributed without permission.
Zimbra for Mac Mail
User Guide June 2013
Zimbra for Mac Mail User Guide Page 2 of 17
Copyright © 1999-2013 Global Relay. Confidential & Proprietary. All Rights Reserved. Not to be reproduced or distributed without permission.
Contents Introduction .......................................................................................................................... 3
Setting up Global Relay Zimbra Email with an IMAP Connection .................................................... 4
Mapping Sent, Junk and Trash Folders ...................................................................................... 9
Setting up Global Relay Zimbra Email with a POP Connection ...................................................... 11
Legal Information ................................................................................................................. 17
Zimbra for Mac Mail User Guide Page 3 of 17
Copyright © 1999-2013 Global Relay. Confidential & Proprietary. All Rights Reserved. Not to be reproduced or distributed without permission.
Introduction This Guide provides you with step-by-step instructions for configuring a Zimbra account in Mac Mail using an IMAP and a POP connection. An IMAP connection syncs email data between devices, because all data is kept on the Zimbra server. When you read or delete an email, information is synced across all devices where you access your email account. A POP connection downloads messages off the server, and multiple connections are not synced. When you read or delete an email, this action might not be reflected across other devices. For example, if all devices are set up to “leave a copy of messages on the server,” multiple devices download and store the same data independently. So deleting a message on one device (e.g. phone) will not be reflected on other devices (e.g. computer). We recommend you configure your account with an IMAP connection.
Zimbra for Mac Mail User Guide Page 4 of 17
Copyright © 1999-2013 Global Relay. Confidential & Proprietary. All Rights Reserved. Not to be reproduced or distributed without permission.
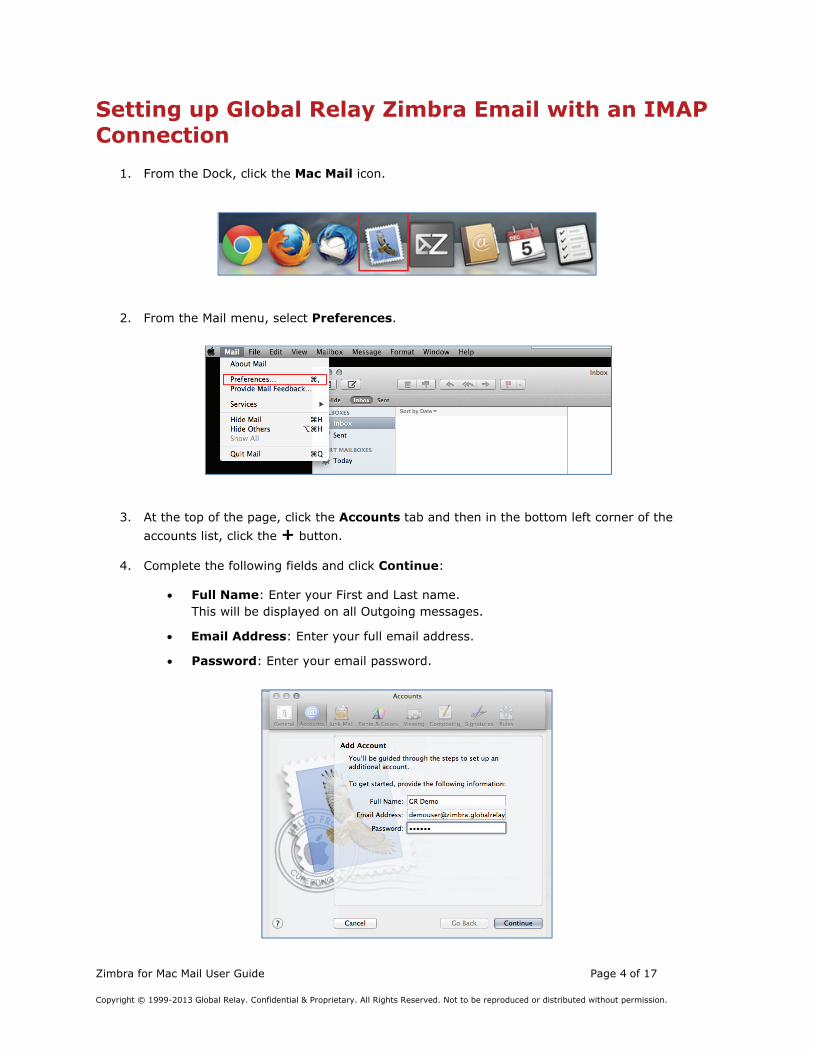
Setting up Global Relay Zimbra Email with an IMAP Connection
1. From the Dock, click the Mac Mail icon.
2. From the Mail menu, select Preferences.
3. At the top of the page, click the Accounts tab and then in the bottom left corner of the
accounts list, click the + button.
4. Complete the following fields and click Continue:
• Full Name: Enter your First and Last name. This will be displayed on all Outgoing messages.
• Email Address: Enter your full email address.
• Password: Enter your email password.
Zimbra for Mac Mail User Guide Page 5 of 17
Copyright © 1999-2013 Global Relay. Confidential & Proprietary. All Rights Reserved. Not to be reproduced or distributed without permission.
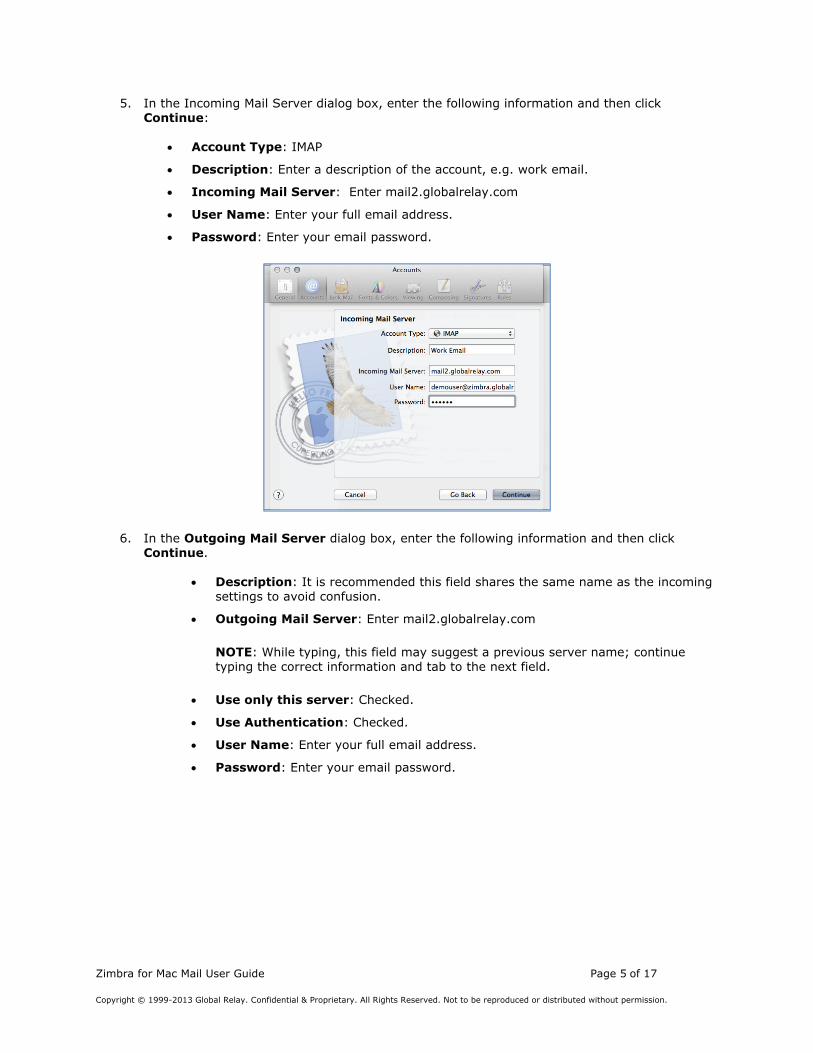
5. In the Incoming Mail Server dialog box, enter the following information and then click Continue:
• Account Type: IMAP
• Description: Enter a description of the account, e.g. work email.
• Incoming Mail Server: Enter mail2.globalrelay.com
• User Name: Enter your full email address.
• Password: Enter your email password.
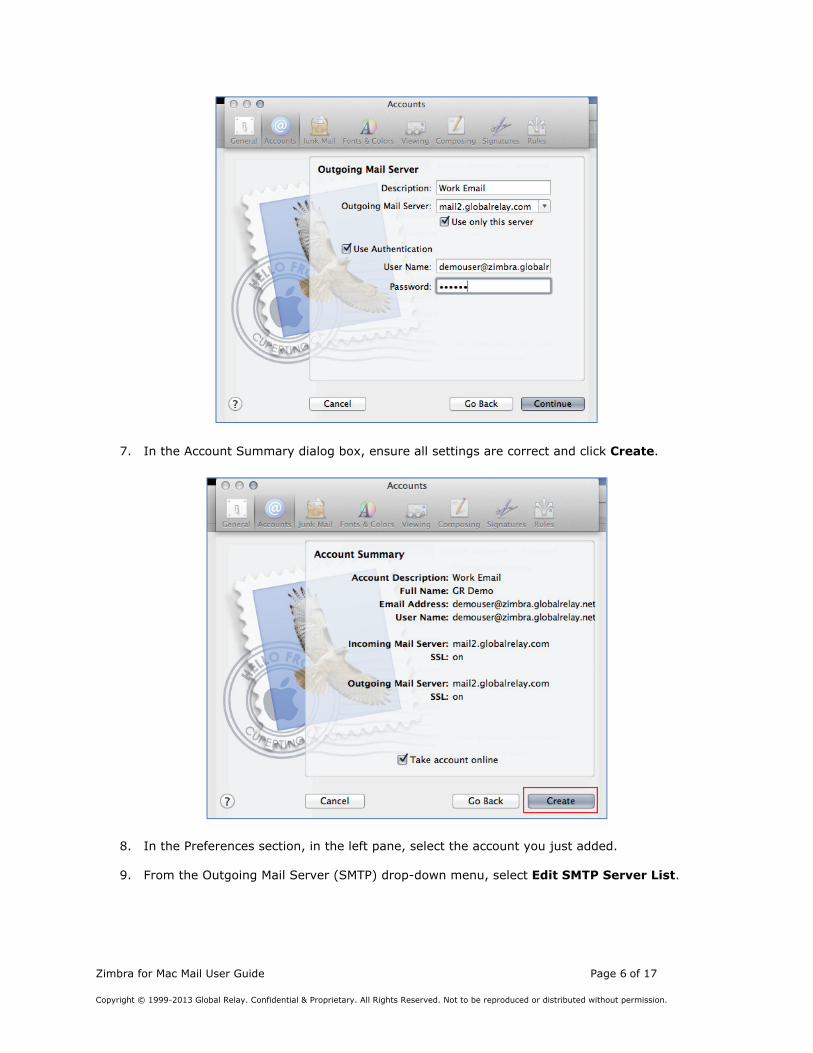
6. In the Outgoing Mail Server dialog box, enter the following information and then click Continue.
• Description: It is recommended this field shares the same name as the incoming settings to avoid confusion.
• Outgoing Mail Server: Enter mail2.globalrelay.com
NOTE: While typing, this field may suggest a previous server name; continue typing the correct information and tab to the next field.
• Use only this server: Checked.
• Use Authentication: Checked.
• User Name: Enter your full email address.
• Password: Enter your email password.
Zimbra for Mac Mail User Guide Page 6 of 17
Copyright © 1999-2013 Global Relay. Confidential & Proprietary. All Rights Reserved. Not to be reproduced or distributed without permission.
7. In the Account Summary dialog box, ensure all settings are correct and click Create.
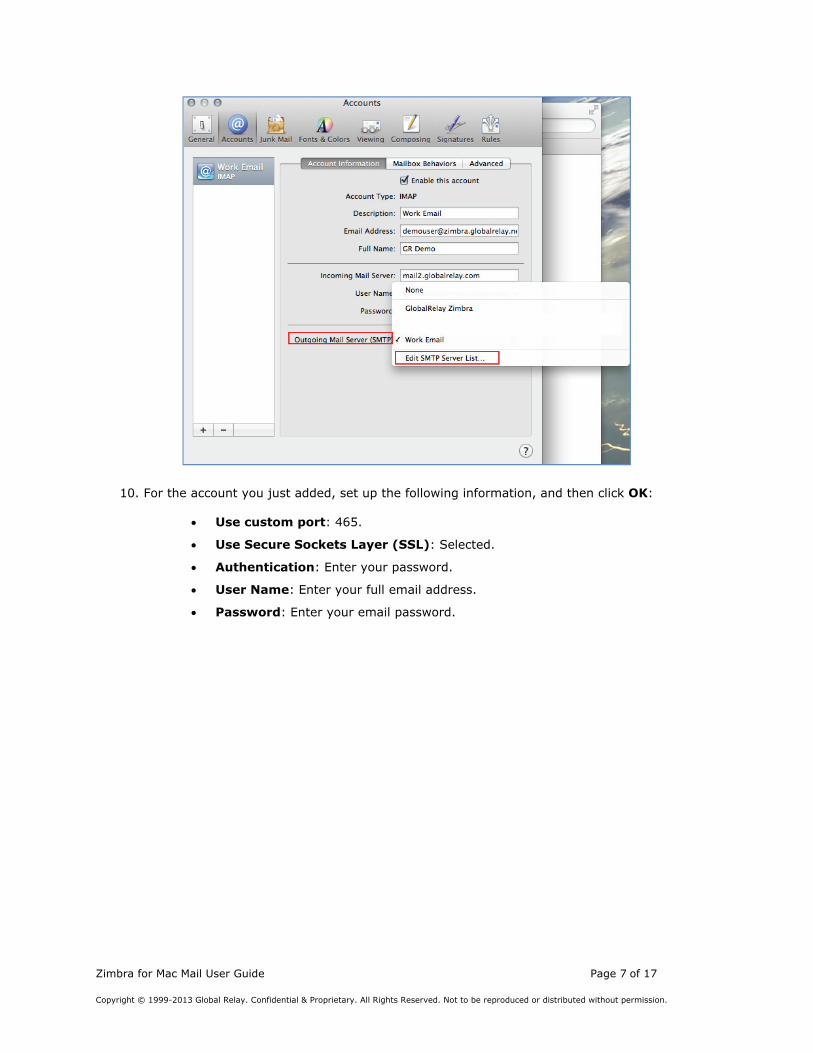
8. In the Preferences section, in the left pane, select the account you just added.
9. From the Outgoing Mail Server (SMTP) drop-down menu, select Edit SMTP Server List.
Zimbra for Mac Mail User Guide Page 7 of 17
Copyright © 1999-2013 Global Relay. Confidential & Proprietary. All Rights Reserved. Not to be reproduced or distributed without permission.
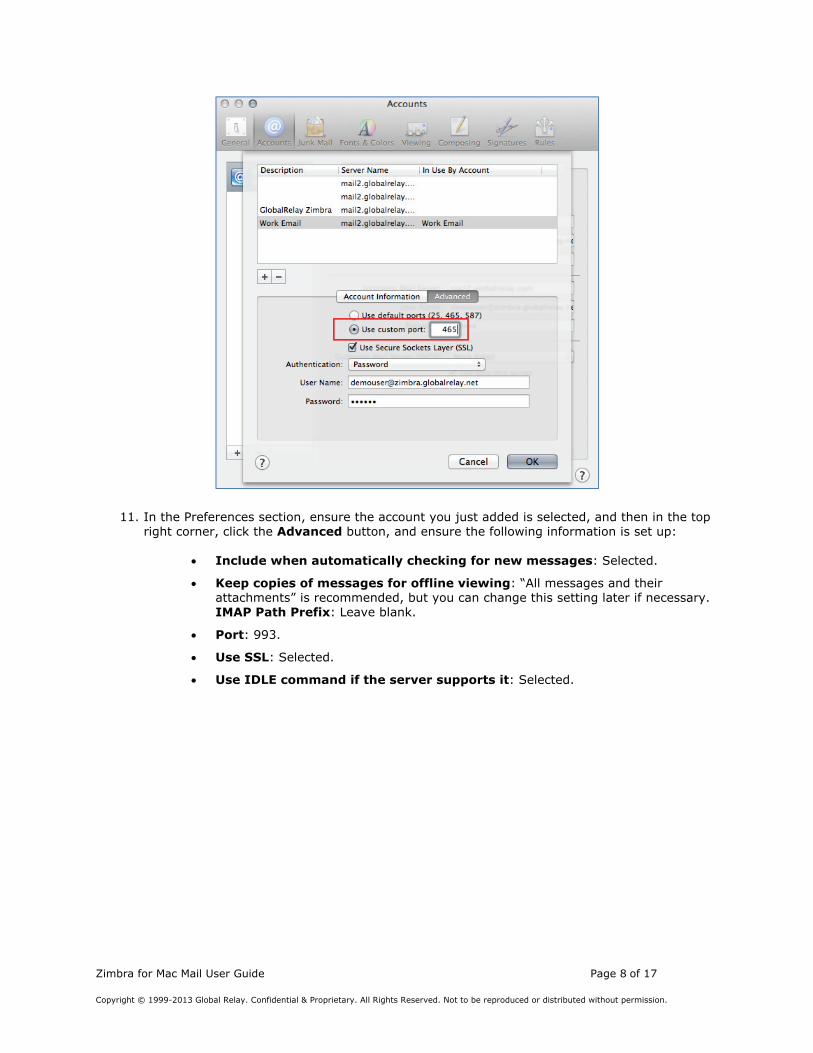
10. For the account you just added, set up the following information, and then click OK:
• Use custom port: 465.
• Use Secure Sockets Layer (SSL): Selected.
• Authentication: Enter your password.
• User Name: Enter your full email address.
• Password: Enter your email password.
Zimbra for Mac Mail User Guide Page 8 of 17
Copyright © 1999-2013 Global Relay. Confidential & Proprietary. All Rights Reserved. Not to be reproduced or distributed without permission.
11. In the Preferences section, ensure the account you just added is selected, and then in the top right corner, click the Advanced button, and ensure the following information is set up:
• Include when automatically checking for new messages: Selected.
• Keep copies of messages for offline viewing: “All messages and their attachments” is recommended, but you can change this setting later if necessary. IMAP Path Prefix: Leave blank.
• Port: 993.
• Use SSL: Selected.
• Use IDLE command if the server supports it: Selected.

Zimbra for Mac Mail User Guide Page 9 of 17
Copyright © 1999-2013 Global Relay. Confidential & Proprietary. All Rights Reserved. Not to be reproduced or distributed without permission.
12. In the top left corner, click the Close button (the circle with the “X”) and then click Save.
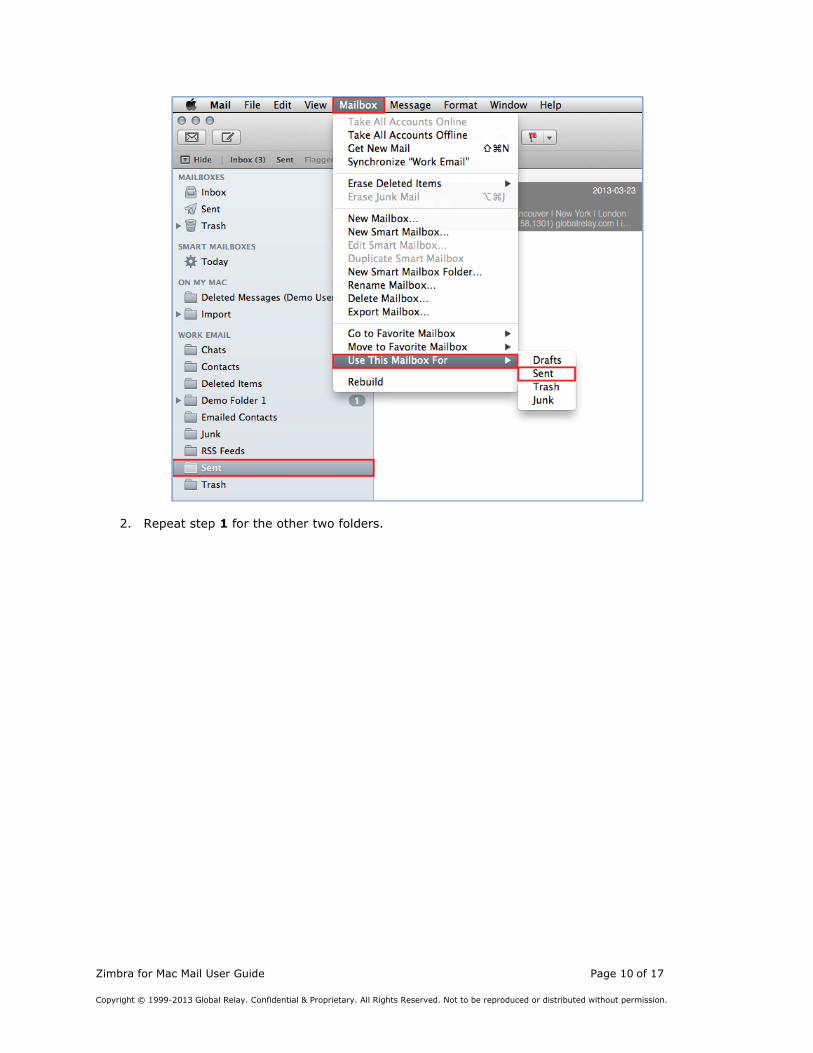
Mapping Sent, Junk and Trash Folders To ensure Mac Mail properly stores messages for Sent, Junk and Trash on our Zimbra servers, perform the following procedure.
1. Select on one of the aforementioned folders (Sent, Junk, or Trash) and then select Mailbox and click Use This Mailbox For… Select the corresponding action.
Zimbra for Mac Mail User Guide Page 10 of 17
Copyright © 1999-2013 Global Relay. Confidential & Proprietary. All Rights Reserved. Not to be reproduced or distributed without permission.
2. Repeat step 1 for the other two folders.
Zimbra for Mac Mail User Guide Page 11 of 17
Copyright © 1999-2013 Global Relay. Confidential & Proprietary. All Rights Reserved. Not to be reproduced or distributed without permission.
Setting up Global Relay Zimbra Email with a POP Connection
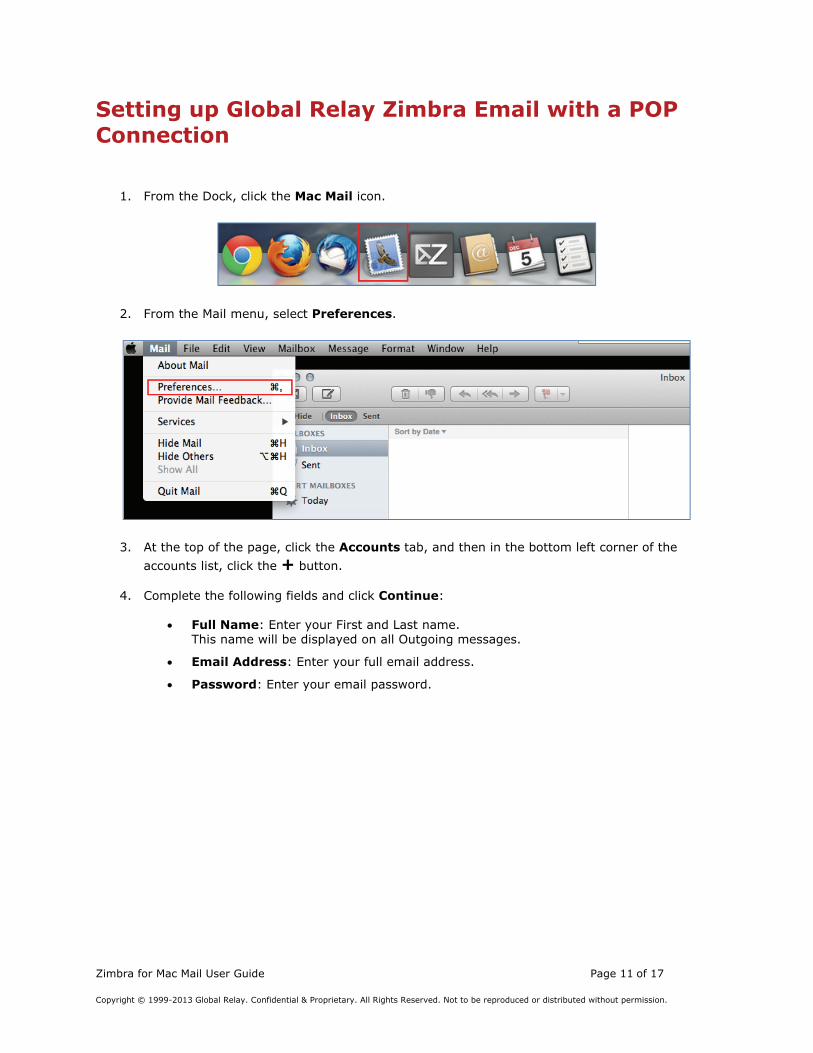
1. From the Dock, click the Mac Mail icon.
2. From the Mail menu, select Preferences.
3. At the top of the page, click the Accounts tab, and then in the bottom left corner of the
accounts list, click the + button.
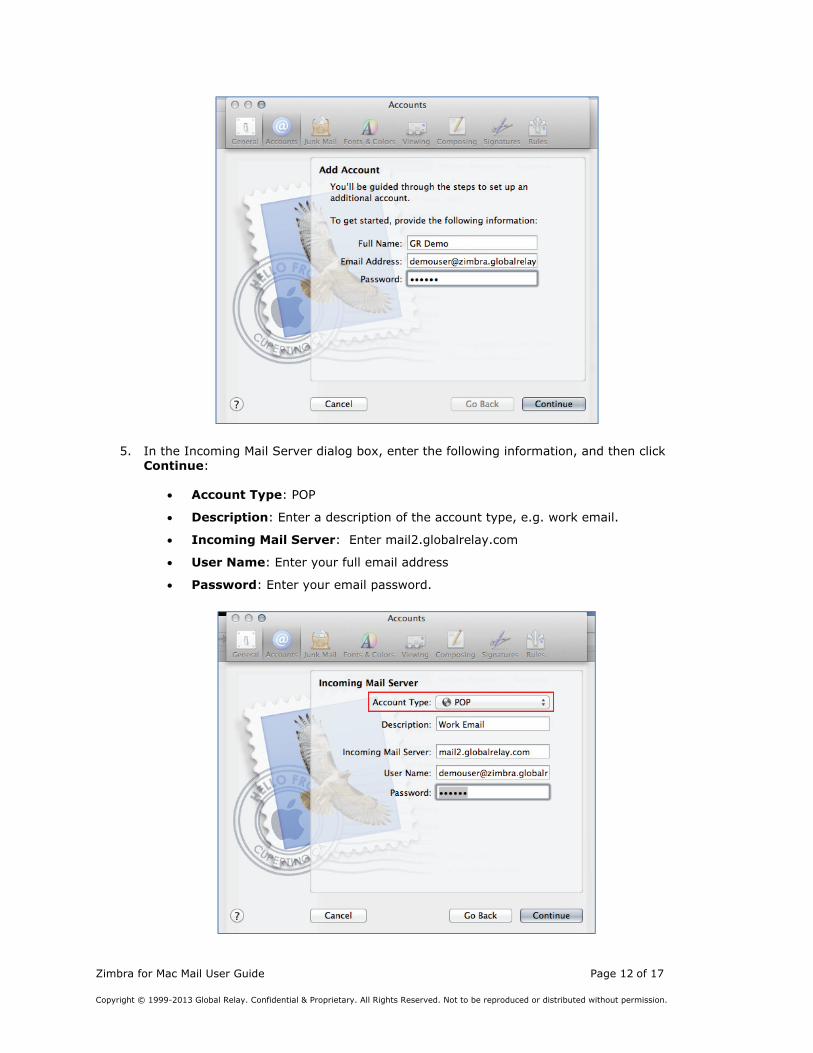
4. Complete the following fields and click Continue:
• Full Name: Enter your First and Last name. This name will be displayed on all Outgoing messages.
• Email Address: Enter your full email address.
• Password: Enter your email password.
Zimbra for Mac Mail User Guide Page 12 of 17
Copyright © 1999-2013 Global Relay. Confidential & Proprietary. All Rights Reserved. Not to be reproduced or distributed without permission.
5. In the Incoming Mail Server dialog box, enter the following information, and then click Continue:
• Account Type: POP
• Description: Enter a description of the account type, e.g. work email.
• Incoming Mail Server: Enter mail2.globalrelay.com
• User Name: Enter your full email address
• Password: Enter your email password.
Zimbra for Mac Mail User Guide Page 13 of 17
Copyright © 1999-2013 Global Relay. Confidential & Proprietary. All Rights Reserved. Not to be reproduced or distributed without permission.
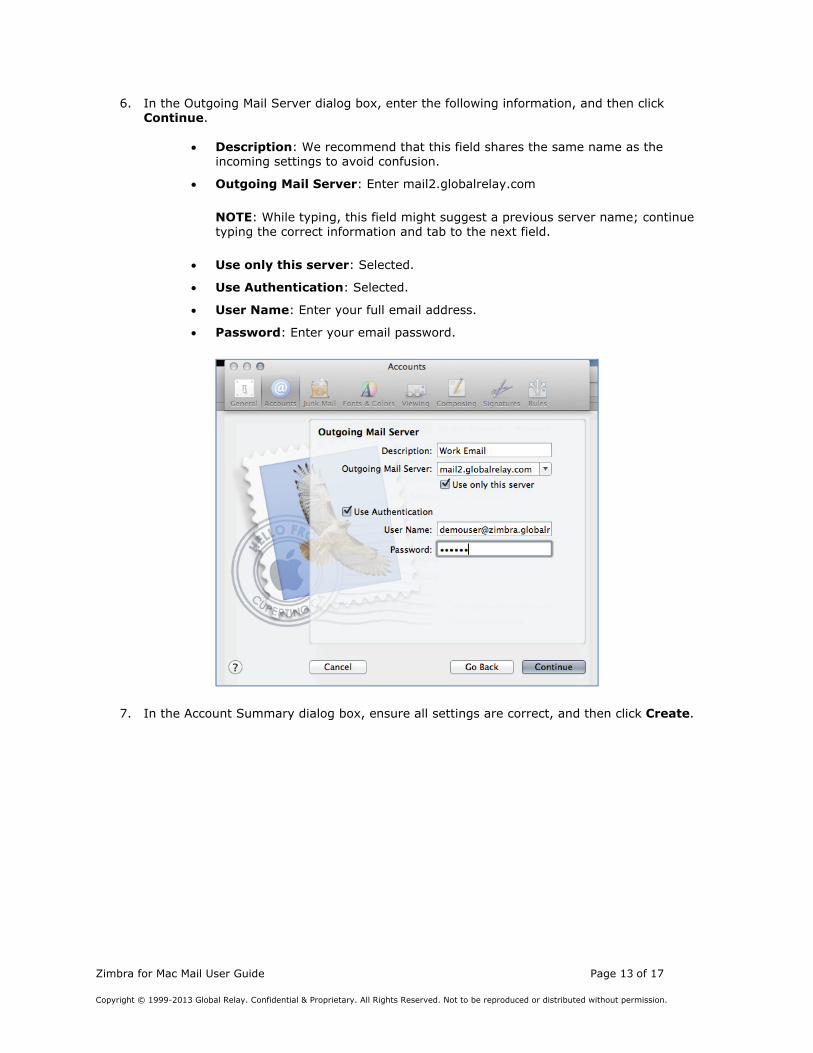
6. In the Outgoing Mail Server dialog box, enter the following information, and then click Continue.
• Description: We recommend that this field shares the same name as the incoming settings to avoid confusion.
• Outgoing Mail Server: Enter mail2.globalrelay.com
NOTE: While typing, this field might suggest a previous server name; continue typing the correct information and tab to the next field.
• Use only this server: Selected.
• Use Authentication: Selected.
• User Name: Enter your full email address.
• Password: Enter your email password.
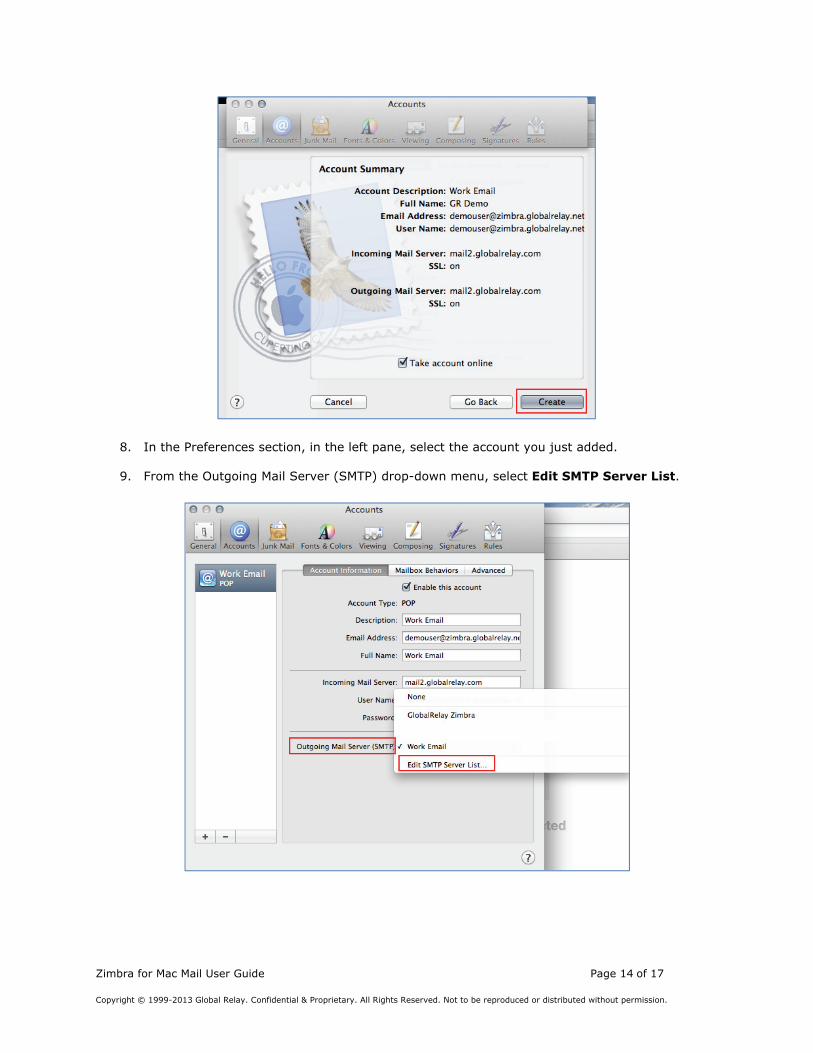
7. In the Account Summary dialog box, ensure all settings are correct, and then click Create.
Zimbra for Mac Mail User Guide Page 14 of 17
Copyright © 1999-2013 Global Relay. Confidential & Proprietary. All Rights Reserved. Not to be reproduced or distributed without permission.
8. In the Preferences section, in the left pane, select the account you just added.
9. From the Outgoing Mail Server (SMTP) drop-down menu, select Edit SMTP Server List.
Zimbra for Mac Mail User Guide Page 15 of 17
Copyright © 1999-2013 Global Relay. Confidential & Proprietary. All Rights Reserved. Not to be reproduced or distributed without permission.
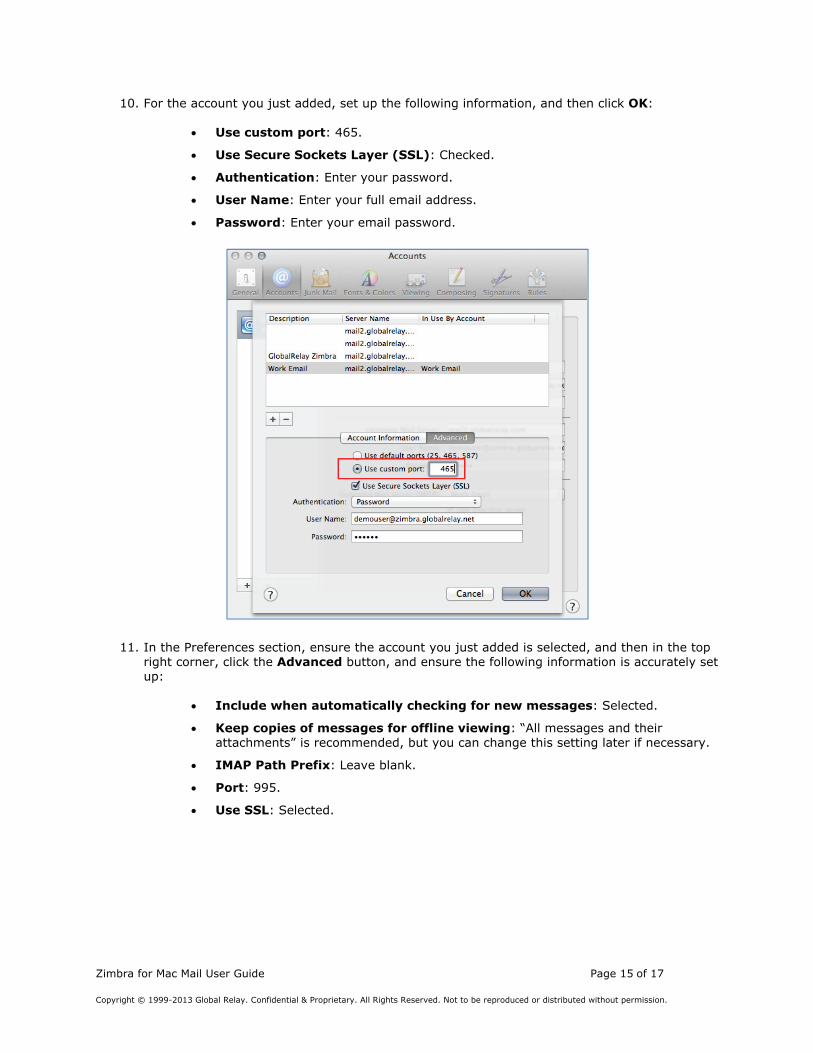
10. For the account you just added, set up the following information, and then click OK:
• Use custom port: 465.
• Use Secure Sockets Layer (SSL): Checked.
• Authentication: Enter your password.
• User Name: Enter your full email address.
• Password: Enter your email password.
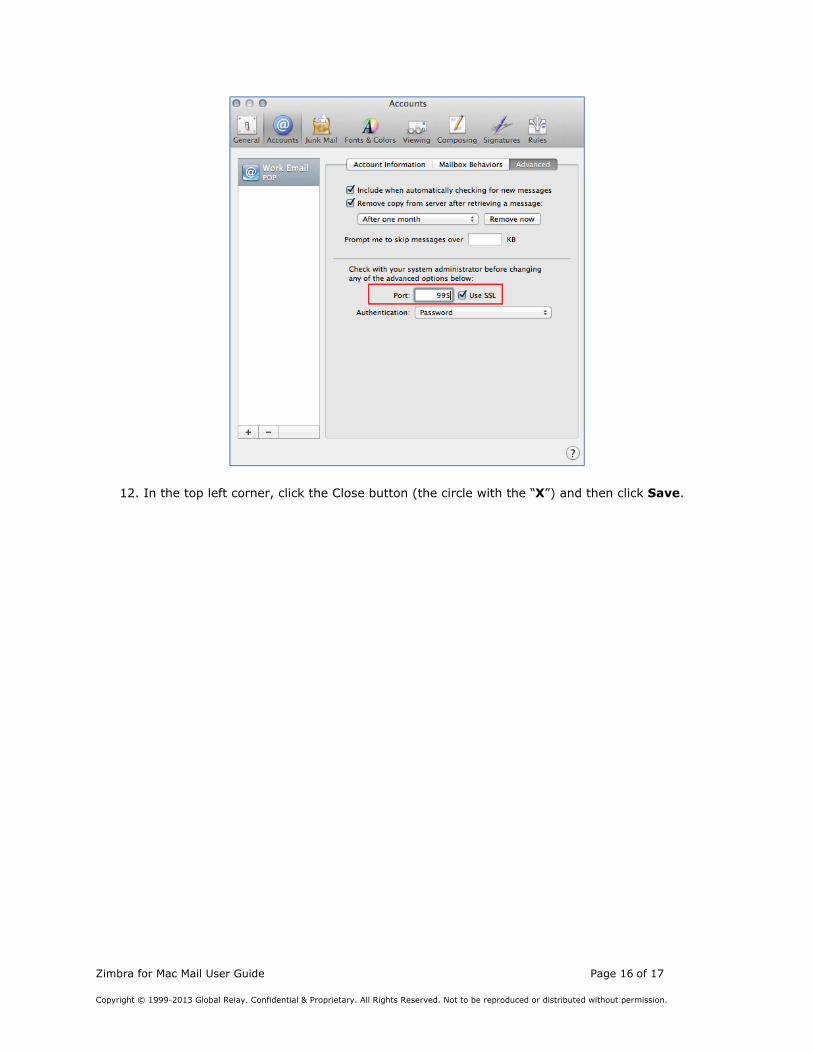
11. In the Preferences section, ensure the account you just added is selected, and then in the top right corner, click the Advanced button, and ensure the following information is accurately set up:
• Include when automatically checking for new messages: Selected.
• Keep copies of messages for offline viewing: “All messages and their attachments” is recommended, but you can change this setting later if necessary.
• IMAP Path Prefix: Leave blank.
• Port: 995.
• Use SSL: Selected.
Zimbra for Mac Mail User Guide Page 16 of 17
Copyright © 1999-2013 Global Relay. Confidential & Proprietary. All Rights Reserved. Not to be reproduced or distributed without permission.
12. In the top left corner, click the Close button (the circle with the “X”) and then click Save.
Zimbra for Mac Mail User Guide Page 17 of 17
Copyright © 1999-2013 Global Relay. Confidential & Proprietary. All Rights Reserved. Not to be reproduced or distributed without permission.
Legal Information
Global Relay, by publishing this document, does not guarantee that any information contained herein is and will remain accurate or that use of the information will ensure correct and faultless operation of the relevant service or equipment. Global Relay, its agents and employees, shall not be held liable to or through any user for any loss or damage whatsoever resulting from reliance on the information contained herein.
This document contains information proprietary to Global Relay and may not be reproduced, disclosed, or used in whole or part without the express written permission of Global Relay.
Any Software, including but not limited to, the code, screen, page, structure, sequence, and organization thereof, and Documentation are protected by national copyright laws and international treaty provisions. This User Guide is subject to U.S. and other national export regulations.
Nothing in this document is intended, nor does it, alter the legal obligations, responsibilities or relationship between yourself and Global Relay as set out in the contract existing between us.
Global Relay will not be liable for any compliance or technical information provided herein.