z stylus - asusdlcdnet.asus.com/pub/asus/accessory/z_stylus/e10229_z_stylus.pdf · 8 z stylus...
TRANSCRIPT
Z StylusE-Manual
First EditionJuly 2015
E10229
2 Z Stylus E-Manual
COPYRIGHT INFORMATION
No part of this manual, including the products and software described in it, may be reproduced, transmitted, transcribed, stored in a retrieval system, or translated into any language in any form or by any means, except documentation kept by the purchaser for backup purposes, without the express written permission of ASUSTeK COMPUTER INC. (“ASUS”).
ASUS PROVIDES THIS MANUAL “AS IS” WITHOUT WARRANTY OF ANY KIND, EITHER EXPRESS OR IMPLIED, INCLUDING BUT NOT LIMITED TO THE IMPLIED WARRANTIES OR CONDITIONS OF MERCHANTABILITY OR FITNESS FOR A PARTICULAR PURPOSE. IN NO EVENT SHALL ASUS, ITS DIRECTORS, OFFICERS, EMPLOYEES OR AGENTS BE LIABLE FOR ANY INDIRECT, SPECIAL, INCIDENTAL, OR CONSEQUENTIAL DAMAGES (INCLUDING DAMAGES FOR LOSS OF PROFITS, LOSS OF BUSINESS, LOSS OF USE OR DATA, INTERRUPTION OF BUSINESS AND THE LIKE), EVEN IF ASUS HAS BEEN ADVISED OF THE POSSIBILITY OF SUCH DAMAGES ARISING FROM ANY DEFECT OR ERROR IN THIS MANUAL OR PRODUCT.
Products and corporate names appearing in this manual may or may not be registered trademarks or copyrights of their respective companies, and are used only for identification or explanation and to the owners’ benefit, without intent to infringe.
SPECIFICATIONS AND INFORMATION CONTAINED IN THIS MANUAL ARE FURNISHED FOR INFORMATIONAL USE ONLY, AND ARE SUBJECT TO CHANGE AT ANY TIME WITHOUT NOTICE, AND SHOULD NOT BE CONSTRUED AS A COMMITMENT BY ASUS. ASUS ASSUMES NO RESPONSIBILITY OR LIABILITY FOR ANY ERRORS OR INACCURACIES THAT MAY APPEAR IN THIS MANUAL, INCLUDING THE PRODUCTS AND SOFTWARE DESCRIBED IN IT.
Copyright © 2015 ASUSTeK COMPUTER INC. All Rights Reserved.
LIMITATION OF LIABILITY
Circumstances may arise where because of a default on ASUS’ part or other liability, you are entitled to recover damages from ASUS. In each such instance, regardless of the basis on which you are entitled to claim damages from ASUS, ASUS is liable for no more than damages for bodily injury (including death) and damage to real property and tangible personal property; or any other actual and direct damages resulted from omission or failure of performing legal duties under this Warranty Statement, up to the listed contract price of each product.
ASUS will only be responsible for or indemnify you for loss, damages or claims based in contract, tort or infringement under this Warranty Statement.
This limit also applies to ASUS’ suppliers and its reseller. It is the maximum for which ASUS, its suppliers, and your reseller are collectively responsible.
UNDER NO CIRCUMSTANCES IS ASUS LIABLE FOR ANY OF THE FOLLOWING: (1) THIRD-PARTY CLAIMS AGAINST YOU FOR DAMAGES; (2) LOSS OF, OR DAMAGE TO, YOUR RECORDS OR DATA; OR (3) SPECIAL, INCIDENTAL, OR INDIRECT DAMAGES OR FOR ANY ECONOMIC CONSEQUENTIAL DAMAGES (INCLUDING LOST PROFITS OR SAVINGS), EVEN IF ASUS, ITS SUPPLIERS OR YOUR RESELLER IS INFORMED OF THEIR POSSIBILITY.
SERVICE AND SUPPORT
Visit our multi-language web site at http://support.asus.com
Z Stylus E-Manual 3
Table of Contents
About this manual .....................................................................................................4Conventions used in this manual ............................................................................. 5Typography ....................................................................................................................... 5
Chapter 1: Getting startedGetting to know your Z Stylus ..............................................................................8Inserting the battery ................................................................................................10Replacing the tip ........................................................................................................11
Chapter 2: Using your Z StylusStarting for the first time .........................................................................................14Using the function buttons ....................................................................................14Hovering your Z Stylus ............................................................................................15
Chapter 3: Working with your ZenPadQuick Launch Panel ..................................................................................................18Instant Page .................................................................................................................19Smart Crop ...................................................................................................................20Working with SuperNote ........................................................................................21
Switching between drawing tools ........................................................................... 22Adding drawing tools to the library ........................................................................ 22Deleting drawing tools from the library ................................................................. 23Using pen only mode .................................................................................................... 23
AppendicesNotices ...........................................................................................................................26ASUS Technical Support Information .................................................................28
4 Z Stylus E-Manual
About this manualThis manual provides information about the hardware and software features of your Notebook PC, organized through the following chapters:
Chapter 1: Getting started
This chapter details the hardware components of your Z Stylus and shows you how to use the different parts.
Chapter 2: Using your Z Stylus
This chapter provides an overview of using your Z Stylus.
Chapter 3: Working with your ZenPad
This chapter shows you how to use your Z Stylus with the ZenPad.
Appendices
This section includes notices and safety statements for your Z Stylus.

Z Stylus E-Manual 5
Conventions used in this manualTo highlight key information in this manual, some text are presented as follows:
IMPORTANT! This message contains vital information that must be followed to complete a task.
NOTE: This message contains additional information and tips that can help complete tasks.
WARNING! This message contains important information that must be followed to keep you safe while performing tasks and prevent damage to your Notebook PC's data and components.
Typography
Bold = This indicates a menu or an item that must be selected.
Italic = This indicates sections that you can refer to in this manual.

6 Z Stylus E-Manual

Z Stylus E-Manual 7
Chapter 1: Getting started
8 Z Stylus E-Manual
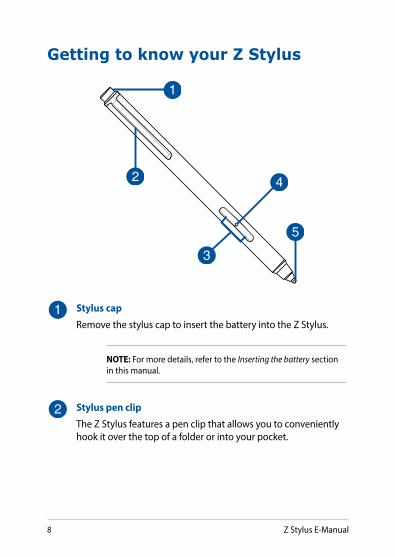
Getting to know your Z Stylus
Stylus cap
Remove the stylus cap to insert the battery into the Z Stylus.
NOTE: For more details, refer to the Inserting the battery section in this manual.
Stylus pen clip
The Z Stylus features a pen clip that allows you to conveniently hook it over the top of a folder or into your pocket.

Z Stylus E-Manual 9
Function buttons
You can use these buttons to access additional functions in various apps. The 1st button is the button closer to the tip, and the 2nd button is the button closer to the clip.
NOTE: For more details, refer to Using the function buttons in this manual.
LED power indicator
The LED power indicator will light up for three (3) seconds when you insert the battery. The LED power indicator also lights up when the battery is low.
Replaceable stylus tip
The stylus tip can be easily replaced with a replacement tip by using the tip removal tool.
NOTE: For more details, refer to the Replacing the tip section in this manual.
10 Z Stylus E-Manual
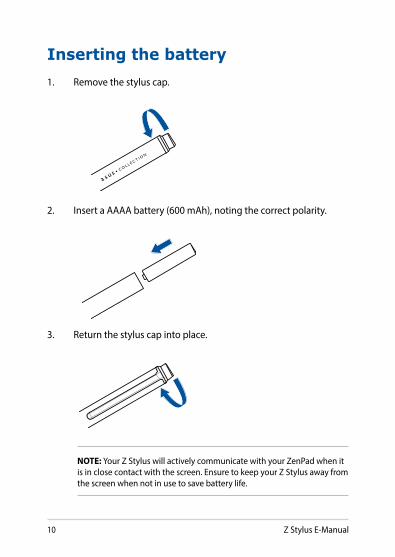
Inserting the battery1. Remove the stylus cap.
2. Insert a AAAA battery (600 mAh), noting the correct polarity.
3. Return the stylus cap into place.
NOTE: Your Z Stylus will actively communicate with your ZenPad when it is in close contact with the screen. Ensure to keep your Z Stylus away from the screen when not in use to save battery life.
Z Stylus E-Manual 11
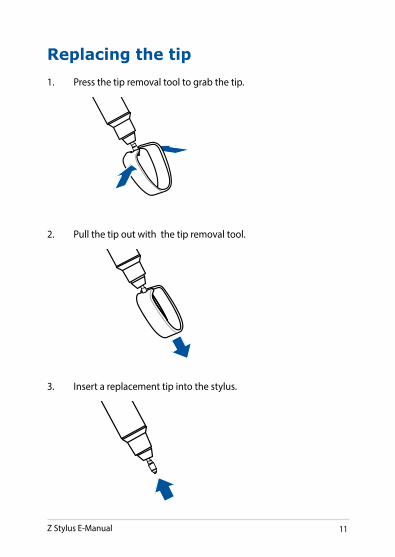
Replacing the tip1. Press the tip removal tool to grab the tip.
2. Pull the tip out with the tip removal tool.
3. Insert a replacement tip into the stylus.

12 Z Stylus E-Manual
Z Stylus E-Manual 13
Chapter 2: Using your Z Stylus
14 Z Stylus E-Manual
Starting for the first timeBefore using your Z Stylus for the first time, you will have to enable the Z Stylus feature on your ZenPad.
To enable the Z Stylus feature:
1. Launch the Settings screen by doing any of the following:
• Launch Quick settings then tap .
• Tap > Settings.
2. Scroll down the Settings screen and select Z Stylus.
3. Slide Z Stylus to ON.
NOTE: A notification icon will appear on the status bar to indicate
the battery status of your Z Stylus.
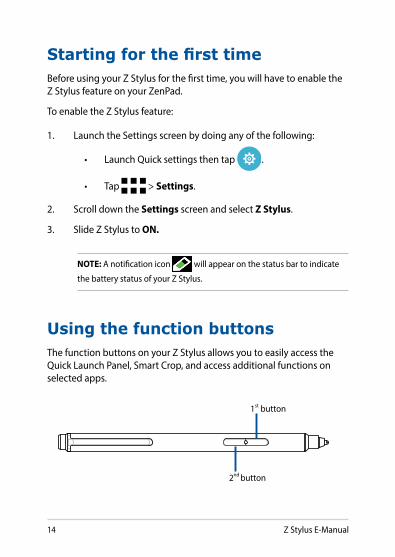
Using the function buttonsThe function buttons on your Z Stylus allows you to easily access the Quick Launch Panel, Smart Crop, and access additional functions on selected apps.
1st button
2nd button
Z Stylus E-Manual 15
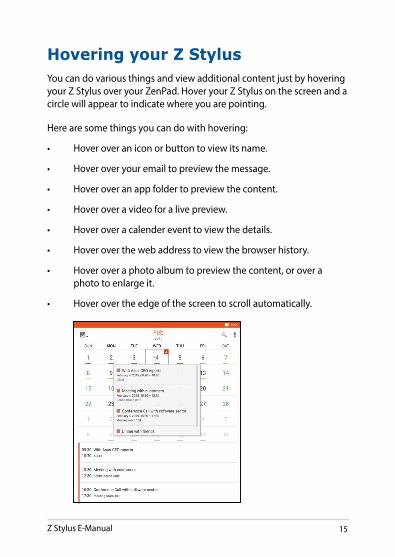
Hovering your Z StylusYou can do various things and view additional content just by hovering your Z Stylus over your ZenPad. Hover your Z Stylus on the screen and a circle will appear to indicate where you are pointing.
Here are some things you can do with hovering:
• Hoveroveraniconorbuttontoviewitsname.
• Hoveroveryouremailtopreviewthemessage.
• Hoveroveranappfoldertopreviewthecontent.
• Hoveroveravideoforalivepreview.
• Hoveroveracalendereventtoviewthedetails.
• Hoveroverthewebaddresstoviewthebrowserhistory.
• Hoveroveraphotoalbumtopreviewthecontent,oroveraphoto to enlarge it.
• Hoverovertheedgeofthescreentoscrollautomatically.

16 Z Stylus E-Manual

Z Stylus E-Manual 17
Chapter 3: Working with your ZenPad
18 Z Stylus E-Manual
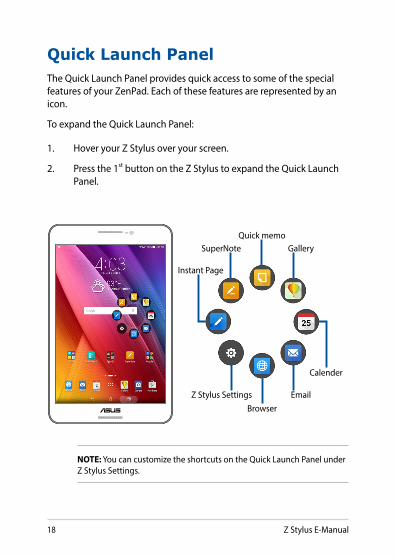
Quick Launch PanelThe Quick Launch Panel provides quick access to some of the special features of your ZenPad. Each of these features are represented by an icon.
To expand the Quick Launch Panel:
1. Hover your Z Stylus over your screen.
2. Press the 1st button on the Z Stylus to expand the Quick Launch Panel.
Z Stylus Settings Email
Calender
Gallery
Instant Page
Quick memoSuperNote
Browser
NOTE: You can customize the shortcuts on the Quick Launch Panel under Z Stylus Settings.
Z Stylus E-Manual 19
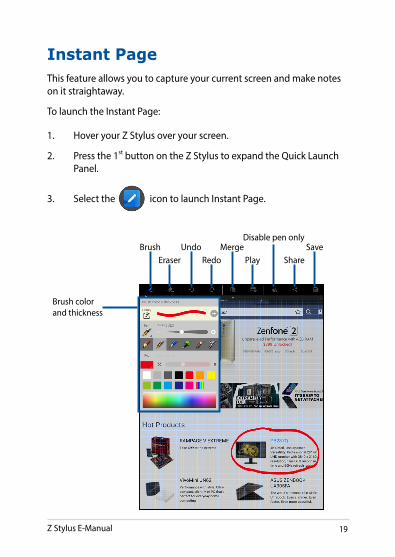
Instant PageThis feature allows you to capture your current screen and make notes on it straightaway.
To launch the Instant Page:
1. Hover your Z Stylus over your screen.
2. Press the 1st button on the Z Stylus to expand the Quick Launch Panel.
3. Select the icon to launch Instant Page.
BrushEraser
UndoRedo
MergePlay
Disable pen only
ShareSave
Brush color and thickness
20 Z Stylus E-Manual
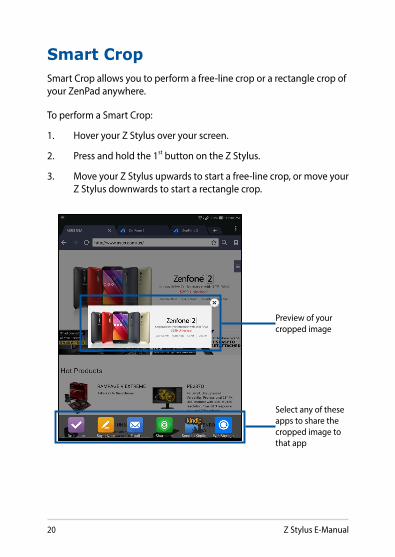
Smart CropSmart Crop allows you to perform a free-line crop or a rectangle crop of your ZenPad anywhere.
To perform a Smart Crop:
1. Hover your Z Stylus over your screen.
2. Press and hold the 1st button on the Z Stylus.
3. Move your Z Stylus upwards to start a free-line crop, or move your Z Stylus downwards to start a rectangle crop.
Preview of your cropped image
Select any of these apps to share the cropped image to that app
Z Stylus E-Manual 21
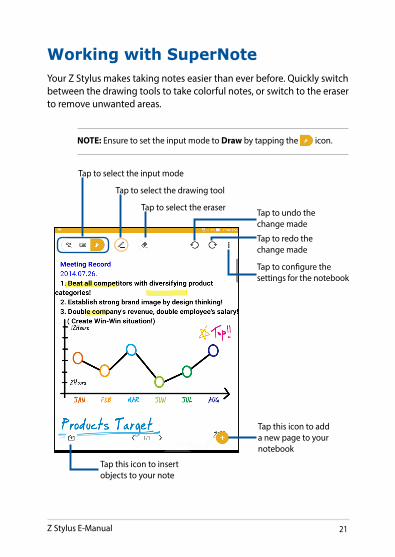
Working with SuperNoteYour Z Stylus makes taking notes easier than ever before. Quickly switch between the drawing tools to take colorful notes, or switch to the eraser to remove unwanted areas.
NOTE: Ensure to set the input mode to Draw by tapping the icon.
Tap to select the input mode
Tap to configure the settings for the notebook
Tap to redo the change made
Tap to undo the change made
Tap this icon to add a new page to your notebook
Tap this icon to insert objects to your note
Tap to select the drawing tool
Tap to select the eraser
22 Z Stylus E-Manual
Switching between drawing toolsSwitch between drawing tools by simply pressing a button.
To switch between drawing tools:
1. Hover your Z Stylus over your screen.
2. Press the 2nd button on the Z Stylus to cycle between the drawing tools library and eraser.
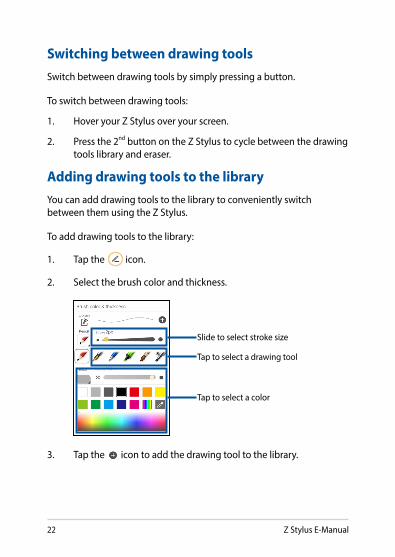
Adding drawing tools to the libraryYou can add drawing tools to the library to conveniently switch between them using the Z Stylus.
To add drawing tools to the library:
1. Tap the icon.
2. Select the brush color and thickness.
Slide to select stroke size
Tap to select a drawing tool
Tap to select a color
3. Tap the icon to add the drawing tool to the library.
Z Stylus E-Manual 23
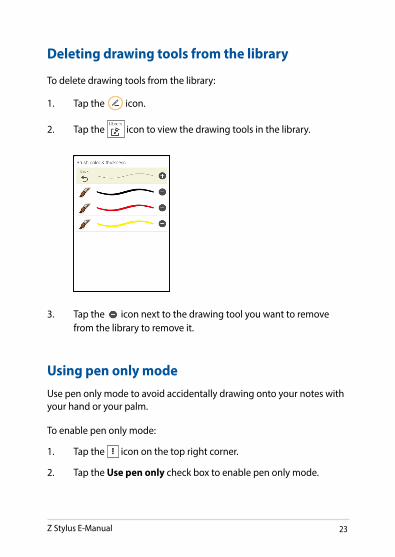
3. Tap the icon next to the drawing tool you want to remove from the library to remove it.
Using pen only modeUse pen only mode to avoid accidentally drawing onto your notes with your hand or your palm.
To enable pen only mode:
1. Tap the icon on the top right corner.
2. Tap the Use pen only check box to enable pen only mode.
Deleting drawing tools from the library
To delete drawing tools from the library:
1. Tap the icon.
2. Tap the icon to view the drawing tools in the library.

24 Z Stylus E-Manual

Z Stylus E-Manual 25
Appendices
26 Z Stylus E-Manual
Notices
CE-EMC:The EMC Directive also forbids affixing of marks that are similar to the CE marking, and also those that are likely to mislead third parties in relation to the meaning of the CE marking, e.g. by giving the impression that they are needed in order to have free access to a Member State’s market. For apparatus under the EMC Directive, the CE marking is the only marking having regulatory effect regarding EMC within the European Community.
EN300330-1 V1.7.1, EN300330-2 V1.5.1, EN301489-1 V1.9.2, EN301489-3 V1.6.1, EN62311:2008.
FCCEQUIPMENT AUTHORIZATION REQUIREMENT.
Devices operating below 490 kHz in which all emissions are at least 40 dB below the limits in §15.209 shall be verified pursuant to the procedures in Subpart J of part 2 of this chapter prior to marketing. This device complies with Part 15 of the FCC Rules. Operation is subject to the following two conditions:
(1) this device may not cause harmful interference, and
(2) this device must accept any interference received, including interference that may cause undesired operation.
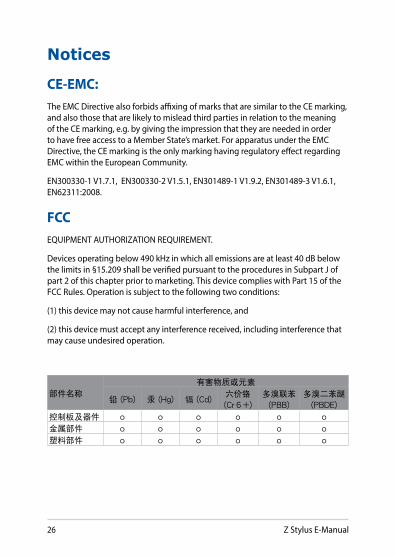
部件名稱
有害物質或元素
鉛 (Pb) 汞 (Hg) 鎘 (Cd)六價鉻
(Cr6+)
多溴聯苯
(PBB)
多溴二苯醚
(PBDE)
控制板及器件 o o o o o o
金属部件 o o o o o o
塑料部件 o o o o o o
Z Stylus E-Manual 27
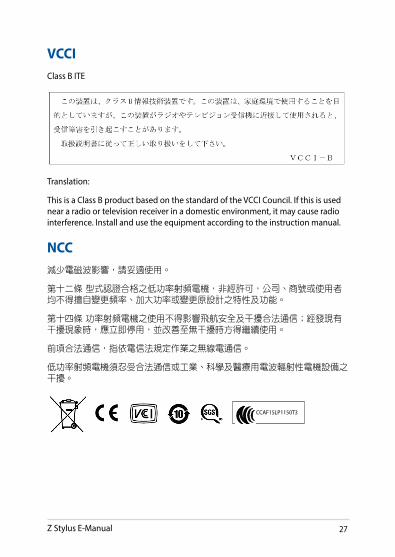
VCCIClass B ITE
Translation:
This is a Class B product based on the standard of the VCCI Council. If this is used near a radio or television receiver in a domestic environment, it may cause radio interference. Install and use the equipment according to the instruction manual.
NCC減少電磁波影響,請妥適使用。
第十二條 型式認證合格之低功率射頻電機,非經許可,公司、商號或使用者均不得擅自變更頻率、加大功率或變更原設計之特性及功能。
第十四條 功率射頻電機之使用不得影響飛航安全及干擾合法通信;經發現有干擾現象時,應立即停用,並改善至無干擾時方得繼續使用。
前項合法通信,指依電信法規定作業之無線電通信。
低功率射頻電機須忍受合法通信或工業、科學及醫療用電波輻射性電機設備之干擾。
CCAF15LP1150T3
28 Z Stylus E-Manual
ASUS Technical Support Information
ASUSTeK COMPUTER INC. (Asia Pacific)Address: 15 Li-Te Road, Peitou, Taipei, Taiwan 11259Website: www.asus.com.tw
Technical SupportTelephone: +886228943447Support Fax: +886228907698Online support: support.asus.com*
ASUS COMPUTER INTERNATIONAL (America)Address: 800 Corporate Way, Fremont, CA 94539, USATelephone: +15029550883Fax: +15029338713Website: usa.asus.comOnline support: support.asus.com*
ASUS COMPUTER GmbH (Germany and Austria)Address: Harkort Str. 21-23, D-40880 Ratingen, GermanyFax: +492102959911Website: www.asus.com.deOnline contact: www.asus.com.de/sales
Technical SupportTelephone (Component): +491805010923**Telephone (System/ Notebook/Eee/LCD): +491805010920**Fax: +492102959911Online support: support.asus.com*
* Available on this site is an online Technical Inquiry Form that you can fill out to contact technical support.
** EUR 0.14/minute from a German fixed landline; EUR 0.42/minute from a mobile phone.