yokart admin manual – comprehensive multivendor ecommerce store management system simplified
TRANSCRIPT

2
Table of Content
Title Page number
1. Admin Login 4
2. Dashboard 5
3. Catalog Shops
Product Brands
Product Categories
Products Product Reviews
Product Tags
Admin Options
Supplier Options
Filter
Attributes
8
4. Buyers/Suppliers Users
Order Cancellation Requests
Suppliers Approval Requests
Supplier Approval Form
Supplier Request
34
5. Affiliates Affiliate Users
Withdrawal Requests
45
6. CMS Collections Management
Navigation Management Content Pages
Content Block
Language Labels
Slides Management Banner Management
Empty Cart Items Management FAQ Category Management
FAQs Management
Testimonials Management
Report Reasons
Cancel Reasons Return Reasons
Shipping Companies
Shipping Duration Labels
Discount Coupons
49

3
Social Platforms Management
7. Settings Country Management Zone Management State Management
General Settings Commission Management
Affiliate Commission Management Theme Management
Payment Methods
Email Templates Server Info
Database Backup & Restore
Server Info
94
8. Orders Customer Orders
Vendor Orders
PayPal Adaptive Payments
Withdrawal Requests
Return Requests
164
9. Reports Sales
Users
Products
Shops
Tax
Commissions
Affiliates
181
10. Export / Import Import Export
Settings
198
11. Blog Categories
Posts
Contribution
Comments
208
12. Messages 216
13. Admin Users 219

4
1. Admin Login Admin can login into system. Please see the screenshot below:
Credentials to login - Admin: Username: welcome Password: welcome On click of Forgot Password link, Admin can get his/her password reset link at email id by fill up the following details:
Security Code

5
2. Dashboard On dashboard we have the following sections:
In the first section, Admin can view the about the following information:
New Users - Total Number of new users
Orders - Total amount of orders.
New Shops – Total Number of shops on site.
Sales Earnings – Total earning of site. Please see the screenshot below:
Sale Statistics & Total Sales/Orders In this section Admin can view following information:
Monthly sales report of portal
Monthly earning report of portal
Monthly report for total number of products added on the site
Monthly report for user registered on the site
Total Sales by present day/week/month total number of orders.
Please see the screenshot below:
6
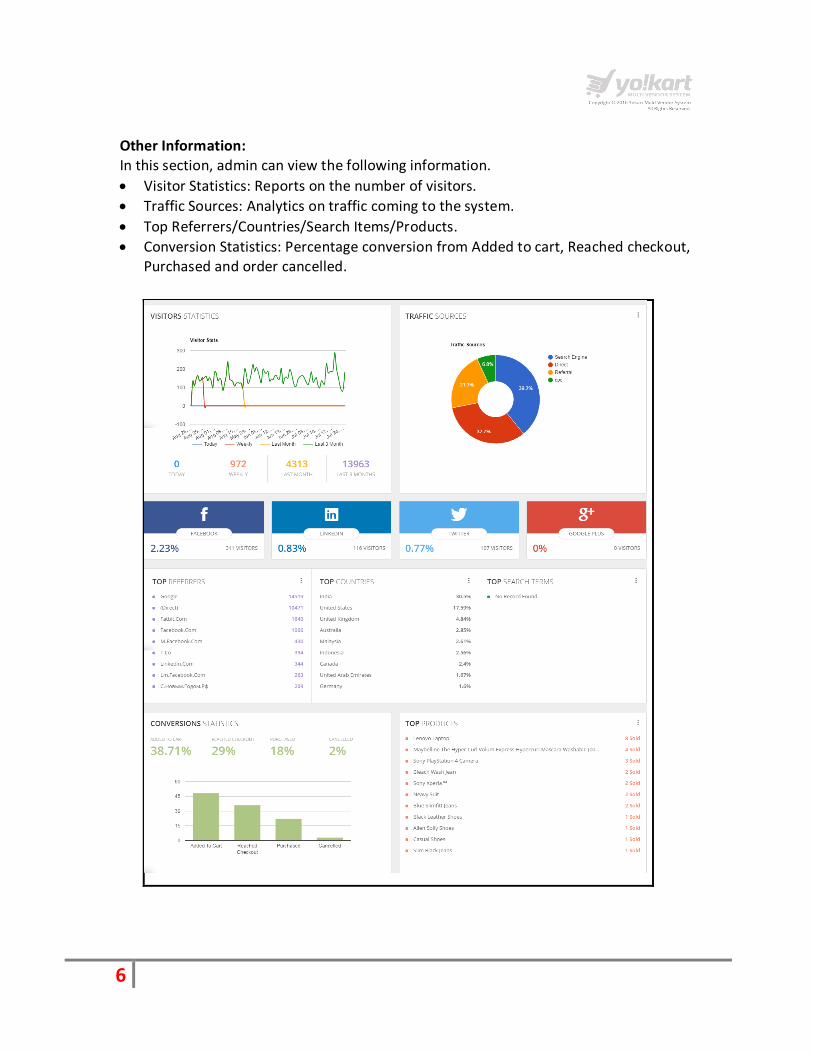
Other Information: In this section, admin can view the following information.
Visitor Statistics: Reports on the number of visitors.
Traffic Sources: Analytics on traffic coming to the system.
Top Referrers/Countries/Search Items/Products.
Conversion Statistics: Percentage conversion from Added to cart, Reached checkout, Purchased and order cancelled.

7
Last 5 Orders:- In this section, Admin can view the most recent orders (Recent 10 orders) placed on site. Please see the screenshot below:
On click of View All link, Admin will be redirected to the orders listing page.
On click of icon, Admin will be redirected to the orders details page.
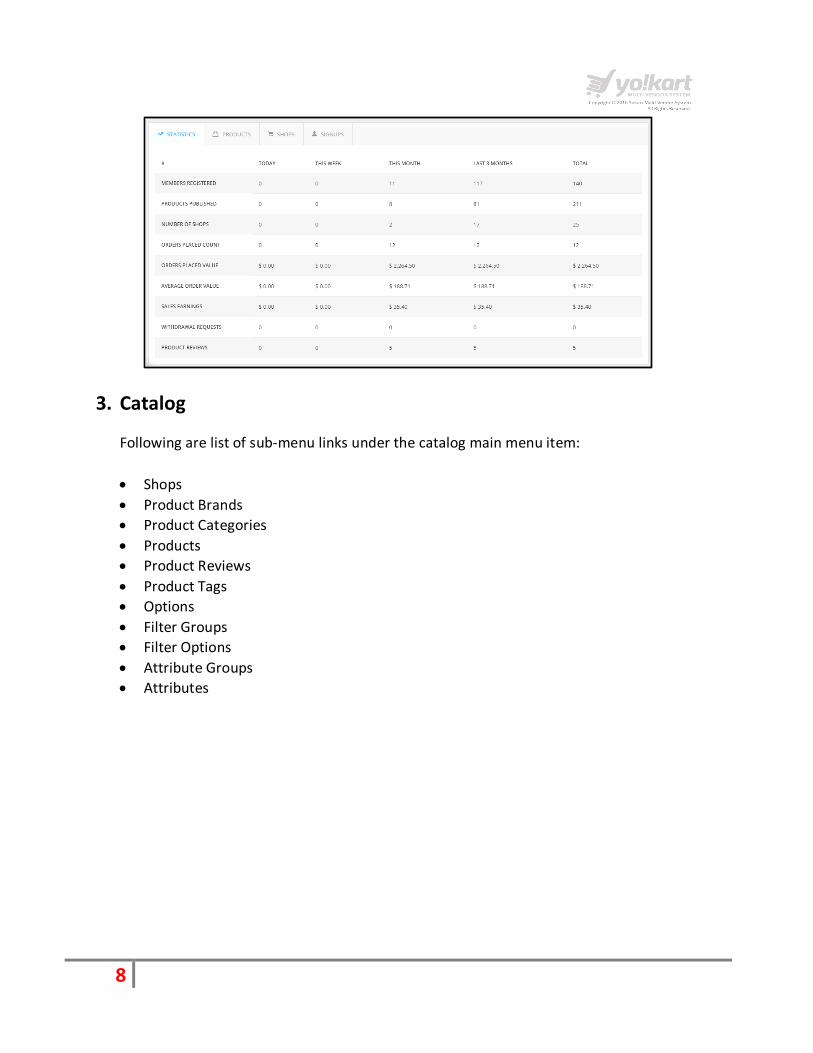
Site Statistics In this section Admin can view weekly, monthly and daily statistics about the following sections.
Site Statistics
Products
Shops
Signups Please see the screenshot below:
8
3. Catalog
Following are list of sub-menu links under the catalog main menu item:
Shops
Product Brands
Product Categories
Products
Product Reviews
Product Tags
Options
Filter Groups
Filter Options
Attribute Groups
Attributes

9
Shops:
Admin can select shops link under the catalog menu item in the left panel. Please see the
screenshot below:
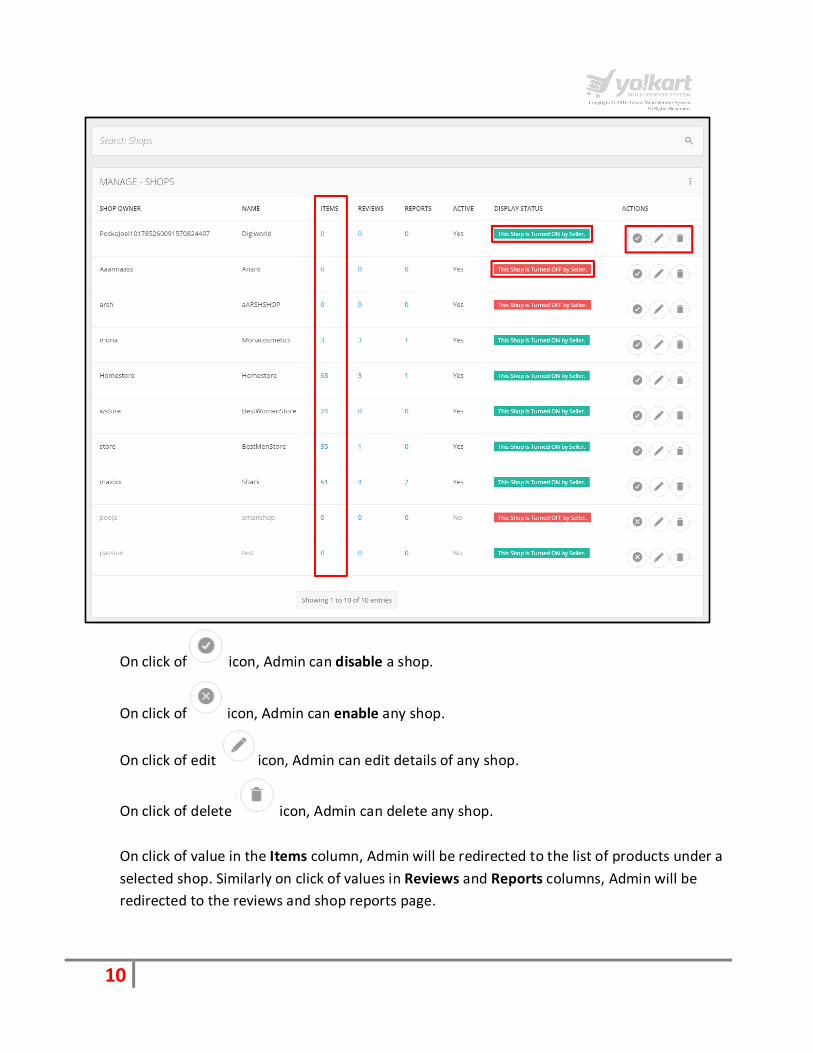
In this section, Admin can manage the shops which are registered in the system. Please see
the screenshot below:
10
On click of icon, Admin can disable a shop.
On click of icon, Admin can enable any shop.
On click of edit icon, Admin can edit details of any shop.
On click of delete icon, Admin can delete any shop.
On click of value in the Items column, Admin will be redirected to the list of products under a
selected shop. Similarly on click of values in Reviews and Reports columns, Admin will be
redirected to the reviews and shop reports page.

11
Products Brands Admin can select Product Brands link under the catalog menu item in the left panel. Please
see the screenshot below:

12
In this section, Admin can manage the list of brands. Please see the screenshot below:
On click of icon, Admin can disable any brand.
On click of icon, Admin can enable any brand.
Note: After disabling a brand, all products under that brand will not display on the website.
On click of edit icon, Admin can edit details of any brand and on click of delete
icon, Admin can delete any brand.
On clicking the value in the Items column, Admin will be redirected to the list of products
which are added under a selected category.
On click of Add Brand button, Admin will be redirected to the Brand Setup page. Admin need
to add following details.
Name
Description
URL keywords
Page Title
Meta Keywords
Meta Description

13
Please see the screenshot below:
14
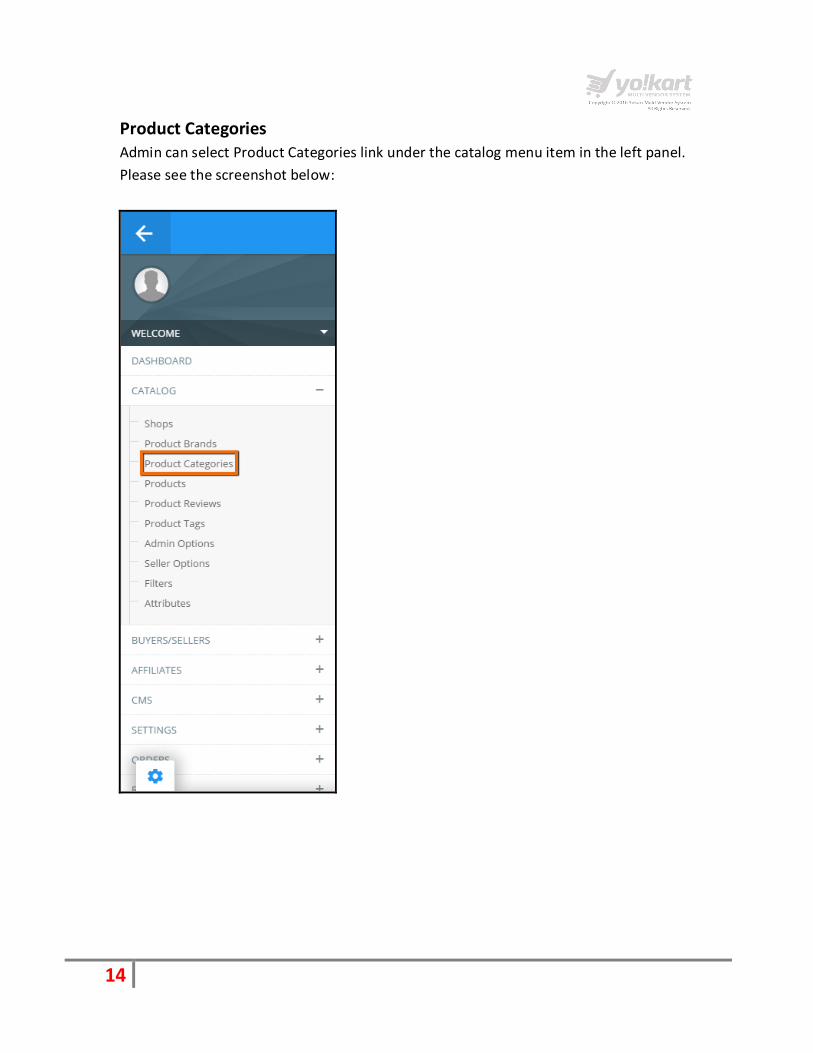
Product Categories Admin can select Product Categories link under the catalog menu item in the left panel.
Please see the screenshot below:

15
In this section Admin can manage the product categories. Please see the screenshot below:
On click of icon, Admin can disable any category.
On click of icon, Admin can enable any category.
Note: After disabling a category, all the products under that category will not display on the
website.
On click of icon, Admin can edit details of any category. On click of icon, Admin can
delete any category.
On clicking the value in the subcategory column, Admin will be redirected to the list of sub-
categories which are associated with a selected category.
16
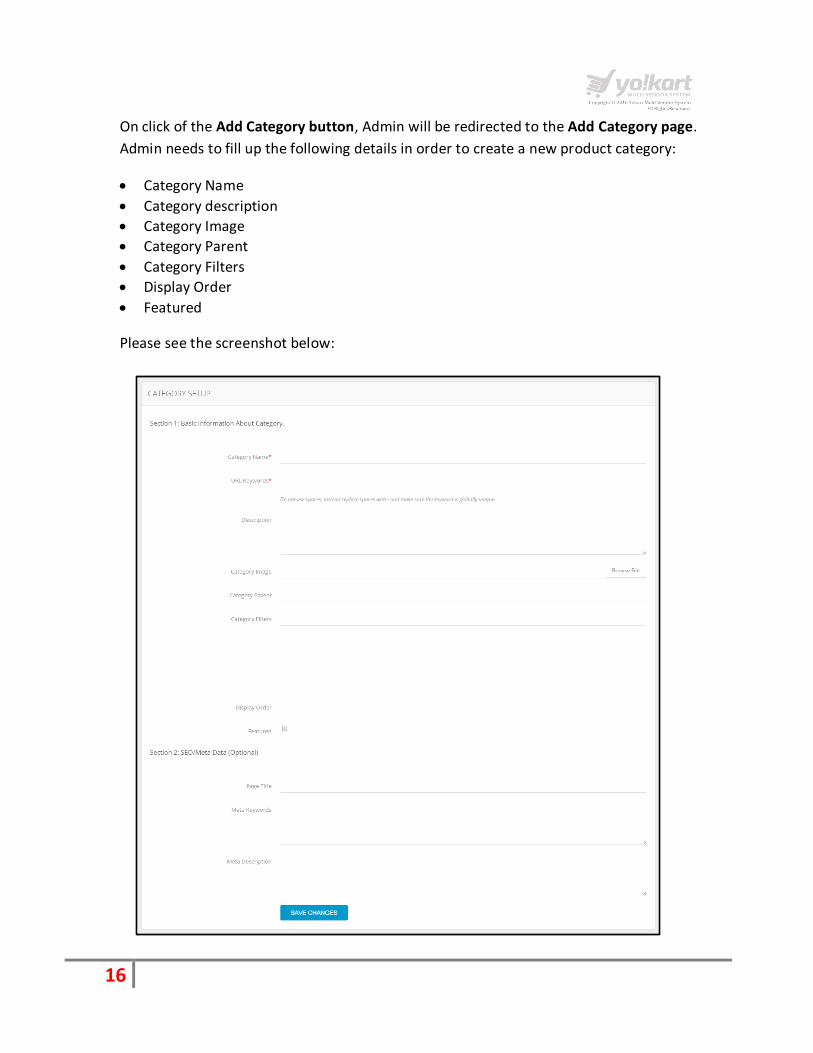
On click of the Add Category button, Admin will be redirected to the Add Category page.
Admin needs to fill up the following details in order to create a new product category:
Category Name
Category description
Category Image
Category Parent
Category Filters
Display Order
Featured
Please see the screenshot below:

17
Products
Admin can select Products link under the catalog menu item in the left panel. Please see the screenshot below:
18
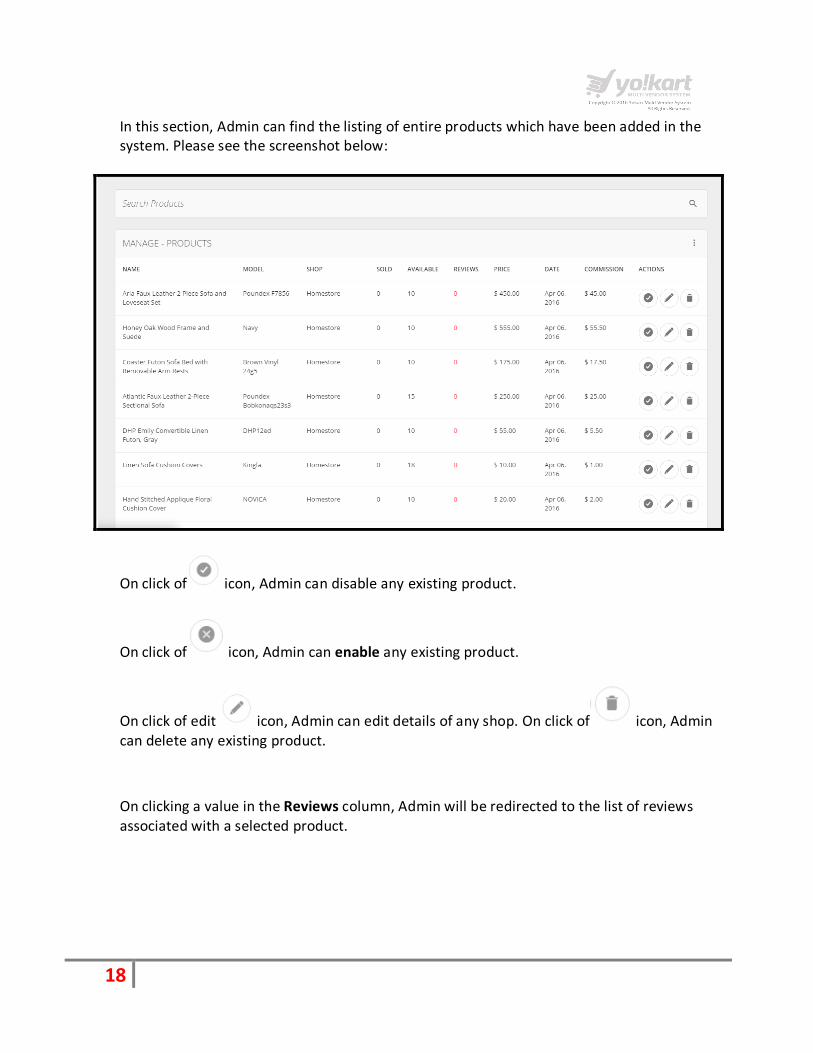
In this section, Admin can find the listing of entire products which have been added in the system. Please see the screenshot below:
On click of icon, Admin can disable any existing product.
On click of icon, Admin can enable any existing product.
On click of edit icon, Admin can edit details of any shop. On click of icon, Admin can delete any existing product.
On clicking a value in the Reviews column, Admin will be redirected to the list of reviews associated with a selected product.

19
Products Reviews
Admin can select Products Reviews link under the catalog menu item in the left panel. Please see the screenshot below:
20
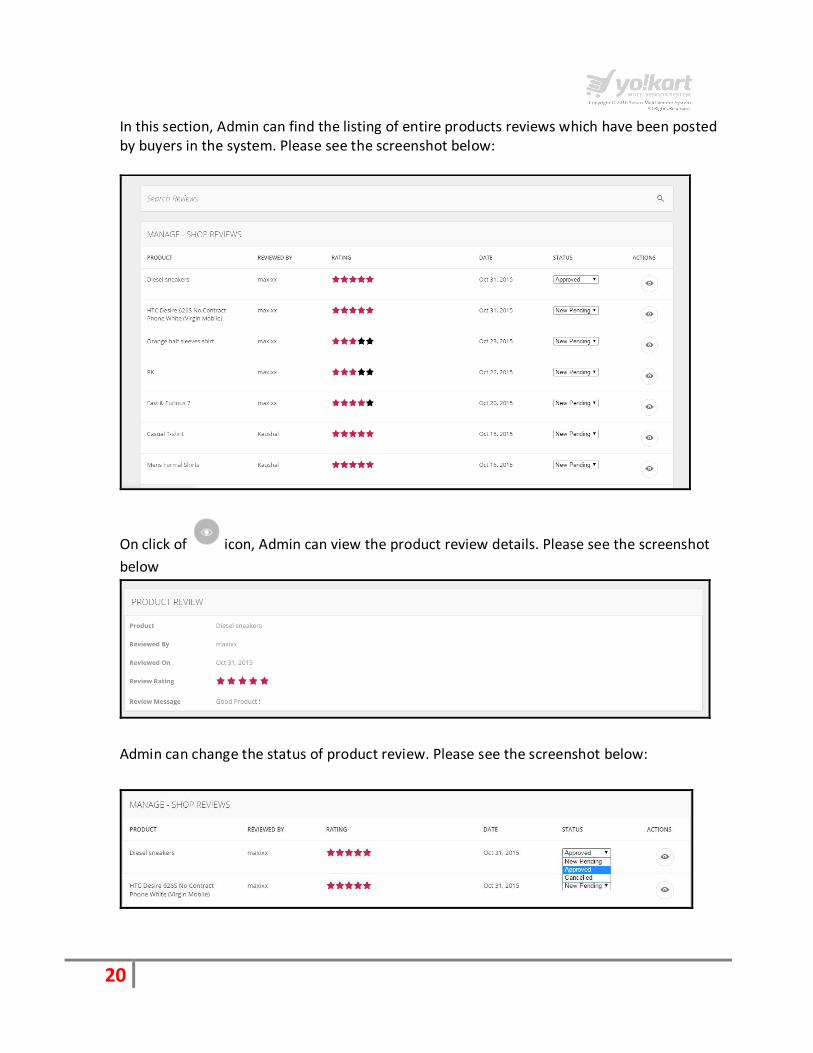
In this section, Admin can find the listing of entire products reviews which have been posted by buyers in the system. Please see the screenshot below:
On click of icon, Admin can view the product review details. Please see the screenshot
below
Admin can change the status of product review. Please see the screenshot below:

21
Products Tags
Admin can select Products Tags link under the catalog menu item in the left panel. Please see the screenshot below:

22
In this section, Admin can find the listing of entire products tags which have been created by buyers in the system. Please see the screenshot below:
On click of edit icon, Admin can edit name of the tag.
On click of delete icon, Admin can delete any existing product tag.
On click of Add product tags, Admin can add new product tag and these product tags can be assigned to products while listing the products. Please see the screenshot below.
23
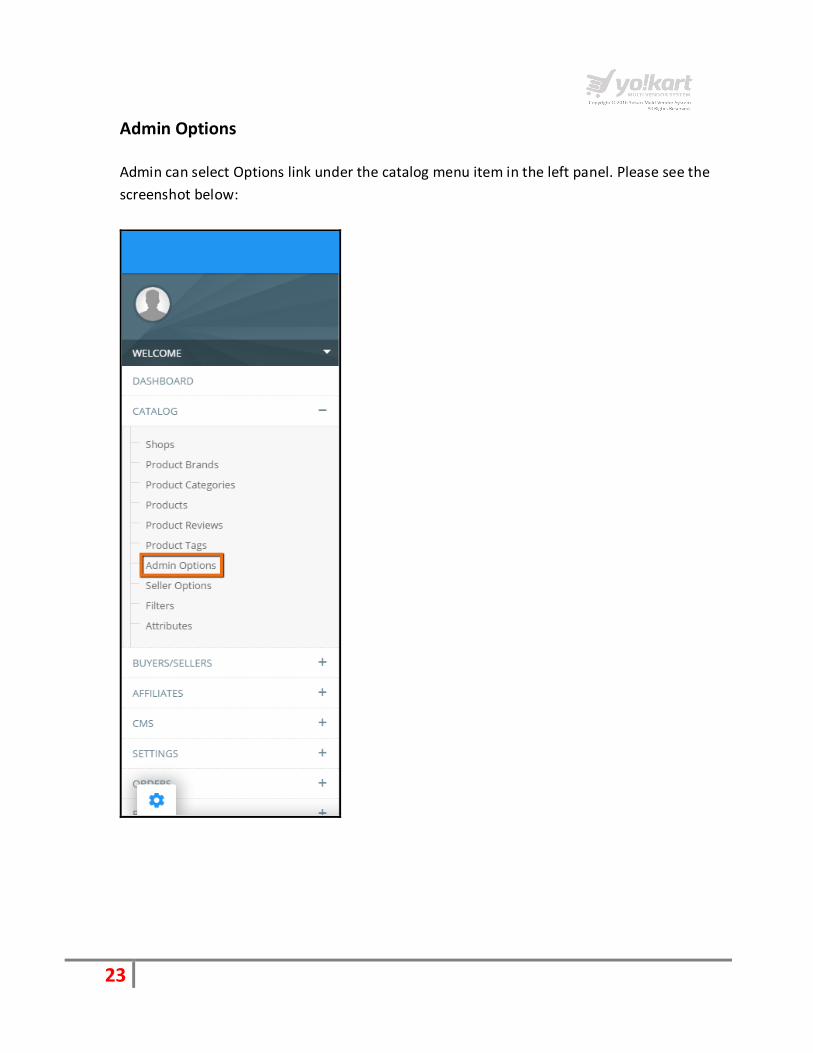
Admin Options
Admin can select Options link under the catalog menu item in the left panel. Please see the
screenshot below:

24
In this section Admin can manage options for a product. Please see the screenshot below:
On click of icon, Admin can edit details of any existing Option.
On click of icon, Admin can delete any existing Option.
Note: Each Option has a type like: Dropdown, Checkbox, Radio etc.
Please see below the effects of changes made by Admin in options area in the Vendor
section:
Vendor has to select an Option while adding a product. Please see the screenshot below
regarding the vendor area:
25
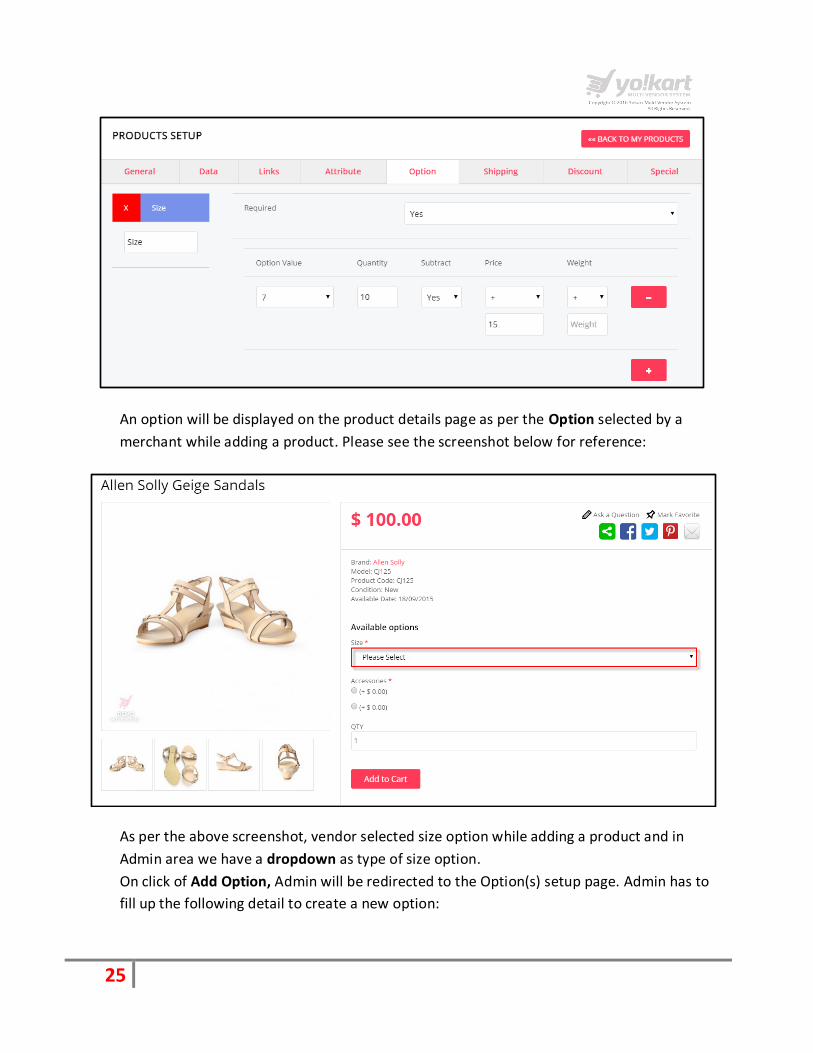
An option will be displayed on the product details page as per the Option selected by a
merchant while adding a product. Please see the screenshot below for reference:
As per the above screenshot, vendor selected size option while adding a product and in
Admin area we have a dropdown as type of size option.
On click of Add Option, Admin will be redirected to the Option(s) setup page. Admin has to
fill up the following detail to create a new option:

26
Type of Option
o List box
o Dropdown
o Radio
o Checkbox
o Text
o Text area
o File
o Date
o Time
o Date & Time
Name of option
Sort Order
Add values for an option
Please see the screenshot below:

27
Seller Options Admin can select Supplier Options link under the catalog menu item in the left panel. Please
see the screenshot below:
28
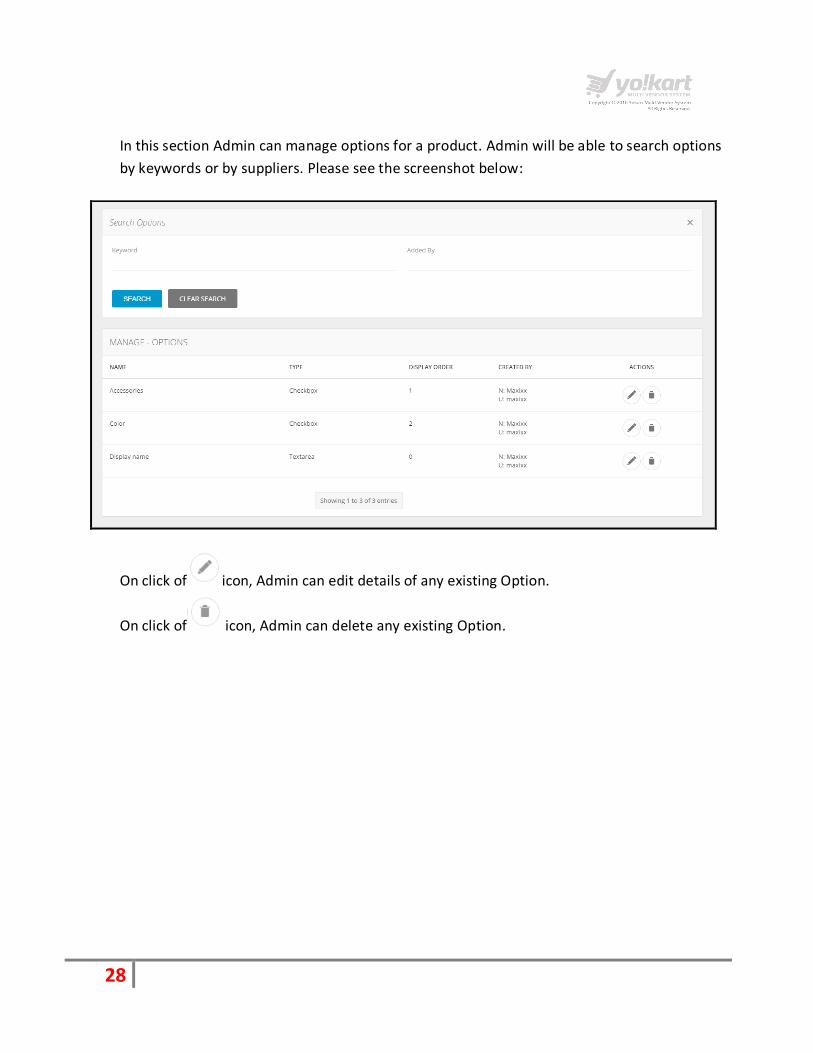
In this section Admin can manage options for a product. Admin will be able to search options
by keywords or by suppliers. Please see the screenshot below:
On click of icon, Admin can edit details of any existing Option.
On click of icon, Admin can delete any existing Option.
29
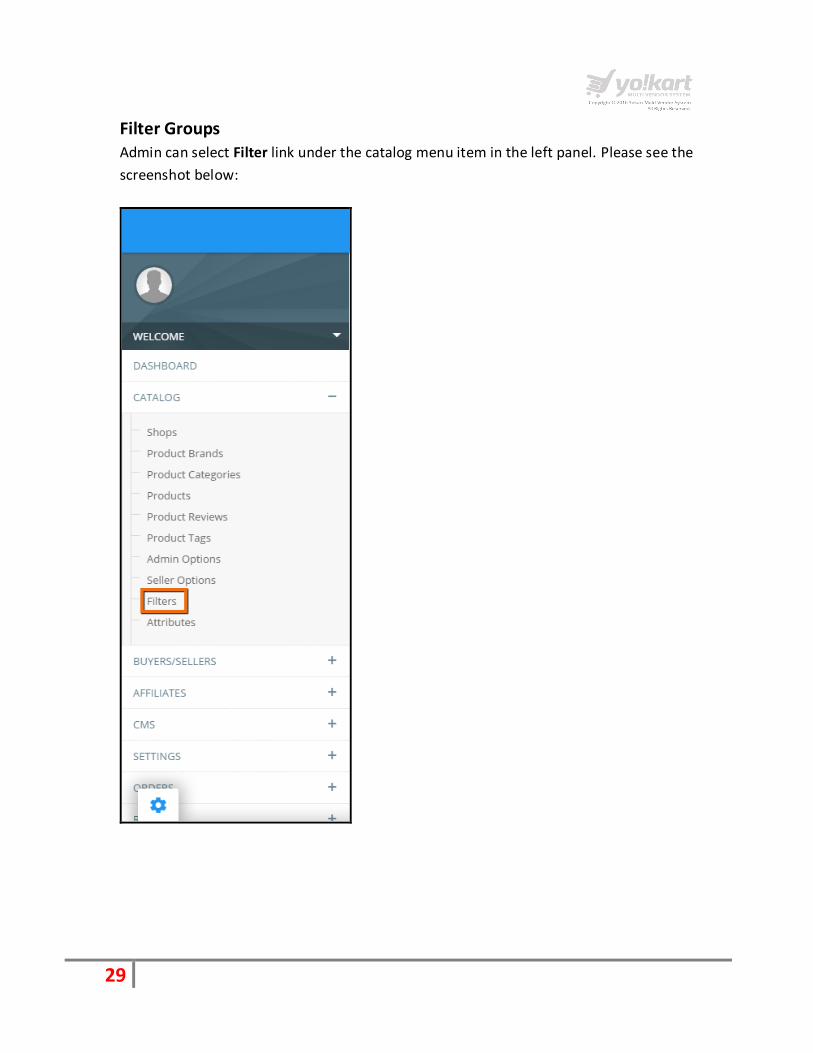
Filter Groups Admin can select Filter link under the catalog menu item in the left panel. Please see the
screenshot below:

30
In this section, Admin can manage the Filter. Admin will be able to search Filters by
keywords. Please see the screenshot below:
On click of edit icon, Admin can edit any Filter Group. On click of delete icon,
Admin can delete any Filter Group.
On click of Add Filter link, Admin can add a new filter group. Please see the screenshot
below:
31
Admin can add a new filter option on click of Add Filter button. Admin has to fill up the
following details to add a filter option:
Filter Name
Display Order
Admin has to fill up the following information to add a filter option:
Filter Group
Name
Display Order

32
Attribute
Admin can select Attribute link under the catalog menu item in the left panel. Please see the
screenshot below:

33
On click Attribute link, Admin will be redirected to the Manage Attributes page. Please see
the screenshot below:
On click of edit icon, Admin can edit any Attribute. On click of delete icon,
Admin can delete any Attribute.
On click of icon, Admin can search an Attribute by keyword.
On click of Add Attribute link, Admin can add a new attribute group. Admin need to fill up
the following fields to add an Attribute Group:
Attribute Group/Attribute Name
Display Order

34
4. Buyers/Suppliers
Users
Cancellation Request
Supplier Approval Requests
Supplier Approval Form
Users
In this section Admin manages the entire list of users which are registered on the system.
Admin can select Users link under the buyers/suppliers menu item in the left panel. Please
see the screenshot below:
35
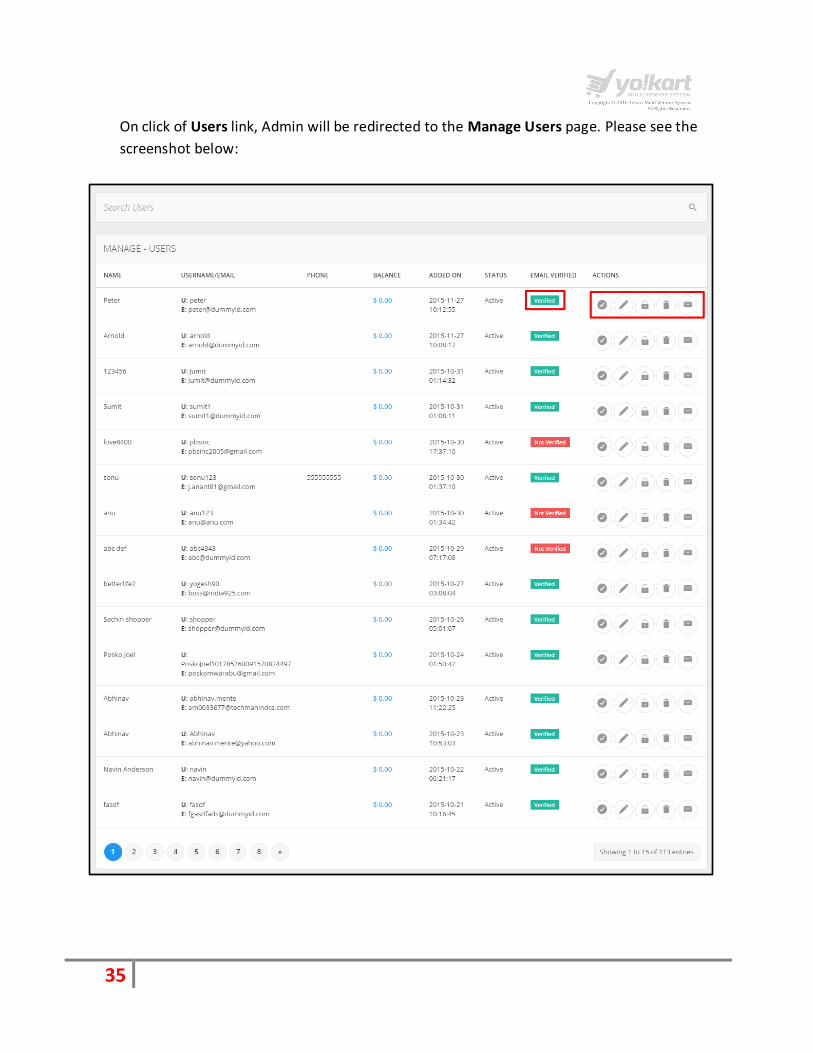
On click of Users link, Admin will be redirected to the Manage Users page. Please see the
screenshot below:
36
On click of icon, Admin can disable any existing user. On click of icon, Admin
can enable any existing user.
On click of icon, Admin can edit any existing user. On click of icon, Admin can
delete any existing user.
Admin can also search a user by Keyword, Status, Date From and Date To fields.
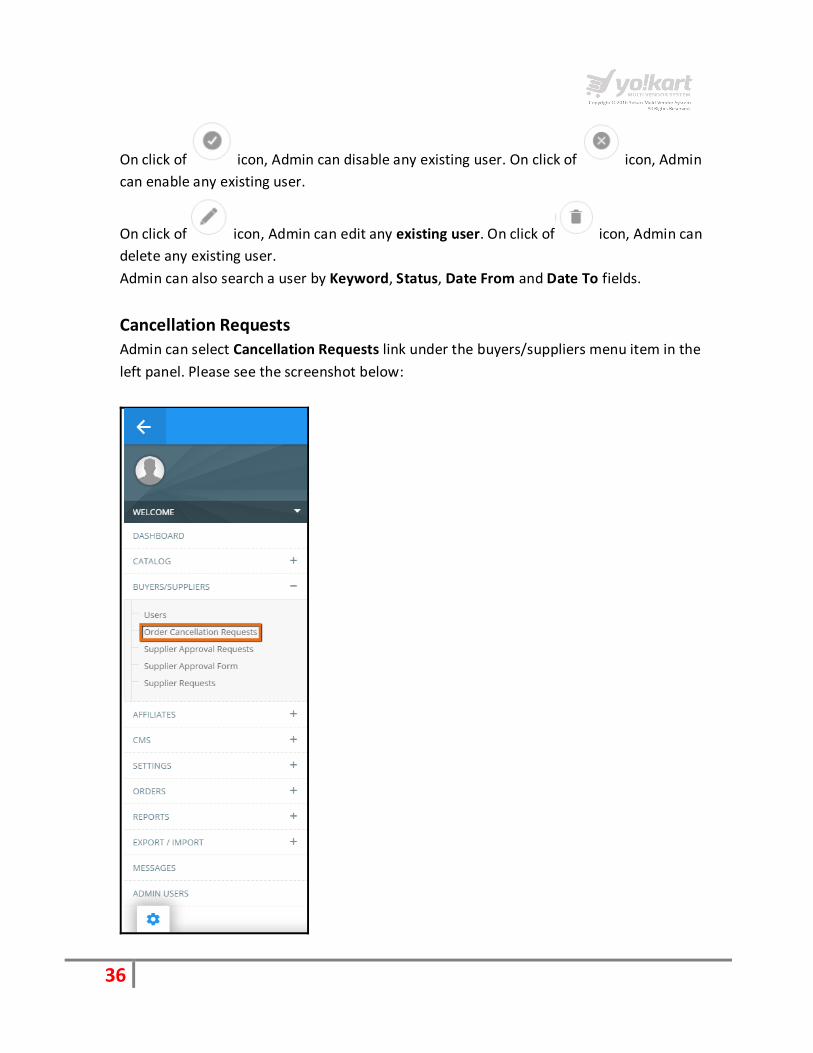
Cancellation Requests
Admin can select Cancellation Requests link under the buyers/suppliers menu item in the
left panel. Please see the screenshot below:

37
On click of Cancellation Request link, Admin will be redirected to the list of cancellation
requests page. Please see the screenshot below:

38
Supplier Approval requests Admin can select Supplier Approval Requests link under the buyers/suppliers menu item in
the left panel. Please see the screenshot below:
Registered users have to fill up the supplier approval form to become a seller.

39
On click of Supplier Approval Requests, Admin will be redirected to the supplier requests
listing page. Please see the screenshot below:
On click of icon, Admin can view details of a request. Please see the screenshot below:
On the request details page, Admin can view all information submitted by a buyer through
supplier request form.
On click of Back To Supplier Requests link, Admin will be redirected to the requests listing
page.

40
Supplier Approval Form Admin can select Supplier Approval Form link under the buyers/suppliers menu item in the
left panel. Please see the screenshot below:

41
In this section admin can define fields for supplier request form.
On click of Supplier Approval Form, Admin will be redirected to the supplier requests listing
page.
There are following information available for each field:
Type – Type of field like textbox, text area, file upload etc.
Caption – Label for a field
Help Text – Help text for a field
Required – Yes/No
Display Order – This option allow you to set display order of a field
On click of icon, Admin can delete any existing field from the supplier approval form
On click of icon, Admin can add a new field in the supplier approval form.

42
Supplier Requests
Admin can select Supplier Requests link under the buyers/suppliers menu item in the left
panel. Please see the screenshot below:

43
Whenever supplier makes a request to add brands from its dashboard then he needs to click
on the Request for new brand link. Please see the screenshot for reference.
After clicking on Request for new brand, Supplier will see a pop-up to submit their requests.
Please see the screenshot.
44
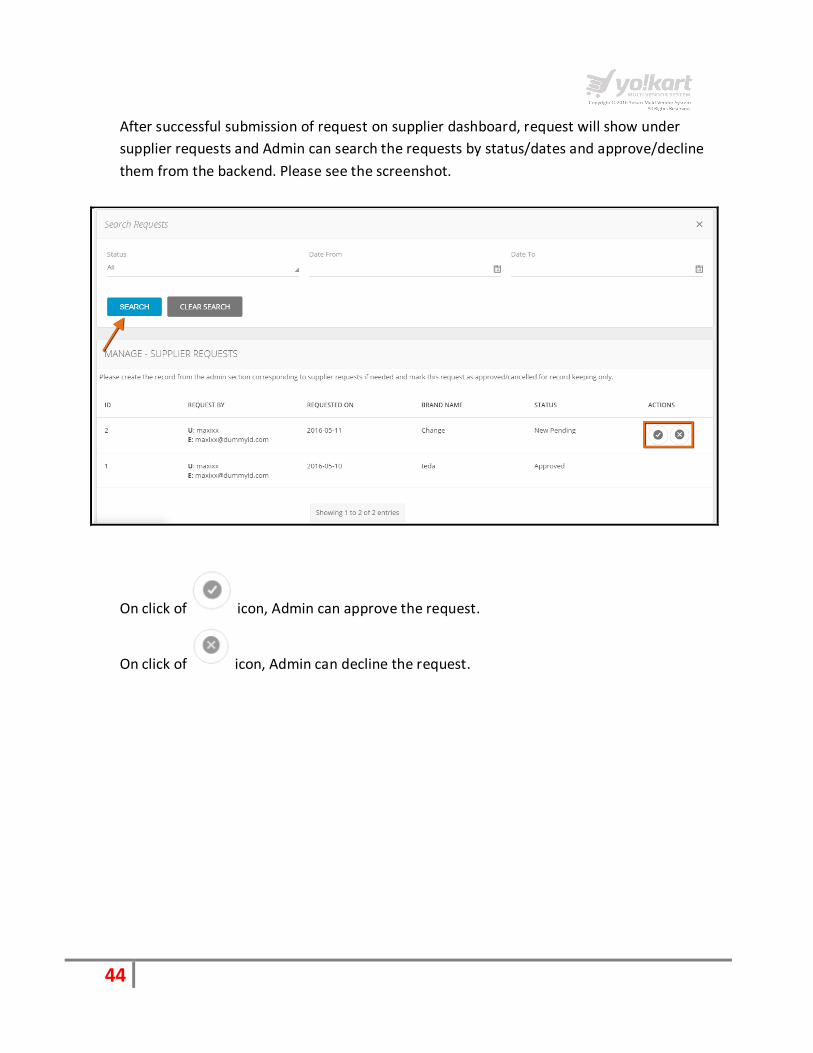
After successful submission of request on supplier dashboard, request will show under
supplier requests and Admin can search the requests by status/dates and approve/decline
them from the backend. Please see the screenshot.
On click of icon, Admin can approve the request.
On click of icon, Admin can decline the request.
45
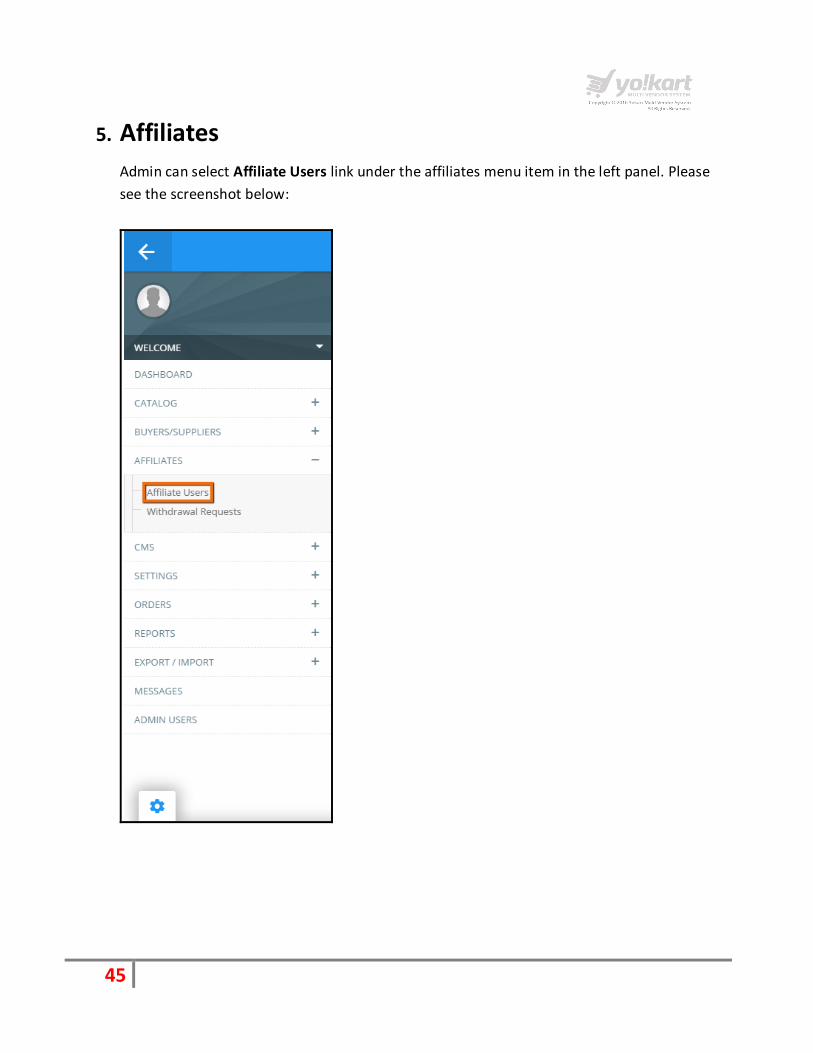
5. Affiliates
Admin can select Affiliate Users link under the affiliates menu item in the left panel. Please
see the screenshot below:

46
On the Affiliate Users page Admin can view the list of Affiliate users and can search users by
using keywords and other options. Please see the screenshot below:
On click of icon, Admin can approve the Affiliate user on the portal.
On click of icon, admin can disable the Affiliate user.
On click of icon, Admin can sign in using the Affiliate User credentials.
On click of icon, Admin can edit the details of Affiliate users.
On click of icon, Admin can decline the request.
47
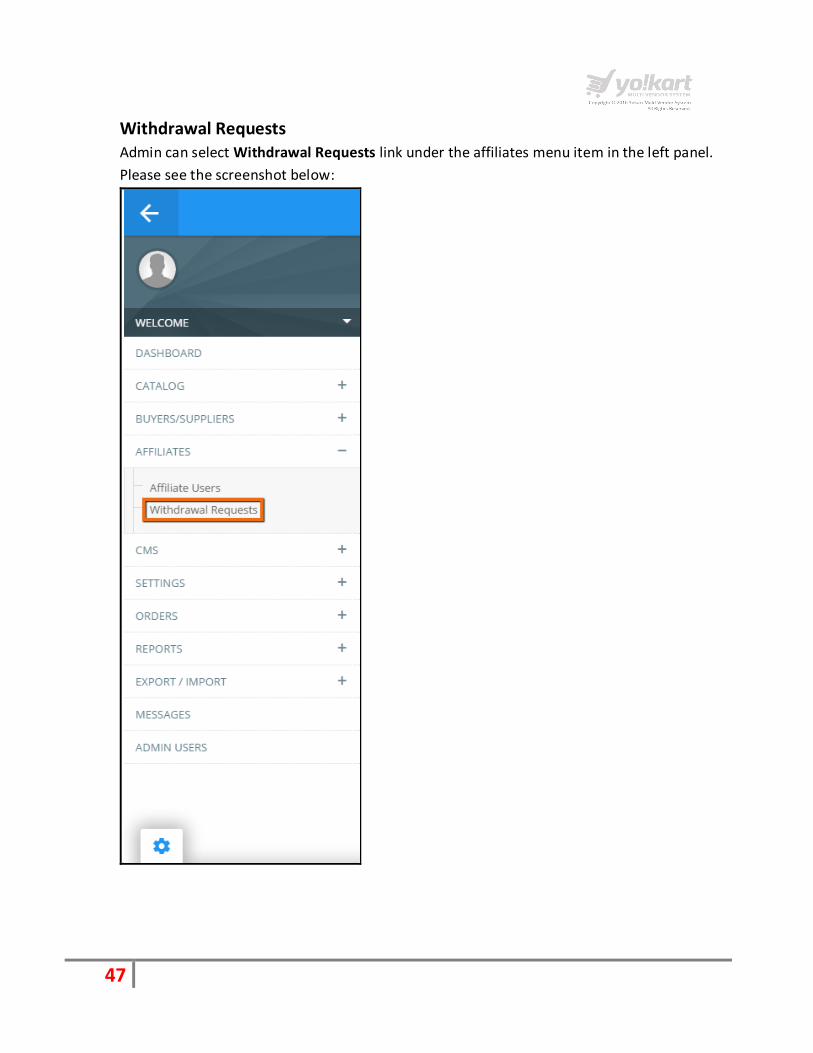
Withdrawal Requests Admin can select Withdrawal Requests link under the affiliates menu item in the left panel.
Please see the screenshot below:

48
On the Withdrawal requests page Admin can view the list of Affiliate withdrawal requests
and can search the same by using keywords, status, etc. Please see the screenshot below:

49
6. CMS – Content Management System
Following links are available under the CMS menu:
Collections Management
Navigation Management
Content Pages
Content Block
Language Labels
Slides Management
Banner Management
Empty Cart items Management
FAQ Category Management
FAQs Management
Testimonials Management
Report Reasons
Cancel Reasons
Return Reasons
Shipping Companies
Shipping Duration Labels
Discount Coupons
Social Platforms Management

50
Collections Management
Admin can select Collection Management link under the CMS menu item in the left panel.
Please see the screenshot below:

51
There are following sections under the Collections Management:
Top Selling
New Arrivals
Featured Products
Featured Shops
Admin can add new collection and can disable, edit and delete the previous collection.
Please see the screenshot below.
On click of icon, Admin can disable the existing collections.
On click of icon, Admin can decline the request.
On click of icon, Admin can easily edit an existing collection. Please see the screenshot
below regarding the Top Selling section:

52

53
As per the above screenshot, following fields are available on the Collection Setup page:
Name
In this field we need to define the name of a collection. As per the screenshot we are using
Top Sellers.
Display Title
This text will display as collection title on the home page.
Collection Image
As per the current design the collection image is not showing in front end.
Type
There are four types of collections:
o Categories – For display categories (Like: Top selling products by category)
o Products – For display products (Like: Featured Products)
o Shops – For display Shops(Like: Featured Shops)
o Brands – For Display Brands (Like: Top Brands)
Categories
This is an autosuggest box. We can choose from the categories which are available on the
website. As per the above screenshot, we have selected the following categories for Top
Selling collection:
o Fashion >> Men Accessories
o Fashion >> Women Accessories
o Fashion
o Fashion >> Women Clothing >> Jeans
o Fashion >> Women Accessories >> Cosmetics Product
o Fashion >> Women Accessories >> Sunglasses
o Fashion >> Women Clothing>> Dresses
o Fashion >> Men Accessories >> Tie
Criteria
There are following criteria’s are available:
o Price Low to High – Display records in ascending order based on prices
o Price High to Low – Display records in descending order based on prices.
o Most popular (Top Selling) – Top selling products

54
o New Arrivals – New Arrived products
o Ratings High to Low – Based on Ratings of products
o Featured – Based on featured products
Primary records
Primary records are number of categories which Admin want to display under Top Selling
section. Currently we are displaying 8 categories.
Child Records
Child Records are number of products you want to display with the categories. Currently we
are displaying 3 products.

55
Display Order
This option is display order for sections (Like: Top selling as 0 display order and new arrivals
as 1 display order)
In front end, you can find the Collections under the homepage slides. Please see the
screenshot below:
56
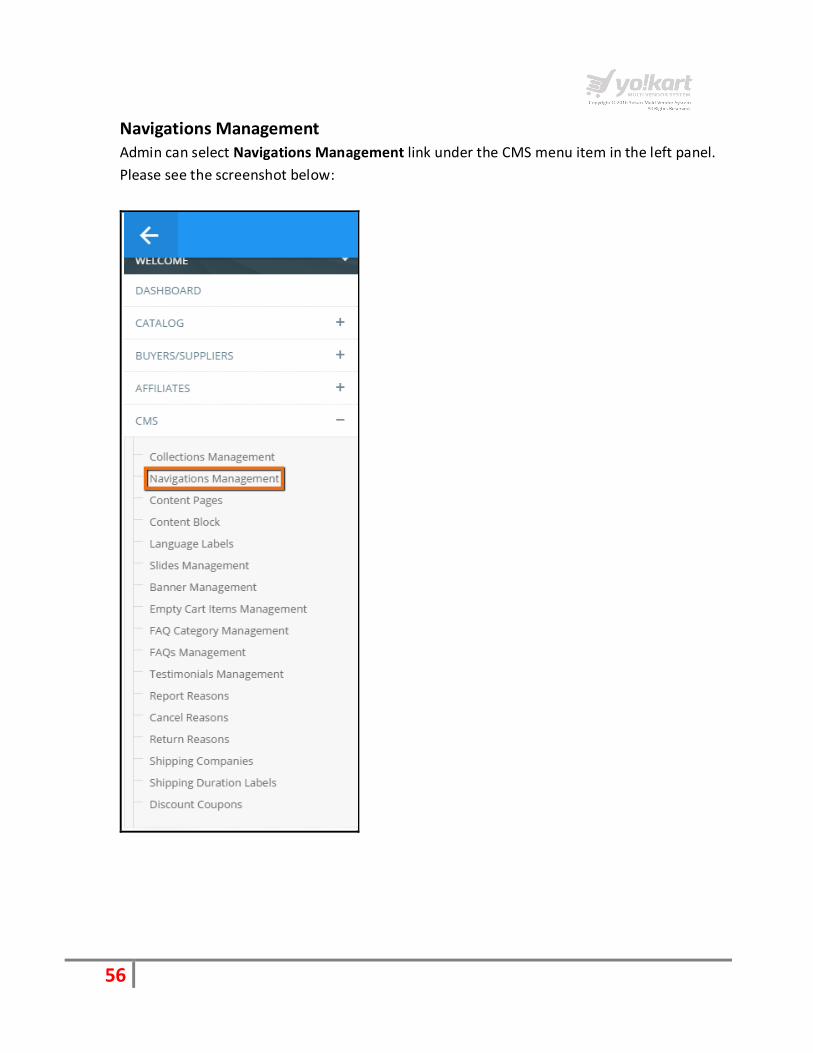
Navigations Management Admin can select Navigations Management link under the CMS menu item in the left panel.
Please see the screenshot below:

57
On the Navigations Management page Admin can view the list of navigation headings.
Please see the screenshot below:
On click of icon, Admin will display the list of pages under a selected title. We are
displaying 3 pages links under the Company new navigation. Please see the screenshot
below:
On click of icon, Admin can edit any existing page.
On click of icon, Admin can delete any existing page.

58
On click of Back to Navigation link, Admin will be redirected back to the Navigation
Management page.
On click of Add Navigation Page link, Admin will be redirected to the Page Setup page.
Please see the screenshot below:
Admin has to fill up the following details for add a navigation page on front end:
Caption Name – Name of the link
Type – There are following types of pages:
o CMS Page – Content pages
o External Page– External link for a page
o Custom HTML – Custom HTML for a page
Link Target –
o Current Window – Target link to Current window
o New Window – Target link to New Window
Link to CMS page – List of pages under the content pages
External Page – If you want to link the page to the external link.
Custom HTML – If you want to define custom HTML for this new page.
Display Order – Display order like 0,1,2 etc.
59
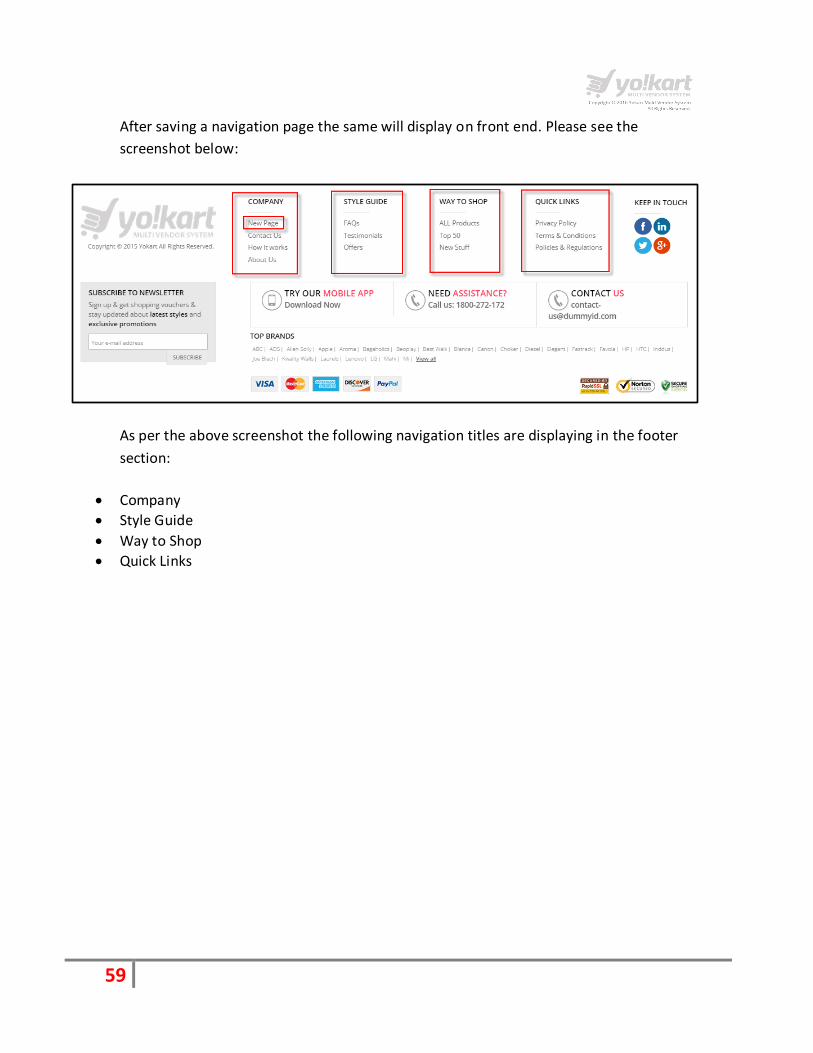
After saving a navigation page the same will display on front end. Please see the
screenshot below:
As per the above screenshot the following navigation titles are displaying in the footer
section:
Company
Style Guide
Way to Shop
Quick Links

60
Content Pages Admin can select Content Pages link under the CMS menu item in the left panel. Please see
the screenshot below:

61
On click of Content Pages link, Admin will be redirected to the content pages section; on this
page we have a list of all the content pages. Please see the screenshot below:
On click of icon, Admin can easily edit content of any existing content page.
On click of icon, Admin can delete any existing content page.
On click of Add content Page link, Admin can create a new page in the system. Admin has to
add the following information in order to create a content page:
Title
Content
URL Keywords
Meta title
Meta Keywords
Meta Description

62
Content Block Admin can select Content Block link under the CMS menu item in the left panel. Please see
the screenshot below:
In this section Admin can manage the extra content pages.

63
On click of content block link, Admin will be redirected to content block page.
Please see the screenshot below:
On click of icon, admin can change the title and content of respective content block.
Please see the screenshot.

64
Language Labels Admin can select Language labels link under the CMS menu item in the left panel. Please see
the screenshot below:

65
On click of Language Labels link, Admin will be redirected to the language labels listing page.
Please see the screenshot below:

66
On click of icon, Admin can easily edit an update label text.
On click of icon, Admin can delete any existing selected label
Note: It is recommended not to delete any existing label, after deleting a label, Admin will
not be able to edit language for that label.
Slides Management
Admin can select Slides Management link under the CMS menu item in the left panel. Please
see the screenshot below:
67
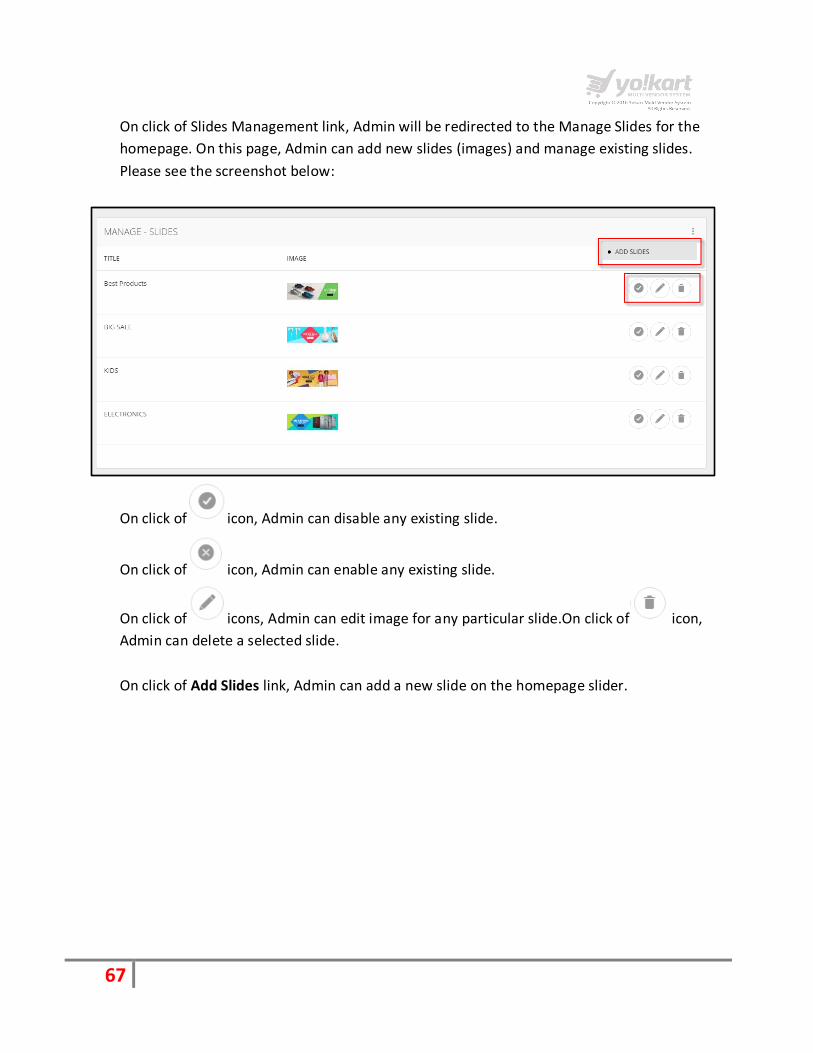
On click of Slides Management link, Admin will be redirected to the Manage Slides for the
homepage. On this page, Admin can add new slides (images) and manage existing slides.
Please see the screenshot below:
On click of icon, Admin can disable any existing slide.
On click of icon, Admin can enable any existing slide.
On click of icons, Admin can edit image for any particular slide.On click of icon,
Admin can delete a selected slide.
On click of Add Slides link, Admin can add a new slide on the homepage slider.
68
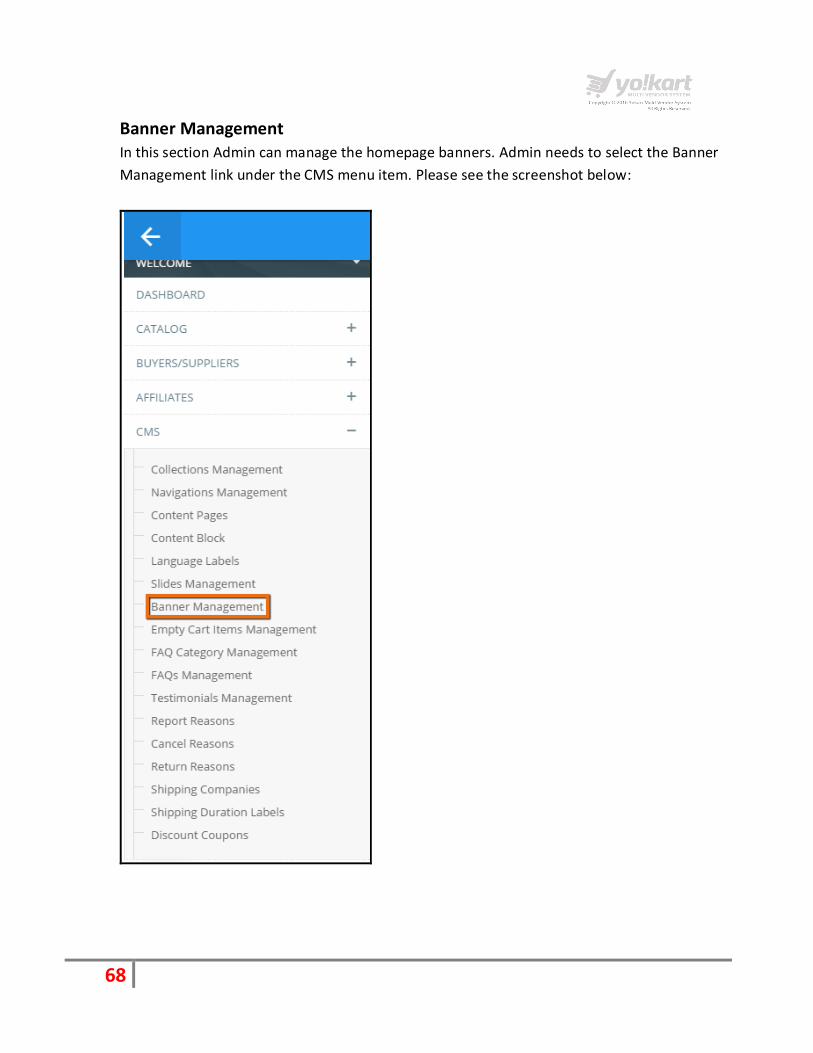
Banner Management In this section Admin can manage the homepage banners. Admin needs to select the Banner
Management link under the CMS menu item. Please see the screenshot below:

69
On click of Banner Management link, Admin will be redirected to the Manage Banners page.
Please see the screenshot below:
On click of icon, Admin can disable any banner.
On click of icon, Admin can enable any banner.
On click of icon, Admin can edit any selected banner. On click delete icon, Admin
can delete any existing banner. On click of Add Banner button, Admin can add a new banner
and disable any banner.
These Banners are displaying on homepage under the Featured Shops section. Please see the
screenshot below:
70
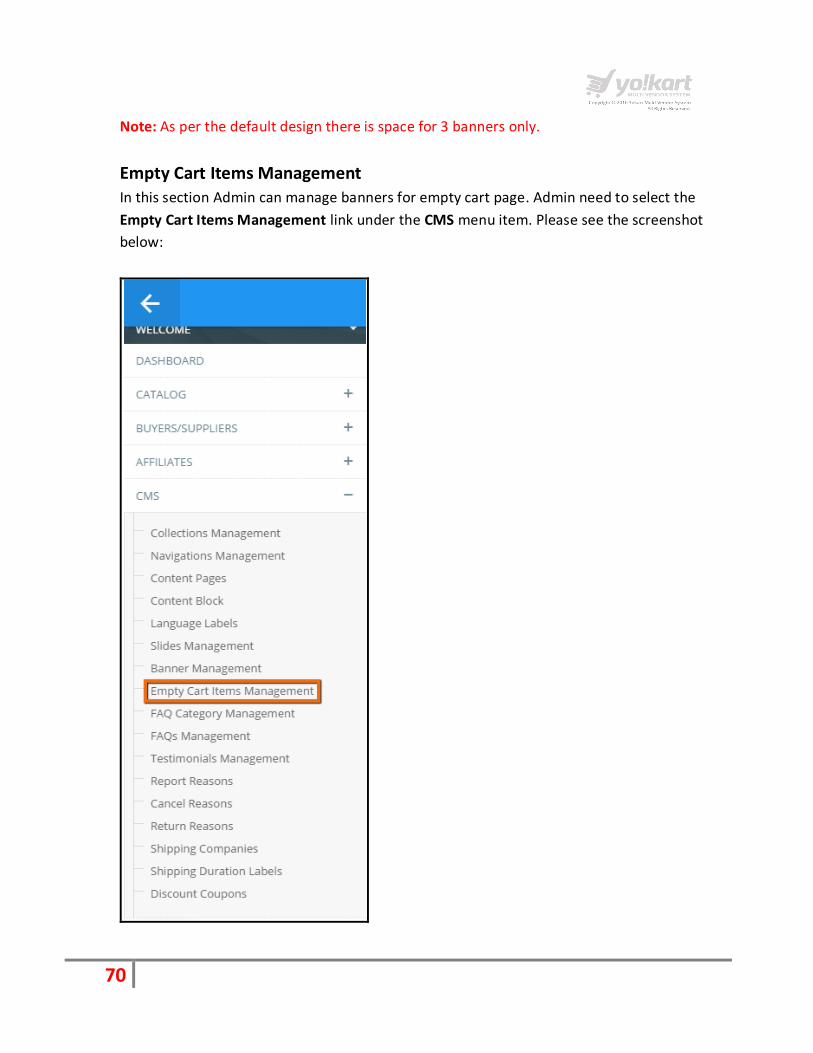
Note: As per the default design there is space for 3 banners only.
Empty Cart Items Management
In this section Admin can manage banners for empty cart page. Admin need to select the
Empty Cart Items Management link under the CMS menu item. Please see the screenshot
below:

71
On click of Empty Cart Management link, Admin will be redirected to the empty cart
management page. Please see the screenshot below:
On click of icon, Admin can disable any FAQ Category. On click of icon, admin
can enable an existing empty cart item
On click of icon, Admin can edit any existing empty cart item. On click of icon,
Admin can delete any existing empty cart item.
On click of Add-empty cart items, Admin can add a new existing item. Please see the
screenshot below:

72
FAQ Category Management In this section Admin can manage the FAQ categories for FAQ page. Admin need to select the
FAQ Category Management link under the CMS menu item. Please see the screenshot
below:

73
On click of FAQ Category Management, Admin will be redirected to the Manage FAQ
Categories page. On this page Admin can manage categories for FAQ section. Please see
the screenshot below:
On click of icon, Admin can disable any FAQ Category. On click of icon, Admin
can enable any FAQ Category.
On click of icon, Admin can edit name of an existing FAQ category. On click of
icon, Admin can delete any FAQ category.
On click of Add FAQ Category link, Admin can add a new FAQ category.

74
FAQs Management In this section Admin can manage the content for FAQ page. Please see the screenshot
below:

75
On click of FAQ Management link, Admin will be redirected to the Manage FAQs page.
Please see the screenshot below:
On click of Admin can edit content of any existing FAQ.
On click of Admin can delete any existing FAQ.

76
On click of Add FAQ link, Admin can add a new FAQ. Please see the screenshot below:
Admin has to fill up the following details to add content for a new FAQ:
FAQ Category
Question Title
Description
Page Title
Meta Keywords
Meta Description

77
Testimonials Management In this section Admin can manage the testimonials for his/her site. Admin need to select
the Testimonials Manage link under the CMS menu item. Please see the screenshot below:

78
On click of Testimonials Management link, Admin will be redirected to the Manage
Testimonials page. Please see the screenshot below:
These testimonials are displaying on the testimonials page. Please see below the demo link
of testimonials page: http://demo.yo-kart.com/testimonials

79
On click of Admin can edit any existing testimonial.
On click of Admin can delete any existing testimonial.
Report Reasons
In this section Admin can manage the list of reasons. Admin needs to select the Report
Reasons link under the CMS section. Please see the screenshot below:

80
On click of Report Reasons link, Admin will be redirected to the Manage Report Reasons
page. Please see the screenshot below:
On click of icon, Admin can edit an existing reason.
On click of icon, Admin can delete an existing reason from the list.
On click of Add Report Reason link, Admin will be redirected to the add report reason page.
Please see the screenshot below:
Note: These reasons are displaying on Report a Shop form.

81
Cancel Reasons In this section Admin can manage the list of cancel reasons. Admin need to select the
Return Reasons link under the CMS section. Please see the screenshot below:
82
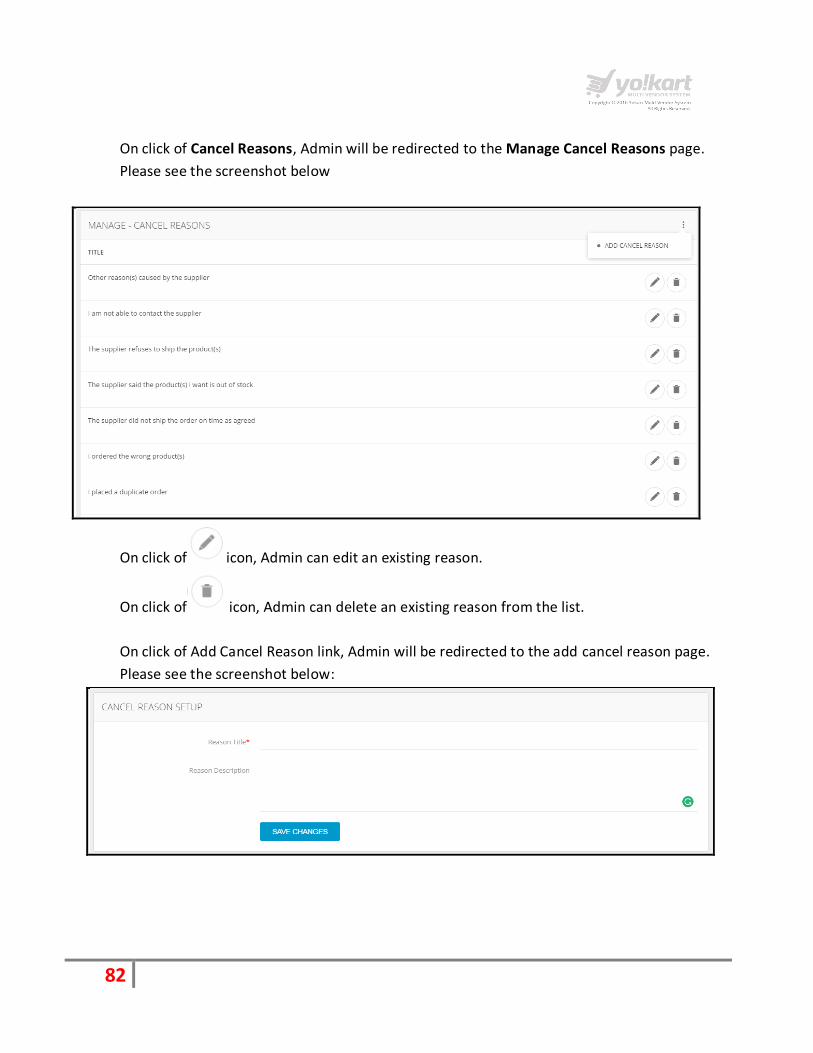
On click of Cancel Reasons, Admin will be redirected to the Manage Cancel Reasons page.
Please see the screenshot below
On click of icon, Admin can edit an existing reason.
On click of icon, Admin can delete an existing reason from the list.
On click of Add Cancel Reason link, Admin will be redirected to the add cancel reason page.
Please see the screenshot below:

83
Return Reasons In this section Admin can manage the list of return reasons. Admin need to select the Return
Reasons link under the CMS section. Please see the screenshot below:

84
On click of Return Reasons, Admin will be redirected to the Manage Return Reasons page.
Please see the screenshot below:
On click of icon, Admin can edit title of an existing reason.
On click of icon, Admin can delete an existing reason from the list.
On click of ADD Return Reason, Admin can add a return reason. Please see the screenshot
below:
Note: These reasons are getting displayed on front end when buyers submit a request for
Return/Exchange.

85
Shipping Companies In this section Admin can manage the list of shipping companies. Admin need to select the
Shipping Companies link under the CMS section. Please see the screenshot below:

86
On click of Shipping Companies link, Admin will be redirected to the Manage Shipping
Company page. On this page Admin can easily Add/Edit/Delete shipping companies. Please
see the screenshot below:
On click of Admin edit the details of a shipping company.
On click of Admin can delete an existing shipping company.
On click of Add Shipping Company link, Admin will be redirected to add shipping company
page.
Note: These companies are displaying in seller area, under the shipping tab while adding
shipping company for a product. Please see the screenshot below regarding seller area:
87
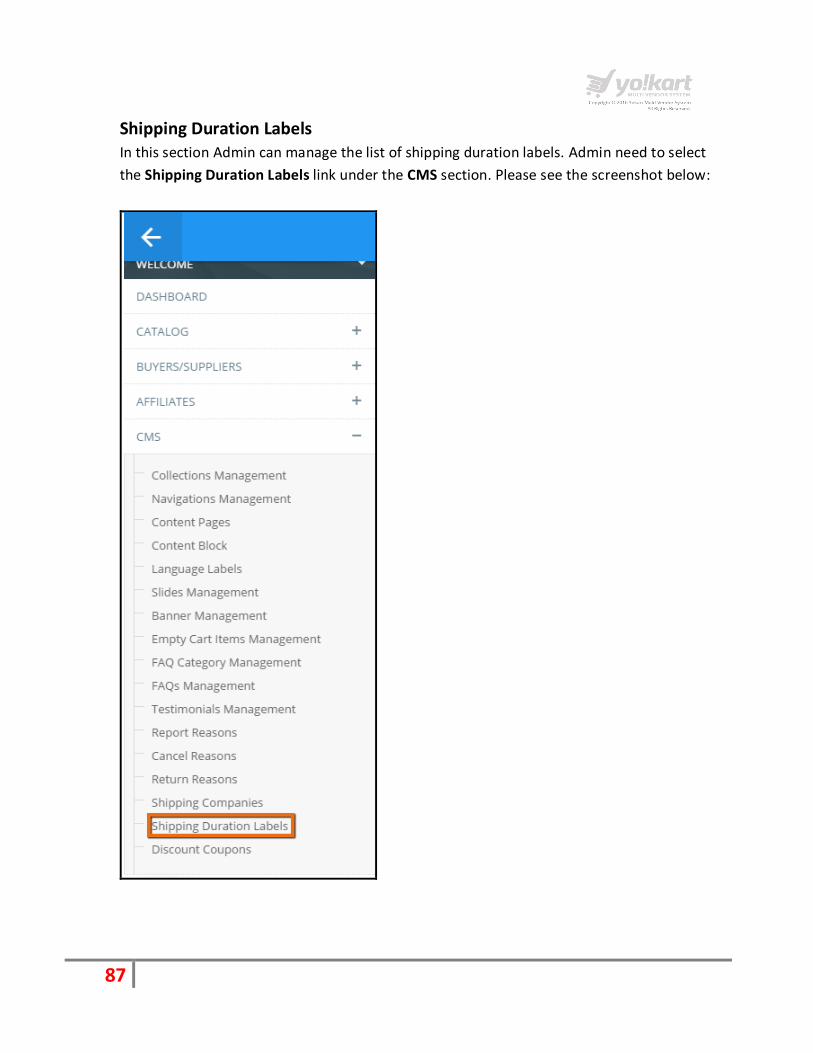
Shipping Duration Labels In this section Admin can manage the list of shipping duration labels. Admin need to select
the Shipping Duration Labels link under the CMS section. Please see the screenshot below:

88
On click of Shipping Duration Labels, Admin will be redirected to the Manage Shipping
Durations Page. Please see the screenshot below:
On click of icon, Admin edit the details of a shipping company.
On click of icon Admin can delete an existing shipping company.
Note: These labels are displaying in seller area, under the shipping tab while adding Shipping
Duration for a product.

89
Discount Coupons In this section Admin can create Discount Coupons. For creating coupons, Admin needs to
fill up the following details for a coupon:

90
On click of Discount Coupons link, Admin will be redirected to the Manage Coupons page.
Please see the screenshot below:
On click of icon, Admin edits the details of a shipping company.
On click of icon, Admin can delete an existing shipping company.
On click of Add Coupon button, Admin will be redirected to the Add Coupon page. Admin
has to fill up the following details to create a coupon:
Name
Description
Code
Image
Min Order Value
Discount Type
Discount Value
Max Discount Value
91
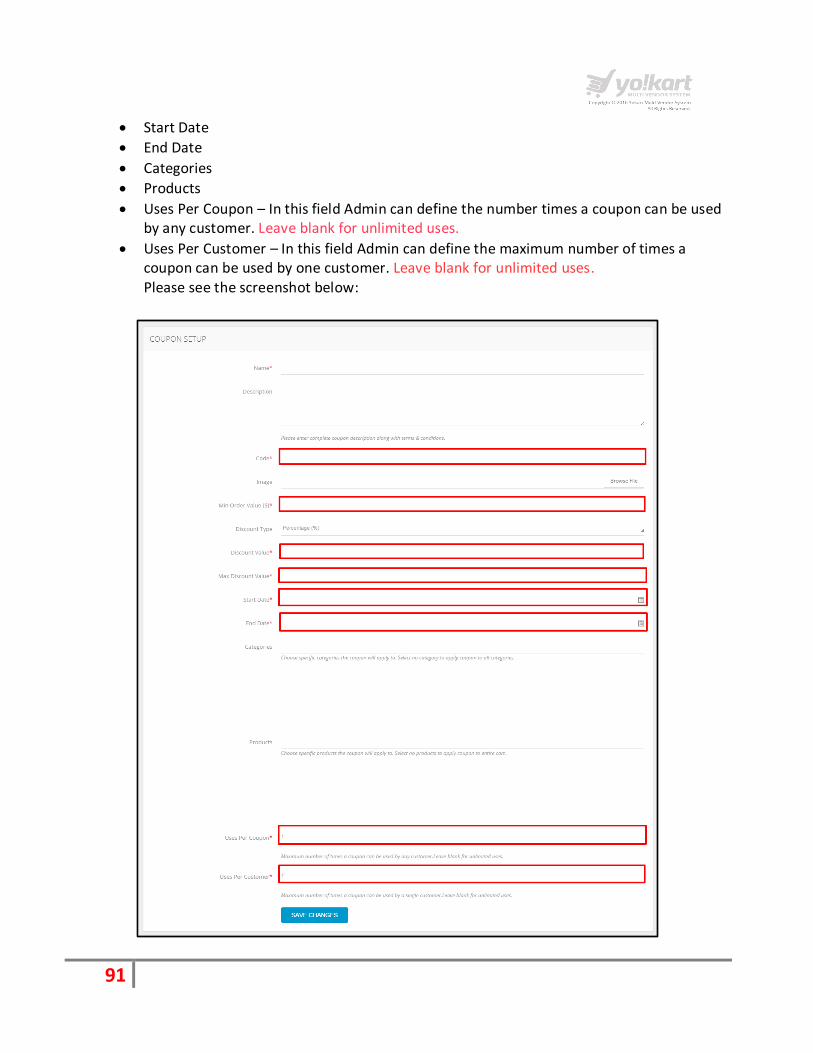
Start Date
End Date
Categories
Products
Uses Per Coupon – In this field Admin can define the number times a coupon can be used by any customer. Leave blank for unlimited uses.
Uses Per Customer – In this field Admin can define the maximum number of times a coupon can be used by one customer. Leave blank for unlimited uses. Please see the screenshot below:
92
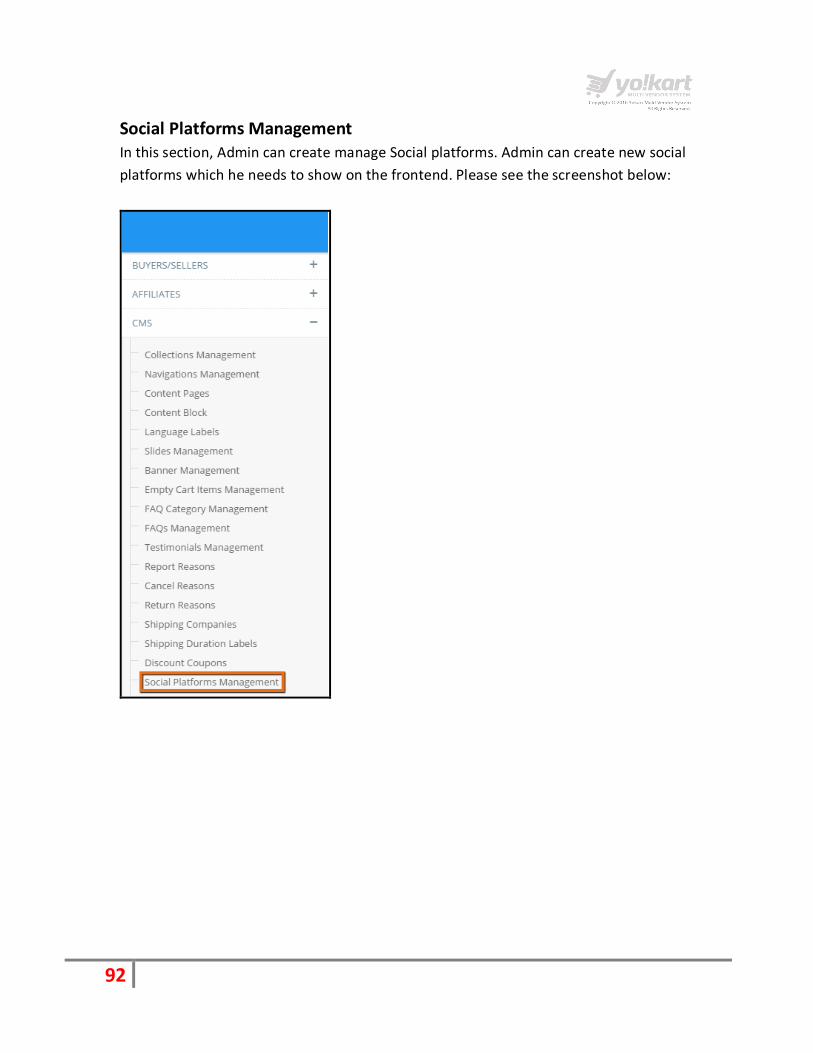
Social Platforms Management In this section, Admin can create manage Social platforms. Admin can create new social
platforms which he needs to show on the frontend. Please see the screenshot below:

93
On click of Social Platforms Management, Admin will be redirected to the Manage Social
Platforms Page. Please see the screenshot below:
On click of icon, Admin can disable any existing Social platform from frontend.
On click of icon, Admin can enable any existing Social platform from frontend.
On click of icon, Admin can edit any existing Social platform from frontend.
On click of icon, Admin can delete any existing Social platform from frontend.
On click of Add Social Platform, Admin can add new social platform on the system.

94
7. Settings
There are following links under the Settings menu item:
Country Management
Zone Management
State Management
Currency Management
General Settings
Commission Settings
Affiliate Commission Settings
Theme Settings
Payment Methods
Email Templates
Database Backup & Restore
Server Info
Country Management
Admin can select Country Management link under settings menu link. Please see the
screenshot below:
95
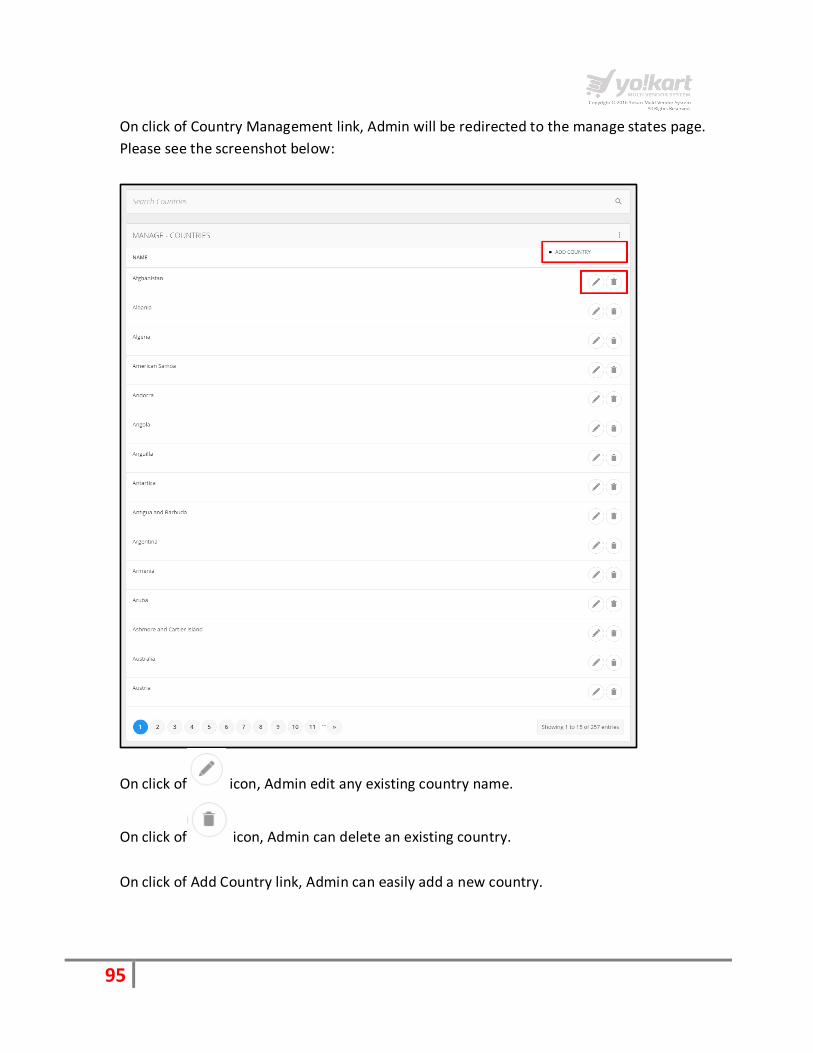
On click of Country Management link, Admin will be redirected to the manage states page.
Please see the screenshot below:
On click of icon, Admin edit any existing country name.
On click of icon, Admin can delete an existing country.
On click of Add Country link, Admin can easily add a new country.

96
On click of icon, Admin can also search a country by keyword. Please see the
screenshot below:
Zone Management
Admin can select zone Management link under settings menu. Please see the screenshot
below.

97
On click of Zone Management link, Admin will be redirected to the manage Zones page.
Please see the screenshot below:
On click of icon, Admin edit any existing Zone name and description.
On click of icon, Admin can delete an existing zone.
On click of Add Zone link, Admin can easily add a new zone.
On click of icon, Admin can also search a zone by keyword. Please see the screenshot
below:

98
State Management
Admin can select State Management link under settings menu item. Please see the
screenshot below:
In this section Admin can manage list of states.

99
On click of State Management link, Admin will be redirected to the manage states page.
Please see the screenshot below:

100
On click of icon, Admin can edit a country name.
On click of icon, Admin can delete any existing shipping country.
On click of Add State button, Admin can easily add a new state in the system. Admin needs
to fill up the following details for adding a state:
Zone
Country
Name
Code
Please see the screenshot below:
On click of icon, Admin can search a state by Keyword and Country from drop down.
Please see the screenshot below:

101
General Settings
Admin can select General Setting link under the settings menu item. Please see the
screenshot below:

102
Admin has following tab is available under general settings:
General
Local
SEO
Option
Withdrawal
Live Chat
Third Party APIs
Server
Sharing
Referral
General Settings – General
Under General tab, Admin can set following settings:
Site Name – Name of site
Site Owner – Name of site owner
Site Owner Email – Email address of site owner
Address – Physical address of business
Telephone
Fax
Desktop Logo – Logo for desktop version of site
Mobile Logo/Icon – Separate logo for mobile design
Website Favicon – Admin can upload favicon for his site.
Apple touch icon – Admin can upload Apple touch icon for mobile devices.
Footer logo/Graphic – Separate logo for footer section
Watermark image – Watermark image for products
Note: Please add "image/x-icon" mime type under "Allowed File Mime Types" & "Allowed
Image Mime Types" on "Local" Tab under settings before uploading favicon.
Please see the screenshot below regarding the same:

103

104
General Settings - Local
Under Local tab, Admin can manage the site settings. Admin can manage the following
information:
Language – English(This is default language, only 1 language can run at one time in the application)
Time zone – Set time zone for website
Country – Select country of existence for website
Date Format – Set date format for website
Currency – Set currency name
Currency Symbol – Choose currency symbol
Display currency symbol – Positioning of currency symbol next to the amount.
Allowed file extensions – List of extension files which admin would like to allow on site
Allowed file MIME types – List of MIME types allowed for website
Allowed Image MIME Types – List of image MIME types allowed for website Please see the screenshot below:
105
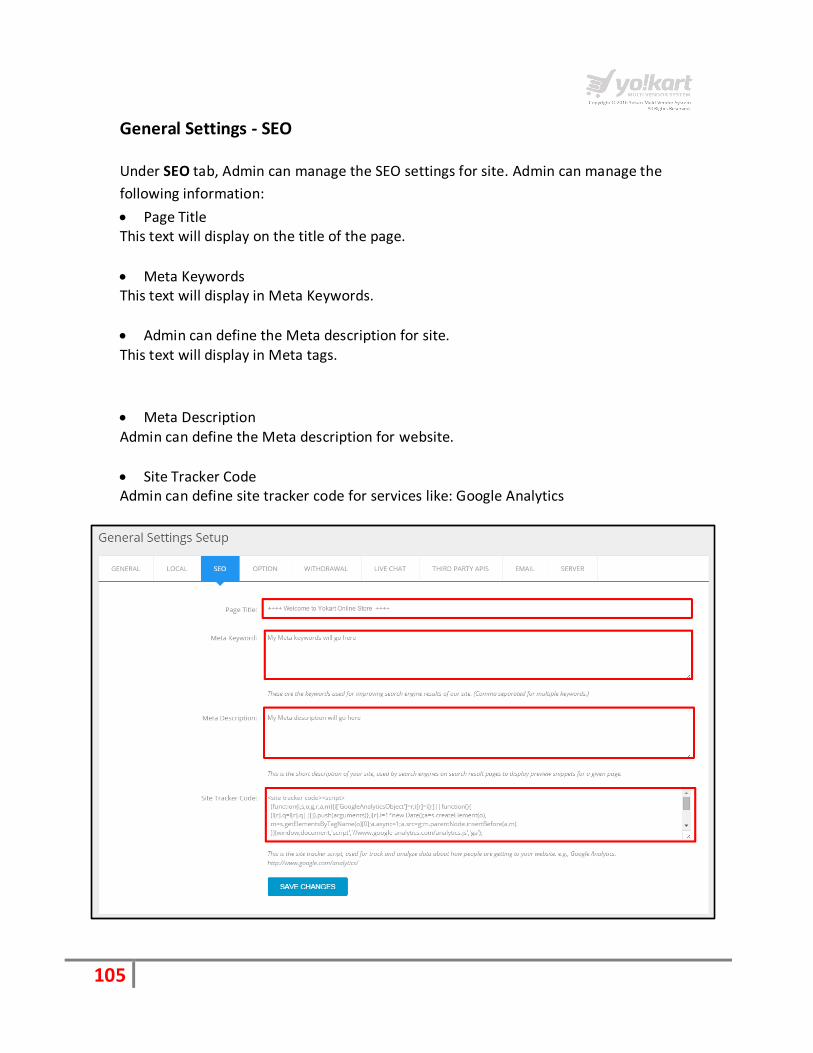
General Settings - SEO
Under SEO tab, Admin can manage the SEO settings for site. Admin can manage the
following information:
Page Title This text will display on the title of the page.
Meta Keywords This text will display in Meta Keywords.
Admin can define the Meta description for site. This text will display in Meta tags.
Meta Description Admin can define the Meta description for website.
Site Tracker Code Admin can define site tracker code for services like: Google Analytics

106
General Settings - Option
Under Options tab, Admin can manage settings for the following sections:
Products
Reviews
Tax
Commission
Account
Checkout
Products – For site products, Admin can set the following options:
Products Minimum Price – Admin can set minimum price for a product.
Default items per page (Catalog) – Number of products Admin would like to display on
product listing page.
Default Items Per Page (Admin) – Number of Items Admin would like to display in Admin
area.
Please see the screenshot below:
Reviews – For site Reviews, Admin can set the following options:
Default reviews status
Allow review
New review alert email
Please see the screenshot below:

107
Tax – Admin can set tax for entire site. Please see the screenshot below:
Commission – In this section, Admin can set portal commission on each product. Admin
needs to set the following information:
Site Commission Percentage for Vendor -
This is site earning, as per the below screenshot admin will get 8% commission on each sale.
Maximum Site Commission
In this field, Admin can define maximum site commission on each sale.
Please see the screenshot below:
Account –In this section, Admin can manage settings for User Accounts on website.
Following options are available under this section:
Enable Administrator Approval After Registration
On check this option, Admin need to approve each user after registration.
Enable Email Verification After Registration

108
If Admin would like to send email verification link to each user after registration then he
needs to check this option. An email will be sent to the user at his/her registered email
address, after clicking on the verification link users will be able to login into the system.
Enable Auto login After registration
Admin needs to check this option, if Admin would like to automatically login a user after
register on site.
Enable Notify Administrator on Each Registration
Admin needs to check this option, if admin would like to notify himself on each registration
of new users
Enable Sending welcome mail After registration
Admin needs to check this option if, Admin would like to send welcome mail to each user
after registration.
Enable Auto Logout After Password Change
If this option will be checked then users will be automatically logged out after changing their
password.
Enable Facebook Login
Admin can enable and disable the Facebook login on site by check/uncheck this option.
Enable Google Login
Admin can enable and disable the Google login on site by check/uncheck this option.
Account Terms
Admin can enable/disable Account and Terms on registration page.
Please see the screenshot below:

109
Checkout:
In this section, Admin can manage the settings related to the checkout process. Please see
the screenshot below:

110
Please see below the list of options under checkout section:
New Order Alert Email
If Admin would like to receive email for each new order then he needs to select Yes option.
Default Child Order Status
This will be default status for each child order.
Note: Child orders are like sub orders. Each single product in an order is treated as a sub
order.
Default Paid Order Status
This will be default status of all paid orders.
Note: Paid orders are those orders which have Paid payment status.
Default Shipping Order Status
This will be default status for orders which are under shipping process.
Default Cancel Order Status
This will be default status for cancelled orders.
Return Request Order Status
This will be default status for orders which have Return Request as an order status.
Return Request Withdrawn Order Status
This will be default status for those orders which have withdrawn return request.
Return Request Approved Order Status
This status will be default status for orders whose return request has been approved

111
In this section, Admin can set order status for a particular status. Following are the list of
Order status:
Vendor Order Status:
Admin can check the order status, which he would like to display under vendors area.
Vendor will be able to view the orders which have order status as per the checked Vendor
Order Status
Buyer Orders Status:
Admin can check the order status, which he would like to display under the Buyer area.
Buyer will be able to view the orders as per the checked Buyer Order Status
Processing Order Status:
Admin can check the order status which Admin would like to display on the vendors area
while processing an order. Please see the screenshot below:

112
Completed Order Status:
Admin can check the orders status to mark an order as complete.
Feedback Ready Order Status:
Admin can check orders status in order to make an order available for feedback.
Allow Order Cancellation by Buyer’s:
113
Admin can check order status, when he wants to allow the buyers to cancel an order.
Allow Return/Exchange:
Admin can check order status for making an order available for return/Exchange
Purchase Calculation (For Buyers):
Purchases will be considered as per the selected order status.
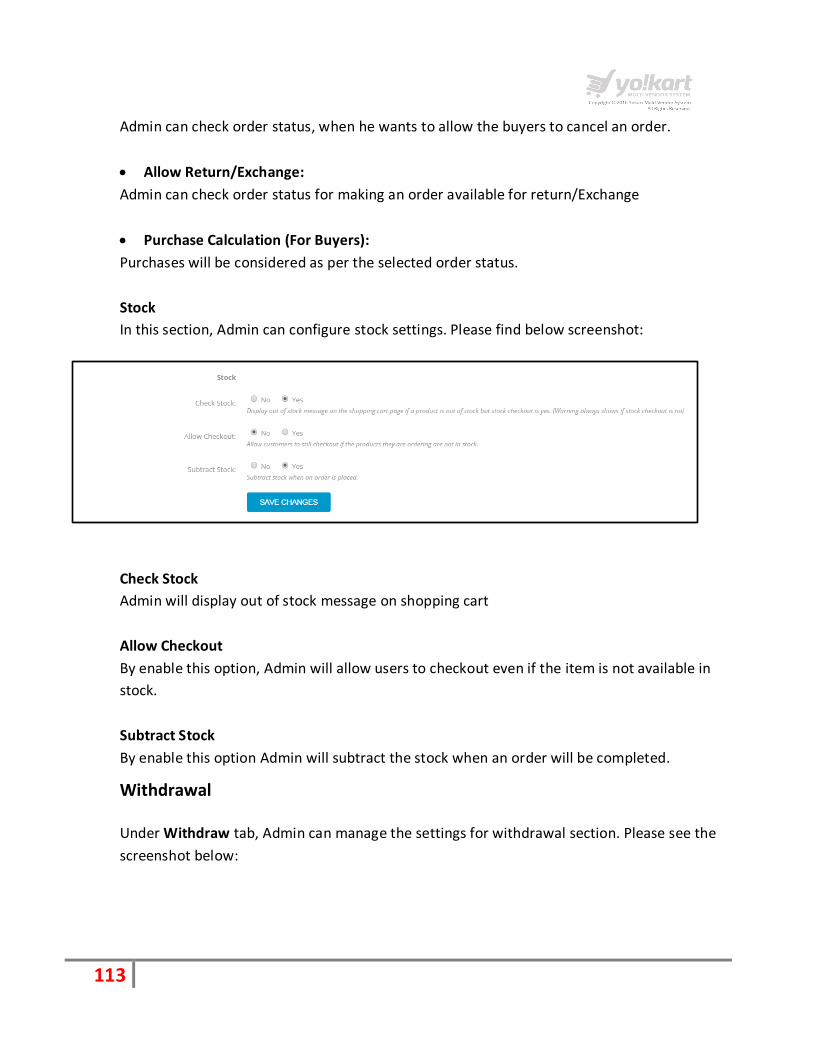
Stock
In this section, Admin can configure stock settings. Please find below screenshot:
Check Stock
Admin will display out of stock message on shopping cart
Allow Checkout
By enable this option, Admin will allow users to checkout even if the item is not available in
stock.
Subtract Stock
By enable this option Admin will subtract the stock when an order will be completed.
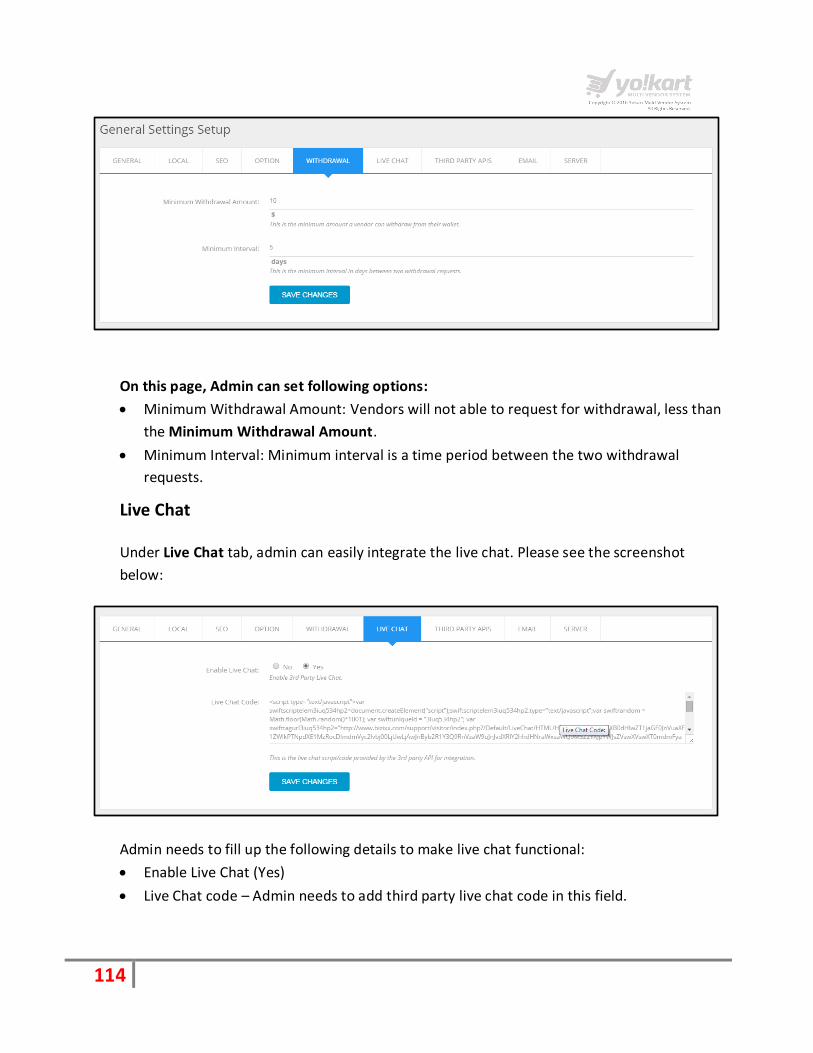
Withdrawal
Under Withdraw tab, Admin can manage the settings for withdrawal section. Please see the
screenshot below:
114
On this page, Admin can set following options:
Minimum Withdrawal Amount: Vendors will not able to request for withdrawal, less than
the Minimum Withdrawal Amount.
Minimum Interval: Minimum interval is a time period between the two withdrawal
requests.
Live Chat
Under Live Chat tab, admin can easily integrate the live chat. Please see the screenshot
below:
Admin needs to fill up the following details to make live chat functional:
Enable Live Chat (Yes)
Live Chat code – Admin needs to add third party live chat code in this field.

115
Third Part API’s
Under Third Party API’s, Admin can manage third party API’s which have been integrated on
website. Please see the screenshot below:
Following are list of fields available on third party API’s section:
Facebook Account URL
Facebook APP ID

116
Facebook App Secret
Google Plus Developer Key
Google Plus Client ID
Linked in Account URL
Twitter Account URL
Google Plus Account URL
MailChimp Key
MailChimp List ID
Following are the steps to get Facebook App id and Facebook App secret.
Step 1: Login into your Facebook account.

117
Step 2: After login, open this url: https://developers.facebook.com/apps, on this page you
will have an option for create a new app. Please see the screenshot below:
Step 3: Click the Add a New App button. If you do not find the option to create a new app in the
upper right hand corner then you need to click on "My Apps" and select Add a New App.
Step4: On click of Add a new app, a pop up to select a platform for a new app will be open.
We need to select Website platform from the available options. Please see the screenshot
below:
118
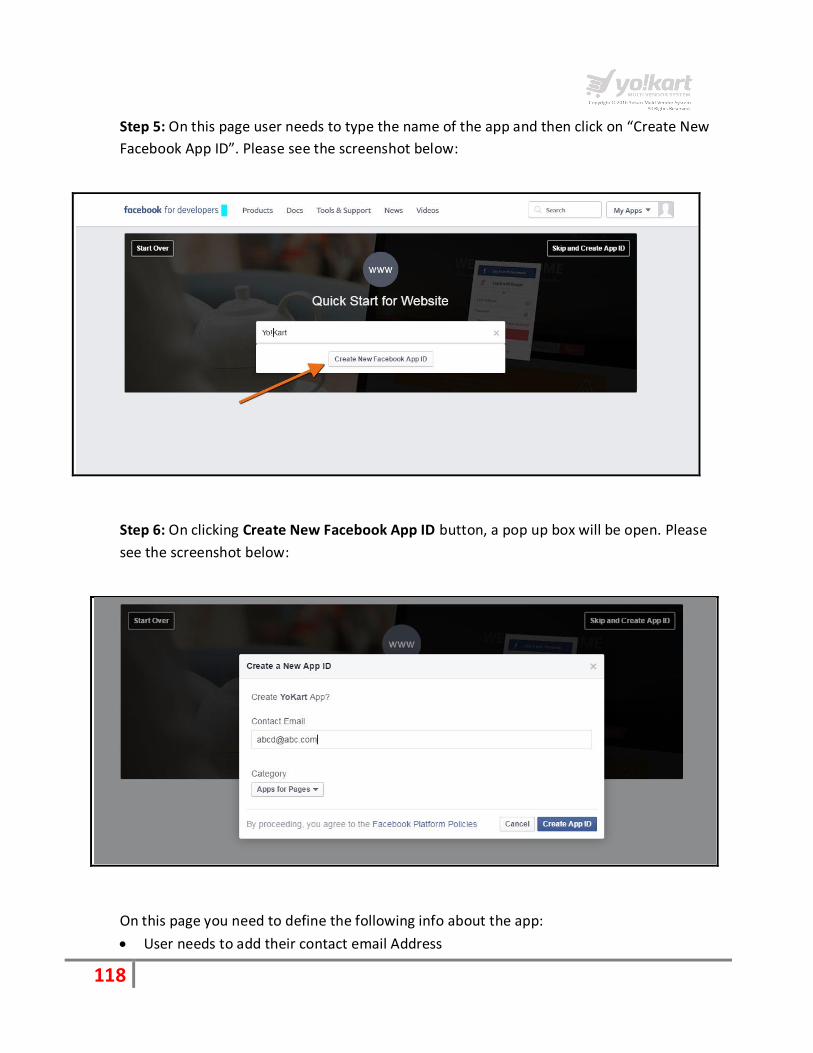
Step 5: On this page user needs to type the name of the app and then click on “Create New
Facebook App ID”. Please see the screenshot below:
Step 6: On clicking Create New Facebook App ID button, a pop up box will be open. Please
see the screenshot below:
On this page you need to define the following info about the app:
User needs to add their contact email Address

119
Select category for app – App For Pages
Step 7: After clicking on Create App ID button, a new app will be created and app will display
under the list of apps on Dashboard. Please see the screenshot below:
Step 8: On click of App title: YoKart and user will be redirected to the app details page. On
the app details dashboard you can get the App ID. Please see the screenshot below:
On this page you need to do two things
Use this App ID to add/fill in to their admin panel under general settings.

120
To view App Secret need to click on the show button under the App Secret field.
Step 9: On click of Show button, a pop up will be open to re-enter your password. After
entering your password, you will be able to view App secret key and can add to their admin
panel. Please see the screenshot below:

121
Step: After, creating the App ID, please go to settings to add the platform.
Step 11: To add the website URL, user needs to add platform after creating the App ID

122
Step 12: Users need to select their preferred options after clicking on Add Platform. Please
note that for website, you need to select on website platform only.
Step 13: Users need to add their website URL in this tab so that Login process via Facebook is
completed from developer account.

123
Step 14: Users need to select App review on the left navigation and make the App live to
public by selecting YES.

124
Please see the steps to get Google Plus developer key / Client ID.
Step 1: Login into your Google account
Step 2: Go to the Google Developers Console. Please see the screenshot below:
Step 3: Select create a project option under the main menu drop down. Please see the
screenshot below:
125
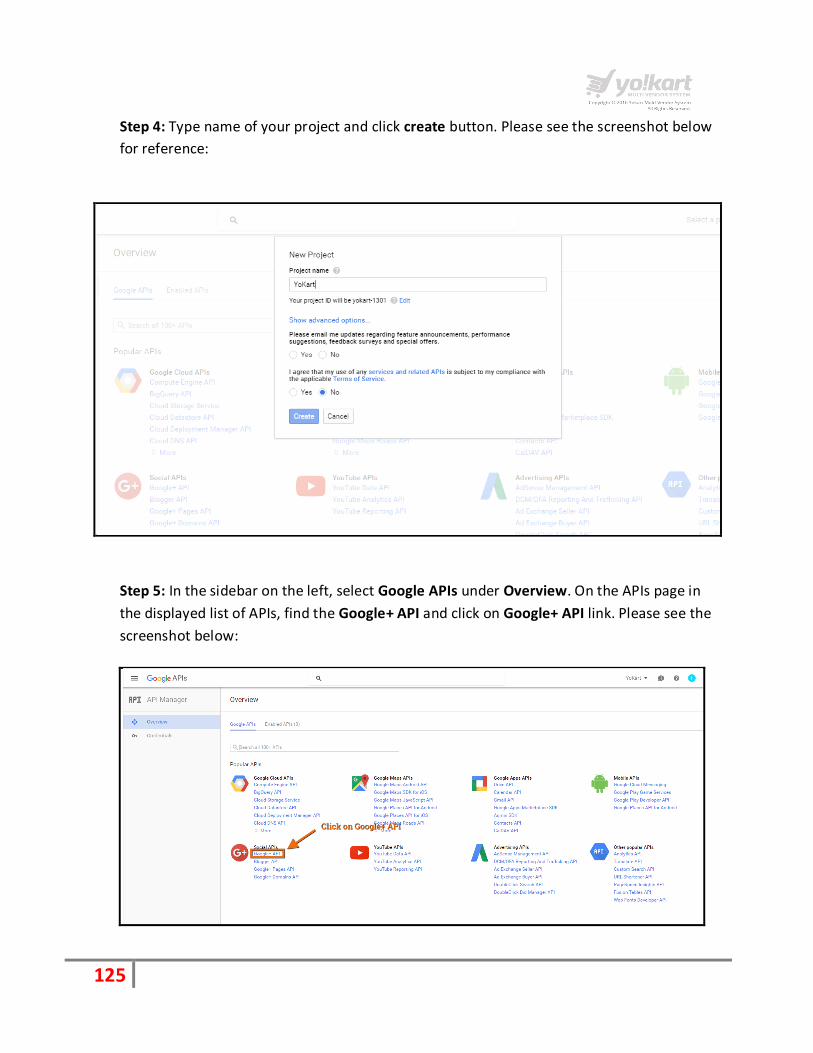
Step 4: Type name of your project and click create button. Please see the screenshot below
for reference:
Step 5: In the sidebar on the left, select Google APIs under Overview. On the APIs page in
the displayed list of APIs, find the Google+ API and click on Google+ API link. Please see the
screenshot below:

126
Step 6: On the displayed list of APIs, find the Google+ API and click on ENABLE to set the
status ON:
Step 7: In the sidebar on the left, select Credentials under the API Manager. Please see the
screenshot below:
127
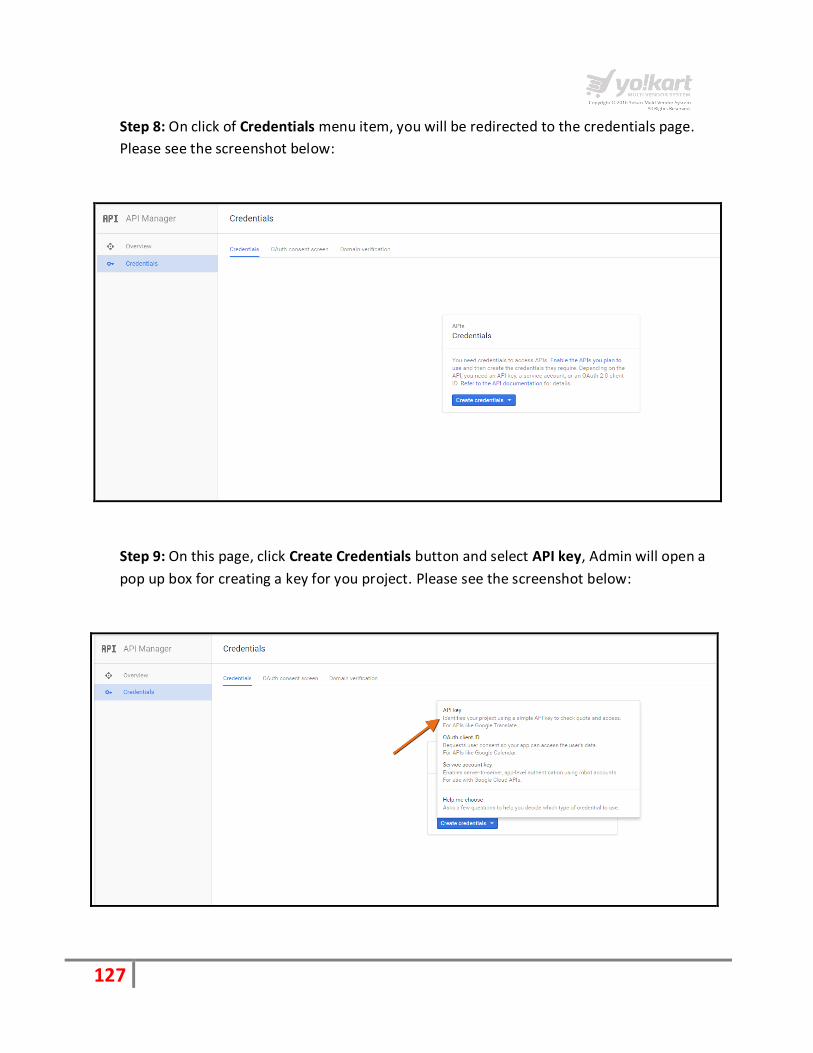
Step 8: On click of Credentials menu item, you will be redirected to the credentials page.
Please see the screenshot below:
Step 9: On this page, click Create Credentials button and select API key, Admin will open a
pop up box for creating a key for you project. Please see the screenshot below:
128
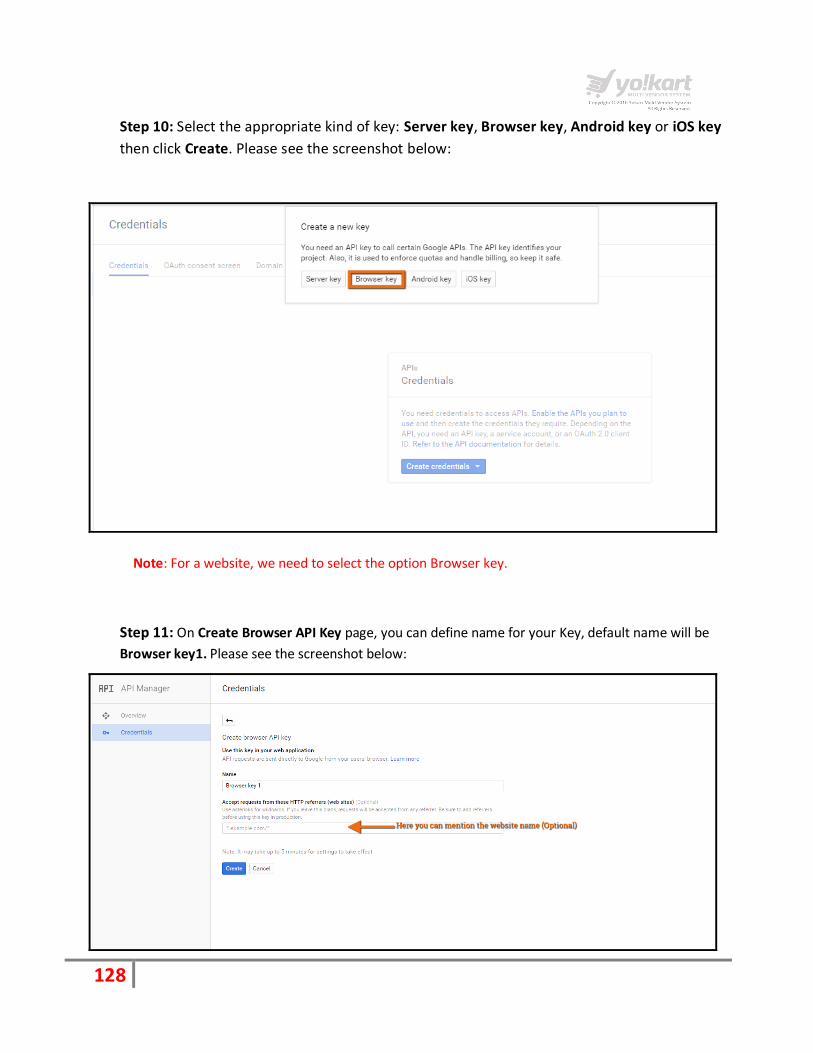
Step 10: Select the appropriate kind of key: Server key, Browser key, Android key or iOS key
then click Create. Please see the screenshot below:
Note: For a website, we need to select the option Browser key.
Step 11: On Create Browser API Key page, you can define name for your Key, default name will be
Browser key1. Please see the screenshot below:

129
Step 12: On click of Create button, API Key will be generated. User can copy the key by clicking on
copy Icon and paste it on the backend of the website in the required field (Google Plus Developer
Key). Please see the screenshot below:
How to create Client ID and Client Secret Key? Please see below the steps to create a client ID:
Step 1: In the sidebar select Credentials under API Manager. Please see the screenshot
below:

130
Step2: On the Credentials page select OAuth client ID from the Add credentials drop down
list. Please see the screenshot below:
Step 3: On click OAuth2.0 client ID link, User will be redirected to the Create client ID page.
User has to fill up the following detail to create a client id:
Application Type (Web Application in case of website)
Application Name
Authorized redirect URL
131
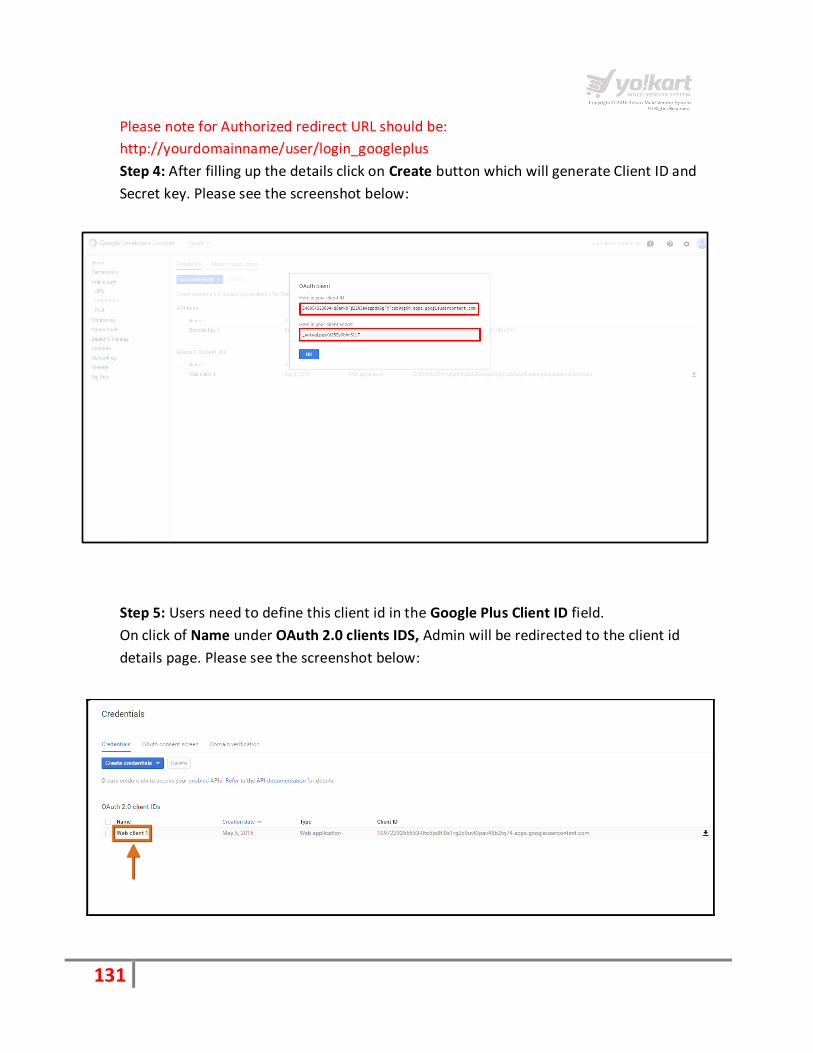
Please note for Authorized redirect URL should be:
http://yourdomainname/user/login_googleplus
Step 4: After filling up the details click on Create button which will generate Client ID and
Secret key. Please see the screenshot below:
Step 5: Users need to define this client id in the Google Plus Client ID field.
On click of Name under OAuth 2.0 clients IDS, Admin will be redirected to the client id
details page. Please see the screenshot below:
132
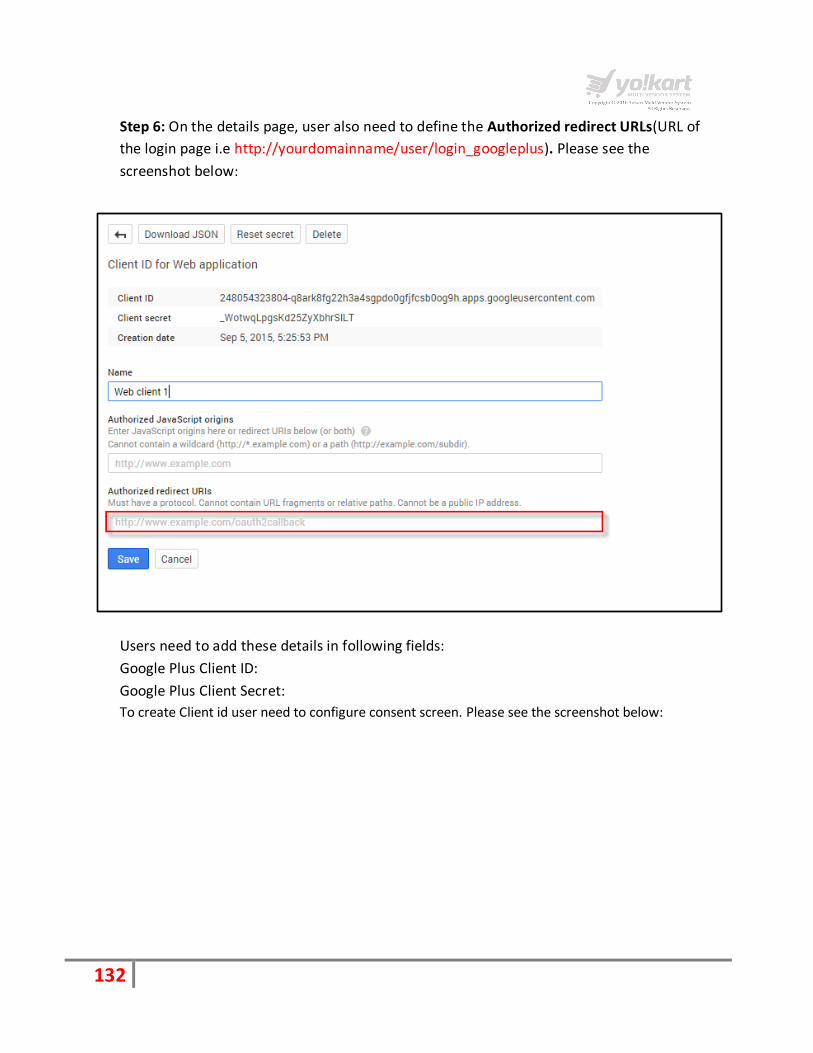
Step 6: On the details page, user also need to define the Authorized redirect URLs(URL of
the login page i.e http://yourdomainname/user/login_googleplus). Please see the
screenshot below:
Users need to add these details in following fields:
Google Plus Client ID:
Google Plus Client Secret:
To create Client id user need to configure consent screen. Please see the screenshot below:

133
Step 7: After creating the Client ID, users need to click on consent screen button which will
redirect the user to the project details page. On this page you need to fill up the following
details about your project:
Project Name
Home Page URL (Optional)
Product logo
Privacy Policy URL (Optional)
Terms of Service URL (Optional)

134
Mailchimp Please see below the steps to fetch MailChimp Key:
Step 1: Login into your Mail Chimp account. Please see the screenshot below:

135
Step 2: After login, on the dashboard page, select Account under drop down on the top
right. Please see the screenshot below:

136
Step 3:-On MailChimp account page, under Extras drop down, select API keys. Refer to the
screenshot:
On the API keys page, click on Create A Key button. Refer to the screenshot:
137
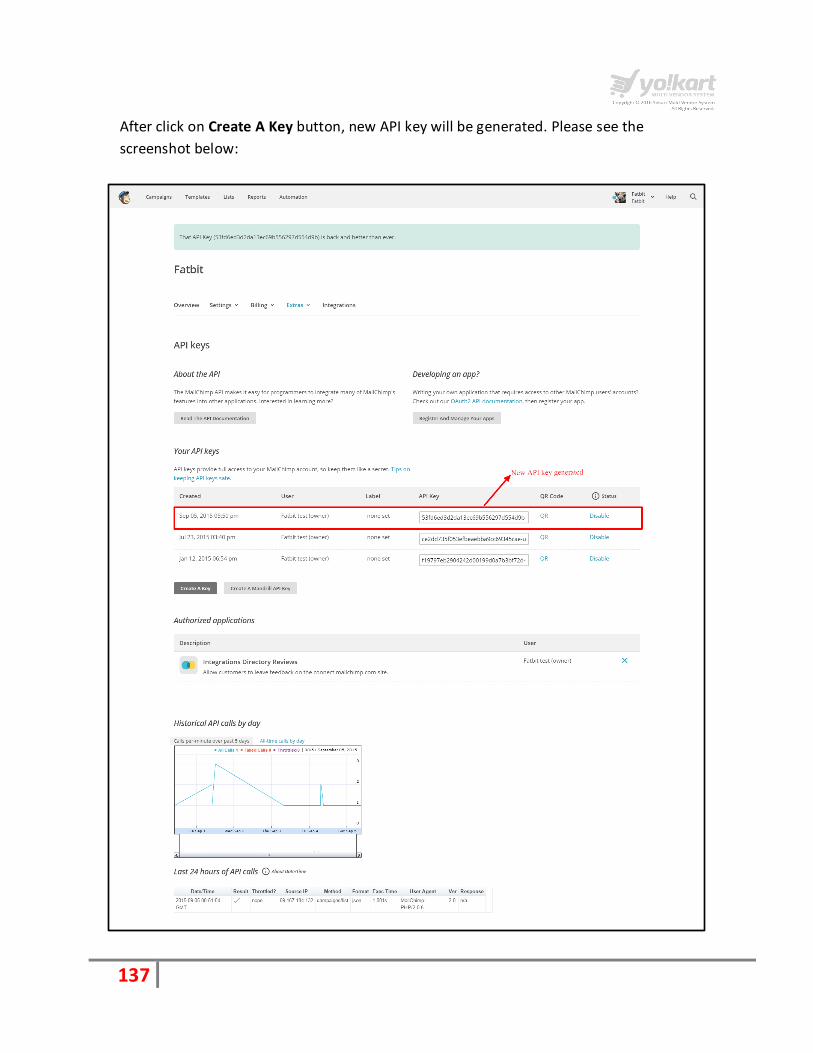
After click on Create A Key button, new API key will be generated. Please see the
screenshot below:
138
You can use this API key as a MailChimp Key
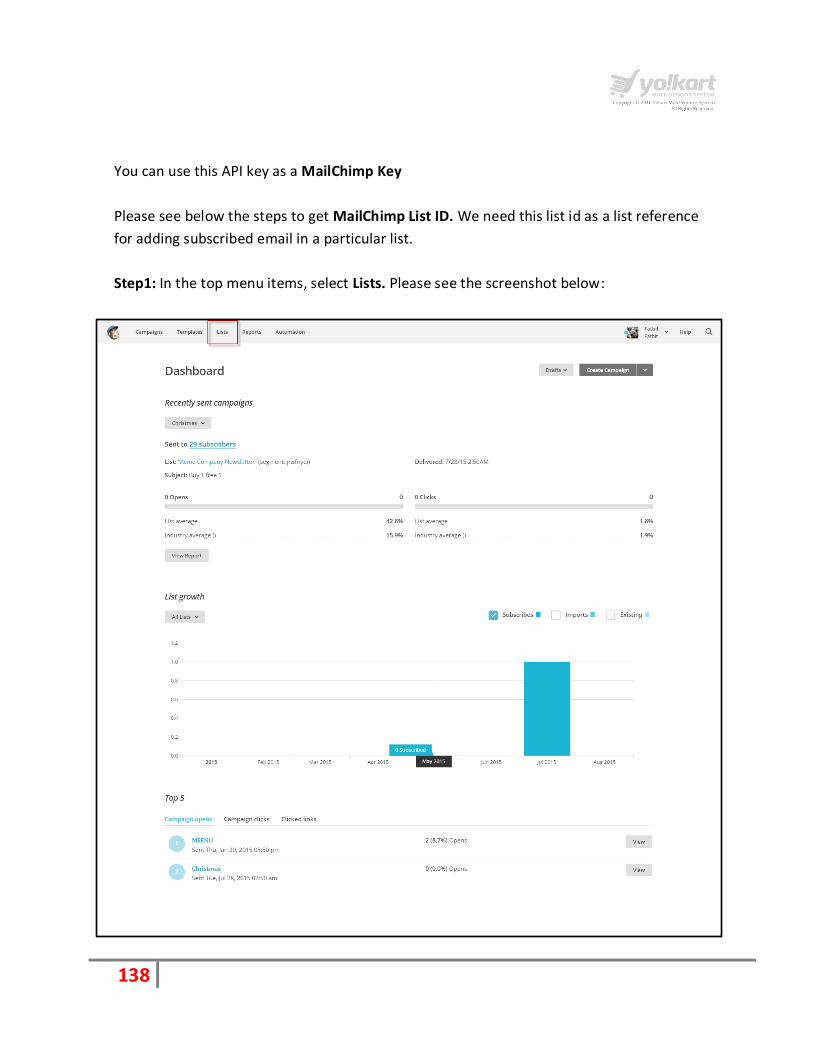
Please see below the steps to get MailChimp List ID. We need this list id as a list reference
for adding subscribed email in a particular list.
Step1: In the top menu items, select Lists. Please see the screenshot below:
139
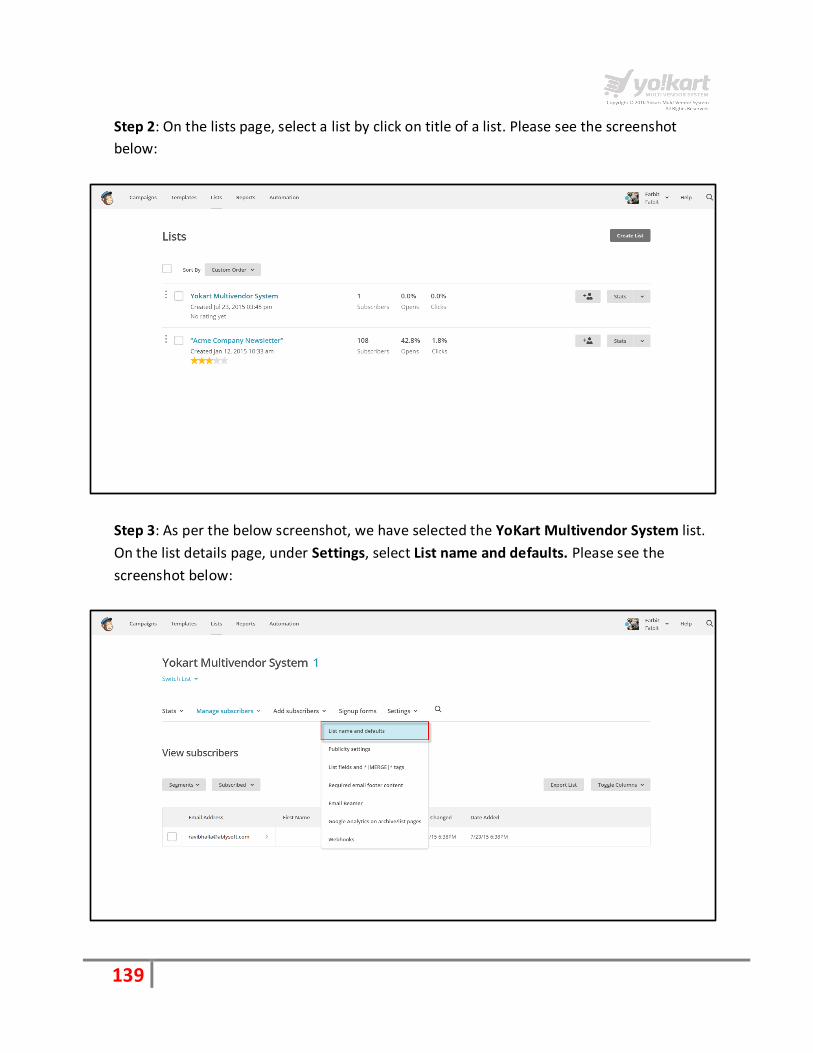
Step 2: On the lists page, select a list by click on title of a list. Please see the screenshot
below:
Step 3: As per the below screenshot, we have selected the YoKart Multivendor System list.
On the list details page, under Settings, select List name and defaults. Please see the
screenshot below:

140
Step 4: On the List name and defaults page, we have a List ID. Under the list id section you
can find the list id. Please see the screenshot below:

141
Linked In Account Please see below the steps to get Linked profile link.
Step 1: Login into your LinkedIn account. Please see the screenshot below:
Step2: Select Edit Profile link under the Profile menu item. Please see the screenshot below:

142
On the edit profile page, you can get the profile link. Please see the screenshot below:
Twitter Account
Please see below the step to get your twitter id
Step 1: Login into your twitter account:

143
Step2: Select settings from the drop down list. Please see the screenshot below:
Step3: On the settings page, under the username, there will be a link of your account. Please
see the screenshot below:

144
General Settings – Email
Under this tab, Admin can set email settings. Please see the screenshot below:
Following options are available on the email settings page:
From Email
From name
Reply to Email Address
Contact Email Address
Send Email
SMTP Email
SMTP Host
SMTP Port
SMTP Username
SMTP Password
145
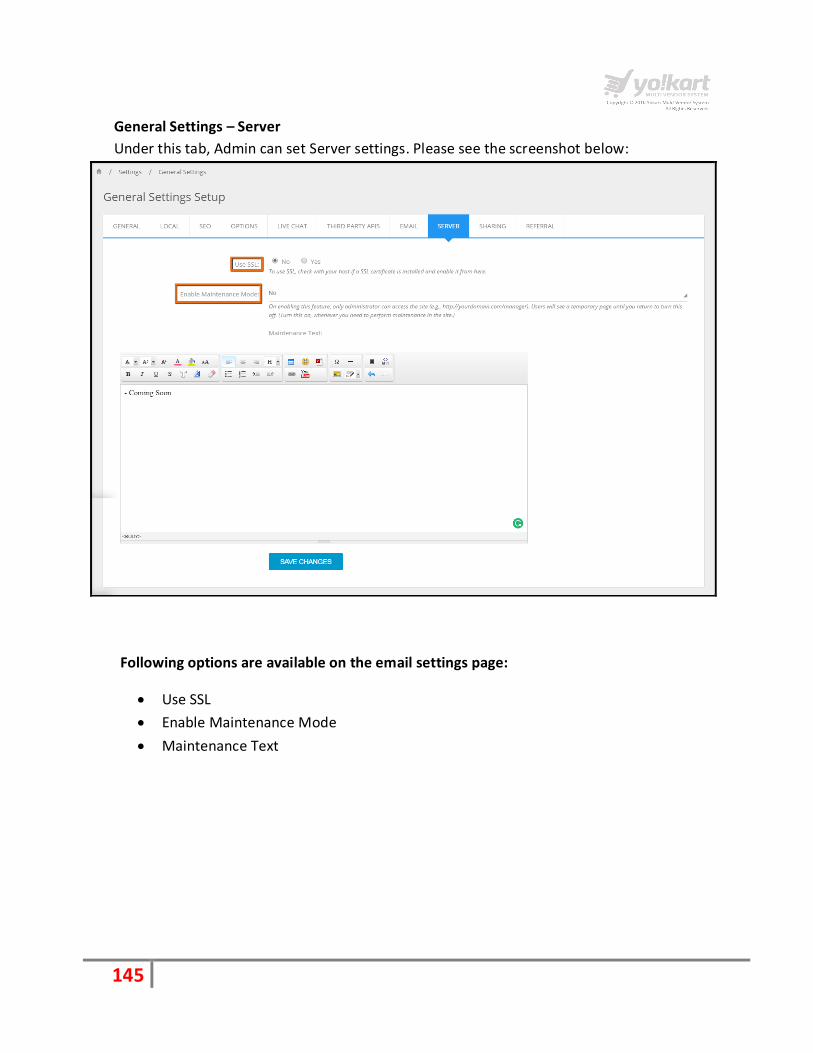
General Settings – Server
Under this tab, Admin can set Server settings. Please see the screenshot below:
Following options are available on the email settings page:
Use SSL
Enable Maintenance Mode
Maintenance Text

146
General Settings – Sharing
Under this tab, Admin can set Sharing settings. Please see the screenshot below:
Following options are available on the email settings page:
Social Feed Image
Facebook – Post Title/Caption/Description
Twitter – Post Title

147
General Settings – Referral
Under this tab, Admin can set Referral settings. Please see the screenshot below:
Following options are available on the email settings page:
Enable Referral Module
Reward Benefits on Registration for Referrers and Referrals
Reward Benefits on First Purchase for Referrers and Referrals
148
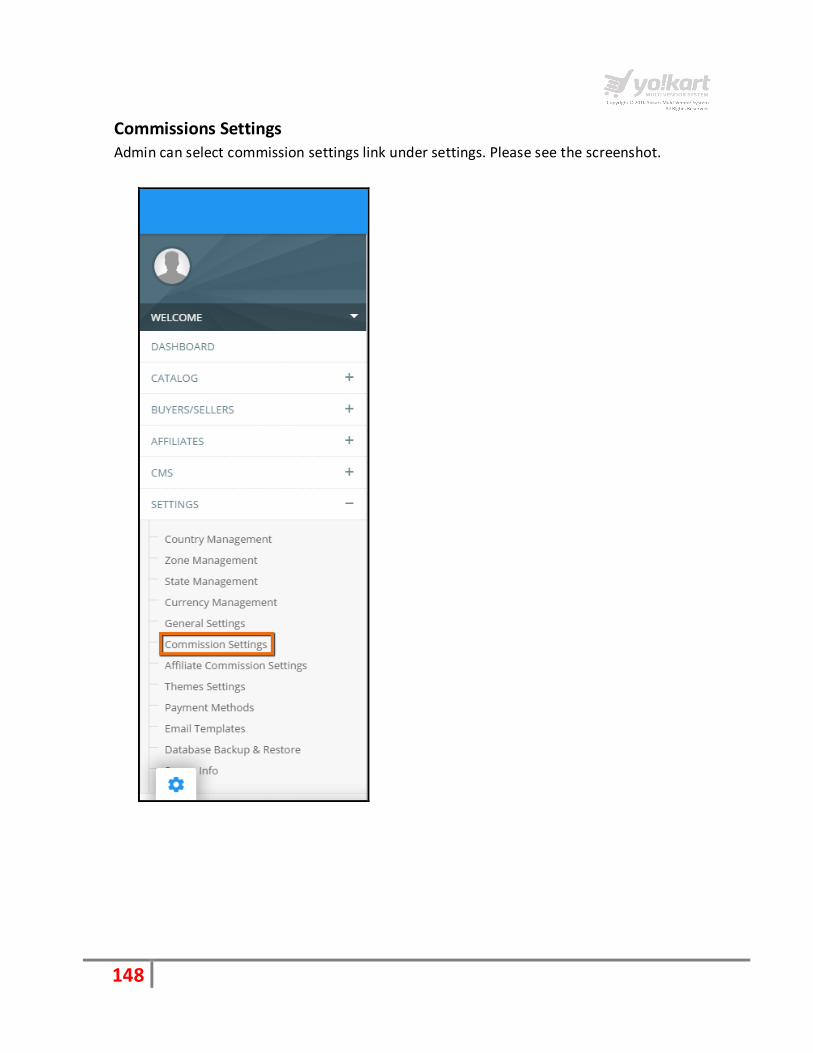
Commissions Settings Admin can select commission settings link under settings. Please see the screenshot.

149
On click of commission settings link, Admin will be redirected to the manage commissions
settings page. Please see the screenshot below:
Admin can add commissions for specific category, vendor & product with fee
Admin can view how the commission settings work by clicking on it. Please see the
screenshot.
150
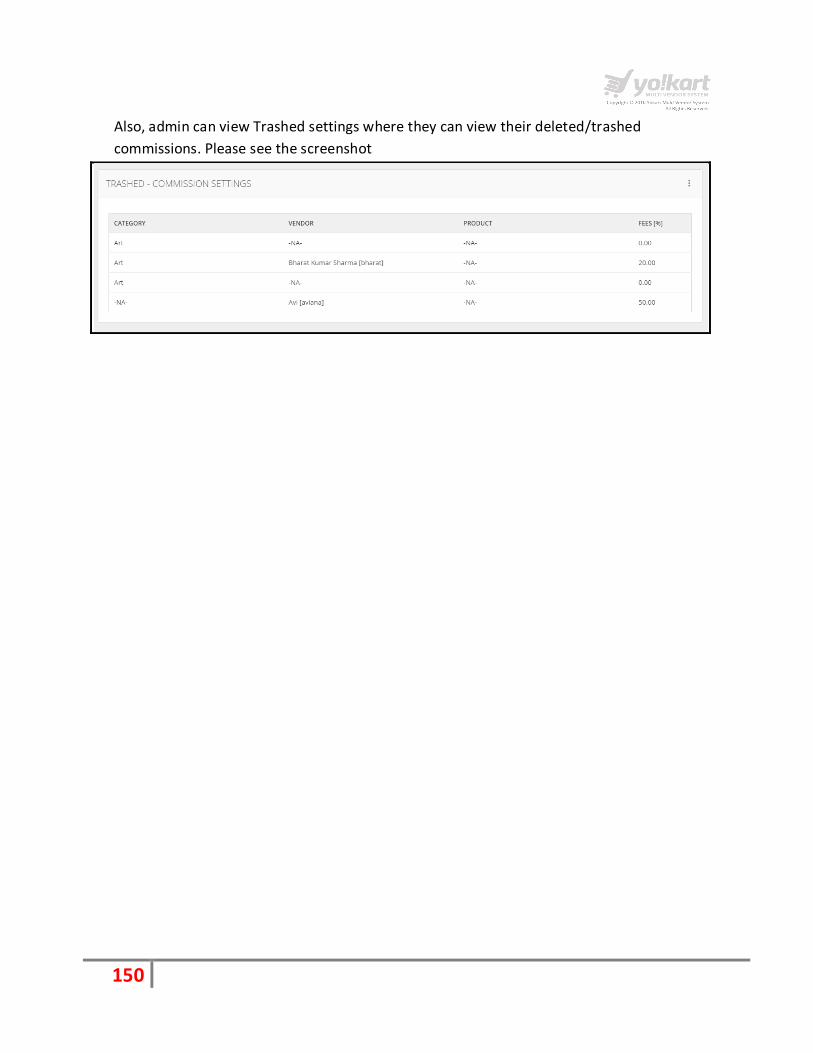
Also, admin can view Trashed settings where they can view their deleted/trashed
commissions. Please see the screenshot
151
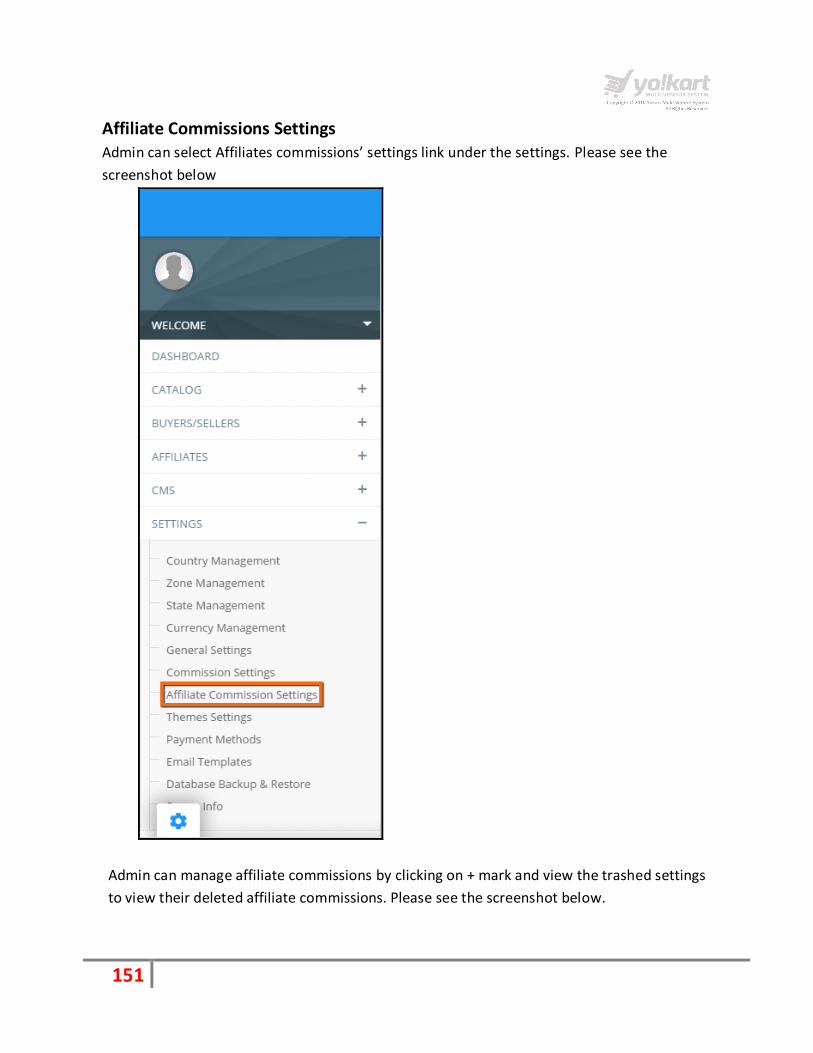
Affiliate Commissions Settings Admin can select Affiliates commissions’ settings link under the settings. Please see the
screenshot below
Admin can manage affiliate commissions by clicking on + mark and view the trashed settings
to view their deleted affiliate commissions. Please see the screenshot below.

152
Theme Settings Admin can select Theme settings link under the settings. Please see the screenshot below:

153
On click of Theme settings link, Admin will be redirected to theme settings page. Admin can
preview or activate the theme from the backend. Please see the screenshot below:
154
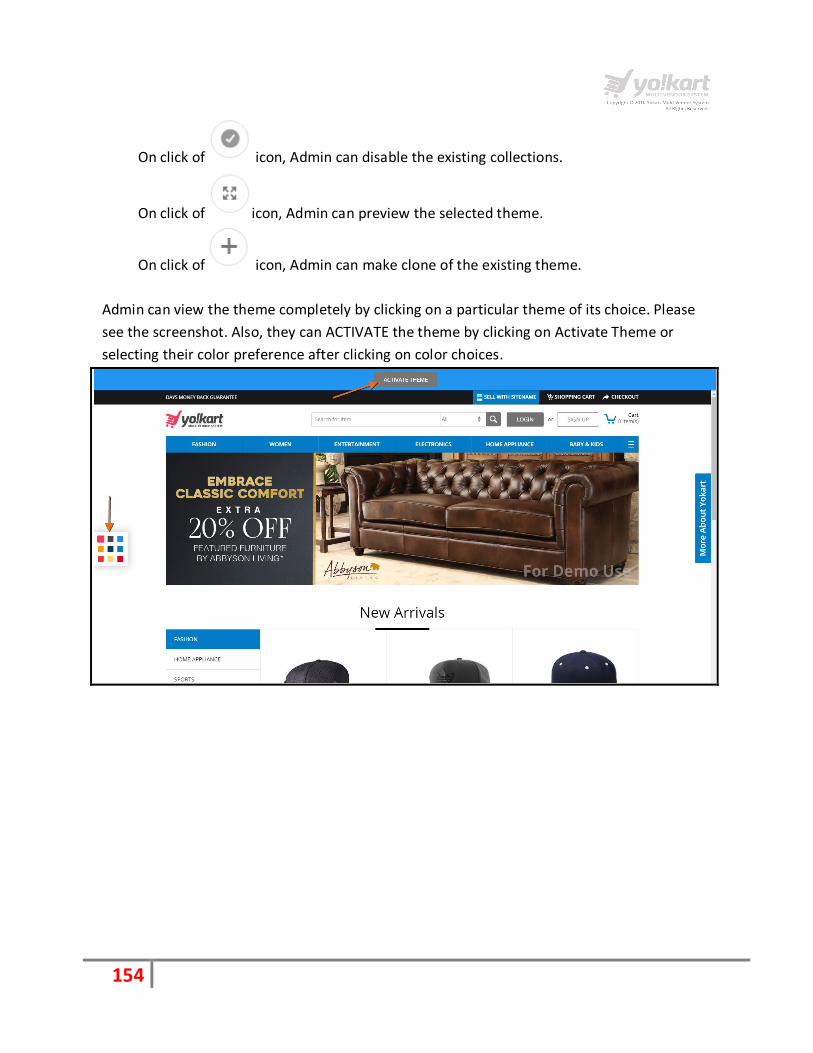
On click of icon, Admin can disable the existing collections.
On click of icon, Admin can preview the selected theme.
On click of icon, Admin can make clone of the existing theme.
Admin can view the theme completely by clicking on a particular theme of its choice. Please
see the screenshot. Also, they can ACTIVATE the theme by clicking on Activate Theme or
selecting their color preference after clicking on color choices.

155
Payment Methods Admin can select Payment method link under the settings. Please see the screenshot below:
156
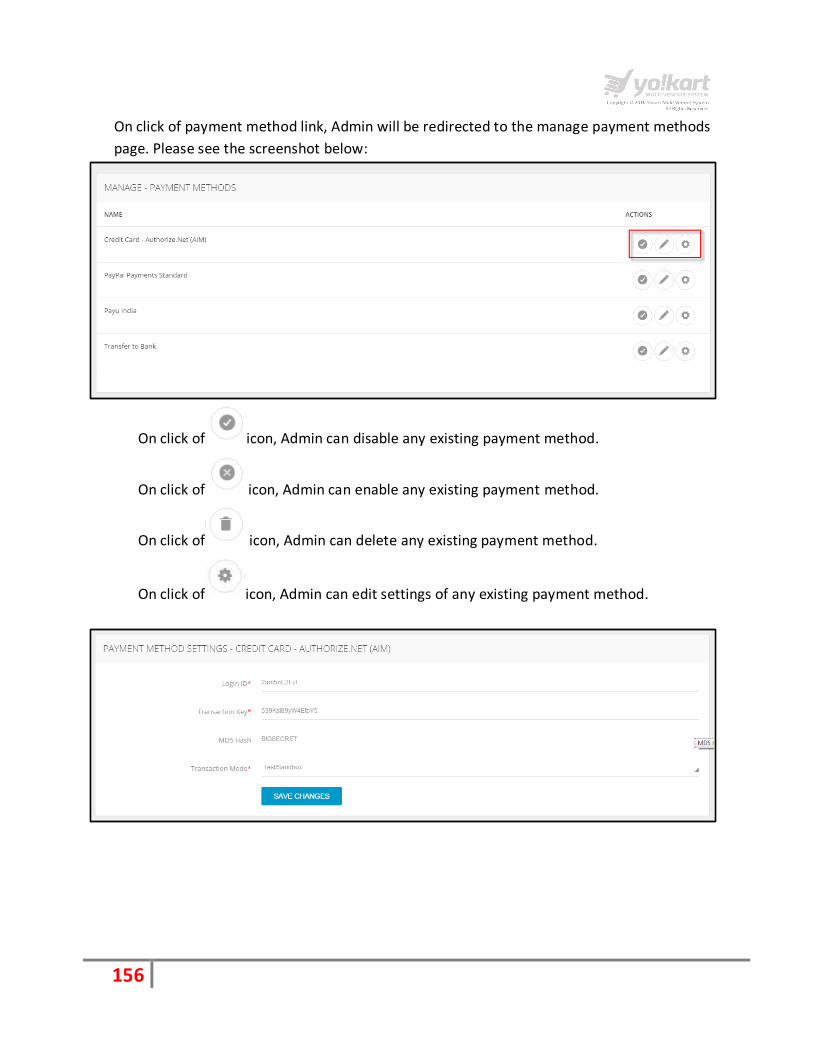
On click of payment method link, Admin will be redirected to the manage payment methods
page. Please see the screenshot below:
On click of icon, Admin can disable any existing payment method.
On click of icon, Admin can enable any existing payment method.
On click of icon, Admin can delete any existing payment method.
On click of icon, Admin can edit settings of any existing payment method.

157
Email Templates Admin can select Email Templates link under the settings menu item. Please see the
screenshot below:
158
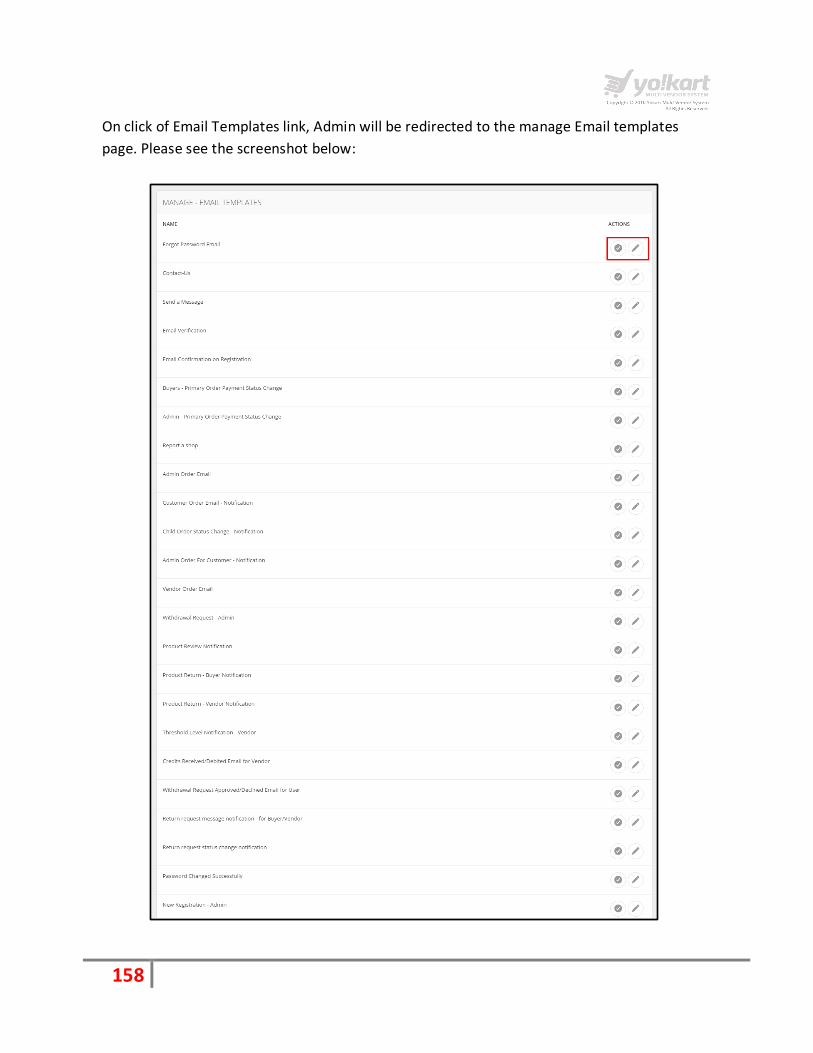
On click of Email Templates link, Admin will be redirected to the manage Email templates
page. Please see the screenshot below:

159
Following type of email templates are available in this section:
Forgot Password Email
This template will be send to user when he will receive an email regarding the reset
password link.
Contact us
This template will be triggered when a user submit the contact us form on site.
Send a message
This is template for conversation between a supplier and a buyer.
Email verification
This template will be triggered and send to users for verify their email address.
Email Confirmation on registration
This template will be triggered when users register on the site, for confirm their email.
Buyers - Primary Order Payment Status Change
This template will be triggered when a primary order status will be changed. Buyer will
receive this email.
Admin - Primary Order Payment Status Change
This template will be triggered when a primary order status will be changed. Admin will
receive this email.
Report a shop
This template will be triggered when a user report a shop to YoKart. Admin will receive
this email notification.
Admin Order Email
This template will be triggered when an order will be made on site.
Customer Order Email – Notification
This template will be triggered
Child Order Status Change – Notification

160
This template will be triggered when a child order status will be changed
Admin Order For Customer – Notification
This template will be triggered when a child order status will be changed. Admin will
receive this notification via email.
Vendor Order Email
This template will be triggered when a vendor receive an order.
Withdrawal Request – Admin
This template will be triggered when a vendor request for a withdrawal. Admin will
receive email regarding the withdrawal request.
Product Review Notification
This template will be triggered when a vendor will receive review on his product.
Product Return - Buyer Notification
This template will be triggered when a buyer request for return a product. Buyer will
receive an email regarding the same.
Product Return - Vendor Notification
This template will be triggered when a buyer request for return a product. Vendor will
receive an email regarding the same.
Threshold Level Notification – Vendor
This template will be triggered to receive inventory notification for a product. Vendor will
receive email regarding the same.
Credits Received/Debited Email for Vendor
This template will be triggered
Withdrawal Request Approved/Declined Email for User
This template will be triggered when a withdrawal request approved/Decline by Admin.
Vendor will receive this email.
Return request message notification - for Buyer/Vendor
161
This template will be triggered when a buyer submit a return request. Both buyer and
vendor will receive this email.
Return request status change notification
This email template will be triggered after change status of a return request.
Password Changed Successfully
This template will be triggered after change password through password reset link.
New Registration – Admin
This template will be triggered when a new user register on site. Admin will receive email
regarding the same.
Welcome Mail on Registration
This template will be triggered for send a welcome email to a new registered user.
Note: In general settings under the option tab, Admin can check/uncheck the settings to
send welcome mail after registration.
Order Cancellation Notification - Vendor &Admin
This template will be triggered when a buyer cancels an order. Vendor and Admin both
will receive this notification.
Note: After cancel an order, only Admin can Approve/Decline the cancel request for an
order.
Cancellation Request Approved/Declined Email for User
This template will be triggered when a cancellation request is Approved/Declined by
Admin. Buyer will receive this email.
On click of icon, Admin can disable any existing email template and on click of icon,
Admin can enable any existing email template.
On click of icon, Admin can easily edit the content and language of any email template

162
Database Backup and restore In this section Admin can back up and restore the database. Please see the screenshot below:
In Database Backup & Restore section:
Admin need to define the filename, on click of Backup on Server. A back file will be created
on server.
On click of Download Database button Admin can download a database.

163
On click of Restore Database button Admin can restore a database.
On click of Delete Database button, Admin can delete the back file.
In Database upload section:
Admin can upload a database file. This file will be listing under the list of database back up
files:
Admin can Download Restore and Delete database file.
Server Info
On this page Admin can view the info about his/her server. Please see the screenshot below:

164
8. Orders
There are following links are available under the orders section:
Customer Orders
Vendor Orders
Withdrawal Requests
Return Requests
Customer Orders
Admin can select Customer Orders link under the Orders menu item. Please see the
screenshot below:
165
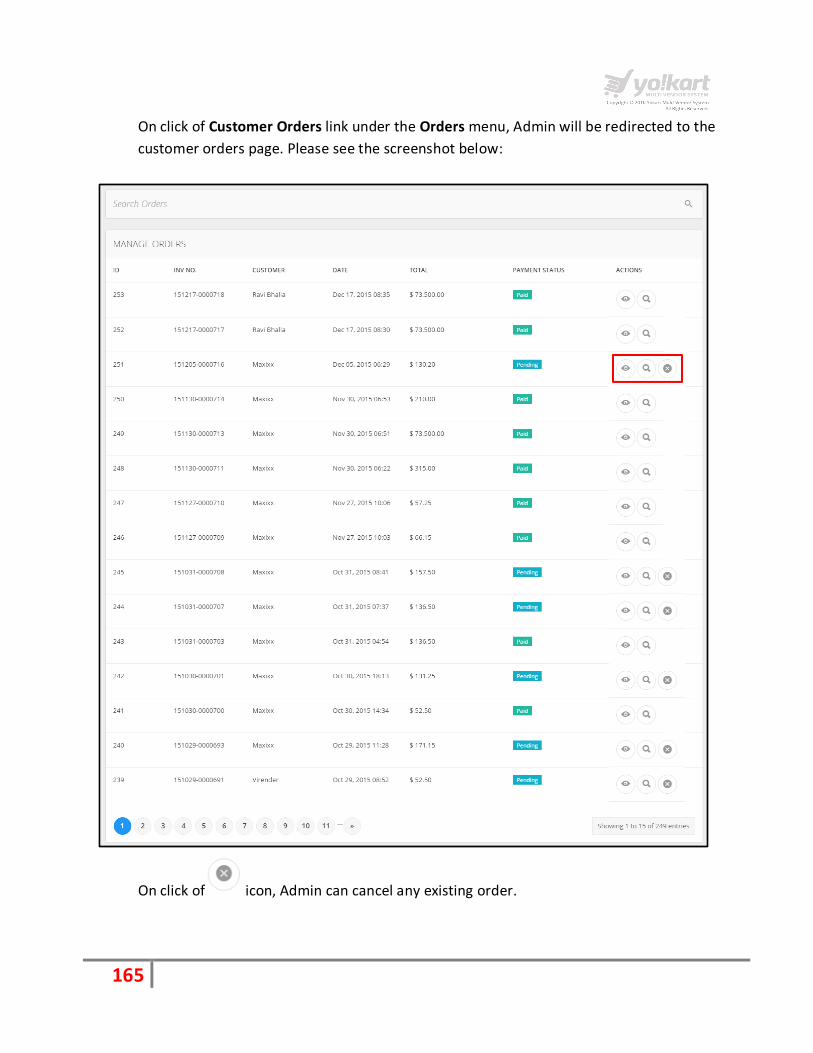
On click of Customer Orders link under the Orders menu, Admin will be redirected to the
customer orders page. Please see the screenshot below:
On click of icon, Admin can cancel any existing order.

166
On click of icon, Admin can view the details of an order. Please see the screenshot
below:

167
On the order details page, Admin can view following information about an order:
IP Address – IP Address of Buyer
Invoice id – Invoice id generated by system.
Payment Status
Discount Coupon – If there would be any discount coupon used by buyer.
Payment Method – As per the above screenshot, user has paid through wallet.
Commission – Portal Commission
Tax – Tax amount (Set by Admin through general settings, current tax is: 5% )
Order Total – Product Amount + Tax
In case of Bank transfer, on the customer order details page, Admin has to add the following
information about the payment:
Payment Method
Txn ID
Amount
Comments
Please see the screenshot below:

168
On click of icon, Admin can view the vendor associated with existing order.Please
see the screenshot below:
On click of icon, Admin can cancel an order. On click of icon,Admin can view the
following information as a vendor about an order:
IP Address – IP Address of Buyer
Invoice id – Invoice id generated by system.
Payment Status
Order Date
Customer id
Payment Method – As per the above screenshot, user has paid through wallet.
Commission – Portal Commission
Tax – Tax amount (Set by Admin through general settings, current tax is: 5% )
Order Total – Product Amount + Tax
Please see the screenshot below:

169
On click of Back to Vendor Orders link, Admin will be redirected to the vendor orders
listing page.
170
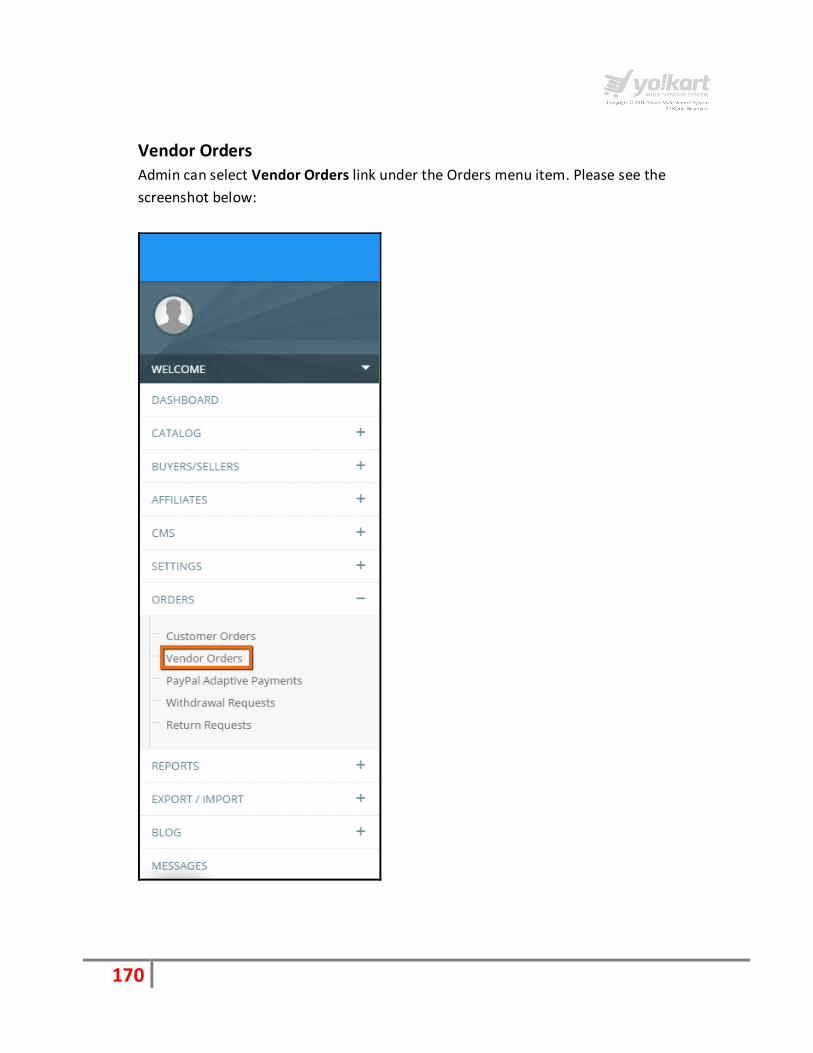
Vendor Orders
Admin can select Vendor Orders link under the Orders menu item. Please see the
screenshot below:

171
On click of Vendor Orders, Admin will be redirected to the Manage Vendor Orders page.
Please see the screenshot below:

172
On click of icon, Admin can cancel a cancellation request.
Note: We are considering each product in an order as a sub order. For ex: If there are
three products in an order then there will be three sub orders under that order.
On click of icon, Admin can view detail of any order. Please see the screenshot
below:

173

174
PayPal Adaptive Payments Admin can select PayPal Adaptive Payments link under Orders menu item. Please see
the screenshot below regarding the same:

175
On click of PayPal Adaptive Payments link under the Orders menu, Admin will be
redirected to the Payments page. Please see the screenshot below:

176
Withdrawal Requests
Admin can select Withdrawal Requests link under Orders menu item. Please see the
screenshot below regarding the same:

177
On click of Withdrawal Requests link under the Orders menu, Admin will be redirected
to the withdrawal requests page. Please see the screenshot below:
On click of icon, Admin can approve a withdrawal request. On click of icon,
Admin can cancel a withdrawal request.
Default status of each request will be pending. After Approve/Cancel a request, request
status will be updated accordingly.
On click of icon, Admin can search a return request by keyword and status. Please
see the screenshot below:
Note: Admin has to manually deposit amount in Sellers account.
178
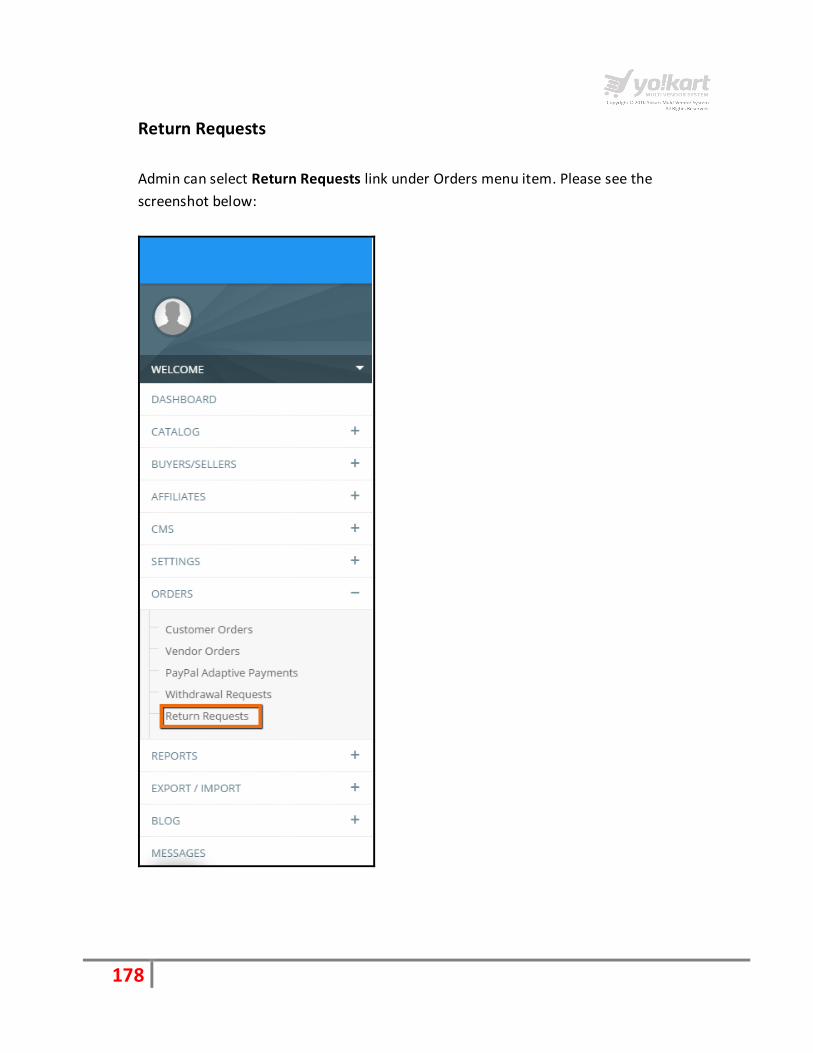
Return Requests
Admin can select Return Requests link under Orders menu item. Please see the
screenshot below:
179
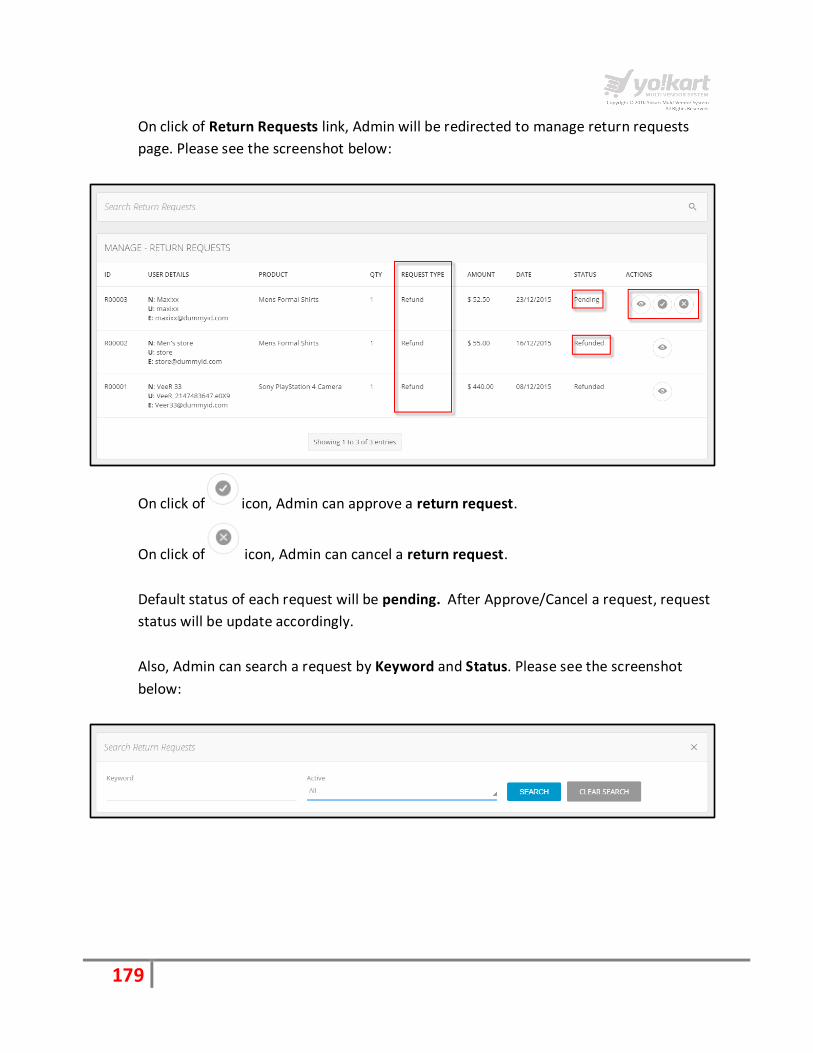
On click of Return Requests link, Admin will be redirected to manage return requests
page. Please see the screenshot below:
On click of icon, Admin can approve a return request.
On click of icon, Admin can cancel a return request.
Default status of each request will be pending. After Approve/Cancel a request, request
status will be update accordingly.
Also, Admin can search a request by Keyword and Status. Please see the screenshot
below:

180
On click of icon, Admin can view order details and messages thread between the
buyer and Vendor. Please see the screenshot below:
On click of Back to Return Requests link, Admin will be redirected to the return request
listing page.
On this page Admin can view the following details about a request:
Product Name
Quantity
Request Type
Reason
Date Status
Amount
Messages
Admin message section – Admin can send message to both vendor and buyer.

181
9. Reports
In this section Admin can view the reports by Users, vendors etc. Following links are
available under the reports section:
Sales
Users
Products
Shops
Tax
Commissions
Affiliates
Sales
Admin can select Sales link under the Reports menu item. Please see the screenshot
below:
182
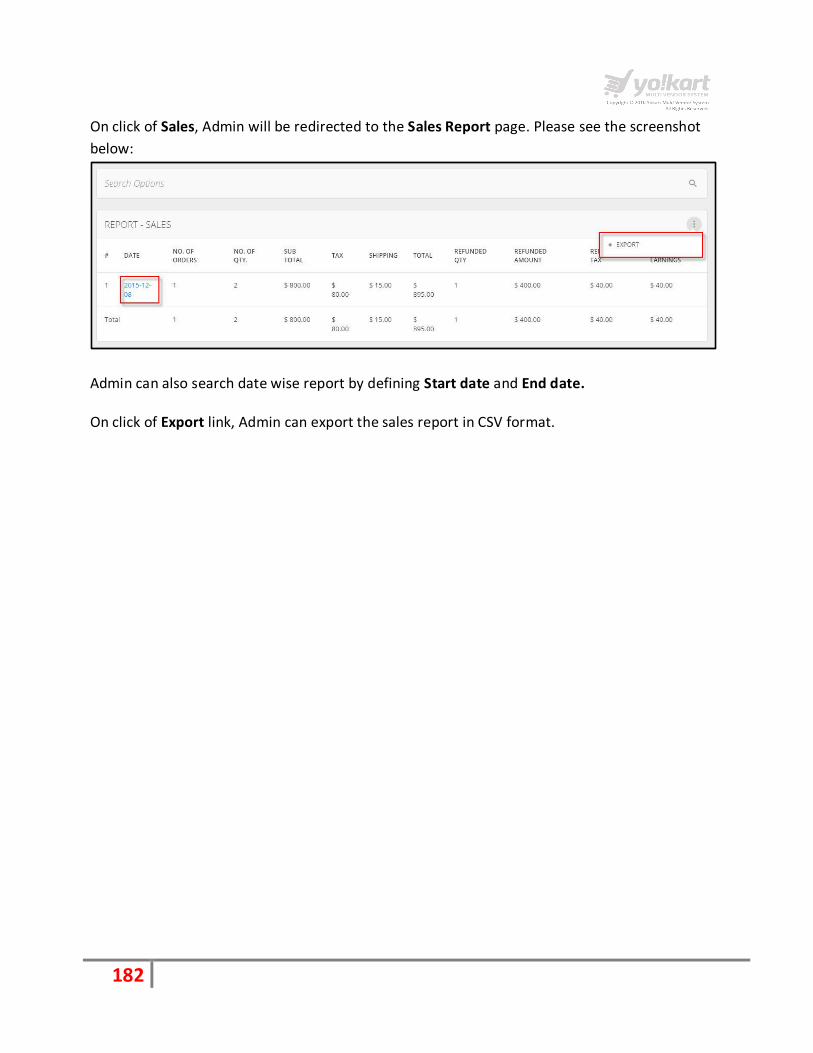
On click of Sales, Admin will be redirected to the Sales Report page. Please see the screenshot
below:
Admin can also search date wise report by defining Start date and End date. On click of Export link, Admin can export the sales report in CSV format.
183
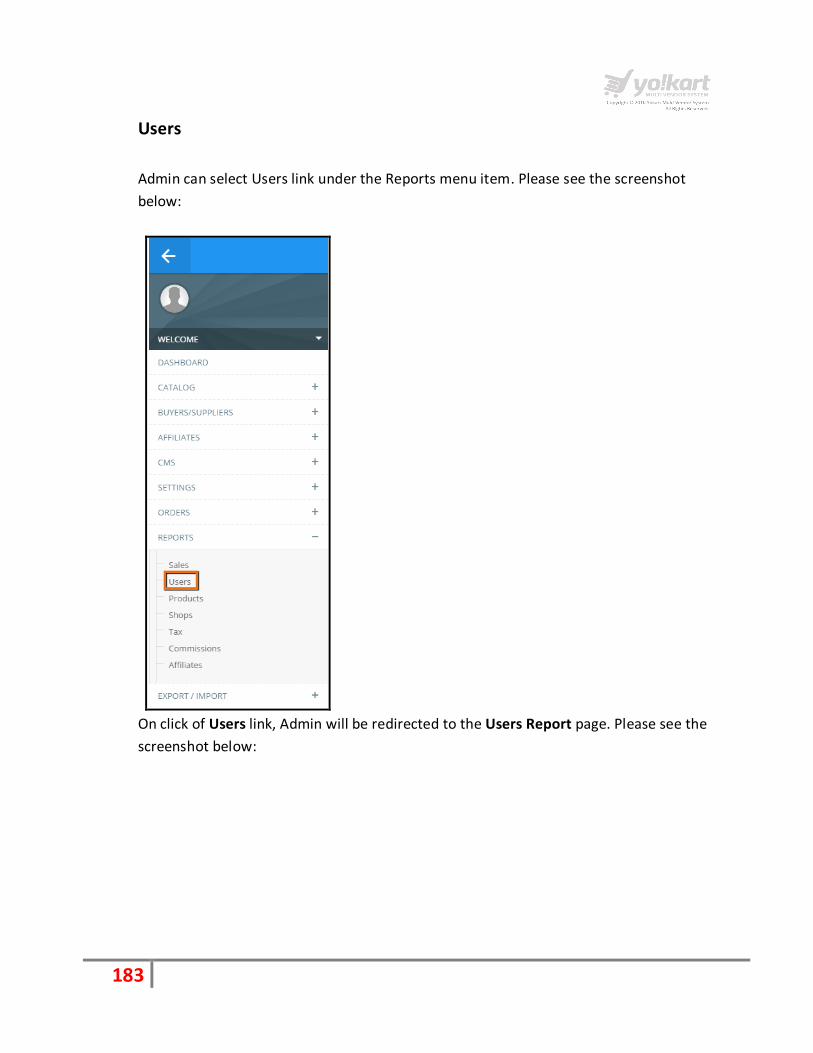
Users
Admin can select Users link under the Reports menu item. Please see the screenshot
below:
On click of Users link, Admin will be redirected to the Users Report page. Please see the
screenshot below:
184
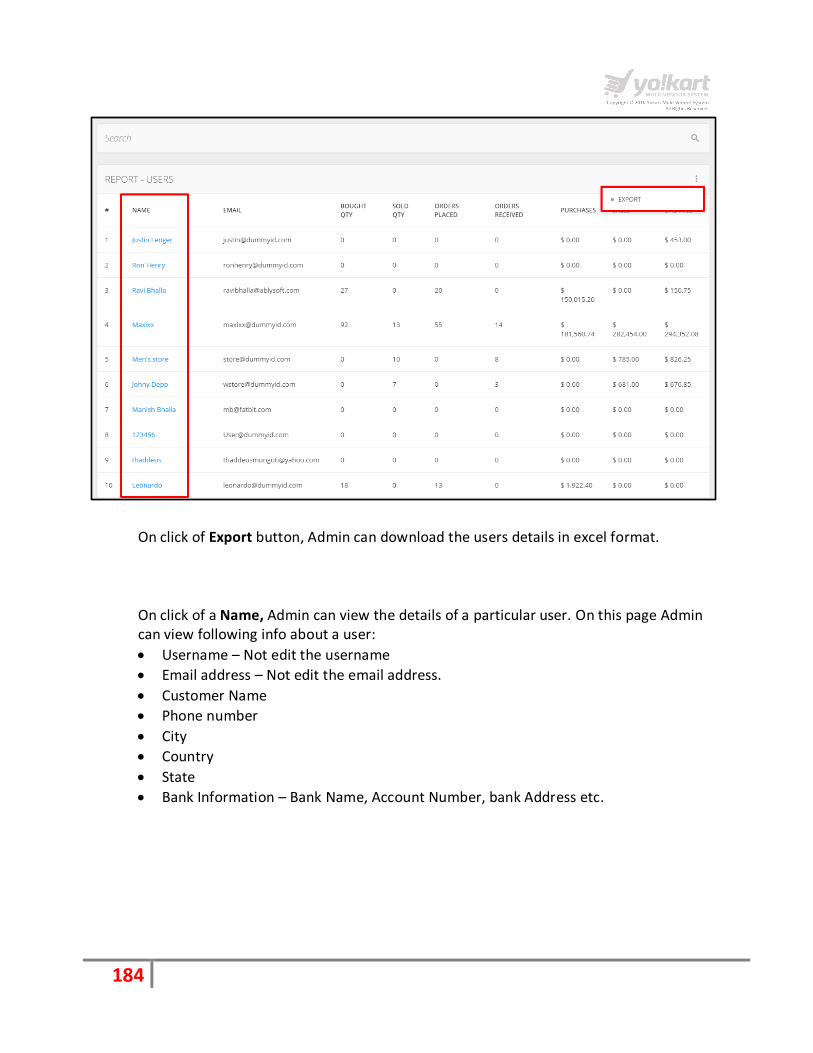
On click of Export button, Admin can download the users details in excel format.
On click of a Name, Admin can view the details of a particular user. On this page Admin can view following info about a user:
Username – Not edit the username
Email address – Not edit the email address.
Customer Name
Phone number
City
Country
State
Bank Information – Bank Name, Account Number, bank Address etc.

185
Please see the screenshot below:

186
Products
Admin can select Products link under the Reports menu item. Please see the screenshot
below:

187
On click of Products link under the Reports menu item, Admin will be redirected to the
products report page. Please see the screenshot below:
On click of Export link, Admin can export the products report in excel format (.xls)
On the product reports page, Admin can view following information about each product:
Title
Unit Price
No of orders
Sold Qty
Total
Shipping
Tax
Total (Total + Shipping + Tax)
Commission

188
On click of product title, Admin will be redirected to the product details page. Please see
the screenshot below:
189
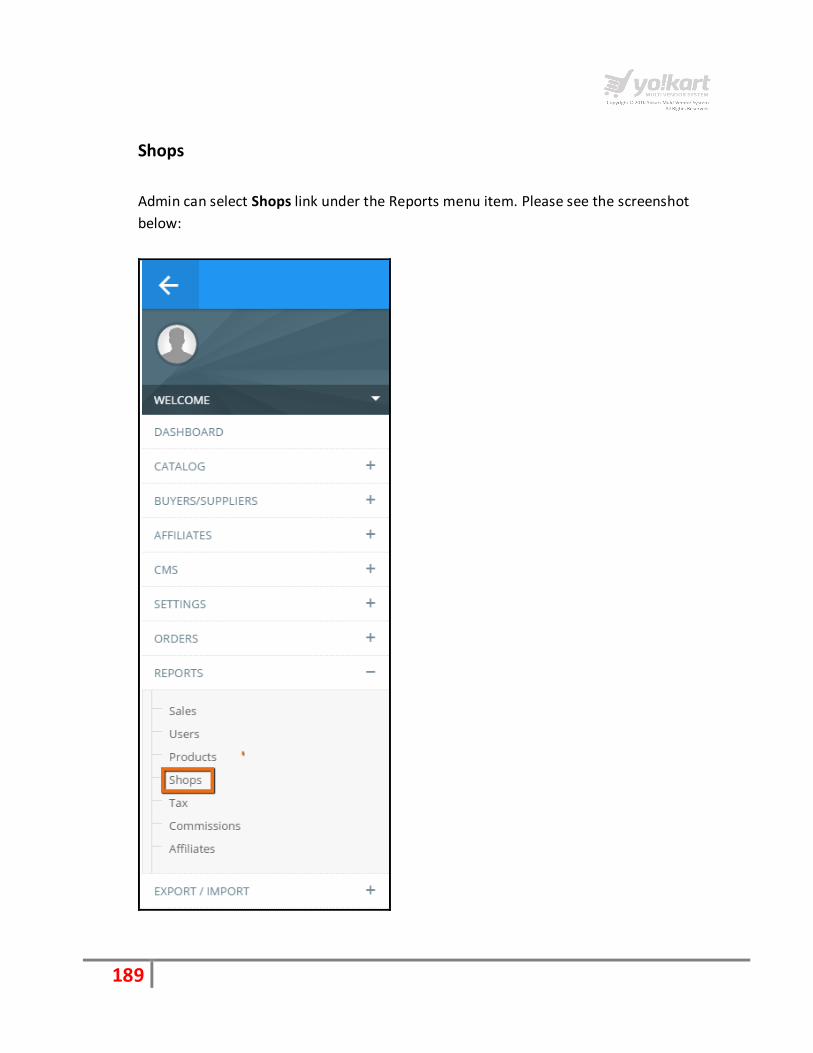
Shops
Admin can select Shops link under the Reports menu item. Please see the screenshot
below:

190
On click of a Shop link, Admin will be redirected to the Shops Report page. Please see
the screenshot below:
On the Shops Report page, Admin can view the following info about a shop:
Shop Name – Name of the Shop.
Shop Owner – Name of the shop owner.
Shop Items – Number of products uploaded shop owner.
Sold Quantity – Number of products sold so far.
Sales – Total Sales
Site Commission – Site commission earned through total sales.
Reviews – Number of reviews
Rating–Average rating according to all reviews.
On click of Export link, Admin can export shops information in excel file.

191
Tax
Admin can select Tax link under Reports menu item. Please see the screenshot below:

192
On click of Tax link, Admin will be redirected to the Tax Report page. Please see the
screenshot below:
On click of Export button, Admin can export the data in excel file (Format: .xls)
On click of Shop name, Admin will be redirected to the Shop details page.Please see the
screenshot below:

193
On the shop details page, Admin can view following information about a shop.

194
Commissions
Admin can select Commissions link under Reports menu item. Please see the screenshot
below:

195
On click of Commissions link under the Reports section, Admin will be redirected to the
Commission’s report page. Please see the screenshot below:
On click of Export button, Admin can export the data in excel file (Format: .xls)
On this page Admin can view the following details about the commissions:
Shop Name – Name ot the shop
Orders – Total number of orders of a shop
Sales – Total sales of a Shop
Commission – Commission earned through a shop On click of Shop title, Admin will be redirected the shop details page.

196
Affiliates
Admin can select Affiliates link under Reports menu item. Please see the screenshot
below:

197
On click of Affiliates link under the Reports section, Admin will be redirected to the
Commission’s report page. Please see the screenshot below:
On click of Export button, Admin can export the data in excel file (Format: .xls)
On this page Admin can view the following details about the commissions:
Name – Name of the Affiliate User
Email – Email address of the User
Date – Registration Date of User
Account Balance – Account balance of the Affiliate User
Revenue- Revenue generated by Affiliate User.
Commission Received- Commission received by Affiliate User
Commission Pending- Pending commissions of Affiliate User On click of Affiliate name, Admin will be redirected the Affiliate details page.
198
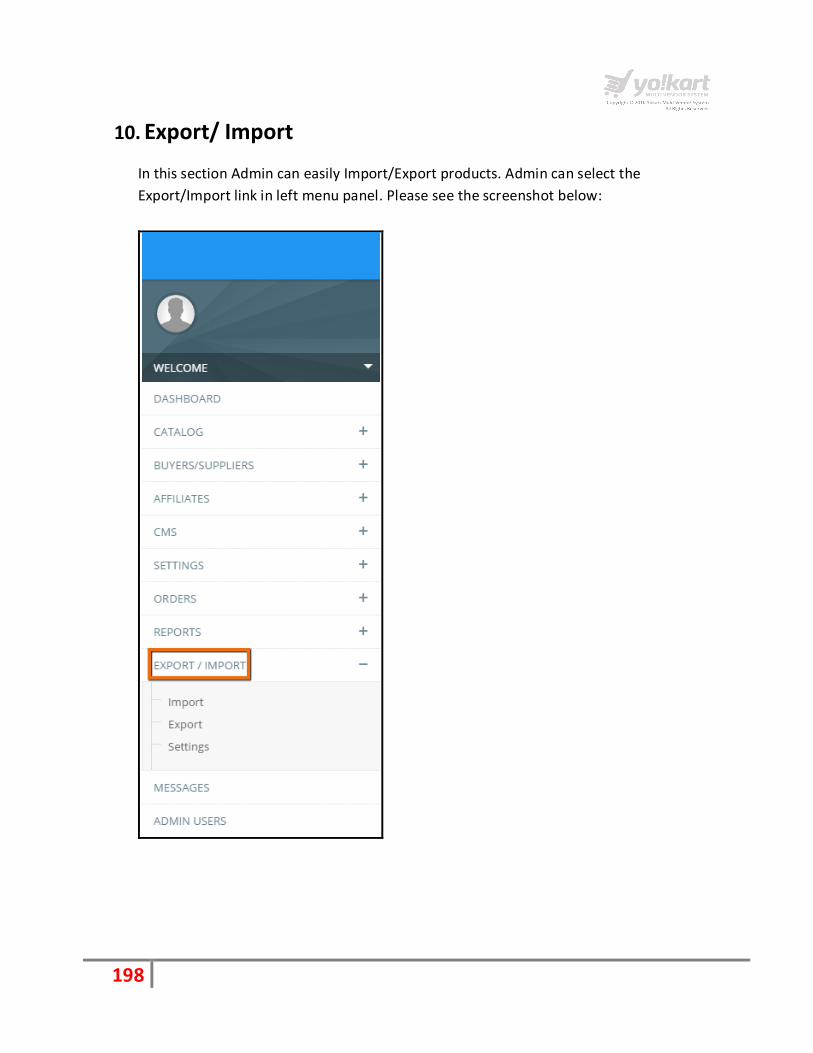
10. Export/ Import
In this section Admin can easily Import/Export products. Admin can select the
Export/Import link in left menu panel. Please see the screenshot below:

199
On click of Export/Import link, Admin will be redirected to the Import-Export Settings
page. Please see the screenshot below:
Following are the list of information which is available for export:
Categories
Products
Option definations
Attribute definitions
Filter definitions
Shipping definitions
Shipping Companies
Categories
200
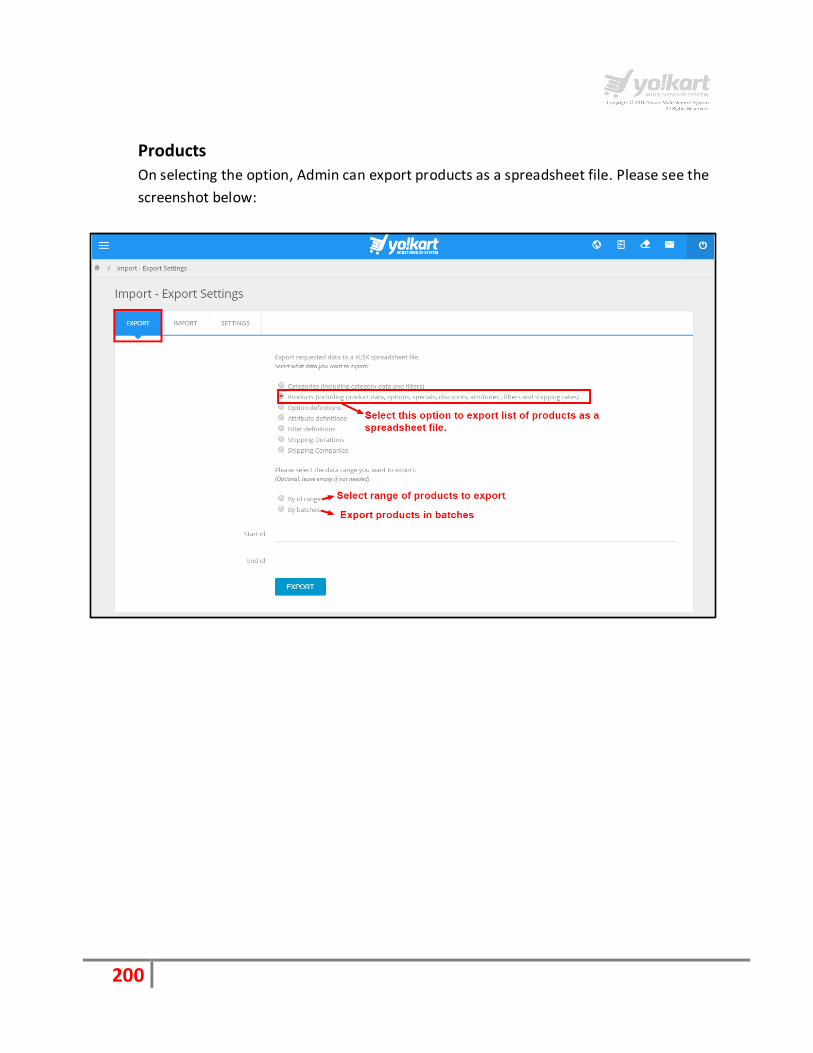
Products
On selecting the option, Admin can export products as a spreadsheet file. Please see the
screenshot below:
201
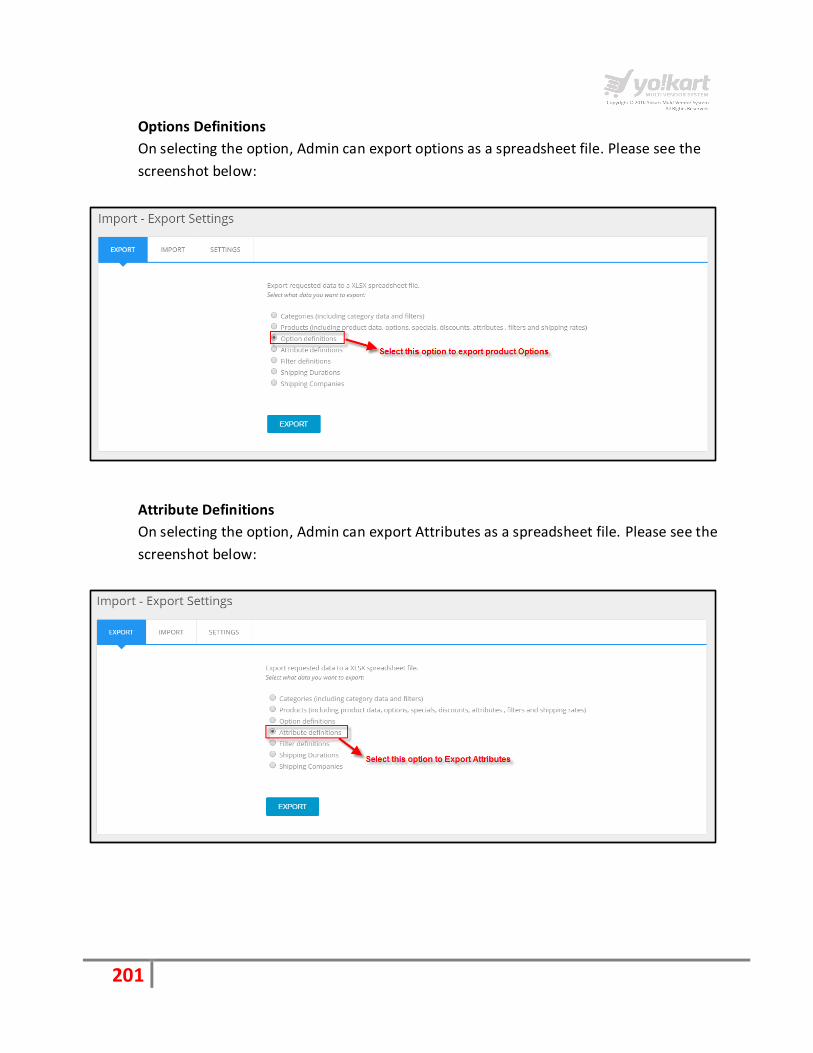
Options Definitions
On selecting the option, Admin can export options as a spreadsheet file. Please see the
screenshot below:
Attribute Definitions
On selecting the option, Admin can export Attributes as a spreadsheet file. Please see the
screenshot below:
202
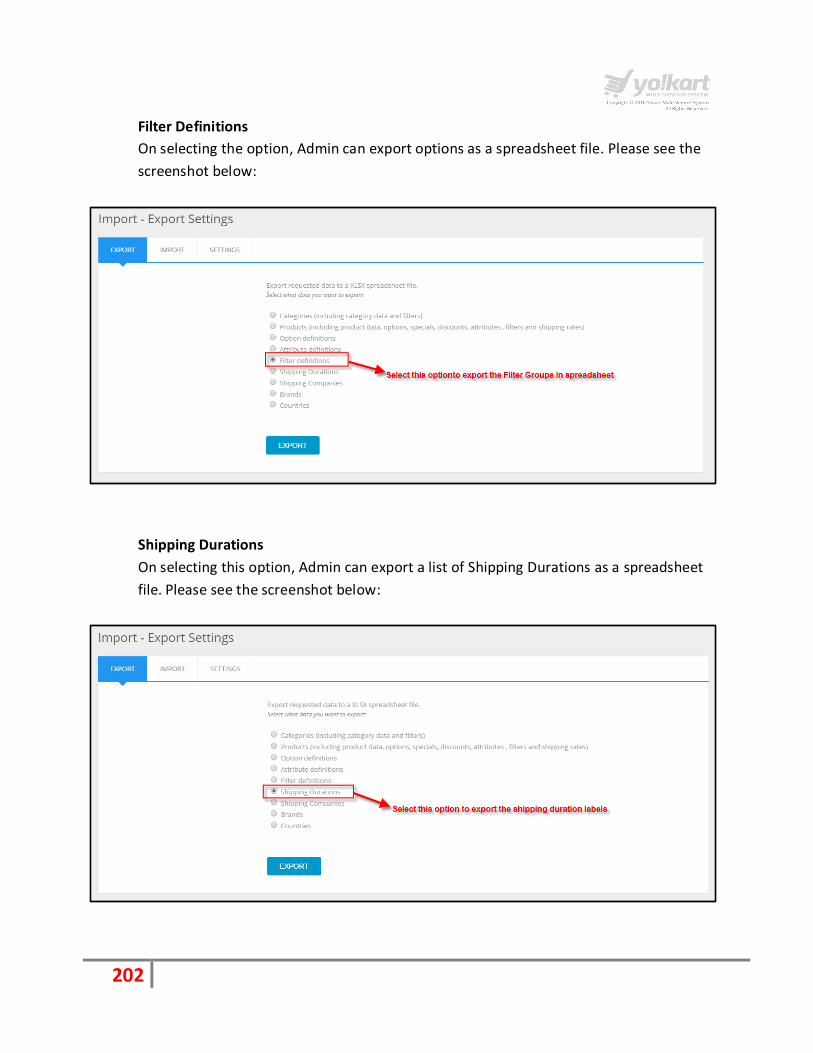
Filter Definitions
On selecting the option, Admin can export options as a spreadsheet file. Please see the
screenshot below:
Shipping Durations
On selecting this option, Admin can export a list of Shipping Durations as a spreadsheet
file. Please see the screenshot below:
203
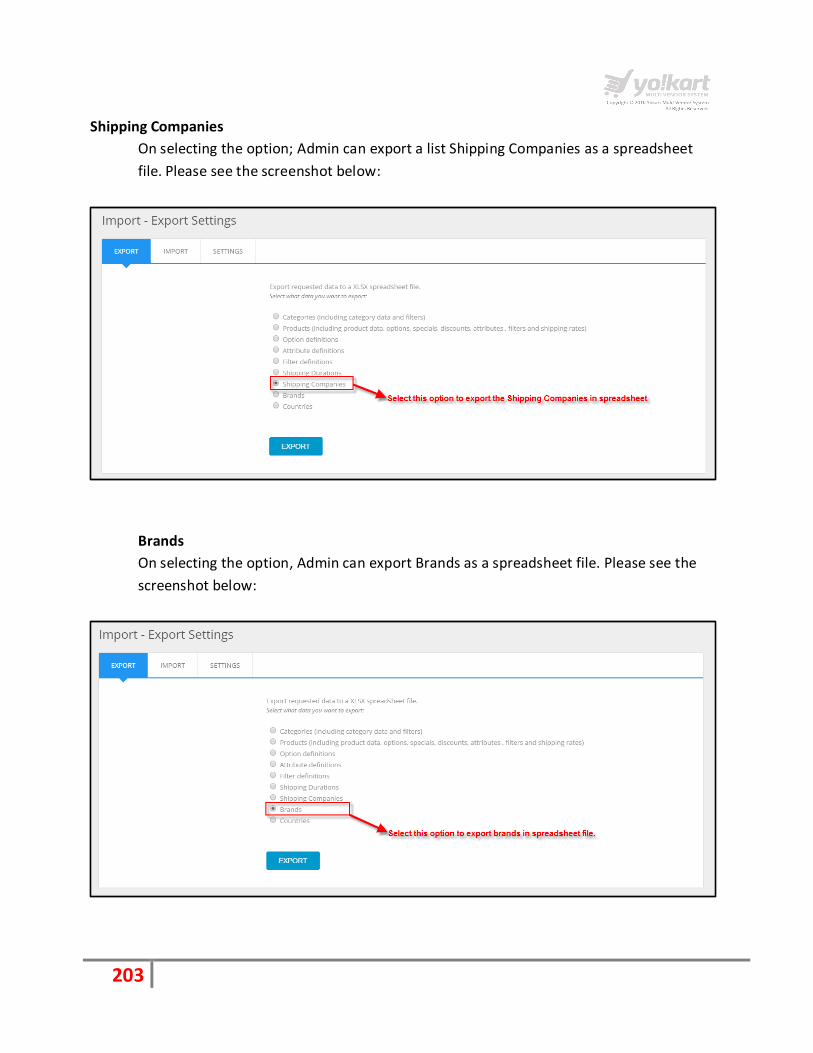
Shipping Companies
On selecting the option; Admin can export a list Shipping Companies as a spreadsheet
file. Please see the screenshot below:
Brands
On selecting the option, Admin can export Brands as a spreadsheet file. Please see the
screenshot below:
204
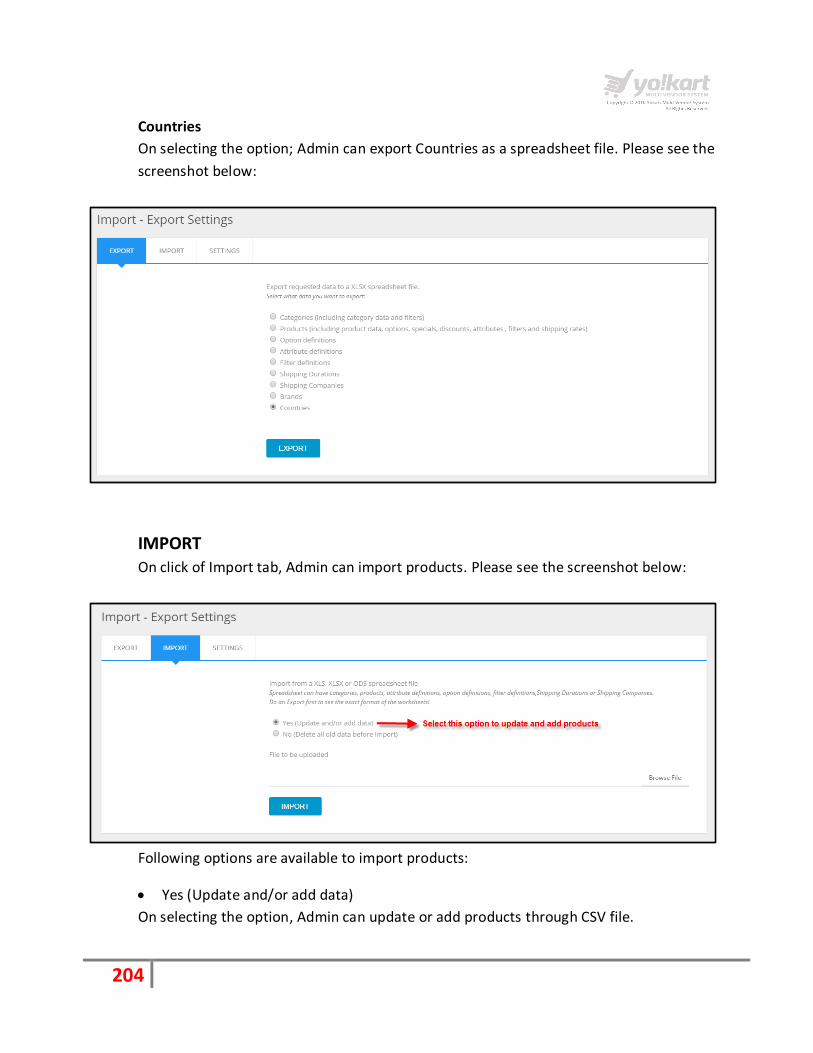
Countries
On selecting the option; Admin can export Countries as a spreadsheet file. Please see the
screenshot below:
IMPORT On click of Import tab, Admin can import products. Please see the screenshot below:
Following options are available to import products:
Yes (Update and/or add data)
On selecting the option, Admin can update or add products through CSV file.

205
System will compare the products id with CSV file, existing products will be updated and
others products will be added in the system.
No (Delete all old data before import)
In this process, firstly system is removing the details of existing product and adding the
details mentioned in the CSV file.
On selecting the option; Admin can export options as a spreadsheet file. Please see the
screenshot below:

206
Settings
On the settings page, Admin can select setting to Import/Export information from database.
Please see the screenshot below:
Use collection_id instead of collection Name in worksheets 'categoryCollections'
You can check this to Import/Export collection id instead collection name.
Use added_by_id instead of added by (user name) in worksheets 'Products'
You can check this option to Import/Export id of the user who added this product.
Use brand_id instead of brand name in worksheets 'Products'
You can check this option to Import/Export brand_id in place of brand name.
Use shop_id instead of shop name in worksheets 'Products'
You can check this option to Import/Export shop id instead shop name
Use option_id instead of option name in worksheets 'ProductOption' and
'ProductOptionValues'
You can check this option to Import/Export option id instead option name

207
Use option_value_id instead of option_value name in worksheet
'ProductOptionValues'
You can check this option if you want to Import/Export option value id instead option
value.
Use attribute_group_id instead of attribute_group name in worksheet
'ProductAttributes'
You can check this option to import/export attribute group id instead group name.
Use attribute_id instead of attribute name in worksheet 'ProductAttributes'
You can check this option to import/export attribute_id instead attribute_name
Use filter_group_id instead of filter_group_name in worksheets 'ProductFilters' and
'CategoryFilters'
You can check this option to import/export filter_group_id instead filter_group_name
Use filter_id instead of filter name in worksheets 'ProductFilters' and 'CategoryFilters'
You can check this option to import/export filter_id instead filter_name
Use country_id instead of country name in worksheets 'Products' and
'ProductShippingRates'
You can check this option to import/export country_id instead country_name
This settings is for products worksheet and product shipping rates worksheet
Use company_id instead of company name in worksheets 'ProductShippingRates'
You can check this option to import/export company_id instead company_name
Use duration_id instead of duration name in worksheets 'ProductShippingRates'
You can check this option to import/export duration_id instead duration_name
Use phpTemp cache for large Exports (will be slightly slower)
You can check this option to cache the spreadsheet while Exporting
Use phpTemp cache for large Imports (will be slightly slower)
You can check this option to cache the spreadsheet while Importing

208
11. Blog Admin can select Blog link in the left panel and can manage categories of blog. Please see
the screenshot below:
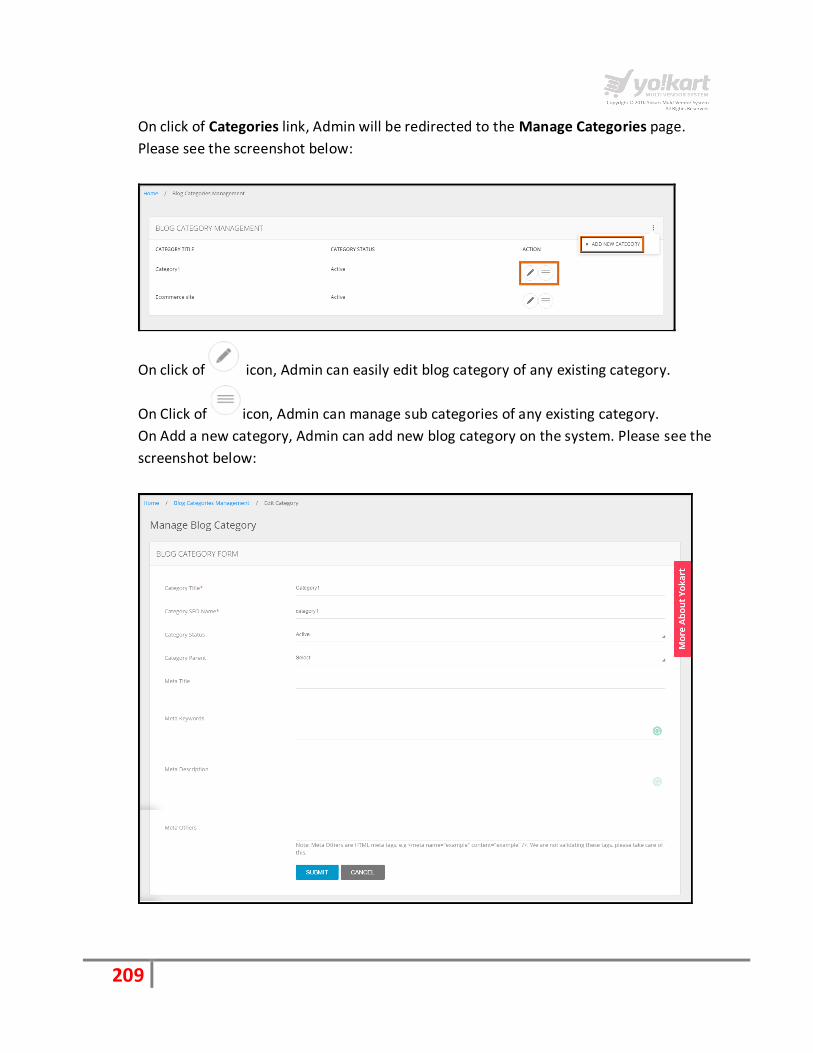
209
On click of Categories link, Admin will be redirected to the Manage Categories page.
Please see the screenshot below:
On click of icon, Admin can easily edit blog category of any existing category.
On Click of icon, Admin can manage sub categories of any existing category.
On Add a new category, Admin can add new blog category on the system. Please see the
screenshot below:
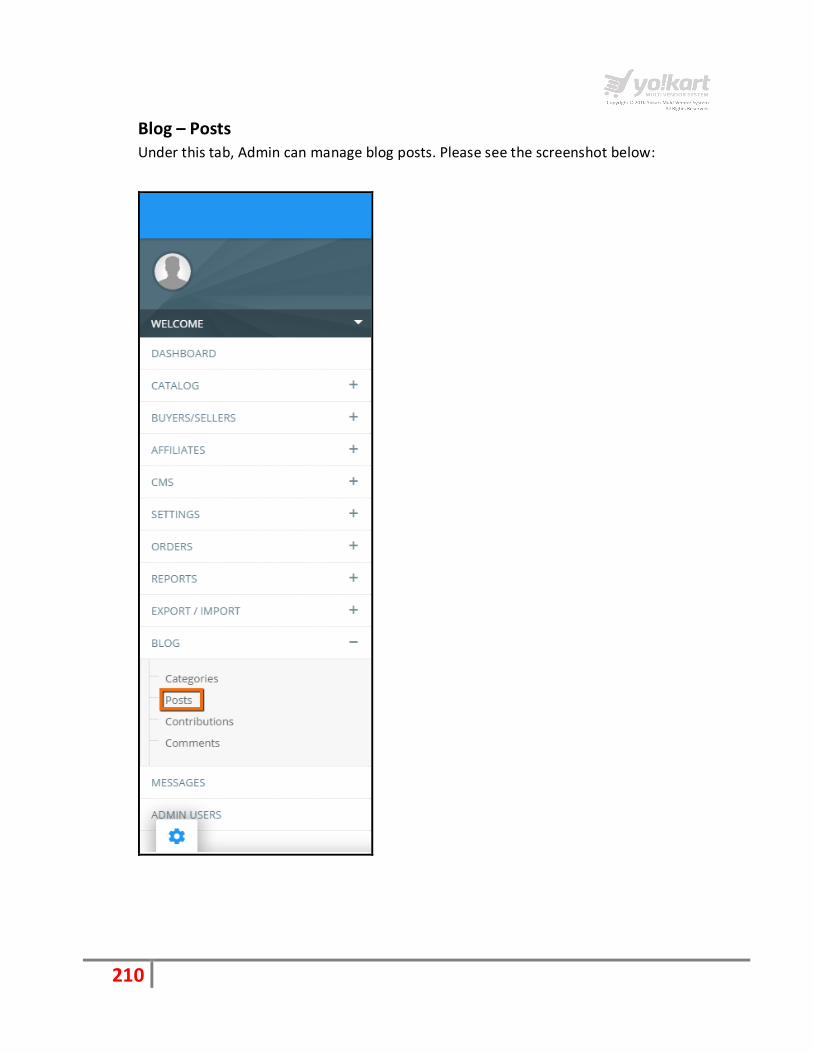
210
Blog – Posts Under this tab, Admin can manage blog posts. Please see the screenshot below:

211
On click of Posts link, Admin will be redirected to the blog list page. Please see the
screenshot below:
Admin can search for blog posts that are published or draft on the system.
On click of icon, Admin can edit the existing blog post.
On click of icon, Admin can delete any existing blog post.
On click of Add new post, Admin can add a new post on the system.

212
Blog – Contribution Under this tab, Admin can manage blog contributions on the system. Please see the
screenshot below:

213
On click of Contribution link, Admin will be redirected to the blog contribution page and
can search contributions. Please see the screenshot below:
On click of icon, Admin can view the Contribution requests and change the
contribution status.
On click of icon, Admin can delete any contribution request.

214
Blog – Comments Under this tab, Admin can manage blog comments on the system. Please see the
screenshot below:

215
On click of Comments link, Admin will be redirected to the blog comments page and can
search the comments. Please see the screenshot below:
On click of icon, Admin can view the Comment requests and change the comment
status.
On click of icon, Admin can delete any comment request on the system.
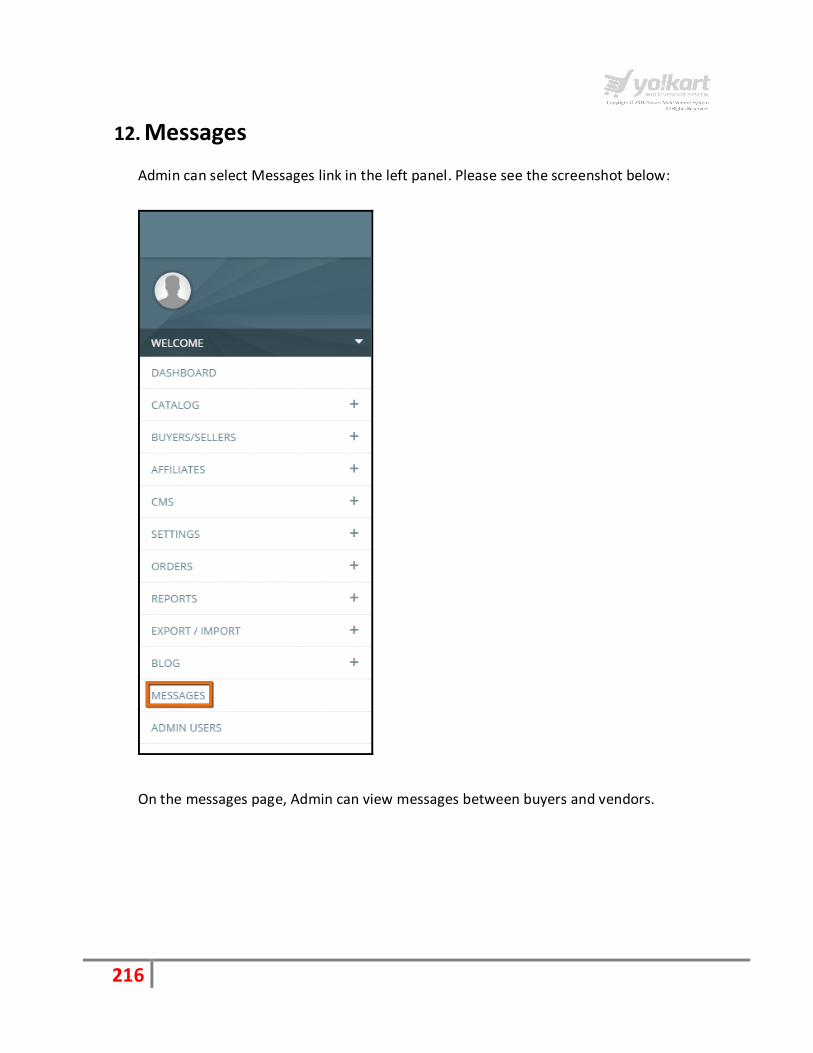
216
12. Messages
Admin can select Messages link in the left panel. Please see the screenshot below:
On the messages page, Admin can view messages between buyers and vendors.
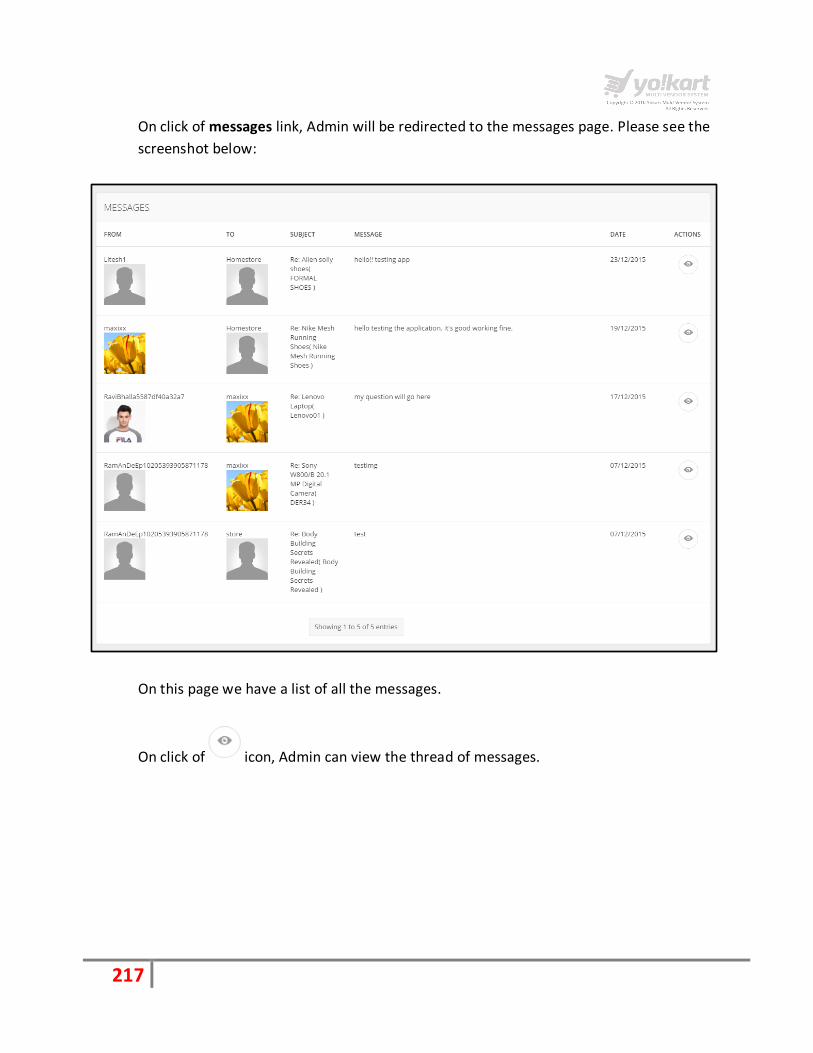
217
On click of messages link, Admin will be redirected to the messages page. Please see the
screenshot below:
On this page we have a list of all the messages.
On click of icon, Admin can view the thread of messages.

218
Admin can also delete a message on click of icon.
First message will be displayed on the top of messages list. On click of icon in front of every message, Admin can delete any message from the messages list.
Admin can edit any message text on click of a particular message and this message will be updated in the message thread

219
13. Admin Users
In this section Admin can manage Sub-Admin users. Please see the screenshot below:

220
On click of Admin Users link, Admin will be redirected to the Manage admin users page.
Please see the screenshot below:
On click of icon, Admin can edit details of any existing user.
On click of icon, Admin can change password of any existing user.
On click of icon, Admin can delete any existing user.
On click of icon, Admin can assign permission to a particular user. Please see the
screenshot below:

221
On the Permissions Set up page, Admin can check the modules which would be assigned to the Sub Admin user.
On click of Add Admin User, Admin will be redirected to the Admin User Setup page. Admin needs to fill up the following details to add a new user:
Full Name
Username
Password
Confirm Password