xtend voice logger - user manual - ivr toolkit · this user manual allows you to learn the basics...
TRANSCRIPT
User Manual
Xtend Voice Logger
The information given in this document is the property of Xtend Technologies. We take every care in preparing this
document, but no guarantee is given to the matter present in the guide. Our products are under continual
improvement and we reserve the right to change the content without any notice.
© 2013 Xtend Technologies. All Rights Reserved.
COPYRIGHT NOTICE
- 2 -
US
ER M
AN
UA
L
Congratulations! on your choice of a world-class product from Xtend, this will provide you with a full-featured
voice recording solution. Xtend Voice Logger is a high quality telephone call recording product designed to suit
individual organisational needs. The unique product with advanced call recording features ensures quality and
productivity-wise upgradation in business.
WELCOME
- 3 -
US
ER M
AN
UA
L
- 4 -
US
ER M
AN
UA
L
Contents
1.
2.
3.
4.
4.1.
4.2.
4.3.
5.
5.1.
5.1.1.
5.1.2.
5.1.3.
5.1.4.
5.2.
5.2.1.
5.2.2.
5.2.3.
5.2.4.
5.3.
5.3.1.
5.3.2.
5.3.3.
5.3.4.
5.3.5.
5.3.6.
5.3.7.
5.3.8.
5.4.
5.4.1.
5.4.2.
5.4.3.
5.4.4.
5.4.5.
5.4.6.
Introduction ...................................................5
Xtend Voice Logger ......................................6
Minimum System Requirements...................7
Browser Interface at a Glance ......................8
Program Shortcut ..................................8
Login Page ............................................9
Home Page ...........................................9
Menu and Submenu Paradigm ...................11
Live Calls .............................................11
Active .........................................11
All ..............................................12
Trunk Status ..............................13
Ranking .....................................14
Logs Report .........................................15
Today.........................................15
This Month.................................19
From To .....................................19
Full.............................................20
Search .................................................20
Search - Simple.........................20
Search - Numbers .....................22
Search - Comments ..................23
Search - Duration ......................23
Search - Call Id..........................24
Advanced ..................................25
Search/Delete............................27
Search-Repeated Calls .............28
Administration ......................................29
User Accounts ...........................29
Phone Book...............................36
DLI/Extension Management ......40
Wave Merging ...........................43
Grouping....................................44
Client Logins..............................46
5.5.
5.5.1.
5.5.2.
5.5.3.
5.5.4.
5.6.
5.6.1.
5.6.2.
5.6.3.
5.7.
5.7.1.
5.7.2.
5.7.3.
5.7.4.
5.7.5.
5.7.6.
5.7.7.
5.7.8.
5.7.9.
5.8.
5.8.1.
5.8.2.
5.8.3.
5.8.4.
5.9.
5.9.1.
5.9.2.
5.9.3.
5.9.4.
5.9.5.
5.10.
5.10.1.
5.10.2.
6.
Statistics ..............................................46
Call Statistics.............................47
Call Summary............................48
Service Statistics .......................49
Idle Statistics .............................50
System Logs ........................................51
Session Logs.............................51
Event Logs ................................52
System Logs..............................52
Configuration .......................................53
Trunks........................................53
Devices......................................56
General Settings........................57
Location Settings.......................61
Wave Path .................................61
Backup Wave Path ....................62
Call Tags....................................63
Agent Popup Mapping ...............65
E-mail Settings ..........................70
Backup ................................................71
Backup Data..............................71
Restore Data .............................72
Delete Data ...............................73
Export Data ...............................74
Reports ................................................75
Backup ......................................75
Restore......................................76
Delete ........................................77
Export ........................................77
E-mail ........................................78
Manage Device..................................79
Start .........................................79
Shutdown ................................80
Contact Us ..................................................81

This user manual allows you to learn the basics to the advanced features of Xtend Voice Logger. Just follow the
user guide for thorough knowledge on how to use our product with ease. This guide gives details on various links
and sublinks, menus and submenus and the various functions/purpose of each with a screenshot of it.
1. Introduction
- 5 -
US
ER M
AN
UA
L
Xtend Voice Logger is a multi-channel voice recording solution that records the analog, digital and VoIP lines. The
product helps in improving customer service by enabling your support staff and supervisors to review the actual
telephone conversation with your customer ensuring that you can immediately address pending issues quickly
and fairly.
The call monitoring can be done locally or remotely by means of a browser-enabled interface that allows you to
listen to live or recorded calls from anywhere in the world. Voice logs can be used to implement performance
reviews, perform self-appraisal and can be used to train customer support staff to handle calls in difficult
situations.
2. Xtend Voice Logger
- 6 -
US
ER M
AN
UA
L
Unified architecture with remote access, centralised management and multi-login facility
Easily integrates with existing telephony to record multiple channels
Real-time call status information display and snoop capability
Caller/called id, time, duration, status and much more with daily, weekly, monthly,
date-wise reports and e-mail facility
Call alert popup/notification window with real-time updation
Export call reports in HTML/Excel format
Backup to CD/DVD/hard disk or .zip files for later restoration
Automatic scheduled backup of recorded files
Low disk space notification and board failure alerts
Graphical charts for statistical analysis
Call record commenting and custom tag creation for critical calls
Phonebook integration for informative call records
Audio compression to PCM/GSM formats
ActiveX based advanced audio player with AGC and DTMF mute capability
Export audio files to MP3/PCM/GSM formats
System failure information with error reports and information on user session
Simple search using phone numbers/comments/duration/date etc. and advanced
search using multiple criterions
Wave encryption with detailed call tagging
Audio recording with excellent sound quality
Salient Features

3. Minimum System Requirements
- 7 -
US
ER M
AN
UA
L
Operating System (32/64-bit) : Windows 2008/2012/Vista/7/8
Browser : Internet Explorer 6.0 or above
Processor Speed : Dual Core or higher
Memory : 2 GB or above
Hard Disk Space : 500 MB for software installation
1 GB approx. for 175 hrs of recording
Note: The specification mentioned here is for recording a single port and this shall vary with the increase in number of ports.
Xtend Voice Logger implements an easy-to-use remotely accessible browser interface with full-fledged reporting
features. This displays complete call information with Caller/Called Id, Date, Time and Duration etc. It is possible
to access the user-friendly interface from a remote PC or Laptop to monitor real-time calls. You'll find the software
interface extremely convenient and useful while auditing recorded conversations. Read the document in full to
get familiar with the different features present in the browser interface of Xtend Voice Logger.
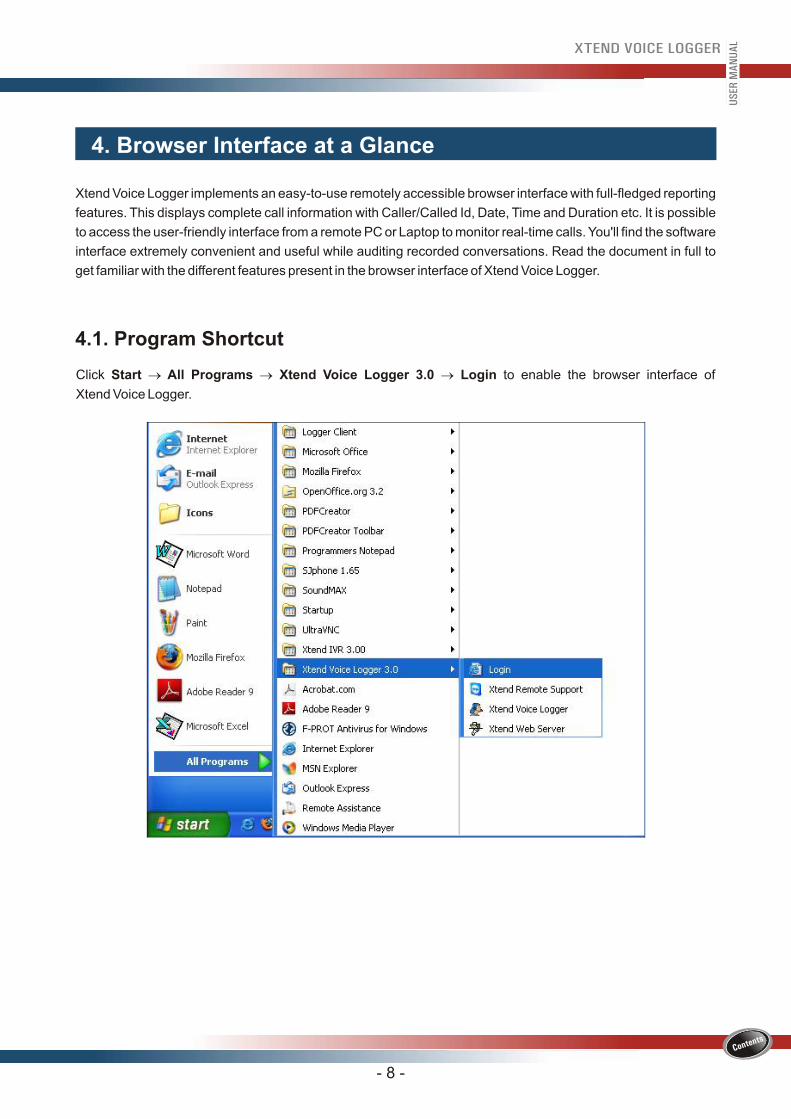
4.1. Program Shortcut
Click Start ® All Programs Xtend Voice Logger 3.0 Login to enable the browser interface of
Xtend Voice Logger.
® ®
4. Browser Interface at a Glance
- 8 -
US
ER M
AN
UA
L
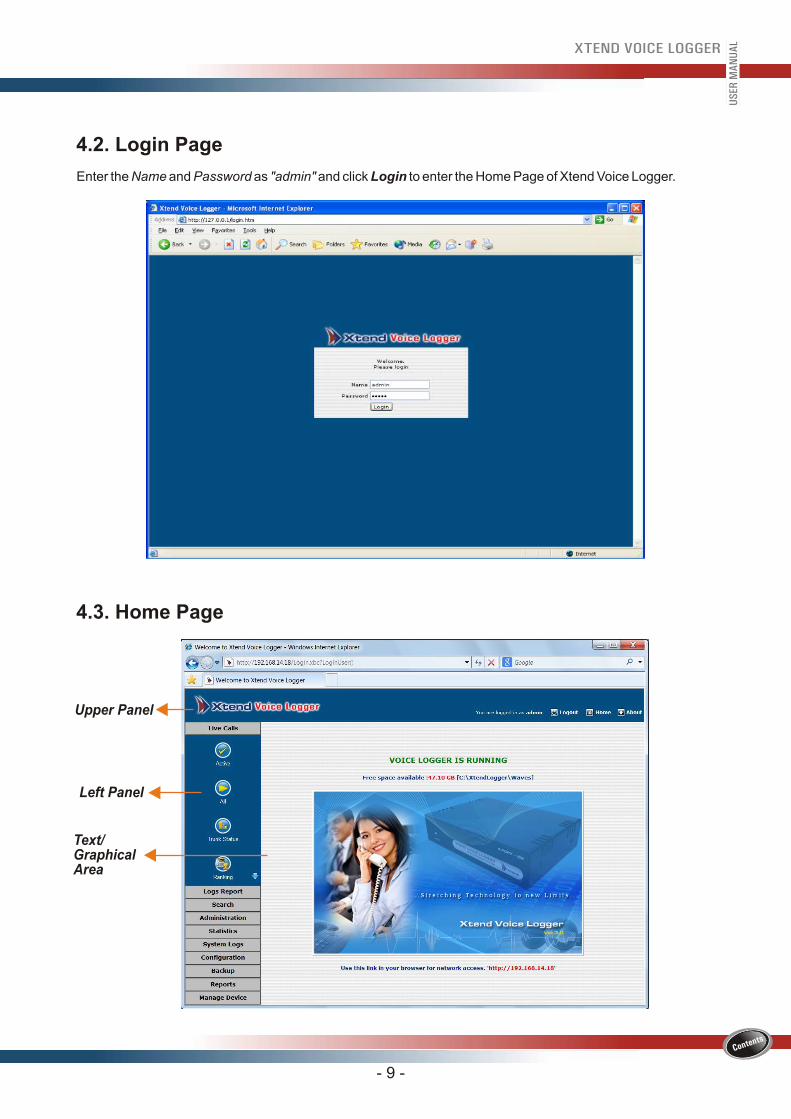
4.2. Login Page
Enter the Name and Password as "admin" and click Login to enter the Home Page of Xtend Voice Logger.
4.3. Home Page
Upper Panel
Left Panel
Text/Graphical Area
- 9 -
US
ER M
AN
UA
L

OPTIONS DESCRIPTION
Login info Shows the current username.
Logout Allows to log out of the session.
Home Displays the Home Page of Xtend Voice Logger.
About Shows the Logger and Engine version.
Upper Panel
Left Panel
Left Panel comprises of menus and submenus - Live Calls, Logs Report, Search, Administration, Statistics,
System Logs, Configuration, Backup, Reports and Manage Device.
Text/Graphical Area
Text/Graphical area is the display area that displays the complete call information. This area is not static and
changes as per the selection of menu items on the Left Panel.
- 10 -
US
ER M
AN
UA
L
5. Menu and Submenu Paradigm
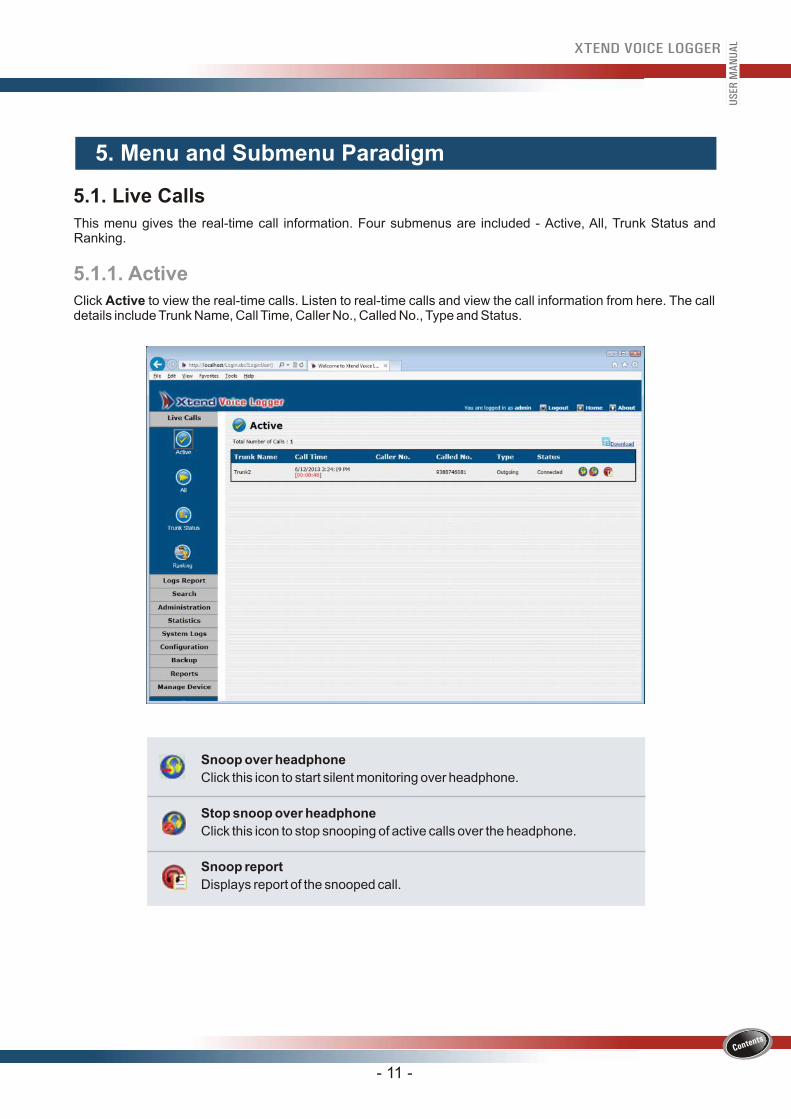
5.1. Live Calls
This menu gives the real-time call information. Four submenus are included - Active, All, Trunk Status and Ranking.
5.1.1. Active Click Active to view the real-time calls. Listen to real-time calls and view the call information from here. The call details include Trunk Name, Call Time, Caller No., Called No., Type and Status.
Snoop over headphone
Click this icon to start silent monitoring over headphone.
Stop snoop over headphone
Click this icon to stop snooping of active calls over the headphone.
Snoop report
Displays report of the snooped call.
- 11 -
US
ER M
AN
UA
L
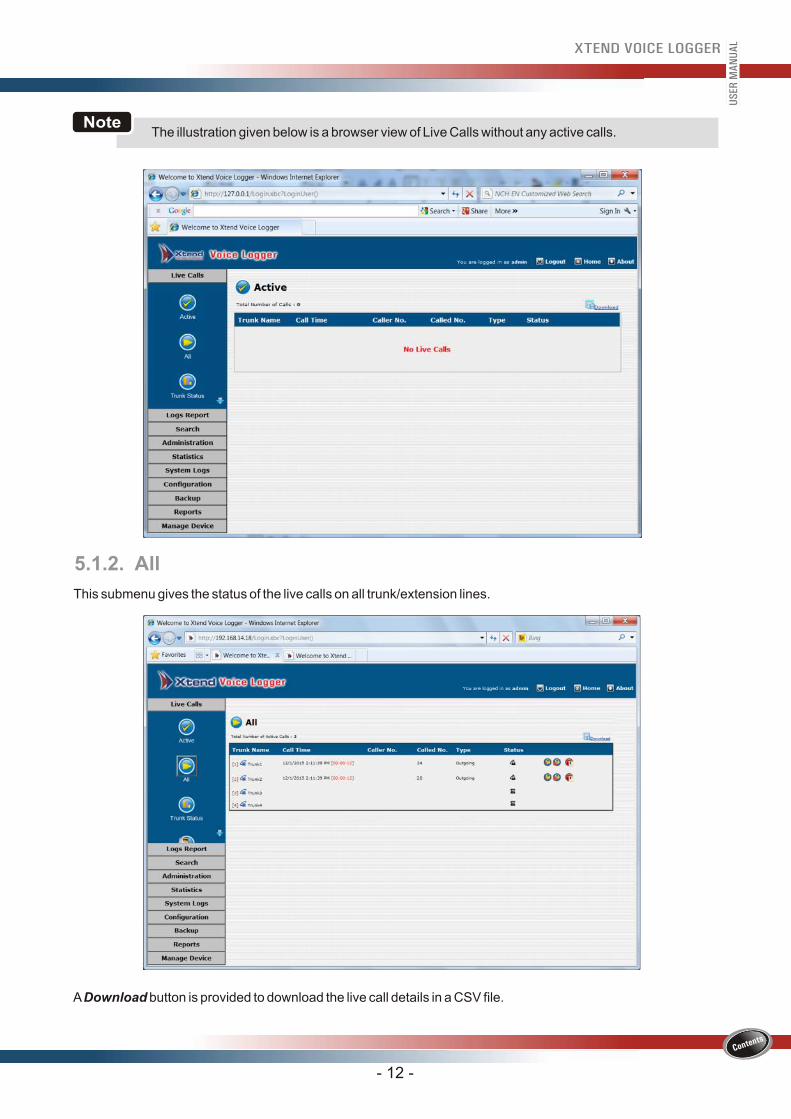
5.1.2. All
This submenu gives the status of the live calls on all trunk/extension lines.
- 12 -
US
ER M
AN
UA
L
The illustration given below is a browser view of Live Calls without any active calls.Note
A Download button is provided to download the live call details in a CSV file.
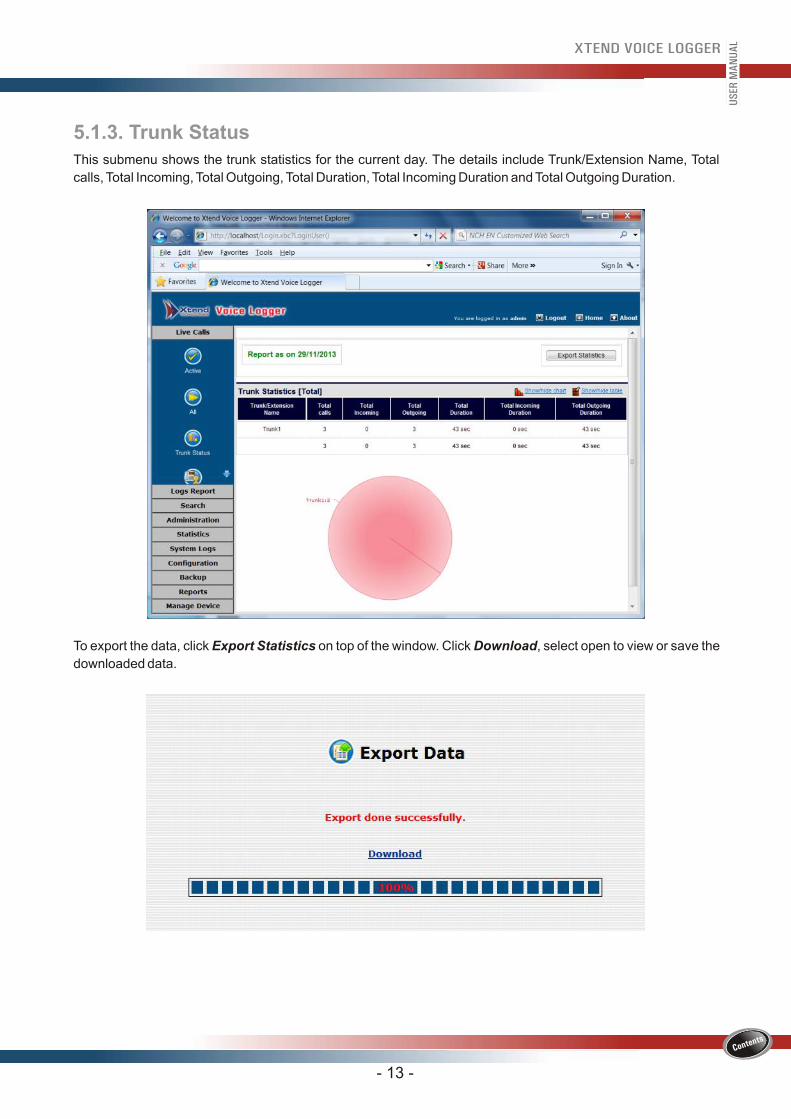
To export the data, click Export Statistics on top of the window. Click Download, select open to view or save the
downloaded data.
- 13 -
US
ER M
AN
UA
L
5.1.3. Trunk Status
This submenu shows the trunk statistics for the current day. The details include Trunk/Extension Name, Total
calls, Total Incoming, Total Outgoing, Total Duration, Total Incoming Duration and Total Outgoing Duration.
- 14 -
US
ER M
AN
UA
L
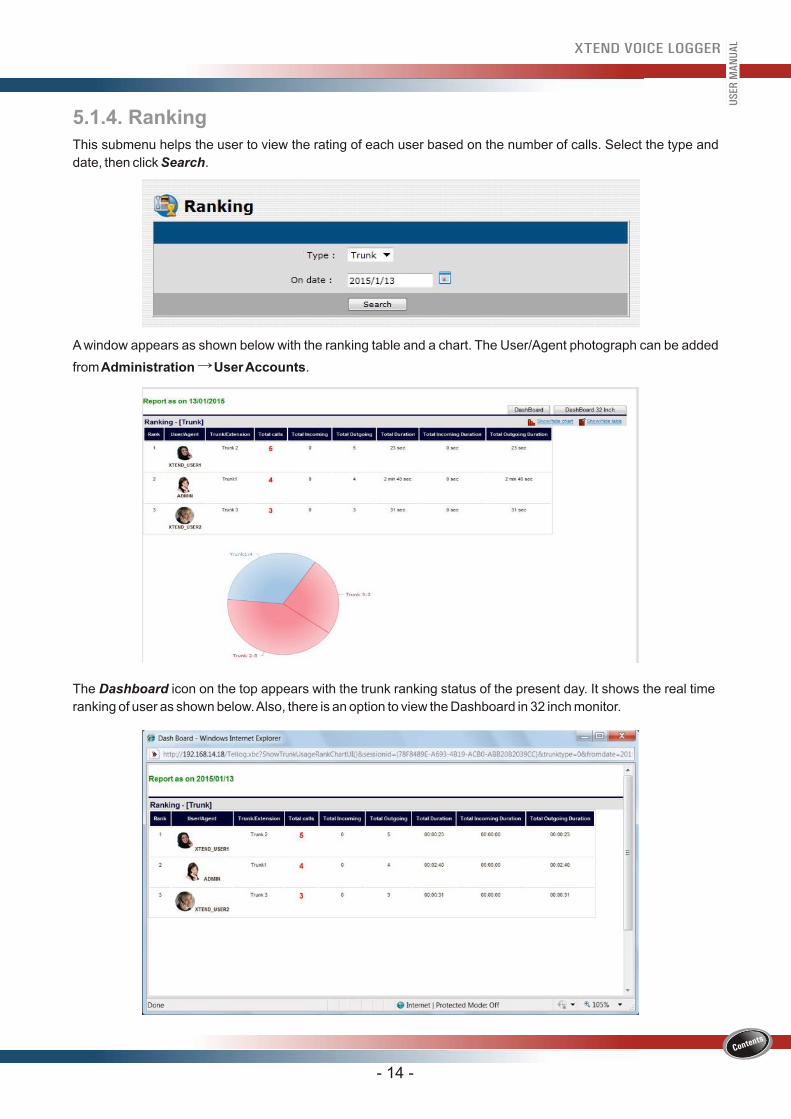
5.1.4. Ranking
This submenu helps the user to view the rating of each user based on the number of calls. Select the type and
date, then click Search.
A window appears as shown below with the ranking table and a chart. The User/Agent photograph can be added
from Administration → User Accounts.
The Dashboard icon on the top appears with the trunk ranking status of the present day. It shows the real time
ranking of user as shown below. Also, there is an option to view the Dashboard in 32 inch monitor.
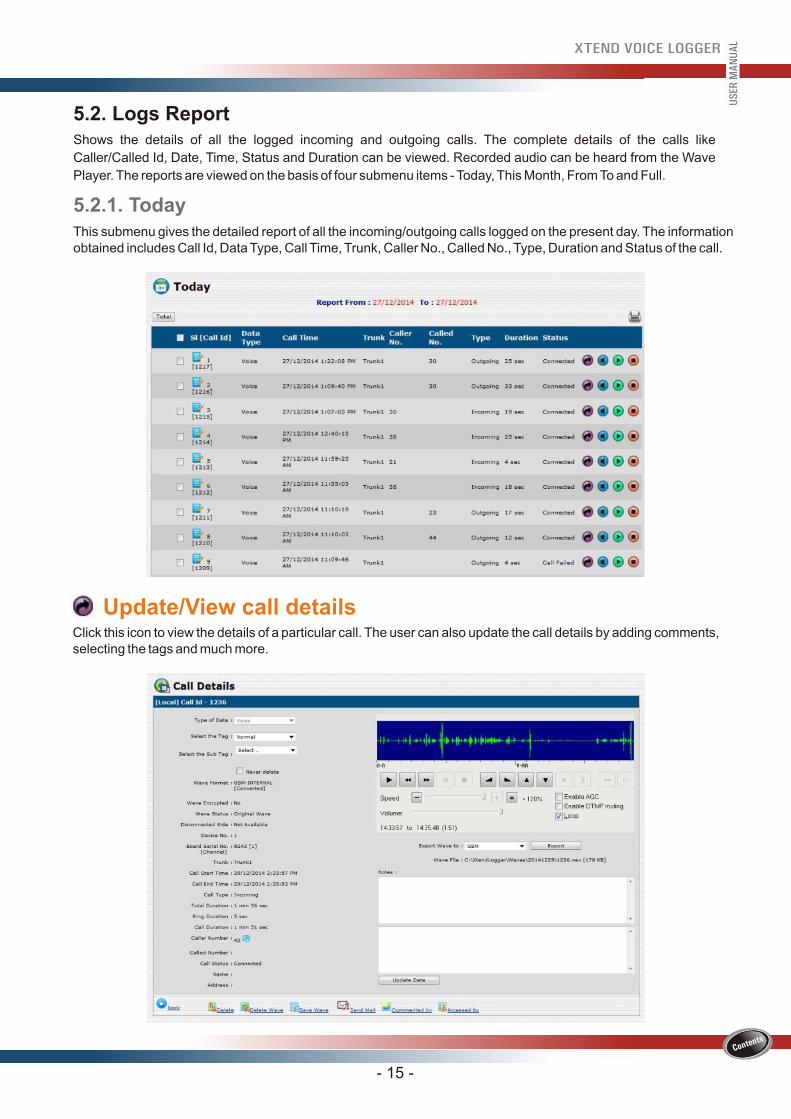
Update/View call detailsClick this icon to view the details of a particular call. The user can also update the call details by adding comments, selecting the tags and much more.
- 15 -
US
ER M
AN
UA
L
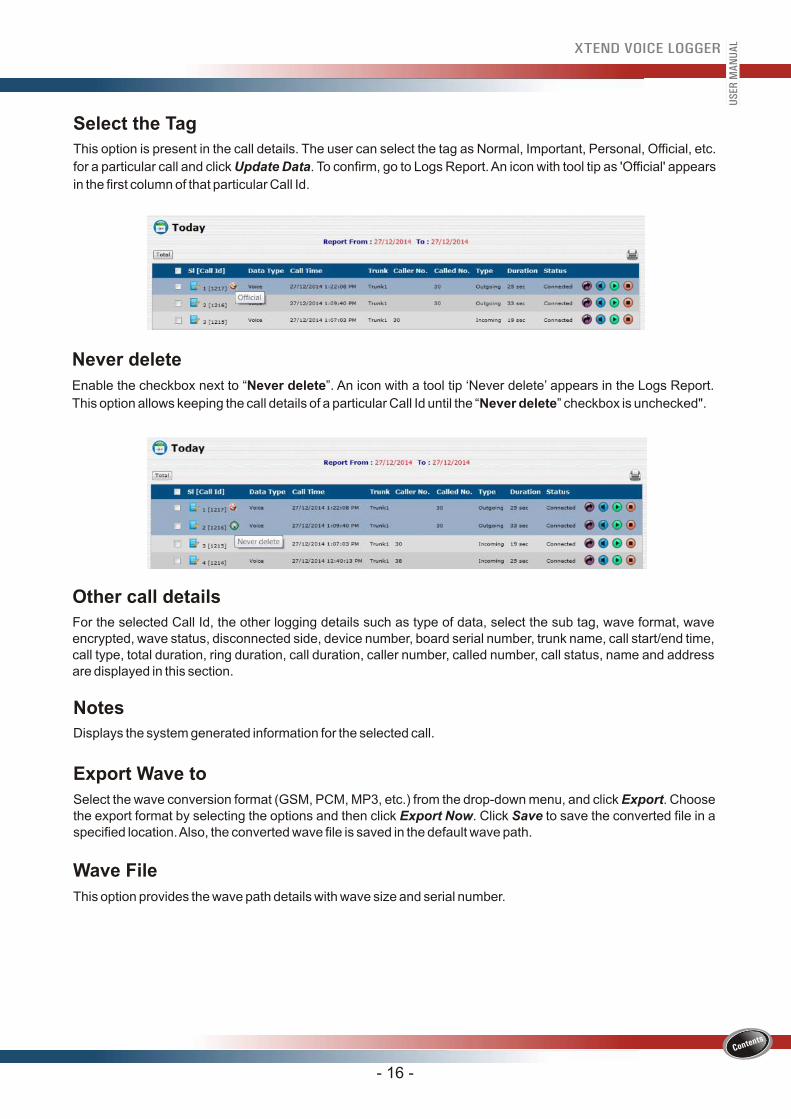
5.2.1. TodayThis submenu gives the detailed report of all the incoming/outgoing calls logged on the present day. The information obtained includes Call Id, Data Type, Call Time, Trunk, Caller No., Called No., Type, Duration and Status of the call.
5.2. Logs ReportShows the details of all the logged incoming and outgoing calls. The complete details of the calls like
Caller/Called Id, Date, Time, Status and Duration can be viewed. Recorded audio can be heard from the Wave
Player. The reports are viewed on the basis of four submenu items - Today, This Month, From To and Full.
Never delete
Enable the checkbox next to “Never delete”. An icon with a tool tip ‘Never delete’ appears in the Logs Report.
This option allows keeping the call details of a particular Call Id until the “Never delete” checkbox is unchecked".
Other call details
For the selected Call Id, the other logging details such as type of data, select the sub tag, wave format, wave encrypted, wave status, disconnected side, device number, board serial number, trunk name, call start/end time, call type, total duration, ring duration, call duration, caller number, called number, call status, name and address are displayed in this section.
Notes
Displays the system generated information for the selected call.U
SER
MA
NU
AL
Select the Tag
This option is present in the call details. The user can select the tag as Normal, Important, Personal, Official, etc.
for a particular call and click Update Data. To confirm, go to Logs Report. An icon with tool tip as 'Official' appears
in the first column of that particular Call Id.
Export Wave to
Select the wave conversion format (GSM, PCM, MP3, etc.) from the drop-down menu, and click Export. Choose the export format by selecting the options and then click Export Now. Click Save to save the converted file in a specified location. Also, the converted wave file is saved in the default wave path.
Wave File
This option provides the wave path details with wave size and serial number.
- 16 -

Delete WaveClick Delete Wave to remove the selected wave file.
Save WaveUser can save the selected audio file to a different location.
Send MailClick this icon to send the wave file via e-mail.
Commented ByClick this option to view the list of users who have commented on the selected call. The information
obtained include Commented by and Commented Time.
Accessed ByRecorded calls are monitored by authorised users. Click this option to view the list of the monitoring
officials for the selected call, call access time, access method and total accesses.
Wave Player is an ActiveX control that allows the user to audit the logged conversation with the tools
present here. The logged conversation can be heard from a headphone/speaker.
Wave Player
- 17 -
US
ER M
AN
UA
L
Add to Phonebook
Click this icon and enter the details like Name, Contact Number and Address to add the details to the Phonebook.
Back
Click this icon to go to the previous page.
DeleteClick Delete to remove the complete details of the selected call.
1 2 3 4 5 6 7 8 9 10 11 12 13 14 15 16 17 18
Comment box
Enter the remarks for the selected call in the text box and click Update Data.
- 18 -
US
ER M
AN
UA
L
1 Play Listen to logged conversation.
2 Rewind Click this option to move the control backward and click Play to listento recorded conversation from the selected point.
3 Fast Forward Allows to move forward through a recording at a speed faster than the actual speed it is played.
4 Pause Playing Stops playing the logged conversation temporarily till Play is pressed.
5 Stop Playing Stops playing the logged conversation.
6 Delete the Removes the selected portion (temporarily).selected region
7 Trim the non- Retains the selected portion and masks the unwanted parts. selected region
8 Clears the selection Deselects the selected portion.
9 Fade in audio Gradually increases the volume of the logged conversation when played.
10 Fade out audio Gradually decreases the volume of the logged conversation when played.
11 Increase volume Upper arrowhead increases the volume.
12 Decrease volume The lower arrowhead decreases the volume while hearing the logged conversation.
13 Undo all changes Edited files can be retained to its original form with this option.
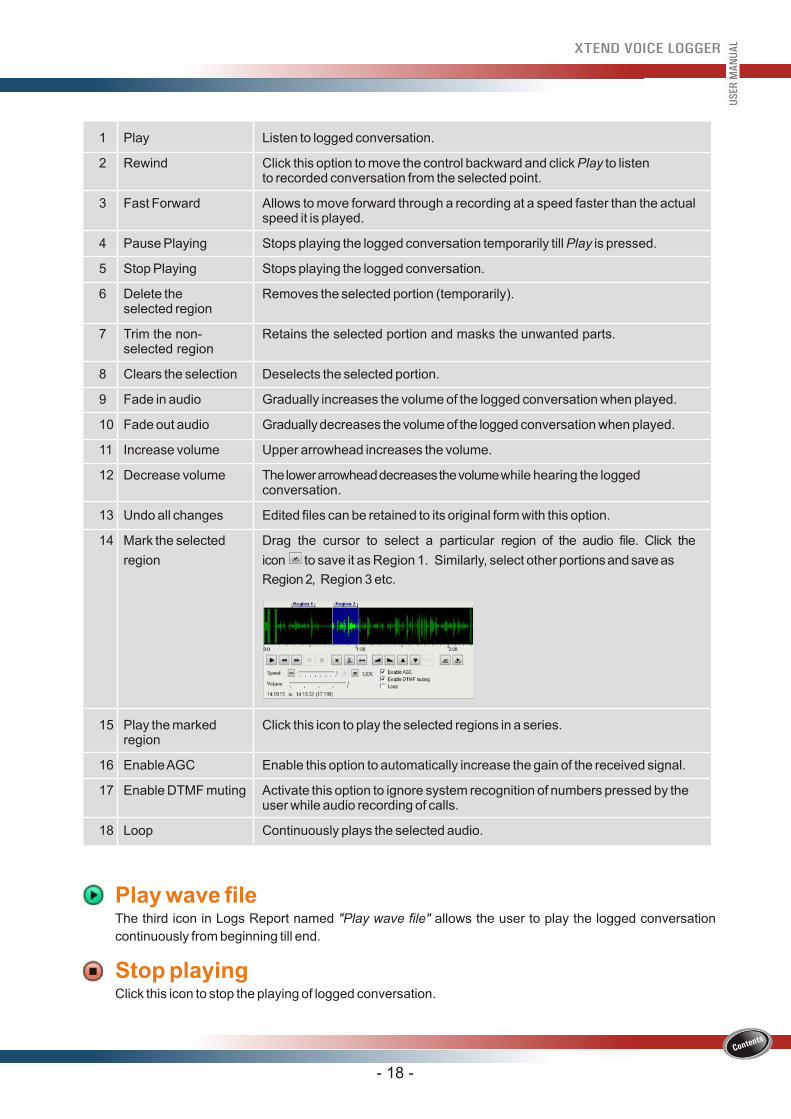
14 Mark the selected Drag the cursor to select a particular region of the audio file. Click the
region icon to save it as Region 1. Similarly, select other portions and save as
Region 2, Region 3 etc.
15 Play the marked Click this icon to play the selected regions in a series. region
16 Enable AGC Enable this option to automatically increase the gain of the received signal.
17 Enable DTMF muting Activate this option to ignore system recognition of numbers pressed by the user while audio recording of calls.
18 Loop Continuously plays the selected audio.
Play wave file
Stop playing
The third icon in Logs Report named "Play wave file" allows the user to play the logged conversation
continuously from beginning till end.
Click this icon to stop the playing of logged conversation.
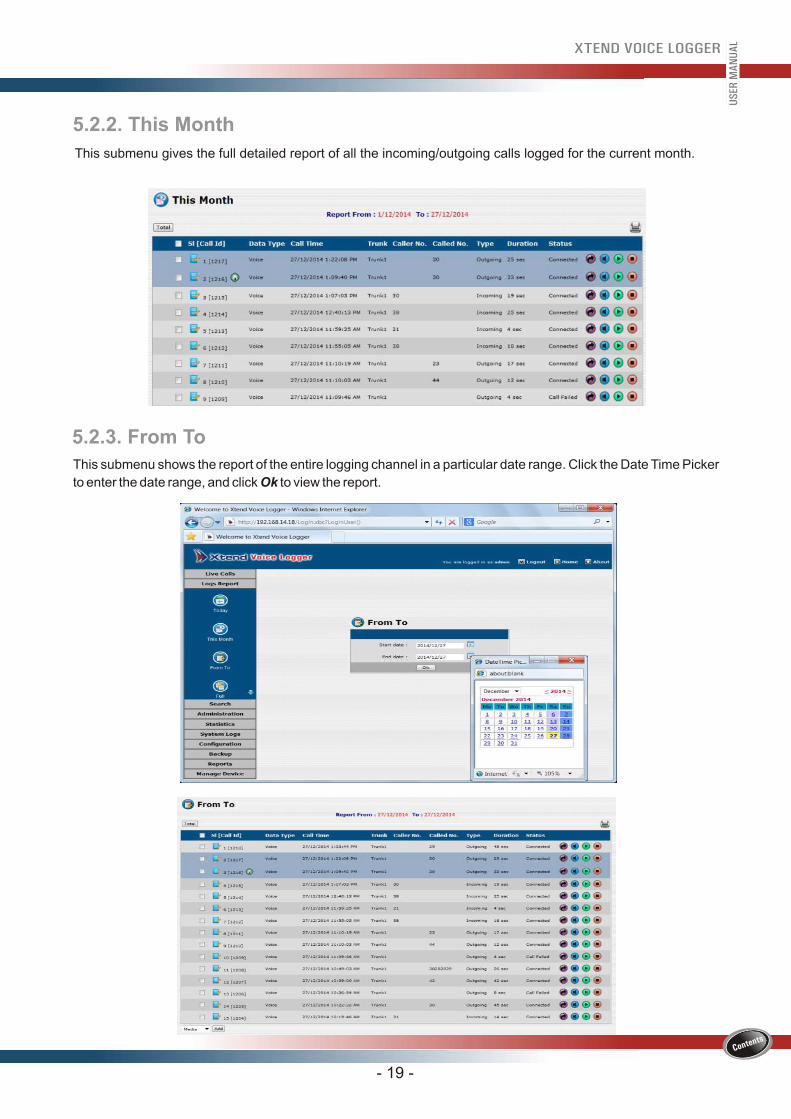
5.2.3. From To
This submenu shows the report of the entire logging channel in a particular date range. Click the Date Time Picker
to enter the date range, and click Ok to view the report.
- 19 -
US
ER M
AN
UA
L
5.2.2. This Month
This submenu gives the full detailed report of all the incoming/outgoing calls logged for the current month.
5.3. SearchSearch menu helps the user to retrieve the details of specific calls in a faster pace. Find the most relevant call
information from this menu within few seconds. Search menu comprises of eight submenus - Search-Simple,
Search-Numbers, Search-Comments, Search-Duration, Search-Call Id, Advanced, Search/Delete and Search-
Repeated Calls.
5.3.1. Search-Simple
Enter Caller Number/Called Number/Comments and select from the six options available i.e., Today, This Week,
This Month, This Year, From To and All to view the search results.
TodaySelect Today, and then type the Caller Number/Called Number/Comments. Click Search to view the search
results.
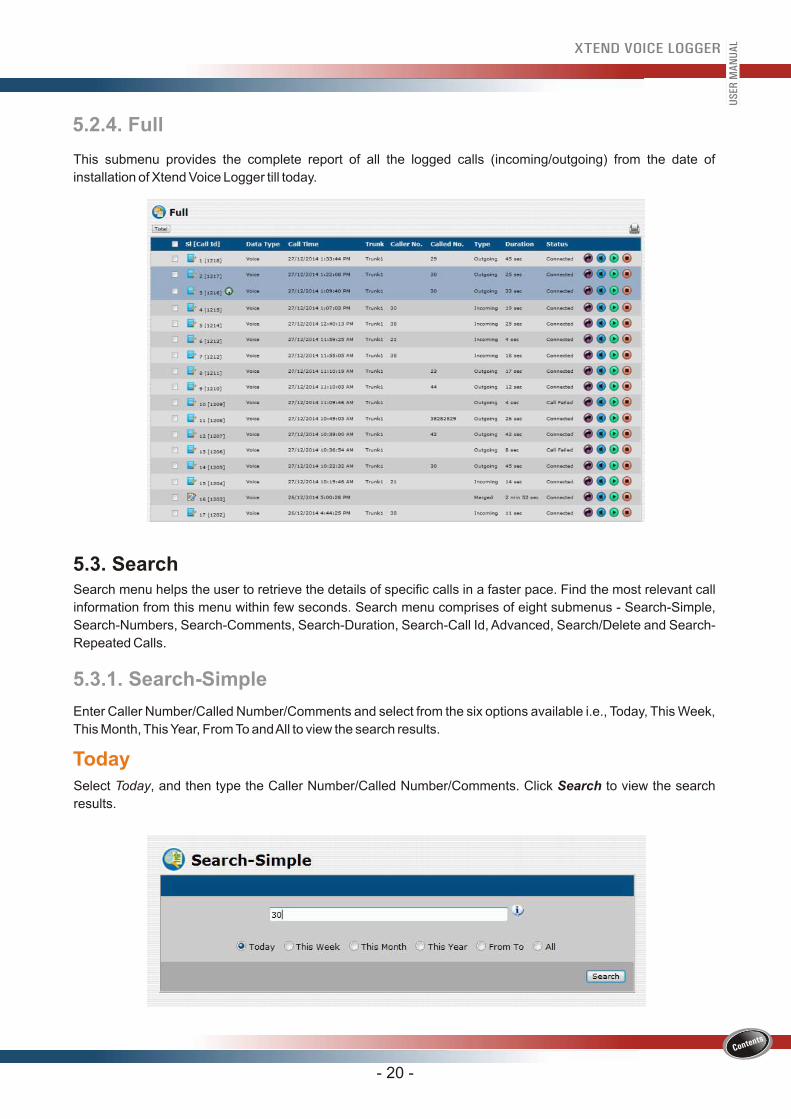
5.2.4. Full
This submenu provides the complete report of all the logged calls (incoming/outgoing) from the date of
installation of Xtend Voice Logger till today.
- 20 -
US
ER M
AN
UA
L
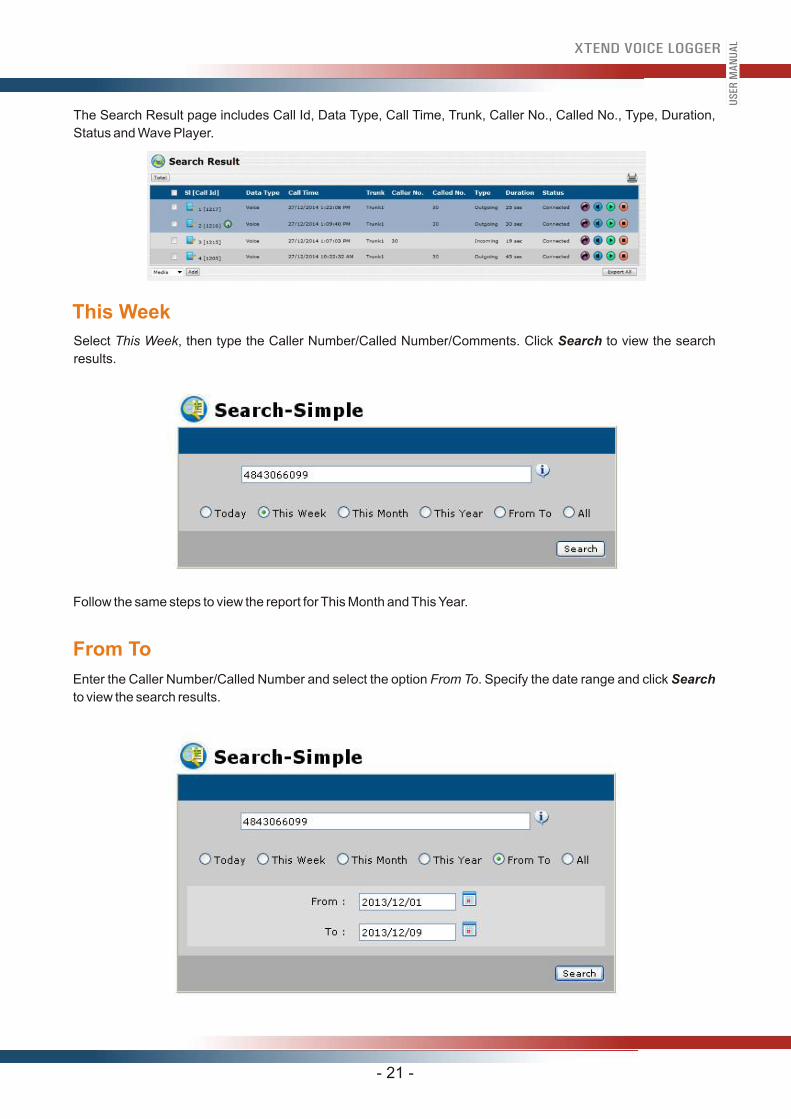
The Search Result page includes Call Id, Data Type, Call Time, Trunk, Caller No., Called No., Type, Duration,
Status and Wave Player.
- 21 -
US
ER M
AN
UA
L
This Week
Select This Week, then type the Caller Number/Called Number/Comments. Click Search to view the search
results.
Follow the same steps to view the report for This Month and This Year.
From To
Enter the Caller Number/Called Number and select the option From To. Specify the date range and click Search
to view the search results.
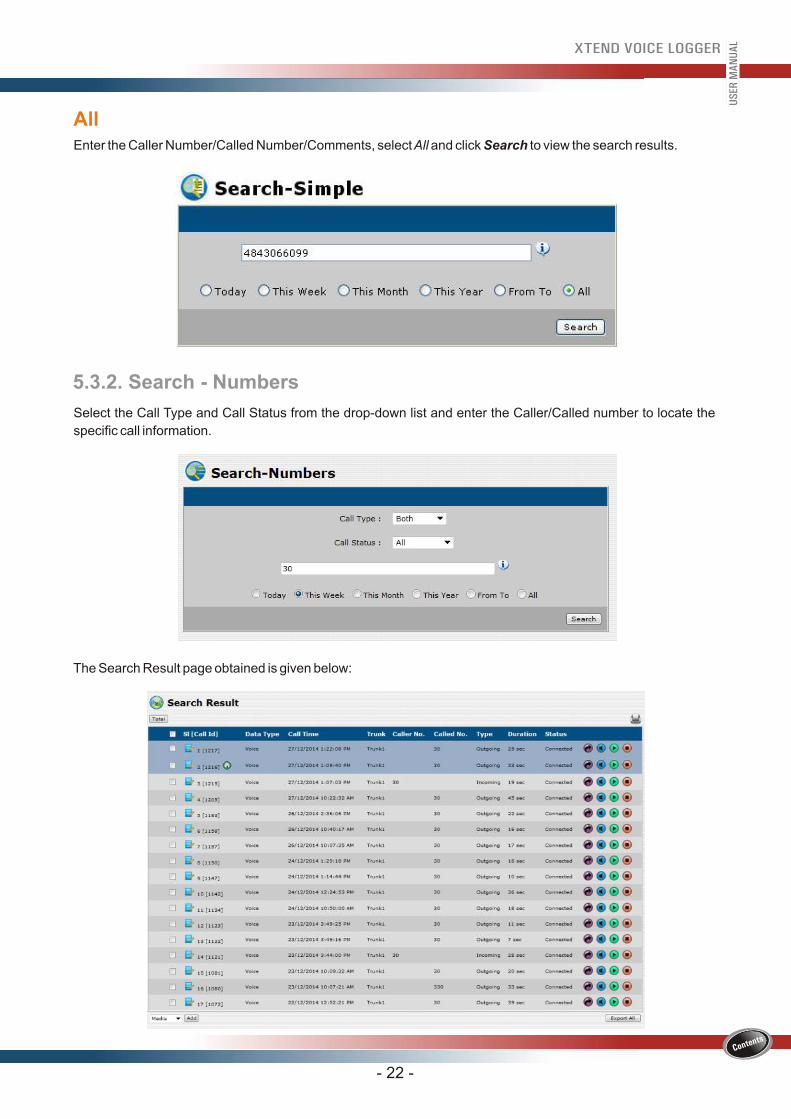
5.3.2. Search - Numbers
Select the Call Type and Call Status from the drop-down list and enter the Caller/Called number to locate the
specific call information.
The Search Result page obtained is given below:
AllEnter the Caller Number/Called Number/Comments, select All and click Search to view the search results.
- 22 -
US
ER M
AN
UA
L
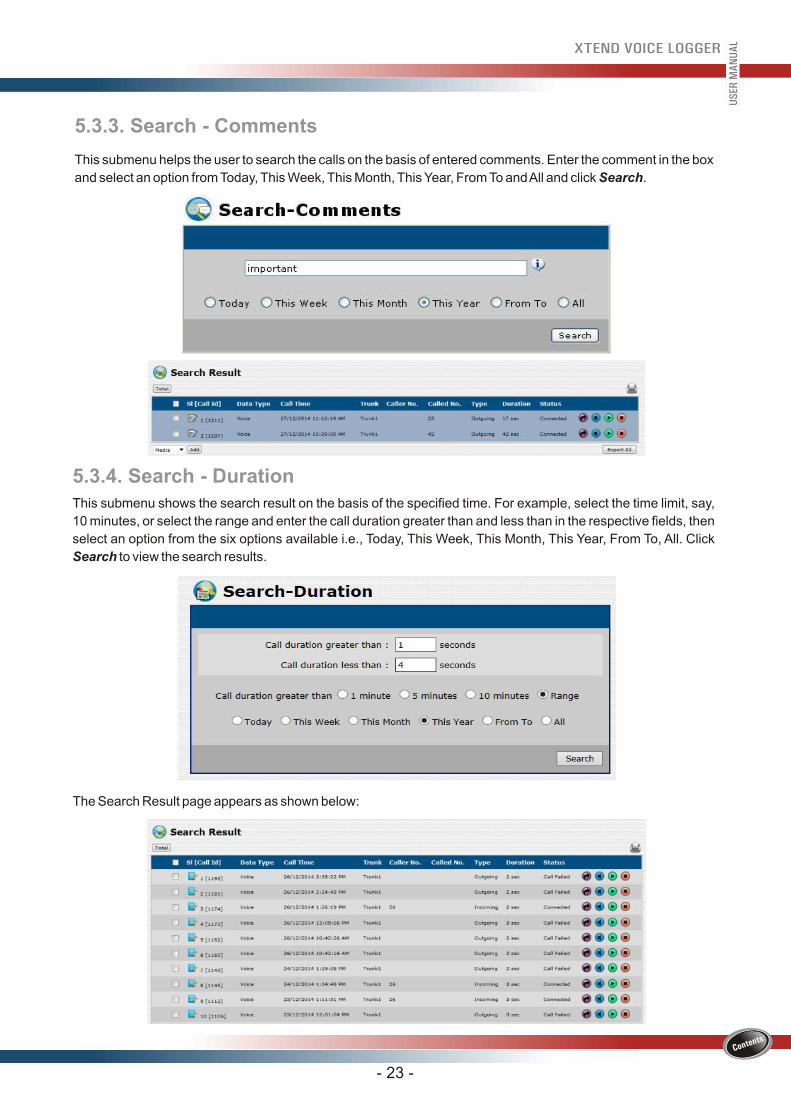
5.3.3. Search - Comments
This submenu helps the user to search the calls on the basis of comments. Enter the comment in the box
and select an option from Today, This Week, This Month, This Year, From To and All and click Search.
entered
5.3.4. Search - DurationThis submenu shows the search result on the basis of the specified time. For example, select the time limit, say,
10 minutes, or select the range and enter the call duration greater than and less than in the respective fields, then
select an option from the six options available i.e., Today, This Week, This Month, This Year, From To, All. Click
Search to view the search results.
- 23 -
US
ER M
AN
UA
L
The Search Result page appears as shown below:
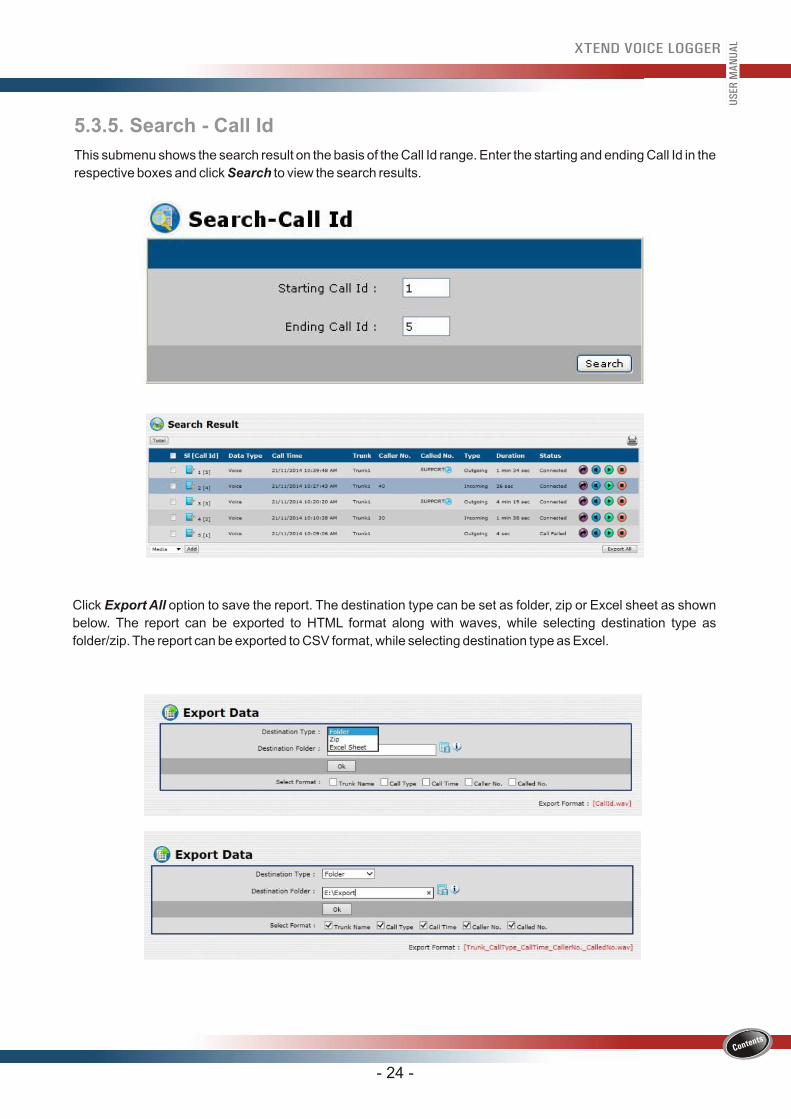
5.3.5. Search - Call Id
This submenu shows the search result on the basis of the Call Id range. Enter the starting and ending Call Id in the
respective boxes and click Search to view the search results.
- 24 -
US
ER M
AN
UA
L
Click Export All option to save the report. The destination type can be set as folder, zip or Excel sheet as shown
below. The report can be exported to HTML format along with waves, while selecting destination type as
folder/zip. The report can be exported to CSV format, while selecting destination type as Excel.
5.3.6. AdvancedThis menu allows locating specific call information on the basis of two or more user-specified conditions. This
submenu allows the user to search the calls on the basis of the following criteria:
- 25 -
US
ER M
AN
UA
L
Heard/Unheard - Select Heard to
view the calls that are monitored
from the Wave Player, else select
Unheard
Date range - Date From and Date To
Never delete
Tag/Label
Select the Sub Tag
Trunk Name
Trunk
Channel Number
Call Type
Number Type
Type of data
Phone Book Name
Group
Location
Called Number
Caller Number
Call Status
Call duration
Ring duration
Total duration
Comments
Notes
The Search Result page appears as shown below. The information obtained includes Call Id, Data Type, Call
Time, Trunk, Caller No., Called No., Type, Duration and Status.
User can enter the remark in the comment box and retrieve specific call information. Select one of the options
present within Sort on to generate sorted results in ascending or descending order. Enter the mode of search
criteria. The search advances on the basis of certain match criteria. These are:
Exact match Search results will be based on the accurate match.
Similar match Search results will be based on the calls that are
nearest match to the given criteria, for e.g., assume
that a search has to be done for incoming call with
initial 3 digits as 998. Enter 998 in the box given for
Called Number and click Search.
Match all Enter the search criteria and select the search mode
as "Match all" to view the Call Ids that satisfy all the
conditions, for e.g., select "Call type" as "Outgoing"
and "Call duration greater than" as "40 seconds". Call
details that satisfy both these conditions will be
displayed.
Match any Enter the search criteria and select the search mode
as "Match any" to view the Call Ids that satisfy either
of the conditions, for e.g., select "Call Type" as
"Outgoing" and "Call Status" as "User Busy". Call
details that satisfy one of these conditions will be
displayed.
- 26 -
US
ER M
AN
UA
L
5.3.7. Search/Delete
This submenu is used to search as well as delete the calls. Enter the necessary search criteria and click the
Search button.
- 27 -
US
ER M
AN
UA
L
The Search Result page obtained will be as follows:
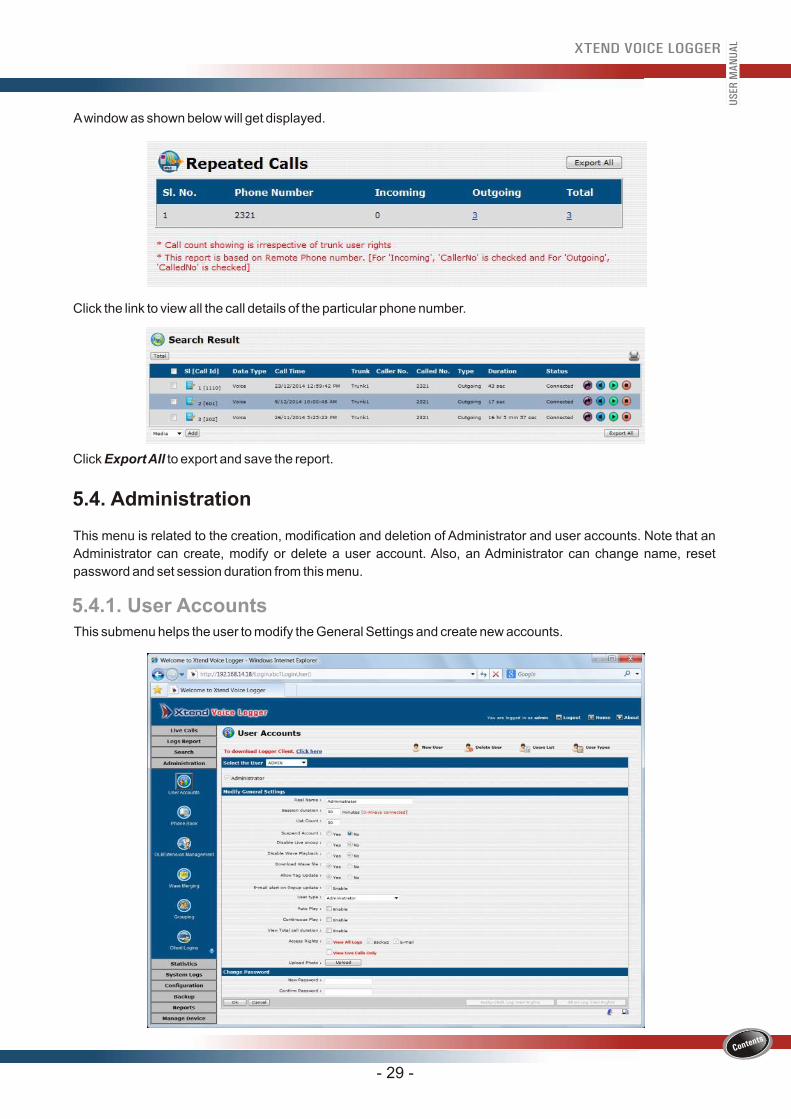
5.3.8. Search-Repeated CallsThis submenu helps to view the repeated calls and their count. Enter the phone number/extension in the respective boxes and click Search to view the search results.
To delete the calls, enable the checkbox next to Call Id and click Delete present at the bottom of the page. To
delete all the calls simultaneously, click Delete All.
Click OK on the confirmation message that appears.
- 28 -
US
ER M
AN
UA
L
5.4.1. User AccountsThis submenu helps the user to modify the General Settings and create new accounts.
5.4. Administration
This menu is related to the creation, modification and deletion of Administrator and user accounts. Note that an
Administrator can create, modify or delete a user account. Also, an Administrator can change name, reset
password and set session duration from this menu.
A window as shown below will get displayed.
- 29 -
US
ER M
AN
UA
L
Click the link to view all the call details of the particular phone number.
Click Export All to export and save the report.
- 30 -
US
ER M
AN
UA
L
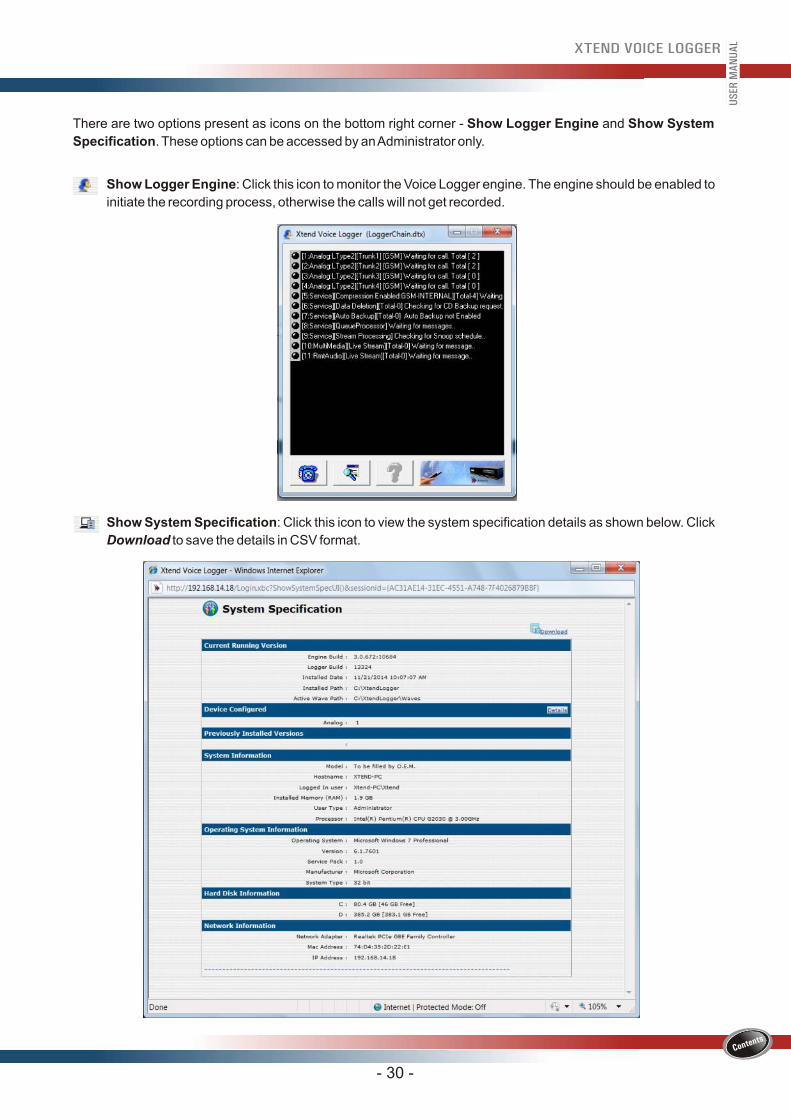
There are two options present as icons on the bottom right corner - Show Logger Engine and Show System
Specification. These options can be accessed by an Administrator only.
Show Logger Engine: Click this icon to monitor the Voice Logger engine. The engine should be enabled to
initiate the recording process, otherwise the calls will not get recorded.
Show System Specification: Click this icon to view the system specification details as shown below. Click
Download to save the details in CSV format.

Modify General Settings
Real Name Indicates the real name of the user.
Session duration The active time duration for the selected user.
List Count The number of records to be displayed per page. For example, if the limit
specified is 10, then 10 logged calls will be displayed in the Logs Report.
Suspend Account Enable and disable the user account. When a suspended user tries to enter the
browser interface, a message is displayed as "Your account is blocked ".
Disable Live snoop Yes option denotes deactivation of live snooping feature and No denotes
activation of live snooping.
Disable Wave Playback Yes option denotes deactivation of wave playback feature and No denotes that
the wave playback is enabled.
Download Wave file Yes option denotes that the wave download option is enabled and user can
download the wave file.
Auto Play Allows to automatically play the selected wave file in a displayed report.
Continuous Play Allows to automatically play the recorded wave files one after the other in a
displayed report. Consecutive playback is performed only for the records
available in the current displayed page.
Access Rights Four types of access rights can be allotted to a user:
View all Logs: This option allows the user to view all the recorded and live trunk details.
Backup: Allows taking the backup of the logged calls.
E-mail: Allows sending e-mails.
View Live Calls Only: This can be selected only for following user types - “Call Reports - Limited Access” and “Data Backup”. User can view the live calls only from the assigned trunks.
View Total call duration This option allows to view the total call duration along with the total number of calls.
- 31 -
US
ER M
AN
UA
L
Allow Tag Updation Yes option denotes that the tag updation is activated and user can update the
tags.
E-mail alert on Popup
update
This option allows to send an e-mail to alert the user about the popup updation.
User type Select the user type from the drop down list.
Select the User
Select the login name from the drop-down list to view the user account of the selected user.
To modify the settings, create a new user type with the required settings.
- 32 -
US
ER M
AN
UA
L
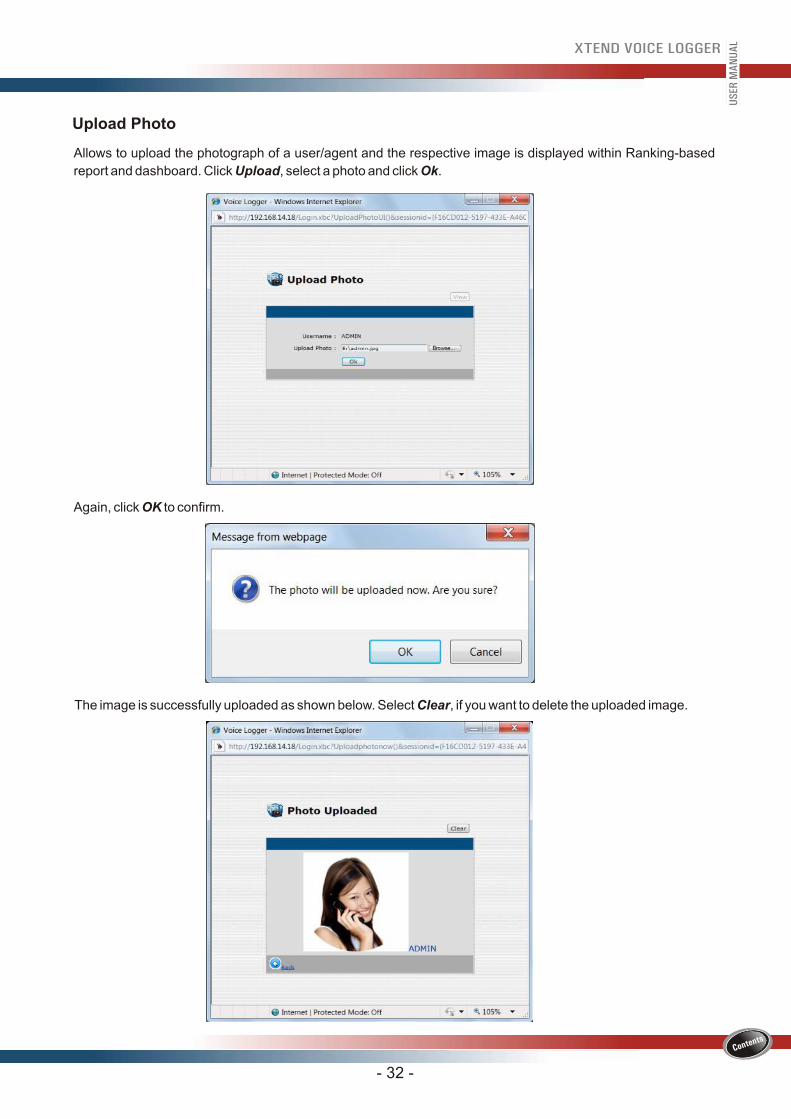
Upload Photo
Allows to upload the photograph of a user/agent and the respective image is displayed within Ranking-based
report and dashboard. Click Upload, select a photo and click Ok.
Again, click OK to confirm.
The image is successfully uploaded as shown below. Select Clear, if you want to delete the uploaded image.
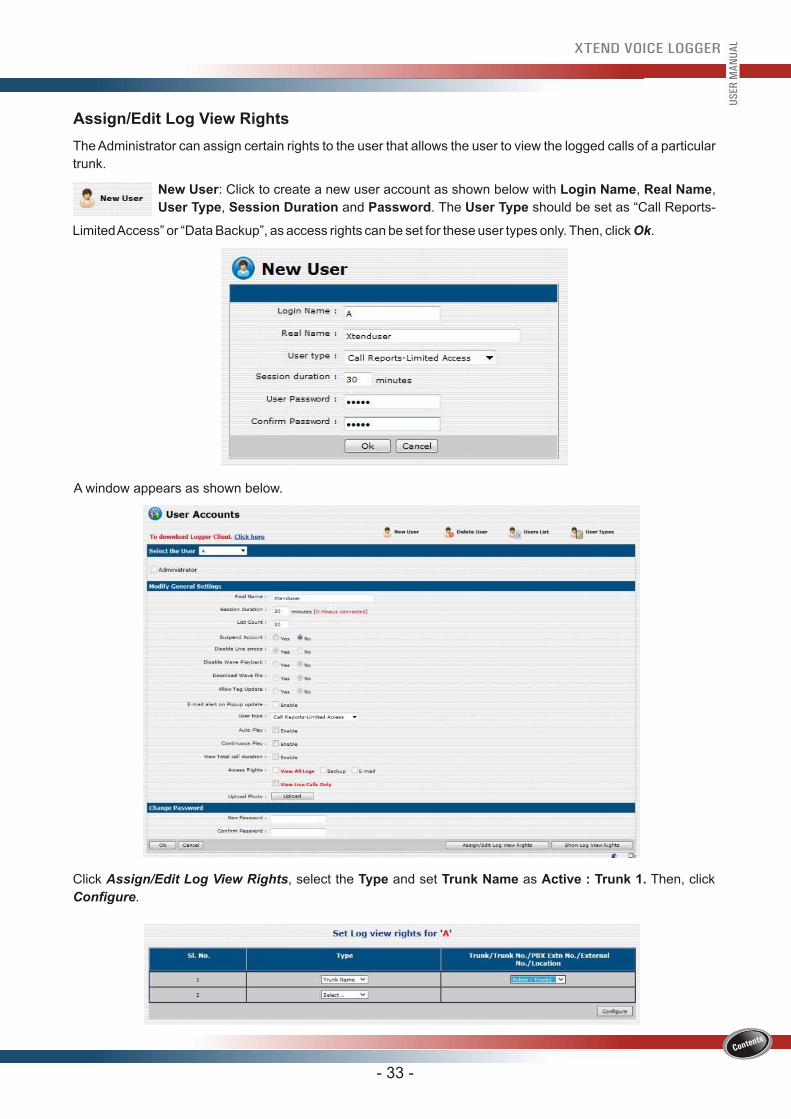
Assign/Edit Log View Rights
The Administrator can assign certain rights to the user that allows the user to view the logged calls of a particular
trunk.
- 33 -
US
ER M
AN
UA
L
Click Assign/Edit Log View Rights, select the Type and set Trunk Name as Active : Trunk 1. Then, click
Configure.
New User: Click to create a new user account as shown below with Login Name, Real Name,
User Type, Session Duration and Password. The User Type should be set as “Call Reports-
Limited Access” or “Data Backup”, as access rights can be set for these user types only. Then, click Ok.
A window appears as shown below.
Click this link to delete the user account. The delete option is allowed for a user with
administrative rights. Click Ok on the confirmation message that appears.
Click this link to view the list of users. The information obtained include User Name, Real
Name, Session, List Count, Live Snoop, Wave Play and Auto Play. The count of total users can
also be seen.
- 34 -
US
ER M
AN
UA
L
A message appears as "Rights updated successfully".
To delete the rights of a user, select the box next to Sl. No. and click Delete Rights. To edit the rights of a particular
user, click Edit Rights, make the changes and click Ok to save.
Show Log View Rights
Click this button to view the rights of a particular user.
Click this icon to view the list of created user types and the official’s name who has
created the user type. The system generated user types cannot be deleted or
modified.
- 35 -
US
ER M
AN
UA
L
To create a new user type click the icon Create User Type, enter the details and click Ok to save.
5.4.2. Phone BookThis submenu helps you to store the name and details of the customers. This facility helps the call monitoring
official to have a quick identification of the caller whenever an incoming call arrives.
Click the link New Address to add a new entry to the Phone Book. Provide the Name, Phone Number and
Address, then click Ok. Enable the checkbox next to "Alert on Incoming call" to receive an alert whenever a call is
generated.
- 36 -
US
ER M
AN
UA
L
To create another address, follow the above steps again.
- 37 -
US
ER M
AN
UA
L
Click the link Address List to view the list of contact numbers entered in the Phone Book.
To delete the address, select the address as shown below and click Delete.
Click OK to confirm.
The selected address will get deleted. Click Clear Phone Book to delete all the addresses.
- 38 -
US
ER M
AN
UA
L
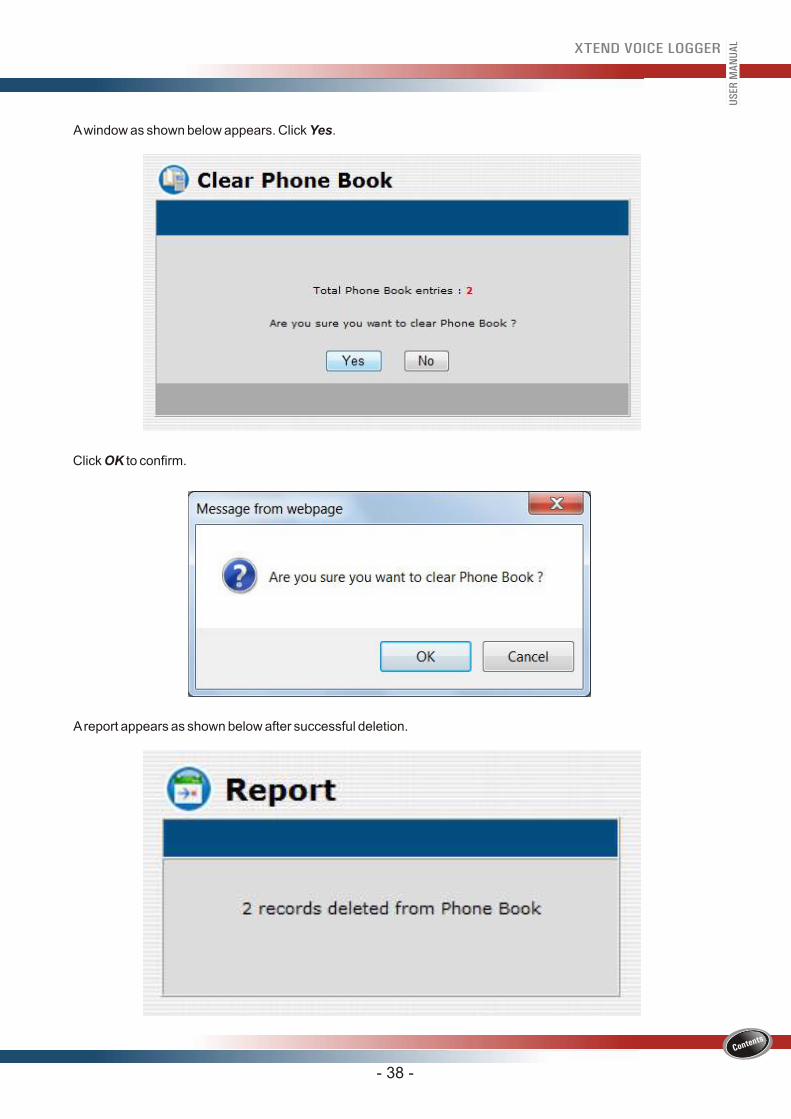
A window as shown below appears. Click Yes.
Click OK to confirm.
A report appears as shown below after successful deletion.
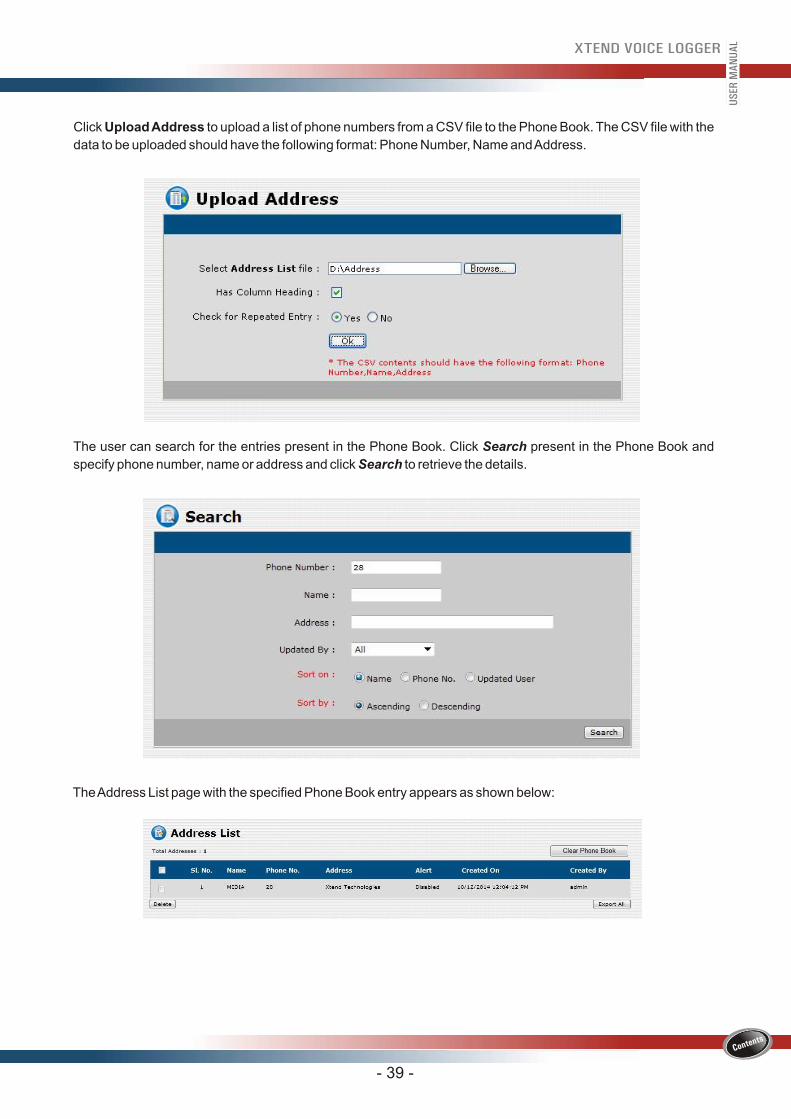
Click Upload Address to upload a list of phone numbers from a CSV file to the Phone Book. The CSV file with the
data to be uploaded should have the following format: Phone Number, Name and Address.
The user can search for the entries present in the Phone Book. Click Search present in the Phone Book and
specify phone number, name or address and click Search to retrieve the details.
The Address List page with the specified Phone Book entry appears as shown below:
- 39 -
US
ER M
AN
UA
L
- 40 -
US
ER M
AN
UA
L
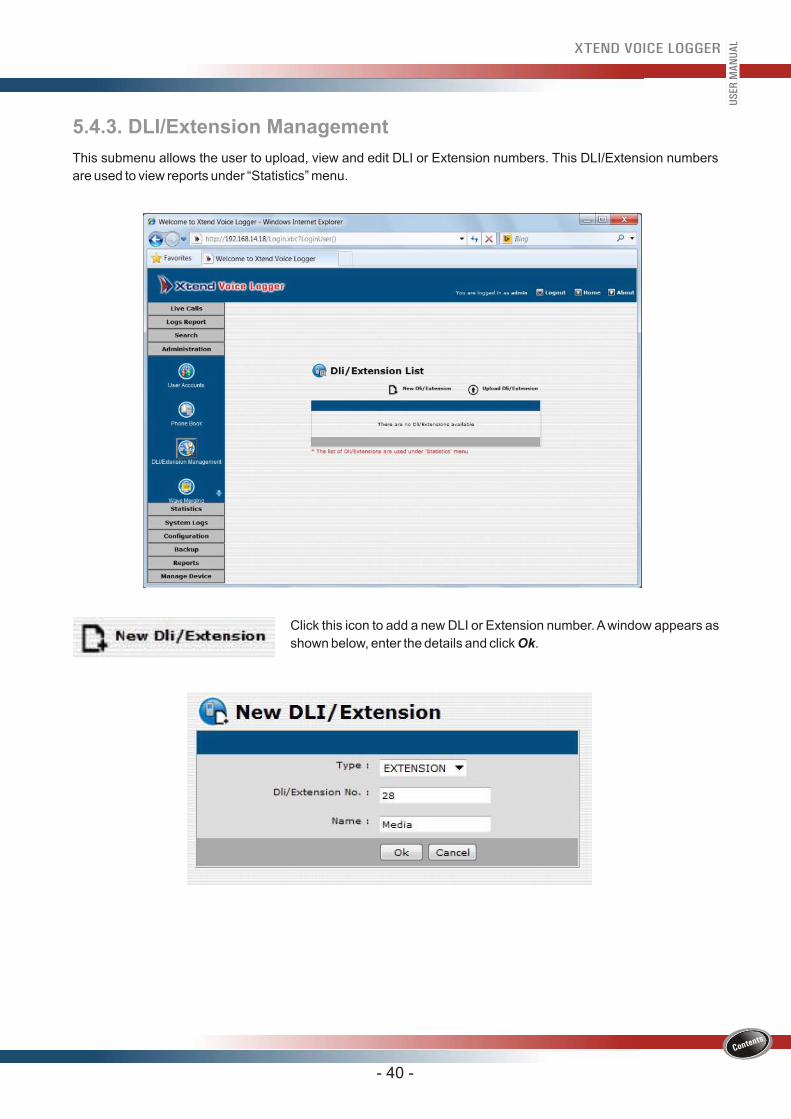
5.4.3. DLI/Extension Management
This submenu allows the user to upload, view and edit DLI or Extension numbers. This DLI/Extension numbers
are used to view reports under “Statistics” menu.
Click this icon to add a new DLI or Extension number. A window appears as
shown below, enter the details and click Ok.
- 41 -
US
ER M
AN
UA
L
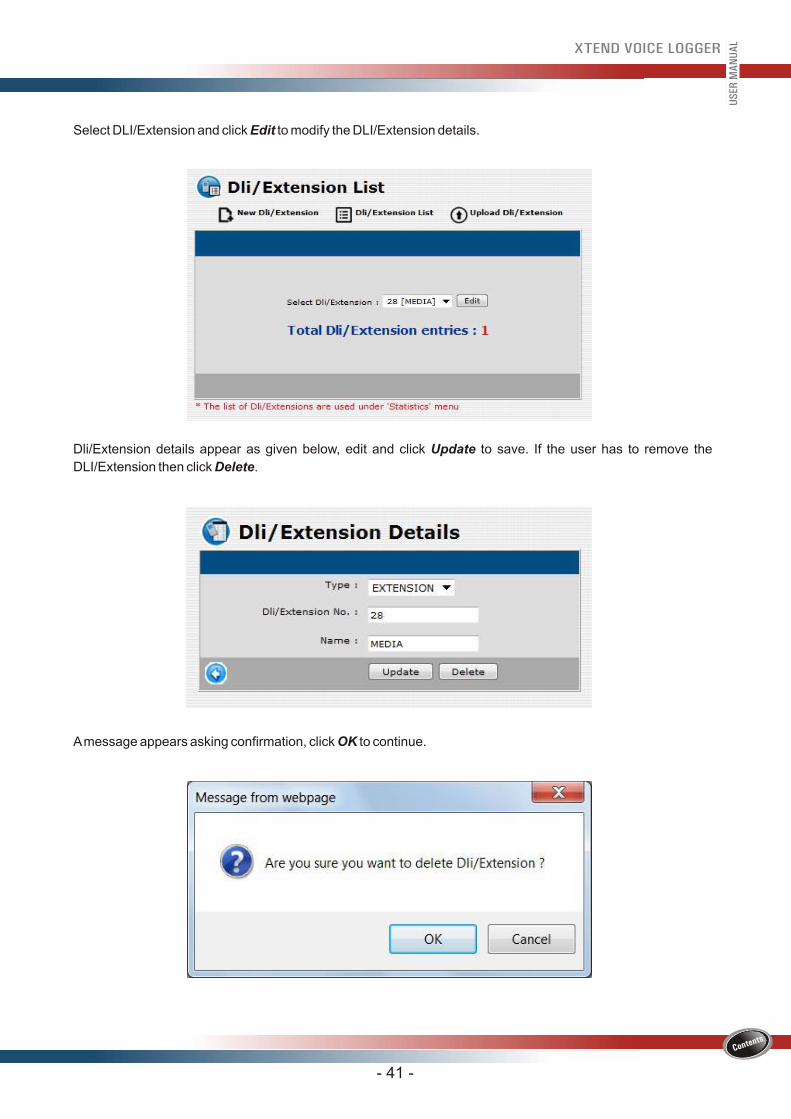
Dli/Extension details appear as given below, edit and click Update to save. If the user has to remove the
DLI/Extension then click Delete.
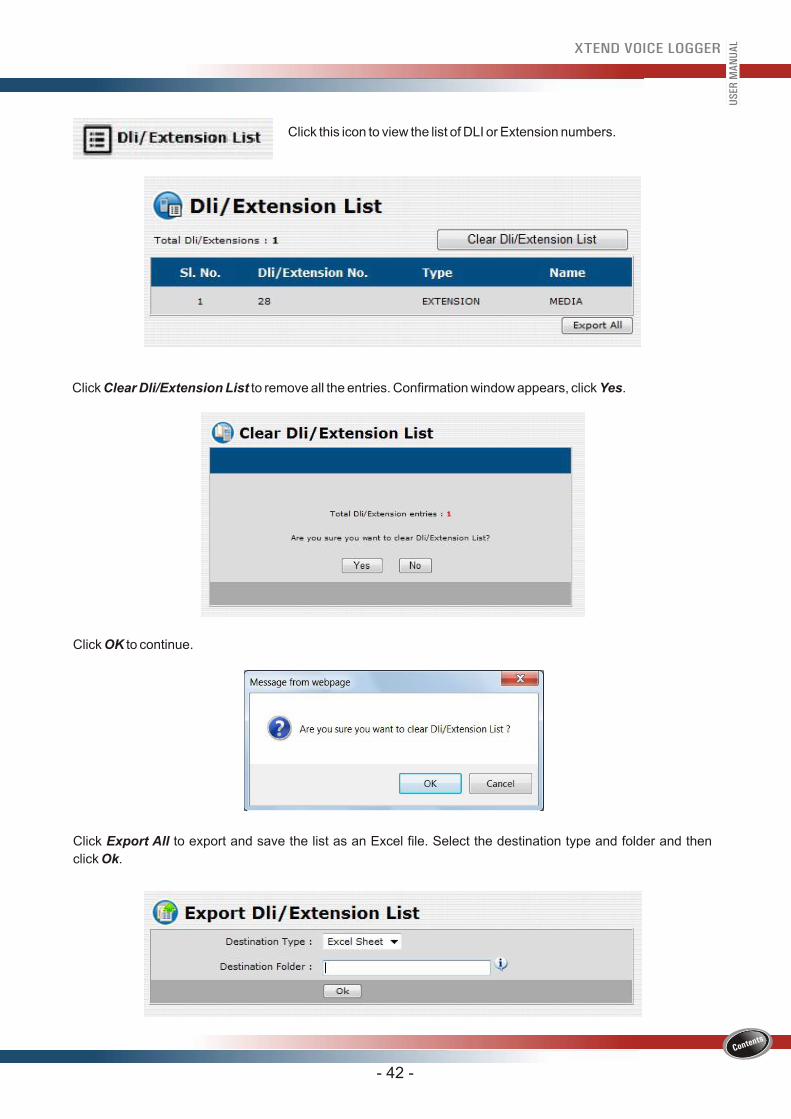
A message appears asking confirmation, click OK to continue.
Select DLI/Extension and click Edit to modify the DLI/Extension details.
- 42 -
US
ER M
AN
UA
L
Click OK to continue.
Click Clear Dli/Extension List to remove all the entries. Confirmation window appears, click Yes.
Click Export All to export and save the list as an Excel file. Select the destination type and folder and then
click Ok.
Click this icon to view the list of DLI or Extension numbers.
- 43 -
US
ER M
AN
UA
L
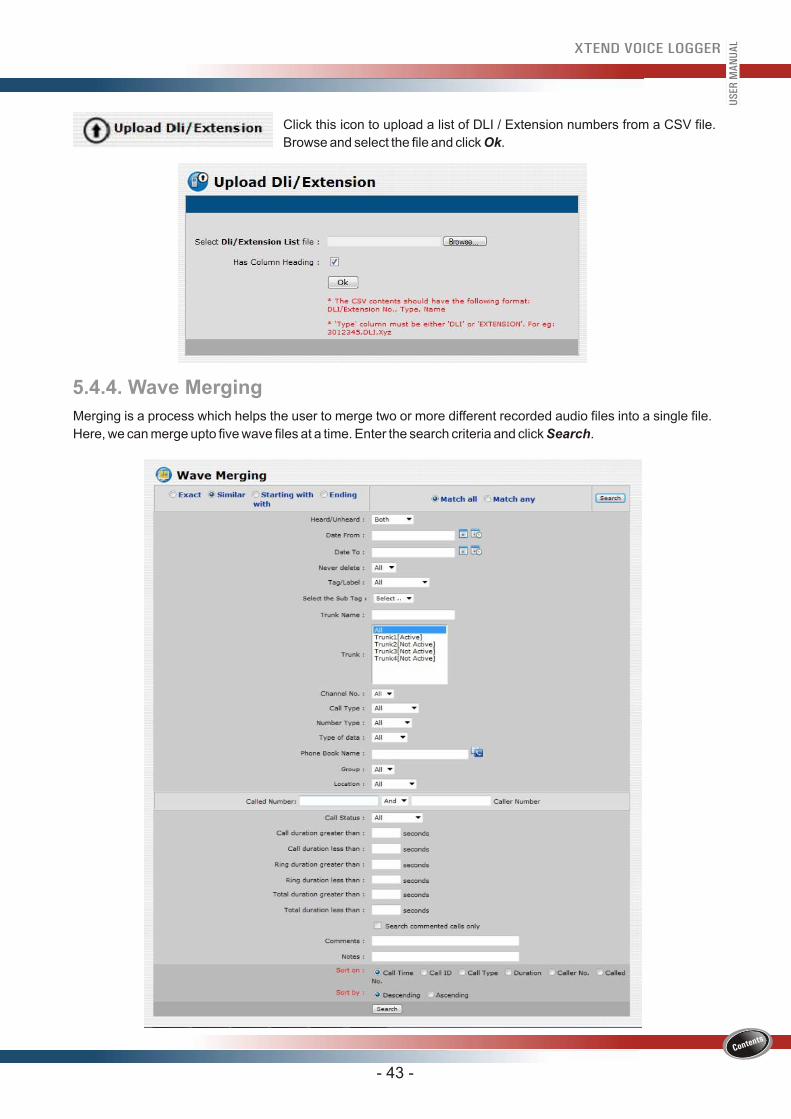
5.4.4. Wave Merging
Merging is a process which helps the user to merge two or more different recorded audio files into a single file.
Here, we can merge upto five wave files at a time. Enter the search criteria and click Search.
Click this icon to upload a list of DLI / Extension numbers from a CSV file.
Browse and select the file and click Ok.
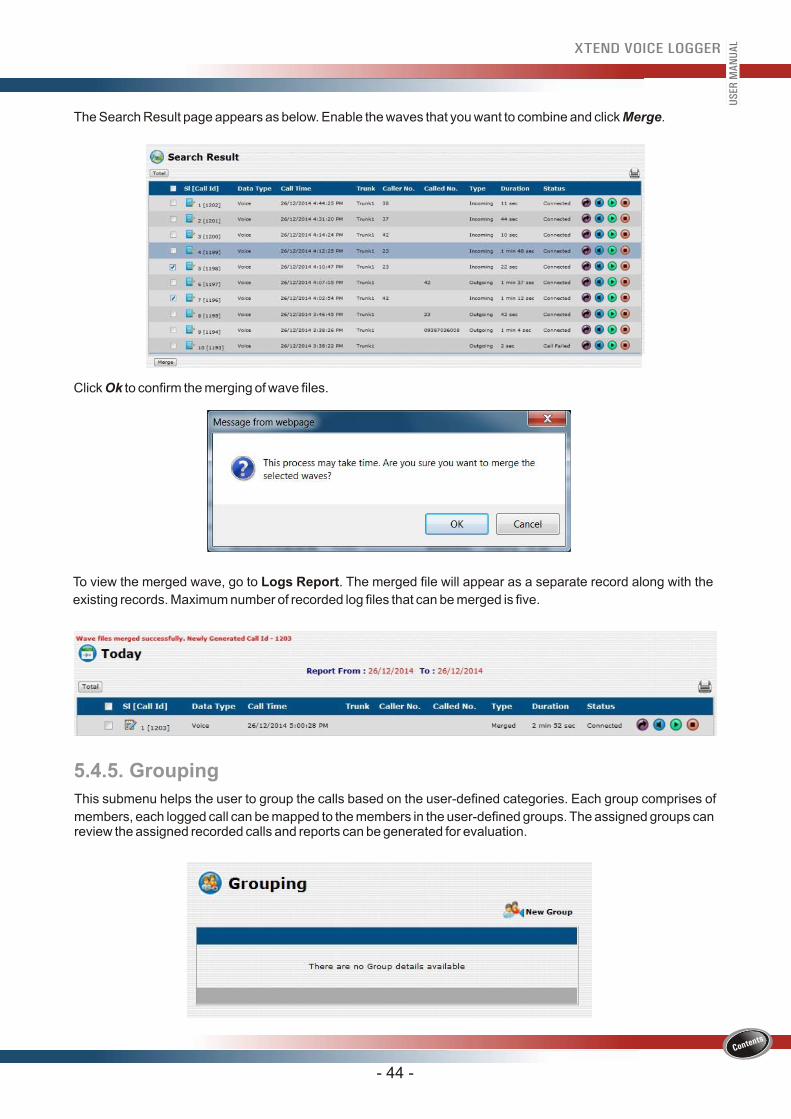
The Search Result page appears as below. Enable the waves that you want to combine and click Merge.
- 44 -
US
ER M
AN
UA
L
Click Ok to confirm the merging of wave files.
To view the merged wave, go to Logs Report. The merged file will appear as a separate record along with the
existing records. Maximum number of recorded log files that can be merged is five.
5.4.5. Grouping
This submenu helps the user to group the calls based on the user-defined categories. Each group comprises of
members, each logged call can be mapped to the members in the user-defined groups. The assigned groups canreview the assigned recorded calls and reports can be generated for evaluation.
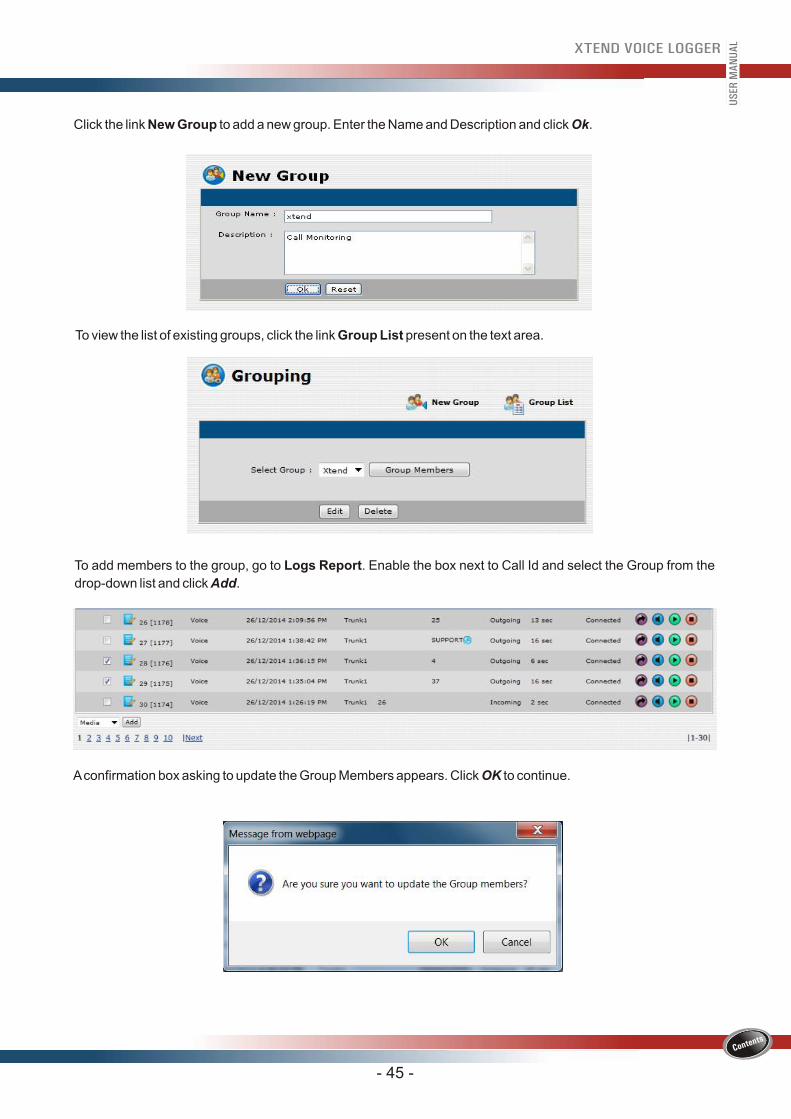
Click the link New Group to add a new group. Enter the Name and Description and click Ok.
- 45 -
US
ER M
AN
UA
L
To view the list of existing groups, click the link Group List present on the text area.
To add members to the group, go to Logs Report. Enable the box next to Call Id and select the Group from the
drop-down list and click Add.
A confirmation box asking to update the Group Members appears. Click OK to continue.
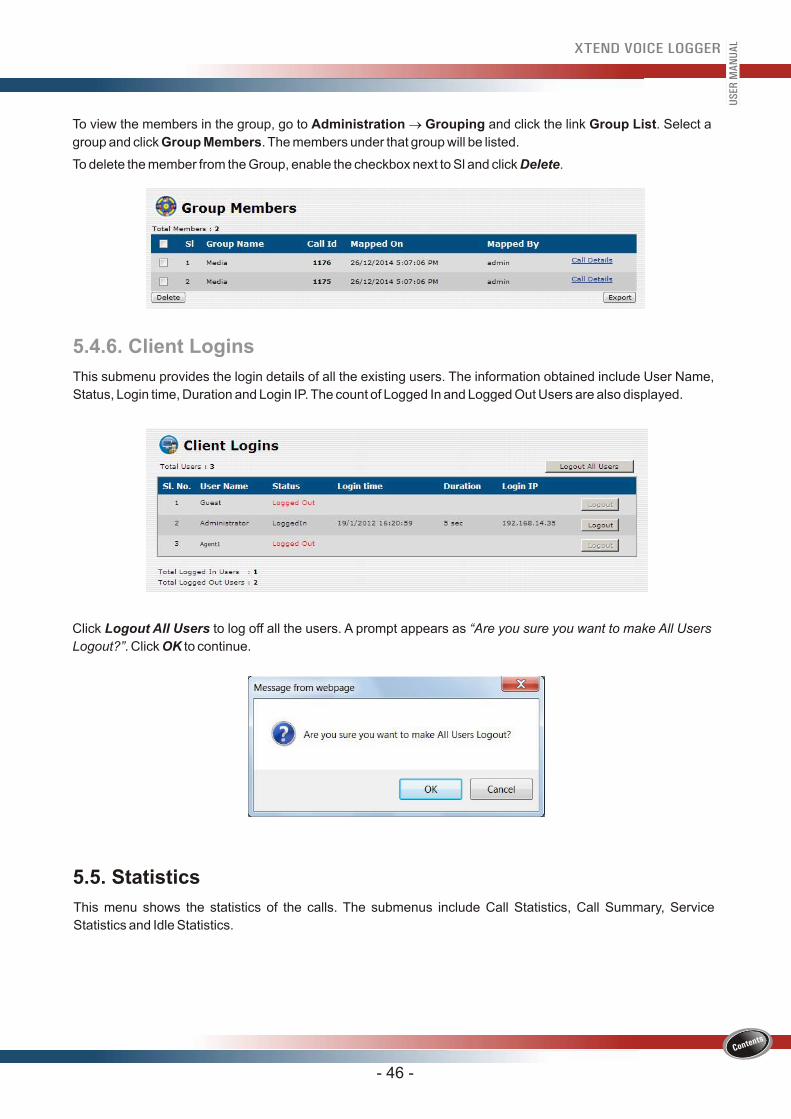
To view the members in the group, go to Administration Grouping and click the link Group List. Select a
group and click Group Members. The members under that group will be listed.
To delete the member from the Group, enable the checkbox next to Sl and click Delete.
®
- 46 -
US
ER M
AN
UA
L
5.4.6. Client Logins
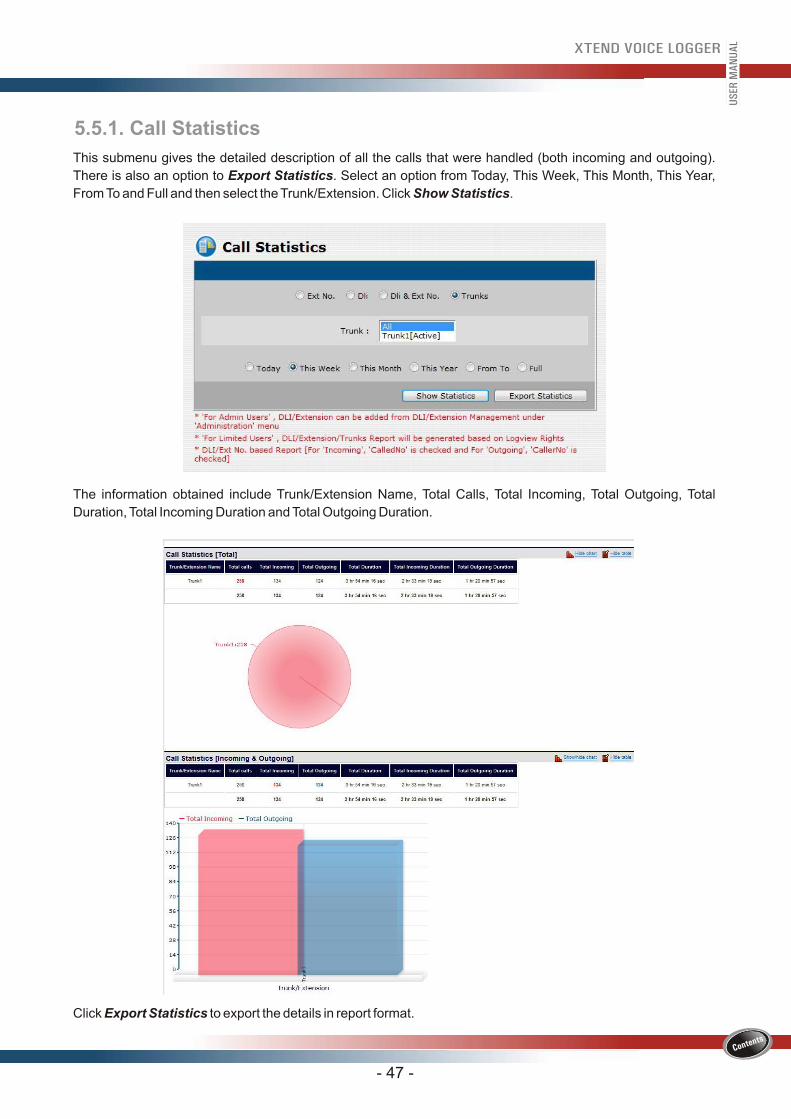
This submenu provides the login details of all the existing users. The information obtained include User Name,
Status, Login time, Duration and Login IP. The count of Logged In and Logged Out Users are also displayed.
Click Logout All Users to log off all the users. A prompt appears as “Are you sure you want to make All Users
Logout?”. Click OK to continue.
Agent1
5.5. Statistics
This menu shows the statistics of the calls. The submenus include Call Statistics, Call Summary, Service
Statistics and Idle Statistics.
US
ER M
AN
UA
L
5.5.1. Call Statistics
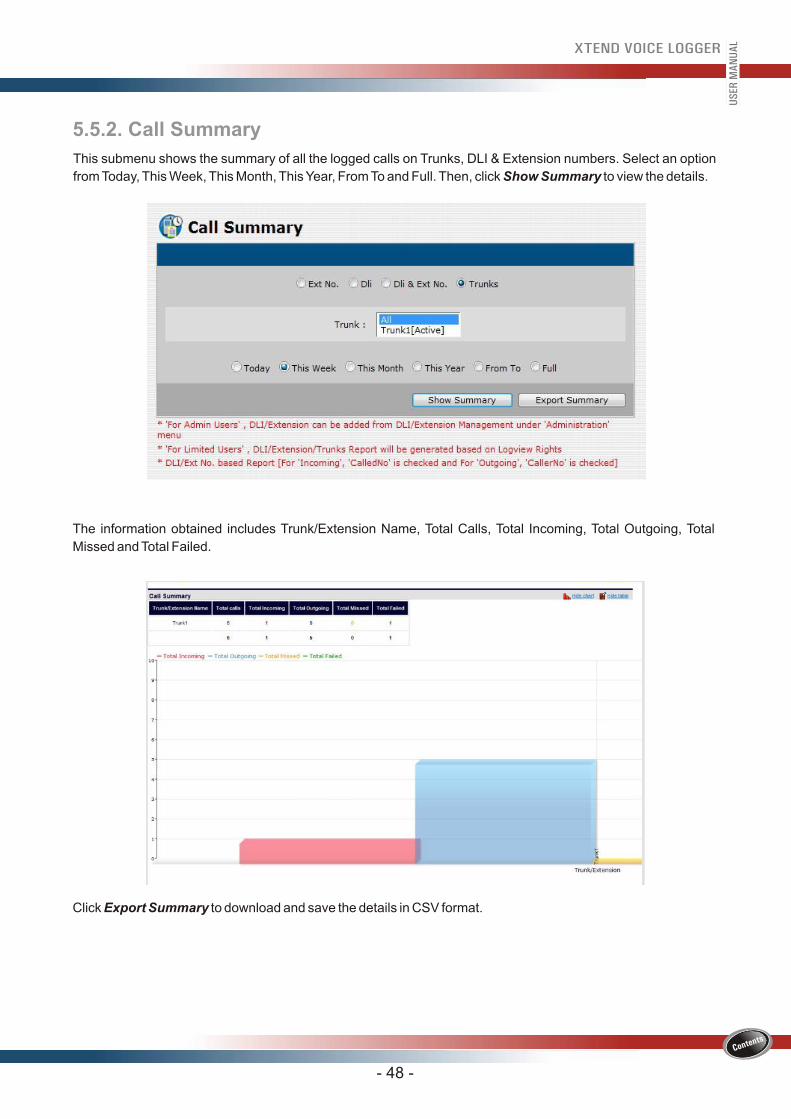
This submenu gives the detailed description of all the calls that were handled (both incoming and outgoing).
There is also an option to Export Statistics. Select an option from Today, This Week, This Month, This Year,
From To and Full and then select the Trunk/Extension. Click Show Statistics.
- 47 -
The information obtained include Trunk/Extension Name, Total Calls, Total Incoming, Total Outgoing, Total
Duration, Total Incoming Duration and Total Outgoing Duration.
Click Export Statistics to export the details in report format.
- 48 -
US
ER M
AN
UA
L
5.5.2. Call Summary
This submenu shows the summary of all the logged calls on Trunks, DLI & Extension numbers. Select an option
from Today, This Week, This Month, This Year, From To and Full. Then, click Show Summary to view the details.
The information obtained includes Trunk/Extension Name, Total Calls, Total Incoming, Total Outgoing, Total
Missed and Total Failed.
Click Export Summary to download and save the details in CSV format.
- 49 -
US
ER M
AN
UA
L
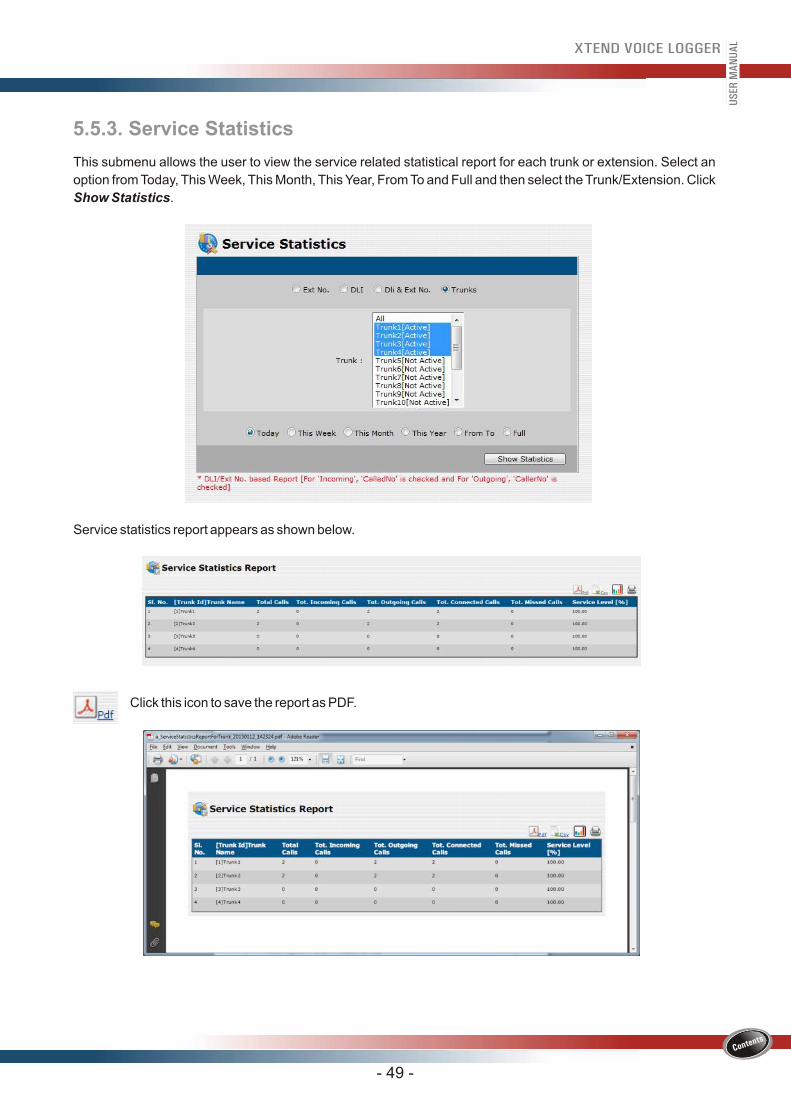
This submenu allows the user to view the service related statistical report for each trunk or extension. Select an
option from Today, This Week, This Month, This Year, From To and Full and then select the Trunk/Extension. Click
Show Statistics.
5.5.3. Service Statistics
Service statistics report appears as shown below.
Click this icon to save the report as PDF.
- 50 -
US
ER M
AN
UA
L
Click this icon to save the report as CSV file.
Click this icon to view the graphical representation of the report.
This submenu gives the details of the trunk-wise idle statistics. Select an option from the five options available
i.e., Today, This Week, This Month, This Year and From To. Also, select the Trunk/Extension and click Show
Statistics.
5.5.4. Idle Statistics
- 51 -
US
ER M
AN
UA
L
The information obtained include Trunk/Extension Name, Total Time, Total InUse Time and Total Idle Time.
The menu includes Session Logs, Event Logs and System Logs.
5.6. System Logs
5.6.1. Session LogsMultiple users can access the browser interface of Xtend Voice Logger with the assigned user rights. Session
Logs display the login and logout information of users through the browser interface and client popup.
Administrator can select this submenu and enter the login date and time to view the session details. User can be
selected from the drop-down list.
The report comprises of User Name, Login time, Logout Time, Duration, Login IP, Logout Method, Login Type
and Total Number of Sessions. Click Export option to export and save the details.
This submenu gives the details of all the events that occur after the configuration of Voice Logger. The time of
occurrence of the event along with its details will be displayed. The count of total number of events can also be
seen. A search option is also added to this submenu, so that the user can trace the events quickly.
5.6.2. Event Logs
This submenu gives the system related details of the voice logging application. The information obtained include
Start Time, Last Running Time, Reason and Updated Time. A search option is also added to this submenu, so
that the user can trace the logs quickly.
5.6.3. System Logs
- 52 -
US
ER M
AN
UA
L
Click Search (highlighted with red rectangular box) to track and retrieve a specific event. A window appears as
shown below. Enter the date and search string, then click Ok.
The event logs corresponding to the search string and date will appear.
5.7. Configuration
This menu helps the user to carry out the settings for the Trunks and Devices. The submenu items include Trunks,
Devices, General Settings, Location Settings, Wave Path, Backup Wave Path, Call Tags, Agent Popup Mapping
and E-mail Settings.
5.7.1. Trunks
This submenu gives the details of the configured trunks. The user can add trunks, view and edit trunk list and
schedule recording duration for incoming/outgoing calls of a particular trunk.
To add a new trunk, click the link Add Trunk present in the text area. Enter the Trunk Name and select the Trunk
Type from the drop-down list and click Add.
- 53 -
US
ER M
AN
UA
L
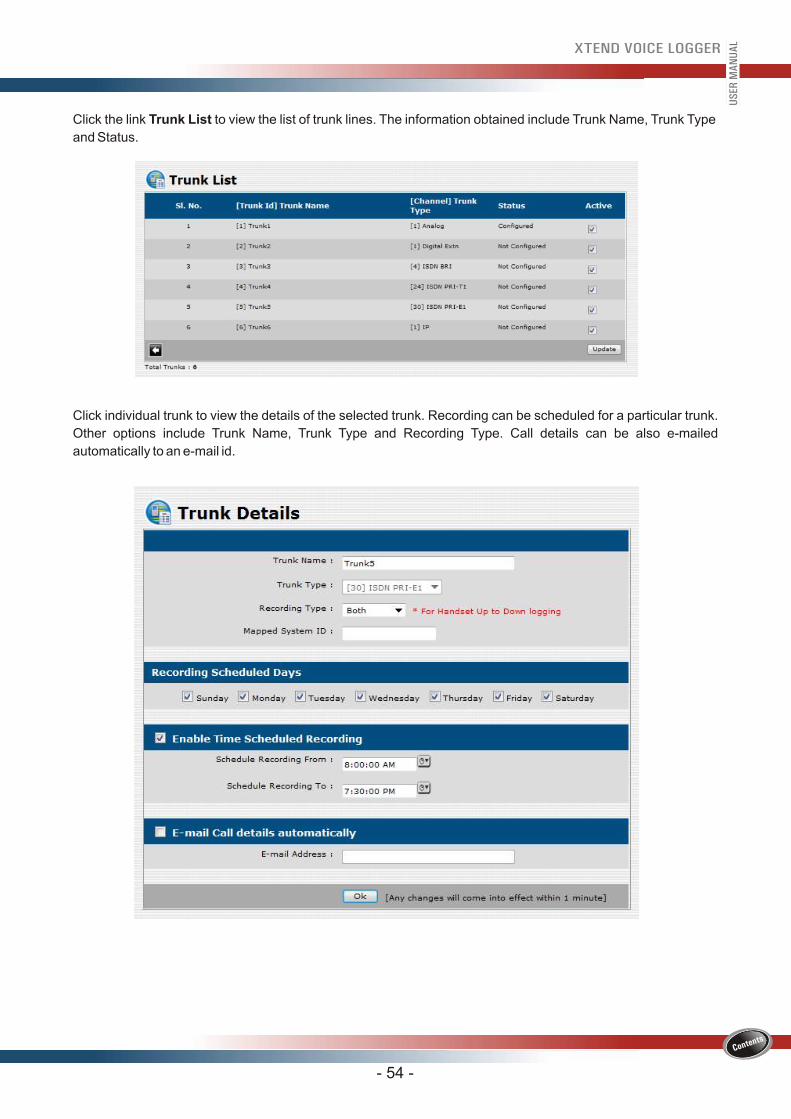
Click the link Trunk List to view the list of trunk lines. The information obtained include Trunk Name, Trunk Type
and Status.
- 54 -
US
ER M
AN
UA
L
Click individual trunk to view the details of the selected trunk. Recording can be scheduled for a particular trunk.
Other options include Trunk Name, Trunk Type and Recording Type. Call details can be also e-mailed
automatically to an e-mail id.
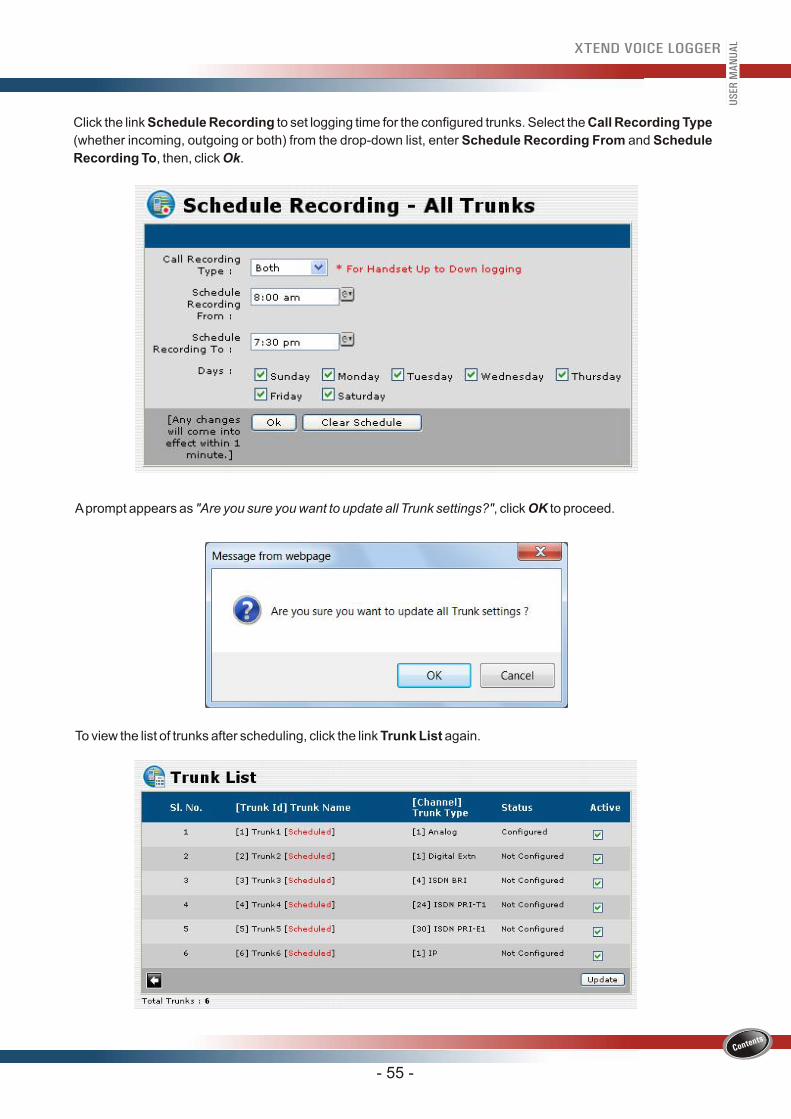
To view the list of trunks after scheduling, click the link Trunk List again.
- 55 -
US
ER M
AN
UA
L
A prompt appears as "Are you sure you want to update all Trunk settings?", click OK to proceed.
Click the link Schedule Recording to set logging time for the configured trunks. Select the Call Recording Type
(whether incoming, outgoing or both) from the drop-down list, enter Schedule Recording From and Schedule
Recording To, then, click Ok.
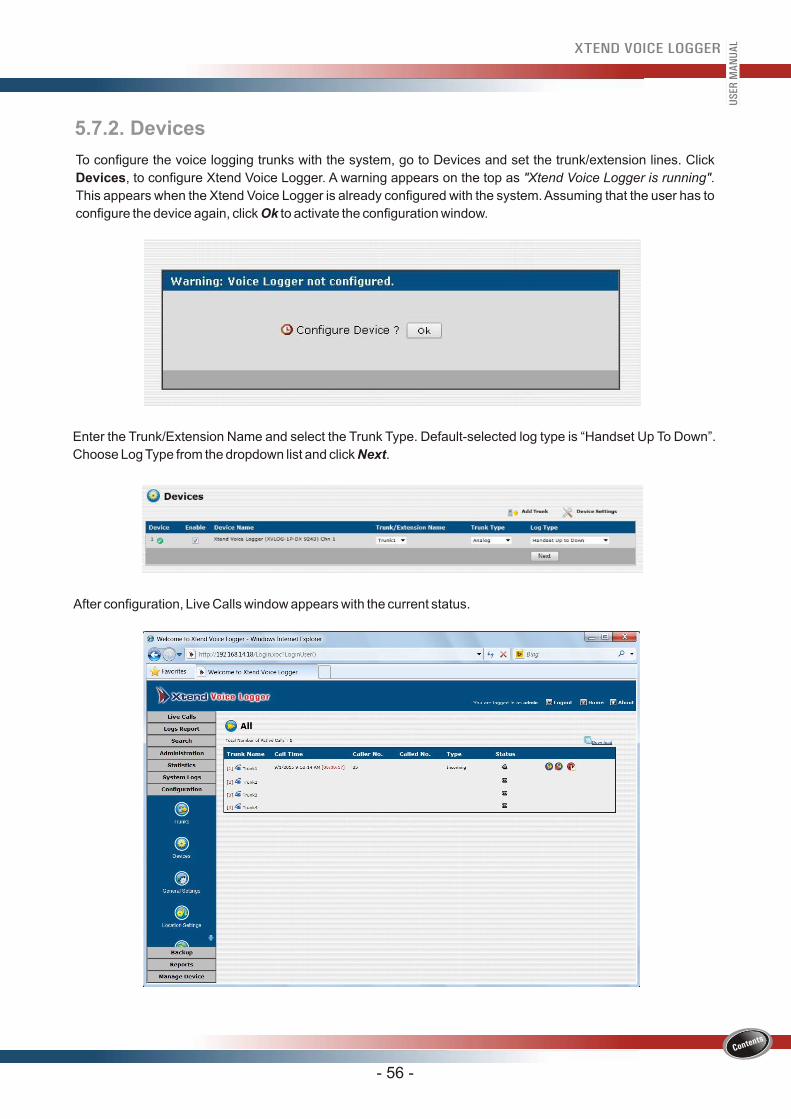
After configuration, Live Calls window appears with the current status.
- 56 -
US
ER M
AN
UA
L
Enter the Trunk/Extension Name and select the Trunk Type. Default-selected log type is “Handset Up To Down”.
Choose Log Type from the dropdown list and click Next.
5.7.2. Devices
To configure the voice logging trunks with the system, go to Devices and set the trunk/extension lines. Click
Devices, to configure Xtend Voice Logger. A warning appears on the top as "Xtend Voice Logger is running".
This appears when the Xtend Voice Logger is already configured with the system. Assuming that the user has to
configure the device again, click Ok to activate the configuration window.
- 57 -
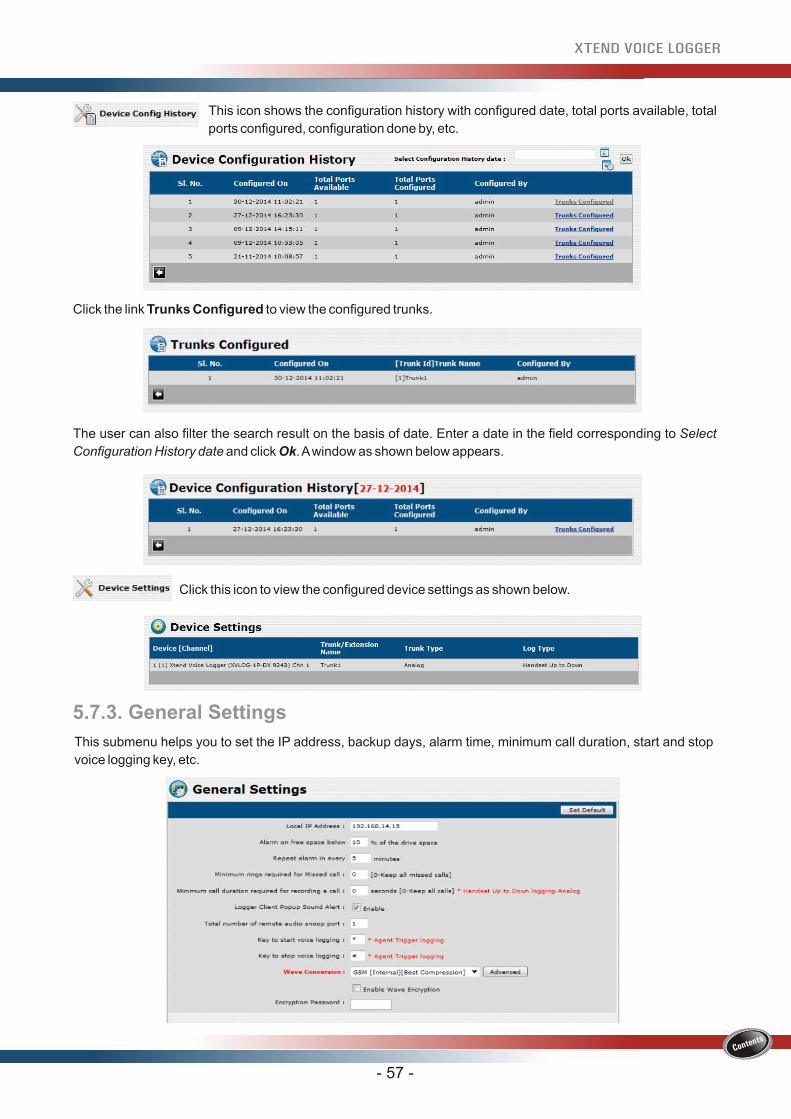
This icon shows the configuration history with configured date, total ports available, total
ports configured, configuration done by, etc.
Click the link Trunks Configured to view the configured trunks.
The user can also filter the search result on the basis of date. Enter a date in the field corresponding to Select
Configuration History date and click Ok. A window as shown below appears.
Click this icon to view the configured device settings as shown below.
5.7.3. General Settings
This submenu helps you to set the IP address, backup days, alarm time, minimum call duration, start and stop
voice logging key, etc.
Local IP address: Enter the IP address of the Voice Logger server system.
Alarm on free space below ___% of the drive space: Enter the number (in percentage) to set an alarm that indicates the user about the low disk space.
Repeat alarm in every ___ minutes: Enter the time (in minutes) to set the time interval for the alarm.
Minimum rings required for Missed call: Enter the seconds required for a missed call. For e.g., If the number of rings for a missed call is 2, then enter the duration in seconds corresponding to two rings.
Minimum call duration required for recording a call: Enter the call duration in seconds to record the call.
Logger Client Popup Sound Alert: Enable the option to activate sound alert along with the popup at the agent side.
Total No. of Remote Audio Snoop Ports: The number of remote audio snoop ports appears as 1 indicating that remote snooping can be carried out by one authorised official only. If more than one remote snoop is required, then license for additional ports needs to be purchased.
Key to start voice logging: Enter key like *, # etc. to initiate logging.
Key to stop voice logging: Enter key like *, # etc. to stop the process of logging.
Enable Wave Encryption: Select the checkbox to enable encryption with tamper-proof checksum.
Encryption Password: Enter the password for encryption.
- 58 -
US
ER M
AN
UA
L
Wave Conversion: Select the wave conversion format from the drop-down list. Click Advanced button to view the window as shown below.
- 59 -
US
ER M
AN
UA
L
E-mail Alert Settings
Select the required Wave Conversion/Compression option from the drop-down list and click Update.
A confirmation prompt appears, click OK.
Alert on low free space in every ___ minutes: Set the time to receive e-mail alert on low free space.
Alert on trunk idle for more than ___ minutes: Set the time to receive e-mail alert on sensing non-operational trunk for a long time.
Alert on trunk idle from: Enter the initial time or pick the initial time from Time Picker to receive alert on idle trunk.
Alert on trunk idle to: Enter the end time or pick the end time from Time Picker to receive alert on idle trunk.
Send Alerts to: Enter recipient's e-mail id to receive alerts.
Auto Backup
User can take the manual or automatic backup of the logged calls. Manual backup is taken into CD/DVD, folder or
zip file. To activate the auto-backup procedure, enable the checkbox corresponding to Auto Backup and enter the
details in the relevant fields as shown below.
Exclude Trunk/Phone Number Logging
The user can enable this option and enter a valid phone number so that the calls from and to the specified number
will be excluded from logging. Specify the phone number in the field named Trunk Nos. and click Ok.
Live Backup
The user can take the live backup of the calls with this option. Enable Live Backup, specify the folder for backup
and enter the number (in percentage) to set an alarm that indicates the user about the low disk space. The logs of
live backup cannot be restored.
- 60 -
US
ER M
AN
UA
L
Every X mints: Backup will be carried out in every “X” minutes, here “X” denotes the time interval defined by
the user.
Hourly: Backup will be carried out on an hourly-basis.
Daily: Backup will be carried out on a daily-basis.
Weekly: Backup will be carried out on a weekly-basis.
Monthly: Backup will be carried out on a monthly-basis.
Note: After the updations in General Settings, it is recommended to restart the Voice Logger.
5.7.4. Location SettingsThis submenu provides details of the location like Location Id, Location Name, Method and Status. When the
data from different locations are synchronised to the centralised server, this submenu helps to find the location-
wise details.
Click the link Add Location to add a new location. Enter the Name, Details, IP Address, Port and Status of the
location and click Update.
5.7.5. Wave PathWave Path allows the user to select the location for saving the logged wave file.
- 61 -
US
ER M
AN
UA
L
Click the link New Wave Path to add a new path. Enter a valid path and select Yes/No from the drop-down list for
the activation of wave path. Click Ok to save the changes.
To view the complete list of user-defined wave paths, click the link Wave Path List present in the text area. The
information obtained includes Wave Path, Free Space and Status. The count of total wave paths can also be
seen.
5.7.6. Backup Wave Path
This submenu helps the user to set the backup wave path for automatic live backup of wave files.
- 62 -
US
ER M
AN
UA
L
User can click the link New Wave Path to specify a backup path to save the copy of all the logged call information
to a different drive and activate it. In case, if the logged calls are deleted from the default backup area, then user
can go to the specified path in the Backup Wave Path to recover the files. The files can only be recovered and
cannot be restored.

Click the link Wave Path List to view the list of all user-defined backup wave paths. The information obtained
include Backup Wave Path, Free Space and Status. The count of total backup wave paths can also be seen.
5.7.7. Call Tags
This submenu helps you to add new tags to each record. These labels identify the importance of each call in the
Logs Report. User can also sort the report using the tag option.
- 63 -
US
ER M
AN
UA
L
Click Edit (highlighted with red clolur) button to edit the selected tag. A window appears as shown below, edit the
details and click Update.
Click Delete (highlighted with blue colour) to remove the selected tag. A confirmation prompt appears, click OK.
Deletion can be carried out for tags which are not assigned to any of the record. If a tag has been assigned to a
particular record within logs report, then the tag cannot be deleted.
- 64 -
US
ER M
AN
UA
L
To add a new tag, click the link New Tag. Enter the tag name and select an icon for the tag and click Ok.
Enter an e-mail address to get an e-mail alert, whenever the created tag is updated in logs report or popup.
To view the complete list of tags, click the link Tag List.
Click Sub Tags to categorise the tags. For example, the tag name “Ultrapersonal” can be categorised with
respect to the agents. Enter the sub tag name and click OK.
- 65 -
US
ER M
AN
UA
L
To add another sub tag, click Add Sub Tags.
Click the icon to delete the sub tag. A confirmation prompt appears as shown below, click OK.
To assign a tag to a record, go to Logs Report, select a submenu and click Update/View call details of the
chosen record. Select the tag from the drop-down list of "Select the Tag" and “Select the Sub Tag”, then click
Update Data.
Agent Popup Mapping helps the user to map the trunk details with the Username/IP of the agent's system, so that
a popup alert will be generated during the calls (both incoming and outgoing).
5.7.8. Agent Popup Mapping
Click the link New Agent Popup Mapping to create a new mapping. Select the Trunk Type as Analog/Digital Trunk from the drop-down list. Also, select the user from the drop-down list. Enter the IP address and select the Client Port (Default Port for TCP=2856, UDP= 2855).
Enable Incoming Popup: Enables the incoming call popup.
Enable Outgoing Popup: Allows to enable the outgoing call popup.
Enable Critical Alarm: Enable this option to get a critical alarm popup for low disk space, board failure and idle trunk.
Enable Auto Remote Snoop: User can snoop the calls from the specified trunk, when this option is enabled.
Enable URL Post: This option enables to post a URL, that includes the popup details for updation in an external CRM. After updating the details, click Add to create the popup mapping.
When User/IP address is enabled, the user has to put a checkmark in the box next to “Enable Incoming and
Outgoing Popup”. When a call is dialed or received, the user will be notified through popups and the ongoing call
can be snooped.
- 66 -
US
ER M
AN
UA
L
- 67 -
US
ER M
AN
UA
L
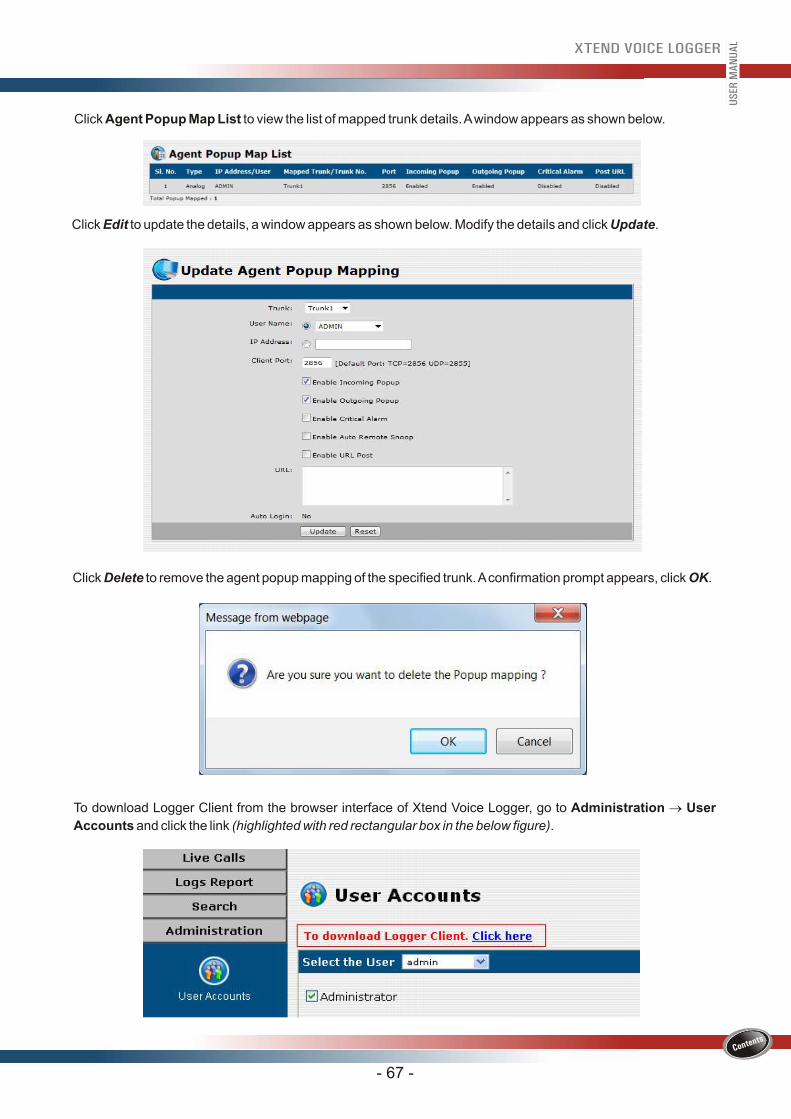
Click Agent Popup Map List to view the list of mapped trunk details. A window appears as shown below.
Click Edit to update the details, a window appears as shown below. Modify the details and click Update.
Click Delete to remove the agent popup mapping of the specified trunk. A confirmation prompt appears, click OK.
To download Logger Client from the browser interface of Xtend Voice Logger, go to Administration ® User
Accounts and click the link (highlighted with red rectangular box in the below figure).
- 68 -
US
ER M
AN
UA
L
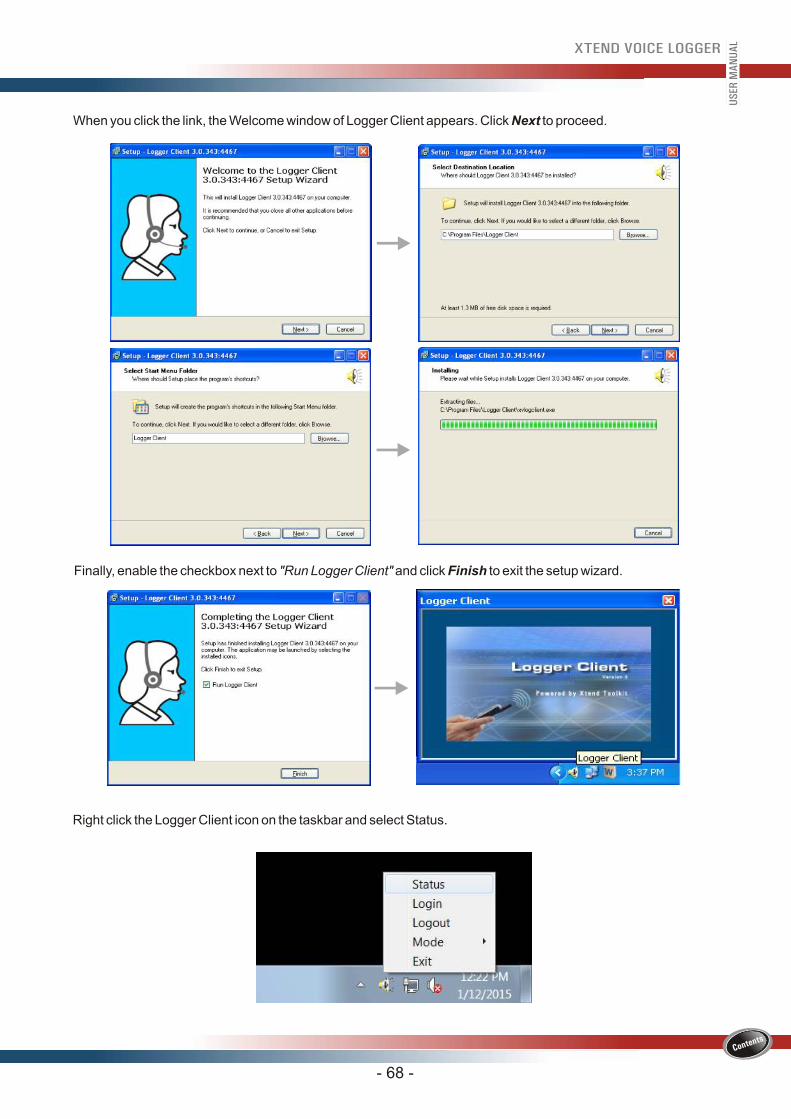
When you click the link, the Welcome window of Logger Client appears. Click Next to proceed.
Finally, enable the checkbox next to "Run Logger Client" and click Finish to exit the setup wizard.
Right click the Logger Client icon on the taskbar and select Status.
- 69 -
US
ER M
AN
UA
L
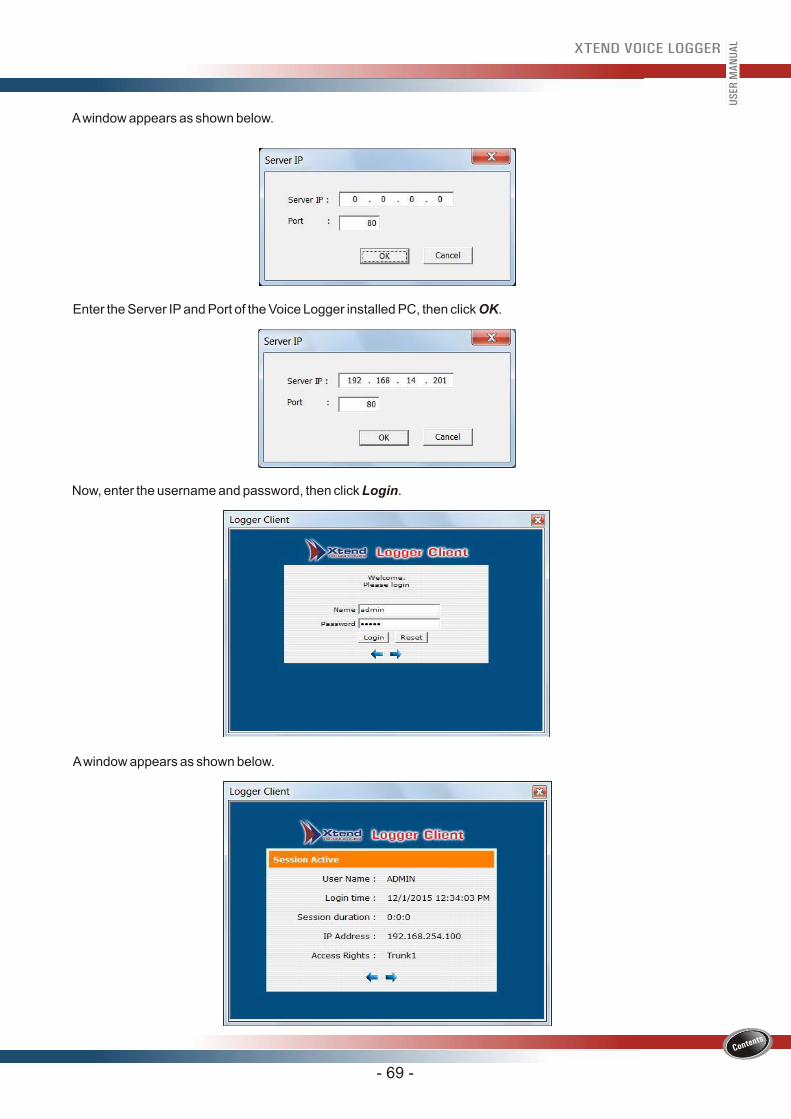
A window appears as shown below.
Enter the Server IP and Port of the Voice Logger installed PC, then click OK.
Now, enter the username and password, then click Login.
A window appears as shown below.
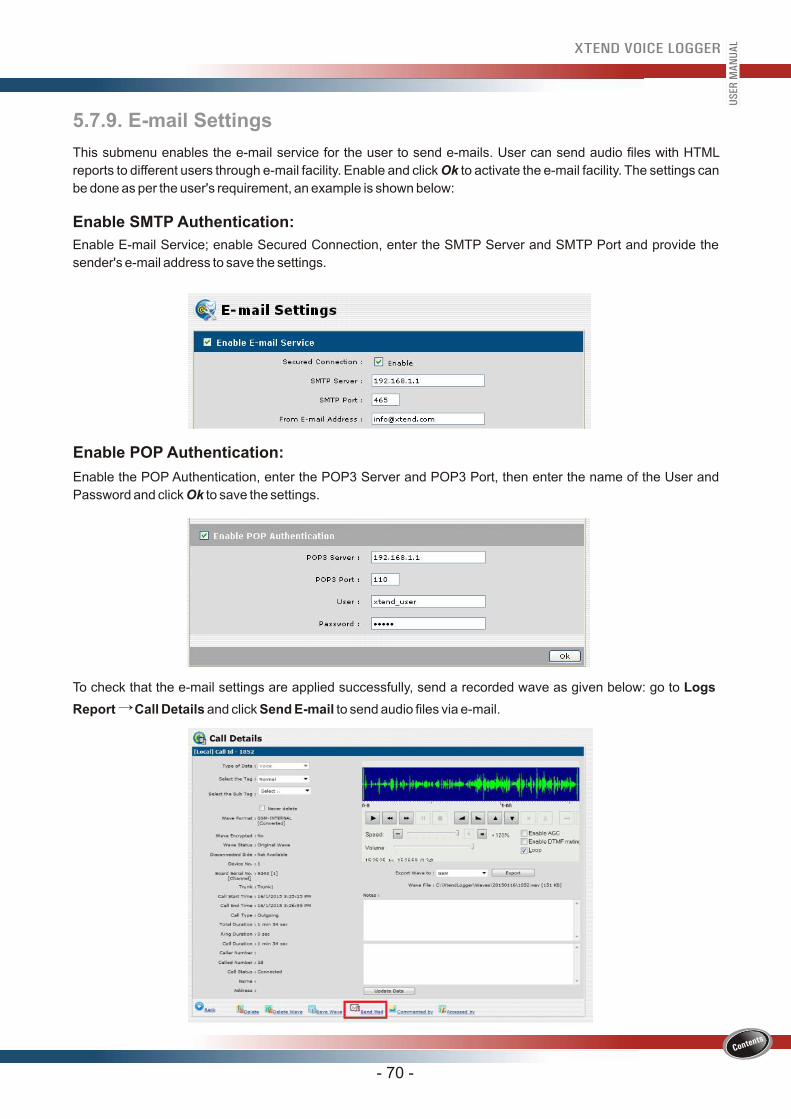
5.7.9. E-mail Settings
This submenu enables the e-mail service for the user to send e-mails. User can send audio files with HTML
reports to different users through e-mail facility. Enable and click Ok to activate the e-mail facility. The settings can
be done as per the user's requirement, an example is shown below:
Enable SMTP Authentication:
Enable E-mail Service; enable Secured Connection, enter the SMTP Server and SMTP Port and provide the
sender's e-mail address to save the settings.
Enable POP Authentication:
Enable the POP Authentication, enter the POP3 Server and POP3 Port, then enter the name of the User and
Password and click Ok to save the settings.
To check that the e-mail settings are applied successfully, send a recorded wave as given below: go to Logs
Report → Call Details and click Send E-mail to send audio files via e-mail.
- 70 -
US
ER M
AN
UA
L
5.8. Backup
This menu functions as a storage area for saving the details of all logged calls. The submenus available are
Backup Data, Restore Data, Delete Data and Export Data.
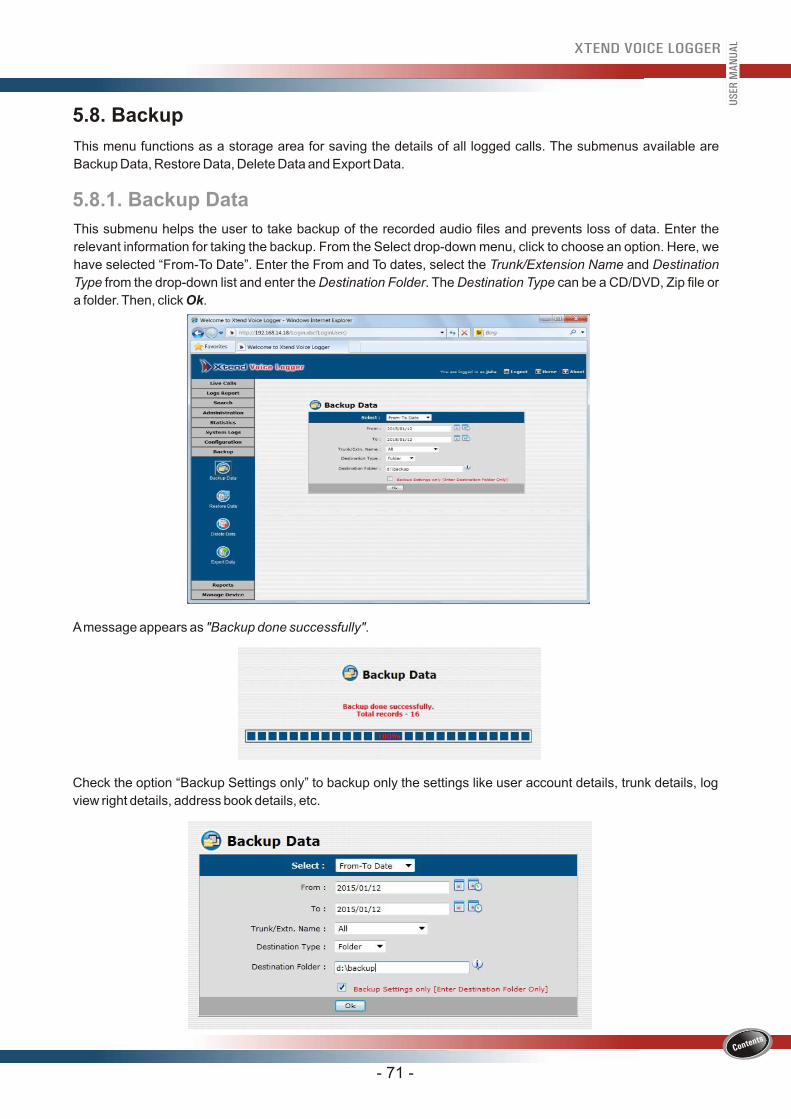
5.8.1. Backup Data
This submenu helps the user to take backup of the recorded audio files and prevents loss of data. Enter the
relevant information for taking the backup. From the Select drop-down menu, click to choose an option. Here, we
have selected “From-To Date”. Enter the From and To dates, select the Trunk/Extension Name and Destination
Type from the drop-down list and enter the Destination Folder. The Destination Type can be a CD/DVD, Zip file or
a folder. Then, click Ok.
A message appears as "Backup done successfully".
- 71 -
US
ER M
AN
UA
L
Check the option “Backup Settings only” to backup only the settings like user account details, trunk details, log
view right details, address book details, etc.
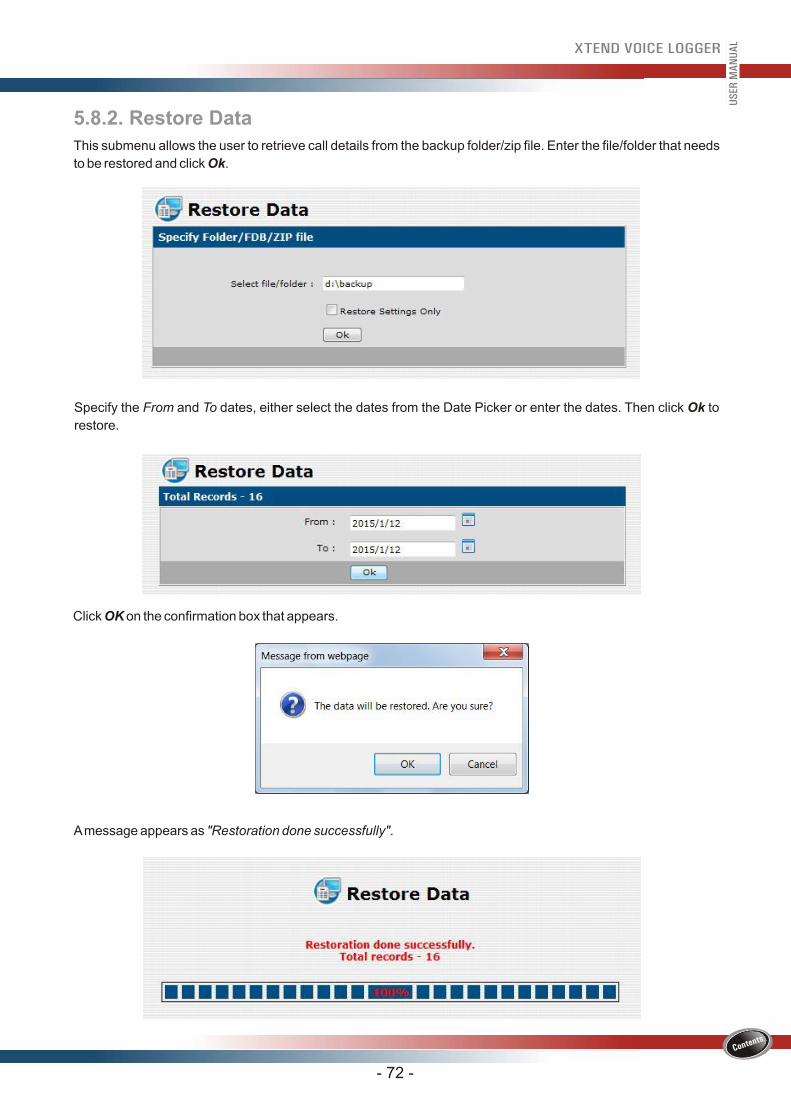
5.8.2. Restore Data
This submenu allows the user to retrieve call details from the backup folder/zip file. Enter the file/folder that needs
to be restored and click Ok.
Specify the From and To dates, either select the dates from the Date Picker or enter the dates. Then click Ok to
restore.
Click OK on the confirmation box that appears.
- 72 -
US
ER M
AN
UA
L
A message appears as "Restoration done successfully".
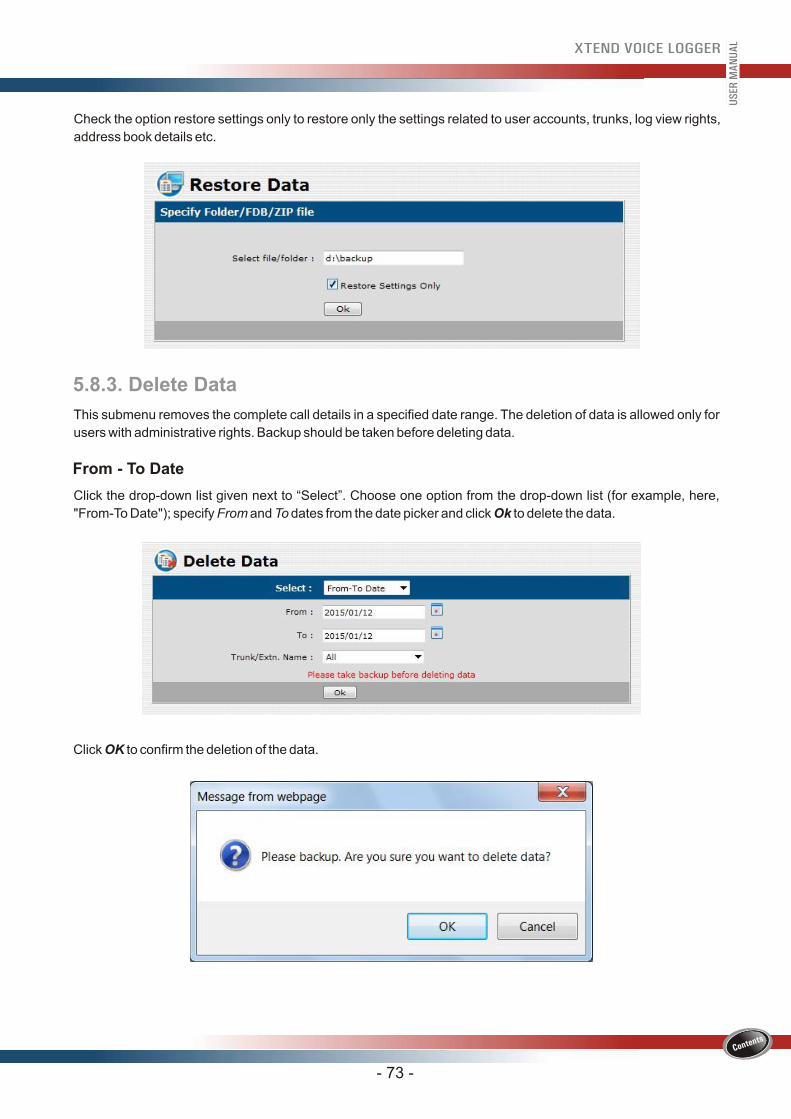
5.8.3. Delete Data
This submenu removes the complete call details in a specified date range. The deletion of data is allowed only for
users with administrative rights. Backup should be taken before deleting data.
From - To Date
Click the drop-down list given next to “Select”. Choose one option from the drop-down list (for example, here,
"From-To Date"); specify From and To dates from the date picker and click Ok to delete the data.
Click OK to confirm the deletion of the data.
- 73 -
US
ER M
AN
UA
L
Check the option restore settings only to restore only the settings related to user accounts, trunks, log view rights,
address book details etc.
Again click OK.
A message appears as "Deletion done successfully".
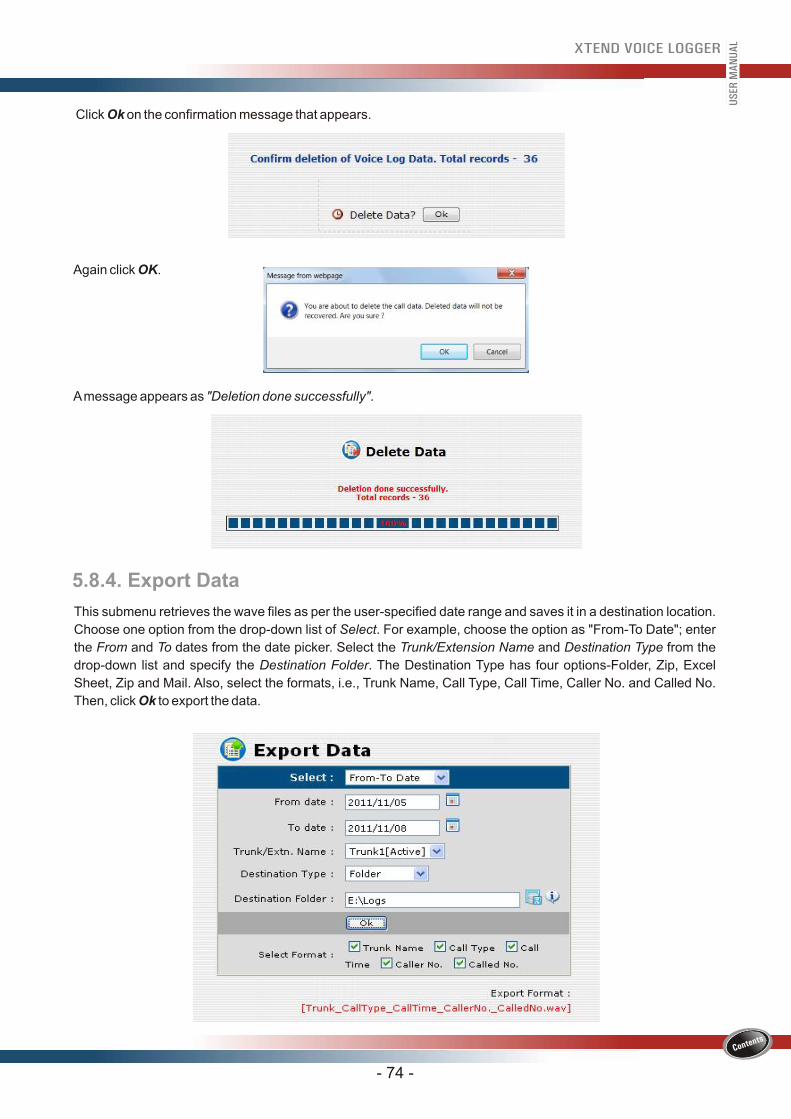
5.8.4. Export Data
This submenu retrieves the wave files as per the user-specified date range and saves it in a destination location.
Choose one option from the drop-down list of Select. For example, choose the option as "From-To Date"; enter
the From and To dates from the date picker. Select the Trunk/Extension Name and Destination Type from the
drop-down list and specify the Destination Folder. The Destination Type has four options-Folder, Zip, Excel
Sheet, Zip and Mail. Also, select the formats, i.e., Trunk Name, Call Type, Call Time, Caller No. and Called No.
Then, click Ok to export the data.
- 74 -
US
ER M
AN
UA
L
Click Ok on the confirmation message that appears.

5.9. Reports
This menu gives the complete details of Backup Data, Restore Data, Delete Data and Export Data. The
submenus present are - Backup, Restore, Delete, Export and E-mail.
5.9.1. Backup
This submenu gives the details of the backup taken from Xtend Voice Logger. Choose one option from the drop-
down list of “Select” (for example, here the selected option is "From-To Date"). Then, enter the From and To dates
and click Ok.
A message appears as "Export done successfully".
- 75 -
US
ER M
AN
UA
L
The information obtained include Time, From, To, Total, Type, User, Location, Status and Method.
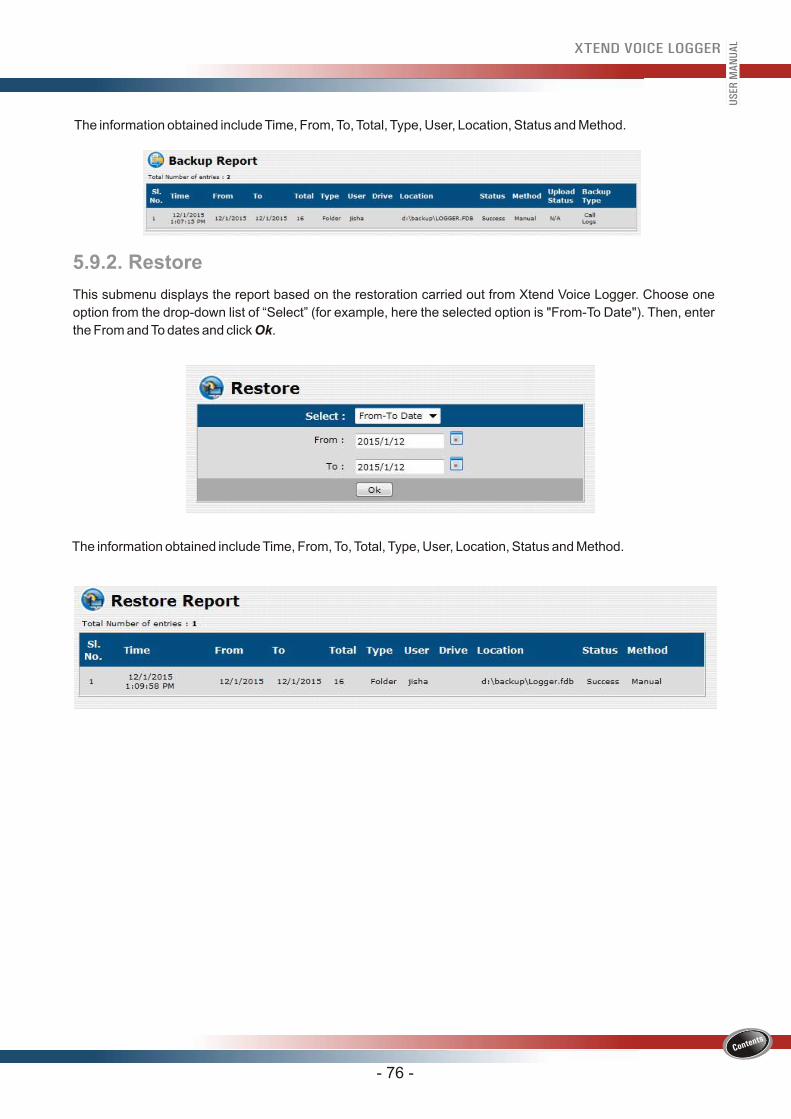
5.9.2. Restore
This submenu displays the report based on the restoration carried out from Xtend Voice Logger. Choose one
option from the drop-down list of “Select” (for example, here the selected option is "From-To Date"). Then, enter
the From and To dates and click Ok.
The information obtained include Time, From, To, Total, Type, User, Location, Status and Method.
- 76 -
US
ER M
AN
UA
L

5.9.3. Delete
This submenu displays the report based on the data deleted from Xtend Voice Logger. Choose one option from
the drop-down list of “Select” (for example, here the selected option is "From-To Date"). Then, enter the From
and To dates and click Ok.
The information obtained include Time, From, To, Total, User, Status and Method.
5.9.4. Export
This submenu gives the details of the exported . Choose one option from the drop-down list of “Select”
(for example, here the selected option is "From-To Date"). Then, enter the From and To dates and click Ok.
data
- 77 -
US
ER M
AN
UA
L
The information obtained include Time, From, To, Total, Type, User, Location, Status and Method.
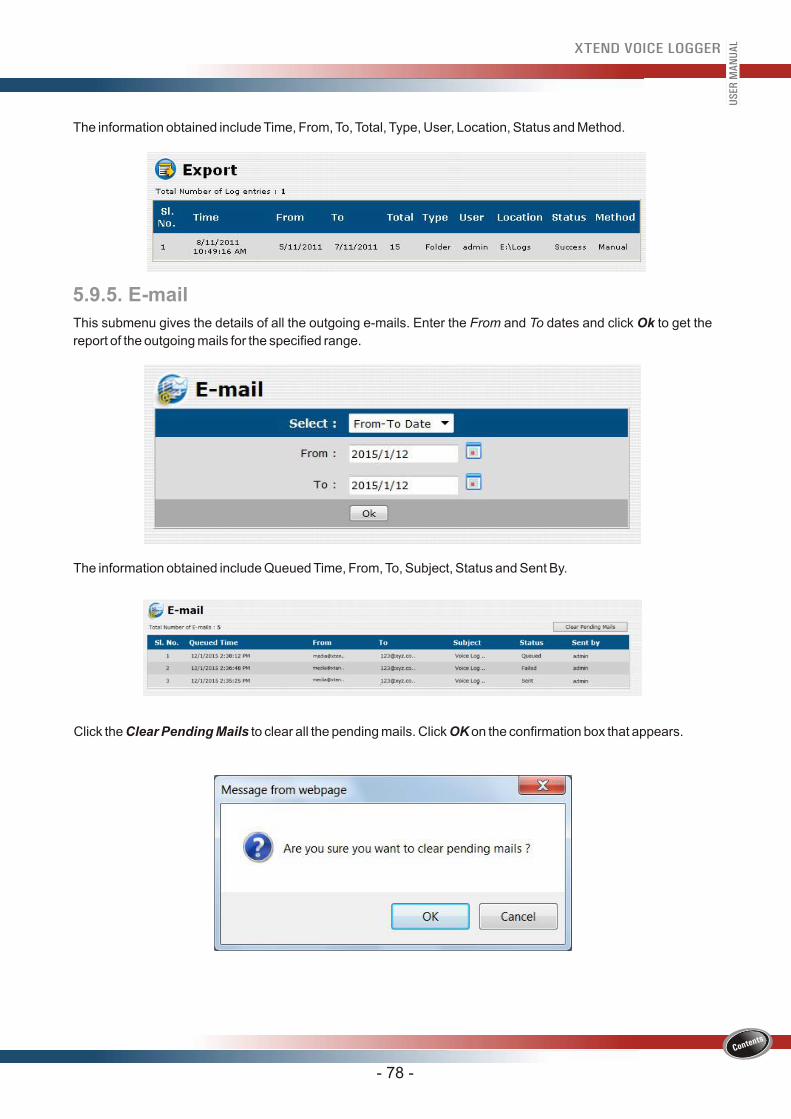
5.9.5. E-mail
This submenu gives the details of all the outgoing e-mails. Enter the From and To dates and click Ok to get the
report of the outgoing mails for the specified range.
The information obtained include Queued Time, From, To, Subject, Status and Sent By.
Click the Clear Pending Mails to clear all the pending mails. Click OK on the confirmation box that appears.
- 78 -
US
ER M
AN
UA
L
5.10. Manage Device
This menu will help the user to start and shutdown the Voice Logger. Click Manage Device, two submenus Start
and Shutdown will appear.
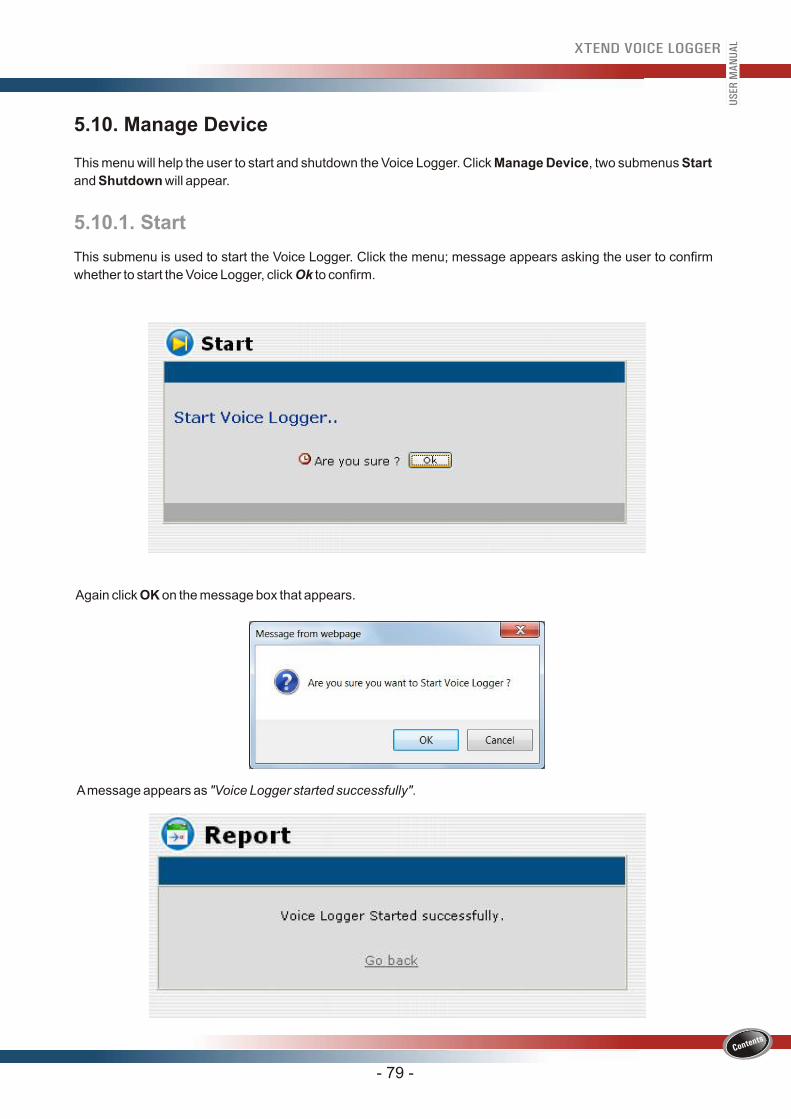
5.10.1. Start
This submenu is used to start the Voice Logger. Click the menu; message appears asking the user to confirm
whether to start the Voice Logger, click Ok to confirm.
Again click OK on the message box that appears.
A message appears as "Voice Logger started successfully".
- 79 -
US
ER M
AN
UA
L
- 80 -
5.10.2. Shutdown
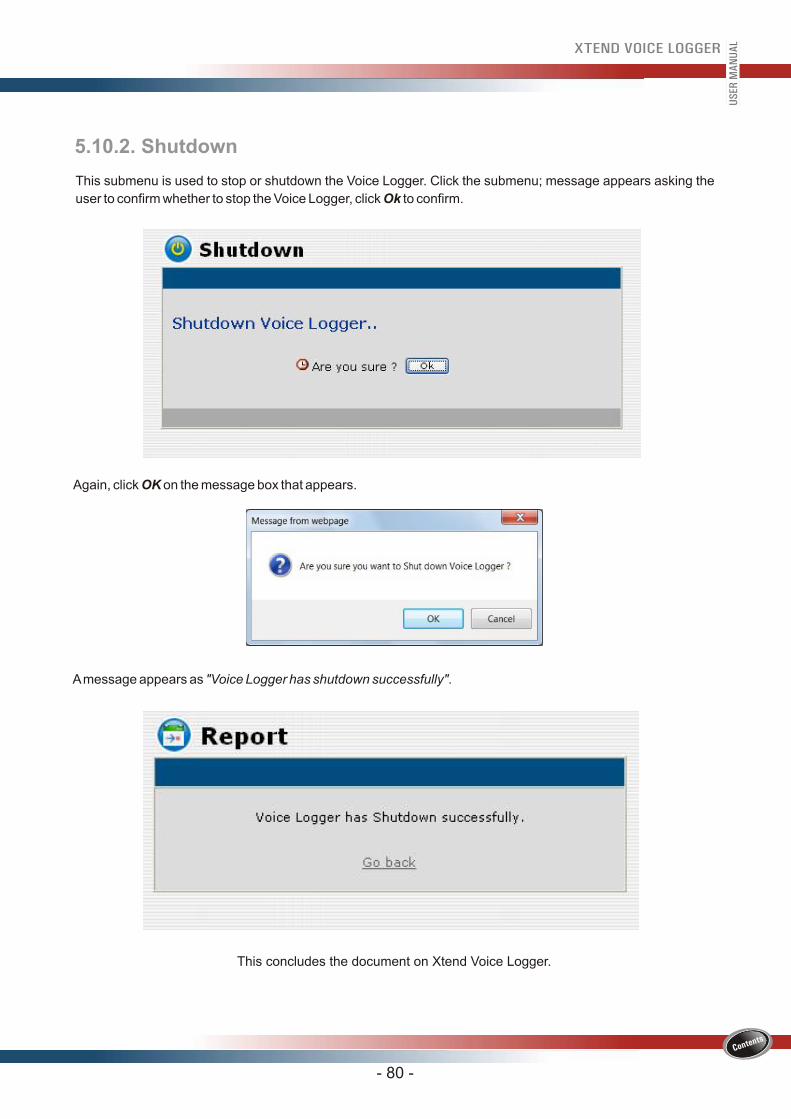
This submenu is used to stop or shutdown the Voice Logger. Click the submenu; message appears asking the
user to confirm whether to stop the Voice Logger, click Ok to confirm.
Again, click OK on the message box that appears.
A message appears as "Voice Logger has shutdown successfully".
This concludes the document on Xtend Voice Logger.
US
ER M
AN
UA
L

6. Contact Us
Xtend Technologies (P) Ltd.,Blue Hill, Kalathiparambil Cross Road, Ernakulam South, Kochi-682016, Kerala, India,
Phone: +91-484-2378008/3291008, +91-9388686080, E-mail: [email protected], Web: www.xtendtech.com
Regional Office for South East Asia:
Xtend Technologies Pte Ltd., 71, Ayer Rajah Crescent, #02-14, Ayer Rajah Industrial Estate, Singapore-139951,
Phone: +65-67797972, E-mail: [email protected], Web: www.xtendtech.com.sg
Regional Office for Middle East:
Xtend Technologies LLCP.O. Box No. 83939, Suite #124, Hor Al Anz Plaza, Hor Al Anz, Dubai, UAE,
Phone: +971-4-2545081, E-mail: [email protected], Web: www.xtendtech.ae
Regional Office for South Central Asia:
57393-07