xdp duramax lmm egr delete item number: xd166€¦ · xdp duramax lmm egr delete (xd166) page 1 xdp...
TRANSCRIPT
XDP Duramax LMM EGR Delete (XD166) Page 1
XDP Duramax LMM EGR Delete
Item Number: XD166
Before removing any parts from your truck, please compare the items you have received with the packing list
provided to verify that you have everything necessary to install your XDP Duramax LMM EGR Delete.
WARNING: This high performance product is intended SOLELY for closed-course racing use and is not street legal in ANY state. This product cannot be used on any vehicle that is registered or certified for highway use. *Aftermarket Tuning Required*
Ensure that the vehicle has not been in use and that the engine is cool to the touch. Always wear eye
protection when working on any vehicle.
* PLEASE READ INSTRUCTIONS PRIOR TO INSTALLATION *
E.)
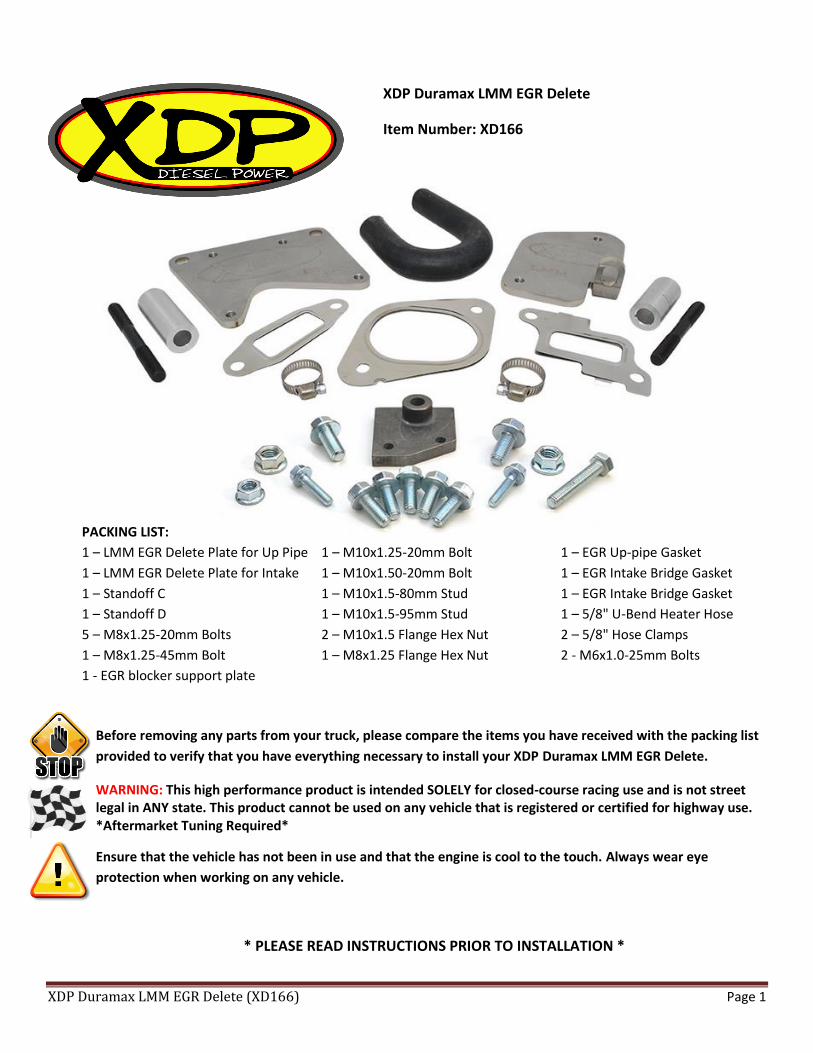
PACKING LIST:
1 – LMM EGR Delete Plate for Up Pipe 1 – M10x1.25-20mm Bolt 1 – EGR Up-pipe Gasket
1 – LMM EGR Delete Plate for Intake 1 – M10x1.50-20mm Bolt 1 – EGR Intake Bridge Gasket
1 – Standoff C 1 – M10x1.5-80mm Stud 1 – EGR Intake Bridge Gasket
1 – Standoff D 1 – M10x1.5-95mm Stud 1 – 5/8" U-Bend Heater Hose
5 – M8x1.25-20mm Bolt s 2 – M10x1.5 Flange Hex Nut 2 – 5/8" Hose Clamps
1 – M8x1.25-45mm Bolt 1 – M8x1.25 Flange Hex Nut 2 - M6x1.0-25mm Bolts
1 - EGR blocker support plate
XDP Duramax LMM EGR Delete (XD166) Page 2
XDP Duramax LMM EGR Delete
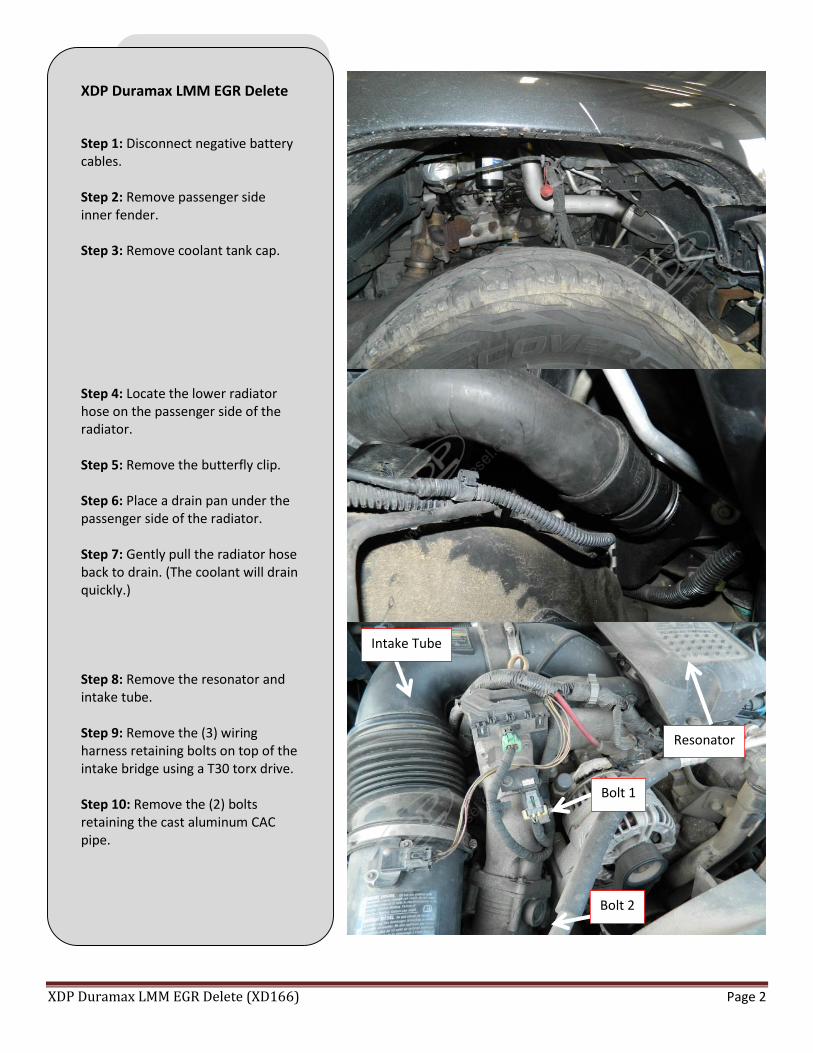
Step 1: Disconnect negative battery cables. Step 2: Remove passenger side inner fender. Step 3: Remove coolant tank cap. Step 4: Locate the lower radiator hose on the passenger side of the radiator. Step 5: Remove the butterfly clip. Step 6: Place a drain pan under the passenger side of the radiator. Step 7: Gently pull the radiator hose back to drain. (The coolant will drain quickly.) Step 8: Remove the resonator and intake tube. Step 9: Remove the (3) wiring harness retaining bolts on top of the intake bridge using a T30 torx drive. Step 10: Remove the (2) bolts retaining the cast aluminum CAC pipe.
Intake Tube
Resonator
Bolt 1
Bolt 2
XDP Duramax LMM EGR Delete (XD166) Page 3
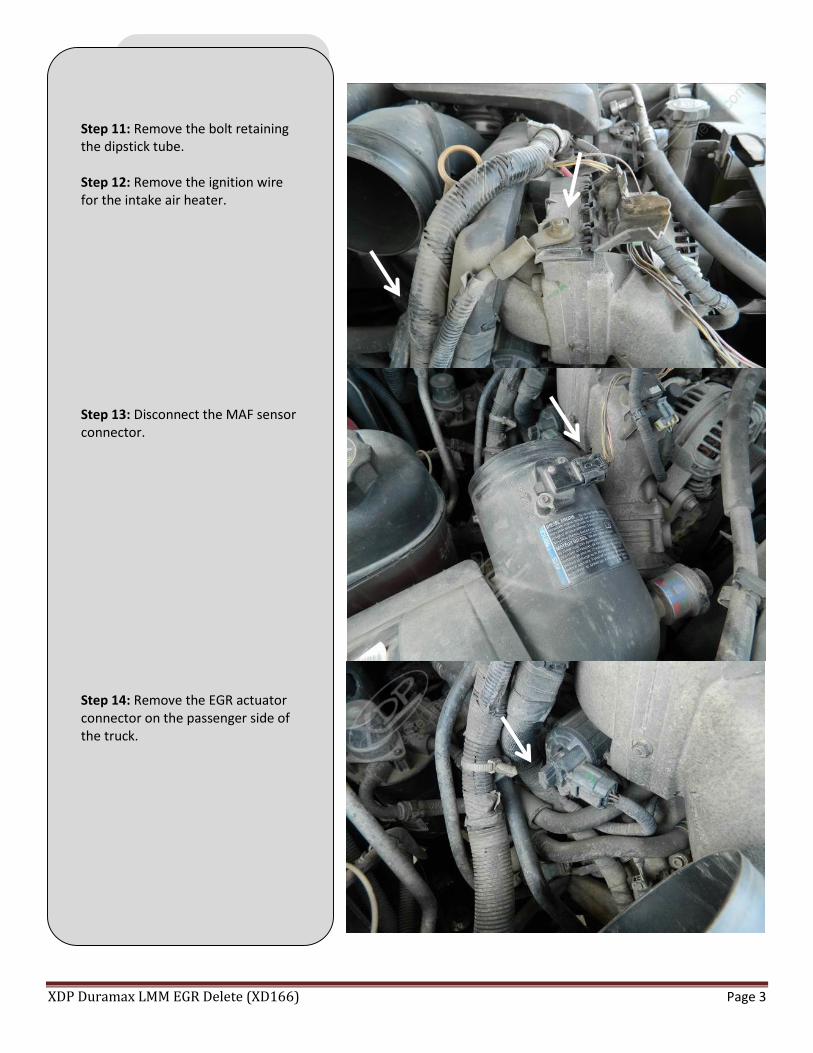
Step 11: Remove the bolt retaining the dipstick tube. Step 12: Remove the ignition wire for the intake air heater. Step 13: Disconnect the MAF sensor connector. Step 14: Remove the EGR actuator connector on the passenger side of the truck.
XDP Duramax LMM EGR Delete (XD166) Page 4
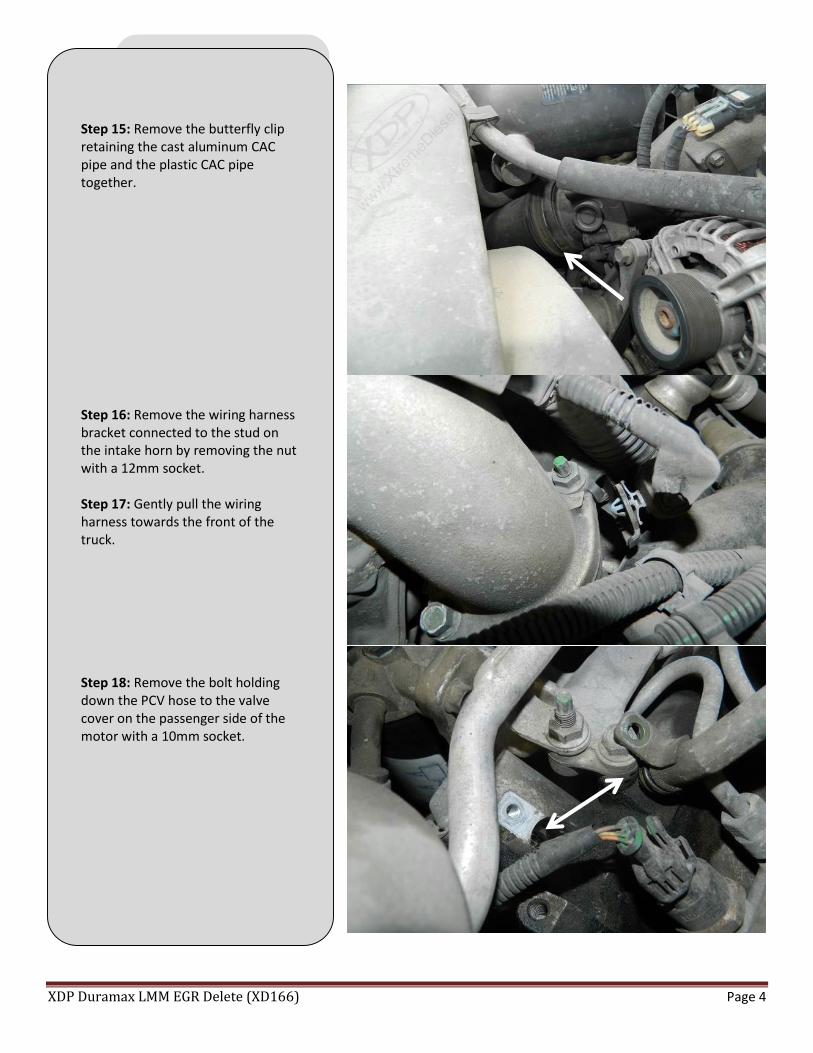
Step 15: Remove the butterfly clip retaining the cast aluminum CAC pipe and the plastic CAC pipe together. Step 16: Remove the wiring harness bracket connected to the stud on the intake horn by removing the nut with a 12mm socket. Step 17: Gently pull the wiring harness towards the front of the truck. Step 18: Remove the bolt holding down the PCV hose to the valve cover on the passenger side of the motor with a 10mm socket.
XDP Duramax LMM EGR Delete (XD166) Page 5
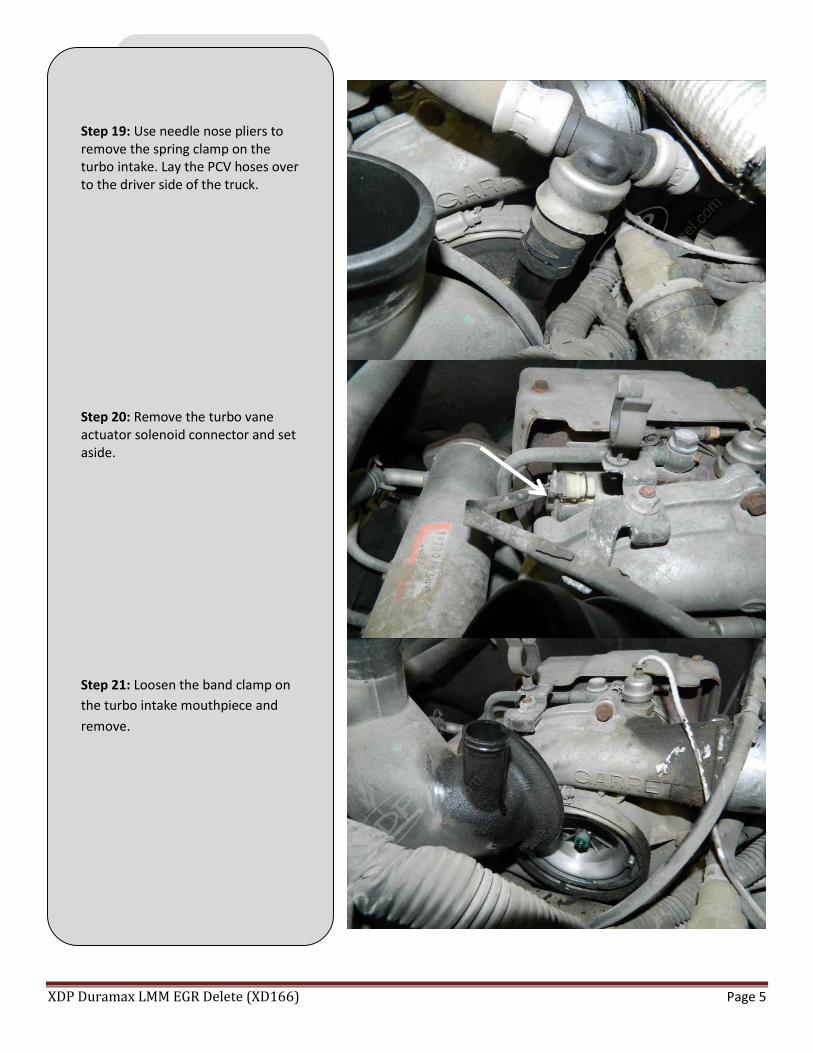
Step 19: Use needle nose pliers to remove the spring clamp on the turbo intake. Lay the PCV hoses over to the driver side of the truck. Step 20: Remove the turbo vane actuator solenoid connector and set aside. Step 21: Loosen the band clamp on
the turbo intake mouthpiece and
remove.
XDP Duramax LMM EGR Delete (XD166) Page 6
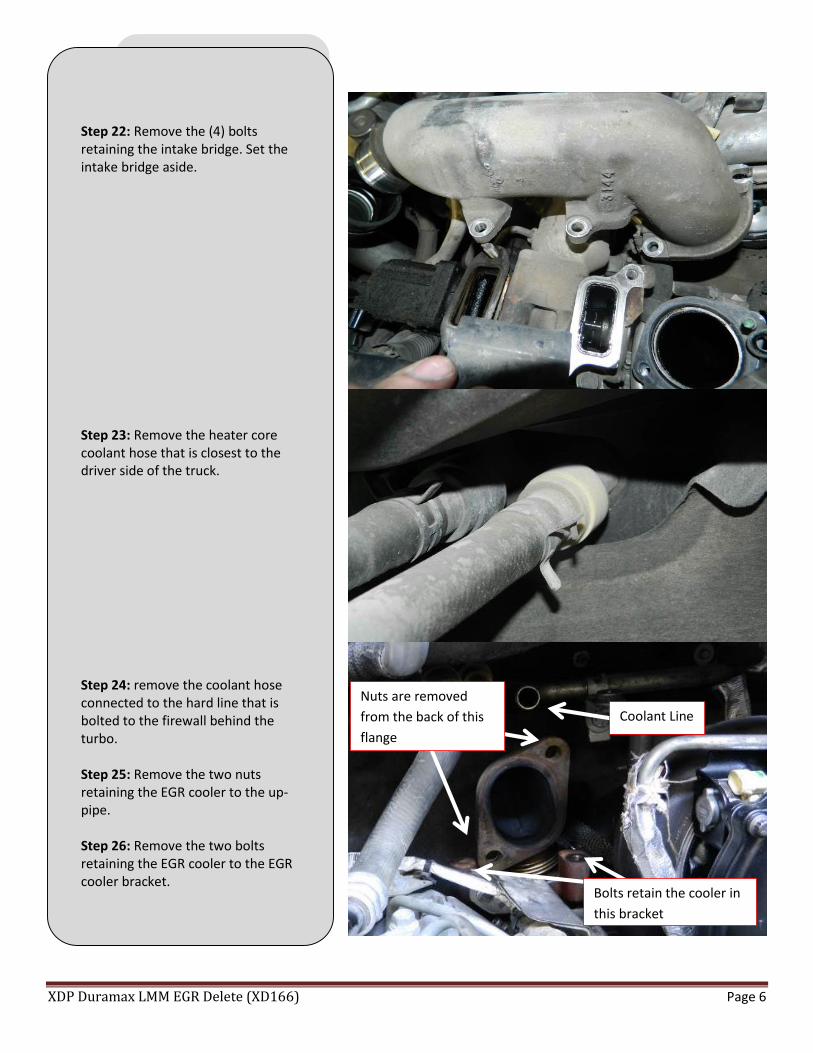
Step 22: Remove the (4) bolts retaining the intake bridge. Set the intake bridge aside. Step 23: Remove the heater core coolant hose that is closest to the driver side of the truck. Step 24: remove the coolant hose connected to the hard line that is bolted to the firewall behind the turbo. Step 25: Remove the two nuts retaining the EGR cooler to the up-pipe. Step 26: Remove the two bolts retaining the EGR cooler to the EGR cooler bracket.
Bolts retain the cooler in
this bracket
Nuts are removed
from the back of this
flange
Coolant Line
XDP Duramax LMM EGR Delete (XD166) Page 7
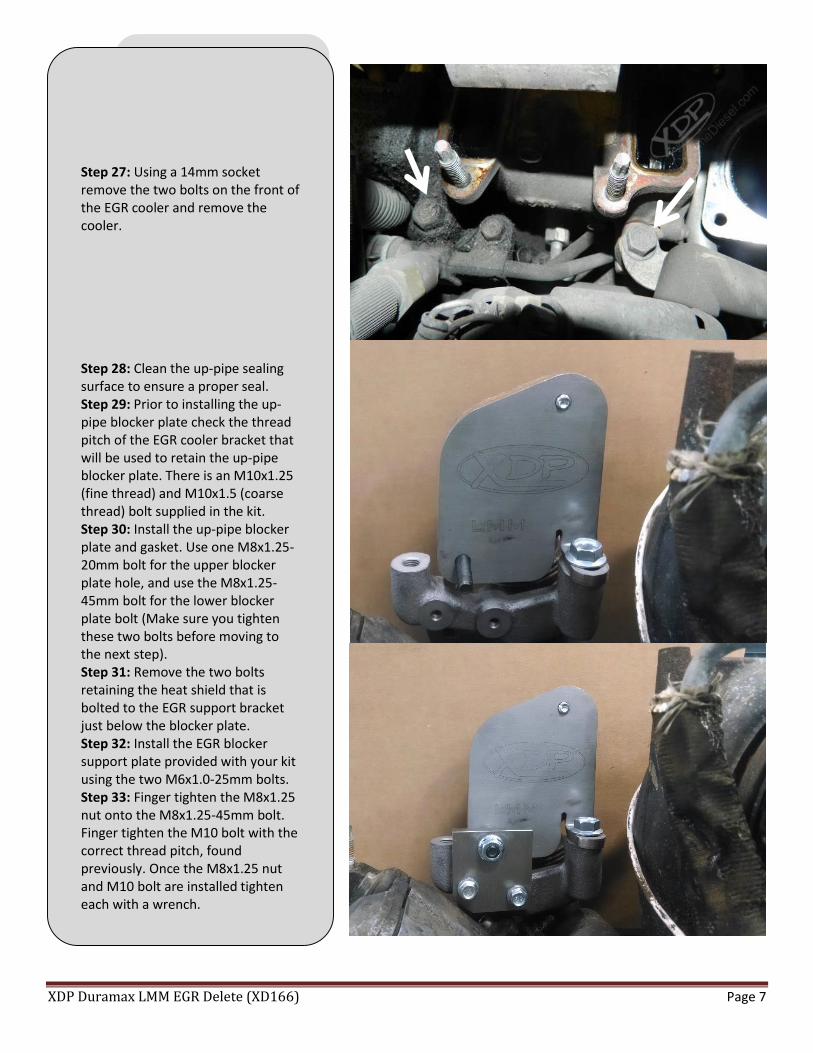
Step 27: Using a 14mm socket remove the two bolts on the front of the EGR cooler and remove the cooler. Step 28: Clean the up-pipe sealing surface to ensure a proper seal. Step 29: Prior to installing the up-pipe blocker plate check the thread pitch of the EGR cooler bracket that will be used to retain the up-pipe blocker plate. There is an M10x1.25 (fine thread) and M10x1.5 (coarse thread) bolt supplied in the kit. Step 30: Install the up-pipe blocker plate and gasket. Use one M8x1.25-20mm bolt for the upper blocker plate hole, and use the M8x1.25-45mm bolt for the lower blocker plate bolt (Make sure you tighten these two bolts before moving to the next step). Step 31: Remove the two bolts retaining the heat shield that is bolted to the EGR support bracket just below the blocker plate. Step 32: Install the EGR blocker support plate provided with your kit using the two M6x1.0-25mm bolts. Step 33: Finger tighten the M8x1.25 nut onto the M8x1.25-45mm bolt. Finger tighten the M10 bolt with the correct thread pitch, found previously. Once the M8x1.25 nut and M10 bolt are installed tighten each with a wrench.
XDP Duramax LMM EGR Delete (XD166) Page 8
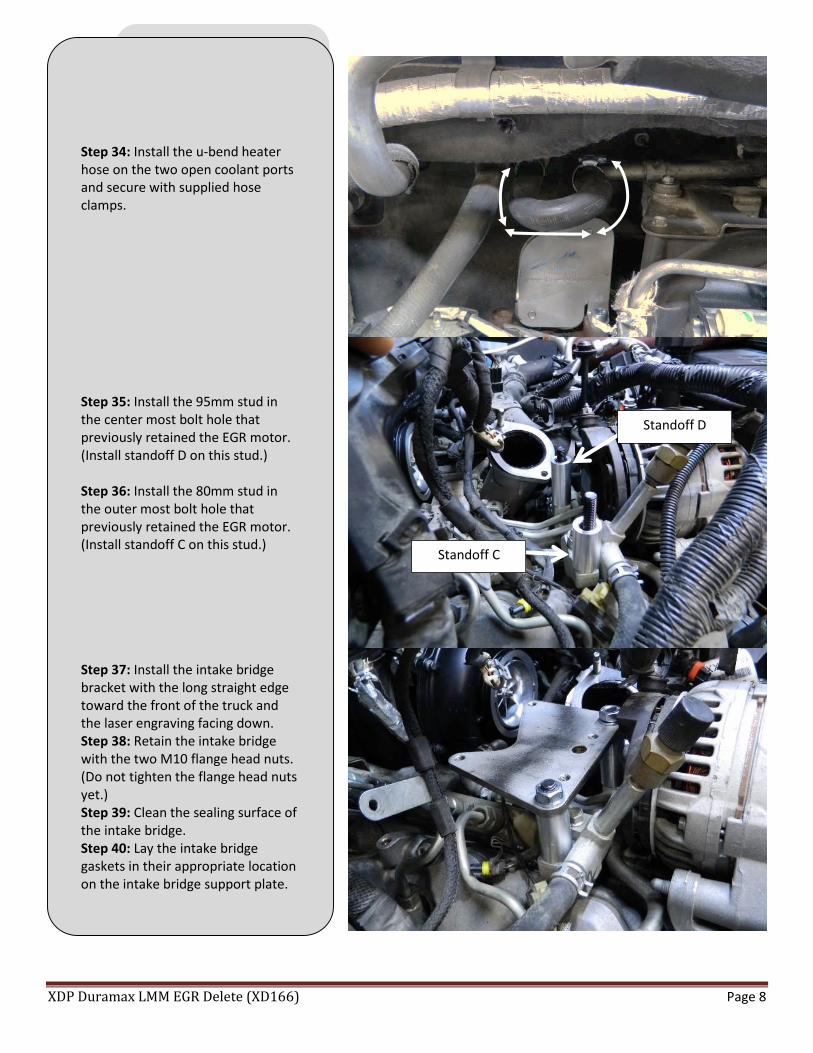
Step 34: Install the u-bend heater hose on the two open coolant ports and secure with supplied hose clamps. Step 35: Install the 95mm stud in the center most bolt hole that previously retained the EGR motor. (Install standoff D on this stud.) Step 36: Install the 80mm stud in the outer most bolt hole that previously retained the EGR motor. (Install standoff C on this stud.) Step 37: Install the intake bridge bracket with the long straight edge toward the front of the truck and the laser engraving facing down. Step 38: Retain the intake bridge with the two M10 flange head nuts. (Do not tighten the flange head nuts yet.) Step 39: Clean the sealing surface of the intake bridge. Step 40: Lay the intake bridge gaskets in their appropriate location on the intake bridge support plate.
Standoff D
Standoff C
XDP Duramax LMM EGR Delete (XD166) Page 9
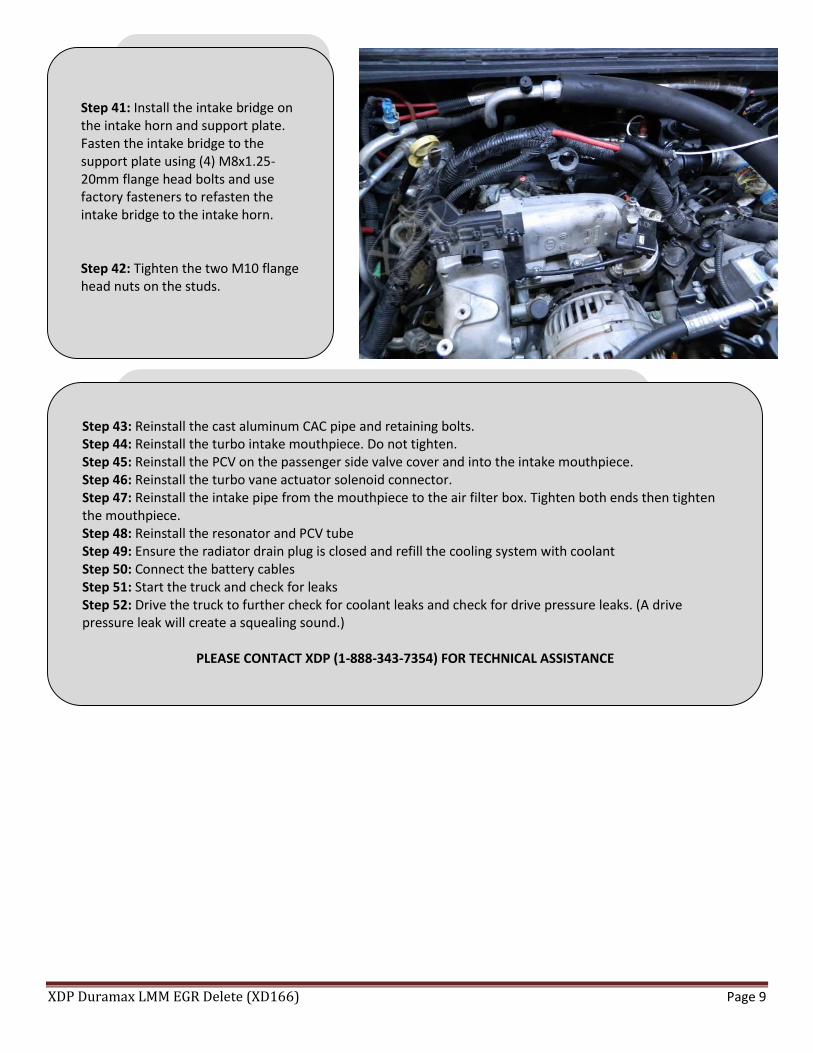
Step 41: Install the intake bridge on the intake horn and support plate. Fasten the intake bridge to the support plate using (4) M8x1.25-20mm flange head bolts and use factory fasteners to refasten the intake bridge to the intake horn. Step 42: Tighten the two M10 flange head nuts on the studs.
Step 43: Reinstall the cast aluminum CAC pipe and retaining bolts. Step 44: Reinstall the turbo intake mouthpiece. Do not tighten. Step 45: Reinstall the PCV on the passenger side valve cover and into the intake mouthpiece. Step 46: Reinstall the turbo vane actuator solenoid connector. Step 47: Reinstall the intake pipe from the mouthpiece to the air filter box. Tighten both ends then tighten the mouthpiece. Step 48: Reinstall the resonator and PCV tube Step 49: Ensure the radiator drain plug is closed and refill the cooling system with coolant Step 50: Connect the battery cables Step 51: Start the truck and check for leaks Step 52: Drive the truck to further check for coolant leaks and check for drive pressure leaks. (A drive pressure leak will create a squealing sound.)
PLEASE CONTACT XDP (1-888-343-7354) FOR TECHNICAL ASSISTANCE