windows powershell for .net developers - second edition - sample chapter
DESCRIPTION
Chapter No. 1 Getting Started with Windows PowerShellEfficiently administer and maintain your development environment with Windows PowerShellFor more information: http://bit.ly/1XjbQ56TRANSCRIPT
P r o f e s s i o n a l E x p e r t i s e D i s t i l l e d
Effi ciently administer and maintain your development environment with Windows PowerShell
Windows PowerShell for .NET DevelopersSecond Edition
Chendrayan Venkatesan
Sherif Talaat
Window
s PowerShell for .N
ET Developers
Second Edition
Windows PowerShell for .NET DevelopersSecond Edition
Windows PowerShell for .NET Developers, Second Edition is your guide to perform automation using Windows PowerShell. This book will help you to understand PowerShell syntax and will also teach you techniques for removing the rough edges of manual deployments. Packed with PowerShell scripts and sample C# codes to automate tasks, it also includes real-world scenarios such as administrating offi ce servers and client side automation to help you save time and perform deployments or troubleshooting swiftly and effi ciently.
The book begins with the Windows PowerShell basics, explores the signifi cant features of Windows Management Framework 5.0, covers the basic concepts of Desired State Confi guration, and looks at the importance of idempotent deployments.
By the end of the book, you will have a good understanding of Windows PowerShell's features and will be able to automate your tasks and manage confi gurations effectively.
Who this book is written forIf you are an IT professional or developer who has worked on the .NET platform and want to learn about automation using Windows PowerShell, then this book is for you. This guide takes you from the basics and gradually progresses to an intermediate level to show you how to perform professional scripting.
$ 49.99 US£ 31.99 UK
Prices do not include local sales tax or VAT where applicable
Chendrayan VenkatesanSherif Talaat
What you will learn from this book
Understand the concepts of building PowerShell scripts and the basics of programming
Manage the LYNC, Exchange, and SharePoint platforms
Create a Pull server using SMB fi le sharing and HTTP or HTTPS
Use .NET classes in Windows PowerShell and C# to manage Exchange Online
Use PowerShell in C# to manage Exchange Online and work with .NET classes in PowerShell
Automate LYNC clients, and consume Client Side Object Models to administer SharePoint Online
P U B L I S H I N GP U B L I S H I N G
professional expert ise dist i l led
P U B L I S H I N GP U B L I S H I N G
professional expert ise dist i l led
Visit www.PacktPub.com for books, eBooks, code, downloads, and PacktLib.
Foreword by Sherif Talaat, PowerShell MVP
Free Sample
In this package, you will find: The author biography
A preview chapter from the book, Chapter 1 'Getting Started with
Windows PowerShell'
A synopsis of the book’s content
More information on Windows PowerShell for .NET Developers
Second Edition

About the Authors
Chendrayan Venkatesan (Chen V) is a SharePoint IT Professional who has worked for the Information, Computer and Technology industry since 2005. Chen V started his career as Windows XP technical support engineer and became a SharePoint IT Pro in the year 2007. He mainly focuses on automating Microsoft Technologies such as SharePoint, LYNC, and Exchange. He was awarded the Microsoft Most Valuable Professional (MVP) in 2014. He speaks on Windows PowerShell, SharePoint Servers, Content Management, and IT Process Automations. He blogs in http://chen.about-powershell.com and is mentoring three IT professionals in PowerShell. He is a TechNet Wiki addict and has introduced Windows PowerShell as a category in the TechNet Wiki Guru award competition. To connect with Chen V you can visit his web site http://about-powershell.com or choose your favourite social media twitter @ChendrayanV or LinkedIn nl.linkedin.com/in/chendrayanv.
Sherif Talaat is a young computer science addict. He holds many technology certifi cates. Sherif has been working in the ICT industry since 2005. He has worked on the Microsoft's core infrastructure platforms and solutions with more focus on the cloud and data center management, IT Process Automation (ITPA), and scripting techniques.
Sherif is one of the early adopters of Windows PowerShell in Middle East and Africa. He speaks about Windows PowerShell at technical events and user groups' gatherings; he is also the founder of Egypt PowerShell User Group and the author of the fi rst and only Arabic PowerShell blog. He has been awarded the Egyptian MCIT Shield and has won the Microsoft Most Valuable Professional (MVP) award for PowerShell seven times in a row since 2009. He is also the author of three different Windows PowerShell titles for IT professionals and developers. Last but not least, he is also a TED conference speaker.
You can learn more about him at http://sheriftalaat.com and follow him on Twitter @SherifTalaat.
PrefaceWindows PowerShell is no longer a secret in the world of IT. Starting in 2006, it's been growing and has now turned out to be a massive automation platform especially for Microsoft products and technologies.
Windows PowerShell 5.0 for .NET Developers is your self-start guide to performing automation using Windows PowerShell. This book will help you to understand the PowerShell syntax and grammar and will also teach you techniques to remove the rough edges of manual deployments. Packed with PowerShell scripts and sample C# codes to automate tasks, it also includes real-world scenarios, such as administrating offi ce servers to help you save time and perform deployments swiftly and effi ciently.
What this book coversChapter 1, Getting Started with Windows PowerShell, covers the basics of Windows PowerShell, the importance of object-based shells, and how ISE helps us in building scripts.
Chapter 2, Unleashing Development Skills Using Windows PowerShell 5.0, explores XML and COM automation and NET objects for Admin and Development tasks. You will also get acquainted with the PowerShell modules and how script debugging works.
Chapter 3, Exploring Desired State Confi guration, gets you started with Desired State Confi guration (DSC) concepts such as installing WMF 5.0 April 2015 Preview, Imperative versus declarative programming and their signifi cant features. It also explores Windows Remote Management and CIM, and teaches you to create confi gurations scripts.
Chapter 4, PowerShell and Web Technologies, starts with the installation and confi guration of Web Access, and explores Web requests, services, and REST API.
Preface
Chapter 5, Exploring Application Programming Interface, covers the key benefi ts of the API and using it in Windows PowerShell, Exchange Web Services, LYNC Client-side API, and SharePoint Client Side Object Model; you'll walk through a demo to create a PowerShell module in C# for offi ce servers.
[ 1 ]
Getting Started with Windows PowerShell
In this chapter, we will cover the following topics:
• What is Windows PowerShell?• Installing Windows Management Framework 5.0 on Windows Server 2012• The Windows PowerShell console• Setting up the console using GUI and PowerShell• Benefits of the Windows PowerShell ISE• Creating snippets in the PowerShell ISE
Scripting the cmdlet styleThis is a self-paced guide for you to learn Windows PowerShell in order to perform IT automation. The management goals of IT are to simplify the creation and operation of computing environments. IT professionals and developers need to complete their daily tasks swiftly in order to avoid chaos.
Windows PowerShell is an object-based and distributed automation platform that enables IT professionals and developers to speed up their development tasks and deployments. The Windows PowerShell scripting language makes daily tasks more productive.
The goal of this book is to share the features of Windows PowerShell 5.0 and how developers can utilize its benefi ts. Let's dive into Windows PowerShell 5.0 so that we can design our infrastructure, automate our daily tasks, manage drifts in our environment, quicken the deployment tasks, and so on.
Getting Started with Windows PowerShell
[ 2 ]
The IT industry is growing rapidly; to adapt and minimize the impact, we need to plan and design our infrastructure so as to meet the growing needs with minimum chaos. It's challenging and really diffi cult to automate the tasks without PowerShell. Windows PowerShell plays a major role by not only enabling task automation, but also allowing us to design our infrastructure with the help of IT professionals and developers.
Developers from the .NET background can quickly understand PowerShell. Developers can easily create their own cmdlets (cmdlets, pronounced as command lets, are nothing but the lightweight commands used in Windows PowerShell) and leverage it in the infrastructure as needed. Thus, the deployment tasks become easier and the productivity increases by automation.
Come, let's dive into Windows PowerShell 5.0 and its features.
Before we begin, let's note that Windows PowerShell 5.0 is not a stable release. So, if you identify any bugs in the command, you can fi le a case at http://connect.microsoft.com.
This self-paced guide will discuss the following:
• Working with PowerShell cmdlets• PowerShell scripting• Exploring PowerShell modules• Exploring the XML, COM, and .NET objects• Exploring JSON, REST API, and Web Services• Features of Windows PowerShell 5.0• Exploring DSC to configure servers• Exploring web technologies using PowerShell• Consuming API in C# and PowerShell• Using PowerShell codes in C#
If you are interested in knowing the origin of Windows PowerShell 5.0, you should read Monad Manifesto at:http://blogs.msdn.com/cfs-file.ashx/__key/communityserver-components-postattachments/00-01-91-05-67/Monad-Manifesto-_2D00_-Public.doc
Chapter 1
[ 3 ]
Introducing Windows PowerShellWindows PowerShell is an object-based command-line interface with a very powerful scripting language built on .NET. Windows PowerShell is designed with access to several cmdlets, functions, fi lters, scripts, aliases, and executables.
From Windows Management Framework 4.0 onward, a new confi guration management platform has been introduced in PowerShell 4.0, which is Windows PowerShell Desired State Confi guration (DSC).
Windows PowerShell is very enhanced in the version 5.0 April 2015 Preview release. This is not a stable release, but we will explore the new features introduced in Windows PowerShell 5.0. The current stable version is Windows PowerShell 4.0.
IT professionals and developers use their own statements or defi nitions based on the way they use PowerShell. Mostly, they defi ne PowerShell as a scripting language. Yeah! This is true but not completely because Windows PowerShell does much more. However, the offi cial page of Windows PowerShell defi nes PowerShell as an automation platform and scripting language for Windows and Windows Server that allows you to simplify the management of your systems. Unlike the other text-based shells, PowerShell harnesses the power of the .NET Framework, providing us with rich objects and a massive set of built-in functionality to help you take control of your Windows environments. Refer to the following URL:
https://msdn.microsoft.com/en-us/powershell
You may wonder, why Windows PowerShell? Why not VBScript? This is a very common question that most administrators think. It's good to know both, but VBScript is fading, and compared to PowerShell, it is very limited. Windows PowerShell can access all .NET libraries, which helps us explore DLLs easily; on the other hand, VBScript has limitations. If you are a beginner Windows PowerShell will be a better choice because it is easier to understand and very powerful. The Windows PowerShell cmdlets are rich and very easy to understand. Using Windows PowerShell, we can avoid repeated steps, automate administration tasks, avoid GUI clicks, and do much more. This is not limited to IT Professionals; developers can also do much more by exploring Windows PowerShell, such as performing development tasks faster than before.
From Windows PowerShell 5.0 onward, we can develop classes, parse structured objects using the new cmdlets, and do the package management easily using the PackageManagement module. This module is introduced in version 5.0 but was formerly known as the OneGet module; many such modules are enhanced in the new version.
Getting Started with Windows PowerShell
[ 4 ]
But wait, this is not all; you can refer to the following link to get a list of the new features in Windows PowerShell 5.0:https://technet.microsoft.com/en-us/library/hh857339.aspx#BKMK_new50
Installing Windows Management Framework 5.0Before we explore the PowerShell console host and the PowerShell ISE, let's install Windows Management Framework 5.0 April 2015 Preview (Latest Build). Windows Management Framework 5.0 is now supported on Windows 7 and Windows Server 2008 R2 SP1—this will be covered in Chapter 3, Exploring Desired State Confi guration in detail. Windows Management Framework is shipped out of the box in the Windows 10 operating system and Windows Server Technical Preview. So, there is no need for manual installation.
To start the demo, we need to perform the following functions in our machine environment:
• Set up Windows 2012 R2 Data Center• Download .NET Framework 4.5 (Included in Windows Server 2012)• Download Windows Management Framework 4.0• Download Windows Management Framework 5.0
Windows 2008 R2 has PowerShell 2.0 by default. To install Windows Management Framework 5.0, we need to upgrade from Windows Management Framework 4.0.
To open Windows PowerShell, perform the following functions:
1. Click on the start icon.2. Type Windows PowerShell in Search programs and fi les.3. It lists Windows PowerShell ISE and Windows PowerShell.
Here, ISE is short for Integrated Scripting Environment.
Ignore x86—it's a 32-bit Windows PowerShell application (we will not use it in any of our examples in this book).
Chapter 1
[ 5 ]
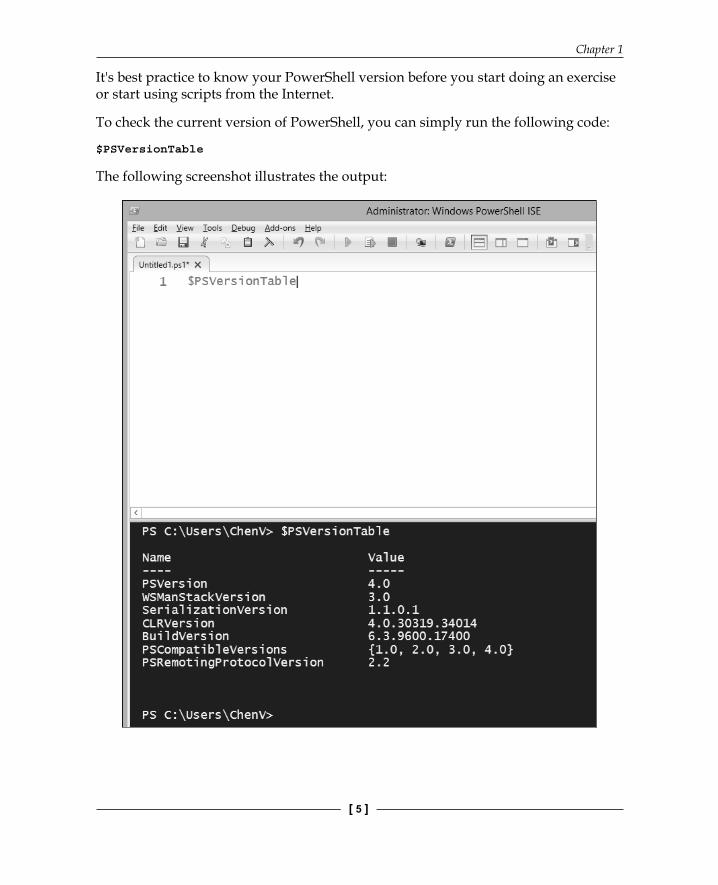
It's best practice to know your PowerShell version before you start doing an exercise or start using scripts from the Internet.
To check the current version of PowerShell, you can simply run the following code:
$PSVersionTable
The following screenshot illustrates the output:
Getting Started with Windows PowerShell
[ 6 ]
Windows Server 2012 R2 has WMF Version 4.0 by default. Let's upgrade it to WMF 5.0. If you are performing this task on Windows 7 or Windows 2008 R2 with SP1, install WMF 4.0 prior to WMF 5.0.
Following are the links where you can download the .NET framework and WMF from:
• .NET Framework 4.5—http://www.microsoft.com/en-us/download/details.aspx?id=30653
• WMF 5.0—http://www.microsoft.com/en-us/download/details.aspx?id=46889
Do read the system requirements before proceeding into the production environment. The installation of WMF 5.0 requires a reboot.
Once the .NET framework 4.0 is in place, update it to the .NET framework 4.5.
As per the Microsoft Document, the .NET framework 4.5 is included in Windows 8 and Windows Server 2012. We can skip the .NET framework 4.5 installation.
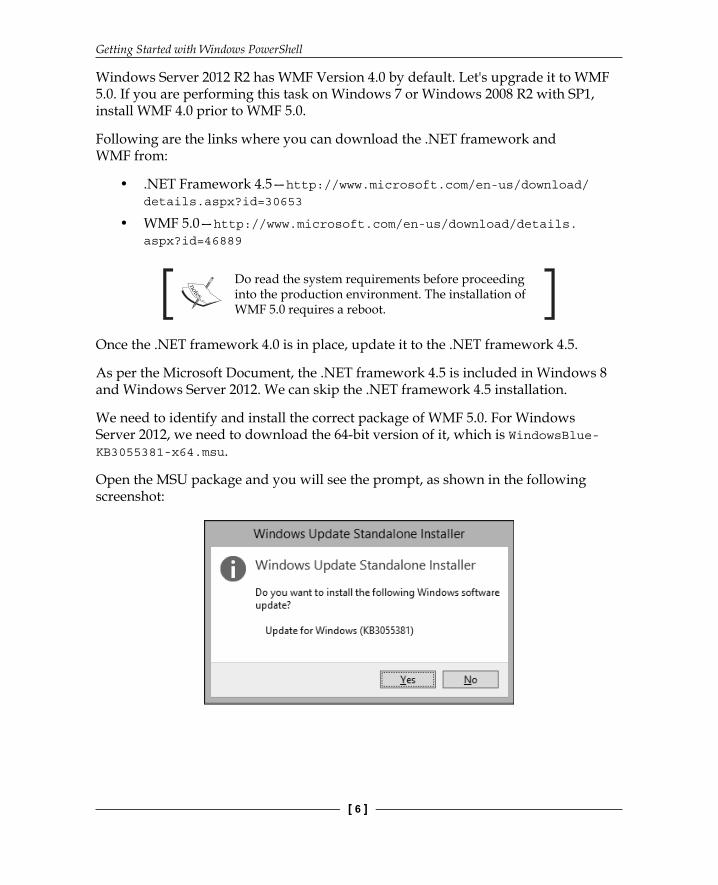
We need to identify and install the correct package of WMF 5.0. For Windows Server 2012, we need to download the 64-bit version of it, which is WindowsBlue-KB3055381-x64.msu.
Open the MSU package and you will see the prompt, as shown in the following screenshot:
Chapter 1
[ 7 ]
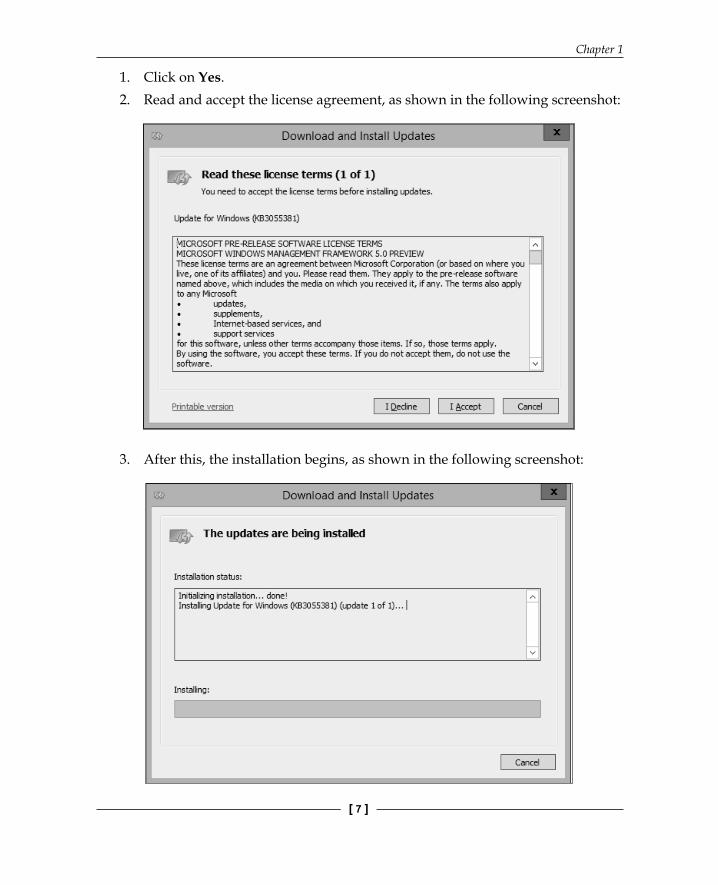
1. Click on Yes.2. Read and accept the license agreement, as shown in the following screenshot:
3. After this, the installation begins, as shown in the following screenshot:
Getting Started with Windows PowerShell
[ 8 ]
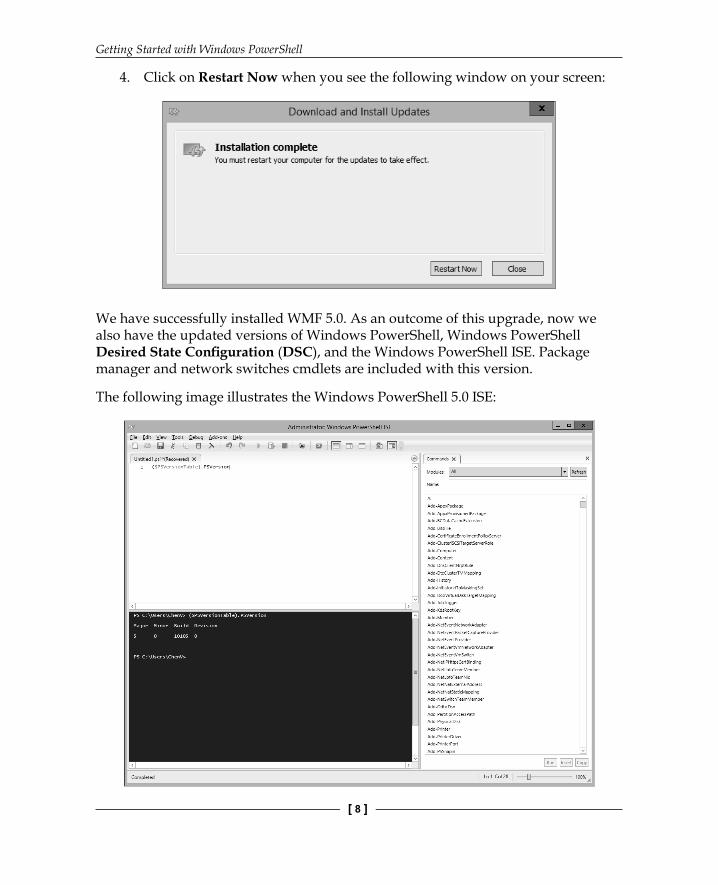
4. Click on Restart Now when you see the following window on your screen:
We have successfully installed WMF 5.0. As an outcome of this upgrade, now we also have the updated versions of Windows PowerShell, Windows PowerShell Desired State Confi guration (DSC), and the Windows PowerShell ISE. Package manager and network switches cmdlets are included with this version.
The following image illustrates the Windows PowerShell 5.0 ISE:
Chapter 1
[ 9 ]
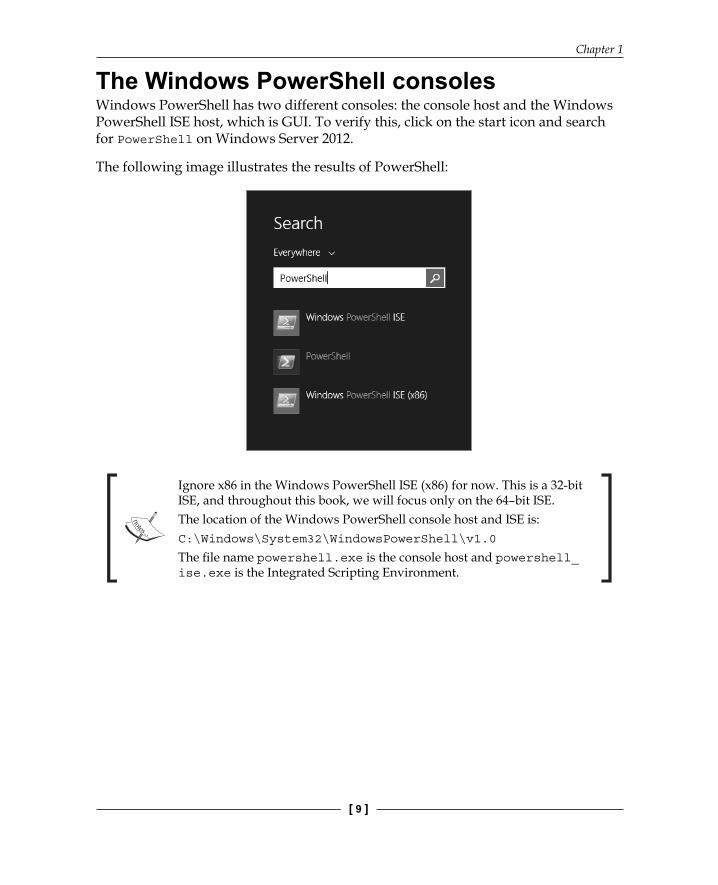
The Windows PowerShell consolesWindows PowerShell has two different consoles: the console host and the Windows PowerShell ISE host, which is GUI. To verify this, click on the start icon and search for PowerShell on Windows Server 2012.
The following image illustrates the results of PowerShell:
Ignore x86 in the Windows PowerShell ISE (x86) for now. This is a 32-bit ISE, and throughout this book, we will focus only on the 64–bit ISE.The location of the Windows PowerShell console host and ISE is:C:\Windows\System32\WindowsPowerShell\v1.0
The fi le name powershell.exe is the console host and powershell_ise.exe is the Integrated Scripting Environment.

Getting Started with Windows PowerShell
[ 10 ]
The Windows PowerShell console hostThis is where we begin with the PowerShell cmdlets. It's easy for on-the-fl y cmdlet executions. The following image illustrates the PowerShell 5.0 console host:
By default, the background color is blue, and in the foreground, the color of the text is white.
There is no need to type out the complete command; the PowerShell console allows Tab Completion. For example, Get-Se + Tab completes the Get-Service command. Tab completion is not only for the commands and parameters; we can also select the properties using tab key.
To execute the following PowerShell code:
Get-Service -Name BITS | Select -Property Name , Status
Chapter 1
[ 11 ]
Windows PowerShell allows tab completion like this:
Get-Ser + Tab -N + Tab BITS | sel + Tab -Pro + Tab N + Tab, S + Tab
There are multiple ways to start a PowerShell console: we could either use the Run dialog box, or type PowerShell in an open command-line window. These techniques allow you to pass arguments to Windows PowerShell, including the switches that control how Windows PowerShell works and the parameters that execute additional commands. For example, you can start Windows PowerShell in the no-logo mode (which means that the logo banner is turned off) using the startup command, PowerShell -nologo. By default, when you start Windows PowerShell via the command shell, Windows PowerShell runs and then exits. If you want Windows PowerShell to execute a command and not terminate, type PowerShell /noexit, followed by the command text.
We can use this to schedule our script in task schedulers. To see all the switches, run the following command:
PowerShell.exe /?
Downloading the example codeYou can download the example code fi les from your account at http://www.packtpub.com for all the Packt Publishing books you have purchased. If you purchased this book elsewhere, you can visit http://www.packtpub.com/support and register to have the fi les e-mailed directly to you.
Setting up the console host using GUIWe can change the look and feel of the console host using GUI. To do this, we need to perform the following steps:
Click on the Windows PowerShell icon, which appears in the upper-left corner and select Properties. This has four tabs—Options, Font, Layout, and Colors. Let's explore each tab.
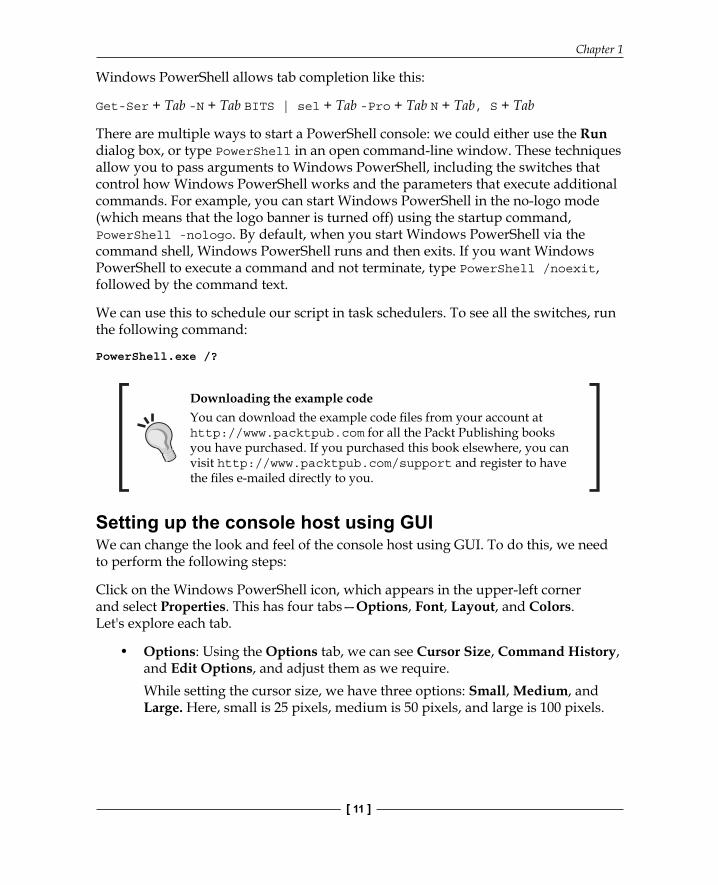
• Options: Using the Options tab, we can see Cursor Size, Command History, and Edit Options, and adjust them as we require.While setting the cursor size, we have three options: Small, Medium, and Large. Here, small is 25 pixels, medium is 50 pixels, and large is 100 pixels.
Getting Started with Windows PowerShell
[ 12 ]
The following image illustrates the Options tab:
By default, the command history retains the last 50 commands in a buffer. We can customize this by increasing or decreasing the Buffer Size value.
$MaximumHistoryCount is a built-in variable that returns the actual value of the command's history. This takes precedence over GUI.
Chapter 1
[ 13 ]
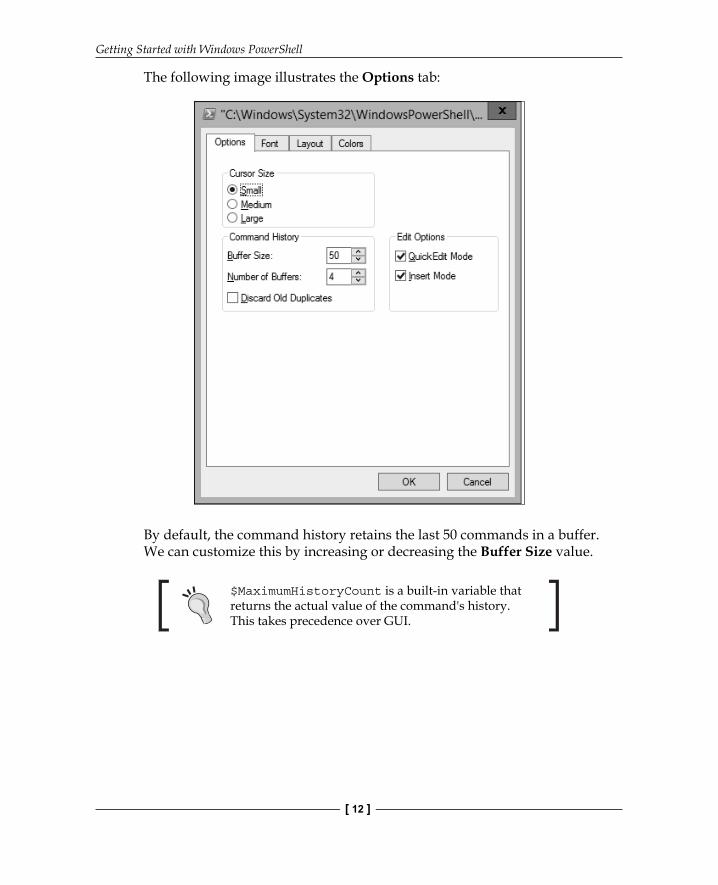
• Font: Using the Font tab, we can change the size, style, and type. Before applying changes, we can preview the console host using the preview window.The following image illustrates the Font tab:
Getting Started with Windows PowerShell
[ 14 ]
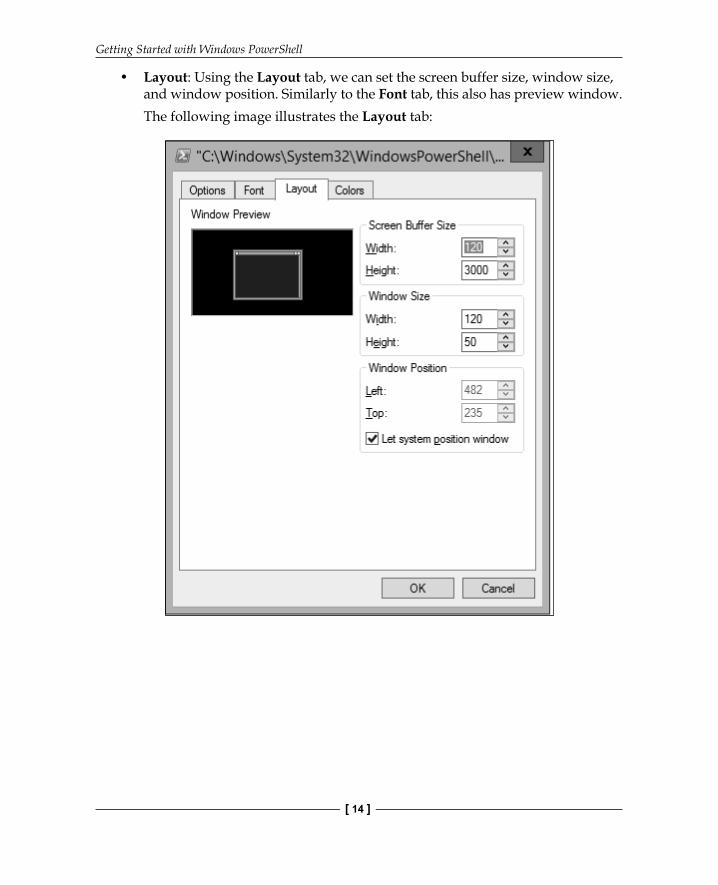
• Layout: Using the Layout tab, we can set the screen buffer size, window size, and window position. Similarly to the Font tab, this also has preview window.The following image illustrates the Layout tab:
Chapter 1
[ 15 ]
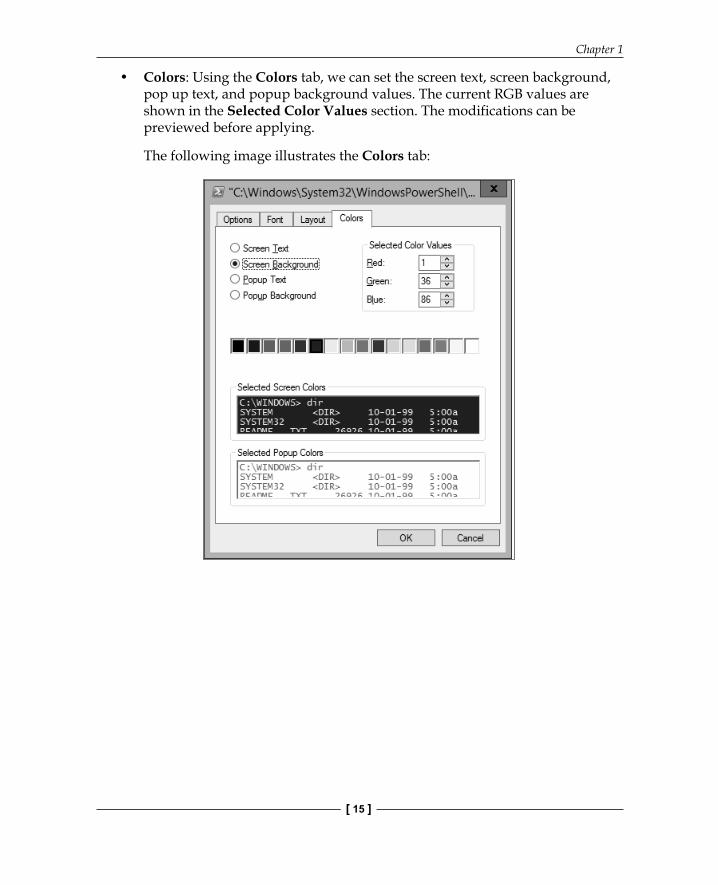
• Colors: Using the Colors tab, we can set the screen text, screen background, pop up text, and popup background values. The current RGB values are shown in the Selected Color Values section. The modifications can be previewed before applying.
The following image illustrates the Colors tab:
Getting Started with Windows PowerShell
[ 16 ]
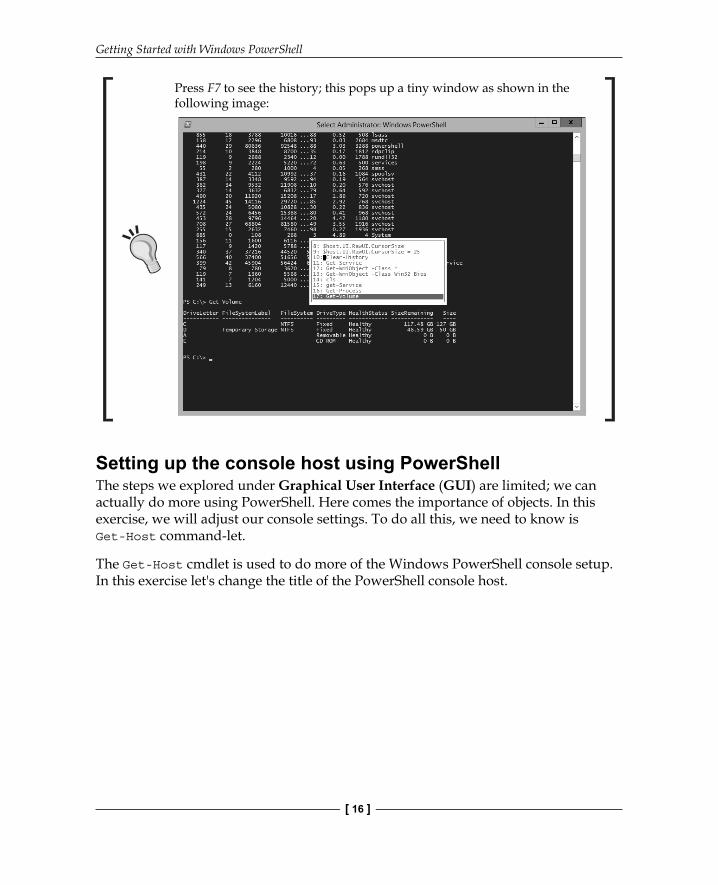
Press F7 to see the history; this pops up a tiny window as shown in the following image:
Setting up the console host using PowerShellThe steps we explored under Graphical User Interface (GUI) are limited; we can actually do more using PowerShell. Here comes the importance of objects. In this exercise, we will adjust our console settings. To do all this, we need to know is Get-Host command-let.
The Get-Host cmdlet is used to do more of the Windows PowerShell console setup. In this exercise let's change the title of the PowerShell console host.
Chapter 1
[ 17 ]
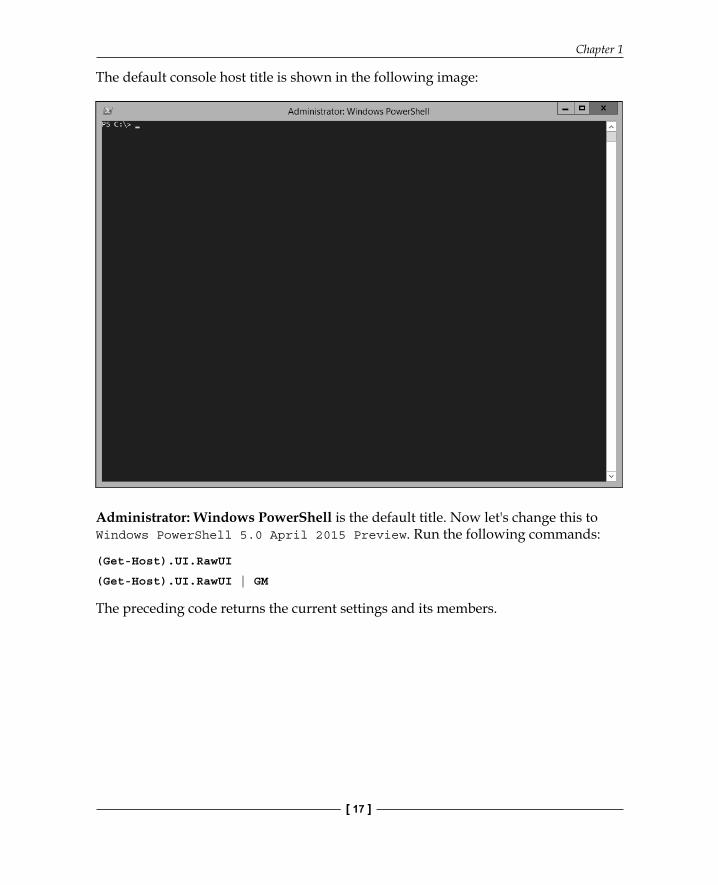
The default console host title is shown in the following image:
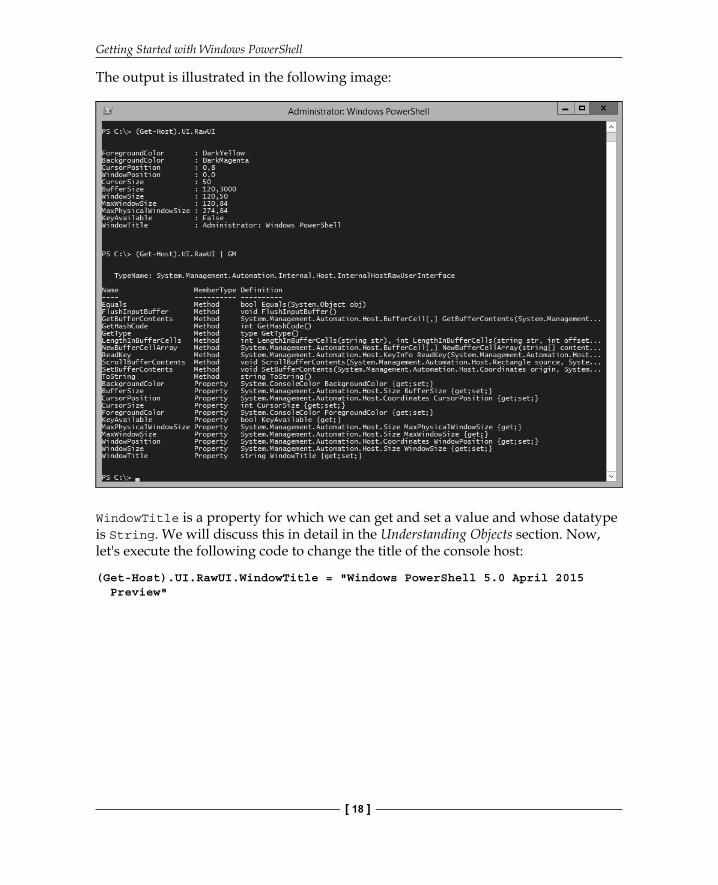
Administrator: Windows PowerShell is the default title. Now let's change this to Windows PowerShell 5.0 April 2015 Preview. Run the following commands:
(Get-Host).UI.RawUI
(Get-Host).UI.RawUI | GM
The preceding code returns the current settings and its members.
Getting Started with Windows PowerShell
[ 18 ]
The output is illustrated in the following image:
WindowTitle is a property for which we can get and set a value and whose datatype is String. We will discuss this in detail in the Understanding Objects section. Now, let's execute the following code to change the title of the console host:
(Get-Host).UI.RawUI.WindowTitle = "Windows PowerShell 5.0 April 2015 Preview"
Chapter 1
[ 19 ]
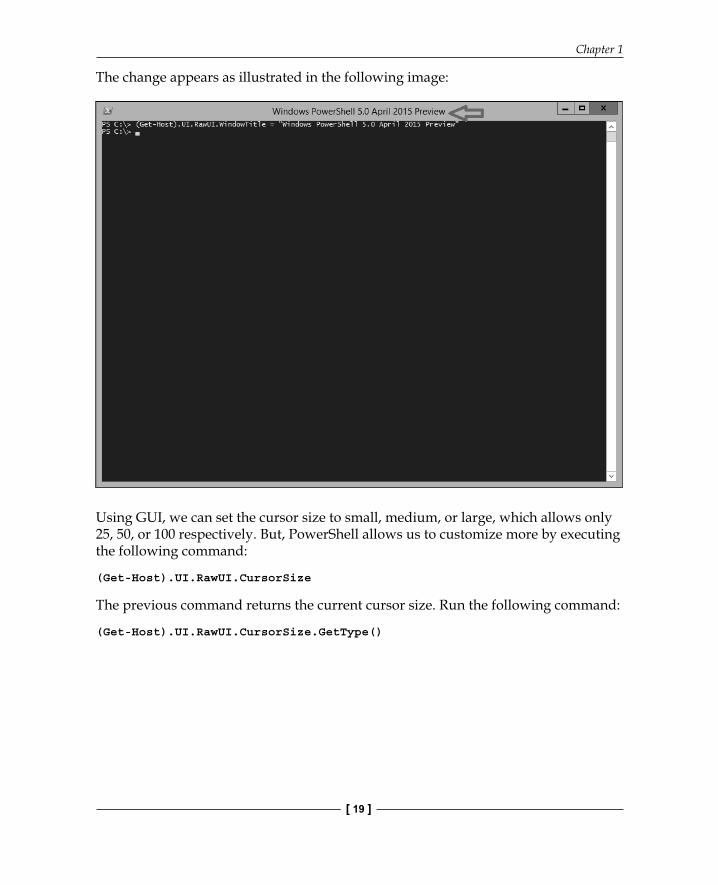
The change appears as illustrated in the following image:
Using GUI, we can set the cursor size to small, medium, or large, which allows only 25, 50, or 100 respectively. But, PowerShell allows us to customize more by executing the following command:
(Get-Host).UI.RawUI.CursorSize
The previous command returns the current cursor size. Run the following command:
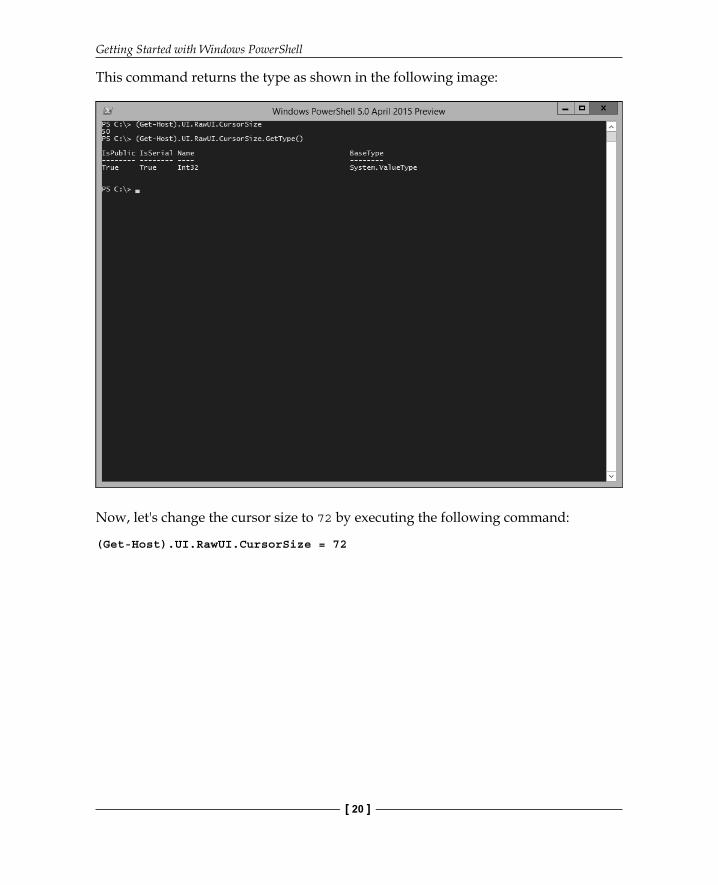
(Get-Host).UI.RawUI.CursorSize.GetType()
Getting Started with Windows PowerShell
[ 20 ]
This command returns the type as shown in the following image:
Now, let's change the cursor size to 72 by executing the following command:
(Get-Host).UI.RawUI.CursorSize = 72
Chapter 1
[ 21 ]
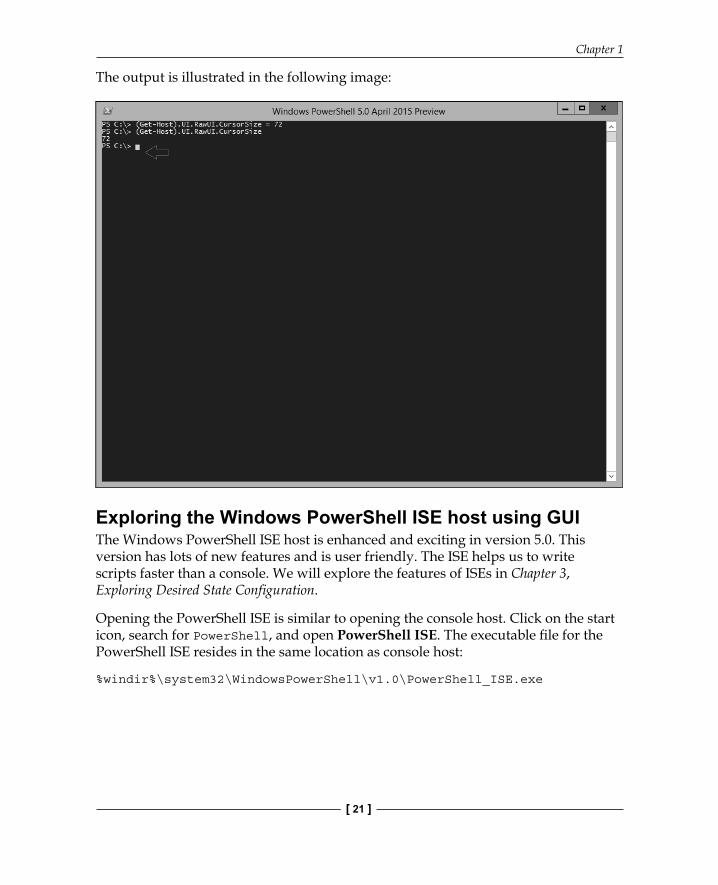
The output is illustrated in the following image:
Exploring the Windows PowerShell ISE host using GUIThe Windows PowerShell ISE host is enhanced and exciting in version 5.0. This version has lots of new features and is user friendly. The ISE helps us to write scripts faster than a console. We will explore the features of ISEs in Chapter 3, Exploring Desired State Confi guration.
Opening the PowerShell ISE is similar to opening the console host. Click on the start icon, search for PowerShell, and open PowerShell ISE. The executable fi le for the PowerShell ISE resides in the same location as console host:
%windir%\system32\WindowsPowerShell\v1.0\PowerShell_ISE.exe
Getting Started with Windows PowerShell
[ 22 ]
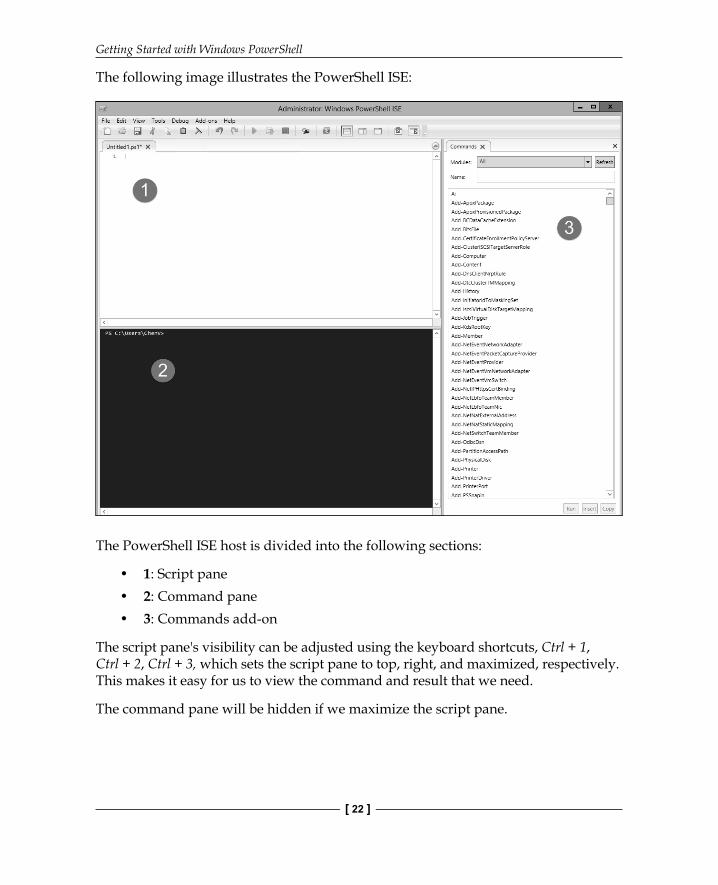
The following image illustrates the PowerShell ISE:
The PowerShell ISE host is divided into the following sections:
• 1: Script pane• 2: Command pane• 3: Commands add-on
The script pane's visibility can be adjusted using the keyboard shortcuts, Ctrl + 1, Ctrl + 2, Ctrl + 3, which sets the script pane to top, right, and maximized, respectively. This makes it easy for us to view the command and result that we need.
The command pane will be hidden if we maximize the script pane.

Chapter 1
[ 23 ]
Let us learn more about commands add-on pane:
1. By default, all the available modules will be shown. Click on the drop-down list to view the modules.
2. Click on Refresh if any new modules are loaded.3. Type the command name, and it will show the output as illustrated in the
following image:
4. Enter the command.
Getting Started with Windows PowerShell
[ 24 ]
5. Select the command.6. Click on the help icon, and this opens up the help in GUI.7. Enter the parameters as required. The * sign denotes mandatory.8. The common parameters are not always required, but we will use them in
the next chapters.9. We can run the code, copy it, or click on Insert, which appears in the
command pane. Ensure that you haven't maximized the Script Pane.
An ISE allows us to cut, copy, paste, start IntelliSense, and start the snippets. Similarly to other windows operations, Ctrl + X, Ctrl + C, and Ctrl + Y will cut, copy, and paste, respectively.
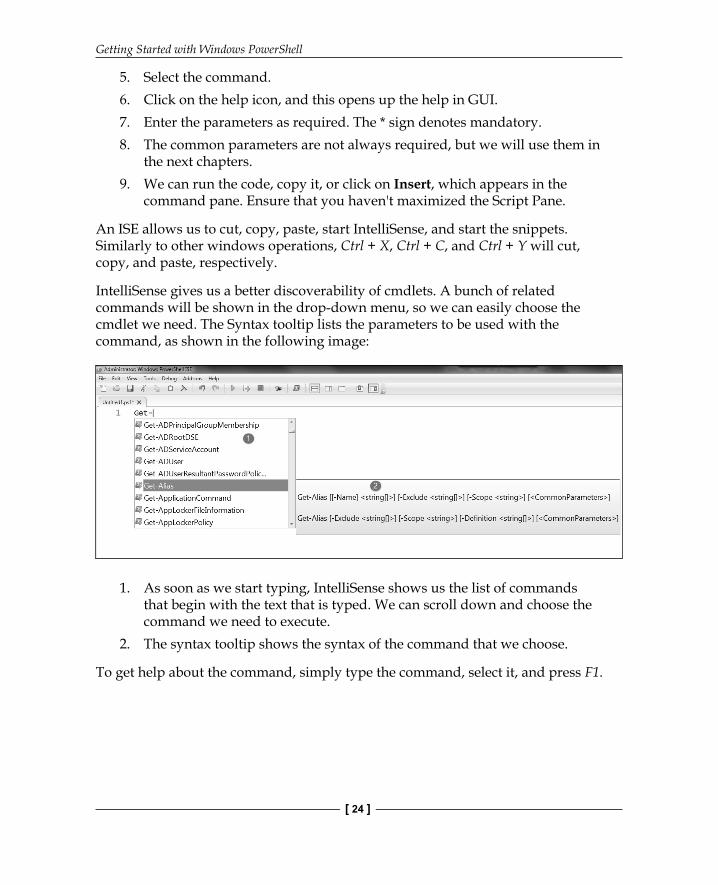
IntelliSense gives us a better discoverability of cmdlets. A bunch of related commands will be shown in the drop-down menu, so we can easily choose the cmdlet we need. The Syntax tooltip lists the parameters to be used with the command, as shown in the following image:
1. As soon as we start typing, IntelliSense shows us the list of commands that begin with the text that is typed. We can scroll down and choose the command we need to execute.
2. The syntax tooltip shows the syntax of the command that we choose.
To get help about the command, simply type the command, select it, and press F1.
Chapter 1
[ 25 ]
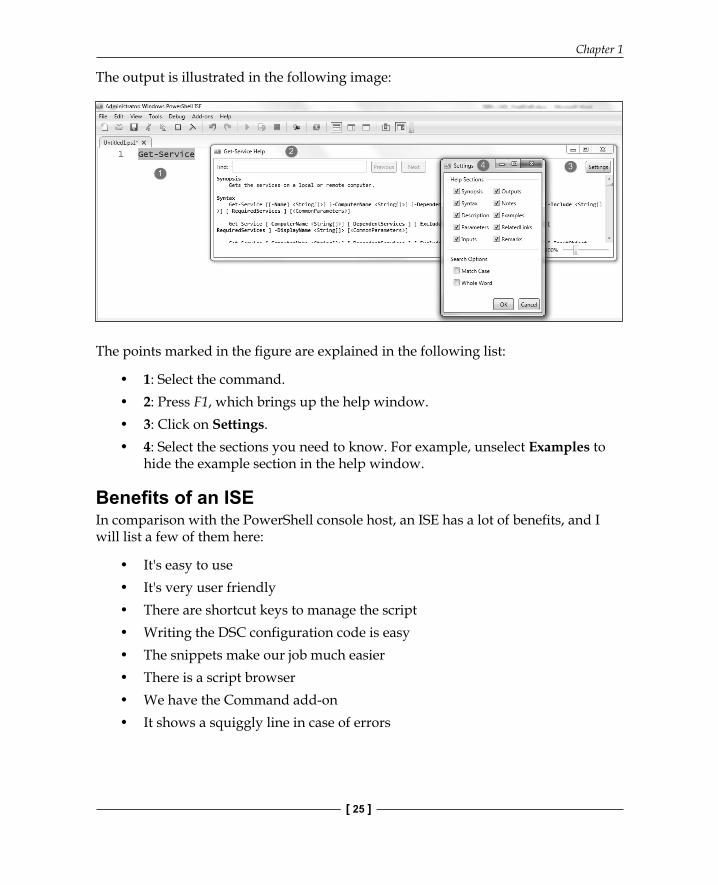
The output is illustrated in the following image:
The points marked in the fi gure are explained in the following list:
• 1: Select the command.• 2: Press F1, which brings up the help window.• 3: Click on Settings.• 4: Select the sections you need to know. For example, unselect Examples to
hide the example section in the help window.
Benefi ts of an ISEIn comparison with the PowerShell console host, an ISE has a lot of benefi ts, and I will list a few of them here:
• It's easy to use• It's very user friendly• There are shortcut keys to manage the script• Writing the DSC configuration code is easy• The snippets make our job much easier• There is a script browser• We have the Command add-on• It shows a squiggly line in case of errors

Getting Started with Windows PowerShell
[ 26 ]
The PowerShell ISE script browserPowerShell ISE has a script browser feature that allows us to search for the script in TechNet's script gallery. This is optional but worth using! This is because using Script Browser, we can download and use the scripts available in TechNet's script gallery.
The following image illustrates Script Browser:
Following are a few options in Script Browser:
• You can search for the script you need. Type the script's name in the textbox provided, right-click on the script, and select either Add to favorites or the Download option.
• Your favorite scripts appears in the Favorites tab.
Chapter 1
[ 27 ]
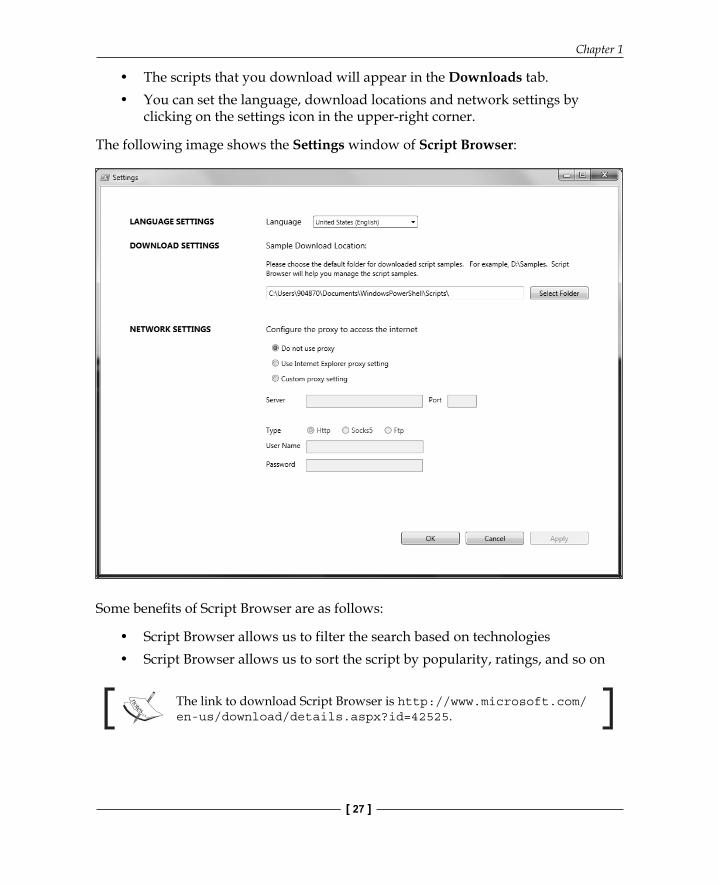
• The scripts that you download will appear in the Downloads tab.• You can set the language, download locations and network settings by
clicking on the settings icon in the upper-right corner.
The following image shows the Settings window of Script Browser:
Some benefi ts of Script Browser are as follows:
• Script Browser allows us to filter the search based on technologies• Script Browser allows us to sort the script by popularity, ratings, and so on
The link to download Script Browser is http://www.microsoft.com/en-us/download/details.aspx?id=42525.
Getting Started with Windows PowerShell
[ 28 ]
Using an interactive shellWindows PowerShell can be used either interactively or as a script automation. Before we take a look at script automations, let's explore the use of an interactive shell.
We can do arithmetic operations in Windows PowerShell as follows:
2 + 2
This will return 4. Consider the following operation:
2 + 2 * 3
This will return 8.
Windows PowerShell does left-to-right arithmetic operations according to the precedence rules. In the preceding expressions, PowerShell performed the operation as 2 * 3 + 2. We need to use parenthesis, as with (2 + 2) * 3, which return the result as 12. Here, (2 + 2) is known as grouping.
Using Windows PowerShell, we can do much more, such as system unit calculations, hexadecimal conversions, and so on, and few examples are as follows:
4GB / 1MB
This returns 4096.
(0xc85).ToChar($_)
This returns the following character:
'�'
In Windows PowerShell, we can use .NET classes. Here's an example:
[System.Math]::PI
This returns the value of pi, which is 3.14159265358979.
Windows PowerShell allows us to use class directly, without using the namespace, shown as follows:
[Math]::PI
Chapter 1
[ 29 ]
Refer to the following MSDN link for the System.Math class: https://msdn.microsoft.com/en-us/library/system.math%28v=vs.110%29.aspx
The command shown before was just an example. With reference to this, we can build code as per our needs using .NET classes.
Windows PowerShell cmdletsIn this topic, we will cover the following:
• Exploring Windows PowerShell commands• Exploring Windows PowerShell modules• Getting help• Understanding aliases, expressions, objects, pipelines, filtering,
and formatting• Scripting with Windows PowerShell
Windows PowerShell is designed to execute four kinds of named commands:
• Cmdlets: These are .NET programs designed to interact with PowerShell• Scripts: These are files with the FileName.PS1 extension• Functions: These are a block of code that are very helpful for script organization• Native window commands: These are internal commands such as MKDIR,
CHDIR, and so on
The internal commands of Windows PowerShell are called cmdlets. Cmdlets are always named in the verb-and-noun combination. This appears as Verb-Noun, for example Get-Service and Stop-Service, where Get and Stop are verbs, and Service is a noun.
(Verb)—Action
(Noun)—Something to be acted on
For example, Get-Service
Let's execute the following command:
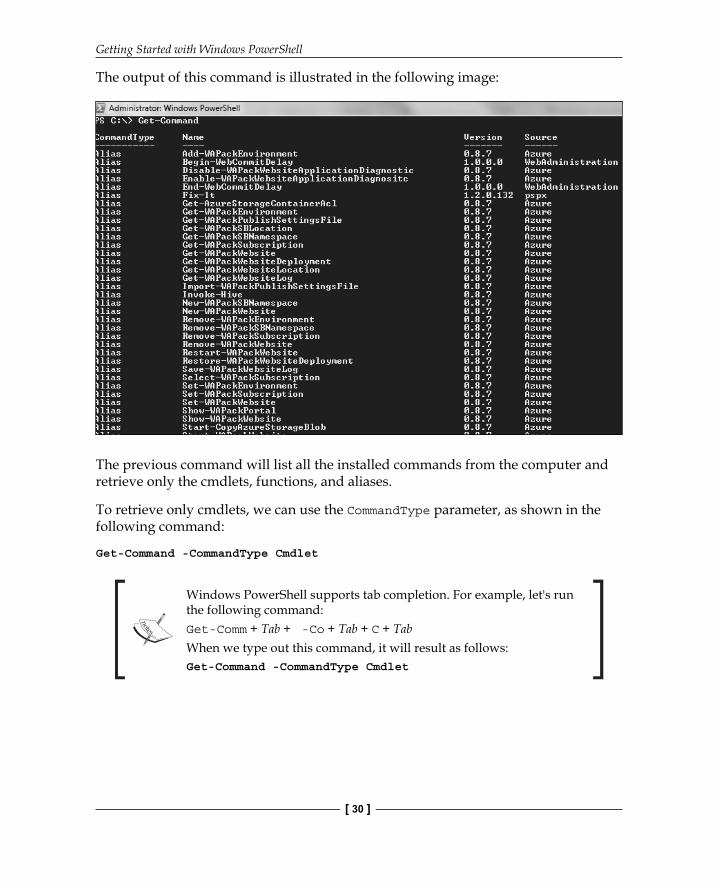
Get-Command
Getting Started with Windows PowerShell
[ 30 ]
The output of this command is illustrated in the following image:
The previous command will list all the installed commands from the computer and retrieve only the cmdlets, functions, and aliases.
To retrieve only cmdlets, we can use the CommandType parameter, as shown in the following command:
Get-Command -CommandType Cmdlet
Windows PowerShell supports tab completion. For example, let's run the following command:Get-Comm + Tab + -Co + Tab + C + TabWhen we type out this command, it will result as follows:Get-Command -CommandType Cmdlet
Chapter 1
[ 31 ]
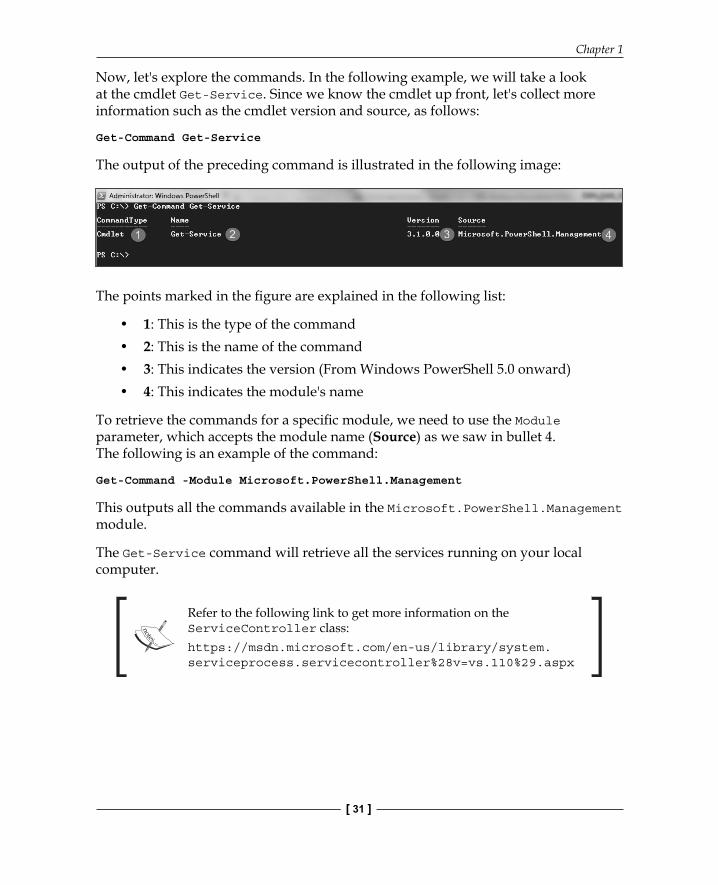
Now, let's explore the commands. In the following example, we will take a look at the cmdlet Get-Service. Since we know the cmdlet up front, let's collect more information such as the cmdlet version and source, as follows:
Get-Command Get-Service
The output of the preceding command is illustrated in the following image:
The points marked in the fi gure are explained in the following list:
• 1: This is the type of the command• 2: This is the name of the command• 3: This indicates the version (From Windows PowerShell 5.0 onward)• 4: This indicates the module's name
To retrieve the commands for a specifi c module, we need to use the Module parameter, which accepts the module name (Source) as we saw in bullet 4. The following is an example of the command:
Get-Command -Module Microsoft.PowerShell.Management
This outputs all the commands available in the Microsoft.PowerShell.Management module.
The Get-Service command will retrieve all the services running on your local computer.
Refer to the following link to get more information on the ServiceController class:https://msdn.microsoft.com/en-us/library/system.serviceprocess.servicecontroller%28v=vs.110%29.aspx
Getting Started with Windows PowerShell
[ 32 ]
Let's see the alternate of the Get-Service cmdlet using the .NET class. To do this, let's fi nd the TypeName of the Get-Service cmdlet by executing Get-Service | Get-Member and this gives the TypeName as System.ServiceProcess.ServiceController. Windows PowerShell allows us to use this directly as follows:
[System.ServiceProcess.ServiceController]::GetServices()
Now, let's take a look at how the command that we just discussed works.
Here, we will consume the .NET ServiceController class in PowerShell and invoke the GetServices() method.
The GetServices method has an overload with a machineName parameter. To fi nd this, we will execute the following command:
[System.ServiceProcess.ServiceController]::GetServices
The difference is that here, we did not use parentheses. The output of OverloadDefinitions is as follows:
OverloadDefinitions
-------------------
static System.ServiceProcess.ServiceController[] GetServices()
static System.ServiceProcess.ServiceController[] GetServices(string machineName)
We can query the service information of a remote computer by passing the host name of the remote computer as the machineName parameter, as follows:
[System.ServiceProcess.ServiceController]::GetServices('RemoteServer')
Getting helpThis is the most important and interesting topic. No matter what technology we consume, all we need to know is the way to get help for it. Most IT professionals and developers say that they use Google to fi nd this.
Chapter 1
[ 33 ]
For PowerShell, help is much more focused. It's very diffi cult to remember all the commands. So, we can search for a command and fi nd help for the same. Let's take a look at how to seek help for Windows PowerShell cmdlets.
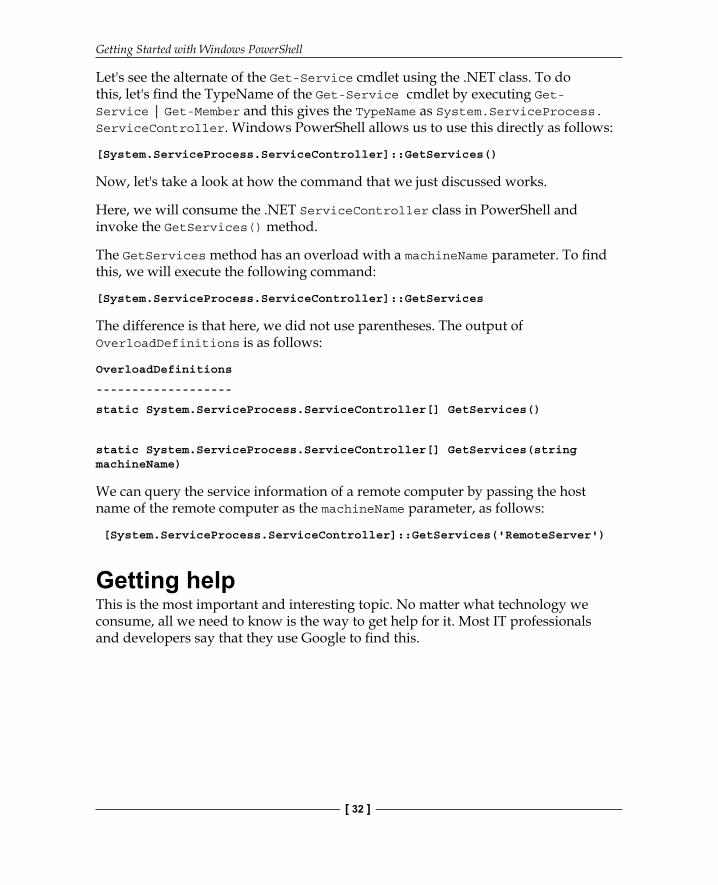
Get-Help Get-Service
The output is illustrated in the following image:
The sections in the image are explained as follows:
• NAME: This is the name of the command (Get-Service)• SYNOPSIS: This is the abstract of the command• SYNTAX: This gives us the syntax of the commands, which includes all its
parameters and its type• DESCRIPTION: This is the description of the command whose help we are
looking for• RELATED LINKS: This contains the URL of online versions of the command,
and other commands related to the one we are looking for help regarding• REMARKS: This will guide us to explore examples, detailed information,
full help, and online help
Getting Started with Windows PowerShell
[ 34 ]
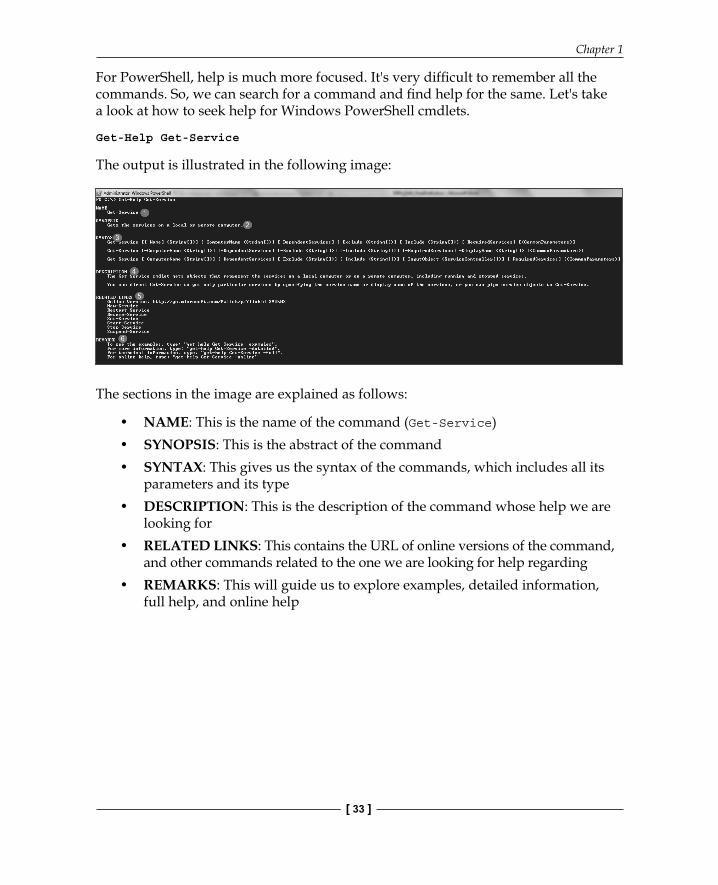
If more information than that fi tting the page view is to be displayed, the console is paginated. For example, if we execute the Get-Help Get-Service -Detailed | more command, the details will output as shown in the following image:
If we press Enter, we can view one line after another, whereas pressing the space key will give a page view.
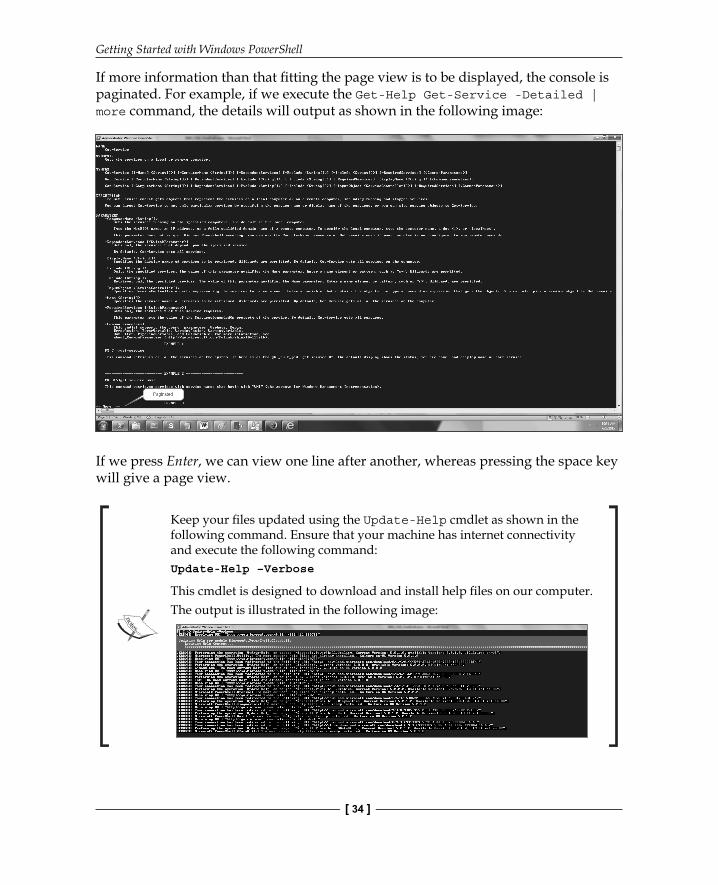
Keep your fi les updated using the Update-Help cmdlet as shown in the following command. Ensure that your machine has internet connectivity and execute the following command:Update-Help –Verbose
This cmdlet is designed to download and install help fi les on our computer.The output is illustrated in the following image:
Chapter 1
[ 35 ]
Ensure that you have an Internet connection while updating your help. The reason for updating help is to keep the help document up-to-date. Let us learn more about the Get-Help cmdlet:
• The Help cmdlet is an alias for Get-Help (Aliases will be covered in the next section).
• The Get-Help cmdlet allows us to view the online help using the Online parameter. The following command will open the online URL in the default web browser:Get-Help Get-Service –Online
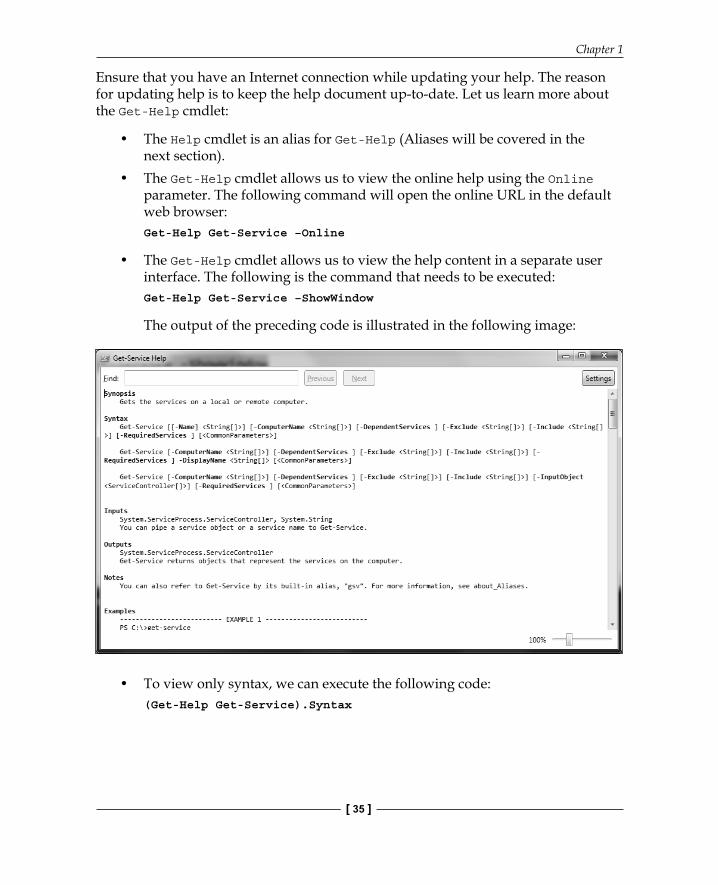
• The Get-Help cmdlet allows us to view the help content in a separate user interface. The following is the command that needs to be executed:Get-Help Get-Service –ShowWindow
The output of the preceding code is illustrated in the following image:
• To view only syntax, we can execute the following code:(Get-Help Get-Service).Syntax

Getting Started with Windows PowerShell
[ 36 ]
Understanding aliasesUsing aliases in Windows PowerShell is not advised by many. The reason for this is readability and understandability. Developers are comfortable using an alias because it's easier, but the diffi culty is in remembering the alias for each cmdlet.
The bottom line is that aliases are shortcuts for Windows PowerShell cmdlets.
Windows PowerShell has two types of aliases:
• The built-in alias: This is an alias that represents PowerShell's native cmdlets• The user-defined alias: This is an alias created by us for specific needs.
The following command retrieves all the commands available in the Microsoft.PowerShell.Management module:
Get-Command -Module Microsoft.PowerShell.Management
The following image shows the output of the previous command:
Using the following alias, we can achieve the same output as with –like:
gcm -Module Microsoft.PowerShell.Management
Here, gcm is an alias or shortcut for the Get-Command cmdlet.
Chapter 1
[ 37 ]
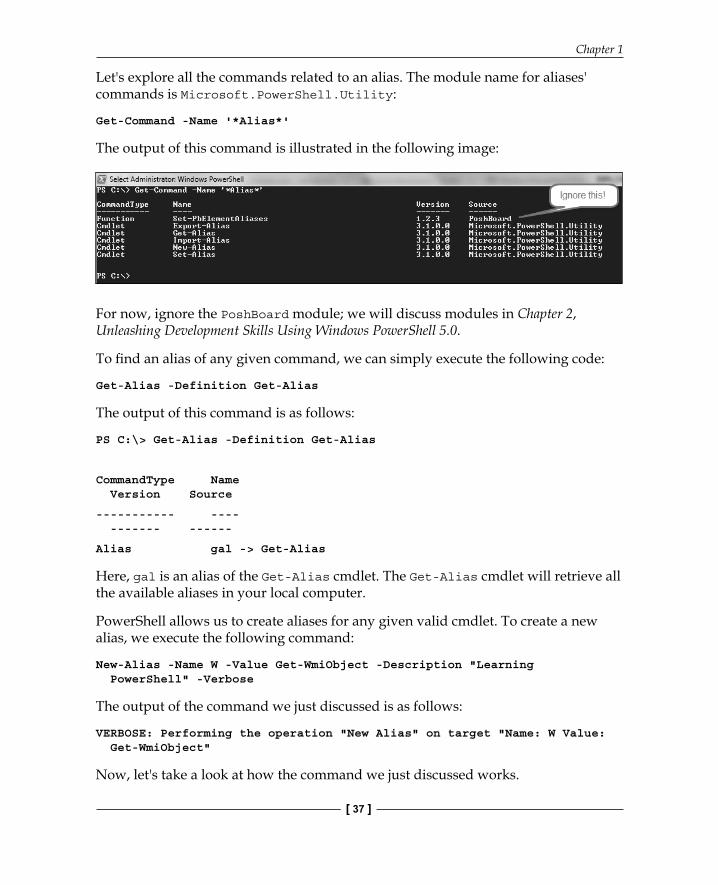
Let's explore all the commands related to an alias. The module name for aliases' commands is Microsoft.PowerShell.Utility:
Get-Command -Name '*Alias*'
The output of this command is illustrated in the following image:
For now, ignore the PoshBoard module; we will discuss modules in Chapter 2, Unleashing Development Skills Using Windows PowerShell 5.0.
To fi nd an alias of any given command, we can simply execute the following code:
Get-Alias -Definition Get-Alias
The output of this command is as follows:
PS C:\> Get-Alias -Definition Get-Alias
CommandType Name Version Source
----------- ---- ------- ------
Alias gal -> Get-Alias
Here, gal is an alias of the Get-Alias cmdlet. The Get-Alias cmdlet will retrieve all the available aliases in your local computer.
PowerShell allows us to create aliases for any given valid cmdlet. To create a new alias, we execute the following command:
New-Alias -Name W -Value Get-WmiObject -Description "Learning PowerShell" -Verbose
The output of the command we just discussed is as follows:
VERBOSE: Performing the operation "New Alias" on target "Name: W Value: Get-WmiObject"
Now, let's take a look at how the command we just discussed works.
Getting Started with Windows PowerShell
[ 38 ]
The New-Alias command is used to create an alias.
The W part is a friendly name. You can choose any name you need, but you can't create a new alias with the existing, used names.
The Value command is used here. We also used the Get-WmiObject command, and that's our defi nition.
The Description parameter is for our reference.
The Verbose parameter just shows the action performed by the message.
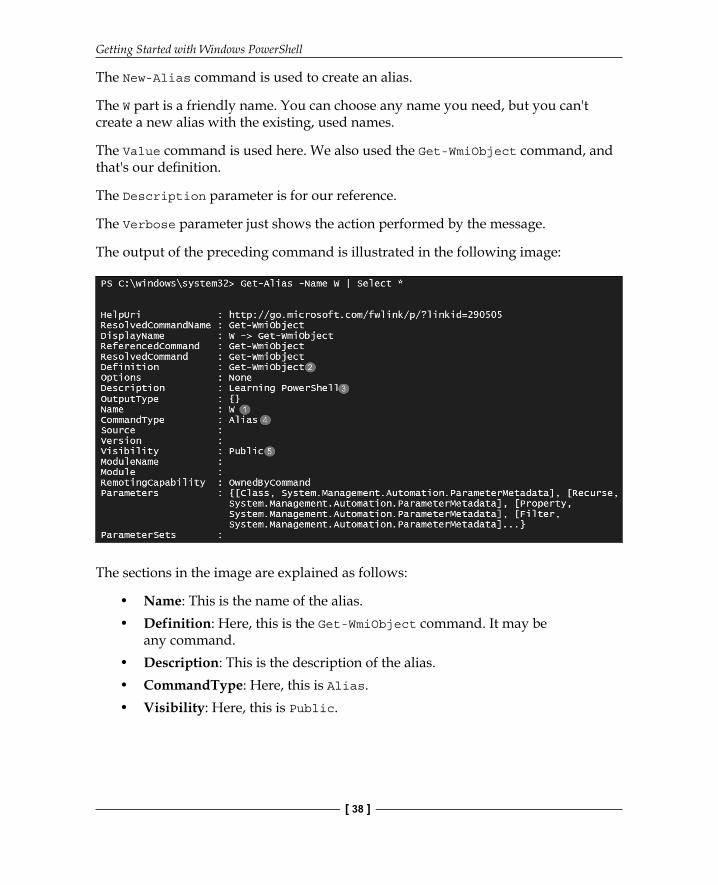
The output of the preceding command is illustrated in the following image:
The sections in the image are explained as follows:
• Name: This is the name of the alias.• Definition: Here, this is the Get-WmiObject command. It may be
any command.• Description: This is the description of the alias.• CommandType: Here, this is Alias.• Visibility: Here, this is Public.
Chapter 1
[ 39 ]
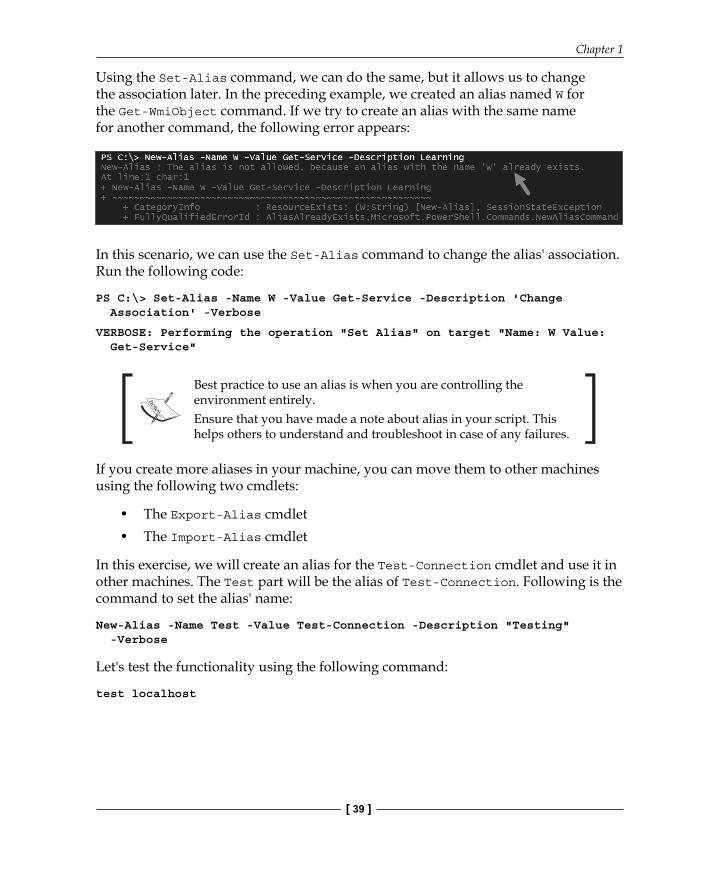
Using the Set-Alias command, we can do the same, but it allows us to change the association later. In the preceding example, we created an alias named W for the Get-WmiObject command. If we try to create an alias with the same name for another command, the following error appears:
In this scenario, we can use the Set-Alias command to change the alias' association. Run the following code:
PS C:\> Set-Alias -Name W -Value Get-Service -Description 'Change Association' -Verbose
VERBOSE: Performing the operation "Set Alias" on target "Name: W Value: Get-Service"
Best practice to use an alias is when you are controlling the environment entirely.Ensure that you have made a note about alias in your script. This helps others to understand and troubleshoot in case of any failures.
If you create more aliases in your machine, you can move them to other machines using the following two cmdlets:
• The Export-Alias cmdlet• The Import-Alias cmdlet
In this exercise, we will create an alias for the Test-Connection cmdlet and use it in other machines. The Test part will be the alias of Test-Connection. Following is the command to set the alias' name:
New-Alias -Name Test -Value Test-Connection -Description "Testing" -Verbose
Let's test the functionality using the following command:
test localhost
Getting Started with Windows PowerShell
[ 40 ]
This command returns the following output:
Let's use the Export-Alias cmdlet and export only this alias using the following command:
Export-Alias -Name test C:\Temp\CustomAlias.txt –Verbose
We will get the following output:
# Alias File
# Exported by : ChenV
# Date/Time : Tuesday, August 25, 2015 1:57:28 PM
# Computer : CHENV
"Test","Test-Connection","Testing","None"
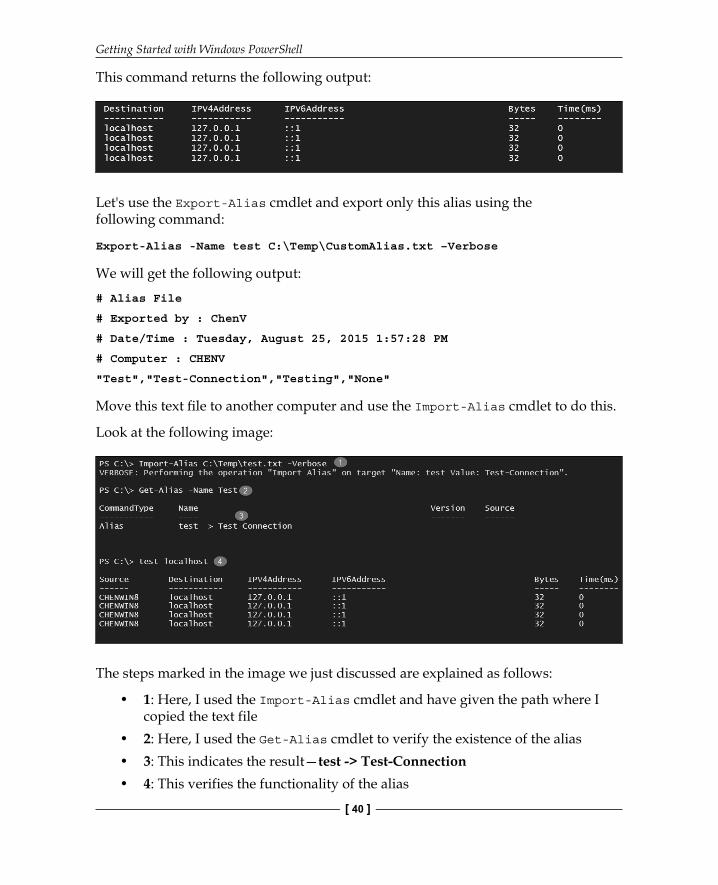
Move this text fi le to another computer and use the Import-Alias cmdlet to do this.
Look at the following image:
The steps marked in the image we just discussed are explained as follows:
• 1: Here, I used the Import-Alias cmdlet and have given the path where I copied the text file
• 2: Here, I used the Get-Alias cmdlet to verify the existence of the alias• 3: This indicates the result—test -> Test-Connection• 4: This verifies the functionality of the alias
Chapter 1
[ 41 ]
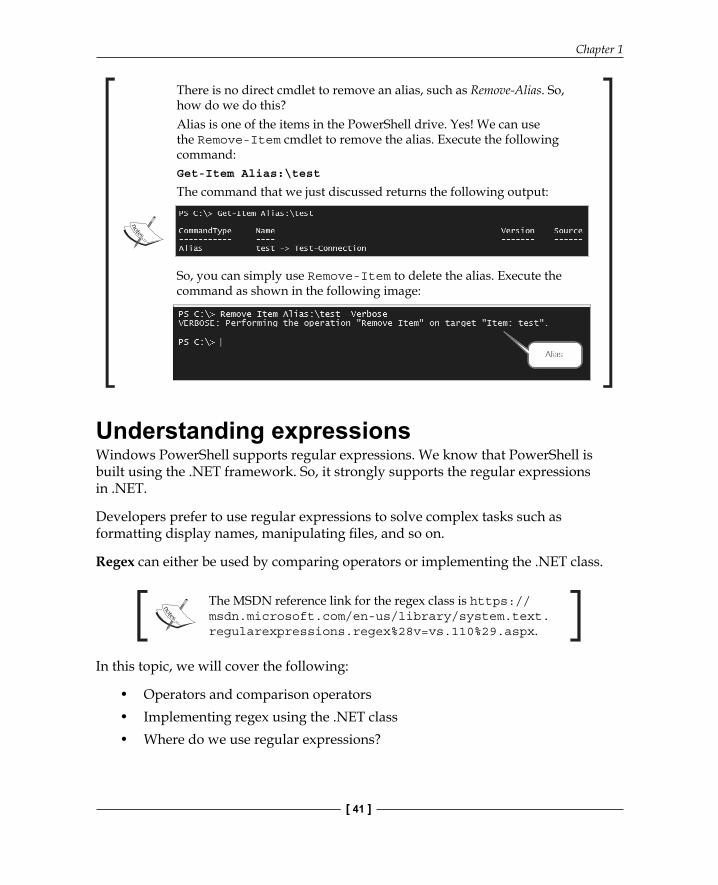
There is no direct cmdlet to remove an alias, such as Remove-Alias. So, how do we do this?Alias is one of the items in the PowerShell drive. Yes! We can use the Remove-Item cmdlet to remove the alias. Execute the following command:Get-Item Alias:\test
The command that we just discussed returns the following output:
So, you can simply use Remove-Item to delete the alias. Execute the command as shown in the following image:
Understanding expressionsWindows PowerShell supports regular expressions. We know that PowerShell is built using the .NET framework. So, it strongly supports the regular expressions in .NET.
Developers prefer to use regular expressions to solve complex tasks such as formatting display names, manipulating fi les, and so on.
Regex can either be used by comparing operators or implementing the .NET class.
The MSDN reference link for the regex class is https://msdn.microsoft.com/en-us/library/system.text.regularexpressions.regex%28v=vs.110%29.aspx.
In this topic, we will cover the following:
• Operators and comparison operators• Implementing regex using the .NET class• Where do we use regular expressions?
Getting Started with Windows PowerShell
[ 42 ]
Before we proceed with regular expressions, let's explore a few things about operators.
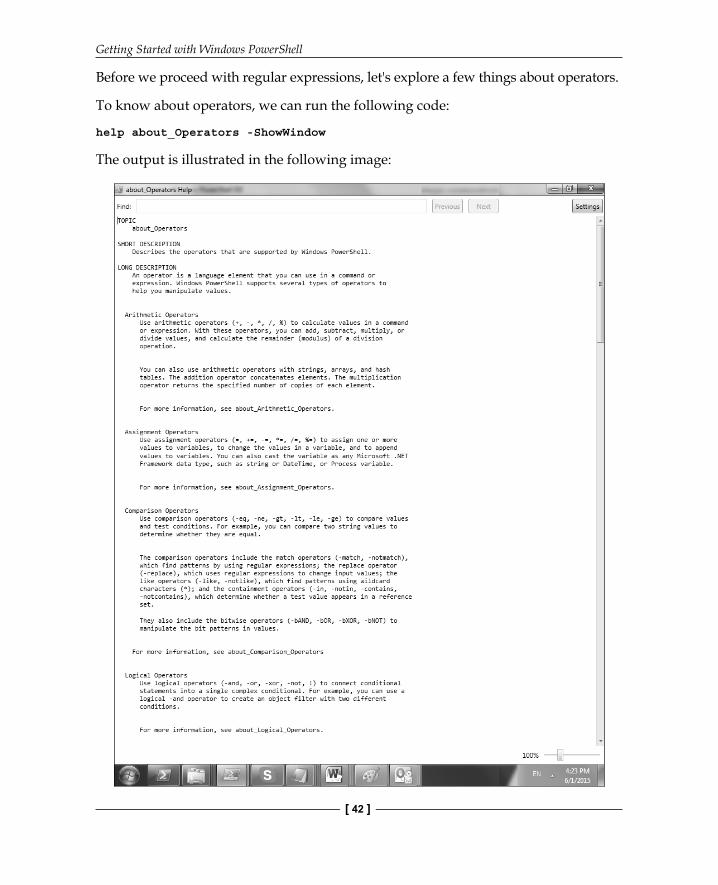
To know about operators, we can run the following code:
help about_Operators -ShowWindow
The output is illustrated in the following image:
Chapter 1
[ 43 ]
To retrieve help for all the operators in Windows PowerShell, you can run each of the following lines of code and explore their usage:
help about_Arithmetic_Operators
help about_Assignment_Operators
help about_Comparison_Operators
help about_Logical_Operators
help about_Type_Operators
help about_Split
help about_Join
help about_Redirection
Windows PowerShell has operators such as arithmetic operators, assignment operators, comparison operators, logical operators, redirection operators, split and join operators, type operators, format operators, static member operators, and so on.
As we are exploring regular expressions, we will focus only on the comparison operators.
Comparison operators are used to compare values and to fi nd the matching pattern. By default, comparison operators are not case sensitive.
We can also perform case-sensitive pattern matching using C before the operators.
Let's consider both these in the following example:
#Case In-Sensitive
"PowerShell" -match "PowerShell"
This command returns the output as true.
#Case Sensitive
"PowerShell" -cmatch "powershell"
This command returns the output as false.
Now, it's time for us to use the .NET regular expressions in Windows PowerShell with the comparison operators
The MSDN link for a quick reference guide to regular expressions is https://msdn.microsoft.com/en-us/library/az24scfc%28v=vs.110%29.aspx
Here is a command that uses a regular expression to check whether the fi rst three characters are digits in a given string.
Getting Started with Windows PowerShell
[ 44 ]
For example, the given string is 123-456-ABC. Then, the command would be as follows:
"123-245-ABC" -match '^\d{3}'
This command returns the output as true.
"EFG-245-ABC" -match '^\d{3}'
This command returns the output as false.
Now, let's take a look at how the command that we just discussed works, in the following list:
• ^: This is the beginning of the string.• \d: This is to check the digits.• {3}: This matches the previous elements n times. In our case, it's three times.
Use the following regular expression to remove the white space characters from any given string:
"Power Shell" -replace '\s' , ''
This returns PowerShell.
In case of replacing a string with null with the help of the replace operator, we can execute the following command: "Power Shell" -replace '\s'
There is no need to explicitly mention replacing a string with a non-white space character.
The given input string is Power Shell. The expression removes the white space between Power and Shell in the string and outputs the Powershell word. The white space is removed as explained in the following steps:
• In the preceding code, we used the comparison operator, –replace• The \s character is the white space character in regex• This is replaced with a non-white space character
We can swap strings using regular expressions.
Chapter 1
[ 45 ]
Consider the given string as FirstName LastName:
#Given Name: FirstName LastName
#Required Output: LastName, FirstName
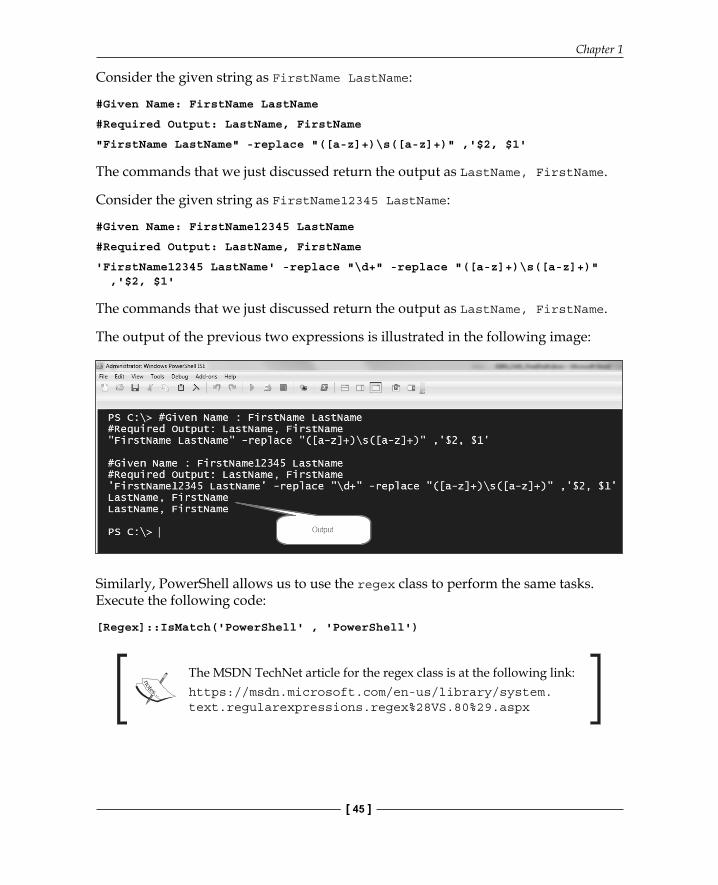
"FirstName LastName" -replace "([a-z]+)\s([a-z]+)" ,'$2, $1'
The commands that we just discussed return the output as LastName, FirstName.
Consider the given string as FirstName12345 LastName:
#Given Name: FirstName12345 LastName
#Required Output: LastName, FirstName
'FirstName12345 LastName' -replace "\d+" -replace "([a-z]+)\s([a-z]+)" ,'$2, $1'
The commands that we just discussed return the output as LastName, FirstName.
The output of the previous two expressions is illustrated in the following image:
Similarly, PowerShell allows us to use the regex class to perform the same tasks. Execute the following code:
[Regex]::IsMatch('PowerShell' , 'PowerShell')
The MSDN TechNet article for the regex class is at the following link:https://msdn.microsoft.com/en-us/library/system.text.regularexpressions.regex%28VS.80%29.aspx
Getting Started with Windows PowerShell
[ 46 ]
The IsMatch method is a member of the regex class. This method is overloaded, which indicates whether the regular expression fi nds a match in the input string. This is a simple example to check whether a string contains another string.
The MSDN TechNet article for the regex class members is at the following link:https://msdn.microsoft.com/en-US/library/system.text.regularexpressions.regex_members%28v=vs.80%29.aspx
Developers can easily understand and implement regex. However, IT professionals or system administrators may have diffi culties in understanding the arguments to be passed.
What arguments should we pass for members? It's not always necessary to refer to the MSDN article. Instead, we can use PowerShell to fi nd the overloaded defi nitions.
In the following example, we will use the Replace method (the public method of the regex class):
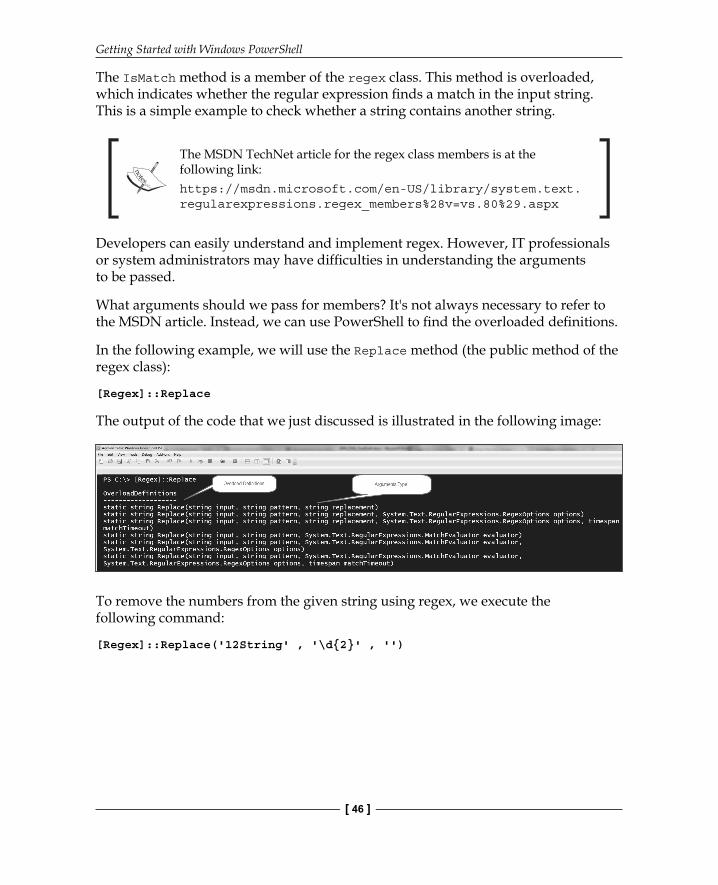
[Regex]::Replace
The output of the code that we just discussed is illustrated in the following image:
To remove the numbers from the given string using regex, we execute the following command:
[Regex]::Replace('12String' , '\d{2}' , '')
Chapter 1
[ 47 ]
The command that we just considered returns the output as String. We get this output as explained in the following steps:
• Using the Regex class, we invoked the public method, Replace.• As per the overloaded definitions, we have an option to pass three
arguments—string, pattern, and replacement string.• The '\d' shorthand character represents the digits and {n} checks n times.
In our case, it's two times.• This was replaced with empty values.
Understanding objectsIn general, a term object is something that we can touch and feel, and the same is applicable for PowerShell as well. An object in PowerShell is a combination of methods and properties:
Objects = Properties + Methods
A property is something that we can get or set. In short, properties store information about the object.
A method is an action to be invoked on a particular object.
Objects are constructed using their types, properties, and methods.
In this section, we will cover the following topics:
• Getting help about objects, properties, and methods• Exploring objects, properties, methods, and types
Before we explore objects, let's have a look at the help documentation using the following commands:
help about_Objects
help about_Properties
help about_Methods
The objects that we see in PowerShell are a part of the .NET framework, and PowerShell will allow us to create custom objects as well.
From Windows PowerShell 5.0 onward, we can create objects using a class. This will be covered in the Chapter 2, Unleashing Development Skills Using Windows PowerShell 5.0.
Getting Started with Windows PowerShell
[ 48 ]
Now, let's explore objects in detail. In the following example, we will use the Get-Date command:
$Date = Get-Date
Here, $Date is a variable in Windows PowerShell and Get-Date is a cmdlet to get the current date and time.
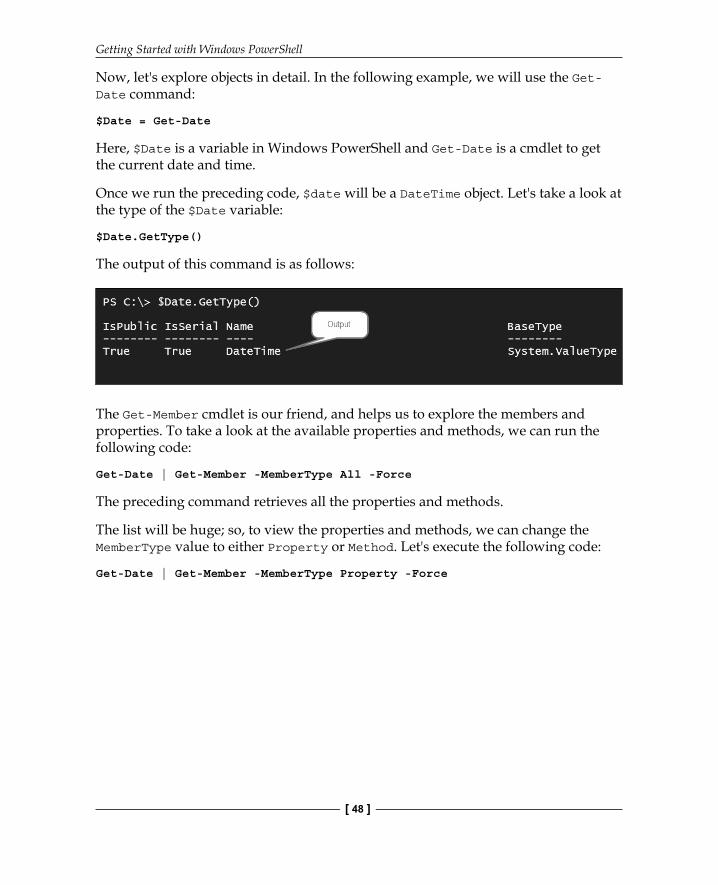
Once we run the preceding code, $date will be a DateTime object. Let's take a look at the type of the $Date variable:
$Date.GetType()
The output of this command is as follows:
The Get-Member cmdlet is our friend, and helps us to explore the members and properties. To take a look at the available properties and methods, we can run the following code:
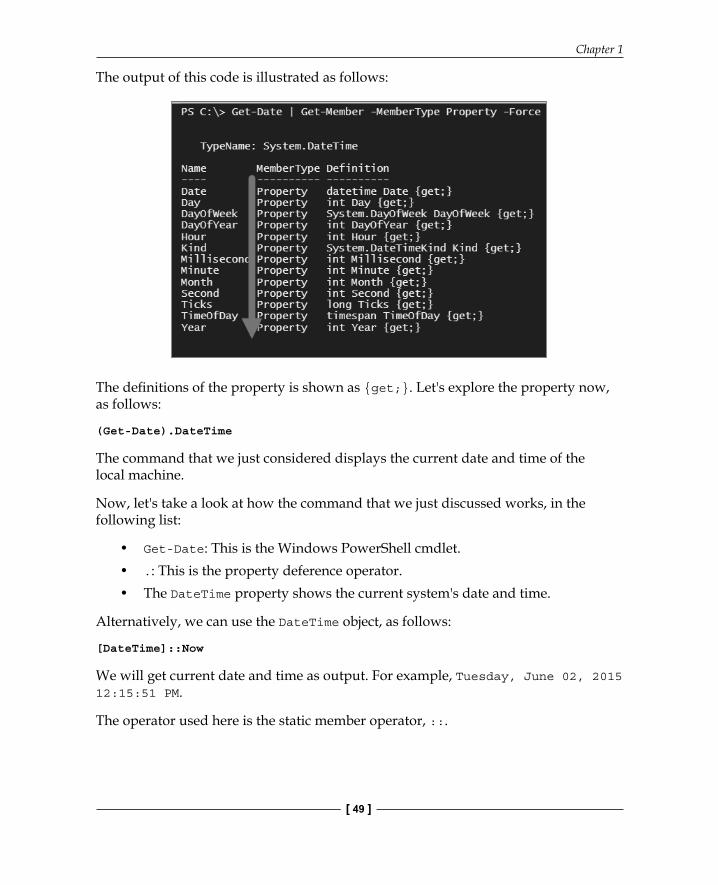
Get-Date | Get-Member -MemberType All -Force
The preceding command retrieves all the properties and methods.
The list will be huge; so, to view the properties and methods, we can change the MemberType value to either Property or Method. Let's execute the following code:
Get-Date | Get-Member -MemberType Property -Force
Chapter 1
[ 49 ]
The output of this code is illustrated as follows:
The defi nitions of the property is shown as {get;}. Let's explore the property now, as follows:
(Get-Date).DateTime
The command that we just considered displays the current date and time of the local machine.
Now, let's take a look at how the command that we just discussed works, in the following list:
• Get-Date: This is the Windows PowerShell cmdlet.• .: This is the property deference operator.• The DateTime property shows the current system's date and time.
Alternatively, we can use the DateTime object, as follows:
[DateTime]::Now
We will get current date and time as output. For example, Tuesday, June 02, 2015 12:15:51 PM.
The operator used here is the static member operator, ::.
Getting Started with Windows PowerShell
[ 50 ]
To invoke the methods of an object, we will follow the same procedure. But, if the method needs arguments, we need to pass it accordingly, as shown in the following command:
Get-Date | Get-Member -MemberType Method –Force
We used the –Force parameter to retrieve all the methods, including the hidden ones.
Execute the following code:
(Get-Date).AddDays(1)
Here, we added one day to the current day and the output is as follows:
Wednesday, June 03, 2015 12:55:35 PM
Alternatively, we can write ([DateTime]::Now).AddDays(1).
The $psISE object is the root object of the Integrated Scripting Environment. Using this we can toggle settings of the ISE, as follows:
$psISE | GM -Force
The output of the command we just discussed retrieves all the members of $PSISE. One of the property options that hold all the options of the ISE is as follows:
$psISE.Options
To modify the zoom, use the following code:
$psISE.Options.Zoom = 150
To modify the Intellisense timeout seconds, we execute the following code:
$psISE.Options.IntellisenseTimeoutInSeconds = 5
To change the script pane's background color, we execute the following code:
$psISE.Options.ScriptPaneBackgroundColor = 'Green'
Chapter 1
[ 51 ]
Understanding pipelinesA Windows PowerShell pipeline is used to join two or more statements with a pipeline operator. The Pipeline operator is '|'.
We have used pipelines in previous examples; let's know about pipeline use case scenario.
In this section, we will cover the following:
• Using a pipeline operator• Where to use a pipeline operator
Windows PowerShell is designed to use pipeline. Here's an example of pipelines:
Command1 | Command2 | Command3
Here, Command1 sends the object to Command2; the processed object will then be sent to Command3, which will output the results. Take a look at the following command:
help about_Pipelines -ShowWindow
A pipeline works in the following way:
• The parameter must accept input from a pipeline (however, not all do so)• The parameter must accept the type of object being sent or a type that the
object that can be converted to• The parameter must not already be used in the command
Now, let's take a look at the following example:
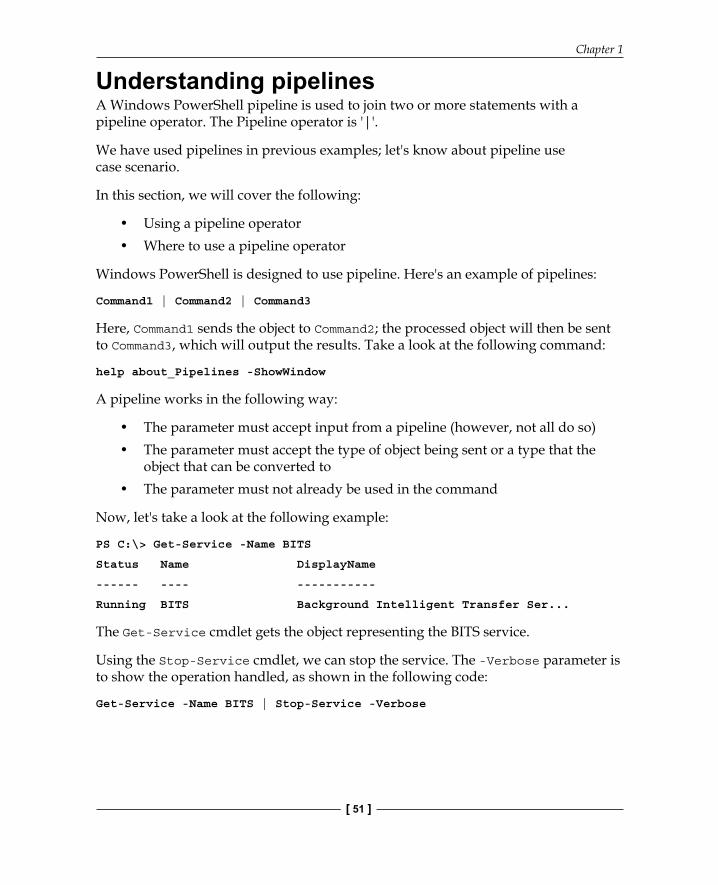
PS C:\> Get-Service -Name BITS
Status Name DisplayName
------ ---- -----------
Running BITS Background Intelligent Transfer Ser...
The Get-Service cmdlet gets the object representing the BITS service.
Using the Stop-Service cmdlet, we can stop the service. The -Verbose parameter is to show the operation handled, as shown in the following code:
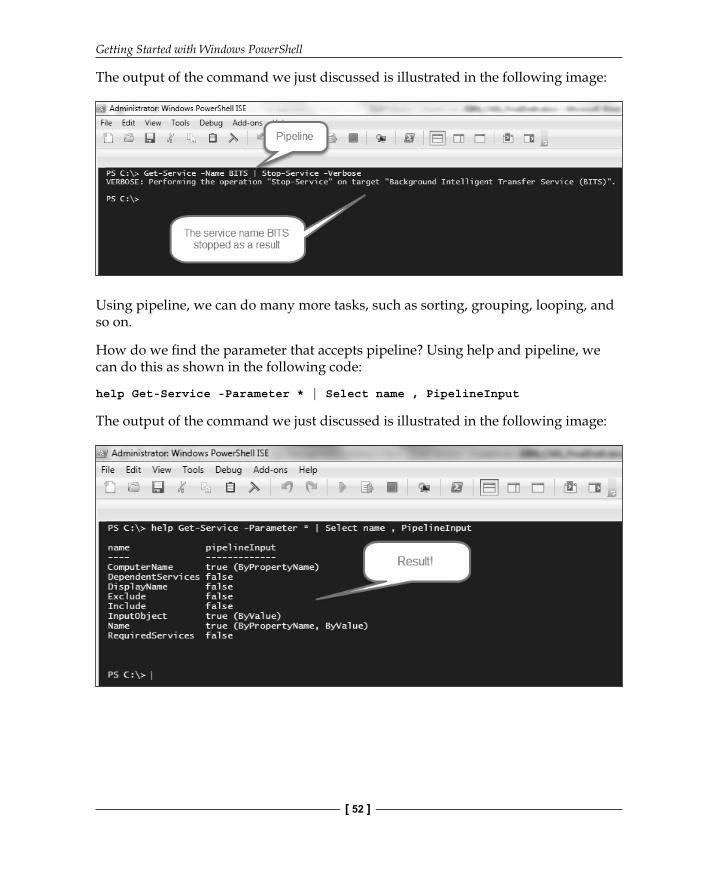
Get-Service -Name BITS | Stop-Service -Verbose
Getting Started with Windows PowerShell
[ 52 ]
The output of the command we just discussed is illustrated in the following image:
Using pipeline, we can do many more tasks, such as sorting, grouping, looping, and so on.
How do we fi nd the parameter that accepts pipeline? Using help and pipeline, we can do this as shown in the following code:
help Get-Service -Parameter * | Select name , PipelineInput
The output of the command we just discussed is illustrated in the following image:
Chapter 1
[ 53 ]
To retrieve the Windows services of the remote machine, SharePoint001, we can write the command as follows:
'SharePoint001' | %{Get-Service -ComputerName $_}
In short, the pipeline passes the output to another command so that the next command has something to work with or simply connects the output to other commands. This helps IT professionals automate tasks such as inventorying, reporting, and so on.
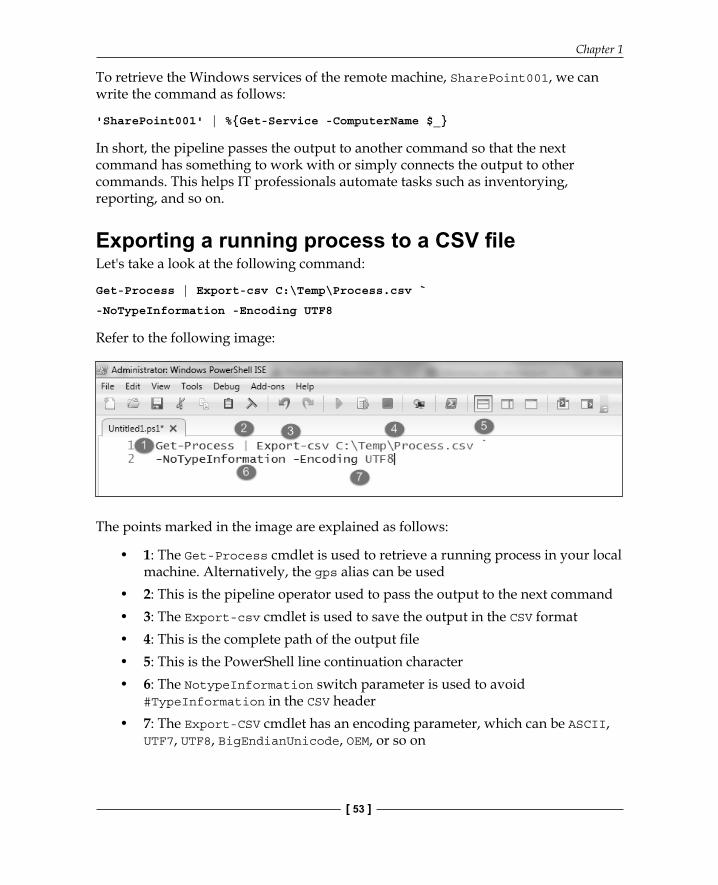
Exporting a running process to a CSV fi leLet's take a look at the following command:
Get-Process | Export-csv C:\Temp\Process.csv `
-NoTypeInformation -Encoding UTF8
Refer to the following image:
The points marked in the image are explained as follows:
• 1: The Get-Process cmdlet is used to retrieve a running process in your local machine. Alternatively, the gps alias can be used
• 2: This is the pipeline operator used to pass the output to the next command• 3: The Export-csv cmdlet is used to save the output in the CSV format• 4: This is the complete path of the output file• 5: This is the PowerShell line continuation character• 6: The NotypeInformation switch parameter is used to avoid
#TypeInformation in the CSV header• 7: The Export-CSV cmdlet has an encoding parameter, which can be ASCII,
UTF7, UTF8, BigEndianUnicode, OEM, or so on
Getting Started with Windows PowerShell
[ 54 ]
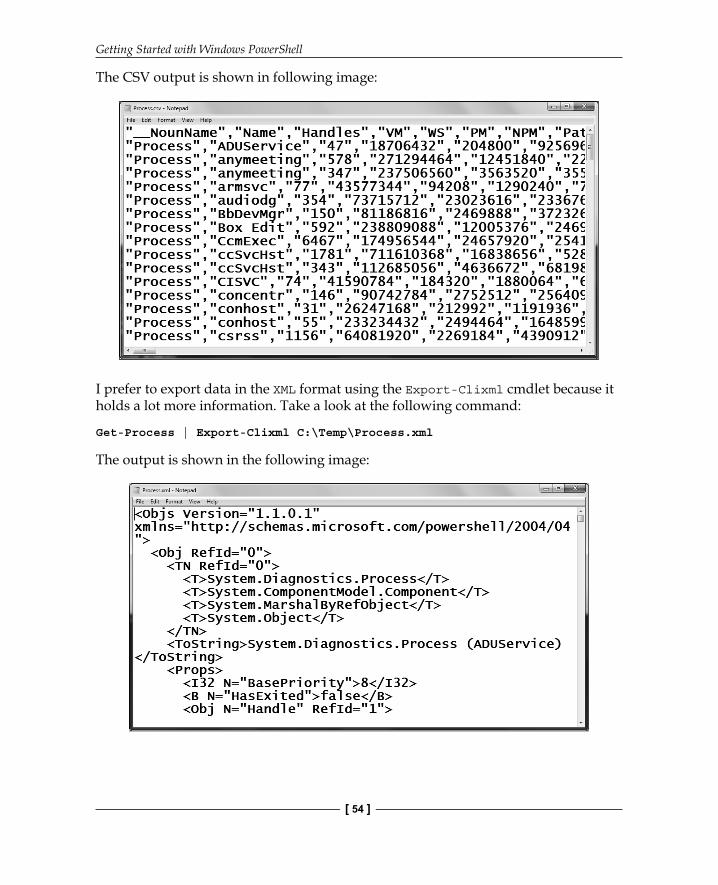
The CSV output is shown in following image:
I prefer to export data in the XML format using the Export-Clixml cmdlet because it holds a lot more information. Take a look at the following command:
Get-Process | Export-Clixml C:\Temp\Process.xml
The output is shown in the following image:
Chapter 1
[ 55 ]
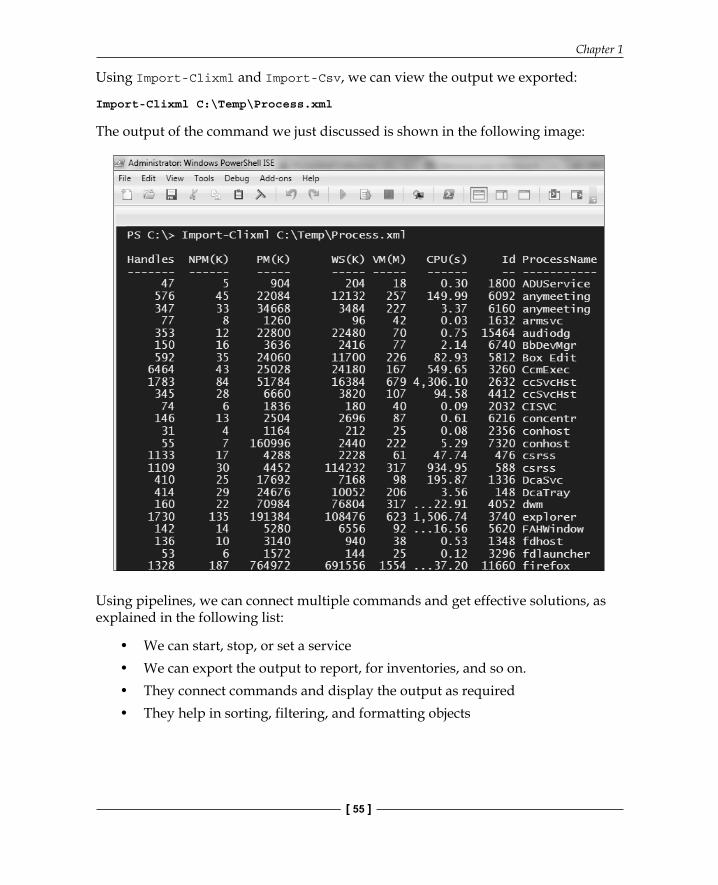
Using Import-Clixml and Import-Csv, we can view the output we exported:
Import-Clixml C:\Temp\Process.xml
The output of the command we just discussed is shown in the following image:
Using pipelines, we can connect multiple commands and get effective solutions, as explained in the following list:
• We can start, stop, or set a service• We can export the output to report, for inventories, and so on.• They connect commands and display the output as required• They help in sorting, filtering, and formatting objects

Getting Started with Windows PowerShell
[ 56 ]
Understanding fi ltering and formattingIn Windows PowerShell, fi ltering and formatting are used in most places to get the output in the desired format. Select-Object is very useful cmdlet to fi lter.
In this section, we will cover the following topics:
• Basics of filtering• Basics of formatting
Consider the following command:
Get-Command -Noun Object
The output is as shown in the following image:
Use the following Help commands:
Help Select-Object -Examples
Help Where-Object -Examples
Using the Select-Object cmdlet, we can select the fi rst and last n items from the collection of objects. The Select-Object cmdlet can be used to retrieve only unique values (ignoring duplicates).

Chapter 1
[ 57 ]
Now, let's explore Select-Object for fi ltering. Let's consider that we have a set of objects from 65 to 90; to select the fi rst 10, we need to pipe and use Select-Object, as shown in the following command:
65..90 | Select -First 10
We will get the output as 65 to 74.
Consider the following command:
1,2,2,3 | Select -Unique
Here, we will get the output as 1, 2, and 3.
Take a look at the following command:
1,2,2,3 | Select -Last 1
Here, we will get the output as 3.
Consider the following command:
1,2,2,3 | Select -SkipLast 1
We will get the output as 1, 2, and 2.
Take a look at the following command:
1,2,2,3 | Select -Skip 2
Here, we will get the output as 2 and 3.
To get help for all the parameters in Select-Object, use the following code:
help Select-Object -Parameter *
The Where-Object cmdlet is used to fi lter data returned by the other cmdlet. This cmdlet accepts comparison operators.
Let's explore the syntax of the Where-Object cmdlet, as follows:
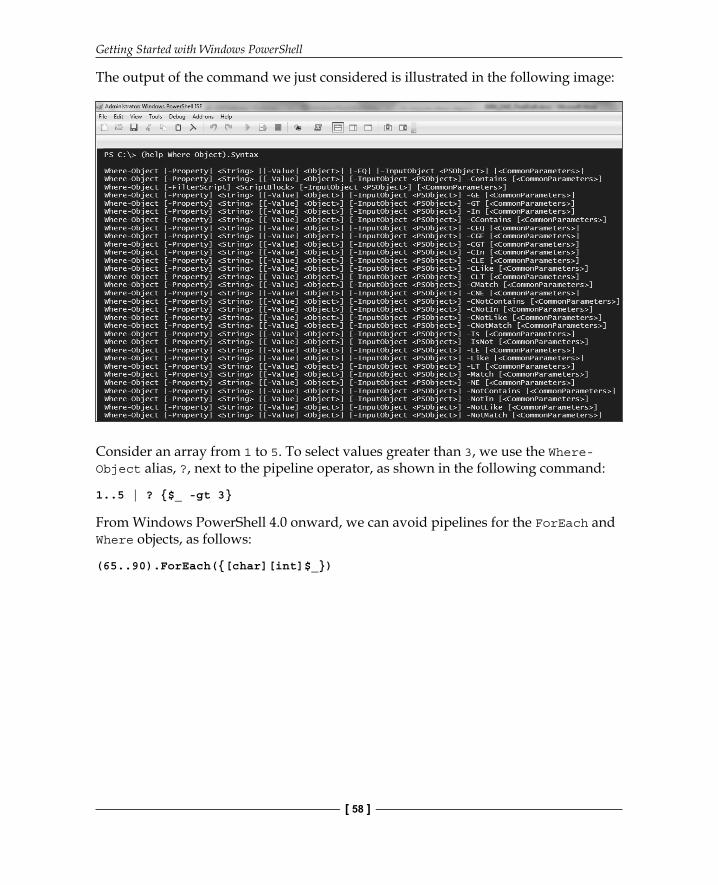
(help Where-Object).Syntax
Getting Started with Windows PowerShell
[ 58 ]
The output of the command we just considered is illustrated in the following image:
Consider an array from 1 to 5. To select values greater than 3, we use the Where-Object alias, ?, next to the pipeline operator, as shown in the following command:
1..5 | ? {$_ -gt 3}
From Windows PowerShell 4.0 onward, we can avoid pipelines for the ForEach and Where objects, as follows:
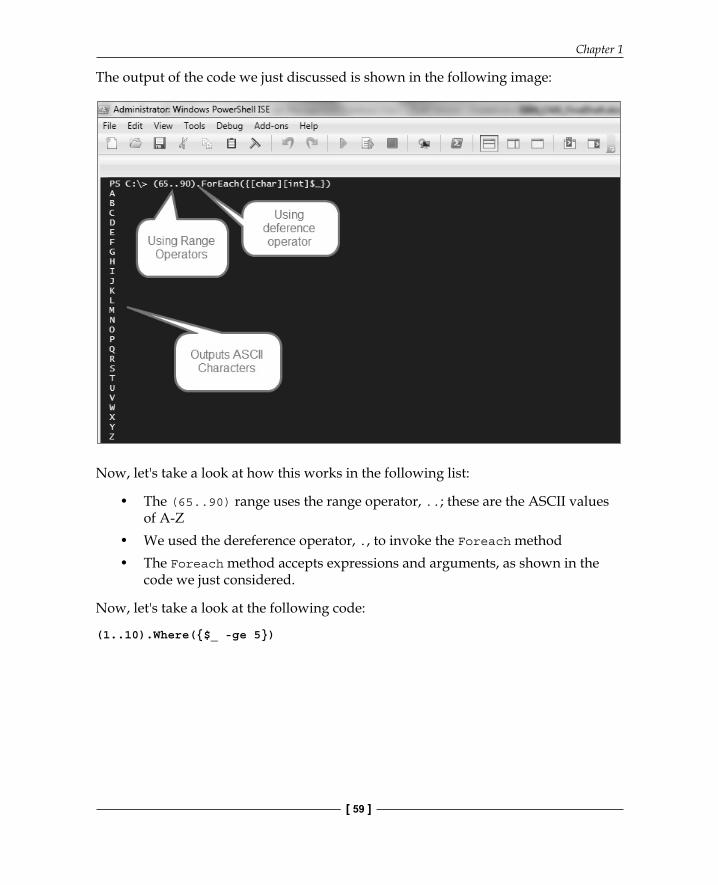
(65..90).ForEach({[char][int]$_})
Chapter 1
[ 59 ]
The output of the code we just discussed is shown in the following image:
Now, let's take a look at how this works in the following list:
• The (65..90) range uses the range operator, ..; these are the ASCII values of A-Z
• We used the dereference operator, ., to invoke the Foreach method• The Foreach method accepts expressions and arguments, as shown in the
code we just considered.
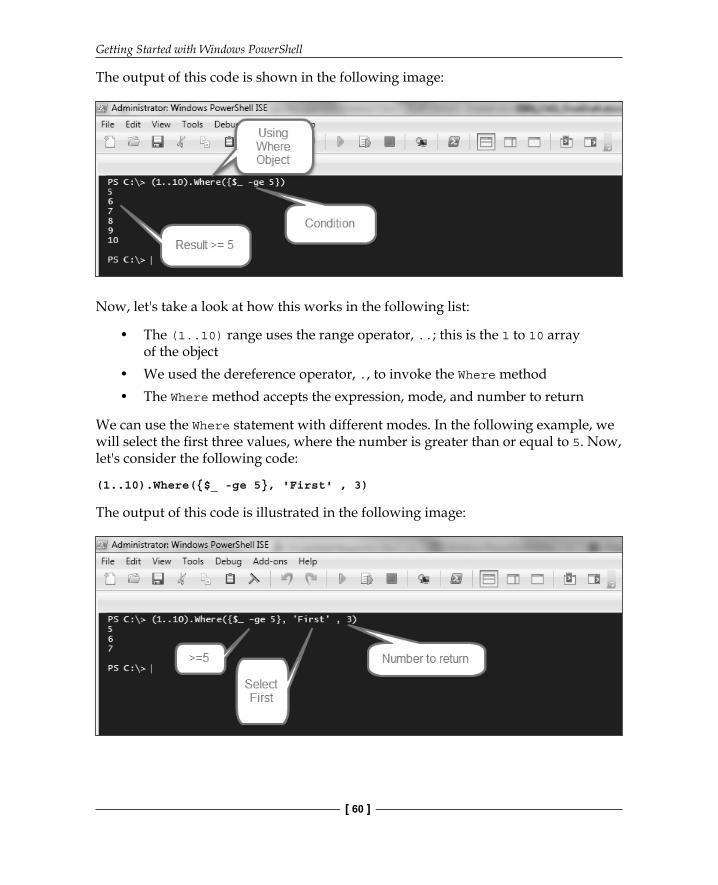
Now, let's take a look at the following code:
(1..10).Where({$_ -ge 5})
Getting Started with Windows PowerShell
[ 60 ]
The output of this code is shown in the following image:
Now, let's take a look at how this works in the following list:
• The (1..10) range uses the range operator, ..; this is the 1 to 10 array of the object
• We used the dereference operator, ., to invoke the Where method• The Where method accepts the expression, mode, and number to return
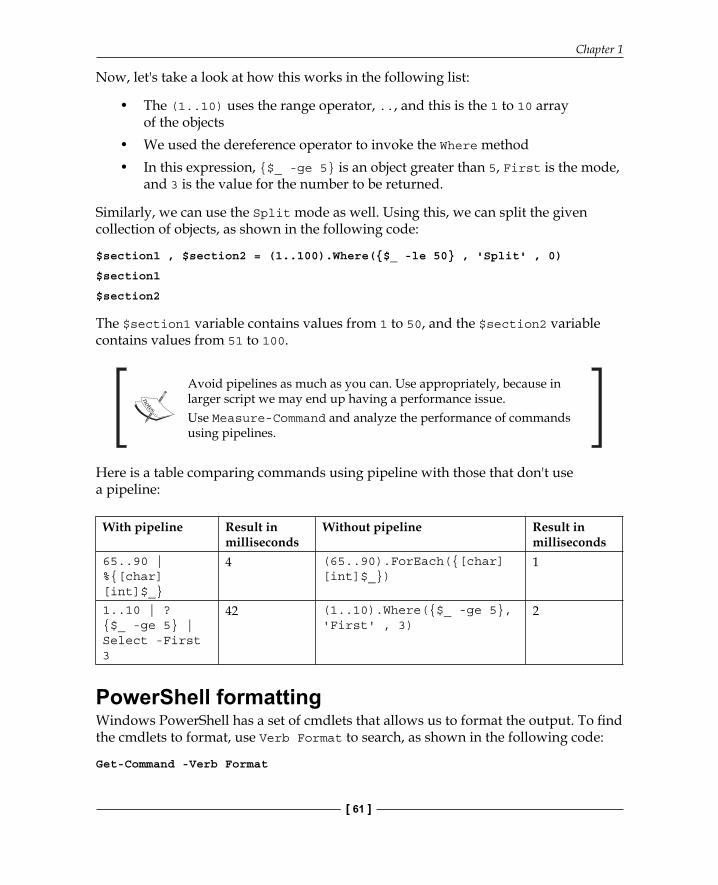
We can use the Where statement with different modes. In the following example, we will select the fi rst three values, where the number is greater than or equal to 5. Now, let's consider the following code:
(1..10).Where({$_ -ge 5}, 'First' , 3)
The output of this code is illustrated in the following image:
Chapter 1
[ 61 ]
Now, let's take a look at how this works in the following list:
• The (1..10) uses the range operator, .., and this is the 1 to 10 array of the objects
• We used the dereference operator to invoke the Where method• In this expression, {$_ -ge 5} is an object greater than 5, First is the mode,
and 3 is the value for the number to be returned.
Similarly, we can use the Split mode as well. Using this, we can split the given collection of objects, as shown in the following code:
$section1 , $section2 = (1..100).Where({$_ -le 50} , 'Split' , 0)
$section1
$section2
The $section1 variable contains values from 1 to 50, and the $section2 variable contains values from 51 to 100.
Avoid pipelines as much as you can. Use appropriately, because in larger script we may end up having a performance issue.Use Measure-Command and analyze the performance of commands using pipelines.
Here is a table comparing commands using pipeline with those that don't use a pipeline:
With pipeline Result in milliseconds
Without pipeline Result in milliseconds
65..90 | %{[char][int]$_}
4 (65..90).ForEach({[char][int]$_})
1
1..10 | ? {$_ -ge 5} | Select -First 3
42 (1..10).Where({$_ -ge 5}, 'First' , 3)
2
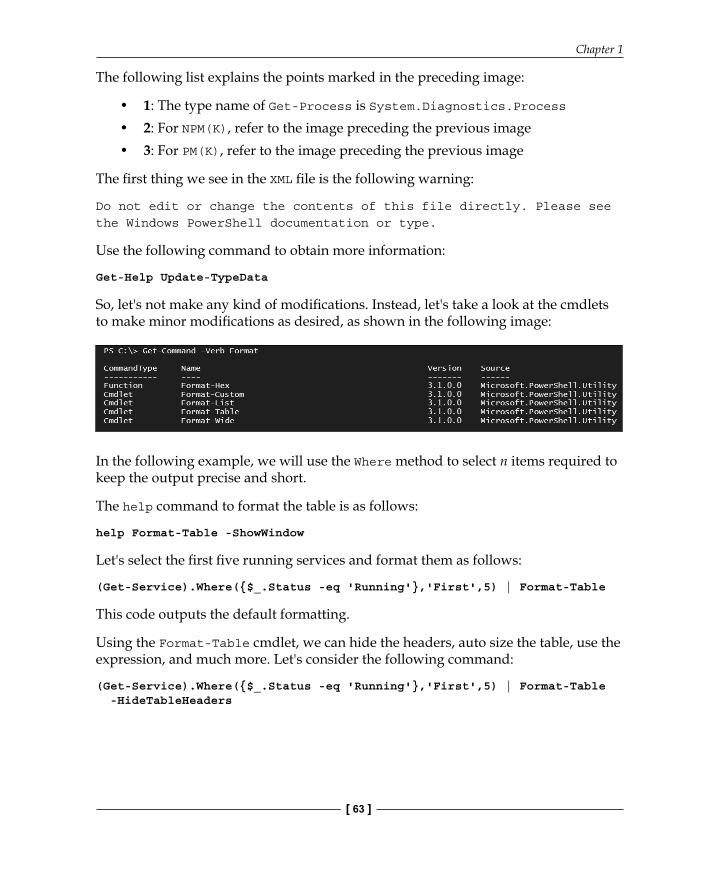
PowerShell formattingWindows PowerShell has a set of cmdlets that allows us to format the output. To fi nd the cmdlets to format, use Verb Format to search, as shown in the following code:
Get-Command -Verb Format
Getting Started with Windows PowerShell
[ 62 ]
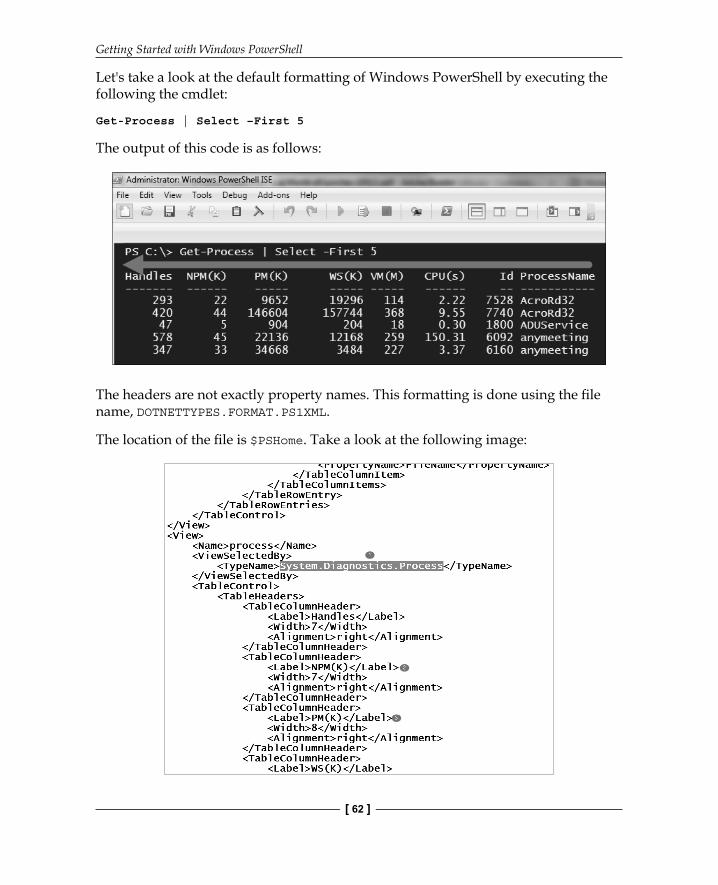
Let's take a look at the default formatting of Windows PowerShell by executing the following the cmdlet:
Get-Process | Select –First 5
The output of this code is as follows:
The headers are not exactly property names. This formatting is done using the fi le name, DOTNETTYPES.FORMAT.PS1XML.
The location of the fi le is $PSHome. Take a look at the following image:
Chapter 1
[ 63 ]
The following list explains the points marked in the preceding image:
• 1: The type name of Get-Process is System.Diagnostics.Process• 2: For NPM(K), refer to the image preceding the previous image• 3: For PM(K), refer to the image preceding the previous image
The fi rst thing we see in the XML fi le is the following warning:
Do not edit or change the contents of this file directly. Please see the Windows PowerShell documentation or type.
Use the following command to obtain more information:
Get-Help Update-TypeData
So, let's not make any kind of modifi cations. Instead, let's take a look at the cmdlets to make minor modifi cations as desired, as shown in the following image:
In the following example, we will use the Where method to select n items required to keep the output precise and short.
The help command to format the table is as follows:
help Format-Table -ShowWindow
Let's select the fi rst fi ve running services and format them as follows:
(Get-Service).Where({$_.Status -eq 'Running'},'First',5) | Format-Table
This code outputs the default formatting.
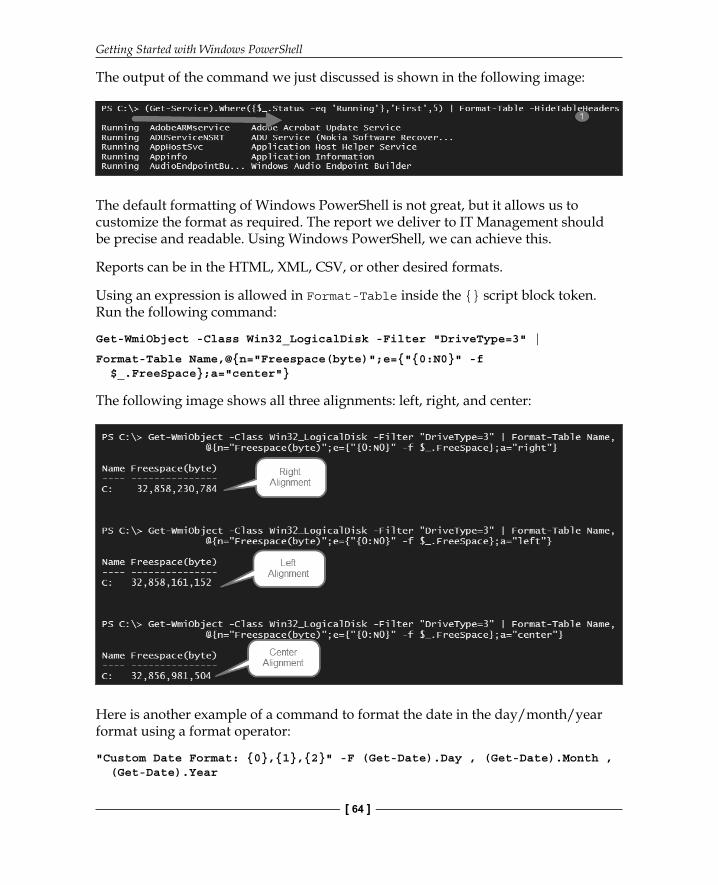
Using the Format-Table cmdlet, we can hide the headers, auto size the table, use the expression, and much more. Let's consider the following command:
(Get-Service).Where({$_.Status -eq 'Running'},'First',5) | Format-Table -HideTableHeaders
Getting Started with Windows PowerShell
[ 64 ]
The output of the command we just discussed is shown in the following image:
The default formatting of Windows PowerShell is not great, but it allows us to customize the format as required. The report we deliver to IT Management should be precise and readable. Using Windows PowerShell, we can achieve this.
Reports can be in the HTML, XML, CSV, or other desired formats.
Using an expression is allowed in Format-Table inside the {} script block token. Run the following command:
Get-WmiObject -Class Win32_LogicalDisk -Filter "DriveType=3" |
Format-Table Name,@{n="Freespace(byte)";e={"{0:N0}" -f $_.FreeSpace};a="center"}
The following image shows all three alignments: left, right, and center:
Here is another example of a command to format the date in the day/month/year format using a format operator:
"Custom Date Format: {0},{1},{2}" -F (Get-Date).Day , (Get-Date).Month , (Get-Date).Year
Chapter 1
[ 65 ]
To view the LastWriteTime.DayOfWeek fi le, run the following command:
Get-ChildItem C:\Temp | Ft name , @{n="Day of Week" ; E = {$_.LastWriteTime.DayOfWeek}}
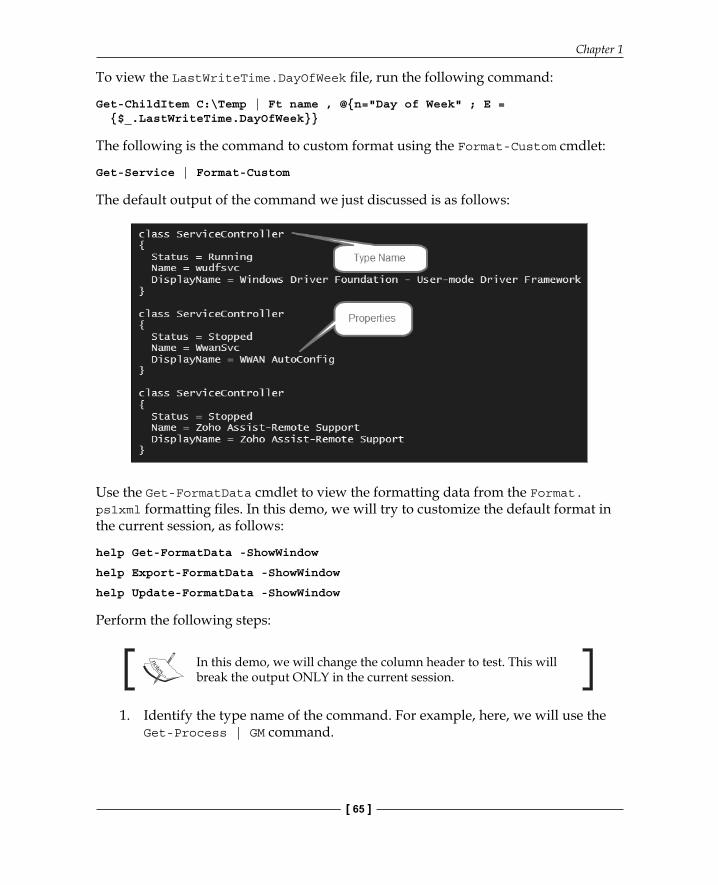
The following is the command to custom format using the Format-Custom cmdlet:
Get-Service | Format-Custom
The default output of the command we just discussed is as follows:
Use the Get-FormatData cmdlet to view the formatting data from the Format.ps1xml formatting fi les. In this demo, we will try to customize the default format in the current session, as follows:
help Get-FormatData -ShowWindow
help Export-FormatData -ShowWindow
help Update-FormatData -ShowWindow
Perform the following steps:
In this demo, we will change the column header to test. This will break the output ONLY in the current session.
1. Identify the type name of the command. For example, here, we will use the Get-Process | GM command.
Getting Started with Windows PowerShell
[ 66 ]
2. The TypeName parameter is System.Diagnostics.Process, as shown in the following command:Get-FormatData -TypeName System.Diagnostics.Process |
Export-FormatData -Path C:\Temp\TestView.Format.PS1XML
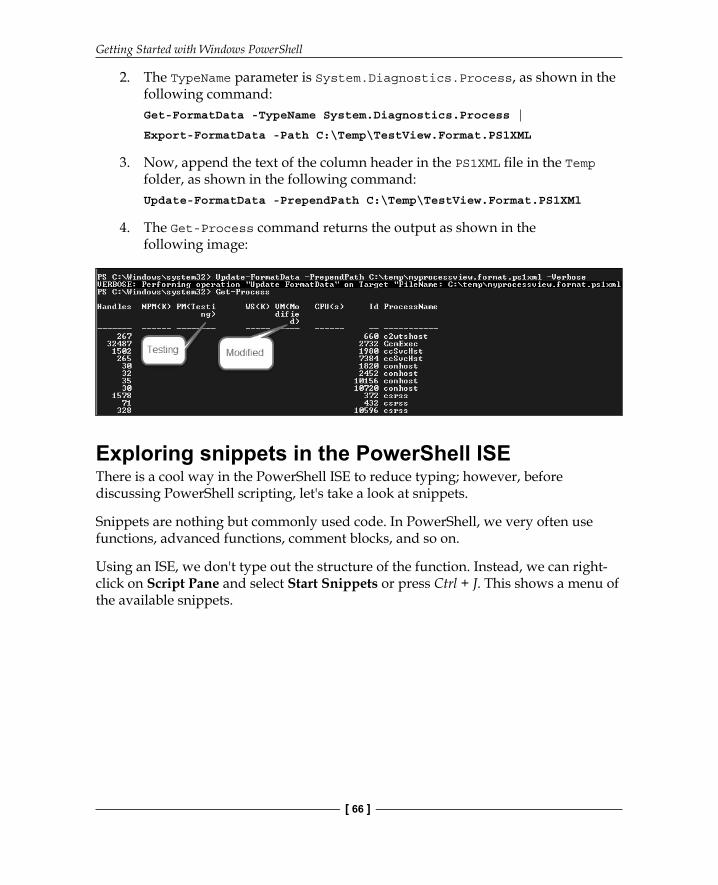
3. Now, append the text of the column header in the PS1XML fi le in the Temp folder, as shown in the following command:Update-FormatData -PrependPath C:\Temp\TestView.Format.PS1XMl
4. The Get-Process command returns the output as shown in the following image:
Exploring snippets in the PowerShell ISEThere is a cool way in the PowerShell ISE to reduce typing; however, before discussing PowerShell scripting, let's take a look at snippets.
Snippets are nothing but commonly used code. In PowerShell, we very often use functions, advanced functions, comment blocks, and so on.
Using an ISE, we don't type out the structure of the function. Instead, we can right-click on Script Pane and select Start Snippets or press Ctrl + J. This shows a menu of the available snippets.
Chapter 1
[ 67 ]
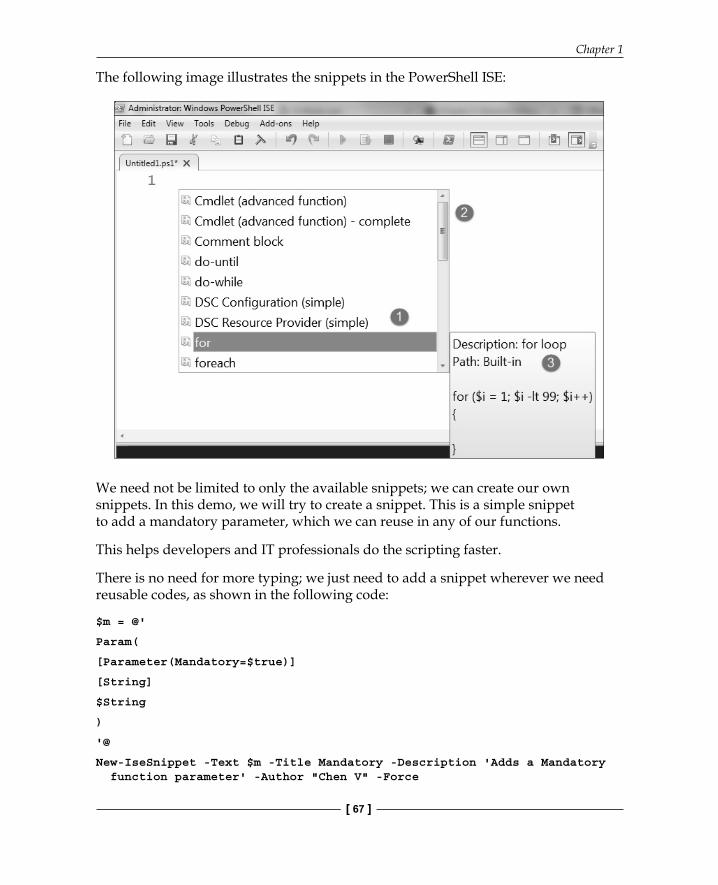
The following image illustrates the snippets in the PowerShell ISE:
We need not be limited to only the available snippets; we can create our own snippets. In this demo, we will try to create a snippet. This is a simple snippet to add a mandatory parameter, which we can reuse in any of our functions.
This helps developers and IT professionals do the scripting faster.
There is no need for more typing; we just need to add a snippet wherever we need reusable codes, as shown in the following code:
$m = @'
Param(
[Parameter(Mandatory=$true)]
[String]
$String
)
'@
New-IseSnippet -Text $m -Title Mandatory -Description 'Adds a Mandatory function parameter' -Author "Chen V" -Force
Getting Started with Windows PowerShell
[ 68 ]
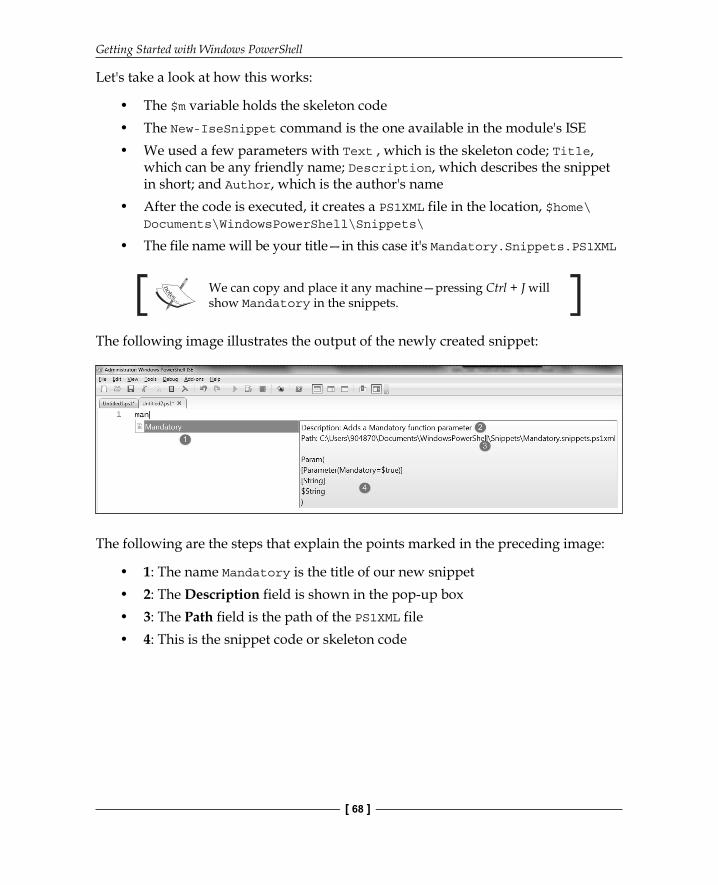
Let's take a look at how this works:
• The $m variable holds the skeleton code• The New-IseSnippet command is the one available in the module's ISE• We used a few parameters with Text , which is the skeleton code; Title,
which can be any friendly name; Description, which describes the snippet in short; and Author, which is the author's name
• After the code is executed, it creates a PS1XML file in the location, $home\Documents\WindowsPowerShell\Snippets\
• The file name will be your title—in this case it's Mandatory.Snippets.PS1XML
We can copy and place it any machine—pressing Ctrl + J will show Mandatory in the snippets.
The following image illustrates the output of the newly created snippet:
The following are the steps that explain the points marked in the preceding image:
• 1: The name Mandatory is the title of our new snippet• 2: The Description field is shown in the pop-up box• 3: The Path field is the path of the PS1XML file• 4: This is the snippet code or skeleton code
Chapter 1
[ 69 ]
Getting started with PowerShell scriptingLet's take a look at scripting in the cmdlet style.
We've arrived at a place from where we can explore PowerShell scripting with the knowledge of the previous topics. Wait! We haven't covered all that we need for scripting in PowerShell. Before we begin discussing scripting, we should know more about the scripting principles, using variables, commenting, writing help, and so on.
Here are a few principles of scripting:
If you want to deliver scripts to your organization or community, it's good to create the variables and follow the standard naming conventions. Do not use plain text passwords in the scripts, and avoid technical jargon in the comment blocks. Ensure that the script is readable for others.
Using Windows PowerShell scripting, we can perform complex tasks with the help of imperative commands. The scripting language supports branching, variables, and functions.
From now on, we will use the PowerShell ISE for its ease of use and benefi ts.
In this section, we will cover the following topics:
• Using variables• The basics of Windows PowerShell scripting• Writing the functions and advanced functions
Let's now discuss using variables.
A variable is used to store information, and it is the result of a running script.
Here's an example:
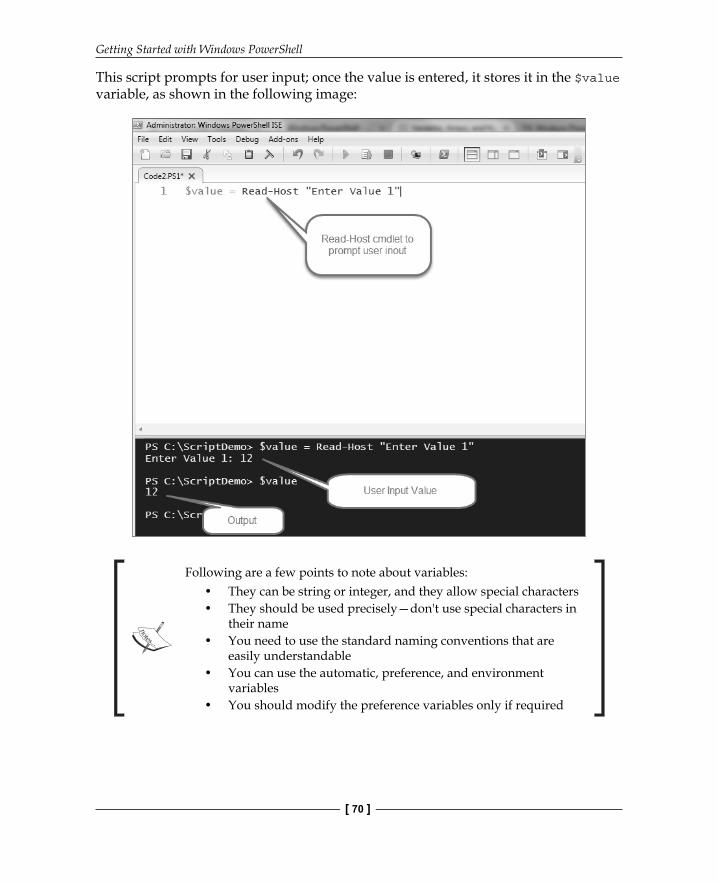
$value = Read-Host "Enter Value 1"
Getting Started with Windows PowerShell
[ 70 ]
This script prompts for user input; once the value is entered, it stores it in the $value variable, as shown in the following image:
Following are a few points to note about variables:• They can be string or integer, and they allow special characters• They should be used precisely—don't use special characters in
their name• You need to use the standard naming conventions that are
easily understandable• You can use the automatic, preference, and environment
variables• You should modify the preference variables only if required
Chapter 1
[ 71 ]
Using the New-Variable cmdlet, a variable can be created along with a scope defi nition. In the following example, let's create a variable name, ws, which holds the value of the Windows service, and sets the scope to Global:
New-Variable -Name 'ws' -Value (Get-Service) -Scope Global
Using Remove-Variable, it can be removed, as shown in the following code:
Remove-Variable -Name ws -Verbose
Windows PowerShell scripting is used to automate your daily tasks. It may be anything such as reporting, server health checkup, performing tasks such as restarting services, stopping services, deploying solutions, installing Windows features, and much more.
The following points need to be considered while creating PowerShell scripting:
• Keep the PowerShell code simple and neat.• Follow the same indentation throughout the code.• Make a clear, comments-based help.• Comment on your parameters with descriptions. This allows others to get
help about the parameters.
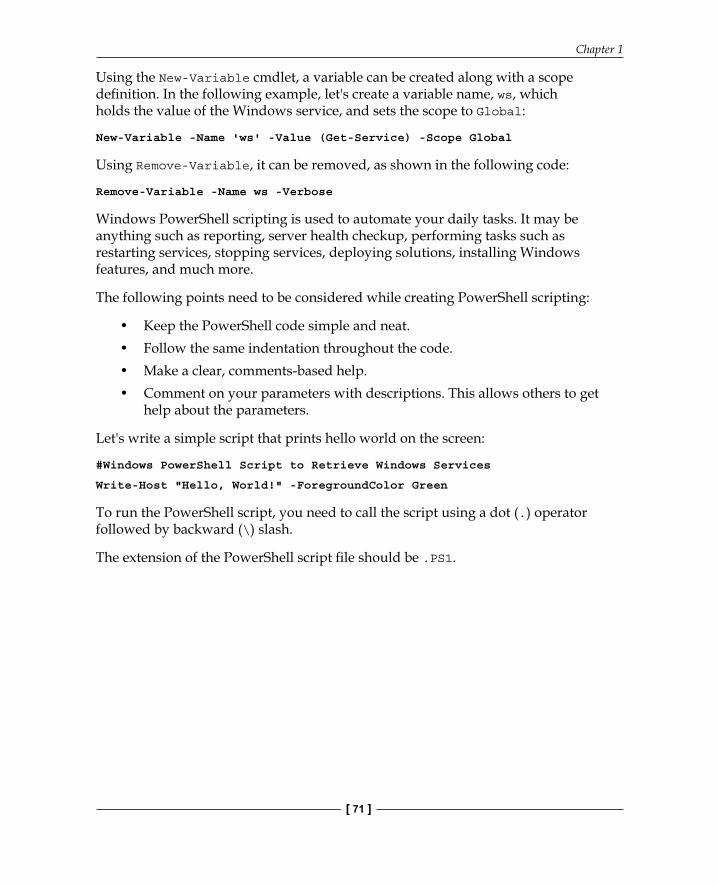
Let's write a simple script that prints hello world on the screen:
#Windows PowerShell Script to Retrieve Windows Services
Write-Host "Hello, World!" -ForegroundColor Green
To run the PowerShell script, you need to call the script using a dot (.) operator followed by backward (\) slash.
The extension of the PowerShell script fi le should be .PS1.
Getting Started with Windows PowerShell
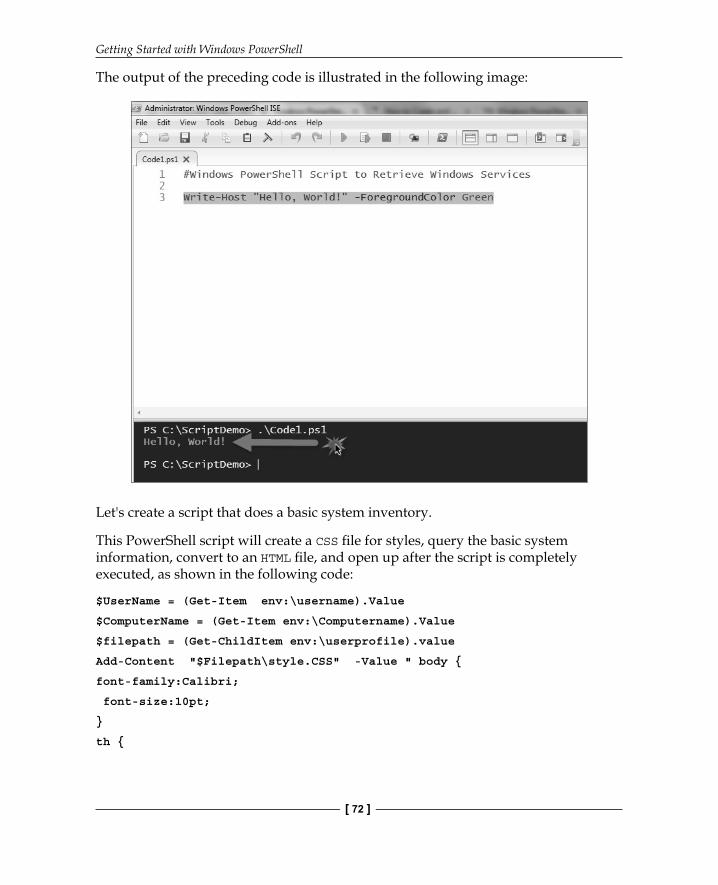
[ 72 ]
The output of the preceding code is illustrated in the following image:
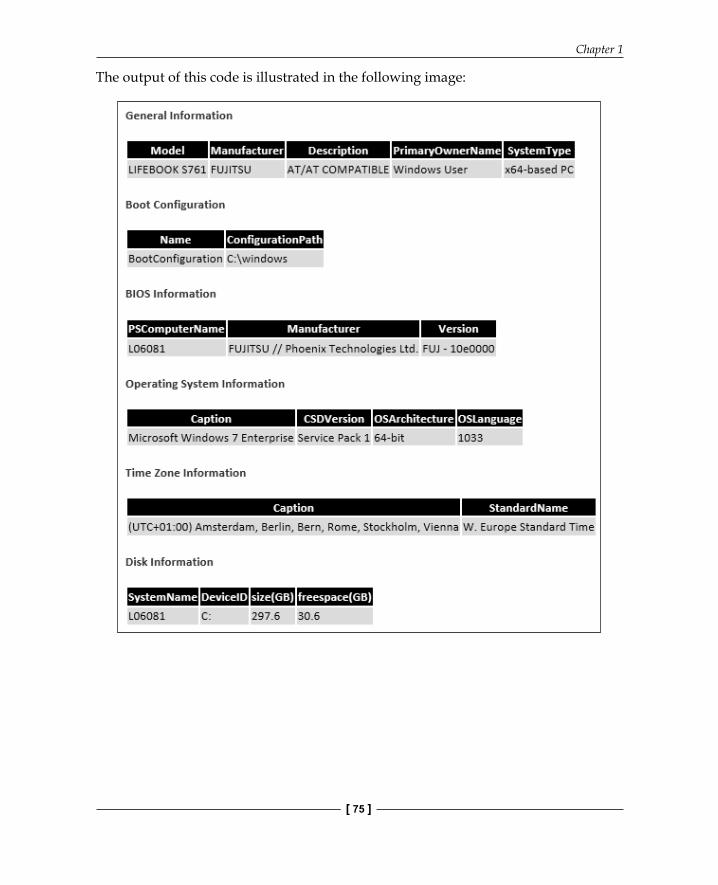
Let's create a script that does a basic system inventory.
This PowerShell script will create a CSS fi le for styles, query the basic system information, convert to an HTML fi le, and open up after the script is completely executed, as shown in the following code:
$UserName = (Get-Item env:\username).Value
$ComputerName = (Get-Item env:\Computername).Value
$filepath = (Get-ChildItem env:\userprofile).value
Add-Content "$Filepath\style.CSS" -Value " body {
font-family:Calibri;
font-size:10pt;
}
th {
Chapter 1
[ 73 ]
background-color:black;
color:white;
}
td {
background-color:#19fff0;
color:black;
}"
Write-Host "CSS File Created Successfully... Executing Inventory Report!!! Please Wait !!!" -ForegroundColor Yellow
#ReportDate
$ReportDate = Get-Date | Select -Property DateTime |ConvertTo-Html -Fragment
#General Information
$ComputerSystem = Get-WmiObject -Class Win32_ComputerSystem |
Select -Property Model , Manufacturer , Description , PrimaryOwnerName , SystemType |ConvertTo-Html -Fragment
#Boot Configuration
$BootConfiguration = Get-WmiObject -Class Win32_BootConfiguration |
Select -Property Name , ConfigurationPath | ConvertTo-Html -Fragment
#BIOS Information
$BIOS = Get-WmiObject -Class Win32_BIOS | Select -Property PSComputerName , Manufacturer , Version | ConvertTo-Html -Fragment
#Operating System Information
$OS = Get-WmiObject -Class Win32_OperatingSystem | Select -Property Caption , CSDVersion , OSArchitecture , OSLanguage | ConvertTo-Html -Fragment
#Time Zone Information
$TimeZone = Get-WmiObject -Class Win32_TimeZone | Select Caption , StandardName |
ConvertTo-Html -Fragment
#Logical Disk Information
$Disk = Get-WmiObject -Class Win32_LogicalDisk -Filter DriveType=3 |
Select SystemName , DeviceID , @{Name="size(GB)";Expression={"{0:N1}" -f($_.size/1gb)}}, @{Name="freespace(GB)";Expression={"{0:N1}" -f($_.freespace/1gb)}} |
Getting Started with Windows PowerShell
[ 74 ]
ConvertTo-Html -Fragment
#CPU Information
$SystemProcessor = Get-WmiObject -Class Win32_Processor |
Select SystemName , Name , MaxClockSpeed , Manufacturer , status |ConvertTo-Html -Fragment
#Memory Information
$PhysicalMemory = Get-WmiObject -Class Win32_PhysicalMemory |
Select -Property Tag , SerialNumber , PartNumber , Manufacturer , DeviceLocator , @{Name="Capacity(GB)";Expression={"{0:N1}" -f ($_.Capacity/1GB)}} | ConvertTo-Html -Fragment
#Software Inventory
$Software = Get-WmiObject -Class Win32_Product |
Select Name , Vendor , Version , Caption | ConvertTo-Html -Fragment
ConvertTo-Html -Body "<font color = blue><H4><B>Report Executed On</B></H4></font>$ReportDate
<font color = blue><H4><B>General Information</B></H4></font>$ComputerSystem
<font color = blue><H4><B>Boot Configuration</B></H4></font>$BootConfiguration
<font color = blue><H4><B>BIOS Information</B></H4></font>$BIOS
<font color = blue><H4><B>Operating System Information</B></H4></font>$OS
<font color = blue><H4><B>Time Zone Information</B></H4></font>$TimeZone
<font color = blue><H4><B>Disk Information</B></H4></font>$Disk
<font color = blue><H4><B>Processor Information</B></H4></font>$SystemProcessor
<font color = blue><H4><B>Memory Information</B></H4></font>$PhysicalMemory
<font color = blue><H4><B>Software Inventory</B></H4></font>$Software" -CssUri "$filepath\style.CSS" -Title "Server Inventory" | Out-File "$FilePath\$ComputerName.html"
Write-Host "Script Execution Completed" -ForegroundColor Yellow
Invoke-Item -Path "$FilePath\$ComputerName.html"
Chapter 1
[ 75 ]
The output of this code is illustrated in the following image:
Getting Started with Windows PowerShell
[ 76 ]
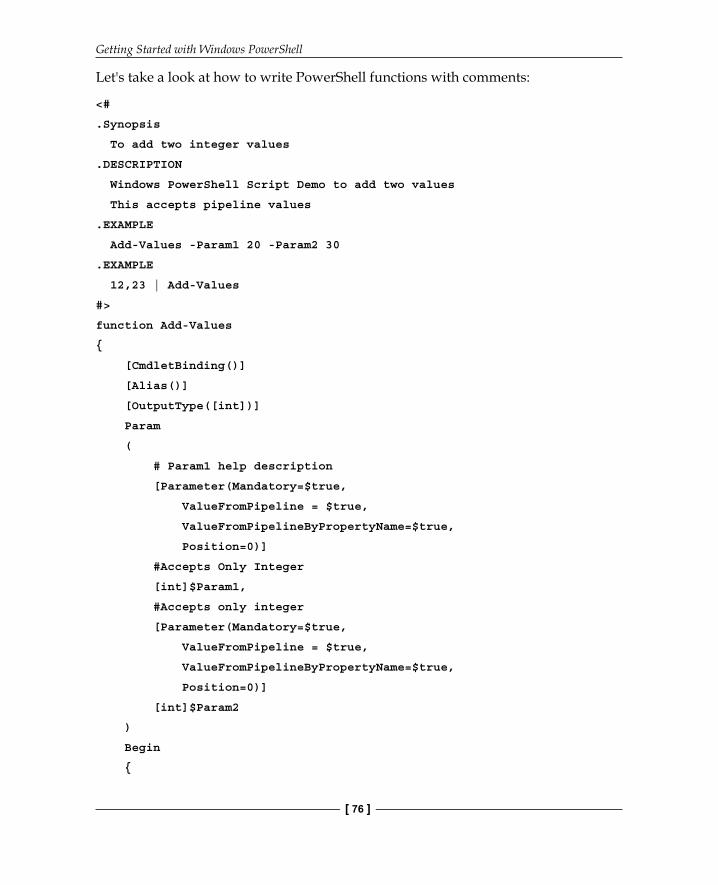
Let's take a look at how to write PowerShell functions with comments:
<#
.Synopsis
To add two integer values
.DESCRIPTION
Windows PowerShell Script Demo to add two values
This accepts pipeline values
.EXAMPLE
Add-Values -Param1 20 -Param2 30
.EXAMPLE
12,23 | Add-Values
#>
function Add-Values
{
[CmdletBinding()]
[Alias()]
[OutputType([int])]
Param
(
# Param1 help description
[Parameter(Mandatory=$true,
ValueFromPipeline = $true,
ValueFromPipelineByPropertyName=$true,
Position=0)]
#Accepts Only Integer
[int]$Param1,
#Accepts only integer
[Parameter(Mandatory=$true,
ValueFromPipeline = $true,
ValueFromPipelineByPropertyName=$true,
Position=0)]
[int]$Param2
)
Begin
{
Chapter 1
[ 77 ]
"Script Begins"
}
Process
{
$result = $Param1 + $Param2
}
End
{
$result
}
}
This is not a good script, but I will use this to demonstrate a PowerShell function with comments in order to help explore the use of help.
The following is an explanation of how this code works:
1. The most important part is the comment block. Let's take a look at the following code snippet:<#
.Synopsis
To add two integer values
.DESCRIPTION
Windows PowerShell Script Demo to add two values
This accepts pipeline values
.EXAMPLE
Add-Values -Param1 20 -Param2 30
.EXAMPLE
12,23 | Add-Values
#>
2. We need to provide a short description and synopsis of the script, as we did in this example. This will help others explore and know the usage of the script.
3. Then, we used the Function keyword and followed the standard Verb-Noun naming convention. In this example, we used Add-Values.
4. We parameterized our script using the Param block.
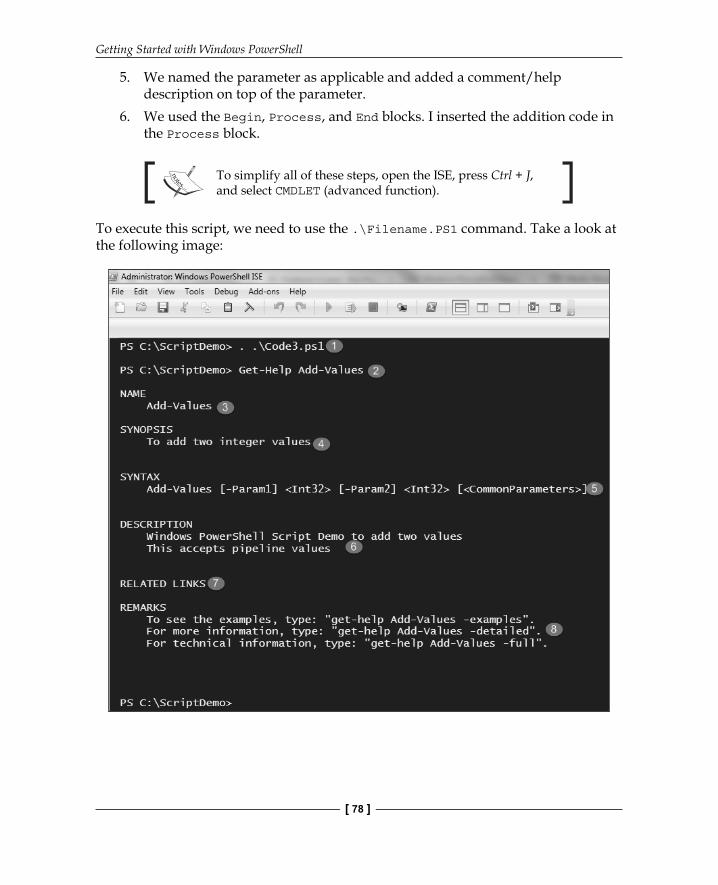
Getting Started with Windows PowerShell
[ 78 ]
5. We named the parameter as applicable and added a comment/help description on top of the parameter.
6. We used the Begin, Process, and End blocks. I inserted the addition code in the Process block.
To simplify all of these steps, open the ISE, press Ctrl + J, and select CMDLET (advanced function).
To execute this script, we need to use the .\Filename.PS1 command. Take a look at the following image:
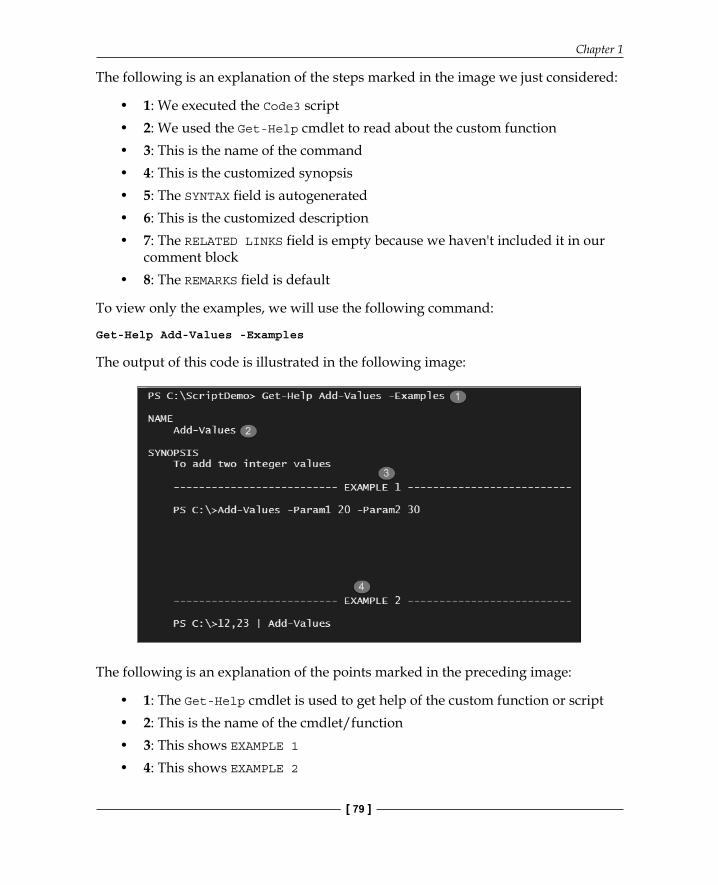
Chapter 1
[ 79 ]
The following is an explanation of the steps marked in the image we just considered:
• 1: We executed the Code3 script• 2: We used the Get-Help cmdlet to read about the custom function• 3: This is the name of the command• 4: This is the customized synopsis• 5: The SYNTAX field is autogenerated• 6: This is the customized description• 7: The RELATED LINKS field is empty because we haven't included it in our
comment block• 8: The REMARKS field is default
To view only the examples, we will use the following command:
Get-Help Add-Values -Examples
The output of this code is illustrated in the following image:
The following is an explanation of the points marked in the preceding image:
• 1: The Get-Help cmdlet is used to get help of the custom function or script• 2: This is the name of the cmdlet/function• 3: This shows EXAMPLE 1• 4: This shows EXAMPLE 2

Getting Started with Windows PowerShell
[ 80 ]
Similarly, we can view only parameters. The help description given above each parameter appears using the following code:
Get-Help Add-Values -Parameter *
Take a look at the following image:
The following are a few commands that use the help command:
help about_Functions
help about_Functions_Advanced_Methods
help about_Functions_Advanced_Parameters
help about_Functions_CmdletBindingAttribute
help about_Functions_OutputTypeAttribute
Let's take a look at how to write advanced functions.
Advanced functions are similar to compiled cmdlets but not exactly the same.
Here is a table comparing advanced functions and compiled cmdlets:
Advanced functions Compiled cmdletsThese are designed using the PowerShell script.
These are designed using a .NET framework, such as C#, and compiled as DLL.
The actual work will be done in the process blocks.
The actual work will be done in the process records.
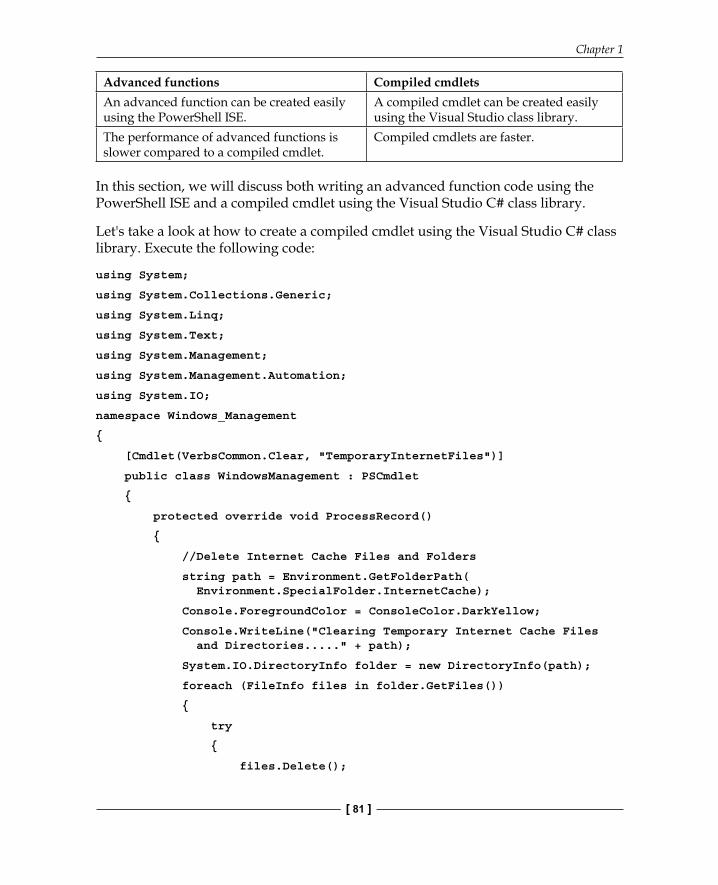
Chapter 1
[ 81 ]
Advanced functions Compiled cmdletsAn advanced function can be created easily using the PowerShell ISE.
A compiled cmdlet can be created easily using the Visual Studio class library.
The performance of advanced functions is slower compared to a compiled cmdlet.
Compiled cmdlets are faster.
In this section, we will discuss both writing an advanced function code using the PowerShell ISE and a compiled cmdlet using the Visual Studio C# class library.
Let's take a look at how to create a compiled cmdlet using the Visual Studio C# class library. Execute the following code:
using System;
using System.Collections.Generic;
using System.Linq;
using System.Text;
using System.Management;
using System.Management.Automation;
using System.IO;
namespace Windows_Management
{
[Cmdlet(VerbsCommon.Clear, "TemporaryInternetFiles")]
public class WindowsManagement : PSCmdlet
{
protected override void ProcessRecord()
{
//Delete Internet Cache Files and Folders
string path = Environment.GetFolderPath( Environment.SpecialFolder.InternetCache);
Console.ForegroundColor = ConsoleColor.DarkYellow;
Console.WriteLine("Clearing Temporary Internet Cache Files and Directories....." + path);
System.IO.DirectoryInfo folder = new DirectoryInfo(path);
foreach (FileInfo files in folder.GetFiles())
{
try
{
files.Delete();
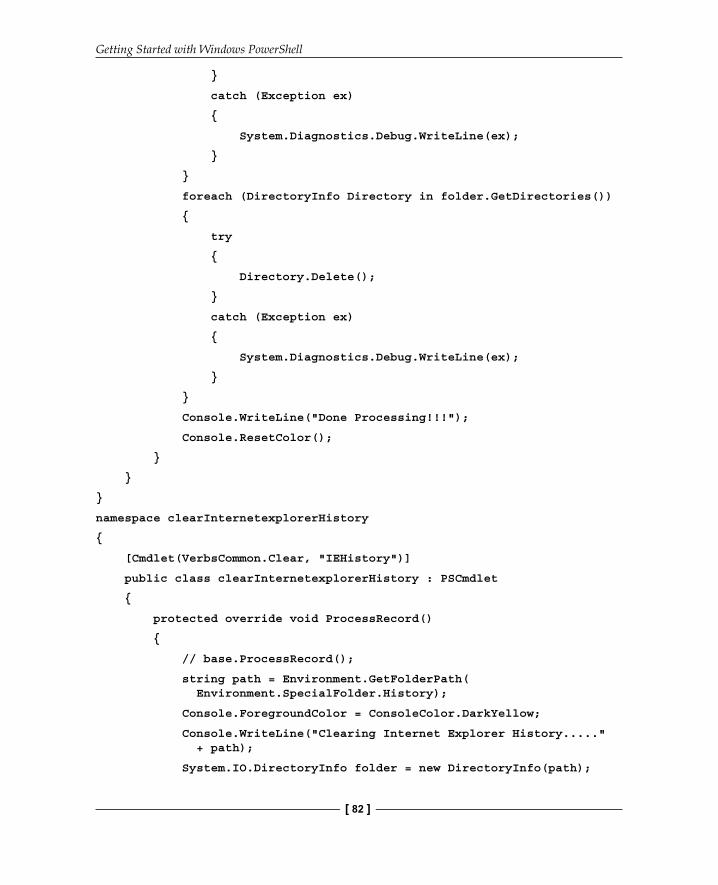
Getting Started with Windows PowerShell
[ 82 ]
}
catch (Exception ex)
{
System.Diagnostics.Debug.WriteLine(ex);
}
}
foreach (DirectoryInfo Directory in folder.GetDirectories())
{
try
{
Directory.Delete();
}
catch (Exception ex)
{
System.Diagnostics.Debug.WriteLine(ex);
}
}
Console.WriteLine("Done Processing!!!");
Console.ResetColor();
}
}
}
namespace clearInternetexplorerHistory
{
[Cmdlet(VerbsCommon.Clear, "IEHistory")]
public class clearInternetexplorerHistory : PSCmdlet
{
protected override void ProcessRecord()
{
// base.ProcessRecord();
string path = Environment.GetFolderPath( Environment.SpecialFolder.History);
Console.ForegroundColor = ConsoleColor.DarkYellow;
Console.WriteLine("Clearing Internet Explorer History....." + path);
System.IO.DirectoryInfo folder = new DirectoryInfo(path);
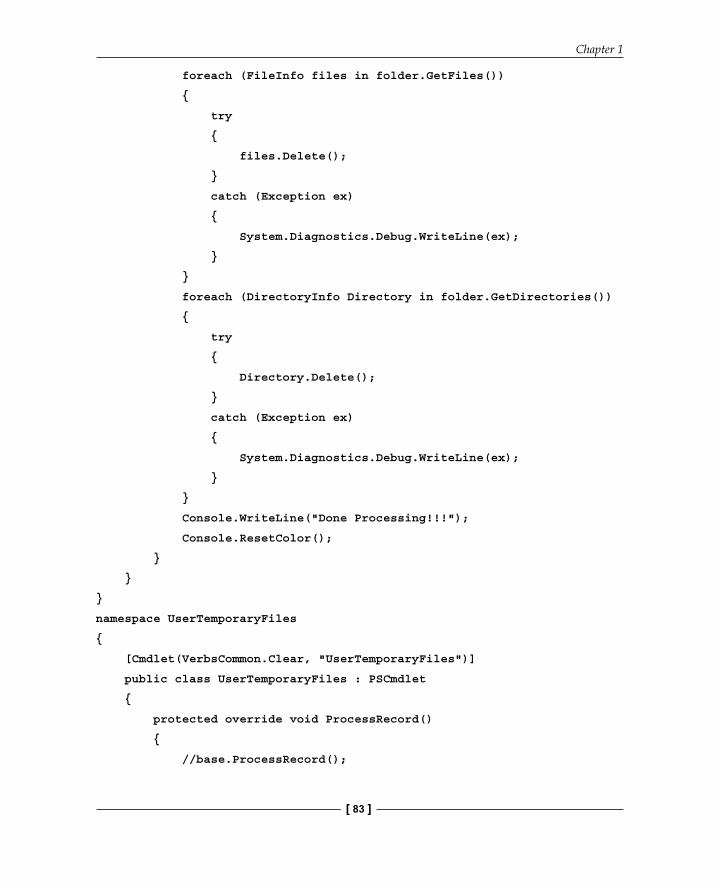
Chapter 1
[ 83 ]
foreach (FileInfo files in folder.GetFiles())
{
try
{
files.Delete();
}
catch (Exception ex)
{
System.Diagnostics.Debug.WriteLine(ex);
}
}
foreach (DirectoryInfo Directory in folder.GetDirectories())
{
try
{
Directory.Delete();
}
catch (Exception ex)
{
System.Diagnostics.Debug.WriteLine(ex);
}
}
Console.WriteLine("Done Processing!!!");
Console.ResetColor();
}
}
}
namespace UserTemporaryFiles
{
[Cmdlet(VerbsCommon.Clear, "UserTemporaryFiles")]
public class UserTemporaryFiles : PSCmdlet
{
protected override void ProcessRecord()
{
//base.ProcessRecord();
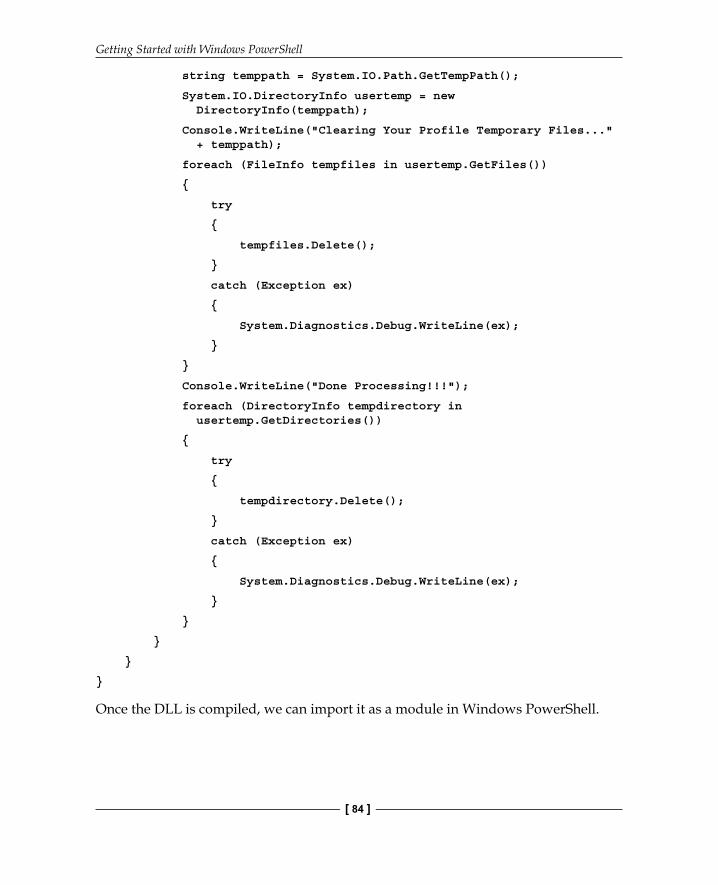
Getting Started with Windows PowerShell
[ 84 ]
string temppath = System.IO.Path.GetTempPath();
System.IO.DirectoryInfo usertemp = new DirectoryInfo(temppath);
Console.WriteLine("Clearing Your Profile Temporary Files..." + temppath);
foreach (FileInfo tempfiles in usertemp.GetFiles())
{
try
{
tempfiles.Delete();
}
catch (Exception ex)
{
System.Diagnostics.Debug.WriteLine(ex);
}
}
Console.WriteLine("Done Processing!!!");
foreach (DirectoryInfo tempdirectory in usertemp.GetDirectories())
{
try
{
tempdirectory.Delete();
}
catch (Exception ex)
{
System.Diagnostics.Debug.WriteLine(ex);
}
}
}
}
}
Once the DLL is compiled, we can import it as a module in Windows PowerShell.
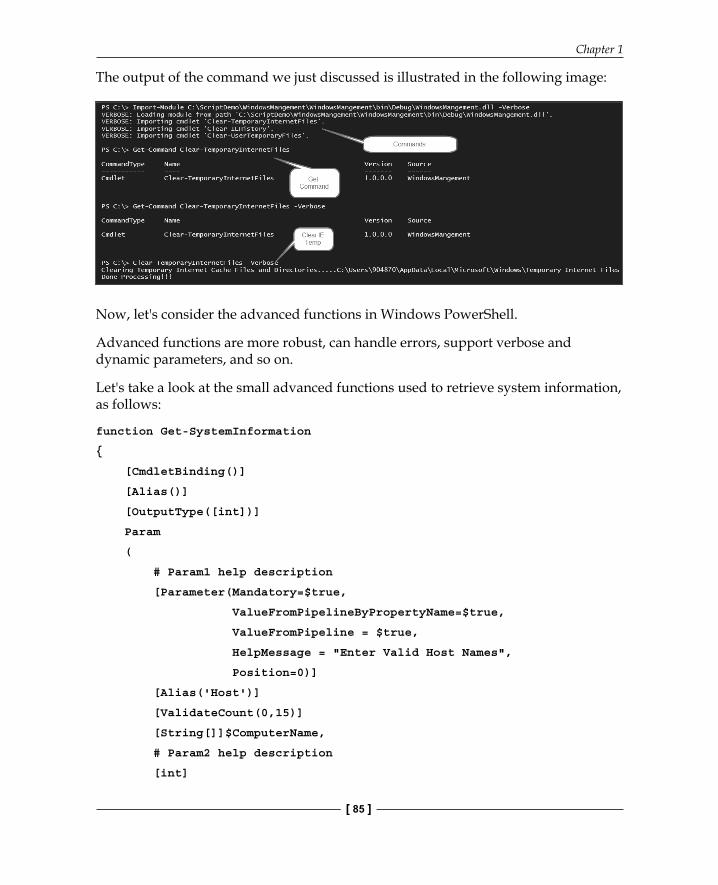
Chapter 1
[ 85 ]
The output of the command we just discussed is illustrated in the following image:
Now, let's consider the advanced functions in Windows PowerShell.
Advanced functions are more robust, can handle errors, support verbose and dynamic parameters, and so on.
Let's take a look at the small advanced functions used to retrieve system information, as follows:
function Get-SystemInformation
{
[CmdletBinding()]
[Alias()]
[OutputType([int])]
Param
(
# Param1 help description
[Parameter(Mandatory=$true,
ValueFromPipelineByPropertyName=$true,
ValueFromPipeline = $true,
HelpMessage = "Enter Valid Host Names",
Position=0)]
[Alias('Host')]
[ValidateCount(0,15)]
[String[]]$ComputerName,
# Param2 help description
[int]
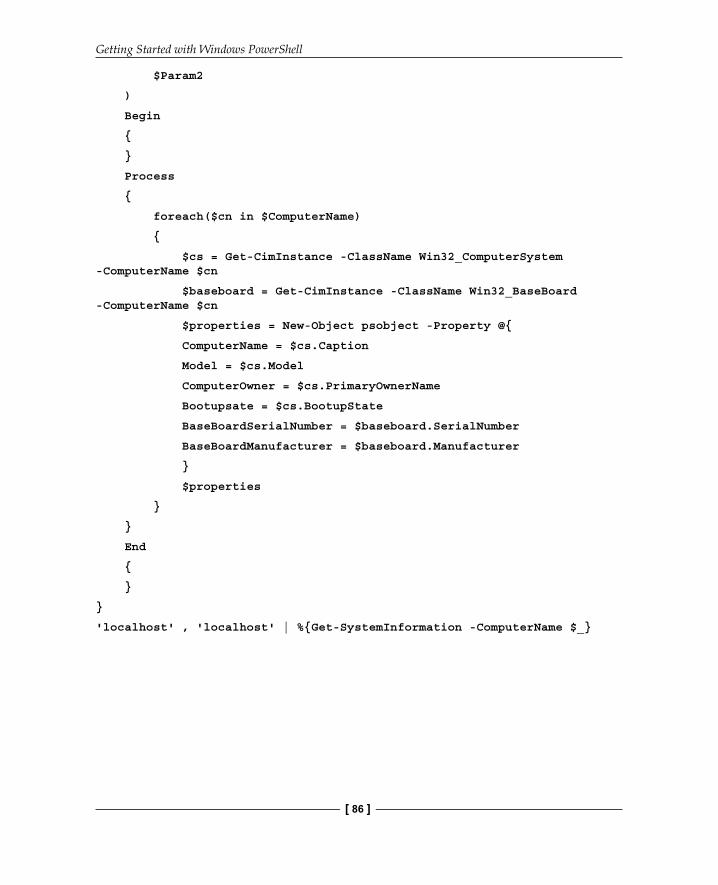
Getting Started with Windows PowerShell
[ 86 ]
$Param2
)
Begin
{
}
Process
{
foreach($cn in $ComputerName)
{
$cs = Get-CimInstance -ClassName Win32_ComputerSystem -ComputerName $cn
$baseboard = Get-CimInstance -ClassName Win32_BaseBoard -ComputerName $cn
$properties = New-Object psobject -Property @{
ComputerName = $cs.Caption
Model = $cs.Model
ComputerOwner = $cs.PrimaryOwnerName
Bootupsate = $cs.BootupState
BaseBoardSerialNumber = $baseboard.SerialNumber
BaseBoardManufacturer = $baseboard.Manufacturer
}
$properties
}
}
End
{
}
}
'localhost' , 'localhost' | %{Get-SystemInformation -ComputerName $_}
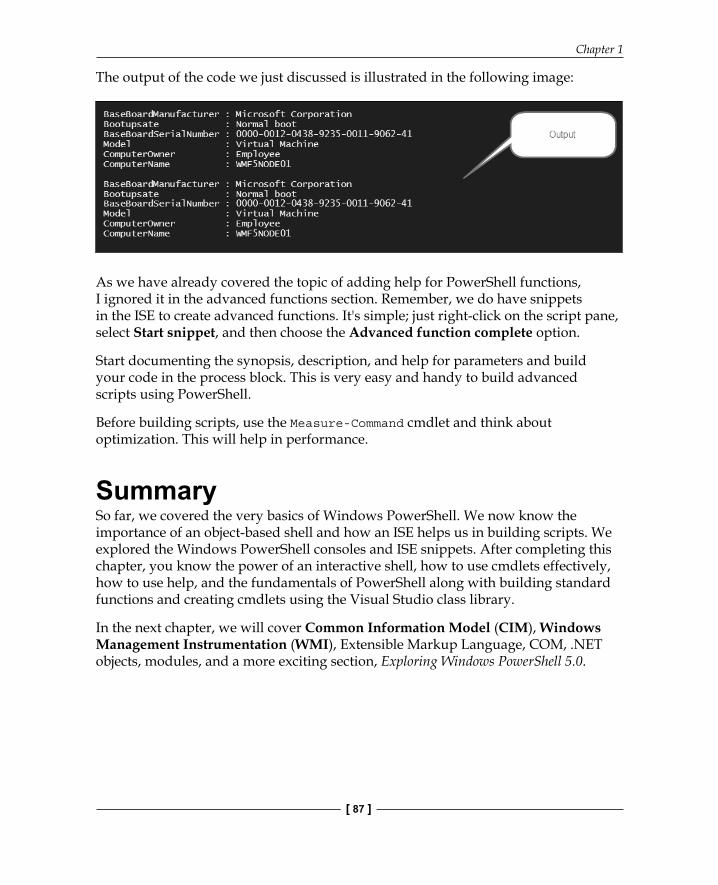
Chapter 1
[ 87 ]
The output of the code we just discussed is illustrated in the following image:
As we have already covered the topic of adding help for PowerShell functions, I ignored it in the advanced functions section. Remember, we do have snippets in the ISE to create advanced functions. It's simple; just right-click on the script pane, select Start snippet, and then choose the Advanced function complete option.
Start documenting the synopsis, description, and help for parameters and build your code in the process block. This is very easy and handy to build advanced scripts using PowerShell.
Before building scripts, use the Measure-Command cmdlet and think about optimization. This will help in performance.
SummarySo far, we covered the very basics of Windows PowerShell. We now know the importance of an object-based shell and how an ISE helps us in building scripts. We explored the Windows PowerShell consoles and ISE snippets. After completing this chapter, you know the power of an interactive shell, how to use cmdlets effectively, how to use help, and the fundamentals of PowerShell along with building standard functions and creating cmdlets using the Visual Studio class library.
In the next chapter, we will cover Common Information Model (CIM), Windows Management Instrumentation (WMI), Extensible Markup Language, COM, .NET objects, modules, and a more exciting section, Exploring Windows PowerShell 5.0.
Where to buy this book You can buy Windows PowerShell for .NET Developers Second Edition from the
Packt Publishing website.
Alternatively, you can buy the book from Amazon, BN.com, Computer Manuals and most internet
book retailers.
Click here for ordering and shipping details.
www.PacktPub.com
Stay Connected:
Get more information Windows PowerShell for .NET Developers
Second Edition