wildlife photography - bsop.ca · digital darkroom tools for the wildlife photographer ..... 32 raw...
TRANSCRIPT


Page 2 of 42 All text and images © Paul Burwell Photography unless otherwise indicated
This page left intentionally blank

Page 3 of 42 All text and images © Paul Burwell Photography unless otherwise indicated
This page left intentionally blank ........................................................................................... 2 Introduction .............................................................................................................................. 5
What’s covered in this course… ....................................................................................................... 5 Equipment ................................................................................................................................ 6
Cameras ............................................................................................................................................... 6 Lenses .................................................................................................................................................. 6 Camera Support .................................................................................................................................. 7
Hand-holding ..................................................................................................................................... 7 Tripods .............................................................................................................................................. 7 Tripod Heads - Gimbal Heads .......................................................................................................... 7 Tripod Heads - Ballheads ................................................................................................................. 8 Beanbags and other specialized devices .......................................................................................... 8
Storage ................................................................................................................................................. 9 Camera Bags .................................................................................................................................... 9 Memory Card Storage ....................................................................................................................... 9 Portable Storage Devices ................................................................................................................. 9 Keeping your equipment from the elements ..................................................................................... 9 Flash and flash extenders ................................................................................................................. 9
Making Pictures ..................................................................................................................... 11 Film versus digital ............................................................................................................................ 11 RAW versus JPEG ............................................................................................................................ 11 Digital advantage: histogram ........................................................................................................... 13 Camera Exposure modes ................................................................................................................. 15 Using Electronic Flash ..................................................................................................................... 16 Controlling the light .......................................................................................................................... 16 Backgrounds, backgrounds, backgrounds .................................................................................... 17 Autofocus considerations ................................................................................................................ 17 Image Stabilization – Vibration Reduction ..................................................................................... 18 Portrait versus behaviour ................................................................................................................ 18 Landscape and portrait orientation ................................................................................................. 18 Making Sharp Images ....................................................................................................................... 19 Eye-to-eye .......................................................................................................................................... 20 Water .................................................................................................................................................. 20
In the field ............................................................................................................................... 21 Research is your best friend ............................................................................................................ 21 Strategies for getting close .............................................................................................................. 21
Should You? ................................................................................................................................... 21 By foot ............................................................................................................................................. 22 Being Patient ................................................................................................................................... 22 Blinds – portable, permanent and mobile ....................................................................................... 23 Feeding Sites .................................................................................................................................. 23 Luring .............................................................................................................................................. 24 Blending In ...................................................................................................................................... 25
Being creative ........................................................................................................................ 26 Composition ...................................................................................................................................... 26
Examples – Stronger versus weaker images ...................................................................... 26 Example 1 .......................................................................................................................................... 27 Example 2 .......................................................................................................................................... 28 Example 3 .......................................................................................................................................... 29 Example 4 .......................................................................................................................................... 30 Example 5 .......................................................................................................................................... 31

Page 4 of 42 All text and images © Paul Burwell Photography unless otherwise indicated
Digital Darkroom tools for the Wildlife Photographer ........................................................ 32 RAW tools .......................................................................................................................................... 32
Adobe Camera RAW (ACR) ........................................................................................................... 32 Adobe Lightroom ............................................................................................................................. 32
Image processing tools .................................................................................................................... 32 Adobe Photoshop ........................................................................................................................... 32 Nik Software’s Viveza ..................................................................................................................... 32 Noise Ninja or Neat Image .............................................................................................................. 32
Printing ................................................................................................................................... 33 Print or die ......................................................................................................................................... 33 Home versus lab ............................................................................................................................... 33 Fine Art printing ................................................................................................................................ 33
Where to find wildlife ............................................................................................................. 34 Close to home ................................................................................................................................... 34
Elk Island National Park .................................................................................................................. 34 Hawrelak Park ................................................................................................................................. 34 Whitemud Creek ............................................................................................................................. 34 North Saskatchewan River Valley ................................................................................................... 34 Murray Marsh .................................................................................................................................. 35 Beaverhill Lake ............................................................................................................................... 35
Around Alberta .................................................................................................................................. 36 Jasper National Park ....................................................................................................................... 36
Canada ............................................................................................................................................... 36 Riding Mountain National Park ....................................................................................................... 36 Churchill Manitoba .......................................................................................................................... 36 Great Bear Rainforest, British Columbia ......................................................................................... 36
International ...................................................................................................................................... 37 Game Farms and Captive Animals .................................................................................................. 38
Canadian Locations ........................................................................................................................ 39 US Locations ................................................................................................................................... 39
Selling your work ................................................................................................................... 40 Magazines ....................................................................................................................................... 40 Stock ............................................................................................................................................... 40 Calendars, greeting cards, etc. ....................................................................................................... 40
Other information .................................................................................................................. 41 Useful web sites ................................................................................................................................ 41
Wildlife Photography PBS Television Series .................................................................................. 41 Nature Photography Web Sites ...................................................................................................... 41 Wildlife Photography Workshops and Tours ................................................................................... 41
Paul Burwell Photography ............................................................................................................... 42

Page 5 of 42 All text and images © Paul Burwell Photography unless otherwise indicated
Introduction
What’s covered in this course… Equipment
o Cameras o Lenses o Camera Support o Storage o Keeping your equipment from the
elements o Flash and flash extenders
Making Pictures o Film versus digital o RAW versus JPEG o Digital advantage: histogram o Camera Exposure modes o Using Electronic Flash o Controlling the light o Backgrounds, backgrounds,
backgrounds o Autofocus considerations o Image Stabilization – Vibration
Reduction o Portrait versus behaviour o Landscape and portrait orientation o Making Sharp Images o Eye-to-eye o Water
Being creative o Composition
Examples of stronger versus weaker images
In the field
o Research is your best friend o Strategies for getting close
The Digital Darkroom o RAW tools o Image processing tools o Photoshop tools
Printing o Home versus lab o Fine Art printing
Where to find wildlife o Close to home o Around Alberta o Canada o International o Game Farms and Captive Animals
Selling your work o Calendars, greeting cards, etc. o Stock
Other information o Useful web sites

Page 6 of 42 All text and images © Paul Burwell Photography unless otherwise indicated
Equipment
Cameras
Any camera can be useful for wildlife photography. Practically, a high-end “point-and-shoot” with an optical zoom of at least 10x is necessary Optimally, I recommend use of an SLR camera which supports interchangeable lenses
o There are a variety of digital SLRs and they sport a variety of sensor sizes o A standard, or full-frame sensor has the same coverage as a 35mm film camera o Some of the “lower-end” digital SLR cameras can be extremely useful for wildlife
photography because they have a smaller sensor which results in what is know as a “crop factor”
o A camera with a 1.6 crop factor, like a Canon 70D or Nikon D7200 (1.5 crop factor) will effectively change the field-of-view of a 300mm lens into a 480mm lens on a Canon body or 450mm lens on a Nikon body. In other words, a 1.6 crop factor camera with a 300mm lens will see the same
thing in the viewfinder that a full-frame camera with a 480mm lens will see. Water sealing – The vast majority of cameras sold today are not “water proof”.
o Look for equipment that has some weather sealing to help keep moisture and dust at bay Built-in obsolescence – While the camera you buy today will continue to take the same quality of
images long into the future, the fact is that the digital camera business is very similar to the computer business in that there will always be a “better” camera available in about 18 months.
o I suggest making your big investments in quality lenses (glass) as that will usually do more to help your image quality than the latest/greatest new camera
Lenses
A standard lens that approximates the magnification we see with our eyes is a 50mm lens on a full-frame camera. Every time that 50mm doubles, the objects move twice as close. Therefore, a 300mm lens on a full-frame camera brings objects about six times closer. (On a 1.6 crop camera it will bring things almost ten times closer with a focal range close to 500mm)
If you are just getting into wildlife photography and are looking for a good lens to get started with, I’d recommend a zoom lens with a range of about 70-300mm.
o Sigma makes a relatively affordable 50-500 F4-F6.3 lens o Tamron makes a relatively affordable 150-600 F5-6.3 lens
If you’re primarily interested in bird photography and especially song birds like sparrows, warblers, fly catchers, etc. there is basically no such thing as too big a lens. With small subjects like these you will want the largest lens you can afford.
When shopping for lenses I would always look for lenses that have tripod collars with them. Tripod collars make it very easy to change from shooting in landscape (horizontal) orientation to portrait (vertical) orientation.
I’m not a big fan of putting “protector” filters onto lenses except in extreme conditions of salt water spray or sand.
o My philosophy is that I’ve spent good money on high quality glass so why would I want to put an inferior piece of glass (in a filter) in front of my nice lens
o Lens hoods are my favourite piece of lens protection

Page 7 of 42 All text and images © Paul Burwell Photography unless otherwise indicated
Camera Support
Hand-holding Many photographers are not accustomed to making images with a tripod. They find them
cumbersome to use but instead enjoy the flexibility that hand-holding their camera provides. I am a strong advocate for using a monopod or tripod whenever practical. Even with today’s
advanced image stabilization systems, it is generally advisable to use a tripod to enhance your image quality.
If you insist on hand-holding your camera, learn how to properly brace yourself. o When standing, have one hand supporting the lens from underneath while the other hand
operates the camera’s controls and shutter. o Keep your elbows tucked tight against your body to provide extra support. o When kneeling or lying prostrate on the ground, look for ways to brace yourself against
your own body or another structure in order to enhance the camera’s stability.
Tripods If you decide to use a tripod to help improve the quality of your images, please spend money on
a good, solid tripod built to support the weight of equipment you’ll be using. When buying tripods you pay for weight and rigidity. The lighter the tripod, the more expensive
it will be especially when that is combined with rigidity. When starting out, look for a good quality aluminum tripod. High-end tripods are made of light-weight materials like carbon fibre and are incredibly strong I personally prefer Gitzo carbon fibre tripods for their light weight and tremendous rigidity.
Tripod Heads - Gimbal Heads I almost exclusively use a gimbal head when photographing wildlife while using a tripod. Why? A gimbal head allows you to completely balance your equipment. You don’t need to worry
about the head flopping over if you let go of it. On a gimbal head, when you let go of your equipment, it just returns to a center position.
A gimbal head gives you fingertip control while panning your equipment left to right or up and down (or any combination thereof).
When you’re photographing a subject that is moving a lot, a gimbal head allows you to concentrate on the action instead of fiddling with a ballhead.
I use a Black Widow Gimbal Head from a company called Jobu-Design. Wimberley and Kirk Enterprises also make excellent gimbal heads.

Page 8 of 42 All text and images © Paul Burwell Photography unless otherwise indicated
Tripod Heads - Ballheads Most photographers seem set on using a ballhead to support their lens and camera. If you do use
a ballhead, make sure it is engineered to support the equipment’s weight. A good ballhead will lock down in a manner that doesn’t allow the angle to creep due to the
weight of the equipment. When I use a ballhead, I’m partial to the ballheads made by Really Right Stuff. Kirk Enterprises
also makes excellent ballheads. Tripods - When considering a tripod, look for one that is over-engineered and built to withstand
at least a 1/3 more weight than your heaviest equipment.
Beanbags and other specialized devices Beanbags - I often use my vehicle as a blind while I’m photographing wildlife. To help
facilitate this photography I have a large and heavy saddle-shaped beanbag that sits over my window. I can rest my camera lens on top of this beanbag and make very sharp images.
Skimmers – Skimmers are devices that sit very low to the ground and allow the photographer to scoot the support along the ground while looking for low-level photography opportunities.
Window Mounts – These are specialized devices that mount on a vehicle’s window to support a lens.

Page 9 of 42 All text and images © Paul Burwell Photography unless otherwise indicated
Storage
Camera Bags There are almost as many camera storage bags as there are photographers Most photographers I know have an extensive collection of camera bags and yet still can’t
classify one bag as the perfect bag Visiting camera stores and trying them out for yourself are the only ways to decide
o Many online camera forums have extensive discussions on the pros and cons of various bags
Memory Card Storage Chances are you’re going to need to carry more than one memory card at a time. A memory card
carry case can help keep your memory cards organized and safe from dust and moisture. I recommend a brightly coloured, waterproof case. This will help you find it in the event of inadvertently dropping the case during the excitement of a wildlife photography session.
Portable Storage Devices When you’re on an extended trip in the field and away from your home computer, some thought
needs to be given to what you’re going to do with all those memory cards full of great images. Personally, I always bring a couple of personal storage devices (PSD’s) to download my memory cards to. That gives me two copies of my images and I download a third copy to my laptop. With three copies of my images in hand, I have no qualms about reformatting my memory cards to use again.
Keeping your equipment from the elements When photographing in inclement conditions, care needs to be given to keep your equipment
safe. A variety of covers are available that will work for most camera/lens combinations Many camera bags come with a protective rain cover that is kept tucked away in a pocket until it
is required
Flash and flash extenders A flash is a great way to add some punch to images on a dull day or to fill in some shadow areas.
If you decide that you want to use flash, consider using a flash bracket. Without the use of a flash bracket to get the flash away from your camera’s lens, many of your photos will have animals with red/white/devil eyes in them. That takes a lot of extra processing to get some usable shots.
Flash takes a lot of battery power to operate and you can end up draining your batteries quite quickly. A lot of the advanced flash units available for cameras today allow for an external battery pack to be connected to the flash. This helps reduce the time between shots when your flash is not usable and it also helps provide you with more shots between battery changes. And speaking of battery changes, if you plan on using flash, make sure you bring some spare batteries with you.
Practice using the exposure compensation features on your flash to dial down the amount of light being used so that your images retain a natural appearance.

Page 10 of 42 All text and images © Paul Burwell Photography unless otherwise indicated
Most electronic flashes have a relatively limited range that can be greatly eclipsed by a telephoto lens.
o A solution for this is to use a flash extender. o Flash extenders are usually a Fresnel lens mounted on a bracket in front of the lens.
This concentrate and magnifies the flash allowing the light to be projected greater distances
The most common device for this is called a Better Beamer

Page 11 of 42 All text and images © Paul Burwell Photography unless otherwise indicated
Making Pictures
Film versus digital This tends to be one of those “religious” issues with passionate views on both sides of the argument. I personally have completely switched to digital and all of my pro photographer friends have as well. A few will occasionally pull out their film cameras for specialized infrared or black and white work, but the vast majority of working pros in wildlife photography are photographing digitally. There is nothing at all wrong with film or film cameras. They still produce the same results that they always have. The main issues are primarily the cost of film and film or slide processing. An area where digital cameras have a big advantage over their analogue counterparts is in the area of low-light photography. Many of the newer digital cameras provide tremendous performance in low-light conditions that the film cameras cannot touch. Low-light capabilities can be important for the wildlife photographer because you aren’t always photographing in ideal conditions and having the flexibility to dial up the ISO settings to improve your shutter speeds can be very useful.
RAW versus JPEG (Reprinted from Outdoor Photography Canada Magazine) Much discussion is bound to occur when photographers get together and the question arises: “Do you shoot in RAW mode?” Modern digital SLR and high-end point-and-shoot cameras support recording the images they produce as JPEG files and as RAW files. The camera’s image sensor produces unprocessed data for each image taken and can store that data as a RAW file which does not resemble an image in any way. JPEG is an industry standard for storing images in a compressed format. To produce JPEG images, the camera processes the unrefined image data using preset parameters to adjust their sharpness, contrast, brightness and colour saturation. Many photographers prefer to have their camera produce RAW files because they consider them to be the digital equivalent of film negatives and love the flexibility of processing the images. In many ways, working in RAW allows photographers the flexibility they enjoyed processing images in the darkroom. Because RAW files contain the unprocessed image data directly from the camera’s sensor, software can massage that information to produce the most pleasing image possible. It also offers the potential of salvaging over or under exposed areas of an image or even recovering from situations where the camera or photographer chose the incorrect white balance. There are several advantages to having your camera directly produce JPEG files. The files are smaller than RAW files allowing more of them fit on a memory card and the JPEGs are faster to transfer to the computer. The JPEG files the camera produces are ready to go and with the exception of cropping often require no further processing. Many photographers who produce a large number of images that will require little or no further processing choose JPEG as their format of choice.

Page 12 of 42 All text and images © Paul Burwell Photography unless otherwise indicated
The disadvantages of having your camera solely produce JPEG files arise when an image or sequence of images require manipulation to produce a pleasing image. When the camera created the JPEG image, it already applied a number of adjustments to the photograph based on the camera’s settings. The JPEG format is a “lossy” format that achieves its smaller size by discarding some of the image data. Because you are dealing with an already compressed and adjusted file, it is not as resilient when adjusting the size, sharpness, colour and saturation or white balance. If the manipulated image is again saved as a JPEG file, additional compression artefacts may result in an inferior image The primary disadvantages of RAW files are their larger size and the amount of time it takes to process them. Because RAW files are unrefined data files they need to be processed with software in order to convert them into a picture. A camera that can produce RAW files will include software from the camera’s manufacturer to process those files. Additionally, third party companies such as Adobe, Phase One, Breeze Systems and Bibble Labs all make excellent products for processing RAW files. These third party applications have options and features not usually found in the camera’s included software. While software for processing RAW files has preset functionality to process the image, a perfectionist photographer can spend a fair amount of time adjusting the software’s various settings while working towards producing an optimal image. I fall into the perfectionist category and prefer to have my camera produce RAW files. I love the flexibility of processing my RAW files and making various tweaks to my images without introducing unnecessary artefacts into my images. Additionally, by retaining the raw image data I allow myself the option for further processing at some point in the future should it prove warranted. So, when asked, I’m happy to state that I shoot in the RAW.

Page 13 of 42 All text and images © Paul Burwell Photography unless otherwise indicated
Digital advantage: histogram (Reprinted from Outdoor Photography Canada)
One of the most useful tools available to the outdoor digital photographer is the histogram built into their camera. Photographing outdoors often presents some unique lighting challenges and your camera's histogram can really help you - if you let it. The first step is to consult your camera's user manual and turn on the camera's histogram display.
A histogram is a bar graph. That last sentence may have triggered some math trauma from your past so that you are now itching to turn the page. Trust me, keep reading, and I'll get you through this.
A histogram is a bar graph arranged so that pixels representing dark or shadow details are on the left side, middle toned pixels are in the central area, and bright or highlight pixels on the right. I use the mnemonic "righty brighty" to remember which side the highlights are on. The height of the bars tells you the relative percentage of the pixels in that tonal range. There is no such thing as a wrong or correct histogram. Each histogram simply reflects the characteristics of the image and depending on the effect the photographer is aiming for, the histogram can vary widely.
Compared to the human eye, cameras have a limited dynamic range when recording scenes with a lot of contrast. When an image contains too much contrast, detail is lost in the extremes and those pixels are said to be clipped. Clipped pixels show up on the histogram as pixels stacked against the extreme left (for shadows) and right (for highlights) sides. To produce an image with as much detail as possible, you want the histogram to show a fairly even distribution of pixels without a preponderance of clipped shadow or highlight pixels.
Example 1
Example 2

Page 14 of 42 All text and images © Paul Burwell Photography unless otherwise indicated
Example 1 shows a photograph with clipped shadow details as well as a preponderance of pixels on the left side of the graph. These are the symptoms of an underexposed image with a dark, dull appearance and detail missing in the shadows. In this example the camera's meter tried to automatically produce an image that is of medium tone and it was fooled by the bright conditions.
After seeing the underexposed histogram from my first attempt, I adjusted my camera to purposely overexpose the next image. Example 2 shows a histogram with clipped highlight details and the distribution of pixels weighted towards the right side. These are indicators of an overexposed image with a washed out appearance and detail missing in the highlights.
Learning from my two previous attempts, I backed off the overexposure a bit and ended up with a well exposed image in Example 3. The histogram still tends towards the right side, but this is natural as I was photographing a bright scene with a lot of snow and sunshine. Overall, the histogram shows a good distribution of pixels in the shadow, medium tone and highlight areas with no clipping at either end of the graph.
I encourage you to turn on that histogram and experiment with making photographs in different conditions noting the results. Learn how to adjust your camera in response to the histogram and you will increase your percentage of well exposed photographs.
Example 3

Page 15 of 42 All text and images © Paul Burwell Photography unless otherwise indicated
Camera Exposure modes Your camera probably has a number of modes that you can use for choosing an exposure.
Automatic or programmed mode - The camera makes all the decisions about shutter speed and aperture size.
Manual mode - The photographer makes all the decisions about shutter speed and aperture size. TV or Shutter Priority mode - The photographer chooses a desired shutter speed and the camera
automatically adjusts the aperture based on what it is metering. AV or Aperture Priority mode - The photographer chooses a desired aperture and the camera
automatically adjusts the shutter speed based on what it is metering. In general, I shoot most of my wildlife images in aperture priority mode. I do this because I’m typically looking to control the depth-of-field in my images to try to separate my subject from its background. Of course, there is no “rule” for this sort of thing and the exposure mode you choose will ultimately depend on what you are trying to achieve. Modern cameras generally have a number of modes for metering the light coming into the camera. Although the technology has greatly improved over the last few years, unfortunately there isn’t one mode that is perfect for every situation.
Spot Metering - In spot metering mode you point the camera’s sensor at the point you want the camera to meter off of and the camera makes the appropriate exposure. Remember that the camera is looking to make whatever it meters equivalent in tone to an 18% grey card. If your subject isn’t a neutral tone, you need to compensate for the difference in the camera by using exposure compensation.
Center-Weighted Metering - This mode of metering reads the light from the entire sensor but places an emphasis on the light coming from the central and lower area of the sensor. A good general-use metering mode as it is most likely to accurately meter a scene where the upper part of the scene (like the sky) is brighter than the main subject of the photograph.
Multi-Segmented Metering - This is the mode I primarily use. Canon calls it evaluative metering while Nikon calls it matrix metering. This metering mode meters a large portion of the scene and sets exposure based on the distribution of brightness, color, distance and composition in order to attempt to render a natural result.
Like everything else, you need to practice with your camera in the various exposure and metering modes to learn how your camera will react in various situations. You will want to be comfortable with your exposure mode and metering so that you produce the best exposed images possible.

Page 16 of 42 All text and images © Paul Burwell Photography unless otherwise indicated
Using Electronic Flash Electronic flash is an excellent tool when used correctly. Unfortunately, many photographers are not comfortable using flash and end up with images that look “flashed.” Furry animals can look especially bad when electronic flash is used too aggressively. When using flash, you are typically using it to provide some balance in bright or back-lit conditions or when you want to add a catch-light that isn’t in your subject’s eyes naturally. When flash is used properly, it usually isn’t apparent to the casual observer that the scene was flashed. If you plan on having an electronic flash in your camera toolbox, make sure it supports flash exposure compensation. This is very useful for use as a fill light. Because of this, you will usually be using your flash as a fill flash and you need to be able to reduce the amount of light your flash is generating to avoid a “flashed” appearance to your images. In bright conditions with shadow, or back-lit situations, you will want to use your flash as a fill light. You want to fill in the area that is in shadow in order to create a well-balanced, properly exposed image. This is another area where digital shooters have a big advantage over film photographers. Both the camera’s LCD screen and the available histogram allow the digital photographer to determine, at a glance, if the light from the flash is too much, too little or just right and then make the appropriate adjustments. On average, I usually start with my flash exposure compensation dialed down two stops (-2) and adjust from there. Of course, it ultimately depends on my subject, distance to the subject and the lighting conditions. Another use for fill flash is on dark overcast days where the flash will bring back the color and saturation that might otherwise be missing. It also adds a catch-light to help bring life to the subject. If you are going to be using an electronic flash, you need to take battery life and the time it takes the flash to recycle into consideration. Therefore, I recommend using an external battery pack for your flash. External battery packs will usually more than double the number of flashes your flash can produce before exhausting the batteries and will greatly reduce the time it takes the flash to recycle its charge so it is ready for the next shot.
Controlling the light Keep an eye on your position as it relates to the direction of the light. In general, you want the light streaming over your shoulder to light up your subject. A good trick for following the light is to point your shadow at the subject. Remember that you aren’t anchored to any one spot and you can, and should, change positions both to vary your background and to use the optimal light. If you end up shooting into the light, look for opportunities to make silhouettes. Rim lit subjects can also be very effective when your subject is positioned against a dark background.

Page 17 of 42 All text and images © Paul Burwell Photography unless otherwise indicated
Backgrounds, backgrounds, backgrounds Perhaps the single most important element to consider when composing a wildlife photograph is the background. It is very easy for distracting elements to sneak into the backgrounds behind your subjects. It is important to notice how the background you are photographing an animal against can impact your images. Unless you are creating environmental shots, you usually don’t want a lot of clutter in the background as it can distract the viewer of a photograph from focusing on the animal. Few things ruin an otherwise perfectly good shot more than discovering that your beautiful subject has a tree or branch seemingly growing out of its head. Many wildlife images are made at a relatively large aperture. Using a large aperture allows the photographer to minimize the depth-of-field in an image. The depth-of-field is a term that describes how much of the image in front of the focus point and how much of the image behind the focus point is in focus. Shooting at a lens’s larger aperture setting (F2.8, F4, F5.6) allows for photographs with a wonderfully blurred background that allow the viewer to focus exclusively on the subject of the image. Remember that the smaller the f-stop, the larger the aperture opening which results in a shallower depth-of-field. When photographing an animal with a long snout or beak up-close, try to use enough depth-of-field to keep both the animal’s eyes and the end of its nose in focus.
Autofocus considerations By mastering your camera’s autofocus system, you will find yourself with better pictures. It can be very useful to learn how to quickly switch the autofocus point your camera uses to focus. You can practice this technique by watching television through your camera’s viewfinder and moving the focus point to the current speaker’s eye. If nothing else is in focus in your images, you will usually want the animal’s eye to be in focus. When an animal is prone to quickly change positions, Canon shooters will want to set their camera’s autofocus system to AI-Servo while Nikon users will want to select Continuous-Servo AF. Because the animals typically move around a lot, you need your camera’s autofocus system to be in a mode where it can track the moving wildlife while you maintain an interesting composition. If your subject is relatively stationary, you can use your camera’s one-shot focus mode to allow you to focus on an eye and recompose the shot for compositional purposes.

Page 18 of 42 All text and images © Paul Burwell Photography unless otherwise indicated
Image Stabilization – Vibration Reduction Many modern lenses and even some cameras have a gyroscope based system for helping stabilize vibrations and movement to help produce sharper images at lower shutter speeds. Today’s modern systems can help the photographer create sharp images in much lower light (2-3 stops) than might otherwise have been possible. However, the situation becomes slightly clouded when a photographer is using an image stabilized (vibration reduced) lens or camera mounted to a tripod. Some systems detect the lack of movement and shut themselves down. Others unfortunately create softer images as they attempt to reduce movement and vibration that isn’t there. Consult your manuals to determine if you should be using the vibration reduction systems when your equipment is mounted on a tripod. Modern stabilization systems work well with a tripod and further enhance the stability provided by a tripod. When I photograph wildlife, the vast majority of my images are made with an image stabilized lens, with the image stabilization function turned on and with the lens mounted on a tripod.
Portrait versus behaviour Many photographers end up with a pile of portrait photographs of their wildlife subjects. And there’s nothing wrong with that. However, watching for a variety of opportunities can really flesh-out an image collection. By researching an animal and studying its behaviour, it is often possible to anticipate behaviour. Capturing a bird taking flight, flying or landing are all examples of interesting behaviour shots that help document an animal. Cute behaviours, especially in baby mammals are especially compelling for viewers.
Landscape and portrait orientation It seems that many photographers are hesitant to change the position of their camera from landscape (horizontal) to portrait (vertical) shots or vice-versa. Not only does changing the camera’s orientation change the shot, it may be that one orientation is superior to another for a given situation. This is a situation where a lens with a tripod ring really helps out. I always leave the tripod ring on my lenses loose so I can quickly switch between landscape and portrait orientation. Trying to accomplish this by flopping your camera and lens over on a ballhead is prone to problems including missing the shot while you fumble to get things lined up.

Page 19 of 42 All text and images © Paul Burwell Photography unless otherwise indicated
Making Sharp Images Nothing is more frustrating than having a great camera with a nice lens and returning home with soft images. What went wrong? Here are a few suggestions for making sure you return home with the sharp images you want.
Lenses - The higher quality the lens, the better images it can produce. Most camera and lens manufacturers make a line of “professional” lenses. In addition to being more expensive, these lenses can produce tack-sharp, well saturated images.
Focusing - If you haven’t mastered your camera’s focussing system, or worse yet are relying on the camera to determine what to focus on, you are greatly reducing your chance at making sharp images.
o Practice, practice, practice until this essential skill comes naturally Shutter Speed - You need enough shutter speed to have a reasonable chance at making a sharp
image. The general rule of thumb is that your shutter speed matches the focal length you’re shooting at. E.g. For an image made at 220mm you should be shooting at a minimum of 1/200th of a second. With an image stabilized or vibration reduced lens, you can generally get away with 1/2 that shutter speed (1/100th of a second in this example).
o If your subject is moving around, you also need enough shutter speed to freeze the motion. In most situations, you probably need shutters speeds of 1/250th of a second, or faster, to freeze the motion.
o Digital photographers have a definite advantage here over film shooters because they can simply set their camera to a higher ISO in order to achieve a desired minimum shutter speed
Auto ISO – If your camera allows you to set your camera to Auto ISO (the camera chooses the ISO) while allowing you to specify a minimum shutter speed, this can be a great way to make sure that you maintain adequate shutter speeds even in changing lighting conditions.
o In this situation, I generally follow the 1/Focal_Length rule-of-thumb when choosing a minimum shutter speed.
Camera Support - Many photographers are not accustomed to making images with a tripod. They find them cumbersome to use but instead enjoy the flexibility that hand-holding their camera gives them.
o I am a strong advocate for using a tripod whenever practical. Even with today’s advanced image stabilization systems, it is generally advisable to use a tripod to enhance your image quality.
o If you are photographing for any length of time, a tripod or monopod helps reduce the muscle fatigue that would otherwise inevitably occur.
o If you insist on hand-holding your camera, learn how to properly brace yourself. When standing, have one hand supporting the lens from underneath while the
other hand operates the camera’s controls and shutter. Keep your elbows tucked tight against your body to provide extra support.
o When kneeling or lying prostrate on the ground, look for ways to brace yourself against your own body or another structure in order to enhance the camera’s stability.
Tripods - When considering a tripod, look for one that is over-engineered and built to withstand
at least a 1/3 more weight than your heaviest equipment. o I personally prefer Gitzo carbon fibre tripods for their light weight and tremendous
rigidity.

Page 20 of 42 All text and images © Paul Burwell Photography unless otherwise indicated
Tripod Heads - Gimbal Heads
o I almost exclusively use a gimbal head when photographing wildlife while using a tripod. Why? A gimbal head allows you to completely balance your equipment. You don’t
need to worry about the head flopping over if you let go of it. On a gimbal head, when you let go of your equipment, it just returns to a center position.
A gimbal head gives you fingertip control while panning your equipment left to right or up and down (or any combination thereof).
When you’re photographing a subject that is moving a lot, a gimbal head allows you to concentrate on the action instead of fiddling with a ballhead.
I use a Black Widow Gimbal Head from a company called Jobu-Design. Wimberley and Kirk Enterprises also make excellent gimbal heads.
Tripod Heads - Ballheads
o Most photographers seem set on using a ballhead to support their lens and camera. If you do use a ballhead, make sure it is engineered to support the equipment’s weight.
o A good ballhead will lock down in a manner that doesn’t allow the angle to creep due to the weight of the equipment.
o When I use a ballhead, I’m partial to the ballheads made by Really Right Stuff. Kirk Enterprises also makes excellent ballheads.
Squeeze, don’t stab - One aspect that is often missed in the analysis of why an image isn’t sharp
is how the photographer releases the shutter. o I suggest photographers learn how to gently squeeze the shutter button to create an image
as opposed to wildly stabbing at it. o When using telephoto lenses, just the act of stabbing or jabbing at the shutter button can
be enough vibration to make an image soft.
Eye-to-eye Many captivating wildlife images are made at the animal’s eye level. When you are allowed to do so by the animal’s trainer, move to a lower shooting position that puts your camera’s lens at or near the animal’s eye level. It makes the animal look more majestic and compelling when you are at its eye level. Learn to watch the animal’s eyes as it is the eyes that will help tell the story in your photography. In general, wildlife images are a lot stronger when the subject’s eye or eyes are clearly visible in an image and sharply in focus. Try to capture a catch-light in the animal’s eyes or add one using some fill-flash. A catch-light in an animal’s eyes adds life to an image. It is a good idea to keep your eye on your viewfinder during a session with an animal. You can bet that the moment you’re distracted and not watching the animal through your camera’s viewfinder an opportunity for a great photograph will be missed. Try to get in the habit of continually composing and focusing on the animal so you’re ready when something special happens.
Water At locations water, look for opportunities to include the water in your images both behaviourally as well as for reflections.

Page 21 of 42 All text and images © Paul Burwell Photography unless otherwise indicated
In the field
Research is your best friend For the dedicated wildlife photographer, it is very helpful to do homework; research the subject or subjects you plan on photographing in order to learn their behaviours. The wide variety and in-depth information available on the Internet makes this chore considerably easier than it was just a few years ago. Research will help you get to the right type of environments to photograph the subjects you are looking for. It will help you learn the best time of year and time of day will yield the best and most productive results. Research will also help you gain a greater appreciation and respect for your subject. When you’re in the field, it can also be useful to pay close attention to your subject. Keep notes to help you remember past behaviours to help you predict future behaviour. For instance, what behaviour did a hawk exhibit right before it took off from a fence post or tree top? This sort of research comes through experience and the only way to gain experience is to get out in the field, find some subjects are start to really pay attention to what is going on. Learning to be more than a casual observer is critical for developing insights that help predict behaviour.
Strategies for getting close
Should You? While many animals are quite safe to get close to, you need to always think about safety and ask yourself if you should be trying to get safe. You also need to consider the time of year. If it is fall, and the animals are in rut, chances are the males especially are going to be quite aggressive and approaching them to closely could be dangerous. If it is spring time, and an animal has youngsters, you don’t want to move in so closely that either the parent or youngsters become agitated. And with an animal like a bear, getting too close to a youngster can be a decision that can cost you your health or even your life. Again, research your subjects. Become knowledgeable in their behaviours and plan accordingly.

Page 22 of 42 All text and images © Paul Burwell Photography unless otherwise indicated
By foot One of the hardest but most satisfying ways of getting close to a wild animal is on foot. Many animals have been habituated to fear the human form and will often scurry or fly off in the opposite direction on their first recognition of an approaching human. To approach on foot, a wildlife photographer needs to learn to disguise their purpose. Each individual animal seems to have an invisible line that they are comfortable having a human approach within. Move across that line and the animal is quickly gone. Walking directly, in a straight line, towards an animal and making eye contact will very quickly cause the animal to flee. Learn to walk slowly and seemingly randomly while slowly making your way in the general direction of your subject. Try not to stare and even avoid eye contact. Stop for a few minutes at a time during your approach to let the animal become accustomed to you. This can help reassure the animal that you are not a predator. Take images during your approach. When you’re starting out, chances are that you’re going to push your luck too far and the animal will leave. If you’ve been waiting to move to the perfect distance before taking a picture, you’re out of luck. For animals with antlers, I’ve found a way to approach on foot that tends to work fairly well. I take my tripod, with its feet extended and turn it upside down with the feet now above my head. As I walk in a general direction towards my subject, I sway the tripod legs back and forth. This distortion of my human form has helped me get closer to deer, elk and moose than I would normally achieve. While it may seem like a good idea to get totally into stealth mode and crawl or slink towards an animal it usually doesn’t work. The animal associates this behaviour with a predator, puts it on edge or much more likely to flee. When working your way towards Birds of Prey like hawks, owls or other raptors, a clue that the animal is about to flush is that they often defecate right before take-off. I’ve never determined why exactly this behaviour occurs, but it has helped me catch a number of flight shots as the animal takes flight.
Being Patient In my opinion, the single most useful attribute a wildlife photographer can possess is patience. I cannot count the number of times I’ve been out at a location and grown frustrated that I haven’t got any great shots yet or nothing’s happening. Assuming I’m in a location with a reasonable chance of activity, more times than not my patience pays off and eventually I get some useful shots. Staying in one spot and being patient lets the animals grow accustomed to you. By staying still and relatively immobile it signals that you’re not a predator interested in a meal. This also provides an opportunity to study the animal and their behaviour. Another benefit of staying still and patient is that the animal might decide to come closer to you on its own. Many animals are curious critters just as curious about you as you are them. Don’t give them a reason to fear you and you might be surprised at how close they’ll come.

Page 23 of 42 All text and images © Paul Burwell Photography unless otherwise indicated
Blinds – portable, permanent and mobile Photographing wildlife from a blind is a tried and true approach for getting shots. If you’re lucky enough to have property with a pond on it or land with game trails, building a small structure, with openings for your camera gear, can get a great way to get some unique shots. Permanent blinds tend to be a bit more comfortable and provide ample cover from animals. Another option when you don’t have the ability to build something more permanent is to use a portable blind. Many wildlife photographers use the same portable pop-up blinds that hunters use for their activities. These portable blinds are relatively lightweight and can be carried into a remote location. Their disadvantage is that they are temporary cover and they can be adversely affected by things like wind or even stolen. My favourite blind is my automobile. An automobile does a great job at hiding the human form and many animals or so used to vehicles driving by that they take practically no notice of them. When you use your vehicle as a blind you need to be extremely mindful of the other traffic around you. Stopping in the middle of the road to get a shot is dangerous and stupid. I always pull my vehicle well off the road and engage the hazard lights to remind other traffic that I’m there. You will also need to make sure that you turn off the vehicle to stop the engine vibrations from softening your images. When considering how to position your vehicle, it is often best to pick a best-guess optimal spot rather than planning on moving several times. The sound of an engine starting or the sound the tires make while they slowly move along a gravel road are often enough of an alert to an animal that something unusual is going on and they should make their get-a-way. Using a blind though, requires patience. If an animal sees you enter a blind, it will usually stay away for a while until it either forgets you’re there or determines you’re not a threat.
Feeding Sites Setting up your gear where animals regularly come to eat or drink is almost guaranteed to get you some shots. Animals are most active in the mornings and so this will often be the time when you will want to be at their favourite watering or feeding spot. Many people have bird feeders and baths in their backyards for the neighbourhood birds. Properly positioning an attractive perch close to a feeder or water feature is an excellent strategy for obtaining very useful images of these birds. Birds are probably the easiest animals to attract by feeding. And where it is easy to attract birds, the neighbourhood squirrels are sure to follow. Squirrels can be quite greedy in their seed consumption and many avid bird feeder take extraordinary measures to keep them away. However, squirrels can be great subjects for wildlife photography as there are furry and cute. Unless you really know what you are doing, you do not want to try to attract larger animals via feeding. Having a hungry bear, has been habituated to being fed, wandering around is going to cause problems and will probably end up with the bear being killed.

Page 24 of 42 All text and images © Paul Burwell Photography unless otherwise indicated
Luring Playing recorded sounds of birds and mammals is another tool available to the avid wildlife photographer. A portable music player coupled to some battery powered speakers can be an excellent way of luring in song birds or calling a rutting deer, elk or moose within vicinity of your blind. However, the ethical wildlife photographer makes very careful and judicious use of these tools. There is much controversy in the birding world as to whether or not the playing of bird calls during the spring mating season (coincidentally the season when these calls have their greatest effects) causes the birds to experience undue stress during an already stressful time of the year for them. Therefore, the calls need to be used only occasionally and without undue repetition. No ethical wildlife photographer puts the health of their subjects at risk. Another strategy often used for luring birds of prey is the use of live mice as bait. This is especially popular during the winter months when a hungry owl will gladly swoop down and capture a mouse for the pleasure of a photographer. Again, this is another method with a lot of controversy surrounding it. It is usually easy to determine when an image of an owl was obtained through the use of baiting. The wonderful head-on shots of a bird flying directly at a camera are almost always obtained through baiting. Baiting birds of prey is controversial because some are concerned that the birds may become accustomed to being fed, and once the mice stop being provided, the owl will be in difficulty. Others fear that the store-bred mice might have health issues not present in the owl’s regular food sources that could affect the health of the bird. If you do decide to bait owls, don’t lure them along roads. There are have been several cases in recent years where photographers would toss mice out of their vehicles towards owl and the owls swoop down along the road to collect the food. The problem is that the owls learn to associate cars with food and end up getting hit, injured or killed by a vehicle. Again, an ethical wildlife photographer takes care to make sure they aren’t putting their subjects at risk.

Page 25 of 42 All text and images © Paul Burwell Photography unless otherwise indicated
Blending In Some wildlife photographers go to extreme lengths to blend in to their surroundings. These photographers are concerned that the appearance of their lenses can be a distraction to their subjects. It is possible to purchase camouflage coverings for lenses that help break up their shapes and have the additional benefit of protecting the lens from scrapes or bumps. Other photographers go to the same lengths as serious hunters and cover themselves in camouflage clothing from head to toe. Hunting clothing can be useful outdoor attire for a wildlife photographer because it is often warm and water resistant. Some camouflage also has the ability to restrict the wearer’s scent from travelling with the wind, making it more likely that game animals will approach their position. Some photographers take this blending in so seriously that they even adopt Ghillie Suits that completely obscure them into their surrounds.
© Raptor Systems © Ghillie-suits.org

Page 26 of 42 All text and images © Paul Burwell Photography unless otherwise indicated
Being creative
Composition During the excitement of photographing a compelling wildlife subject, it can be easy to forget about the “rules” of composition and instead just try to keep the subject in frame and create a well exposed image. The “rules” of composition, including the Rule of Thirds and the Golden Mean, apply to wildlife photography and can help you create more compelling images.
Page 27 of 42 All text and images © Paul Burwell Photography unless otherwise indicated
Examples – Stronger versus weaker images
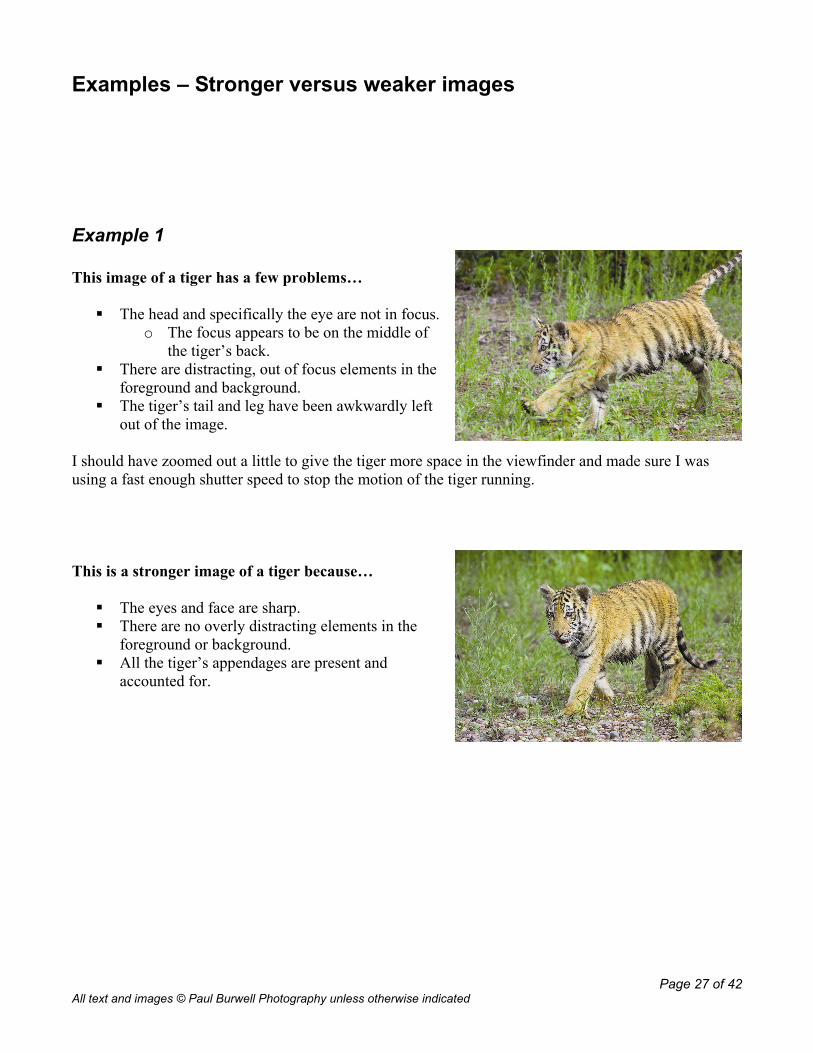
Example 1 This image of a tiger has a few problems… The head and specifically the eye are not in focus.
o The focus appears to be on the middle of the tiger’s back.
There are distracting, out of focus elements in the foreground and background.
The tiger’s tail and leg have been awkwardly left out of the image.
I should have zoomed out a little to give the tiger more space in the viewfinder and made sure I was using a fast enough shutter speed to stop the motion of the tiger running. This is a stronger image of a tiger because… The eyes and face are sharp. There are no overly distracting elements in the
foreground or background. All the tiger’s appendages are present and
accounted for.

Page 28 of 42 All text and images © Paul Burwell Photography unless otherwise indicated
Example 2 This photograph of a bobcat has a few problems… There is little to no eye contact. The camera is shooting down at the animal. The ears are in an awkward position. There is no catch-light in the eyes.
I should have waited for the bobcat to turn its head towards me and for its ears to be facing forward. Additionally, the image would have been a lot stronger if I’d moved into a lower shooting position to capture the bobcat’s eyes at its eye level. This is a stronger photograph of a bobcat because… There is excellent eye contact with a catch-light. The photograph was made at the bobcat’s eye level. The ears are forward and the expression is alert.

Page 29 of 42 All text and images © Paul Burwell Photography unless otherwise indicated
Example 3 This shot of a running tiger has a couple of problems… The action, expression and moment the picture was captured are
very good, but, the unfortunate tiger appears to have a tree growing out of its back.
The tree also adds a distracting background element. Although I timed this shot fairly well, the tree that appears to grow out of the tiger’s back is quite distracting. A couple of steps to the right or left would have solved the problem. The only way to repair this image at this point is by spending a lot of time in working the image in my photo editing software. It is almost always more time efficient to make the image correctly in the camera than to have to spend time working in the digital darkroom. This shot of a running tiger is stronger because… Again the action, expression and moment the picture was
captured are very good. Moving a few steps to the right removed the tree from the tiger’s
back and gives a cleaner background.

Page 30 of 42 All text and images © Paul Burwell Photography unless otherwise indicated
Example 4 This wolf portrait has a few problems… While there is good eye contact and an alert expression, the
tongue hanging out while the wolf is panting suggests it might be a German Shepherd instead of a wolf.
The camera is slightly shooting down at the wolf. The crop of the wolf’s head is awkward with just the tops of
the legs being included. Having the wolf in shadow against a bright background makes
for a distracting setting. This image has a lot working against it. The bright background is very distracting. And remember that a panting animal is rarely a majestic animal. This is a stronger wolf portrait because… There is good eye contact and an alert expression. The eyes tell us it’s a wolf and there’s no tongue hanging out to
confuse us. The shot was made close to the wolf’s eye level. A head and shoulder crop tends to be a more comfortable
portrait.

Page 31 of 42 All text and images © Paul Burwell Photography unless otherwise indicated
Example 5 This shot of a pair of skunks has a few problems … The camera’s automatic meter was fooled by the
bright conditions with an animal with both black and white fur.
In this shot the highlights are blown and this causes there to be little to no detail in much of the skunks’ white fur.
There isn’t much happening in this image to tell a compelling story.
An animal like a skunk in bright light is a perfect example of a time to use manual exposure. Even then, it can be very tricky to retain details in both the white and black areas of the skunk. Additionally, my timing here created a boring image. This shot of a pair of skunks is stronger because… The camera’s meter was set manually. In this shot there are plenty of details in the
skunk’s white fur. The interaction between the skunks tells a story
and makes for a more compelling image.

Page 32 of 42 All text and images © Paul Burwell Photography unless otherwise indicated
Digital Darkroom tools for the Wildlife Photographer
RAW tools
Adobe Camera RAW (ACR) Adobe Camera RAW is probably the tool used by more photographers than any other tool to process their RAW images.
Adobe Lightroom Lightroom is the tool that I use on all of my images to catalogue them, organize them and primarily process them. By using the adjustment brush, Lightroom gives photographers control over the brightness, contrast, saturation, white balance and sharpness of individual portions of the image instead of just the overall image. An additional benefit of Adobe Lightroom is that it can be used to catalogue an extensive image collection.
Image processing tools
Adobe Photoshop The de facto standard for image processing is Adobe Photoshop. Photoshop Elements provide more features than the average photographer will ever use. The latest full-featured versions of Photoshop, CC, provide professional tools for the working photographer. The downside with a program like Photoshop CC is that it is an incredibly complex program that can take a long time to master and become productive with. One can always choose to use the automated correction features built into a program like CC but they are only scratching the surface as to what is possible in Photoshop. If you don’t want the added complexity, stick with Photoshop Elements which will perform most corrections with a couple of clicks of the mouse.
Nik Software’s Viveza This, in my opinion, is a revolutionary piece of software that gives the Photoshop or Aperture user incredible control over the various elements of an image. It makes adjustments extremely painless and can add hours of productive time to the digital photographer’s day.
Noise Ninja or Neat Image Wildlife photographers often find themselves taking pictures in low-light conditions. Although modern digital cameras do an amazing job at producing great images in less than ideal conditions, the images produced could do with a little noise reduction. Both Noise Ninja, from Picturecode.com, and Neat Image, from neatimage.com, provide excellent noise reduction in images either as a plug-in for Photoshop or as a stand-alone application.

Page 33 of 42 All text and images © Paul Burwell Photography unless otherwise indicated
Printing
Print or die If nothing else comes from this discussion on printing, I encourage you, nay; I implore you, PRINT YOUR IMAGES! In this digital age, far too many photographers seem satisfied to let their photos languish in digital limbo. When you get an image that is special to you, print it. And, print it as big as is practical. Photography needs to be seen to be appreciated and that’s far more likely to happen with a photo on a wall or in a book then an image languishing on a photographer’s computer.
Home versus lab Although there is nothing that can beat the convenience of printing at home and seeing instant results, printing through a commercial is usually a lot more economical. More and more commercial photo labs are making profiles available for their machines which allows for images to be captures, processed and printed in a completely colour managed environment. If the commercial lab you’re dealing with doesn’t provide regularly updated ICC profiles for their machines, you need to deal with another printer. There is no other way to guarantee that the image you see on your calibrated home computer will match the image you get from the lab. As of the writing of this document, colour managed labs are printing 4”x6” prints for $0.17 and enlargements up to 12”x18” for $2.99.
Fine Art printing If you’re interested in producing and selling your own prints, or “fine art” prints, you will want to invest in a good printer. Most fine art prints are made on carefully calibrated printers using the finest matt or glossy papers available. This is not an inexpensive option, but for the ultimate in control, it is the only option available. The most popular printers in this category are made by Epson and start with the 17” wide 3800 and go up to the 44” wide 9880 or even the 64” wide 11880. Canon and HP have recently become competitive in this field as well. Canon’s printers suitable for fine art prints start with the 17” wide iPF5100 and go up to the 60” wide iPF9100. HP features the 24” wide Z2100 and their top-end printer is the 44” wide Z3100.

Page 34 of 42 All text and images © Paul Burwell Photography unless otherwise indicated
Where to find wildlife
Close to home The Edmonton area features an astounding variety of areas to find wildlife. Here’s a listing of some of my favourites.
Elk Island National Park This national park, only 20-30 minutes from the eastern edge of Edmonton features the highest concentration of wildlife out of all the national parks in Alberta. Wildlife commonly scene in the park includes bison (plains and woods), deer, elk, moose, coyote, porcupine, beavers, squirrels and ground squirrels. Birds found in the park include owls, hawks eagles, geese, swans, pelicans, ducks, grebes and a variety of song birds (sparrows, warblers, fly catchers, thrushes). I strongly encourage wildlife photographers to venture out to the park and learn the various roads and trails that the wildlife frequent. Care needs to be taken around the larger animals because although they aren’t predators, they can still be quite dangerous when surprised or crowded. Special care needs to be taken during the fall rut.
Hawrelak Park Hawrelak Park is an excellent spot for getting shots of summer water birds like geese and ducks. These birds become very use to people and they can often be photographed at close range. During the winter months, a number of feeders are kept stocked by dedicated volunteers. Winter birds visible around the feeders can include wood peckers, sparrow, chickadees, pine siskins, redpolls, pine grosbeaks, nut hatches and crossbills.
Whitemud Creek Whitemud creek is another great spot for wildlife. The trail system throughout the ravine that follows the creek allows easy access to the birds in the forest as well as the occasional deer, hare, squirrel or porcupine.
North Saskatchewan River Valley The North Saskatchewan River valley is a very special place that we are lucky to have in Edmonton. Many water birds can be found on and around the river during the warmer months. Various song birds are present throughout the treed areas. For relatively unique mammals, I’ve found both chipmunks and ground hogs in the river valley just across from downtown. The fall colours in the river valley are also a treat for the landscape photographer as the Aspen trees turn a brilliant yellow before losing their leaves for the winter.

Page 35 of 42 All text and images © Paul Burwell Photography unless otherwise indicated
Murray Marsh This is a Duck’s Unlimited wetlands located north west of Edmonton on RR 265 just north of Highway 37. This is a great spot for shore and water birds. The gravel road goes right along the east side of the wetlands giving great morning photography opportunities with the sun behind you.
Beaverhill Lake Beaverhill Lake, located just to the south east of Tofield was designated an Important Bird Area (IBA) in 1997. Although the lake has shrunk considerably over the last few years with our dry conditions, it is still a great place to observe the diversity of our birds. The Beaverhill Bird Observatory is a great place to visit in the spring and fall when banders work the mist nets each morning to monitor and record the migrant activity through the area. Raptors are very abundant around the lake and it is quite easy to view several species during a single visit to the area.

Page 36 of 42 All text and images © Paul Burwell Photography unless otherwise indicated
Around Alberta
Jasper National Park For wildlife, Jasper is an obvious spot that shouldn’t be ignored. In the early spring it isn’t unusual to see a bear working through the vegetation in a ditch. Elk are very plentiful and easy to photograph around the Jasper town site. Along Highway 16 from the park entrance to Jasper there are a number of opportunities to photograph Big Horn sheep. If you decide to stop along the road for a photo opportunity, remember to do so safely. Also, if a large “bear jam” (a group of tourist vehicles stopped to photograph a bear often in a dangerous manner) is already in progress, consider not stopping. Many of these tourists behave in a dangerous manner that puts people and the bears at risk by closely approach the apparently docile animals. It is extremely unfortunate when a bear acting like a bear needs to be killed because of the stupidity of a tourist photographer. Please don’t be that person.
Canada
Riding Mountain National Park This park is a great place to see and photograph Black Bears in their cinnamon, blond and black colour varieties. It is a park teaming with abundant wildlife ranging from wolves, deer, elk, bison, and moose to a huge variety of birds. This is a large park, covering almost 3,000 square kilometres. It is an oasis of nature situated amongst the vast Canadian prairie. The folks at the Riding Mountain Guest Ranch put out feed for black bears in the area. Photographers are placed into a secure blind to photograph the bears and their activities as they come, go and play. Cinnamon and blond coloured bears are quite prevalent in the area. The Guest Ranch also provides safaris into Riding Mountain National Park to look for other wildlife.
Churchill Manitoba Perhaps no other animal is as enigmatic of Canada as the Polar Bear. Churchill is a great spot for Polar Bear photography because each falls the Polar Bears gather in around Churchill, waiting for the ice to form in Hudson’s Bay. This conglomeration of bears makes it likely that photographers will be able to see and photograph the bears. If you go, take an organized tour on a Tundra Buggy to get you safely close to the areas where the bears are waiting.
Great Bear Rainforest, British Columbia This special place, only accessible by boat, features old growth forest along with a very special sub-species of Black Bear. The Kermode or Spirit Bear is genetically a Black Bear but it has a gene that causes its fur to be white. About 10% of the Black Bears in the region are Spirit Bears. Other animals that photographers might photograph include Grizzlies, Black Bears, Humpback Whales and if you’re extremely lucky, the elusive coastal Grey Wolf.

Page 37 of 42 All text and images © Paul Burwell Photography unless otherwise indicated
International International wildlife opportunities abound. From photographing on the Serengeti of Africa to the frozen tundra of Iceland or the icy splendours of Antarctica, the world awaits the wildlife photographer with the financial banking to make these photo opportunities available. Alaska is a tremendously popular place for photographers as the opportunities to get images of Brown or Grizzly Bears abound. For North American bird enthusiasts Florida and New Mexico are extremely popular destinations during the winter months. And for opportunities to catch glimpses of elusive predators in the wild, Yellowstone National Park remains a favourite amongst photographers. If your primary interest is in expanding your image collection, look for a trip that caters to photographers and can almost guarantee to get you close to the animals. Look for trips with leaders who have experience in the area you plan on travelling to and with helping photographers bring home tremendous images.

Page 38 of 42 All text and images © Paul Burwell Photography unless otherwise indicated
Game Farms and Captive Animals In the wild, it can be extremely hard, and even dangerous, to get close enough to the large predators in order to take good photographs. Encountering animals like Cougars in the wild is extremely unlikely and can often prove fatal for one or both parties. To help photographers get these images, game farms came into existence in the 1950’s when Disney and other film companies wanted to create films with animals as their stars. Photographing at game farms is another subject with some controversy attached to it. Some people believe that all animals should be free and not held in captivity for any purpose, let alone photography. Others, such as myself, argue that these wildlife models are an important aspect of nature photography and allow others to gain a real appreciation for these animals that they wouldn’t otherwise receive. As long as the game farm takes care of their animals, follows the local, state or provincial and federal laws in regards to their business, I have absolutely no problem with them. For the wildlife photographer, game farms are a tremendous resource for getting pictures of animals they would be unlikely to encounter in the wild. Some of these elusive animals might include: Black and Brown bears, cougars, lynx, bobcats, wolves, foxes, coyotes, lions, tigers and snow leopards. In addition to having access to photograph these animals, the game farms put the animals into natural settings where images can be made without trying to photograph through a chain-link fence or with a fence appearing into the background. Safety is another advantage of photographing at a game farm. Where stalking a large predator like a cougar in the wild could well lead to a dangerous encounter, the game farm provides a safe environment for photographing these animals. These animals are born into captivity and become accustomed to their life. The animals are not placed under the stress of being stalked by a determined photographer intent on making images of them. The last advantage of photographing at a game farm I’ll mention is that can allow a photographer to practice and sharpen their skills, helping prepare them for when they find wildlife in the field. When a person visits a game farm they are usually involved in at least 3 photo sessions with various animals. In these sessions, the photographer gets a lot of opportunity to make images while working on their composition and focussing skills. Another place to consider photographing captive animals is at a zoo. In modern zoos, the animal’s homes are made to look as natural as possible. Images captured of animals in zoos where it isn’t apparent that the animal is in a zoo can be very useful too. Another issue that comes up is whether or not to disclose the fact that a particular image was shot under “controlled conditions”. My personal preference is to disclose that information. I see no reason to pretend that the image wasn’t made at a game farm. Images on my web site that were made under controlled conditions are all labelled with “CA” to denote the image is an image of a Captive Animal. Don’t let anyone tell you that it is easier to photograph a captive animal. Although the aspect of actually finding the animal is removed, it still takes a talented photographer to compose and interesting and compelling image. Poor photographers often return from zoos with so-so images while a pro will return with a truly special set of images.
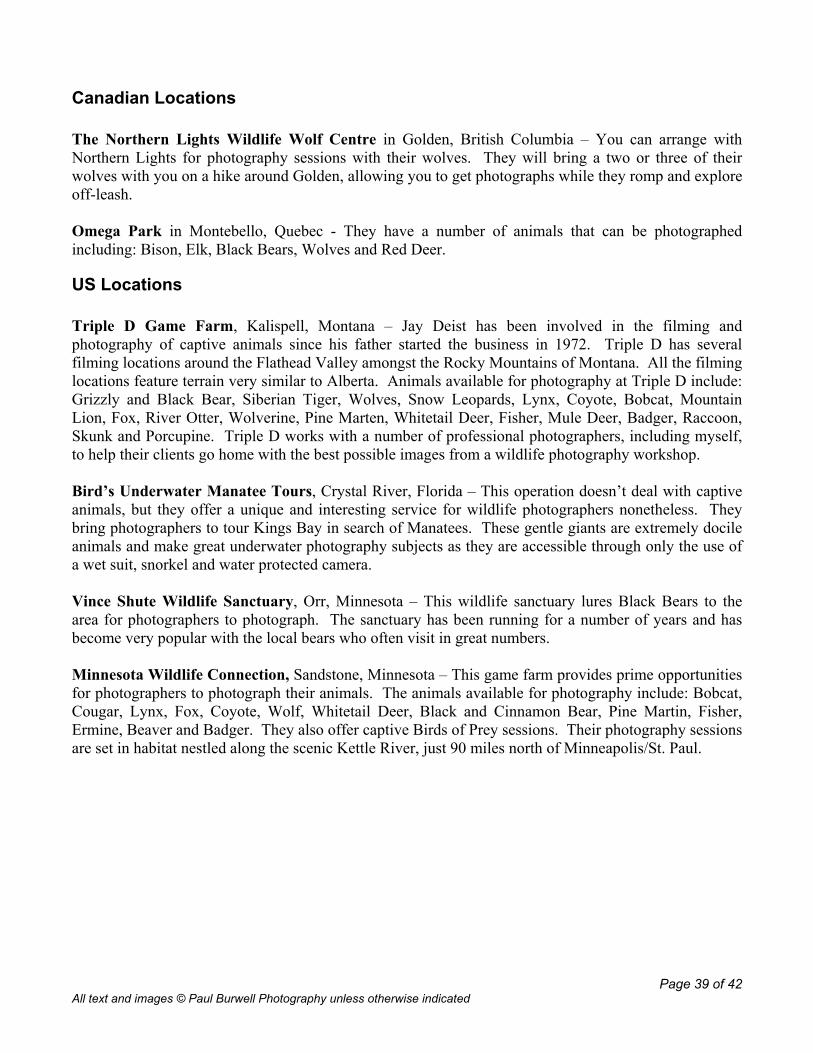
Page 39 of 42 All text and images © Paul Burwell Photography unless otherwise indicated
Canadian Locations The Northern Lights Wildlife Wolf Centre in Golden, British Columbia – You can arrange with Northern Lights for photography sessions with their wolves. They will bring a two or three of their wolves with you on a hike around Golden, allowing you to get photographs while they romp and explore off-leash. Omega Park in Montebello, Quebec - They have a number of animals that can be photographed including: Bison, Elk, Black Bears, Wolves and Red Deer.
US Locations Triple D Game Farm, Kalispell, Montana – Jay Deist has been involved in the filming and photography of captive animals since his father started the business in 1972. Triple D has several filming locations around the Flathead Valley amongst the Rocky Mountains of Montana. All the filming locations feature terrain very similar to Alberta. Animals available for photography at Triple D include: Grizzly and Black Bear, Siberian Tiger, Wolves, Snow Leopards, Lynx, Coyote, Bobcat, Mountain Lion, Fox, River Otter, Wolverine, Pine Marten, Whitetail Deer, Fisher, Mule Deer, Badger, Raccoon, Skunk and Porcupine. Triple D works with a number of professional photographers, including myself, to help their clients go home with the best possible images from a wildlife photography workshop. Bird’s Underwater Manatee Tours, Crystal River, Florida – This operation doesn’t deal with captive animals, but they offer a unique and interesting service for wildlife photographers nonetheless. They bring photographers to tour Kings Bay in search of Manatees. These gentle giants are extremely docile animals and make great underwater photography subjects as they are accessible through only the use of a wet suit, snorkel and water protected camera. Vince Shute Wildlife Sanctuary, Orr, Minnesota – This wildlife sanctuary lures Black Bears to the area for photographers to photograph. The sanctuary has been running for a number of years and has become very popular with the local bears who often visit in great numbers. Minnesota Wildlife Connection, Sandstone, Minnesota – This game farm provides prime opportunities for photographers to photograph their animals. The animals available for photography include: Bobcat, Cougar, Lynx, Fox, Coyote, Wolf, Whitetail Deer, Black and Cinnamon Bear, Pine Martin, Fisher, Ermine, Beaver and Badger. They also offer captive Birds of Prey sessions. Their photography sessions are set in habitat nestled along the scenic Kettle River, just 90 miles north of Minneapolis/St. Paul.

Page 40 of 42 All text and images © Paul Burwell Photography unless otherwise indicated
Selling your work Many photographers dream of being able to quit their day job and spend there time amongst nature living a life of Zen while making their living from their nature photography. However, the reality is that there are no professional photographers today who make their living strictly from the sale of their images. None. Zero. Zilch. Notta. I hope I’m making my point here.
Magazines If you want to get into the business of wildlife or nature photography, my advice is to write or learn to write marketable stories and articles to accompany your photos. It is much more likely that you will be able to sell a package of an article with strong accompanying photographs than just the photographs on their own. Magazines are inundated with photographers trying to sell their images. With the proliferation of digital photography, everybody and their dog, and I’ve seen some great photos from dogs, thinks they are, or are on the verge of becoming, a professional photographer. Once you’ve developed a portfolio of strong images, brain storm ideas for articles that you could write that could be supported by images you have. Most magazines are much more interested in a dynamic, well-written article than a few pretty pictures. Most magazines have their submission guidelines available on their web site for download or instructions for obtaining the submission guidelines in the front of the magazine. Follow these submission guidelines totally and completely. Ignoring or deviating from the guidelines is just asking for your submission to join the round bin of obscurity, the trash can.
Stock If you or I had started into the business of nature photography in the 1970’s or 80’s, we could probably have made a decent living off of the sale of our stock images. However, in today’s world of microstock agencies and their puny fees and payouts, the likelihood of making money from nature photography is extremely unlikely. Think you’ve got an amazing photo of Lake Louise? Well so do 100,000 other people and 99,950 are willing to give it away for free if someone asks. That’s not to say there is absolutely no money to be made in stock photography. If you can choose a niche that isn’t covered to death by a million other photographers and you develop an outstanding catalogue of unique images covering your niche, you can probably eek out a few hundred dollars a month in royalty payments.
Calendars, greeting cards, etc. Like magazine companies, the calendar and greeting card industry is usually inundated with nature photographers trying to sell their images. This doesn’t mean you shouldn’t try, you should just be prepared for rejection and realize that you’re likely going to need to be very persistent to make any headway.

Page 41 of 42 All text and images © Paul Burwell Photography unless otherwise indicated
Other information
Useful web sites
Wildlife Photography PBS Television Series Wild Photo Adventures TV with Doug Gardner. http://www.wildphotoadventures.com/
Nature Photography Web Sites Google+ Naturescapes.Net- http://www.naturescapes.net Nature Photographers Online Magazine- http://www.naturephotographers.net/ Outdoor Photography Canada Magazine Forum-
http://www.outdoorphotographycanada.com/ BirdPhotographers.Net- http://www.birdphotographers.net
Wildlife Photography Workshops and Tours Paul Burwell Photography – http://www.PaulBurwell.com

Page 42 of 42 All text and images © Paul Burwell Photography unless otherwise indicated
Paul Burwell Photography I am happy to answer any and all questions submitted via email regarding the Wildlife
Photography topics we covered in class or general photography questions. I also offer private Lightroom, Photoshop and digital workflow tutoring.
I have a blog, specifically on the topic of wildlife photography. You can find the blog at:
www.WildShots.ca I produce a free monthly newsletter that you can subscribe to through my web site
Web site: www.PaulBurwell.com Email: [email protected]