what's new in gerber omega 6 - gerbertechnology.com · omega 6.5 jobs can be saved back to...
TRANSCRIPT

P84773A Page 1 2/1/2017
What's New in GERBER OMEGA™ 6.5 Introduction
Omega 6.5 builds on OMEGA 6.0 features to offer even better design tools, easier and faster output, more PLT informational and presentation tools, and much more! Major features include:
Groups of groups or nested groups
PLT file costing of Gerber vinyls and GerberColor Foils, and automatic text character counting using the PLT Extract tool
New PDF export filter with support for clipping paths and named colors
Constraints for detail editing and line digitizing with the ALT key
Copy and paste or merge data from PLT Extract results into PLT files for customer presentations or job tracking
Easier back-cut decals
And much more!
See the table of contents of this document for a summary of features and complete information, and visit the Gerber website for the latest information.
Page 2
What's New in Gerber OMEGA 6.5
Click on a page number to jump to a topic. Press Alt+Left arrow key to jump back to the table of contents.
Introduction ................................................................................................................... 1
Omega 6.5 jobs can be saved back to previous OMEGA versions ........................... 4
Omega 6.5 can be loaded side-by-side with OMEGA 3.0 and later ........................... 4
Links to previous "What's New" documents .............................................................. 4
Groups of Groups or Nested Groups .......................................................................... 4
Groups of Groups Video .......................................................................................... 4
New "Ungroup All" function ......................................................................................... 4
Maintain original CMYK colors in imported CMYK EPS, AI, and PDF files .............. 5
CMYK Import Video ................................................................................................. 5
New PDF export capability ........................................................................................... 5
PDF Export Video .................................................................................................... 5
ALT Constraints now apply to detail edit and line/curve digitize tools .................... 5
6.5 ALT Constraints Video ....................................................................................... 5
ALT constraints added in OMEGA 6.0 can be selectively activated ......................... 6
6.5 ALT Constraints Video ....................................................................................... 6
Show Filled / Wireframe (F8), and mouse-based zoom and pan operations while in Composer dialog boxes ................................................................................................ 6
Dialog Box Zoom and Pan Video ............................................................................. 6
Outside Contour Only in the Outline dialog box ........................................................ 7
Outline Outside Contour Video................................................................................. 7
Shadow "Hide Originals" .............................................................................................. 7
Shadow Hide Originals Video .................................................................................. 7
Clipped images in Show Image wireframe mode only display the portion of the image inside the clipping path. .................................................................................... 9
Clipping Path Show Image Improvement Video ....................................................... 9
Plot Backcut parameters are now saved in the PRM file so the same job will use the same backcut settings when opened at a later time ............................................ 9
Backcut Improvements Video .................................................................................. 9

Page 3
Plot Backcut Dialog Box now has named settings that can be reused for subsequent backcut jobs ............................................................................................. 9
Backcut Improvements Video .................................................................................. 9
Automatic alignment performance is improved with backcutting .......................... 10
Vinyl colors from the current vinyl palette can be assigned using vinyl names. .. 10
Vinyl Assignment Video ......................................................................................... 10
"All Profiles" can now be used for the output profile in the Composer Color Management Dialog Box. ............................................................................................ 11
Improvements to the PLT Extract program ............................................................... 11
PLT Extract Video .................................................................................................. 11
PLT Extract can generate PLT file and output material costs for Gerber vinyls and GerberColor Foils ...................................................................................................... 11
Results from PLT Extract CSV files can be merged into PLT files for customer presentations and internal cost tracking. ................................................................... 11
PLT Extract creates useful summaries of PLT and PRM information .................. 11
PLT Extract now has a text counter that shows the number of Gerber text and small text characters in a PLT file .............................................................................. 11
Viewing and using the data created by the PLT Extract program .............................. 14
1) Insert new AutoText Field Codes in Composer that will automatically merge the CSV data into a PLT file OR ...................................................................................... 14
2) Copy and paste extracted CSV data from a spreadsheet directly into Composer. ................................................................................................................. 14
Add the PLT Extract fields to be merged into Composer through the use of a new "Insert Field" button in the Small Text dialog box or Text Entry Dialog box. .............. 15
Suggested Summary Field Codes ............................................................................. 17
PLT Extract and Field Code Automatic Merging Usage Notes: ................................. 22
PLT Extract now has a text counter that shows the number of Gerber text and small text characters in a PLT file. ...................................................................................... 23
Advanced PLT Extract and CSV Merge Topics ......................................................... 24
Variable Rows of Data based on Vinyls, Foils, Fonts, Layers .................................... 26
Choosing Vinyl and Foil Formats for Cost Extraction ................................................. 26
Changing Values in the Gerber Cost File .................................................................. 27
Make universal cost file changes by editing a cost CSV file ...................................... 29
Complete List of PLT Extract Fields........................................................................... 30
Miscellaneous .............................................................................................................. 34

Page 4
Omega 6.5 jobs can be saved back to previous OMEGA versions Usage: Composer File>Save as>Choose PLT version.
Omega 6.5 can be loaded side-by-side with OMEGA 3.0 and later Omega 6.5 can be loaded side by side OMEGA 6, 5, 4 and 3. At the end of the OMEGA 6.5 install, click NO when prompted to uninstall previous versions.
Links to previous "What's New" documents See below for links to previous "What's New in OMEGA" documents. What's New in OMEGA 6.0 What's New in OMEGA 5.0 What's New in OMEGA 4.0 What's New in OMEGA 3.0 What's New in OMEGA 2.6 What's New in OMEGA 2.5.1 What's New in OMEGA 2.5
Groups of Groups or Nested Groups
Groups of Groups Video
Usage: Select a series of objects>Arrange>Group. Select additional objects>Arrange>Group. Repeat as needed. Composer has the ability to create groups of objects that will select and deselect at the same time. Before OMEGA 6.5, if a series of grouped objects were grouped, a single large group would be created where an ungroup operation would break the group into its individual components. With OMEGA 6.5, multiple groups can be grouped, and ungroup operations will restore the previous groups instead of completely ungrouping into individual objects.
Groups can be grouped an unlimited number of times.
Any type of object in Composer can be part of a group including Text, Small text, vectors, images, dimensions, etc.
If a ReAction operation is performed on a group of groups, the groups formed by the ReAction operation are restored and the larger groups are not maintained. For example, text is grouped by each line when it is generated. If three lines of text are grouped, then the text is edited, the text will revert to three groups again.
If CTRL is used to temporarily break a group, then those objects are added to a different group, the original group is made smaller and a new larger group is created.
New "Ungroup All" function Usage: Select a group or group of groups>Arrange>Ungroup All. All items are removed from any groups, allowing for the selection of individual objects.

Page 5
Maintain original CMYK colors in imported CMYK EPS, AI, and PDF files
CMYK Import Video
When importing EPS, AI, and PDF files that are designed and saved as CMYK, the original CMYK values can be maintained when importing into Composer. Usage: Composer File>Open or Import
Choose the File type of EPS, AI or PDF (with "GSP 2.5 As Vectors" in the filter name)
Choose the File Name
Click on the checkbox labeled "Import Pure CMYK Values"
Click OK.
The file will import with the same CMYK values as the original file.
The original EPS, AI and PDF files must be designed and saved as CMYK files.
New PDF export capability
PDF Export Video
Usage: Design or open a file in Composer>Composer File Menu>Export or Save As>Choose PDF – Adobe Acrobat File Format (GSP65)>Click Options>Choose settings as needed>Name File as Needed>OK
This new export filter allows for the creation of PDF files for proofing and inkjet workflows. This filter offers the same export options as the GSP EPS format, including named spot and CMYK colors, and named paths and strokes for CutContours. In addition, named spot colors will look more vibrant when saving spot colors and vinyls as RGB colors if there is no reference to the named spot color in the target application where the PDF file is opened.
ALT Constraints now apply to detail edit and line/curve digitize tools 6.5 ALT Constraints Video
Usage: Hold down the ALT key while clicking and/or dragging with the tools below to limit the movement of the tool results. Default constraint values can be changed in Layout>Change Constraints.

Page 6
The following detail edit and digitize tool movement can be limited or constrained by holding the ALT key while clicking and dragging with the tools:
Cleaver (same as move constraint. Default constraint = 45 degrees)
Hook (same as move constraint. Default constraint = 45 degrees)
Slice and dice (same as move constraint. Default constraint = 45 degrees)
Freeform Pencil: Works best by holding ALT and clicking and dragging to draw individual straight lines as opposed to trying to change direction while holding ALT.
Digitize Line and Curve Tools (same as move constrain. Default constraint = 45 degrees)
ALT constraints added in OMEGA 6.0 can be selectively activated 6.5 ALT Constraints Video
The ALT key constraints added in OMEGA 6.0 can be activated or deactivated by turning on checkboxes in the Layout>Change Constraints dialog box. This can reduce conflicts between using the ALT key for handle move operations. Usage:
Composer Layout Menu>Change Constraints
Click on or off the constraints to be activated.
Click OK to exit the dialog box and activate these settings or click Preferences then OK to make these changes permanent.
Show Filled / Wireframe (F8), and mouse-based zoom and pan operations while in Composer dialog boxes
Dialog Box Zoom and Pan Video
Usage: The following display commands can now be used while in Composer dialog boxes:
Press F8 to toggle between filled and wireframe modes
Move the cursor over the Composer work-area and use the mouse wheel to pan up and down
Move the cursor over the Composer work-area and use CTRL+Mousewheel to zoom in and out
Move the cursor over the Composer work-area and use Shift+Mousewheel to pan left and right
Page 7
This feature is especially useful to adapt the preview when used with the OMEGA 6.0 ability to apply effects from Composer dialog boxes such as outline, distortion, warp, and fit text to path.
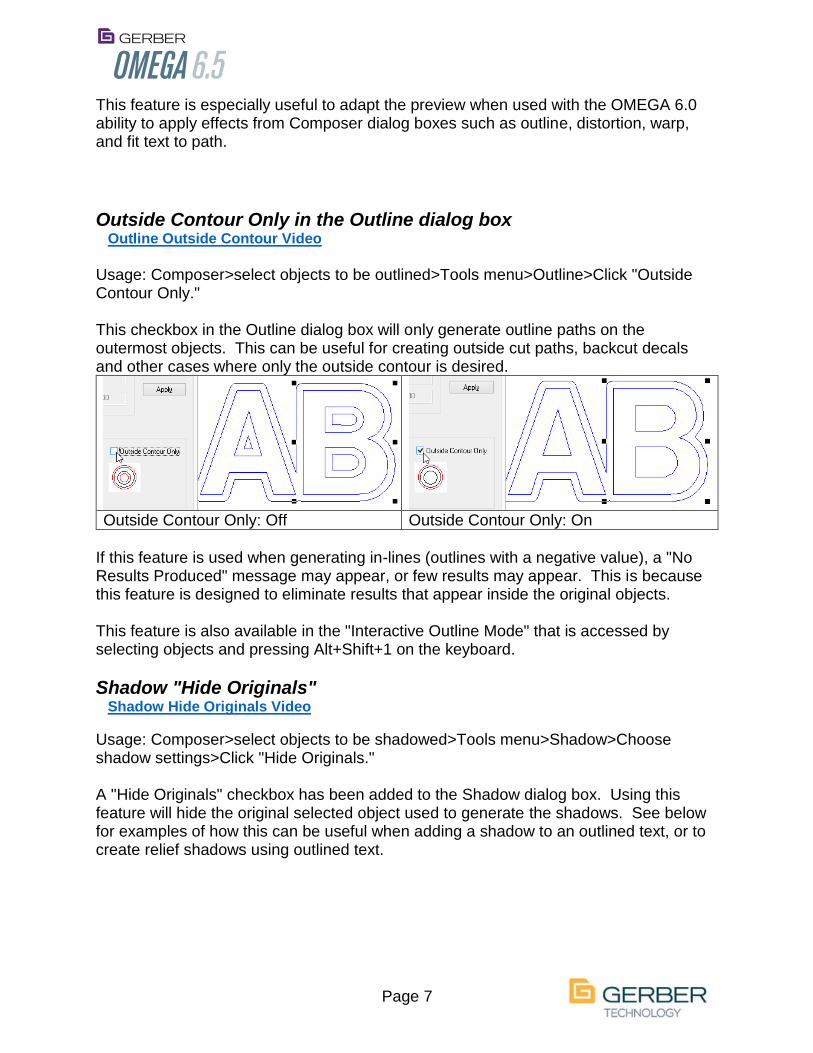
Outside Contour Only in the Outline dialog box Outline Outside Contour Video
Usage: Composer>select objects to be outlined>Tools menu>Outline>Click "Outside Contour Only." This checkbox in the Outline dialog box will only generate outline paths on the outermost objects. This can be useful for creating outside cut paths, backcut decals and other cases where only the outside contour is desired.
Outside Contour Only: Off Outside Contour Only: On
If this feature is used when generating in-lines (outlines with a negative value), a "No Results Produced" message may appear, or few results may appear. This is because this feature is designed to eliminate results that appear inside the original objects. This feature is also available in the "Interactive Outline Mode" that is accessed by selecting objects and pressing Alt+Shift+1 on the keyboard.
Shadow "Hide Originals" Shadow Hide Originals Video
Usage: Composer>select objects to be shadowed>Tools menu>Shadow>Choose shadow settings>Click "Hide Originals." A "Hide Originals" checkbox has been added to the Shadow dialog box. Using this feature will hide the original selected object used to generate the shadows. See below for examples of how this can be useful when adding a shadow to an outlined text, or to create relief shadows using outlined text.

Page 8
Original Selection Shadow Hide Originals ON (partial shadow)
Original Selection Shadow Hide Originals OFF (partial shadow)
Original Selection Shadow Hide Originals ON (composite shadow)
Original Selection Shadow Hide Originals OFF (composite shadow)
Page 9
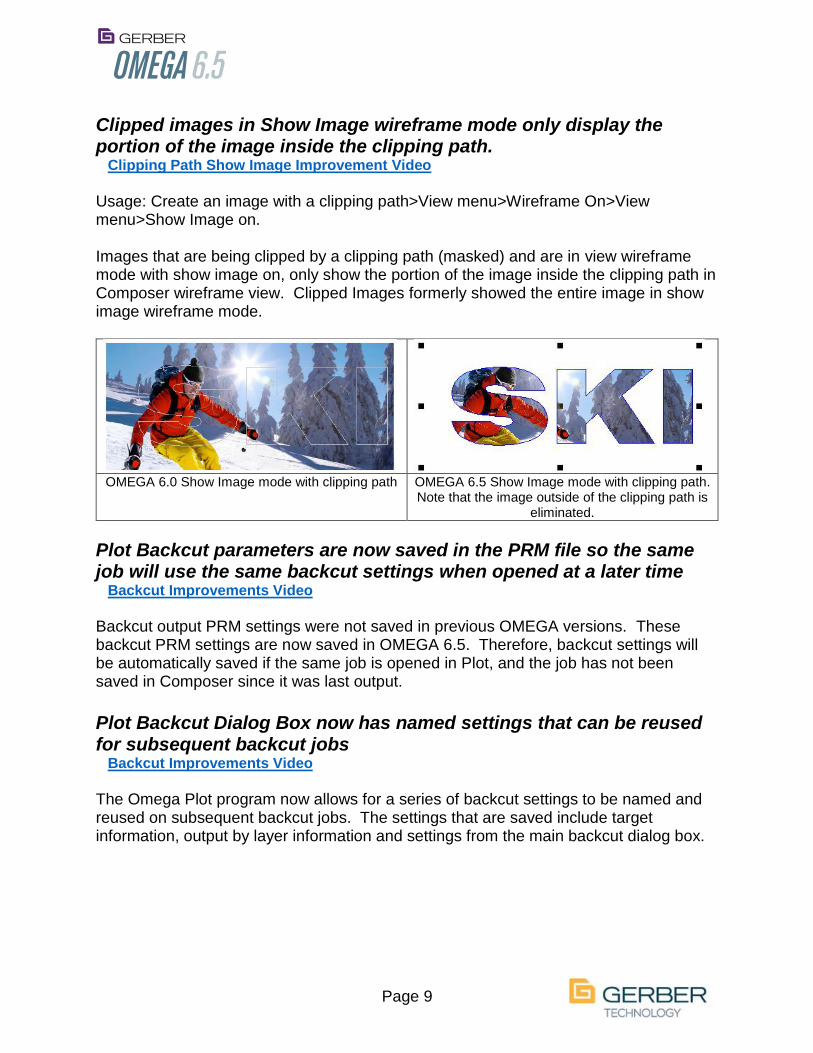
Clipped images in Show Image wireframe mode only display the portion of the image inside the clipping path.
Clipping Path Show Image Improvement Video
Usage: Create an image with a clipping path>View menu>Wireframe On>View menu>Show Image on. Images that are being clipped by a clipping path (masked) and are in view wireframe mode with show image on, only show the portion of the image inside the clipping path in Composer wireframe view. Clipped Images formerly showed the entire image in show image wireframe mode.
OMEGA 6.0 Show Image mode with clipping path OMEGA 6.5 Show Image mode with clipping path.
Note that the image outside of the clipping path is eliminated.
Plot Backcut parameters are now saved in the PRM file so the same job will use the same backcut settings when opened at a later time
Backcut Improvements Video
Backcut output PRM settings were not saved in previous OMEGA versions. These backcut PRM settings are now saved in OMEGA 6.5. Therefore, backcut settings will be automatically saved if the same job is opened in Plot, and the job has not been saved in Composer since it was last output.
Plot Backcut Dialog Box now has named settings that can be reused for subsequent backcut jobs
Backcut Improvements Video
The Omega Plot program now allows for a series of backcut settings to be named and reused on subsequent backcut jobs. The settings that are saved include target information, output by layer information and settings from the main backcut dialog box.

Page 10
Automatic alignment performance is improved with backcutting Automatic alignment more properly locates the enVision™ 375 toolhead when cutting the liner in the backcut process. Due to slight differences from cutter to cutter, it is recommended that "Pause before cutting" be left on to allow for adjustments before cutting.
Vinyl colors from the current vinyl palette can be assigned using vinyl names.
Vinyl Assignment Video
Previous OMEGA versions only allowed vinyls to be assigned by clicking on a color in the vinyl palette. Vinyl colors can now be assigned by name in the Image Fill Dialog Box. Omega CS can now access the Image fill Dialog Box to access this vinyl

Page 11
assignment feature. OMEGA CS cannot access the other fill features in the fill dialog box.
Select the objects that require the vinyl color to be assigned or changed
Go into the image fill dialog box (click on the bucket or press 1)
Click on the Vinyl Palette button
Click on the vinyl name dropdown and choose the needed color OR type the first few letters of the needed color.
Type the first letter and press the down arrow to scroll through all the colors that begin with that letter.
Click the select button, then click OK to assign the color and exit the fill dialog box.
"All Profiles" can now be used for the output profile in the Composer Color Management Dialog Box. Previously, All Profiles was only available if ImageRIP was installed.
Improvements to the PLT Extract program PLT Extract Video
PLT Extract can generate PLT file and output material costs for Gerber vinyls and GerberColor Foils
Results from PLT Extract CSV files can be merged into PLT files for customer presentations and internal cost tracking.
PLT Extract creates useful summaries of PLT and PRM information
PLT Extract now has a text counter that shows the number of Gerber text and small text characters in a PLT file
The PLT Extract program introduced with OMEGA 6.0 extracts useful design and material information from PLT files. Also, output information is extracted from output PRM files if the same job is output or previewed from the Omega Plot program.

Page 12
The OMEGA 6.5 PLT Extract can be linked to a material cost file. The extracted CSV file displays Composer PLT file vinyl and foil costs, and also displays Omega Plot output costs if the job is output to Plot using output all or opened in PLOT.
The Composer material costs in extracted CSV files are shown as US Dollar cost per square foot and as cost per linear foot.
PLOT material costs are only shown as US Dollar cost per linear foot. Therefore, Plot output linear foot material costs will be higher than Composer square foot costs.
NOTE: All PLT Extract costs are estimates. Gerber is not responsible for incorrect or improper use of the data. All costing and pricing must be verified by the user. PLT Extract Usage:
Create and save a PLT file. Output the file to Plot if needed. Run the OMEGA 6.5 PLT Extract program.
1. To include vinyl and foil costs, click on Select Cost File.
Select the default cost file located at c:\jobs\Gerber Cost File.CSV.
2. Select the PLT file with the data to be extracted.
3. Click on Extract to CSV to save with the same file name as the PLT file, or click on the three dots to the right to Save As to enter a different file name.
2.
1.
3. 3.

Page 13
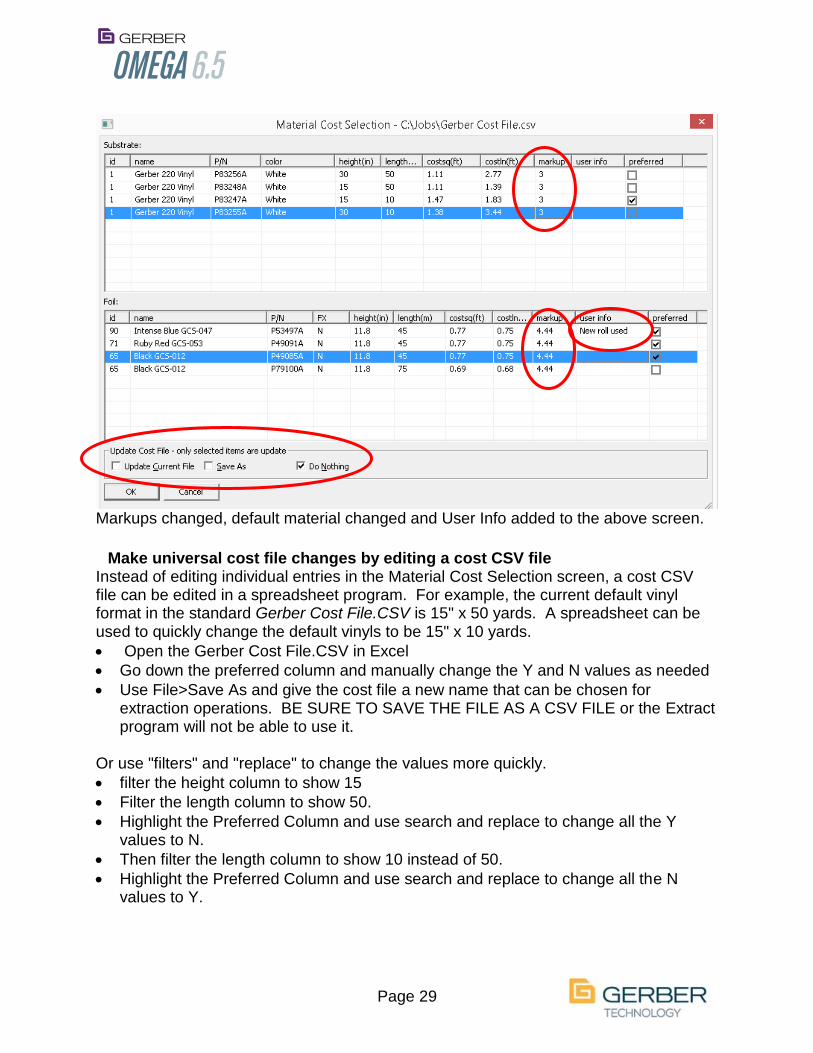
4. A Material Cost Selection screen will appear. This screen shows the vinyl and foil colors used in the job.
Click OK to accept the default formats/material costs for those colors. To choose different material formats for the colors in the job, click on the needed version of the vinyl or foils, then click OK to create the extracted file.
5. In the Extract program, click on "Show in Folder" to see the extracted CSV file. The CSV file is located in the same folder as the PLT file.
6. The extracted CSV file will be highlighted. Press enter or double click the CSV file to show the results in Excel (or whatever program is associated with CSV files).
Here are some examples of different sections of an extracted CSV file, as seen in a spreadsheet program.

Page 14
Viewing and using the data created by the PLT Extract program The result of an extracted PLT file is a CSV file or an RTF file. The recommended format is a CSV file (Comma Separated Values). The extracted CSV file has many information fields extracted from a PLT file that can be viewed in a spreadsheet for informational purposes, used for customer proofs, internal operational information or for other business purposes. Additionally, this information can be merged from an extracted CSV file into a PLT file for customer presentations or other presentations. This information can be moved from an extracted CSV file to a PLT file in two ways: 1) Insert new AutoText Field Codes in Composer that will automatically merge
the CSV data into a PLT file OR 2) Copy and paste extracted CSV data from a spreadsheet directly into
Composer.
1. Insert new PLT Extract fields in Composer that will automatically merge data from an extracted CSV data into the Composer file.
Once the field codes are in Composer, select the field codes, go to Tools>Repeats/Merge, click on the first tab and set repeats to x:1 and y:1, click on the sixth tab, choose the extracted CSV file then click OK or Apply.
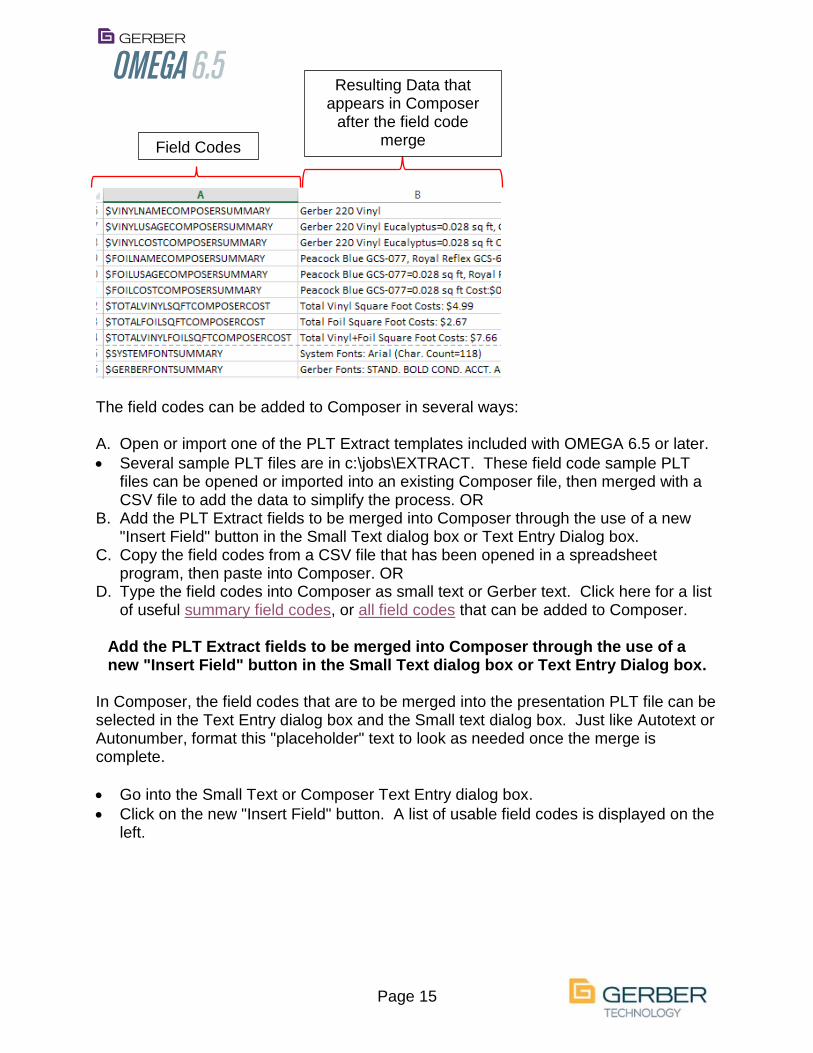
Column A of each CSV file is a series of field codes. These field codes correspond to data in column B of the CSV file. These field codes can be added to Composer, then can be used to automatically merge extracted data from a specific CSV file. This process is much like existing AutoText functionality.
Resulting Data Field Codes
Page 15
The field codes can be added to Composer in several ways: A. Open or import one of the PLT Extract templates included with OMEGA 6.5 or later.
Several sample PLT files are in c:\jobs\EXTRACT. These field code sample PLT files can be opened or imported into an existing Composer file, then merged with a CSV file to add the data to simplify the process. OR
B. Add the PLT Extract fields to be merged into Composer through the use of a new "Insert Field" button in the Small Text dialog box or Text Entry Dialog box.
C. Copy the field codes from a CSV file that has been opened in a spreadsheet program, then paste into Composer. OR
D. Type the field codes into Composer as small text or Gerber text. Click here for a list of useful summary field codes, or all field codes that can be added to Composer.
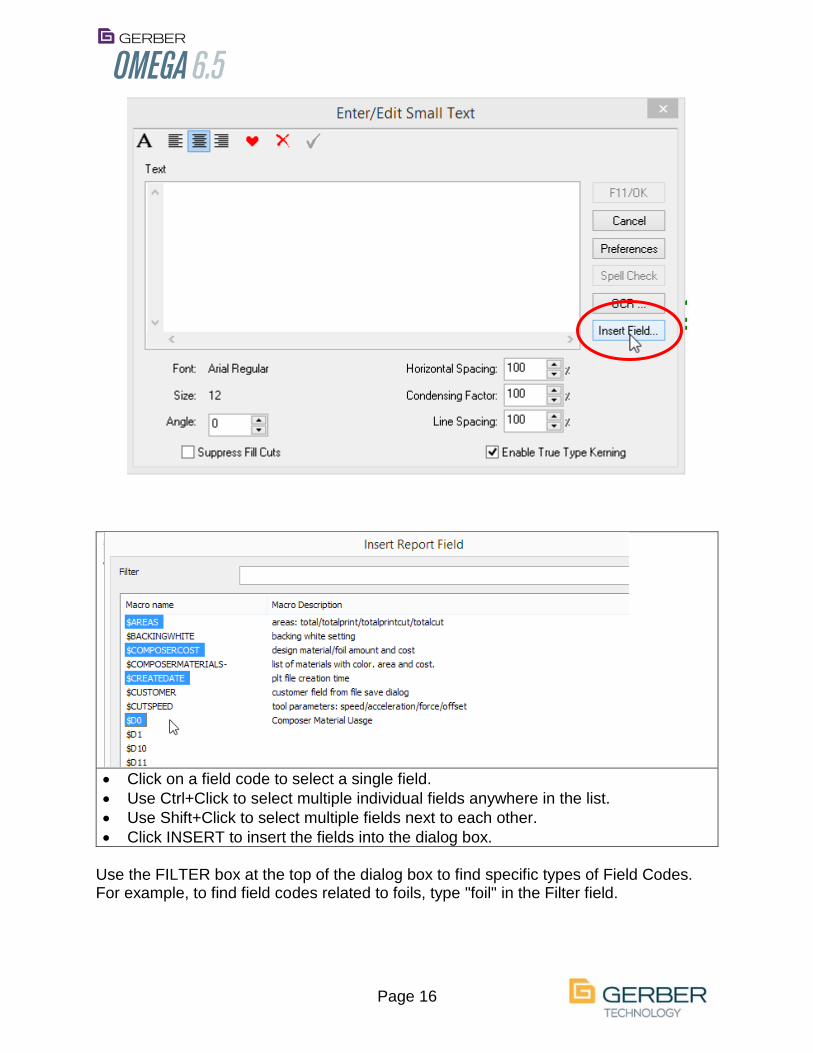
Add the PLT Extract fields to be merged into Composer through the use of a new "Insert Field" button in the Small Text dialog box or Text Entry Dialog box.
In Composer, the field codes that are to be merged into the presentation PLT file can be selected in the Text Entry dialog box and the Small text dialog box. Just like Autotext or Autonumber, format this "placeholder" text to look as needed once the merge is complete.
Go into the Small Text or Composer Text Entry dialog box.
Click on the new "Insert Field" button. A list of usable field codes is displayed on the left.
Resulting Data that appears in Composer
after the field code merge Field Codes
Page 16
Click on a field code to select a single field.
Use Ctrl+Click to select multiple individual fields anywhere in the list.
Use Shift+Click to select multiple fields next to each other.
Click INSERT to insert the fields into the dialog box.
Use the FILTER box at the top of the dialog box to find specific types of Field Codes. For example, to find field codes related to foils, type "foil" in the Filter field.

Page 17
Note: When a field code is entered in Composer, the data from column B is displayed when the merge occurs in Composer.
Suggested Summary Field Codes The following list includes suggested Field Codes that summarize a series of columns and or rows of information in a single field code:
Field Code Description Example
$FULLNAME plt file path C:/jobs/extract/extract example simple.plt
$EXTRACTDATE Date the CSV file was extracted
November 14,2016 12:35:36 PM
$CREATEDATE Date the plt file was created
October 07,2016 03:44:46 PM
$MODIFYDATE plt file modified date and time
January 19,2017 03:10:09 PM
$COMPOSERVINYLFOILCOSTSUMMARY Summarizes Composer vinyl and foil costs
Total Composer vinyl+foil cost sq(ft)=7.656
$DESIGNTIME Summarizes Composer design time
Design Time: 00 h 36 min 27 sec
$DESIGNSIZE size of plt file in bytes Design Size: Width=33.185 inches Height=11.750 inches
$PERIMETERS distances: total/ totalprint/ totalprintcut/ totalcut
Perimeters: All=129.706 inches Print=36.947 inches Print/Cut=85.431 inches Cut=83.637 inches
$SYSTEMFONTSUMMARY system font usage summary with character count
System Fonts: Arial (Char. Count=2553)
$GERBERFONTSUMMARY Gerber font usage summary with character count
Gerber Fonts: HELV.BOLD COND.ACCT.AK.REV.C (Char. Count=4), GOUDY HANDTOOLED ACCT.A.K.REV.C (Char. Count=3)
$VINYLNAMECOMPOSERSUMMARY all vinyl names used in Composer job
Composer vinyl names: Gerber 220 Vinyl White, Gerber 220 Vinyl Violet
$FOILNAMECOMPOSERSUMMARY all foil names used in Composer job
Composer foil names: Intense Blue GCS-047, Ruby Red GCS-053, Black GCS-012, Jet Black GCX-012,
$VINYLUSAGECOMPOSERSUMMARY all vinyls used in Composer job with height and width
Composer vinyl usage: Gerber 220 Vinyl White=0.087 sq ft, Gerber 220 Vinyl Violet=0.034 sq ft,
$FOILSUSAGECOMPOSERSUMMARY all foils used in Composer job with height and width
Composer foil usage: Intense Blue GCS-047=0.013 sq ft, Ruby Red GCS-053=0.018 sq ft, Black GCS-012=0.032 sq ft, Jet Black GCX-012=0.002 sq ft,

Page 18
$VINYLCOSTCOMPOSERSUMMARY all vinyls used in Composer job with sq ft and cost
Composer vinyl cost: Gerber 220 Vinyl White=0.087 sq ft Cost:$0.10, Gerber 220 Vinyl Violet=0.034 sq ft Cost:$0.05,
$FOILCOSTCOMPOSERSUMMARY all foils used in Composer job with sq ft and cost
Composer foil cost: Intense Blue GCS-047=0.013 sq ft Cost:$0.01, Ruby Red GCS-053=0.018 sq ft Cost:$0.01, Black GCS-012=0.032 sq ft Cost:$0.02, Jet Black GCX-012=0.002 sq ft Cost:$0.00,
$TOTALVINYLSQFTCOMPOSERCOST total Composer job vinyl sq ft cost
Composer Total Vinyl Square Foot Costs: $0.15
$TOTALFOILSQFTCOMPOSERCOST total Composer job foil sq ft cost
Composer Total Foil Square Foot Costs: $0.04
$TOTALVINYLFOILSQFTCOMPOSERCOST total Composer job vinyl+foil sq ft cost
Composer Total Vinyl+Foil Square Foot Costs: $0.19
$VINYLNAMEPLOTSUMMARY output Plot summary of all vinyls used in job
Plot vinyl names: Gerber 220 Vinyl
$VINYLUSAGEPLOTSUMMARY output Plot summary of all vinyls used in job with height and width
Plot vinyl usage: Gerber 220 Vinyl=1.930 sq ft,
$VINYLCOSTPLOTSUMMARY output Plot summary of all vinyls used in job with sq ft and cost
Plot vinyl cost: Gerber 220 Vinyl=1.930 sq ft Cost:$2.14,
$FOILNAMEPLOTSUMMARY output Plot summary of all foils used in job
Plot foil names: Intense Blue GCS-047, Ruby Red GCS-053, Black GCS-012, Jet Black GCX-012,
$FOILUSAGEPLOTSUMMARY output Plot summary of all foils used in job with sq ft usage
Plot foil usage: Intense Blue GCS-047=0.971 sq ft, Ruby Red GCS-053=1.204 sq ft, Black GCS-012=1.275 sq ft, Jet Black GCX-012=0.703 sq ft,
$FOILCOSTPLOTSUMMARY output Plot summary of all foils used in job with sq ft usage and cost
Plot foil cost: Intense Blue GCS-047=0.971 sq ft Cost:$0.67, Ruby Red GCS-053=1.204 sq ft Cost:$0.83, Black GCS-012=1.275 sq ft Cost:$0.88, Jet Black GCX-012=0.703 sq ft Cost:$0.54,
$TOTALVINYLSQFTPLOTCOST output Plot total vinyl sq ft cost Plot Total Vinyl Square Foot Costs: $2.14
$TOTALFOILSQFTPLOTCOST output Plot total foil sq ft cost Plot Total Foil Square Foot Costs: $2.92
$TOTALVINYLFOILSQFTPLOTCOST output Plot total vinyl+foil sq ft cost
Plot Total Vinyl+Foil Square Foot Costs: $5.06
Here is a simple example of using field codes to merge CSV data into Composer:
PLT Extract creates information about the Gerber fonts and Truetype/Opentype fonts used in a PLT file. The Gerber font information can be accessed by using the field code $GerberFontSummary. In Composer, use small text (recommended) or Gerber text to type the field code $GerberFontSummary (capitalization not important). The font, color, size and print/cut settings of the original text will be used for the merged data.
Select $GerberFontSummary in Composer, then go to Tools>Repeats / Merge.
Page 19
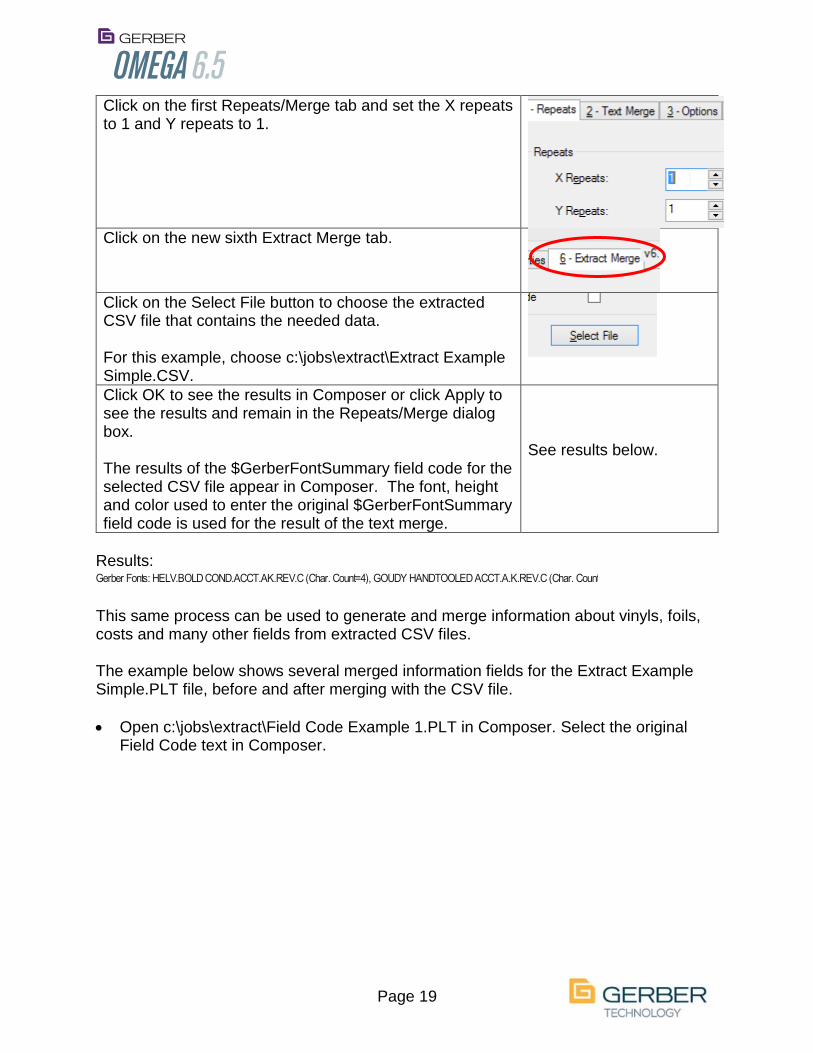
Click on the first Repeats/Merge tab and set the X repeats to 1 and Y repeats to 1.
Click on the new sixth Extract Merge tab.
Click on the Select File button to choose the extracted CSV file that contains the needed data. For this example, choose c:\jobs\extract\Extract Example Simple.CSV.
Click OK to see the results in Composer or click Apply to see the results and remain in the Repeats/Merge dialog box. The results of the $GerberFontSummary field code for the selected CSV file appear in Composer. The font, height and color used to enter the original $GerberFontSummary field code is used for the result of the text merge.
See results below.
Results:
This same process can be used to generate and merge information about vinyls, foils, costs and many other fields from extracted CSV files. The example below shows several merged information fields for the Extract Example Simple.PLT file, before and after merging with the CSV file.
Open c:\jobs\extract\Field Code Example 1.PLT in Composer. Select the original Field Code text in Composer.
Gerber Fonts: HELV.BOLD COND.ACCT.AK.REV.C (Char. Count=4), GOUDY HANDTOOLED ACCT.A.K.REV.C (Char. Count=3)

Page 20
Go to Tools>Repeats/Merge
Click on Tab 1 set repeats to x:1 and y:1
Click on Tab 6
Click SELECT FILE
Choose the file c:\jobs\extract\EXTRACT EXAMPLE SIMPLE.CSV>Click OK or Apply
Merged Results:
The job and merged data can be formatted into a presentation style, then exported to a JPG, PDF or other format as a presentation.

Page 21
2. Copy and paste extracted CSV data from a spreadsheet into Composer
As an alternative to merging the data into Composer through the use of Field Codes, the extracted data can simply be copied from the CSV file and pasted into Composer.
Extract the data using the PLT Extract program. Open the extracted CSV file in a spreadsheet program.
Be sure to adjust the column width, font, font height, justification, bolding, etc. in the spreadsheet program to avoid overlapping text in Composer.
Highlight the needed fields in the spreadsheet and copy (CTRL+C, or Edit>Copy, or right click>copy). If the needed data occurs over several columns select column A to get the field code description, as well as columns B, C, D, E etc as needed.
Switch to Composer and Edit>Paste or Edit>Paste Here.
Again, adjust the formatting in the spreadsheet to reduce or avoid text editing in Composer.

Page 22
Click OK to accept the default font substitutions.
The data appears in
Composer, with formatting similar to the original spreadsheet formatting.
Be sure to adjust the column width, font, font height, bolding, etc. in the spreadsheet program to avoid overlapping text in Composer.
Repeat the above
copy/paste steps to get different information from the CSV file into Composer.
Arrange and format the graphics and data in Composer as needed.
Print or save.
PLT Extract and Field Code Automatic Merging Usage Notes:
Another simple way to get field codes into Composer is to copy the field codes from column A of an extracted file and paste into Composer. The fields can then be merged using tab 6 of the Tools>Repeats/Merge dialog box.
All costs are estimates. Gerber is not responsible for incorrect or improper use of the data. All costing and pricing must be verified by the user.
Composer square foot vinyl and foil costs are based on the square foot size of the shapes that use the materials. Plot vinyl and foil costs are linear costs and are based on the length of the shapes times the linear material costs.
If using Composer materials for costing, keep the size of the PLT file to be less than the size of the output device. This will provide a more accurate cost especially for linear foot costing, because Composer does not calculate for paneled jobs.
Page 23
The PLT Extract can create a CSV or an RTF file. The recommended format is a CSV file (Comma Separated Values). A CSV file is a simple file format that allows for the orderly presentation of multiple data values, with each data value separated by a comma.
It is strongly recommended that these CSV files are viewed in a spreadsheet program such as Excel or Google Sheets. The use of a spreadsheet program shows each data value in a column instead of being separated by a comma.
If viewing a CSV file in a basic editor such as Notepad, each field value is separated by a comma.
An RTF file (rich text format) can be opened in a word processing program such as Word or Google Docs. If an RTF file is created, the data is separated by commas, PLUS an image/ picture of the PLT file is created at the end of the RTF.
If the job is output from GSPPlot and a PRM file exists, actual output material usage and linear costs will be included.
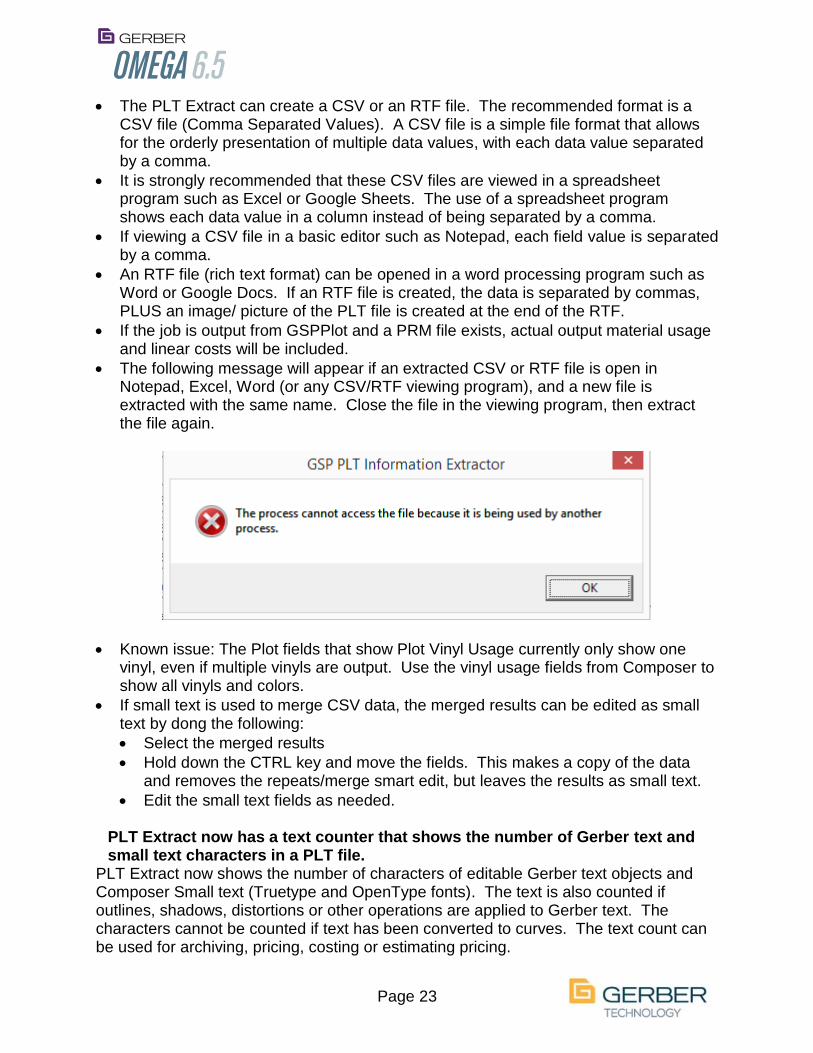
The following message will appear if an extracted CSV or RTF file is open in Notepad, Excel, Word (or any CSV/RTF viewing program), and a new file is extracted with the same name. Close the file in the viewing program, then extract the file again.
Known issue: The Plot fields that show Plot Vinyl Usage currently only show one vinyl, even if multiple vinyls are output. Use the vinyl usage fields from Composer to show all vinyls and colors.
If small text is used to merge CSV data, the merged results can be edited as small text by dong the following:
Select the merged results
Hold down the CTRL key and move the fields. This makes a copy of the data and removes the repeats/merge smart edit, but leaves the results as small text.
Edit the small text fields as needed.
PLT Extract now has a text counter that shows the number of Gerber text and small text characters in a PLT file.
PLT Extract now shows the number of characters of editable Gerber text objects and Composer Small text (Truetype and OpenType fonts). The text is also counted if outlines, shadows, distortions or other operations are applied to Gerber text. The characters cannot be counted if text has been converted to curves. The text count can be used for archiving, pricing, costing or estimating pricing.
Page 24
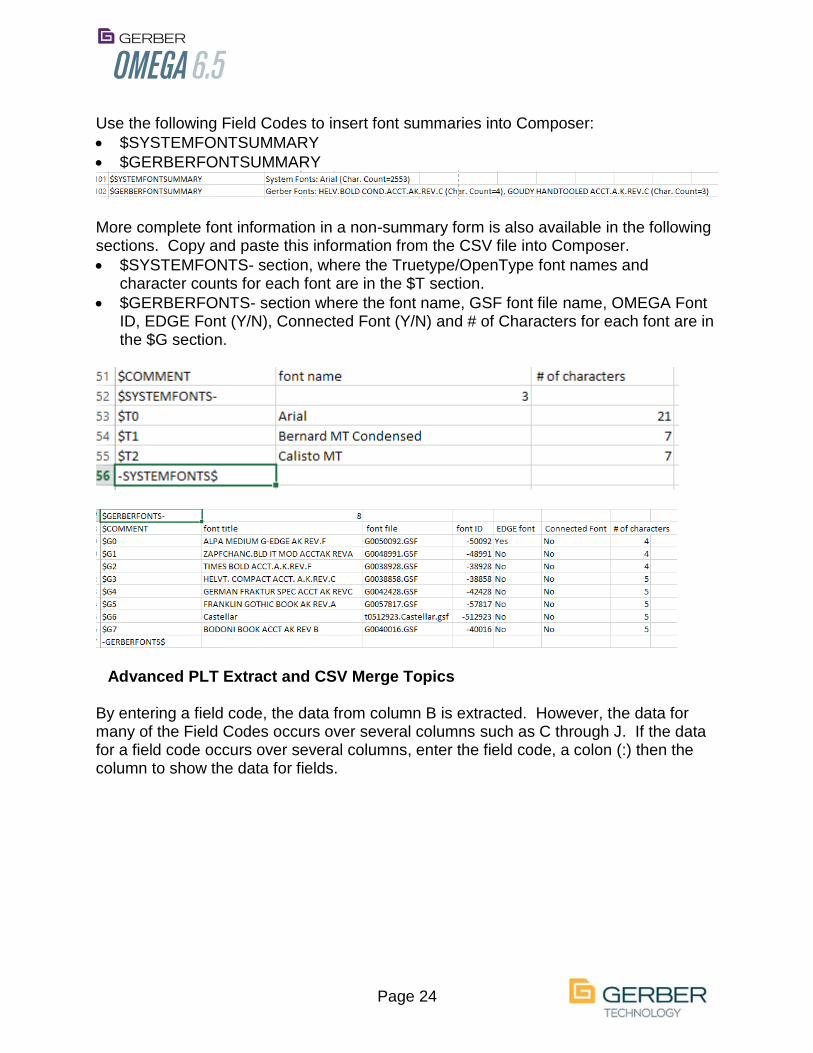
Use the following Field Codes to insert font summaries into Composer:
$SYSTEMFONTSUMMARY
$GERBERFONTSUMMARY
More complete font information in a non-summary form is also available in the following sections. Copy and paste this information from the CSV file into Composer.
$SYSTEMFONTS- section, where the Truetype/OpenType font names and character counts for each font are in the $T section.
$GERBERFONTS- section where the font name, GSF font file name, OMEGA Font ID, EDGE Font (Y/N), Connected Font (Y/N) and # of Characters for each font are in the $G section.
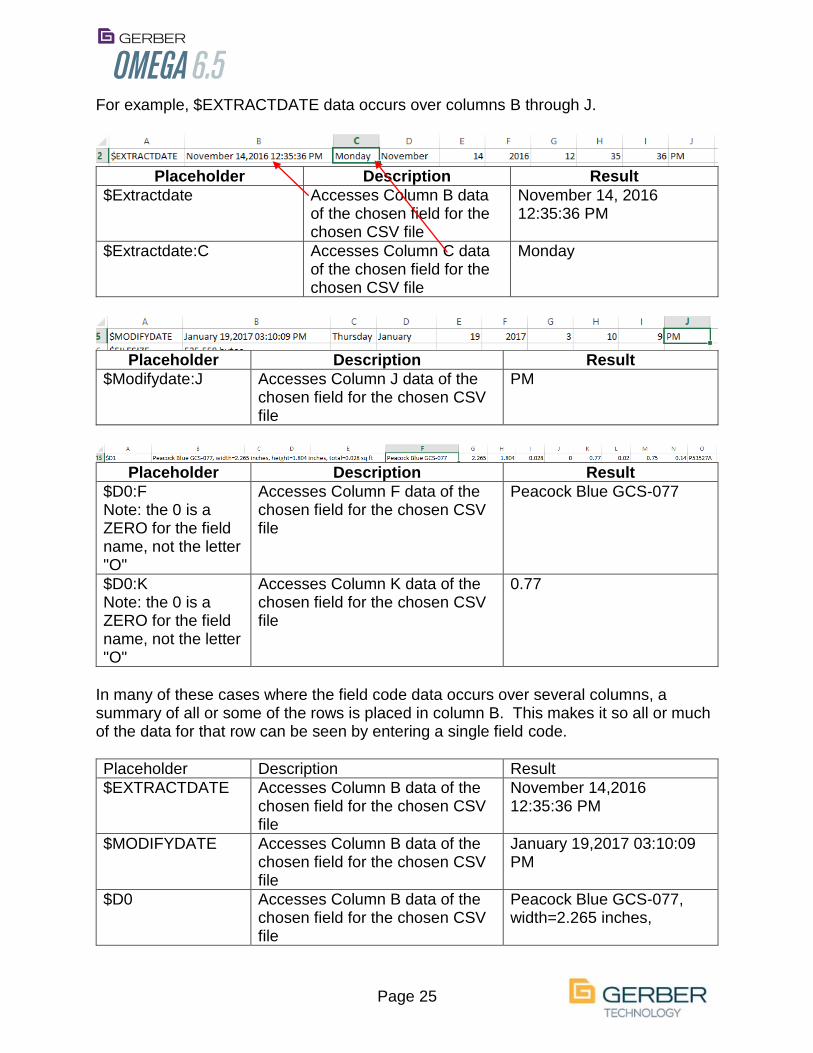
Advanced PLT Extract and CSV Merge Topics By entering a field code, the data from column B is extracted. However, the data for many of the Field Codes occurs over several columns such as C through J. If the data for a field code occurs over several columns, enter the field code, a colon (:) then the column to show the data for fields.
Page 25
For example, $EXTRACTDATE data occurs over columns B through J.
Placeholder Description Result
$Extractdate Accesses Column B data of the chosen field for the chosen CSV file
November 14, 2016 12:35:36 PM
$Extractdate:C Accesses Column C data of the chosen field for the chosen CSV file
Monday
Placeholder Description Result
$Modifydate:J Accesses Column J data of the chosen field for the chosen CSV file
PM
Placeholder Description Result
$D0:F Note: the 0 is a ZERO for the field name, not the letter "O"
Accesses Column F data of the chosen field for the chosen CSV file
Peacock Blue GCS-077
$D0:K Note: the 0 is a ZERO for the field name, not the letter "O"
Accesses Column K data of the chosen field for the chosen CSV file
0.77
In many of these cases where the field code data occurs over several columns, a summary of all or some of the rows is placed in column B. This makes it so all or much of the data for that row can be seen by entering a single field code.
Placeholder Description Result
$EXTRACTDATE Accesses Column B data of the chosen field for the chosen CSV file
November 14,2016 12:35:36 PM
$MODIFYDATE Accesses Column B data of the chosen field for the chosen CSV file
January 19,2017 03:10:09 PM
$D0 Accesses Column B data of the chosen field for the chosen CSV file
Peacock Blue GCS-077, width=2.265 inches,
Page 26
height=1.804 inches, total=0.028 sq ft
NOTE: Only the data is inserted into the merged results, so it may be more informative to include a field description before the Merge Field. For example, enter the following: Material #1 = $D0: In Composer this will show up as Material #1 = Perfect Match Red-Gerber 220 Vinyl
Variable Rows of Data based on Vinyls, Foils, Fonts, Layers Different PLT files have different numbers of vinyl colors, foil colors, layers, Gerber fonts and Truetype fonts. Therefore, when an extraction occurs, different numbers of certain fields are generated. For example, $D0 through $D(n) (where n is a variable number) contains the Composer vinyls and foils for a job. If a job only has 1 vinyl, then only $D0 will appear in the extraction file. If a PLT file has 15 vinyls and foils, then $D0 through $D14 will appear in the extraction file. In the first case, only $D0 is required in Composer. In the second case, $D0 through $D14 are required in Composer. This specific information might be useful if using a database to extract specific information from an extracted CSV file. Otherwise, simply use the summary field codes as shown above. To deal with these variable rows of data, summary field codes can be used, or the information can be copied from the CSV file and pasted into Composer or other programs. A list of all the addressable field codes are listed at the end of this document.
Choosing Vinyl and Foil Formats for Cost Extraction The same vinyl and foil colors have different formats and costs. For example, Bright Yellow vinyl is available in 15", 24", 30" and 48" widths, and as 10 yard and 50 yard rolls of each width. Black GCS-012 GerberColor Foil is available as an FX foil vs Edge 1&2 foil, and is available in 45 meter, 75 meter and 91 meter lengths. Each version of the same color has a different price per square foot. To allow for accurate pricing, a screen will appear asking the user to accept the default formats, or choose the preferred formats for the materials in the job. The following material categories are automatically checked and highlighted as "preferred" materials by default.
Default Vinyl format = 15" x 50 yards
Default EDGE FX and EDGE 1&2 foils = 45 meter (if available)
Default EDGE machine type (EDGE 1&2 vs EDGE FX) is based on the following:
If only a PLT file exists and the job has not been output, the EDGE is defined in Composer>File>Device Select.
If the job has been output from PLOT and a PRM file exists with a specific EDGE defined as the output device, the EDGE type in the PRM file is used to select the EDGE foil format.

Page 27
If these formats are acceptable as the default, simply click OK to use these formats for the job costing. Otherwise, click on the specific material formats for the colors in the job that should be used for the costing. To save the new material formats for future use, either click on "Update existing file" or "Create new File." Use the required cost file for the next extraction.
NOTE: It is strongly advised that the updated cost file is saved with a new name.
Changing Values in the Gerber Cost File The default cost file is called Gerber Cost File.CSV. This file includes the Gerber Vinyls and Foils with the following columns of information: Vinyls
Id Internal Omega ID. Do not change.
Name Palette name in Composer and Plot
P/N Gerber part number for that vinyl color at the specified size
Color Color as specified in the Omega palette
height(in) Height of material in inches
length(yd) Length of material in yards
costsq(ft) cost of 1 square foot of material based on width, length and Cost/roll
costln(ft) cost per linear foot based on length and cost/roll
Markup User value to mark up the cost per square foot and cost per linear foot
User info User added notes
Preferred Which size roll should be used as the default size for any given color
Cost/Roll Gerber list price for that part number. Used to calculate cost per square foot and cost per linear foot.
GerberColor Foils
Id Internal Omega ID. Do not change.
Name GerberColor Foil type and color code as in Composer and Plot
P/N Gerber part number for that foil at the specified size
FX Is this foil an FX foil? Y = Yes, No = Edge 1&2 foil
height(in) Height of foil in inches. All foils are 11.8 inches
length(m) Length of foil in meters
costsq(ft) Dollar cost of 1 square foot of that foil based on width, length and cost/roll.
costln(ft) Dollar cost per linear foot based on length and cost/roll.

Page 28
Markup User value to mark up the cost per square foot and cost per linear foot
user info User added notes
Preferred Which size roll should be used as the default size for any given color
Cost/Roll Gerber list price for that part number. Used to calculate cost per square foot and cost per linear foot.
The following cost file fields can be edited in the Material Cost Selection screen that appears after clicking the "Extract" button. To edit these fields, double click on the existing value and enter a new value as follows:
costsq(ft): Double click and enter a new value
costln(ft): Double click and enter a new value
Markup: Double click and enter a value as follows:
To mark up by a percentage, enter a percent value such as 200%. This will increase the material cost in that extracted file for that material to increase by the markup percentage. For example, if the total sq ft cost for yellow vinyl is $1.50 and a markup of 200% is used, the total cost for that yellow vinyl will be 3.00 (1.50*2).
To mark up by an absolute dollar value, enter an absolute value such as 2.25 without a percent sign. This will increase the material cost in that extracted file for that material to increase by the markup value. For example, if the total sq ft cost for yellow vinyl is $1.50 and a markup of 2.25 is used, the total cost for that yellow vinyl will be 3.75 (1.50+2.25).
user info: User notes about a material.
Preferred: click on another material size for a color shown. This new format will be shown as the automatically selected format if that color is used in a future job.
If any of the above changes are made to the cost file in the Material Cost Selection screen, the Cost file used can be optionally updated to permanently reflect the changes. The updated cost file must be chosen and used for future PLT extractions:
Update Current File: Makes changes to the existing cost file. These changes will be used in future extraction operations if this cost file is chosen
Save As: Makes changes to a new Cost CSV file. The user is prompted for a new file name. These changes will be used in future extraction operations if the newly named cost file is chosen.
Do Nothing: Only uses the changes for the current extraction. The costs are not saved in any cost file.
Page 29
Markups changed, default material changed and User Info added to the above screen.
Make universal cost file changes by editing a cost CSV file
Instead of editing individual entries in the Material Cost Selection screen, a cost CSV file can be edited in a spreadsheet program. For example, the current default vinyl format in the standard Gerber Cost File.CSV is 15" x 50 yards. A spreadsheet can be used to quickly change the default vinyls to be 15" x 10 yards.
Open the Gerber Cost File.CSV in Excel
Go down the preferred column and manually change the Y and N values as needed
Use File>Save As and give the cost file a new name that can be chosen for extraction operations. BE SURE TO SAVE THE FILE AS A CSV FILE or the Extract program will not be able to use it.
Or use "filters" and "replace" to change the values more quickly.
filter the height column to show 15
Filter the length column to show 50.
Highlight the Preferred Column and use search and replace to change all the Y values to N.
Then filter the length column to show 10 instead of 50.
Highlight the Preferred Column and use search and replace to change all the N values to Y.
Page 30
Use File>Save As and give the cost file a new name that can be chosen for extraction operations. BE SURE TO SAVE THE FILE AS A CSV FILE or the Extract program will not be able to use it.
The same concept can be used to change the Material costs, markups, or any other editable value to a customized value. Always use SAVE AS to preserve the original cost file if needed. Excel spreadsheet operations can also be performed on the entries in the cost file as long as the final file format is saved as a CSV file.
Complete List of PLT Extract Fields
Field codes marked with * are recommended fields that include useful information with a single field code.
Fields codes ending in SUMMARY are a collection of data from multiple rows and columns.
Field codes with P only appear in the extracted CSV file if the file has been output from Plot and a valid PRM file exists.
These fields exist in C:\Program Files (x86)\Gerber Scientific Products\OMEGA 6.50\Software\ReportMacroList.ini.
Macro name Macro Description
* $EXTRACTDATE time the PLT Extract report was generated
* $FULLNAME plt file path
* $CREATEDATE plt file creation time
* $MODIFYDATE plt file modified date and time
* $FILESIZE size of plt file in bytes
$DESCRIPTION description field from file save dialog
* $CUSTOMER customer field from file save dialog
* $KEYWORDS keywords field from file save dialog
* $DESIGNTIME elapsed design time
* $DESIGNSIZE total design dimensions
* $PERIMETERS distances: total/totalprint/totalprintcut/totalcut
* $SYSTEMFONTSUMMARY system font usage summary
* $GERBERFONTSUMMARY Gerber font usage summary
* $COMPOSERVINYLFOILCOSTSUMMARY summary of Composer vinyl and foil costs without listing materials
* $VINYLNAMECOMPOSERSUMMARY all vinyls used in Composer job
* $FOILNAMECOMPOSERSUMMARY all foils used in Composer job
* $VINYLUSAGECOMPOSERSUMMARY all vinyls used in Composer job with sq ft usage
* $FOILUSAGECOMPOSERSUMMARY all foils used in Composer job with sq ft usage
* $VINYLCOSTCOMPOSERSUMMARY all vinyls used in Composer job with sq ft and cost
* $FOILCOSTCOMPOSERSUMMARY all foils used in Composer job with sq ft and cost
* $TOTALVINYLSQFTCOMPOSERCOST total Composer job vinyl sq ft cost

Page 31
* $TOTALFOILSQFTCOMPOSERCOST total Composer job foil sq ft cost
* $TOTALVINYLFOILSQFTCOMPOSERCOST total Composer job vinyl+foil sq ft cost
* $VINYLNAMEPLOTSUMMARY output Plot summary of all vinyl names used in job
* $VINYLUSAGEPLOTSUMMARY output Plot summary of all vinyls used in sq ft
* $VINYLCOSTPLOTSUMMARY output Plot summary of all vinyls used in job with sq ft and cost
* $FOILNAMEPLOTSUMMARY output Plot summary of all foil names used in job
* $FOILUSAGEPLOTSUMMARY output Plot summary of all foils used in job in sq ft
* $FOILCOSTPLOTSUMMARY output Plot summary of all foils used in job with sq ft and cost
* $TOTALVINYLSQFTPLOTCOST output Plot total vinyl sq ft cost
* $TOTALFOILSQFTPLOTCOST output Plot total foil sq ft cost
* $TOTALVINYLFOILSQFTPLOTCOST output Plot total vinyl+foil sq ft cost
* $PRMMODIFYDATE last modification time of prm file
$PLOTTER plotter name
$VPRINTER printer name
* $PLOTSCALAR job scaling. length and width.
$PLOTVINYLUSAGE- the number of Plot vinyls
$PLOTFOILUSAGE- the number of Plot foils
* P
$PLOTREPEATS x and y Plot repeats - if a job is plotted muliple times
P $PRINTASPROCESS print as process setting
P $RENDERTIMESECONDS rendering time in seconds
P $PRINTRESOLUTION print resolution - i.e. 300x300
P $CUTSPEED tool parameters: speed/acceleration/force/offset
$PROCESS is process color used in job?
$SPECTRATONE is spectratone used in job?
$PANTONE are Pantone colors used in job?
$COMPOSERMATERIALS- # of Composer vinyls and foils
P $PLOTVINYLUSED size of vinyl used as length and width
P $PLOTSPACING border spacing. length and width.
P $DOUBLECUT double cut setting
P $FINISHCOAT finish coat setting
P $BACKINGWHITE backing white setting
P $GLOBALPRIME global prime setting
P $SOLIDPRIME solid prime setting
$NUMBERS count of objects: layers/objects/hidden-objects/geometry-objects/small-text-objects/total-options
$AREAS areas: total/totalprint/totalprintcut/totalcut
$LAYERS- # of layers
P $PLOTMATERIALCOST output material/foil amount cost
$PLTVERSION plot file version
$SIGNATURE plot file signature
$D0 Composer Material Usage. # of results rows varies by job.
$D1
$D2
$D3

Page 32
$D4
$D5
$D6
$D7
$D8
$D9
$D10
$D11
$D12
$D13
$D14
$D15
$D16
$D17
$D18
$D19
$D20
$D21
$D22
$D23
$D24
$D25
P $F0 Plot Foil Usage. # of results rows varies by job.
P $F1
P $F2
P $F3
P $F4
P $F5
P $F6
P $F7
P $F8
P $F9
P $F10
P $F11
P $F12
P $F13
P $F14
P $F15
P $M0 Plot Vinyl Usage. # of results rows varies by job.
P $M1
P $M2
P $M3
P $M4
P $M5
P $M6
P $M7
P $M8
P $M9
P $M10
P $M11
P $M12
P $M13
Page 33
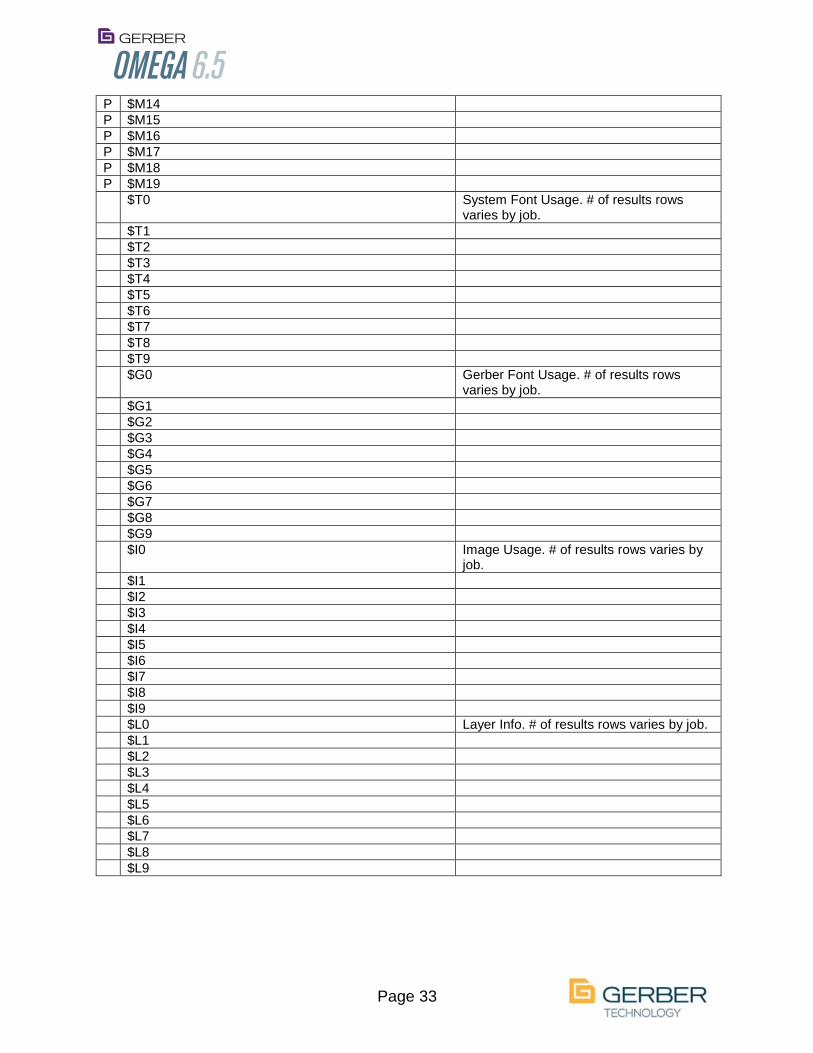
P $M14
P $M15
P $M16
P $M17
P $M18
P $M19
$T0 System Font Usage. # of results rows varies by job.
$T1
$T2
$T3
$T4
$T5
$T6
$T7
$T8
$T9
$G0 Gerber Font Usage. # of results rows varies by job.
$G1
$G2
$G3
$G4
$G5
$G6
$G7
$G8
$G9
$I0 Image Usage. # of results rows varies by job.
$I1
$I2
$I3
$I4
$I5
$I6
$I7
$I8
$I9
$L0 Layer Info. # of results rows varies by job.
$L1
$L2
$L3
$L4
$L5
$L6
$L7
$L8
$L9

Page 34
Miscellaneous Arabic Text Entry reliability has been improved. Copy/Paste operations from Composer into desktop publishing programs has been improved. Certain Composer nesting operations perform more reliably. TTF and OTF fonts based on OMEGA GSF fonts have been removed. They are still available for matching purposes in the Fond My Font online database. Open shapes properly display when clipped with a clipping path. Previous OMEGA versions would incorrectly display open shapes that were being clipped.