what is password manager and how to create password...
TRANSCRIPT
Kaspersky PURE 2.0
What is Password Manager and how to create password
database
Content
What is Password Manager and how to create password database .......................................... 2
What is Password Manager .................................................................................................... 2
Main features of Password Manager ...................................................................................... 2
Starting Password Manager ................................................................................................... 3 What is Master Password ................................................................................................... 4 Creating Master Password .................................................................................................. 4 Locking Password Manager ................................................................................................ 8 Password Manager Settings window ................................................................................ 11 Password database window .............................................................................................. 12 Caption button of Password Manager ............................................................................... 13
Adding account to Password database ................................................................................. 14 Adding website account to Password database ................................................................ 14 Adding account for application to Password database ...................................................... 23 Adding and using Identities ............................................................................................... 30 Adding and using bookmarks ............................................................................................ 34 Adding Secure memos ...................................................................................................... 36
Password database managing ............................................................................................. 42 Importing/exporting password database ........................................................................... 42 Backup copies of Password Database .............................................................................. 54
Configuring Password Manager ........................................................................................... 58
Portable version of Password Manager ................................................................................ 70
What is Password Manager and how to create password database
What is Password Manager
Using passwords is the most common authorization method, and frequently a password is the
only obstacle for intruders who try to get access to your personal data.
Password Manager is an indispensable tool for the active Internet user. It fully automates the
process of entering passwords and other data into websites and saves the user going to the
trouble of creating and remembering multiple passwords. When you use Password Manager
to log in, you can rest assured that your data is safe. The software creates exceptionally strong
passwords and prevents your login information from being stolen. All confidential data is
encrypted and kept in a dedicated database on your computer.
From the Password Manager window you can:
► Open the password database;
► Open the settings window;
► Add a new account or identity;
► Create portable version on a USB-drive;
► Launch Password Generator;
► Open frequently used accounts.
The Password Manager interface includes the following components:
► Password Manager window;
► Icon in the taskbar notification area;
► Context menu;
► Settings window;
► Password database window;
► Pointer;
► Caption button.
Main features of Password Manager
One-click authorization
Password Manager saves the parameters you use to access web resources (login and
password). With each subsequent visit to the site the program will insert your credentials
automatically. Password Manager also works with applications which require authorization
(Skype, ICQ, Outlook and etc.).
Secure protection of your passwords
Password Manager stores your passwords and other personal information in a secure, encrypted database on your computer. The passwords which have been saved can only be decrypted using a master password or another method of authentication specified by the user, which ensures security and prevents your information from being stolen by cybercriminals.
Password Manager inserts information directly into web resources and applications without
using the keyboard and effectively protects your passwords against keyloggers (a keylogger is
a malicious program that tracks the sequence of keystrokes on the keyboard in order to record
a user’s personal information, such as passwords).
Password Manager effectively combats phishing attacks as it verifies the authenticity of web
addresses and the software version before any passwords are inserted.
Accounts
You can use several user accounts for one website (application), or one account for several
websites (applications).
Identification cards
Password Manager allows long registration forms to be completed automatically based on
identification cards containing personal data which the user creates in advance. Several cards
can be used to store business and personal information separately (e.g. first and last name,
year of birth, sex, email address, telephone number, country of residence, etc.).
Secure memos
Password Manager enables you not only to securely store logins and passwords but also
personal records which you would like to remain confidential such as: SIM card PIN codes,
software keys, passport details, etc. It is possible to use templates with standard data types
when creating a secure memo.
Secure exchange of account details
Sometimes we need to share our login and password to a certain resource with family and
friends. To avoid sending your confidential information openly, take advantage of the new
option included in Password Manager that allows the exchange of encrypted login
information. After a predetermined period of time, the product will remind you that the account
information has been shared with another user and you will be able to modify the access
parameters to ensure security.
Various authentication methods
You can decrypt you password databases in Password Manager using a Master Password,
removable USB or Bluetooth device (for example, using your mobile device).
Password generator
The generator included in Password Manager will help you to create strong passwords that
would be difficult for cybercriminals to crack.
One database for all passwords
You can import your passwords and personal data stored in web browsers and other
applications to Password Manager. You can also unite different password databases into just
one (for example, databases on different computers).
Portable version
A portable version of the program enables you to use the password database on any computer
without installing Password Manager. The version can be launched from various external
memory devices, e.g. a USB or a flash drive. When the removable media is disconnected,
Password Manager will automatically close and your data will be removed from the computer.
Starting Password Manager
What is Master Password
Password Manager includes different protection methods against unauthorized access to your
password database. One of these protection methods is Master Password.
Master Password is your personal key to access your password database containing your
passwords and other personal data. Without Master Password it is impossible to access the
password database. Keep it in secret.
When creating your Master Password, it is recommended to follow the following
recommendations:
► a password can contain digits, Latin characters, space and special characters («.»,
«,», «?», «!», «<», «>», «”», etc.);
► You must not use in the password:
words found in a dictionary or set expressions;
any easy-to-guess sequence like: qwerty, 123456789, qazxsw etc.;
personal data: first and last names, addresses, passport numbers, social security
numbers etc.;
it is strongly advised not to reuse the passwords which you use to run other
programs (e-mail, databases, etc).
Creating Master Password
The Password Manager Configuration Wizard will start automatically at first Password
Manager launch. To start working with Password Manager go through configuration steps:
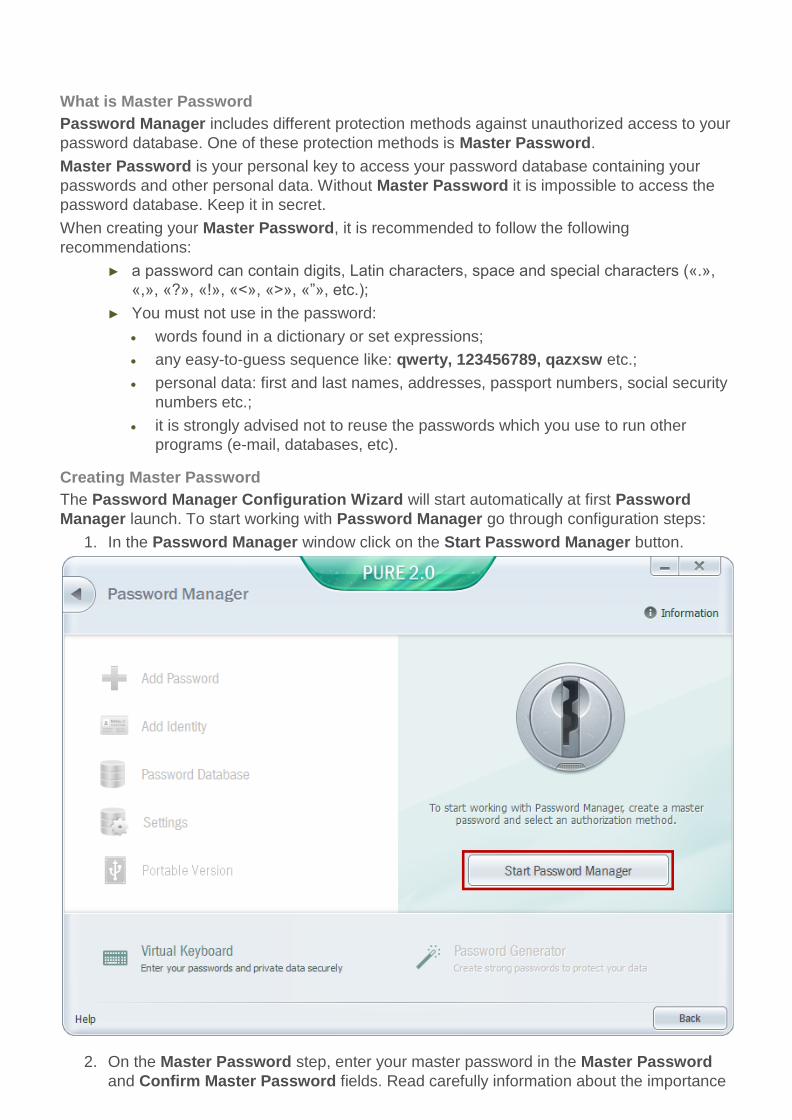
1. In the Password Manager window click on the Start Password Manager button.
2. On the Master Password step, enter your master password in the Master Password
and Confirm Master Password fields. Read carefully information about the importance
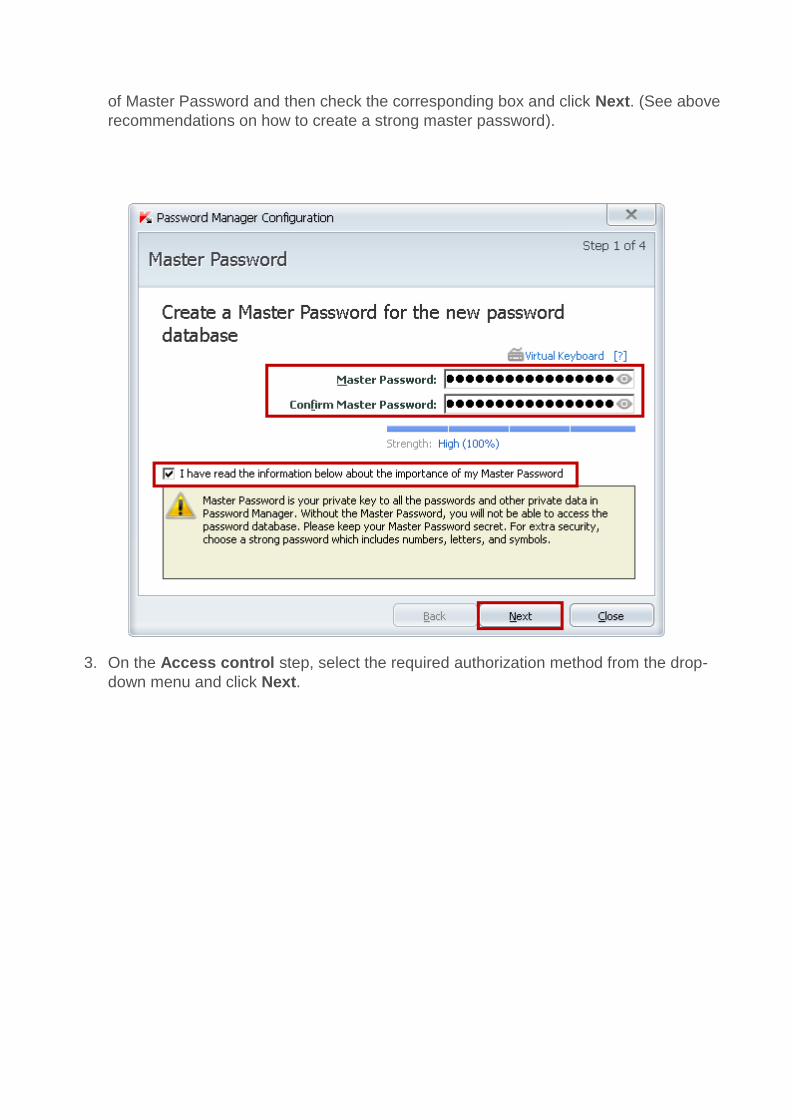
of Master Password and then check the corresponding box and click Next. (See above
recommendations on how to create a strong master password).
3. On the Access control step, select the required authorization method from the drop-
down menu and click Next.
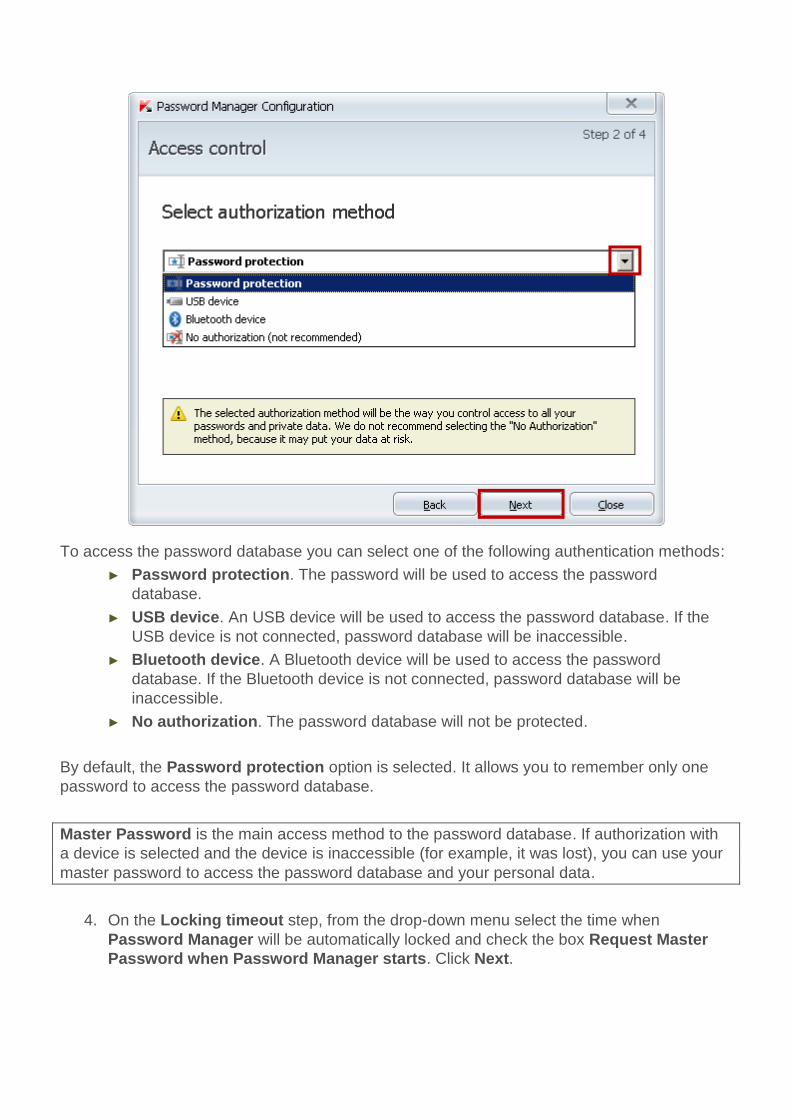
To access the password database you can select one of the following authentication methods:
► Password protection. The password will be used to access the password
database.
► USB device. An USB device will be used to access the password database. If the
USB device is not connected, password database will be inaccessible.
► Bluetooth device. A Bluetooth device will be used to access the password
database. If the Bluetooth device is not connected, password database will be
inaccessible.
► No authorization. The password database will not be protected.
By default, the Password protection option is selected. It allows you to remember only one
password to access the password database.
Master Password is the main access method to the password database. If authorization with
a device is selected and the device is inaccessible (for example, it was lost), you can use your
master password to access the password database and your personal data.
4. On the Locking timeout step, from the drop-down menu select the time when
Password Manager will be automatically locked and check the box Request Master
Password when Password Manager starts. Click Next.

5. Select browsers in which special plug-ins of Password Manager will be installed. Close
all windows of selected web browsers and click on the Next button.
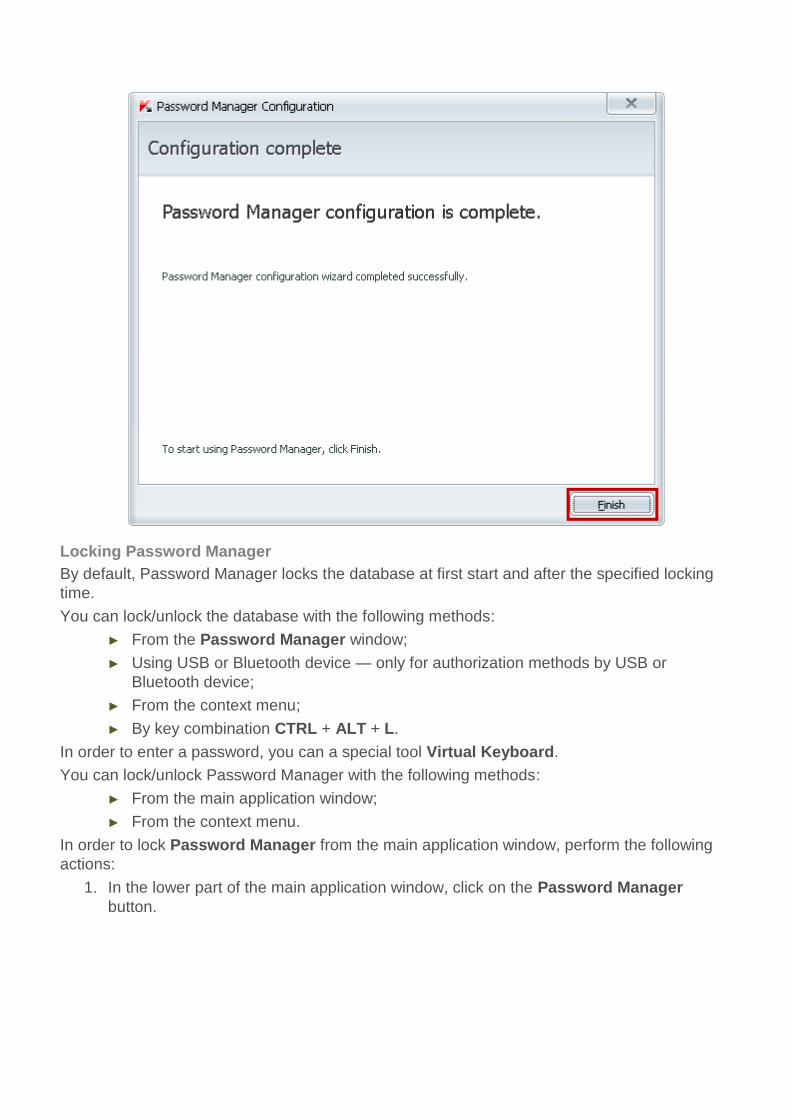
6. Configuration of Password Manager completed. Click Finish to start working with
Password Manager
Locking Password Manager
By default, Password Manager locks the database at first start and after the specified locking
time.
You can lock/unlock the database with the following methods:
► From the Password Manager window;
► Using USB or Bluetooth device — only for authorization methods by USB or
Bluetooth device;
► From the context menu;
► By key combination CTRL + ALT + L.
In order to enter a password, you can a special tool Virtual Keyboard.
You can lock/unlock Password Manager with the following methods:
► From the main application window;
► From the context menu.
In order to lock Password Manager from the main application window, perform the following
actions:
1. In the lower part of the main application window, click on the Password Manager
button.
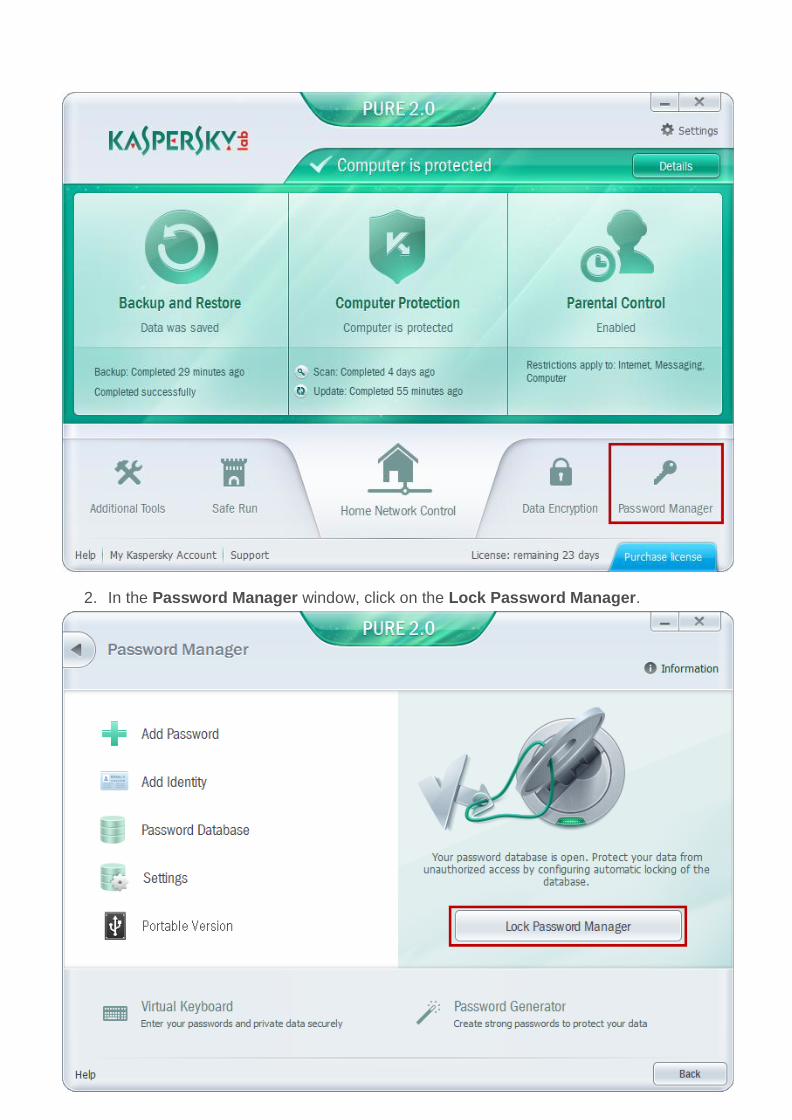
2. In the Password Manager window, click on the Lock Password Manager.
In order to lock Password Manager from the context menu, perform the following actions:
1. Right-click the Kaspersky PURE 2.0 icon in the Taskbar notification area.
2. From the open context menu select Lock Password Manager.
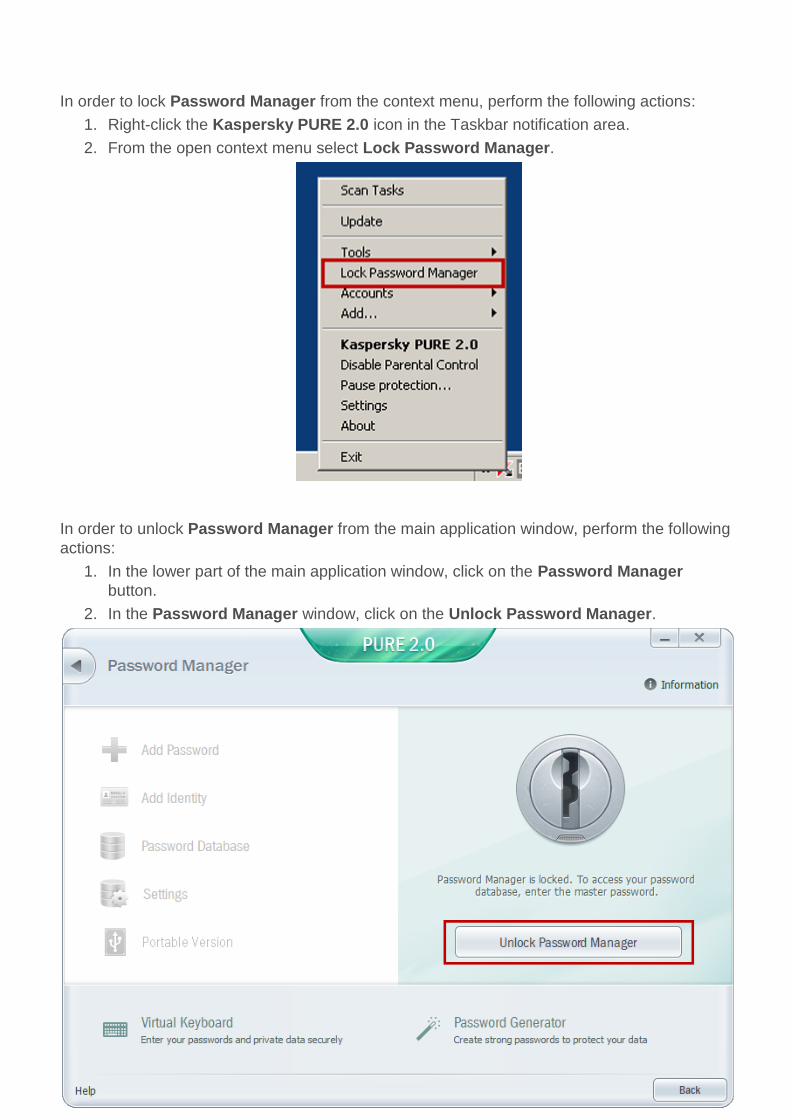
In order to unlock Password Manager from the main application window, perform the following
actions:
1. In the lower part of the main application window, click on the Password Manager
button.
2. In the Password Manager window, click on the Unlock Password Manager.

3. Enter your Master Password for Password Manager and click on the Unlock button.
In order to unlock Password Manager from the context menu, perform the following actions:
1. Right-click on the Kaspersky PURE 2.0 icon in the Taskbar notification area.
2. Select Unlock Password Manager.
3. Enter your Master Password for Password Manager and click on the Unlock button.
Password Manager Settings window
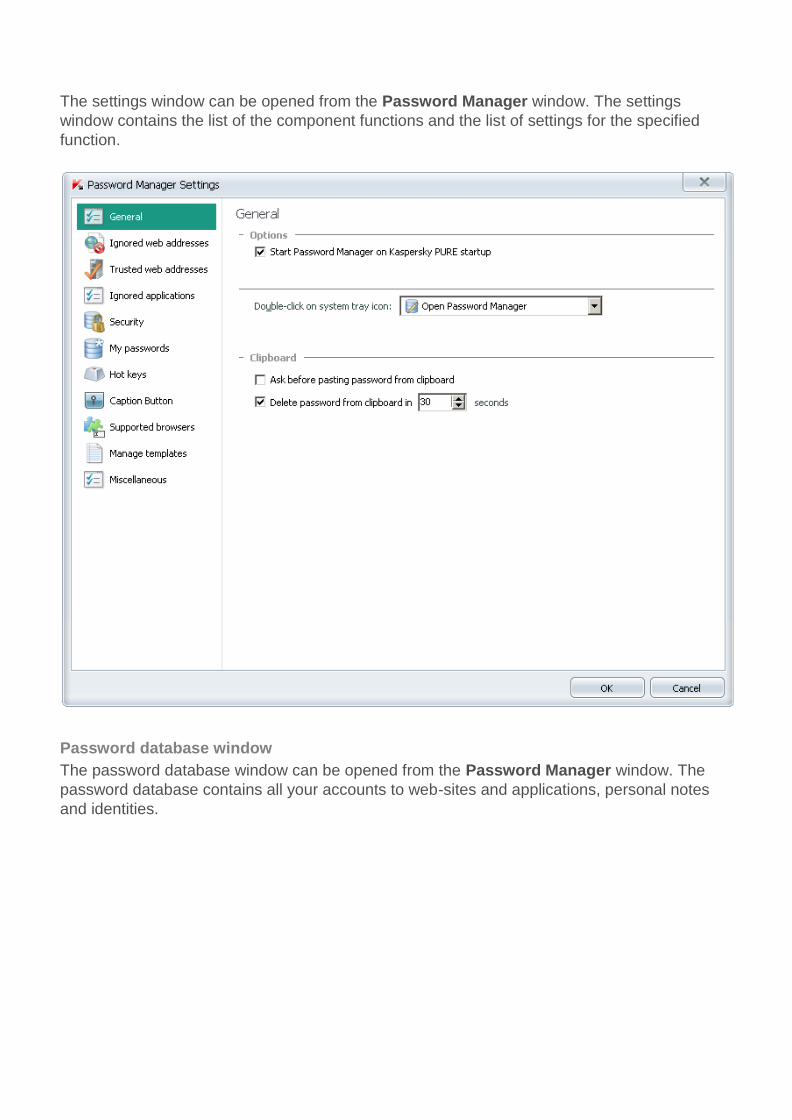
The settings window can be opened from the Password Manager window. The settings
window contains the list of the component functions and the list of settings for the specified
function.
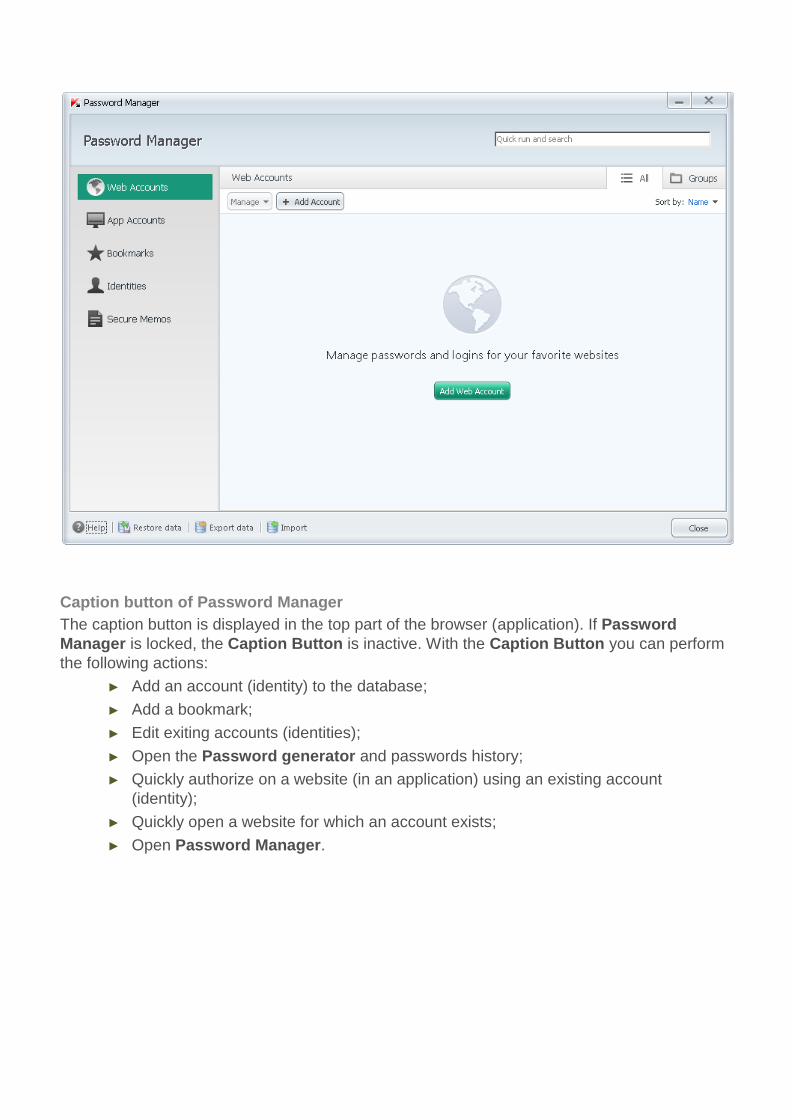
Password database window
The password database window can be opened from the Password Manager window. The
password database contains all your accounts to web-sites and applications, personal notes
and identities.
Caption button of Password Manager
The caption button is displayed in the top part of the browser (application). If Password
Manager is locked, the Caption Button is inactive. With the Caption Button you can perform
the following actions:
► Add an account (identity) to the database;
► Add a bookmark;
► Edit exiting accounts (identities);
► Open the Password generator and passwords history;
► Quickly authorize on a website (in an application) using an existing account
(identity);
► Quickly open a website for which an account exists;
► Open Password Manager.
Adding account to Password database
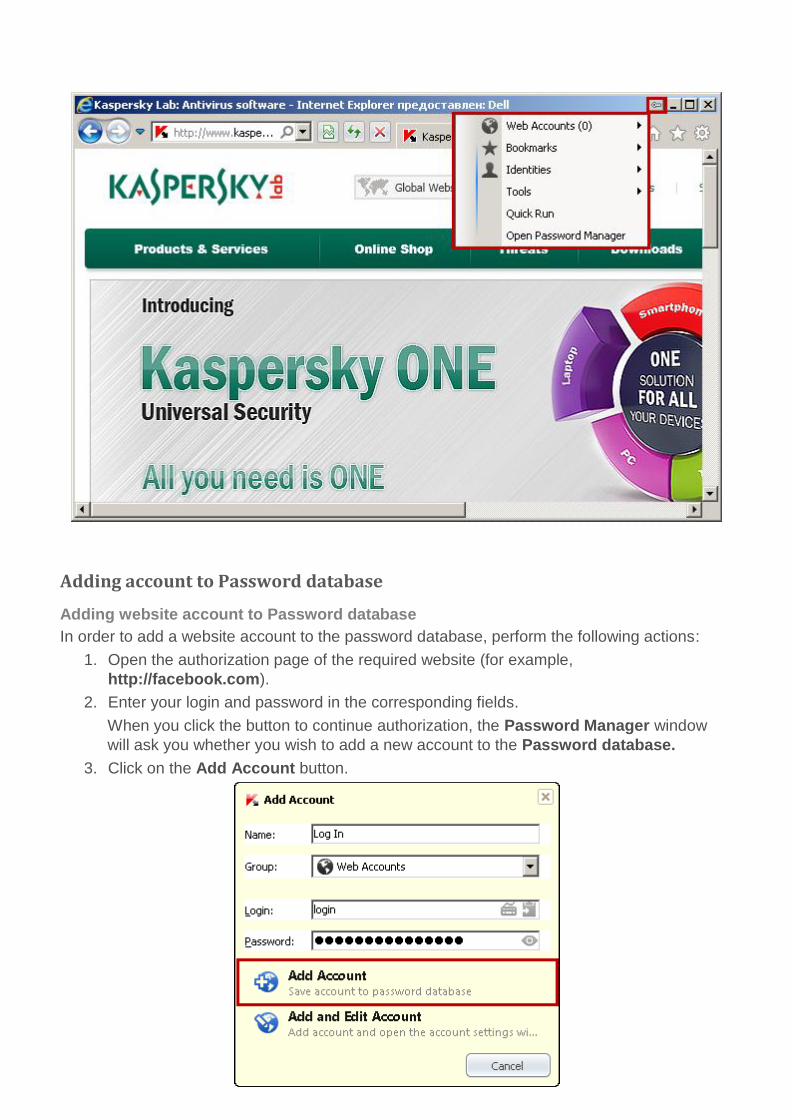
Adding website account to Password database
In order to add a website account to the password database, perform the following actions:
1. Open the authorization page of the required website (for example,
http://facebook.com).
2. Enter your login and password in the corresponding fields.
When you click the button to continue authorization, the Password Manager window
will ask you whether you wish to add a new account to the Password database.
3. Click on the Add Account button.
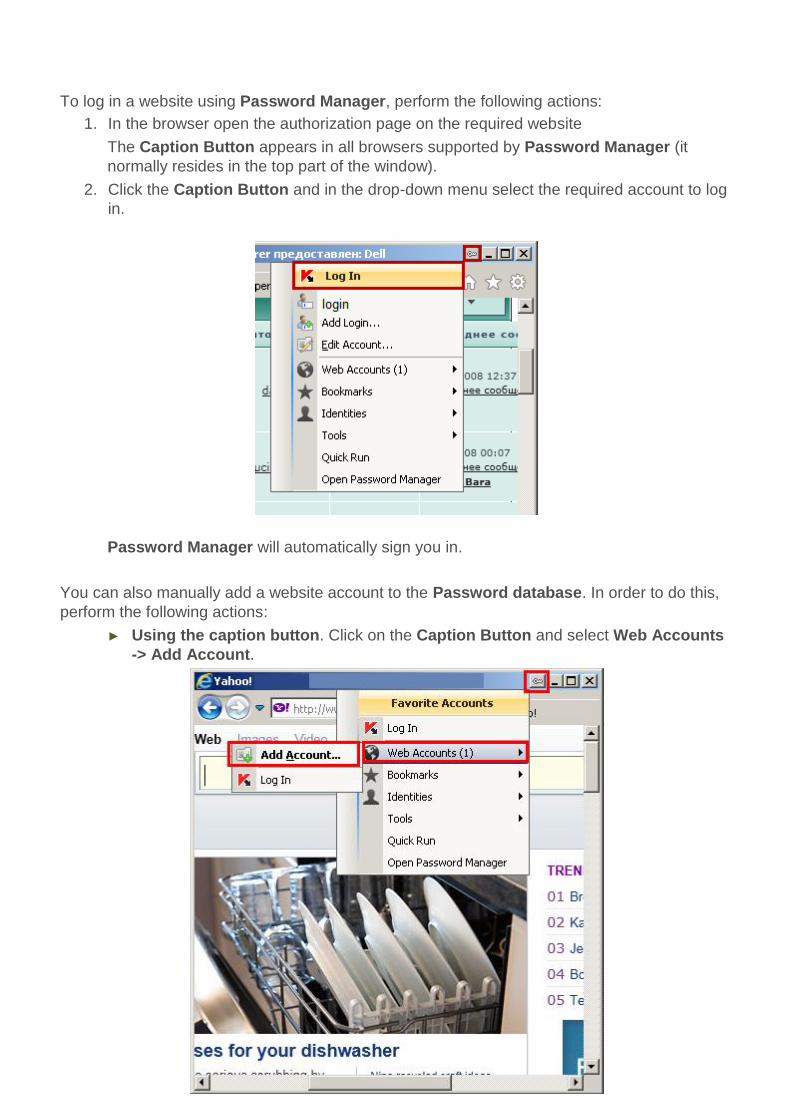
To log in a website using Password Manager, perform the following actions:
1. In the browser open the authorization page on the required website
The Caption Button appears in all browsers supported by Password Manager (it
normally resides in the top part of the window).
2. Click the Caption Button and in the drop-down menu select the required account to log
in.
Password Manager will automatically sign you in.
You can also manually add a website account to the Password database. In order to do this,
perform the following actions:
► Using the caption button. Click on the Caption Button and select Web Accounts
-> Add Account.
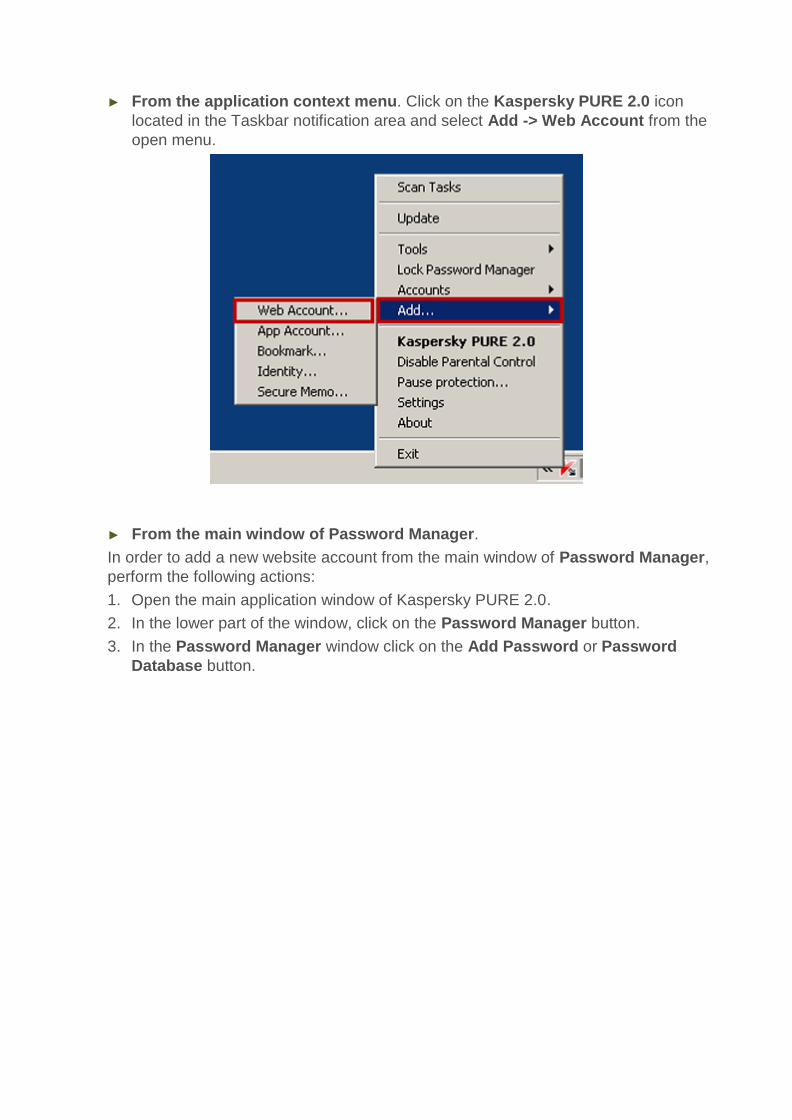
► From the application context menu. Click on the Kaspersky PURE 2.0 icon
located in the Taskbar notification area and select Add -> Web Account from the
open menu.
► From the main window of Password Manager.
In order to add a new website account from the main window of Password Manager,
perform the following actions:
1. Open the main application window of Kaspersky PURE 2.0.
2. In the lower part of the window, click on the Password Manager button.
3. In the Password Manager window click on the Add Password or Password
Database button.
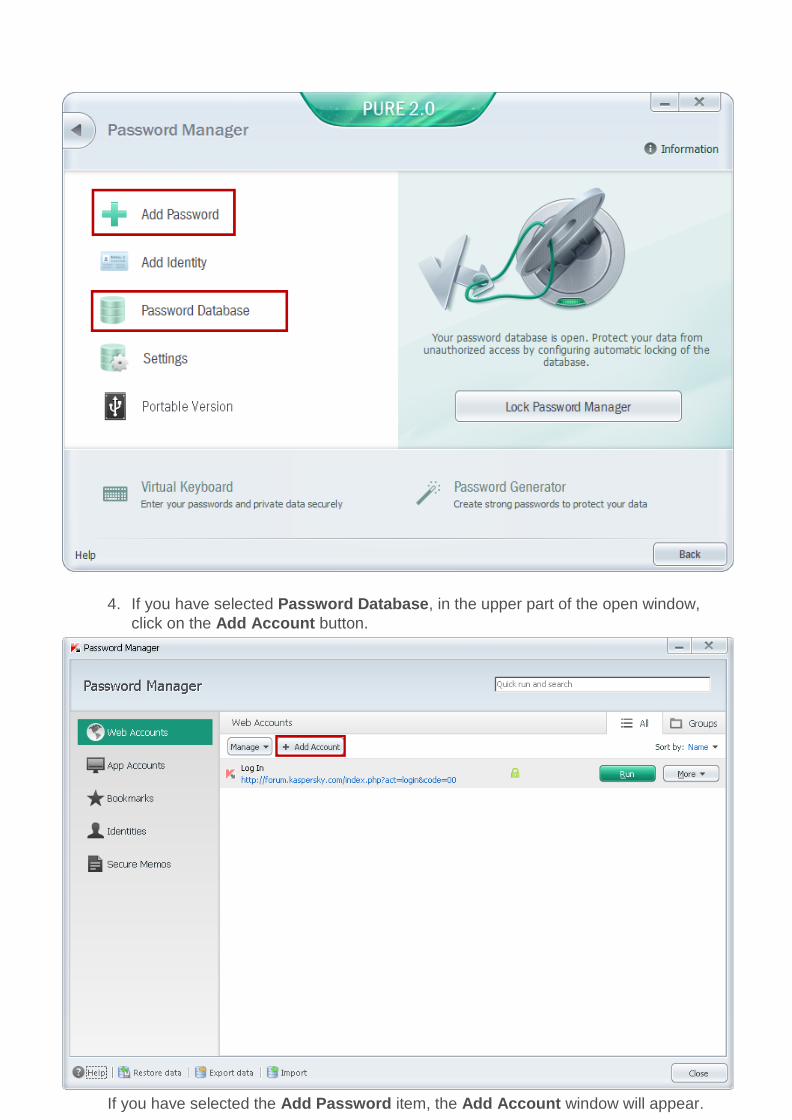
4. If you have selected Password Database, in the upper part of the open window,
click on the Add Account button.
If you have selected the Add Password item, the Add Account window will appear.
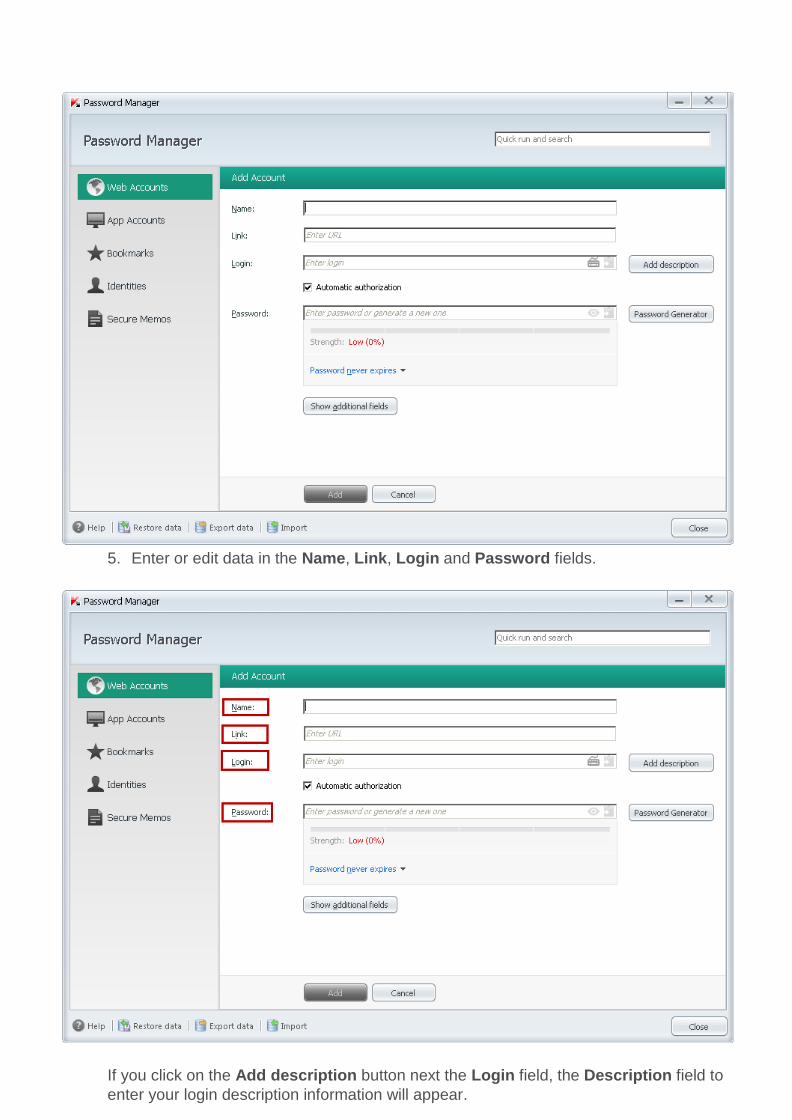
5. Enter or edit data in the Name, Link, Login and Password fields.
If you click on the Add description button next the Login field, the Description field to
enter your login description information will appear.
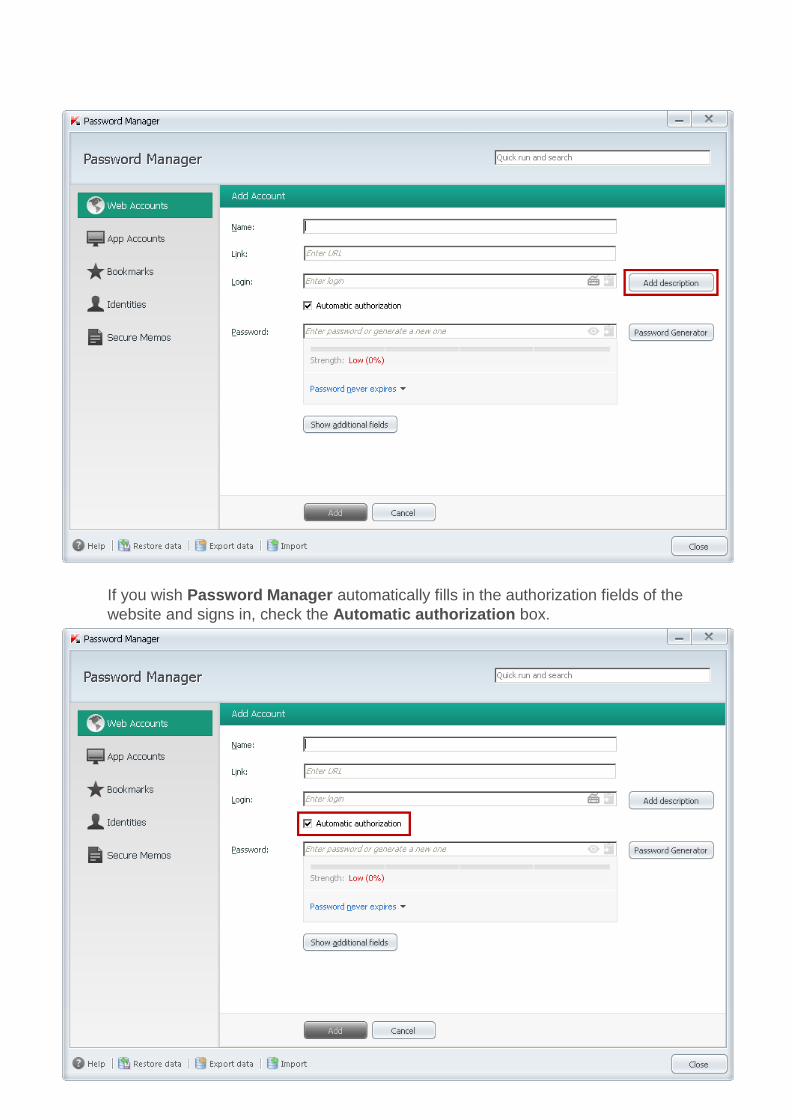
If you wish Password Manager automatically fills in the authorization fields of the
website and signs in, check the Automatic authorization box.
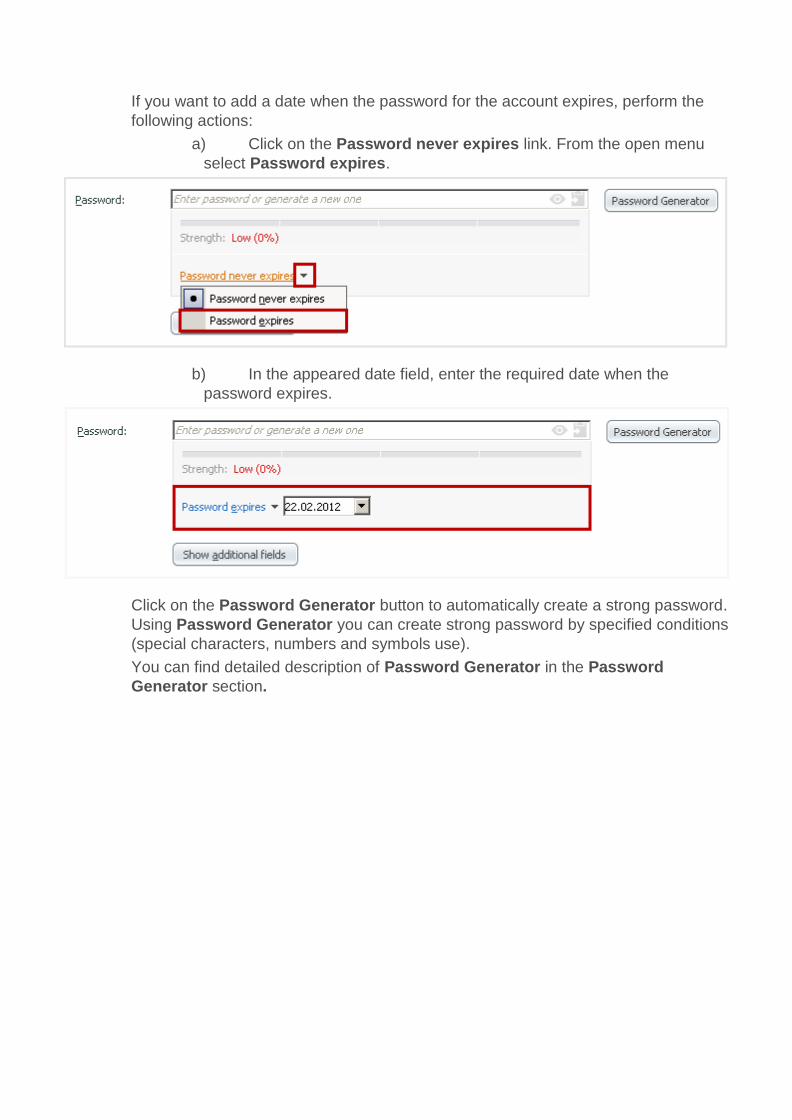
If you want to add a date when the password for the account expires, perform the
following actions:
a) Click on the Password never expires link. From the open menu
select Password expires.
b) In the appeared date field, enter the required date when the
password expires.
Click on the Password Generator button to automatically create a strong password.
Using Password Generator you can create strong password by specified conditions
(special characters, numbers and symbols use).
You can find detailed description of Password Generator in the Password
Generator section.
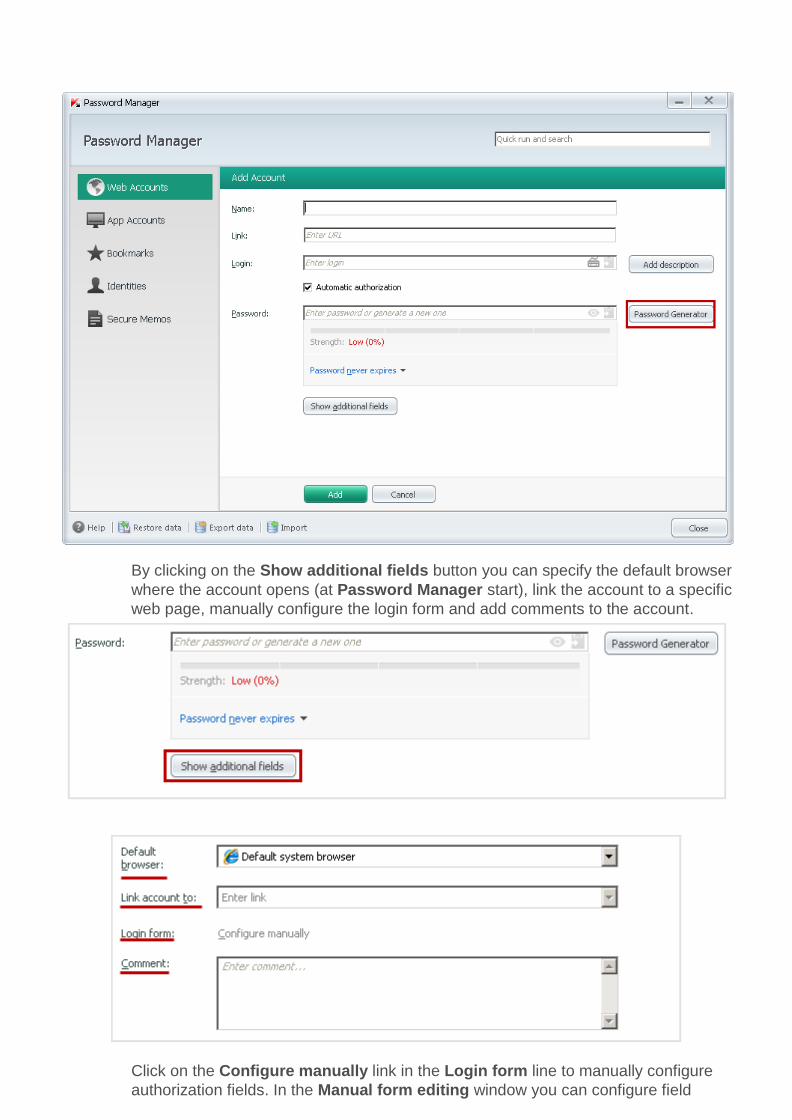
By clicking on the Show additional fields button you can specify the default browser
where the account opens (at Password Manager start), link the account to a specific
web page, manually configure the login form and add comments to the account.
Click on the Configure manually link in the Login form line to manually configure
authorization fields. In the Manual form editing window you can configure field
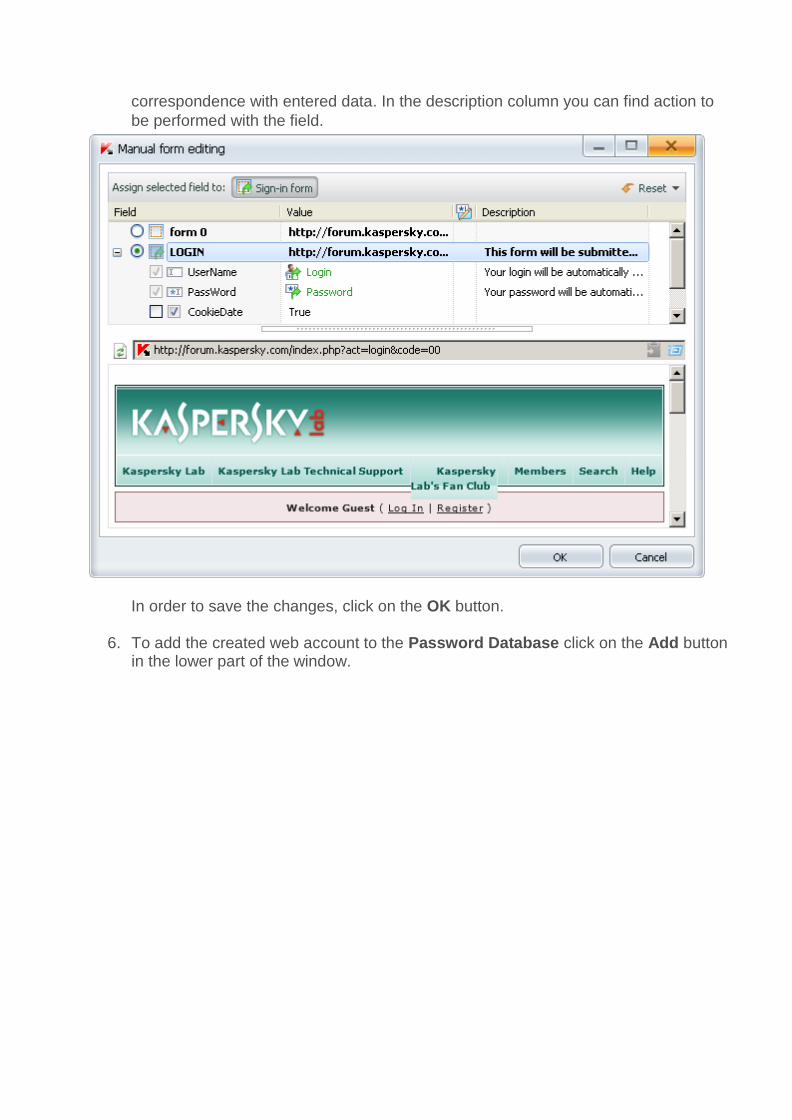
correspondence with entered data. In the description column you can find action to
be performed with the field.
In order to save the changes, click on the OK button.
6. To add the created web account to the Password Database click on the Add button in the lower part of the window.
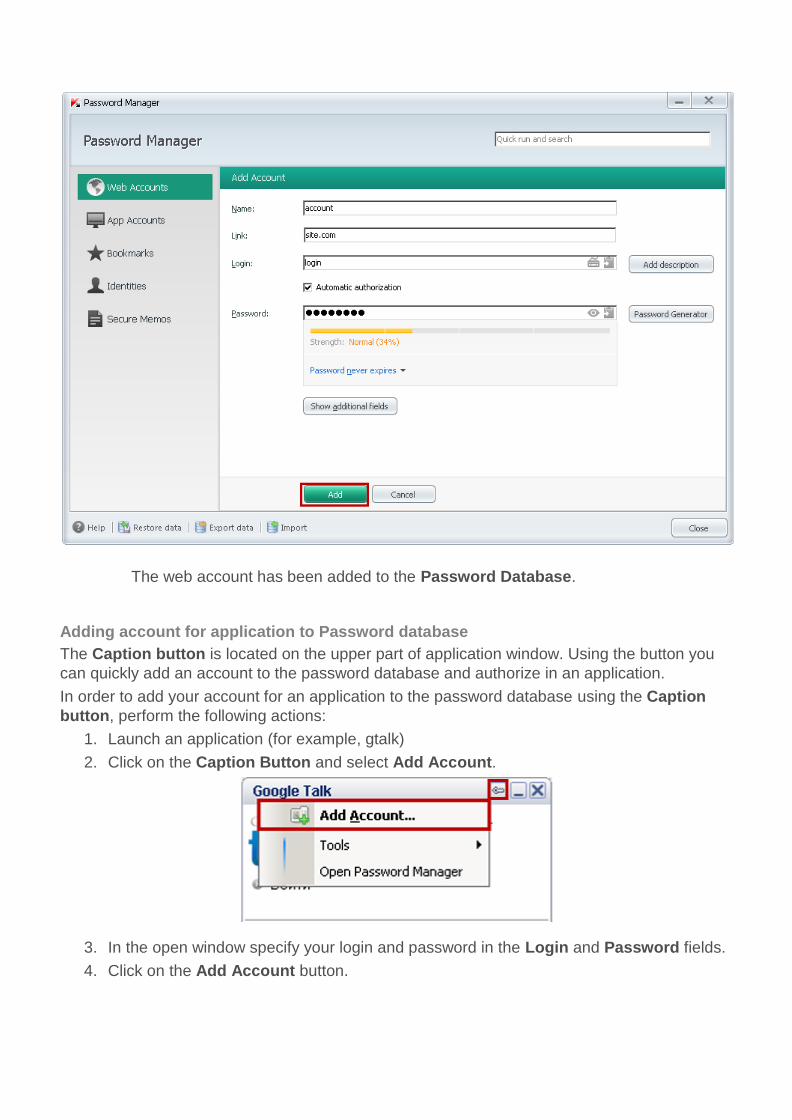
The web account has been added to the Password Database.
Adding account for application to Password database
The Caption button is located on the upper part of application window. Using the button you
can quickly add an account to the password database and authorize in an application.
In order to add your account for an application to the password database using the Caption
button, perform the following actions:
1. Launch an application (for example, gtalk)
2. Click on the Caption Button and select Add Account.
3. In the open window specify your login and password in the Login and Password fields.
4. Click on the Add Account button.

The account has been added to the Password database.
In order to sign in using Password Manager, perform the following actions:
1. Open the authorization window of the application (for example, gtalk).
2. Click on the Caption Button and select the required user to sign in from the drop-down
menu (for example, user).
Password Manager will automatically sign the user in.
You can also manually add an account for an application to the password database of
Password Manager. You can open the window of adding accounts with the following methods:
► From the context menu of Kaspersky PURE 2.0 —
To do this, perform the following actions:
1. In the Taskbar notification area right-click the Kaspersky PURE 2.0 icon and
select Add.
2. From the open menu select App Account.
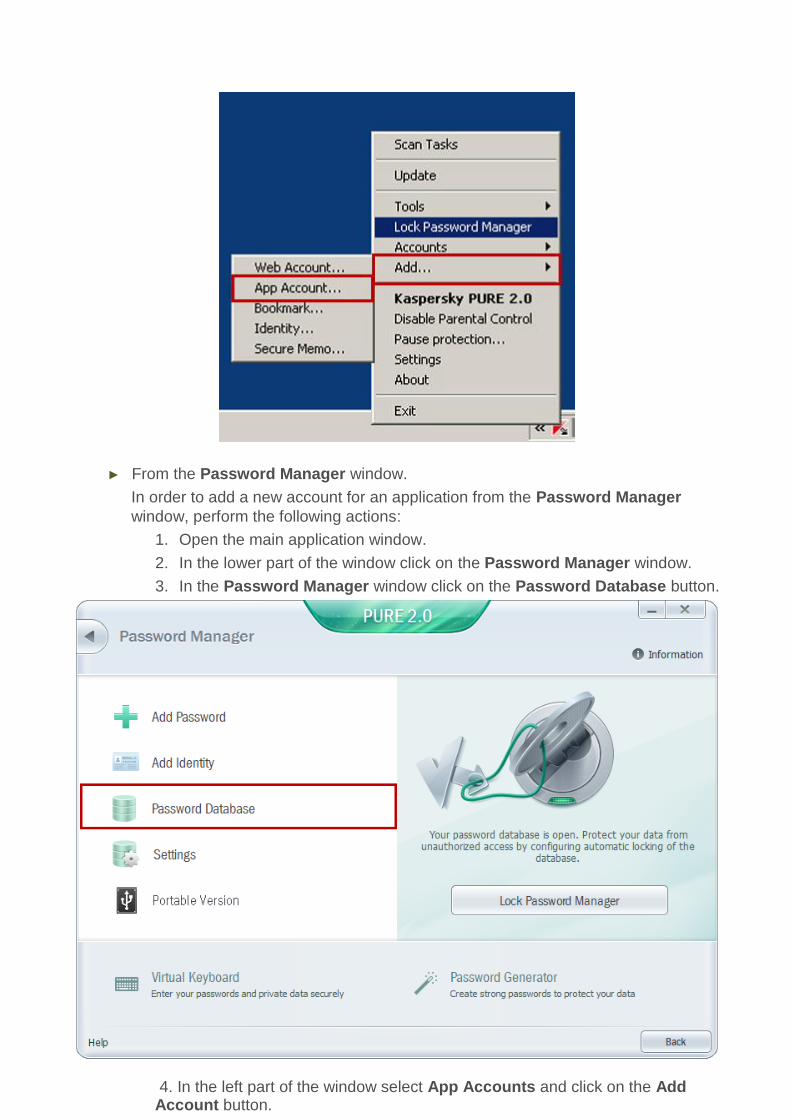
► From the Password Manager window.
In order to add a new account for an application from the Password Manager
window, perform the following actions:
1. Open the main application window.
2. In the lower part of the window click on the Password Manager window.
3. In the Password Manager window click on the Password Database button.
4. In the left part of the window select App Accounts and click on the Add Account button.
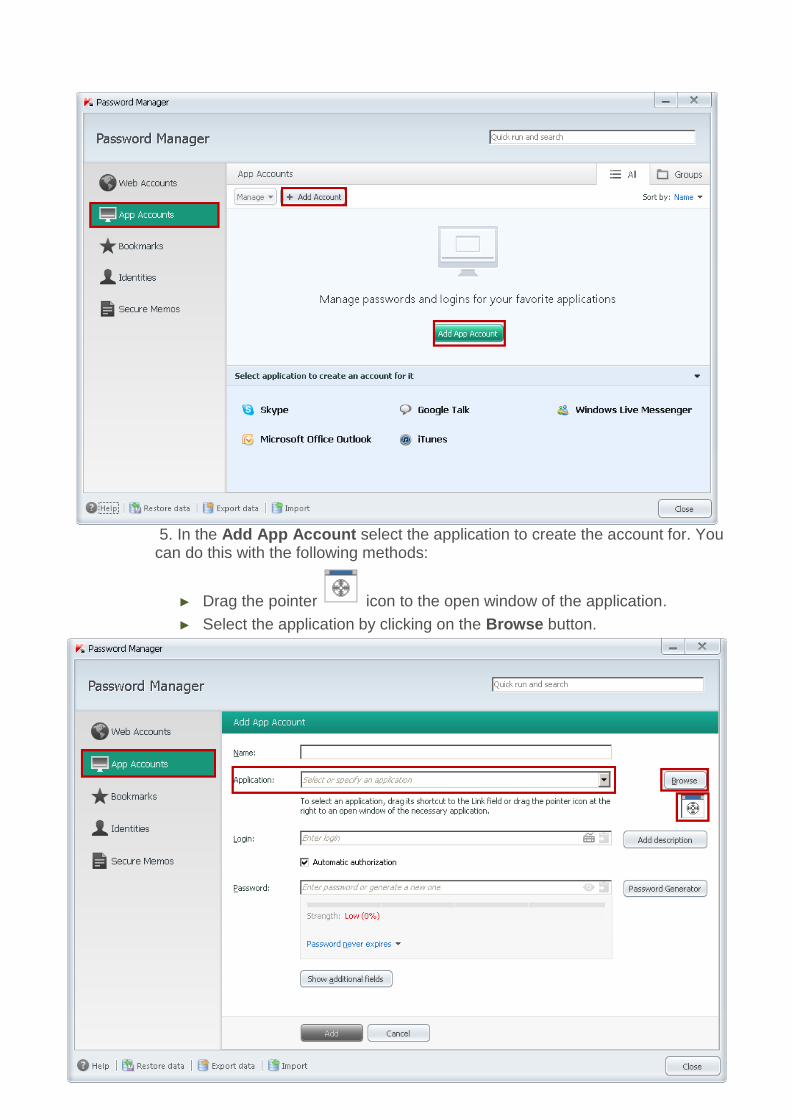
5. In the Add App Account select the application to create the account for. You can do this with the following methods:
► Drag the pointer icon to the open window of the application.
► Select the application by clicking on the Browse button.
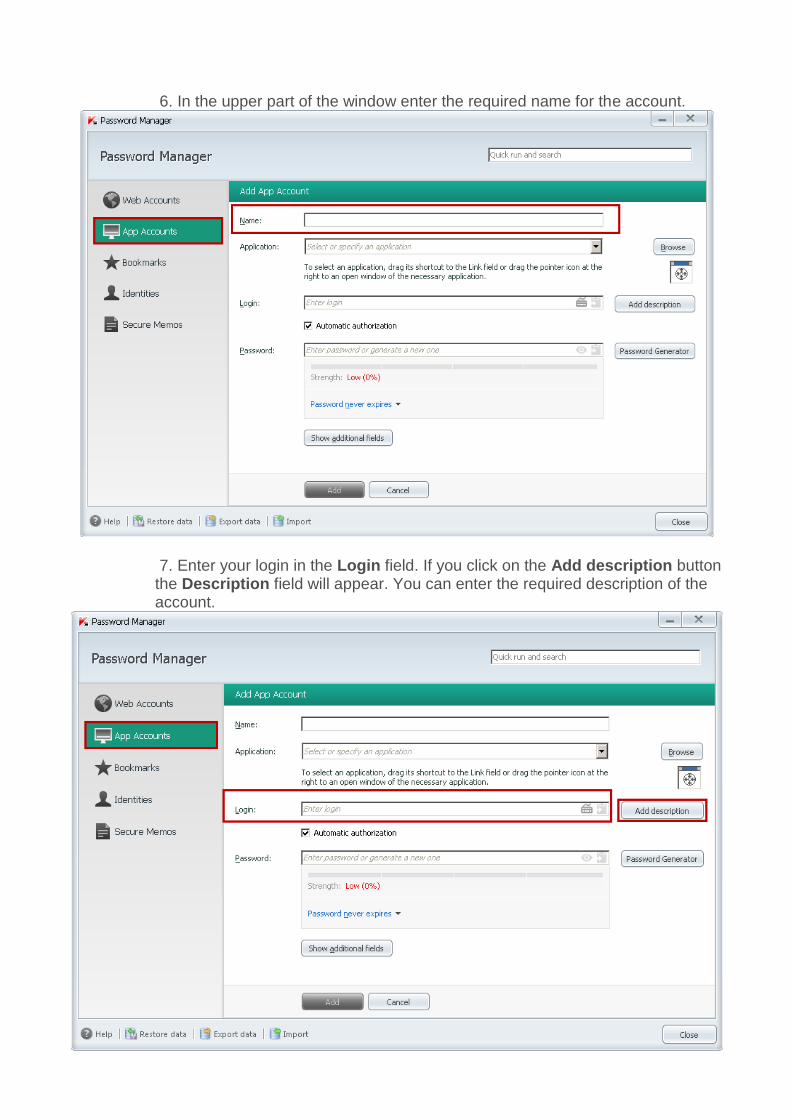
6. In the upper part of the window enter the required name for the account.
7. Enter your login in the Login field. If you click on the Add description button the Description field will appear. You can enter the required description of the account.
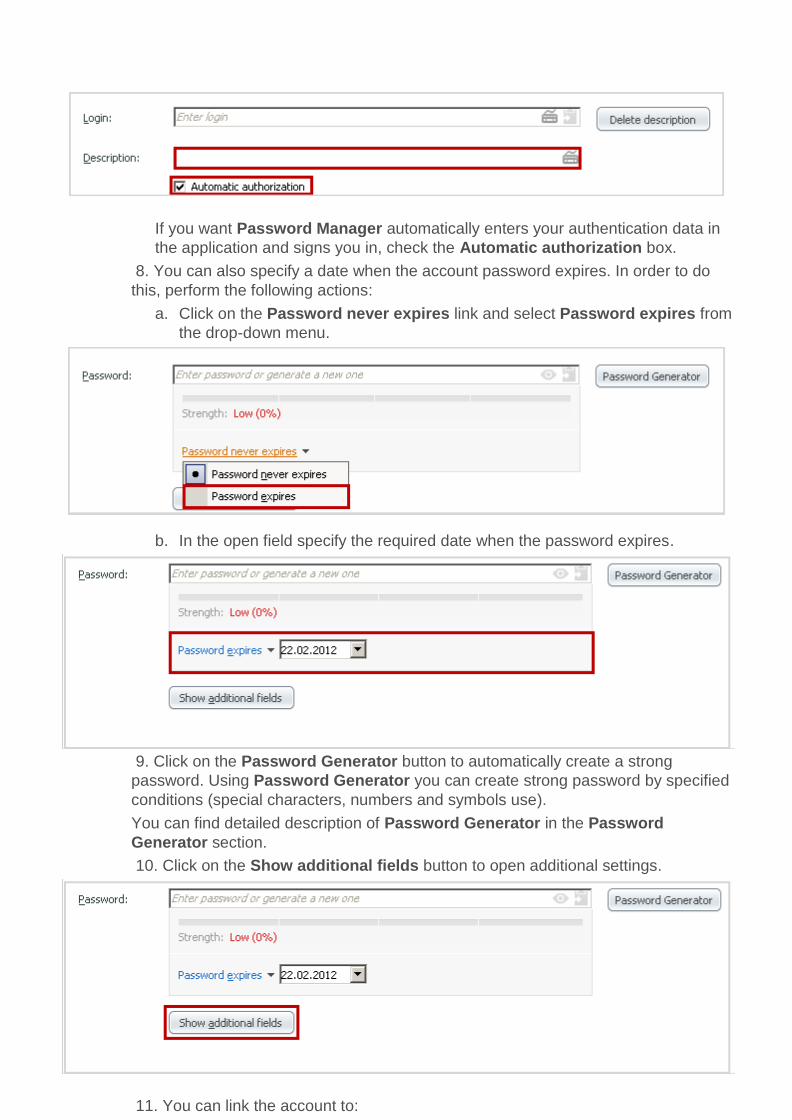
If you want Password Manager automatically enters your authentication data in
the application and signs you in, check the Automatic authorization box.
8. You can also specify a date when the account password expires. In order to do
this, perform the following actions:
a. Click on the Password never expires link and select Password expires from
the drop-down menu.
b. In the open field specify the required date when the password expires.
9. Click on the Password Generator button to automatically create a strong
password. Using Password Generator you can create strong password by specified
conditions (special characters, numbers and symbols use).
You can find detailed description of Password Generator in the Password
Generator section.
10. Click on the Show additional fields button to open additional settings.
11. You can link the account to:
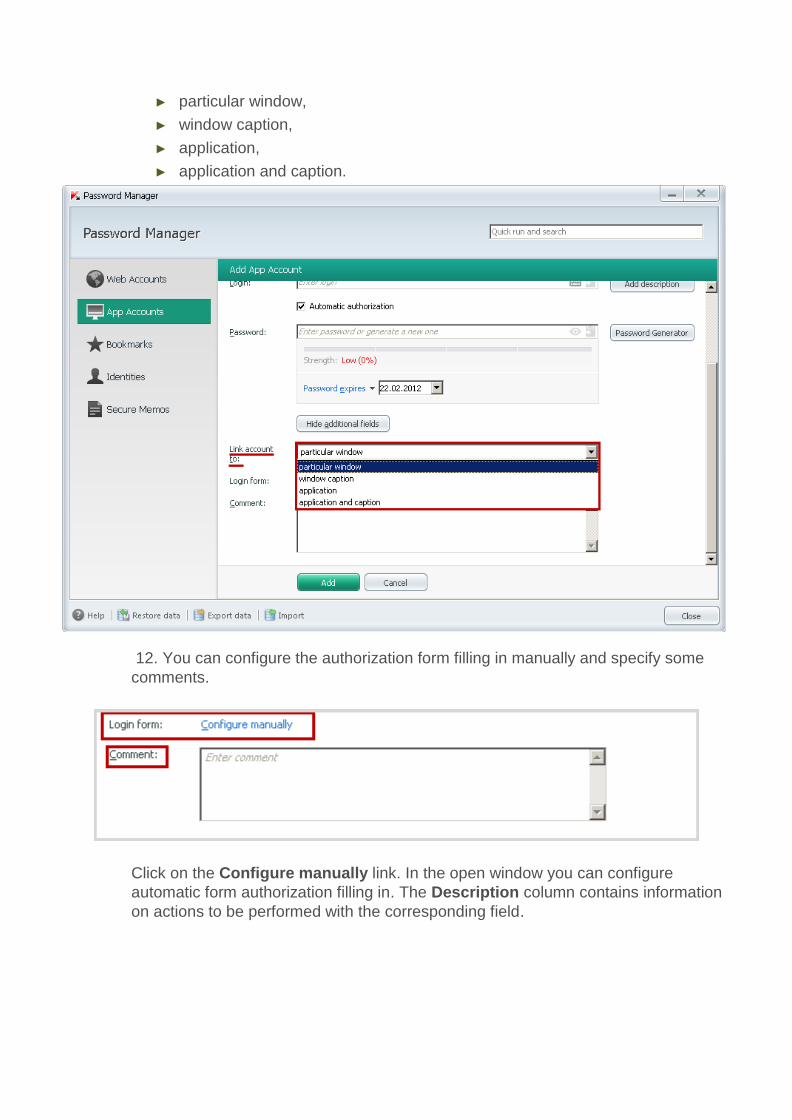
► particular window,
► window caption,
► application,
► application and caption.
12. You can configure the authorization form filling in manually and specify some
comments.
Click on the Configure manually link. In the open window you can configure
automatic form authorization filling in. The Description column contains information
on actions to be performed with the corresponding field.
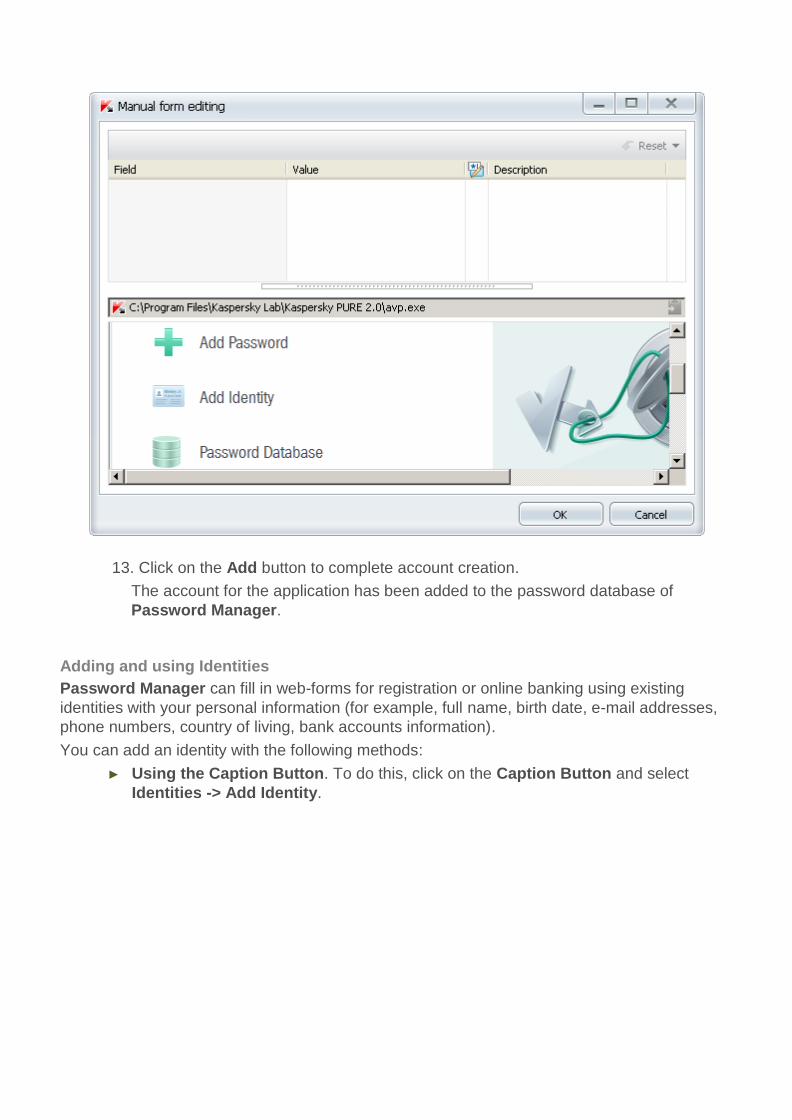
13. Click on the Add button to complete account creation.
The account for the application has been added to the password database of
Password Manager.
Adding and using Identities
Password Manager can fill in web-forms for registration or online banking using existing
identities with your personal information (for example, full name, birth date, e-mail addresses,
phone numbers, country of living, bank accounts information).
You can add an identity with the following methods:
► Using the Caption Button. To do this, click on the Caption Button and select
Identities -> Add Identity.
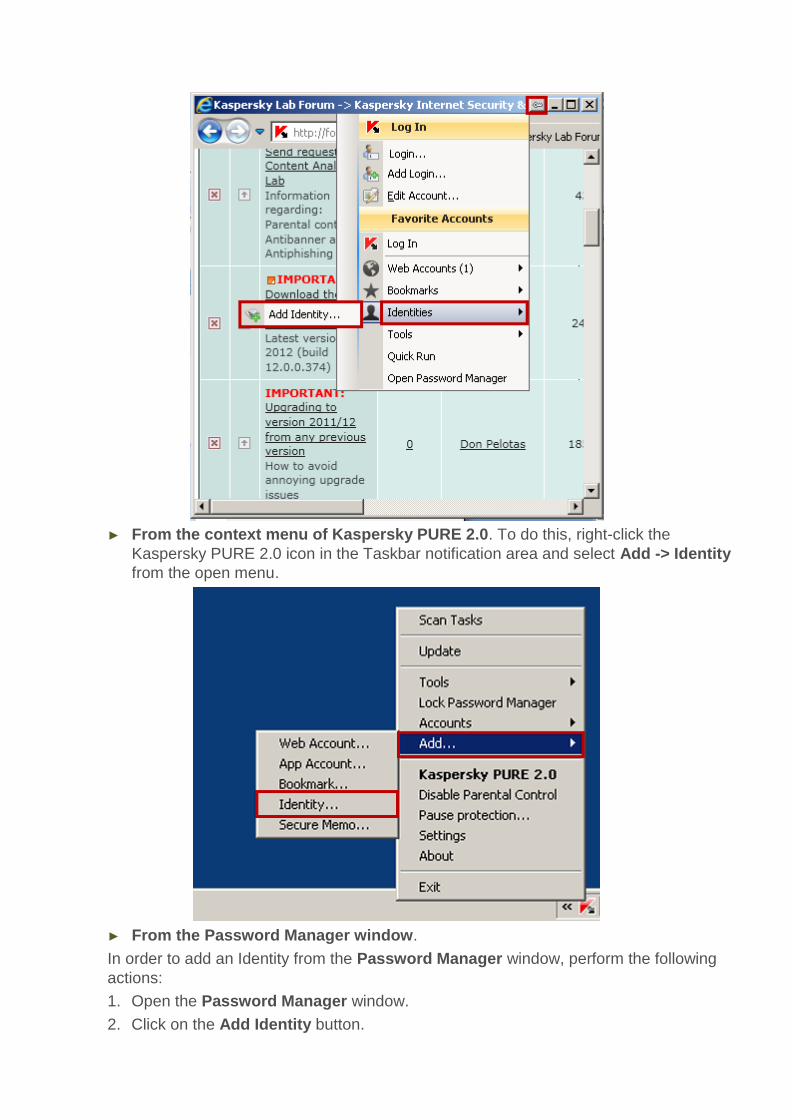
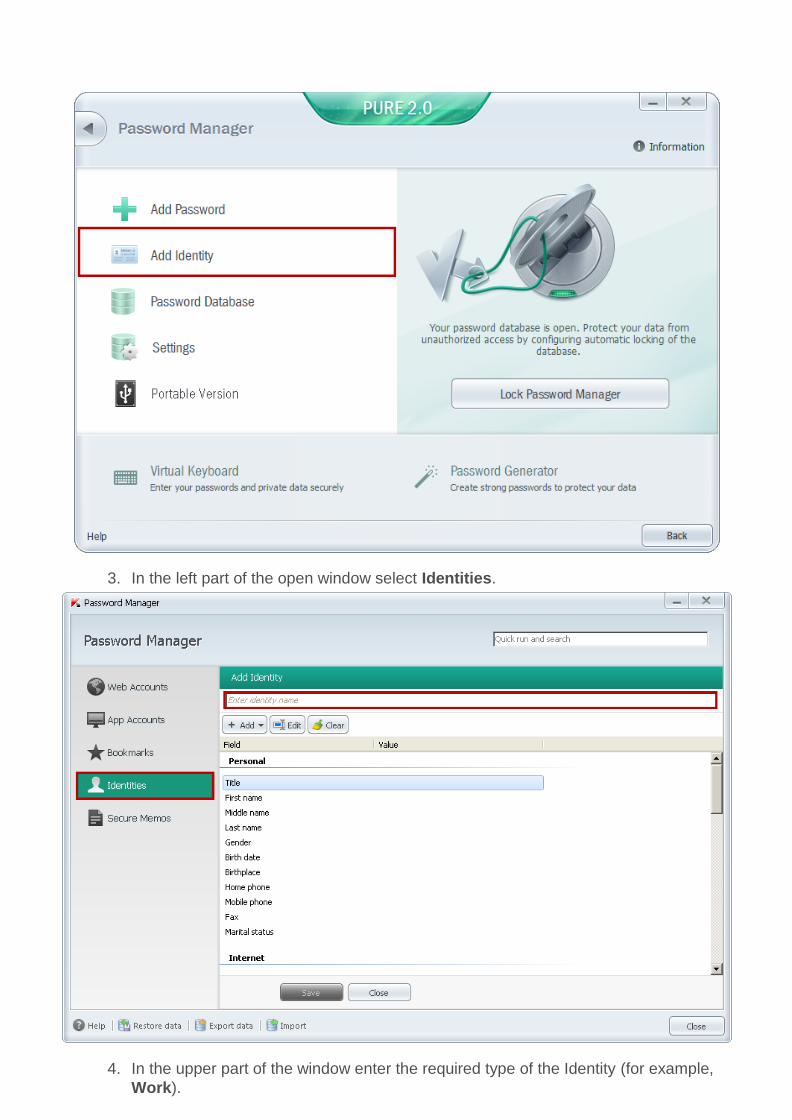
► From the context menu of Kaspersky PURE 2.0. To do this, right-click the
Kaspersky PURE 2.0 icon in the Taskbar notification area and select Add -> Identity
from the open menu.
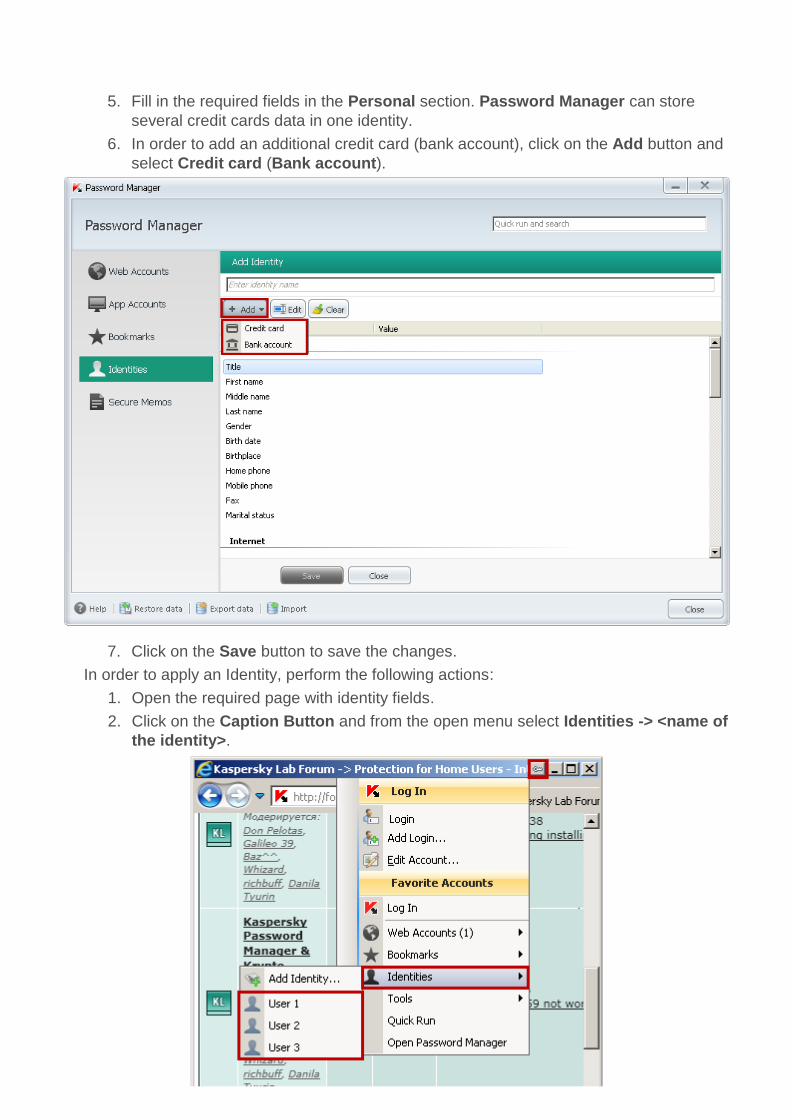
► From the Password Manager window.
In order to add an Identity from the Password Manager window, perform the following
actions:
1. Open the Password Manager window.
2. Click on the Add Identity button.
3. In the left part of the open window select Identities.
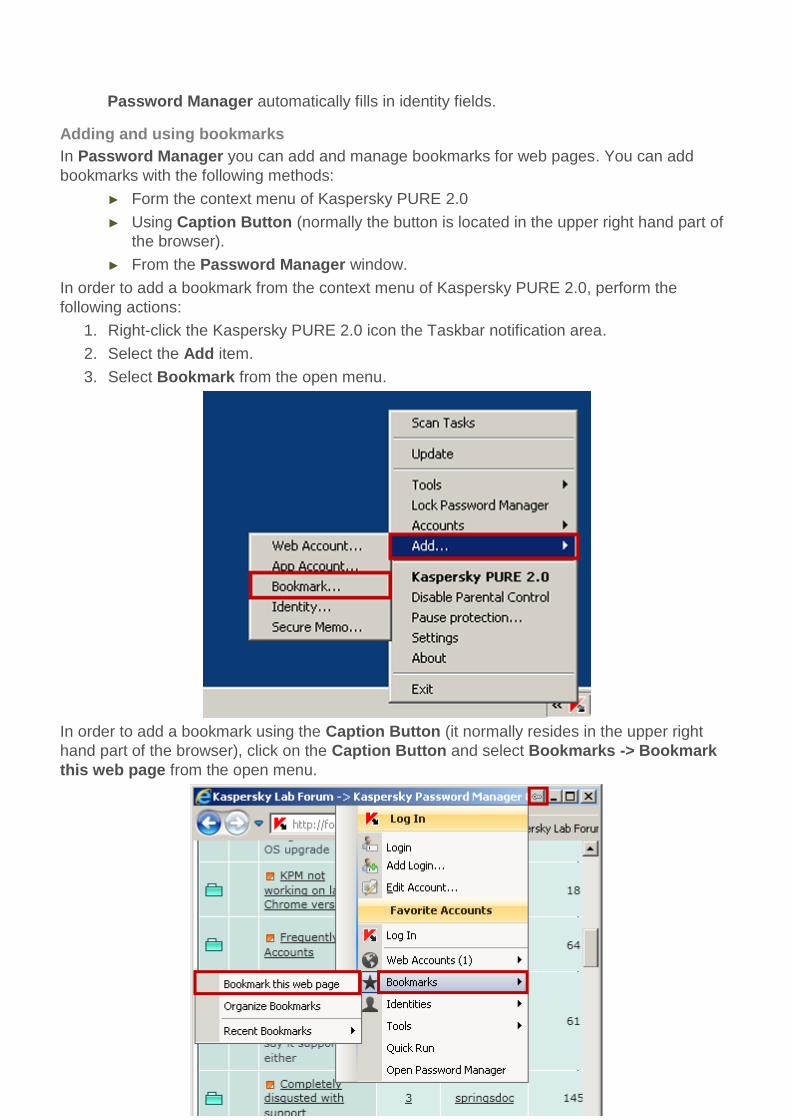
4. In the upper part of the window enter the required type of the Identity (for example,
Work).
5. Fill in the required fields in the Personal section. Password Manager can store
several credit cards data in one identity.
6. In order to add an additional credit card (bank account), click on the Add button and
select Credit card (Bank account).
7. Click on the Save button to save the changes.
In order to apply an Identity, perform the following actions:
1. Open the required page with identity fields.
2. Click on the Caption Button and from the open menu select Identities -> <name of
the identity>.
Password Manager automatically fills in identity fields.
Adding and using bookmarks
In Password Manager you can add and manage bookmarks for web pages. You can add
bookmarks with the following methods:
► Form the context menu of Kaspersky PURE 2.0
► Using Caption Button (normally the button is located in the upper right hand part of
the browser).
► From the Password Manager window.
In order to add a bookmark from the context menu of Kaspersky PURE 2.0, perform the
following actions:
1. Right-click the Kaspersky PURE 2.0 icon the Taskbar notification area.
2. Select the Add item.
3. Select Bookmark from the open menu.
In order to add a bookmark using the Caption Button (it normally resides in the upper right
hand part of the browser), click on the Caption Button and select Bookmarks -> Bookmark
this web page from the open menu.
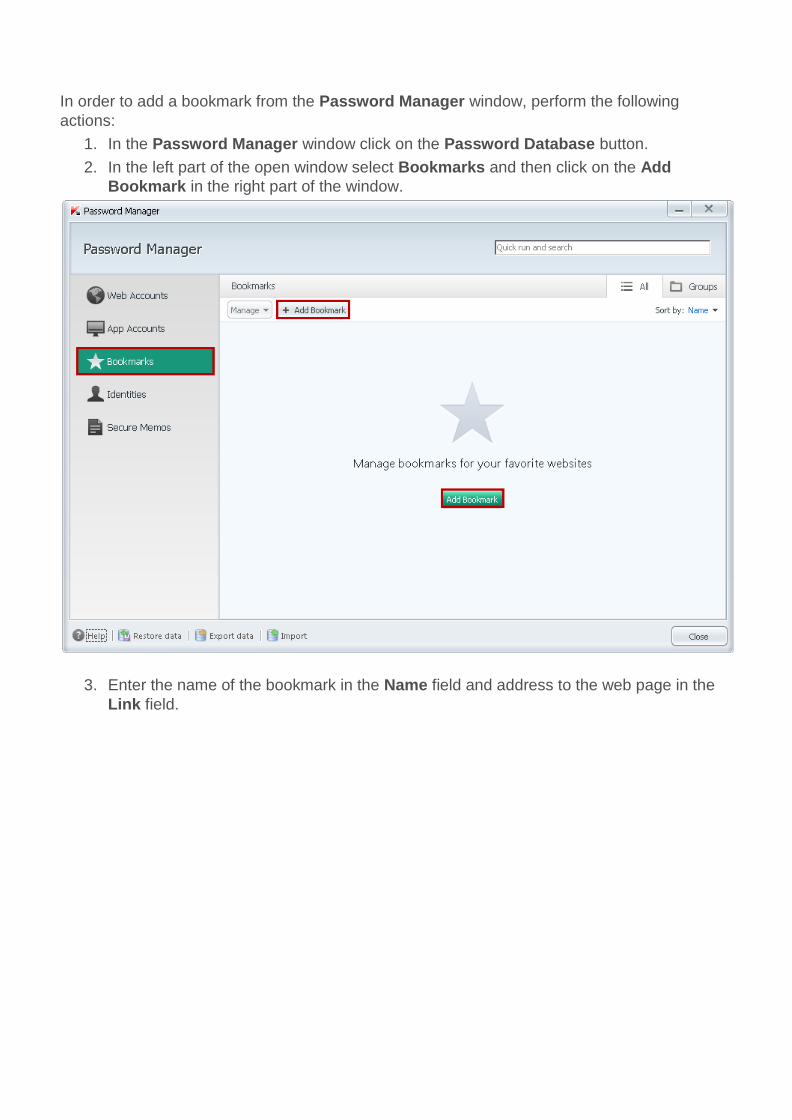
In order to add a bookmark from the Password Manager window, perform the following
actions:
1. In the Password Manager window click on the Password Database button.
2. In the left part of the open window select Bookmarks and then click on the Add
Bookmark in the right part of the window.
3. Enter the name of the bookmark in the Name field and address to the web page in the
Link field.
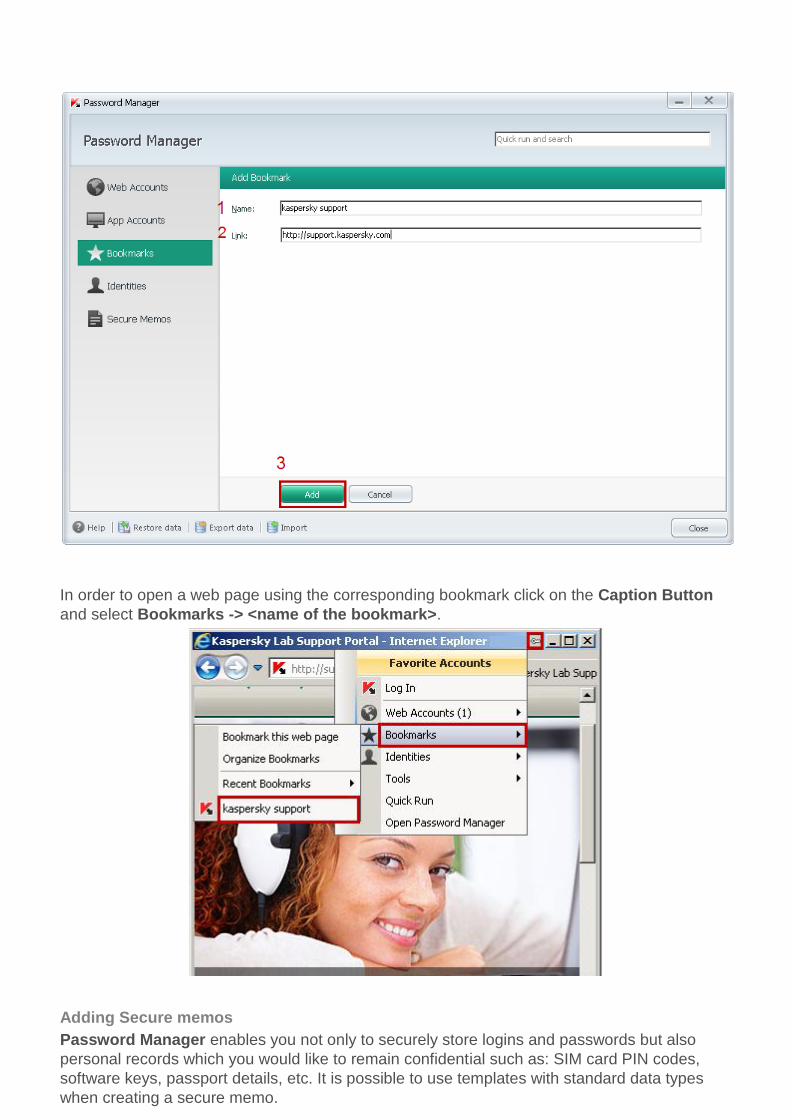
In order to open a web page using the corresponding bookmark click on the Caption Button
and select Bookmarks -> <name of the bookmark>.
Adding Secure memos
Password Manager enables you not only to securely store logins and passwords but also
personal records which you would like to remain confidential such as: SIM card PIN codes,
software keys, passport details, etc. It is possible to use templates with standard data types
when creating a secure memo.
You can edit secure memos settings after adding them.
You can create a secure memo with the following methods:
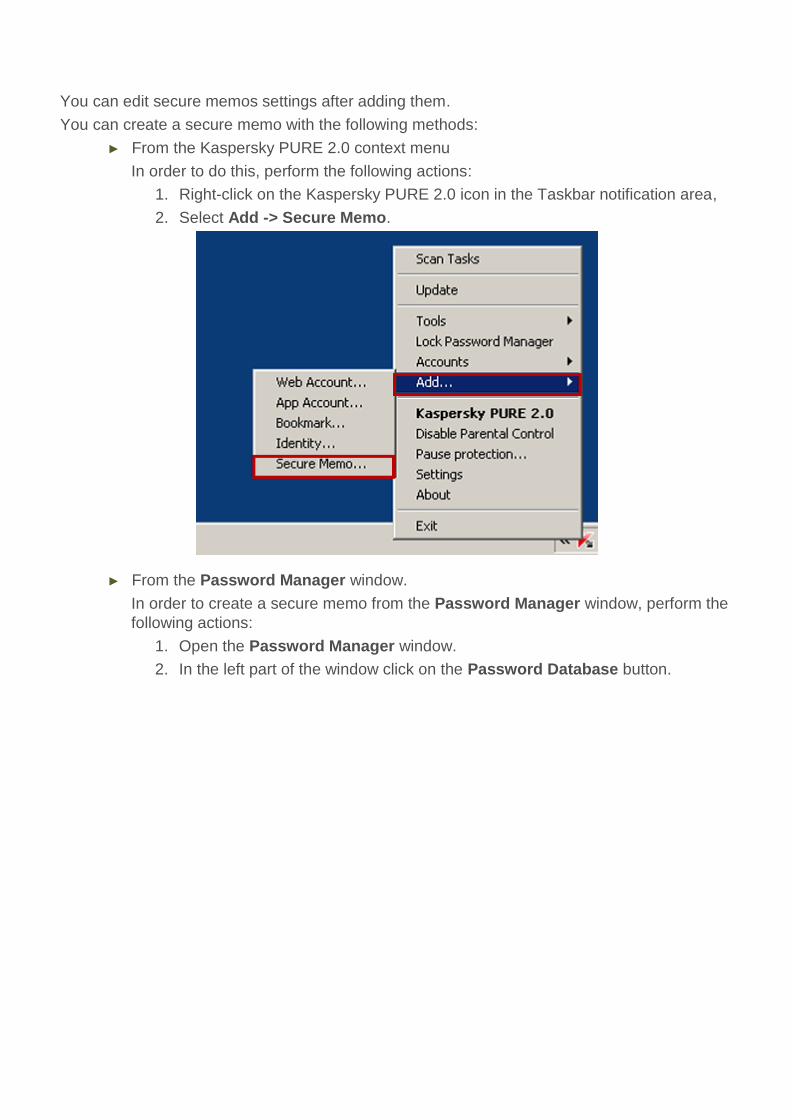
► From the Kaspersky PURE 2.0 context menu
In order to do this, perform the following actions:
1. Right-click on the Kaspersky PURE 2.0 icon in the Taskbar notification area,
2. Select Add -> Secure Memo.
► From the Password Manager window.
In order to create a secure memo from the Password Manager window, perform the
following actions:
1. Open the Password Manager window.
2. In the left part of the window click on the Password Database button.
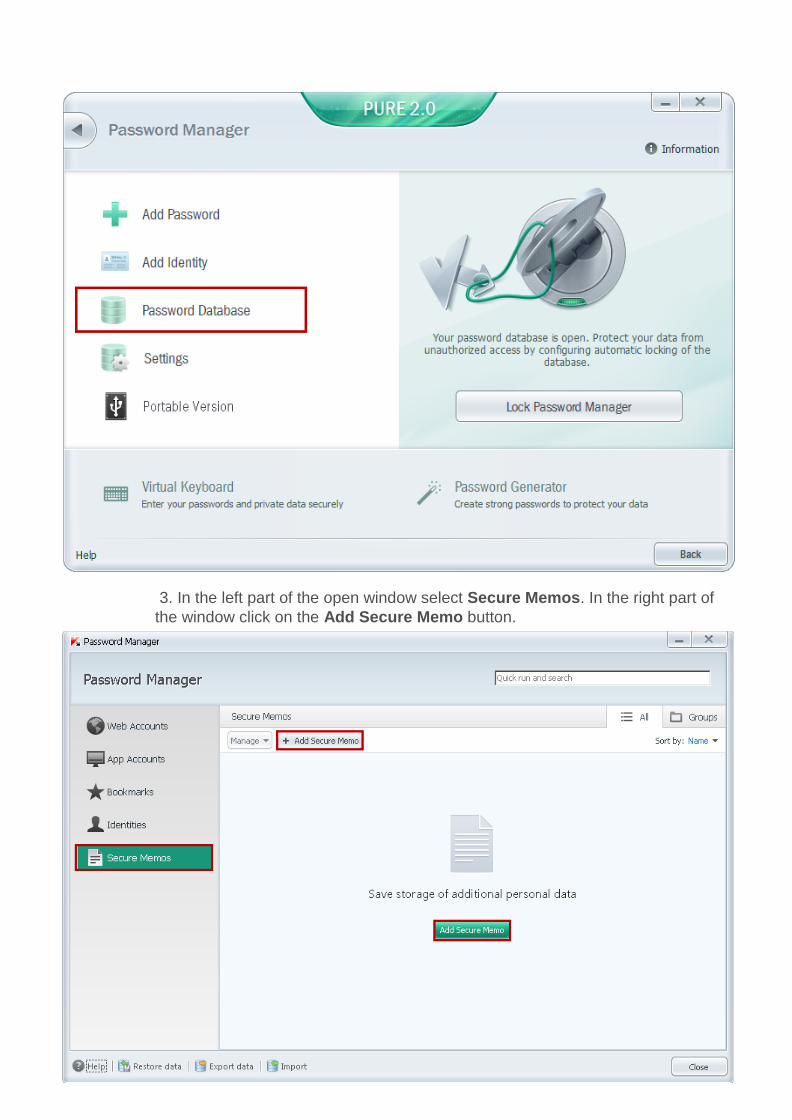
3. In the left part of the open window select Secure Memos. In the right part of
the window click on the Add Secure Memo button.
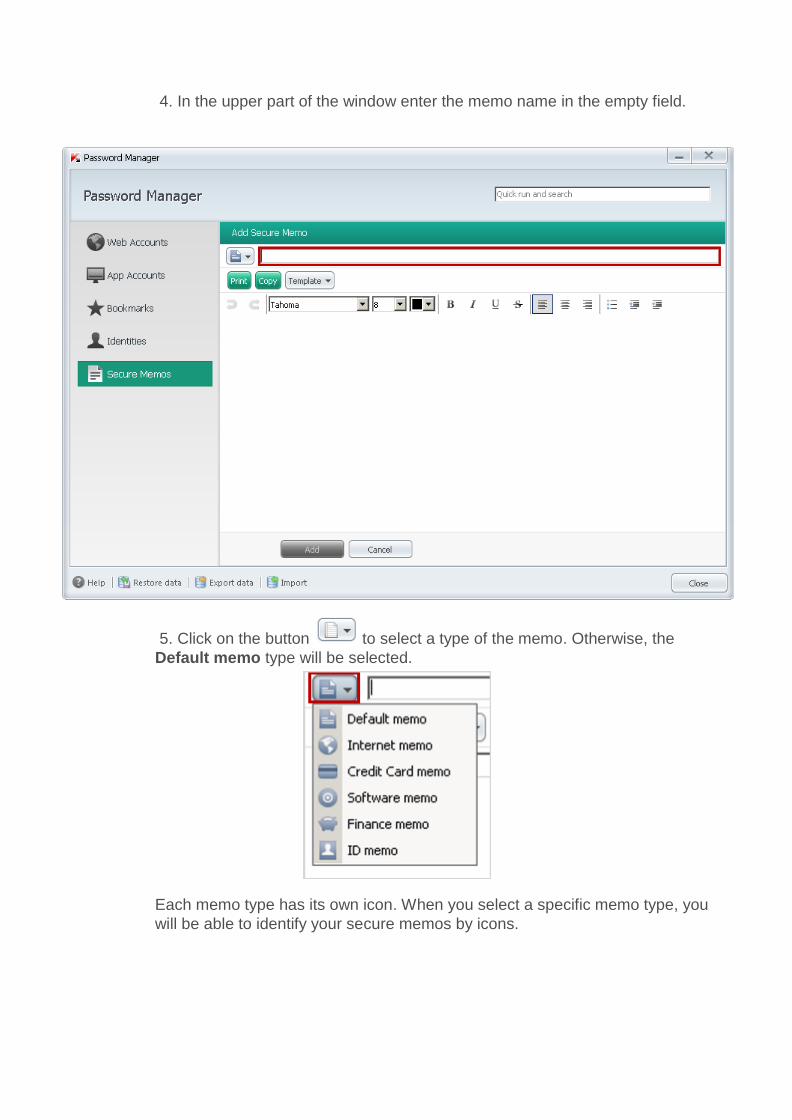
4. In the upper part of the window enter the memo name in the empty field.
5. Click on the button to select a type of the memo. Otherwise, the
Default memo type will be selected.
Each memo type has its own icon. When you select a specific memo type, you
will be able to identify your secure memos by icons.
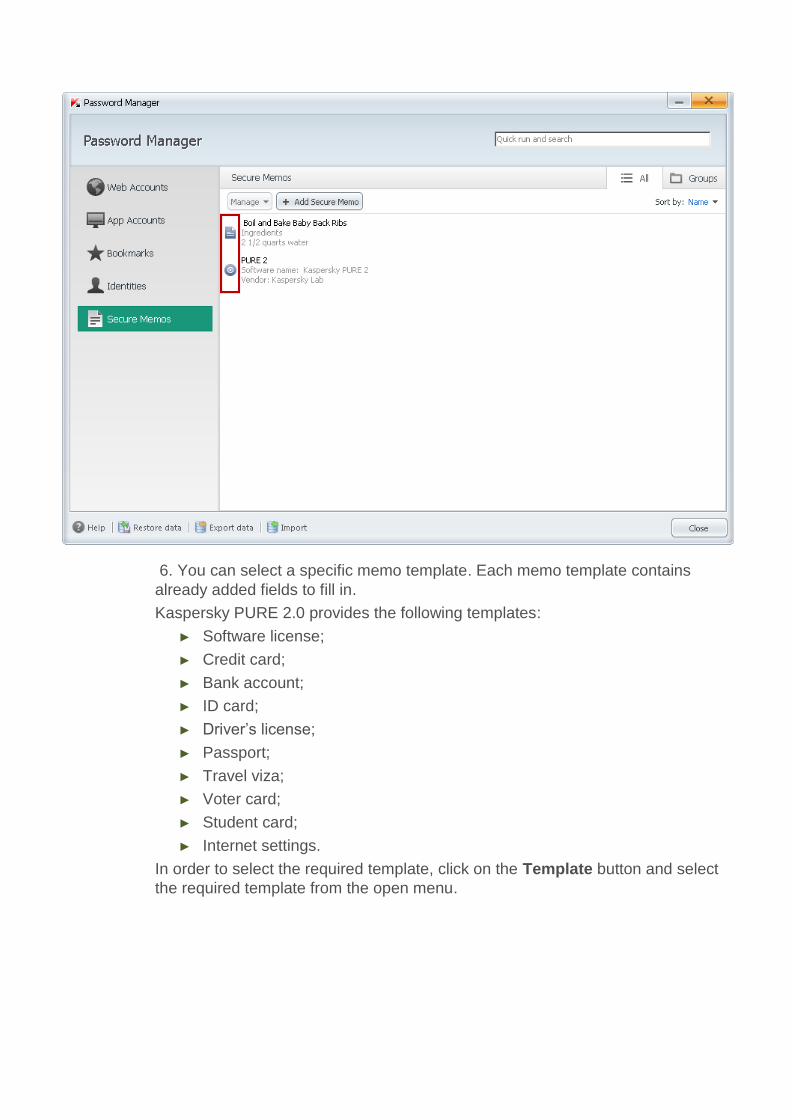
6. You can select a specific memo template. Each memo template contains
already added fields to fill in.
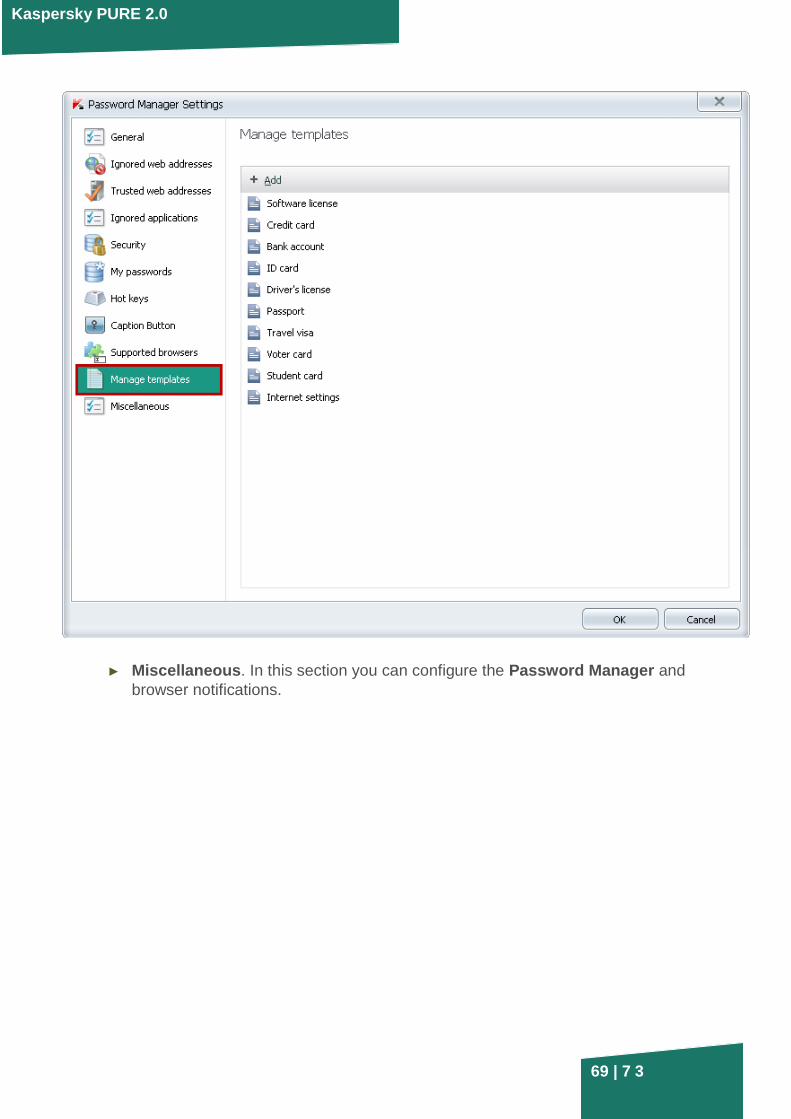
Kaspersky PURE 2.0 provides the following templates:
► Software license;
► Credit card;
► Bank account;
► ID card;
► Driver’s license;
► Passport;
► Travel viza;
► Voter card;
► Student card;
► Internet settings.
In order to select the required template, click on the Template button and select
the required template from the open menu.
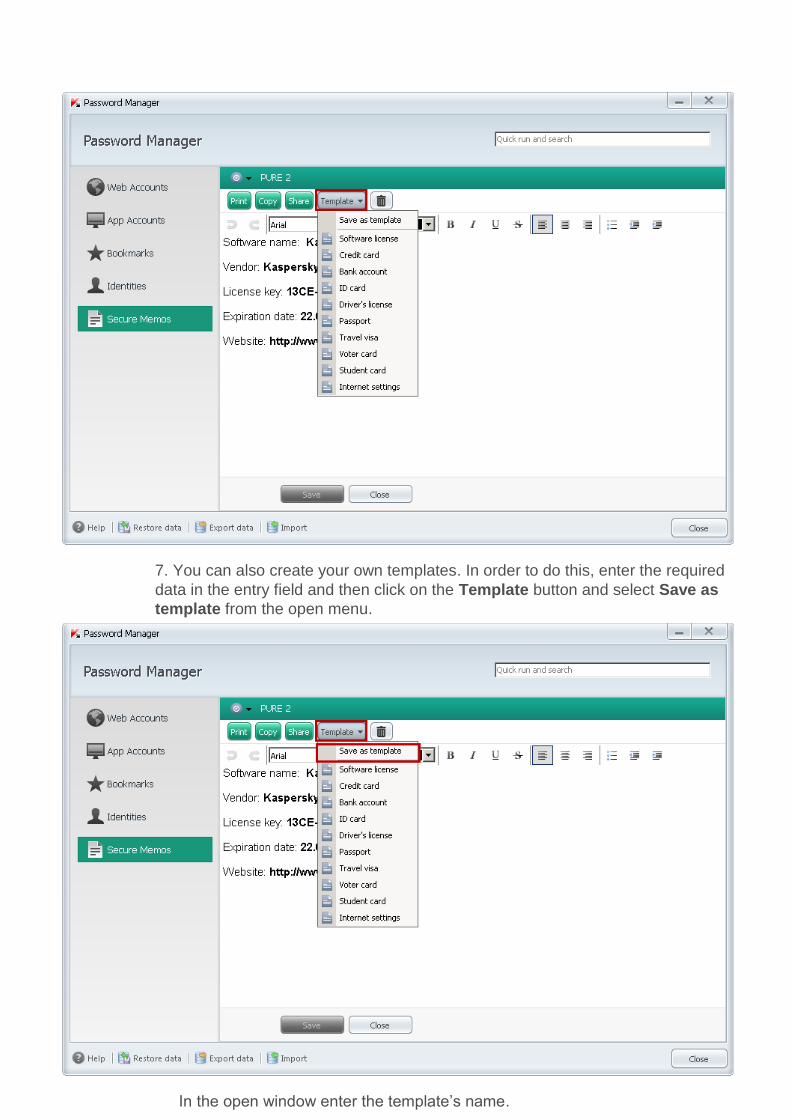
7. You can also create your own templates. In order to do this, enter the required
data in the entry field and then click on the Template button and select Save as
template from the open menu.
In the open window enter the template’s name.
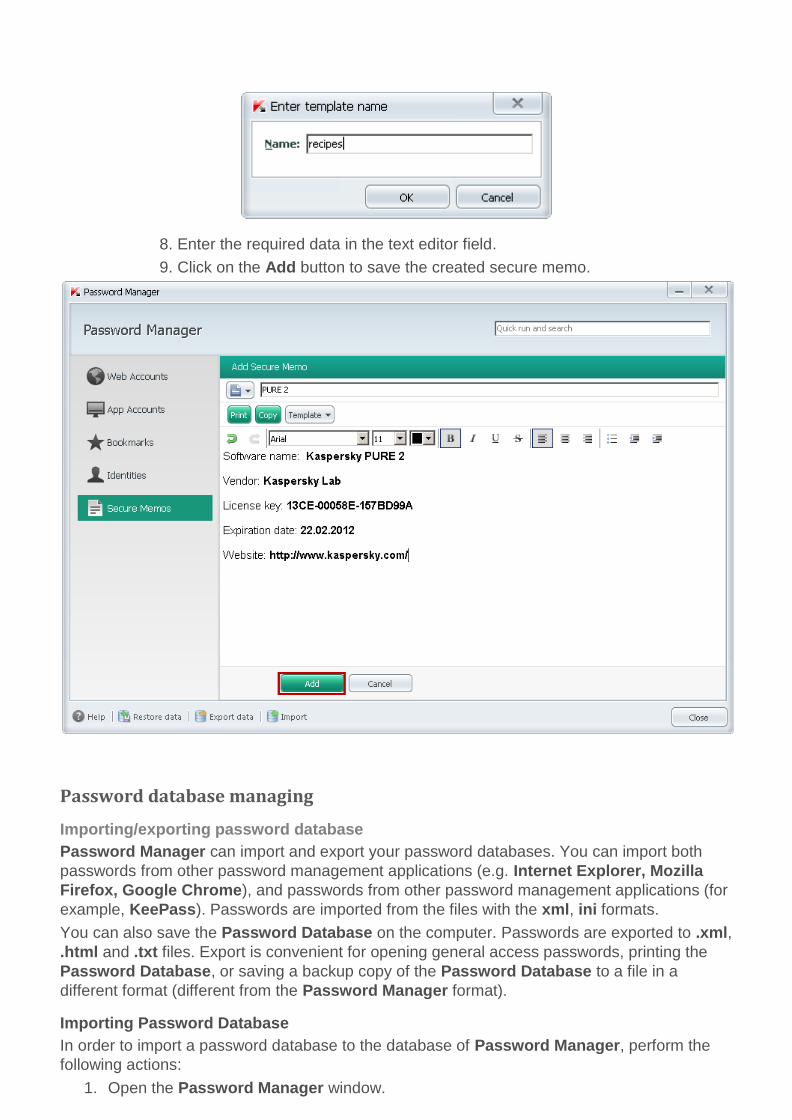
8. Enter the required data in the text editor field.
9. Click on the Add button to save the created secure memo.
Password database managing
Importing/exporting password database
Password Manager can import and export your password databases. You can import both
passwords from other password management applications (e.g. Internet Explorer, Mozilla
Firefox, Google Chrome), and passwords from other password management applications (for
example, KeePass). Passwords are imported from the files with the xml, ini formats.
You can also save the Password Database on the computer. Passwords are exported to .xml,
.html and .txt files. Export is convenient for opening general access passwords, printing the
Password Database, or saving a backup copy of the Password Database to a file in a
different format (different from the Password Manager format).
Importing Password Database
In order to import a password database to the database of Password Manager, perform the
following actions:
1. Open the Password Manager window.
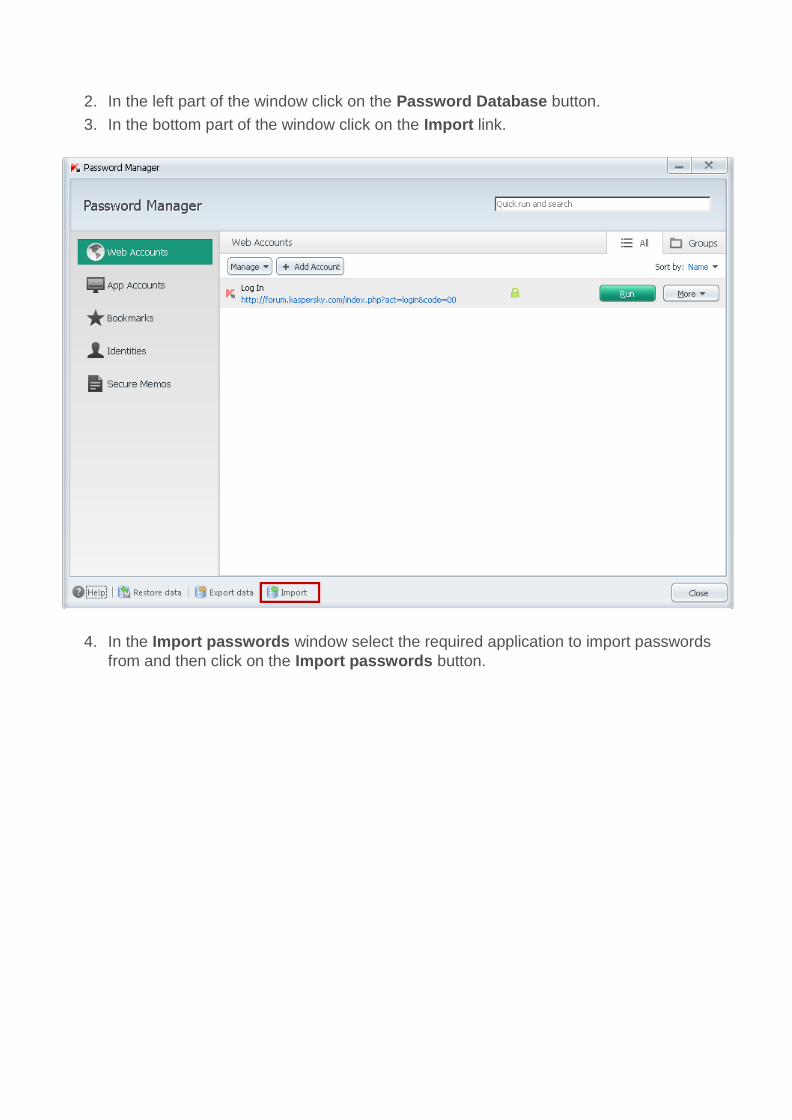
2. In the left part of the window click on the Password Database button.
3. In the bottom part of the window click on the Import link.
4. In the Import passwords window select the required application to import passwords
from and then click on the Import passwords button.
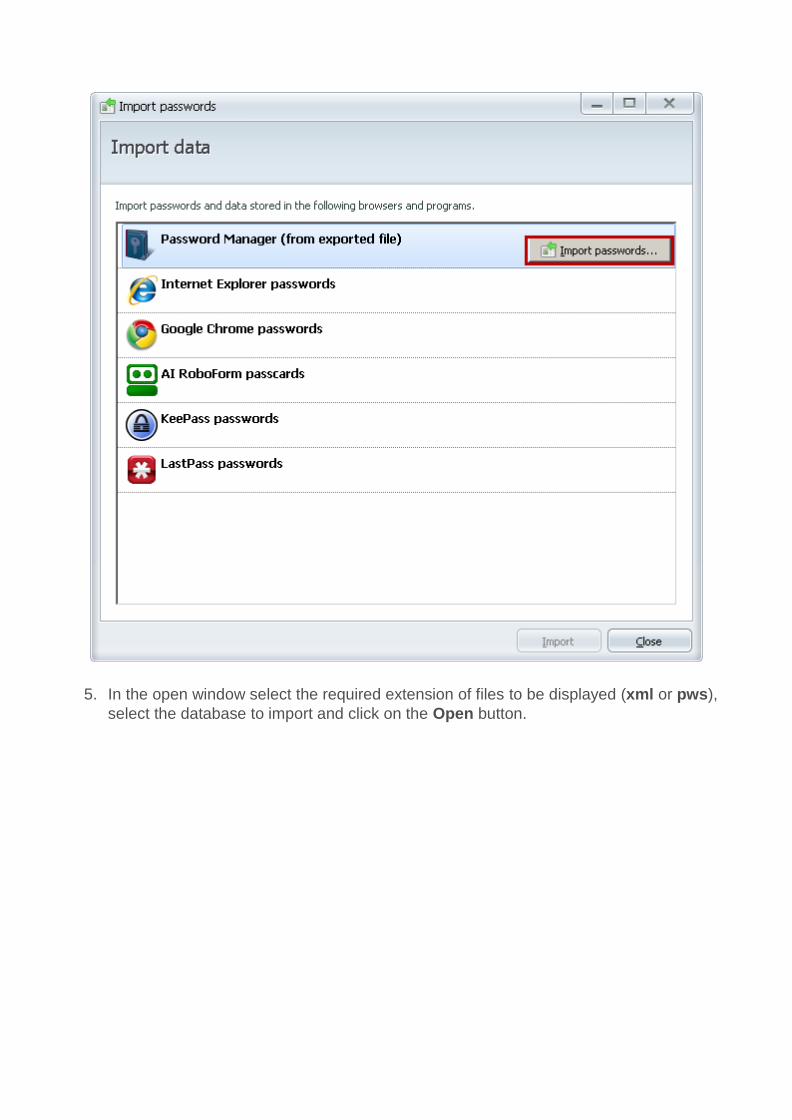
5. In the open window select the required extension of files to be displayed (xml or pws),
select the database to import and click on the Open button.
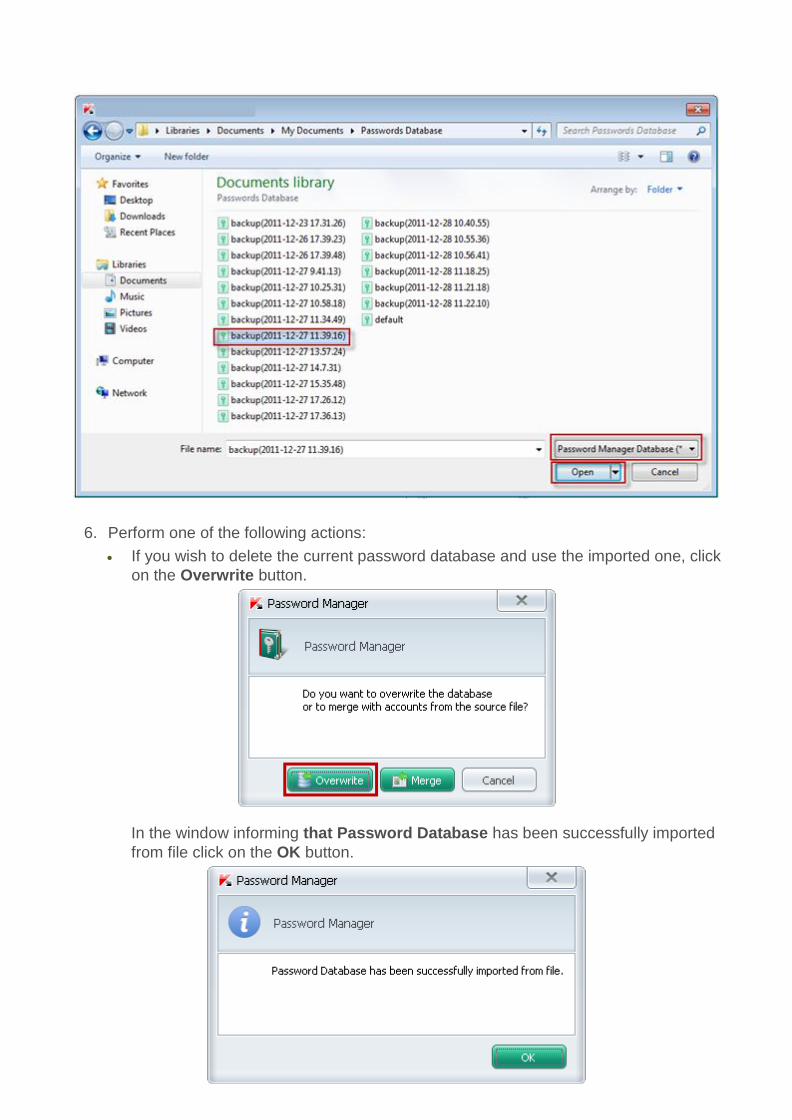
6. Perform one of the following actions:
If you wish to delete the current password database and use the imported one, click
on the Overwrite button.
In the window informing that Password Database has been successfully imported
from file click on the OK button.
Passwords import has been completed.
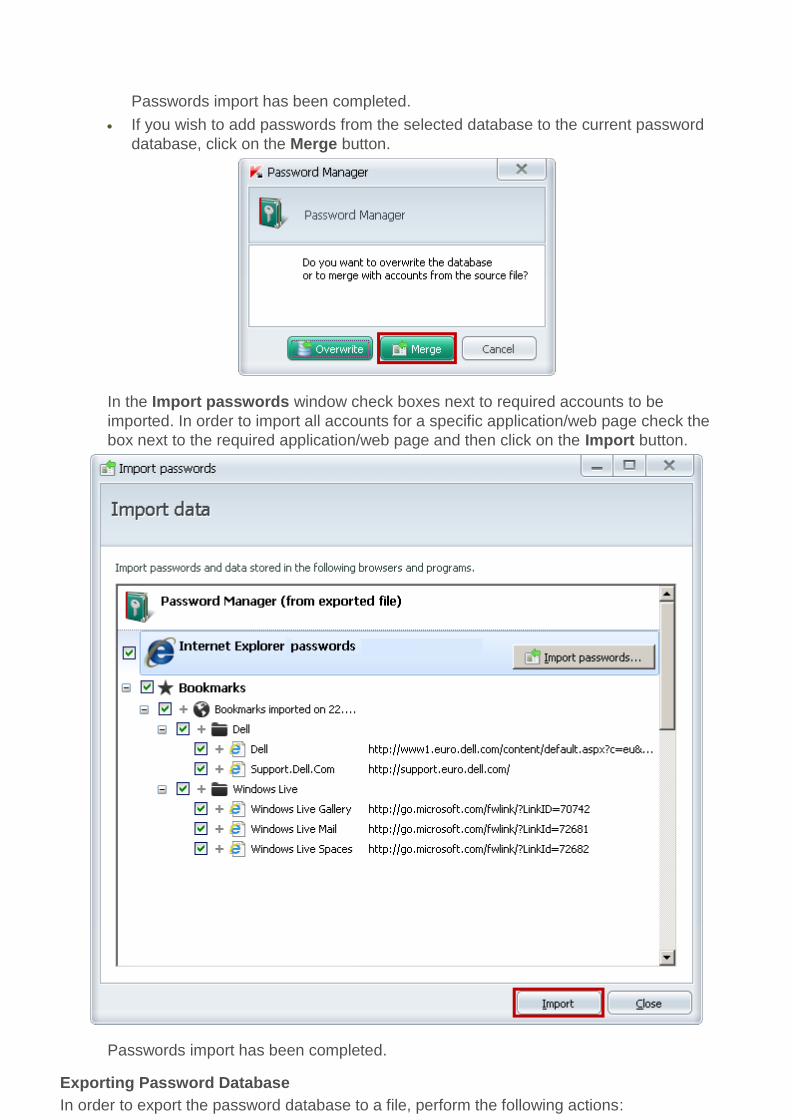
If you wish to add passwords from the selected database to the current password
database, click on the Merge button.
In the Import passwords window check boxes next to required accounts to be
imported. In order to import all accounts for a specific application/web page check the
box next to the required application/web page and then click on the Import button.
Passwords import has been completed.
Exporting Password Database
In order to export the password database to a file, perform the following actions:
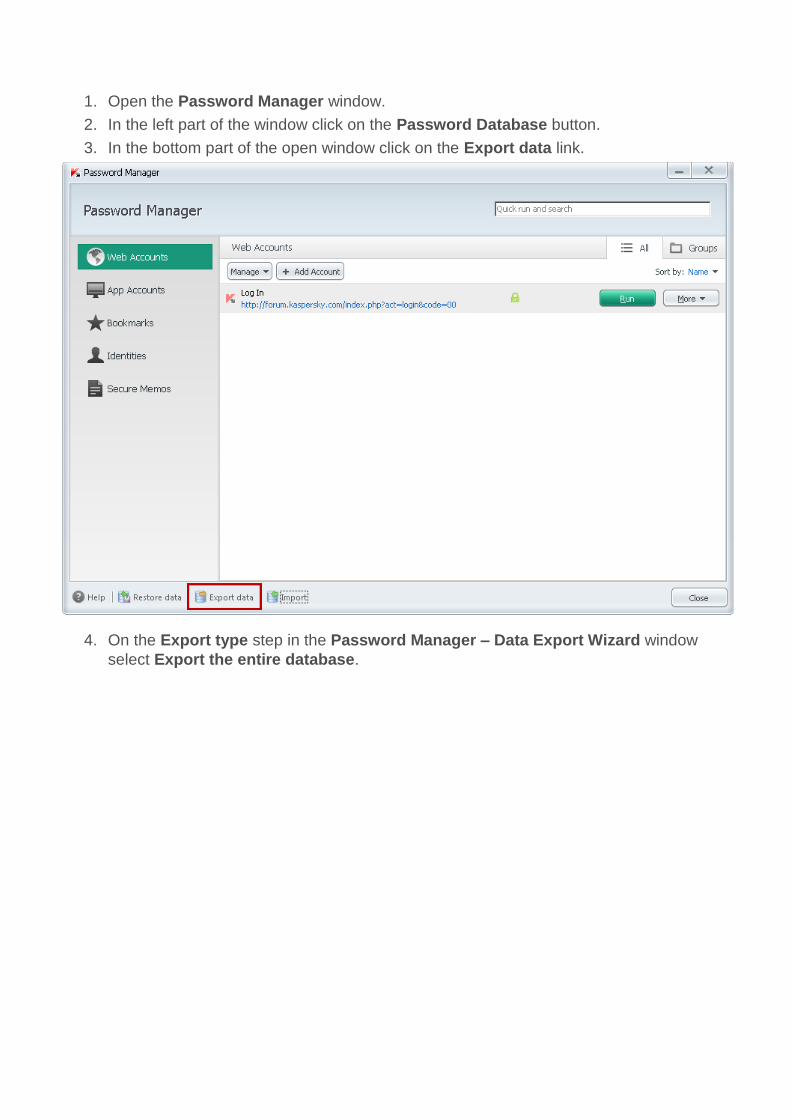
1. Open the Password Manager window.
2. In the left part of the window click on the Password Database button.
3. In the bottom part of the open window click on the Export data link.
4. On the Export type step in the Password Manager – Data Export Wizard window
select Export the entire database.
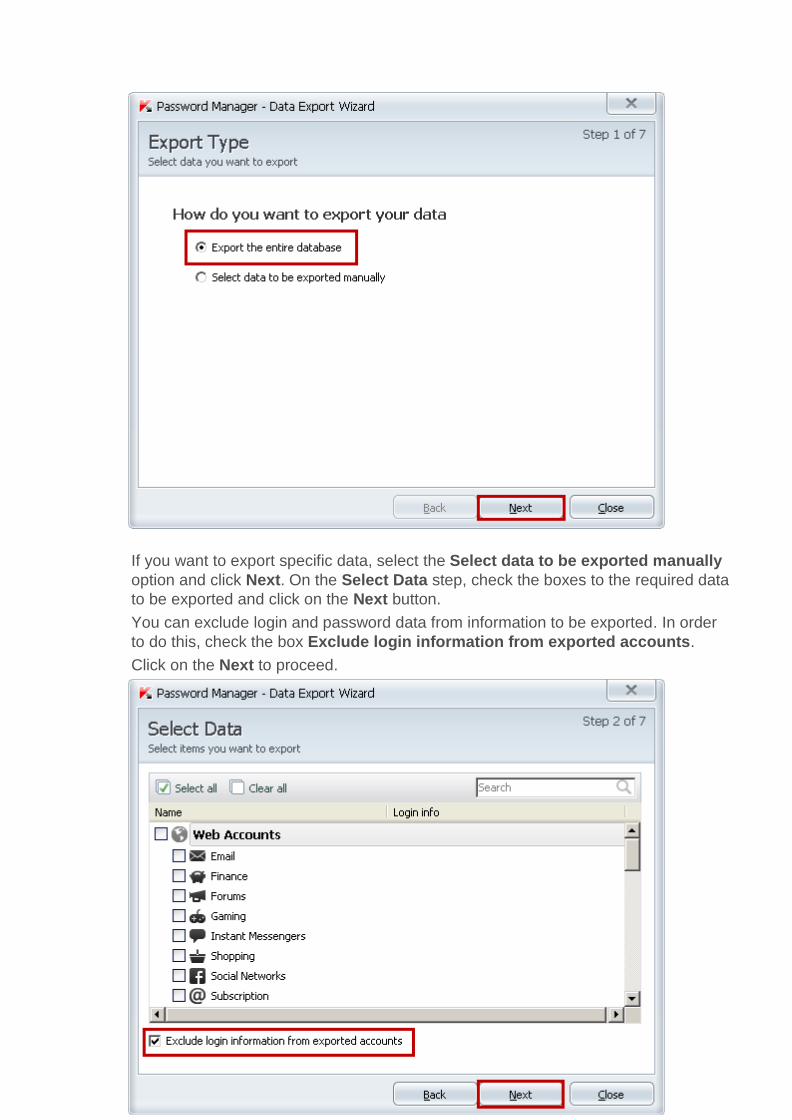
If you want to export specific data, select the Select data to be exported manually
option and click Next. On the Select Data step, check the boxes to the required data
to be exported and click on the Next button.
You can exclude login and password data from information to be exported. In order
to do this, check the box Exclude login information from exported accounts.
Click on the Next to proceed.
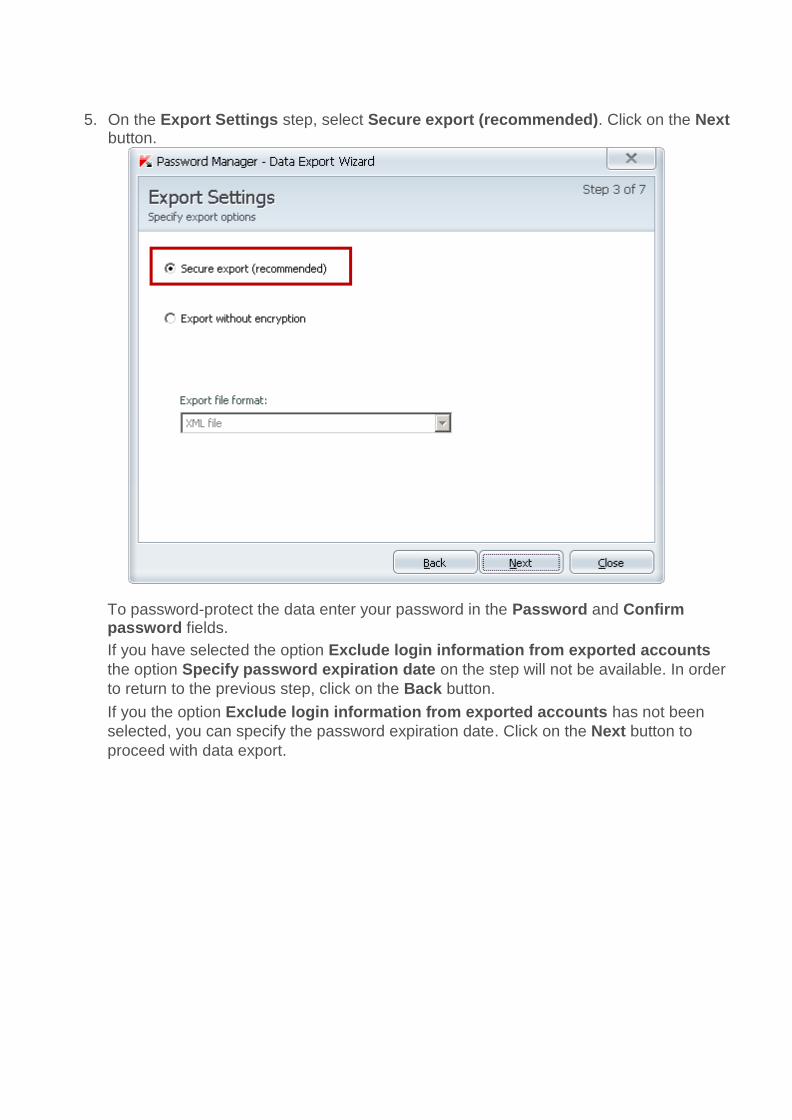
5. On the Export Settings step, select Secure export (recommended). Click on the Next
button.
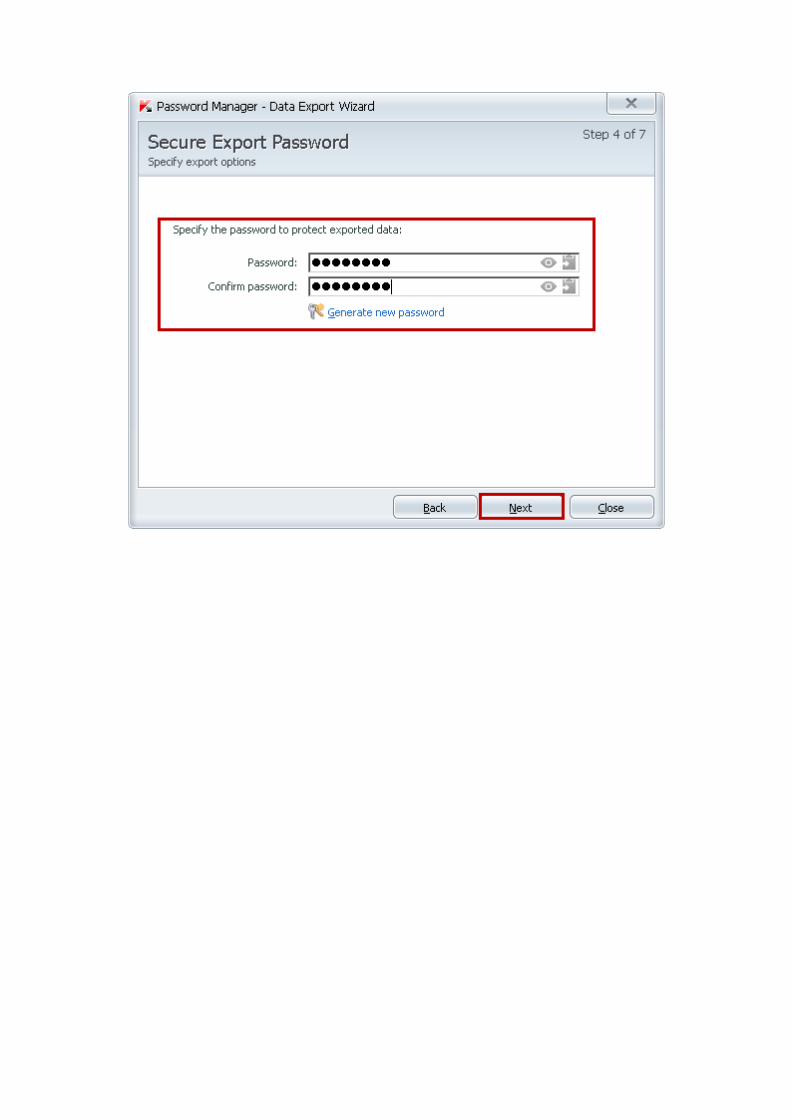
To password-protect the data enter your password in the Password and Confirm password fields.
If you have selected the option Exclude login information from exported accounts
the option Specify password expiration date on the step will not be available. In order
to return to the previous step, click on the Back button.
If you the option Exclude login information from exported accounts has not been
selected, you can specify the password expiration date. Click on the Next button to
proceed with data export.

Kaspersky PURE 2.0
51 | 7 3
Not encrypted files containing exported data are not protected. If you want to select an It
is recommended to encrypt the file which will contain your personal data.
In order to encrypt the exported file, select Secure export (recommended).
extension of the file which will contain your data, select Export without encryption and
then select the required file extension from the drop-down menu.
In order to proceed with data export, click on the Next button.
In the open window informing that data will not be encrypted click on the OK button.
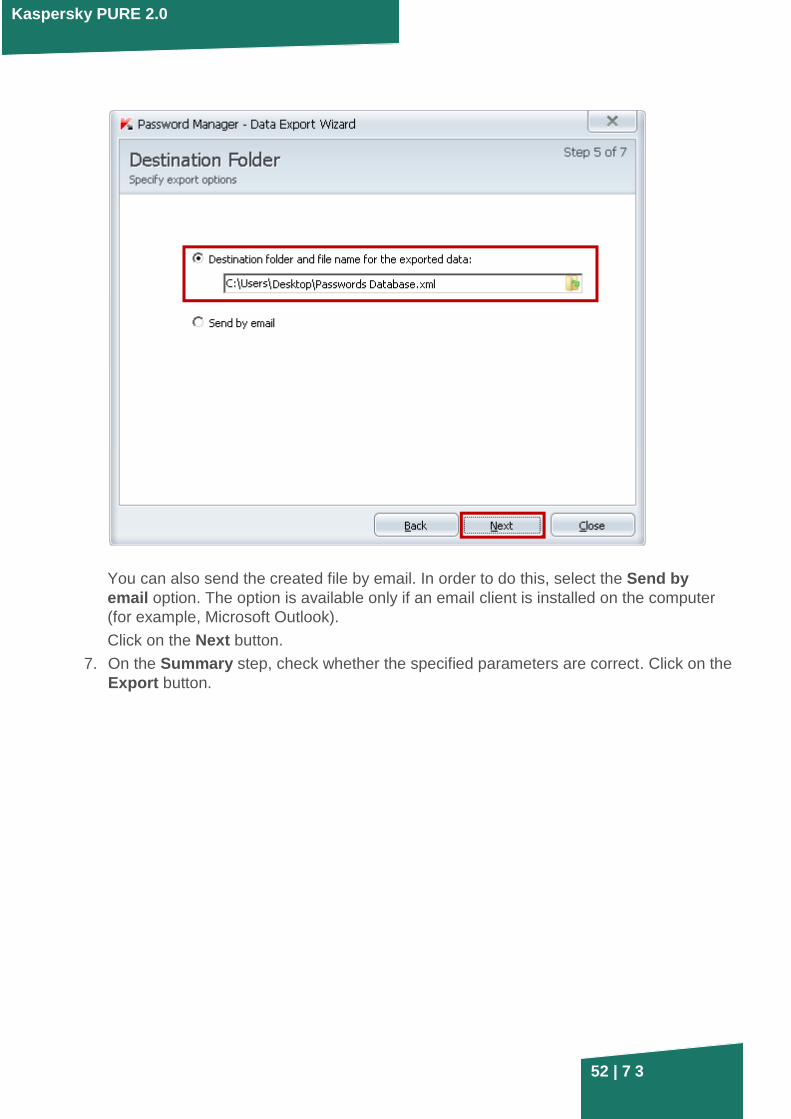
6. On the Destination folder step, select Destination folder and file name for the
exported data.
Kaspersky PURE 2.0
52 | 7 3
You can also send the created file by email. In order to do this, select the Send by
email option. The option is available only if an email client is installed on the computer
(for example, Microsoft Outlook).
Click on the Next button.
7. On the Summary step, check whether the specified parameters are correct. Click on the
Export button.

Kaspersky PURE 2.0
53 | 7 3
Your data have been exported to the file.
8. Click on the Finish button to exit from the Wizard.

Kaspersky PURE 2.0
54 | 7 3
Backup copies of Password Database
Each time you edit the password database Password Manager creates backup copies of the
database. Files of backup copies are encrypted.
In the Password Manager interface backup copies of the password database are displayed in
the list sorted out by backup time. Files are provided with the following additional data:
► Current folder;
► Backup date and time;
► Performed changes.
Restoring data from backup copies
You can use backup copies for the following purposes:
► To restore the password database;
► To delete old versions of backup copies;
► To change the store folder.
You can restore the password database if:
► You need to cancel last changes;
► The password database was deleted or overwritten;
► The current password database is not damaged or corrupted after system failures.
In order to restore the password database from a backup copy, perform the following actions:
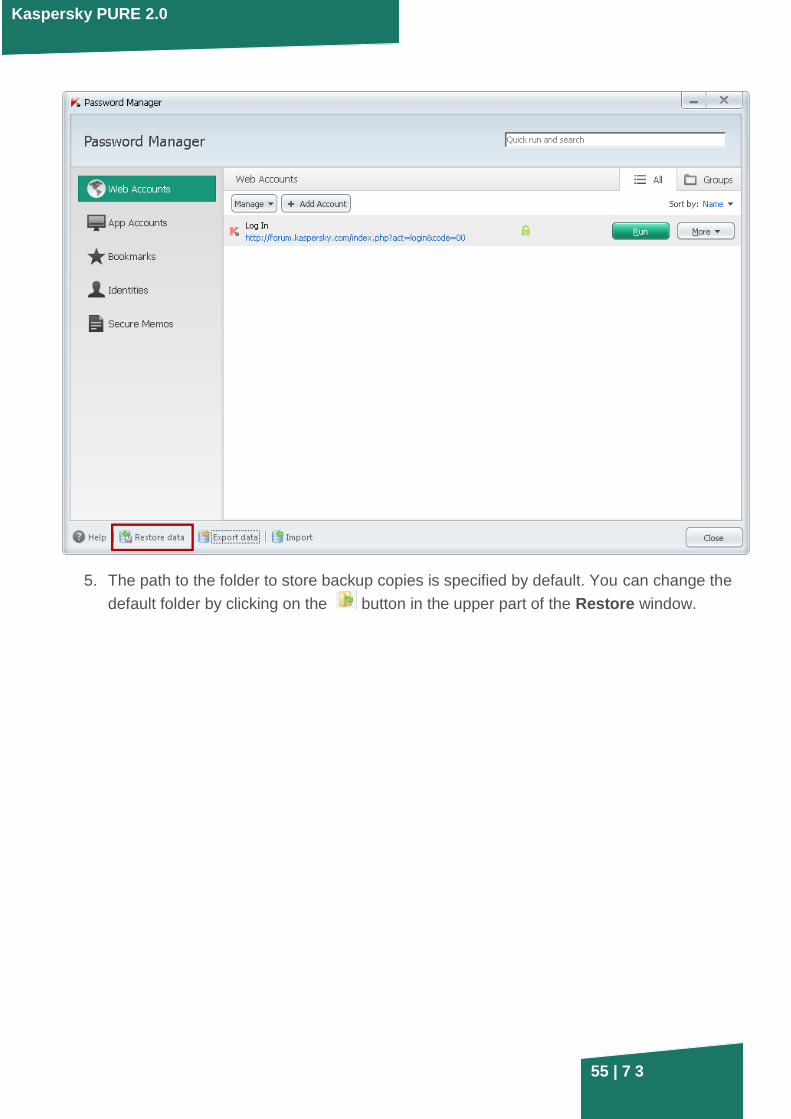
1. Open the main application window.
2. In the bottom part of the window click on the Password Manager button.
3. In the Password Manager window click on the Password Database button.
4. In the bottom part of the window click on the Restore data link.
Kaspersky PURE 2.0
55 | 7 3
5. The path to the folder to store backup copies is specified by default. You can change the
default folder by clicking on the button in the upper part of the Restore window.

Kaspersky PURE 2.0
56 | 7 3
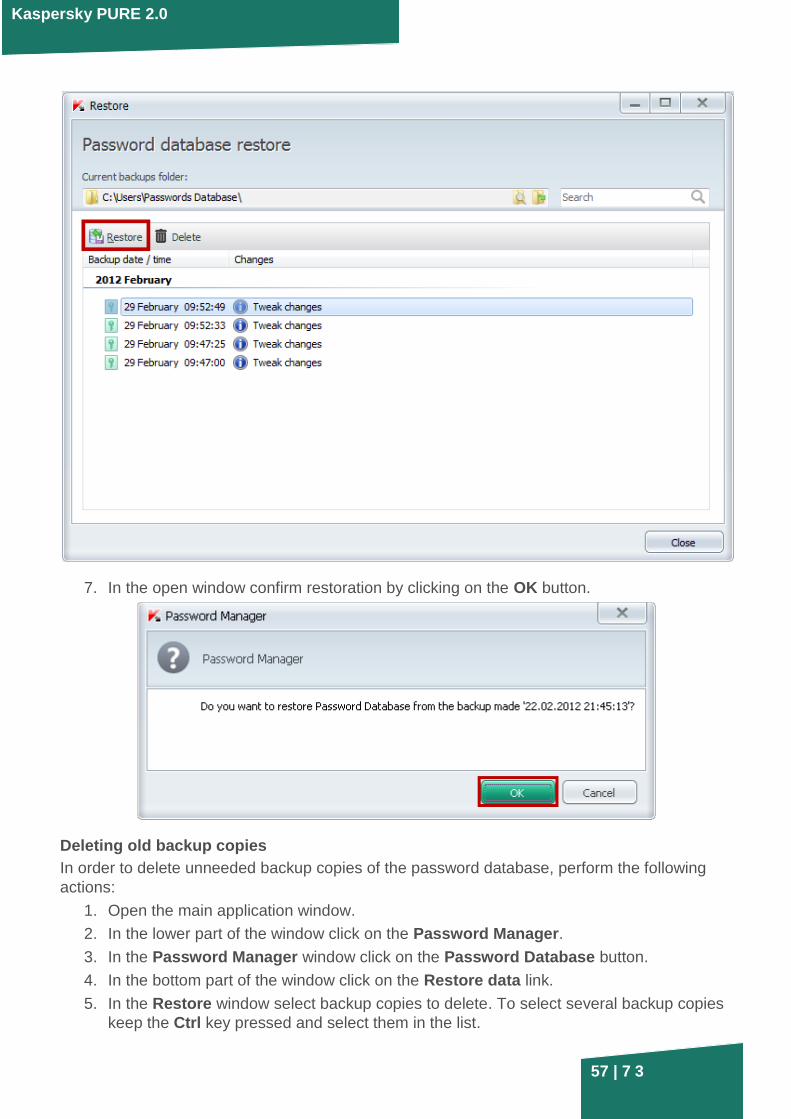
6. Select the required backup copy from the list and click on the Restore button.
Kaspersky PURE 2.0
57 | 7 3
7. In the open window confirm restoration by clicking on the OK button.
Deleting old backup copies
In order to delete unneeded backup copies of the password database, perform the following
actions:
1. Open the main application window.
2. In the lower part of the window click on the Password Manager.
3. In the Password Manager window click on the Password Database button.
4. In the bottom part of the window click on the Restore data link.
5. In the Restore window select backup copies to delete. To select several backup copies
keep the Ctrl key pressed and select them in the list.
Kaspersky PURE 2.0
58 | 7 3
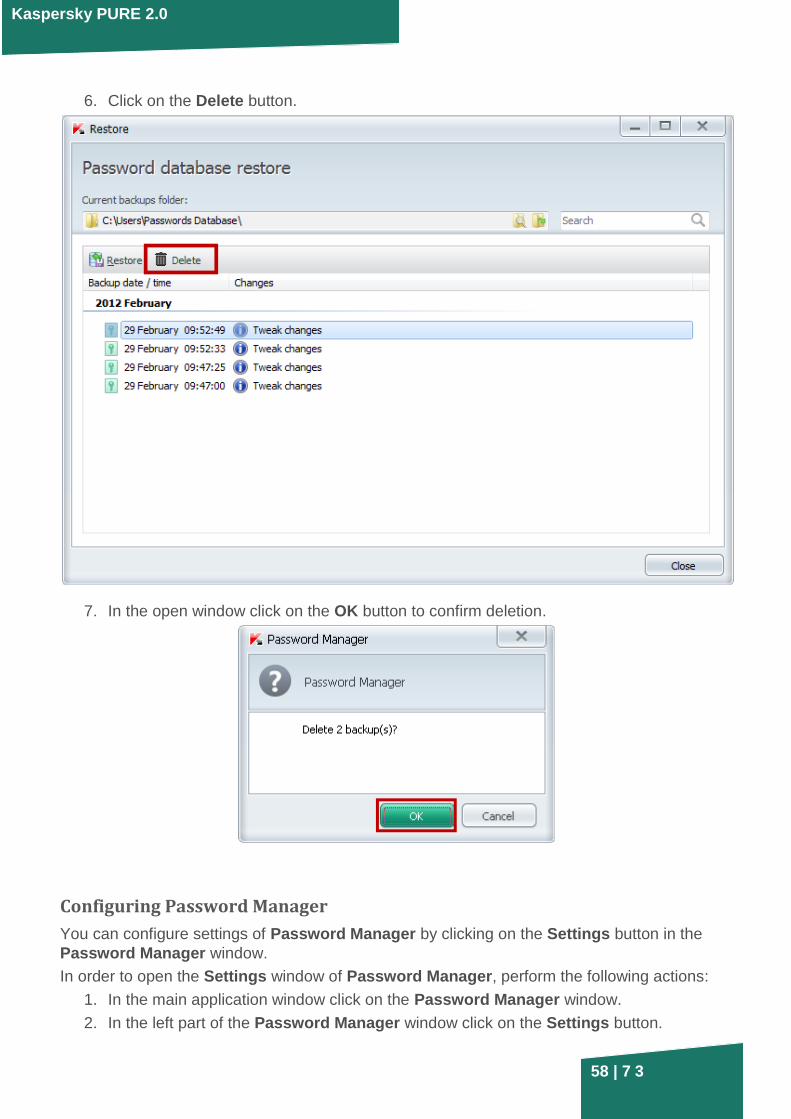
6. Click on the Delete button.
7. In the open window click on the OK button to confirm deletion.
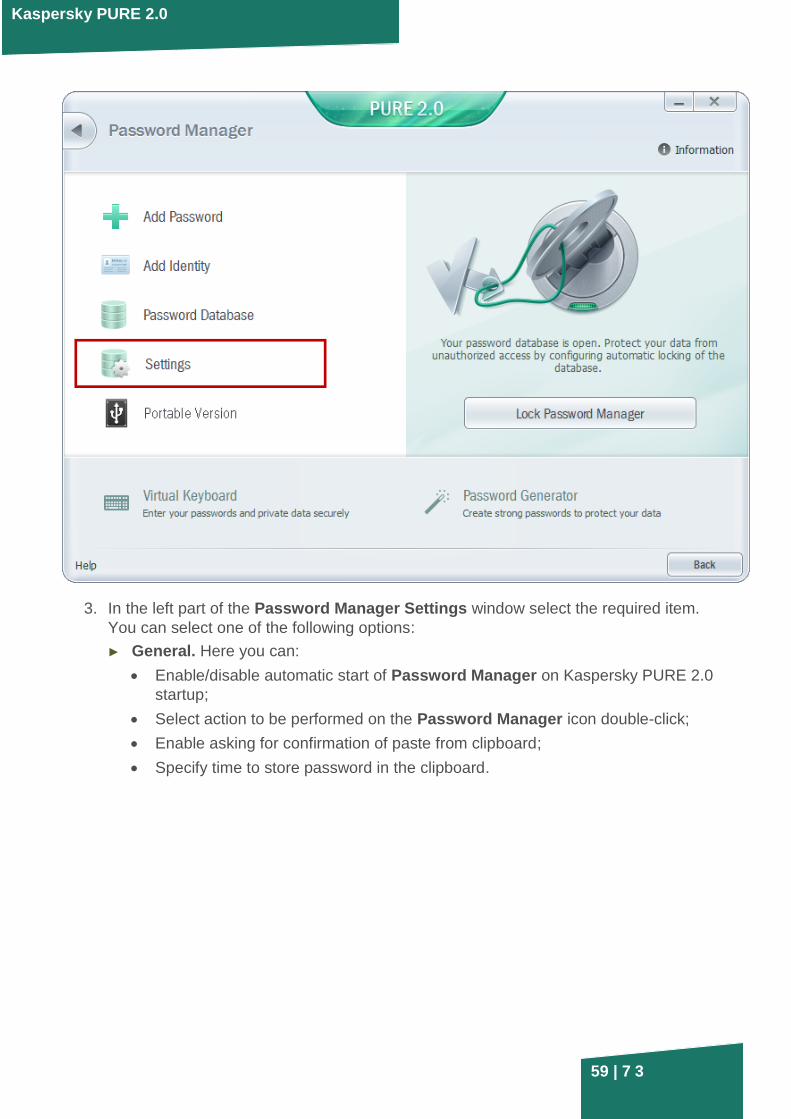
Configuring Password Manager
You can configure settings of Password Manager by clicking on the Settings button in the
Password Manager window.
In order to open the Settings window of Password Manager, perform the following actions:
1. In the main application window click on the Password Manager window.
2. In the left part of the Password Manager window click on the Settings button.
Kaspersky PURE 2.0
59 | 7 3
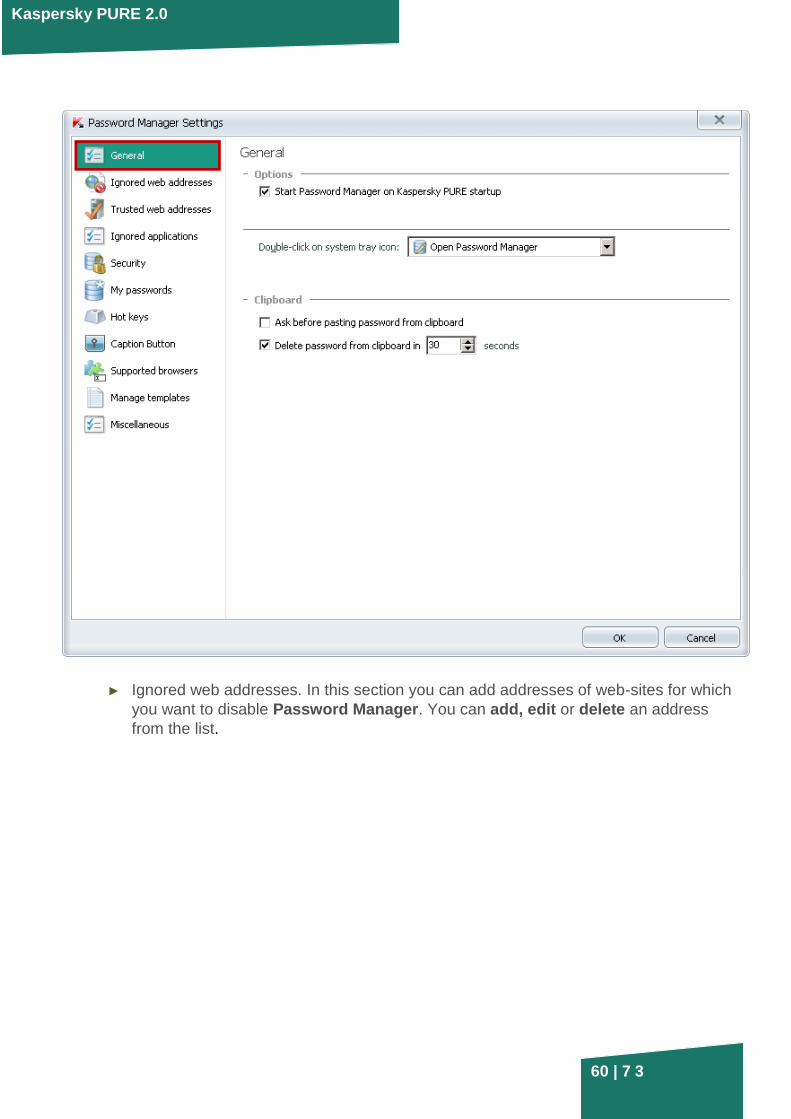
3. In the left part of the Password Manager Settings window select the required item.
You can select one of the following options:
► General. Here you can:
Enable/disable automatic start of Password Manager on Kaspersky PURE 2.0
startup;
Select action to be performed on the Password Manager icon double-click;
Enable asking for confirmation of paste from clipboard;
Specify time to store password in the clipboard.
Kaspersky PURE 2.0
60 | 7 3
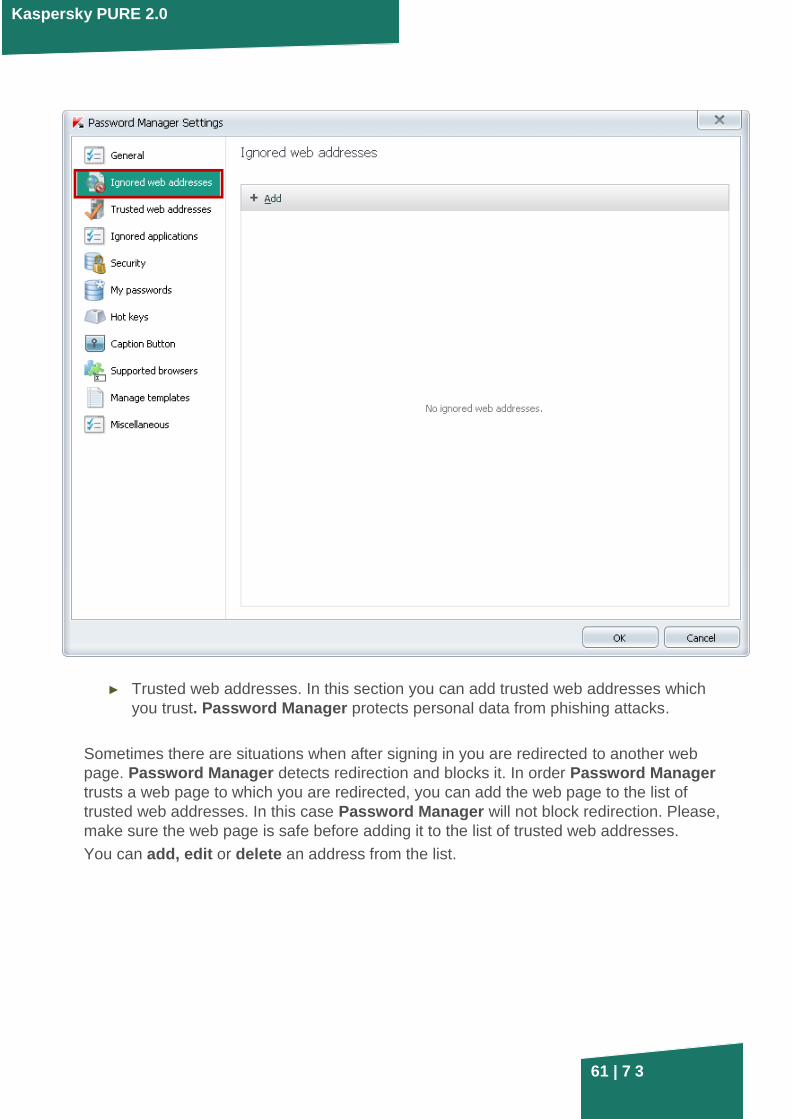
► Ignored web addresses. In this section you can add addresses of web-sites for which
you want to disable Password Manager. You can add, edit or delete an address
from the list.
Kaspersky PURE 2.0
61 | 7 3
► Trusted web addresses. In this section you can add trusted web addresses which
you trust. Password Manager protects personal data from phishing attacks.
Sometimes there are situations when after signing in you are redirected to another web
page. Password Manager detects redirection and blocks it. In order Password Manager
trusts a web page to which you are redirected, you can add the web page to the list of
trusted web addresses. In this case Password Manager will not block redirection. Please,
make sure the web page is safe before adding it to the list of trusted web addresses.
You can add, edit or delete an address from the list.

Kaspersky PURE 2.0
62 | 7 3
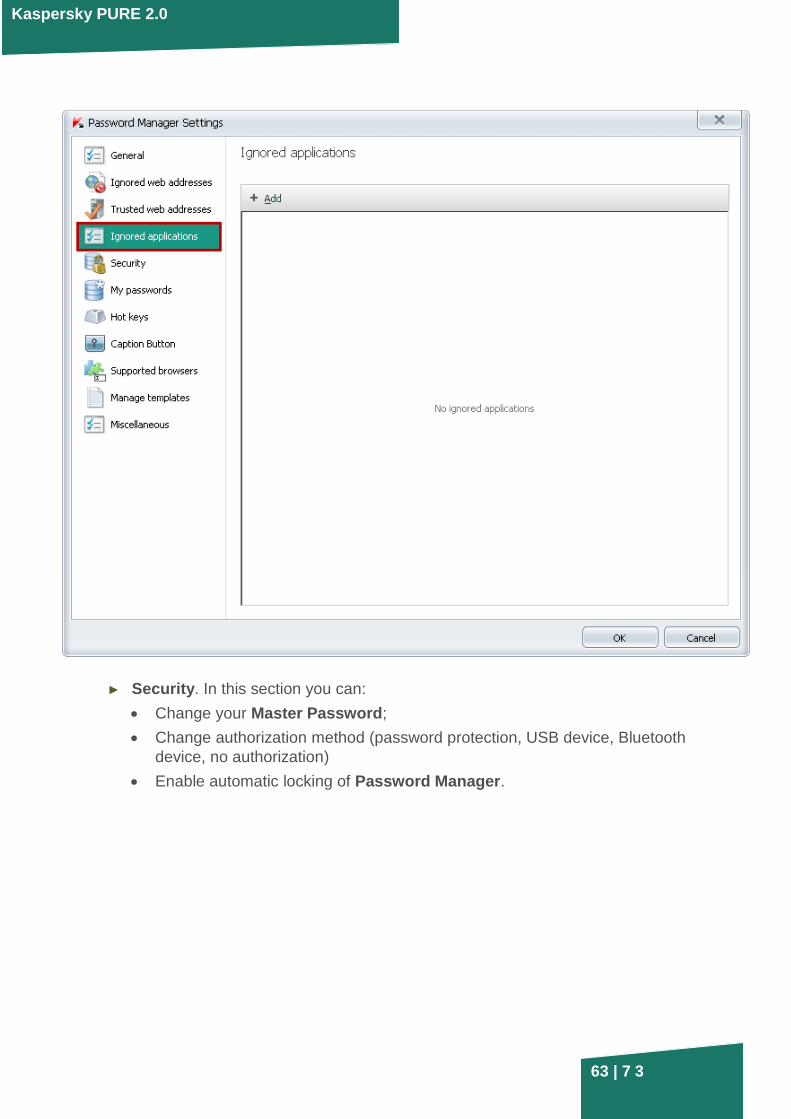
► Ignored applications. In this section you can add applications for which you want to
disable Password Manager. You can add or delete an application from the list.
Kaspersky PURE 2.0
63 | 7 3
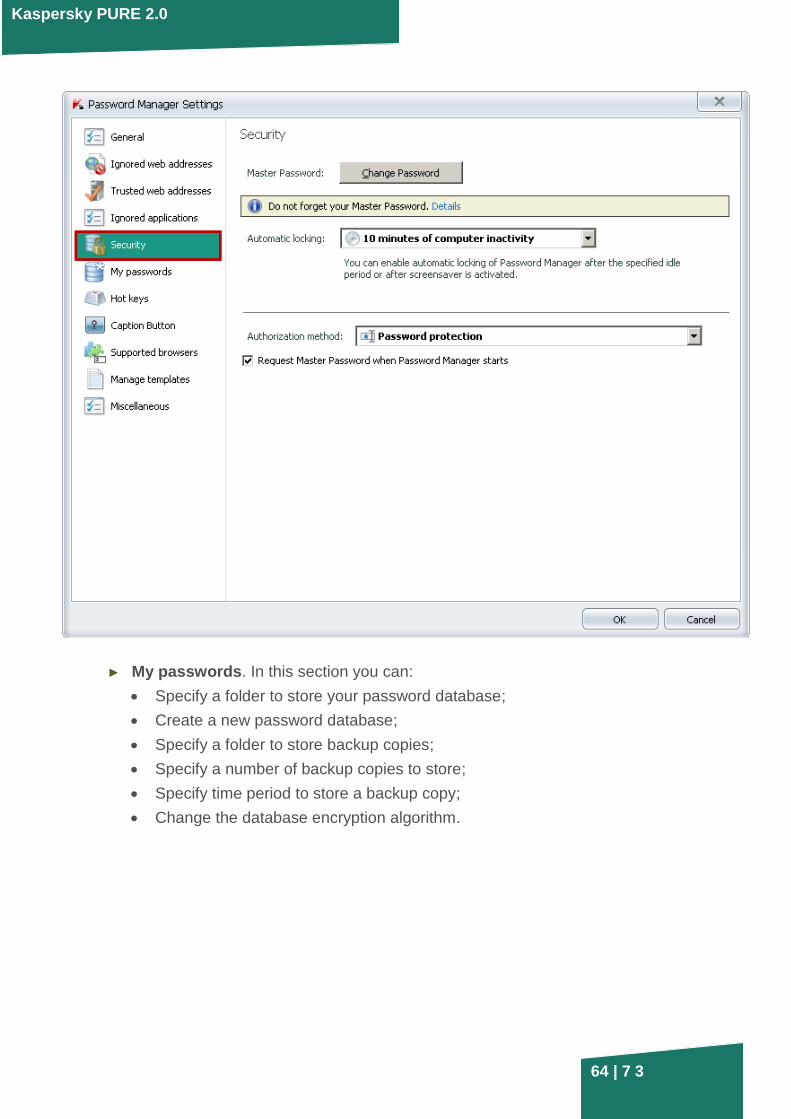
► Security. In this section you can:
Change your Master Password;
Change authorization method (password protection, USB device, Bluetooth
device, no authorization)
Enable automatic locking of Password Manager.
Kaspersky PURE 2.0
64 | 7 3
► My passwords. In this section you can:
Specify a folder to store your password database;
Create a new password database;
Specify a folder to store backup copies;
Specify a number of backup copies to store;
Specify time period to store a backup copy;
Change the database encryption algorithm.

Kaspersky PURE 2.0
65 | 7 3
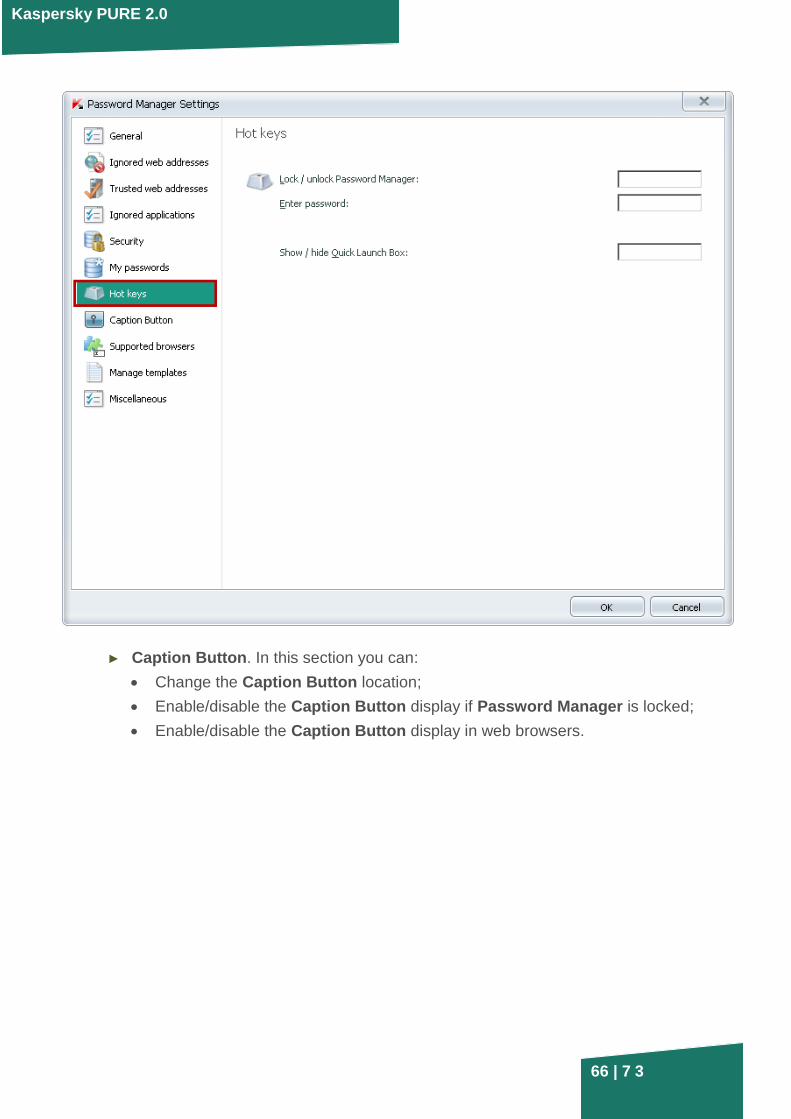
► Hot keys. In this section you can set hot keys for Password Manager actions. You
can specify key combinations for the following actions:
Locking/unlocking Password Manager;
Password entering;
Quick launch box opening.
Kaspersky PURE 2.0
66 | 7 3
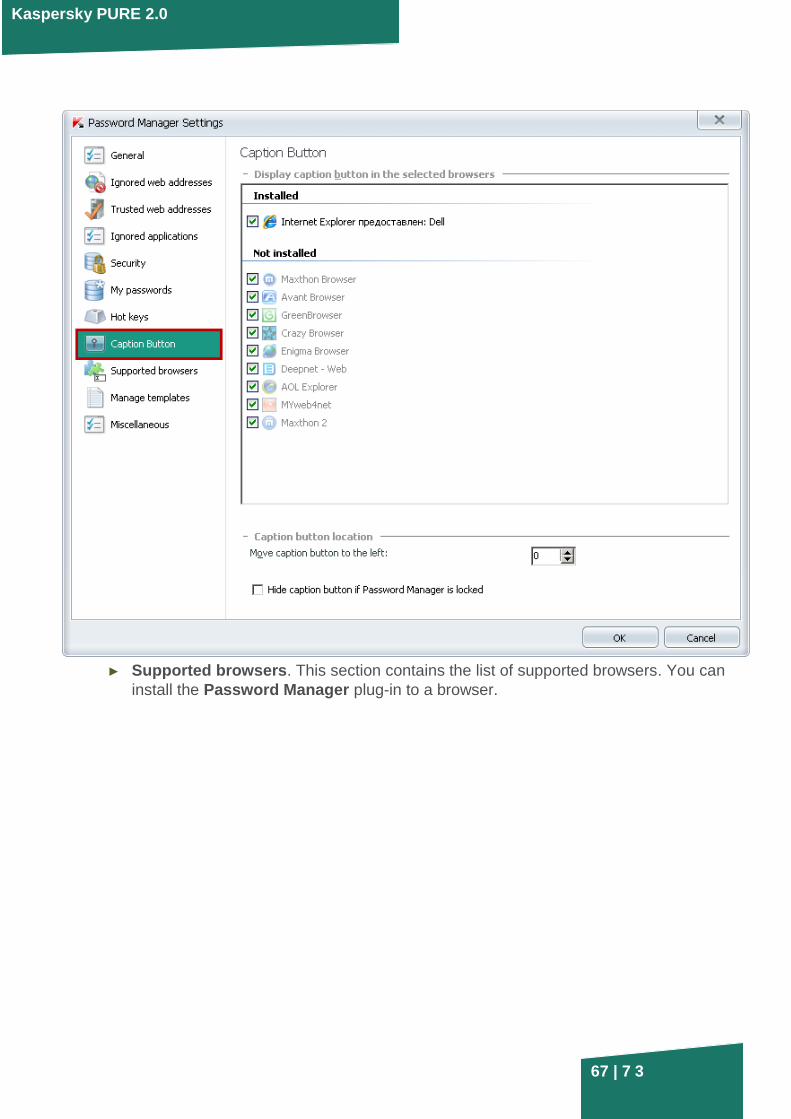
► Caption Button. In this section you can:
Change the Caption Button location;
Enable/disable the Caption Button display if Password Manager is locked;
Enable/disable the Caption Button display in web browsers.
Kaspersky PURE 2.0
67 | 7 3
► Supported browsers. This section contains the list of supported browsers. You can
install the Password Manager plug-in to a browser.

Kaspersky PURE 2.0
68 | 7 3
► Manage templates. In this section you can add, edit or delete templates for secure
memos.
Kaspersky PURE 2.0
69 | 7 3
► Miscellaneous. In this section you can configure the Password Manager and
browser notifications.

Kaspersky PURE 2.0
70 | 7 3
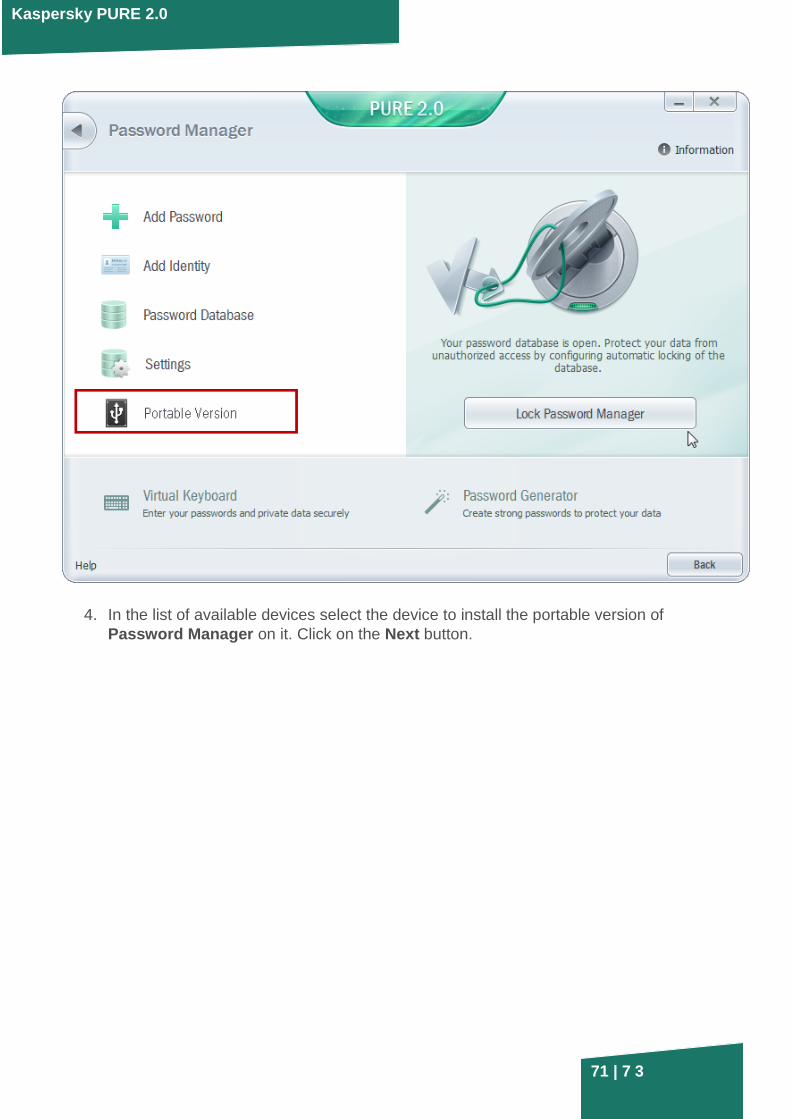
Portable version of Password Manager
With portable version created you can connect a removable device to any computer and use
your password database. As soon as a removable device is disabled, Password Manager
automatically closes and removes all of your data from the public computer.
To create a portable version of Password Manager, perform the following actions:
1. Connect the removable device to the computer.
2. Open the Password Manager window.
3. In the left part of the Password Manager window click Portable Version.
Kaspersky PURE 2.0
71 | 7 3
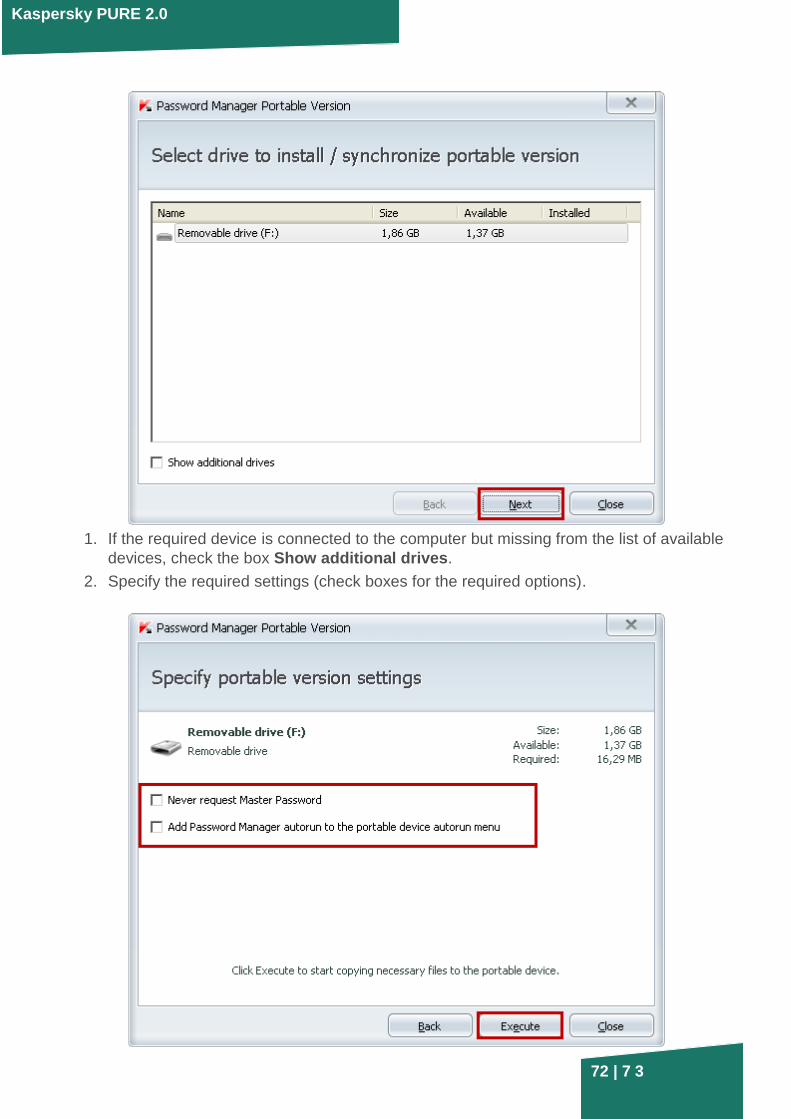
4. In the list of available devices select the device to install the portable version of
Password Manager on it. Click on the Next button.
Kaspersky PURE 2.0
72 | 7 3
1. If the required device is connected to the computer but missing from the list of available
devices, check the box Show additional drives.
2. Specify the required settings (check boxes for the required options).
Kaspersky PURE 2.0
73 | 7 3
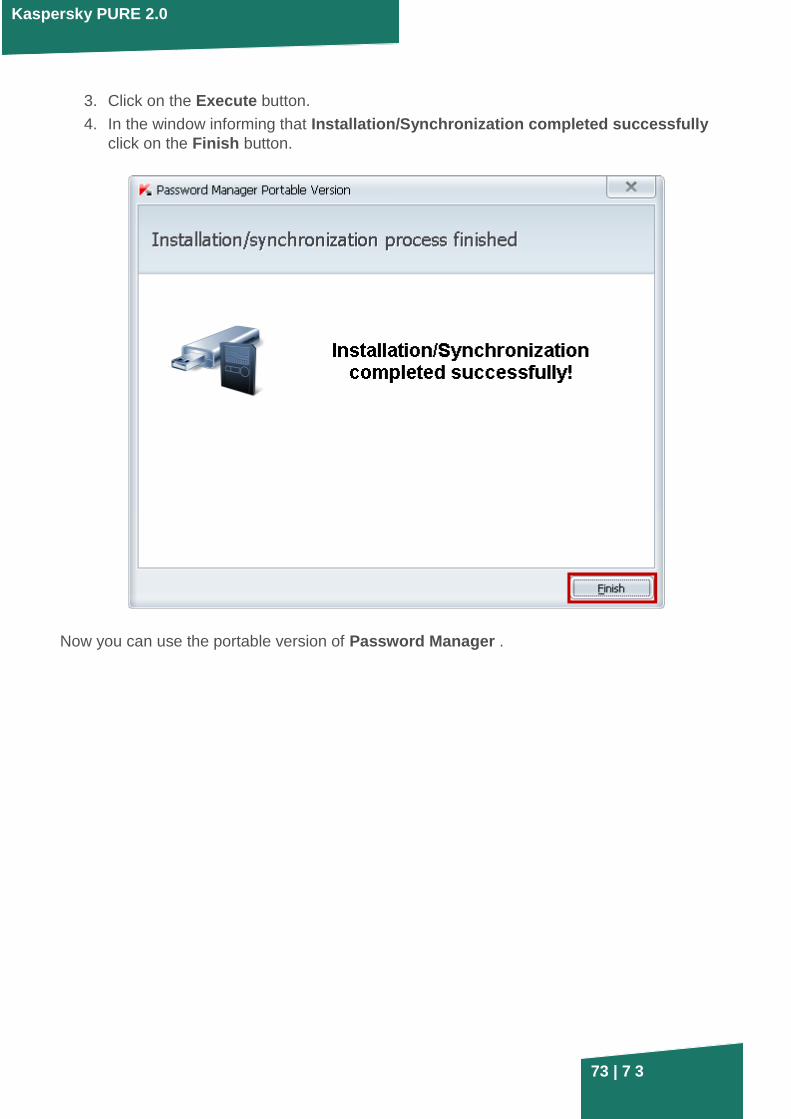
3. Click on the Execute button.
4. In the window informing that Installation/Synchronization completed successfully
click on the Finish button.
Now you can use the portable version of Password Manager .