vuesion® - p bx · pdf file¾ double-click on that icon to start the login...
TRANSCRIPT
Vuesion®
User Guide
Vuesion® Call Center Agent/Supervisor
Information in this document is furnished only under a customer license agreement or nondisclosure agreement, and may be used or copied only in accordance with the terms of such agreement. The software described in this document is protected by copyright, and may not be copied on any medium except as specifically authorized in the license or nondisclosure agreement. This document is also protected by copyright, and may not be reproduced or transmitted, in whole or part, by any means, including photocopying, facsimile transmission, or reduction to any electronic medium or machine-readable form, without the express written consent from BBX Technologies, LLC. Copyright © 2006 BBX Technologies, LLC. All rights reserved.

Contents 1 COMPUTER CONSIDERATIONS .................................................................................................................... 2 2 MEDIA CLIENT LOGIN .................................................................................................................................... 3
2.1 AGENT CLIENT SOFTWARE LOGIN..................................................................................................................... 3 2.2 AGENT/SUPERVISOR SCREEN LAYOUT............................................................................................................... 4
3 TITLE BAR INFO AREA.................................................................................................................................... 5 4 MENU AREA ........................................................................................................................................................ 5
4.1 MENU AREA ►FILE .......................................................................................................................................... 5 4.2 MENU AREA ►EDIT.......................................................................................................................................... 5 4.3 MENU AREA ►VIEW ........................................................................................................................................ 5 4.4 MENU AREA ►CONFIGURATION....................................................................................................................... 6
4.4.1 Configuration ►Views Setup ►Setup View 1 ........................................................................................ 6 4.4.2 Configuration ►Screen Setup................................................................................................................. 7 4.4.3 Configuration ►Feature Setup............................................................................................................... 7 4.4.4 Configuration ►Take Calls .................................................................................................................... 8 4.4.5 Configuration ►Associated Numbers..................................................................................................... 8 4.4.6 Configuration ►Administration ............................................................................................................. 8
4.5 MENU AREA ► CALL HISTORY OUTGOING / INCOMING ................................................................................... 8 4.6 MENU AREA ► HELP ........................................................................................................................................ 9 4.7 MENU AREA ► GO ........................................................................................................................................... 9
4.7.1 Menu Area ► Go ►Personal Speed Dials............................................................................................. 9 4.7.2 Menu Area ► Go ►System Speed Dials ................................................................................................ 9 4.7.3 Menu Area ► Go ► CDR Reports....................................................................................................... 10 4.7.4 Menu Area ► Go ► Center Reports .................................................................................................... 10 4.7.5 Menu Area ► Go ► Voice Logger....................................................................................................... 10
5 TOOL BAR AREA ............................................................................................................................................. 10 6 CALL CONTROL PANE................................................................................................................................... 11
6.1 TELEPHONY FEATURE KEYS............................................................................................................................ 11 6.2 CONTACT CENTER STATUS FEATURE KEYS .................................................................................................... 12 6.3 MY VIEWS....................................................................................................................................................... 13
7 STATUS VIEW PANE ....................................................................................................................................... 13 7.1 AGENT NEAR-REAL TIME STATISTICS ............................................................................................................. 14
7.1.1 Agent Status........................................................................................................................................... 14 7.1.2 Agent Daily Summary............................................................................................................................ 14
8 CALL STATUS PANE ....................................................................................................................................... 15 9 TELEPHONY FEATURE KEYS OPERATION............................................................................................. 15
9.1 ANSWER A CALL.............................................................................................................................................. 15 9.2 CLEAR A CALL ................................................................................................................................................ 16 9.3 TRANSFER A CALL........................................................................................................................................... 16 9.4 HOLD A CALL .................................................................................................................................................. 16 9.5 CONFERENCE CALLS ....................................................................................................................................... 16 9.6 PARK CALLS.................................................................................................................................................... 17 9.7 PAGING TO MAKE ANNOUNCEMENTS ............................................................................................................... 17 9.8 SET A USER AS “IN/OUT OF OFFICE”................................................................................................................ 17 9.9 QUICK CHAT ................................................................................................................................................... 18 9.10 RECORD...................................................................................................................................................... 18
10 CONTACT CENTER WALLBOARD ....................................................................................................... 19 10.1 ACD GROUP NAMES .................................................................................................................................. 19 10.2 RESCUE QUEUE........................................................................................................................................... 19 10.3 NEAR-REAL-TIME STATUS.......................................................................................................................... 20 10.4 DAILY STATISTICS AND SUMMARY............................................................................................................. 20
11 KEYBOARD QUICK ACCESS KEYS ...................................................................................................... 20

Vuesion Call Center Supervisor/Agent User’s Guide 2
1 COMPUTER CONSIDERATIONS
It is paramount that all users have the Permissions and Security rights to allow Read, Write, and Modify functionality of the content in the Vuesion client folder on users C drive.
It is recommended not to use any screen savers since these can affect your ability to process calls.
It is recommended to close the Client Software application before shutdown of the workstation.
It is recommended not to install software of unknown source on the workstation. CTI Media Super
Console operates with Microsoft® Office and Microsoft® Outlook, database programs such as Symantec ACT™, Goldmine and others. If the CTI Media Super Console does not function after a new program is installed, please contact your system administrator for information.
The CTI Media Super Console software operates on Windows™ 98/NT/XP and Windows™ 2000.
Make sure that one of these Operating systems is installed on your computer.
Verify that the workstation is connected to a LAN (Local Area Network) in a Windows network. The CTI Media Super Console also operates in a Windows Workgroup environment. If a Novell™ network is installed make sure that the revision is equal or greater than 5.0.
Minimum requirements for your computer should include 64 MB of RAM, 1 GB hard drive and 10
MB Ethernet (100 MB recommended).

Vuesion Call Center Supervisor/Agent User’s Guide 3
2 Media Client Login
2.1 Agent Client Software Login
Locate the CTI Client icon on the desktop. Double-Click on that icon to start the login Procedure.
Select the login type: ACD Agent for contact center agents or ACD Supervisor for contact center supervisors.
Last Login: Click Last Login to by-pass the user ID and password. Once the user logs in for the first time successfully from a PC desktop, subsequent logins are made easier since the user does not have to reenter the extension number, User ID and password. A screen with “Last Login” option is presented. Click on the “Last Login” button to have to immediately log-in.
Login: This option allows the user to enter an extension number, a User ID and password to login.
Exit: Cancels the login procedure. When selecting “Login”:
Extension #: Enter your extension number. User ID: Enter your User ID. Password: Enter your password.
Note: If the user attempts to login with an extension number or User ID that are already in use by another user, an error message is provided as seen below. Contact your system administrator for any questions on User IDs configured in the system.
In the following example, a user has attempted to login on an extension that is already being used by user ID 9999.

Vuesion Call Center Supervisor/Agent User’s Guide 4
Once the login is successful the Standard screen appears.
2.2 Agent/Supervisor Screen layout
The Agent/Supervisor screen is composed of 8 areas:
Title Bar Info: Shows user name and extension information. Menu Area: The Menu Area allows the user to configure the CTI Media Client, access speed
dials, and view reports. Tool Bar: The Tool bars offer short cut functions to customize the desktop layout. Dialing Box: The Dialing box is used for manual dialing. Call Control Pane: The Call Control Pane has 3 different views Telephony keys, Contact Center
keys, and My Views Status View Pane: The Icon Status View allows users to observe the states of other extensions
and to manage call routing to these extensions if necessary. Call Status Pane: The Call Status area lets the users visualize incoming calls, outgoing calls, and
other call related status (hold, transfer, recall, conference …). Contact Center Wallboard: Displays real-time daily statistics for the Contact Center groups.
Status View Pane
Call Status Pane
Contact Center Wallboard
Title Bar Info Menus Tool Bar Dialing Box
Call Control Pane
Vuesion Call Center Supervisor/Agent User’s Guide 5
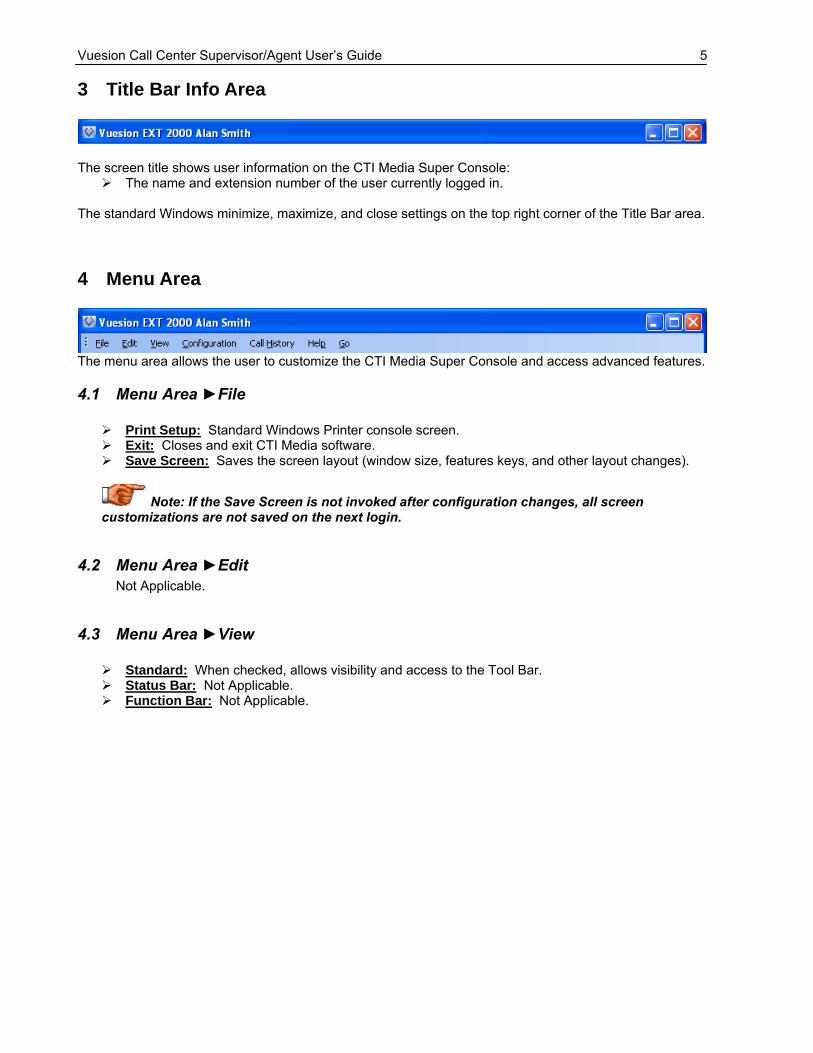
3 Title Bar Info Area
The screen title shows user information on the CTI Media Super Console:
The name and extension number of the user currently logged in.
The standard Windows minimize, maximize, and close settings on the top right corner of the Title Bar area.
4 Menu Area
The menu area allows the user to customize the CTI Media Super Console and access advanced features.
4.1 Menu Area ►File
Print Setup: Standard Windows Printer console screen. Exit: Closes and exit CTI Media software. Save Screen: Saves the screen layout (window size, features keys, and other layout changes).
Note: If the Save Screen is not invoked after configuration changes, all screen customizations are not saved on the next login.
4.2 Menu Area ►Edit Not Applicable.
4.3 Menu Area ►View
Standard: When checked, allows visibility and access to the Tool Bar. Status Bar: Not Applicable. Function Bar: Not Applicable.

Vuesion Call Center Supervisor/Agent User’s Guide 6
4.4 Menu Area ►Configuration
4.4.1 Configuration ►Views Setup ►Setup View 1
This configuration item allows the user to add/delete the extension numbers that are shown on each view. If allowed by class of service, the user selects the view to be configured and selects which extensions to be shown for the selected view. The user can repeat these steps for all 12 customizable views if desired.
View Setup Setup View ?: Select the view to be customized (View 1 through View 12). View Name: Add the view name (This name will show on the View button of the main screen). Visible: Select an extension from the list that will appear on the view. Navigate the mouse to the
”Visible” field corresponding to the selected extension number. Left click with the mouse to toggle from ” ” to “Yes”. When “Yes” appears the corresponding extension number will show on the selected view. If wanting to take an extension out of the view left mouse click the “Yes” to toggle back to “ “.
Column Names: Click the column names to toggle from Ascending/Descending order. OK: Once all wanted extensions have been included or excluded from the view, click OK. The
View will automatically update and all icons are rearranged in alphabetical order by full name.

Vuesion Call Center Supervisor/Agent User’s Guide 7
4.4.2 Configuration ►Screen Setup
When using CTI Media Super Console, it is possible to minimize the main window and use your computer for other applications like Word Processing, spreadsheets etc…. To avoid maximizing and minimizing the window manually when you need to use your telephone, there are three settings available to automate this process.
Maximize on Answer: When checked, the CTI Media Super Console screen automatically pops up as soon as the user originates a call or answers an incoming call.
Maximize on Ring: When checked, the CTI Media Super Console screen automatically pops up when the user receives an incoming call.
Minimize on idle: When checked, the CTI Media Super Console screen is automatically minimized only when the user clicks on the Release button to clear a call.
4.4.3 Configuration ►Feature Setup
If allowed by class of service, the user is able to configure the CTI Media Super Console with some feature operation options:
Quick Transfer: When checked, the user transfers a call simply by a single mouse click on the icon of the desired extension, eliminating the use of the “Transfer” key. If not checked, the user has to click the “Transfer” feature key followed by the icon of the extension (Warm Transfer).
Direct Call Pickup: When checked, the user can pick up a call from a ringing extension simply by double clicking on the “ringing” icon.

Vuesion Call Center Supervisor/Agent User’s Guide 8
4.4.4 Configuration ►Take Calls If a Supervisor or Agent is configured not to take calls in a ACD group and wishes to start taken calls, they may do so by navigating to “Take Calls” and clicking “ON”.
4.4.5 Configuration ►Associated Numbers Not Applicable.
4.4.6 Configuration ►Administration Can only be accessed by an Administrator. A password screen will be presented to gain access.
4.5 Menu Area ► Call History Outgoing / Incoming The Call History feature provides independent lists for outgoing and incoming calls.
Outgoing: This window shows the last 800 outgoing calls generated from the station associated with the computer. To redial a number, simply select the number to be called and click on “Dial” button.
Incoming: This window shows the last 800 incoming calls that were answered by the station associated with the computer. To redial a number, simply select the number to be called and click on “Dial” button.
Once the Outgoing/Incoming History window is selected, the user is able to view the numbers dialed or received with Caller ID (when available), date and time and duration of the calls.
Clear: Clears the selected entry. Clear All: Clears entire call history. Dial: Use this key to dial the selected number. Exit: Closes the history window.
Note: this is only possible if caller ID is available on the incoming call. Note: For both incoming and outgoing call history, when the buffer reaches 800 calls, the next call
overrides the oldest call in the history log so that the log always keeps the most recent 800 calls.

Vuesion Call Center Supervisor/Agent User’s Guide 9
4.6 Menu Area ► Help About BBX CTI: To access revision level of CTI Client software. User’s Guide: To access the CTI Client user’s guide. Unified FAX Guide: To access the Unified FAX guide.
4.7 Menu Area ► Go
4.7.1 Menu Area ► Go ►Personal Speed Dials
This screen allows the user to add, delete, or dial personal speed dial numbers. The personal speed dial numbers reside on the user’s computer.
Dial: Select the appropriate personal speed dial number; click “Dial” to make the call. Delete: Select the appropriate personal speed dial number, click “Delete” to remove the
personal speed dial from the list. Add: Enter the personal speed dial name, enter the personal speed dial number, click OK to
save or Cancel to abort.
4.7.2 Menu Area ► Go ►System Speed Dials This screen looks and configures just like the Personal Speed Dials. However, the System Speed Dial numbers reside on the server and are accessible by all users that have a CTI Media Super Console.
Dial: Select the appropriate personal speed dial number; click “Dial” to make the call.
Vuesion Call Center Supervisor/Agent User’s Guide 10
Delete: Select the appropriate personal speed dial number, click “Delete” to remove the personal speed dial from the list.
Add: Enter the personal speed dial name, enter the personal speed dial number, click OK to save or Cancel to abort.
4.7.3 Menu Area ► Go ► CDR Reports Allows user access to Standard Call Reports and only accessible if allowed in Class Of Service.
4.7.4 Menu Area ► Go ► Center Reports Only applicable and accessible for Supervisor agents if allowed in Class Of Service.
4.7.5 Menu Area ► Go ► Voice Logger Only accessible for Supervisor use if licensed on the Vuesion Server.
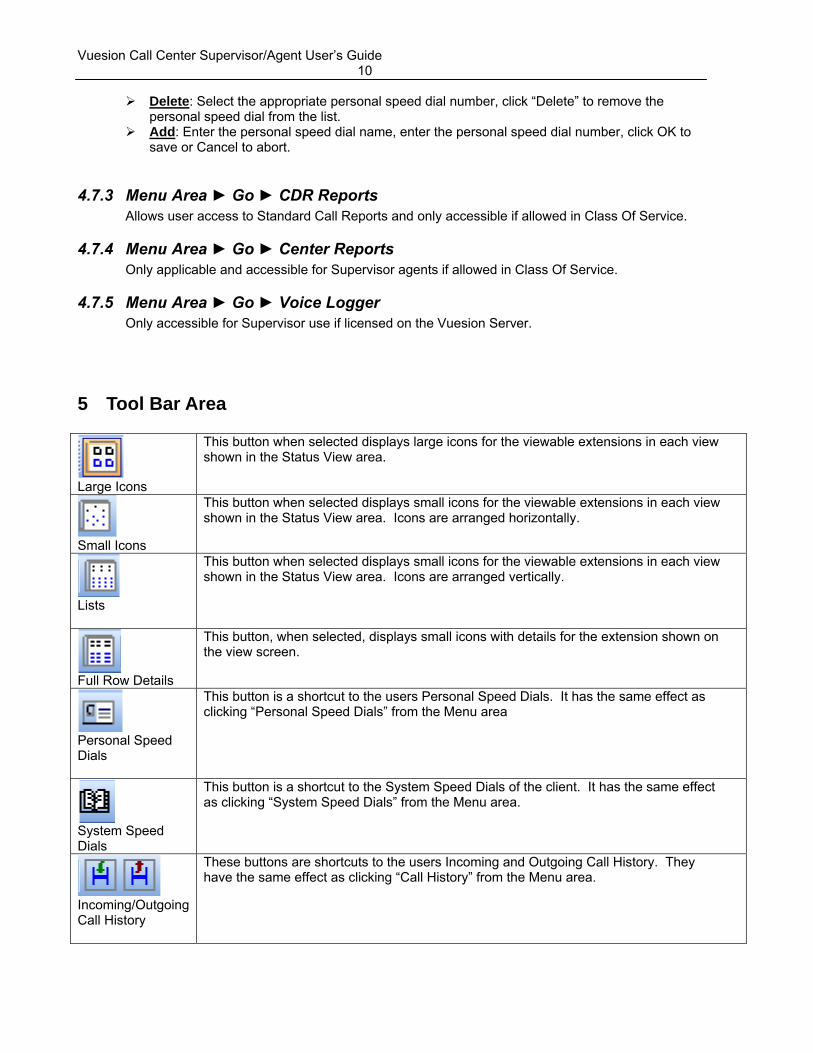
5 Tool Bar Area
Large Icons
This button when selected displays large icons for the viewable extensions in each view shown in the Status View area.
Small Icons
This button when selected displays small icons for the viewable extensions in each view shown in the Status View area. Icons are arranged horizontally.
Lists
This button when selected displays small icons for the viewable extensions in each view shown in the Status View area. Icons are arranged vertically.
Full Row Details
This button, when selected, displays small icons with details for the extension shown on the view screen.
Personal Speed Dials
This button is a shortcut to the users Personal Speed Dials. It has the same effect as clicking “Personal Speed Dials” from the Menu area
System Speed Dials
This button is a shortcut to the System Speed Dials of the client. It has the same effect as clicking “System Speed Dials” from the Menu area.
Incoming/Outgoing Call History
These buttons are shortcuts to the users Incoming and Outgoing Call History. They have the same effect as clicking “Call History” from the Menu area.

Vuesion Call Center Supervisor/Agent User’s Guide 11
Outgoing Calls with Callbacks
This button should only be accessed when an agent wants to retry dialing a “Callback” call when the first attempt to contact the customer was not successful. The feature “Callback” is a licensed feature and must be enabled on the Server for accessibility.
Standard Reports
This button is a shortcut to the Standard Reports. It has the same effect as clicking “Standard Reports” from the Menu area.
Call Center Reports
This button is a shortcut to the Call Center Reports. It has the same effect as clicking “Center Reports” from the Menu area.
Voice Recorder
This button is a shortcut to the Voice Logger. It has the same effect as clicking “Voice Logger” from the Menu area.
Help
This button is a shortcut to Help. It has the same effect as clicking “Help” from the Menu area.
Dialing Box
In order to dial a local or long distance number, click inside the dial box, type number to be dialed followed by pressing <Enter> on the keyboard. Dialing 9 to access outside dialing is not necessary. However, if dialing long distance the 1 may not be necessary if the local Area Codes are defined in the Switch.txt file on the Vuesion Server. Even if the Local Area Codes are defined, the 1 will be absorbed and will not prohibit the client from dialing out.
6 Call Control Pane
6.1 Telephony Feature Keys
Start Recording: Click to start a “Live Recording” and click again to stop recording.
Set Monitor: Click to start a monitoring session (Supervisor Only). Chat: Click to start an internal chat session. Out of Office: Should not be used by Call Center users. Conference: Click to initiate a conference call. Voicemail: Click to retrieve user’s voice mail. Park Idle: Click to place a call into a “Call Park Orbit”. Transfer: Click to start a “Supervised” transfer. Hold: Click to place a connected call on hold and click again to retrieve held
call. Release: Click to release a call. Answer: Click to answer an incoming call.
Vuesion Call Center Supervisor/Agent User’s Guide 12
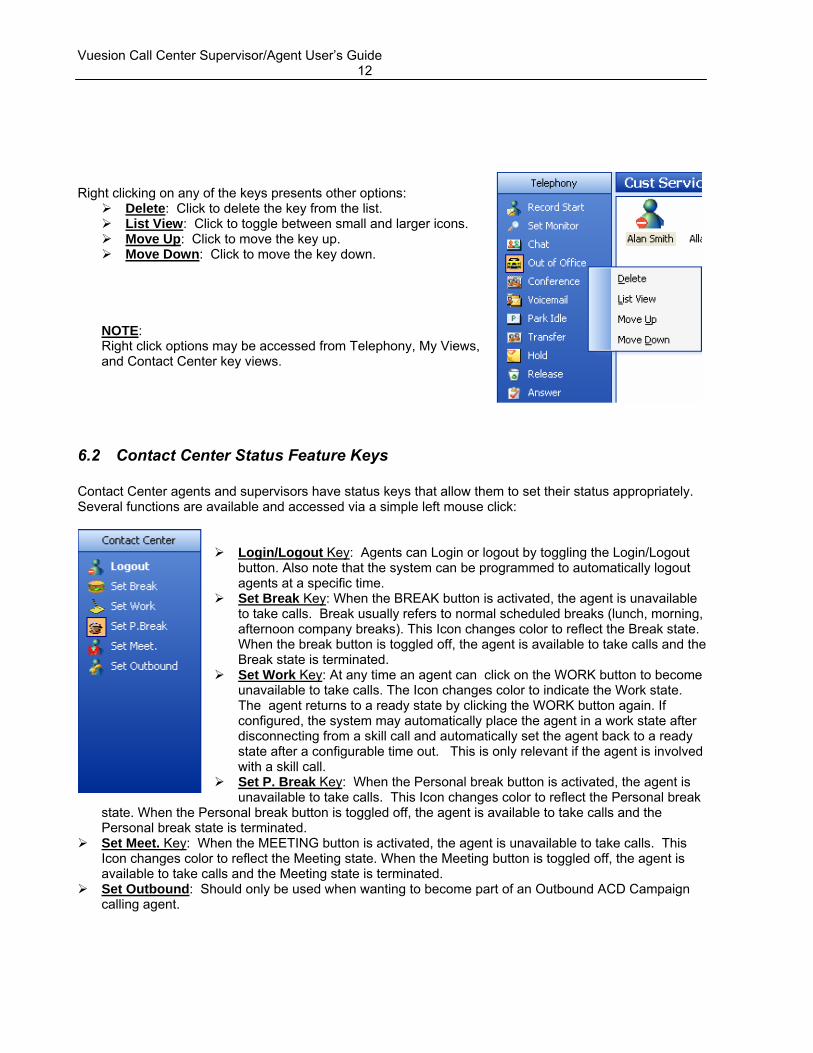
Right clicking on any of the keys presents other options:
Delete: Click to delete the key from the list. List View: Click to toggle between small and larger icons. Move Up: Click to move the key up. Move Down: Click to move the key down.
NOTE: Right click options may be accessed from Telephony, My Views, and Contact Center key views.
6.2 Contact Center Status Feature Keys Contact Center agents and supervisors have status keys that allow them to set their status appropriately. Several functions are available and accessed via a simple left mouse click:
Login/Logout Key: Agents can Login or logout by toggling the Login/Logout button. Also note that the system can be programmed to automatically logout agents at a specific time.
Set Break Key: When the BREAK button is activated, the agent is unavailable to take calls. Break usually refers to normal scheduled breaks (lunch, morning, afternoon company breaks). This Icon changes color to reflect the Break state. When the break button is toggled off, the agent is available to take calls and the Break state is terminated.
Set Work Key: At any time an agent can click on the WORK button to become unavailable to take calls. The Icon changes color to indicate the Work state. The agent returns to a ready state by clicking the WORK button again. If configured, the system may automatically place the agent in a work state after disconnecting from a skill call and automatically set the agent back to a ready state after a configurable time out. This is only relevant if the agent is involved with a skill call.
Set P. Break Key: When the Personal break button is activated, the agent is unavailable to take calls. This Icon changes color to reflect the Personal break
state. When the Personal break button is toggled off, the agent is available to take calls and the Personal break state is terminated.
Set Meet. Key: When the MEETING button is activated, the agent is unavailable to take calls. This Icon changes color to reflect the Meeting state. When the Meeting button is toggled off, the agent is available to take calls and the Meeting state is terminated.
Set Outbound: Should only be used when wanting to become part of an Outbound ACD Campaign calling agent.
Vuesion Call Center Supervisor/Agent User’s Guide 13
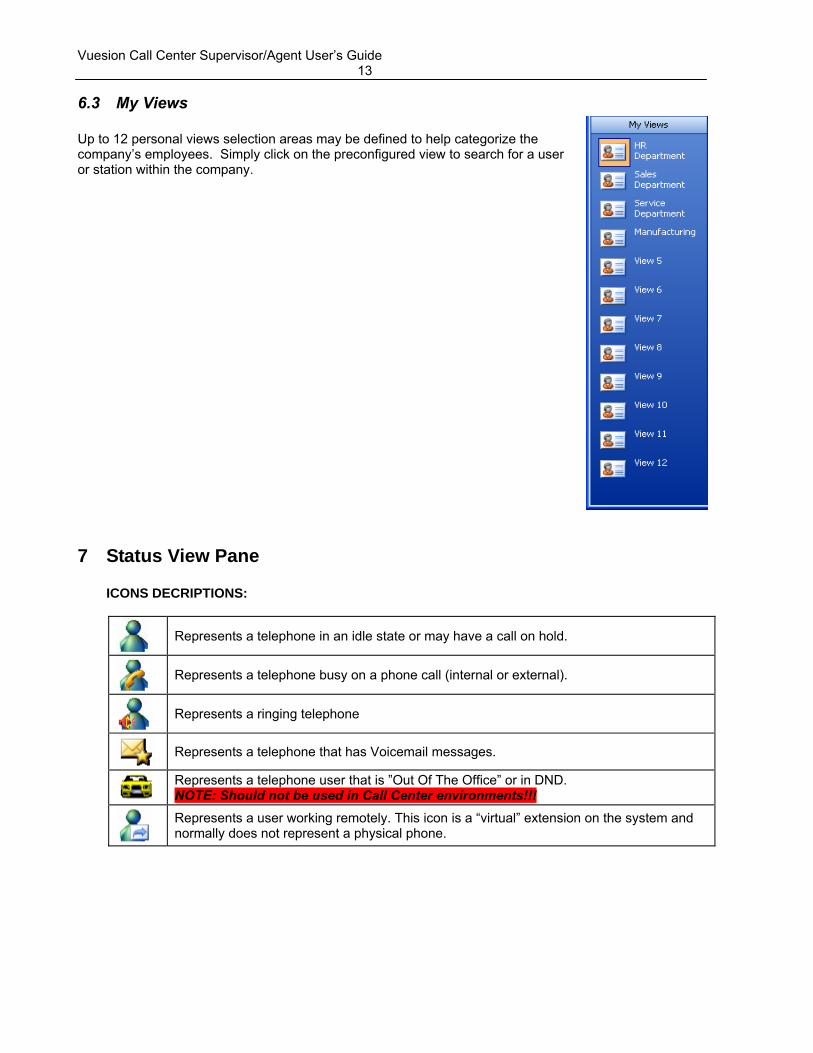
6.3 My Views Up to 12 personal views selection areas may be defined to help categorize the company’s employees. Simply click on the preconfigured view to search for a user or station within the company.
7 Status View Pane
ICONS DECRIPTIONS:
Represents a telephone in an idle state or may have a call on hold.
Represents a telephone busy on a phone call (internal or external).
Represents a ringing telephone
Represents a telephone that has Voicemail messages.
Represents a telephone user that is ”Out Of The Office” or in DND. NOTE: Should not be used in Call Center environments!!!
Represents a user working remotely. This icon is a “virtual” extension on the system and normally does not represent a physical phone.

Vuesion Call Center Supervisor/Agent User’s Guide 14
7.1 Agent Near-Real time Statistics Call Center Supervisors have instant access to near real time daily statistics on agents they
supervise. Information such as number of calls taken, number of breaks, thresholds exceeded, and more are available by a simple right mouse click on the icon of agent.
7.1.1 Agent Status Supervisors may remotely control and view the status of agents:
Logout: forces the status of an agent to be logged out. Set Ready: forces the status of an agent to the Ready state (idle and available to take calls). Active States: shows the current agent’s status and sign in time. Time Started: shows the duration that the agent is in the current state and how long the agent has
been logged in. Daily Activities: shows users states and call handling activity throughout the day.
7.1.2 Agent Daily Summary Agent Ready: Shows only the duration of how long the agent has been logged in and ready to
handle a call. Unanswered: Number of unanswered calls from the call center queue. The agent is logged in and
ready to receive calls. These calls are presented to the agent who did not answer them. The agent is automatically placed in Personal Break mode until the agent clicks on the Personal Break key to go back to Ready state.
Answered: Number of answered calls from the call center queue. Pers. Breaks: Number of personal breaks the agent has taken since logged in. Breaks: Number of Breaks the agent has taken since logged in. Meetings: Number of Meetings the agent has taken since logged in.
Work/Wrap-up: Total time in (Hours, Minutes, Seconds) of the combined duration of all wrap up times taken since logged. When an agent terminates a call center call, the agent is automatically place in wrap up mode. The wrap up timeout is programmable and varies from 2 seconds to never.

Vuesion Call Center Supervisor/Agent User’s Guide 15
Preview Description:
The “Preview” section under the Icon Status View area will display a user’s extension number when placing the mouse on their icon. It will also display Extended States information if available.
8 Call Status Pane
This area provides information on current calls managed by the Media Client user. It provides the following information:
Icon: Icon view on the status of the call. Status: Description of the status of the call. Number: Inbound caller ID or outbound dialed number. Name: Name if provided by the central office or name programmed in the ANI routing tables
by the system’s administrator. Time: Start time on the call. Length: Call duration. From: Specified the originating line or extension number. ID: This field is used when customer database access is used to fetch and display the caller’s
ID from the database. Info: This field is used when customer database access is used to fetch and display the
caller’s Account number from the database. Level: This field is used when customer database access is used to fetch and display the
caller’s Level number from the database.
9 Telephony Feature Keys Operation
9.1 Answer a call
Answer key: Answers the audibly ringing call. This button is particularly useful when using a
headset. When the call is answered, the status changes from Ringing to Connected. The call can also be answered by clicking on the “Ringing” Icon to the left of the “Incoming” status
field. This method is useful when several calls are ringing; the user is able to select which call to answer.

Vuesion Call Center Supervisor/Agent User’s Guide 16
Once answered, the call status reflects the connected status as follows:
9.2 Clear a Call Release key: Releases the current connected call.
Note: When the call is released and the associated CTI Media Super Console Telephone is a single line telephone, The “Initiating” icon shows in the Status field until the telephone is hung up.
9.3 Transfer a Call One Click Transfer: When Quick transfer is enabled (Configuration ►Feature Setup), and the
user is in the connected state, simply left mouse-click on the icon of the desired extension, and the call is immediately transferred. The selected destination icon may be a local extension, remote extension, or virtual extension.
Transfer key: This key is used primarily in supervised transfer conditions (Warm Transfer). While on a call in the connected state, the user may left-mouse-click the TRANSFER key followed by a left mouse click on the destination station. In supervised/screen mode, the user may wait for the called extension to answer before announcing the call. Once announced, left mouse click on the RELEASE key to complete the supervised transfer. If the called extension does not desire to take the call, the caller has to wait for the called extension to hang up before returning to the original call.
Transfer key – (Retrieval): When wanting to retrieve a supervised transfer call, single click the “Calling” icon in the Status field. By clicking the “Calling” icon, it will pull the call back so further options can be taken.
9.4 Hold a Call Hold key: While on a call, click the Hold button to place a call on hold. Several calls may be
placed on hold for later retrieval. When Hold is invoked the icon changes from Connected to “On Hold”.
To retrieve a held call, simply click the Hold key again to retrieve the last caller put on hold. To retrieve and select a different held call, click on the Hold icon next to the “On Hold” Status field.
9.5 Conference Calls Conference Key: While on a call place the first call on hold. Make or receive the second call,
when the second call is established click the CONFERE button to begin the conference.

Vuesion Call Center Supervisor/Agent User’s Guide 17
The list of connected parties is displayed in the number field. To add more parties, repeat the same steps as above. To release the conference, click RELEASE.
9.6 Park Calls Park Idle Key: While on a call, click the Park button to place a call on Park. A list of available
Call Park Orbits is presented to the user. Click to choose an empty park location to park the call. Available park locations have an empty identifier. Park locations in use have a caller number identifier. Once the parked call is retrieved, the identifier is emptied.
Park Indications: Once the call is parked, the Status field and Icon changes to an “On Park…” state as indicated below. Other client users will also notice a change on their “Park” key under the Telephone Key area to indicate there is a “parked” call.
9.7 Paging to make announcements Page Key: This key allows the user to announce calls on the company wide speakers controlled by a paging system. This feature is generally used after parking a call. When the user is done paging, click the Release key to release from paging.
9.8 Set a user as “In/Out of Office” Out of Office Key: Use this button to indicate that a telephone user is in or out of the office. Left
click once on the icon to be programmed and then click on the “Out of Office” key to toggle. Once the extension is successfully set “Out of Office”, the corresponding icon is updated.
Park orbit is in use. The identifier is the caller number.
Available park locations. The identifier is empty
Vuesion Call Center Supervisor/Agent User’s Guide 18
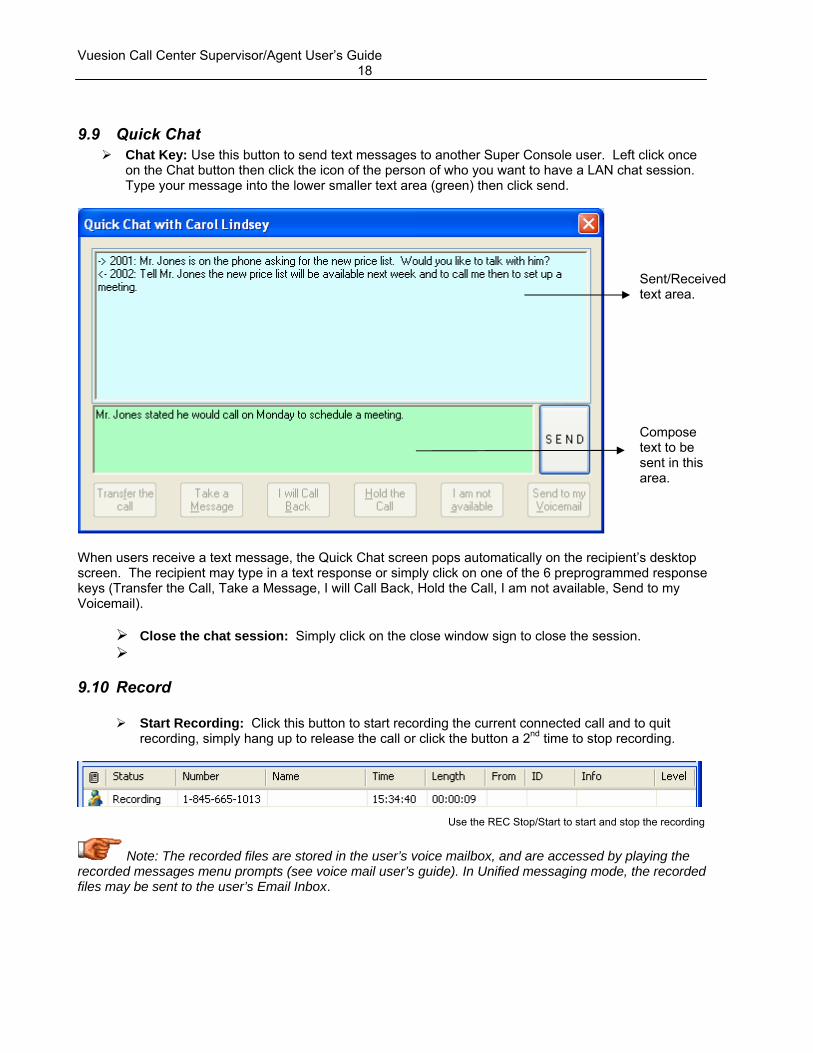
9.9 Quick Chat Chat Key: Use this button to send text messages to another Super Console user. Left click once
on the Chat button then click the icon of the person of who you want to have a LAN chat session. Type your message into the lower smaller text area (green) then click send.
When users receive a text message, the Quick Chat screen pops automatically on the recipient’s desktop screen. The recipient may type in a text response or simply click on one of the 6 preprogrammed response keys (Transfer the Call, Take a Message, I will Call Back, Hold the Call, I am not available, Send to my Voicemail).
Close the chat session: Simply click on the close window sign to close the session.
9.10 Record
Start Recording: Click this button to start recording the current connected call and to quit recording, simply hang up to release the call or click the button a 2nd time to stop recording.
Note: The recorded files are stored in the user’s voice mailbox, and are accessed by playing the recorded messages menu prompts (see voice mail user’s guide). In Unified messaging mode, the recorded files may be sent to the user’s Email Inbox.
Compose text to be sent in this area.
Sent/Received text area.
Use the REC Stop/Start to start and stop the recording
Vuesion Call Center Supervisor/Agent User’s Guide 19
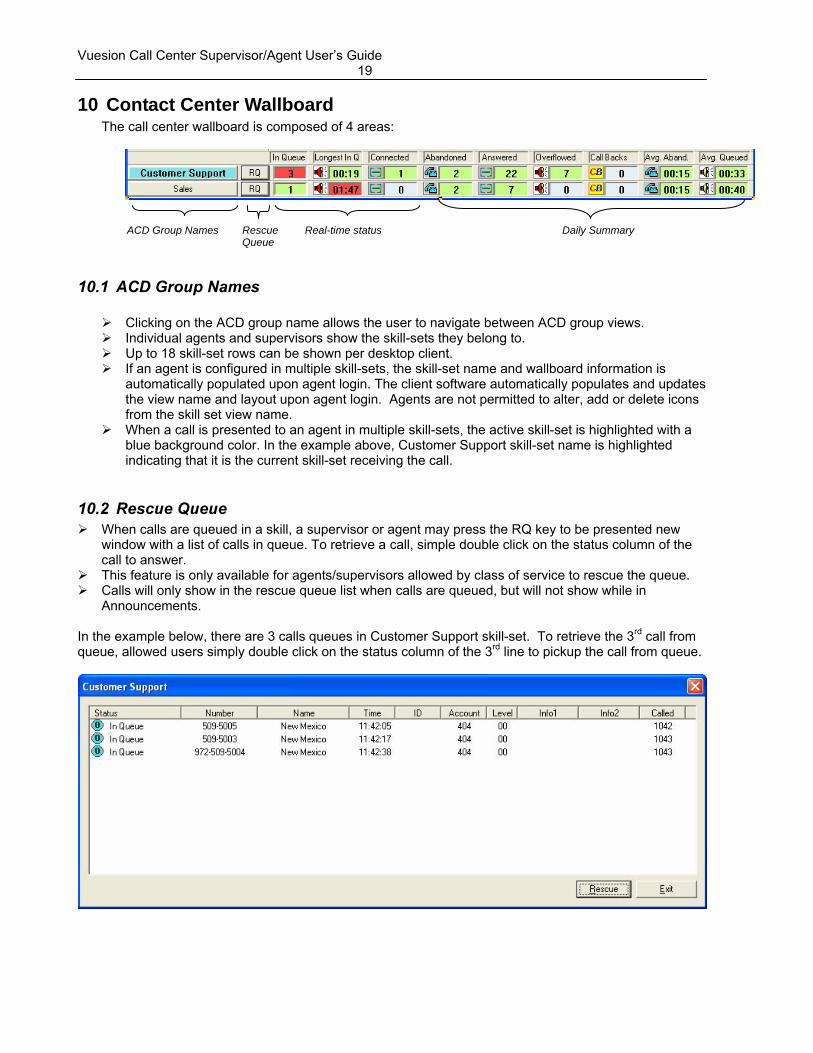
10 Contact Center Wallboard The call center wallboard is composed of 4 areas:
10.1 ACD Group Names
Clicking on the ACD group name allows the user to navigate between ACD group views. Individual agents and supervisors show the skill-sets they belong to. Up to 18 skill-set rows can be shown per desktop client. If an agent is configured in multiple skill-sets, the skill-set name and wallboard information is
automatically populated upon agent login. The client software automatically populates and updates the view name and layout upon agent login. Agents are not permitted to alter, add or delete icons from the skill set view name.
When a call is presented to an agent in multiple skill-sets, the active skill-set is highlighted with a blue background color. In the example above, Customer Support skill-set name is highlighted indicating that it is the current skill-set receiving the call.
10.2 Rescue Queue When calls are queued in a skill, a supervisor or agent may press the RQ key to be presented new
window with a list of calls in queue. To retrieve a call, simple double click on the status column of the call to answer.
This feature is only available for agents/supervisors allowed by class of service to rescue the queue. Calls will only show in the rescue queue list when calls are queued, but will not show while in
Announcements. In the example below, there are 3 calls queues in Customer Support skill-set. To retrieve the 3rd call from queue, allowed users simply double click on the status column of the 3rd line to pickup the call from queue.
ACD Group Names Rescue Real-time status Daily Summary Queue

Vuesion Call Center Supervisor/Agent User’s Guide 20
10.3 Near-Real-time Status This area shows the current status of the skill. It shows the number of calls queued, the longest time of a call in the queue and number of calls connected.
In queue: shows the number of calls in queue. When the pre-configured threshold is reached or exceeded, the background color changes from green to red.
Longest in Q: shows the longest holding call in the queue. When the pre-configured threshold is reached or exceeded, the background color changes from green to red.
Connected: shows the total number of calls connected with agents in the skill-set. This number is updated in real-time.
10.4 Daily Statistics and Summary This area reports the daily peaks and averages on the key call elements for a skill. It shows the total number of abandoned, answered and overflowed calls. It also shows averages of time duration of abandoned and queued calls. These times are reset at 12:01 AM every day. See CTI Media Call Reports for information on detailed and summary reports.
Abandoned: shows the daily total number of calls that abandoned while in queue. Answered: shows the daily total number of calls answered Overflowed: shows the daily total number of calls that overflowed to another destination. The overflow
time and destination are pre-configured per skill-set Call Backs: Future feature Avg Aband.: shows the average hold time before callers hang up while waiting in queue. Avg. Queued: shows the average hold time before calls are answered from the queue. The number is
also referred to as “average time to answer”.
11 Keyboard Quick Access Keys
When the CTI Media Client Software is used. Some limited features can be accessed via keyboard. This is only possible when the Client Software is in scope (Window Selected and active).
SPACE bar Answer Call Numeric Keypad: “Del” Clear Numeric Keypad: “Enter” Dial Numeric Keypad: “+” Hold Numeric Keypad: “ - “ Transfer

www.bbxtech.com
© BBX Technologies, LLC2006 • Subject to availability. Right of modification reserved.
The information provided in this document contains merely general
descriptions or characteristics of performance which in case of actual use
do not always apply as described or which may change as a result of
further development of the products.
An obligation to provide the respective characteristics shall only exist if
expressly agreed in the terms of contract.
The trademarks used are owned by BBX Technologies, LLC or their
respective owners.