vr6 timing chain
DESCRIPTION
vw vr6 timing chainTRANSCRIPT

Engine, disassembling and assembling Removing and installing “V” ribbed belt Valve timing, checking Valve timing, setting Sealing flange and flywheel/drive plate, removing and installing Drive plate, removing and installing Oil seal on vibration damper end of crankshaft, replacing Crankshaft, removing and installing Pistons and connecting rods, disassembling and assembling Piston and cylinder measurements
Volkswagen Jetta, Golf, GTI 1999, 2000 2.8 Liter VR6 2V Engine Mechanical, Engine Code(s): AFP 13 Engine-Crankshaft, Cylinder block (Page GR-13)
Volkswagen Jetta, Golf, GTI 1999, 2000 2.8 Liter VR6 2V Engine Mechanical, Engine Code(s): AFP Engine, disassembling and assembling (Page 13-1)
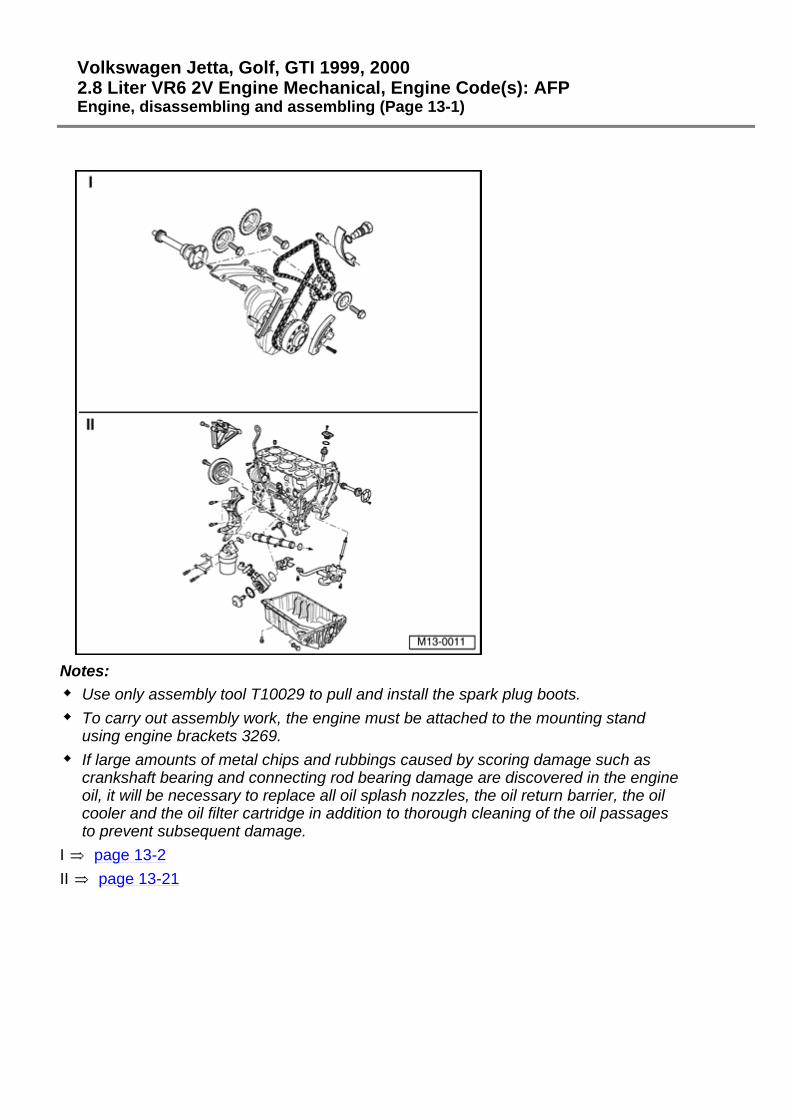
Notes:Use only assembly tool T10029 to pull and install the spark plug boots.To carry out assembly work, the engine must be attached to the mounting stand using engine brackets 3269.If large amounts of metal chips and rubbings caused by scoring damage such as crankshaft bearing and connecting rod bearing damage are discovered in the engine oil, it will be necessary to replace all oil splash nozzles, the oil return barrier, the oil cooler and the oil filter cartridge in addition to thorough cleaning of the oil passages to prevent subsequent damage.
I page 13-2 II page 13-21

Volkswagen Jetta, Golf, GTI 1999, 2000 2.8 Liter VR6 2V Engine Mechanical, Engine Code(s): AFP Engine, disassembling and assembling (Page 13-2)
Section I
1 - Camshaft sprocketFor roller chain -9-Removing and installing page 15-34
2 - Pickup wheelThe bearing surface on the cam wheel and pickup wheel must be dry when installedFor Hall sensor (G40)Removing and installing page 15-34
3 - 100 NmCoat contact surface of the bolt head with oil when installingHold camshaft with open-end wrench SW 24 when removing and installing page 15-34
4 - Bearing bolt, 18 NmFor tension bar -7-

Volkswagen Jetta, Golf, GTI 1999, 2000 2.8 Liter VR6 2V Engine Mechanical, Engine Code(s): AFP Engine, disassembling and assembling (Page 13-3)
5 - Oil sealReplace if damaged or leaky
6 - Chain tensioner, 40 NmFor camshaft roller chain -9-Rotate engine only with chain tensioner installed
7 - Tension barFor camshaft roller chain -9-
8 - SprocketFor roller chain -15-Installing page 13-10
9 - Camshaft roller chainMark direction of travel (installation position) before removing Fig. 1 , page 13-27 Installing page 13-10

Volkswagen Jetta, Golf, GTI 1999, 2000 2.8 Liter VR6 2V Engine Mechanical, Engine Code(s): AFP Engine, disassembling and assembling (Page 13-4)
10 - 100 NmUse locking bracket 3406 for tightening and loosening page 13-10
11 - SprocketFor camshaft roller chain -9-Install page 13-10
12 - 10 Nm13 - Chain tensioner with tension bar
For roller chain -15-Before installation, release tension on the stop teeth in the chain tensioner with a small screwdriver and press the tension bar against the chain tensionerRotate engine only with chain tensioner installed

Volkswagen Jetta, Golf, GTI 1999, 2000 2.8 Liter VR6 2V Engine Mechanical, Engine Code(s): AFP Engine, disassembling and assembling (Page 13-5)
14 - Drive gear sprocketSeated in crankshaftGround tooth for bearing parting line = TDC cyl. 1 page 13-10
15 - Roller chainMark direction of travel (installation position) before removing Fig. 1 , page 13-27 Install page 13-10
16 - Sliding railFor roller chain -15-Remove together with roller chain page 13-10
17 - Bolt without collar, 10 NmFor sliding rail -16-

Volkswagen Jetta, Golf, GTI 1999, 2000 2.8 Liter VR6 2V Engine Mechanical, Engine Code(s): AFP Engine, disassembling and assembling (Page 13-6)
18 - Bolt with collar, 10 NmFor sliding rail -21-
19 - 20 NmUse with "D6" thread locking compound
20 - 20 Nm21 - Sliding rail
For camshaft roller chain -9-22 - 10 Nm
Use with "D6" thread locking compound23 - Thrust washer24 - Intermediate shaft
Volkswagen Jetta, Golf, GTI 1999, 2000 2.8 Liter VR6 2V Engine Mechanical, Engine Code(s): AFP Engine, disassembling and assembling (Page 13-7)
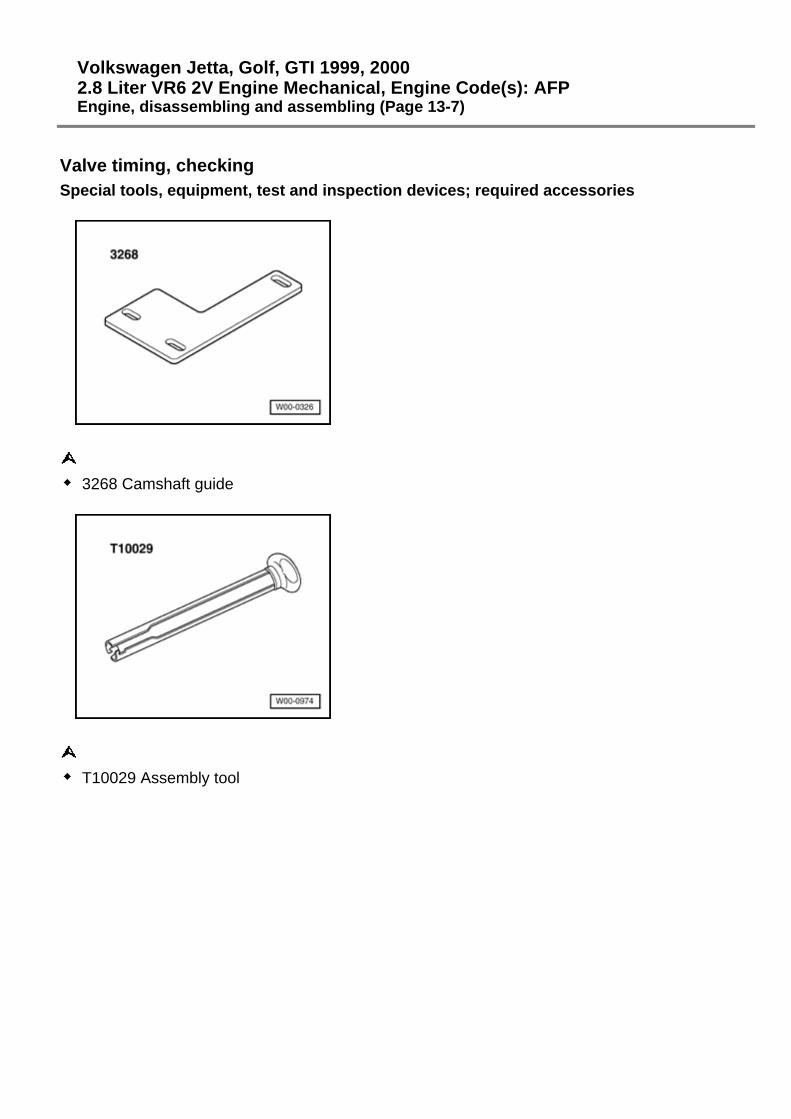
Valve timing, checkingSpecial tools, equipment, test and inspection devices; required accessories
3268 Camshaft guide
T10029 Assembly tool

Volkswagen Jetta, Golf, GTI 1999, 2000 2.8 Liter VR6 2V Engine Mechanical, Engine Code(s): AFP Engine, disassembling and assembling (Page 13-8)
Test sequence- Remove right sound damping tray:
Repair Manual, Body-Exterior , Repair Group 50- Remove valve cover page 15-8.
- Using the mounting bolt for the vibration damper, align the crankshaft with the TDC cyl. 1 position -arrow- by turning in the direction of rotation of the engine.
If TDC cyl. 1 position is correct, it will be possible to see a slot -arrow- on the sprockets of the intermediate shaft.Notes:This condition is only reached in every second TDC position.If the groove cannot be seen:- Turn the crankshaft one turn further in the direction of rotation of the engine.

Volkswagen Jetta, Golf, GTI 1999, 2000 2.8 Liter VR6 2V Engine Mechanical, Engine Code(s): AFP Engine, disassembling and assembling (Page 13-9)
It must be possible to insert camshaft guide 3268 into both shaft slots.

Volkswagen Jetta, Golf, GTI 1999, 2000 2.8 Liter VR6 2V Engine Mechanical, Engine Code(s): AFP Engine, disassembling and assembling (Page 13-10)
Valve timing, setting
(Installing timing chains)Special tools, equipment, test and inspection devices; required accessories
3268 Camshaft guide3406 Locking bracketT10029 Assembly toolV.A.G 1331 torque wrench (5-50 Nm)V.A.G 1332 torque wrench (40-200 Nm)

Volkswagen Jetta, Golf, GTI 1999, 2000 2.8 Liter VR6 2V Engine Mechanical, Engine Code(s): AFP Engine, disassembling and assembling (Page 13-11)
ProcedureWith engine removedInstall roller chain and chain tensioner with tension bar:
- Set and check the position of the crankshaft in relation to the intermediate shaft.The ground tooth of drive gear -B- must be aligned with the bearing parting line (TDC cyl. 1).
- Install bolt without collar for sliding rail -2-and tighten to 10 Nm.

Volkswagen Jetta, Golf, GTI 1999, 2000 2.8 Liter VR6 2V Engine Mechanical, Engine Code(s): AFP Engine, disassembling and assembling (Page 13-12)
- Install sliding rail -2- with roller chain -1- and both sprockets -3- and -4- (note direction of travel of the roller chain page 13-27 , Fig. 1 ).The mark on the sprocket for roller chain -4- must be aligned with notches -C- or -D- on the thrust washer.
- Release stop teeth in the chain tensioner with a small screwdriver -A-.- Press tension bar against the chain tensioner and tighten chain tensioner to 10 Nm.
- Lock vibration damper in position with locking bracket 3406.

Volkswagen Jetta, Golf, GTI 1999, 2000 2.8 Liter VR6 2V Engine Mechanical, Engine Code(s): AFP Engine, disassembling and assembling (Page 13-13)
- Tighten sprockets 3 and 4 for the intermediate shaft to 100 Nm.- Remove locking bracket 3406.- Check position of the crankshaft in relation to the intermediate shaft.
The ground tooth of drive gear -B- must be aligned with the bearing parting line (TDC cyl. 1).
Install camshaft roller chain and chain tensioner with tension bar:- Set both camshafts to TDC cyl. 1.
- Align camshafts with camshaft guide 3268.- Install bearing bolt for tension bar and tighten to 18 Nm.- Install tension bar for chain tensioner (camshaft roller chain).- Install bearing bolt with collar for sliding rail and tighten to 10 Nm.

Volkswagen Jetta, Golf, GTI 1999, 2000 2.8 Liter VR6 2V Engine Mechanical, Engine Code(s): AFP Engine, disassembling and assembling (Page 13-14)
Notes:If the cylinder head is removed:- Install cylinder head page 15-15 - Push sliding rail onto bearing bolt. Insert short mounting screw with "D6" locking
compound and tighten both bolts to 20 Nm.
- Place camshaft roller chain on intermediate shaft (note direction of travel).- Mount camshaft sprocket and roller chain on camshaft for cylinder bank 1, 3 and 5
(long camshaft) and counter tighten by hand.- Mount camshaft sprocket (with pickup wheel for Hall generator) and camshaft roller
chain to the camshaft for cylinder bank 2, 4, and 6 and tighten by hand.

Volkswagen Jetta, Golf, GTI 1999, 2000 2.8 Liter VR6 2V Engine Mechanical, Engine Code(s): AFP Engine, disassembling and assembling (Page 13-15)
Notes:Coat contact surfaces of the bolt heads with oil when installing.- Remove camshaft guide 3268.- Tighten mounting bolts for camshaft sprockets to 100 Nm.
Notes:Hold camshaft -arrow- only with open-end wrench SW 24. The camshaft guide 3268 must not be inserted when tightening or loosening the sprockets.- Coat the sealing surface of the sealing flange with AMV 188 001 02 and install.
Tighten mounting bolt to 10 Nm.- Replace oil seal for sealing flange page 13-30.- Prepare cylinder head gasket for assembly page 15-7 , Fig. 2.- Coat the sealing surface of the cover piece with AMV 188 001 02.

Volkswagen Jetta, Golf, GTI 1999, 2000 2.8 Liter VR6 2V Engine Mechanical, Engine Code(s): AFP Engine, disassembling and assembling (Page 13-16)
- Coat the O-ring for the oil passage seal and insert in cover piece.- Install cover piece, insert all mounting bolts and turn in opposite direction slightly.- Initially tighten 8 mm mounting bolts to 25 Nm, then tighten 6 mm mounting bolts to
10 Nm.- Install chain tensioner for camshaft roller chain and tighten to 40 Nm.Notes:Rotate engine only with chain tensioner installed. Otherwise, the camshaft roller chain will skip.- Rotate the crankshaft two turns in the direction of rotation of the engine and check
valve timing page 13-7.

Volkswagen Jetta, Golf, GTI 1999, 2000 2.8 Liter VR6 2V Engine Mechanical, Engine Code(s): AFP Engine, disassembling and assembling (Page 13-17)
With engine installed, cylinder head removed
- Using the mounting bolt for the vibration damper, align the crankshaft with the mark for TDC cyl. 1 -arrow-.
If cylinder 1 is correctly at TDC position, it will be possible to see a slot -arrow- on the intermediate shaft sprockets.If the slot is not visible:- Turn the crankshaft one turn in the direction of rotation of the engine.Notes:If the crankshaft is turned with the cylinder head removed, a second mechanic must guide the camshaft roller chain by hand to prevent blocking.- Set both camshafts to TDC of cyl. 1.
Volkswagen Jetta, Golf, GTI 1999, 2000 2.8 Liter VR6 2V Engine Mechanical, Engine Code(s): AFP Engine, disassembling and assembling (Page 13-18)
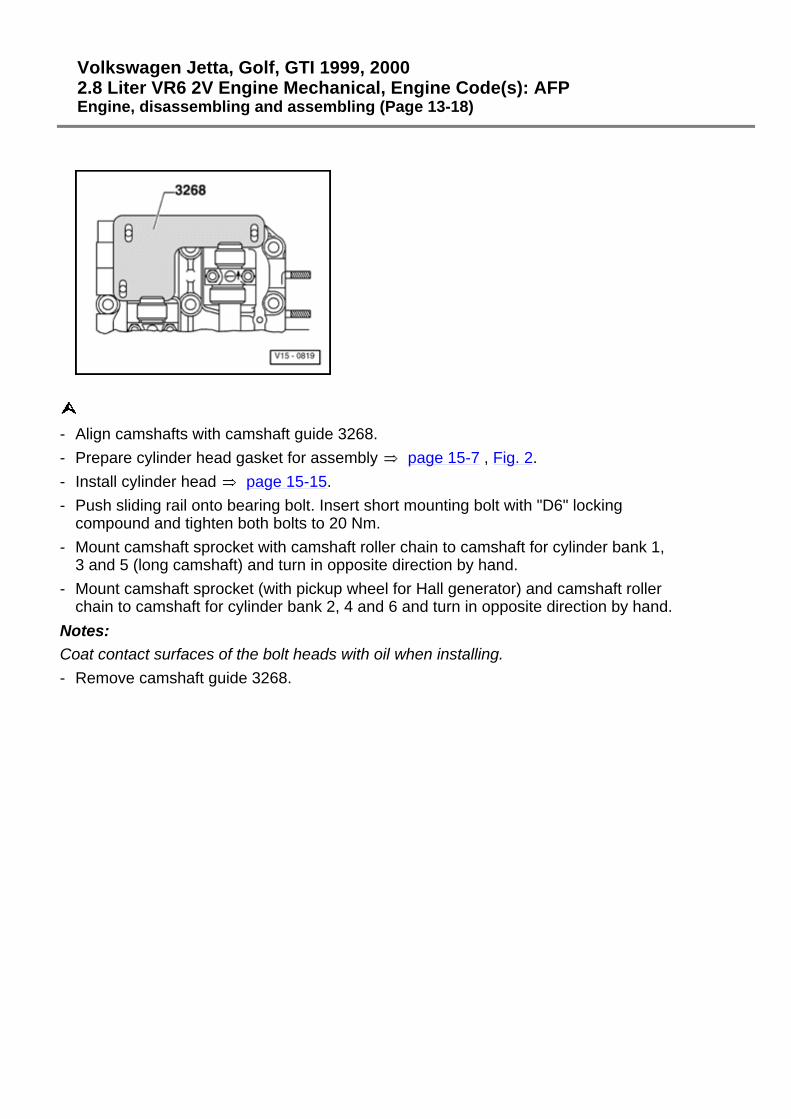
- Align camshafts with camshaft guide 3268.- Prepare cylinder head gasket for assembly page 15-7 , Fig. 2.- Install cylinder head page 15-15.- Push sliding rail onto bearing bolt. Insert short mounting bolt with "D6" locking
compound and tighten both bolts to 20 Nm.- Mount camshaft sprocket with camshaft roller chain to camshaft for cylinder bank 1,
3 and 5 (long camshaft) and turn in opposite direction by hand.- Mount camshaft sprocket (with pickup wheel for Hall generator) and camshaft roller
chain to camshaft for cylinder bank 2, 4 and 6 and turn in opposite direction by hand.Notes:Coat contact surfaces of the bolt heads with oil when installing.- Remove camshaft guide 3268.

Volkswagen Jetta, Golf, GTI 1999, 2000 2.8 Liter VR6 2V Engine Mechanical, Engine Code(s): AFP Engine, disassembling and assembling (Page 13-19)
- Tighten mounting bolts for camshaft sprockets to 100 Nm.
Notes:Hold camshaft -arrow- only with open-end wrench SW 24. The camshaft guide 3268 must not be inserted when tightening or loosening the sprockets.- Coat the sealing surface of the sealing flange with AMV 188 001 02.- Coat the O-ring for the oil passage seal and insert in cover piece.- Install cover piece, insert all mounting bolts and turn in opposite direction slightly.- Initially tighten 8 mm mounting bolts to 25 Nm, then tighten 6 mm mounting bolts to
10 Nm.- Install chain tensioner for camshaft roller chain and tighten to 40 Nm.

Volkswagen Jetta, Golf, GTI 1999, 2000 2.8 Liter VR6 2V Engine Mechanical, Engine Code(s): AFP Engine, disassembling and assembling (Page 13-20)
Notes:Rotate engine only with chain tensioner installed. Otherwise, the camshaft roller chain will skip.- Rotate crankshaft twice in engine travel direction and check timing page 13-7.
Marking roller chains- Mark the roller chains before removal (e.g., put an arrow in the direction of travel
with paint).Notes:Do not mark the chain with a center punch, chisel, etc.

Volkswagen Jetta, Golf, GTI 1999, 2000 2.8 Liter VR6 2V Engine Mechanical, Engine Code(s): AFP Engine, disassembling and assembling (Page 13-21)
Section II
1 - 10 Nm2 - Oil pump drive cover3 - O-Ring
ReplaceCoat with oil before assembly
4 - Oil pump drive5 - Cylinder block
Removing and installing sealing flange and flywheel/drive plate page 13-30 Removing and installing crankshaft page 13-40 Disassembling and assembling piston and connecting rod page 13-44
6 - Intermediate shaft7 - Thrust washer

Volkswagen Jetta, Golf, GTI 1999, 2000 2.8 Liter VR6 2V Engine Mechanical, Engine Code(s): AFP Engine, disassembling and assembling (Page 13-22)
8 - 10 NmInsert with "D6" locking compound
9 - Knock sensor 2 (G66)Checking:
Repair Manual, 2.8 Liter VR6 OBD II Fuel Injection & Ignition , Repair Group 0110 - 20 Nm
Tightening torque has influence on the function of the knock sensor11 - Engine rpm sensor (G28)
Checking: Repair Manual, 2.8 Liter VR6 OBD II Fuel Injection & Ignition , Repair Group 01
12 - Drive shaftFor oil pump drive
13 - O-RingReplace

Volkswagen Jetta, Golf, GTI 1999, 2000 2.8 Liter VR6 2V Engine Mechanical, Engine Code(s): AFP Engine, disassembling and assembling (Page 13-23)
14 - Coolant pipeRemoving and installing page 19-7
15 - Oil pumpDisassembling and assembling page 17-9 Coat oil pressure pipe on engine block and oil pump housing with AMV 188 001 02
16 - 25 Nm17 - Oil pan
Removing and installing page 17-12 18 - Oil pan drain plug, 30 Nm19 - Round gasket
Replace20 - 15 Nm21 - Oil cooler cover, 25 Nm

Volkswagen Jetta, Golf, GTI 1999, 2000 2.8 Liter VR6 2V Engine Mechanical, Engine Code(s): AFP Engine, disassembling and assembling (Page 13-24)
22 - Oil coolerCoat contact surfaces outside the oil seal with AMV 188 001 02 Check for free movement with the surrounding partsSee note page 13-1
23 - Bracket24 - Oil filter housing
Disassembling and assembling page 17-7 25 - Gasket
ReplaceNote installation positionCoat with oil before installing
26 - BracketFor valve for two-stage intake pipe switch-over (N156)
27 - Compact bracketFor alternator, air conditioning compressor and power steering pump

Volkswagen Jetta, Golf, GTI 1999, 2000 2.8 Liter VR6 2V Engine Mechanical, Engine Code(s): AFP Engine, disassembling and assembling (Page 13-25)
28 - Guide bolt, 25 Nm29 - Guide tube
For oil dipstickAttached to intake pipe-top section with bolt
30 - Vibration damperRemoving and installing "V" ribbed belt page 13-28
31 - 100 Nm plus additional 1 / 4 turn (90 )ReplaceUse locking bracket 3406 for loosening and tightening Fig. 1 Tighten with torque-limiting wrench V.A.G 1601
32 - 45 Nm33 - Engine bracket34 - 10 Nm
Volkswagen Jetta, Golf, GTI 1999, 2000 2.8 Liter VR6 2V Engine Mechanical, Engine Code(s): AFP Engine, disassembling and assembling (Page 13-26)
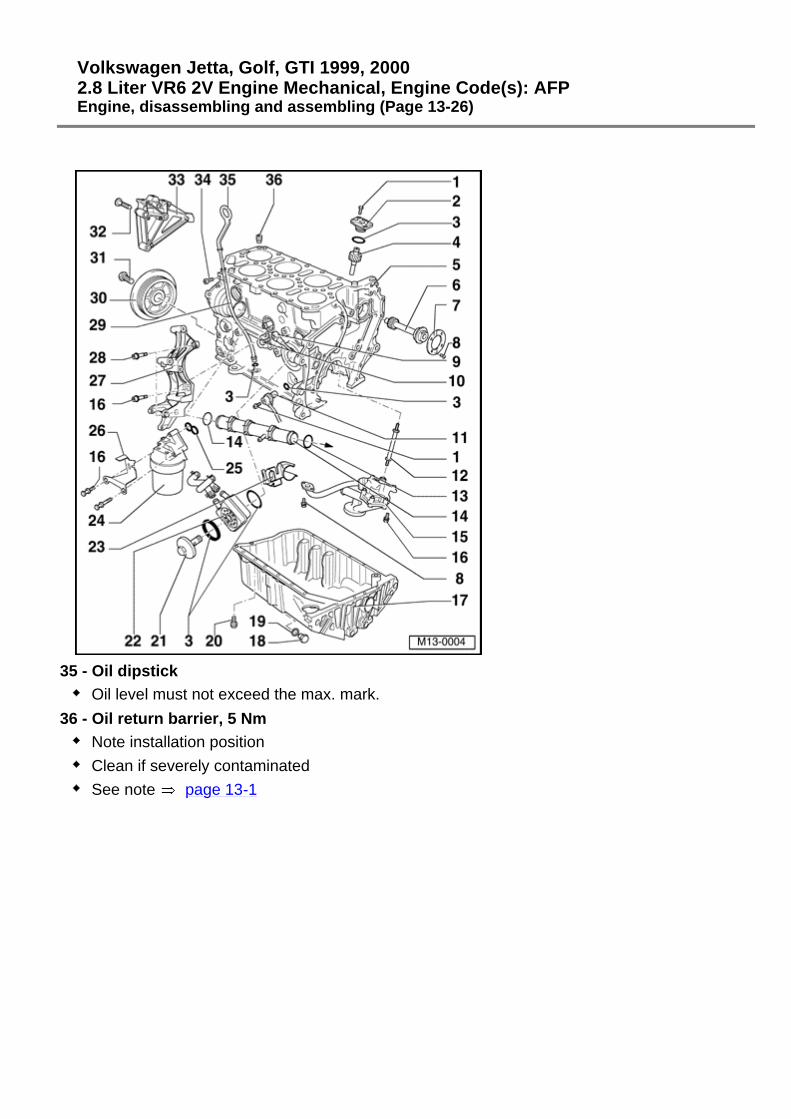
35 - Oil dipstickOil level must not exceed the max. mark.
36 - Oil return barrier, 5 NmNote installation positionClean if severely contaminatedSee note page 13-1

Volkswagen Jetta, Golf, GTI 1999, 2000 2.8 Liter VR6 2V Engine Mechanical, Engine Code(s): AFP Engine, disassembling and assembling (Page 13-27)
Fig. 1 To loosen and tighten the mounting bolt, lock vibration damper in position with locking bracket 3406Notes:The mounting bolt for the vibration damper must be replaced.

Volkswagen Jetta, Golf, GTI 1999, 2000 2.8 Liter VR6 2V Engine Mechanical, Engine Code(s): AFP Engine, disassembling and assembling (Page 13-28)
Removing and installing "V" ribbed beltSpecial tools, equipment, test and inspection devices
Hex head bolt M8x80Removing "V" ribbed belt- Remove right sound damping tray:
Exterior body assembly work; Rep. Manual 50; front body; assembly overview Repair Manual, Body-Exterior , Repair Group 50
- Mark the direction of travel of the "V" ribbed belt.

Volkswagen Jetta, Golf, GTI 1999, 2000 2.8 Liter VR6 2V Engine Mechanical, Engine Code(s): AFP Engine, disassembling and assembling (Page 13-29)
- Screw the 8 mm x 80 bolt into tapped hole -A- of the belt tensioner until pressure on the "V" ribbed belt is released.
Notes:Screw the bolt in only far enough to make it possible to remove the "V" ribbed belt. Otherwise, the belt tensioner housing can be damaged.- Remove "V" ribbed belt.Installing "V" ribbed beltNotes:
Before installing the "V" ribbed belt, make sure that all the assemblies (alternator, air conditioning compressor, power steering pump) are tightly mounted.When installing the "V" ribbed belt, note the direction of travel and make sure the belt is correctly seated in the belt pulleys.

- Put on the "V" ribbed belt.- Remove 8 mm bolt from the tensioner.After work is completed, always:- Start engine and check belt run.

Volkswagen Jetta, Golf, GTI 1999, 2000 2.8 Liter VR6 2V Engine Mechanical, Engine Code(s): AFP Sealing flange and flywheel/drive plate, removing and installing (Page 13-30)
Notes:Clutch repairs:
Repair Manual, Manual Transmission 02J , Repair Group 30Notes:
To carry out the assembly work, the engine must be attached to the engine stand with engine bracket 3269.
1 - 100 Nm plus additional 1 / 4 turn (90 )ReplaceUse locking bracket 3406 for loosening and tightening page 13-33 Tighten with torque wrench V.A.G 1601

Volkswagen Jetta, Golf, GTI 1999, 2000 2.8 Liter VR6 2V Engine Mechanical, Engine Code(s): AFP Sealing flange and flywheel/drive plate, removing and installing (Page 13-31)
2 - Vibration damper3 - 10 Nm4 - Oil Seal
Replace page 13-33 5 - Sealing flange
Coat sealing surface with AMV 188 001 026 - Cylinder block
Removing and installing crankshaft page 13-40 Disassembling and assembling piston and connecting rod page 13-44
7 - Oil sealCoat sealing surfaces with AMV 188 001 02

Volkswagen Jetta, Golf, GTI 1999, 2000 2.8 Liter VR6 2V Engine Mechanical, Engine Code(s): AFP Sealing flange and flywheel/drive plate, removing and installing (Page 13-32)
8 - Oil sealRemove with extractor 2086Slightly coat the sealing lip of the oil seal with oilTo install, position with mounting sleeve 2003/2A Pull in to stop with 2003/3
9 - Flywheel/drive plateRemoving and installing drive plate page 13-37
10 - 60 Nm plus additional 1 / 4 turn (90 )Replace
11 - 25 Nm

Volkswagen Jetta, Golf, GTI 1999, 2000 2.8 Liter VR6 2V Engine Mechanical, Engine Code(s): AFP Sealing flange and flywheel/drive plate, removing and installing (Page 13-33)
Oil seal on vibration damper end of crankshaft, replacing
Special tools, equipment, test and inspection devices; required accessories 3203 Oil seal extractor3266 Guide sleeves3406 Locking bracketV.A.G 1332 torque wrench (40-200 Nm)V.A.G 1601 torque wrench (150-800 Nm)

Volkswagen Jetta, Golf, GTI 1999, 2000 2.8 Liter VR6 2V Engine Mechanical, Engine Code(s): AFP Sealing flange and flywheel/drive plate, removing and installing (Page 13-34)
Removing- Remove "V" ribbed belt page 13-28.
- Remove vibration damper. To do so, lock vibration damper in position with locking bracket 3406.
- Remove the vibration damper bolt.- Turn the inner section of oil seal extractor 3203 three turns (approx. 4 mm) out of the
outer section and lock in position with knurled screw.
- Coat the threaded head of oil seal extractor 3203 with oil, set in place and with heavy pressure, screw it as far as possible into the seal.
- Loosen the knurled screw and turn the inner part against the crankshaft until the seal is removed.

Volkswagen Jetta, Golf, GTI 1999, 2000 2.8 Liter VR6 2V Engine Mechanical, Engine Code(s): AFP Sealing flange and flywheel/drive plate, removing and installing (Page 13-35)
Installing- Lightly coat the sealing lip of the seal with oil.
- Place the guide sleeve from 3266 on the crankshaft nose.- Push the oil seal over the guide sleeve.
- Press the seal in with the pressure sleeve from 3266 until it reaches the stop. Use the old mounting bolt for the vibration damper.

Volkswagen Jetta, Golf, GTI 1999, 2000 2.8 Liter VR6 2V Engine Mechanical, Engine Code(s): AFP Sealing flange and flywheel/drive plate, removing and installing (Page 13-36)
- Install vibration damper and lock in place using locking bracket 3406.- Tighten the new mounting bolt to 100 Nm and turn an additional 1/4 turn (90 ).- Install "V" ribbed belt page 13-28.

Volkswagen Jetta, Golf, GTI 1999, 2000 2.8 Liter VR6 2V Engine Mechanical, Engine Code(s): AFP Sealing flange and flywheel/drive plate, removing and installing (Page 13-37)
Drive plate, removing and installing
Special tools, equipment, test and inspection devices; required accessories3406 Locking bracketV.A.G 1331 torque wrench (5-50 Nm)V.A.G 1332 torque wrench (40-200 Nm)Depth gaugeAuxiliary ruler
Volkswagen Jetta, Golf, GTI 1999, 2000 2.8 Liter VR6 2V Engine Mechanical, Engine Code(s): AFP Sealing flange and flywheel/drive plate, removing and installing (Page 13-38)
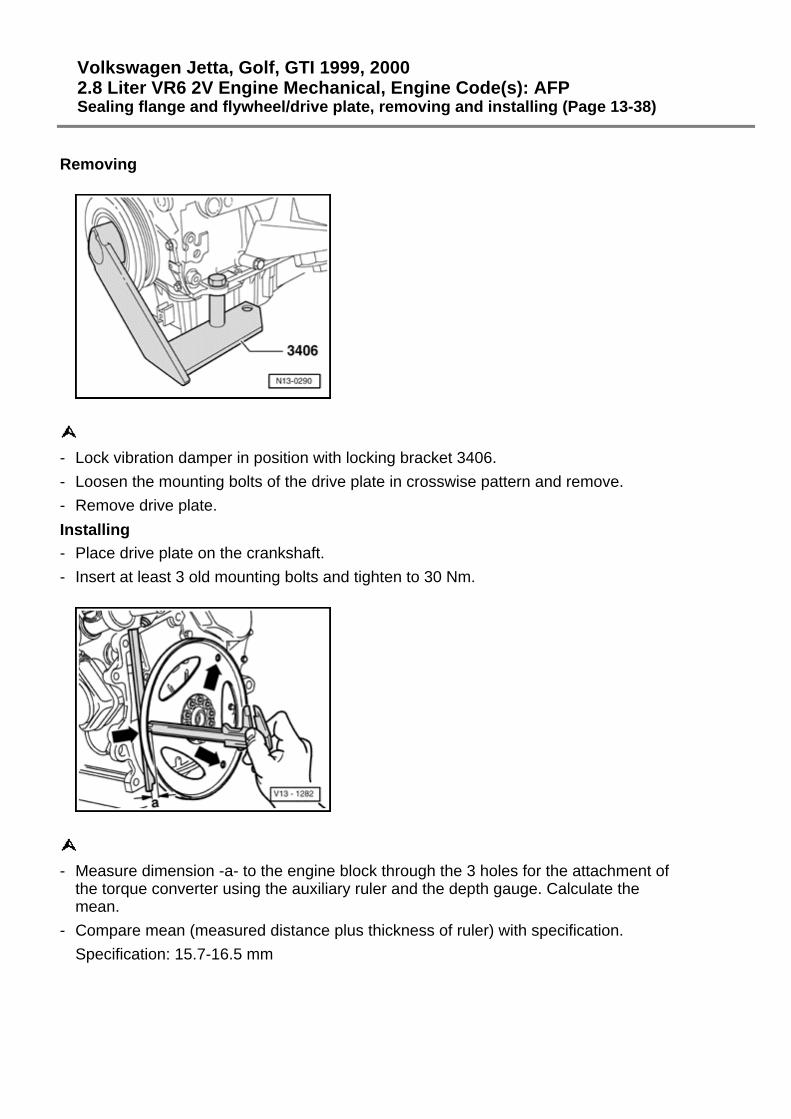
Removing
- Lock vibration damper in position with locking bracket 3406.- Loosen the mounting bolts of the drive plate in crosswise pattern and remove.- Remove drive plate.Installing- Place drive plate on the crankshaft.- Insert at least 3 old mounting bolts and tighten to 30 Nm.
- Measure dimension -a- to the engine block through the 3 holes for the attachment of the torque converter using the auxiliary ruler and the depth gauge. Calculate the mean.
- Compare mean (measured distance plus thickness of ruler) with specification.Specification: 15.7-16.5 mm

Volkswagen Jetta, Golf, GTI 1999, 2000 2.8 Liter VR6 2V Engine Mechanical, Engine Code(s): AFP Sealing flange and flywheel/drive plate, removing and installing (Page 13-39)
If the specification is not reached:
- Remove the drive plate once more and use the appropriate compensating shim -1-.Notes:Only one compensating shim of the appropriate thickness may be used for compensation.If the specification is met:- Insert new mounting bolts and hand tighten.- Install drive plate; use new mounting bolts and tighten to 60 Nm plus an additional
1/4 turn (90 ).
Volkswagen Jetta, Golf, GTI 1999, 2000 2.8 Liter VR6 2V Engine Mechanical, Engine Code(s): AFP Crankshaft, removing and installing (Page 13-40)
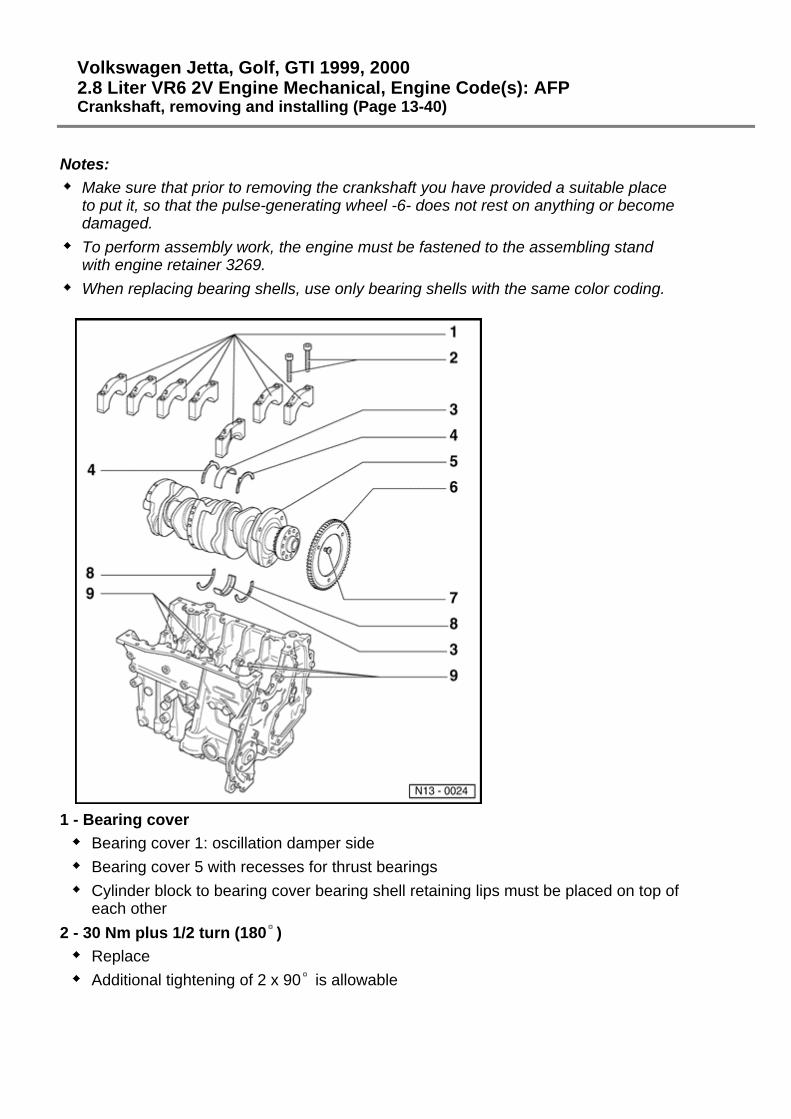
Notes:Make sure that prior to removing the crankshaft you have provided a suitable place to put it, so that the pulse-generating wheel -6- does not rest on anything or become damaged. To perform assembly work, the engine must be fastened to the assembling stand with engine retainer 3269.When replacing bearing shells, use only bearing shells with the same color coding.
1 - Bearing coverBearing cover 1: oscillation damper sideBearing cover 5 with recesses for thrust bearingsCylinder block to bearing cover bearing shell retaining lips must be placed on top of each other
2 - 30 Nm plus 1/2 turn (180 )ReplaceAdditional tightening of 2 x 90 is allowable

Volkswagen Jetta, Golf, GTI 1999, 2000 2.8 Liter VR6 2V Engine Mechanical, Engine Code(s): AFP Crankshaft, removing and installing (Page 13-41)
3 - Bearing shells 1-7For bearing covers without oil grooveFor cylinder block with oil grooveDo not switch worn bearing shells (mark bearing shells)
4 - Thrust bearingFor bearing cover 5Note fastening
5 - CrankshaftSee note prior to removal page 13-40 Axial play new: 0.07-0.23 mm, max. wear: 0.30 mmMeasure radial play with Plastigage-new: 0.2-0.06 mm, max. wear: 0.10 mmDo not change the position of the crankshaft when measuring radial play
Crankshaft measurements:Main bearing: 59.958-59.978 mmConnecting rod bearing: 53.958-53.978 mmFinishing not allowable

Volkswagen Jetta, Golf, GTI 1999, 2000 2.8 Liter VR6 2V Engine Mechanical, Engine Code(s): AFP Crankshaft, removing and installing (Page 13-42)
6 - Pulse-generator wheelFor engine speed sensor (G28)ReplaceInstalling Fig. 1
7 - 10 Nm plus 1 / 4 turn (90 )Replace
8 - Thrust bearingFor cylinder block, bearing 5Note fastening
9 - Oil injectorFor crankshaft bearings 2-7For piston coolingOpening pressure: 2.0 bar over pressureRemoving and installing page 17-5 , Fig. 1 Observe notice page 13-1

Volkswagen Jetta, Golf, GTI 1999, 2000 2.8 Liter VR6 2V Engine Mechanical, Engine Code(s): AFP Crankshaft, removing and installing (Page 13-43)
Fig. 1 Installing pulse-generating wheel on crankshaftMake sure the crankshaft to pulse-generating wheel connecting surface is free of oil and grease.- To provide additional fastening, apply a light coat of adhesive D 000 600 to the back
of the pulse-generating wheel.- Make sure that the marker -VR6- (arrow) is aligned with the single threaded bore.- First, lightly tighten all fastening screws by hand.- Next, tighten fastening screws to 10 Nm plus additional 1 / 4 turn (90 ).

Volkswagen Jetta, Golf, GTI 1999, 2000 2.8 Liter VR6 2V Engine Mechanical, Engine Code(s): AFP Pistons and connecting rods, disassembling and assembling (Page 13-44)
1 - Piston ringsOffset joint by 120Install and remove with piston ring pliersMarking "TOP" to piston topCheck joint clearance Fig. 1 Check side clearance Fig. 2
2 - PistonChecking Fig. 3 Mark installation location to connecting rod and respective cylinder belonging to pistonTall side of the piston top points toward the middle of the cylinder blockInstall using funnel 3278 Fig. 5
3 - Connecting rodReplace only as a setMark respective cylinder to which the connecting rod belongs -B-Installation location: markers -A- must be positioned on top of each other

Volkswagen Jetta, Golf, GTI 1999, 2000 2.8 Liter VR6 2V Engine Mechanical, Engine Code(s): AFP Pistons and connecting rods, disassembling and assembling (Page 13-45)
4 - Connecting rod coverNote installation location
5 - 30 Nm plus 1 / 4 turn (90 )ReplaceOil thread bearing surfaceTo measure radial play tighten to 30 Nm, however, do not continue turning
6 - Bearing shellNote installation locationDo not switch worn bearing shellsBearing shell retaining lips must be firmly placed in the recessesAxial clearance, new: 0.05-0.31 mm, max. wear: 0.40 mmMeasure radial clearance with Plastigage. New: 0.02-0.07 mm, max. wear: 0.10 mmDo not change the position of the crankshaft when measuring radial play

Volkswagen Jetta, Golf, GTI 1999, 2000 2.8 Liter VR6 2V Engine Mechanical, Engine Code(s): AFP Pistons and connecting rods, disassembling and assembling (Page 13-46)
7 - Cylinder blockCheck cylinder bore Fig. 4 Piston and cylinder measurements page 13-51
8 - Piston pinsIf binding occurs, heat piston to 60 CRemove and install with flaring tool VW 222 a
9 - Locking ring

Volkswagen Jetta, Golf, GTI 1999, 2000 2.8 Liter VR6 2V Engine Mechanical, Engine Code(s): AFP Pistons and connecting rods, disassembling and assembling (Page 13-47)
Fig. 1 Piston ring-checking joint clearanceSpecial tools, equipment, test and inspection devices; required accessories
Feeler gaugeTest procedure- Push the ring at a right angle to the cylinder wall, to the bottom of cylinder opening,
approx. 15 mm away from the cylinder edge. In order to push in, use a piston without piston rings.

Volkswagen Jetta, Golf, GTI 1999, 2000 2.8 Liter VR6 2V Engine Mechanical, Engine Code(s): AFP Pistons and connecting rods, disassembling and assembling (Page 13-48)
Fig. 2 Piston ring-checking side clearanceSpecial tools, equipment, test and inspection devices; required accessories
Feeler gauge- Clean piston ring groove before checking.
Fig. 3 Checking pistonSpecial tools, equipment, test and inspection devices; required accessories
External micrometer 75-100 mm- Measure approx. 6 mm from the bottom edge, offset 90 to the piston pin axis.
Maximum deviation from nominal size is 0.04 mm

Volkswagen Jetta, Golf, GTI 1999, 2000 2.8 Liter VR6 2V Engine Mechanical, Engine Code(s): AFP Pistons and connecting rods, disassembling and assembling (Page 13-49)
Fig. 4 Checking cylinder boreSpecial tools, equipment, test and inspection devices; required accessories
Internal micrometer 50-100 mmTest procedure- Perform a crosswise measurement in 3 places in transverse direction -A- and
lengthwise direction -B-. Maximum deviation from nominal size is 0.08 mmNotes:The cylinder bore measurement cannot be taken if the cylinder block is fastened to the assembling trestle with engine retainer 3269; faulty measurements are possible.

Volkswagen Jetta, Golf, GTI 1999, 2000 2.8 Liter VR6 2V Engine Mechanical, Engine Code(s): AFP Pistons and connecting rods, disassembling and assembling (Page 13-50)
Fig. 5 Installing piston with funnel 3278Special tools, equipment, test and inspection devices; required accessories
3278 FunnelNotes:If you are using a new funnel to install pistons, guide the piston with oiled piston rings through the funnel twice and, if necessary, remove resulting shavings. Only then should you install the piston with piston rings.Procedure- Manually push the piston into the oiled funnel. The tall side of the piston top must
point in the direction of the funnel spout -arrow-.- Hold the funnel (with inserted piston) at the upper edge and push the piston in with
both thumbs.- Push the piston in until it protrudes approx. 15 mm below the bottom edge of the
funnel.- Start the piston in its respective cylinder bore. The funnel spout -arrow- must point
toward the middle of the cylinder block.- Firmly place the funnel on the cylinder block and push the piston in.

Volkswagen Jetta, Golf, GTI 1999, 2000 2.8 Liter VR6 2V Engine Mechanical, Engine Code(s): AFP Pistons and connecting rods, disassembling and assembling (Page 13-51)
Piston and cylinder measurements