volvo v70, xc70 & s80 volvo navigation...
TRANSCRIPT
OPERATING MANUAL
VOLVO V70, XC70 & S80
VOLVO NAVIGATION SYSTEM (VNS) Web Edition
G033589
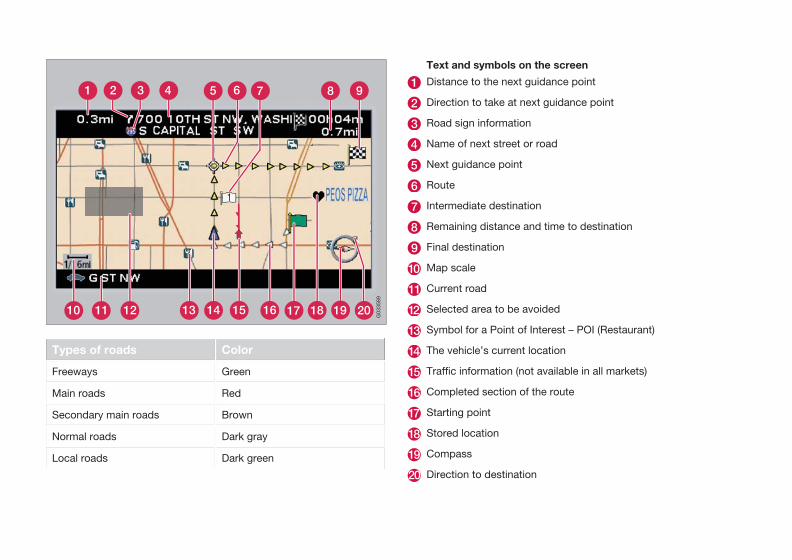
Types of roads Color
Freeways Green
Main roads Red
Secondary main roads Brown
Normal roads Dark gray
Local roads Dark green
Text and symbols on the screen
Distance to the next guidance point
Direction to take at next guidance point
Road sign information
Name of next street or road
Next guidance point
Route
Intermediate destination
Remaining distance and time to destination
Final destination
Map scale
Current road
Selected area to be avoided
Symbol for a Point of Interest – POI (Restaurant)
The vehicle’s current location
Traffic information (not available in all markets)
Completed section of the route
Starting point
Stored location
Compass
Direction to destination
VOLVO NAVIGATION SYSTEM (VNS)VNS is a navigation system developed by Volvo, which isdesigned to help guide you to the destination of your choiceand provide information along the way.
The system includes features that enable you to set itineraries,search for certain types of points of interest along your route,store special destinations, etc.
The system indicates the vehicle’s current location, and showspart or all of the route to your destination, depending on thesettings you have made. If at any time you should decide todeviate from the route originally set by the system, a new routeto the destination will automatically be calculated.
By enabling you to reach your destination quickly and by themost direct route, Volvo's navigation system also helps con-tribute to improving the environment.
NAVTEQ DATABASE End-User License Agreement
See the information on page 58.

Contents
4
0101 Quick guideGetting started............................................ 8
0202 Getting to know your
navigation systemThis manual............................................... 12Before you begin....................................... 13DVDs and the screen................................ 15V70/XC70 system overview...................... 16S80 navigation system overview.............. 18Navigation system controls...................... 20On-screen keyboard................................. 21Maps, types of roads, and the compass. . 22Main menu, Scroll menu........................... 25Shortcut menu.......................................... 26Menu selections........................................ 28 03
03 Planning your tripSetting a destination................................. 32Stored locations, Last ten......................... 35Return trip, Intersection............................ 36Map search, Search by lat/long................ 37Itinerary..................................................... 38Storing a location...................................... 40Next destination........................................ 41Current position........................................ 42Settings..................................................... 43Avoiding an area....................................... 44Map and Guidance options...................... 46System options......................................... 47Demo......................................................... 48
Contents
5
0404 Symbols on the mapPoints of interest....................................... 52
0505 Questions & AnswersFrequently asked questions...................... 56EULA – License agreement....................... 58
0606 IndexIndex......................................................... 61
G028767
6
Getting started.......................................................................................... 8
01QUICK GUIDE
01 Quick guide
Getting started01
8
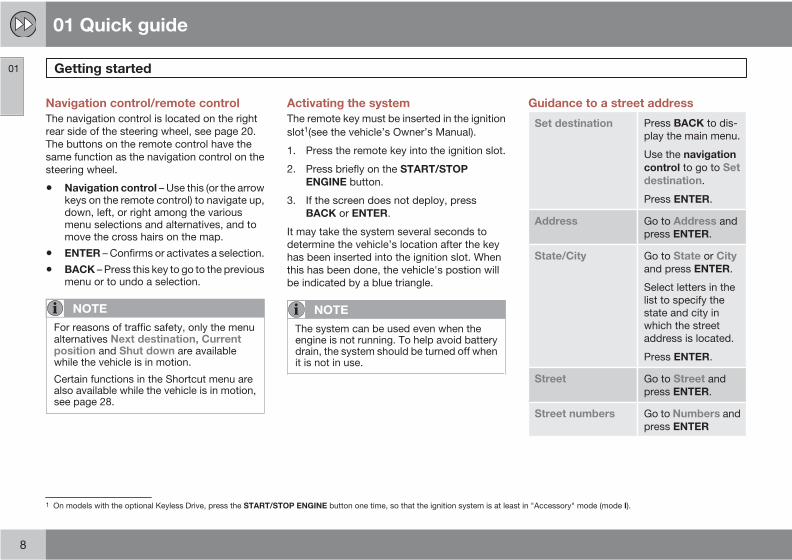
Navigation control/remote controlThe navigation control is located on the rightrear side of the steering wheel, see page 20.The buttons on the remote control have thesame function as the navigation control on thesteering wheel.
• Navigation control – Use this (or the arrowkeys on the remote control) to navigate up,down, left, or right among the variousmenu selections and alternatives, and tomove the cross hairs on the map.
• ENTER – Confirms or activates a selection.
• BACK – Press this key to go to the previousmenu or to undo a selection.
NOTE
For reasons of traffic safety, only the menualternatives Next destination, Currentposition and Shut down are availablewhile the vehicle is in motion.
Certain functions in the Shortcut menu arealso available while the vehicle is in motion,see page 28.
Activating the systemThe remote key must be inserted in the ignitionslot1(see the vehicle’s Owner’s Manual).
1. Press the remote key into the ignition slot.
2. Press briefly on the START/STOPENGINE button.
3. If the screen does not deploy, pressBACK or ENTER.
It may take the system several seconds todetermine the vehicle’s location after the keyhas been inserted into the ignition slot. Whenthis has been done, the vehicle's postion willbe indicated by a blue triangle.
NOTE
The system can be used even when theengine is not running. To help avoid batterydrain, the system should be turned off whenit is not in use.
Guidance to a street address
Set destination Press BACK to dis-play the main menu.
Use the navigationcontrol to go to Setdestination.
Press ENTER.
Address Go to Address andpress ENTER.
State/City Go to State or Cityand press ENTER.
Select letters in thelist to specify thestate and city inwhich the streetaddress is located.
Press ENTER.
Street Go to Street andpress ENTER.
Street numbers Go to Numbers andpress ENTER
1 On models with the optional Keyless Drive, press the START/STOP ENGINE button one time, so that the ignition system is at least in "Accessory" mode (mode I).
01 Quick guide
Getting started 01
9
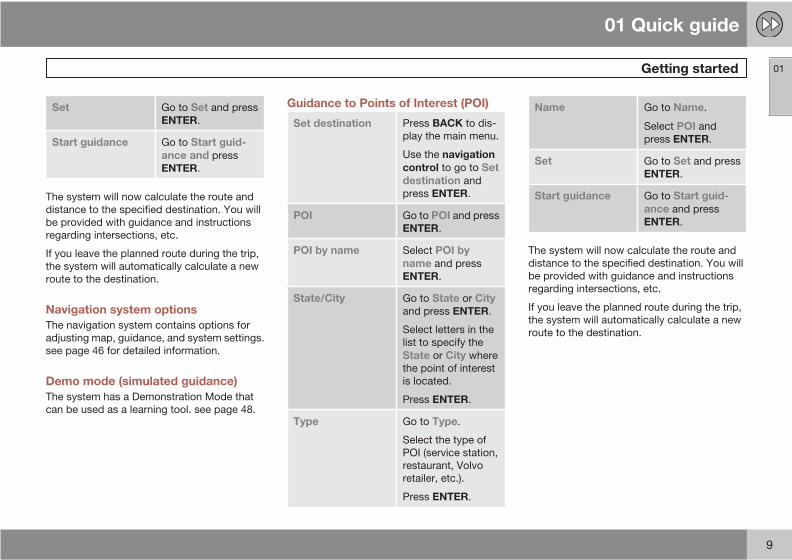
Set Go to Set and pressENTER.
Start guidance Go to Start guid-ance and pressENTER.
The system will now calculate the route anddistance to the specified destination. You willbe provided with guidance and instructionsregarding intersections, etc.
If you leave the planned route during the trip,the system will automatically calculate a newroute to the destination.
Navigation system optionsThe navigation system contains options foradjusting map, guidance, and system settings.see page 46 for detailed information.
Demo mode (simulated guidance)The system has a Demonstration Mode thatcan be used as a learning tool. see page 48.
Guidance to Points of Interest (POI)
Set destination Press BACK to dis-play the main menu.
Use the navigationcontrol to go to Setdestination andpress ENTER.
POI Go to POI and pressENTER.
POI by name Select POI byname and pressENTER.
State/City Go to State or Cityand press ENTER.
Select letters in thelist to specify theState or City wherethe point of interestis located.
Press ENTER.
Type Go to Type.
Select the type ofPOI (service station,restaurant, Volvoretailer, etc.).
Press ENTER.
Name Go to Name.
Select POI andpress ENTER.
Set Go to Set and pressENTER.
Start guidance Go to Start guid-ance and pressENTER.
The system will now calculate the route anddistance to the specified destination. You willbe provided with guidance and instructionsregarding intersections, etc.
If you leave the planned route during the trip,the system will automatically calculate a newroute to the destination.
G02
8780
10
This manual............................................................................................. 12Before you begin..................................................................................... 13DVDs and the screen.............................................................................. 15V70/XC70 system overview.................................................................... 16S80 navigation system overview............................................................. 18Navigation system controls..................................................................... 20On-screen keyboard............................................................................... 21Maps, types of roads, and the compass................................................ 22Main menu, Scroll menu......................................................................... 25Shortcut menu........................................................................................ 26Menu selections...................................................................................... 28
02GETTING TO KNOW YOUR NAVIGATION SYSTEM
02 Getting to know your navigation system
This manual
02
12
Using this manualThe manual is divided into chapters describingthe various features and functions of the navi-gation system.
See Planning your trip on page 32 for moredetailed descriptions and selections of settingsfor specifying a destination.
Menu selections/PathsMenu selections in this manual are listed ingray text, for example Set destinationAddress Street.
Quick guideA quick guide is available to help you getstarted with the basic functions as quickly aspossible, see page 8.
Changes in the manualThe specifications, design features, and illus-trations in this manual are not binding. Wereserve the right to make modifications withoutprior notice.
© 2008 Volvo Car Corporation
02 Getting to know your navigation system
Before you begin
02
13
General informationThe VNS system can be used even if a desti-nation has not be specified.
The map, with the vehicle’s current location,will be displayed on the screen, with the vehiclemarked as a blue triangle.
WARNING
• Always use good judgment when fol-lowing navigation system guidance,and do not follow guidance that seemscontrary to your own best judgment.
• Never use the navigation system or anyother feature in your vehicle in a waythat distracts you from the task of driv-ing safely. Distraction can lead to a seri-ous accident.
• Set and make changes in your naviga-tion system only with the vehicleparked.
• Be aware of the current traffic situation.
• Always comply with relevant traffic reg-ulations.
Map modeWhen the system starts, text is displayed onthe screen that must be confirmed by pressingENTER.
The system then enters Map mode and thecurrent map view is displayed.
• Press ENTER to access the Shortcutmenu, see page 26.
• Press BACK to access the Main menu, seepage 25.
1. Use the navigation control to activateMap scroll mode, for example, to see sec-tions of the map that are outside of thescreen.
2. Press ENTER to activate the Map scrollmenu. See also Scroll menu seepage 25.
SettingsThe system contains default settings, but itstarts with the settings that were most recentlymade.
If a setting has been changed and thenreturned to the factory setting, only the settingin question is affected.
There is no global function to return all settingsto the factory defaults.
On/Off
On1. The remote key must be inserted in the
ignition slot1in order to use the system (seethe vehicle’s Owner’s Manual).
2. Press ENTER or BACK to activate the sys-tem.
3. The screen is activated automatically.
It may take several seconds for the system todetermine the vehicle’s location and direction.
OffThe system is automatically shut off when thekey is removed from the ignition slot (or whenthe driver’s door is opened on vehicles with theoptional keyless drive).
The system can also be turned off manually sothat it does not start automatically the next timethe remote key is inserted in the ignition slot.
1. Press BACK to go to the Main menu.
2. Go to Shut down with the navigationcontrol.
3. Press ENTER.
4. The screen will retract automatically.
1 On models with the optional Keyless Drive, press the START button one time, so that the ignition system is at least in "Accessory" mode (mode I).
02 Getting to know your navigation system
Before you begin
02
14
NOTE
The system can be used even when theengine is not running. To help avoid batterydrain, the system should be turned off whenit is not in use.
Demo (simulated guidance)For an overview of how guidance functions,specify a destination.
If the vehicle is at a standstill, guidance can besimulated to the specified destination, seeStart demo on page 48.
02 Getting to know your navigation system
DVDs and the screen
02
15
Contents of DVDsEach set of DVDs contains at least two discs.Each disc contains information covering agreater part of the North American network ofroads. However, each disc contains detailedinformation about addresses, points of inter-est, etc., in a specific geographic area.
During a trip, a message will be displayed whenit is time to switch DVDs. If the DVD containingdetailed information about the area in whichyou are currently driving is not inserted, onlygeneral information about the road network willbe available.
The maps and data on the DVDs are static.They will not automatically update to reflectreal-life changes to road and traffic patterns.Updated DVDs are produced periodically.Please contact your Volvo retailer for moreinformation about availability.
Changing DVDsWhen changing DVDs, the ignition must be onduring the entire procedure (see the vehicle’sOwner’s Manual).
1. Turn on the navigation system.
2. Remove the upholstered panel that con-ceals the main unit under the floor on theleft side of the trunk or cargo compartment.
3. Hook a thumb behind the upper edge andpull it out (see the overview illustrations atthe beginning of this chapter).
4. Release the catch on front of the main unit.
5. Press the EJECT button and remove theDVD.
6. Insert the new map DVD.
7. Lock the catch.
In certain cases, new functions may be addedto the system when the new DVD is inserted. Ifthe DVD also contains new system software,you will be prompted to accept a systemupdate.
Confirm by selecting YES.
The text Preparing to load SystemSoftware. Please wait… will then be dis-played.
The update takes approximately 15 minutes.The VNS start screen will be displayed whenupdating is completed and the navigation sys-tem is ready for use.
NOTE
The screen may retract or go blank while anupdate is underway.
DVD care• When changing discs, make sure that they
are kept free of oil, grease and other impur-ities.
• The discs must not be exposed to mois-ture.
• The discs must be kept in their packagingwhen not in use.
• Avoid storing discs in excessive heat,direct sunlight, or in a dusty environment.
Screen careClean the display screen with a soft, non-staticcloth or a moist paper towel and a mild windowcleaning agent.
Never use petroleum based solvents or abra-sive substances when cleaning the screen.
02 Getting to know your navigation system
V70/XC70 system overview
02
16
2 3 4
5
61
G01
9625

02 Getting to know your navigation system
V70/XC70 system overview
02
17
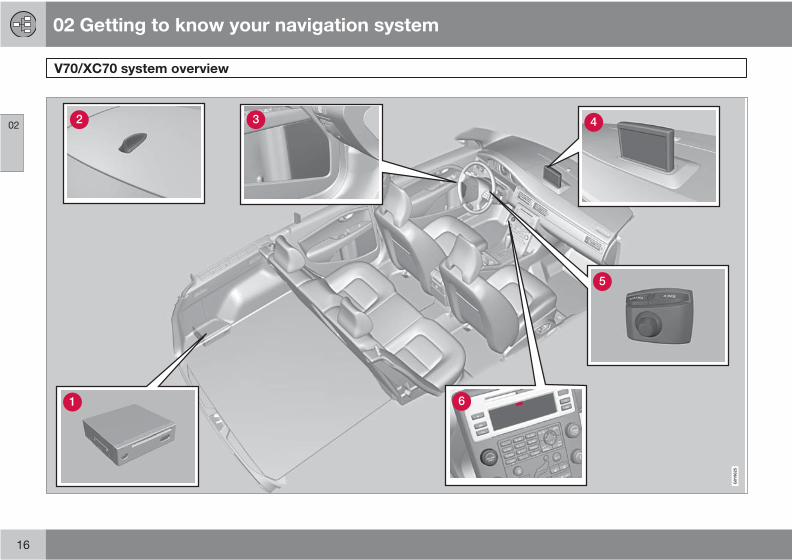
Main VNS unit and DVD driveThe main unit and DVD drive is located on theleft side of the cargo area, and includes the fol-lowing functions:
• Determining the vehicle’s location.
• Calculating a route to the selected desti-nation.
• Voice guidance.
NOTE
• The EJECT button is located to the leftand the locking catch is on the right sideof the main unit.
• The DVD drive is intended for playingVolvo’s map DVDs only.
Global Positioning System (GPS)antennaThe antenna is integrated into the roof module.
NOTE
The GPS receiver is integrated into the mainunit. Using signals from the Global Position-ing System, the vehicle’s speedometer, anda gyroscopic sensor, it calculates the vehi-cle’s current location and direction.
This also helps the system calculate direc-tion and location if the GPS signal is tem-porarily interrupted, such as when drivingthrough a tunnel.
SpeakersSound from the navigation system comes fromthe vehicle’s audio system front speakers.
ScreenThe screen displays the maps and providesdetailed information about intersections, dis-tances, etc.
For information about caring for the screen,see page 15.
Navigation controlThe navigation control is located in the rightrear side of the steering wheel. Use it to moveamong menu alternatives, to confirm selec-tions or to go back in the menu system.
For additional information, see page 20.
Volume control and infrared (IR)receiverUse the vehicle’s audio system volume controlduring voice guidance to raise or lower the vol-ume. The volume can also be adjusted in themenu system.
The IR receiver for the VNS remote control islocated above the numeric keypad on the cen-ter instrument panel.
02 Getting to know your navigation system
S80 navigation system overview
02
18
3 4
1
5
6
2
G02
1310
02 Getting to know your navigation system
S80 navigation system overview
02
19
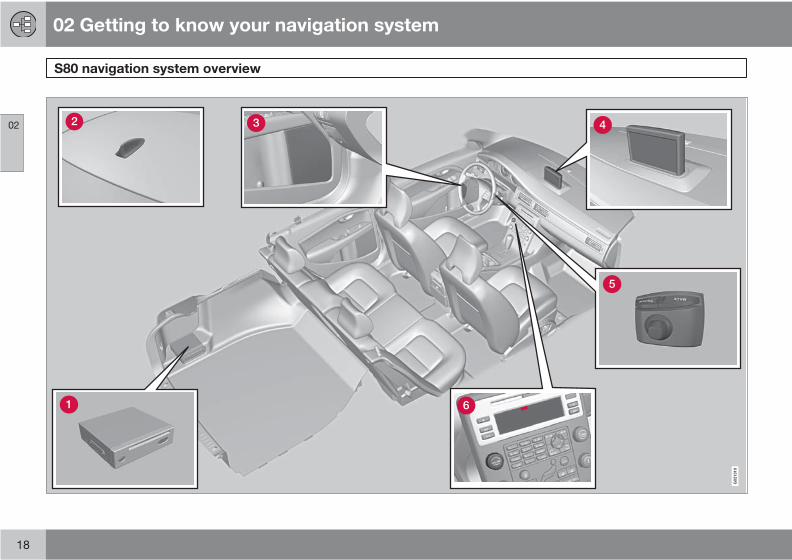
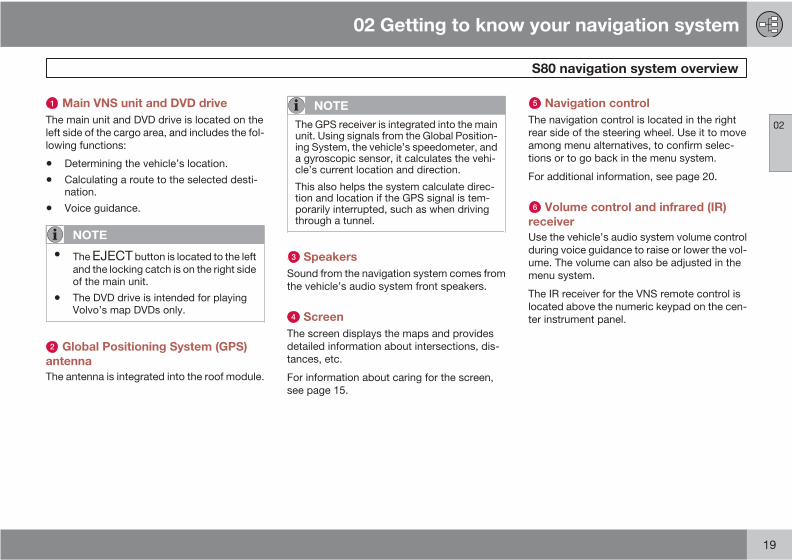
Main VNS unit and DVD driveThe main unit and DVD drive is located on theleft side of the cargo area, and includes the fol-lowing functions:
• Determining the vehicle’s location.
• Calculating a route to the selected desti-nation.
• Voice guidance.
NOTE
• The EJECT button is located to the leftand the locking catch is on the right sideof the main unit.
• The DVD drive is intended for playingVolvo’s map DVDs only.
Global Positioning System (GPS)antennaThe antenna is integrated into the roof module.
NOTE
The GPS receiver is integrated into the mainunit. Using signals from the Global Position-ing System, the vehicle’s speedometer, anda gyroscopic sensor, it calculates the vehi-cle’s current location and direction.
This also helps the system calculate direc-tion and location if the GPS signal is tem-porarily interrupted, such as when drivingthrough a tunnel.
SpeakersSound from the navigation system comes fromthe vehicle’s audio system front speakers.
ScreenThe screen displays the maps and providesdetailed information about intersections, dis-tances, etc.
For information about caring for the screen,see page 15.
Navigation controlThe navigation control is located in the rightrear side of the steering wheel. Use it to moveamong menu alternatives, to confirm selec-tions or to go back in the menu system.
For additional information, see page 20.
Volume control and infrared (IR)receiverUse the vehicle’s audio system volume controlduring voice guidance to raise or lower the vol-ume. The volume can also be adjusted in themenu system.
The IR receiver for the VNS remote control islocated above the numeric keypad on the cen-ter instrument panel.
02 Getting to know your navigation system
Navigation system controls
02
20
Location of the navigation control andIR (infrared) receiver
G02
8733
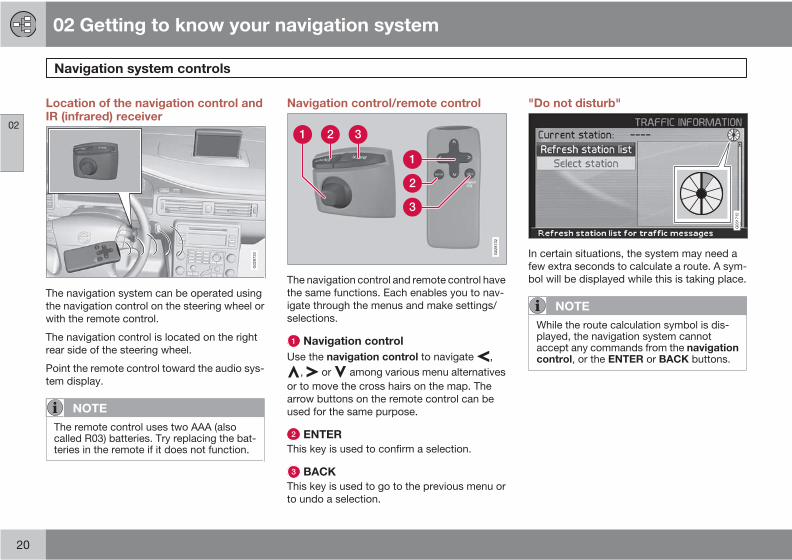
The navigation system can be operated usingthe navigation control on the steering wheel orwith the remote control.
The navigation control is located on the rightrear side of the steering wheel.
Point the remote control toward the audio sys-tem display.
NOTE
The remote control uses two AAA (alsocalled R03) batteries. Try replacing the bat-teries in the remote if it does not function.
Navigation control/remote control
1
1 2 3
2
3
G02
8732
The navigation control and remote control havethe same functions. Each enables you to nav-igate through the menus and make settings/selections.
Navigation controlUse the navigation control to navigate ,
, or among various menu alternativesor to move the cross hairs on the map. Thearrow buttons on the remote control can beused for the same purpose.
ENTERThis key is used to confirm a selection.
BACKThis key is used to go to the previous menu orto undo a selection.
"Do not disturb"
G03
1712
In certain situations, the system may need afew extra seconds to calculate a route. A sym-bol will be displayed while this is taking place.
NOTE
While the route calculation symbol is dis-played, the navigation system cannotaccept any commands from the navigationcontrol, or the ENTER or BACK buttons.
02 Getting to know your navigation system
On-screen keyboard
02
21
Specifying an address
G023189
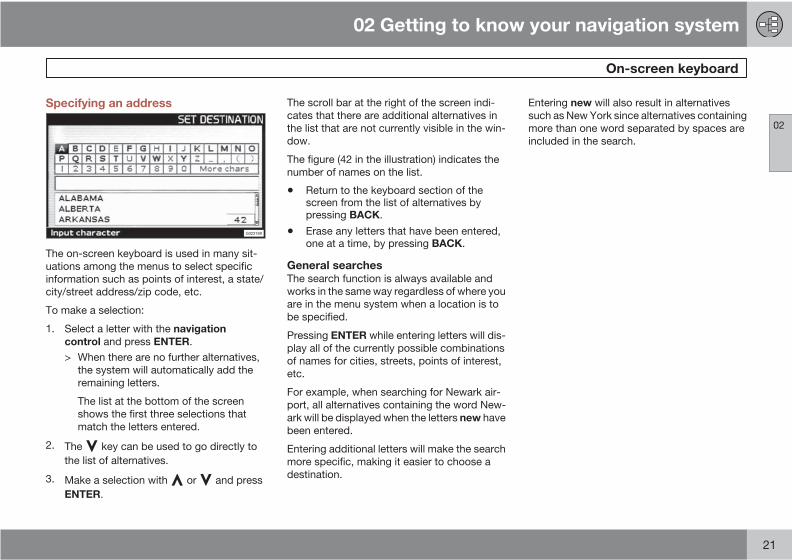
The on-screen keyboard is used in many sit-uations among the menus to select specificinformation such as points of interest, a state/city/street address/zip code, etc.
To make a selection:
1. Select a letter with the navigationcontrol and press ENTER.> When there are no further alternatives,
the system will automatically add theremaining letters.
The list at the bottom of the screenshows the first three selections thatmatch the letters entered.
2. The key can be used to go directly tothe list of alternatives.
3. Make a selection with or and pressENTER.
The scroll bar at the right of the screen indi-cates that there are additional alternatives inthe list that are not currently visible in the win-dow.
The figure (42 in the illustration) indicates thenumber of names on the list.
• Return to the keyboard section of thescreen from the list of alternatives bypressing BACK.
• Erase any letters that have been entered,one at a time, by pressing BACK.
General searchesThe search function is always available andworks in the same way regardless of where youare in the menu system when a location is tobe specified.
Pressing ENTER while entering letters will dis-play all of the currently possible combinationsof names for cities, streets, points of interest,etc.
For example, when searching for Newark air-port, all alternatives containing the word New-ark will be displayed when the letters new havebeen entered.
Entering additional letters will make the searchmore specific, making it easier to choose adestination.
Entering new will also result in alternativessuch as New York since alternatives containingmore than one word separated by spaces areincluded in the search.
02 Getting to know your navigation system
Maps, types of roads, and the compass
02
22
Map views
21
3 4
G02
8750
02 Getting to know your navigation system
Maps, types of roads, and the compass
02
23
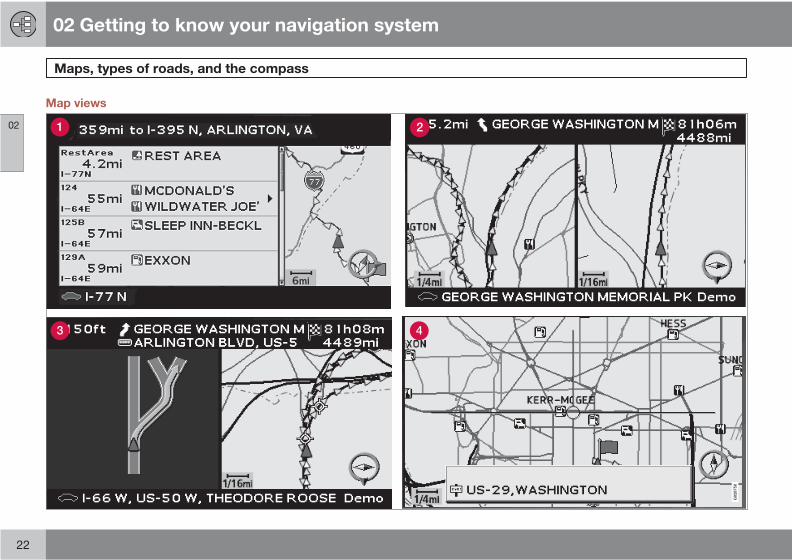
Map views of the current locationThe way in which the map is displayeddepends on the vehicle’s location and the set-tings that have been made in the system, suchas map scale, geographic location, the sym-bols that have been selected for display, etc.
An explanation of the text, signs, and symbolsthat may be displayed on the screen can befound on the inside of the front cover of thismanual.
The name of the current route can be viewedat the bottom of the screen without setting adestination.
Along a highway. The screen shows pointsof interest along the highway, seepage 26.
Two maps. The screen shows the samemap, but with two different scales, seepage 26.
Detailed intersection information. Thescreen shows the direction in which youshould turn at the next intersection. Visualinformation is always accompanied byvoice guidance.
Map scroll mode, see page 25.
Voice guidanceOnce a destination has been entered and thevehicle is approaching an intersection or anexit, a voice will provide guidance about dis-tance and type of action to be taken. A detailedmap of the intersection is also displayed.
The voice guidance is repeated as the vehiclesapproaches the intersection. Adjust the vol-ume with the audio system’s volume control(this must be done while guidance is beinggiven).
In the menu system, go to Settings Guidingoptions Guidance voice - to choosebetween a male or female voice, or no voiceguidance at all, and go to System options toselect the language to be used by the system.see page 46 for more information.
NOTE
In certain cases, voice guidance willreplaced by an audible signal.
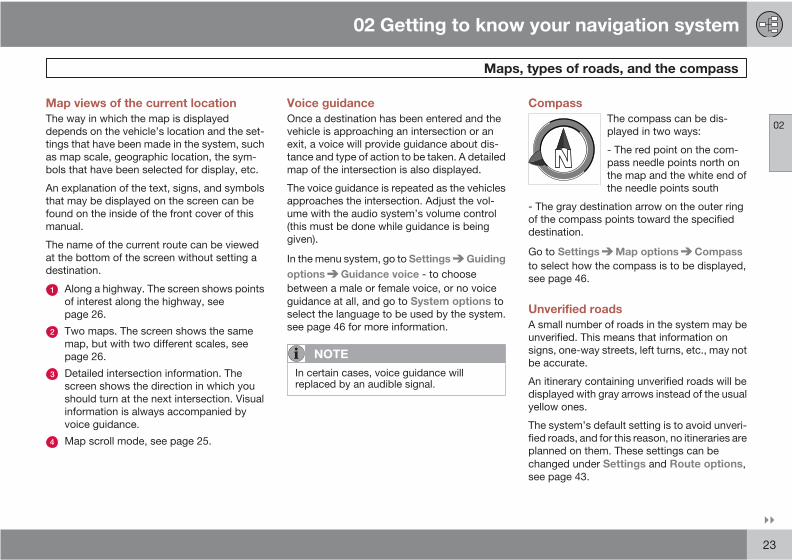
CompassThe compass can be dis-played in two ways:
- The red point on the com-pass needle points north onthe map and the white end ofthe needle points south
- The gray destination arrow on the outer ringof the compass points toward the specifieddestination.
Go to Settings Map options Compassto select how the compass is to be displayed,see page 46.
Unverified roadsA small number of roads in the system may beunverified. This means that information onsigns, one-way streets, left turns, etc., may notbe accurate.
An itinerary containing unverified roads will bedisplayed with gray arrows instead of the usualyellow ones.
The system’s default setting is to avoid unveri-fied roads, and for this reason, no itineraries areplanned on them. These settings can bechanged under Settings and Route options,see page 43.
02 Getting to know your navigation system
Maps, types of roads, and the compass
02
24
The system provides information when anunverified road is added to an itinerary andwhen the vehicle begins to travel on one ofthese roads.
02 Getting to know your navigation system
Main menu, Scroll menu
02
25
Main menu
G023196
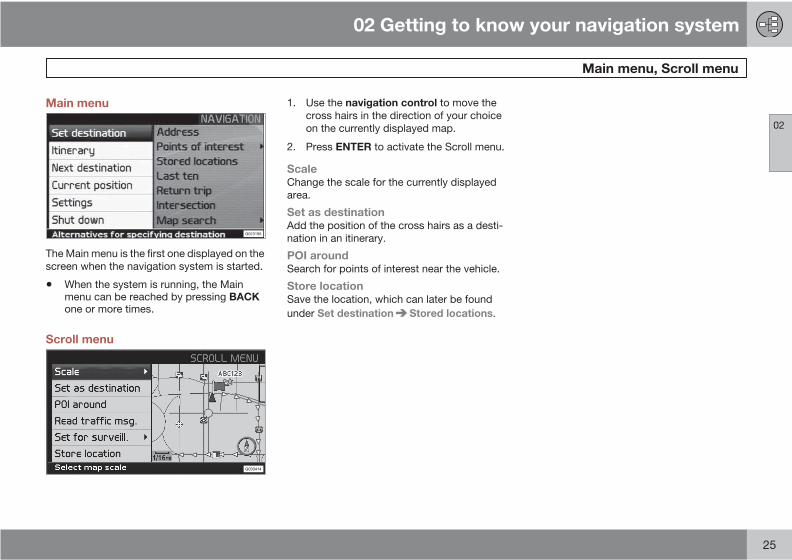
The Main menu is the first one displayed on thescreen when the navigation system is started.
• When the system is running, the Mainmenu can be reached by pressing BACKone or more times.
Scroll menu
G033414
1. Use the navigation control to move thecross hairs in the direction of your choiceon the currently displayed map.
2. Press ENTER to activate the Scroll menu.
ScaleChange the scale for the currently displayedarea.
Set as destinationAdd the position of the cross hairs as a desti-nation in an itinerary.
POI aroundSearch for points of interest near the vehicle.
Store locationSave the location, which can later be foundunder Set destination Stored locations.
02 Getting to know your navigation system
Shortcut menu
02
26
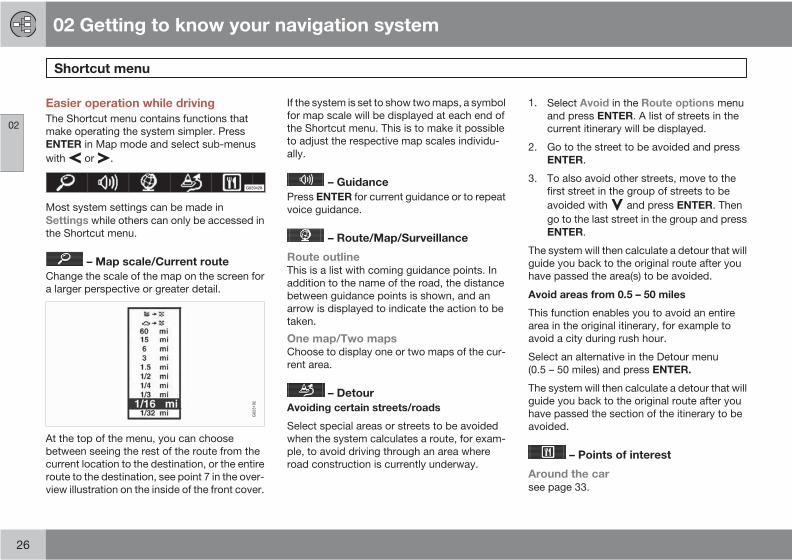
Easier operation while drivingThe Shortcut menu contains functions thatmake operating the system simpler. PressENTER in Map mode and select sub-menuswith or .
G029428
Most system settings can be made inSettings while others can only be accessed inthe Shortcut menu.
– Map scale/Current routeChange the scale of the map on the screen fora larger perspective or greater detail.
At the top of the menu, you can choosebetween seeing the rest of the route from thecurrent location to the destination, or the entireroute to the destination, see point 7 in the over-view illustration on the inside of the front cover.
G02
3192
If the system is set to show two maps, a symbolfor map scale will be displayed at each end ofthe Shortcut menu. This is to make it possibleto adjust the respective map scales individu-ally.
– GuidancePress ENTER for current guidance or to repeatvoice guidance.
– Route/Map/Surveillance
Route outlineThis is a list with coming guidance points. Inaddition to the name of the road, the distancebetween guidance points is shown, and anarrow is displayed to indicate the action to betaken.
One map/Two mapsChoose to display one or two maps of the cur-rent area.
– DetourAvoiding certain streets/roads
Select special areas or streets to be avoidedwhen the system calculates a route, for exam-ple, to avoid driving through an area whereroad construction is currently underway.
1. Select Avoid in the Route options menuand press ENTER. A list of streets in thecurrent itinerary will be displayed.
2. Go to the street to be avoided and pressENTER.
3. To also avoid other streets, move to thefirst street in the group of streets to beavoided with and press ENTER. Thengo to the last street in the group and pressENTER.
The system will then calculate a detour that willguide you back to the original route after youhave passed the area(s) to be avoided.
Avoid areas from 0.5 – 50 miles
This function enables you to avoid an entirearea in the original itinerary, for example toavoid a city during rush hour.
Select an alternative in the Detour menu(0.5 – 50 miles) and press ENTER.
The system will then calculate a detour that willguide you back to the original route after youhave passed the section of the itinerary to beavoided.
– Points of interest
Around the carsee page 33.
02 Getting to know your navigation system
Shortcut menu
02
27
Along the routesee page 33.
Along HWYChoose to search for e.g., rest areas or fillingstations that are near the highway.
If the calculated route includes more than onehighway, the system will search along the high-way on which the vehicle is currently traveling.
02 Getting to know your navigation system
Menu selections
02
28
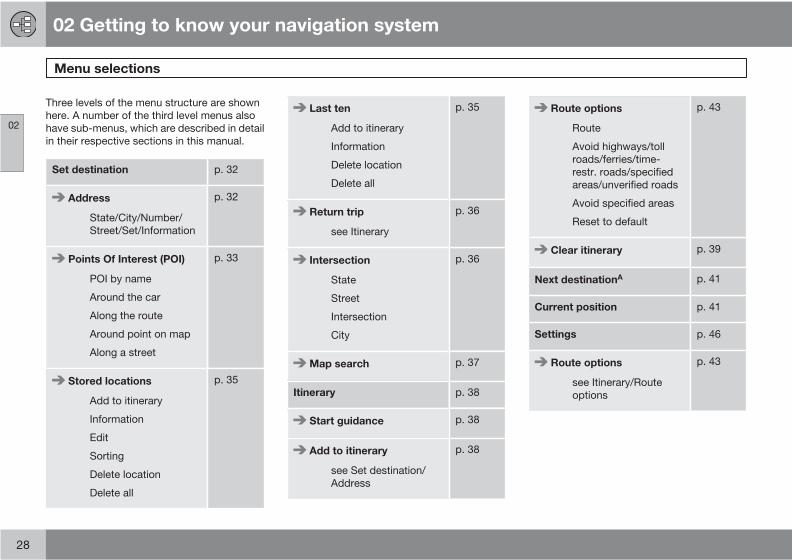
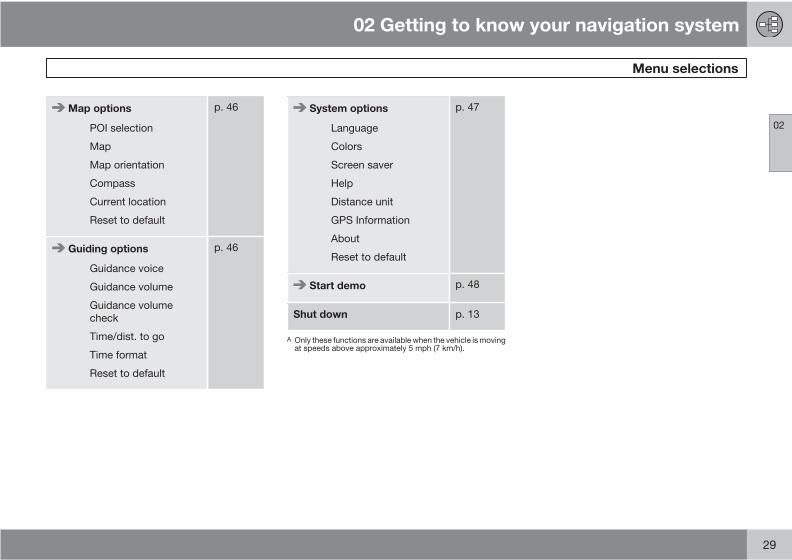
Three levels of the menu structure are shownhere. A number of the third level menus alsohave sub-menus, which are described in detailin their respective sections in this manual.
Set destination p. 32
Address
State/City/Number/Street/Set/Information
p. 32
Points Of Interest (POI)
POI by name
Around the car
Along the route
Around point on map
Along a street
p. 33
Stored locations
Add to itinerary
Information
Edit
Sorting
Delete location
Delete all
p. 35
Last ten
Add to itinerary
Information
Delete location
Delete all
p. 35
Return trip
see Itinerary
p. 36
Intersection
State
Street
Intersection
City
p. 36
Map search p. 37
Itinerary p. 38
Start guidance p. 38
Add to itinerary
see Set destination/Address
p. 38
Route options
Route
Avoid highways/tollroads/ferries/time-restr. roads/specifiedareas/unverified roads
Avoid specified areas
Reset to default
p. 43
Clear itinerary p. 39
Next destinationA p. 41
Current position p. 41
Settings p. 46
Route options
see Itinerary/Routeoptions
p. 43
02 Getting to know your navigation system
Menu selections
02
29
Map options
POI selection
Map
Map orientation
Compass
Current location
Reset to default
p. 46
Guiding options
Guidance voice
Guidance volume
Guidance volumecheck
Time/dist. to go
Time format
Reset to default
p. 46
System options
Language
Colors
Screen saver
Help
Distance unit
GPS Information
About
Reset to default
p. 47
Start demo p. 48
Shut down p. 13
A Only these functions are available when the vehicle is movingat speeds above approximately 5 mph (7 km/h).
G028782
30
Setting a destination............................................................................... 32Stored locations, Last ten....................................................................... 35Return trip, Intersection.......................................................................... 36Map search, Search by lat/long.............................................................. 37Itinerary................................................................................................... 38Storing a location.................................................................................... 40Next destination...................................................................................... 41Current position...................................................................................... 42Settings................................................................................................... 43Avoiding an area..................................................................................... 44Map and Guidance options..................................................................... 46System options....................................................................................... 47Demo....................................................................................................... 48
03PLANNING YOUR TRIP
03 Planning your trip
Setting a destination
03
32
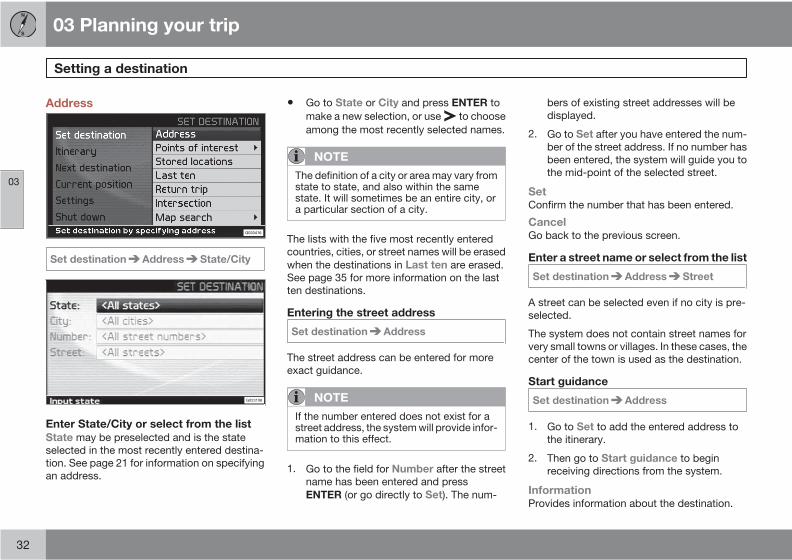
Address
G033416
Set destination Address State/City
G023198
Enter State/City or select from the listState may be preselected and is the stateselected in the most recently entered destina-tion. See page 21 for information on specifyingan address.
• Go to State or City and press ENTER tomake a new selection, or use to chooseamong the most recently selected names.
NOTE
The definition of a city or area may vary fromstate to state, and also within the samestate. It will sometimes be an entire city, ora particular section of a city.
The lists with the five most recently enteredcountries, cities, or street names will be erasedwhen the destinations in Last ten are erased.See page 35 for more information on the lastten destinations.
Entering the street address
Set destination Address
The street address can be entered for moreexact guidance.
NOTE
If the number entered does not exist for astreet address, the system will provide infor-mation to this effect.
1. Go to the field for Number after the streetname has been entered and pressENTER (or go directly to Set). The num-
bers of existing street addresses will bedisplayed.
2. Go to Set after you have entered the num-ber of the street address. If no number hasbeen entered, the system will guide you tothe mid-point of the selected street.
SetConfirm the number that has been entered.
CancelGo back to the previous screen.
Enter a street name or select from the list
Set destination Address Street
A street can be selected even if no city is pre-selected.
The system does not contain street names forvery small towns or villages. In these cases, thecenter of the town is used as the destination.
Start guidance
Set destination Address
1. Go to Set to add the entered address tothe itinerary.
2. Then go to Start guidance to beginreceiving directions from the system.
InformationProvides information about the destination.
03 Planning your trip
Setting a destination
03
33
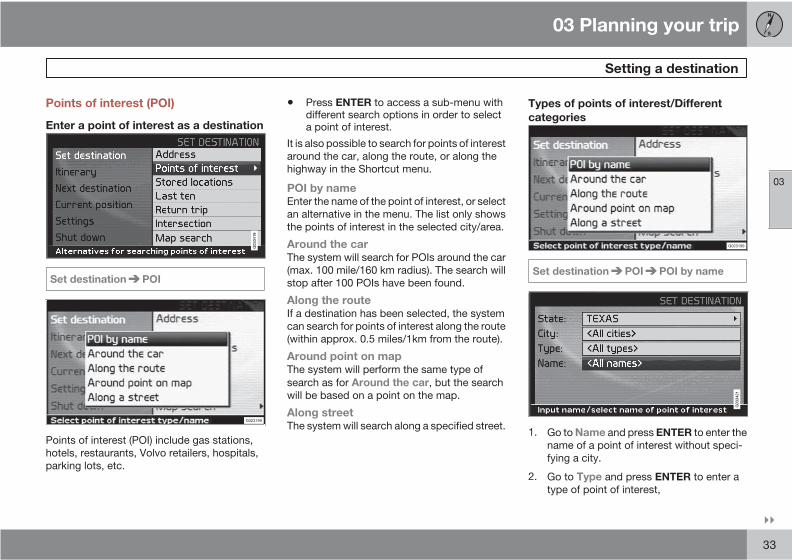
Points of interest (POI)
Enter a point of interest as a destination
G03
3418
Set destination POI
G023199
Points of interest (POI) include gas stations,hotels, restaurants, Volvo retailers, hospitals,parking lots, etc.
• Press ENTER to access a sub-menu withdifferent search options in order to selecta point of interest.
It is also possible to search for points of interestaround the car, along the route, or along thehighway in the Shortcut menu.
POI by nameEnter the name of the point of interest, or selectan alternative in the menu. The list only showsthe points of interest in the selected city/area.
Around the carThe system will search for POIs around the car(max. 100 mile/160 km radius). The search willstop after 100 POIs have been found.
Along the routeIf a destination has been selected, the systemcan search for points of interest along the route(within approx. 0.5 miles/1km from the route).
Around point on mapThe system will perform the same type ofsearch as for Around the car, but the searchwill be based on a point on the map.
Along streetThe system will search along a specified street.
Types of points of interest/Differentcategories
G023199
Set destination POI POI by name
G03
3421
1. Go to Name and press ENTER to enter thename of a point of interest without speci-fying a city.
2. Go to Type and press ENTER to enter atype of point of interest,
03 Planning your trip
Setting a destination
03
34
or
Press to choose among the mostrecently selected ones.
3. Go to Set and press ENTER.
4. Then go to Start guidance and pressENTER to receive guidance to the desti-nation.
To make the search more exact,
• Select a City first and then go to Name.
NOTE
There are sub-categories of restaurants tosimplify the search.
Information about a point of interestInformation is displayed for e.g., the address,coordinates, and the phone number to the POI.There are several ways to search for informa-tion about a POI. The simplest and quickestway is as follows:
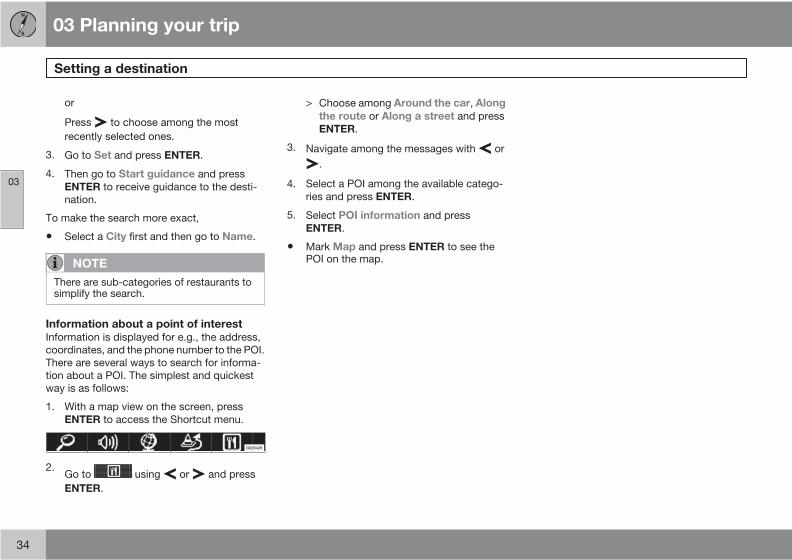
1. With a map view on the screen, pressENTER to access the Shortcut menu.
G029428
2.Go to using or and pressENTER.
> Choose among Around the car, Alongthe route or Along a street and pressENTER.
3. Navigate among the messages with or.
4. Select a POI among the available catego-ries and press ENTER.
5. Select POI information and pressENTER.
• Mark Map and press ENTER to see thePOI on the map.
03 Planning your trip
Stored locations, Last ten
03
35
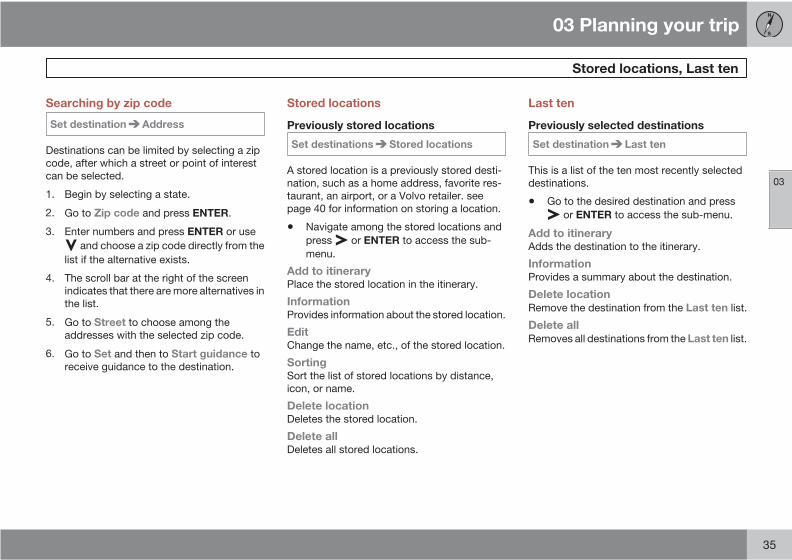
Searching by zip code
Set destination Address
Destinations can be limited by selecting a zipcode, after which a street or point of interestcan be selected.
1. Begin by selecting a state.
2. Go to Zip code and press ENTER.
3. Enter numbers and press ENTER or use and choose a zip code directly from the
list if the alternative exists.
4. The scroll bar at the right of the screenindicates that there are more alternatives inthe list.
5. Go to Street to choose among theaddresses with the selected zip code.
6. Go to Set and then to Start guidance toreceive guidance to the destination.
Stored locations
Previously stored locations
Set destinations Stored locations
A stored location is a previously stored desti-nation, such as a home address, favorite res-taurant, an airport, or a Volvo retailer. seepage 40 for information on storing a location.
• Navigate among the stored locations andpress or ENTER to access the sub-menu.
Add to itineraryPlace the stored location in the itinerary.
InformationProvides information about the stored location.
EditChange the name, etc., of the stored location.
SortingSort the list of stored locations by distance,icon, or name.
Delete locationDeletes the stored location.
Delete allDeletes all stored locations.
Last ten
Previously selected destinations
Set destination Last ten
This is a list of the ten most recently selecteddestinations.
• Go to the desired destination and press or ENTER to access the sub-menu.
Add to itineraryAdds the destination to the itinerary.
InformationProvides a summary about the destination.
Delete locationRemove the destination from the Last ten list.
Delete allRemoves all destinations from the Last ten list.

03 Planning your trip
Return trip, Intersection
03
36
Return trip
Back to the starting point• Select Start guidance and press ENTER.
The system will begin guiding you back to thelocation at which Start guidance was mostrecently selected.
Intersection
Specifying a destination via intersections
Set destination Intersection
1. Enter Street and press ENTER.> All existing intersections will be dis-
played under Interse. if there arestreets that meet or cross the route.
2. Go to the intersection(s) that you would liketo set as destinations.
3. Go to Set and press ENTER.
4. Go to Start guidance and press ENTERto receive guidance to the intersection.
NOTE
If the chosen combination of intersectionsexists in more than one city, a city must alsobe specified.
Searches can only be made for intersec-tions of larger streets.

03 Planning your trip
Map search, Search by lat/long
03
37
Map searches
Searching for a location on the map
Set destination Map search Point onmap
1. Use the navigation control to move thecross hairs to the desired destination andpress ENTER to access the scroll menu.
2. Go to Set as destination and pressENTER.
ScaleTemporarily change the map scale whilesearching with the cross hairs.
Set as destinationSelect a location on the map as a final or inter-mediate destination.
POI aroundThe system searches for points of interestaround a specified point on the map (max. 100mile/160 km radius). The search will stop after100 POIs have been found.
Store locationStore a location on the map.
NOTE
Searches can be made directly with thecross hairs by using the navigationcontrol in Map mode.
Searching by latitude/longitude
Set as destination Map searchLatitude/longitude
1. Select a destination by specifying its coor-dinates on the map.
2. Select a latitude with the navigationcontrol: N for north or S for south.
3. Go to the second row to specify a longi-tude: select E for east or W for west.> OK
This shows the position with the speci-fied coordinates on the map.
4. Press ENTER to access the map scrollmenu.
5. Go to Set as destination and pressENTER to select the position as a destina-tion.
6. Press BACK to resume entering coordi-nates.> Cancel
Return to the previous screen.
03 Planning your trip
Itinerary
03
38
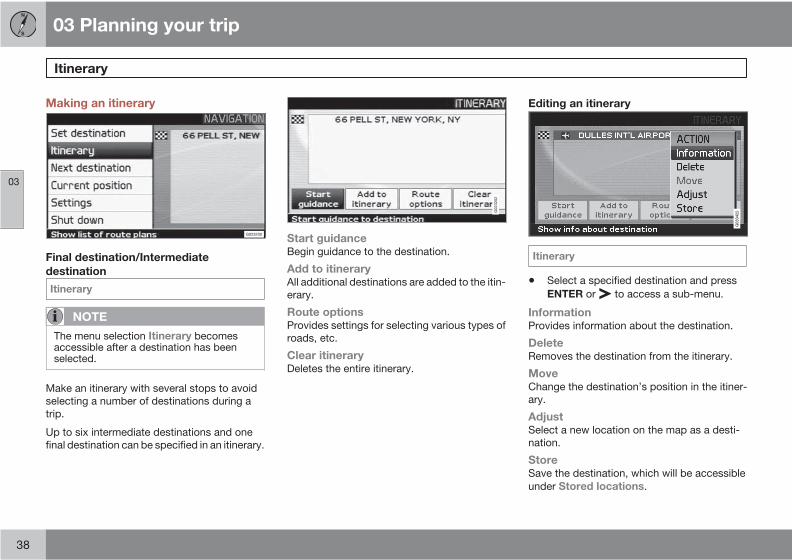
Making an itinerary
G023200
Final destination/Intermediatedestination
Itinerary
NOTE
The menu selection Itinerary becomesaccessible after a destination has beenselected.
Make an itinerary with several stops to avoidselecting a number of destinations during atrip.
Up to six intermediate destinations and onefinal destination can be specified in an itinerary.
G02
3202
Start guidanceBegin guidance to the destination.
Add to itineraryAll additional destinations are added to the itin-erary.
Route optionsProvides settings for selecting various types ofroads, etc.
Clear itineraryDeletes the entire itinerary.
Editing an itinerary
G03
3422
Itinerary
• Select a specified destination and pressENTER or to access a sub-menu.
InformationProvides information about the destination.
DeleteRemoves the destination from the itinerary.
MoveChange the destination’s position in the itiner-ary.
AdjustSelect a new location on the map as a desti-nation.
StoreSave the destination, which will be accessibleunder Stored locations.

03 Planning your trip
Itinerary
03
39
Start guidance
Itinerary Start guidance
G02
3202
When you have entered a destination and Startguidance has been selected, the system willbegin to calculate a destination – Wait will bedisplayed on the screen.
If you leave the planned route during your trip,the system will automatically calculate a newroute.
Removing destinations from anitinerary
Itinerary
To delete intermediate destinations in anitinerary:
1. Select one of the specified intermediatedestinations and press ENTER or toaccess a sub-menu.
2. Go to Delete and press ENTER.
To delete all destinations:
• Go directly to Clear itinerary and pressENTER.
NOTE
All intermediate destinations and the finaldestination will be deleted.
03 Planning your trip
Storing a location
03
40
Storing for re-use
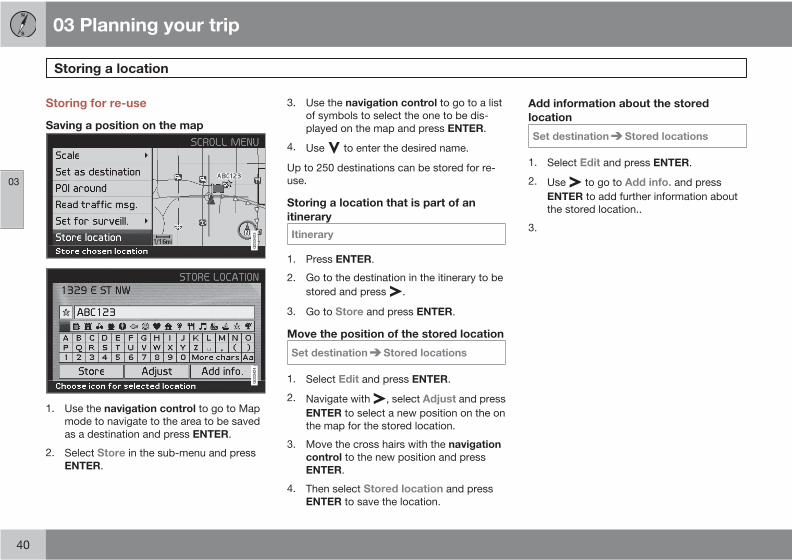
Saving a position on the map
G03
3423
G03
3424
1. Use the navigation control to go to Mapmode to navigate to the area to be savedas a destination and press ENTER.
2. Select Store in the sub-menu and pressENTER.
3. Use the navigation control to go to a listof symbols to select the one to be dis-played on the map and press ENTER.
4. Use to enter the desired name.
Up to 250 destinations can be stored for re-use.
Storing a location that is part of anitinerary
Itinerary
1. Press ENTER.
2. Go to the destination in the itinerary to bestored and press .
3. Go to Store and press ENTER.
Move the position of the stored location
Set destination Stored locations
1. Select Edit and press ENTER.
2. Navigate with , select Adjust and pressENTER to select a new position on the onthe map for the stored location.
3. Move the cross hairs with the navigationcontrol to the new position and pressENTER.
4. Then select Stored location and pressENTER to save the location.
Add information about the storedlocation
Set destination Stored locations
1. Select Edit and press ENTER.
2. Use to go to Add info. and pressENTER to add further information aboutthe stored location..
3.
03 Planning your trip
Next destination
03
41
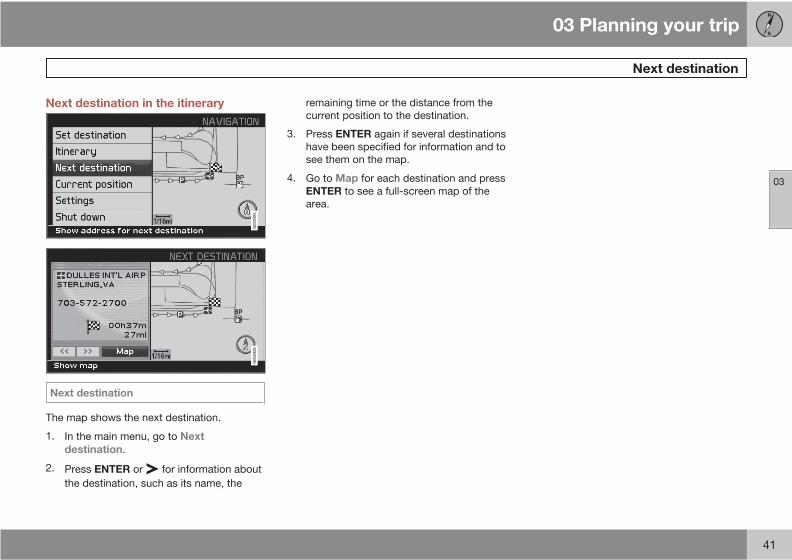
Next destination in the itinerary
G03
3425
G03
3426
Next destination
The map shows the next destination.
1. In the main menu, go to Nextdestination.
2. Press ENTER or for information aboutthe destination, such as its name, the
remaining time or the distance from thecurrent position to the destination.
3. Press ENTER again if several destinationshave been specified for information and tosee them on the map.
4. Go to Map for each destination and pressENTER to see a full-screen map of thearea.
03 Planning your trip
Current position
03
42
Current position
G03
3427
G03
3428
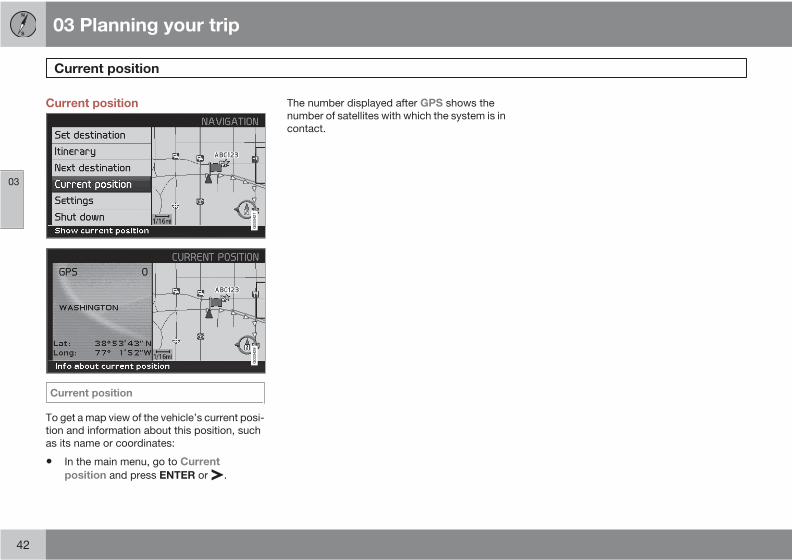
Current position
To get a map view of the vehicle’s current posi-tion and information about this position, suchas its name or coordinates:
• In the main menu, go to Currentposition and press ENTER or .
The number displayed after GPS shows thenumber of satellites with which the system is incontact.
03 Planning your trip
Settings
03
43
Route options
Settings Route options
• Use the navigation control to moveamong the options, select the desired set-tings and press ENTER to save the set-tings.
• Press BACK to cancel a setting.
RouteSelect Fast or Short for the system to calcu-late a route.
Avoid highwaysSet the system to avoid highways/freewayswhen calculating a route.
Avoid toll roadsSet the system to avoid toll roads when calcu-lating a route.
Avoid ferriesSet the system to avoid ferries when calculat-ing a route.
Avoid time-restr. roadsSet the system to avoid time-restricted roadswhen calculating a route. This function requiresthat the vehicle’s clock be correctly set for thecurrent time zone.
Avoid specified areas1. Set the system to avoid specified areas
when calculating a route and press .
2. Choose Selected and press again tospecify an area.
Avoid unverified roadsSet the system to avoid or use unverified roadswhen calculating a route.
Reset to defaultReturn to the system’s factory settings forroute options.
• Press , select OK and press ENTER.
NOTE
When the system calculates a route overlonger distances, it is designed to selectmajor roads (highways/freeways, etc).
If you have set the system to avoid highwaysand toll roads, the system will avoid guidingyou to these types of roads to as great anextent as possible, and will only use suchroads when no other reasonable alternativeis available.
03 Planning your trip
Avoiding an area
03
44
Selecting an area
Enter an area to be a avoided
Settings Route options Avoidspecified areas
This function is designed to help you avoidbeing guided to areas, cities or sections of cit-ies that you prefer not to drive through. Thesystem always excludes these areas when cal-culating a route.
NOTE
Highways that are part of a calculated routethat pass through an avoided area are anexception.
1. Press and choose Selected.
2. Press again to enter the area.
None• Press ENTER to deactivate previously
selected areas.
Selected1. Press to enter new areas.
2. Press ENTER to activate previously storedareas, which are marked with an X.
See also the following step pertaining to the"Avoid specified areas" sub-menu.
Sub-menu – avoiding specified areas
Settings Route options Avoidspecified areas Selected
Select alternatives in the sub-menu and pressENTER.
MapUse the navigation control to enter the area tobe avoided directly on the map.
See also the next step, "Entering areas on themap."
AddressEnter the address of an area to be avoided. Theaddress will comprise the center of the area.
Entering areas on the map
Settings Route options Avoidspecified areas Selected Map
Use the navigation control to move the mid-point of the cross hairs to the center of the areato be avoided.
The name of the place at which the mid-pointof the cross hairs is pointing will be displayedat the bottom of the map. The rectangle showsthe size of the area.
1. Press ENTER to access the sub-menu.
2. Select alternatives and press ENTER.
ScaleEnter the size of the map to be displayed of thearea to be avoided.
Set area to avoidSave the specified area.
Adjust size• Change the size of the area using the
navigation control.
• Press BACK to undo a change.
Adjust area• Move to a new area using the navigation
control.
• Press BACK to undo a move.
Saved areas to be avoided
Settings Route options Avoidspecified areas Selected Map
Select which of the previously saved areas areto be avoided when a route is calculated.These are marked with an X.
1. Select an area with or .
2. Mark or unmark an area using or .
OKActivate areas marked with an X. The activatedareas will be shown on the map.
03 Planning your trip
Avoiding an area
03
45
CancelUndo any changes and return to Routeoptions.

03 Planning your trip
Map and Guidance options
03
46
Map options
Settings Map options
Select the way in which the map is displayedon the screen.
1. Select a function to be set with thenavigation control.
2. Press ENTER to open the function.
POI selection• Press to access a sub-menu.
• Select Show all to see all points of interestsymbols on the map.
• Select Hide all if no POI symbols are to bedisplayed.
• Select Show selected and press toenter the symbols that you would like tohave displayed on the map. These are acti-vated with an X.
1. Navigate with or to choose amongthe symbols.
2. Activate/deactivate with or
3. Press ENTER to save.
MapIf the map is not displayed, the system pro-vides guidance with arrows on the screen.
Map orientationChoose if north or the vehicle’s current direc-tion should be at the top of the screen.
CompassSelect the way in which the compass is dis-played on the screen.
Current locationSelect whether or not the name of the street onwhich you are currently driving will be dis-played at the bottom of the screen
Reset to defaultReturn to the factory settings for Map options.
• Press , select OK and press ENTER.
Guidance options
Settings Guiding options
Guidance voiceSelect Female/Male
Guidance volumeSelect a value between 1–35 to set the volumelevel or Off for no voice guidance.
The volume level can also be adjusted usingthe audio system's volume control during voiceguidance.
Guidance volume checkThe set volume is indicate by a chime.
Time/dist. to goSelect RTA, ETA or Hide.
• RTA is the remaining length of time to thedestination.
• ETA is the estimated time of arrival.
Time formatSelect 12 or 24-hour intervals.
Reset to defaultReturn to the factory settings for Guidingoptions.
• Press , select OK and press ENTER.
03 Planning your trip
System options
03
47
Setting system options
Settings System options
• Move among the functions with thenavigation control.
• Press ENTER to save settings.
• Press BACK to undo a setting.
LanguageSelect the language to be used in the systemmenus and for voice guidance.
ColorsSelect Bright, Contrast, or Dark for colorsthat best suit the current ambient light.
Screen saverIf the screen saver is set to ON, the screen willgo blank after 30 seconds.
If guidance or other information is provided, thescreen is activated automatically.
HelpHide or display context sensitive help texts atthe bottom of the screen.
Distance unitChoose to display distances in miles or kilo-meters.
GPS Information• Press to show coordinates and the
address of the vehicle’s current location,
and to display the number of satellites withwhich the system has contact.
AboutDisplays system and map information.
Reset to defaultReturn to the factory setting for Systemoptions.
• Press , select OK and press ENTER.
03 Planning your trip
Demo
03
48
Start the demo (system simulation)
Settings Start demo
When the vehicle is at a standstill, this functionoffers simulated guidance to the currently setdestination.
Stop demo interrupts the simulation.
NOTE
The demonstration function can only beused if a destination has been selected.
03 Planning your trip
03
49
G028760
50
Points of interest..................................................................................... 52
04SYMBOLS ON THE MAP
04 Symbols on the map
Points of interest
04
52
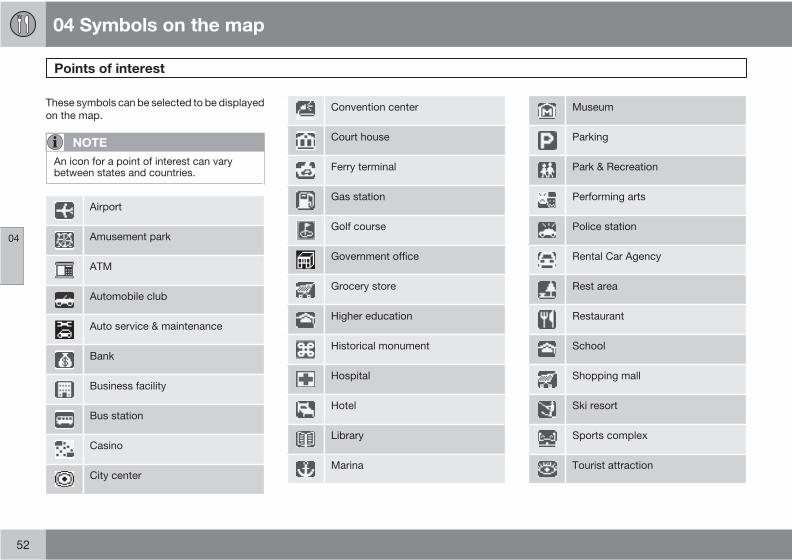
These symbols can be selected to be displayedon the map.
NOTE
An icon for a point of interest can varybetween states and countries.
Airport
Amusement park
ATM
Automobile club
Auto service & maintenance
Bank
Business facility
Bus station
Casino
City center
Convention center
Court house
Ferry terminal
Gas station
Golf course
Government office
Grocery store
Higher education
Historical monument
Hospital
Hotel
Library
Marina
Museum
Parking
Park & Recreation
Performing arts
Police station
Rental Car Agency
Rest area
Restaurant
School
Shopping mall
Ski resort
Sports complex
Tourist attraction
04 Symbols on the map
Points of interest
04
53
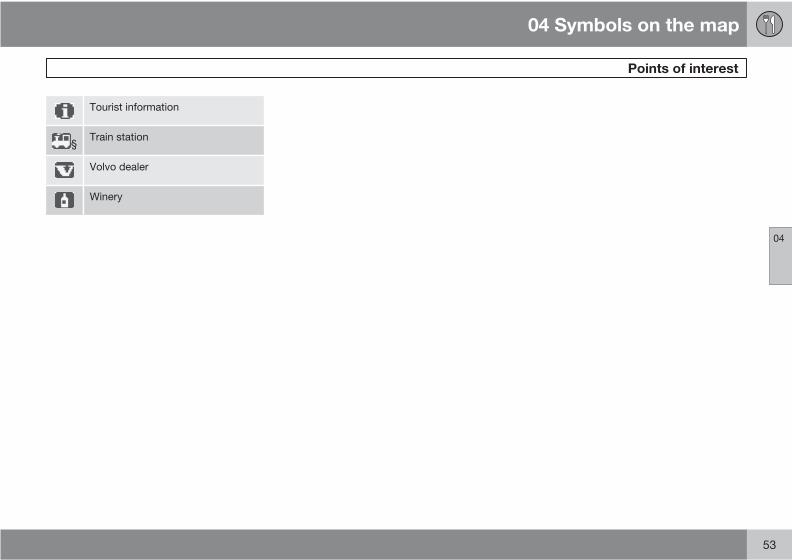
Tourist information
§Train station
Volvo dealer
Winery
G028784
54
Frequently asked questions.................................................................... 56EULA – License agreement..................................................................... 58

05QUESTIONS & ANSWERS
05 Questions & Answers
Frequently asked questions
05
56
The vehicle’s position on the map isincorrect.The Global Positioning System (GPS) indicatesthe car’s position with an accuracy of about65 feet (20 meters).
Accuracy may be even less when driving onroads lying parallel to another road, windingroads, roads on several levels, and also afterdriving a long distance without making any dis-tinct turns.
Tall buildings and mountains, tunnels, via-ducts, over/underpasses etc., also have a neg-ative affect on the reception of GPS signals,which means that the estimation of the car’sposition may not be precise.
VNS does not always calculate thefastest/shortest route.Parameters such as distance, width of road,type of road, number of right or left turns, trafficcircles etc., are all taken into account whencalculating the best theoretical route. Experi-ence and local knowledge may, however, leadto a better choice of route.
The VNS system chooses toll roads,freeways, and ferries even though I haveopted to avoid them.When calculating routes over longer distances,for technical reasons the system can only usemajor roads. If you select NO for toll roads and
freeways, they will be avoided as much as pos-sible, but will be used if no other reasonablealternative is available.
After being transported, the car’sposition on the map is incorrect.If the car is transported, for example by ferry ortrain, or in such a way as to impede the recep-tion of GPS signals, it can take up to 5 minutesto calculate the car’s new position correctly.
The vehicle’s position on the map isincorrect after its battery has beendisconnected.If power has been cut from the GPS antenna,it can take more than 5 minutes for the GPSsignals to be received correctly and the car’sposition to be calculated.
The car symbol on the map moveserratically after a tire changeIn addition to the GPS receiver, the vehicle’sspeedometer and an onboard gyro are alsoused to calculate the vehicle’s current locationand direction of travel. If the spare tire is put onthe vehicle, or is a change is made from sum-mer to winter tires (or vice versa), the naviga-tion system must "learn" the new dimensionsof the tire(s). Therefore, it may be necessary todrive for several miles, including a number ofturns, for the system to make this adjustment.
The map image does not correspond toactual conditions.Factors such as the constant expansion andrebuilding of the road network, new traffic reg-ulations constantly being introduced etc.,mean that the digital map database is notalways complete.
The maps and data on the DVDs are static.They will not automatically update to reflectreal-life changes to road and traffic patterns.Updated DVDs are produced periodically.Please contact your Volvo retailer for moreinformation about availability.
The map scale sometimes changes.There is no detailed map information for certainareas. If this is the case, the system automati-cally changes the map scale.
Certain menu options are not available.Check the settings that you have made. SelectReset to default for the particular option toreturn to the default settings.
The car symbol on screen jumps forwardor spins.The system may need a few seconds to sensethe position and movement of the car beforeyou drive off.
1. Switch off the VNS system and the ignition.
05 Questions & Answers
Frequently asked questions
05
57
2. Switch on the ignition again and restartVNS, but remain at a standstill for a shorttime before driving off.
I am planning a long trip but do not wantto specify destinations in the cities that Iwill be passing through. What is theeasiest way to set up an itinerary?Select the final destination directly on the mapusing the cross hairs. The system will automat-ically guide you to the final destination even ifyou drive past intermediate destinations.
How can I select a final destination/intermediate destination that is not onthe DVD that is currently being used?Specify the destination in the usual manner. Ifthe desired information is not displayed,change DVDs to the one containing the desiredgeographic area.
NOTE
The entire network of roads is on each DVD,but detailed information is found on the DVDfor the area in question.
The navigation system contains severalDVDs. How do I know which one to use?You should primarily use the DVD that containsdetailed information about the area in which
you live. This information is printed on theDVD’s jewel case and on the disc.
If you plan to drive through several states orprovinces, it is advisable to have all of the DVDshandy.
Will my itinerary disappear when Ichange map DVDs?No, the itinerary will be stored until you deleteit.
The system’s map information is not up-to-dateContact your Volvo retailer for updated mapinformation.
WARNING
Navigating safely
Always use good judgment when followingnavigation system guidance, and do not fol-low guidance that seems contrary to yourown best judgment.
Why are no street addresses available fordestinations in another state?Each map DVD contains basic information forthe entire network of roads. Detailed informa-tion such as addresses, points of interest, etc.,are split up among the respective DVDs forgeographic areas. Otherwise, the DVDs areidentical. Check that the correct DVD for the
area that your destination is in is inserted in thenavigation system’s DVD player.
How can I easily check to see which DVDis activated?See Settings System options About forinformation on the DVD’s version and whichgeographic area it covers.
05 Questions & Answers
EULA – License agreement
05
58
END-USER TERMSThe Map Data Disc ("Data") is provided for yourpersonal, internal use only and not for resale. Itis protected by copyright, and is subject to thefollowing terms and conditions which areagreed to by you, on the one hand, and NAV-TEQ North America, LLC ("NT") and its licen-sors (including their licensors and suppliers) onthe other hand.
© 2006-2008 NAVTEQ. All rights reserved.
The Data for areas of Canada includes infor-mation taken with permission from Canadianauthorities, including: © Her Majesty theQueen in Right of Canada, © Queen’s Printerfor Ontario, © Canada Post Corporation, Geo-Base®.
NAVTEQ holds a non-exclusive license fromthe United States Postal Service® to publishand sell ZIP+4® information.
©United States Postal Service® 2005. Pricesare not established, controlled or approved bythe United States Postal Service®. The follow-ing trademarks and registrations are owned bythe USPS: United States Postal Service, USPS,and ZIP+4.
TERMS AND CONDITIONS
Personal Use OnlyYou agree to use this Data for the solely per-sonal, non-commercial purposes for which youwere licensed, and not for service bureau,time-sharing or other similar purposes.Accordingly, but subject to the restrictions setforth in the following paragraphs, you maycopy this Data only as necessary for your per-sonal use to (i) view it, and (ii) save it, providedthat you do not remove any copyright noticesthat appear and do not modify the Data in anyway.
You agree not to otherwise reproduce, copy,modify, decompile, disassemble or reverseengineer any portion of this Data, and may nottransfer or distribute it in any form, for any pur-pose, except to the extent permitted by man-datory laws.
You may transfer the Data and all accompany-ing materials on a permanent basis if you retainno copies and the recipient agrees to theseEnd-User Terms. Data provided in multi-discsets may not be transferred or sold on a dividedor single disc basis.
RestrictionsExcept where you have been specificallylicensed to do so by NT and without limiting thepreceding paragraph, you may not (a) use thisData with any products, systems, or applica-
tions installed or otherwise connected to or incommunication with vehicles, capable of vehi-cle navigation, positioning, dispatch, real timeroute guidance, fleet management or similarapplications; or (b) with or in communicationwith any positioning devices or any mobile orwireless-connected electronic or computerdevices, including without limitation cellularphones, palmtop and handheld computers,pagers, and personal digital assistants orPDAs.
WarningThe Data may contain inaccurate or incompleteinformation due to the passage of time, chang-ing circumstances, sources used and thenature of collecting comprehensive geo-graphic data, any of which may lead to incor-rect results.
No WarrantyThis Data is provided to you "as is," and youagree to use it at your own risk. NT and itslicensors (and their licensors and suppliers)make no guarantees, representations or war-ranties of any kind, express or implied, arisingby law or otherwise, including but not limitedto, content, quality, accuracy, completeness,effectiveness, reliability, fitness for a particularpurpose, usefulness, use or results to beobtained from this Data, or that the Data orserver will be uninterrupted or error-free.

05 Questions & Answers
EULA – License agreement
05
59
Disclaimer of WarrantyNT AND ITS LICENSORS (INCLUD-ING THEIR LICENSORS AND SUP-PLIERS) DISCLAIM ANY WARRAN-TIES, EXPRESS OR IMPLIED, OFQUALITY, PERFORMANCE, MER-CHANTABILITY, FITNESS FOR APARTICULAR PURPOSE OR NON-INFRINGEMENT.Some States, Territories and Countries do notallow certain warranty exclusions, so to thatextent the above exclusion may not apply toyou.
Disclaimer of LiabilityNT AND ITS LICENSORS (INCLUD-ING THEIR LICENSORS AND SUP-PLIERS) SHALL NOT BE LIABLE TOYOU IN RESPECT OF ANY CLAIM,DEMAND OR ACTION, IRRESPEC-TIVE OF THE NATURE OF THECAUSE OF THE CLAIM, DEMANDOR ACTION ALLEGING ANY LOSS,INJURY OR DAMAGES, DIRECT ORINDIRECT, WHICH MAY RESULTFROM THE USE OR POSSESSIONOF THE INFORMATION; OR FOR
ANY LOSS OF PROFIT, REVENUE,CONTRACTS OR SAVINGS, OR ANYOTHER DIRECT, INDIRECT, INCI-DENTAL, SPECIAL OR CONSE-QUENTIAL DAMAGES ARISING OUTOF YOUR USE OF OR INABILITY TOUSE THIS INFORMATION, ANYDEFECT IN THE INFORMATION, ORTHE BREACH OF THESE TERMS ORCONDITIONS, WHETHER IN ANACTION IN CONTRACT OR TORTOR BASED ON A WARRANTY, EVENIF NT OR ITS LICENSORS HAVEBEEN ADVISED OF THE POSSIBIL-ITY OF SUCH DAMAGES.Some States, Territories and Countries do notallow certain liability exclusions or damageslimitations, so to that extent the above may notapply to you.
Export ControlYou agree not to export from anywhere anypart of the Data provided to you or any directproduct thereof except in compliance with, andwith all licenses and approvals required under,applicable export laws, rules and regulations.
Entire AgreementThese terms and conditions constitute theentire agreement between NT (and its licen-sors, including their licensors and suppliers)and you pertaining to the subject matterhereof, and supersedes in their entirety anyand all written or oral agreements previouslyexisting between us with respect to such sub-ject matter.
Governing LawThe above terms and conditions shall be gov-erned by the laws of the State of Illinois, withoutgiving effect to (i) its conflict of laws provisions,or (ii) the United Nations Convention for Con-tracts for the International Sale of Goods,which is explicitly excluded.
You agree to submit to the jurisdiction of theState of Illinois for any and all disputes, claimsand actions arising from or in connection withthe Data provided to you hereunder.
Government End UsersIf the Data is being acquired by or on behalf ofthe United States government or any otherentity seeking or applying rights similar tothose customarily claimed by the United Statesgovernment, this Data is a "commercial item"as that term is defined at 48 C.F.R. ("FAR")2.101, is licensed in accordance with theseEnd User Terms, and each copy of the Data
05 Questions & Answers
EULA – License agreement
05
60
delivered or otherwise furnished shall bemarked and embedded as appropriate with thefollowing "Notice of Use," and shall be treatedin accordance with such Notice:
NOTICE OF USE
CONTRACTOR (MANUFACTURER/SUPPLIER) NAME: NAVTEQ
CONTRACTOR (MANUFACTURER/SUPPLIER) ADDRESS: 222 MerchandiseMart Plaza, Suite 900, Chicago, Illinois 60654
This Data is a commercial item as defined inFAR 2.101 and is subject to the End UserTerms under which this Data was provided.
© 2006-2008 NAVTEQ – All rights reserved.
If the Contracting Officer, federal governmentagency, or any federal official refuses to usethe legend provided herein, the ContractingOfficer, federal government agency, or anyfederal official must notify NAVTEQ prior toseeking additional or alternative rights in theData.
DensoHereby, DENSO CORPORA-TION declares that this DN-NS-020 isin compliance with the essential
requirements and other relevant provisions ofDirective 1999/5/EC.
06 Index
06
61
A
Activating the system.................................. 8
Avoiding an area........................................ 44
C
Compass.................................................... 23
D
Demo......................................................... 48
Destinationintersection........................................... 36last ten.................................................. 35latitude/longitude.................................. 37points of interest................................... 33return trip.............................................. 36searching for......................................... 35setting................................................... 32stored locations.................................... 35street address....................................... 32zip code................................................ 35
DVDcare....................................................... 15changing............................................... 15contents................................................ 15
E
End-User terms.......................................... 58
F
Frequently asked questions....................... 56
G
Guidanceoptions.................................................. 46starting.................................................. 32to a point of interest............................... 9to a street address.................................. 8voice..................................................... 23
I
Itinerarymaking.................................................. 38next destination in................................ 41removing destinations from.................. 39start guidance....................................... 39storing for re-use.................................. 40
M
Mapcurrent position..................................... 42options.................................................. 46screens................................................. 22searches............................................... 37symbols on........................................... 52
Map mode.................................................. 13
Menuscroll..................................................... 25shortcut................................................. 26system overview................................... 28
N
Navigation control.................................. 8, 20
06 Index
06
62
O
On/Off........................................................ 13
P
Points of interestas a destination.................................... 33symbols on the map............................. 52
Q
Questions & Answers................................. 56
Quick guide.................................................. 8
R
Remote control...................................... 8, 20
Return trip.................................................. 36
Roads, unverified....................................... 23
Route options............................................ 43
S
Screencare....................................................... 15
Scroll menu................................................ 25
Setting a destination.................................. 32
Shortcut menu........................................... 26
Simulated guidance (demo)....................... 48
Start guidance........................................... 39
Stored locations......................................... 35
Street address, as destination................... 32
Symbol - Do not disturb............................ 20
Symbols on the map.................................. 52
System options.......................................... 47
U
Unverified roads......................................... 23
V
Voiceguidance............................................... 23
Volvo Navigation Systemactivating................................................ 8demo..................................................... 48end-user terms..................................... 58general information............................... 13options.................................................. 47overview S80........................................ 18overview V70/XC70.............................. 16questions & answers............................ 56quick guide............................................. 8route options........................................ 43switching on/off.................................... 13system menus...................................... 28unverified roads.................................... 23
Z
Zip code, as a destination......................... 35

