visual studio 2010 - university of...
TRANSCRIPT

SENG 403, Tutorial 2
VISUAL STUDIO 2010
1
S E N G 4 0 3 - W I N T E R 2 0 1 1

We will learn how to:
1. Introduction to Visual Studio
2. Create a project
3. Debug an application
4. Add controls to a form (e.g. checkboxes and buttons)
5. Position controls (using layouts)
6. Add dialog boxes to a form
7. Write code by using IntelliSense
8. Write event handler methods
AGENDA
2
S E N G 4 0 3 - W I N T E R 2 0 1 1

• Microsoft’s Getting Started Help:
• a series of sequential lessons that introduces you to Visual C# and Visual Basic.
• http://msdn.microsoft.com/en-us/library/dd492135.aspx
GETTING STARTED
3
S E N G 4 0 3 - W I N T E R 2 0 1 1

VISUAL STUDIO.NET
Integrated Development Environment – allows the
automation of many of the common programming tasks in
one environment
Writing the code
Checking for Syntax (Language) errors
Compiling and Interpreting(Transferring to computer language)
Debugging (Fixing Run-time or Logic Errors)
Running the Application
4
S E N G 4 0 3 - W I N T E R 2 0 1 1

WHAT IS VISUAL C# .NET
4th Generation Programming Environment / Development
Language
Based on C language
Most widely used tool for developing Windows Applications
Graphical User Interface (GUI)
Menus, Buttons, Icons to help the user
Full Object-Oriented Programming (OOP) Language
5
S E N G 4 0 3 - W I N T E R 2 0 1 1

PROJECT AND SOLUTION
CONCEPTS
•User creates a new project in Visual Studio
A solution and a folder are created at the same time with the same name as the project
The project belongs to the solution
Multiple projects can be included in a solution
•Solution
Contains several folders that define an application’s structure
Solution files have a file suffix of .sln
•Project: contains files for a part of the solution
Project file is used to create an executable application
A project file has a suffix of .vbproj (if you choose to work with Visual Basic)
Every project has a type (Console, Windows, etc.)
Every project has an entry point: A Sub procedure named Main or a Form6
S E N G 4 0 3 - W I N T E R 2 0 1 1
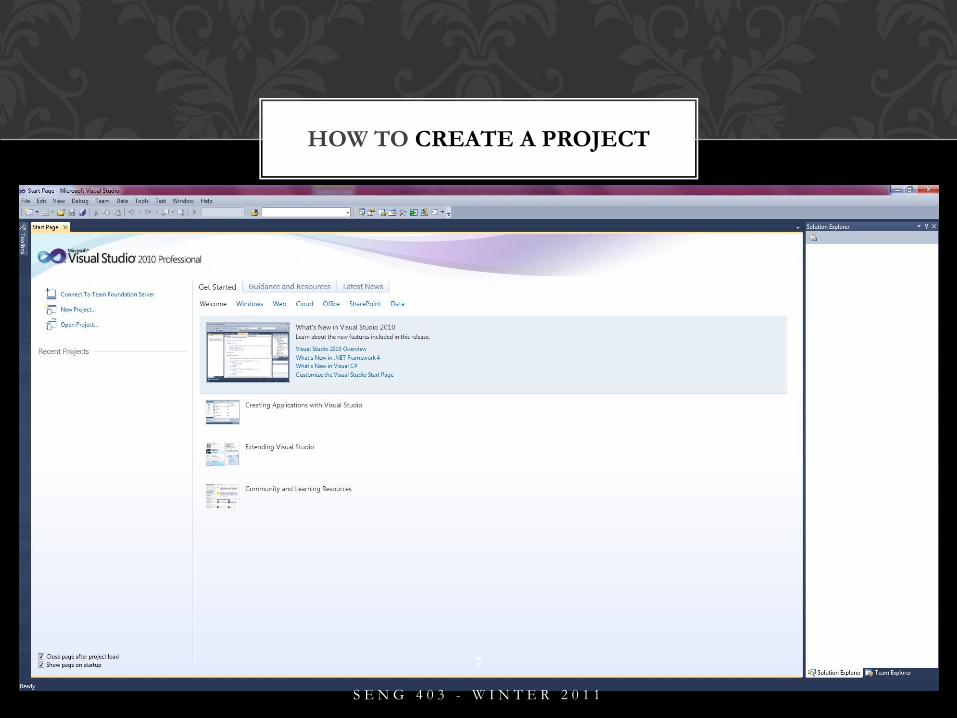
HOW TO CREATE A PROJECT
7
S E N G 4 0 3 - W I N T E R 2 0 1 1

This is the start point in all projects and is always done the same way.
1- Create a Windows Forms Application project
2- Give it a name.
HOW TO CREATE A PROJECT
8
S E N G 4 0 3 - W I N T E R 2 0 1 1
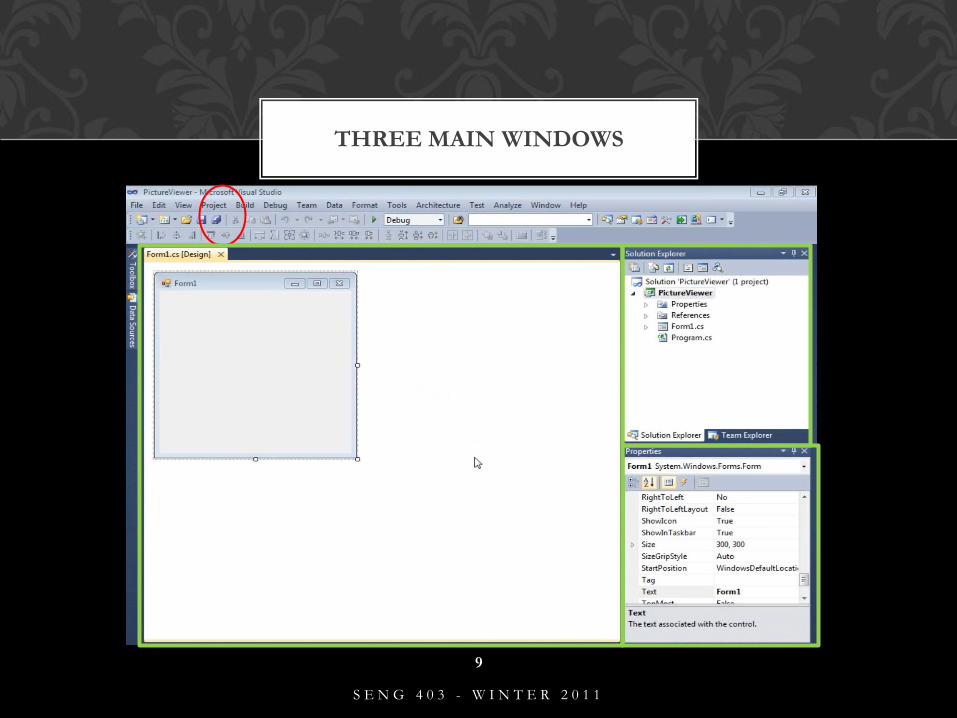
THREE MAIN WINDOWS
9
S E N G 4 0 3 - W I N T E R 2 0 1 1

MAKE IT LOOK LIKE THIS
10
S E N G 4 0 3 - W I N T E R 2 0 1 1
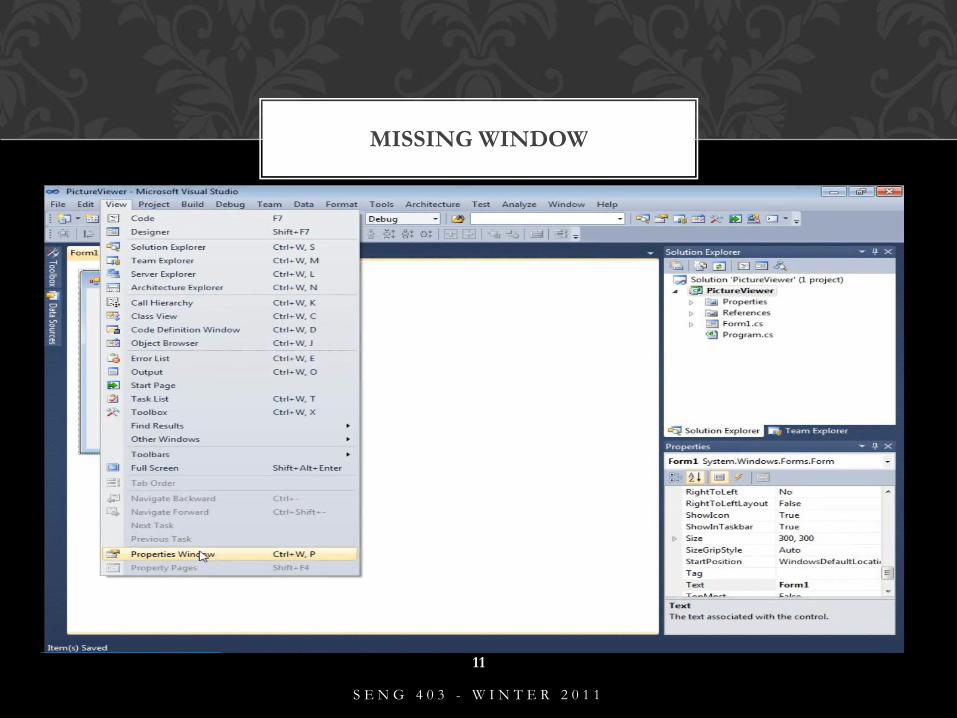
MISSING WINDOW
11
S E N G 4 0 3 - W I N T E R 2 0 1 1
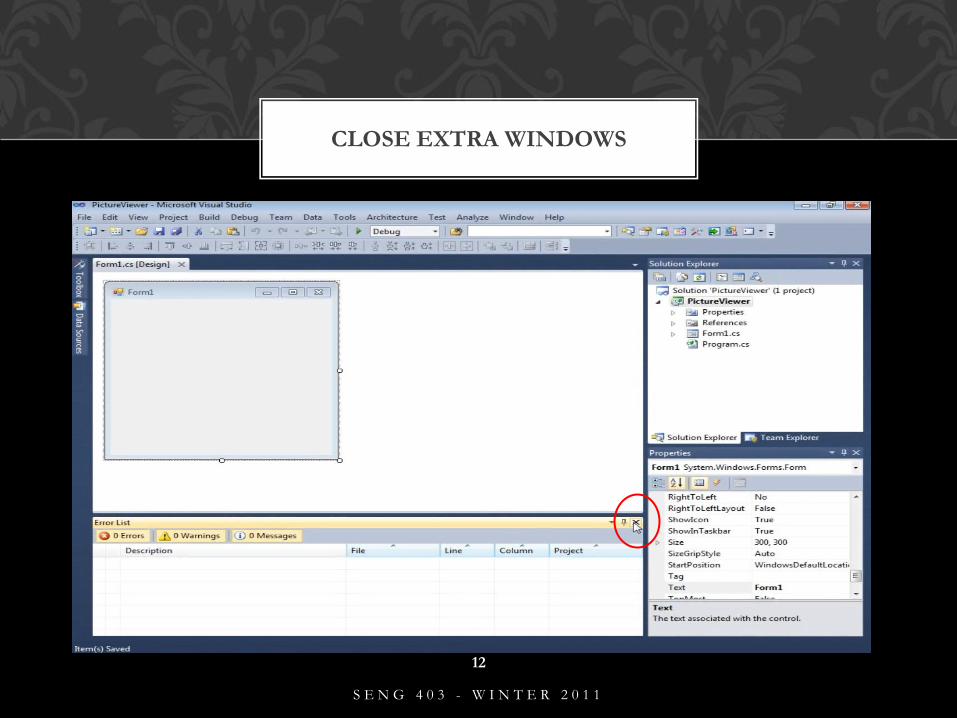
CLOSE EXTRA WINDOWS
12
S E N G 4 0 3 - W I N T E R 2 0 1 1
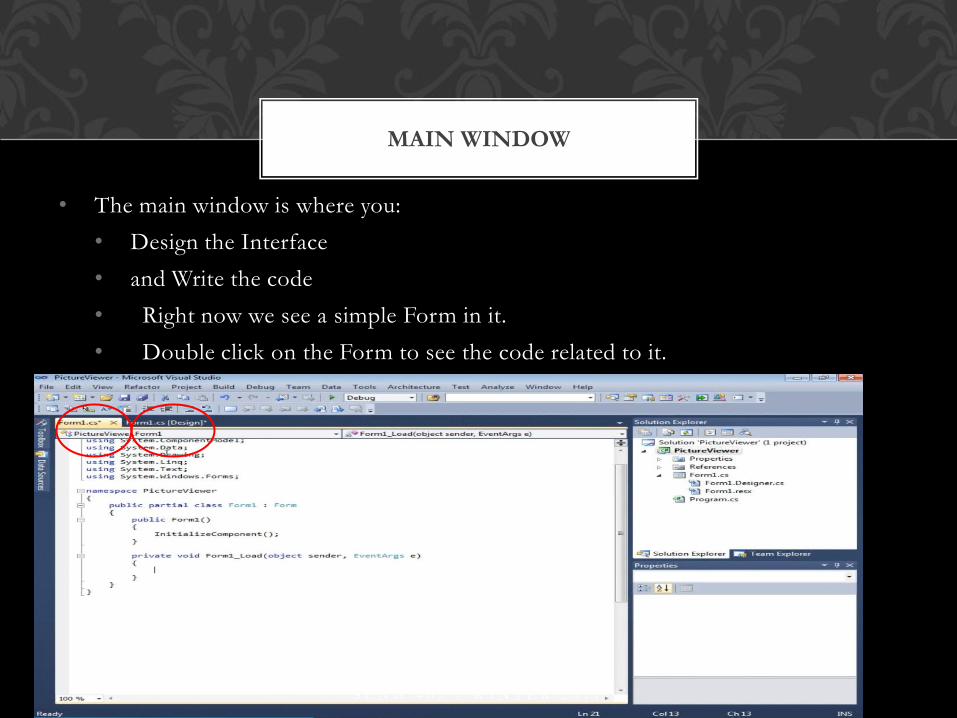
• The main window is where you:
• Design the Interface
• and Write the code
• Right now we see a simple Form in it.
• Double click on the Form to see the code related to it.
MAIN WINDOW
13
S E N G 4 0 3 - W I N T E R 2 0 1 1

• Solution Explorer contains all the files in the project (solution)
• Click on one of the file and notice the
change is Properties window.
• Now double click on the Form files
with the .cs extension.
• You’ll see one of them will opens the
code file and the other one the design
view of the Form
SOLUTION EXPLORER WINDOW
14
S E N G 4 0 3 - W I N T E R 2 0 1 1
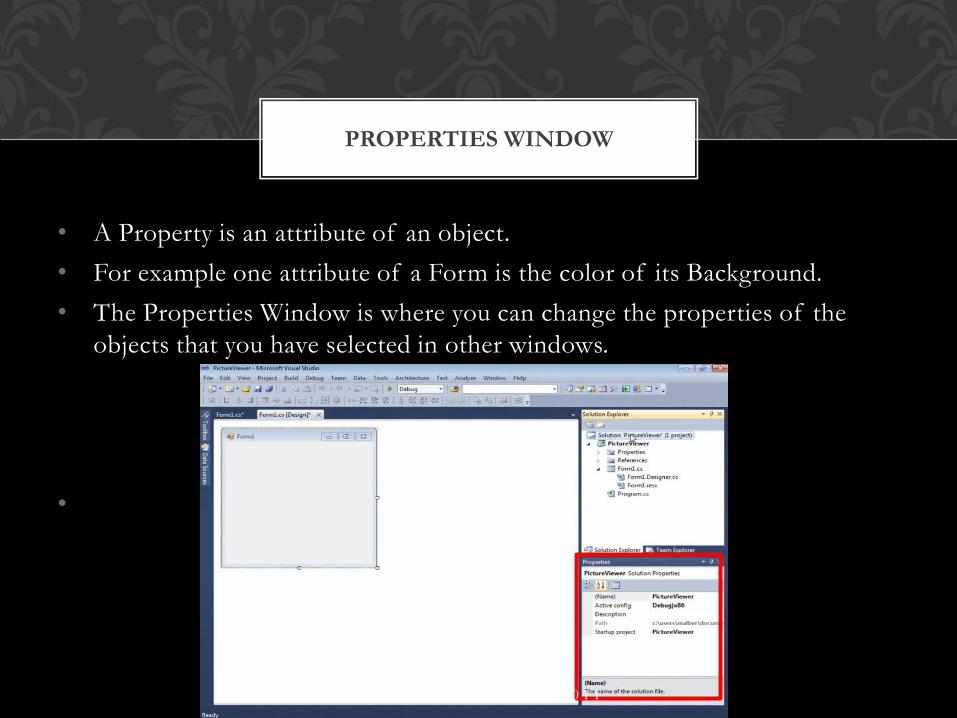
• A Property is an attribute of an object.
• For example one attribute of a Form is the color of its Background.
• The Properties Window is where you can change the properties of the
objects that you have selected in other windows.
•
PROPERTIES WINDOW
15
S E N G 4 0 3 - W I N T E R 2 0 1 1

• When you run your program from
inside the IDE it is called debugging.
(Integrated Development Environment
or IDE is the whole Visual Studio window)
• Because you are running it to find
and fix bugs.
• To stop debugging click on the Stop
button
LET’S RUN THE PROGRAM!!
16
S E N G 4 0 3 - W I N T E R 2 0 1 1

• In Solution window select Form1.cs to go to the design view of the Form
• Now in the Main window click on the Form so that its properties are shown in Properties window.
• Let’s change the title
of the Form. (Change the
Text property of the Form to
Picture Viewer)
• You can order the properties
by Alphabets or Category.
MODIFYING THE FORM USING
PROPERTIES WINDOW
17
S E N G 4 0 3 - W I N T E R 2 0 1 1

• You change the size of
the Form using either this
or this
• Run the program to see
the changes after
changing the size.
CHANGE THE SIZE OF THE FORM
18
S E N G 4 0 3 - W I N T E R 2 0 1 1

• Pause on the Toolbox tab
• Click on Containers category
and then double click on
TableLayoutPanel
ADD CONTROLS TO THE
APPLICATION
19
S E N G 4 0 3 - W I N T E R 2 0 1 1

• Click on the TableLayoutPanel in the Form
Or
• Select it from here (from the list right above the Properties window)
• .... Now you can start modifying TableLayoutPanel properties
SELECTING A CONTROL
20
S E N G 4 0 3 - W I N T E R 2 0 1 1
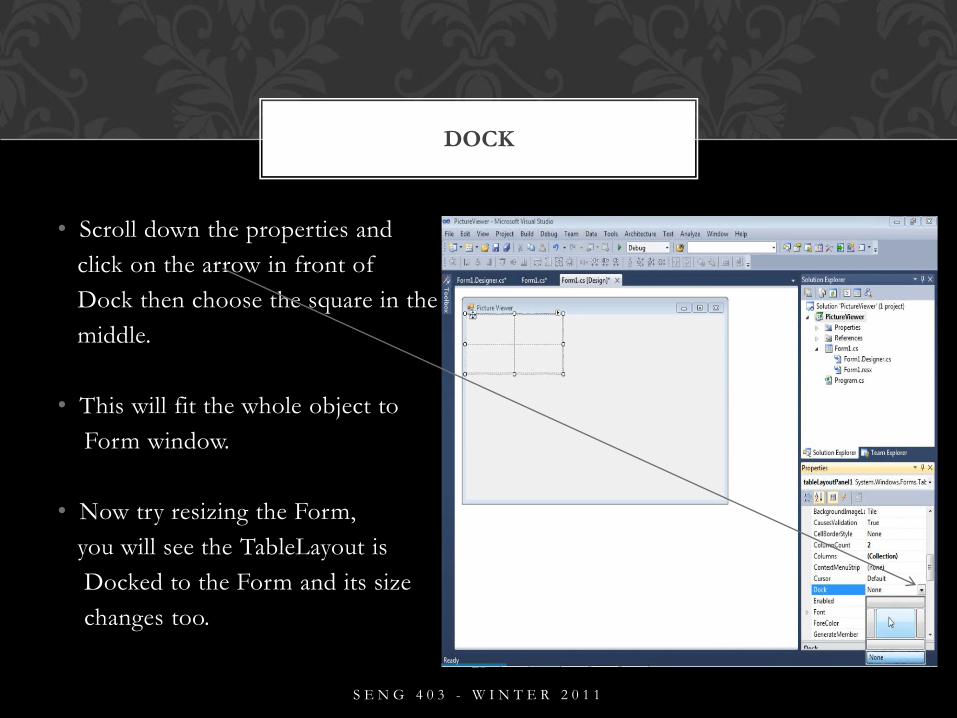
• Scroll down the properties and
click on the arrow in front of
Dock then choose the square in the
middle.
• This will fit the whole object to
Form window.
• Now try resizing the Form,
you will see the TableLayout is
Docked to the Form and its size
changes too.
DOCK
21
S E N G 4 0 3 - W I N T E R 2 0 1 1

• Each cell of the TableLayotPanel can contain a control (e.g. a Button or a
Label)
• Before we start adding a control into those cells first let’s resize them.
• Select the TableLayoutPanel
• Notice a small button with a triangle in up right corner of it (as shown in
the figure in next slide).
• Click on it and you’ll see that you can set some of the properties here too.
(The list that opens up is called the Task List. It is shown in the figure in the next slide)
TASK LIST
22
S E N G 4 0 3 - W I N T E R 2 0 1 1

• In the popup menu:
Choose Column and then:
set Column1 to 15%
set Column2 to 85%
Choose Row and then :
set Row1 to 90%
set Row2 to 10%
• You can also do this by
dragging the cells borders.
EDIT ROWS AND COLUMNS
23
S E N G 4 0 3 - W I N T E R 2 0 1 1

• Go to the Toolbox and expand the Common Control category (These are
the controls that are commonly used).
• Select PictureBox.
• Since the TableLayoutPanel is docked to the Form, the IDE adds the
control to the first cell.
Note:
To delete a control, select it and press the delete key on the keyboard.
CHOOSING A COMMON CONTROL
24
S E N G 4 0 3 - W I N T E R 2 0 1 1

• Open the Task List of the PictureBox and select Dock to the panel container.
• If you want the image to be the size of the PictureBox, no matter how much you resize the Form:
•Select the SizeMode property and set it to StretchImage.
• You can also set the image to expand two columns of the TableLayoutPanel by setting the value of the following property two:
ColumnSpan
• By setting the BorderStyle property to Fixed3D, you’ll see an empty frame when the PictureBox is empty.
PICTUREBOX PROPERTIES
25
S E N G 4 0 3 - W I N T E R 2 0 1 1

• From the controls, add a CheckBox to the Form. We want it to resize the PictureBox when its selection status changes.
• Note that it is added to the next available cell.
•Change the Text property of the CheckBox to “Stretch”.
•Now we want to add three button to the other cell. But the problem is that each cell can contain only one Control.
•To overcome this problem we use FlowLayoutPanel control in that cell. We add it to the cell and dock it to the cell borders and … now we can either
click on the Button control in ToolBox 4 times or copy one added Button and paste it three times.
ADD A CHECKBOX
26
S E N G 4 0 3 - W I N T E R 2 0 1 1

• Name the buttons as: Show picture, Clear the picture, Set the background color,
and Close. (Change their Text properties to these)
• Select one button and then hold the Ctrl key down and select the other buttons:
Their common properties are now shown in the property window.
• Select the AutoSize property
and set it to True notice that
the size of the buttons are
changed automatically
according to the text on them.
NAME AND SIZE THE BUTTONS
27
S E N G 4 0 3 - W I N T E R 2 0 1 1
1- Rename Controls
2- Add event handlers
3- Add dialog box components to the form
NEXT STEPS
28
S E N G 4 0 3 - W I N T E R 2 0 1 1

Since the texts being shown on the buttons are different from their name (the name
used in the codes) we’d better change their name so that they represent the buttons
more appropriately in the code.
For example, you can name Close as “closeButtun” with no space in between.
Change the name of all Buttons accordingly.
You don’t have to rename the CheckBox because there is only one check box and you
won’t have problem keeping track of it in the code.
RENAME (NAME) CONTROLS
29
S E N G 4 0 3 - W I N T E R 2 0 1 1

When you click on the buttons their codes will be executed.
In order to add the code you first need to double click on the button.
An event handler (shown in red rectangular below) will be added to the code and it is
executed whenever the button is pressed.
ADDING CODE FOR THE
BUTTONS
30
S E N G 4 0 3 - W I N T E R 2 0 1 1
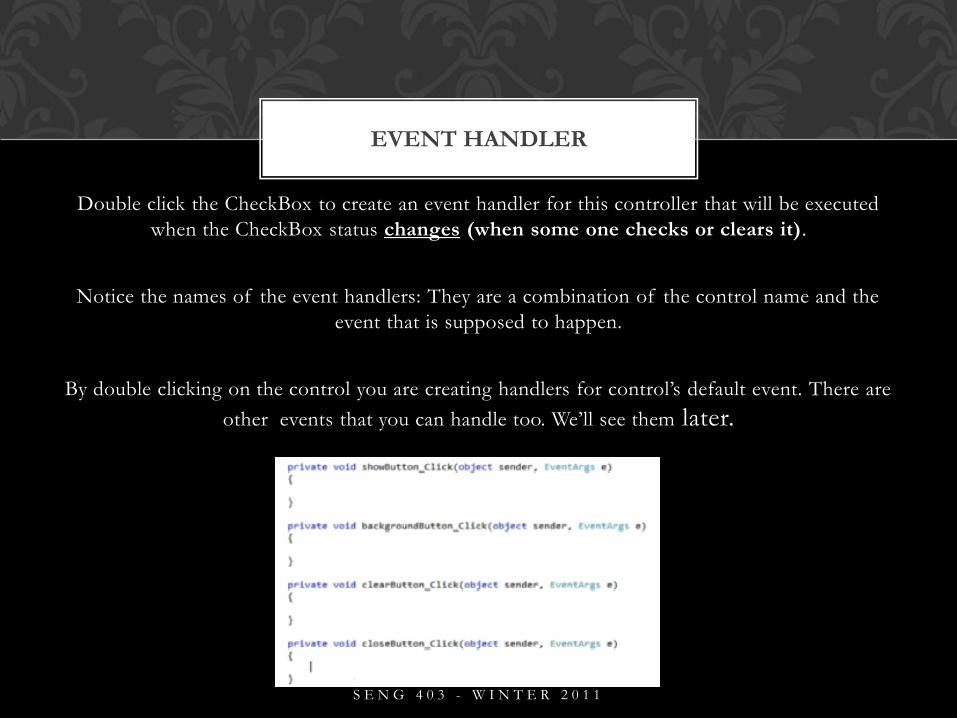
Double click the CheckBox to create an event handler for this controller that will be executed
when the CheckBox status changes (when some one checks or clears it).
Notice the names of the event handlers: They are a combination of the control name and the
event that is supposed to happen.
By double clicking on the control you are creating handlers for control’s default event. There are
other events that you can handle too. We’ll see them later.
EVENT HANDLER
31
S E N G 4 0 3 - W I N T E R 2 0 1 1
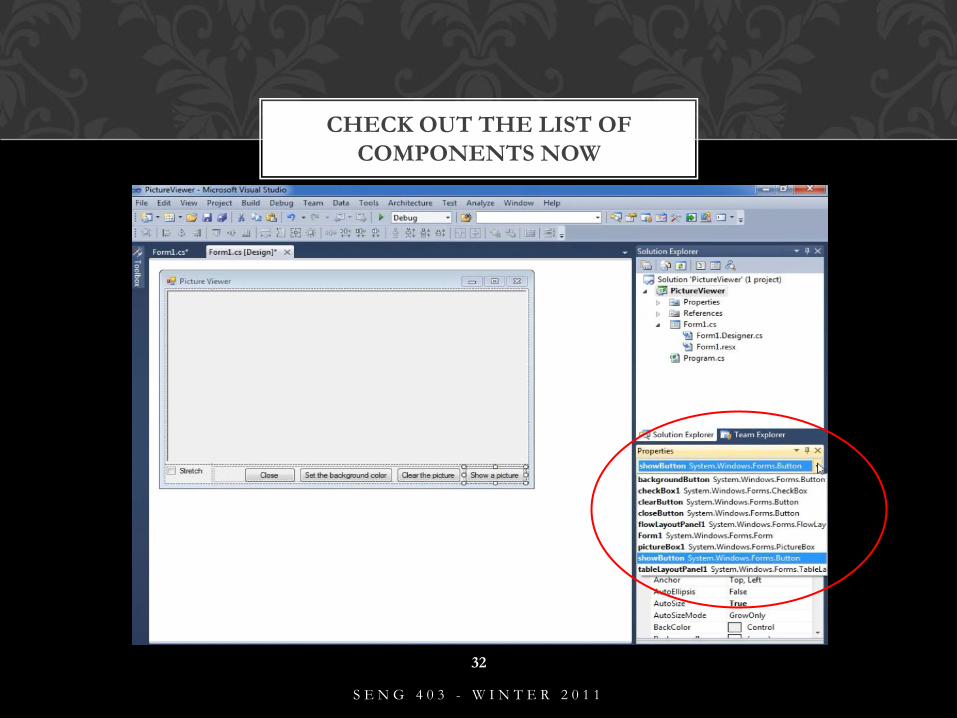
CHECK OUT THE LIST OF
COMPONENTS NOW
32
S E N G 4 0 3 - W I N T E R 2 0 1 1

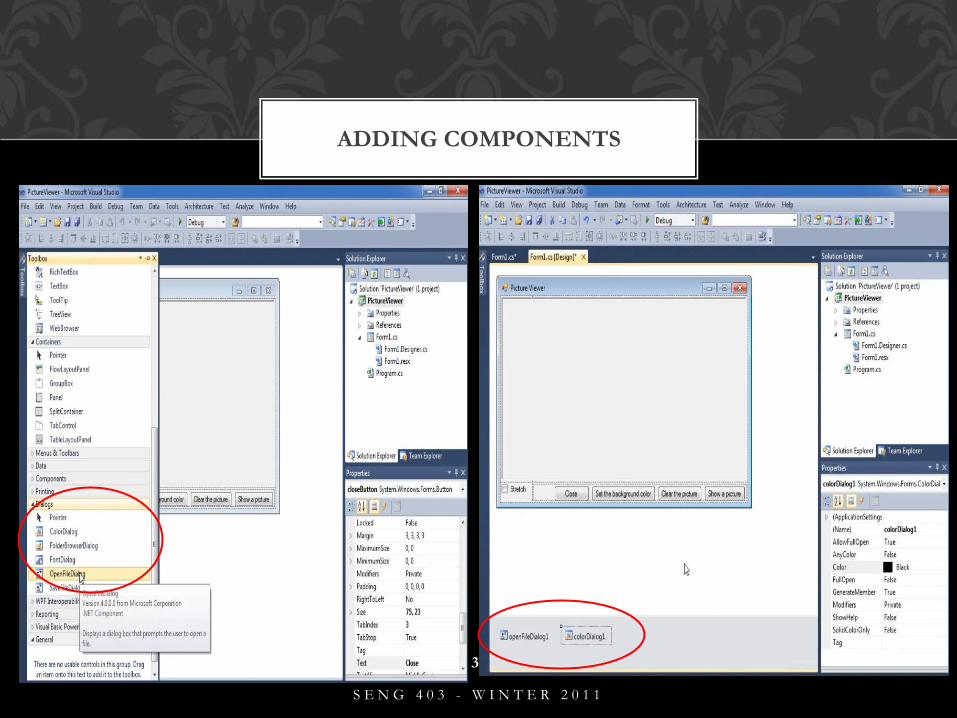
• For Show a Picture button: when clicked, an open file dial box appears.
•For Set Background Color: when selected, a dialog box that enables user to choose the color of the background appears.
-------------------------------
•To do this we need to first:
•Add an OpenFileDialog component and a ColorDialog component to the Form.
-------------------------------
•A component is like a control in some ways.
•Use the ToolBox to add one and use the Properties window to set its properties.
------------------------------
•But unlike a simple component a component is not visible on the Form.
ADD FUNCTIONALITY TO THE
BUTTONS
33
S E N G 4 0 3 - W I N T E R 2 0 1 1
ADDING COMPONENTS
34
S E N G 4 0 3 - W I N T E R 2 0 1 1

WHAT IS AN OPEN FILE DIALOG
35
S E N G 4 0 3 - W I N T E R 2 0 1 1

1- Change the title of the
OpenFileDialog component to:
Select a Picture File (by changing
its Text property)
2- Type these file types in
the Filter property of
OpenFileDialog component
MODIFY THE OPENFILEDIALOG
COMPONENT
36
S E N G 4 0 3 - W I N T E R 2 0 1 1
It’s now time to add some code.
37
S E N G 4 0 3 - W I N T E R 2 0 1 1

• In Visual Studio, as you type code, the IntelliSense opens up a list of
suggested completions for the word you are typing.
• You can select from this list by clicking on an item in it or you can press
Tab and the highlighted suggestion will appear in the code.
ADD CODE (USING
INTELLISENSE)
38
S E N G 4 0 3 - W I N T E R 2 0 1 1

Add the following code to the showButton_Click method
The code says:
Open the openFileDialog box and then if the user clicks OK execute the body of the “if ”.
When you put the period (dot) after openFileDialog1 the IntelliSense will show you the list of openFileDialog1 properties, events, and methods.
After the dot, type “sh”, you’ll then see the IntellieSense filters out the suggestions to those starting with “sh”; now choose ShowDialog method and put two parentheses
after that (because it is a method it needs ( ) after it)
ADD CODE
39
S E N G 4 0 3 - W I N T E R 2 0 1 1

It is a good idea to save your program regularly (using the Save All button)
Now run (Debug) the program. And test the key “Show a Picture”.
RUN THE PROGRAM AND TEST IT
40
S E N G 4 0 3 - W I N T E R 2 0 1 1
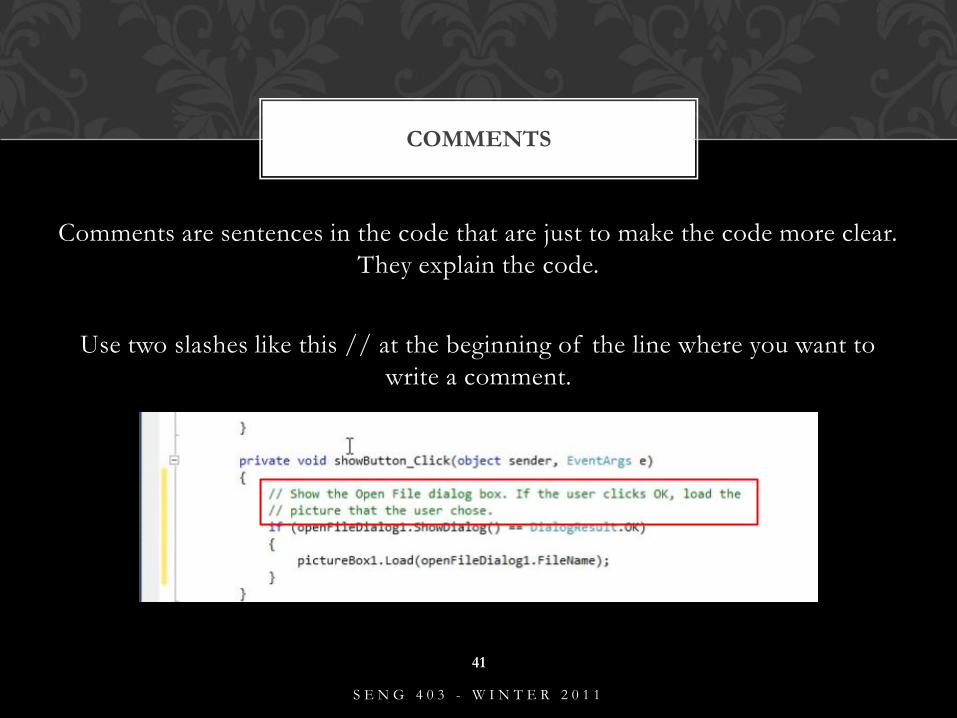
Comments are sentences in the code that are just to make the code more clear.
They explain the code.
Use two slashes like this // at the beginning of the line where you want to
write a comment.
COMMENTS
41
S E N G 4 0 3 - W I N T E R 2 0 1 1

Add the following codes to their corresponding methods.
If you go back to the Form1.cs tab in the Main window you’ll be able to find those
methods (which were generated when you double clicked on the buttons in the Form).
42
S E N G 4 0 3 - W I N T E R 2 0 1 1
We are now ready to run the program.
43
S E N G 4 0 3 - W I N T E R 2 0 1 1

Microsoft MSDN Website:
http://msdn.microsoft.com/en-us/vcsharp/aa336766
http://idealprogrammer.com/videos/visual-studio-2010-over-3-hours-of-
video-tutorials/
http://www.learnvisualstudio.net/
REFERENCES & FURTHER
EXAMPLES
44
S E N G 4 0 3 - W I N T E R 2 0 1 1