vdot user’s manual - virginia department of … user’s manual october 2017 vdot preconstruction...
TRANSCRIPT
AASHTOWare Project Preconstruction™
(Formerly Trnsport)
Version 3.01.164
VDOT User’s Manual
October 2017

VDOT Preconstruction User’s Manual October 2017 Table of Contents - 2
SUPPORT / HELP
Purpose Name Email Phone Number
All Preconstruction Questions/Support
COV login/password Management
VITA (VCCC) Customer Care
Center [email protected] 1‐866‐637‐8482
Preconstruction Support Team
Tracey R. Bowman [email protected] 804‐371‐4356
Construction Division Staff
Gil Falasco
[email protected] 804‐786‐1097 (Item Code Pricing)
Frank Gbinije
[email protected] 804‐786‐2980 (Schedule Category)
VDOT Preconstruction User’s Manual October 2017 Table of Contents - 3
VDOT Preconstruction USER’S Manual
TABLE OF CONTENTS
1. GETTING STARTED
1.1.1 Internet Explorer Settings for VDOT/Internal Users ................................. 1-1 1.1.2 Internet Explorer Settings for Consultants/External Users ....................... .1-1 1.1.3 Navigation ................................................................................................. .1-2 1.1.4 Using Online Help .................................................................................... .1-2 1.1.5 Search ........................................................................................................ .1-3 1.2 Logging On .......................................................................................................... 1-4
1.2.1 Logging onto Preconstruction. .................................................................. 1-5 1.2.2 Logging Off .............................................................................................. 1-5
1.3 The Dashboard ..................................................................................................... 1-6 1.3.1 Menu Bar ................................................................................................... 1-7 1.3.2 Quick Links ............................................................................................... 1-8 1.3.3 Hypertext Links ........................................................................................ 1-8 1.3.4 Alternate Paths .......................................................................................... 1-8 1.3.5 Using Bookmarks...................................................................................... .1-8 1.3.6 Icons .......................................................................................................... .1-9 1.3.7 Viewing Previous Activity ........................................................................ .1-9 1.3.8 Viewing My Pages .................................................................................. .1-10
1.4 Understanding Your Role .................................................................................. 1-10 1.5 Using Components ............................................................................................. 1-11 1.5.1 Working with Fields ................................................................................ 1-12 1.6 Overview, Summary, Tabs and Quick Links ..................................................... 1-13 1.7 Using the Quick Find Search Box ...................................................................... 1-14
2. PROJECTS
2.1 Responsibility ....................................................................................................... 2-1 2.2 Creating a New Project ........................................................................................ 2-2 2.3 Complete Remaining Fields ................................................................................. 2-5 2.4 Project Quick Links .............................................................................................. 2-6 2.5 General Tab ........................................................................................................... 2-7
2.5.1 iPM Interface .......................................................................................... 2-13 2.6 Counties, Districts and Points tabs - Associating these to a Project .................. 2-19
2.6.1 Deleting a County from a Project ........................................................... 2-20 2.7 District Tab ......................................................................................................... 2-21 2.8 Points Tab ........................................................................................................... 2-22 2.9 Road Segments Tab ............................................................................................ 2-23 2.10 Bridge Segments Tab ........................................................................................ 2-25 2.11 Project Workflow .............................................................................................. 2-27 2.12 Retrieving a Project ........................................................................................... 2-28 2.13 Delete a Project ................................................................................................. 2-29 2.14 Copying a Project ............................................................................................. 2-30

VDOT Preconstruction User’s Manual October 2017 Table of Contents - 4
2.14.1 Copy a Project (Alternate Method) ...................................................... 2-31 2.15 Validating a Project.................................................................................. 2-32
2.15.1 Validating a Project from the Project Overview ................................... 2-32 2.15.2 Validating from an Open Project .......................................................... 2-33 2.15.3 Validation Error Checking Overview ................................................... 2-34
3. MAINTENANCE-FUNDED PROJECTS
3.1 Schedule Work (at multiple locations with like assets) ........................................ 3-1 3.2 Maintenance-funded Project at a single location (i.e., Bridge Repair) ................. 3-1 3.3 Creating a New Project ......................................................................................... 3-2
3.3.1 Retrieving a Project ................................................................................... 3-5 3.3.2 Project Quick Links ................................................................................... 3-6 3.3.2 General tab ................................................................................................ 3-7 3.3.3 Counties, Districts and Points tabs - Associating these to a Project ....... 3-13 3.3.3.1 Deleting a County from a Project .............................................. 3-14 3.3.4 District Tab ............................................................................................. 3-15 3.3.5 Points Tab ............................................................................................... 3-16 3.3.6 Road Segments tab .................................................................................. 3-17 3.3.7 Bridge Segments tab .............................................................................. 3-18
3.4 Workflow tab ..................................................................................................... 3-19 3.5 Retrieving a Project ............................................................................................ 3-20 3.6 Deleting a Project ............................................................................................... 3-21 3.7 Copying a Project ............................................................................................... 3-22
3.7.1 Copy a Project (Alternate Method) ........................................................ 3-23 3.8 Validating a Project ............................................................................................. 3-23
4. CATEGORIES
4.1 Adding a Category ............................................................................................... 4-3 4.3 Copying a Category .............................................................................................. 4-7 4.4 Deleting a Category .............................................................................................. 4-9
5. MANAGING ITEMS
5.1 Lump Sum Items .................................................................................................. 5-2 5.2 Adding an Item ...................................................................................................... 5-3
5.2.1 Adding an Item with the New Button ....................................................... 5-4 5.2.2 Adding Items with Quick Add .................................................................. 5-7 5.2.3 Adding Items with Select Items ................................................................ 5-8 5.2.4 Adding Items on the Item Worksheet ........................................................ 5-9
5.3 Deleting an Item ................................................................................................. 5-10 5.4 Determining Construction Surveying Prices, Mobilization, Construction Engineering (CEI), Contingency and Contract Requirement Costs ................... 5-11
5.4.1 Calculating Construction Surveying ....................................................... 5-11 5.4.2 Calculating Mobilization ........................................................................ 5-12
Mobilization Work Sheet ........................................................................ 5-13 5.4.3 Calculating Construction Engineering and Inspection (CEI) ................. 5-14

VDOT Preconstruction User’s Manual October 2017 Table of Contents - 5
5.4.3.1 Entering a Construction Engineering (CEI) Percentage (less common method) ............................................................... 5-14 5.4.3.2 Entering Construction Engineering (CEI) Lump Sum (most common method) ............................................................. 5-15
5.5 Contingency (Non-Bid Cost) ............................................................................. 5-16 5.5.1 Entering Contingency as a Percentage .................................................... 5-17 5.5.2 Entering Contingency as a Lump Sum ................................................... 5-18
5.6 Contract Requirements (Non-Bid Costs) ........................................................... 5-19
6. FUND PACKAGES & FUNDING ITEMS
6.1 Predefined Fund Packages ................................................................................... 6-1 6.1.1 Funding Specifics for Pre-Defined Fund Packages .................................. 6-2 6.1.2 Example of Betterment Custom Fund Package ........................................ 6-3
6.2 Methods to Add Fund Packages ............................................................................ 6-4 6.2.1 Adding a Pre-Defined Fund Package ........................................................ 6-5 6.2.2 Creating a New Custom Fund Package .................................................... 6-6 6.2.2.1 Adding Funding Specifics ............................................................. 6-7
6.3 Funding: Assign to Items (Pre-Defined Fund Package) ........................................ 6-9 6.3.1 Funding: Assign to Items (for a Custom Fund Package) ........................ 6-10 6.4 Deleting a Fund Package ........................................................................................ 6-11
7. ITEM PRICING & REPORTS
7.1 Generate Bid-Based Prices for an Entire Estimate ............................................... 7-2 7.1.1 Generate Prices for a Category .................................................................. 7-3 7.1.2 Generate a Price for an Individual Item ..................................................... 7-4 7.1.3 Enter a Price Manually............................................................................... 7-5 7.2 Price Scatter Plot .................................................................................................. 7-6 7.3 Running the Preliminary Project Detail Estimate VDOT Report ........................ 7-8
7.3.1 Running the Detail report from the Dashboard ......................................... 7-8 7.3.2 Running the Detail report from an open Project ....................................... 7-9
8. PRIME PROJECTS
8.1 Prime Controlling Project ..................................................................................... 8-2 8.2 Adding a Prime Project ........................................................................................ 8-3 8.2.1 Adding/Associating Projects to a Prime Project ....................................... 8-5 8.2.2 Workflow tab ............................................................................................. 8-6 8.3 Disassociating (Removing) Projects from a Prime Project .................................. 8-7 8.4 Deleting a Prime Project ...................................................................................... 8-8 8.5 Running the Prime Detail Estimate Report .......................................................... 8-9
8.5.1 Running the Detail report from the Dashboard ......................................... 8-9 8.5.2 Running the Detail report from an open Project ....................................... 8-9
VDOT Preconstruction User’s Manual October 2017 Table of Contents - 6
9. MANAGING PROPOSALS
9.1 Creating a Proposal from a Project (Most Common Method) .............................. 9-2 9.1.2 Creating a Proposal from Scratch (Less Common Method) ..................... 9.3 9.2 Changing a Proposal ............................................................................................ 9-10 9.2.1 Adding Projects to a Proposal .................................................................. 9-11 9.2.2 Removing Projects from a Proposal ........................................................ 9-12 9.3 Assigning Time Locations .................................................................................. 9-13 9.4 Setting Proposal Workflow ................................................................................. 9-15 9.5 Specifying Section and Line Numbers ................................................................ 9-16 9.5.1 Add a Proposal Section ............................................................................ 9-17 9.5.1.1 Adding a Section Automatically(Less Common Method)........... 9-17 9.5.1.2 Adding a Section Manually ......................................................... 9-18 9.5.2 Assigning Items to the Section ................................................................ 9-18 9.6 Copying a Proposal ............................................................................................. 9-19 9.6.1 Copy a Proposal (no associated Projects) ............................................... 9-19 9.6.2 Copy a Proposal Including Project(s) ..................................................... 9-23 9.7 Deleting a Proposal ............................................................................................. 9-22 9.7.1 Deleting a Proposal (with no Project(s) associated) ............................... 9-22 9.7.2 Deleting a Proposal Including Project(s) ................................................ 9-23 9.8 Generating Bid-Based Prices for Proposals ........................................................ 9-24 9.9 Generating the Proposal Price Schedule Reports ................................................ 9-25 9.10 Assigning Wage Decisions ................................................................................ 9-27 9.11 Proposal Addendums ......................................................................................... 9-28 9.11.1 Adding Items in Addendum Phase ........................................................ 9-29 9.12 Lessons Learned – Common Proposal Errors .................................................. 9-32 9.12.1 Non –Bid Items in the correct category ................................................. 9-33 9.12.2 Non-Bid Items in Regular Bid Categories ............................................. 9-33 9.12.3 Check for “N” flags in Prelim. Project Detail Estimate ......................... 9-33 9.12.4 All Items assigned to the Proposal Section ............................................ 9-34 9.12.5 All Projects associated in Prime are in the Proposal.............................. 9-34 9.12.6 Unit Prices displayed on Schedule of Items (SOI) ............................... 9-35 9.12.7 Project contains a Road Segment ........................................................... 9-36
Appendix A – Project ID NUMBER (PCN)
Appendix B – Item Code Table
Appendix C – County Conversion
Appendix D – City Conversion
Appendix E – Project Work Types
Appendix F – FHWA Type Codes
Appendix G – Federal Work Codes
Appendix H – Progress Schedule Category

VDOT Preconstruction User’s Manual October 2017 1-1
1. GETTING STARTED The Preconstruction software is a Web application designed to run on Google Chrome, Microsoft Edge, and Internet Explorer version 11 (IE11). To run successfully, please check the following settings based on the browser type and version that you are using. Note: External users must use Internet Explorer.
1.1.1 Internet Explorer Browser Settings for VDOT Employees/Internal Users 1. Start Internet Explorer (IE) 2. Click on Tools 3. Click on Internet Options
4. Under Browsing History, click the Settings button. 5. For the Check for newer versions of stored pages setting, click the Every time I
visit the webpage option. 6. Click OK.
7. Select the Tools pulldown, select Compatibility View Settings.
8. Uncheck the Display intranet sites in Compatibility View check box. 9. Click Close.
1.1.2 Internet Explorer Browser Settings for Consultants/EXTERNAL Users External users must use Internet Explorer to access Precon through the SSLVPN firewall.
1. Start Internet Explorer (IE) 2. Click on Tools 3. Click on Internet Options 4. Under Browsing History, click the Settings button. 5. For the Check for newer versions of stored pages setting, click the Every time I
visit the webpage option. 6. Click OK. 7. Click on the Security tab 8. Click on the Green Trusted Sites Icon 9. Click the Sites button 10. Add ALL THREE website(s) to the zone ***
https://sslvpn.vita.virginia.gov
https://sslvpn‐1.vita.virginia.gov
https://sslvpn‐2.vita.virginia.gov
11. Click Close 12. Click the Advanced tab. 13. In the Settings box, scroll down to the Security section, and ensure the Enable
DOM Storage option is selected. 14. Click OK. 15. Select the Tools pulldown, select Compatibility View Settings. 16. Uncheck the Display intranet sites in Compatibility View check box. 17. Click Close.

VDOT Preconstruction User’s Manual October 2017 1-2
1.1.3 Navigation
This user's guide can be printed, allowing readers to navigate the document by using the table of contents, chapter numbers, and page numbers. Viewing this user's guide in pdf format provides additional opportunities for navigation.
Note: Adobe Reader must be installed on your workstation in order to view this document as a pdf file. You can download the latest version of Adobe Reader from the Adobe website: http://www.adobe.com/
When you view the user's guide as a pdf file, you can use the Bookmarks panel on the left side of the Adobe Reader window to navigate within the document. The Bookmarks panel contains an outline of the section headings used in the document, similar to a table of contents. Bookmarks function like hyperlinks. You can click a bookmark to display the related page in the right pane of the Reader window. The pdf version of the user's guide also contains hyperlinks throughout the text. You can click a hyperlink to view a different page that describes related features or tasks. Entries in the table of contents are also linked to the related pages in the document. Finally, viewing the user's guide as a pdf file enables you to use the search features in Adobe Reader. To display the search field, click the Edit menu and click Find, or you can press CTRL+F. Type a word or phrase in the search field, and press Enter. Adobe Reader displays the first instance of the word or phrase you entered. You can click the Next and Previous buttons to view each additional instance.
1.1.4 Using Online Help
The AASHTOWare Project Help system provides a wealth of information immediately available to you while you work. Understanding how the Help system works makes it easier to find the information you need.
The Help system is context sensitive, which means that when you click the Help button on a component in the software, the system provides information about the functionality of that component only. Each Help page provides links to other Help pages containing related information.
The Help system also contains topics that are more general in nature and not linked to a specific component in the software. You can navigate the entire Help system by clicking the Contents link in the top left corner of any Help page, or by clicking the Help button on the Menu Bar.
The Contents pane is organized by business category and uses expandable and collapsible books and pages to display the list of topics available in the Help system. This pane helps you navigate through the hierarchy of topics to find a desired category and subject. Click a book to expand it, and then click the page you want to see. The system displays the page in the right pane of the browser window.

VDOT Preconstruction User’s Manual October 2017 1-3
1.1.5 Search
The Search pane provides a rapid full-text search of all the topics in the Help system. To display the Search pane from any Help page, click the Search button in the top left corner next to the Contents button. To perform a search, type your search criteria in the Search input field on the toolbar, and click the Go button. To search for a phrase, enclose the phrase in quotes in the Search field. The system performs the search and automatically opens the Search pane, which displays a list of the topics in which the search text appears. Topics are ranked in order of best match. Click on a topic to display the page in the right pane of the browser window. You can also perform a search in the Search pane itself by clicking on the Search tab. To make your first experiences with AASHTOWare Project easier and more intuitive, you might also want to review the Getting Started section.

VDOT Preconstruction User’s Manual October 2017 1-4
1.2 Logging On To Log on to Preconstruction, follow these steps:
1. Open an Internet browser and navigate to:
https://aashtoproject.cov.virginia.gov VDOT employees/Internal Users
https://sslvpn.vita.virginia.gov/vdot-portal Consultants/External Users
External users are provided a separate document with complete instructions.
2. Enter your COV Username (format: FirstName.LastName)
3. Enter your Password.
4. Select Agency Users for the Domain.
5. Click the Logon button.
Figure 1 - Preconstruction Logon Screen
If you get an error at this screen, you may have an issue with your COV login/password please contact:
VITA helpdesk at [email protected] or (866) 637-8482.
For all other Precon questions, please contact [email protected]
Enter your FirstName.LastName And select Agency Options from the pulldown. Click the Log On button.

VDOT Preconstruction User’s Manual October 2017 1-5
1.2.1 Logging onto Preconstruction When you logon to Preconstruction, this will take you to the Dashboard.
The Dashboard is the gateway to all of the Preconstruction components.
To expand or contract a component, click the Expand-Shrink button located on the left of the Component name.
Your Role and access rights will determine which Preconstruction components that you will have access to.
Figure 2 – Access Rights and the Preconstruction Dashboard
1.2.2 Logging Off To Log off the system properly click the Log off button on the Dashboard on any page in the application.
When you log off, the software ends your session and takes you to the Preconstruction logon page.
Your Role and access rights, which are attached to your Login ID, will determine which Precon components you will have access to.
The Preconstruction component is thegateway to all the components in the application to manage Projects, Prime Projects, Proposals, Lettings and Bid Data. Click the corresponding blue link to open
Use these buttons to access Help and to Log off

VDOT Preconstruction User’s Manual October 2017 1-6
1.3 The Dashboard
When you log on to the system, the software opens on the dashboard. You can also go to the dashboard at any time by clicking the Home button on the Menu Bar.
The dashboard contains one or more components. Each component is identified by a title set within a blue header bar. Each component provides access to the information and processes required for a specific area of your agency's work. The components you see on your dashboard are those that match the specific areas of responsibility assigned to your active role. See Understanding Your Role and Using Components for more information.
The following example shows the dashboard as it might appear for a system administrator. Keep in mind that some of the components shown in the example might not be available for you depending on your active role and which business areas are included on your system.
Figure 3 - The Preconstruction Dashboard
The dashboard includes these standard features:
Menu Bar — The system displays the Menu Bar at the top of every webpage in the system. The buttons and menus on this bar help you to move quickly through the system to visit the pages and components you use most often.
Home Page News — This component provides important VDOT specific information.
External Links — This component provides links to websites you use outside of the AASHTOWare Project application.
Expanded Component
Menu
Quick Links
Collapsed Component
Row Action Button
Action Buttons on the Dashboard

VDOT Preconstruction User’s Manual October 2017 1-7
1.3.1 Menu Bar The system displays the Menu Bar at the top of every webpage in the system.
Figure 4 - The Preconstruction Menu Bar
The left side of the Menu Bar contains these buttons and menus:
Home - Clicking this button takes you to the dashboard for your active role. Clicking the down arrow opens the Home menu, which contains an indicator for your active role (bold text with a check mark) and lists all the roles assigned to you. This menu allows you to switch roles from any location in the system. When you switch roles, you remain on the component where you were working unless the new role does not have appropriate security rights, in which case the system takes you to the dashboard.
Previous - Clicking this button returns you to the last page you visited in the system using your active role. Clicking the down arrow displays a list of links to the most recent pages you visited in your active role, along with a link to the Previous Activity Overview component. On the Previous Activity Overview, you can access a much longer list of links to previously viewed pages. Clicking a link takes you to that location in the system.
My Pages - Clicking this button takes you to the My Page Overview component, where you can manage frequently used (or favorite) pages for your active role. You can add pages as favorites from any location in the system by clicking the down arrow and selecting Remember this Page.
The right side of the Menu Bar contains these buttons and menus:
Actions - Clicking this button opens a menu of actions you can take within the system. The actions that are listed are limited to those that are relevant for your active role. When you select an action, the system automatically takes you to the component in the system where the action can be performed.
Help - If your agency has recorded agency Help, clicking this button takes you to a separate browser window containing online help for your active role. If agency Help has not been recorded, clicking this button takes you to the Welcome page of the standard online Help.
Log off - Clicking this button ends your session (see Logging Off).

VDOT Preconstruction User’s Manual October 2017 1-8
1.3.2 Quick Links Quick links are displayed in blue text below the Menu Bar and above the webpage title. These links allow you to quickly jump to application pages related to the current page.
Figure 5 - Quick Links below the Menu Bar
If you are on a page that contains multiple components, quick links preceded by the label On this page are displayed for each component on the page. When you click one of these quick links, the system automatically scrolls the page to the location of the component.
1.3.3 Hypertext Links
Hypertext links can be located anywhere on an application component, including a field value, and are identified by blue text. When clicked, a link takes you to another component or page, usually one containing more detailed information than what is available in the current component. After you have clicked a link, it changes from blue to purple to remind you that you have already visited that link.
Note: In a list, when you add a new row in which one of the field values is a hypertext link, the link is disabled until you save the new record.
1.3.4 Alternate Paths
Keep in mind that all of the various navigational elements, such as hypertext links, quick links, recent pages, and Actions menus, can all provide different ways of accomplishing the same task. The same command might be accessible from an Actions menu or as a link. For example, to access the Project Overview component, you can click the Projects link on the Preconstruction component, or you can select Open from the Actions menu on the Projects row. Both methods of navigation achieve the same result. Feel free to explore the system and find the ways of navigation that are best for you.
1.3.5 Using Bookmarks
You can bookmark specific pages in the software just as you would for any other website. However, if you have not yet logged on to the system, clicking a bookmark will take you to the logon page rather than the bookmarked page.

VDOT Preconstruction User’s Manual October 2017 1-9
1.3.6 Icons Icons are small images throughout the system that either convey information or can be clicked to perform an action. For example, a red asterisk icon indicates a required field. An eraser icon in a Quick Find search box can be clicked to reset search criteria. This table shows some of the common icons used in the system:
Figure 6 - System Icons
1.3.7 Viewing Previous Activity
The Previous Activity Overview contains a list of links to the most recent pages and components you visited using your active role. To display the Previous Activity Overview, click the down arrow on the Previous button on the Menu Bar, and select View Previous Activity.
Each row contains a link to the previously visited page, the date and time of the last visit, and an Actions button. The list is sorted by most to least recently visited.
To navigate to a previously visited page, click the Page Title link in the appropriate row. To
delete an activity from the list, select Delete from the Actions menu on the activity row. To reverse the delete action, click the Undo button. Click Save when to apply your changes to the system.

VDOT Preconstruction User’s Manual October 2017 1-10
1.3.8 Viewing My Pages
The My Page Overview component contains a list of all the pages you have added to your My Pages list for your active role. To add a page to the My Pages list for your active role, first navigate to the page you want to add. Next, click the My Pages arrow on the Menu Bar, and click Remember this Page. The page is added to the My Pages list for your active role.
To display the My Page Overview, click the My Pages button on the Menu Bar. The component lists all of the pages you added when logged in with the same user role that is currently active.
To delete a page from the list, select Delete from the Actions menu on the page's row. When you are finished, click Save to apply your changes to the system.
1.4 Understanding your Role A user role is a name associated with a collection of security access rights to the information contained in system components. Roles combine the permissions needed for several related tasks and allow you more efficient access to the parts of the system you need. Roles are designed by your agency and assigned to you by your system administrator.
All users of the system are assigned at least one security role. Many users have multiple roles, but you can only use one role at a time. Therefore, you are always limited to the security access rights of your Active Role.
To see which of your roles is currently active, click the down arrow on the Home button on the Menu Bar. The Home menu lists all of the roles that are currently assigned to you. Your active or current role appears at the top of the list with a check mark beside it.
You can switch your active role at any time by clicking another role on the Home menu. By selecting a different role, your permissions and security access are changed to reflect the areas you need to access to perform your duties in the new role. When you switch roles, the system continues to display the component where you were working unless the new role does not have appropriate security rights, in which case the system takes you to the dashboard.
If you are assigned multiple roles that have responsibilities for multiple approvals at different stages of the same workflow or approval process, you can only perform the approval corresponding to the authority of your Active Role. If the approvals are sequential, however, the system allows you to switch roles without leaving the approval component.

VDOT Preconstruction User’s Manual October 2017 1-11
1.5 Using Components
The web-based AASHTOWare Project system displays information in application components. A component is a container for the information and business functions on an application webpage. Components are made up of elements such as fields, lists, and links. An application webpage can contain one or more components. Some components contain a list of tabs along the left side, each of which corresponds to a subset of information related to the component entity.
Note: To protect the information contained in your agency's system, components and webpages only display the information and action features for which your active role has been assigned access.
Each component includes these features:
A blue header is displayed across the top of the component. The component header can contain several features, including the title of the component, a Save button, an Actions button, a Help button , and an expand/collapse button . The header might also contain contextual information related to the data contained in the component.
A vertical scroll bar is included on the right side of any component that contains more content than can be viewed in the browser window.
The most common elements found on components are fields in which information can be recorded.
Most components contain lists of rows for a type of data, such as projects or proposals.
Components with lists contain a variety of filters to make it easier to find specific rows. For more information about the different kinds of filters you can use and customize.
Actions menus allow you to choose a function or process to perform on data. Most components contain multiple types of Actions menus. All Actions menus provide access to the files and links attached to the active entity row.
Selection modal windows are used throughout the system to make it easier for you to add one or more rows of data to another entity (for example, to add projects to a proposal).
Keyboard keys have limited functionality in components. The Tab key can be used to move from one field to the next, the Enter key can be used to scroll through a drop down list of values in a field, and the arrow keys can be used to scroll through lists of rows.
Many components contain tabs arranged vertically on the left side of the component. Clicking each tab displays the fields and information on that tab. Clicking the Save button on a tabbed component saves the information on all of the tabs at once.

VDOT Preconstruction User’s Manual October 2017 1-12
1.5.1 Working with Fields
Fields are the most common element found within components. Information can be recorded in fields. You can move from one field to another by pressing the Tab key or moving your pointer to the field and clicking the left mouse button.
A component can contain one or more of the following types of fields:
Text boxes contain textual characters of any type. Some text boxes are capable of storing multiple rows of text. This type of text box includes a magnifying glass button on the right side of the box. Clicking this button opens a secondary text window that allows you to view and edit the text in a larger area. In this window you can use standard Windows editing commands like cutting (CTRL+X), copying (CTRL+C), and pasting (CTRL+V). When you are finished editing text, click the Apply button or press the Escape key to close the text window.
Numeric fields contain only numeric characters. For all non-key numeric fields, the system automatically inserts and corrects the placement of commas and justifies values to the right when you leave the field.
Auto-complete fields are like text boxes except that they automatically display a filtered list of field values based on the first few characters you type into the field. Auto-complete fields are indicated by a magnifying glass icon at the beginning of the field.
Pressing the Enter key without typing any characters returns the first ten rows in that list, displayed as a drop-down menu. To build the list, the system searches for ID and Name/Description values. By default, the first ten rows that match the entered criteria are returned. At the end of the returned list, there is a link to display the next available set of rows and a count of the total number of rows matching the search criteria. A scroll bar allows you to move up and down through the returned list. Pressing the up or down arrow key populates the field with the previous or next value in the drop-down menu. To populate the field, click the appropriate value from the drop-down menu.
Date and Date/Time fields include a calendar button next to the field. Click the calendar button to display a calendar from which you can select a date to populate the field instead of typing the date manually.
The system default date format is MM/DD/YYYY and the system default time format is the 12-hour format with AM or PM designation.

VDOT Preconstruction User’s Manual October 2017 1-13
Note: The value you enter in a date field must be valid and reasonable (for example, it should not exceed 99 years in the future).
Drop-down list boxes include a down arrow next to the field. Click the down arrow to display a list of possible field values.
Click an item in the list to populate the field. A scroll bar is available when needed to scroll through the list of values. Typing a letter cycles the values through all of the values that start with that letter. If there are no values that start with that letter, the value in the select box will not change. After you have clicked the scroll bar, pressing the up or down arrow key scrolls through the open drop down list.
Non-editable fields display information without a text box. You cannot change the information in this type of field.
Check boxes are square boxes that can be selected or cleared by positioning the mouse pointer over them and clicking the left mouse button. Check boxes are used to turn an option on or off.
Combined fields display read-only pieces of information derived from multiple fields, but treated as a single field on the page.
Agency fields look and behave like any other field, but have been customized for purposes specific to your agency. For this reason, these fields differ among agencies and, unless your agency has created custom agency Help, these fields are not documented in the online help system or this user's guide.
1.6 Overview, Summary, Tabs and Quick Links All the major components in Preconstruction are accessed the same way, with the same navigation method used for all of the major Preconstruction Components: Projects, Prime Projects, Proposals and Lettings.
1. You start at the Dashboard and select the major component: Projects, Prime Projects, Proposals and Lettings.
2. Clicking on the component will take you to that component’s Overview screen. At this point, you can search for and select the specific Project, Prime Project, Proposal or Letting.
At the component’s Overview screen you can also add a new Project, Prime Project, Proposal or Letting.
3. Once you have found your specific Project, Prime Project, Proposal or Letting, you can click on its link which opens in the Summary screen where information can be edited.
4. The Summary screen, as are most other screens, is arranged by Tabs, with each tab containing information related to the name of the tab.

VDOT Preconstruction User’s Manual October 2017 1-14
1.7 Using the Quick Find Search Box A Quick Find search box is a part of each component that contains a list.
It searches all rows in the list for a string of text and then displays only rows with fields containing that string. The search begins automatically once the third character is entered and the text entered will remain there until you click the button.
Figure 7 – Project Overview Search box
Follow these steps to use the Quick Find search box:
1. Click in the Quick Find search box for a list that you want to filter.
For example, in the Project Overview screen, the list being searched is the list of projects.
2. Type the string of characters you want to match or use as a delimiter. The Quick Find filter is not case-sensitive.
After you type at least three characters and wait a moment, the system refreshes the list and displays the rows that contain the string of characters you entered.
The search criterion creates a temporary filter.
3. If you want to remove a row from the list of search results, select Exclude from Search Results on the Actions Menu for that row.
The row is removed from the list of search results.
You can exclude additional rows as needed.

VDOT Preconstruction User’s Manual October 2017 2-1
2. PROJECTS
This chapter covers creating, changing and deleting projects. Please note that the specifics for
entering Maintenance-funded projects are provided in Chapter 3.
2.1 Responsibility
Whether you, the user, actually initiate the creation of the project or wait to receive your copy
from another user; can be determined by the three cases described below:
Case 1: The Project Manager will create the project and make copies to move to the
control groups of the other designers/disciplines involved.
• Before copies of the project are sent out, a Prime Project should be created
and all of the projects (both the original and any copies) associated to the
Prime Project.
Case 2: The designer (who is not a Project Manager) will not create the project. They
will find their copy of the project in their listing of projects once the Project
Manager has made a copy in their control group. The designer will review this
project as submitted to him/her and make appropriate revisions.
• If the designer does not have the project in their project listings, they should
contact the Project Manager.
Case 3: The designer will create a new project(s) if not provided by the Project Manager
and the Project Manager will be responsible for adding the project(s) to the
Prime.
Case 4: For a “stand-alone” project (a project in which no other division will be
involved), the designer will create the project(s). A Prime Project must be
created, and the project(s) associated to it.
All users should use all UPPER CASE for ALL fields in Preconstruction
(formerly Trnsport)

VDOT Preconstruction User’s Manual October 2017 2-2
Appendix A
Fill in all Required fields
on the General Tab ONLY
Click Save When finished
The Add Project screen opens on the General tab.
From the Preconstruction Dashboard, click on Projects. This will take you to the Project Overview screen.
Click the component bar action button and select Add.
2.2 Creating a New Project
The Add Project function creates a new Project and opens on the General tab, which
allows you to add basic information for the new project.
• Click on Projects from the Preconstruction Dashboard located on the Home page.
• Click the Project Overview Action button and click Add.
• Fill in only the required fields on the General tab.
• Please see Appendix A for proper naming conventions.
Please use all UPPER CASE for ALL fields in Precon.
Figure 1 - Adding a New Project from the Project Overview screen

VDOT Preconstruction User’s Manual October 2017 2-3
The Add Project screen requires entry of only the minimum required fields (on the General Tab ONLY) for the database to determine if the Project ID is unique, once the new project is saved then the user will complete the remaining fields and tabs.
Please use all UPPER CASE for ALL fields in Precon.
The following fields are required (indicated by a red asterisk ) when adding a new Project:
1. Project ID (See Appendix A for proper naming conventions)
2. Project Description
3. Progress Schedule Category (See Appendix H)
4. Control Group
5. Item Code Table
6. Unit System
7. FHWA 534
8. UPC Number (MUST be 8 digits, add leading zeros)
9. Date of Estimate (auto fills current date)
The Add Project screen will display four tabs: General, Counties, Districts and Points.
The remaining Project Summary tabs – Road Segment, Bridge Segment and Workflow should not be filled in when Adding a project.
To save the newly added project, click the Save button found on the right side of the Add Project header.

VDOT Preconstruction User’s Manual October 2017 2-4
Saving the Project and Correcting Errors
When the required fields on the General tab of the Add Project screen have been completed or
when you are ready to save your data, click the Save button to insure that all
information entered has been saved.
• If you have completed all required field criteria satisfactorily and the Project ID (PCN) is
a unique number, the project will be added/saved.
• The Project ID field can be changed as long as you are on the Add Project screen, even if
the project was previously saved on that screen.
• Once you navigate away from the Add project screen, then you can only return to that
project by way of the Project Summary screen. The Project ID field will convert to
display-only and cannot be changed. This ensures unique Project ID’s in the database.
• If a required field was not filled-in or incorrect data entered at a field which is supported
with a reference table, an Error box will display. For example, if you left a required field
blank or entered invalid data, you will see an Error box at the top giving information as
to what field was left blank or contains an invalid value.
• If you attempted to create a project with a Project ID already in existence in the Precon
database, you will see an Error box with the message that the Project ID (the primary
key) is already being used by another project. A project could already exist in another
control group with the Project ID you have just attempted to create. Precon will not
allow duplicate Project IDs.
Note: when any errors are presented, they may only show up one at a time, so you may have to
go through several corrections before a save is successful.
Errors must be corrected before the new project record will be saved/created.

VDOT Preconstruction User’s Manual October 2017 2-5
2.3 Complete Remaining Fields
Now that you have created & saved your Project and the required fields on the General tab, click
the Overview link, enter the new project’s UPC Number and complete the remaining tabs;
Counties, Districts, Points, Road Segment, Bridge Segment and Workflow tabs.
Figure 3 - Retrieving a Project from the Project Overview Screen
To complete the Project:
1. Click on the Overview quick link at the top left of the Add Project screen or click on the
Home button and then click on Projects from the Preconstruction Dashboard located on
the Home page.
• This will take you to the Project Overview screen.
2. Clear out the Search by clicking on the eraser, and then enter the UPC Number.
3. The Project Summary row will open. Click on the Project ID to open your Project.
Click the Project ID to open.
Enter the UPC number in the search box, search automatically
begins after the 3rd
digit is typed.

VDOT Preconstruction User’s Manual October 2017 2-6
2.4 Project Quick links
Quick links are displayed in blue text below the Menu Bar and above the blue component
bar. These links allow you to quickly jump to application pages for the project.
All but the Wage Decisions quick links are discussed in later chapters.
• Users do not need to enter Wage decisions information at the project level.
That information is added in the Proposal. See chapter 9 for details
Not Used

VDOT Preconstruction User’s Manual October 2017 2-7
2.5 General Tab
Figure 4 - The General Tab Fields

VDOT Preconstruction User’s Manual October 2017 2-8
Use the [TAB] key to move between fields and enter the project information on the General tab.
Some fields have Reference Tables. As you [TAB] to such a field, a drop-down arrow will
appear. A selection MUST be made from the available choices in the table.
GENERAL TAB FIELD DESCRIPTIONS:
Project ID Required: The Project ID (formerly PCN) may consist of as many as 13
characters (14 characters are required for maintenance-funded (Maintenance
Division) projects). Refer to Appendix A for Project ID instructions. (Once the
project is completed and added to the database, this field becomes display-only and
cannot be changed.)
Examples: 0000109813C01, 0000110328N01
Project Description Required: For all projects (other than bridge), enter the description
of the type of work being performed on this project. The description from iPM is
the best source. For Bridge projects, enter the description from the front sheet title
block from the plan set.
City/Cnty: Select County or City in which the project is located from the drop-down
menu which should match the State Project Number. Appendix C & D includes
County & City codes and appropriate conversions when required.
Ex.: Project number is 0615-047-169. County/City Code is 047.
Pavement Type: Select the appropriate code from the drop-down menu.
Pavement Type Code
Code Description
ASPH Asphalt Concrete
BITC Bituminous Concrete
BITP Bituminous Penetration
COMB Combination Asphalt &
Concrete
GRDE Grade & Drained Earth
GRVL Gravel or Stone
MIXB Mixed Bituminous
OTHR All Others
POCC Portland Cement Concrete
PRIM Primitive
UNIM Unimproved
VDOT Preconstruction User’s Manual October 2017 2-9
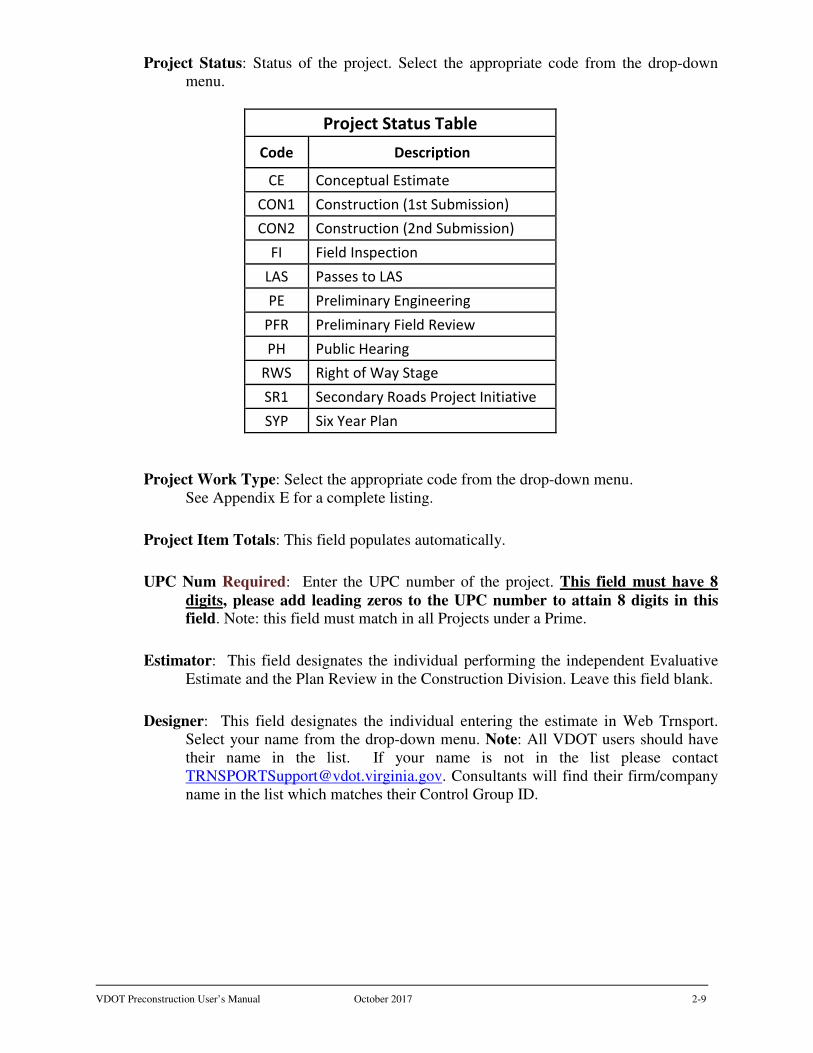
Project Status: Status of the project. Select the appropriate code from the drop-down
menu.
Project Status Table
Code Description
CE Conceptual Estimate
CON1 Construction (1st Submission)
CON2 Construction (2nd Submission)
FI Field Inspection
LAS Passes to LAS
PE Preliminary Engineering
PFR Preliminary Field Review
PH Public Hearing
RWS Right of Way Stage
SR1 Secondary Roads Project Initiative
SYP Six Year Plan
Project Work Type: Select the appropriate code from the drop-down menu.
See Appendix E for a complete listing.
Project Item Totals: This field populates automatically.
UPC Num Required: Enter the UPC number of the project. This field must have 8
digits, please add leading zeros to the UPC number to attain 8 digits in this field. Note: this field must match in all Projects under a Prime.
Estimator: This field designates the individual performing the independent Evaluative
Estimate and the Plan Review in the Construction Division. Leave this field blank.
Designer: This field designates the individual entering the estimate in Web Trnsport.
Select your name from the drop-down menu. Note: All VDOT users should have
their name in the list. If your name is not in the list please contact
[email protected]. Consultants will find their firm/company
name in the list which matches their Control Group ID.

VDOT Preconstruction User’s Manual October 2017 2-10
Job Number (C#, B#, CREW): This field is derived from the last numbers of the State
Project number and can be found in IPM Pool tab under the Federal Numbers.
Select the appropriate code from the drop-down menu. Example below from iPM.
Users will select the CXXX for roadway, utilities, traffic, etc disciplines. Bridge
projects will use the BXXX in the list.
Control Group Required: The control group is the security designation that dictates
what project(s) users have access to. This field populates automatically with your
control group when creating new projects. The data in this field may be changed
in order to transfer a project to another person/control group.
IPM Interface button: Refer to section 2.5.1 for complete details. Please note this
feature only functions within VDOT networks.
Item Code Table Required: Select from the drop-down menu. This coincides with the
current Road and Bridge Specifications manual.
16 = 2016 Blue spec book or 07 = 2007 Green spec book
Unit System Required: Defaults to E (English Project). Note: Metric is no longer used.
State Project No.: Enter the state project number in its entirety, complete with dashes,
commas, etc. with the (FO) or (NFO) or State funded projects get no
designation at the beginning.
Federal Project No: Enter the Federal Project Number, if applicable, in its entirety,
complete with dashes, parentheses, etc. If the project is not federally-funded, enter
NONE. Ex.: NH-5401(876)
EXAMPLE: (FO) 0123-076-F29, C501, B604, B605
(NFO)HSIP-005-706, N501
ST8B-968-F17, N501
CITY or COUNTY CODE
TYPE
SECTION
(FO) = FEDERAL OVERSIGHT or (NFO) = NO FEDERAL OVERSIGHT or blank = State Funded
ROUTE #

VDOT Preconstruction User’s Manual October 2017 2-11
Federal Oversight: Select the appropriate code from the drop-down menu. Reminder:
The (NFO) or (FO) designation should be added to the State project # field. FO = Federal Oversight
NFO = No Federal Oversight
N/A = State Project
Federal ID: Enter only the numbers from the Federal Project Number, with no
punctuation, no alpha characters, and seven digits maximum.
If the project does not have a Federal Project Number enter “NONE”
EXAMPLE: Fed. Project No. is STP-5A03(264)
Enter, 503264
FHWA 534 Required: Enter the five alpha-numeric character code, found in the Project
Pool of iPM.
Controlling Project Checkbox: Should be checked for the project containing the most
money. See Chapter 8 of this manual for details.
Primary Project District ID: This field populates automatically.
Urban/Rural Class: Select the appropriate code from the drop-down menu: U, R or S.
Project Type: Select the appropriate code from the drop-down menu.
RAAP (Regular Advertisement and Award Process) are advertised on the 2nd
Tuesday for
a minimum of 21 days. Most actually exceed 35 days. They are mailed to our
prequalified contractors and posted on VDOT’s Contractors Advertisement Bulletin
Board (CABB) web system and the eVa website.
SAAP (Special Advertisement and Award Process) are advertised for 10 days minimum.
Most actually exceed 25 days. They are mailed to our prequalified contractors and
posted on VDOT’s Contractors Advertisement Bulletin Board (CABB) web system
and the eVa website.
PROJECT TYPE CODE
CODE USE
CM Construction / Maintenance Hybrid
CMMR Maintenance RAAP
CMMS Maintenance SAAP
CMSR Maintenance Schedule RAAP
CR Construction RAAP
CS Construction SAAP
EM Emergency

VDOT Preconstruction User’s Manual October 2017 2-12
Progress Schedule Category Required: Select the appropriate Progress Schedule from
the drop-down menu.
For description of codes or references, See Appendix H or open this link:
http://www.virginiadot.org/business/resources/const/projectcategories.pdf
Date of Estimate Required: When you first create (add) the Project, this field will be
automatically populated with the current date. This field indicates the date the
estimate was first created.
Last L&D Estimate: This field populates automatically.
Loaded L&D Estimate: This field populates automatically.
Date of Gen Bid Base Prices: This is a date field. Users should change the date in this
field when the prices have been changed or generated from the database.
Project Validation button: This is a VDOT specific project validation that should be run
in conjunction with the Project validation from the blue component bar. It checks
the following:
a. Checks all Regular/Bid categories do not have items checked Non-Bid.
b. Compares CEI & Contingency lump sums versus percentages at the category
level. Projects can have lump sum or percentages but never both.
c. Checks that a project has at least one (1) Road Segment.
d. Checks that all items are assigned to a Fund Package.

VDOT Preconstruction User’s Manual October 2017 2-13
2.5.1 iPM Interface
Preconstruction has an interface that will pull the general project data from iPM and transfer
the data into the fields of Preconstruction. The project in iPM is associated by the UPC field
so it is crucial that the UPC field be filled out correctly. In order for this interface to work,
the user must reside on the VDOT network. Unfortunately, this feature does not work for
external users/Consultants.
The IPM Interface must be used from within an existing Project. From the Home Screen
select Projects.
Type your Project ID into the Search box on the Project Overview Screen. Click on the
Project ID once you have found your project

VDOT Preconstruction User’s Manual October 2017 2-14
You are now in the Project on the General Tab. Scroll to the bottom of the page and select the
button IPM Interface.
The iPM interface will open a new window on your web browser. This page will show the
current data you have on your project in Precon. Verify that the UPC Code is correct before
moving forward.

VDOT Preconstruction User’s Manual October 2017 2-15
Select the Import IPM Data button. A new widow will appear. The column on the left displays
the current data you have in Precon and the column on the right displays the data in IPM. The
Select checkbox beside each row allows you to choose which fields you want to overwrite with
iPM Data. Click the Update button to import the iPM data or the Close button to cancel
importing those fields to Precon. You will receive a message that the data updated successfully.
Click OK to return to the IPM main screen.

VDOT Preconstruction User’s Manual October 2017 2-16
Next, select the Import Job Data button. A new window will appear with the IPM Job Data.
Depending on the UPC, there may be multiple selections associated to the project. The Select
checkbox allows the user to select which job they would like to import. Click the Update button
to import the iPM data or the Close button to cancel importing those fields to Precon. You will
receive a message that the data updated successfully. Click OK to return to the IPM main screen.
VDOT Preconstruction User’s Manual October 2017 2-17
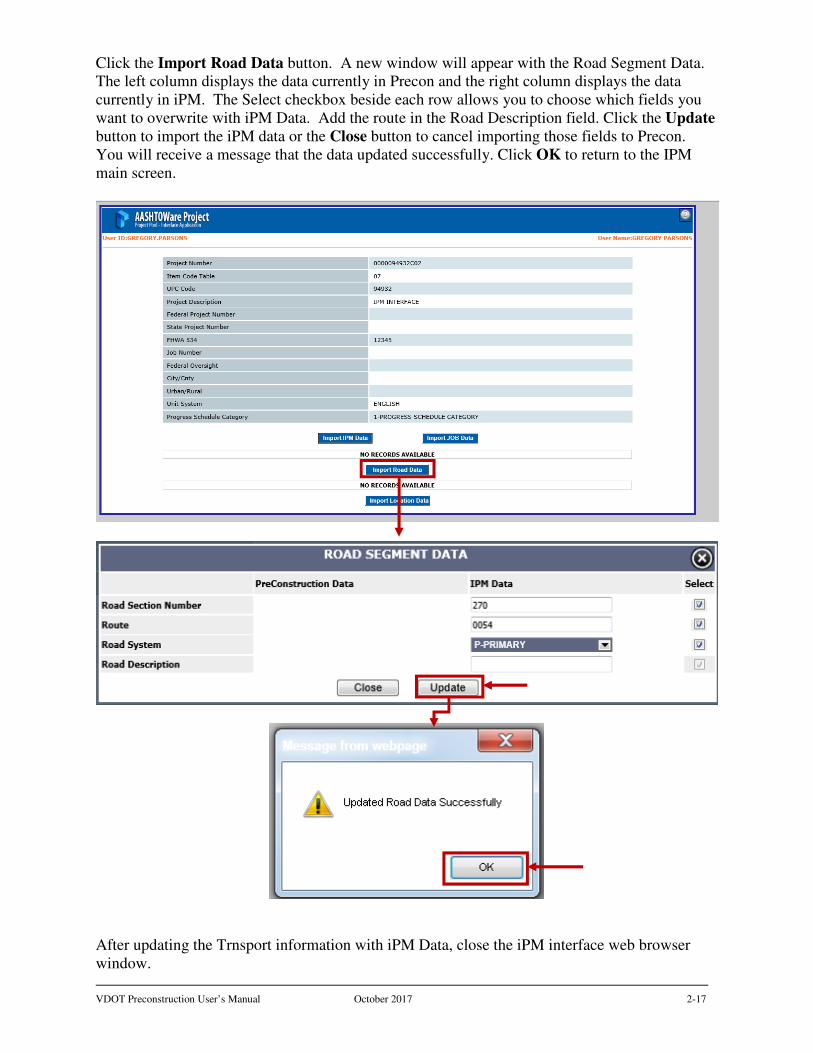
Click the Import Road Data button. A new window will appear with the Road Segment Data.
The left column displays the data currently in Precon and the right column displays the data
currently in iPM. The Select checkbox beside each row allows you to choose which fields you
want to overwrite with iPM Data. Add the route in the Road Description field. Click the Update
button to import the iPM data or the Close button to cancel importing those fields to Precon.
You will receive a message that the data updated successfully. Click OK to return to the IPM
main screen.
After updating the Trnsport information with iPM Data, close the iPM interface web browser
window.

VDOT Preconstruction User’s Manual October 2017 2-18
Notice that the Precon data is not showing the new iPM Data. This is because the database has
been updated since your last page refresh. Select the F5 key to refresh your page. Notice that
the data from iPM is now displayed on your project.

VDOT Preconstruction User’s Manual October 2017 2-19
2.6 Counties, Districts and Points tabs - Associating these to a Project
Counties tab
Each project must have at least one county associated to it and its Percentage must equal 100%.
Failure to associate a county will prevent the generation of the preliminary detail estimate report.
The Primary County selected should match the county that is used in IPM.
Figure 2 - The Counties tab
When adding a County at the Project summary screen, click the New button, a blank row will open to enter the county information.
App. C
Check the Primary
County, used in IPM
Select County from pull-down
Click the Save button when finished
All together Must equal
100.00

VDOT Preconstruction User’s Manual October 2017 2-20
To add a County:
1. When the Counties tab is displayed, if it is not showing a blank row, click the New
button and enter the following information:
2. County ID: this is a search field. Enter the county number or name and then select the
appropriate code from the drop-down menu. See Appendix C for a complete listing.
3. Percentage: this is a required field and will default to 100.
• This is the percentage of the Project that is associated with this County.
4. Primary: Checkbox – This should always be checked for the larger percentage county.
• One county must be flagged as the Primary County, which is the controlling
county. This primary county should match the county shown in iPM.
5. When the county information has been entered, click the Save button.
2.6.1 Deleting a County from a Project
To remove a County from a Project, select the Counties tab and select the County row’s Action
Menu and select Delete. After the row turns grey, click on Save to complete the delete.
To change a County to a different County, go to the Counties tab and select the County ID
field and change to the new County ID, and then select Save.

VDOT Preconstruction User’s Manual October 2017 2-21
2.7 District Tab
Each project must have at least one District and its associated Residency assigned to the project,
which can be found in iPM.
Figure 3 - The Districts tab
To add a District:
1. When the District tab displays, if it is not showing a blank row, click the New button and
enter the following information:
2. District ID: This is a search field. Hit the Enter key or enter all or part of the District
number or name and select the appropriate District from the drop-down list. See
Appendix D for a complete list.
District District No. Bristol 1
Salem 2
Lynchburg 3
Richmond 4
Hampton Roads 5
Fredericksburg 6
Culpeper 7
Staunton 8
Northern VA 9
3. Primary: Checkbox: Should always be checked. This checkbox indicates that the
District is the first or principal district in which work will be performed for this project.
• If there are multiple Districts, then one District must be flagged as the Primary
District and contains the majority of the work.
When adding a District at the Project summary screen, click the New button, a blank row will open to enter the district information.
Click the Save button when finished
App. D
Enter the District # or type the name in this search field. Be sure to include the Residency
Should always be checked

VDOT Preconstruction User’s Manual October 2017 2-22
2.8 Points Tab
The Points tab provides vital project data for the From & To description and the Longitude &
Longitude of the project.
Figure 4 - The Points tab
To add Points (location) information:
1. Click the New button and enter the following information:
2. Type field Required: This field will default to Midpoint and can only be Midpoint.
3. Latitude field Required: Enter the Latitude using this format 36:36:43.00.
4. Longitude field Required: Enter the Longitude using this format 80:23:27.00. The
negative should not be entered.
5. Location field Required: Enter the FROM: description and To: description from iPM.
Be sure to hit the Enter key after the From sentence has been entered.
6. Category ID field: Not used, leave blank.
Note about Long/Lat: If a project spans a large area, provide the Long/Lat at the center of the
work area. The Long/Lat fields are used by the Civil Rights Division to determine DBE goals
using a 75 mile radius from the point provided.
Enter the Long/Lat, in the middle of the project, be sure it is on the road or pavement.
Click the Save button when finished
When adding a Points (location) at the Project summary screen, click the New button, a blank row will open to enter the point information.
Enter the From and To descriptions from IPM
Leave blank
Always Midpoint

VDOT Preconstruction User’s Manual October 2017 2-23
2.9 Road Segments tab
A road segment is a portion of a road that can be described by a set of starting and ending
stationing. A Road Segment should be created for each road on the project. A road segment can
be used to locate a specific section of a road as the site for a project's work or a portion of the
project's work. All Precon projects (including Bridge projects) must have at least 1 Road
Segment.
Figure 5 - The Road Segment tab
When adding a Road Segment at the Project summary screen, click the New button, a blank row will open to enter the road segment information.
Click the Save button when finished
IPM
Optional
Enter Primary
leave blank Optional

VDOT Preconstruction User’s Manual October 2017 2-24
The fields on the Road Segment tab are:
1) Name: The name of the Road Segment.
2) Road Section No.: Enter the section number of the Project Number (the third part of
the State Project Number).
Ex.: Project number is 0615-047-169. Section number is 169.
3) Description Required: Enter the word Primary in this field.
4) Lane Mile: A unit of measure one standard lane wide and one mile long. Note: The
Lane miles should not be separated between Road Segments, the project total Lane
Miles should be entered in the first road segment of a project if there is more than 1
Road Segment.
5) Length: The length of the Road Segment in miles, to 4 decimal places.
6) Width: The width of the Road Segment in feet, to 4 decimal places.
7) Applied Depth: The depth of the pavement in the Road Segment in inches (or in
centimeters for metric projects). This field is optional.
8) Road System Required: The functional class of the road (obtained from the title sheet
of the plan set or iPM). Select the appropriate code from the drop-down menu.
9) Route Required: Enter the Route Number exactly as it appears in the State Project
Number, it must be 4 digits:
Ex. #1: Project number is 0064-122-101, C501. Route number is 0064.
Ex. #2: Project number is U000-124-110, B610. Route number is U000.
Ex. #3: Project number is 0615-047-169, C501. Route number is 0615.
10) Beginning Station: Enter the beginning station of the project (from iPM or the plan
set cover sheet) and the “+” and decimals should be included, otherwise this field can be
left blank. (Ex.: 1290+10.72) This field is optional.
11) Ending Station: Enter the ending station of the project (from iPM or the plan set cover
sheet) and the “+” and decimals should be included, otherwise this field can be left blank.
(Ex.: 1360+15.95.) This field is optional.
12) Category ID: A unique identifier assigned to each Project Category in the system. This
field is not used, leave blank.

VDOT Preconstruction User’s Manual October 2017 2-25
2.10 Bridge Segments tab
A bridge segment can be used to locate a specific section of a bridge as the site for a project's
work or a portion of the project's work. It can also refer to an entire bridge. Not all Precon
projects require a Bridge segment but all Bridge projects must include at least one Road
Segment.
Figure 6 - The Bridge Segment Tab

VDOT Preconstruction User’s Manual October 2017 2-26
The fields on the Bridge Segment tab are:
1. Bridge Plan Number Required: Enter the number in this field. Ex: 276-73
2. Description Required: Enter the description.
3. Bridge Type Required: Select the appropriate type from the pull-down.
Bridge Type
Code Description
001 PRESTRESSED CONCRETE BEAM
002 CONCRETE BOX GIRDER
003 RIGID FRAME
004 BOX CULVERT
005 STEEL BOX GIRDER
006 ROLLED BEAM
007 STEEL PLATE GIRDER
008 TRUSS
009 CONCRETE SLAB SPAN
010 CHANNEL BEAM
011 ARCH
012 SWING SPAN
013 BASCULE SPAN
014 COMBINATION PLATE GIRDER & ROLLED BEAM
016 LIFT SPAN
017 RETRACTILE SPAN
018 OTHER
019 PEDESTRIAN OR BIKEWAY BRIDGE
020 PRESTRESSED BOX BEAM
021 PRESTRESSED SLAB
022 PRESTRESSED CONCRETE BEAM, BULB-T
4. Length Required: Enter the length in miles, to 4 decimal places.
5. Width Required: Enter the width in feet, to 4 decimal places.
6. Number of Spans Required: Enter the number of spans as a whole number.
7. Category ID: A unique identifier assigned to each Project Category in the system. This
field is not used.

VDOT Preconstruction User’s Manual October 2017 2-27
2.11 Project Workflow
The Workflow tab is a crucial step in moving an estimate through the phases of the software to
produce the Contract document. Users must make the proper selection for all Projects and the
Prime according to the table below. Leaving the workflow fields blank results in reporting errors.
Figure 7a - The Workflow Tab – PROJECT
Figure 7b - The Workflow Tab – PRIME
Workflow Phase Definitions
WORKFLOW NAME DESCRIPTION NOTES
1 Project Definition Phase Engineers/Designers Use
2 Proposal Definition Phase Construction Division/District SAPP Coordinators
3A Advertisement Phase Locks Proposal/No changes from Projects
Any changes once the Proposal is Advertised must be added in the Addenda phase with proper notification to Document assembly group
3B Addenda Phase Changes only reflected when Addenda is open
Changes made during Advertisement.
4 Bid Letting Phase Construction Division Use Only
ADMIN
Role
Only
5 Post Bid Evaluation Phase Construction Division Use Only
6 Preconstruction has ended Phase
Construction Division Use Only
7 Moved to Construction/SiteManager
Passed to CLR/SiteManager Construction Division Use Only
8 Historical Phase Construction Division Use Only

VDOT Preconstruction User’s Manual October 2017 2-28
2.12 Retrieving a Project
To open an existing project:
1. Click on Projects from the Preconstruction Dashboard located on the Home page.
• This will take you to the Project Overview screen.
2. Clear out the Search by clicking on the eraser, then enter the Project ID (upc number).
3. The Project Summary row will display all projects with that upc that are available in
your control group.
4. Click the Project ID to open it.
Figure 8 - Selecting and Opening a Project
Click the Project ID to open.
Enter the UPC number in the search box, search automatically
begins after the 3rd
digit is typed.

VDOT Preconstruction User’s Manual October 2017 2-29
2.13 Delete a Project
Note: Prior to deleting a project, YOU MUST disassociate the project from the
Prime and the Proposal if attached. See Prime and Proposal chapters for details.
To delete a project
1. Enter the UPC in the search field.
2. Select the row action button for the project you wish to delete.
3. Select Delete.
4. The row will turn grey and can be reversed by clicking the Undo button.
5. Click the Save button to delete the Project.
Figure 10 - Deleting a project
Use this button to reverse the Delete before the Save button is clicked
To confirm the delete click the Save button

VDOT Preconstruction User’s Manual October 2017 2-30
2.14 Copying a Project
To copy a project from the Project Overview screen:
1. Click the row action button of the project you wish to copy, select Copy.
2. When you click on Copy, it will bring up the Copy Project screen displaying the old
Project to be copied.
3. Enter a new and unique Project ID.
4. Click the Copy button on the Copy Project header to complete the copy.
5. The Project will copy without errors or warnings. When completed, the Copy will
return the user to the copied Project’s Project Summary General tab which displays the
new Project ID.
Figure 11 - Copying a Project from the Project Overview Screen
Click the row action button of the project you wish to copy, Select Copy
A new window opens. Enter a new unique Project ID and click the Copy button

VDOT Preconstruction User’s Manual October 2017 2-31
2.14.1 Copy a Project (Alternate Method)
As an alternative, the copy can be performed from within a Project from the General Tab.
• Click the blue component bar action button and select Copy.
• Enter a new Unique Project ID and the click the Copy button.
Figure 12 - Copying a Project from within a Project
A new window opens. Enter a new unique Project ID and click the Copy button

VDOT Preconstruction User’s Manual October 2017 2-32
2.15 Validating a Project
All projects/estimates should be validated to check for errors. The validation process generates a
list of warnings about the state of the project and does not stop further processing. Validation can
be performed at any time in the estimate life-cycle but should be run before the user runs detail
reports. Validation can be run the Project Overview screen or from within an open project.
2.15.1 Validating a project from the Project Overview
To validate a project without opening it, perform the following steps:
1. Navigate to Project Overview screen
2. Enter the UPC in the search box.
3. Select the Row action button for that project
4. Select Validate Project.
5. A new browser window/tab opens and
provides results of validation, error messages
will appear here using the color coding
described in Chapter 1.
6. If errors occur, close the validation browser
tab, make the necessary corrections and then
re-run the Validation so that your project is
free of errors.

VDOT Preconstruction User’s Manual October 2017 2-33
2.15.2 Validating from an Open Project
Validation within an open project is available in two locations: Project Summary or Project
Category and Item Summary screens.
To validate from an open project, perform the following steps:
1. Navigate to the Project Overview screen.
2. Enter the UPC in the search box.
3. Open the desired project.
4. Select the Row action button from either the Project Summary or Project Category
and Item Summary screens.
5. Select Validate.
6. A new browser window/tab opens and provides results of validation, error messages
will appear here using the color coding described in Chapter 1.
7. If errors occur, close the validation browser tab, make the necessary corrections and
then re-run the Validation so that your project is free of errors.
Figure 13 – Validate from Project Summary

VDOT Preconstruction User’s Manual October 2017 2-34
2.15.3 Validation Error Checking Overview
This validation is the standard “out of the box” checking from the software company and is not
customizable by an agency.
The Validation process checks PROJECTS for the following:
� The project contains at least one project item.
� The project contains at least one county.
� The sum of the project county percentages equals 100%.
� The project contains at least one district.
� The project contains at least one category.
� VDOT’s agency setting for Require Project Item Assigned to Category option
is set to True, then all project items must be assigned to a category.
� All project items must be assigned to a category.
� All project items must have a quantity.
o blank, null are not valid, 0 is a warning
� All project items must have a price.
o blank, null are not valid, 0 is a warning
o If the Bid Requirement Code field is set to Minimum for an item, the project
item price must be greater than or equal to the value in the Unit Price
Comparison field.
o If the Bid Requirement Code field is set to Maximum for an item, the project
item price must be less than or equal to the value in the Unit Price Comparison
field.
� The project contains a point location record with the word "midpoint" recorded in
the Description field and recorded values for longitude and latitude.
� All project items have been funded.
• All fund packages associated with an item must pass funding validations.
• All alternate sets attached to a project item must have an alternate member
defined at the item level.
o For each alternate set, there should be at least one item with an assigned set
and member.
• All alternate sets attached to a project category must have an alternate member
defined at the category level.
o For each category alternate set, there should be at least one category with
an assigned set and member.

VDOT Preconstruction User’s Manual October 2017 2-35
The Validation process checks PROPOSALS for the following:
� The proposal has a primary county.
� The proposal has at least one associated project.
� A proposal time record is identified as Main Time.
� Proposal items exist for the proposal.
� All proposal items have a quantity.
o blank, null are not valid; 0 is a warning.
� All proposal items have a price.
o blank, null are not valid; 0 is a warning.
o Unit prices do not fall outside the boundaries of the minimum or maximum value
held in the Unit Price Comparison field whenever multiple projects containing
items with minimum or maximum bid requirements but with different Unit Price
Comparison values are added to the same proposal.
� Proposal items identified as fractional lump sums have the same estimated price
and quantities that sum to 1.0. For more information about lump sums, please see
Chapter 5 for more details.
� All proposal items are assigned to a section (needed for Expedite).
Project Validation button This is a VDOT specific project validation that should be run in conjunction with the Project
validation from the blue component bar. It checks the following:
a. Checks all Regular/Bid categories do not have items checked Non-Bid.
b. Compares CEI & Contingency lump sums versus percentages at the category
level. Projects can have lump sum or percentages but never both.
c. Checks that a project has at least one (1) Road Segment.
d. Checks that all items are assigned to a Fund Package.

VDOT Preconstruction User’s Manual October 2017 3-1
3. MAINTENANCE-FUNDED PROJECTS For simplicity in this chapter, this type of project will be referred to as a maintenance-funded project. This chapter covers adding, changing and deleting maintenance-funded projects. A special chapter is required for this since much information input for maintenance-funded projects differs from construction projects. There are two basic types of maintenance-funded projects:
o Schedule Work (at multiple locations with like assets)
o Maintenance-funded Project at a single location (i.e., Bridge Repair)
3.1 Schedule Work (at multiple locations with like assets) An example of schedule work is Plant Mix or Bridge Joint Repairs being done in 8 different counties, and involving all three types of road systems (interstate, primary, secondary). In Preconstruction, this work needs to be broken down into separate projects BY COUNTY, BY SYSTEM. For the above-mentioned example, 24 projects would need to be created.
TIP: If the projects will be basically the same (same funding, same pay items, etc.), take advantage of the Copying a Project option. Prepare one project in its entirety, composing the category, attaching the funding and the items, and THEN copy the project. Once the project is copied, minor modifications may be made to the copy(ies). See 2.14 Copying a Project for instructions to copy a project.
3.2 Maintenance-funded Project at a single location (i.e. Bridge Repair)
Entry for Maintenance-funded projects at a single location is entered the same as Construction projects with the exception of the Project ID (see Appendix A). Refer to Section 2 – Projects of this manual.
All users should use all UPPER CASE for ALL fields in Preconstruction
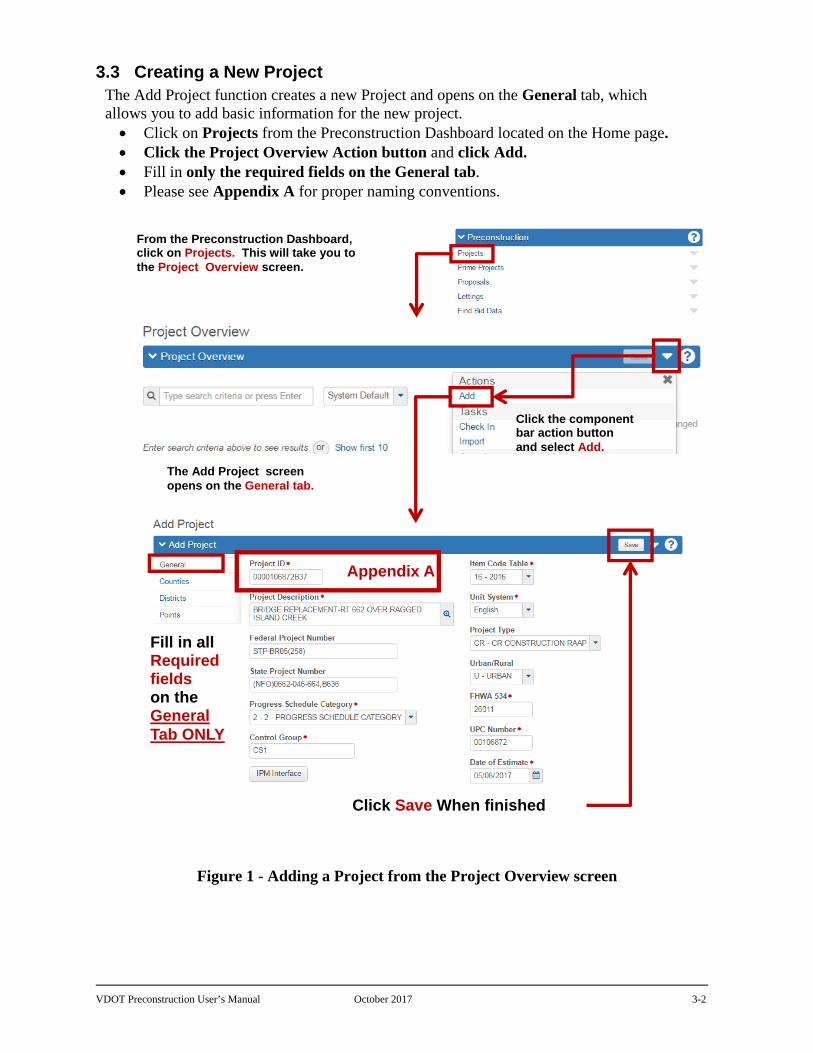
VDOT Preconstruction User’s Manual October 2017 3-2
Appendix A
Fill in all Required fields on the General Tab ONLY
Click Save When finished
The Add Project screen opens on the General tab.
From the Preconstruction Dashboard, click on Projects. This will take you to the Project Overview screen.
Click the component bar action button and select Add.
3.3 Creating a New Project The Add Project function creates a new Project and opens on the General tab, which allows you to add basic information for the new project. Click on Projects from the Preconstruction Dashboard located on the Home page. Click the Project Overview Action button and click Add. Fill in only the required fields on the General tab. Please see Appendix A for proper naming conventions.
Figure 1 - Adding a Project from the Project Overview screen

VDOT Preconstruction User’s Manual October 2017 3-3
The Add project screen requires entry of only the minimum required fields for the database to determine if the Project ID is unique, once the new project is saved then the user will complete the remaining fields.
Please use all UPPER CASE for ALL fields in Precon.
The following fields are required (indicated by a red asterisk ) when adding a new Project:
1. Project ID (See Appendix A for complete rules and instructions)
2. Project Description
3. Progress Schedule Category (See Appendix H)
4. Control Group
5. Item Code Table
6. Unit System
7. FHWA 534
8. UPC Number (must be 8 digits)
9. Date of Estimate
The Add Project screen will display four tabs: General, Counties, Districts and Points.
The remaining Project Summary tabs – Road Segment, Bridge Segment and Workflow will not appear until you have saved the Add Project screen and go to the Project Overview screen and retrieve the newly added Project.
To save the newly added project, click the Save button found on the right side of the Add Project header.

VDOT Preconstruction User’s Manual October 2017 3-4
Saving the Project and Correcting Errors
When all tabs of the Add Project screen have been completed or when you are ready to save your
data, click the Save button to insure that all information entered has been saved.
If you have completed all required field criteria satisfactorily and the Project ID (PCN) is a unique number, the project will be added/saved.
The Project ID field can be changed as long as you are on the Add Project screen, even if the project was previously saved on that screen.
Once you navigate away from the Add project screen, then you can only return to that project by way of the Project Summary screen. The Project ID field will convert to display-only and cannot be changed. This ensures unique Project ID’s in the database.
If a required field was not filled-in or incorrect data entered at a field which is supported with a reference table, an Error box will display. For example, if you left a required field blank or entered invalid data, you will see an Error box at the top giving information as to what field was left blank or contains an invalid value.
If you attempted to create a project with a Project ID already in existence in the Precon database, you will see an Error box with the message that the Project ID (the primary key) is already being used by another project. A project could already exist in another control group with the Project ID you have just attempted to create. Precon will not allow duplicate Project IDs.
Note: when any errors are presented, they may only show up one at a time, so you may have to go through several corrections before a save is successful.
Errors must be corrected before the new project record will be saved/created.

VDOT Preconstruction User’s Manual October 2017 3-5
3.3.1 Retrieving a Project
Now that you have created & saved your Project and the required fields on the General tab, click the Overview link, enter the new project’s UPC Number and complete the remaining tabs; Counties, Districts, Points, Road Segment, Bridge Segment and Workflow tabs.
Figure 3 - Retrieving a Project from the Project Overview Screen
To complete the Project:
1. Click on the Overview quick link at the top left of the Add Project screen or click on the Home button and then click on Projects from the Preconstruction Dashboard located on the Home page.
This will take you to the Project Overview screen.
2. Clear out the Search by clicking on the eraser, and then enter the UPC Number.
3. The Project Summary row will open. Click on the Project ID to open your Project.
Click the Project ID to open.
Enter the UPC number in the search box, search automatically
begins after the 3rd
digit is typed.

VDOT Preconstruction User’s Manual October 2017 3-6
3.3.2 Project Quick links Quick links are displayed in blue text below the Menu Bar and above the blue component bar. These links allow you to quickly jump to application pages for the project. All but the Wage Decisions quick links are discussed in later chapters.
• Users do not need to enter Wage decisions information at the project level. That information is added in the Proposal. See chapter 9 for details
Not Used

VDOT Preconstruction User’s Manual October 2017 3-7
Current Spec Book
Pg. 2-9
State Project #
VDOT user or
Company Name
8 Digits Required
App. A
iPM
App. H
Pg. 2-11
Numerals from Federal Project Number
For the Project Prime
iPM
Const. Division Staff
iPM
iPM
Pg. 2-8
Enter/Update Date Items Priced
App. E
iPM
iPM/App. C
Enter Date Estimate Started
iPM
3.3.2 General tab
Figure 4 - The General Tab Fields

VDOT Preconstruction User’s Manual October 2017 3-8
Use the [TAB] key to move between fields and enter the project information on the General tab.
Some fields have Reference Tables. As you [TAB] to such a field, a drop-down arrow will appear. A selection MUST be made from the available choices in the table.
General Tab FIELD DESCRIPTIONS:
Project ID (PCN) Required: required - The Project ID (PCN) consists of 14 characters. Refer to Appendix A for Project ID instructions. (Once the project is completed and added to the database, this field becomes display-only and cannot be changed.)
Examples: M514SSB104463, M217PMN110484 Project Description Required: For all projects (other than bridge), enter the description
of the type of work being performed on this project. The description from iPM is the best source. For Bridge projects, enter the description from the front sheet title block from the plan set.
City/Cnty: Select County or City in which the project is located from the drop-down
menu which should match the State Project Number. Appendix C & D includes County & City codes and appropriate conversions when required.
Ex.: Project number is 0615-047-169. County/City Code is 047. Pavement Type: Select the appropriate code from the drop-down menu.
Pavement Type Code
Code Description
ASPH Asphalt Concrete
BITC Bituminous Concrete
BITP Bituminous Penetration
COMB Combination Asphalt & Concrete
GRDE Grade & Drained Earth
GRVL Gravel or Stone
MIXB Mixed Bituminous
OTHR All Others
POCC Portland Cement Concrete
PRIM Primitive
UNIM Unimproved

VDOT Preconstruction User’s Manual October 2017 3-9
Project Status: Status of the project. Select the appropriate code from the drop-down menu.
Project Status Table
Code Description
CE Conceptual Estimate
CON1 Construction (1st Submission)
CON2 Construction (2nd Submission)
FI Field Inspection
LAS Passes to LAS
PE Preliminary Engineering
PFR Preliminary Field Review
PH Public Hearing
RWS Right of Way Stage
SR1 Secondary Roads Project Initiative
SYP Six Year Plan
Project Work Type: Select the appropriate code from the drop-down menu
(Maintenance Surface Treatment, Maintenance Signals, Maintenance Asphalt Resurfacing, etc.). Maintenance work types are MAR, MSS, or MST. See Appendix E
Project Item Totals: This field populates automatically. UPC Num Required: Enter the UPC number of the project. This field must have 8
digits, please add leading zeros to the UPC number to attain 8 digits in this field. Note: this field must match in all Projects under a Prime.
Estimator: This field designates the individual performing the independent Evaluative Estimate. Select the appropriate code from the drop-down menu.
Designer: This field designates the individual entering this estimate in Web Trnsport. Select the appropriate code from the drop-down menu. Note: All VDOT users should have their name in the list. If your name is not in the list please contact [email protected]. Consultants may find their firm name in the list.
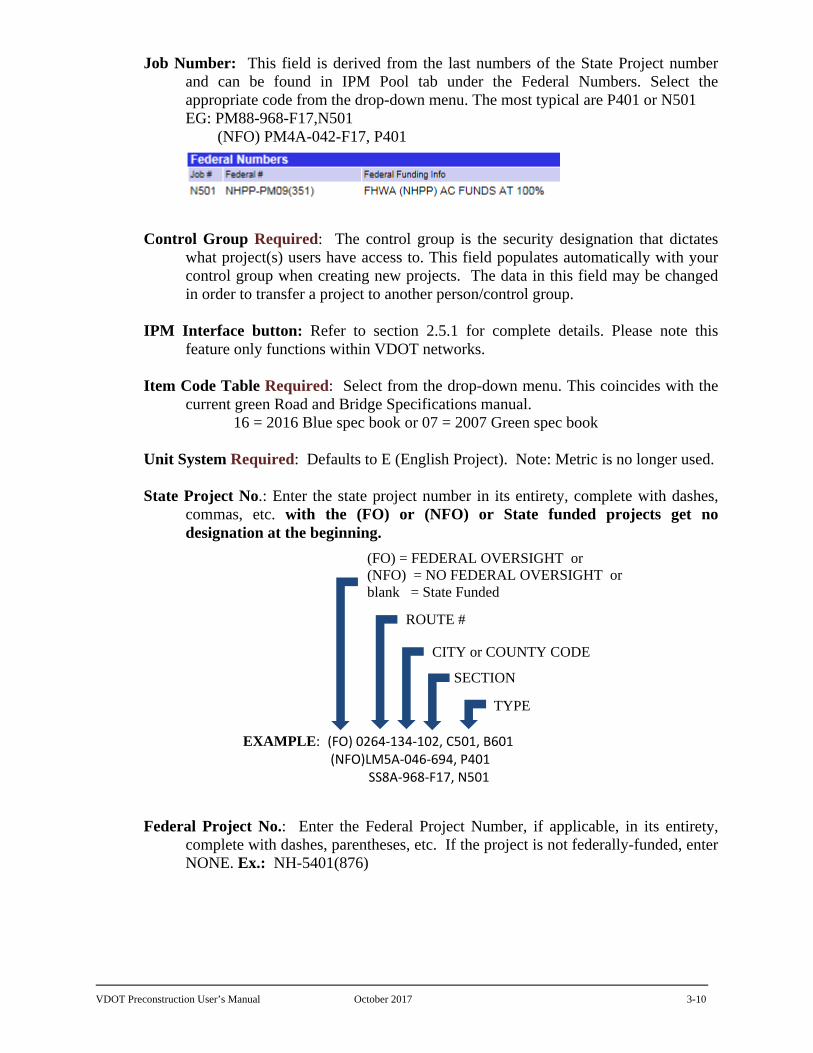
VDOT Preconstruction User’s Manual October 2017 3-10
EXAMPLE: (FO) 0264‐134‐102, C501, B601 (NFO)LM5A‐046‐694, P401
SS8A‐968‐F17, N501
CITY or COUNTY CODE
TYPE
SECTION
(FO) = FEDERAL OVERSIGHT or (NFO) = NO FEDERAL OVERSIGHT or blank = State Funded
ROUTE #
Job Number: This field is derived from the last numbers of the State Project number and can be found in IPM Pool tab under the Federal Numbers. Select the appropriate code from the drop-down menu. The most typical are P401 or N501
EG: PM88-968-F17,N501 (NFO) PM4A-042-F17, P401
Control Group Required: The control group is the security designation that dictates what project(s) users have access to. This field populates automatically with your control group when creating new projects. The data in this field may be changed in order to transfer a project to another person/control group.
IPM Interface button: Refer to section 2.5.1 for complete details. Please note this
feature only functions within VDOT networks. Item Code Table Required: Select from the drop-down menu. This coincides with the
current green Road and Bridge Specifications manual. 16 = 2016 Blue spec book or 07 = 2007 Green spec book Unit System Required: Defaults to E (English Project). Note: Metric is no longer used. State Project No.: Enter the state project number in its entirety, complete with dashes,
commas, etc. with the (FO) or (NFO) or State funded projects get no designation at the beginning.
Federal Project No.: Enter the Federal Project Number, if applicable, in its entirety,
complete with dashes, parentheses, etc. If the project is not federally-funded, enter NONE. Ex.: NH-5401(876)

VDOT Preconstruction User’s Manual October 2017 3-11
Federal Oversight: Select the appropriate code from the drop-down menu. Reminder: The (NFO) or (FO) designation should be added at the beginning of the State project # field with parenthesis.
FO = Federal Oversight NFO = No Federal Oversight N/A = State Project Federal ID: Enter only the numbers from the Federal Project Number, with no
punctuation, no alpha characters, and seven digits maximum.
If the project does not have a Federal Project Number enter “NONE”
EXAMPLE: Fed. Project No. is STP-5A03(264) Enter, 503264
FHWA 534 Required: Enter the five alpha-numeric character code, found in the Project Pool of iPM.
Controlling Project Checkbox: Should be checked for the project containing the most
money. See Chapter 8 of this manual for details. Primary Project District ID: This field populates automatically.
Urban/Rural Class: Select the appropriate code from the drop-down menu: U, R or S. Project Type: Select the appropriate code from the drop-down menu.
RAAP (Regular Advertisement and Award Process) are advertised on the 2nd Tuesday for
a minimum of 21 days. Most actually exceed 35 days. They are mailed to our prequalified contractors and posted on VDOT’s Contractors Advertisement Bulletin Board (CABB) web system and the eVa website.
SAAP (Special Advertisement and Award Process) are advertised for 10 days minimum.
Most actually exceed 25 days. They are mailed to our prequalified contractors and
PROJECT TYPE CODE
CODE USE
CM Construction / Maintenance Hybrid
CMMR Maintenance RAAP
CMMS Maintenance SAAP
CMSR Maint Schedule RAAP
CR Construction RAAP
CS Construction SAAP
EM Emergency

VDOT Preconstruction User’s Manual October 2017 3-12
posted on VDOT’s Contractors Advertisement Bulletin Board (CABB) web system and the eVa website.
Progress Schedule Category Required: Select the appropriate Progress Schedule from the drop-down menu.
For description of codes or references, See Appendix H or open this link: http://www.virginiadot.org/business/resources/const/projectcategories.pdf
Date of Estimate Required: When you first add the Project, this field will be automatically populated with the current date.
Last L&D Estimate: This field populates automatically.
Loaded L&D Estimate: This field populates automatically. Date of Gen Bid Base Prices: This field no longer populates automatically, users
should fill in this field every time they price Items and/or Category Items. iPM Interface Button: Please see 2.5.1 of this manual for complete details. Project Validation button: This is a VDOT specific project validation that should be run
in conjunction with the Project validation from the blue component bar. It checks the following: a. Checks all Regular/Bid categories do not have items checked Non-Bid. b. Compares CEI & Contingency lump sums versus percentages at the category
level. Projects can have lump sum or percentages but never both. c. Checks that a project has at least one (1) Road Segment.
d. Checks that all items are assigned to a Fund Package.

VDOT Preconstruction User’s Manual October 2017 3-13
3.3.3 Counties, Districts and Points tabs - Associating these to a Project
Counties tab
Each project must have at least one county associated to it and its Percentage must equal 100%. Failure to associate a county will prevent the generation of the preliminary detail estimate report. The Primary County selected should match the county that is used in IPM.
Figure 5 - The Counties tab
When adding a County at the Project summary screen, click the New button, a blank row will open to enter the county information.
App. C
Check the Primary
County, used in IPM
Select County from pull-down
Click the Save button when finished
All together Must equal
100.00

VDOT Preconstruction User’s Manual October 2017 3-14
To add a County:
1. When the Counties tab is displayed, if it is not showing a blank row, click the New button and enter the following information:
2. County ID: this is a search field. Enter the county number or name and then select the appropriate code from the drop-down menu. See Appendix D for a complete listing.
3. Percentage: this is a required field and will default to 100.
This is the percentage of the Project that is associated with this County.
4. Primary: Checkbox – This should always be checked. One county must be flagged as the Primary County, which is the controlling
county. Since the County Percentage must be 100%, this county must be flagged as Primary.
5. When the county information has been entered, click the Save button.
3.3.3.1 Deleting a County from a Project
To remove a County from a Project, select the Counties tab and select the County row’s Action Menu and select Delete. After the row turns grey, click on Save to complete the delete.
To change a County to a different County, go to the Counties tab and select the County ID field and change to the new County ID, and then select Save.

VDOT Preconstruction User’s Manual October 2017 3-15
3.3.4 District Tab
Each project must have at least one District and its associated Residency assigned to the project, which can be found in iPM.
Figure 6 - The Districts tab
To add a District:
1. When the District tab displays, if it is not showing a blank row, click the New button and enter the following information:
2. District ID: This is a search field. Hit the Enter key or enter all or part of the District number or name and select the appropriate District from the drop-down list.
District District No. Bristol 1 Salem 2 Lynchburg 3 Richmond 4 Hampton Roads 5 Fredericksburg 6 Culpeper 7
Staunton 8 Northern VA 9
3. Primary: Checkbox – This checkbox indicates that the District is the first or principal district in which work will be performed for this project.
If there are multiple Districts, then one District must be flagged as the Primary District.
When adding a District at the Project summary screen, click the New button, a blank row will open to enter the district information.
Click the Save button when finished
App. D
Enter the District # or type the name in this search field. Be sure to include the Residency
Should always be checked

VDOT Preconstruction User’s Manual October 2017 3-16
3.3.5 Points Tab Each project must have at least one Project Point for the “From and To description”, and the longitude and latitude for the project
All fields on the Points tab are required when you access this tab, enter data and save it.
Figure 7 - The Points tab
To add Points (location) information: 1. When clicking the points tab, if it is blank, click the New button and enter the following
information:
2. Type field Required: This field will default to Midpoint and can only be Midpoint.
3. Latitude field Required: Enter the Latitude using this format 36:36:43.00.
4. Longitude field Required: Enter the Longitude using this format 80:23:27.00. The negative should not be entered.
5. Location field Required: Enter the Residency Name or Various (Ex: Saluda Residency)
6. Category ID field: Not used, leave blank.
Note about Long/Lat: If a project spans a large area, provide the Long/Lat at the center of the work area. The Long/Lat fields are used by the Civil Rights Division to determine DBE goals using a 75 mile radius from the point provided.
Enter the Long/Lat, in the middle of the project, be sure it is on the road or pavement.
Click the Save button when finished
When adding a Points (location) at the Project summary screen, click the New button, a blank row will open to enter the point information.
Enter the From and To descriptions from IPM
Leave blank
Always Midpoint

VDOT Preconstruction User’s Manual October 2017 3-17
3.3.6 Road Segments tab
A road segment is a portion of a road that can be described by a set of starting and ending stationing. A Road Segment should be created for each road on the project. A road segment can be used to locate a specific section of a road as the site for a project's work or a portion of the project's work.
Figure 8 - The Road Segments tab
When adding a Road Segment at the Project summary screen, click the New button, a blank row will open to enter the road segment information.
Click the Save button when finished
IPM
Optional
Enter Primary
leave blank Optional

VDOT Preconstruction User’s Manual October 2017 3-18
The fields on the Road Segment tab are:
1) Name: Leave blank
2) Road Section No.: Enter F18. This is the fiscal year that the schedule is Let.
3) Description Required: Enter the description of the type of work performed on this project. EG: Plant Mix Overlay or Primary Plant Mix Resurfacing or Various
4) Lane Mile: A unit of measure one standard lane wide and one mile long. Note: The Lane miles should not be separated between Road Segments, the project total Lane Miles should be entered in the first road segment of a project if there is more than 1 Road Segment.
5) Length: Leave blank
6) Width: Leave blank
7) Applied Depth: Leave blank
8) Road System Required: The functional class of the road (obtained from the title sheet of the road plans). Select the appropriate code from the drop-down menu.
9) Route Required: Enter Various.
10) Beginning Station: Leave blank
11) Ending Station: Leave blank
12) Lane Mile: Leave blank
13) Category ID: Leave blank
3.3.7 Bridge Segments Tab The Bridge Segment tab is not used for Schedule/Maintenance work. Skip this Tab.

VDOT Preconstruction User’s Manual October 2017 3-19
3.4 Project Workflow
The Workflow tab is a crucial step in moving an estimate through the phases of the software to produce the Contract document. Users should make the proper selection for all Projects and the Prime according to the table below.
Figure 9a - The Workflow Tab – Project
Figure 9b - The Workflow Tab – Prime
Workflow Phase Definitions
WORKFLOW NAME DESCRIPTION NOTES
1 Project Definition Phase Engineers/Designers Use
2 Proposal Definition Phase Construction Division/District SAPP Coordinators
3A Advertisement Phase Locks Proposal/No changes from Projects
Any changes once the Proposal is Advertised must be added in the Addenda phase with proper notification to Document assembly group
3B Addenda Phase Changes only reflected when Addenda is open
Changes made during Advertisement.
4 Bid Letting Phase Construction Division Use Only
ADMIN Role Only
5 Post Bid Evaluation Phase Construction Division Use Only
6 Preconstruction has ended Phase
Construction Division Use Only
7 Moved to Construction/SiteManager
Passed to CLR/SiteManager Construction Division Use Only
8 Historical Phase Construction Division Use Only

VDOT Preconstruction User’s Manual October 2017 3-20
3.5 Retrieving a Project
To open an existing project:
1. Click on Projects from the Preconstruction Dashboard located on the Home page.
This will take you to the Project Overview screen.
2. Clear out the Search by clicking on the broom, then enter the Project ID and hit Enter.
3. The Project Summary row will come up. Make sure that the Project ID is correct and click on the Project ID.
4. The Project Summary screen opens with the correct Project ID being displayed.
Figure 10 – Selecting and Opening a Project
Click the Project ID to open.
Enter the UPC number in the search box, search automatically
begins after the 3rd
digit is typed.

VDOT Preconstruction User’s Manual October 2017 3-21
3.6 Deleting a Project
Note: Prior to deleting a project, YOU MUST disassociate the project from the Prime and the Proposal if attached. See Prime and Proposal Sections for details.
To delete a project
1. Enter the UPC in the search field.
2. Select the row action button for the project you wish to delete.
3. Select Delete.
4. The row will turn grey and can be reversed by clicking the Undo button.
5. Click the Save button to delete the Project.
Figure 13 - Deleting a project
Use this button to reverse the Delete before the Save button is clicked
To confirm the delete click the Save button

VDOT Preconstruction User’s Manual October 2017 3-22
3.7 Copying a Project
To copy a project from the Project Overview screen:
1. Click on the Project’s row Action Menu button to open up the Action Menu and click on Copy.
2. When you click on Copy, it will bring up the Copy Project screen displaying the old Project to be copied.
3. Enter a new and unique Project ID..
4. Click the Copy button on the Copy Project header to complete the copy.
5. The Project will copy without errors or warnings. When completed, the Copy will return the user to the copied Project’s Project Summary General tab displaying the new Project ID.
Figure 14 - Copying a Project from the Project Overview Screen
Click the row action button of the project you wish to copy, Select Copy
A new window opens. Enter a new uniqueProject ID and click the Copy button

VDOT Preconstruction User’s Manual October 2017 3-23
3.7.1 Copy a Project (Alternate Method)
As an alternative, the copy can be performed from within a Project from the General Tab.
Click the blue component bar action button and select Copy.
Enter a new Unique Project ID and the click the Copy button.
Figure 15 - Copying a Project from within a Project
3.8 Validating a Project Please see Chapter 2 of this manual for complete Project Validation information.
A new window opens. Enter a new unique Project ID and click the Copy button

VDOT Preconstruction User’s Manual October 2017 4-1
4. CATEGORIES
Preconstruction uses categories to separate items of work into specific groups and is the parent of all items. Before you can add your items (quantities) and funding, categories must be created. A separate category must be created for these areas of criteria:
o Regular Bid Items
o State Forces (Police Patrol, ROW monuments, Railroad, Work performed by state resources, Utility Inspector, etc.)
o Demolition of Buildings (Clearing of Parcels, Closing Wells, Removal of Underground Storage Tanks, Removal of Asbestos)
o Betterment / Utility Relocation
o Contract Requirements (Incentives/Dis-Incentives) Refer to Chapter 5 for more details
o Construction Engineering and Inspection (CEI) Refer to Chapter 5 for more details
o Contingency – Refer to Chapter 5 for more details
Categories are identified with a four-digit number and fall in two distinct types:
1. Bid Category (items the contractor will bid/build) or 2. Non-Bid Category (overhead costs VDOT incurs that the contractor does not bid/use).
It is imperative that the following numbering scheme be followed for BID & NON-BID Categories:
● REGULAR BID Category numbers 0001 - 1999 Ex: 0100, 0150, 0200, 0300, 0400, etc.
Examples:
Road Design, Traffic
or Bridge Project
Utility Project Example:
● NON-BID Category number 2000 - 2999 Work performed by State Forces
Examples: Police Patrol, State Force work,
Utility Inspector, Railway
● NON-BID Category numbers 3001 – 3003
Construction Eng (CEI) Lump Sum: 3001
Contract Requirements: 3002 (Use Incentives/Disincentives here)
Contingency Lump Sum: 3003

VDOT Preconstruction User’s Manual October 2017 4-2
Opening a Project’s Categories and Items
Open the Project
Click the Categories and Items quick link
The Categories tab contains a list of all existing Categories associated with the project. Each Category row contains detail information for that Category.
To expand a Category row, select the Category in the list and click on the Expand button for that row.
Each row contains an Action Menu that lists actions that can be performed for the Category.
Figure 1 - Project's Category and Items Summary Screen

VDOT Preconstruction User’s Manual October 2017 4-3
4.1 Adding a Category To add a new Category in a Project perform the following steps:
1. Select the Categories Tab.
2. Click the New button
3. If the new Category is not expanded to show the fields, click the Expand button.
4. Enter information in the fields listed.
5. Click Save when you are finished to save the new Category.
6. The system displays a message to confirm that the new information was successfully saved.
Figure 2 - Adding a New Category

VDOT Preconstruction User’s Manual October 2017 4-4
CATEGORY FIELD DESCRIPTIONS: Category ID (Number) Required: Enter the unique 4-digit category number. Use the
following format to number the categories:
Regular bid items (including field office): 0100, 0200, 0300, 0400, etc.
Non-bid items
State Forces, Police Patrol, RW Monuments, Utility Inspector,
Railway, etc: (2000-2999)
Lump Sum CEI (3001)
Contract Requirements (Incentives/Disincentives) (3002)
Lump Sum Contingency (3003)
Note that when the estimate is printed, the categories will be arranged numerically; therefore, some thought should be given to the category number assignments.
For Bid Options or Alternates: The Construction Division plan reviewer section is responsible for building bid options/alternates when necessary.
Category description Required: Enter a description. Ex: REGULAR BID ITEMS
Proposal Section Number: Defaults to “0001” and should always be 0001. Combine Like Categories: The checkbox will default to checked and should not be
changed. This field combines several different categories (as long as the funding source and funding percentages are the same) into a single proposal section.
Construction Eng. Pct (aka CEI): A percentage entered in this field will calculate the CEI costs for all the items under that Category. NOTE: CEI percentages should only be used on Regular Bid Item Categories (Categories 0001 through 1999). For Non-Bid Categories 2000-3003, the value should always equal zero.
Contingency Pct Required: When a number is entered in this field, it will calculate that
percentage for all the items in that Category. NOTE: Contingency percentages should only be used on Regular Bid Item Categories (Categories 0001 through 1999). For Non-Bid Categories 2000-3003, the value should always equal zero.
Contingency costs are based on L&D’s IIM-LD-249 --2-Tiered Approach to Project Oversight:
1. Tier I (< or = 5 Million) = 5.0 percent OR 2. Tier II (> 5 Million) = 10.0 percent
Note: If you use the Lump Sum method for entering the Contingency, you must enter 0.00 in this field, please see 5.3 of this manual for complete details.

VDOT Preconstruction User’s Manual October 2017 4-5
Activity Code Required: Choose appropriate value from the drop-down menu. This field classifies and distinguishes between the federal and state funding pool for the Cardinal financial system. This is not to be confused with the Funding packages within a Preconstruction estimate.
The Engineering Divisions uses most often: a.) 631 = Federal (Participating) b.) 731 = NonFED (State – Non Participating) Utilities:
a.) 656 = Federal b.) 756 = State
Demolition of Buildings: a.) 668 = Purchase of Buildings - Federal b.) 768 = Purchase of Buildings –NonFED (State)
Maintenance Activity: This field is for maintenance-funded projects only, Maintenance
project should enter 72000, otherwise leave this field blank. Asset Type: Select an appropriate choice from the pull-down for maintenance-funded
projects only. Leave this field blank
Category Alternate Set ID: A unique identifier assigned to each Category Alternate Set in the Category Alternate Set List. Category alternate sets contain one or more alternate members, and can be used to determine Section alternatives. A Project may contain multiple category alternate sets. Alternates are the Construction Division Plan reviewer’s responsibility. Leave this field blank.
Category Alternate Member ID: A unique identifier assigned to each category alternate
member of a Category Alternate Set. A Category cannot be assigned to a Category Alternate Set without identifying a Category Alternate member. Alternates are the Construction Division Plan reviewer’s responsibility. Leave this field blank.
Federal Eligibility Required: Enter Y or N. This designation can be found in iPM. Federal Structure ID: Enter the 5-digit HTRIS Structure ID. This is a unique 5-digit
number assigned to the structure and may be found on the first screen of the structure inventory in the HTRIS system. (This is not to be confused with the 4-digit Structure Number assigned by the State of Virginia.) Enter the Structure ID in the first 5 spaces of this field, leaving the remainder of the field blank. (Enter leading zeroes if necessary to fill 5 spaces.) If it is not a bridge project, leave this field blank.
The District Safety Inspection personnel in the Districts shall be contacted for the
Structure ID. FHWA Type Code: Choose appropriate value from the drop-down menu. This table
consists of specific Federal Work Type codes. See Appendix F.
Federal Work Code: Choose appropriate value from the drop-down menu. See Appendix G.

VDOT Preconstruction User’s Manual October 2017 4-6
Low Cost Flag: Display only – cannot be changed on this screen. A system generated indicator for a Category Section, or bid item that contributes to the low cost total in an estimate.
Life Cycle Cost: The expected maintenance cost over the life of the work being performed. The value is added to the bid amount for the alternate category in low cost calculations and decisions, but it is not part of the actual award amount. Leave this field blank.

VDOT Preconstruction User’s Manual October 2017 4-7
4.2 Copying a Category
If you are adding a new category to a project that is similar to another category, you can create a copy of the existing category and assign it a new Category ID. This saves the time it would take to enter all the category detail information again. You can then make any minor changes required for the new category. Note: All items that are within the Category are also copied.
You can copy a category to the current project or another project, and choose whether to include associated data such as locations, funds, and alternate sets.
The Category may be copied into any existing Project in your Control Group.
Follow these steps to copy a Category:
1. On the Project Summary screen, click the Categories and Items Quick link.
2. On the Project Category and Item Summary screen, click the Categories tab.
3. Locate the Category you want to copy, and select Copy from the Actions Menu on the Category row.
The system takes you to the Copy Category screen.
4. If you are copying the Category to another Project, enter the destination Project's ID in the Project ID field.
5. Click in the Category ID field, and replace the value with a unique ID for the new Category.
Be sure to follow the format for numbering Categories.
6. If you want to copy associated information to the new Category, select the appropriate check boxes for the type of data you want to copy: Copy Fund Packages, Copy Alternate Sets, and Copy Locations.
7. Click the Copy Category to Project button on the screen header.
8. The system validates the new Category ID, adds the new Category to the destination Project, and takes you back to the Categories tab.
9. When you copy a Category to the same Project, all the information in the source Category is copied to the new Category with the following exceptions and differences:
The Low Cost Flag field values are determined automatically by the system after the copy is made.
Project Item Line Number field values in the copied Category will not necessarily match the source values, but will be determined by the order of insertion into the Project.
10. When you copy a Category to another Project, all the information in the source Category is copied to the new Category with the following exceptions and differences:
The Low Cost Flag field values are determined automatically by the system after the copy is made.
Project Item Line Number and Project Item ID field values in the copied Category will not necessarily match the source Project's values, but will be determined by the order of insertion into the destination Project.

VDOT Preconstruction User’s Manual October 2017 4-8
11. If you do not include the Category's associated information in the copy, the system clears the Section ID, Fund Package ID, Alternate Set ID, and Alternate Member ID fields.
Figure 3 - Copying a Project's Category
To copy a Category (and its contents) to another Project,enter the destination Project ID in the Project ID field.
To copy a Category (and its contents) enter the new Category number.
Click the Copy Category to Project button.

VDOT Preconstruction User’s Manual October 2017 4-9
4.4 Deleting a Category There are 2 methods to delete a Category and this is dependent upon whether the Category includes items.
To Delete a category perform the following steps:
1. Select the action button on the Category row you wish to delete
2. Select Delete.
3. If the Category has items within it, the following error displays.
4. If you are certain you want to delete the Category AND all the items within it, select the action button on the Category row you wish to delete.
5. Select Delete Category and Associated Data.
This means all the items under that Category will be deleted!!
USE EXTREME CAUTION: Once this is selected it deletes automatically. There is no opportunity to Undo!
Figure 4 – Deleting a Category
If Category contains items,Deletion not possible. Deletion only allowed if Category is empty.
Deletes Category and ALL the items within it. CAUTION! Once clicked it automatically deletes. There is no Undo!

VDOT Preconstruction User’s Manual October 2017 5-1
5. ITEMS The Items used in a Preconstruction estimate are contained within the Item Code Table from the current Specification book. There are 2 types of items: Standard Items and Non-Standard items. A complete list can be found here: http://www.virginiadot.org/business/const/resource.asp The Items tab on the Project Category and Item Summary component contains an accordion list of all the items in the project. Each row represents one item. Each row displays an Actions button and values for the Project Item Line Number, Item ID and Description, Quantity, and Unit of Measure fields. If you are working only with the items in a single project category, you can use the Category ID filter at the top of the page to filter out of the list all items except those you are working with. Click the Category ID down arrow, and select the category you want. You can choose No Filter to display all items in the list.
Figure 1 – Project Category and Item Summary Screen

VDOT Preconstruction User’s Manual October 2017 5-2
5.1 Lump Sum Items Lump sum items are items for which a typical unit of measure does not exist (for example, mobilization).
A lump sum item can be defined by three methods:
True lump sum
A true lump sum item is bid in a lump sum amount (that is, with a quantity of 1). The quantity, at the proposal item level, is grouped together as a single unit and the item is priced and bid as a whole. For true lump sum items, the Lump Sum and the Bid as Lump Sum check boxes are selected on the Item Summary component.
Fractional lump sum
A fractional lump sum item has a fractional quantity (greater than 0 but less than 1.0) but, at the proposal level, the quantity must equal a summed quantity of 1.0, and it is bid with a single value. Like true lump sum items, fractional lump sum items have both the Lump Sum and the Bid as Lump Sum check boxes selected on the Item Summary component. If a project item has a fractional lump sum quantity, there must be at least one other project item which, when combined at the proposal level, sums the quantity to 1.0. In order to combine, the fractional lump sum items must have the same unit price. Errors are indicated at the proposal item level and on the proposal validation if these conditions are not met. The same item can be true or fractional depending on how your agency wishes to price that particular item.
Hybrid lump sum
A hybrid lump sum item has a typical unit of measure and quantity (which may be greater than 1), but is bid in a lump sum amount (that is, with a quantity of 1.0). The Bid as Lump Sum check box will be selected, but not the Lump Sum check box. For example, a "Clearing and Grubbing" item can be a hybrid lump sum item if its quantity is measured in terms of acres, but it is bid in a lump sum amount.
Characteristics of Lump Sum Items
Type Lump
Sum Flag
Bid as LS Flag Checked
Has Unit of
Measure
Estimate Quantity
Estimate Price for Multiple Occurances
Proposal Total
Quantity
Bid Quantity
True Yes Yes No 1 Same or Different
1 1
Fractional Yes Yes No 0 < Qty > 1 Same 1 1
Hybrid Yes Yes Yes 0 < Qty Same or Different
1 1
Note: For hybrid items at the proposal item level and bid item level pages, the quantity is displayed as the estimated quantity, but is calculated based on a quantity of 1.0 for the extended item amount.

VDOT Preconstruction User’s Manual October 2017 5-3
5.2 Adding an Item There are 4 ways to add an item to a project, from either the Categories and Items or the Item Worksheet quick link.
Figure 2 – 4 Ways to Add Items
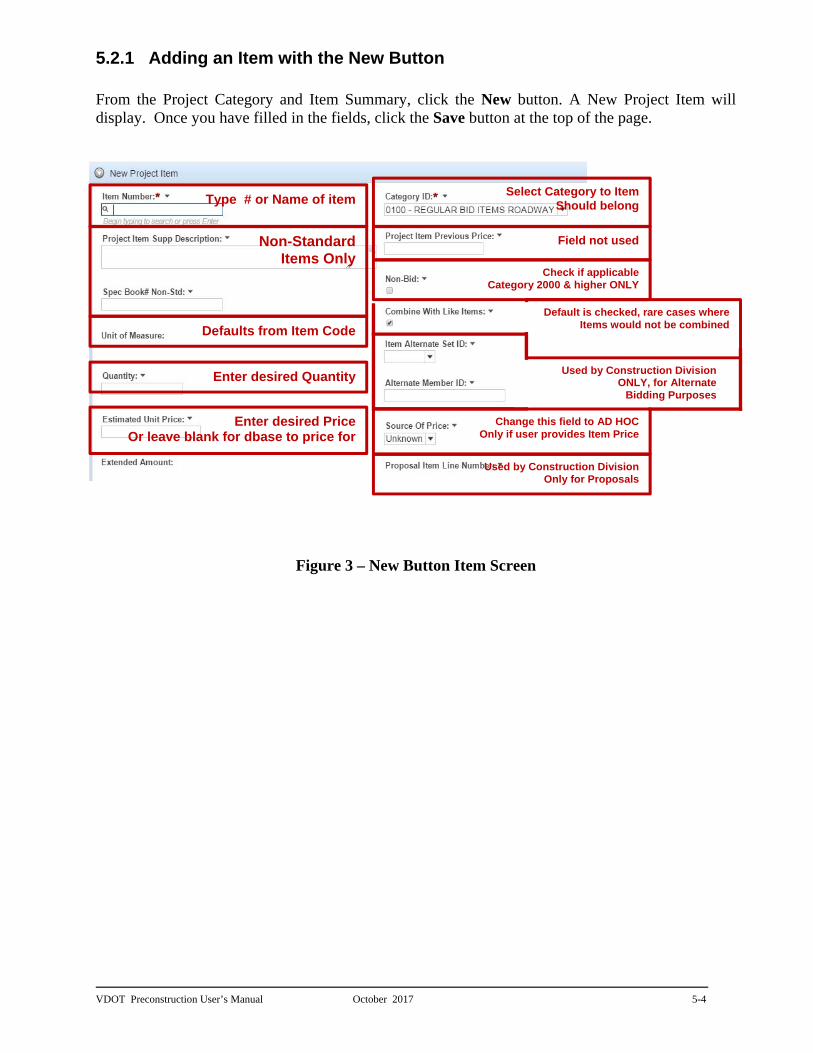
VDOT Preconstruction User’s Manual October 2017 5-4
Default is checked, rare cases whereItems would not be combined
Non-StandardItems Only
Enter desired PriceOr leave blank for dbase to price for
Used by Construction Division Only for Proposals
Defaults from Item Code
Enter desired Quantity
Type # or Name of item
Check if applicable Category 2000 & higher ONLY
Select Category to Item Should belong
Field not used
Change this field to AD HOC Only if user provides Item Price
Used by Construction DivisionONLY, for Alternate
Bidding Purposes
5.2.1 Adding an Item with the New Button From the Project Category and Item Summary, click the New button. A New Project Item will display. Once you have filled in the fields, click the Save button at the top of the page.
Figure 3 – New Button Item Screen

VDOT Preconstruction User’s Manual October 2017 5-5
ITEM FIELD DESCRIPTIONS: Item Number Required: Enter the 5-digit number for the item. The item number or
description will search the item code table. Once the Item Code Table displays your item, click the item to fill in the field.
Project Item Supp Description: This field becomes required for Non-Standard items only.
Enter the wording needed to complete the non-standard item description.
IMPORTANT: Standard Items: this table is designed per the current specification book. If you find that a standard item does not suit your situation or you have a slight deviation of the standard specification, you need to use a Non-Standard item and provide additional information. Users are not permitted to add supplemental description to standard item codes. Non-standard items: Before using a non-standard item, be certain that there is not a standard item that is applicable. Once you determine that there is not an applicable standard item, you will need to select one of the items in the table that is prefixed with NS. These items are interspersed throughout the table in places where deemed appropriate. Additionally, there are very general NS items at the end of many of the groupings; select from these very general NS items only as a last resort. See Appendix B for the Item Code Index. Note: The same NS item number may be used more than once in an estimate as long as the description you give at the Project Item Supp Description field is unique.
There will be occasions when you will be entering NS items for multiple projects that will be advertised on the same contract. Consideration must be given to the non-standard descriptions as to whether or not you wish the items to be combined.
o If you do not wish items to combine, be sure to give unique descriptions in this
field.
o If you wish items to combine, the descriptions given in this field must be exactly the same. In addition, any other information you enter on the item screen must be exactly the same (spec book#, source of price, etc.).
Note: The “NS” will print on the estimate, but will not print on the proposal.
Spec Book# Non-Std: This is a required field for all Non-Standard items entered in an
estimate. Up to three Specification Numbers, or 11 characters, shall be entered. Enter the Specification Number here, if known. If the Specification Number does not reference a location providing measurement and payment details for the Non-Std Item you MUST provide measurement and payment information for the Non-Std Item, to do so you shall enter “ATTD” to indicate Special Provisions are attached in the contract or “PLAN” to indicate pertinent information is on the plans. The Special Provisions and pertinent information associated with “ATTD” or “PLAN” must be submitted to the Construction Division for review and acceptance.

VDOT Preconstruction User’s Manual October 2017 5-6
Unit of Measure: This field will display the units of the item that you selected. Quantity: Enter the quantity of the item. Please Note: Enter the quantity of the item to
the nearest 10th of the quantity on the plan, for example 2.5 - Quantities entered in Precon need to match what’s shown on the summary that the estimate is built from.
Estimate Unit Price: Leave this field blank for standard items. When you have finished
your estimate, the prices will be generated when you generate bid based prices. The designer has the option to overwrite the generated price.
A Price must be filled in for non-standard items. Be sure to lock the price so the generate price process will not overwrite your work/price.
Extended Amount: When the quantity and estimated price are filled in, the extension of
those two numbers is shown in this field. Price Lock Flag: Select the checkbox if you would like to lock the unit price for the
selected item including all Lump Sum items where the users enter a price. This prevents the system from overwriting prices that the user enters.
Category ID Required: Select the Category that you wish to assign the item to from the
drop down list. All items in the estimate must be assigned to a category. Project Item Previous Price: This field is reserved for Construction Division. Changes
from the estimated price can be tracked by utilizing this field. Non-Bid Item: Default is unchecked. Any Item within Categories 2000 through 3003 must
have this box checked to prevent items from appearing on the contractor’s bid sheets. Combine w/Like Items: Defaults to checked to combine like items on the proposal;
uncheck box if you do not want to combine items on the proposal. Item Alternate Set ID: This field is only used by the Construction division, leave field
blank. Alternate Member ID This field is only used by the Construction division, leave field
blank. Source of Price: This value will be set once the item is priced and determined by the
method the price was created. Proposal Line Number: This field is filled in by Preconstruction after generating line
numbers in the proposal.

VDOT Preconstruction User’s Manual October 2017 5-7
Select a Category from the pull-down list
Enter Item number, type the # or name of item
Enter Supp descr & Spc Book NS fields for Non-std items ONLY
Enter Quantity, Note: LS (lump sum) Items quantity should always be 1
*
*
Enter Est Price, leave blank to allow system to generate price
*
Check Non Bid for ALL items in Cat 2000-3003
Check Price Lock for all items that are priced manually or LS
5.2.2 Adding Items with Quick Add From the Project Category and Item Summary, click the action’s button and select Quick Add Items. This will bring you to the Quick Add items screen. Fill in the fields and select the Save button to save the item. Note that Suppl Descr and Spec Book NS fields will be required if you are entering a non-standard item.
Figure 4 – Quick Add Item Screen

VDOT Preconstruction User’s Manual October 2017 5-8
Select Category from pull-down list
Enter Item number, type the # or name of item
Select from list
Click Add to Project
5.2.3 Adding Items with Select Items From the Project Category and Item Summary, click the action’s button and select Select Items. This opens the Select items screen. Select the category from the pull-down menu. Search for the items you want to add. Select the item from the list. Note: the item will highlight and a green check mark displays to the right, multiple items may be selected at the same time. Click the Add to Project button to add the item(s) to the project.
Figure 5 – Select Item Screen

VDOT Preconstruction User’s Manual October 2017 5-9
Type the 4-digit Category ID
Enter the Quantity
Enter Item number, type the # or name of item
Use the Tab key to move from field to field
Enter the Est Price
5.2.4 Adding Items on the Item Worksheet The Breakdown Item Worksheet contains all the breakdown items in the project and provides a quick way to enter and change breakdown item information. To access this component, click the Item Worksheet quick link from any open Project.
Figure 6 – Delete Item Screen

VDOT Preconstruction User’s Manual October 2017 5-10
5.3 Deleting an Item From the Project Category and Item Summary, find the item you want to delete. Select the row actions button for that item and then select Delete from the list of actions.
Figure 7 – Delete Item Screen

VDOT Preconstruction User’s Manual October 2017 5-11
5.4 Determining Construction Surveying Prices, Mobilization, Construction Engineering (CEI), Contingency and Contract Requirement costs
Two items shall be entered on every Road design (Project ID’s ending in CXX) and Structure & Bridge (Project ID’s ending in BXX) Preconstruction estimate.
1. Construction Surveying (Calculate first) – Item Code 00101
2. Mobilization (calculation includes Construction Surveying cost) – Item Code 00100
It is recommended that these two items be entered, with a quantity of 1 and a value of zero, at the time the rest of the items are entered. Then calculate and fill in the cost after all other items in the estimate are complete. Recalculation of the Construction Surveying and Mobilization may be required if project totals change. Note: It is important to enter Ad hoc at Source of Price and check the box for Estimated Price Lock field. Failure to change the Estimated Price Lock field will allow a price to be generated by Preconstruction - a price which is only an average of bid history prices, not the price based on the formula for which VDOT figures Mobilization and Construction Surveying.
5.4.1 Calculating Construction Surveying All Location & Design and Structure & Bridge projects will contain the pay item Construction Surveying (Item Code 00101) and should be entered under a Regular Bid Item Category. The cost is determined by the following:
o Structure and Bridge – $1,500 per span
o Location and Design – 1% of the total project cost, If there is a Traffic component on the project, calculate 1% of the sum of the “C” (road design) and the “T”(traffic) projects
– Add $1,000 for each “D” number. o Traffic Engineering – Construction Surveying costs for Traffic engineering projects are
calculated and included in the L&D road design estimate.

VDOT Preconstruction User’s Manual October 2017 5-12
5.4.2 Calculating Mobilization All Location & Design projects and all Structure & Bridge projects shall contain the pay item Mobilization (Item Code 00100) and should be entered under a Regular Bid Item category. The mobilization calculation includes the cost of Construction Surveying. Traffic engineering projects which are a part of an L&D project will not include Mobilization. The road designers will calculate their Mobilization based upon the sum of the “C” (road design) and “T” (traffic) projects.
FORMULA FOR MOBILIZATION
Project Cost More than To and Including Limit
$ - $ 200,000.00 10% of Contract
$ 200,000.00 $ 1,000,000.00 $20,000 plus 7.5% of Total Contract minus $200,000
$ 1,000,000.00 OVER $80,000 plus 5% of Total Contract minus $1,000,000 Item Code 00100 has a Lump Sum unit of measure and so the Quantity should always be 1. Note: It is important to enter Ad hoc at Source of Price and check the box for Estimated Price Lock field. Failure to change the Estimated Price Lock field will allow a price to be generated by the history database - a price which is only an average of bid history prices which will overwrite the price you entered.
Figure 8 – Mobilization

VDOT Preconstruction User’s Manual October 2017 5-13
Mobilization Work Sheet
CONTRACTAMOUNTUNDER$200,000
Line 1. Contract Amount = ..............................................................$ ______________
Line 2. Line 1 x 0.10 = Mobilization ................................................$ ______________
CONTRACTAMOUNTOVER$200,000BUTUNDER$1,000,000
Line 1. Contract Amount = ...............................................................$ ______________
Line 2. Line 1 - $200,000 = .............................................................$ ______________
Line 3. Line 2 x 0.075 = ...................................................................$ ______________
Line 4. Line 3 + $20,000 = Mobilization .........................................$ ______________
CONTRACTAMOUNTOVER$1,000,000
Line 1. Contract Amount = ..............................................................$ ______________
Line 2. Line 1 - $1,000,000 = ..........................................................$ ______________
Line 3. Line 2 x 0.05 = .....................................................................$ ______________
Line 4. Line 3 + $80,000 = Mobilization .........................................$ ______________

VDOT Preconstruction User’s Manual October 2017 5-14
5.4.3 Calculating Construction Engineering and Inspection (CEI) (Non-Bid Cost) The Non-Bid Construction Engineering and Inspection (CEI) covers a range of costs and the Project Manager is ultimately responsible for developing and managing the construction engineering and inspection budget but the District Construction or Maintenance Staff can also provide the appropriate amount. The Construction Engineering and Inspection (CEI) cost can be entered in Preconstruction in one of two ways: It must be one or the other, BUT NOT BOTH.
1. As a percentage in the Construction Eng PCT field on the Category screen (Entered Only on Categories 0001 through 1999) (less common method) See 5.3.3.1 for details.
OR 2. As a Lump Sum (most common method) See 5.3.3.2 for details.
5.4.3.1 Entering a Construction Engineering (CEI) Percentage (less common method) If you choose to determine the Construction Engineering (CEI) by a percentage the table below should be used. Note: This calculation shall not include the Construction Surveying or Mobilization costs. The Construction Eng Percent (aka CEI) field is located at the Category and should only be entered on Regular bid categories (0001 through 1999). A CEI percentage should never be added to Categories 2000 and higher.
Figure 9 – CEI Percentage
Note: If you choose to add Construction Engineering (CEI) as a lump sum, enter 0.0 in the Const Eng Pct field on ALL CATEGORIES.
CE
I% N
OT
allo
we
d on
C
ateg
orie
s 20
00-3
003

VDOT Preconstruction User’s Manual October 2017 5-15
5.4.3.2 Entering Construction Engineering (CEI) Lump Sum (most common method) Lump Sum Construction Engineering (CEI) uses Item Code 25580 and must be entered under category 3001, see Chapter 4 for complete details. Item 25580 has a TEC (Total Engineering Cost) unit of measure and the quantity should always be 1.
Figure 10 – CEI Percentage
Note: It is important to enter Ad hoc at Source of Price and check the box for Estimated Price Lock field. Failure to change the Estimated Price Lock field will allow a price to be generated by history database - a price which is only an average of bid history prices which will overwrite your unit price.

VDOT Preconstruction User’s Manual October 2017 5-16
5.5 Contingency (Non-Bid Cost) The Contingency cost on construction and maintenance contracts is used to capture the potential cost of additional work, unforeseen conditions such as differing site conditions, plan changes etc. Contingency is a Non-Bid cost and is only calculated for Regular Bid Items (Categories 0001 through 1999). The following items need to be accounted for in your contingency budget for both construction and maintenance contracts including schedule work:
Fuel Adjustment
Asphalt Price Adjustment
Steel Adjustment
Ride ability
Contingency costs are based on L&D’s IIM-LD-249 2-Tiered Approach to Project Oversight: 1. Tier I = 5.0 percent OR 2. Tier II = 10.0 percent
If there is more than one federal project number, the contingency cost should be allocated to each federal project. The cost may be divided among other Project ID’s, if the Project Manager desires but if using contingency percentages they must match in all Project estimates. The Contingency cost can be entered in Preconstruction in one of two ways: It must be one or the other, BUT NOT BOTH.
1. As a percentage in the Contingency PCT field on the Category screen (less common method) (Entered Only on Categories 0001 through 1999) See 5.3.1 for details.
OR 2. As a Lump Sum (most common method) See 5.3.2 for details

VDOT Preconstruction User’s Manual October 2017 5-17
5.5.1 Entering Contingency as a Percentage Enter 5.0 or 10.0 in the Contingency Pct field under the Regular Category only. Important note: Contingency percentages should only be entered on Categories 0001 through 1999. See Chapter 4 for details. Note to Project Managers: The Contingency percentage must match across all projects in the Prime and/or Proposal.
Figure 11 – Contingency Percentage
CE
I% a
nd C
ont
inge
ncy
% N
OT
al
low
ed o
n C
ate
gorie
s 20
00-3
003

VDOT Preconstruction User’s Manual October 2017 5-18
5.5.2 Entering Contingency as a Lump Sum Lump Sum Contingency uses Item Code 25590 and must be entered under it’s own category 3003, see Chapter 4 for complete details. The Contingency Item 25590 has a TEC (Total Engineering Cost) unit of measure and the quantity should always be 1.
Figure 12 – Lump Sum Contingency
Note: If using the Lump Sum method for Contingency, be sure that all categories have 0.0 in the Contingency % field. Note: It is important to enter Ad hoc at Source of Price and check the box for Estimated Price Lock field. Failure to change the Estimated Price Lock field will allow a price to be generated by history database - a price which is only an average of bid history prices which will overwrite your unit price.

VDOT Preconstruction User’s Manual October 2017 5-19
5.6 Contract Requirements (Non-Bid Costs) The Contract Requirements item was established to capture potential project Incentives/Disincentives (I/D) payments. Users may utilize HUB-CAP or other methods to determine the Maximum cost. Contract Requirements uses Item Code 25585 and must be entered under category 3002, see Chapter 4 for complete details. Item 25585 has a TEC (Total Engineering Cost) unit of measure and the quantity should always be 1.
Figure 13 – Contract Requirements / Incentives & Disincentives
Note: It is important to enter Ad hoc at Source of Price and check the box for Estimated Price Lock field. Failure to change the Estimated Price Lock field will allow a price to be generated by history database - a price which is only an average of bid history prices which will overwrite your unit price.
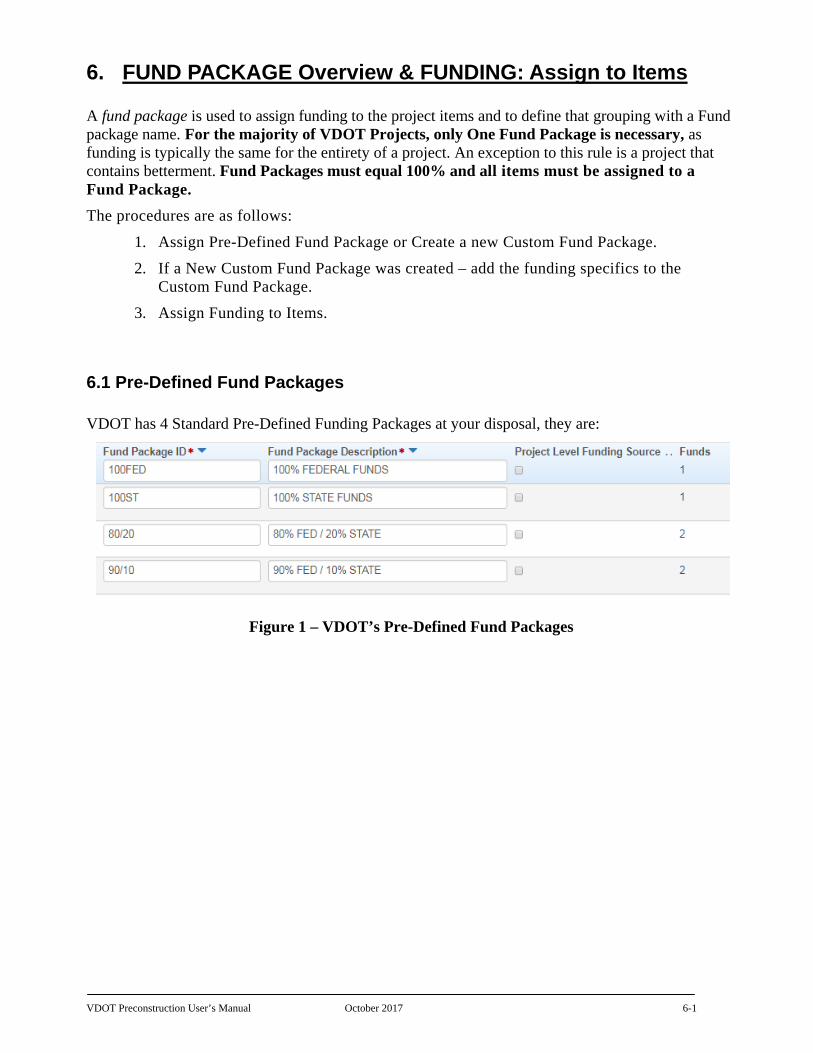
VDOT Preconstruction User’s Manual October 2017 6-1
6. FUND PACKAGE Overview & FUNDING: Assign to Items A fund package is used to assign funding to the project items and to define that grouping with a Fund package name. For the majority of VDOT Projects, only One Fund Package is necessary, as funding is typically the same for the entirety of a project. An exception to this rule is a project that contains betterment. Fund Packages must equal 100% and all items must be assigned to a Fund Package.
The procedures are as follows:
1. Assign Pre-Defined Fund Package or Create a new Custom Fund Package.
2. If a New Custom Fund Package was created – add the funding specifics to the Custom Fund Package.
3. Assign Funding to Items.
6.1 Pre-Defined Fund Packages VDOT has 4 Standard Pre-Defined Funding Packages at your disposal, they are:
Figure 1 – VDOT’s Pre-Defined Fund Packages

VDOT Preconstruction User’s Manual October 2017 6-2
6.1.1 Funding Specifics for Pre-Defined Fund Packages
Figure 2 – Funding Specifics for VDOT’s Pre-Defined Fund Packages

VDOT Preconstruction User’s Manual October 2017 6-3
6.1.2 Example of a Betterment Custom Fund Package
Figure 3 – Betterment Custom Fund Package Example

VDOT Preconstruction User’s Manual October 2017 6-4
6.2 Methods to Add Fund Packages There are 2 methods to Add a Funding Package to a Project:
1. Select a Fund Package from a Pre-Defined List (Most common method) 2. Create a New Custom Fund Package from scratch (that is not in the Pre-Defined List)
Figure 4 – Two Methods to Add a Fund Package
To use a Pre-Defined Fund Package Click the Select Fund Packages button
Click the New button to create a New Custom Fund package that is different than the Pre-Defined Fund Packages.
11 22

VDOT Preconstruction User’s Manual October 2017 6-5
11
Click the Select Fund Packages button
Click Show first 10
Select desired Fund Package from the list
Click Add Fund Package
6.2.1 Adding a Pre-Defined Fund Package Perform the following steps to add a Pre-Defined Fund Package to a Project.
1. From an open project, click the Fund Package Overview quick link. 2. Click the Select Fund Packages button, a new window will open. 3. Click Show first 10 in the middle of the screen. 4. Select the desired Fund Package from the list, a green check mark displays to the right of
the chosen package in the list. 5. Click the Add Fund Package button. 6. Caution: the Project Level Check box – should NEVER be checked. 7. Go to 6.X for the next step.
Figure 5 – Adding a Pre-Defined Fund Package

VDOT Preconstruction User’s Manual October 2017 6-6
6.2.2 Creating a New Custom Fund Package Perform the following steps to Create a new Custom Fund Package for a Project.
1. From an open project, click the Fund Package Overview quick link. 2. Click the New button, a new window will open. 3. Add a New Fund Package name in the Fund Package field. Keep the name as short as
possible. 4. Enter a Description in the description field. 5. Click the SAVE button on the blue component bar. 6. Caution: the Project Level Check box – should NEVER be checked. 7. Go to 6.2.2.1 to complete this task.
Figure 6 – Creating a New Custom Fund Package
Click the New button to create a Fund package that is different than the Pre-Defined Fund Packages.
Add descriptionAdd New Fund Package Name,Keep as short as possible Click Save
Do NOT Check

VDOT Preconstruction User’s Manual October 2017 6-7
6.2.2.1 Adding Funding Specifics Perform the following steps to Add Funding Specifics to the new Custom Fund Package.
1. Click the 0 on the right of the screen of the new fund package or click the row action down arrow and Select Open.
Figure 7 – Two ways to open Fund specifics

VDOT Preconstruction User’s Manual October 2017 6-8
Adding Funding Specifics Continued 2. Click the Select Funds button. 3. Perform a search in the search box or Click Show first 10 and select from the list. 4. Click the Add to Fund Package button. 5. Fill in 1 in all the Priority fields 6. Change the percentage field as required. 7. Ensure the Total of all equal 100% 8. Click the Save button on the blue component bar.
Figure 8 – Adding funding specifics
Click Select Funds
Priority should always be 1
Must total 100% Click Save

VDOT Preconstruction User’s Manual October 2017 6-9
6.3 Funding:Assign to Items to a Project (for Pre-Defined Fund Packages)
Assigning funds will be dependent on the type and/or the number of Fund package(s) a project contains.
Perform the following steps to Assign Funding to all the items: 1. Click the Funding: Assign to Items quick link. 2. Click the Radial button on the All Project Items row.
Figure 9 –Funding: Assign to Items
Click the Lettered Radial button
Click Save

VDOT Preconstruction User’s Manual October 2017 6-10
6.3.1 Funding:Assign Funding to a Project (for a Custom Fund Package)
Assigning funds will be dependent on the type and/or the number of Fund package(s) a project contains. Perform the following steps to Assign Funding to all the items:
1. Click the Funding: Assign to Items quick link. 2. Click the Radial buttons for each Category to correspond to the correct fund package.
Figure 10 –Funding: Assign to Items
Click Expand All to show Fund specifics
Check radial buttons to correspond with the Fund package on the right

VDOT Preconstruction User’s Manual October 2017 6-11
6.4 Deleting a Fund Package Perform the following steps to delete a Fund Package. You must have a project open to do this.
1. Click the Fund Package Overview quick link.
2. Select the row action button for the Fund Package row.
3. Select Delete.
4. Click the Save button on the blue component bar.
Figure 11 – Deleting a Fund Package

VDOT Preconstruction User’s Manual October 2017 7-1
7. Item Pricing & Reports
The Item Pricing quick link component allows you to change the estimated unit price for any project item. You can change the price of a single item manually, or you can automatically generate a price based on historical bids. It is recommended to generate the bid-based prices for all the items in the project(s)
Generated prices from the 2-year bid history are based on the combination of the following:
1. District (location) 2. Item Code 3. Quantity
There will be instances when generating prices will not produce a price due to the combination of the item code, quantity and location. Preconstruction will not generate prices for Non-Standard items. Therefore, the engineer/designer will need to determine a logical price and enter it manually. VDOT’s Construction Division maintains Historical Pricing found here: http://www.virginiadot.org/business/const/resource.asp VDOT employees may utilize the Staunton database to determine prices, found here:
http:// stauntonapps/main/bridge/inside_vdot/items.asp

VDOT Preconstruction User’s Manual October 2017 7-2
7.1 Generate Bid-Based Prices for an Entire Estimate The system updates the value in the Price field and changes the Est Type to either Regression or Average, depending on which estimation model is chosen. The Ext Amount and Project Item Total fields are also automatically updated. If no historical information is available for an item, the system updates the Price field with the reference price and changes the Est Type to Reference. If reference price information is not available, the system leaves the price as it was or blank. To generate Prices for an Entire estimate perform the following steps:
1. Click the Item Pricing quick link. A new screen opens and the categories in your estimate are listed.
2. Select the Component Action Button. 3. Select Price All Items. 4. A message will display once the process is complete. 5. Return the General tab and change the Date of Gen Bid Base Prices field to the date
the prices were generated.
Figure 1 – Generate Bid-Based Prices for entire estimate
Prices generated for All Categories in project

VDOT Preconstruction User’s Manual October 2017 7-3
7.1.1 Generate Prices for a Category To generate historical prices for a specific Category perform the following steps:
1. Click the Item Pricing quick link. 2. Click the row Action Button of the Category you wish to price. 3. Select Price Category.
Figure 2 – Generate Bid-Based Prices for Category

VDOT Preconstruction User’s Manual October 2017 7-4
7.1.2 Generate a Price for an Individual Item To generate a historical price for an individual item perform the following steps.
1. Click the Item Pricing quick link. 2. Expand the Category of the item you wish to price. 3. Change the price in the Price field. 4. Click the padlock icon to lock the price. Note: All prices that are entered manually must be locked to protect them from the
generate bid-based price process. 5. Click Save.
Figure 3 – Generate Price for Individual Item

VDOT Preconstruction User’s Manual October 2017 7-5
7.1.3 Enter a Price Manually If you know the price of a particular item or the database does not generate one for you, to enter a price manually perform the following steps.
1. Click the Item Pricing quick link. 2. Expand the Category of the item you wish to price. 3. Enter your price in the Est Price field 4. Click the padlock icon to lock the price.
Note: Locking the price is important so that when the Generate price process is run, it does not overwrite the price that you entered.
5. The Src Price field automatically populates Ad Hoc.
Figure 4 – Enter a Price Manually
Change Amount
Click Padlock to lock price
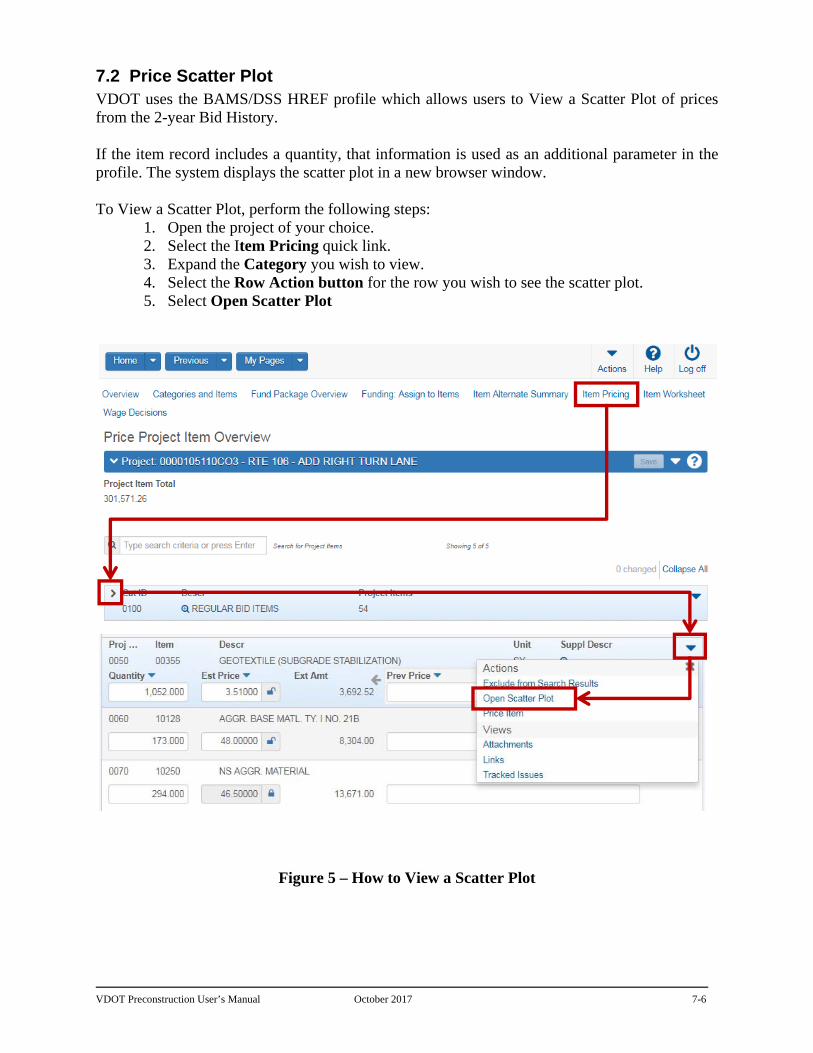
VDOT Preconstruction User’s Manual October 2017 7-6
7.2 Price Scatter Plot VDOT uses the BAMS/DSS HREF profile which allows users to View a Scatter Plot of prices from the 2-year Bid History. If the item record includes a quantity, that information is used as an additional parameter in the profile. The system displays the scatter plot in a new browser window. To View a Scatter Plot, perform the following steps:
1. Open the project of your choice. 2. Select the Item Pricing quick link. 3. Expand the Category you wish to view. 4. Select the Row Action button for the row you wish to see the scatter plot. 5. Select Open Scatter Plot
Figure 5 – How to View a Scatter Plot

VDOT Preconstruction User’s Manual October 2017 7-7
The Scatter Plot is an interactive window where you can move your cursor over the dots in the graph to show additional information in the upper right corner of the graph. This data is based on the past 2 years.
Figure 6 – Scatter Plot Overview

VDOT Preconstruction User’s Manual October 2017 7-8
7.3 Running the Preliminary Project Detail Estimate VDOT Report The Preliminary Project Detail Estimate VDOT report is a group of reports that uses the Engineer's estimated prices to provide a project, proposal, or prime project view of costs, including add-on engineering and contingency percentages and funding breakdowns.
VDOT has incorporated extra error checking features (that the Validation process does not provide) in this report. Users should ensure that all red errors are corrected before submission to the Construction Division for Advertisement.
The report is comprised of four individual reports:
Cover Page
Summary Sheet
Cost Estimate
Funding Summary
When generating this report, the user can choose to include one, several, or all of these in the reports.
7.3.1 Running the Detail report from the Dashboard 1. Click the Dashboard Global Action button. 2. Select Generate Report. 3. Choose Preliminary Project Detail Estimate VDOT from the list, a green check
box appears to the left. It automatically moves to page 2. 4. In the search box, enter the desired UPC number. 5. Click the desired Project ID from the list, a green check box appears to the left. 6. Click the blue Next arrow button on the upper right of your screen. 7. Check or uncheck the boxes from the list of 4 report pages that you desire, all 4
default as checked. 8. Click the Execute button on the blue component bar. 9. The report opens in a new Browser tab.
Note: Please remember to save or print the PDF, this is the only time you will have the opportunity to do so. Otherwise, you will have to re‐run the report.

VDOT Preconstruction User’s Manual October 2017 7-9
7.3.2 Running the Detail report from an open Project This report can be run in almost every quick link page within a project.
1. Open the desired project. 2. Click the blue component Action Button. 3. Select Preliminary Project Detail Estimate VDOT 4. Check or uncheck the boxes from the list of 4 report pages that you desire, all 4
default as checked. 5. Click the Execute button on the blue component bar. 6. The report opens in a new Browser tab.
Note: Please remember to save or print the PDF, this is the only time you will have the opportunity to do so. Otherwise, you will have to re‐run the report.
Preliminary Project Detail Estimate VDOT Report ERROR Example Users should ensure that the report contains no red errors and that there are no “N” flags for Categories 0001 through 1999. The “N” indicates non-bid, Non-bid Items should only reside in Categories 2000 and higher.
Figure 7 – Check Reports for Red Error Messages

VDOT Preconstruction User’s Manual October 2017 8-1
8. PRIME PROJECTS A Prime Project must be created for every State or Federal project that will be advertised. The Prime acts as a link to all the Projects and thus any changes in the Projects are reflected in Prime reports. The prime combines all the projects from the different disciplines and does two important things. A Prime is required even if there is only one Project. The Prime has 2 functions:
1. Provides the Construction Division Team leader (person that prepares Proposals for Advertisement) the list of correct Preconstruction projects that are to be included in the advertisement. For example: Some advertisements consist of more than 1 UPC or more than 1 bridge.
2. Uploads cost estimate information to the PCES module of IPM, every night at 7pm. Prime Project ID: Is 13 digits and always begins with a C and ends with the Project ID number of the largest project (most money). The name of the Prime should correspond to the controlling project. For example, if the projects to be combined are: 00009845C02, 00009845B21, 00009845B22, 00009845T01 and 00009845L02:
Prime Project ID = C000009845C02.
In most cases, the Project used for the Prime Project will also be the Controlling Project.
Whether you, as a user, create a Prime Project or not can be determined by the three cases described below:
Case 1: It is the responsibility of the Project Manager to create the original project and make the appropriate copies for the other disciplines/users on the project team (i.e. Bridge, Traffic Engineering, Environmental, Consultants)
The Project Manager will create the Prime Project and associate all projects to it then move the projects to the team members respective control groups.
Case 2: The designer who is not the Project Manager receives a project from the Project Manager. The project has been linked to the Prime Project by the Project Manager. Therefore, this designer will not create a Prime Project unless directed by the Project Manager to do so.
Case 3: The designer of a “stand-alone” project (a project in which no other division will be involved) shall create a Prime Project and associate the project(s) to it.

VDOT Preconstruction User’s Manual October 2017 8-2
8.1 Prime Controlling Project A checkbox is used to designate a Project as a Controlling Project, which is the Controlling Project in a Prime containing multiple projects. The Project with the majority of the Construction funds/money should be the Controlling project. The name of the Prime will correspond to the name of the controlling project.
There can be only one Controlling Project designated per Prime.
In most cases, the Project used for the Prime Project will also be the Controlling Project.
Figure 1- Prime Controlling Project

VDOT Preconstruction User’s Manual October 2017 8-3
8.2 Adding a Prime Project
To add a Prime Project from the Prime Project Overview screen follow these steps:
1. Click on the Prime Project link from the Preconstruction Dashboard found on the Home page.
2. Open the Prime Project Overview header’s Action Menu and click Add. 3. The Add Prime Project screen opens. 4. Enter the Prime Project data and click the Save button when finished.
Figure 2 - Adding a New Prime Project
Must begin with a C

VDOT Preconstruction User’s Manual October 2017 8-4
PRIME FIELD DESCRIPTIONS:
Prime Project ID: 13 Digits and must start with a C and ends with the Project ID number. Ex: C000104340C01 or C000009845C02
Control Group: The control group is the security designation which decides which user
has access to which prime project(s). This field will already be filled out with your control group. The data in this field may be changed in order to transfer the prime project to another control group.
Project Location: Use the first line for the From: information and the second line for
the To: information. Bridge projects will use the location from the title sheet. Ex: FROM: 0.09 MI. W. WEST HIGHLANDS BLVD. TO: 0.01 MI. W. WEST HIGHLANDS BLVD. Federal Project Number: Enter the Federal Project Number, if applicable, in its
entirety, complete with dashes, parentheses, etc. If the project is not federally-funded, enter NONE. Ex: STP-5A03(264)
State Project Number: Enter the state project number in its entirety, complete with
dashes, commas, etc. Ex: (NFO) 0615-047-169, C501 Federal Appropriation Codes: Not currently used. Road Name: Enter the name of the road or leave blank. Ex: HOLLAND ROAD or RTE 628, MCCLELLAN ROAD

VDOT Preconstruction User’s Manual October 2017 8-5
8.2.1 Adding/Associating Project(s) to a Prime
To add (link) projects to a Prime perform the following steps: 1. Open the Prime of your choice. 2. Select the Projects tab on the left side of the screen. 3. Click the Select Projects button. 4. Enter the UPC number in the search box. 5. Click all the Projects from the list that belong in the Prime. 6. Click the Add to Prime Project button. 7. Click the Save button.
Figure 3 - Adding Projects to a Prime
Click Projects to add to Prime

VDOT Preconstruction User’s Manual October 2017 8-6
8.2.2 Prime Workflow
The Workflow tab is a crucial step in moving an estimate through the phases of the software to produce the Contract document. Users must make the proper selection for all Projects and the Prime according to the table below. Leaving the workflow fields blank, results in reporting errors.
Workflow field: set to VDOT Workflow Project-Proposal-Contract
Workflow Phase: set to Project Definition Phase
Figure 4 - The Workflow Tab – PRIME
Do not leave these fields Blank

VDOT Preconstruction User’s Manual October 2017 8-7
8.3 Disassociating (Removing) Projects from a Prime Project
Warning: When Remove is selected, the Project Row is automatically removed. There is no opportunity to reverse the selection, as the row is immediately removed without clicking the Save button. To restore the row, you must associate the Project back to the Prime Project.
1. Open Prime. 2. Click the row action button of the appropriate Project. 3. Click Remove.
Figure 5 - Disassociating (Removing) a Project from a Prime Project

VDOT Preconstruction User’s Manual October 2017 8-8
8.4 Deleting a Prime Project A Prime can be deleted only after all the projects have been disassociated (removed). Not all users have the permissions to delete a Prime. Contact [email protected] if you are unable to delete a Prime. To delete a Prime perform the following steps.
1. Open the Prime. 2. Click the Projects tab. 3. Remove all Projects (see 8.3 for complete instructions). 4. Click the Overview quick link. 5. Click the row action button of Prime you wish to delete. 6. Click Delete.
Figure 6 - Deleting a Prime
VDOT Preconstruction User’s Manual October 2017 8-9
8.5 Running the Prime Project Detail Estimate VDOT Report
The Prime Project Detail Estimate VDOT report is a combined report that calculates the totals for all the projects associated to the Prime.
The report is comprised of four individual reports:
Cover Page
Summary Sheet
Cost Estimate
Funding Summary
When you generate this report, you can choose to include one, several, or all of these reports.
8.5.1 Running the Detail report from the Dashboard 1. Click the Dashboard Global Action button. 2. Select Generate Report. 3. Choose Preliminary Prime Detail Estimate VDOT from the list, a green check box
appears to the left. It automatically moves to page 2. 4. In the search box, enter the desired UPC number. 5. Click the desired Project ID from the list, a green check box appears to the left. 6. Click the blue Next arrow button on the upper right of your screen. 7. Check or uncheck the boxes from the list of 4 report pages that you desire, all 4
default as checked. 8. Click the Execute button on the blue component bar. 9. The report opens in a new Browser tab.
Note: Please remember to save or print the PDF, this is the only time you will have the opportunity to do so. Otherwise, you will have to re‐run the report.
8.5.2 Running the Detail report from an open Project This report can be run in almost every quick link page within a project.
1. Open the desired project. 2. Click the Action Button on the blue component bar. 3. Select Preliminary Prime Detail Estimate VDOT. 4. Check or uncheck the boxes from the list of 4 report pages that you desire, all 4
default as checked. 5. Click the Execute button on the blue component bar. 6. The report opens in a new Browser tab.
Note: Please remember to save or print the PDF, this is the only time you will have the opportunity to do so. Otherwise, you will have to re‐run the report.
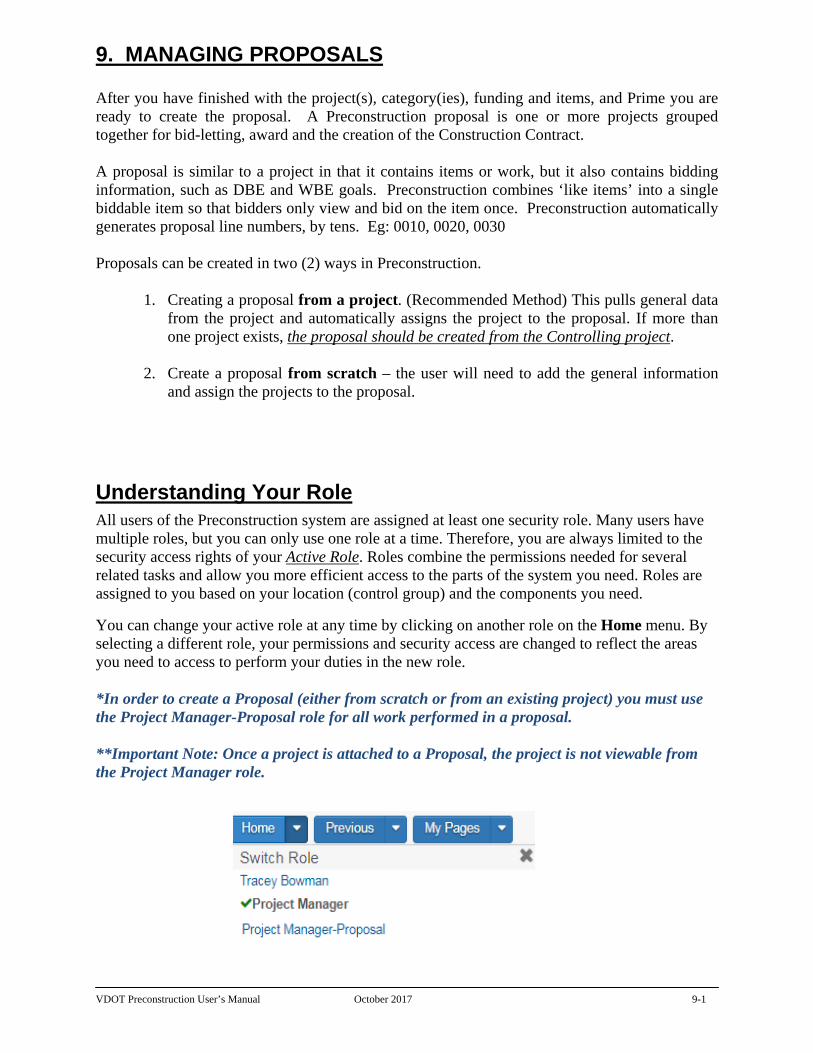
VDOT Preconstruction User’s Manual October 2017 9-1
9. MANAGING PROPOSALS After you have finished with the project(s), category(ies), funding and items, and Prime you are ready to create the proposal. A Preconstruction proposal is one or more projects grouped together for bid-letting, award and the creation of the Construction Contract. A proposal is similar to a project in that it contains items or work, but it also contains bidding information, such as DBE and WBE goals. Preconstruction combines ‘like items’ into a single biddable item so that bidders only view and bid on the item once. Preconstruction automatically generates proposal line numbers, by tens. Eg: 0010, 0020, 0030 Proposals can be created in two (2) ways in Preconstruction.
1. Creating a proposal from a project. (Recommended Method) This pulls general data
from the project and automatically assigns the project to the proposal. If more than one project exists, the proposal should be created from the Controlling project.
2. Create a proposal from scratch – the user will need to add the general information and assign the projects to the proposal.
Understanding Your Role All users of the Preconstruction system are assigned at least one security role. Many users have multiple roles, but you can only use one role at a time. Therefore, you are always limited to the security access rights of your Active Role. Roles combine the permissions needed for several related tasks and allow you more efficient access to the parts of the system you need. Roles are assigned to you based on your location (control group) and the components you need.
You can change your active role at any time by clicking on another role on the Home menu. By selecting a different role, your permissions and security access are changed to reflect the areas you need to access to perform your duties in the new role. *In order to create a Proposal (either from scratch or from an existing project) you must use the Project Manager-Proposal role for all work performed in a proposal. **Important Note: Once a project is attached to a Proposal, the project is not viewable from the Project Manager role.

VDOT Preconstruction User’s Manual October 2017 9-2
9.1 Creating a Proposal from a Project (Most Common Method) To create a Proposal from the controlling project, perform the following steps:
1. From the Preconstruction component select Projects. In the search box, query for the project you wish to create a proposal.
2. Select the project row Actions menu and select Create Proposal from Project. 3. Fill in all the required fields and click Save
Figure 1 – Project Overview Screen

VDOT Preconstruction User’s Manual October 2017 9-3
9.1.2 Creating a Proposal from scratch (less common method) To create a Proposal from scratch, perform the following steps:
1. From the Home screen, click the Proposals quick link. 2. Click the row action button on the blue component bar, select Add. 3. Fill in all the required fields and click Save.
Figure 2 – Creating a Proposal from scratch
Some fields are required; the proposal will not be saved to the database unless the required fields are filled-in. The required fields are listed with a red asterisk behind the field name. Non required fields should also be filled in, if applicable. Once you have filled in the correct fields, click the Save button. If the Proposal ID you created is already in the system, you will receive an error message. You will also receive an error message if you have left any required fields blank.
Once the proposal is saved, you will be directed to the Proposal General Tab. Notice that other fields are now displayed on the Proposal General Tab. These fields include:
All Proposals must begin with a C

VDOT Preconstruction User’s Manual October 2017 9-4
Proposal Field Descriptions:
Proposal ID: All Proposal ID’s must begin with a C (excerpt from Appendix A, of this manual) and should match the corresponding Prime ID (which is also the name of the controlling project for the Proposal)
Order Number (aka Call): Contact the Construction Division’s Federal Submissions
Coordinator for Call number assignment. Proposal Description: Required. Enter a short description of the work to be performed.
This should match the project description from IPM and the Prime. Location: Type the location with format: FROM: (location) TO: (location). For Projects with Plans, enter the location from the front sheet title block. Federal Project No.: Enter the federal project number, if applicable, in its entirety,
complete with dashes, parentheses, etc. If the project is not federally-funded, enter NONE. EXAMPLE: NH-5401(876)
State Project Number 1: Enter the state project number in its entirety, complete with
dashes, commas, etc. EXAMPLE: (NFO) 7029-021-103, C502 State Project Number 2: Use only when more space is needed for the State Project
Number 1 row, otherwise leave blank. State Project Number 3: Use only when more space is needed for the State Project
Number 2 row, otherwise leave blank.

VDOT Preconstruction User’s Manual October 2017 9-5
DBE Goal: Not Required: Select the appropriate code from the drop-down menu. DBE/MBE Goal (PCT): Required. Percentage will be determined by the Civil Rights
Division & entered by the Construction division staff after Bid Letting. Enter 0.0 in this field.
WBE Goal PCT: Percentage will be determined by the Civil Rights Division & entered
by the Construction division staff after Bid Letting. Enter 0.0 in this field. Advertisement Date: Required. Enter the Advertisement Date in MM/DD/YYYY
format or select the date from the calendar icon. Rejected checkbox: Used by Construction division, leave unchecked. Reason for Non-Processing: Used by the Construction Division, leave this field blank. Prev Let As ContID: Field used by Construction Division for Call’s that are Let a
second time. If the proposal represents a project that has been let in the past, put the CONTID (Contract ID) of that previous proposal here. Trns·port will use this field in the LAS schedule to produce a report on the letting history. If the proposal has been re-let several times, always enter the most recently used CONTID here; Trns·port will trace the chain back to its source.
DBE GOAL BOTH MBE and WBE Goals or Requirements
DBE DBE Goals or Requirements
ND Not Yet Determined
NONE NO DBE Goals or Requirements

VDOT Preconstruction User’s Manual October 2017 9-6
Contract Type: Required. Select the appropriate code from the drop-down menu.
CONTRACT TYPE
CM Construction / Maintenance Hybrid
CMMR Maintenance RAAP
CMMS Maintenance SAAP
CMSR Maint. Schedule RAAP
CMSS CMSS Maint. Schedule SAAP
CR CR Construction RAAP
CS CS Construction SAAP
DB DB Construction Design/Build
EM EM Emergency
Proposal Type: Select the appropriate code from the drop-down menu.
PROPOSAL TYPE
01 ‐ GRADING 18 ‐ SEAL COAT
02 ‐ STABILIZATION 19 ‐ REJUVENATING
03 ‐ STRUCTURES 20 ‐ CLEARING AND GRUBBING
04 ‐ BRIDGES 21 ‐ LANDSCAPING
05 ‐ CONCRETE BOX CULVERT 22 ‐ SPRINKLER SYSTEM
06 ‐ RETAINING WALL 23 ‐ PLANTING
07 ‐ HOT BITUMINOUS PAVEMENT 24 ‐ SODDING
08 ‐ CONCRETE PAVEMENT 25 ‐ CURB AND GUTTER
09 ‐ SIGNING 26 ‐ SIDEWALK
10 ‐ STRIPING 27 ‐ BIKEWAY
11 ‐ LIGHTING 28 ‐ GUARD RAIL
12 ‐ SIGNALIZATION 29 ‐ IMPACT ATTENUATER
13 ‐ TOPSOIL 30 ‐ CHANNEL RELOCATION
14 ‐ SEEDING 31 ‐ GRADING AND SURFACING OF CAMPGROUNDS
15 ‐ MULCHING 32 ‐ SAFETY REST AREA WITH COMFORT AND FACILITIES
16 ‐ HOT BITUMINOUS PAVEMENT OVERLAY
33 ‐ PORT OF ENTRY BUILDING AND SCALES
17 ‐ PLANT MIX SEAL COAT 34 ‐ TRAFFIC AND SURVEILLANCE

VDOT Preconstruction User’s Manual October 2017 9-7
Contract Work Type: Required. Select the appropriate code from the drop-down menu.
CONTRACT WORK TYPE
01 ‐ BRIDGE 15 ‐ PAVING / ASPHALT
02 ‐ BRIDGE ORDINDARY MAINTENANCE
16 ‐ PAVING / CONCRETE
03 ‐ BRIDGE PAINTING 17 ‐ PAVEMENT MARKING/MARKERS
04 ‐ BRIDGE REPOAIR (& REHAB) 18 ‐ PAVEMENT REPAIR
05 ‐ BRIDGE WIDENING 19 ‐ PLANTING
06 ‐ BOX CULVERT 20 ‐ SIDEWALK, CURB & GUTTER
07 ‐ CURB CUT RAMP 21 ‐ SIGNALS
08 ‐ DEMOLITION 22 ‐ SIGNING / SIGN OVERLAY
09 ‐ FENCE REPAIR/REPLACE 23 ‐ SURFACE (OVERLAY & TREATMENT)
10 ‐ GRADE / DRAIN / PAVE 24 ‐ UTILITY
11 ‐ GR REPLACEMENT/REPAIR 25 ‐ WIDEN ROADWAY
12 ‐ JACKED PIPE/PIPE REHAB 26 ‐ WILDFLOWERS
13 ‐ MAINT REPLACEMENT 27 ‐ PEDESTRIAN / BIKES
14 ‐ NEW ROADWAY
On Call Proposal: Field Removed Proposal Item Total: Price generated from proposal total, no action required by user.
Proposal Cost: Entered by Construction Division. Enter 0.0. Complete Plan Cost: Entered by Construction Division. Enter 0.0. Cost of Half Size Plans: Entered by Construction Division. Enter 0.0. Cross Section Cost: Entered by Construction Division. Enter 0.0. Electronic Media Cost: Entered by Construction Division. Enter 0.0. Control Group: The control group is the security designation which decides which user
has access to which proposals(s). This field will already be filled out with your control group. The data in this field may be changed in order to transfer the project to another control group.
Contract ID: A Contract’s unique ID- should be identical to the Proposal ID.

VDOT Preconstruction User’s Manual October 2017 9-8
Primary Fund Type: Required. Select the appropriate code from the drop-down menu.
Proposal Status: Used by the Construction Division after Bid Letting only, leave blank. Status Date: Used by the Construction Division after Bid Letting only, leave blank. Funding Source: Required Select the appropriate code from the drop-down menu.
FUNDING SOURCE CM – CONSTRUCTION/MAINTENANCE
CONS‐CONSTRUCTION
MANT‐MAINTENANCE
Bridges: Required. Enter the number of bridges on the proposal. Enter 0.0 for no bridges. OJT Goal: Used by the Construction Division, leave blank. OJT Goal Units: Used by the Construction Division, leave blank. OJT Goal Comments: Used by the Construction Division, leave blank. Primary County: This field will populate if Proposal was created from a project,
otherwise select the appropriate code from the drop-down menu and should match iPM.
Primary District: This field will populate if Proposal was created from a project,
otherwise select the appropriate code from the drop-down menu and should match iPM. Ensure the District selected includes the corresponding Residency.
Plan Reviewer: As determined by Construction Division. Select from the pulldown
menu. Proposal Funding Total: A field used to enter amount to limit funding on a proposal.
Used by the Construction Division, leave blank.
PRIMARY FUND TYPE BOND
FED – FEDERAL
OTH – OTHER
STA – STATE
TOLL

VDOT Preconstruction User’s Manual October 2017 9-9
Mandatory Showing: Select the appropriate value. Y (YES) or N (NO) NOTE: Select Y ONLY if the showing is mandatory. If not, then select N. You can
still enter the showing location for non-mandatory showings. Showing Location Code: Select the location code from the dropdown menu.
NOTE: To add a new showing location code follow these instructions: (this can only
be performed by certain individuals in the Construction Division).
1. Click on the button Show Location at the bottom of the Proposal General Tab.
2. On the bottom of the list click to insert new show location record.
3. Enter the location code: For example: If Bristol, enter ‘01’ followed by the next sequence for the district (0159).
4. Enter location description. For example: Lebanon Residency.
5. Enter the physical address: for example: 100 Easy Street.
6. Enter City, State and Zip code.
7. Enter location detail.
8. Comments: This field is used if you need to explain the location. For example: no physical address or need to give directions.
Once you are done, click insert data. You must logoff Preconstruction and back in to see the newly added location code.
Showing Date: As determined by Construction Division, leave blank. Showing Time: As determined by Construction Division, leave blank. Showing Location: Enter extra showing information in this field as needed. Progress Schedule Category: Select the appropriate code from the drop-down menu. Proposal to Doc Assembly: Used by the Construction Division, leave blank. CTB Meeting Date: The actual date that the Transportation Board holds their meeting
for award recommendation, used by Construction Division after Bid Letting only. Leave blank.

VDOT Preconstruction User’s Manual October 2017 9-10
Click Proposal ID to open
9.2 Changing a Proposal From the Preconstruction Home screen select Proposals. This opens the Proposal Overview Screen. Enter a UPC number in the search box and click the Proposal ID to open the Proposal.
Figure 3 – Proposal Overview Screen This opens the Proposal on the General Tab where you can make edits to the fields. Note that changes cannot be made to the Proposal ID field as it is display-only. Once you have made edits, click the Save button to save changes. A Save complete message will display.
Figure 4 – Changing a Proposal

VDOT Preconstruction User’s Manual October 2017 9-11
9.2.1 Adding Projects to a Proposal When projects are added to a Proposal they act as a link to all the items in each project. Each proposal must have To add projects to a Proposal perform the following steps.
1. Open the Proposal. 2. Click the Projects tab. 3. Click the Select Projects button. Opens a new window. 4. In the search box, enter the UPC. 5. Click the projects in the list, a green check box appears next to each selection. 6. Click the Add to Proposal button. This closes the Select Projects window. 7. Click the Save button on the blue component bar.
Figure 5 – Adding Projects to a Proposal
Click Projects in list
Enter UPC in the search box

VDOT Preconstruction User’s Manual October 2017 9-12
9.2.2 Removing Projects from a Proposal To remove a project from the proposal, select the row actions button for the project in the list on the Projects Tab. Select Remove from the actions list. The project is removed and a message of Save Complete will be displayed.
Figure 6 – Removing Projects from Proposal

VDOT Preconstruction User’s Manual October 2017 9-13
9.3 Assigning Time Locations Each proposal must have at least one time, numbered 00, in order to specify time limits and liquidated damages in Site Manager. Preconstruction allows three types of days (VDOT only uses one of these):
1. Fixed Completion date (DT) - VDOT only uses Fixed Completion date (DT) 2. Available days (AD) – Do not use 3. Calendar days (CD) – Cost Plus Time bidding information is also entered at the
proposal time level but is only used for the calendar days. Do not use.
To add Time to a Proposal perform the following steps:
1. Open the Proposal 2. Click the Time tab. 3. Click the New button. 4. Fill in fields as described in the next section. 5. Click Save.
Figure 7 – Adding Time to the Proposal (Fixed Completion Date)
Spell out the completion date
Always 00
Always DT
Always Checked

VDOT Preconstruction User’s Manual October 2017 9-14
Time Field Descriptions
Site Number: This value will always equal 00. Time Description: Write/Spell out the completion date to match the Completion Date
Field. Example: January 1, 2030
Type of Days: From the drop-down menu, select either DT (Fixed Completion Date DT) Number of Time Units: If CD was chosen for the Type of Days, this field becomes
required. Time Units: If CD was chosen for the Type of Days, this field becomes required. Hours
or Days. Main Proposal Time: This should be checked if CD or DT is used for the Type of Days
field.
Completion Date: If DT was chosen, this field becomes required. Enter the Completion Date in MM/DD/YYYY format or select the date from the calendar icon.
Liquidated Damages Rate: The amount to be charged, in whole dollars, for each time
unit (hours or days) that a contractor exceeds the allowed time for a contract. If you enter a value in this field, you must also enter a value in the Liquidated Damages Unit of Time field. Default is 0.
Liquidated Damages Unit of Time: The time used for liquidated damages on a contract.
Valid values are Hours or Days. Default is Days Road User Cost Per Day: The field is used by Construction Division only. A value
entered in this field indicates the Site is a Cost Plus Time Site. Enter the cost per day value (whole number; no dollar sign) to determine the low bidder in a Cost Plus Time bid. A value can only be entered in this field if the selection in the Type of Days field is CD. The value is the cost per day (dollar amount) of the inconvenience of the construction. Leave blank.
Maximum Time: A maximum amount of time a vendor may bid on this proposal. Leave
blank. Leave blank. Minimum Time: A minimum amount of time a vendor may bid on this proposal. Leave
blank. Leave blank.

VDOT Preconstruction User’s Manual October 2017 9-15
9.4 Setting Proposal Workflow A proposal’s workflow is an important setting to move the proposal through the phases of the letting. Workflow fields should never be left blank. It’s important to remember that you should never move the workflow backwards, they should only move forward in the list on the next page. Click in the workflow field and select VDOT WORKFLOW PROJECT-PROPOSAL-CONTRACT and click in the WorkflowPhase field and select PROPOSAL DEFINITION PHASE. Once these are selected click the Save button. NOTE: Once a project(s) is associated to a Proposal, the workflow setting in the Proposal controls the workflow of the projects.
Figure 8 – Proposal Workflow
Workflow Phase Definitions
WORKFLOW NAME DESCRIPTION NOTES
1 Project Definition Phase Engineers/Designers Use
2 Proposal Definition Phase Construction Division/District SAPP Coordinators
3A Advertisement Phase Locks Proposal/No changes from Projects
Any changes once the Proposal is Advertised must be added in the Addenda phase with proper notification to Document assembly group
3B Addenda Phase Changes only reflected when Addenda is open
Changes made during Advertisement.
4 Bid Letting Phase Construction Division Use Only
ADMIN Role Only
5 Post Bid Evaluation Phase Construction Division Use Only
6 Preconstruction has ended Phase
Construction Division Use Only
7 Moved to Construction/SiteManager
Passed to CLR/SiteManager Construction Division Use Only
8 Historical Phase Construction Division Use Only

VDOT Preconstruction User’s Manual October 2017 9-16
9.5 Specifying Section and Line Numbers When you create a proposal that consists of one or more project(s), sections need to be generated which assigns proposal line numbers, Preconstruction then combines the projects and project items in the following way:
o If you have selected the Combine With Like Items checkbox in the Project item, each item will appear once because Preconstruction combines them into single proposal line items, even if they are in different categories or projects. Bidders can then bid on a single item. In order for non-standard items to combine, the Description (Non-std) and Spec Book (Non-std) information must be exactly the same.
o If you have not selected the Combine With Like Items checkbox, that item will not be combined.
o Because bidders will not bid on non-bid items (you select the Non-Bid checkbox on the project item), non-bid items will be omitted from the proposal report.
o After Preconstruction combines like items, it assigns unique proposal line numbers, then updates every database item record to reflect the proposal line item number to which the record now belongs.

VDOT Preconstruction User’s Manual October 2017 9-17
9.5.1 Add a Proposal Section
The Proposal Sections and Items component allows you to organize the items in the proposal into sections and to generate proposal line numbers. Each proposal must have at least one (1) section and they can be created manually or automatically. 9.5.1.1 Generating Sections Automatically (Recommended Method)
When you generate proposal sections automatically, all of the proposal items are assigned to sections. You do not need to use the Assign Items to Sections command unless you want to review or make changes to the assignments. If you add new items to one of the projects in the proposal after you automatically generate sections, you can use the Auto Generate Sections command again to assign the new items to a section. To Generate Sections Automatically perform the following steps:
1. Click the Sections and Items quick link. 2. Click the Component Actions button on the blue component bar. 3. Select Auto Generate Sections. 4. Section ID should be 0001 (4 digits).
Figure 9 – Auto Generate Sections
Should always be 4 digits
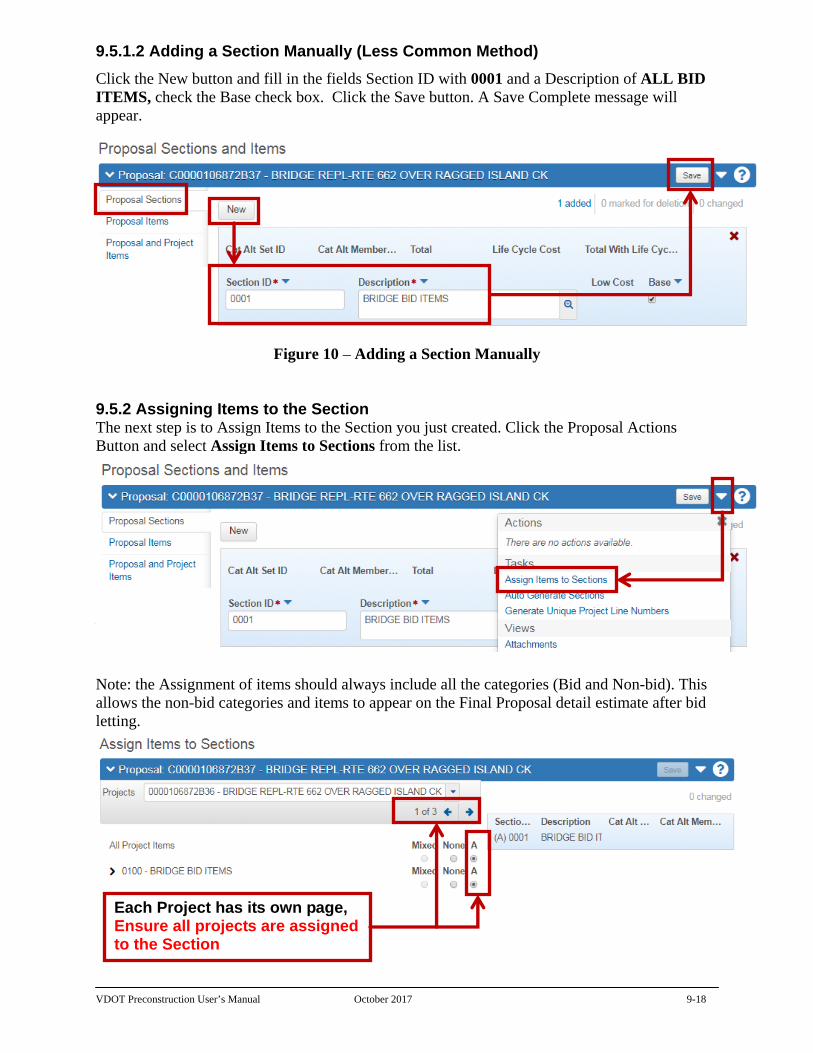
VDOT Preconstruction User’s Manual October 2017 9-18
9.5.1.2 Adding a Section Manually (Less Common Method)
Click the New button and fill in the fields Section ID with 0001 and a Description of ALL BID ITEMS, check the Base check box. Click the Save button. A Save Complete message will appear.
Figure 10 – Adding a Section Manually
9.5.2 Assigning Items to the Section The next step is to Assign Items to the Section you just created. Click the Proposal Actions Button and select Assign Items to Sections from the list.
This will open the Assign Items to Sections page. You will have this screen for each project associated to the proposal. Be sure to assign all items and all categories for each project by selecting the drop down or the blue arrow buttons to page through the projects. To assign all project items to the section, select the A button beside All Project Items and click the Save button. Note: the Assignment of items should always include all the categories (Bid and Non-bid). This allows the non-bid categories and items to appear on the Final Proposal detail estimate after bid letting.
Each Project has its own page, Ensure all projects are assigned to the Section

VDOT Preconstruction User’s Manual October 2017 9-19
9.6 Copying a Proposal If you are setting up a new proposal that is similar to another proposal already saved in the database, you can copy the existing proposal and assign it a new proposal ID. You can then make any minor changes required for the new proposal. Preconstruction has two methods: • Copy (no associated projects) • Copy Proposal and Project Note: Proposals/Projects that are Rejected and then re-advertisement shall be copied and a version letter is added to the end of the Project name, Proposal name and Contract ID. EG: C0000101289M01B 9.6.1 Copy a Proposal (no associated Projects) To copy a proposal, find the proposal you wish to copy on the Proposal Overview Screen. Select the proposal row Actions menu and click Copy from the list.
Preconstruction displays the Copy Proposal window. Enter a new Proposal ID in the field. The Proposal ID cannot be the same as a Proposal that is already in the database.
Figure 11 – Copy a Proposal
Click the Copy button once you have entered a new proposal ID. A Saved Complete message will display and you will be taken to the new proposal General Tab. Note that no projects are associated to the new proposal.
Enter new Proposal ID

VDOT Preconstruction User’s Manual October 2017 9-20
9.6.2 Copy Proposal and Project(s) To copy a Proposal and Projects perform the following steps.
1. From the Proposal overview screen, enter the UPC in the search box. 2. Select the row action button of the Proposal you wish to copy. 3. Select Copy Proposal and Project. 4. Enter the new Proposal name in the New Proposal ID field. 5. Click the Right arrow to go to the next page. 6. Click all the projects in the list that you wish to include in the Proposal. 7. Click the Right arrow to go to the next page. 8. Enter the New Project ID’s (same order from the previous screen) 9. Click the Copy Proposal button.
Figure 12 – Copy Proposal and Project

VDOT Preconstruction User’s Manual October 2017 9-21
Copy Proposal and Project(s) Continued
Figure 13 – Copy Proposal and Project Continued
Click Projects in list
Add Project name(s) in the same order from previous screen

VDOT Preconstruction User’s Manual October 2017 9-22
9.7 Deleting a Proposal When the occasion to delete a proposal occurs, it is important to remember a proposal record contains several levels of associated information, deleting a proposal can have serious consequences. Projects are associated (linked) to a proposal and Projects MUST BE REMOVED FROM THE PROPOSAL BEFORE DELETING A PROPOSAL. Please use Extreme Caution when deleting a Proposal!
There are two options to delete a Proposal 1. Delete Proposal 2. Delete Including Project
9.7.1 Delete a Proposal (with no Project(s) associated) To delete a proposal, find the proposal you wish to delete on the Proposal Overview Screen. Select the proposal row Actions menu and click DELETE from the list. An additional screen appears, select Delete only the Proposal. Note: this process does not have an UNDO option so please use caution when deleting!
Figure 14 – Delete a Proposal
Caution! Did you remove the Projects? Once clicked, deletion occurs There is no Undo

VDOT Preconstruction User’s Manual October 2017 9-23
9.7.2 Delete a Proposal Including Project(s) To delete a proposal, find the proposal you wish to delete on the Proposal Overview Screen. Select the proposal row Actions menu and click Delete Including Projects from the list. An additional screen appears, select Delete only the Proposal. Note: this process does not have an UNDO option so please use caution when deleting!
Figure 15 – Delete Proposal and its associated Projects
Caution! Did you remove the Projects? Once clicked, deletion occurs There is no Undo

VDOT Preconstruction User’s Manual October 2017 9-24
9.8 Generating Bid-Based Prices for Proposal The Price Proposal Items component allows you to change the estimated unit price for any proposal item. If you are on the Proposal General Tab, click the Item Pricing quick link at the top of the page. This opens the Price Proposal Items screen where you can see all items that are associated to the proposal. You can click any Actions button to generate a price based on historical bids or you can manually change the price of a single item. You can also generate bid-based prices for all items in the proposal or all items in a section at once.
Figure 16 – Price Proposal Items Screen
To manually change the price of a proposal item, click in the Price field, and type the new price. Notice that a lock is displayed in the Price field. If the lock is closed you cannot change the price until you unlock the item and save the estimate. When you modify a proposal item price and save your change, several updates take place:
The system sets the Est Type field for that item to Ad Hoc. The new price, estimation type, and pricing comments are automatically updated in the
associated project items. The extended amount is recalculated for the proposal item and the associated project
items. The total price for the proposal is updated and for the associated projects.
Note: Once the Proposal has been advertised (and Proposal set to Advertisement phase) prices may only be changed with an Open addendum.
Expand Section

VDOT Preconstruction User’s Manual October 2017 9-25
9.9 Generating the Proposal Price Schedule Report (aka Schedule of Items or SOI) The Proposal Price Schedule report has the options to display the Proposal Cover Page, Schedule of Items, Proposal Estimate, DBE Interest Report, Fuel Sheet, Steel Sheet, Major Items, and Merge Data Sheet. From the Proposal Overview Screen, search for your proposal. Click the row Actions button for the proposal and select Proposal Price Schedule VDOT..
Figure 17 – Proposal Overview Screen

VDOT Preconstruction User’s Manual October 2017 9-26
From the Generate Report menu, click the appropriate check boxes then click the Execute button.
Figure 18 – Generate Proposal Price Schedule Screen A new browser tab will open with the report and you can save the report as a pdf. Note that the report is not stored in the system. If you do not save the report before you close the browser, you will not be able to view it again unless you regenerate the report.
Figure 19 – Price Proposal Schedule Screen

VDOT Preconstruction User’s Manual October 2017 9-27
9.10 Assigning Wage Decisions The Proposal Wage Decision Overview component provides access to all the wage decisions that are currently associated with the proposal. Wage decisions are not associated directly with the proposal, but rather with the projects in the proposal. To access the Proposal Wage Decision Overview component, click the Wage Decisions Quick link on the Proposal Summary component. Click the button Select Wage Decisions to assign wage decisions to the project. Search for the wage decision you will add to the project and then select it from the list. A green check will display beside the decision. Select Add to Project and then Save.
Figure 20– Proposal Wage Decision Overview
If this is “Yes” Wage decisions must be added
Click Current year in list

VDOT Preconstruction User’s Manual October 2017 9-28
9.11 Proposal Addendums After a proposal has been advertised, subsequent changes to proposal information that affect contractor bidding (such as proposal times, items, or special provisions) must be tracked and distributed (revisions are posted to CADD/Bid-X) to the proposal vendors (Contractors) to make them aware of the changes from the original advertisement. Once a proposal Workflow has been set to Advertisement phase, the system locks the proposal from updating from the project(s) level. This is accomplished by adding addenda to the proposal. Before you can add an addendum to a proposal, the proposal must be changed to the Addenda Workflow phase. WORD OF CAUTION: Do not Auto Generate Sections while in an Open Addendum!! From the Proposal General Tab, select the Addenda quick link. This opens the Addendum Summary page. Select the New button and complete the Description and Comments fields. Click the Save button. This automatically opens the newly created addendum.
Figure 21 – Addendum Summary Screen

VDOT Preconstruction User’s Manual October 2017 9-29
9.11.1 Adding Items in Addendum Phase If you wish to add an item, you must determine the appropriate Proposal Item Line Number so that the new item is inserted (numerically by the item code number) in the correct line on the Proposal Price Schedule (aka Schedule of Items or SOI). This is accomplished by using the Proposal Price Schedule report to find the correct Proposal line number. Here is an example:
Figure 22 – Adding Items after Advertisement

VDOT Preconstruction User’s Manual October 2017 9-30
Step 1: To add a new item, open the appropriate project within the Proposal, click the Project Categories and Items tab, click the Items tab then click the New button. Enter all the required fields, including the Proposal Item Line Number field. Click Save. Please don’t forget to assign the new item to a funding package by selecting the Funding: Assign to items quick link. Step 2: The new item(s) must be added to an existing fund package within the project. See Chapter 6 (section 6.2.2) for details. Step 3: Assign the new item(s) to the Proposal section. Otherwise they will not appear on the Proposal detail estimate report. See Section 9.6.1.3
Figure 23 – Adding Project Items Screen

VDOT Preconstruction User’s Manual October 2017 9-31
Step 4: Close and Approve the Addendum Once you have completed all the necessary corrections, the next step is to Close and then Approve the Addendum.
Step 2 - Approve
Step 1 - Close

VDOT Preconstruction User’s Manual October 2017 9-32
9.12 Lessons Learned – Common Proposal Errors 9.12.1 Make sure these items are in the correct Category, marked as non-bid and have a quantity of 1. Category 3001- CEI Lump Sum Use item code 25580 Construction Engineering Category 3002- Contract Requirements Use item code 25585 Contract Requirements Category 3003- Contingency Lump Sum Use item code 25590 Contingency Excerpt from Chapter 4 of the Preconstruction User’s Manual

VDOT Preconstruction User’s Manual October 2017 9-33
9.12.2 Check to make sure there are no non-bid items in the regular bid items category. Preliminary Project Detail Estimate Report will generate an error if a TEC item is in a regular bid item category
9.12.3 Check is to ensure there are no “N” flags column in the Preliminary Project Detail Estimate Report.

VDOT Preconstruction User’s Manual October 2017 9-34
9.12.4 Make sure all items are assigned to the Proposal Section
The Auto Generate Sections button will automatically create a section for each category on the projects. Multiple sections should only be used when creating a proposal with Additives and/or Alternates. 9.12.5 Check to make sure all projects associated to the prime are associated to the proposal and name the Proposal after the controlling project.
Error – All “A”’s Should be filled in

VDOT Preconstruction User’s Manual October 2017 9-35
9.12.6 To fix unit prices displaying on the Schedule of Items (SOI) You will have to select the Project item from the Categories and Items link and remove the Bid requirement code and replace it with a null value.
Bid Requirement code field should be blank

VDOT Preconstruction User’s Manual October 2017 9-36
9.12.7 Make sure the Project has a Road Segment with a Route and Road System. No road segment creates issues with the Ballot report.

VDOT Preconstruction User’s Manual October 2017 APPENDIX A-1
APPENDIX A – PROJECT ID (PCN) NUMBER The format of the Project ID for various types of projects is as follows:
A.1 Projects with UPC Numbers The 13-character Project ID (PCN) is composed of the following: Position Explanation
1-10 = UPC (iPM) Number, with leading zeroes 11 = Type of Project: C – L&D (Construction) D – Drainage Structures over 20’ in length B – Bridge H – Hydraulics L – Environmental R – Right of Way T – Traffic Engineering U – Utilities X – Maintenance (Regular Project using Maintenance Funds) N – No Plan M – Minimum Plan 12-13 = For Constr., Bridge, etc. The last two digits of the fourth part of the state
project number, following the C, B, R, etc.
(Ex: for C503 project, enter 03 in positions 12 & 13 for B622 project, enter 22 in positions 12 & 13)
EXAMPLES of Project ID (PCN):
0000008216C01 (C501 project for UPC# 8216) 0000015492B01 (B601 project for UPC# 15492) 0000010679N01 (N501 project for UPC # 10679) 0000106515R01 (R201 project for UPC# 106515) 0000100625M01 (M501 project for UPC# 100625) 0000108104D44 (D644 project for UPC# 108104)

VDOT Preconstruction User’s Manual October 2017 APPENDIX A-2

VDOT Preconstruction User’s Manual October 2017 APPENDIX A-3
A.2 Maintenance Projects & SAAP Projects
The 13-character Project ID is composed of the following: Position Explanation
1 = M (for Maintenance-funded) 2 = 1 – Bristol 2 – Salem 3 – Lynchburg 4 – Richmond 5 – Hampton Roads 6 – Fredericksburg 7 – Culpeper 8 – Staunton 9 – Northern Virginia 3-4 = Year EX. 16 or 17 5-6 = Project Type = ST – Surface Treatment SS – Slurry Seal LM – Latex Modified PM – Plant Mix 7 = Schedule Letter – A, B, C, etc. 8-13 = 6 Digit Unique UPC A unique UPC is set up for each county, for each system. The District Maintenance Engineer will assist in determining the Project ID for your project.
Examples of Project ID for Maintenance & SAAP Projects:
CM218STA111166 SS8A800111612
M0M117SS110871 LM8C800110684 M615LMA107318 M115PMD106385 M415SSA107434 M215STA107156

VDOT Preconstruction User’s Manual October 2017 APPENDIX A-4
A.3 District Originated or Urban Projects (Non-IPM Projects) The 13-character Project ID is composed of the following: Position Explanation
1-2 = BR – Bristol SA – Salem LY – Lynchburg RC – Richmond SU – Hampton Roads FR – Fredericksburg CU – Culpeper ST – Staunton NV – Northern Virginia UR – Urban 3-13 = Assigned by Districts or Local Assistance Division
A.4 Prime Project ID and Proposal & Contract ID Both the Prime Project ID and the Proposal/Contract ID begin with a C and end with the Project ID of the largest project. The Proposal ID and Contract ID should always be the same. The Prime and the Proposal/Contract ID are typically 15 digits.
Example 1: Projects ID’s are: 0000003942C01 0000003942B01 0000003942B02 Prime Project = C00000003942C01 Proposal/Contract ID = C00000003942C01
Example 2: Project ID is: M615LMA107318 Prime Project = CM615LMA0107318 Proposal/Contract ID = CM615LMA0107318 Note: The C is added to the Project ID, it does not replace the first digit.
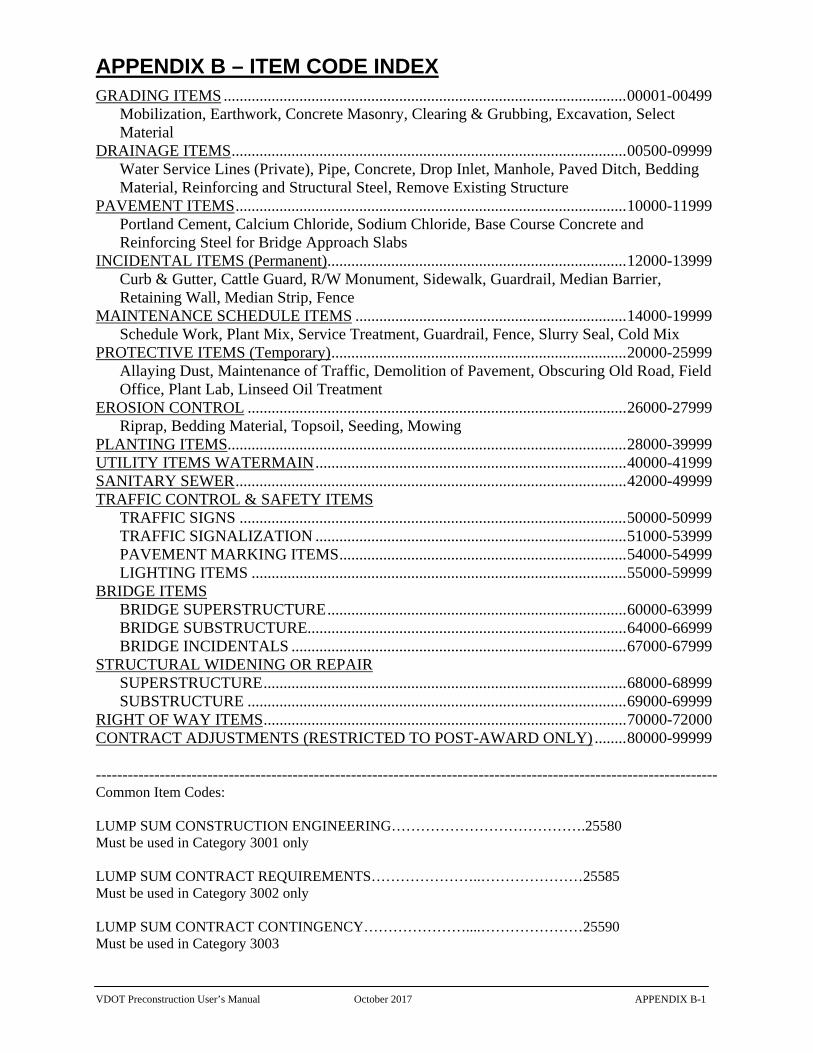
VDOT Preconstruction User’s Manual October 2017 APPENDIX B-1
APPENDIX B – ITEM CODE INDEX GRADING ITEMS ..................................................................................................... 00001-00499 Mobilization, Earthwork, Concrete Masonry, Clearing & Grubbing, Excavation, Select
Material DRAINAGE ITEMS ................................................................................................... 00500-09999 Water Service Lines (Private), Pipe, Concrete, Drop Inlet, Manhole, Paved Ditch, Bedding
Material, Reinforcing and Structural Steel, Remove Existing Structure PAVEMENT ITEMS .................................................................................................. 10000-11999 Portland Cement, Calcium Chloride, Sodium Chloride, Base Course Concrete and
Reinforcing Steel for Bridge Approach Slabs INCIDENTAL ITEMS (Permanent) ........................................................................... 12000-13999 Curb & Gutter, Cattle Guard, R/W Monument, Sidewalk, Guardrail, Median Barrier,
Retaining Wall, Median Strip, Fence MAINTENANCE SCHEDULE ITEMS .................................................................... 14000-19999 Schedule Work, Plant Mix, Service Treatment, Guardrail, Fence, Slurry Seal, Cold Mix PROTECTIVE ITEMS (Temporary) .......................................................................... 20000-25999 Allaying Dust, Maintenance of Traffic, Demolition of Pavement, Obscuring Old Road, Field
Office, Plant Lab, Linseed Oil Treatment EROSION CONTROL ............................................................................................... 26000-27999 Riprap, Bedding Material, Topsoil, Seeding, Mowing PLANTING ITEMS.................................................................................................... 28000-39999 UTILITY ITEMS WATERMAIN .............................................................................. 40000-41999 SANITARY SEWER .................................................................................................. 42000-49999 TRAFFIC CONTROL & SAFETY ITEMS
TRAFFIC SIGNS ................................................................................................. 50000-50999 TRAFFIC SIGNALIZATION .............................................................................. 51000-53999 PAVEMENT MARKING ITEMS ........................................................................ 54000-54999 LIGHTING ITEMS .............................................................................................. 55000-59999
BRIDGE ITEMS BRIDGE SUPERSTRUCTURE ........................................................................... 60000-63999 BRIDGE SUBSTRUCTURE................................................................................ 64000-66999 BRIDGE INCIDENTALS .................................................................................... 67000-67999
STRUCTURAL WIDENING OR REPAIR SUPERSTRUCTURE ........................................................................................... 68000-68999 SUBSTRUCTURE ............................................................................................... 69000-69999
RIGHT OF WAY ITEMS ........................................................................................... 70000-72000 CONTRACT ADJUSTMENTS (RESTRICTED TO POST-AWARD ONLY) ........ 80000-99999 --------------------------------------------------------------------------------------------------------------------- Common Item Codes: LUMP SUM CONSTRUCTION ENGINEERING………………………………….25580 Must be used in Category 3001 only LUMP SUM CONTRACT REQUIREMENTS…………………..…………………25585 Must be used in Category 3002 only LUMP SUM CONTRACT CONTINGENCY…………………....…………………25590 Must be used in Category 3003

VDOT Preconstruction User’s Manual October 2017 APPENDIX C-1
APPENDIX C – CONVERSION CHART (COUNTY)
COUNTY - DISTRICT - RESIDENCY CONVERSION CHART County Name County Code District No. Residency Arlington C000 9 Fairfax Accomack C001 5 Accomac Albemarle C002 7 Charlottesville Alleghany C003 8 Lexington Amelia C004 4 Amelia Amherst C005 3 Amherst Appomattox C006 3 Appomattox Augusta C007 8 Verona Bath C008 8 Lexington Bedford C009 2 Bedford Bland C010 1 Tazewell Botetourt C011 2 Salem Brunswick C012 4 South Hill Buchanan C013 1 Lebanon Buckingham C014 3 Dillwyn Campbell C015 3 Appomattox Caroline C016 6 Bowling Green Carroll C017 2 Hillsville Charles City C018 4 Sandston Charlotte C019 3 Halifax Chesterfield C020 4 Chesterfield Clarke C021 8 Luray Craig C022 2 Salem Culpeper C023 7 Culpeper Cumberland C024 3 Dillwyn Dickenson C025 1 Wise Dinwiddie C026 4 Petersburg Elizabeth City C027 * 5 Tidewater Toll Essex C028 6 Bowling Green Fairfax C029 9 Fairfax Fauquier C030 7 Warrenton Floyd C031 2 Hillsville Fluvanna C032 7 Louisa Franklin C033 2 Rocky Mount Frederick C034 8 Edinburg Giles C035 2 Christiansburg Gloucester C036 6 Saluda
Goochland C037 4 Ashland

VDOT Preconstruction User’s Manual October 2017 APPENDIX C-2
County Name County Code District No. Residency Grayson C038 1 Wytheville Greene C039 7 Charlottesville Greensville C040 5 Franklin Halifax C041 3 Halifax Hanover C042 4 Ashland Henrico C043 4 Sandston Henry C044 2 Martinsville Highland C045 8 Verona Isle of Wight C046 5 Suffolk James City C047 5 Williamsburg King George C048 6 Fredericksburg King and Queen C049 6 Saluda King William C050 6 Bowling Green Lancaster C051 6 Warsaw Lee C052 1 Jonesville Loudoun C053 9 Leesburg Louisa C054 7 Louisa Lunenburg C055 4 Amelia Madison C056 7 Culpeper Mathews C057 6 Saluda Mecklenburg C058 4 South Hill Middlesex C059 6 Saluda Montgomery C060 2 Christiansburg Nansemond C061 * 5 Suffolk Nelson C062 3 Amherst New Kent C063 4 Sandston Norfolk C064 * 5 Norfolk Northampton C065 5 Accomac Northumberland C066 6 Warsaw Nottoway C067 4 Amelia Orange C068 7 Culpeper Page C069 8 Luray Patrick C070 2 Martinsville Pittsylvania C071 3 Chatham Powhatan C072 4 Chesterfield Prince Edward C073 3 Dillwyn Prince George C074 4 Petersburg Princess Anne C075 * 5 Norfolk Prince William C076 9 Manassas Pulaski C077 2 Christiansburg Rappahannock C078 7 Warrenton Richmond C079 6 Warsaw
Roanoke C080 2 Salem Rockbridge C081 8 Lexington

VDOT Preconstruction User’s Manual October 2017 APPENDIX C-3
County Name County Code District No. Residency Rockingham C082 8 Harrisonburg Russell C083 1 Lebanon Scott C084 1 Jonesville Shenandoah C085 8 Edinburg Smyth C086 1 Abingdon Southampton C087 5 Franklin Spotsylvania C088 6 Fredericksburg Stafford C089 6 Fredericksburg Surry C090 5 Waverly Sussex C091 5 Waverly Tazewell C092 1 Tazewell Warren C093 8 Luray Warwick C094 * 5 Williamsburg Washington C095 1 Abingdon Westmoreland C096 6 Warsaw Wise C097 1 Wise Wythe C098 1 Wytheville York C099 5 Williamsburg
*Counties 27, 61, 64, 75 & 94 are no longer counties. These numbers are still used in cases where work is being done in the locations they designate.
Districtwide County Code District No.
Bristol C961 1 Salem C962 2 Lynchburg C963 3 Richmond C964 4 Hampton Roads C965 5
Fredericksburg C966 6 Culpeper C967 7
Staunton C968 8 Northern VA C96A 9

VDOT Preconstruction User’s Manual October 2017 APPENDIX D-1
APPENDIX D – CONVERSION CHART (CITY)
CITY - DISTRICT - RESIDENCY – COUNTY CONVERSION CHART
City Code City Name District No. Residency County Code 100 Alexandria 9 Fairfax C000 101 Big Stone Gap 1 Wise C097 102 Bristol 1 Abingdon C095 103 Buena Vista 8 Lexington C081 104 Charlottesville 7 Charlottesville C002 105 Clifton Forge 8 Lexington C003 106 Colonial Heights 4 Chesterfield C020 107 Covington 8 Lexington C003 108 Danville 3 Chatham C071 109 Emporia 5 Franklin C040 110 Falls Church 9 Fairfax C029 111 Fredericksburg 6 Fredericksburg C088 112 Front Royal 8 Luray C093 113 Galax 2 Hillsville C017 114 Hampton 5 Tidewater Toll Fac. C027 115 Harrisonburg 8 Harrisonburg C082 116 Hopewell 4 Petersburg C074 117 Lexington 8 Lexington C081 118 Lynchburg 3 Appomattox C015 119 Marion 1 Abingdon C086 120 Martinsville 2 Martinsville C044 121 Newport News 5 Williamsburg C094 122 Norfolk 5 Norfolk C064 123 Petersburg 4 Petersburg C026 124 Portsmouth 5 Norfolk C064 125 Pulaski 2 Christiansburg C077 126 Radford 2 Christiansburg C060 127 Richmond 4 Chesterfield C020 128 Roanoke 2 Salem C080 129 Salem 2 Salem C080 130 South Boston 3 Halifax C041 131 Chesapeake 5 Norfolk C064 132 Staunton 8 Verona C007 133 Suffolk 5 Suffolk C061 134 Virginia Beach 5 Norfolk C075 136 Waynesboro 8 Verona C007 137 Williamsburg 5 Williamsburg C047 138 Winchester 8 Edinburg C034

VDOT Preconstruction User’s Manual October 2017 APPENDIX D-2
City Code City Name District No. Residency County Code 139 Wytheville 1 Wytheville C098 140 Abingdon 1 Abingdon C095 141 Bedford 2 Bedford C009 142 Blackstone 4 Amelia C067 143 Bluefield 1 Tazewell C092 144 Farmville 3 Dillwyn C073 145 Franklin 5 Franklin C087 146 Norton 1 Wise C097 147 Poquoson 5 Williamsburg C099 148 Richlands 1 Tazewell C092 149 Vinton 2 Salem C080 150 Blacksburg 2 Christianburg C060 151 Fairfax 9 Fairfax C029 152 Manassas Park 9 Manassas C076 153 Vienna 9 Fairfax C029 154 Christiansburg 2 Christiansburg C060 155 Manassas 9 Manassas C076 156 Warrenton 7 Warrenton C030 157 Rocky Mount 2 Rocky Mount C033 158 Tazewell 1 Tazewell C092 159 Luray 8 Luray C069 160 Accomac 5 Accomac C001 161 Alberta 4 South Hill C012 162 Altavista 3 Appomattox C015 163 Amherst 3 Amherst C005 164 Appalachia 1 Wise C097 165 Appomattox 3 Appomattox C006 166 Ashland 4 Ashland C042 167 Belle Haven 5 Accomac C001 168 Berryville 8 Luray C021 169 Bloxom 5 Accomac C001 170 Boones Mill 2 Rocky Mount C033 171 Bowling Green 6 Bowling Green C016 172 Boyce 8 Luray C021 173 Boydton 4 South Hill C058 174 Boykins 5 Franklin C087 175 Branchville 5 Franklin C087 176 Bridgewater 8 Harrisonburg C082 177 Broadway 8 Harrisonburg C082 178 Brodnax 4 South Hill C012/58 179 Brookneal 3 Appomattox C015 180 Buchanan 2 Salem C011 181 Burkeville 4 Amelia C067 182 Cape Charles 5 Accomac C065
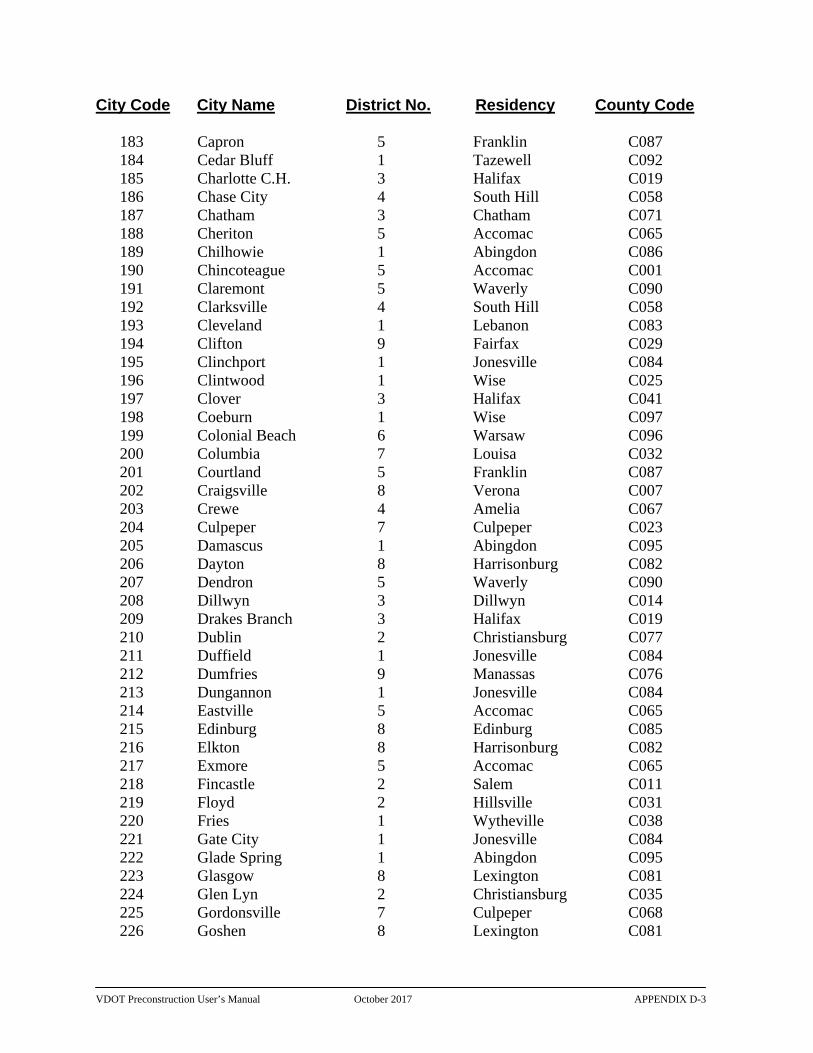
VDOT Preconstruction User’s Manual October 2017 APPENDIX D-3
City Code City Name District No. Residency County Code 183 Capron 5 Franklin C087 184 Cedar Bluff 1 Tazewell C092 185 Charlotte C.H. 3 Halifax C019 186 Chase City 4 South Hill C058 187 Chatham 3 Chatham C071 188 Cheriton 5 Accomac C065 189 Chilhowie 1 Abingdon C086 190 Chincoteague 5 Accomac C001 191 Claremont 5 Waverly C090 192 Clarksville 4 South Hill C058 193 Cleveland 1 Lebanon C083 194 Clifton 9 Fairfax C029 195 Clinchport 1 Jonesville C084 196 Clintwood 1 Wise C025 197 Clover 3 Halifax C041 198 Coeburn 1 Wise C097 199 Colonial Beach 6 Warsaw C096 200 Columbia 7 Louisa C032 201 Courtland 5 Franklin C087 202 Craigsville 8 Verona C007 203 Crewe 4 Amelia C067 204 Culpeper 7 Culpeper C023 205 Damascus 1 Abingdon C095 206 Dayton 8 Harrisonburg C082 207 Dendron 5 Waverly C090 208 Dillwyn 3 Dillwyn C014 209 Drakes Branch 3 Halifax C019 210 Dublin 2 Christiansburg C077 211 Duffield 1 Jonesville C084 212 Dumfries 9 Manassas C076 213 Dungannon 1 Jonesville C084 214 Eastville 5 Accomac C065 215 Edinburg 8 Edinburg C085 216 Elkton 8 Harrisonburg C082 217 Exmore 5 Accomac C065 218 Fincastle 2 Salem C011 219 Floyd 2 Hillsville C031 220 Fries 1 Wytheville C038 221 Gate City 1 Jonesville C084 222 Glade Spring 1 Abingdon C095 223 Glasgow 8 Lexington C081 224 Glen Lyn 2 Christiansburg C035 225 Gordonsville 7 Culpeper C068 226 Goshen 8 Lexington C081

VDOT Preconstruction User’s Manual October 2017 APPENDIX D-4
City Code City Name District No. Residency County Code 227 Gretna 3 Chatham C071 228 Grottoes* 8 Verona C007 228 Grottoes* 8 Harrisonburg C082 229 Grundy 1 Lebanon C013 230 Halifax 3 Halifax C041 231 Hallwood 5 Accomac C001 232 Hamilton 9 Leesburg C053 233 Haymarket 9 Manassas C076 234 Haysi 1 Wise C025 235 Herndon 9 Fairfax C029 236 Hillsboro 9 Leesburg C053 237 Hillsville 2 Hillsville C017 238 Holland 5 Suffolk C061 239 Honaker 1 Lebanon C083 240 Independence 1 Wytheville C038 241 Iron Gate 8 Lexington C003 242 Irvington 6 Warsaw C051 243 Ivor 5 Franklin C087 244 Jarratt 5 Franklin C040 244 Jarratt 5 Waverly C091 245 Jonesville 1 Jonesville C052 246 Keller 5 Accomac C001 247 Kenbridge 4 Amelia C055 248 Keysville 3 Halifax C019 249 Kilmarnock 6 Warsaw C051/66 250 La Crosse 4 South Hill C058 251 Lawrenceville 4 South Hill C012 252 Lebanon 1 Lebanon C083 253 Leesburg 9 Leesburg C053 254 Louisa 7 Louisa C054 255 Lovettsville 9 Leesburg C053 256 Madison 7 Culpeper C056 257 McKenney 4 Petersburg C026 258 Melfa 5 Accomac C001 259 Middleburg 9 Leesburg C053 260 Middletown 8 Edinburg C034 261 Mineral 7 Louisa C054 262 Monterey 8 Verona C045 263 Montross 6 Warsaw C096 264 Mt. Crawford 8 Harrisonburg C082 265 Mt. Jackson 8 Edinburg C085 266 Narrows 2 Christiansburg C035 267 Nassawadox 5 Accomac C065 268 New Castle 2 Salem C022

VDOT Preconstruction User’s Manual October 2017 APPENDIX D-5
City Code City Name District No. Residency County Code 269 New Market 8 Edinburg C085 270 Newsoms 5 Franklin C087 271 Nickelsville 1 Jonesville C084 272 Occoquan 9 Manassas C076 273 Onancock 5 Accomac C001 274 Onley 5 Accomac C001 275 Orange 7 Culpeper C068 276 Painter 5 Accomac C001 277 Pamplin City* 3 Dillwyn C073 277 Pamplin City* 3 Appomattox C006 278 Parksley 5 Accomac C001 279 Pearisburg 2 Christiansburg C035 280 Pembroke 2 Christiansburg C035 281 Pennington Gap 1 Jonesville C052 282 Phenix 3 Halifax C019 283 Pocahontas 1 Tazewell C092 284 Port Royal 6 Bowling Green C016 285 Pound 1 Wise C097 286 Purcellville 9 Leesburg C053 287 Quantico 9 Manassas C076 288 Remington 7 Warrenton C030 289 Richcreek 2 Christiansburg C035 290 Ridgeway 2 Martinsville C044 291 Round Hill 9 Leesburg C053 292 Rural Retreat 1 Wytheville C098 293 Saint Charles 1 Jonesville C052 294 Saint Paul 1 Wise C097 295 Saltville 1 Abingdon C086/95 305 Stony Creek 5 Waverly C091 306 Strasburg 8 Edinburg C085 296 Saxis 5 Accomac C001 297 Scottsburg 3 Halifax C041 298 Scottsville* 7 Charlottesville C002 298 Scottsville* 7 Louisa C032 299 Shenandoah 8 Luray C069 300 Smithfield 5 Suffolk C046 301 South Hill 4 South Hill C058 302 Stanardsville 7 Charlottesville C039 303 Stanley 8 Luray C069 304 Stephens City 8 Edinburg C034 307 Stuart 2 Martinsville C070 308 Surry 5 Waverly C090 309 Tangier 5 Accomac C001 310 Tappahannock 6 Bowling Green C028

VDOT Preconstruction User’s Manual October 2017 APPENDIX D-6
City Code City Name District No. Residency County Code 311 The Plains 7 Warrenton C030 312 Timberville 8 Harrisonburg C082 313 Toms Brook 8 Edinburg C085 314 Troutdale 1 Wytheville C038 315 Troutville 2 Salem C011 316 Urbanna 6 Saluda C059 317 Victoria 4 Amelia C055 318 Virgilina 3 Halifax C041 319 Wachapreague 5 Accomac C001 320 Wakefield 5 Waverly C091 321 Warsaw 6 Warsaw C079 322 Washington 7 Warrenton C078 323 Waverly 5 Waverly C091 324 Weber City 1 Jonesville C084 325 West Point 6 Bowling Green C050 326 Whaleyville 5 Suffolk C061 327 White Stone 6 Warsaw C051 328 Windsor 5 Suffolk C046 329 Wise 1 Wise C097 330 Woodstock 8 Edinburg C085 331 Hurt 3 Chatham C071 333 ** Collinsville 2 Martinsville C044 335 ** Quantico Station 9 Manassas C076 338 ** West Gate 9 Manassas C076 339 Clinchco 1 Wise C025
* A county line runs through these cities. The use of two county (and two residency) codes is coupled only with secondary roads projects. For all other purposes, the county with the lowest number is used.
** Unincorporated Urban Places

VDOT Preconstruction User’s Manual October 2017 APPENDIX E-1
APPENDIX E – PROJECT WORK TYPES
CODE DESCRIPTION
BDO BRIDGE DECK OVERLAY
BDR BRIDGE DECK REPLACEMENT
BN BRIDGE NEW
BWR BRIDGE WIDENING & REPAIR
CBC CONSTRUCTION NEW BOX CULVERT
CDA CONSTRUCTION DEMOLITION/ABATEMENT
CITS CONSTRUCTION DEMOLITION/ABATEMENT
CNA CONSTRUCTION NEW ALIGNMENT
CTL CONSTRUCTION NEW TURN LANES
CUE CONSTRUCTION UPGRADE EXISTING LANES
CW CONSTRUCTION WIDENING (ADDING LANES)
CWM CONSTRUCTION WETLAND MITIGATION/LANDSCAP
MAR MAINT ASPHALT PLANT MIX RESURFACING
MBD MAINTENANCE BR SUPERST REPAIR/ REHAB
MBSB MAINTENANCE BR SUBSTRUCTURE REPAIR/REHAB
MG MAINTENANCE GUARDRAIL
MPAR MAINTENANCE PAVEMENT REPAIRS
MPIR MAINTENANCE PIPE REHABILITATION
MPM MAINTENANCE PAVEMENT MARKING
MRWF MAINTENANCE RIGHT OF WAY FENCING
MSCG MAINTENANCE SIDEWALK/CURB & GUTTER
MSIG MAINENANCE SIGNAGE
MSIN MAINTENANCE SIGNALS
MSR MAINTENANCE SLOPE REPAIR
MSS MAINTENANCE SLURRY SEAL
MST MAINTENANCE SURFACE TREATMENT

VDOT Preconstruction User’s Manual October 2017 APPENDIX F-1
APPENDIX F – FHWA Type Codes CODE NAME
01 NEW CONSTRUCTION ROADWAY
03 4R - RECONSTRUCTION- ADDED CAPACITY
04 4R - RECONSTRUCTION-NO ADDED CAPACITY
05 4R - SYSTEM PRESERVATION - RESURFAC
06 4R - RESTORATION & REHABILITATION
07 4R - RELOCATION
08 BRIDGE - NEW CONSTRUCTION
10 BRIDGE - REPLACEMENT-ADDED CAPACITY
11 BRIDGE - REPLACE-NO ADDED CAPACITY
13 BRIDGE - REHAB-ADDED CAPACITY
14 BRIDGE-REHAB-NO ADDED CAPACITY
15 PRELIMINARY ENGINEERING
16 RIGHT OF WAY
17 CONSTRUCTION ENGINEERING
18 PLANNING
19 RESEARCH
20 ENVIRONMENTAL ONLY
21 SAFETY
22 SAFETY - RAIL/HWY CROSSING
23 TRANSIT
24 TRAFFIC MANAGEMENT/ENGINEERING-HOV
25 VEHICLE WEIGHT ENFORCEMENT PROGRAM
26 FERRY BOATS
27 ADMINISTRATION
28 OTHER-FACILITIES FOR PEDS/BIKES
29 OTHER-ACQUISITION OF SCENIC/HISTORY
30 OTHER-SCENIC OR HISTORIC HWY PROGRAM
31 OTHER-LANDSCAPE/SCENIC BEAUTIFY
32 OTHER-HISTORIC PRESERVATION
33 OTHER-REHAB/OPER OF HISTORIC BLDG
34 OTHER-PRESERVATION OF ABANDONED RWY
35 OTHER-CTRL/REMOVAL OUTDOOR ADVERTISE
36 OTHER-ARCHAEOLOGICAL PLAN/RESEARCH
37 OTHER-MITIGATION OF WATER POLLUTION
38 OTHER-SAFETY AND ED FOR PED/BIKE
39 OTHER-ESTABLISHMENT TRANS MUSEUMS
40 OTHER-SPECIAL BRIDGE
41 OTHER-YOUTH CONSERVATION/SERVICE
42 OTHER-TRAINING
43 OTHER-UTILITIES
44 OTHER-OTHER
45 DEBT SERVICE
47 BRIDGE PRESERVATION
48 BRIDGE PROTECTION
49 BRIDGE INSPECTION AND RELATED TRAINING
50 NEW TUNNEL
51 TUNNEL REPLACEMENT
52 TUNNEL REHABILITATION
53 TUNNEL PRESERVATION
54 TUNNEL PROTECTION
55 TUNNEL INSPECTION AND RELATED TRAINING
56 OTHER ASSET INSPECTIONS

VDOT Preconstruction User’s Manual October 2017 APPENDIX F-2
FHWA Type Code Descriptions
CODE NAME DESCRIPTION
01 New Construction
Construction of a new roadway that will not replace an existing roadway. A new roadway will provide: (1) a roadway where none existing, or (2) an additional and alternate roadway to an existing roadway will remain open and continue to serve through traffic.
03-4R Reconstruction, Added Capacity
Construction on approximate alignment of an existing route where the old pavement structure is substantially removed and replaced. Such reconstruction includes widening to provide continuous additional through lane(s), or adding, or revising interchanges, replacing other highway elements such as a grade separation to replace an existing grade intersection. Also included, where necessary, are other incidental improvements such as drainage and shoulder improvements.
04-4R Reconstruction, No added Capacity
Widening the lanes and/or shoulders of an existing roadway without adding through lanes. This may include reconstructing the existing pavement and other incidental improvements such as shoulder and drainage improvements.
05-4R Resurfacing
Placement of additional surface material over the existing roadway to improve serviceability or to provide additional strength. There may be some upgrading of unsafe features and other incidental work in conjunction with resurfacing. Where surfacing is constructed by a separate project as a final stage of construction, the type of improvement should be the same as that of the preceding stage B new route, relocation, reconstruction, minor widening, etc.
06-4R Restoration and Rehabilitation
Work required to return existing pavement (including shoulders) to a condition of adequate structural support or to a condition adequate for placement of an additional stage of construction. There may be some upgrading of unsafe features or other incidental work in conjunction with the restoration and rehabilitation. Typical improvements would include replacing spalled or malfunctioning joints; substantial pavement stabilization prior to resurfacing; grinding/grooving of rigid pavements; replacing deteriorated materials; reworking or strengthening bases or sub-bases, and adding under-drains.
07-4R Relocation
Construction of a roadway at a new location that replaces an existing roadway. The new roadway carries all the through traffic with the previous facility closed or retained as a land–service road only.
08 New Bridge Construction of a new bridge that does not replace or relocate an existing bridge.
*Projects using these Improvement Codes must report a National Bridge Inventory (NBI) Structure Number.

VDOT Preconstruction User’s Manual October 2017 APPENDIX F-3
CODE NAME DESCRIPTION
*10 Bridge Replacement
Total replacement of a bridge with a new structure. The use of this code requires the reporting of the National Bridge Inventory (NBI) structure number in the "Bridge Number" data field.
*13 Bridge Rehabilitation
Major work required to restore the structural integrity of bridge as well as work necessary to correct major safety defects. If HBRRP funds are involved, the use of this code requires the reporting of the National Bridge Inventory (NBI) structure number in the "Bridge Number" data field.
**15 Preliminary Engineering
For the preparation of plans, specifications, and estimates (PS&E), traffic, and related studies including field inspections, surveys material testing and borings.
16 Right of Way
For purchase of land, improvements and easements, in addition to the cost of moving and relocating buildings, businesses, and persons.
**17 Construction Engineering
Oversight of construction of roadways, structures, and traffic service facilities including additional design work after construction project is let.
*Projects using these Improvement Codes must report a National Bridge Inventory (NBI) Structure Number. **Transportation Enhancement Projects (Program Codes with fund source 33B0, Q220) must use these Improvement Codes.
CODE NAME DESCRIPTION
18 Planning For Planning related purposes.
19 Research For Research related purposes.

VDOT Preconstruction User’s Manual October 2017 APPENDIX F-4
20 Environmental Only
For improvements that do not provide any increase in the level of service, in the condition of the facility or in safety features. Typical improvements, which would fall in this category, would be noise barriers, beautification and other environmentally related features not built as a part of any other improvement type. If environmental mitigation is needed as the result of a bridge project, and it is confined to the reasonable touchdown and the bridge itself, then it is allowable with HBRRP funds. Outside the reasonable touchdown would not be considered eligible.
21 Safety
For projects or a significant portion of a project that provides features or devices to enhance safety. For example, expenditures on projects designed to improve the safety of at-grade railroad crossings or for the construction of facilities dedicated to the enforcement of vehicle weight regulations.
22 Rail/Highway Crossing
Improvements to crossing warning Protective Devices such as signs, markings, and cross bucks; flashing light additions/improvements; and improvements to track circuitry.
23 Transit For transit and transit-related purposes.
24 Traffic Management/Engineering – HOV
Traffic operation improvements that are designed to reduce traffic congestion and to facilitate the flow of traffic, both people and vehicles, on existing systems, or to conserve motor fuels. Include automated toll collection equipment, road and bridge surveillance and control systems, etc.
25 Vehicle Weight Enforcement Program Vehicle Weight Enforcement Program
26 Ferry Boats Ferry Boats
27 Administration Administration for National Recreational Trails Projects, Commercial Vehicles, and other similar projects.
**28 Facilities for Pedestrians and Bicycles For independent projects (not part of any other Federal-aid Highway project) to construct a facility to accommodate bicycle transportation and pedestrians.
**29 Acquisition of Scenic Easements and Scenic or Historic Sites
For projects consisting of easement and fee-simple purchase of sites of historic significance and/or considered worthy of preserving due their scenic qualities within the view shed of a transportation facility.
**30 Scenic or Historic Highway Programs For projects consisting of scenic highway program and implementation activities not included in safety and other related improvements.
**Transportation Enhancement Projects (Program Codes with fund source 33B0, Q220) must use these Improvement Codes.
CODE NAME DESCRIPTION
**31 Landscaping and Other Scenic Beautification
For projects involving landscaping and other scenic beautification through planting and related work. This includes vegetation management to assure the sustainability of landscape areas.

VDOT Preconstruction User’s Manual October 2017 APPENDIX F-5
**32 Historic Preservation
For projects consisting of purchasing and restoring/rehabilitating a building, structure, or facility (other than transportation buildings, structures and facilities) that is directly related to the transportation system.
**33
Rehabilitation and Operation of Historic Transportation Buildings, Structures, or Facilities
For projects consisting of purchasing and restoring/rehabilitating, and/or operating transportation buildings, structures, or facilities considered to be of historic significance.
**34 Preservation of Abandoned Railway Corridors
For projects to preserve an abandoned railway corridor. It is expected that most of these projects will accommodate bicycle and pedestrian use. This code may be used for any railway corridor conversion project including those used by equestrians, skaters, and skiers. Not to be used for National Recreational Trails projects.
**35 Control and Removal of Outdoor Advertising
For projects to purchase outdoor advertising for permanent removal, to remove illegal outdoor advertising, or to develop an outdoor advertising control plan.
**36 Archeological Planning and Research
For projects involving the identification, evaluation, planning, and/or research of historic or archeological planning and research under Transportation Enhancements.
**37 Mitigation of Water Pollution due to Highway Runoff
**38 Safety and Education for Pedestrians/Bicyclists
**39 Establishment of Transportation Museums
**40 Special Bridge
This category includes bridge inventory, inspection and classification and other special bridge projects, such as load posting, not covered by another type of improvement code
**41 Youth Conservation Service
42 Training Training, Supportive Services; TRAC; On the Job Training
43 Utilities Utilities
44 Other Miscellaneous work such as National Recreational Trails construction, noise barriers, etc.
45 Debt Service
Interest payments and retirement of principal under an eligible bond issue (including capitalized interest) and any other cost incidental to the sale of an eligible bond issue (including issuance costs, insurance or other credit enhancement fees, and other bond-related costs as determined).
*Projects using these Improvement Codes must report a National Bridge Inventory (NBI) Structure Number. **Transportation Enhancement Projects (Program Codes with fund source 33B0, Q220) must use these Improvement Codes.

VDOT Preconstruction User’s Manual October 2017 APPENDIX F-6
BRIDGE IMPROVEMENT TYPES
Code Name Structure Number Required?
Definition
Highway Bridge Program Funds MAP‐21 Funds
40 Special Bridge No
Includes bridge inventory, inspection and classification and other special bridge projects, such as load posting, not covered by another type of improvement code. Also includes application of calcium magnesium acetate, sodium acetate/formate, or other environmentally acceptable, minimally corrosive ant‐icing and deicing compositions.
Includes low water crossing replacement, application of calcium magnesium acetate, sodium acetate/formate, or other environmentally acceptable, minimally corrosive anti‐icing and deicing compositions, and other eligible bridge projects not covered by another type of improvement code.
47 Bridge Preservation
Yes
Preventative Maintenance activities that are a cost effective means of extending the service life of a bridge.
Activities that prevent, delay, or reduce deterioration of bridges or bridge elements, restore the function of existing bridges, keep bridges in good condition and extend their life.
48 Bridge Protection
Yes Not Applicable
Includes scour countermeasures, seismic retrofits, impact protection measures, security countermeasures, and protection against extreme events.
49 Bridge Inspection and Related Training
No Not Applicable
Bridge inspection and evaluation activities, including in‐depth and special inspections. Bridge inspection related training.

VDOT Preconstruction User’s Manual October 2017 APPENDIX F-7
TUNNEL IMPROVEMENT TYPES
Code Name Structure Number Required?
MAP‐21 Funds
50 New Tunnel No
Construction of a new tunnel that does not replace or relocate an existing tunnel.
51 Tunnel Replacement Yes
Total replacement of a tunnel with a new structure constructed with additional lanes in the same general traffic corridor.
52 Tunnel Rehabilitation Yes
For the work required to restore structural integrity of a tunnel, as well as, work necessary to correct major safety defects.
53 Tunnel Preservation Yes
Activities that prevent, delay, or reduce deterioration of tunnels or tunnel elements, restore the function of existing tunnels, keep tunnels in good condition and extend their life.
54 Tunnel Protection Yes
Includes impact protection measures, security countermeasures, and protection against extreme events.
55 Tunnel Inspection and Related Training
No
Tunnel inspection and evaluation, including in‐depth and other special inspections. Tunnel inspection training.

VDOT Preconstruction User’s Manual October 2017 APPENDIX F-8
OTHER ASSETS IMPROVEMENT TYPES
(Including Signs, Earth Walls, & Drainage)
Code Name Structure Number Required?
MAP‐21 Funds
56 Other Asset Inspections
No
Inspection and evaluation of infrastructure assets other than bridge or tunnels, including signs and sign‐structures, earth retaining walls and drainage structures. Inspection related training for signs and sign‐structure, earth retaining walls and drainage structures.

VDOT Preconstruction User’s Manual October 2017 APPENDIX G-1
APPENDIX G – FEDERAL WORK CODES
CODE DESCRIPTION
ALT Alternates
BRAL Bridge Alterations
BRRP Bridge Replacement
DEMO Demolition
DSSR Deck Superstructure Replacement
ENVR Environmental
GENL General
MABR Major Bridge Rehabilitation
MAWD Major Widening
MCON Minor Construction - City
MIBR Minor Bridge Rehabilitation
MIWD Minor Widening
NCON New Construction
NCST New Construction-Surface Treatment
NONE No Supplemental Code
NWBR New Bridge
PREL Preliminary Studies Only
R&B Roadway & Bridge
RCST Reconstruction/Resurfacing
RDWY Roadway
RECS Reconstruction
RELC Relocation
RPRS Deck Super/Substructure Repairs
RSRF Resurfacing
RSRH Restoration & Rehabilitation
SAFT Safety/Traffic/TMS

VDOT Preconstruction User’s Manual October 2017 APPENDIX H-1
APPENDIX H – PROGRESS SCHEDULE CATEGORY
Projects undertaken by VDOT vary in size, complexity, and risk; therefore, a one-size fits all approach to project management is unsuitable. Hence, a project ranking system has been defined to group projects by category based primarily on level of complexity and risk. The categorization of projects allows for a statewide consistent approach to scheduling and to ensure that the appropriate scheduling provision is applied. This is necessary to ensure that the appropriate level of scheduling efforts needed to establish and maintain schedule control on the project is applied.
Project Category – Level of Complexity and Risk
The VDOT project ranking system consists of six categories representing varying levels of complexity and risk ranging from very low to very high. Category M is the lowest, which represents typical maintenance projects and schedule type work. Categories I through V represent typical construction projects ranging from simple to very complex. Characteristics of each project category are described as follows: 1. Category M – Category M is the lowest level of the project ranking system, which represents
typical maintenance contracts and seasonal schedule type work of very low complexity and risk. For such projects, specific timeframes for accomplishing the work is not a major constraint. Generally, a full construction season is given to allow for flexibility in planning and scheduling the Work. Therefore, Category M projects do not require the level of scheduling efforts typically needed for construction projects.
A. Criteria for Category M Projects – Category M projects must generally meet the following
criteria:
i) Typical seasonal maintenance and schedule type work generally with contract duration of one construction season or less (Time is not a major constraint); or
ii) Simple repairs or straight-forward maintenance work; and iii) Minimal traffic impact or limitations to the Work; and iv) No involvement with other major construction or improvement projects.

VDOT Preconstruction User’s Manual October 2017 APPENDIX H-2
B. Examples of Category M Projects – The following are typical Category M projects:
Pavement schedules (Asphalt overlay, surface treatments & slurry seals);
Bridge joint repairs;
Bridge painting (minimum traffic impact);
Guardrail improvements;
Curb and gutter repair/replacement;
Raised pavement marker installation, lens replacement;
Pavement marking schedules;
Minor Bridge repair (District wide, minor miscellaneous);
Rumble strip installation;
Slope slide repair, scour repair;
Ground mounted sign maintenance/replacement;
Incidental concrete repair;
Pipe culvert rehabilitation;
Bridge cleaning;
Retaining wall/ Sound wall repair;
Signal maintenance & repair (District wide). C. Category M Scheduling Requirements – Category M scheduling requirements are based
on the basic scheduling information necessary for the Department to coordinate all work required to complete the Contract and to communicate with the public. The schedule information will also be used to plan for and manage the Department’s cash flow, resources, and traffic. The Category M Schedule of Operations submission requirements are as follows:
i) An Initial Plan of Operations in the form of a written narrative to provide a
description of the overall plan and intended sequence of progress.
ii) An Initial Schedule of Operations showing in a tabular format, the period of time within which work at each location, route, or segment of Work as delineated in the contract will be accomplished. A bar-chart or CPM schedule may be substituted, at the contractor’s option.
iii) Every week, on a day agreed to by the Contractor and the Engineer, the Contractor is required to provide a Two-week Look-ahead (TWLA) schedule to show the detailed schedule of work planned for the following two weeks. The TWLA schedule may be provided in a tabular or bar-chart format.

VDOT Preconstruction User’s Manual October 2017 APPENDIX H-3
2. Category I – Category I is the lowest level of the project ranking system for typical construction projects, which represents small, simple, low risk, and short duration construction projects. Such projects involve limited and straight-forward operations with limited project constraints and minimal or no traffic impact.
A. Criteria for Category I Projects – Category I projects must generally meet the following
criteria:
i) Contract duration of one construction season or less (typically short durations); or ii) Estimated contract value of $1 million or less; and iii) Limited items of work; and
iv) Simple operations in familiar and favorable conditions; and v) Minimal traffic impact or limitations to the Work; and vi) Does not include utility adjustments or relocations; and vii) Contract does not contain any Special Provisions for special time-related conditions,
such as Interim Contract Milestones, A+B Bidding, Insensitive/Disincentive, or Lane Rental; and
viii) Project has no major materials delivery restrictions, environmental impacts, delayed
right-of-way acquisitions or access, or other similar constraints and restrictions.
On a case by case basis, certain single-season simple and low risk projects with estimated contract value greater than $1M that generally meet the criteria listed above may qualify as Category I, as determined by the Area Construction Engineer (ACE);
On a case by case basis, certain Federal Oversight (FO) maintenance projects or time sensitive maintenance projects with traffic impact may qualify as Category I, as determined by the ACE. Such projects may include concrete pavement repairs or overlay work on major corridors or certain relatively complex time sensitive maintenance projects that are involved with major construction or improvement projects. In such cases, the ACE should consult with the State Construction Scheduler for concurrence.
B. Examples of Category I Projects – The following are typical Category I projects:
Rural grade, drain, & pave of unpaved roads (may include minor horizontal & vertical alignment changes and rural rustic projects with drainage work);
Minor bridge deck repair & concrete overlay (may include multiple bridges);
Break, seat, & overlay concrete pavement;
Spot improvements (multiple locations any of: incidental concrete, minor widening, enhanced pavement marking, & sign installation);
Building demolition in advance of construction projects;
Retaining wall installation or extensive repair;
Minor bridge substructure repairs (with traffic impact);
Bridge painting (multiple locations or with traffic impact);

VDOT Preconstruction User’s Manual October 2017 APPENDIX H-4
Minor urban reconstruction & improvement (could include curb & gutter and
sidewalks; new or extended turn lanes);
Surface reclamation, sub-grade stabilization & overlays;
Bridge steel repair (with traffic impact);
Signal installation – Site specific (w/o intersection improvements, no regional on-call installations);
Overhead sign installation & lighting installations (multiple locations & or significant amount of lighting);
Simple concrete pavement repair and/or asphalt overlay (major corridor, minimum traffic impact).
C. Category I Scheduling Requirements – Category I scheduling requirements are based
on the basic scheduling information needed to communicate the Contractor’s work plan and to assess progress of the Work. The schedule information will also be used to plan for and manage the Department’s resources, expenditures, traffic, as well as to communicate with the general public. The Category I Progress Schedule submission requirements are as follows:
i) A written Baseline Progress Schedule Narrative describing the contractors initial
proposed sequence and work plan. ii) A Baseline Progress Schedule showing in a tabular format, the times within which the
individual activities that make up the project will be accomplished. A bar-chart or CPM schedule may be substituted, at the contractor’s option.
iii) A Progress Earnings Schedule (Form C-13C) to show the planned progress for each
month in terms of percent complete. Percent complete is based on cumulative anticipated earnings relative to the total contract value.
iv) A two-week look-ahead schedule due every week to show the detail schedule for
work planned for the following two weeks.
v) A revision of the Baseline Progress Schedule is required when the schedule has been significantly impacted by a change in the Work or condition or the contractor has deviated significantly from his baseline plan or schedule.

VDOT Preconstruction User’s Manual October 2017 APPENDIX H-5
3. Category II – Category II represents slightly complex and relatively small to medium size construction projects that are typically completed in one or two construction seasons. Category II projects typically involve a limited number of straightforward contiguous, linear, or repetitive operations with typical project constraints and minimal traffic impact. Category II may also include certain multi-season low risk projects with minimal constraints or traffic impact. Such projects may involve simple repetitive or linear operations performed at multiple locations. They may also involve typical low risk widening projects in a rural setting, involving a limited number of straightforward contiguous or linear operations.
A. Criteria for Category II Projects – Category II projects must generally meet the following
criteria:
i) Contract duration of one construction season or less (may be two construction seasons, but involve simple linear or repetitive operations); or
ii) Estimated contract value generally less than $3 million; and iii) Limited number of straightforward contiguous or linear operations; and iv) Low to medium traffic impact; and v) Typical conditions and limitations to the work; and vi) May include minimal utility adjustments; and vii) Contract does not contain Special Provisions for special time-related conditions, such
as Contract interim milestones, Incentives/Disincentives, A+B bidding, or Lane Rental, etc.; and
viii) Project has no major materials delivery restrictions, environmental impacts, right-of-
way acquisitions, or other similar constraints and restrictions.
On a case by case basis, certain slightly complex and low to medium risk projects with estimated contract value over $3M that generally meet the criteria listed above may qualify as Category II, as determined by the ACE.
On a case by case basis, certain high-volume Federal Oversight (FO) maintenance projects or relatively complex maintenance projects that involve multiple items of work, multiple schedule constraints, or significant traffic impact may qualify as Category II, as determined by the ACE. Such projects may include concrete pavement repairs or overlay work on major corridors or certain relatively complex time sensitive maintenance projects that are involved with major construction or improvement projects. In such cases, the ACE should consult with the State Construction Scheduler for concurrence.
B. Examples of Category II Projects – The following are typical Category II projects:
Urban grade, drain, & pave projects of low to medium complexity;
Rural new construction or reconstruction grade separation roadway and bridge projects (low to medium size and complexity);
Complex reconstruction and improvements, including widening and multiple turn lanes that may include utility adjustments;
Major bridge substructure repairs (with low to medium traffic impact);
Bridge deck replacements, such as multi-span or over railroads;

VDOT Preconstruction User’s Manual October 2017 APPENDIX H-6
Major bridge deck repair & concrete overlay (multi-span or over railroads);
Intersection improvements with lighting and/or signal installation;
Bridge & drainage structure replacements (frequently single span with limited
approach work);
Major drainage improvements;
Complex concrete pavement repair and/or asphalt overlay (major corridor, significant traffic impact);
Multi-season bridge painting (with low to medium traffic impact). C. Scheduling Requirements for Category II – As the amount of work, project duration, or
level of complexity and associated risks increases, a scheduling tool that can graphically depict the sequence and timing of the activities in a time-scale format is required to effectively communicate the Contractor’s plan of operations and the intended sequence of progress. The Category II Progress Schedule submission requirements are as follows:
i) A written Baseline Progress Schedule Narrative describing the contractors initial
proposed sequence and work plan. ii) A Baseline Progress Schedule showing in a bar-chart format, the times within which
the individual activities that make up the project will be accomplished. A CPM schedule may be substituted, at the contractor’s option.
iii) A Progress Earnings Schedule (Form C-13C) to show the planned progress for each
month in terms of percent complete. Percent complete is based on cumulative anticipated earnings relative to the total contract value.
iv) A monthly update of the Progress Schedule and Progress Earnings Schedule is
required to show the actual progress and the current plan to complete the remaining work.
v) A revision of the Baseline Progress Schedule is required when the schedule has been
significantly impacted by a change in the Work or condition or the contractor has deviated significantly from his baseline plan or schedule.

VDOT Preconstruction User’s Manual October 2017 APPENDIX H-7
4. Category III – Category III represents moderately complex, medium risk, and medium-size projects that are typically completed within two or three construction seasons. Category III projects typically involve a limited number of concurrent operations with typical project constraints and/or traffic impact. Category III projects may also include certain medium to large size multi-season low risk projects of relative complexity. Such as limited span bridge widening or interchange projects in a rural setting with typical constraints and minimal traffic impact.
A. Criteria for Category III Projects – Category III projects must generally meet the following criteria:
i) Med-size projects with contract duration generally spanning 2-3 construction
seasons; or ii) Estimated contract value generally between $3M and $10M; and iii) Limited number of concurrent work-paths; and iv) Medium limitations to the work and traffic impact; and v) Limited number of utility adjustments; and vi) Contract does not contain Special Provisions for special time-related conditions, such
as Contract interim milestones, Incentives/Disincentives, A+B bidding, or Lane Rental, etc.; and
vii) Project has no major materials delivery restrictions, environmental impacts, right-of-
way acquisitions, or other similar constraints and restrictions.
On a case by case basis, certain moderately complex and medium risk projects with estimated contract value over $10M that generally meet the criteria listed above may qualify as Category III, as determined by the ACE.
On a case by case basis, certain high-volume Federal Oversight (FO) maintenance projects or relatively complex maintenance projects that involve multiple items of work, multiple schedule constraints, and/or significant traffic impact may qualify as Category III, as determined by the ACE. Such projects may include major concrete pavement repairs or overlay work on major corridors or certain relatively complex time sensitive maintenance projects that are involved with major construction or improvement projects. In such cases, the ACE should consult with the State Construction Scheduler for concurrence.
B. Examples of Category III Projects – The following are typical Category III projects:
Intersection improvements, including widening and multiple turn lanes with utilities,
lighting and/or signal installation (with medium complexity and traffic impact); New roadway/bridge construction or extension projects (medium size, complexity,
and traffic impact); Bridge deck replacements (multi-span, medium traffic impact); Bridge & drainage structure replacements (limited span with approach work); Bridge reconstruction/widening projects (medium size, complexity, and traffic
impact).

VDOT Preconstruction User’s Manual October 2017 APPENDIX H-8
C. Scheduling Requirements for Category III – As the number of operations or level of complexity and associated risks grow a scheduling tool that allows for adequate planning and scheduling of multiple concurrent activities with considerations for associated project constraints is needed to execute and control the Work. Such scheduling method will require that sufficient details and activity relationships are added to establish inter-dependencies between related activities to form network paths, with which the activities are scheduled. This is necessary to aid the project staff in efficiently planning and managing the Work and available resources. It is also necessary that the project critical path and the minimum time needed to complete the project are established. The Category III Progress Schedule submission requirements are as follows:
i) A Preliminary Progress Schedule to provide a start-up schedule to execute and
monitor the Work for the first sixty (60) calendar days. ii) A written Baseline Progress Schedule Narrative describing the contractors initial
proposed sequence and work plan. iii) A Baseline Progress Schedule showing in a CPM format, the times within which the
individual activities that make up the project will be accomplished. iv) A Baseline Progress Earnings Schedule (Form C-13C) to show the planned progress
for each month in terms of percent complete. Percent complete is based on anticipated earnings relative to the total contract value.
v) A monthly update of the Progress Schedule and Progress Earnings Schedule is
required to show the actual progress and the current plan to complete the remaining work.
vi) A revision of the Baseline Progress Schedule is required when the schedule has been
significantly impacted by a change in the Work or condition or the contractor has deviated significantly from his baseline plan or schedule.

VDOT Preconstruction User’s Manual October 2017 APPENDIX H-9
5. Category IV – Category IV represents complex, high risk, and medium to large size projects that are typically completed within three or more construction seasons. Category IV projects typically involve multiple concurrent operations with substantial project constraints and/or traffic impact. Such projects include, but are not limited to new, reconstruction, extension, or widening/improvements of medium to large roadway/bridge projects with substantial constraints and/or traffic impact. Category IV projects may also include certain med-size high-risk projects of relative complexity that include provisions for special time-related constraints or conditions as described below.
A. Criteria for Category IV Projects – Category IV projects must generally meet the
following criteria:
i) Medium to large size projects with contract duration generally spanning 3 or more construction seasons; or
ii) Estimated contract value generally between $10M and $75M; or iii) Contract contain Special Provisions for special time-related conditions, such as
Contract interim milestones, Incentives/Disincentives, A+B bidding, or Lane Rental, etc.; and
iv) Multiple concurrent work-paths; and v) Complex construction staging, phasing, or MOT issues; and vi) Complex constructability issues; and vii) Substantial traffic impact and limitations to the work; or viii) May include major utility relocation/adjustments; and ix) Project has no major materials delivery restrictions, environmental impacts, right-of-
way acquisitions, or other similar constraints and restrictions.
On a case by case basis, certain relatively complex and high risk projects with estimated contract value less than $10M that generally meet the criteria listed above may qualify as Category IV, as determined by the ACE. In such cases, the ACE should consult with the State Construction Scheduler for concurrence. On a case by case basis, certain relatively complex and high risk projects with estimated contract value over $75M that generally meet the criteria listed above may qualify as Category IV, as determined by the ACE.
B. Examples of Category IV Projects – The following are typical Category IV projects:
Major urban intersection improvements, including widening and multiple turn lanes
with utilities, lighting and/or signal installation (medium to large size, complex, and significant traffic impact);
Rural/Urban new construction or reconstruction grade separation roadway and bridge
projects (medium to large size, complex, major corridor); Major bridge deck replacements (substructure repairs, multi-span, multi-lane, major
corridor, with significant traffic impact); Major bridge & drainage structure replacements (multi-span with extensive approach
work);

VDOT Preconstruction User’s Manual October 2017 APPENDIX H-10
Major widening projects (medium to large size and complexity, major corridor, with
significant traffic impact).
C. Scheduling Requirements for Category IV – As the size, complexity, and associated risks grow, a scheduling tool that allows for adequate planning and scheduling of multiple concurrent operations is needed to execute and control the Work. For such projects, a tool that allows for an accurate assessment of the reasonableness of the schedule and current status of the activities and the project based on costs is also needed to control the project and to manage schedule-related risks on the project. The Category IV scheduling and Progress Schedule submission requirements are based on the Category III requirements with additional requirements as described below:
i) A Preliminary Progress Schedule to provide a start-up schedule to execute and
monitor the Work for the first ninety (90) calendar days.
ii) A written Baseline Progress Schedule Narrative describing the contractors initial proposed sequence and work plan.
iii) A cost-loaded Baseline Progress Schedule showing in a CPM format, the times within
which the individual activities that make up the project will be accomplished. The cost-loaded schedule will be used to generate the time-distributed cost data on which the Progress Earnings Schedule is based.
iv) A Baseline Progress Earnings Schedule (Form C-13CPM) based on time-distributed
cost data generated from the cost-loaded schedule to show the planned progress for each month in terms of percent complete. Percent complete is based on anticipated earnings relative to the total contract value.
v) A 30-day look-ahead schedule to depict work planned for the next period.
vi) A monthly update of the Progress Schedule is required to show the actual progress and the current plan to complete the remaining work.
vii) A revision of the Baseline Progress Schedule is required when the schedule has been
significantly impacted by a change in the Work or condition or the contractor has deviated significantly from his baseline plan or schedule.
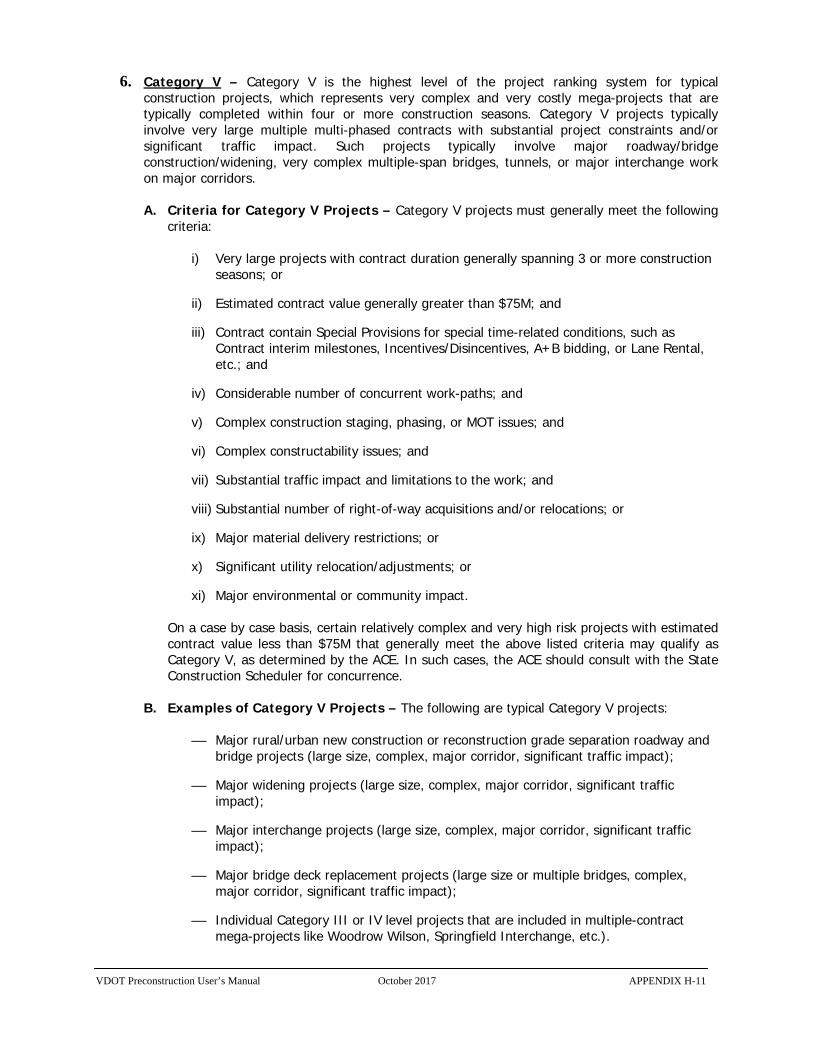
VDOT Preconstruction User’s Manual October 2017 APPENDIX H-11
6. Category V – Category V is the highest level of the project ranking system for typical construction projects, which represents very complex and very costly mega-projects that are typically completed within four or more construction seasons. Category V projects typically involve very large multiple multi-phased contracts with substantial project constraints and/or significant traffic impact. Such projects typically involve major roadway/bridge construction/widening, very complex multiple-span bridges, tunnels, or major interchange work on major corridors.
A. Criteria for Category V Projects – Category V projects must generally meet the following
criteria:
i) Very large projects with contract duration generally spanning 3 or more construction seasons; or
ii) Estimated contract value generally greater than $75M; and iii) Contract contain Special Provisions for special time-related conditions, such as
Contract interim milestones, Incentives/Disincentives, A+B bidding, or Lane Rental, etc.; and
iv) Considerable number of concurrent work-paths; and v) Complex construction staging, phasing, or MOT issues; and vi) Complex constructability issues; and vii) Substantial traffic impact and limitations to the work; and viii) Substantial number of right-of-way acquisitions and/or relocations; or ix) Major material delivery restrictions; or x) Significant utility relocation/adjustments; or xi) Major environmental or community impact.
On a case by case basis, certain relatively complex and very high risk projects with estimated contract value less than $75M that generally meet the above listed criteria may qualify as Category V, as determined by the ACE. In such cases, the ACE should consult with the State Construction Scheduler for concurrence.
B. Examples of Category V Projects – The following are typical Category V projects:
Major rural/urban new construction or reconstruction grade separation roadway and bridge projects (large size, complex, major corridor, significant traffic impact);
Major widening projects (large size, complex, major corridor, significant traffic
impact);
Major interchange projects (large size, complex, major corridor, significant traffic impact);
Major bridge deck replacement projects (large size or multiple bridges, complex, major corridor, significant traffic impact);
Individual Category III or IV level projects that are included in multiple-contract
mega-projects like Woodrow Wilson, Springfield Interchange, etc.).

VDOT Preconstruction User’s Manual October 2017 APPENDIX H-12
C. Scheduling Requirements for Category V – As the size, complexity, and associated risks
grow, a scheduling tool that will allow for adequate planning and scheduling of multiple concurrent operations, projects, manpower, equipment, and expenditures is required to accomplish the Work. Such scheduling tool should also allow for an accurate assessment of the status of the individual activities and the project; as well as progress of selected major operations that will have the greatest influence on the schedule. The Category V scheduling and Progress Schedule submission requirements are based on the Category IV requirements with additional requirements as described below:
i) A qualified and dedicated project scheduler/coordinator to coordinate all scheduling
meetings and issues. ii) Contractor’s working on a Category V project will be required to develop and
maintain their schedules in a collaborative environment within the VDOT scheduling database.
iii) A written Baseline Progress Schedule Narrative describing the contractors initial
proposed sequence and work plan. iv) A Preliminary Progress Schedule to provide a start-up schedule to execute and
monitor the Work for the one hundred and twenty (120) calendar days. v) A cost-loaded and resource-loaded Baseline Progress Schedule showing in a CPM
format, the times within which the individual activities that make up the project will be accomplished. The cost-loaded schedule will be used to generate the time-distributed cost data on which the Progress Earnings Schedule is based.
vi) A Baseline Progress Earnings Schedule (Form C-13CPM) based on time-distributed
cost data generated from the cost-loaded schedule to show the planned progress for each month in terms of percent complete. Percent complete is based on anticipated earnings relative to the total contract value.
vii) A Commodity Progress Report (Form C-13COM) to show the anticipated progress of
selected items of work, whose rate of progress will have the greatest influence on the schedule.
viii) A weekly four-week look-ahead schedule detailing work planned for the next four
weeks.
ix) A monthly update of the Progress Schedule is required to show the actual progress and the current plan to complete the remaining work.
x) A revision of the Baseline Progress Schedule is required when the schedule has been
significantly impacted by a change in the Work or condition or the contractor has deviated significantly from his baseline plan or schedule.