v2v 11lab security
DESCRIPTION
V2V 11Lab Security WAS8TRANSCRIPT

WebSphere Version to Version Migration Workshop
Lab 7: Securing Applications in Liberty Profile
What this Lab Exercise is about
In this lab, you are going to secure access to applications deployed onto Liberty Profile. It maintains security in a default install by ensuring that it only listens to requests from the localhost and only HTTP protocol is supported.
In this exercise you learn how to configure the server to listen for HTTPS requests, configure a basic user registry, and protect access so only authorized users can execute a servlet.
Assumptions
It is assumed that you are using the WebSphere Version to Version Migration Workshop VMWare image that has been pre-installed with the necessary binaries.
In this exercise, you will:
• Configure the Liberty server for HTTPS support
• Setup a basic user registry in Liberty Profile
• Securing application resources
• Testing user access to secure resources in the blog application
Configure the Liberty server for HTTPS support
The configuration of the server to enable HTTPS support is a two-step process.
• Create self-signed SSL certificates
• Configuring the server to use these certificates for SSL
1) Create a self-signed certificate
__a. The securityUtility command line tool needs to be used to create the SSL certificates.
__b. Open the command prompt
__c. Navigate to the directory Liberty Profile was installed to, e.g. C:\IBM\LibertyProfile\wlp\
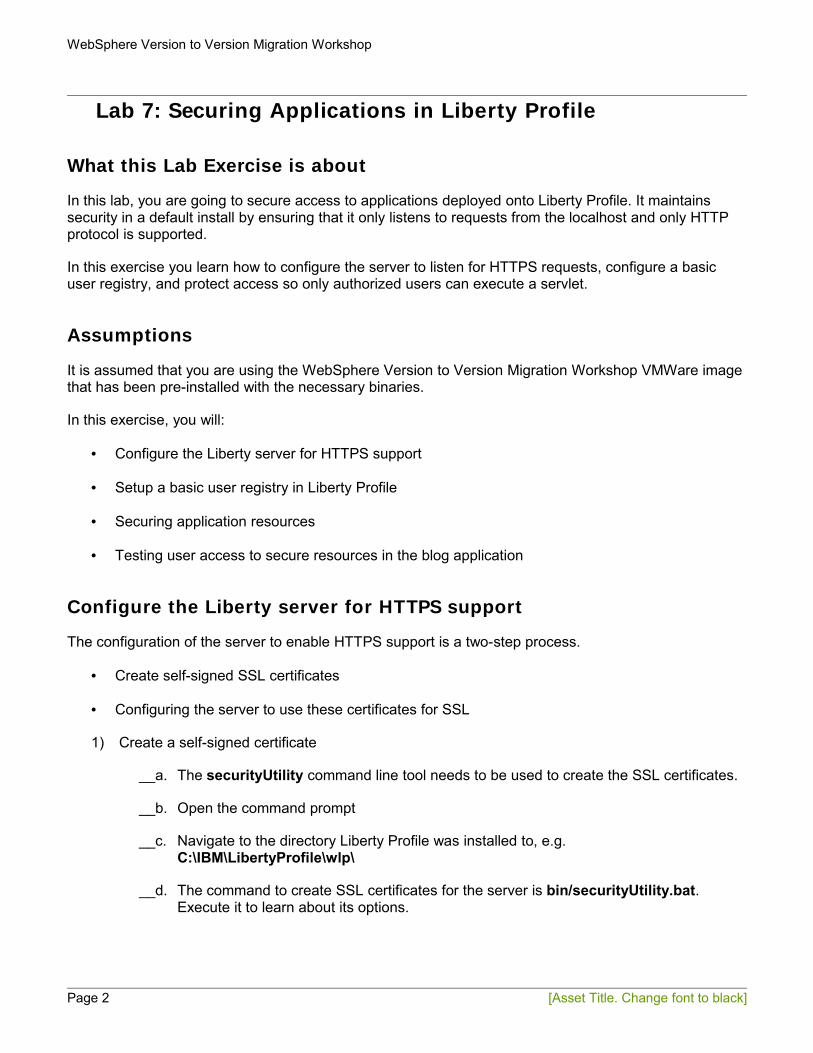
__d. The command to create SSL certificates for the server is bin/securityUtility.bat. Execute it to learn about its options.
Page 2 [Asset Title. Change font to black]
IBM Software
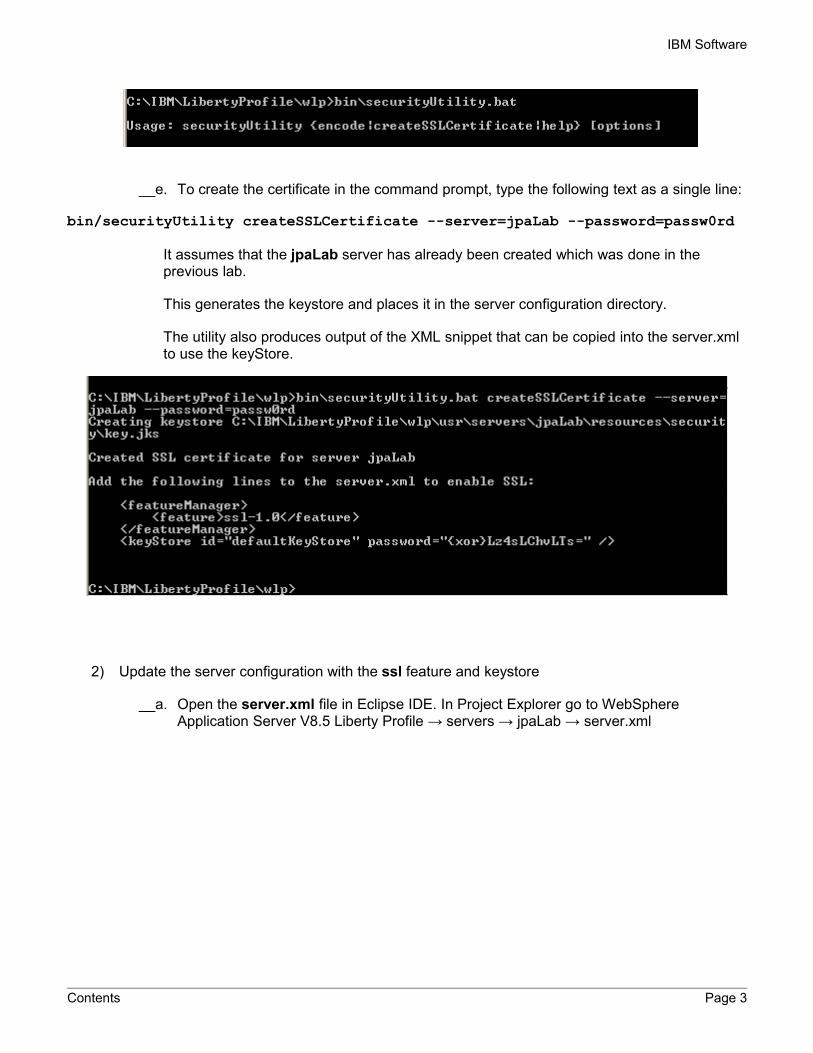
__e. To create the certificate in the command prompt, type the following text as a single line:
bin/securityUtility createSSLCertificate --server=jpaLab --password=passw0rdIt assumes that the jpaLab server has already been created which was done in the previous lab.
This generates the keystore and places it in the server configuration directory.
The utility also produces output of the XML snippet that can be copied into the server.xml to use the keyStore.
2) Update the server configuration with the ssl feature and keystore
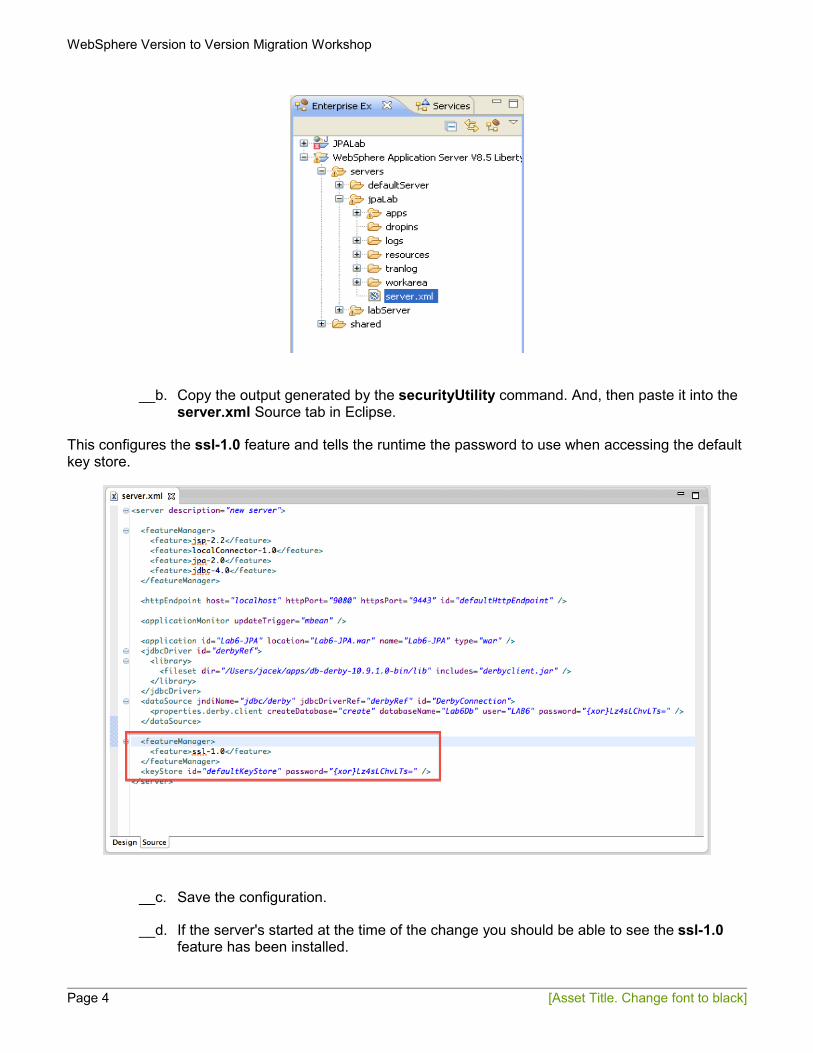
__a. Open the server.xml file in Eclipse IDE. In Project Explorer go to WebSphere Application Server V8.5 Liberty Profile → servers → jpaLab → server.xml
Contents Page 3
WebSphere Version to Version Migration Workshop
__b. Copy the output generated by the securityUtility command. And, then paste it into the server.xml Source tab in Eclipse.
This configures the ssl-1.0 feature and tells the runtime the password to use when accessing the default key store.
__c. Save the configuration.
__d. If the server's started at the time of the change you should be able to see the ssl-1.0 feature has been installed.
Page 4 [Asset Title. Change font to black]
IBM Software
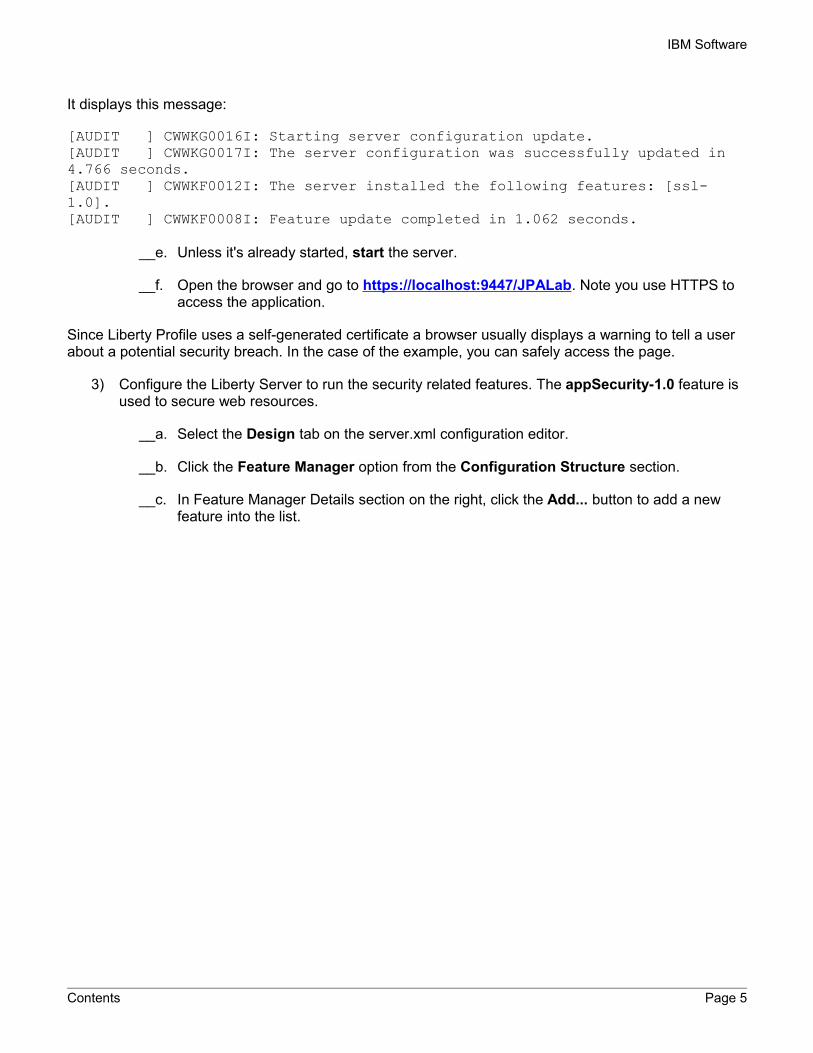
It displays this message:
[AUDIT ] CWWKG0016I: Starting server configuration update.[AUDIT ] CWWKG0017I: The server configuration was successfully updated in 4.766 seconds.[AUDIT ] CWWKF0012I: The server installed the following features: [ssl-1.0].[AUDIT ] CWWKF0008I: Feature update completed in 1.062 seconds.
__e. Unless it's already started, start the server.
__f. Open the browser and go to https://localhost:9447/JPALab. Note you use HTTPS to access the application.
Since Liberty Profile uses a self-generated certificate a browser usually displays a warning to tell a user about a potential security breach. In the case of the example, you can safely access the page.
3) Configure the Liberty Server to run the security related features. The appSecurity-1.0 feature is used to secure web resources.
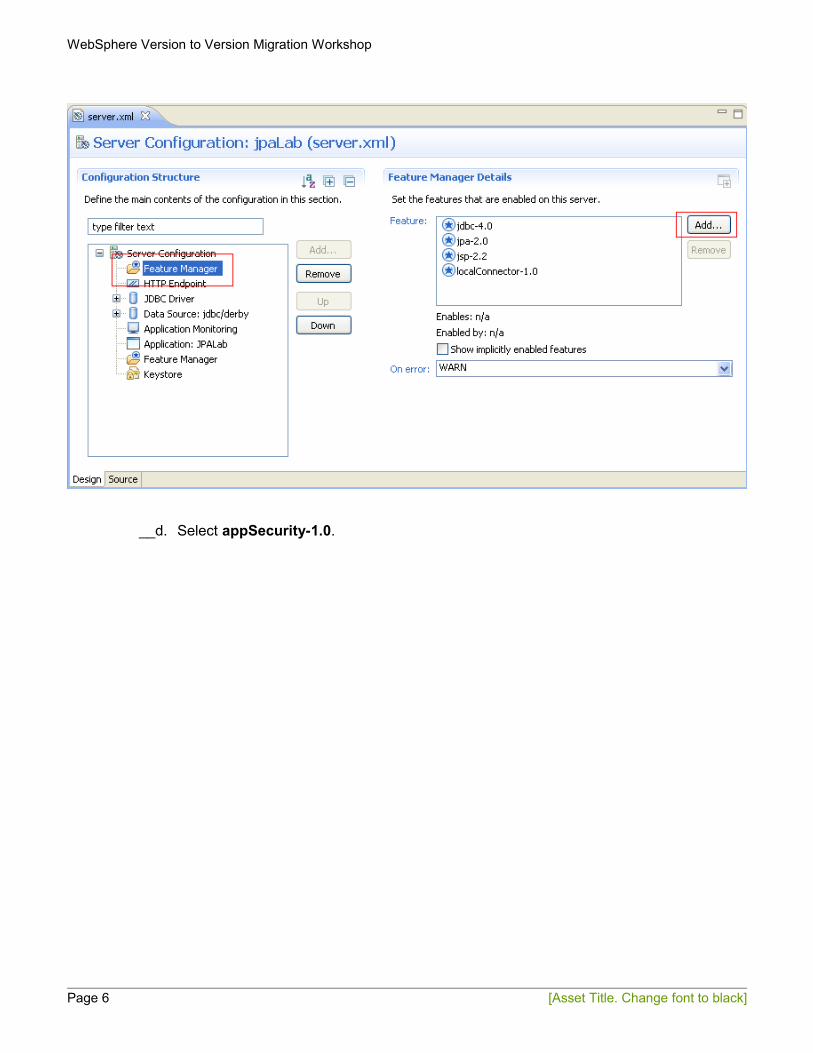
__a. Select the Design tab on the server.xml configuration editor.
__b. Click the Feature Manager option from the Configuration Structure section.
__c. In Feature Manager Details section on the right, click the Add... button to add a new feature into the list.
Contents Page 5
WebSphere Version to Version Migration Workshop
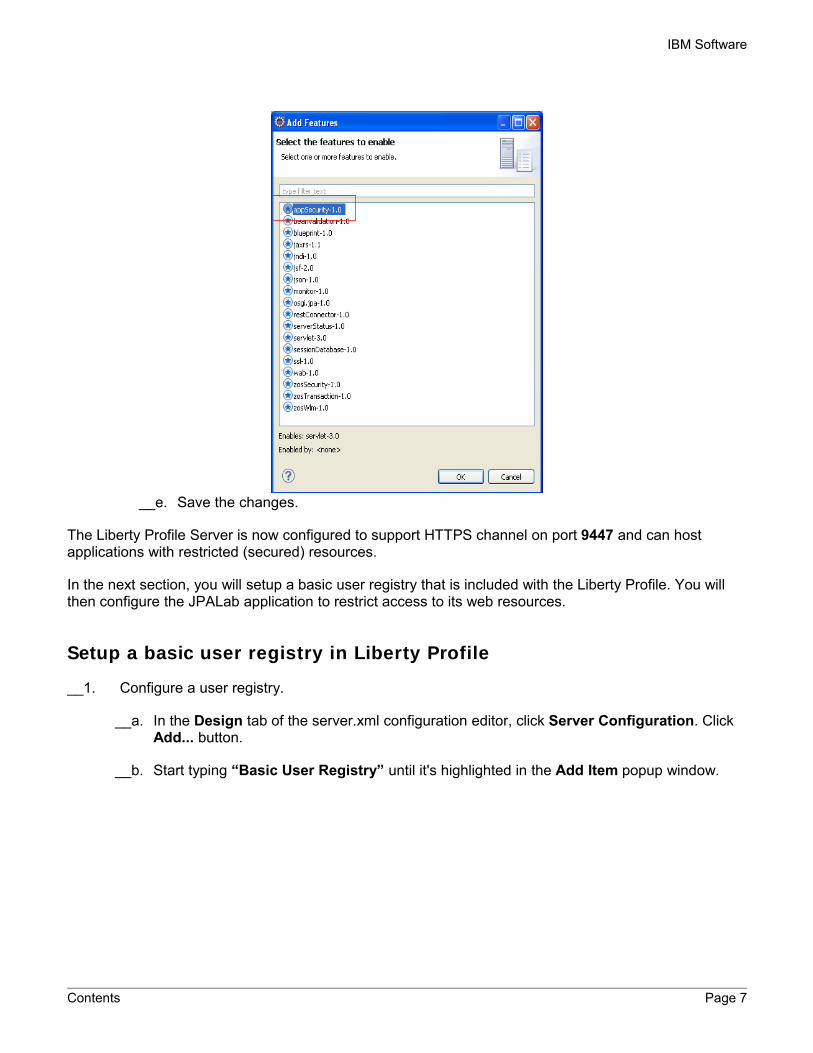
__d. Select appSecurity-1.0.
Page 6 [Asset Title. Change font to black]
IBM Software
__e. Save the changes.
The Liberty Profile Server is now configured to support HTTPS channel on port 9447 and can host applications with restricted (secured) resources.
In the next section, you will setup a basic user registry that is included with the Liberty Profile. You will then configure the JPALab application to restrict access to its web resources.
Setup a basic user registry in Liberty Profile
__1. Configure a user registry.
__a. In the Design tab of the server.xml configuration editor, click Server Configuration. Click Add... button.
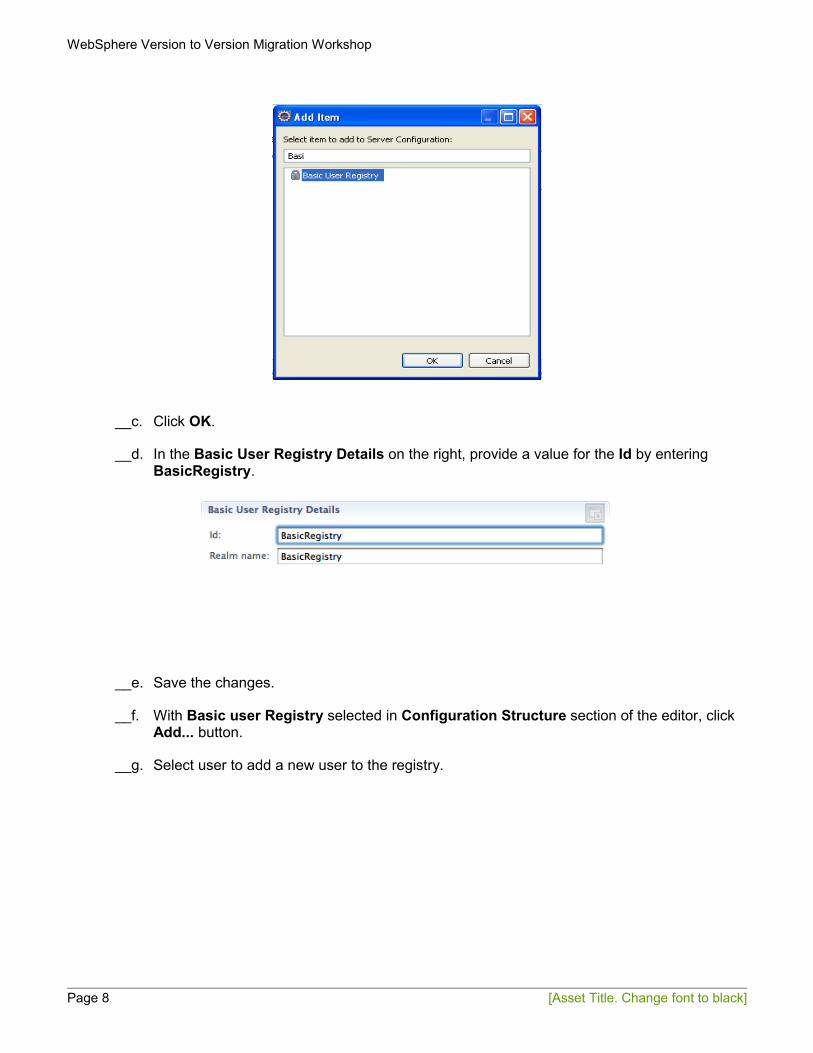
__b. Start typing “Basic User Registry” until it's highlighted in the Add Item popup window.
Contents Page 7
WebSphere Version to Version Migration Workshop
__c. Click OK.
__d. In the Basic User Registry Details on the right, provide a value for the Id by entering BasicRegistry.
__e. Save the changes.
__f. With Basic user Registry selected in Configuration Structure section of the editor, click Add... button.
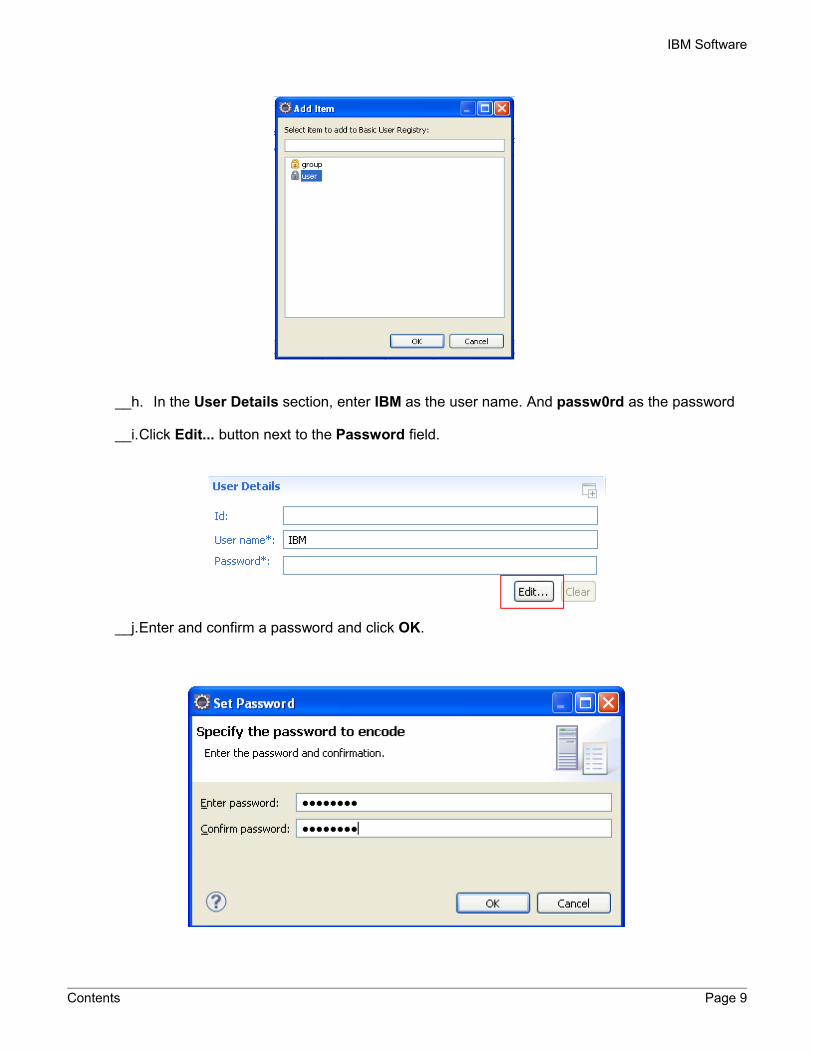
__g. Select user to add a new user to the registry.
Page 8 [Asset Title. Change font to black]
IBM Software
__h. In the User Details section, enter IBM as the user name. And passw0rd as the password
__i.Click Edit... button next to the Password field.
__j.Enter and confirm a password and click OK.
Contents Page 9
WebSphere Version to Version Migration Workshop
__k. Save the server configuration.
Congratulations! The basic user registry now exists in the server and contains one user named IBM.
Securing application resources
The next step is to configure security for the JPALab application. This requires a web deployment descriptor – web.xml.
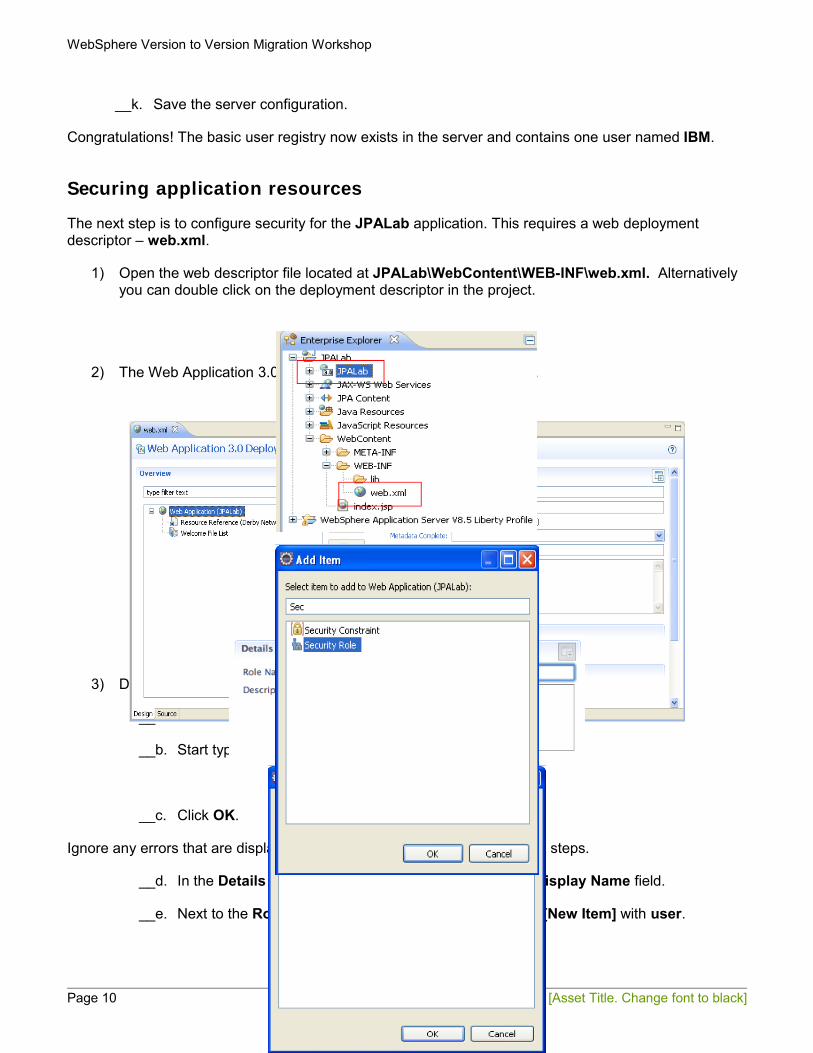
1) Open the web descriptor file located at JPALab\WebContent\WEB-INF\web.xml. Alternatively you can double click on the deployment descriptor in the project.
2) The Web Application 3.0 Deployment Descriptor Editor will open.
__a. Select Web Application (JPALab) and click Add...
__b. Start typing “Security Role” and then select it in the list.
__c. Click OK.
__d. In the Role Name field enter user.
__e. Save the changes.
3) Define the security constraints for the protected resources
__a. Select Web Application (JPALab) and click Add....
__b. Start typing “Security Constraint” to select it in the list.
__c. Click OK.
Ignore any errors that are displayed. These will be fixed in the subsequent steps.
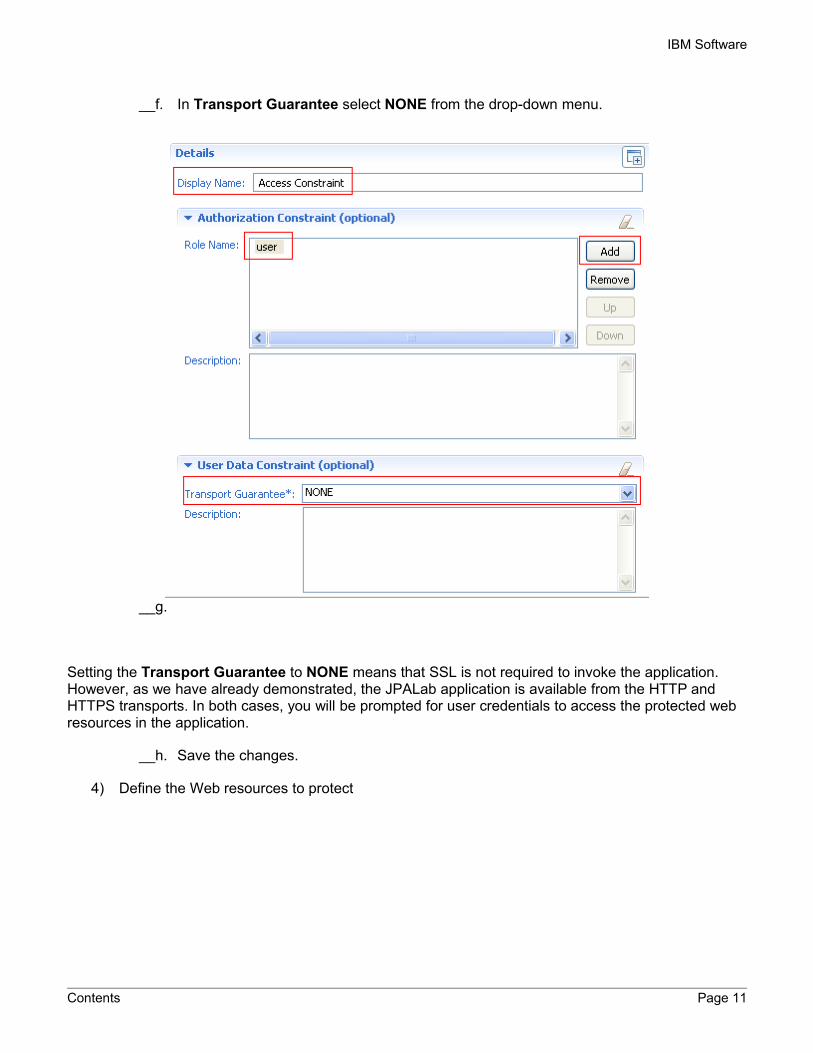
__d. In the Details section, enter Access Constraint in the Display Name field.
__e. Next to the Role Name text area, click Add and replace [New Item] with user.
Page 10 [Asset Title. Change font to black]
IBM Software
__f. In Transport Guarantee select NONE from the drop-down menu.
__g.
Setting the Transport Guarantee to NONE means that SSL is not required to invoke the application. However, as we have already demonstrated, the JPALab application is available from the HTTP and HTTPS transports. In both cases, you will be prompted for user credentials to access the protected web resources in the application.
__h. Save the changes.
4) Define the Web resources to protect
Contents Page 11
WebSphere Version to Version Migration Workshop
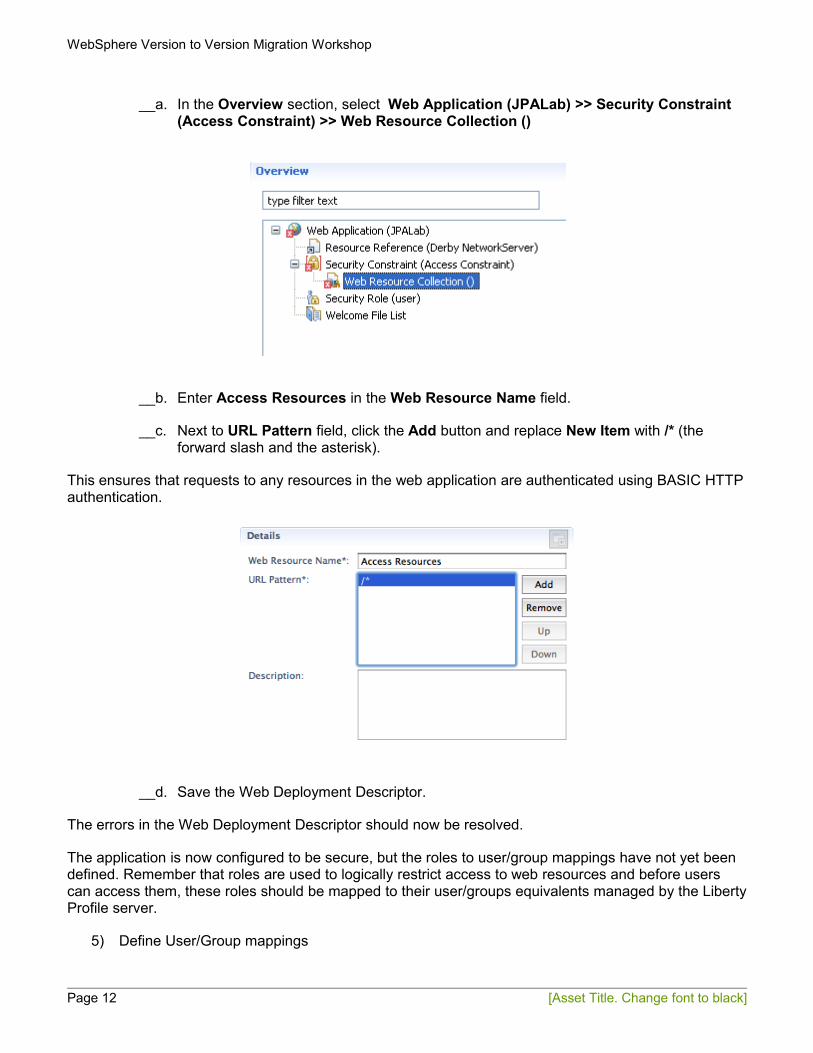
__a. In the Overview section, select Web Application (JPALab) >> Security Constraint (Access Constraint) >> Web Resource Collection ()
__b. Enter Access Resources in the Web Resource Name field.
__c. Next to URL Pattern field, click the Add button and replace New Item with /* (the forward slash and the asterisk).
This ensures that requests to any resources in the web application are authenticated using BASIC HTTP authentication.
__d. Save the Web Deployment Descriptor.
The errors in the Web Deployment Descriptor should now be resolved.
The application is now configured to be secure, but the roles to user/group mappings have not yet been defined. Remember that roles are used to logically restrict access to web resources and before users can access them, these roles should be mapped to their user/groups equivalents managed by the Liberty Profile server.
5) Define User/Group mappings
Page 12 [Asset Title. Change font to black]
IBM Software
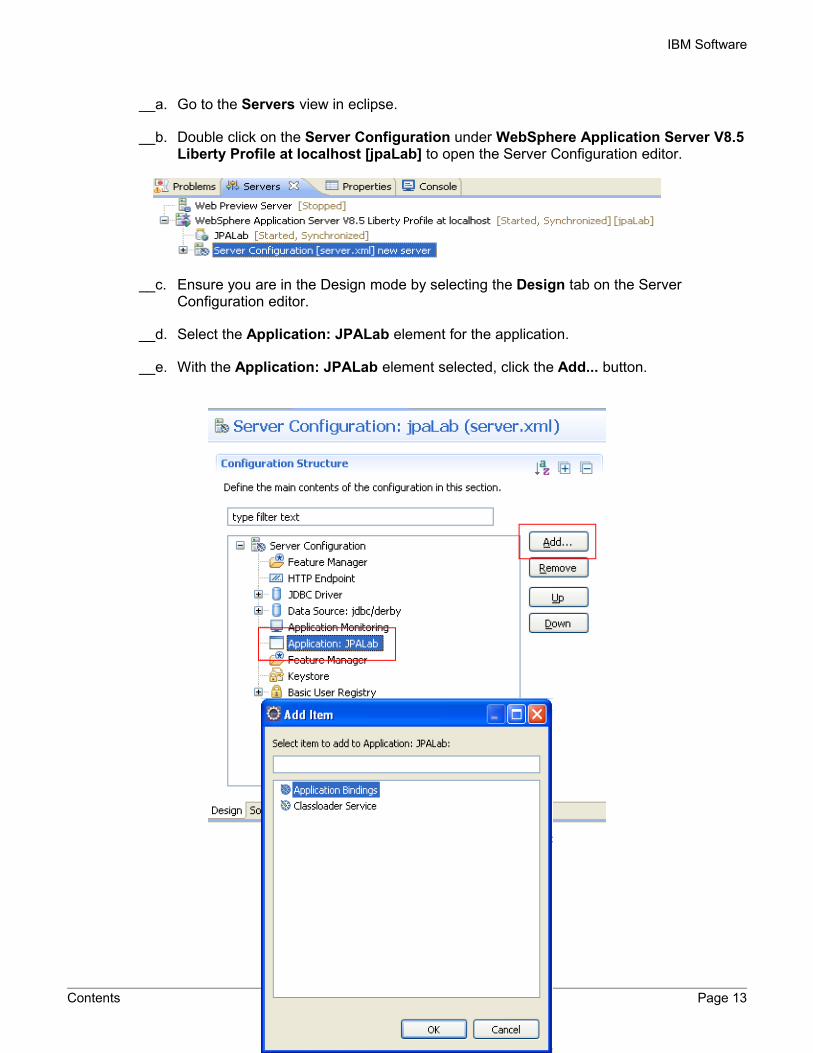
__a. Go to the Servers view in eclipse.
__b. Double click on the Server Configuration under WebSphere Application Server V8.5 Liberty Profile at localhost [jpaLab] to open the Server Configuration editor.
__c. Ensure you are in the Design mode by selecting the Design tab on the Server Configuration editor.
__d. Select the Application: JPALab element for the application.
__e. With the Application: JPALab element selected, click the Add... button.
Contents Page 13

WebSphere Version to Version Migration Workshop
__g. When highlighted, click the OK button.
__h. With Application Bindings selected, click the Add... button.
__i.Select the only available security-role from the list.
__j.Click the OK button to confirm the selection.
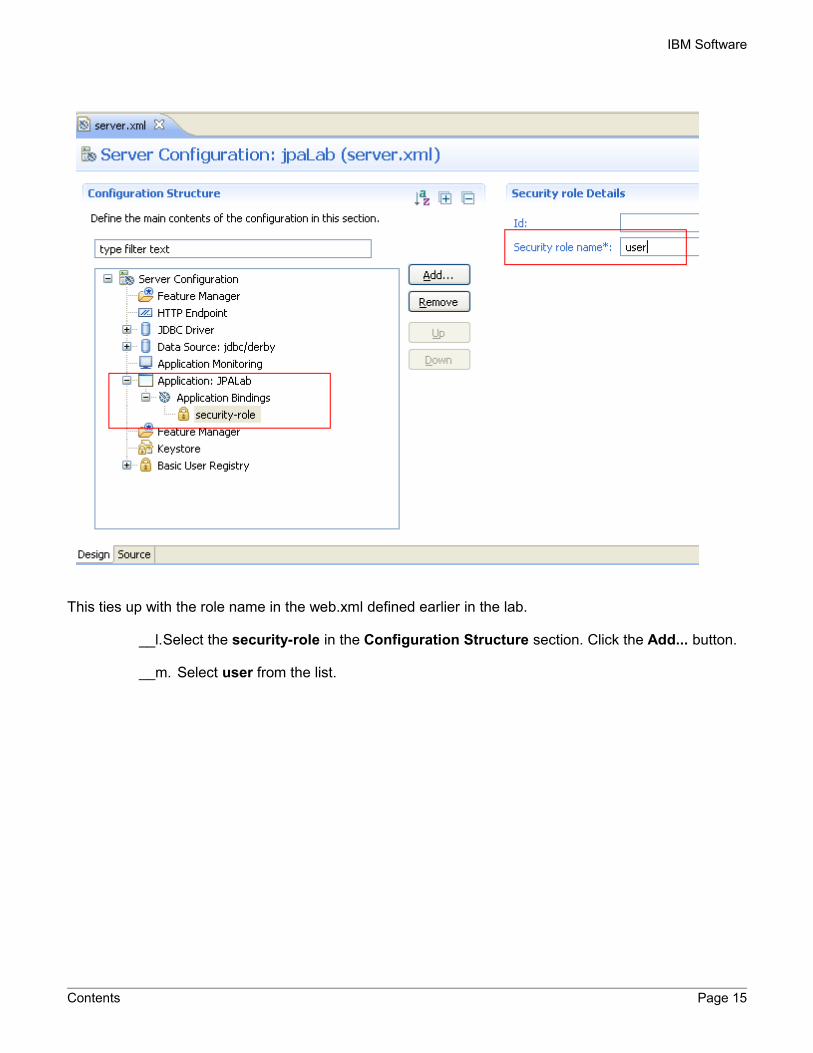
__k. In the Security role Details section, provide the Security role name as user.
Page 14 [Asset Title. Change font to black]
IBM Software
This ties up with the role name in the web.xml defined earlier in the lab.
__l.Select the security-role in the Configuration Structure section. Click the Add... button.
__m. Select user from the list.
Contents Page 15
WebSphere Version to Version Migration Workshop
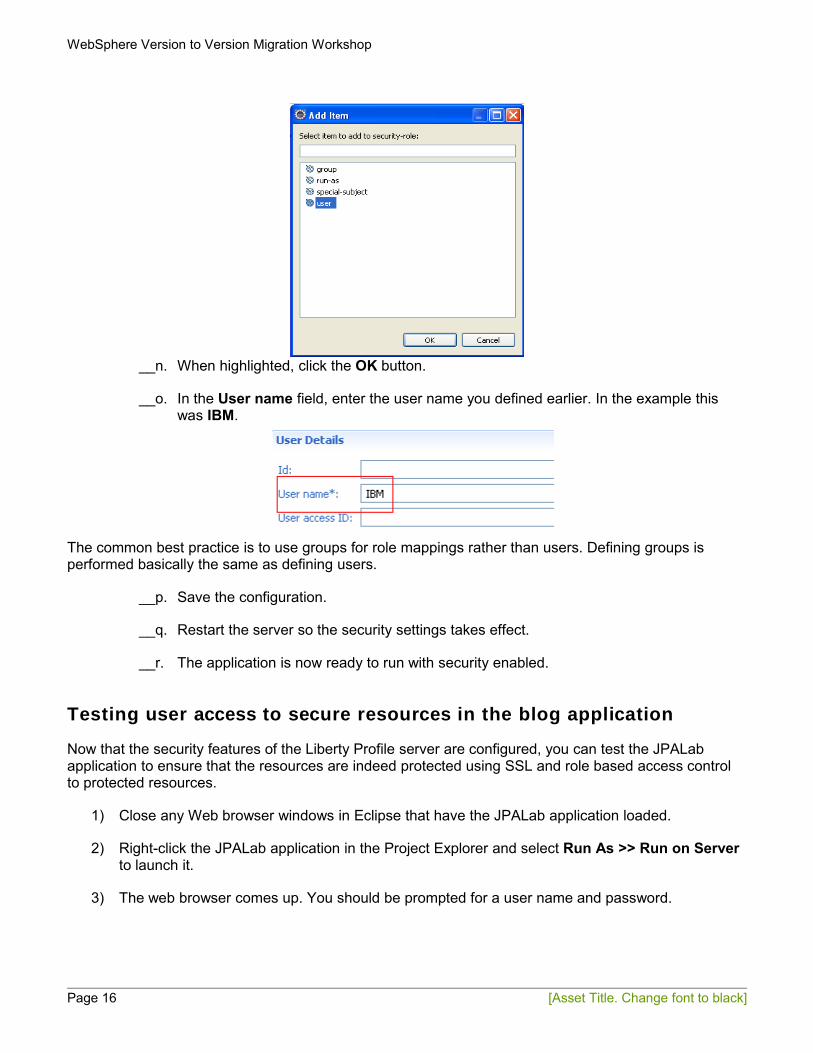
__n. When highlighted, click the OK button.
__o. In the User name field, enter the user name you defined earlier. In the example this was IBM.
The common best practice is to use groups for role mappings rather than users. Defining groups is performed basically the same as defining users.
__p. Save the configuration.
__q. Restart the server so the security settings takes effect.
__r. The application is now ready to run with security enabled.
Testing user access to secure resources in the blog application
Now that the security features of the Liberty Profile server are configured, you can test the JPALab application to ensure that the resources are indeed protected using SSL and role based access control to protected resources.
1) Close any Web browser windows in Eclipse that have the JPALab application loaded.
2) Right-click the JPALab application in the Project Explorer and select Run As >> Run on Server to launch it.
3) The web browser comes up. You should be prompted for a user name and password.
Page 16 [Asset Title. Change font to black]
IBM Software
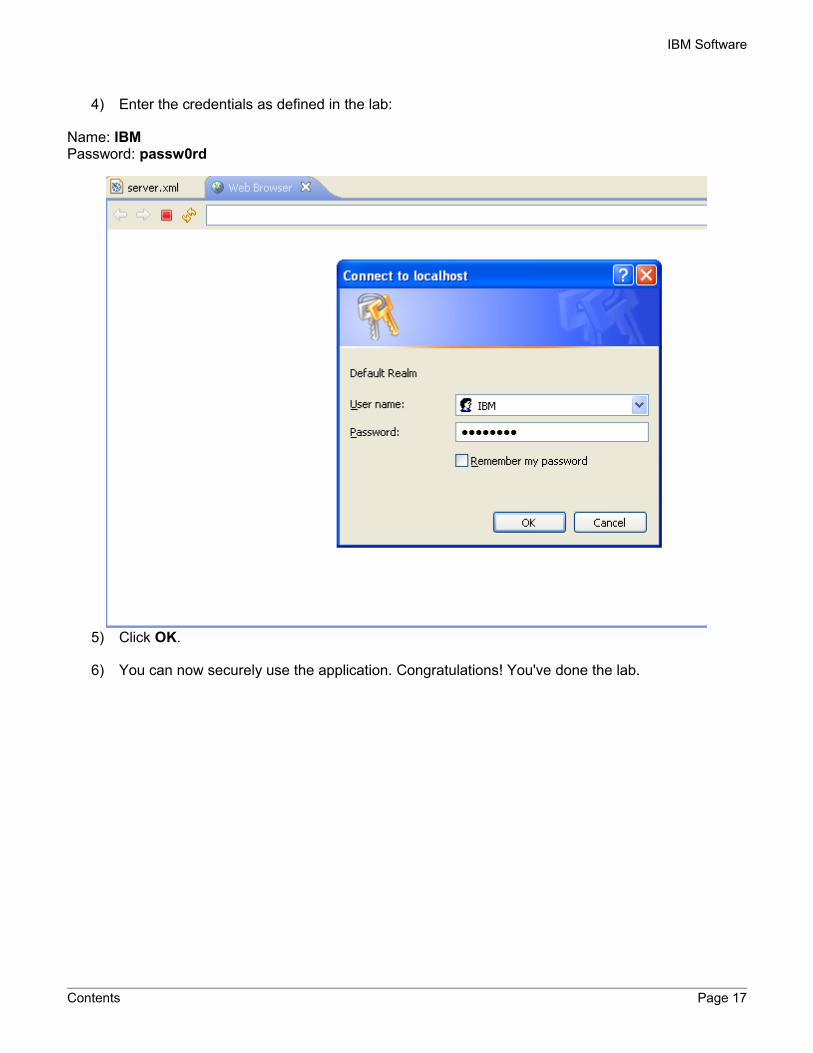
4) Enter the credentials as defined in the lab:
Name: IBMPassword: passw0rd
5) Click OK.
6) You can now securely use the application. Congratulations! You've done the lab.
Contents Page 17