user manual - wolverine data · 2 thank you for purchasing wolverine pass-200 portable scanner....
TRANSCRIPT
Wolverine Data
PASS-200 Portable Scanner
User Manual
V1.0
1
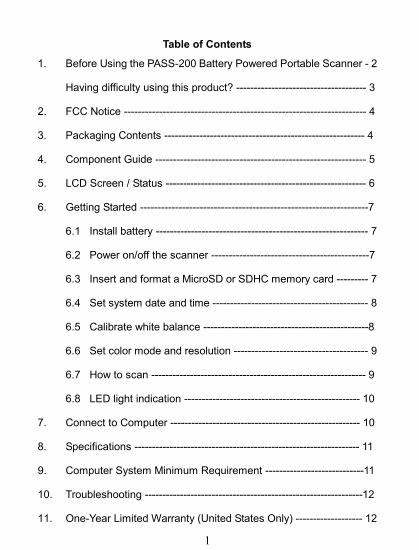
Table of Contents
1. Before Using the PASS-200 Battery Powered Portable Scanner - 2
Having difficulty using this product? ------------------------------------- 3
2. FCC Notice --------------------------------------------------------------------- 4
3. Packaging Contents --------------------------------------------------------- 4
4. Component Guide ------------------------------------------------------------ 5
5. LCD Screen / Status --------------------------------------------------------- 6
6. Getting Started -----------------------------------------------------------------7
6.1 Install battery ------------------------------------------------------------ 7
6.2 Power on/off the scanner ---------------------------------------------7
6.3 Insert and format a MicroSD or SDHC memory card --------- 7
6.4 Set system date and time -------------------------------------------- 8
6.5 Calibrate white balance -----------------------------------------------8
6.6 Set color mode and resolution -------------------------------------- 9
6.7 How to scan ------------------------------------------------------------- 9
6.8 LED light indication -------------------------------------------------- 10
7. Connect to Computer ------------------------------------------------------ 10
8. Specifications ---------------------------------------------------------------- 11
9. Computer System Minimum Requirement ----------------------------11
10. Troubleshooting --------------------------------------------------------------12
11. One-Year Limited Warranty (United States Only) ------------------- 12
2
Thank you for purchasing Wolverine PASS-200 Portable Scanner. Thishandheld battery operated scanner gives you the freedom to scandocuments, magazines, photos, newspapers, or books on the fly.PASS-200 Scanner has a unique double roller mechanism and produceseasy and perfect scans every time. It saves all your scans directly to aMicro-SD or SDHC memory card; no computer or software is required.
Please take a moment to read through this manual. Its contents mayhelp you to get the best use of the scanner.
1. Before Using the PASS-200 Portable ScannerThis section provides important safety information that you should readbefore operating your PASS-200 scanner.
Do not drop or handle aggressively as it may cause damageto the device.
Do not allow the device to come into contact with water orother liquids. In the event that water or other liquids enters theinterior, immediately turn off the device. Continue using thedevice may result in fire or electrical shock.
Do not handle the device with wet hands. Doing so maycause electrical shock and damages to the unit.
Do not place the device close to any equipment generatingstrong electromagnetic fields. Exposure to strong magneticfields may cause malfunction or data corruption.
Do not expose the device to extreme temperatures, humidityor vibrations, which may cause damage to the device.

3
Do not move or disconnect the device from the computerwhile the device is reading/writing data. This may causedamage to the data and/or the device.
Under no circumstances should user try to repair the device.Doing so may cause electrical shock and void the warranty.
Warranty will be void if the device is mishandled. Please take care inhandling the PASS-200 Portable Scanner. Wolverine Data is notresponsible for consequential damages, including loss of data. Alwaysback up all data. For full warranty statement see the end of thismanual.Wolverine Data has no obligation to repair, replace or issue refundswithout a Return Merchandise Authorization (RMA) number and theoriginal purchase receipt of the defective product.Repairs or replacement service will not be offered to Products that weremisused, repaired without authorization, or for operations beyond therange of intended use.Product replacements may be either new or refurbished, provided thatthe replacement has functionality at least equal to that of the productbeing replaced.Wolverine Data is not responsible for any data stored on the returnedproduct, please backup any data prior to shipping the unit.All OUT OF WARRANTY repairs maybe subject to repair fee. Pleasecontact your dealer or Wolverine Data for current charges.
Having difficulty using this product?Please try the following options:
Call us at 949-458-9888 M-F 9:00-5:00 Pacific Time. Visit www.wolverinedata.com/support to find the latest
documentation and other help tips.
4
E-mail or write to our technical support staff [email protected] or to our address:9939 Muirlands Blvd. Irvine, CA 92618.
2. FCC NoticeThis equipment has been tested and found to comply with the limits for aClass B digital device, pursuant to Part 15 of the FCC Rules. Theselimits are designed to provide reasonable protection against harmfulinterference in a residential installation.To comply with the limits for a Class B digital device, pursuant to Part 15of the FCC Rules, this device, when needed, must only be connected tocomputer equipment certified to comply with the Class B limits.
3. Packaging ContentsPASS-200 portable scannerUSB cableCarry bagCalibration cardCleaning clothUser ManualMicroSD or SDHC memory card (not supplied)2xAA alkaline batteries (not supplied)
5
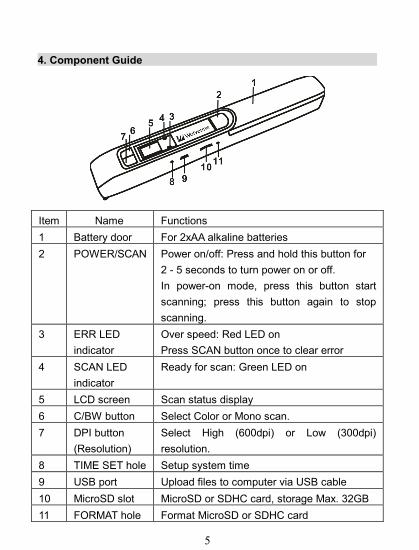
4. Component Guide
Item Name Functions1 Battery door For 2xAA alkaline batteries2 POWER/SCAN Power on/off: Press and hold this button for
2 - 5 seconds to turn power on or off.In power-on mode, press this button startscanning; press this button again to stopscanning.
3 ERR LEDindicator
Over speed: Red LED onPress SCAN button once to clear error
4 SCAN LEDindicator
Ready for scan: Green LED on
5 LCD screen Scan status display6 C/BW button Select Color or Mono scan.7 DPI button
(Resolution)Select High (600dpi) or Low (300dpi)resolution.
8 TIME SET hole Setup system time9 USB port Upload files to computer via USB cable10 MicroSD slot MicroSD or SDHC card, storage Max. 32GB11 FORMAT hole Format MicroSD or SDHC card

6
5. LCD Screen / Status
Item Function Description
1 SD card indicator Files will be stored in MicroSD or
SDHC memory card
Storage: Micro-SD or SDHC Card,
max. 32GB
2 Battery indicator Battery --- fullBattery --- empty
3 Effect indicator Color or Mono4 Counting indicator Quantity of scanned files in MicroSD
or SDHC card5 Selected resolution High: 600dpi; Low: 300dpi

7
6. Getting Started
6.1 Install battery
1) Slide battery door outward.Please see the picture.
2) Insert 2 x AA batteries (notsupplied) into the batterycompartment according to the polarities shown in thecompartment.
6.2 Power on/off the scannerPress and hold Power/Scan button for 2~5 seconds to turn on/offthe scanner.
6.3 Insert and format a MicroSD or SDHC memory cardYou need to use a MicroSD or SDHC card to record and store thescanned files. The scanner supports the capacity up to 32GB. TheMicroSD or SDHC card must be formatted before the first scanning.
1) Turn off the scanner.2) Insert MicroSD or SDHC
card (not supplied) withgold contacts facing up.Gently push the card all theway in until latched. Do notforce the card into the slot; forcing may damage thescanner and the memory card. Please see the picture.
3) Power on the scanner.4) Use the tip of a paper clip to press “FORMAT” hole. “F”
will show on the LCD.5) Press Power/Scan button to start formatting the card.6) SD card indicator will be blinking until formatting is
completed.
8
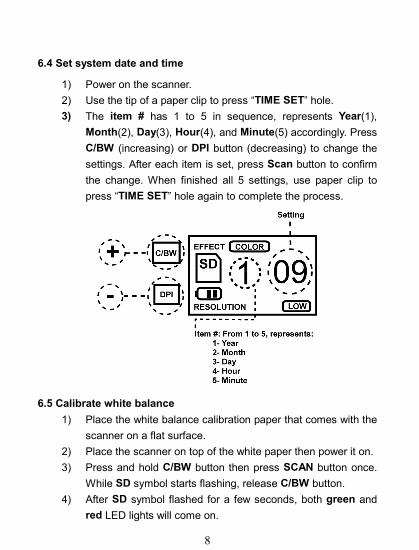
6.4 Set system date and time
1) Power on the scanner.2) Use the tip of a paper clip to press “TIME SET” hole.3) The item # has 1 to 5 in sequence, represents Year(1),
Month(2), Day(3), Hour(4), and Minute(5) accordingly. PressC/BW (increasing) or DPI button (decreasing) to change thesettings. After each item is set, press Scan button to confirmthe change. When finished all 5 settings, use paper clip topress “TIME SET” hole again to complete the process.
6.5 Calibrate white balance1) Place the white balance calibration paper that comes with the
scanner on a flat surface.2) Place the scanner on top of the white paper then power it on.3) Press and hold C/BW button then press SCAN button once.
While SD symbol starts flashing, release C/BW button.4) After SD symbol flashed for a few seconds, both green and
red LED lights will come on.
9
5) Don’t move the scanner and wait for the red LED to go off,and then slide the scanner across on the white area back andforth slowly and smoothly until the green LED goes off.
6) The white color balance calibration is completed.7) Repeat the calibration process as needed.
6.6 Set color mode and resolutionThe default settings are in COLOR mode and LOW resolution.Press DPI button to select resolution in HIGH or LOW. And pressC/BW button to select color in COLOR or MONO mode.
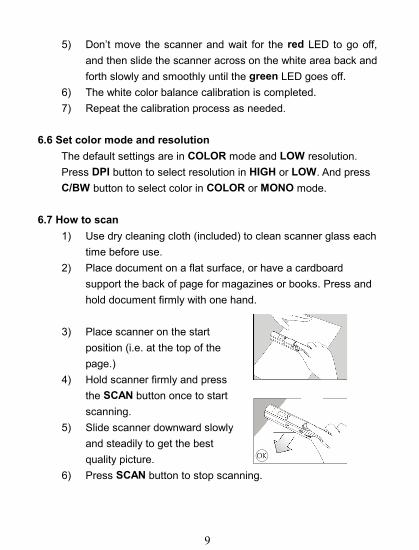
6.7 How to scan1) Use dry cleaning cloth (included) to clean scanner glass each
time before use.2) Place document on a flat surface, or have a cardboard
support the back of page for magazines or books. Press andhold document firmly with one hand.
3) Place scanner on the startposition (i.e. at the top of thepage.)
4) Hold scanner firmly and pressthe SCAN button once to startscanning.
5) Slide scanner downward slowlyand steadily to get the bestquality picture.
6) Press SCAN button to stop scanning.
10
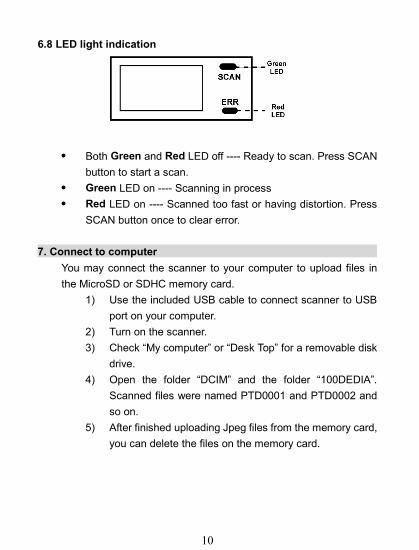
6.8 LED light indication
Both Green and Red LED off ---- Ready to scan. Press SCANbutton to start a scan.
Green LED on ---- Scanning in process Red LED on ---- Scanned too fast or having distortion. Press
SCAN button once to clear error.
7. Connect to computerYou may connect the scanner to your computer to upload files inthe MicroSD or SDHC memory card.
1) Use the included USB cable to connect scanner to USBport on your computer.
2) Turn on the scanner.3) Check “My computer” or “Desk Top” for a removable disk
drive.4) Open the folder “DCIM” and the folder “100DEDIA”.
Scanned files were named PTD0001 and PTD0002 andso on.
5) After finished uploading Jpeg files from the memory card,you can delete the files on the memory card.
11
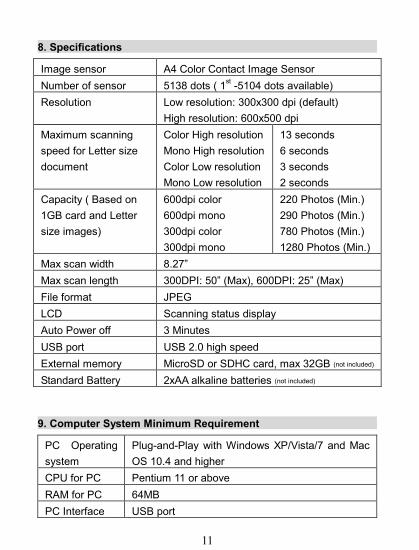
8. Specifications
Image sensor A4 Color Contact Image SensorNumber of sensor 5138 dots ( 1st -5104 dots available)Resolution Low resolution: 300x300 dpi (default)
High resolution: 600x500 dpiMaximum scanningspeed for Letter sizedocument
Color High resolutionMono High resolutionColor Low resolutionMono Low resolution
13 seconds6 seconds3 seconds2 seconds
Capacity ( Based on1GB card and Lettersize images)
600dpi color600dpi mono300dpi color300dpi mono
220 Photos (Min.)290 Photos (Min.)780 Photos (Min.)1280 Photos (Min.)
Max scan width 8.27”Max scan length 300DPI: 50” (Max), 600DPI: 25” (Max)File format JPEGLCD Scanning status displayAuto Power off 3 MinutesUSB port USB 2.0 high speedExternal memory MicroSD or SDHC card, max 32GB (not included)
Standard Battery 2xAA alkaline batteries (not included)
9. Computer System Minimum Requirement
PC Operatingsystem
Plug-and-Play with Windows XP/Vista/7 and MacOS 10.4 and higher
CPU for PC Pentium 11 or aboveRAM for PC 64MBPC Interface USB port
12
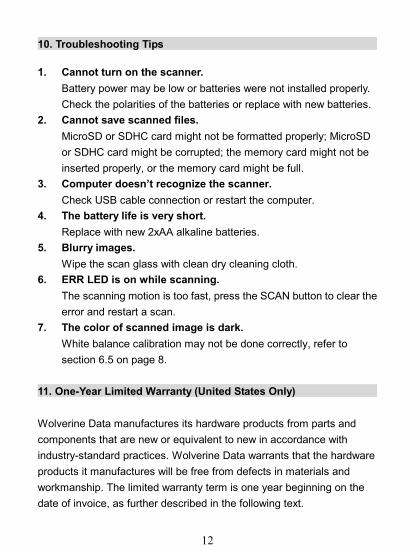
10. Troubleshooting Tips
1. Cannot turn on the scanner.Battery power may be low or batteries were not installed properly.Check the polarities of the batteries or replace with new batteries.
2. Cannot save scanned files.MicroSD or SDHC card might not be formatted properly; MicroSDor SDHC card might be corrupted; the memory card might not beinserted properly, or the memory card might be full.
3. Computer doesn’t recognize the scanner.Check USB cable connection or restart the computer.
4. The battery life is very short.Replace with new 2xAA alkaline batteries.
5. Blurry images.Wipe the scan glass with clean dry cleaning cloth.
6. ERR LED is on while scanning.The scanning motion is too fast, press the SCAN button to clear theerror and restart a scan.
7. The color of scanned image is dark.White balance calibration may not be done correctly, refer tosection 6.5 on page 8.
11. One-Year Limited Warranty (United States Only)
Wolverine Data manufactures its hardware products from parts andcomponents that are new or equivalent to new in accordance withindustry-standard practices. Wolverine Data warrants that the hardwareproducts it manufactures will be free from defects in materials andworkmanship. The limited warranty term is one year beginning on thedate of invoice, as further described in the following text.
13
Damage due to shipping the product to you is covered under this limitedwarranty. Otherwise, this limited warranty does not cover damage dueto external causes, including accident, abuse, misuse, problems withelectrical power, servicing not authorized by Wolverine Data, usage notin accordance with product instructions, failure to perform requiredpreventive maintenance, and problems caused by use of parts andcomponents not supplied by Wolverine Data.
The warranty extends only to the first consumer purchaser, and is nottransferable. This limited warranty does not cover any items that are inone or more of the following categories: software; external devices(except as specifically noted); accessories or parts added to a WolverineData system after the system is shipped from Wolverine Data or itsresellers; accessories or parts that are not installed in the WolverineData factory.
During the one-year period, beginning on the invoice date, WolverineData will repair or replace products returned to Wolverine Data's facility.
To request limited warranty service, you must contact Wolverine Data'sTechnical Support Services within the limited warranty period. Refer tothe section titled “Having difficulty using this product?” on page 3 to findthe appropriate telephone number for obtaining customer assistance. Iflimited warranty service is required, Wolverine Data will issue a RMA(Return Material Authorization) Number. You must ship the productsback to Wolverine Data in their original or equivalent packaging, prepayshipping charges, and insure the shipment or accept the risk of loss ordamage during shipment. Wolverine Data will ship the repaired orreplacement products to you freight prepaid if you use an address in the
14
continental United States, where applicable. Shipments to otherlocations will be made freight collect.
To obtain service, you must include: (a) a copy of your receipt or othercomparable proof of purchase; (b) a written description of the problem;(c) your address and telephone number; (d) Write the RMA number onthe outside shipping packaging.
NOTE: Wolverine Data uses new and reconditioned parts made byvarious manufacturers in performing limited warranty repairs andbuilding replacement products. If Wolverine Data repairs or replaces aproduct, its limited warranty term is not extended.
Warranty ExclusionsNormal Wear and Tear. Periodic maintenance, repair and replacementof parts due to normal wear and tear are excluded from coverage.
Abuse and Misuse. Defects or damage that result from: (a) improperoperation, storage, misuse or abuse, accident or neglect, such asphysical damage (cracks, scratches, etc.) to the surface of the productresulting from misuse; (b) contact with liquid, water, rain, extremehumidity or heavy perspiration, sand, dirt or the like, extreme heat, orfood; (c) use of the products or accessories for commercial purposes orsubjecting the product or accessory to abnormal usage or conditions; or(d) other acts which are not the fault of Wolverine Data, are excludedfrom coverage.
Use of Non-Authorized Accessories on PASS-200 Scanner. Defects ordamages that resulted from the use of non-authorized accessories or
15
other peripheral equipment on PASS-200 scanner are excluded fromcoverage.
Unauthorized Service or Modification. Defects or damages resultingfrom service, testing, adjustment, instillation, maintenance, alteration, ormodification in any way by someone other than Wolverine Data areexcluded from coverage.
Altered Products. Product or accessories with (a) serial numbers or datetags that have been removed, altered or obliterated; (b) broken seals orthat show evidence of tampering; (c) mismatched board serial numbers;or (d) nonconforming or non-Wolverine Data parts or accessories, areexcluded from coverage.
Other LimitationsAny implied warranties, including without limitation the impliedwarranties of merchantability and fitness for a particular purpose, shallbe limited to the duration of this limited warranty, otherwise the repair,replacement or refund as provided under this express limited warranty isthe exclusive remedy of the consumer, and is provided in lieu of all otherwarranties, express or implied. In no event shall wolverine data be liable,whether in contract or tort (including negligence) for damages in excessof the purchase price of the product, accessory or software, or for anyindirect, incidental, special or consequential damages of any kind, orloss of revenue or profits, loss of business, loss of information or data,software or application with the ability or inability to use the product,accessories or software to the full extent these damages may bedisclaimed by law. Some states (or jurisdictions) do not allow theexclusion or limitation of incidental or consequential damages, so theabove exclusion or limitation may not apply to you.

16
Thank you for choosing Wolverine!
Having difficulty using PASS-200 Scanner?Please try the following options:
Call us at 949-458-9888 M-F 9:00-5:00 Pacific Time. Visit www.wolverinedata.com/support to find the latest
documentation and other help tips. E-mail or write to our technical support staff at
Quick Start Guide1. Slide battery door outward.2. Install 2 x AA batteries (not supplied).3. Power on the scanner - Press and hold POWER/SCAN button
for 2~5 seconds.4. Insert a memory card - Use a MicroSD or SDHC card (not
supplied) to record and store the scanned files.5. Format the memory card – The card must be formatted to
FAT32 format before first use (please refer to page 7).6. Set system date and time (please refer to page 8).7. Calibrate white balance (please refer to page 8).8. Set color mode (color or mono) and resolution (600 or 300dpi).9. Make a scan – Press SCAN button once and slide the scanner
downward slowly and steadily to get the best quality picture.Press SCAN button to stop the scan.
LED light indication Both Green and Red LED off ---- Ready to scan. Press SCAN
button to start a scan. Green LED on ---- Scanning in process Red LED on ---- Scanned too fast or having distortion. Press
SCAN button once to clear error.