us army mountaineering techniques (advanced) - · pdf filemountaineering techniques (advanced)...
TRANSCRIPT
MOUNTAINEERING TECHNIQUES (ADVANCED)
BILL LYDE GS9/E. LIVINGSTON GS12
SUBCOURSE NO. IN0494
UNITED STATES ARMY INFANTRY SCHOOL FORT BENNING, GEORGIA 31905-5593
5 Credit Hours
GENERAL
The purpose of this subcourse is to teach the techniques you must know in order to cope with mountainous terrain. The advanced mountaineering apply to all operations on mountainous terrain. If you are skilled in military mountaineering, you can perform essential missions in difficult terrain. These skills are expanded by training with experienced climbers as a team, and by learning how to modify new techniques to suit your own style. As experience is gained, new techniques are added to your mountaineering knowledge as long as safety and caution are retained.
TASK: Identify advanced mountaineering techniques on glaciers, snow-covered mountains, and alpine paths.
CONDITIONS: Given the subcourse material, a training scenario and extracts, as applicable, the student will complete the examination at the end of this subcourse.
STANDARDS: The student will successfully answer 70 percent of the questions on a multiple-choice based examination for subcourse IN0494.
TABLE OF CONTENTS
LESSON 1: MOUNTAINEERING TECHNIQUES ON GLACIERS AND SNOW-COVERED MOUNTAINS
Part A: CLASSIFICATION OF SNOW
Part B: AVALANCHES
Part C: SAFETY RULES
Part D: AVALANCHE RESCUE
PART E: MOVEMENT ON SNOW AND ICE
Practice Exercise
LESSON 2: MOUNTAINEERING TECHNIQUES ON ALPINE PATHS
Part A: ALPINE PATHS AND HANDLINES
Part B: STEPS AND LADDERS
Part C: WALKWAYS
Practice Exercise
ADMINISTRATIVE INSTRUCTIONS
SUBCOURSE CONTENT
This subcourse contains two lessons. Lesson 1 covers advanced mountaineering techniques on glaciers and snow-covered mountains. Lesson 2 covers advanced mountaineering techniques on alpine paths.
Supplementary Requirements
Prerequisites. There is one prerequisite for this subcourse which must be completed before you begin studying the material contained within this subcourse.
IN 0486, Mountaineering Techniques (BASIC)
Supervisory Assistance. There are no supervisory requirements for completion of this subcourse.
References. No supplementary references are needed for this subcourse.
GRADING AND CERTIFICATION INSTRUCTIONS
INSTRUCTIONS TO THE STUDENT
This subcourse has a multiple-choice test covering all lessons. You must score a minimum of 70 percent on this test to meet the objective of the subcourse. Answer all questions on the enclosed ACCP examination response sheet. After completing the examination, place the answer sheet in the self-addressed envelope provided and mail it to the Institute for Professional Development (IPD) for scoring. IPD will send you a copy of your score.
Five credit hours will be awarded for the successful completion of this subcourse.
This subcourse reflects the doctrine which was current at the time it was prepared. In your own work situation, always refer to the latest publication.
Whenever the masculine gender is used, both men and women are included, unless otherwise stated.
INTRODUCTION
Mountains exist in almost every country in the world. Almost every war has included some type of mountain operations. This pattern will not change; therefore, soldiers will fight in mountainous terrain in future conflicts.
Mountain operations have not changed, but the equipment and transportation available today have changed. The helicopter allows access to terrain that was once unreachable or could be reached only by slow methodical climbing.
If bad weather exists, commanders must still use mountain climbing techniques to reach certain objectives. Soldiers and leaders must know how to cope with mountainous terrain. These techniques must be applied in a safe and cautious manner.
To be proficient, each soldier must work together as a team in building on mountaineering techniques today, tomorrow, and in the future.
LESSON ONE
MOUNTAINEERING TECHNIQUES ON GLACIERS AND
SNOW-COVERED MOUNTAINS
OVERVIEW
TASK DESCRIPTION:
In this lesson, you will learn to identify mountaineering techniques on glaciers and snow-covered mountains.
LEARNING OBJECTIVE:
TASKS: Understand mountaineering techniques on glaciers and snow-covered mountains.
CONDITIONS: Given the subcourse material for this lesson, a training scenario, and extracts as applicable, the student will complete the practical exercise to demonstrate an understanding of mountaineering techniques on glaciers and snow-covered mountains.
STANDARDS: The student will demonstrate his comprehension and knowledge of the task by displaying an understanding of mountaineering techniques on glaciers and snow-covered mountains.
REFERENCES: The material contained in this lesson was derived from the following publication: TC 90-6-1
INTRODUCTION
During the winter, mountaineering operations must be customized with special preparation, training, and equipment to negotiate difficult and dangerous snow-covered ground. It is imperative that you become self-sufficient and trained in these techniques to avoid mission failure as well as loss of lives.
PART A - CLASSIFICATION OF SNOW
1. General
During the winter, it is imperative that you know which forms of snow are beneficial, and which are hazards to you as a climber. To clarify the danger inherent in snow and ice, it is necessary to outline the forms that snow assumes in its transition to glacier ice.
There are two types of snow: powder snow (loose snow) and compact snow (slab).
• Powder snow (loose snow). This snow is in its early stages and is further classified as new snow, or settling/settled snow.
New snow maintains individuality of flakes (crystals) or grains, which are free to move independently of each other immediately following its fall. If new snow is dry, it is feathery; if damp, it quickly consolidates into settling or settled snow. Snow is dry at subfreezing temperatures and wet at higher temperatures, where it contains water held among the ice grains. Dry snow consists of two forms: the round and the faceted forms.
• The round form consists of well-rounded grains that are joined to give the snow slab cohesive strength. This form usually occurs when the snow cover is deep and temperatures are moderate.
• The faceted form consists of angular crystals that are poorly bonded. These usually occur near the bottom of snow layers that are not too deep; thus, they are called depth hoar. They usually develop in extremely cold weather.
When melting occurs, the dry forms disappear and other forms take their place. The snow forms into clusters of grains where the water is free to drain. Slush forms where the drainage is diverted. This form is not cohesive.
• Compact snow (slab). This is snow that has passed beyond the stage of settled snow, where the individual crystals or grains are attached to bonded to give the snow some cohesiveness.
• Glacial firn or neve is densely packed snow that has survived at least one summer melt season. Glacier ice forms from the continuing compaction of firn until it is impermeable.
2. Snow Formations.
The forms of snow change during their transition from dry new snow to glacier ice. Temperature, humidity, and wind are important modifying factors in this transition.
Sun crust, wind crust or wind loose-packed snow, and wind slab are phenomena that should be important to you, the mountain soldier.
• Sun Crust. This is any snow that has had the top superficial layer melted by heat and subsequently refrozen often in repeated cycles. A layer of snow that is sun-crusted and weathered throughout its thickness becomes firn snow (neve). Sun crust commonly overlies loose powder snow.
• Wind Crust or Wind Loose-packed Snow. This is usually found on windward slopes and is anchored firmly to the underlying snow. Wind crust is usually safe. Freezing rain crust is also safe but once buried under new snow may form sliding layers for avalanches. Surface hoar crystals grow onto the surface on clear, cold nights. The feathery crystals also form weak layers once they are buried by subsequent snowfalls. Any type of crust, once buried under new snow is a potential slide base for avalanches.
• Wind Slab. This is formed from snow transported and deposited by winds. While the slabs are well compacted, they are loosely anchored to the underlying surface and are poorly bonded to the substratum. Having been transported by wind, the component grains are rounded and do not reflect the light. For this reason, the surface of a wind slab has a dull, chalky appearance. Wind slabs are dangerous because they often form the platform for subsequent avalanches.
PART B - AVALANCHES
1. General
The two main causes of avalanches are the weight of large amounts of accumulated snow, and steep slopes that exceed the cohesive forces within the snowpack or between the snowpack and ground. These two elements combined can produce an avalanche.
• Terrain. Ground surface conditions have considerable effect upon snow in contact. A broken, serrated, or boulder-strewn surface provides a good anchor for a snowpack. In other conditions, this surface can provide dangerous stress concentrations in the snowpack. Slides breaking off at ground level do occur but are unlikely. Smooth, even slopes of bare earth, solid rock, or grass favor massive ground-level avalanches, typical of the high alpine zone.
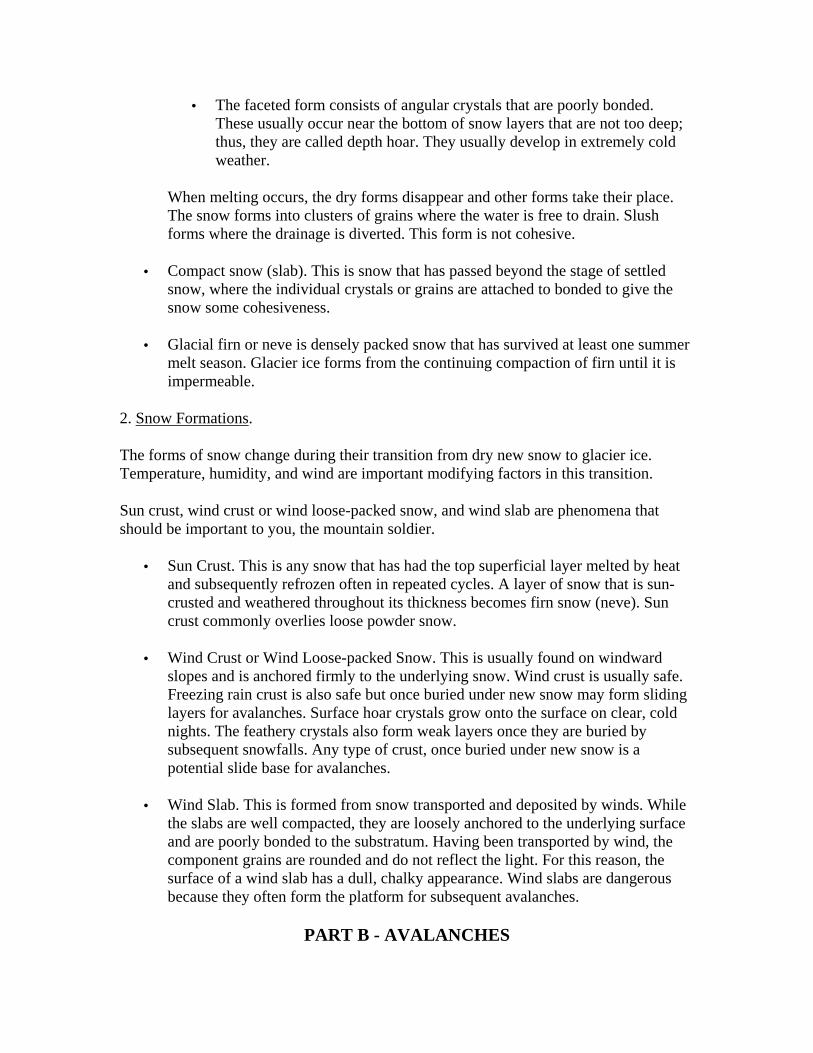
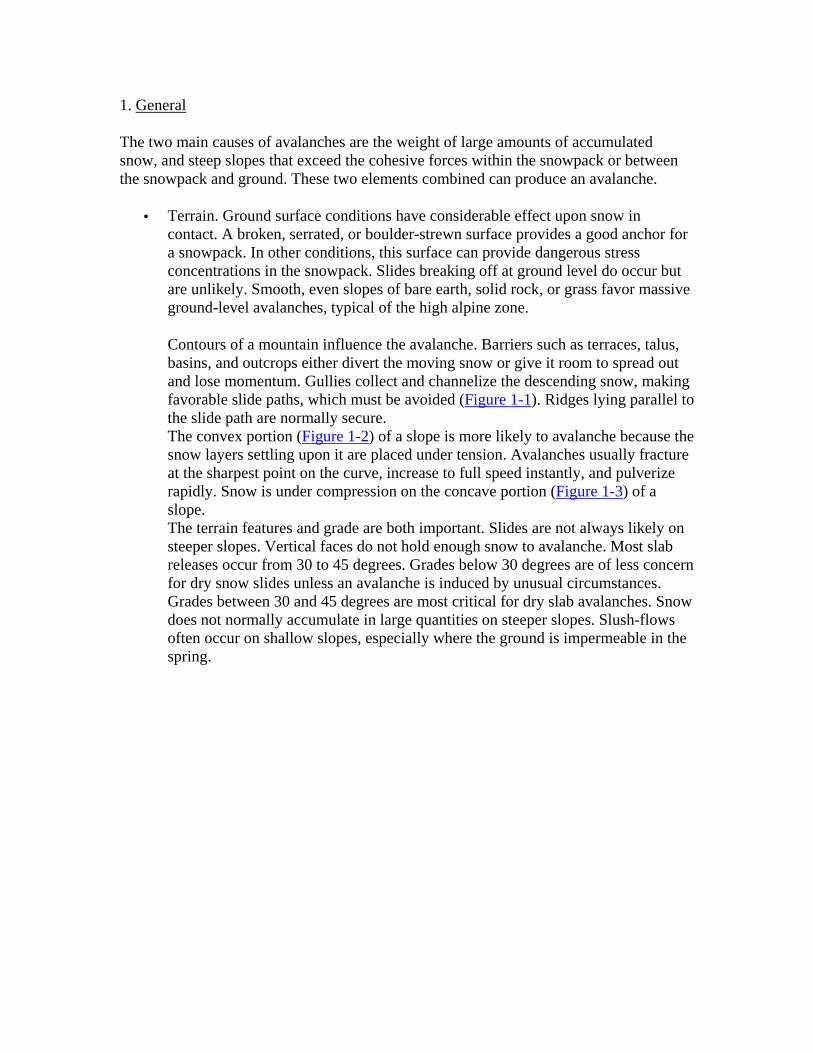
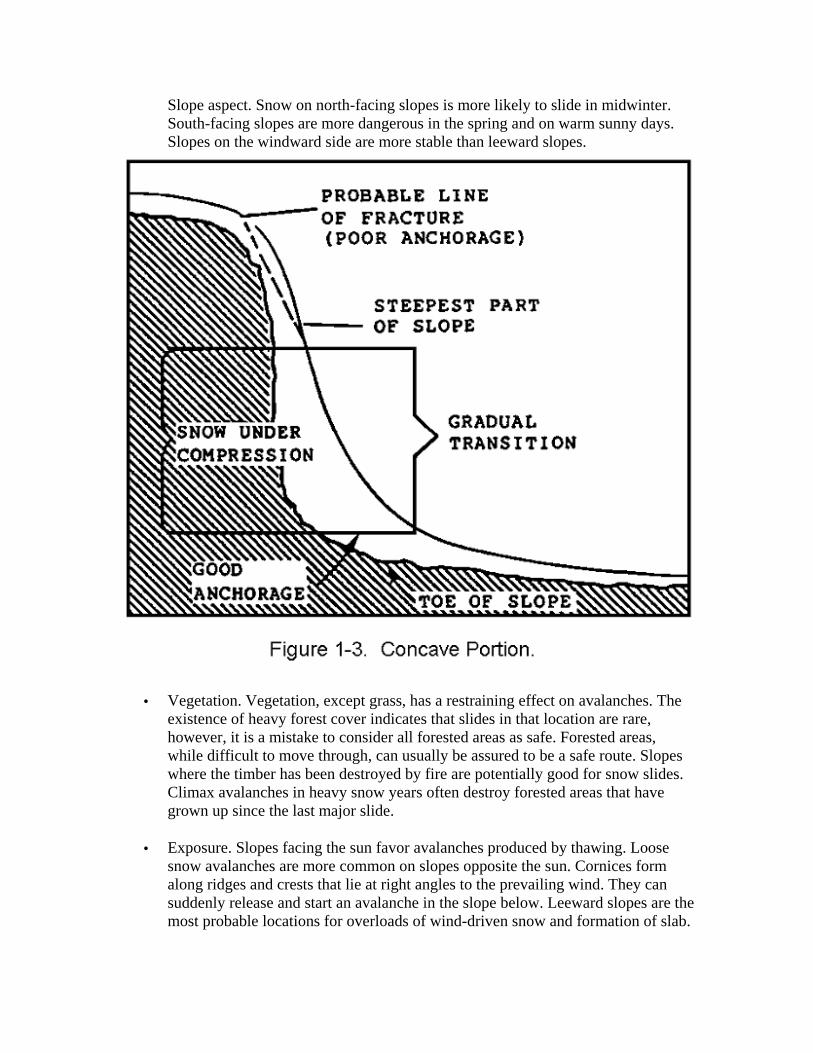
Contours of a mountain influence the avalanche. Barriers such as terraces, talus, basins, and outcrops either divert the moving snow or give it room to spread out and lose momentum. Gullies collect and channelize the descending snow, making favorable slide paths, which must be avoided (Figure 1-1). Ridges lying parallel to the slide path are normally secure. The convex portion (Figure 1-2) of a slope is more likely to avalanche because the snow layers settling upon it are placed under tension. Avalanches usually fracture at the sharpest point on the curve, increase to full speed instantly, and pulverize rapidly. Snow is under compression on the concave portion (Figure 1-3) of a slope. The terrain features and grade are both important. Slides are not always likely on steeper slopes. Vertical faces do not hold enough snow to avalanche. Most slab releases occur from 30 to 45 degrees. Grades below 30 degrees are of less concern for dry snow slides unless an avalanche is induced by unusual circumstances. Grades between 30 and 45 degrees are most critical for dry slab avalanches. Snow does not normally accumulate in large quantities on steeper slopes. Slush-flows often occur on shallow slopes, especially where the ground is impermeable in the spring.
The most dangerous slopes are those that have a convex portion above the tree line where tensile stresses can develop and have a concave portion below where the flow of snow can accelerate. The upper portion is usually the starting zone. The dimensions of the slope (length and width) determine the size of the snow slide and amount of destruction.
• Slope Steepness. Slopes as gentle as 15 degrees have avalanches under the right conditions. The majority of avalanches start on slopes between 25 and 60 degrees. Above the 60 degrees line they are too steep to build up significant amounts of snow, however, any slope above 30 degrees should be evaluated for stability before movement over snow. The slope angle can be estimated by using an inclinometer, which may be constructed from two equal-length ski poles. One pole is marked at exact center and the other is left unmarked. To determine if a slope is greater or less than 30 degrees, the unmarked pole is mated to the mid point of the marked pole at a 90-degree angle. By placing the tip of the marked pole on the ground, a determination can be made by observing the full-length pole as it is oriented up the fall line.
Slope profile. Dangerous slab avalanches are more likely to occur on convex slopes, but may also occur on concave slopes. Concave slopes are usually more stable than convex slopes and, therefore, safer. This does not mean avalanches do not occur on concave slopes. Not only do avalanches occur on concave slopes, but they may be triggered from the flat ground below the slope.
Slope aspect. Snow on north-facing slopes is more likely to slide in midwinter. South-facing slopes are more dangerous in the spring and on warm sunny days. Slopes on the windward side are more stable than leeward slopes.
• Vegetation. Vegetation, except grass, has a restraining effect on avalanches. The existence of heavy forest cover indicates that slides in that location are rare, however, it is a mistake to consider all forested areas as safe. Forested areas, while difficult to move through, can usually be assured to be a safe route. Slopes where the timber has been destroyed by fire are potentially good for snow slides. Climax avalanches in heavy snow years often destroy forested areas that have grown up since the last major slide.
• Exposure. Slopes facing the sun favor avalanches produced by thawing. Loose snow avalanches are more common on slopes opposite the sun. Cornices form along ridges and crests that lie at right angles to the prevailing wind. They can suddenly release and start an avalanche in the slope below. Leeward slopes are the most probable locations for overloads of wind-driven snow and formation of slab.
On the other hand, snow is transported from the wind-beaten slopes, and that which remains is packed and stabilized.
• Climate and Weather. In addition to the terrain factors, climate and weather are the other basic elements for the avalanche phenomenon.
Storms that deposit up to 2.5 cm (1 inch) of new snow each hour are common. About 80 percent of all avalanches occur as a direct result of the additional load deposited during a snowstorm. The remaining 20 percent are delayed action avalanches that occur for no obvious reason. Temperature fluctuates widely and rapidly in the mountains. Prolonged spells of extremely low temperatures occur. There are occasional intrusions of warm air masses, usually in connection with a storm. Rainfall may occur in the coastal zones and create avalanche conditions. The temperature greatly affects the cohesion of snow; a decrease in temperature retards the settlement of the slab and increases the chances of forming a depth hoar layer on which the slab can glide. Wind action during storms in the mountains is strong. Its influence on snow is the most important of all the contributing factors. It transports snow from one exposure to another during storms and fair weather, thus promoting overloads on certain slopes. It also modifies the size and shape of snow particles.
2. Types of Avalanches
Avalanches may be classified according to the type of snow involved, manner of release, or size. Classification according to the type of snow involved is normally used.
All slides are divided into two general groups: loose-snow avalanches and slab avalanches.
• Loose-Snow Avalanches. An avalanche of loose snow always starts on the surface from a point or a narrow sector. From the starting point it grows like a fan, expanding in width and depth. The speed and nature of its development depend on whether the snow is dry, damp, or wet.
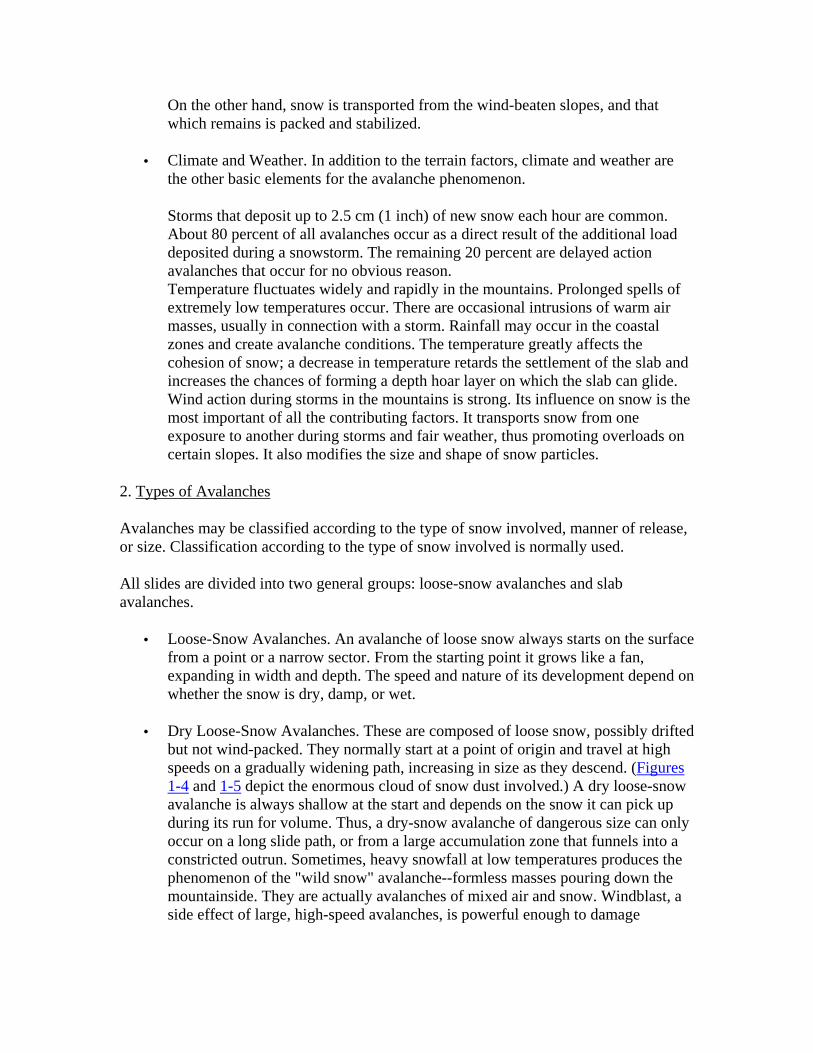
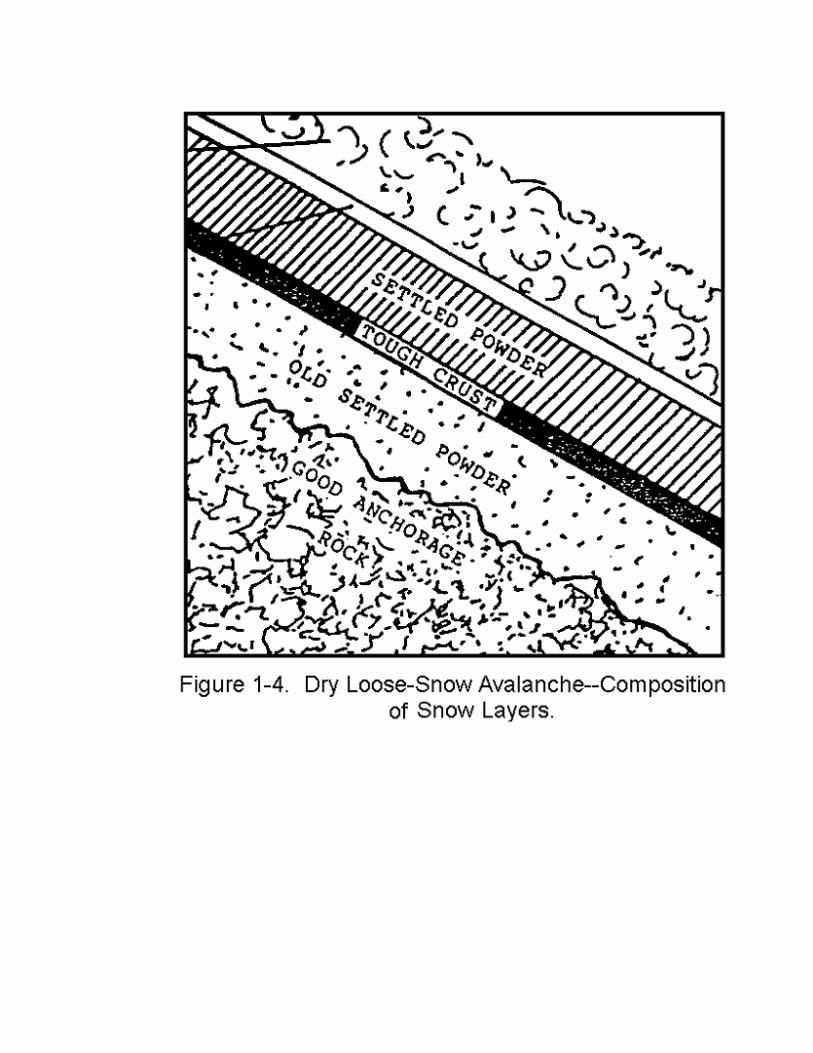
• Dry Loose-Snow Avalanches. These are composed of loose snow, possibly drifted but not wind-packed. They normally start at a point of origin and travel at high speeds on a gradually widening path, increasing in size as they descend. (Figures 1-4 and 1-5 depict the enormous cloud of snow dust involved.) A dry loose-snow avalanche is always shallow at the start and depends on the snow it can pick up during its run for volume. Thus, a dry-snow avalanche of dangerous size can only occur on a long slide path, or from a large accumulation zone that funnels into a constricted outrun. Sometimes, heavy snowfall at low temperatures produces the phenomenon of the "wild snow" avalanche--formless masses pouring down the mountainside. They are actually avalanches of mixed air and snow. Windblast, a side effect of large, high-speed avalanches, is powerful enough to damage

structures and endanger life outside the actual avalanche path. The hazard from loose-snow avalanches is soon over.
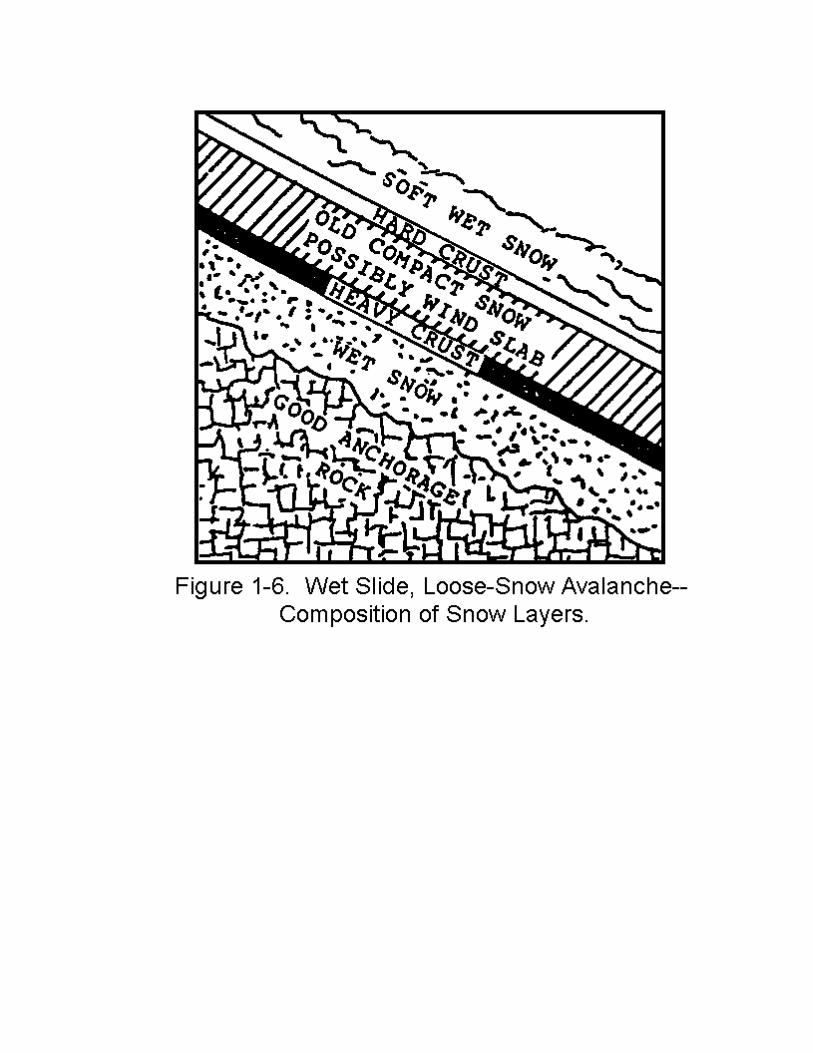
• Damp- and Wet-Slide Loose-Snow Avalanches. These resemble avalanches of dry snow with the same point of origin, gradually becoming wider. Their mass is many times greater than that of a dry avalanche, and they are therefore much more destructive. Being heavier and stickier, however, they develop more friction and travel at a slower rate.
The principal hazard of damp- and wet-snow avalanches is to fixed installations. Such avalanches are of comparatively low speed, causing them to stop suddenly when they lose momentum and to pile up in towering masses. This is in contrast to the dry slide, which tends to spread out like the splash of a wave.
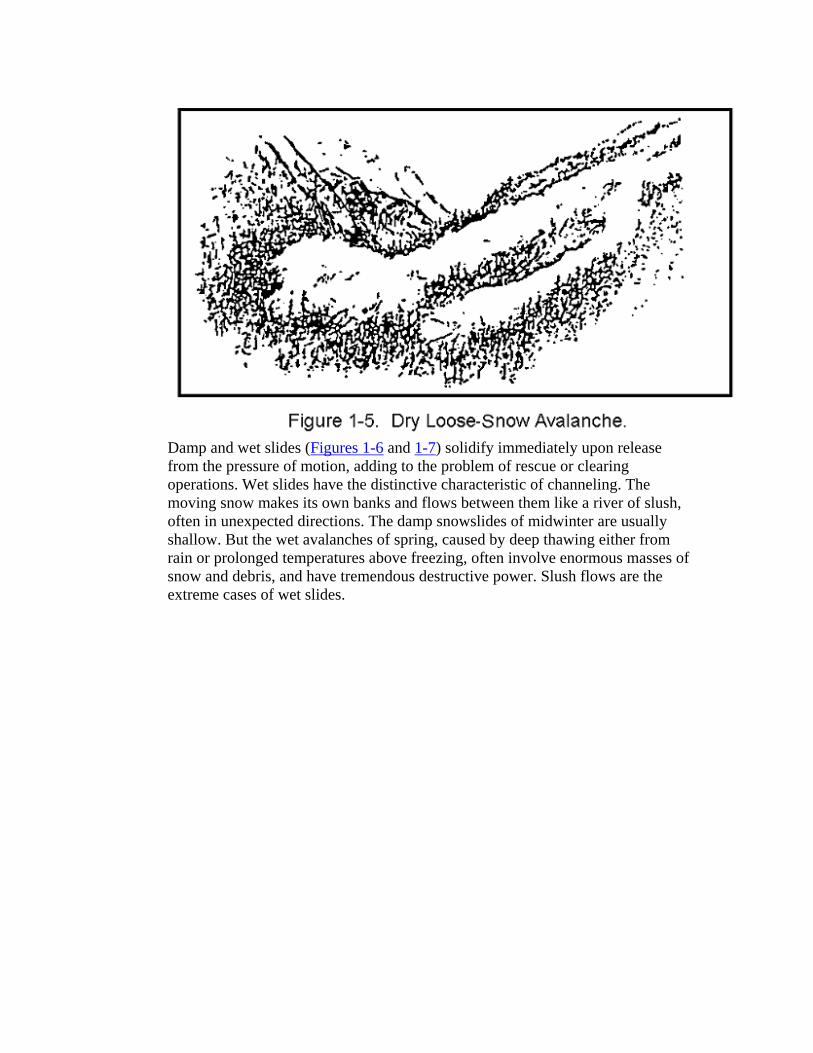
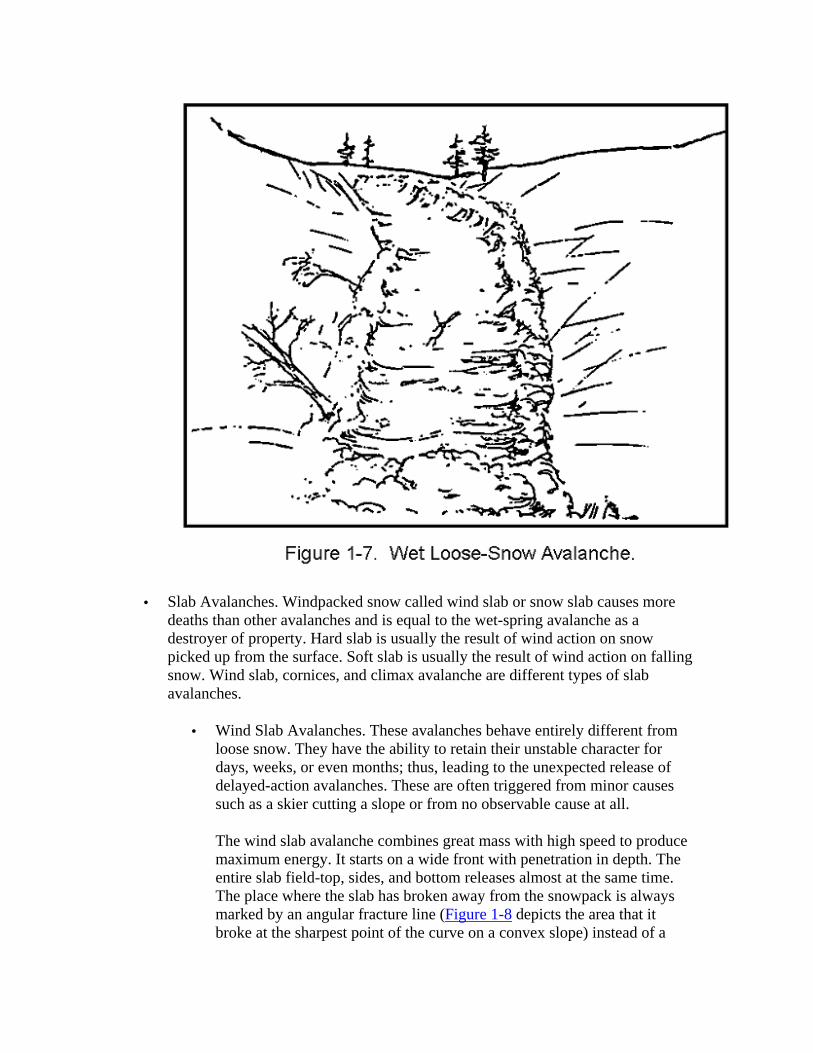
Damp and wet slides (Figures 1-6 and 1-7) solidify immediately upon release from the pressure of motion, adding to the problem of rescue or clearing operations. Wet slides have the distinctive characteristic of channeling. The moving snow makes its own banks and flows between them like a river of slush, often in unexpected directions. The damp snowslides of midwinter are usually shallow. But the wet avalanches of spring, caused by deep thawing either from rain or prolonged temperatures above freezing, often involve enormous masses of snow and debris, and have tremendous destructive power. Slush flows are the extreme cases of wet slides.
• Slab Avalanches. Windpacked snow called wind slab or snow slab causes more deaths than other avalanches and is equal to the wet-spring avalanche as a destroyer of property. Hard slab is usually the result of wind action on snow picked up from the surface. Soft slab is usually the result of wind action on falling snow. Wind slab, cornices, and climax avalanche are different types of slab avalanches.
• Wind Slab Avalanches. These avalanches behave entirely different from loose snow. They have the ability to retain their unstable character for days, weeks, or even months; thus, leading to the unexpected release of delayed-action avalanches. These are often triggered from minor causes such as a skier cutting a slope or from no observable cause at all.
The wind slab avalanche combines great mass with high speed to produce maximum energy. It starts on a wide front with penetration in depth. The entire slab field-top, sides, and bottom releases almost at the same time. The place where the slab has broken away from the snowpack is always marked by an angular fracture line (Figure 1-8 depicts the area that it broke at the sharpest point of the curve on a convex slope) instead of a
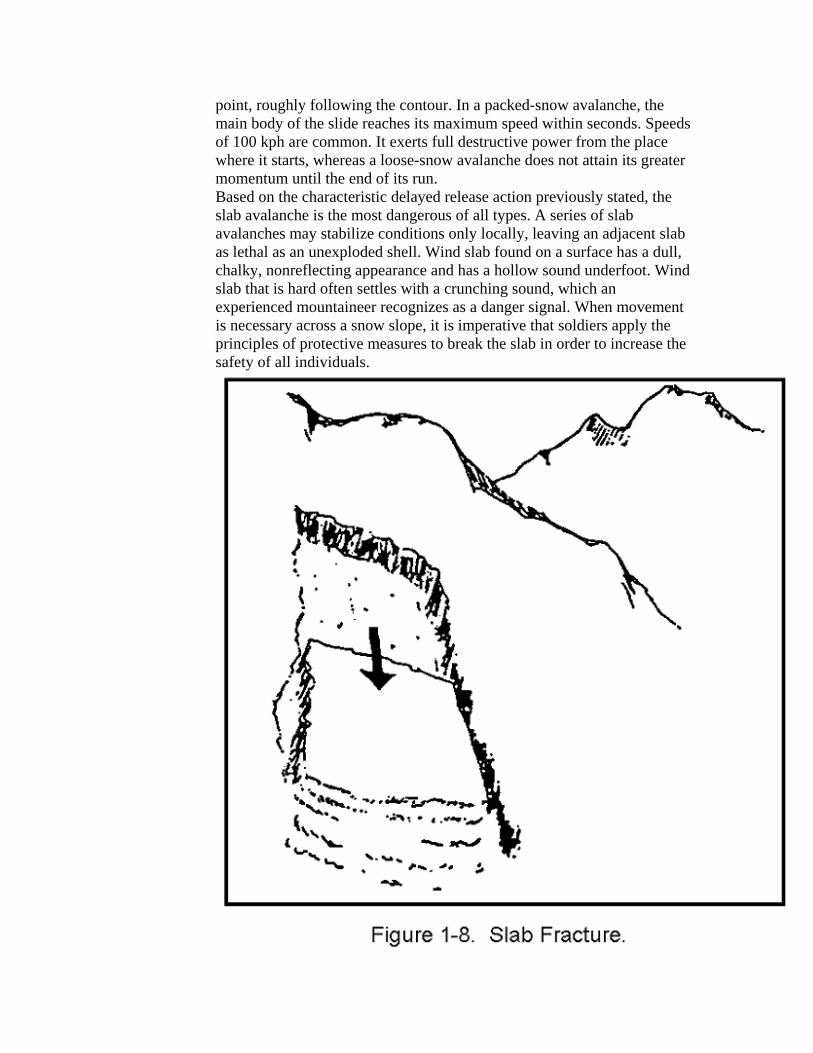
point, roughly following the contour. In a packed-snow avalanche, the main body of the slide reaches its maximum speed within seconds. Speeds of 100 kph are common. It exerts full destructive power from the place where it starts, whereas a loose-snow avalanche does not attain its greater momentum until the end of its run. Based on the characteristic delayed release action previously stated, the slab avalanche is the most dangerous of all types. A series of slab avalanches may stabilize conditions only locally, leaving an adjacent slab as lethal as an unexploded shell. Wind slab found on a surface has a dull, chalky, nonreflecting appearance and has a hollow sound underfoot. Wind slab that is hard often settles with a crunching sound, which an experienced mountaineer recognizes as a danger signal. When movement is necessary across a snow slope, it is imperative that soldiers apply the principles of protective measures to break the slab in order to increase the safety of all individuals.
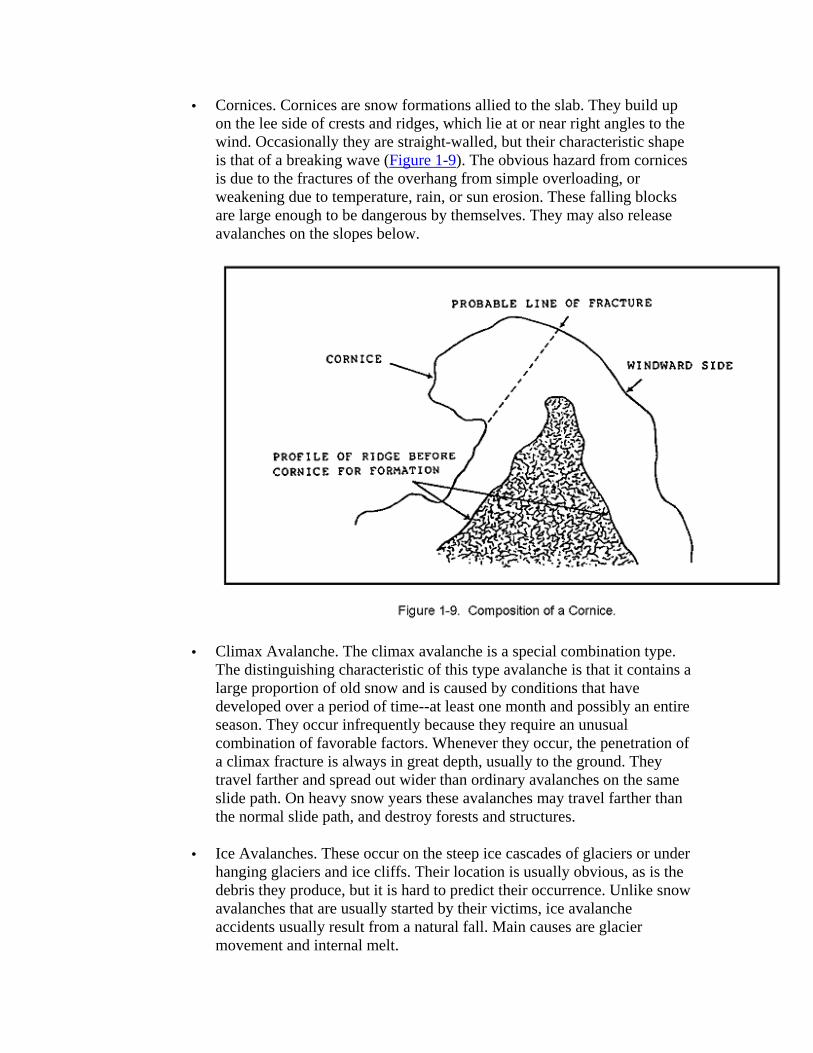
• Cornices. Cornices are snow formations allied to the slab. They build up on the lee side of crests and ridges, which lie at or near right angles to the wind. Occasionally they are straight-walled, but their characteristic shape is that of a breaking wave (Figure 1-9). The obvious hazard from cornices is due to the fractures of the overhang from simple overloading, or weakening due to temperature, rain, or sun erosion. These falling blocks are large enough to be dangerous by themselves. They may also release avalanches on the slopes below.
• Climax Avalanche. The climax avalanche is a special combination type. The distinguishing characteristic of this type avalanche is that it contains a large proportion of old snow and is caused by conditions that have developed over a period of time--at least one month and possibly an entire season. They occur infrequently because they require an unusual combination of favorable factors. Whenever they occur, the penetration of a climax fracture is always in great depth, usually to the ground. They travel farther and spread out wider than ordinary avalanches on the same slide path. On heavy snow years these avalanches may travel farther than the normal slide path, and destroy forests and structures.
• Ice Avalanches. These occur on the steep ice cascades of glaciers or under hanging glaciers and ice cliffs. Their location is usually obvious, as is the debris they produce, but it is hard to predict their occurrence. Unlike snow avalanches that are usually started by their victims, ice avalanche accidents usually result from a natural fall. Main causes are glacier movement and internal melt.
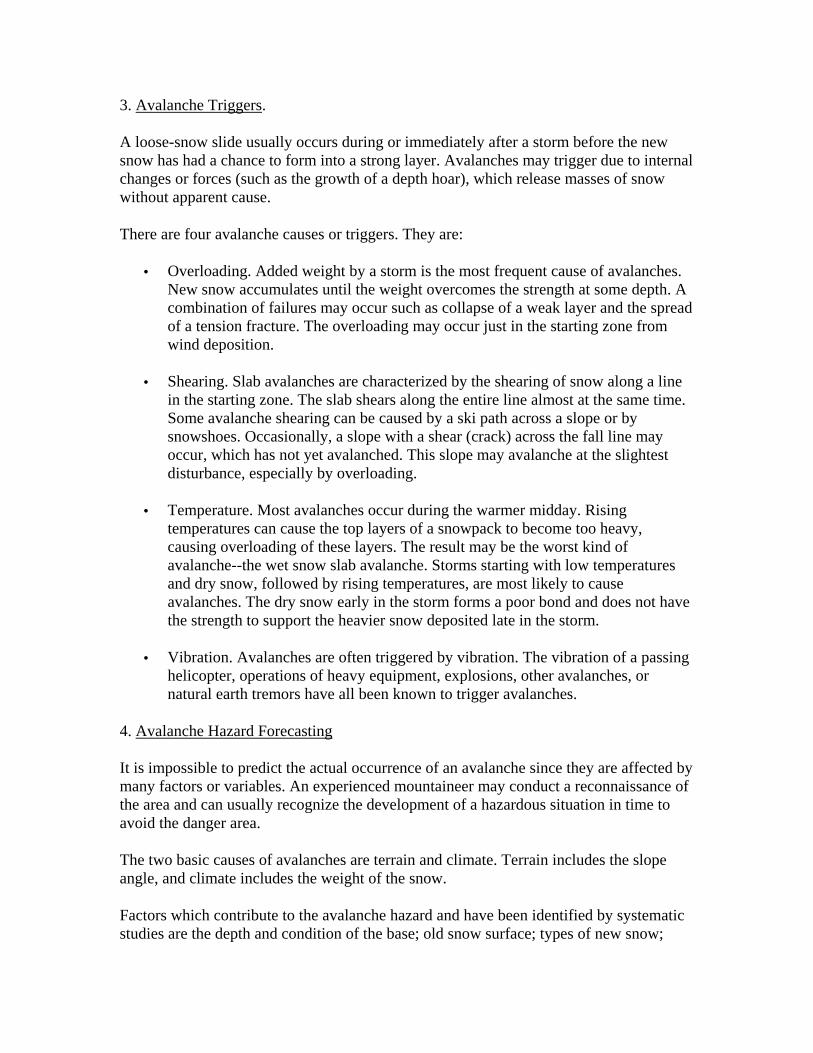
3. Avalanche Triggers.
A loose-snow slide usually occurs during or immediately after a storm before the new snow has had a chance to form into a strong layer. Avalanches may trigger due to internal changes or forces (such as the growth of a depth hoar), which release masses of snow without apparent cause.
There are four avalanche causes or triggers. They are:
• Overloading. Added weight by a storm is the most frequent cause of avalanches. New snow accumulates until the weight overcomes the strength at some depth. A combination of failures may occur such as collapse of a weak layer and the spread of a tension fracture. The overloading may occur just in the starting zone from wind deposition.
• Shearing. Slab avalanches are characterized by the shearing of snow along a line in the starting zone. The slab shears along the entire line almost at the same time. Some avalanche shearing can be caused by a ski path across a slope or by snowshoes. Occasionally, a slope with a shear (crack) across the fall line may occur, which has not yet avalanched. This slope may avalanche at the slightest disturbance, especially by overloading.
• Temperature. Most avalanches occur during the warmer midday. Rising temperatures can cause the top layers of a snowpack to become too heavy, causing overloading of these layers. The result may be the worst kind of avalanche--the wet snow slab avalanche. Storms starting with low temperatures and dry snow, followed by rising temperatures, are most likely to cause avalanches. The dry snow early in the storm forms a poor bond and does not have the strength to support the heavier snow deposited late in the storm.
• Vibration. Avalanches are often triggered by vibration. The vibration of a passing helicopter, operations of heavy equipment, explosions, other avalanches, or natural earth tremors have all been known to trigger avalanches.
4. Avalanche Hazard Forecasting
It is impossible to predict the actual occurrence of an avalanche since they are affected by many factors or variables. An experienced mountaineer may conduct a reconnaissance of the area and can usually recognize the development of a hazardous situation in time to avoid the danger area.
The two basic causes of avalanches are terrain and climate. Terrain includes the slope angle, and climate includes the weight of the snow.
Factors which contribute to the avalanche hazard and have been identified by systematic studies are the depth and condition of the base; old snow surface; types of new snow;
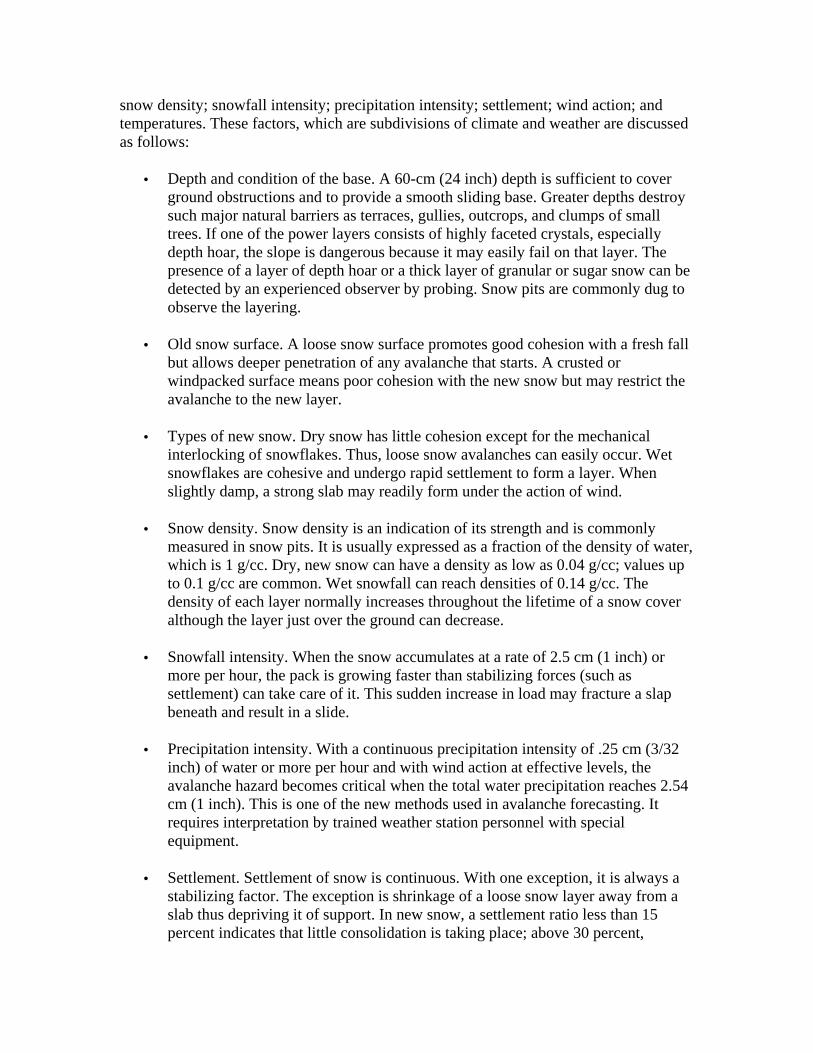
snow density; snowfall intensity; precipitation intensity; settlement; wind action; and temperatures. These factors, which are subdivisions of climate and weather are discussed as follows:
• Depth and condition of the base. A 60-cm (24 inch) depth is sufficient to cover ground obstructions and to provide a smooth sliding base. Greater depths destroy such major natural barriers as terraces, gullies, outcrops, and clumps of small trees. If one of the power layers consists of highly faceted crystals, especially depth hoar, the slope is dangerous because it may easily fail on that layer. The presence of a layer of depth hoar or a thick layer of granular or sugar snow can be detected by an experienced observer by probing. Snow pits are commonly dug to observe the layering.
• Old snow surface. A loose snow surface promotes good cohesion with a fresh fall but allows deeper penetration of any avalanche that starts. A crusted or windpacked surface means poor cohesion with the new snow but may restrict the avalanche to the new layer.
• Types of new snow. Dry snow has little cohesion except for the mechanical interlocking of snowflakes. Thus, loose snow avalanches can easily occur. Wet snowflakes are cohesive and undergo rapid settlement to form a layer. When slightly damp, a strong slab may readily form under the action of wind.
• Snow density. Snow density is an indication of its strength and is commonly measured in snow pits. It is usually expressed as a fraction of the density of water, which is 1 g/cc. Dry, new snow can have a density as low as 0.04 g/cc; values up to 0.1 g/cc are common. Wet snowfall can reach densities of 0.14 g/cc. The density of each layer normally increases throughout the lifetime of a snow cover although the layer just over the ground can decrease.
• Snowfall intensity. When the snow accumulates at a rate of 2.5 cm (1 inch) or more per hour, the pack is growing faster than stabilizing forces (such as settlement) can take care of it. This sudden increase in load may fracture a slap beneath and result in a slide.
• Precipitation intensity. With a continuous precipitation intensity of .25 cm (3/32 inch) of water or more per hour and with wind action at effective levels, the avalanche hazard becomes critical when the total water precipitation reaches 2.54 cm (1 inch). This is one of the new methods used in avalanche forecasting. It requires interpretation by trained weather station personnel with special equipment.
• Settlement. Settlement of snow is continuous. With one exception, it is always a stabilizing factor. The exception is shrinkage of a loose snow layer away from a slab thus depriving it of support. In new snow, a settlement ratio less than 15 percent indicates that little consolidation is taking place; above 30 percent,

stabilization is proceeding rapidly. Over a long period, ordinary snow layers shrink up to 90 percent, but slab layers may shrink no more than 60 percent. Abnormally low shrinkage in a layer indicates that a slab is forming.
• Wind action. Wind action is an important contributing factor. It overloads certain slopes at the expense of the others, it grinds snow crystals to simpler forms, and it constructs stable crust and brittle slab, often side by side. Warm wind (chinook of North Arnerica, and the foehn of Europe) is an effective thawing agent--even more effective than sunlight. An average velocity of 15 knots is the minimum effective level for wind action in building avalanche hazards.
• Temperatures. Air temperature determines the type of snow that falls. At temperatures below 15 degrees F the new snow is unstable, and does not settle to form a strong layer. The settlement is rapid above 28 degrees F. Sudden temperature changes can induce dangerous thermal stresses in a slab.
Avalanches obey mechanical laws that can be identified and evaluated by trained personnel with special equipment. While in the field, you must rely on the following factors:
• Terrain-grade 25 degrees or steeper anywhere in the avalanche track. (This is not an average grade.)
• Old snow depth-enough to cover ground obstructions.
• Surface crusted-normally only new snow will slide.
• Surface loose-good cohesion between layers but both old and new snow may slide.
• New snow depth-25 cm (10 inches) or more.
• Snowfall intensity-2.5 cm (1 inch) per hour or more. This can be assumed when snowfall is heavy enough to restrict visibility from 100 to 200 meters (109 to 218 yards).
• Precipitation intensity-.25 cm (3/32 inch) per hour of water or more, plus strong wind action. This can be assumed if snowfall intensity is 2.5 cm (1 inch) per hour and snow is damp or noticeably heavy for dry snow, or dry snow is granular or like pellets.
• Settlement-noticeably low. Watch the snow collars around the trees or posts.
• Wind-an average of 15 knots or higher. This can be assumed if snow is blown parallel or almost parallel to ground.
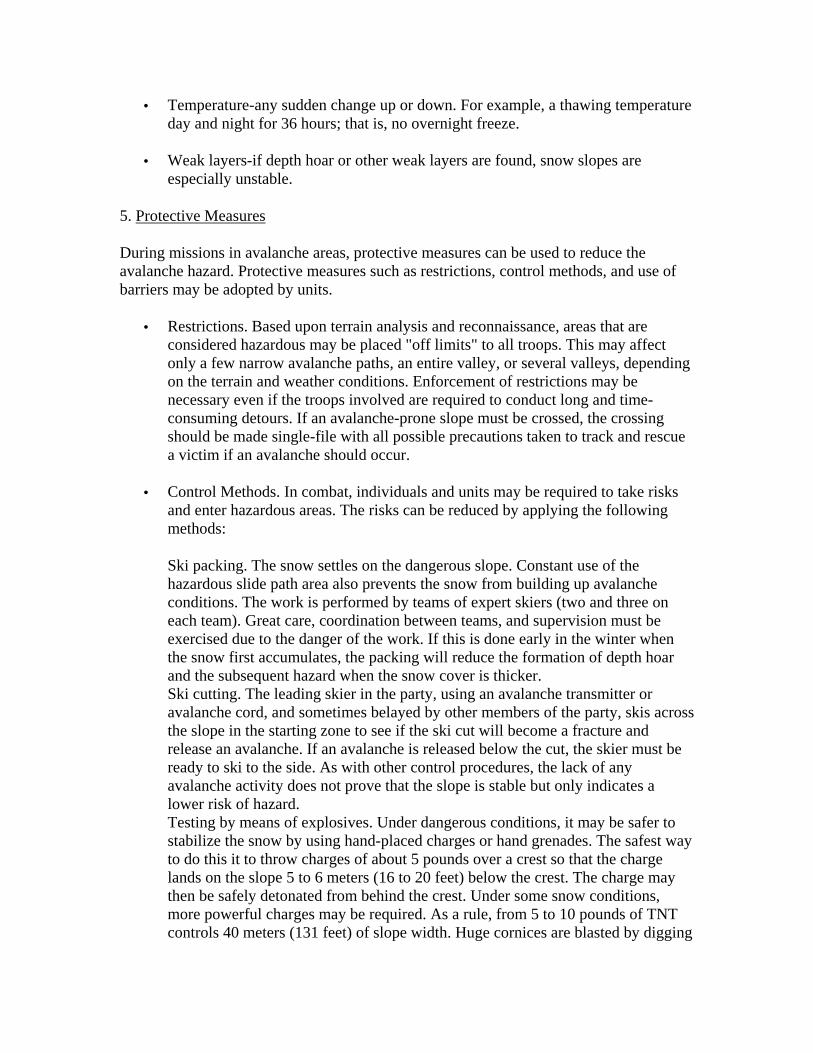
• Temperature-any sudden change up or down. For example, a thawing temperature day and night for 36 hours; that is, no overnight freeze.
• Weak layers-if depth hoar or other weak layers are found, snow slopes are especially unstable.
5. Protective Measures
During missions in avalanche areas, protective measures can be used to reduce the avalanche hazard. Protective measures such as restrictions, control methods, and use of barriers may be adopted by units.
• Restrictions. Based upon terrain analysis and reconnaissance, areas that are considered hazardous may be placed "off limits" to all troops. This may affect only a few narrow avalanche paths, an entire valley, or several valleys, depending on the terrain and weather conditions. Enforcement of restrictions may be necessary even if the troops involved are required to conduct long and time-consuming detours. If an avalanche-prone slope must be crossed, the crossing should be made single-file with all possible precautions taken to track and rescue a victim if an avalanche should occur.
• Control Methods. In combat, individuals and units may be required to take risks and enter hazardous areas. The risks can be reduced by applying the following methods:
Ski packing. The snow settles on the dangerous slope. Constant use of the hazardous slide path area also prevents the snow from building up avalanche conditions. The work is performed by teams of expert skiers (two and three on each team). Great care, coordination between teams, and supervision must be exercised due to the danger of the work. If this is done early in the winter when the snow first accumulates, the packing will reduce the formation of depth hoar and the subsequent hazard when the snow cover is thicker. Ski cutting. The leading skier in the party, using an avalanche transmitter or avalanche cord, and sometimes belayed by other members of the party, skis across the slope in the starting zone to see if the ski cut will become a fracture and release an avalanche. If an avalanche is released below the cut, the skier must be ready to ski to the side. As with other control procedures, the lack of any avalanche activity does not prove that the slope is stable but only indicates a lower risk of hazard. Testing by means of explosives. Under dangerous conditions, it may be safer to stabilize the snow by using hand-placed charges or hand grenades. The safest way to do this it to throw charges of about 5 pounds over a crest so that the charge lands on the slope 5 to 6 meters (16 to 20 feet) below the crest. The charge may then be safely detonated from behind the crest. Under some snow conditions, more powerful charges may be required. As a rule, from 5 to 10 pounds of TNT controls 40 meters (131 feet) of slope width. Huge cornices are blasted by digging
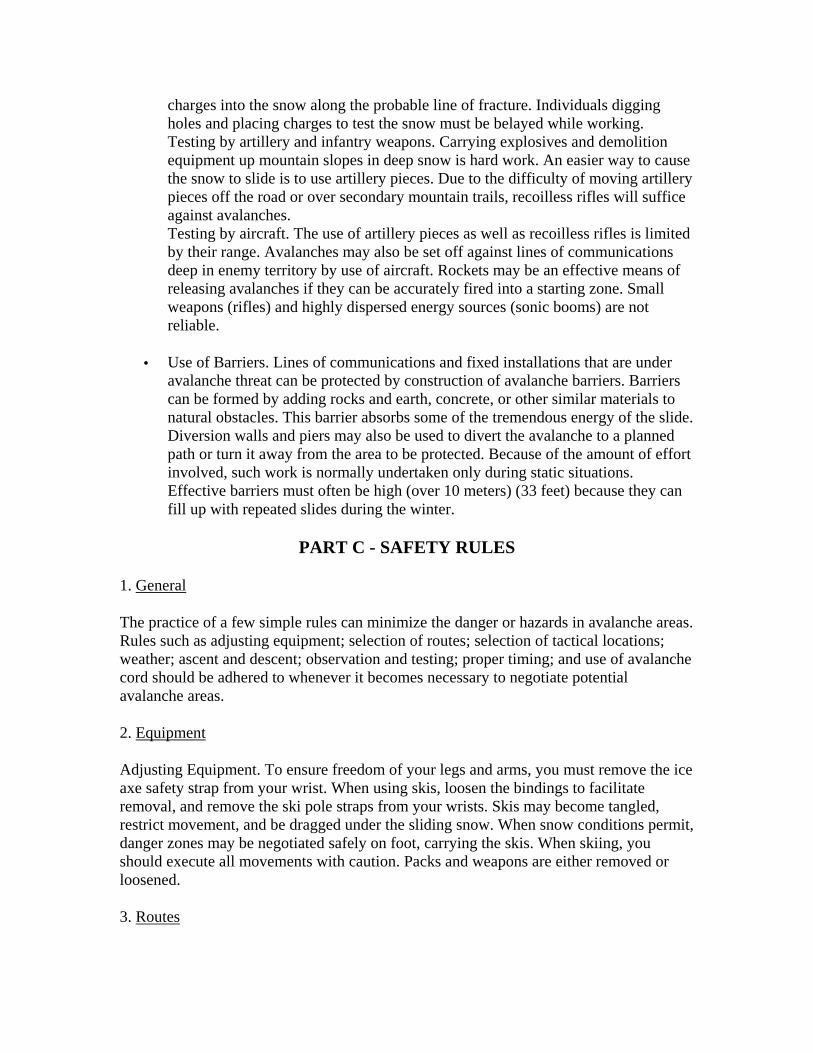
charges into the snow along the probable line of fracture. Individuals digging holes and placing charges to test the snow must be belayed while working. Testing by artillery and infantry weapons. Carrying explosives and demolition equipment up mountain slopes in deep snow is hard work. An easier way to cause the snow to slide is to use artillery pieces. Due to the difficulty of moving artillery pieces off the road or over secondary mountain trails, recoilless rifles will suffice against avalanches. Testing by aircraft. The use of artillery pieces as well as recoilless rifles is limited by their range. Avalanches may also be set off against lines of communications deep in enemy territory by use of aircraft. Rockets may be an effective means of releasing avalanches if they can be accurately fired into a starting zone. Small weapons (rifles) and highly dispersed energy sources (sonic booms) are not reliable.
• Use of Barriers. Lines of communications and fixed installations that are under avalanche threat can be protected by construction of avalanche barriers. Barriers can be formed by adding rocks and earth, concrete, or other similar materials to natural obstacles. This barrier absorbs some of the tremendous energy of the slide. Diversion walls and piers may also be used to divert the avalanche to a planned path or turn it away from the area to be protected. Because of the amount of effort involved, such work is normally undertaken only during static situations. Effective barriers must often be high (over 10 meters) (33 feet) because they can fill up with repeated slides during the winter.
PART C - SAFETY RULES
1. General
The practice of a few simple rules can minimize the danger or hazards in avalanche areas. Rules such as adjusting equipment; selection of routes; selection of tactical locations; weather; ascent and descent; observation and testing; proper timing; and use of avalanche cord should be adhered to whenever it becomes necessary to negotiate potential avalanche areas.
2. Equipment
Adjusting Equipment. To ensure freedom of your legs and arms, you must remove the ice axe safety strap from your wrist. When using skis, loosen the bindings to facilitate removal, and remove the ski pole straps from your wrists. Skis may become tangled, restrict movement, and be dragged under the sliding snow. When snow conditions permit, danger zones may be negotiated safely on foot, carrying the skis. When skiing, you should execute all movements with caution. Packs and weapons are either removed or loosened.
3. Routes
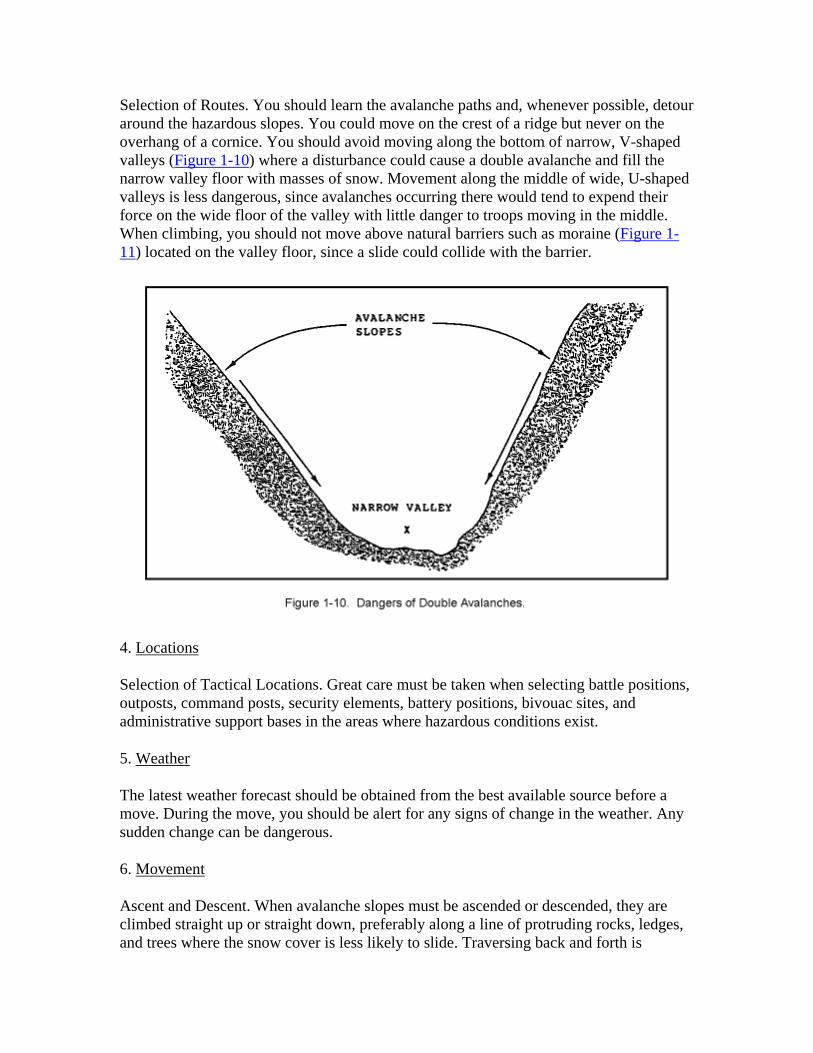
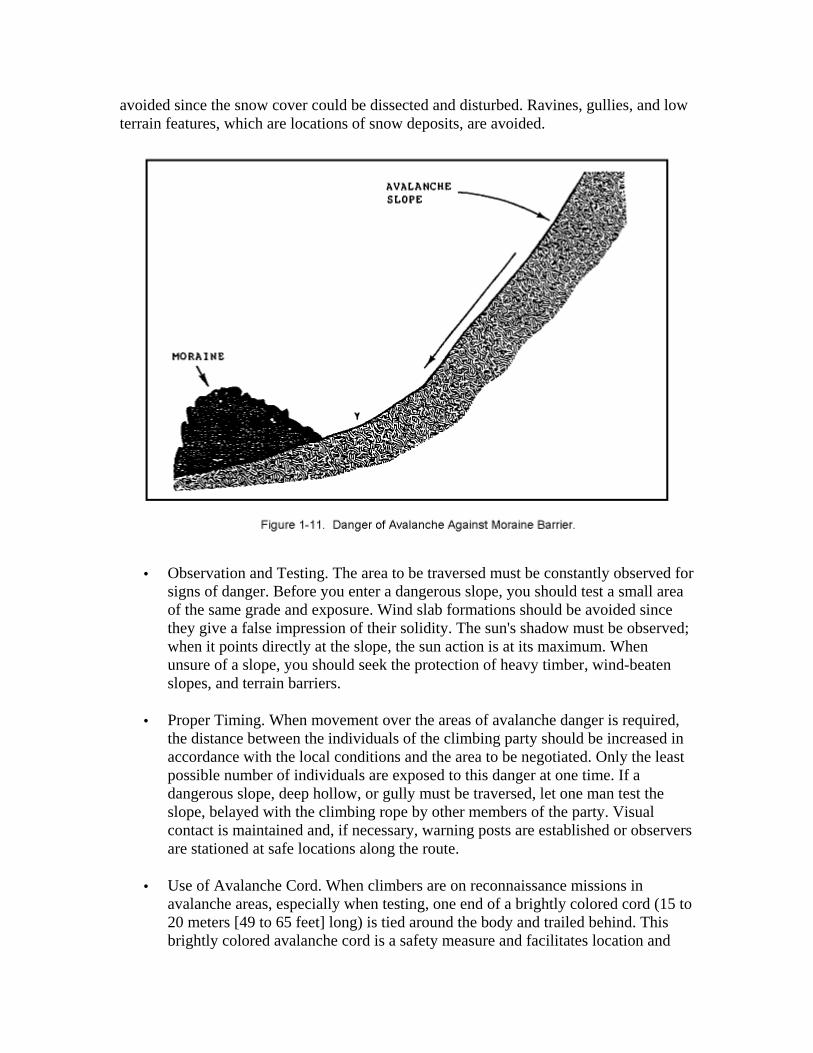
Selection of Routes. You should learn the avalanche paths and, whenever possible, detour around the hazardous slopes. You could move on the crest of a ridge but never on the overhang of a cornice. You should avoid moving along the bottom of narrow, V-shaped valleys (Figure 1-10) where a disturbance could cause a double avalanche and fill the narrow valley floor with masses of snow. Movement along the middle of wide, U-shaped valleys is less dangerous, since avalanches occurring there would tend to expend their force on the wide floor of the valley with little danger to troops moving in the middle. When climbing, you should not move above natural barriers such as moraine (Figure 1-11) located on the valley floor, since a slide could collide with the barrier.
4. Locations
Selection of Tactical Locations. Great care must be taken when selecting battle positions, outposts, command posts, security elements, battery positions, bivouac sites, and administrative support bases in the areas where hazardous conditions exist.
5. Weather
The latest weather forecast should be obtained from the best available source before a move. During the move, you should be alert for any signs of change in the weather. Any sudden change can be dangerous.
6. Movement
Ascent and Descent. When avalanche slopes must be ascended or descended, they are climbed straight up or straight down, preferably along a line of protruding rocks, ledges, and trees where the snow cover is less likely to slide. Traversing back and forth is
avoided since the snow cover could be dissected and disturbed. Ravines, gullies, and low terrain features, which are locations of snow deposits, are avoided.
• Observation and Testing. The area to be traversed must be constantly observed for signs of danger. Before you enter a dangerous slope, you should test a small area of the same grade and exposure. Wind slab formations should be avoided since they give a false impression of their solidity. The sun's shadow must be observed; when it points directly at the slope, the sun action is at its maximum. When unsure of a slope, you should seek the protection of heavy timber, wind-beaten slopes, and terrain barriers.
• Proper Timing. When movement over the areas of avalanche danger is required, the distance between the individuals of the climbing party should be increased in accordance with the local conditions and the area to be negotiated. Only the least possible number of individuals are exposed to this danger at one time. If a dangerous slope, deep hollow, or gully must be traversed, let one man test the slope, belayed with the climbing rope by other members of the party. Visual contact is maintained and, if necessary, warning posts are established or observers are stationed at safe locations along the route.
• Use of Avalanche Cord. When climbers are on reconnaissance missions in avalanche areas, especially when testing, one end of a brightly colored cord (15 to 20 meters [49 to 65 feet] long) is tied around the body and trailed behind. This brightly colored avalanche cord is a safety measure and facilitates location and
rescue of individuals buried by an avalanche, since the cord tends to remain on or near the surface of the slide.
PART D - AVALANCHE RESCUE
1. General
During avalanche rescues, military operations differ slightly from civilian operations due to the number of personnel involved in the climbing parties, and the immediate available personnel left at the avalanche site. In civilian rescues only one or two surviving personnel are available due to small climbing parties. Therefore, the odds of recovering a live victim in military operations are higher than those in a civilian rescue attempt. Before undertaking glacial operations, it is mandatory to organize rescue teams to ensure they are self-sufficient, equipped with life support equipment, and prepared to conduct extended operations. All team members must be trained in probing, transceiver use, first aid, and digging.
Survival margin; phases of rescue operations; immediate action; follow-up; evacuation; methodology of locating victims; probable locations; and probing are rescue procedures that all members of the climbing party should be familiar with. They are discussed as follows:
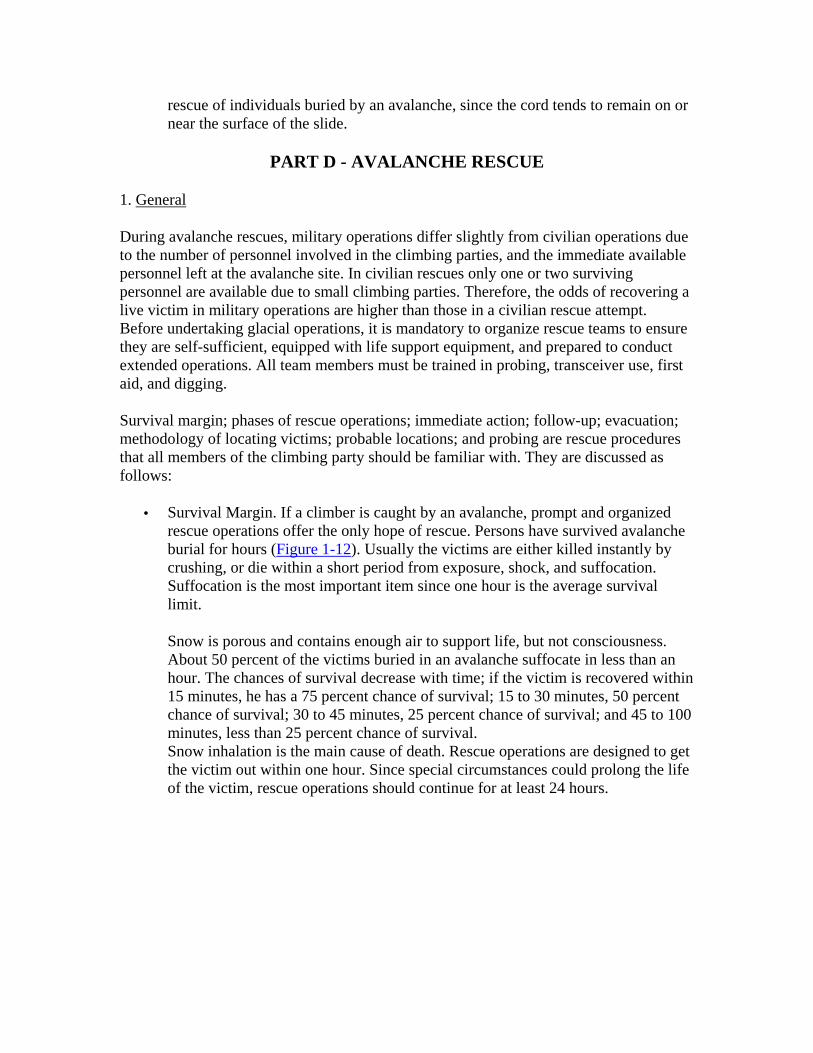
• Survival Margin. If a climber is caught by an avalanche, prompt and organized rescue operations offer the only hope of rescue. Persons have survived avalanche burial for hours (Figure 1-12). Usually the victims are either killed instantly by crushing, or die within a short period from exposure, shock, and suffocation. Suffocation is the most important item since one hour is the average survival limit.
Snow is porous and contains enough air to support life, but not consciousness. About 50 percent of the victims buried in an avalanche suffocate in less than an hour. The chances of survival decrease with time; if the victim is recovered within 15 minutes, he has a 75 percent chance of survival; 15 to 30 minutes, 50 percent chance of survival; 30 to 45 minutes, 25 percent chance of survival; and 45 to 100 minutes, less than 25 percent chance of survival. Snow inhalation is the main cause of death. Rescue operations are designed to get the victim out within one hour. Since special circumstances could prolong the life of the victim, rescue operations should continue for at least 24 hours.
2. Phases of Rescue Operations
The object of a rescue action is speed. Equipment and manpower must be assembled as quickly as possible at the avalanche site. Regardless of the rescue plan, exact preparation and organization are needed for any operation that presupposes a live rescue rather than recovery of a dead victim.
To achieve this goal, a three-stage rescue operation is organized:
• Immediate action by personnel remaining at the avalanche site.
• Follow-up by an alert rescue unit on call at the parent organization.
• Evacuation of victim(s).
• Immediate Action. Surviving members of the unit are organized into the first rescue team at the avalanche site, and immediately start rescue operations.
The main factors in a successful rescue operation are the ability to be well-organized and to act immediately. The leader of this rescue team must decide if a follow-up rescue party and other help are needed; if so, it is requested by the quickest means. If avalanche dogs can be located, they should be brought to the accident site by helicopter with their trainers. Random probing begins where there are indications of the location of the victim. If no indications are found, the random probing starts in likely locations such as obstructions in the slide path caused by trees, boulders, or transitions. The tip and edges of the slide are also searched. A human body is bulky and is apt to be thrown toward the surface or sides. If the victim is found unconscious, first aid (artificial respiration) must be administered at once. Hot liquids and warm sleeping bags should be available for conscious victims. The alert rescue team reinforces the first rescue team.
• Follow-Up. The follow-up rescue party on duty is alerted, issued special equipment and provided transportation.
This party is dispatched under command of the most experienced officer or NCO, and should consist of one squad or one platoon and medical personnel. It should leave within 15 minutes after receiving the alert and be lightly equipped--speed is the first consideration. The strength of the alert rescue party is that they are an on-call, trained unit, and are small enough to get ready and move out rapidly. If the area to be searched is extensive, a second or follow-up party must be sent to the accident scene as a reinforcement. The second or follow-up party should move out from one-half to one hour after the avalanche. It carries a complete set of equipment including probes, shovels, 200-pound sled, radio, rations, and other required items.
• Evacuation. Avalanche victims who are rescued alive must be evacuated under the care of medical personnel by the fastest means available. The evacuation should be accomplished by helicopter if possible.
• Methods of Locating Victims. Search operations must optimize the victim's chance for survival. A slow and thorough search would probably guarantee finding the victim, but the chances of finding him alive would be remote.
The following techniques increase the probability of effecting a live rescue:
• Before entering the avalanche track, the starting zones above should be checked to ensure that no more avalanches will run on that same track. It may be necessary to blast other starting zones before it is safe for a large party to work on the avalanche deposit.
• Once the safety of the rescuers is ensured, the party begins by establishing from witnesses where the victim was located just before the avalanche release. It then determines the point where the victim disappeared. Making
use of this and any other information, a probable victim trajectory line can be established leading to high-priority search areas. A rapid systematic check is made of the avalanche debris surface, marking all clues.
• A probe is usually started at the runout point of the avalanche. If justified by visible signs of equipment or avalanche cord, an initial random probe can be made of high-priority regions. If not justified, a coarse probe can be made of all likely burial areas. The coarse probe is repeated as long as a live rescue remains possible. The fine probe is repeated only when the possibility of a live rescue is improbable.
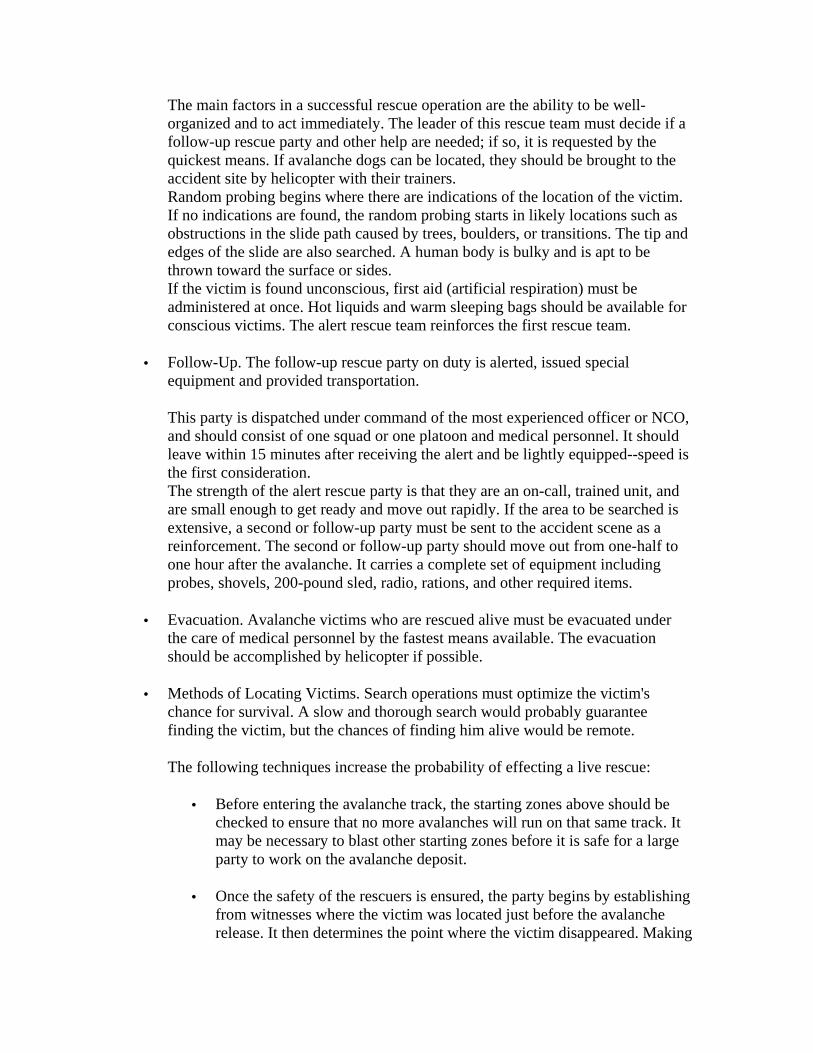
• Probable Locations. A moving avalanche resembles a fluid. A human body with a higher density than the flowing snow would be expected to sink deeper and deeper into the avalanche. Many factors obscure this statement. Turbulence, terrain, and the victim's own efforts to surface himself all interact to determine the final burial position. Study of a large number of case histories leads to the following conclusions:
• Most buried victims are carried to the place of greatest deposition, usually the toe of the slide. If two points of the victim's trajectory can be established, a high probability exists that the victim is near the downhill flow line, passing through these two points (Figure 1-13).
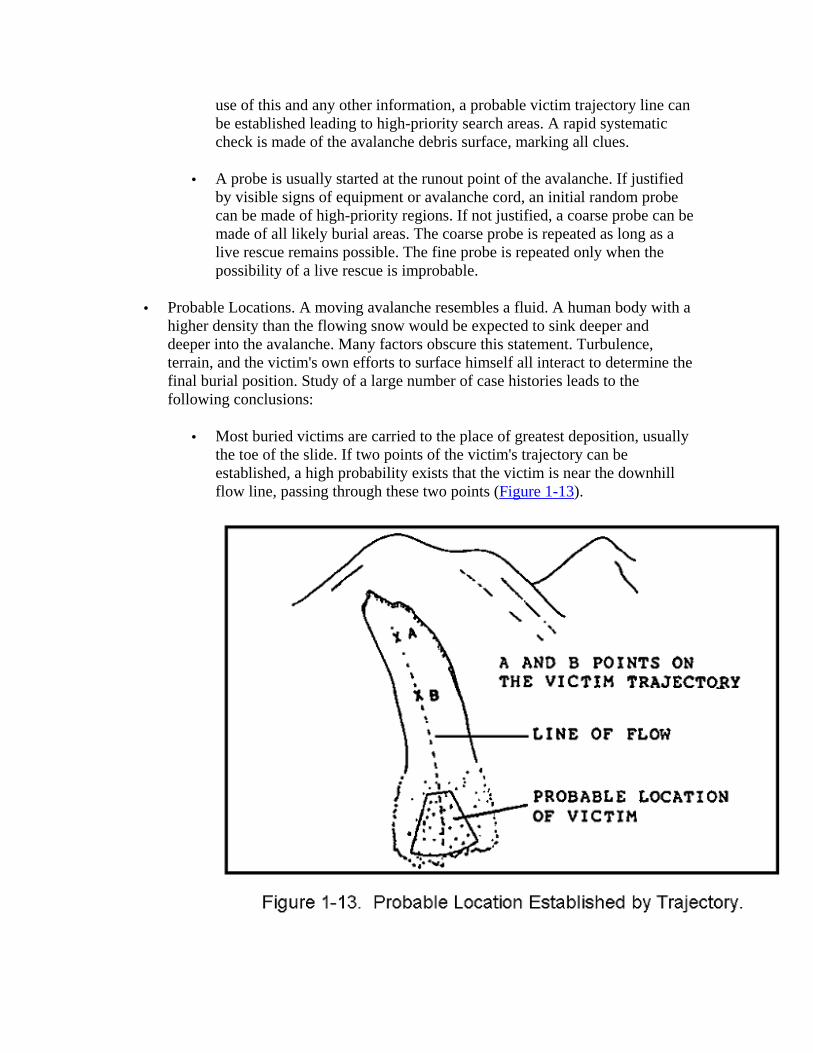
• Any terrain feature that catches and holds avalanche debris might also catch a victim (Figure 1-14).
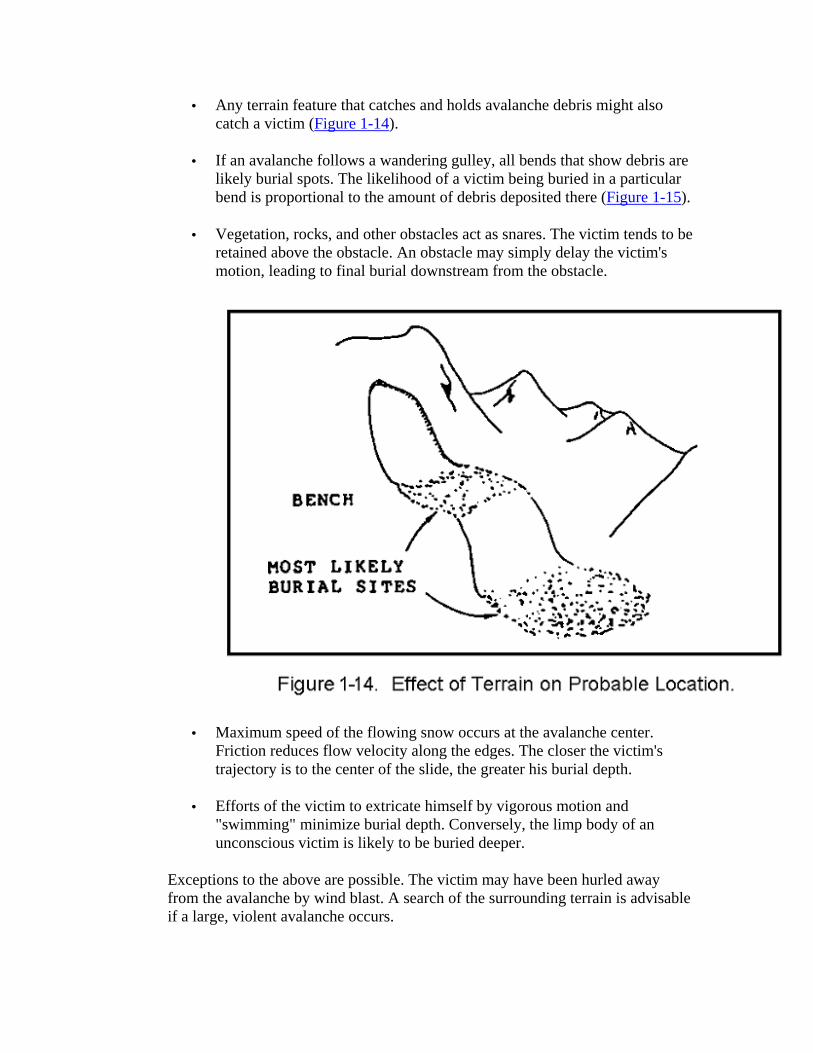
• If an avalanche follows a wandering gulley, all bends that show debris are likely burial spots. The likelihood of a victim being buried in a particular bend is proportional to the amount of debris deposited there (Figure 1-15).
• Vegetation, rocks, and other obstacles act as snares. The victim tends to be retained above the obstacle. An obstacle may simply delay the victim's motion, leading to final burial downstream from the obstacle.
• Maximum speed of the flowing snow occurs at the avalanche center. Friction reduces flow velocity along the edges. The closer the victim's trajectory is to the center of the slide, the greater his burial depth.
• Efforts of the victim to extricate himself by vigorous motion and "swimming" minimize burial depth. Conversely, the limp body of an unconscious victim is likely to be buried deeper.
Exceptions to the above are possible. The victim may have been hurled away from the avalanche by wind blast. A search of the surrounding terrain is advisable if a large, violent avalanche occurs.
• Probing. Probing involves simple equipment that can be operated by personnel who do not have previous training. However, to ensure proper execution of the probe line, the search leader must know this technique. This method is not as commonly used now that trained avalanche dogs and beacons are used in civilian operations, but since they are not readily available to military units, its discussion is necessary.
Probe poles. Rigid steel tubing about 1.25 cm (1/2 inch) in diameter is recommended for the main probe pole, and lengths of 3 to 4 meters (9 to 13 feet) are best. Longer poles are harder to manage especially in a high wind. Standardizing the length of poles in a unit should be required. When the poles are of equal length, it is obvious when one probe in the line is stopped by an obstruction. Although the rigid steel probe poles are preferred, sectional poles should be carried by all units habitually operating in avalanche areas. This allows units to begin probing immediately. In the absence of probe poles, initial probing attempts can be started using ski poles in two methods: the ski pole can be reversed, probing with the wrist strap down; or the basket can be removed (the preferred method) so that the point is down. This method allows the ski pole to penetrate the snow more easily than in the first method.
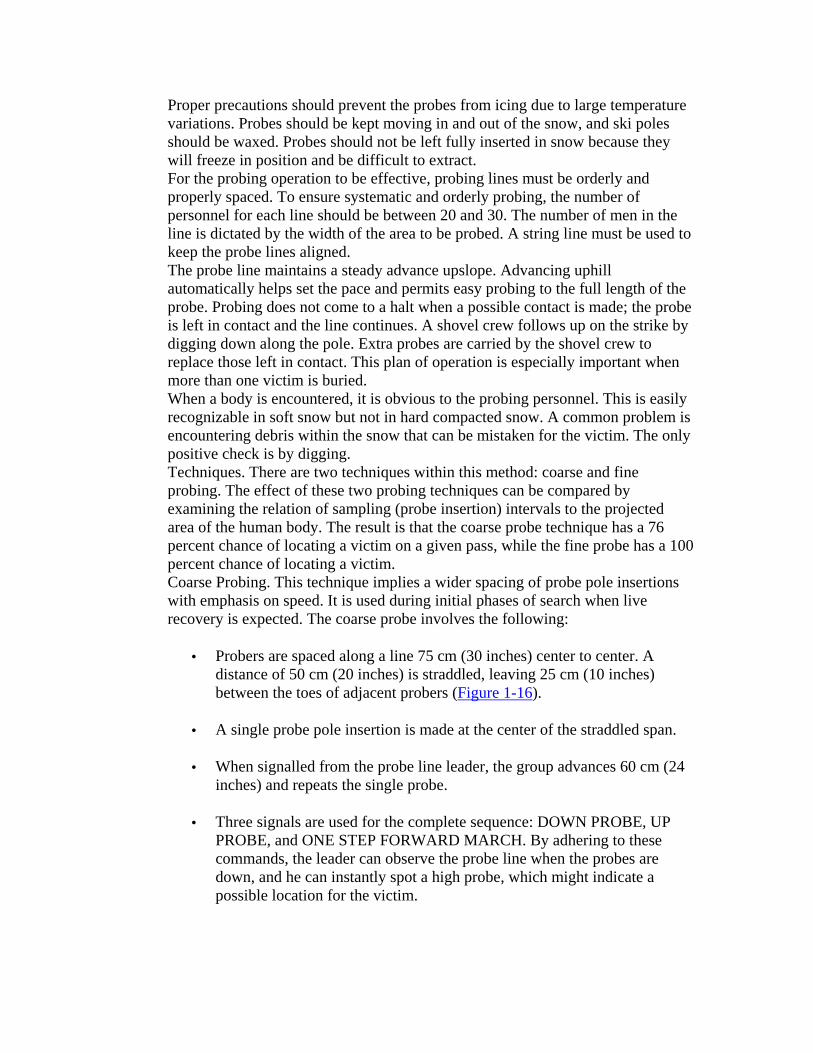
Proper precautions should prevent the probes from icing due to large temperature variations. Probes should be kept moving in and out of the snow, and ski poles should be waxed. Probes should not be left fully inserted in snow because they will freeze in position and be difficult to extract. For the probing operation to be effective, probing lines must be orderly and properly spaced. To ensure systematic and orderly probing, the number of personnel for each line should be between 20 and 30. The number of men in the line is dictated by the width of the area to be probed. A string line must be used to keep the probe lines aligned. The probe line maintains a steady advance upslope. Advancing uphill automatically helps set the pace and permits easy probing to the full length of the probe. Probing does not come to a halt when a possible contact is made; the probe is left in contact and the line continues. A shovel crew follows up on the strike by digging down along the pole. Extra probes are carried by the shovel crew to replace those left in contact. This plan of operation is especially important when more than one victim is buried. When a body is encountered, it is obvious to the probing personnel. This is easily recognizable in soft snow but not in hard compacted snow. A common problem is encountering debris within the snow that can be mistaken for the victim. The only positive check is by digging. Techniques. There are two techniques within this method: coarse and fine probing. The effect of these two probing techniques can be compared by examining the relation of sampling (probe insertion) intervals to the projected area of the human body. The result is that the coarse probe technique has a 76 percent chance of locating a victim on a given pass, while the fine probe has a 100 percent chance of locating a victim. Coarse Probing. This technique implies a wider spacing of probe pole insertions with emphasis on speed. It is used during initial phases of search when live recovery is expected. The coarse probe involves the following:
• Probers are spaced along a line 75 cm (30 inches) center to center. A distance of 50 cm (20 inches) is straddled, leaving 25 cm (10 inches) between the toes of adjacent probers (Figure 1-16).
• A single probe pole insertion is made at the center of the straddled span.
• When signalled from the probe line leader, the group advances 60 cm (24 inches) and repeats the single probe.
• Three signals are used for the complete sequence: DOWN PROBE, UP PROBE, and ONE STEP FORWARD MARCH. By adhering to these commands, the leader can observe the probe line when the probes are down, and he can instantly spot a high probe, which might indicate a possible location for the victim.

• It is important that the signals be adjusted to a rhythmic pace set by the leader. Strict discipline and firm, clear commands are essential for efficient probing. The probers work silently.
Fine Probing. This technique involves close-spaced probing with emphasis on thoroughness. Fine probing is the concluding measure that usually finds the victim (dead or alive). The fine probe involves the following:
• Probers are spaced the same as for the coarse probe.
• Each man probes in front of his left foot, then in the center of his straddled position, and finally in front of his right foot.
• When signalled from the probe line leader, the line advances 30 cm (12 inches) and repeats the probing sequence (Figure 1-17). Each probe is 30 cm (12 inches) from the adjacent one.
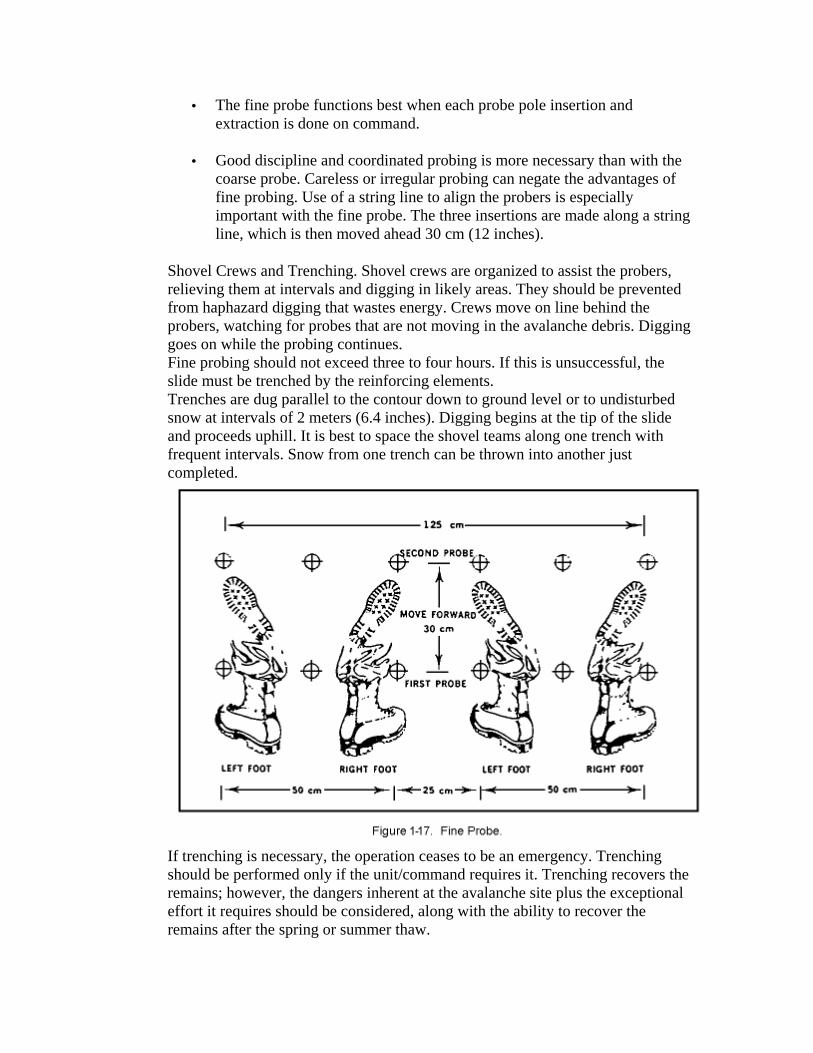
• The fine probe functions best when each probe pole insertion and extraction is done on command.
• Good discipline and coordinated probing is more necessary than with the coarse probe. Careless or irregular probing can negate the advantages of fine probing. Use of a string line to align the probers is especially important with the fine probe. The three insertions are made along a string line, which is then moved ahead 30 cm (12 inches).
Shovel Crews and Trenching. Shovel crews are organized to assist the probers, relieving them at intervals and digging in likely areas. They should be prevented from haphazard digging that wastes energy. Crews move on line behind the probers, watching for probes that are not moving in the avalanche debris. Digging goes on while the probing continues. Fine probing should not exceed three to four hours. If this is unsuccessful, the slide must be trenched by the reinforcing elements. Trenches are dug parallel to the contour down to ground level or to undisturbed snow at intervals of 2 meters (6.4 inches). Digging begins at the tip of the slide and proceeds uphill. It is best to space the shovel teams along one trench with frequent intervals. Snow from one trench can be thrown into another just completed.
If trenching is necessary, the operation ceases to be an emergency. Trenching should be performed only if the unit/command requires it. Trenching recovers the remains; however, the dangers inherent at the avalanche site plus the exceptional effort it requires should be considered, along with the ability to recover the remains after the spring or summer thaw.
PART E - MOVEMENT ON SNOW AND ICE
1. General
When travelling over snow, and skis or snowshoes are not being used, the principles of movement over rocky terrain apply. No special techniques are required when the snow lies over a foundation of other than glacier ice and when the terrain is not steep. The success of the operation depends on proper route selection and on using procedures that reduce exertion.
2. Movement on Snow
Movement on snow includes but is not limited to walking on low-angle slopes; snow climbing on steeper angles; descending; security on snow; snow anchors; and snow climbing roped in.
• Walking on Low-Angle Slopes. There are two techniques for walking on low-angle slopes. They are:
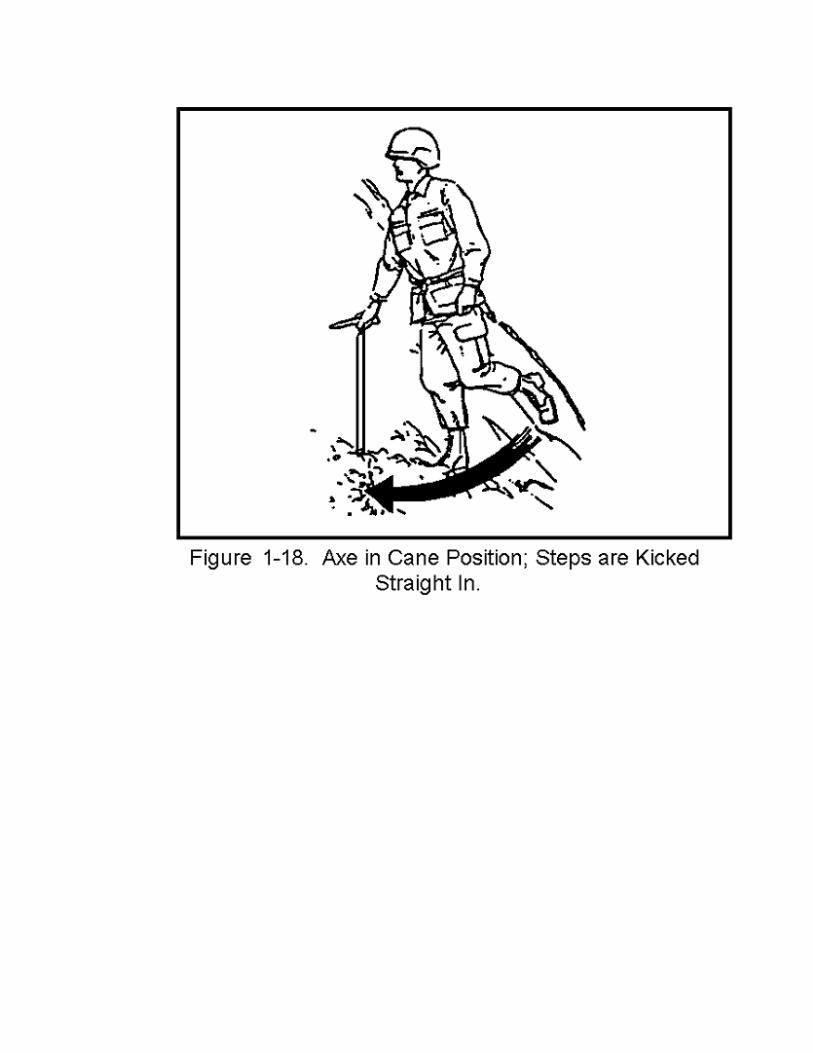
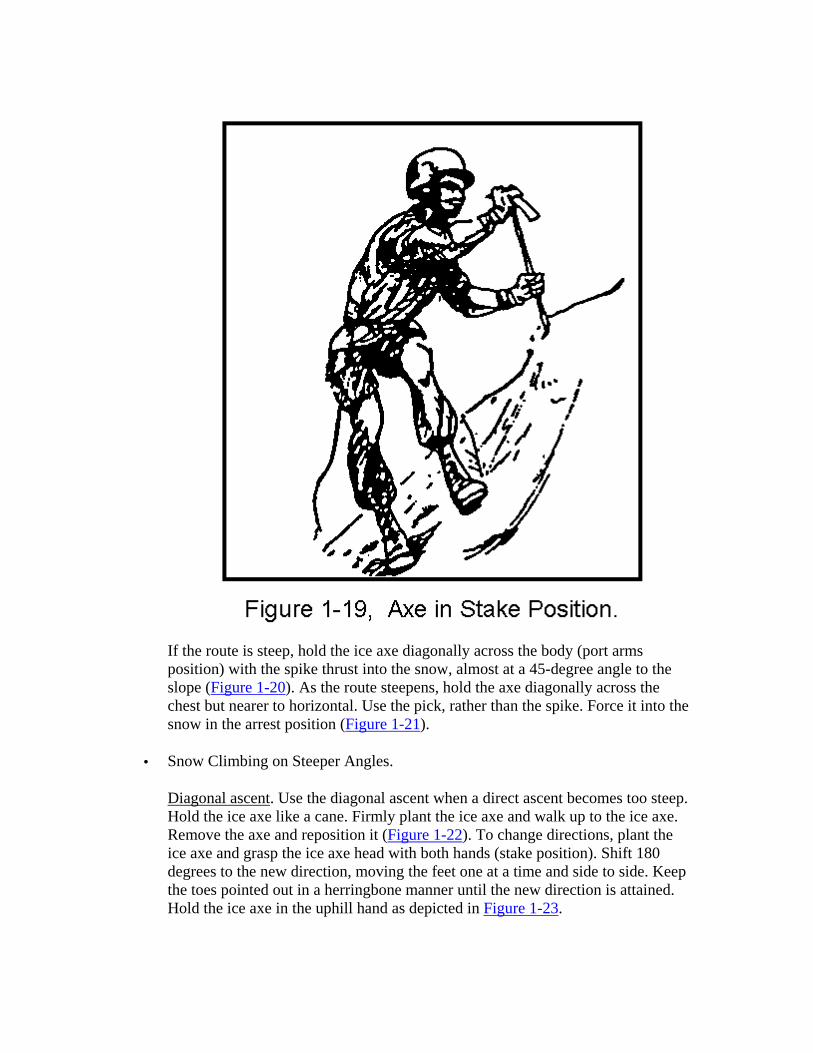
Rest step. The rest step is used while walking on all angles of snow to allow the leg muscles to relax. After each step, the rear leg supports the full body weight by extending and locking the rear knee. Pace should be slow but steady with methodical breathing. Step kicking. Step kicking is performed on moderate angles when crampons are not worn. Hold the ice axe like a cane with the palm over the adze and the thumb under the pick. Plant the ice axe, with the spike down, into the snow. With one foot, step up and kick a foothold into the snow. With the other foot, step up and kick a second foothold. With the body in balance, withdraw the axe and replant it an arm's length in front of the body. The ice axe can also be held in the stake position. Hold the head in one hand with the other grasping high on the shaft, and position the ice axe centered in front of the body. As the angle steepens, advance diagonally (Figures 1-18 and 1-19). Successive soldiers should step in the same footsteps as the lead climber.
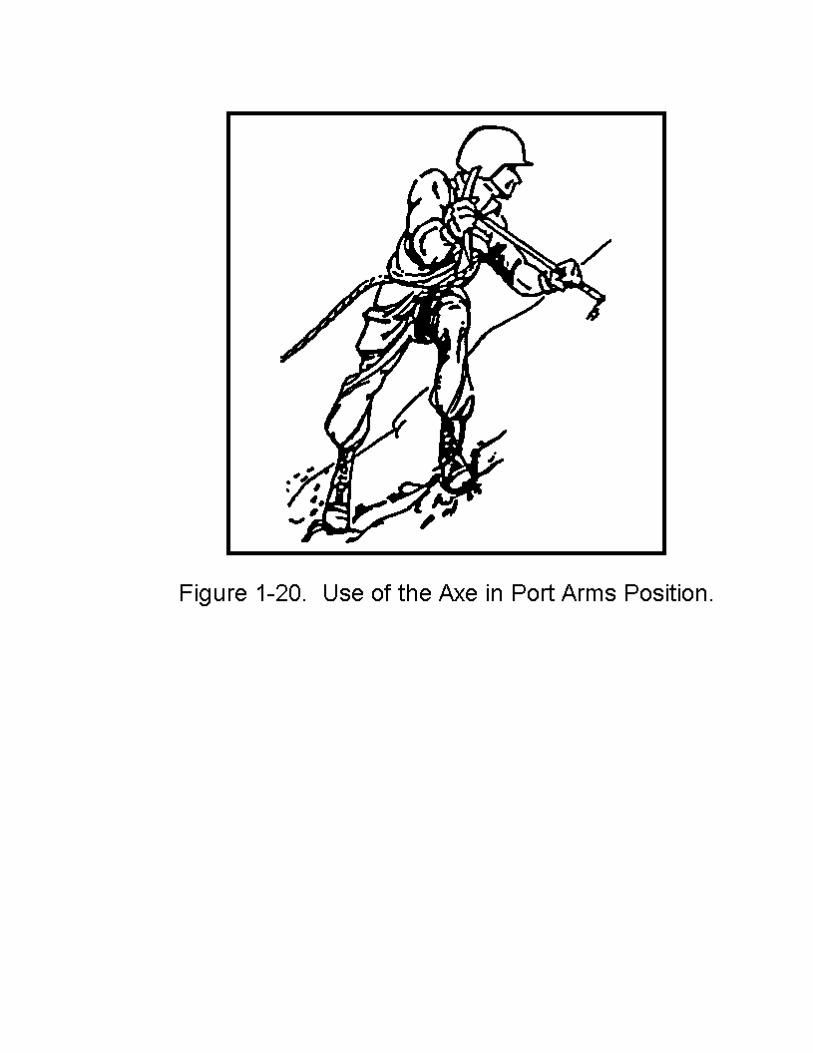
If the route is steep, hold the ice axe diagonally across the body (port arms position) with the spike thrust into the snow, almost at a 45-degree angle to the slope (Figure 1-20). As the route steepens, hold the axe diagonally across the chest but nearer to horizontal. Use the pick, rather than the spike. Force it into the snow in the arrest position (Figure 1-21).
• Snow Climbing on Steeper Angles.
Diagonal ascent. Use the diagonal ascent when a direct ascent becomes too steep. Hold the ice axe like a cane. Firmly plant the ice axe and walk up to the ice axe. Remove the axe and reposition it (Figure 1-22). To change directions, plant the ice axe and grasp the ice axe head with both hands (stake position). Shift 180 degrees to the new direction, moving the feet one at a time and side to side. Keep the toes pointed out in a herringbone manner until the new direction is attained. Hold the ice axe in the uphill hand as depicted in Figure 1-23.
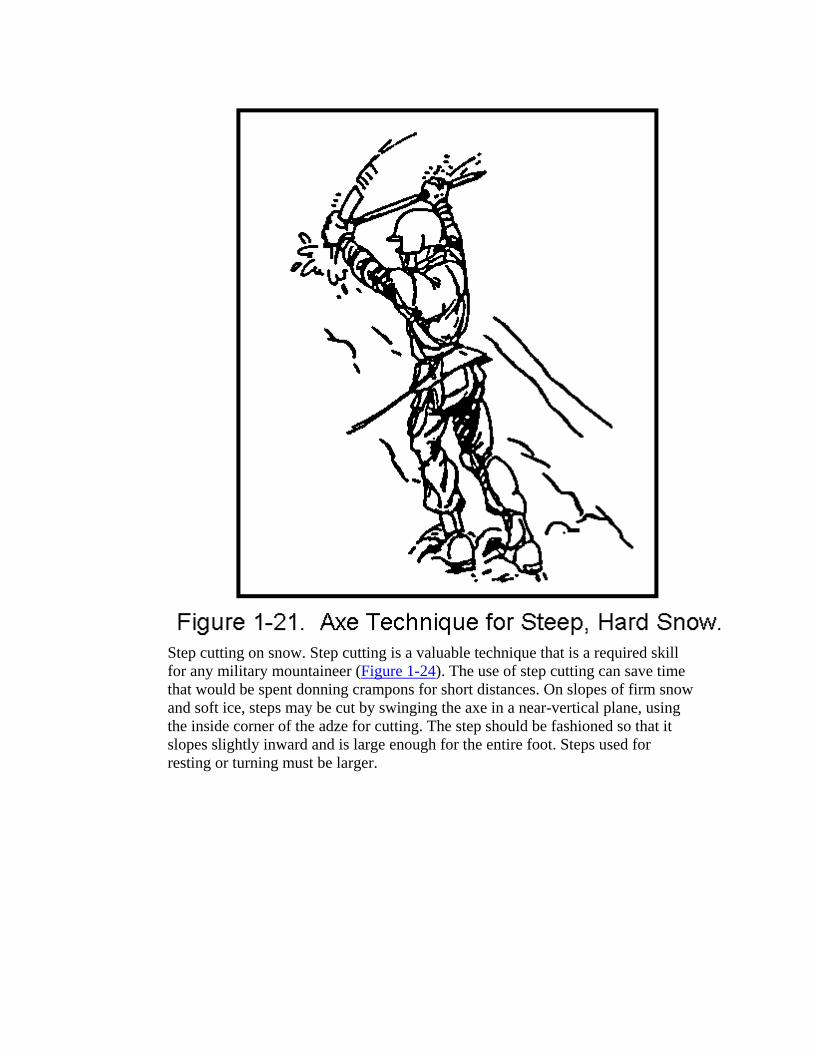
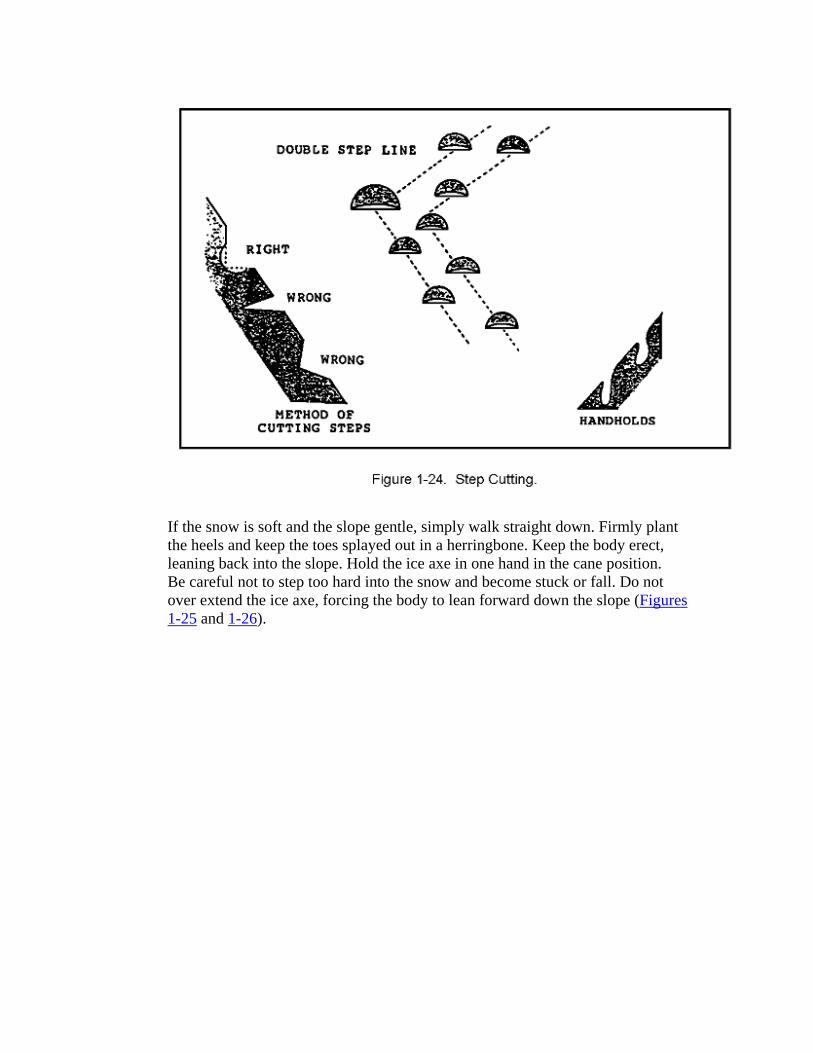
Step cutting on snow. Step cutting is a valuable technique that is a required skill for any military mountaineer (Figure 1-24). The use of step cutting can save time that would be spent donning crampons for short distances. On slopes of firm snow and soft ice, steps may be cut by swinging the axe in a near-vertical plane, using the inside corner of the adze for cutting. The step should be fashioned so that it slopes slightly inward and is large enough for the entire foot. Steps used for resting or turning must be larger.
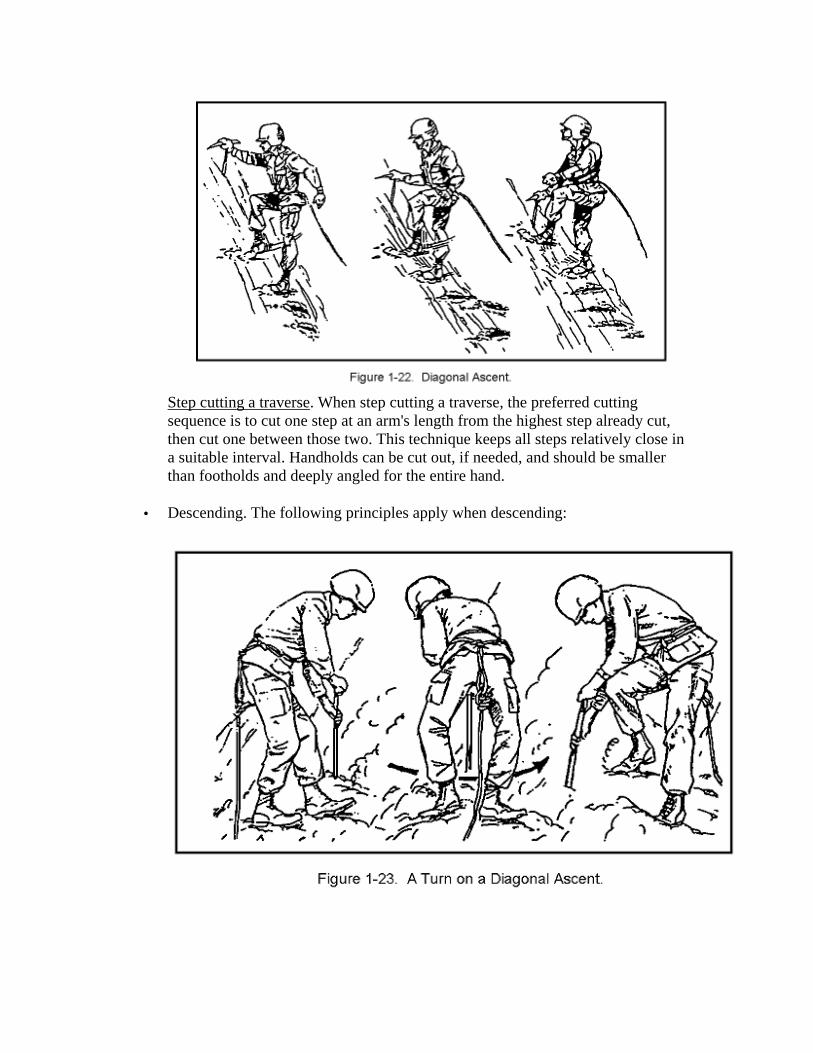
Step cutting a traverse. When step cutting a traverse, the preferred cutting sequence is to cut one step at an arm's length from the highest step already cut, then cut one between those two. This technique keeps all steps relatively close in a suitable interval. Handholds can be cut out, if needed, and should be smaller than footholds and deeply angled for the entire hand.
• Descending. The following principles apply when descending:
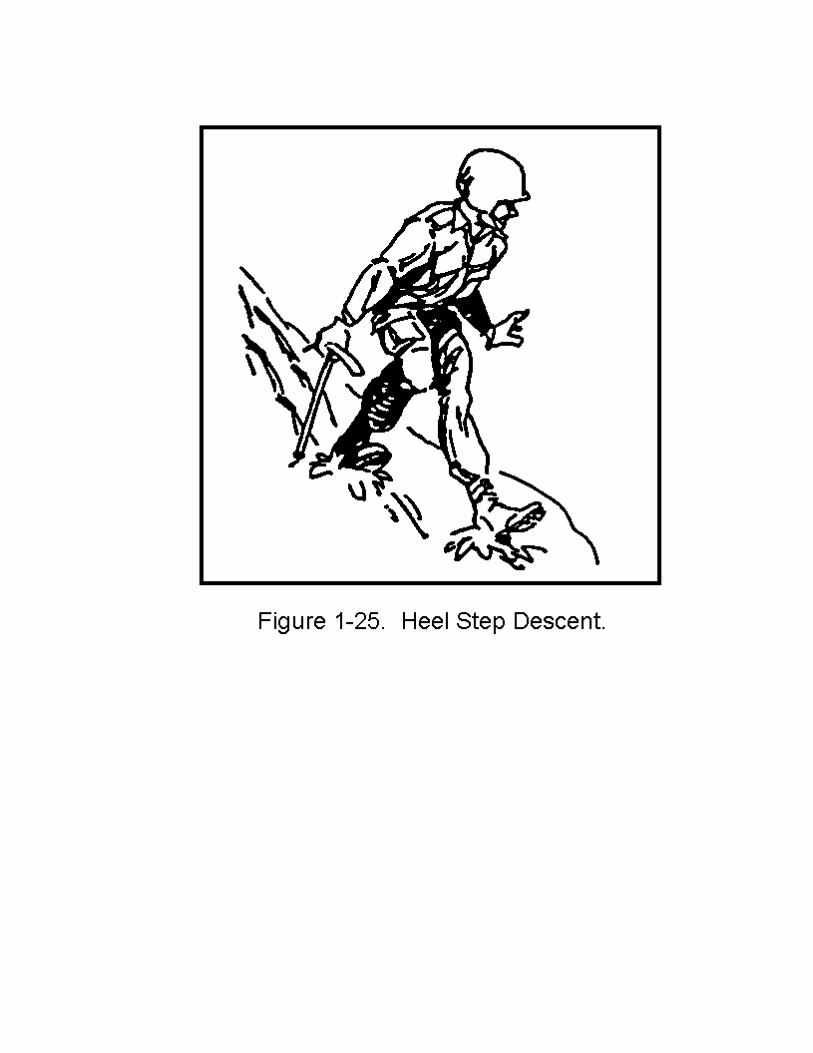
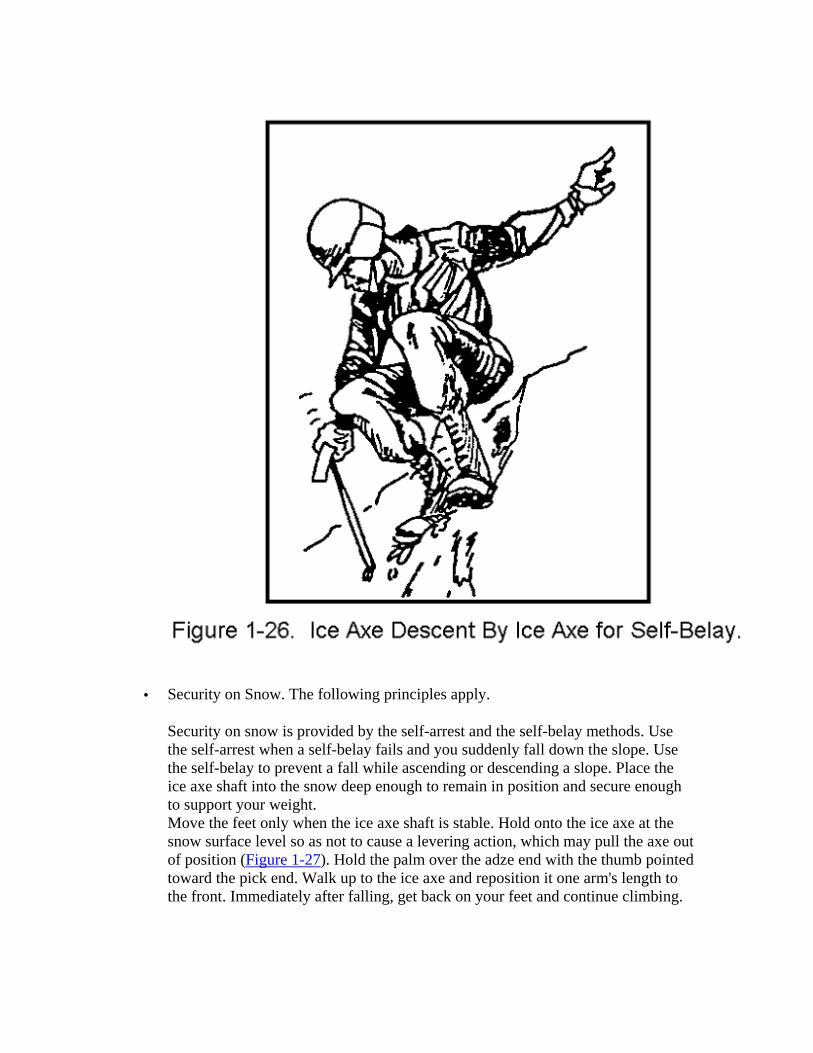
If the snow is soft and the slope gentle, simply walk straight down. Firmly plant the heels and keep the toes splayed out in a herringbone. Keep the body erect, leaning back into the slope. Hold the ice axe in one hand in the cane position. Be careful not to step too hard into the snow and become stuck or fall. Do not over extend the ice axe, forcing the body to lean forward down the slope (Figures 1-25 and 1-26).
• Security on Snow. The following principles apply.
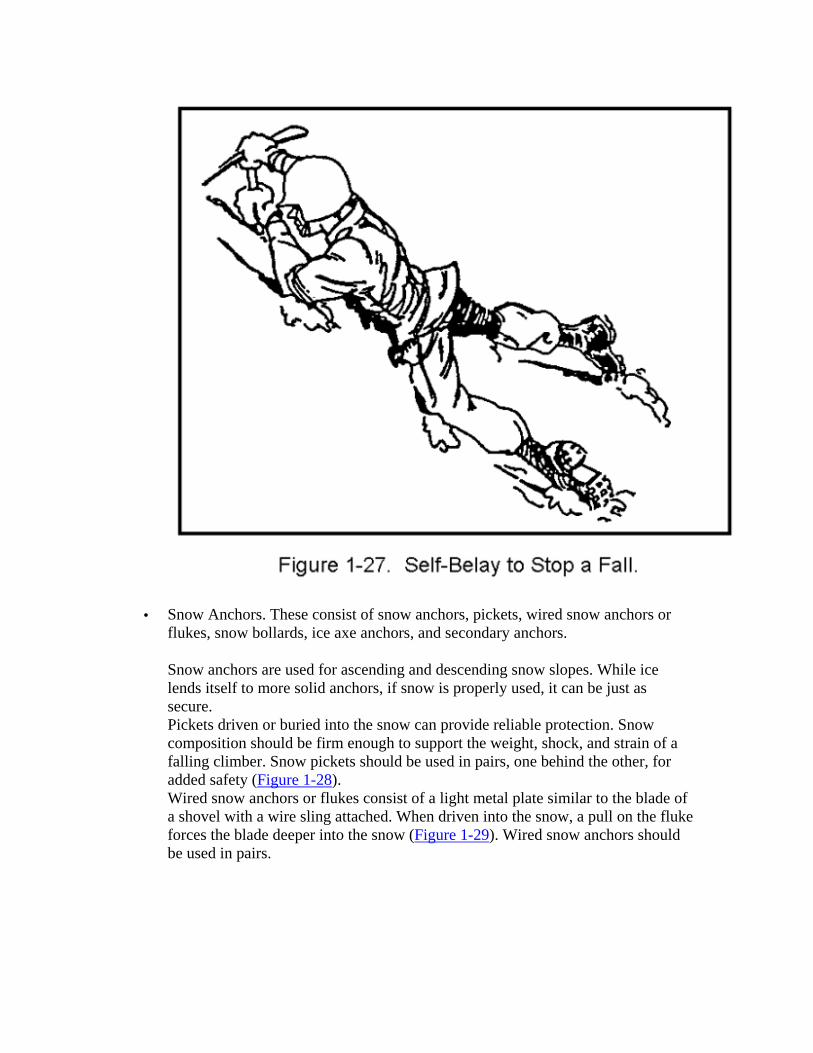
Security on snow is provided by the self-arrest and the self-belay methods. Use the self-arrest when a self-belay fails and you suddenly fall down the slope. Use the self-belay to prevent a fall while ascending or descending a slope. Place the ice axe shaft into the snow deep enough to remain in position and secure enough to support your weight. Move the feet only when the ice axe shaft is stable. Hold onto the ice axe at the snow surface level so as not to cause a levering action, which may pull the axe out of position (Figure 1-27). Hold the palm over the adze end with the thumb pointed toward the pick end. Walk up to the ice axe and reposition it one arm's length to the front. Immediately after falling, get back on your feet and continue climbing.
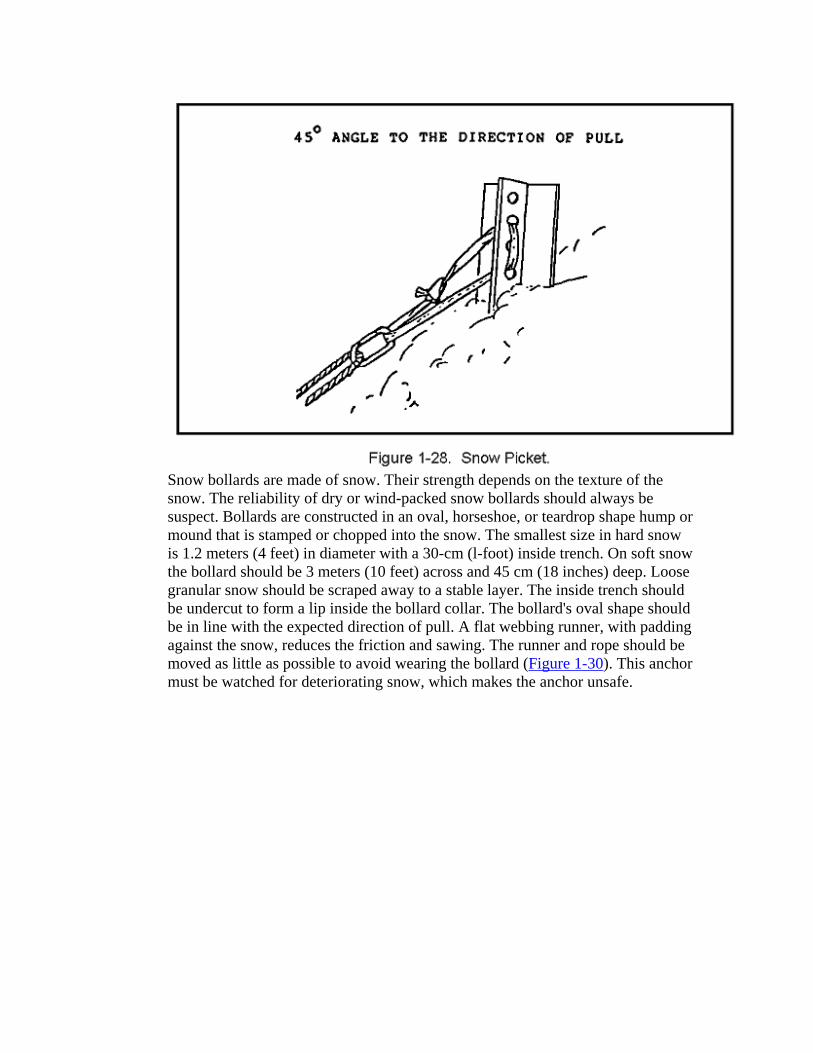
• Snow Anchors. These consist of snow anchors, pickets, wired snow anchors or flukes, snow bollards, ice axe anchors, and secondary anchors.
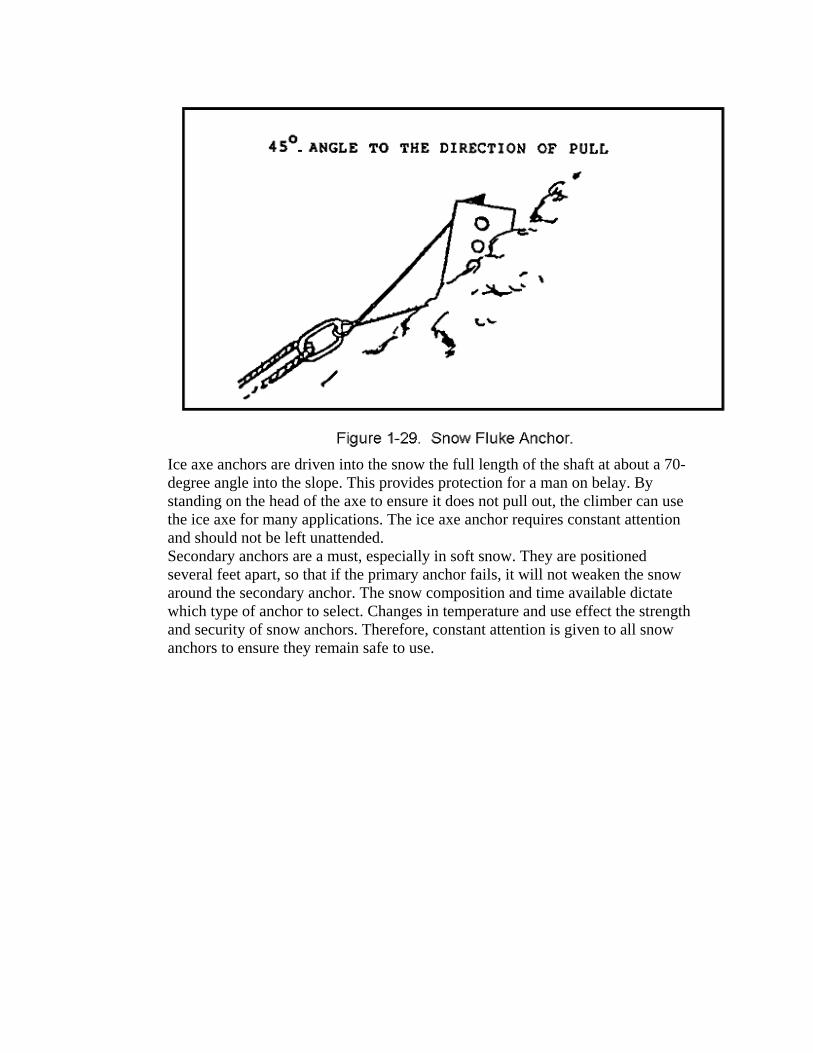
Snow anchors are used for ascending and descending snow slopes. While ice lends itself to more solid anchors, if snow is properly used, it can be just as secure. Pickets driven or buried into the snow can provide reliable protection. Snow composition should be firm enough to support the weight, shock, and strain of a falling climber. Snow pickets should be used in pairs, one behind the other, for added safety (Figure 1-28). Wired snow anchors or flukes consist of a light metal plate similar to the blade of a shovel with a wire sling attached. When driven into the snow, a pull on the fluke forces the blade deeper into the snow (Figure 1-29). Wired snow anchors should be used in pairs.
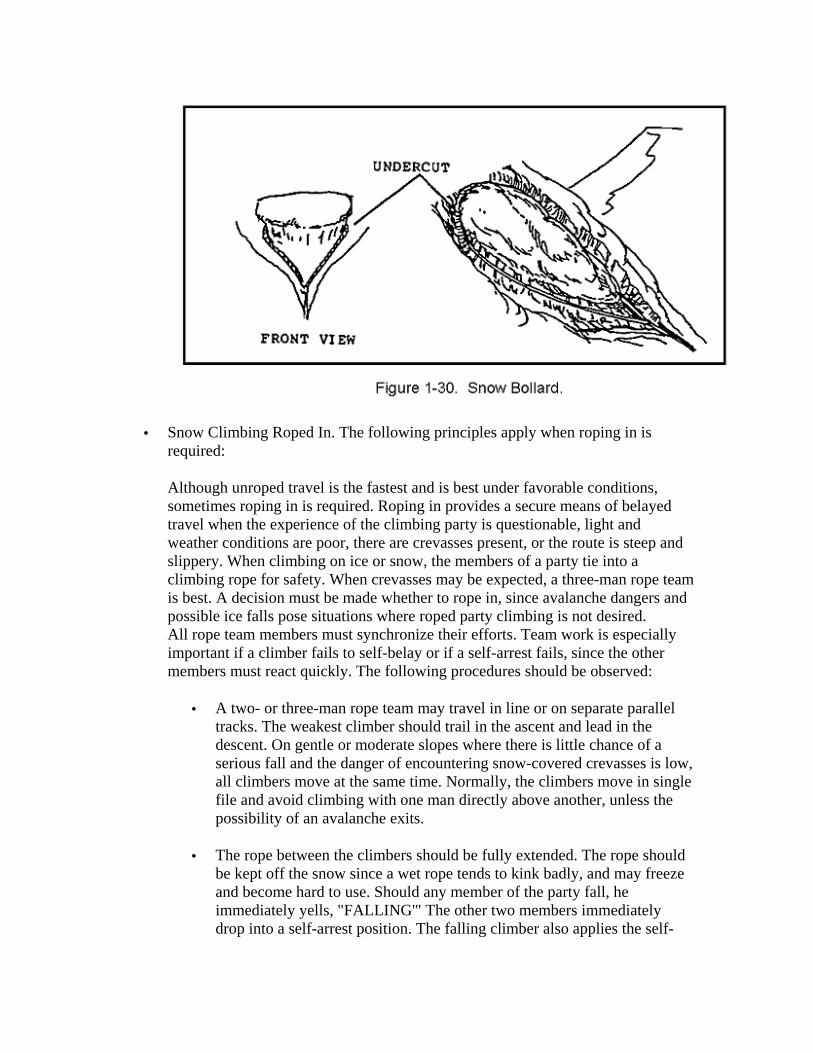
Snow bollards are made of snow. Their strength depends on the texture of the snow. The reliability of dry or wind-packed snow bollards should always be suspect. Bollards are constructed in an oval, horseshoe, or teardrop shape hump or mound that is stamped or chopped into the snow. The smallest size in hard snow is 1.2 meters (4 feet) in diameter with a 30-cm (l-foot) inside trench. On soft snow the bollard should be 3 meters (10 feet) across and 45 cm (18 inches) deep. Loose granular snow should be scraped away to a stable layer. The inside trench should be undercut to form a lip inside the bollard collar. The bollard's oval shape should be in line with the expected direction of pull. A flat webbing runner, with padding against the snow, reduces the friction and sawing. The runner and rope should be moved as little as possible to avoid wearing the bollard (Figure 1-30). This anchor must be watched for deteriorating snow, which makes the anchor unsafe.
Ice axe anchors are driven into the snow the full length of the shaft at about a 70-degree angle into the slope. This provides protection for a man on belay. By standing on the head of the axe to ensure it does not pull out, the climber can use the ice axe for many applications. The ice axe anchor requires constant attention and should not be left unattended. Secondary anchors are a must, especially in soft snow. They are positioned several feet apart, so that if the primary anchor fails, it will not weaken the snow around the secondary anchor. The snow composition and time available dictate which type of anchor to select. Changes in temperature and use effect the strength and security of snow anchors. Therefore, constant attention is given to all snow anchors to ensure they remain safe to use.
• Snow Climbing Roped In. The following principles apply when roping in is required:
Although unroped travel is the fastest and is best under favorable conditions, sometimes roping in is required. Roping in provides a secure means of belayed travel when the experience of the climbing party is questionable, light and weather conditions are poor, there are crevasses present, or the route is steep and slippery. When climbing on ice or snow, the members of a party tie into a climbing rope for safety. When crevasses may be expected, a three-man rope team is best. A decision must be made whether to rope in, since avalanche dangers and possible ice falls pose situations where roped party climbing is not desired. All rope team members must synchronize their efforts. Team work is especially important if a climber fails to self-belay or if a self-arrest fails, since the other members must react quickly. The following procedures should be observed:
• A two- or three-man rope team may travel in line or on separate parallel tracks. The weakest climber should trail in the ascent and lead in the descent. On gentle or moderate slopes where there is little chance of a serious fall and the danger of encountering snow-covered crevasses is low, all climbers move at the same time. Normally, the climbers move in single file and avoid climbing with one man directly above another, unless the possibility of an avalanche exits.
• The rope between the climbers should be fully extended. The rope should be kept off the snow since a wet rope tends to kink badly, and may freeze and become hard to use. Should any member of the party fall, he immediately yells, "FALLING'" The other two members immediately drop into a self-arrest position. The falling climber also applies the self-
arrest procedure. By using this method, called the team arrest, a fall by one member of the party is arrested by the entire party.
Snow belays include the mechanical and body belays in rock climbing, which are the same basic belays used in snow climbing. The climber stamps positions in the snow for the feet and other areas to provide security and stability. When possible, he faces in the direction of pull and leans into the slope. The boot-axe belay, standing snaplink-ice axe belay, sitting hip belay, and stance belay methods are discussed as follows: Whenever a climber is belaying, he should tie a safety line and attach it to a piece of protection, which is separate from the belay-climbing rope protection.
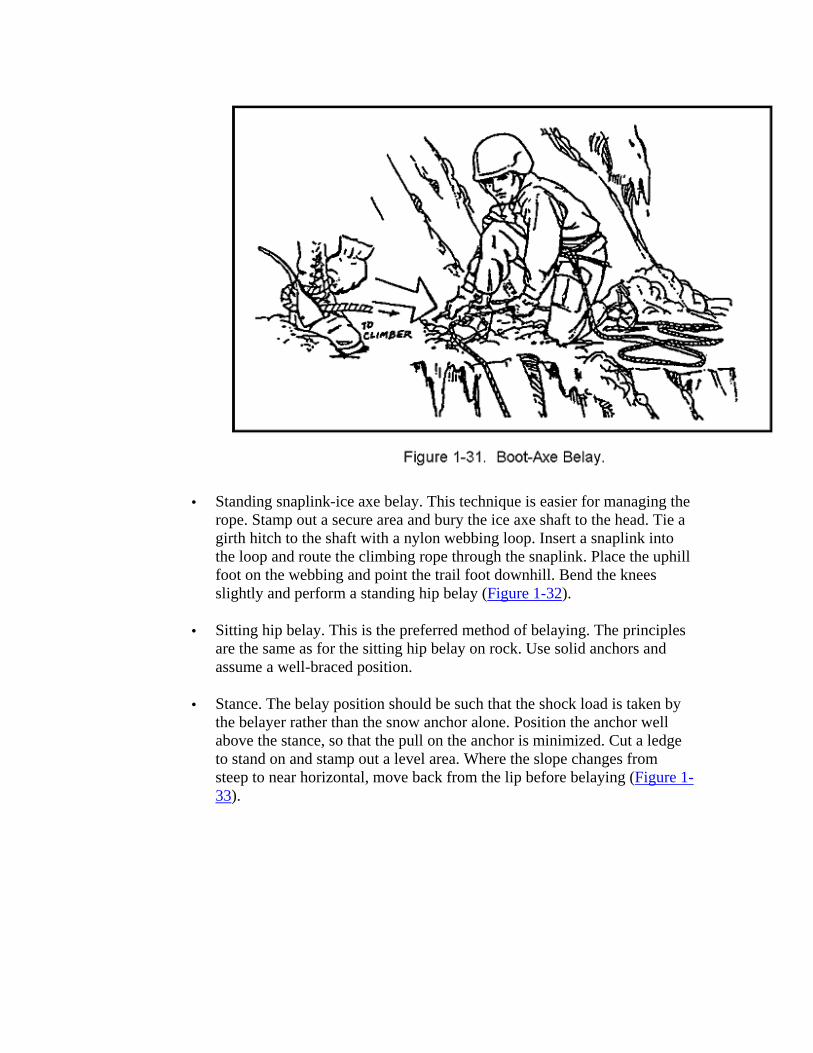
• Boot-axe belay. This type of belay is the least secure, but it is the easiest and quickest to set up. Stamp out a firm platform. Drive the ice axe into the snow down to the head, tilted slightly uphill at about a 70-degree angle. Place the uphill foot below the ice axe, and parallel with the pick to prevent it from shearing out. Position the downhill foot in a stable, well-braced position. The uphill hand is on the adze in the self-arrest grasp. Cross the rope over the toe of the uphill boot, place around the ice axe shaft, and back across the uphill foot's instep. Manage the rope with the downhill hand (brake hand), while keeping the uphill hand on the top of the axe head to prevent it form popping upward. Brake uphill around the ankle, forming an "S" bend. Concentrate your body weight on the axe and the foot bracing it. Brace the downhill foot for balance and against the downward pull. Pull the slack downhill with the brake hand, allowing the slack to run downhill; taking up slack requires practice. Slide the brake hand uphill toward the axe. Maintain control of the rope, never allowing the brake hand to leave the rope (Figure 1-31).
• Standing snaplink-ice axe belay. This technique is easier for managing the rope. Stamp out a secure area and bury the ice axe shaft to the head. Tie a girth hitch to the shaft with a nylon webbing loop. Insert a snaplink into the loop and route the climbing rope through the snaplink. Place the uphill foot on the webbing and point the trail foot downhill. Bend the knees slightly and perform a standing hip belay (Figure 1-32).
• Sitting hip belay. This is the preferred method of belaying. The principles are the same as for the sitting hip belay on rock. Use solid anchors and assume a well-braced position.
• Stance. The belay position should be such that the shock load is taken by the belayer rather than the snow anchor alone. Position the anchor well above the stance, so that the pull on the anchor is minimized. Cut a ledge to stand on and stamp out a level area. Where the slope changes from steep to near horizontal, move back from the lip before belaying (Figure 1-33).
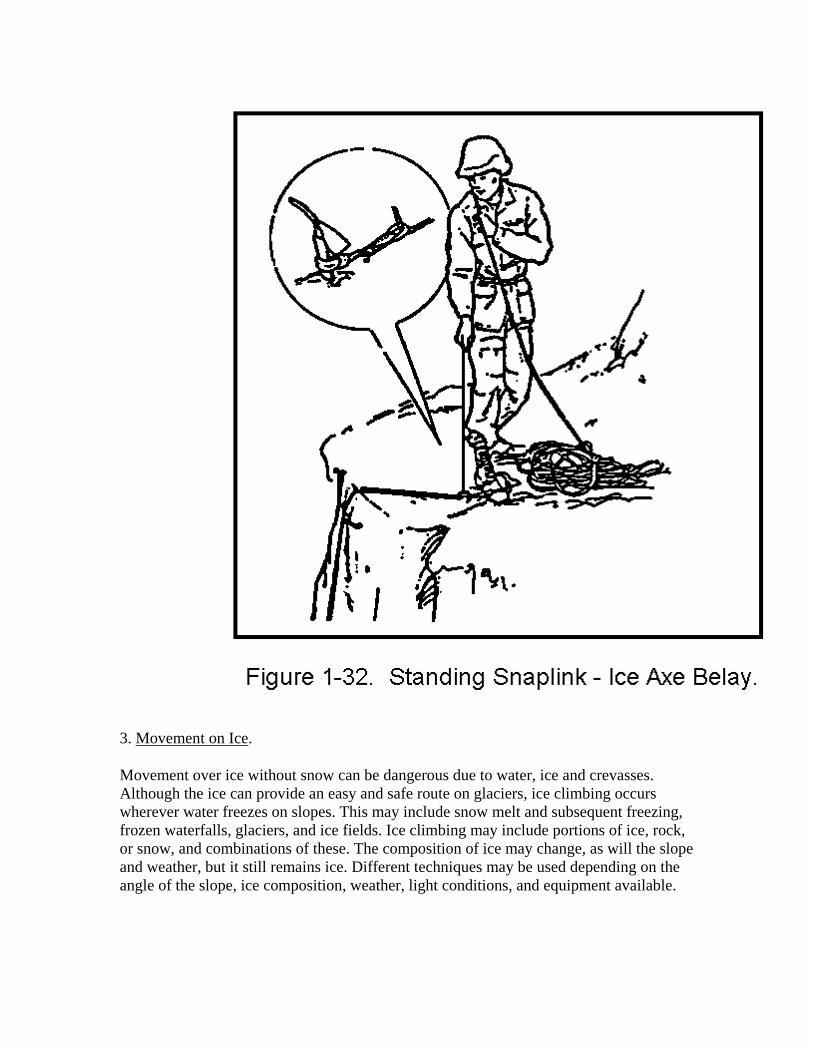
3. Movement on Ice.
Movement over ice without snow can be dangerous due to water, ice and crevasses. Although the ice can provide an easy and safe route on glaciers, ice climbing occurs wherever water freezes on slopes. This may include snow melt and subsequent freezing, frozen waterfalls, glaciers, and ice fields. Ice climbing may include portions of ice, rock, or snow, and combinations of these. The composition of ice may change, as will the slope and weather, but it still remains ice. Different techniques may be used depending on the angle of the slope, ice composition, weather, light conditions, and equipment available.
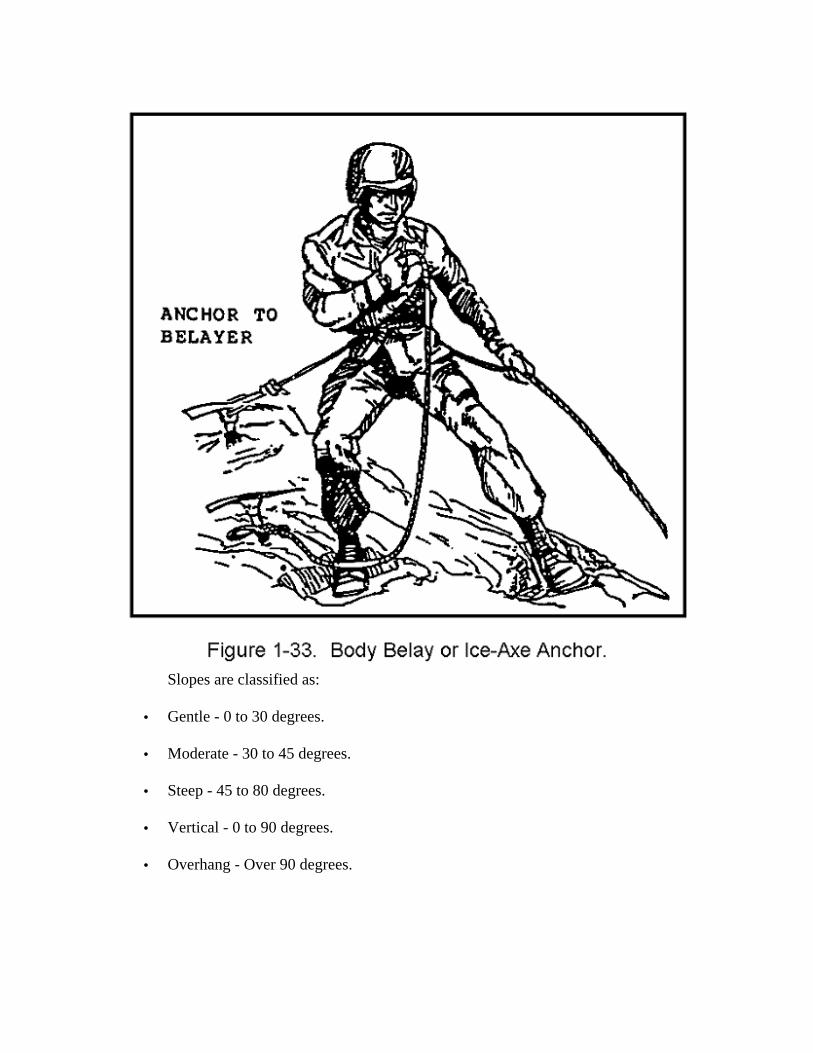
Slopes are classified as:
• Gentle - 0 to 30 degrees.
• Moderate - 30 to 45 degrees.
• Steep - 45 to 80 degrees.
• Vertical - 0 to 90 degrees.
• Overhang - Over 90 degrees.
LESSON 1 PRACTICAL EXERCISE
Instructions The following items will test your understanding of the material covered in this lesson. There is only one correct answer for each item. When you have completed the exercise, check your answers with the answer key that follows. If you answer any item incorrectly, review that part of the lesson which contains the portion involved. Situation Your battalion is participating in a winter exercise in the mountains of West Germany. During the exercise, your mission is to function effectively in snow-covered terrain, to recognize the potential of avalanche danger. 1. During the operation, your unit has been called to assist in an avalanche rescue. You must
a. ensure that the assigned personnel report to the rescue site within three hours.
b. follow rescue procedures and since the personnel in the rescue team have been previously trained their safety is of no concern.
c. take proper precautions under trees and sheltered areas without assessing the situation.
d. try to get the victim(s) out within one hour since that is the average survival limit. 2. In order to take protective measures in an avalanche area, as a leader, you have been directed to stabilize the snow by using hand-placed charges or hand grenades. Your primary responsibility is to
a. brief all personnel involved by letting them know that testing by means of explosives will be conducted and all men must be belayed while working.
b. ensure all personnel have received artillery training and their training records are kept up-to-date.
c. assist your men in dispersing energy (sonic boom) over the potential avalanche area.
d. keep the lines of communication open in case they are set-off by the tremendous energy of the slide, and to maximize hazard. 3. Your unit is climbing through an avalanche path when you encounter a moraine barrier. You should
a. avoid this area since the disturbance could cause a double avalanche.
b. expose only a limited number of personnel to this danger at one time.
c. avoid moving above barriers located on the valley floor since a slide could collide with the barrier.
d. immediately build another barrier to protect you from the tremendous energy of the slide. 4. The surface of a wind slab has a dull, chalky appearance which is formed by well compacted snow having been transported by wind. When operating in the mountains, you must
a. know this phenomenon because its presence indicates that avalanches are rare.
b. understand that a disturbance to the slab will cause little danger to the troops.
c. take cover away from heavy timber and observe the sun's rays until the slab disappears.
d. recognize this form of snow because they are extremely dangerous and often form the platform for avalanches. 5. You are aware that since the adaption of airmobile operations, large-scale winter operations have been made possible. You know this is the result of
a. avalanche and vegetation training.
b. terrain and meteorological training.
c. effects of special training and equipment.
d. snow and slab conditions.
LESSON ONE
PRACTICE EXERCISE
ANSWER KEY AND FEEDBACK
Item Correct Answer and Feedback
1. d. try to get the victim(s) out within one hour since that is the
average survival limit.
Avalanche rescues are critical since the surviving victim(s) are depending on the rescue team. As time moves on, the chance for living decreases--speed and time are critical factors in avalanche rescues.
2. a. brief all personnel involved by letting them know that testing by
means of explosives will be conducted and all men must be belayed while working.
This action is taken as a preventive measure under dangerous conditions. To reduce the risk of severe personal injuries, all personnel entering or involved in hazardous areas should wear protective clothing and equipment.
3. c. avoid moving above barriers located on the valley floor since a
slide could collide with the barrier.
When selecting a route, avalanche paths should be learned ahead of time. Avoid dangerous areas by moving along the middle of wide U-shaped valleys which are less dangerous.
4. d. recognize this form of snow because they are extremely
dangerous and often form the platform for avalanches.
Since wind slabs are snow transported from the wind, their grains are rounded and do not reflect the light, giving a false impression of their solidity.
5. c. effects of special training and equipment.
Before the adaption of airmobile operations, units were required to carry the load of winter operations entirely by themselves.
Airmobility has enhanced this capability by providing the assistance and implementation of large cold-weather operations.
LESSON 2
MOUNTAINEERING TECHNIQUES ON ALPINE PATHS
OVERVIEW
TASK DESCRIPTION:
In this lesson you will learn about alpine paths, erection of landlines, steps, ladders, suspended walkways, and three-rope suspended walkways.
LEARNING OBJECTIVE:
TASKS: Identify mountaineering techniques on alpine paths.
CONDITIONS: Given the subcourse material for this lesson, a training scenario and extracts, as applicable, the student will complete the practice exercise at the end of this lesson.
STANDARDS: The student will demonstrate his comprehension and knowledge of the task by applying the correct procedure for mountaineering operations on alpine paths.
REFERENCES: The material contained in this lesson was derived from the following publication: TC 90-6-1
INTRODUCTION
Careful integration of mountaineering techniques on the battlefield will add continuity and enhance a unit's ability to better obtain its objectives.
PART A - OPERATIONS ON ALPINE PATHS AND HANDLINES
1. Alpine Paths.
Fixed alpine paths are constructed when the unit will remain in one area for a long time, or to assist troops in traversing rugged mountain terrain, ascending or descending steep mountain slopes, and carrying combat equipment or supply loads up to 50 pounds. Paths should be constructed to allow movement in both directions at the same time, and so that casualties can be evacuated over them on litters.
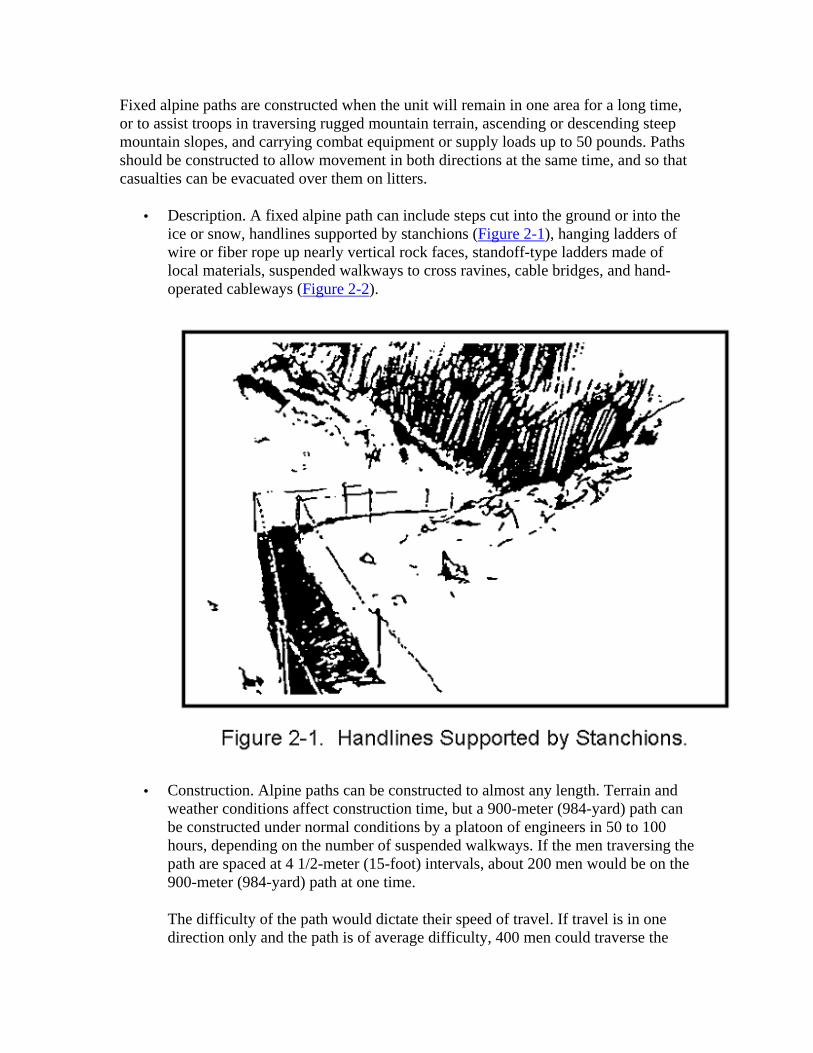
• Description. A fixed alpine path can include steps cut into the ground or into the ice or snow, handlines supported by stanchions (Figure 2-1), hanging ladders of wire or fiber rope up nearly vertical rock faces, standoff-type ladders made of local materials, suspended walkways to cross ravines, cable bridges, and hand-operated cableways (Figure 2-2).
• Construction. Alpine paths can be constructed to almost any length. Terrain and weather conditions affect construction time, but a 900-meter (984-yard) path can be constructed under normal conditions by a platoon of engineers in 50 to 100 hours, depending on the number of suspended walkways. If the men traversing the path are spaced at 4 1/2-meter (15-foot) intervals, about 200 men would be on the 900-meter (984-yard) path at one time.
The difficulty of the path would dictate their speed of travel. If travel is in one direction only and the path is of average difficulty, 400 men could traverse the

900 meters (984 yards) in one hour. Assuming that each man carries a 50-pound load of supplies, 10 tons could be delivered to the terminal end in one hour. If the path is constructed so that traffic is free to move steadily in both directions at all points, 400 men or 10 tons of material can be delivered to each terminal every hour.
The site and terrain where the alpine path is to be constructed should be surveyed by experienced mountain climbers.
• Route Requirements. Bypassing of obstacles and attempts at camouflage may require the path to traverse a greater distance but reduces the construction time, increases the capacity of the completed path, and minimizes delay caused by enemy action.
The path should avoid steep or vertical cliffs, and overhanging rocks. These require ladders and for personnel to move slowly over the path. Snow or rock in areas susceptible to slides must be avoided. The path must follow a route not visible to the enemy. The route can be easily camouflaged from observation if it follows ravines and rock ledges.
• Safety Lines. Personnel performing the route survey should erect safety lines along the route selected as an aid to men in the construction crew who are less experienced.
Safety lines may consist of ropes strung outside the working party about 1 meter (3.2 feet) off the ground, and securely fastened to natural or artificial anchors. These are used as handholds only; they are not secured to party members. In hazardous locations, safety lines may consist of ropes with one end securely anchored. The free end of a rope is tied around the waist of a man engaged in construction. A convenient anchor can be made from a piton driven into an easily reached crack in the rock. Another method is for each man to tie the Prusik knot in his safety line to an anchor. When a route survey has been completed, an estimate can be made of the number and length of each type of component, and the amount of material each individual can carry. In addition to the equipment listed for actual construction, tools, and safety equipment are also required.
• An ample supply of the following construction tools should be available:
Drill, stone, hand, 4.2 by 60 cm (1.6 by 24 inches). Drill, triangular, hand, 2.5 by 45 cm (1 by 18 inches). Drill, triangular, hand, 1.9 by 45 cm (3/4 by 18 inches). Hammer, double-face, striking, 4 pound Ladle, hand, 10-cm (4-inch) diameter bowl. Pot, melting, 18 cm (7 inches) inside diameter. Pumps, air, hand.
• The following safety equipment should be available:
A supply of rope (9 to 11 mm [3/8 to 7/16 inch]) is needed for safety lines. Snaplinks and artificial anchors are required for the emplacement of protection to provide safety, belays, ascents, and descents for party members.
The materials required for constructing a fixed alpine path can be transported by vehicle or carried by men. When wire or fiber rope is to be carried by men, it may be impractical to cut the rope into sections, which make suitable individual loads. Enough rope should be coiled for an individual load in a figure eight with about 3 meters (10 feet) of free rope left before coiling the second load, continuing the same manner for the succeeding loads. The loads are then carried like a chain.
2. Erection of Handlines.

When erection of an alpine path is necessary, the size of the working party will depend on the type of components to be installed, steepness of the terrain, and experience of the troops involved. If the men are inexperienced in mountain operations, a small working party is best since it is easier to control and less accidents occur. If the men must carry the materials to the site, allowances must be made for extra men to perform these tasks. Otherwise, a normal working party is a platoon of engineer soldiers organized into groups and assigned to prepare the most difficult sections of the path first.
Handlines are supported by stanchions made of pipe or wooden posts securely fastened into the ground. The ends are fastened to rock anchors to maintain the proper tension in the lines, which may be a fiber rope or marline-clad rope.
• Pipe Stanchions. The standard pipe stanchion is constructed of iron that is 2.5 cm (1 inch) in diameter (Figure 2-3).
Each stanchion is 100 cm (39 inches) long. Two wire rope clips (1.9 cm [3/4 inch]) are fastened through holes in the pipe with the centers of the clips 90 cm (35 inches) apart. This stanchion can be used for a suspended walkway, which uses two wire ropes on each side. For handlines, the lower wire rope clip is removed or left off. The bottom of the stanchion is inserted (without the wire rope clip) into a hole drilled at least 25 cm (10 inches) deep. Stanchions should be placed in rock, using sulfur to hold them in place. The sulfur is melted in a long-handled ladle over a gasoline fire pit and poured into the hole around the stanchion. If the stanchion must be placed in earth, the hole is made in solid-packed ground, and the hole around the stanchion is filled with concrete. Stanchions are spaced about 10 meters (33 feet) apart on both sides of the path and 75 to 90 cm (30 to 35 inches) apart from one side of the path to the other.

• Wood Post Stanchion. Wood posts can be used as stanchions (Figure 2-4) for handlines, or standing timber may be used if the path is through natural growth. Wood post stanchions should be 6 to 8 cm (2 to 3 inches) in diameter and should be notched near the top so rope handlines can be tied to them with a clove hitch.
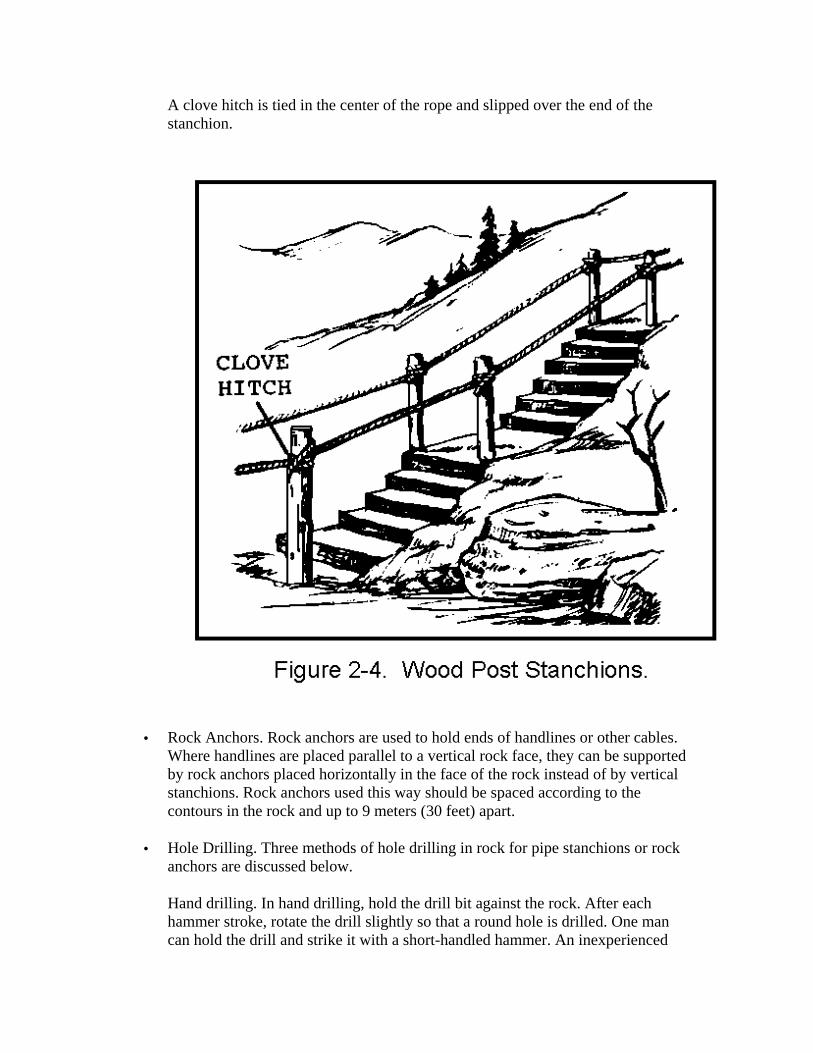
A clove hitch is tied in the center of the rope and slipped over the end of the stanchion.
• Rock Anchors. Rock anchors are used to hold ends of handlines or other cables. Where handlines are placed parallel to a vertical rock face, they can be supported by rock anchors placed horizontally in the face of the rock instead of by vertical stanchions. Rock anchors used this way should be spaced according to the contours in the rock and up to 9 meters (30 feet) apart.
• Hole Drilling. Three methods of hole drilling in rock for pipe stanchions or rock anchors are discussed below.
Hand drilling. In hand drilling, hold the drill bit against the rock. After each hammer stroke, rotate the drill slightly so that a round hole is drilled. One man can hold the drill and strike it with a short-handled hammer. An inexperienced
man can drill a hole 25 cm (10 inches) deep in ordinary rock in 30 to 60 minutes. For faster drilling, one man holds the drill and rotates it, while one or two other men strike it with hammers. Three inexperienced men should drill a hole 25 cm (10 inches) deep in about 15 minutes. Gasoline-operated hammer. A gasoline-operated hammer can be used for drilling holes in positions where there is enough room for it to operate, and accessibility permits. It is faster than hand drilling. Pneumatic drills. Pneumatic drills can be used in more accessible locations and are faster. A small portable gasoline-engine-driven compressor is available.
• Line Rigging. Wire or fiber rope can be used for handlines. However, wire rope is stiff and the ends of any broken wires produce severe cuts on the hands. Therefore, wire rope must be wrapped before use.
A marline-clad rope, if available, is a satisfactory material for such uses. Both fiber rope 1.9 cm (3/4 inch) in diameter and marline-clad wire rope with a l.9-cm (3/4 inch) outside diameter have the required strength. Fiber rope weighs less and is more flexible, but is not as strong as the same size wire rope. Wire rope is more durable, resists weathering, and offers greater resistance to stretching. To rig either rope, pass one end through the eye of a rock anchor at one end of the handline. Fasten this free end to the main portion of the rope to provide a firm hold. Splice or tie fiber rope with a bowline with the eye of the anchor in the bight of the knot; or fasten wire rope with clips or clamps. Roll the coil of rope along the path at the base of the stanchions. If wooden post stanchions are used with fiber rope, raise the rope to the top at each stanchion, pull tight, and tie around the top of the stanchion with a clove hitch. If pipe stanchions are used, lift the wire fiber rope to the top of the stanchion, and insert a wire rope clip over the rope through the stanchion. Place the nuts on the ends of the U-bolt of the clip and tighten slightly. Pull the rope tightly past the stanchion, and securely tighten the nuts. Construction continues along the path to the end of the handline or until the coil of rope is used up. Fasten the free end to a rock anchor the same as the beginning of the path. Where rock anchors are used to support the rope along vertical rock faces, feed the rope through the eyes of the anchors. In rigging wire rope, remove kinks along the path as they develop since they can cause stretching and deformation of the wire, weakening the line after erection.
PART B - STEPS AND LADDERS
1. General.
Steep and moderate slopes covered with ice or snow make climbing difficult. Since there is less oxygen at high altitudes, men tire rapidly. Handlines can assist but do not solve the problem. The following procedures should be observed when building steps:
2. Steps.
• Steps cut in the slope (Figure 2-4) can assist climbers. The rise of the step should not exceed 20 to 25 cm (8 to 10 inches). On gradual slopes a single 20-cm (8-inch) step can be cut every few meters, and the surface between steps can be leveled. On steeper slopes the steps are cut closer together but should not be less than 25 to 30 cm (10 to 12 inches) apart. Each step should extend the full width of the path.
• For snow and earth, a shovel or pick-mattock should be used to cut the steps. Steps in ice are harder to cut and an ice axe, pick, or pick-mattock should be used. The steps can be cut before or after handlines are erected, but it is easier to cut them after the handlines are up, since the handlines can assist the crew when cutting the steps.
3. Ladders.
During the operation, the use of ladders may be necessary. Hanging ladders are made of wire or fiber rope anchored at the top and suspended vertically. They are difficult to ascend or descend, especially for a man carrying a pack or load, and should be used only when necessary. These ladders act as a traffic bottleneck and three or four of them should be provided at each location. Standoff ladders have two wooden or metal uprights, which are placed at an angle for easier climbing. Both types can be constructed to the required size and carried to their final location.
During the construction of standoff ladders; hanging ladders; wire rope ladders with pipe rungs; wire rope ladders with wire rope rungs; fiber rope ladders with fiber rope rungs; and rope ladders with wood rungs, the following procedures should be observed:
• Standoff Ladders. Standoff ladders are built in dimensions to suit the circumstances. The two uprights are 5- by 10-cm (2- by 4-inch) lumber placed on end, or poles 8 cm (3 inches) in diameter roughly cut and dressed at the site. The uprights should extend 5 or 6 meters (16 or 20 feet). The uprights are placed 45 cm (18 inches) apart and the rungs are nailed at 25-cm (10-inch) intervals. At least two nails are used at each end of each rung.
For standoff ladders made of finished material (Figure 2-5A), the rungs are made of 2.5- to 5-cm (1- to 2-inch) lumber. For ladders made of native material (Figure 2-5B), the rungs are made of timber 5 cm (2 inches) in diameter. Timber should be carefully trimmed clean to avoid snagging clothing and equipment. Each ladder is anchored firmly in place with a wire or fiber rope anchor and fastened around the upper rung to a solid anchor. The ladder should also be braced at the base to lesson excessive motion during use.

• Hanging Ladders. Uprights of hanging ladders may be made of wire or fiber rope. Both uprights should be anchored at the top and bottom. Wire rope uprights with pipe rungs make the best hanging ladders since they are stiff and have minimal sag. Wire rope uprights with wire rungs can be used but are not as rigid. Fiber rope uprights can be used with wood or fiber rope rungs. They should be used sparingly since they are highly flexible, which causes them to twist under a climber. A secure anchor should be used to anchor each upright of a hanging ladder at the top (Figure 2-6). A log is placed at the break of the ladder at the top to hold the uprights and rungs away from the rock face, which provides better handholds and footholds. A single anchor is usually sufficient at the bottom of the ladder (Figure 2-7).
• Wire Rope Ladder With Pipe Rungs. A wire rope ladder can be made using 2.5-cm (1-inch) or 1.9-cm (3/4-inch) pipe rungs; the 2.5-cm (1-inch) pipe rungs are best.
Standard pipe stanchions (Figure 2-3) are used for wire rope ladders. They are spaced 30 cm (12 inches) apart in the ladder (Figure 2-8), and then 1.9-cm (3/4-inch) wire rope clips are inserted over 1.9-cm (3/4-inch) wire rope uprights. If .9-cm (3/8-inch) wire rope uprights are used, the wire rope clips are removed from the pipe stanchions and .9-cm (3/8-inch) wire rope clips are inserted in the pipe over the wire rope uprights.
When 1.9-cm (3/4-inch) pipe rungs are used, the rungs are again spaced 30 cm (12 inches) apart in the ladder, but uprights are spaced only 30 cm (12 inches) apart because of the weaker pipe used. The rungs may be fastened in place by two different methods.
• In one method, a hole 1.1 cm (.4 inch) in diameter is drilled at each end of each pipe rung, and .9-cm (3/8-inch) wire rope uprights are threaded through the holes. To hold each rung in place, a .9-cm (3/8-inch) wire clip
is fastened around the wire rope upright at each end of each rung after the rung is in final position.
• Another method is to cut the pipe rungs 30 cm (12 inches) long and weld the U-bolt of a .9-cm (3/8-inch) wire rope clip against each end. The rungs are 30 cm (12 inches) apart on .9-cm (3/8-inch) wire rope uprights. The nuts and the base of the wire rope clips are placed on the U-bolts, and the nuts are tightened to hold the rungs in place.
• Wire Rope Ladder With Wire Rope Rungs. To make a wire rope ladder (Figure 2-8) with wire rope rungs, the .9-cm (3/8-inch) wire rope uprights are laid out on the ground. The first length is laid out in a series of U-shaped bends. The second
length is laid out with the U-shaped bends opposing those in the first series and the horizontal rung portions overlapping. A .9-cm (3/8-inch) wire rope clip is fastened around the overlapping rung portions at each end of each rung to hold them firm.
• Fiber Rope Ladder With Fiber Rope Rungs. Fiber rope ladders with fiber rope rungs (Figure 2-9) can be made using two or three uprights. When three uprights are used, a loop is made in the center upright at the position for each rung. The two outside uprights are spaced 50 cm (20 inches) apart. A loop and single splice hold each end of each rung to the outside upright. A loop in the center of the rung passes through the loop in the center upright. If only two uprights are used, the rungs are held in place by a loop and single splice at each upright. The two uprights must be closer together with shorter rungs to stiffen the ladder. Ladders of either type are flexible and difficult to climb.
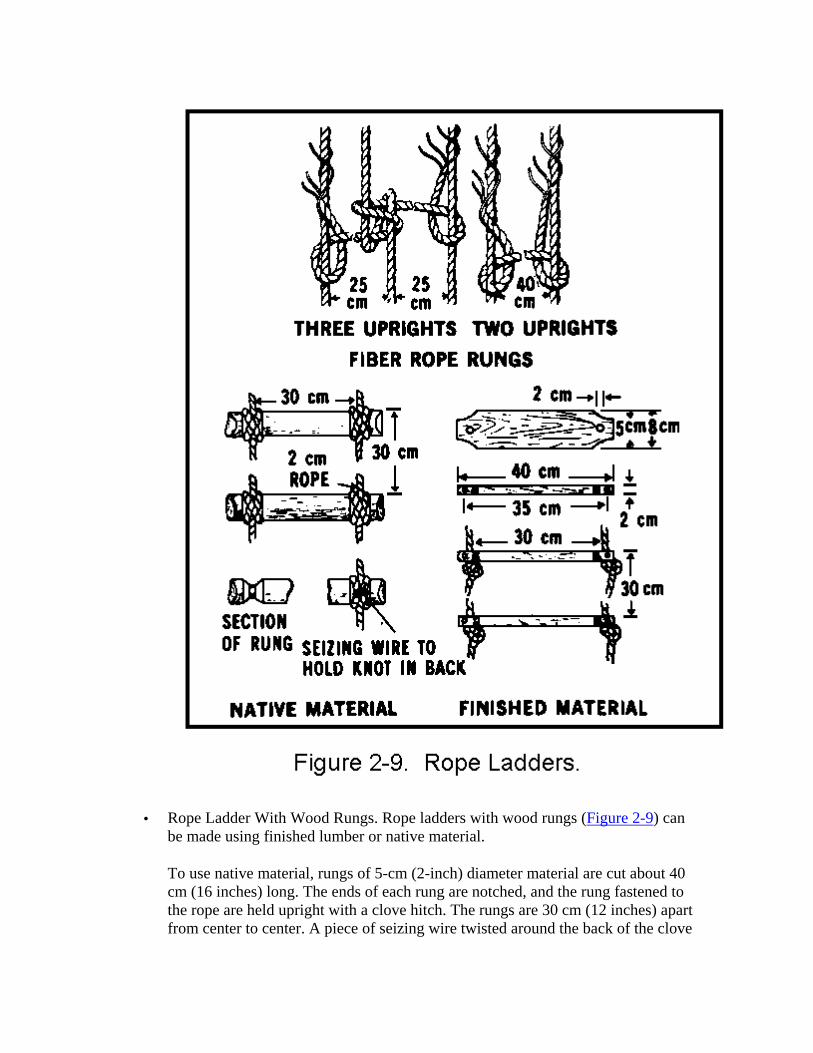
• Rope Ladder With Wood Rungs. Rope ladders with wood rungs (Figure 2-9) can be made using finished lumber or native material.
To use native material, rungs of 5-cm (2-inch) diameter material are cut about 40 cm (16 inches) long. The ends of each rung are notched, and the rung fastened to the rope are held upright with a clove hitch. The rungs are 30 cm (12 inches) apart from center to center. A piece of seizing wire twisted around the back of the clove
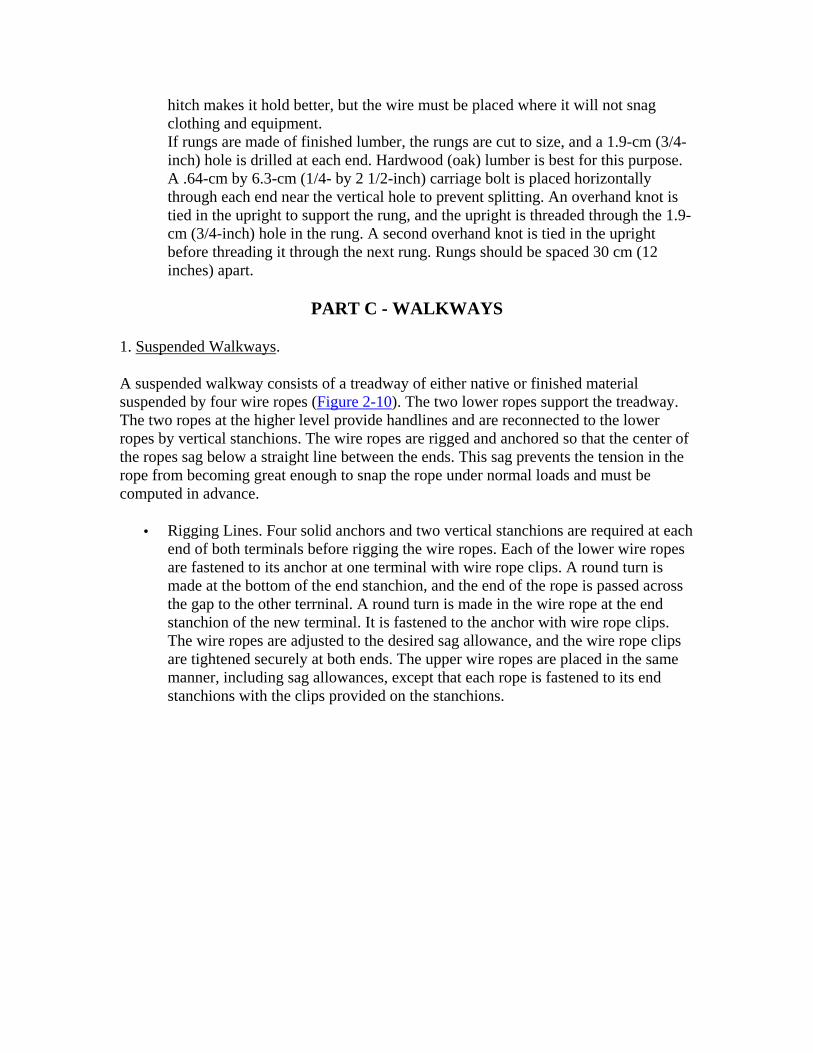
hitch makes it hold better, but the wire must be placed where it will not snag clothing and equipment. If rungs are made of finished lumber, the rungs are cut to size, and a 1.9-cm (3/4-inch) hole is drilled at each end. Hardwood (oak) lumber is best for this purpose. A .64-cm by 6.3-cm (1/4- by 2 1/2-inch) carriage bolt is placed horizontally through each end near the vertical hole to prevent splitting. An overhand knot is tied in the upright to support the rung, and the upright is threaded through the 1.9-cm (3/4-inch) hole in the rung. A second overhand knot is tied in the upright before threading it through the next rung. Rungs should be spaced 30 cm (12 inches) apart.
PART C - WALKWAYS
1. Suspended Walkways.
A suspended walkway consists of a treadway of either native or finished material suspended by four wire ropes (Figure 2-10). The two lower ropes support the treadway. The two ropes at the higher level provide handlines and are reconnected to the lower ropes by vertical stanchions. The wire ropes are rigged and anchored so that the center of the ropes sag below a straight line between the ends. This sag prevents the tension in the rope from becoming great enough to snap the rope under normal loads and must be computed in advance.
• Rigging Lines. Four solid anchors and two vertical stanchions are required at each end of both terminals before rigging the wire ropes. Each of the lower wire ropes are fastened to its anchor at one terminal with wire rope clips. A round turn is made at the bottom of the end stanchion, and the end of the rope is passed across the gap to the other terrninal. A round turn is made in the wire rope at the end stanchion of the new terminal. It is fastened to the anchor with wire rope clips. The wire ropes are adjusted to the desired sag allowance, and the wire rope clips are tightened securely at both ends. The upper wire ropes are placed in the same manner, including sag allowances, except that each rope is fastened to its end stanchions with the clips provided on the stanchions.
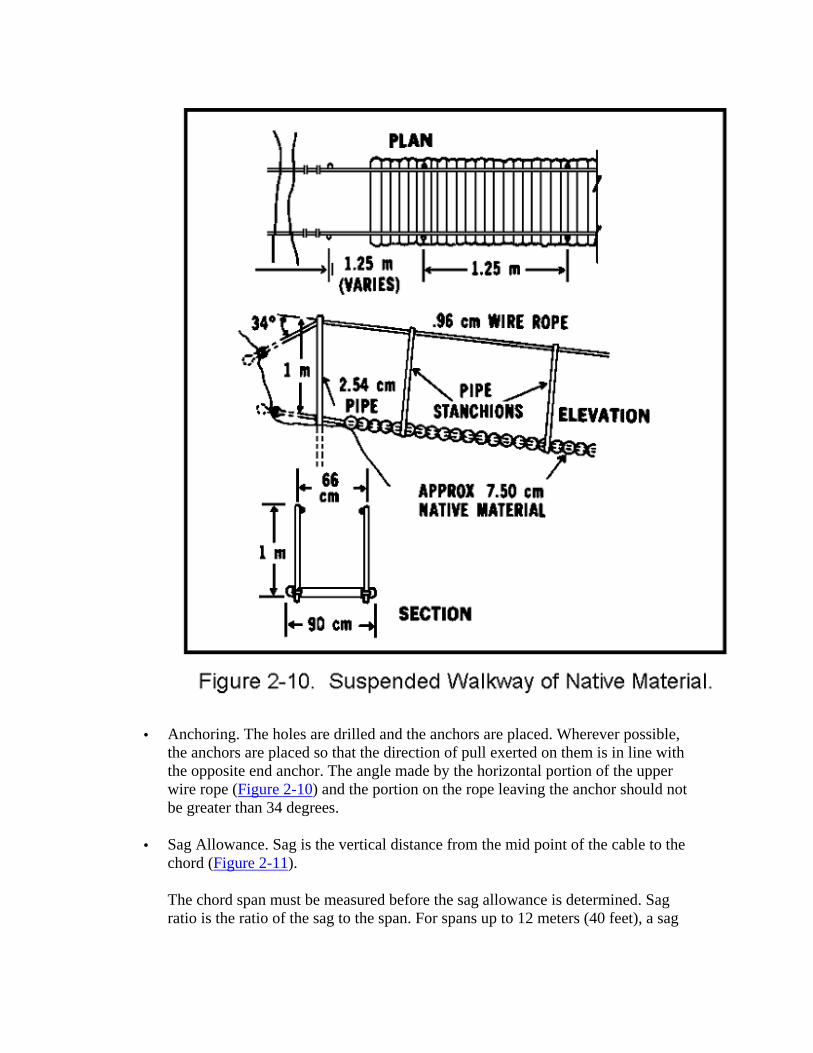
• Anchoring. The holes are drilled and the anchors are placed. Wherever possible, the anchors are placed so that the direction of pull exerted on them is in line with the opposite end anchor. The angle made by the horizontal portion of the upper wire rope (Figure 2-10) and the portion on the rope leaving the anchor should not be greater than 34 degrees.
• Sag Allowance. Sag is the vertical distance from the mid point of the cable to the chord (Figure 2-11).
The chord span must be measured before the sag allowance is determined. Sag ratio is the ratio of the sag to the span. For spans up to 12 meters (40 feet), a sag
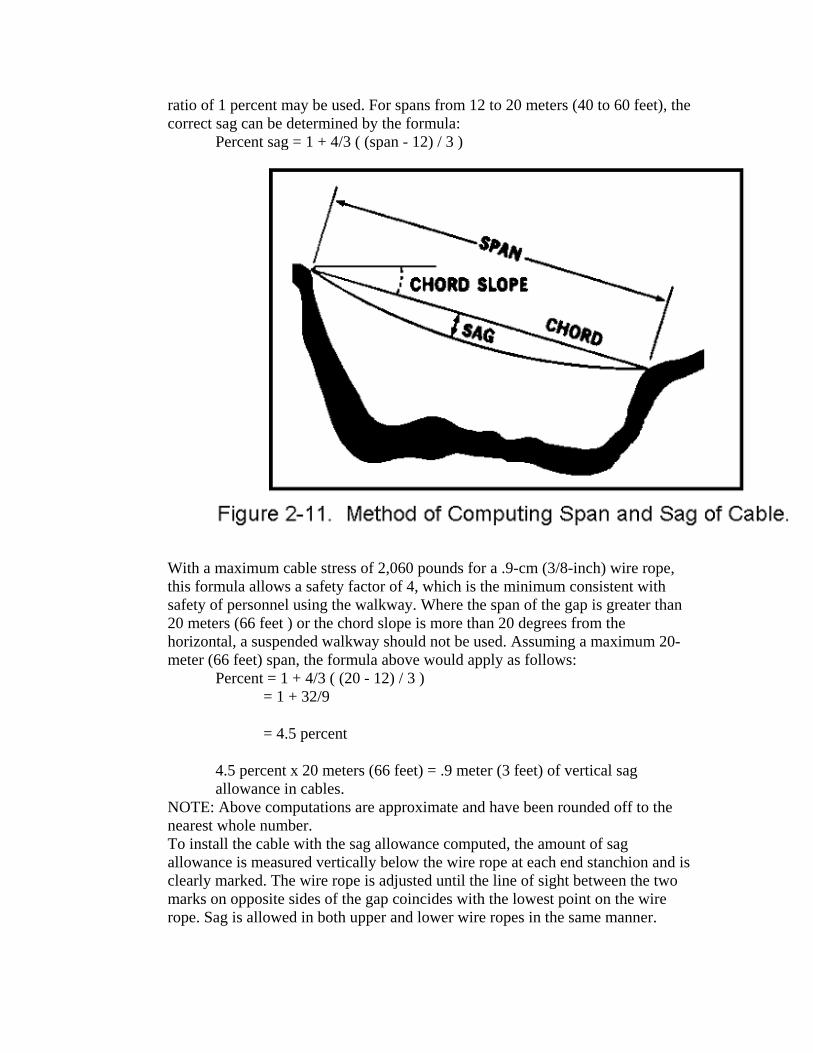
ratio of 1 percent may be used. For spans from 12 to 20 meters (40 to 60 feet), the correct sag can be determined by the formula:
Percent sag = 1 + 4/3 ( (span - 12) / 3 )
With a maximum cable stress of 2,060 pounds for a .9-cm (3/8-inch) wire rope, this formula allows a safety factor of 4, which is the minimum consistent with safety of personnel using the walkway. Where the span of the gap is greater than 20 meters (66 feet ) or the chord slope is more than 20 degrees from the horizontal, a suspended walkway should not be used. Assuming a maximum 20-meter (66 feet) span, the formula above would apply as follows:
Percent = 1 + 4/3 ( (20 - 12) / 3 ) = 1 + 32/9
= 4.5 percent
4.5 percent x 20 meters (66 feet) = .9 meter (3 feet) of vertical sag allowance in cables.
NOTE: Above computations are approximate and have been rounded off to the nearest whole number. To install the cable with the sag allowance computed, the amount of sag allowance is measured vertically below the wire rope at each end stanchion and is clearly marked. The wire rope is adjusted until the line of sight between the two marks on opposite sides of the gap coincides with the lowest point on the wire rope. Sag is allowed in both upper and lower wire ropes in the same manner.
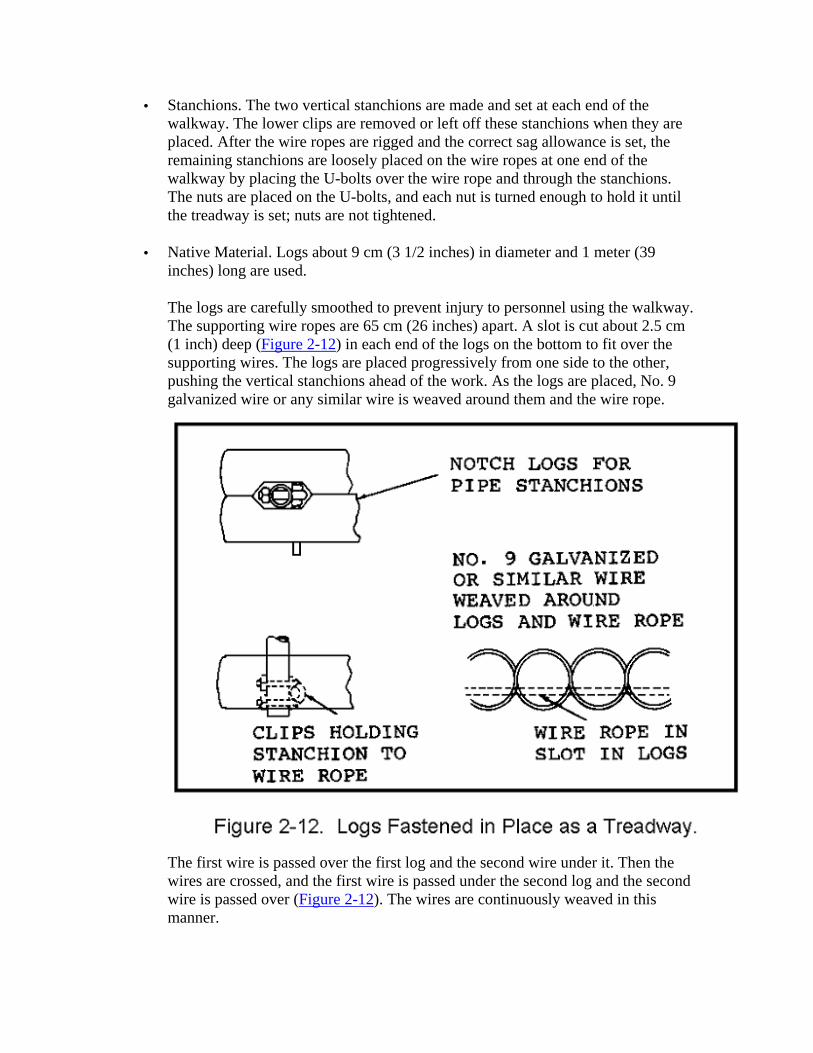
• Stanchions. The two vertical stanchions are made and set at each end of the walkway. The lower clips are removed or left off these stanchions when they are placed. After the wire ropes are rigged and the correct sag allowance is set, the remaining stanchions are loosely placed on the wire ropes at one end of the walkway by placing the U-bolts over the wire rope and through the stanchions. The nuts are placed on the U-bolts, and each nut is turned enough to hold it until the treadway is set; nuts are not tightened.
• Native Material. Logs about 9 cm (3 1/2 inches) in diameter and 1 meter (39 inches) long are used.
The logs are carefully smoothed to prevent injury to personnel using the walkway. The supporting wire ropes are 65 cm (26 inches) apart. A slot is cut about 2.5 cm (1 inch) deep (Figure 2-12) in each end of the logs on the bottom to fit over the supporting wires. The logs are placed progressively from one side to the other, pushing the vertical stanchions ahead of the work. As the logs are placed, No. 9 galvanized wire or any similar wire is weaved around them and the wire rope.
The first wire is passed over the first log and the second wire under it. Then the wires are crossed, and the first wire is passed under the second log and the second wire is passed over (Figure 2-12). The wires are continuously weaved in this manner.
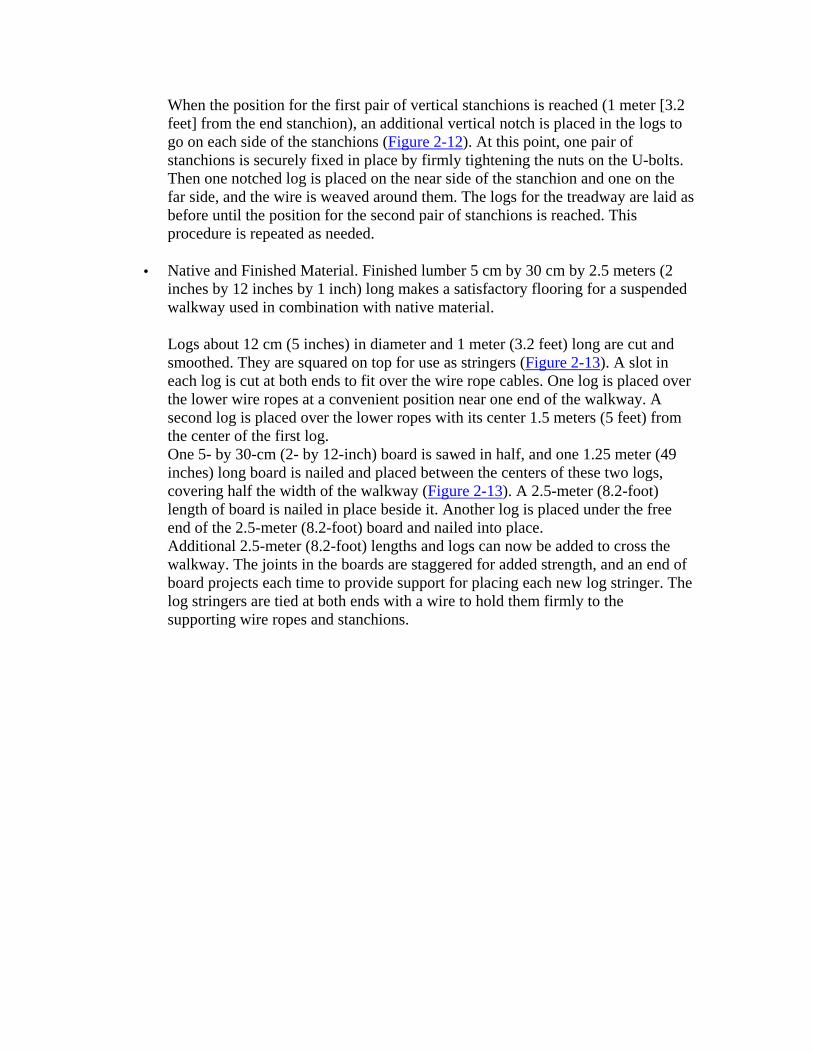
When the position for the first pair of vertical stanchions is reached (1 meter [3.2 feet] from the end stanchion), an additional vertical notch is placed in the logs to go on each side of the stanchions (Figure 2-12). At this point, one pair of stanchions is securely fixed in place by firmly tightening the nuts on the U-bolts. Then one notched log is placed on the near side of the stanchion and one on the far side, and the wire is weaved around them. The logs for the treadway are laid as before until the position for the second pair of stanchions is reached. This procedure is repeated as needed.
• Native and Finished Material. Finished lumber 5 cm by 30 cm by 2.5 meters (2 inches by 12 inches by 1 inch) long makes a satisfactory flooring for a suspended walkway used in combination with native material.
Logs about 12 cm (5 inches) in diameter and 1 meter (3.2 feet) long are cut and smoothed. They are squared on top for use as stringers (Figure 2-13). A slot in each log is cut at both ends to fit over the wire rope cables. One log is placed over the lower wire ropes at a convenient position near one end of the walkway. A second log is placed over the lower ropes with its center 1.5 meters (5 feet) from the center of the first log. One 5- by 30-cm (2- by 12-inch) board is sawed in half, and one 1.25 meter (49 inches) long board is nailed and placed between the centers of these two logs, covering half the width of the walkway (Figure 2-13). A 2.5-meter (8.2-foot) length of board is nailed in place beside it. Another log is placed under the free end of the 2.5-meter (8.2-foot) board and nailed into place. Additional 2.5-meter (8.2-foot) lengths and logs can now be added to cross the walkway. The joints in the boards are staggered for added strength, and an end of board projects each time to provide support for placing each new log stringer. The log stringers are tied at both ends with a wire to hold them firmly to the supporting wire ropes and stanchions.
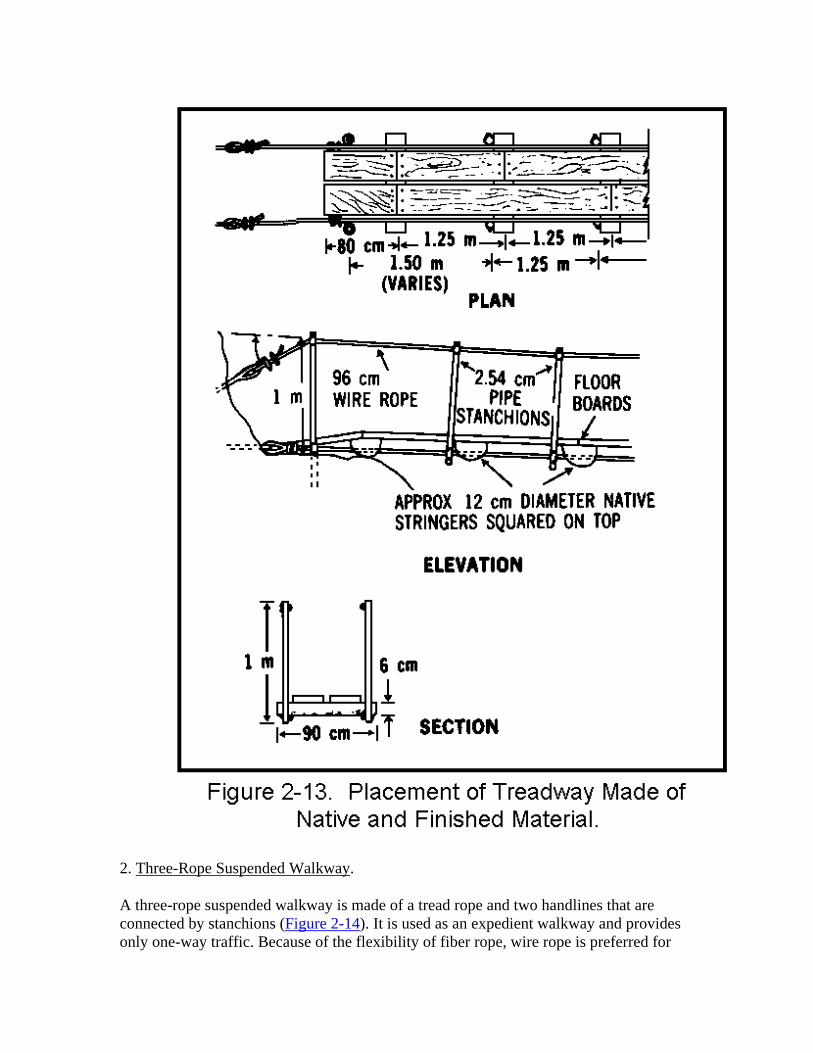
2. Three-Rope Suspended Walkway.
A three-rope suspended walkway is made of a tread rope and two handlines that are connected by stanchions (Figure 2-14). It is used as an expedient walkway and provides only one-way traffic. Because of the flexibility of fiber rope, wire rope is preferred for
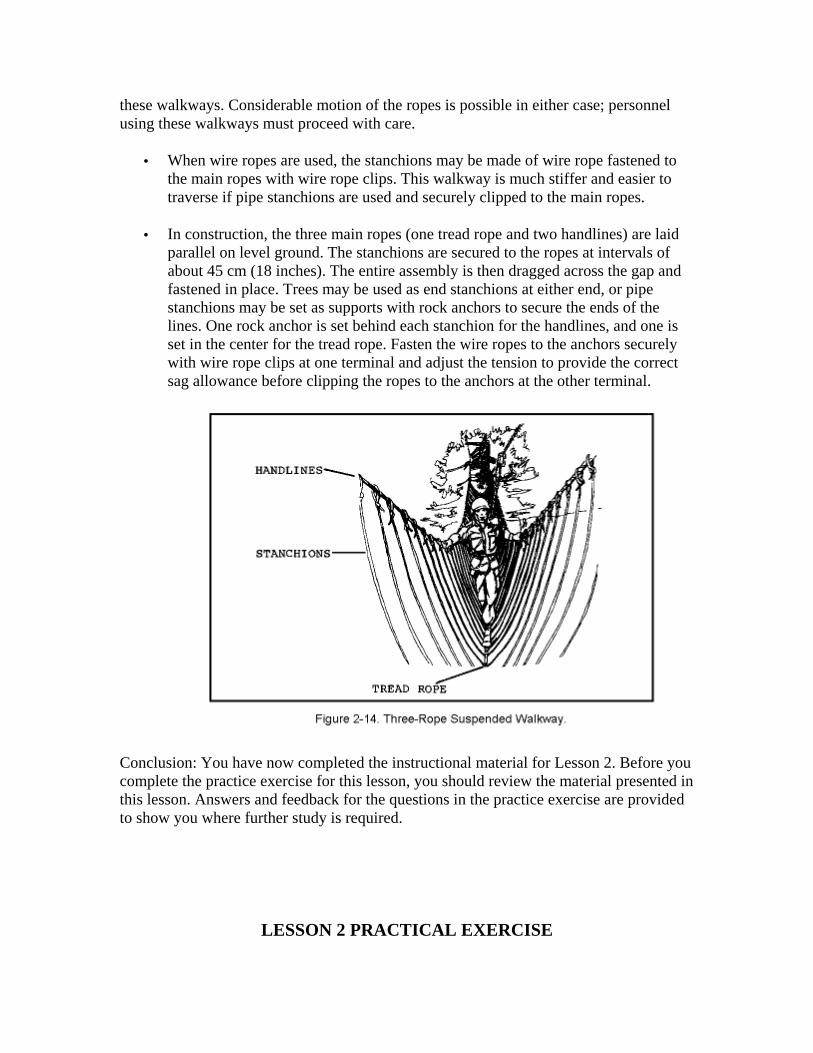
these walkways. Considerable motion of the ropes is possible in either case; personnel using these walkways must proceed with care.
• When wire ropes are used, the stanchions may be made of wire rope fastened to the main ropes with wire rope clips. This walkway is much stiffer and easier to traverse if pipe stanchions are used and securely clipped to the main ropes.
• In construction, the three main ropes (one tread rope and two handlines) are laid parallel on level ground. The stanchions are secured to the ropes at intervals of about 45 cm (18 inches). The entire assembly is then dragged across the gap and fastened in place. Trees may be used as end stanchions at either end, or pipe stanchions may be set as supports with rock anchors to secure the ends of the lines. One rock anchor is set behind each stanchion for the handlines, and one is set in the center for the tread rope. Fasten the wire ropes to the anchors securely with wire rope clips at one terminal and adjust the tension to provide the correct sag allowance before clipping the ropes to the anchors at the other terminal.
Conclusion: You have now completed the instructional material for Lesson 2. Before you complete the practice exercise for this lesson, you should review the material presented in this lesson. Answers and feedback for the questions in the practice exercise are provided to show you where further study is required.
LESSON 2 PRACTICAL EXERCISE
Instructions The following items will test your understanding of the material covered in this lesson. There is only one correct answer for each item. When you have completed the exercise, check your answers with the answer key that follows. If you answer any item incorrectly, review that part of the lesson which contains the portion involved. Situation During a mountaineering exercise your unit mission is to function effectively, and to utilize proper equipment and methods when constructing alpine paths. 1. Your unit has been tasked to survey the site and terrain where an alpine path is to be constructed. When selecting the route you
a. have the path follow a route not visible to the enemy.
b. use stanchions and artificial anchors to support the projected walkway.
c. follow a route along cliffs and rock edges to avoid camouflaging.
d. ensure safety lines are secured to party members while working. 2. When erection of an alpine path is necessary, the size of the working party will depend on
a. the amount of time, weather condition, and attitude of the troops.
b. the type components, terrain, and experience of the troops.
c. the type climbing equipment and available time.
d. the engineers assigned to your unit. 3. The three methods for drilling holes in rocks for pipe stanchions are
a. line drilling, battery-operated hammer, and pneumatic drill.
b. rapid, vertical and coil drilling.
c. standoff, ladden, and vertical drilling.
d. handdrilling, gasoline-operated hammer, and pneumatic drills.

4. During operations, the use of ladders may be necessary. The type ladder that is most difficult for an individual to ascend or descend carrying a pack is
a. a rope ladder bridge with wooden rungs.
b. a hanging ladder.
c. a standoff ladder.
d. a wire rope ladder bridge with rungs. 5. Suspended walkways consist of a treadway of either native or finished material. The wire ropes are rigged and anchored so that
a. the center of the ropes sag below a straight line between the ends.
b. the sag creates tension in the rope great enough to prevent snapping of the rope.
c. the ends of the rope have equal amounts of sag as the center.
d. no sag is allowed in any section of the rope. 6. Three-rope suspended walkway is made of a tread rope and two handlines. It is used
a. as an expedient walkway for two-way traffic.
b. as an expedient walkway for one-way traffic.
c. to traverse equipment in both directions.
d. as an emergency means of transporting, only.
LESSON TWO
PRACTICE EXERCISE
ANSWER KEY AND FEEDBACK
Item Correct Answer and Feedback
1. a. have the path follow a route not visible to the enemy.
The selection of route requirements is critical and should be conducted only by experienced mountain climbers. The path should be camouflaged from the enemy when possible, even if it may require the path to traverse greater distance.
2. b. depends on the type components, terrain and troop experience.
When erecting an alpine path the size of the working party will depend on the type components to be installed, steepness of the terrain, and experience of the troops involved
3. d. hand drilling, gasoline-operated hammer, and pneumatic drill
4. b. hanging ladder
Hanging ladders are made of wire or fiber rope anchored at the top and suspended vertically. They are difficult to ascend or descend, especially for an individual carrying a pack or load
5. a. the center of the rope sag below a straight line, between the
ends. The wire ropes are rigged and anchored so that the center of the rope sag below a straight line, between the ends
6. b. as an expedient walkway for one-way traffic.
A three-rope suspended walkway is made of a tread rope and two handlines that are connected by stanchions. It is used as an expedient walkway for one-way traffic.