ucs ipv6 management configuration example - cisco · ucs ipv6 management configuration example...
TRANSCRIPT
UCS IPv6 Management Configuration Example
Document ID: 118784
Contributed by Padmanabhan Ramaswamy and Shankar Prasath, CiscoTAC Engineers.Mar 06, 2015
Contents
IntroductionPrerequisites Requirements Components UsedBackground InformationConfigure FI Configuration Access the UCSM Via IPv6 CIMC Over IPv6 Launch the KVM Console and Other ServicesVerify Verify the IPv6 Address Assignment for the FIs Test Basic Network Connectivity Verify the IPv6 Address Assignment for the CIMC Trace the CIMC Inband Connection Path for Blade Servers Trace the CIMC Inband Connection Path for Rack ServersTroubleshootFrequently Asked Questions (FAQs) Can I use IPv6 Private Unicast addresses for the management port? Does UCS support Stateless Address Autoconfiguration (SLAAC)? Can I use IPv6 for iSCSI initiators when I use iSCSI boot? What happens when the UCSM is downgraded from UCS Version 2.2 or later to UCS Version 2.1 orearlier? What happens when the FI is downgraded from UCS Version 2.2 or later to UCS Version 2.1 or earlier? What happens when the CIMC uses UCS Version 2.1 or earlier? What happens when the CIMC is downgraded from UCS Version 2.2 or later to UCS Version 2.1 orearlier? Are there any reserved prefixes that cannot be used for IPv6 addresses? Are there any reserved VLANs that cannot be used for Inband management?Related Information
Introduction
This document describes how to configure the Cisco Unified Computing System (UCS) managementend−points with IPv6 addresses.
Prerequisites
Requirements
Cisco recommends that you have knowledge of these topics:
Cisco UCS Manager (UCSM )• Cisco Integrated Management Controller (CIMC)• Familiarity with IPv6•
Components Used
The information in this document is based on these software and hardware versions:
Cisco UCS B Series• Cisco UCSM Version 2.2(3a)• Cisco UCS M3 Series Blade Servers•
The information in this document was created from the devices in a specific lab environment. All of thedevices used in this document started with a cleared (default) configuration. If your network is live, make surethat you understand the potential impact of any command.
Background Information
IPv6 management support on the UCS was introduced in UCS Version 2.2. Both the 6100 and 6200 SeriesFabric Interconnects (FIs) can have an IPv6 address for the management port apart from their IPv4 addresses.In addition to this, the CIMC address for the M3 servers can have IPv6 addresses. This is available when youchoose the Inband access method.
IPv6 can be used by external clients in order to access UCS services such as:
HTTP/HTTPS• Secure Shell (SSH)• Telnet• Simple Network Management Protocol (SNMP)• Cisco Interaction Manager (CIM)• Web Service Management (WS−Management)• Flash Policy Server•
With the UCS as a client, IPv6 can be used in order to access various categories of services such as:
Network Services Domain Name System (DNS), SNMP, and Network Time Protocol (NTP)• Authentication services Lightweight Directory Access Protocol (LDAP), TACACS, and RADIUS• File transfer services SSH, FTP, SSH File Transfer Protocol (SFTP), and TFTP• Other services Syslog, Callhome, Network File System (NFS) client, and vCenter agent•
Configure
This section describes how to configure the Cisco UCSM end−points with IPv6 addresses
Note: Use the Command Lookup Tool (registered customers only) in order to obtain more information on thecommands used in this section.
FI Configuration
During initial setup, you can configure the management interface with either an IPv4 or an IPv6 address. If itis configured with an IPv6 address, then you must manually add an IPv4 address for the management interfaceafter the initial setup via the UCSM CLI or GUI.
This example shows the steps that are completed in order to configure an IPv6 address for the managementport during initial setup:
Enter the configuration method. (console/gui) ? console Enter the setup mode; setup newly or restore from backup. (setup/restore) ? setup You have chosen to setup a new Fabric interconnect. Continue? (y/n): y Enforce strong password? (y/n) [y]: n Enter the password for "admin": Confirm the password for "admin": Is this Fabric interconnect part of a cluster(select 'no' for standalone)? (yes/no) [n]: n Fabric interconnect will be in stand alone mode Enter the system name: ucs−ipv6 Physical Switch Mgmt0 IP address : 2014::10:76:78:107 Physical Switch Mgmt0 IPv6 prefix : 64 IPv6 address of the default gateway : 2014::10:76:78:1
IPv6 addresses can be added to a setup that has only IPv4 addresses, and the current IPv6 addresses can bechanged as well. These options are available from both the UCSM GUI and the CLI.
This example shows the steps that are completed from the UCSM GUI:
This example shows the steps that are completed from the UCSM CLI:
FI−A# scope fabric−interconnect aFI−A /fabric−interconnect # scope ipv6−config
FI−A /fabric−interconnect/ipv6−config # set out−of−band ipv6 2014::10:76:78:107FI−A /fabric−interconnect/ipv6−config* # set out−of−band ipv6−gw 2014::10:76:78:1FI−A /fabric−interconnect/ipv6−config* # set out−of−band ipv6−prefix 64
FI−A* # scope fabric−interconnect bFI−A /fabric−interconnect* # scope ipv6−configFI−A /fabric−interconnect/ipv6−config* # set out−of−band ipv6 2014::10:76:78:108FI−A /fabric−interconnect/ipv6−config* # set out−of−band ipv6−gw 2014::10:76:78:1FI−A /fabric−interconnect/ipv6−config* # set out−of−band ipv6−prefix 64
FI−A* # scope systemFI−A /system* # set virtual−ip ipv6 2014::10:76:78:106
FI−A* # commit−buffer
Note: The configuration is not effective until the commit−buffer command is entered. Cisco recommends thatyou make all of the needed changes before you enter this command.
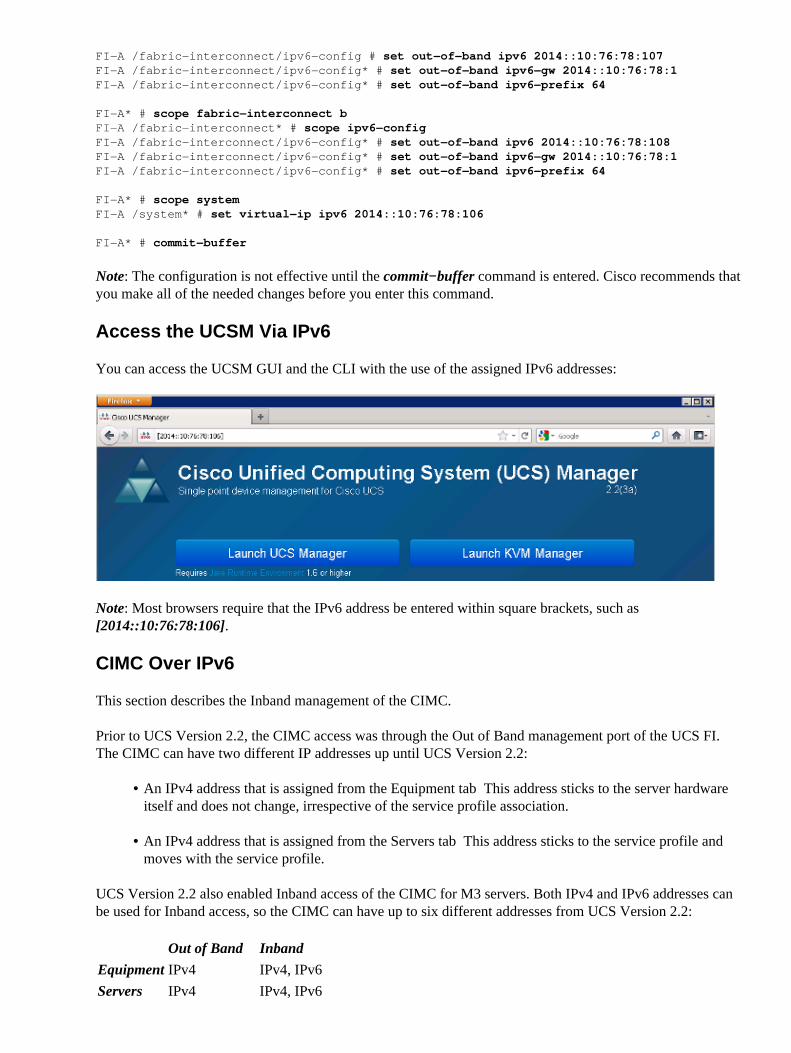
Access the UCSM Via IPv6
You can access the UCSM GUI and the CLI with the use of the assigned IPv6 addresses:
Note: Most browsers require that the IPv6 address be entered within square brackets, such as[2014::10:76:78:106].
CIMC Over IPv6
This section describes the Inband management of the CIMC.
Prior to UCS Version 2.2, the CIMC access was through the Out of Band management port of the UCS FI.The CIMC can have two different IP addresses up until UCS Version 2.2:
An IPv4 address that is assigned from the Equipment tab This address sticks to the server hardwareitself and does not change, irrespective of the service profile association.
•
An IPv4 address that is assigned from the Servers tab This address sticks to the service profile andmoves with the service profile.
•
UCS Version 2.2 also enabled Inband access of the CIMC for M3 servers. Both IPv4 and IPv6 addresses canbe used for Inband access, so the CIMC can have up to six different addresses from UCS Version 2.2:
Out of Band Inband
EquipmentIPv4 IPv4, IPv6
Servers IPv4 IPv4, IPv6
Tip: Refer the CIMC Inband Access on UCS−B Series Blades Configuration Example Cisco document formore information about Inband access and configuration.
This example describes the steps that are completed in order to configure Inband IPv6 addresses for the CIMCvia the Equipment tab of the UCSM GUI:
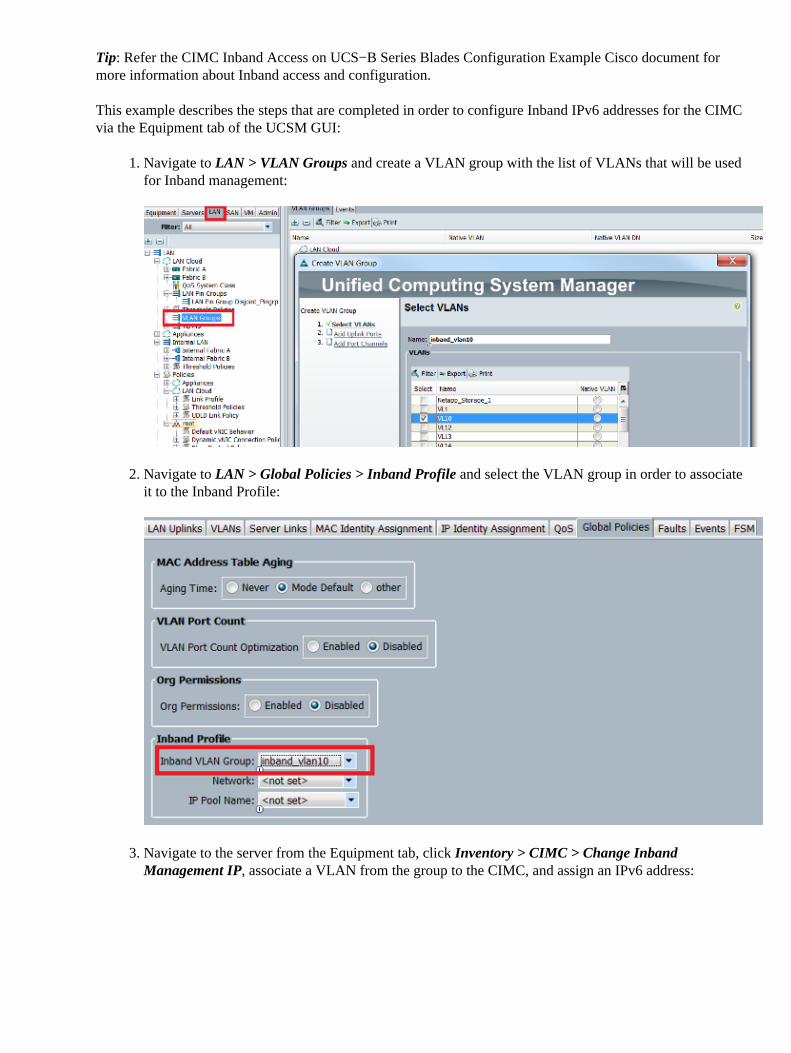
Navigate to LAN > VLAN Groups and create a VLAN group with the list of VLANs that will be usedfor Inband management:
1.
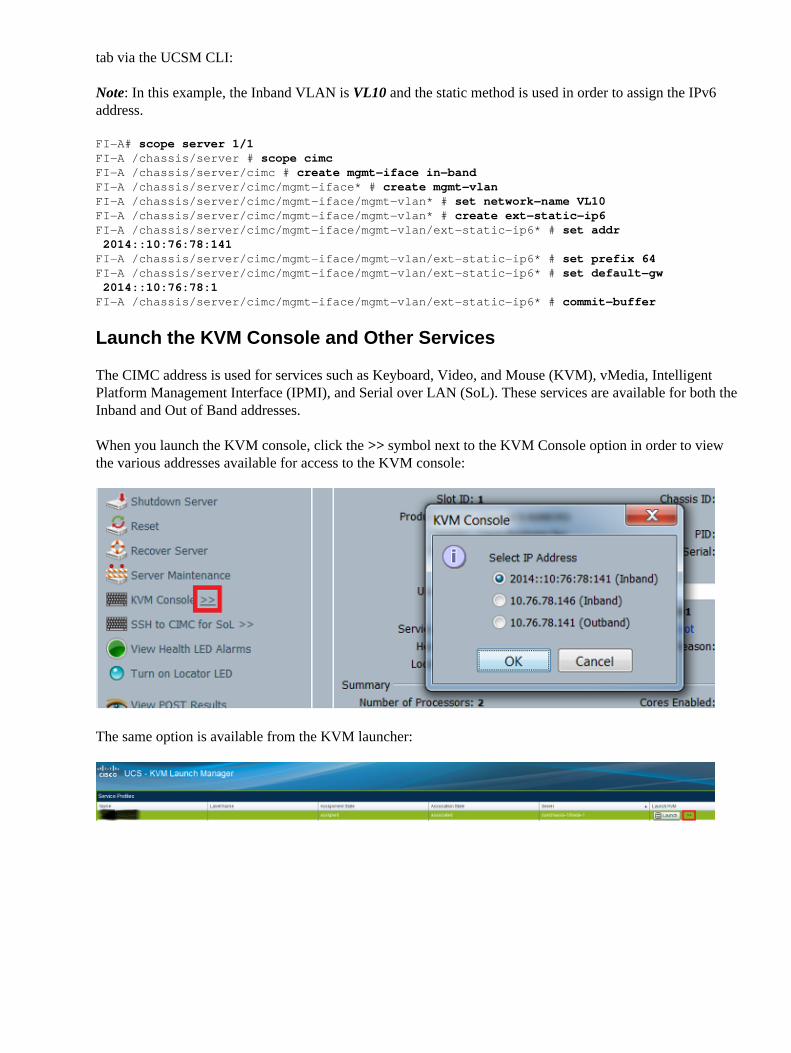
Navigate to LAN > Global Policies > Inband Profile and select the VLAN group in order to associateit to the Inband Profile:
2.
Navigate to the server from the Equipment tab, click Inventory > CIMC > Change InbandManagement IP, associate a VLAN from the group to the CIMC, and assign an IPv6 address:
3.

Choose a VLAN from the Network drop down list, click Inband IPv6, and assign an IPv6 address.The next image shows the static assignment method.
Note: The address can either be static or from an IPv6 pool, which you can create under LAN > Pools> IP Pools.
4.
The same procedure is used when you assign the IPv6 address from the Servers tab. The next example showsthe steps that are completed in order to configure an Inband IPv6 address for the CIMC from the Equipment
tab via the UCSM CLI:
Note: In this example, the Inband VLAN is VL10 and the static method is used in order to assign the IPv6address.
FI−A# scope server 1/1FI−A /chassis/server # scope cimcFI−A /chassis/server/cimc # create mgmt−iface in−bandFI−A /chassis/server/cimc/mgmt−iface* # create mgmt−vlanFI−A /chassis/server/cimc/mgmt−iface/mgmt−vlan* # set network−name VL10FI−A /chassis/server/cimc/mgmt−iface/mgmt−vlan* # create ext−static−ip6FI−A /chassis/server/cimc/mgmt−iface/mgmt−vlan/ext−static−ip6* # set addr 2014::10:76:78:141FI−A /chassis/server/cimc/mgmt−iface/mgmt−vlan/ext−static−ip6* # set prefix 64FI−A /chassis/server/cimc/mgmt−iface/mgmt−vlan/ext−static−ip6* # set default−gw 2014::10:76:78:1FI−A /chassis/server/cimc/mgmt−iface/mgmt−vlan/ext−static−ip6* # commit−buffer
Launch the KVM Console and Other Services
The CIMC address is used for services such as Keyboard, Video, and Mouse (KVM), vMedia, IntelligentPlatform Management Interface (IPMI), and Serial over LAN (SoL). These services are available for both theInband and Out of Band addresses.
When you launch the KVM console, click the >> symbol next to the KVM Console option in order to viewthe various addresses available for access to the KVM console:
The same option is available from the KVM launcher:
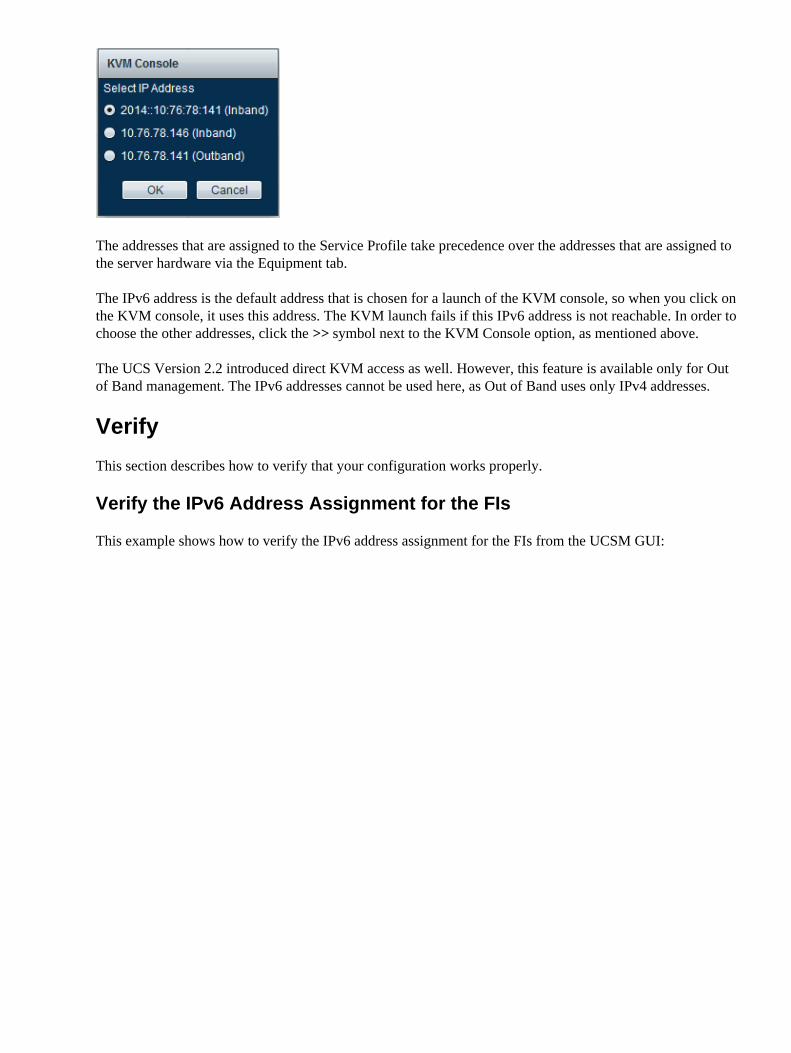
The addresses that are assigned to the Service Profile take precedence over the addresses that are assigned tothe server hardware via the Equipment tab.
The IPv6 address is the default address that is chosen for a launch of the KVM console, so when you click onthe KVM console, it uses this address. The KVM launch fails if this IPv6 address is not reachable. In order tochoose the other addresses, click the >> symbol next to the KVM Console option, as mentioned above.
The UCS Version 2.2 introduced direct KVM access as well. However, this feature is available only for Outof Band management. The IPv6 addresses cannot be used here, as Out of Band uses only IPv4 addresses.
Verify
This section describes how to verify that your configuration works properly.
Verify the IPv6 Address Assignment for the FIs
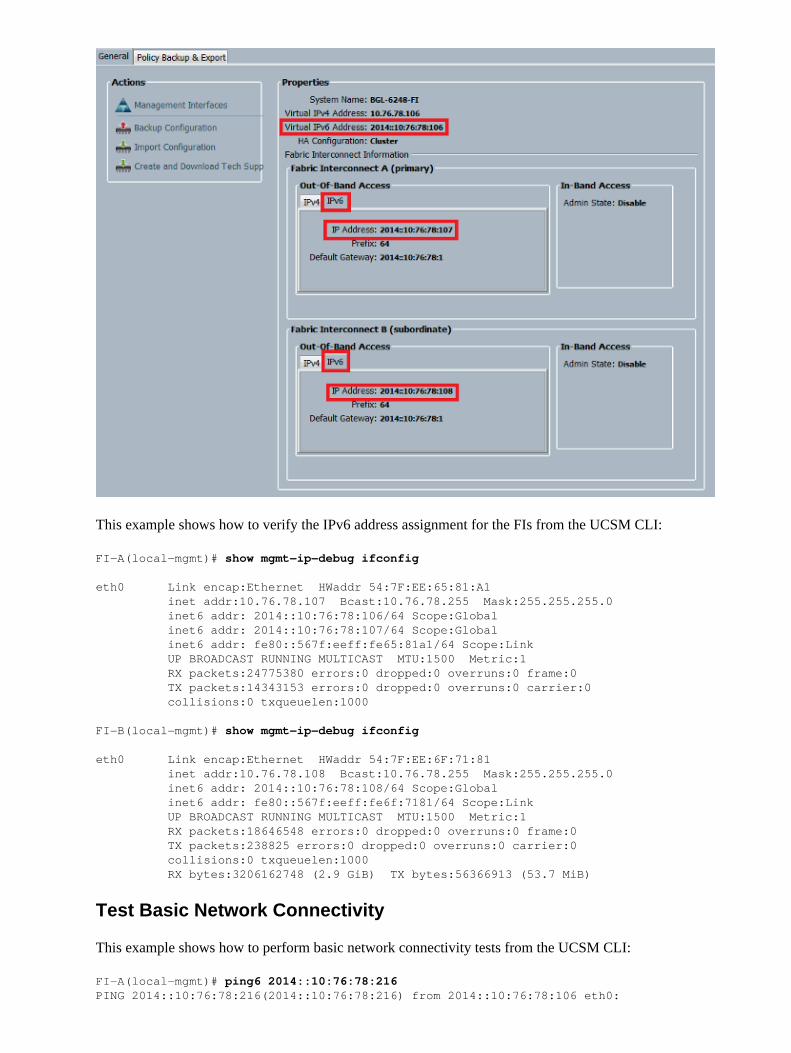
This example shows how to verify the IPv6 address assignment for the FIs from the UCSM GUI:
This example shows how to verify the IPv6 address assignment for the FIs from the UCSM CLI:
FI−A(local−mgmt)# show mgmt−ip−debug ifconfig
eth0 Link encap:Ethernet HWaddr 54:7F:EE:65:81:A1 inet addr:10.76.78.107 Bcast:10.76.78.255 Mask:255.255.255.0 inet6 addr: 2014::10:76:78:106/64 Scope:Global inet6 addr: 2014::10:76:78:107/64 Scope:Global inet6 addr: fe80::567f:eeff:fe65:81a1/64 Scope:Link UP BROADCAST RUNNING MULTICAST MTU:1500 Metric:1 RX packets:24775380 errors:0 dropped:0 overruns:0 frame:0 TX packets:14343153 errors:0 dropped:0 overruns:0 carrier:0 collisions:0 txqueuelen:1000
FI−B(local−mgmt)# show mgmt−ip−debug ifconfig
eth0 Link encap:Ethernet HWaddr 54:7F:EE:6F:71:81 inet addr:10.76.78.108 Bcast:10.76.78.255 Mask:255.255.255.0 inet6 addr: 2014::10:76:78:108/64 Scope:Global inet6 addr: fe80::567f:eeff:fe6f:7181/64 Scope:Link UP BROADCAST RUNNING MULTICAST MTU:1500 Metric:1 RX packets:18646548 errors:0 dropped:0 overruns:0 frame:0 TX packets:238825 errors:0 dropped:0 overruns:0 carrier:0 collisions:0 txqueuelen:1000 RX bytes:3206162748 (2.9 GiB) TX bytes:56366913 (53.7 MiB)
Test Basic Network Connectivity
This example shows how to perform basic network connectivity tests from the UCSM CLI:
FI−A(local−mgmt)# ping6 2014::10:76:78:216PING 2014::10:76:78:216(2014::10:76:78:216) from 2014::10:76:78:106 eth0:
56 data bytes64 bytes from 2014::10:76:78:216: icmp_seq=1 ttl=64 time=1.92 ms64 bytes from 2014::10:76:78:216: icmp_seq=2 ttl=64 time=0.262 ms64 bytes from 2014::10:76:78:216: icmp_seq=3 ttl=64 time=0.260 ms64 bytes from 2014::10:76:78:216: icmp_seq=4 ttl=64 time=0.222 ms64 bytes from 2014::10:76:78:216: icmp_seq=5 ttl=64 time=0.196 ms64 bytes from 2014::10:76:78:216: icmp_seq=6 ttl=64 time=0.231 ms
FI−A(local−mgmt)# traceroute6 2014::10:76:78:216traceroute to 2014::10:76:78:216 (2014::10:76:78:216) from 2014::10:76:78:106, 30 hops max, 16 byte packets 1 2014::10:76:78:216 (2014::10:76:78:216) 0.244 ms * 0.253 ms
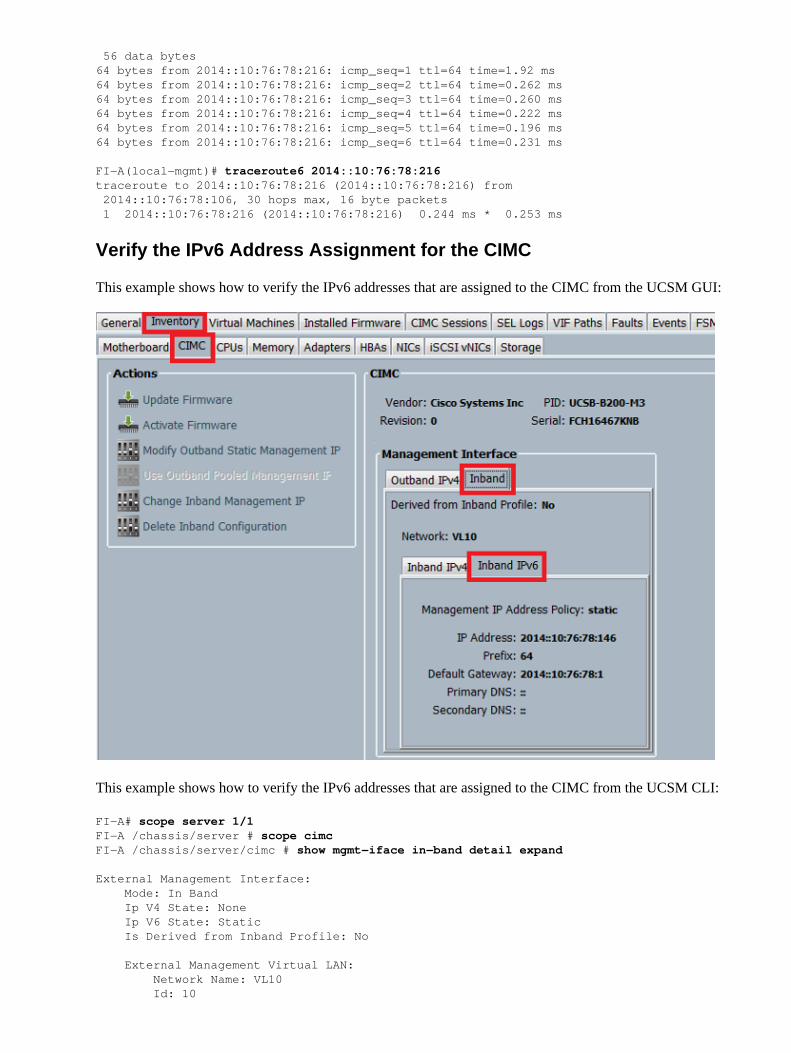
Verify the IPv6 Address Assignment for the CIMC
This example shows how to verify the IPv6 addresses that are assigned to the CIMC from the UCSM GUI:
This example shows how to verify the IPv6 addresses that are assigned to the CIMC from the UCSM CLI:
FI−A# scope server 1/1FI−A /chassis/server # scope cimcFI−A /chassis/server/cimc # show mgmt−iface in−band detail expand
External Management Interface: Mode: In Band Ip V4 State: None Ip V6 State: Static Is Derived from Inband Profile: No
External Management Virtual LAN: Network Name: VL10 Id: 10
External Management Static IPv6: IP Address: 2014::10:76:78:146 Default Gateway: 2014::10:76:78:1 Prefix: 64 Primary DNS IP: :: Secondary DNS IP: ::
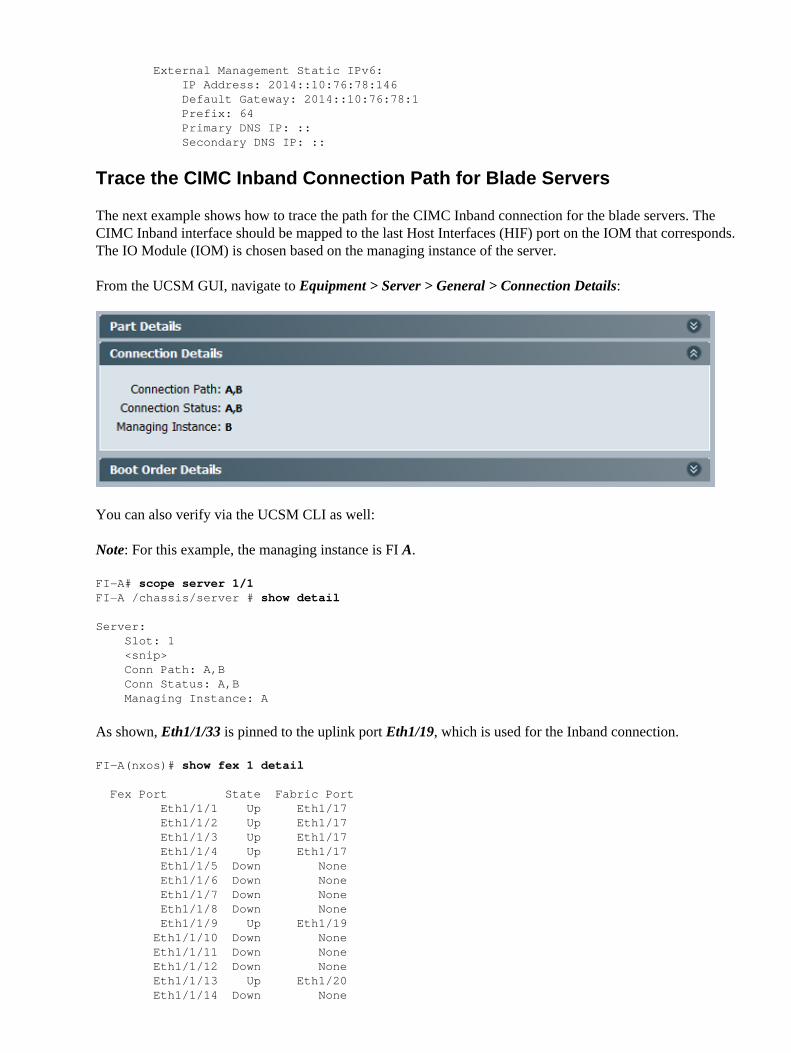
Trace the CIMC Inband Connection Path for Blade Servers
The next example shows how to trace the path for the CIMC Inband connection for the blade servers. TheCIMC Inband interface should be mapped to the last Host Interfaces (HIF) port on the IOM that corresponds.The IO Module (IOM) is chosen based on the managing instance of the server.
From the UCSM GUI, navigate to Equipment > Server > General > Connection Details:
You can also verify via the UCSM CLI as well:
Note: For this example, the managing instance is FI A.
FI−A# scope server 1/1FI−A /chassis/server # show detail
Server: Slot: 1 <snip> Conn Path: A,B Conn Status: A,B Managing Instance: A
As shown, Eth1/1/33 is pinned to the uplink port Eth1/19, which is used for the Inband connection.
FI−A(nxos)# show fex 1 detail
Fex Port State Fabric Port Eth1/1/1 Up Eth1/17 Eth1/1/2 Up Eth1/17 Eth1/1/3 Up Eth1/17 Eth1/1/4 Up Eth1/17 Eth1/1/5 Down None Eth1/1/6 Down None Eth1/1/7 Down None Eth1/1/8 Down None Eth1/1/9 Up Eth1/19 Eth1/1/10 Down None Eth1/1/11 Down None Eth1/1/12 Down None Eth1/1/13 Up Eth1/20 Eth1/1/14 Down None
Eth1/1/15 Down None Eth1/1/16 Down None Eth1/1/17 Up Eth1/17 Eth1/1/18 Down None Eth1/1/19 Down None Eth1/1/20 Down None Eth1/1/21 Up Eth1/18 Eth1/1/22 Up Eth1/18 Eth1/1/23 Up Eth1/18 Eth1/1/24 Up Eth1/18 Eth1/1/25 Down None Eth1/1/26 Down None Eth1/1/27 Down None Eth1/1/28 Down None Eth1/1/29 Down Eth1/20 Eth1/1/30 Down Eth1/20 Eth1/1/31 Down Eth1/20 Eth1/1/32 Down Eth1/20 Eth1/1/33 Up Eth1/19
The running configuration now adds the Inband VLAN, which is VLAN 10 in this example.
FI−A(nxos)# show run int eth1/1/33
interface Ethernet1/1/33 no pinning server sticky switchport mode trunk switchport trunk native vlan 4044 switchport trunk allowed vlan 10,4044 no shutdown
FI−A(nxos)# show mac address−table vlan 10Legend: * − primary entry, G − Gateway MAC, (R) − Routed MAC, O − Overlay MAC age − seconds since last seen,+ − primary entry using vPC Peer−Link VLAN MAC Address Type age Secure NTFY Ports/SWID.SSID.LID−−−−−−−−−+−−−−−−−−−−−−−−−−−+−−−−−−−−+−−−−−−−−−+−−−−−−+−−−−+−−−−−−−−−−−−−−−−−−* 10 e02f.6d9a.9e71 dynamic 0 F F Eth1/1/33
Trace the CIMC Inband Connection Path for Rack Servers
This example shows how to trace the CIMC Inband connection path for the rack servers. The CIMC interfaceshould be mapped to a Vethernet interface, which is mapped to the Fabric Extender (FEX) port to which theserver is connected. If the server connects to two different FEX modules in an High Availability (HA) setup,the managing instance must be checked in order to determine the path.
From the UCSM GUI, navigate to Equipment > Rack−mounts > Server > General > Connection Details:
You can also verify via the UCSM CLI as well:
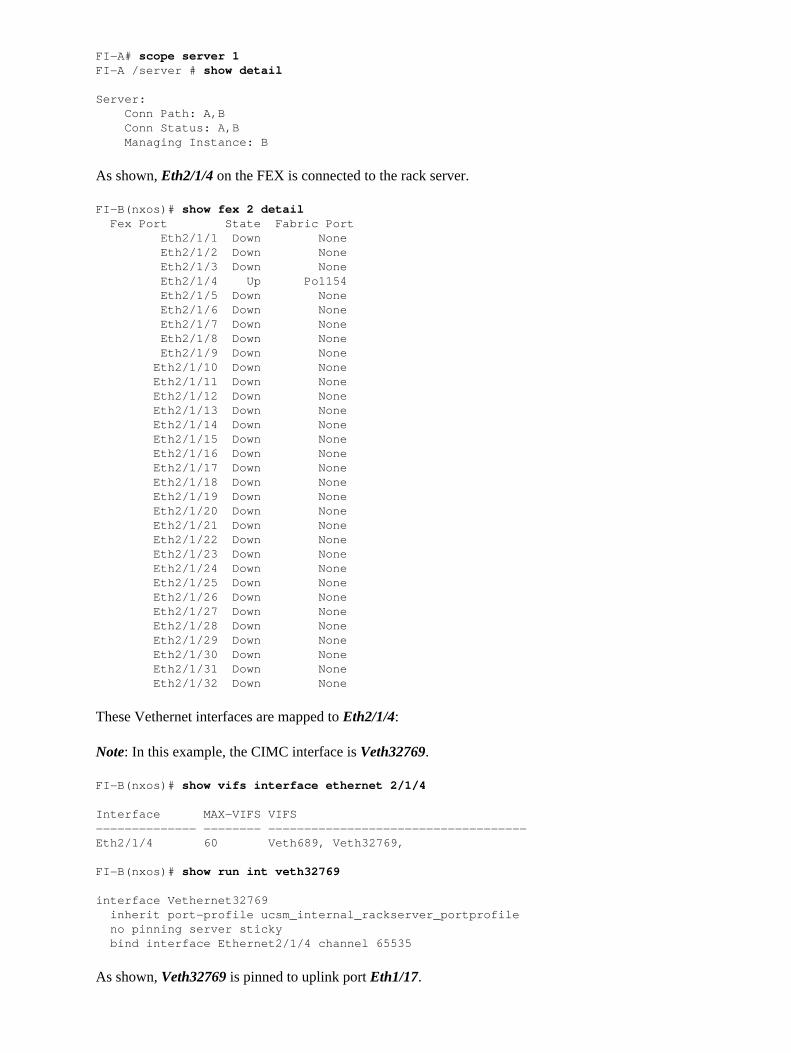
FI−A# scope server 1FI−A /server # show detail
Server: Conn Path: A,B Conn Status: A,B Managing Instance: B
As shown, Eth2/1/4 on the FEX is connected to the rack server.
FI−B(nxos)# show fex 2 detail Fex Port State Fabric Port Eth2/1/1 Down None Eth2/1/2 Down None Eth2/1/3 Down None Eth2/1/4 Up Po1154 Eth2/1/5 Down None Eth2/1/6 Down None Eth2/1/7 Down None Eth2/1/8 Down None Eth2/1/9 Down None Eth2/1/10 Down None Eth2/1/11 Down None Eth2/1/12 Down None Eth2/1/13 Down None Eth2/1/14 Down None Eth2/1/15 Down None Eth2/1/16 Down None Eth2/1/17 Down None Eth2/1/18 Down None Eth2/1/19 Down None Eth2/1/20 Down None Eth2/1/21 Down None Eth2/1/22 Down None Eth2/1/23 Down None Eth2/1/24 Down None Eth2/1/25 Down None Eth2/1/26 Down None Eth2/1/27 Down None Eth2/1/28 Down None Eth2/1/29 Down None Eth2/1/30 Down None Eth2/1/31 Down None Eth2/1/32 Down None
These Vethernet interfaces are mapped to Eth2/1/4:
Note: In this example, the CIMC interface is Veth32769.
FI−B(nxos)# show vifs interface ethernet 2/1/4
Interface MAX−VIFS VIFS−−−−−−−−−−−−−− −−−−−−−− −−−−−−−−−−−−−−−−−−−−−−−−−−−−−−−−−−−−Eth2/1/4 60 Veth689, Veth32769,
FI−B(nxos)# show run int veth32769
interface Vethernet32769 inherit port−profile ucsm_internal_rackserver_portprofile no pinning server sticky bind interface Ethernet2/1/4 channel 65535
As shown, Veth32769 is pinned to uplink port Eth1/17.
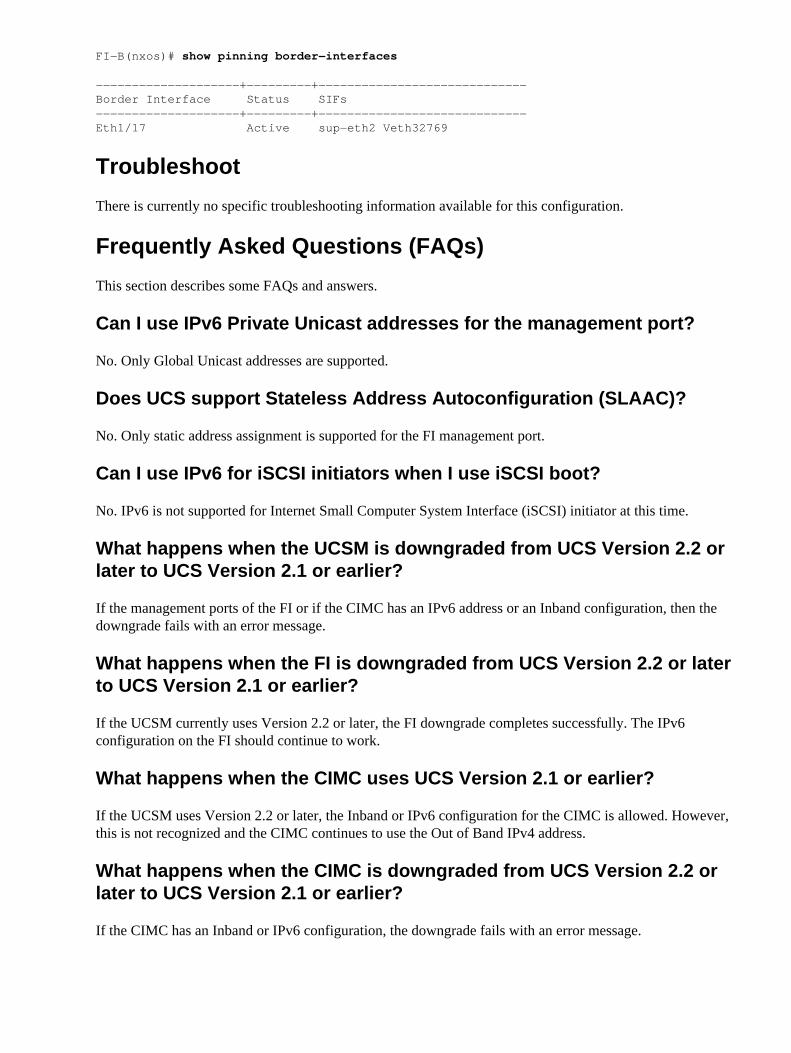
FI−B(nxos)# show pinning border−interfaces
−−−−−−−−−−−−−−−−−−−−+−−−−−−−−−+−−−−−−−−−−−−−−−−−−−−−−−−−−−−−Border Interface Status SIFs−−−−−−−−−−−−−−−−−−−−+−−−−−−−−−+−−−−−−−−−−−−−−−−−−−−−−−−−−−−−Eth1/17 Active sup−eth2 Veth32769
Troubleshoot
There is currently no specific troubleshooting information available for this configuration.
Frequently Asked Questions (FAQs)
This section describes some FAQs and answers.
Can I use IPv6 Private Unicast addresses for the management port?
No. Only Global Unicast addresses are supported.
Does UCS support Stateless Address Autoconfiguration (SLAAC)?
No. Only static address assignment is supported for the FI management port.
Can I use IPv6 for iSCSI initiators when I use iSCSI boot?
No. IPv6 is not supported for Internet Small Computer System Interface (iSCSI) initiator at this time.
What happens when the UCSM is downgraded from UCS Version 2.2 orlater to UCS Version 2.1 or earlier?
If the management ports of the FI or if the CIMC has an IPv6 address or an Inband configuration, then thedowngrade fails with an error message.
What happens when the FI is downgraded from UCS Version 2.2 or laterto UCS Version 2.1 or earlier?
If the UCSM currently uses Version 2.2 or later, the FI downgrade completes successfully. The IPv6configuration on the FI should continue to work.
What happens when the CIMC uses UCS Version 2.1 or earlier?
If the UCSM uses Version 2.2 or later, the Inband or IPv6 configuration for the CIMC is allowed. However,this is not recognized and the CIMC continues to use the Out of Band IPv4 address.
What happens when the CIMC is downgraded from UCS Version 2.2 orlater to UCS Version 2.1 or earlier?
If the CIMC has an Inband or IPv6 configuration, the downgrade fails with an error message.
Are there any reserved prefixes that cannot be used for IPv6 addresses?
Yes. Reserved prefix values are 0 and 128. Only 1 through 127 can be used.
Are there any reserved VLANs that cannot be used for Inbandmanagement?
Yes. VLANs 1, 2, and 3 cannot be used along with the regular list of reserved VLANs (3968 to 4047).
Related Information
Cisco UCS Manager GUI Configuration Guide, Release 2.2• Cisco UCS Manager CLI Configuration Guide, Release 2.2• IPv6 Knowledge Base Portal• CIMC Inband Access on UCS−B Series Blades Configuration Example• Technical Support & Documentation − Cisco Systems•
Updated: Mar 06, 2015 Document ID: 118784