u-pointer - hitachi · connecting the projector and pc ... 5 - the u-pointer configuration ......
TRANSCRIPT
1
U-Pointer (Windows computer)
User ManualDisplayed images from projector become an interactive whiteboard with U-Pointer
U-Pointer enables interactive operation without a dedicated board such as the operation on the connected computer or writing on the display with the sensor equipped in the projector and bundled interactive pen.
2
Contents
Connecting the projector and PC ------------------------------------------------------------------------------------------------------------------------ 3
Driver Installation --------------------------------------------------------------------------------------------------------------------------------------------- 4
Configuration Setting ---------------------------------------------------------------------------------------------------------------------------------------- 5 - The U-Pointer Configuration ----------------------------------------------------------------------------------------------------------------------- 5 - Alignment View ---------------------------------------------------------------------------------------------------------------------------------------- 6 - Calibration ---------------------------------------------------------------------------------------------------------------------------------------------- 7
Running the U-Pointer -------------------------------------------------------------------------------------------------------------------------------------- 9
Pen Action ------------------------------------------------------------------------------------------------------------------------------------------------------ 9
Specifications ------------------------------------------------------------------------------------------------------------------------------------------------- 10
Troubleshooting ---------------------------------------------------------------------------------------------------------------------------------------------- 10
NOTE • The information in this manual is subject to change without notice.• The illustrations in this manual are for illustrative purposes. They may differ slightly from your product.• The manufacturer assumes no responsibility for any errors that may appear in this manual.• The reproduction, transfer or copy of all or any part of this document is not permitted without express written consent.

3
Connecting the projector and PCUse the USB cable to connect the projector and PC.
After you start the PC, please power on the projector.
USB cable
4
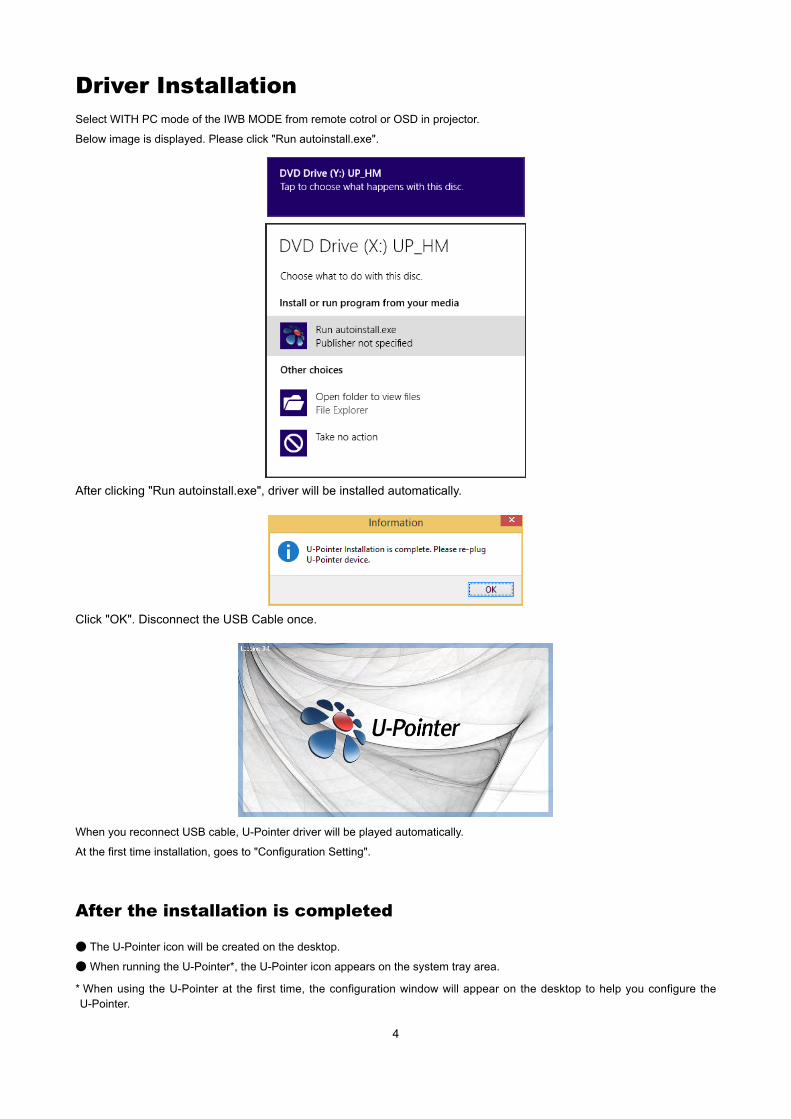
Driver InstallationSelect WITH PC mode of the IWB MODE from remote cotrol or OSD in projector.
Below image is displayed. Please click "Run autoinstall.exe".
When you reconnect USB cable, U-Pointer driver will be played automatically.
At the first time installation, goes to "Configuration Setting".
After clicking "Run autoinstall.exe", driver will be installed automatically.
Click "OK". Disconnect the USB Cable once.
After the installation is completed
● The U-Pointer icon will be created on the desktop.
● When running the U-Pointer*, the U-Pointer icon appears on the system tray area.
* When using the U-Pointer at the first time, the configuration window will appear on the desktop to help you configure the U-Pointer.
5
Configuration Setting
4
1
2
3
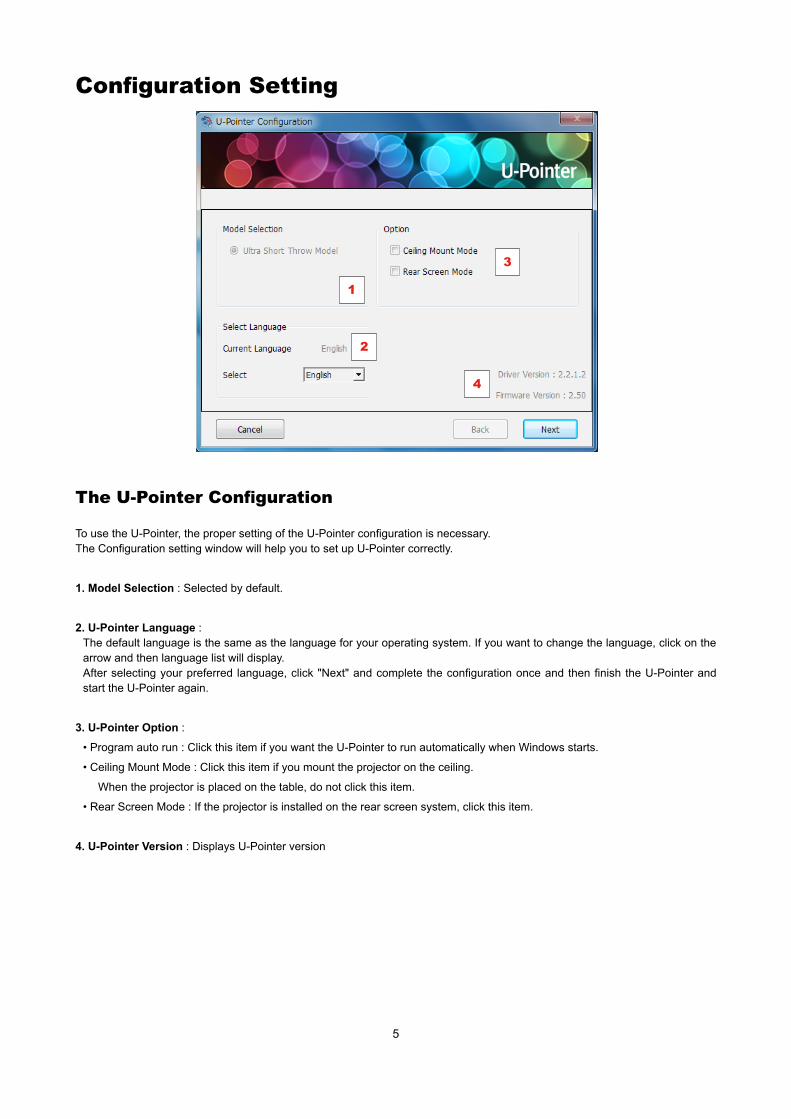
The U-Pointer Configuration
To use the U-Pointer, the proper setting of the U-Pointer configuration is necessary.The Configuration setting window will help you to set up U-Pointer correctly.
1. Model Selection : Selected by default.
2. U-Pointer Language : The default language is the same as the language for your operating system. If you want to change the language, click on the arrow and then language list will display. After selecting your preferred language, click "Next" and complete the configuration once and then finish the U-Pointer and start the U-Pointer again.
3. U-Pointer Option :
• Program auto run : Click this item if you want the U-Pointer to run automatically when Windows starts.
• Ceiling Mount Mode : Click this item if you mount the projector on the ceiling.
When the projector is placed on the table, do not click this item.
• Rear Screen Mode : If the projector is installed on the rear screen system, click this item.
4. U-Pointer Version : Displays U-Pointer version
6
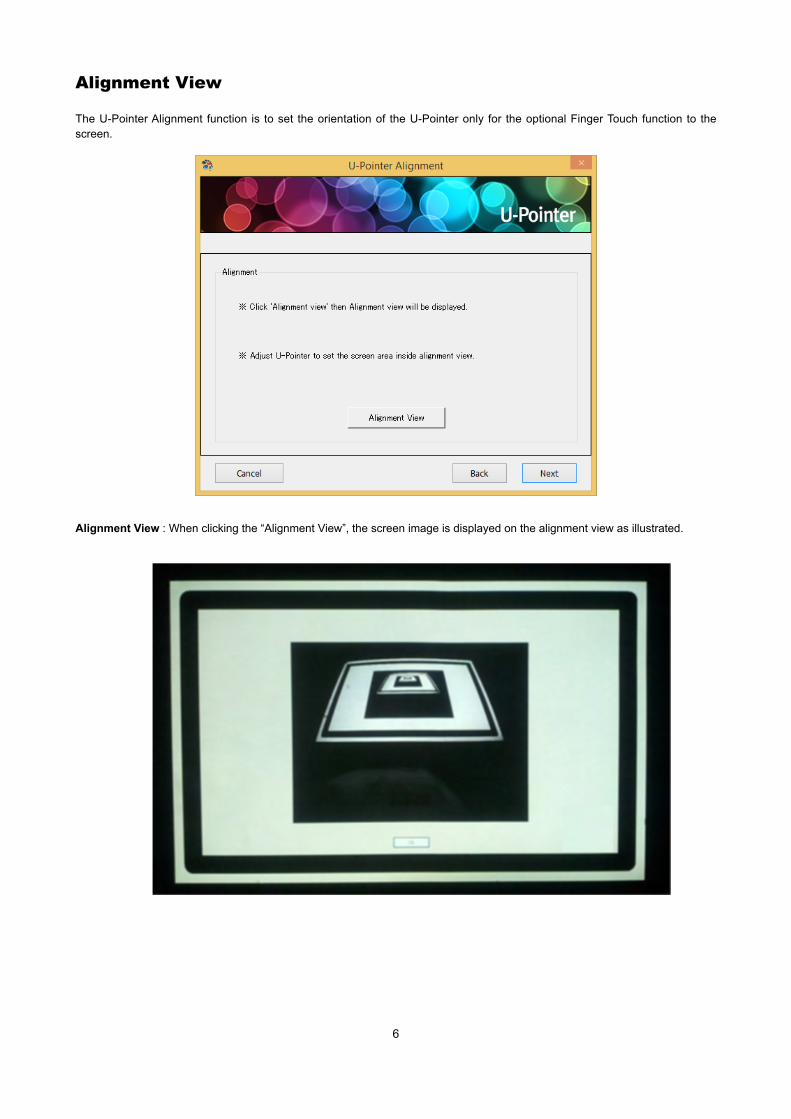
Alignment View
The U-Pointer Alignment function is to set the orientation of the U-Pointer only for the optional Finger Touch function to the screen.
Alignment View : When clicking the “Alignment View”, the screen image is displayed on the alignment view as illustrated.
7
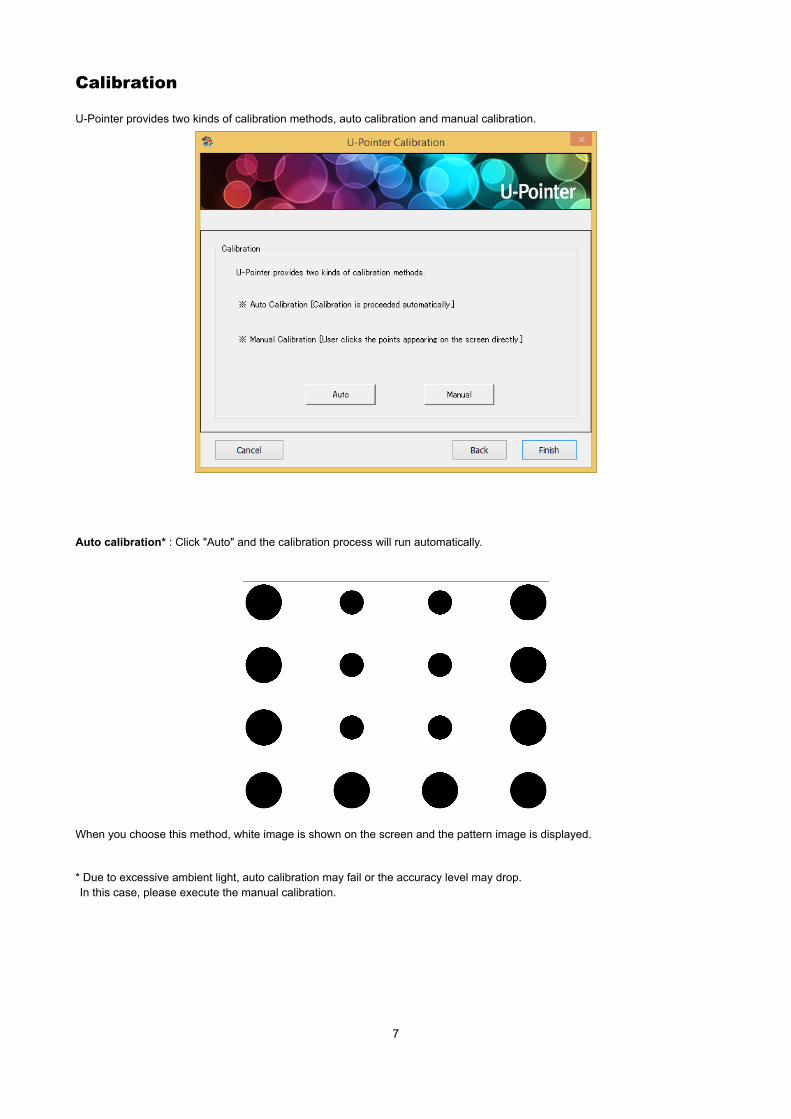
When you choose this method, white image is shown on the screen and the pattern image is displayed.
Calibration
U-Pointer provides two kinds of calibration methods, auto calibration and manual calibration.
Auto calibration* : Click "Auto" and the calibration process will run automatically.
* Due to excessive ambient light, auto calibration may fail or the accuracy level may drop. In this case, please execute the manual calibration.

8
Manual calibration : Click "Manual" and the calibration window will be projected on the screen. Use the Interactive pen to click the center of calibration cursor immediately after it appears. Then the next cursor will display. Repeat this process until the last calibration cursor disappears.
9
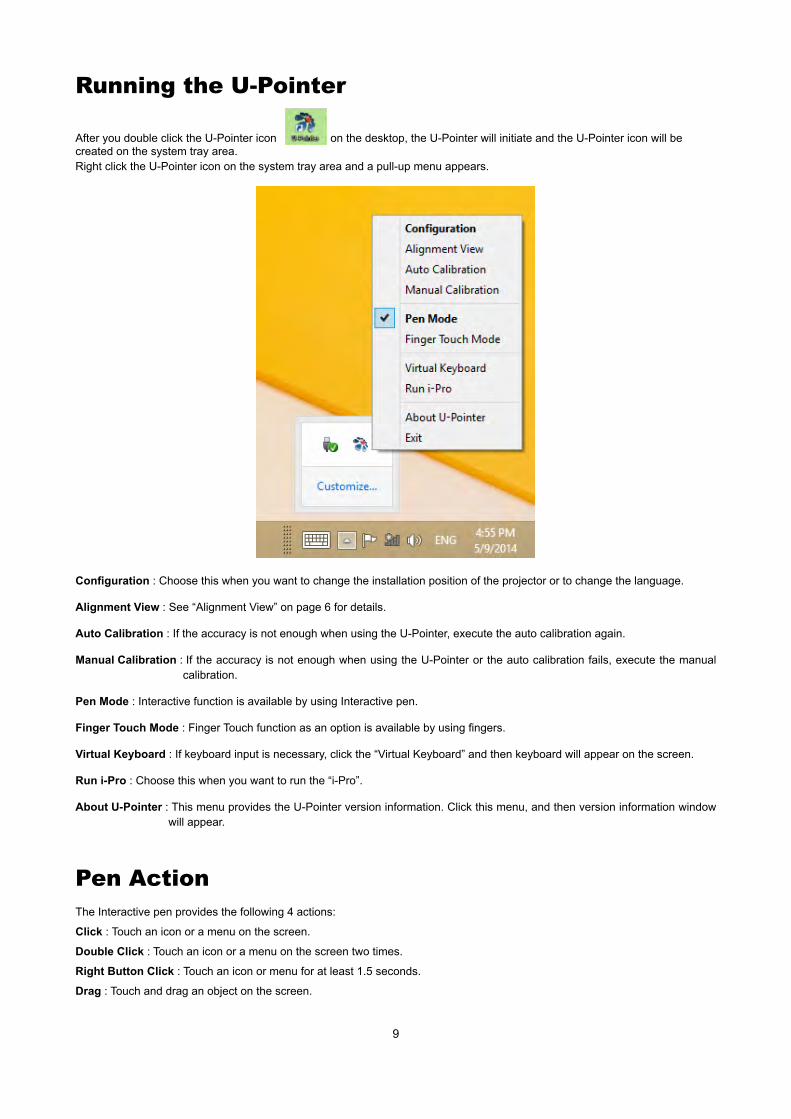
Running the U-Pointer
After you double click the U-Pointer icon on the desktop, the U-Pointer will initiate and the U-Pointer icon will be created on the system tray area. Right click the U-Pointer icon on the system tray area and a pull-up menu appears.
Configuration : Choose this when you want to change the installation position of the projector or to change the language.
Alignment View : See “Alignment View” on page 6 for details.
Auto Calibration : If the accuracy is not enough when using the U-Pointer, execute the auto calibration again.
Manual Calibration : If the accuracy is not enough when using the U-Pointer or the auto calibration fails, execute the manual calibration.
Pen Mode : Interactive function is available by using Interactive pen.
Finger Touch Mode : Finger Touch function as an option is available by using fingers.
Virtual Keyboard : If keyboard input is necessary, click the “Virtual Keyboard” and then keyboard will appear on the screen.
Run i-Pro : Choose this when you want to run the “i-Pro”.
About U-Pointer : This menu provides the U-Pointer version information. Click this menu, and then version information window will appear.
Pen ActionThe Interactive pen provides the following 4 actions:
Click : Touch an icon or a menu on the screen.
Double Click : Touch an icon or a menu on the screen two times.
Right Button Click : Touch an icon or menu for at least 1.5 seconds.
Drag : Touch and drag an object on the screen.
10
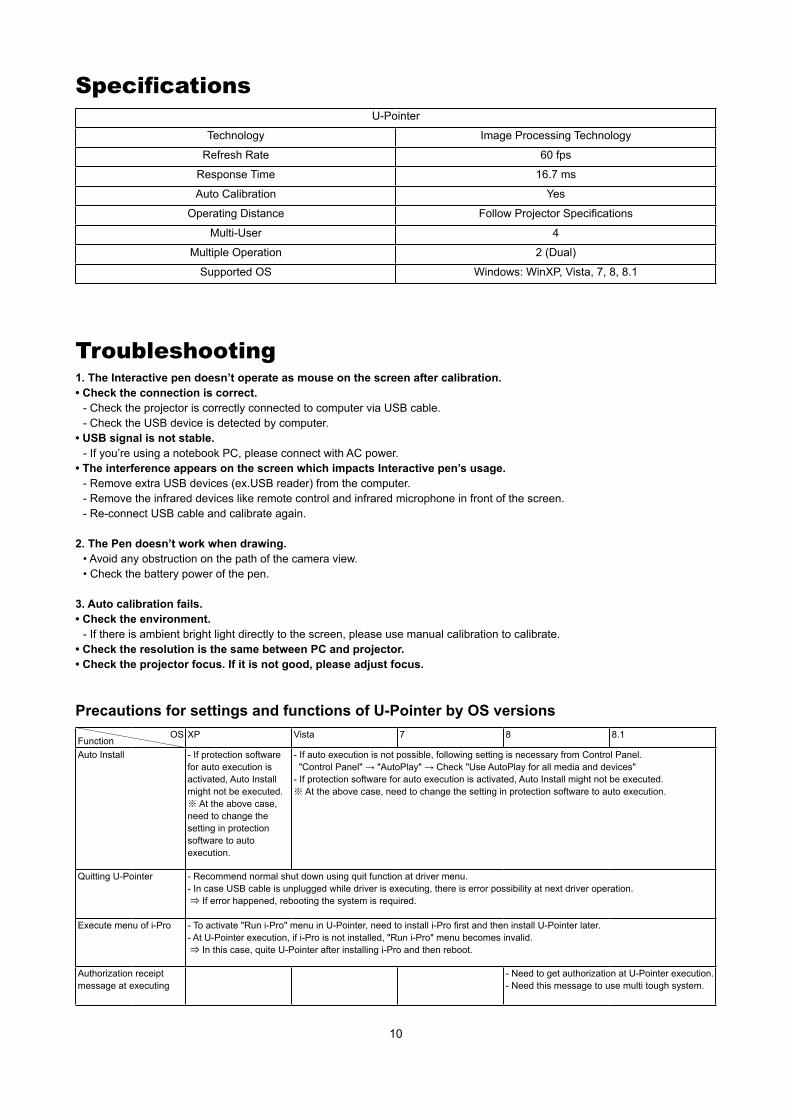
Specifications U-Pointer
Technology Image Processing Technology
Refresh Rate 60 fps
Response Time 16.7 ms
Auto Calibration Yes
Operating Distance Follow Projector Specifications
Multi-User 4
Multiple Operation 2 (Dual)
Supported OS Windows: WinXP, Vista, 7, 8, 8.1
Troubleshooting1. The Interactive pen doesn’t operate as mouse on the screen after calibration.• Check the connection is correct.
- Check the projector is correctly connected to computer via USB cable.- Check the USB device is detected by computer.
• USB signal is not stable.- If you’re using a notebook PC, please connect with AC power.
• The interference appears on the screen which impacts Interactive pen’s usage.- Remove extra USB devices (ex.USB reader) from the computer.- Remove the infrared devices like remote control and infrared microphone in front of the screen.- Re-connect USB cable and calibrate again.
2. The Pen doesn’t work when drawing.• Avoid any obstruction on the path of the camera view.• Check the battery power of the pen.
3. Auto calibration fails.• Check the environment.
- If there is ambient bright light directly to the screen, please use manual calibration to calibrate.• Check the resolution is the same between PC and projector.• Check the projector focus. If it is not good, please adjust focus.
Function OS XP Vista 7 8 8.1
Auto Install - If protection software for auto execution is activated, Auto Install might not be executed.※ At the above case, need to change the setting in protection software to auto execution.
- If auto execution is not possible, following setting is necessary from Control Panel. "Control Panel" → "AutoPlay" → Check "Use AutoPlay for all media and devices" - If protection software for auto execution is activated, Auto Install might not be executed.※ At the above case, need to change the setting in protection software to auto execution.
Quitting U-Pointer - Recommend normal shut down using quit function at driver menu.- In case USB cable is unplugged while driver is executing, there is error possibility at next driver operation. ⇒ If error happened, rebooting the system is required.
Execute menu of i-Pro - To activate "Run i-Pro" menu in U-Pointer, need to install i-Pro first and then install U-Pointer later.- At U-Pointer execution, if i-Pro is not installed, "Run i-Pro" menu becomes invalid. ⇒ In this case, quite U-Pointer after installing i-Pro and then reboot.
Authorization receipt message at executing
- Need to get authorization at U-Pointer execution.- Need this message to use multi tough system.
Precautions for settings and functions of U-Pointer by OS versions